

Page 1
Operating Instructions
Instrucciones de funcionamiento
Instrukcja obsługi
Návod k obsluze
Инструкция по эксплуатации
Інструкція з експлуатації
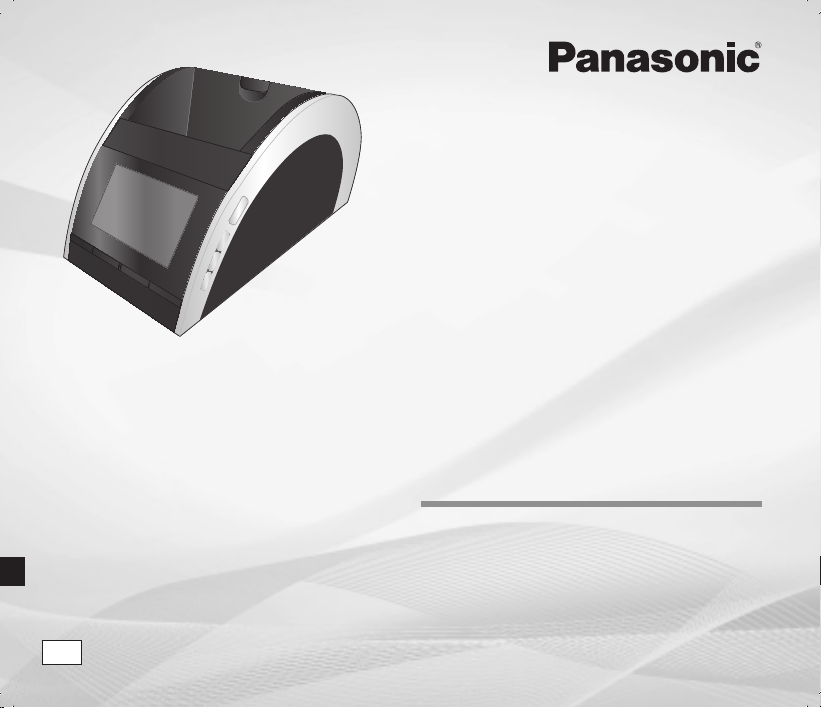
Clock Radio
Radio reloj
Radiobudzik
Radiobudík
Радио-часы
Радіо-годинник
Model No. RC-DC1
EG
RQTX1209-2E
Page 2
ENGLISH
2
NEDERLANDS
ENGLISH
Dear Customer
Thank you for purchasing this product.
For optimum performance and safety, please read
ENGLISH
these instructions thoroughly before connecting,
operating or adjusting this product.
Keep this manual for future reference.
CAUTION!
NEDERLANDS
• DO NOT INSTALL OR PLACE THIS UNIT IN
A BOOKCASE, BUILT-IN CABINET OR IN
ANOTHER CONFINED SPACE. ENSURE THE
UNIT IS WELL VENTILATED. TO PREVENT
RISK OF ELECTRIC SHOCK OR FIRE HAZARD
ENGLISH
DUE TO OVERHEATING, ENSURE THAT
CURTAINS AND ANY OTHER MATERIALS DO
NOT OBSTRUCT THE VENTILATION VENTS.
• DO NOT OBSTRUCT THE UNIT’S
VENTILATION OPENINGS WITH
NEWSPAPERS, TABLECLOTHS, CURTAINS,
AND SIMILAR ITEMS.
• DO NOT PLACE SOURCES OF NAKED
FLAMES, SUCH AS LIGHTED CANDLES, ON
THE UNIT.
• DISPOSE OF BATTERIES IN AN
ENVIRONMENTALLY FRIENDLY MANNER.
THIS UNIT IS INTENDED FOR USE IN MODERATE
CLIMATES.
RQTX1209
2
2
WARNING:
TO REDUCE THE RISK OF FIRE, ELECTRIC
SHOCK OR PRODUCT DAMAGE,
• DO NOT EXPOSE THIS APPARATUS TO RAIN,
MOISTURE, DRIPPING OR SPLASHING AND
THAT NO OBJECTS FILLED WITH LIQUIDS,
SUCH AS VASES, SHALL BE PLACED ON THE
APPARATUS.
• USE ONLY THE RECOMMENDED
ACCESSORIES.
• DO NOT REMOVE THE COVER (OR BACK);
THERE ARE NO USER SERVICEABLE PARTS
INSIDE. REFER SERVICING TO QUALIFIED
SERVICE PERSONNEL.
This product may receive radio interference
caused by mobile telephones during use. If such
interference is apparent, please increase separation
between the product and the mobile telephone.
The socket outlet shall be installed near the
equipment and easily accessible.
The mains plug of the power supply cord shall
remain readily operable.
To completely disconnect this apparatus from the AC
Mains, disconnect the power supply cord plug from
AC receptacle.
Product identifi cation marking
Product Location
Main unit Bottom
AC adaptor Bottom
Page 3

ENGLISH
ENGLISH
ENGLISH
3
SUOMI
VAROITUS!
• ÄLÄ ASENNA TAI LAITA TÄTÄ LAITETTA
KABINETTITYYPPISEEN KIRJAKAAPPIIN
TAI MUUHUN SULJETTUUN TILAAN, JOTTA
TUULETUS ONNISTUISI. VARMISTA, ETTÄ
VERHO TAI MIKÄÄN MUU MATERIAALI
EI HUONONNA TUULETUSTA, JOTTA
VÄLTETTÄISIIN YLIKUUMENEMISESTA
JOHTUVA SÄHKÖISKU- TAI
TULIPALOVAARA.
• ÄLÄ PEITÄ LAITTEEN TUULETUSAUKKOJA
SANOMALEHDELLÄ, PÖYTÄLIINALLA,
VERHOLLA TAI MUULLA VASTAAVALLA
ESINEELLÄ.
• ÄLÄ ASETA PALAVAA KYNTTILÄÄ TAI
MUUTA AVOTULEN LÄHDETTÄ LAITTEEN
PÄÄLLE.
• HÄVITÄ PARISTOT LUONTOA
VAHIN GOITTAMATTOMALL A TAVALLA .
TÄMÄ LAITE ON TARKOITETTU KÄYTETTÄVÄKSI
LEUDOSSA ILMASTOSSA.
VAROITUS:
VÄHENNÄ TULIPALON, SÄHKÖISKUN TAI
LAITTEISTON VAHINGOITTUMISEN VAARAA
• TÄTÄ LAITETTA EI SAA ALTISTAA SATEELLE,
KOSTEUDELLE, ROISKEILLE TAI TIPPUVILLE
NESTEILLE. LAITTEEN PÄÄLLE EI SAA
MYÖSKÄÄN ASETTAA MITÄÄN NESTEELLÄ
TÄYTETTYÄ ESINETTÄ, KUTEN MALJAKKOA.
• KÄYTÄ VAIN SUOSITELTUJA
LISÄVARUSTEITA .
• ÄLÄ IRROTA KANTTA (TAI TAUSTAA).
SISÄLLÄ EI OLE KÄYTTÄJÄN
HUOLLETTAVISSA OLEVIA OSIA. HUOLLON
SAA SUORITTAA VAIN AMMATTITAITOINEN
HENKILÖKUNTA.
Pistorasia tulee asentaa laitteen lähelle
helppopääsyiseen paikkaan.
Verkkojohdon pistokkeen on oltava aina helposti
käytettävissä.
Tämä laite voidaan kytkeä kokonaan irti
verkkovirrasta irrottamalla verkkojohdon pistoke
pistorasiasta.
RQTX1209
3
3
ENGLISH
ENGLISH
ENGLISH
Page 4

ENGLISH
4
NEDERLANDS
ENGLISH
NORSK
ADVARSEL!
• APPARATET MÅ IKKE PLASSERES I EN
ENGLISH
BOKHYLLE, ET INNEBYGGET KABINETT
ELLER ET ANNET LUKKET STED HVOR
VENTILASJONSFORHOLDENE ER
UTILSTREKKELIGE. SØRG FOR AT
GARDINER ELLER LIGNENDE IKKE
FORVERRER VENTILASJONSFORHOLDENE,
SÅ RISIKO FOR ELEKTRISK SJOKK ELLER
BRANN FORÅRSAKET AV OVERHETING
NEDERLANDS
UNNGÅS.
• APPARATETS VENTILASJONSÅPNINGER
MÅ IKKE DEKKES TIL MED AVISER,
BORDDUKER, GARDINER OG LIGNENDE.
• PLASSER IKKE ÅPEN ILD, SLIK SOM
ENGLISH
LEVENDE LYS, OPPÅ APPARATET.
• BRUKTE BATTERIER MÅ KASSERES UTEN
FARE FOR MILJØET.
DETTE APPARATET ER BEREGNET TIL BRUK
UNDER MODERATE KLIMAFORHOLD.
RQTX1209
4
4
ADVARSEL:
FØLG NEDENSTÅENDE INSTRUKSER FOR Å
REDUSERE RISIKOEN FOR BRANN, ELEKTRISK
STØT OG SKADE PÅ PRODUKTET:
• DETTE APPARATET MÅ IKKE UTSETTES FOR
REGN, FUKTIGHET, DRYPP ELLER SPRUT,
OG INGEN VÆSKEFYLTE GJENSTANDER,
SOM F.EKS. VASER, MÅ PLASSERES PÅ
APPARATET.
• BRUK KUN ANBEFALT TILBEHØR.
• IKKE FJERN DEKSELET (ELLER BAKSIDEN);
APPARATET INNEHOLDER INGEN DELER
SOM KAN SKIFTES ELLER REPARERES AV
BRUKEREN. OVERLAT TIL KVALIFISERTE
SERVICETEKNIKERE Å UTFØRE SERVICE.
Strømuttaket må befi nne seg i nærheten av utstyret
og være lett tilgjengelig.
Støpslet på strømkabelen må være klart til bruk.
Når dette apparatet skal kobles helt fra strømnettet
(AC), må støpslet på strømkabelen trekkes ut av
stikkontakten.
Page 5

ENGLISH
ENGLISH
ENGLISH
5
Safety precautions
Placement
Set the unit up on an even surface away from direct
sunlight, high temperatures, high humidity, and
excessive vibration. These conditions can damage the
cabinet and other components, thereby shortening the
unit’s service life.
Place it at least 15 cm away from wall surfaces to avoid
distortion and unwanted acoustical effects.
Do not place heavy items on the unit.
Voltage
Do not use high voltage power sources. This can
overload the unit and cause a fi re.
Do not use a DC power source. Check the source
carefully when setting the unit up on a ship or other
places where DC is used.
AC adaptor protection
Ensure the AC adaptor is connected correctly and
not damaged. Poor connection and lead damage can
cause fi re or electric shock. Do not pull, bend, or place
heavy items on the lead.
Grasp the plug fi rmly when unplugging the adaptor.
Pulling the AC adaptor can cause electric shock.
Do not handle the plug with wet hands. This can cause
electric shock.
Foreign matter
Do not let metal objects fall inside the unit. This can
cause electric shock or malfunction.
Do not let liquids get into the unit. This can cause
electric shock or malfunction. If this occurs,
immediately disconnect the unit from the power supply
and contact your dealer.
Do not spray insecticides onto or into the unit. They
contain fl ammable gases which can ignite if sprayed
into the unit.
Service
Do not attempt to repair this unit by yourself. If sound
is interrupted, indicators fail to light, smoke appears,
or any other problem that is not covered in these
instructions occurs, disconnect the AC adaptor and
contact your dealer or an authorised service centre.
Electric shock or damage to the unit can occur if the
unit is repaired, disassembled or reconstructed by
unqualifi ed persons.
Extend operating life by disconnecting the unit from the
power source if it is not to be used for a long time.
RQTX1209
5
5
ENGLISH
ENGLISH
ENGLISH
Page 6
ENGLISH
6
NEDERLANDS
ENGLISH
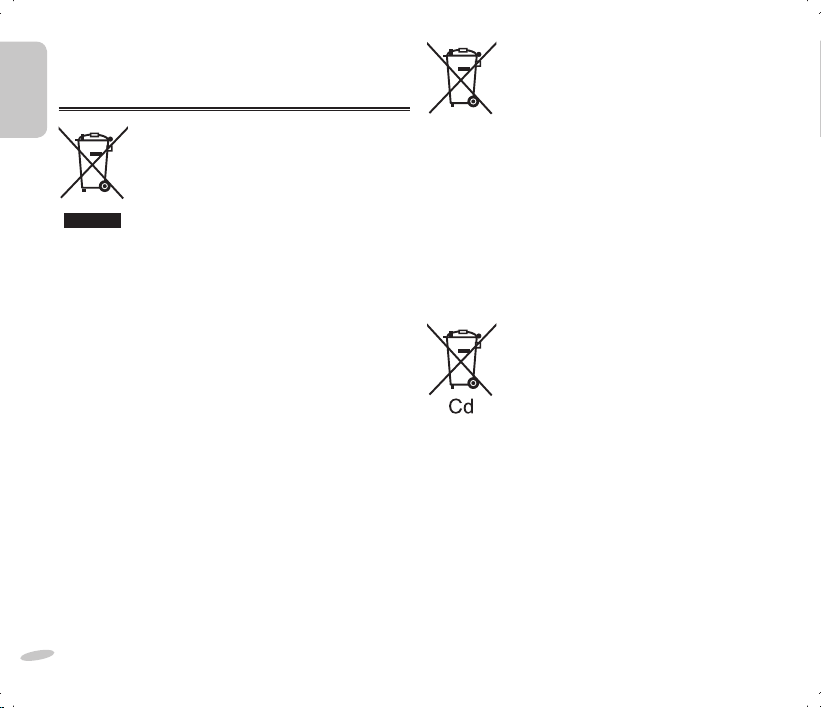
Information for Users on Collection and
Disposal of Old Equipment and used
Batteries
ENGLISH
NEDERLANDS
ENGLISH
These symbols on the products,
packaging, and/or accompanying
documents mean that used electrical and
electronic products and batteries should
not be mixed with general household
waste.
For proper treatment, recovery and
recycling of old products and used
batteries, please take them to applicable
collection points, in accordance with your
national legislation and the Directives
2002/96/EC and 2006/66/EC.
By disposing of these products and
batteries correctly, you will help to save
valuable resources and prevent any
potential negative effects on human
health and the environment which could
otherwise arise from inappropriate waste
handling.
For more information about collection and
recycling of old products and batteries,
please contact your local municipality,
your waste disposal service or the point
of sale where you purchased the items.
Penalties may be applicable for incorrect
disposal of this waste, in accordance with
national legislation.
For business users in the European
Union
If you wish to discard electrical and
electronic equipment, please contact your
dealer or supplier for further information.
[Information on Disposal in other
Countries outside the European
Union]
These symbols are only valid in the
European Union. If you wish to discard
these items, please contact your local
authorities or dealer and ask for the
correct method of disposal.
Note for the battery symbol (bottom
two symbol examples):
This symbol might be used in combination
with a chemical symbol. In this case it
complies with the requirement set by the
Directive for the chemical involved.
RQTX1209
6
6
Page 7
ENGLISH
ENGLISH
ENGLISH
7
Table of contents
Safety precautions .......................................................5
Supplied accessories ...................................................7
Compatible iPod and iPhone .......................................7
Overview of controls ....................................................8
Making the connections ...............................................9
Setting the clock ...........................................................9
Using an iPod or iPhone ............................................10
Using the radio ...........................................................10
Using the sleep timer .................................................11
Using the alarm ...........................................................11
Using the Memory Loader application .....................12
Memory back-up battery ............................................13
Troubleshooting guide ...............................................14
Specifi cations .............................................................15
Maintenance ................................................................15
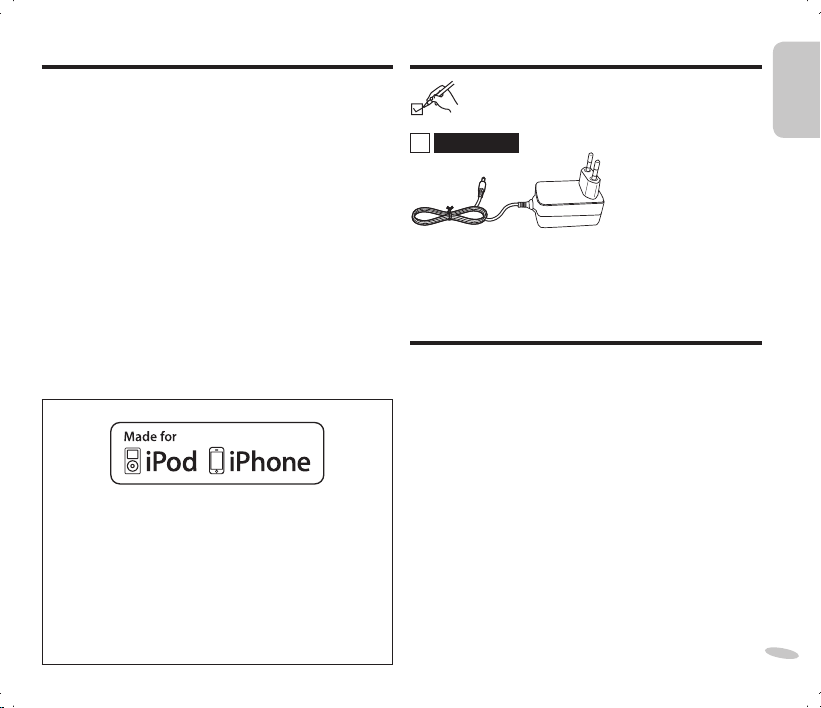
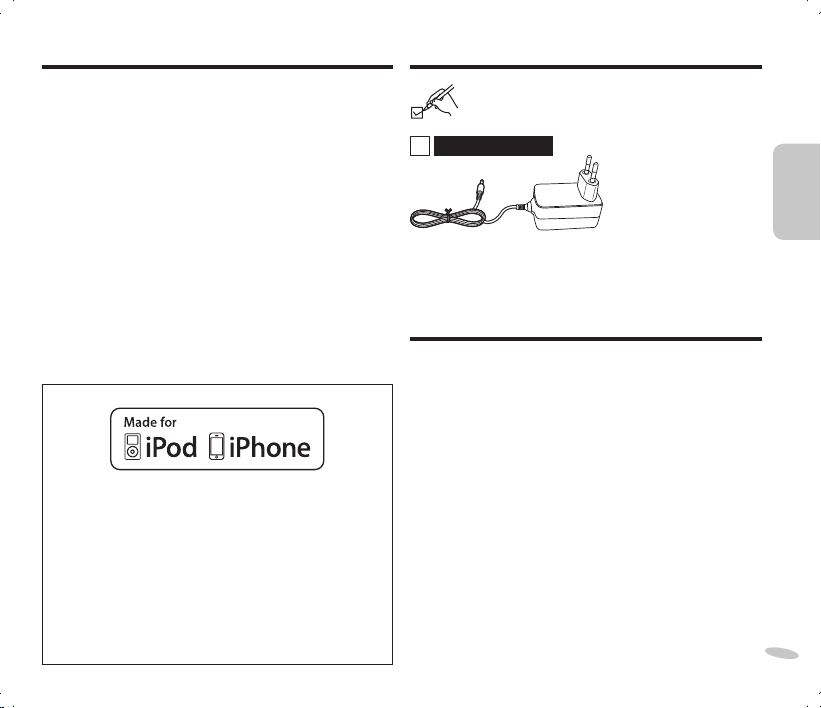
“Made for iPod” and “Made for iPhone” mean that an
electronic accessory has been designed to connect
specifi cally to iPod, or iPhone, respectively, and has been
certifi ed by the developer to meet Apple performance
standards.
Apple is not responsible for the operation of this device or its
compliance with safet y and regulatory standards.
iPhone, iPod, iPod classic, iPod nano, and iPod touch are
trademarks of Apple Inc., registered in the U.S. and other
countries.
Supplied accessories
Please check and identify the supplied accessories.
1 AC adaptor
Compatible iPod and iPhone
• iPod nano 5th generation (video camera) (8GB, 16GB)
• iPod touch 2nd generation (8GB, 16GB, 32GB, 64GB)
• iPod classic [120GB, 160GB ( 2009)]
• iPod nano 4th generation (video) (8GB, 16GB)
• iPod classic (160GB) (2007)
• iPod touch 1st generation (8GB, 16GB, 32GB)
• iPod nano 3rd generation (video) (4GB, 8GB)
• iPod classic (80GB)
• iPod nano 2nd generation (aluminum) (2GB, 4GB, 8GB)
• iPod 5th generation (video) (60GB, 80GB)
• iPod 5th generation (video) (30GB )
• iPod nano 1st generation (1GB, 2GB, 4GB)
• iPod 4th generation (colour display) (40GB, 60GB)
• iPod 4th generation (colour display) (20GB, 30GB)
• iPod 4th generation (40GB)
• iPod 4th generation (20GB)
• iPod mini (4GB, 6GB)
• iPhone 3GS (16GB, 32GB)
• iPhone 3G (8GB, 16GB)
• iPhone (4GB, 8GB, 16GB)
Compatibility depends on the software version of your iPod or
iPhone.
RQTX1209
7
7
ENGLISH
ENGLISH
ENGLISH
Page 8

ENGLISH
8
NEDERLANDS
ENGLISH
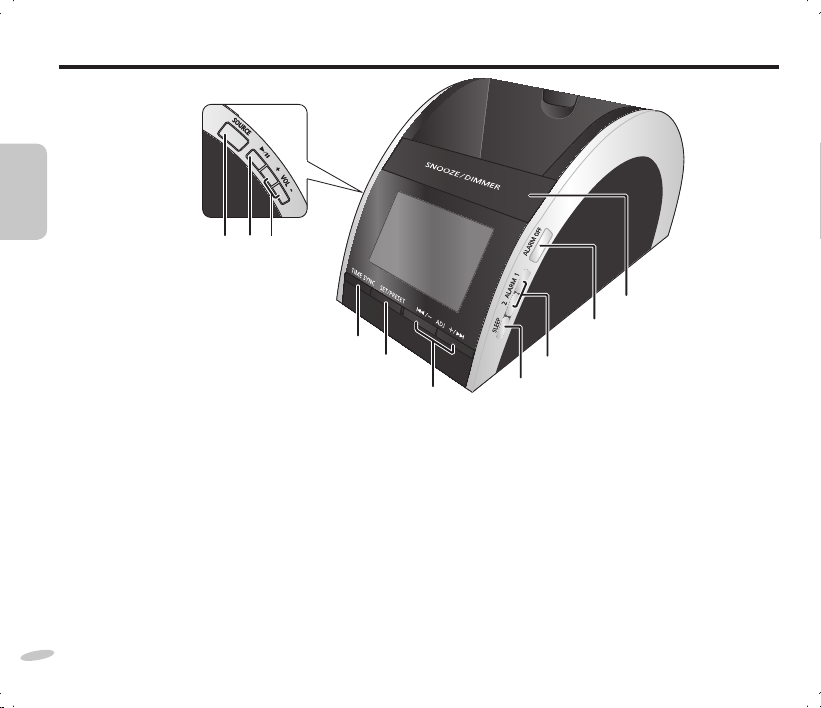
Overview of controls
ENGLISH
NEDERLANDS
HIJ
ENGLISH
A [SNOOZE/DIMMER]
Snooze: To stop the alarm for 9 minutes.
Dimmer: To adjust the display panel’s brightness
(High (default), Medium or Low).
B [ALARM OFF]
To turn off the alarm.
C [ALARM 1], [ALARM 2]
To activate either alarm 1 or alarm 2 function.
To display alarm 1 or alarm 2 setting.
D [SLEEP]
To activate sleep function.
To activate daylight saving time (summer time) in clock
mode.
E [2/ –, ADJ], [+/ 6, ADJ]
RQTX1209
To adjust clock, radio and alarm settings.
To skip to previous or next track.
8
8
To backward or forward search through a track.
G
F
A
B
C
E
D
F [SET/PRESET]
To set the clock.
To perform automatic presetting or to view preset channels
in radio mode.
G [TIME SYNC]
To synchronise the main unit with an iPod or iPhone’s time.
H [+, VOL], [–, VOL]
To adjust the volume.
To select a 12-hour or 24-hour clock display.
I [
4/9
]
To start music playback from an iPod or iPhone and to
pause during playback.
J [SOURCE]
To select clock, “IPOD” or “ RADIO FM” mode.
Page 9
ENGLISH
ENGLISH
ENGLISH
9
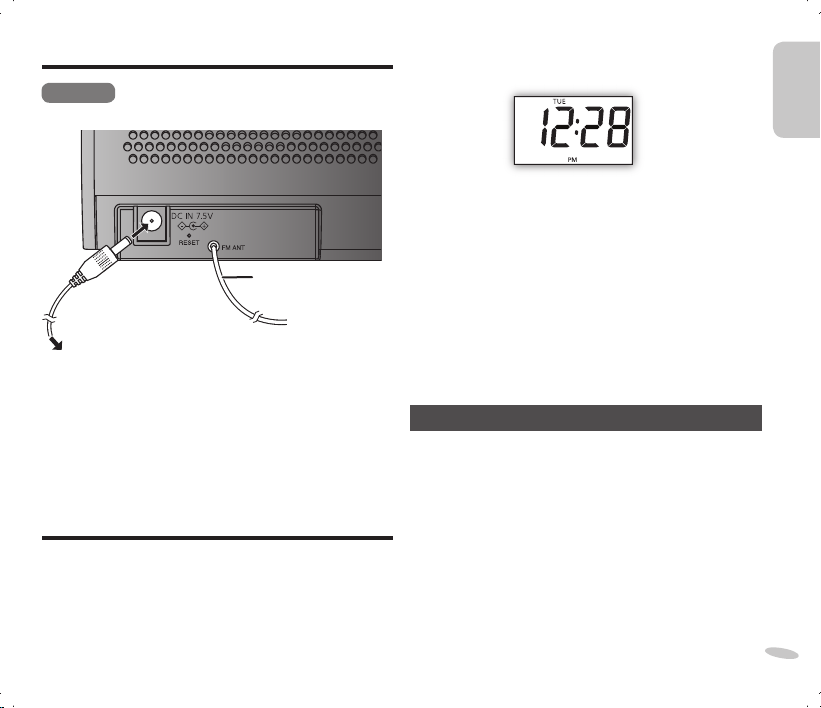
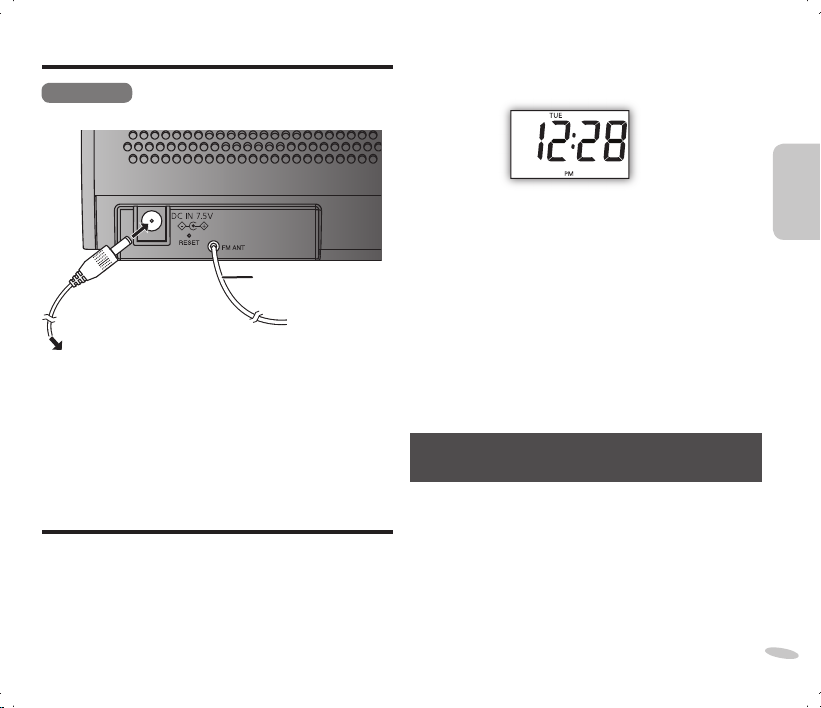
Making the connections
Rear view
FM indoor antenna
To household
mains socket
Connect the AC adaptor.
• Do not use an AC adaptor from other equipment.
• Do not use any other AC adaptors except the supplied one.
• The unit is in the standby condition when the AC adaptor is
connected. The primary circuit is always “live” as long as the
AC adaptor is connected to an electrical outlet.
Setting the clock
The clock is displayed once the main unit is connected to the
household mains socket.
Reset the clock regularly to maintain accuracy (monthly
accuracy +/– 60 seconds).
1
Press and hold [SET/ PRESET] for 2 seconds.
2
Press [2/ –, ADJ] or [+ /6, ADJ] to select the day.
3
Press [SET/ PRESET] again to confi rm.
4
Repeat steps 2 and 3 to set the hour and minute.
Example:
To change the clock display
In clock mode, press and hold [+, VOL] and [–, VOL] at the
same time for 2 seconds to select between a 12-hour or 24-hour
display.
For 12-hour display:
AM : “ PM” is not displayed.
PM : “ PM” is displayed.
Daylight saving time (summer time)
In clock mode, press and hold [SLEEP] to activate or cancel
daylight saving time (summer time) function.
“DST” is displayed when the function is activated.
Synchronising clock with iPod or iPhone time
This function allows you to set the clock’s time to be the same
time as your iPod or iPhone’s time (
and iPhone”).
Press [TIME SYNC] while an iPod or iPhone is docked unto
the main unit.
Note:
• Exact synchronisation of an iPod or iPhone with the main
unit is not possible. There could be a difference of up to
59 seconds between them.
• Compatibility depends on the software version of your iPod
or iPhone.
Z page 7,
“Compatible iPod
RQTX1209
9
9
ENGLISH
ENGLISH
ENGLISH
Page 10

ENGLISH
10
NEDERLANDS
ENGLISH
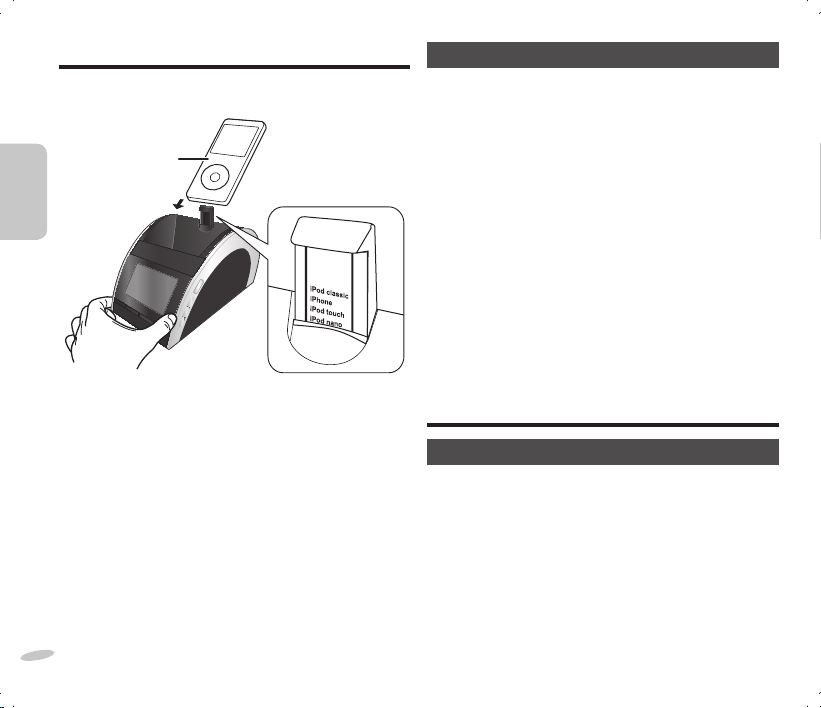
Using an iPod or iPhone
1
Pull out the iPod or iPhone support.
Adjust the support according to the height of your iPod or
ENGLISH
iPhone.
iPod
(not included)
iPod cl
assic
iPhone
iPod tou
ch
iPod n
NEDERLANDS
ENGLISH
2
Connecting an iPod or iPhone.
Hold the main unit when connecting or disconnecting the
iPod or iPhone.
Note:
When docking an iPod touch or iPhone for the fi rst time, a
message will be displayed on your iPod touch or iPhone if the
Memory Loader application has not been installed (Z page 12).
Charging an iPod or iPhone
The iPod or iPhone charges automatically when connected to
the main unit.
• See iPod or iPhone display to check its charging status.
• If the iPod or iPhone is not being used for an extended period
of time after charging has completed, disconnect it from the
main unit, as the battery will be depleted naturally. (Once fully
charged, additional charging will not occur.)
RQTX1209
10
10
ano
Gently pull out the
iPod or iPhone
support.
Playing an iPod or iPhone
1
Place an iPod or iPhone in the dock and turn it on.
2
Press [SOURCE] to select “IPOD”.
3
Press [
4/9
or iPhone. Press again to pause playback .
4
Press [2/ –, ADJ] or [+ /6, ADJ] to skip to the
previous or next track.
5
Press and hold [2/ –, ADJ] or [+ /6, ADJ] to
backward or forward search through a track .
Note:
• If the iPod or iPhone automatically shuf fl es or skip a track;
– Turn off its “Shake” feature (if there is any).
– Play the iPod or iPhone using an iPod or iPhone dock
• For iPod or iPhone operation details, refer to iPod or iPhone’s
User Guide.
] once to start music playback from the iPod
adaptor (not included).
Using the radio
Manual tuning
1
Press [SOURCE] to select “RADIO FM”.
2
Press [2/ –, ADJ] or [+ /6, ADJ] to select the desired
frequency.
To tune automatically
Press and hold [2 /–, ADJ] or [+/ 6, ADJ ] until the frequency
starts changing rapidly. Automatic tuning stops when it fi nds a
station or when [2/ –, ADJ ] or [+/6, ADJ ] is pressed again.
Note:
For better reception, ex tend and change the direction of the FM
antenna.
Page 11

ENGLISH
ENGLISH
ENGLISH
11
Memory preset
You may store your favourite channels in 5 FM preset channels.
Preparation
Press [SOURCE] to select “RADIO FM”.
Automatic presetting (AP)
Press and hold [SOURCE] until “AP” is displayed.
Note:
• Automatic presetting begins from the current frequency.
• Only the fi rst 5 stations detected will be stored.
• “AP” will blink continuously until all 5 channels have been set.
Manual presetting
1
Press [2/ –, ADJ] or [+ /6, ADJ] to select the desired
frequency.
2
Press and hold [SET/ PRESET] for 2 seconds to display
the preset number.
3
Press [2/ –, ADJ] or [+ /6, ADJ] to select a preset
number.
4
Press [SET/ PRESET] again to confi rm.
Tuning in to a preset channel
Press [SET/ PRESET] to switch bet ween preset channels.
Using the sleep timer
This function enables you to turn off the unit automatically after
the set time (only in iPod and radio mode).
1
Press [SLEEP] to activate the timer.
2
Press [SLEEP] again to select your desired time
(in minutes) .
OFF (default) ] 30 ] 60 ] 90 ] 120
Note:
Press [SLEEP] once to check the remaining time.
Using the alarm
You can set two different alarm times. Before setting the alarm,
make sure to set the clock (
Setting the alarm
1
Press and hold [ALARM 1] or [ALARM 2] until the hour
display blinks.
2
Within 10 seconds, press [2 /–, ADJ ] or [+ /6 , ADJ]
to set the hour.
3
Press [ALARM 1] or [ALARM 2] to confi rm.
4
Repeat steps 2 and 3 to set the minutes.
5
Press [2/ –, ADJ] or [+ /6, ADJ] to select the days
of the week:
MON-SUN (everyday) ] MON-FRI (weekdays)
6
Press [ALARM 1] or [ALARM 2] to confi rm.
7
Press [2/ –, ADJ] or [+ /6, ADJ] to select the desired
alarm mode: “IPOD”, “RADIO” or “BUZZER”.
8
Press [ALARM 1] or [ALARM 2] to confi rm.
“IPOD” selection: Continue with steps 9 and 10.
“RADIO” selection: Continue from steps 11 to 14.
Setting iPod alarm
9
Press [2/ –, ADJ] or [+ /6, ADJ] to adjust the
volume level.
10
Press [ALARM 1] or [ALARM 2] to confi rm the setting.
Note:
• The buzzer will sound if no iPod or iPhone is detected at the
set alarm time.
• Music will be played from the iPod or iPhone’s library when
the alarm sounds.
Z page 9,
“Setting the clock ”).
SAT-SUN (weekend)SAT-SUN (weekend)
(Continued on next page)
RQTX1209
11
11
ENGLISH
ENGLISH
ENGLISH
Page 12
ENGLISH
12
NEDERLANDS
ENGLISH
Setting radio alarm
11
Press [2/ –, ADJ] or [+ /6, ADJ] to adjust the
volume level.
12
Press [ALARM 1] or [ALARM 2] to confi rm.
ENGLISH
13
Press [2/ –, ADJ] or [+ /6, ADJ] to select the
desired preset channel.
14
Press [ALARM 1] or [ALARM 2] to confi rm the setting.
Note:
• Alarm will function only when powered by AC power.
• To activate or display the alarm setting, press [ALARM 1] or
NEDERLANDS
[ALARM 2] once.
• Press [ALARM 1] or [ALARM 2] again to deactivate the alarm
function.
Turning off the alarm
ENGLISH
Press [ALARM OFF] to turn off the alarm.
The alarm will sound at the same time on the next day.
Note:
If the alarm is not turned off, it will sound continuously for
59 minutes before turning off by itself.
Snoozing the alarm
Press [SNOOZE] when the alarm sounds to stop it for a few
minutes.
The alarm will sound again after 9 minutes.
Tip:
For iPod touch and iPhone users, use the Memory Loader
application to unlock custom alarm settings (Z see right).
RQTX1209
12
12
Using the Memory Loader application
This main unit is designed to operate with the Memory Loader
application which can be downloaded from the App Store
(search for MemoryLoader).
If you have not already downloaded the free Memory Loader
application, you will see the following message on your iPod
touch or iPhone display:
Application Not Installed
This accessory requires an
application you do not have
installed. Would you like to install it
from the App store?
This message is a reminder for you to download the application
in order to enjoy the enhanced features of this main unit.
However, your iPod touch and iPhone will work properly with
this main unit even without the Memory Loader application
installed.
The Memory Loader application only works with iPod touch and
iPhone running on OS 3.0 or later.
Once the Memor y Loader application is installed into your
iPod touch or iPhone, the following functions can be easily
accessible and controlled directly through the application’s
platform.
Alarm
• Adjust alarm 1 and alarm 2 settings easily.
• You may select any combination of days for the alarm to
sound.
• You can choose your desired snooze settings from a choice
of 1 to 30 minutes.
Radio
• Preset 5 FM channels by scrolling through your desired
frequencies by using the picker.
Events
• You can be alerted of dates stored on your iPod touch or
iPhone contacts (if the alarm is set to sound on that day).
Page 13
ENGLISH
ENGLISH
ENGLISH
13
Nap
• You can set a short nap timer or countdown on your iPod
touch or iPhone.
Daylight saving time ( DST)
• Activate or deactivate the daylight saving time function with
one simple step.
For more information, visit: www.memoryloader.com
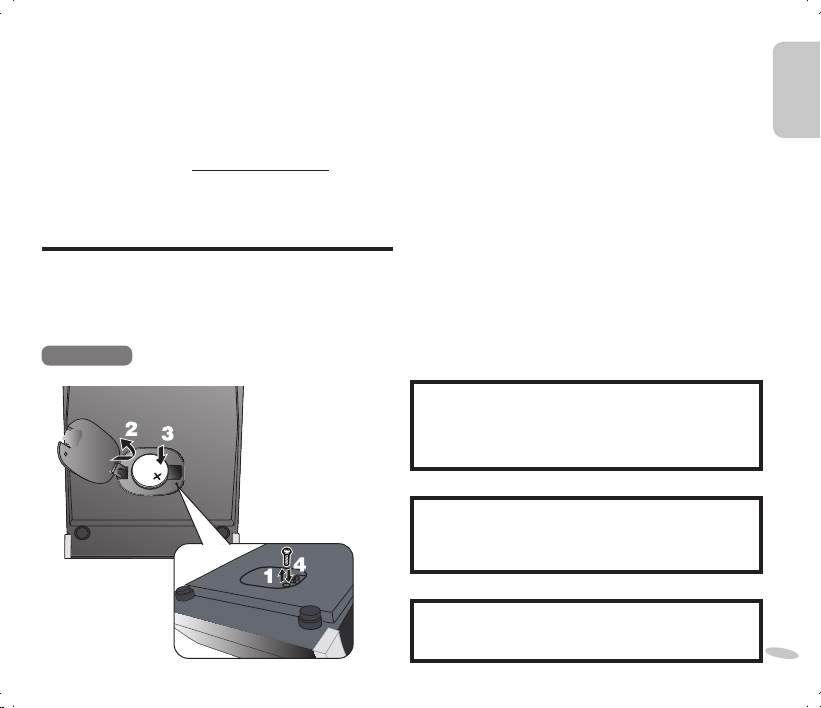
Memory back-up battery
The back-up battery (CR2032, not included) saves the clock
and alarm settings in the event of a power interruption.
Inserting the battery
When there is no bat tery, the batter y-weak indicator will be
displayed until a battery is inser ted.
Bottom view
1
Keep the AC adaptor connected to the household mains
socket when unscrewing the screw on the cover of the
battery holder using a screwdriver.
2
Open the cover of the battery holder.
3
Insert a new battery with the (+) side facing up.
4
Close the cover of the battery holder and secure it with
the screw.
Replacing the battery
The service life of this battery is approximately 1 month.
When the batter y is weak, the battery-weak indicator will blink
constantly on the display.
Note:
• Do not heat or expose to fl ame.
• Do not leave the battery (ies) in an automobile exposed
to direct sunlight for a long period of time with doors and
windows closed.
• Remove the battery if the clock radio is not going to be used
for a long period of time. Store in a cool, dark place.
CAUTION
Danger of explosion if bat tery is incorrectly replaced.
Replace only with the same or equivalent t ype
recommended by the manufacturer. Dispose of used
batteries according to the manufacturer’s instructions.
Warning
Keep the Button-Type battery out of the reach of children.
Never put Button-Type battery in mouth. If swallowed call
your doctor.
ENGLISH
ENGLISH
ENGLISH
Warning
Risk of fi re, explosion and burns. Do not recharge,
disassemble, heat above 60°C or incinerate.
RQTX1209
13
13
Page 14

ENGLISH
14
NEDERLANDS
ENGLISH
Troubleshooting guide
Before requesting service, make the following checks. If you
are in doubt about some of the check points, or if the solutions
indicated do not solve the problem, consult your dealer for
ENGLISH
instructions.
■ Radio
A noise or sound distortion is heard.
• Distance the unit away from any television, personal computer
or device easily infl uenced by magnetism.
■ Clock
Clock cannot be synchronised to iPod or iPhone’s time.
• Make sure the iPod or iPhone is securely connected and
turned on (Z page 9).
• Update your iPod or iPhone with the latest sof tware.
NEDERLANDS
Daylight saving time does not work.
• Make sure the clock has been set correctly.
• Press and hold [SLEEP] in clock mode to activate daylight
saving time (Z page 9).
ENGLISH
■ Alarm
The iPod, radio or buzzer alarm does not sound at the
preset time.
• Check that “ALARM 1” or “ALARM 2” has been correctly
activated (Z page 11).
The iPod or radio alarm is activated but there is no sound at
the preset time.
• Check the alarm’s volume setting (Z page 11, 12).
■ iPod or iPhone
The iPod or iPhone cannot be operated with this unit.
• Make sure the iPod or iPhone has been securely connected
and turned on (Z page 10).
• Update your iPod or iPhone with the latest sof tware.
There is no sound from the iPod or iPhone.
• Make sure the iPod or iPhone has been securely connected
(Z page 10).
• Adjust the volume.
The iPod or iPhone does not charge.
• Check the connections. Turn off and remove the iPod or
RQTX1209
iPhone from the dock connector. Reinsert and turn it on again
14
(Z page 10).
14
Reset
This function enables you to restore the main unit to the original
factor y settings or when it is behaving abnormally.
Rear view
Press [RESET] with a paper clip or a pointed object .
Page 15
ENGLISH
ENGLISH
ENGLISH
15
Specifi cations
AMPLIFIER SECTION
RMS Output Power (Mono)
Front channel 2.6 W per channel (8
TUNER SECTION
Preset memory FM 5 stations
Frequency modulation (FM)
Frequency range
87.50 MHz to 108.00 MHz (50 kHz step)
Antenna terminals 75 (unbalanced)
SPEAKER SECTION
Type 1 way, 1 speaker system (Bass refl ex)
Speaker unit(s) Impedance 8
Full range 2.5 cm cone type
GENERAL
Power supply (AC adaptor) AC 100 to 240 V, 50/60 Hz
DC Output 7.5 V
Power consumption (with iPod or iPhone charging)
Main unit 7 W
Dimensions (W x H x D) 112 mm x 80 mm x 150 mm
Mass
Main unit 0.37 kg
AC adaptor 0.14 kg
Operating temperature range 0°C to +35°C
Operating humidity range
20% to 80 % RH (no condensation)
), 1 kHz, 10% THD
Power consumption in standby mode:
Main unit 0.3 W (approximate)
AC adaptor 0.3 W (approximate)
Note:
1) Specifi cations are subject to change without notice.
Mass and dimensions are approximate.
2) Total harmonic distortion is measured by the digital spectrum
analyser.
Maintenance
To clean this unit, wipe with a soft, dry cloth.
• Never use alcohol, paint thinner or benzine to clean this unit.
• Before using chemically treated cloth, read the instructions
that came with the cloth carefully.
RQTX1209
15
15
ENGLISH
ENGLISH
ENGLISH
Page 16
ENGLISH
2
ESPAÑOL
ENGLISH
Estimado Cliente
Muchísimas gracias por haber adquirido este aparato.
Para un funcionamiento y seguridad óptimos, lea con
atención estas instrucciones antes de conectar, utilizar
o confi gurar este producto.
Guarde este manual para su consulta en el futuro.
ESPAÑOL
¡ADVERTENCIA!
• PARA MANTENER BIEN VENTILADA ESTA
UNIDAD, NO LA INSTALE NI PONGA EN UN
ESTANTE DE LIBROS, MUEBLE EMPOTRADO
U OTRO ESPACIO DE DIMENSIONES
REDUCIDAS. ASEGÚRESE QUE CORTINAS
ENGLISH
Y OTROS MATERIALES NO OBSTRUYAN
LAS CONDICIONES DE VENTILACIÓN PARA
PREVENIR EL RIESGO DE SACUDIDAS
ELÉCTRICAS O INCENDIOS DEBIDOS AL
RECALENTAMIENTO.
• NO OBSTRUYA LAS ABERTURAS DE
VENTILACIÓN DE LA UNIDAD CON
PERIÓDICOS, MANTELES, CORTINAS U
OBJETOS SIMILARES.
• NO COLOQUE OBJETOS CON LLAMA
DESCUBIERTA, UNA VELA POR EJEMPLO,
ENCIMA DE LA UNIDAD.
• TIRE LAS PILAS DE FORMA QUE NO
CONTAMINE EL MEDIO AMBIENTE.
ESTA UNIDAD HA SIDO DISEÑADA PARA SER
UTILIZADA EN CLIMAS MODERADOS.
RQTX1209
2
16
ADVERTENCIA:
PARA REDUCIR EL RIESGO DE INCENDIOS,
DESCARGAS ELÉCTRICAS O DAÑOS EN EL
PRODUCTO,
• NO EXPONGA ESTE APARATO A LA LLUVIA,
HUMEDAD, GOTEO O SALPICADURAS, Y NO
COLOQUE ENCIMA DEL MISMO OBJETOS
CON LÍQUIDOS COMO, POR EJEMPLO,
FLOREROS.
• UTILICE SOLAMENTE LOS ACCESORIOS
RECOMENDADOS.
• NO QUITE LA CUBIERTA (O EL PANEL
TRASERO); EN EL INTERIOR NO HAY
PIEZAS QUE PUEDA REPARAR EL USUARIO.
SOLICITE LAS REPARACIONES AL
PERSONAL DE SERVICIO CUALIFICADO.
Este producto puede tener interferencias causadas
por teléfonos móviles durante su utilización. Si
tales interferencias resultan evidentes, aumente la
separación entre el producto y el teléfono móvil.
La toma de corriente deberá estar instalada
cerca del equipo y donde se pueda acceder a ella
fácilmente.
El enchufe del cable de la alimentación deberá estar
siempre listo para ser utilizado.
Para desconectar completamente este aparato de
la red de CA, desconecte el enchufe del cable de
alimentación del receptáculo de CA.
Símbolos de identifi cación del producto
Producto Ubicación
Unidad principal Parte inferior
Adaptador de CA Parte inferior
Page 17

ENGLISHESPAÑOL
ENGLISH
3
Precauciones de seguridad
Ubicación
Coloque el unidad en una superfi cie plana lejos de la
luz la del sol, temperatura y humedad altas, y vibración
excesiva. Estas condiciones pueden dañar la caja y
otros componentes, reduciendo por lo tanto la vida útil
de la unidad.
Colóquela por lo menos a 15 cm de superfi cies de
paredes para evitar distorsión y efectos acústicos
indeseados.
No ponga objetos pesados sobre la unidad.
Objetos extraños
No permita que objetos de metal caigan dentro de la
unidad. Esto puede causar una descarga eléctrica o un
fallo en el funcionamiento.
No permita que entren líquidos en la unidad. Esto
puede causar una descarga eléctrica o un fallo
en el funcionamiento. Si ocurre esto, desconecte
inmediatamente la unidad de la fuente de alimentación
y póngase en contacto con su distribuidor.
No rocíe insecticidas sobre o dentro de la unidad.
Contienen gases infl amables que pueden encenderse
si son rociados dentro de la unidad.
ESPAÑOL
Voltaje
No utilice fuentes de alimentación de alta tensión. Esto
puede sobrecargar la unidad y causar un incendio.
No use una fuente de alimentación de CC. Compruebe
cuidadosamente la fuente cuando instale la unidad en
una embarcación o en otro lugar donde se utilice CC.
Protección del adaptador de CA
Asegúrese de que el adaptador de CA esté conectado
correctamente y no esté dañado. Una mala conexión
y daños en el cable pueden causar un incendio o una
descarga eléctrica. No tire del cable ni lo doble, y no
ponga objetos pesados encima de él.
Sujete fi rmemente el enchufe cuando desconecte el
adaptador. Tirar del adaptador de CA puede causar
una descarga eléctrica.
No maneje el enchufe con las manos mojadas. Esto
puede causar una descarga eléctrica.
Servicio
No intente reparar esta unidad usted mismo. Si el
sonido se interrumpe, los indicadores no se iluminan,
aparece humo o se produce cualquier otro problema
que no esté tratado en estas instrucciones, desconecte
el adaptador de CA y póngase en contacto con su
distribuidor o con un centro de servicio autorizado. Si
la unidad es reparada, desarmada o reconstruida por
personas que no estén cualifi cadas para ello pueden
producirse descargas eléctricas o daños en la misma.
Aumente la vida útil de la unidad desconectándola de
la fuente de alimentación si no la va a utilizar durante
mucho tiempo.
RQTX1209
3
17
ENGLISH
Page 18
ENGLISH
4
ESPAÑOL
ENGLISH
Información para Usuarios sobre la
Recolección y Eliminación de aparatos
viejos y baterías usadas
Estos símbolos en los productos,
embalajes y/o documentos adjuntos,
signifi can que los aparatos eléctricos y
electrónicos y las baterías no deberían
ser mezclados con los desechos
ESPAÑOL
ENGLISH
RQTX1209
4
18
domésticos.
Para el tratamiento apropiado, la
recuperación y el reciclado de aparatos
viejos y baterías usadas, por favor,
observe las normas de recolección
aplicables, de acuerdo a su legislación
nacional y a las Directivas 2002/96/CE y
2006/66/CE.
Al desechar estos aparatos y baterías
correctamente, Usted estará ayudando a
preservar recursos valiosos y a prevenir
cualquier potencial efecto negativo sobre
la salud de la humanidad y el medio
ambiente que, de lo contrario, podría
surgir de un manejo inapropiado de los
residuos.
Para mayor información sobre la
recolección y el reciclado de aparatos
y baterías viejos, por favor, contacte
a su comunidad local, su ser vicio de
eliminación de residuos o al comercio
donde adquirió estos aparatos.
Podrán aplicarse penas por la eliminación
incorrecta de estos residuos, de acuerdo
a la legislación nacional.
Para usuarios empresariales en la
Unión Europea
Si usted desea descartar aparatos
eléctricos y electrónicos, por favor
contacte a su distribuidor o proveedor a
fi n de obtener mayor información.
[Informacion sobre la Eliminación
en otros Países fuera de la Unión
Europea]
Estos símbolos sólo son válidos dentro
de la Unión Europea. Si desea desechar
estos objetos, por favor contacte con
sus autoridades locales o distribuidor
y consulte por el método correcto de
eliminación.
Nota sobre el símbolo de la bateria
(abajo, dos ejemplos de símbolos):
Este símbolo puede ser usado en
combinación con un símbolo químico.
En este caso, el mismo cumple con
los requerimientos establecidos por la
Directiva para los químicos involucrados.
Page 19
ENGLISHESPAÑOL
ENGLISH
5
Índice
Accesorios suministrados
Precauciones de seguridad .........................................3
Accesorios suministrados ...........................................5
iPod e iPhone compatibles ..........................................5
Controles .......................................................................6
Conexiones ...................................................................7
Puesta en hora ..............................................................7
Utilización un iPod o iPhone .......................................8
Utilización la radio ........................................................8
Utilización del temporizador para dormir ...................9
Utilización la alarma .....................................................9
Utilización la aplicación Memory Loader .................10
Pila de repuesto de la memoria .................................11
Guía para la solución de problemas .........................12
Especifi caciones ........................................................13
Mantenimiento ............................................................13
“Made for iPod” y “Made for iPhone” signifi ca que un
accesorio electrónico ha sido diseñado para conectarse
específi camente a iPod, o iPhone, respectivamente, y su
fabricante ha certifi cado que cumple con los estándares de
rendimiento de Apple.
Apple no se responsabiliza del funcionamiento de este
dispositivo o su cumplimiento de las normas de regulación
y seguridad.
iPhone, iPod, iPod classic, iPod nano e iPod touch son
marcas comerciales de Apple Inc., registradas en EUA y
otros países.
Por favor, compruebe e identifi que los accesorios
suministrados.
1 Adaptador de CA
iPod e iPhone compatibles
• iPod nano 5a generación (video cámara) (8GB, 16GB)
• iPod touch 2a generación (8GB, 16GB, 32GB, 64GB )
• iPod classic [120GB, 160GB ( 2009)]
• iPod nano 4a generación (video) (8GB, 16GB)
• iPod classic (160GB) (2007)
• iPod touch 1a generación (8GB, 16GB, 32GB)
• iPod nano 3a generación (video) (4GB, 8GB)
• iPod classic (80GB)
• iPod nano 2a generación (aluminio) (2GB, 4GB, 8GB)
• iPod 5a generación (video) (60GB, 80GB)
• iPod 5a generación (video) (30GB)
• iPod nano 1a generación (1GB, 2GB, 4GB)
• iPod 4a generación (pantalla de color) (40GB, 60GB)
• iPod 4a generación (pantalla de color) (20GB, 30GB)
• iPod 4a generación (40GB)
• iPod 4a generación (20GB)
• iPod mini (4GB, 6GB)
• iPhone 3GS (16GB, 32GB)
• iPhone 3G (8GB, 16GB)
• iPhone (4GB, 8GB, 16GB)
La compatibilidad depende de la versión del software de su
iPod o iPhone.
RQTX1209
5
19
ESPAÑOL
ENGLISH
Page 20
ENGLISH
6
ESPAÑOL
ENGLISH
Controles
ESPAÑOL
HIJ
ENGLISH
A [SNOOZE/DIMMER]
Función de repetición de alarma: Para detener la alarma
durante 9 minutos.
Atenuador: Para ajustar el brillo del panel del visor
(Alto (predeterminado), Medio o Bajo).
B [ALARM OFF]
Para apagar la alarma.
C [ALARM 1], [ALARM 2]
Para activar la función alarma 1 o alarma 2.
Para mostrar la confi guración de alarma 1 o alarma 2.
D [SLEEP]
Para activar la función dormir.
Para activar el horario de ahorro de energía (en verano) en
el modo reloj.
E [2/ –, ADJ], [+/ 6, ADJ]
Para ajustar las confi guraciones del reloj, la radio y la
alarma.
Para saltar a la pista anterior o siguiente.
RQTX1209
Para adelantar o retroceder la búsqueda dentro de una
6
pista.
20
G
F
E
F [SET/PRESET]
G [TIME SYNC]
H [+, VOL], [–, VOL]
I [
J [SOURCE]
A
B
C
D
Para confi gurar el reloj.
Para realizar una confi guración previa automática o para
visualizar los canales preconfi gurados en el modo radio.
Para sincronizar la unidad principal con la hora de un iPod
o iPhone.
Para ajustar el volumen.
Para seleccionar la visualización de un reloj de 12 o
24 horas.
4/9
]
Para iniciar la reproducción de música desde un iPod o
iPhone y para pausar la reproducción.
Para seleccionar el modo reloj, “IPOD” o “RADIO FM”.
Page 21
ENGLISHESPAÑOL
ENGLISH
7
Conexiones
Vista trasera
3
Pulse [SET/ PRESET] nuevamente para confi rmar.
4
Repita los pasos 2 y 3 para confi gurar la hora y los
minutos.
Ejemplo:
Antena interior de FM
A la toma de CA
Conecte el adaptador de CA.
• No utilice un adaptador de CA de otro equipo.
• No utilice ningún otro adaptador de CA que no sea el
proporcionado.
• El aparato estará en la condición de espera cuando el
adaptador de CA esté conectado. El circuito primario estará
siempre con corriente cuando el adaptador de CA esté
conectado a un tomacorriente.
Puesta en hora
El reloj se visualizará una vez que la unidad principal esté
conectada a la toma de CA de la casa.
Vuelva a poner en hora el reloj periódicamente para mantener
su precisión (precisión mensual +/– 60 segundos).
1
Mantenga pulsado [SET/ PRESET] durante 2 segundos.
2
Pulse [2/ –, ADJ] o [+/6 , ADJ] para seleccionar el
día.
Para cambiar el visualizador del reloj
En el modo reloj, mantenga pulsados [+, VOL] y [–, VOL] al
mismo tiempo durante 2 segundos para seleccionar entre un
visualizador de 12 o 24 horas.
Para el visualizador de 12 horas:
AM : No se visualiza “PM”.
PM : Se visualiza “PM”.
Horario de ahorro de energía (durante el verano)
En el modo reloj, mantenga pulsado [SLEEP] para activar o
cancelar la función horario de ahorro de energía (durante el
verano).
Se visualizará “ DST” cuando se active la función.
Sincronizar el reloj con la hora de un iPod o
iPhone
Esta función le permite confi gurar la hora del reloj para que
sea igual a la de su iPod o iPhone (
compatibles”).
Pulse [TIME SYNC] mientras un iPod o iPhone esté
conectado a la unidad principal.
Nota:
• No es posible realizar la sincronización exacta de un iPod o
iPhone con la unidad principal. Puede existir una diferencia
de hasta 59 segundos entre ambos.
• La compatibilidad depende de la versión del software de su
iPod o iPhone.
Z página 5,
“iPod e iPhone
RQTX1209
7
21
ESPAÑOL
ENGLISH
Page 22
ENGLISH
8
ESPAÑOL
ENGLISH
Utilización un iPod o iPhone
1
Desconecte el soporte del iPod o iPhone.
Ajuste el sopor te según la altura de su iPod o iPhone.
iPod
(no incluido)
iPod cl
assic
iPhone
ESPAÑOL
ENGLISH
2
Conectar un iPod o iPhone.
Sostenga la unidad principal cuando conecte o desconecte
el iPod o iPhone.
Nota:
Cuando conecte un iPod touch o un iPhone por primera vez,
se visualizará un mensaje en su iPod touch o iPhone si no se
instaló la función Memory Loader (Z página 10).
Cargar un iPod o iPhone
El iPod o iPhone se carga automáticamente cuando se conecta
a la unidad principal.
• Observe la pantalla del iPod o iPhone para verifi car el estado
de carga.
• Si no se utiliza el iPod o iPhone durante un periodo
prolongado después de terminar la carga, desconéctelo de la
unidad principal, ya que la pila se agotará de modo natural.
RQTX1209
(Cuando esté totalmente cargada, no podrá efectuar cargas
adicionales.)
8
22
iPod tou
ch
iPod n
ano
Desconecte
suavemente
el soporte del
iPod o iPhone.
Reproducir un iPod o iPhone
1
Coloque un iPod o iPhone en la base y enciéndalo.
2
Pulse [SOURCE] para seleccionar “IPOD”.
3
Pulse [
4/9
el iPod o iPhone. Vuelva a pulsar para pausar la
reproducción.
4
Pulse [2/ –, ADJ] o [+/6 , ADJ] para saltar a la pista
anterior o siguiente.
5
Mantenga pulsado [2 / –, ADJ] o [+ /6, ADJ] para
adelantar o retroceder la búsqueda dentro de una pista.
Nota:
• Si el iPod o el iPhone elige automáticamente o se salta una
pista;
– Desactive su característica de “Shake” (Agitar) (si la hay).
– Escuche el iPod o el iPhone utilizando un adaptador de
• Para conocer detalles sobre el uso del iPod o iPhone,
consulte el Manual del usuario del iPod o iPhone.
] una vez para reproducir música desde
conexión de iPod o iPhone (no incluido).
Utilización la radio
Sintonización manual
1
Pulse [SOURCE] para seleccionar “RADIO FM”.
2
Pulse [2/ –, ADJ] o [+/6 , ADJ] para seleccionar la
frecuencia deseada.
Para sintonizar automáticamente
Mantenga pulsado [2 /–, ADJ] o [+/6, ADJ] hasta que la
frecuencia empiece a cambiar rápidamente. La sintonización
automática se detiene cuando encuentra una estación o
cuando se pulsa [2/ –, ADJ] o [+/6, ADJ] nuevamente.
Nota:
Para lograr una mejor recepción, extienda y cambie la dirección
de la antena de FM.
Page 23

ENGLISHESPAÑOL
ENGLISH
9
Grabación de emisoras en memoria
Puede almacenar sus canales favoritos en 5 canales de FM
preconfi gurados.
Preparación
Pulse [SOURCE] para seleccionar “RADIO FM”.
Preconfi guración automática (AP)
Mantenga pulsado [SOURCE] hasta visualizar “AP”.
Nota:
• La preconfi guración automática empieza desde la frecuencia
actual.
• Solo se almacenarán las primeras 5 estaciones detectadas.
• “AP” parpadeará de forma continua hasta que se hayan
defi nido los 5 canales.
Presintonización manual
1
Pulse [2/ –, ADJ] o [+/6 , ADJ] para seleccionar la
frecuencia deseada.
2
Mantenga pulsado [SET/ PRESET] durante 2 segundos
para visualizar el número preconfi gurado.
3
Pulse [2/ –, ADJ] o [+/6 , ADJ] para seleccionar un
número preconfi gurado.
4
Pulse [SET/ PRESET] nuevamente para confi rmar.
Sintonizar un canal preconfi gurado
Pulse [SET/ PRESET] para cambiar entre canales
preconfi gurados.
Utilización del temporizador para dormir
Esta función le permite apagar la unidad automáticamente
después de la hora defi nida (solo en el modo iPod y radio).
1
Pulse [SLEEP] para activar el temporizador.
2
Pulse [SLEEP] nuevamente para seleccionar su hora
deseada (en minutos).
]
OFF (predeterminado)
Nota:
Pulse [SLEEP] una vez para verifi car el tiempo restante.
30 ] 60 ] 90 ] 120
Utilización la alarma
Puede confi gurar dos horas de alarma diferentes. Antes
de confi gurar la alarma, asegúrese de confi gurar el reloj
(
Z página 7,
Confi gurar la alarma
1
2
3
4
5
MON-SUN (todos los días) ] MON-FRI (días entre semana)
6
7
8
Confi gurar la alarma del iPod
9
10
Nota:
• El timbre sonará si no se detecta ningún iPod o iPhone a la
• Se reproducirá música de la biblioteca del iPod o iPhone
“Puesta en hora”).
Mantenga pulsado [AL ARM 1] o [ALARM 2] hasta que el
visualizador de la hora parpadee.
En un lapso de 10 segundos, pulse [2/ –, ADJ] o
[+/6 , ADJ] para confi gurar la hora.
Pulse [ALARM 1] o [ALARM 2 ] para confi rmar.
Repita los pasos 2 y 3 para confi gurar los minutos.
Pulse [2/ –, ADJ] o [+/6 , ADJ] para seleccionar los
días de la semana:
SAT-SUN (fi n de semana)SAT-SUN (fi n de semana)
Pulse [ALARM 1] o [ALARM 2 ] para confi rmar.
Pulse [2/ –, ADJ] o [+/6 , ADJ] para seleccionar
el modo de alarma deseado: “IPOD”, “RADIO” o
“BUZZER”.
Pulse [ALARM 1] o [ALARM 2 ] para confi rmar.
Selección de “IPOD”: Continúe con los pasos 9 y 10.
Selección de “RADIO”: Continúe con los pasos del 11 al 14.
Pulse [2/ –, ADJ] o [+/6 , ADJ] para ajustar el
nivel de volumen.
Pulse [ALARM 1] o [ALARM 2 ] para confi rmar la
confi guración.
hora de la alarma confi gurada.
cuando suene la alarma.
(Continúa en la próxima página)
RQTX1209
9
23
ESPAÑOL
ENGLISH
Page 24

ENGLISH
10
ESPAÑOL
ENGLISH
Confi gurar la alarma de la radio
11
Pulse [2/ –, ADJ] o [+/6 , ADJ] para ajustar el
nivel de volumen.
12
Pulse [ALARM 1] o [ALARM 2 ] para confi rmar.
13
Pulse [2/ –, ADJ] o [+/6 , ADJ] para seleccionar el
canal preconfi gurado deseado.
14
Pulse [ALARM 1] o [ALARM 2 ] para confi rmar la
confi guración.
Nota:
ESPAÑOL
• La alarma funcionará solo cuando esté conectada al
suministro eléctrico de CA.
• Para activar o visualizar la confi guración de la alarma, pulse
[ALARM 1] o [ALARM 2] una vez.
• Pulse [ALARM 1] o [ALARM 2] nuevamente para desactivar la
función de alarma.
ENGLISH
Apagar la alarma
Pulse [ALARM OFF] para apagar la alarma.
La alarma sonará a la misma hora el día siguiente.
Nota:
Si no se apaga la alarma, sonará de manera constante durante
59 minutos antes de apagarse sola.
Repetición de alarma
Pulse [SNOOZE] cuando suene la alarma para detenerla
por unos minutos.
La alarma volverá a sonar al cabo de 9 minutos.
Sugerencia:
A los usuarios de iPod touch y iPhone les conviene
utilizar la aplicación Memor y Loader para desbloquear las
confi guraciones de alarmas personalizadas ( Z ver derecha).
RQTX1209
10
24
Utilización la aplicación Memory
Loader
Esta unidad principal está diseñada para funcionar con la
aplicación Memory Loader que se puede descargar desde el
App Store (búsqueda de MemoryLoader).
Si todavía no ha descargado la aplicación Memor y Loader
gratuita, visualizará el siguiente mensaje en la pantalla de su
iPod touch o iPhone:
Aplicación no instalada
Este accesorio requiere una
aplicación que no tiene instalada.
¿Desea instalarla desde la App
Este mensaje sir ve para recordarle que deberá descargar
la aplicación para disfrutar las funciones mejoradas de
esta unidad principal. Sin embargo, su iPod touch y iPhone
funcionarán correctamente con esta unidad principal aunque la
aplicación Memory Loader no esté instalada.
La aplicación Memor y Loader solo funciona con iPod touch y
iPhone con OS 3.0 o una versión posterior.
Una vez que haya instalado la aplicación Memory Loader en
su iPod touch o iPhone, las siguientes funciones se volverán
fácilmente accesibles y las controlará directamente a través de
la plataforma de la aplicación.
Alarma
• Ajuste las confi guraciones de alarma 1 y alarma 2 fácilmente.
• Puede seleccionar cualquier combinación de días para que
suene la alarma.
• Puede elegir la confi guración de repetición de alarma
deseada entre 1 y 30 minutos.
Radio
• Preconfi gure 5 canales FM desplazándose a través de las
frecuencias deseadas utilizando el seleccionador.
Eventos
• Puede recibir la aler ta de las fechas almacenadas en los
contactos de su iPod touch o iPhone (si la alarma está
confi gurada para sonar ese día).
Store?
Page 25

ENGLISHESPAÑOL
ENGLISH
11
Descansar
• Puede confi gurar un tiempo o conteo de descanso breve en
su iPod touch o iPhone.
Horario de ahorro de energía (DST)
• Active o desactive la función horario de ahorro de energía
con un solo paso simple.
Para obtener más información, visite: www.memoryloader.com
Pila de repuesto de la memoria
Esta pila de repuesto (CR2032, no incluido) guarda las
confi guraciones del reloj y la alarma en caso de que se
produzca una interrupción del suministro eléctrico.
Colocar la pila
Cuando no haya ninguna pila, se mostrará en la pantalla el
indicador de pila débil hasta que se coloque una pila.
Vista de la parte de abajo
1
Mantenga un adaptador de CA conectado al suministro
de energía de CA de la casa al desajustar el tornillo
de la cubierta del soporte de la pila utilizando un
destornillador.
2
Abra la cubierta del soporte de la pila.
3
Coloque una pila nueva con el lado (+) hacia arriba.
4
Cierre la cubierta del soporte de la pila y asegúrelo con
el tornillo.
Sustituir la pila
La vida útil de esta pila es aproximadamente 1 mes.
Cuando la pila esté débil, el indicador de pila débil parpadeará
constantemente en la pantalla.
Nota:
• No caliente o exponga a las llamas.
• No deje la(s) pila (s) en un automóvil expuesto a luz solar
directa durante un largo período de tiempo con las puertas y
ventanas cerradas.
• Retire la pila si la radio reloj no va a ser utilizada durante
mucho tiempo. Guárdela en un lugar fresco y oscuro.
CUIDADO
Hay peligro de explosión por si se sustituye
incorrectamente la batería. Sólo sustituya con el mismo
tipo recomendado por el fabricante o que sea equivalente.
Deseche las baterías usadas según instruye el fabricante.
Advertencia
Mantenga la pila tipo botón fuera del alcance de los niños.
No la ponga nunca en la boca. Si alguien la traga, llame a
un médico.
ESPAÑOL
ENGLISH
Advertencia
Riesgo de incendio, explosión o quemaduras. No cargue,
desarme, caliente a más de 60°C ni incinere.
RQTX1209
11
25
Page 26

ENGLISH
12
ESPAÑOL
ENGLISH
Guía para la solución de problemas
Antes de solicitar el ser vicio de reparaciones haga las
comprobaciones indicadas en la tabla de abajo. Si tiene alguna
duda acerca de algunos de los puntos de comprobación o si las
soluciones indicadas no resuelven el problema, consulte a su
distribuidor para obtener instrucciones.
■ Radio
Se oye sonido distorsionado o ruido.
• No coloque la unidad cerca de televisores, ordenadores
personales u otros dispositivos a los que afecte fácilmente el
magnetismo.
■ Reloj
No se puede sincronizar el reloj a la hora del iPod o iPhone.
• Asegúrese de que el iPod o iPhone está conectado de
manera segura y encendido (Z página 7).
ESPAÑOL
• Actualice su iPod o iPhone con el software más reciente.
El horario de ahorro de energía no funciona.
• Asegúrese de que el reloj ha sido confi gurado correctamente.
• Mantenga pulsado [SLEEP] en el modo reloj para activar el
horario de ahorro de energía (Z página 7).
ENGLISH
■ Alarma
La alarma del iPod, la radio o el timbre no suena a la hora
preconfi gurada.
• Verifi que que “ALARM 1” o “ALARM 2” hayan sido activadas
correctamente (Z página 9).
La alarma del iPod o la radio está activada pero no suena a
la hora preconfi gurada.
• Verifi que la confi guración de volumen de la alarma
(Z página 9, 10).
■ iPod o iPhone
El iPod o iPhone no funcionan con esta unidad.
• Asegúrese de que el iPod o iPhone haya sido conectado de
manera segura y esté encendido (Z página 8).
• Actualice su iPod o iPhone con el software más reciente.
No hay ningún sonido del iPod o iPhone.
• Asegúrese de que el iPod o iPhone haya sido conectado de
manera segura (Z página 8).
• Ajuste el volumen.
El iPod o iPhone no se carga.
• Compruebe las conexiones. Apague el iPod o iPhone, y
RQTX1209
retírelo del conector de la base. Vuelva a introducirlo y
12
enciéndalo otra vez (Z página 8).
26
Restablecer
Esta función le permite restablecer la unidad principal a las
confi guraciones de fábrica originales o cuando tenga un
funcionamiento anormal.
Vista trasera
Pulse [RESET] con un gancho para papel o un objeto con
punta.
Page 27

ENGLISHESPAÑOL
ENGLISH
13
Especifi caciones
SECCIÓN DEL AMPLIFICADOR
Potencia de salida RMS (Mono)
Canal frontal 2,6 W por canal (8
distorsión armónica total del 10%
SECCIÓN DEL SINTONIZADOR
Memoria presintonizada 5 emisoras de FM
Modulación de frecuencia (FM)
Gama de frecuencias
87,50 MHz a 108,00 MHz (en pasos de 50 kHz)
Terminales de antena 75
SECCIÓN DE ALTAVOCES
Tipo Sistema de 1 altavoz de 1 vía (Refl ector de bajos)
Altavoz(ces) Impedancia 8
Gama completa Tipo cónico de 2,5 cm
GENERALIDADES
Alimentación (adaptador de CA) 100 a 240 V CA, 50/60 Hz
Salida de CC 7,5 V
Consumo energético
(mientras el iPod o iPhone se está cargando)
Unidad principal 7 W
Dimensiones (An x Al x Prf) 112 mm x 80 mm x 150 mm
Peso
Unidad principal 0,37 kg
Adaptador de CA 0,14 kg
Gama de temperaturas de funcionamiento 0°C a +35°C
Gama de humedades de funcionamiento
20% a 80% humedad relativa (sin condensación)
), 1 kHz,
(desequilibrado)
Consumo en el modo de espera:
Unidad principal 0,3 W (aproximados)
Adaptador de CA 0,3 W (aproximados)
Nota:
1) Las especifi caciones están sujetas a cambios sin previo
aviso.
Los pesos y las dimensiones son aproximados.
2) La distorsión armónica total se mide con el analizador de
espectro digital.
Mantenimiento
Utilice un paño suave y seco para limpiar esta unidad.
• No utilice nunca alcohol, diluyente de pintura o gasolina para
limpiar esta unidad.
• Antes de utilizar un paño impregnado químicamente, lea con
atención las instrucciones del mismo.
RQTX1209
13
27
ESPAÑOL
ENGLISH
Page 28

ENGLISH
2
NEDERLANDS
POLSKI
Drogi Kliencie
Dziękujemy Ci za zakupienie tego produktu.
W celu zapewnienia optymalnej jakości odbioru i
bezpieczeństwa, przed podłączeniem, uruchomieniem
lub zmianą ustawień urządzenia należy dokładnie
zapoznać się z niniejszą instrukcją obsługi.
Prosimy o zachowanie niniejszej instrukcji obsługi.
Niniejsza instrukcja została opracowana na podstawie
oryginalnej publikacji fi rmy Panasonic Corporation.
NEDERLANDS
UWAGA!
• NINIEJSZEGO URZĄDZENIA NIE NALEŻY
INSTALOWAĆ LUB UMIESZCZ AĆ W SZAFCE
POLSKI
NA KSIĄŻKI, ZABUDOWANEJ SZAFCE LUB
INNEJ OGRANICZONEJ PRZESTRZENI, W
CELU ZAPEWNIENIA DOBREJ WENTYLACJI.
NALEŻY SIĘ UPEWNIĆ, ŻE ZASŁONY I INNE
MATERIAŁY NIE ZASŁ ANIAJĄ OTWORÓW
WENTYLACYJNYCH TAK, ABY ZAPOBIEC
RYZYKU PORAŻENIA PRĄDEM LUB POŻARU
W WYNIKU PRZEGRZANIA.
• NIE ZASŁANIAJ OTWORÓW
WENTYLACYJNYCH URZĄDZENIA
GAZETAMI, OBRUSAMI, ZASŁONAMI I
PODOBNYMI PR ZEDMIOTAMI.
• NIE UMIESZCZAJ NA URZĄDZENIU
ŹRÓDEŁ OTWARTEGO OGNIA, TAKICH JAK
ZAPALONE ŚWIECE.
• POZBYWAJ SIĘ ZUŻYTYCH BATERII W
SPOSÓB NIE ZAGRAŻAJĄCY ŚRODOWISKU
NATURALNEMU.
URZĄDZENIE JEST PRZEZNACZONE DO
RQTX1209
UŻYWANIA W KLIMACIE UMIARKOWANYM.
2
28
OSTRZEŻENIE:
ABY OGRANICZYĆ NIEBEZPIECZEŃSTWO
POŻARU, PORAŻENIA PRĄDEM LUB
USZKODZENIA URZĄDZENIA,
• NIE NALEŻY WYSTAWIAĆ URZĄDZENIA
NA DZIAŁANIE DESZCZU, WILGOCI,
KAPANIE LUB ZACHLAPANIE; PONADTO
NA URZĄDZENIU NIE NALEŻY USTAWIAĆ
ŻADNYCH NACZYŃ ZAWIERAJĄCYCH PŁYNY,
TAKICH JAK WAZONY.
• NALEŻY STOSOWAĆ TYLKO ZALECANE
AKCESORIA.
• NIE ZDEJMOWAĆ POKRYWY (LUB PANELU
TYLNEGO); WEWNĄTRZ URZĄDZENIA
NIE MA CZĘŚCI PRZEZNACZONYCH DO
WYMIANY PRZEZ UŻYTKOWNIKA. SERWIS
NALEŻY ZLECIĆ W AUTORYZOWANYM
PUNKCIE SERWISOWYM.
To ur ządzenie może odbierać zakłócenia wywołane
użyciem telefonu komórkowego. Jeżeli takie
zakłócenia wystąpią, wskazane jest zwiększenie
odległości pomiędzy urządzeniem a telefonem
komórkowym.
Gniazdo zasilania powinno znajdować się blisko
urządzenia i być łatwo dostępne.
Wtyczka przewodu zasilania podłączona do
gniazdka powinna być łatwo dostępna.
Aby całkowicie odłączyć urządzenie od zasilania,
odłącz wtyczkę przewodu zasilania od gniazdka.
Oznaczenie identyfi kacyjne produktu
Produkt Lokalizacja
Urządzenie główne Spód
Zasilacz prądu przemiennego Spód
Page 29

ENGLISHENGLISH
POLSKI
3
Środki ostrożności
Ustawienie urządzenia
Urządzenie należy ustawić na równej powierzchni,
z dala od miejsc bezpośrednio nasłonecznionych, w
których panuje wysoka temperatura, duża wilgotność
lub występują nadmierne drgania. Takie warunki
mogą doprowadzić do uszkodzenia obudowy i innych
części i przez to skrócić czas prawidłowego działania
urządzenia.
Aby uniknąć zniekształcenia i innych niekorzystnych
efektów akustycznych, ustawiać urządzenie w
odległości przynajmniej 15 cm od ścian.
Na urządzeniu nie wolno umieszczać żadnych ciężkich
przedmiotów.
Napięcie
Nie wolno stosować źródeł zasilania o wysokim
napięciu. Można w ten sposób doprowadzić do
przeciążenia urządzenia i spowodować pożar.
Nie wolno stosować zasilania prądem stałym. Przed
podłączeniem urządzenia do zasilania na statku lub w
innym miejscu, gdzie stosowane jest zasilanie prądem
stałym, należy sprawdzić dokładnie parametry źródła
zasilania.
Ochrona zasilacza
Należy sprawdzić, czy zasilacz jest dobrze podłączony
i czy nie jest uszkodzony. Złe podłączenie lub
uszkodzenie przewodu może być przyczyną pożaru
lub porażenia prądem. Nie wolno ciągnąć za przewód,
zginać go ani kłaść na nim ciężkich przedmiotów.
Przy odłączaniu zasilacza należy chwycić mocno za
wtyczkę. Ciągnięcie za zasilacz grozi porażeniem
prądem elektrycznym.
Nie wolno dotykać wtyczki mokrymi rękoma. Grozi to
porażeniem prądem elektrycznym.
Obce przedmioty i substancje
Należy uważać, aby do wnętrza urządzenia nie dostały
się metalowe przedmioty. Mogą one być przyczyną
porażenia prądem elektrycznym lub nieprawidłowej
pracy urządzenia.
Należy uważać, aby do wnętrza urządzenia nie dostały
się substancje płynne. Mogą one być przyczyną
porażenia prądem elektrycznym lub nieprawidłowej
pracy urządzenia. Jeśli do tego dojdzie, należy
natychmiast odłączyć urządzenie od zasilania i
skontaktować się ze sprzedawcą.
Nie wolno rozpylać na powierzchnię urządzenia lub do
jego wnętrza środków owadobójczych. Zawierają one
łatwopalne gazy, które mogą
dostanie się do wnętrza urządzenia.
zapalić się, jeżeli środek
Naprawa
Użytkownik nie powinien podejmować się naprawy
urządzenia na własną rękę. Jeśli dźwięk jest
przerywany, wskaźniki nie świecą, pojawia się dym
lub wystąpi problem, któr y nie został omówiony
w niniejszej instrukcji, należy odłączyć zasilacz i
skontaktować się ze sprzedawcą lub autoryzowanym
punktem serwisowym. W przypadku napraw,
demontażu lub przeróbek wykonywanych przez osoby
niewykwalifi kowane może dojść do porażenia prądem
elektrycznym lub uszkodzenia urządzenia.
Czas eksploatacji urządzenia można wydłużyć
odłączając je od źródła zasilania, kiedy nie jest ono
używane przez dłuższy okres.
RQTX1209
3
29
ENGLISH
POLSKI
Page 30

ENGLISH
4
NEDERLANDS
POLSKI
Informacja dla użytkowników o
gromadzeniu i pozbywaniu się zużytych
urządzeń i baterii
NEDERLANDS
POLSKI
RQTX1209
4
30
Niniejsze symbole umieszczane na
produktach, opakowaniach i/lub w
dokumentacji towarzyszącej oznaczają ,
że nie wolno mieszać zużytych urządzeń
elektrycznych i elektronicznych oraz
baterii z innymi odpadami domowymi.
W celu zapewnienia właściwego
przetwarzania, utylizacji oraz recyklingu
zużytych produktów i baterii, należy
oddawać je do wyznaczonych punktów
gromadzenia odpadów zgodnie z
przepisami prawa krajowego oraz
postanowieniami Dyrektyw 2002/96/WE i
2006/66/WE.
Prawidłowe pozbywanie się w/w
produktów i baterii pomaga oszczędzać
cenne zasoby naturalne i zapobiegać
potencjalnemu negatywnemu wpływowi
na zdrowie człowieka oraz stan
środowiska naturalnego, który towarzyszy
niewłaściwej gospodarce odpadami.
Więcej informacji o zbiórce oraz
recyklingu zużytych produktów i baterii
można otrzymać od władz lokalnych,
miejscowego przedsiębiorstwa
oczyszczania lub w punkcie sprzedaży, w
którym użytkownik nabył przedmiotowe
towary.
Za niewłaściwe pozbywanie się
powyższych odpadów mogą grozić
kary przewidziane przepisami prawa
krajowego.
Dotyczy użytkowników fi rmowych
działających na terenie Unii
Europejskiej
Chcąc w odpowiedni sposób pozbyć
się urządzeń elektrycznych lub
elektronicznych, należy skontaktować
się ze sprzedawcą lub dostawcą, który
udzieli dalszych informacji.
[Informacje o pozbywaniu się w/w
urządzeń w państwach trzecich]
Niniejsze symbole obowiązują wyłącznie
na terenie Unii Europejskiej. Chcąc
pozbyć się w/w urządzeń elektrycznych
lub elektronicznych, należy skontaktować
się z władzami lokalnymi lub sprzedawcą
w sprawie właściwego sposobu
wyrzucania tego rodzaju przedmiotów.
Dotyczy symbolu baterii (symbole
przykładowe):
Ten symbol może występować wraz z
symbolem pierwiastka chemicznego. W
takim przypadku spełnia on wymagania
Dyrektywy w sprawie określonego środka
chemicznego.
Page 31

ENGLISHENGLISH
POLSKI
5
Spis treści
Dostarczone wyposażenie
Środki ostrożności ....................................................... 3
Dostarczone wyposażenie ........................................... 5
Kompatybilny iPod i iPhone ........................................ 5
Opis elementów sterowania ........................................6
Połączenia ..................................................................... 7
Ustawianie zegara ........................................................7
Korzystanie z iPod’a lub iPhone’a ..............................8
Korzystanie z radia .......................................................8
Korzystanie z timera wyłączającego...........................9
Korzystanie z alarmu....................................................9
Korzystanie z aplikacji Memory Loader ...................10
Bateria podtrzymująca pamięć.................................. 11
Rozwiązywanie problemów .......................................12
Dane techniczne .........................................................13
Konserwacja ...............................................................13
„Made for iPod” i „Made for iPhone” oznaczają , że
elektroniczne wyposażenie zostało przeznaczone do
podłączenia do iPod’a lub iPhone’a i producent w ydał
oświadczenie co do jego zgodności ze standardami pracy
fi rmy Apple.
Firma Apple nie ponosi odpowiedzialności za działanie tego
urządzenia oraz jego zgodność z wymogami prawnymi oraz
dotyczącymi bezpieczeństwa.
iPhone, iPod, iPod classic, iPod nano oraz iPod touch to
znaki fi rmowe fi rmy Apple Inc., zarejestrowane w Stanach
Zjednoczonych i innych krajach.
Sprawdzić i znaleźć poszczególne elementy
dostarczonego wyposażenia.
1 Zasilacz prądu przemiennego
Kompatybilny iPod i iPhone
• iPod nano 5. generacji (kamera wideo) (8GB, 16GB)
• iPod touch 2. generacji (8GB, 16GB, 32GB, 64GB)
• iPod classic [120GB, 160GB (2009)]
• iPod nano 4. generacji (wideo) (8GB, 16GB)
• iPod classic (160GB) (2007)
• iPod touch 1. generacji (8G B, 16GB, 32GB)
• iPod nano 3. generacji (wideo) (4GB, 8GB)
• iPod classic (8 0GB)
• iPod nano 2. generacji (aluminiowy) (2GB, 4GB, 8GB)
• iPod 5. generacji (wideo) (60GB, 8 0GB)
• iPod 5. generacji (wideo) (30GB)
• iPod nano 1. generacji (1GB, 2GB, 4GB)
• iPod 4. generacji (kolorowy w yświetlacz) (40GB, 60GB)
• iPod 4. generacji (kolorowy w yświetlacz) (20GB, 3 0GB)
• iPod 4. generacji (40GB)
• iPod 4. generacji (20GB)
• iPod mini (4GB, 6GB)
• iPhone 3GS (16GB, 32GB)
• iPhone 3G (8GB, 16GB)
• iPhone (4GB, 8GB, 16GB)
Kompatybilność jest uzależniona od wersji oprogramowania
zainstalowanego na iPod’zie lub iPhone’ie.
RQTX1209
5
31
ENGLISH
POLSKI
Page 32

ENGLISH
6
NEDERLANDS
POLSKI
Opis elementów sterowania
NEDERLANDS
HIJ
POLSKI
A [SNOOZE/DIMMER]
Funkcja odraczanie: Aby wstrzymać alar m na 9 minut.
Przyciemniacz: Aby w yregulować jasność wyświetlacza
(Wysoka (tryb domyślny), Średnia lub Niska).
B [ALARM OFF]
Aby wyłączyć alarm.
C [ALARM 1], [AL ARM 2]
Aby włączyć funkcję alarmu 1 lub alarmu 2.
Aby wyświetlić ustawienie alarmu 1 lub alarmu 2.
D [SLEEP]
Aby włączyć funkcję uśpienia.
Aby włączyć czas letni w tr ybie zegara.
E [2/–, ADJ], [+/6, ADJ]
Aby wyregulować ustawienia zegara, radia i alarmu.
RQTX1209
Aby przeskoczyć do poprzedniego lub następnego utworu.
6
Aby wyszukać wstecz lub w przód w obrębie utworu.
32
G
F
A
B
C
E
D
F [SET/PRESET]
Aby ustawić zegar.
Aby przeprowadzić automatyczne programowanie lub
przejrzeć zaprogramowane kanały w trybie radia.
G [TIME SY NC]
Aby zsynchronizować główne urządzenie z czasem iPod’a
lub iPhone’a.
H [+, VOL], [–, VOL]
Aby wyregulować poziom głośności.
Aby wybrać 12 lub 24-godzinny wyświetlacz zegara.
I [
4/9
]
Aby rozpocząć odt warzanie muzyki z iPod’s lub iPhone’a i
wstrzymać podczas odtwarzania.
J [SOURCE]
Aby wybrać tr yb zegara, „IPOD” lub „RADIO FM ”.
Page 33

ENGLISHENGLISH
POLSKI
7
Połączenia
yg
Widok od tyłu
Antena wewnętrzna FM
Do domowego
gniazdka zasilającego
Podłączanie zasilacza.
• Nie stosować zasilaczy, pochodzących z innych urządzeń.
• Nie uż ywać innych zasilaczy prądu przemiennego za
wyjątkiem dołączonego.
• Gdy zasilacz sieciowy jest podłączony, urządzenie znajduje
się w stanie gotowości. Obwód pier wotny jest zawsze pod
napięciem, gdy tylko zasilacz jest podłączony do sieci.
Ustawianie zegara
Zegar wyświetla się po podłączeniu głównego urządzenia do
źródła zasilania.
Zegar należy regularnie nastawiać, aby zawsze była ustawiona
dokładna godzina (miesięczna dokładność +/– 60 sekund).
1
Naciśnij i pr zytrzymaj [SET/PRESET] przez 2 sekundy.
2
Naciśnij [2 /–, ADJ] lub [+/6, ADJ], aby w ybrać
dzień.
3
Naciśnij ponownie [SET/PRESET ], aby potwierdzić.
4
Powtórz kroki 2 i 3, aby ustawić godzinę i minuty.
Przykład:
Aby zmienić wyświetlacz zegara
W trybie zegara nacisnąć i przytrzymać równocześnie
[+, VOL] i [–, VOL] przez 2 sekundy, aby wybrać między 12 i
24-godzinnym wyświetlaczem.
Na 12-godzinnym wyświetlaczu:
AM : Nie jest w yświetlany symbol „PM”.
PM : Wyświetlany jest symbol „PM”.
Czas letni
Z trybie zegara nacisnąć i przytrzymać [SLEEP], aby włączyć
lub anulować funkcję czasu letniego.
Kiedy funkcja jest włączona, wyświetla się „DST”.
Synchronizacja zegara z czasem iPod’a lub
iPhone’a
Funkcja poz wala nastawić czas zegara na ten sam czas, co
czas iPod’a lub iPhone’a (
iPhone”).
Naciskać [TIME SYNC], podcz as gdy iPod lub iPhone j est
dokowany na głównym ur ządzeniu.
Uwaga:
• Dokładna synchronizacja iPod’a lub iPhone’a z głównym
urządzeniem nie jest możliwa. Różnica między nimi może
wynosić do 59 sekund.
• Kompatybilność jest uzależniona od wersji oprogramowania
zainstalowanego na iPod’zie lub iPhone’ie.
Z strona 5,
„Kompatybilny iPod i
RQTX1209
7
33
ENGLISH
POLSKI
Page 34

ENGLISH
8
NEDERLANDS
POLSKI
Korzystanie z iPod’a lub iPhone’a
1
Wyciąganie podstawy iPod’a lub iPhone’a.
Wyregulować podstawę zgodnie z wysokością iPod’a lub
iPhone’a.
iPod
(nie należy do
wyposażenia)
iPod cl
assic
iPhone
iPod tou
ch
iPod n
NEDERLANDS
POLSKI
2
Podłączanie iPod’a lub iPhone’a.
Przytrzymać główne urządzenie podczas podłączania lub
rozłączania iPod’a lub iPhone’a.
Uwaga:
Dokując iPod touch lub iPhone po raz pierwszy, na
wyświetlaczu iPod touch’a lub iPhone’a pojawi się komunikat,
jeśli nie zainstalowano aplikacji Memory Loader (Z strona 10).
Ładowanie iPod’a lub iPhone’a
iPod lub iPhone będą ładowane automatycznie w momencie
podłączenia do głównego urządzenia.
• Spojrzeć na wyświetlacz iPod’a lub iPhone’a, aby sprawdzić
status ładowania.
• W razie niekor zystania z iPod’a lub iPhone’a przez dłuższy
czas po zakończeniu ładowania, należy odłączyć go od
głównego urządzenia, ponieważ bateria ulega wyczerpaniu
RQTX1209
w naturalny sposób. (Po peł nym nał adowaniu nie nastąpi
8
dodatkowe ładowanie.)
34
ano
Delikatnie wyciągnąć
podstawę iPod’a lub
iPhone’a.
Odtwarzanie iPod’a lub iPhone’a
1
Umieść iPod lub iPhone w jednostce dokującej i włącz.
2
Naciśnij [SOURCE], aby wybrać „IPOD”.
3
Naciśnij jeden ra z [
muzyki z iPod’a lub iPhone’a. Naciśnij p onownie, aby
wstrzymać odtwarzanie.
4
Naciśnij [2 /–, ADJ] lub [+/6, ADJ], aby przejść do
poprzedniego lub następnego utworu.
5
Naciśnij i pr zytrzymaj [2/– , ADJ] lub [+/6, ADJ],
aby wyszukać wstecz lub w przód w obrębie utworu.
Uwaga:
• Jeśli iPod lub iPhone automatycznie wybiera losowo lub
pomija utwór;
– Wyłączyć funkcję „Shake” (Potrząsania) (jeśli istnieje).
– Odtworzyć iPod’a lub iPhone’a używając adapter dokujący
iPod’a lub iPhone’a (nie należy do w yposażenia).
• Odnośnie szczegółów działania iPod’a lub iPhone’a, patrz
Podręcznik uży tkownika iPod’a lub iPhone’a.
4/9
], aby uruchomić odt war zanie
Korzystanie z radia
Strojenie ręczne
1
Naciśnij [SOURCE], aby wybrać „RADIO FM”.
2
Naciśnij [2 /–, ADJ] lub [+/6, ADJ], aby w ybrać
żądaną częstotliwość.
Strojenie automatyczne
Naciśnij i przytr zymaj [2/–, ADJ] lub [+/6, A DJ], dopóki
częstotliwość nie zacznie się szybko zmieniać. Automatyczne
dostrajanie zatrzymuje się, kiedy znajdzie stację lub po
ponownym naciśnięciu [2 /–, ADJ] lub [+/6, ADJ].
Uwaga:
Dla lepszego odbioru należy przemieścić i zmienić kierunek
anteny FM.
Page 35

ENGLISHENGLISH
POLSKI
9
Programowanie stacji
Ulubione kanały można przechowywać na 5 zaprogramowanych
kanałach FM.
Przygotowanie
Naciśnij [SOURCE], aby wybrać „RADIO FM”.
Automatyczne programowanie (AP)
Nacisnąć i przytrzymać [SOURCE] do czasu, gdy
wyświetlacz urządzenia pokaże „AP”.
Uwaga:
• Automatyczne programowanie rozpocznie się od aktualnej
częstotliwości.
• Zostanie zachowanych tylko 5 pierwszych w ykr ytych stacji.
• „AP” będzie migał w trybie ciągłym do chwili ustawienia
wszystkich 5 kanałów.
Ręczne programowanie stacji
1
Naciśnij [2 /–, ADJ] lub [+/6, ADJ], aby w ybrać
żądaną częstotliwość.
2
Naciśnij i pr zytrzymaj [SET/PRESET] przez 2 sekundy,
aby wyświetlić zaprogramowany numer.
3
Naciśnij [2 /–, ADJ] lub [+/6, ADJ], aby w ybrać
zaprogramowany numer.
4
Naciśnij ponownie [SET/PRESET ], aby potwierdzić.
Dostrajanie do zaprogramowanego kanału
Nacisnąć [SET/PRESET], aby przełączać między
zaprogramowanymi kanałami.
Korzystanie z timera wyłączającego
Ta funkcja umożliwia automatyczne w yłączanie urządzenia po
ustawionym czasie (tylko w trybie iPod’a i radia).
1
Naciśnij [SLEEP], aby włączyć timer.
2
Naciśnij ponownie [SLEEP], aby wybrać żądany czas
(w minutach).
OFF (tryb domyślny) ] 30 ] 60 ] 90 ] 120
Uwaga:
Nacisnąć jeden raz [S LEEP], aby sprawdzić pozostały czas.
Korzystanie z alarmu
Można ustawić dwa różne czasy alarmów. Przed ustawieniem
alarmu, należy pamiętać o ustawieniu zegara (
„Ustawianie zegara”).
Ustawianie alarmu
1
Naciśnij i pr zytrzymaj [ALARM 1] lub [ALARM 2] do
czasu, aż wyświetlacz godz iny zacznie migać.
2
W ciągu 10 sekund naciśnij [2 /–, ADJ] lub
[+/6, ADJ], aby ustawić godzinę.
3
Naciśnij [AL ARM 1] lub [ALARM 2], aby potwierdziç
4
Powtórz kroki 2 i 3, aby ustawić minuty.
5
Naciśnij [2 /–, ADJ] lub [+/6, ADJ], aby w ybrać dni
tygodnia:
MON- SUN (wszystkie dni) ] MO N-FRI (dni robocze)
SAT-SUN (weekend)SAT-SUN (weekend)
6
Naciśnij [AL ARM 1] lub [ALARM 2], aby potwierdziç.
7
Naciśnij [2 /–, ADJ] lub [+/6, ADJ], aby w ybrać
żądany tr yb alarmu: „IPOD”, „RADI O” lub „BUZZER”.
8
Naciśnij [AL ARM 1] lub [ALARM 2], aby potwierdziç.
Wybór „IPOD”: Kontynuuj kroki 9 i 10.
Wybór „ RADIO”: Kontynuuj kroki od 11 do 14.
Ustawianie alarmu iPod’a
9
Naciśnij [2 /–, ADJ] lub [+/6, ADJ], aby
wyregulować poziom głośności.
10
Naciśnij [AL ARM 1] lub [ALARM 2], aby potwierdzić
ustawienie.
Uwaga:
• Brzęczyk rozlegnie się, jeśli nie wykryto żadnego iPod’a lub
iPhone’a pr zy ustawionym czasie alarmu.
• Kiedy rozlegnie się alarm, zostanie odtworzona muzyka z
biblioteki iPod’a lub iPhone’a.
(Ciąg dalszy na następnej stronie)
Z strona 7,
RQTX1209
9
35
ENGLISH
POLSKI
Page 36

ENGLISH
10
NEDERLANDS
POLSKI
Ustawianie alarmu radia
11
Naciśnij [2 /–, ADJ] lub [+/6, ADJ], aby
wyregulować poziom głośności.
12
Naciśnij [AL ARM 1] lub [ALARM 2], aby potwierdziç
13
Naciśnij [2 /–, ADJ] lub [+/6, ADJ], aby w ybrać
żądany zaprogramowany kanał.
14
Naciśnij [AL ARM 1] lub [ALARM 2], aby potwierdzić
ustawienie.
Uwaga:
• Alarm zadziała tylko wtedy, gdy urządzenie jest zasilane.
NEDERLANDS
• Aby włączyć lub w yświetlić ustawienie alarmu, nacisnąć
jeden raz [ALARM 1] lub [A LARM 2].
• Nacisnąć [ALA RM 1] lub [ALARM 2], aby wyłączyć funkcję
alarmu.
POLSKI
Wyłączanie alarmu
Nacisnąć [ALARM OFF], aby wyłączyć alarm.
Alarm rozlegnie się o tym samym czasie następnego dnia.
Uwaga:
Jeśli alar m nie jest wyłączony, będzie rozlegał się stale przez
59 minut zanim sam się wyłączy.
Odraczanie alarmu
Nacisnąć [SNOOZE], kiedy rozlegnie się alarm, aby
zatrzymać go na kilka minut.
Alarm rozlegnie się ponownie po 9 minutach.
Wskazówka:
W przypadku uż ytkowników iPod touch’a i iPhone’a, należy
skorzystać z aplikacji Memory Loader, aby odblokować
domyślne ustawienia alarmu (Z patrz po prawej).
RQTX1209
10
36
Korzystanie z aplikacji Memory
Loader
Główne urządzenie jest przeznaczone do pracy z aplikacją
Memory Loader, którą można pobrać ze sklepu App Store
(szukaj MemoryLoader).
Jeśli nie pobrano jeszcze aplikacji Memory Loader za
darmo, na wyświetlaczu iPod touch’a lub iPhone’a pojawi się
następujący komunikat:
Program nie zainstalowany
To akcesorium wymaga programu,
który nie jest zainstalowany. Czy
chcesz zainstalować go z App
Komunikat ten stanowi przypomnienie, że należy pobrać
aplikację, aby móc pełni korzystać z zaawansowanych funkcji
głównego urządzenia. Niemniej iPod touch i iPhone będzie
działać prawidłowo z głównym urz ądzeniem nawet bez
zainstalowania aplikacji Memory Loader.
Aplikacja Memory Loader działa jedynie z iPod touch’em lub
iPhone’em z systemem operacyjnym 3.0 lub nowszym.
Po zainstalowaniu aplikacji Memory Loader na iPod touch’u lub
iPhone’ie, poniższe funkcje będą łatwo dostępne i sterowane
bezpośrednio z platformy aplikacji.
Alarm
• Regulacja ust awień alarmu 1 i alarmu 2 w prosty sposób.
• Można wybrać kombinację dni, w które ma rozlec się alarm.
• Można wybrać żądane ustawienia funkcji snooze od 1 do
30 minut.
Radio
• Programowanie 5 kanałów FM pr zez przewijanie wybierakiem
żądanych częstotliwości.
Wydarzenia
• Można ustawić powiadomienie o pr zechowywanych datach
w kontaktach iPod touch’a lub iPhone’a (jeśli alarm jest
ustawiony na ten dzień).
Store?
Page 37

ENGLISHENGLISH
POLSKI
11
Drzemka
• Na iPod touch’u lub iPhone’ie można ustawić czas krótkiej
drzemki lub odliczanie.
Czas letni (DST)
• Włączenie lub wyłączenie funkcji czasu letniego w jednym
prostym kroku.
Dodatkowe informacje znajdują się na stronie inter netowej:
www.memoryloader.com
Bateria podtrzymująca pamięć
Bateria podtrzymująca (CR 2032, nie należy do wyposażenia)
zapisuje ustawienia zegara i alarmu na wypadek przer wy w
zasilaniu.
Umieszczanie baterii
W przypadku braku bater ii, wskaźnik niskiego poziomu
naładowania baterii będzie widoczny na wyświetlaczu do czasu
jej umieszczenia.
Widok od dołu
1
Zasilacz pozostaw podłączony do źródła zasilania
podczas odkręcania śrubokrętem śruby pokrywy
komory na baterię.
2
Otwórz pokrywę komory na baterię.
3
Umieść nową baterię stroną z symbolem (+) do góry.
4
Zamknij pokrywę komory na baterię i zabezpiecz śrubą.
Wymiana baterii
Czas eksploatacji tej baterii wynosi około 1 miesiąca.
Kiedy bateria jest słaba na wyświetlaczu będzie stale migał
wskaźnik niskiego poziomu naładowania baterii.
Uwaga:
• Nie zbliżać baterii do źródeł ciepła lub ognia.
• Bater ii nie należy pozostawiać przez dłuższy czas, w
pojeździe z zamkniętymi drzwiami i oknami, narażonym na
bezpośrednie promieniowanie słoneczne.
• Baterię należy wyjąć, jeżeli radiobudzik nie będzie używany
przez dłuższy okres. Przechowywać w chłodnym, ciemnym
miejscu.
UWAGA
Istnieje niebezpieczeństwo wybuchu w przypadku, gdy
baterie zostaną nieprawidłowo założone. Baterie należy
wymieniać na takie same lub na baterie równorzędnego
typu, zalecane przez producenta. Zużytych baterii należy
pozbywać się zgodnie z instrukcjami producenta.
Ostrzeżenie
Należy trzymać baterię guzikową poza zasięgiem dzieci.
Nigdy nie należy wkładać baterii guzikowej do buzi. W ra zie
połknięcia należy skontaktować się z lekar zem.
Ostrzeżenie
Ryzyko pożaru, wybuchu oraz poparzeń. Nie ładować,
rozbierać na części, podgrzewać do temperatury
przekraczającej 60°C lub doprowadzić do spalenia.
RQTX1209
11
37
ENGLISH
POLSKI
Page 38

ENGLISH
12
NEDERLANDS
POLSKI
Rozwiązywanie problemów
Przed oddaniem urządzenia do napraw y należy przeprowadzić
następujące kontrole. W przypadku wątpliwości, co do
niektórych punktów kontrolnych lub jeśli podane rozwiązania
nie eliminują problemu, należy zwrócić się po wskazówki do
sprzedawcy.
„Czynności wykonywane przez zakł ady usługowe polegające
na sprawdzeniu: działania, parametrów technic znych,
czyszczeniu g łowic i toru taśmy, regulacji i czyszczeniu
mechanizmu, strojeniu programatorów, wymianie żarówek
i bezpieczników —nie są zaliczane do ilości napraw
stanowiących podstawę wymiany sprzętu zgodnie z §36,
NEDERLANDS
pkt. 1.3. Uchwał y Nr. 71 Rady Ministrów z 1983.06.13.,
opublikowanej w Monitor ze Polskim Nr. 21 z 1983.06.29.”
„Uszkodzenia mechaniczne, termiczne, chemiczne
zewnętrznych części metalowych i z t worzyw sztucznych
oraz sznury przyłączeniowe, słuchawkowe—nie podlegają
POLSKI
gwarancji.”
■ Zegar
Nie można zsynchronizować zegara z czasem iPod’a lub
iPhone’a.
• Upewnić się, że iPod lub iPhone jest bezpiecznie podłączony
i włączony (Z strona 7).
• Aktualizować iPod lub iPhone pr zy użyciu najnowszego
oprogramowania.
Nie działa czas letni.
• Upewnić się, że zegar został prawidłowo ustawiony.
• Nacisnąć i przytrzymać [SLEEP] w tr ybie zegara, aby
włączyć czas letni (Z strona 7).
■ Alarm
Alarm iPod’a, radia czy br zęczyka nie rozlega się w
zaprogramowanym czasie.
• Sprawdzić, czy „ ALARM 1” lub „ ALARM 2” został prawidłowo
włączony (Z strona 9).
Alarm iPod’a lub radia jest włączony, ale w
zaprogramowanym czasie nie rozlega się żaden dźwięk.
RQTX1209
• Sprawdzić ustawienie głośności alarmu (Z strona 9, 10).
12
38
■ iPod lub iPhone
iPod lub iPhone nie działa z t ym urządzeniem.
• Upewnić się, że iPod lub iPhone został bezpiecznie
podłączony i włączony (Z strona 8).
• Aktualizować iPod lub iPhone pr zy użyciu najnowszego
oprogramowania.
Z iPod’a ani z iPhone’a nie wydobywa się żaden dźwięk.
• Upewnić się, że iPod lub iPhone został bezpiecznie
podłączony (Z strona 8).
• Wyregulować poziom g łośności.
iPod lub iPhone nie ładuje się.
• Sprawdzić połączenia. iPod lub iPhone w yłączyć i wyjąć ze
złącza dokującego. Włożyć go ponownie i włączyć
(Z strona 8).
■ Radio
Słychać hałas lub zniekształcenie dźwięku.
• Urządzenie odsunąć od telewizora, komputera lub urządzenia
podlegającego magnetyzmowi.
Zerowanie
Funkcja ta pozwala przy wrócić główne urządzenie do
jej oryginalnych ustawień fabr ycznych lub w przypadku
nieprawidłowej pracy.
Widok od tyłu
Nacisnąć [RESET] spinaczem lub ostro zakończonym
przedmiotem.
Page 39

ENGLISHENGLISH
POLSKI
13
Dane techniczne
SEKCJA WZMACNIACZA
Całkowita moc wyjściowa (tryb mono)
Kanał przedni 2,6 W na kanał (8
10% całkowitego zniekształcenia harmonicznego ( THD)
SEKCJA TUNERA
Pamięć zaprogramowanych stacji FM 5 stacji
Modulacja częstotliwościowa (FM)
Zakres częstotliwości
87,50 MHz do 108,0 0 MHz (w krokach co 50 kHz)
Gniazda antenowe 75
SEKCJA ZESTAWÓW GŁOŚNIKOWYCH
Typ System 1-drożny, 1-głośnikowy (Bass-refl ex)
Zestaw(y) głośnikowe Impedancja 8
Pełen zakres 2,5 cm stożkowy
DANE OGÓLNE
Zasilanie (Zasilacz prądu przemiennego)
Prąd przemienny 100 do 240 V, 50/60 Hz
Wyjściowy prąd stał y 7,5 V
Pobór mocy (podczas ładowania się iPod’a lub iPhone’a)
Urządzenie główne 7 W
Wymiar y (szer. x wys. x głęb.) 112 mm x 80 mm x 150 mm
Masa
Urządzenie główne 0,37 kg
Zasilacz prądu przemiennego 0,14 kg
Zakres temperatur roboczych 0°C do +35°C
Zakres wilgotności roboczych
od 20% do 80% RH (bez kondensacji)
(niezrównowa żone)
), 1 kHz,
Pobór mocy w tr ybie gotowości:
Urządzenie główn e 0,3 W (około)
Zasilacz prądu przemi ennego 0,3 W (około)
Uwaga:
1) Dane techniczne mogą ulec zmianie bez powiadomienia.
Masa i wymiary podane są w przybliżeniu.
2) Wartość całkowitych zniekształceń harmonicznych została
zmierzona przy użyciu cyfrowego analizatora widma.
Konserwacja
W celu oc zyszczenia urządzenia należy przetrzeć je
miękką, suchą szmatką.
• Do czyszczenia urządzenia nie należy stosować alkoholu,
rozcieńczalnika ani benzyny.
• Przed użyciem chusteczki nasączonej środkiem chemicznym
należy zapoznać się z do łączoną do niej instrukcją.
RQTX1209
13
39
ENGLISH
POLSKI
Page 40

ČESKY
2
NEDERLANDS
ENGLISH
Vážený Zákazníku
Děkujeme za zakoupení tohoto výrobku.
Pro optimální využití a bezpečnost si přečtěte pečlivě
ČESKY
tento návod před připojováním, používáním nebo
nastavováním tohoto produktu.
Uschovejte si prosím tento návod k obsluze.
POZOR!
NEDERLANDS
• ABYSTE ZAJISTILI DOBRÉ VENTILAČNÍ
PODMÍNKY, NIKDY NEINSTALUJTE TENTO
PŘÍSTROJ V KNIHOVNĚ, VESTAVĚNÉ SKŘÍNI
NEBO JINÉM UZAVŘENÉM PROSTORU.
ZAJISTĚTE, ABY ZÁVĚSY A VŠECHNY
OSTATNÍ MATERIÁLY NEBRÁNILY V DOBRÉ
ENGLISH
VENTILACI, ABYSTE PŘEDEŠLI NEBEZPEČÍ
ÚRAZU ELEKTRICKÝM PROUDEM NEBO
NEBEZPEČÍ POŽÁRU, KTERÉ BY MOHLO
VZNIKNOUT PŘEHŘÁT ÍM PŘÍSTROJE.
• NEBLOKUJTE VENTILAČNÍ OTVORY
PŘÍSTROJE NOVINAMI, UBRUSY, ZÁVĚSY A
JINÝMI MATERIÁLY.
• NEPOKLÁDEJTE ZDROJE OTEVŘENÉHO
OHNĚ, JAKO NAPŘÍKLAD HOŘÍCÍ SVÍČKY, NA
PŘÍSTROJ.
• ZBAVTE SE BATERIÍ SPR ÁVNÝM ZPŮSOBEM
S OHLEDEM NA ŽIVOTNÍ PROSTŘEDÍ.
TENTO PŘÍSTROJ JE KONSTRUOVÁN PRO
POUŽITÍ V MÍRNÉM KLIMATU.
RQTX1209
2
40
UPOZORNĚNÍ:
ABYSTE SNÍŽILI NEBEZPEČÍ VZNIKU POŽÁRU,
ÚRAZU ELEKTRICKÝM PROUDEM NEBO
POŠKOZENÍ PŘÍSTROJE:
• NEVYSTAVUJTE TOTO ZAŘÍZENÍ DEŠTI,
NADMĚRNÉ VLHKOSTI, KAPAJÍCÍ VODĚ A
POSTŘÍKÁNÍ. NA ZAŘÍZENÍ BY NEMĚLY BÝT
UMISŤOVÁNY ŽÁDNÉ OBJEKTY NAPLNĚNÉ
VODOU, JAKO JSOU NAPŘÍKLAD VÁZY.
• POUŽÍVEJTE POUZE DOPORUČENÉ
PŘÍSLUŠENSTVÍ.
• NEODSTRAŇUJTE KRYT PŘÍSTROJE
(NEBO JEHO ZADNÍ STR ANU); UVNITŘ
NEJSOU ŽÁDNÉ SOUČÁSTI, JEJICHŽ
OPRAVU BY MĚL PROVÁDĚT UŽIVATEL.
OPRAVY PŘENECHEJTE KVALIFIKOVANÝM
PRACOVNÍKŮM SERVISU.
Tento výrobek může být během používání rušen
rádiovou interferencí, která je způsobena mobilním
telefonem. Jestliže k takovéto interferenci dojde,
zajistěte prosím větší vzdálenost mezi tímto
výrobkem a mobilním telefonem.
Zásuvka by měla být poblíž zařízení a snadno
dostupná.
Zástrčka sít’ového přívodu by měla zůstat snadno
obsluhovatelná.
Abyste přístroj zcela odpojily od sítě, odpojte
zástrčku sít’ového přívodu ze zásuvky.
Identifi kační značka výrobku
Výrobek Lokalita
Hlavní jednotka Dole
Síťový adaptér Dole
Page 41

ČESKY
ENGLISH
ENGLISH
3
Bezpečnostní upozornění
Umístění
Umístěte přístroj na vodorovný povrch mimo dosah
přímého slunečního záření, vysokých teplot, vlhkosti a
přílišných vibrací. Takové prostředí by mohlo poškodit
skříňku přístroje nebo jiné komponenty a zkrátit tak
životnost přístroje.
Zařízení umístěte nejméně 15 cm od stěny, abyste
předešli zkreslení a nechtěným zvukovým efektům.
Na přístroj nepokládejte těžké předměty.
Cizí předměty
Zabraňte vniknutí kovových předmětů do přístroje.
To m ůže zapříčinit úraz elektrickým proudem nebo
poruchu.
Zabraňte vniknutí kapaliny do přístroje. To může
zapříčinit úraz elektrickým proudem nebo poruchu.
Pokud se tak stane, okamžitě odpojte přístroj ze sítě a
kontaktujte vašeho prodejce.
Obsahují hořlavý plyn, kter ý by mohl ve styku s
přístrojem vzplanout. Nerozprašujte žádné insekticidy
na přístroj ani do něj.
ČESKY
ENGLISH
Napětí
Nepoužívejte pro napájení zásuvky s vysokým
napětím. To může vést k přetížení přístroje a způsobit
požár.
K napájení nepoužívejte stejnosměrný zdroj.
Zkontrolujte pečlivě zdroj, zapojujete-li přístroj na lodi
nebo podobném místě, kde se používá stejnosměrný
proud.
Ochrana síťový adaptér
Přesvědčte se, že je síťový adaptér řádně zapojen, a
že není poškozen. Špatné připojení nebo poškození
kabelu může zapříčinit požár nebo úraz elektrickým
proudem. Za kabel netahejte, neohýbejte ho a
neumísťujte na něj těžké předměty.
Při odpojování adaptér vždy uchopte pevně zástrčku.
Tah ání z a sí ťový adaptér může způsobit úraz
elektrickým proudem.
Nezacházejte s kabelem mokrýma rukama. To může
zapříčinit úraz elektrickým proudem.
Servis
Nepokoušejte se přístroj opravit sami. Pokud přístroj
přestane hrát, kontrolky přestanou svítit, objeví se kouř
nebo dojde k jinému problému, který není popsán v
těchto instrukcích, odpojte přístroj ze sítě a kontaktujte
vašeho prodejce nebo autorizovaný servis. Pokud se
nekvalifi kovaná osoba snaží rozebrat nebo opravit
přístroj, může dojít k úrazu elektrickým proudem nebo
k poškození přístroje.
Pokud přístroj delší dobu nepoužíváte, odpojte ho ze
sítě, prodloužíte tak jeho životnost.
RQTX1209
3
41
ENGLISH
Page 42

ČESKY
4
NEDERLANDS
ENGLISH
Informace pro spotřebitele o sběru
a likvidaci odpadu z elektrických a
elektronických zařízení a použitých baterií z
ČESKY
domácností
Tyto symboly na výrobcích, obalech nebo
v průvodní dokumentaci znamenají, že
použitá elektrická a elektronická zařízení
a baterie nepatří do běžného domácího
NEDERLANDS
ENGLISH
odpadu.
Správná likvidace, recyklace a opětovné
použití jsou možné jen pokud odevzdáte
tato zařízení a použité baterie na místech
k tomu určených, za což neplatíte žádné
poplatky, v souladu s platnými národnímu
předpisy a se Směrnicemi 2002/96/EU a
2006/66/EU.
Správnou likvidací přístrojů a baterií
pomůžete šetřit cenné suroviny a
předcházet možným negativním
účinkům na lidské zdraví a na přírodní
prostředí, které jinak mohou vzniknout při
nesprávném zacházení s odpady.
Další informace o sběru, likvidaci a
recyklaci starých přístrojů a použitých
baterií Vám poskytnou místní úřady,
provozovny sběrných dvorů nebo
prodejna, ve které jste toto zboží
zakoupili.
Při nesprávné likvidaci odpadu vám hrozí
pokuta v souladu s národní legislativou a
místními předpisy.
Informace pro právnické osoby se
sídlem v zemích Evropské Unie (EU)
Pokud chcete likvidovat elektrická nebo
elektronická zařízení, obraťte se na
prodejce nebo dodavatele s žádostí o
další informace.
[Informace o likvidaci v zemích mimo
Evropskou Unii (EU)]
Tyto symboly platí jen v zemích Evropské
unie. Pokud chcete likvidovat tento
produkt, obraťte se na místní úřady nebo
prodejce a informujte se o správném
způsobu likvidace.
Poznámka k symbolu baterie (symboly
uprostřed a dole):
Tento symbol může být použit v
kombinaci s chemickým symbolem.
V tomto případě splňuje tento symbol
legislativní požadavky, které jsou
předepsány pro chemickou látku
obsaženou v baterii.
RQTX1209
4
42
Page 43

ČESKY
ENGLISH
ENGLISH
5
Obsah
Dodávané příslušenství
Bezpečnostní upozornění ............................................ 3
Dodávané příslušenství ............................................... 5
Kompatibilita s iPod a iPhone ..................................... 5
Přehled ovládání ...........................................................6
Provedení zapojení .......................................................7
Nastavení hodin ............................................................7
Použití iPod nebo iPhone ............................................8
Používání rádia .............................................................8
Použití automatického vypnutí ....................................9
Použití budíku ............................................................... 9
Použití zařízení Memory Loader ................................10
Baterie pro zálohování paměti .................................. 11
Odstraňování závad ...................................................12
Specifi kace ..................................................................13
Údržba .........................................................................13
„Made for iPod“ a „Made for iPhone“ znamená, že
elektronické zařízení bylo navrženo speciálně pro připojení
k iPod nebo k iPhone a bylo výrobcem c ertifi kováno, že
splňuje výkonnostní normy společnosti Apple.
Apple neodpovídá za funkci tohoto z ařízení nebo jeho shodu
s bezpeč nostními a zákonnými normami.
iPhone, iPod, iPod classic, iPod nano a iPod touch jsou
obchodní značky Apple Inc., registrované v USA a dalších
zemích.
Zkontrolujte si prosím a identifi kujte dodávané
příslušenství.
1 Síťový adaptér
Kompatibilita s iPod a iPhone
• iPod nano 5. generace (videokamera) (8GB, 16GB)
• iPod touch 2. generace (8GB, 16GB, 32GB, 64GB)
• iPod classic [120GB, 160GB (2009)]
• iPod nano 4. generace (video) (8GB, 16GB)
• iPod classic (160GB) (2007)
• iPod touch 1. generace (8GB, 16GB, 32GB)
• iPod nano 3. generace (video) (4GB, 8GB)
• iPod classic (8 0GB)
• iPod nano 2. generace (hliníkov ý) (2GB, 4G B, 8GB)
• iPod 5. generace (video) (60GB, 80GB)
• iPod 5. generace (video) (30GB)
• iPod nano 1. generace (1GB, 2GB, 4GB)
• iPod 4. generace (barevný displej) (40GB, 60GB)
• iPod 4. generace (barevný displej) (20GB, 30GB)
• iPod 4. generace (40GB)
• iPod 4. generace (20GB)
• iPod mini (4GB, 6GB)
• iPhone 3GS (16GB, 32GB)
• iPhone 3G (8GB, 16GB)
• iPhone (4GB, 8GB, 16GB)
Kompatibilita závisí rovněž na verzi softwaru iPod nebo iPhone.
RQTX1209
5
43
ČESKY
ENGLISH
ENGLISH
Page 44

ČESKY
6
NEDERLANDS
ENGLISH
Přehled ovládání
ČESKY
NEDERLANDS
HIJ
ENGLISH
A [SNOOZE/DIMMER]
Zdřímnout si: Zastavit budík na 9 minut.
Ztlumit: Nastavit jasnost displeje (Vysoká (výchozí),
Střední nebo Nízká).
B [ALARM OFF]
Vypnout budík.
C [ALARM 1], [AL ARM 2]
Aktivovat funkci budíku 1 nebo budíku 2.
Zobrazit nastavení budíku 1 nebo budíku 2.
D [SLEEP]
Aktivovat funkci spaní.
Aktivovat letní č as v režimu hodiny.
E [2/–, ADJ], [+/6, ADJ]
Seřídit nastavení hodin, rádia a budíku.
RQTX1209
Přeskočit na předchozí nebo další skladbu.
6
Vyhledat dopředu nebo zpět ve skladbě.
44
G
F
A
B
C
E
D
F [SET/PRESET]
Nastavit hodiny.
Provést automatické přednastavení nebo zobrazit
předvolené kanály v režimu rádio.
G [TIME SY NC]
Synchronizovat hlavní jednotku s časem v iPod nebo
iPhone.
H [+, VOL], [–, VOL]
Nastavte hlasitost.
Vybrat 12-hodinové nebo 24-hodinové zobrazení času.
I [
4/9
]
Spustit přehrávání hudby z iPod nebo iPhone a zastavit
během přehrávání.
J [SOURCE]
Vybrat režim hodiny, „IPOD“ nebo „ RADIO FM“.
Page 45

ČESKY
ENGLISH
ENGLISH
7
Provedení zapojení
y
Pohled zezadu
FM pokojová anténa
Pro domácí
síťovou zásuvku
Připojte síťový adaptér.
• Nepoužívejte napájecí síťový adaptéry jiného zařízení.
• Nepoužívejte žádné jiné síťové adaptéry s výjimkou
dodaných.
• Při připojení síťového adaptéru je přístroj v režimu
pohotovostního stavu (Standby). Primární obvody jsou při
jeho zasunutí do zásuvky živé.
Nastavení hodin
Hodiny se zobrazí jakmile se hlavní jednotka zapojí do síťové
zásuvky.
Nechte hodiny pravidelně dodržovat přesnost (měsíční přesnost
+
/– 60 sekund).
1
Stiskněte a přidržte [SET/PRESET] po dobu 2 sekund.
2
Stiskněte [2/– , ADJ] nebo [+/6 , ADJ] pro výb ěr
dne.
3
Stiskněte [SET/PRESET] znovu pro potvrzení.
4
Opakujte kroky 2 a 3 pro nastavení hodiny a minuty.
Příklad:
Změnit zobrazení hodin.
V režimu hodin ve stejný okamžik stiskněte a př idržte [+, VOL]
a [–, VOL] po dobu 2 sekund a vyberte 12-hodinové nebo
24-hodinové zobrazení.
Pro 12-hodinové zobrazení:
AM : „PM“ se nezobrazuje.
PM : „PM“ se zobrazuje.
Letní čas
V režimu hodin stiskněte a přidr žte [SLEEP] pro aktivaci nebo
vypnutí funkce letního č asu.
„DST“ se zobrazí při ak tivaci funkce.
Synchronizace hodin s časem v iPod nebo
iPhone
Tato funkce vám umožní nastavit čas na hodinách tak, aby
byl stejný jako čas ve vašem iPod nebo iPhone (
„Kompatibilita s iPod a iPhone“).
Stiskněte [TIME SYNC] zatímco je iPod nebo iPhone
zapojován do hlavní jednotky.
Poznámka:
• Přesná synchornizace iPod nebo iPhone s hlavní jednotkou
není možná. Mezi nimi může dojít až k 59 vteřinovému
rozdílu.
• Kompatibilita závisí rovněž na verzi softwaru iPod nebo
iPhone.
Z str. 5,
RQTX1209
7
45
ČESKY
ENGLISH
ENGLISH
Page 46

ČESKY
8
NEDERLANDS
ENGLISH
Použití iPod nebo iPhone
1
Vytáhněte podpěru iPod nebo iPhone.
Podporu natavte pdoe v ýšky svého iPod nebo iPhone.
ČESKY
iPod
(není v
příslušenství)
iPod cl
assic
iPhone
iPod tou
ch
iPod n
NEDERLANDS
ENGLISH
2
Připojování iPod nebo iPhone.
Při připojování nebo odpojování zařízení iPod nebo iPhone
hlavní jednotku přidržte.
Poznámka:
Při pr vním zasunutí iPod touch nebo iPhone se na vašem
iPod touch nebo iPhone zobrazí zpráva v případě, že nebyla
instalována aplikace Memory Loader (Z str. 10).
Nabíjení iPod nebo iPhone
iPod nebo iPhone se dobijí automaticky, pokud je připojen k
hlavní jednotce.
• Stav nabíjení zkontrolujte na displeji iPod nebo iPhone.
• Pokud nebudete po dokončení nabíjení iPod nebo iPhone
po delší dobu používat, odpojte jej od hlavní jednotky, jinak
samozřejmě dochází ke zhor šování baterie. (Po úplném dobití
k dalšímu dobíjení nedochází.)
RQTX1209
8
46
ano
Jemně vytáhněte
podpěru iPod nebo
iPhone.
Přehrávání iPod nebo iPhone
1
Zasunutí a zapnutí iPod nebo iPhone.
2
Stiskněte [SOURCE] p ro výběr „IPOD“.
3
Sitskněte [
iPod nebo iPhone. Opětovným stisknutím přehrávání
zastavíte.
4
Stiskněte [2/– , ADJ] nebo [+/6 , ADJ] pro
přeskočení předchozí nebo příští skladby.
5
Stiskněte a přidržte [2/–, ADJ] nebo [+/6, ADJ] pro
přehrávání dobpedu a hledání ve skladbě.
Poznámka:
• Jestliže iPod nebo iPhone automaticky promíchá nebo
přeskočí skladbu;
– Vypněte funkci „Shake“ (Potřesení) (pokud existuje).
– iPod nebo iPhone přehrajte s pomocí dock adapter (není v
• Podrobnosti o používání iPod nebo iPhone viz Uživatelská
příručka iPod nebo iPhone.
4/9
příslušenství).
] pro zahájení přehrávání hudby z
Používání rádia
Ruční ladění
1
Stiskněte [SOURCE] p ro výběr „R ADIO FM“.
2
Stiskněte [2/– , ADJ] nebo [+/6 , ADJ] pro výb ěr
požadované frekvence.
Pro automatické ladění
Stiskněte a přidržte [2/–, A DJ] nebo [+/6, ADJ] dokud se
nezačne frekvenc e rychle měnit. Automatické ladění se zastaví
když vyhledá st anici nebo když znovu stisknete [ 2/–, ADJ]
nebo [+/6, ADJ].
Poznámka:
Z důvodu lepšího příjmu rozšiřte a změňte směr FM antény.
Page 47

ČESKY
ENGLISH
ENGLISH
9
Předvolba paměti
Své oblíbené kanály si můžete uložit na 5 přednastavených FM
kanálech.
Příprava
Stiskněte [SOURCE] pro výběr „RADIO FM“.
Automatická předvolba (AP)
Stiskněte a dr žte [SOURCE] dokud se nezobrazí „AP“.
Poznámka:
• Automatické přednastavení začíná od aktuální frekvence.
• Uloží se pouze prvních 5 zjištěných stanic.
• „A P“ bude nepřetržitě blikat až do nastavení všech 5 kanálů.
Manuální předvolba
1
Stiskněte [2/– , ADJ] nebo [+/6 , ADJ] pro výb ěr
požadované frekvence.
2
Stiskněte a dr žte [SET/PRESET] po dobu 2 sekund než
se zeobrazí číslo předvolby.
3
Stiskněte [2/– , ADJ] nebo [+/6 , ADJ] pro výb ěr
požadovaného čísla.
4
Stiskněte [SET/PRESET] znovu pro potvrzení.
Naladění na předvolený kanál
Pro přepnutí m ezi předvolenými kanály stiskněte
[SET/PRESET].
Použití automatického vypnutí
Tato funkce vám umožní vypnout přístroj automaticky po
nastaveném čase (pouze v režimu iPod a rádio).
1
Pro aktivaci č asovače stiskněte [SLEEP].
2
Stiskněte [SLEEP] opět pro výběr požadovaného času
(v minutách).
OFF (výchozí) ] 30 ] 60 ] 90 ] 120
Poznámka:
Stiskněte [SLEEP] pro kontrolu zbý vajícího času.
Použití budíku
Můžete nastavit dva různé časy budíku. Před nastavením
budíku zkontrolujte, že jste nastavili hodiny (
„Nastavení hodin“).
Nastavení budíku
1
Stiskněte a přidržte [ALARM 1] nebo [AL ARM 2] dokud
nezačnou hodiny na displeji blikat.
2
Během 10 sekund stiskněte [2/–, ADJ] nebo
[+/6, ADJ] pro nastavení hodiny.
3
Stiskněte [AL ARM 1] nebo [ALARM 2] p ro pot vrzení.
4
Opakujte kroky 2 a 3 pro nastavení minut.
5
Stiskněte [2/– , ADJ] nebo [+/6 , ADJ] pro výb ěr dnů
v týdnu:
MON-SUN (každý den) ] MON- FRI (pracovní dny)
SAT-SUN (víkend)SAT-SUN (víkend)
6
Stiskněte [AL ARM 1] nebo [ALARM 2] p ro pot vrzení.
7
Stiskněte [2/– , ADJ] nebo [+/6 , ADJ] pro výb ěr
požadovaného režimu budíku: „IPOD“, „RADIO“ nebo
„BUZZER“.
8
Stiskněte [AL ARM 1] nebo [ALARM 2] p ro pot vrzení.
„IPOD“ výběr: Pokračovat krok y 9 a 10.
„RADIO“ výběr: Pokračujte krok y 11 až 14.
Nastavení iPod budíku
9
Stiskněte [2/– , ADJ] nebo [+/6 , ADJ] pro
nastavení hlasitosti.
10
Pro potvrzení nastavení stiskněte [ALARM 1] nebo
[ALARM 2].
Poznámka:
• Pokud v nastavení času nebude detekován žádný iPod nebo
iPhone, rozezní se bzučák.
• Při přehrávání budíku bude hudba přehrávána z knihovny
iPod nebo iPhone.
(Pokračování na další straně)
Z str. 7,
RQTX1209
9
47
ČESKY
ENGLISH
ENGLISH
Page 48

ČESKY
10
NEDERLANDS
ENGLISH
Nastavení rádiobudíku
11
Stiskněte [2/– , ADJ] nebo [+/6 , ADJ] pro
nastavení hlasitosti.
ČESKY
12
Stiskněte [AL ARM 1] nebo [ALARM 2] p ro pot vrzení.
13
Stiskněte [2/– , ADJ] nebo [+/6 , ADJ] pro výb ěr
požadovaného předvoleného kanálu.
14
Pro potvrzení nastavení stiskněte [ALARM 1] nebo
[ALARM 2].
Poznámka:
• Budíku bude funkční pouze při zapojení do sítě.
NEDERLANDS
• Abyste aktivovalli nebo zobrazili nastavení budíku, jednou
stiskněte [ALARM 1] nebo [AL ARM 2].
• Pro deaktivaci funkce budíku znovu stiskněte [ALAR M 1]
nebo [ALARM 2].
ENGLISH
Vypnutí budíku
Stiskněte [AL ARM OFF] pro vypnutí budíku.
Budík se spustí další den ve stejný čas.
Poznámka:
Pokud budík nevypnete, bude nepřetr žitě znít 59 minut než se
sám vypne.
Dřímání
Abyste budík na pár minut zastavilili, stiskněte [SNOOZE].
Budík se znovu spustí po 9 minutách.
Tip:
Pro uživatele iPod touch a iPhone, použijte aplikaci Memory
Loader k odemčení běžného nastavení budíku (Z viz napravo).
RQTX1209
10
48
Použití zařízení Memory Loader
Tato hlavní jednotka je navr žena k provozu s aplikací
Memor y Loader, kterou lze stáhnout z App Store (vyhledat
MemoryLoader).
Jestliže ještě nemáte nainstalovanou aplikaci zdarma Memory
Loader, na displeji iPod touch nebo iPhone se zobrazí
následující zpráva:
Neinstalovaná aplikace
Tot o p říslušenství požaduje aplikaci,
která není instalovaná. Chcete ji
instalovat z App Store?
Tato zpráva je připomenutí, že si máte tuto aplikaci stáhnout,
abyste si vychutnali vylepšené funkce hlavní jednotky. Nicméně,
váš iPod touch nebo iPhone bude s hlavní jednotkou správně
spolupracovat i bez instalace Memory Loader.
Aplikace Memory Loader funguje pouze na iPod touch a iPhone
s OS 3.0 nebo vyšším.
Jakmile je aplikace Memory Loader nainstalována do vašeho
iPod touch nebo iPhone, následující funkce budou snadno
dostupné a ovládatelné přímo prostřednictvím platformy
aplikace.
Budíku
• Snadné natavení budíku 1 a budíku 2.
• Pro spuštění budíku můžete vybrat jakoukoli kombinaci dnů.
• Možnost zdřímnutí si můžete nastavit od volby od 1 do
30 minut.
Rádio
• Přednastavit 5 FM kanálů projížděním vašich oblíbených
frekvencí s použitím kolečka.
Události
• Můžete být upozorněni na data uložená v iPod touch nebo
iPhone ( je-li na ten den nataven budíku).
Page 49

ČESKY
ENGLISH
ENGLISH
11
Zdřímnutí
• Ve svém iPod touch nebo iPhone můžete nastavit krátké
zdřímnutí nebo odpočet.
Letní čas (DST)
• Aktivovat nebo deaktivovat funkci uložení letního času jedním
krokem.
Pro více informací navštivte: www.memoryloader.com
Baterie pro zálohování paměti
Záložní baterie (CR2032, není v příslušenství) ochrání natavení
hodin a budíku v případě přerušení napájení.
Vkládání baterie
Když je baterie slabá, dokud nebude baterie vložena, zobrazí se
ukazatel slabé baterie.
Pohled zdola
1
Nechte adaptér zapojení do síťové zásuvky dokud
neodšroubujete kryt prostoru na baterie.
2
Otevet e kryt prostoru na baterie.
3
Vložte novou baterii, stranou (+) nahoru.
4
Zavřete kryt baterie a zašroubujte ho.
Výměa baterie.
Životnost této baterie je přibližně 1 měsíc.
Když je baterie slabá, na displeji se rozbliká indikátor slabé
baterie.
Poznámka:
• Nevystavujte teplu nebo ohni.
• Nenechávejte baterie v automobilu vystavené přímému
slunečnímu světlu po delší dobu, když jsou zavřené dveře a
okna.
• Jestliže nehodláte delší dobu používat radiobudík, baterii
vyjměte. Skladujte na chladném a tmavém místě.
POZOR
V případě nesprávné výměny baterie hrozí nebezpečí
výbuchu. Vyměňujte pouze za stejný nebo rovnocenný t yp,
který doporučuje v ýrobce. Použité baterie likvidujte podle
pokynů výrobce.
Varování
Knofl íkovou baterii udržujte mimo dosah dětí. Nikdy
nedávejte knofl íkovou baterii do úst. Při jejím spolknutí
okamžitě zavolejte lékaře.
Varování
Nebezpečí požáru, výbuchu a popálení. Nedobijete,
nerozebírejte, nev ystavujte teplotám nad 60°C a
nevhazujte do ohně.
RQTX1209
11
49
ČESKY
ENGLISH
ENGLISH
Page 50

ČESKY
12
NEDERLANDS
ENGLISH
Odstraňování závad
Před žádostí o servis proveďte následující kontroly. Jste-li na
pochybách ohlednì nìkteré z níže uvedených kontrol, nebo
ČESKY
pokud řešení uvedená problém nevyřeší, v yžádejte si pokyny
od svého prodejce.
■ Hodiny
Hodiny nelze synchronizovat s časem na iPod nebo
iPhone.
• Ujistěte se, že je iPod nebo iPhone bezpečně zapojen a
zapnut (Z str. 7).
• Aktualizujte svůj iPod nebo iPhone na nejnovější software.
NEDERLANDS
Letní čas nefunguje.
• Zkontrolujte, zda byly hodiny správně nastaveny.
• Pro aktivaci letního č asu v režimu hodin stiskněte a přidržte
[SLEEP] (Z str. 7).
■ Budík
ENGLISH
iPod, rádio nebo budík zdřímnutí se nerozezní v nastavený
čas.
• Zkontrolujte zda „ALARM 1“ nebo „ ALARM 2“ byl správně
aktivován (Z str. 9).
Budík na iPod nebo v rádiu je aktivován, ale pro předvolený
čas není vybrán žádný zvuk.
• Zkontrolujte nastavení hlasitosti budíku (Z str. 9, 10).
■ iPod nebo iPhone
iPod ani iPhone nelze spustít bez této jednotky.
• Ujistěte se, že je iPod nebo iPhone bezpečně zapojen a
zapnut (Z str. 8).
• Aktualizujte svůj iPod nebo iPhone na nejnovější software.
V iPod ani v iPhone není žádný zvuk.
• Ujistěte se, že je iPod nebo iPhone bezpečně zapojen
(Z str. 8).
• Nastavte hlasitost.
iPod nebo iPhone se nenabijí.
• Zkontrolujte připojení. Vypněte iPod nebo iPhone a vyjměte je
z dokovacího konektoru. Zasuňte znovu a zapněte (Z str. 8).
RQTX1209
12
50
■ Rádio
Je slyšet hluk nebo zkreslený zvuk.
• Umístěte jednotku do bezpečné vzdálenosti od jakékoli
televize, osobního počítače nebo zařízení snadno
ovlivnitelného magnetismem.
Vymazat
Díky této funkci můžete obnovit původní tovární nastavení
jednotky nebo v případě abnormálního chování.
Pohled zezadu
Tlačítko [RESET ] stiskněte kancelářskou sponkou nebo
špičatým předmětem.
Page 51

ČESKY
ENGLISH
ENGLISH
13
Specifi kace
SEKCE ZESILOVAČE
RMS výsutpní výkon (Mono)
Přední kanál 2,6 W na kanál (8
SEKCE LADĚNÍ
Pamět’ předvoleb 5 stanic FM
Frekvenční modulace (FM)
Frekvenční rozsah
87,50 MHz až 108,00 MHz (50 kHz krok)
Anténní konektor 75
SEKCE REPRODUKTORŮ
Typ 1- pásmov ý, 1-reproduktorový systém (Bass refl ex)
Reproduktor(y) Impedance 8
Plný rozsah 2,5 cm kónický
VŠEOBECNĚ
Napájení (Síťový adaptér) AC 100 až 240 V, 50/60 Hz
DC výkon 7,5 V
Spotřeba (nabíjení iPod nebo iPhone)
Hlavní jednotka 7 W
Rozměry (Š x V x H) 112 mm x 80 mm x 150 mm
Hmotnost
Hlavní jednotka 0,37 kg
Síťový adaptér 0,14 kg
Rozsah provozních teplot 0°C až +35°C
Rozsah provozní vlhkosti
20% až 80% RH (bez kondenzace)
), 1 kHz, 10 % THD
(nesymetrický)
Spotřeba v pohotovostním režimu (standby):
Hlavní jednotka 0,3 W (přibližně)
Síťový adaptér 0,3 W (přibližně)
Poznámka:
1) Technické údaje podléhají změnám bez předchozího
upozornění.
Hmotnost a rozměr y jsou přibližné.
2) Celkové harmonické zkreslení je měřeno digitálním
spektrálním analyzátorem.
Údržba
K vyčištění přístroje použijte jemný a suchý hadřík.
• Nikdy nepoužívejte k čištění přístroje alkohol, ředidlo nebo
technický benzín.
• Před použitím chemicky impregnované látky si pročtěte
instrukce přiložené k látce.
RQTX1209
13
51
ČESKY
ENGLISH
ENGLISH
Page 52

ENGLISH
2
РУССКИЙ
ENGLISH
Уважаемый Покупатель
Благодарим Вас за покупку данного изделия.
Для обеспечения оптимальной и безопасной работы
системы внимательно прочтите данную инструкцию до
подключения, использования и настройки изделия.
Сохраните инструкцию для дальнейших справок.
РУССКИЙ
ПРЕДОСТЕРЕЖЕНИЕ!
•
HE CЛEДУET УCTAHABЛИBATЬ ИЛИ
PAЗMEЩATЬ ДAHHЬIЙ AППAPAT B KHИЖHOM
ШKAФУ, BCTPOEHHOM ШKAФУ ИЛИ ДРУГOM
ОГPAHИЧEHHOM ПPOCTPAHCTBE ДЛЯ TOГO,
ЧTOБЬI COXPAHИTЬ УCЛOBИЯ XOPOШEЙ
BEHTИЛЯЦИИ. УДOCTOBEPЬTECЬ, ЧTO
ENGLISH
ШTOPЬI И ДPУГИE ПОДОБHЬIE ПPEДMETЬI HE
ПPEПЯTCTBУЮT HOPMAЛЬHOЙ BEHTИЛЯЦИИ
ДЛЯ ПPEДOTBPAЩEHИЯ PИCKA ПOPAЖEHИЯ
ЭЛЕКТРИЧЕСКИМ ТОКОМ ИЛИ ВОЗНИКНОВЕНИЯ
ПОЖАРА ИЗ-ЗА ПЕРЕГРЕВА.
•
НЕ ЗАКРЫВАЙТЕ ВЕНТИЛЯЦИОННЫЕ
ОТВЕРСТИЯ АППАРАТА ГАЗЕТАМИ,
СКАТЕРТЯМИ, ШТОРАМИ И ПОДОБНЫМИ
ПРЕДМЕТАМИ.
•
НЕ РАЗМ ЕЩА ЙТЕ НА АППАРАТ ИСТОЧНИКИ
ОТКРЫТОГО ПЛАМЕНИ, ТАКИЕ, КАК ГОРЯЩИЕ
СВЕЧИ.
•
ВЫБРАСЫВАЙТЕ БАТАРЕИ В МУСОР,
УЧИТЫВАЯ ОХРАНУ ОКРУЖАЮЩЕЙ СРЕДЫ.
ЭТОТ АППАРАТ ПРЕДНАЗНАЧЕН ДЛЯ
ИСПОЛЬЗОВАНИЯ В КЛИМАТЕ СРЕДНЕЙ ПОЛОСЫ.
RQTX1209
2
52
ПРЕДУПРЕЖДЕНИЕ:
ЧТОБЫ УМЕНЬШИТЬ ОПАСНОСТЬ ВОЗНИКНОВЕНИЯ
ПОЖАРА, ПОРАЖЕНИЯ ЭЛЕКТРИЧЕСКИМ ТОКОМ
ИЛИ ПОВРЕЖДЕНИЯ ИЗДЕЛИЯ,
•
НЕ ПОДВЕРГАЙТЕ ЭТОТ АППАРАТ
ВОЗДЕЙСТВИЮ ДОЖДЯ, ВЛАГИ, КАПЕЛЬ
ИЛИ БРЫЗГ, И НЕ ПОМЕЩАЙТЕ НА АППАРАТ
НИКАКИЕ ПРЕДМЕТЫ, НАПОЛНЕННЫЕ ВОДОЙ,
НАПРИМЕР, ВАЗЫ.
•
ИСПОЛЬЗУЙТЕ ТОЛЬКО РЕКОМЕНДУЕМЫЕ
ПРИНАДЛЕЖНОСТИ.
•
НЕ СНИМАЙТЕ КРЫШКУ (ИЛИ ЗАДНЮЮ
КРЫШКУ); ВНУТРИ НЕТ ЧАСТЕЙ ДЛЯ
ОБСЛУЖИВАНИЯ ПОЛЬЗОВАТЕЛЕМ. ЗА
ОБСЛУЖИВАНИЕМ ОБРАЩАЙТЕСЬ К
КВАЛИФИЦИРОВАННОМУ ОБСЛУЖИВАЮЩЕМУ
ПЕРСОНАЛУ.
Это изделие может принимать радио помехи,
обусловленные переносными телефонами. Если
такие помехи являются очевидными, увеличьте,
пожалуйста, расстояние между изделием и
переносным телефоном.
Сетевая розетка должна быть расположена вблизи
оборудования, и быть легко доступной.
Вилка сетевого шнура питания должна оставаться
быстро доступной.
Чтобы полностью отсоединить этот аппарат от сети
переменного тока, отсоедините вилку сетевого шнура
питания от розетки переменного тока.
Маркировка для идентификации изделия
Изделие Местоположение
Основной устройство Снизу
Сетевой адаптер Снизу
Page 53

ENGLISH
РУССКИЙ
ENGLISH
3
Меpы предосторожности
Расположение
Устан овите устройство на ровной поверхности в месте,
защищенном от воздействия прямых солнечных лучей,
высоких темпеpатуp, высокой влажности и сильных
вибpаций. Влияние вышеуказанных факторов может
привести к повреждению корпуса и других компонентов
устройства, тем самым сокращая срок его службы.
Располагайте устройство на pасстоянии, по крайней
мере, 15 см от стен во
нежелательных акустических эффектов.
Не ставьте на устройство тяжелые предметы.
Напpяжение
Не используйте высоковольтные источники
электропитания. Это может привести к перегрузке
устройства и возникновению пожаpа.
Не используйте источники питания постоянного тока.
Перед установкой устройства на судах или в дpугом
месте, где используется постоянный ток, внимательно
пpовеpьте источник электропитания.
Меры предосторожности при обращении с
блоком питания переменного тока
Блок питания переменного тока должен быть правильно
подключен и не поврежден. Плохое подключение,
а также повреждение кабеля может привести к
возгоранию или поражению электрическим током. Не
тяните за кабель, не сгибайте его, а также не кладите на
него тяжелые предметы.
При отключении блока питания надёжно удерживайте
сетевую вилку. Не тяните за
может привести к поражению электрическим током.
Не прикасайтесь к вилке мокрыми руками. Это может
привести к поражению электрическим током.
избежание искажений и
провод блока питания – это
Постоpонние пpедметы
Не допускайте попадания металлических предметов
в устройство. Это может привести к поражению
электрическим током или возникновению неполадок.
Не допускайте попадания жидкостей в устройство. Это
может привести к поражению электрическим током
или возникновению неполадок. В случае попадания
жидкости в устройство немедленно отключите его от
источника электропитания и обратитесь к местному
дилеру.
pаспыляйте инсектициды на устройство или
Не
внутрь устройства. В их состав входят горючие газы,
которые могут воспламениться при попадании внутрь
устройства.
Техническое обслуживание
Не пытайтесь ремонтировать данное устройство
самостоятельно. Если прерывается звук, не горят
индикаторы, появился дым или возникла любая другая
неполадка, которая не описана в этой инструкции,
отключите блок питания переменного тока от розетки
и обратитесь к своему дилеру или в авторизованный
центр обслуживания. Выполнение ремонта,
демонтажа или восстановления функций устройства
некомпетентными лицами
электрическим током или повреждению устройства.
Если устройство не будет использоваться в течение
продолжительного периода времени, можно
продлить срок его службы, отключив от источника
электропитания.
может привести к поражению
РУССКИЙ
ENGLISH
RQTX1209
3
53
Page 54

ENGLISH
4
РУССКИЙ
ENGLISH
Информация для покупателя
Название продукции: Радио -часы
Название страны
производителя:
Название производителя: Панасоник Корпорэйшн
Юридический адрес:1006 Кадома, Осака, Япония
Дата производства: Вы можете уточнить год и месяц по
серийному номеру на табличке.
Пример маркировки—Серийный номер № XX1AXXXXXXX
РУССКИЙ
(X-любая цифра или буква)
Год: Трeтья цифра в серийном номере (1—2001, 2—2002, ...
0—2010)
Месяц: Четвeртая бyква в серийном номере (А—Январь,
В—Февраль, ...L—Декабрь)
Примечание: Сентябрь может указываться как “S” вместо “I”.
ENGLISH
Дополнительная
информация:
Установленный производителем в порядке п. 2 ст. 5
федерального закона РФ “О защите прав потребителей” срок
службы данного изделия равен 7 годам с даты производства
при условии, что изделие используется в строгом соответствии
с настоящей инструкцией по эксплуатации и применимыми
техническими стандартами.
RQTX1209
4
54
Китай
Пожалуйста внимательно
прочитайте инструкцию по
эксплуатации.
–Если Вы увидите такой символ–
Информация по обращению с отходами для стран,
не входящих в Европейский Союз
Действие этого символа
распространяется только на Европейский
Союз.
Если Вы собираетесь выбросить данный
продукт, узнайте в местных органах
власти или у дилера, как следует
поступать с отходами такого типа.
Содеpжание
Меpы предосторожности ....................................................3
Принадлежности, поставляемые в комплекте ................ 5
Совместимые устройства iPod и iPhone .......................... 5
Oбзор органов управления ................................................. 6
Выполнение соединений ....................................................7
Настройка часов ................................................................... 7
Использование iPod или iPhone ........................................8
Использование радио ..........................................................8
Использование таймера сна ...............................................9
Использование будильника ...............................................9
Использование приложения Memory Loader .................10
Резервное питание от батарейки ..................................... 11
Устранение неполадок .......................................................12
Технические характеристики ............................................13
Техническое обслуживание и ремонт .............................13
Page 55

ENGLISH
РУССКИЙ
ENGLISH
5
Принадлежности, поставляемые в
комплекте
Проверьте наличие принадлежностей в комплекте.
1 Сетевой адаптер
Надписи “Made for iPod” и “Made for iPhone” означают, что
электронное вспомогательное устройство было специально
разработано для подключения к iPod или iPhone, и его
соответствие стандартам качества функционирования Apple
гарантировано разработчиком.
Компания Apple не несет ответственности за работу данного
устройства или его соответствие стандартам безопасности и
регулятивным нормам.
iPhone, iPod, iPod classic, iPod nano и iPod touch являются
торговыми марками Apple Inc., зарегистрированными в США и
других странах.
Совместимые устройства iPod и
iPhone
•
iPod nano 5-го поколение (видеокамера) (8ГБ, 16ГБ)
•
iPod touch 2-го поколения (8ГБ, 16ГБ, 32ГБ, 64ГБ)
•
iPod classic [120ГБ, 160 ГБ (2009)]
•
iPod nano 4-го поколения (видео) (8ГБ, 16ГБ)
•
iPod classic (160ГБ) (2007)
•
iPod touch 1-го поколения (8ГБ, 16ГБ, 32ГБ)
•
iPod nano 3-го поколения (видео) (4ГБ, 8ГБ)
•
iPod classic (80 ГБ)
•
iPod nano 2-го поколения (алюминиевый) (2ГБ, 4ГБ, 8ГБ)
•
iPod 5-го поколения (видео) (60ГБ, 80ГБ)
•
iPod 5-го поколения (видео) (30ГБ)
•
iPod nano 1-го поколения (1ГБ, 2ГБ, 4ГБ)
•
iPod 4-го поколения (цветной дисплей) (40ГБ, 60ГБ)
•
iPod 4-го поколения (цветной дисплей) (20ГБ, 30ГБ)
•
iPod 4-го поколения (40ГБ)
•
iPod 4-го поколения (20ГБ)
•
iPod mini (4ГБ, 6ГБ)
•
iPhone 3GS (16ГБ, 32ГБ)
•
iPhone 3G (8ГБ, 16ГБ)
•
iPhone (4ГБ, 8ГБ, 16ГБ)
Совместимость зависит от версии программного обеспечения,
установленного на iPod или iPhone.
РУССКИЙ
ENGLISH
RQTX1209
5
55
Page 56

ENGLISH
6
РУССКИЙ
ENGLISH
Oбзор органов управления
РУССКИЙ
HIJ
ENGLISH
A
[SNOOZE/DIMMER]
Дремать: Приостановка сигнала будильника на 9 минут.
Снижение яркости: Настройка яркости панели дисплея
(высокая (по умолчанию), средняя или низкая).
B
[ALARM OFF]
Служит для выключения сигнала будильника.
C
[ALARM 1], [ALARM 2]
Активация функции будильника 1 или будильника 2.
Отображение установок будильника 1 или будильника 2.
D
[SLEEP]
Активация функции сна.
Активация перехода на летнее время в режиме часов.
E
[2/–, ADJ], [+/6, ADJ]
Настройка часов, радио и будильника.
RQTX1209
Переход на начало предыдущей или следующей дорожки.
6
Перемотка с поиском вперед и назад в пределах дорожки.
56
G
F
A
B
C
E
D
F
[SET/PRESET]
Установка часов.
Автоматическая настройка или просмотр предустановленных
каналов в режиме радио.
G
[TIME SYNC]
Синхронизация времени между данным устройством и iPod
или iPhone.
H
[+, VOL], [–, VOL]
Регулировка громкости.
Выбор 12-часового или 24-часового формата отображения
времени.
I
[
4/9
]
Запуск воспроизведения с iPod или iPhone и пауза в ходе
воспроизведения.
J
[SOURCE]
Выбор режима часов, “IPOD” или “RADIO FM”.
Page 57

ENGLISH
РУССКИЙ
ENGLISH
7
Выполнение соединений
у
Вид сзади
Комнатная FM-антенна
К электрической розетке
Подключите сетевой блок питания.
•
Не используйте блок питания переменного тока от другого
оборудования.
•
Использование других сетевых адаптеров переменного тока,
кроме поставленных в комплекте, запрещено.
•
Когда подключен сетевой адаптер, аппарат находится в
состоянии ожидания. Пока сетевой адаптер подключен к
электрической розетке, первичная цепь всегда находится под
напряжением.
Настройка часов
После подключения устройства к бытовой электросети, на нём
отображается время.
Для поддержания точности регулярно подстраивайте часы
(погрешность за месяц составляет +/– 60 секунд).
1
Нажмите и в течение 2 секунд удерживайте [SET/PRESET].
2
Нажмите [2/–, ADJ] или [+/6, ADJ], чтобы выбрать
день.
3
Нажмите [SET/PRESET] снова для подтверждения.
4
Повторите шаги 2 и 3 для установки часов и минут.
Пример:
Изменение формата отображения времени
В режиме часов нажмите и одновременно в течение 2 секунд
удерживайте [+, VOL] и [–, VOL], чтобы выбрать 12-часовой или
24-часовой формат отображения времени.
В 12-часовом режиме:
AM (До полудня) : “PM” не отображается.
PM (После полудня) : “PM” отображается.
Переход на летнее время
В режиме часов нажмите и удерживайте [SLEEP], чтобы
активировать функцию перехода на летнее время или отменить
её выполнение.
Когда эта функция активирована, отображается “DST”.
Синхронизация часов со временем iPod или
iPhone
Эта функция позволяет устанавливать ваши часы на то же
самое время, что и в устройствах iPod или iPhone (
“Совместимые устройства iPod и iPhone”).
Нажмите [TIME SYNC], когда в подставке данного устройства
установлен iPod или iPhone.
Примечание:
•
Точ н ая синхронизация iPod или iPhone с данным устройством
невозможно. Разница между установками времени между ними
может достигать 59 секунд.
•
Совместимость зависит от версии программного обеспечения,
установленного на iPod или iPhone.
Z стp. 5,
РУССКИЙ
ENGLISH
RQTX1209
7
57
Page 58

ENGLISH
8
РУССКИЙ
ENGLISH
Использование iPod или iPhone
1
Выдвиньте подставку для iPod или iPhone.
Отрегулируйте подставку по высоте вашего устройства iPod
или iPhone.
iPod
(не входит
в комплект
поставки)
РУССКИЙ
ENGLISH
2
Подключение iPod или iPhone.
При подключении и отключении iPod или iPhone
придерживайте основное устройство.
Примечание:
При установке в подставку устройства iPod touch или iPhone в
первый раз, в случае если не установлено приложение Memory
Loader, на вашем устройстве iPod touch или iPhone появится
соответствующее сообщение (Z стp. 10).
Зарядка iPod или iPhone
iPod или iPhone при подключении к данному устройству начинают
заряжаться автоматически.
•
Состояние зарядки можно проверить на дисплее iPod или iPhone.
•
Если iPod или iPhone не предполагается использовать в
течение длительного периода времени после выполнения
полной зарядки, отсоедините его от данного устройства, так как
аккумулятор будет разряжаться естественным образом. (После
RQTX1209
выполнения полной зарядки дополнительная подзарядка не
8
осуществляется.)
58
iPod cl
assic
iPhone
iPod tou
ch
iPod n
ano
Осторожно
выдвиньте
подставку для
iPod или iPhone.
Воспроизведение с iPod или iPhone
1
Поместите iPod или iPhone в подставку и включите его.
2
Нажмите [SOURCE], чтобы выбрать “IPOD”.
3
Нажмите [
4/9
музыки с iPod или iPhone. Нажмите снова, чтобы
приостановить воспроизведение.
4
Нажмите [2/–, ADJ] или [+/6, ADJ], чтобы перейти к
предыдущей или следующей дорожке.
5
Нажмите и удерживайт е [2/ –, ADJ] или [+/6, ADJ], для
перемотки с поиском вперед и назад в пределах дорожки.
Примечание:
•
Если iPod или iPhone автоматически перемешивает дорожки
или пропускает дорожку;
– Выключите опцию “Shake” (Встряхивание) (если таковая
имеется).
– Осуществляйте воспроизведение с iPod или iPhone с
помощью док-адаптера для iPod или iPhone (не входит в
комплект поставки).
•
Более подробные сведения по обращению с iPod или iPhone
приведены в Pуководство пользователя iPod или iPhone.
] один раз, чтобы начать воспроизведение
Использование радио
Ручная предварительная
1
Нажмите [SOURCE], чтобы выбрать “RADIO FM”.
2
Нажмите [2/–, ADJ] или [+/6, ADJ], чтобы выбрать
желаемую частоту.
Автоматическая настройка
Нажмите и удерживайте [2 /–, ADJ] или [+/6, ADJ], пока
частота не начнет быстро изменяться. Автоматическая настройка
останавливается, когда найдена станция, или после повторного
нажатия [2/–, ADJ] или [+/6, ADJ].
Примечание:
Для улучшения приёма выдвиньте антенну FM и подберите её
ориентацию.
Page 59

ENGLISH
РУССКИЙ
ENGLISH
9
Память предустановок
Вы можете сохранить свои любимые каналы, ипользуя 5
предустановок FM.
Подготовка
Нажмите [SOURCE], чтобы выбрать “RADIO FM”.
Автоматическое назначение предустановок (AP)
Нажмите и удерживайт е [SOURCE], пока не появится
индикация “AP”.
Примечание:
•
Автоматическое назначение предустановок начинается с
текущей частоты.
•
Сохраняются только 5 первых обнаруженных станций.
•
Пока не записаны все 5 каналов, непрерывно мигает “AP”.
Назначение предустановок вручную
1
Нажмите [2/–, ADJ] или [+/6, ADJ], чтобы выбрать
желаемую частоту.
2
Нажмите и в течение 2 секунд удерживайте
[SET/PRESET], чтобы отобразить номер предустановки.
3
Нажмите [2/–, ADJ] или [+/6, ADJ], чтобы выбрать
номер предустановки.
4
Нажмите [SET/PRESET] снова для подтверждения.
Настройка на предустановленный канал
Нажмите [SET/PRESET] для переключения между
предустановленными каналами.
Использование таймера сна
Эта функция позволяет настроить автоматическое выключение
устройства после окончания заданного периода времени (только
для iPod и режима радио).
1
Нажмите [SLEEP], чтобы активировать таймер.
2
Нажмите [SLEEP] снова, чтобы выбрать желаемое время
(в минутах).
OFF (по умолчанию)
Примечание:
Нажмите [SLEEP] один раз, чтобы проверить оставшееся время.
]
30 ] 60 ] 90 ] 120
Использование будильника
Вы можете задать два разных времени срабатывания
будильника. Прежде чем настраивать будильник, обязательно
установите часы (
Настройка будильника
1
Нажмите и удерживайт е [ALARM 1] или [ALARM 2], пока
показания часа не начнут мигать.
2
В течение 10 секунд нажмите [2/–, ADJ] или [+/6, ADJ],
чтобы установить час.
3
Нажмите [ALARM 1] или [ALARM 2] для подтверждения.
4
Повторите шаги 2 и 3 для установки минут.
5
Нажмите [2/–, ADJ] или [+/6, ADJ], чтобы выбрать
день недели:
6
Нажмите [ALARM 1] или [ALARM 2] для подтверждения.
7
Нажмите [2/–, ADJ] или [+/6, ADJ], чтобы выбрать
желаемый режим подачи сигнала будильника: “IPOD”,
“RADIO” или “BUZZER”.
8
Нажмите [ALARM 1] или [ALARM 2] для подтверждения.
Выбор “IPOD”: Продолжайте, перейдя к шагам 9 и 10.
Выбор “RADIO”: Продолжайте, перейдя к шагам с 11 по 14.
Настройка сигнала будильника iPod
9
Нажмите [2/–, ADJ] или [+/6, ADJ], чтобы настроить
уровень громкости.
10
Нажмите[ALARM 1] или [ALARM 2] для подтверждения
установки.
Примечание:
•
Если в момент срабатывания будильника iPod или iPhone не
будет обнаружен, подаётся сигнал зуммера.
•
В момент срабатывания будильника будет включено
воспроизведение музыки из библиотеки iPod или iPhone.
Z стp. 7,
“Настройка часов”).
MON-SUN (каждый день) ] MON-FRI (рабочие дни)
SAT-SUN (выходны е)SAT-SUN (выходные)
(Продолжение на следующей странице)
РУССКИЙ
ENGLISH
RQTX1209
9
59
Page 60

ENGLISH
10
РУССКИЙ
ENGLISH
Уст ан ов ка радио-будильника
11
Нажмите [2/–, ADJ] или [+/6, ADJ], чтобы настроить
уровень громкости.
12
Нажмите [ALARM 1] или [ALARM 2] для подтверждения.
13
Нажмите [2/–, ADJ] или [+/6, ADJ], чтобы выбрать
желаемый предустановленный канал.
14
Нажмите [ALARM 1] или [ALARM 2] для подтверждения
установки.
Примечание:
РУССКИЙ
•
Будильник работает только при использовании питания от сети
переменного тока.
•
Чтобы активировать или посмотреть установку будильника,
нажмите один раз [ALARM 1] или [AL ARM 2].
•
Нажмите [ALARM 1] или [ALARM 2] снова, чтобы отключить
функцию будильника.
ENGLISH
Выключение будильника
Нажмите [ALARM OFF] для отключения будильника.
Сигнал будильника прозвучит в это же самое время на
следующий день.
Примечание:
Если не выключить сигнал будильника, он будет непрерывно
звучать в течение 59 минут, после чего выключится сам.
Приостановка сигнала будильника (дремать)
Нажмите [SNOOZE], когда звучит сигнал будильника, чтобы
приостановить его на несколько минут.
Будильник зазвучит снова через 9 минут.
Совет:
Пользователи iPod touch и iPhone могут воспользоваться
приложением Memory Loader, чтобы разблокировать
индивидуальные настройки будильника (Z см. справа).
RQTX1209
10
60
Использование приложения Memory Loader
Это устройство поддерживает работу с приложением Memory
Loader, которое можно загрузить с web-сайта App Store (ищите
MemoryLoader).
Если вы еще не загрузили бесплатное приложение Memory
Loader, вы увидите на дисплее своего iPod touch или iPhone
следующее сообщение:
Программа не установлена
Для работы этого аксессуара
необходимо установить
соответствующую программу.
Хотите установить ее из App
Это сообщение является напоминанием, чтобы вы загрузили
приложение и затем могли с удовольствием пользоваться
расширенными функциями данного устройства. Однако ваш iPod
touch и iPhone будут правильно работать с данным устройством
даже без установленного приложения Memory Loader.
Приложение Memory Loader работает только на iPod touch
iPhone под управлением OS 3.0 или более поздней версии.
После установки на iPod touch или iPhone приложения Memory
Loader, с использованием платформы этого приложения можно
легко управлять перечисленными ниже функциями.
Будильник
•
Вы можете легко настроить будильник 1 и будульник 2.
•
Вы можете выбрать любое сочетание дней, в которые будет
срабатывать будильник.
•
Для дремлющего режима с приостановкой сигнала будильника
можно выбрать любой промежуток времени от 1 до 30 минут.
Pадио
•
Создайте предустановки для 5 каналов FM, пролистывая
желаемые частоты с помощью указателя.
События
•
Вы можете включить напоминания о датах, сохраненных
в книге контактов iPod touch или iPhone (если в этот день
разрешено срабатывание будильника).
Store?
и
Page 61

ENGLISH
РУССКИЙ
ENGLISH
11
Короткий сон
•
Вы можете настроить на своём на iPod touch или iPhone таймер
короткого сна или обратного отсчета.
Переход на летнее время (DST)
•
Включите или выключите функцию перехода на летнее время
одним простым действием.
Получите более подробную информацию на:
www.memoryloader.com
Резервное питание от батарейки
Батарейка резервного питания (CR2032, не входит в комплект
поставки) служит для сохранения установок часов и будильника в
случае перебоев сетевого электропитания.
Вставка батарейки
Когда батарейка отсутствует, индикатор разряда батарейки
отображается до тех пор, пока она не будет вставлена.
Вид снизу
1
Оставив блок питания переменного тока подключённым
к сетевой розетке, с помощью отвёртки открутите крышку
держателя батарейки.
2
Откройте крышку держателя батарейки.
3
Вставьте новую батарейку контактом (+) кверху.
4
Закройте крышку держателя батарейки и закрепите её
отвёрткой.
Замена батарейки
Срок службы батарейки составляет приблизительно 1 месяц.
Когда заряд батарейки истекает, индикатор разряда батарейки на
дисплее начинает непрерывно мигать.
Примечание:
•
Не нагревайте и подвергайте воздействию огня.
•
Нельзя оставлять батарею(и) в автомобилях с закрытыми
дверями и окнами, не защищенных от воздействия прямых
солнечных лучей в течение длительного времени.
•
Если радио-часы не будут использоваться в течение
длительного периода времени, выньте батарейку. Храните
батарейки в прохладном темном месте.
ПРЕДУПРЕЖДЕНИЕ
При неправильной замене аккумулятора возникает
опасность взрыва. Производить замену, используя
только тот же тип аккумулятора, или равноценный ему,
рекомендуемый производителем. Размещение в отходы
использованных аккумуляторов производить согласно
инструкциям производителя.
Предупреждение
Держите кнопочную батарейку в недоступном для детей
месте. Никогда не кладите кнопочную батарейку в рот. В
случае проглатывания обратитесь к врачу.
РУССКИЙ
ENGLISH
Предупреждение
Опасность пожара, взрыва и пламени. Не перезаряжайте, не
разбирайте, не нагревайте выше 60°C и не сжигайте.
RQTX1209
11
61
Page 62

ENGLISH
12
РУССКИЙ
ENGLISH
Устранение неполадок
Перед обращением к специалисту по техническому
обслуживанию выполните следующие действия. Если у вас есть
сомнения относительно некоторых пунктов проверки, или если
перечисленные действия не решают проблему, обратитесь за
инструкциями к своему дилеру.
■ Часы
Часы не синхронизируются со временем iPod или iPhone.
•
Убедитесь в том, что iPod или iPhone надёжно подсоединён и
включён (Z стp. 7).
РУССКИЙ
•
Установите на iPod или iPhone последнюю версию
программного обеспечения.
Функция перехода не летнее время не работает.
•
Проверьте, правильно ли установлены часы.
•
Нажмите и удерживайте [SLEEP] в режиме часов, чтобы
активировать функцию перехода на летнее время (Z стp. 7).
ENGLISH
■ Будильник
Сигнал будильника iPod, радио или зуммера не звучит в
заданное время.
•
Проверьте, правильно ли активирована функция “AL ARM 1” или
“ALARM 2” (Z стp. 9).
Будильник iPod или радио срабатывает, но в заданное время
не раздаётся звука.
•
Проверьте установку громкости будильника (Z стp. 9, 10).
■ iPod или iPhone
iPod или iPhone не работает с данным устройством.
•
Убедитесь в том, что iPod или iPhone надёжно подсоединён и
включён (Z стp. 8).
•
Установите на iPod или iPhone последнюю версию
программного обеспечения.
От iPod или iPhone не воспроизводится звук.
•
Убедитесь в том, что iPod или iPhone надёжно подсоединён
(Z стp. 8).
•
Отрегулируйте уровень громкости.
Не происходит зарядка iPod или iPhone.
RQTX1209
•
Проверьте соединения. Выключите iPod или iPhone и снимите
его с разъема в подставке. Снова вставьте и включите
12
оборудование (Z стp. 8).
62
■ Pадио
Слышен шум или искажения звука.
•
Увеличьте расстояние между данным устройством и
телевизором, персональным компьютером или устройством,
создающим электромагнитные помехи.
Сброс
Эта функция позволяет восстановить исходные заводские
настройки данного устройства или восстановить его
работоспособность в случае сбоев.
Вид сзади
Скрепкой или заострённым предметом нажмите [RESET].
Page 63

ENGLISH
РУССКИЙ
ENGLISH
13
Технические характеристики
БЛОК УСИЛИТЕЛЯ
Среднеквадратичная выходная мощность (моно)
Передний канал 2,6 Вт на канал (8 Ом), 1 кГц, 10% THD
БЛОК ТЮНЕРА
Заранее установленная память 5 FM-станций
Частотная модуляция (FM)
Диапазон частот
От 87,50 MГц до 108,00 MГц (с шагом 50 кГц)
Антенныe входы 75 Ом (несогласованный)
БЛОК ДИНАМИКОВ
Тип 1-полосная система с 1 динамиком (oтражатель басов)
Блок(и) динамиков Сопротивление 8 Ом
Полный диапазон 2,5 см кoничecкoгo типa
ОБЩИЕ ПАРАМЕТРЫ
Электропитание (Сетевой адаптер)
Переменный ток от 100 до 240 В, 50/60 Гц
Выход постоянного тока 7,5 В
Потребляемая мощность (с заряжающимся iPod или iPhone)
Основной устройство 7 Вт
Размеры (Ш x В x Г) 112 мм x 80 мм x 150 мм
Масса
Основной устройство 0,37 кг
Сетевой адаптер 0,14 кг
Рабочий диапазон температур от 0°C до +35°C
Рабочий диапазон влажности
от 20% до 80% относительной влажности (без конденсации)
Потребляемая мощность в режиме ожидания:
Основной устройство 0,3 Вт (приблизительно)
Сетевой адаптер 0,3 Вт (приблизительно)
Примечание:
1) Тех н иче с к ие характеристики могут быть изменены без
уведомления.
Масса и размеры даны приблизительно.
2) Полный коэффициент гармонических искажений измерен с
помощью цифрового анализатора спектра.
Техническое обслуживание и ремонт
Для очистки данного устройства используйте мягкую сухую
ткань.
•
Ни в коем случае не используйте для очистки устройства спирт,
растворители или бензин.
•
Перед использованием химически обработанной ткани
обратитесь к инструкции по ее эксплуатации.
РУССКИЙ
ENGLISH
RQTX1209
13
63
Page 64

ENGLISH
ИНФОРМАЦИЯ
О СЕРТИФИКАЦИИ ПPOДУКЦИИ
РУССКИЙРУССКИЙ
ENGLISHENGLISH
RQTX1209
1414
64
Радиоприемник с часами Panasonic модели
RC-DC1#### (где #=0-9, A-Z, - или пробел) с блоком питания
сертифицирован
ОРГАНОМ ПО СЕРТИФИКАЦИИ ПРОДУКЦИИ “ГОСТ-АЗИЯ”,
(Регистрационный номер в Го с р е е с т р е - POCC SG.0001.11BZ02)
Сертификат соответствия: No POCC CN.BZ02.B08593
Сертификат соответствия выдан:02 июля 2010 гoда
Сертификат соответствия
02 июля 2013 гoда
действителен до:
Модели RC-DC1#### (где #=0-9,
A-Z, - или пробел) Panasonic
cooтвeтствуют тpeбoваниям
нормативных документов:
ГOCT P MЭK 60065-2005;
ГOCT 5651-89 (Та бл. 1 (поз. 11),
табл. 2 (поз. 6.7));
ГOCT 22505-97; ГOCT Р 51515-99;
ГOCT Р 51317.3.2-2006 (Разд. 6, 7);
ГOCT Р 51317.3.3 -2008
Срок cлужбы 7 (ceмь) лeт
Page 65

Шановний Покупцю
Дякуємо Вам за придбання цього пристрою.
Для оптимального використання та безпеки прочитайте
уважно цю інструкцію, перед тим як під’єднувати,
здійснювати керування або налаштовувати цей виріб.
Збережіть цей посібник для майбутнього використання.
УBAГA!
•
HE BCTAHOBЛЮЙTE I HE POЗMIЩУЙTE ЦЕЙ
AПAPAT У KHИЖKOBIЙ ШAФI, BБУДOBAHИX
MEБЛЯX AБO B IHШOMУ OБMEЖEHOMУ
ПРОСТОРІ. ПEPEKOHAЙTECЬ, ЩO AПAPAT
ДOБPE BEHTИЛЮЄTЬCЯ. ДЛЯ ЗАПОБIГAHHЯ
HEБEЗПЕKИ УPAЖEHHЯ EЛEKTPИЧHИM
CTPУMOM AБO BИНИKHEHHЯ ПОЖЕЖІ
BHACЛIДOK ПEPEГPIBУ, ПEPEKOHAЙTECЬ,
ЩO ЗABICKИ ЧИ БУДЬ-ЯKI IHШI MATEPIAЛИ HE
ЗАГОРОДЖУЮTЬ BEHTИЛЯЦІЙНІ OTBOPИ.
•
HE ЗAГOPOДЖУЙTE BEHTИЛЯЦІЙHI OTBOPИ
ГAЗETAMИ, CKATEPTИHAMИ, ЗABICKAMИ TA
ПOДIБHИMИ ПPEДMETAMИ.
•
HE CTABTE ДЖEPEЛA BIДKPИTOГO ПOЛУM’Я,
HAПPИKЛAД, ЗАПАЛEHI CBIЧKИ, HA AПAPAT.
•
ЛIKBIДУЙTE БATAPEЙKИ EKOЛOГIЧHO
ПPИЙHЯTИM CПOCOБOM.
ЦEЙ AПAPAТ ПРИЗHAЧEHИЙ ДЛЯ BИKOPИCTAHHЯ
У ПОМIPHИX KЛlМATИЧHИХ УМОBAХ.
УВАГА!
ЩОБ УНИКНУТИ РИЗИКУ ВИНИКНЕННЯ ПОЖЕЖІ,
УРАЖЕННЯ ЕЛЕКТРИЧНИМ СТРУМОМ АБО
ПОШКОДЖЕННЯ ВИРОБУ:
•
ЗАПОБІГАЙТЕ ПОТРАПЛЯННЮ НА ПРИСТРІЙ
ДОЩОВИХ КРАПЕЛЬ, ВОЛОГИ АБО БРИЗОК,
ТА НЕ СТАВТЕ НА ПРИСТРІЙ ПРЕДМЕТИ,
НАПОВНЕНІ ВОДОЮ, НАПРИКЛАД, ВАЗИ ТОЩО.
•
ВИКОРИСТОВУЙТЕ ТІЛЬКИ РЕКОМЕНДОВАНІ
ПРИЛАДДЯ.
•
НЕ ЗНІМАЙТЕ КРИШКУ (ЧИ ЗАДНЮ ПАНЕЛЬ);
ВСЕРЕДИНІ НЕМАЄ ДЕТАЛЕЙ, ЯКІ ПОТРЕБУЮТЬ
ОБСЛУГОВУВАННЯ АБО МОЖУТЬ БУТИ
ПОЛАГОДЖЕНІ КОРИСТУВАЧЕМ. ДОВІРЯЙТЕ
РОБОТИ З РЕМОНТУ ТА ОБСЛУГОВУВАННЯ
ТІЛЬКИ КВАЛІФІКОВАНИМ СПЕЦІАЛІСТАМ.
Цeй вирiб може приймати радiоперешкоди, що
створюються мобiльними телефонами пiд час їх
використання. Якщо такi перешкоди є помiтними, будь
ласка, збiльшiть вiдстaнь мiж виpoбом та мобiльним
телефоном.
Штепсельну розетку потрібно встановити біля
обладнання та забезпечити вільний доступ до неї.
Штепсельна вилка шнура живлення повинна бути
готова до виккористання.
Щоб повністю відключити цей пристрій від мережі
живлення змінного струму, вийміть штепсельну вилку
зі штепсельної розетки.
Позначки для ідентифікації виробу
Гол о в н і й пристрій Знизу
Адаптер змінного струму Знизу
Виріб Місце розташування
ENGLISH
РУССКИЙ ЯЗЫК
УКРАЇНСЬКАУКРАЇНСЬКА
RQTX1209
22
65
Page 66

3
ENGLISH
РУССКИЙ ЯЗЫК
УКРАЇНСЬКА
Заходи безпеки
Розташування пристрою
Устан овіть пристрій на рівній поверхні у місці,
захищеному від попадання прямого сонячного проміння,
високої температури, підвищеної вологості та
надлишкової вібрації. Ці фактори можуть пошкодити
корпус та інші компоненти пристрою і скоротити строк
його служби.
Розташуйте пристрій на відстані не менше, ніж 15 см
від стін, щоб уникнути спотворення звуку та небажаних
акустичних
Не кладіть важкі предмети на пристрій.
Напруга
Не використовуйте джерела живлення високої напруги.
УКРАЇНСЬКА
Це може призвести до перенапруги пристрою та
викликати пожежу.
Не використовуйте джерела живлення постійного
струму. Уважно перевірте джерело живлення перед
тим, як встановлювати пристрій на борту судна або в
будь-якому іншому місці, де використовується постійний
струм.
Застережні заходи за обходженням з блоком
живлення змінного струму
Блок живлення змінного струму має бути правильно
підключений та не пошкоджений. Поганий контакт та
пошкодження кабелю може спричинити пожежу або
ураження електричним струмом. Не тягніть за кабель, не
згинайте його та не кладіть на нього важкі предмети.
Вимикаючи блок живлення надійно утримуйте мережну
вилку. Не тягніть за провід блока живлення – це може
привести до враження електричним струмом.
RQTX1209
Не беріть штепсельну вилку мокрими руками. Це може
3
призвести до ураження електричним струмом.
66
ефектів.
Сторонні предмети
Не допускайте потрапляння металевих предметів
всередину пристрою. Це може призвести до ураження
електричним струмом або до поломки пристрою.
Не допускайте потрапляння в аппарат рідини. Це може
призвести до ураження електричним струмом або
до поломки пристрою. Якщо це трапилось, негайно
відключіть пристрій від джерела живлення та зверніться
до вашого дилера.
Не розпилюйте на пристрій інсектициди. Вони містять
легкозаймистий газ, який може спалахнути при
попаданні у пристрій.
Технічне обслуговування
Не намагайтеся відремонтувати пристрій власноруч.
Якщо переривається звук, не горять індикатори,
з’явився дим або виникла якась інша несправність, що
не описана в цієї інструкції, вимкніть блок живлення
змінного струму від розетки й зверніться до свого
дилера чи в авторизований центр обслуговування.
Ремонт, розбирання або модифікування пристрою
некваліфікованою особою може призвести до ураження
електричним струмом.
Щоб подовжити строк служби пристрою, від’єднуйте його
від джерела живлення, коли він не використовується
протягом тривалого часу.
Page 67

4
ENGLISH
РУССКИЙ ЯЗЫК
УКРАЇНСЬКА
Інформація для покупця
Назва продукції: Радіо-годинник
Назва країни виробника: Китай
Назва виробника: Панасонік Корпорейшн
Юридична адреса:1006 Кадома, Осака, Японія
Дата виготовлення: можна уточнити рік та місяць за серійним
номером у табличці.
Приклад маркування— серійний номер № XX1AXXXXXXX
(X - будь-яка цифра чи буква)
Рік: Тре т я цифра серійного номера (1—2001, 2—20 02, ...
0—2010)
Місяць: Четверта буква серійного номера (А—Січень,
В—Лютий, ...L—Груден ь)
Примітка: Вересень може бути вказаний як «S» замість «I».
Додаткова інформація: Будь ласка, уважно
Встановлений виробником відповідно до п. 2 ст. 5 федерального
закону «Про захист прав споживачів» термін служби цього
виробу дорівнює 7 рокам з дати виготовлення за умови, що виріб
використовується у суворій відповідності до дійсної інструкції з
експлуатації та технічних стандартів, що застосовуються до цього
виробу.
прочитайте
експлуатації.
інструкцію з
–За наявності цього знаку–
Інформація щодо утилізації в країнах, які не
входять в Європейський Союз
Даний символ дійсний тільки на території
Європейського Союзу.
При потребі утилізації даного виробу
зверніться до місцевого керівництва
або дилера щодо правильного методу її
здійснення.
Зміст
Заходи безпеки......................................................................3
Приладдя у комплекті ..........................................................5
Сумісні пристрої iPod та iPhone ......................................... 5
Огляд органів керування .....................................................6
Виконання підключень ........................................................7
Настройка годинника ...........................................................7
Використання iPod або iPhone ........................................... 8
Використання радіо .............................................................8
Використання режиму сну ..................................................9
Використання будильника ..................................................9
Використання програми Memory Loader ........................10
Резервне живлення від батарейки ..................................11
Посібник із усунення несправностей ..............................12
Технічне обслуговування ..................................................12
Технічні характеристики ...............................Задня кришка
4
67
УКРАЇНСЬКА
RQTX1209
Page 68

5
ENGLISH
РУССКИЙ ЯЗЫК
УКРАЇНСЬКА
Приладдя у комплекті
УКРАЇНСЬКА
5
68
Перевірте та ідентифікуйте додані приладдя.
1 Адаптер змінного струму
Надписи «Made for iPod» і «Made for iPhone» визначають,
що електронне приладдя було розроблено спеціально
для під’єднання до iPod і сертифіковане розробником для
відповідності стандартам якості роботи Apple.
Корпорація Apple не несе відповідальності за роботу цього
пристрою чи його відповідність стандартам безпеки і
регулятивним нормам.
iPhone, iPod, iPod classic, iPod nano і iPod touch є торговими
марками компанії Apple Inc., зареєстрованими в США та інших
країнах.
RQTX1209
Сумісні пристрої iPod та iPhone
•
iPod nano 5-го покоління (відеокамера) (8ГБ, 16ГБ)
•
iPod touch 2-го покоління (8ГБ, 16ГБ, 32ГБ, 64ГБ)
•
iPod classic [120ГБ, 160 ГБ (2009)]
•
iPod nano 4-го покоління (відео) (8ГБ, 16ГБ)
•
iPod classic (160ГБ) (2007)
•
iPod touch 1-го покоління (8ГБ, 16ГБ, 32ГБ)
•
iPod nano 3-го покоління (відео) (4ГБ, 8ГБ)
•
iPod classic (80 ГБ)
•
iPod nano 2-го покоління (алюмінієвий корпус) (2ГБ, 4ГБ, 8ГБ)
•
iPod 5-го покоління (відео) (60ГБ, 80ГБ)
•
iPod 5-го покоління (відео) (30ГБ)
•
iPod nano 1-го покоління (1ГБ, 2ГБ, 4ГБ)
•
iPod 4-го покоління (з кольоровим дисплеєм) (40ГБ, 60ГБ)
•
iPod 4-го покоління (з кольоровим дисплеєм) (20ГБ, 30ГБ)
•
iPod 4-го покоління (40ГБ)
•
iPod 4-го покоління (20ГБ)
•
iPod mini (4ГБ, 6ГБ)
•
iPhone 3GS (16ГБ, 32ГБ)
•
iPhone 3G (8ГБ, 16ГБ)
•
iPhone (4ГБ, 8ГБ, 16ГБ)
Сумісність залежить від версії програмного забезпечення
пристрою iPod чи iPhone.
Page 69

6
ENGLISH
РУССКИЙ ЯЗЫК
УКРАЇНСЬКА
Огляд органів керування
HIJ
G
A
[SNOOZE/DIMMER]
Дрімати: Припинення сигналу будильника на 9 хвилин.
Зниження яскравості: Настроювання яскравості панелі
дисплею (Висока (за умовчанням), Середня або Низька).
B
[ALARM OFF]
Служить для вимкнення сигналу будильника.
C
[ALARM 1], [ALARM 2]
Активація функції будильника 1 або будильника 2.
Відображення встановлень будильника 1 або будильника 2.
D
[SLEEP]
Активація функції сну.
Активація переходу на літній час у режимі годинника.
E
[2/–, ADJ], [+/6, ADJ]
Настроювання годинника, радіо та будильника.
Перехід до початку попередньої або наступної доріжки.
Перемотування з пошуком вперед і назад у межах доріжки.
F
A
B
C
E
D
F
[SET/PRESET]
Установлювання годинника.
Автоматичне настроювання або перегляд передустановлених
каналів у режимі радіо.
G
[TIME SYNC]
Синхронізація часу між цим пристроєм та iPod або iPhone.
H
[+, VOL], [–, VOL]
Регулювання гучності.
Вибір 12-годинного або 24-годинного формату відображення
часу.
I
[
4/9
]
Запуск відтворювання з iPod або iPhone і пауза в ході
відтворювання.
J
[SOURCE]
Вибір режиму годинника, «IPOD» або «RADIO FM».
6
69
УКРАЇНСЬКА
RQTX1209
Page 70

7
ENGLISH
РУССКИЙ ЯЗЫК
УКРАЇНСЬКА
Виконання підключень
Вигляд ззаду
Кімнатна антена
FM-діапазону
До побутової розетки
УКРАЇНСЬКА
змінного струму
Підключить блок живлення змінного струму.
•
Не використовуйте блок живлення змінного струму від іншого
обладнання.
•
Не використовуйте інші адаптери змінного струму, окрім того,
що додається.
•
При підключеному адаптері змінного струму апарат
знаходиться в режимі очікування. Первинний контур завжди
знаходиться під напругою, доки адаптер змінного струму
залишається підключеним до електричної розетки.
Настройка годинника
Після підключення пристрою до побутової електромережі, на
ньому відображується час.
Для підтримування точності регулярно підстроюйте годинник
(похибка за місяць складає +/– 60 секунд).
RQTX1209
1
Натисніть і на протязі 2 секунд утримуйте [SET/PRESET].
7
2
Натисніть [2/–, ADJ] або [+/ 6, ADJ], щоб вибрати день.
70
3
Натисніть [SET/PRESET] знов для підтвердження.
4
Повторіть кроки 2 і 3 для встановлення годин і хвилин.
Приклад:
Зміна формату відображення часу
В режимі годинника натисніть і одночасно на протязі 2 секунд
утримуйте [+, VOL] і [–, VOL], щоб вибрати 12-годинний або
24-годинний формат відображення часу.
У 12-годинному режимі:
AM (До полудня) : «PM» не відображується.
PM (Після полудня) : «PM» відображується.
Перехід на літній час
У режимі годинника натисніть і утримуйте [SLEEP], щоб
активувати функцію переходу на літній час або скасувати її
виконання.
Коли ця функція активована, відображується «DST».
Синхронізація годинника з часом iPod або
iPhone
Ця функція дозволяє встановлювати ваш годинник на той же
самий час, що і в пристроях iPod або iPhone (
«Сумісні пристрої iPod та iPhone»).
Натисніть [TIME SY NC], коли у підставці цього пристрою
встановлений iPod або iPhone.
Примітка:
•
Точ н а синхронізація iPod або iPhone з цим пристроєм
неможлива. Різниця встановленого часу між ними може
досягати 59 секунд.
•
Сумісність залежить від версії програмного забезпечення
пристрою iPod чи iPhone.
Z сторінка 5,
Page 71

8
ENGLISH
РУССКИЙ ЯЗЫК
УКРАЇНСЬКА
Використання iPod або iPhone
1
Висуньте підставку для iPod або iPhone.
Відрегулюйте підставку за висотою вашого пристрою iPod
або iPhone.
iPod
(не постачається
у комплекті)
iPod cl
assic
iPhone
iPod tou
ch
iPod n
ano
2
Підключення iPod або iPhone.
Притримуйте апарат під час підключення чи відключення iPod
чи iPhone.
Примітка:
Під час встановлення в підставку пристрою iPod touch або iPhone
в перший раз, у випадку коли не встановлена програма Memory
Loader, на вашому пристрої iPod touch або iPhone з’явиться
відповідне повідомлення (Z сторінка 10).
Зарядка iPod або iPhone
iPod або iPhone після підключення до цього пристрою починають
заряджатися автоматично.
•
Стан зарядки можна перевірити на дисплеї iPod або iPhone.
•
Якщо ви не маєте наміру використовувати iPod або iPhone на
протязі тривалого часу після повної зарядки, відключить його
від цього пристрою, тому що акумулятор буде розряджатися
природним чином. (Після виконання повної зарядки додаткова
підзарядка не здійснюється.)
Обережно висуньте
підставку для iPod
або iPhone.
Відтворення з iPod або iPhone
1
Поставте iPod або iPhone в підставку і увімкніть його.
2
Натисніть [SOURCE], щоб вибрати «IPOD».
3
Натисніть [
музики з iPod або iPhone. Натисніть знов, щоб припинити
відтворення.
4
Натисніть [2/–, ADJ] або [+/ 6, ADJ], щоб перейти до
попередньої або наступної доріжки.
5
Натисніть і утримуйте [2/–, ADJ] або [+/6, ADJ] для
перемотування з пошуком вперед і назад у межах доріжки.
Примітка:
•
Якщо iPod чи iPhone автоматично перемішує доріжки або
пропускає доріжку;
– Вимкніть опцію «Shake» (Струшування) (якщо подібна є у
– Виповнюйте відтворення з iPod чи iPhone за допомогою
•
Більш детальна інформація з використання iPod або iPhone
наведена в Руководство пользователя iPod або iPhone.
4/9
] один раз, щоб почати відтворення
наявності).
адаптера доку для iPod чи iPhone (не постачається у
комплекті).
Використання радіо
Ручна настройка
1
Натисніть [SOURCE], щоб вибрати «RADIO FM».
2
Натисніть [2/–, ADJ] або [+/ 6, ADJ], щоб вибрати
бажану частоту.
Автоматична настройка
Натисніть і утримуйте [2/–, ADJ] або [+/6, ADJ], поки не
почне швидко змінюватися частота. Автоматичне настроювання
зупиняється, коли знайдено станцію, або після повторного
натиснення [2/–, ADJ] або [+/6, ADJ].
Примітка:
Для поліпшення приймання висуньте антенну FM і підберіть її
орієнтацію.
8
71
УКРАЇНСЬКА
RQTX1209
Page 72

9
ENGLISH
РУССКИЙ ЯЗЫК
УКРАЇНСЬКА
Попередня настройка пам’яті
Ви можете зберегти свої улюблені канали з використанням 5
передустановок FM.
Підготовка
Натисніть [SOURCE], щоб вибрати «RADIO FM».
Автоматична попередня настройка (AP)
Натисніть і утримуйте [SOURCE], поки не з’явиться індикація
«AP».
Примітка:
•
Автоматичне призначення перед установок починається з
поточної частоти.
•
Зберігається тільки 5 перших виявлених станцій.
•
Поки не записані всі 5 каналів, безперервно блимає «AP».
Ручна попередня настройка
1
Натисніть [2/–, ADJ] або [+/ 6, ADJ], щоб вибрати
бажану частоту.
2
Натисніть і на протязі 2 секунд утримуйте [SET/PRESET],
УКРАЇНСЬКА
щоб відобразити номер передустановки.
3
Натисніть [2/–, ADJ] або [+/ 6, ADJ], щоб вибрати
номер передустановки.
4
Натисніть [SET/PRESET] знов для підтвердження.
Настроювання на передустановлений канал
Натисніть [SET/PRESET] для переключення між
передустановленими каналами.
Використання режиму сну
Ця функція дозволяє настроювати автоматичне вимкнення цього
пристрою після закінчення заданого періоду часу (тільки для iPod
і режиму радіо).
1
Натисніть [SLEEP], щоб активувати таймер.
2
Натисніть [SLEEP] знов, щоб вибрати бажаний час (у
хвилинах).
OFF (за умовчанням)
RQTX1209
Примітка:
9
Натисніть [SLEEP] один раз, щоб перевірити час, який залишився.
72
]
30 ] 60 ] 90 ] 120
Використання будильника
Ви можете встановити два різних часу спрацьовування
будильника. Перед тим як настроювати будильник, обов’язково
встановіть годинник (
Настроювання будильника
1
Натисніть і утримуйте [ALARM 1] або [ALARM 2], поки
показання годин не почнуть блимати.
2
На протязі 10 секунд натисніть [2/–, ADJ] або
[+/6, ADJ], щоб встановити години.
3
Натисніть [ALARM 1] або [ALARM 2] для підтвердження.
4
Повторіть кроки 2 і 3 для установлення хвилин.
5
Натисніть [2/–, ADJ] або [+/ 6, ADJ], щоб вибрати день
тижню:
MON-SUN (кожний день) ] MON-FRI (робочі дні)
6
Натисніть [ALARM 1] або [ALARM 2] для підтвердження.
7
Натисніть [2/–, ADJ] або [+/ 6, ADJ], щоб вибрати
бажаний режим подачі сигналу будильника: «IPOD»,
«RADIO» або «BUZZER».
8
Натисніть [ALARM 1] або [ALARM 2] для підтвердження.
Вибір «IPOD»: Продовжуйте і перейдіть до кроків 9 і 10.
Вибір «RADIO»: Продовжуйте і перейдіть до кроків з 11 до 14.
Настроювання сигналу будильника iPod
9
Натисніть [2/–, ADJ] або [+/ 6, ADJ], щоб настроїти
рівень гучності.
10
Натисніть [ALARM 1] або [ALARM 2] для підтвердження
установлення.
Примітка:
•
Якщо в момент спрацювання будильника iPod або iPhone не
буде знайдений, подається сигнал зумера.
•
В момент спрацювання будильника буде увімкнено відтворення
музики з бібліотеки iPod або iPhone.
Z сторінка 7,
SAT-SUN (вих ідні)SAT-SUN (вихідні)
«Настройка годинника»).
Page 73

10
ENGLISH
РУССКИЙ ЯЗЫК
УКРАЇНСЬКА
Уст ан ов ле нн я радіо-будильника
11
Натисніть [2/–, ADJ] або [+/ 6, ADJ], щоб настроїти
рівень гучності.
12
Натисніть [ALARM 1] або [ALARM 2] для підтвердження.
13
Натисніть [2/–, ADJ] або [+/ 6, ADJ], щоб вибрати
бажаний передустановленый канал.
14
Натисніть [ALARM 1] або [ALARM 2] для підтвердження
установлення.
Примітка:
•
Будильник працює тільки за умови живлення від мережі
змінного струму.
•
Щоб активувати або побачити установлення будильника,
натисніть один раз [ALARM 1] або [AL ARM 2].
•
Натисніть [ALARM 1] або [AL ARM 2] знов, щоб вимкнути
функцію будильника.
Вимкнення будильника
Натисніть [ALARM OFF] для вимкнення будильника.
Сигнал будильника пролунає в той же самий час наступного дня.
Примітка:
Якщо не вимкнути сигнал будильника, він буде безперервно
лунати на протязі 59 хвилин, після чого вимкнеться сам.
Припинення сигналу будильника (дрімати)
Натисніть [SNOOZE], коли лунає сигнал будильника, щоб
припинити його на декілька хвилин.
Будильник пролунає знов через 9 хвилин.
Порада:
Користувачі iPod touch і iPhone можуть використати програму
Memor y Loader, щоб розблокувати індивідуальні настройки
будильника (Z cдив. праворуч).
Використання програми Memory
Loader
Цей пристрій призначений для роботи з програмою Memory
Loader, яку можна завантажити з web-сайту App Store (шукайте
MemoryLoader).
Якщо ви ще не завантажили безкоштовну програму Memory
Loader, ви побачите на дисплеї свого iPod touch або iPhone
наступне повідомлення:
Програма не встановлена
Це приладдя використовує
програму, що не встановлена.
Встановити програму з App store?
Це повідомлення є нагадуванням, щоб ви завантажили програму
й могли з задоволенням користатися розширеними функціями
цього пристрою. Однак ваш iPod touch і iPhone будуть правильно
працювати з цим пристроєм навіть без установленої програми
Memor y Loader.
Програма Memor y Loader працює тільки на iPod touch і iPhone під
керуванням OS 3.0 або
Після встановлення на iPod touch або iPhone програми Memory
Loader, з використанням платформи цієї програми можна легко
керувати переліченими нижче функціями.
Будильник
•
Ви можете легко настроювати будильник 1 і будильник 2.
•
Ви можете вибрати будь-яке сполучення днів, в які буде
спрацьовувати будильник.
•
Для режиму дрімоти з припиненням сигналу будильника можна
вибрати будь-який інтервал часу від 1 до 30 хвилин.
Радіо
•
Створіть передустановки для 5 каналів FM, переглядаючи
бажані частоти за допомогою покажчика.
Події
•
Ви можете увімкнути нагадування про дати, записані в книзі
контактів iPod touch або iPhone (якщо в цей день дозволяється
спрацьовування будильника).
новішої версії.
(Продовження на наступній сторінці)
10
73
УКРАЇНСЬКА
RQTX1209
Page 74

11
ENGLISH
РУССКИЙ ЯЗЫК
УКРАЇНСЬКА
Короткий сон
•
Ви можете настроїти на своєму на iPod touch або iPhone таймер
короткого сну або зворотного відліку.
Перехід на літній час (DST)
•
Увімк ніт ь або вимкніть функцію переходу на літній час однією
простою дією.
Отримайте більш детальну інформацію на:
www.memoryloader.com
Резервне живлення від батарейки
Батарейка резервного живлення (CR2032, не постачається
у комплекті) служить для зберігання настроєм годинника і
будильника в разі перебоїв мережевого електроживлення.
Вставлення батарейки
Коли батарейка відсутня, індикатор розряду батарейки
УКРАЇНСЬКА
відображується до того, поки вона не буде вставлена.
Вигляд знизу
RQTX1209
11
74
1
Залишив блок живлення змінного струму приєднаним до
к мережевої розетки, за допомогою викрутки відкрутить
кришку утримувача батарейки.
2
Відкрийте кришку утримувача батарейки.
3
Вставте нову батарейку контактом (+) угору.
4
Закрийте кришку утримувача батарейки і закріпить її
викруткою.
Зміна батарейки
Тер м ін служби батарейки складає приблизно 1 місяць.
Коли заряд батарейки закінчується, індикатор розряду батарейки
на дисплеї починає безперервно блимати.
Примітка:
•
Не допускайте нагрівання чи контакту батарей з полум’ям.
•
Не залишайте батарею(и) в машині під прямим сонячним
промінням на тривалий термін із закритими вікнами та дверима.
•
Якщо радіо-годинник не буде використовуватися на протязі
тривалого часу, висуньте батарейку. Зберігайте батарейки у
прохолодному і темному місці.
УBAГA
Якщо батарейка встановлена неправильно, існує небезпека
вибуху. Замінюйте її тільки на аналогічну батарейку або
батарейку подібного типу, відповідно до рекомендацій
виробника обладнання. Використані батарейки утилізуйте
згідно з інструкціями компанії-виробника.
Увага
Зберігайте батарею батарейку таблеткового типу у місці,
недоступному для дітей. Не кладіть батарею батарейку в
рот. В разі проковтування негайно зверніться до лікаря.
Увага
Ризик пожежі, вибуху чи опіків. Не перезаряджайте, не
розбирайте, не нагрівайте виріб до температури вище 60°C
та не спалюйте його.
Page 75

12
ENGLISH
РУССКИЙ ЯЗЫК
УКРАЇНСЬКА
Посібник із усунення несправностей
Перш ніж звертатись до ремонтної служби, прочитайте надані
нижче поради. Якщо ви маєте сумніви відносно деяких пунктів
перевірки, або якщо перелічені дії не вирішують проблему,
зверніться за інструкціями до свого дилера.
■ Радіо
Чути шум або спотворення звуку.
•
Збільшить відстань між цим пристроєм та телевізором,
персональним комп’ютером або пристроєм, який створює
електромагнітні перешкоди.
■ Годинник
Год и нни к не синхронізується з часом iPod або iPhone.
•
Переконайтеся в тому, що iPod або iPhone надійно підключений
та увімкнений (Z сторінка 7).
•
Оновіть програмне забезпечення iPod чи iPhone до найновішої
версії.
Функція переходу не літній час не працює.
•
Перевірте, чи правильно встановлений годинник.
•
Натисніть і утримуйте [SLEEP] в режимі годинника, щоб
активувати функцію переходу на літній час (Z сторінка 7).
■ Будильник
Сигнал будильника iPod, радіо або зумера не лунає в
установлений час.
•
Перевірте, чи правильно активована функція «ALARM 1» або
«ALARM 2» (Z сторінка 9).
Будильник iPod або радіо спрацьовує, але в установлений
час немає звуку.
•
Перевірте установку гучності будильника (Z сторінка 9, 10).
■ iPod або iPhone
iPod або iPhone не працює з цим пристроєм.
•
Переконайтеся в тому, що iPod або iPhone надійно підключений
та увімкнений (Z сторінка 8).
•
Оновіть програмне забезпечення iPod чи iPhone до найновішої
версії.
Від iPod або iPhone не відтворюється звук.
•
Переконайтеся в тому, що iPod або iPhone надійно підключений
(Z сторінка 8).
•
Відрегулюйте гучність.
Не відбувається зарядка iPod або iPhone.
•
Перевірте під’єднання. Вимкніть iPod або iPhone та зніміть його
з рознімання в підставці. Ще раз вставте і увімкніть
(Z сторінка 8).
Скидання
Ця функція дозволяє відновити початкові заводські настройки
цього пристрою або відновити його працездатність у випадку
збоїв.
Вигляд ззаду
Скріпкою або загостреним предметом натисніть [RESET].
Технічне обслуговування
Для очистки пристрою використовуйте м’яку суху тканину.
•
Не використовуйте для очистки пристрою спирт, розчинники
або бензин.
•
Перед використанням хімічно обробленої серветки зверніться
до інструкції щодо поводження з нею.
12
75
УКРАЇНСЬКА
RQTX1209
Page 76

Технічні характеристики
СЕКЦІЯ ПІДСИЛЮВАЧА
Середньоквадратична вихідна потужність (моно)
Передній канал 2,6 Вт на канал (8 Ом), 1 кГц, 10% THD
БЛОК ТЮНЕРА
Напередустановлені станції 5 станцій діапазону FM
Частотна модуляція (FM)
Частотний діапазон
87,50 МГц до 108,00 МГц (крок – 50 кГц)
Контакти антени 75 Ом (незбалансований)
СЕКЦІЯ ДИНАМІКІВ
Тип 1-полосна система з 1 динаміком (відбиття басу)
Акустична система(и) Загальний опір 8 Ом
Повний діапазон 2,5 см конічного типу
ЗАГАЛЬНІ ПАРАМЕТРИ
Живлення (Адаптер змінного струму)
Від 100 до 240 В змінного струму, 50/60 Гц
Вихід постійного струму 7,5 В
Споживана потужність (з iPod або iPhone, який заряджується)
Гол о в н і й пристрій 7 Вт
Габ а р и т и (Ш x В x Г) 112 мм x 80 мм x 150 мм
Вага
Гол о в н і й пристрій 0,37 кг
Адаптер змінного струму 0,14 кг
Робочий діапазон температури Від 0°С до +35°С
Робочий діапазон вологості
Від 20% до 80% відносної вологості (без
Споживання енергії в режимі очікування:
Гол овні й пристрій 0,3 Вт (приблизно)
Адаптер змінного струму 0,3 Вт (приблизно)
Примітка:
1) Тех н ічн і характеристики можуть бути змінені без
попередження.
Вага та габарити є приблизними.
2) Сумарне значення коефіцієнта нелінійних спотворень
вимірюється цифровим аналізатором спектру.
конденсації)
Panasonic Corporation
Web Site: http://panasonic.net
EU
Pursuant to at the directive 2004/108/ EC, article 9(2)
Panasonic Testing Centre
Panasonic Marketing Europe GmbH
Winsbergring 15, 22525 Hamburg, Germany
RuSp CzEn UrPo
RQTX1209-2E
L0610HH2070
 Loading...