

Page 1

Mini
R
Digital Video Camcorder
Operating Instructions
Model No. PV-DV53
Before attempting to connect, operate or adjust this product, please read these
instructions thoroughly.
Spanish Quick Use Guide is included.
Guía para rápida consulta en español está incluida.
For assistance, please call : 1-800-211-PANA(7262) or send e-mail to : consumerproducts@panasonic.com
LSQT0650B
Page 2
Things You Should Know
Thank you for choosing Panasonic!
You have purchased one of the most
sophisticated and reliable products on the
market today. Used properly, we’re sure it
will bring you and your family years of
enjoyment. Please take time to fill in the
information below. The serial number is on
the tag located on the underside of your
Palmcorder. Be sure to retain this manual
as your convenient Palmcorder information
Date of Purchase
Dealer Purchased From
Dealer Address
Dealer Phone No.
Model No.
Serial No.
source.
Safety Precautions
WARNING: TO PREVENT FIRE OR SHOCK HAZARD,
DO NOT EXPOSE THIS EQUIPMENT TO RAIN OR MOISTURE.
Mini
Your
and Long (LP) mode.
It is recommended that only cassette tapes that have been tested and inspected for use in
VCR machines with the
Note: This equipment has been tested and found to comply with Part 15 of the FCC
Rules. These limits are designed to provide reasonable protection against harmful
interference when operated in a residential environment.
If this equipment does cause interference to radio or television reception, which can be
determined by turning the equipment off and on, use the equipment in another location
and/or utilize an electrical outlet different from that used by the receiver.
If necessary, consult the dealer or an experienced radio/TV technician for help. You may
find the booklet, ‘Something About Interference’ available from FCC local regional offices
helpful.
FCC Warning: To assure continued FCC compliance, use only the specifed shielded
2
Palmcorder is designed to record and play back in Standard Play (SP) mode
Mini
mark be used.
This symbol warns the user that uninsulated
CAUTION
RISK OF ELECTRIC SHOCK
DO NOT OPEN
CAUTION: TO REDUCE THE RISK OF ELECTRIC SHOCK,
DO NOT REMOVE COVER (OR BACK)
NO USER-SERVICEABLE PARTS INSIDE
REFER SERVICING TO QUALIFIED SERVICE PERSONNEL
voltage within the unit may have sufficient
magnitude to cause electric shock.
Therefore, it is dangerous to make any kind
of contact with any inside part of this unit.
This symbol alerts the user that important
literature concerning the operation and
maintenance of this unit has been included.
Therefore, it should be read carefully in order
to avoid any problems.
The above markings are located on the appliance bottom cover.
Model Number : PV-DV53
Trade Name : Panasonic
Responsibility Party : Matsushita Electric Corporation of America
Address : One Panasonic Way Secaucus New Jersey 07094
Telephone Number : 1-800-211-PANA(7262)
This device complies with Part 15 of the FCC Rules. Operation is subject to the
following two conditions: (1) This device may not cause harmful interference, and
(2) this device must accept any interference received, including interference that
may cause undesired operation.
interface cable when connecting digital video camcorder to computer in
accordance with instruction herein. Also, any unauthorized changes or
modifications to this equipment would void the user’s authority to operate.
For assistance, please call : 1-800-211-PANA(7262) or send e-mail to : consumerproducts@panasonic.com
Declaration of Conformity
Page 3

Important Safeguards
1. Read Instructions — All the safety and operating
instructions should be read before the unit is
operated.
2. Retain Instructions — The safety and operating
instructions should be retained for future reference.
3. Heed Warnings — All warnings on the unit and in the
operating instructions should be adhered to.
4. Follow Instructions — All operating and maintenance
instructions should be followed.
5. Cleaning — Unplug this video unit from the wall outlet
before cleaning. Do not use liquid or aerosol
cleaners. Use a dry cloth for cleaning.
6. Attachments — Do not use attachments not
recommended by the video product manufacturer as
they may be hazardous.
7. Water and Moisture — Do not use this video unit near
water — for example near a bath tub, wash bowl,
kitchen sink, or laundry tub, in a wet basement, or
near a swimming pool, and the like.
8. Accessories — Do not place this video unit on an
unstable cart, stand, tripod, bracket, or table. The
video unit may fall, causing serious injury to a child or
adult, and serious damage to the unit. Use only with
a cart, stand, tripod, bracket, or table recommended
by the manufacturer, or sold with the video unit. Any
mounting of the unit should follow the manufacturer’s
instructions and should use a
mounting accessory
recommended by the
manufacturer. An appliance and
cart combination should be moved
with care. Quick stops, excessive
force, and uneven surfaces may
cause the appliance and cart
combination to overturn.
9. Ventilation — Slots and openings in the cabinet are
provided for ventilation and to ensure reliable
operation of the video unit and to protect it from
overheating. These openings must not be blocked or
covered. Never place the video unit on a bed, sofa,
rug, or other similar surface, or near or over a radiator
or heat register. This video unit should not be placed
in a built-in installation such as a bookcase or rack
unless proper ventilation is provided or the
manufacturer’s instructions have been adhered to.
10. Power Sources — This video unit should be operated
only from the type of power source indicated on the
marking label. If you are not sure of the type of power
supply to your home, consult your appliance dealer
or local power company. For video units intended to
be operated from battery power, or other sources,
refer to the operating instructions.
11. Grounding or Polarization — This video unit may be
equipped with either a polarized 2-wire AC
(Alternating Current) line plug (a plug having one
blade wider than the other) or 3-wire grounding type
plug, a plug having a third (grounding) pin.
The 2-wire polarized plug will fit into the power outlet
only one way. This is a safety feature. If you are
unable to insert the plug fully into the outlet, try
reversing the plug. If the plug still fails to fit, contact
your electrician to replace your obsolete outlet. Do
not defeat the safety purpose of the polarized plug.
The 3-wire grounding type plug will fit into a
grounding type power outlet. This is a safety feature.
If you are unable to insert the plug into the outlet,
contact your electrician to replace your obsolete
outlet. Do not defeat the safety purpose of the
grounding type plug.
12. Power-Cord Protection — Power-supply cords
should be routed so that they are not likely to be
walked on or pinched by items placed upon or
against them, paying particular attention to cords of
plugs, convenience receptacles, and the point
where they exit from the unit.
13. Outdoor Antenna Grounding — If an outside
antenna or cable system is connected to the video
unit, be sure the antenna or cable system is
grounded so as to provide some protection against
voltage surges and built-up static charges. Part 1 of
the Canadian Electrical Code, in USA Section 810
of the National Electrical Code, provides information
with respect to proper grounding of the mast and
supporting structure, grounding of the lead-in wire to
an antenna discharge unit, size of grounding
conductors, location of antenna discharge unit,
connection to grounding electrodes, and
requirements for the grounding electrode.
ANTENNA
LEAD IN
WIRE
GROUND
CLAMP
ANTENNA
DISCHARGE UNIT
ELECTRIC
SERVICE
EQUIPMENT
-
NATIONAL ELECTRICAL CODE
NEC
(NEC SECTION 810-20)
GROUNDING CONDUCTORS
(NEC SECTION 810-21)
GROUND CLAMPS
POWER SERVICE GROUNDING
ELECTRODE SYSTEM
(NEC ART 250, PART H)
14. Lightning — For added protection of this video unit
receiver during a lightning storm, or when it is left
unattended and unused for long periods of time,
unplug it from the wall outlet and disconnect the
antenna or cable system. This will prevent damage
to the video unit due to lightning and power-line
surges.
Before Use
3
Page 4

Important Safeguards
15. Power Lines — An outside antenna system should
not be located in the vicinity of overhead power lines
or other electric light or power circuits, or where it can
fall into such power lines or circuits. When installing
an outside antenna system, extreme care should be
taken to keep from touching such power lines or
circuits as contact with them might be fatal.
16. Overloading — Do not overload wall outlets and
extension cords as this can result in a risk of fire or
electric shock.
17. Objects and Liquids — Never push objects of any
kind into this video unit through openings as they
may touch dangerous voltage points or short out
parts that could result in a fire or electric shock.
Never spill liquid of any kind onto the video unit.
18. Servicing — Do not attempt to service this video unit
yourself as opening or removing covers may expose
you to dangerous voltage or other hazards. Refer all
servicing to qualified service personnel.
19. Damage Requiring Service — Unplug this video unit
from the wall outlet and refer servicing to qualified
service personnel under the following conditions:
a. When the power-supply cord or plug is damaged.
b. If any liquid has been spilled into, or objects have
fallen onto, the video unit.
c. If the video unit has been exposed to rain or water.
d. If the video unit does not operate normally by
following the operating instructions. Adjust only
those controls that are covered by the operating
instructions, as an improper adjustment of other
controls may result in damage and will often
require extensive work by a qualified technician to
restore the video unit to its normal operation.
e. If the video unit has been dropped or the cabinet
has been damaged.
f. When the video unit exhibits a distinct change in
performance — this indicates a need for service.
20. Replacement Parts — When replacement parts are
required, be sure the service technician has used
replacement parts specified by the manufacturer or
have the same characteristics as the original part.
Unauthorized substitutions may result in fire, electric
shock or other hazards.
21. Safety Check— Upon completion of any service or
repairs to this video unit, ask the service technician to
perform safety checks to determine that the video
unit is in safe operating order.
Precautions
USE & LOCATION
• TO AVOID SHOCK HAZARD ... Your Palmcorder and power supply should not be exposed to rain or moisture. Do
not connect the power supply or operate your Palmcorder if it gets wet. Your Palmcorder has been designed for
outdoor use, however it is not designed to sustain direct exposure to water, rain, sleet, snow, sand, dust, or direct
splashing from a pool or even a cup of coffee. This action could permanently damage the internal parts of your
Palmcorder. Do not attempt to disassemble this unit. There are no user serviceable parts inside. Unplug your
Palmcorder from the power supply before cleaning.
• DO NOT AIM YOUR PALMCORDER AT THE SUN OR OTHER BRIGHT OBJECTS
• DO NOT LEAVE THE PALMCORDER WITH THE EVF AIMED DIRECTLY AT THE SUN AS THIS MAY CAUSE
DAMAGE TO THE INTERNAL PARTS OF THE EVF
• DO NOT EXPOSE YOUR PALMCORDER TO EXTENDED HIGH TEMPERATURE ... Such as, direct sunlight,
inside a closed car, next to a heater, etc... This action could permanently damage the internal parts of your
Palmcorder.
• AVOID SUDDEN CHANGES IN TEMPERATURE ... If the unit is suddenly moved from a cold place to a warm
place, moisture may form on the tape and inside the unit.
• DO NOT LEAVE YOUR PALMCORDER OR THE POWER SUPPLY TURNED ON WHEN NOT IN USE.
• STORAGE OF YOUR PALMCORDER ... Store and handle your Palmcorder in a manner that will not subject it to
unnecessary movement (avoid shaking and striking). Your Palmcorder contains a sensitive pick-up device which
could be damaged by improper handling or storage.
CARE
• TO CLEAN YOUR PALMCORDER ... Do not use strong or abrasive detergents when cleaning your Palmcorder
body.
• TO PROTECT THE LENS ... Do not touch the surface of the lens with your hand. Use a commercial Palmcorder
lens solution and lens paper when cleaning the lens. Improper cleaning can scratch the lens coating.
• TO PROTECT THE FINISH OF YOUR PALMCORDER ... Before handling your Palmcorder, make sure your hands
and face are free from any chemical products, such as suntan lotion, as it may damage the finish.
4
For assistance, please call : 1-800-211-PANA(7262) or send e-mail to : consumerproducts@panasonic.com
Page 5

Table of Contents
Things You Should Know ................................................................................................ 2
Important Safeguards ..................................................................................................... 3
Precautions .....................................................................................................................4
Before Using ....................................................................................................................6
• Easy Cassette Eject/Insertion ................................................................................... 7
• Self Demo Mode .......................................................................................................... 8
Quick Guide .....................................................................................................................9
Supplying Power ........................................................................................................... 11
Setting the Clock ...........................................................................................................13
Using the Palmcorder Menu......................................................................................... 14
Before Use
Camera Recording ........................................................................................................ 15
• Simple Recording .................................................................................................. 15
• Digital PhotoShot™ Mode ..................................................................................... 17
• Zoom ..................................................................................................................... 18
Special Effect Features................................................................................................. 20
Advanced Settings ........................................................................................................ 23
Playback Your Recordings ........................................................................................... 27
Special Effect Features................................................................................................. 29
Digital Features ............................................................................................................. 33
Editing Features ............................................................................................................ 38
PC Connection .............................................................................................................. 42
PHOTOVU LINK (Optional) ............................................................................................ 44
Palmcorder Accessory System ...................................................................................46
Palmcorder Accessory Order Form ............................................................................ 47
Notes On Operations .................................................................................................... 48
Specifications ................................................................................................................ 50
Before Requesting Service .......................................................................................... 51
Request for Service Notice .......................................................................................... 52
On-Screen Displays (OSD) ........................................................................................... 53
Limited Warranty ........................................................................................................... 54
Customer Services Directory ...................................................................................... 55
Spanish Quick Use Guide/Guía Para Uso Rápido ......................................................56
MENU OSD ..................................................................................................................... 59
Electronic Viewfinder/LCD Monitor Indications ..........................................................63
Index of Controls ...........................................................................................................65
Index ............................................................................................................... Back Cover
Camera VCR
Special Features
For Your Information
5
Page 6

Mini
Before Using
Unpack your Palmcorder
1 pc. AC Adaptor
(PV-DAC11) with AC Cable
and DC Cable
1 pc. Battery Pack
(CGR-D08/CGR-D08R)
1 pc. A/V Cable
(LSJA0452)
1 pc. Lens Cap (LSYF0521)
with Lens Cap Strap
(LSGQ0066)
Microsoft® and Windows® are registered trademarks of Microsoft in the United States
and other countries.
Intel® Pentium® is a registered trademark.
i.LINK is a trademark.
PHOTOVU LINK is a registered trademark.
IBM is a registered trademark of IBM Company.
1 pc. Shoulder Strap
(LSFC0012)
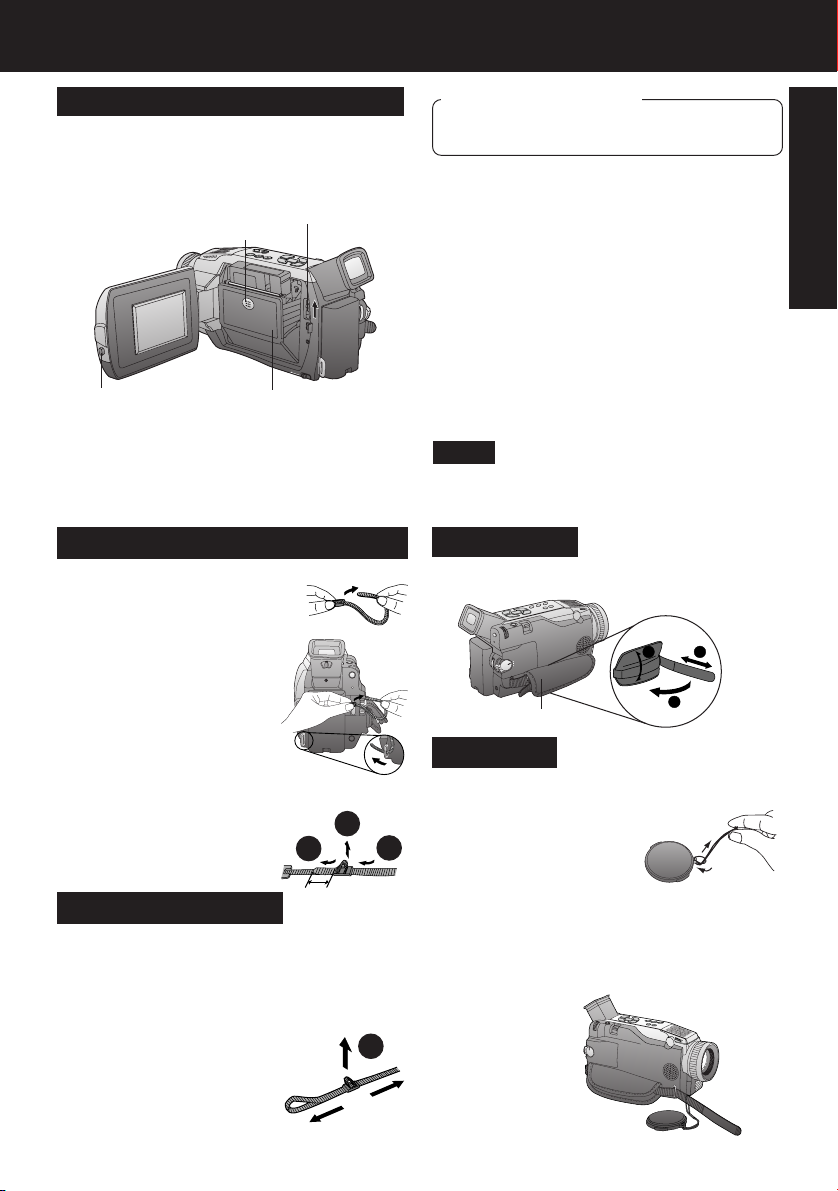
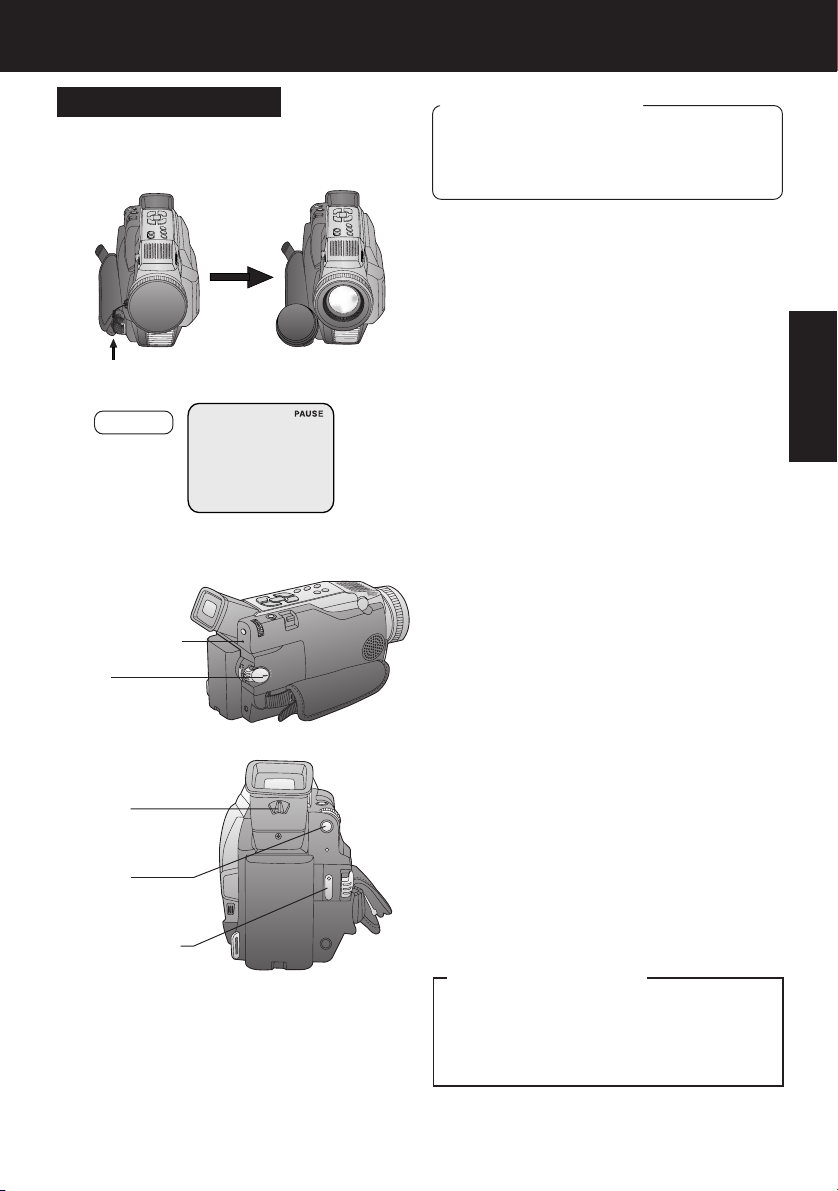
How to remove the Sensor tag
Open the Hand Strap as illustrated
1
at left.
1
Hand Strap
2
Record Speed/Playback Time
Use only those tapes having the
logo indicating the 6.35 mm digital
standard.
Record Speed/
Cassette type
AY-DVM30EJ
AY-DVM60EJ
AY-DVM80EJ 80 minutes 120 minutes
Playback time
SP
30 minutes
60 minutes
LP
45 minutes
90 minutes
Remove the Sensor tag.
2
Then, replace the Hand Strap.
Erase Protection
Cassettes have a sliding record tab to
ensure recordings are not accidentally
erased.
1 To prevent accidental erasure:
Slide the tab to the left (open).
record tab
2 To record again:
Slide the tab to the right (close).
6
For assistance, please call : 1-800-211-PANA(7262) or send e-mail to : consumerproducts@panasonic.com
Page 7
Before Using
Easy Cassette Eject/Insertion
• If the Palmcorder is connected to a power
source, the cassette can be inserted and
ejected without turning the Palmcorder
on.
1LCD-OPEN
4PUSH
CLOSE
Cassette Compartment
Cover
2TAPE EJECT
Attaching the Shoulder Strap
1 Undo the two strap ends
from their buckles.
2 Thread the strap ends
through the Strap
Attachment Rings.
Before you begin
• Connect the Palmcorder to a power
source. (pp. 11, 12)
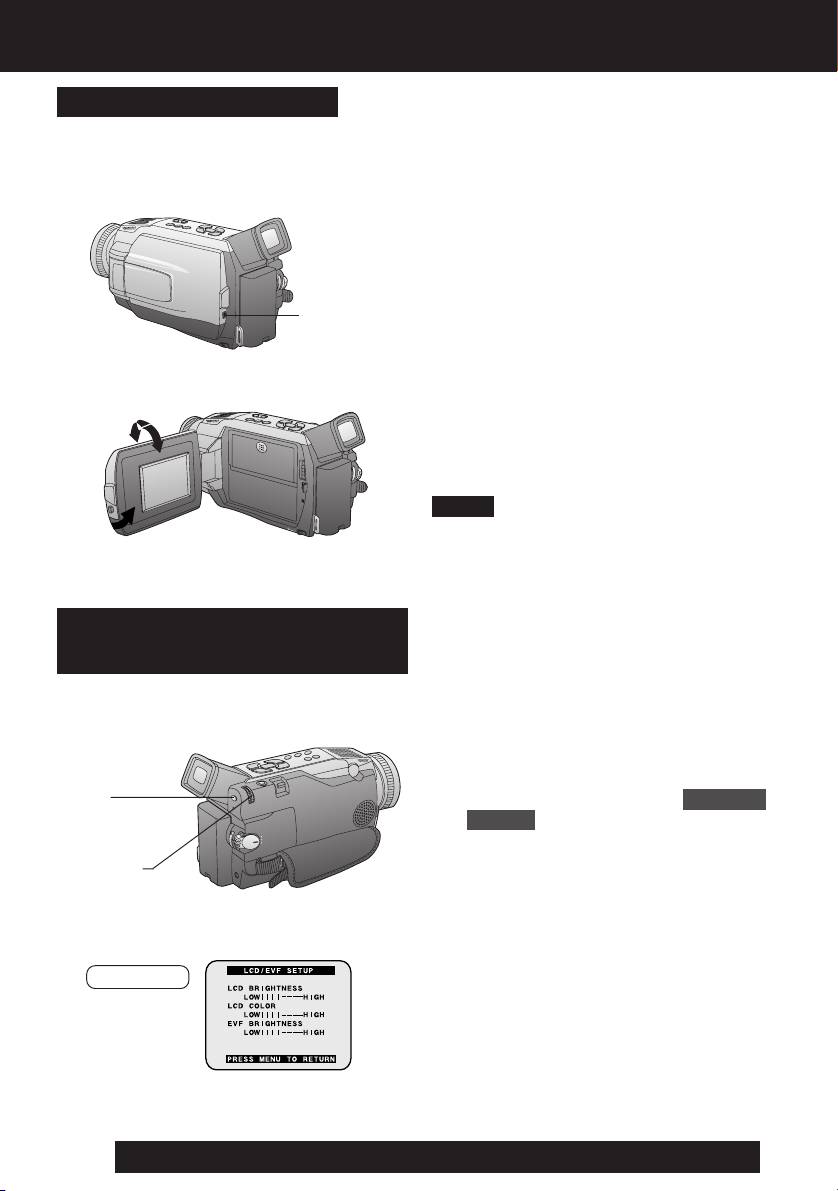
1 Press LCD-OPEN to unlock the LCD
monitor, and swing it fully open.
2 Slide TAPE EJECT to open the
Cassette Compartment Cover.
3 Insert a cassette record tab up,
window side facing out.
4 Press PUSH CLOSE to close the
Cassette Compartment Cover.
• To remove the cassette...
Slide TAPE EJECT to open the Cassette
Compartment Cover and pull the cassette
tape straight out.
Note
• When inserting the cassette, make sure it
is facing the right direction and then push
it in completely.
Hand Strap
Adjust the length of the Hand Strap to the
size of your hand as illustrated.
2
1
Hand Strap
3
Before Use
3 Reinsert the strap ends through their
buckles.
• Make sure the straps
are not twisted.
Adjust the Length
2
3
1
1 Loosen the strap from the Buckle and
create a loop.
2 Pull the strap firmly through the
Buckle to shorten or lengthen the
strap.
1
OR
Lens Cap
Attaching the Lens Cap Strap:
Thread the Lens Cap Strap through the
Strap Attachment Ring as shown.
Attaching the Lens Cap Strap to the
Hand Strap:
Remove the Hand Strap from the front
clasp and thread the Strap through the loop
in the Lens Cap Strap.
Reattach the Hand Strap.
7
Page 8
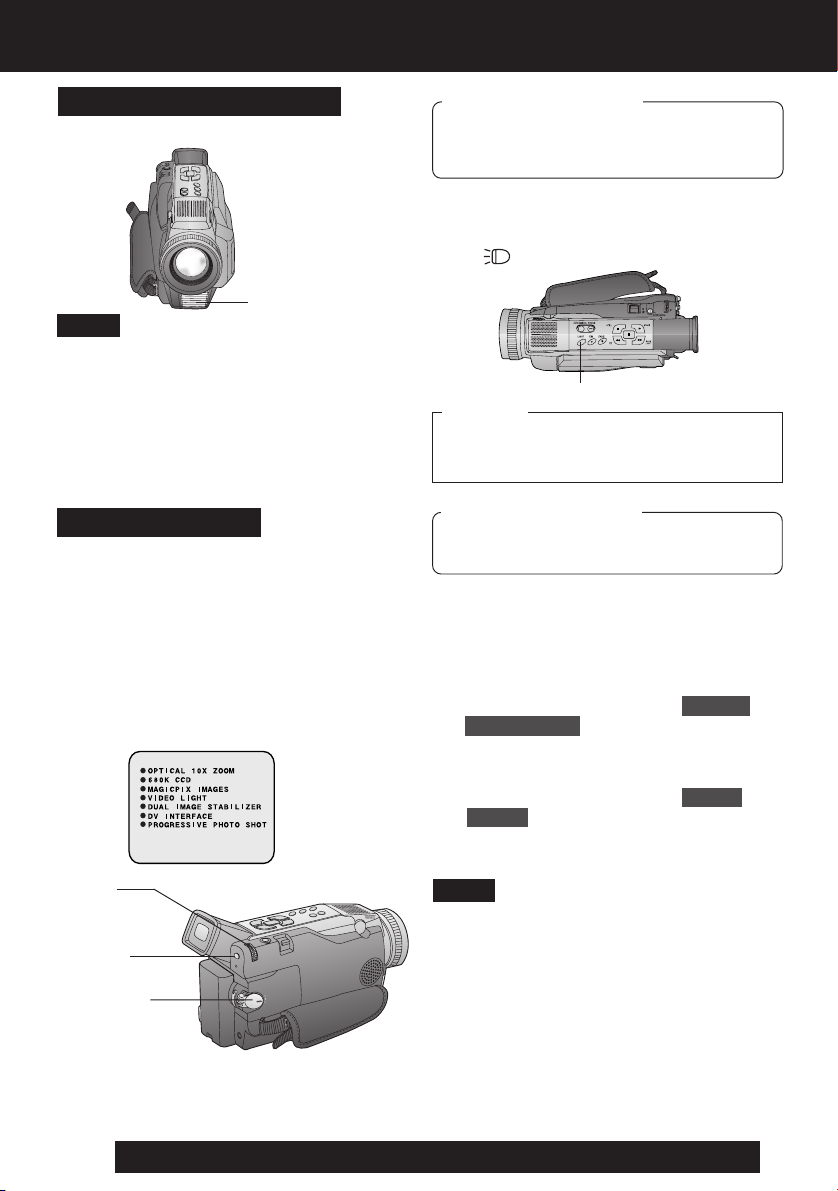
Before Using
Using the Built-in Light
To brighten the natural colors in a scene.
Built-in Light
Note
• Using Light reduces battery time.
• Provide adequate ventilation if using
Light in a hot environment for a long time.
• Set LIGHT to OFF when not in use.
• When replacing the bulb, see page 48.
Self Demo Mode
If no operation takes place for approx.
10 minutes after the AC Adaptor was
connected to the Palmcorder and the
POWER Switch was turned to CAMERA
without inserting a Cassette, the
Palmcorder is automatically set to Self
Demo mode for introducing its function.
To turn it off, follow steps 1~4 below.
[ EVF or LCD Monitor ]
3, 4
JOG KEY
2MENU
1POWER
Before you begin
• Connect the Palmcorder to a power
source. (pp. 11, 12)
• Set POWER to CAMERA.
1 Hold down LIGHT for more than
0.7 second to turn ON or OFF.
•“
” will appear on the screen.
1LIGHT
Caution
This light becomes hot during operation.
Make sure nothing covers the light during
operation.
Before you begin
• Connect the Palmcorder to a power
source. (pp. 11, 12)
1 Set POWER to CAMERA.
2 Press MENU to display the CAMERA
FUNCTIONS menu screen.
3 Rotate JOG KEY to select OTHER
FUNCTIONS , and press JOG KEY to
display the OTHER FUNCTIONS menu
screen.
4 Rotate JOG KEY to select DEMO
MODE , and press JOG KEY to select
OFF.
• Press MENU to exit.
Note
• If any button is pressed or operated
(except PLAY/MULTI, ZOOM and LIGHT),
the Self Demo mode is canceled.
• The Self Demo mode can be started by
setting DEMO MODE to ON and by
exiting the menu.
To turn Self Demo back on:
• Set to DEMO MODE : ON in MENU
screen.
8
For assistance, please call : 1-800-211-PANA(7262) or send e-mail to : consumerproducts@panasonic.com
Page 9
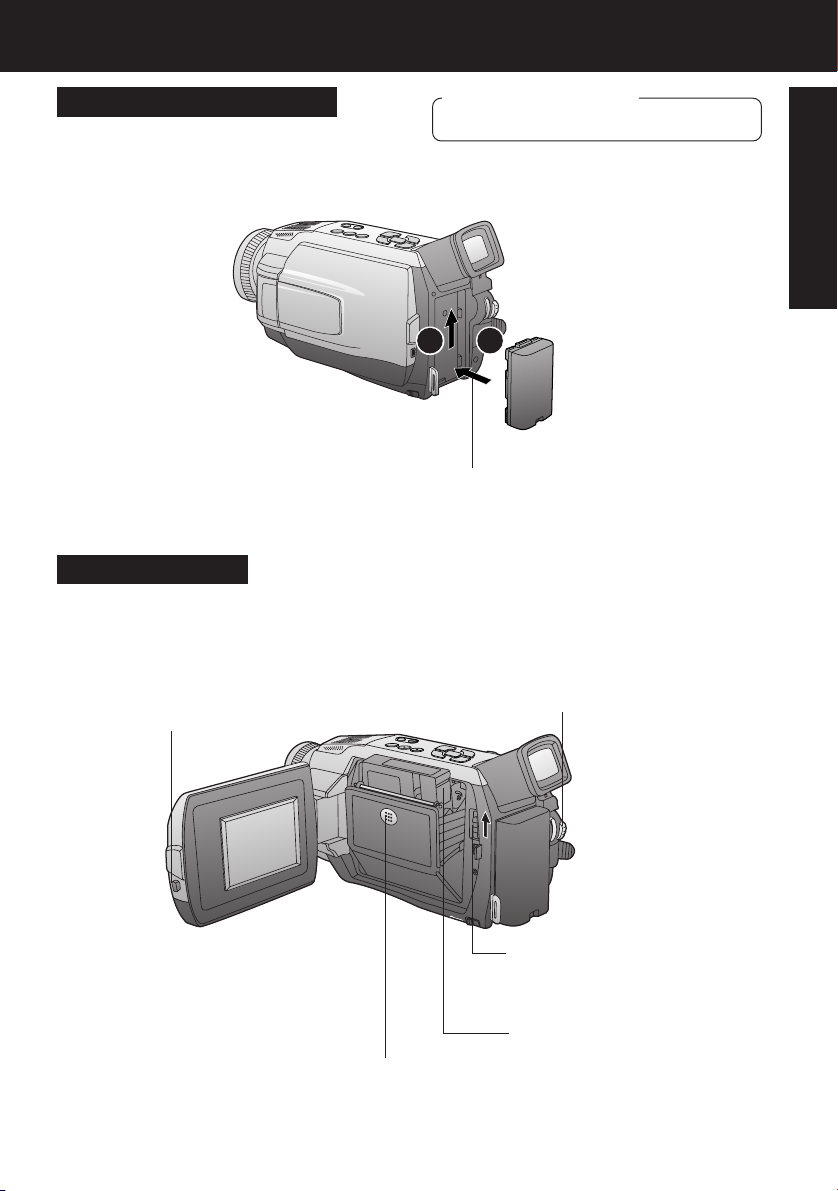
Quick Guide
Insert the Battery Pack
Before you begin
• Charge the Battery. (p. 11)
12
1 Insert the Battery Pack and slide
it up until it locks with a click.
Insert Cassette
These Palmcorders are equipped with the Easy Cassette Eject System so
it is easy to insert or remove tapes, even when on a tripod. (p. 7)
Before Use
1 Press LCD-OPEN to unlock the LCD
monitor, and swing it fully open.
5 Press PUSH CLOSE mark to
close the Cassette
Compartment Cover.
2Set POWER to VCR or
CAMERA.
3 Slide TAPE EJECT to open
the Cassette Compartment
Cover.
4 Insert a cassette record tab
up, window side facing out.
• Make sure the record tab
is closed. (p. 6)
9
Page 10
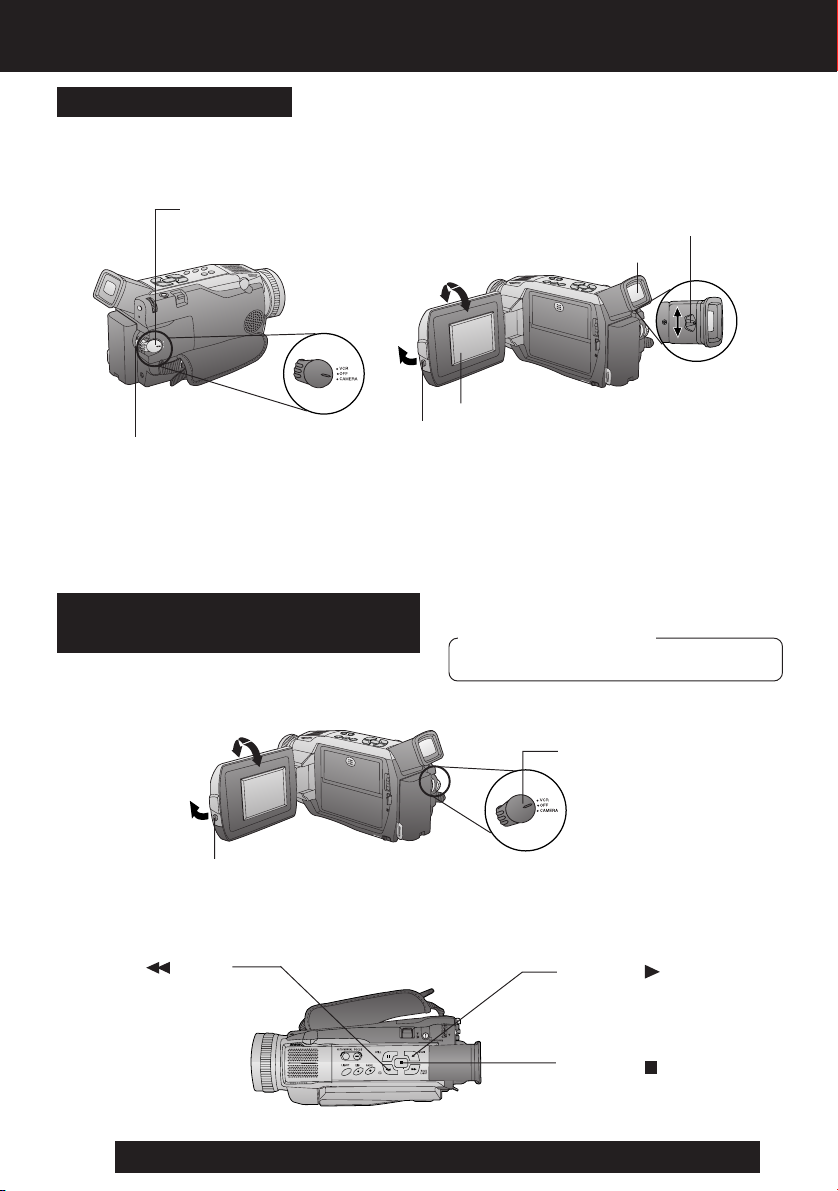
Quick Guide
Camera Recording
When the LCD monitor is fully open, the
Viewfinder automatically turns OFF.
1 Set POWER to CAMERA.
4 Press REC/PAUSE to start recording.
Press REC/PAUSE again to pause
recording.
To Watch Playback in the LCD
(Liquid Crystal Display)
When the LCD monitor is fully open, the
Viewfinder automatically turns OFF.
180°
90°
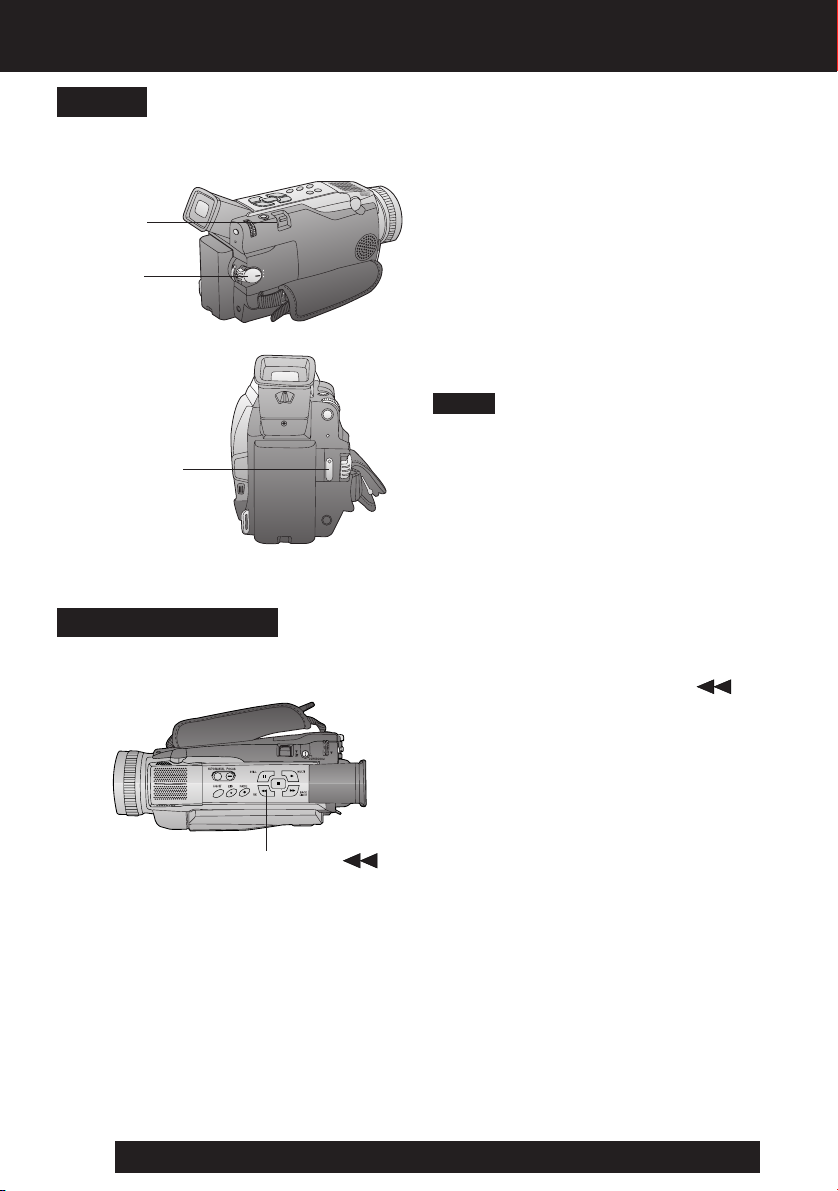
2 Adjust the Vision Adjustment
Control to your eyesight.
Viewfinder
180°
90°
LCD Monitor
3 Press LCD-OPEN to unlock
the LCD monitor. Swing it fully
open and adjust the angle.
Before you begin
• Charge the Battery. (p. 11)
1Set POWER to VCR.
2 Press LCD-OPEN to unlock the LCD
monitor. Swing it fully open and
adjust the angle.
3 Press (REW)
to rewind the tape.
10
For assistance, please call : 1-800-211-PANA(7262) or send e-mail to : consumerproducts@panasonic.com
4Press (PLAY) to start
playback.
5 Press (STOP) to stop
playback.
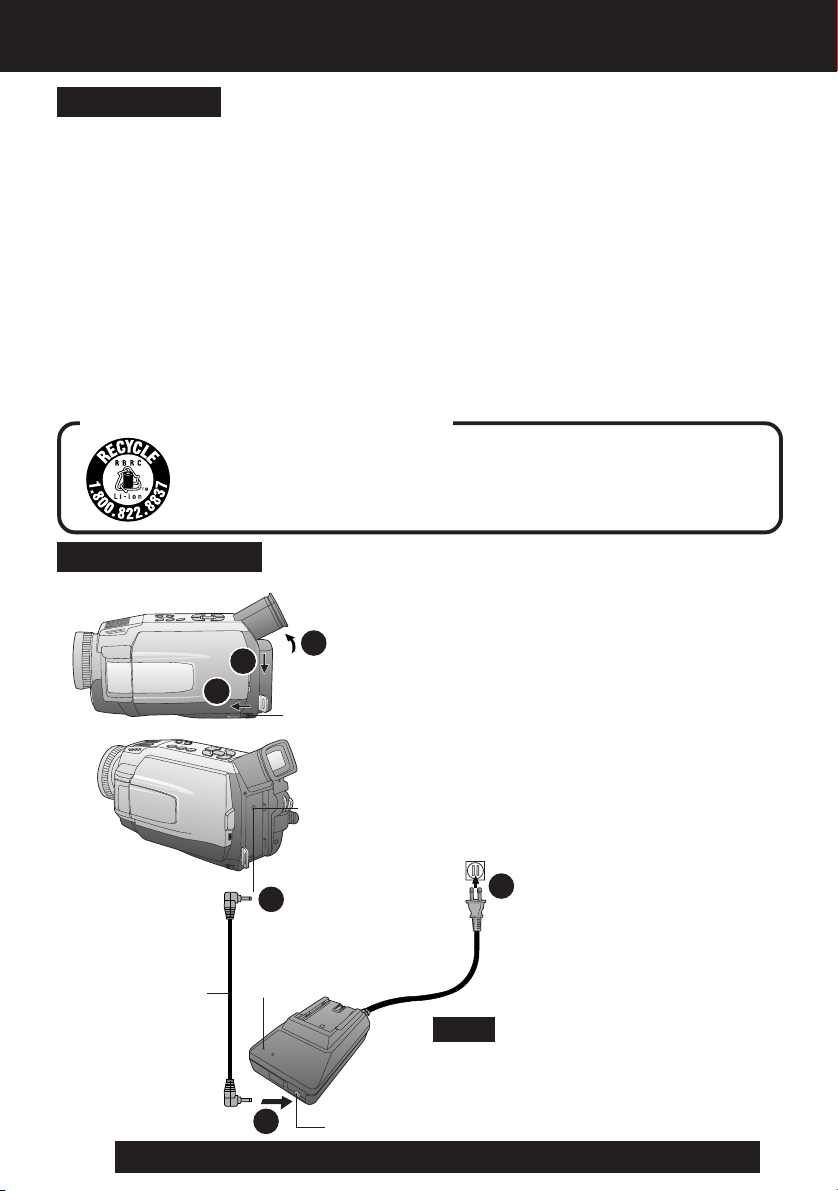
Page 11

Supplying Power
Charge the Battery Pack on
the AC Adaptor
1Connect and plug in the Power Cord
as shown.
• POWER Lamp will light.
• Remove the DC Cable, if attached,
from the adaptor.
2Attach the Battery as shown to
POWER Lamp
charge.
• CHARGE Lamp lights up. It goes out
when charging is complete (approx.
1 hour). Expect approx. 1 hour
50 minutes of operation (using EVF)
when fully charged.
3Remove the Battery.
CHARGE Lamp
Note
About the Flashing of the CHARGE Lamp
• Charge the Battery within an ambient temperature range of 10 °C (50 °F) and
30 °C (86 °F).
• If charging is done in extreme low or high temperatures, Battery charge time increases.
CHARGE Lamp flashes when...
• The Battery is being charged, but charging is taking longer than normal.
• Charging is not possible. Remove the Battery once, wait a short time, then re-attach it
for charging.
Slide the Battery out and then lift up.
Before Use
Insert the Battery Pack
2
1
1 Insert the Battery Pack and slide it up
until it locks with a click.
Remove the Battery Pack
1
3
2
BATT RELEASE
1 Tilt Viewfinder upward.
2 Remove the Battery Pack and slide
the Battery downward while sliding the
BATT RELEASE.
11
Page 12
Supplying Power
Battery Care
Caution:
• Charge only with specified charger.
• Charge the Battery within an ambient
temperature range of 10 °C (50 °F) and
30 °C (86 °F).
• The Battery may be warm after charging or just
after use. This is normal.
• Do not use an insufficiently charged or worn out
Battery.
• If charging is done in extreme low or high
temperatures, Battery charge time increases.
Safety precautions:
• Do not place the Battery near, or dispose of in fire.
• Do not directly connect (short circuit) the positive
(+) and negative (–) terminals.
• Never attempt to disassemble or reassemble the
Battery.
U.S.A. CONSUMERS: ATTENTION:
A lithium ion/polymer battery that is recyclable powers the product
you have purchased. Please call 1-800-8-BATTERY for information
on how to recycle this battery.
Use AC Adaptor
To avoid damage to the Battery:
• Do not drop or jar the Battery.
• Use the Battery with specified models only.
• If the Battery is used in extremely high
temperatures, a safety device will automatically
prevent operation.
To insure longer battery life:
• While not in use, remove Battery from the
Palmcorder and AC Adaptor and store in a
cool, dark, dry place. If you leave the Battery in
the Palmcorder or on the AC Adaptor, the Battery
will no longer be rechargeable.
• Keep the Battery terminals clean.
12
3
1
2
BATT RELEASE
sliding the BATT RELEASE to remove
the Battery Pack. (p. 11)
2 Insert the DC Cable into the DC IN
Terminal.
3 Connect the other end of the DC
Cable to the AC Adaptor as shown.
1 Slide the Battery downward while
DC IN Terminal
1
POWER
DC Cable
(Supplied)
For assistance, please call : 1-800-211-PANA(7262) or send e-mail to : consumerproducts@panasonic.com
Lamp
2
DC Output Connector
4 Plug in the AC Adaptor.
• The POWER Lamp on the AC
Adaptor lights up.
3
Note
• When not in use, unplug the AC Adaptor
from the AC outlet. (AC Adaptor consumes
1 W of electric power when plugged into
an AC outlet even when not in use.)
Page 13
Setting the Clock
Set the Date and Time
The date and time is calculated, including
leap year, up to DEC 31 2089.
2, 3, 4
JOG KEY
1MENU
EXAMPLE:
YEAR
MONTH
: 2003
PUSH
: JAN
PUSH
Push
Rotate
Before you begin
• Connect the Palmcorder to a power
source. (pp. 11, 12)
• Set POWER to CAMERA or VCR.
1 Press MENU to display the Camera or
VCR mode menu screen.
(p. 14)
CAMERA
FUNCTIONS
VCR
FUNCTIONS
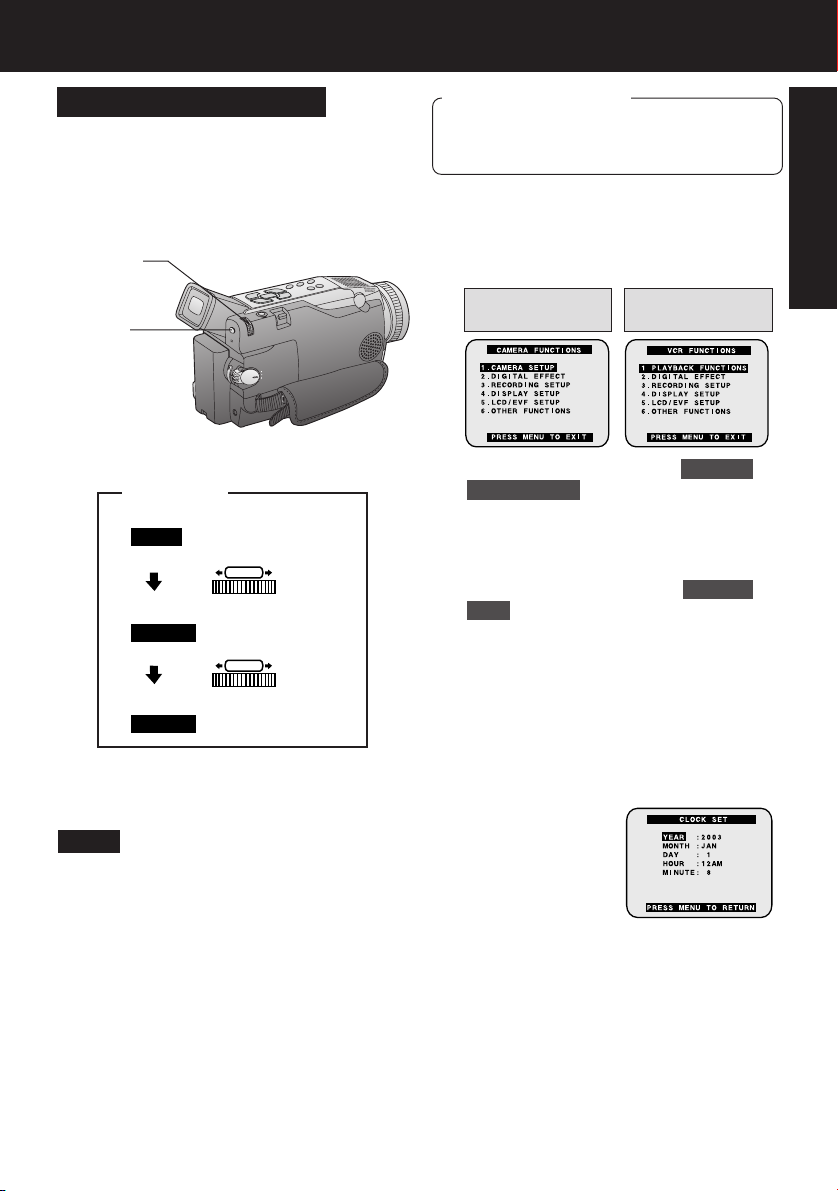
2 Rotate JOG KEY to select OTHER
FUNCTIONS , and then press JOG
KEY to display the OTHER
FUNCTIONS menu screen.
3 Rotate JOG KEY to select CLOCK
SET , and then press JOG KEY to set
to ON. (Menu OSD: pp. 60, 62)
• The CLOCK SET menu screen is
displayed.
Before Use
MONTH
Note
• To make corrections,
Press JOG KEY repeatedly to move back
to an item and correct.
• A built-in Battery maintains clock
operation. If the Palmcorder is not
connected to a power source for a few
months, the built-in battery may discharge
and “CLOCK BATTERY” indication
appears. (p. 53)
: FEB
4 Rotate JOG KEY to select YEAR, then
press JOG KEY to fix and move to the
next item. Likewise, set the month,
day, hour, and minute.
When CLOCK SET setting is
completed, press MENU twice to start
the clock and exit.
13
Page 14
Using the Palmcorder Menu
The Palmcorder features two menu
displays: one for CAMERA mode
(recording) and the other for VCR mode
(Playback). (pp. 59~62)
• While the Menu screen is displayed, you
cannot record on or play a tape.
• While recording, the Menu screen cannot
be displayed.
• During playback, the Menu screen can be
displayed.
Before you begin
• Connect the Palmcorder to a power
source. (pp. 11, 12)
• Set POWER to CAMERA or VCR.
2, A, B, C
JOG KEY
1, D
MENU
Displaying the MENU
1Press MENU to display the CAMERA
or VCR menu (according to the
POWER setting).
2Rotate JOG KEY to select a menu
item.
Setting the MENU Items
(EX. VCR Mode menu)
APress JOG KEY to set your selection.
BRotate JOG KEY to select a menu
item.
CPress JOG KEY to set your selection.
• The “ ” mark indicates selection.
DPress MENU to exit the menu.
CAMERA Main menu
1 : CAMERA SETUP
To select PROG. AE, PROGRESSIVE,
D. ZOOM, or CINEMA.
2 : DIGITAL EFFECT
To select EFFECT.
3 : RECORDING SETUP
To select REC SPEED, AUDIO REC, or
SCENEINDEX.
4 : DISPLAY SETUP
To select DATE/TIME, C. DISPLAY,
C. RESET, or DISPLAY.
5 : LCD/EVF SETUP
To select LCD BRIGHTNESS, LCD
COLOR, or EVF BRIGHTNESS.
6 : OTHER FUNCTIONS
To select BEEP SOUND, SHTR
EFFECT, CLOCK SET, SELF REC, or
DEMO MODE.
14
For assistance, please call : 1-800-211-PANA(7262) or send e-mail to : consumerproducts@panasonic.com
VCR Main menu
1 : PLAYBACK FUNCTIONS
To select BLANK SEARCH, 12 bit
AUDIO, or MULTI SPEED.
2 : DIGITAL EFFECT
To select EFFECT1, EFFECT2, or
D. ZOOM.
3 : RECORDING SETUP
To select REC SPEED or AUDIO DUB.
4 : DISPLAY SETUP
To select DATE/TIME, C. DISPLAY,
C. RESET, or DISPLAY.
5 : LCD/EVF SETUP
To select LCD BRIGHTNESS, LCD
COLOR, or EVF BRIGHTNESS.
6 : OTHER FUNCTIONS
To select CLOCK SET.
Page 15
Camera Recording
Simple Recording
Remove the lens cap and clip it to the hand
strap.
Clip here
EVF
REC/PAUSE mode
POWER Lamp
1, 5
POWER
Before you begin
• Connect the Palmcorder to a power
source. (pp. 11, 12)
• Insert a cassette with the record tab
closed. (p. 6)
1 Set POWER to CAMERA.
• The POWER Lamp lights red.
• Be sure POWER is fully turned to the
CAMERA position.
Camera
2 With the Viewfinder Eye Cup held up
against your eye, adjust the Vision
Adjustment Control to your eyesight.
• Adjust the EVF Brightness of the
Viewfinder if necessary.
Please refer to “To adjust the LCD/
EVF BRIGHTNESS or COLOR” on
page 16.
3 Set to REC SPEED “SP” or “LP” in
the RECORDING SETUP menu
screen.
(Menu OSD: p. 59)
4 Press REC/PAUSE to start recording.
•“REC” is displayed on the screen.
Press REC/PAUSE again to pause
recording.
2Vision
Adjustment
Control
3MENU
4REC/PAUSE
WARNING:
• Do not leave the Palmcorder with the
EVF aimed directly at the sun as this
may cause damage to the internal parts
of the EVF.
• Do not lift, or carry, the Palmcorder
by the EVF or the LCD Monitor.
5 Set POWER to OFF when finished.
• To remove the cassette, slide TAPE
EJECT.
• When the Palmcorder is aimed at
excessively bright objects, or bright lights,
a vertical bar may appear in the picture.
This is a normal characteristic of the CCD
pick-up device. Try to avoid this whenever
possible.
To conserve power
After 5 minutes, the Record/Pause mode
will automatically change to Standby
mode.
To resume recording, set POWER to
OFF and then ON again.
15
Page 16
Camera Recording
Using the LCD Monitor
The LCD (Liquid Crystal Display) monitor
can be used while recording.
1LCD-OPEN
180°
1Press LCD-OPEN to unlock the LCD
monitor.
2 Swing the LCD monitor fully open
and adjust the viewing angle.
• The LCD monitor will automatically
turn on.
• When the LCD monitor is completely
closed, it will shut off automatically to
save power.
• Adjust the LCD Brightness and/or
color of the LCD monitor if necessary.
Please refer to “To adjust the LCD/
EVF BRIGHTNESS or COLOR”
below.
90°
90°
To adjust the LCD/EVF
BRIGHTNESS or COLOR
1, 5
MENU
2, 3, 4
JOG KEY
EVF/LCD
3 Start recording.
Note
• Using the LCD monitor will reduce battery
operating time.
• Close the LCD monitor completely when
not in use.
1Press MENU to display the main menu
screen.
2 Rotate JOG KEY to select LCD/EVF
SETUP from the main menu screen.
(Menu OSD: pp. 60, 62)
3 Press JOG KEY to display the LCD/
EVF SETUP screen.
4 Press JOG KEY to select LCD
BRIGHTNESS, LCD COLOR, or
EVF BRIGHTNESS, then rotate JOG
KEY to adjust.
16
5 Press MENU twice to exit this mode.
For assistance, please call : 1-800-211-PANA(7262) or send e-mail to : consumerproducts@panasonic.com
Page 17

Digital PhotoShot™ Mode
Use this feature to record a seven second
(approx.) still image from the current camera
picture. Audio is also recorded for on-thespot narration. Or, you can add narration
later with the Audio Dubbing feature to make
an interesting slide show, etc. (p. 38)
Camera Recording
1 Set POWER to CAMERA.
2 Press PHOTOSHOT in Record/Pause
mode. “PHOTO” will appear in the
EVF or the LCD monitor.
EVF/LCD
1POWER
2PHOTOSHOT
Progressive PhotoShot™
Mode
With the progressive PhotoShot Function,
you can record still pictures with higher
resolution than with the normal PhotoShot
Function.
5
PHOTOSHOT
3, 4
JOG KEY
1POWER
2MENU
Camera
Note
• If SHTR EFFECT on the OTHER
FUNCTIONS menu screen is set to ON, a
sound effect similar to the shutter of a film
camera will be heard when PHOTOSHOT
is pressed.
• When PHOTOSHOT is pressed, the
playback image takes approx. 7 seconds
to process. After that, the Camera mode
screen will be displayed.
1 Set POWER to CAMERA.
2 Press MENU to display the CAMERA
FUNCTIONS menu screen.
3 Rotate JOG KEY to select CAMERA
SETUP , and press JOG KEY to
display the CAMERA SETUP menu
screen.
4 Rotate JOG KEY to select
PROGRESSIVE , and press JOG
KEY to select ON.
• Press MENU to exit.
•“ P ” will appear in the EVF or the
LCD monitor.
5 Press PHOTOSHOT in Record/Pause
mode.
EVF/LCD
Note
• This Function may not work with some
function settings.
17
Page 18
Camera Recording
Zoom
You can gradually zoom in for close ups or
zoom out for wide angle shots.
1 Set POWER to CAMERA.
2POWER
ZOOM
1POWER
3REC/PAUSE
Recording Check
To playback the final few seconds of the
last recorded scene in the REC/PAUSE
mode.
2 Zoom slowly:
by lightly pressing the “T” (Telephoto)
or the “W” (Wide Angle) side of the
POWER ZOOM.
Zoom quickly:
by applying more pressure.
3 Start recording.
Note
• The zooming speed ranges from a slow
17 seconds to a fast 1.5 seconds
according to the amount of pressure
applied to the POWER ZOOM.
1Press RECORDING CHECK
briefly in the REC/PAUSE mode.
The [CHK] indication appears.
After checking, the Palmcorder returns
to the REC/PAUSE mode.
18
• For Recording Check, the Palmcorder
must be in the same mode (SP or LP) as
was used for recording, otherwise the
1RECORDING CHECK
For assistance, please call : 1-800-211-PANA(7262) or send e-mail to : consumerproducts@panasonic.com
playback picture is distorted.
Page 19
Recording Still Pictures
You can record still pictures of any desired
duration together with sound.
1, 2STILL
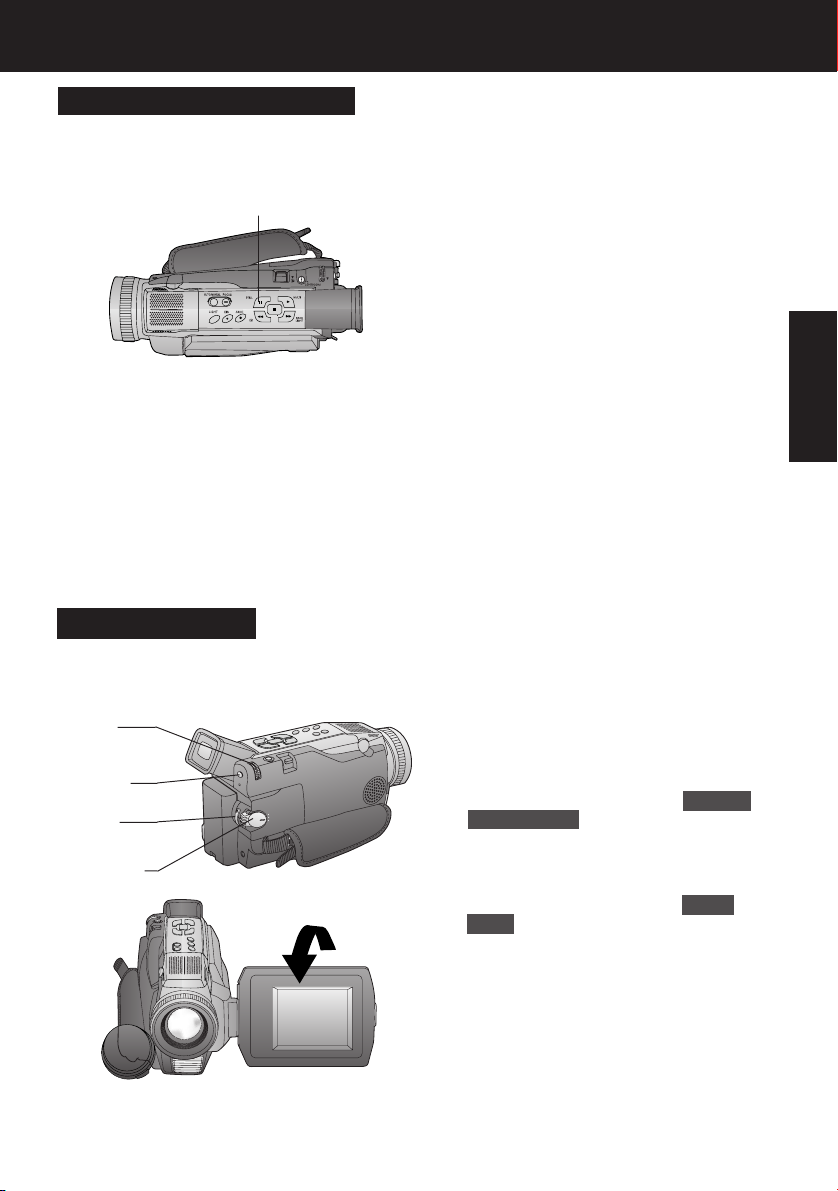
Self Recording
Rotate the LCD monitor 180 degrees so it
faces the same direction as the lens to
record yourself.
Camera Recording
1 While in RECORD mode, press STILL
and hold for 2 seconds to capture a
still picture. The captured still picture
will be recorded together with sound.
2 Press STILL once again to release
the still picture. The camera will
resume recording real-time pictures.
1 Set POWER to CAMERA.
Camera
3, 4
JOG KEY
2MENU
5REC/
PAUSE
1POWER
180°
2 Press MENU to display the CAMERA
FUNCTIONS menu screen.
3 Rotate JOG KEY to select OTHER
FUNCTIONS , then press JOG KEY
to display the OTHER FUNCTIONS
menu screen.
4 Rotate JOG KEY to select SELF
REC , and then press JOG KEY to
select MIRROR. (Menu OSD: p. 60)
• Press MENU to exit.
• The picture in the LCD monitor will
appear reversed.
5 Start recording.
19
Page 20

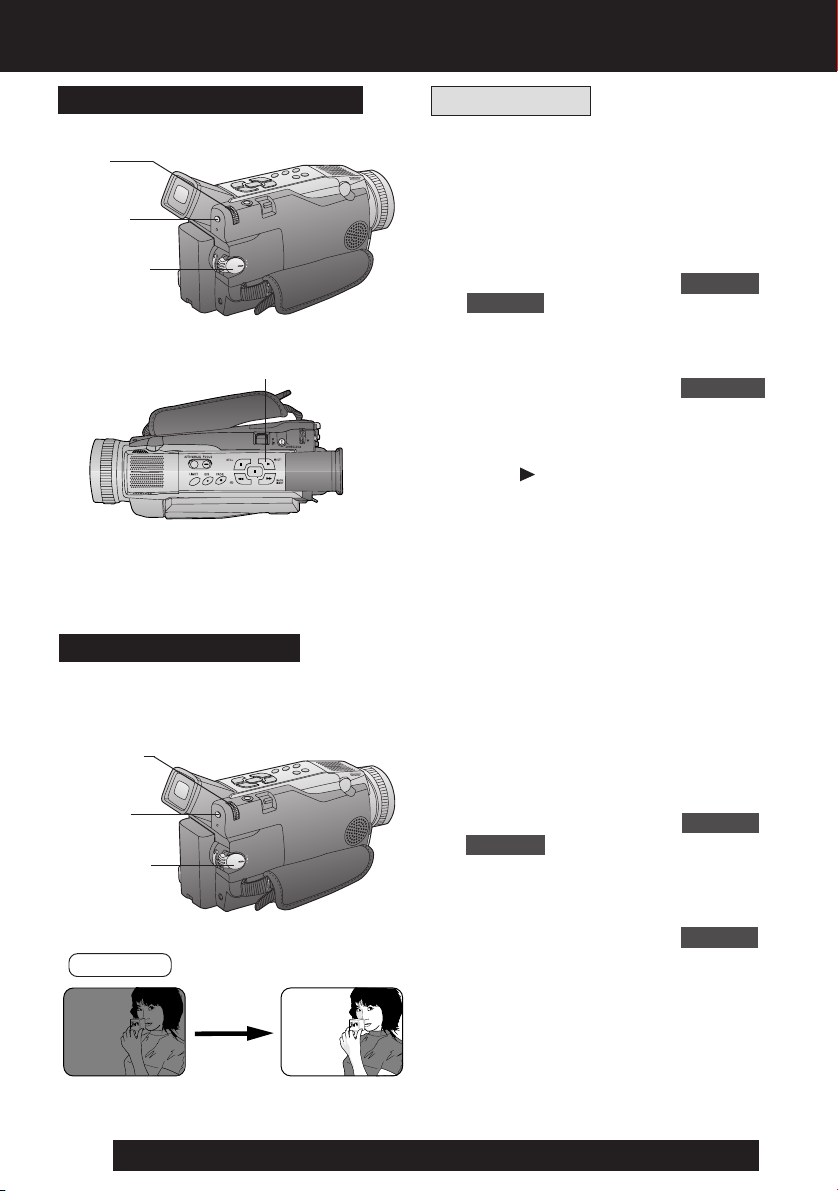
Special Effect Features
CINEMA Mode
You can record a picture compatible with a
wide-screen TV equipped with an S-Video
picture terminal and Zoom/Wide features.
1Set POWER to CAMERA.
2Press MENU to display the CAMERA
FUNCTIONS menu screen.
3, 4
JOG KEY
1POWER
3Rotate JOG KEY to select CAMERA
SETUP , then press JOG KEY to
display the CAMERA SETUP menu
screen.
4Rotate JOG KEY to select CINEMA ,
and then press JOG KEY to select
2MENU
5REC/PAUSE
ON.
• A black strip will appear at the top
and bottom of the picture.
• Press MENU to exit.
•“CINEMA” will appear on the screen.
5Start recording.
Backlight
Use when recording a subject that is darker
than the surrounding scene, is in a
shadowed area, or when the light source is
in back of your subject.
1 Set POWER to CAMERA.
2 Press BACK LIGHT to activate the
Backlight feature.
• The Indicator “
EVF or LCD monitor.
EVF/LCD
” will appear in the
1POWER
20
For assistance, please call : 1-800-211-PANA(7262) or send e-mail to : consumerproducts@panasonic.com
2, 3BACK LIGHT
3 Press BACK LIGHT again to cancel
the Backlight feature.
EVF/LCD
Note
• The Indicator “
EVF or LCD monitor when OFF is
selected in the DISPLAY menu.
” will not appear in the
Page 21
Special Effect Features
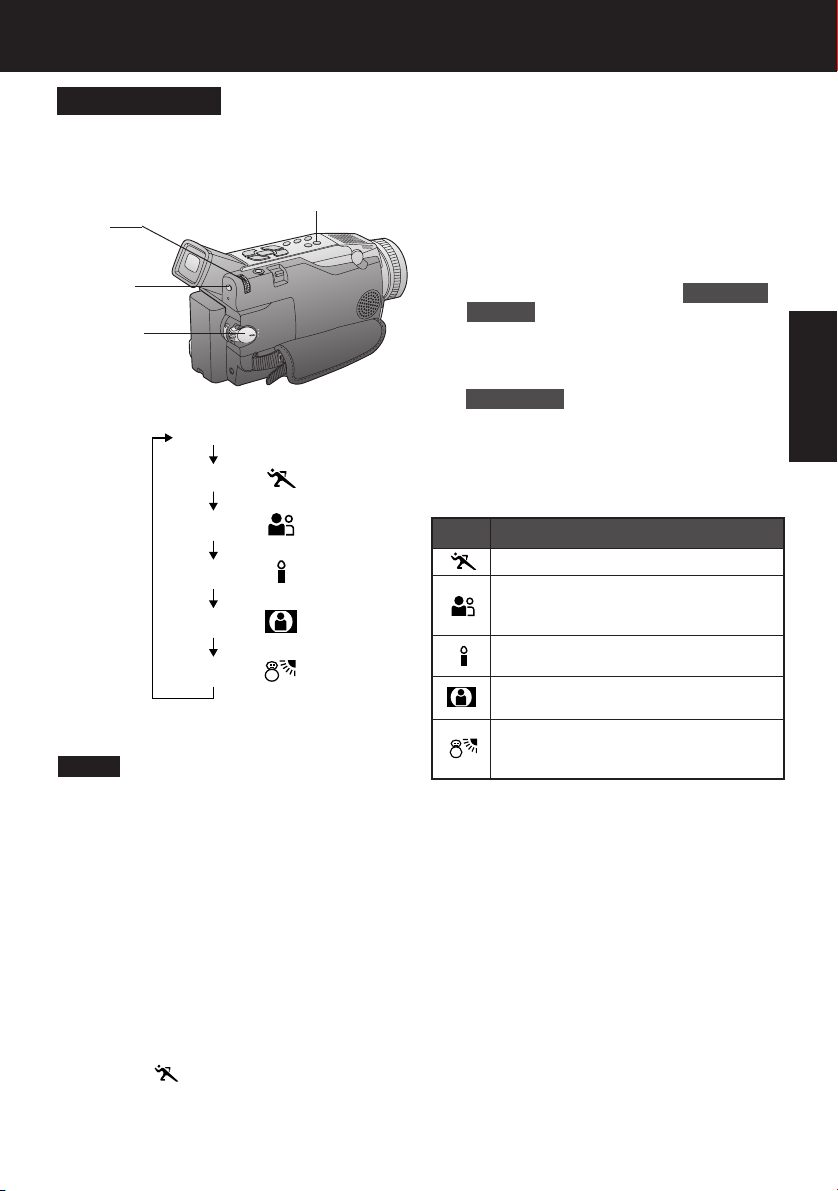
Program AE
The Auto Exposure feature can be used to
make quality recordings in a variety of
scene situations.
2AUTO/MANUAL
4, 5
JOG KEY
3MENU
1POWER
(No display)
SPORTS
PORTRAIT
LOW-LIGHT
SPOT-LIGHT
SURF&SNOW
Note
SPORTS mode
• The recorded images will not be so blurred
when they are viewed later using slow or
still picture playback.
• When playing back a sports mode
recording, the movement may appear
slightly jerky.
• Do not use this mode when recording
under fluorescent, mercury, or sodium
lighting. These types of lights will affect
the color and brightness of the images.
• A vertical band of light might appear when
recording objects that are brightly
illuminated or highly reflective.
• If the amount of light is insufficient, the
SPORTS “
EVF or the LCD monitor.
• The image may flicker if this mode is
used indoors.
” indicator will flash in the
1 Set POWER to CAMERA.
2 Hold down AUTO/MANUAL for more
than 0.7 second so that the “MNL”
indication appears in the EVF or the
LCD monitor.
3 Press MENU to display the CAMERA
FUNCTIONS menu screen.
4 Rotate JOG KEY to select CAMERA
SETUP , and then press JOG KEY to
display the CAMERA SETUP menu
screen.
5 Rotate JOG KEY to select
PROG. AE , then press JOG KEY
repeatedly to select one of the five
modes shown below.
• Press MENU to exit.
6 Repeat steps 2~5 to select OFF to
cancel this feature.
Mode
For recording fast action scenes.
For recording only subjects in the
foreground, while ignoring
subjects in the background.
For recording in extreme low light
conditions.
Recording in situations where
subjects are under a spotlight(s).
For recording in locations with a
high degree of “Dazzle,” such as
snow slopes and the seashore.
PORTRAIT mode
• The image may flicker if this mode is
used indoors.
LOW-LIGHT mode
• Scenes recorded in extremely low light
levels may not come out properly.
SPOT-LIGHT mode
• If the recorded subject is extremely bright,
the picture may appear whitish.
SURF&SNOW mode
• If the recorded subject is extremely bright,
the picture may appear whitish.
• It is not possible to select the SPORTS
mode or PORTRAIT mode or Low-Light
mode together with the MAGICPIX mode
in the DIGITAL EFFECT camera menu.
Indication
21
Camera
Page 22
Special Effect Features
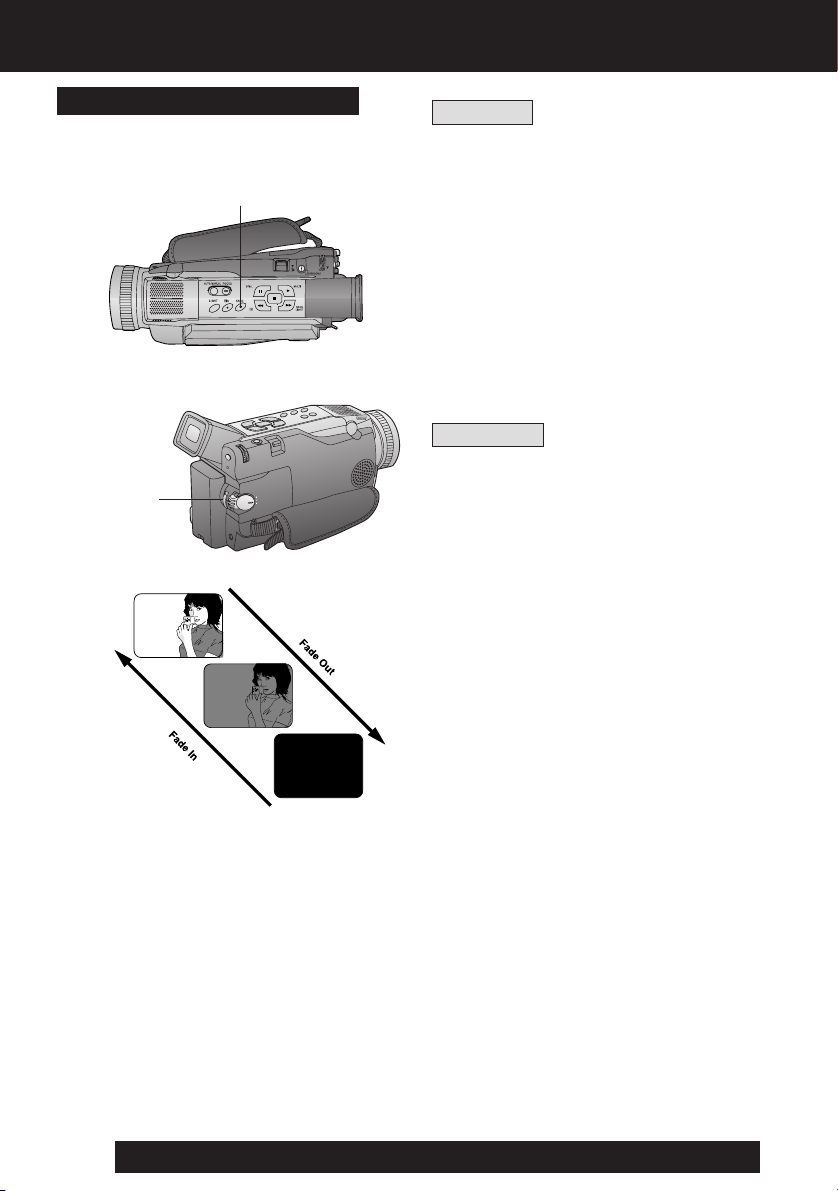
Audio/Video Fade In/Out
You can make smoother scene transitions
for a more professional look.
1, 3, AFADE
2, BREC/
PAUSE
Fade In
Starting the first scene with “fade in” is very
effective.
1 In REC/PAUSE mode, hold down
FADE until the picture fades out.
2 Press REC/PAUSE to start
recording.
3 Release FADE and the picture will
gradually fade in.
Fade Out
Use to create a soft ending or (together
with fade in) for a soft transition from one
scene to the next.
ADuring recording, hold down FADE
until the picture fades out.
BPress REC/PAUSE to pause the
recording.
22
For assistance, please call : 1-800-211-PANA(7262) or send e-mail to : consumerproducts@panasonic.com
Page 23
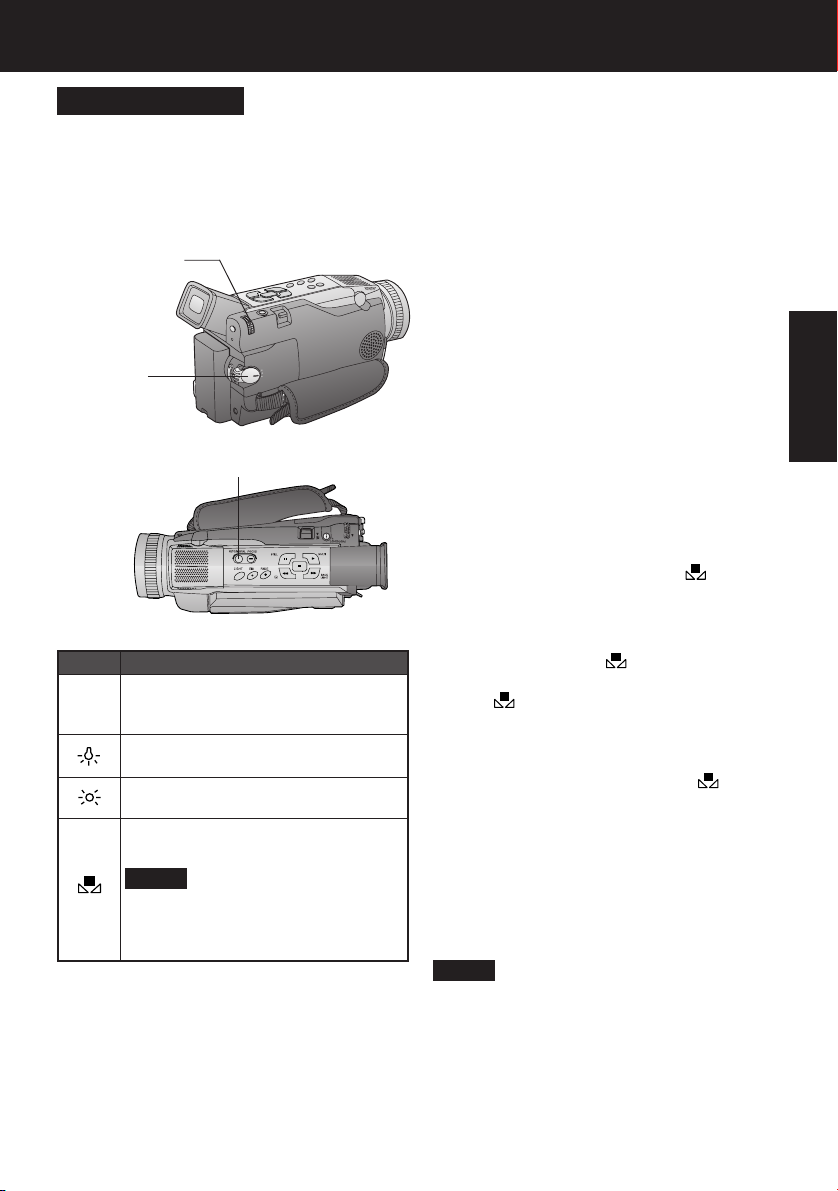
White Balance
Auto White Balance (“AWB”) automatically
maintains optimum color balance in most
lighting conditions. However, when using
Digital Functions, etc., you may get better
results by using the manual adjustment.
3, 4, A, B
JOG KEY
Advanced Settings
1 Set POWER to CAMERA.
2 Hold down AUTO/MANUAL for more
than 0.7 second so that the “MNL”
indication appears in the EVF or the
LCD monitor.
3 Press JOG KEY repeatedly until
“AWB” appears in the EVF or LCD
monitor.
Camera
1POWER
Mode
Automatically maintains optimum
color balance in most lighting
AWB
conditions.
When the source illumination is a
halogen lamp.
When shooting outdoors on a
sunny day.
The White Balance setting that
was previously set manually.
*
• When ZOOM is set to 10X or
2AUTO/MANUAL
Description
ote
Note
higher, White Balance cannot be
adjusted.
4 Rotate JOG KEY to select other
modes. (See mode chart at left.)
• Hold down AUTO/MANUAL for more
than 0.7 second to cancel the
setting.
* For manual White Balance
adjustment:
A. Rotate JOG KEY to select “ ” .
B. Point the Palmcorder at a white
object (full-screen) and hold JOG
KEY down until “ ” indication stops
flashing.
• If “
” indication flashes when the
Palmcorder is turned on, the previous
manual White Balance setting is in
effect.
In the following cases, the “
indication flashes:
• The flashing indicates that the
previouly adjusted White Balance
setting is still kept. This setting will be
kept until White Balance is adjusted
again.
• Correct White Balance may not be
attainable manually in poor lighting.
Note
• DISPLAY must be set to ALL for MF, AE,
W.BALANCE, HIGH SPEED SHUTTER,
or IRIS to be displayed on the LCD or
EVF.
• While “MAGICPIX” is displayed on the
LCD or EVF, Manual White Balance is
inoperable.
”
23
Page 24
Advanced Settings
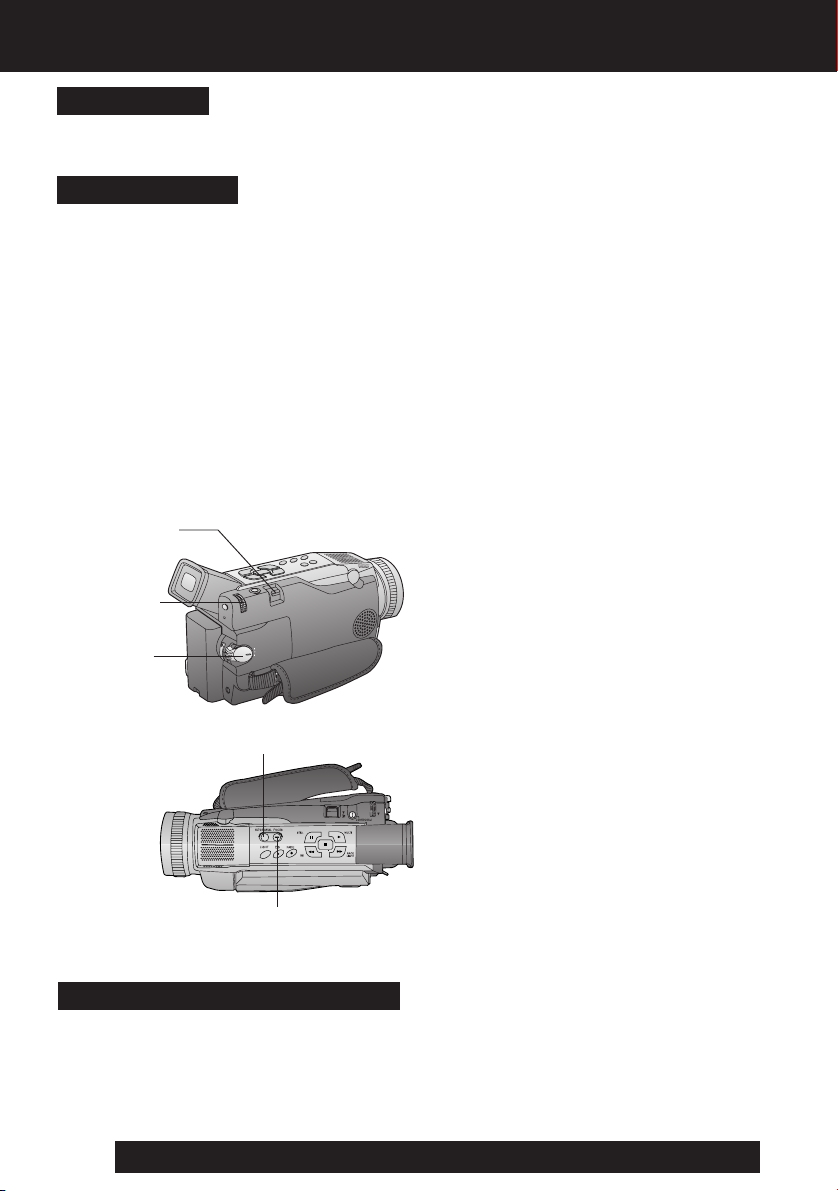
Auto Focus
The Palmcorder automatically adjusts the focus over the entire zoom range.
Manual Focus
Use Manual Focus (MF) when recording ...
• a subject through glass.
• a scene where the subject is far from the
Palmcorder and there are objects in the
foreground.
• a subject with distinct horizontal stripes.
• a subject not centered in the Viewfinder.
• subjects with shiny surfaces.
• an obliquely angled subject.
• a bright, flat subject such as a white wall.
• in low light situations.
• a scene with fast motions, like a golf swing.
Re-focusing may be required
• when your Palmcorder is aimed at a new
scene.
1 Set POWER to CAMERA.
2 Hold down AUTO/MANUAL for more
than 0.7 second so that the “MNL”
indication appears in the EVF or the
LCD monitor.
3 Press FOCUS so that the “MF”
(Manual Focus) indication appears in
the EVF or the LCD monitor.
4 Press and hold POWER ZOOM, “T”
side (Telephoto), until the lens is at
maximum zoom in.
4, 6POWER
ZOOM
5M.FOCUS
DIAL
5 Turn M.FOCUS DIAL until the picture
is in focus.
• It may be necessary to back away
from the subject to focus the image
properly.
1POWER
6 Press POWER ZOOM to “W” or “T”
as desired.
• The subject will remain in focus over
2AUTO/MANUAL
the entire zooming range.
• It may be necessary to back away
from the subject to focus the image
properly.
3FOCUS
Macro Focus (for close-ups)
Press the “W” side of POWER ZOOM to the maximum wide angle position.
Auto Focus will function with the subject as close as 25 mm (1 inch) in front of the lens.
24
For assistance, please call : 1-800-211-PANA(7262) or send e-mail to : consumerproducts@panasonic.com
Page 25
Advanced Settings
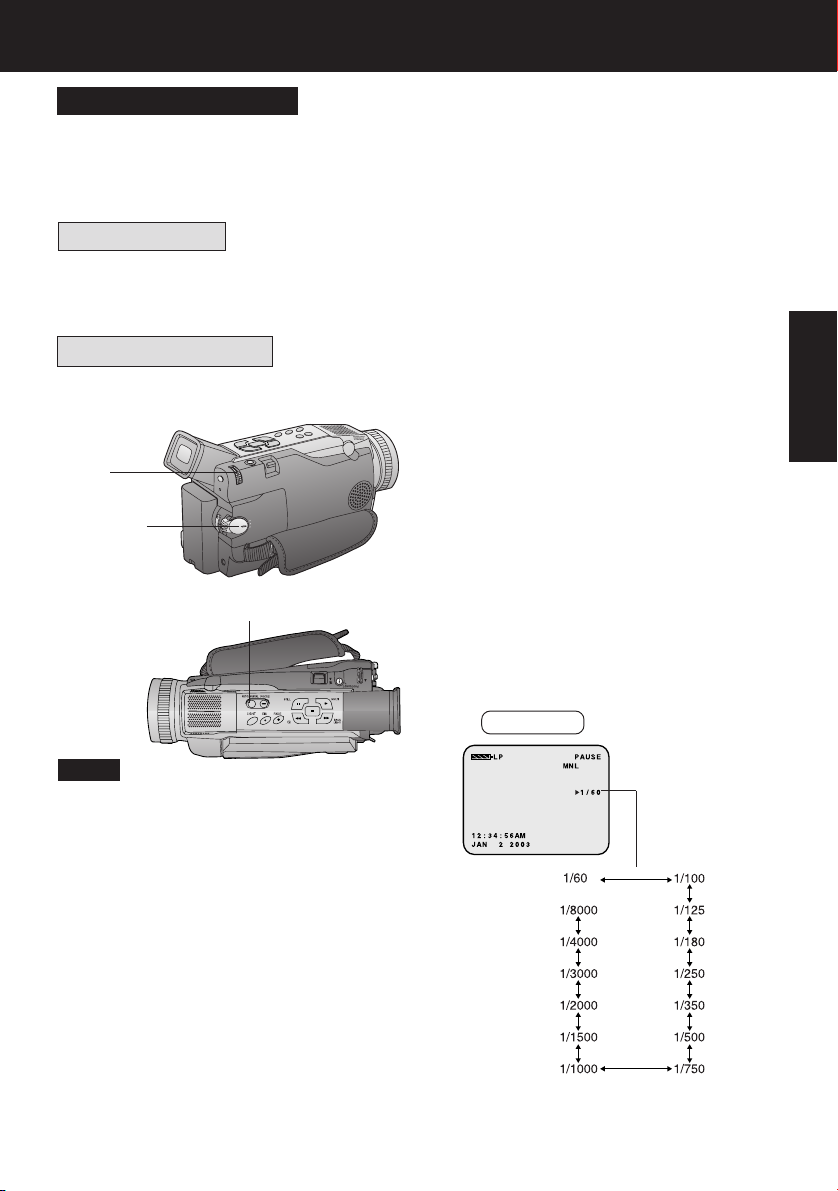
High Speed Shutter
To record high speed motion (e.g. tennis
stroke) with improved STILL or SLOW
MOTION playback when watching the tape
on this Palmcorder.
Auto Shutter
In the AUTO mode (no indication in the EVF and LCD monitor), the Palmcorder will
automatically adjust the shutter speed (up to 1/350).
• AUTO mode is automatically selected whenever the POWER Switch is set to CAMERA.
Manual Selection
1 Set POWER to CAMERA.
2 Hold down AUTO/MANUAL for more
3, 4
JOG KEY
1POWER
than 0.7 second so that the “MNL”
indication appears in the EVF or the
LCD monitor.
3 Press JOG KEY repeatedly to display
the shutter speed.
Camera
2AUTO/MANUAL
Note
• For proper color reproduction, it is
recommended that you use this feature
outdoors. For indoor High Speed Shutter
recording, additional halogen or tungsten
light should be provided. Fluorescent light
will degrade the picture quality.
• This feature requires ample light. More
light is required for the fastest shutter
speeds.
• The Auto Focus system may not operate
properly in insufficient light when using
the High Speed Shutter.
• When PROG.AE is ON, you cannot
manually select the shutter speed.
• When MagicPix is ON, H.S.S. cannot
manually select the shutter speed.
• When PROGRESSIVE is set to ON, the
shutter speed cannot be adjusted to
1/750 s or faster.
4 Rotate JOG KEY to choose one of the
following shutter speeds.
• Hold down AUTO/MANUAL for more
than 0.7 second to cancel the setting.
EVF/LCD
25
Page 26

Advanced Settings
Adjusting the Iris Manually
Normally, the Palmcorder adjusts the
exposure automatically. However, when
the background is extremely bright, or
when the subject is backlit, you can
compensate by adjusting the Iris manually.
1 Set POWER to CAMERA.
2 Hold down AUTO/MANUAL for more
than 0.7 second so that the “MNL”
indication appears in the EVF or the
LCD monitor.
3, 4
JOG KEY
1POWER
EVF/LCD
2AUTO/MANUAL
Iris
Setting
3 Press JOG KEY repeatedly so that
Iris setting indication appears in the
EVF or the LCD monitor.
4 Rotate JOG KEY to adjust the iris;
• When a value closer to “CLOSE” is
selected, the image becomes darker.
• When a value closer to “OP+18dB” is
selected, the image becomes
brighter.
• Hold down AUTO/MANUAL for more
than 0.7 second to cancel the
setting.
Note
• The value to which +dB is attached
indicates a gain value. If this value is too
large, the quality of the image
deteriorates.
• Depending on ZOOM magnification, the
iris value may not be displayed correctly.
• If you are using Program AE mode, you
cannot adjust the iris. If the iris is adjusted
manually, the above modes will be
canceled.
26
For assistance, please call : 1-800-211-PANA(7262) or send e-mail to : consumerproducts@panasonic.com
Page 27
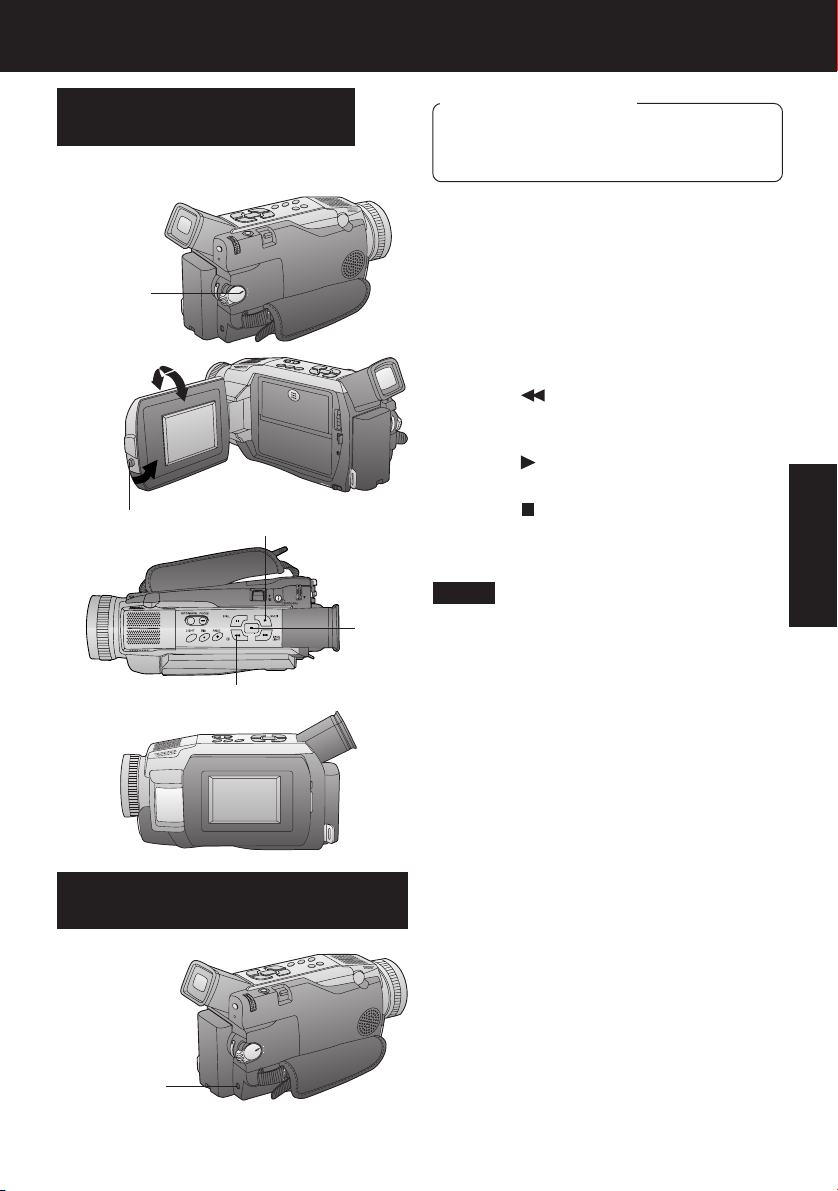
Playback Your Recordings
Playback using the LCD
Monitor
You can also use the LCD monitor to
playback your recording.
1POWER
180°
90°
90°
2LCD-OPEN
4PLAY
3REWIND SEARCH
5STOP
Before you begin
• Connect the Palmcorder to a power
source. (pp. 11, 12)
• Insert a recorded cassette.
1 Set the POWER to VCR.
• The POWER lamp lights red.
• Be sure POWER is fully turned to the
VCR position.
2 Press LCD-OPEN to unlock the LCD
monitor and swing open.
3 Press (REWIND/SEARCH) to
rewind the tape.
4 Press (PLAY) to start playback.
5 Press (STOP) to stop playback.
• When the tape reaches its beginning
during rewind or rewind search, it will
stop automatically.
Note
• When a tape recorded in LP mode on
another digital video camera is played
back on this unit, the picture may appear
mosaic.
• Using the LCD monitor reduces battery
operating time.
• You can place the Palmcorder on a table,
etc. for viewing. Rotate the LCD Monitor
180° and swing it up against the
Palmcorder body as shown.
VCR
Connecting Earphone
(not supplied)
PHONE Jack
You can connect earphones (not supplied)
to the PHONE Jack.
27
Page 28

Playback Your Recordings
Repeat Playback
1 Press PLAY for more than 5 seconds
in STOP mode.
• The Palmcorder will go into Repeat
Playback mode when the tape
reaches its end.
• The letter “R
EVF and LCD monitor.
2 Turn the Palmcorder OFF to exit the
Repeat Playback mode.
1 Rotate VOLUME to adjust the volume
of the built-in speaker in PLAY mode.
• The volume setting screen appears.
EVF/LCD
Adjusting the Volume
1PLAY
R
1, 2
VOLUME
” will appear in the
Built-in
Speaker
EVF/LCD
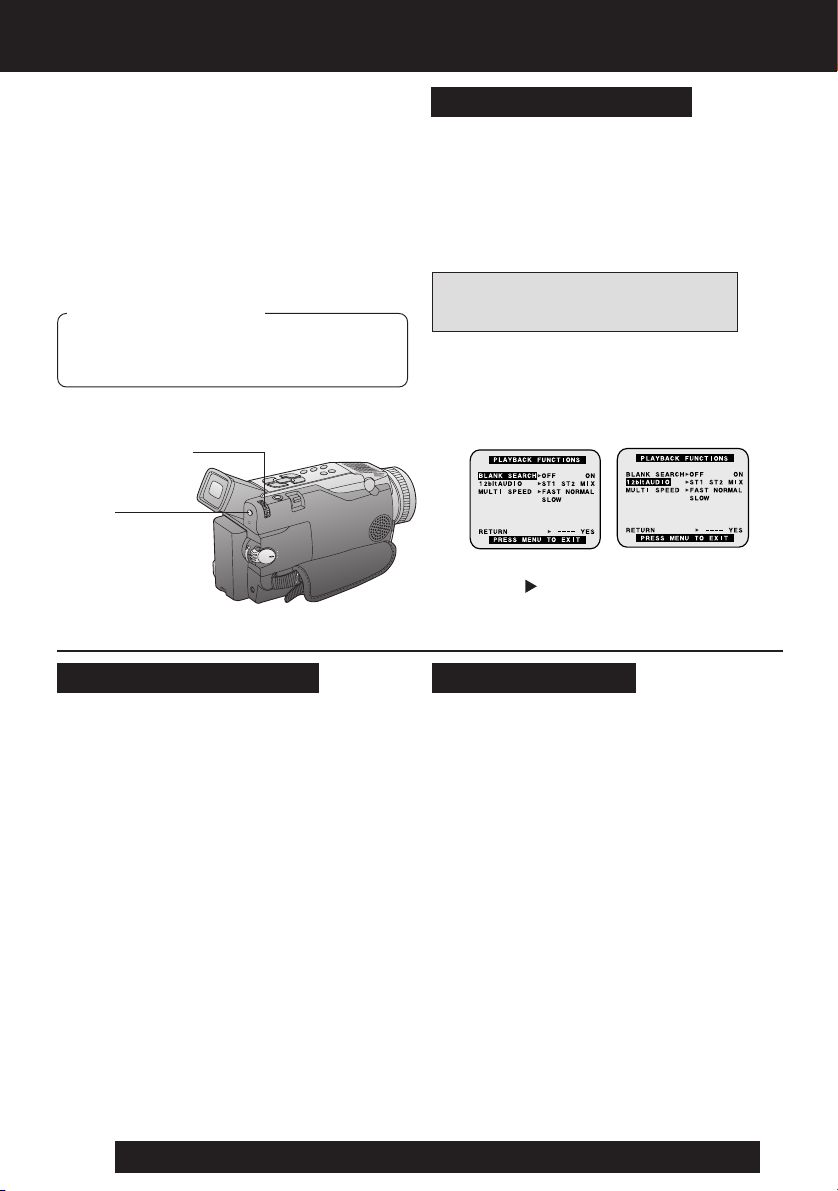
Blank Search
You can go directly to a blank portion of
tape and start recording exactly where you
left off.
3, 4, 5
JOG KEY
2MENU
1POWER
EVF/LCD
2 Press “T” to increase the volume.
Press “W” to decrease the volume.
1Set POWER to VCR.
2 Press MENU to display the VCR
FUNCTIONS menu screen.
3 Rotate JOG KEY to select
PLAYBACK FUNCTIONS , then
press JOG KEY to display the
PLAYBACK FUNCTIONS menu
screen.
4 Rotate JOG KEY to select BLANK
SEARCH in the PLAYBACK
FUNCTIONS menu.
(Menu OSD: p. 61)
5 Press JOG KEY to select ON.
•“BLANK” will appear on the screen.
28
For assistance, please call : 1-800-211-PANA(7262) or send e-mail to : consumerproducts@panasonic.com
Page 29

Special Effect Features
Note
• Sound is muted during all special effects.
Rapid Visual Search
BPLAY
A, BREWIND/
SEARCH
EVF/LCD
STILL Picture
A, BFAST FORWARD/
SEARCH
1, 2PAUSE
2PLAY
ADuring playback, hold down
(FAST FORWARD/SEARCH) or
(REWIND/SEARCH).
The search will continue for as long
as the button is held down.
OR
BPress (FAST FORWARD/
SEARCH) or
once for a continuous rapid visual
search.
Press
• When executing a rapid visual
(PLAY) to release.
Note
search, the picture may become
bluish for an instant or mosaic. This
is normal during this mode.
(REWIND/SEARCH)
1Press (PAUSE) during playback.
2Press (PLAY) or (PAUSE) to
release.
Note
• To protect the tape and video heads, your
Palmcorder’s operating modes will revert
as follows:
STILL STOP (after 3 minutes.)
VCR
Fast Forward/Rewind Check
Monitor normal picture playback during fast
forward or rewind.
BREWIND/
SEARCH
AFAST FORWARD/
SEARCH
AHold down (FAST FORWARD/
SEARCH) during fast forward.
BHold down (REWIND/SEARCH)
during rewind.
• The picture will appear for as long as the
button is held down.
29
Page 30

Special Effect Features
Note
• Sound is muted during all special effects.
Variable Speed Search
1 Press (PLAY) to start playback.
2, 3
JOG KEY
1PLAY
2 Press JOG KEY for about 1 second.
3 Rotate JOG KEY to adjust the
playback speed.
• Rotate JOG KEY clockwise for
forward playback.
• Rotate JOG KEY counterclockwise
for reverse playback.
To return to normal playback:
Press
normal speed.
• The Variable Speed Search function
• The review playback at the 1X speed is
• During the Variable Speed Search
• During the Variable Speed Search, sound
• The Variable Speed Search feature is not
(PLAY). Playback will continue at
Note
offers a choice of six playback speeds
(1/5X (LP mode: 1/3X), 1X, 2X, 5X, 10X,
20X) both in forward and reverse
directions.
playback in reverse direction.
(except 1X speed in forward direction),
mosaic-like patterns will appear in the
picture.
is muted.
available when the Repeat Playback is
active.
Jog Frame by Frame Search
JOG KEY
30
For assistance, please call : 1-800-211-PANA(7262) or send e-mail to : consumerproducts@panasonic.com
During Still mode, rotate JOG KEY to
advance or reverse the picture one frame
at a time.
Page 31

Special Effect Features
Strobe Multi Mode
In Strobe Multi Mode, you can select the
rate at which a succession of still screens
are captured from the playback picture.
1 Set POWER to VCR.
2 Press MENU to display the VCR
FUNCTIONS menu screen.
3, 4, 5
JOG KEY
1POWER
2MENU
6MULTI
6PLAY
Note
• A Multi Image Playback screen cannot be
output from the DV terminal or PC
Connector terminal.
• A Multi screen will have slightly lower
image quality.
3 Rotate JOG KEY to select PLAYBACK
FUNCTIONS , then press JOG KEY to
display the PLAYBACK FUNCTIONS
menu screen.
4 Rotate JOG KEY to select PLAYBACK
MULTI SPEED in the PLAYBACK
FUNCTIONS menu screen.
(Menu OSD: p. 61)
5 Press JOG KEY repeatedly to set
desired speed.
Strobe Speeds
Strobe Speeds
FAST
NORMAL
SLOW
• Press MENU to exit.
9 screen capture time
Every 0.3 seconds
Every 0.6 seconds
Every 1.0 seconds
6 Press (PLAY) to start playback.
Press
to start capturing.
• A succession of 9 screens will be
• Press (PLAY) to start playback.
(MULTI) at the point you want
captured, and playback will stop.
EVF/LCD
Press (STOP) to stop playback.
VCR
31
Page 32
Special Effect Features
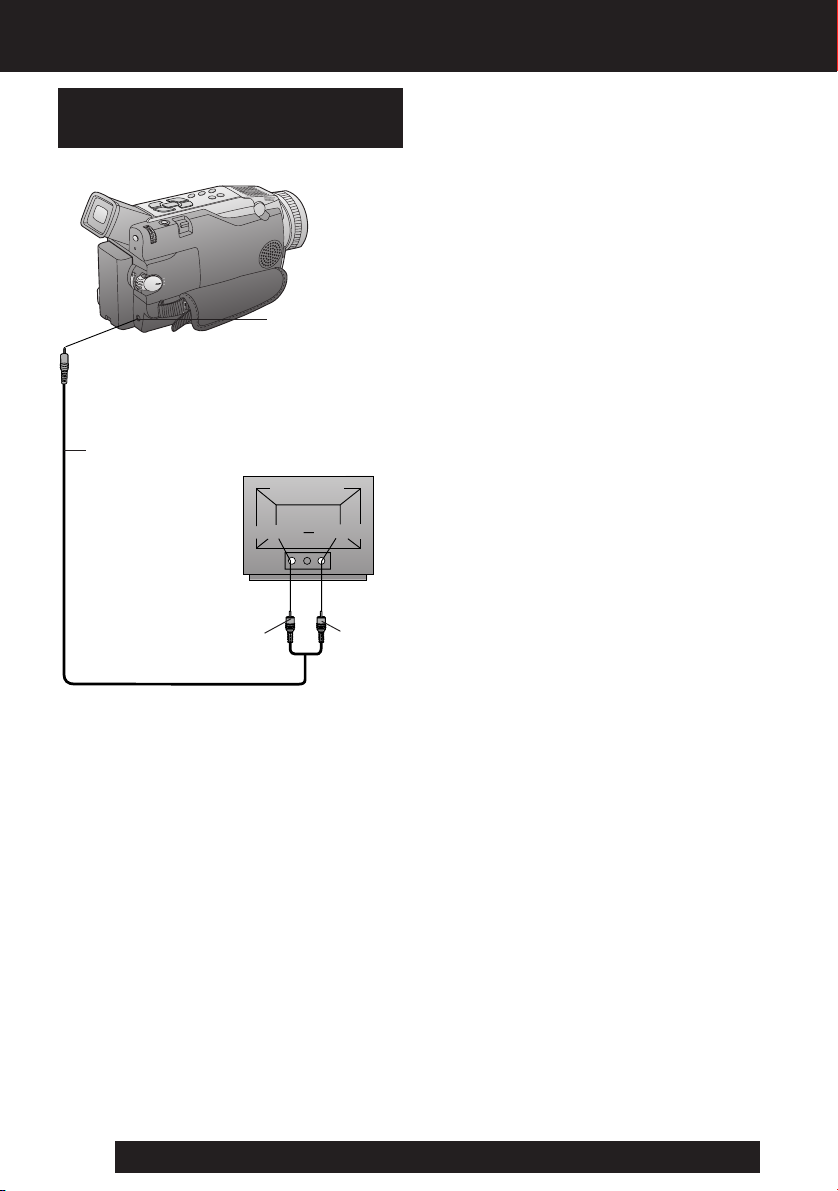
View Recording/Playback on
your TV
[ TV with AUDIO/VIDEO IN Jacks ]
1Set POWER to CAMERA or VCR.
To view what the Palmcorder is
recording or to playback a tape on your
TV.
A/V Cable
(Supplied)
Audio In Video In
To Audio In
A/V OUT
Back of TV
2Turn your TV ON and set it to LINE
INPUT.
Check your TV operating instructions
for further information.
3Start playback or begin a recording.
• Make sure the Palmcorder and TV are
turned off while connecting.
• Please connect the A/V Cable securely.
To Video In
32
For assistance, please call : 1-800-211-PANA(7262) or send e-mail to : consumerproducts@panasonic.com
Page 33
Digital Features
Digital Zoom
This feature is useful when you want to
record close-up shots of subjects located
beyond a normal zoom range of 1X to 10X
magnification. With the digital zooming
feature, you can select a magnification of
25X or even to 700X.
Note
• Other Digital Functions are turned off
automatically when the EIS and Digital
Zoom are selected.
EVF/LCD
Zoom In (“T”)
D.ZOOM
Zoom Out (“W”)
5POWER
ZOOM
3, 4
JOG KEY
1POWER
2MENU
5REC/PAUSE
CAMERA mode
1 Set POWER to CAMERA.
2 Press MENU to display the CAMERA
FUNCTIONS menu screen.
3 Rotate JOG KEY to select CAMERA
SETUP , then press JOG KEY
to display the CAMERA SETUP menu
screen.
4 Rotate JOG KEY to select D. ZOOM ,
then press JOG KEY to select
25X or 700X.
25X : from 10X to 25X
700X : from 10X to 700X
OFF : Turn off D.ZOOM
• Press MENU to exit.
5 Press REC/PAUSE to start
recording and press POWER ZOOM to
zoom in or zoom out.
• The magnification level is always
displayed in the EVF or the LCD
monitor when DISPLAY is set to ALL
or PARTIAL. (Menu OSD: p. 60)
6 Repeat steps 2~4 to select OFF to
cancel this feature.
Note
• The normal optical zoom functions from
1X to 10X.
• As magnification increases, resolution
significantly decreases.
• Because the image is enlarged digitally,
the picture may become distorted when
higher magnification levels are used.
• When the level falls below 10X, the
normal zooming function will resume.
• Focus distance becomes 1.2 m (4 feet) if
the lens is in full telephoto.
Digital Features
33
Page 34
Digital Features
Digital Zoom (Continued)
3, 4
JOG KEY
2MENU
1POWER
5PLAY
MagicPix™ Images
Color recording of video or still images onto
the Mini DV tape in low lighting.
(pp. 36, 59)
VCR mode
1Set POWER to VCR.
2Press MENU to display the VCR
FUNCTIONS menu screen.
3Rotate JOG KEY to select DIGITAL
EFFECT , then press JOG KEY
to display the DIGITAL EFFECT
menu screen.
4Rotate JOG KEY to select D. ZOOM ,
then press JOG KEY to select ON.
• Press MENU to exit.
5Press (PLAY) to start playback.
• The center portion of the image
doubles in size.
6Repeat steps 2~4 to select OFF to
cancel this feature.
1 Set POWER to CAMERA.
3, 4, 5
JOG KEY
2MENU
1POWER
EVF/LCD
34
For assistance, please call : 1-800-211-PANA(7262) or send e-mail to : consumerproducts@panasonic.com
2 Press MENU to display the CAMERA
FUNCTIONS menu screen.
3 Rotate JOG KEY to select DIGITAL
EFFECT , and then press JOG KEY
to display the DIGITAL EFFECT menu
screen.
4 Rotate JOG KEY to select EFFECT ,
and then press JOG KEY repeatedly
to select MAGICPIX.
• Press MENU to exit.
5 To cancel the Digital Function, press
JOG KEY repeatedly to select OFF.
Page 35
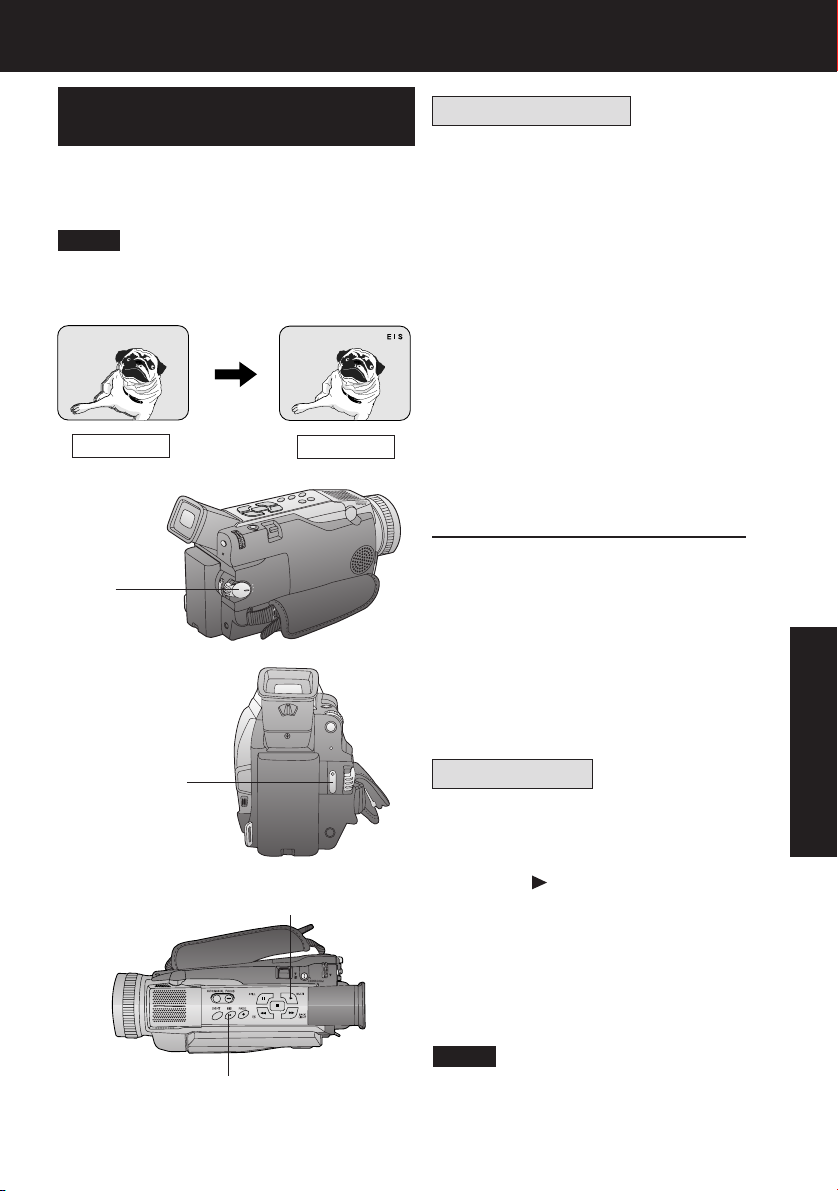
Digital Features
Dual Digital Electronic Image
Stabilization System (D.E.I.S.)
This feature helps compensate for any
unintentional hand or body movement. It
can be used in both the Recording and
Playback (VCR) modes.
Note
• Other Digital Functions are turned off
automatically when the EIS and Digital
Zoom are selected.
NORMAL
EIS ON
1, A
POWER
CAMERA mode
1 Set POWER to CAMERA.
2 Press EIS to stabilize the picture.
• Picture flicker may be observed when
taping under fluorescent lighting
conditions.
• The EIS indicator flashes when the
light level is inadequate.
• Turn D.E.I.S. OFF during recording
when using a tripod.
3 Press REC/PAUSE to start recording.
4 Press EIS again to cancel.
• Be sure that D.E.I.S. is turned off
when not needed.
D.E.I.S. may not function when...
• Palmcorder movement is too
extreme.
• Recording a subject with distinct
horizontal or vertical stripes.
• Recording in low light situations.
• Recording a subject under a great
amount of fluorescent light.
• Recording a scene with very fast
motions.
Digital Features
3REC/PAUSE
BPLAY
2, 4, C, DEIS
VCR mode
A Set POWER to VCR.
B Press (PLAY) to start playback.
C Press EIS to stabilize the picture.
D Press EIS again to cancel.
• Be sure that D.E.I.S. is turned off
when not needed.
Note
• When using D.E.I.S in VCR mode, the
image size is slightly larger.
35
Page 36

Digital Features
Other Digital Functions
Use the following features to add interest
and professionalism to your recordings or
playback. Select from twelve special
effects.
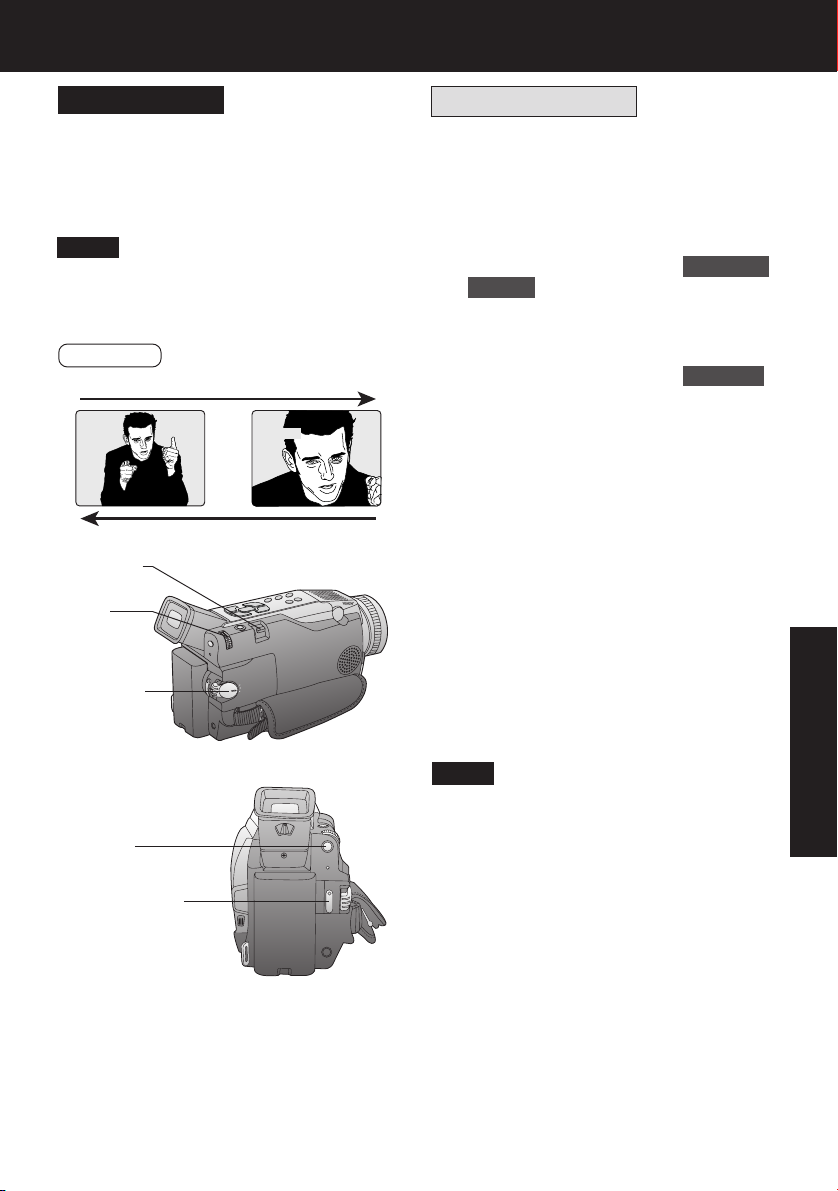
1Set POWER to CAMERA or VCR.
2Press MENU to display the menu
screen.
3, 4, 5
JOG KEY
2MENU
1POWER
Types of Digital Functions
MIRROR
Symmetrical image from the current
camera picture.
STROBE
The recording appears as a sequence of
still frames.
MOSAIC
The picture appears in a mosaic pattern.
SLIM
The picture is expanded vertically.
TRAIL
The subject being recorded creates a trail
when in motion.
STRETCH
The picture is expanded horizontally.
MAGICPIX (Not available during playback)
Color recording of video or still images onto
the Mini DV in low lighting. (p. 34)
• Only Manual Focus is available.
WIPE (Not available during playback)
Successive scenes are separated in a way
which simulates the drawing of a curtain.
MIX (Not available during playback)
The current scene is mixed in with the
following scene during scene changes.
P-IN-P (Not available during playback)
PinP (Still image) is displayed on the
Main Picture.
SEPIA (Only available during playback)
The picture is played back in sepia, a
brownish color, giving it an antique look.
B/W (Black-and-white) (Only available
during playback)
The picture is played back in black-and-
white.
36
For assistance, please call : 1-800-211-PANA(7262) or send e-mail to : consumerproducts@panasonic.com
3Rotate JOG KEY to select DIGITAL
EFFECT in the CAMERA or VCR
mode menu screen, then press JOG
KEY to display the DIGITAL EFFECT
menu screen.
4Rotate JOG KEY to select EFFECT in
the CAMERA mode menu screen or
EFFECT1 / EFFECT2 in the VCR
mode menu screen, and then press
JOG KEY repeatedly to select one of
the Digital Functions listed on the left.
5To cancel the Digital Function, press
JOG KEY repeatedly to select OFF.
Note
• The EIS and Digital Zoom features are
turned off automatically when one of the
Digital Functions listed at left is
selected.
To use the WIPE function
a.In Camera mode, set the “EFFECT” item
in the main menu screen to “WIPE”.
(Menu OSD: p. 59)
b.Press REC/PAUSE to start recording.
c.Press REC/PAUSE to pause the
recording. The last scene will be
memorized.
d.Press RECORD/PAUSE to start
recording again. The new scene will take
the place of the memorized scene.
To use the MIX function
a.In Camera mode, set the “EFFECT” item
in the main menu screen to “MIX”
(Menu OSD: p. 59). Then, perform steps
b-d above.
The memorized scene and the new
scene will appear mixed as the scene
changes from one to the other.
Page 37
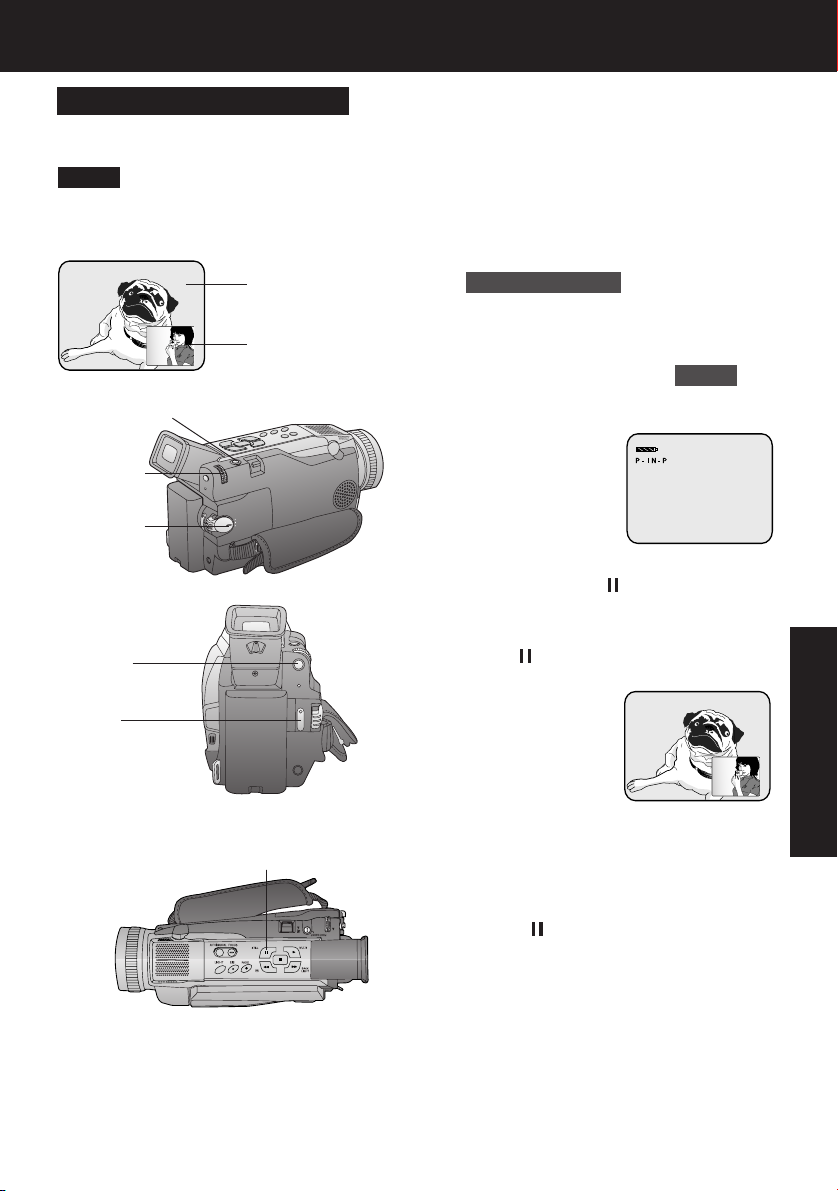
Picture in Picture (PinP)
You can display a PinP (still image) screen
on the Main Picture.
Note
• PinP position is fixed at the bottom right
of the screen.
Main Picture
Picture in Picture
(PinP still image)
PHOTOSHOT
3, 4JOG
KEY
1POWER
2MENU
Digital Features
1 Set POWER to CAMERA.
2 Press MENU to display the CAMERA
FUNCTIONS menu screen.
3 Rotate JOG KEY repeatedly to select
DIGITAL EFFECT , then press JOG
KEY to display the DIGITAL EFFECT
menu screen.
4 Press JOG KEY to select P-IN-P .
• Press MENU to exit this menu.
•“P-IN-P” will appear in the EVF or the
LCD monitor.
5 Aim at the scene you wish to place as
PinP, then press (CAMERA STILL)
to freeze the image.
Digital Features
6 Press (CAMERA STILL) again to
place the frozen image as PinP.
7REC/
PAUSE
5, 6, 7
CAMERA STILL
7 Press REC/PAUSE to record a scene
with PinP image.
• Press PHOTOSHOT to record a
scene with PinP image in PhotoShot
mode.
• Press (CAMERA STILL) again to
remove PinP image.
37
Page 38
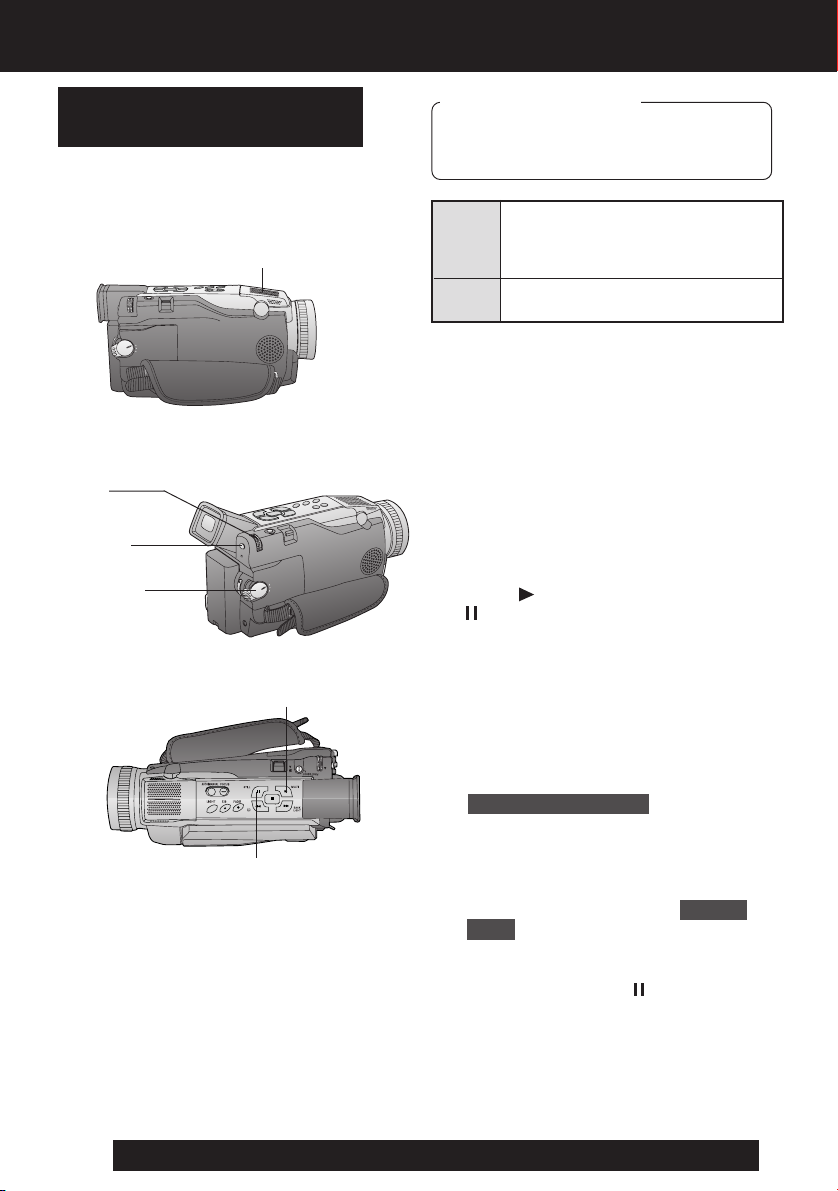
Editing Features
Audio Dubbing using the
Built-in Microphone
The original sound can be replaced with
new sound using the built-in Palmcorder
microphone.
Built-in Microphone
4, 5
JOG KEY
3MENU
1POWER
Before you begin
• Turn on the Palmcorder.
• Insert a pre-recorded tape to be
dubbed.
The original sound is recorded
12 bit
16 bit
• Select 12 bit if you do not want the
original sound to be completely replaced
during an audio dub.
• With tape containing both 12 bit and
16 bit audio, please note that if dubbing is
started in a 16 bit portion, the 12 bit audio
will also be completely replaced.
on ST (Stereo) 1, and the new
sound will be recorded on ST
(Stereo) 2.
The original sound is replaced
with the new sound.
1 Set POWER to VCR.
2 Press (PLAY). Then press
(PAUSE) where you want dubbing to
begin.
38
2PLAY
3 Press MENU to display the VCR
FUNCTIONS menu screen.
4 Rotate JOG KEY to select
RECORDING SETUP , then press
JOG KEY to display the RECORDING
SETUP menu screen.
2PAUSE
5 Rotate JOG KEY to select AUDIO
DUB , and then press JOG KEY to
select ON.
• The Palmcorder will go to Stand By
mode, and “A.DUB
appears in the EVF or the LCD
monitor.
For assistance, please call : 1-800-211-PANA(7262) or send e-mail to : consumerproducts@panasonic.com
” indication
Page 39
6, 7PAUSE
To listen to the desired audio sound, set
the 12 bit AUDIO setting of the VCR mode
MENU (Menu OSD: p. 61) as follows:
12 bit AUDIO:The following selections are
available for 12 bit AUDIO dubbed
recordings only (sound recorded in SP
mode only).
Set this position to listen to the
ST 1
original sound.
Set this position to listen to the
ST 2
audio dubbed sound.
Set this position to listen to both
the original sound and the audio
MIX
dubbed sound.
Note
• When a 16 bit recording is dubbed over,
the original audio of the recording will be
erased.
• When a 12 bit recording is dubbed over
and played back, and MIX is selected as
the AUDIO, both the original audio and
the dubbed audio are played back.
• If you recorded in LP mode, you cannot
use the A.DUB feature.
Editing Features
6 Press (PAUSE) to start Audio
Dubbing. “A.DUB ” indication
appears.
• Connect the Palmcorder to the TV in
order to monitor the sound.
(p. 32)
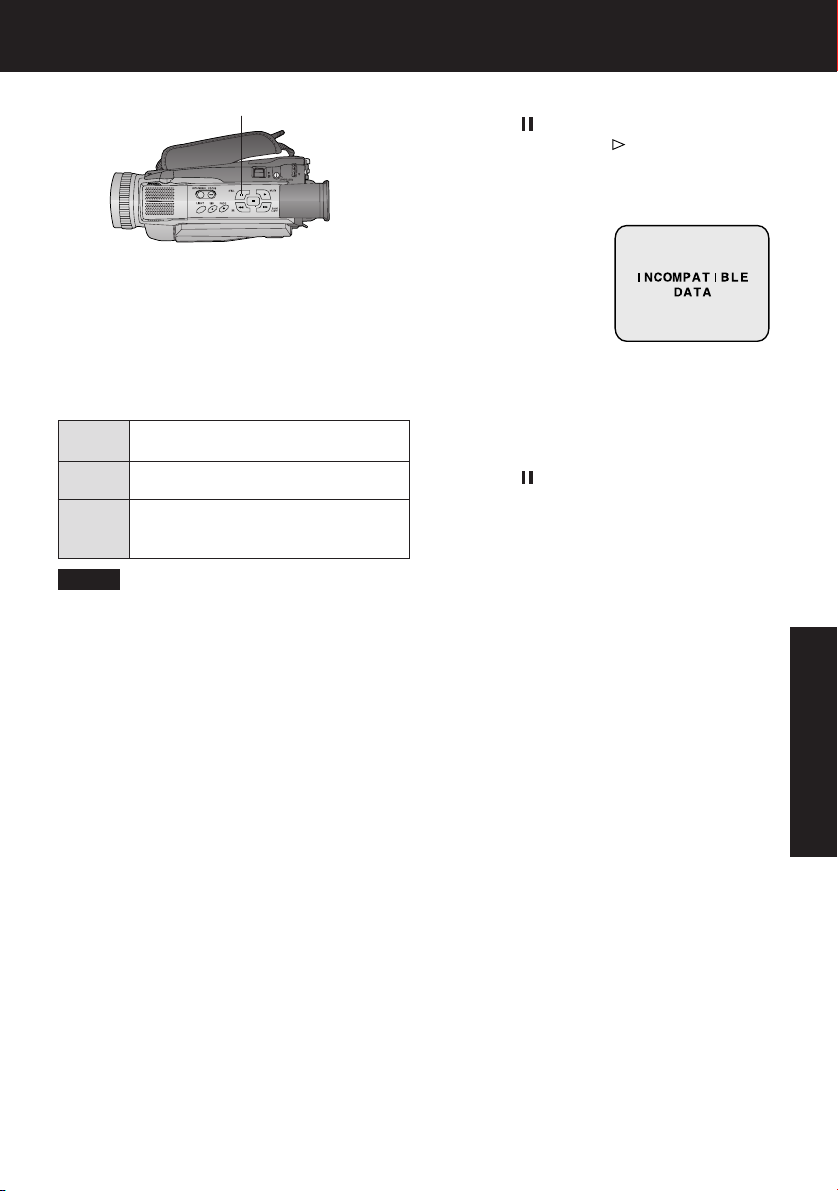
Only NTSC (National Television Standards
Committee) recorded tapes can be audio
dubbed. The following screen appears if
the tape was not recorded in NTSC format.
7 Press (PAUSE) to stop Audio
Dubbing.
• If the microphone used for dubbing gets
too near the speaker of your TV,
a howling noise (feedback) may occur.
• If the tape position is in or was started in
a blank section, you cannot use the
A.DUB feature.
Editing Features
39
Page 40
Editing Features
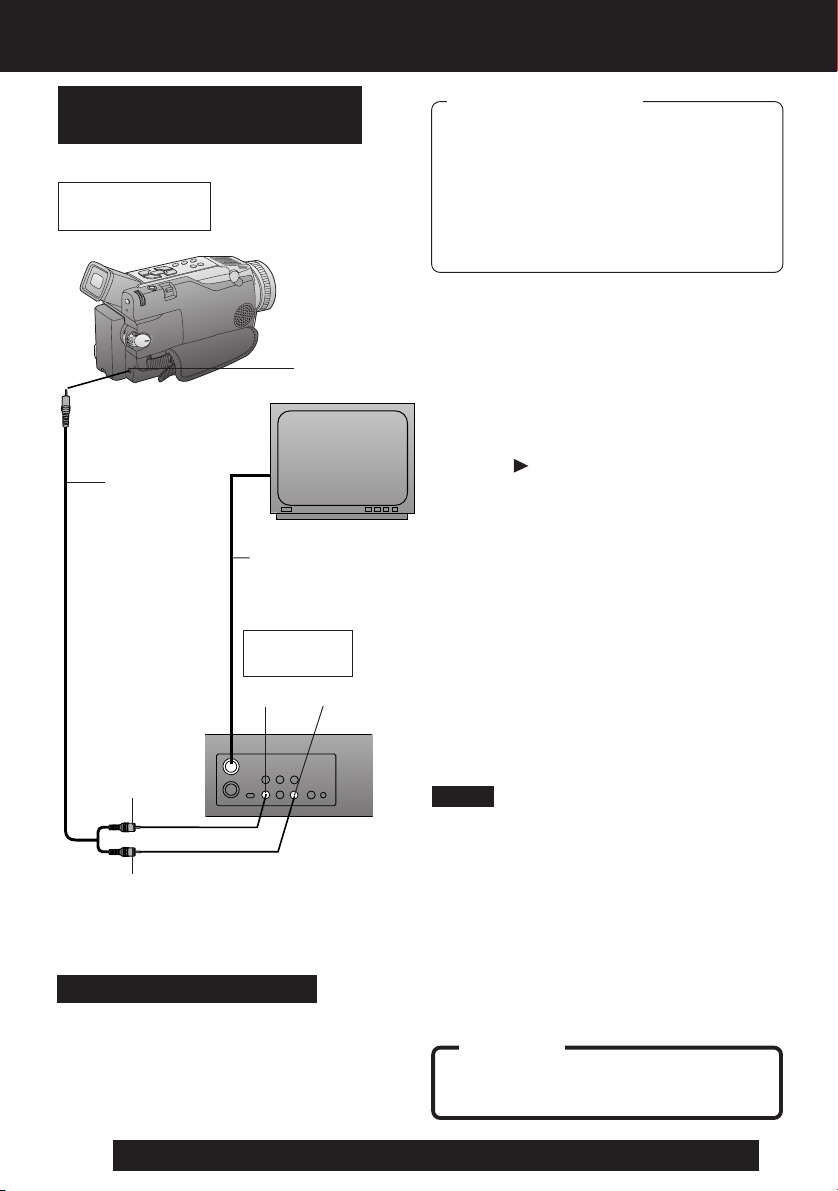
Copying your Tapes to
VHS Cassette
Source (Playing)
Palmcorder
A/V Cable
(Supplied)
VHF Connecting
Cable (not
supplied)
Recording:
VCR (Rear)
Audio In
A/V OUT
TV
(To View)
Video In
Before you begin
• Connect both Palmcorder and VCR to
their power sources.
• Connect the Palmcorder to a VCR as
illustrated left.
• Turn ON both units.
• Set the recording VCR’s Input Signal
Selector to LINE.
• Set the Palmcorder POWER to VCR.
1Insert a pre-recorded tape
into the source (playing) Palmcorder
and a blank tape, with record tab in
place, into the target VCR (Recorder).
2Press (PLAY) on the Palmcorder.
When the tape reaches the point you
want to start dubbing, press PAUSE.
3Place the VCR into REC/PAUSE
mode. (See VCR manual.)
4Simultaneously, press PAUSE on
both units to begin copying.
To Audio In
To Video In
Monitor with your TV
• Turn the TV ON and select its VCR
channel (either CH3 or CH4).
• Set the VCR/TV Selector on the
recording VCR to VCR.
40
For assistance, please call : 1-800-211-PANA(7262) or send e-mail to : consumerproducts@panasonic.com
5Press STOP on both units when
copying is completed.
Note
• For technical reasons, dubbing a tape
may reduce its quality.
• If the Time Code is displayed in the EVF
or LCD monitor, it cannot be reset.
• Only the DATE/TIME, when displayed,
will be recorded on the tape.
CAUTION:
Unauthorized exchanging and/or
copying of copyrighted recordings may
be copyright infringement.
Page 41
Editing Features
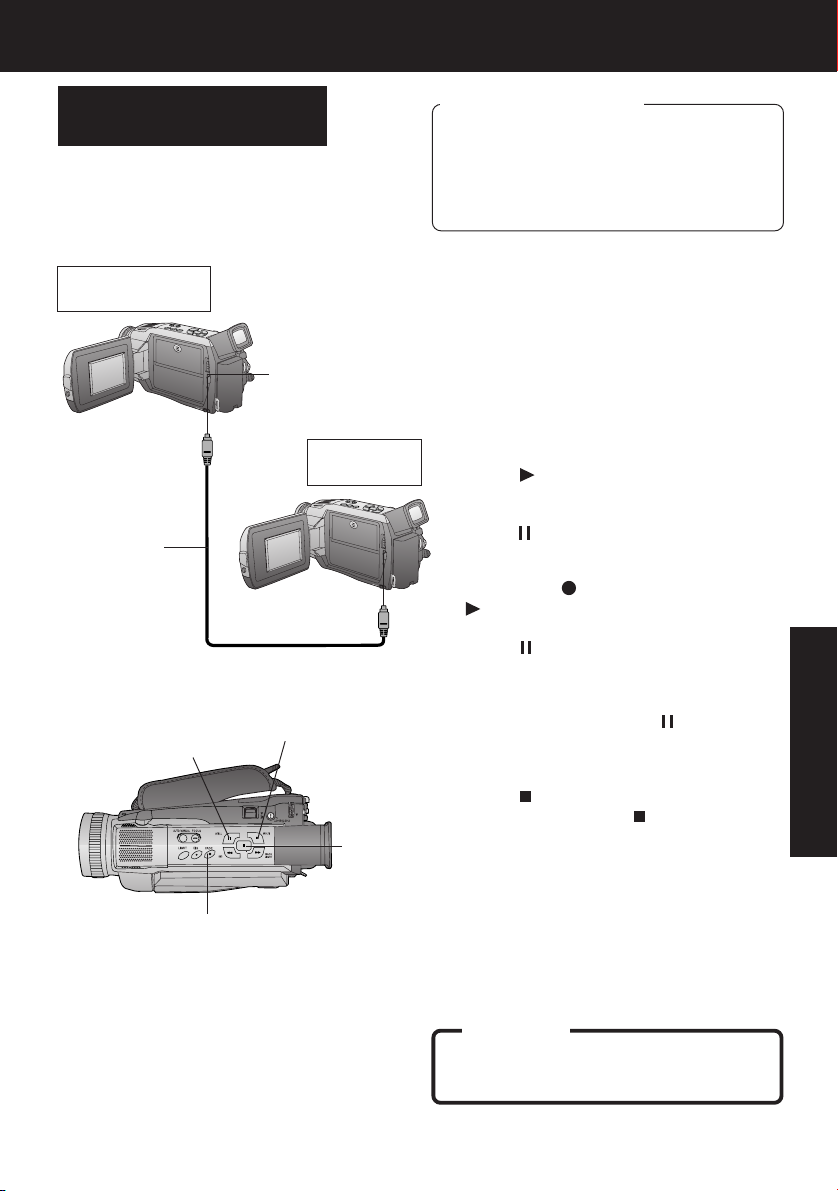
Copying from Digital
Equipment (dubbing)
High quality digital-to-digital copying can
be accomplished if both Palmcorders
incorporate the DV Input/Output (i.LINK)
Connector (DV Interface cable (i.LINK) is
not supplied).
Source (Playing)
Palmcorder
DV Input/Output
(i.LINK) Connector
Recording
Palmcorder
DV Interface
Cable (i.LINK)
(optional)
Before you begin
• Connect both Palmcorders to their
power sources.
• Connect the two Palmcorders using the
DV Interface cable (i.LINK)
(4-pin to 4-pin).
• Turn both Palmcorders ON.
1 Insert a pre-recorded tape into the
source (playing) Palmcorder, and set
POWER to VCR.
2 Insert a blank tape with the record
tab closed into the target (recording)
Palmcorder and set POWER to VCR.
3 Press (PLAY) on the source
Palmcorder. When the tape reaches
the point you want to start dubbing,
press
(PAUSE).
4 Hold down (REC) and press
(PLAY) on the target (recording)
Palmcorder.
Press (PAUSE) to pause the tape at
the starting point of the dub.
Editing Features
3, 4, 5
PAUSE
4REC
3, 4PLAY
6STOP
5 Simultaneously, press (PAUSE) on
both units to begin dubbing.
6 Press (STOP) on the recording
unit, and then press (STOP) on the
playing unit to end dubbing.
CAUTION:
Unauthorized exchanging and/or
copying of copyrighted recordings may
be copyright infringement.
41
Page 42

PC Connection
PC Connection with DV Interface Cable (i.LINK)
A video clip can be transferred directly to your PC (Personal Computer) via a DV Interface
Cable (i.LINK) (not supplied) using products and software from a number of video editing
software companies.
Using products from video editing software companies allows you to capture and edit
video clips using the DV Interface (i.LINK).
Our DVC being OHCI compliant should have no problem working
with any OHCI compliant Firewire Card/video - Editing software
package.
PC Connector
DV Input/Output
(i.LINK)
Connector
DV Interface Cable (i.LINK)
(6-to-4 pin) (not supplied)
Note
• During Palmcorder playback, do not disconnect the DV Interface Cable (i.LINK) or turn
the Palmcorder off as this may cause a PC hang-up error.
42
For assistance, please call : 1-800-211-PANA(7262) or send e-mail to : consumerproducts@panasonic.com
Page 43

PC Connection
PHOTOVU LINK Driver (Optional)
An image recorded on the DV Tape can be transferred to your PC (Personal Computer).
System Requirements for PHOTOVU LINK Driver (Optional)
• IBM PC/AT or compatible
®
• Intel
Pentium® Processor
• Microsoft Windows
• RAM: 16 MB or more
• 2 MB minimum available hard disk
space
• 256 color monitor (full color
recommended)
*Satisfy the conditions recommended by Microsoft for Windows.
98/98SE/ME/2000/XP
To PC Connector
• 3.5 inch 1.44 MB floppy disk drive
(for installation)
• RS-232C serial port (D-Sub 9-pin)
An adaptor (D-Sub 9-pin male to a
D-Sub female) is required for a
D-Sub 25-pin
• Mouse or other pointing device
4
RS-232C Serial port
(D-Sub 9-pin)
(Default is COM1.)
2
PC Connection
PC Connecting Cable for Windows
(optional: PC Connection Unit (PV-DRS2A, p46))
Connection
1 Turn off your PC.
2 Connect the Palmcorder to your PC (Windows) using the PC connecting cable
(optional: PC Connection Unit (PV-DRS2A, p46)).
• Before connecting the Palmcorder to the PC, make sure the PC
power is off to insure that images are transferred properly.
3 Turn on your PC.
4 Set the Palmcorder POWER to VCR.
Note
• For extended periods of use, it is recommended to use the AC Adaptor as a power
source.
• Refer to PC or Windows manual to identify which COM port is to be used for
connection.
43
Page 44

PHOTOVU LINK (Optional)
1 Turn your PC (Personal Computer) on
and start up Windows.
2 Insert PHOTOVU LINK DRIVER Disk
(Optional) into a floppy disk drive.
Running the Software
PHOTOVU LINK:
You can transfer images from your
Palmcorder tape to your PC.
3 Click on Start, then “Run
……
…”
……
4 Type in “a:\setup.exe” and click OK.
• If your 3.5 inch floppy disk drive is not
“A”, use the appropriate letter.
5 Follow the instructions as they appear
on the PC screen until the installation
is complete.
• Setup window will disappear when
the installation is complete.
Before you begin
• Insert the Tape. (p. 9)
• Make Palmcorder-PC connections.
(p. 43)
• Turn your PC on.
• Set Palmcorder POWER to VCR.
44
1Click on Start, “(All) Programs,”
“Panasonic,” “Palmcorder,” then
“PHOTOVU LINK.”
2“PHOTOVU LINK” is opened.
Note
• COM Port and Baudrate are automatically
selected.
Refer to Help for information about
application operations and other Error
messages.
For assistance, please call : 1-800-211-PANA(7262) or send e-mail to : consumerproducts@panasonic.com
Page 45

PHOTOVU LINK (Optional)
Using Tape Image Data
Pictures captured with the Palmcorder
can be transferred to your PC.
Transfer Button
Operation
Button
Before you begin
• Insert a recorded tape. (p. 9)
• Make Palmcorder-PC connections.
(p. 43)
• Turn your PC on.
• Set Palmcorder POWER to VCR.
1 Repeat steps 1 and 2 on page 44 to
run the Software.
2 “Preview Window” screen appears.
3 Search and Select a still scene you
want to transfer to your PC using VCR
Operation Buttons on the “Preview
window” screen. Then click on
“Transfer” to transfer selected image
from camcorder to “Preview Window”
in PLAY or STILL mode.
PC Connection
Note
• If, while transferring the image to your PC,
the displayed picture appears abnormal,
close PHOTOVU LINK and turn
Camcorder POWER off. Run PHOTOVU
LINK again and turn Palmcorder Power
back on. Now transfer again.
• Photo Search may fail to detect a
recorded PhotoShot image if the image is
3 seconds or less.
4 Click on “File” then “Save As”.
Save transferred image to PC.
45
Page 46

Palmcorder Accessory System
Accessory #
PV-DAC11A
CGR-D08A/1B
CGR-D16A/1B
CGP-D28A/1B
CGR-D53A/1K
PV-DDC9
Figure
Description
AC Adaptor with AC Cable
and DC Cable
800mAh / 1 h 30 min, Battery
Pack
1600mAh / 3 h, Battery Pack
2800mAh / 5 h, Battery Pack
5300mAh / 9 h, Battery Pack
DV Interface Cable (i.LINK)
(4-pin to 4-pin)
Price
$119.95
$69.95
$99.95
$129.95
$229.95
$55.00
PV-DRS2A
46
PC Connection Unit
(RS-232C Serial Kit)
For assistance, please call : 1-800-211-PANA(7262) or send e-mail to : consumerproducts@panasonic.com
Call for
Pricing
Page 47

Palmcorder Accessory Order Form
Please photocopy this form when placing an order.
1. Palmcorder Model #
2. Items Ordered
QuantityAccessory # Price EachDescription
Subtotal
Your State & Local Sales Tax
Shipping & Handling
Total Enclosed
3. Method of payment (check one)
Check of Money Order enclosed (NO C.O.D.SHIPMENTS)
VISA Credit Card #
MasterCard Expiration Date
Discover Customer Signature
Make Check or Money Order to: PANASONIC ACCESSORIES
(Please do not send cash)
4. Shipping information (UPS delivery requires complete street address)
Ship To:
Mr.
Mrs.
Ms.
First Last
Street Address
City State Zip
Phone #:
Day ( )
Night ( )
Total Price
6.95
For Your Information
TO OBTAIN ANY OF OUR PALMCORDER ACCESSORIES YOU CAN DO ANY OF THE
FOLLOWING:
VISIT YOUR LOCAL PANASONIC DEALER
OR
CALL PANASONIC’S ACCESSORY ORDER LINE AT 1-800-332-5368
[6 AM-5 PM M-F, 6 AM-10:30 AM SAT, PACIFIC TIME]
OR
MAIL THIS ORDER TO: PANASONIC SERVICES COMPANY ACCESSORY ORDER OFFICE
20421 84th Avenue South Kent, WA. 98032
47
Page 48
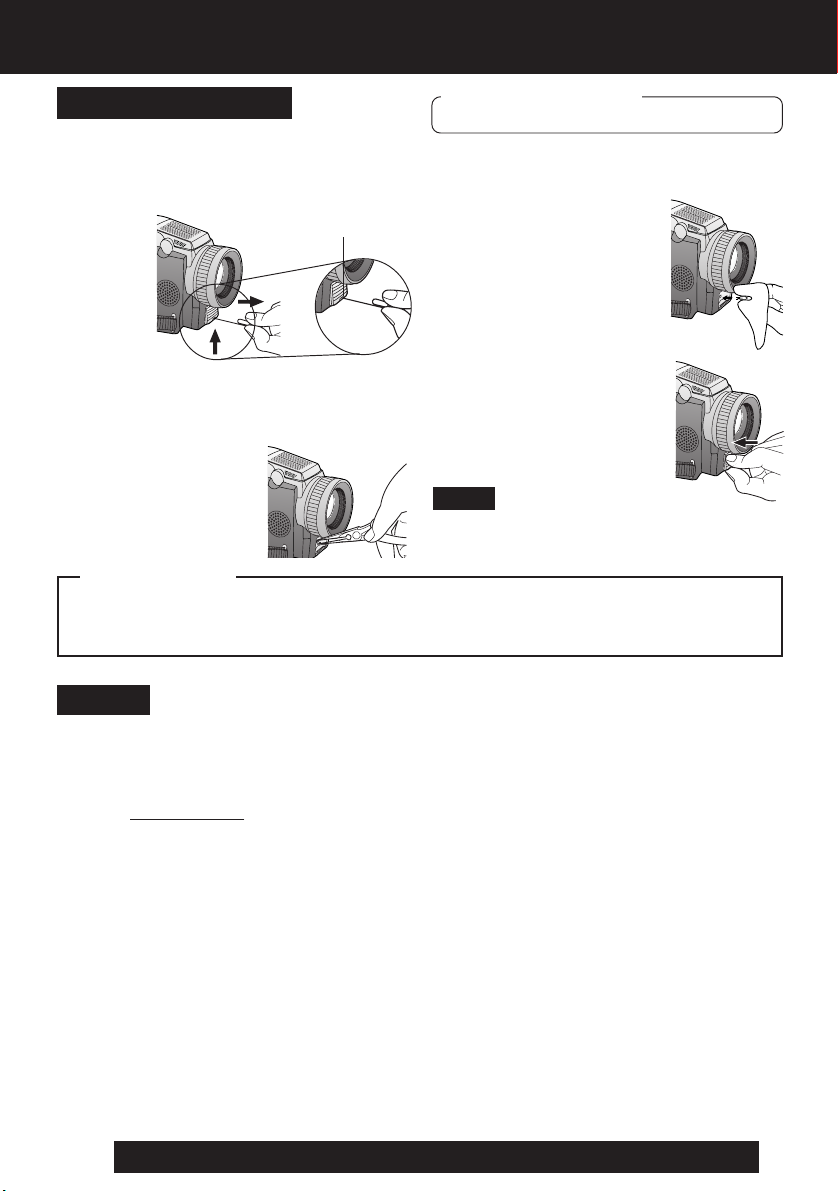
Notes On Operations
Replacing the Bulb
1 Insert a rigid wire, such as an
extended paper clip into point (A)
and lift cover up.
(A)
Before you begin
• Set POWER to OFF.
3 Replace bulb using a clean cloth or
tissue. (Do not touch with fingers.)
4Replace lens cover.
2 Using Tweezers or needle-nose
pliers, carefully remove bulb.
• Take unit to servicenter if you need
assistance.
Note
• Handle bulb gently. Excessive force may
cause bulb to crack.
DANGER:
Use only replacement bulb (PART NO. LSLL0028) supplied by Panasonic to reduce risk
of fire. Handle new bulb with cloth or tissue as skin oils decrease bulb life. Remove lens
cover and allow bulb to cool before replacing to avoid possible burn hazard.
Notice
This product has a fluorescent lamp that contains a small amount of mercury. It also
contains lead in some components. Disposal of these materials may be regulated in
your community due to environmental considerations. For disposal or recycling
information please contact your local authorities, or the Electronics Industries Alliance:
<http://
www.eiae.org.>
48
For assistance, please call : 1-800-211-PANA(7262) or send e-mail to : consumerproducts@panasonic.com
Page 49
Notes On Operations
Approximate Brightness Values
Your Palmcorder has been designed for normal scene illumination of 150 footcandles
(1500 lx). However, the Palmcorder may be used at F1:1.8, if illumination is more than
0.5 footcandles (5 lx).
The table below shows the color temperature for reference.
PALMCORDER
SETTINGS
(Amber Filter
Range)
- - - - - - - - - - - - -
“OUTDOOR”
- - -
“AUTO”
“INDOOR”
- - -
- - - - - - - - - - - - -
(Blue Filter
Range)
CONDITIONS
• Fair weather, blue sky
• Slightly cloudy sky
• Cloudy or rainy sky
• Sunlight in clear weather at
midday
• Average sunlight in clear weather
• Sunlight 2 hours after sunrise
and before sunset
• Sunlight 40 min. after sunrise
and before sunset
• Sunlight 30 min. after sunrise
and before sunset
• Sunlight 20 min. after sunrise
and before sunset
KELVIN COLOR
TEMPERATURE
— 10,000
— 8,000
— 7,000
— 6,500
— 6,000
— 5,500
— 5,000
— 4,500
— 4,000
— 3,500
— 3,200
— 2,800
— 2,000
ARTIFICIAL LIGHT SOURCENATURAL LIGHT
• Color television
• Fluorescent lamp (Daylight)
• Camera flash bulb
• Blue lamp for photography
• Fluorescent lamp (White)
• Normal flash bulb
• Fluorescent lamp (Off-white)
• Tungsten lamp for
photography
• Halogen lamp
• Iodine lamp
• Tungsten lamp
• Acetylene lamp
• Kerosene lamp
• Candlelight
COLOR TINT
MIXTURE
Bluish
Whitish
Yellowish
Reddish
For Your Information
49
Page 50

Specifications
Power Source: Palmcorder: 7.2 V DC (Battery)
AC Adaptor: 110/120/220/240 V AC, 50/60 Hz
Battery: Lithium-Ion Type DC 7.2 V
Power Consumption: Palmcorder : 7.2 V/7.8 V DC 6.5 W (Max. 9.5 W)
AC Adaptor : 18 W
Digital Interface i.LINK (IEEE1394)
Video Signal: EIA Standard (525 lines, 60 fields) NTSC color signal
Video Recording System: 2 rotary heads. helical scanning system
Audio: 12 bit (32 kHz) 4 tracks
16 bit (48 kHz) 2 tracks
Pick-Up System and Device: One integral color filter Charge Coupled Device (CCD)
Lens: 10:1 zoom lens, F1:1.8 with auto iris control
Focal length: 3.6 mm - 36 mm
Power zoom function
Lens filter diameter: 43 mm
Viewfinder: 6.0 mm (0.24 inch) Electronic Viewfinder
LCD Monitor: 63.5 mm (2.5 inch) Liquid Crystal Display
Minimum Illumination Required: 5 lx (F1:1.8) 0.5 footcandles
Operating Temperature: 32 °F~104 °F (0 °C~40 °C)
Operating Humidity: 10 %~75 %
Weight: Palmcorder : 0.58 kg
AC Adaptor : 0.16 kg
Dimensions: Palmcorder : 74 (W) x 88.5 (H) x 182 (D) mm
AC Adaptor : 70 (W) x 45 (H) x 115 (D) mm
7.8 V DC (AC Adaptor)
1 W (when not in use.)
1.28 Ibs.
0.35 Ibs.
2-7/8 (W) x 3-1/2 (H) x 7-1/8 (D) inch
2-3/4 (W) x 1-3/4 (H) x 4-1/2 (D) inch
Weight and dimensions shown are approximate.
Designs and specifications are subject to change without notice.
50
For assistance, please call : 1-800-211-PANA(7262) or send e-mail to : consumerproducts@panasonic.com
Page 51

Before Requesting Service
Cleaning Care for Video Heads
(a) Video Head Cleaning: Normally, your Palmcorder will not
require head cleaning. However, it is possible that the heads
may become clogged due to dust in the air, playing damaged
tapes, long term use, etc. If “NEED HEAD CLEANING”
appears for 5 seconds in the EVF or LCD monitor, the heads
may require cleaning.
Clogged Video Head
Tape Operations Caution
• When you go from function to function (PLAY, FF, REW etc.), please note that the unit
will not accept a new function operation until the previous operation is complete.
• The POWER Button and all function buttons, (PLAY, FF, REW, etc.) are only operational
after the tape has been completely loaded.
(b) Cleaning the Heads: It is recommended that head cleaning
be performed by a qualified service technician. Please contact
your nearest Panasonic Servicenter. An alternate solution is to
obtain a head cleaning cassette. Please use Panasonic
cleaning cassette (AY-DVMCLA). Be sure to follow the
cleaning instructions carefully. Excessive use of the head
cleaning cassette could shorten video head life.
Use this cassette only when a head clogging symptoms occur.
Refer servicing to qualified service personnel.
Lens Hood Area Operation Caution
When the following accessories are attached and the zoom is set to maximum wide
angle, the four corners of the sceen may appear darker:
• Wide or Telephoto conversion lens (optional).
• A filter (optional), etc. and then the lens hood.
• Two filters (optional).
For Your Information
51
Page 52

Before Requesting Service
If you have a problem with your Palmcorder, it may be something you can correct yourself.
Check the list below for symptoms and corrections.
Symptom
No picture in the EVF or LCD Monitor...
Video cassette cannot be inserted...
Video cassette cannot be removed...
No operation starts when operation buttons are
pressed...
Recording cannot be done...
Auto Focus does not operate...
Sound from microphone cannot be monitored...
Sound cannot be heard...
Correction
• Make sure the Power Source is connected.
(pp. 11, 12)
• Make sure the POWER switch is set to VCR or
CAMERA. (pp. 15, 27)
• Check the Dew Indicator. (p. 53)
• Make sure the Battery is fully charged. (p. 11)
• Make sure all necessary cables are connected
correctly and firmly. (p. 12)
• Make sure the Lens Cap is removed. (p. 15)
• Make sure the Power Source is connected.
(pp. 11, 12)
• Insert the cassette record tab up, window side
facing out. (p. 9)
• Make sure the Power source is connected.
(pp. 11, 12)
• Check the Dew Indicator. (p. 53)
• Make sure the record tab is closed. (p. 6)
• Check the Battery Indication. (p. 63)
• Make sure FOCUS is set to AUTO. (p. 24)
• Make sure the unit is ON and set to CAMERA
mode. (p. 15)
• Make sure the unit is set to REC or REC/
PAUSE mode. (p. 15)
• Make sure the Audio on the VCR MENU is set to
ST1. (pp. 38, 61)
Request for Service Notice
Please photocopy this form when making a request for service notice.
In the unlikely event this product needs
service.
Request for Service Notice:
Mail this completed form and your Proof of Purchase along with your unit to:
52
For assistance, please call : 1-800-211-PANA(7262) or send e-mail to : consumerproducts@panasonic.com
Panasonic Services Company
1705 N. Randall Road
Elgin, IL. 60123-7847
Attn: Camcorder Repair
• Please include your proof of purchase.
(Failure to due so will delay your repair.)
• To further speed your repair, please provide
an explanation of what is wrong with the unit
and any symptom it is exhibiting.
Page 53

On-Screen Displays (OSD)
The following warning displays appear in the EVF and the LCD monitor.
Indications
Condition
If the Palmcorder is in CAMERA mode without a cassette inserted,
“
” will flash and “TAPE NOT INSERTED” will appear for
5 seconds. Recording will not start.
If the Palmcorder is in CAMERA mode or Audio dub mode with
the cassette sliding record tab opened, “
“CHECK REC TAB” will appear for 5 seconds. Recording will not
start.
When Audio dub is performed and recording is other than NTSC
format, “
seconds.
When the tape is about to end in REC mode, “ END” will
flash and “TAPE END” will appear for 5 seconds.
When an incompatible tape is detected, “INCOMPATIBLE
TAPE” will appear for 5 seconds.
If the video heads require cleaning, “NEED HEAD CLEANING”
will appear for 5 seconds.
When an AUDIO DUB is attempted on a pre-recorded LP tape,
“CANNOT REC LP-MODE” will appear for 5 seconds.
If excessive moisture condenses in the unit, “WARNING” will
flash, “DEW DETECTED” will appear, and the Palmcorder will
automatically turn OFF in 15 seconds.
In this case, wait until the indicator no longer flashes when your
Palmcorder is turned ON again.
When a battery recharge is necessary, “WARNING” will
flash, “LOW BATTERY” will appear, and the Palmcorder will
automatically turn OFF in 15 seconds. (p. 63)
” will flash and “CANNOT REC” will appear for 5
” will flash and
When the built-in lithium clock battery is discharged, “CLOCK
BATTERY” will appear. To re-charge the lithium clock battery,
connect the AC Adaptor to the Palmcorder. Recharging takes
approx. 4 hours. Reset the clock after charging.
If you play a tape recorded in a format other than NTSC or you try
to copy copy-protected data, “INCOMPATIBLE DATA” will appear.
53
For Your Information
Page 54

Limited Warranty
PANASONIC CONSUMER ELECTRONICS COMPANY,
DIVISION OF MATSUSHITA ELECTRIC
CORPORATION OF AMERICA
One Panasonic Way Secaucus, New Jersey 07094
PANASONIC SALES COMPANY, DIVISION OF MATSUSHITA
ELECTRIC OF PUERTO RICO, INC.,
AVE. 65 de Infantería, Km. 9.5 San Gabriel Industrial Park,
Carolina, Puerto Rico 00985
Panasonic/Quasar Video Products
Limited Warranty Coverage
If your product does not work properly because of a defect in materials or workmanship, Panasonic Consumer Electronics Company
or Panasonic Sales Company (collectively referred to as “the warrantor”) will, for the length of the period indicated on the chart below,
which starts with the date of original purchase (“warranty period”), at its option either (a) repair your product with new or refurbished
parts, or (b) replace it with a new or a refurbished product. The decision to repair or replace will be made by the warrantor.
Product
Camcorder
DVD/VCR Deck,
A/V Mixer
TV/VCR, TV/DVD,
TV/DVD/VCR
Combination
TV/HDR
Combination
Rechargeable
Batteries
(in exchange for
defective item)
Tape
(in exchange for
defective item)
Memory Cards (in
exchange for
defective item)
During the “Labor” warranty period there will be no charge for labor. During the “Parts” warranty period, there will be no charge for
parts. You must carry-in or mail-in your product or arrange for in-home service, as applicable, during the warranty period. If nonrechargeable batteries are included, they are not warranted. This warranty only applies to products purchased and serviced in the
United States or Puerto Rico. This warranty is extended only to the original purchaser of a new product which was not sold “as is”.
A purchase receipt or other proof of the original purchase date is required for warranty service.
Carry-In, Mail-in or In-Home Service
For Carry-In, Mail-In or In-Home Service (as applicable) in the United States call toll free contact number listed above or visit
Panasonic Web Site: http://www.panasonic.com
For assistance in Puerto Rico call Panasonic Sales Company (787)-750-4300 or fax (787)-768-2910.
In-Home service, if applicable, requires clear, complete and easy access to the product by the authorized servicer and does not
include removal or re-installation of an installed product. It is possible that certain in-home repairs will not be completed in-home,
but will require that the product, or parts of the product, be removed for shop diagnosis and/or repair and then returned.
Limited Warranty Limits And Exclusions
This warranty ONLY COVERS failures due to defects in materials or workmanship, and DOES NOT COVER normal wear and tear
or cosmetic damage, nor does it cover markings or retained images on the picture tube resulting from viewing fixed images
(including, among other things, letterbox pictures on standard 4:3 screen TV’s, or non-expanded standard 4:3 pictures on wide
screen TV’s, or onscreen data in a stationary and fixed location). The warranty ALSO DOES NOT COVER damages which
occurred in shipment, or failures which are caused by products not supplied by the warrantor, or failures which result from
accidents, misuse, abuse, neglect, mishandling, misapplication, alteration, faulty installation, set-up adjustments, misadjustment of
consumer controls, improper maintenance, power line surge, lightning damage, modification, or commercial use (such as in a hotel,
office, restaurant, or other business), rental use of the product, service by anyone other than a Factory Servicenter or other
Authorized Servicer, or damage that is attributable to acts of God.
THERE ARE NO EXPRESS WARRANTIES EXCEPT AS LISTED UNDER “LIMITED WARRANTY COVERAGE”. THE
WARRANTOR IS NOT LIABLE FOR INCIDENTAL OR CONSEQUENTIAL DAMAGES RESULTING FROM THE USE OF THIS
PRODUCT, OR ARISING OUT OF ANY BREACH OF THIS WARRANTY. (As examples, this excludes damages for lost time, cost of
having someone remove or re-install an installed unit if applicable, or travel to and from the servicer, loss of media or images, data or
other memory or recorded content. The items listed are not exclusive, but are for illustration only.)
ALL EXPRESS AND IMPLIED WARRANTIES, INCLUDING THE WARRANTY OF MERCHANTABILITY, ARE LIMITED TO THE
PERIOD OF THE LIMITED WARRANTY.
Some states do not allow the exclusion or limitation of incidental or consequential damages, or limitations on how long an implied
warranty lasts, so the exclusions may not apply to you.
This warranty gives you specific legal rights and you may also have other rights which vary from state to state. If a problem with this
product develops during or after the warranty period, you may contact your dealer or Servicenter. If the problem is not handled to
your satisfaction, then write to the warrantor’s Consumer Affairs Department at the addresses listed for the warrantor.
PARTS AND SERVICE (INCLUDING COST OF AN IN-HOME SERVICE CALL, WHERE APPLICABLE) WHICH ARE NOT
COVERED BY THIS LIMITED WARRANTY ARE YOUR RESPONSIBILITY.
54
One (1) Year (except CCD
Image Sensor)
CCD Image Sensor - 6 (Six) Months
One (1) Year
One (1) Year (except CRT)
CRT - Two (2) Years
One (1) Year (except CRT)
CRT - Two (2) Years
Ten (10) Days
Five (5) Days
Ninety (90) Days
For assistance, please call : 1-800-211-PANA(7262) or send e-mail to : consumerproducts@panasonic.com
Parts
Limited Warranty
Labor
Ninety (90) Days
Ninety (90) Days
Ninety (90) Days
Ninety (90) Days
Ninety (90) Days
Ninety (90) Days
Ninety (90) Days
Not Applicable
Not Applicable
Not Applicable
Carry-In or Mail-In
Carry-In or Mail-In
Carry-In: 21” CRT and Smaller
In-Home or Carry-In: 22”
CRT and Larger
In-Home or Carry-In
Carry-In or Mail-In
Carry-In or Mail-In
Carry-In or Mail-In
Service
Contact Number
1-800-211-PANA(7262)
1-800-211-PANA(7262)
1-800-211-PANA(7262)
1-888-843-9788
1-800-211-PANA(7262)
1-800-211-PANA(7262)
1-800-211-PANA(7262)
Page 55

Customer Services Directory
For Product Information, Operating Assistance, Literature Request, Dealer Locations,
and all Customer Service inquiries please contact:
1-800-211-PANA (7262),
or send e-mail : consumerproducts@panasonic.com
For hearing or speech impaired TTY users, TTY: 1-877-833-8855
Web Site: http://www.panasonic.com
You can purchase parts, accessories or locate your
nearest servicenter by visiting our Web Site.
Accessory Purchases:
1-800-332-5368 (Customer Orders Only )
For hearing or speech impaired TTY users, TTY: 1-866-605-1277
Panasonic Services Company 20421 84th Avenue South, Kent, WA 98032
(Monday-Friday 6 am-5 pm; Saturday 6 am-10:30 am, PST)
(Visa, MasterCard, Discover Card, American Express, Check)
Monday-Friday 9 am-9 pm; Saturday-Sunday 9 am-7 pm, EST.
Product Repairs
MAIL TO :
Please carefully pack and ship, prepaid and insured, to the Elgin Centralized Factory Servicenter.
Customer’s in Puerto Rico, please ship or carry in to location below (“Service in Puerto Rico”).
Matsushita Electric of Puerto Rico, Inc. Panasonic Sales Company/ Factory Servicenter:
Ave. 65 de Infanteria. Km. 9.5, San Gabriel Industrial Park, Carolina, Puerto Rico 00985
Centralized Factory Servicenter
Panasonic Services Company
1705 N. Randall Road,
Elgin, IL 60123-7847
Attention: Camcorder Repair
Service in Puerto Rico
Phone (787) 750-4300 Fax (787) 768-2910
As of August 2002
For Your Information
55
Page 56
Spanish Quick Use Guide/Guía Para Uso Rápido
Precauciones para su seguridad
ADVERTENCIA: PARA EVITAR INCENDIOS Y DESCARGAS
ELÉCTRICAS, NO EXPONGA ESTE EQUIPO A LA LLUVIA NI A
LA HUMEDAD.
Mini
Su
Estándar (SP) y modo Largo (LP).
Se recomienda el uso sólo de cintas de cassette que hayan sido probadas e
inspeccionadas para su uso en aparatos VCR con la marca
Este dispositivo cumple con la parte 15 de las Reglas del FCC. El funcionamiento está
sujeto a las dos siguientes condiciones: (1) Este dispositivo puede no causar
interferencias perjudiciales, y (2) este dispositivo debe aceptar cualquier interferencia
recibida, incluyendo interferencias que pueden causar un funcionamiento no deseado.
Nota: Este equipo ha sido puesto a prueba y se encontró que cumple con la Parte 15
Advertencia del FCC:
Palmcorder está diseñada para grabar y reproducir en el modo de Reproducción
Mini
.
Este símbolo tiene por finalidad alertar al
PRECAUCIÓN
RIESGO DE DESCARGA ELÉCTRICA
NO ABRIR
PRECAUCIÓN: PARA REDUCIR EL RIESGO DE
DESCARGA ELÉCTRICA, NO QUITE LA
CUBIERTA (O PARTE POSTERIOR).
EL APARATO NO TIENE EN SU INTERIOR PIEZAS
QUE PUEDAN SER REPARADAS POR EL USUARIO.
SOLICITE TODA REPARACIÓN A PERSONAL DE
SERVICIO CUALIFICADO.
usuario acerca de la presencia de tensión
sin aislación en el interior del producto, que
puede tener la intensidad suficiente como
para causar descargas eléctricas. Por lo
tanto, hacer contacto con cualquier pieza
en el interior de la unidad es peligroso.
Este símbolo tiene por finalidad alertar al
usuario de la presencia de importantes
instrucciones de operación y
mantenimiento en la literatura incluida con
la unidad. Por lo tanto, lea detenidamente
la literatura incluida para evitar problemas.
La etiqueta de régimen está pegada en la base de la cubierta del cargador.
de las reglas del FCC. Estos limites están diseñados para proveer una
protección razonable contra interferencias cuando se opera en un ambiente
residencial.
Si este equipo causa interferencias en la recepción de radio o televisión, lo cual
se puede comprobar al apagar y encender el equipo, utilice el equipo en otra
ubicación y/o utilice un tomacorriente diferente al que está utilizando el receptor.
Si es necesario, consulte con el distribuidor o un técnico experto de radio/TV
para solicitar ayuda. Puede encontrar útil el folleto ‘Información sobre las
interferencias’ disponible en las oficinas regionales del FCC local.
Para asegurar la conformidad continua del FCC, utilice solamente el cable de
interfaz blindado cuando conecte una cámara de video digital a una
computadora de acuerdo con las instrucciones incluidas aquí. También,
cualquier cambio sin autorización o modificaciones a este equipo anularían la
autoridad del usuario para operarlo.
56
For assistance, please call : 1-800-211-PANA(7262) or send e-mail to : consumerproducts@panasonic.com
Page 57

Spanish Quick Use Guide/Guía Para Uso Rápido
Inserte de la batería
Antes de comenzar
• Cargue la battería. (Página 11.)
2
1
1 Coloque la batería y deslícela
hacia arriba hasta que se quede
bloqueada con un clic.
Inserte el Cassette
Esta videocámara contiene un sistema de ejecución fácil del cassette. Por eso,
es fácil de introducir o sacar el cassette aunque esté montado sobre un
trípode. (Página 7.)
1 Presione LCD-OPEN y abra
completamente el monitor LCD.
2 Ajuste el interruptor
de alimentación
(POWER) a la posición
VCR o CAMERA.
5Presione la marca PUSH CLOSE
(EMPUJAR PARA CERRAR) para
cerrar la tapa del compartimiento del
cassette.
For Your Information
3 Deslice el interruptor de
expulsión de cinta (TAPE
EJECT) para abrir la tapa del
compartimento del cassette.
4 Introduzca un cassette con
la parte de la ventana hacia
arriba.
• Asegúrese de que la
lengüeta de grabación
esté cerrada. (Página 6.)
57
Page 58

Spanish Quick Use Guide/Guía Para Uso Rápido
Grabación con la cámara
Cuando el monitor LCD se enchuentra totalmente
abjerto, el visor se DESACTIVA automàticamente.
1 Ajuste el interruptor de
alimentación (POWER) a la
posición CAMERA.
180°
2 Ajuste el control lde ajuste
90°
Monitor LCD
4Presione el botón de grabación/
pausa (REC/PAUSE) para iniciar la
grabación.
Vuelva a pulsar el botón de
grabación/pausa (REC/PAUSE) para
hacer una pausa en la grabación.
Para ver la reproducción en el LCD (pantalla
de visualización de cristal líquido)
Cuando el monitor LCD se enchuentra
totalmente abierto, el visor se DESACTIVA
automáticamente.
180°
90°
3 Presione el botón de apertura del
LCD (LCD-OPEN) para des bloquear
el monitor LCD. Balancée abriéndolo
completamente y ajuste el àngulo.
Antes de comenzar
• Cargue la battería. (Pàgina 11.)
de visión según lo desee.
Visor
1 Ajuste el interruptor
de alimentación
(POWER) a la
posición VCR.
2Presione el botón de apertura del LCD (LCD-OPEN)
para des bloquear el monitor LCD. Balancée
abriéndolo completamente y ajuste el ángulo.
3Presione el botón de
rebobinado (REW)
para rebobinar la cinta.
58
For assistance, please call : 1-800-211-PANA(7262) or send e-mail to : consumerproducts@panasonic.com
4 Presione el botón de
reproducción (PLAY)
para reproducir la cinta.
5 Presione el botón de
parada (STOP) para
detener la reproducción.
Page 59

MENU OSD
Camera Mode Menu Screen
1
2
3
4
5
6
7
8
PROG. AE (p. 21)
1
To select one of the 5 Program AE
modes. Setting to OFF cancels the
previously selected Program AE
mode.
PROGRESSIVE (p. 17)
2
When set to ON, still pictures taken
with PhotoShot are recorded with a
higher resolution than with normal
PhotoShot.
D. ZOOM (p. 33)
3
To select 25X (from 10X to 25X) or
700X (from 10X to 700X).
Setting to OFF cancels the previously
selected digital zoom.
CINEMA (p. 20)
4
When set to ON, you can record a
picture compatible with a wide-screen
TV equipped with an S2 picture
terminal.
EFFECT (pp. 34, 36)
5
To select one of the 10 digital
functions.
Setting to OFF cancels the previously
selected digital function.
REC SPEED (pp. 6, 15)
6
SP:Normal recording speed mode.
LP: Recording time is 1.5 times as
long as in the SP mode. For
example, 120 minutes of
recording is possible on a
80 minute tape.
AUDIO REC (p. 38)
7
12 bit: The sound is recorded in the
12 bit/32 kHz mode.
16 bit: The sound is recorded in the
16 bit/48 kHz high-quality
mode.
SCENEINDEX (REC Only)
8
DAY: An index signal is recorded
when recording is restarted
after the date has changed
since the last recording.
2 HOUR:An index signal is recorded
when recording is restarted
after a lapse of more than
2 hours.
For Your Information
59
Page 60

MENU OSD
9
10
11
12
13
14
15
16
17
18
DATE/TIME (p. 64)
9
The date and time can be set and
displayed on the screen.
C. DISPLAY (p. 63)
10
To select the desired type of counter
indication displayed on the LCD
Monitor or in the viewfinder.
C. RESET (p. 63)
11
Setting to ON resets the counter to
zero.
DISPLAY (p. 63)
12
To select the desired type of display
changes to all function display,
Partial display, and Minimum display.
LCD/EVF SETUP (p. 16)
13
Setting to ON displays the menu for
adjusting the LCD brightness, color
level, and the EVF brightness.
BEEP SOUND
14
Set to ON to hear beep when starting
and stopping camera recording or
when unusual conditions occur. To
cancel the beep, set to OFF.
Palmcorder will beep:
Once when you start recording
Twice when you stop recording
Repeatedly when warning of
unusual conditions. (p. 53)
SHTR EFFECT (p. 17)
15
When set to ON, still pictures taken in
the PhotoShot mode are recorded
with a visual shutter effect and click
sound.
CLOCK SET (p. 13)
16
When set to ON, the date and time
can be set on the screen.
SELF REC (p. 19)
17
NORMAL: During self-recording, the
picture on the LCD Monitor is the
same as it will be recorded.
MIRROR: During self-recording, the
picture on the LCD Monitor is
horizontally reversed.
DEMO MODE (p. 8)
18
When set to ON, Self Demo starts.
60
For assistance, please call : 1-800-211-PANA(7262) or send e-mail to : consumerproducts@panasonic.com
Page 61

MENU OSD
VCR Mode Menu Screen
1
2
3
4
5
6
BLANK SEARCH (p. 28)
1
Select ON to go directly to a blank
portion of the tape.
12bit AUDIO (p. 39)
2
To select the desired audio playback
mode after performing audio dubbing
in the 12 bit mode (SP mode only).
ST1 : The original sound alone is
played back.
ST2 : The dubbed sound alone is
played back.
MIX : The original sound and the
dubbed sound are played back
together.
MULTI SPEED (p. 31)
3
In Strobe Multi mode, used to select
the interval at which a succession of
still screens are captured from the
playback picture.
FAST : Every 0.3 seconds
NORMAL : Every 0.6 seconds
SLOW : Every 1.0 seconds
EFFECT1 (p. 36)
4
To select one of the 6 digital functions.
Setting to OFF cancels the previously
selected digital function.
EFFECT2 (p. 36)
5
To select one of the 2 digital picture
effects for playback. Setting to OFF
cancels the previously selected digital
effect.
D. ZOOM (p. 34)
6
Set to ON to double the size of a
playback image. Setting to OFF
cancels the previously selected digital
zoom.
For Your Information
61
Page 62

MENU OSD
7
8
9
10
11
12
13
REC SPEED (p. 6)
7
SP: Normal recording speed
mode.
LP: Recording time is 1.5 times as
long as in the SP mode. For
example, 120 minutes of
recording is possible on an
80 minute tape.
AUDIO DUB (p. 38)
8
Set to AUDIO DUB “ON” in the Menu
OSD to use the Audio Dub feature.
DATE/TIME (p. 64)
9
The date and time can be set and
displayed on the screen.
C. DISPLAY (p. 63)
10
To select the desired type of counter
indication displayed on the LCD
Monitor or in the viewfinder.
C.RESET (p. 63)
11
Setting to ON resets the counter to
zero.
DISPLAY (p. 63)
12
To select the desired type of display
changes to all function display, Partial
display, and Minimum display.
LCD/EVF SETUP (p. 16)
13
Setting to ON displays the menu for
adjusting the LCD brightness, color
level, and the EVF brightness.
CLOCK SET (p. 13)
14
When set to ON, the date and time can
be set on the screen.
14
62
For assistance, please call : 1-800-211-PANA(7262) or send e-mail to : consumerproducts@panasonic.com
Page 63

Electronic Viewfinder/LCD Monitor Indications
Here are some of the basic indications which will appear on the Palmcorder EVF and LCD
Monitor. Only Date and Time indications will be recorded onto the tape.
CAMERA/VCR Mode
a
g
b
c
d
e
f
h
Battery Remaining
a
Tape Remaining
b
(AY-DVM30EJ)
R0:30
R0:00
• It will take several seconds for the tape
remaining indicator to operate after the
tape starts moving.
CINEMA Indication
c
(Menu OSD: p. 59)
Digital Zoom and other Digital
d
Functions (Menu OSD: p. 59)
This display appears when the digital
zoom function has been activated.
Playback Effect (Menu OSD: p. 61)
e
This display appears when SEPIA or
B/W is selected in VCR menu.
Volume Display (p. 28)
f
The volume bar appears when the
volume of the built-in speaker is being
adjusted.
Tape Speed Indication
g
(Menu OSD: p. 59)
Indicates the tape speed (SP or LP).
(AY-DVM60EJ)
FULL
EMPTY
R1:00
R0:00
Counter/Time Code
h
The indication switches as shown
below when the desired “C. DISPLAY”
mode is selected from the menu.
(Menu OSD: pp. 60, 62)
Linear Time Counter
Time Code
Memory Counter M 0:00.00
The Palmcorder will stop whenever it
reaches the point where the counter was
previously set to M 0:00.00 during audio
dub, fast forward, or rewind.
Time Code 0h00m00s00f
The Palmcorder calculates and displays
exactly where you are on any tape in terms
of hours, minutes, seconds, and frames
(30 frames = 1 second).
• This display cannot be reset.
IMPORTANT NOTE:
• Display must be set to ALL for MF, AE,
W.BALANCE or BACK LIGHT indications
to be displayed on the EVF or LCD Panel
when selected.
• C.RESET does not work when
C. DISPLAY is set to T.CODE.
Memory Counter
For Your Information
63
Page 64
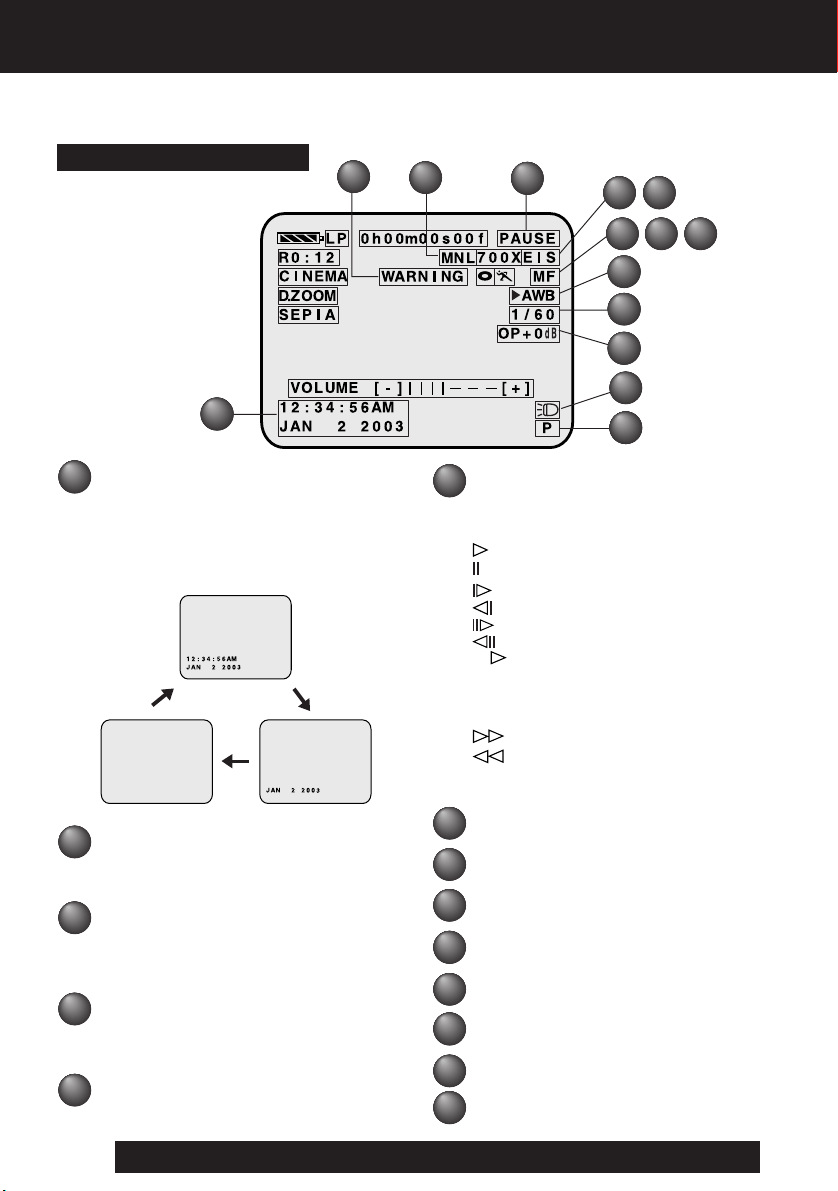
Electronic Viewfinder/LCD Monitor Indications
CAMERA/VCR Mode
l
i
Date and Time Indication
i
(Menu OSD: pp. 60, 62)
As shown below, the date and time
indication changes each time DATE/TIME
is selected from the Palmcorder’s MENU
(Menu OSD: pp. 60, 62).
D/T
(DATE/TIME)
DATEOFF
Light Indication (p. 8)
j
This display appears when LIGHT is
set to ON.
Progressive Indication
k
(Menu OSD: p. 59)
This display appears when
PROGRESSIVE is set to ON.
WARNING Indication (p. 53)
l
The warning displays appear in the
EVF and the LCD monitor.
MNL Indication (pp. 23~26)
m
This display appears when AUTO/
MANUAL is pressed to MANUAL.
64
For assistance, please call : 1-800-211-PANA(7262) or send e-mail to : consumerproducts@panasonic.com
m
n
o p
q r s
t
u
v
j
j
k
Tape Mode Indications
n
REC Recording.
PHOTO PhotoShot recording.
PAUSE Paused during recording.
R
CHK Recording Check.
FF Fast forward.
REW Rewind.
BLANK Blank Search.
SEARCH Index Search.
Zoom Magnification Level (p. 33)
o
Digital EIS Indications (p. 35)
p
Backlight Indication (p. 20)
q
PROGRAM-AE Indication (p. 21)
r
Manual Focus Indication (p. 24)
s
White Balance Indication (p. 23)
t
Shutter Mode Indication (p. 25)
u
Iris Indication (p. 26)
v
Playback.
Still.
Slow (forward).
Slow (reverse).
Frame Advance (forward).
Frame Advance (reverse).
Repeat Playback.
FF Search.
REW Search.
Page 65

Front View
Built-in
Microphone
Lens
Built-in Light
pp. 8, 48.
Side View
JOG KEY
pp. 13, 14.
M.FOCUS DIAL
p. 24.
POWER
(VCR•OFF•CAMERA)
pp. 9, 10.
Index of Controls
Shoulder Strap
Attachment Ring
p. 7.
BATT RELEASE
pp. 11, 12.
Built-in Speaker
p. 28.
Shoulder Strap
Attachment Ring
p. 7.
Hand Strap
p. 7.
Rear View
Cassette
Compartment
Cover
p. 7.
LCD (Liquid
Crystal Display)
Monitor
pp. 9, 10, 16, 27.
LCD-OPEN
pp. 9, 10, 16, 27.
TAPE EJECT
pp. 7, 9.
DV Input/Output
(i.LINK) Connector
pp. 41, 42.
DC IN Terminal
p. 12.
PC Connector
p. 43.
65
For Your Information
Page 66

Index of Controls
Rear View
Electronic
Viewfinder (EVF)
p. 10.
MENU
pp. 13, 14.
A/V Output
Connector
p. 32.
PHONE Jack
p. 27.
Top View
FOCUS
p. 24.
AUTO/MANUAL
pp. 23~26.
FADE
p. 22.
REC
p. 41.
LIGHT
p. 8.
EIS
p. 35.
REW
pp. 10, 27.
RECORDING CHECK
p. 18.
PHOTOSHOT
p. 17.
POWER ZOOM
pp. 18, 33.
VOLUME
p. 28.
Lens Cap
p. 7.
PAUSE
pp. 29, 39, 41.
CAMERA STILL
p. 37.
PLAY
pp. 10, 27.
MULTI
p. 31.
STOP
pp. 10, 27.
FF
p. 29.
BACK LIGHT
p. 20.
Back View
Vision
Adjustment
Control
pp. 10, 15.
POWER Lamp
p. 15.
REC/PAUSE
pp. 10, 15.
66
For assistance, please call : 1-800-211-PANA(7262) or send e-mail to : consumerproducts@panasonic.com
Page 67
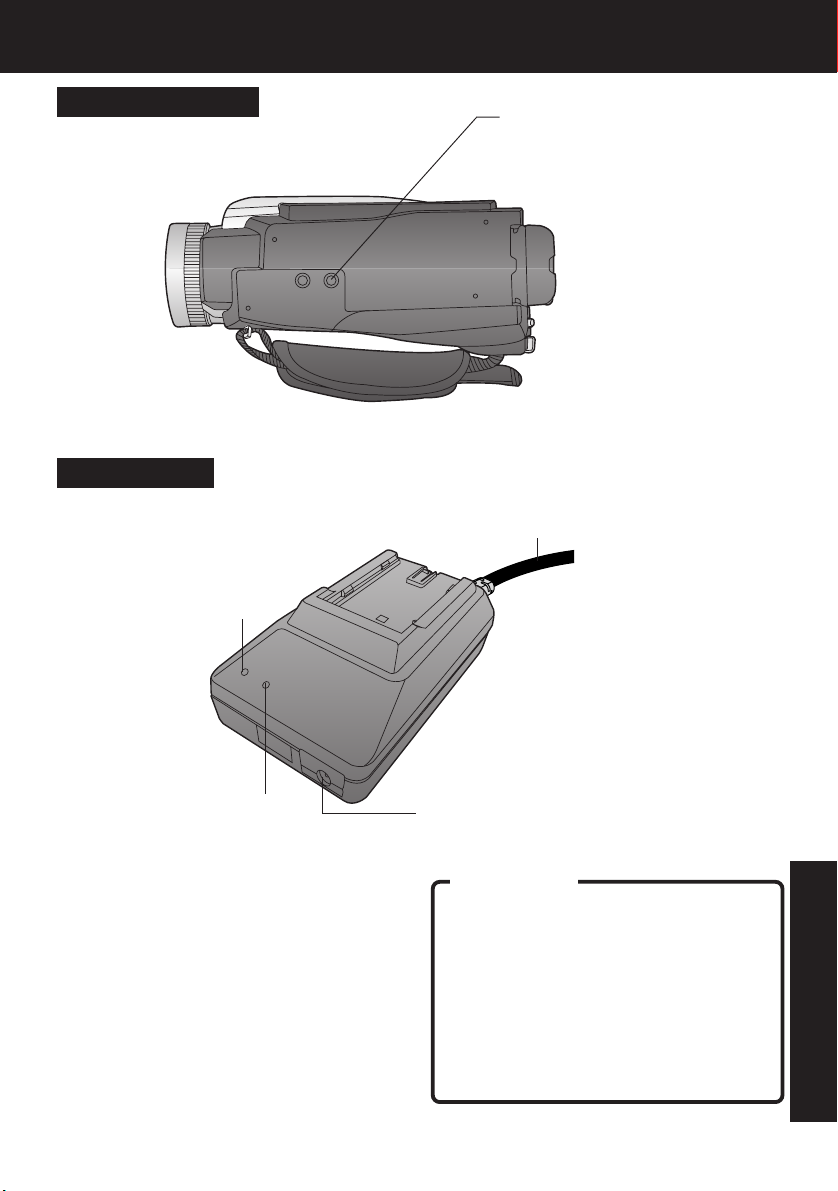
Index of Controls
Underside View
AC Adaptor
POWER Lamp
pp. 11, 12.
Tripod
Receptacle
AC Power Cord
pp. 11, 12.
CHARGE Lamp
p. 11.
VCR DC Output
Connector
p. 12.
For Your Information
CAUTION:
This unit will operate on 110/120/220/
240 V AC. An AC plug adaptor may
be required for voltages other than
120V AC. Please contact either a
local or foreign electrical parts
distributor for assistance in selecting
an alternate AC plug.
We recommend using the accessory
power plug adaptor (VJSS0070/
KZDB4ZE00001) in an area which
has special AC outlets.
67
Page 68

Index
A
AC Adaptor ... 6, 11, 12, 46
Accessories (Optional) .
Accessories (Supplied) ... 6
Adjusting the Volume .... 28
A/V Cable ................. 6, 32
Approximate Brightness
Values ......................... 49
Audio Dubbing ........ 38, 39
Audio/Video Fade In/Out
...................................... 22
B
Backlight ....................... 20
Battery Pack ... 6, 9, 11, 46
Battery Remaining
Indication .................... 63
Battery Warning ............ 53
Before Requesting Service
................................ 51, 52
Blank Search ................ 28
Built-in Light .................... 8
C
CINEMA Mode .............. 20
Cleaning Care for
Video Heads ............... 51
Clock Battery ................ 53
Clock Set ...................... 13
Connecting Earphone ... 27
Copying from Digital
Equipment ..................... 41
Copying your Tapes ...... 40
Customer Services
Directory ..................... 55
D
Date and Time Indication
...................................... 64
DC Power Cable . 6, 12, 46
DEW Indication ............. 53
Digital E.I.S. .................. 35
Digital Functions ........... 36
Digital PhotoShot™ Mode
...................................... 17
Digital Video Cassette Tape
........................................ 6
Digital Zoom ............ 33, 34
DV Interface Cable (i.LINK)
.......................... 41, 42, 46
46
E
Easy Cassette Eject ....... 7
Erase Protection Tab ....... 6
EVF/LCD Monitor Indications
................................ 63~64
F
Fast Forward/Rewind Check ..
Focus ............................ 24
H
Hand Strap ...................... 7
High Speed Shutter ...... 25
How to remove the Sensor
tag ................................. 6
I
Important Safeguards ..... 3
Index of Controls ..... 65~67
Iris ................................. 26
J
Jog Search .................... 30
L
LCD/EVF Setting .......... 16
Lens Cap.............. 6, 7, 15
Lens Cap Strap ........... 6, 7
Limited Warranty ........... 54
M
MagicPix™ Images....... 34
Memory Counter ........... 63
MENU OSD ............. 59~62
O
On-Screen Displays (OSD)
...................................... 53
P
Palmcorder Accessory
Order Form .................. 47
PC Connection ........ 42, 43
PHOTOVU LINK ...... 44, 45
Picture in Picture (PinP)
...................................... 37
Playback using the LCD
Monitor ........................ 27
Precautions ..................... 4
Program AE .................. 21
Progressive PhotoShot™
Mode ........................... 17
29
Q
Quick Guide .............. 9, 10
R
Rapid Visual Search ..... 29
Recording Check .......... 18
Recording Still Pictures ... 19
Repeat Playback........... 28
Replacing the Bulb ....... 48
Request for Service Notice
...................................... 52
S
Safety Precautions.......... 2
Self Demo Mode ............. 8
Self Recording .............. 19
Set the Date and Time .. 13
Shoulder Strap ............ 6, 7
Simple Recording ......... 15
Spanish Quick Use Guide
................................ 56~58
Specifications ............... 50
STILL Picture ................ 29
Strobe Multi Mode ......... 31
Supplying Power ..... 11, 12
T
Table of Contents ............ 5
Tape Remaining Indications
...................................... 63
Tape Speed ..................... 6
Tape Warning ................ 53
U
Using the Palmcorder Menu
...................................... 14
V
Variable Speed Search . 30
VHF Connecting Cable
...................................... 40
Volume Display ....... 28, 63
W
White Balance .............. 23
Z
Zoom In/Out .................. 18
Panasonic Consumer Electronics Company,
Division of Matsushita Electric Corporation of America
One Panasonic Way Secaucus, New Jersey 07094
Panasonic Sales Company (“PSC”),
Division of Matsushita Electric of Puerto Rico, Inc.
Ave. 65 de Infanteria, Km. 9.5 San Gabriel Industrial Park Carolina,
Puerto Rico 00985
68
For assistance, please call : 1-800-211-PANA(7262) or send e-mail to : consumerproducts@panasonic.com
P
Printed in Japan
LSQT0650B
S1102A2013
 Loading...