

Panasonic PV-DM2799 Owner’s Manual
I
Panasonic_
Omnlvlsionl VH_I
TV/DVD/VCR Combination
Operating Instructions
Mo_elPV-DM2799
Q@
I. .Im
As an ENERGY STAR e Partner,
Matsushita Electric Corporation of
America has determined that this
product or product model meets
the ENERGY STAR e guidelines for
energy efficiency.
O I G I TA L mnALA.mO
Please read these instructions carefully before attempting to
connect, operate or adjust this product. Please save thismanual.
Spanish Quick Use Guide is included• (Gufa para rdpida consulta
en espa_ol estd incluida.)
II iio] I_. k'4.'l kl I_l lie tilO!-_l ilim:tl[lZl_,.la e .j,_A| _.FA__l._;_,_am

ImportantSafeguardsandPrecautions
READ AND RETAIN ALL SAFETY AND t
OPERATING INSTRUCTIONS. HEED ALL
INSTALLATION I
POWER SOURCE CAUTION
Operate only from power source indicated on unit
or in this manual If urmertain, have your Eleotdc
Utility Sewice Company or Video Products Dealer
vedfy your home power source.
2 POWER CORD PLUG
For safety, this unit has a polarized type plug (one
wide blade), or a throe-wire grounding type plug.
Always hold the plugfirmly and make sore your
hands are dry when plugging in or unplugging the
AC power cord. Regularly remove dust, dirt, etc.
co the plug.
The plug fits into outlet one way. If tl cannot be fully
inserlod,!try reversing it.If it sbll willnot fit, have an
alect_ Install the proper wall outlet. Do not
tamper _ the plug.
_r_nl_ng outlet.
ffne_, have an_ installthe pmpor
3
,protect against
r persenal Injuw:
not rest heavy objects on,
ywsy.
type
and mu_t be
_cords isa
::;, ;, and damaged or
alectddan.
4 DO NOT BLOCK VENTILATION HOLES
Vontlla_ openlyIn the cabinet release heat
generated dudng Operation. If blocked, heat
build-up may result in a fire hazard or heat
_ge tocassettes.
protaof :
a. Never cover ventilation slots while unit is ON, or
operate unit while placed on a bed, sofa, rug, or
other soft surface,
b. Avoid built-in installation such as a book case
or_, unlesspmpedyvent,atad.
E PLACEMENT AVOID EX1REMELY HOT LOCATIONS
oR SUDDEN TEMPERATURE CHANGES
Do nOt_lplacounit over Ornear a _er or
• p_gulatol', in direct sunlight, inside closad vehicles,
I OUTDOOR ANTENNA INSTALLATION I
1 SAFE _NA AND CABLE CONNECTION
1WARNINGS IN THE MANUAL AND ON UNIT
Anoutsideantennaorcablesystem must
be propodygroundedto previdesome Pt _-._.
pmtsctionagainstbuiltup static F "_'_ _"
chargesandvoRage, _ _'_/,_,
Section810ofthe _ //"'_ "%
Nat=alE lCo , 2P1"'--"----'--
ANSI/NFPA70 (in I _ I_ .Z-_='_,_"
Canada,pad 1of the _ i_k_z_:_-,,--- =m,
CanadianElectricalCode) _---.L_ ,,___,,_
providesinfomlstion r4c._w._.,._,_ _,_,_
regardingpropergroundingof the mastandsupportingstructure,
groundingof the !ead-inwireto an antenna dischargeunit,sizeof
groundingconductors,locationofantennadischargeunit,connection
to groundingelectrode;,andrequirementsforthe groundingelectrode,
2 KEEP ANTENNA CLEAR OF HIGH VOLTAGE POWER UNES
OR CIRCUITS
Locstean outsideanisnnasystemwel_swayftom powerlinssand
eisofdc_igl_torpowe"dmuits=o it wilt nevertouchthesepowe'sourees
shouklit everlelL When instaliisgantnsna,_0solutely nevertouch
powerlinas,drcuitsorofher power sourcanns Ibiscouldbe lstaL
I USING THE UNIT I
Before unitis brought out of stomga Ormoved to a new location,
refer again to the INSTALLATION _ of these saleguaKIs.
1 KEEP UNIT WELL AWAY FROM WATER OR MOISTURE,
saob sa vasas, alnl_;_, etc; ....
2 IF EXPOSED TO _iMOi_RE OR STRONG IMPACT,
unplug unit and have _'lnsPectad _ a q_lified _rvise"
technician before USe:: '
3 ELECl_ICAL _.S
extended pe_; d_ _! _:from the
power seurce:_ wel!_ the ant_nr_ and cabte'system,
4 WHEN UN_.I_'P_U_GED IN,
. DoNOT_P_; ..... _ :, ,
- liquid has spllisd kito unit.
- unit was dropped orothendse damaged.
- unit emits smoke; nmlodors, or noises.
Immedlataly unplug unit, and have It Inspected by a sen4ce
technician to avoid potential fire and shock hazards.
• Never dropor posh any objeot through openings le unit.
Touching intornel ports may causa eisctric shock or fire hezard.
Do not put any foreign objant un the disc tray.
• Keep magnetic objects, such as speakers, away from unitto
aveld _ Interfemnoe.
5 USING ACCESSORIES
Use only accessories recommended by the manufacturer to
avoid dsk of fire, shock, or other hazards.
6 CLEANING UNrr " ;_i i_._
Un_ugun_Useac_n, dry,ch_!_ unVea_dclothto
gentlyremove dust or dabds. DO NOT USE _leg fluids;
aerosois,or Iorced air that could over-spray, Or._ Inlo _
and cause elsotdcalshock. Any _, such_ wax,_'
adhesive tape, etc. my mar the cabl_t sodace_ _ff!; _
cold place to • warm one, moisture may condense
in unitand on the tape causing damage.
i
Never subject unit to vibration, impact, or place it
so that the surface is it;tad as internal parts may
be seriously damaged.
6TO AVOID PERSONAL INJURY
• Never place unit on support or stand that is not
firm, level, and adequately strong.
The unit could fall causing sadous _JJ_
injury to a child or adult end
damage to the unit.
• Move any applisnoe eod cart
combination with care.
Quick stops, excessive force, and
uneven surfaces may cause objects to overtur_l.
• Carefully follow all operating instructions. ,
I,j
I SERVICE ........ J
1 DO NOT SERVICE PRODUCT YOURSELF
If, after carefully following detailed opemitng instructions, the
unit does not operate properly, do not attempt to open or
remove covem, or make any adjustments not dasodbed in the
manual. Unplug unit and contact a qualffied service technician.
2 REPLACEMENT OF PARTS
Make sure the service technician uses only parts specified by
the manufacturer, or have equal safety characteristics as
original parts.The use of unauthorized sobstltutse may result
in tim, electda shock, or other hazards.
$ SAFETY CHECK AFTER SERVICING
After unit is sendced or repaired, request that a thorough safely
check be done as daasribed in the _acturor's service
literaturo to insure video unit is in safe operatin0 condition.
Safety Precautions/Mesures de sdcuritd
Warning:To prevent fire or shock hazard, do not expose this equipment to rein or moisture.
Caution: To prevent electric shock, match wide blade of plug to wide slot, fully Insert.
Avertissement: Afin de prdvenlr tout risque d'incendie ou de chocs 61ectrlques, ne pas exposer cat
apparell _ la plule ou/_ une humlditd excessive.
Attention: Pour 6viter les chocs 61ectriques, Introduire la lame la plus large de la fiche dans la borne
correspondante de la prise et pousser jusqu'au fond.
This video recorder, equipped with the HQ (High Quality) System, is compatible with existing VHS equipment.
Only use those tapes with the _g_ mark, It is recommended that only cassette tapes that have been tested
and inspected for use in2, 4, 6, and 8 hour VCR machines be used.
This television receiver provides display of television closed captioning in accordance with §15.119 of the FCC
rules.
FCC WARNING: Any unauthorized changes or modifications to this equipment would void the user's
authority to operate.
!
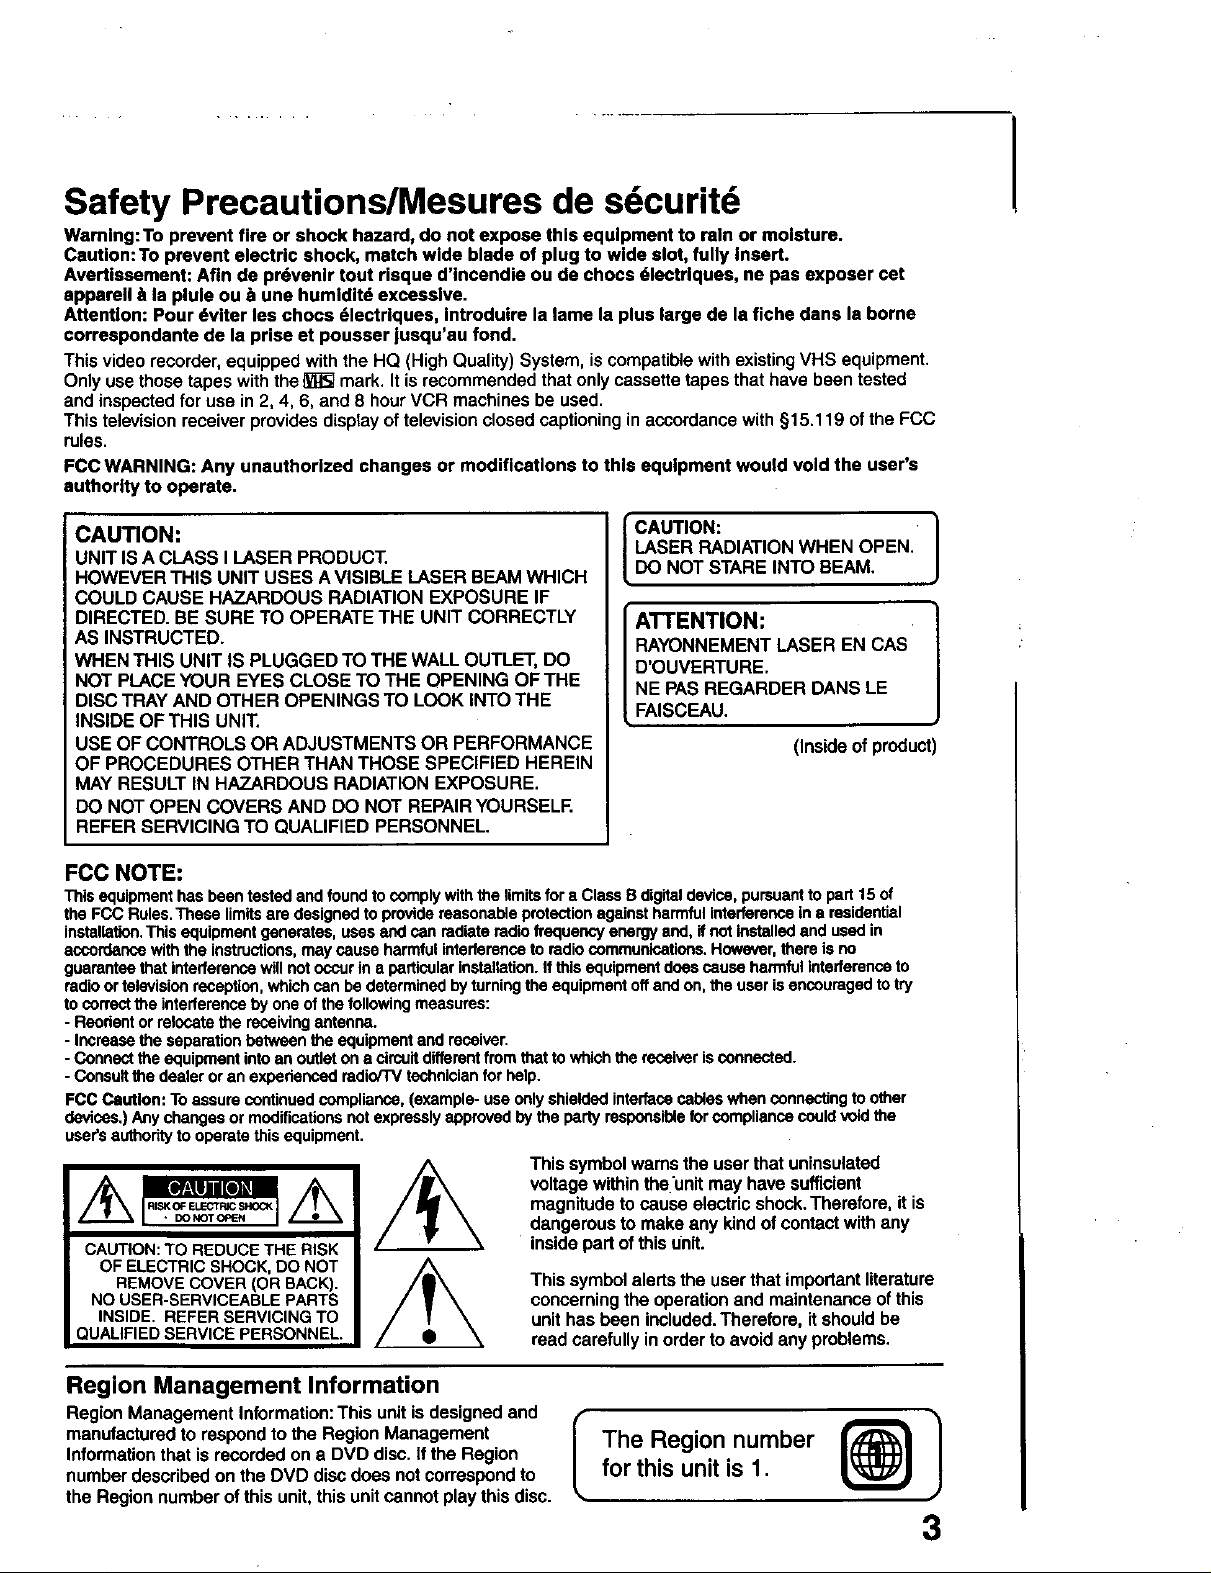
CAUTION:
UNIT IS A CLASS I LASER PRODUCT.
HOWEVER THIS UNIT USES A VISIBLE LASER BEAM WHICH
COULD CAUSE HAZARDOUS RADIATION EXPOSURE IF
DIRECTED. BE SURE TO OPERATE THE UNIT CORRECTLY
AS INSTRUCTED.
WHEN THIS UNIT IS PLUGGED TO THE WALL OUTLET, DO
NOT PLACE YOUR EYES CLOSE TO THE OPENING OF THE
DISC TRAY AND OTHER OPENINGS TO LOOK INTO THE
INSIDE OF THIS UNIT.
USE OF CONTROLS OR ADJUSTMENTS OR PERFORMANCE
OF PROCEDURES OTHER THAN THOSE SPECIFIED HEREIN
MAY RESULT IN HAZARDOUS RADIATION EXPOSURE.
DO NOT OPEN COVERS AND DO NOT REPAIR YOURSELF.
REFER SERVICING TO QUALIFIED PERSONNEL.
LASER RADIATIONWHEN OPEN.
CAUTION: ]
DO NOT STARE INTOBEAM,
ATTENTION:
RAYONNEMENTLASER EN CAS
D'OUVERTURE.
NE PAS REGARDERDANS LE
FAISCEAU.
(Insideofproduct)
FCC NOTE:
Thisequipmenthasbeentestedand foundto complywiththe limitsforaClassB digitaldevice,pursuantto part 15of
theFCC Rules.These limitsare designedto providereasonableprotectionagainstharmfulinterferenceina residential
installation.This equipment generates,usesendcanradiateradiofrequencyenergyand,ifnot installedand usedin
accordancewiththe instructions,maycauseharmfulinterferenceto radiocommunications.However,there is no
guaranteethat interferencewillnotoccurin a particularinstallation.Ifthis equipmentdoescauseharmfulinterferenceto
radioortelevisionreception,whichcan bedeterminedbyturningtheequipmentoffandon,the userisencouragedtotry
tocorrectthe interferencebyoneofthefollowingmeasures:
- Rendentorrelocatethe receivingantenna.
- Increasethe separationbetweentheequipmentand receiver.
- Connectthe equipment intoan outletona circuitdifferentfrom thatto whichthereceiverisconnected.
- Consultthe dealeroran expedensedredio/TVtechnicianfor help.
FCCCaution: Toassurecontinuedcompliance,(example-use onlyshieldedinterfacecables when connecting to other
devices,)Anychangesor modificationsnotexpresslyapprovedby theparty respoesiblefur compliancecouldvoidthe
user'sauthorityto operatethis equipment.
This symbol warns the user that uninsulated
voltage withinthe'unit may have sufficient
magnitude to cause electric shock.Therefore, it is
dangerous to make any kind of contact with any
CAUTION: TO REDUCE THE RISK
OF ELECTRIC SHOCK, DO NOT
REMOVE COVER (OR BACK).
NO USER-SERVICEABLE PARTS
INSIDE. REFER SERVICING TO
QUALIFIED SERVICE PERSONNEL.
inside part ofthis unit.
This symbol alerts the user that important literature
concerning the operation and maintenance of this
unit has been included. Therefore, it should be
read carefully in order to avoid any problems.
Region Management Information
Region Management Information: This unit is designed and [
manufactured to respond to the Region Management
Information that is recorded on a DVD disc. If the Region
number described on the DVD disc does not correspond to
the Region number of this unit, this unitcannot play this disc.
The Region number
for thisunitis 1.
L
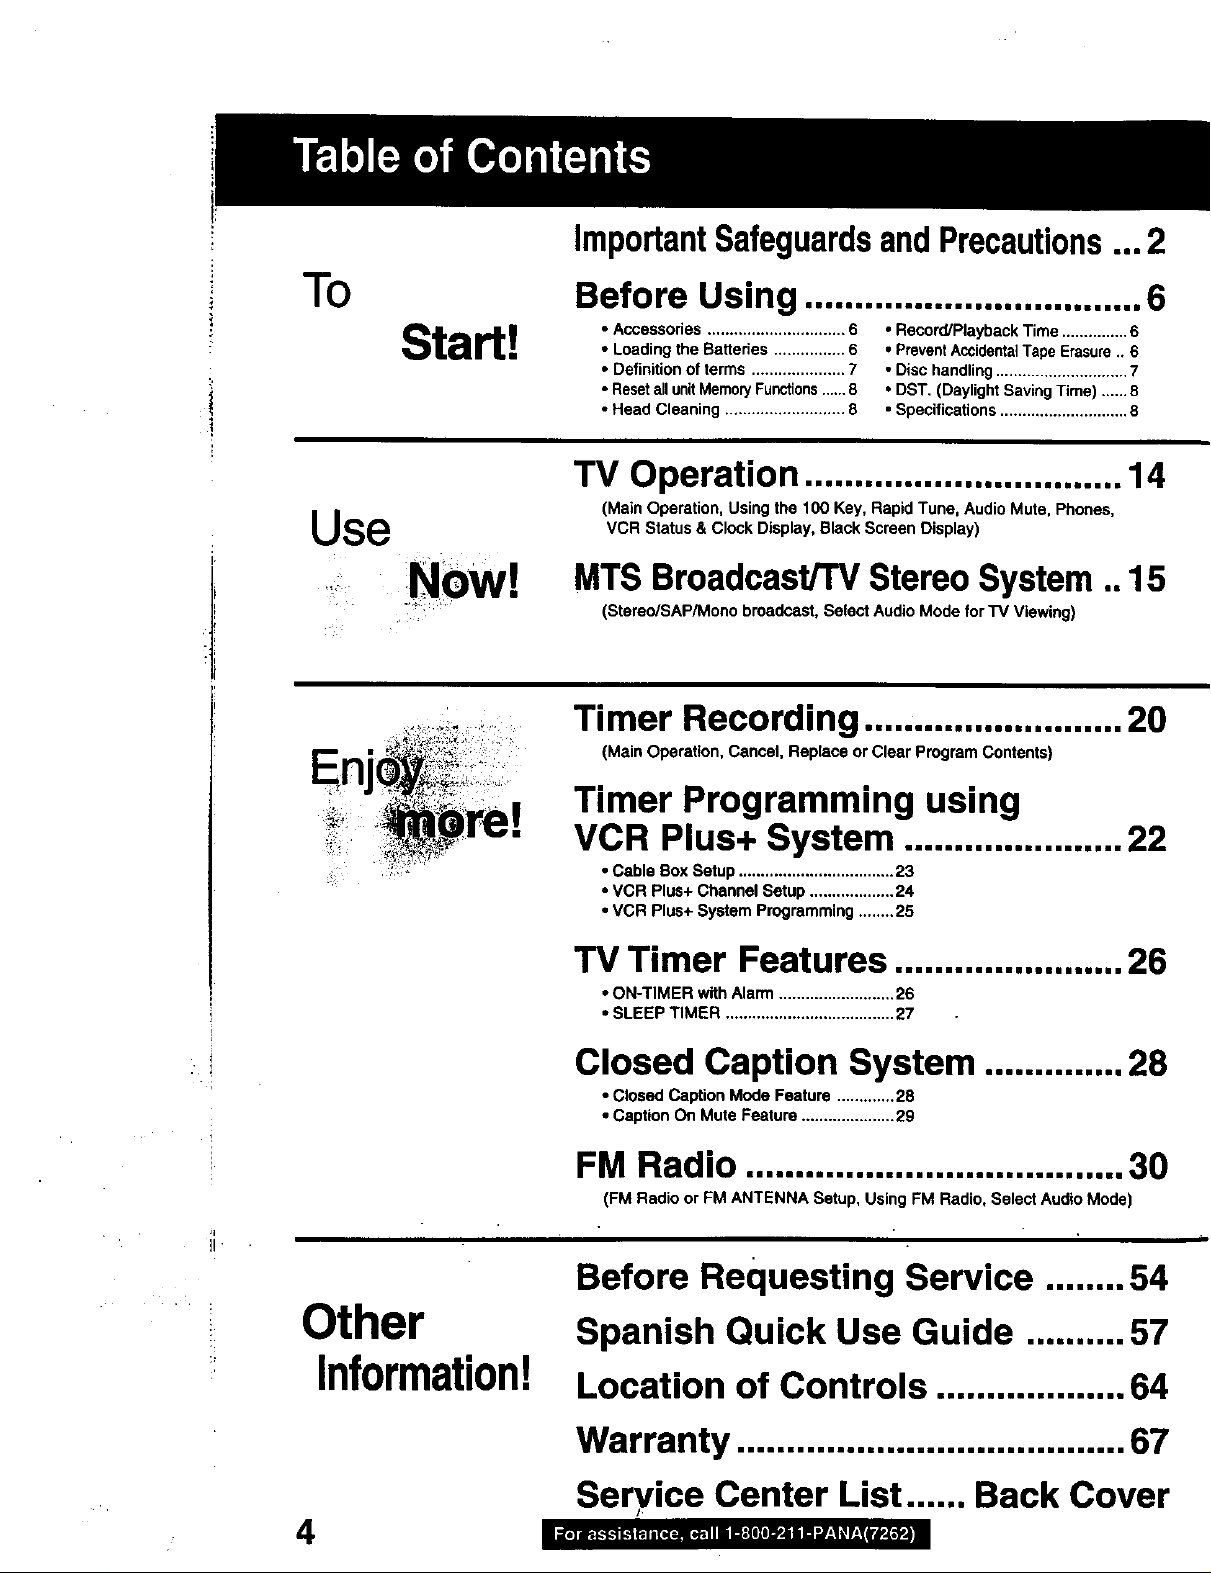
ImportantSafeguardsandPrecautions...2
To
Start!
!
Before Using ..................................
• Accessories ............................... 6 • Record/Playback Time ............... 6
• Loading the Batteries ................ 6 ° Prevent AccidentalTape Erasure. 6
• Definition of terms ..................... 7 • Disc handling .............................. 7
• Reset all unit MemoryFunctions...,..8 ° DST. (Daylight Saving Time) ...... 8
• Head Cleaning ........................... 8 • Specifications ............................. 8
6
TV Operation ................................ 14
(Main Operation,Using the 100 Key, RapidTune, AudioMute, Phones,
Use
Now
VCR Status& Clock Display,BlackScreenDisplay)
MTS Broadcast/TV Stereo System .. 15
(Stereo/SAPAVIonobroadcast,SelectAudioMode for TV Viewing)
Timer Recording .......................... 20
(Main Operation, Cancel, Replace or Clear Program Contents)
Timer Programming using
VCR Plus+ System ...................... 22
• Cable Box Setup ................................... 23
• VCR Plus+ Channel Setup ................... 24
• VCR Plus+ System Programming ........ 25
TV Timer Features ....................... 26
• ON-TIMER with Alarm .......................... 26
• SLEEP TIMER ...................................... 27
f
Closed Caption System .............. 28
• Closed Caption Mode Feature ............. 28
• Caption Off Mute Feature ..................... 29
FM Radio ...................................... 30
(FM Radio or FM ANTENNA Setup, Using FM Radio, Select Audio Mode)
Before Requesting Service ........ 54
Other
Information!
4
Spanish Quick Use Guide .......... 57
Location of Controls ................... 64
Warranty ....................................... 67
Service Center List ...... Back Cover
Iire] ill_-,l..,.,ik-tt.:.i n[_-.pl,Rsnii DZfItI_.ii iaY;| _ |,..t_#_
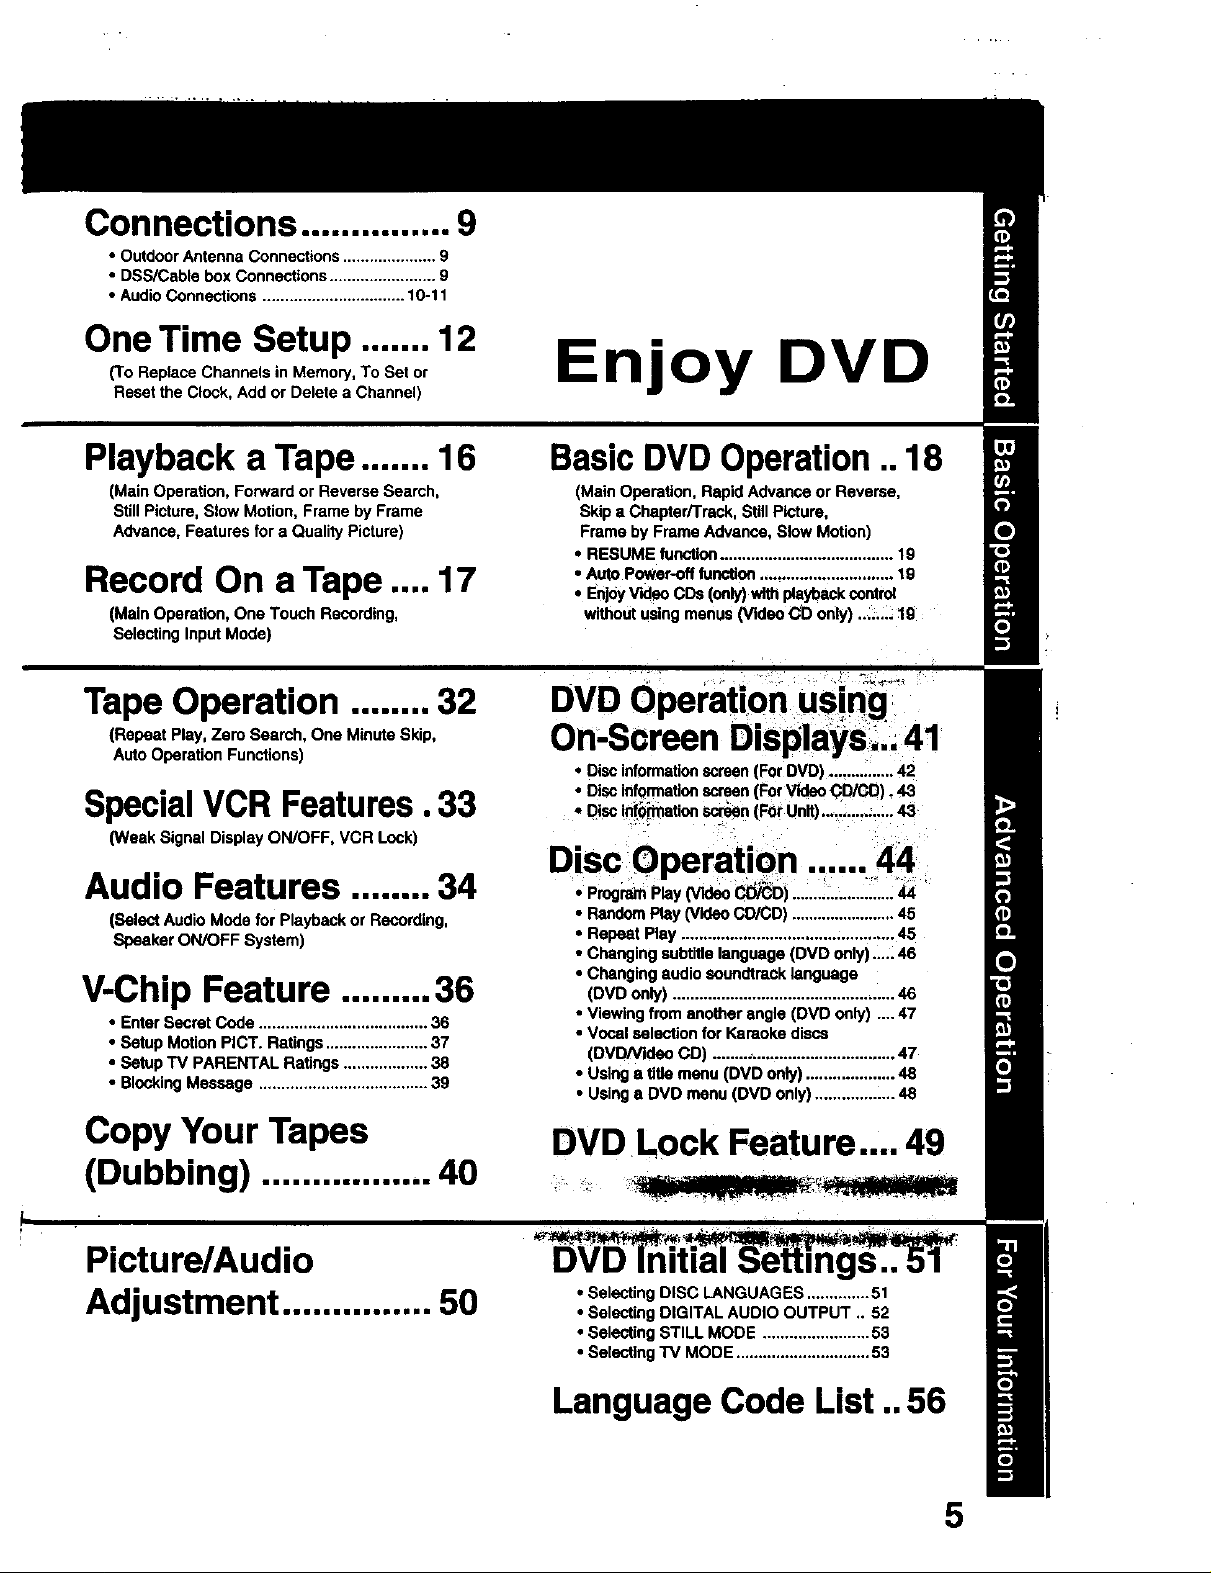
Connections ............... 9
• Outdoor Antenna Connections ..................... 9
• DSS/Ceble box Connections ........................ 9
• Audio Connections ................................ 10-1 t
One Time Setup ....... 12
(To Replace Channels in Memory, To Set or
Reset the Clock, Add or Delete a Channel)
Enjoy DVD
Playback a Tape ....... 16
(Main Operation, Forward or Reverse Search,
Still Picture, Slow Motion, Frame by Frame
Advance, Features for a Quality Picture)
Record On a Tape .... 17
(Main Operation, One Touch Recording,
Selecting Input Mode)
BasicDVDOperation..18
(MainOperation,RapidAdvanceor Reverse,
Skipa Chapter/Track,Still Picture,
FramebyFrameAdvance,SlowMotion)
• RESUME function....................................... 19
• Auto Power-offtunction ............................. 19
• EnjoyV'KlaoCDs (only)withplaybackcontrol
withoutusingmenus(VideoCD only) .......: lg
0p !n_"rape Operation ........ 32 DVD eration us i "
(Repeat Play, Zero Seamh. One Minute Skip, On-Screen Displays...41
Auto Operation Functions)
SpecialVCR Features.33 ol)iscin!0_ationscroen[ForUnlt).................43
0Neok Signal Display ON/OFF, VCR Lock)
Audio Features ........ 34
(SelectAudioModefor Playbackor Recording,
SpeakerON/OFF System)
V-Chip Feature ......... 36
• Enter Secret Code ...................................... 36
• Setup Motion PICT. Ratings ....................... 37
• Setup TV PARENTAL Ratings ................... 38
• Blocking Message ...................................... 39
• Disc information screen [For DVD) ............... 42
• Disc information screen [For Video CD/CD). 43
Disc Operation ...... 44
• Program Play (Video CO/CD) ...................... 44
• Random Play (Video CD/CD) ........................ 45
• Repeat Play ................................................ 45
• Changing subtitle language (DVD only)..... 46
• Changing audio anundtrack language
(DVD only) .................................................. 46
• Viewing from ano_er angle (DVD only) .... 47
• Vocal selection for Keraoke discs
(DVD/Vldeo CD) ......................................... 47
• Using a title menu (DVD only) .................... 48
• Using a DVD menu (DVD only) .................. 48
Copy Your Tapes
(Dubbing) ................. 40
Picture/Audio
Adjustment ............... 50
DVDLock Feature ....49
UVU InRlal _et_Ings.. :)I
• Selecting DISC LANGUAGES .............. 51
• Selecting DIGITAL AUDIO OUTPUT .. 52
• Selecting STILL MODE ........................ 53
• Selecting "IV MODE .............................. 53
Language Code List ..56
5
J!
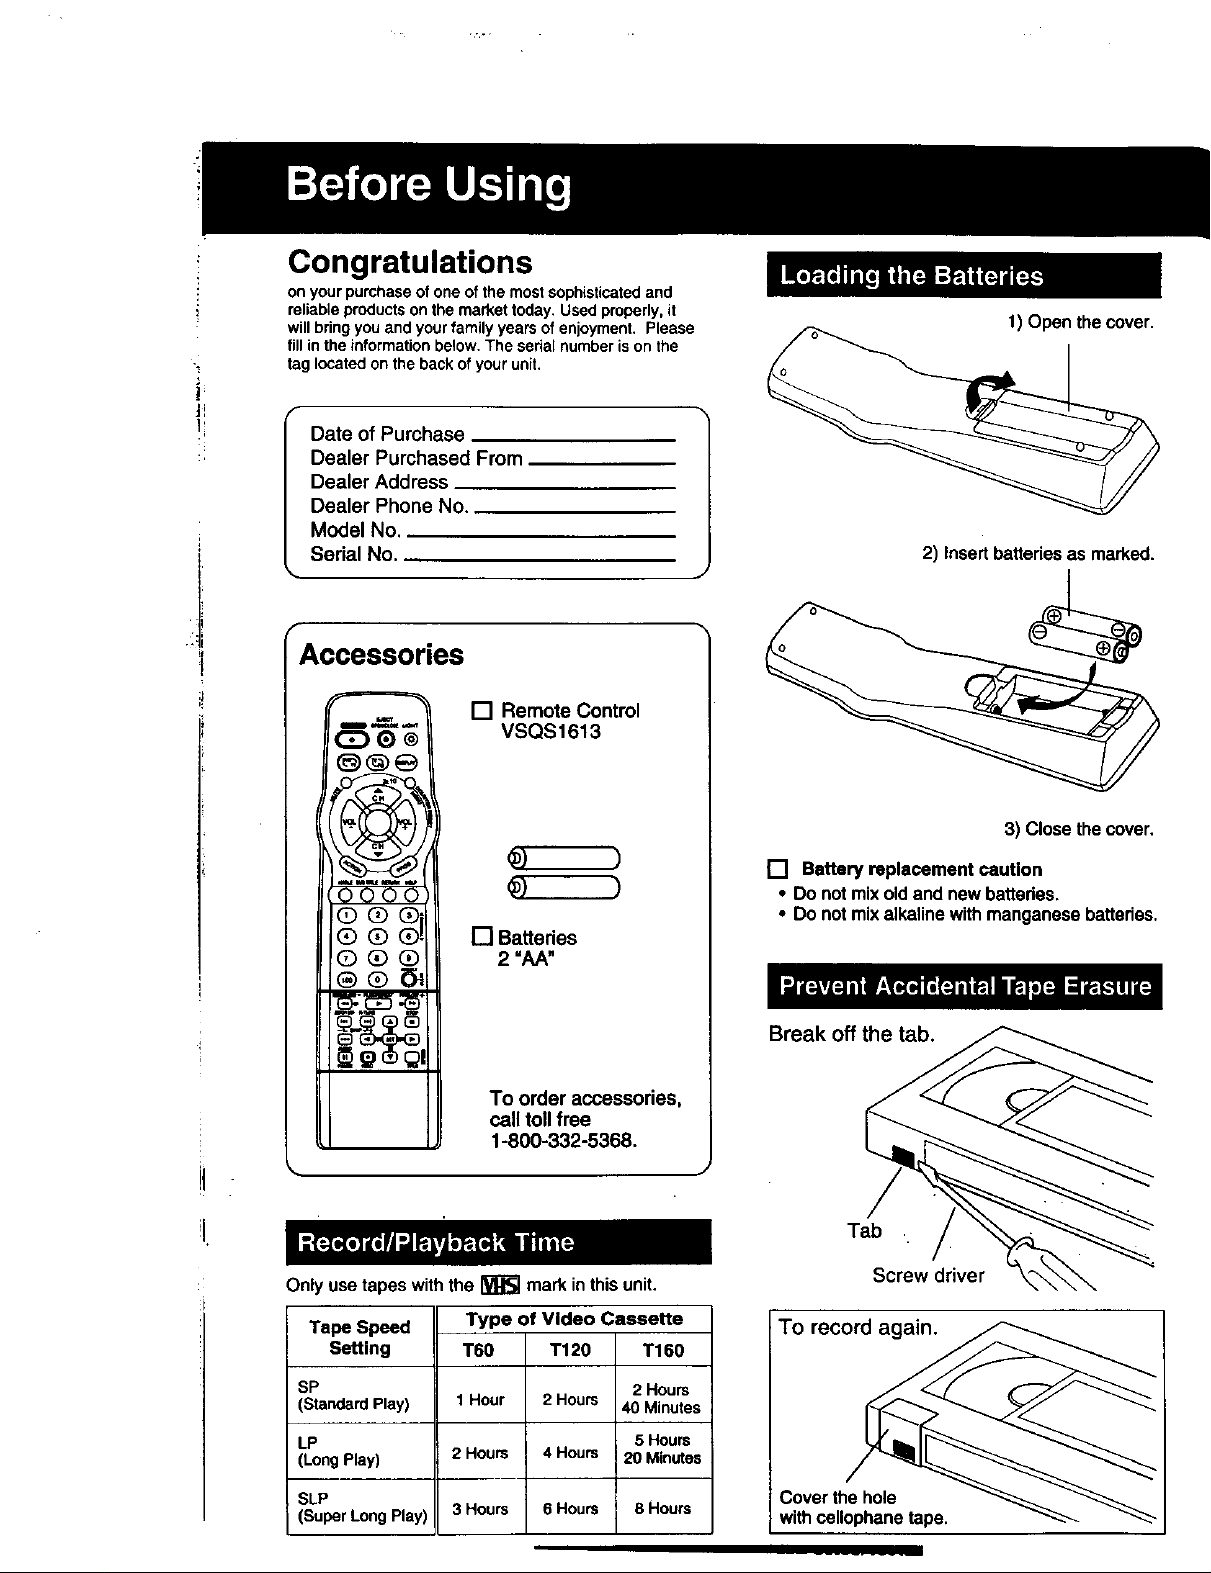
Congratulations
on your purchase of one of the most sophisticated and
reliable products on the market today. Used properly, it
will bring you and your family years of enjoyment. Please
fill in the information below. The serial number is on the
tag located on the back of your unit.
Date of Purchase
Dealer Purchased From
Dealer Address
Dealer Phone No.
Model No.
Serial No.
Accessories
[] Remote Control
VSQS1613
@@e
1) Open the cover.
]
2) Insert batteries as marked.
3) Closethe cover.
Ii
!1
Q ,
®
®
Only use tapes with the _ mark in this unit.
Tape Speed
Setting
SP
(StandardPlay)
LP
(LongPlay)
[] Battedes
2=AA.
To order accessories,
call tollfree
1-800-332-5368.
Type of Video Cassette
T60 T120 T160
2 Hours
1 Hour 2 Hours 40 Minutes
5 Hours
2 Hours 4 Hours 20 Minutes
[] Battery replacement caution
• Donotmixold andnewbatteries.
• Donotmixalkalinewithmanganesebatteries.
Break off the tab.
Tab
Screw driver
To record again.
SLP
(SuperLongPlay)
3 Hours 6 Hours 8 Hours
Cover the hole
with cellophane tape.
Discformatssupportedbythisunit
Theunitcanplaybackdiscsbearinganyofthe
followingmarks:
DVD
3" (8 cm) disc/5" (12 cm) disc
_]_ Video CD
8" (6 cm) disc/5" (12 cm) disc
man_Aumo 3" (6 cm) disrJ5" (12 crn) disc
Discs which cannot be played withthis unit
• DVD withRegionNo.otherthan"1"or "ALL"
• DVD of PALsystem
• DVD-ROM
• DVD-R/DVD-FIAM
• CD-ROM
• CDV
• CD-G
• CD-RW
• Do not try to play Photo CD or CD-R.
co
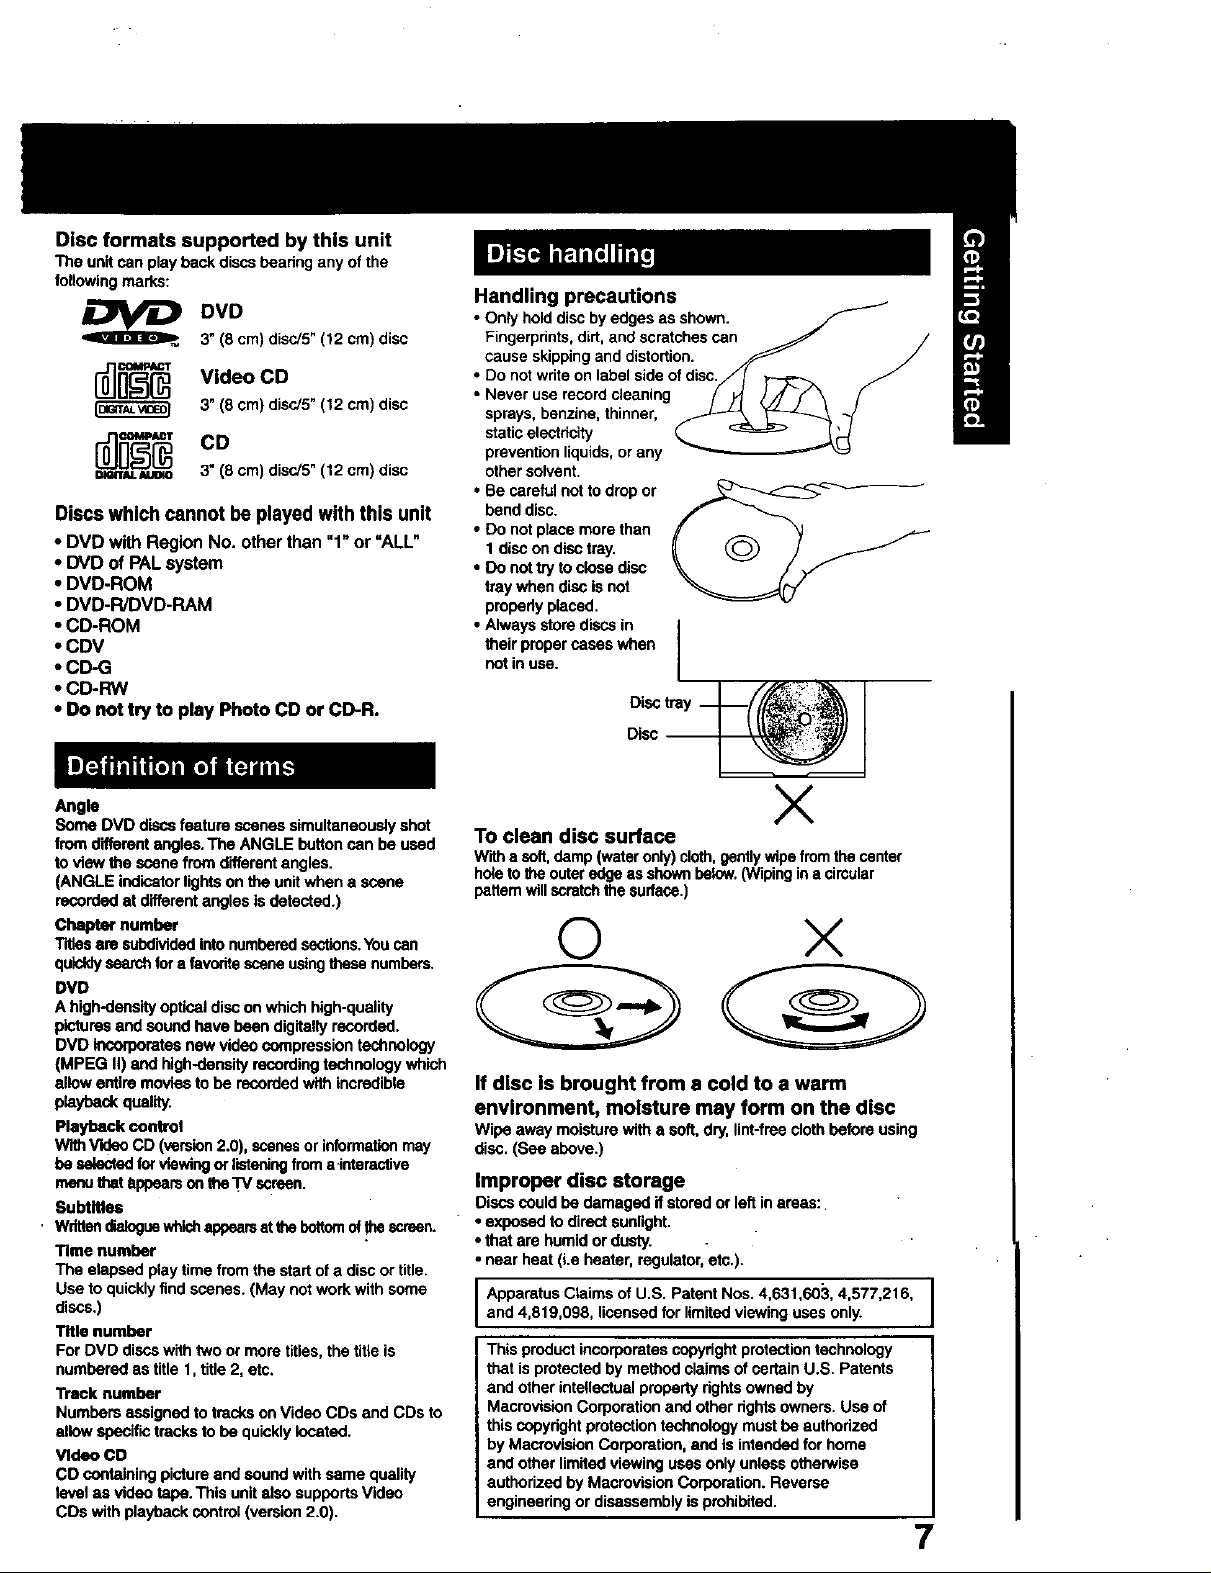
Handling precautions
• Only holddisc by edges as shown.
Fingerprints, dirt, and scratches can
cause skipping and distortion.
• Do not write on label side of disc.
• Never use record claaning
sprays, benzine, thinner,
static electricity
prevention liquids, or any
other solvent.
• Be careful not to drop or
bend disc.
• Do not place more than
1 disc on disc tray.
• Do not try to close disc
tray when disc is not
propedy placed.
• Always store discs in
their proper cases when
not in use.
Disctrey
Disc --
Angle
Some DVD discs feature scenes simultaneously shot
from different angles. The ANGLE button can be used
to view the scene from different angles.
(ANGLE indicator lights on the unit when a scene
recorded at different angles is detected.)
Chapter number
Titles are suha'Mdedinto numbered sections.You can
quicklysearch for a favorite scene using these numbers.
DVD
A high-deosity optical discon which high-quality
pictures and sound have been digitally recorded.
DVD incorporates new video compression technology
(MPEG II) and high-density recording technology which
allow entire movies to be recorded with incredible
playbackquality.
Playback eantml
With Vldao CD (version 2.0), scenesor informationmay
be selected for viewing or listeningfrom a_nteractive
mseu that i_opoars on the W screen.
Subtitles
, Wdtlon_elogue whichappearsst the bcttomof the scresc.
Time number
The elapsed play time from the start of a disc or title.
Use to quickly find scenes. (May not work with some
discs.)
Title number
For DVD discs with two or more titles, the title is
numbered as title 1, title 2, etc.
Track number
Numbers assigned to tracks on Video CDs and CDs to
allow specific tracks to be quickly located.
Video CD
CD containing picture and sound with same quality
level as video tape. This unit also supports Video
CDs with playback control (version 2.0).
×
To clean disc surface
Withasoft,damp(wateronly)cloth,gentlywipe fromthecenter
ho_eto theouteredgeasshownbelow.(Wipingina circular
pettemwillscratchthesurface,)
© ×
If disc is brought from a cold to a warm
environment, moisture may form on the disc
Wipe away moisture with a soft, dry. lint-free cloth before using
disc. (Sea above.)
Improper disc storage
Discs could ha damaged if stored or left in areas:
• exposed to direct sunlight.
• that are humid or dusty.
• near heat (Le heater, regulator, etc.).
Apparatus Claims of U.S. Patent Nos. 4,631,603, 4,577,216,
and 4,819,098, licensed for limited viewing uses only.
This product incorporates copyright protection technology
that is protected by method claims of certain U,S. Patents
and other intellectual property dghts owned by
Macrovision Corporation and other rights owners. Use of
this copyright protection technology must be authodzed
by Macrovision Corporation, and is intended for home
and other limited viewing uses only unless otherwise
authorized by Maorovision Corporation. Reverse
engineering or disassembly is prohibited.
7
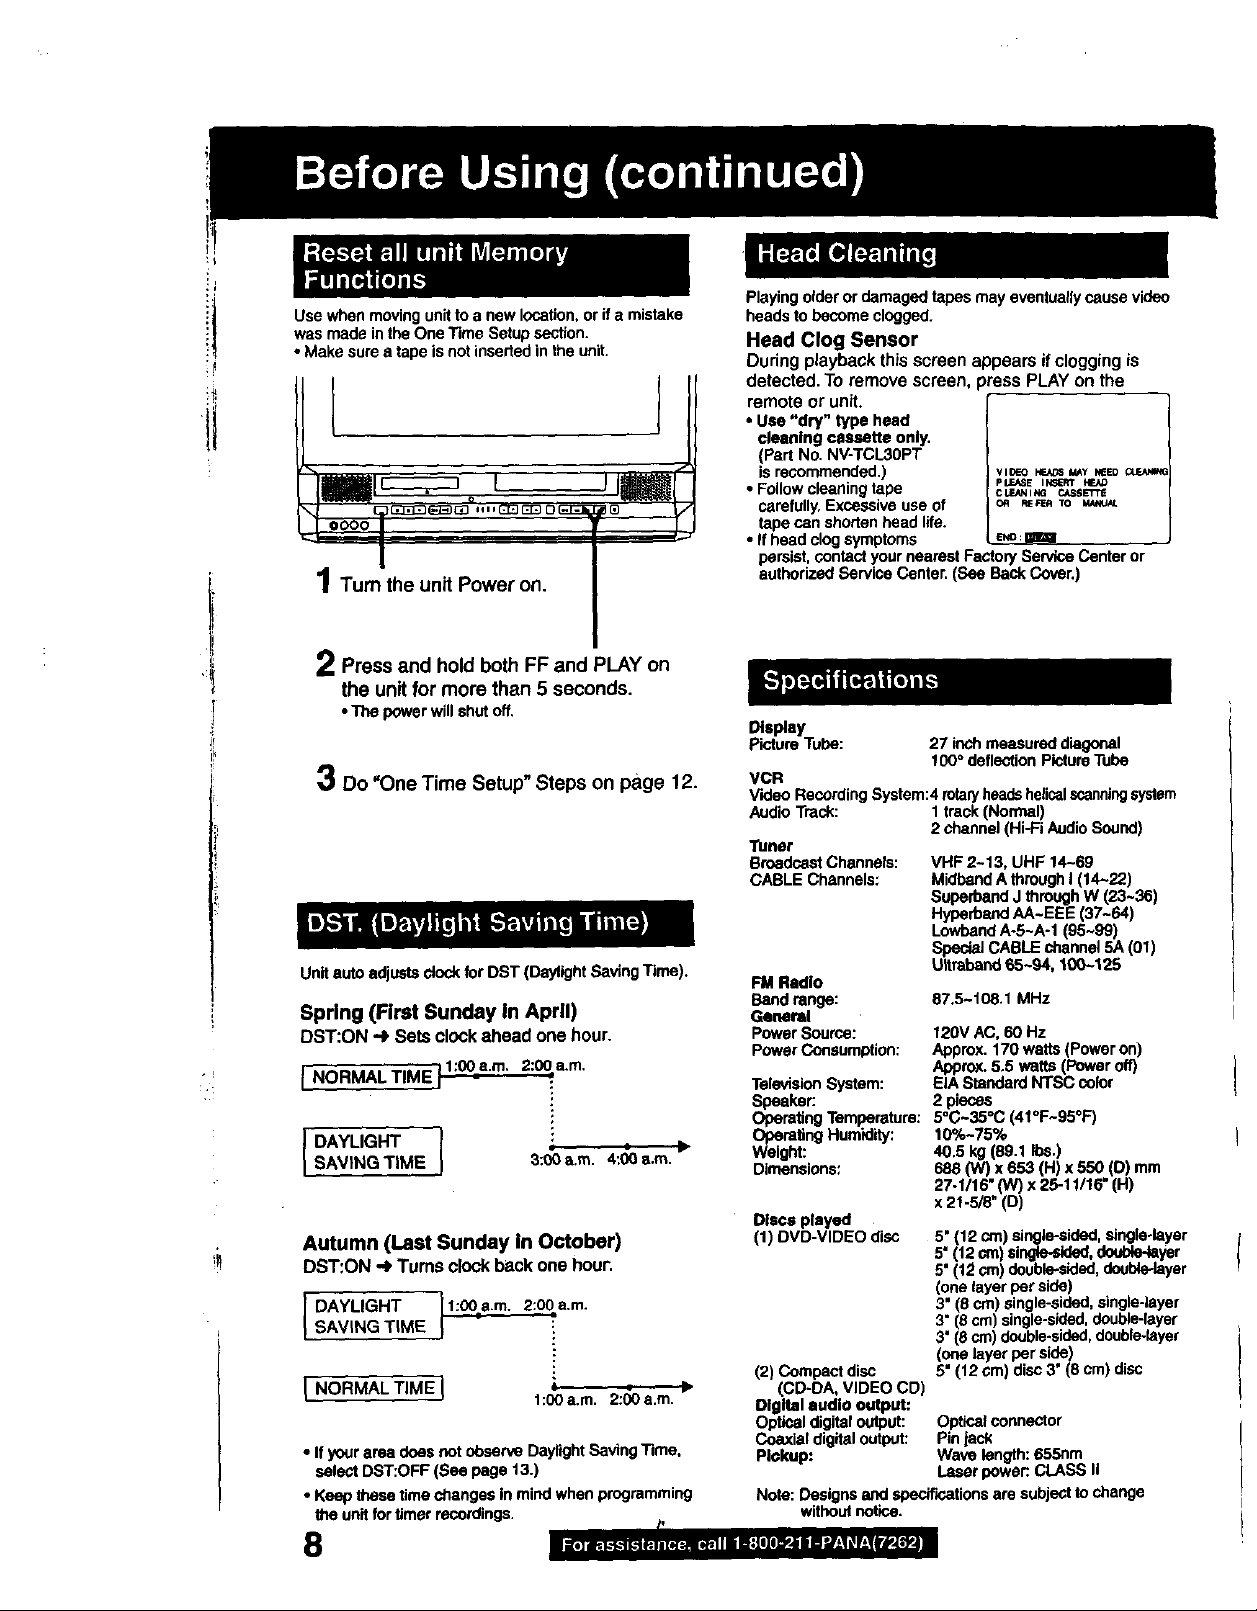
Use when moving unit to a new location, or if a mistake
was made in the One Time Setup section.
• Make sure a tape is not inserted in the unit.
1 Turn the unit Power on.
2 Press and hold both FF and PLAY on
the unit for more than 5 seconds.
•ThepowerwillshutOff.
3 Do =OneTime Setup" Steps on page 12.
UnitautoadjustsdockforDST(DaylightSavingTime).
Spring (First Sunday in April)
DST:ON.e Setsclockaheadone hour.
[ NORMALTIME1l:00"a'm'2:00a.m,
DAYLIGHT 1 ' -SAVINGTIME 3:00a.m. 4:00a.m. "
Autumn (Last Sunday in October)
DST:ON_ Turnsclockbackonehour.
DAYLIGHT 1l:00=e.m. 2:00,a.m.
SAVtNG T ME
I NORMAL TIME I ' ;
• If your area does riot observe Daylight Saving Time,
select DST:OFF (See page t3.)
• Keep these time changes in mind when programming
the unit fortimer recordings.
1:00a.m. 2:00a.m.
8
Playing older or damaged tapes may eventually cause video
heads to become clogged.
Head Clog Sensor
During playback this screen appears if clogging is
detected. To remove screen, press PLAY on the
remote or unit.
• use "dry" type head
dsenthg cassette only.
(Part No. NV-TCL30PT
is recommended.) v,oeo _ _v _eo
• Follow cleaning tape c_._,_PLU,SE,_rc,Lss_x_o
carefully, Excessive use of o_ _Fe.ATO
tape can shorten head life.
• If head clogsymptoms a,Jo:
persist, contact your nearest Factory Service Center or
authorized Service Center, (See Sack Cover,)
Display
Picture Tube: 27 inch measured diagonal
VCR
Video Recording System:4 rotary headshelicalscanningsystem
Audio Track: 1 track (Normal)
Tuner
BroadcastChannels:
CABLEChannels:
FM Radio
Bandrange:
General
PowerSource:
PowerConsumption:
TelevisionSystem:
Speaker:.
OperatingTemperature:
_OeeigreitngHumidity:
ht:
Dimensions:
Dlaca played
(1) DVD-VIDEO disc
(2) Compact disc
(CD-DA, VIDEO CD)
Digital audio output:
Optical digital output: Optical connector
Coaxial digital output: Pin Jack
PIckup: Wave length: 655nm
Note: Designs and spenif'w.ationsare subject to change
without notice.
100° deflection Picture Tube
2 channel (Hi-Fi Audio Sound)
VHF 2-13, UHF 14-69
Midband A through I (14--22)
Superband J through W (23~36)
Hyped)end AA~EEE (37-64)
Lowband A-5~A-1 (95~997
SpeclaJ CABLE channel 5A (017
Uitreband 65-94, 100-125
87,5~t08.1 MHz
120V AC, 60 Hz
Approx. 170 watts (Power on)
Approx. 5.5 watts (Power off)
EIA Standard NTSC color
2 pieces
5°G~350C (41 °F-95°F)
1O%-75%
40.5 kg (89.1 Ibs.)
688 (W) x 653 (H) x 550 (D) mm
27-1/16" ON) x 25-11/16" (H)
x 2t-5/8" (D)
5:(12 Cm) single-sided, single-layer
5 (12 ¢xn)si_, doutde-layer
5" (12 crn) double-sidnd,dcobkPlayer
(one layer per side)
3:(8 cm) single-sided, single-iayer
3 (8 cm) single-slded, double-layer
3 (8 cm) double-sided, double-iayer
(one layer per side)
5" (12 cm) disc 3" (8 cm) disc
Laser power:.CLASS ti

Unhook the antenna from your previous TV (Flat}TwinLead
or VCR and connect it to the back of the 300 OhmCable
unit as shown in the diagram. _-_.._ _.
If your antenna system has separate UHF UHF/VHF BandMixer _ _
and VHF lead-ins, you need a UHF/VHF (notsupplied) ,=_//
Band Mixer (not supplied.) _)_J_
WARNING: _ (Round)75Ohm _::)... _
When using"Nuttype"RF coaxial _ coaxialCable or --.
cables,tightenwithfingersonly. fr^,_ An*_nna r_ ---- - --- - _ ,_ _ '- -_
Overti htenin ma dama e ....... I ;-_J'(_ ontoIransTormer I l-I(_,,_- -
termingls g Y g (notsupplied} L_ ....
(Flat)TwinLead . _' J ....
300 Ohm Cable _ uacKor unit
• Without a Cable Box
You can;
• record or view unscrambled channels.
You cannot;
• record or view scrambled channels.
• view a channel other than the one
selected for any type of recording.
• With a Cable Box
You can;
• record or view any channel Including scrambled channels.
NOTE: Channel selection must be made at the cable box.
You cannot;
• view a channel other than the one selected for any
type of recording.
• do a Timer recording of a channel unless you select it
at the cable box.
Noteto CABLE System Installer I
Thisreminderisprovidedtocall the CABLE(CableTV) System
InstallersattentiontoArticle820-40 of theNEC that provides
guidelinesforpropergroundingand, inparticular,specifiesthat
thecablegroundshall be conoe_ tothe groundingsystemof
thebuilding,as closetothe pointof cable entryas practical.
• With a DSS Receiver
You can; • •
• record or view any channel including scrambled
channels.
NOTE: Channelselectionmustbemadeat theDSS
Receiver.
You cannot;
• view a channel other than the one selected for
any type of recording.
• do a Timer recording of a channel unless you
select it at the DSS box.
NOTE: TheDSSreceivermustbeturnedoffto view
programsfromecableboxorantenna•SeetheDSS
manualfordetails.
unit
I
unit
9
I_lf'Check list before you begin.
[] Turn down the volume, then turn this unit, as well
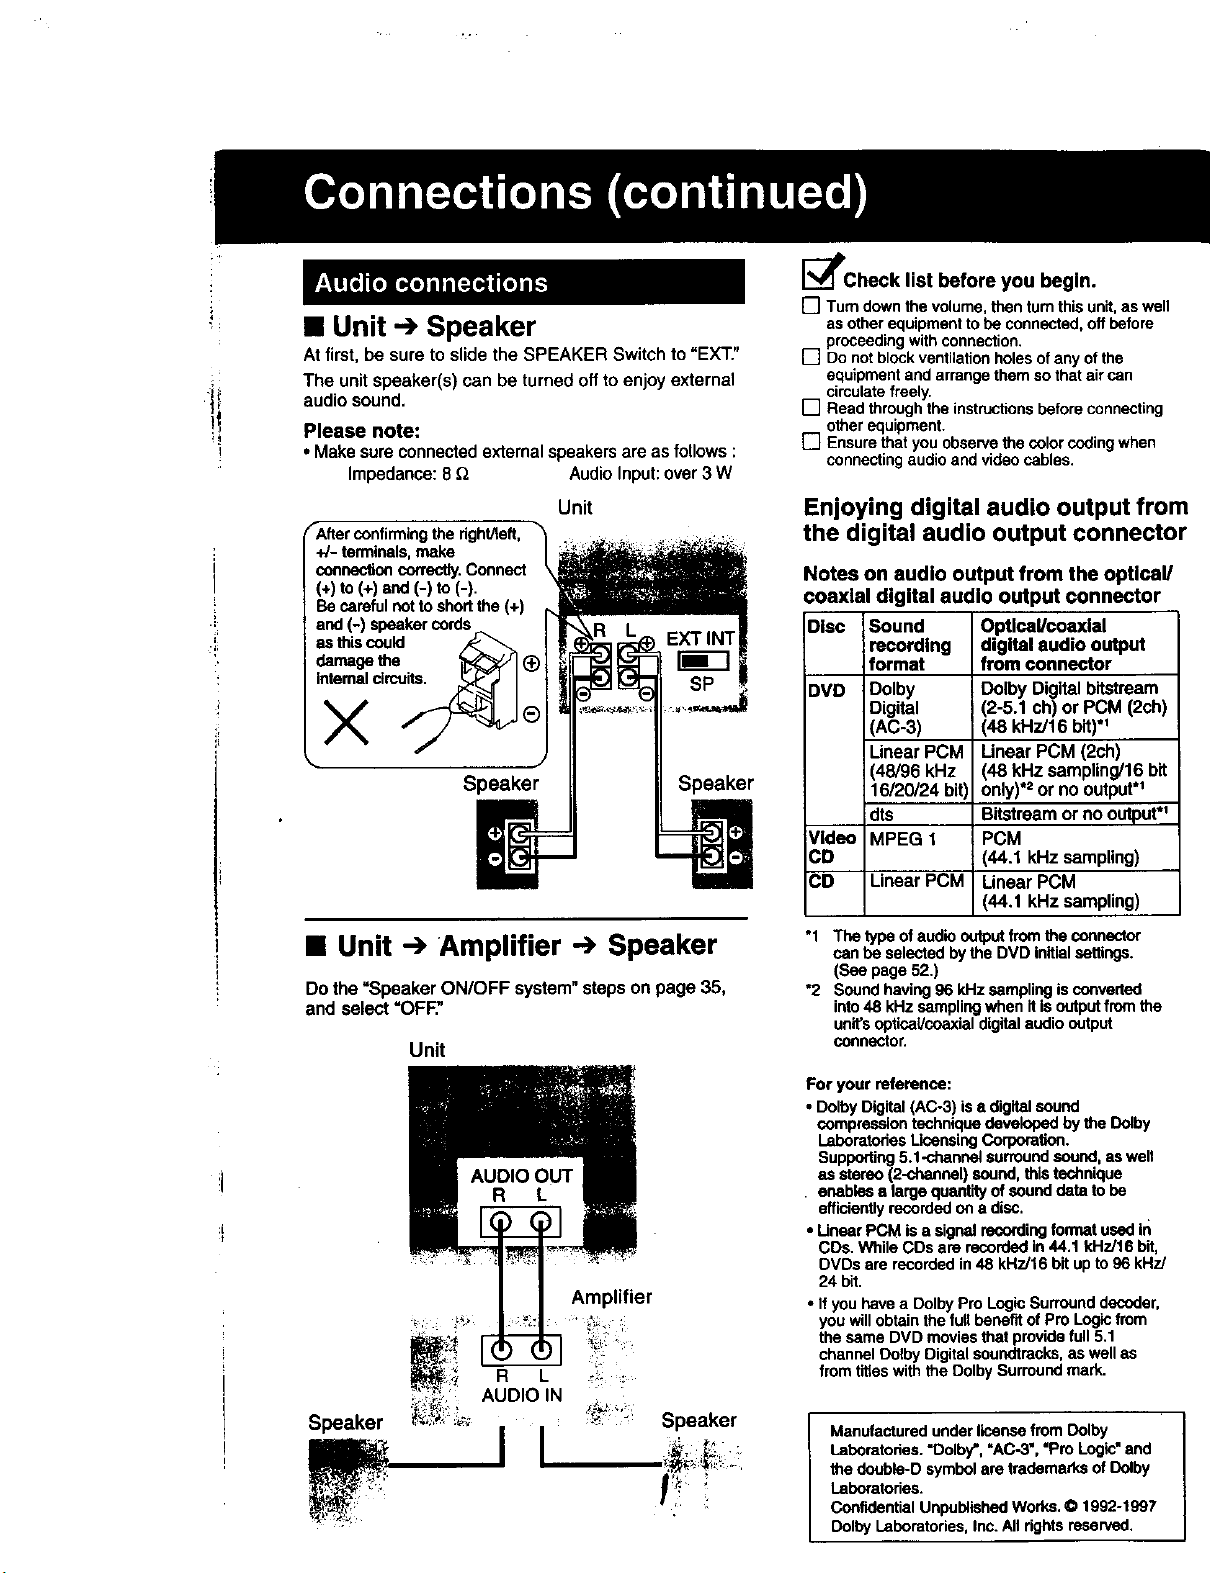
• Unit ...)Speaker
At first, be sure to slide the SPEAKER Switch to =EXT."
The unit speaker(s) can be turned off to enjoy external
audio sound,
Please note:
I
• Makesureconnectedexternalspeakersareasfollows:
Impedance:8_ AudioInput:over3 W
Unit
as other equipment to be connected, off before
proceeding with connection.
[] Do not block ventilation holes ofany of the
equipment and arrange them so that air can
circulate freely.
[] Read through the instructions before connecting
other equipment.
[] Ensure that you observe the color coding when
connecting audio and video cables.
Enjoying digital audio output from
the digital audio output connector
Notes on audio output from the optical/
coaxial digital audio output connector
×
Speaker Speaker
• Unit --)Amplifier --) Speaker
Do the "Speaker ON/OFF system" steps on page 35,
and select "OFF:".
Unit
Disc Sound Optical/coaxial
DVD Dolby Dolby Digital bitstream
Video MPEG 1 PCM
CD (44,1 kHz sampling)
CD Linear PCM Linear PCM
"1 The type of audio output from the connector
*2 Sound having 96 kHz sampling is converted
recording digital audio output
format from connector
Digital (2-5.1 ch) or PCM (2ch)
(AC-3) (48 kHz/16 bit).1
Linear PCM Linear PCM (2ch)
48/96 kHz (48 kHz sampling/16 bit
16/20/24 bit only)*=or no output.1
idts Bitstream or no output*_
(44.1 kHz sampling)
can be selected by the DVD initial settings.
(See page 52.)
into 48 kHz sampling when it is output from the
units optical/coaxial digital audio output
connector.
For your refemnue:
• Dolby Digital (AC-3) is a digital sound
compression technique developed by the Dolby
Laboratories Licensing Corporation.
Supporting 5.1-channel surround sound, as well
as stereo (2-channel) SOUnd,this technique
• enables a large quantity of sound data to be
efficiently recorded on a disc.
:i
Amplifier
Speaker
r
Speaker
I¢
• Uuear PCM is a signal recording format used If)
CDs. While COs are recorded in 44.1 kHz/16 bit,
DVDs are recorded in 48 kHz/16 bit up to96 kHz/
24 bit.
• If you have a Dolby Pro Logic Surround decoder,
you will obtain the full benefit of Pro Logic from
the same DVD movies that provide full 5.1
channel Dctby Digital soundtrecks, as well as
from tit_eswith the Dolby Surround mark.
Manufactured under license from Dolby
Laboratories. "Dolby', =AC-3", "Pro LOgic"and
the deuble-D symbol are trademarks of Dufby
laboratories.
Confidential Unpublished Works. O 1992-1997
Dolby laboratories, Inc. All fights reserved,
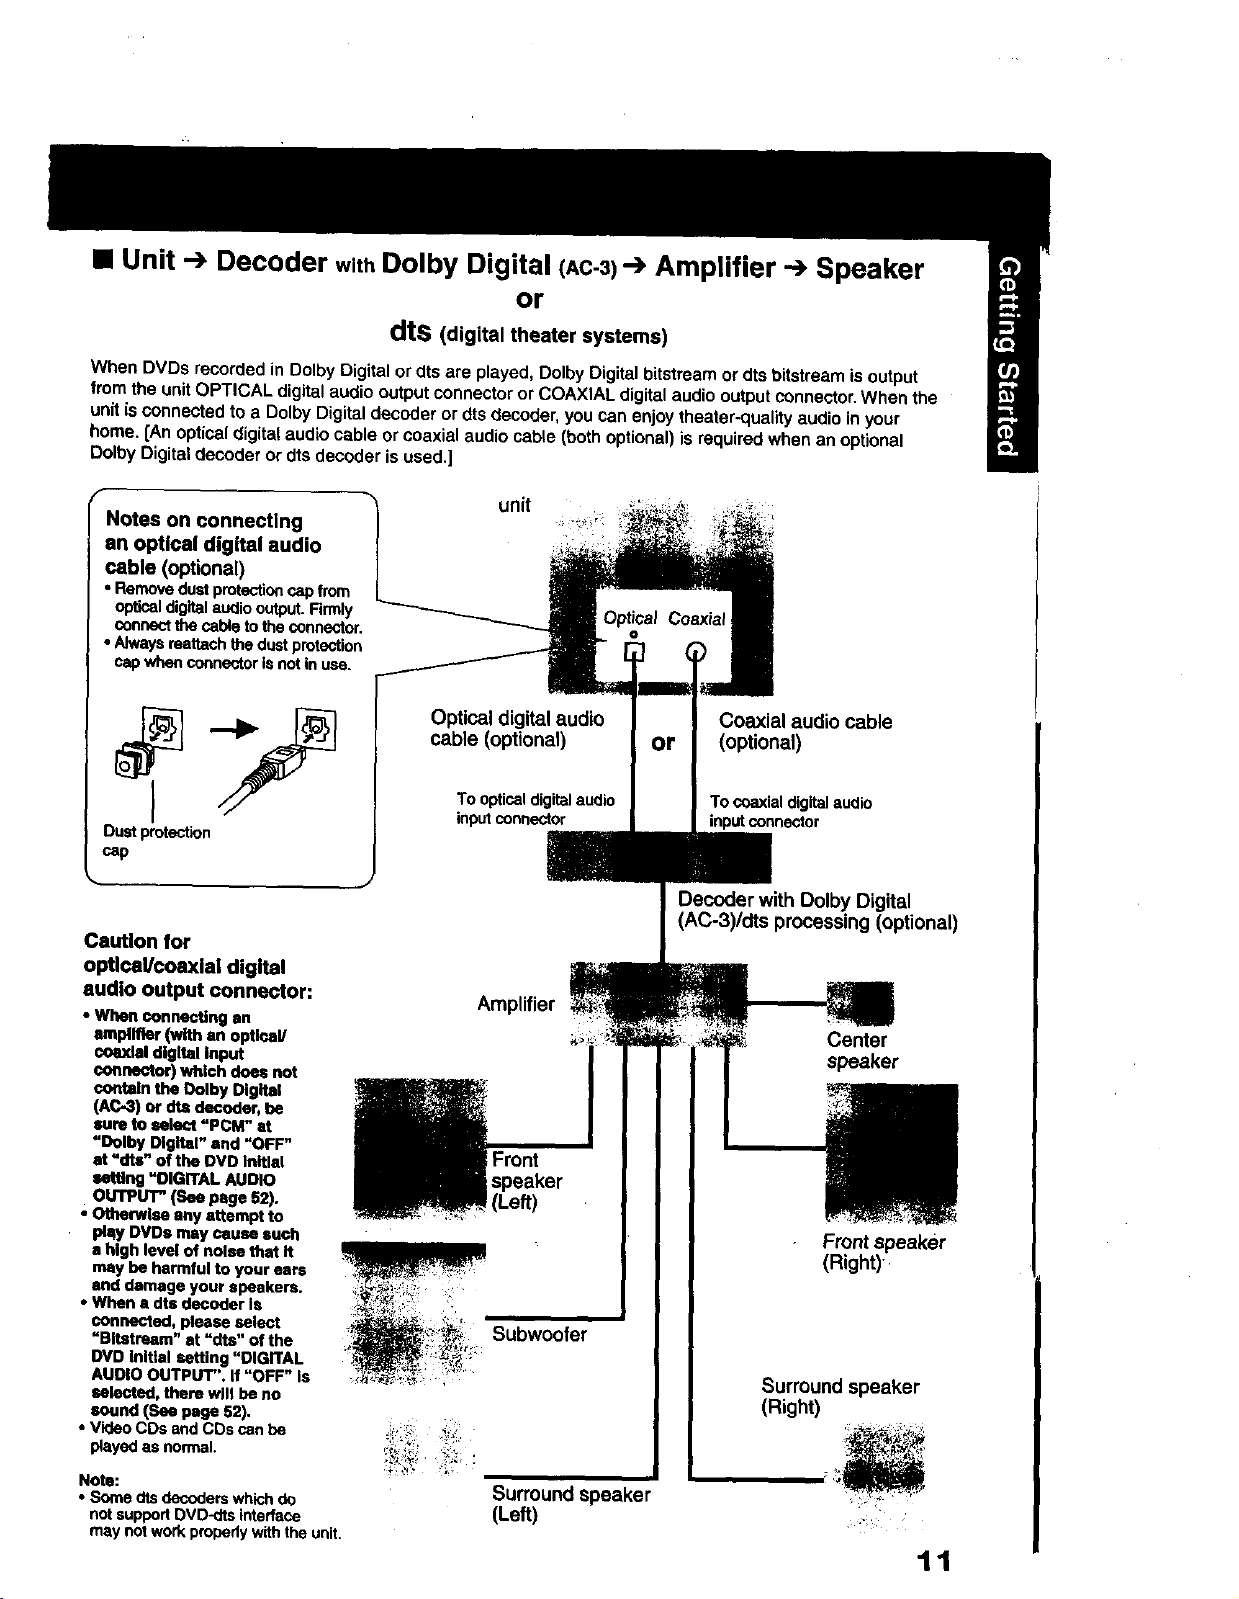
• Unit --) Decoder withDolby Digital (AC-3)-) Amplifier --) Speaker
or
dts (digital theater systems)
When DVDs recorded inDolby Digital or dts are played, Dolby Digital bitstream or dts bitstream is output
from the unit OPTICAL digital audio output connector or COAXIAL digital audio output connector. When the
unit is connected to a Dolby Digital decoder or dts decoder, you can enjoy theater-quality audio in your
home. [An optical digital audio cable or coaxial audio cable (both optional) is required when an optional
Dolby Digital decoder or dtsdecoder is used.]
unit
Notes on connecting
an optical digital audio
cable (opt'_nal)
• Removedustprotectioncap from
opticaldigitalaudiooutput.Firmly
cormectthe cabk_to thecon_ctor.
• Alwaysreattach_qedustprotection
capwhenconnectorisnotin use.
Coaxial audio cable
(optional}
Dustprotection
cap
Caution for
optlcal/coaxlei digital
audio output connector:
• When connecting an
amplifier (with an optical/
coexistdigital Input
connector) which does not
cordatnthe Dolby Digital
(AC=3)or dm decoder, be
sure to select =PCM" at
"Dolby Digital" end "OFF"
at "tits" ofthe DVD Initial
settlng "DIGITAL AUDIO
OUW'UT"(Seepages2).
• Otherwise any attempt to
DVDs may cause such
a h_h k.-J_ o4 nolse that tt
may be harmful to your ears
and damage your speakerS.
• When a dts decoder I_,,
connected, please select
=Bltatream" st "dto" of the
DVD Initial setting "DIGITAL
AUDIOOUTPUT". If "OFF" Is
selected, there will be no
sound (See page 52),
• VideoCDs endCDs can be
playedas normal.
Note:
• Some (:itsdecoders which do
not suppod DVD-dts interfase
m_,ynot work propedy _ the u_it.
Decoder with Dolby Digital
(AC-3)/dts processing (optional)
Amplifier
Center
speaker
Front
speaker
(Left)
Front speaker
(Right)
Subwoofer
Surround speaker
(Right)
Surround speaker
(Left)
11

When the unit isturned on the first time, setup
mode is entered automatically,
_L
_ Press POWER on
the remote or unit.
1
POWER
Start Channel Auto
2
Set and Clock Auto
2
Set.
CHANNEL/CLOCK /¢rro SET
IFY(_J USEACABLE BOX,
*_NE I T TO yO_ LOCAL FI_ C_
THEN,**
_E PIl_l_ UPKF¢
(_1 Press CH •.
UP
!
NJTO SET P_ING
O2
I
(Setup completed)
]Pre,scH,tOex.t.
12124/1_ FRI12:00PMOFF are not correct,
s_'wl_ : c_o Setor Resetthe
*urncu0_ _-r cou_=_ Clock" stepson
_ (Setup incomplete)
• If the displayed
timeand DST
pleasedo "To
the next page
and select
"MANUAL."
Set the clock
manually.
Press ACTION
and do "To Set
or Reset the
Clock" step D on
the next page.
IMPORTANTNOTE FOR AUTO CLOCKSET
• Auto clock set is padorrned the first
time when the unit is tumed off each
day. It used, a cable box must be left
on and tuned to the PBS channel at
the time the unit power is turned off it
you want auto clock set to be done.
If using, a DSS receiver, it must be
turned off for auto clock set.
If Cable Box or DSS receiver is
connected to the unit via Audio/Video
Jacks, an RF coaxial cable must also
be connected for auto clock set and
channel auto set features.
If, for any reason, the time is changed
manually, automatic time correction
will not occur.
12
. °|li] dfc.k'f_'l k"lt'J IIZe[=,JKel_l I IDlt llll_ll l "./-q i_I!YIW_;_.I
!
3
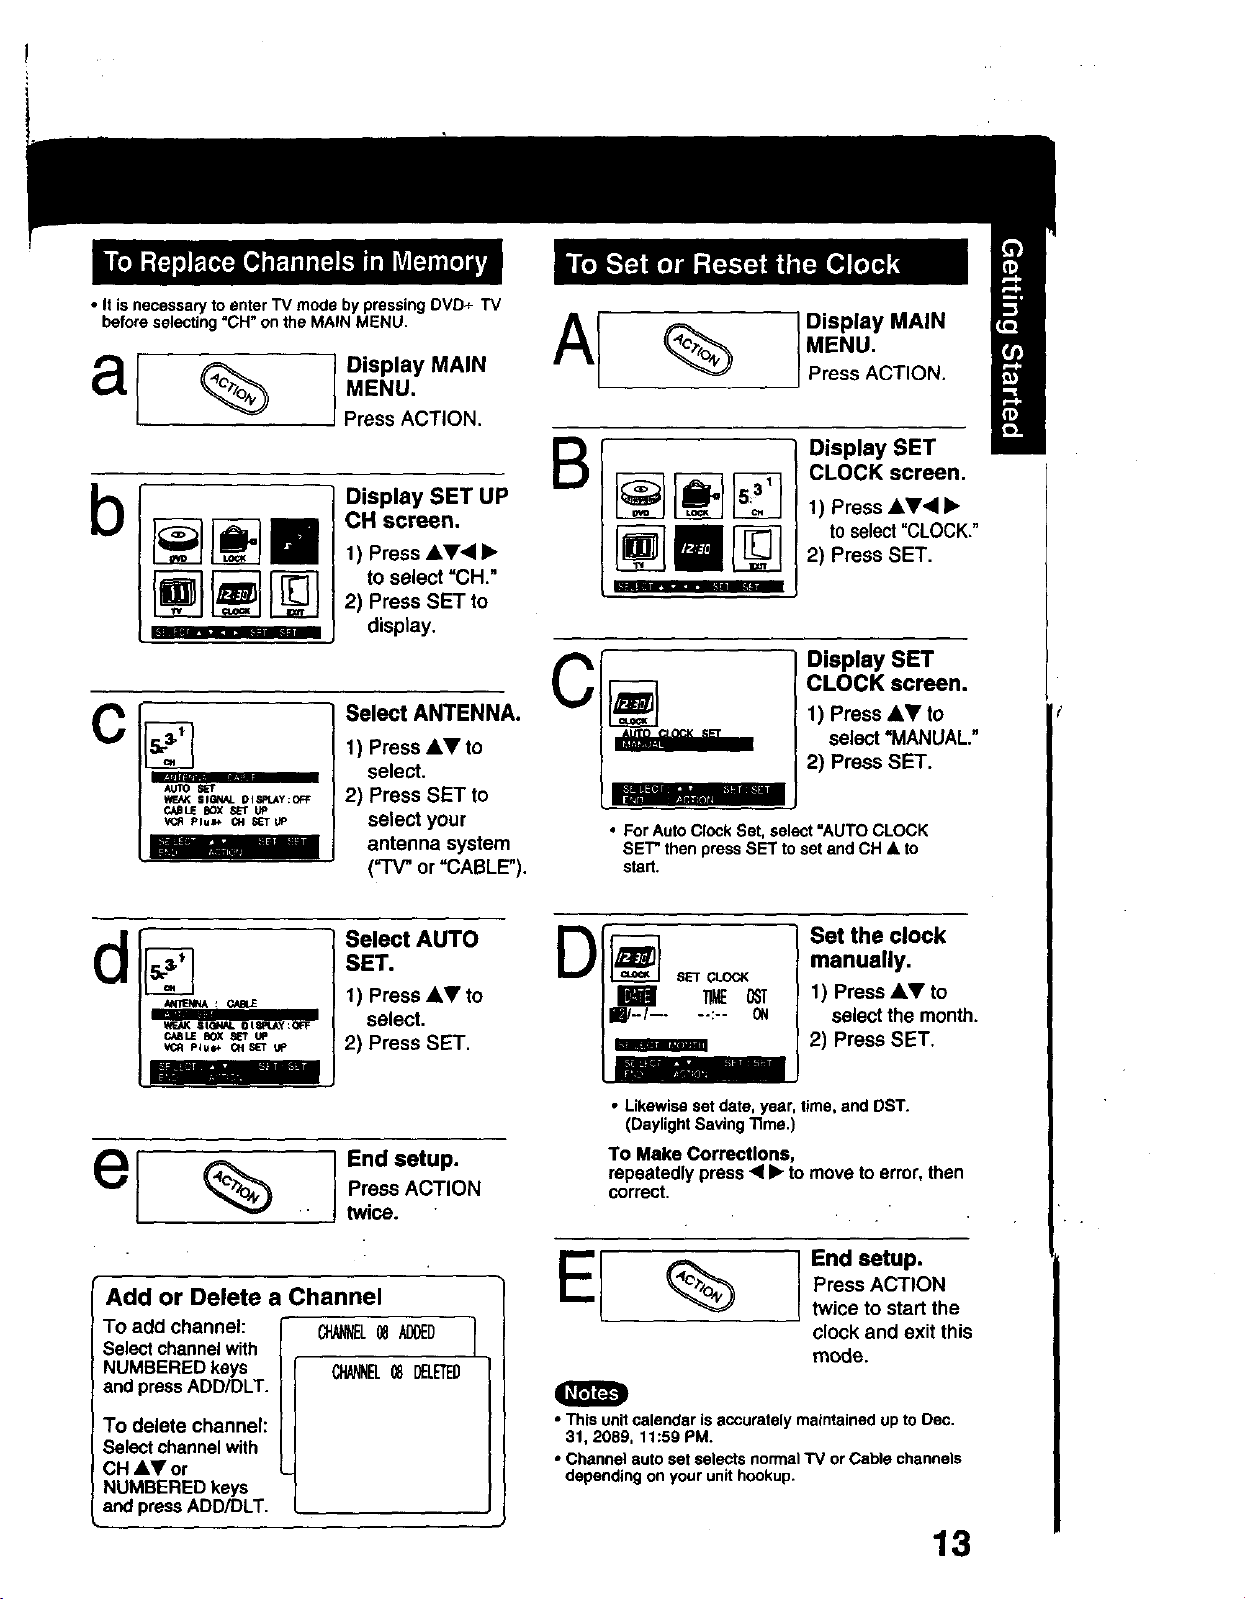
• It is necessary to enter TV mode by pressing DVD+ TV
before selecting "CH" on the MAIN MENU.
a
I Display MAIN
b
Press ACTION.
Display SET UP
CH screen.
1) Press Ay<I •
to select =CH."
2) Press SET to
display.
SelectANTENNA.
C
1) Press •Y to
AUlOs_r
t_cAK BH_:AL OISP_AY:OFF
CAeUE BOX SET UP
VCR Plul+ CH SET UP
select.
2) Press SET to
select your
antenna system
("TV" or "CABLE').
A
B
C
• For Auto Clock Set, select "AUTO CLOCK
SET" then press SET to set and CH • to
start.
Display MAIN
MENU.
Press ACTION.
Display SET
CLOCK screen.
1) Press •Y4•
to select"CLOCK."
2) Press SET.
Display SET
CLOCK screen.
1) Press &Y to
select =MANUAL."
2) Press SET.
Select AUTO
d
V_./J( SIGNAL OIf_l.y:OFF
CABLE BO_ SET _
V_4 Plul+ CH SET UP
mll_lml i_a _41m lJrm
el % IEn°.e'up
Add or Delete a Channel
To add channel: _l. _ /_0ED
Selectchannelwith
NUMBERED keys
and pressADD/DLT.
To delete channel:
Selectchannelwith
CH &Y or
NUMBERED keys
and pressADD/DLT,
SET.
1) Press A_!' to
select.
2) Press SET.
Press ACTION
twice.
CHANNEL_ D_ETEI_
D
I
• Likewiseset date,year, time, and DST.
(DaylightSavingTime.)
To Make Corrections,
repeatedlypress• • to move toerror, then
correct.
O
• This unit calendar is accurately maintained up to Dec.
31, 2089, 11:59 PM
• Channel auto set selects normal "IV or Cable channels
depending on your unit hookup.
SET CLOCK
- --:-- ON
Set the clock
manually.
1) Press &Y to
select the month.
2) Press SET.
End setup.
Press ACTION
twice to start the
clock and exit this
mode.
13
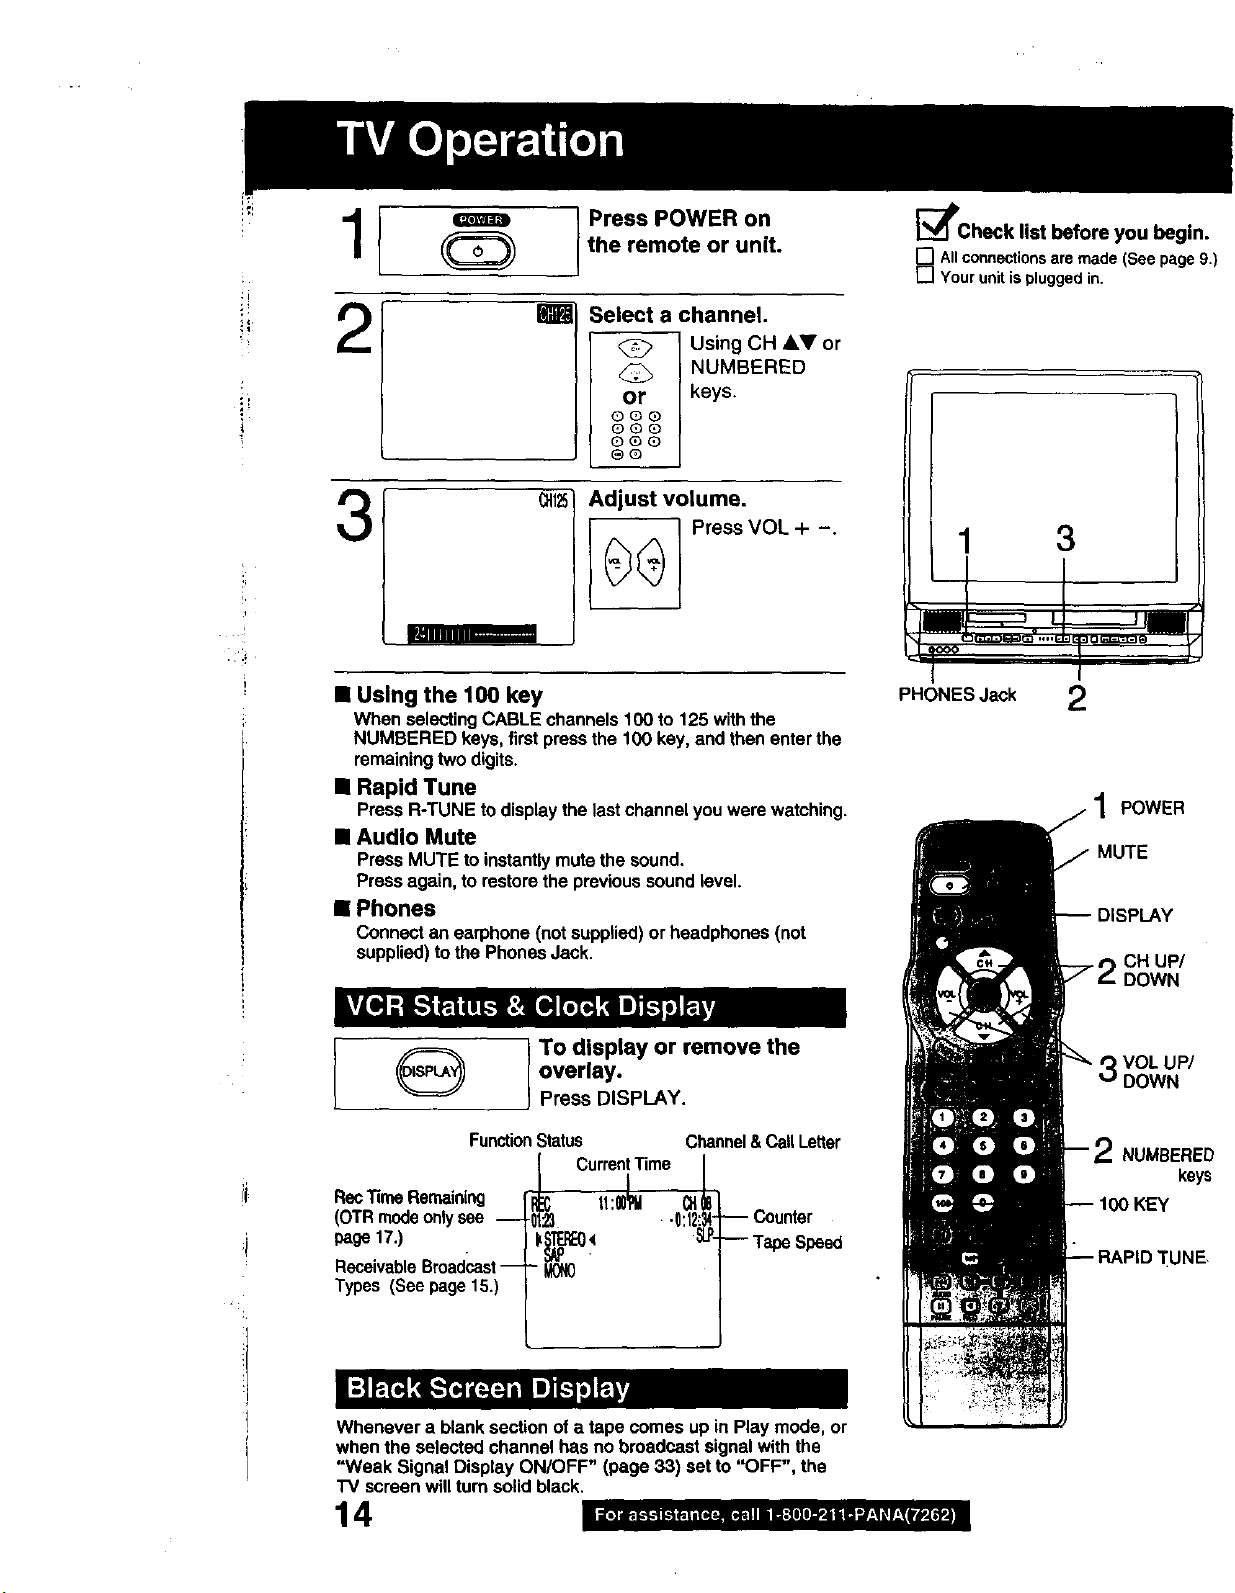
Press POWER on
the remote or unit.
Select a channel.
%
2
@ ] Using CH &V or
@ | NUMBERED
_lPcheck list before you begin.
_AII connectionsare made(See page 9.)
Your unitispluggedin.
i
i
_1125Adjust volume.
3
ooo
oGo
or J keys.
®G
Press VOL + -.
1 3
"f.ooo _'.,,.E_
• Using the 100 key
When selecting CABLE channels 100 to 125 with the
NUMBERED keys, first press the 100 key, and then enter the
remaining two digits.
• Rapid Tune
Press R-TUNE to display the last channel you were watching.
II Audio Mute
Press MUTE to instantly mute the sound.
Press again, to restore the previous sound level.
• Phones
Connect an earphone (not supplied) or headphones (not
supplied) to the Phones Jack.
PHONES Jack 2
POWER
MUTE
CH UP/
DOWN
To display or remove the
overlay.
Press DISPLAY.
FunctionStatus
ii
RecTuneRemaining
(OTRmodeonlysee
page17.)
ReceivableBroadcast]
Types (Seepage15.)
Whenever a blank section of a tape comes up in Play mode, or
when the selected channel has no broadcast signal with the
"Weak Signal Display ON/OFF" (page 33) set to "OFF", the
TV screen will turn solid black.
!
CurrentTime
012 -Off
_ :_ Speed
Channel& Call Letter
VOL UP/
NUMBERED
keys
"(UNE,
14 l l'] d_'l"S'l I"__=1ilD1=Jlell i m;|O]O_'& I mq"J-*q_r_' fiJ_ i
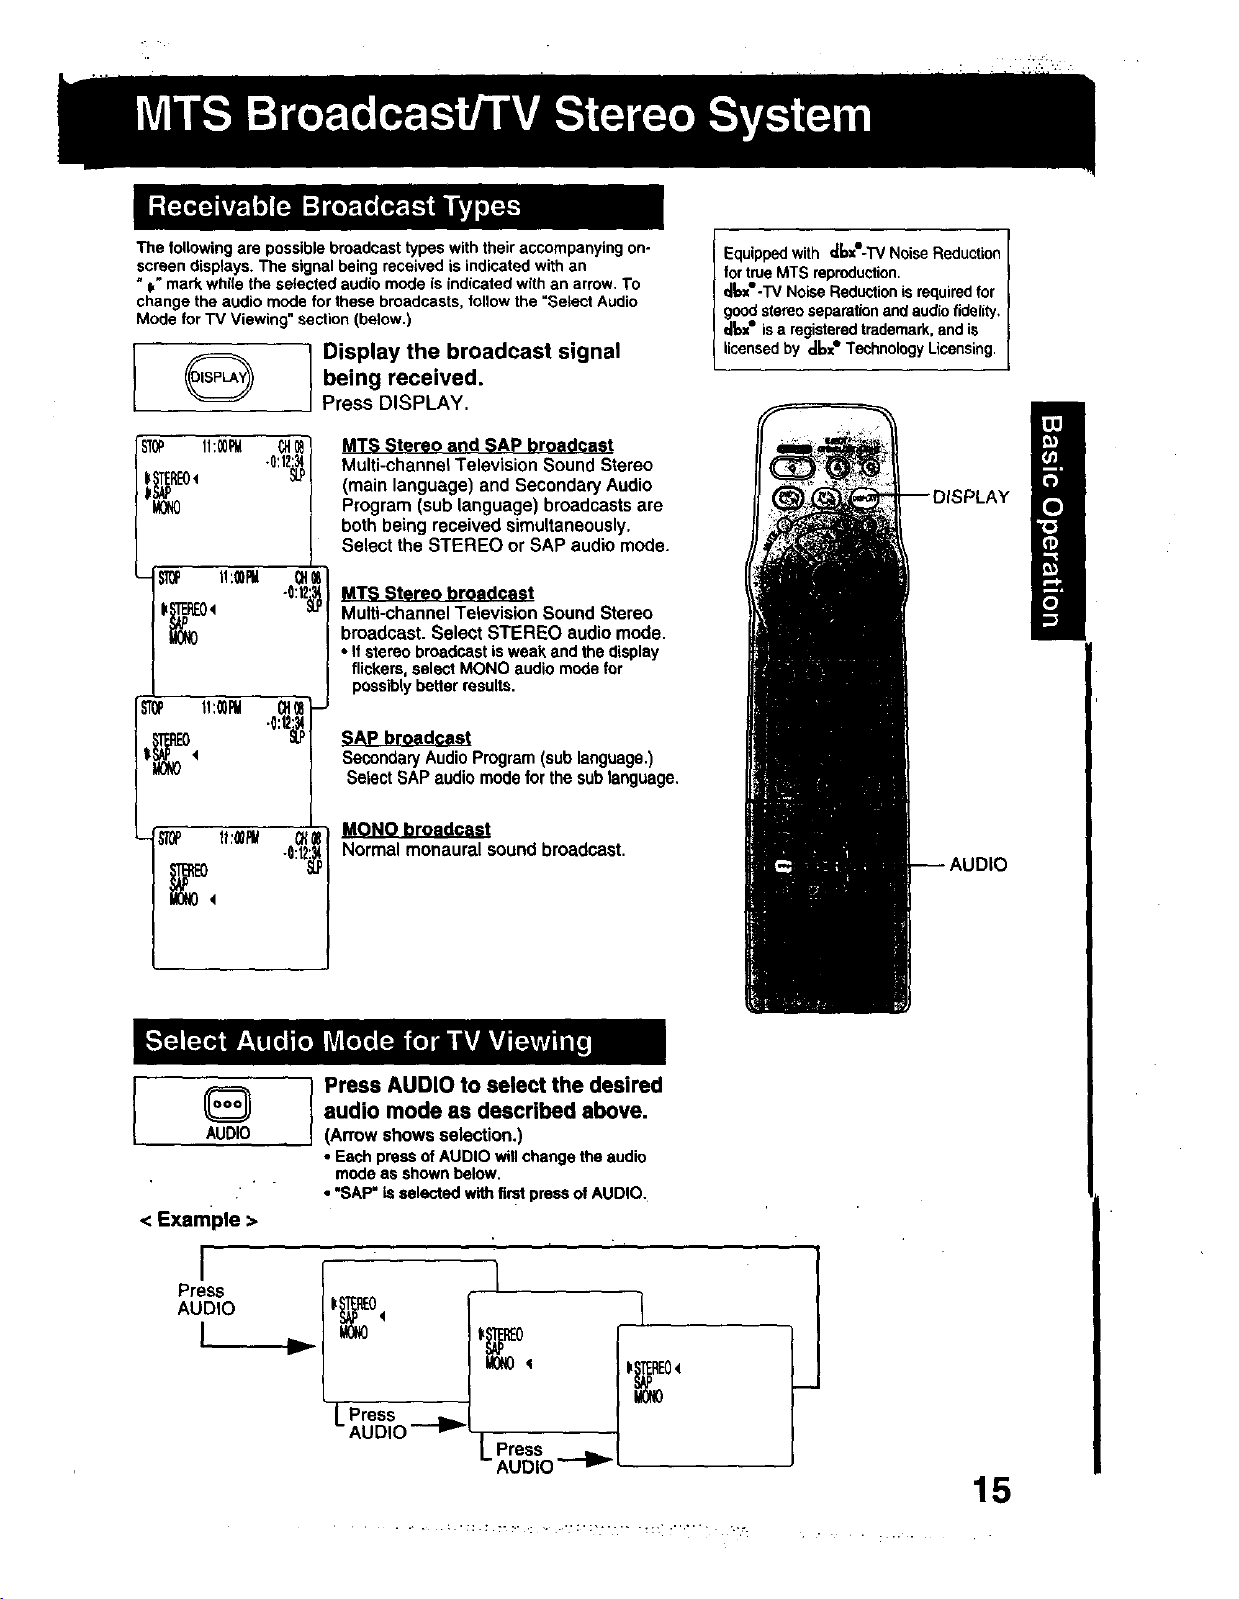
The following are possible broadcast types with their accompanying on-
screen displays, The signal being received is indicated with an
"i" mark whi{e the selected audio mode is indicated with an arrow. To
change the audio mode for these broadcasts, follow the "Select Audio
Mode for TV Viewing" section (below.)
Display the broadcast signal
being received.
Press DISPLAY.
MTS Stereo and SAP broadcast
i_TERE0t
Multi-channel Television Sound Stereo
(main language) and Secoodarj Audio
Program (sub language) broadcasts are
both being received simultaneously.
Select the STEREO or SAP audio mode.
I
Equipped with _6='-TVNoise Reduction I
fortrue MTS reproduction. I
dl=x'-TV Noise Reductionis required for I
good stereo separation and audio fidelity,
dbx" isa registeredtrademark, and is
icensed by d6x= Technoogy Licensing.
0€
4
AUDIO
< Example >
MTS Stereo broadcast
Multi-channel Television Sound Stereo
broadcast. Select STEREO audio mode.
• Ifstereobroadcastisweak andthe display
flickers,select MONO audiomodefor
possiblybetterresults.
•0: '
SAP broadcast
SecondaryAudio Program (sub language.)
SelectSAP audiomodeforthe sublanguage,
MQNO broadcast
Normalmonauralsoundbroadcast.
audio mode as described above.
I Press AUDIO to select the desired
(Arrow shows selection.)
• Each press of AUDIO will change the audio
mode as shown below.
• "SAP" is selected with first press of AUDIO.
I
Press
AUDIO
I
y
Press
AUDIO
Press
AUDIO _'
15
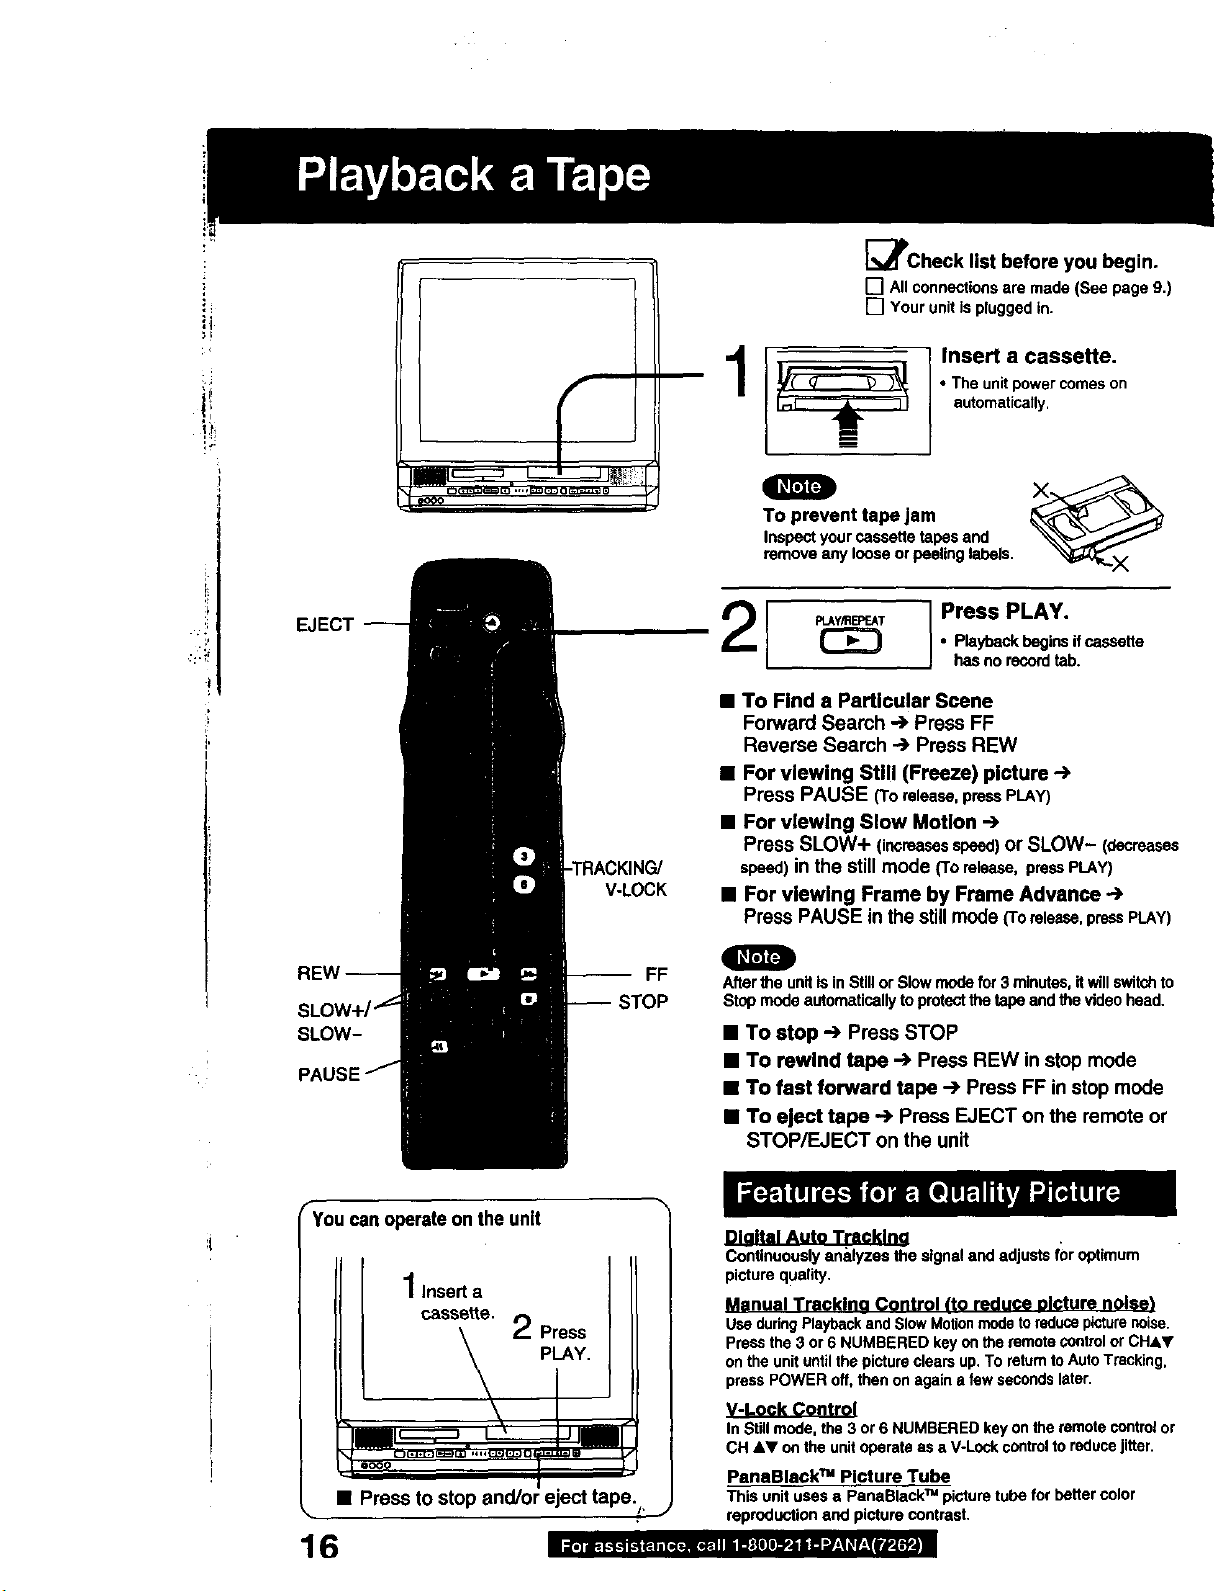
[_lPCheck list before you begin.
[] All connectionsare made(See page9.)
[] Yourunitis pluggedin.
;I
Insert a cassette.
• The unit power comes on
automatically.
!;
O
To prevent tape jam
Inspectyourcassettetapesand
removeanylooseorpeelinglabels,
i
EJECT
Press PLAY.
• Playback begins if cassette
has no record tab.
•i
• To Find a Particular Scene
Forward Search ") Press FF
Reverse Search --) Press REW
• For viewing Stl!l (Freeze) picture -->
Press PAUSE (Torelease,pressPLAY)
• For viewing Slow Motion ..)
Press SLOW+ (increasesspeed)or SLOW- (decreases
speed)in the stillmode (Torelease,pressPLAY)
V-LOCK
-- FF
;TOP
SLOW-
• For viewing Frame by Frame Advance .+
Press PAUSE inthe still mode (Toreisa_e,pressPLAY)
O
After the unit Is in Still or Slow mode for 3 minutes, itwillswitch to
Stop mode automatically to protectthe tape and the video head.
• To stop ..) Press STOP
• To rewind tape -.) Press REW instop mode
• To fast forward tape -.) Press FF in stopmode
• To eject tape -->Press EJECT on the remote or
STOP/EJECT on the unit
Youcan operate on theunit
1 Insert a
cassette.
I r
, \ j
Press
PLAY.
• Press to stop and/ol eject tape.,
16
_lttntJ_dJL_a=kiBl
Continuously analyzan the signal and adjusts for optimum
picture quality.
Manual Tracklna Control (to reduce olcture nolse_
Use during Playback and Slow Motionmodetoreducepicturenoise.
press the 3 or 6 NUMBERED key on the remote control or CHAY
on the unituntil the picture clears up. To returnto AutoTracking,
press POWER off, then on again a few seconds later.
V-Lock Control
In Still mode, the 3 or 6 NUMBERED key onthe remote control or
CH &Y on the unit operate as a V-Lock control to reduce jitter.
PanaBlack T" Picture Tube
Thisunit usesa PanaBlackx"picturetubeforbettercolor
reproductionand picturecontrast,
ii[•1 il_ I.'1.I I.Ii;I i 1_. [et_lll i O _]l] l]€_ JII II "./-_| 11r._[l'J_-[i_'4
SELECT
3SPEED,
PAUSE
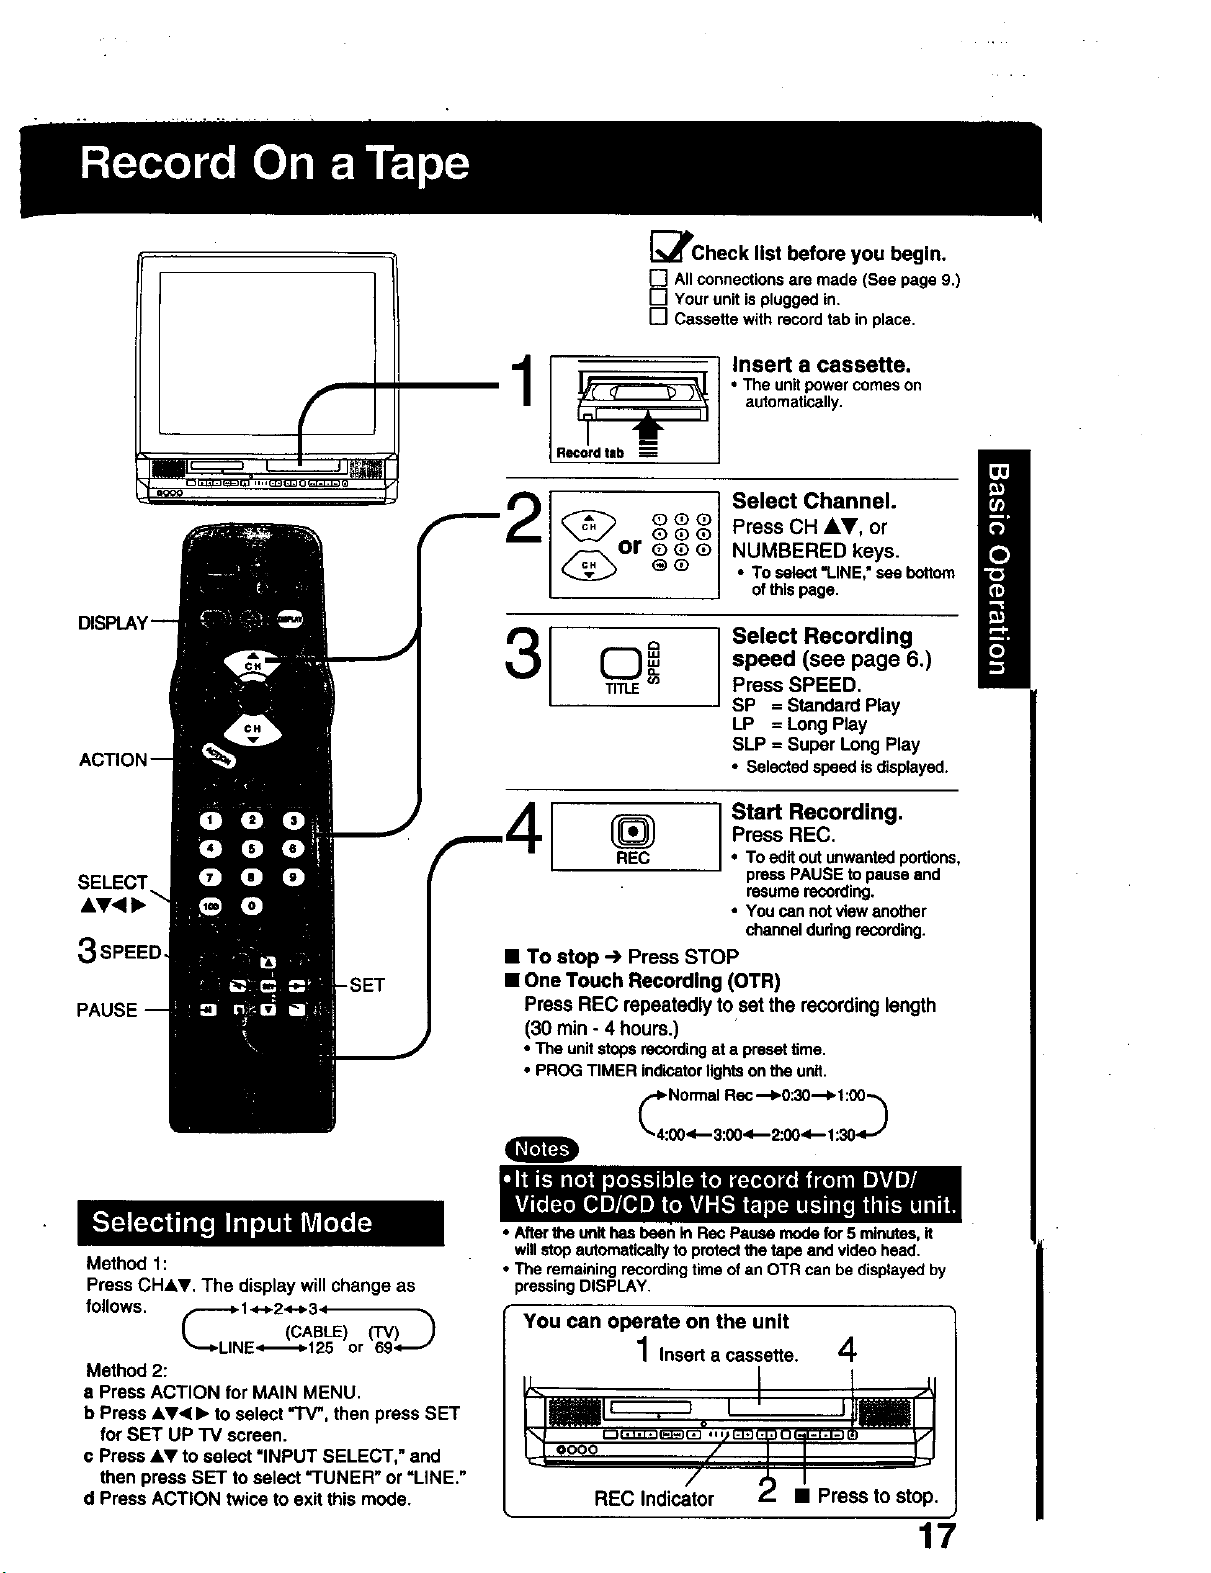
_Check list before you begin.
[] All connectionsare made(See page9.)
[] Your unit is pluggedin.
[] Cassette withrecordtab inplace.
Insert a cassette.
1
3
I t
Record tab _---
or
TITLE
• The unitpowercomeson
automatically.
Select Channel.
Press CH &V, or
NUMBERED keys.
• To select"LINE," see bottom
ofthispage.
Select Recording
speed (see page 6.)
Press SPEED.
SP = Standard Play
LP = Long Play
SLP = Super Long Play
• Selectedspeedis displayed.
Start Recording.
@ Press REC.
REC To edit outunwantedportions,
• To stop ") Press STOP
• One Touch Recording (OTR)
Press REC repeatedly toset the recording length
(30 rain - 4 hours.)
• The unitstopsrecordingat a presettime.
• PROG TIMER indicatorlightsonthe unit.
pressPAUSE to pauseand
resumerecording.
• You can notviewanother
channelduringrecording.
Method 1:
Press CHh,T. The display will change as
follows. _ 1._2--b3, -._
_.-_LINE.t._125 or 694_-/
Method 2:
8 Press ACTION for MAIN MENU.
b Press &.V4 I_ to select "TV', then press SET
for SET UP I"V screen.
€ Press &W' to select "INPUT SELECT," and
then press SET to select "TUNER" or "LINE."
d Press ACTION twice to exit this mode.
(CABLE) (TV) J
• Aftertheunithas been In Rec Pause modefor 5 rntnutse,it
willstopautomaticallyto protectthe tape andvideohead.
• The remainingrecordingtimeof an OTR can be displayedby
pressingDISPLAY.
YOU can operate on the unit
1 Insert a cassette.
4
,I
REC Indicator • Press to stop.
17
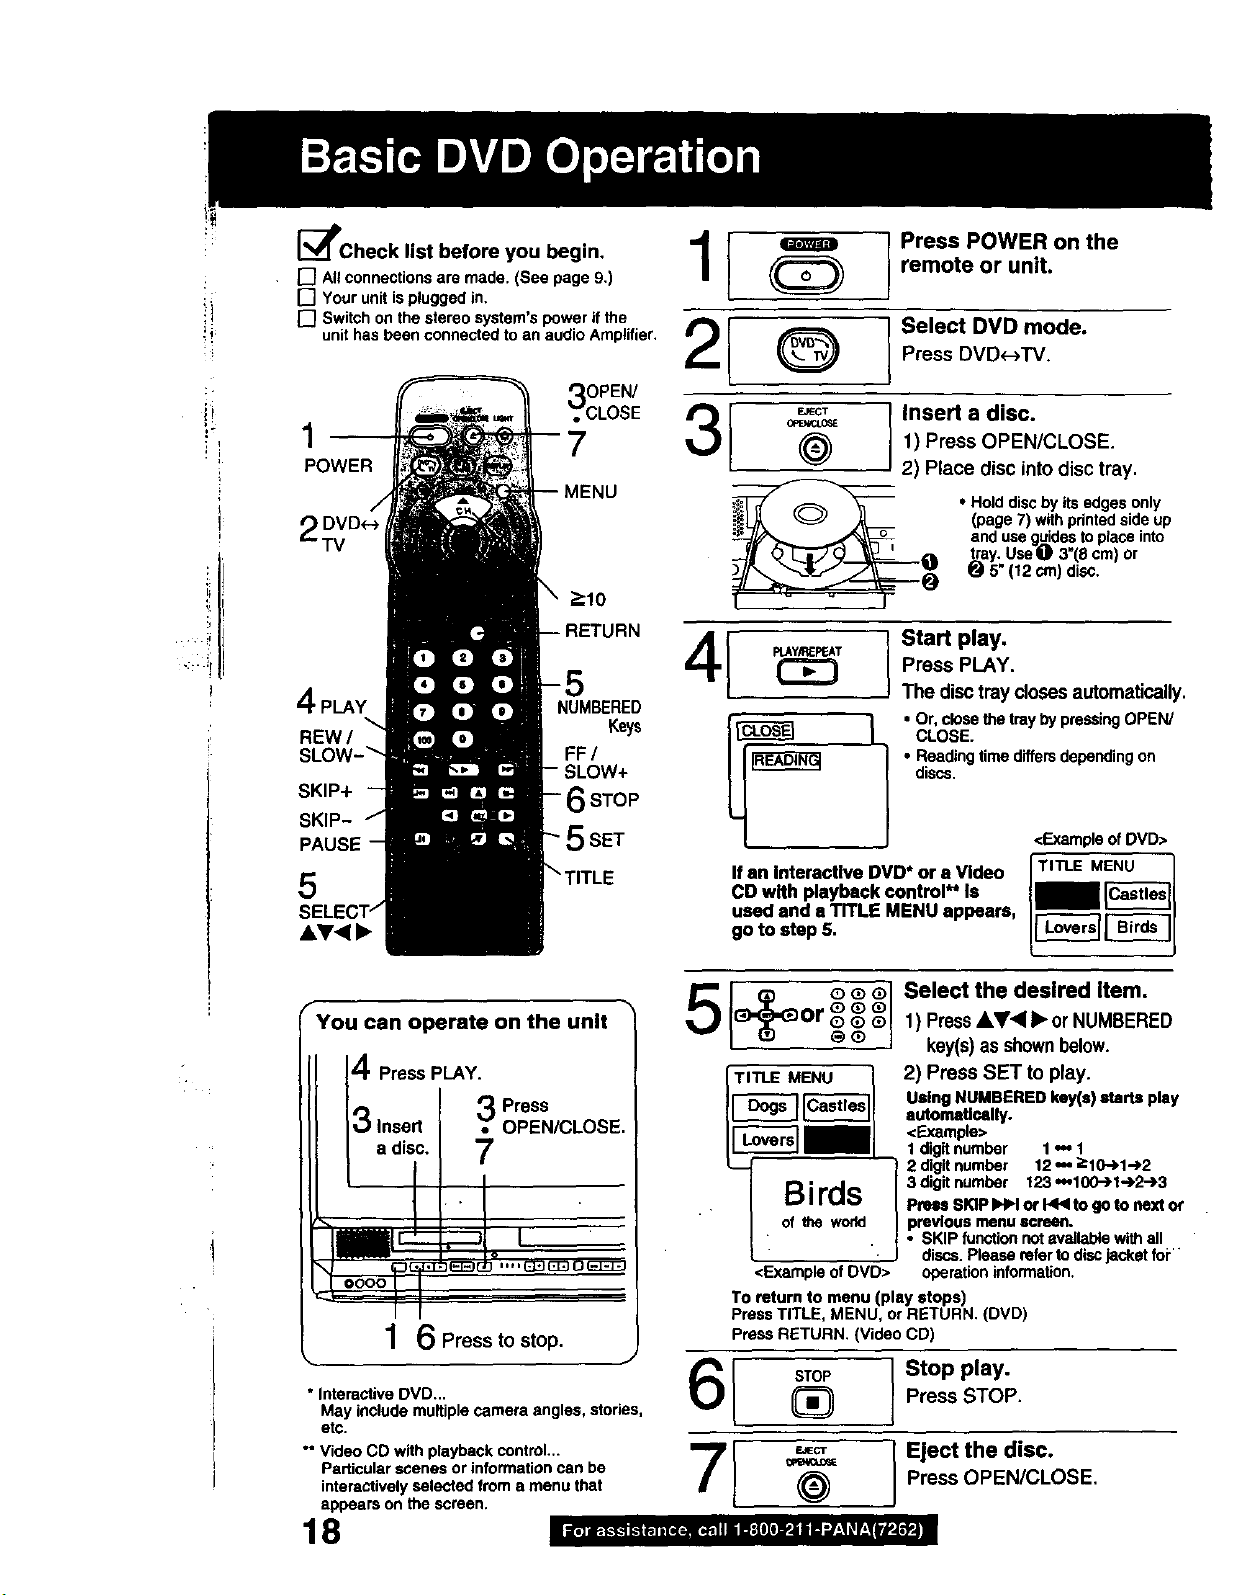
[_lPCheck list before you begin,
[] All connections are made. (See page 9,)
[] Your unit is plugged in,
[] Switch Ollthe stereo system's power if the
unit has been connected to an audio Amplifier,
OPEN/ 2I
__
POWER
7CLOSE3 i
MENU
Press POWER on the
remote or unit.
Select DVD mode.
@
_c, Insert a disc.
(_Et_L0S£
(_ 1) Press OPEN/CLOSE.
Press DVD_TV.
2) Place disc into disc tray.
(page 7) with pdnted side up
• Hold disc by its edges only
and use guides to place into
tray. UseO 3"(8 cm) or
!
:>10
4PLAY NUMBERED
REW /
SKIP+ STOP
SKIP-
PAUSE SET
5
"_ Keys
FF/
SLOW+
You can operate on the unit
4PressPLAY.
3 Insert ?Press
a disc. 7
/ !=-'-'r - :'_; I
I_ ........._p_m_',,,,_ o-_
oooo||
1 6 Press to stop.
OPEN/CLOSE
__ e 5" (12 cm) disc.
41 L Start play"
• | Birds
_T Press PLAY.
The disctraydoses automatically.
I CLOSE.
• Reading time differs depending on
discs.
Ifan InteractiveDVD* ors Video
CD with playback control** Is
used and s TITLE MENUappears,
go to step 5,
Select the desired Item.
oroo_
L of the wodd
<Example of DVD>
To return to menu (play stops)
Press TITLE, MENU, or RETURN. (DVD)
press RETURN. (Video CD)
1) Press&Y<I • or NUMBERED
key(s)as shownbelow.
2) Press SET to play.
Using NUMBERED key(s) starts play
automaUcally.
<Example>
1 digit number 1 _, 1
2 digit number 12 w ;=10-).1 @2
3 digit number 123,_100-)1->2->3
Pros SKIP IHH or 14< to go to next or
previous menu screen.
• SKIP function not available with all
discs. Please refer to disc jacket foi""
operation information.
<Example of DVD>
L°_re{Iair= I
* Interactive DVD...
May include multiple camera angles, stories,
etc.
" Video CD with playback control...
Particular scenes or information can be
interactively selected frorn a menu that
appears on the screen.
18
61 STOP I Stop play •Press STOP.
7[ __(_ Eject the disc.
I • ......
Press OPEN/CLOSE,
• To Find a Particular Scene
Rapid Advance -->
Press FF in play mode
Rapid Reverse --->
Press REW in play mode
(To release, press PLAY)
• Sounds are heard during rapidadvance at speed 1.
(Noise <static> may be heard on DVDs recorded in LPCM
format.)
• Starting rapid advance (reverse) during play started from
menu on Video COs may recall menu.
• The speed of advance (reverse), slow at first, increases
with each additional press of the button up to 5 levels.
• To Skip a Chapter/Track
Skipping Ahead --)
Press SKIP _•1 during play
Each press skips a chapter (DVD) or track (Video CD/CD).
Skipping Back ...)
Press 1<1'4SKIP during play
Pressing once midway through a chapter/track retums to
start of that chapter/track. Each additional press skips back
one chaptar/tmck.
• Pressing SKIP )'l_i or J<l<l dudng play started from
menu on Video CDs may recall menu.
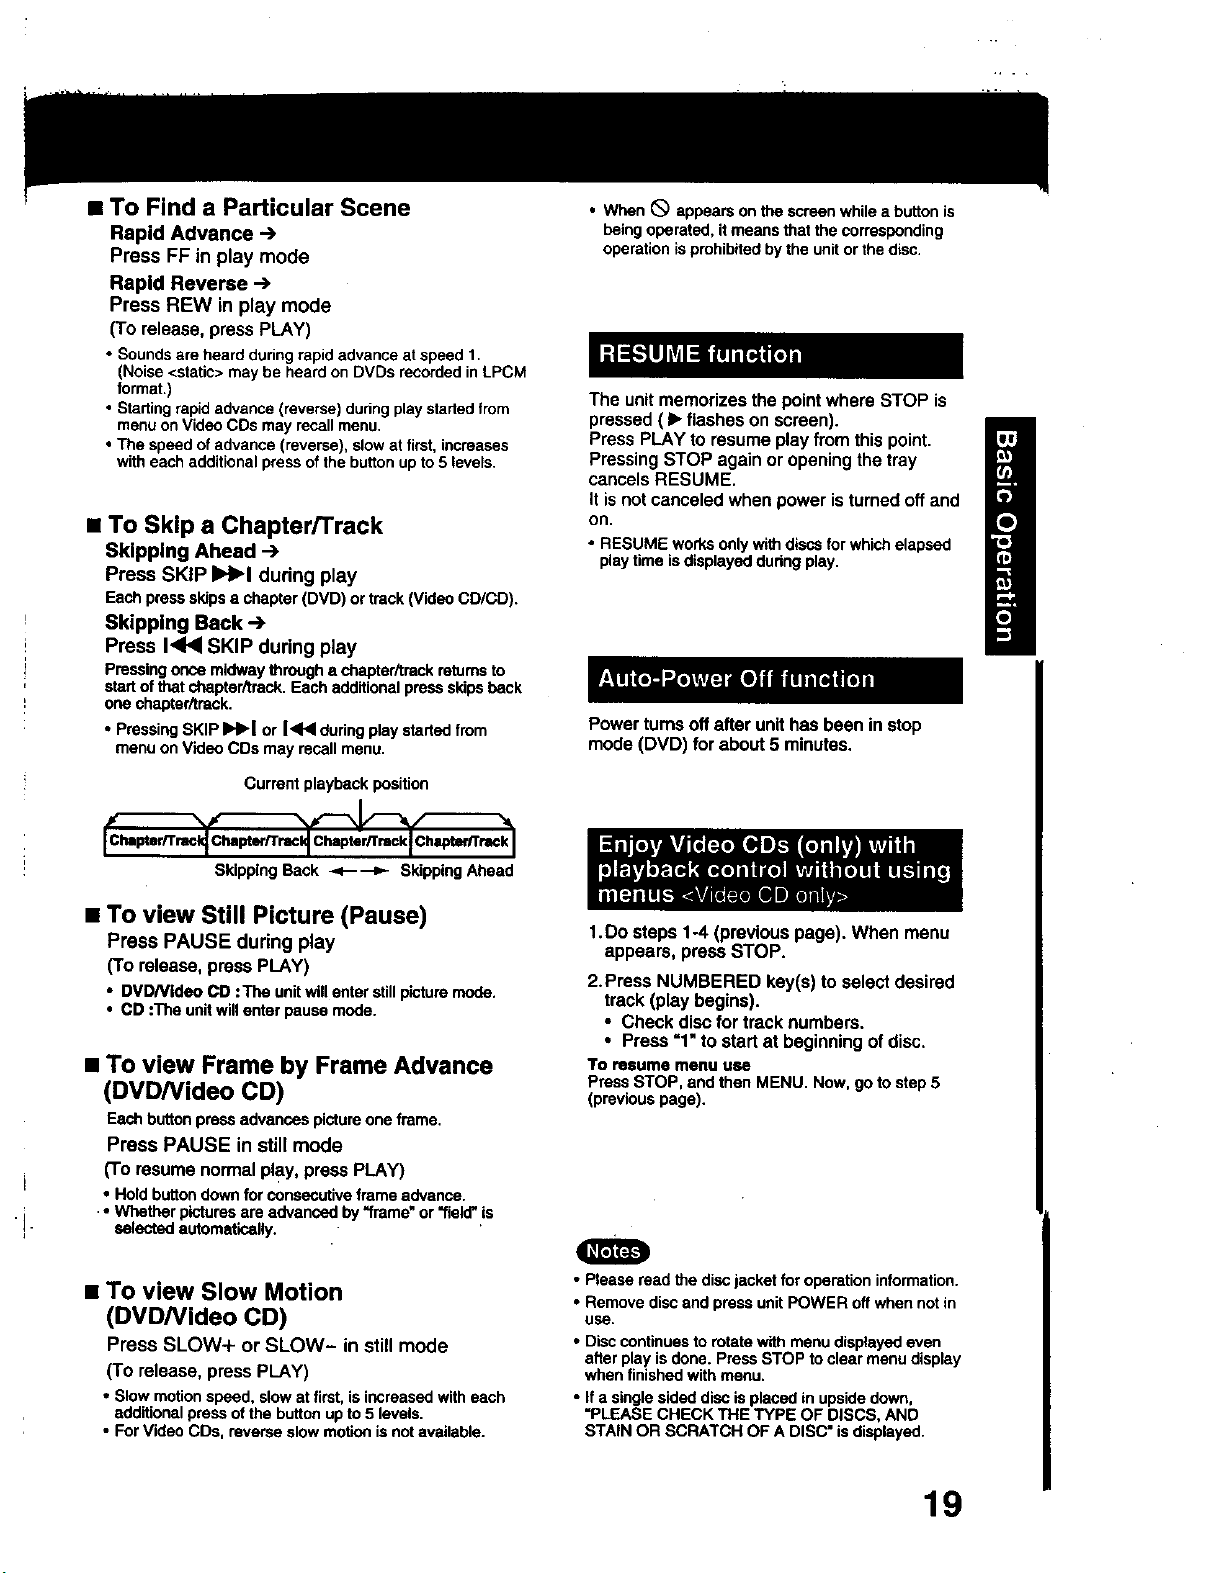
Current playback position
• When _ appears on the screen while a button is
being operated, it means that the corresponding
operation is prohibited bythe unit or the disc.
The unit memorizes the point where STOP is
pressed(• flasheson screen).
Press PLAY to resume play from this point.
Pressing STOP again or opening the tray
cancels RESUME.
It is not canceled when power is turned off and
on.
• RESUME works only with discs for which elapsed
play time is displayed during play.
Powerturnsoffafterunithas been instop
mode(DVD) for about5 minutes.
Skipping Back -<-----_- Skipping Ahead
• To view Still Picture (Pause)
Press PAUSE during play
(To release, press PLAY)
• DVD/Vldeo CD :The unit will enter still picture mode,
• CD :The unit will enter pause mode.
• To view Frame by Frame Advance
(DVD/Video CD)
Each button press advances picture one frame,
Press PAUSE in still mode
(To resume normal play , press PLAY)
• Hold button down for consecutive frame advance.
•• Whether pictures ere advanced by "frame" or "field" is
selected automatically.
• To view Slow Motion
(DVD/Video CD)
Press SLOW+ or SLOW- in still mode
(TO release, press PLAY)
• Slow motion speed, slow at first, is increased with each
additional press of the button up to 5 levels.
• For Video CDs, reverse slow motion is not available.
1.Do steps 1-4 (previouspage). When menu
appears,pressSTOP.
2.Press NUMBERED key(s) to select desired
track (play begins).
• Check disc for track numbers.
• Press =1" to start at beginning of disc.
To resume menu use
PressSTOP, and then MENU. Now,go to step 5
(previouspage).
• Please read the disc jacket for operation information.
• Remove disc and press unit POWER off when not in
use.
• Disc continues to rotate with menu displayed even
after play is done. press STOP to clear menu displey
when finished with menu.
• If a single aided discis placed in upside down,
=PLEASE CHECK THE TYPE OF DISCS, AND
STAIN OR SCRATCH OF A DiSC =is displayed.
19
 Loading...