

Panasonic PV-DF2703, PV-DF2003 Owner’s Manual
Panasonic
TV/DVD/VCR Combination
Operating Instructions
OrnnlvlsIon [_
Model No. PV-DF2003/PV-DF2703
. Initial Setup and Connection Procedures are on pages 14 to 15.
DIGITAl.
DIEIlmL _ _ VIDEO
_ s an ENERGY STAR e Partner, Matsushita Electric Corporation
Please read these instructions carefully before attempting to connect,
operate or adjust this product, Please save this manual.
Spanish Quick Use Guide is included.
(Guia pars r&pida consuBa en espaSol estA incluida.)
This operating instruction book is designed for use with models PV-DF2003 and PV-DF2703,
Illustrations in this manual show the PV-DF2703, Features may vary, so please read carefully,
of America has determined that this product or product model
meets the ENERGY STARe guidelines for energy efficiency.
MULTI FORMAT PLAYBACK
*Ability [o play backmaydependonrecordingconditions.
@
SafetyPrecautions/Mesuresde sdcuritd
Warning : To prevent fire or shock hazard, do not expose this equipment to rain or
Caution : To prevent electric shock, match wide blade of plug to wide slot, fully insert.
Avertisaement : Afin de pr_venir tout risque d'incendie ou de choca _lectriquea, ne pas exposer
Attention : Pour dviter les chocs _lectriques, introduire la lame la plus large de la fiche dans
FCC WARNING : Any unauthorized changes or modifications to this equipment would void the
This video recorder, equipped with the HQ_gh Quality) System, is compatible with existing VHS
equipment. Only usa those tapes with the _ mark. It is recommended that only cassette tapes that
have been tested and inspected for use in 2, 4, 6, and 8 hour VCR machines be used. This television
receiver provides display of television closed captioning in accordance with §15.119 of the FCC rules.
CAUTION:
UNIT IS A CLASS I LASER PRODUCT.
HOWEVER THiS UNIT USES A ViSiBLE LASER BEAM WHICH
COULD CAUSE HAZARDOUS RADIATION EXPOSURE IF DIRECTED.
BE SURE TO OPERATE THE UNIT CORRECTLY AS INSTRUCTED.
WHEN THIS UNIT IS PLUGGED TO THE WALL OUTLET, DO NOT
PLACE YOUR EYES CLOSE TO THE OPENING OF THE DISC TRAY
AND OTHER OPENINGS TO LOOK INTO THE INSIDE OF THIS UNIT.
USE OF CONTROLS OR ADJUSTMENTS OR PERFORMANCE OF
PROCEDURES OTHER THAN THOSE SPECIFIED HEREIN MAY
RESULT IN HAZARDOUS RADIATION EXPOSURE.
DO NOT OPEN COVERS AND DO NOT ATTEMPT TO REPAIR THE
UNIT YOURSELF. REFER SERVICING TO QUALIFIED PERSONNEL.
FCC NOTICE:
This equipment has been tested and found to comply with part 15 of the FCC Rules. These limits are
designed to provide reasonable protection against harmful interference when operated in a residential
environment. If this equipment does cause interference to radio or television reception, which can be
determined by turning the equipment off and on, use the equipment in another location and/or utilize an
electrical outlet different from that used by the receiver. If necessary, consult the dealer or an experienced
rsdio/TV technician for help. You may find the booklet, "Something About Interference" available from
FCC local regional offices helpful.
This product utilizes both s Cathode Ray Tube (CRT) and other components that contain lead. Disposal
of these materials may be regulated in your community due to environmental considerations. For
disposal or recycling information please contact your local authorities, or the Electronics Industries
A ance: <http:/_,vww.eiae.org.>
moisture.
cet appareil & la pluie ou _ une humiditd excessive.
la borne correspondante de la prise et pouaser jusqu'au fond.
user's authority to operate.
LASER RADIATION
WHEN OPEN. DO NOT
ICAUTION: 1
STARE INTO BEAM.
RAYONNEMENT LASER
EN CAS D'OUVERTURE.
NE PAS REGARDER
E 1
DANS LE FAISCEAU.
(Inside of product)
This symbol warns the user that uninsulated voltage within the
unit may have sufficient magnitude to cause electric shock.
Therefore, it is dangerous to make any kind of contact with any
inside part of this unit.
This symbol alerts the user that important literature concerning
the operation and maintenance of this unit has been included.
Therefore, it should be read carefully in order to avoid any
problems.
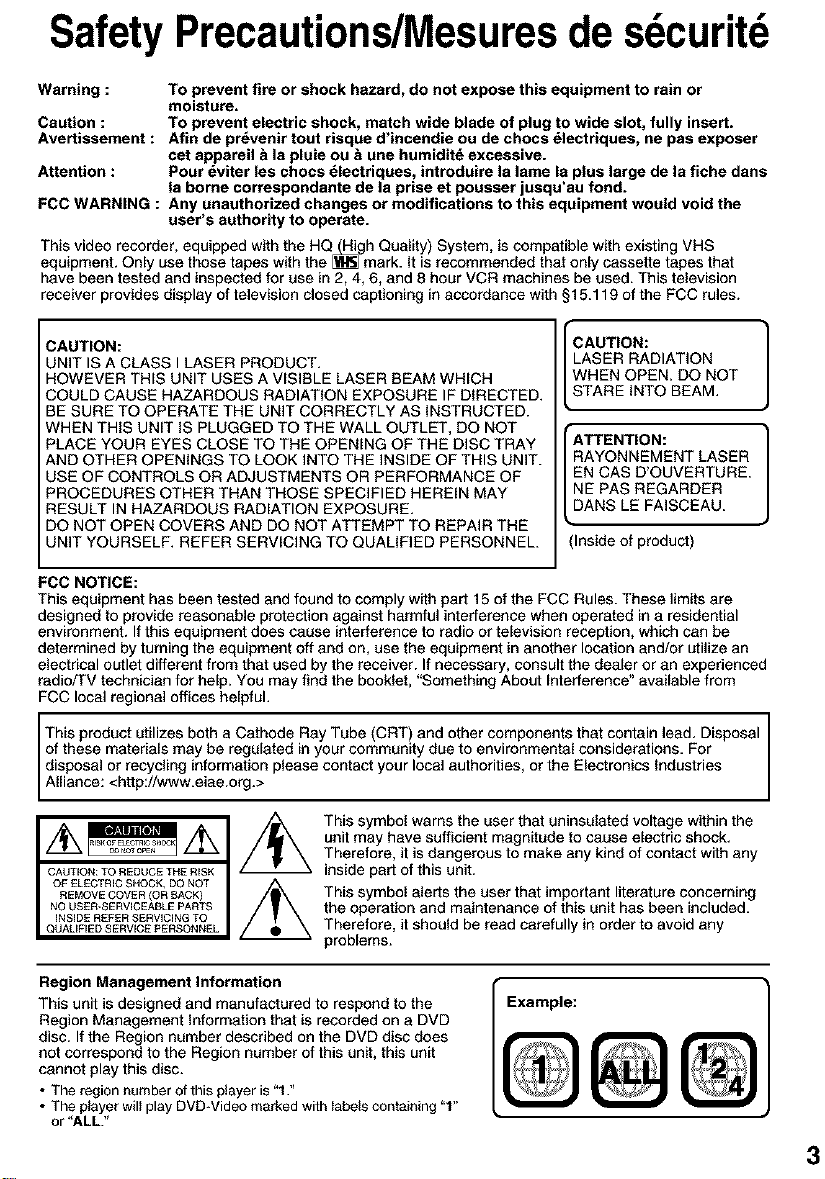
Region Management Information
This unit is designed and manufactured to respond to the
Region Management Information that is recorded on e DVD
disc. If the Region number described on the DVD disc does
not correspond to the Region number of this unit, this unit
cannot play this disc.
• The region number of this player is "1."
• The player will play DVBWideo marked with labels containing "1"
or "ALL."
Example:
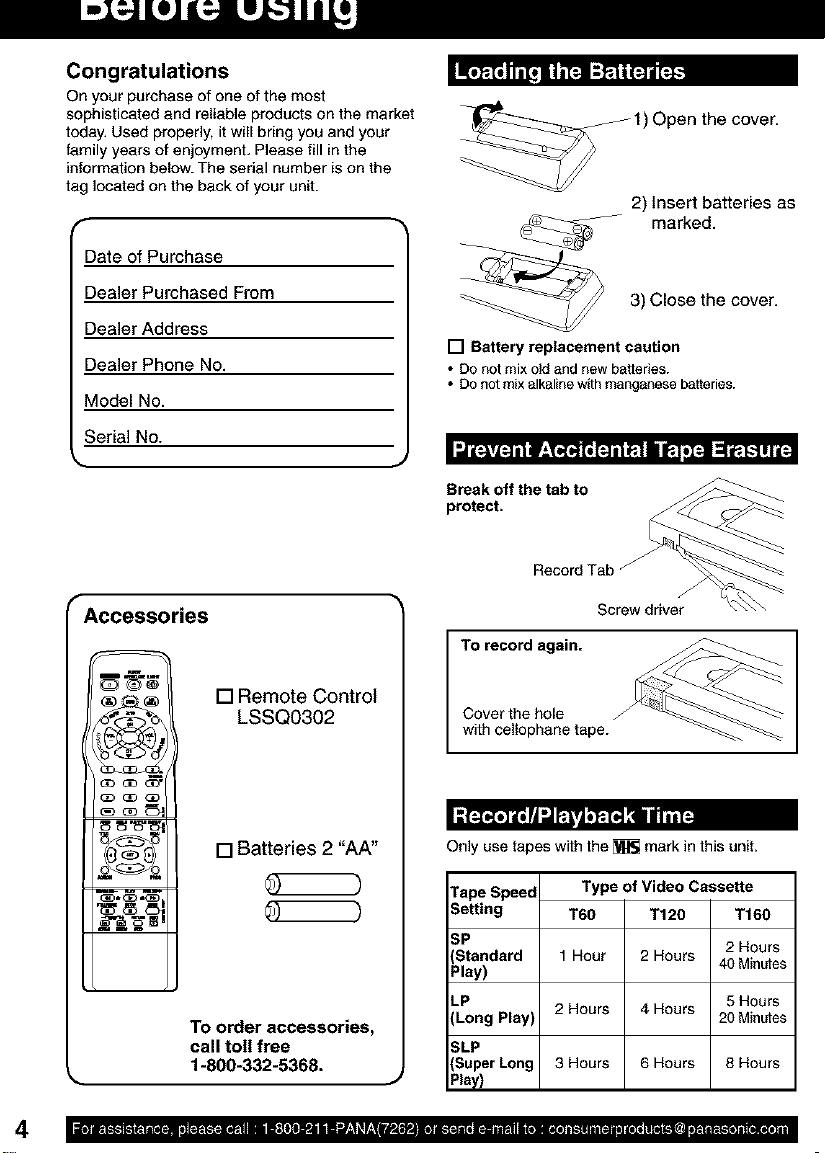
Congratulations
On your purchase of one of the most
sophisticated and reliable products on the market
today, Used properly, it will bring you and your
family years of enjoyment, Please fill in the
information below. The serial number is on the
tag located on the back of your unit.
r •
Date of Purchase
1) Open the cover.
2) Insert batteries as
marked.
Dealer Purchased From
Dealer Address
Dealer Phone No.
Model No.
Serial No.
r Accessories
®c_ []Remote Control
LSSQ0302
[]Batteries 2 "AA"
TO order accessories,
call toil free
1-800-332-5368.
3) Close the cover.
[] Battery replacement caution
• DOnot mix old and new batteries.
• Do not mix alkaline with manganese batteries.
Break off the tab to
protect.
RecordTab
J
Screw driver
To record again.
Cover the hole
with cellophane tape.
Only use tapes with the _ mark in this unit.
Tape Speed
Setting
SP 2 Hours
Standard 40 Minutes
Play)
LP 5 Hours
(Long Play) 20 Minutes
SLP
(Super Long 8 Hours
Type of Video Cassette
T60 T120
1 Hour 2 Hours
2 Hours 4 Hours
3 Hours 6 Hours
T160
Play)
II[_]LW_'PJ LwJJ L_W_JLIIJL_ LI[_3
Important Saf uards and Precautions ........................................................................ 2
Safety Precaubons/Mesures de secunte ....................................................................... 3
Before Using .................................................................................................................... 4
Information (Unit, Cassette, Disc .................................................................................. 6
Location of Controls ....................................................................................................... 8
Connections ................................................................................................................... 11
Initial Setup (Ready to Play) ......................................................................................... 14
Reset Language, Channels, Clock, Time Zone Adjust ............................................... 16
Playback aTape............................................................................................................. 18
Record On a Tape.......................................................................................................... 18
e¢_ . * .
Copy Your Tapes (Dubbing) ......................................................................................... 19
Basic DVD Operation .................................................................................................... 20
TV Operation .................................................................................................................. 22
MTS BroadcastJTVStereo System ............................................................................... 23
Closed Caption System ................................................................................................ 24
TV Timer Features ......................................................................................................... 26
On-Screen Display (OSD) ............................................................................................. 27
FM Radio ........................................................................................................................ 28
TimerRecording ............................................................................................................ 30
Cable Box Universal Remote Control Feature ............................................................ 32
Tape Operation .............................................................................................................. 34
Special VCR Features ................................................................................................... 38
V-Chip Control Feature ................................................................................................ 40
Audio Features .............................................................................................................. 44
Video/Audio Menu ......................................................................................................... 46
Video/Audio Adjustment ............................................................................................... 47
Disc Operation .............................................................................................................. 48
DVD Operation using On-Screen Displays ................................................................. 53
MP3PNMA/JPEG Playback Operation .......................................................................... 56
DVD Lock Feature .......................................................................................................... 59
Settings for DVD Operation .......................................................................................... 60
Language Code List ...................................................................................................... 63
Before Requesting Service ........................................................................................... 64
Warning and Instruction Displays ............................................................................... 66
Spanish Quick Use Guide/Guia para rdpida consulta ................................................ 67
Limited Warranty ........................................................................................................... 74
Customer Services Directory ....................................................................................... 75
Index ............................................................................................................................... 76
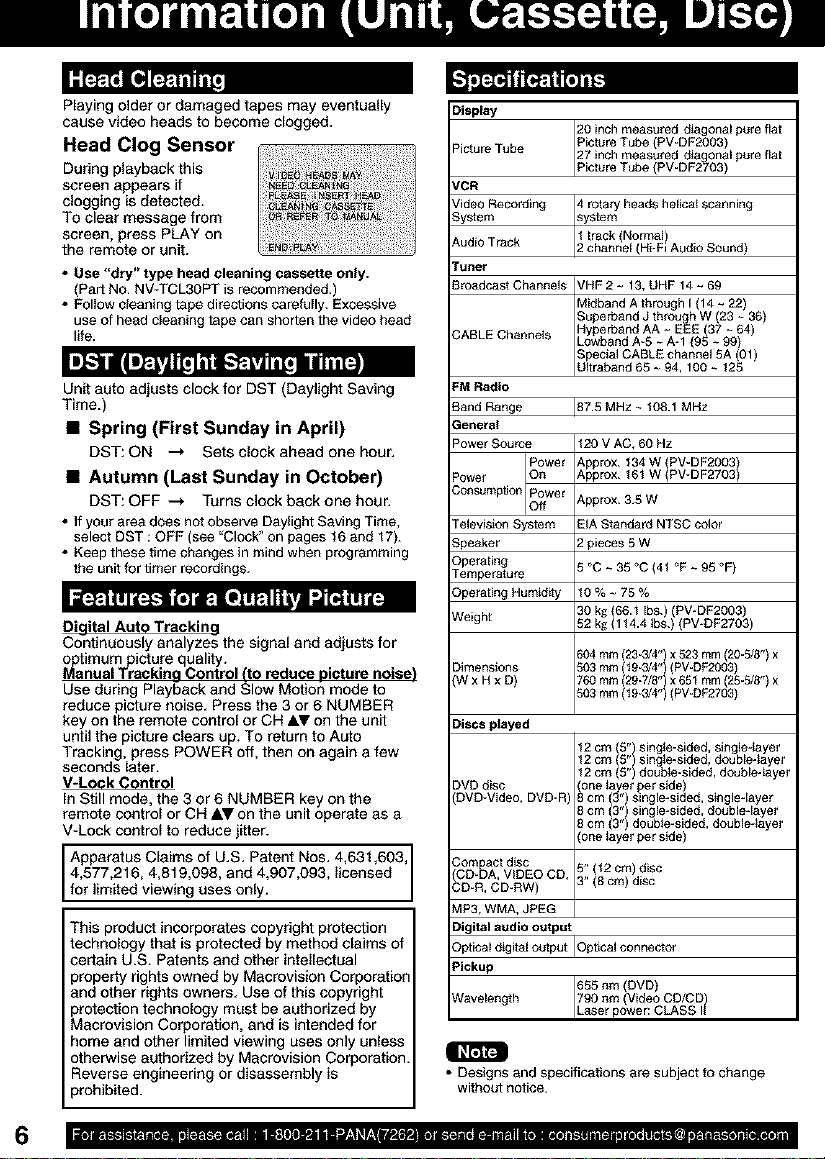
Playing older or damaged tapes may eventually
cause video heads to become clogged.
Head Clog Sensor
During playback this
screen appears if
clogging is detected.
To clear message from
screen, press PLAY on
the remote or unit.
• Use "dry" type head cleaning cassette only.
(Part No. NV*TCL3OPT is recommended.)
• Follow cleaning tape directions carefully. Excessive
use of head cleaning tape can shorten the video head
life.
Unit auto adjusts clock for DST (Daylight Saving
Time.)
• Spring (First Sunday in April)
DST: ON --_ Sets clock ahead one hour.
• Autumn (Last Sunday in October)
DST: OFF --_ Turns clock back one hour.
• Ifyour area does not observe Daylight Saving Time,
select DST : OFF (see "Clock_'on pages t6 and 17).
• Keep these time changes in mind when programming
the unit for timer recordings.
Digital Auto Tracking
Continuously analyzes the signal and adjusts for
_atimum picture quality.
nual Tracking Control (to reduce picture noise)
Use during Playback and Slow Motion mode to
reduce picture noise. Press the 3 or 6 NUMBER
key on the remote control or CH AV on the unit
until the picture clears up. To return to Auto
Tracking, press POWER off, then on again a few
seconds later.
V-Lock Control
In Still mode, the 3 or 6 NUMBER key on the
remote control or CN AV on the unit operate as a
V-Lock control to reduce jitter.
Apparatus Claims of U.S. Patent Nas. 4,631,603,
4,577,216, 4,819,098, and 4,907,093, licensed
for limited viewing uses only.
This product incorporates copyright protection
technology that isprotected by method claims of
certain U.S. Patents and other intellectual
property rights owned by Macrovision Corporation
and other rights owners. Use of this copyright
protection technology must be authorized by
Macrovision Corporation, and is intended for
home and other limited viewing uses only unless
otherwise authorized by Macrovision Corporation.
Reverse engineering or disassembly is
prohibited.
Display
Picture Tube 27 inch measured dis onal pure flat
VCN
Video Recording 4 rotary heads heiicat scanning
System system
Audio Track
Tuner
Broadcast Channels VHF 2 ~ 13, UHF 14 ~ 69
CABLE Channels Lowband A-5 ~ A-1 (96 ~ 99)
FM Radio
Band Range
General
Power Source
Consumption
Power O_
Television SyStem
Speaker
Ope_6ng
Temperatu_
Ope_6ng Humiddy
Weight
Dimensions 503mm(t9-3/4")(PV-DF2003)
(W x Hx D) 760mm (29-718")x 65tmm (25-5/8")x
Discs played
DVBdisc _one layer perside
DVO-Video,DVD-R _cm (3") single-sided, single-layer
3oreact disc
CD-I_A,VIDEOCD. 5" (t2 cm) disc
3D-R, CD-RW) 3" (8 cm) disc
20 inch measured diagonal pure flat
Picture Tube (PV-DF2OO3)
Picture Tube (PV-DF_O3)
2 channel (Hi-Fi Audio Sound)
_d A through I (14 ~ 22)
Superband J through W (23 ~ 36)
Hyperband AA ~ EEE (37 ~ 64)
Special CABLE channel 5A (01)
Ultraband 65 ~ 94, 100 ~ 125
_87.5 MHz 108.1 MHz
120 V AC, 60 Hz
Power
Approx. t34 W PV-DF2OO3
Approx. 16t W IPV-DF2703 /
Approx. 3.5 W
EIA Standard NTSC color
2 pieces 5 W
5°C~35_C{4t °F~95_F)
10%~75%
30 kg (66.1 Ibs.) (PV-DF2OO3)
52 kg {114.4 tbs.) (PV-DF2703)
604mm (23-3/4")x 523mm (20-518")x
503mm (t 9-3/4") (PV-DF2703)
12cm ()5" single-sided, single-layer
12cm (5") single-sided, double-layer
12em (5") double-sided, double-layer
8cm(3")single-sided,doubleqayer
8cm (3") double-sided, double-layer
(one layer per side)
MP3.WMA.JPEG
Digital audio output
Optical digital output _Opticalconnector
Pickup
Wavelength 790 nm (Video CD/CD)
• Designs and specifications are subject to change
without notice.
655nm (DVD)
,Laser power: CLASS
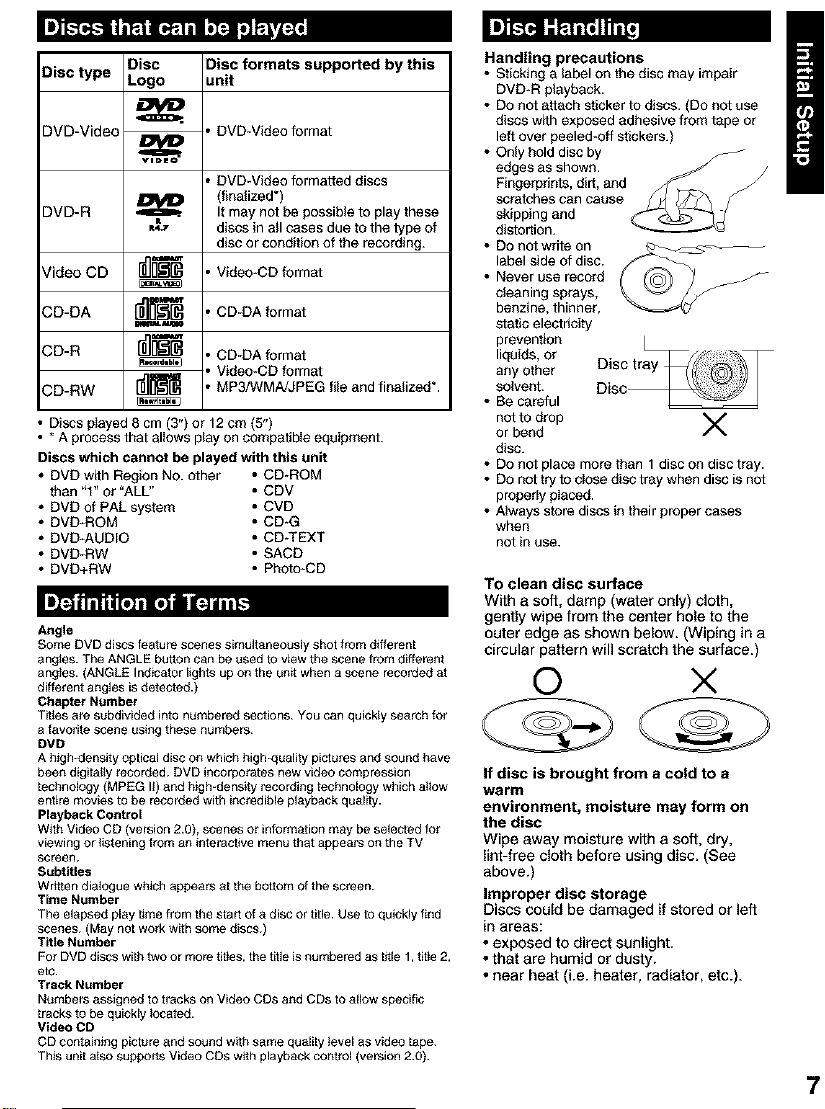
Disc type Disc Disc formats supported by this
Logo unit
DVD-Video , DVD-VMeo format
, DVD-VMeo formatted discs
DVD-R _..
,,t,
(finalized*)
It may not be possible to play these
discs in all cases due to the type of
disc or condition of the recording.
Video CD lUlU[]_ , Vldeo-CD format
CD-DA r_=_ , CD-DA fornlat
=alw.n, mm
CD-R [_ ' CD-DA fornlat
, Video-CD format
CD-RW r_ , MP3/WMA/JPEG file and finalized*.
• Discs played 8 cm (3") or 12 cm (5")
• * A process that allows play on compatible equipment.
Discs which cannot be played with this unit
• DVD with Region NO. other • CD_ROM
than "t" or "ALL" ° CDV
• DVD of PAL system ° CVD
• DVD*ROM ° CD-G
• DVD*AUDIO ° CD-TEXT
• DVD*RW • SACD
• DVD+RW ° Photo-CD
Angle
Some DVD discs feature scenes simultaneously shot from differen[
angles. The ANGLE button can be used to view the scene from different
angles. (ANGLE Indicator lights up on the umt when a scene receded at
different angles is detected.)
Chapter Number
Tit_es a_ subdivided into nt_mbered sections. You can quickly search for
a favodto scene using these numbers.
DMD
A high-density optical disc on which high-quality pictures and sound have
been digitally recorded. DVD incorporates new video compression
technology (MPEG II) and high-density recording technology which a_tow
entire movies to be receded with incredible playback quality.
Playback Control
With Video CD (version 2.0), scenes Or information may be selected for
viewing or _etening from an interactive menu that appea_ on the TV
screen.
Subtitles
Wr_en dialogue which appears at the bottom of the screen.
Time Number
The elapsed pley _me from the start of a disc or title. Use to quickly find
scenes. (May not wo_k with some discs.)
TlSe Number
For DVD disCS with two or more ti[les, the title is numbered as t_le 1, ti[le 2,
etc.
Track Number
Nt_mbers assigned to tracks on Video CDs and CDs to allow specific
tracks to be quickly _oceted.
Video CD
CD contaietng pic_re and sound with seine quality _evel as video tape.
This uni[ a_so suppers Video CDs w_h playback coetrol (version 2.0).
Handling precautions
• Sticking a label on the disc may impair
DVD-R playback.
• DOnot attach sticker to discs. (Do net use
discs with exposed adhesive from tape or
left over peeled-off stickers.)
• Only hold disc by
edges as shown.
Fingerprints, dirt, and
scratches can cause
skipping and
distortion.
• DOnet write on
label side of disc.
• Never use record
cleaning sprays,
benzine, thinner,
static electricity
prevention
liquids, or
any other
solvent.
• Be careful
not to drop V
or bend
disc.
• DOnet place more than 1 disc on disc tray.
• DOnot try to close disc tray when disc is not
properly pIaced.
• Always store discs in their proper cases
when
not in use.
To clean disc surface
With a soft, damp (water only) cloth,
gently wipe from the center hole to the
outer edge as shown below. (Wiping in a
circular pattern will scratch the surface.)
© ×
If disc is brought from a cold to a
warm
environment, moisture may form on
the disc
Wipe away moisture with a soft, dry,
lint-free cloth before using disc. (See
above.)
Improper disc storage
Discs could be damaged if stored or left
in areas:
• exposed to direct sunlight.
• that are humid or dusty.
• near heat (i.e. heater, radiator, etc.).
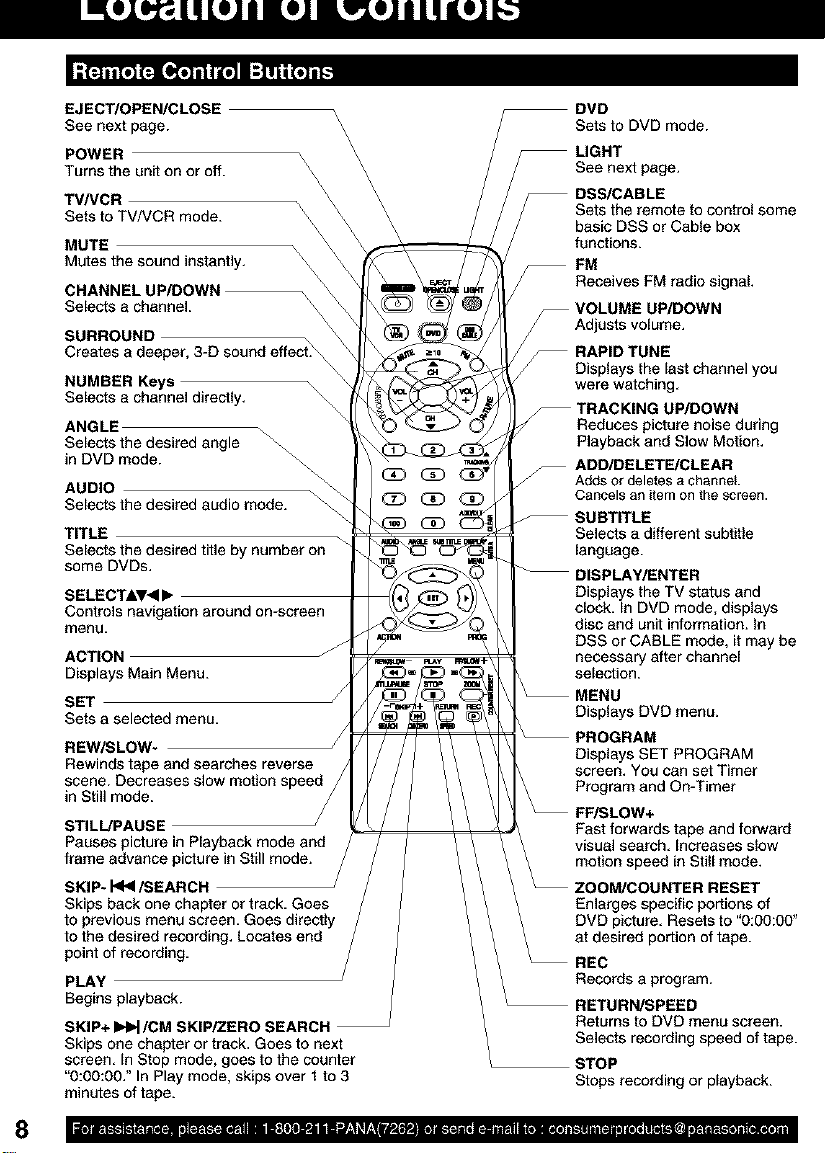
EJECT/OPEN/CLOSE _\
See next page. \
POWER _\
Turns the unit on or off. \
TV/VCR
Sets to TV/VCR mode. \\
MUTE
\
\
\
\
\
Mutes the sound instantly,
CHANNEL UP/DOWN
Selects a channel.
SURROUND _\
Creates a deeper, 3-D sound effect._
NUMBER Keys
Selects a channel directly,
ANGLE _
Selects the desired angle _
in DVD mode. \_
\4
AUDIO \
Selects the desired audio mode.
TITLE
Selects the desired title by number on
some DVDs.
SELECTIV<I •
Controls navigation around on-screen
menu.
ACTION J
Displays Main Menu.
SE1
Sets a selected menu.
REWiSLOW-
Rewinds tape and searches reverse
scene. Decreases s
in Still mode.
STILL/PAUSE
Pauses picture in Playback mode and
frame advance picture in S
SKIP* _/SEARCH
Ski_
Locates end
Sets to DVD mode.
See next page.
DSS/CABLE
Sets the remote to control some
basic DSS or Cable box
functions.
FM
_ Receives PM radio signal,
_ VOLUME UP/DOWN
Adjusts volume.
\
Displays the last channel you
were watching,
TRACKING UP/DOWN
Reduces picture noise during
Playback and Slow Motion,
ADD/DELETE/CLEAR
Adds or deletes achannel.
Cancels an item on the screen.
Selects a different subtitle
language.
DISPLAY/ENTER
Displays the TV status and
clock, In DVD mode, displays
disc and unit information, in
DSS or CABLE mode, it may be
necessary after channel
selection.
MENU
Displays DVD menu.
PROGRAM
Displays SET PROGRAM
screen, You can set Timer
and forward
visual search, increases slow
motion s
Enlarges specific portions of
DVD picture, Resets to "0:00:00"
at desired portion of tape.
PLAY
Begins playback.
SKIP+ I_/CM SKIP/ZERO SEARCH J
Skips one chapter or track, Goes to next
screen, In Step mode, goes to the counter
"0:00:00," In Play mode, skips over 1 to 3
minutes of tape.
_ Records a program.
RETURN/SPEED
Returns to DVD menu screen.
Selects recording speed of tape.
STOP
Stops recording or playback.
LIGHT button:
When LIGHT is pressed, (DVD, VI_R,DSS/CABLE, CH UP/DOWN, VOL UP/DOWN) buttons will light for
5 seconds for easy button location.
If no button is pressed in 5 seconds, the light goes out to conserve the batteries.
EJECT/OPEN/CLOSE button:
When this button is pressed in TV-VCR mode, the tape is ejected.
This button is inoperative if pressed during recording.
If pressed in DVD mode, the disc tray opens or closes.
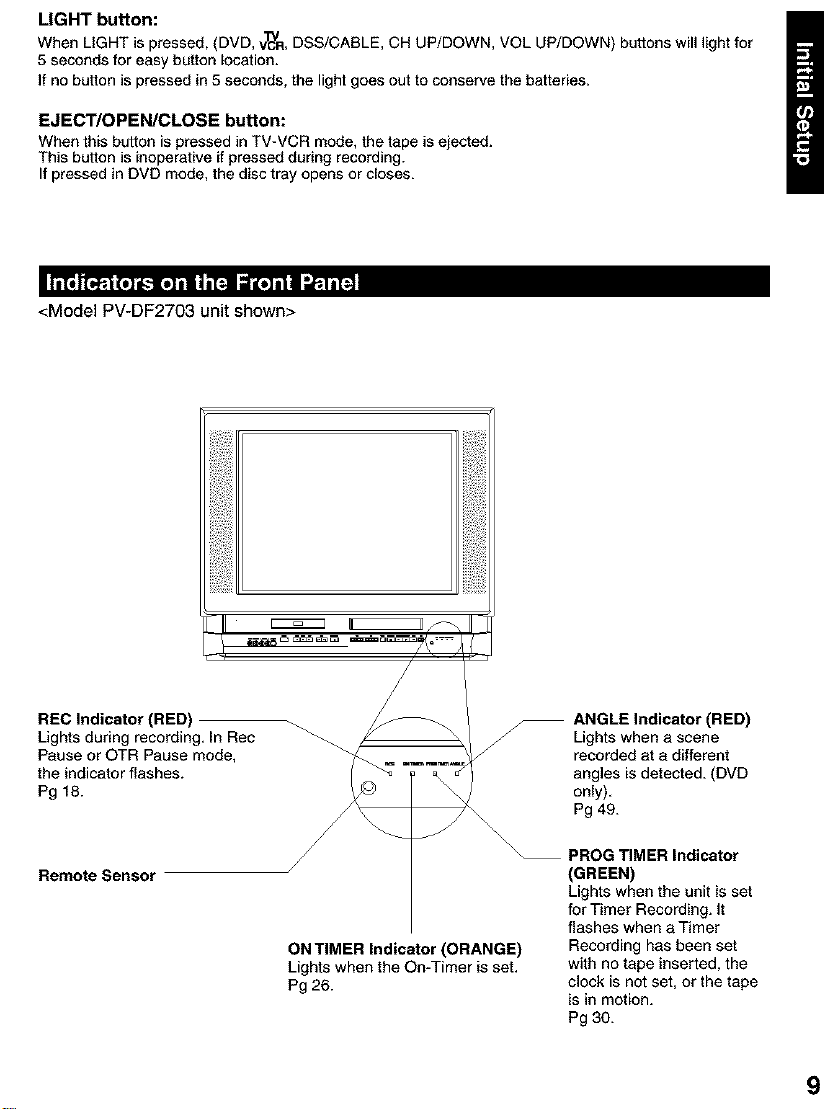
<Model PV-DF2703 unit shown>
II IIi
REC Indicator (RED) _ / _ / /_ ANGLE Indicator (RED)
Lights during recording. In Rec _ _/ f Lights when a scene
Pause or OTR Pause mode, _/_ ..... _/ recorded at a different
the indicator flashes. [ _ _ _ J angles is detected. (DVD
Pg18 _ /7_ on,y).
\
Remote Sensor (GREEN)
ON TIMER Indicator (ORANGE) Recording has been set
Lights when the On-Timer is set. with no tape inserted, the
Pg 26. clock is not set, or the tape
Pg 49.
PROG TIMER Indicator
Lights when the unit is set
for Timer Recording. It
flashes when a Timer
is in motion.
Pg 30.
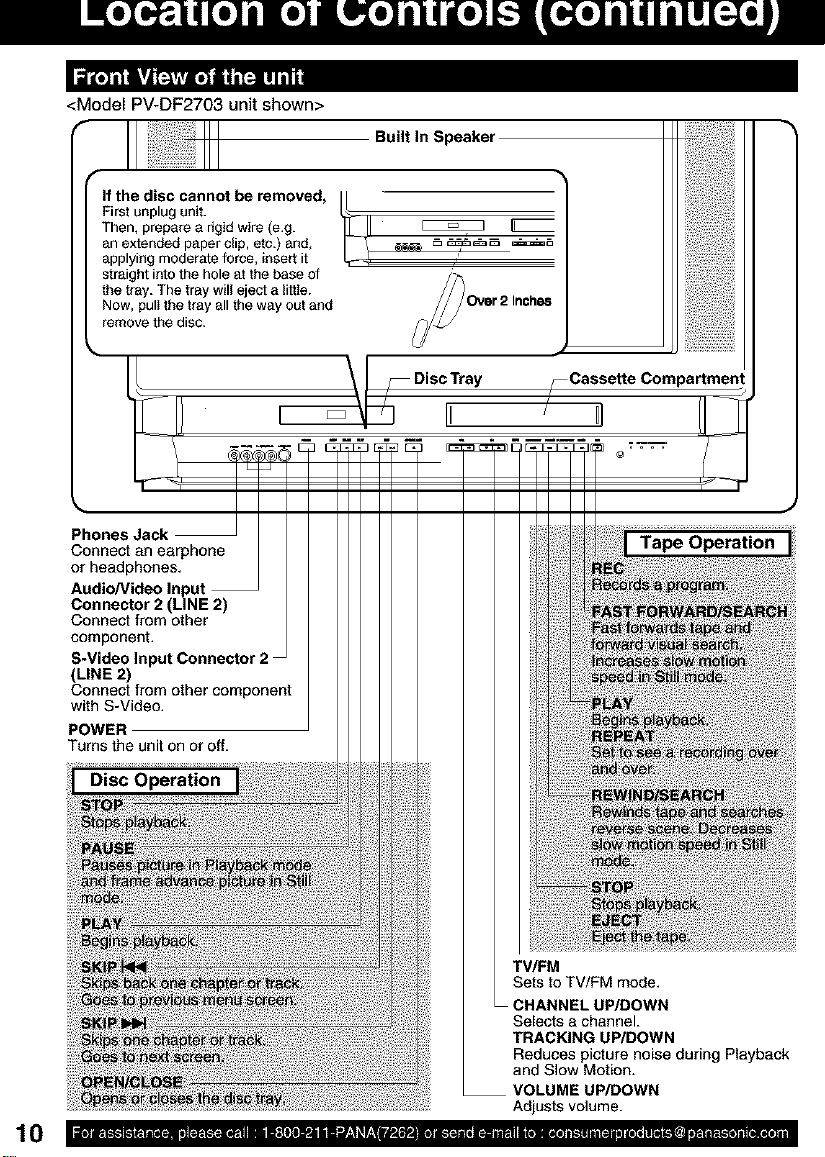
<Model PV-DF2703 unit shown>
t_
If the disc cannot be removed,
Firstunplug unit.
Then, prepare a rigid wire (e.g.
anextended paperclip, etc.) and,
applying moderate force, insert it
straight into the hole at the base of
the tray. The tray will eject a little.
Now, pulIthe tray all the way out and
remove the disc.
Built In Speaker
F Disc Tray
li
_Cassette Compartmen
TV/FM
Sets to TV/FM mode.
CHANNEL UP/DOWN
Selects a channel.
TRACKING UP/DOWN
Reduces picture noise during Playback
and Slow Motion.
VOLUME UP/DOWN
Adjusts volume.
"-. T - • " _t'_t[i
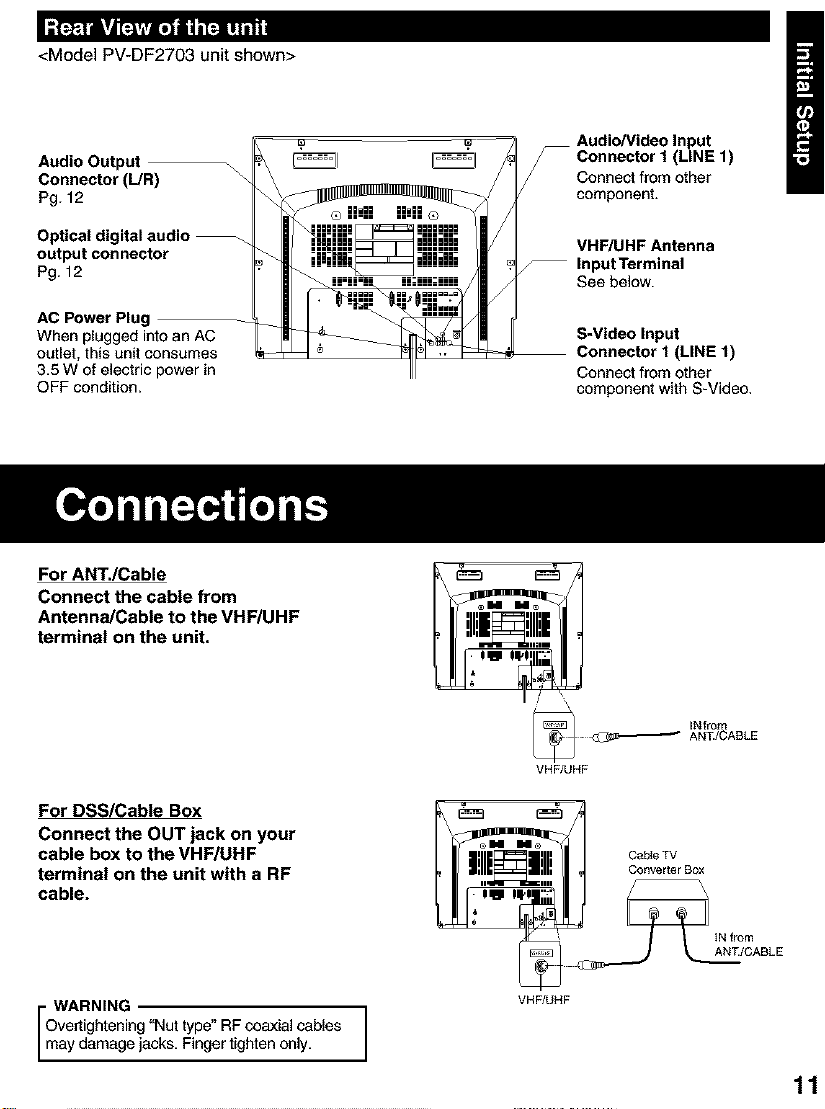
<Model PV-DF2703 unit shown>
Audio Output \\
Connector (L/R)
Pg. 12
Audio/Video Input
Y Connector I (LINE 1)
Connect from other
component.
Optical digital audio --
output connector
Pg. 12
AC Power Plug
When plugged into an AC
outlet, this unit consumes
3,5 W of electric power in
OFF condition.
For ANT./Cable
Connect the cable from
Antenna/Cable to the VHF/UHF
terminal on the unit.
For DSS/Cabte Box
Connect the OUT jack on your
cable box to the VHF/UHF
terminal on the unit with a RF
cable.
VHF/UHF Antenna
-- Input Terminal
See below.
S-Video Input
Connector 1 (LINE 1)
Connect from other
component with S-Video,
VHF/UHF
IN from
ANd/CABLE
Overtightening "Nut type" RF coaxial cables
i WARNING j
may damage jacks. Finger tighten only.
VHFIUHF
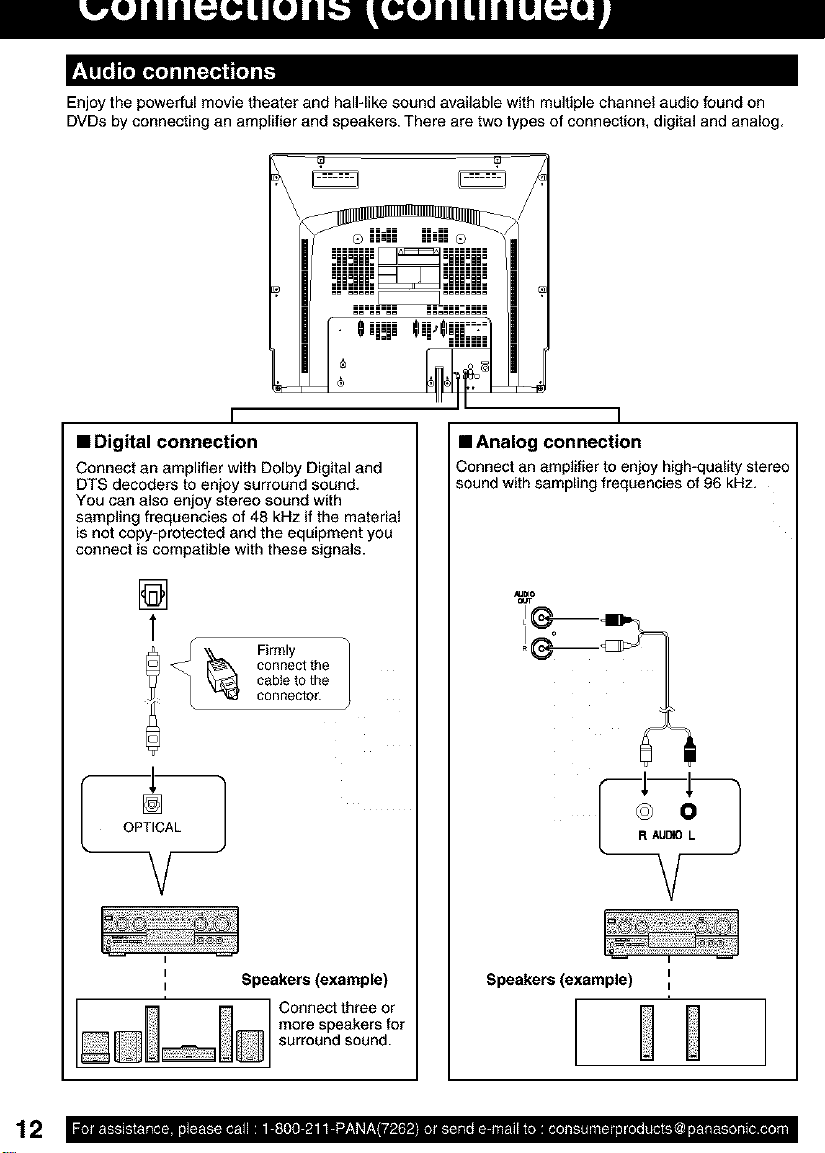
Enjoy the powerful movie theater and hall-like sound available with multiple channel audio found on
DVDs by connecting an amplifier and speakers. There are two types of connection, digital and analog,
I
• Digital connection
Connect an amplifier with Dolby Digital and
DTS decoders to enjoy surround sound,
You can also enjoy stereo sound with
sampling frequencies of 48 kHz if the material
is not copy-protected and the equipment you
connect is compatible with these signals.
[]
T
connectthe
cableto the
Firmly
connector.
OPTICAL
V
i Speakers (example)
i
Connect three or
more speakers for
surround sound.
I
• Analog connection
Connect an amplifier to enjoy high-quality stereo
sound with sampling frequencies of 96 kHz,
Speakers (example) i
I
DD
_Check List
[] Turn down the volume, then turn this unit, as well
as other equipment to be connected, off before
proceeding with connection.
[] Do not block ventilation holes of any equipment
and arrange them so that air can circulate freely.
[] Read through the instructions before connecting
other equipment.
[] Ensure that you observe the color coding when
connecting audio and video cables.
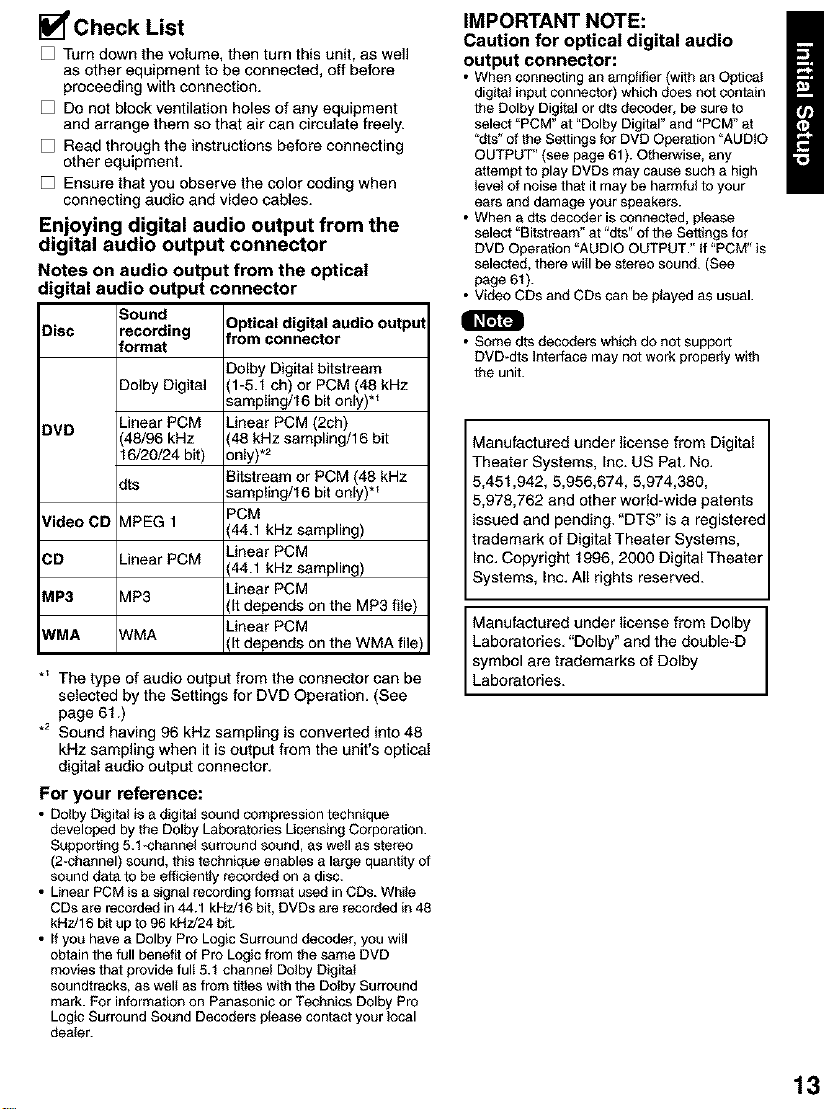
Enjoying digital audio output from the
digital audio output connector
Notes on audio output from the optical
digital audio output connector
Disc recording from connector
DVD Linear PCM Linear PCM (2ch)
Video CD V1PEG1 (44.1 kHz sampling)
CD Linear PCM (44.1 kHz sampling)
MP3 V1P3 (It depends on the MP3 file)
WMA A/MA (It depends on the WMA file)
*_ The type of audio output from the connector can be
selected by the Settings for DVD Operation. (See
page 61.)
.2 Sound having 96 kHz sampling is converted into 48
kHz sampling when it is output from the unit's optical
digital audio output connector.
For your reference:
• Dolby Digital is a digital sound compression technique
developed by the Dolby Laboratories Licensing Corporation.
Supporting 5.t -channel surround sound, as well as stereo
(2_channel) sound, this technique enables a large quantity of
sound data to be efficiently recorded on a disc.
• Linear PCM is a signal recording format used in CDs. While
CDs are recorded in 44.1 kHz/t 6 bit, DVDs are recorded in 48
kHz/16 bit up to 96 kHz/24 bit.
• If you have a Dolby Pro Logic Surround decoder, you will
obtain the full benefit of Pro Logic from the same DVD
movies that provide full 5.1 channel Dolby Digital
soundtracks, as well as from titles with the Dolby Surround
mark. For information on Panasonic or Technics Dolby Pro
Logic Surround Sound Decoders please contact your local
dealer.
_ound Optical digital audio output
Iormat
Dolby Digital bitstraam
_)olby Digital (1-5.1 ch) or PCM (45 kHz
sampling/16 bit only) *_
_,8/96kHz 48 kHz sampling/16 bit
16/20/24 bit) only).2
:its sampling/16 bit only) *_
Bitstraam or PCM (48 kHz
PCM
Linear PCM
Linear PCM
Linear PCM
IMPORTANT NOTE:
Caution for optical digital audio
output connector:
• When connecting an amplifier (with an Optical
digital input connector) which does not contain
the Dolby Digital or dts decoder, be sure to
select "PCM" at "Dolby Digital" and "PCM" at
'dts" o1the Settings for DVD Operation "AUDIO
OUTPUT" (see page 61 ). Otherwise, any
attempt to play DVDs may cause such a high
level 01 noise that it may be harmful to your
ears and damage your speakers.
• When a dts decoder is connected, please
select "Bitstream" at "dts" of the Settings for
DVD Operation "AUDIO OUTPUT." tf "PCM" is
selected, there will be stereo sound. (See
page 61 ).
• Video CDS and CDs can be played as usual.
• Some dts decoders which do not support
DVD-dts Interface may not work properly with
the unit.
Manufactured under license from Digital
Theater Systems, Inc. US Pat. No.
5,451,942, 5,956,674, 5,974,380,
5,978,762 and other world-wide patents
issued and pending. "DTS" is a registered
trademark of Digital Theater Systems,
Inc. Copyright 1996, 2000 Digital Theater
Systems, Inc. All rights reserved.
Manufactured under license from Dolby
Laboratories. "Dolby" and the double-D
symbol are trademarks of Dolby
Laboratories.
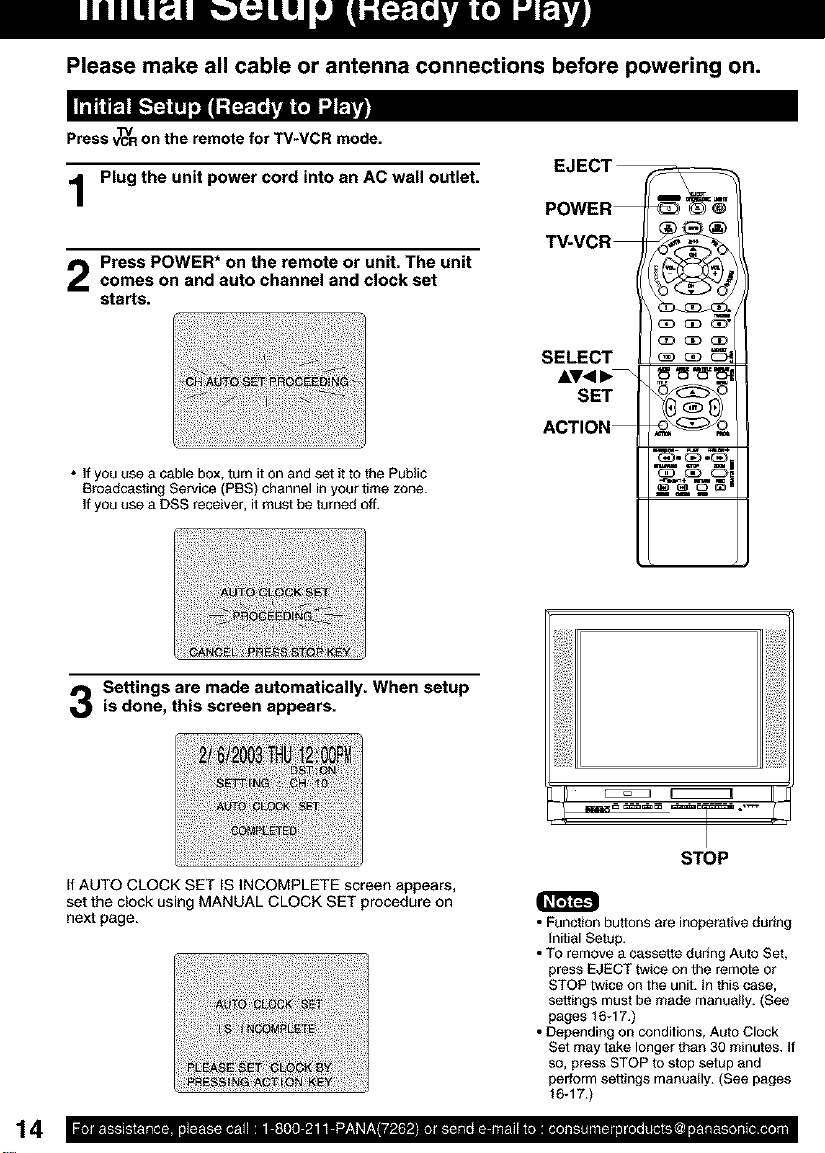
Please make all cable or antenna connections before powering on.
Press V_'Ron the remote for TV*VCR mode.
EJECT
Plug the unit power cord into an AC wall outlet.
Press POWER* on the remote or unit. The unitcomes on and auto channel and clock set
starts.
POWER
T_VCR
SELECT
cD_
cD_
• if you use a cable box, turn it on and set it to the Public
Broadcasting Service (PBS) channel in your time zone.
If you use a DSS receiver, it must be turned off.
Settings are made automatically. When setup
is done, this screen appears,
If AUTO CLOCK SET IS INCOMPLETE screen appears,
set the clock using MANUAL CLOCK SET procedure on
next page.
SET
ii.q till i,ii
ACTION
m _ m I
Ill
STOP
• Function buttons are inoperative dudng
Initial Setup.
• TO remove a cassette dudng Auto Set,
press EJECT twice on the remote or
STOP twice on the unit. In this case,
settings must be made manually. (See
pages 16-17.)
• Depending on conditions, Auto Clock
Set may take longer than 30 minutes, if
so, press STOP to stop setup and
perform settings manually. (See pages
16q7.)
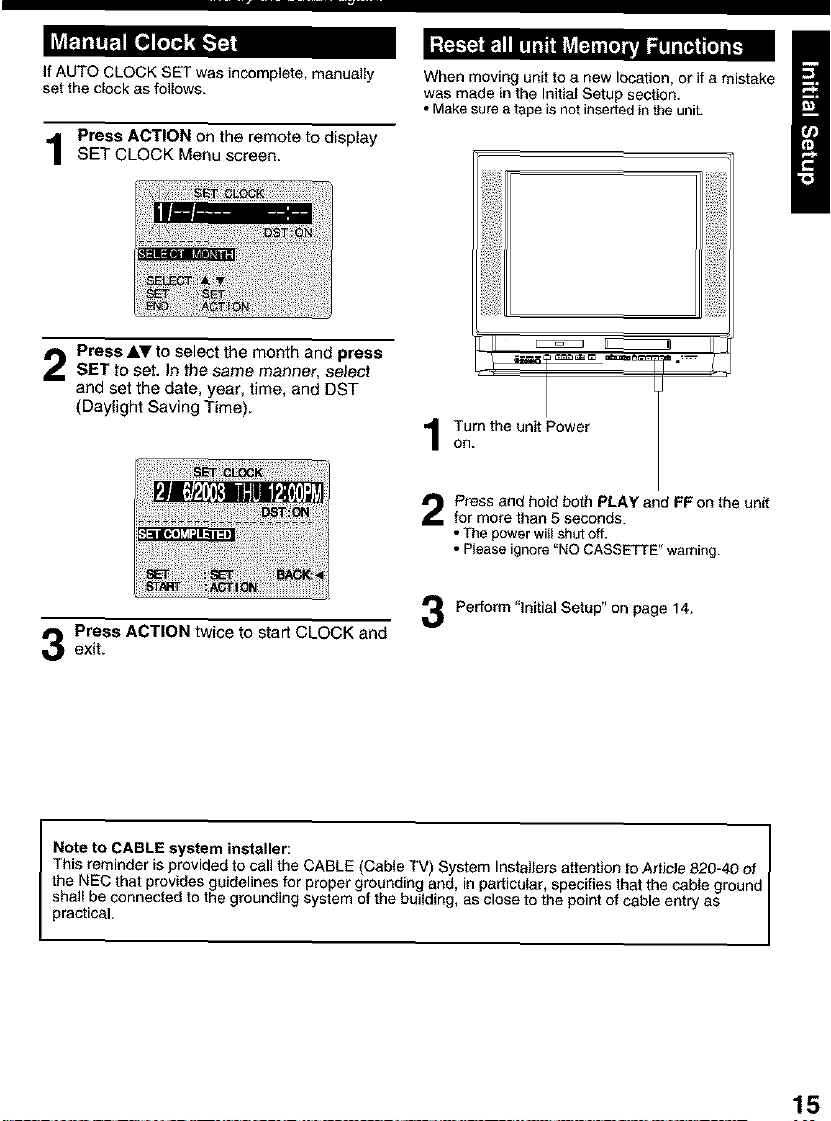
If AUTO CLOCK SET was incomplete, manually When moving unit to a new location, or if a mistake
set the clock as follows, was made in the Initial Setup section.
Press ACTION on the remote to display
SET CLOCK Menu screen
• Make sure a tape is not inserted in the unit.
Press AV to select the month and press
SET to set. In the same manner, select
and set the date, year, time, and DST
]-II _ _E:_:_:::::_ II
El
(Daylight Saving Time)
on.
Turn the unit Power
Press and herd both PLAY and FP on the unit
for more than 5 seconds.
• The power will shut off.
• Please ignore "NO CASSETTE" warning.
Pertorm"lnitialSetup"onpage14.
Press ACTION twice to start CLOCK andexit.
This reminder is provided to call the CABLE (Cable TV) System Installers attention to Article 820-40 of
the NEC that provides guidelines for proper grounding and, in particular, specifies that the cable ground I
shall be connected to the grounding system of the building as close to the point of cable entry as
I Note to CABLE system installer: I
practical.
15
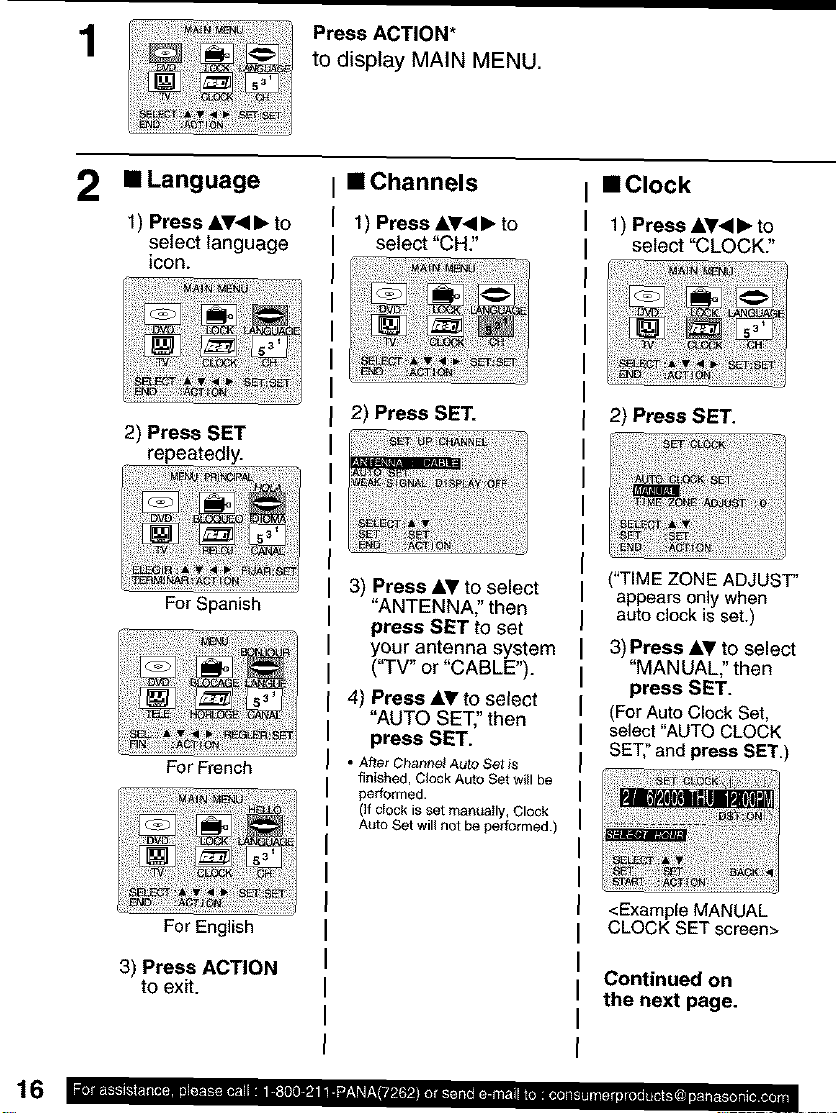
1
Press ACTION*
to display MAIN MENU.
2 • Language
1) Press &T< I_ to
select language
icon.
2) Press SET
repeatedly.
For Spanish
For French
• Channels
1) Press &Y<I I_ to
select "CH."
2) Press SET.
3) Press AY to select
"ANTENNA:' then
press SET to set
your antenna system
("TV" or "CABLE").
4) Press &_r to select
"AUTO SET,"then
press SET.
• After Channe_ Auto Set is
finished, Clock Auto Set will be
performed.
(li dock isset manea_ly, Clock
Auto Set will not be performed,)
• Clock
1) Press AT<I=, to
select "CLOCK:'
2) Press SET.
("TIME ZONE ADJUST"
appears only when
auto clock is set.)
3) Press AT to select
"MANUAL" then
press SET.
(ForAuto Clock Set,
select"AUTO CLOCK
SET:'and press SET.)
For English
3) Press ACTION
to exit.
<Example MANUAL
CLOCK SET screen>
Continued on
the next page.
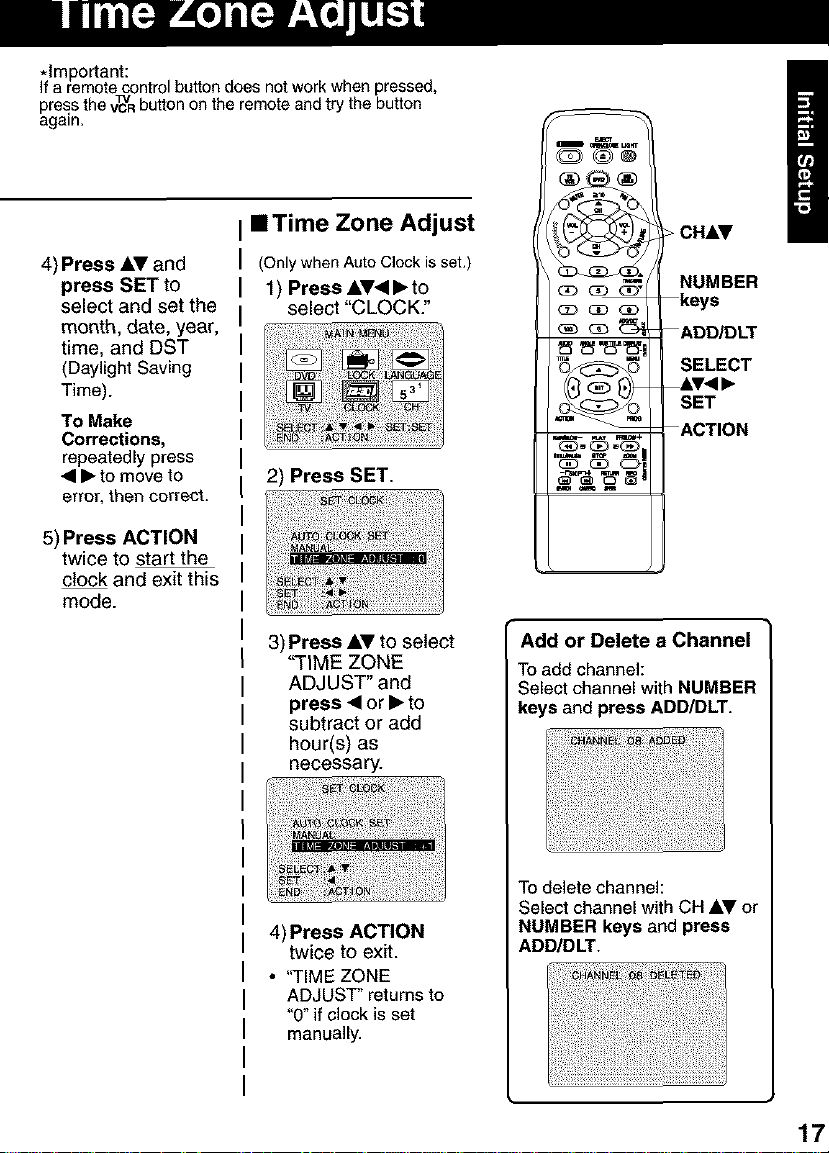
*Important:
If a remote control button does not work when pressed,
press the v_'abutton on the remote and try the button
again.
4) Press AV and
press SET to
select and set the
month, date, year,
time, and DST
(Daylight Saving
Time).
To Make
Corrections,
repeatedly press
• • to move to
error, then correct.
5) Press ACTION
twice to start the
clock and exit this
mode.
• Time Zone Adjust
(Only when Auto Clock is set.)
1) Press AV• • to
select "CLOCK."
2) Press SET.
3) Press AV to select
"TIME ZONE
ADJUST" and
press • or • to
subtract or add
hour(s) as
necessary.
CHAr
(]o _ NUMBER
<:D c]o aD keys
_ _,, --ADD/DLT
o _ © SELECT
SET
&V<I •
ACTION
_.= ,=m m
Add or Delete a Channel
To add channel:
Select channel with NUMBER
keys and press ADD/DLT.
4) Press ACTION
twice to exit.
• "TIME ZONE
ADJUST" returns to
"0"if clock is set
manually.
To delete channel:
Select channel with CH AV or
NUMBER keys and press
ADD/DLT.
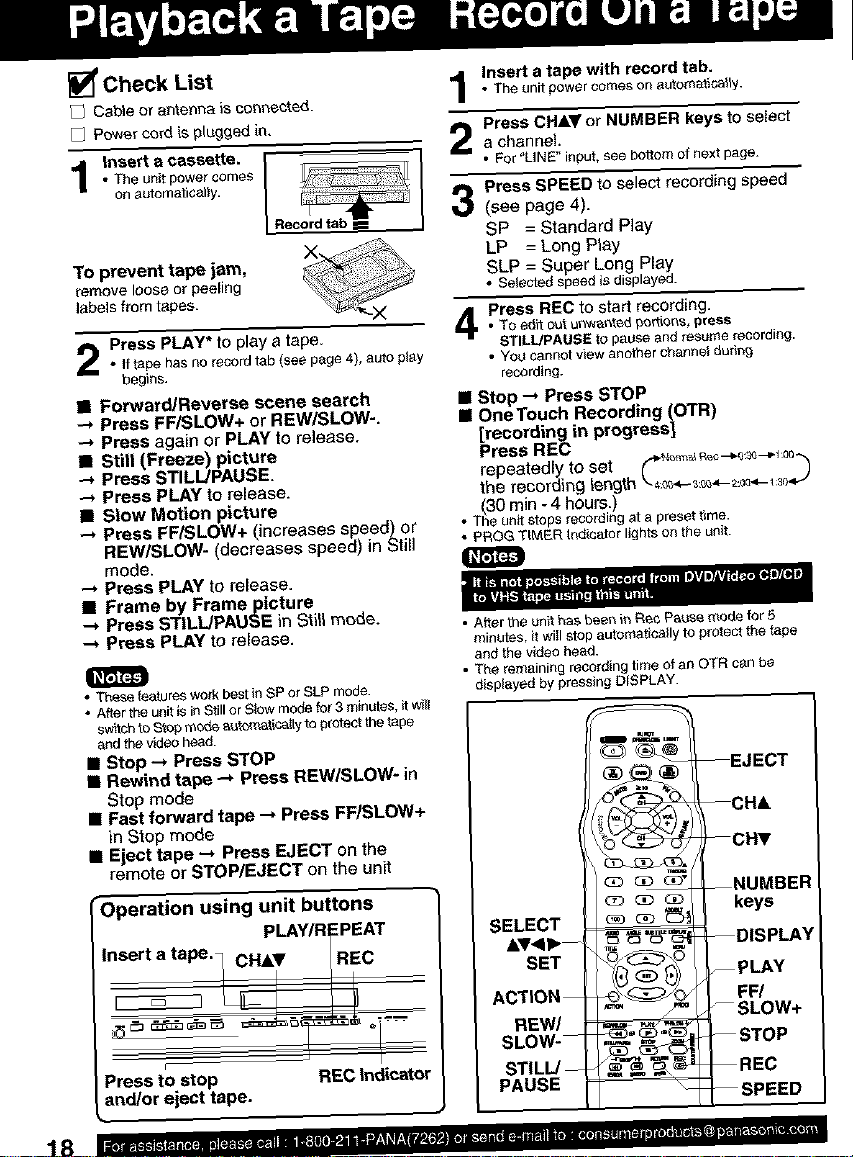
Check List
Cable or antenna i_ co_cted.
P_wercord is ptugged in.
• The unitpowercomes
on sutomaticatiy.
1,nso acos.t 1
To prevent tape jam,
remove loose or peeling
labels from tapes.
Press PLAY* to play a tape
• ff tape hasno record tab (see page 4), auto play
begins.
• Forward/Reveree scene search
Press FFiSLOW+ or REW/SLOW-.
Press again or PLAY to release.
• Still (Freeze) picture
--_PressSTILL/PAUSE.
Press PLAY to release.
• Slow Motion picture
--_ Press FFiSLOW+ (increases speed) or
REW/SLOW= (decreases speed) in Still
mode.
Press PLAY to release.
II Frame by Frameptcture
PressSTILL/PAUSE in S_il_mode.
Press PLAY to reJease.
• Tr_se features work best in SP or SLP mode.
• After the unit is in Still or Slow mode for 3 minutes, _ w_|l
switch to S'_O_mo_ automat_ca_ty to p_otact the tape
and the video head.
• Stop _ Press STOP
• Rewind tape --, Press REW/SLOW* in
Step mode
ill Fast forward tape --_ Press FF/SLOW+
in Slop mode
I Eject tape -_ Press EJECT on the
remote or STOP/EJECT on the unit
r
Operation using unit buttons
Insert a tape. CHA_' REC
r
Press to stop
and/or eject tape.
R_
-'PEAT
REC Indicstor
Insert a tape with record tab,
• The unit power comeson _utomaftcal_y.
Press CHAr or NUMBER keys to select
a channel.
• For "LINE" input, see bottomof next page.
Press SPEED to select recording speed
(see page 4).
SP = Standard Play
LP = Long Play
SLP = Super Long Play
Selected speed is displayed.
Press REC to start recording.
TOedit outu_we_ted portions, pre_s
STILL/PAUSE to pause and resume recording.
• YO_car_notview another channel du_g
recording.
• Stop "-_ Press STOP
II OneTouch Recording (OTR)
[recording in progress]
Press REC
repeatedly to set _..,_1 _:_ _
the recording length _:__._:_._-_:_e___.J
• (30 rain - 4 hours.)
The unit stops recording at a preset time.
• PROG TIMER t_dicator lights on the unit.
O
• After the _n_ has been in _ec Pau_ mode for 5
minutes, it wiII stop automatic_tiy to pr_t the tape
arid the video head.
• T_e remaining recording time of an OTF{ cen be
displayed by pressing DISPLAY.
--EJECT
--CH&
--CI'_
--NUMBER
SELECT
SET
ACTION --
REW/
SLOW-
STILL/--
PAUSE
keys
--DISPLAY
, PLAY
FF/
SLOW+
-- STOP
-- REC
--SPEED
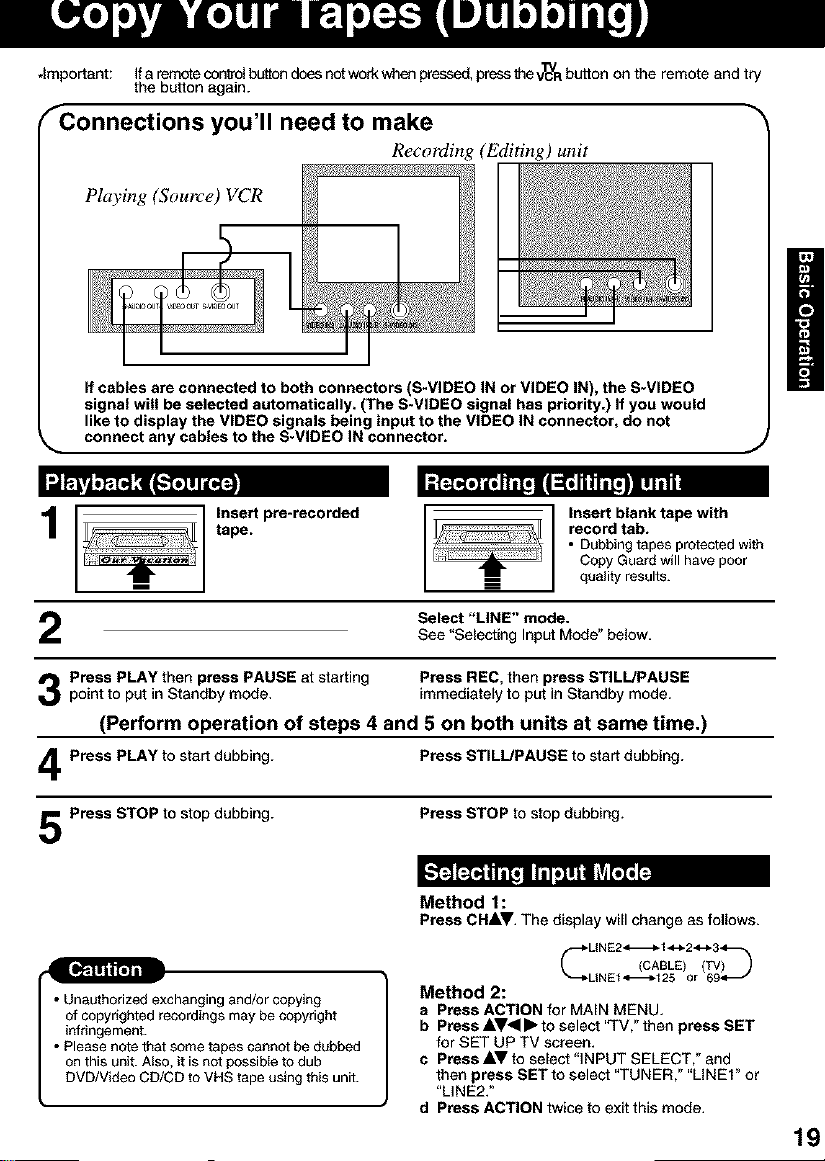
.Important: Ifa remote con_'olbutton does notworkwhen pressed,pressthevl_R button on the remote and try
the button again.
FConnections you'll need to make _"
Recording (Editing) unit
Playing (Source) VCR
If cables are connected to both connectors (S-VIDEO IN or VIDEO IN), the S-VIDEO
signal will be selected automatically. (The S-VIDEO signal has priority.) If you would
like to display the VIDEO signals being input to the VIDEO IN connector, do not
connect any cables to the S-VIDEO IN connector.
L,]'m'a
1
Insert pre*recorded
tape.
Select "LINE" mode.
See "Selecting Input Mode" below.
Insert blank tape with
record tab.
• Dubbing tapes protected with
Copy Guard will have poor
quality results.
J
Press PLAY then press PAUSE at starting Press REC, then press STILL/PAUSEpoint to put in Standby mode. immediately to put in Standby mode.
(Perform operation of steps 4 and 5 on both units at same time.)
Press PLAY to start dubbing. Press STILL!PAUSE to start dubbing.
Press STOP to stop dubbing. Press STOP to stop dubbing.
Method 1:
PressCHAr. The displaywill change as follows.
6" ,oAoLE>
"--_-LINEl'_--_-125 or 69_--"
• Unauthorized exchanging and/or copying
of copyrighted recordings may be copyright
infringement.
• Please note that some tapes cannot be dubbed
on this unit. Also, it is not possible to dub
DVD/Video CD/CD to VHS tape using this unit.
Method 2:
a Press ACTION for MAIN MENU.
b Press AV_I • to select 'q"V," then press SET
for SET UP TV screen.
e Press AV to select "INPUT SELECT," and
then press SET to select "TUNER," "LINEI" or
"LINE2."
d Press ACTION twice to exit this mode.
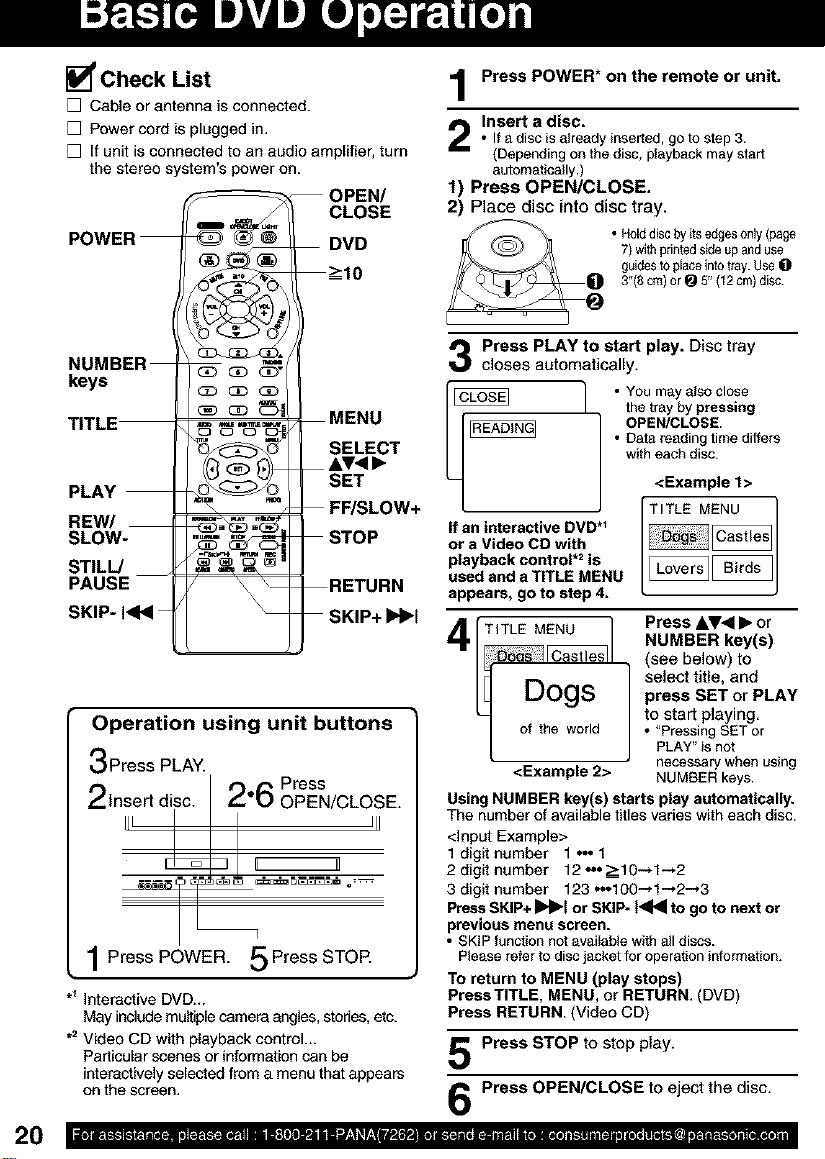
[] Check List
[] Cable or antenna is connected.
[] Power cord is plugged in.
[] It unit is connected to an audio amplifier, turn
the stereo system's power on.
OPEN/
CLOSE
POWER
DVD
_-->10
Press POWER* on the remote or unit,
Insert a disc.
• If a disc is already inserted, goto step 3.
(Depending on the disc, playback may start
automatically.)
1) Press OPEN/CLOSE.
2) Place disc into disc tray.
• Holddisc by its edgesonly (page
7) withprinted skte up anduse
guides to placeinto tray. Use 0
3"(8 cm) or _ 5" (12 cm) disc.
NUMBER
keys
TITLE
_ QD (3D
DC) OO
MENU
SELECT
AT<•
PLAY
REW/
SLOW-
SET
FF/SLOW+
STOP
STILL/
PAUSE
SKIP- I_lql
RETURN
SKIP+IH_I
Operation using unit buttons
Press PLAY.
Insert disc. I foo OPEN/CLOSE.
III --_- -1 III
_ r_ Press
q
1Press POWER. 5Press STOP.
*_Interactive DVD_.
May include multiple camera angles, studes, etc.
.2 Video CD with playback control...
Particular scenes or information can be
interactively selected from a menu that appears
on the screen.
Press PLAY to start play. Disc tray
closes automatically.
I • You may also close
the tray by pressing
• Data reading time differs
with each disc.
<Example 1>
OPEN/CLOSE.
If an interactive DVD *_
or a Video CD with
playback control .2 is
used and a TITLE MENU
appears, go to step 4.
TITLE MENU
_1
Dogs
of the world
<Example 2>
Using NUMBER key(s) starts play automatically.
The number of available titles varies with each disc.
<input Example>
1 digit number 1 o.. 1
2 digit number 12 ,..=>-10--,1-.2
3 digit number 123 ._100-* 1-,2-.3
Press SKIP+ II_lbl or SKIP- t<141to go to next or
previous menu screen.
• SKIP function not available with aJldiscs.
Please refer to disc jacketfor operaSoninformation.
TO return to MENU (play stops)
Press TITLE, MENU, or RETURN. (DVD)
Press RETURN. (Video CD)
'D_ _lEcNaUt,esl
ILove;sllBirds I
Press &V< • or
NUMBER key(s)
(see below) to
press SET or PLAY
to start playing
• "Pressing SETor
J elect title, and
PLAY"is not
necessary when using
NUMBER keys.
Press STOP to stop play.
Press OPEN/CLOSE to eject the disc.
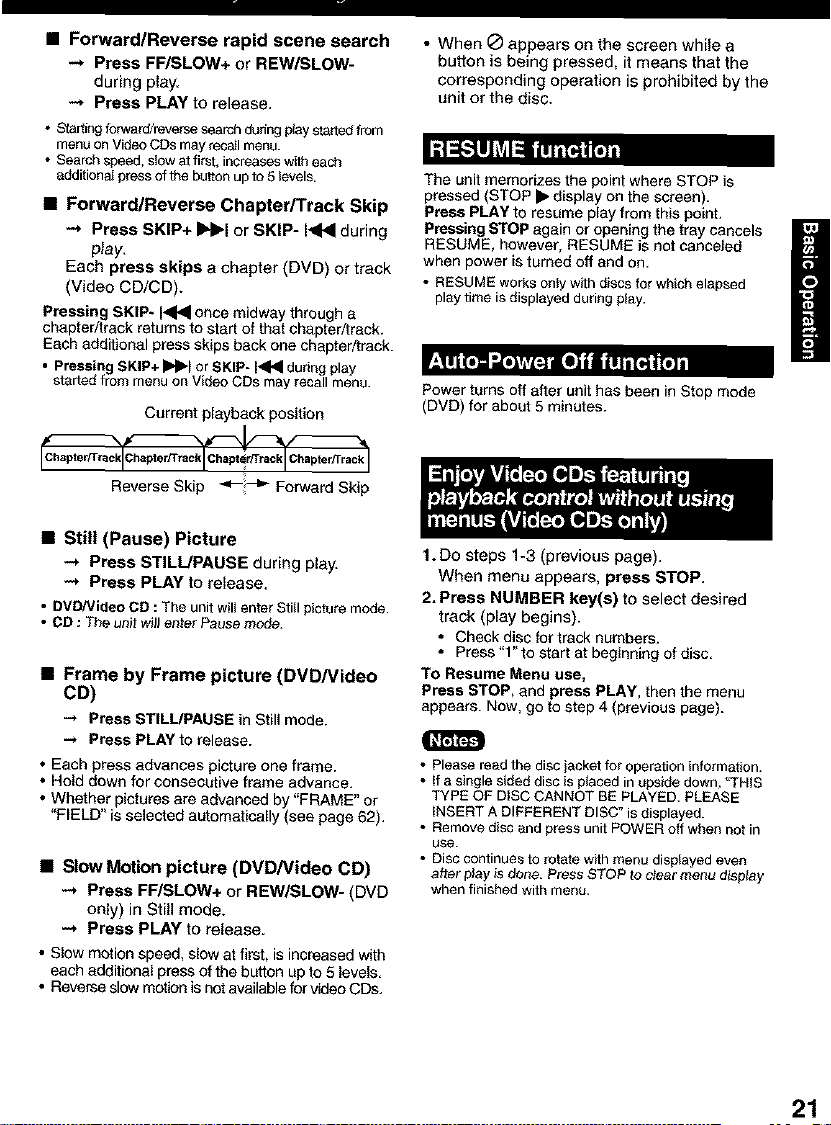
• Forward/Reverse rapid scene search
-.* Press FF/SLOW+ or REW/SLOW-
during play.
-* Press PLAY to release.
• Staffing forward/reverse search dudng play started from
menu on Video CDs may recall menu.
• Search speed, slow at first, increases with each
additional press of _e button up to 5 levels.
• Forward/Reverse Chapter/Track Skip
-.* Press SKIP+ ••1 or SKIP- I_ql during
p_ay,
Each press skips a chapter (DVD) or track
(Video CD/CD).
Pressing SKIP* I_1_ once midway through a
chapter/track returns to start of that chapter/track.
Each additional press skips back one chapter/track.
• Pressing SKIP+ 11_1_1or SKIP- I_1_1during play
started from menu on Video CDs may recall menu.
Current playback position
I I I I
Reverse Skip _---_ Forward Skip
• When _ appears on the screen while a
button is being pressed, it means that the
corresponding operation is prohibited by the
unit or the disc.
Id_"tUJL_L_
The unit memorizes the point where STOP is
pressed (STOP • display on the screen).
Press PLAY to resume play from this point.
Pressing STOP again or opening the tray cancels
RESUME, however, RESUME is not canceled
when power is turned off and on.
• RESUME works onlywith dlsos for which elapsed
play time is displayed during play.
Power turns off after unit has been in Stop mode
(DVD) for about 5 minutes.
H
• Still (Pause) Picture
-.* Press STILL/PAUSE during play.
-* Press PLAY to release.
• DVD/Video CD : The unit will enter Still picture mode.
• CD : The unit will enter Pause mode.
• Frame by Frame picture (DVD/Video
CD)
-* Press STILL/PAUSE in Still mode.
Press PLAY to release.
• Each press advances picture one frame.
• Hold down for consecutive frame advance.
• Whether pictures are advanced by "FRAME" or
"FIELD" is selected aL_omatically (see page 62).
• Slow Motion picture (DVD/Video CD)
-.* Press FF/SLOW+ or REW/SLOW- (DVD
only) in Still mode.
-* Press PLAY to release
• Slow motion speed, slow at first, is increased with
each additional press of the button up to 5 levels.
• Reverse slow motion is not available for video CDs.
1. DO steps 1-3 (previous page).
When menu appears, press STOP.
2. Press NUMBER key(s) to select desired
track (play begins).
• Check disc for track numbers.
• Press"l"tostartatbeginningofdisc.
TO Resume Menu use,
Press STOP, and press PLAY, then the menu
appears. Now, go to step 4 (previous page).
• Please read the disc jacket for operation information.
• tf a single sided disc is placed in upside down, 'q_NIS
TYPE OF DiSC CANNOT BE PLAYED. PLEASE
INSERT A DIFFERENT DISC" is displayed.
• Remove disc and press unit POWER off when not in
use.
• Disc continues to rotate with menu displayed even
after p_ayis done. Press STOP to clear menu display
when finished with menu.
21
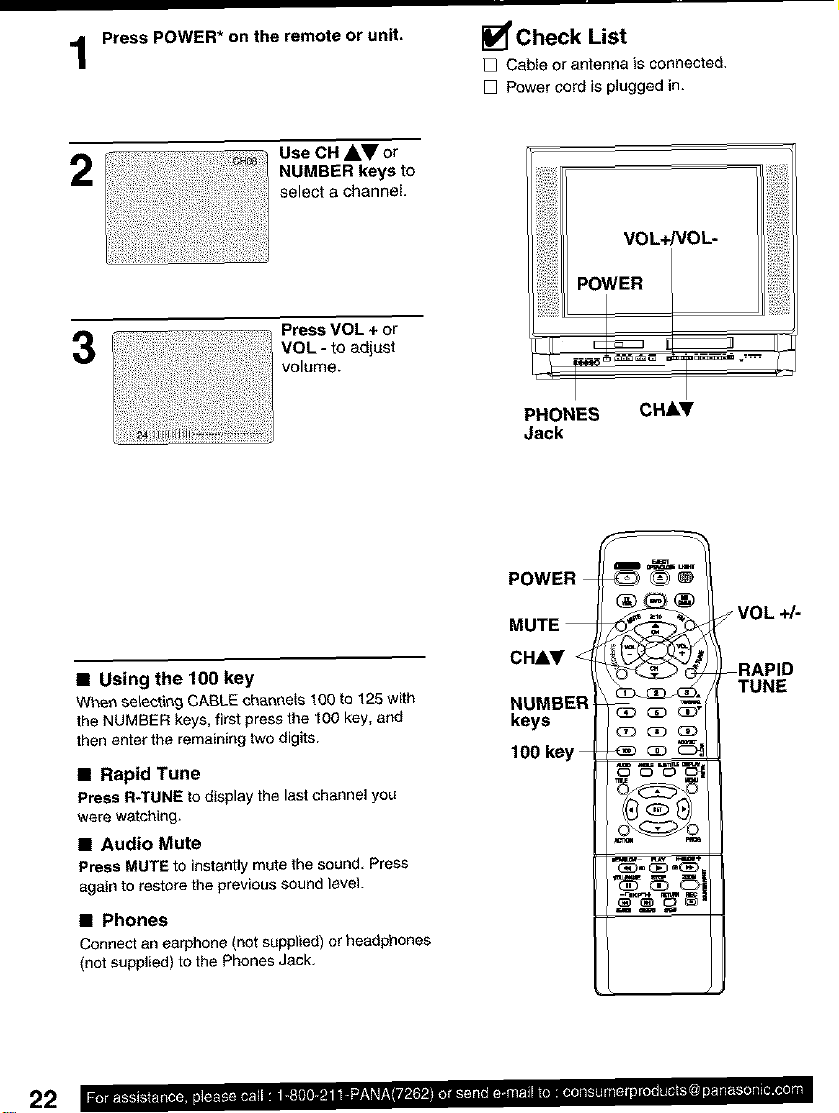
Press POWER* on the remote or unit.
Check List
[] Cabte or antenna is connected.
[] Power cord is plugged in.
2
3
• Using the 100 key
Wb,en selecting CABLE channels 100 to 125 with
the NUMBER keys, first press the t00 key, and
then enter the remaining two digits.
• Rapid Tune
Press R-TUNE to display the last channel you
were watching.
• Audio Mute
Press MUTE to instantly mute the sound. Press
again to restore the previous sound level.
• Phones
ConneCt an earphone (not supplied) or headphones
(not supplied) to the Phones Jack.
Use CH AV or
NUMBER keys to
select a channel.
Press VOL + or
VOL - to adjust
volume.
VOL* OL- i
PHONES CHk'
Jack
POWER
MUTE
CH&y
NUMBER
keys
100 key
-RAPID
VOL +/-
TUNE
22
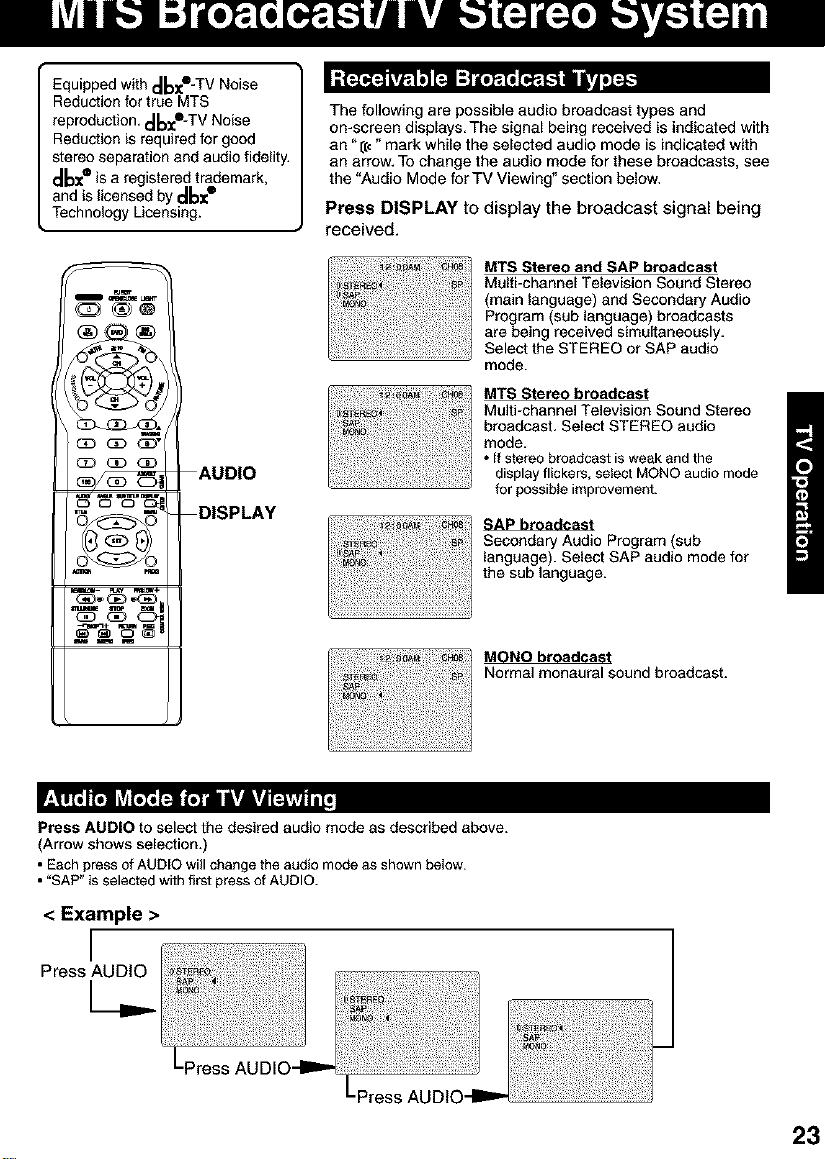
Equipped with _-TV Noise
Reduction for true MTS
reproduction, t,I_-TV Noise
Reduction is required for good
stereo separation and audio fidelity.
t_ is a registered trademark,
and is licensed by _
Technology Licensing.
m_
oo_
_CD_
CD QD QD
AUDIO
_OO_ DISPLAY
_ _÷
The following are possible audio broadcast types and
on-screen displays, The signal being received is indicated with
an "((," mark while the selected audio mode is indicated with
an arrow, To change the audio mode for these broadcasts, see
the "Audio Mode forTV Viewing" section below,
Press DISPLAY to display the broadcast signal being
received.
MTS Stereo and SAP broadcast
Multi-channel Television Sound Stereo
(main language) and Secondary Audio
Program (sub language) broadcasts
are being received simultaneously,
Select the STEREO or SAP audio
mode.
MTS Stereo broadcast
Multi-channel Television Sound Stereo
broadcast, Select STEREO audio
mode.
• (f stereo broadcast isweak and the
display flickers, se)ect MONO audio mode
for possib(e improvement.
SAP broadcast
Secondary Audio Program (sub
language). Select SAP audio mode for
the sub language.
MONO broadcast
Normal monaural sound broadcast.
,(_'I']'U]_',',',',',',',',_JT]T_";_U]"__lkr|r_j
Press AUDIO to select the desired audio mode as described above.
(Arrow shows selection.)
• Each pressof AUDIO will change the audio mode as shown below.
• "SAP" is selected with first pressof AUDIO.
< Example >
Lpress AUDIO--ram,-
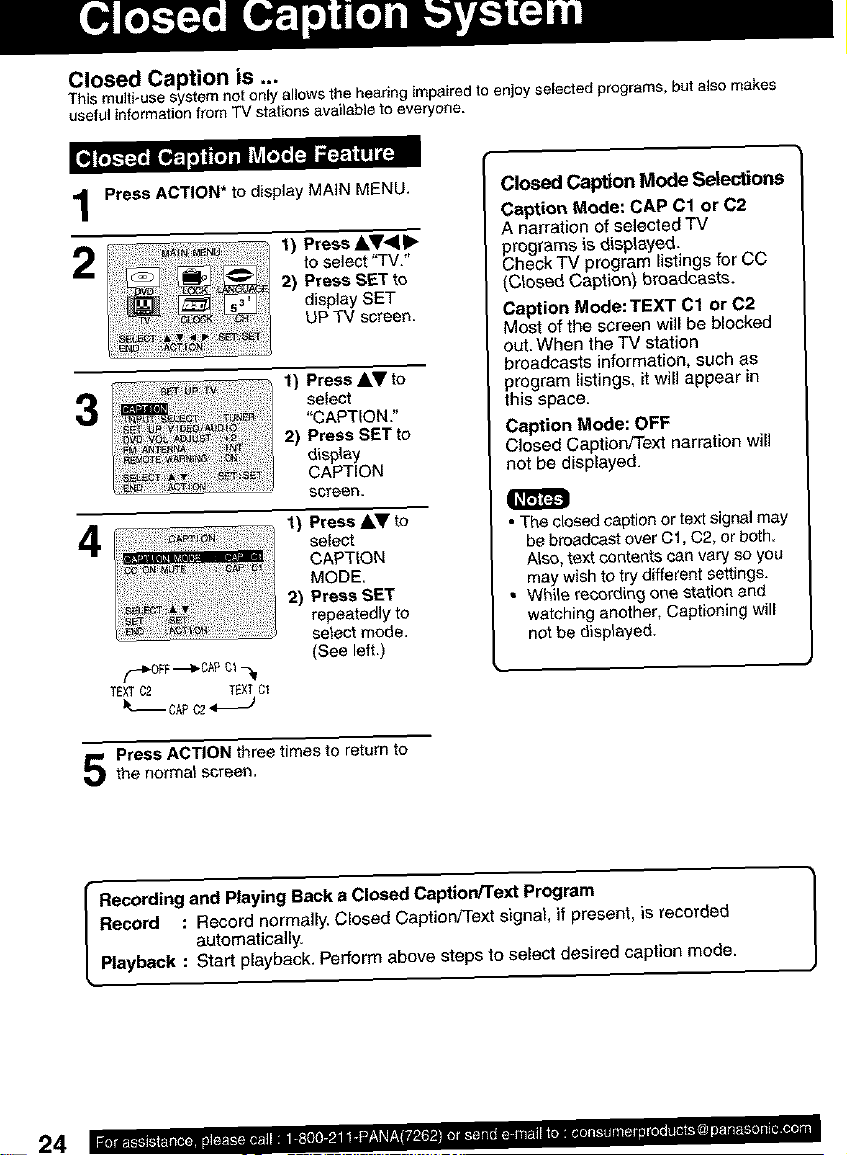
Closed Caption is ...
This multi-use systemnetonlyallowsthe hearingimpairedto enjoyselectedprograms,but alsomakes
usefulinformationfromTV stations availableto everyone.
Press ACTION* to display MAIN MENU.
2
3
4
(._OFF_CAP 01_1
TEXTC2 TEXTC1
_t_._CAPC2.-._)
Press ACTION three times to return to
the normal screen.
1) Press &V<II_
toselect "TV."
2) Press SET to
display SET
UP TV screen.
1) Press AV to
select
"CAPTION."
2) Press SET to
display
CAPTION
screen
Press AY to
1)
select
CAPTION
MODE,
Press SET
2)
repeatedly to
select mode.
(See left.)
Closed Caption Mode Selections
Caption Mode: CAP C1 or C2
A narration of selected TV
_rograms is displayed.
heck TV program listings for CC
(Closed Caption) broadcasts.
Caption Mode: TEXT C1 or 02
Most of the screen will be blocked
out.When the TV station
broadcasts information, such as
program listings, it will appear in
this space.
Caption Mode: OFF
Closed Caption/Text narration wiJJ
not be displayed.
• The closed caption or textsignal may
be broadcast over Cl, C2, or both.
Also, text contents can vary so you
may wish to try different settings.
• Wh{_erecording one station and
watching another, Captioning will
not be displayed.
24
Closed
Record : Record normally. Closed Caption/Text signal, if present, is recorded
Recording and Playing Back a Caption/Text PrOgram
Playback : Start playback. Perform above steps to select desired caption mode.
automatically.
 Loading...