


TV / DVD / VCR Combination
Operating Instructions
Model No. PV-DF2702-K
Initial Setup
Basic Operation
TV Operation
Timer Operation
• Initial Setup and Connection Procedures are on pages 11 to 17.
As an ENERGY STAR Partner, Panasonic has determined that this product or
product model meets the ENERGY STAR guidelines for energy efficiency.
Please read these instructions carefully before attempting to connect,
operate, or adjust this product. Please save this manual.
DF2702-K(P01).p65 2002/03/08, 18:271
Advanced Operation
For Your Information
LSQT0586A

Important Safeguards and Precautions
READ AND RETAIN ALL SAFETY AND
OPERATING INSTRUCTIONS. HEED ALL
WARNINGS IN THE MANUAL AND ON UNIT
INSTALLATION
1 POWER SOURCE CAUTION
Operate only from power source indicated on unit
or in this manual. If uncertain, have your Electric
Utility Service Company or Video Products Dealer
verify your home power source.
2 POWER CORD PLUG
For safety, this unit has a polarized type plug (one
wide blade), or a three-wire grounding type plug.
Always hold the plug firmly and make sure your
hands are dry when plugging in or unplugging the
AC power cord. Regularly remove dust, dirt, etc.
on the plug.
POLARIZED PLUG CAUTION:
The plug fits into outlet only one way. If it cannot be
fully inserted, try reversing it. If it still will not fit, have
an electrician install the proper wall outlet. Do not
tamper with the plug.
GROUNDING PLUG CAUTION:
The plug requires a three-hole grounding outlet.
If necessary, have an electrician install the proper
outlet. Do not tamper with the plug.
3 POWER CORD
To avoid unit malfunction, and to protect against
electrical shock, fire or personal injury:
- Keep power cord away from heating appliances
and walking traffic. Do not rest heavy objects on,
or roll such objects over the power cord.
- Do not tamper with the cord in any way.
- An extension cord should have the same type
plug (polarized or grounding) and must be
securely connected.
- Overloaded wall outlets or extension cords are
fire hazards.
- Frayed cords, damaged plugs, and damaged or
cracked wire insulation are hazardous and should
be replaced by a qualified electrician.
4 DO NOT BLOCK VENTILATION HOLES
Ventilation openings in the cabinet release heat
generated during operation. If blocked, heat
build-up may result in a fire hazard or heat
damage to cassettes or discs.
For your protection:
a. Never cover ventilation slots while unit is ON,
or operate unit while placed on a bed, sofa,
rug, or other soft surface.
b. Avoid built-in installation, such as a book case
or rack, unless properly ventilated.
5
AVOID EXTREMELY HOT LOCATIONS OR
SUDDEN TEMPERATURE CHANGES
Do not place unit over or near a heater or radiator,
in direct sunlight, inside closed vehicles,
in high temperature [over 95 °F (35 °C)], or in over
75% humidity. If unit is suddenly moved from a
cold place to a warm one, moisture may
condense in unit and on the tape causing
damage. Never subject unit to vibration, impact,
or place it so that the surface is tilted as internal
parts may be seriously damaged.
6 TO AVOID PERSONAL INJURY
• Never place unit on support or stand that is not
firm, level, and adequately strong. The unit could
fall causing serious injury to a child
or adult and damage to the unit.
• Move any appliance and cart
combination with care.
Quick stops, excessive force, and
uneven surfaces may cause objects to overturn.
• Carefully follow all operating instructions.
2
OUTDOOR ANTENNA INSTALLATION
1 SAFE ANTENNA AND CABLE CONNECTION
An outside antenna or cable system must be properly
grounded to provide some protection
against built up static charges
and voltage. Section 810
of the National Electrical
Code, ANSI/NFPA 70 (in
Canada, part 1 of the
Canadian Electrical Code)
provides information
regarding proper grounding of the mast and supporting
structure, grounding of the lead-in wire to an antenna
discharge unit, size of grounding conductors, location of
antenna discharge unit, connection to grounding
electrodes, and requirements for the grounding electrode.
2 KEEP ANTENNA CLEAR OF HIGH VOLTAGE
POWER LINES OR CIRCUITS
Locate an outside antenna system well away from power
lines and electric light or power circuits so it will never
touch these power sources should it ever fall. When
installing antenna, absolutely never touch power lines,
circuits or other power sources as this could be fatal.
ELECTRIC
SERVICE
EQUIPMENT
NEC
- NATIONAL ELECTRICAL CODE
GROUND
CLAMP
GROUND CLAMPS
POWER SERVICE GROUNDING
ELECTRODE SYSTEM
(NEC ART 250, PART H)
USING THE UNIT
Before unit is brought out of storage or moved to a new location,
refer again to the INSTALLATION section of these safeguards.
1 KEEP UNIT WELL AWAY FROM WATER OR
MOISTURE, such as vases, sinks, tubs, etc.
2 IF EXPOSED TO RAIN, MOISTURE, OR
STRONG IMPACT, unplug unit and have it inspected
by a qualified service technician before use.
3 ELECTRICAL STORMS
During a lightning storm, or before leaving unit unused for
extended periods of time, disconnect all equipment from
the power source as well as the antenna and cable system.
4 WHEN UNIT IS PLUGGED IN
• DO NOT OPERATE IF:
- liquid has spilled into unit.
- unit was dropped or otherwise damaged.
- unit emits smoke, odours, or noises.
Immediately unplug unit, and have it inspected by a
service technician to avoid potential fire and shock hazards.
Never drop or push any object through openings in unit.
•
Touching internal parts may cause electric shock or fire hazard.
Do not put any foreign object on the tray.
• Keep magnetic objects, such as speakers, away from
unit to avoid electrical interference.
5 USING ACCESSORIES
Use only accessories recommended by the manufacturer
to avoid risk of fire, shock, or other hazards.
6 CLEANING UNIT
Unplug unit. Use a clean, dry, chemically untreated cloth to
gently remove dust or debris. DO NOT USE cleaning fluids,
aerosols, or forced air that could over-spray, or seep into unit and
cause electrical shock. Any substance, such as wax, adhesive
tape, etc. may mar the cabinet surface. Exposure to greasy,
humid, or dusty areas may adversely affect internal parts.
SERVICE
1 DO NOT SERVICE PRODUCT YOURSELF
If, after carefully following detailed operating instructions, the
unit does not operate properly, do not attempt to open or
remove covers, or make any adjustments not described in the
manual. Unplug unit and contact a qualified service technician.
2 REPLACEMENT OF PARTS
Make sure the service technician uses only parts specified
by the manufacturer, or have equal safety characteristics
as original parts. The use of unauthorized substitutes may
result in fire, electric shock, or other hazards.
3 SAFETY CHECK AFTER SERVICING
After unit is serviced or repaired, request that a thorough safety
check be done as described in the manufacturer’s service
literature to ensure video unit is in safe operating condition.
ANTENNA
LEAD IN
WIRE
ANTENNA
DISCHARGE UNIT
(NEC SECTION 810-20)
GROUNDING CONDUCTORS
(NEC SECTION 810-21)
DF2702-K(P02-3).p65 2002/03/08, 18:272

Safety Precautions
WARNING:
To prevent fire or shock hazard, do not expose this equipment to rain or moisture.
CAUTION : To prevent electric shock, match wide blade of plug to wide slot, fully insert.
This video recorder, equipped with the HQ (High Quality) System, is compatible with existing
VHS equipment. Only use those tapes with the
tapes that have been tested and inspected for use in 2, 4, 6, and 8 hour VCR machines be used.
This television receiver provides display of television closed captioning.
CAUTION:
UNIT IS A CLASS I LASER PRODUCT.
HOWEVER THIS UNIT USES A VISIBLE LASER BEAM WHICH COULD
CAUSE HAZARDOUS RADIATION EXPOSURE IF DIRECTED. BE
SURE TO OPERATE THE UNIT CORRECTLY AS INSTRUCTED.
WHEN THIS UNIT IS PLUGGED TO THE WALL OUTLET, DO NOT
PLACE YOUR EYES CLOSE TO THE OPENING OF THE DISC TRAY
AND OTHER OPENINGS TO LOOK INTO THE INSIDE OF THIS UNIT.
USE OF CONTROLS OR ADJUSTMENTS OR PERFORMANCE OF
PROCEDURES OTHER THAN THOSE SPECIFIED HEREIN MAY
RESULT IN HAZARDOUS RADIATION EXPOSURE.
DO NOT OPEN COVERS AND DO NOT ATTEMPT TO REPAIR THE
UNIT YOURSELF. REFER SERVICING TO QUALIFIED PERSONNEL.
This product utilizes both a Cathode Ray Tube (CRT) and other components that contain lead.
Disposal of these materials may be regulated in your community due to environmental
considerations. For disposal or recycling information please contact your local authorities, or the
Electronics Industries Alliance: <http://
www.eiae.org.>
mark. It is recommended that only cassette
CAUTION:
LASER RADIATION WHEN
OPEN. DO NOT STARE
INTO BEAM.
(Inside of product)
CAUTION
RISK OF ELECTRIC SHOCK
DO NOT OPEN
CAUTION: TO REDUCE THE RISK
OF ELECTRIC SHOCK, DO NOT
REMOVE COVER (OR BACK)
NO USER-SERVICEABLE PARTS
INSIDE REFER SERVICING TO
QUALIFIED SERVICE PERSONNEL
This symbol warns the user that uninsulated voltage
within the unit may have sufficient magnitude to cause
electric shock. Therefore, it is dangerous to make any
kind of contact with any inside part of this unit.
This symbol alerts the user that important literature
concerning the operation and maintenance of this unit
has been included. Therefore, it should be read carefully
in order to avoid any problems.
Region Management Information
Region Management Information: This unit is designed and
manufactured to respond to the Region Management
Information that is recorded on a DVD disc. If the Region
number described on the DVD disc does not correspond to
the Region number of this unit, this unit cannot play this disc.
DF2702-K(P02-3).p65 2002/03/08, 18:273
The Region number
for this unit is 1.
1
3

Before Using
Congratulations
on your purchase of one of the most
sophisticated and reliable products on the
market today. Used properly, it will bring you
and your family years of enjoyment. Please fill
in the information below. The serial number is
on the tag located on the back of your unit.
Date of Purchase
Dealer Purchased From
Dealer Address
Dealer Phone No.
Model No.
Serial No.
PV-DF2702-K
Accessories
Remote Control
LSSQ0302
Loading the Batteries
1) Open the cover.
2) Insert batteries as
marked.
3) Close the cover.
Battery replacement caution
• Do not mix old and new batteries.
• Do not mix alkaline with manganese batteries.
Prevent Accidental Tape Erasure
Break off the tab
to protect.
Record Tab
Batteries 2 “AA”
4
DF2702-K(P04 Before).p65 2002/03/08, 18:274
Screw driver
To record again.
Cover the hole
with cellophane tape.
Record/Playback Time
Only use tapes with the mark in this unit.
Tape Speed
Setting
SP (Standard Play)
(Super Long Play)
Type of Video Cassette
T160T120T60
1 Hour
2 Hours
3 Hours
2 Hours
4 HoursLP (Long Play)
6 Hours
2 Hours
40 Minutes
5 Hours
20 Minutes
8 HoursSLP

Table of Contents
Initial Setup
TV / VCR
Important Safeguards and Precautions / Safety Precautions ........ 2 - 3
Before Using ........................................................................................ 4
Information (Unit, Cassette, Disc) .................................................. 6 - 7
Location of Controls ..................................................................... 8 - 11
Connections ................................................................................ 11 - 13
Initial Setup .................................................................................. 14, 15
Reset Language, Channels, Clock, Time Zone Adjust .............. 16, 17
Basic Operation
TV / VCR
DVD
Playback a Tape ................................................................................ 18
Record On a Tape ............................................................................. 18
Copy Your Tapes (Dubbing) .............................................................. 19
Basic DVD Operation .................................................................. 20, 21
TV Operation
TV / VCR
TV Operation ..................................................................................... 22
MTS Broadcast / TV Stereo System ................................................. 23
Closed Caption System ............................................................... 24, 25
TV Timer Features ............................................................................. 26
On-Screen Display (OSD) ................................................................. 27
FM Radio ..................................................................................... 28, 29
Timer Operation
TV / VCR
Timer Recording .......................................................................... 30, 31
Initial Setup
Basic Operation
TV Operation
Timer Operation
Advanced Operation
TV / VCR
DVD
Cable Box Universal Remote Control Feature ............................ 32, 33
Tape Operation ........................................................................... 34 - 37
Special VCR Features ................................................................. 38, 39
V-Chip Control Feature .............................................................. 40 - 45
Audio Features ............................................................................ 46, 47
Video / Audio Menu ........................................................................... 48
Video / Audio Adjustment .................................................................. 49
Disc Operation ............................................................................ 50 - 54
DVD Operation using On-Screen Displays ................................ 55 - 57
MP3 Playback Operation .................................................................. 58
DVD Lock Feature ............................................................................. 59
For Your Information
TV / VCR
DVD
DF2702-K(P05 contents).p65 2002/03/08, 18:275
Warning and Instruction Displays ..................................................... 63
Before Requesting Service ......................................................... 64, 65
Warranty/Servicentre List .................................................................. 67
Index ............................................................................................ 68, 69
Settings for DVD Operation ........................................................ 60 - 62
Language Code List .......................................................................... 66
Advanced Operation
For Your Information
5

Information (Unit, Cassette, Disc)
SpecificationsHead Cleaning
Playing older or damaged tapes may eventually
cause video heads to become clogged.
Head Clog Sensor
V I DE
O
During playback this
screen appears if clogging
is detected. To remove
screen, press PLAY on the
remote or unit.
HEADS MAY
NEED C
LEAN I NG
PL
EASE
I
NSERT HEAD
C
LEAN I NG CASSETTE
OR
REFER TO MANUAL
END : PLAY
• Use “dry” type head cleaning cassette only.
(Part No. NV-TCL30PT is recommended.)
• Follow cleaning tape directions carefully.
Excessive use of head cleaning tape can shorten
the video head life.
• If head clog symptoms persist, contact your
nearest Factory Servicentre or authorized
Servicentre. (See Page 67.)
DST (Daylight Saving Time)
Unit auto adjusts clock for DST (Daylight Saving Time.)
■■
■ Spring (First Sunday in April)
■■
DST : ON
■■
■ Autumn (Last Sunday in October)
■■
DST : ON
• If your area does not observe Daylight Saving
Time, select DST : OFF (see “Clock” on pages
16 and 17).
• Keep these time changes in mind when
programming the unit for timer recordings.
➛➛
➛ Sets clock ahead one hour.
➛➛
➛➛
➛ Turns clock back one hour.
➛➛
Features for a Quality Picture
Digital Auto Tracking
Continuously analyzes the signal and adjusts for
optimum picture quality.
Manual Tracking Control (to reduce picture noise)
Use during Playback and Slow Motion mode to
reduce picture noise. Press the 3 or 6 number key
on the remote control or CH on the unit until the
picture clears up. To return to Auto Tracking, press
POWER off, then on again a few seconds later.
V-Lock Control
In Still mode, the 3 or 6 number key on the remote
control or CH on the unit operate as a V-Lock
control to reduce jitter.
Pure Flat Picture Tube
This unit is equipped with Pure Flat picture tube.
Display
Picture Tube: 27 inch diagonal pure flat
Picture Tube
VCR
Video Recording System:
Audio Track: 1 track (Normal)
4 rotary heads helical
scanning system
2 channel
(Hi-Fi Audio Sound)
Tuner
Broadcast Channels: VHF 2 ~ 13, UHF 14 ~ 69
CABLE Channels: Midband A through I (14 ~ 22)
Superband J through W (23 ~ 36)
Hyperband AA ~ EEE (37 ~ 64)
Lowband A-5 ~ A-1 (95 ~ 99)
Special CABLE channel 5A (01)
Ultraband 65 ~ 94, 100 ~ 125
FM Radio
Band range: 87.5 ~ 108.1 MHz
General
Power Source: 120V AC, 60 Hz
Power Consumption: Power On
Approx. 174 watts
Power Off
Approx. 3.5 watts
Television System: EIA Standard NTSC colour
Speaker: 2 pieces
Operating Temperature: 5 °C ~ 35 °C (41 °F ~ 95 °F)
Operating Humidity: 10 % ~ 75%
Weight: 52 kg (114.4 lbs.)
Dimensions: 760(W) x 651 (H) x 503 (D) mm
29-15/16
19-13/16
Discs played
(1) DVD-VIDEO disc 5” (12 cm) single-sided,
single-layer
5” (12 cm) single-sided,
double-layer
5” (12 cm) double-sided,
double-layer
(one layer per side)
3” (8 cm) single-sided,
single-layer
3” (8 cm) single-sided,
double-layer
3” (8 cm) double-sided,
double-layer
(one layer per side)
(2) Compact disc 5” (12 cm) disc
(CD-DA, VIDEO CD) 3” (8 cm) disc
Digital audio output:
Optical digital output: Optical connector
Pickup: Wave length:
Laser power: CLASS II
Note : Designs and specifications are subject to change
without notice.
” (W) x 25-5/8” (H) x
” (D)
655 nm (DVD)
790 nm (Video CD/CD)
6
DF2702-K(P06-7 Information).p65 2002/03/08, 18:276

Disc formats supported by this unit
The unit can play back discs bearing any of
the following marks:
DVD
3” (8 cm) disc / 5” (12 cm) disc
Video CD
3” (8 cm) disc / 5” (12 cm) disc
CD
3” (8 cm) disc / 5” (12 cm) disc
Discs which cannot be played with this unit
• DVD with Region No. other than “1” or “ALL”
• DVD of PAL system
• DVD-ROM
• DVD-R/DVD-RAM
• CD-ROM
• CDV
• CD-G
• Do not try to play a Photo CD.
is a registered trademark.
Definition of Terms
Angle
Some DVD discs feature scenes simultaneously
shot from different angles. The ANGLE button can be
used to view the scene from different angles.
(ANGLE Indicator lights up on the unit when a scene
recorded at different angles is detected.)
Chapter Number
Titles are subdivided into numbered sections. You can
quickly search for a favourite scene using these numbers.
DVD
A high-density optical disc on which high-quality
pictures and sound have been digitally recorded.
DVD incorporates new video compression technology
(MPEG II) and high-density recording technology
which allow entire movies to be recorded with
incredible playback quality.
Playback Control
With Video CD (version 2.0), scenes or information
may be selected for viewing or listening from an
interactive menu that appears on the TV screen.
Subtitles
Written dialogue which appears at the bottom of the screen.
Time Number
The elapsed play time from the start of a disc or title.
Use to quickly find scenes.
Title Number
For DVD discs with two or more titles, the title is
numbered as title 1, title 2, etc.
Track Number
Numbers assigned to tracks on Video CDs and CDs
to allow specific tracks to be quickly located.
Video CD
CD containing picture and sound with same quality
level as video tape. This unit also supports Video
CDs with playback control (version 2.0).
(May not work with some discs.)
Disc Handling
Handling precautions
• Only hold disc by edges as shown.
Fingerprints, dirt, and scratches
can cause skipping and distortion.
• Do not write on label
side of disc.
• Never use record
cleaning sprays, benzine,
thinner, static electricity
prevention liquids, or any
other solvent.
• Be careful not to drop or
bend disc.
• Do not place more than
1 disc on disc tray.
• Do not try to close disc
tray when disc is not
properly placed.
• Always store discs in their
proper cases when
not in use.
To clean disc surface
With a soft, damp (water only) cloth, gently wipe from
the centre hole to the outer edge as shown below.
(Wiping in a circular pattern will scratch the surface.)
If disc is brought from a cold to a warm
environment, moisture may form on the disc
Wipe away moisture with a soft, dry, lint-free cloth
before using disc. (See above.)
Improper disc storage
Discs could be damaged if stored or left in areas:
• exposed to direct sunlight.
• that are humid or dusty.
• near heat (i.e. heater, radiator, etc.).
Apparatus Claims of U.S. Patent Nos. 4,631,603, 4,577,216,
and 4,819,098, licensed for limited viewing uses only.
This product incorporates copyright protection technology
that is protected by method claims of certain U.S. Patents
and other intellectual property rights owned by Macrovision
Corporation and other rights owners. Use of this copyright
protection technology must be authorized by Macrovision
Corporation, and is intended for home and other limited
viewing uses only unless otherwise authorized by
Macrovision Corporation. Reverse engineering or
disassembly is prohibited.
Disc tray
Disc
Initial Setup
7
DF2702-K(P06-7 Information).p65 2002/03/08, 18:277
Location of Controls
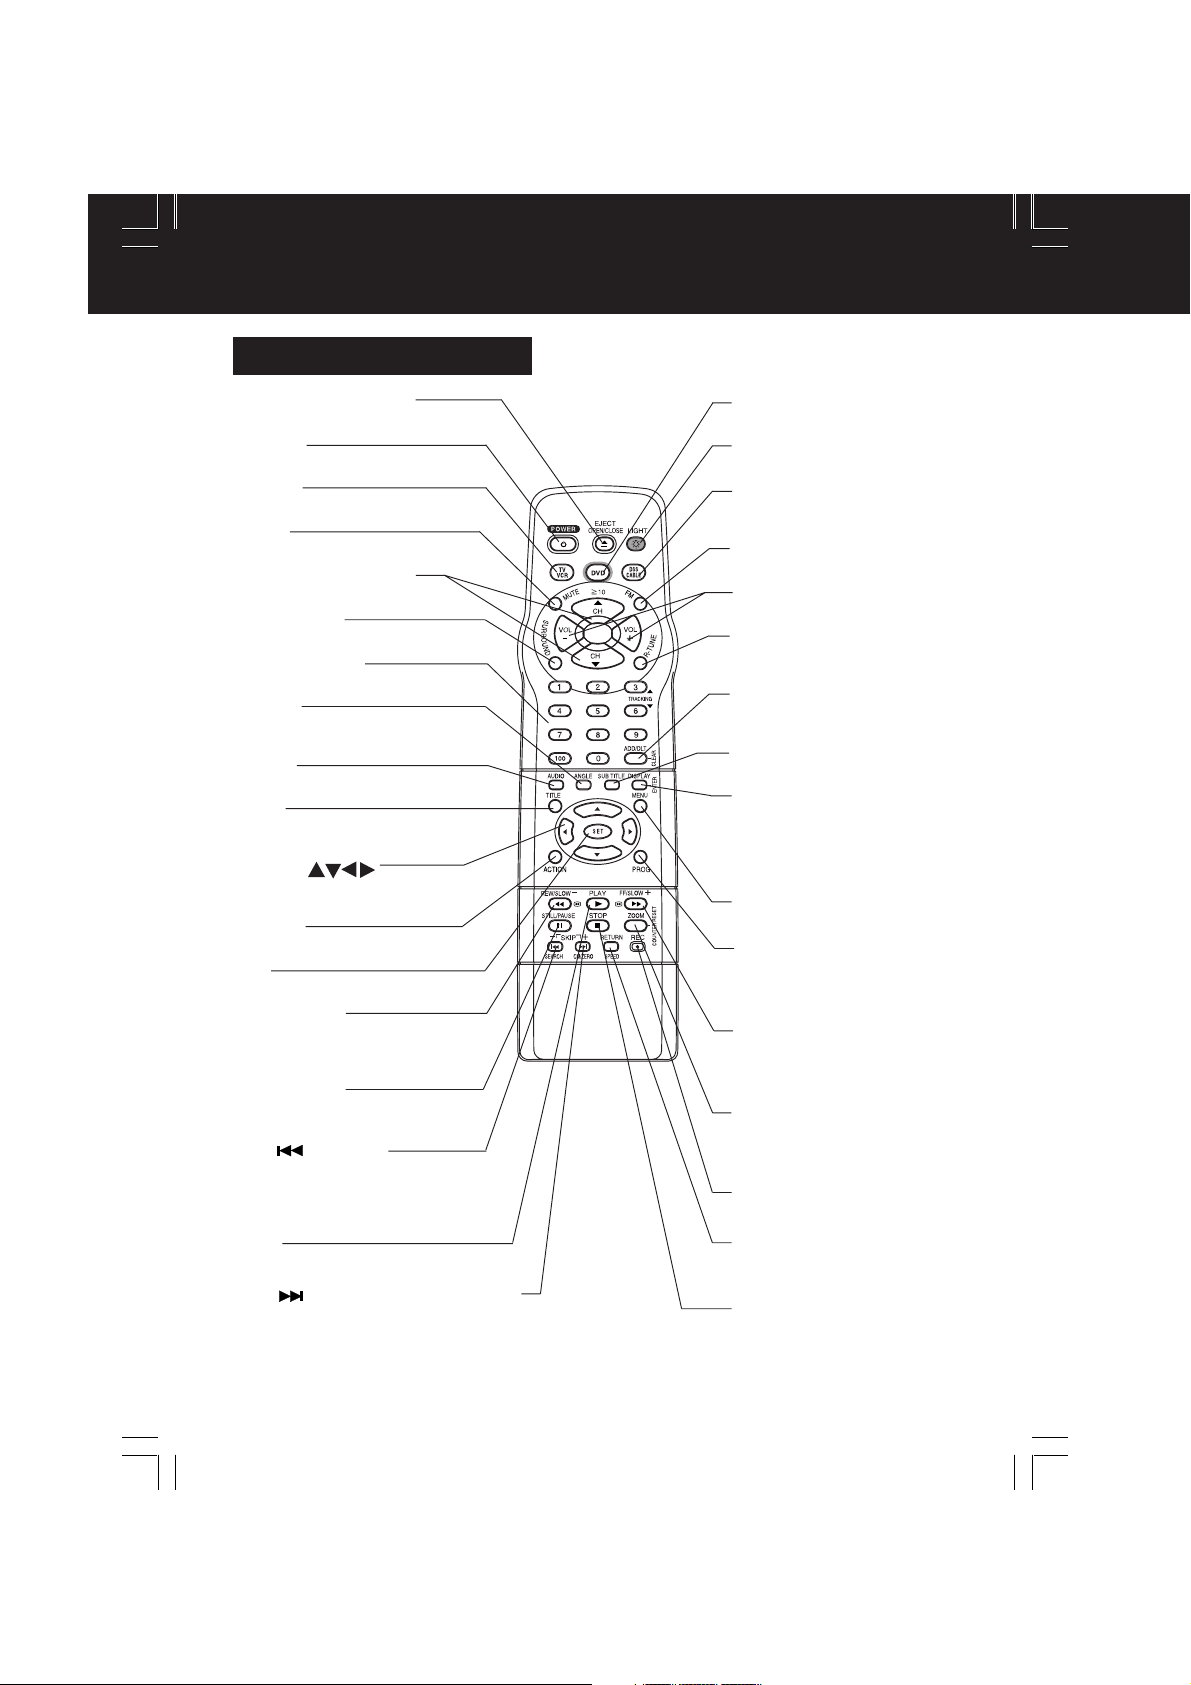
Remote Control Buttons
EJECT/OPEN/CLOSE
See next page.
POWER
Turn the unit on or off.
TV/VCR
Sets to TV/VCR mode.
MUTE
Mutes the sound instantly.
CHANNEL UP/DOWN
Selects a channel.
SURROUND
Creates a deeper, 3-D sound effect.
NUMBER Keys
Selects a channel directly.
ANGLE
Selects the desired angle
in DVD mode.
AUDIO
Selects the desired audio mode.
TITLE
Selects the desired title by number
on some DVDs.
SELECT
Control navigation around
on-screen menu.
ACTION
Displays Main Menu.
SET
Sets a selected menu.
REW/SLOW-
Rewinds tape and searches reverse
scene. Decreases slow motion
speed in Still mode.
STILL/PAU SE
Pauses picture in Play mode and
frame advance picture in Still mode.
SKIP /SEARCH
Skips back one chapter or track. Goes to
previous menu screen. Goes directly
to the desired recording. Locates end
point of recording.
PLAY
playback.
Begins
SKIP
Skips one chapter or track. Goes to next
screen. In Stop mode, goes to the counter
“0:00:00”. In Play mode, skips
3 minutes of tape.
/CM SKIP/ZERO SEARCH
over 1 to
DVD
Sets to DVD mode.
LIGHT
See next page.
DSS/CABLE
Sets the remote to control some
basic DDS or Cable box functions.
FM
Receives FM radio signal.
VOLUME UP/DOWN
Adjusts volume.
RAPID TUNE
Displays the last channel
you were watching.
ADD/DELETE/CLEAR
Adds or deletes a channel.
Cancels an item on the screen.
SUB TITLE
Selects a different subtitle language.
DISPLAY/ENTER
Displays the TV status and clock.
In DVD mode, displays disc and
unit information.
In DSS or CABLE mode, it may be
necessary after channel selection.
MENU
Displays DVD menu.
PROGRAM
Displays SET PROGRAM screen.
You can set Timer Program and
On-Timer.
FF/SLOW+
Fast forwards tape and forward
visual search. Increases slow
motion speed in Still mode.
ZOOM/COUNTER RESET
Enlarges specific portions of DVD
picture. Resets to “0:00:00” at
desired portion of tape.
REC
Records a program.
RETURN/SPEED
Returns to DVD menu screen.
Selects recording speed of tape.
STOP
Stops recording or playback.
8
DF2702-K(P08-11 Location).p65 2002/03/08, 18:278

Universal Light Tower® Illuminated Remote Control
LIGHT button:
When LIGHT is pressed, (DVD,
, DSS/CABLE, CH UP/DOWN, VOL UP/DOWN)
buttons will light for 5 seconds for easy button location.
If no button is pressed in 5 seconds, the light goes out to conserve the battery.
EJECT/OPEN/CLOSE button:
When this button is pressed in TV-VCR mode, the tape is ejected.
This button is inoperative if pressed during recording.
If pressed in DVD mode, the disc tray opens or closes.
Indicators on the Front Panel
Initial Setup
REC Indicator
Lights up during recording.
In Rec Pause or OTR
Pause mode, the Indicator
flashes.
Pg. 18
Remote Sensor
DF2702-K(P08-11 Location).p65 2002/03/08, 18:279
ON-TIMER Indicator
Lights up when the On Timer
is set
Pg. 26
ANGLE Indicator
Lights up when a scene
recorded at different
angles is detected.
(DVD only).
Pg. 51
PROG TIMER Indicator
Lights up when the unit is
set for Timer Recording.
It flashes when a Timer
Recording has been set with
no tape inserted, the clock
is not set, or the tape is in
motion.
Pg. 26
9

Location of Controls (continued)
Front View of the unit
If the disc cannot be removed,
First unplug unit.
Then, prepare a rigid wire (e.g. an
extended paper clip, etc.) and, applying
moderate force, insert it straight into
the hole at the base of the tray. The tray
will eject a little. Now, pull the tray all
the way out and remove the disc.
Over 2 inches
Phones Jack
Connect an earphone
or headphones.
Audio/Video Input
Connector 2 (LINE 2)
Connect from other
component.
S-Video Input Connector
Connect from other
component with S-Video.
POWER (See page 8.)
Disc Tray
Built In Speaker (✕ 2)
Cassette Compartment
REC (See page 8.)
FAST FORWARD/SEARCH
PLAY/REPEAT (See page 8.)
REWIND/SEARCH (See page 8.)
(See page 8.)
STOP (See page 8.)
PAUSE (See page 8.)
PLAY (See page 8.)
SKIP (See page 8.)
SKIP (See page 8.)
OPEN/CLOSE (See page 8.)
10
DF2702-K(P08-11 Location).p65 2002/03/08, 18:2710
STOP/EJECT (See page 8.)
TV/FM (See page 8.)
CHANNEL UP/DOWN
TRACKING UP/DOWN
VOLUME UP/DOWN (See page 8.)
(See page 8.)

Rear View of the unit
Initial Setup
Audio Output
Connector (L/R)
Pg. 12
VHF/UHF Antenna
Input Terminal
See below.
AC Power Plug
When plugged into an AC outlet,
this unit consumes 3.5 W of
electric power in OFF condition.
Connections
For ANT./Cable
Connect the cable from
Antenna/Cable to the VHF/UHF
terminal on the unit.
Audio/Video Input
Connector 1 (LINE 1)
Connect from
other component.
S-Video Input
Connector
Connect from
other component
with S-Video.
Optical digital audio
output connector
Pg. 13
IN from
VHF/UHF
VHF/UHF
DIGITAL AUDIO OUT
PCM/BITSTREAM
OPTICAL COXIAL
ANT./CABLE
VHF/UHF
For DSS/Cable Box
Connect the OUT jack on your
cable box to the VHF/UHF
terminal on the unit with a RF
cable.
WARNING
Overtightening “Nut type” RF coaxial cables
may damage jacks. Finger tighten only.
DF2702-K(P08-11 Location).p65 2002/03/08, 18:2711
VHF/UHF
DIGITAL AUDIO OUT
PCM/BITSTREAM
OPTICAL COXIAL
VHF/UHF
VHF/UHF
Cable TV
Converter Box
from
IN
ANT./CABLE
11

Connections (continued)
Audio connections
■ Unit
➛➛
➛ Amplifier
➛➛
Unit
AUDIO OUT
R L
R L
AUDIO IN
Speaker
Manufactured under license from Dolby
Laboratories. “Dolby”, “Pro Logic” and the
double-D symbol are trademarks of Dolby
Laboratories. Confidential Unpublished Works.
© 1992-1997 Dolby Laboratories, Inc. All rights
reserved.
➛➛
➛ Speaker
➛➛
Amplifier
Speaker
12
Ready Checklist
Turn down the volume, then turn this unit, as well as
other equipment to be connected, off before
proceeding with connection.
Do not block ventilation holes of any of the
equipment and arrange them so that air can
circulate freely.
Read through the instructions before connecting
other equipment.
Ensure that you observe the colour coding when
connecting audio and video cables.
Enjoying digital audio output from the
digital audio output connector
Notes on audio output from the optical digital
audio output connector
Disc
Sound
recording
format
Dolby Digital
DVD
Linear PCM
(48/96 kHz
16/20/24 bit)
dts
Video
CD
CD
MP3
*1 The type of audio output from the connector can be
*2 Sound having 96 kHz sampling is converted into 48
MPEG 1
Linear PCM
MP3
selected by the Settings for DVD Operation. (See
page 61.)
kHz sampling when it is output from the unit’s optical
digital audio output connector.
For your reference:
• Dolby Digital is a digital sound compression technique
developed by the Dolby Laboratories Licensing
Corporation. Supporting 5.1-channel surround sound,
as well as stereo (2-channel) sound, this technique
enables a large quantity of sound data to be efficiently
recorded on a disc.
• Linear PCM is a signal recording format used in CDs.
While CDs are recorded in 44.1 kHz/16 bit, DVDs are
recorded in 48 kHz/16 bit up to 96 kHz/24 bit.
• If you have a Dolby Pro Logic Surround decoder, you
will obtain the full benefit of Pro Logic from the same
DVD movies that provide full 5.1 channel Dolby Digital
soundtracks, as well as from titles with the Dolby
Surround mark. For information on Panasonic or
Technics Dolby Pro Logic Surround Sound Decoders
please contact your local dealer.
Optical digital audio
output from connector
Dolby Digital bitstream
(1-5.1 ch) or OFF (no
output)*
1
Linear PCM (2ch)
(48 kHz sampling/16 bit
only)*
2
or no output*
1
Bitstream or no output*
PCM
(44.1 kHz sampling)
Linear PCM
(44.1 kHz sampling)
Linear PCM
(It depends on the MP3 file)
1
DF2702-K(P12-13) connect.p65 2002/03/08, 18:2712

■ Unit
➛➛
➛ Dolby Digital Decoder
➛➛
➛➛
➛ Amplifier
➛➛
➛➛
➛ Speaker
➛➛
or
➛➛
Unit
➛ dts (digital theatre systems) Decoder
➛➛
When DVDs recorded in Dolby Digital or dts are played, Dolby Digital bitstream or dts
bitstream is output from the unit Optical digital audio output connector. When the unit is
connected to a Dolby Digital decoder or dts decoder, you can enjoy theatre-quality audio in
your home. [An optical digital audio cable (optional) is required when an optional Dolby
Digital decoder or dts decoder is used.]
➛➛
➛ Amplifier
➛➛
➛➛
➛ Speaker
➛➛
Initial Setup
Notes on connecting an Optical
digital audio cable (optional)
• Firmly connect the cable to the
connector.
IMPORTANT NOTE:
Caution for optical digital audio
output connector:
• When connecting an amplifier (with
an Optical digital input connector)
which does not contain the Dolby
Digital or dts decoder, be sure to
select “OFF” at “Dolby Digital” and
“OFF” at “dts” of the Settings for
DVD Operation “AUDIO OUTPUT”
(see page 61). Otherwise, any
attempt to play DVDs may cause
such a high level of noise that it may
be harmful to your ears and damage
your speakers.
• When a dts decoder is connected,
please select “Bitstream” at “dts” of
the Settings for DVD Operation
“AUDIO OUTPUT”. If “OFF” is
selected, there will be no sound.
(See page 61).
• Video CDs and CDs can be played
as normal.
Note:
• Some dts decoders which do not
support DVD-dts interface may not
work properly with the unit.
Unit
Optical digital audio
cable (optional)
Amplifier
Front
Speaker
Subwoofer
Surround
speaker
Decoder with Dolby Digital/
dts processing (optional)
Centre speaker
Front
Speaker
Surround
speaker
DF2702-K(P12-13) connect.p65 2002/03/08, 18:2713
13
Initial Setup (Ready to Play)
Please make all cable or antenna connections before powering on.
Initial Setup (Ready to Play)
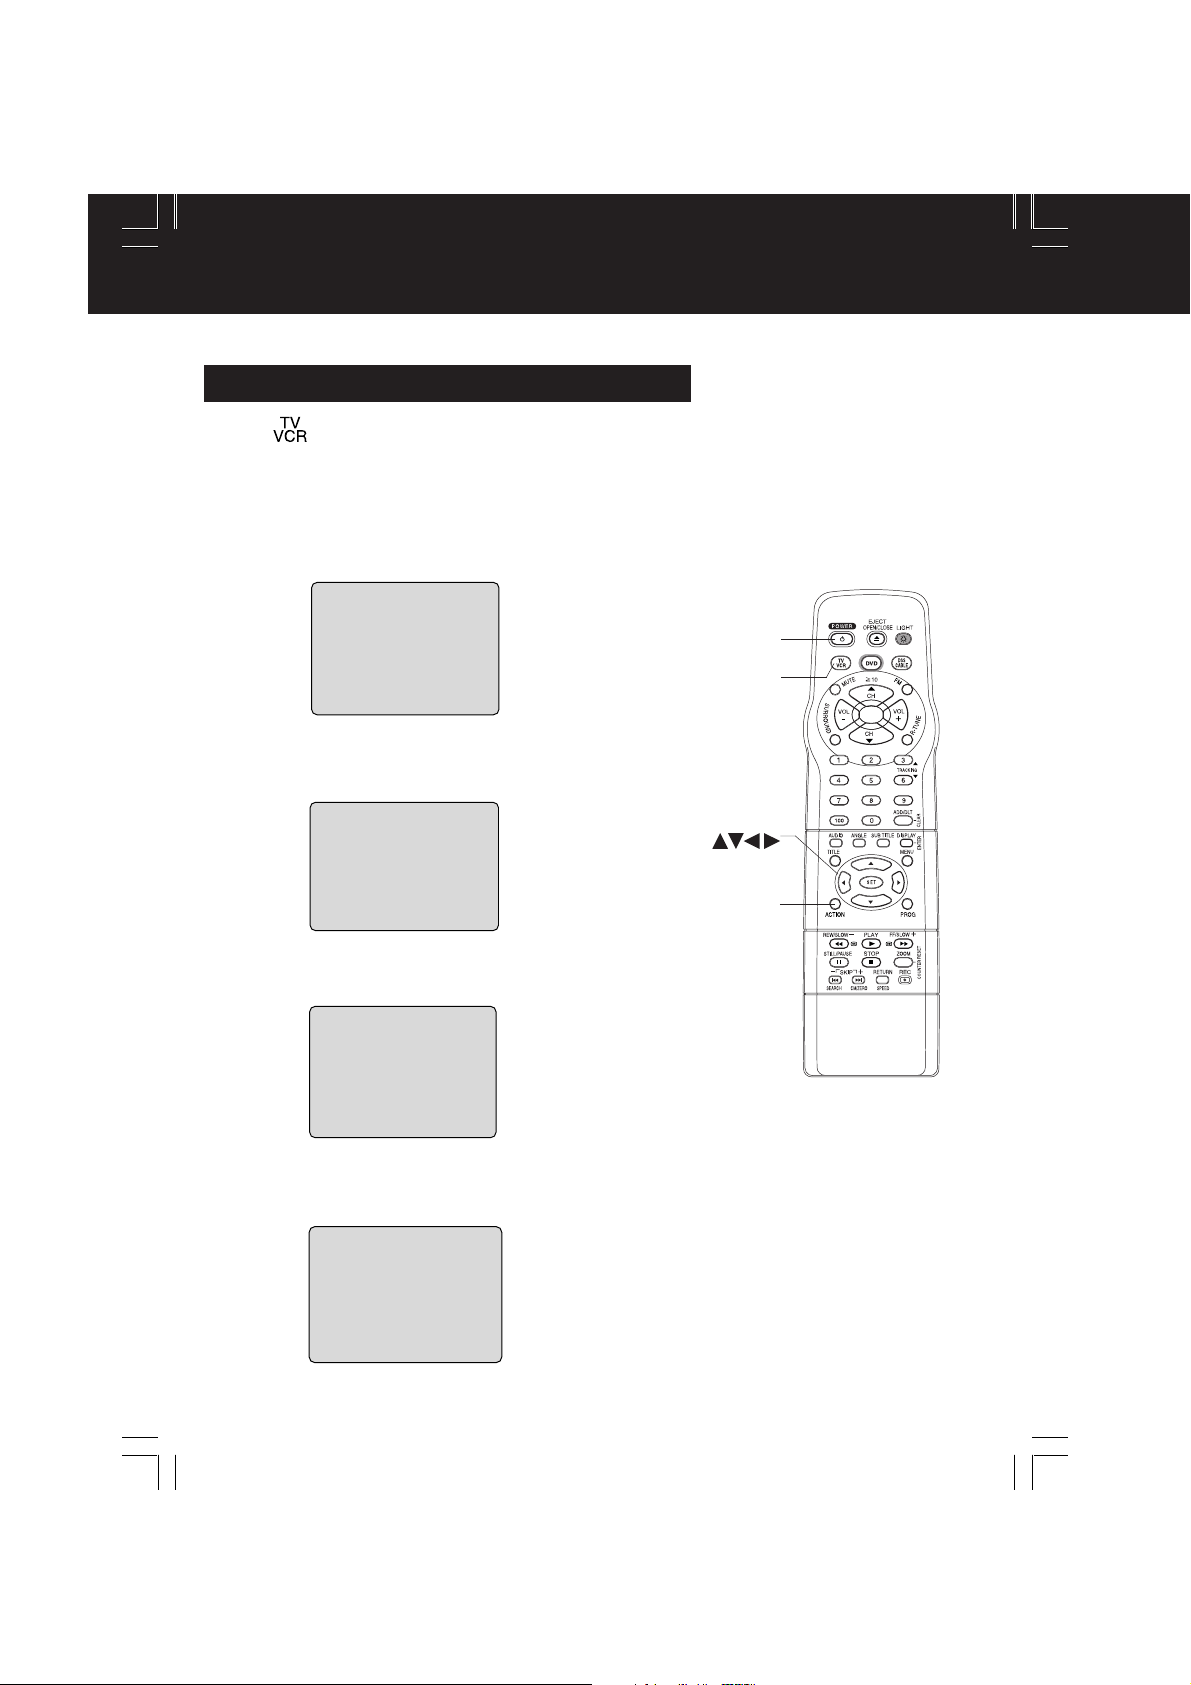
Press on the remote for TV-VCR mode.
Plug the unit power cord into an AC wall outlet.
1
Press POWER* on the remote or unit. The unit
comes on and auto channel and clock set starts.
2
CH AUTO SET PROCEEDING
• If you use a cable box, turn it on and set it to the Public
Broadcasting Service (PBS) channel in your time zone.
If you use a DSS receiver, it must be turned off.
AUTO CLOCK SET
PROCEEDING
CANCEL : PRESS STOP KEY
Settings are made automatically.
When setup is done, this screen appears.
3
2 / 6 /
2002
WED 12 : 00PM
DST : O
ETED
N
0
SETT I NG : CH 1
UTO CLOCK SET
A
CO
MPL
If AUTO CLOCK SET IS INCOMPLETE
screen appears, set the clock using MANUAL
CLOCK SET procedure on next page.
POWER
TV-VCR
SELECT
SET
ACTION
A
UTO CLOCK SET
MPL
I S I NCO
PLEASE SET CLOCK BY
R
ESS I NG ACT I ON KEY
P
ETE
14
DF2702-K(P14-15)Initial setup.p65 2002/03/08, 18:2714

Important:
*
If a remote control button does not work when pressed, press the button on the remote
and try the button again.
Manual Clock Set
If AUTO CLOCK SET was incomplete, manually
set the clock as follows.
Press ACTION on the Remote to
display SET CLOCK Menu screen.
1
SET CLOCK
: ON
DST
SELE CT MONTH
SELECT :
SET :
END
:
Press to select the month and
press SET to set. In the same
2
manner, select and set the date,
year, time, and DST. (Daylight
Saving Time)
SET
ACT I ON
Reset all unit Memory Functions
When moving unit to a new location, or if a
mistake was made in the Initial Setup section.
• Make sure a tape is not inserted in the unit.
Turn the unit
1
Power on.
Press and hold both PLAY and FF
2
on the unit for more than 5
seconds.
• The power will shut off.
• Please ignore “NO CASSETTE” warning.
Perform “Initial Setup” on the 14.
3
Initial Setup
Press ACTION twice to start
CLOCK and exit.
3
Note to CABLE system installer:
This reminder is provided to call the CABLE (Cable TV) System
Installers attention to Article 820-40 of the NEC that provides
guidelines for proper grounding and, in particular, specifies that
the cable ground shall be connected to the grounding system of
the building, as close to the point of cable entry as practical.
DF2702-K(P14-15)Initial setup.p65 2002/03/08, 18:2715
15

Reset Language, Channels, Clock, Time Z
1
DVD
TV
SELECT :
END : ACT I ON
Language
2
1) Press to
select language
icon.
DVD
TV
SELECT :
END : ACT I ON
2) Press SET
repeatedly.
MENU PR I NCIPAL
DVD
ELEG I R :
TERM I NAR :
For Spanish
DVD
SEL. :
REGLER : SET
FIN :
For French
DVD
TV
SELECT :
END : ACT I ON
For English
M A I N MENU
LOCK
CLOC
M A I N MENU
LOCK
CLOC
BLOQUEO
RELOJTV
F I
ACT I ON
MENU
BLOCAGE
HORLOGETELE
ACT I ON
M A I N MENU
LOCK
CLOC
LANGUAGE
K
SET : SET
LANGUAGE
K
LANGUAGE
K
1
3
5
CH
1
3
5
CH
SET : SET
HOLA
ID I OMA
1
3
5
CANAL
JAR : SET
BONJOUR
LANGUE
1
3
5
CANAL
HELLO
1
3
5
CH
SET : SET
Press ACTION*
to display MAIN MENU.
Channels
1) Press to
select “CH.”
M A I N MENU
LOCK
DVD
CLOC
TV
SELECT :
END : ACT I ON
2) Press SET.
SET UP CHA
ANT
ENNA
: CABLE
UTO SE
T
A
CHANNEL CAPT I ON
W
EAK S I GNAL
SELECT :
SET
END
D I
: SET
: ACT I ON
3) Press to select
“ANTENNA,” then
press SET to set
your antenna system
(“TV” or “CABLE”).
4) Press to select
“AUTO SET,” then
press SET.
• After Channel Auto
Set is finished, Clock
Auto Set will be
performed.
(If clock is set
manually, Clock Auto
Set will not be
performed.)
LANGUAGE
5
CH
K
SET : SET
NNE
L
SPLAY : OFF
Clock
1) Press to
select “CLOCK.”
M A I N MENU
LANGUAGE
LOCK
1
3
DVD
CLOC
TV
SELECT :
END : ACT I ON
K
3
5
CH
SET : SET
1
2) Press SET.
SET CLOCK
AUTO CLOCK SET
MANU
AL
T I M
E ZONE AD
SELECT :
SET
: SET
: ACT I ON
END
JUS
T :
0
(“TIME ZONE ADJUST”
appears only when
auto clock is set.)
3) Press to select
“MANUAL,” then
press SET.
(For Auto Clock Set,
select “AUTO CLOCK
SET,” and press SET.)
CLOC
K
SET
2 / 6/
2002
SELE CT
HOUR
SELECT :
SET :
SET
END
:
ACT I ON
<Example MANUAL
CLOCK SET screen>
:
WED
12
00
DST
: ON
BACK :
PM
3) Press ACTION to
exit.
16
DF2702-K(P16-17 lang ch clk).p65 2002/03/08, 18:2716
Continued on the
next page.

C
HANNEL
08 ADDED
C
HANNEL
08 DELE T
ED
Time Zone Adjust
Time Zone Adjust
4)Press and
press SET to select
and set the month,
date, year, time, and
DST (Daylight Saving
Time)
.
To Make Corrections,
repeatedly press
to move to error, then
correct.
5)Press ACTION twice
to start the clock and
exit this mode.
(Only when Auto Clock is set.)
1) Press to
select “CLOCK.”
DVD
TV
SELECT :
END : ACT I ON
2) Press SET.
AUTO CLOCK SET
MANU
T I M
SELECT :
SET
:
END
: ACT I ON
M A I N MENU
LOCK
CLOC
SET CLOCK
AL
E ZONE AD
LANGUAGE
K
SET : SET
JUS
T :
3
5
CH
*
1
0
Important:
If a remote control button does not work
when pressed, press the button on
the remote and try the button again.
NUMBER
keys
ADD/DLT
SELECT
SET
ACTION
Initial Setup
DF2702-K(P16-17 lang ch clk).p65 2002/03/08, 18:2717
3)Press to select
“TIME ZONE
ADJUST” and
press or to
subtract or add
hour(s) as
necessary.
SET CLOCK
AUTO CLOCK SET
MANU
AL
T I M
E ZONE AD
SELECT :
SET
:
END
: ACT I ON
JUS
T :
+1
4)Press ACTION
twice to exit.
•“TIME ZONE ADJUST”
returns to “0” if clock is
set manually.
Add or Delete a Channel
To add channel:
Select channel with number
keys and press ADD/DLT.
To delete channel:
Select channel with CH
or number keys and press
ADD/DLT.
17

Playback a Tape
Record On a Tape
Ready Checklist
All connections are made.
Your unit is plugged in.
Insert a tape.
1
Record
tab
To prevent tape jam,
remove loose or peeling
labels from tapes.
• The unit power comes
on automatically.
Press PLAY* to play a tape.
• If tape has no record tab (see page 4),
2
auto play begins.
■ Forward/Reverse scene search
➛➛
➛ Press FF/SLOW+ or REW/SLOW-.
➛➛
➛➛
➛ Press again or PLAY to release.
➛➛
■ Still (Freeze) picture
➛➛
➛ Press STILL/PAUSE.
➛➛
➛➛
➛ Press PLAY to release.
➛➛
■ Slow Motion picture
➛➛
➛ Press FF/SLOW+ (increases speed) or
➛➛
REW/SLOW- (decreases speed) in
Still mode.
➛➛
➛ Press PLAY to release.
➛➛
■ Frame by Frame picture
➛➛
➛ Press STILL/PAUSE in Still mode.
➛➛
➛➛
➛ Press PLAY to release.
➛➛
Notes
• These features work best in SP or SLP mode.
• After the unit is in Still or Slow mode for 3
minutes, it will switch to Stop mode automatically
to protect the tape and the video head.
■ Stop
■ Rewind tape
■ Fast forward tape
■ Eject tape
➛➛
➛ Press STOP
➛➛
➛➛
➛ Press REW/SLOW-
➛➛
in Stop mode
➛➛
➛ Press FF/SLOW+
➛➛
➛➛
➛ Press EJECT on the remote
➛➛
in Stop mode
or STOP/EJECT on the unit
Operation using unit buttons
PLAY/REPEAT
Insert a tape.
Press to stop and/or
eject tape.
CH
REC
REC Indicator
18
Insert a tape with record tab.
• The unit power comes on automatically.
1
Press CH or number keys to
Select Channel.
2
• For “LINE1” or “LINE2” input, see bottom
of next page.
Press SPEED to select recording
speed (see page 4).
3
SP = Standard Play
LP = Long Play
SLP = Super Long Play
• Selected speed is displayed.
Press REC to start recording.
• To edit out unwanted portions, press
4
REW/SLOW-
STILL/PAUSE to pause and resume
recording.
• You cannot view another channel during
recording.
■ Stop
■ One Touch Recording (OTR)
• It is not possible to record from DVD/
• After the unit has been in Rec Pause mode
• The remaining recording time of an OTR can
➛➛
➛ Press STOP
➛➛
Press REC repeatedly
to set the recording
length (30 min - 4 hours.)
• The unit stops recording at a preset time.
• PROG TIMER Indicator lights on the unit.
Notes
Video CD/CD to VHS tape using this unit.
for 5 minutes, it will stop automatically to
protect the tape and the video head.
be displayed by pressing DISPLAY.
SELECT
SET
ACTION
STILL/
PAUSE
Normal Rec
0:30 1:00
EJECT
CH
CH
NUMBER
keys
DISPLAY
PLAY
FF/SLOW+
STOP
REC
SPEED
1:302:003:004:00
DF2702-K(P18-19) play_rec_copy.p65 2002/03/08, 18:2718

Copy Your Tapes (Dubbing)
1
2
3
125LINE 1
(CABLE)
69
(TV)
or
LINE 2
*
Connections you’ll need to make
Recording (Editing) unit
Important:
If a remote control button does not work
when pressed, press the button on
the remote and try the button again.
Playing (Source) VCR
MONO
VIDEO
IN FROM
ANT.
OUT TO
TV
Insert prerecorded tape.
LINE2
VIDEO IN L-AUDIO IN-R
VIDEO IN L-AUDIO IN-R
or
Recording (Editing) unit
Insert blank tape
with record tab.
• Dubbing tapes protected
with Copy Guard will have
poor quality results.
1
R-AUDIO-L
OUT
IN
Playback (Source)
Select “LINE” mode.
2
3
Press PLAY then
PAUSE at starting
point to put in
Standby mode.
See “Selecting Input Mode” below.
Press REC, then
Press STILL/PAUSE
immediately to put in
Standby mode.
(Perform operation of steps 4 and 5 on both units at same time.)
4
Press PLAY
to start dubbing.
Press STILL/PAUSE
to start dubbing.
Rear
LINE1
Basic Operation
Press STOP
5
STOP
to stop dubbing.
Caution
• Unauthorized exchanging and/or
copying of copyrighted recordings
may be copyright infringement.
• Please note that some tapes
cannot be dubbed on this unit.
Also, it is not possible to dub
DVD/Video CD/CD to VHS tape
using this unit.
DF2702-K(P18-19) play_rec_copy.p65 2002/03/08, 18:2719
Press STOP
to stop dubbing.
Selecting Input Mode
Method 1:
Press CH . The display will change as follows.
Method 2:
a Press ACTION for MAIN MENU.
b Press to select “TV”, then press SET for
SET UP TV screen.
c Press to select “INPUT SELECT,” and then
press SET to select “TUNER”, “LINE1” or “LINE2.”
d Press ACTION twice to exit this mode.
• LINE1 : For rear Audio/Video connection.
LINE2 : For front Audio/Video connection.
19

Basic DVD Operation
Ready Checklist
All connections are made. (See pages 11-13.)
Your unit is plugged in.
If unit is connected to an audio amplifier,
turn the stereo system’s power on.
Operation using unit buttons
Press PLAY.
Insert disc.
3
•
74
3
Press
OPEN/CLOSE.
Press POWER* on the remote or unit.
1
Press DVD to select DVD mode.
• If a disc is already inserted, go to step 4.
2
(Depending on the disc, playback may start
automatically.)
Insert a disc.
1) Press OPEN/CLOSE.
3
2) Place disc into disc tray.
• Hold disc by its edges only
(page 7
) with printed side up
and
1
2
Press PLAY to start play.
Disc tray closes automatically.
4
CLOSE
READING
If an interactive DVD*1 or a
Video CD with playback
control*
MENU appears, go to step 5.
5
2
is used and a TITLE
T I TLE MENU
Cas t l es
Dogs
i r
ds
Love
B
r
s
Dogs
of the world
use guides to place into
tray. Use
5” (12 cm) disc.
• You may also close the tray
by pressing OPEN/CLOSE.
• Data reading time differs with
each disc.
1
3”(8 cm) or
<Example>
T I TLE MENU
Dogs
Love
Press or
number key(s) (see
below) to select title
and press SET to
play.
Using number key(s)
starts play automatically.
r
s
2
Cas t l es
i r
ds
B
Press POWER
1
*1Interactive DVD...
May include multiple camera angles,
stories, etc.
*2Video CD with playback control...
Particular scenes or information can be
interactively selected from a menu that
appears on the screen.
Press STOP.
6
20
DF2702-K(P20-21 Basic DVD).p65 2002/03/08, 18:2820
<Example> 1 digit number 1 ••• 1
Press SKIP | or | to go to next or previous menu screen.
• SKIP function not available with all discs.
Please refer to disc jacket for operation information.
To return to MENU (play stops)
Press TITLE, MENU, or RETURN. (DVD)
Press RETURN. (Video CD)
<Example>
2 digit number 12 ••• 10➛1➛2
3 digit number 123 •••100➛1➛2➛3
Press STOP to stop play.
6
Press OPEN/CLOSE to eject the disc.
7

Important:
*
I
f a remote control button does not work when pressed, press the DVD button on the remote
and try the button again.
■ Forward/Reverse rapid scene
search
➛➛
➛ Press FF/SLOW+ or REW/SLOW-
➛➛
during play.
➛➛
➛ Press PLAY to release.
➛➛
• Starting forward/reverse search during play
started from menu on Video CDs may recall
menu.
• Search speed, slow at first, increases with
each additional press of the button up to 5
levels.
■ Forward/Reverse Chapter/Track
Skip
➛➛
➛ Press SKIP | or
➛➛
|
during play.
Each press skips a chapter (DVD) or
track (Video CD/CD).
Pressing | SKIP once midway through a
chapter/track returns to start of that chapter/track.
Each additional press skips back one chapter/
track.
• Pressing SKIP | or | during play started
from menu on Video CDs may recall menu.
Current playback position
Chapter/Track Chapter/Track Chapter/TrackChapter/Track
Reverse Skip Forward Skip
■ Still (Pause) Picture
➛➛
➛ Press STILL/PAUSE during play.
➛➛
➛➛
➛ Press PLAY to release.
➛➛
• DVD/Video CD : The unit will enter Still picture mode.
• CD : The unit will enter Pause mode.
■ Frame by Frame picture
(DVD/Video CD)
➛➛
➛ Press STILL/PAUSE in Still mode.
➛➛
➛➛
➛ Press PLAY to release.
➛➛
• Each press advances picture one frame.
• Hold down for consecutive frame advance.
• Whether pictures are advanced by “FRAME” or
“FIELD” is selected automatically (see page 62).
■ Slow Motion picture (DVD/Video CD)
➛➛
➛
Press FF/SLOW+ or REW/SLOW-
➛➛
(DVD only) in Still mode.
➛➛
➛ Press PLAY to release.
➛➛
• Slow motion speed, slow at first, is increased
with each additional press of the button up to 5
levels.
• Reverse slow motion is not available for video
CDs.
• When appears on the screen while a button
is being operated, it means that the
corresponding operation is prohibited by the
unit or the disc.
RESUME function
The unit memorizes the point where STOP
is pressed (
Press PLAY to resume play from this point.
Pressing STOP again or opening the tray
cancels RESUME, however, RESUME is not
cancelled when power is turned off and on.
• RESUME works only with discs for which
elapsed play time is displayed during play.
flashes on screen).
Auto-Power Off function
Power turns off after unit has been in Stop
mode (DVD) for about 5 minutes.
Enjoy Video CDs featuring
playback control without
using menus (Video CDs only)
1.Do steps 1-4 (previous page).
When menu appears, press STOP.
2.Press number key(s) to select desired
track (play begins).
• Check disc for track numbers.
• Press “1” to start at beginning of disc.
To Resume Menu use,
Press STOP, and press PLAY, then the menu
appears. Now, go to step 5 (previous page).
Notes
• Please read the disc jacket for operation
information.
• If a single sided disc is placed in upside down,
“PLEASE CHECK THE DISC,
AND FOR STAINS OR SCRATCHES ON
DISC” is displayed.
• Remove disc and press unit POWER off when
not in use.
• Disc continues to rotate with menu displayed
even after play is done. Press STOP to clear
menu display when finished with menu.
Basic Operation
DF2702-K(P20-21 Basic DVD).p65 2002/03/08, 18:2821
21

TV Operation
Important:
*
If a remote control button does not work
when pressed, press the
the remote and try the button again.
button on
Press POWER* on the remote or unit.
1
Use CH or
0 8
A
BC
2
3
24
number keys to
select a channel.
Press VOL + or VOL -
to adjust volume.
Ready Checklist
All connections are made. (See page 11).
Your unit is plugged in.
VOL + / VOL -
POWER
PHONES
Jack
CH
■ Using the 100 key
When selecting CABLE channels 100 to 125
with the number keys, first press the 100 key,
and then enter the remaining two digits.
■ Rapid Tune
Press R-TUNE to display the last channel you
were watching.
■ Audio Mute
Press MUTE to instantly mute the sound.
Press again to restore the previous sound level.
■ Phones
Connect an earphone (not supplied) or
headphones (not supplied) to the Phones Jack.
22
DF2702-K(P22 TV).p65 2002/03/08, 18:2822

MTS Broadcast / TV Stereo System
STOP
1 2 : 0 0A
M
ABC
0 : 0 0 : 0 0
SP
STER
EO
SAP
M
ONO
Equipped with ®-TV Noise
Reduction for true MTS
reproduction. ®-TV Noise
Reduction is required for good
stereo separation and audio fidelity.
®
is a registered trademark, and
is licensed by ®Technology
Licensing.
Receivable Broadcast Types
The following are possible audio broadcast types and
on-screen displays. The signal being received is indicated
with an “ ” mark while the selected audio mode is indicated
with an arrow. To change the audio mode for these
broadcasts, see the “Select Audio Mode for TV Viewing”
section (below.)
Press DISPLAY to display
the broadcast signal being received.
ABC
STOP
STER
SAP
M
STOP
STER
SAP
M
STOP
STER
SAP
M
STOP
STER
SAP
M
ONO
ONO
ONO
ONO
1 2 : 0 0A
EO
1 2 : 0 0A
EO
1 2 : 0 0A
EO
1 2 : 0 0A
EO
M
0 : 0 0 : 0 0
M
0 : 0 0 : 0 0
M
0 : 0 0 : 0 0
M
0 : 0 0 : 0 0
MTS Stereo and SAP broadcast
Multi-channel Television Sound Stereo
SP
(main language) and Secondary Audio
Program (sub language) broadcasts are
being received simultaneously.
Select the STEREO or SAP audio mode.
MTS Stereo broadcast
ABC
Multi-channel Television Sound Stereo
SP
broadcast. Select STEREO audio mode.
• If stereo broadcast is weak and the
display flickers, select MONO audio
mode for possible improvement.
SAP broadcast
ABC
Secondary Audio Program
SP
(sub language).
Select SAP audio mode for the sub
language.
MONO broadcast
ABC
SP
Normal monaural sound broadcast.
TV Operation
Audio Mode for TV Viewing
Press AUDIO to select the desired audio mode
as described above.
(Arrow shows selection.)
• Each press of AUDIO will change the audio mode as shown
below.
• “SAP” is selected with first press of AUDIO.
< Example >
M
0 : 0 0 : 0 0
ABC
SP
STOP
1 2 : 0 0A
STER
EO
SAP
M
ONO
M
0 : 0 0 : 0 0
ABC
SP
Press AUDIO
Press AUDIO
STOP
1 2 : 0 0A
STER
EO
SAP
M
ONO
Press AUDIO
23
DF2702-K(P23 MTS).p65 2002/03/08, 18:2823

Closed Caption System
Closed Caption is ...
This multi-use system not only allows the hearing impaired to enjoy selected programs,
but also makes useful information from TV stations available to everyone.
Closed Caption Mode Feature
Press ACTION*
to display MAIN MENU.
1
2
3
4
M A I N MENU
LOCK
DVD
CLOC
TV
SELECT :
END : ACT I ON
SET
UP TV
CAPT I ON
I NPUT
SELECT : T
SET UP V I DEO / AUD I
FM
ANT
ENNA : I
REMOTE W
ARN I NG
VOL ADJUST : + 2
DVD
SELECT :
END
CAPT I ON MODE
CC ON MUTE
SELECT :
SET : SET
END
TEXT C2
: ACT I ON
CAPT I ON
: ACT I ON
OFF
CAP C2
K
: ON
SET : SET
:
:
CAP C1
1)Press to
LANGUAGE
5
CH
SET : SET
UNER
O
NT
select “TV.”
2)Press SET to
1
3
display SET UP
TV screen.
1) Press to
select “CAPTION”.
2) Press SET
to display
CAPTION screen.
1) Press to
CAP C1
CAP C1
select CAPTION
MODE.
2) Press SET
repeatedly to select
mode. (See left.)
TEXT C1
Press ACTION three times
to return to the normal screen.
5
Recording and Playing Back a Closed Caption/
Text Program
Record : Record normally. Closed Caption/Text
Playback : Start playback. Perform above steps to
signal, if present, is recorded
automatically.
select desired caption mode.
Closed Caption Mode Selections
Caption Mode: CAP C1 or C2
A narration of selected TV programs is
displayed.
Check TV program listings for CC
(Closed Caption) broadcasts.
Caption Mode: TEXT C1 or C2
The lower half of the screen will be
blocked out. When the TV station
broadcasts information, such as program
listings, it will appear in this space.
Caption Mode: OFF
Closed Caption /Text narration will not be
displayed.
NOTE :
The closed caption or text signal may be
broadcast over C1, C2, or both.
Also, text contents can vary so you may
wish to try different settings.
24
DF2702-K(P24-25TV CC).p65 2002/03/08, 18:2824

Important:
*
I
f a remote control button does not work when pressed, press the button on the remote
and try the button again.
Caption On Mute Feature
Closed Caption narration, if available, is displayed
when MUTE button is pressed for silence.
Press ACTION
to display MAIN MENU.
1
2
3
4
5
M A I N MENU
LOCK
DVD
CLOC
TV
SELECT :
END : ACT I ON
SET
UP TV
CAPT I ON
I NPUT
SELECT : T
SET UP V I DEO / AUD I
FM
ANT
ENNA : I
REMOTE W
ARN I NG
VOL ADJUST : + 2
DVD
SELECT :
: ACT I ON
END
CAPT I ON
CAPT I ON MODE
CC ON MUTE
SELECT :
SET : SET
END
: ACT I ON
CAP C1
NO
CAP C2
:
LANGUAGE
K
SET : SET
UNER
O
NT
: ON
SET : SET
OFF
:
CAP C1
1) Press to
select “TV.”
2) Press SET to
1
3
5
CH
display SET UP
TV screen.
1) Press to
select “CAPTION”.
2) Press SET to
display CAPTION
screen.
1)Press to
select CAPTION
MODE.
2)Press SET
repeatedly to
select “OFF.”
1) Press to select
CC ON MUTE.
2) Press SET
repeatedly to select
desired mode.
• Each press of SET will
change the display
as shown left.
• The caption may be
broadcast over CAP
C1 or C2.
TV Operation
Note
• When a disc supporting closed caption
is used, the subtitle and the closed
caption may overlap. In this case, turn
the subtitle or caption on mute mode off.
(See page 50.)
DF2702-K(P24-25TV CC).p65 2002/03/08, 18:2825
Press ACTION three times
to return to the normal screen.
6
Press MUTE to mute the sound and
display closed captioning.
7
• To cancel, press MUTE again.
25

TV Timer Features
SET : SET
SELECT :
END
: PROG
SET PROGRAM
T I MER PR
OGRAMM I NG
ON T I MER
S
LEEP T I MER : 00
ON-TIMER with Alarm
This unit can be set to automatically power on in one of
4 modes (TV, VCR Playback, FM radio, or DVD/Video
CD/CD.) You can also combine the On-Timer with a
one minute alarm that gradually increases in volume.
Press PROG* to display SET PROGRAM
screen.
1
SET PROGRAM
T I MER PR
2
SELECT :
SET : SET
END
3
ALARM : O
SELE CT HOU
SELECT :
SET : SET
END
• ON-TIMER mode
selection order
CH02CH
CH01
DVD
4
ALARM : O
SELE CT
C
SELECT :
SET
END
OGRAMM I NG
ON T I MER
S
LEEP T I MER : 00
: PROG
O
N T I MER
N
R
: PROG
03
CH125
FM9
FM8
O
N T I MER
N
ALARM
ANCEL : ADD / DLT
: SET BACK :
: PROG
When “ON” is selected,
an alarm will gradually increase in volume for one
minute or until cancelled by pressing any button
(including VOL + -).
To Make Corrections,
use
and to move back and correct.
Press PROG to set ON TIMER.
•“ON TIMER SET” is displayed.
5
• ON TIMER Indicator lights up on the unit.
To Cancel ON-TIMER set,
Repeat steps 1 and 2. Then, press ADD/DLT to clear
the time in step 3. Now, press PROG to end.
“ON TIMER END” briefly appears on-screen.
1)Press to select
“ON TIMER.”
2)Press SET to display
ON TIMER screen.
1) Press to select
desired settings.
2) Press SET to set the
ON-TIMER TIME or
ON-TIMER mode.
• Make sure a tape is inserted
if Playback mode is selected.
• Make sure a disc is inserted
if DVD (DVD/Video CD/CD)
mode is selected.
VCR
• See “FM Radio” on pages
FM1
28 and 29 for instructions on
how to preset FM stations.
Press to select
ALARM “ON” or “OFF.”
Ready Checklist
The clock is set to correct time.
ON TIMER Indicator
Sleep Timer
This unit can be set for auto power off.
Press PROG to display SET
PROGRAM screen.
1
1) Press
2
SLEEP TIMER 30 60 90 00
To cancel,
press SET repeatedly until 00 appears.
Press PROG to return to the
normal screen.
3
• Pressing DISPLAY with sleep
timer set displays remaining time.
Note
If no button on the remote or unit
(including a button used to turn off
the alarm) is pressed within 60
minutes after unit turns itself on, it
will turn itself back off.
to select
SLEEP
TIMER.
2) Press SET
repeatedly
to select
the desired
time.
26
DF2702-K(P26 TV timer).p65 2002/03/08, 18:2826

Important:
*
On-Screen Display (OSD)
TV/VCR Status & Clock Display
Press DISPLAY
to display or remove the overlay.
Channel Caption
Function Status
Rec Time Remaining
(OTR mode only, see
page 18.)
Receivable Broadcast
Types (See page 23.)
Current Time
REC
1 2 : 0 0P
0 : 25
STER
EO
SAP
M
ONO
Blue Screen Display
Whenever a blank section of a tape comes up in
Play mode, or when the selected channel has no
broadcast signal with the Weak Signal Display
Feature set to “OFF” (see page 39), the screen will
turn solid blue.
(See page 38.)
ABC
M
-0 : 1 2 : 3 4
SP
If a remote control button does not work
when pressed, press the button on
the remote and try the button again.
Counter
Tape Speed
(See page 4.)
TV Operation
DF2702-K(P27 VCR status ).p65 2002/03/08, 18:2827
Channel & Function Display
When a function button is pressed (PLAY, FF, etc.)
or you change channels, the unit mode or channel
number will be displayed. (Some station names
may also appear if Channel Caption is set. See
page 38.)
0 8
A
BC
PLAY
27

FM Radio
FM Radio is ...
This unit has an FM radio with built-in antenna, 9 station preset, and a band range of
87.5 ~ 108.1 MHz. You can even set the On-Timer (page 26) to wake up to your favourite
radio station.
FM Radio Setup
Press FM on the remote or
press TV/FM on the unit to display
1
FM radio mode.
Press a number
key* (1~9) to
select the FM
2
1 2 : 0 0PM
FM 1 87. 5MHz
preset number.
1) Press CH
to select the
desired radio
station. (Each
press changes
frequency by 200
KHz.)
3
1 2 : 0 0PM
FM
1 8 7. 7MHz
MEMORY : PRESS
1 2 : 0 0PM
ADD / DLT KEY
2) Press ADD/DLT
FM
1 8 7. 7MHz
MEMOR I ZED
To Make Corrections,
select station with a
number key, then do
step 3 again.
To exit FM mode,
press
remote or TV/FM on the
unit.
or DVD on the
to set the radio
station.
Hold down CH or
for a few seconds,
then release to
quickly scan for FM
stations in your area.
• To cancel, press
CH or while in
search mode.
FM Antenna Setup
Make sure FM tuning is done
correctly (see FM Radio Setup).
Press ACTION
to display MAIN MENU.
1
TV/FM
CH
1)Press
2)Press SET
1
3
5
CH
2
M A I N MENU
LOCK
DVD
CLOC
TV
SELECT :
END : ACT I ON
LANGUAGE
K
SET : SET
28
DF2702-K(P28-29 FM).p65 2002/03/08, 18:2828
to select “TV.”
to display SET
UP TV screen.
Continued on next page.

Important:
*
I
f a remote control button does not work when pressed, press the FM button on the remote
and try the button again.
SET
UP TV
ARN I NG
: ON
SET : SET
CAPT I ON
I NPUT SELECT : T
3
SET UP V I DEO / AUD I
FM
ANT
ENNA : I
REMOTE W
VOL ADJUST : + 2
DVD
SELECT :
END
: ACT I ON
■■
■ For cable TV users
■■
➛ “INT”
■■
■ For antenna users
■■
➛ “EXT”
Press ACTION twice to end setup.
4
1)Press to
UNER
O
NT
2)Press SET to
select FM
ANTENNA.
select “INT
(INTERNAL)” or
“EXT
(EXTERNAL)” to
determine which
one sounds best.
Using FM Radio
Press FM on the remote or
press TV/FM on the unit to display
1
FM radio mode.
1 2 : 0 0PM
2
FM 1 87. 5MHz
To exit FM mode,
press
or DVD on the remote or TV/FM
on the unit.
Audio Mode for FM Radio
1 2 : 0 0PM
STERE
O
M
ONO
FM
1 8 7. 7MHz
Notes
• FM radio cannot be recorded on a Video cassette.
• You may get better reception by repositioning the unit.
• You cannot select FM Radio mode during playback or record, or while
a blue back screen (PROG, ACTION, MENU) is displayed.
• Once stations are set, the selected station and current time are
displayed when FM Radio mode is entered.
To remove time, press DISPLAY. If DISPLAY is pressed again, the unit
status screen appears.
TV Operation
Press a number
key (1~9) to
select a preset
FM number
(see FM Radio
Setup on page 28).
Press AUDIO
repeatedly to select
“STEREO” or “MONO”
in FM Radio mode.
29
DF2702-K(P28-29 FM).p65 2002/03/08, 18:2829

Timer Recording
You can set up to 8 programs to be recorded while
you are away.
Press PROG* to display SET
PROGRAM screen.
1
SET PROGRAM
T I MER PR
2
SELECT :
SET : SET
END
DATE START ST
3
7
TODA
- - - - - - - - -- - - - - - - -- - - - - - -
SELE CT
SELE
SET
END
ON T I MER
S
LEEP T I MER : 00
: PROG
FR I
--:--
Y
START DAT
CT :
: SET
: PROG
OGRAMM I NG
OPC
--:-- --
E
Example
Today’s
Date
SELECT / Selection Order
7
WEEKLY
(SAT)
Repeat step 3 to set:
• Start time, stop time
• Channel (or LINE for outside source)
• Speed (SP, LP, SLP)
1) Press to select
TIMER PROGRAMMING
2) Press SET to
display screen
• If a program is already in
memory, press , and
SET to select an unused
program number.
H
Press to select
and SET or to set
SLP
the recording DATE.
• 1~31 = One time
• DAILY = MON~FRI
• WEEKLY SUN~SAT
= Same time once a week
2
31
WEEKLY
(MON)
1
68 9
WEEKLY
(SUN)
DAILY
.
Ready Checklist
All connections are made.
Your unit is plugged in.
The clock is set to correct time.
The tape is long enough.
The record tab is in place.
.
PROG TIMER Indicator
4
P DT START
1
2
3 -- -- : -4 -- -- : --
STOP CH
day 9 : 00 p 12 : 00a 08 SP
-- -- : --
-- : -- --
-- : -- --
-- : -- --
CANCEL : ADD / DLT
SELECT
E
NTER :
END
: PROG
1 - 8
SET
:
SPD
--
--
--
Press PROG twice to exit this mode.
• If you’re using a cable box, make sure that it
5
is tuned to the desired channel and the power
is left on for timer recording.
• PROG TIMER Indicator lights up on the unit.
30
DF2702-K(P30-31 Timer Rec).p65 2002/03/08, 18:2830
Press PROG to end
the program.
To Enter More
Programs,
press to select
and SET to set a blank
program number, and
then repeat step 3.

Important:
*
I
f a remote control button does not work when pressed, press the button on the remote
and try the button again.
Cancel a Timer Recording:
(Recording is in progress)
Hold down STOP for a few seconds
to cancel the Timer Recording.
• Any future daily or weekly recordings
will be performed as programmed.
Review, Replace or Clear Program
Contents : (
Repeat steps 1 and 2 on page 30.
1
2
Recording is not in progress
Press to select
the desired program.
CANCEL : ADD / DLT
SELECT
E
NTER :
END
: PROG
1 - 8
SET
:
To Replace program...
3
DATE
S
8 SAT 9:00
TODA
Y
- - - - - - - - -- - - - - - - -- - - - - - -
SELE CT
SELECT :
SET
: SET
END
: PROG
TART
S
P 12: 00A
START DAT
TOP
E
BACK :
1) Press SET to display.
CH
08
2)
SLP
Press to select
and press SET or
to set new
program contents.
3) Press PROG.
To Clear program...
P DT START
1 -- -- : --
2
3
4
STOP CH
-- : -- - 8 10 : 00p 12 : 00a
10 8 : 00p 9 : 00p 10
SU
9 : 00p 10 : 00p
1 - 8
SELECT
E
NTER :
END
: PROG
SET
:
125
L1
S
PD
Press ADD/DLT.
-SP
SP
LP
)
Timer Operation
DF2702-K(P30-31 Timer Rec).p65 2002/03/08, 18:2831
Press PROG twice to exit this mode.
4
Notes
• 2 minutes before Timer recording is performed,
“PLEASE PREPARE FOR TIMER REC” appears
and/or the PROG TIMER Indicator flashes.
Be sure a cassette with record tab is loaded and the
unit is in Stop mode.
• If the start times of two programs overlap, the lower
numbered program will have priority.
• If the start time for a Timer Recording comes up
during a normal recording or One Touch Recording
(page 18), the Timer Recording will not be performed.
• If there is a power interruption of more than one
minute, the recording may not be performed or
continued.
• If “INCOMPLETE” appears after all items have been
set, check all entries and make necessary
corrections.
31

Cable Box Universal Remote Control Feature
Universal Remote Control is...
The Remote Control may be set up to control some
basic DSS or Cable box functions.
The Universal Remote Control Setup
Find your DSS box or Cable box
Brand Code Number from one of
1
the charts on the next page.
Setup remote.
2
Hold down DSS CABLE and press
number keys to enter code.
• If code number is 100 or greater,
e.g., press 1 - 0 - 2 for 102.
Confirm code entry.
3
Press POWER* to turn selected unit
ON or OFF.
• See below for controllable functions in each
mode.
Notes
• Please repeat the Universal Remote Control Setup
after replacing remote control batteries.
• The remote control will not operate all DSS receivers
or Cable Boxes made by the manufacturers listed.
If you get no results, your particular brand cannot be
controlled.
Using the Universal Remote Control
(Available Buttons / Functions)
Once the remote control has been properly set up,
you can select TV-VCR, FM, DVD, DSS or CABLE
mode depending on which functions you wish to
control.
Press , FM, DVD or DSS CABLE on the
remote control to select the desired mode. (See below
for buttons available in each mode.)
Set to , FM, DVD:
All TV functions, as well as functions of TV-VCR, FM,
or DVD.
Set to DSS CABLE:
• Basic VCR functions, e.g. PLAY, REC, etc.
• CABLE/DSS function, e.g. POWER, ENTER,
NUMBER keys (except 100 key), CH UP/DOWN.
32
DF2702-K(P32-33 Univ rem).p65 2002/03/08, 18:2832

Important:
*
If a remote control button does not work when pressed, press the , DVD, FM button on
the remote and try the button again.
DSS Brand Code Numbers
Toshiba ........................................................... 90
Hitachi/ Hughes ........................................ 91, 99
Primestar ........................................................ 92
Drake .............................................................. 93
Magnavox ................................................. 94, 95
Uniden ....................................................... 94, 95
Cable Box Brand Code Numbers
Archer ....................... 44, 06, 01, 120, 05, 63, 126
Cableview ...... 29, 09, 01, 63, 120, 44, 42, 30, 52,
Citizen ................ 44, 52, 30, 63, 42, 04, 124, 126
Curtis ................................. 08, 09, 25, 61, 53, 87
Century .................................. 44, 51, 75, 59, 126
Cabletenna ...............29, 09, 01, 63, 120, 44, 126
Cable Cinema ...........29, 09, 01, 63, 120, 44, 126
Diamond ...................29, 09, 01, 63, 120, 44, 126
Eagle .................... 62, 40, 22, 13, 58, 20, 26, 107
Eastern .............................................. 28, 29, 130
Explorer ............................. 08, 09, 25, 61, 53, 87
Gemini ............................................... 30, 04, 124
General Electric ................................. 01, 57, 120
General Instruments .... 01, 84, 83, 34, 03, 02, 04,
55, 65, 66, 67, 68, 120, 106, 121, 122, 115, 117,
Gerrard .......................................... 44, 51, 75, 59
GC Electronics ............. 44, 42, 63, 29, 30, 52, 04,
Hamlin ............ 41, 14, 15, 28, 102, 104, 103, 130
Hitachi ............................................................. 31
Jerrold ........ 01, 84, 83, 34, 03, 02, 04, 55, 65, 66,
67, 68, 120, 106, 121, 122, 115, 117, 118, 124
Jasco ................................................. 30, 04, 124
Macom ............................................................ 31
Magnavox ................................................ 26, 112
Matsushita ............................. 17, 16, 08, 87, 109
Movietime ...................32, 39, 42, 44, 126, 38, 40
Maestro ..................................................... 74, 35
NEC .............................................. 40, 19, 38, 32
NSC .............................................. 40, 19, 38, 32
Novavision ......................... 08, 09, 25, 61, 53, 87
Next Level ............. 01, 84, 83, 34, 03, 02, 04, 55,
65, 66, 67, 68, 120, 106, 121, 122
Oak ........................................... 46, 11, 129, 101
04, 124, 126
118, 124
124, 126
Optimus .................................................... 94, 95
Panasonic ....................................................... 96
ProScan .......................................................... 97
RCA ................................................................ 97
SONY ...................................................... 98, 105
Oak Sigma ................................. 46, 11, 129, 101
Panasonic .............................. 17, 16, 08, 87, 109
Philips ................. 23, 24, 20, 13, 07, 50, 128, 129
Pioneer ................................................ 06, 05, 12
Pulsar ................. 04, 42, 63, 44, 30, 52, 124, 126
Quest .................................................. 06, 05, 12
Radio Shack ...........................44, 51, 75, 59, 126
RCA ....................................... 17, 16, 08, 87, 109
Realistic ..................................44, 51, 75, 59, 126
Recoton ..................................44, 51, 75, 59, 126
Regal .............. 41, 14, 15, 28, 102, 104, 103, 130
Regency ............................................ 28, 29, 130
Rembrandt ... 44, 42, 63, 29, 01, 32, 39, 120, 126
Samsung ..................................42, 06, 32, 05, 40
Scientific Atlanta .................08, 09, 25, 61, 53, 87
Sheritech ......................................................... 27
Signal ...................................................... 26, 112
SL Marx .......... 42, 06, 32, 40, 43, 44, 52, 63, 126
Sprucer ................................... 17, 16, 08, 87, 109
Standard Components ........... 32, 39, 42, 44, 126
Stargate ........... 04, 42, 32, 40, 63, 44, 30, 52, 06,
124, 126
Sylvania ..................................................... 19, 18
Teknika ...................................................... 74, 35
Telecaption .............................................. 77, 127
Teleview ............................. 40, 19, 38, 32, 42, 06
Texscan ..................................................... 19, 18
Tocom .............................. 34, 33, 01, 42, 66, 120
Toshiba ........................................................... 36
Unika ........................ 44, 42, 63, 29, 01, 126, 120
Universal .......................... 52, 43, 44, 63, 42, 126
Viewstar ............... 62, 40, 22, 13, 58, 20, 26, 107
Videoway ...................................... 07, 23, 50, 129
Vidtek .............................................................. 64
Zenith ........................................... 07, 23, 50, 129
Advanced Operation
Notes
• In DSS or CABLE mode, it may be necessary to press ENTER after pressing number
keys for channel selection.
• In DSS or CABLE mode, POWER, CH Up/Down, Number Keys, ACTION, PROG,
DISPLAY/ENTER, SEARCH/SKIP-, R-TUNE, SELECT, SET, CM SKIP/ZERO/SKIP+,
COUNTER RESET/ZOOM, ANGLE, AUDIO, TITLE, SUB TITLE, MENU, or ADD/DLT are
not available. Press
, FM, DVD to use these functions.
• Depending on your DSS receiver or Cable box brand, some of the functions listed may not
be remote controllable.
• Some DSS receiver or Cable box brands require you to turn on the power manually.
• Due to changes in infra-red commands used by manufacturers, some brands
have several codes. If your unit does not respond to the first code, please try the next one.
DF2702-K(P32-33 Univ rem).p65 2002/03/08, 18:2833
33

Tape Operation
Search System is ...
Each time a recording is made, an invisible index mark is placed on the tape.
When timer recordings are made, program index and information are also included.
These index marks can be used to access or scan recordings.
Index Search
Go directly to the desired recording.
ENTER I NDEX NUMBER : 1
1
US I
FOR
REVERSE SEARCH
NEXT
EX
I NDEX SEARCH
NG 1- 9
KEYS
W
ARD SEARCH : FF
:
SEARCH
I T :
STOP
:
REW
Press SEARCH*
in Playback or
Stop mode to
display INDEX
SEARCH screen,
and then press
number keys
to select the
recording number.
• To calculate
Press FF or REW
to start search.
2
I NDEX SEARCH
FOR
W
ARD SEARCH : FF
REVERSE SEARCH
:
Play begins at
search end.
To search forward
or back 1 index,
press FF or REW
REW
while screen left is
displayed (10
seconds).
To cancel, press PLAY or STOP.
number, see below.
FFREW
■■
■ To calculate the Index Number
■■
Example 1:
To go to rec. 2 from rec. 4, enter 3 and press REW.
61572 34
Example 2:
To go to rec. 6 from rec. 2, enter 4 and press FF.
17534 62
NOTE: indicates start points of each recording.
34
DF2702-K(P34-37 tape OP).p65 2002/03/08, 18:2834
Notes
• Make each entry within 5 minutes,
or the Index Search mode will be
cancelled.
• If Index Search is started very close
to an index mark, that index mark
may not be counted in the search.

Important:
*
If a remote control button does not work when pressed, press the button on the remote
and try the button again.
Program End Search
Locates end point of recording for continuity.
Press SEARCH twice in Playback or
Stop mode to display PROGRAM
1
END SEARCH screen .
Press FF
to start search.
To cancel,
press PLAY or STOP.
2
PROGRAM END SEARCH
SEARCH START : FF
I T :
SEARCH
EX
Example of Program End Search operation.
Fig.1
Program 1
Press SEARCH button
Fig.2
Program 1
Press SEARCH button
Fig.3
If search exceeds a few seconds in BLANK area.
Program 1
End Point
PLAYBACK DIRECTION
INDEX
Program 2 or BLANK
BLANK
End Point
INDEX
Program 2
FF
FF
BLANK
Press SEARCH button
FF
INDEX
BLANK
End Point
Program 2
Upon locating end point...
The unit searches slightly past end point,
reverse searches, and plays the last few
seconds of the program, then stops.
Advanced Operation
DF2702-K(P34-37 tape OP).p65 2002/03/08, 18:2835
Press SEARCH button
Note
• If Program End Search is started very close
to an index mark, that mark may be
skipped over.
35

Tape Operation (continued)
Repeat Play
Set to see a recording over and over.
PLAY
REPEAT ON
To turn “ON,”
press PLAY/REPEAT on the unit
repeatedly in Play mode to select
“REPEAT ON”.
To turn “OFF,”
repeat above to select “REPEAT OFF.”
• Playback repeats when tape end is
reached or unrecorded portion over 30
seconds is detected.
Note
• For repeat play in DVD mode, see page 57.
Zero Search
To quickly return to a specific tape counter location.
Press DISPLAY* during playback
to display the Counter.
1
PLAY 12 : 00
PM
2
Continue playback, rewind, or
fast forward.
3
Press STOP.
4
Press CM/ZERO in stop mode to
start ZERO SEARCH.
5
• Unit goes into FF or REW mode and
stops at the last point the Counter was
set to 0:00:00.
Press COUNTER
0 : 00 : 00
RESET at the
SLP
desired position to
reset to “0:00:00.”
36
DF2702-K(P34-37 tape OP).p65 2002/03/08, 18:2836
PLAY/REPEAT

Important:
*
If a remote control button does not work when pressed, press the button on the remote
and try the button again.
Auto Operation Functions
■■
■ Auto Shut Off
■■
No broadcast signal in TV mode (Only when
Weak Signal Display is set to OFF.), DVD stop,
or blank tape is played for 5 minutes
➛ Power turns off
• This feature is cancelled if any button is
pressed during above conditions.
■■
■ Auto Playback
■■
Insert a tape in Power off mode
➛ Power turns on
• Playback begins if tape has no record tab.
■■
■ Auto Rewind (except for Recording)
■■
Tape reaches its end
➛ Rewind, ➛ Stop
■■
■ Playback Auto Eject
■■
Tape with no record tab reaches its end
➛ Rewind, ➛ Stop, ➛ Eject
(Repeat Play is “OFF”)
Commercial Skip
By pressing the CM/ZERO button in Playback mode
you can skip over 1 to 3 minutes of recorded tape in
just a few seconds.
Press CM/ZERO repeatedly to select skip
time in Playback mode.
• No indication appears.
Advanced Operation
DF2702-K(P34-37 tape OP).p65 2002/03/08, 18:2837
37

Special VCR Features
Channel Caption
Press ACTION*
to display MAIN MENU.
1
M A I N MENU
2
3
4
DVD
TV
SELECT :
END : ACT I ON
SET UP CHA
ANT
ENNA
UTO SE
A
CHA
NNEL
W
EAK S I GNAL D I
SELECT :
SET
: SET
END
: ACT I ON
CHANNEL CAPT I ON
ABC
CBS
FOX
NBC
SELE
CT :
SET
: SET
END
: ACT I ON
CHANNEL
ABC
CBS
FOX
NBC
CLEA
R : ADD / D
SELE
CT :
SET
:
END
: ACT I ON
: CABLE
T
CAPT I
- -
- -
-
-
-
-
-
-
SET
LOCK
CLOC
K
ON
SPLAY : OFF
PB
C
NN
-
-
ESPN
-
-
H
BO
-
-
CAPT I ON
PB
C
NN
ESPN
H
BO
LT
LANGUAGE
SET : SET
NNE
L
S
S
1) Press to
select “CH.”
1
2) Press SET to
3
5
CH
display SET UP
CHANNEL screen.
1) Press to select
CHANNEL CAPTION.
2) Press SET to
display screen.
1) Press to select a
-
-
-
-
-
-
-
-
station.
2) Press SET (or ) to
move cursor to the
right.
3) Press to select
channel number.
4) Press
SET (or )
set preset captions.
• Repeat step 4 until the
Caption List is complete.
Channel Caption is ...
Station names, e.g. ABC, CNN, etc.
are set so they will appear when a
channel is selected. Choose 24
preset names.
Ready Checklist
You need a list of stations and the
channel numbers you receive them
on.
to
To Make Corrections
Press , then SET (or ) to select channel
number.
Press
to change, or ADD/DLT to delete.
Press ACTION three times
to end setup.
5
38
DF2702-K(P38 CH captioon).p65 2002/03/08, 18:2838

Important:
*
If a remote control button does not work when pressed, press the button on the remote
and try the button again.
Ready Checklist
It is necessary to enter TV mode by pressing
before selecting “CH” on the MAIN MENU.
Remote Warning Feature
When Universal Remote Control (page 32) is
used, and this feature is set to “ON,” a warning
appears whenever an invalid key is pressed in
DSS or Cable mode.
Press ACTION
to display MAIN MENU.
1
M A I N MENU
2
3
• “REMOTE WARNING : OFF”
DVD
TV
SELECT :
END : ACT I ON
CAPT I ON
I NPUT SELECT : T
SET UP V I DEO / AUD I
FM
ANT
REMOTE W
VOL ADJUST : + 2
DVD
SELECT :
END
: ACT I ON
LOCK
CLOC
K
SET
UP TV
ENNA : I
ARN I NG
: ON
LANGUAGE
SET : SET
SET : SET
➛ Remote warning will not appear even if
invalid key is pressed.
Press ACTION twice
to return to normal screen.
4
1) Press to
select “TV.”
2) Press SET to
1
3
5
CH
UNER
O
NT
display SET UP
TV screen.
1)Press to
select REMOTE
WARNING.
2)Press SET to
set “ON” or
“OFF.”
REC
Weak Signal Display Feature
When “ON” is selected, the picture is displayed even
when a broadcast signal is weak or non-existent.
Press ACTION
to display MAIN MENU.
1
2
M A I N MENU
LOCK
DVD
CLOC
TV
SELECT :
END : ACT I ON
LANGUAGE
K
SET : SET
1) Press
“CH.”
1
3
5
2) Press SET to
CH
display SET
UP CHANNEL
to select
screen.
3
Notes
SET UP CHA
ANT
ENNA
UTO SE
A
CHANNEL CAPT I ON
W
EAK S I GNAL D I
SELECT :
SET
: SET
END
: ACT I ON
: CABLE
T
NNE
SPLAY : OFF
L
1) Press to
select WEAK
SIGNAL
DISPLAY.
2) Press SET to
set “ON” or
“OFF.”
•“ON” = Picture is displayed regardless of
signal condition, and may not
always be clearly visible.
“OFF”= Screen turns solid blue when
signal is absent or weak.
• If unit is connected to equipment which
has blue back feature, selecting “ON” will
have no effect on the other equipment.
Press ACTION twice
to return to the normal screen.
4
VCR Lock
All operations are prohibited except Timer
recording and tape eject. Useful for families
with small children.
In Stop mode, hold
down REC on the
VCR L
OCK ACT I VATED
unit without a
cassette inserted
for 7 seconds to
VCR L
OCK OFF
turn “ON.”
(Please ignore “NO
CASSETTE”
warning.)
Repeat above with
or without cassette
to turn “OFF.”
• VCR Lock is cancelled automatically
after about 24 hours if clock is set.
39
Advanced Operation
DF2702-K(P39 SPECIAL VCR).p65 2002/03/08, 18:2839

V-Chip Control Feature
V-Chip Control Feature is...
This unit has a built-in V-Chip Control which allows
you to block unwanted TV usage based on US
MOVIES, US TV PROGRAMS, Canadian English
Language and Canadian French Language Ratings.
Enter Secret Code
A 4-digit code must be entered to view a blocked
program or change rating settings.
Press ACTION*
to display MAIN MENU.
1
M A I N MENU
2
3
DVD
TV
SELECT :
END : ACT I ON
ENTER 4-D I G I T
BACK SPACE
ENTER : 0
: ACT I ON
END
LOCK
CLOC
LOCK
-
9
- -
:
LANGUAGE
K
To Make Corrections
Press repeatedly to
move the cursor.
Press number keys to
make the correction.
1) Press to
select “LOCK.”
2) Press SET to display
1
3
5
CH
SET : SET
LOCK screen.
1) Press number keys
CODE
to enter your secret
code.
2) Enter same code
again for confirmation.
• Step 2) not necessary
when changing rating or
secret code.
• Take care that you are
not observed entering
the secret code.
Process of V-Chip Control Feature
Enter Code
Setup
Blocking
LOCK
CONF I RM 4-D I G I T CODE
4
CHANGE
CONT
END
****
RECOGN I ZED
****
CODE : ADD / DLT
I
NUE : SET
: ACT I ON
Press SET to display
LOCK MENU (see
pages 41, 42).
Or
Press ACTION twice
to exit.
Changing your secret code
• You will need your current code.
Do steps 1 ~ 3. In step 4, press CLEAR to clear
current code.
Repeat steps 3 and 4 to enter new code.
40
DF2702-K(P40 V-chip).p65 2002/03/08, 18:2840
Notes
• Some rental movies do not
include V-Chip data.
• DO NOT forget your secret code.
• Once ratings are set, restricted
tapes or programs cannot be
accessed unless the secret code
is entered.

Important:
*
If a remote control button does not work when pressed, press the button on the remote
and try the button again.
If LOCK menu is not displayed, perform
“Enter Secret Code” steps on page 40.
US MOVIES Ratings
1
■ “ON”
■ “OFF”
2
3
NR (Not Rated) PROGRAMS
Some movies, such as old movies
or foreign movies usually have no ratings.
LOCK
US MOV I ES
: O
CHANGE
US
DVD
SELECT :
END
US MOV I ES
US
DVD
SELECT :
END
SETT I
TV PROGRAMS
CHANGE
SETT I
LOCK
CHANGE
SETT I
NEXT PAGE
: ACT I ON
➛➛
➛ V-Chip Control is activated.
➛➛
➛➛
➛ V-Chip Control is deactivated.
➛➛
LOCK
: O
CHANGE
SETT I
TV PROGRAMS
CHANGE
SETT I
LOCK
CHANGE
SETT I
NEXT PAGE
: ACT I ON
NGS
NGS
NGS
SET : SET
NGS
NGS
NGS
SET : SET
1)Press to select
FF
: O
: O
: O
: O
US MOVIES.
FF
2)Press SET to set
FF
“ON” or “OFF.”
1)Press to select
FF
CHANGE
FF
SETTINGS.
FF
2)Press SET to
display screen.
1)Press to select
VIEW NR
PROGRAMS?.
2)Press SET to set
“YES” or “NO.”
Process of V-Chip Control Feature
Enter Code
Setup
US MOVIES RATINGS
G
GENERAL AUDIENCE:
All ages admitted.
PG
PARENTAL GUIDANCE:
Some material may not be suitable
for children.
PG-13
PARENTS CAUTIONED:
Some material may be
inappropriate for children under 13.
R
RESTRICTED:
Children under 17 must be
accompanied by a parent or adult.
NC-17
OVER AGE 17 ONLY:
No one 17 and under admitted.
X
ADULTS ONLY:
Blocking
Advanced Operation
1) Press to select
4
and SET to set
ratings to be
blocked.
(See ratings chart
on this page.)
Press ACTION to redisplay LOCK menu
and continue with US TV PROGRAMS
5
Ratings Setup (next page).
Or, press ACTION four times to exit.
DF2702-K(P41-45 V-chip).p65 2002/03/08, 18:2841
41

V-Chip Control Feature (continued)
If LOCK menu is not displayed, do
“Enter Secret Code” steps on page 40.
US TV PROGRAMS Ratings
1
■ “ON”
■ “OFF”
2
V I EW NR
3
NR (Not Rated) PROGRAMS
Some TV shows, such as news, sports,
weather, bulletins, emergency information
usually have no ratings.
V I EW NR
4
Note
You may select from
standard TV ratings
(chart 1), or customize
to a specific content rating
(chart 2).
LOCK
US MOV I ES
: O
CHANGE
US
DVD
SELECT :
END
US MOV I ES
US
DVD
SELECT :
END
CONTA
SELECT :
END
FOR
SELECT :
END
SETT I
TV PROGRAMS
CHANGE
SETT I
LOCK
CHANGE
SETT I
NEXT PAGE
: ACT I ON
➛➛
➛ V-Chip Control is activated.
➛➛
➛➛
➛ V-Chip Control is deactivated.
➛➛
LOCK
: O
CHANGE
SETT I
TV PROGRAMS
CHANGE
SETT I
LOCK
CHANGE
SETT I
NEXT PAGE
: ACT I ON
PROGRAMS
TV-Y
FV
TV-Y7
TV
-
G
V
TV-PG
TV-1 4
TV
TV-Y
TV
TV
TV-PG
TV-1 4
TV
V
V
-
MA
I
NS NO RAT I NG
SET : SET
: ACT I ON
PROGRAMS
FV
-
Y7
-
G
V
V
V
-
MA
ALL
CH I
LDREN
SET : SET
: ACT I ON
NGS
: O
NGS
: O
NGS
SET : SET
NGS
: O
NGS
: O
NGS
SET : SET
? :
YES
UNLOCKED
S L D
S L D
S L
? :
YES
UNLOCKED
S L D
S L D
S L
1) Press * to
FF
select US TV
FF
PROGRAMS.
FF
2) Press SET to set
“ON” or “OFF.”
1)Press to select
FF
CHANGE
FF
SETTINGS.
FF
2)Press SET to
display screen.
1)Press to
select VIEW NR
PROGRAMS?.
2)Press SET to set
“YES” or “NO.”
1)Press to select
and SET to set
ratings to be
blocked.
(See ratings charts
on this page.)
• Ratings highlighted in
Green will be blocked.
Ratings in white letters
will not be blocked.
Process of V-Chip Control Feature
Enter Code
US TV PROGRAMS RATINGS:
Chart 1
TV-Y
FOR ALL CHILDREN:
Content specifically geared to young
viewers ages 2-6.
TV-Y7
TV-PG
TV-MA
FOR AGE 7 AND OLDER:
May contain mild physical or comedic
violence which may frighten children
under 7.
TV-G
GENERAL AUDIENCE:
Contains little or no violence, strong
language, or sexual dialogue or
situations.
PARENTAL GUIDANCE:
May contain infrequent coarse
language, limited violence, some
suggestive sexual dialogue and
situations.
PARENTS CAUTIONED:
TV-14
May contain sophisticated themes,
sexual situations, strong language,
and more intense violence.
MATURE AUDIENCE:
May contain mature themes, profane
language, graphic violence, and
sexual situations.
US TV PROGRAMS RATINGS:
Chart 2
Fantasy Violence
FV
Violence
V
Sexual Situations
S
Adult Language
L
Sexually Suggestive Dialogue
D
Setup
Blocking
Press ACTION four times
to exit this mode.
5
42
DF2702-K(P41-45 V-chip).p65 2002/03/08, 18:2842

Important:
*
If a remote control button does not work when pressed, press the button on the remote
and try the button again.
If LOCK menu is not displayed, do
“Enter Secret Code” steps on page 40.
Canadian English Language
Ratings
1
2
■ “ON”
■ “OFF”
3
V I EW E
4
E (Exempt) PROGRAMS
Some TV shows, such as news, sports,
weather, bulletins, and emergency
information usually have no ratings.
LOCK
US MOV I ES
: O
CHANGE
US
DVD
SELECT :
END
SELECT :
END
EXEMPT
SELECT :
END
SETT I
TV PROGRAMS
CHANGE
SETT I
LOCK
CHANGE
SETT I
NEXT PAGE
: ACT I ON
LOCK
: ACT I ON
➛➛
➛ V-Chip Control is activated.
➛➛
➛➛
➛ V-Chip Control is deactivated.
➛➛
PROGRAMS
C
C8+
G
PG
1 4+
1
8+
: ACT I ON
NGS
: O
NGS
: O
NGS
SET : SET
SET : SET
? :
YES
UNLOCKED
SET : SET
1)Press to select
FF
NEXT PAGE.
FF
2)Press SET to
FF
display screen.
1)Press to select
CANADIAN
ENGLISH.
2)Press SET to set
“ON” or “OFF.”
1)Press to select
CHANGE
SETTINGS.
2)Press SET to
display screen.
1)Press to select
VIEW E
PROGRAMS?.
2)Press SET to set
“YES” or “NO.”
Canadian English Language RATINGS
C
Children
C8+
PG
14+
18+
Children 8 years and older
General Audience
G
Parental Guidance
Viewers 14 years and older
Adult Programming
Advanced Operation
V I EW E
PROGRAMS
? :
YES
Press to select
5
SELECT :
END
: ACT I ON
SET : SET
and SET to set ratings
to be blocked. (See
ratings chart on this
page.)
Press ACTION to redisplay LOCK menu
and continue with Canadian French
6
Language Ratings Setup (next page).
Or, press ACTION four times to exit.
DF2702-K(P41-45 V-chip).p65 2002/03/08, 18:2843
43

V-Chip Control Feature (continued)
If LOCK menu is not displayed, do
“Enter Secret Code” steps on page 40.
Canadian French Language
Ratings
1
LOCK
US MOV I ES
: O
CHANGE
US
DVD
SELECT :
END
SETT I
TV PROGRAMS
CHANGE
SETT I
LOCK
CHANGE
SETT I
NEXT PAGE
: ACT I ON
NGS
NGS
NGS
SET : SET
1)Press * to select
FF
: O
: O
NEXT PAGE.
FF
2)Press SET to
FF
display screen.
2
■ “ON”
■ “OFF”
3
4
LOCK
CANADIAN ENGLISH
CHANGE SETT I
CANADIAN
CHANGE SETT I
SELECT :
END
: ACT I ON
CANADIAN ENGLISH
CHANGE SETT I
CANADIAN
CHANGE SETT I
SELECT :
END
: ACT I ON
8 ANS+
13 ANS+
16 ANS+
18 ANS+
SELECT :
END
: ACT I ON
FRENCH : O
PREVIOUS PAGE
➛➛
➛ V-Chip Control is activated.
➛➛
➛➛
➛ V-Chip Control is deactivated.
➛➛
LOCK
FRENCH : O
PREVIOUS PAGE
G
: O
FF
NGS
FF
NGS
SET : SET
: O
FF
NGS
FF
NGS
SET : SET
SET : SET
1)Press to select
CANADIAN
FRENCH.
2)Press SET to set
“ON” or “OFF.”
1)Press to select
CHANGE
SETTINGS.
2)Press SET to
display screen.
1)Press to select
VIEW E
PROGRAMS?.
2)Press SET to set
“YES” or “NO.”
E (Exempt) PROGRAMS
Some TV shows, such as news, sports,
weather, bulletins, and emergency
information usually have no ratings.
V I EW E
PROGRAMS
? :
YES
Repeatedly press
to select and SET to
set ratings to be
blocked. (See ratings
chart on this page.)
5
G
8 ANS+
13 ANS+
16 ANS+
18 ANS+
GENERAL AUD I ENCE
SELECT :
END
: ACT I ON
UNLOCKED
SET : SET
Canadian French Language RATINGS
G
8 ANS +
General
Not recommended for
young children
13 ANS +
Programming may not
be suitable for children
under the age of 13
16 ANS +
Programming is not
suitable for children
under the age of 16
Press ACTION four times to exit this
mode.
6
44
DF2702-K(P41-45 V-chip).p65 2002/03/08, 18:2844
18 ANS +
Programming
restricted to adults

Important:
*
If a remote control button does not work when pressed, press the button on the remote
and try the button again.
Blocking Message
<When V-Chip Control is activated>
• If a program or movie exceeds the ratings
you have set, a message will appear on a
black background and sound is muted.
ABC
PROGRAM
RAT I NG
EXCEEDED
+
I NG : 1
3ANS
RAT
ACCESS CODE
0-9
ENTER :
----
<Canadian Rating>
PROGRAM
RAT I NG
I NG : PG-1
RAT
ACCESS CODE
ENTER :
0-9
<US Rating>
To View a Blocked Program / Movie
[Temporarily Deactivate V-Chip Control]
Enter your secret code (ACCESS CODE) in
the Blocking Message screen.
• V-Chip Control is reactivated when
power is turned off or power failure occurs.
[Deactivate V-Chip Control]
Enter your secret code (steps 1-4 page 40).
Then, set US MOVIES and/or US TV
PROGRAMS and/or CANADIAN ENGLISH
LANGUAGE and/or CANADIAN FRENCH
LANGUAGE to “OFF” using
(Ratings set on pages 41-44 are retained and
will be in effect when V-Chip Control is
activated again.)
and SET.
3
EXCEEDED
----
ABC
Process of V-Chip Control Feature
Enter Code
Setup Blocking
DF2702-K(P41-45 V-chip).p65 2002/03/08, 18:2845
Advanced Operation
45

Audio Features
Audio Mode for Playback
Choose the type of sound track for playback.
See the “Playback a Tape” section on
page 18 to playback the tape.
1
Press AUDIO repeatedly
H I F I ( L / R )
2
H
I F I ( L
)
H
I F I ( R
)
N
ORM
AL
• This screen appears when
you press AUDIO during
playback.
(each press within 5 seconds)
to select desired mode.
• Select “HIFI (L/R)”, “HIFI (L)”
or “HIFI (R)” to listen to
stereo recordings in stereo
sound. Select “NORMAL” for
monaural sound.
Audio Mode for Recording
Choose audio mode to match recording type.
Press AUDIO repeatedly to select the audio
mode according to the type of broadcast to
1
be recorded.
• The Audio mode selected stays in effect until it is
changed.
With the proper audio mode
setting, your unit can:
• record and playback MTS stereo
broadcast (main language) in
stereo Hi-Fi. Stereo sound is
recorded on the left and right
audio tracks and on the video
portion of a tape.
• record and playback a monaural
broadcast (main language) or
SAP (Secondary Audio Program,
usually in a second language) on
the Hi-Fi tracks for better quality
monaural sound.
• playback non-Hi-Fi tapes in
monaural.
See the “Record On a Tape” section on
page 18 to do a recording.
2
Notes
• Only tapes recorded in Hi-Fi stereo will playback with
true stereo sound. Standard stereo tapes will playback
with monaural sound.
• To listen to Hi-Fi stereo playback, the unit AUDIO (L/R)
jacks must be connected to a stereo amp and speakers.
• There may be a difference in audio level between Hi-Fi
and normal audio playback.
46
DF2702-K(P46-47 Audio).p65 2002/03/08, 18:2846

Important:
*
If a remote control button does not work when pressed, press the button on the remote
and try the button again.
DVD Volume Adjust
Audio recorded on a DVD or Video CD often
incorporates a dynamic range of sound.
This means that, when compared to a music CD,
etc., the average volume is generally lower and the
peaks may be higher. This unit can be set so that
the volume is increased automatically.
Press ACTION*
to display MAIN MENU.
1
1)Press to
select “TV.”
2)Press SET to display
1
3
5
CH
SET UP TV screen.
1)Press to select
UNER
O
NT
DVD VOL ADJUST.
2)Press SET to set the
level (0, +1, or +2).
2
3
M A I N MENU
LOCK
DVD
CLOC
TV
SELECT :
END : ACT I ON
SET
UP TV
CAPT I ON
I NPUT SELECT : T
SET UP V I DEO / AUD I
FM
ANT
ENNA : I
REMOTE W
ARN I NG
VOL ADJUST : + 2
DVD
SELECT :
END
: ACT I ON
LANGUAGE
K
SET : SET
: ON
SET : SET
Press ACTION twice to return to normal
screen.
4
Surround Sound System
You can hear a deeper, 3-D sound effect using just
the unit’s two front speakers.
Set Surround sound.
SURROUND ON
SURROUND OFF
Press SURROUND.
•“SURROUND ON”
is displayed.
To Cancel,
press SURROUND.
Advanced Operation
DF2702-K(P46-47 Audio).p65 2002/03/08, 18:2847
Notes
• Surround sound effect is not available for normal
(mono) broadcasts.
• The surround effect (TV, VCR mode only) is not
output to Audio Output L/R Connector.
47

Video / Audio Menu
Important:
*
If a remote control button does not work
when pressed, press the button on
the remote and try the button again.
This feature allows easy setting of picture and sound suitable for each program source.
Audio MenuVideo Menu
Press ACTION* to display MAIN
MENU.
1
1) Press
2) Press SET to
1
3
5
CH
1) Press to
UNER
O
NT
2) Press SET to
O
1) Press
2) Press SET
to select “TV.”
display SET UP
TV screen.
select “SET UP
VIDEO/AUDIO.”
display.
select “VIDEO
MENU.”
repeatedly to
select desired
2
3
4
M A I N MENU
LOCK
DVD
CLOC
TV
SELECT :
END : ACT I ON
SET
UP TV
CAPT I ON
I NPUT SELECT : T
SET UP V I DEO / AUD I
FM
ANT
ENNA : I
REMOTE W
ARN I NG
VOL ADJUST : + 2
DVD
SELECT :
: ACT I ON
END
SET UP V I DEO / AUD I
V I DEO MENU
V
A
AUD I O ADJUST
SELECT :
SET : SET
END
I DEO ADJUST
UD I O MENU
: ACT I ON
: NORMAL
: MUS I C
LANGUAGE
K
SET : SET
: ON
SET : SET
mode. (See
below.)
Press ACTION three times to end
setup.
5
to
Do steps 1 - 3 left.
a
b
SET UP V I DEO / AUD I
V I DEO MENU
I DEO ADJUST
V
UD I O MENU
A
AUD I O ADJUST
SELECT :
SET : SET
END
: ACT I ON
: NORMAL
: MUS I C
O
1) Press to
select “AUDIO
MENU.”
2) Press SET to
select desired
mode.
(See below.)
Press ACTION three times to end
c
setup.
[Audio Menu]
■■
■ NORMAL
■■
■■
■ AUTO
■■
[Audio AGC (Auto Gain Control)]
The sound level is automatically adjusted to
suit the program source (see below left).
■■
■ MOVIE
■■
Sound suited to movies.
■■
■ MUSIC
■■
Sound suited to music. (Factory setting)
■■
■ SPEECH
■■
Sound suited to dialogue.
[Video Menu]
■■
■ NORMAL
■■
Factory setting.
■■
■ MOVIE
■■
Picture is adjusted for a Movie-like feel.
■■
■ NIGHT
■■
Colour and picture intensity are adjusted
to be easier on the eyes for night
viewing.
Volume level
High
TV TV
Standard
Low
AUDIO MENU : NORMAL
CD
<Audio AGC Example>
Volume level
High
Standard
Low
48
DF2702-K(P48-49 A-V Menu).p65 2002/03/08, 18:2848
CD
TV TV
AUDIO MENU : AUTO
Notes
• The effects of this feature on the signal is not
output to the Audio/Video Output Connector.
• When AUDIO MENU mode is “AUTO,” the
AUDIO ADJUST setting will be “STANDARD.”
• AUDIO MENU settings remain in memory.
• VIDEO MENU settings do not remain in memory.

Video / Audio Adjustment
Video Adjustment
Press ACTION to display MAIN
1
MENU.
UNER
O
NT
1
3
5
CH
O
1) Press
to select “TV.”
2) Press SET to
display SET UP
TV screen.
1) Press to
select “SET UP
AUDIO/VIDEO.”
2) Press SET to
display.
1) Press to
select “VIDEO
ADJUST.”
2) Press SET to
display.
1) Press to
select an item.
(See below.)
2) Press
to
adjust.
M A I N MENU
2
3
4
5
DVD
TV
SELECT :
END : ACT I ON
CAPT I ON
I NPUT SELECT : T
SET UP V I DEO / AUD I
FM
ANT
REMOTE W
VOL ADJUST : + 2
DVD
SELECT :
: ACT I ON
END
SET UP V I DEO / AUD I
V I DEO MENU
I DEO ADJUST
V
UD I O MENU
A
AUD I O ADJUST
SELECT :
SET : SET
END
: ACT I ON
V I DEO ADJUST
COLOR
T I NT
R I GHTNESS
B
P I CTUR
SHARPNESS
AND
ARD
ST
SELECT :
ADJUST :
END
: ACT I ON
LOCK
CLOC
K
SET
UP TV
ENNA : I
ARN I NG
: ON
: NORMAL
: MUS I C
E
LANGUAGE
SET : SET
SET : SET
To Reset VIDEO Controls.
Press
and SET to select and set
“STANDARD.” All controls return to their
factory settings.
Audio Adjustment
Press ACTION to display MAIN
a
MENU.
M A I N MENU
b
c
d
e
DVD
TV
SELECT :
END : ACT I ON
CAPT I ON
I NPUT SELECT : T
SET UP V I DEO / AUD I
FM
ANT
REMOTE W
VOL ADJUST : + 2
DVD
SELECT :
: ACT I ON
END
SET UP V I DEO / AUD I
V I DEO MENU
I DEO ADJUST
V
UD I O MENU
A
AUD I O ADJUST
SELECT :
SET : SET
END
: ACT I ON
AUDIO ADJUST
BASS
TREBLE
BALANCE
STANDARD
SELECT :
ADJUST :
END
: ACT I ON
LOCK
CLOC
K
SET
UP TV
ENNA : I
ARN I NG
: NORMAL
: MUS I C
LANGUAGE
SET : SET
: ON
SET : SET
To Reset AUDIO Controls.
Press
and SET to select and set
“STANDARD.” All controls return to their
factory settings.
1) Press
2) Press SET to
1
3
5
CH
1) Press to
UNER
O
NT
2) Press SET to
O
1) Press to
2) Press SET to
1) Press
2) Press
to select “TV.”
display SET UP
TV screen.
select “SET UP
AUDIO/VIDEO.”
display.
select “AUDIO
ADJUST.”
display.
select an item.
(See below.)
to
adjust.
to
Advanced Operation
Press ACTION four times to end
setup.
6
[VIDEO Adjustment]
■■
■ COLOR Control
■■
Adjust colour intensity.
■■
■ TINT Control
■■
Adjust for natural flesh tones.
■■
■ BRIGHTNESS Control
■■
Adjust picture brightness.
■■
■ PICTURE Control
■■
Adjust picture intensity by adjusting both
contrast and colour level in the proper
balance.
■■
■ SHARPNESS Control
■■
Adjust picture sharpness.
DF2702-K(P48-49 A-V Menu).p65 2002/03/08, 18:2849
Press ACTION four times to end
setup.
f
[AUDIO Adjustment]
■■
■ BASS Control
■■
To adjust the intensity of low frequency
sound.
■■
■ TREBLE Control
■■
To adjust the intensity of high frequency
sound.
■■
■ BALANCE Control
■■
To adjust the (L/R) unit speaker output
level.
• The levels set here do not affect other
audio equipment when connected to the
Audio Output L/R Connector.
49

ENG
FRA
DEU
ITA
ESP
NLD
English
French
German
Italian
Spanish
Dutch
SVE
NOR
DAN
POR
RUS
JPN
Swedish
Norwegian
Danish
Portuguese
Russian
Japanese
CHI
KOR
MAL
VIE
THA
∗
Chinese
Korean
Malay
Vietnamese
Thai
Other
Disc Operation
Subtitle Language (DVD only)
You can select a different subtitle language
(if offered) than the one set at the Settings for DVD
Operation. (See page 60.)
Press SUB TITLE*
1
2
Te amo
Number of subtitle language being played back.
Notes
• When closed captioning is used along with subtitles, they may
overlap. If so, turn one function off. (See pages 24 and 25.)
• If after several presses of the button the language does not
change, language selection is not offered on the disc.
• Subtitles may not change to the selected language immediately.
• When power is turned on again or disc is removed, subtitles
revert to initial setting language. If the initial language is not
recorded on the disc, the disc’s priority language will appear.
in Play mode to display
the subtitle selection
on-screen.
• Display disappears after 5
seconds.
• When no subtitles are offered,
“-” will be displayed instead of
the language number.
1) Press to select
desired language.
2) Press (or ) to set.
3) Press (or ) to
select “ON” or “OFF.”
Ready Checklist
Please read “Basic DVD Operation” on
page 20.
[Subtitle language (No.)]
[Audio soundtrack language (No.)]
Audio Soundtrack Language (DVD only)
You can change the audio soundtrack language,
selected at the Settings for DVD Operation, to a
different language if available. (See page 60.)
(This operation works only with discs on which
multiple audio soundtrack languages are recorded.)
a
b
AUDIO:1 ENG
Dolby Digital 3/2.1ch
Hello
SELECT
: SET:SET
AUDIO:3 ESP
Dolby Digital 3/2.1ch
Hola
SELECT
: SET:SET
Press AUDIO in Play
mode to display the audio
selection on-screen.
• Display disappears after 5
seconds.
Audio attribute 1 type, sampling
frequency, bit No. of the disc.
1) Press to select
desired language.
Number of the audio
soundtrack language being
played back.
50
DF2702-K(P50-52)Disc OP.p65 2002/03/08, 18:2850
• Change the No. by pressing ,
and press SET.
[Audio attribute 1 type,
sampling frequency, bit No. of
the disc (see page 61)
LPCM
Dolby Digital
DTS
Notes
• If, after several presses of the AUDIO
button the language does not change,
language selection is not offered on the
disc.
• When power is turned on again or disc
is removed, language reverts to initial
setting. If this language is not recorded
on the disc, the language recorded will
be heard.
96KHz
or
48KHz
1ch - 5.1ch
1ch - 5.1ch
16bit
Linear PCM disc
20bit
24bit
Dolby Digital disc
DTS disc
]

• DVD Karaoke (1 vocal) VOCAL ON VOCAL OFF
• DVD Karaoke (2 vocals) VOCAL V1 + V2 VOCAL V1 VOCAL V2 VOCAL OFF
• Video CD LR L R
Important:
*
If a remote control button does not work when pressed, press the DVD button on the remote
and try the button again.
When
while a button is being operated,
it means that the corresponding
operation is prohibited by the unit
or the disc.
Notes
• ANGLE Indicator lights up on the unit
when a scene recorded at different
angles is detected.
• The angle number can be set
beforehand so that the angle is
switched whenever ANGLE Indicator
lights up.
appears on the screen
ANGLE Indicator
Multiple Angle Viewing (DVD only)
DVDs may contain scenes shot from multiple camera
angles allowing the same scene to be viewed at
different angles. You can view these angles,
if available, using the ANGLE button.
Press ANGLE in Play
1
2
Number of angle being played back.
Vocal selection for Karaoke discs (DVD/Video CD)
Press AUDIO in Play mode to display the
a
audio screen.
b
mode to display the angle
selection on-screen.
• Display disappears after 5
seconds.
1) Press to select the
desired angle.
1) Press (or ) to
select as shown below.
2) Press (or ) to set.
(DVD only)
Notes
• Closed captioning will not be
displayed while Picture Zoom is
used. To see subtitles, set the
subtitle feature to ON (see page 50).
• The subtitle cannot be enlarged nor
can it’s position be changed.
• The picture zoom feature does not
work with a Video CD.
• During picture zoom, “ZOOM1” or
“ZOOM2” is displayed on-screen.
• Zooming, on some discs, may result
in poor picture quality, or may not
operate at all.
DF2702-K(P50-52)Disc OP.p65 2002/03/08, 18:2851
Picture Zoom (DVD only)
You can enlarge specific portions of a picture and
select the zoom ratio using the ZOOM button on the
remote during DVD playback.
Set Zoom size.
Press ZOOM repeatedly to change display as follows.
• You can enlarge the centre portion of the image to one of 2
magnifications.
X 1.0 (ORIGINAL)
Hello! Hello! Hello!
■ Use the , , and buttons to move the position up,
down, left and right.
X 1.5 (ZOOM 1) X 2.0 (ZOOM 2)
1st press
2nd press
ZOOM 1
3rd press
ZOOM 2
51
Advanced Operation

Disc Operation (continued)
Title menu (DVD only)
Some DVDs have more than one title, e.g.
movies. If the disc offers a title menu, you can
select the desired title number. (Operation may
vary according to the disc.)
Press TITLE* in
Play mode to
display title screen.
• Pressing TITLE again
ds
resumes play from the
scene when TITLE was
first pressed.
1
T I TLE MENU
Dogs
Love
Cas t l es
r
s
<Example>
B
i r
1) Press or
number Key(s)
to select a title.
2) Press SET or
2
T I TLE MENU
Cas t l es
Dogs
Love
r
s
i r
ds
B
PLAY to start
B i rds
of the world
<Example>
play.
• Step 2) not necessary
when using number
key(s).
DVD menu (DVD only)
DVDs may offer a special menu. This menu may
include guides to unique contents, audio/subtitle
languages, etc. Although contents and operation
may vary, the following steps show basic steps
for using the menu.
DVD MENU
a
1 . SUBT I TLE
2 . AUD
I
O
3 . ANGLE
<Example>
DVD MENU
b
1 . SUBT I TLE
2 . AUD
I
O
3 . ANGLE
<Example>
Repeat step “b” if there is
more than one menu.
Press MENU in Play
mode to display DVD
menu.
• Pressing MENU again
resumes play from the
scene when MENU
was first pressed.
1) Press or
number key(s)
to select an item.
2) Press SET or
PLAY to access.
• Step 2) not necessary
when using number
key(s).
52
DF2702-K(P50-52)Disc OP.p65 2002/03/08, 18:2852

SELECT :
SET : SET END : DI SPLAY
PLAY
DISC REPEAT
PROGRAM PLAY
SET : SET END : DISPLAY
SET : SET NEXT :D ISPLAY
TRACK : 1 VI DEO CD
PBC : OFF 1 :35 : 12
Important:
*
If a remote control button does not work when pressed, press the , DVD button on the remote
and try the button again.
Program Play (Video CD/CD)
You can program specific tracks and order of play.
Press ACTION in Stop mode to display
1
MAIN MENU.
M A I N MENU
2
DVD
TV
SELECT :
END : ACT I ON
DVD MAI N MENU
LOCK
CLOC
LANGUAGE
K
SET : SET
3
SELECT :
SET : SET
END : ACTI ON
PLAY MODE
4
SELECT :
SET : SET
END : ACTI ON
PROGRAM PLAY
DI SC PROGRAM
1 61116 5 8
2 7 12 17 15 6
5
3 8 13 18 1 13
4 9 14 19 3 2
5101520 2
CLEAR LAST
CLEAR ALL START
SELECT :
SET : SET
END : ACTI ON
• Repeat step 5 to select another track.
• The selected track is added on the right side.
PROGRAM PLAY
DI SC PROGRAM
1 61116 5 8
2 7 12 17 15 6
6
3 8 13 18 1 13
4 91419 3 2
5101520 2
CLEAR LAST
CLEAR ALL START
SELECT :
SET : SET
END : ACTI ON
Notes
• Up to 15 tracks can be programmed.
•“ ” or “ ” (depending on disc) indicates additional
PROGRAM PLAY screen. Press for next or
previous screen.
• To clear the last program one by one,
Press to move to “CLEAR LAST” and press
SET. (Pressing CLEAR also clears last program.)
• To clear all programs,
Press to move to “CLEAR ALL” and press SET.
(Programs are also cleared when the power is turned off or
the disc is removed.)
1) Press to
select “DVD.”
2) Press SET to
1
3
5
CH
display screen.
1) Press to select
“PLAY MODE.”
2) Press SET to
display screen.
1) Press to select
“PROGRAM PLAY.”
2) Press SET to
display screen.
1) Press to
select a track
number.
(Track numbers on
disc are displayed.)
2) Press SET to set.
1) Press to
select “START.”
2) Press SET to start
play of programs in the
sequence selected.
• To cancel, press STOP
during play, then press
CLEAR.
Ready Checklist
Unit is in TV-VCR mode, press .
Video CD or CD is inserted.
Program Repeat Play
(Video CD/CD)
Do steps 1 through 6 on
a
this page.
Press DISPLAY to display
Disc Information screen.
b
c
d
e
(Disc Information Screen)
Press DISPLAY again to
display Unit Information screen.
Press SET to enter Select mode.
(“REPEAT OFF” will flash.)
(Unit Information Screen)
Press to select “DISC
REPEAT.”
(Unit Information Screen)
Press SET to set mode.
(“DISC REPEAT” stops
f
flashing.)
To cancel, select “REPEAT
OFF” in step e, then press
SET.
Advanced Operation
53
DF2702-K(P53-57)Disc OP2.p65 2002/03/08, 18:2853

Disc Operation (continued)
Random Play (Video CD/CD)
Tracks are played in a random order.
Press ACTION* in Stop mode to display
MAIN MENU.
1
Important:
*
If a remote control button does not work
when pressed, press the
the remote and try the button again.
button on
2
3
4
M A I N MENU
LOCK
DVD
CLOC
TV
SELECT :
END : ACT I ON
DVD MAI N MENU
SELECT :
SET : SET
END : ACTI ON
PLAY MODE
SELECT :
SET : SET
END : ACTI ON
LANGUAGE
K
SET : SET
1) Press
to select “DVD.”
1
2) Press SET to
3
5
CH
display screen.
1) Press to select
“PLAY MODE.”
2) Press SET to
display screen.
1) Press to select
“RANDOM PLAY.”
2) Press SET to begin
random play.
• To cancel, press STOP
during play, then press
CLEAR.
54
DF2702-K(P53-57)Disc OP2.p65 2002/03/08, 18:2854

DVD Operation using On-Screen Displays
When DISPLAY is pressed, On-Screen Displays
show disc information (title/chapter/track number,
elapsed playing time) and unit information (repeat
play, Play mode).
Press DISPLAY in Play or Stop mode to
display “On-Screen Display.”
1
• Each press of DISPLAY changes the on-screen
display as follows. (Please refer to page 56 or 57.)
Selected disc information
Selected unit information
Note
DISPLAY button does not function while DVD
TITLE MENU is displayed.
➛
➛➛
➛➛
➛
➛➛
➛➛
Normal Screen
1) Press (or ) to select an item.
2) Press SET to set.
2
1) Press to select the setting.
2) Press SET to set.
3
Ready Checklist
Unit is in DVD mode, press DVD.
<Example of DVD>
T ITLE : 12 DVD
CHAPTER : 11 0:12:34
T ITLE : 12 DVD
CHAPTER : 24 0:12:34
SELECT :
SET : SET NEXT : DISPLAY
SELECT :
SET : SET NEXT : DISPLAY
<Example of Video CD>
TRACK : 12 VI DEO CD
PBC : OFF 0 : 12: 34
TRACK : 17 VIDEO CD
PBC : OFF 0 : 12: 34
SET : SET NEXT : DISPLAY
SET : SET NEXT : D ISPLAY
DF2702-K(P53-57)Disc OP2.p65 2002/03/08, 18:2855
• For some functions the
setting will be
registered immediately
without pressing SET.
• When numbers are
displayed (e.g. title
number), the NUMBER
keys are also available.
To make corrections,
press
repeatedly to move to
error, then correct.
• Pressing is effective
for elapsing time
instead of the above
buttons. Press
repeatedly to delete
the error, then correct.
To return to the
normal screen,
press CLEAR or
DISPLAY repeatedly.
and SET
Notes
• When DISPLAY is pressed
during playback of a Video
CD with Playback control, the
NUMBER keys are not
available on the displayed
screen. In this case, press
DISPLAY again to remove
the displayed screen.
• When
screen while a button is being
operated, it means that the
corresponding operation is
prohibited by the unit or the
disc.
appears on the
Advanced Operation
55

DVD Operation using On-Screen Displays (continued)
Detailed Descriptions of Each On-Screen Display
Disc information screen (for DVD)
1. TITLE No.
• Change the No. by pressing * or the NUMBER
keys, and press SET.
2. Chapter No.
• Change the No. by pressing or the NUMBER
keys, and press SET.
3. Disc currently being played
4. Elapsed playing time
The screen may be changed by selecting the
elapsed time.
• Change the elapsed time by pressing NUMBER
keys, and press SET.
(e.g.) 01 : 23 : 45 0 ➛ 1 ➛ 2 ➛ 3 ➛ 4 ➛ 5
• This function does not work with some discs.
Disc information screen (for Video CD/ CD)
A. Track No.
• Change the No. by pressing or the NUMBER
keys, and press SET.
B. Playback control ON/OFF
[Video CD with playback control only]
ON Video CD menu play is displayed.
OFF Video CD menu play is cleared.
C. Disc currently being played
Video CD CD
D. Elapsed playing time
1
T ITLE : 1 DVD
CHAPTER : 12 1 :12 : 55
2
SELECT :
SET : SET NEXT: D ISPLAY
A
TRACK : 1 V IDEO CD
PBC : OFF 1 : 35: 12
B
SET : SET NEXT: DI SPLAY
3
4
C
D
Notes
• Track No. and elapsed playing time are not
displayed during play started from menu of Video
CDs with playback control.
• When appears on the screen while a button is
being operated, it means that the corresponding
operation is prohibited by the unit or the disc.
56
DF2702-K(P53-57)Disc OP2.p65 2002/03/08, 18:2956

Important:
*
I
f a remote control button does not work when pressed, press the DVD button on the remote
and try the button again.
Detailed Descriptions of Each On-Screen Display
Unit information screen
• Change the desired mode during play by pressing , and press SET.
a. Repeat Play
DVD CHAPTER REPEAT TITLE REPEAT REPEAT OFF
Video CD/CD TRACK REPEAT DISC REPEAT REPEAT OFF
a
b. Play mode [Video CD/ CD only] (See page 53 or 54.)
PROGRAM PLAY program play
RANDOM PLAY random play
--
---
normal play
b
PLAY
CHAPTER REPEAT
SELECT :
SET : SET END : DI SPLAY
PLAY
DI SC REPEAT
RANDOM PLAY
For your reference
•
CHAPTER/TITLE REPEAT PLAY (DVD)
CURRENT PLAYBACK POSITION
TITLE
chapter
chapter
CHAPTER REPEAT
TITLE REPEAT
NORMAL PLAY
chapter
Note
• For repeat play in VCR mode, see page 36.
DF2702-K(P53-57)Disc OP2.p65 2002/03/08, 18:2957
SET : SET END :D ISPLAY
•
TRACK/DISC REPEAT PLAY (Video CD/CD)
CURRENT PLAYBACK POSITION
track
track
TRACK REPEAT
DISK REPEAT
NORMAL PLAY
track
Advanced Operation
57

MP3 Playback Operation
MP3 Playback
You can use this unit to play MP3 format audio recorded for
personal use with a computer etc. onto a CD-R or CD-RW.
Play may not be possible in some cases due to the
condition of the recording.
Press POWER* on the remote or unit.
1
Press OPEN/CLOSE,
and then place a MP3 disc into the disc tray.
2
Press OPEN/CLOSE to close.
MP3 MENU is displayed and playback is
started automatically.
3
displayed.)
Function
Status
PLAY
ROOT . .
VA
Folder area
(The currently
displayed folder
turns green)
TECHNO
POPS
J
AZZ
PLAY MODE : NORMAL
<Example>
ROOT
VA
END_W
DD_CUB I C
N
O
N
O
TECHNO
POPS
J
AZZ
■ Forward/Reverse Search
Press FF/SLOW+ or REW/SLOW- during play.
Press PLAY to release.
• Search speed, slow at first, increases with each
additional press of the button up to 4 levels.
■ Forward/Reverse Track Skip
Press SKIP | or | SKIP during play.
Each press skips a track.
• If pressed within first 3 seconds of playback, skips to
the previous track. If over 3 seconds, returns to first
of that track. (| SKIP only.)
• Only the SKIP | or | SKIP button can be used
for track skip selection during playback.
Place unit into Stop mode before performing folder/
file selection (see above right.)
PLAY MODE
ALTZ
CTURNE
RN
(The MP3 CD directory structure
displayed in the above example OSD is
shown in the diagram at left.)
(The MP3 CD directory is
<Example>
MENU
DD_
ALTZ
CUB I C
00 : 00 :
MP3
END_W
NOCTURNE
NORN
Counter
Parent
00
folder
File area
(The selected
MP3 file/folder
is displayed
with a cursor.)
: MP3 file
: Folder
: Parent folder
■ MP3 playback (During STOP mode)
■ Select folder (During STOP mode)
■ Select parent folder (During STOP
■ Select PLAY MODE (During STOP
1) Press
to select an MP3 file ( ).
2) Press SET or PLAY to start playback.
1) Press
to select a folder ( ).
2) Press SET to display files/folders
contained in the folder.
mode)
1) Press
to select a folder ( ).
2) Press SET to make changes to
the previous directory display.
Note
• Folder area operation cannot be done.
Only file area operation is possible.
mode)
1) Press
to move cursor to PLAY
MODE.
2) Press to select the desired
PLAY MODE (see below).
[PLAY MODE]
NORMAL:
All MP3 files are selected and
played back one time only.
SINGLE REPEAT:
The selected MP3 file is
played back repeatedly.
FOLDER REPEAT:
The MP3 files contained in
the selected folder are played
back repeatedly.
However, folders below the
selected folder are not played
back.
DISC REPEAT:
All MP3 files are played back
repeatedly.
Press STOP to stop playing.
4
Press OPEN/CLOSE to eject the disc.
The MP3 MENU is closed automatically.
5
58
DF2702-K(P58-62 DVD).p65 2002/03/08, 18:2958

DVD Lock Feature
SELECT :
SET : SET END : DI SPLAY
,
YOUR SELECTI ON EXCEEDS THE
PLAYER S RATI NG LIMIT.
DO YOU WANT TO CHANGE THE
LIMIT?
YES
NO
Important:
*
If a remote control button does not work when
pressed, press the
, DVD button on the
remote and try the button again.
You can prevent playback of DVDs with a specific rating level which may be unsuitable
for children.
• Some DVDs are encoded with a rating level. If the disc rating is higher (stricter) than the one you
preset, playback will be prohibited.
Caution
Discs not encoded with a rating level will play even if the jacket states it is for
mature audiences. For these discs, the DVD Lock Ratings will not work.
DVD Lock Ratings (DVD only)
Perform DVD Lock setting in TV mode.
Enter your secret code to display LOCK menu.
(Perform “Enter Secret Code” steps on page 40.)
1
■ “ON”
■ “OFF”
2
3
LOCK
US MOV I ES
: O
CHANGE
US
DVD
SELECT :
END
US MOV I ES
US
DVD
SELECT :
END
LOCK ALL
SELECT :
END
SETT I
TV PROGRAMS
CHANGE
SETT I
LOCK
CHANGE
SETT I
NEXT PAGE
: ACT I ON
➛➛
➛ DVD Lock is activated.
➛➛
LOCK
: O
CHANGE
SETT I
TV PROGRAMS
CHANGE
SETT I
LOCK
CHANGE
SETT I
NEXT PAGE
: ACT I ON
1
2
3
4
SET : SET
: ACT I ON
NGS
NGS
NGS
SET : SET
➛➛
➛ DVD Lock is deactivated.
➛➛
NGS
NGS
NGS
SET : SET
UNLOCKED
5
6
7
8
1) Press to select
FF
: O
: O
: O
: O
“DVD LOCK.”
FF
2) Press SET to set
FF
“ON” or “OFF.”
1) Press to select
FF
“CHANGE
FF
SETTINGS.”
FF
2) Press SET to display
screen.
1) Press to
select rating level.
2) Press SET to select
“LOCKED” or
“UNLOCKED.”
LEVEL 1 : LOCK ALL:
Playback of all DVDs, CDs and Video CDs is
prohibited. (Use to prohibit play of mature theme
DVDs not encoded with rating a level.)
LEVEL 2 : DVDs expressly for children can be played back.
LEVEL 3 to 7 :
DVDs for general audiences/children can be
played back. (DVDs with mature content are
prohibited.)
LEVEL 8 : NO LIMIT: (Factory preset)
All DVDs can be played back.
• Ratings which are highlighted in Green will be blocked;
those not highlighted (white letters) will not be blocked.
Press ACTION three times to end setup.
4
<When DVD Lock is activated>
After DVD Lock is set and a
blocked DVD is played, this
message will appear. The
message may differ depending
on the disc.
To continue viewing a blocked
program for now,
Press
to select “YES” and
SET. Then, enter your 4-digit
secret code. When “NO” is
selected, blocked programs
cannot be viewed.
To change DVD LOCK settings
After entering your secret code in
step 3 on page 40, select “OFF”
to deactivate DVD Lock or
change the rating level.
Advanced Operation
59
DF2702-K(P58-62 DVD).p65 2002/03/08, 18:2959

Settings for DVD Operation
Press ACTION* in Stop mode to display
MAIN MENU.
1
2
3
DVD
SELECT :
END : ACT I ON
DI SC LANGUAGES
AUDIO OUTPUT
ST IL L MODE : AUTO
TV MODE : Letterbox
SELECT :
SET : SET
END : ACTI ON
M A I N MENU
LOCK
CLOC
TV
DVD MAI N MENU
LANGUAGE
K
SET : SET
1) Press to
select “DVD.”
1
2) Press SET to display
3
5
CH
screen.
1) Press to select
an item.
2) Press SET to set.
DISC LANGUAGES (See below.)
Any languages offered on the disc can be set. If a
language not offered is set, the original disc language will
be selected.
AUDIO OUTPUT (See page 61.)
You can set the audio output that comes from the digital
audio output terminal.
STILL MODE (See page 62.)
To select “FIELD” or “FRAME” to prevent jitter or to make
small text or fine patterns clearly visible in a still picture.
When “AUTO” is set, “FIELD” or “FRAME” is selected
automatically.
TV MODE (See page 62.)
To select whether the video material for a wide-screen will
be played back in Pan & Scan style or in Letterbox style.
DISC LANGUAGES (DVD only)
To select and set the language of the audio soundtrack,
subtitles, or title/DVD menus for all discs to be played.
DI SC LANGUAGES
AUDIO OUTPUT
4
ST IL L MODE : AUTO
TV MODE : Letterbox
SELECT :
SET : SET
END : ACTI ON
AUDIO : English
SUBT ITLE : AUTO
5
MENUS : English
SELECT :
SET : SET
END : ACTI ON
DVD MAI N MENU
DI SC LANGUAGES
1) Press to select
“DISC LANGUAGES.”
2) Press SET to display
screen.
1) Press to select
an item.
2) Press SET
repeatedly for
desired language.
(Please refer right.)
Press ACTION to redisplay DVD menu
and go to step 3 to setup another item.
6
Or, press ACTION three times to exit.
60
Once initial settings are done, they
remain in memory (even after the
power is off) until changed.
This means the unit will always
operate under the same conditions
(especially DVDs) each time.
Ready Checklist
Unit is in TV-VCR mode, press .
“AUDIO” selections
To select the audio soundtrack language.
(factory preset: English)
English/Spanish/French
Original: Original disc language
OTHER ✱✱✱✱: Other language selection*
“SUBTITLE” selections
To select the subtitle language.
(Factory preset: AUTO)
AUTO: Same language selected for
“AUDIO”
• If language set for “AUDIO”
is used in playback, subtitles
will not appear.
• If another language is used
during playback, the subtitles
will appear in the language
English/Spanish/French
OTHER ✱✱✱✱: Other language selection*
selected at “AUDIO” setup.
“MENUS” selections
(factory preset: English)
To select the language used in title
menus or DVD menus.
English/Spanish/French
OTHER ✱✱✱✱: Other language selection*
To enter OTHER ✱✱✱✱
Press number keys (Please refer to
language codes on page 66).
To make corrections, press
repeatedly to delete language code
number, and correct.
*1If the selected language is not offered,
the original disc language is selected.
code number,
1
1
1
DF2702-K(P58-62 DVD).p65 2002/03/08, 18:2960

Important:
*
If a remote control button does not work when pressed, press the , DVD button on the
remote and try the button again.
AUDIO OUTPUT
Select the digital output to be output from the
optical digital audio output connector of the unit.
Do steps 1 and 2 on page 60.
1
DVD MAI N MENU
DI SC LANGUAGES
AUDIO OUTPUT
2
ST IL L MODE : F
TV MODE : Letterbox
SELECT :
SET : SET
END : ACTI ON
LPCM(DVD) : OFF
Dolby Digital : Bitstream
d ts : OFF
3
DRC : OFF
SURROUND : OFF
SELECT :
SET : SET
END : ACTI ON
■■
■ “LPCM (DVD)” selections
■■
OFF: Linear PCM of less than 48 kHz/16 bit is output.
When playing DVDs recorded in linear PCM of
over 48 kHz/20 bit or 96 kHz, no digital audio is
output. (Factory preset)
PCM: When playing DVDs recorded in linear PCM of
48 kHz/20 bit/24 bit or 96 kHz, digital audio
converted to 48 kHz/16 bit is output.
(Digital output of PCM audio is restricted to
48 kHz/16 bit or below for copyright protection.)
■■
■ “Dolby Digital” selections
■■
Bitstream: Dolby Digital bitstream (1ch-5.1ch) is
OFF: No output.
■■
■ “dts” selections
■■
Bitstream: dts bitstream is output. (Factory preset)
OFF: No output.
■■
■
“DRC (Dynamic Range Compression)” selections
■■
OFF: Normal audio range is selected. (Factory preset)
ON: For dynamic sound even at low volume, this is
useful for late-night listening. [Dolby Digital DVDs
only].
■■
■ “SURROUND” selections
■■
Surround Sound creates the effect of sound coming from
non-existent rear speakers even when only connected to
a 2-channel stereo system.
OFF: No Surround Sound effect. (Factory preset)
ON: Surround Sound effect.
I
ELD
AUDI O OUTPUT
output. (Factory preset)
Press ACTION to redisplay DVD menu
and go to step 2 to setup another item.
4
Or, press ACTION three times to exit.
1) Press to select
“AUDIO OUTPUT.”
2) Press SET to
display screen.
1) Press to select
an item.
2) Press SET
repeatedly for output.
(See below.)
Type of amplifier
to be connected
No amplifier is connected
AV amplifier (with digital
audio input connector)
without Dolby Digital/dts
decoder
AV amplifier including
Dolby Digital decoder
AV amplifier including
Dolby Digital/dts decoder
• Make settings according to amplifier
connected to optical audio output as shown in
above table.
• When a dts decoder is not connected, to enjoy
dts DVD, please select audio output other than
dts at the dts DVD menu screen. Otherwise,
there will be no sound from the unit speakers.
*1 Audio output from unit is converted to 48
kHz/16 bit in addition to audio from digital
audio output.
To enjoy high quality sound at 48 kHz/20 bit /
24 bit or 96 kHz, connect the amplifier or
decoder directly to the audio output
connectors, not to the digital audio output
connector.
(DVD)”.]
*2 When connecting an amplifier (with an
optical digital input connector) which does
not contain the Dolby Digital or dts decoder,
be sure to select “OFF”.
If “Bitstream” is selected, starting DVD play
may cause such a high level of noise as to be
harmful to your ears and damage the
speakers.
*3 When a dts decoder is connected, please
select “Bitstream” in “dts”. If “OFF” is
selected, there will be no sound.
Recommended setting
OFF
Dolby
Digital
OFF
1
OFF*
1
Bitstream
1
Bitstream
2
LPCM
(DVD)
PCM*
PCM*
PCM*
[Select “OFF” at the “LPCM
dts
OFF
OFF*
OFF
Bitstream
Notes
• Turn off other surround effects when
using this surround effect.
• For optimum effect, the distance between
the unit and the listener should be about
3 or 4 times the distance between the
right and left front speakers.
2
3
*
For Your Information
DF2702-K(P58-62 DVD).p65 2002/03/08, 18:2961
61

Settings for DVD Operation (continued)
Important:
STILL MODE
Set to reduce jitter in a displayed still picture or a
motion picture.
*
If a remote control button does not work
when pressed, press the DVD button on
the remote and try the button again.
Do steps 1 and 2 on page 60.
1
DVD MAI N MENU
DI SC LANGUAGES
AUDIO OUTPUT
2
ST IL L MODE : F
TV MODE : Letterbox
SELECT :
SET : SET
END : ACTI ON
AUTO: “FIELD” (Field still) or “FRAME” (Frame still) is
FIELD: “FIELD” (Field still) is always selected.
FRAME: “FRAME” (Frame still) is always selected.
3
automatically selected during the still mode.
(Factory preset)
This setting will reduce jitter when compared
with “AU TO ” on some discs.
Some texts and fine patterns will be seen clearly
when compared with “AUTO” on some discs.
Press ACTION twice to exit this mode.
I
ELD
1) Press * to select
“STILL MODE.”
2) Press SET
repeatedly for mode.
(See below)
Selecting TV MODE
Set the screen display style for widescreen video
material playback.
Do steps 1 and 2 on page 60.
a
DVD MAI N MENU
DI SC LANGUAGES
AUDIO OUTPUT
b
ST IL L MODE : F
TV MODE : Letterbox
SELECT :
SET : SET
END : ACTI ON
Pan & Scan : Widescreen video data is played in Pan
(Factory preset)
Letterbox : Widescreen video data is played in
I
LED
& Scan style (left and right of screen is
trimmed.)
• Video data not formatted in Pan & Scan
will play in letterbox style.
Letterbox style (top and bottom of screen
has black margin).
1) Press to select
“TV MODE.”
2) Press SET
repeatedly for mode.
(See below.)
Example
• Pan & Scan (Factory preset)
• Letterbox
Press ACTION twice to exit this mode.
c
62
DF2702-K(P58-62 DVD).p65 2002/03/08, 18:2962

Warning and Instruction Displays
These displays will alert you of a missed operation or provide further instructions.
OSD
PLEASE SET CLOCK BEFORE
PROGRAMMING
CHECK CASSETTE RECORD TAB
TO CANCEL TIMER REC HOLD DOWN
STOP KEY FOR APPROX 3 SEC
NO CASSETTE
PLEASE INSERT A CASSETTE
PLEASE PREPARE FOR TIMER REC
VIDEO HEADS MAY NEED CLEANING
PLEASE INSERT HEAD CLEANING
CASSETTE OR REFER TO MANUAL
END: PLAY
Caution
If you attempt to set or review a Timer
Recording or set the On-Timer and the
Clock is not set...
If you press REC, and a cassette is
inserted with no record tab...
If you press STOP during a Timer
Recording...
If you press PLAY, FF, REW, or REC
without a cassette inserted...
If the unit is not in Stop mode or a
cassette with record tab is not inserted
two minutes before a Timer Recording
is about to begin...
If head cleaning becomes necessary
while playing back a tape...
Page
16, 17
4, 18
31
18
30, 31
6
VCR LOCK ACTIVATED
PLEASE CHECK THE DISC, AND FOR
STAINS OR SCRATCHES ON DISC
IT IS PROHIBITED TO COPY DVD/
VIDEO CD/CD TO VHS
DF2702-K(P63-65 BEFORE REQ).p65 2002/03/08, 18:2963
If you press a function button other
than STOP/EJECT or POWER while
the unit is in VCR Lock mode...
If you press PLAY, or the unit reads
data from a stained or scratched disc
in DVD mode. Also, if the type of disc
is other than DVD, Video CD or CD...
If you press REC in DVD mode...
39
7
For Your Information
18, 19
63

Before Requesting Service
Check the following points once again if you are having trouble with your unit.
Power
No power…
Power turns itself off...
Monitor
No picture or sound...
Poor picture with normal sound...
Poor sound with normal picture...
Poor TV reception...
No colour or poor colour...
Ghost (multiple) images...
TV programs cannot be watched...
Channel cannot be selected...
VCR
TV program cannot be recorded...
Timer recording cannot be
performed…
No playback picture, or the playback
picture is noisy or contains streaks...
VCR cannot be controlled...
Correction
• Completely insert Power Plug into an AC outlet.
• Set POWER button to ON.
• Auto power-off (shut off) occurs after about 5 min. in DVD mode
with no operation, or if there is no broadcast signal in TV or
Playback mode. Turn the power back on. (P. 21, 37)
Correction
• Make sure your antenna system (TV or CABLE), is correctly
set. (P. 11)
• Completely insert Power Plug into an AC outlet.
• Set POWER button to ON.
• Adjust BRIGHTNESS, SHARPNESS, and PICTURE controls in
the SET UP Video Adjustment. (P. 49)
• Adjust VOLUME control. (P. 22)
• Adjust SHARPNESS and PICTURE controls in the SET UP
Video Adjustment. (P. 49)
• Adjust TINT and COLOR controls in the SET UP Video
Adjustment. (P. 49)
• Install a directional antenna.
• Make sure the selected channel is in unit’s memory. (P. 16)
• Only the channel begin recorded can be viewed on this unit.
Correction
• Make sure your antenna system (TV or CABLE), is correctly
set. (P. 11)
• Make sure cassette record tab is intact. (P. 4)
• Check that clock is set to current time and date.
• Make sure DSS/CABLE box (if used) is left on and tuned to
channel to be recorded.
• Set recording Start/Stop times correctly. (P. 30, 31)
• Timer recording may not be performed or continued if a power
interruption of more than 1 minute occurs before or during a
Timer Recording, even after power is restored.
• Adjust TRACKING control in either direction. (P. 6)
• Try Head Cleaning. (P. 6)
• Make sure VCR LOCK is set to off. (P. 39)
Remote Control
Unit cannot be controlled...
ACTION, PLAY, SELECT, SET
POWER, etc. buttons cannot be
selected...
64
DF2702-K(P63-65 BEFORE REQ).p65 2002/03/08, 18:2964
Correction
• Aim Remote directly at the remote sensor on the unit. (P. 10)
• Avoid any object blocking signal path.
• Inspect the remote batteries. (P. 4)
• Make sure VCR LOCK is set to off. (P. 39)
• Exposing unit remote sensor to direct fluorescent or outdoor
light may cause signal interference.
• Press for TV-VCR mode. (P. 32)
• Press DVD for DVD mode. (P. 32)
• Press FM for FM mode. (P. 32)
• Check remote batteries.

DVD/Video CD/CD
Play fails to start even when
PLAY is pressed...
Play starts but then stops
immediately...
Picture is distorted during rapid
advance or rapid reverse...
No Forward/Reverse search
play...
Play does not start even when
title is selected...
Audio soundtrack and/or
subtitle language is not the one
selected at the initial settings...
No subtitles...
Alternative audio soundtrack
(or subtitle) language cannot
be selected...
Angle cannot be changed...
Correction
• This unit cannot play discs other than DVDs, Video CDs and
CDs.
• The disc may be dirty and require cleaning.
• Be sure disc is installed with label side up.
• The picture will be somewhat distorted at times: this is normal.
• Some discs may have sections which prohibit Forward/
Reverse search. (P. 21)
• Confirm the “DVD LOCK” setting. (P. 59)
• If the audio soundtrack and/or subtitle language selected at
DVD initial settings does not exist on the disc, it will not be
accessible.
• Subtitles appear only when available on disc.
• Select “ON” at the “Subtitle language” section (P. 50) to
display subtitles.
• Alternative language cannot be selected with discs which do
not contain more than one language.
• For some discs, alternative language cannot be selected with
the AUDIO or SUB TITLE button. Try selecting it from the DVD
menu if available.
• This function is dependent on software availability. Even if disc
has multiple angles, they may be recorded for specific scenes
only (ANGLE Indicator on unit lights up). (P. 51)
Miscellaneous
Video cassette cannot be
inserted...
Video cassette cannot be
removed...
Eject does not function or
insertion cannot be done...
Video cassette ejects when a
recording is started, or the
power is turned off for timer
recording...
The disc cannot be removed...
In Stop mode, the VCR motor
(CYLINDER) continues to
rotate...
DF2702-K(P63-65 BEFORE REQ).p65 2002/03/08, 18:2965
Correction
• Insert the cassette window side up; record tab facing you.
• Completely insert Power Plug into an AC outlet.
• Turn the POWER off and then on, and try ejecting or inserting
the tape again.
• Make sure cassette record tab is intact. (P. 4)
• First, unplug unit. Then, prepare a rigid wire (e.g. an extended
paper clip, etc.) and, applying moderate force, insert it straight
into the hole at the base of the tray. The tray will eject a little.
Now, pull the tray all the way out and remove the disc. (P. 9)
• To enable Quick Play mechanism, the VCR cylinder will rotate
for about 3 minutes. This reduces response time from Stop to
Play mode and from Play to Rewind Search mode.
For Your Information
65

Language Code List
Enter the appropriate code number for the initial settings “AUDIO”, “SUBTITLE”
and/or “MENUS” (see page 60).
Code Language
6565 Afar
6566 Abkhazian
6570 Afrikaans
6577 Ameharic
6582 Arabic
6583 Assamese
6588 Aymara
6590 Azerbaijani
6665 Bashkir
6669 Byelorussian
6671 Bulgarian
6672 Bihari
Bengali; Bangla
6678
6679 Tibetan
6682 Breton
6765 Catalan
6779 Corsican
6783 Czech
6789 Welsh
6865 Danish
6869 German
6890 Bhutani
6976 Greek
6978 English
6979 Esperanto
6983 Spanish
6984 Estonian
6985 Basque
7065 Persian
7073 Finnish
7074 Fiji
Code Language
7079 Faroese
7082 French
7089 Frisian
7165 Irish
7168 Scots Gaelic
7176 Galician
7178 Guarani
7185 Gujarati
7265 Hausa
7273 Hindi
7282 Croatian
7285 Hungarian
7289 Armenian
7365 Interlingua
7378 Indonesian
7383 Icelandic
7384 Italian
7387 Hebrew
7465 Japanese
7473 Yiddish
7487 Javanese
7565 Georgian
7575 Kazakh
7576 Greenlandic
7577 Cambodian
7578 Kannada
7579 Korean
7583 Kashmiri
7585 Kurdish
7589 Kirghiz
7665 Latin
Code Language
7678 Lingala
7679 Laothian
7684 Lithuanian
7686
7771 Malagasy
7773 Maori
7775 Macedonian
7776 Malayalam
7778 Mongolian
7779 Moldavian
7782 Marathi
7783 Malay
7784 Maltese
7789 Burmese
7865 Nauru
7869 Nepali
7876 Dutch
7879 Norwegian
7982 Oriya
8065 Panjabi
8076 Polish
8083
8084 Portuguese
8185 Quechua
8277
8279 Romanian
8285 Russian
8365 Sanskrit
8368 Sindhi
8372
8373 Singhalese
Latvian, Lettish
Pashto, Pushto
Rhaeto-Romance
Serbo-Croatian
Code Language
8375 Slovak
8376 Slovenian
8377 Samoan
8378 Shona
8379 Somali
8381 Albanian
8382 Serbian
8385 Sundanese
8386 Swedish
8387 Swahili
8465 Tamil
8469 Telugu
8471 Tajik
8472 Thai
8473 Tigrinya
8475 Turkmen
8476 Tagalog
8479 Tonga
8482 Turkish
8484 Tatar
8487 Twi
8575 Ukrainian
8582 Urdu
8590 Uzbek
8673 Vietnamese
8679 Volapük
8779 Wolof
8872 Xhosa
8979 Yoruba
9072 Chinese
9085 Zulu
66
DF2702-K(P66 Language code).p65 2002/03/08, 18:2966

Warranty/Servicentre List
Panasonic Canada Inc.
5770 Ambler Drive, Mississauga, Ontario L4W 2T3
PANASONIC PRODUCT – LIMITED WARRANTY
Panasonic Canada Inc. warrants this product to be free from defects in material
and workmanship and agrees to remedy any such defect for a period as stated
below from the date of original purchase.
COMBINATION VHS VCR TV / VCR DVD TV:
21” and under Carry-in Service Only Two (2) years, parts (including Picture Tube) and labour
22” and over In-home Service Two (2) years, parts (including Picture Tube) and labour
LIMITATIONS AND EXCLUSIONS
This warranty does not apply to products purchased outside Canada or to any product which has
been improperly installed, subjected to usage for which the product was not designed, misused
or abused, damaged during shipping, or which has been altered or repaired in any way that
affects the reliability or detracts from the performance, nor does it cover any product which is
used commercially. Dry cell batteries are also excluded from coverage under this warranty.
This warranty is extended to the original end user purchaser only. A purchase receipt or other
proof of date of original purchase is required before warranty service is performed.
THIS EXPRESS, LIMITED WARRANTY IS IN LIEU OF ALL OTHER WARRANTIES,
EXPRESS OR IMPLIED, EXCLUDING ANY IMPLIED WARRANTIES OF
MERCHANTABILITY OR FITNESS FOR A PARTICULAR PURPOSE.
IN NO EVENT WILL PANASONIC CANADA INC.
BE LIABLE FOR ANY SPECIAL, INDIRECT OR CONSEQUENTIAL DAMAGES.
In certain instances, some jurisdictions do not allow the exclusion or limitation of incidental
or consequential
and exclusions may not be applicable.
damages, or the exclusion of implied warranties, so the above limitations
WARRANTY SERVICE
For product operation and information assistance, please contact your
Dealer or our Customer Care Centre at:
Telephone #: (905) 624-5505 Fax #: (905) 238-2360 Web: www.panasonic.ca
For product repairs, please contact one of the following:
• Your Dealer who will inform you of an authorized Servicentre nearest you.
• Our Customer Care Centre at (905) 624-5505 or www.panasonic.ca
• A Panasonic Factory Servicentre listed below:
Richmond, British Columbia Calgary, Alberta Mississauga, Ontario Lachine, Québec
Panasonic Canada Inc. Panasonic Canada Inc. Panasonic Canada Inc. Panasonic Canada Inc.
12111 Riverside Way 6835-8
Richmond, BC V6W 1K8 Calgary, AB T2E 7H7 Mississauga, ON L4W 2T3 Lachine, QC H8T 1C4
Tel: (604) 278-4211 Tel: (403) 295-3955 Tel: (905) 624-8447 Tel: (514) 633-8684
Fax: (604) 278-5627 Fax: (403) 274-5493 Fax: (905) 238-2418 Fax: (514) 633-8020
th
St. N. E. 5770 Ambler Dr. 3075, rue Louis A. Amos
IF YOU SHIP THE PRODUCT TO A SERVICENTRE
Carefully pack and send prepaid, adequately insured and preferably in the original carton.
Include details of the defect claimed, and proof of date of original purchase.
DF2702-K(P67 service-war).p65 2002/03/08, 18:2967
For Your Information
67

Index
TV / VCR
A Accessories ................................................ 4
AC Power Plug ......................................... 11
ACTION button ..................................... 8, 16
ADD / DLT / CLEAR button ................. 8, 17
Audio Adjustment ..................................... 49
Audio Auto Gain Control (AGC) .............. 48
AUDIO button ....................................... 8, 23
Audio connections ................................... 12
Audio Features ................................... 48, 49
Audio Menu .............................................. 48
Audio Mode for FM Radio ........................ 29
Audio Mode for Playback ......................... 48
Audio Mode for Recording ....................... 48
Audio Mode for TV Viewing ..................... 23
Audio Mute ............................................... 22
Audio / Video Input
connector (LINE) .......................... 10, 11, 19
Audio Output Connector (L/R) ........... 11, 12
Auto Operation Functions ........................ 37
B Batteries ..................................................... 4
Before Requesting Service ................ 64, 65
Before Using .............................................. 4
Blocking Message .................................... 45
Blue Screen Display ................................. 27
Broadcast Types ...................................... 23
C Cable Box Brand Code Number .............. 33
Cable Box Universal Remote
Control Feature ........................................ 32
CANADIAN ENGLISH Ratings ................ 43
CANADIAN FRENCH Ratings ................. 44
Cassette Compartment ............................ 10
Caption On Mute ...................................... 25
Channel ................................. 14, 16, 17, 27
Channel Caption ...................................... 38
CHANNEL UP / DOWN button ................ 22
Clock ......................................................... 16
Closed Caption ................................... 24, 25
CM SKIP / ZERO SEARCH button ... 8, 36, 37
Code Numbers, DSS / Cable Box Brand . 33
Commercial Skip ...................................... 37
Connections ............................................. 11
Connections, Audio .................................. 12
Connections, DSS / Cable Box................ 11
Connections, Outdoor Antenna ............... 11
Copy Your Tapes (Dubbing) .................... 19
COUNTER RESET button ................... 8, 36
D DISPLAY / ENTER button ............. 8, 27, 32
DSS Brand Code Number ....................... 33
DSS CABLE button .............................. 8, 32
DST (Daylight Saving Time) ...................... 6
E EJECT button ............................................. 8
Eject tape.................................................. 18
F Fast Forward ............................................ 18
FF/SLOW+ button ................................ 8, 18
FM button ............................................. 8, 28
FM Radio ............................................ 28, 29
Forward Search ........................................ 18
Frame by Frame Advance ....................... 18
Front Panel Indicators ............................... 9
Function Display ...................................... 27
68
H Head Cleaning ........................................... 6
I Important Safeguards and Precautions .... 2
Information (Unit, Cassette, Disc) ........ 6 - 7
Initial Setup ............................................... 14
Index Search ............................................ 34
Indicators on the Front Panel .................... 9
Input Mode ............................................... 19
L Language............................................ 14, 16
LIGHT button .............................................. 9
Location of Controls ............................ 8 - 11
M MTS Broadcast / TV Stereo System ....... 23
MUTE button ........................................ 8, 22
N NUMBER keys ......................................... 8, 22
O 100 Key .................................................... 22
One Touch Recording (OTR) .................. 18
On-Screen Display (OSD) ....................... 27
ON-TIMER Indicator ................................ 26
ON-TIMER with Alarm ............................. 26
P Phones ..................................................... 22
Playback ................................................... 18
PLAY button ......................................... 8, 18
POWER button ..................................... 8, 14
PROG button ........................................ 8, 30
Program End Search ............................... 35
PROG TIMER Indicator ....................... 9, 30
Q Quality Picture............................................ 6
R Rapid Tune ............................................... 22
R-TUNE button ......................................... 22
REC button ........................................... 8, 18
REC Indicator ....................................... 9, 18
Rec(ord) .................................................... 18
Record / Playback Speed Settings ............ 4
Remote Control Buttons ............................ 8
Remote Sensor .......................................... 9
Remote Warning Feature ........................ 39
Repeat Play .............................................. 36
Reset Language, Channels, Clock,
Time Zone Adjust .................................... 17
Reset unit ................................................. 15
Reverse Search ....................................... 18
REW/SLOW- button ............................. 8, 18
Rewind ...................................................... 18
S Safety Precautions ..................................... 3
SEARCH button ................................... 8, 34
Secret Code ............................................. 40
Selecting Input Mode ............................... 19
SELECT / SET button .......................... 8, 16
Servicentre List ........................................ 67
Sleep Timer .............................................. 26
Slow Motion .............................................. 18
Special VCR Features ....................... 38, 39
Specifications ............................................. 6
SPEED button ...................................... 8, 18
Still Picture ............................................... 18
STILL / PAUSE button ......................... 8, 18
STOP button ........................................ 8, 18
SURROUND button ............................. 8, 47
Surround Sound ....................................... 47
S-Video Input Connector ................... 10, 11
DF2702-K(P68-69)Index.p65 2002/03/08, 18:2968

TV / VCR
T Table of Contents ...................................... 5
Tape Erasure Prevention ........................... 4
Tape Operation ................................. 34 - 37
Timer Program Review, Replace, Clear . 31
Timer Recording....................................... 30
Timer Recording Cancellation ................. 31
Time Zone Adjust ..................................... 17
TRACKING / V-LOCK buttons .............. 6, 8
TV Operation ............................................ 22
TV Timer Features ................................... 26
TV - VCR button ................................... 8, 32
TV/VCR Status & Clock Display .............. 27
U Unit, Front/Rear view .......................... 9 - 11
Universal Remote Control ....................... 32
US MOVIES Ratings ................................ 41
US TV PROGRAMS Ratings ................... 42
V VCR Lock ................................................. 39
Video Adjustment ..................................... 49
Video Menu .............................................. 48
V-Chip Control Feature ..................... 40 - 45
VHF / UHF Antenna Input Terminal ........ 11
VOLUME UP / DOWN button .............. 8, 22
DVD
A ANGLE button ...................................... 8, 51
Angle Indicator ..................................... 9, 51
Auto-Power Off function .......................... 21
AUDIO button ....................................... 8, 50
AUDIO OUTPUT ...................................... 61
Audio soundtrack language (DVD) ......... 50
B Basic DVD Operation ............................... 20
C CLEAR button ................................ 8, 53, 54
D Definition of terms ...................................... 7
Disc Audio attribute 1 type, sampling
frequency, bit No. ..................................... 50
Disc format ................................................. 7
Disc handling .............................................. 7
Disc information screen ........................... 56
DISC LANGUAGES (DVD) ...................... 60
Disc Operation ......................................... 50
Disc Tray ........................................ 7, 10, 20
DISPLAY .................................................. 55
DISPLAY button ................................... 8, 55
DVD button ........................................... 8, 20
DVD Lock Feature (DVD) ........................ 59
DVD Lock Ratings (DVD) ........................ 59
DVD menu (DVD) ..................................... 52
DVD Operation using On-Screen Displays . 55
DVD Volume Adjust ................................. 47
F FF button .............................................. 8, 20
Forward / Reverse Chapter / Track skip . 21
Forward / Reverse rapid scene search ... 21
Frame by Frame picture
(DVD/Video CD) ....................................... 21
K Karaoke (DVD/Video CD) ........................ 51
W Warranty ................................................... 67
Warning and Instruction Displays ........... 63
Weak Signal Display Feature .................. 39
Z Zero Search.............................................. 36
L Language Code List ................................. 66
M MENU button ............................................ 52
MP3 Playback Operation......................... 58
Multiple angle viewing (DVD) .................. 51
O OPEN / CLOSE button ........................ 8, 20
Optical digital audio output connector .. 11, 13
P Picture Zoom (DVD) ................................ 51
Play ........................................................... 20
Playback control (Video CDs) ................. 21
PLAY button ......................................... 8, 20
Program Play (Video CD/CD) ................. 53
Program Repeat Play (Video CD/CD) .... 53
R Random Play (Video CD/CD) .................. 54
Region number ........................................... 3
Repeat Play .............................................. 57
RESUME function .................................... 21
RETURN button ................................... 8, 20
REW button .......................................... 8, 20
S
Settings for DVD Operation ..................... 60
SKIP + / - button ............................ 8, 20, 21
Slow Motion (DVD/Video CD) ................. 21
SLOW + / - button ................................ 8, 21
STILL MODE ............................................ 62
Still (Pause) Picture ................................. 21
STILL / PAUSE button ......................... 8, 21
Subtitle language (DVD) .......................... 50
T TV MODE ................................................. 62
Title menu (DVD) ..................................... 52
U Unit information screen (Unit) ................. 57
Z ZOOM button ....................................... 8, 51
For Your Information
DF2702-K(P68-69)Index.p65 2002/03/08, 18:2969
69

LSQT0586A
Panasonic Canada Inc.
5770 Ambler Drive,
Mississauga, Ontario L4W 2T3
(905) 624-5010
www.panasonic.ca
DF2702-K(P70 BC).p65 2002/03/08, 18:2970
Montréal:
3075 Louis A. Amos, Lachine, Québec H8T 1C4 (514) 633-8684
Toronto:
5770 Ambler Drive, Mississauga, Ontario L4W 2T3 (905) 238-2181
Calgary:
6835 - 8th Street N.E., Calgary, Alberta T2E 7H7 (403) 295-3922
Vancouver:
12111 Riverside Way, Richmond, BC V6W 1K8 (604) 278-4211
K
Printed in U.S.A.
LSQT0586A
S0302-0

Combiné télé/DVD/magnétoscope
Manuel d’utilisation
Réglage initial
Modèle PV-DF2702-K
• Les instructions concernant le réglage initial et les raccordements
se trouvent aux pages 11 à 17.
Fonctions de base
Fonctionnement
du téléviseur
Fonctionnement
de la minuterie
Fonctions
avancées
À titre de partenaire du programme ENERGY STAR, Panasonic assure
que cet appareil, ou ce modèle, satisfait aux normes d’efficacité
énergétique du programme.
Nous vous recommandons de lire attentivement ces instructions avant de brancher,
d’utiliser ou de régler l’appareil et de les conserver pour référence ultérieure.
(F)DF2702 (P01)-K(F).p65 2002/03/08, 18:321
Autres fonctions
LSQT0590A

Importantes mesures de sécurité
Pour votre sécurité, lire et conserver les mesures de
sécurité et le manuel d’utilisation. Tenir compte
également de toutes les mises en garde indiquées dans
1
le manuel et inscrites sur l’appareil.
1 Mise en garde – Alimentation
N’alimenter l’appareil que sur le type de courant
indiqué dans ce manuel ou sur l’appareil. Dans le
doute, consulter un détaillant ou la compagnie
d’électricité.
2 Fiche polarisée ou avec retour à la terre
Par mesure de sécurité, cet appareil est muni soit
d’une fiche polarisée (branches de largeur différente)
ou d’une fiche à trois branches.
Mise en garde – Fiche polarisée:
Cette fiche ne peut être insérée dans une prise que
dans un sens. Si elle ne peut être entièrement insérée,
essayer l’autre sens. Si elle ne peut être insérée dans
aucun des deux sens, consulter un électricien pour faire
modifier l’installation électrique. Ne pas contourner
cette mesure de sécurité en modifiant la fiche.
Fiche avec retour à la terre:
Cette fiche ne peut être insérée que dans une prise
avec retour à la terre (prise à trois trous). Si cela
s’avérait nécessaire, consulter un électricien pour
installer une prise adéquate. Ne pas contourner cette
mesure de sécurité en modifiant la fiche.
3 Cordon d’alimentation
Placer le cordon dans un endroit où il ne risque pas
d’être écrasé ou étiré. Si une rallonge devenait
nécessaire, s’assurer qu’elle comporte une fiche
polarisée ou une fiche avec retour à la terre et que le
raccordement puisse se faire de manière sécuritaire.
Toute prise, fiche ou cordon endommagés doivent
être remplacés par un électricien qualifié. Les prises
murales surchargées et les rallonges peuvent être
cause d’incendie ou de chocs électriques.
4 Ne pas bloquer les évents d’aération
Les évents d’aération du boîtier assurent l’évacuation
de la chaleur produite par le fonctionnement de
l’appareil. Le blocage des évents peut entraîner une
surchauffe et un risque d’incendie ou de dommage
aux cassettes. Pour plus de protection:
a. Ne jamais placer cet appareil sur un lit, divan ou
tapis, ni recouvrir les évents pendant l’utilisation
de l’appareil.
b. Éviter d’encastrer l’appareil dans une étagère ou
une unité murale à moins d’assurer une
ventilation adéquate.
5 Éviter les pièces surchauffées ou les
changements soudains de température
Ne jamais installer l’appareil sur un radiateur ou une
bouche de chaleur, l’exposer aux rayons directs du
soleil, dans une voiture fermée ou le soumettre à des
variations soudaines de température. Si l’appareil est
soumis à une hausse soudaine de température
ambiante, il peut y avoir formation d’humidité à
l’intérieur, ce qui est susceptible d’endommager
l’appareil.
6 Afin de prévenir tout accident
• Ne pas placer l’appareil sur une surface inclinée.
• N’utiliser que des supports fermes et de niveau.
• Déplacer avec précaution toute
table roulante portant un appareil.
Afin de ne pas renverser
l’appareil et la table roulante,
éviter les arrêts et les
déplacements brusques ainsi
que les surfaces inégales.
• Pour un bon fonctionnement de
l’appareil ou lors de son raccordement à d’autres
appareils, suivre attentivement les
recommandations du manuel d’utilisation et
n’utiliser que les accessoires recommandés par le
manufacturier.
Installation
2 Éloigner l’antenne des lignes et des circuits à haute tension
Après rangement ou lors du déplacement de l’appareil, consulter
la section Installation de ces mesures de sécurité.
1
2 Si l’appareil a été exposé à la pluie, l’humidité ou a subi
3 En cas d’orage
4 Avec l’appareil branché
5 Utilisation des accessoires
6 Nettoyage de l’appareil
1 Ne pas tenter de réparer l’appareil soi-même
2 Remplacement de pièces
3
2
Raccordement sécuritaire à une antenne ou à la câblodistribution
Si l’appareil doit être raccordé à une antenne extérieure ou à la
câblodistribution, s’assurer que
l’antenne ou le câble soit raccordé
à la terre afin de protéger
l’appareil contre les surtensions
et des décharges d’électricité
statique. La partie 1 du Code
canadien de l’électricité contient les
informations concernant la mise à la terre des
mâts d’antenne et de leurs structures, celle du fil de descente à un
parafoudre, le calibre des conducteurs de mise à la terre,
l’emplacement du parafoudre, le raccordement et les exigences
requises pour les électrodes de terre.
Installer toute antenne extérieure à l’abri des lignes à haute
tension, circuit d’éclairage ou lignes d’alimentation au cas où
elle viendrait à tomber. Lors de cette installation, tout contact
avec les lignes et circuits à haute tension, ou toute source
d’alimentation électrique, pourrait être fatal. Du fait de ces
risques, l’installation d’une antenne devrait être confiée à un
électricien.
Éloigner l’appareil de toute source d’humidité et le protéger de l’eau.
un choc violent, le débrancher et le faire vérifier par un
technicien qualifié avant de l’utiliser.
Pendant un orage ou si l’appareil n’est pas utilisé pendant une
période prolongée, débrancher tout équipement des prises de
courant ainsi que l’antenne ou le câble.
• Ne jamais exposer l’appareil à la pluie et le protéger de
• Ne jamais insérer ou laisser tomber des objets à l’intérieur
•Éviter de placer l’appareil directement sur ou sous le
N’utiliser que les accessoires recommandés par le manufacturier afin
d’éviter tout risque d’incendie, de chocs électriques ou autre danger.
Débrancher l’appareil. Utiliser un chiffon doux, sec et propre pour nettoyer
l’appareil. NE PAS utiliser de produits nettoyants, de vaporisateurs ou toute
autre méthode qui pourrait entraîner la pénétration de liquides à l’intérieur de
l’appareil causant ainsi des risques de chocs électriques. Toute substance
comme la cire ou du ruban adhésif risque d’endommager le fini du boîtier. Les
éléments internes peuvent être endommagés par un environnement graisseux,
humide ou poussiéreux.
Si, après avoir suivi attentivement les instructions du manuel,
l’appareil ne fonctionne pas adéquatement, ne pas ouvrir ses
couvercles ni essayer de faire des réglages qui ne sont pas
décrits dans le manuel. Débrancher l’appareil et contacter un
technicien qualifié.
S’assurer que le technicien n’utilise que des pièces
recommandées par le manufacturier ou ayant des
caractéristiques identiques. Toute autre substitution peut
provoquer un risque d’incendie ou de chocs électriques.
Demander au technicien d’effectuer des vérifications de
sécurité
Après tout entretien ou service, demander au technicien
d’effectuer des vérifications de sécurité comme mentionné
dans le manuel de service du fabricant afin de confirmer le
fonctionnement normal de l’appareil.
Installation d’une antenne extérieure
Utilisation de l’appareil
l’eau. NE PAS UTILISER l’appareil si un liquide a été
répandu à l’intérieur. Le débrancher immédiatement et le
faire vérifier par un technicien qualifié. Le déversement
de liquide à l’intérieur de l’appareil peut causer des chocs
électriques et constitue un risque d’incendie.
de l’appareil. Certaines pièces internes sont porteuses de
hautes tensions et peuvent donc causer des chocs
électriques ou provoquer des incendies.
téléviseur afin d’éliminer tout risque d’interférence. Éloigner
l’appareil de tout champ magnétique (aimants).
Entretien
(F)DF2702 (P02-03)-K(F).p65 2002/03/08, 18:322

Mesures de sécurité
Avertissement:
Attention: Pour éviter les chocs électriques, introduire la lame la plus large de la fiche
Le magnétoscope intégré, muni du système HQ, est compatible avec le matériel VHS.
N’utiliser que des cassettes portant la marque . Il est recommandé de n’utiliser que des
cassettes qui ont été testées pour l’utilisation avec des magnétoscopes permettant une
durée d’enregistrement de 2, 4, 6 et 8 heures.
Cet appareil permet I’affichage des sous-titres.
Afin de prévenir tout risque d’incendie ou de chocs électriques, ne pas
exposer cet appareil à la pluie ou à une humidité excessive.
dans la borne correspondante de la prise et pousser jusqu’au fond.
ATTENTION:
CET APPAREIL EST UN PRODUIT LASER DE CLASSE I. TOUTEFOIS,
CET APPAREIL UTILISE UN FAISCEAU LASER VISIBLE, LEQUEL
PEUT CAUSER DES RADIATIONS DANGEREUSES.
SE CONFORMER AUX INSTRUCTIONS DU PRÉSENT MANUEL.
LORSQUE CET APPAREIL EST BRANCHÉ SUR LE SECTEUR, NE
PAS APPROCHER LES YEUX DE L’OUVERTURE DU PLATEAU DU
DISQUE NI DES AUTRES OUVERTURES POUR REGARDER À
L’INTÉRIEUR DE L’APPAREIL.
L’UTILISATION DE COMMANDES OU LE RECOURS À DES
RÉGLAGES AUTRES QUE CEUX INDIQUÉS DANS CE MANUEL
PEUVENT PRÉSENTER DES RISQUES D’EXPOSITION À DES
RADIATIONS.
NE PAS OUVRIR LE BOîTIER. TOUTE RÉPARATION DOIT ÊTRE
FAITE PAR UN PERSONNEL QUALIFIÉ ET NON PAR L’USAGER.
Cet appareil comporte un tube à rayons cathodiques (écran cathodique) et d’autres pièces
contenant du plomb. L’élimination de ces matériaux peut être réglementée dans votre
communauté en raison de considérations environnementales. Pour des informations sur
l’élimination être recyclage de ces matériaux, communiquez avec les autorités locales ou le
ministère de l’environnement de votre province.
Voir aussi le site de Environnement Canada : http://www.ec.gc.ca/wastes_f.html
Le symbole de l’éclair dans un triangle
équilatéral indique la présence d’une tension
suffisamment élevée pour engendrer un risque
de chocs électriques. Il est dangereux de
toucher à une pièce interne de l’appareil.
Le point d’exclamation dans un triangle
équilatéral indique que le manuel d’utilisation
inclus avec l’appareil contient d’importantes
recommandations quant au fonctionnement et
à l’entretien de ce dernier. Il faut donc le lire
attentivement.
ATTENTION:
RAYONNEMENT LASER
EN CAS D’OUVERTURE.
NE PAS REGARDER
DANS LE FAISCEAU.
(Intérieur du produit)
Information sur la gestion des régions
Information sur la gestion des régions :
Cet appareil est conçu et fabriqué de façon à répondre
à l’information de gestion de région enregistrée sur les
disques DVD. Si le numéro de région du DVD ne
correspond pas au numéro de région de cet appareil,
le disque ne pourra pas être lu sur l’appareil.
(F)DF2702 (P02-03)-K(F).p65 2002/03/08, 18:323
Le numéro de région
de cet appareil est 1.
1
3

Avant l’utilisation
Félicitations
Vous avez arrêté votre choix sur l’un des produits
les plus perfectionnés et les plus fiables sur le
marché. Utilisé correctement, il ne manquera pas
de procurer à vous et à votre famille des années
de plaisir. Veuillez prendre le temps de remplir
l’encadré ci-dessous. Le numéro de série est
inscrit sur l’étiquette apposée sur le panneau
arrière de l’appareil.
Date d’achat
Détaillant
Adresse du détaillant
N° de téléphone du détaillant
N° de modèle PV-DF2702-K
N° de série
Accessoires
Télécommande
LSSQ0302
Insertion des piles
1) Ouvrir le couvercle.
2) Insérer les piles en
respectant la
polarité.
3) Refermer le
couvercle.
Avertissement
• Ne pas utiliser une pile neuve avec une pile usagée.
• Ne pas utiliser une pile alcaline avec une
pile au manganèse.
Protection contre l’effacement
Briser la languette.
Languette
de protection
Deux piles “AA”
4
(F)DF2702 (P04-05 Before)-K(F).p65 2002/03/09, 15:304
Tournevis
Pour enregistrer à
nouveau.
Recouvrir l’ouverture
avec du ruban adhésif.
Durée maximum
d’enregistrement et de lecture
N’utiliser dans cet appareil que des
cassettes portant la marque
Vitesse
SP (Standard)
LP (Longue durée)
SLP
(Ultra-longue durée)
Type de cassette vidéo
1 heure
2 heures 4 heures
3 heures 6 heures
.
2 heures
T160T120T60
2 heures
40 minutes
5 heures
20 minutes
8 heures

Table des matières
Réglage initial
Téléviseur /
Magnétoscope
Importantes mesures de sécurité ................................................. 2, 3
Avant I’utilisation............................................................................... 4
Informations (Appareil, cassette, disque)..................................... 6, 7
Emplacement des commandes .................................................8 - 11
Raccordements ....................................................................... 11 - 13
Réglage initial ........................................................................... 14, 15
Modification des réglages de la langue, des canaux,
de l’horloge et du fuseau horaire ............................................... 16, 17
Fonctions de base
Téléviseur /
Magnétoscope
DVD
Lecture ............................................................................................ 18
Enregistrement ............................................................................... 18
Duplication (Copie de cassettes) ................................................... 19
Utilisation de base du DVD ...................................................... 20, 21
Fonctionnement du téléviseur
Téléviseur /
Magnétoscope
Visionnement .................................................................................. 22
Réception d’émissions multivoie / réception stéréo ....................... 23
Affichage des sous-titres .......................................................... 24, 25
Minuterie du téléviseur ................................................................... 26
Affichages à l’écran ........................................................................ 27
Radio FM .................................................................................. 28, 29
Fonctionnement de la minuterie
Téléviseur /
Magnétoscope
Enregistrement différé .............................................................. 30, 31
Réglage initial
Fonctions de base
Fonctionnement
du téléviseur
Fonctionnement
de la minuterie
Fonctions avancées
Téléviseur /
Magnétoscope
DVD
Contrôle du câblosélecteur avec la télécommande multimarque .. 32, 33
Fonctions de défilement .......................................................... 34 - 37
Caractéristiques spéciales ....................................................... 38, 39
Discrétion parentale ................................................................ 40 - 45
Caractéristiques audio ............................................................. 46, 47
Menu vidéo / audio ......................................................................... 48
Réglage vidéo / audio .................................................................... 49
Utilisation du disque ................................................................ 50 - 54
Fonctionnement du lecteur DVD à partir
des affichages à l’écran .......................................................... 55 - 57
Lecture de fichiers MP3 ................................................................. 58
Fonction de verrouillage du DVD ................................................... 59
Autres fonctions
Téléviseur /
Magnétoscope
DVD
(F)DF2702 (P04-05 Before)-K(F).p65 2002/03/08, 18:325
Avertissements et directives .......................................................... 63
Guide de dépannage ................................................................ 64, 65
Garantie/Liste des centres de service ........................................... 67
Index ......................................................................................... 68, 69
Réglages initiaux du DVD ....................................................... 60 - 62
Liste des codes de langue ............................................................. 66
Fonctions
avancées
Autres fonctions
5

Informations (Appareil, cassette, disque)
Nettoyage des têtes
La lecture de bandes usées ou endommagées peut
encrasser les têtes vidéo.
Têtes vidéo avec système de détection
Si les têtes ont besoin d’être nettoyées, l’écran ci- dessous
apparaît à la lecture d’une cassette. Pour quitter l’écran,
appuyer sur la touche PLAY de la télécommande ou de
l’appareil.
• N’utiliser que des cassettes de nettoyage “à sec”.
(Il est recommandé d’utiliser la cassette de
nettoyage NV-TCL30PT)
• S’assurer de se conformer aux instructions
d’utilisation de la cassette de nettoyage.
Des nettoyages fréquents peuvent réduire la durée
de vie des têtes.
• Si, après utilisation de la
cassette de nettoyage, le
problème n’est toujours pas
résolu, contacter le centre
de service Panasonic agréé
le plus près (voir page 67.)
Heure avancée (heure d’été)
Ce combiné permet le réglage automatique de
l’horloge à l’heure avancée.
■■
■ Au printemps (Premier dimanche d’avril)
■■
HR ETE : OUI
■■
■ À l’automne (Dernier dimanche d’octobre)
■■
HR ETE : OUI
• Si l’heure avancée n’est pas en vigueur dans votre
région, sélectionner HR ETE : NON (voir la section
“Horloge” aux pages 16 et 17).
• Tenir compte de ces modifications lors de la
programmation de l’appareil.
➛➛
➛ l’horloge est avancée d’une heure.
➛➛
➛➛
➛ l’horloge recule d’une heure.
➛➛
Contrôle de la qualité de l’image
Pistage numérique automatique
Cette fonction analyse constamment le signal et effectue les
corrections nécessaires en vue d’assurer une qualité
d’image optimale.
Commande de pistage manuel
Pendant la lecture ou le ralenti, utiliser cette fonction pour
réduire la distorsion de I’image. Appuyer sur les touches
numériques 3 ou 6 de la télécommande ou les touches des
canaux de I’appareil jusqu’à ce que I’image soit nette. Pour
revenir au mode de pistage automatique, couper le contact
puis le rétablir quelques secondes plus tard.
Commande de balayage vertical
Utiliser les touches numériques 3 ou 6 de la
télécommande ou les touches des canaux de l’appareil
en mode arrêt sur image pour minimiser le sautillement.
Tube image plat
Ce combiné comporte un tube image plat.
6
Spécifications
Affichage
Tube image:Tube image plat de
Magnétoscope
Système
d’enregistrement vidéo: Balayage hélicoïdal à 4 têtes
Système audio: 1 piste (normal)
Bloc d’accord
Canaux télévisés: VHF 2 à 13, UHF 14 à 69
Canaux câblodistribués: Bande moyenne “A” à “I”
Radio FM
Gamme de fréquence: 87,5 à 108,1 MHz
Divers
Alimentation: 120 V c.a., 60 Hz
Consommation: Environ 174 watts (En contact)
Système de télédiffusion: EIA standard, signal couleur
Haut-parleur: 2 éléments
Température de
fonctionnement: 5 °C à 35 °C (41 °F à 95 °F)
Humidité de
fonctionnement: 10 % à 75 %
Poids (approx.): 52 kg (114,4 lb)
Dimensions (approx.): 760 mm x 651 mm x 503 mm
(L x H x P)
Disques lus:
(1) Disque DVD-Vidéo 12 cm (5 po) un côté, une
(2) Disque compact Disque de 12 cm (5 po)
(CD-DA, CD-Vidéo) Disque de 8 cm (3 po)
Sortie audio numérique:
Sortie numérique optique:Connecteur optique
Capteur:
Longueur d’onde: 655 nm (DVD)
Nota: Les caractéristiques et données techniques
peuvent être modifiées sans préavis.
68,58 cm (27 po),
mesuré en diagonale
rotatives
2 pistes
(sonorité stéréo haute fidélité)
(14 à 22)
Bande supérieure “J” à “W”
(23 à 36)
Bande hyper “AA” à “EEE”
(37 à 64)
Bande inférieure “A5” à “A1”
(95 à 99)
Canal spécial 5 A (01)
Ultrabande 65 à 94, 100 à 125
Environ 3,5 watts
NTSC
29 15/16 po x 25 5/8 po x 19 13/16 po
couche
12 cm (5 po) un côté, deux
couches
12 cm (5 po) deux côtés, deux
couches (une couche par côté)
8 cm (3 po) un côté, une
couche
8 cm (3 po) un côté, deux
couches
8 cm (3 po) deux côtés, deux
couches (une couche par côté)
790 nm (CD-Vidéo/CD)
Puissance de laser: CLASS II
(Hors contact)
(F)DF2702 (P06-7 Inf)-K(F).p65 2002/03/15, 15:306

Formats de disques supportés par l’appareil
Tous les disques portant les étiquettes suivantes
pourront être lus :
DVD
Disque de 8 cm (3 po)/Disque de 12 cm (5 po)
CD-Vidéo
Disque de 8 cm (3 po)/Disque de 12 cm (5 po)
CD
Disque de 8 cm (3 po)/Disque de 12 cm (5 po)
Disques qui ne peuvent être lus sur cet
appareil.
• DVD avec NO. de région autre que “1” ou “ALL”
• DVD au format PAL • DVD-ROM
• DVD-R/DVD-RAM • CD-ROM
• CDV • CD-G
• Ne pas tenter de lire des CD photo.
est une marque déposée.
Définition des termes
Angle
Certains DVD contiennent des scènes qui ont été enregistrées
simultanément sous plusieurs angles (par exemple la même
scène été prise de face, du côté gauche, du côté droit, etc.).
Avec ces disques, la même scène pourra être visionnée sous
un angle différent à l’aide de la touche d’angle (ANGLE).
Numéro de chapitre
Ces numéros sont enregistrés sur les disques DVD. Un titre
est subdivisé en plusieurs sections, chacune ayant un numéro,
et il est possible de repérer rapidement des passages
spécifiques d’une présentation vidéo à l’aide de ces numéros.
DVD
Ce terme représente un disque optique à haute densité sur
lequel des images et des sons de haute qualité ont été
enregistrés à l’aide de signaux numériques. Les DVD, qui
incorporent une nouvelle technologie de compression vidéo
(MPEG ll) et une technologie d’enregistrement à haute
densité, permettent de longs enregistrements d’images
cinématographiques (par exemple un film entier) d’une
grande qualité esthétique.
Commande de lecture
Elle est enregistrée sur un CD vidéo (version 2.0).
Les scènes ou I’information à visionner (ou à écouter)
peuvent être sélectionnées interactivement sur l‘écran du
téléviseur en regardant le menu affiché sur cet écran.
Sous-titres
Ce sont les lignes imprimées qui apparaissent au bas de l’écran.
Chiffres de durée
Ils représentent la durée de lecture qui s’est écoulée
depuis le début d’un disque ou d’un titre. Ils permettent
également de repérer rapidement une scène spécifique.
(Ils ne fonctionnent pas avec tous les disques.)
Numéro de titre
Ces numéros sont enregistrés sur les disques DVD. Si un
disque renferme deux films ou plus, ces films sont numérotés
“titre 1”, “titre 2”, etc.
Numéro de plage
Ce sont des numéros attribués aux plages et qui sont
enregistrés sur les CD vidéo et les CD audio. Ils
permettent de repérer rapidement des plages spécifiques.
CD-Vidéo
Ces disques renferment des images et des sons d’une
qualité équivalente à celle d’une bande vidéo. Ce lecteur
supporte également les CD-Vidéo dotés de la commande
de lecture (version 2.0).
Maniement des disques et entretien
Précautions de maniement
• Tenir le disque par les bords de façon à ne pas
laisser de marques de doigt sur la surface.
Les marques de doigt, la saleté et les
rayures peuvent provoquer des
sauts de lecture et de distorsion.
• Ne pas écrire sur le côté
portant l’étiquette.
• Ne pas utiliser de
vaporisateurs de nettoyage pour disques, benzène,
diluant, liquides antistatique ni aucun autre solvant
d’aucune sorte.
• Faire attention de ne pas
faire tomber ni plier le disque.
• Ne pas mettre plus d’un
disque dans le plateau du disque.
• Ne pas essayer de refermer le plateau du disque si
le disque n’est pas installé correctement.
• Bien ranger le disque dans son étui quand il n’est
pas utilisé.
Plateau du disque
Disque
Si la surface du disque est sale
L’essuyer délicatement avec un chiffon doux et humide
(eau seulement). Pour essuyer les disques, toujours
déplacer le chiffon de l’orifice central vers le bord
extérieur. (Si les disques sont essuyés suivant un
mouvement circulaire, cela risque de provoquer des
rayures circulaires qui engendreront des parasites.)
Si le disque est amené d’un environnement
froid à une pièce chaude, de l’humidité risque
de se former sur le disque
Essuyer l’humidité avec un chiffon doux, sec et sans
peluche avant d’utiliser le disque. (Voir ci-dessus.)
Afin de prévenir les risques de dommages, ne
pas ranger ou laisser les disques dans un endroit
• exposé aux rayons solaires directs ;
• humide ou poussiéreux ;
• près d’une source de chaleur.
Cet appareil est breveté aux États-Unis sous les
références 4,631, 603,4,577,216, et 4,819,098. Licence
accordée pour utilisation privée du seulement.
Ce produit intègre une technologie protégée par copyright,
qui dépend de certains brevets américains ou d’autres
droits de propritété intellectuelle, possédés par Macrovision
Corporation et les autres ayant-droits. L’utilisation de cette
technologie protégée doit être autorisée par Macrovision
Corporation, et doit se faire, sauf exception officielle fournie
par Macrovision Corporation, dans le cadre domestique ou
privé d’un visionnement. Le démontage de l’appareil et
l’inversion de certaines pièces est interdite.
Réglage initial
7
(F)DF2702 (P06-7 Inf)-K(F).p65 2002/03/08, 18:327

Emplacement des commandes
Télécommande
Éjection/Ouverture/Fermeture
Voir à la page suivante.
Interrupteur
Mise en/hors marche de l’appareil.
Télé-magnétoscope
Pour passer au mode télé-magnétoscope.
Réglage silencieux
Coupure instantanée du son.
Changement de canal
Sélection d’un canal.
Ambiophonique
Un effet ambiophonique tridimensionnel
plus profond est possible.
Touches numériques
Syntonisation directe d’un canal.
Angle
Pour la sélection de l’angle de
vision désiré en mode DVD.
Audio
Pour la sélection du mode audio désiré.
Titre
Permet la sélection du titre au moyen
de son numéro sur certains DVD.
Sélection
Pour naviguer dans le menu
affiché à l’écran.
A
ction
Affichage du menu principal.
Réglage
Permet d’effectuer les réglages dans
le menu séléctionné.
Rebobinage/ralenti-
Rebobine la bande et repérage
arrière de séquence.
Pause/Arrêt sur image
Pause à la lecture et défilement
image par image en mode arrêt
sur image.
Saut /Recherche
Saut arrière d’un chapitre ou d’une plage.
Retour au menu précédent. Sélection de
l’enregistrement désiré.
Détection de la fin d’un enregistrement.
Lecture
Amore la lecture.
Saut
/
Saut de pauses publicitaires
/
repérage à zéro
Saut de chapitre ou de plage.
Passage à l’écran suivant.
En mode d’arrêt, permet de défiler jusqu’à
la position correspondant au point “0:00:00”.
En mode de lecture, permet de sauter entre
1 et 3 minutes d’enregistrement (saut de publicité).
Mode DVD
Pour passer au mode DVD.
Éclairage
Voir à la page suivante.
Récepteur DSS/câblosélecteur
Programmer la télécommande pour
commander certaines fonctions de base des
récepteurs DSS et des câblosélecteurs.
FM
Réception radio dans la bande FM.
Commande de volume
Réglage du volume.
Syntonisation rapide
Affichage du dernier canal syntonisé.
Ajout ou effacement d’un canal
Pour annuler une rubrique à l’écran.
Sous-titres
Sélection d’une langue de sous-titres.
Affichage/Entrée
Affichage de l’état du téléviseur et de
l’heure du jour. En mode DVD, affichage
d’informations sur le disque et l'appareil.
En mode récepteur DSS ou câblosélecteur,
cette touche peut être nécessaire après la
syntonisation d’un canal.
Menu
Affichage le menu du disque DVD.
Programmation
Pour appeler l’écran RÉGLAGE
PROGRAMMATION. Permet la
programmation de l’enregistrement
différé et de la minuterie de mise sous
tension automatique.
Avance accélérée
Défilement avant rapide de la bande
et repérage avant de séquence.
Augmentation de la vitesse du
ralenti en mode arrêt sur image.
/ralenti+
Zoom/Remise à zéro du compteur
Pour agrandir des sections
spécifiques d’une image d’un DVD.
Pour remettre le compteur à “0:00:00”
à un endroit sur la bande.
Enregistrement
Enregistrement d’un programme.
Retour/Vitesse
Retour au menu DVD.
Sélection de la vitesse de défilement
à l’enregistrement.
Arrêt
Arrêt de l’enregistrement ou de la
lecture en cours.
8
(F)DF2702 (P08-10 Location)-K(F).p65 2002/03/08, 18:328

Télécommande universelle éclairée, à station verticale (Light Tower® )
Touche d’éclairage:
Suite à une pression sur cette touche, les autres touches (DVD,
/ , VOL +/-) s’allument pendant 5 secondes pour faciliter l’opération.
CH
Si aucune touche n’est pressée dans un délai de 5 secondes, l’éclairage s’éteint pour
conserver l’énergie des piles.
Touche d’éjection/ouverture/fermeture:
Sur pression de cette touche dans le mode télé-magnétoscope, la cassette est éjectée.
La touche n’a aucun effet si un enregistrement est en cours. Si elle est pressée en
mode DVD, le plateau du disque s’ouvre ou se ferme selon le cas.
, DSS/CABLE,
Indicateurs sur panneau avant
Réglage initial
Indicateur
d’enregistrement
Cet indicateur s’allume
pendant un enregistrement.
En mode pause à
l’enregistrement ou lors d’une
pause dans le cours d’un
auto-enregistrement,
l’indicateur clignote.
P. 1 8
Capteur de signal
de la télécommande
Indicateur de minuterie
S’allume lorsque la minuterie est en fonction.
P. 26
(F)DF2702 (P08-10 Location)-K(F).p65 2002/03/09, 15:359
Indicateur d’angle
S’allume lorsqu’une
scène enregistrée sous
plusieurs angles de prise
de vue est détectée.
(DVD seulement).
P. 51.
Indicateur
d’enregistrement
différé
Cet indicateur s’allume
lorsque l’appareil est
programmé en vue d’un
enregistrement différé.
L’indicateur clignote si la
programmation a été faite
sans qu’une cassette
n’ait été mise en place, si
l’horloge n’a pas été
réglée ou si la bande
défile.
P. 30
9

Emplacement des commandes (suite)
Panneau avant de l’appareil
Haut-parleur
Si le disque ne peut être éjecté
Couper d’abord le contact. Introduire
ensuite une petite tige rigide (un
trombone déplié par exemple) dans
l’orifice sous le plateau. Le plateau
devrait se dégager. Il est alors possible
de tirer le plateau et de retirer le
disque.
Plus de 2 pouces
de long
incorporé (✕ 2)
Prise de
casque d’écoute
Pour brancher des
écouteurs ou un
casque d’écoute.
Bornes d’entrée
audio/vidéo (LINE2)
Pour le raccordement
à un autre appareil.
Borne d’entrée S-Vidéo
Pour le raccordement à un
autre appareil avec S-Vidéo.
Interrupteur (Voir page 8)
Arrêt (Voir page 8)
Pause (Voir page 8)
Lecture (Voir page 8)
Saut
Saut
Ouverture/Fermeture (Voir page 8)
(Voir page 8)
(Voir page 8)
10
Plateau du disque
Compartiment de la
cassette
Enregistrement
(Voir page 8)
Avance accélérée/repérage
Lecture/reprise (Voir page 8)
Rebobinage/repérage (Voir page 8)
Arrêt/éjection (Voir page 8)
Téléviseur/FM (Voir page 8)
Changement de canal
Volume (Voir page 8)
(Voir page 8)
Pistage
(Voir page 8)
(F)DF2702 (P08-10 Location)-K(F).p65 2002/03/09, 15:3510

Haut-parleur
VHF/UHF
DIGITAL AUDIO OUT
PCM/BITSTREAM
OPTICAL COXIAL
VHF/UHF
VHF/UHF
Câblosélecteur
Entrée de l’antenne/
câblodistribution
/
incorporé (✕ 2)
Panneau arrière
Prise de sortie
audio (G/D)
P. 1 2
Réglage initial
Bornes d’entrée
audio/vidéo (LINE1)
Pour le raccordement
à un autre appareil.
Prise d’antenne
VHF/UHF
Voir ci-dessous.
Prise d’alimentation c.a.
Une fois l’appareil branché
sur le secteur, sa
consommation d’énergie
sera de 3,5 W (avec le
contact coupé).
Raccordements
Antenne/Câblodistribution
Brancher le câble en provenance
de l’antenne ou de la
câblodistribution à la borne VHF/
UHF de l’appareil.
Borne d’entrée S-Vidéo
Pour le raccordement à un
autre appareil avec S-Vidéo.
Prise de sortie audio
optique numérique
P. 1 3
Entrée de l’antenne
câblodistribution
VHF/UHF
VHF/UHF
DIGITAL AUDIO OUT
PCM/BITSTREAM
OPTICAL COXIAL
VHF/UHF
Câblosélecteur/Récepteur DSS
Au moyen d’un câble RF, relier la
prise OUT du câblosélecteur à la
borne VHF/UHF de l’appareil.
AVERTISSEMENT:
Si les câbles RF coaxiaux utilisés sont de
type à écrou, ne serrer les écrous qu’à la
main. Les serrer trop pourrait endommager
les bornes.
(F)DF2702 (P08-10 Location)-K(F).p65 2002/03/09, 15:3511
11

Raccordements (suite)
Raccordements audio
■
Appareil
➛➛
➛ Amplificateur
➛➛
Appareil
AUDIO OUT
R L
R L
AUDIO IN
Enceinte
Fabriqué sous licence de Dolby Laboratories.
“Dolby”, “Pro Logic” et le symbole double-D
sont des marques commerciales de Dolby
Laboratories. Projet non publié confidentiel.
© 1992-1997 Dolby Laboratories, Inc. Tous
droits réservés.
➛➛
➛ Enceintes
➛➛
Amplificateur
Enceinte
12
Avant de commencer, s’assurer de...
Baisser le volume, puis mettre tous les appareils hors
circuit avant d’effectuer les raccordements.
Ne pas obstruer les orifices de ventilation des
appareils et les disposer de façon que l’air circule
librement.
Bien respecter les codes de couleur lors du
raccordement des câbles audio et vidéo.
Lire les instructions avec d’effectuer un raccordement.
Sonorité numérique avec connecteur de
sortie audio numérique
À propos de la sortie audio du connecteur de
sortie audio numérique optique
Disque
Format
d’enregistrement
du son
Dolby Digital
PCM linéaire
DVD
(48/96 kHz
16/20/24 bits)
dts
CD
MPEG 1
vidéo
CD
PCM linéaire
MP3
MP3
*1 Le type de sortie audio du connecteur pourra être
sélectionné dans les réglages initiaux du DVD. (Voir
page 61.)
*2 Le son échantillonné à 96 kHz est converti en un
échantillonnage à 48 kHz quand il est envoyé par le
connecteur de sortie audio numérique optique de
l’appareil.
Pour référence:
• Le Dolby Digital est une technique de compression du
son numérique mise au point par Dolby Laboratories
Licensing Corporation. Cette technique, qui supporte un
son ambiophonique à 5.1 canaux ainsi qu’un son stéréo
à 2 canaux permet d’enregistrer efficacement une
grande quantité de données sonores sur un disque.
• Le PCM linéaire est un format d’enregistrement du
signal utilisé pour les CD. Alors que les CD sont
enregistrés à 44,1kHz/16 bits, les DVD sont
enregistrés entre 48 kHz/16 bits et 96 kHz/24 bits.
• Le raccordement d’un décodeur ambiophonique Dolby
Pro Logic permet de profiter des mêmes effets Pro
Logic tirés des films DVD avec pistes sonores pour 5.1
canaux Dolby Digital ainsi que des titres identifiés avec
la marque Dolby Surround. Pour plus de
renseignements sur les décodeurs ambiophoniques
Dolby Pro Logic Panasonic ou Technics, contacter votre
détaillant.
Sortie audio numérique
optique par le connecteur
Flux des bits du Dolby Digital
(1-5.1 canaux) ou NON (hors
circuit - pas de sortie)*
1
PCM linéaire (2 canaux)
(échantillonnage de 48 kHz/16 bits
uniquement)*
2
ou pas de sortie*
Flux des bits ou pas de sortie*
PCM
(échantillonnage de 44,1 KHz)
PCM linéaire
(échantillonnage de 44,1 KHz)
PCM linéaire
(selon le fichier MP3)
1
1
(F)DF2702 (P12-13) connect-K.p65 2002/03/08, 18:3312

■ Appareil
➛➛
➛ Décodeur Dolby Digital
➛➛
➛➛
➛ Amplificateur
➛➛
➛➛
➛
➛➛
Enceintes
ou
Appareil
Amplificateur
Lors de la lecture de DVD enregistrés en Dolby Digital ou en dts, le flux des bits Dolby
Digital ou le flux des bits dts est envoyé par le connecteur de sortie audio numérique
OPTICAL. Si l’appareil est raccordé à un décodeur Dolby Digital ou à un décodeur dts, il
sera possible de profiter du son d’une salle de cinéma dans son salon. [Un câble audio
numérique optique (vendu séparément) sera nécessaire pour pouvoir utiliser un décodeur
Dolby Digital ou un décodeur dts vendus séparément.]
Remarques sur le raccordement
d’un câble optique numérique
(vendu séparément)
• Brancher fermement le câble au
connecteur.
Précautions pour le connecteur de
sortie audio numérique optique:
Lors du raccordement d’un
•
amplificateur (avec un connecteur
d’entrée numérique optique) non
équipé d’un décodeur Dolby Digital ou
d’un décodeur dts, s’assurer de bien
sélectionner “NON” sous “Dolby
Digital” et “NON” sous “dts” du réglage
initial “SORTIE AUDIO” de la section
DVD. (Voir page 61.) Autrement, toute
tentative de lecture d’un DVD pourrait
entraîner un niveau de bruit si élevé
qu’il risque d’affecter l’ouïe et
d’endommager les enceintes.
• Si un décodeur dts est raccordé,
sélectionner “Bitstream” sous “dts” du
réglage initial “SORTIE AUDIO” de la
section DVD. Si “NON” est sélectionné,
aucun son ne sera produit. (Voir page
61.)
• Les CD-Vidéo et les CD se lisent
normalement.
Nota:
• Certains décodeurs dts qui ne
prennent pas en charge l’interface
DVD-dts pourraient ne pas fonctionner
correctement avec cet appareil.
➛➛
➛ Décodeur dts (systèmes numériques de cinéma)
➛➛
➛➛
➛ Enceintes
➛➛
➛➛
➛
➛➛
Réglage initial
13
(F)DF2702 (P12-13) connect-K.p65 2002/03/08, 18:3313

Réglage initial (Prêt pour la lecture)
S'assurer d'effectuer tous les raccordements avant de mettre l'appareil
sous tension.
Réglage initial (Prêt pour la lecture)
Appuyer sur sur la télécommande
pour accéder au mode télé-magnétoscope.
Brancher le cordon d’alimentation dans une
prise.
1
Appuyer sur POWER* sur la télécommande ou
l’appareil. L’appareil se met en contact et le
2
réglage automatique des canaux et de l’horloge
s’amorce.
Interrupteur
CH AUTO SET PROCEEDING
• Lors de l’utilisation d’un câblosélecteur, le mettre en
contact et syntoniser le canal PBS. Si un récepteur DSS
est utilisé, il doit être mis hors contact.
AUTO CLOCK SET
PROCEEDING
CANCEL : PRESS STOP KEY
Le réglage se fait automatiquement. Une fois le
réglage terminé, l’écran ci-dessous apparaît.
3
2 / 6 /
2002
WED 12 : 00PM
DST : O
ETED
N
0
SETT I NG : CH 1
UTO CLOCK SET
A
CO
MPL
Si l’écran AUTO CLOCK SET IS INCOMPLETE
apparaît, l’horloge doit être réglée manuellement
selon la marche à suivre décrite à la page suivante.
A
UTO CLOCK SET
MPL
I S I NCO
PLEASE SET CLOCK BY
R
ESS I NG ACT I ON KEY
P
ETE
14
Télémagnétoscope
Sélection
Réglage
Action
Durant le réglage
initial, l’affichage est
en anglais seulement.
Changer la langue une
fois le réglage initial
complété. (Voir à la
page 10 pour modifier
le réglage de la
langue.)
(F)DF2702 (P14-15)Initial-K(F).p65 2002/03/08, 18:3314

Important:
*
Si une touche de la télécommande ne fonctionne pas, appuyer sur la touche
la télécommande et essayer à nouveau.
de
Réglage manuel de l’horloge
Si le réglage automatique de l’horloge n’a pas
fonctionné, régler de la manière suivante:
Appuyer sur ACTION sur la
télécommande pour faire afficher le
1
menu REGLAGE HORLOGE.
Appuyer sur pour sélectionner
le mois et appuyer sur SET pour
2
régler. Régler la date, l’année,
l’heure et l’heure avancée (HR
ETE) de la même façon.
Appuyer deux fois sur ACTION
pour mettre l’horloge en marche et
3
quitter.
Réinitialisation de toutes les
fonctions en mémoire
Utiliser cette fonction lors du déplacement de
l’appareil à un autre endroit ou en cas d’erreur
lors du réglage initial.
• S’assurer qu’aucune cassette ne se trouve
dans le logement.
Établir le contact
1
sur l’appareil.
Maintenir simultanément
2
enfoncées les touches PLAY et FF
de l’appareil pendant plus de 5
secondes.
• Le contact est coupé.
• Ignorer l’avertissement “AUCUNE
CASSETTE INSEREE”.
Pour réinitialiser les fonctions en
3
mémoire, suivre les instructions
décrites à la page 14.
Réglage initial
Note à l’intention de l’installateur du câble:
Ne pas oublier de rappeler au technicien installant le câble que
le Code canadien de l’électricité contient des directives quant à
la mise à la terre de l’installation: il précise en outre que le
câble doit être relié à la mise à la terre de l’immeuble aussi
près du point d’entrée du câble que possible.
(F)DF2702 (P14-15)Initial-K(F).p65 2002/03/08, 18:3315
15

Modification des réglages de la langue, des canaux, de l’horlog
MENU
1
BLOCAGE
DVD
HORLOGETELE
SEL. :
REGLER : SET
FI N :
ACT I ON
Langue
2
1) Appuyer sur
pour sélectionner
“LANGUE.”
MENU
BLOCAGE
DVD
HORLOGETELE
SEL. :
REGLER : SET
FIN :
ACT I ON
2) Appuyer à répétition
sur SET.
M A I N MENU
LOCK
DVD
CLOC
TV
SELECT :
END : ACT I ON
Anglais
MENU PR I NCIPAL
BLOQUEO
DVD
ELEG I R :
TERM I NAR :
SEL. :
FIN :
3) Appuyer sur ACTION
pour quitter.
RELOJTV
F I
ACT I ON
Espagnol
MENU
BLOCAGE
DVD
HORLOGETELE
REGLER : SET
ACT I ON
Français
LANGUE
3
5
CANAL
LANGUE
CANAL
HELLO
LANGUAGE
K
SET : SET
HOLA
ID I OMA
CANAL
JAR : SET
BONJOUR
LANGUE
CANAL
Appuyer sur ACTION*
pour afficher l’écran MENU.
1
Canaux
1) Appuyer sur
pour sélectionner
“CANAL.”
1
3
5
1
3
5
CH
1
3
5
1
3
5
DVD
SEL. :
F IN :
2) Appuyer sur SET.
3) Appuyer sur pour
sélectionner
“ANTENNE”, puis
appuyer sur SET pour
sélectionner “TELE” ou
“CABLE.”
4) Appuyer sur
sélectionner
“REGLAGE AUTO”
puis appuyer sur SET.
• Une fois le réglage
automatique des
canaux terminé, le
réglage automatique
de l’horloge s’amorce.
(Si l’horloge a été
réglée manuellement,
le réglage automatique
de l’horloge n’est pas
fait automatiquement.)
MENU
LANGUE
BLOCAGE
HORLOGETELE
REGLER : SET
ACT I ON
3
5
CANAL
1
pour
Horloge
1) Appuyer sur
pour sélectionner
“HORLOGE.”
MENU
LANGUE
BLOCAGE
DVD
HORLOGETELE
SEL. :
REGLER : SET
F IN :
ACT I ON
2) Appuyer sur SET.
(“FUSEAU HORAIRE” ne s’affiche
qu’une fois l’horloge réglée.)
3) Appuyer sur
pour sélectionner
“MANUEL” puis
appuyer sur SET.
(Pour le réglage
automatique de l’horloge,
sélectionner “REGLAGE
AUTOMATIQUE” et
appuyer sur SET.)
6
<Exemple de RÉGLAGE
MANUEL DE
L’HORLOGE>
3
5
CANAL
1
16
(F)DF2702 (P16-17)Reset-K(F).p65 2002/03/08, 18:3316
Suite à la page
suivante.

4) Appuyer sur et
sur SET pour
sélectionner et régler
le mois, la date,
l’année, l’heure et
l’heure avancée (HR
ETE).
Pour faire des
corrections,
appuyer sur
pour
sélectionner la
rubrique désirée puis
faire les corrections.
5) Appuyer à deux
reprises sur ACTION
mettre l’horloge
pour
en marche et quitter
ce mode.
Fuseau horaire
(Seulement lorsque le réglage
de l’horloge a été fait
automatiquement.)
1) Appuyer sur
pour sélectionner
“HORLOGE.”
MENU
LANGUE
BLOCAGE
DVD
HORLOGETELE
SEL. :
REGLER : SET
F IN :
ACT I ON
2) Appuyer sur SET.
3
5
CANAL
1
*Important: Si une touche de la télécommande ne
fonctionne pas, appuyer sur la touche
de la télécommande et essayer à nouveau.
Touches
numériques
Ajout/
effacement
Sélection
Réglage
Action
Réglage initial
(F)DF2702 (P16-17)Reset-K(F).p65 2002/03/08, 18:3317
3) Appuyer sur
pour sélectionner
“FUSEAU
HORAIRE” puis
appuyer sur
ou
pour faire reculer ou
avancer l’horloge.
4) Appuyer à deux
reprises sur ACTION
pour quitter.
• Le FUSEAU HORAIRE
est remis à “0” si
l’horloge est réglée
manuellement.
Ajout ou effacement d’un canal
Pour ajouter un canal :
Sélectionner le canal au moyen
des touches numériques,
puis appuyer sur ADD/DLT.
Pour supprimer un canal :
Sélectionner le canal au moyen
des touches CH ou des
touches numériques, puis
appuyer sur ADD/DLT.
17

Lecture
Enregistrement
Liste des préparatifs
Tous les raccordements ont été faits.
L’appareil est branché.
Insérer une cassette.
1
Languette
de protection
Pour éviter que la cassette ne
se coince,
retirer toute étiquette déchirée ou qui se décolle.
Appuyer sur PLAY* pour lancer la lecture.
La cassette n’est pas munie de sa languette de
2
protection (voir page 4), la lecture débute
automatiquement.
■ Recherche avant/arrière d’une scène
➛ Appuyer sur FF/SLOW+ ou REW/SLOW-.
➛ Appuyer de nouveau ou sur PLAY pour
désactiver.
■ Arrêt sur image (image fixe)
➛ Appuyer sur STILL/PAUSE.
➛ Appuyer sur PLAY pour désactiver.
• L’appareil est automatiquement
mis en marche.
■ Lecture au ralenti
➛
Appuyer sur FF/SLOW+ (augmentation de
la vitesse) ou sur REW/SLOW- (diminution
de la vitesse) en mode arrêt sur image.
➛ Appuyer sur PLAY pour désactiver.
■ Avance image par image
➛ Appuyer sur STILL/PAUSE en mode
arrêt sur image.
➛ Appuyer sur PLAY pour désactiver.
Nota
• Ces caractéristiques offrent de meilleurs
résultats en modes SP ou SLP.
• Si l’appareil est laissé en mode arrêt sur image
ou ralenti pendant plus de 3 minutes, il passe
automatiquement en mode arrêt pour protéger la
bande et les têtes vidéo.
■ Arrêt ➛ Appuyer sur STOP
■ Rebobinage de la bande
➛Appuyer sur REW/SLOW- en mode arrêt
■ Avance accélérée
➛Appuyer sur FF/SLOW+ en mode arrêt
■ Éjection de la cassette
➛Appuyer sur EJECT (télécommande) ou
sur STOP/EJECT (combiné).
Fonctionnement avec les commandes de l’appareil
Changement de canal
Insérer une cassette.
Appuyer pour arrêter la lecture
et(ou) éjecter la cassette.
Lecture/reprise
Enregistrement
Indicateur
d’enregistrement
18
Insérer une cassette munie de sa
languette de protection.
1
• L’appareil est automatiquement mis en
marche.
Appuyer sur CH ou sur les touches
numériques pour sélectionner le canal.
2
• Pour sélectionner “LIGNE1” ou “LIGNE2”
voir le bas de la page suivante.
Appuyer sur SPEED pour sélectionner
la vitesse de défilement (voir page 4).
3
SP = Standard LP = Longue durée
SLP = Ultra-longue durée
• La vitesse sélectionnée s’affiche.
Appuyer sur REC pour lancer
l’enregistrement.
4
• Pour ne pas enregistrer certains passages,
appuyer sur STILL/PAUSE pour interrompre
l’enregistrement et le poursuivre par la suite.
• Il n’est pas possible de visionner un autre
■ Arrêt ➛ Appuyer sur STOP
■ Auto-enregistrement
Arrêt sur image/
canal durant un enregistrement.
Appuyer à répétition sur REC pour fixer la
durée de l’enregistrement.
(30 minutes ~ 4 heures).
• Il est possible de régler
l’appareil pour un enregistrement d’une durée
donnée suivi de la coupure automatique du contact.
• L’indicateur d’enregistrement différé apparaît
sur le panneau avant de l’appareil.
Nota
• Il n’est pas possible d’enregistrer un disque
DVD/CD vidéo/CD avec cet appareil.
• Si le mode pause est utilisé pendant plus de 5
minutes, l’appareil commute en mode arrêt afin de
protéger la bande et les têtes vidéo.
• La durée d’enregistrement restante peut être
affichée sur pression de la touche DISPLAY en
mode auto-enregistrement.
Éjection
Changement
de canal
Sélection
Réglage
Action
Lecture
Rebobinage/
ralenti-
pause
Touches
numériques
Affichage
Avance
accélérée/
ralenti+
Arrêt
Enregistrement
Vitesse
(F)DF2702 (P18-19)PLAY-K(F).p65 2002/03/08, 18:3318

*Important:Si une touche de la télécommande ne
1
2
3
125LIGNE 1
69
ou
LIGNE 2
Duplication (Copie de cassettes)
fonctionne pas, appuyer sur la touche
de la télécommande et essayer à nouveau.
Raccordements nécessaires.
Magnétoscope de lecture (source)
Insérer une
1
cassette
préenregistrée.
2
Appuyer sur PLAY
3
(Effectuer les étapes 4 et 5 simultanément sur les deux appareils.)
4
puis sur PAUSE au
point de départ désiré
pour passer en mode
attente.
Appuyer sur PLAY
pour amorcer la
duplication.
Télé-magnétoscope
Télé-magnétoscope d’enregistrement (montage)
Insérer une cassette
vierge munie de sa
languette de protection.
• La duplication de cassettes
protégées contre la copie
donne de mauvais résultats.
Sélectionner l’option “LIGNE”.
Voir la section “Sélection du mode d’entrée”
ci-dessous.
Appuyer sur REC puis
immédiatement sur STILL/
PAUSE pour mettre en
mode attente.
Appuyer sur STILL/
PAUSE pour amorcer la
duplication.
Fonctions de base
Appuyer sur STOP
5
Mise en garde
• L’échange ou la copie non
autorisés d’enregistrements peut
enfreindre la loi sur les droits
d’auteur.
• Certaines bandes ne peuvent
être copiées sur cet appareil.
De plus, il n’est pas possible de
copier un disque DVD/CD-Vidéo/
CD sur une bande VHS avec cet
appareil.
(F)DF2702 (P18-19)PLAY-K(F).p65 2002/03/09, 15:4519
STOP
pour arrêter la
duplication.
Appuyer sur STOP pour
arrêter la duplication.
Sélection du mode d’entrée
Méthode 1: Appuyer sur CH
dans I’ordre suivant.
Méthode 2:
a Appuyer sur ACTION pour afficher le menu.
b Appuyer sur
appuyer sur SET pour afficher le menu “REGLAGE
TELEVISEUR”.
c Appuyer sur
puis appuyer sur SET pour sélectionner “BLC ACCORD”,
“LIGNE1” ou “LIGNE2”.
d Appuyer à deux reprises sur ACTION pour quitter ce mode.
• LIGNE1 : connexion audio/vidéo arrière.
LIGNE2 : connexion audio/vidéo avant.
pour sélectionner “TELE” puis
pour sélectionner “SELECT-SOURCE,”
. L’affichage change
19

Utilisation de base du DVD
Liste des préparatifs
Tous les raccordements ont été faits (Voir pages 11-13.).
L’appareil est branché.
S’assurer que le contact est établi sur la chaîne si
l’appareil a été raccordé à un amplificateur audio.
Fonctionnement avec les
commandes sur l’appareil
Appuyer sur PLAY.
Insérer le
3
disque.
Appuyer sur
1
l’interrupteur.
*1DVD interactif…
Peut comporter un choix d’angles de
prises de vue, de scénarios, etc.
*2CD-Vidéo avec pilotage de la lecture…
Il est possible de choisir des scènes ou
des informations à partir d’un menu.
6
•
74
3
Appuyer sur
OPEN/CLOSE.
Appuyer sur cette
touche pour arrêter.
20
Appuyer sur POWER* (sur l’appareil
ou la télécommande).
1
Appuyer sur DVD pour sélectionner le
mode DVD.
2
• Si un disque est déjà en place, passer à l’étape 4.
(Certains disques amorcent la lecture automatiquement.)
Mettre un disque en place.
1) Appuyer sur OPEN/CLOSE.
3
2) Placer le disque sur le plateau.
Appuyer sur PLAY pour lancer la lecture.
Le plateau du disque se ferme automatiquement.
4
FERMETURE
INITIALISATION
Si un DVD*1 interactif ou un CDVidéo avec pilotage de la lecture*
est utilisé et qu’un menu de titres
s’affiche, passer à l’étape 5.
5
<Exemple avec DVD>
<Exemple>
Appuyer sur SKIP | ou | pour passer au menu suivant
ou précédent.
• La fonction d’évitement ne peut être utilisée avec tous les
disques. Se reporter à la pochette du disque pour plus de détails.
Arrêt de la lecture et retour à l’écran de menu
Appuyer sur TITLE, MENU, ou RETURN. (DVD)
Appuyer sur RETURN. (CD-Vidéo)
Appuyer sur STOP pour arrêter la
lecture.
6
Appuyer sur OPEN/CLOSE pour éjecter
le disque.
7
• Tenir le disque par ses bords
(page 7), côté imprimé sur le
dessus, et le placer sur le plateau
en se servant des guides de
1
position. Le plateau accepte les
2
disques de 8 cm (3 po) et de 12
cm (5 po) .
• Il est aussi possible de le fermer
en appuyant sur OPEN/
CLOSE.
• Le temps de lecture varie selon
les disques.
• Numéro à 1 chiffre 1 ••• 1
• Numéro à 2 chiffres 12 ••• 10➛1➛2
• Numéro à 3 chiffres 123 •••100➛1➛2➛3
2
<Exemple avec DVD>
2
Appuyer sur ou
la (les) touche(s)
numérique(s) pour
sélectionner le titre et
appuyer sur SET pour
lancer la lecture.
L’utilisation des touches
numériques amorce
automatiquement la lecture.
1
(F)DF2702 (P20-21 Basic DVD)-K(F).p65 2002/03/08, 18:3320

Important:
*
Si une touche de la télécommande ne fonctionne pas, appuyer sur la touche DVD de la
télécommande et essayer à nouveau.
■ Avance et recul rapides pour
repérage d’une scène
➛ Appuyer sur FF/SLOW+ ou REW/SLOW-
en mode lecture.
➛ Appuyer sur PLAY pour désactiver.
• Amorcer l’avance (ou le recul) rapide pendant
la lecture d’un CD-Vidéo lancé à partir du
menu peut rappeler le menu.
• La vitesse de repérage, lente au début,
augmente sur chaque pression de la touche.
Jusqu’à 5 paliers sont disponibles.
■ Saut avant/arrière d’un chapitre ou
d’une plage
➛ Appuyer sur SKIP | ou |
pendant la lecture. Chaque pression sur
la touche fait sauter un chapitre (DVD)
ou une plage (CD-Vidéo/CD).
Une pression sur | SKIP à mi-parcours au
sein d’un chapitre/plage fait reprendre la lecture
au début du chapitre ou de la plage en question.
Chaque pression supplémentaire fait revenir à la
plage ou au chapitre précédent.
• Une pression sur SKIP | ou | pendant
la lecture d’un CD-Vidéo lancé à partir du menu
peut rappeler le menu.
Chapitre/Plage Chapitre/Plage Chapitre/PlageChapitre/Plage
Position courante
Saut arrière Saut avant
■ Arrêt sur image (Pause)
➛ Appuyer sur STILL/PAUSE pendant la
lecture.
➛ Appuyer sur PLAY pour désactiver.
• DVD/CD-Vidéo : L’appareil passe en mode
arrêt sur image.
• CD : L’appareil passe en mode pause.
■ Avance image par image
➛ Appuyer sur STILL/PAUSE en mode
arrêt sur image.
➛ Appuyer sur PLAY pour désactiver.
• Chaque pression de la touche fait passer à
l’image suivante.
• Maintenir la touche avancée pour un
défilement continu des images.
• L’avance image par image ou champ par
champ est sélectionnée automatiquement (voir
à page 62).
■ Visionnement au ralenti
➛ Appuyer sur FF/SLOW+ ou REW/SLOW-
(DVD seulement) en mode arrêt sur image.
➛ Appuyer sur PLAY pour désactiver.
• La vitesse du ralenti, très lente au début,
augmente sur chaque pression de la touche (5
paliers sont disponibles).
•
Le ralenti arrière n’est pas possible avec un CD-Vidéo.
(DVD/CD-Vidéo)
(DVD/CD-Vidéo)
• Lorsque le symbole s’affiche sur pression
d’une touche, cela signifie que la fonction
demandée ne peut être utilisée.
Fonction de poursuite
L’appareil mémorise l’endroit où la touche
STOP a été pressée (l’indication
à l’écran).
Appuyer sur PLAY pour poursuivre la
lecture à partir de ce point. Appuyer de
nouveau sur STOP ou ouvrir le plateau
du disque annule la fonction de poursuite.
Cependant, elle n’est pas annulée lorsque
le contact est coupé.
• La fonction de poursuite ne fonctionne qu’avec
des disques dont la durée de lecture écoulée
s’affiche pendant la lecture.
clignote
Mise hors contact automatique
Le contact est automatiquement coupé
lorsque l’appareil est laissé en mode arrêt
(DVD) pendant environ 5 minutes.
Visionnement de CD-Vidéo
(seulement) avec pilotage de
la lecture sans utilisation
des menus
1.Suivre les étapes 1 à 4 (page précédente).
Lorsque le menu s’affiche, appuyer sur
STOP.
2.Appuyer sur la(les) touche(s)
numérique(s) correspondant à la plage
désirée (la lecture s’amorce).
• Vérifier le contenu du disque et l’identification
des plages.
• Appuyer sur “1” pour amorcer la lecture au
début de la première plage.
Pour appeler le menu
Appuyer sur STOP et sur PLAY, puis de menu
s’affiche. Passer à l’étape 5 (page précédente).
Nota
• Pour plus de détails sur l’opération, lire les
notes accompagnatrices du disque.
• Si un disque à une seule face est placé sens
dessus dessous, le message suivant s’affiche :
“VERIFIER LE DISQUE OU TOUTE TRACE
DE RAYURE OU DE TACHE SUR LE
DISQUE”.
• Après usage, retirer le disque et couper le
contact.
• Même si la lecture est terminée, la rotation du
disque se poursuit pendant l’affichage du
menu. Appuyer sur STOP pour supprimer
l’affichage du menu.
21
Fonctions de base
(F)DF2702 (P20-21 Basic DVD)-K(F).p65 2002/03/08, 18:3321

Visionnement
*Important: Si une touche de la télécommande ne
fonctionne pas, appuyer sur la touche
de la télécommande et essayer à nouveau.
Appuyer sur POWER* sur
1
l’appareil ou sur la télécommande.
Utiliser CH ou
0 8
A
BC
2
3
24
les touches
numériques pour
sélectionner un canal.
Appuyer sur VOL+
ou VOL- pour régler
le volume.
Liste des préparatifs
Tous les raccordements ont été faits
page 11).
L’appareil est branché.
Volume
Interrupteur
Prise de casque
d’écoute
Changement
de canal
(voir
■ Utilisation de la touche 100
Pour sélectionner les canaux 100 à 125 au
moyen des touches numériques, appuyer
d’abord sur la touche 100, puis entrer les deux
autres chiffres.
■ Syntonisation rapide
Appuyer sur la touche R-TUNE pour
syntoniser le dernier canal sélectionné.
■ Réglage silencieux
Appuyer sur MUTE pour couper
instantanément le son.
Appuyer de nouveau pour rétablir le son à son
volume d’origine.
■ Casque d’écoute
Brancher un casque d’écoute ou un écouteur
(vendus séparément) dans la prise de casque
d’écoute.
22
(F)DF2702 (P22 TV)-K(F).p65 2002/03/08, 18:3322

Réception d’émissions multivoie/réception stéréo
Cet appareil est équipé d’un
réducteur de bruit
une reproduction multivoie fidèle.
Ce réducteur ®est nécessaire
en vue d’assurer une bonne
séparation stéréo et une haute
fidélité du rendu sonore.
une marque déposée, et fabriqué
sous licence de
Licensing.
®
-TV pour
®
Technology
Audio
Affichage
®
est
Modes de réception possibles
La liste ci-dessous comporte les différents modes audio
possibles d’émissions télévisées avec leur affichage. Le
signal reçu est identifié par le symbole “ ”, tandis que le
mode audio sélectionné est indiqué par une flèche. Pour
modifier le mode audio de ces émissions, consulter la section
“Sélection du mode audio de la réception télé” ci-dessous.
Appuyer sur DISPLAY
pour faire afficher le signal reçu.
Émission multivoie stéréo et deux
voies son
Transmission multivoie de signaux audio
en télévision. Une émission comportant
une voie audio secondaire peut être
captée en même temps. Sélectionner
“STEREO” ou “2 VOIE”.
Émission multivoie stéréo
Transmission multivoie de signaux audio
en télévision. Sélectionner le mode audio
“STEREO”.
• Si le signal stéréophonique est faible et que
l’affichage tremble, il est recommandé de
sélectionner le mode MONO pour obtenir
une meilleure réception.
2 VOIE : Voie audio secondaire
Émission comportant une deuxième
voie audio enregistrée dans une langue.
Sélectionner “2 VOIE” pour la réception
dans la langue.
Mono
Émission diffusée en mode monaural
standard.
Fonctionnement
du téléviseur
< Exemple >
Appuyer sur AUDIO
(F)DF2702 (P23 MTS)-K(F).p65 2002/03/08, 18:3323
Sélection du mode audio de la réception télé
Appuyer sur la touche AUDIO pour sélectionner
le mode audio désiré.
• Chaque pression sur la touche AUDIO change l’affichage
de la manière illustrée ci-dessous.
• Le mode “2 VOIE” est sélectionné suite à une
première pression sur AUDIO.
Appuyer
sur AUDIO
Appuyer
sur AUDIO
23

Affichage des sous-titres
Mode affichage des sous-titres
Ce système permet non seulement aux malentendants de suivre certains programmes,
mais aussi la lecture d’informations diffusées par les stations de télévision.
Mode affichage des sous-titres
Appuyer sur ACTION*
pour afficher l’écran MENU.
1
2
BLOCAGE
DVD
HORLOGETELE
SEL. :
REGLER : SET
FI N :
ACT I ON
MENU
1)Appuyer sur
LANGUE
5
CANAL
pour sélectionner
“TELE.”
1
3
2)Appuyer sur SET
pour afficher l’écran
REGLAGE
TELEVISEUR.
REGLAGE
3
4
SOUS - T I TRES
SELECT
REGLAGE
ANTENNE FM
MESSAGE
REGLAGE
TELEV I SEUR
S
OURCE : BLC A
V I DEO / AUD I
D' E
RREUR : OU I
VOL.
DVD : + 2
SEL.
F I N
MODE S/TITRES:
S/TITRES
SEL. :
REGLER:
FIN :
RE
:
: ACT I ON
SOUS-TI TRES
-
SOURDI NE:
SET
ACTION
: I N
G
LER : SET
1)Appuyer sur
CCORD
O
T.
pour sélectionner
“SOUS-TITRES.”
2)Appuyer sur SET
pour afficher l’écran
SOUS-TITRES.
1)Appuyer sur pour
S/ T C1
S/ T C1
sélectionner
“MODE S/TITRES.”
2)Appuyer sur SET à
plusieurs reprises pour
sélectionner le mode.
(Voir ci-contre).
Appuyer à trois reprises sur ACTION
pour revenir à l’écran normal.
5
Enregistrement et lecture d’une émission avec
sous-titres/texte
Enregistrement :
Suivre les instructions pour un enregistrement
ordinaire. Le combiné enregistre automatiquement
les sous-titres ou les textes d’information.
Lecture :
Amorcer la lecture. Suivre les étapes ci-dessus pour
sélectionner le mode d’affichage des sous-titres
désiré.
24
Sélections du mode sous-titres
Mode sous-titres : S/TITRE- C1 ou C2
Tout programme télévisé codé pour
malentendants est reçu avec affichage
de sous-titres. Vérifier le guide-télé pour
la liste de telles émissions.
Mode sous-titres : TEXTE C1 ou C2
Le bas de l’écran est réservé pour
l’affichage de textes télédiffusés par
certaines stations, tels que liste de
programmes télé, informations diverses,
etc.
Mode sous-titres : NON
Aucun sous-titre n’est affiché même si
une émission codée pour
malentendants est diffusée.
Nota
:
Le signal de sous-titrage ou de texte peut être
diffusé en mode C1 ou C2, ou les deux à la fois.
De plus, les informations textuelles peuvent varier ;
aussi est-il recommandé de faire l’essai des
différents modes d’affichage.
(F)DF2702 (P24-25TV CC)-K(F).p65 2002/03/08, 18:3324

Important:
*
Si une touche de la télécommande ne fonctionne pas, appuyer sur la touche de la
télécommande et essayer à nouveau.
Affichage des sous-titres avec
réglage silencieux
Sur réception d’une émission avec sous-titrage, une
pression de la touche MUTE appelle l’affichage des
sous-titres.
Appuyer sur ACTION
pour afficher l’écran MENU.
1
Nota
• Lorsqu’un disque avec sous-titres
codés est utilisé, il est possible que
les sous-titres du disque et les soustitres codés se chevauchent. Dans
un tel cas, désactiver les sous-titres
ou le mode sourdine avec soustitres (voir à la page 50).
2
BLOCAGE
DVD
HORLOGETELE
SEL. :
REGLER : SET
FI N :
ACT I ON
MENU
1)Appuyer sur
LANGUE
5
CANAL
pour sélectionner
“TELE.”
1
3
2)Appuyer sur SET
pour afficher l’écran
REGLAGE
TELEVISEUR.
REGLAGE
3
4
5
SOUS - T I TRES
SELECT
REGLAGE
ANTENNE FM
MESSAGE
REGLAGE
TELEV I SEUR
S
OURCE : BLC A
V I DEO / AUD I
D' E
RREUR : OU I
VOL.
SEL.
:
F I N
: ACT I ON
SOUS-TI TRES
MODE S/TITRES:
-
SOURDI NE:
S/TITRES
SEL. :
SET
REGLER:
ACTION
FIN :
SOUS-TI TRES
MODE S/TITRES:
-
SOURDI NE:
S/TITRES
SEL. :
SET
REGLER:
ACTION
FIN :
: I N
DVD : + 2
RE
G
LER : SET
NON
NON
1)Appuyer sur
CCORD
O
T.
pour sélectionner
“SOUS-TITRES.”
2)Appuyer sur SET
pour afficher l’écran
SOUS-TITRES.
1)Appuyer sur pour
S/ T C1
sélectionner
“MODE S/TITRES.”
2)Press SET à plusieurs
reprises pour
sélectionner “NON”.
1)Appuyer sur pour
S/ T C1
sélectionner
“S/TITRES-SOURDINE.”
2)Press SET à plusieurs
reprises pour
sélectionner le mode
désiré.
• Chaque pression sur la
touche SET modifie l’affichage
de la manière ci-contre.
• Le signal de sous-titrage peut
être diffusé en mode S/T C1
ou S/T C2.
Appuyer à trois reprises sur ACTION
pour revenir à l’écran normal.
6
Appuyer sur MUTE pour couper le son et
afficher les sous-titres.
7
• Pour annuler, appuyer à nouveau sur MUTE.
Fonctionnement
du téléviseur
25
(F)DF2702 (P24-25TV CC)-K(F).p65 2002/03/08, 18:3325

Minuterie du téléviseur
SEL. :
REGLER : SET
FI N : PROG
REGLAGE PROGRAMMATI ON
PROGRAMMATI ON MINUTER IE
MI NUTERIE M ISE S/TENS ION
MI NUTERIE -SOMMEI L : 00
Mise en contact différée avec alarme
Il est possible de programmer la mise en contact
automatique en trois modes (téléviseur, lecture, radio FM
ou DVD/CD vidéo/CD). La mise en contact différée peut
également être combinée à une alarme d’une minute dont
le volume augmente graduellement.
Appuyer sur PROG* pour faire afficher
l’écran REGLAGE PROGRAMMATION.
1
REGLAGE PROGRAMMATI ON
PROGRAMMATI ON MINUTER IE
2
MI NUTERIE M ISE S/ TENSION
MI NUTERIE -SOMMEI L : 00
SEL. :
REGLER : SET
FI N : PROG
3
• ON-TIMER mode
selection order
CA02CA
CA01
DVD
FM9
03
FM8
CA125
MAGNETO
FM1
4
Lorsque “OUI” est sélectionné,
un alarme augmente graduellement de volume pendant
une minute ou jusqu’à son annulation sur pression de
n’importe quelle touche (y compris VOL + -.)
Pour procéder à des corrections,
utiliser les touches
Appuyer sur PROG pour compléter le réglage
de la minuterie de mise sous tension.
5
• Le message “MINUTERIE DE MISE SOUS
TENSION REGLEE” est affiché.
• L’indicateur de minuterie s’allume sur le panneau
avant.
Pour annuler,
répéter les étapes 1 et 2. Appuyer ensuite sur ADD/DLT
pour annuler l’heure (voir l’étape 3.) Appuyer maintenant sur
PROG pour quitter. “MINUTERIE DE MISE SOUS TENSION
ANNULEE” apparaît pendant quelques secondes.
et
1) Appuyer sur pour
sélectionner “MINUTERIE
MISE S/TENSION.”
2) Appuyer sur SET pour
afficher l’écran
MINUTERIE MISE
S/TENSION.
1) Appuyer sur pour
sélectionner le réglage
désiré.
2) Appuyer sur SET pour
régler l’heure de la mise
sous tension ou pour
sélectionner une option
de réglage.
• S’assurer qu’une cassette est
insérée si le mode lecture
magnétoscope est sélectionné.
• Si le mode DVD(DVD/ CD vidéo/
CD) a été sélectionné, s’assurer
qu’un disque est en place.
• Voir la section “Réglage radio FM”
aux pages 28 et 29 pour les
directives de présyntonisation des
stations FM.
Appuyer sur pour
sélectionner ALARME
“OUI” ou “NON.”
pour passer au réglage à corriger.
26
Liste des préparatifs
L’horloge est réglée.
Indicateur de minuterie
Minuterie-sommeil
Il est possible de programmer la mise
hors contact différée de l’appareil.
Appuyer sur PROG pour faire
afficher l’écran REGLAGE
1
PROGRAMMATION.
1) Appuyer sur
2
Minuterie-sommeil 30 60 90 00
Pour annuler, appuyer sur SET à
répétition jusqu’à ce que l’indication 00
s’affiche.
Appuyer sur PROG pour revenir
à l’écran normal.
3
• Appuyer sur DISPLAY après avoir
fait la programmation. La minuteriesommeil appelle l’affichage de la
durée restante.
Nota
Si aucune touche de la télécommande ou
de I’appareil (incluant la touche utilisée
pour annuler I’alarme) n’est appuyée 60
minutes après la mise en contact, le
contact est automatiquement coupé.
pour
sélectionner
la minuteriesommeil.
2) Appuyer sur
SET à
répétition pour
sélectionner
l’heure désirée.
(F)DF2702 (P26 TV timer)-K(F).p65 2002/03/08, 18:3326
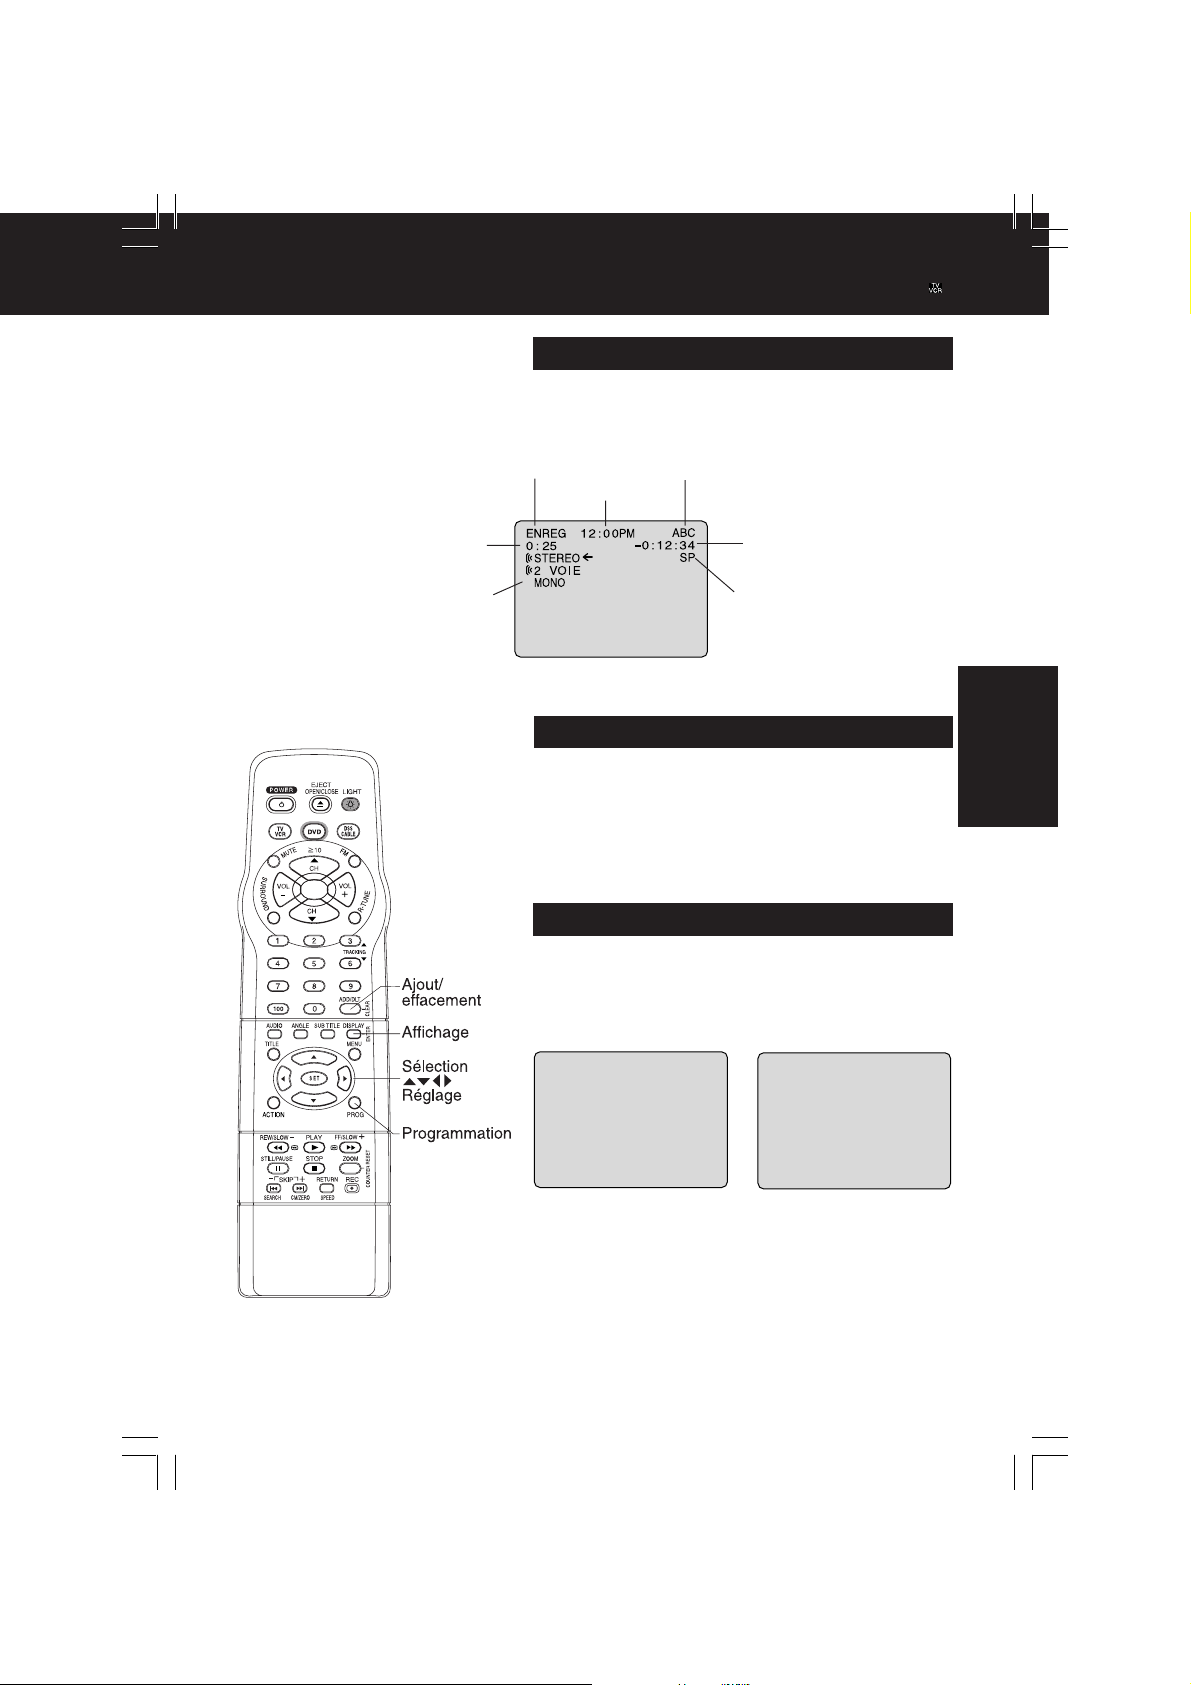
Affichages à l’écran
Ligne d’état et affichage de l’heure
Pour faire apparaître ou disparaître l’affichage.
Appuyer sur DISPLAY.
Fonction
Durée restante (mode
auto-enregistrement
seulement, voir page 18.)
Heure
*Important:Si une touche de la télécommande ne
fonctionne pas, appuyer sur la touche
de la télécommande et essayer à nouveau.
Identification des canaux
(Voir page 38.)
Compteur
Modes de réception possibles
(voir à la page 23.)
Vitesse de
défilement
(voir à la page 4.)
Écran bleu
Dans le cas où un passage d’une cassette est
vierge ou qu’il n’y a pas de signal sur le canal
syntonisé et que l’avertisseur de signal faible est
désactivé (page 39), l’écran devient bleu.
Affichage des fonctions et des canaux
Sur pression d’une touche de commande, PLAY par
exemple, ou lors d’un changement de canal, le
mode sélectionné ou le canal syntonisé apparaît à
I’affichage. (S’il a été programmé, le sigle du canal
est également affiché. Voir aux page 38.)
0 8
A
BC
LECTURE
Fonctionnement
du téléviseur
(F)DF2702 (P27 VCR status )-K(F).p65 2002/03/08, 18:3327
27

Radio FM
Radio FM...
L’appareil possède une radio FM avec antenne intégrée. II est possible de présyntoniser
9 stations dans une bande de fréquence de 87,5 ~ 108,1 MHz. La minuterie de mise en
contact différée (page 26) peut également être réglée pour se réveiller au son de la radio.
Réglage de la radio FM
Appuyer sur FM sur la télécommande
ou TV/FM sur l’appareil pour afficher
1
l’écran du mode radio FM.
1 2 : 0 0PM
2
FM 1 87. 5MHz
3
Pour procéder à des corrections
Appuyer sur la touche numérique
correspondant à l’adresse de la
station en mémoire, puis
recommencer l’étape 3.
Pour quitter le mode FM,
appuyer sur ou DVD sur la
télécommande ou TV/FM sur
l’appareil.
Appuyer sur une
touche numérique*
(1 à 9) pour
sélectionner une
adresse mémoire.
1) Appuyer sur CH
pour
sélectionner la
station radio
désirée. (Chaque
pression modifie
la fréquence de
200 kHz).
2) Appuyer sur
ADD/DLT pour
entrer la station en
mémoire.
Appuyer pendant
quelques secondes
sur la touche CH
ou puis la relâcher
pour balayer la
bande FM.
• Pour désactiver le
balayage, appuyer
sur CH ou
pendant la recherche.
Téléviseur/FM
Changement
de canal
Réglage de I’antenne FM
S’assurer de bien syntoniser la station
dans la bande FM (voir ci-dessus.)
Appuyer sur ACTION pour afficher
l’écran MENU.
1
1) Appuyer sur
pour
LANGUE
3
5
CANAL
sélectionner
1
“TELE.”
2) Appuyer sur SET
pour afficher
l’écran REGLAGE
TELEVISEUR.
2
BLOCAGE
DVD
HORLOGETELE
SEL. :
REGLER : SET
FI N :
ACT I ON
MENU
28
(F)DF2702 (P28-29 FM)-K(F).p65 2002/03/08, 18:3328
Suite à la page suivante.

Important:
*
Si une touche de la télécommande ne fonctionne pas, appuyer sur la touche FM de la
télécommande et essayer à nouveau.
REGLAGE
S
V I DEO / AUD I
D' E
VOL.
SEL.
:
F I N
: ACT I ON
TELEV I SEUR
OURCE : BLC A
RREUR : OU I
DVD : + 2
RE
SOUS - T I TRES
SELECT
3
REGLAGE
ANTENNE FM
MESSAGE
REGLAGE
■■
■ Raccordement à la
■■
câblodistribution
➛ “INT”
■■
■ Raccordement à
■■
: I N
G
LER : SET
CCORD
O
T.
1) Appuyer sur
pour sélectionner
“ANTENNE FM.”
2) Appuyer sur
pour sélectionner
“INT.
(INTÉRIEURE)”
ou “EXT.
(EXTÉRIEURE).”
une antenne
➛ “EXT”
Appuyer sur ACTION à deux reprises.
4
Écoute de la radio FM
Appuyer sur FM sur la télécommande
ou TV/FM sur l’appareil pour afficher
1
l’écran du mode radio FM.
Appuyer sur une
touche numérique
(1 à 9) pour
2
1 2 : 0 0PM
FM 1 87. 5MHz
sélectionner une
adresse mémoire.
(voir la section
“Réglage de la radio
FM” à la page 28).
Pour quitter le mode FM,
appuyer sur
ou DVD sur la
télécommande ou TV/FM sur l’appareil.
Sélection du mode audio pour
la radio FM
1 2 : 0 0PM
STERE
O
M
ONO
FM
1 8 7. 7MHz
Nota
• Il n’est pas possible d’enregistrer une émission FM stéréo sur une vidéocassette.
• La réception FM peut être améliorée en modifiant I’orientation du combiné.
• Le mode radio FM ne peut être réglé lors de la lecture, de I’enregistrement ou lors d’affichages sur un
écran bleu (ACTION, PROGRAMMATION et MENU.)
• Si des stations sont en mémoire, la station syntonisée et l’heure du jour sont affichées sur appel du
mode radio FM. Pour supprimer l’affichage de l’heure, appuyer sur DISPLAY. Si la touche DISPLAY est
pressée à nouveau, l’écran d’état apparaît.
Appuyer à répétition sur
AUDIO pour sélectionner
“STEREO” ou “MONO” en
mode radio FM.
Fonctionnement
du téléviseur
29
(F)DF2702 (P28-29 FM)-K(F).p65 2002/03/08, 18:3329

Enregistrement différé
La mémoire accepte jusqu’à 8 programmes
d’enregistrement différé.
Appuyer sur PROG* pour afficher l’écran
REGLAGE PROGRAMMATION.
1
REGLAGE PROGRAMMATI ON
PROGRAMMATI ON MINUTER IE
2
MI NUTERIE M ISE S/ TENSION
MI NUTERIE -SOMMEI L : 00
SEL. :
REGLER : SET
FI N : PROG
1) Appuyer sur
pour sélectionner
“PROGRAMMATION
MINUTERIE.”
2) Appuyer sur SET
pour afficher
• Si un programme a déjà été
mémorisé, appuyer sur ,
et SET pour sélectionner un
numéro de programme libre.
Appuyer sur pour
3
Exemple
Date
actuelle
sélectionner et SET ou
pour régler la DATE.
• 1-31=Une fois
• QUOTIDIEN
=LUN~VEN
• HEBDOMADAIRE
DIM~SAM
=Même heure une
fois par semaine
Liste des préparatifs
Tous les raccordements sont bien
effectués.
L’appareil est branché.
L’horloge est réglée.
La bande est suffisamment longue.
La languette de prévention
d’effacement est en place.
.
Recommencer l’étape 3 pour régler :
• l’heure du début, l’heure de la fin
• le canal (ou LIGNE pour une source externe)
• la vitesse de défilement (SP, LP, SLP)
Appuyer sur PROG
4
pour mettre fin à la
programmation.
Pour entrer d’autres
programmes
Appuyer sur pour
sélectionner, et sur SET
pour afficher un numéro de
programme libre. Répéter
ensuite l’étape 3.
Appuyer à deux reprises sur PROG
pour quitter ce mode.
5
• Lors de l’utilisation d’un câblosélecteur, s’assurer
que le contact est établi sur le câblosélecteur et
que le canal approprié est syntonisé.
• L’indicateur d’enregistrement différé apparaît sur
le panneau avant.
30
(F)DF2702 (P30-31 Timer Rec)-K(F).p65 2002/03/08, 18:3330
Indicateur d’enregistrement différé
 Loading...