

Page 1

Digital Camera
Model No. PV-DC2090/PV-DC2590
Operating Instructions
R
®
(PV-DC2590 shown)
For assistance, call 1-800-272-7033.
Before attempting to connect, operate or adjust this product, please read these instructions
thoroughly, and keep them for future reference.
Page 2

Things You Should Know
Attach your purchase receipt here
Thank you and congratulations
on your purchase of this state of the art
Panasonic Digital Camera. This product
has been manufactured and tested to
Panasonic’s highest standards to give you
the best in performance and reliability.
Save this operating instruction manual
as an operating and information guide.
Date of Purchase
Dealer Purchased From
Dealer Address
Dealer Phone No.
Model No.
Serial No.
Unpack your Digital Camera
Please confirm that the following items are packed in the Digital Camera box.
They are provided to help you use or set up your Digital Camera.
1pc. Digital Camera
(PV-DC2090/DC2590)
(PV-DC2590 shown)
1pc. Video Cable
(LSJA0238)
1 pc. 8 MB CompactFlash
Card
(LSFA0009, or LSFA0011)
1pc. PC Connection Cable
for Windows
(LSJA0236)
4pcs. AA Alkaline Battery
(LSSB0003)
1pc. Hand Strap
(LSFC0010)
1 pc. CD-R OM of Driver
Software for Windows 95/98
and Macintosh /
Adobe PhotoDeluxe
(LSFT0163)
Microsoft, Windows, and Windows 95/98 are registered trademarks of Microsoft in the United
States and other countries.
Macintosh is a registered trademark of Apple Computer Incorporated.
Adobe, the Adobe logo & PhotoDeluxe are trademarks of Adobe Systems Inc.
CompactFlash is a trademark of SanDisk Corporation.
All product/brand names are trademarks or registered trademarks of the respective holders.
2
1 pc. Compact Modem Card
(Only for PV-DC2590)
(PV-CFM10(LSFA0010)/
LSJA0244)
For assistance, call 1-800-272-7033.
1pc. Ferrite Core
(Only for PV-DC2590)
(LSLP0059)
Page 3

Information
Note: This equipment has been tested and found to comply with the limits for a Class B digital
device, pursuant to Part 15 of the FCC Rules. These limits are designed to provide reasonable
protection against harmful interference in a residential installation. This equipment generates,
uses and can radiate radio frequency energy and, if not installed and used in accordance with
the instructions, may cause harmful interference to radio communications. However, there is no
guarantee that interference will not occur in a particular installation. If this equipment does cause
harmful interference to radio or television reception, which can be determined by turning the
equipment off and on, the user is encouraged to try to correct the interference by one or more of
the following measures:
-- Reorient or relocate the receiving antenna.
-- Increase the separation between the equipment and receiver.
-- Connect the equipment into an outlet on a circuit different from that to which the receiver is
connected.
-- Consult the dealer or an experienced radio/TV technician for help.
FCC Warning: To assure continued FCC compliance, use only the provided shielded interface cable
with ferrite cores when connecting digital camera to computer and clip-on ferrite core
mounted over the user provided modular cable in accordance with instruction herein.
Also, any unauthorized changes or modifications to this equipment could void the
user’s authority to operate.
Precautions
USE & LOCATION
• TO AVOID SHOCK HAZARD ... Your Digital Camera and power supply should not be exposed to
rain or moisture. Do not connect the power supply or operate your Digital Camera if it gets wet.
Your Digital Camera has been designed for outdoor use, however it is not designed to sustain direct
exposure to water, rain, sleet, snow, sand, dust, or a direct splashing from a pool or even a cup of
coffee. This action could permanently damage the internal parts of your Digital Camera. Do not
attempt to disassemble this unit. There are no user serviceable parts inside. Unplug your Digital
Camera from the power supply and have it serviced.
• DO NOT AIM YOUR DIGITAL CAMERA AT THE SUN OR OTHER BRIGHT OBJECTS.
• DO NOT EXPOSE YOUR DIGITAL CAMERA TO EXTENDED HIGH TEMPERATURE ... Such as,
in direct sunlight, inside a closed car, next to a heater, etc... This action could permanently damage
the internal parts of your Digital Camera.
• AVOID SUDDEN CHANGES IN TEMPERATURE ... If the unit is suddenly moved from a cold
place to a warm place, moisture may form inside the unit.
• DO NOT LEAVE YOUR DIGITAL CAMERA OR THE POWER SUPPLY TURNED ON WHEN NOT
IN USE.
• STORAGE OF YOUR DIGITAL CAMERA ... Store and handle your Digital Camera in a manner
that will not subject it to unnecessary movement (avoid shaking and striking). Your Digital Camera
contains a sensitive pick-up device which could be damaged by improper handling or storage.
CARE
• TO CLEAN YOUR DIGITAL CAMERA ... Do not use strong or abrasive detergents when cleaning
your Digital Camera body.
• TO PROTECT THE LENS ... Do not touch the surface of the lens with your hand. Use a
commercial Digital Camera lens solution and lens paper when cleaning the lens. Improper cleaning
can scratch the lens coating.
• TO PROTECT THE FINISH OF YOUR DIGITAL CAMERA ... Before handling your Digital Camera,
make sure your hands and face are free from any chemical products, such as suntan lotion, as it
may damage the finish.
Getting Started
3
Page 4

Important Safety Instructions for Digital
Camera with Compact Modem Card
1. Read and understand all instructions.
2. Follow all warnings and instructions marked on the product.
3. Unplug this product from the card slot before cleaning. Do not use liquid cleaners or
aerosol cleaners. Use a damp cloth for cleaning.
4. Do not use this product near water, for example, near bathtub, wash bowl, kitchen
sink, or laundry tub, in a wet basement, or near a swimming pool.
5. Do not place this product on an unstable cart, stand, or table. The product may fall,
causing serious damage to the product.
6. This product should never be placed near a radiator or heat register. This product
should not be placed in a built-in installation unless proper ventilation is provided.
7. Do not allow anything to rest on the special cable. Do not locate this product where the
cable will be abused by personal walking on it.
8. Do not insert any other cables to the product except the assignment. Do not use this
cable for any other products. This cable is only for the exclusive use. It may cause
serious damage to the product.
9. Never push objects of any kind into this product through cabinet as they may touch
dangerous voltage points or short out parts that could result in a risk of fire or electric
shock. Never spill liquid of any kind on the product.
10.To reduce the risk of electric shock, do not disassemble this product, but take it to a
qualified serviceman when some service or repair work is required. Opening or
removing covers may expose you to dangerous voltages or other risks. Incorrect
reassembly can cause electric shock when the appliance is subsequently used.
11. Unplug this product from the card slot and refer servicing to qualified service
personnel under following conditions:
A. If liquid has been spilled into the product.
B. If the product has been exposed to rain or water.
C. If the product does not operate normally by following the operating instructions.
Adjust only those controls that are covered by the operating instructions because
improper adjustment or other controls may result in damage and will often require
extensive work by a qualified technician to restore the product to normal operation.
D. If the product has been dropped or the cabinet has been damaged.
E. If the product exhibits a distinct change in performance.
12. Avoid using a telephone (other than a cordless type) during an electrical storm.
There may be a remote risk of electric shock from lightning.
13. Do not use the telephone to report a gas leak in the vicinity of the leak.
14. The telecommunication cord which is used for this modem should be minimum
26AWG.
15. These accessory modem card and modular cable models are intended only for use in
and with listed Information Technology Equipment where the host machine includes
instructions for the installation of accessories by the operator.
4
For assistance, call 1-800-272-7033.
Page 5

Precautions for Compact Modem Card
1. This equipment complies with Part 68 of the FCC rules. On the back side of this
equipment is a label that contains, among other information, the FCC registration
number and ringer equivalence number (REN) for this equipment. If requested, this
information must be provided to the Telephone Company.
Guarantee's Name : FUJITSU MEDIA DEVICES LIMITED
Serial number : The date of manufacture is printed on the side of the card.
2. USOC Jack, RJ11C is suited to this equipment.
3. An FCC compliant telephone cord and modular plug is provided with this equipment.
This equipment is designed to be connected to the telephone network or premises
wiring using a compatible modular jack which is Part 68 compliant. See installation
instructions for details.
4. The REN is used to determine the quantity of devices, which may be connected to the
telephone line. Excessive RENs on the telephone line may result in the devices not
ringing in response to an incoming call. In most, but not all areas, the sum of RENs
should not exceed five(5.0). To be certain of the number of devices that may be
connected to a line, as determined by the total RENs, contact the local Telephone
Company.
5. If the terminal equipment PV-CFM10 causes harm to the telephone network, the
Telephone Company will notify you in advance that temporary discontinuance of
service may be required. But if advance notice isn't practical, the telephone company
will notify the customer as soon as possible. Also, you will be advised of your right to
file a compliant with the FCC if you believe it is necessary.
6. The Telephone Company may make changes in it's facilities, equipment, operations or
procedures that could affect the operation of the equipment. If this happens the
Telephone Company will provide advance notice in order for you to make necessary
modifications to maintain uninterrupted service.
7. If trouble is experienced with this equipment PV-CFM10 for repair or warranty
information, please contact Panasonic. If the equipment is causing harm to the
telephone network, the Telephone Company may request that you disconnect the
equipment until the problem is resolved.
8. This equipment cannot be used on public coin phone service provided by the
Telephone Company. Connection to party line service is subject to state tariffs.
(Contact the state public utility commission, public service commission or corporation
commission for Information.)
9. The Telephone Consumer Protection Act of 1991 makes it unlawful for any person to
use a computer or other electric device, including fax machines, to send any message
unless such message clearly contains in a margin at the top or bottom of each
transmitted page or on the first page of the transmission, the date and time it is sent
and an identification of the business or other entity, or other individual sending the
message and the telephone number of the sending machine or such business, other
entity, or individual (refer to page 76).
10.According to the FCC's electrical safety advisory, we recommend that you may install
an AC surge arrestor in the AC outlet to which this equipment is connected. Telephone
companies report that electrical surges, typically lighting transients, are very
destructive to customer terminal equipment connected to AC power sources and that
this is a major nationwide problem.
Getting Started
5
Page 6

Table of Contents
Getting Started
Things You Should Know .................................................................................................. 2
Information........................................................................................................................ 3
Important Safety Instructions for Digital Camera with Compact Modem Card................. 4
Precautions for Compact Modem Card ............................................................................ 5
Declaration of Conformity ................................................................................................. 7
Index of Controls .............................................................................................................. 8
On Screen Display (OSD) .............................................................................................. 11
LCD Monitor Indication ................................................................................................... 12
Power Supply.................................................................................................................. 14
Attaching the Hand Strap ............................................................................................... 15
CompactFlash Card........................................................................................................ 16
Setting the Clock ............................................................................................................ 18
Basic Operation
Capturing Images ........................................................................................................... 19
Adjusting LCD Viewfinder Brightness ............................................................................. 23
Playing Back Captured Images ...................................................................................... 24
Viewing Images on Your TV Screen and Transferring Your Images (VCR) ..................... 28
Special Features
Focus/Macro Recording ................................................................................................. 29
Using the built-in Flash................................................................................................... 30
White Balance ................................................................................................................ 32
Light Metering................................................................................................................. 33
Capture B/W Images ...................................................................................................... 34
Self Timer Recording ...................................................................................................... 35
Adjusting the Iris Manually ............................................................................................. 36
Time Lapse Recording ................................................................................................... 37
To Delete Specific Images.............................................................................................. 38
To Delete All Images ....................................................................................................... 39
Formatting CF Card........................................................................................................ 4 0
To Copy Image Pages .................................................................................................... 41
To Copy All Images......................................................................................................... 42
Slide Show......................................................................................................................43
Inserting the PCMCIA Adaptor ....................................................................................... 44
Transferring your Images (Windows 95/98).................................................................... 46
Transferring your Images (Macintosh)............................................................................ 52
Communication Function................................................................................................ 58
Remote Access .............................................................................................................. 61
Remote Access (Windows 95/98) .................................................................................. 62
Remote Access (Macintosh) .......................................................................................... 68
Communication............................................................................................................... 74
PC Connection ............................................................................................................... 76
Using the Digital Photo Printer ....................................................................................... 78
6
For assistance, call 1-800-272-7033.
Page 7

Table of Contents
For Y our Information
Digital Camera Accessory List ....................................................................................80
Digital Camera Accessory List Order Form................................................................. 8 1
Before Requesting Service.......................................................................................... 82
Specifications .............................................................................................................. 83
Warranty ...................................................................................................................... 84
Service Center Directory ............................................................................................. 85
Index............................................................................................................................86
This operating Instruction book is designed for use with models PV-DC2090 and
PV-DC2590.
The PV-DC2590 is the model used for illustrative purposes.
Features may vary, so please read carefully.
Types of Differences
Getting Started
PV-DC2090
B/W Full Feature Indicator Panel
REC MODE Button
SELF TIMER Button
FLASH Button
Compact Modem Card
Declaration of Conformity
Model Number : PV-DC2090/PV-DC2590/PV-CFM10/LSJA0244
Trade Name : Panasonic
Responsibility Party : Matsushita Electric Corporation of America
Address : One Panasonic Way Secaucus New Jersey 07094
Telephone Number : 1-800-211-PANA (7262)
This device complies with Part 15 of the FCC Rules. Operation is subject to the following two
conditions: (1) This device may not cause harmful interference, and (2) this device must
accept any interference received, including interference that may cause undesired operation.
No
No
No
No
Not Included
PV-DC2590
Yes
Yes
Yes
Yes
Included
7
Page 8

Index of Controls
Front View
POWER Switch (PLAY•OFF•REC•MANUAL REC)
Rotate the POWER switch to REC, MANUAL REC or PLAY.
See pages 16, 18, 19, 22~26, 28~30, 32~38, 41~43, 48, 54,
61, 74, 78.
SHTR (SHUTTER)
Button
See pages 19, 20,
25, 26, 35, 37~41,
74, 78.
FLASH Emitter
See page 30.
SELF TIMER
Lamp
See page 35.
Rear View
Optical Viewfinder
See page 20.
Light Sensor
see page 30.
DISPLAY Button
See pages 20, 74.
Lens
MENU Button
See pages 16, 18, 19, 22~26, 29,
30, 32~38, 41~43, 61, 74, 78.
STAND BY Button
See page 22.
LED Lamp
See pages 18~20,
22~26, 29, 30, 32~38,
41~43, 61, 74, 78.
LCD Viewfinder
See pages 11~13, 19.
/ TELE Button
See pages 16, 18, 19,
22, 23, 25, 27, 29, 30,
32, 33~40, 42, 43, 61,
74, 75, 78.
8
/ - Button
See pages 16, 19,
22~26, 29, 30, 32~36,
38, 41, 74, 75.
For assistance, call 1-800-272-7033.
Strap Attachment Ring
See page 15.
CompactFlash Card
Slot
See pages 16, 44, 58.
/ + Button
See pages 16, 18, 19, 22~26,
29, 30, 32~43, 61, 74, 75, 78.
/ WIDE Button
See pages 16, 18, 19, 22, 23, 25,
27, 29, 30, 32~40, 42, 43, 61, 74,
75, 78.
Page 9

Index of Controls
Getting Started
Rear View
FLASH Button *
See page 31.
VIDEO OUT
Terminal
See page 28.
SERIAL
Terminal
See page 48, 54.
DC IN Terminal
See page 15.
Bottom View
* : PV-DC2590 Only
SELF TIMER Button *
See page 35.
B/W Full Feature Indicator Panel *
See pages 10, 19, 31, 35.
REC MODE Button *
See page 19.
(PV-DC2590 shown)
CARD EJECT
Switch
See page 17.
Battery
Compartment
See page 14.
Tripod Receptacle
Used when securing
the camera to a tripod
9
Page 10
Index of Controls
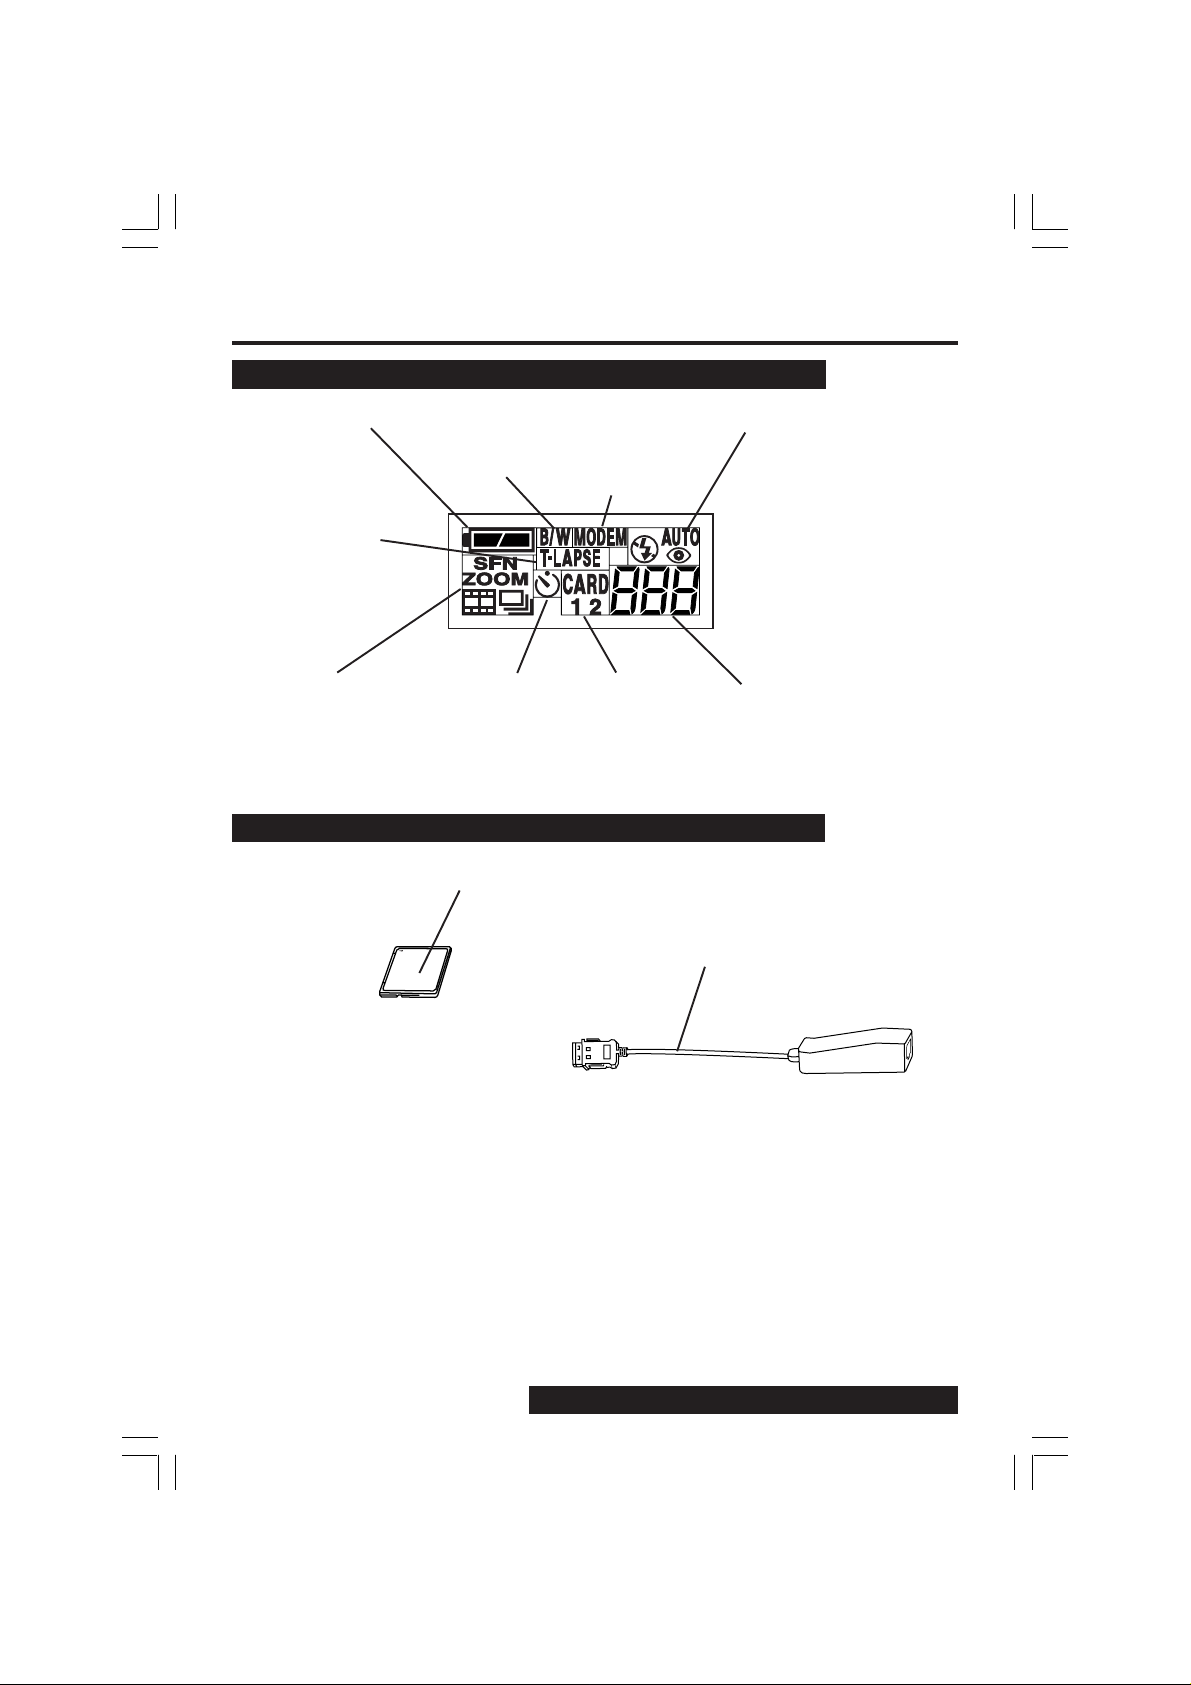
B/W Full Feature Indicator Panel (PV-DC2590 Only)
Battery
Indication
See page 11.
Time Lapse
Indication
See page 37.
Recording Mode
Indication
See page 21.
B/W Mode
Indication
See page 34.
Self Timer
Indication
See page 35.
Modem
Indication
See pages 58,
61, 74.
Card Slot
Indication
See page 16.
Flash Mode
Indication
See page 30.
Remaining
Indication
See page 11.
Compact Modem Card (Included with PV-DC2590)
Compact Modem Card
See page 58.
Modem Cable
See page 58.
10
For assistance, call 1-800-272-7033.
Page 11
On Screen Display (OSD)
The indication displayed on the LCD screen will tell you the operation status of the
Digital Camera.
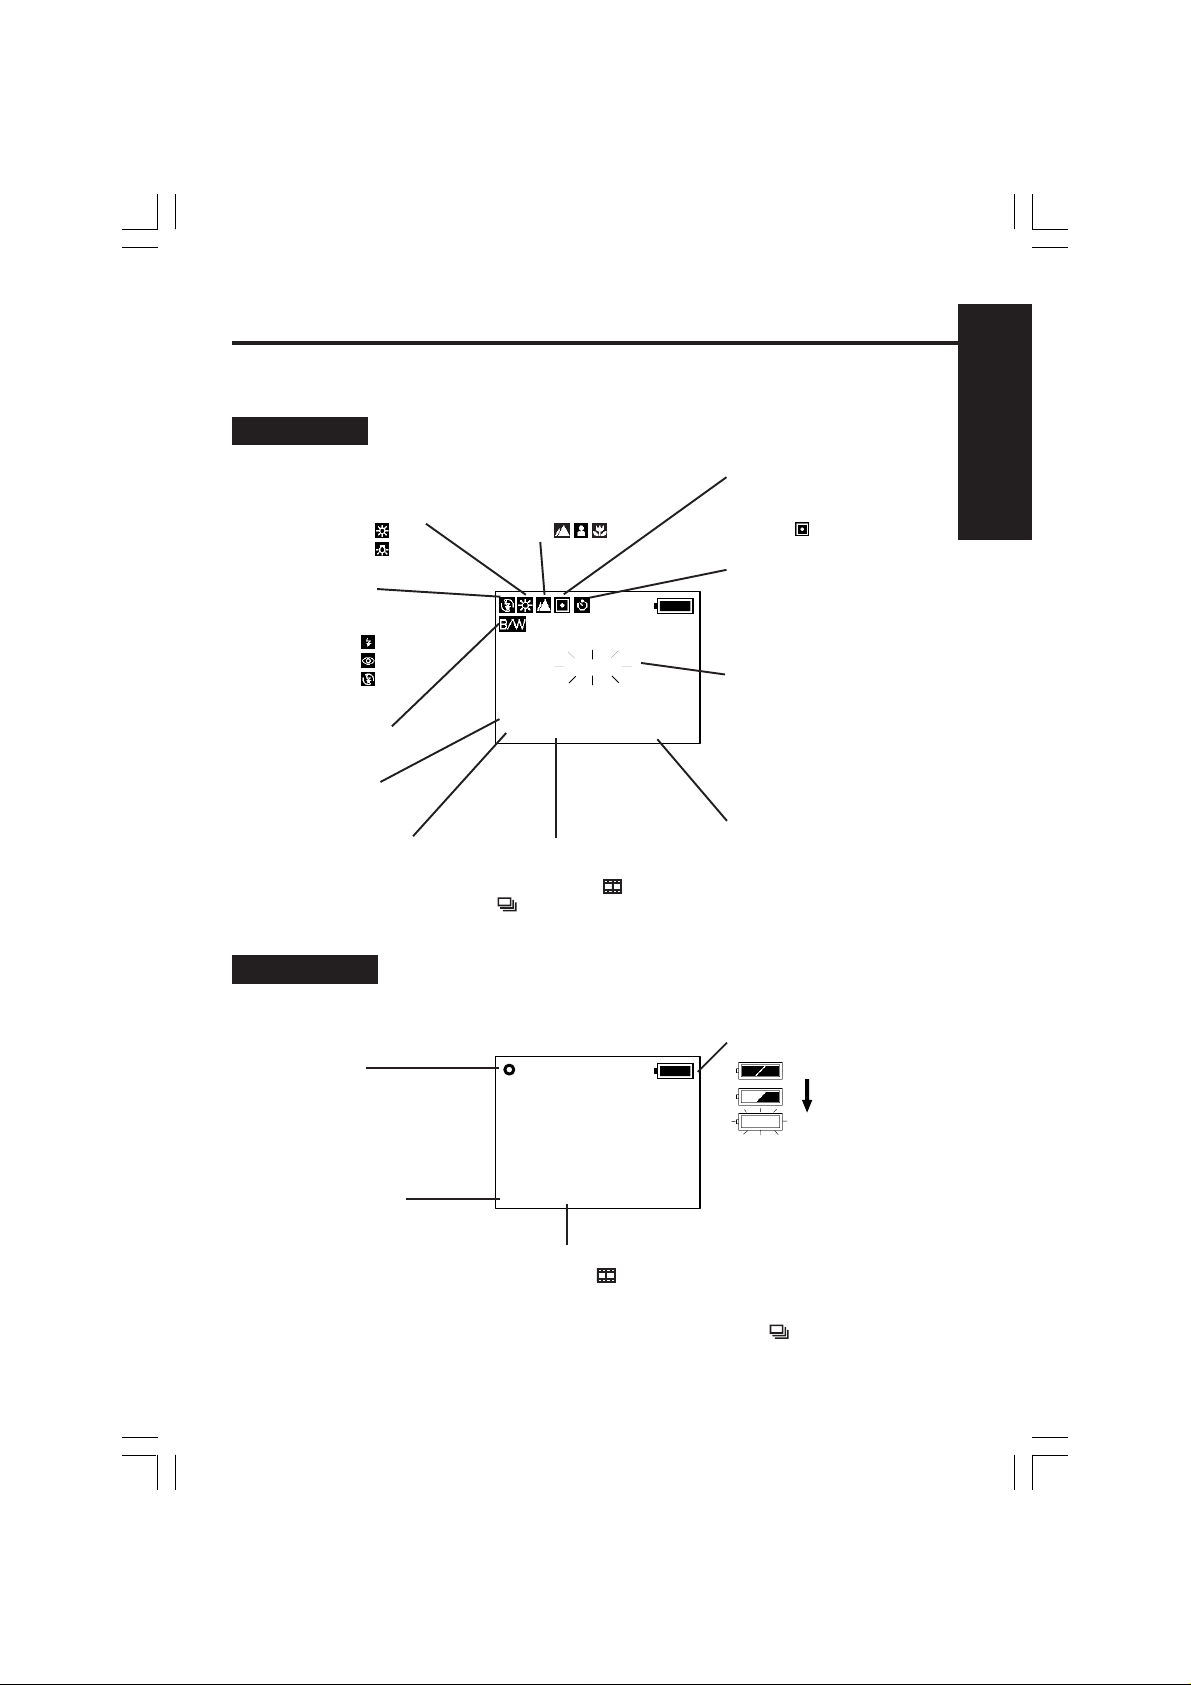
REC OSD
Getting Started
White Balance Mode
(See page 32)
AUTO : No Indication
OUTDOOR :
INDOOR :
Flash Mode
(See pages 30, 31)
AUTO : No Indication
ON :
RED EYE:
OFF :
B/W Mode
(see page 34)
Selected
Card Slot
Image Pages left
in memory
PLAY OSD
Print Mark
(See page 78)
Directory/
Image Number
Focus Mode
(See page 29)
AUTO : No Indication
ZONE :
LIGHT
CARD1
10 F
Recording Mode :
SF(Super Fine), F(Fine), N(Normal),
ZOOM(Zoom), (Motion Image Rec Mode),
(Burst Rec Mode).
CARD1
100-0001 F
MAY 24 1999
10 : 00 AM
MAY 24 1999
10 : 00 AM
Light Metering Mode
(See page 33)
AUTO : No Indication
SPOT :
Self-Timer Mode
(See page 35)
Low Light Warning
"LIGHT" will appear when the
light level is inadequate. In this
case, more light should be
provided or use flash to
achieve better picture quality
and color.
Date/Time Indication
Battery Condition
FULL
EMPTY
As the Battery is depleted, the
indication changes.
LED Lamp will flash when
battery is empty.
Displayed Image Page and its captured mode F(Fine),
N(Normal), or (Motion Image Rec Mode).
• If the image is captured in SF(Super Fine), the displayed image
mode will be F(Fine).
• If the image is captured in ZOOM or (Burst Rec Mode),
the displayed image mode will be N(Normal).
11
Page 12
LCD Monitor Indication
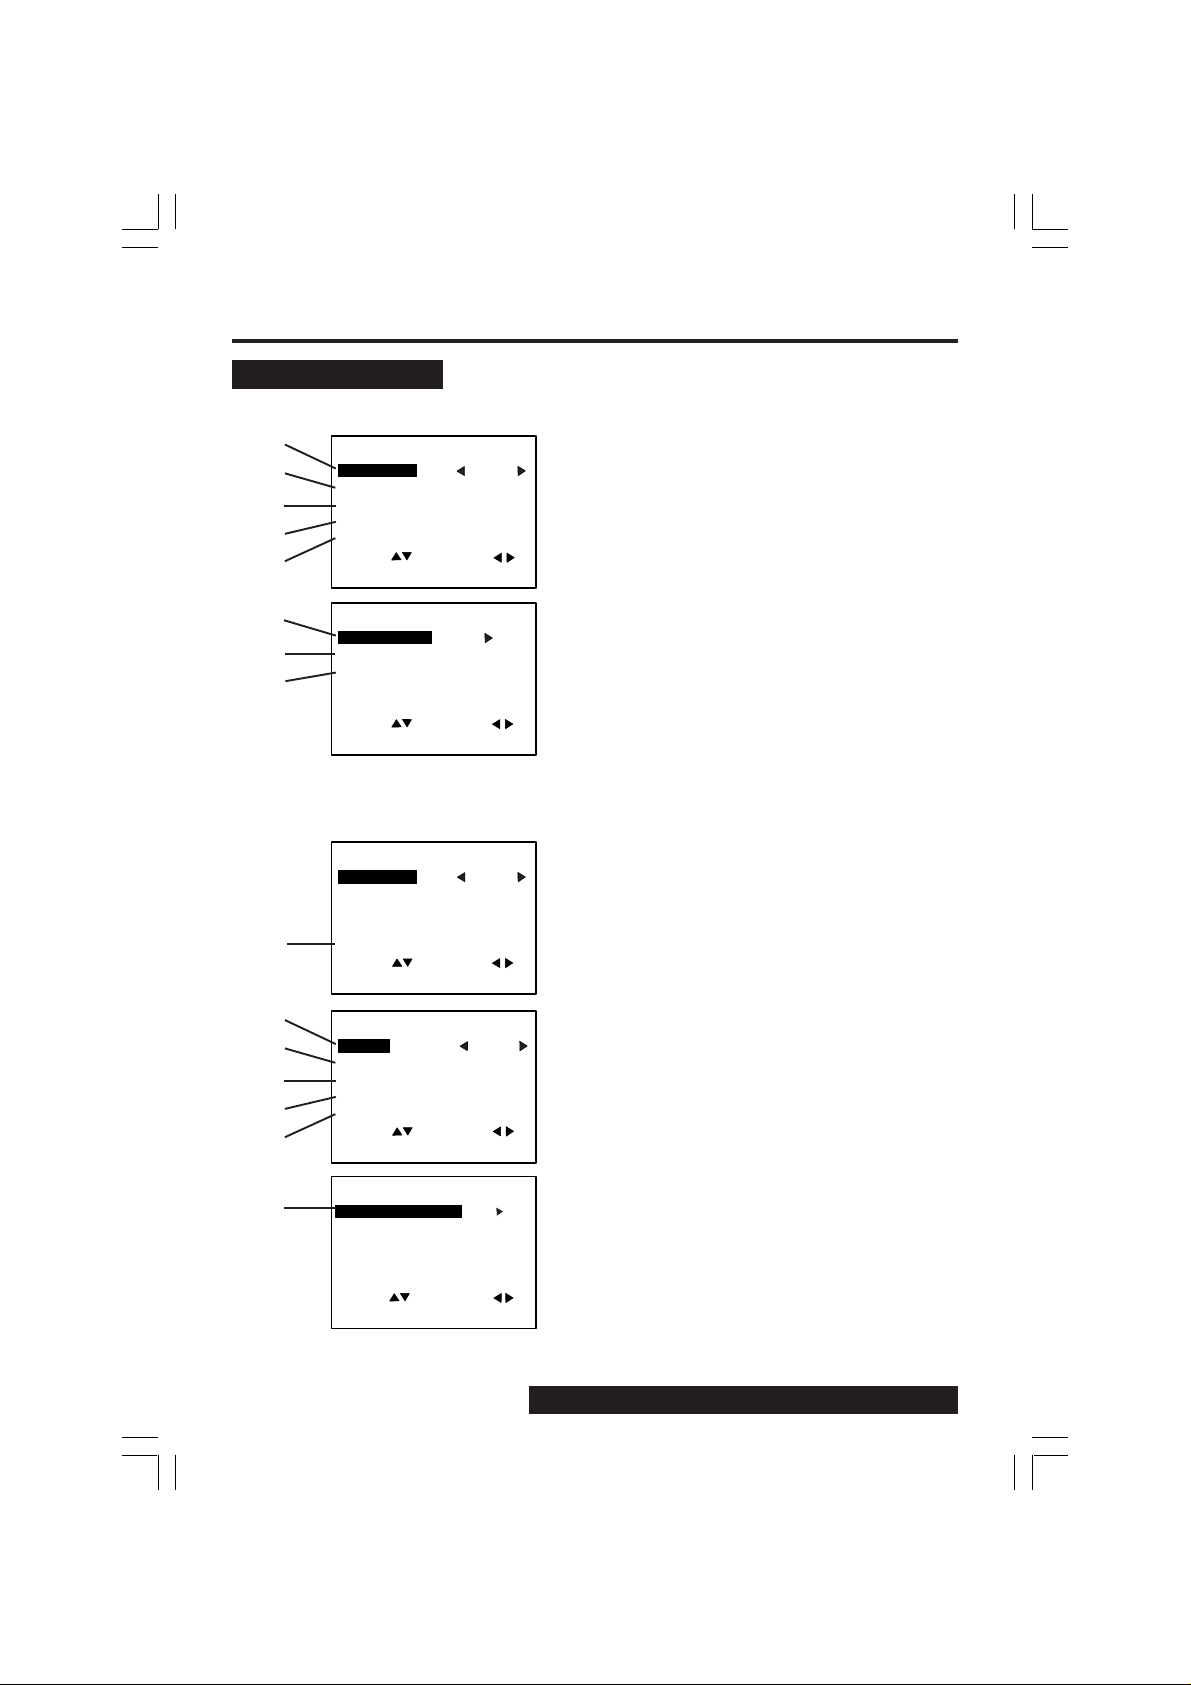
Recording Menu
< REC Mode>
1
2
3
4
5
6
7
8
< MANUAL REC Mode>
9
10
11
12
13
14
<REC MENU>
REC MODE
CARD SLOT
FLASH
SELF TIMER
OTHERS
SEL : SET :
EXIT : MENU
<OTHERS>
BRIGHTNESS
CLOCK SET
BEEP
SEL : SET :
EXIT : MENU
<MANUAL REC 1/3>
REC MODE
CARD SLOT
FLASH
SELF TIMER
IRIS
SEL : SET :
EXIT : MENU
<MANUAL REC 2/3>
FOCUS
WHITE BALANCE
LIGHT METER
B/W
TIME LAPSE
SEL : SET :
EXIT : MENU
N
NO. 1
AUTO
OFF
ON
N
NO. 1
AUTO
OFF
AUTO
AUTO
AUTO
OFF
OFF
1. REC MODE (See Page 21)
To change one of the 6 recording modes.
2. CARD SLOT (See Page 16)
To change card slot NO.1 or NO.2.
• When the 2 pieces of CF card are not
inserted, this item can not be selected.
3. FLASH (See Pages 30, 31)
To change one of the 4 flash modes.
4. SELF TIMER (See Page 35)
To set Self Timer.
5. OTHERS
To select other menu.
6. BRIGHTNESS (See Page 23)
To adjust LCD Viewfinder brightness.
7. CLOCK SET (See Page 18)
To set clock.
8. BEEP (See Page 22)
To set beep on/off when capturing images.
9. IRIS (See Page 36)
To adjust Iris manually.
10.FOCUS (See Page 29)
To select one of the 4 focus modes.
11.WHITE BALANCE (See Page 32)
To change one of the 3 White Balance
modes.
12.LIGHT METERING (See Page 33)
To change AUTO or SPOT.
13.B/W (See Page 34)
To capture Black/White images.
14.TIME LAPSE (See Page 37)
To set time lapse recording.
15.REMOTE ACCESS (See Page 61)
To operate camera from PC.
• When the Compact Modem Card is not
inserted, this item can not be selected.
12
15
<MANUAL REC 3/3>
REMOTE ACCESS
OTHERS
SEL : SET :
EXIT : MENU
For assistance, call 1-800-272-7033.
Page 13

Playback Menu
1
2
3
4
5
6
7
8
<PLAY MENU 1/2>
DISPLAY MODE
CARD SLOT
DELETE
COPY
PRINT MARK
SEL : SET :
EXIT : MENU
<PLAY MENU 2/2>
SLIDE SHOW
COMMUNICATION
OTHERS
SEL : SET :
EXIT : MENU
NORMAL
NO. 1
LCD Monitor Indication
1. DISPLAY MODE
(See Pages 24, 25, 26, 27)
Select playback mode.
2. CARD SLOT (See Page 16)
To select card slot.
3. DELETE (See Pages 38, 39, 40)
Delete image from CF card.
4. COPY (See Pages 41, 42)
Copy image to other CF card.
5. PRINT MARK (See Page 58)
To set print mark.
6. SLIDE SHOW (See Page 43)
Playback images as slide show.
7. COMMUNICATION (See Pages 74, 75)
To send images to a PC or FAX machine.
8. OTHERS
To select other menu.
Getting Started
On Screen Display Order
Press
DISPLAY
OSD OFF
CARD1
10 F
MAY 24 1999
10 : 00 AM
Press DISPLAY
Note:
• Pressing MENU with LCD OFF turns LCD ON and displays the menu.
However, after selecting the settings and exiting the menu, the LCD will stay ON.
Press
DISPLAY
LCD OFF
13
Page 14

Power Supply
Loading the Alkaline Batteries
Bottom View
1While pressing the Lock button, slide
the Battery Compartment lid in the
direction of the arrow and swing it open.
2Install four Alkaline Batteries.
+ - +
-
• Be sure to use Alkaline Batteries.
Never use manganese batteries.
• Make sure that the positive (+) and (-)
ends of the batteries are facing the
correct direction.
3Swing the Battery Compartment lid
down and slide it shut.
WARNING! Do not dispose of in fire, put in backwards, disassemble, or short circuit;
otherwise battery may leak or burst, causing possible personal injury.
Battery Notes Operation Time
Safety precautions:
• Do not mix old and new batteries.
• Do not mix alkaline with manganese
batteries.
• Do not get the AA alkaline batteries near,
or dispose of in fire.
• Do not directly connect (short circuit) the
positive (+) and negative (–) terminals.
• Never attempt to disassemble or reassemble the Battery.
• Do not drop or jar the Battery.
Note:
• Instead of the supplied Alkaline batteries,
you can also use AA type Ni-Cd (high
density type) or nickel-hydride batteries
available on the market.
• If you are not going to use the Digital
Camera for an extended period of time,
remove the batteries from the Digital
Camera.
14
For assistance, call 1-800-272-7033.
When using the supplied Panasonic
alkaline batteries, you will have a maximum
of about 160 images* (at an ambient
temperature of 25°C).
* Conditions :
• Using the Panasonic Alkaline batteries.
• Capturing an image every 30 seconds.
• Using Flash once for every other capture.
• Recording mode is Normal.
Page 15
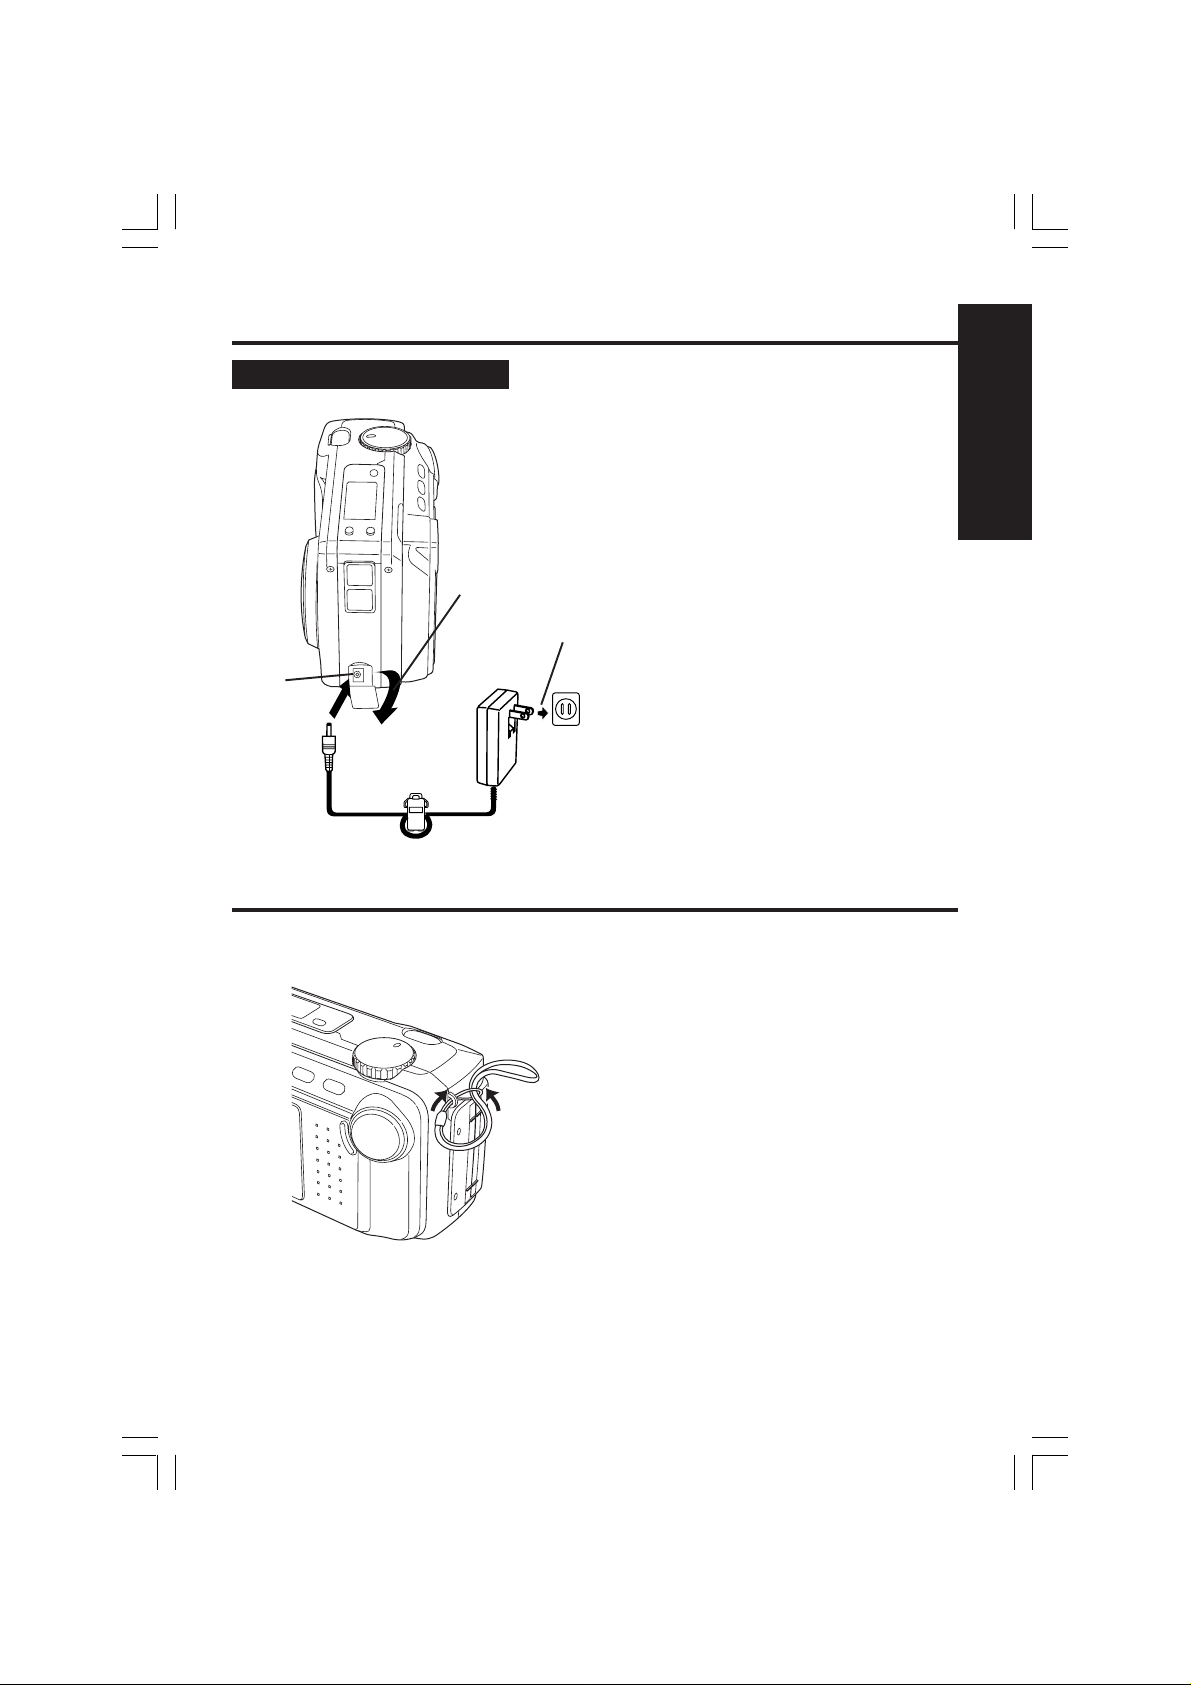
AC Adaptor (Optional)
a
b
Power Supply
1Pull up the Jack Cover.
2Connect DC OUT on the AC Adaptor
to DC IN on the Digital Camera.
3Plug the AC Adaptor into an AC
outlet.
Getting Started
2
1
Note:
• While not in use, unplug the AC Adaptor
3
from the AC outlet.
Attaching the Hand Strap
Thread the Hand Strap through the Strap
Attachment Ring as shown.
15
Page 16
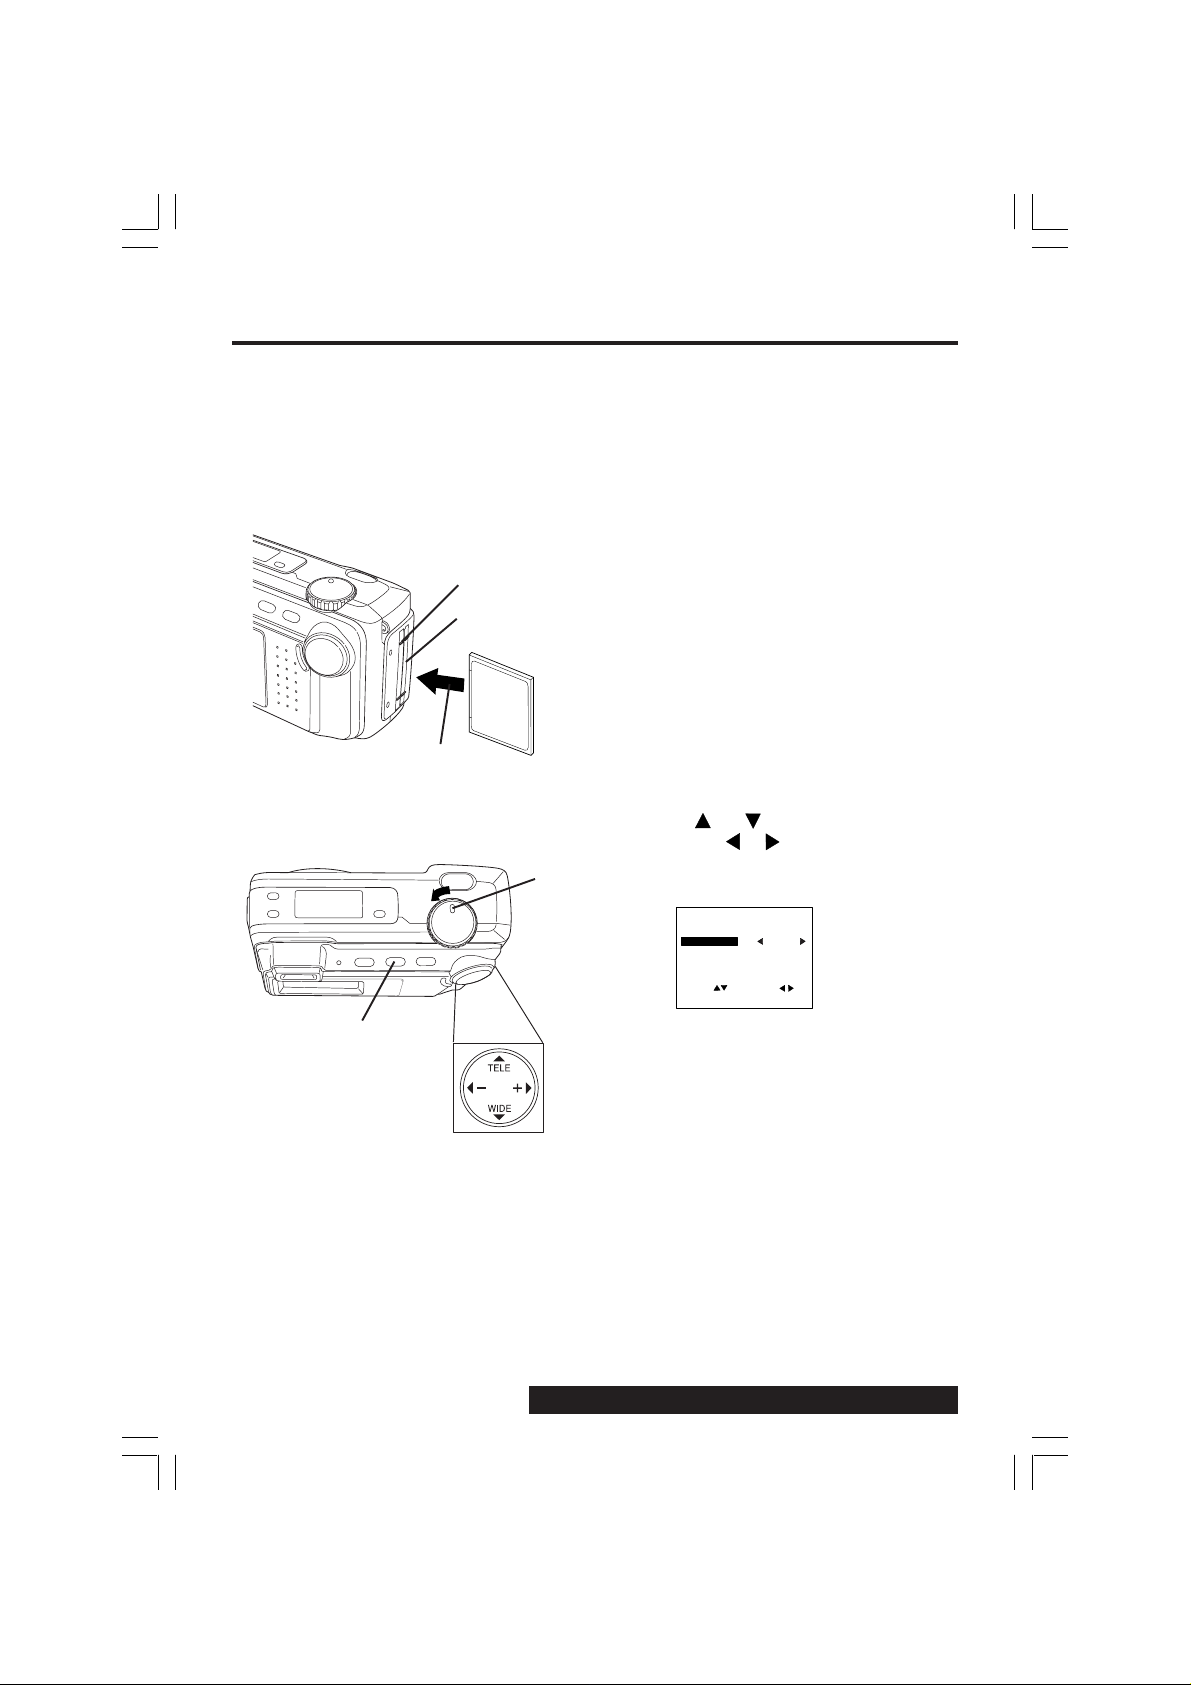
CompactFlash Card
Inserting the CompactFlash Card
• The captured images will be stored on this
CompactFlash Card.
• Be sure to insert the CompactFlash Card
before using the camera.
• You can insert a total of two CompactFlash
cards into the camera, one in each slot.
CARD SLOT 1
CARD SLOT 2
1, 2, 6
3
1Set POWER OFF before inserting the
CompactFlash card.
Insert the CompactFlash Card into the
Card Slot NO.1 or NO.2 in the direction
of the arrow mark and so that the arrow
mark side of the card faces the front
(lens side) of the Digital Camera.
2Push the card fully into CompactFlash
Card Slot.
3Set POWER to REC.
4Press MENU to display REC MENU.
5Press or to select CARD SLOT
and press or to select card slot
NO. 1 or NO. 2 if you inserted the CF
Card into both slots.
<REC MENU>
REC MODE
CARD SLOT
FLASH
SELF TIMER
OTHERS
SEL : SET :
EXIT : MENU
N
NO. 1
AUTO
OFF
16
4
5
• If a CF card is inserted in either of the
card slots, that particular slot will
automatically be selected. All buttons
are inoperable while NO.1 or NO.2 is
flashing on the menu screen.
For assistance, call 1-800-272-7033.
Page 17

6
Note:
• Do not bend, drop, apply high pressure or
subject the card to strong shocks.
• Do not store it in places with high temperature, high humidity, a lot of dust, or
static electricity and strong electromagnetic waves.
• Keep the card's contacts free from dust,
water or other foreign substances. Do not
touch them with your fingers, etc.
• Do not disassemble or deform the card.
• Be sure to make a backup copy of
important data.
• Make sure that you do not insert the card
in the wrong direction.
CompactFlash Card
Removing the CompactFlash Card.
6Set POWER OFF before removing
the CompactFlash card.
Slide the CARD EJECT Switch, so the
Card pops out. (Be careful not to drop
the card.)
• Do not, under any circumstances, eject
the card immediately after pressing the
Shutter Button (during recording of an
image) or while deleting (when "PLEASE
WAIT" is displayed). This could damage
the format of the card and make it
unusable.
• When the card does not eject after
pressing the CARD EJECT Switch, push
the card fully into the slot again and then
press the CARD EJECT Switch firmly.
• "NO CF CARD" will appear on the LCD
Viewfinder and the LED Lamp will flash
when the CompactFlash Card is not
inserted.
• "CF CARD ERROR" will appear on the
LCD Viewfinder and the LED Lamp will
flash if the CompactFlash Card is
defective.
Getting Started
17
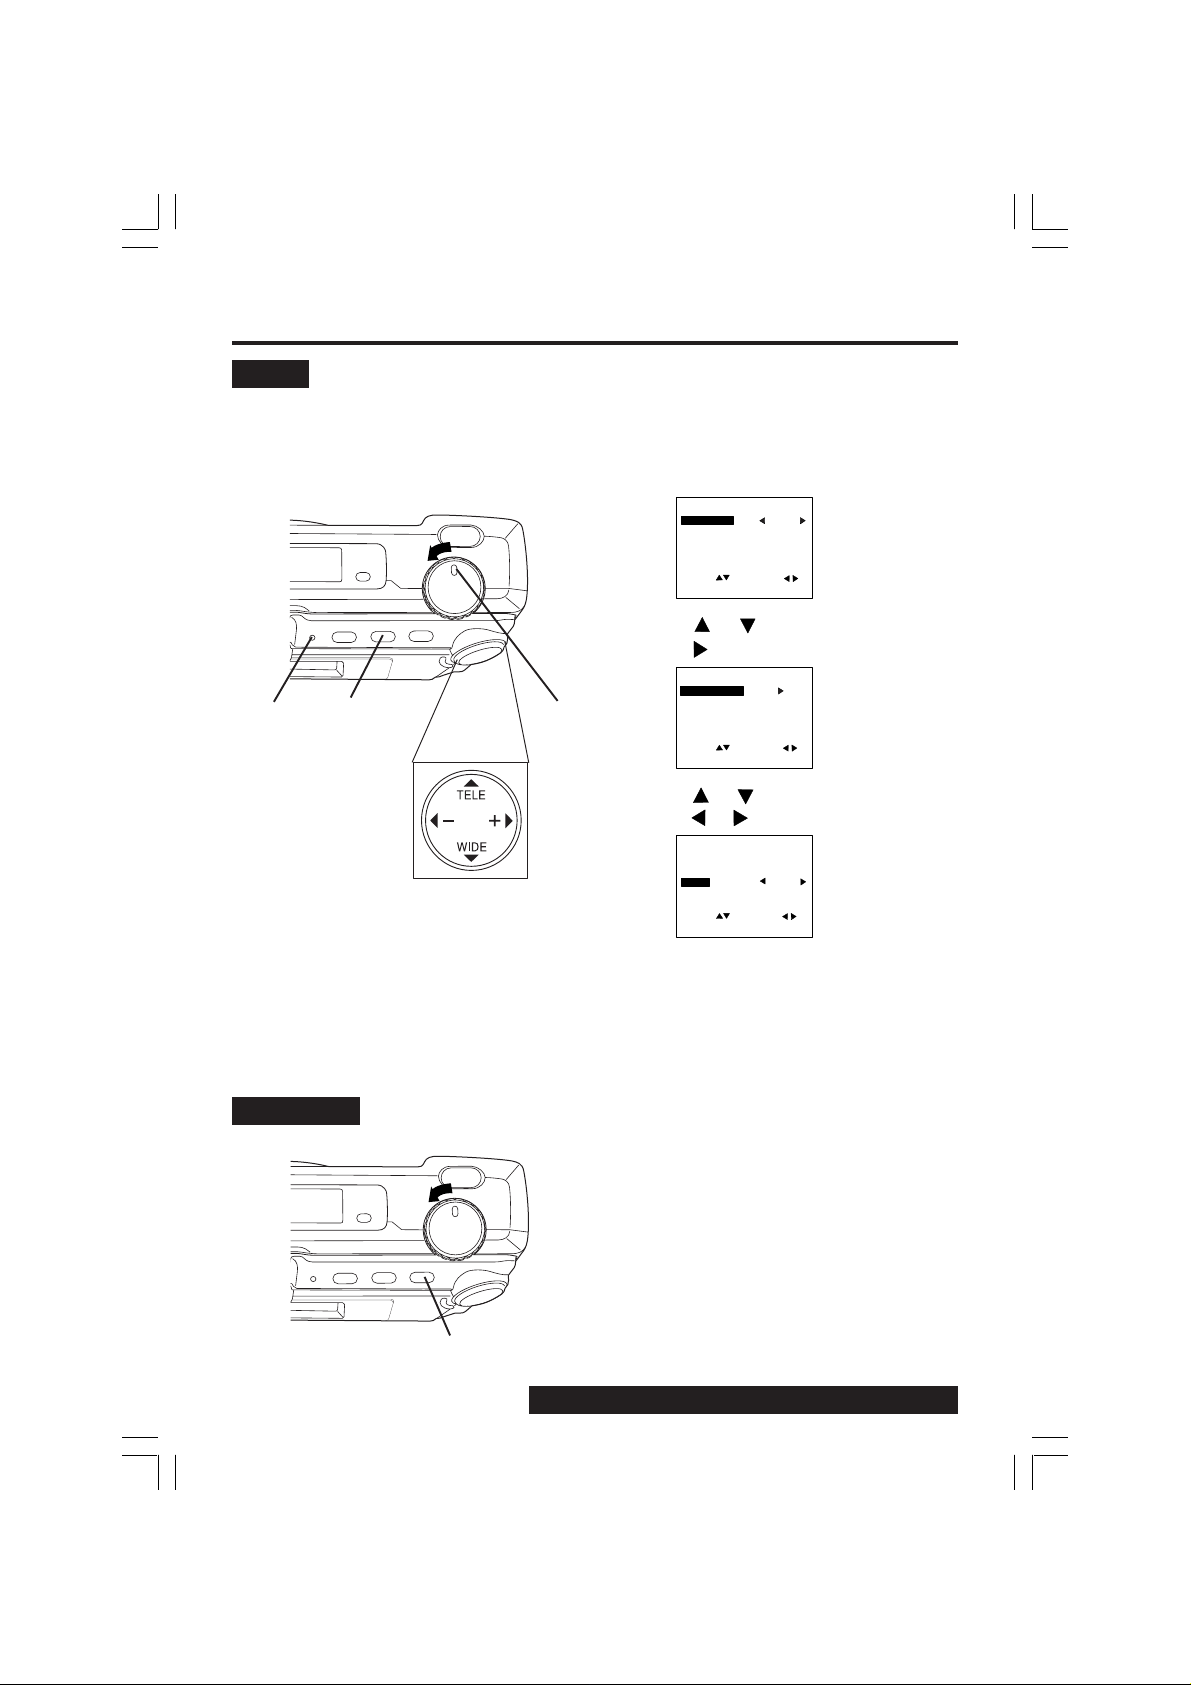
Page 18

Setting the Clock
<OTHERS>
BRIGHTNESS
CLOCK SET
BEEP
SEL : SET :
EXIT : MENU
ON
1
LED Lamp
2, 6
3, 4, 5
1Set POWER to REC.
• The LED Lamp lights up.
2Press MENU to display REC MENU.
<REC MENU>
REC MODE
CARD SLOT
FLASH
SELF TIMER
OTHERS
SEL : SET :
EXIT : MENU
N
NO. 1
AUTO
OFF
3Press or to select OTHERS and
press . Then, press to select
CLOCK SET.
<REC MENU>
REC MODE MODE
CARD SLOT
FLASH
SELF TIMER
OTHERS
SEL : SET :
EXIT : MENU
N
NO. 1
AUTO
OFF
4Press for CLOCK SET menu.
<CLOCK SET>
10 : 00 AM MAY. 24 1999
18
SEL : SET :
EXIT : MENU
5Press or hold down or to select
hour, then press to set.
Repeat for minute, month, day and
year.
• Double check all items before exiting
the menu.
6Press MENU twice to exit.
Clock starts when menu is exited.
Note:
• To make corrections, repeat steps 2-5.
• The clock will continue to operate about
8 hours after the battery has been
removed. If you need to set clock again,
repeat steps above.
For assistance, call 1-800-272-7033.
Page 19

<MANUAL REC 1/3>
REC MODE
CARD SLOT
FLASH
SELF TIMER
IRIS
SEL : SET :
EXIT : MENU
N
NO. 1
AUTO
OFF
Using LCD Viewfinder
LED
Lamp
LCD Viewfinder
2
3, 4
5, 6
1
Capturing Images
1Set POWER to REC or MANUAL
REC.
• The LED Lamp lights up.
2Press MENU to display REC MENU.
<REC Mode>
<REC MENU>
REC MODE
CARD SLOT
FLASH
SELF TIMER
OTHERS
SEL : SET :
EXIT : MENU
<MANUAL REC Mode>
N
NO. 1
AUTO
OFF
3Press or to select REC MODE
and select recording modes
(see page 21), press MENU to exit.
4Press (Tele) or (Wide) to zoom
In and Out.
• Zoom magnification level is up to x3.
• There is no zoom indication on the
LCD Viewfinder.
5Press SHTR down halfway to lock
Auto Focus.
• Beep sounds twice (see page 22).
6Press SHTR down the rest of the way
to actually capture the image.
• Beep sounds once (see page 22).
• While the Digital Camera processes
theimage, the LED Lamp will flash
and then the captured image will be
displayed on the LCD Viewfinder for
a few seconds.
Basic Operation
(Model PV-DC2590 Only)
B/W Full Feature
Indicator Panel
REC MODE
For model PV-DC2590,
■ Do step 1 above.
■ Then, press REC MODE repeatedly to
select recording mode.
• Selected mode will be changed on the
B/W Full Feature Indicator Panel
(see page 10).
■ Now, do step 4 above.
19
Page 20

Capturing Images
Using Optical Viewfinder
In addition to using the LCD Viewfinder,
you can also use the Optical Viewfinder to
frame and capture images.
Using the Optical Viewfinder will prolong
battery life.
4
1Repeat steps 1 to 3 on page 19.
2Press DISPLAY twice to turn off the
LCD Viewfinder.
• If you press MENU, the LCD View-
finder will automatically turn on.
3Frame the image you want to capture
within the recording area guide marks
on the Optical Viewfinder.
<Normal> <Short Distance>
LED
Lamp
Optical
Viewfinder
2
1
11
4Press SHTR to capture the image.
• LED Lamp will flash while the Digital
Camera processes the image.
You may capture another image as
soon as LED Lamp stops flashing.
Notes for LCD and Optical Viewfinder use:
• The number of image pages left in the
selected mode is displayed on the LCD
Viewfinder. When no memory remains, 0
and LED Lamp will flash. To capture other
images, you will first need to delete some
images from memory. (see page 38)
• The Digital Camera is focused automatically.
• Avoid covering the lens with your fingers
when capturing images.
• Do not subject the LCD Viewfinder to
pressure or shock.
• Hold the Digital Camera as steady as
possible when capturing an image.
• The active LCD Viewfinder image will
have a slightly degraded appearance
when compared to a captured or
transferred image. This is normal.
20
For assistance, call 1-800-272-7033.
Page 21

Recording Mode
SF : Super Fine Mode
Select this mode when you want
the highest quality resolution with
the lowest compression
(i.e. for printing).
F : Fine Mode
Select this mode when you want a
high resolution
(i.e. for printing or for archiving an
image).
N : Normal Mode
Select this mode when you want a
lower resolution image
(i.e. for e-mailing or posting on the
Internet).
ZOOM: Zoom Mode
Using ZOOM mode magnifies the
image to twice its normal size.
: Motion Image Rec Mode
Capture an image every 0.1 sec/
frame to create a 4 sec. mini movie.
• The LED Lamp will flash while
processing a motion image.
: Burst Rec Mode
Capture image every 0.5 sec./
frame up to 16 frames while
shutter button is pressed.
• If the remaining page number is
less than 16, you will only be able
to capture up to the number of
images remaining in memory.
Capturing Images
Image Resolution and CapacityRecording Mode
REC Mode
SF
F
N
ZOOM
• The number of images given for each
mode applies when all images are taken
in same mode.
• You can change recording modes at
any time before capturing an image.
• The number of images that can be taken
may differ depending on the subject.
After capturing an image, the number
may not decrease or may decrease by
two.
Image
Resolution
1,280 x 960
1,280 x 960
640 x 480
640 x 480
320 x 240
640 x 480
Capacity
(w/Supplied 8MB CF Card)
Approx. 15 images
Approx. 30 images
Approx. 100 images
Approx. 100 images
Approx. 6 images
Approx. 100 images
Basic Operation
21
Page 22
Capturing Images
Beep
Set to ON to beep when capturing an
image.
To cancel the beep, set to OFF.
LED
Lamp
1Set POWER to REC.
• The LED Lamp lights up.
2Press MENU to display REC MENU.
<REC MENU>
REC MODE
CARD SLOT
FLASH
SELF TIMER
OTHERS
SEL : SET :
EXIT : MENU
N
NO. 1
AUTO
OFF
3Press or to select OTHERS, and
press to display OTHERS menu.
<OTHERS>
BRIGHTNESS
CLOCK SET
BEEP
12, 5
SEL : SET :
EXIT : MENU
ON
3, 4
Stand By
STAND BY
4Press or to select BEEP and
press or to select ON or OFF.
<OTHERS>
BRIGHTNESS
CLOCK SET
BEEP
SEL : SET :
EXIT : MENU
ON
5Press MENU twice to exit.
Digital Camera will beep:
• Once when you capture an image
• Twice when you press the shutter button
half way to adjust the focus.
Press STAND BY, lens will not shorten and
power will turn off. If no operation is
performed for one minute while POWER is
ON, the Camera will go to Stand By mode.
To resume Power ON, press STAND BY.
22
For assistance, call 1-800-272-7033.
Page 23

Adjusting LCD Viewfinder Brightness
<PLAY MENU 1/2>
DISPLAY MODE
CARD SLOT
DELETE
COPY
PRINT MARK
SEL : SET :
EXIT : MENU
NORMAL
NO. 1
You may want to brighten or darken the
LCD (Liquid Crystal Display) Viewfinder for
easier viewing. This adjustment will not
affect the captured image brightness.
1
LED
Lamp
2, 6
3, 4, 5
1Set POWER to REC or PLAY.
• The LED Lamp lights up.
2Press MENU to display MENU.
<REC Mode> <PLAY Mode>
<REC MENU>
REC MODE
CARD SLOT
FLASH
SELF TIMER
OTHERS
SEL : SET :
EXIT : MENU
N
NO. 1
AUTO
OFF
3Press or to select OTHERS and
press to display OTHERS menu.
<OTHERS>
BRIGHTNESS
CLOCK SET
BEEP
SEL : SET :
EXIT : MENU
ON
4Press to display LCD BRIGHTNESS
screen.
<LCD BRIGHTNESS>
Basic Operation
+-
SET :
EXIT : MENU
5Press (-) or (+) to change the
brightness of the LCD Viewfinder;
(+) for brighter, (-) for darker.
6Press MENU twice to exit.
Note:
• The BRIGHT adjustment will be reset to
the original setting when the Digital
Camera is turned off and in Stand By
mode.
23
Page 24

Playing Back Captured Images
Manual Playback
1Set POWER to PLAY.
6
1
LED
Lamp
2
2, 3, 4
Note:
• Turn off the LCD monitor when not in use
by pressing the DISPLAY twice. To turn
the monitor back on, press the DISPLAY
again.
• Pressing MENU with LCD OFF turns LCD
ON and displays the menu. However,
after selecting settings and exiting the
menu, the LCD will stay ON.
24
For assistance, call 1-800-272-7033.
CARD1
100-0001 F
• The LED Lamp lights up.
MAY 24 1999
10 : 00 AM
2Press MENU to display PLAY MENU
and press to set display mode to
NORMAL. Press MENU to exit.
<PLAY MENU 1/2>
DISPLAY MODE
CARD SLOT
DELETE
COPY
PRINT MARK
SEL : SET :
EXIT : MENU
NORMAL
NO. 1
3Press (+) or (-) repeatedly,
[ (+) for ascending order, and (-)
for descending order] to change the
displayed image on the LCD Viewfinder.
• The image page number and
recording mode are displayed at the
bottom of the screen.
CARD1
100-0001 F
• If there are no images in memory,
a blue back screen will be displayed.
MAY 24 1999
10 : 00 AM
4Hold down (+) or (-), [ (+) for
ascending order, and (-) for descending order] to change the displayed
image on the LCD Viewfinder by fast
page advance.
• Page number is changed
continuously while (+) or (-) is
held down.
• Selected page is displayed when
button is released.
(Continued on next page)
Page 25

Playing Back Captured Images
Manual Playback (Continued)
When you capture an image in
(Motion Image Rec) mode (see page 21).
Zoom Playback
LED
Lamp
1
2, 3
5
2, 4
5The following message will appear.
PUSH SHTR
TO AUTO PLAY
CARD1
100-0001
MAY 24 1999
10 : 00 AM
6Press SHTR to start playback of
motion image.
1Set POWER to PLAY.
CARD1
100-0001 F
• The LED Lamp lights up.
MAY 24 1999
10 : 00 AM
2Press MENU to display PLAY MENU
and press to set display mode to
ZOOM.
<PLAY MENU 1/2>
DISPLAY MODE
CARD SLOT
DELETE
COPY
PRINT MARK
SEL : SET :
EXIT : MENU
ZOOM
NO. 1
Basic Operation
3Press MENU, the center portion is
zoomed X2.
4Press , , , or repeatedly to
change the zooming area.
5Press SHTR to restore the image to its
normal size.
25
Page 26
Playing Back Captured Images
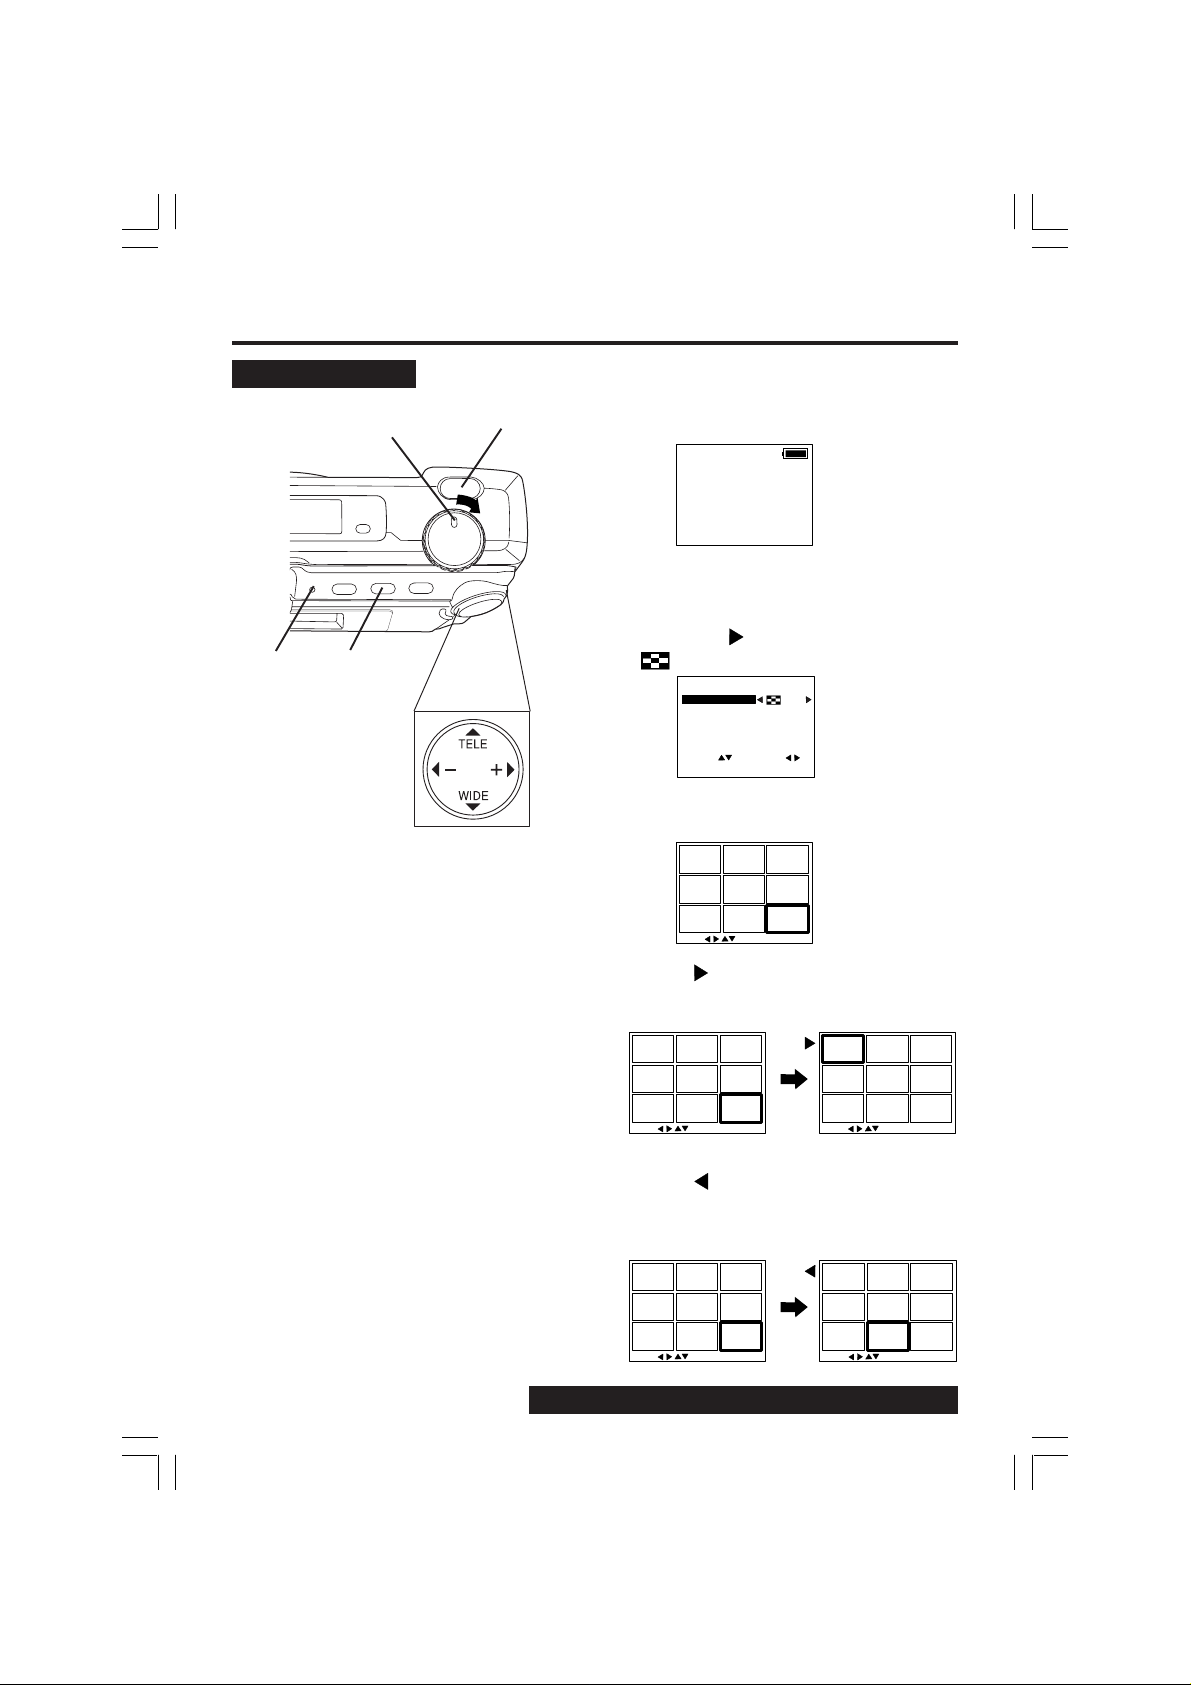
Multi Playback
1Set POWER to PLAY.
1
7
LED
Lamp
2, 3
2, 4,
5, 6
CARD1
100-0010 F
MAY 24 1999
10 : 00 AM
• The LED Lamp lights up.
2Press MENU to display PLAY MENU
and press to set display mode to
.
<PLAY MENU 1/2>
DISPLAY MODE
CARD SLOT
DELETE
COPY
PRINT MARK
SEL : SET :
EXIT : MENU
NO. 1
3Press MENU. A Multi Image Playback
screen will appear.
100
0003 0004
0002
0006 0007
0005
0010
0009
0008
SEL : SET:SHTR
4Press (+) repeatedly to scroll
forward through Multi Image pages
(each page contains 9 images).
100
0003 0004
0002
0006 0007
0005
0010
0009
0008
SEL : SET:SHTR
100
Press
SEL : SET:SHTR
0011
0014
0017
0012 0013
0015 0016
0018 0019
26
5Press (-) to move back through the
images on the page until the number of
the image you want to select is
highlighted.
100
0003 0004
0002
0006 0007
0005
0010
0009
0008
SEL : SET:SHTR
For assistance, call 1-800-272-7033.
100
Press
SEL : SET:SHTR
0002
0005
0008
0003 0004
0006 0007
0009 0010
Page 27

Playing Back Captured Images
6Press to display the preceding
images and to display the next 9
images.
• When the first image on CARD1 is
selected, press to select an image
on CARD2 (if inserted).
When the last image on CARD1 is
selected, press to select an image
on CARD2 (if inserted).
7Press SHTR to playback the image
you selected, and to go back to
Manual Playback.
Basic Operation
27
Page 28

Viewing Images on Your TV Screen and
T ransferring Y our Images (VCR)
1Connect the Digital Camera to your
3
TV or VCR using the Video cable
(supplied) as shown.
2Turn on your TV and select its video
input mode, or, turn on your VCR
and select its line input mode.
(Refer to your TV/VCR manual.)
VIDEO OUT
Terminal
3Set the Digital Camera POWER to
PLAY. You may select playback as
described on page 24 to page 27.
• The LED Lamp lights up.
1
For transferring your images to your VCR.
4Start a recording of the desired
Video Cable
(Supplied)
images. (Refer to your VCR manual.)
Note:
• For extended periods of use, it is
recommended to use the AC Adaptor
(optional) for a power source.
<TV Monitor>
28
Video In
1
Video Cable
(Supplied)
<VCR>
2, 4
2
/
Video In
1
Video Cable
(Supplied)
For assistance, call 1-800-272-7033.
Page 29

Focus/Macro Recording
This camera enables you to capture almost
any subject. However, you may need to
change focus modes according to the
distance from the subject or dark place.
LED
Lamp
2, 4
1
3
1Set POWER to MANUAL REC.
• The LED Lamp lights up.
2Press MENU to display MANUAL REC
menu.
<MANUAL REC 1/3>
REC MODE
CARD SLOT
FLASH
SELF TIMER
IRIS
SEL : SET :
EXIT : MENU
N
NO. 1
AUTO
OFF
3Press or to select FOCUS and
press or to select one of the four
modes shown below.
• Default setting is AUTO.
<MANUAL REC 2/3>
FOCUS
WHITE BALANCE
LIGHT METER
B/W
TIME LAPSE
SEL : SET :
EXIT : MENU
AUTO : Capture images within a range of
7.8 inches (20 cm) to infinity.
: Close-up
Focus will adjust around
7.8 inches (20 cm).
: Portrait
Focus will adjust around
4.9 feet (1.5 m).
: Landscape
Infinity.
AUTO
AUTO
AUTO
OFF
OFF
Special Features
4Press MENU to exit.
• Selected mode will appear on the
LCD Viewfinder (see page 11).
29
Page 30

Using the built-in Flash
<MANUAL REC 1/3>
REC MODE
CARD SLOT
FLASH
SELF TIMER
IRIS
SEL : SET :
EXIT : MENU
N
NO. 1
AUTO
OFF
This camera includes a built-in Flash which
can be used to capture images in dimly lit
conditions.
1Set POWER to REC or MANUAL
2Press MENU to display REC MENU or
LED
Lamp
12, 4
3Press or to select FLASH and
3
Note :
• The LED Lamp on the flash unit lights
when flash is charged and ready.
• The effective range of the flash is roughly
7.8 inches (20 cm) to 9.8 feet (3 m).
If you are using the flash in very bright
areas, the image background may
become dark.
• Never handle the flash unit if your hands
are wet. This may result in electric shock
or damage to the flash.
• Do not use the flash close to a person's
face as it may be harmful to the eyes.
Especially when capturing images of
infants or small children, keep at least
3.3 feet (1 m) away.
• When the recording mode is set to
(Motion Image Rec) or (Burst Rec),
the flash mode will go to (OFF).
• Do not cover the FLASH Emitter and Light
Sensor with your finger or other object.
AUTO : The flash automatically lights
4Press MENU to exit.
REC.
• The LED Lamp lights up.
MANUAL REC menu.
<REC Mode>
<REC MENU>
REC MODE
CARD SLOT
FLASH
SELF TIMER
OTHERS
SEL : SET :
EXIT : MENU
<MANUAL REC Mode>
N
NO. 1
AUTO
OFF
press or to select one of the four
settings shown below.
<REC MENU>
REC MODE MODE
CARD SLOT
FLASH
SELF TIMER
OTHERS
SEL : SET :
EXIT : MENU
N
NO. 1
AUTO
OFF
depending on lighting conditions.
: This setting reduces the red
reflections in the eye when the
flash lights. The flash will light
twice, once before capturing and
then once during capturing.
(The flash will light whenever you
capture an image.)
: The flash will light whenever you
capture an image.
: The flash will not light even when
you capture an image.
• Selected mode will appear on the
LCD Viewfinder (see page 11).
30
For assistance, call 1-800-272-7033.
Page 31

Using the built-in Flash
For model PV-DC2590,
(Flash) Button
B/W Full Feature
Indicator Panel
(Model PV-DC2590 Only)
The Flash will start charging and LCD Viewfinder will go OFF in the following
conditions ;
• POWER is set from OFF to REC and flash is in Flash mode.
• POWER is set from PLAY to REC and flash is in Flash mode.
• POWER is set to REC and Flash mode is changed from OFF to Flash mode.
• During image capture, after flash has occurred.
■ Do step 1 on the left page.
■ Then, press repeatedly to select flash
mode.
• Selected mode will be changed on the
B/W Full Feature Indicator Panel
(see page 10).
Special Features
31
Page 32

White Balance
Auto White Balance automatically
maintains optimum color balance in most
lighting conditions.
1Set POWER to MANUAL REC.
• The LED Lamp lights up.
2Press MENU to display MANUAL REC
menu.
<MANUAL REC 1/3>
REC MODE
CARD SLOT
FLASH
SELF TIMER
IRIS
SEL : SET :
EXIT : MENU
N
NO. 1
AUTO
OFF
LED
Lamp
2, 4
3
1
3Press or to select WHITE
BALANCE and press or to select
one of the three settings shown below.
• Default setting is AUTO.
<MANUAL REC 2/3>
FOCUS
WHITE BALANCE
LIGHT METER
B/W
TIME LAPSE
SEL : SET :
EXIT : MENU
AUTO : Automatically maintains optimum
color balance in most lighting
conditions.
: When shooting outdoors on a
sunny day.
: When the source illumination is a
halogen lamp.
AUTO
AUTO
AUTO
OFF
OFF
4Press MENU to exit.
• Selected mode will appear on the
LCD Viewfinder (see page 11).
32
For assistance, call 1-800-272-7033.
Page 33

According to the recording condition and
purpose, set light metering to measure
exposure time.
LED
Lamp
2, 4
3
1
Light Metering
1Set POWER to MANUAL REC.
• The LED Lamp lights up.
2Press MENU to display MANUAL REC
menu.
<MANUAL REC 1/3>
REC MODE
CARD SLOT
FLASH
SELF TIMER
IRIS
SEL : SET :
EXIT : MENU
N
NO. 1
AUTO
OFF
3Press or to select LIGHT METER
and press or to select one of the
two settings shown below.
• Default setting is AUTO.
<MANUAL REC 2/3>
FOCUS
WHITE BALANCE
LIGHT METER
B/W
TIME LAPSE
SEL : SET :
EXIT : MENU
AUTO : Ideal for normal capturing, the
focus is set to the center portion
of the finder and the entire image
is metered.
: A small sphere in the center
portion of the finder is metered.
This mode is useful for capturing
back lit conditions, such as when
the subject is brightly lit.
AUTO
AUTO
AUTO
OFF
OFF
Special Features
4Press MENU to exit.
• Selected mode will appear on the
LCD Viewfinder (see page 11).
33
Page 34

Capture B/W Images
You can also capture images in black and
white using this mode.
1
LED
Lamp
2, 5
3, 4
1Set POWER to MANUAL REC.
• The LED Lamp lights up.
2Press MENU to display MANUAL REC
menu.
<MANUAL REC 1/3>
REC MODE
CARD SLOT
FLASH
SELF TIMER
IRIS
SEL : SET :
EXIT : MENU
N
NO. 1
AUTO
OFF
3Press or to select B/W.
<MANUAL REC 2/3>
FOCUS
WHITE BALANCE
LIGHT METER
B/W
TIME LAPSE
SEL : SET :
EXIT : MENU
AUTO
AUTO
AUTO
OFF
OFF
4Press or to select ON.
<MANUAL REC 2/3>
FOCUS
WHITE BALANCE
LIGHT METER
B/W
TIME LAPSE
SEL : SET :
EXIT : MENU
AUTO
AUTO
AUTO
ON
OFF
5Press MENU to exit.
34
CARD1
100-0001 F
MAY 24 1999
10 : 00 AM
• indication will be displayed on
the LCD Viewfinder (see page 11)
and B/W Full Feature Indicator Panel
(PV-DC2590 only) (see page 10).
• To return to normal recording, select
OFF in step 4.
For assistance, call 1-800-272-7033.
Page 35

<MANUAL REC 1/3>
REC MODE
CARD SLOT
FLASH
SELF TIMER
IRIS
SEL : SET :
EXIT : MENU
N
NO. 1
AUTO
OFF
The Self-Timer allows you to capture an
image about 10 seconds after pressing the
shutter.
5
1
LED
Lamp
2, 4
3
Self Timer Recording
1Set POWER to REC or MANUAL
REC.
• The LED Lamp lights up.
2Press MENU to display REC MENU or
MANUAL REC menu.
<REC Mode>
<REC MENU>
REC MODE
CARD SLOT
FLASH
SELF TIMER
OTHERS
SEL : SET :
EXIT : MENU
<MANUAL REC Mode>
N
NO. 1
AUTO
OFF
3Press or to select SELF TIMER
and press or to select ON.
This puts the camera in self-timer
mode.
• After ON is selected and MENU is
pressed, mark will appear on the
LCD Viewfinder (see page 11).
Special Features
Self-Timer
Indicator
B/W Full Feature
Indicator Panel
(Self-Timer)
Button
(Model PV-DC2590 Only)
CARD1
100-0001 F
MAY 24 1999
10 : 00 AM
4Press MENU to exit.
5Press SHTR.
• The self-timer indicator lights.
The indicator starts flashing rapidly
after about 8 seconds and the image
is captured about 2 seconds later.
For model PV-DC2590,
■ Do step 1 above.
■ Then, press to set self-timer record-
ing mode.
• will be displayed on the B/W Full
Feature Indicator Panel (see page 10).
■ Now, do step 5 above.
35
Page 36

Adjusting the Iris Manually
Normally, the camera adjusts the exposure
automatically. However, when the
background is extremely bright, or when
the subject is backlit, you can compensate
by adjusting the Iris manually.
1Set POWER to MANUAL REC.
• The LED Lamp lights up.
2Press MENU to display MANUAL REC
menu.
1
REC MODE
CARD SLOT
FLASH
SELF TIMER
IRIS
SEL : SET :
EXIT : MENU
3Press or to select IRIS.
REC MODE
CARD SLOT
FLASH
SELF TIMER
LED
Lamp
2, 6
IRIS
SEL : SET :
EXIT : MENU
4Press to display IRIS screen.
3, 4, 5
<MANUAL REC 1/3>
<MANUAL REC 1/3>
<IRIS>
SET :
EXIT : MENU
N
NO. 1
AUTO
OFF
N
NO. 1
AUTO
OFF
+-
36
5
Press (-) or (+) to change the IRIS;
Press (+) to increase the brightness,
Press (-) to decrease the brightness.
6Press MENU to exit.
Note:
• There are 7 brightness compensation
levels ranging from -3 to +3.
• A blue sky may appear somewhat whiter
when the brightness is increased.
• The brightness cannot be adequately
compensated for in extreme backlight
conditions.
• The original exposure is automatically
restored when the power is turned off.
For assistance, call 1-800-272-7033.
Page 37

Time Lapse enables you to set the camera
to automatically capture an image from
once every minute to once every 24 hours.
5
LED
Lamp
2, 4
1
3
Time Lapse Recording
1Set POWER to MANUAL REC.
• The LED Lamp lights up.
2Press MENU to display MANUAL REC
menu.
<MANUAL REC 1/3>
REC MODE
CARD SLOT
FLASH
SELF-TIMER
IRIS
SEL : SET :
EXIT : MENU
N
NO. 1
AUTO
OFF
3Press or to select TIME LAPSE
and press to select time interval.
You can select a capture rate of 1MIN,
5MIN, 10MIN, 30MIN, 1HOUR,
6HOUR, 12HOUR, or 24HOUR.
<MANUAL REC 2/3>
FOCUS
WHITE BALANCE
LIGHT METER
B/W
TIME LAPSE
SEL : SET :
EXIT : MENU
• Time Lapse feature is available with
Super Fine (SF), Fine (F), Normal (N) and
Zoom mode.
If the REC mode is set to or ,
please change REC mode (see page 21).
AUTO
AUTO
AUTO
OFF
OFF
Special Features
Note :
• During time lapse recording (even during
non-recording intervals), the battery may
become depleted. Therefore, using an
AC Adaptor (optional) is recommended.
4Press MENU to set time lapse mode.
TIME LAPSE MODE
PUSH SHTR TO START
PUSH MENU TO EXIT
CARD1
10 F
5Press SHTR to start time lapse mode
recording.
TIME LAPSE MODE
PUSH MENU TO EXIT
CARD1
10 F
• LED Lamp will flash while the Digital
Camera processes the image
• Press MENU to exit this mode.
37
Page 38

To Delete Specific Images
<DELETE>
DELETE PAGE
DELETE ALL
FORMAT
SEL : SET :
EXIT : MENU
You can delete unwanted images and
increase the remaining image memory.
Warning: Once deleted, images cannot be
restored.
1Set POWER to PLAY.
• The LED Lamp lights up.
2Press MENU to display the PLAY
MENU.
1
6
3Press or to select DELETE and
press to display DELETE menu.
LED
Lamp
2
4Press to display DELETE PAGE
menu.
3, 4, 5
<PLAY MENU 1/2>
DISPLAY MODE
CARD SLOT
DELETE
COPY
PRINT MARK
SEL : SET :
EXIT : MENU
<PLAY MENU 1/2>
DISPLAY MODE
CARD SLOT
DELETE
COPY
PRINT MARK
SEL : SET :
EXIT : MENU
<DELETE PAGE>
SEL PAGE :
DELETE PAGE : SHTR
EXIT : MENU
CARD1
100-0001 F
NORMAL
NO. 1
NORMAL
NO. 1
Important:
• While deleting image, do not turn off the
Digital Camera or unplug the AC
Adaptor (optional) because this will
cause irreversible damage to the memory,
resulting in reduced image storage
capacity.
38
For assistance, call 1-800-272-7033.
5Press or to select the image page
to be deleted.
6Press SHTR to delete a image.
• Image page numbers are adjusted
automatically as images are deleted.
• To delete other specific image pages,
please repeat steps 5–6.
• Press MENU to exit.
Page 39

You can delete all images from memory
NO IMAGE
easily with this operation.
Warning: Once deleted, images cannot be
restored.
LED
Lamp
1
1
4
To Delete All Images
1Repeat Steps 1 to 3 on page 38.
2Press or to select DELETE ALL
and press to display DELETE ALL
menu.
<DELETE ALL>
DELETE ALL IMAGES
OK?
NO
YES
SEL :
ENTER : SHTR
3Press or to select YES.
<DELETE ALL>
DELETE ALL IMAGES
OK?
NO
YES
SEL :
ENTER : SHTR
• To exit this menu, press or to
select NO and press SHTR.
Special Features
1, 2, 3
Important:
• While “PLEASE WAIT” is displayed, do
not turn off the Digital Camera or
unplug the AC Adaptor (optional)
because this will cause irreversible
damage to the memory, resulting in
reduced image storage capacity.
4Press SHTR to delete all image pages.
PLEASE WAIT
• "PLEASE WAIT" will be displayed on
screen as all images are deleted from
memory. Deletion is complete when
"NO IMAGE" is displayed.
39
Page 40

Formatting CF Card
NO IMAGE
You can easily format your CF Card using
this operation.
Warning: Once formatted, all of your
image data will be deleted and
cannot be restored.
LED
Lamp
1
1
4
1, 2, 3
1Repeat steps 1 to 3 on page 38.
2Press or to select FORMAT and
press to display FORMAT menu.
<FORMAT>
DELETE ALL DATA
OK?
NO
YES
SEL :
ENTER : SHTR
3Press or to select YES
<FORMAT>
DELETE ALL DATA
OK?
NO
YES
SEL :
ENTER : SHTR
• To exit this menu, press or to
select NO and press SHTR.
4Press SHTR to format.
Important:
• While “PLEASE WAIT” is displayed, do
not turn off the Digital Camera or
unplug the AC Adaptor (optional)
because this will cause irreversible
damage to the memory, resulting in
reduced image storage capacity.
40
For assistance, call 1-800-272-7033.
PLEASE WAIT
• “PLEASE WAIT” will be displayed on
screen as the CF Card is formatting.
Formatting is complete when
"NO IMAGE" is displayed.
Page 41

You can copy images from CF card to CF
card easily with this operation.
Note :
Be sure to insert a CF card into both slots.
LED
Lamp
1
1
4
To Copy Image Pages
1Set POWER to PLAY, press MENU to
display PLAY MENU and select COPY.
<PLAY MENU 1/2>
DISPLAY MODE
CARD SLOT
DELETE
COPY
PRINT MARK
SEL : SET :
EXIT : MENU
• If a CF card is not inserted into both
slots, you cannot proceed.
NORMAL
NO. 1
2Press to display COPY menu and
select COPY PAGE.
<COPY>
COPY PAGE
COPY ALL
SEL : SET :
EXIT : MENU
Special Features
2, 3, 4
Important:
• While “PLEASE WAIT” is displayed, do
not turn off the Digital Camera or
unplug the AC Adaptor (optional)
because this will cause irreversible
damage to the memory, resulting in
reduced image storage capacity.
Note :
• If the memory capacity of the card that
you want to copy to is not sufficient,
the following message will appear.
NOT ENOUGH MEMORY
PUSH MENU TO EXIT
3Press to display COPY PAGE menu.
<COPY PAGE>
CARD1 CARD2
SEL PAGE :
COPY PAGE : SHTR
EXIT : MENU
CARD1
100-0001 F
• The copy direction of card slot is
selected automatically.
4Press or to select image you
want to copy and press SHTR to copy.
PLEASE WAIT
• “PLEASE WAIT” will be displayed on
screen as the image is being copied.
• To copy other specific image pages,
please repeat step 4.
• Press MENU to exit.
41
Page 42

To Copy All Images
You can copy all images from CF card to
CF card easily with this operation.
NOTE:
Be sure to insert CF cards into both slots.
LED
Lamp
1
1
4
1Set POWER to PLAY, press MENU to
display PLAY MENU and select COPY.
<PLAY MENU 1/2>
DISPLAY MODE
CARD SLOT
DELETE
COPY
PRINT MARK
SEL : SET :
EXIT : MENU
• The currently selected card slot will
automatically be chosen as the copy
from slot (see page 16).
• If a CF card is not inserted into both
slots, you cannot proceed.
NORMAL
NO. 1
2Press to display COPY menu and
select COPY ALL.
<COPY>
COPY PAGE
COPY ALL
2, 3
Important:
• While “PLEASE WAIT” is displayed, do
not turn off the Digital Camera or
unplug the AC Adaptor because this will
cause irreversible damage to the memory,
resulting in reduced image storage
capacity.
Note :
• If the memory capacity of the card that
you want to copy to is not sufficient,
the following message will appear.
NOT ENOUGH MEMORY
PUSH MENU TO EXIT
42
For assistance, call 1-800-272-7033.
SEL : SET :
EXIT : MENU
3Press to display COPY ALL menu
and press or to select YES.
<COPY ALL>
CARD1 CARD2
OK?
NO
YES
SEL :
ENTER : SHTR
• Select NO to return to the Normal
Screen.
• The copy direction of card slot is
selected automatically.
4Press SHTR to copy.
PLEASE WAIT
• “PLEASE WAIT” will be displayed on
screen as the image is being copied.
Page 43

You can playback captured images as a
slide show.
Slide Show
1Set POWER to PLAY.
• The LED Lamp lights up.
LED
Lamp
1
2
3, 4
2Press MENU to display the PLAY
menu.
<PLAY MENU 1/2>
DISPLAY MODE
CARD SLOT
DELETE
COPY
PRINT MARK
SEL : SET :
EXIT : MENU
NORMAL
NO. 1
3Press or to select SLIDE SHOW.
<PLAY MENU 2/2>
SLIDE SHOW
COMMUNICATION
OTHERS
SEL : SET :
EXIT : MENU
4Press to start slide show.
SLIDE SHOW START
PUSH MENU TO EXIT
• Press MENU to exit this mode.
SLIDE SHOW STOP
Special Features
43
Page 44

Inserting the PCMCIA Adaptor
If you are using a computer with a PCMCIA type II slot, you can insert the CompactFlash
Card into a PCMCIA adaptor (not included).
Inserting the CompactFlash Card
• The adaptor with the CompactFlash Card
should be inserted when your computer is
1
in the power on mode.
1Remove the CompactFlash Card from
the camera. (See page 17.)
2Hold the CompactFlash Card so that
the arrow side faces up and points
2
toward the PCMCIA Adaptor. Securely
insert the card into the PCMCIA
Adaptor slot as far as it will go.
3Hold the PCMCIA Adaptor so that the
arrow side points toward the PCMCIA
type II slot of your computer. Securely
insert the PCMCIA Adaptor as far as it
will go.
• Depending on the computer, it may
3
be necessary to turn the PCMCIA
Adaptor upside down in order to
insert the card.
44
Removing the CompactFlash Card
4Remove the PCMCIA Adaptor from the
computer.
5Pull the CompactFlash Card out of the
PCMCIA adaptor.
Note :
Do not remove the PCMCIA Adaptor from
the computer while the computer is working
or while image data is being transferred
between the CompactFlash Card and the
computer (including operation such as
opening and storing images), this will cause
irreversible damage to the memory.
For assistance, call 1-800-272-7033.
Page 45

Inserting the PCMCIA Adaptor
If Windows 95/98 Explorer is opened
Special Features
Sub Directory
(DCim)
Identified as
Removable Hard Disk
Image Folder Image is displayed
as a Panaxxxx.jpg file
45
Page 46

T ransferring Y our Images (Windows 95/98)
System Requirements:
• IBM PC/AT or compatible.
• Windows 95/Windows 98.
• 386SX CPU or higher. (486 recommended.)
• RAM: 16 MB on-board memory.
PalmCam Camera Driver Installation
• 10 MB available hard disk space.
• 256 Color monitor or full color recommended (24bit per pixel or 16.7M color).
• CD-ROM drive (for installation).
• RS-232C serial port (D-Sub 9-pin). An
adaptor is required for a D-Sub 25-pin.
• Mouse or other pointing device.
1Turn on the PC (Personal Computer) and start up Windows.
2Insert supplied Driver Software CD-ROM into the CD-ROM drive.
3Click the "Start" button and then click "Run".
4Type in "d:\Panasonic\PalmCam\Setup.exe" and then click OK.
Note: "d" Denotes the CD-ROM drive designation.
5Follow the instructions as they appear on your PC screen.
46
For assistance, call 1-800-272-7033.
Page 47

T ransferring Y our Images (Windows 95/98)
Twain Driver for Adobe® PhotoDeluxe™ Home Edition 3.0 Installation
• The Twain Driver, when installed, allows your camera to communicate directly with
PhotoDeluxe Home Edition 3.0.
Note:
• Please install Adobe PhotoDeluxe Home Edition 3.0 before installing this driver.
• For information on Adobe PhotoDeluxe, please call 206-675-6120.
Web Site : http://www.adobe.com/supportservice/custsupport/main.html
1Turn on the PC (Personal Computer) and start up Windows.
2Insert supplied Driver Software CD-ROM into the CD-ROM drive.
3Click the "Start" button and then click "Run".
Special Features
4Type in "d:\Panasonic\Twain\Setup.exe" and click "OK".
Note: "d" Denotes the CD-ROM drive designation.
5When installation is completed, start up PhotoDeluxe Home Edition 3.0 and refer to
HELP file for the instructions on how to transmit images.
Adobe and PhotoDeluxe are trademarks of Adobe Systems Incorporated.
47
Page 48

T ransferring Y our Images (Windows 95/98)
4
1, 3
SERIAL
Terminal
RS-232C
(D-Sub 9-pin)
PC Connecting
2
Connection
Cable for Windows
(Supplied)
1Turn off your PC.
2Connect the Digital Camera to your PC (Windows) using the PC connecting cable
(supplied).
3Turn on your PC.
4Set the Digital Camera POWER to PLAY.
• The LED Lamp lights up.
Note:
• For extended periods of use, it is recommended to use the AC Adaptor (Optional) as a
power source.
• While the PC communicates with the Digital Camera, the Digital Camera cannot be
operated.
48
For assistance, call 1-800-272-7033.
Page 49

T ransferring Your Images (Windows 95/98)
Running the Application
1Select Programs/PalmCam 2.0/
PalmCam 2.0 from the Start.
2PalmCam Driver is opened.
Note :
To specify the PORT to which the Camera
is connected. The commands in the COM
Port Setup menu are used to change the
COM Port or Baudrate. The application will
communicate with the Camera using the
set COM Port.
1 Select [Communication] from the [File],
and the select [COM Port Setup...].
2 Select the Serial Port to connect with the
Camera.
• The default setting is COM1.
• If you press “AUTO SETUP”, the Port to
which the Camera is connected is
detected and selected automatically.
3 Select the Baudrate with the Camera.
• The default setting is 38400bps.
• Depending on the PC being used, some
baudrates may not have be available.
Please refer to your PC manual.
Special Features
49
Page 50

T ransferring Y our Images (Windows 95/98)
Data in from Camera
Selected Camera image file will be
transfered to the PC.
1Repeat steps 1 and 2 on page 49 to
run the software.
2Select from the Toolbar or Select
[Communication] from the [File]
menu, and then select [Data in from
Camera] to establish a link between
the Camera and PC.
• A preview Image List dialog box will
appear.
3Select the desired Thumbnail image
from Preview Image List dialog box or
Image transfer, and click [Transfer].
4A Transfer Pass dialog box will appear
to confirm the transfer place. Select the
copy place and then click [OK].
5Click [OK] from the Transfer Pass
dialog Box and then start to transfer the
image. [Now transferring the image...
(Digital Camera -> PC)] will appear and
the image transfer status will appear.
50
Note :
• The images transfered from the Camera
will be automatically saved as file name
[DSC xxx. JPG] (xxx indicates the
number) file name.
• The images transferred from the Camera
will be automatically displayed on the
album file.
For assistance, call 1-800-272-7033.
Page 51

T ransferring Your Images (Windows 95/98)
Data out from Camera
You can transfer modified or pre-recorded
images files from the PC to the Camera.
1Repeat steps 1 and 2 on page 49 to
run the software.
2Select from the Toolbar or Select
[Communication] from the [File]
menu, and then select [Data out to
Camera] to transfer images from the
PC to the Camera.
• The File select dialog box will appear.
3Select the drive and directory where
the desired image is stored.
4Select the desired file name from the
file name list box, or type the file name
in the file name text box.
5Click [OK] to transfer the selected
image to the camera. [Now transferring
the image... (PC -> Digital Camera)]
will appear and the image transfer
status will appear.
Special Features
Note :
• Only JPEG format image file can be
transferred to the Camera. Image size can
be up to 1280 x 960 pixels. Image file not
meeting this requirement must be
changed in order to be transferred to the
Camera.
51
Page 52

T ransferring Y our Images (Macintosh)
System Requirements:
• System 7.1 or later.
• System 8 or later (for Remote Access).
• 68040 CPU or higher, or Power
Macintosh.
• 16 MB of RAM.
PalmCam Camera Driver Installation
• 10MB available hard disk space.
• 256 Color monitor or full color recommended (24bit per pixel or 16.7M color).
• CD-ROM drive (for installation).
• Modem port or printer port (RS-422).
• Mouse or other pointing device.
1Turn on the Macintosh.
2Insert the supplied Driver Software CD-ROM into the CD-ROM drive.
3Double click the "Panasonic Folder".
4Read the "Read Me" file.
5Drag the "PalmCam 2.0 Folder" where you want to copy.
Adobe and PhotoDeluxe are trademarks of Adobe Systems Incorporated.
52
For assistance, call 1-800-272-7033.
Page 53

T ransferring Y our Images (Macintosh)
Plug-in Driver for Adobe® PhotoDeluxe™ 2.0 Installation
• The Plug-in Driver, when installed, allows your camera to communicate directly with
PhotoDeluxe 2.0.
Note:
• Please install Adobe PhotoDeluxe 2.0 before installing this driver.
• For information on Adobe PhotoDeluxe, please call 206-675-6120
Web Site : http://www.adobe.com/supportservice/custsupport/main.html
1Turn on the Macintosh.
2Insert the supplied Driver Software CD-ROM into the CD-ROM drive.
3Double click the CD-ROM icon.
4Drag the "Pdc2590.8bam" file to the "Plug-ins" folder of PhotoDeluxe.
Special Features
5When installation is completed, start up PhotoDeluxe 2.0 and refer to HELP file for the
instructions on how to transmit images.
Adobe and PhotoDeluxe are trademarks of Adobe Systems Incorporated.
53
Page 54

T ransferring Y our Images (Macintosh)
Modem
4
SERIAL
Terminal
port or
printer port
1, 3
2
PC Connecting
Cable for Windows
(Supplied)
Connection
PC Connecting
Cable Adaptor
for Macintosh
(Optional)
1Turn off your PC (Macintosh).
2Connect the Digital Camera to your PC (Macintosh) using the PC connecting cable
(supplied) and PC Connecting Cable Adaptor for Macintosh (Optional).
3Turn on your PC (Macintosh).
4Set the Digital Camera POWER to switch to PLAY.
• The LED Lamp lights up.
Note:
• For extended periods of use, it is recommended to use the AC Adaptor as a power
source.
• While the PC communicates with the Digital Camera, the Digital Camera cannot be
operated.
54
For assistance, call 1-800-272-7033.
Page 55

T ransferring Y our Images (Macintosh)
Running the Application
1Double click the PalmCam icon.
2PalmCam Driver is opened.
Note :
To specify the PORT to which the Camera
is connected. The commands in the COM
Port Setup menu are used to change the
COM Port or Baud Rate. The application
will communicate with the Camera using
the set COM Port.
1 Select [Communication] from the [File],
and the select [COM Port Setup...].
Special Features
2 Select the Serial Port to connect with the
Camera.
• The default setting is Modem Port.
• If you press “Auto Setup”, the Port to
which the Camera is connected is
detected and selected automatically.
3 Select the Baud Rate with the Camera.
• The default setting is 57600bps.
• Depending on the PC being used, some
baudrates may not have be available.
Please refer to your PC manual.
55
Page 56

T ransferring Y our Images (Macintosh)
Data in from Camera
Selected Camera image file will be
transfered to the PC.
1Repeat steps 1 and 2 on page 55 to
run the software.
2Click from the Toolbar or Select
[Communication] from the [File]
menu, and then select [Data in from
Camera] to establish a link between
the Camera and PC.
• A preview Image List dialog box will
appear.
3Select the desired Thumbnail image
from Preview Image List dialog box or
Image transfer, and click [Transfer].
4A Transfer Pass dialog box will appear
to confirm the transfer place. Select the
copy place and then click [OK].
5Click [OK] from the Transfer Pass
dialog Box and then start to transfer the
image. [Now transferring the image...
(Digital Camera -> PC)] will appear and
the image transfer status will appear.
56
Note :
• The images transfered from the Camera
will be automatically saved as file name
[DSC xxx. JPG] (xxx indicates the
number) file name.
• The images transferred from the Camera
will be automatically displayed on the
album file.
For assistance, call 1-800-272-7033.
Page 57

T ransferring Y our Images (Macintosh)
Data out from Camera
You can transfer modified or pre-recorded
images files from the PC to the Camera.
1Repeat steps 1 and 2 on page 55 to
run the software.
2Select from the Toolbar or Select
[Communication] from the [File]
menu, and then select [Data out to
Camera] to transfer images from the
PC to the Camera.
• The File select dialog box will appear.
3Select the drive and directory where
the desired image is stored.
4Select the desired file name from the
file name list box, or type the file name
in the file name text box.
Special Features
5Click [OK] to transfer the selected
image to the camera. [Now transferring
the image... (PC -> Digital Camera)]
will appear and the image transfer
status will appear.
Note :
• Only JPEG format image file can be
transferred to the Camera. Image size can
be up to 1280 x 960 pixels. Image file not
meeting this requirement must be
changed in order to be transferred to the
Camera.
57
Page 58

Communication Function
Image file transfer via a regular telephone
line using the Compact Modem Card.
Refer to Remote Access (pages 61~73)
and Communication (pages 74, 75) for
complete operating instructions.
Please also see the diagram on page 59 to
view the Compact Modem functions.
CARD SLOT 1
CARD SLOT 2
1Set POWER OFF before inserting the
CompactFlash card and modem card.
Insert the CF Card and Compact
Modem Card into the CompactFlash
Card Slots in the direction of the arrow
mark and so that the arrow mark side
of the card faces the front (lens side) of
the Digital Camera.
2Push the cards fully into the
CompactFlash Card Slots.
CompactFlash Card
Compact Modem
Card
(PV-DC2590 only)
Modem Card Slot
Note :
Communication Function is only available in the USA.
This is not an e-mail function.
How to attach the Ferrite Core
Attachment to the modular cord to for FCC Standard observance.
1
2
3Connect the Modem Cable into the
Modem Card, and connect Modular
Jack to the Modular Cord.
1Open the catch of the Ferrite Core.
2Wind the modular cable cord tightly
around the opened Ferrite Core to
make one complete loop as shown.
3
3Close the Ferrite Core Housing.
4
4Thread the cable tie through the hole
in the Ferrite Core Housing.
Modular Cord
(Sold separately)
58
5
5Fasten the Ferrite Core Housing on
the cable so that it does not move.
For assistance, call 1-800-272-7033.
Page 59

Communication Function
*
Special Features
Note :
Communication Function is only available in the USA.
* PalmCam Communication software must be installed.
PalmCam Communication software also available at
www.panasonic.com/palmcam.
*
59
Page 60

Communication Function
Notes for Modem Communication
• Depending on the area, the line situation may be poor making communication
impossible.
• It is not possible to call from an extension line.
(However, it is possible to call from an extension line to an outside line. In this case,
it may be impossible to make a normal call. If you cannot call normally, set the PC
modem not to detect dial tone from the PC modem settings. To change the PC modem
settings, refer to the PC modem operating instructions.)
Also, when you call from an extension line to an outside line, please enter the extension
transmit number to the settings of this application beforehand.
• When you communicate with the Camera using this application, it is recommended to
use a direct outside line as much as possible.
• A multi-line phone that requires line number selection before calling cannot be used.
• While long distance calls usually require a "1" before the area code. With Windows,
the "1" is added automatically, so please do not enter "1" before the number.
(adding "1" may result in a wrong number.)
• It may not possible to call normally when the application for modem use is already
running. In this case, exit the application and try to place the call again.
• Use this application to communicate with the Camera only.
• When you communicate with the Camera using this application, depending on the line
situation, failure may occur during communication. In this case, please exit the
communication and try again later.
• When you transfer Fine or Super Fine mode images, it may take long time, depending
on the line situation. In this case, please exit the communication and try again later.
• If you are using a phone line with call waiting, and use this application to communicate
with the Camera, incoming calls may cause disconnection during communication.
In this case, please try again later.
• It is recommended that an AC Adaptor (optional) be used for communicating with the
Camera using this application. If a battery is used, it may become depleted during
communication.
• Insert the modular cable securely into the modular box until it clicks.
• Even when the cable is correctly connected, the connections inside the box may not
have a good contact. If, even though there is no dial tone, the application dials, but
connection with the Camera cannot be made, the cable in the box may loose contact.
In this case, while firmly pressing the cable deep into the box, try calling again.
• It is not possible to communicate with the Camera with this application using a answering
phone or voice mail line.
• If your PC modem has an answering machine function and you use this application,
set the call capacity on the answering machine to at least 5.
60
For assistance, call 1-800-272-7033.
Page 61

This function enables you to operate the
camera from great distances with the use of
a modem.
• Remote recording from the PC.
• Downloading selected images to the PC.
1
Remote Access
1Set POWER to MANUAL REC.
• The LED Lamp lights up.
2Press MENU to display MANUAL REC
menu.
<MANUAL REC 1/3>
REC MODE
CARD SLOT
FLASH
SELF TIMER
IRIS
SEL : SET :
EXIT : MENU
• When the recording mode is set to
(Motion Image Rec) or (Burst Rec),
the recording mode will go to F (Fine).
N
NO. 1
AUTO
OFF
LED
Lamp
2
3
Note :
Before operating Remote Access,
• Be sure to install PalmCam Camera
Driver (see pages 46, 52).
• Be sure to insert CF Card and Modem
Card into the card slot.
• Make all connection on page 58.
• The Camera must be turned on.
• For extended period of use, it is
recommended to use the AC Adaptor
(optional) for a power source.
3Press or to select REMOTE
ACCESS and press .
REMOTE ACCESS
PUSH MENU TO EXIT
CARD1
10 F
Special Features
61
Page 62

Remote Access (Windows 95/98)
Running the application
You can transfer pre-recorded image files from the PC to the Camera.
Note :
Before operating, please install PalmCam 2.0 Camera Driver.
1Select Programs/PalmCam 2.0/Remote Access 1.0 from the Start.
2When application runs correctly, the Remote Access dialog box will be
displayed.
62
For assistance, call 1-800-272-7033.
Page 63

Remote Access (Windows 95/98)
Settings
You can set the telephone number for
connection from PC to Camera, and specify
the Transfer Path to save images
transferred from the Camera.
1Select [Setting...] from the Remote
Access dialog box.
2The setting dialog box will be
displayed.
Modem :
The modem names registered to the PC
will be listed. Select the modem to be
connected with the telephone line.
If an errors is made in modem selection,
connection with the camera will not be
possible.
• Regarding modem entry, deletion, etc.,
please refer to the PC modem operating
instructions, or Windows manual.
Telephone number (PC -> Digital Camera) :
To set the telephone number for connection
from PC to camera Please set your country code, area code,
and local prefix.
Transfer Path :
To specify the save location of the transferred image - Click the [Browse...] button,
and set the transfer path of the image.
Special Features
• Please set PC modem, Telephone
number (PC -> Digital Camera), and
Transfer Path.
3After setting is completed, click [OK]
to exit the Setting dialog box.
63
Page 64

Remote Access (Windows 95/98)
Camera Connection
1Select [Connect] from the Remote
Access dialog box.
2If communication connection was made
correctly, the Remote Access dialog
box will be change as follows.
• You need to setup the PC's modem
before running this application. For more
details, please refer to the PC modem
operating instructions.
If communication connection cannot be
made correctly, please check for errors in
modem setting method, modem select,
telephone number etc.
Regarding PC modem setting method,
please refer to the PC modem operating
instructions. Regarding the PC modem
select, telephone number setting, please
use the values in the Setting dialog box.
64
For assistance, call 1-800-272-7033.
Page 65

Remote Access (Windows 95/98)
Time Lapse Recording
You can set the recording interval, image
mode and clock for time lapse recording.
1Select [Time Lapse...] from the
Remote Access dialog box.
2The time lapse dialog box will be
displayed.
3Set Record, Mode, Interval and Clock
Setup.
Record :
Select [ON] for time lapse recording.
If you are not going to use or wish to exit
time lapse recording, select [OFF].
Interval :
To set the recording time interval. A length
of 1 minute, 5 minutes, 10 minutes,
30 minutes, 1 hour, 6 hours, 12 hours and
24 hours can be set.
Mode :
Select the recording mode (see page 21).
Clock Setup :
To set the internal clock of the Camera.
Move the cursor and type the date and
time. Click [Clock PC] to set the Camera's
clock to the PC's clock setting.
Remaining :
Displays the number of images which can
be saved on the CF card.
4After setting is completed, click [OK]
to exit the Time Lapse dialog box.
• Changes made regarding the time
lapse function take effect by clicking
the [OK] button in the Time Lapse
dialog box.
If you select [Cancel], all settings are
cancelled.
When you wish to stop time lapse in
progress, repeat step 1 and set
Record to [OFF], then click [OK].
Special Features
65
Page 66

Remote Access (Windows 95/98)
Remote Recording
You can control the Camera's shutter from
the PC to capture and record pictures.
1Select [Shutter...] from the Remote
Access dialog box.
2The shutter dialog box will display the
number of pages remaining in the CF
card for each mode.
3Click [OK] to start recording.
Select [Cancel] to exit.
• Camera recording will start shortly
after [OK] is selected.
4The image captured by the camera is
automatically transferred to the PC.
5If you wish to continue camera
recording, repeat operation from step 1.
66
For assistance, call 1-800-272-7033.
Page 67

Remote Access (Windows 95/98)
Download
You can select the Camera image files to
be transferred to the PC or you can select
the Camera image files you want to delete.
1Select [Download] from the Remote
Access dialog box.
2Image Preview dialog box will be
displayed.
Special Features
3You can perform any one of the
following 3 functions (for more details,
refer to Help) ;
• Preview Images in the Camera.
• Transfer Images from the Camera.
• Delete Specific Image in the Camera.
4Click [Exit] and the Image Preview
dialog box disappears.
67
Page 68

Remote Access (Macintosh)
Running the application
You can transfer pre-recorded image files from the Camera to the PC.
Note :
Before operating, please install PalmCam 2.0 Camera Driver.
1Double click the "PalmCam Remote Access" icon.
2When application runs correctly, the Remote Access dialog box will be
displayed.
68
For assistance, call 1-800-272-7033.
Page 69

Remote Access (Macintosh)
Settings
You can set the telephone number for
connection from PC to Camera, and specify
the Transfer Path to save images transferred from the Camera.
1Select [Setting...] from the Remote
Access dialog box.
2The setting dialog box will be
displayed.
Special Features
• Please set Telephone number
(PC -> Digital Camera), and Transfer
Path.
Telephone number (PC -> Digital Camera) :
Set the telephone number for connection
from PC to camera.
To insert a pause, type a " , " (comma)
between the dial numbers.
Transfer Path :
Specify the save location of the transferred
image. Click the [Browse...] button, and set
the transfer path of the image.
3After setting is completed, click [OK]
to exit the Setting dialog box.
• If you click [Cancel], all settings are
cancelled.
69
Page 70

Remote Access (Macintosh)
Camera Connection
1Select [Connect] from the Remote
Access dialog box.
2If communication connection was made
correctly, the Remote Access dialog
box will change as follows.
• You need to setup the PC's modem
before running this application. For more
details, please refer to the PC modem
operating instructions.
If communication connection cannot be
made correctly, please check for errors in
modem setting method, modem select,
telephone number etc.
Regarding PC modem setting method,
please refer to PC modem operating
instructions. Regarding the telephone
number setting, please use the values in
the Setting dialog box.
70
For assistance, call 1-800-272-7033.
Page 71

Remote Access (Macintosh)
Time Lapse Recording
You can set the recording interval, image
mode and clock for time lapse recording.
1Select [Time Lapse...] from the
Remote Access dialog box.
2The time lapse dialog box will be
displayed.
3Set Record, Interval, Mode and Clock
Setup.
Record :
Select [ON] for time lapse recording.
If you are not going to use or wish to exit
time lapse recording, select [OFF].
Interval :
To set the recording time interval. A length
of 1 minute, 5 minutes, 10 minutes,
30 minutes, 1 hour, 6 hours, 12 hours and
24 hours can be set.
Mode :
Select the recording mode (see page 21).
Clock Setup :
To set the internal clock of the Camera.
Move the cursor and type the date and
time. Click [Clock PC] to set the Camera's
clock to the PC's clock setting.
Remaining :
Displays the number of images which can
be saved on the CF card.
4After setting is completed, click [OK]
to exit the Time Lapse dialog box.
• Changes made regarding the time
lapse function take effect by clicking
the [OK] button in the Time Lapse
dialog box.
If you select [Cancel], all settings are
cancelled.
When you wish to stop time lapse in
progress, repeat step 1 and set
Record to [OFF], then click [OK].
Special Features
71
Page 72

Remote Access (Macintosh)
Remote Recording
You can controls the camera's shutter from
the PC to capture and record pictures.
1Select [Shutter...] from the Remote
Access dialog box.
2The shutter dialog box will display the
number of pages remaining in the CF
card for each mode.
3Click [OK] to start recording.
Select [Cancel] to exit.
• Camera recording will start shortly
after [OK] is selected.
4The image captured by the camera is
automatically transferred to the PC.
5If you wish to continue camera
recording, repeat operation from step 1.
72
For assistance, call 1-800-272-7033.
Page 73

Remote Access (Macintosh)
Download
You can select the Camera image files to
be transferred to the PC or you can select
the Camera image files you want to delete.
1Select [Download] from the Remote
Access dialog box.
2Image Preview dialog box will be
displayed.
Special Features
3You can perform any one of the
following 3 functions (for more details,
refer to Help) ;
• Preview Images in the Camera.
• Transfer Images from the Camera.
• Delete Specific Image in the Camera.
4Click [Exit] and the Image Preview
dialog box disappears.
73
Page 74

Communication
This function enables you to send images
from the Camera to a PC or Fax machine in
a remote location using a modem.
8, 10
1
LED
Lamp
9
2
3, 4, 5,
6, 7, 9
Note :
Before operating Communication;
• Be sure to install and run PalmCam
Camera Driver. (see pages 46, 52).
• Be sure to insert CF Card and Modem
Card into the card slot.
• Make all connection on page 58.
• The PC must be turned on.
• For extended period of use, it is
recommended to use the AC Adaptor
(optional) for a power source.
• Please input your name and telephone
number to comply with FCC regulations.
(see page 76)
1Set POWER to PLAY.
• The LED Lamp lights up.
2Press MENU to display PLAY MENU.
<PLAY MENU 1/2>
DISPLAY MODE
CARD SLOT
DELETE
COPY
PRINT MARK
SEL : SET :
EXIT : MENU
NORMAL
NO. 1
3Press or to select COMMUNICA-
TION and press .
<PLAY MENU 2/2>
SLIDE SHOW
COMMUNICATION
OTHERS
SEL : SET :
EXIT : MENU
• If the Compact Modem Card is not
inserted, "COMMUNICATION" can
not be selected.
4Press or to select TONE, 10PPS,
or 20PPS from LINE TYPE and press
.
<COMMUNICATION>
LINE TYPE
MODEM TYPE
MODE
SEL PAGE
SEL : SET :
EXIT : MENU
• If you have touch tone service, set to
tone. If rotary or pulse service is
used, set to 10PPS or 20PPS.
Normally, 10PPS is selected.
TONE
V34
FAX
74
For assistance, call 1-800-272-7033.
Page 75

Communication
5Press or to select V34, V90, or
K56 from MODEM and press .
• Normally, V90 is selected. If your PC
modem is 56K, set to 56K.
• This step is not necessary when
sending image to a fax machine.
<COMMUNICATION>
LINE TYPE
MODEM
MODE
SEL PAGE
SEL : SET :
EXIT : MENU
TONE
V90
FAX
6Press or to select FAX or DATA
from MODE and press .
<COMMUNICATION>
LINE TYPE
MODEM
MODE
SEL PAGE
SEL : SET :
EXIT : MENU
TONE
V90
FAX
• If you want to send an image to a fax
machine, select FAX.
If you want to send an image to a PC,
select DATA.
7Press to display SELECT PAGE and
press or to select image.
<SELECT PAGE>
SEL PAGE :
SET : SHTR
EXIT : MENU
CARD1
100-0001 F
9Press to select INPUT NUMBER
and press to display INPUT NUM-
BER menu.
Press or to select a number and
press to set.
• Repeat this step to set your
telephone number.
<INPUT NUMBER>
SET NUMBER
_
SET MEMORY : DISPLAY
SEL : SET :
CALL : SHTR EXIT : MENU
• After all settings are made, press
DISPLAY to memorize the number.
Once memorized, the telephone
number will be displayed in
MEMORY CALL in step 8.
10Press SHTR to transfer the image.
• If you selected FAX in step 6,
"DATA EXCHANGING" will
appear.
If you selected
DATA EXCHANGING
NOW CALLING
0,0111201123333
DATA in step 6,
this message
will not appear.
Special Features
8Press SHTR to display TELEPHONE
NUMBER menu.
<TELEPHONE NUMBER>
MEMORY CALL
NO MEMORY
INPUT NUMBER
SEL : SET :
EXIT : MENU
NOW TRANSFERRING
75
Page 76

PC Connection
Driver Software Quick Reference
1 2 3 4 5 6
1 File
Create New Album
To create an untitled album window which
does not have any images.
File Open...
To open an existing image (BMP or JPEG),
or album file.
Close
To close the active image or album window.
Save
To save the active image or album window.
Save As...
To save the active image file under a new
file name while preserving the original file.
Slide Show
• Start...
To start the slide show.
• Option...
To make optional settings for the slide
show.
Communication
• Data in from Camera
To transfer image files from the Camera to
the PC.
• Data out to Camera...
To transfer modified or pre-recorded
image files from the PC to the Camera.
• COM Port Setup...
To specify the port to which the Camera is
connected and to set the Baud rate.
• Clock Setup...
To set the Camera Clock, telephone No.
(Camera -> to PC) and Fax No.
Image Information
To display Image Information.
Create Calendar
• Monthly Calendar
To create monthly calendar.
• Yearly Calendar
To create yearly calendar.
Capture
• Display Capture
To capture whole image.
• Window Capture
To capture current active window.
Print...
To print current active image.
Print Setup...
To select the printer and printer options.
Exit
To quit the "PalmCam" application.
76
For assistance, call 1-800-272-7033.
Page 77

PC Connection
2 Edit
Add to Album...
To add images to a new or existing album
file.
Cut
To remove the selected image from the
active Album and place it on the Clipboard.
Copy
To copy the selected image from the active
Album and place it on the Clipboard.
Paste
To paste the image on the Clipboard in the
active Album.
Undo
To return the picture to the condition before
the last executed operation.
3 Image
Image Adjustment...
To adjust the brightness, contrast, color
saturation and contours of the image.
Rotate
• Right
To rotate the image 90° clockwise.
• Left
To rotate the image 90° counterclockwise.
Image Cutout
To cut out a part of an image and use it to
make another file.
Image Size...
To enlarge or reduce the image to the
designated size.
4 View
To select the desired size of the displayed
image.
5 Window
Cascade
To arrange the image windows so that they
overlap and their title bars are visible.
Tile
To arrange the image windows without
overlapping so that you can see all image
files at once.
Close All
To close all image files opened in the
"PalmCam" application.
Toolbar On/Off
To display or hide the Tool Bar.
Statusbar On/Off
To display or hide the Status Bar.
Tool On/Off
To display or hide the Tool.
6 Help
Contents
To display the Help screen.
Version Information...
To display the Software version
information. Clicking on this screen will
hide the version information.
Special Features
Note:
In some cases, different display contents
and items apply for the Macintosh®.
For details on operation, click the Apple
mark and refer to "Help".
77
Page 78

Using the Digital Photo Printer
<PRINT MARK>
SET/CANCEL PAGE
SET ALL
CANCEL ALL
SEL : SET :
EXIT : MENU
Images can be selected for print out on a
digital photo printer (sold separately).
Stamp Print Marker
LED
Lamp
1
2, 5
3, 4
4
1Set POWER to PLAY.
• The LED Lamp lights up.
2Press MENU to display the PLAY
MENU.
<PLAY MENU 1/2>
DISPLAY MODE
CARD SLOT
DELETE
COPY
PRINT MARK
SEL : SET :
EXIT : MENU
NORMAL
NO. 1
3Press or to select PRINT MARK
and press to display PRINT MARK
menu.
<PLAY MENU 1/2>
DISPLAY MODE
CARD SLOT
DELETE
COPY
PRINT MARK
SEL : SET :
EXIT : MENU
NORMAL
NO. 1
• Select "SET ALL" to mark all images.
Select "CANCEL ALL" to cancel all
image print marks.
4Press or to select the image page
you want to mark for printing and
press SHTR to stamp print mark.
A " " mark will appear on the image.
<PRINT MARK>
SET/CANCEL PAGE
SEL PAGE :
SET/CANCEL : SHTR
EXIT : MENU
CARD1
100-0001 F
78
• Repeat step 4 to stamp other images.
• Press SHTR again to cancel print
mark.
5Press MENU to exit this menu.
TM
This print mark is based on DPOF (Digital Print Order Format).
For assistance, call 1-800-272-7033.
Page 79

Using the Digital Photo Printer
1
1
2
Power Button Input Select Switch
Printing on a Digital Photo Printer
1Remove the CompactFlash Card
containing the captured images from
the camera and insert it into the
PCMCIA Adaptor (see page 44).
2Connect the PCMCIA Adaptor
(included with printer) to the Digital
Photo Printer*.
• *Requires a Digital Photo Printer
PV-PD2000 (sold separately).
• Insert the adaptor in the direction of
the arrow and push the card fully into
the printer.
3Turn on the printer and set the INPUT
SELECT (VIDEO/PC CARD) Switch to
the PC CARD position.
• The Printer ACCESS Lamp will flash.
Special Features
4Slide the AUTO PRINT Lever.
Printing of print marked images begins.
• Please refer to the printer's
operating instructions for details
on printing.
• Moving the AUTO PRINT Lever
during the reading of the
CompactFlash Card (ACCESS Lamp
is flashing) may prevent proper
printing of the images. Wait until the
ACCESS Lamp turns off before
moving the AUTO PRINT Lever.
ACCESS Lamp
AUTO PRINT Lever
79
Page 80

Digital Camera Accessory List
For ordering instructions, see the Accessory Order Form page.
Accessory #
PV-SAC10
PV-CFM10*
PV-MCA10
PV-H125
Figure
Description
AC Adaptor
Compact Modem Card
Macintosh Adaptor Cable
Digital Camera Bag
Price
$69.95
$299.95
$49.95
$29.95
* : For use in the USA only
80
For assistance, call 1-800-272-7033.
Page 81

Digital Camera Accessory Order Form
Please photocopy this form when placing an order.
1. Model #
2. Items Ordered
Your State & Local Sales Tax
Shipping & Handling
3. Method of payment (check one)
Check of Money Order enclosed (NO C.O.D.SHIPMENTS)
VISA Credit Card #
MasterCard Expiration Date
Discover Customer Signature
Make Check or Money Order to: MATSUSHITA ACCESSORIES
(Please do not send cash)
QuantityAccessory # Price EachDescription
Subtotal
Total Enclosed
Total Price
5.00
4. Shipping information (UPS delivery requires complete street address)
Ship To:
Mr.
Mrs.
Ms.
First Last
Street Address
City State Zip
TO OBTAIN ANY OF OUR DIGITAL CAMERA ACCESSORIES YOU CAN DO ANY OF THE
FOLLOWING:
VISIT YOUR LOCAL PANASONIC DEALER
OR
CALL PANASONIC’S ACCESSORY ORDER LINE AT 1-800-272-7033 [8:30 AM-8 PM M-F, EST]
OR
MAIL THIS ORDER TO: PANASONIC SERVICES COMPANY ACCESSORY ORDER OFFICE
20421 84th Avenue South Kent, WA. 98032
Phone #:
Day ( )
Night ( )
For Y our Information
81
Page 82

Before Requesting Service
If you have a problem with your Digital Camera, it may be something you can correct
yourself.
Check the list below for symptoms and corrections.
Symptom
No power
Power shuts off automatically.
Cannot capture the image.
No Picture on the LCD
Viewfinder
B/W picture on the LCD
Viewfinder
LCD Viewfinder image is too
bright or dark.
Indication or image on the
LCD Viewfinder is not focused.
Flash will not light.
Cannot playback.
No picture on the TV
(if connected).
Can not transfer images on the
PC Connection.
Solution
• Alkaline Battery is worn out. (p. 14)
• Make sure polarities are aligned properly. (p. 14)
• Alkaline Battery is worn out. (p. 14)
• The camera will go to Stand By mode.
Press STAND BY, or set the POWER to off
and then set to REC or MANUAL REC. (p. 22)
• CompactFlash card is not inserted. (p. 16)
• Make sure the POWER switch is set to REC or
MANUAL REC. (p. 19)
• No memory. Delete some images before
capturing images. (p. 38)
• LCD Viewfinder is OFF. (p. 13)
• The camera will go Stand By mode.
Press STAND BY, or set the POWER to off
and then set to REC or MANUAL REC. (p. 22)
• The REC mode is set to B/W mode. (p. 34)
• Make sure the LCD Viewfinder brightness
setting is adjusted properly. (p. 23)
• Make sure the focus mode is properly set.
(p. 29)
• The flash mode is set to
Change flash mode. (p. 30, 31)
• CompactFlash card is not inserted. (p. 16)
• There are no images on the CF card.
• Make sure the POWER switch is set to PLAY.
(p. 24)
• Make sure all necessary connections are correct
and tight. (p. 28)
• Make sure the TV is set to video input mode.
(p. 28)
• Make sure all necessary connections are correct
and tight. (p. 46~57)
• Make sure the PalmCam Driver is installed.
(p. 46, 52)
• Make sure the Camera is in PLAY. (p. 24)
(OFF) mode.
(p. 19 ~ 21)
82
For assistance, call 1-800-272-7033.
Page 83

Specifications
CCD 1/2.7 inch (9.34 mm) 1,320,000 Pixels
Lens f=5.2-15.6 mm (equivalent to a 34-102 mm lens on a 35 mm
still camera.)/F2.8-4.7
Focus Auto / Preset (Zone)
Focusing Area 7.9 inch (20cm)–∞ (approx)
Iris F2.8/F8
Shutter Speed 1/4–1/750 sec.
White Balance Auto/Indoor/Outdoor
LCD Viewfinder 1.8 inch (45.7 mm) TFT Color Liquid Crystal Display
Memory CompactFlash (CF) Card (8 MB)
Image Size 1,280 × 960 pixels (Super Fine, Fine)
640 × 480 pixels (Normal, Zoom, mode)
320 × 240 pixels ( mode)
Image Storage Approx. 15 images (Super Fine mode)
(Supplied 8MB CF Card) Approx. 30 images (Fine mode)
Approx. 100 images (Normal, Zoom, mode)
Approx. 6 images ( mode)
Image Format JPEG (Design Rule for Camera File System)
Digital Signal Serial
Video Signal NTSC Composite
Power Supply 4 AA Alkaline Battery/4 AA Ni-Cd Battery /4 AA nickel-hydride
Battery/AC Adaptor
Power Consumption Digital Camera 6V DC, 1.0A (Alkaline Battery)
AC Adaptor (Optional) Input: 120V AC 60Hz 9W
Operating Temperature 32 – 104 °F/0 – 40 °C
Operating Humidity 10 % – 75 %
Weight Digital Camera 8.4 oz approx./280 g approx.
AC Adaptor (Optional) 3.4 oz approx./112 g approx.
Dimensions Digital Camera 4.63 (W) × 2.68 (H) × 2.07 (D) inch
118 (W) × 68 (H) × 52 (D) mm
AC Adaptor (Optional) 1.97 (W) × 2.83 (H) × 0.79 (D) inch
50 (W) × 72 (H) × 20 (D) mm
For Y our Information
Weight and dimensions shown are approximate.
Design and specifications are subject to change without notice.
83
Page 84

Warranty
Panasonic Consumer Electronics
Company, Division of Matsushita
Electric Corporation of America
One Panasonic Way Secaucus,
New Jersey 07094
Panasonic Sales Company, Division of
Matsushita Electric of Puerto Rico, Inc.
Ave. 65 de Infantería. Km. 9.5
San Gabriel Industrial Park, Carolina, Puerto
Rico 00985
PANASONIC/QUASAR Video Products
Limited Warranty
Panasonic Consumer Electronics Company or Panasonic Sales Company (collectively referred to as
“the Warrantor”) will repair this product with new or refurbished parts, free of charge, in the USA or
Puerto Rico, in the event of a defect in materials or workmanship as follows (all time periods
commence from the date of the original purchase):
PRODUCT PARTS LABOR
CAMCORDER ONE (1) YEAR, EXCEPT CCD IMAGE SENSOR NINETY (90) DAYS
DIGITAL CAMERA CCD IMAGE SENSOR - SIX (6) MONTHS NINETY (90) DAYS
VCR ONE (1) YEAR NINETY (90) DAYS
A/V MIXER ONE (1) YEAR NINETY (90) DAYS
MONITOR-VCR ONE (1) YEAR, EXCEPT CRT NINETY (90) DAYS
Monitor-VCR In-home or carry-in Service: 22” (diagonal) CRT / LCD and Larger
Batteries (if included) - New rechargeable batteries in exchange for defective rechargeable batteries
for ten (10) days. Non-rechargeable batteries are not warranted.
Tape (if included) - New video cassette tape in exchange for a defective video cassette tape for five
(5) days.
In-home, carry-in or mail-in service, as applicable, in the USA can be obtained during the warranty
period by contacting a Panasonic Services Company (PASC) Factory Servicenter listed in the
Service Directory. Or call toll free 1-800-272-7033, to locate an authorized PASC Servicenter. Carryin or mail-in service in Puerto Rico can be obtained during the warranty period by calling the
Panasonic Sales Company telephone number listed in the Servicenter Directory.
This warranty is extended only to the original purchaser. A purchase receipt or other proof of the date
of the original purchase is requires before warranty service is rendered.
This warranty only covers failures due to defects in materials and workmanship which occur during
normal use and does not cover normal maintenance, including, but not limited to, video and audio
head cleaning. The warranty does not cover damage which occurs in shipment, or failures which are
caused products not supplied by the warrantor, or failures which result from accident, misuse, abuse,
neglect, mishandling, misapplication, alteration, modification, faulty installation, set-up adjustments,
improper antenna, inadequate signal pickup, maladjustment of consumer controls, improper
operation, power line surge, improper voltage supply, lightning damage, commercial use such as
hotel, office, restaurant, or other business or rental use of the product, or service by anyone other
than a PASC Factory Servicenter or a PASC authorized Servicenter, or damage that is attributable to
acts of God.
LIMITS AND EXCLUSIONS
There are no express warranties except as listed above. THE WARRANTOR SHALL NOT BE
LIABLE FOR INCIDENTAL OR CONSEQUENTIAL DAMAGES (INCLUDING, WITHOUT
LIMITATION, DAMAGE TO TAPES) RESULTING FROM THE USE OF THIS PRODUCTS, OR
ARISING OUT OF ANY BREACH OF THE WARRANTY. ALL EXPRESS AND IMPLIED
WARRANTIES, INCLUDING THE WARRANTIES OF MERCHANTABILITY AND FITNESS FOR
PARTICULAR PURPOSE, ARE LIMITED TO THE APPLICABLE WARRANTY PERIOD SET FORTH
ABOVE. Some states do not allow the exclusion or limitation of incidental or consequential damages,
or limitations on how long an implied warranty lasts, so the above exclusions or limitations may not
apply to you.
This warranty gives you specific legal rights and you may also have other rights which vary from state
to state.
If a problem with this product develops during or after the warranty period, you may contact your
dealer or Servicenter. If the problem is not handled to your satisfaction, then write to the Customer
Satisfaction Center at the Panasonic Consumer Electronics Company address above.
SERVICE CALLS WHICH DO NOT INVOLVE DEFECTIVE MATERIALS OR WORKMANSHIP AS
DETERMINED BY THE WARRANTOR, IN ITS SOLE DISCRETION, ARE NOT COVERED. COSTS
OF SUCH SERVICE CALLS ARE THE RESPONSIBILITY OF THE PURCHASER.
warvid 10/20/97
Monitor-VCR Carry-in Service: 21” (diagonal) CRT / LCD and smaller
84
CRT - TWO (2) YEARS CRT- NINETY (90) DAYS
CUSTOMER PAYS ALL
LABOR CHARGES
AFTER 90 DAYS
For assistance, call 1-800-272-7033.
Page 85

Service Center Directory
For Product Information, operating Assistance, Literature Request, Dealer Locations,
and all Customer Service inquires please contact:
1-800-272-7033, Monday-Friday 8:30am-8pm EST.
Web Site: http://WWW.Panasonic.com
You can purchase parts, accessories or locate your
nearest servicenter by visiting our Web Site.
Product Repairs
Centralized Factory Servicenter
Panasonic Services Company
MAIL TO :
1705 N. Randall Road,
Elgin, IL 60123-7847
Attention: Digital Camera Repair
Please carefully pack and ship, prepaid and insured, to the Elgin centralized repair Factory
Servicenter. While there will be added handling delays, you may bring your unit to one of the
following locations who will then forward the unit to Elgin for repair.
Customer’s in Puerto Rico, please ship or carry in to location below (“Service in Puerto Rico”).
Factory Servicenter Locations
CALIFORNIA
6550 Katella Avenue
Cypress, CA 90630
800 Dubuque Avenue
S. San Francisco,
CA 94080
20201 Sherman Way
Suite 102
Canoga Park, CA 91306
3878 Ruffin Road
Suite A
San Diego, CA 92123
COLORADO
1640 South Abilene
Street Suite D
Aurora, CO 80012
FLORIDA
3700 North 29th Avenue
Suite 102
Hollywood, FL 33020
GEORGIA
8655 Roswell Road
Suite 100
Atlanta, GA 30350
ILLINOIS
1703 North Randall Road
Elgin, IL 60123
(Pick-up / Drop-off only)
9060 Golf Road
Niles, IL 60714
MARYLAND
62 Mountain Road
Glen Burnie MD 21061
MASSACHUSETTS
60 Glacier Drive,
Suite G
Westwood, MA 02090
MICHIGAN
37048 Van Dyke Avenue
Sterling Heights, MI
48312
MINNESOTA
7850-12th Avenue South
Airport Business Center
Bloomington, MN 55425
OHIO
2236 Waycross Road
Civic Center Plaza
Forest Park, OH 45240
PENNSYLVANIA
2221 Cabot Blvd. West
Suite B
Langhorne, PA 19047
Chartiers Valley
Shopping Center
1025 Washington Pike
Bridgeville, PA 15017
TENNESSEE
919-8th Avenue South
Nashville, TN 37203
TEXAS
7482 Harwin Drive
Houston, TX 77036
13615 Welch Road
Suite 101
Farmers Branch,
TX 75244
WASHINGTON
20425-84th Avenue
South
Kent, WA 98032
HAWAII
99-859 Iwaiwa Street
Aiea, Hawaii 96701
Phone (808) 488-1996
Fax (808) 486-4369
For Y our Information
Service in Puerto Rico
Matsushita Electric of Puerto Rico, Inc. Panasonic Sales Company/ Factory Servicenter:
Ave. 65 de Infantería. Km. 9.5 San Gabriel Industrial Park Carolina, Puerto Rico 00985
Phone (787) 750-4300 Fax (787) 768-2910
Accessory Purchases:
Customer Orders Only 1-800-272-7033
As of October ’97
85
Page 86

Index
A
AC Adaptor (optional) 15, 80
Accessory (optional) 80, 81
Accessory (supplied) 2
Alkaline Battery 2, 14
B
Battery Remaining Indication 11
Beep 22
Brightness (LCD Viewfinder) 23
Built-in Flash 30, 31
B/W Full Feature Indicator Panel
(PV-DC2590 only) 7, 9, 10, 19, 31, 34, 35
C
Capturing Images 19, 20, 21, 22
Capture B/W Images 34
CF Card Format 40
Communication 74, 75
CompactFlash Card 2, 16, 17, 58
Compact Modem Card 2, 10, 58, 80
Copy Image 41, 42
D
Delete Image 38, 39
Digital Photo Printer 79
F
Focus/Macro Recording 29
H
Hand Strap 2, 15
I
Iris 36
Index of Control 6, 7
L
LCD Viewfinder 8, 11, 12, 13, 19, 23
Low Light Warning 11
Light Metering 33
M
Manual Playback 24, 25
Modular Cable 58
Multi Playback 26, 27
O
On Screen Display (OSD) 11, 13
Optical Viewfinder 8, 20
P
PC Connection 76, 77
PC Connection Cable for Window s
2, 48, 54
PCMCIA Adaptor 44
Playback 24, 25, 26, 27
Playback Menu 13
POWER Supply 14, 15
Print Mark 78
R
Remote Access 61~73
PC Connection Cable for Window s
2, 48, 54
PCMCIA Adaptor 44
86
For assistance, call 1-800-272-7033.
Page 87

S
Self Timer 9, 12, 35
Setting the Clock 18
Slide Show 43
Specifications 83
Stand By 22
Symptom/Solution 84
T
Transferring Images 28, 46~57
Time Lapse 37
V
Video Cable 2, 28
W
Warranty 84, 85
White Balance 32
Z
Zoom Playback 25
Index
For Y our Information
87
Page 88

Panasonic Consumer Electronics
Company, Division of Matsushita
Electric Corporation of America
One Panasonic Way Secaucus,
New Jersey 07094
Printed in Japan
LSQT0132A 1999
Panasonic Sales Company,
Division of Matsushita Electric of
Puerto Rico, Inc. (“PSC”)
Ave. 65 de Infantería, Km. 9.5
San Gabriel Industrial Park
Carolina, Puerto Rico 00985
 Loading...