

Page 1
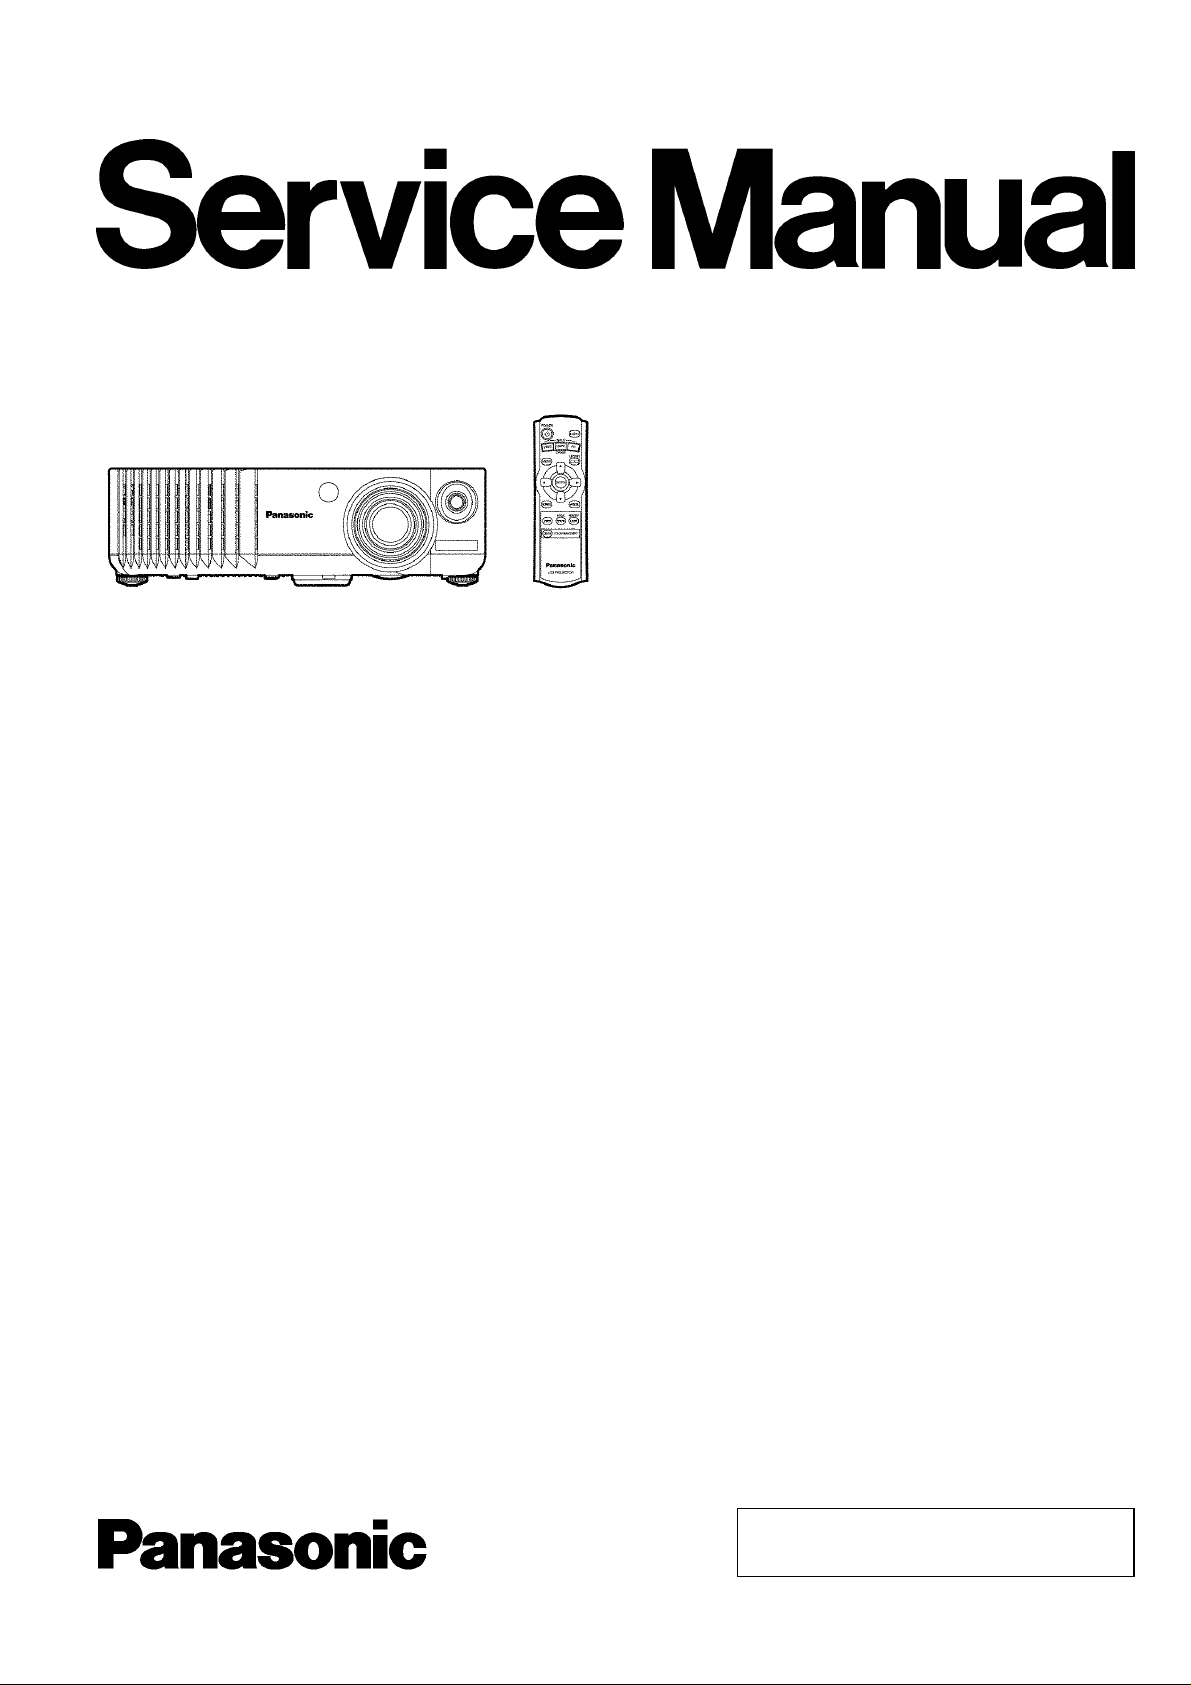
PT-AE700U
PT-AE700E
ORDER NO. VED0409357C0
D10
LCD Projector
© 2004 Matsushita Electric Industrial Co., Ltd. All
rights reserved. Unauthorized copying and
distribution is a violation of law.
Page 2
PT-AE700U / PT-AE700E
2
Page 3
PT-AE700U / PT-AE700E
CONTENTS
Page Page
1 Safety Precautions 5
1.1. General Guidelines
1.2. Leakage Current Check
1.3. UV Precaution and UHM Lamp Precautions
2 Ext Option
5
5
5
6
2.1. Procedure to enter EXT OPTION
2.2. EXT OPTION Menu and Functions
2.3. Canceling EXT OPTION
3 Self-Check Mode
3.1. Procedure to enter the self-check mode
3
6
6
6
7
7
Page 4
PT-AE700U / PT-AE700E
3.2. Self Check Display and Contents 7
3.3. Canceling the self-check mode
4 Service Mode
4.1. Procedure to enter the service mode
4.2. Canceling the service mode
5 Flicker Adjustment Mode
5.1. Procedure to enter the adjustment mode
5.2. Adjustment Display and Contents
5.3. Canceling the flicker adjustment mode
6 Disassembly Instructions
6.1. Printed Circuit Board and Main Parts Location
6.2. Removal of Upper Case
6.3. Removal of A-P.C.Board
6.4. Removal of S-P.C.Board
6.5. Removal of J-P.C.Board (PT-AE700E only)
6.6. Removal of B/Q-Module
6.7. Removal of P-Module
6.8. Removal of K-P.C.Board
6.9. Removal of Lamp Unit
6.10. Removal of Analysis Block and Projection Lens
6.11. Removal of LCD Block
6.12. Removal of Projection Lens
6.13. Replacement of LCD Panel
6.14. LCD Panel Discrimination
6.15. LCD Panel Combination
6.16. Replacement of Projection Polarizer
6.17. Replacement of Incidence Polarizer (R and B)
6.18. Replacement of Incidence Polarizer (G)
6.19. Replacement of PBS Array (Analysis Block)
6.20. Removal of Iris Unit
7 Measurement and Adjustments
7.1. Adjustment Procedure Flowchart
7.2. Cautions for Adjustment
8
9
9
9
9
9
9
9
10
10
11
11
11
11
12
12
13
13
13
14
14
14
15
15
16
16
17
17
18
19
19
7.3. Setting Before Adjustment
7.4. Convergence Adjustment
7.5. Lighting Area Adjustment
7.6. Software for Adjustment
7.7. Flicker Adjustment
7.8. Input Level Adjustment (RGB)
8 Troubleshooting
9 Interconnection Block Diagram
9.1. Interconnection Block Diagram (1/2)
9.2. Interconnection Block Diagram (2/2)
10 Block Diagram
10.1. Power Supply
10.2. Signal Processing (1/3)
10.3. Signal Processing (2/3)
10.4. Signal Processing (3/3)
11 Schematic Diagram
11.1. A-P.C.Board (1/6)
11.2. A-P.C.Board (2/6)
11.3. A-P.C.Board (3/6)
11.4. A-P.C.Board (4/6)
11.5. A-P.C.Board (5/6)
11.6. A-P.C.Board (6/6)
11.7. K-P.C.Board, S-P.C.Board, H-P.C.Board, J-P.C.Board
11.8. B-Module (1/2)
11.9. B-Module (2/2)
12 Circuit Boards
12.1. A-P.CBoard
12.2. J-P.C.Board/S-P.C.Board
13 Terminal guide of ICs and transistors
14 Exploded Views
15 Replacement Parts List
19
19
19
20
22
24
24
26
37
37
38
39
39
40
41
42
43
44
45
46
47
48
49
50
51
52
53
53
54
55
56
60
4
Page 5
PT-AE700U / PT-AE700E
1 Safety Precautions
1.1. General Guidelines
· For continued safety, no modification of any circuit must be
attempted.
· Unplug the power cord from the power outlet before
disassembling this projector.
· It is advisable to use an isolation transformer in the AC
power line before the service.
· Observe the original lead dress during the service. If a short
circuit is found, replace all the parts overheated or
damaged by the short circuit.
· After the service, all the protective devices such as
insulation barriers, insulation papers, shields, and isolation
R-C combinations must be properly installed.
· After the service, check the leakage current to prevent the
customer from getting an electric shock.
1.2. Leakage Current Check
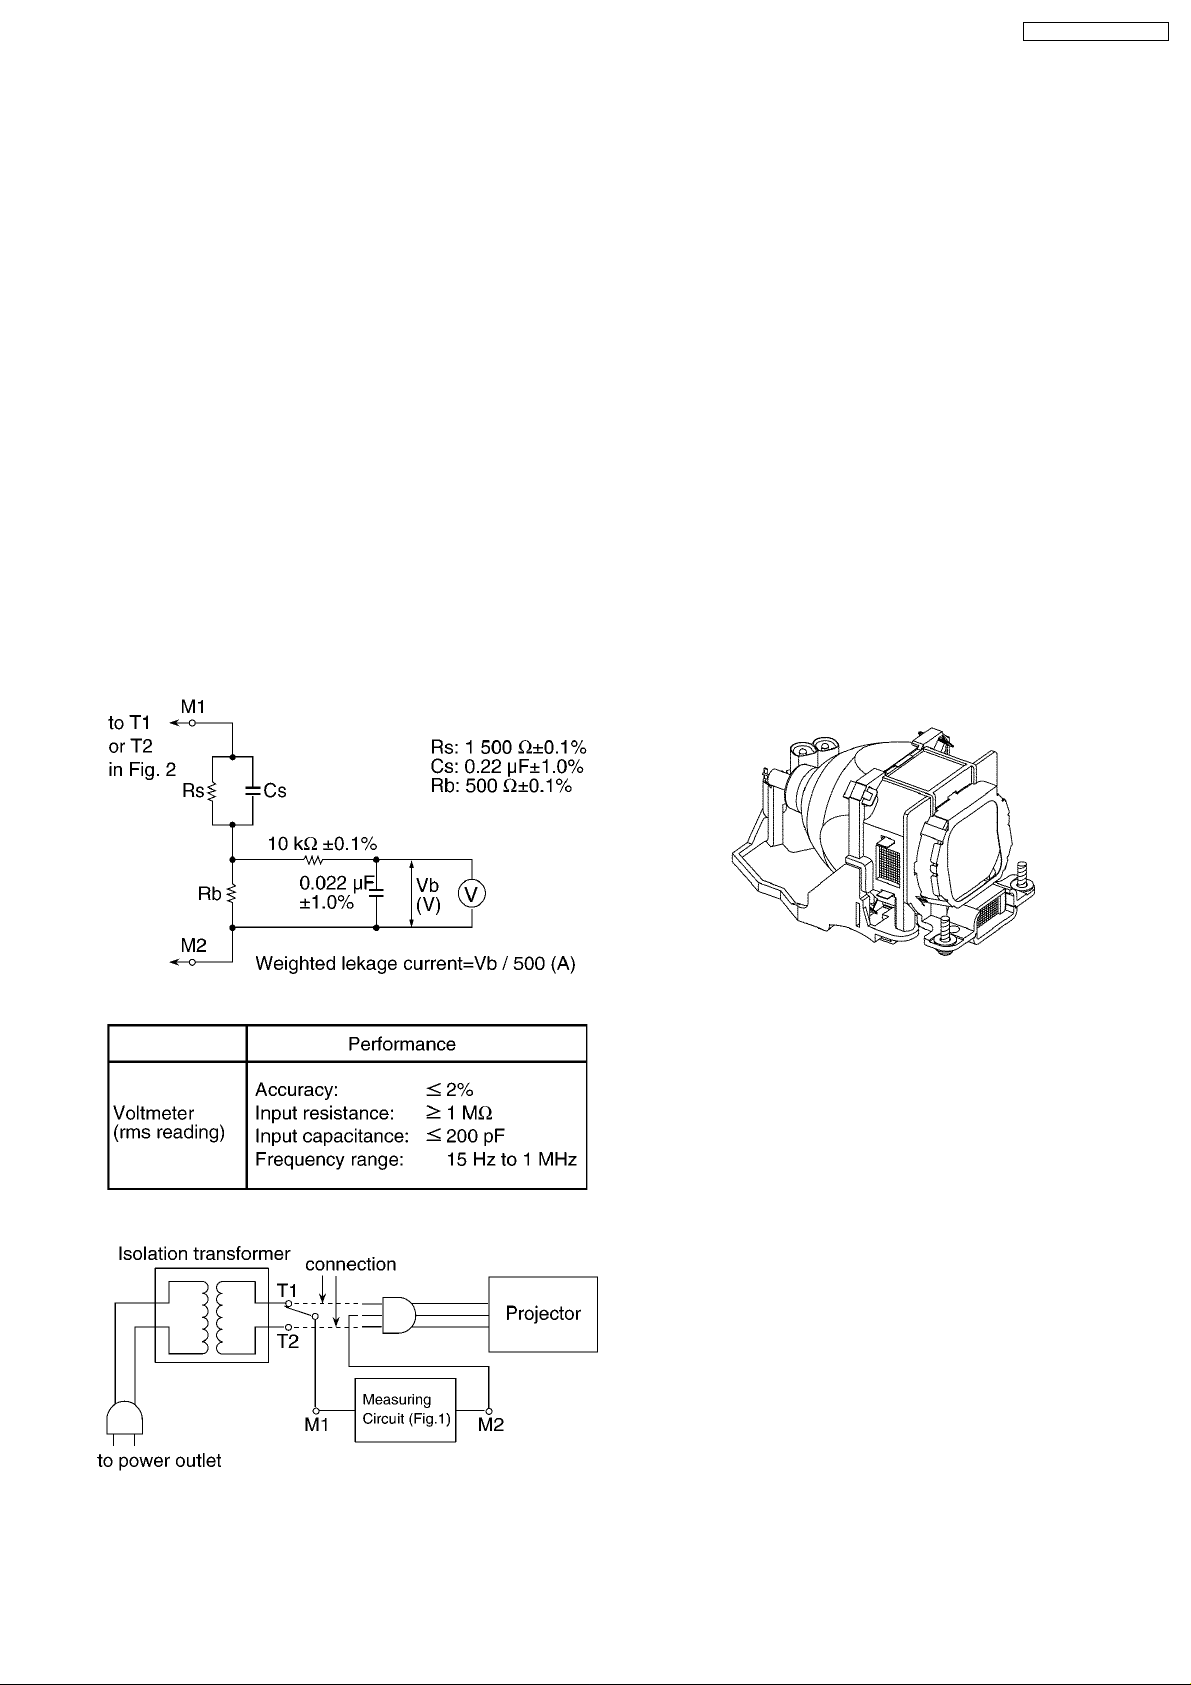
1. Prepare the measuring circuit as shown in Fig.1.
Be sure to use a voltmeter having the performance
described in Table 1.
3. Connect M1 to T1 according to Fig. 2 and measure the
voltage.
4. Change the connection of M1 from T1 to T2 and measure
the voltage again.
5. The voltmeter must read 0.375 V or lower in both of steps
3 and 4. This means that the current must be 0.75 mA or
less.
6. If the reading is out of the above standard, the projector
must be repaired and rechecked before returning to the
customer because of a possibility of an electric shock.
1.3. UV Precaution and UHM Lamp
Precautions
· Be sure to unplug the power cord from the power outlet
when replacing the lamp.
· Because the lamp reaches a very high temperature during
its operation, wait until it cools completely when replacing
the Lamp Unit.
· The lamp emits small amounts of UV-radiation, avoid directeye contact with the light.
· Because the high pressure lamp involves a risk of
explosion, never touch the lamp wire lead during the
service. (See Fig. 3)
Fig. 1
Table 1
Fig. 2
2. Assemble the circuit as shown in Fig. 2. Plug the power
cord in a power outlet.
Fig. 3
5
Page 6
PT-AE700U / PT-AE700E
2 Ext Option
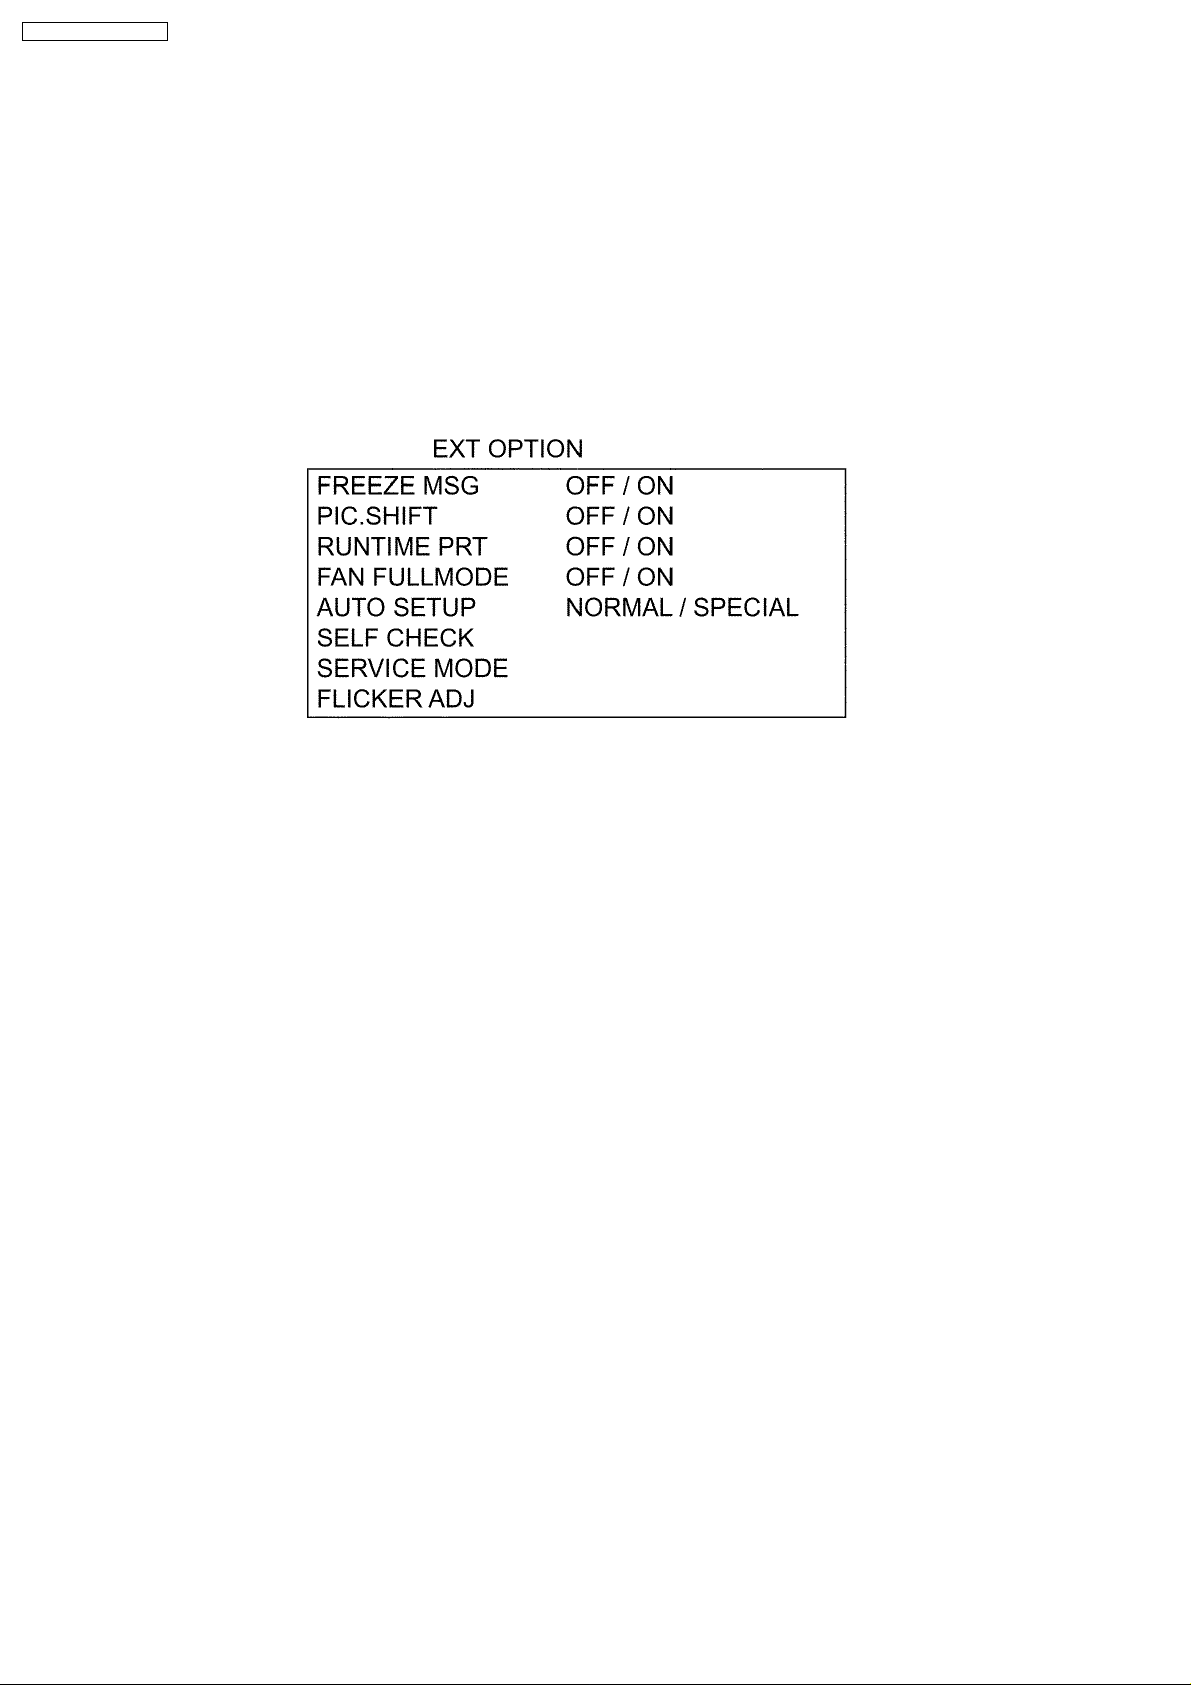
This projector has EXT OPTION in addition to standard on-screen menus.
· There are SELF CHECK, SERVICE MODE and FLICKER ADJ for service, etc.
2.1. Procedure to enter EXT OPTION
1. Press "MENU" button on the main unit or remote control unit to display "MENU" screen, then select "OPTION" and press
"ENTER" button.
2. Select "OSD" on "OPTION" menu and press "ENTER" button 3 seconds or longer.
MENU → OPTION → OSD
2.2. EXT OPTION Menu and Functions
· FREEZE MSG
Switching ON/OFF "FREEZE" on-screen display
· PIC.SHIFT
Switching ON/OFF the antipersistence function
−
− Shifts the picture slightly (by one dot) when every 60 minutes. (one dot shifting three times, one dot shifting three times in
− −
reverse direction, and repeats them alternately.)
· RUNTIME PRT
Switching ON/OFF the shutdown when the operation time for the lamp unit is 2 000 hours or longer
· FAN CONTROL
Setting the cooling fan motor rotation speed
−
− Switching ON "FAN FULLMODE", the rotation level of the fan becomes high-speed rotation (fixed). Moreover, when "FAN
− −
FULLMODE" is ON, changing "FAN CONTROL" in OPTION becomes impossible (setting FAN FULLMODE is given priority
more than FAN CONTROL).
· AUTOSETUP
Setting AUTO SETUP mode
−
− NORMAL: To set the normal mode (the dot clock is adjusted strictly)
− −
−
− SPECIAL: To set the special mode (the dot clock is adjusted roughly)
− −
* Do not change the initial setting (NORMAL).
· SELF CHECK
To enter the self-check mode
· SERVICE MODE
To enter the service mode
· FLICKER ADJ
To enter the flicker adjustment mode
2.3. Canceling EXT OPTION
Press "MENU" button on the main unit or remote control unit.
6
Page 7
3 Self-Check Mode
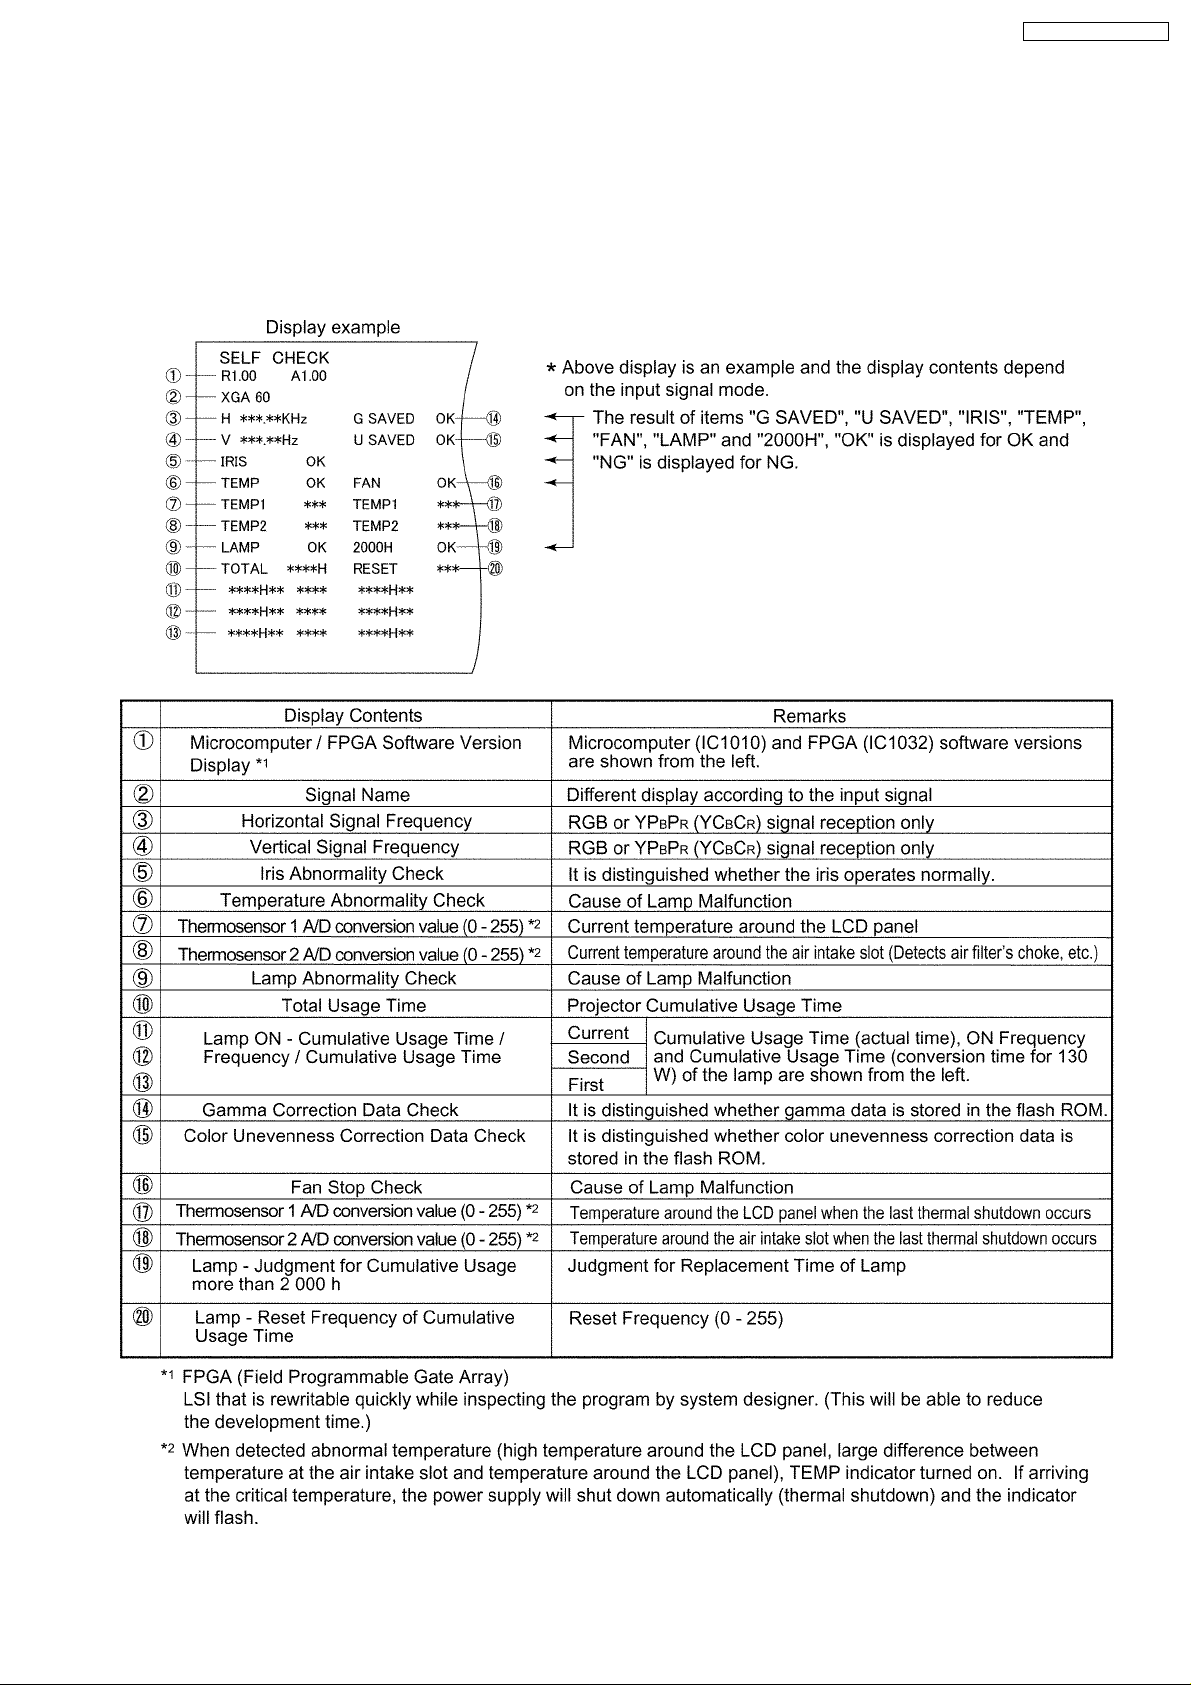
This mode is used to narrow down the location of the failure.
3.1. Procedure to enter the self-check mode
Select "SELF CHECK" on "EXT OPTION" menu and press "ENTER" button on the main unit or remote control unit.
3.2. Self Check Display and Contents
PT-AE700U / PT-AE700E
7
Page 8

PT-AE700U / PT-AE700E
3.3. Canceling the self-check mode
Press "MENU" button on the main unit or remote control unit.
8
Page 9
PT-AE700U / PT-AE700E
4 Service Mode
This mode is used to display seven kinds of test patterns [Horizontal lines, Vertical lines, Dots, Crosshatch, White cross, Black
cross and White (No pattern)] in the four colors (White, Red, Green and Blue).
Note:
· On the service mode, displays above patterns by each color without test equipment such as PC or SG. Use the service
mode for simplified adjustments by your eyes and so on.
4.1. Procedure to enter the service mode
Select "SERVICE MODE" on "EXT OPTION" menu and press "ENTER" button on the main unit or remote control unit.
Note:
· In the service mode, pressing the up-arrow "
left-arrow "
" or right-arrow " " button the color selection (White / Red / Green / Blue).
" or down-arrow " " button allows the test pattern selection and the
4.2. Canceling the service mode
Press "MENU" button on the main unit or remote control unit.
5 Flicker Adjustment Mode
If replacing the optical parts (LCD Panel / LCD block) or A-P.C.Board of this projector, enter the flicker adjustment mode and
minimize the flicker.
5.1. Procedure to enter the adjustment mode
Select "FLICKER ADJ" on "EXT OPTION" menu and press "ENTER" button on the main unit or remote control unit.
Note:
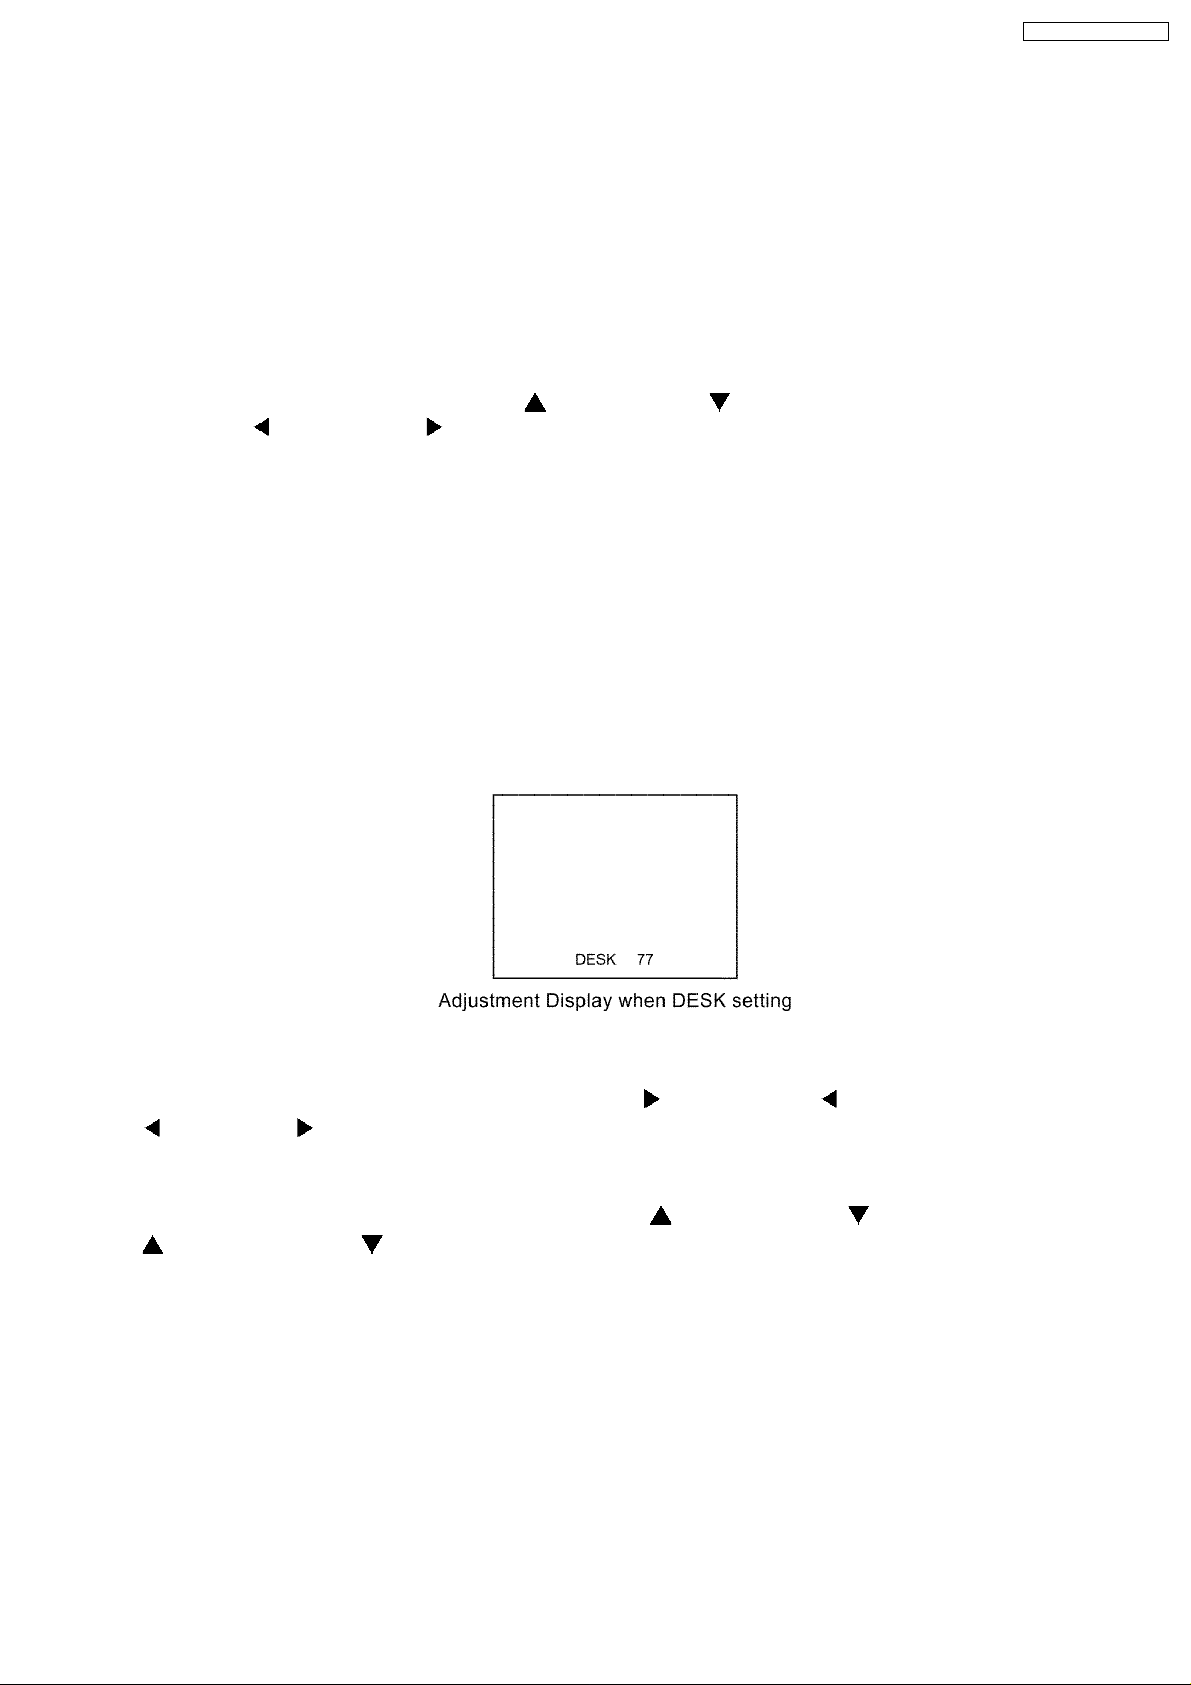
"DESK setting (blue)" is displayed when entering the adjustment mode.
5.2. Adjustment Display and Contents
· Setting value is increased and decreased with the right-arrow " " and left-arrow " " buttons.
"
": Decrease, " ": Increase
−
− Adjust the setting value to minimize the flicker on the screen.
− −
−
− Execute the adjustment by 6 patterns below.
− −
· The pattern (adjustment display) is switched with the up-arrow "
"
": Forward direction, " ": Reverse direction
−
− There are 6 patterns of "DESK setting (blue)", "DESK setting (red)", "DESK setting (green)", "CEILING setting (blue)",
− −
"CEILING setting (red)" and "CEILING setting (green)".
−
− The setting value is saved into this projector when the pattern is switched.
− −
" and down-arrow " " buttons.
5.3. Canceling the flicker adjustment mode
Press "MENU" button on the main unit or remote control unit.
Note:
When "MENU" button is pressed, the setting value at that time is saved into this projector and the adjustment mode is canceled.
9
Page 10
PT-AE700U / PT-AE700E
6 Disassembly Instructions
Warning:
· Be sure to unplug the power cord from the power outlet before disassembling this projector.
Caution:
· While turning over a printed circuit board, be sure to put a insulating material under it to prevent a short circuit.
· Printed circuit boards and wires must not be pulled forcibly, but be handled carefully.
· Connectors also must be handled carefully.
· After repairing this projector, be sure to put back the wires and connectors to the original condition.
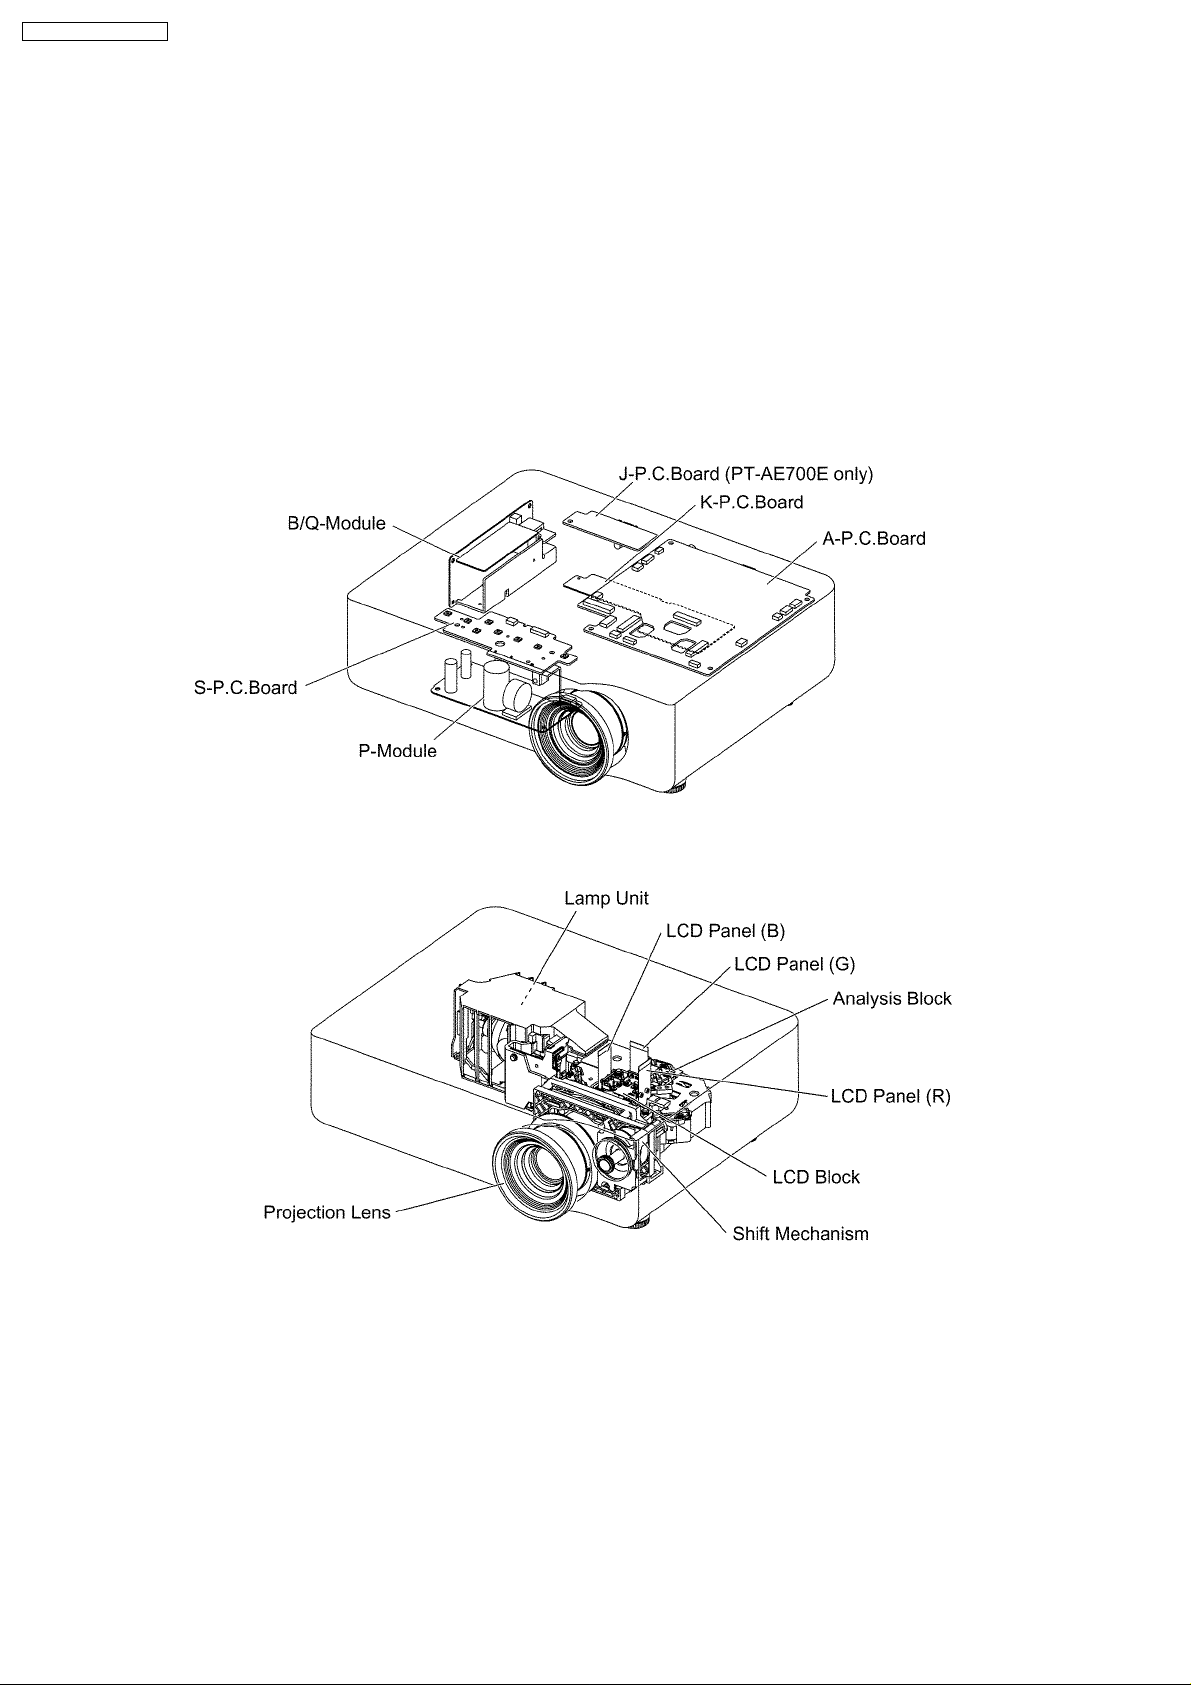
6.1. Printed Circuit Board and Main Parts Location
Electrical Parts
Optical Parts
10
Page 11
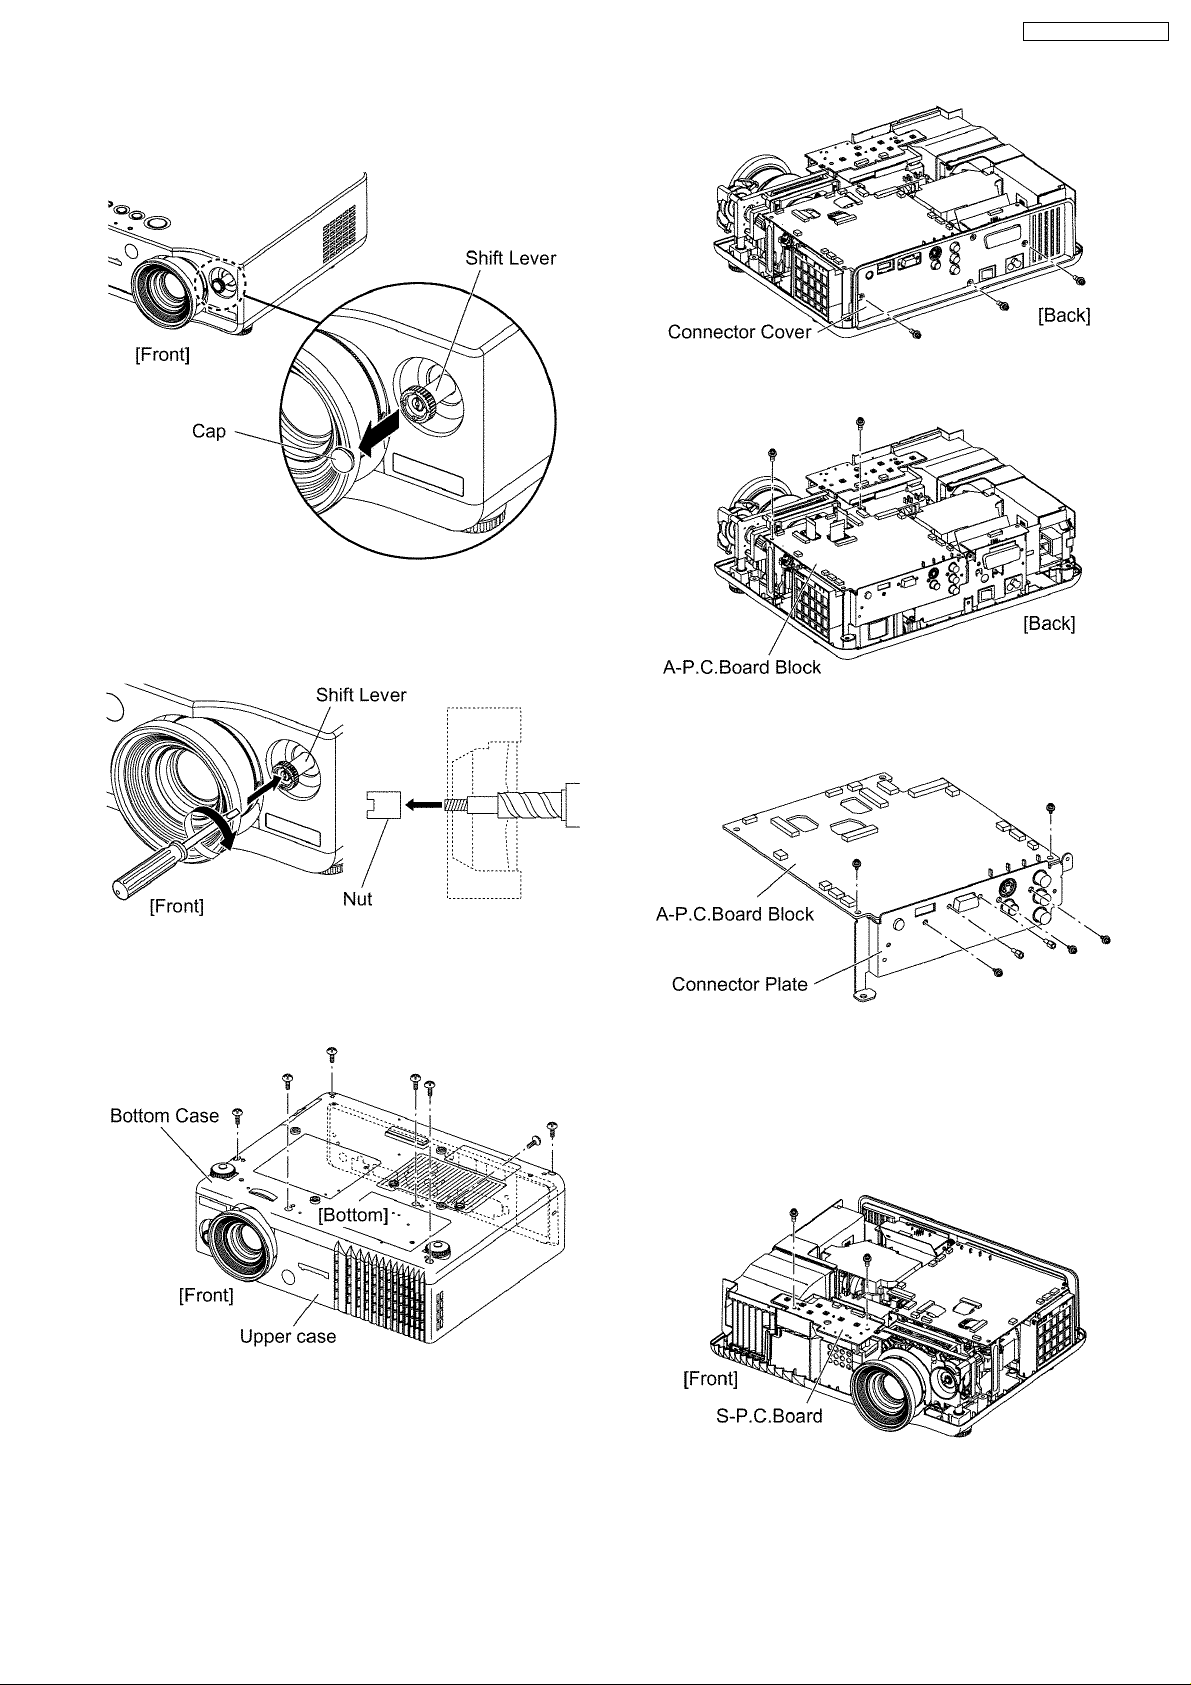
6.2. Removal of Upper Case
1. Remove the cap of the lens shift lever.
2. Unscrew the nut in the shift lever.
Note:
· Turn clockwise the nut to unscrew.
PT-AE700U / PT-AE700E
3. Unscrew the 2 screws and remove the A-P.C.Board block.
3. Turn counterclockwise the shift lever and remove it.
4. Turn the projector upside down.
5. Unscrew the 7 screws.
4. Unscrew the 7 screws and remove the connector plate.
6.4. Removal of S-P.C.Board
1. Remove the upper case according to the section 6.2.
"Removal of Upper Case".
2. Unscrew the 2 screws and remove the S-P.C.Board.
6. Return the projector to the normal position.
7. Remove the upper case.
6.3. Removal of A-P.C.Board
1. Remove the upper case according to the section 6.2.
"Removal of Upper Case".
2. Unscrew the 3 screws and remove the connector cover.
6.5. Removal of J-P.C.Board (PTAE700E only)
1. Remove the upper case according to the section 6.2.
11
Page 12
PT-AE700U / PT-AE700E
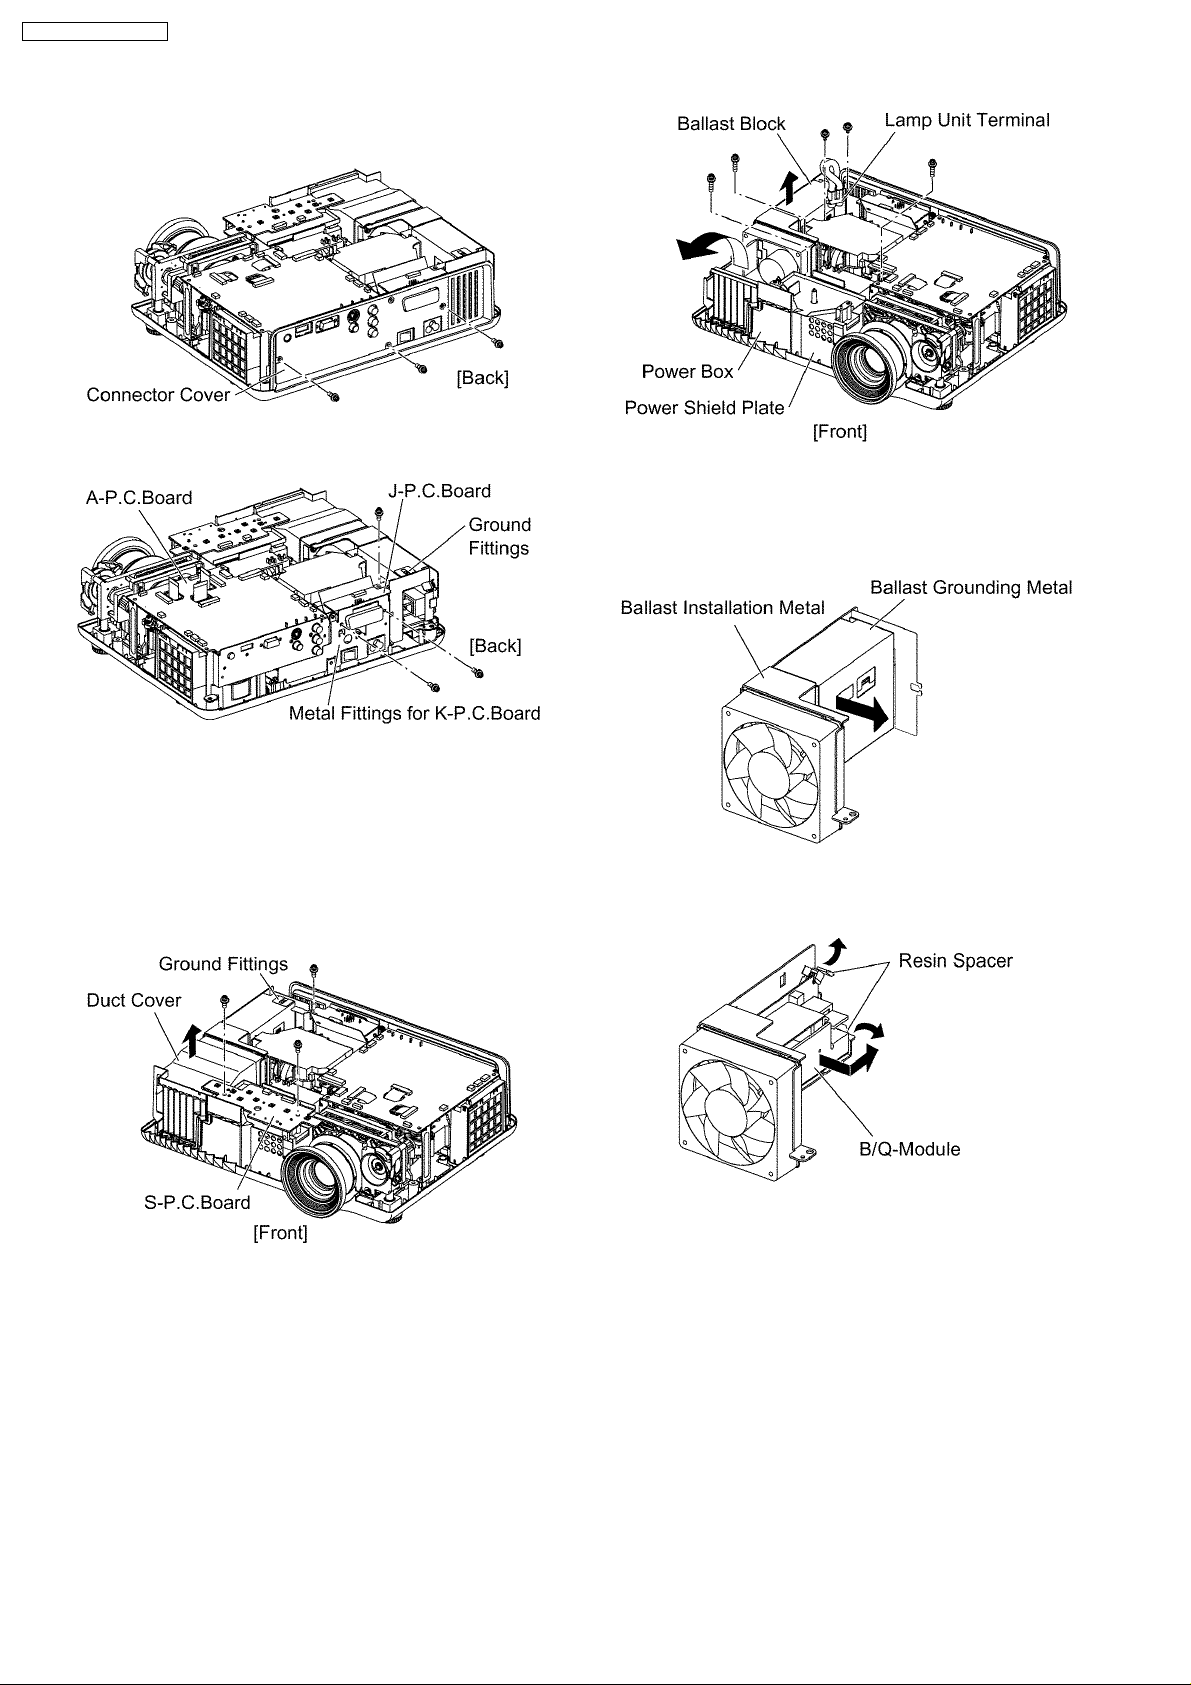
"Removal of Upper Case".
2. Unscrew the 3 screws and remove the connector cover.
3. Unscrew the 3 screws and remove the J-P.C.Board.
8. Disconnect the connector P2 and remove the ballast block.
9. While sliding the ballast grounding metal, unhook the hook
section and remove it.
6.6. Removal of B/Q-Module
1. Remove the upper case according to the section 6.2.
"Removal of Upper Case".
2. Unscrew the 2 screws and remove the S-P.C.Board.
3. Unhook the hook section and remove the duct cover.
4. Unscrew the 1 screw and remove the ground fittings.
5. Unscrew the 1 screw and release the ballast block.
6. Unscrew the 2 screws and remove the power box with
power shield plate.
7. Unscrew the 2 screws and release the lamp unit terminal.
10. Unhook the hook section of resin spacer and remove the
B/Q-Module.
6.7. Removal of P-Module
1. Remove the power box according to the steps 1 through 5
in the section 6.6. "Removal of B/Q-Module".
2. Unscrew the 2 screws and remove the P-Module.
12
Page 13
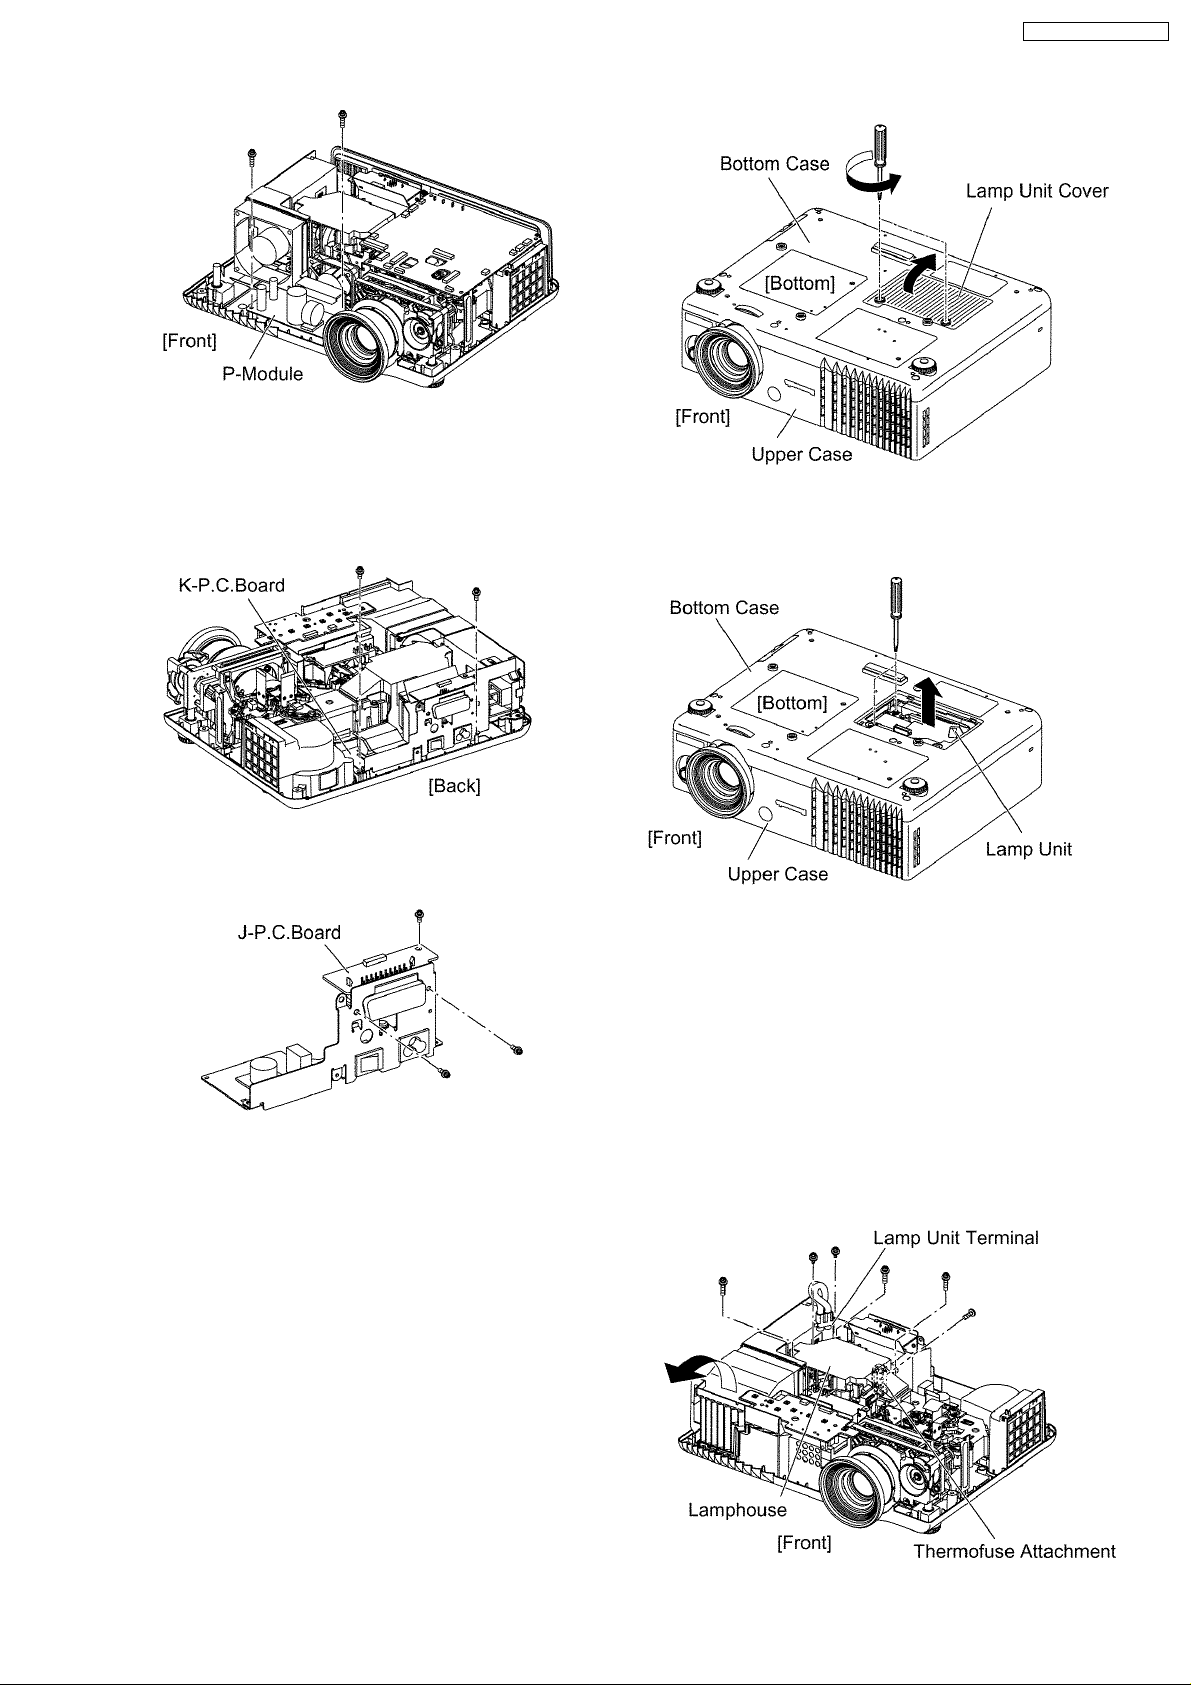
6.8. Removal of K-P.C.Board
1. Remove the A-P.C.Board block according to the steps 1
through 3 in the section 6.3. "Removal of A-P.C.Board".
2. Unscrew the 2 screws and remove the K-P.C.Board block.
PT-AE700U / PT-AE700E
3. Unscrew the 2 screws fixing the lamp unit and remove the
lamp unit.
3. For PT-AE700E, unscrew the 2 screws and remove the JP.C.Board.
6.9. Removal of Lamp Unit
1. Turn the projector upside down.
2. Loosen the 2 screws until they idle and remove the lamp
unit cover.
6.10. Removal of Analysis Block
and Projection Lens
1. Remove the lamp unit according to the section 6.9.
"Removal of Lamp Unit".
2. Remove the A-P.C.Board block according to the steps 1
through 3 in the section 6.3. "Removal of A-P.C.Board".
3. Unscrew the 2 screws and release the lamp unit terminal.
4. Unscrew the 1 screw and remove the thermofuse
attachment.
5. Unscrew the 3 screws and remove the lamphouse.
13
Page 14
PT-AE700U / PT-AE700E
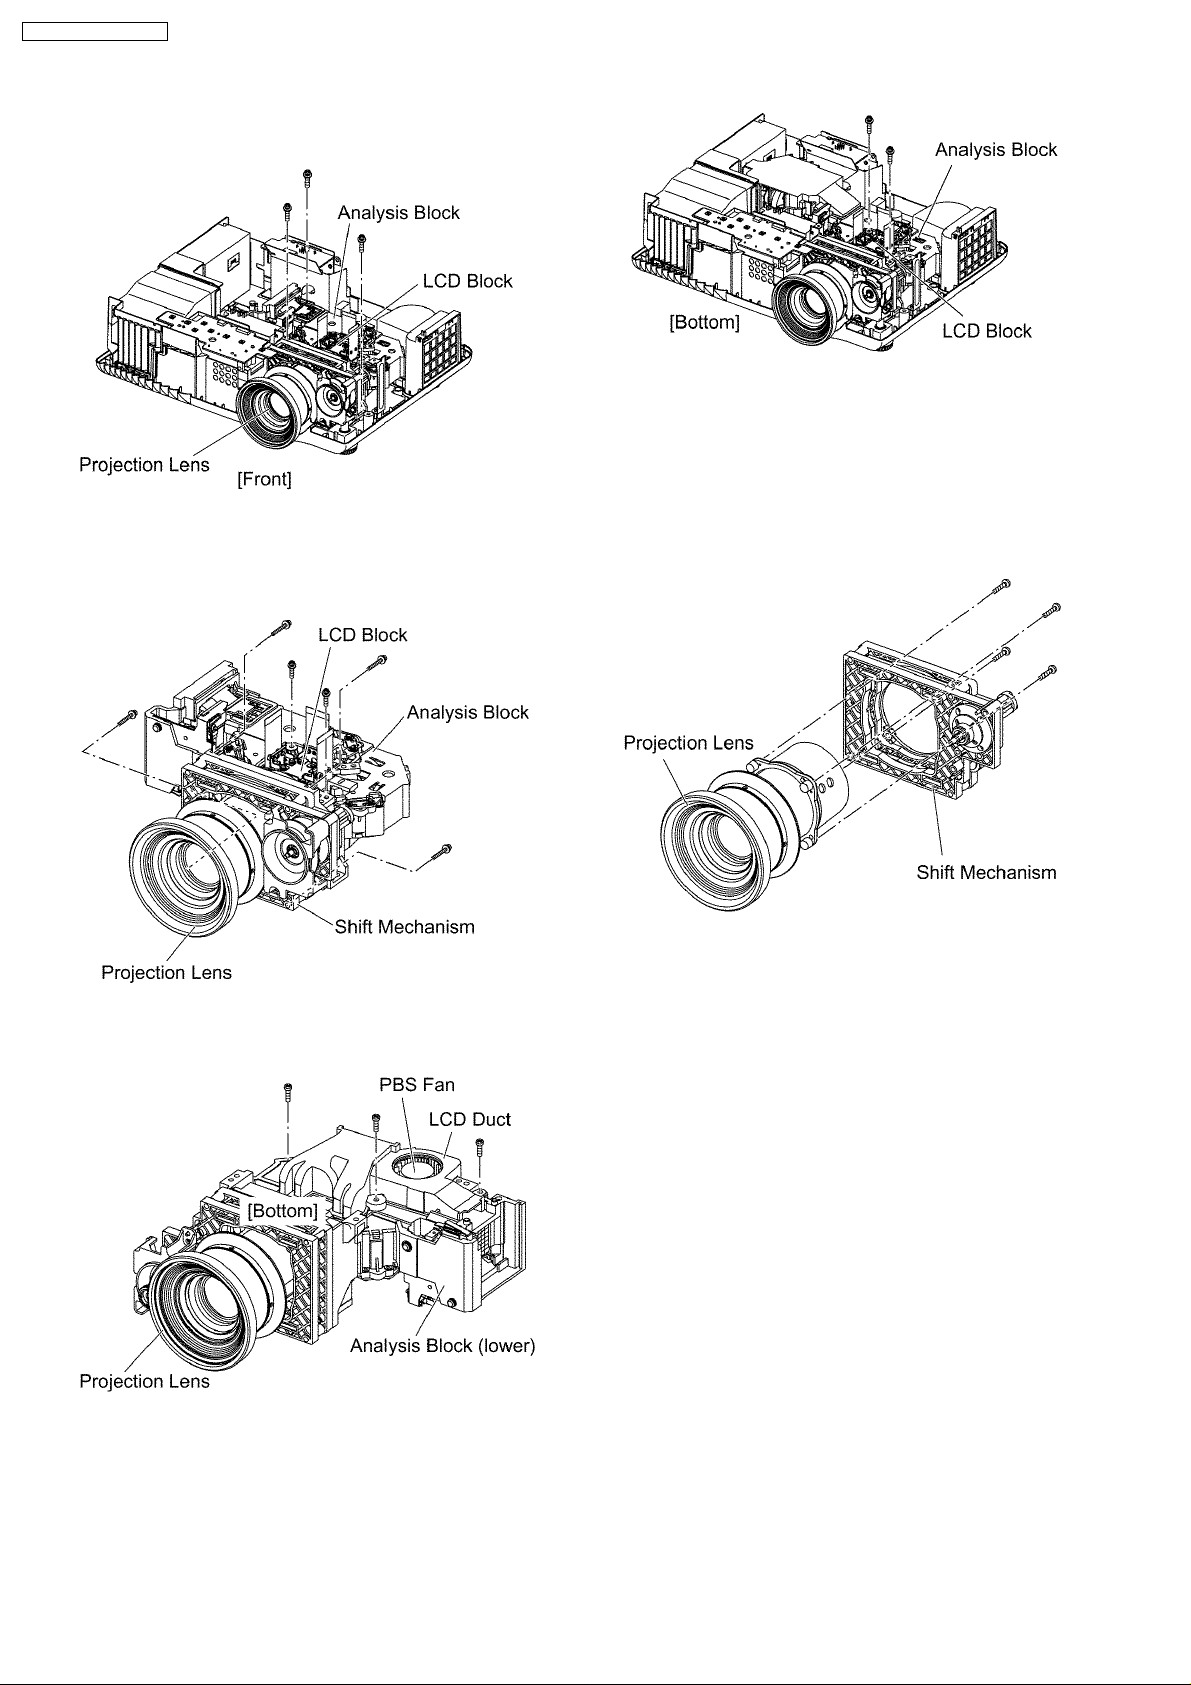
6. Unscrew the 3 screws and remove the block of Analysis
Block, LCD Block and Projection Lens Block.
7. Unscrew the 2 screws and remove the LCD block.
8. Unscrew the 4 screws and remove the projection lens block
(with shift mechanism).
6.12. Removal of Projection Lens
1. Remove the projection lens block according to the steps 1
through 8 in the section 6.10. "Removal of Analysis Block
and Projection Lens".
2. Unscrew the 4 screws and separate the projection lens and
the shift mechanism.
9. Unscrew the 3 screws and remove the LCD duct and PBS
fan.
6.11. Removal of LCD Block
1. Remove the A-P.C.Board block according to the steps 1
through 3 in the section 6.3. "Removal of A-P.C.Board".
2. Unscrew the 2 screws and remove the LCD block.
6.13. Replacement of LCD Panel
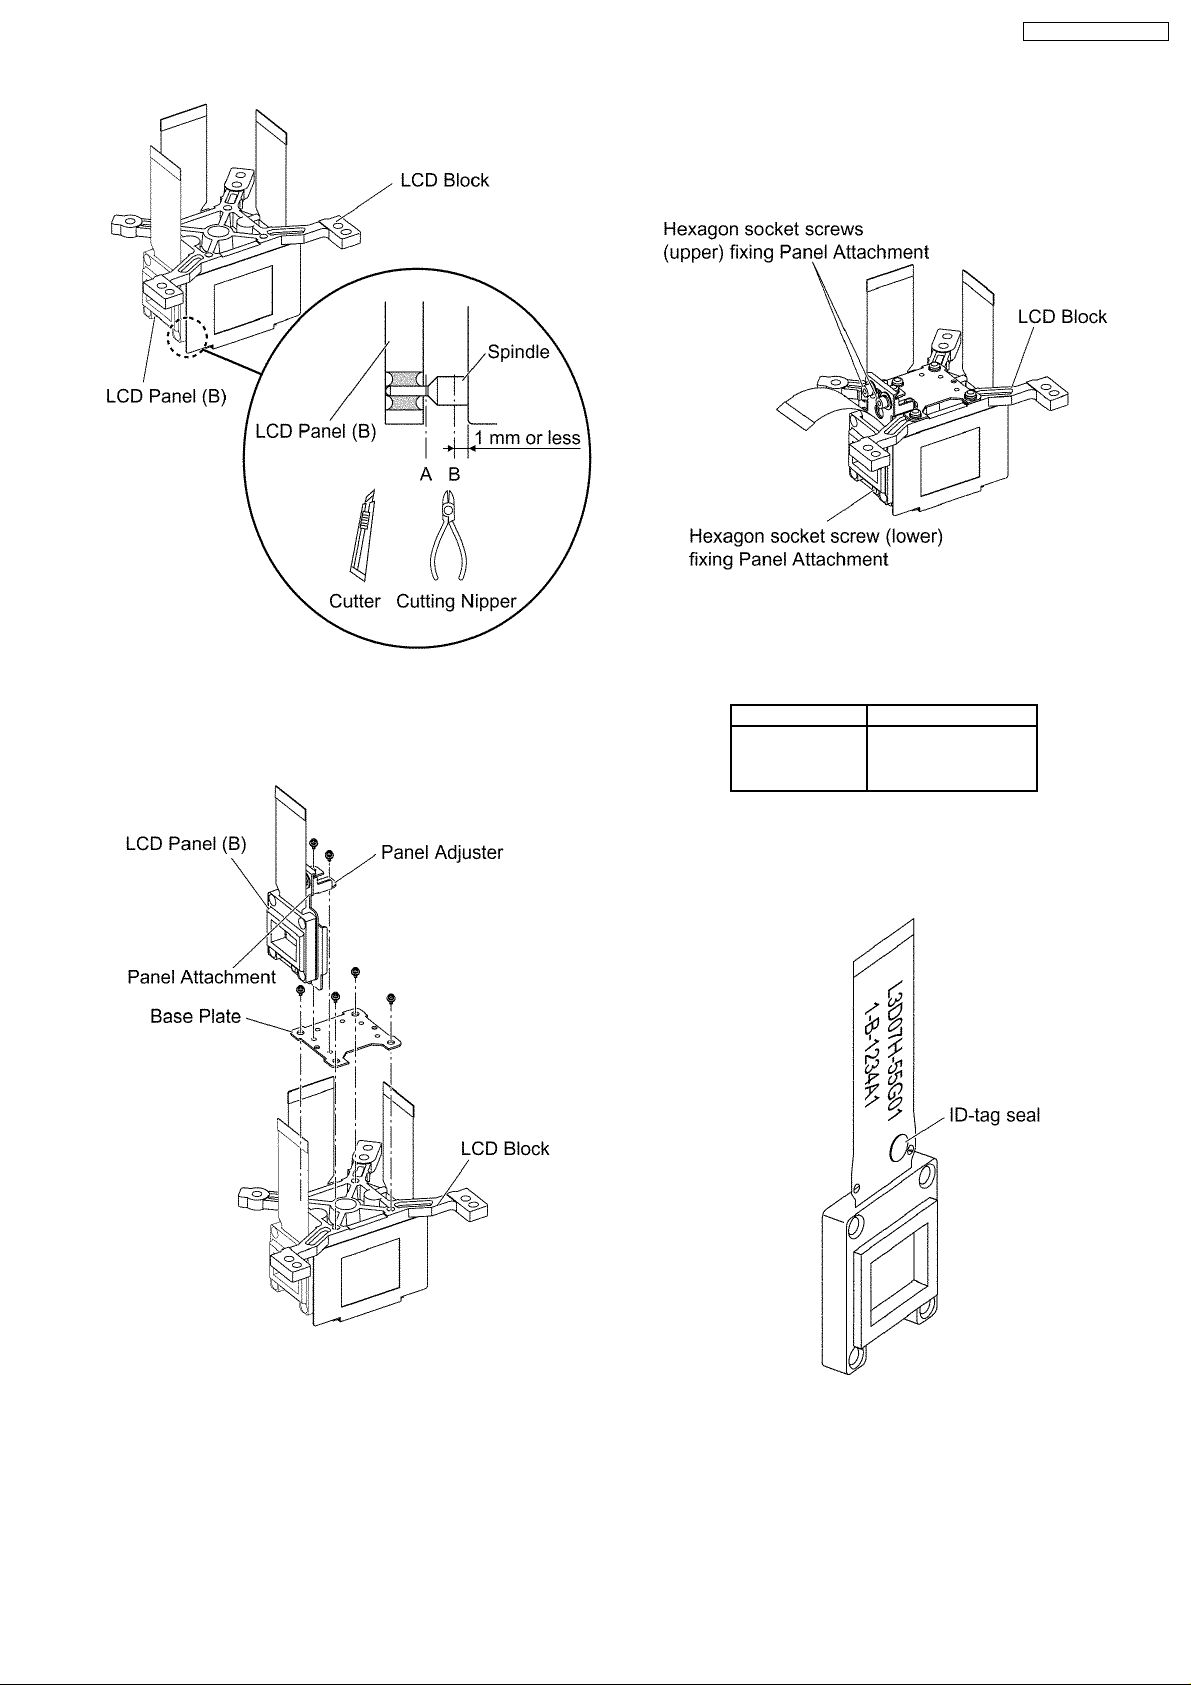
· The procedure is described as an example of LCD panel
(B).
1. Remove the LCD block according to the section 6.11.
"Removal of LCD Block".
2. Cut the 4 LCD panel installation spindles at the position A
and remove the LCD panel.
3. Cut the 4 LCD panel installation spindles at the position B
and remove them.
Notes:
· Work carefully not to apply external force around the
spindle part by using a cutter, cutting nipper or the
like for cutting the spindle.
· Adjust the height after the spindle is cut to 1 mm or
less.
14
Page 15
PT-AE700U / PT-AE700E
Note:
· Prepare a hexagon head wrench processed short.
9. Remove the LCD block again.
10. Tighten the 3 screws fixing the panel attachment.
11. Adhere the shading sheet as it was.
12. Reassemble the projector as it was.
4. Attach the base plate with 4 screws.
5. Tighten the 2 screws temporarily just until new LCD panel
(with the panel attachment and panel adjuster) can be
shifted by your fingers.
6.14. LCD Panel Discrimination
ID-tag seal color LCD panel
Red LCD panel (R)
Blue LCD panel (B)
(No seal) LCD panel (G)
· Since the ID-tag seal is pasted to the FPC of LCD Panl, (R),
(G) or (B) can be easily identified by the color of the seal.
· Finally, identify the panel color by the part number printed
on the FPC.
6. Reassemble the projector in the reverse order of
disassembling, but leave the upper case and the screws
fixing the A-P.C.Board block as they are removed.
7. Adjust the convergence according to the section 7.4.
"Convergence Adjustment".
8. After the adjustment, while paying attention not to vary the
adjusting result, tighten the 2 screws (upper) fixing the
panel attachment temporarily with a hexagon head wrench.
6.15. LCD Panel Combination
· Part number is printed on the FPC of LCD Panel.
· When replacing LCD Panel, use a component which has
the same part number as the original.
15
Page 16
PT-AE700U / PT-AE700E
LCD
panel
R L5BDAXQ00188
G L5BDAXQ00192
B L5BDAXQ00190
Combination 1 Combination 2
(L3D07H-55G01)
(L3D07H-56G01)
(L3D07H-55G01)
L5BDAXQ00191
(L3D07H-56G01)
L5BDAXQ00189
(L3D07H-55G01)
L5BDAXQ00193
(L3D07H-56G01)
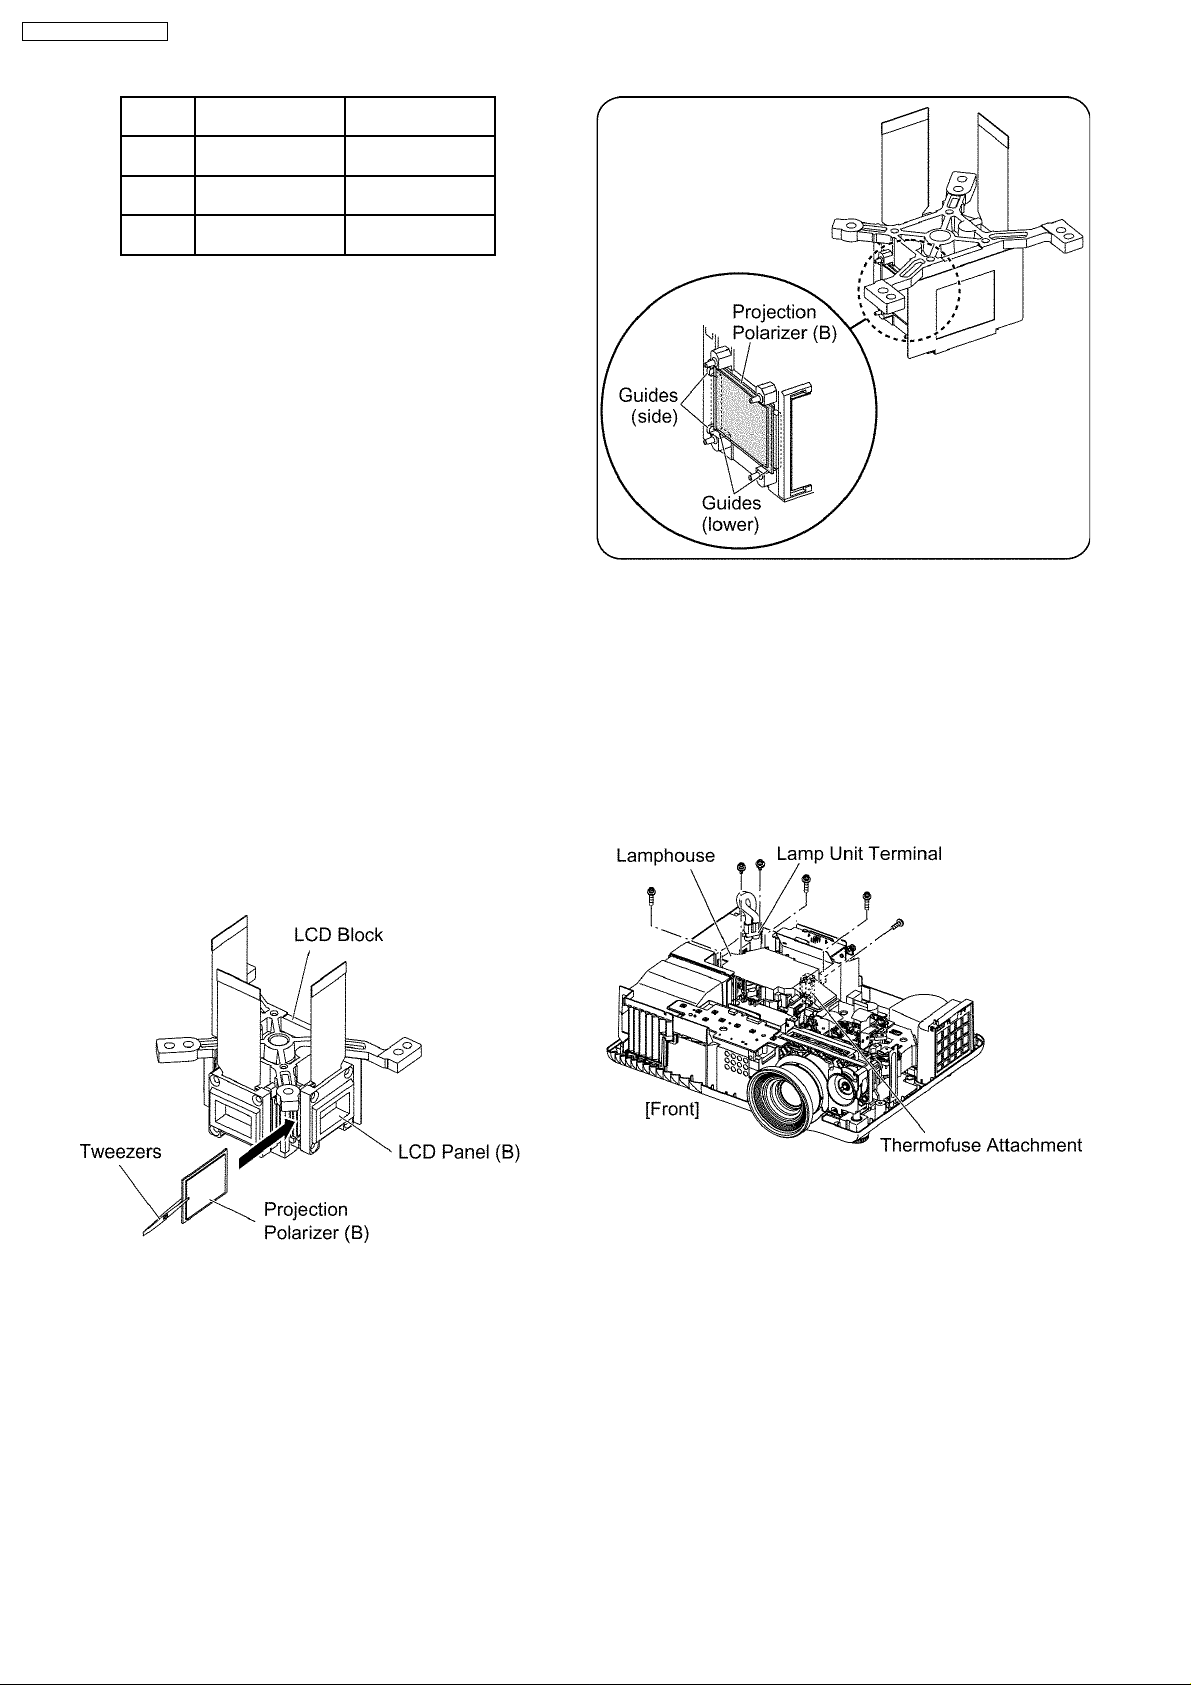
6.16. Replacement of Projection
Polarizer
1. Remove the LCD block according to the section 6.11.
"Removal of LCD Block".
2. Remove the projection polarizer which requires replacing.
(The projection polarizer is adhered with the adhesive
tape.)
Note:
· Be careful not to damage peripheral components
(prism, LCD panel, etc.).
· Use tweezers.
3. Install new projection polarizer.
a. Put adhesive tape on the projection polarizer.
b. Adhere the projection polarizer onthe specified position.
Notes:
· Align the projection polarizer with the guides
(lower, side) of LCD block.
· Be careful not to touch the surface of projection
polarizer.
· Use tweezers.
c. Press the adhesive part and secure the projection
polarizer.
6.17. Replacement of Incidence
Polarizer (R and B)
1. Remove the A-P.C.Board block according to the steps 1
through 3 in the section 6.3. "Removal of A-P.C.Board".
2. Unscrew the 2 screws and release the lamp unit terminal.
3. Unscrew the 1 screw and remove the thermofuse
attachment.
4. Unscrew the 3 screws and remove the lamphouse.
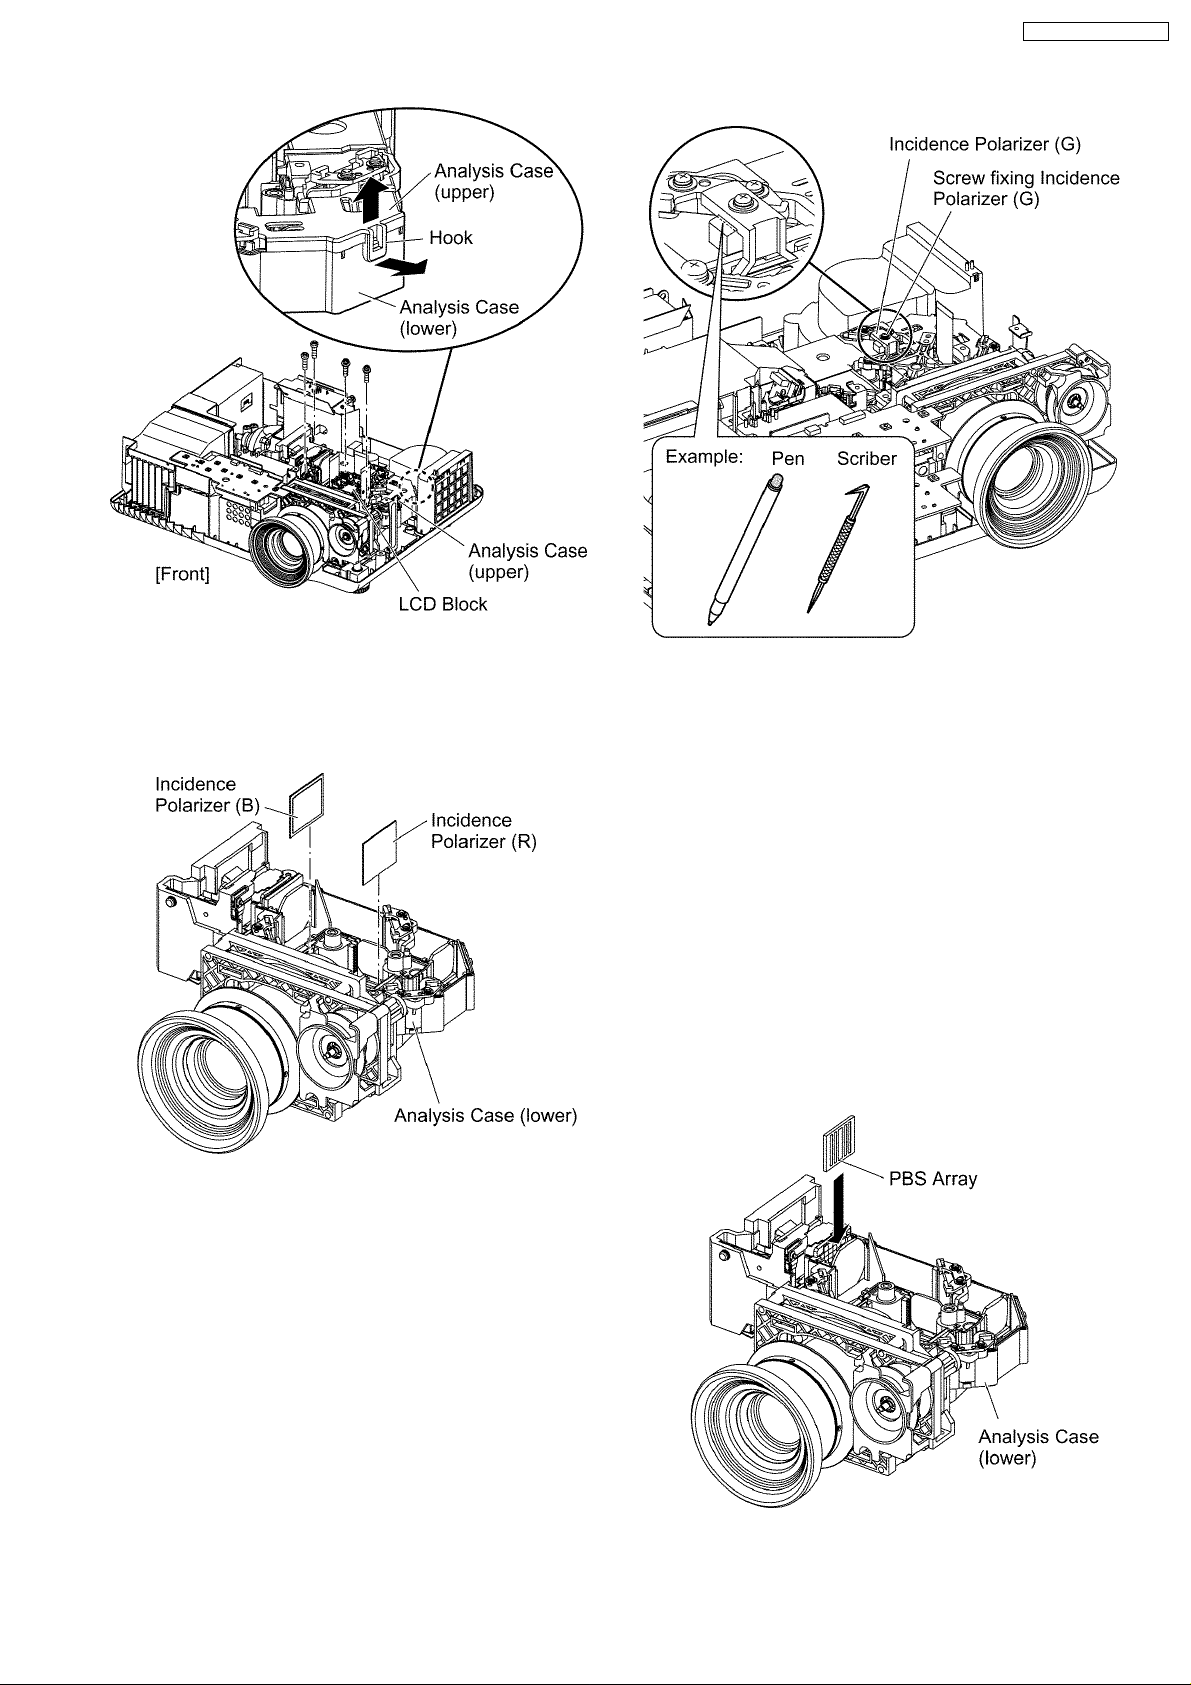
5. Unscrew the 2 screws and remove the LCD block.
6. Unscrew the 2 screws and remove the analysis case
(upper) while expanding the hook of it outside.
Notes:
· Because the hook is damaged easily, be careful not
to expand it excessively.
· The incidence polarizer (G) is installed in the
analysis case (upper). Handle it with care.
16
Page 17
PT-AE700U / PT-AE700E
7. Replace the incidence polarizer.
Note:
· Be careful not to touch the surface of incidence
polarizer.
6.18. Replacement of Incidence
Polarizer (G)
6.19. Replacement of PBS Array
(Analysis Block)
1. Remove the analysis case (upper) according to the steps 1
through 6 in the section 6.17. "Replacement of Incidence
Polarizer (R and B)".
Note:
· Because the hook is damaged easily, be careful not
to expand it excessively.
2. Remove the PBS array .
3. Install new PBS array.
Notes:
· Be careful not to mistake the direction (inside and
outside).
· Be careful not to touch the surface of PBS array.
1. Remove the A-P.C.Board block according to the steps 1
through 3 in the section 6.3. "Removal of A-P.C.Board".
2. Mark positions of the incidence polarizer (G).
Note:
· Mark accurately as possible because the marks will
be used for resetting the incidence polarizer
position.
3. Unscrew the 1 screw and remove the incidence polarizer.
4. Attach a new incidence polarizer and align it with the mark.
5. Tighten the 1 screw polarizer with care not to move the
incidence polarizer position.
17
Page 18
PT-AE700U / PT-AE700E
6.20. Removal of Iris Unit
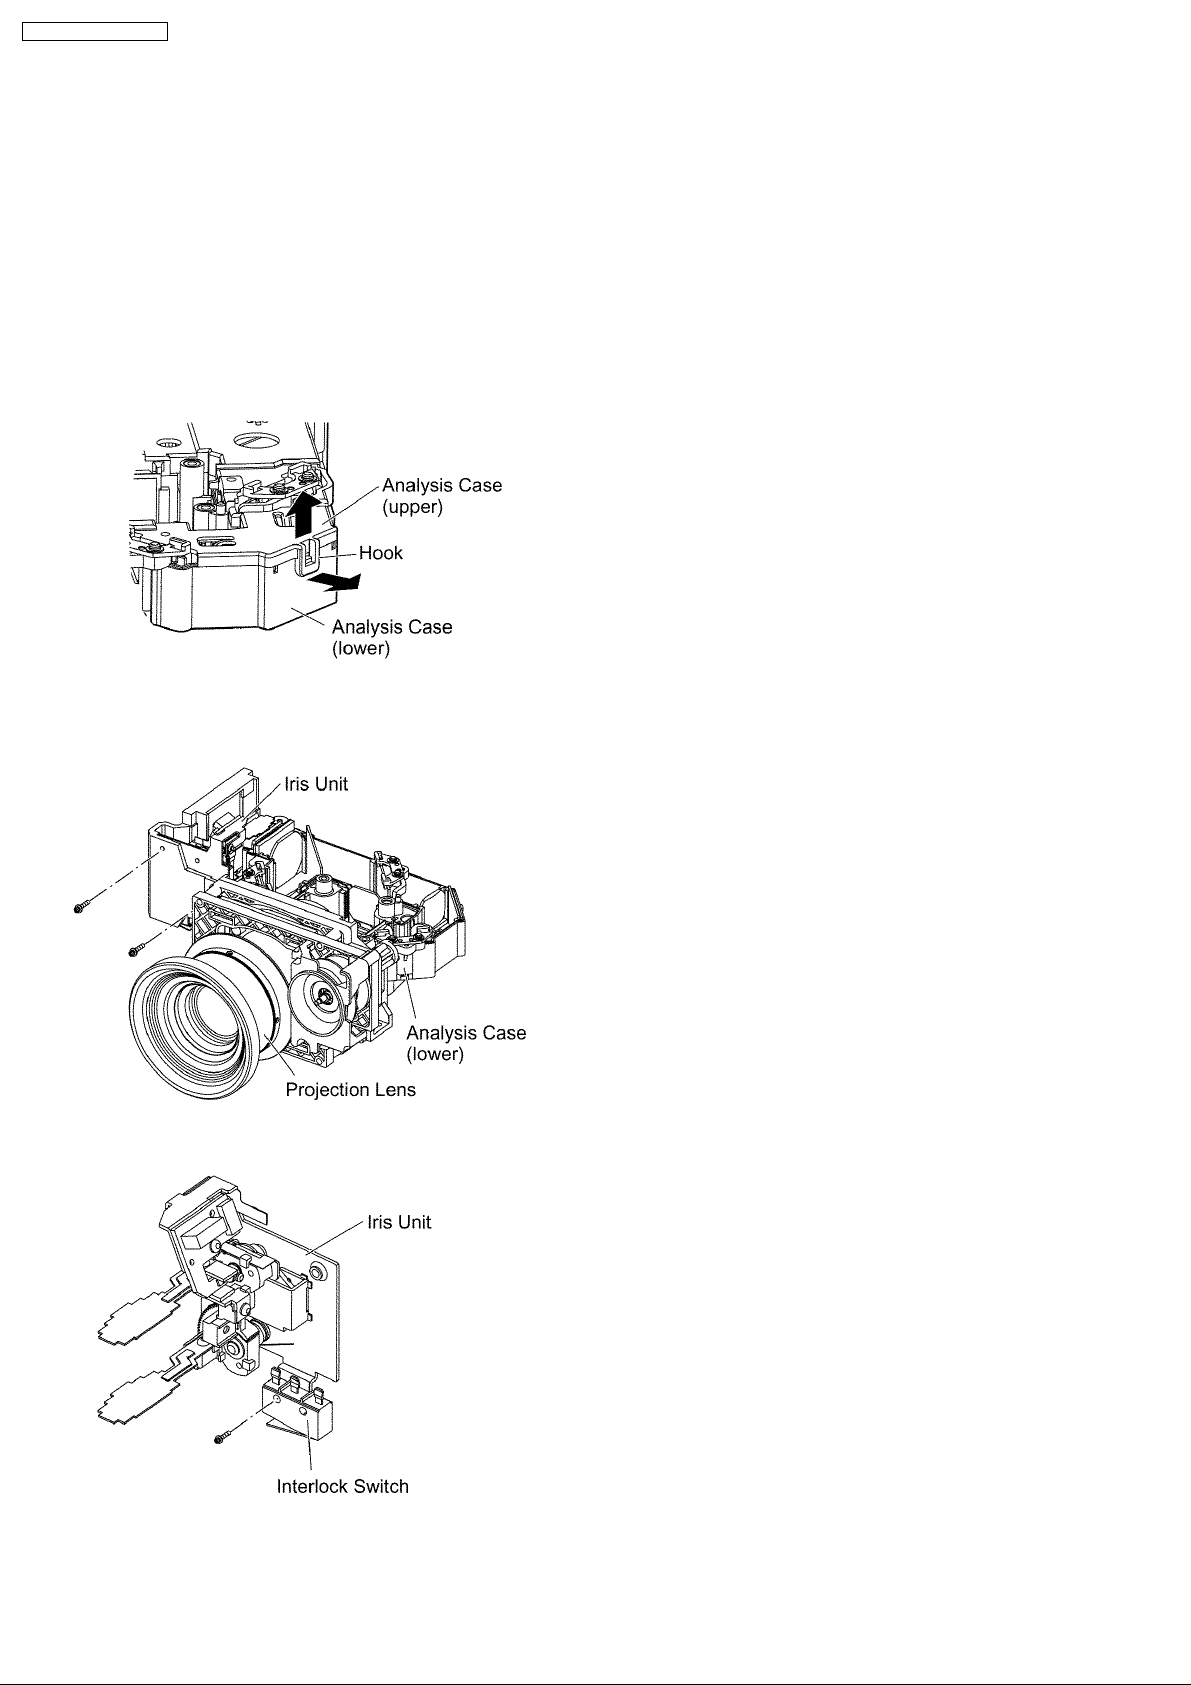
1. Remove the analysis Block according tothe steps 1 through
7 in the section 6.10. "Removal of Analysis Block and
Projection Lens".
2. Unscrew the 2 screws and remove the analysis case
(upper) while expanding the hook of it outside.
Notes:
· Because the hook is damaged easily, be careful not
to expand it excessively.
· The incidence polarizer (G) is installed in the
analysis case (upper). Handle it with care.
3. Unscrew the 2 screwsand remove the iris unit with interlock
switch.
4. Unscrew the 1 screw and remove the interlock switch.
18
Page 19
7 Measurement and Adjustments
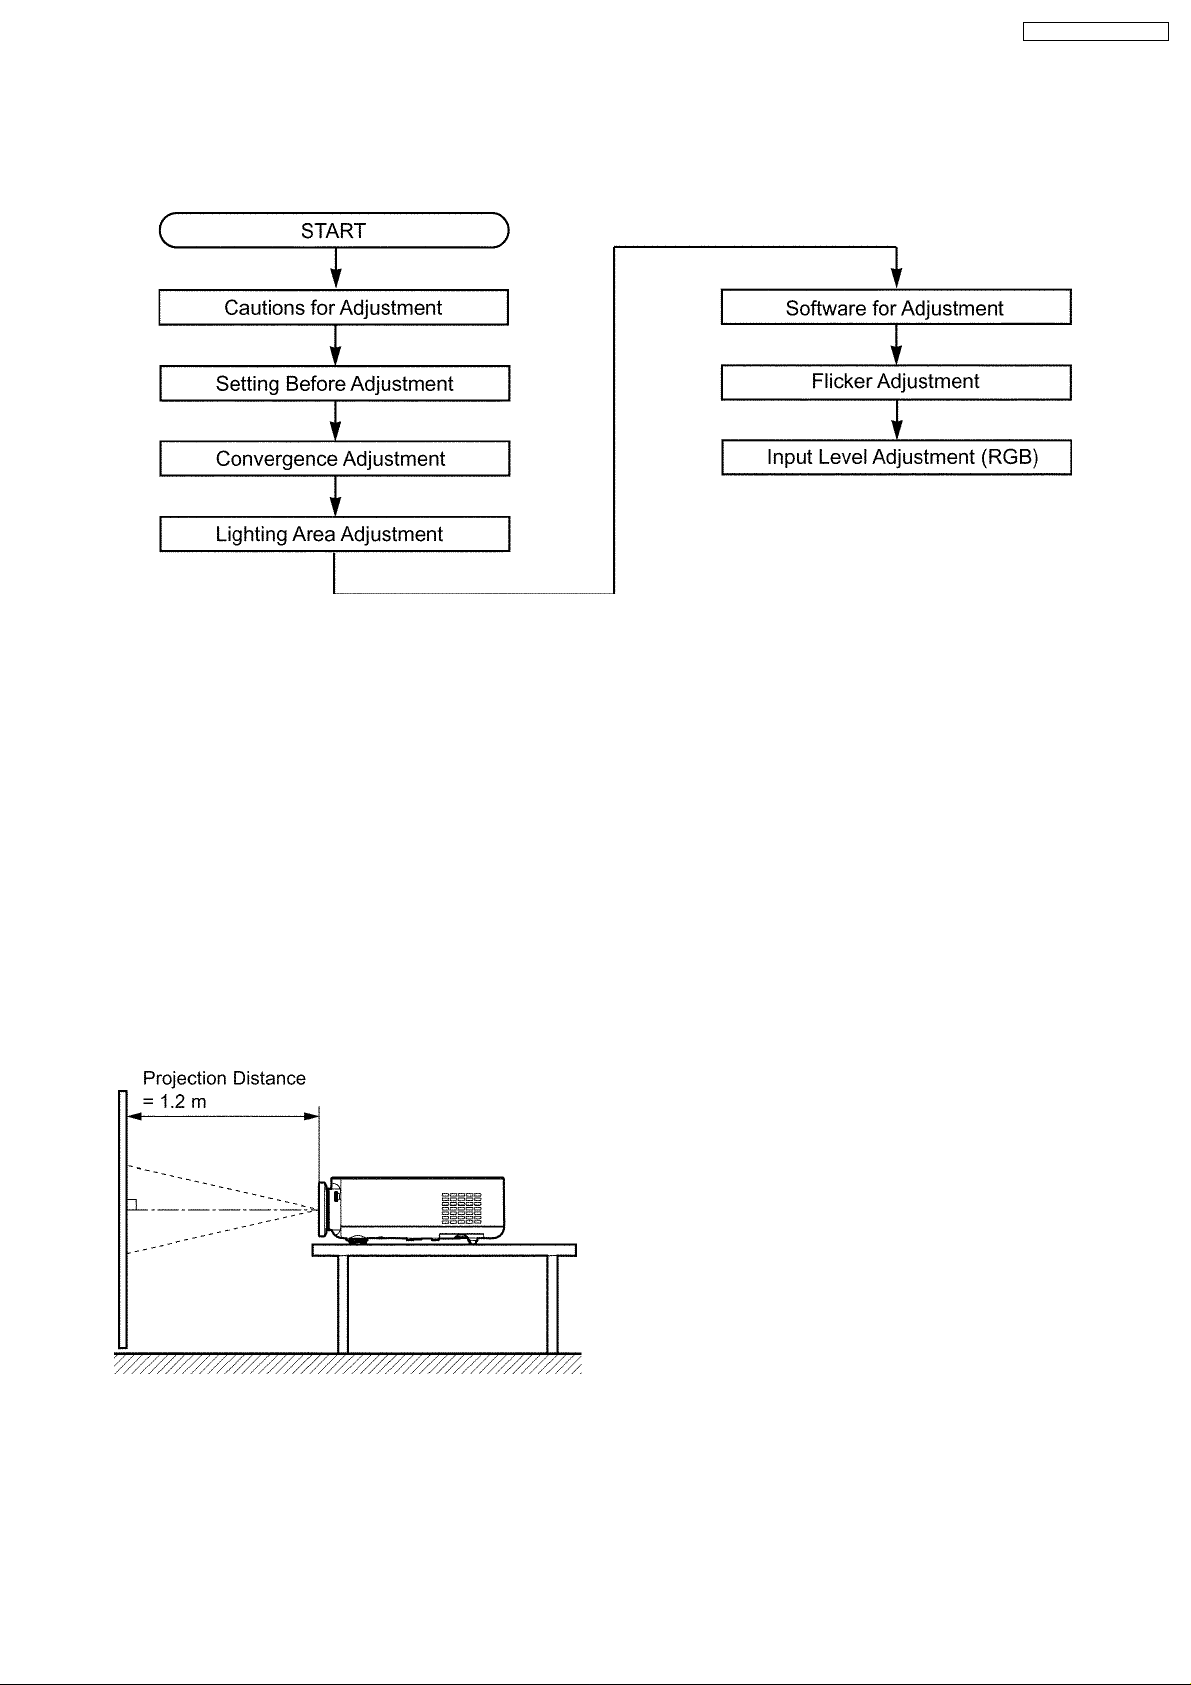
7.1. Adjustment Procedure Flowchart
PT-AE700U / PT-AE700E
7.2. Cautions for Adjustment
· Never turn off the MAIN POWER switch until every fan
completely stops.
· To maintain and ensure safety, always use the
designated components for replacement parts.
· If removing any clamps, lead wires or connectors,
always place them back in their proper locations.
· Be careful not to damage the lead wires or components
when using a soldering iron or similar tool.
7.3. Setting Before Adjustment
· Set up the projector to obtain the projection distance below.
· Turn the zoom ring of the projector to obtain the largest size
of the picture.
7.4. Convergence Adjustment
extension flexible cables and 3 connector extension cables.
Note:
· Consult your dealer or Authorized Service Center for the
service kit.
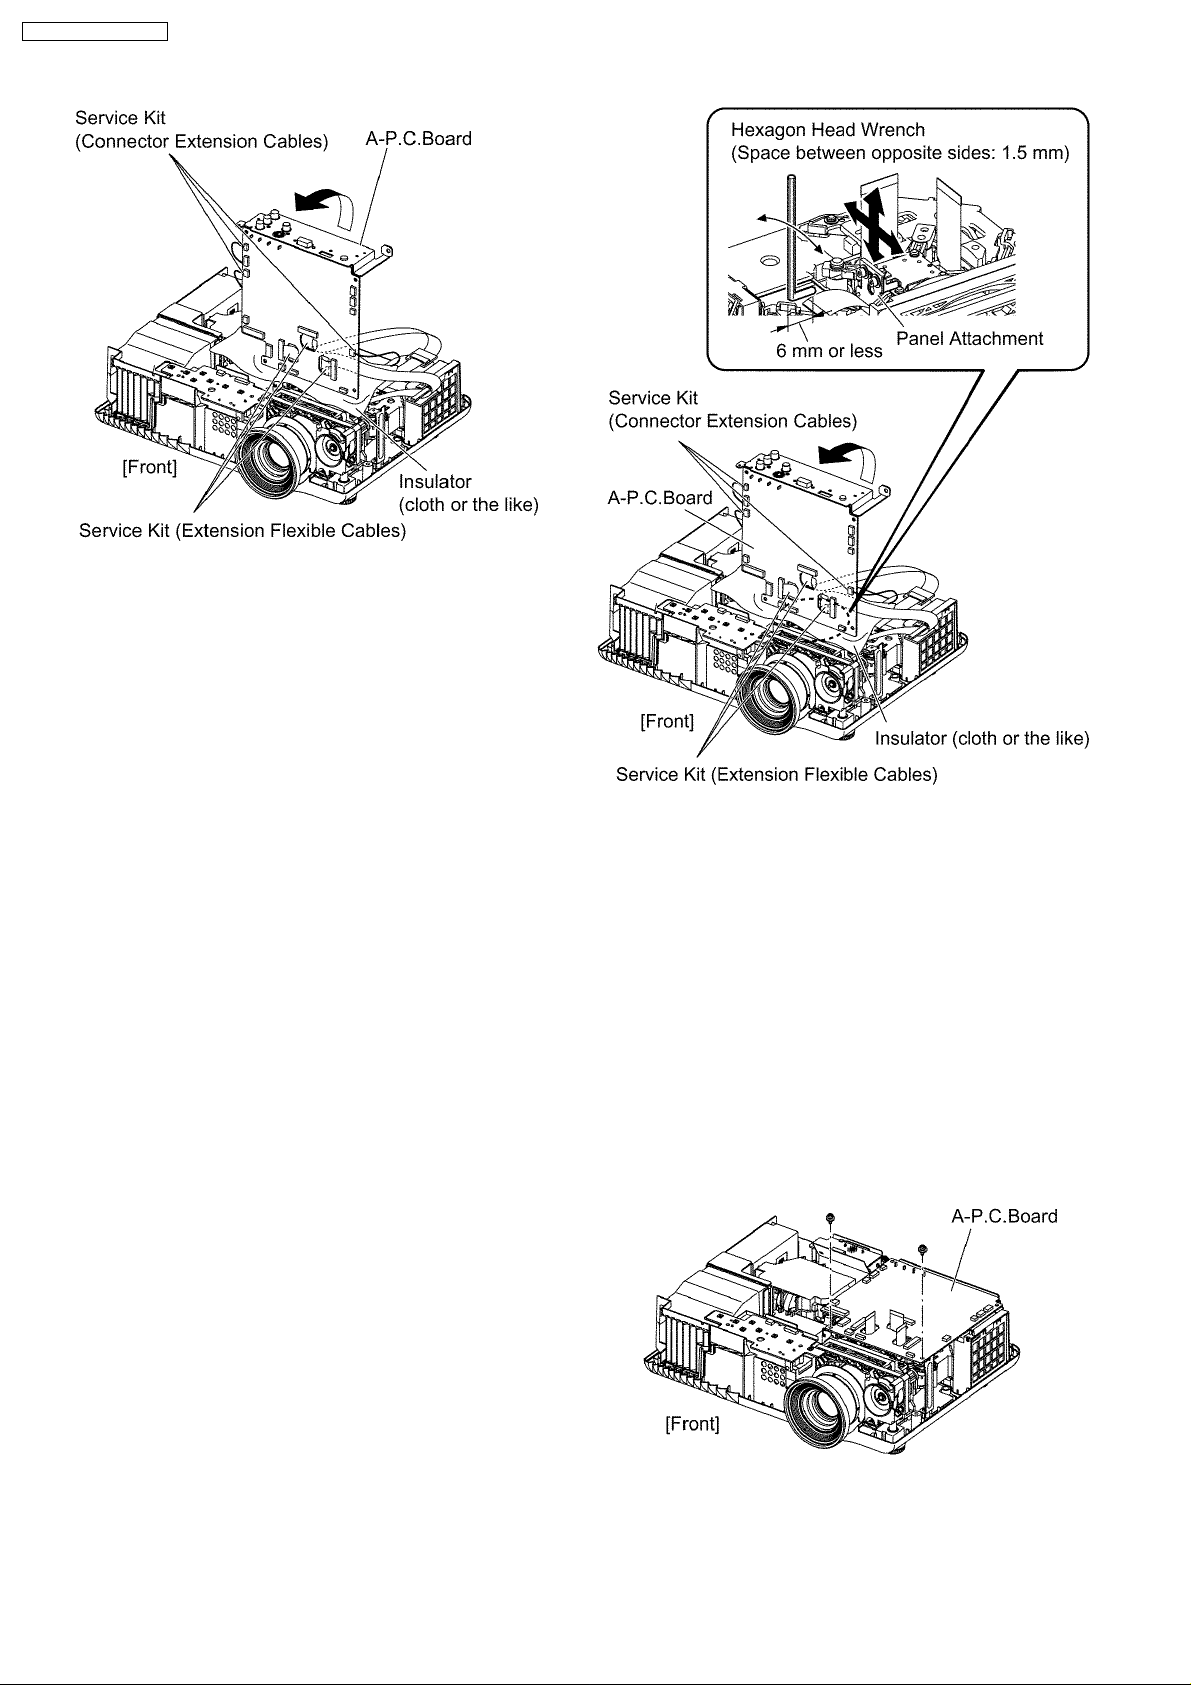
7.4.2. Preparation
1. Loosen 2 screws fixing the panel adjuster and 3 screws
fixing the panel attachment, then tighten the 5 screws
temporarily just until the LCD panel can be shifted by your
fingers.
Note:
· See figures in the section 6.13. "Replacement of
LCD Panel" for 2 screws fixing the panel adjuster
and 3 screws fixing the panel attachment.
2. Reassemble the projector in the reverse order of
disassembling, but leave the upper case and the screws
fixing the A-P.C.Board block as they are removed.
3. Connect the service kit (extension cables).
· Each flexible cable of LCD Panels (R/G/B) - Connectors
(A1/A2/A3) on A-P.C.Board
· Ballast block [Connector (Q3) on Q-Module] - Connector
(A4) on A-P.C.Board
· Intake fan connector - Connector (A15) on A-P.C.Board
· PBS fan connector - Connector (A18) on A-P.C.Board
4. Covering with an insulator (cloth or the like) to prevent a
short circuit, set the A-P.C.Board block on the main unit.
Note:
· Handle with care not to apply external force to
connecting parts which connect the main unit and AP.C.Board.
Execute this adjustment when replacing the LCD panel.
7.4.1. Tools to be used
Service Kit (Part No. TZSH07017): This kit is composed of 3
19
Page 20
PT-AE700U / PT-AE700E
7.4.3. Adjustment Procedure
Prepare 2 pieces of thick black paper (23 mm × 100 mm) that
can be shaded.
· Cover and shade LCD panels with the paper except the
panel for adjustment.
7.4.3.1. When replacing single LCD panel
(R,GorB)
· The procedure is described as an example when LCD panel
(B) is replaced.
1. Display the green crosshatch pattern and adjust the lens
focus.
2. Display green and blue crosshatch patterns.
3. Adjust focus by shifting the panel adjuster for LCD panel (B)
back and forth, then tighten the 2 screws.
4. Adjust the LCD panel (B) position so that the vertical center
of blue crosshatch pattern is overlapped with the vertical
center of green crosshatch pattern.
5. Adjust the LCD panel (B) position so that the horizontal
center of blue crosshatch pattern is overlapped with the
horizontal center of green crosshatch pattern.
6. Correct the tilt of the blue crosshatch pattern by adjusting
the LCD panel (B) position.
7. Display green, red and blue crosshatch patterns and
confirm the convergence. If it is necessary, fine adjust the
convergence so that the red and/or blue crosshatch pattern
is overlapped with green one.
8. After the adjustment, reassemble the projector according to
the section 6.13. "Replacement of LCD Panel".
7.5. Lighting Area Adjustment
7.5.1. Tools to be used
Service Kit (Part No. TZSH07017): This kit is composed of 3
extension flexible cables and 3 connector extension cables.
Note:
· Consult your dealer or Authorized Service Center for the
service kit.
7.5.2. Preparation
1. Remove the upper case and the connector cover according
to the steps 1 through 2 in the section 6.3. "Removal of AP.C.Board".
2. Unscrew the 2 screws.
3. Connect the service kit (extension cables).
· Each flexible cable of LCD Panels (R/G/B) - Connectors
(A1/A2/A3) on A-P.C.Board
20
Page 21
PT-AE700U / PT-AE700E
· Ballast block [Connector (Q3) on Q-Module] - Connector
(A4) on A-P.C.Board
· Intake fan connector - Connector (A15) on A-P.C.Board
· PBS fan connector - Connector (A18) on A-P.C.Board
4. Covering with an insulator (cloth or the like) to prevent a
short circuit, set the A-P.C.Board block on the main unit.
Note:
· Handle with care not to apply external force to
connecting parts which connect the main unit and AP.C.Board.
7.5.3. Adjustment Procedure
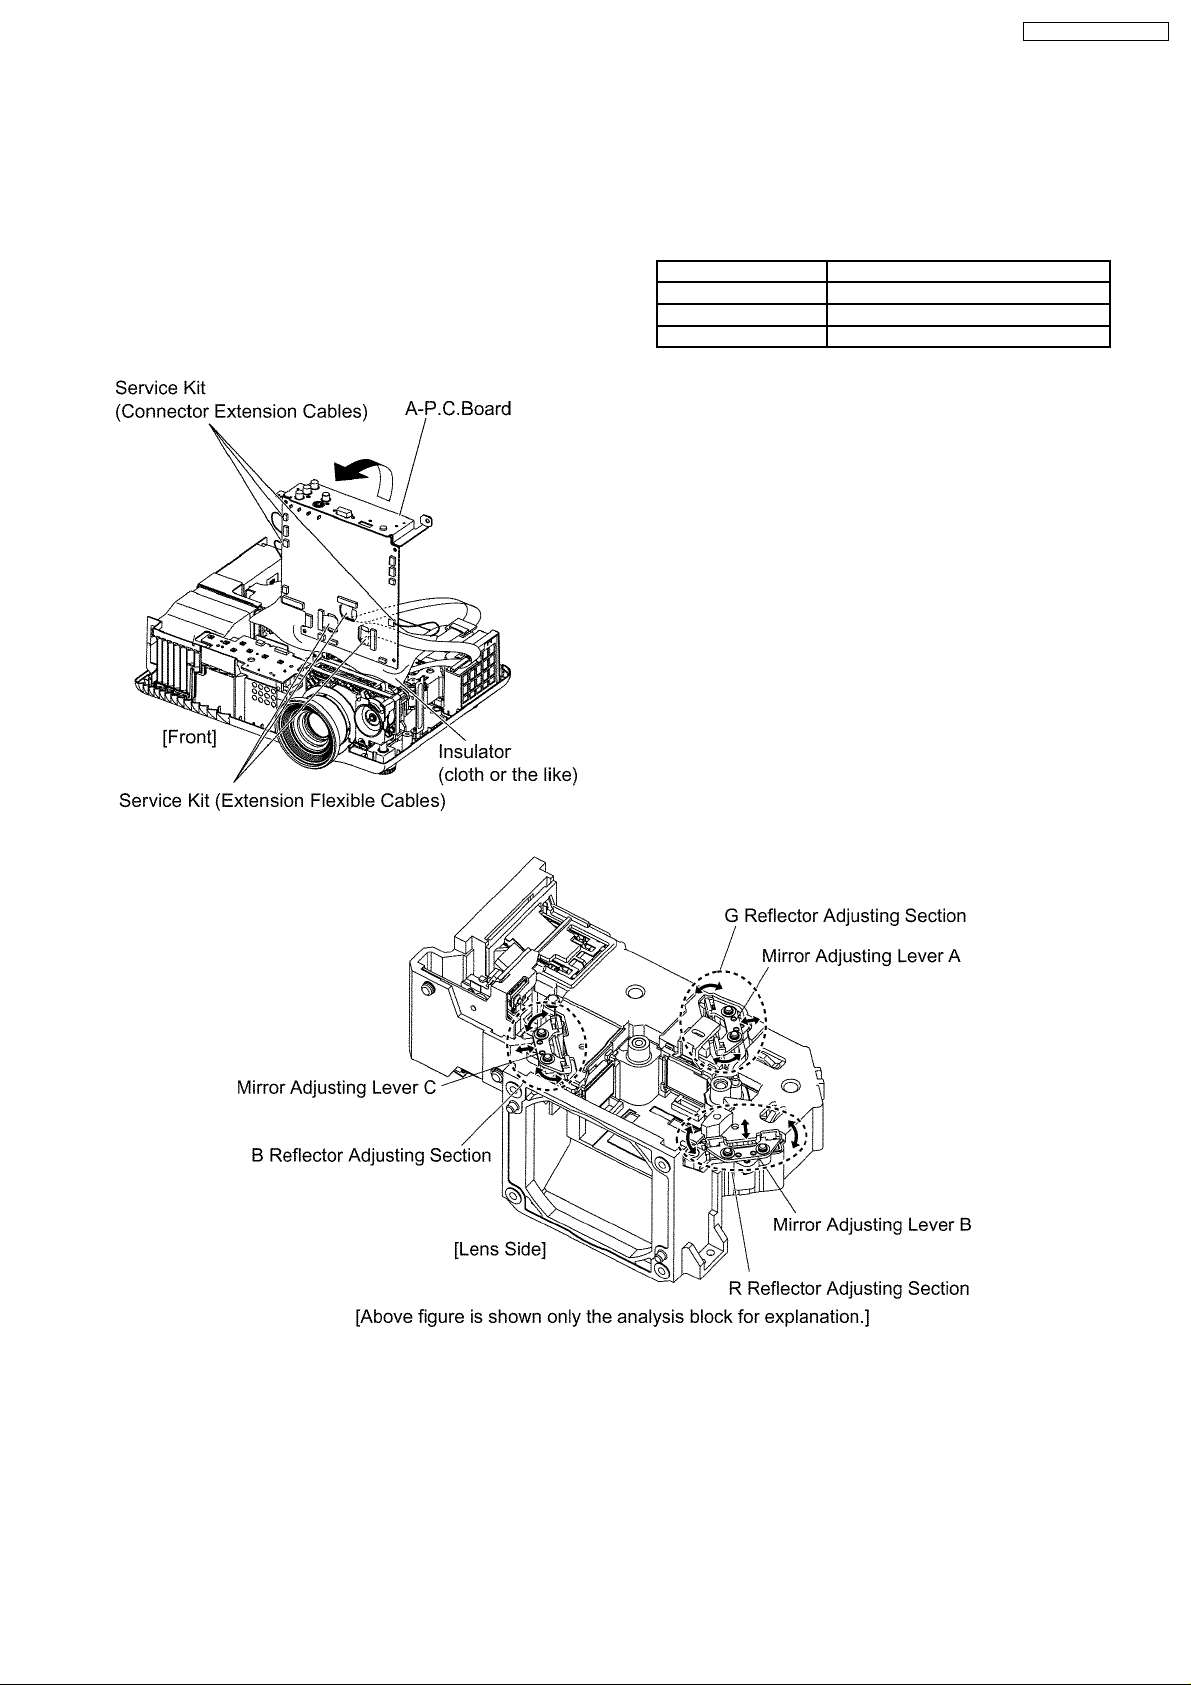
7.5.3.1. Outline
When the lighting area is off from the adjustment and color
unevenness appears, adjust the lighting area into correct
position.
Symptom Measure
Magenta unevenness G Reflector Adjustment
Cyan unevenness R Reflector Adjustment
Yellow unevenness B Reflector Adjustment
· Shifting the mirror adjusting lever horizontally, adjust color
unevenness on the screen upper/lower sides.
· Twisting the mirror adjusting lever, adjust color unevenness
on the screen right/left sides.
7.5.3.2. G Reflector Adjustment
1. Turn on the power and display 100 % white pattern on the
screen.
2. Loosen the 2 screws fixing the mirror adjusting lever A just
until the lever can be shifted.
3. Adjust the mirror adjusting leverA position to minimize color
unevenness on the screen by shifting the lever in arrow
directions.
4. Tighten the 2 screws.
7.5.3.3. R Reflector Adjustment
1. Turn on the power and display 100 % white pattern on the
screen.
2. Loosen the 2 screws fixing the mirror adjusting lever B just
until the lever can be shifted.
3. Adjust the mirror adjusting leverB position to minimize color
21
Page 22
PT-AE700U / PT-AE700E
unevenness on the screen by shifting the lever in arrow
directions.
4. Tighten the 2 screws.
7.5.3.4. B Reflector Adjustment
1. Turn on the power and display 100 % white pattern on the
screen.
2. Loosen the 2 screws fixing the mirror adjusting lever C just
until the lever can be shifted.
3. Adjust the mirror adjusting lever C position to minimize color
unevenness on the screen by shifting the lever in arrow
directions.
4. Tighten the 2 screws.
7.6. Software for Adjustment
7.6.1. Outline
· This projector needs computer-aided adjustments.
· After the software adjustments, this projector must be turned off and on again to memorize the settings.
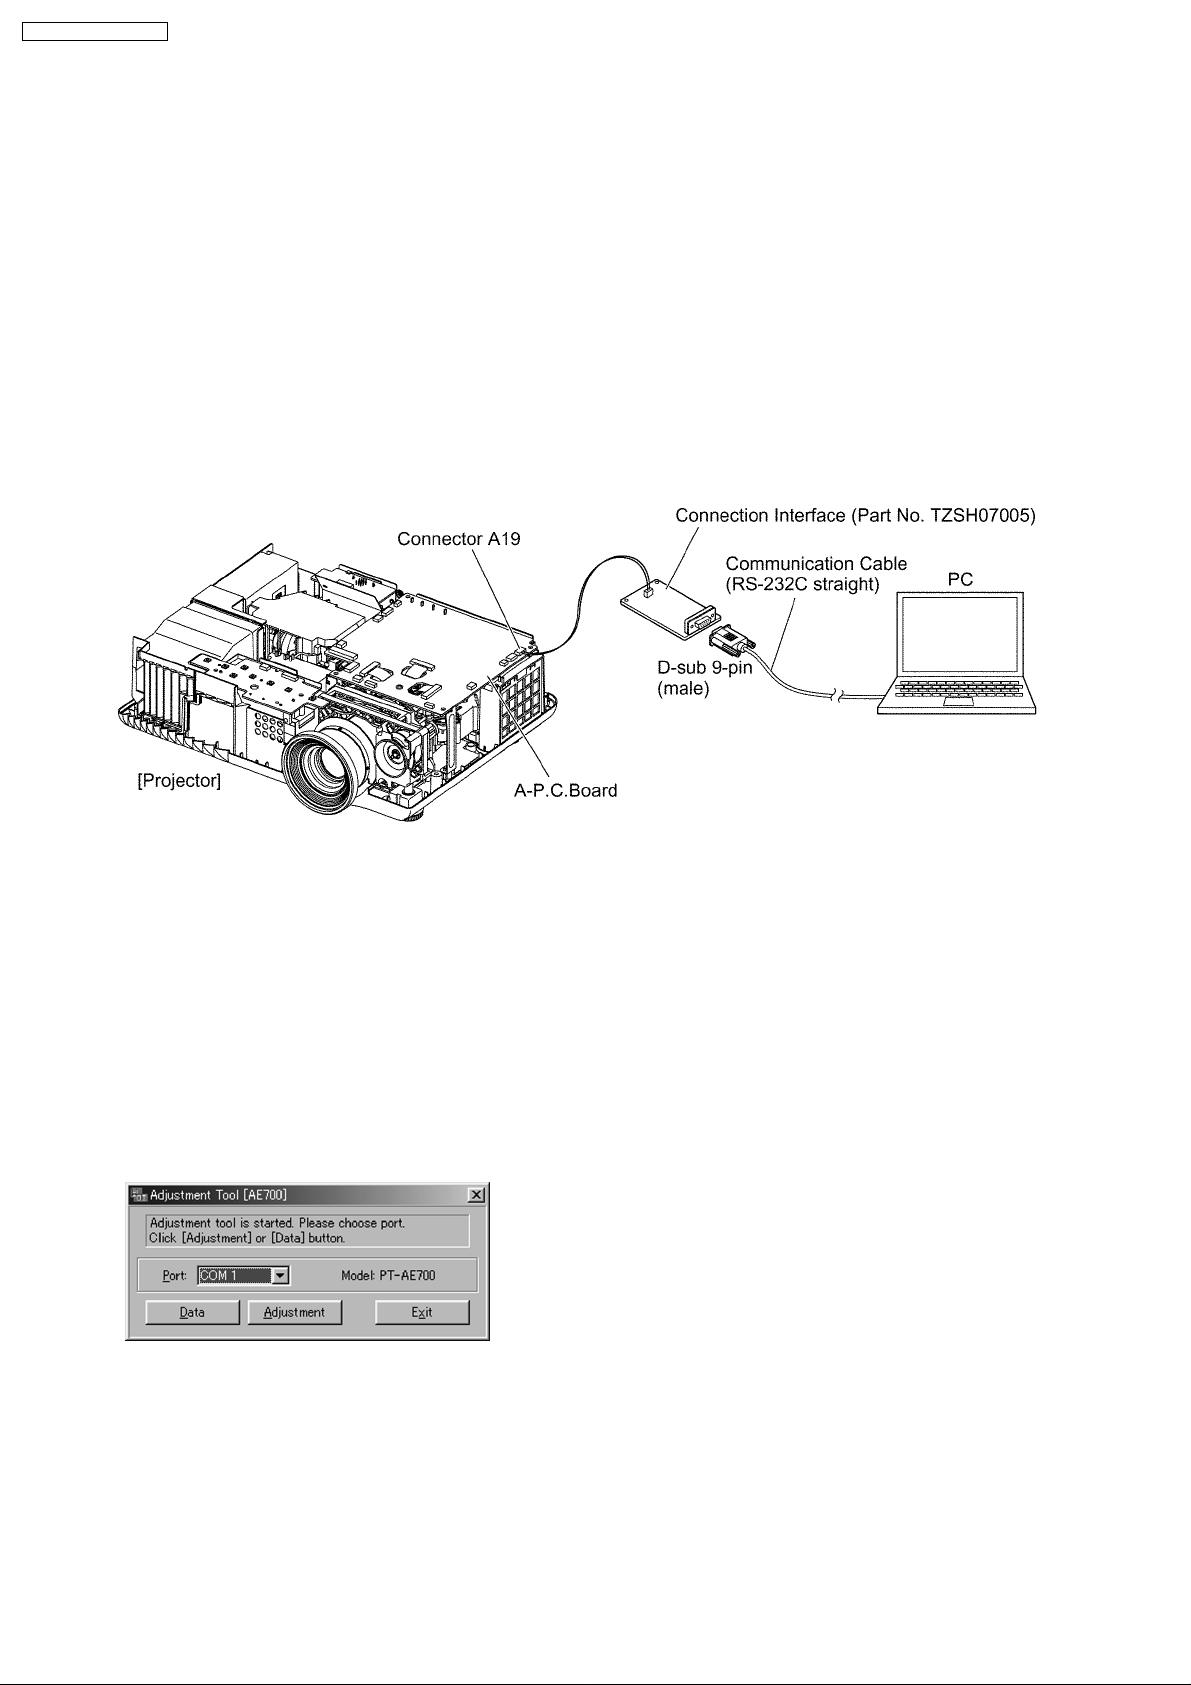
· Connect the connection interface and communication cable between the projector and a PC as shown below.
· Updating the software will change the version number.
7.6.2. Operating Procedure
1. Run the software program by the keyboard entry.
Note:
· Use the software program as below.
Adjustment Tool [AE700]
2. The first menu is Port selection menu.
3. Adjust the projector by selecting the necessary item from
the menu in each stage.
7.6.3. Port Name and Projector Selection
Menu
Select the port name of PC which connects with the projector,
then click [Data] or [Adjustment] button.
7.6.3.1. Explanation of Buttons
Exit:
Exits this application.
Data:
Displays the data transmission/reception menu.
Adjustment:
Displays the adjustment menu.
22
Page 23
PT-AE700U / PT-AE700E
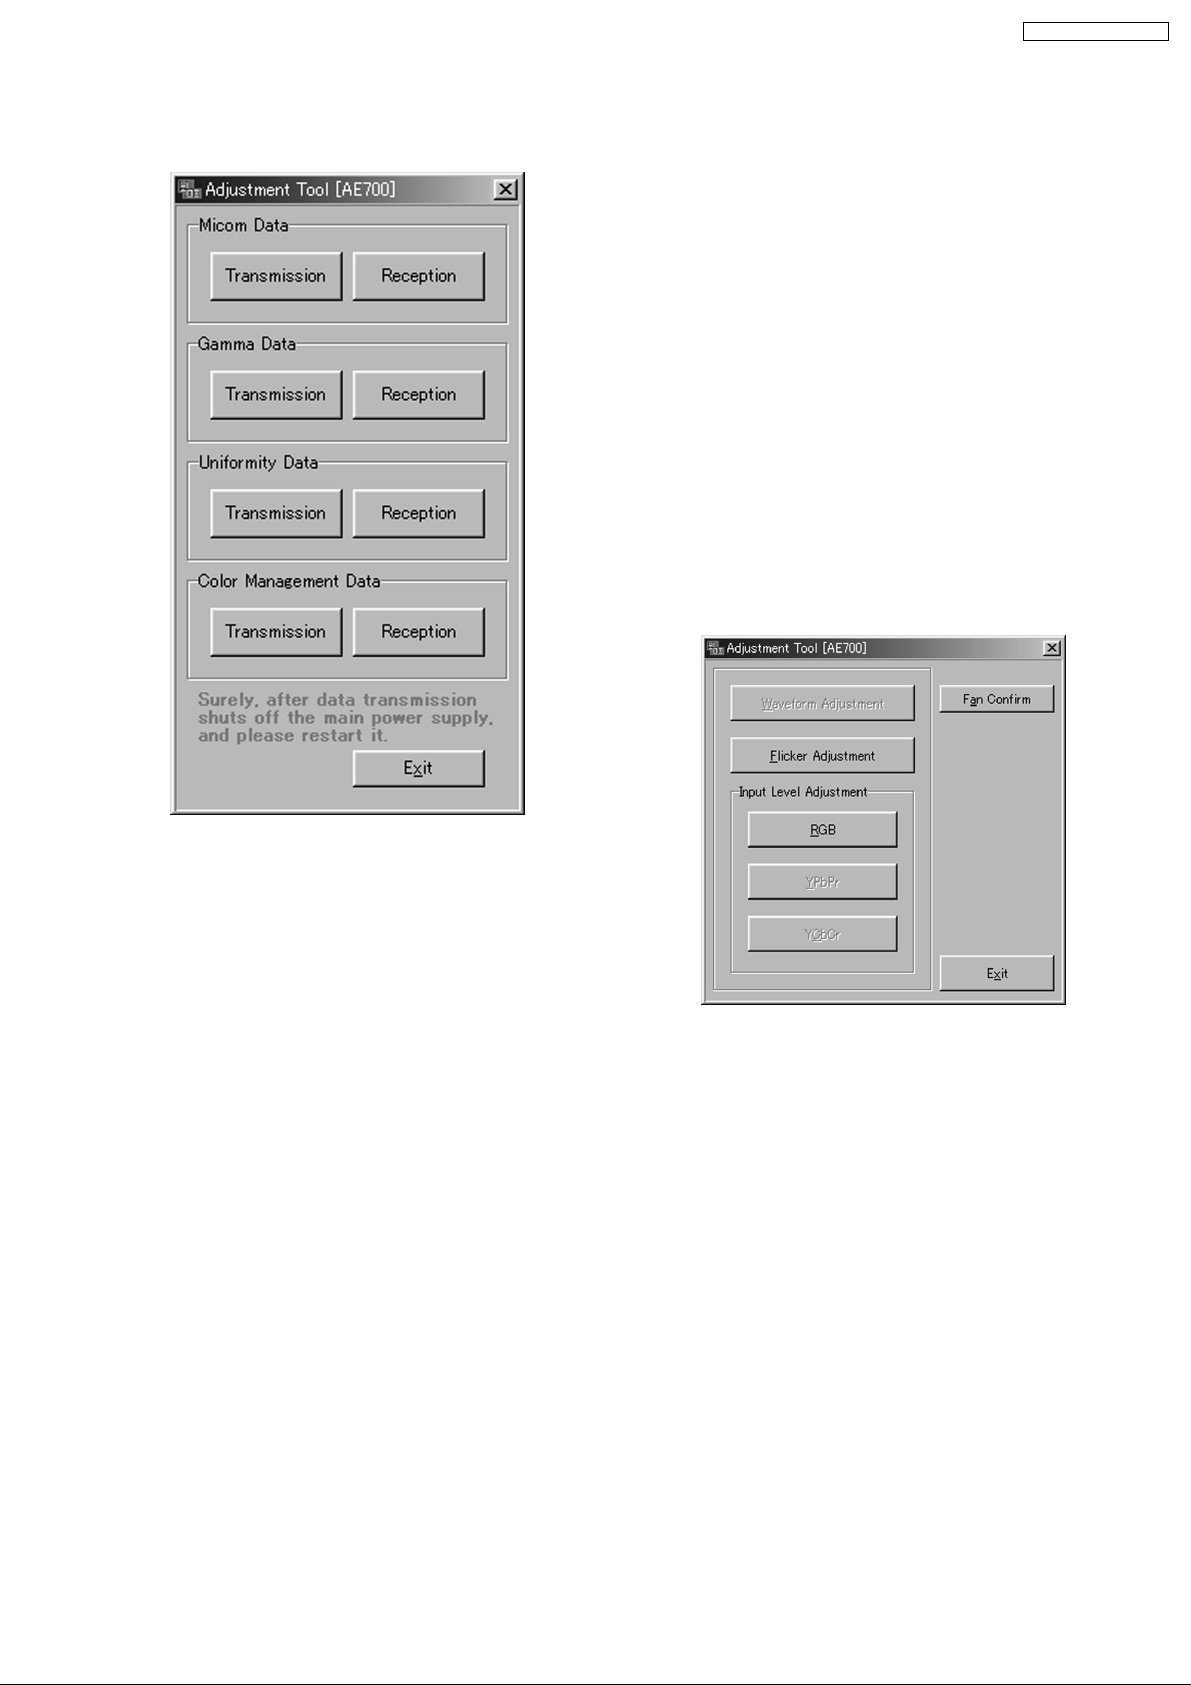
7.6.4. Data Transmission/Reception
Menu
Uniformity Data Transmission:
Reads the color unevenness correction data from the file
and transmits it to the projector.
Uniformity Data Reception:
Receives the color unevenness correction data from the
projector and writes it in the file.
Color Management Data Transmission:
Reads the color management data from the file and
transmits it to the projector.
Color Management Data Reception:
Receives the color management data from the projector
and writes it in the file.
Exit:
Exits this application.
7.6.4.2. Receiving and sending of the
data
Click a target button and specify a file name.
7.6.5. Adjustment Menu
7.6.4.1. Explanation of Buttons
Micom Data Transmission:
Reads the microcomputer data from the file and transmits it
to the projector.
Micom Data Reception:
Receives the microcomputer data from the projector and
writes it in the file.
Gamma Data Transmission:
Reads the gamma data from the file and transmits it to the
projector.
Gamma Data Reception:
Receives the gamma data from the projector and writes it in
the file.
7.6.5.1. Explanation of Buttons
Flicker Adjustment:
Displays Flicker Adjustment menu.
Input Level Adjustment [RGB]:
Displays Input Level Adjustment (RGB) menu.
Exit:
Exits this application.
23
Page 24
PT-AE700U / PT-AE700E
7.7. Flicker Adjustment
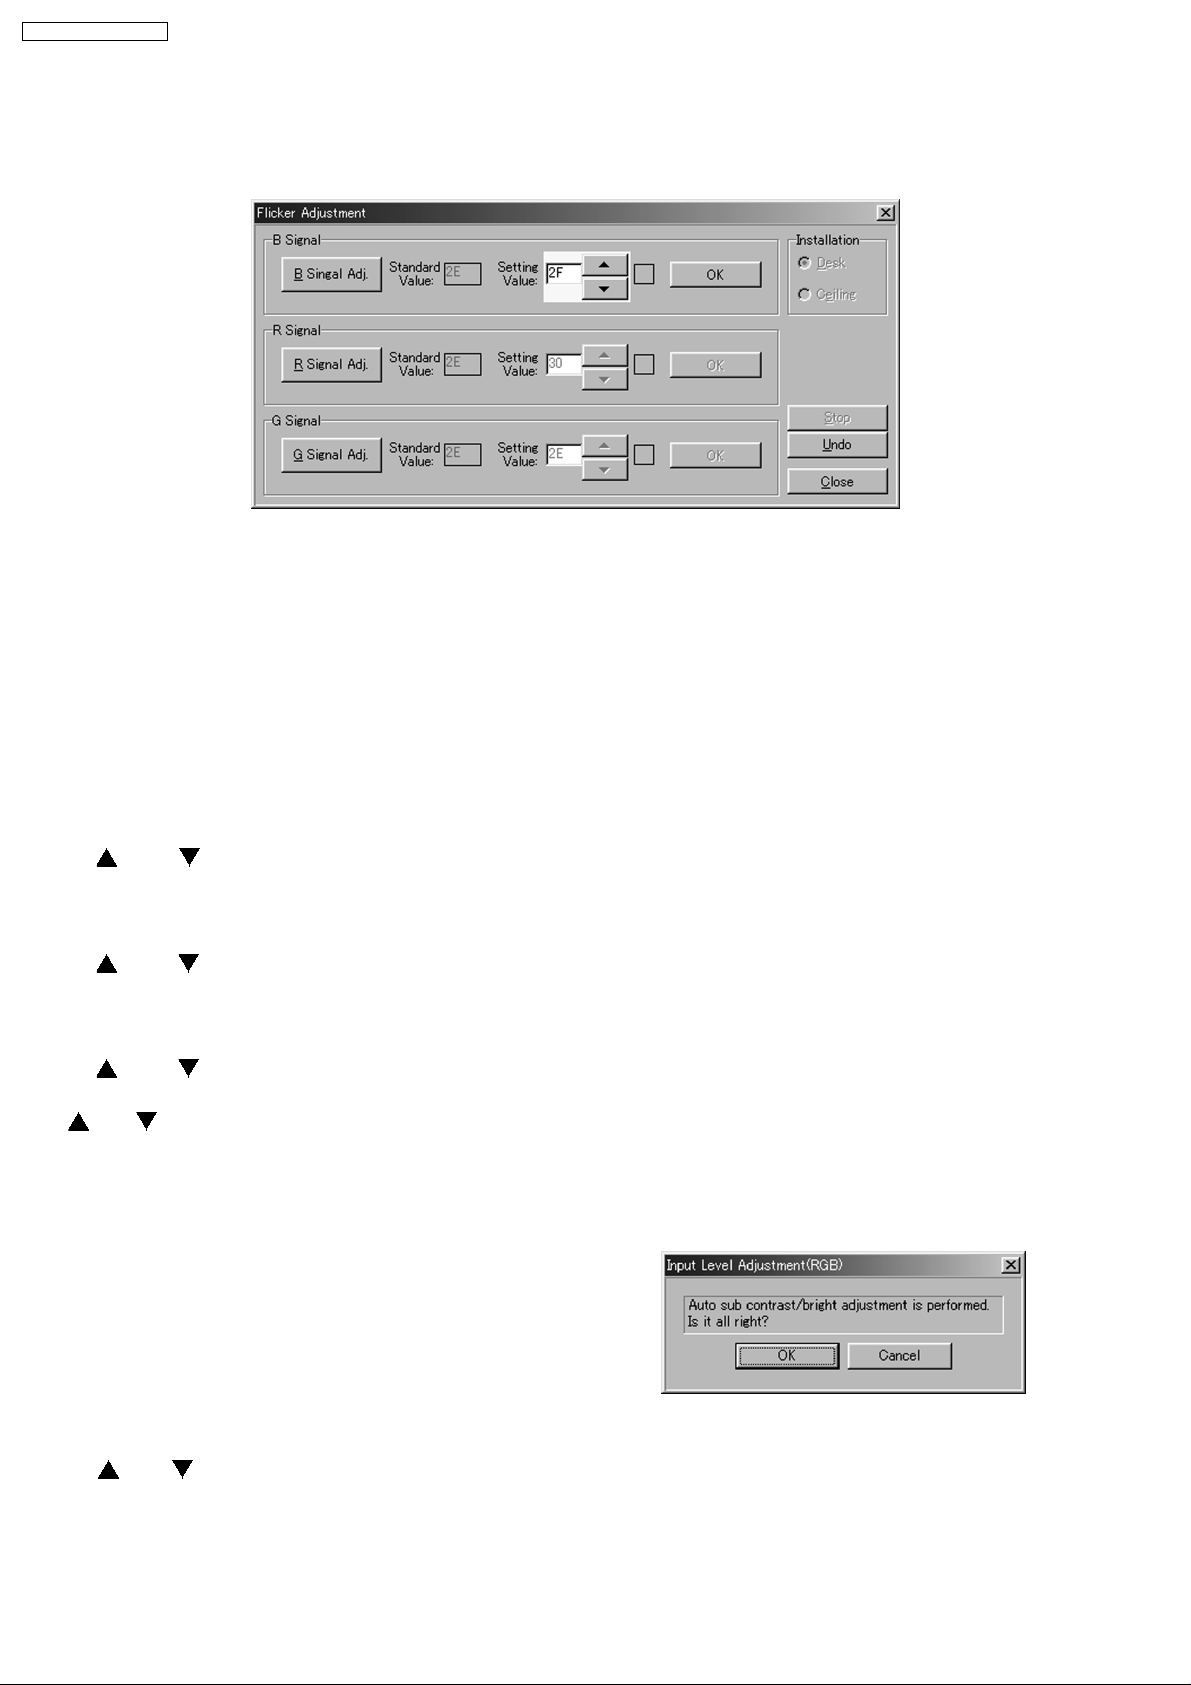
7.7.1. Adjustment Menu
7.7.2. Explanation of Buttons
Desk:
Sets the installation mode to the desk setting and receive
the current data. (This button is usually set for its inactive
mode.)
Ceiling:
Sets the installation mode to the ceiling setting and receive
the current data. (This button is usually set for its inactive
mode.)
B Signal Adj.:
Sets the test signal mode to the B-signal and allows the "
", " " and "OK" buttons of the B-signal to
becomes active.
R Signal Adj.:
Sets the test signal mode to the R-signal and allows the "
", " " and "OK" buttons of the R-signal to
becomes active.
G Signal Adj.:
Sets the test signal mode to the G-signal and allows the "
", " " and "OK" buttons of the G-signal to
becomes active.
or
Changes the setting value and transmits its data. (The 8
and 2 keys on the keyboard have the same functions.) If
releasing the mouse or key after pressing it continuously,
the data is transmitted once. The variable setting value is
enclosed in a box and using the TAB or SPACE key allows
the move of the box.
OK:
Determines the setting value and stores its data in the
EEPROM. (The ENTER key on the keyboard has the same
function.) The item having two or more kinds of setting
values is processed two or more items. Clicking this button
or pressing ENTER key changes the color of the text "OK"
to cyan (light blue). If changing the setting value using the
"
"or" " button or the 8 or 2 key, its color returns to
black.
Stop:
Discontinues the communication. (This button is usually set
for its inactive mode.)
Undo:
Returns the setting value to its original state and transmits
its data. The color of the text "OK" returns to black.
Close:
Closes this menu.
7.7.3. Equipment to be used
PC, Software for Adjustment
7.7.4. Adjustment Procedure
1. Display Flicker Adjustment menu.
2. Click "B Signal Adj," and the blue flicker adjustment pattern
will be displayed.
3. Minimize the flicker while observing the projected pattern.
4. Click "R Signal Adj," and the red flicker adjustment pattern
will be displayed.
5. Minimize the flicker while observing the projected pattern.
6. Click "G Signal Adj," and the green flicker adjustment
pattern will be displayed.
7. Minimize the flicker while observing the projected pattern.
7.8. Input Level Adjustment (RGB)
7.8.1. Adjustment Menu
7.8.2. Explanation of Buttons
OK:
Executes automatic sub contrast and sub brightness
adjustments, then closes this dialog.
24
Page 25

Cancel:
Cancels this menu.
7.8.3. Equipment to be used
PC, RGB Signal Generator, Software for Adjustment
7.8.4. Adjustment Procedure
1. Display Input Level Adjustment (RGB) menu.
2. Input a window pattern signal to PC IN (RGB) connector.
Note:
· Use approx. 15 % window pattern as follows.
Black background (screen width) : White window
width = 2 : 1
Black background (screen height) : White window
height = 3 : 1
3. Click the OK button.
PT-AE700U / PT-AE700E
25
Page 26
PT-AE700U / PT-AE700E
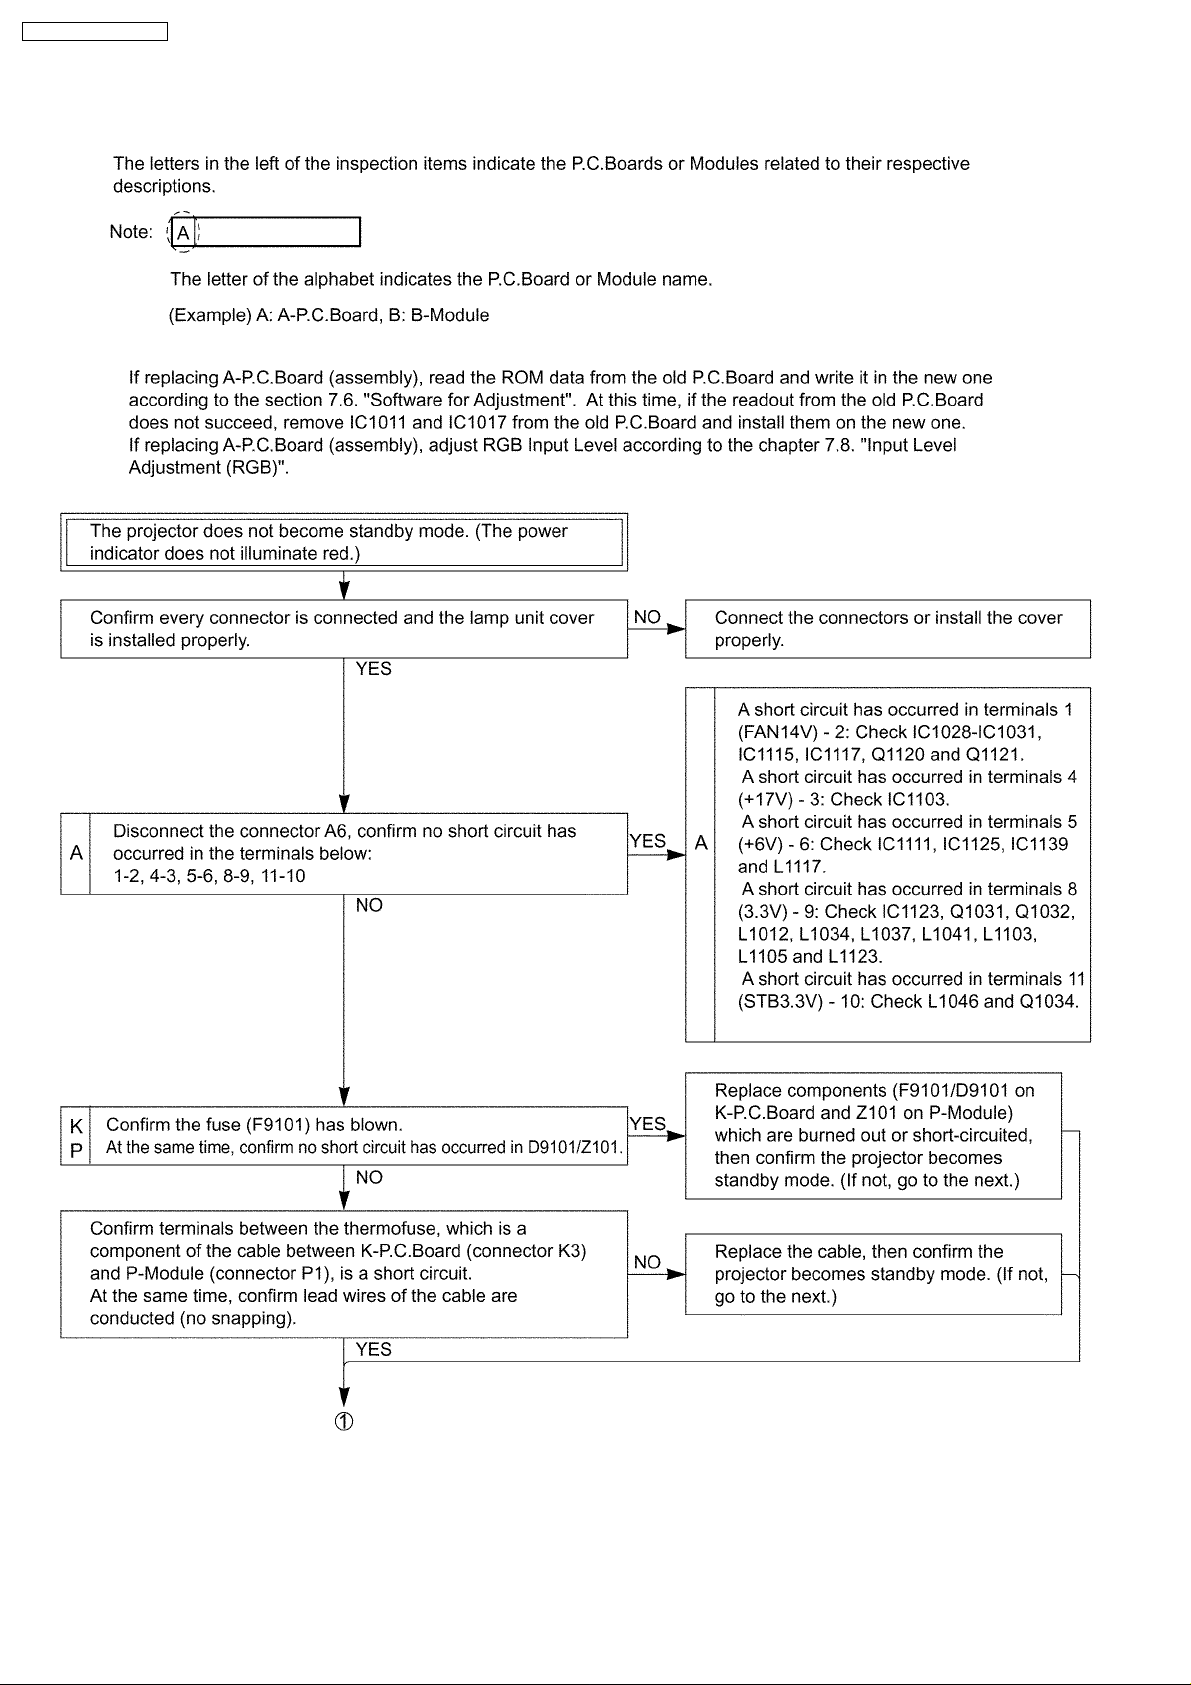
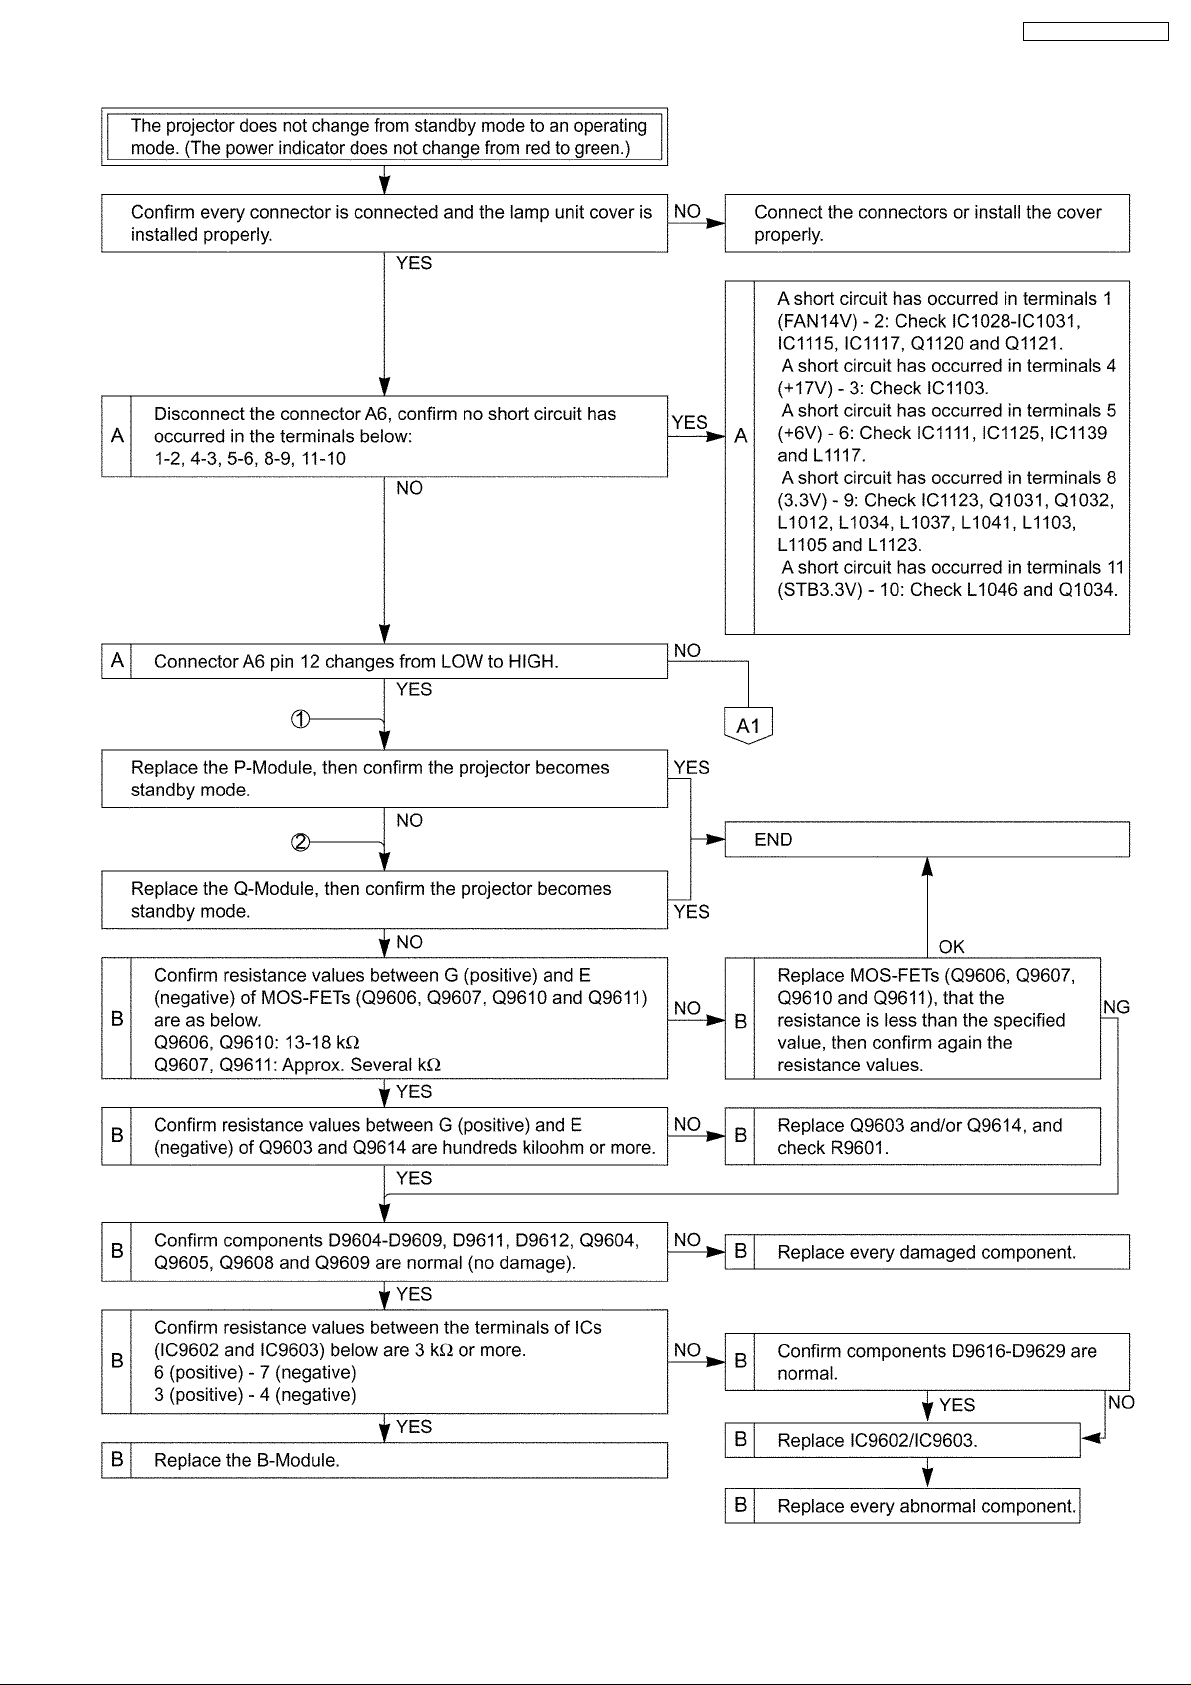
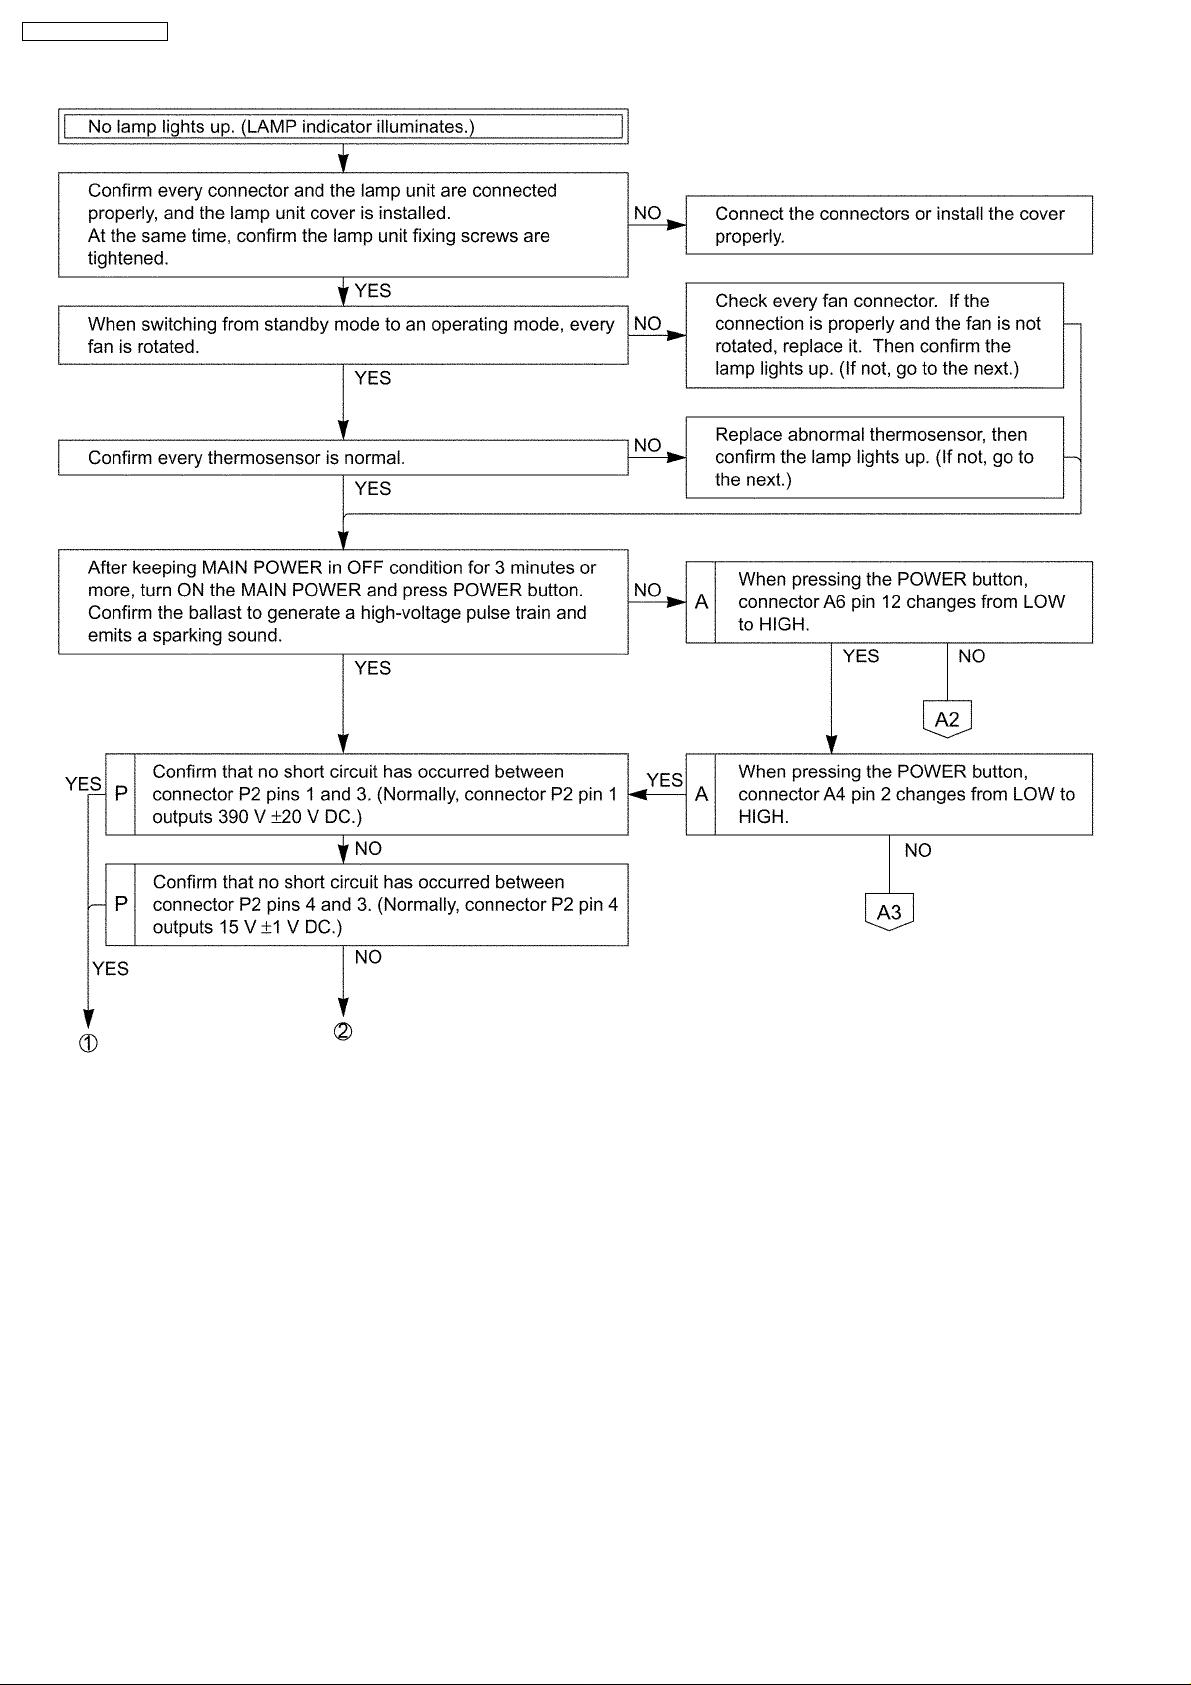
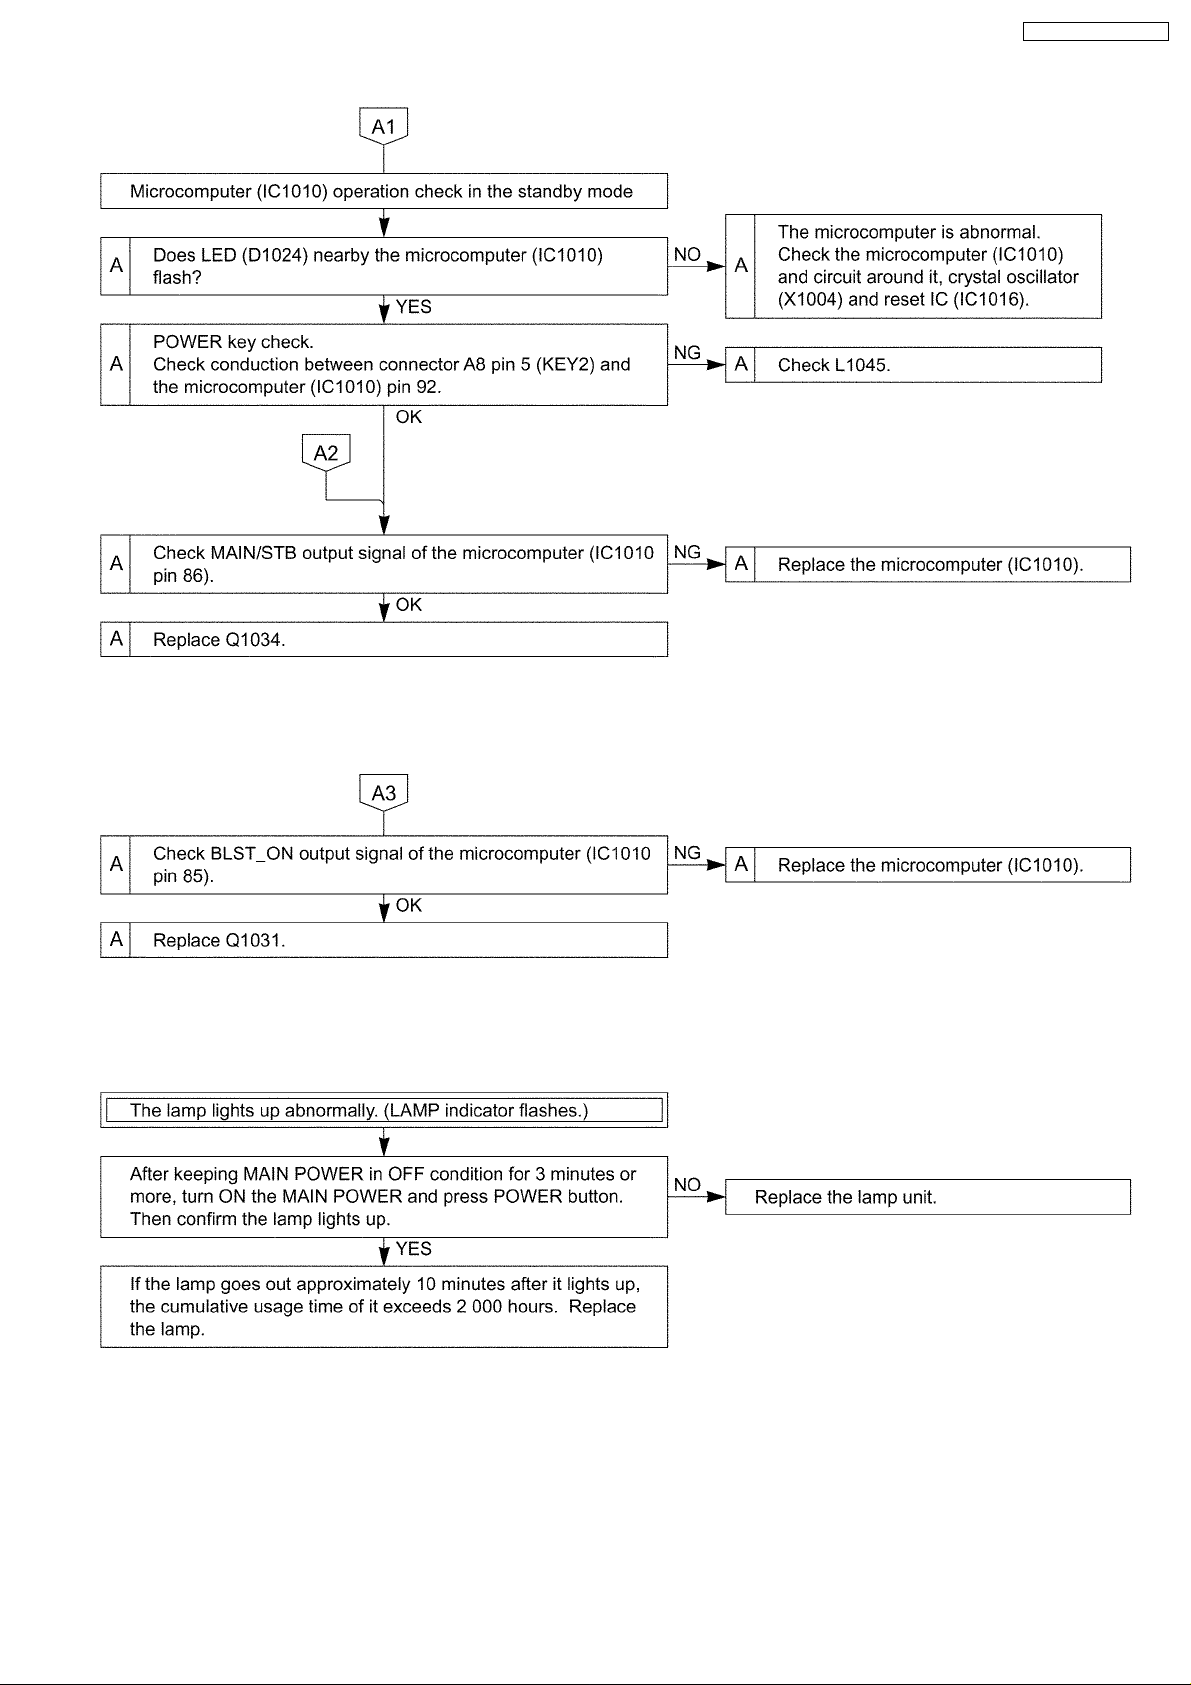
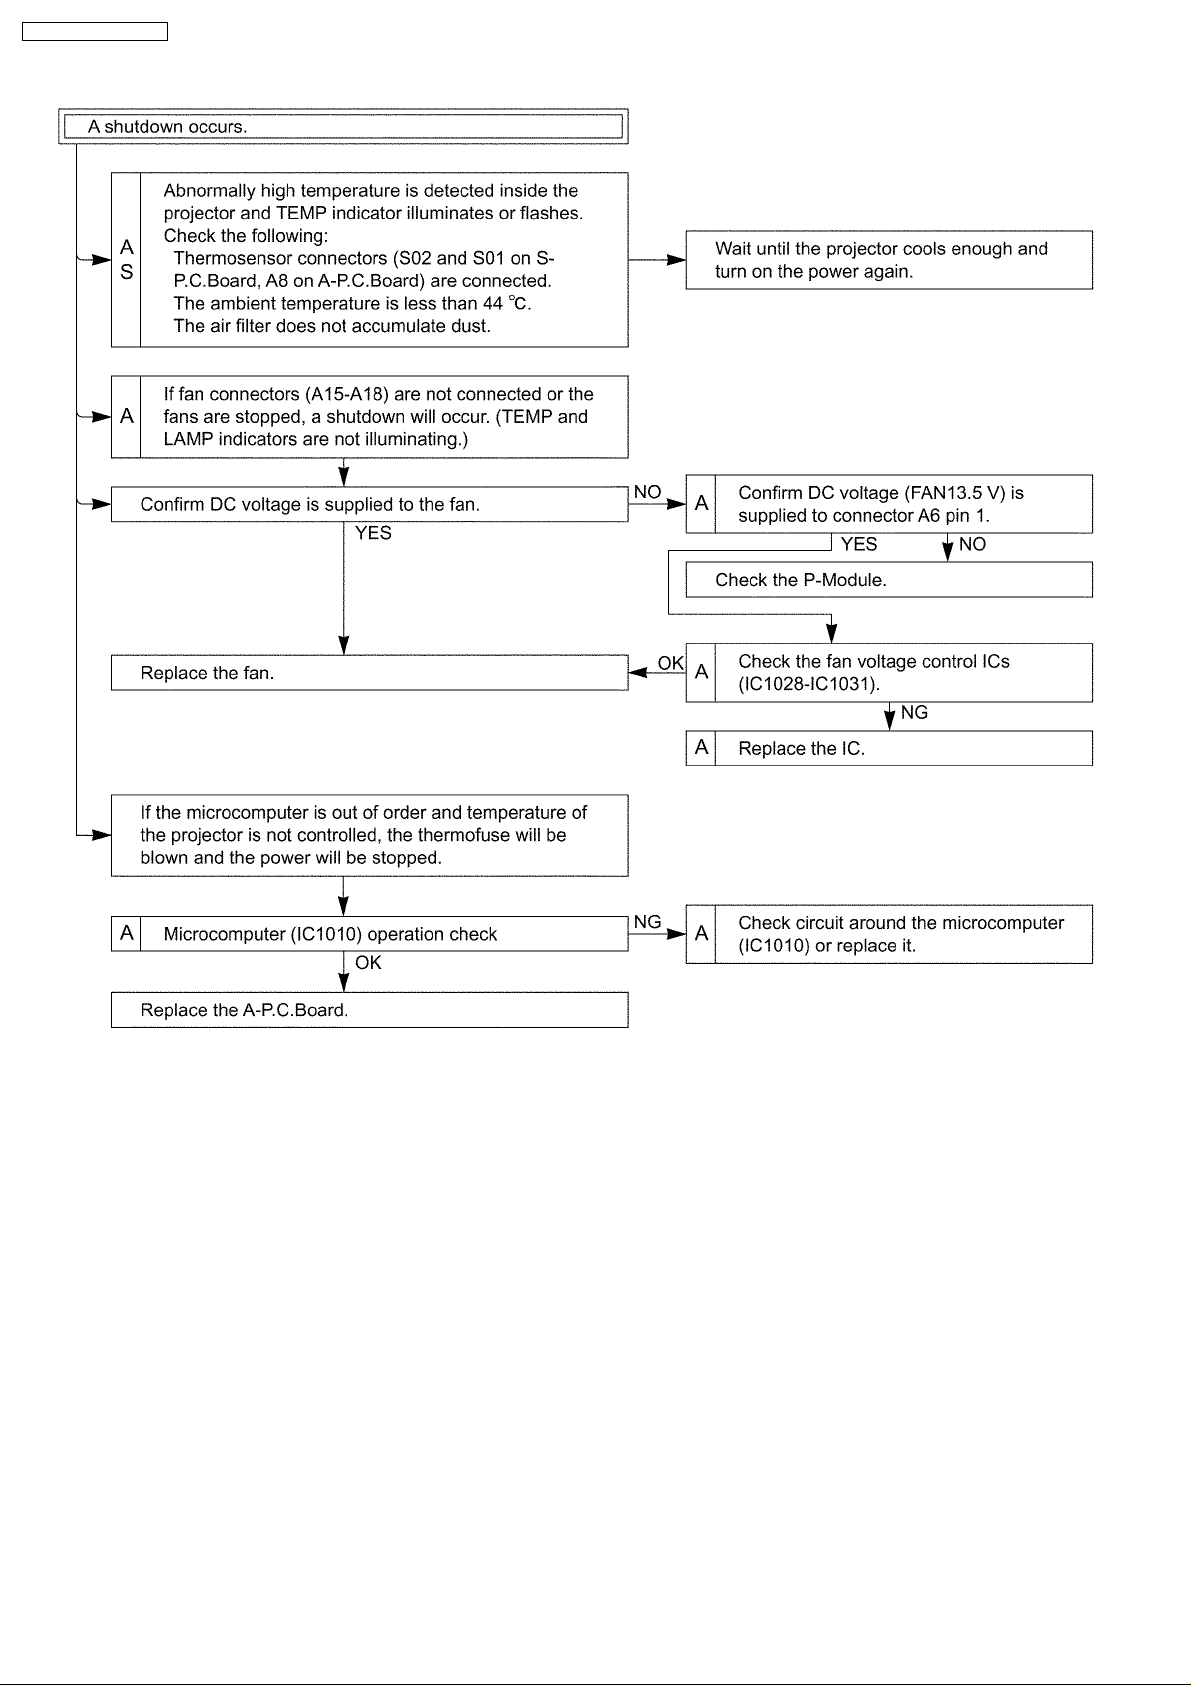
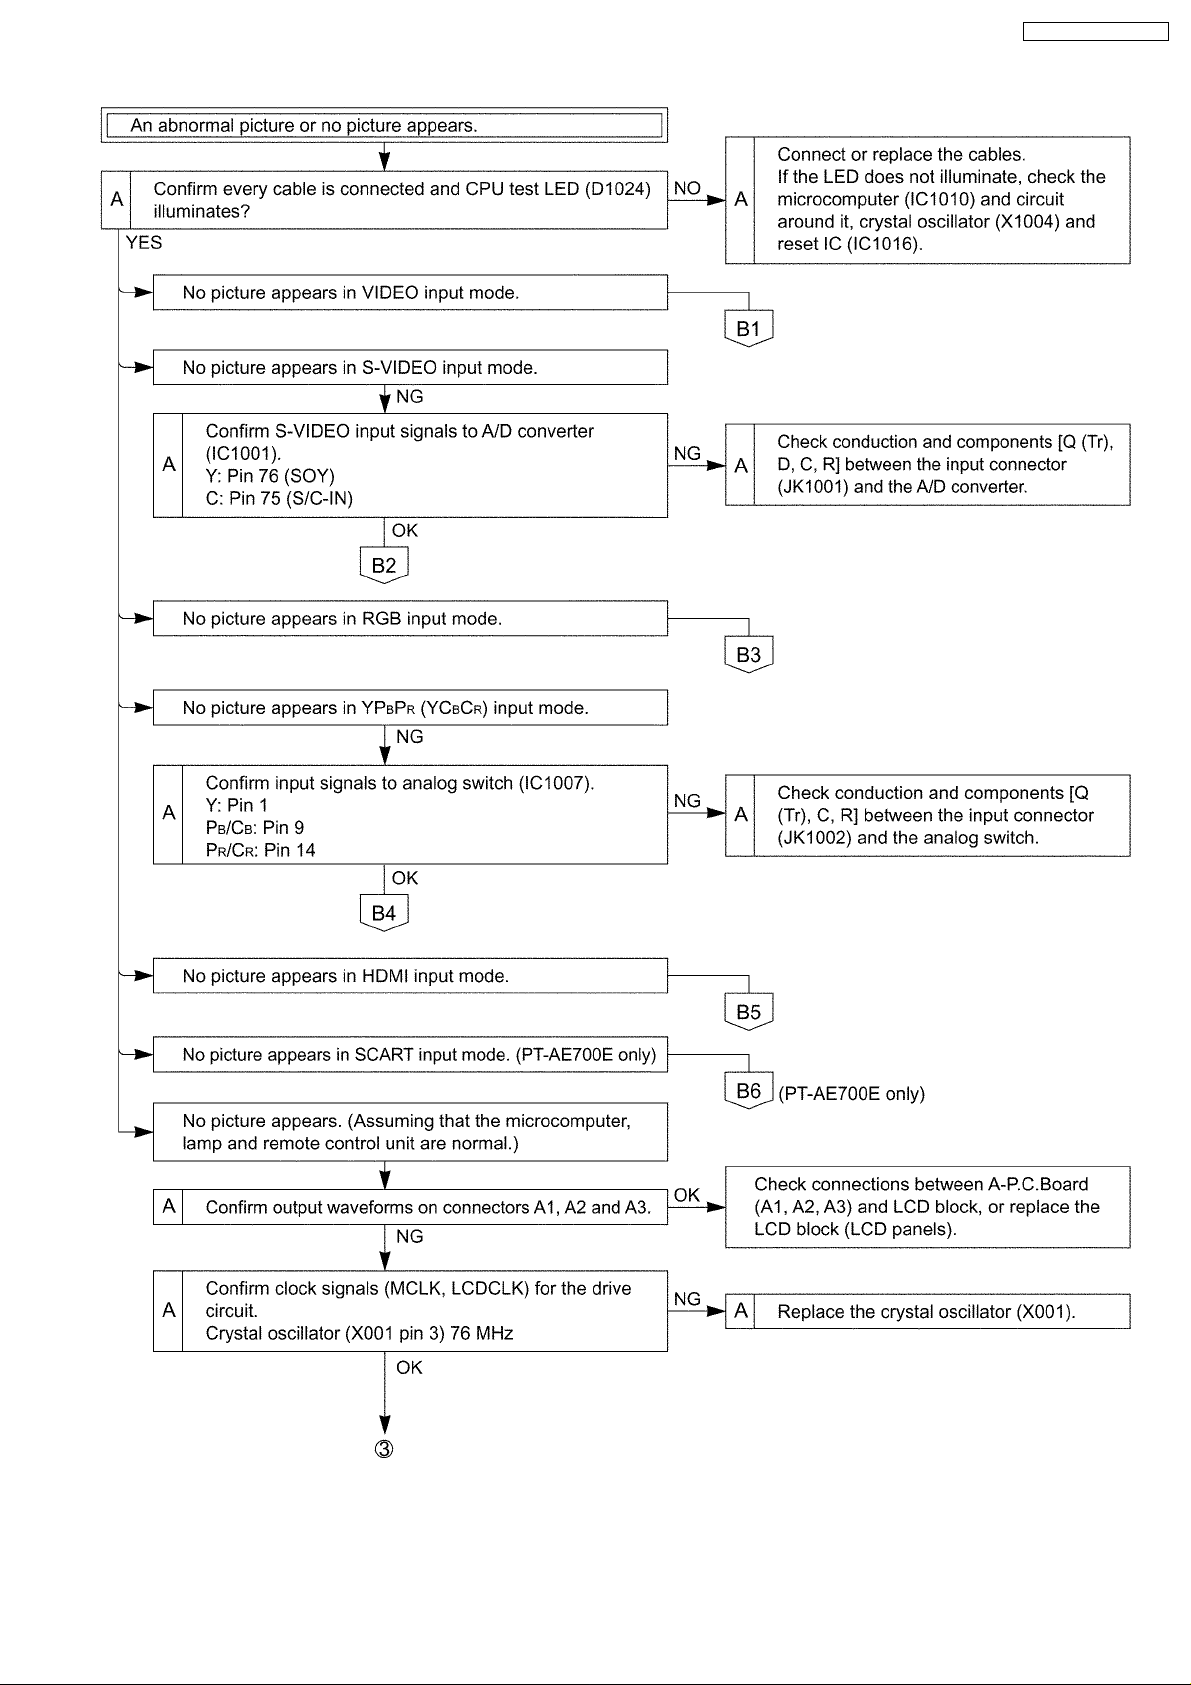
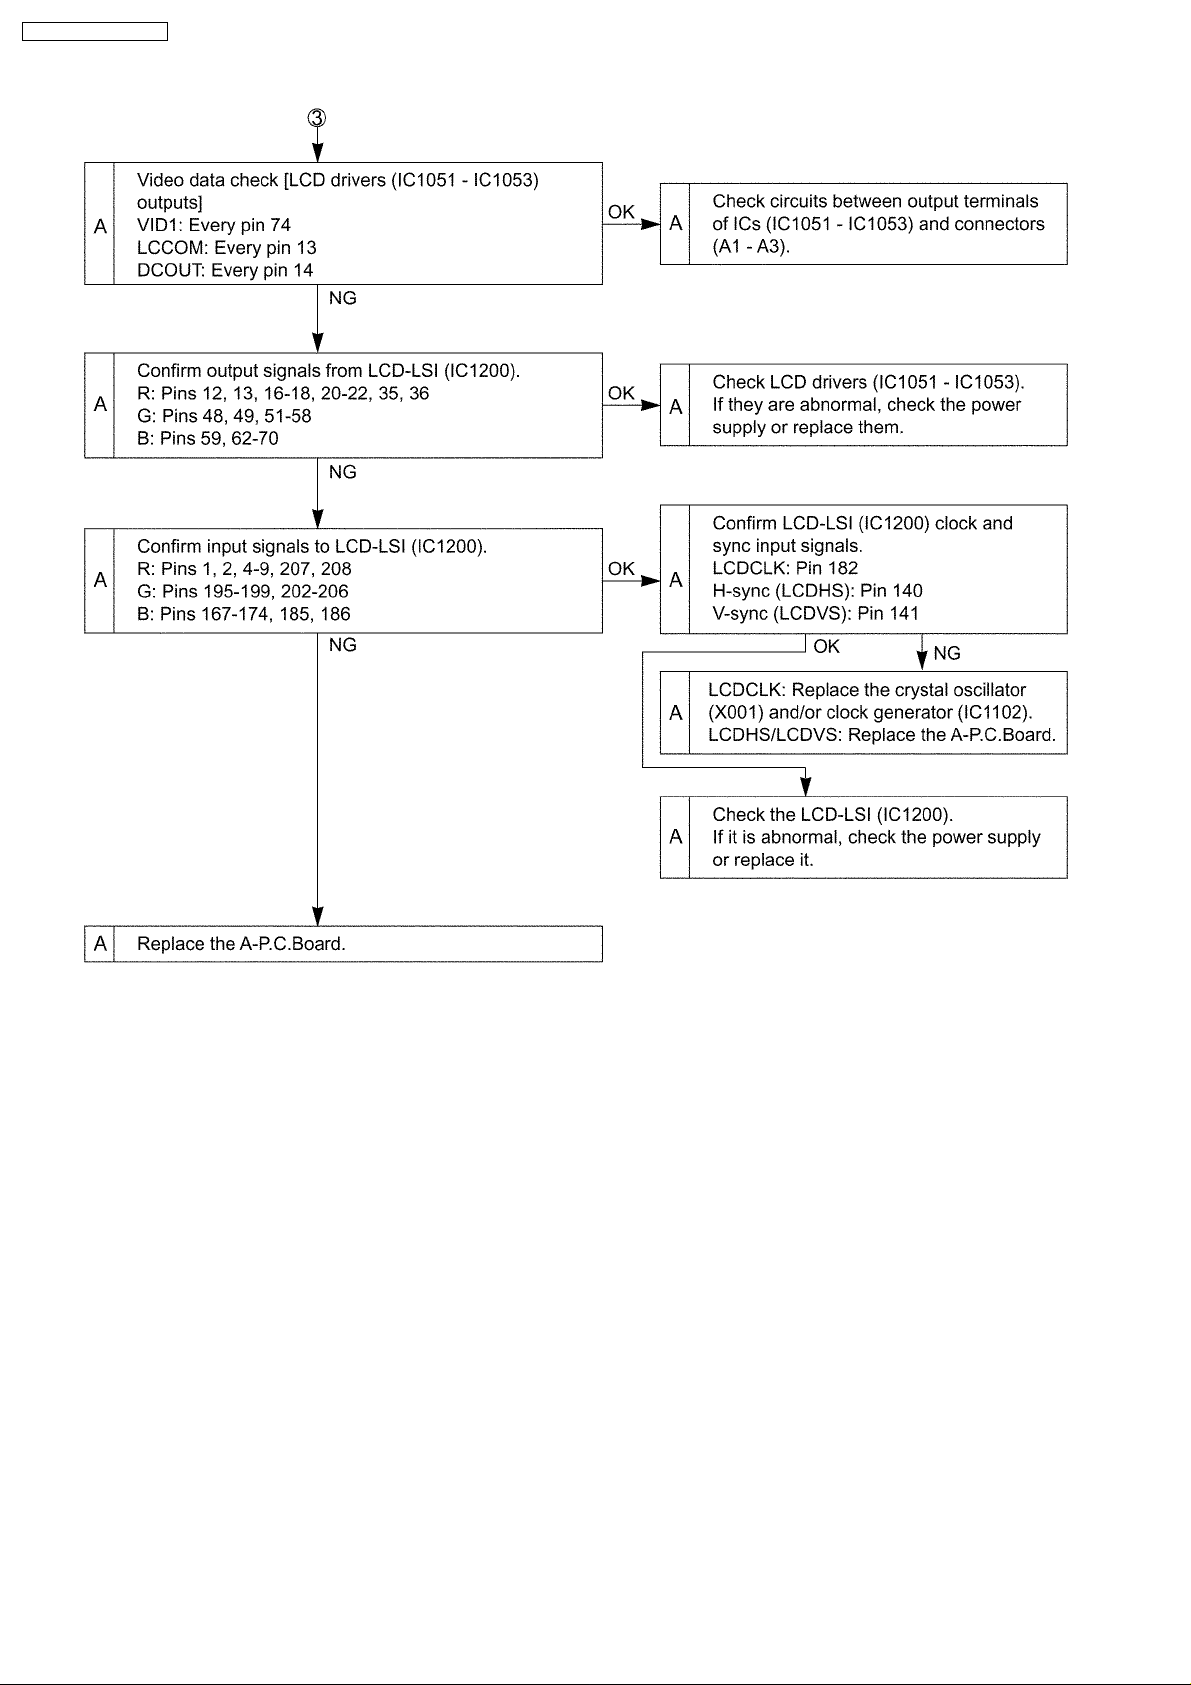
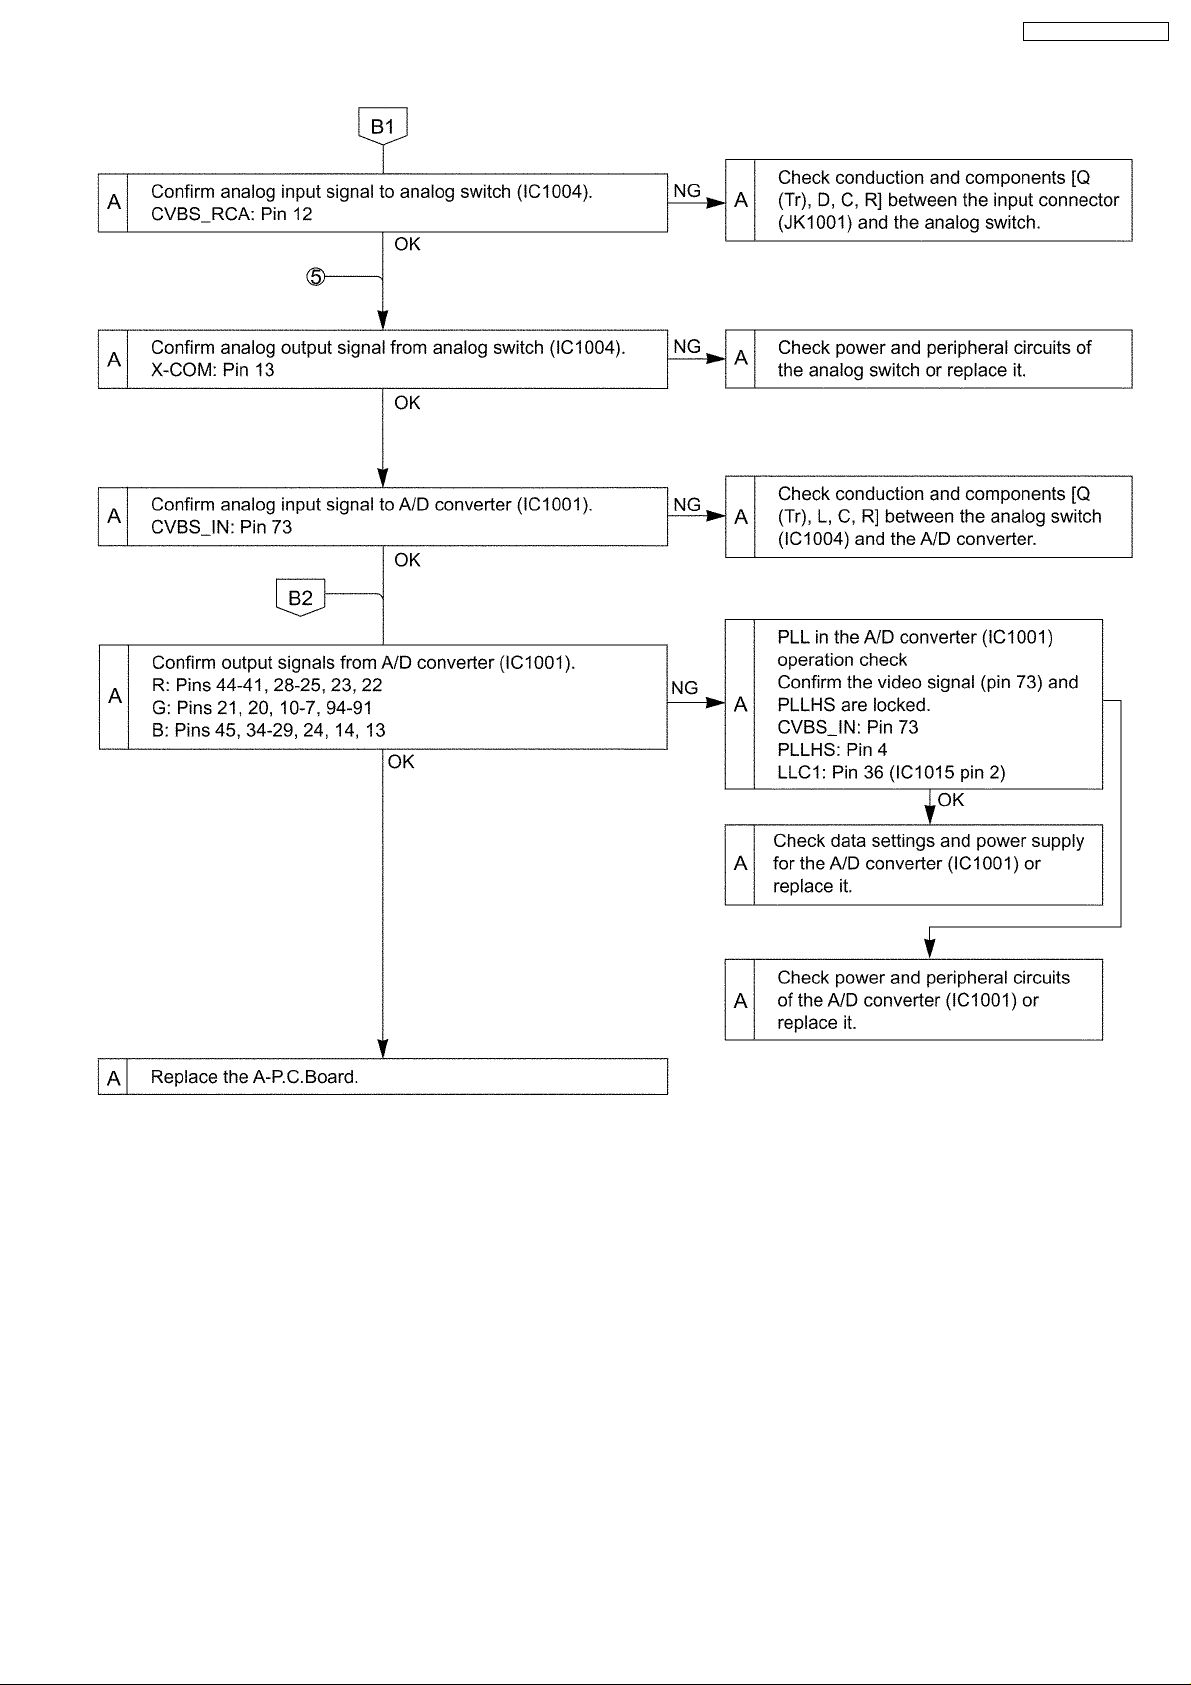
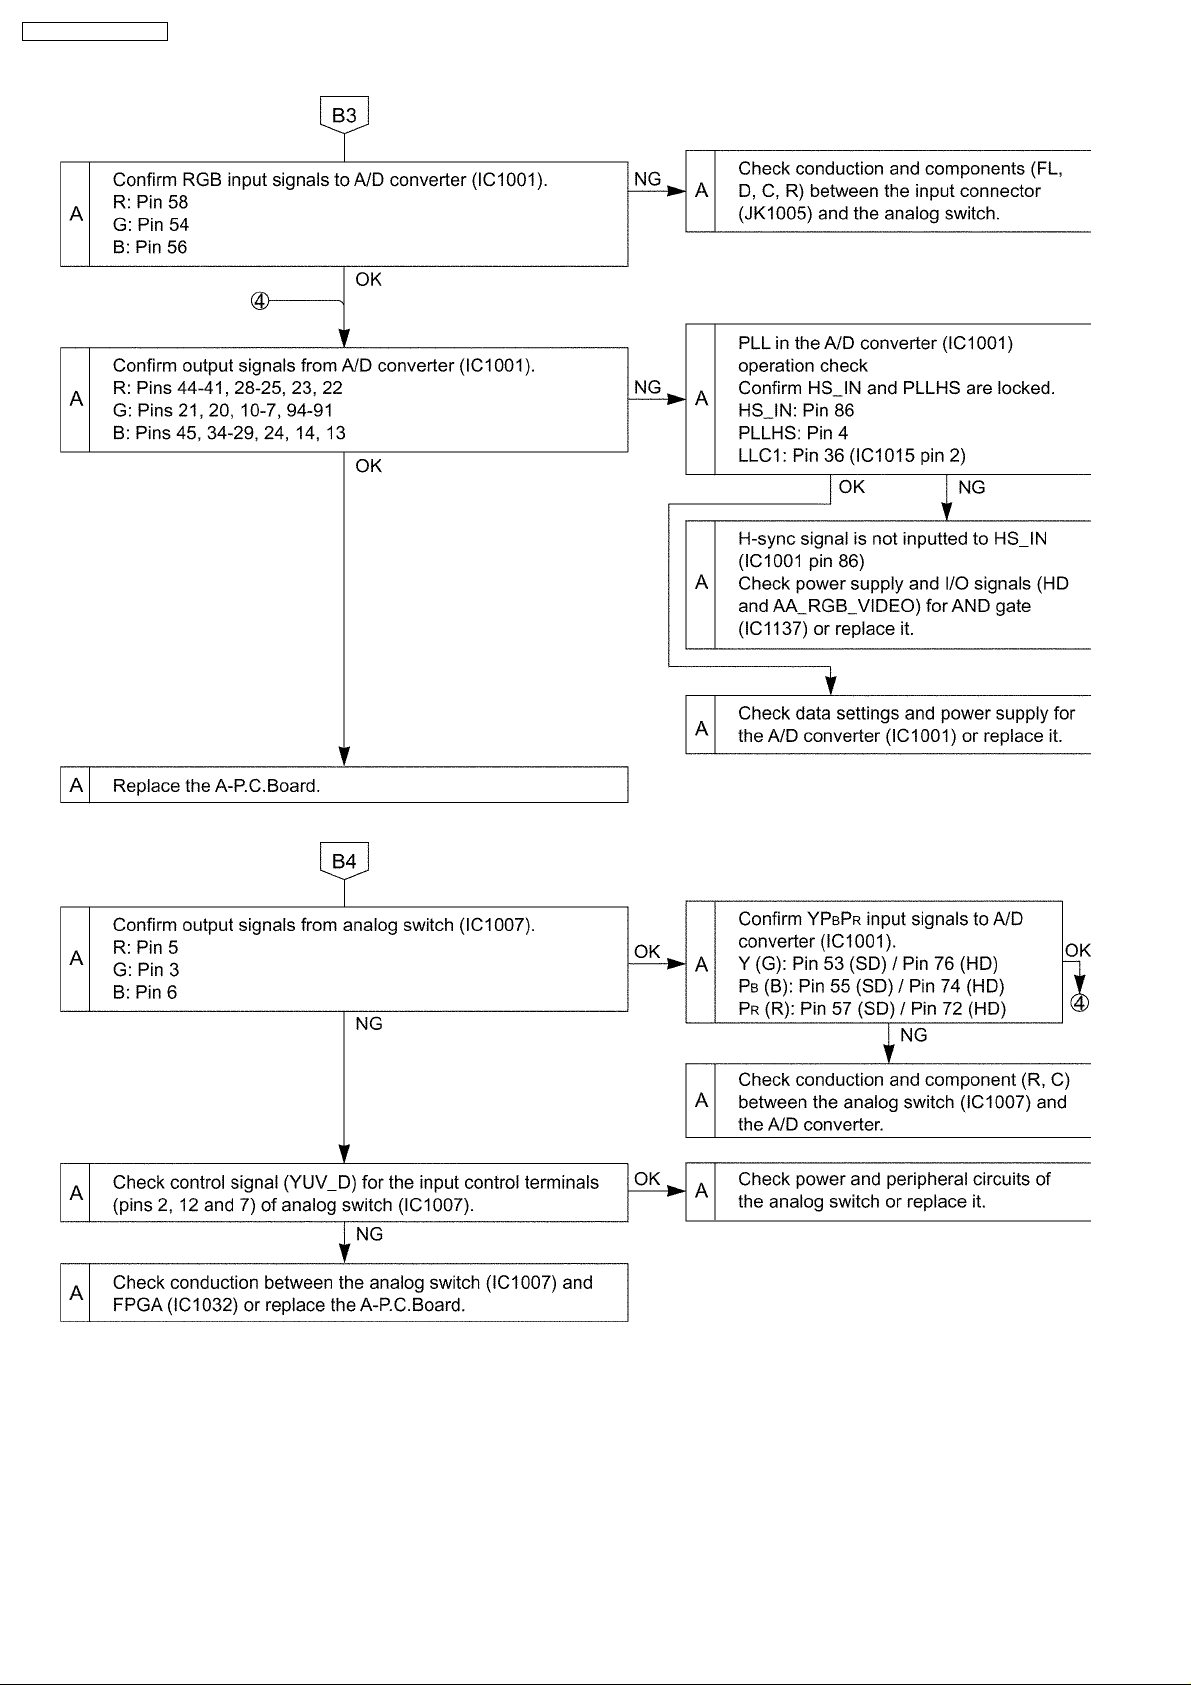
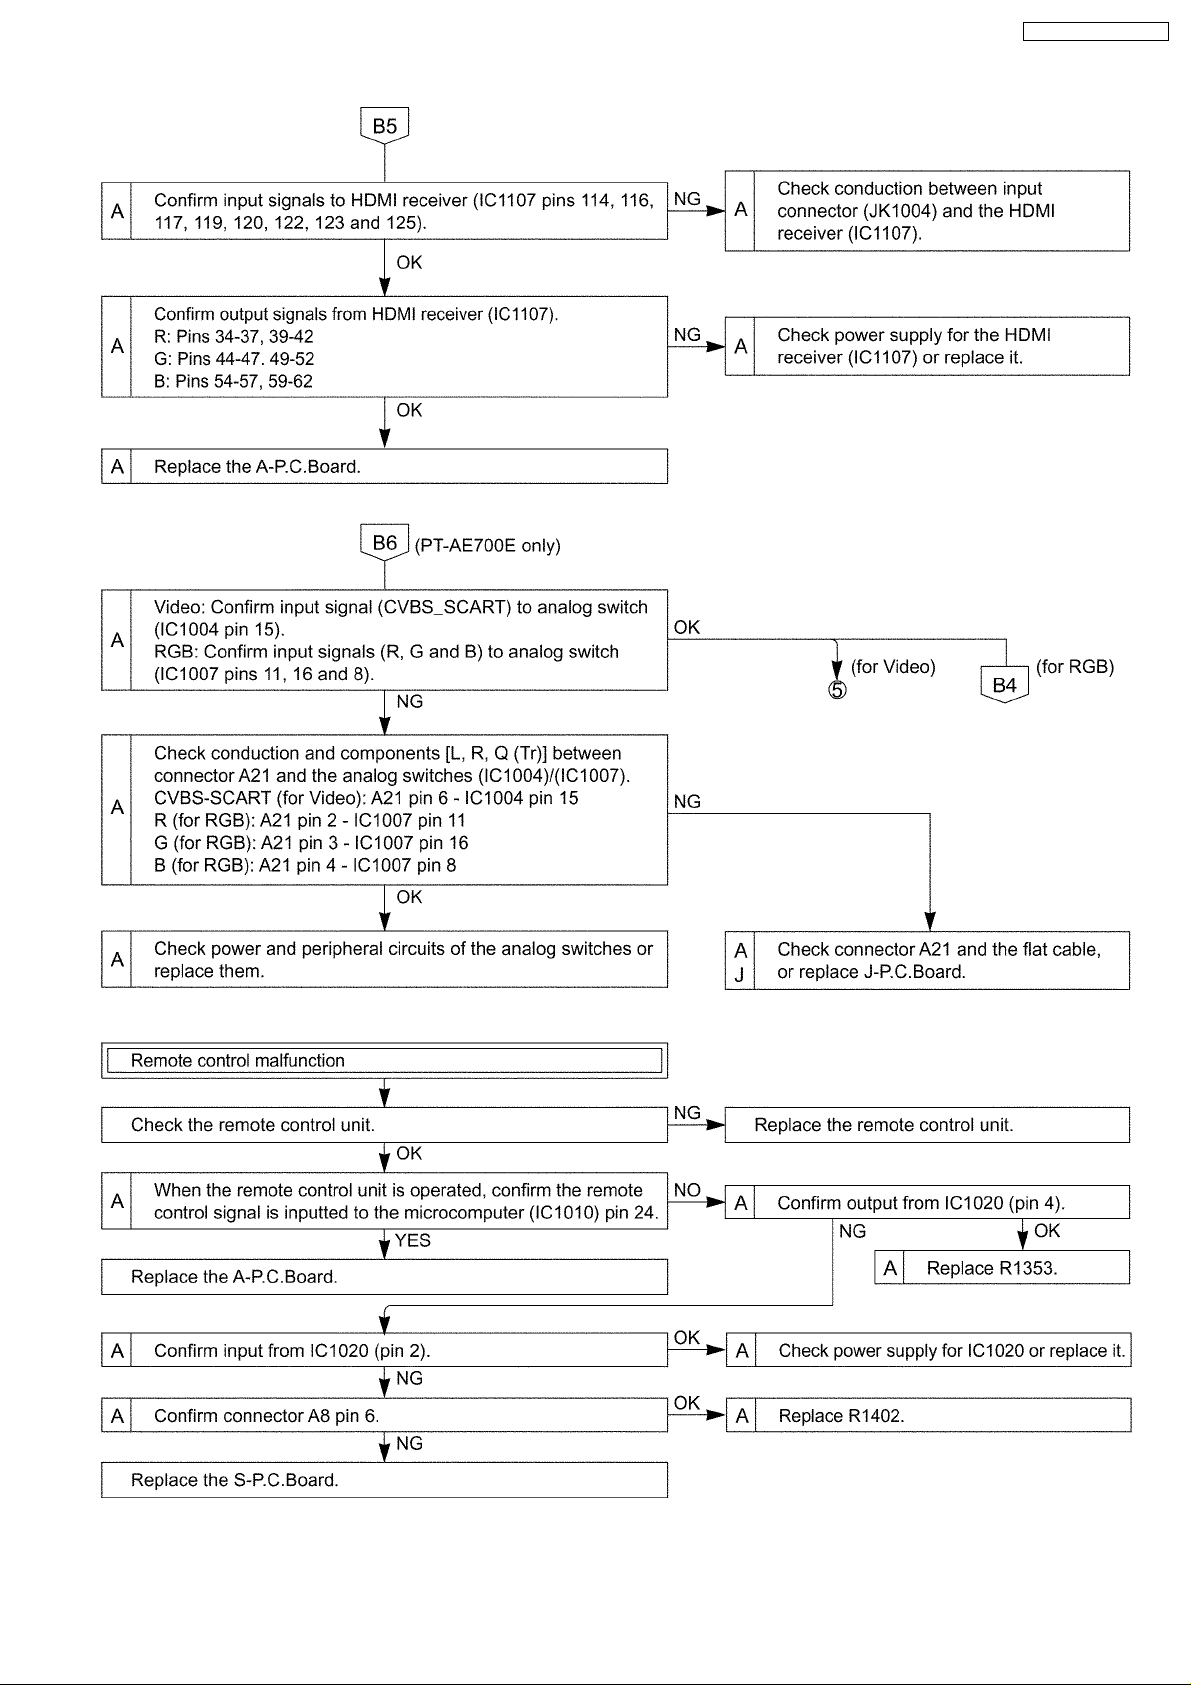
8 Troubleshooting
26
Page 27
PT-AE700U / PT-AE700E
27
Page 28
PT-AE700U / PT-AE700E
28
Page 29
PT-AE700U / PT-AE700E
29
Page 30
PT-AE700U / PT-AE700E
30
Page 31
PT-AE700U / PT-AE700E
31
Page 32
PT-AE700U / PT-AE700E
32
Page 33
PT-AE700U / PT-AE700E
33
Page 34
PT-AE700U / PT-AE700E
34
Page 35
PT-AE700U / PT-AE700E
35
Page 36

PT-AE700U / PT-AE700E
36
Page 37
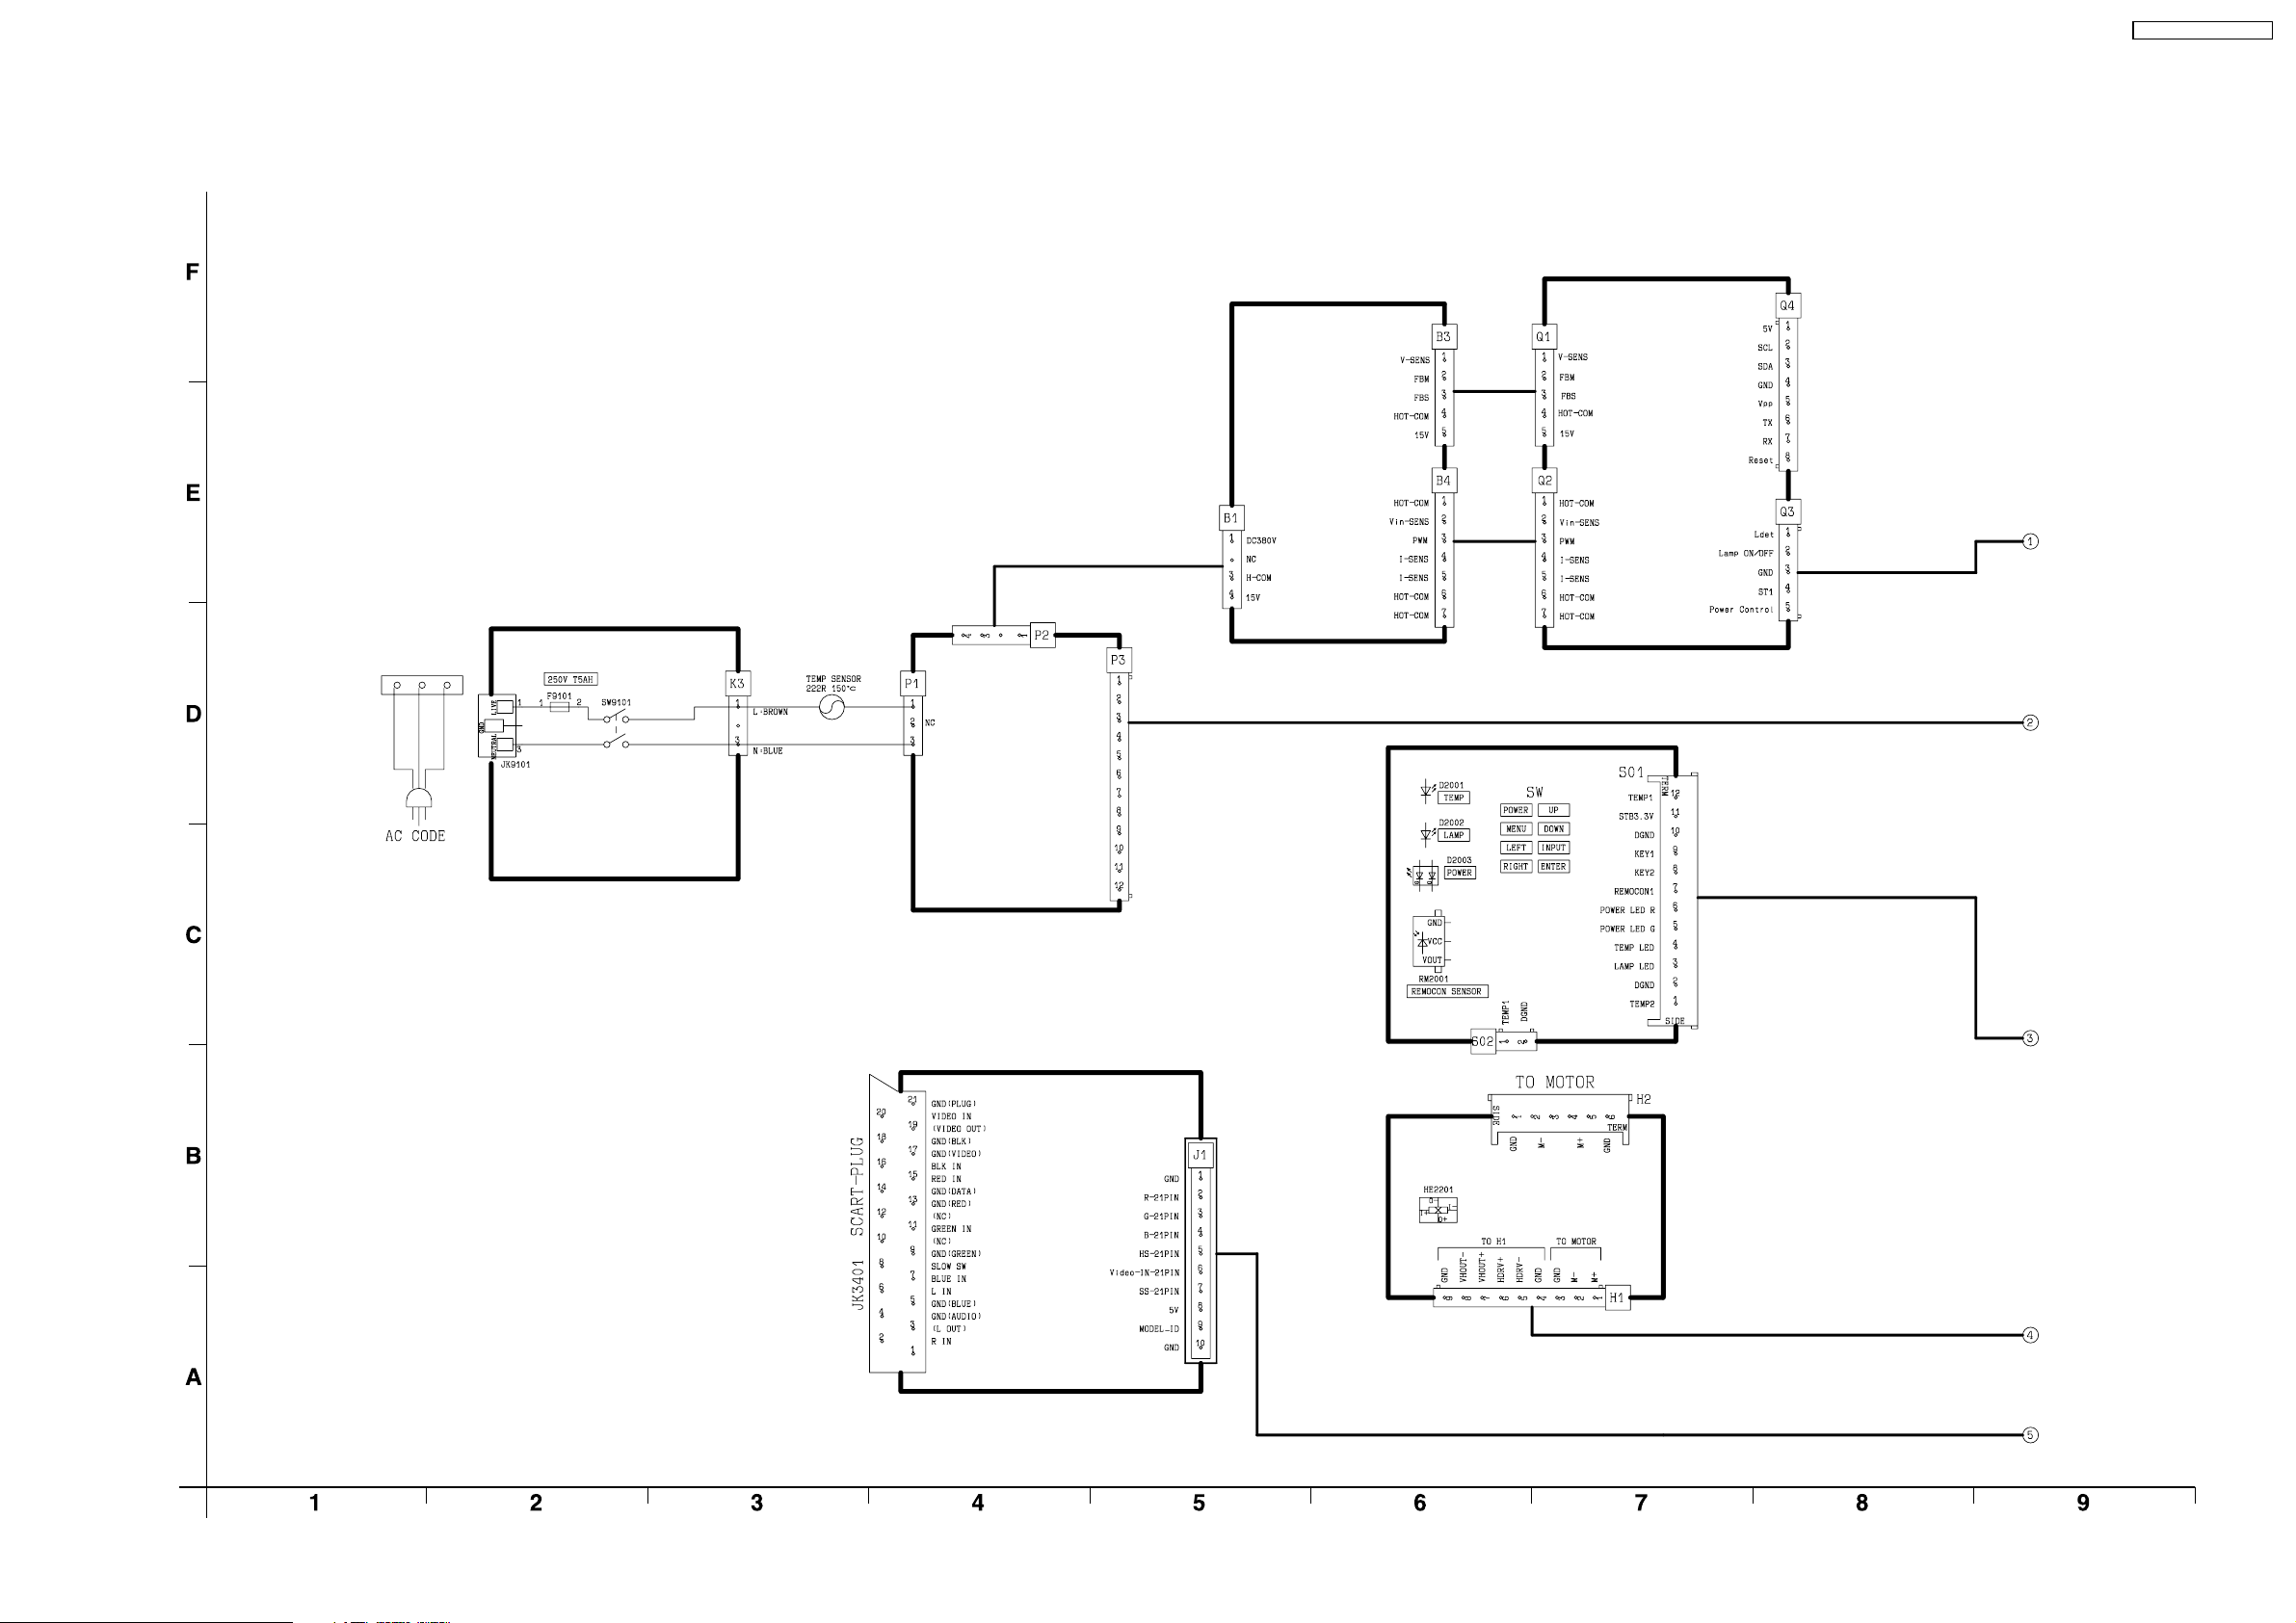
9 Interconnection Block Diagram
9.1. Interconnection Block Diagram (1/2)
Interconnection Block Diagram (1/2)
PT-AE700U / PT-AE700E
K-P.C.Board
P-Module
B-Module
Q-Module
B/Q-Module
S-P.C.Board
J-P.C.Board
(PT-AE700E only)
H-P.C.Board
37
Page 38
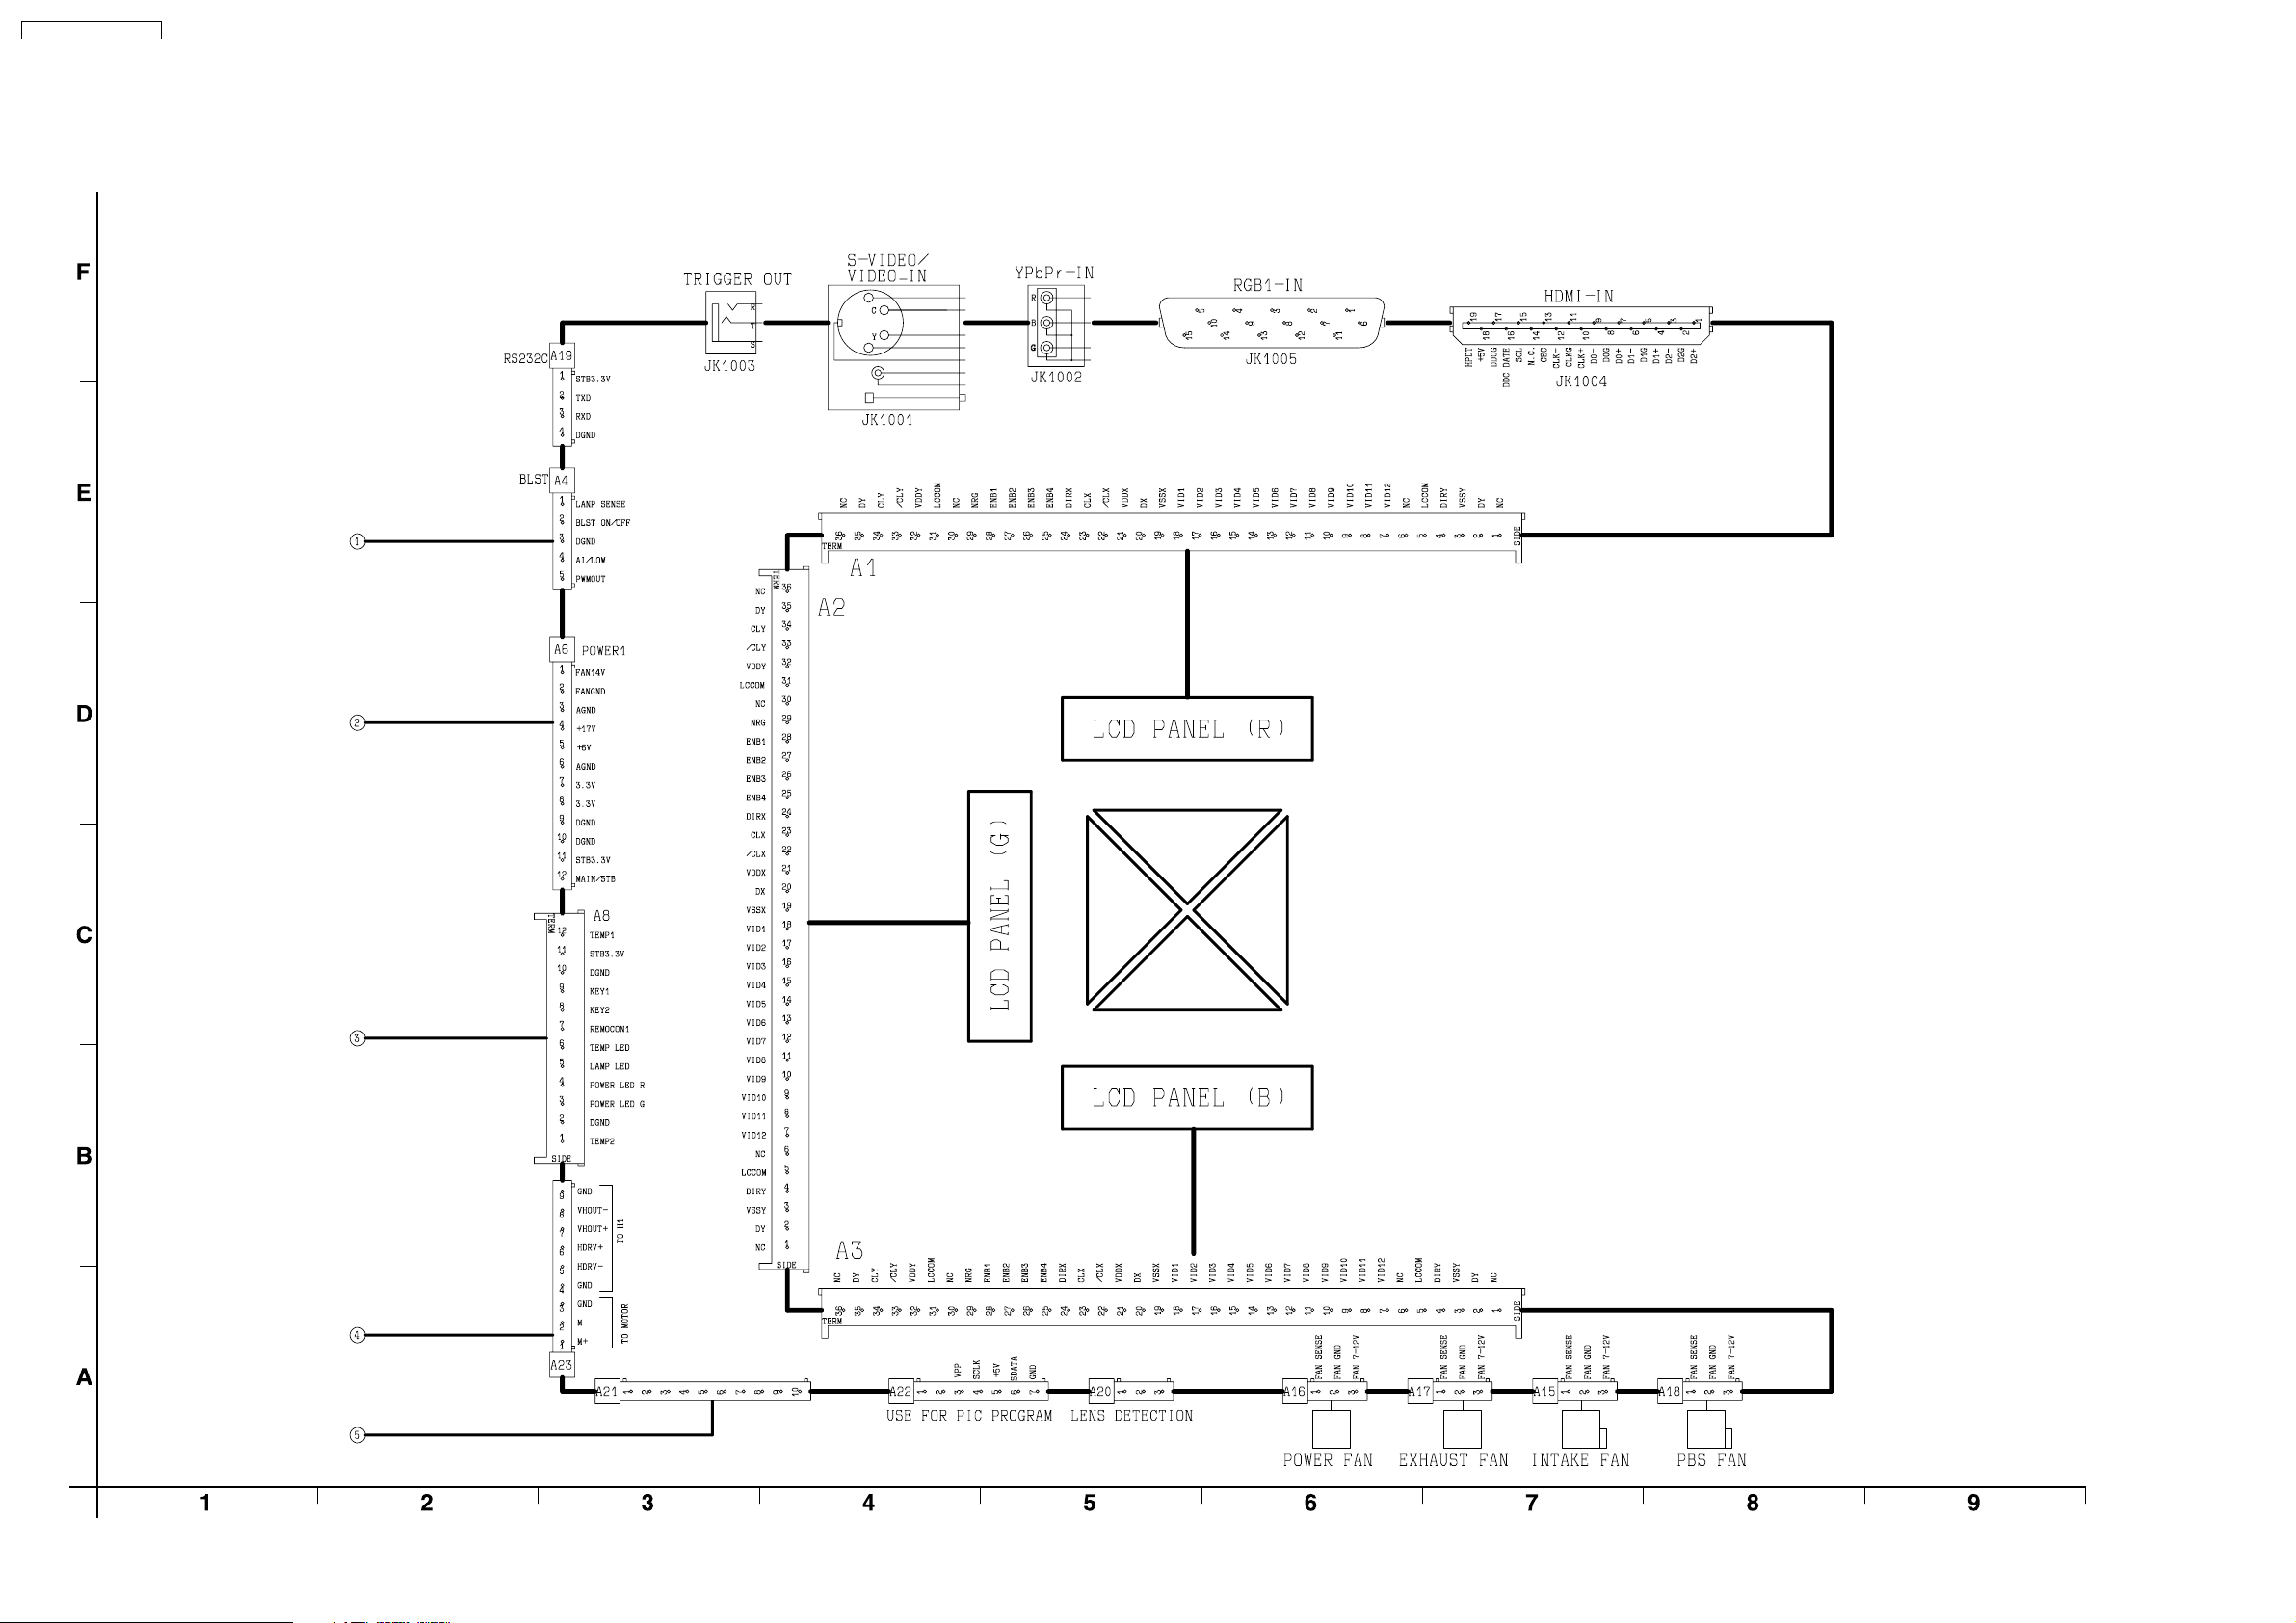
PT-AE700U / PT-AE700E
9.2. Interconnection Block Diagram (2/2)
Interconnection Block Diagram (2/2)
A-P.C.Board
38
Page 39
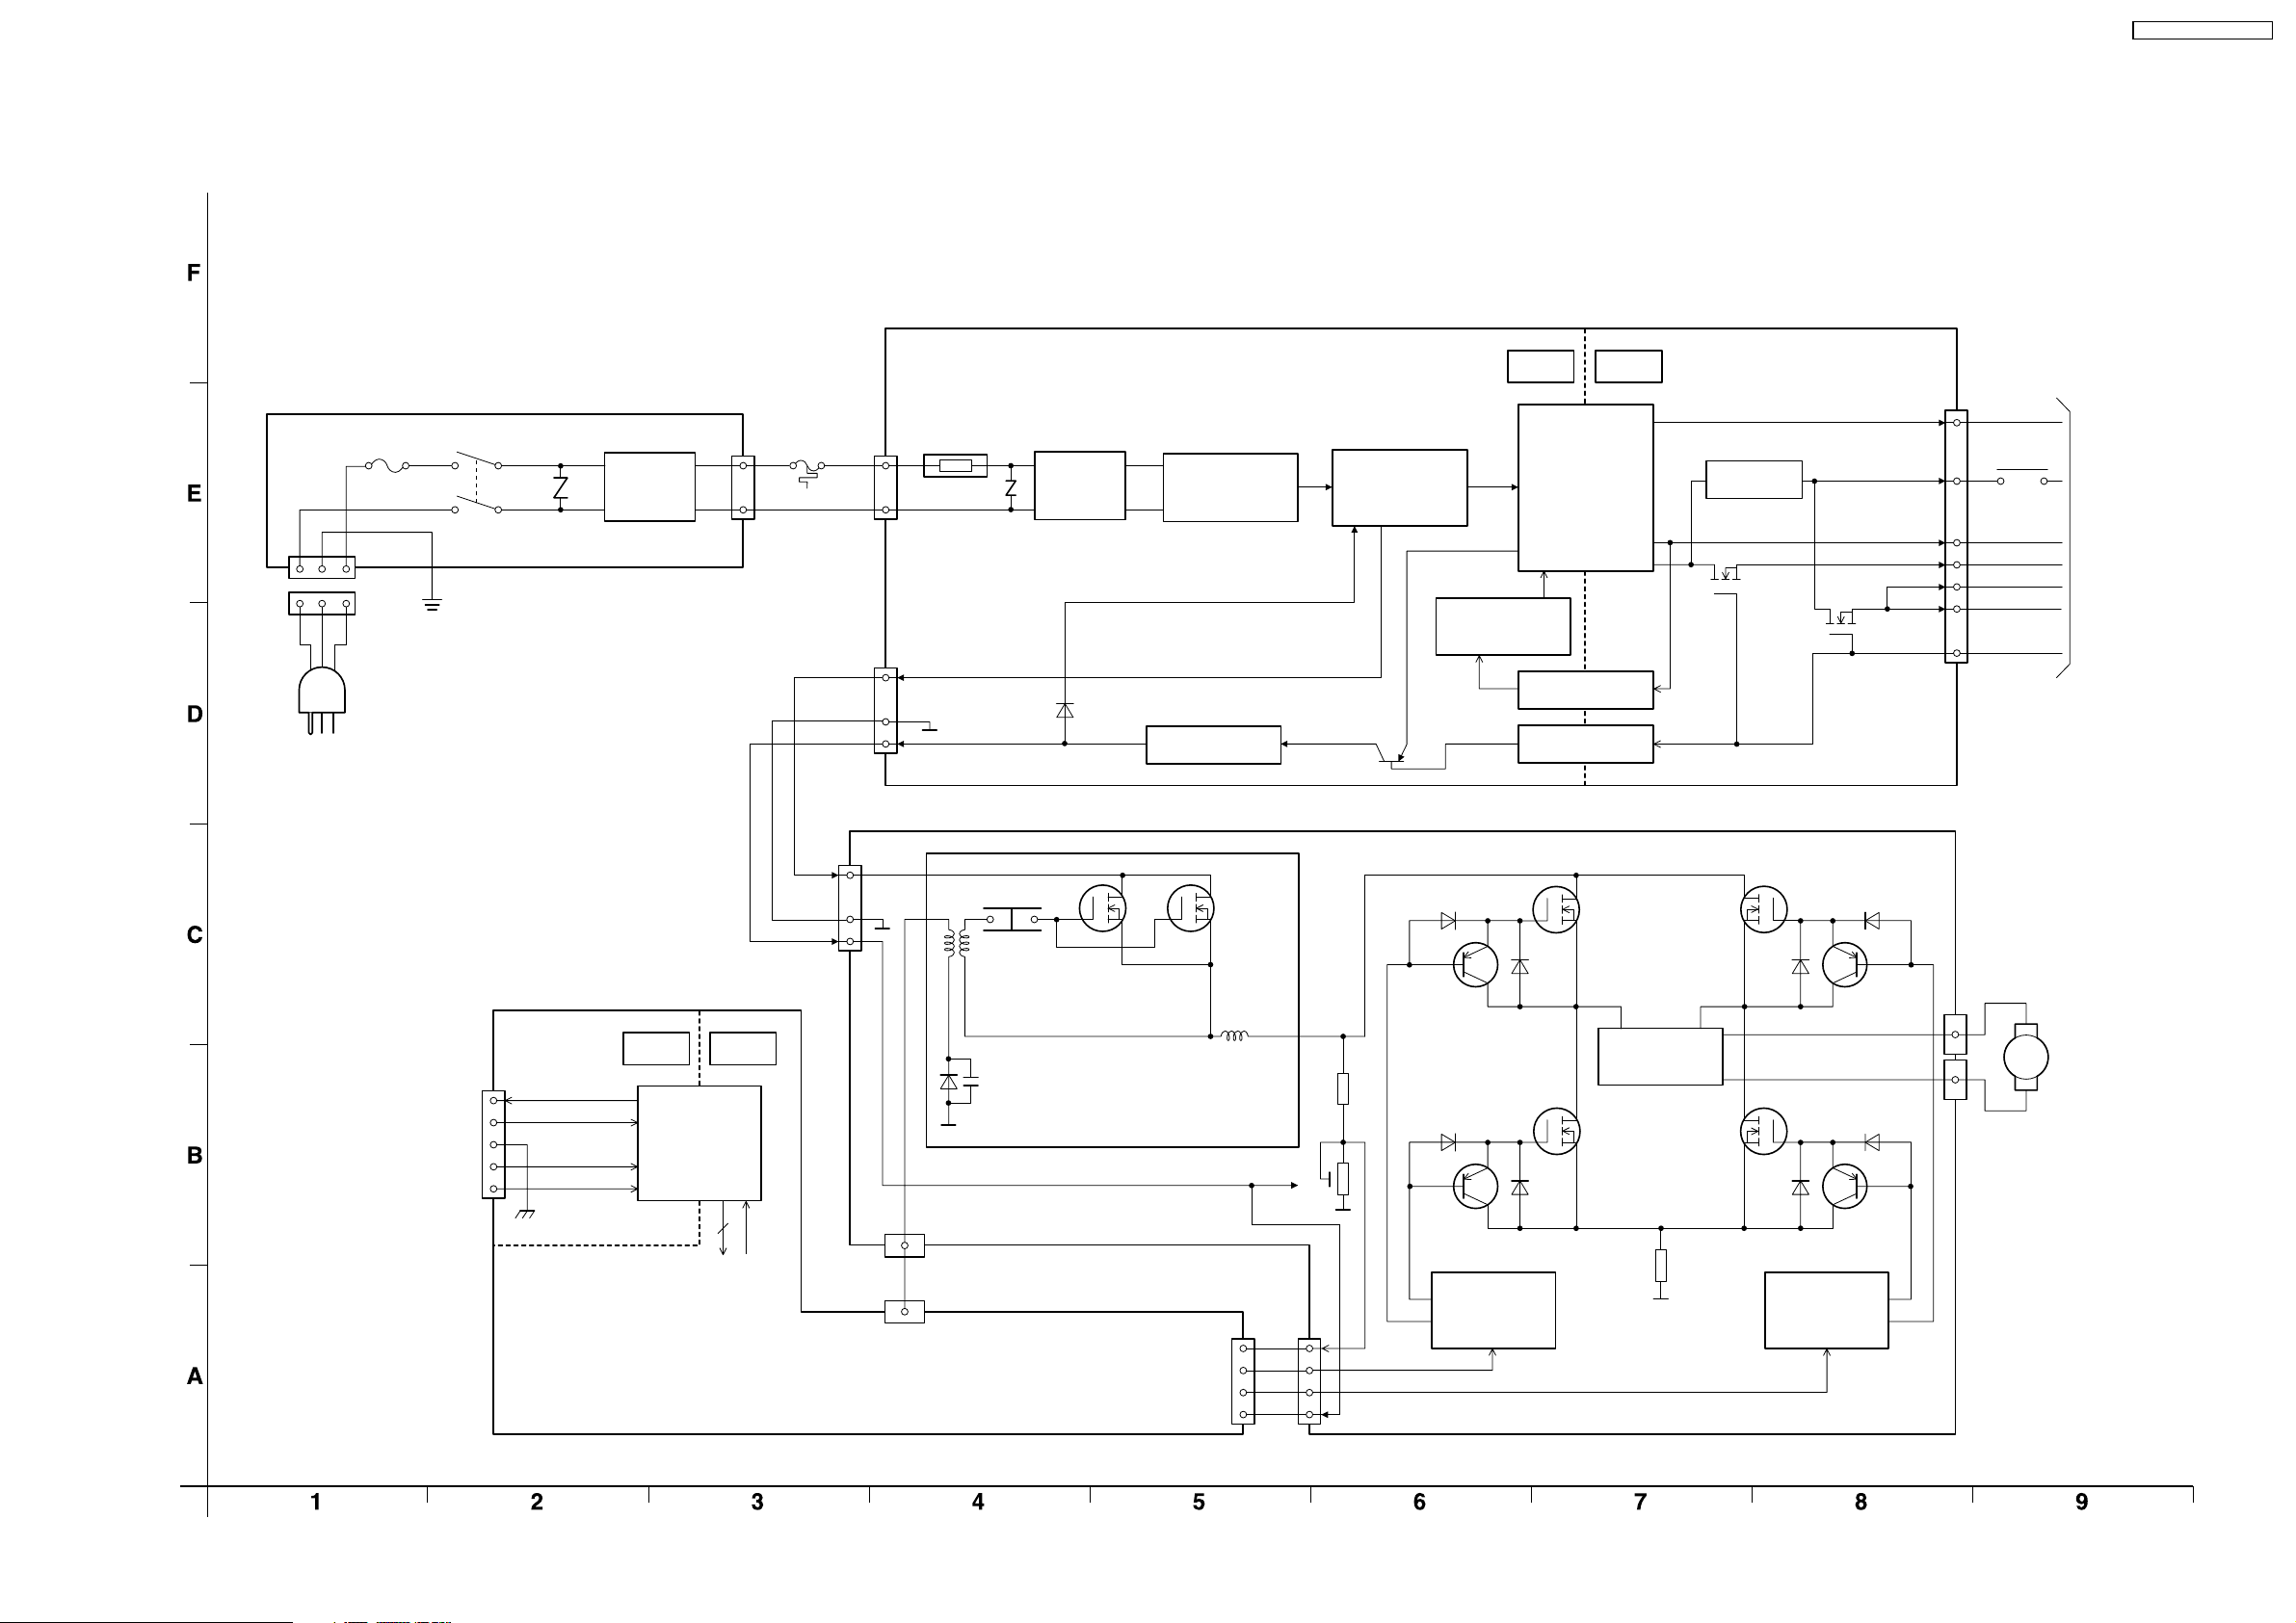
10 Block Diagram
10.1. Power Supply
Power Supply
F9101
AC IN
Power Cord
MAIN POWER
Ground Lug
D9101
K-P.C.Board
LINE
FILTERS
K3
THERMOFUSE
PT-AE700U / PT-AE700E
HOT COLD
P3
+17 V
P1
P2
1
3
4
TH101
Z101
DC380 V
15 V
LINE
FILTER
RECTIFIER
IC102
15 V AVR
POWER
FACTOR
CORRECTION
Q107
SWITCHING
REGULATOR
PHOTOISOLATOR
PHOTOISOLATOR
SWITCHING
TRANSFORMER
Q205
MC202
Q204
STB 3.4 V
FAN 14 V
+6 V
3.4 V
3.4 V
MAIN/STB
4
INTERLOCK
SWITCH
11
1
5
7
8
12
A-P.C.Board
A6
P-Module
A-P.C.Board
A4
Q3
1
2
3
4
5
L det
Lamp ON/OFF
ST1
Power Control
HOT COLD
PHOTOISOLATORS
3
B1
1
3
4
D
S
G
G
STEP-DOWN CHOPPER
B4
Q2
B/Q-Module
Q9614Q9603
D
S
15 V
B3
Q1
D9604
Q9604
D9606
Q9605
HALF BRIDGE
DRIVER
(MASTER)
G
D9605
G
D9607
D
S
D
S
Q9606
IGNITER
BLOCK
Q9607
Q9610
Q9611
D
S
D
S
G
D9609
G
D9612
HALF BRIDGE
DRIVER
(SLAVE)
D9608
Q9608
LAMP
B5
B6
D9611
Q9609
IC9602IC9603
Q-Module
(CONTROLLER)
B-Module
39
Page 40
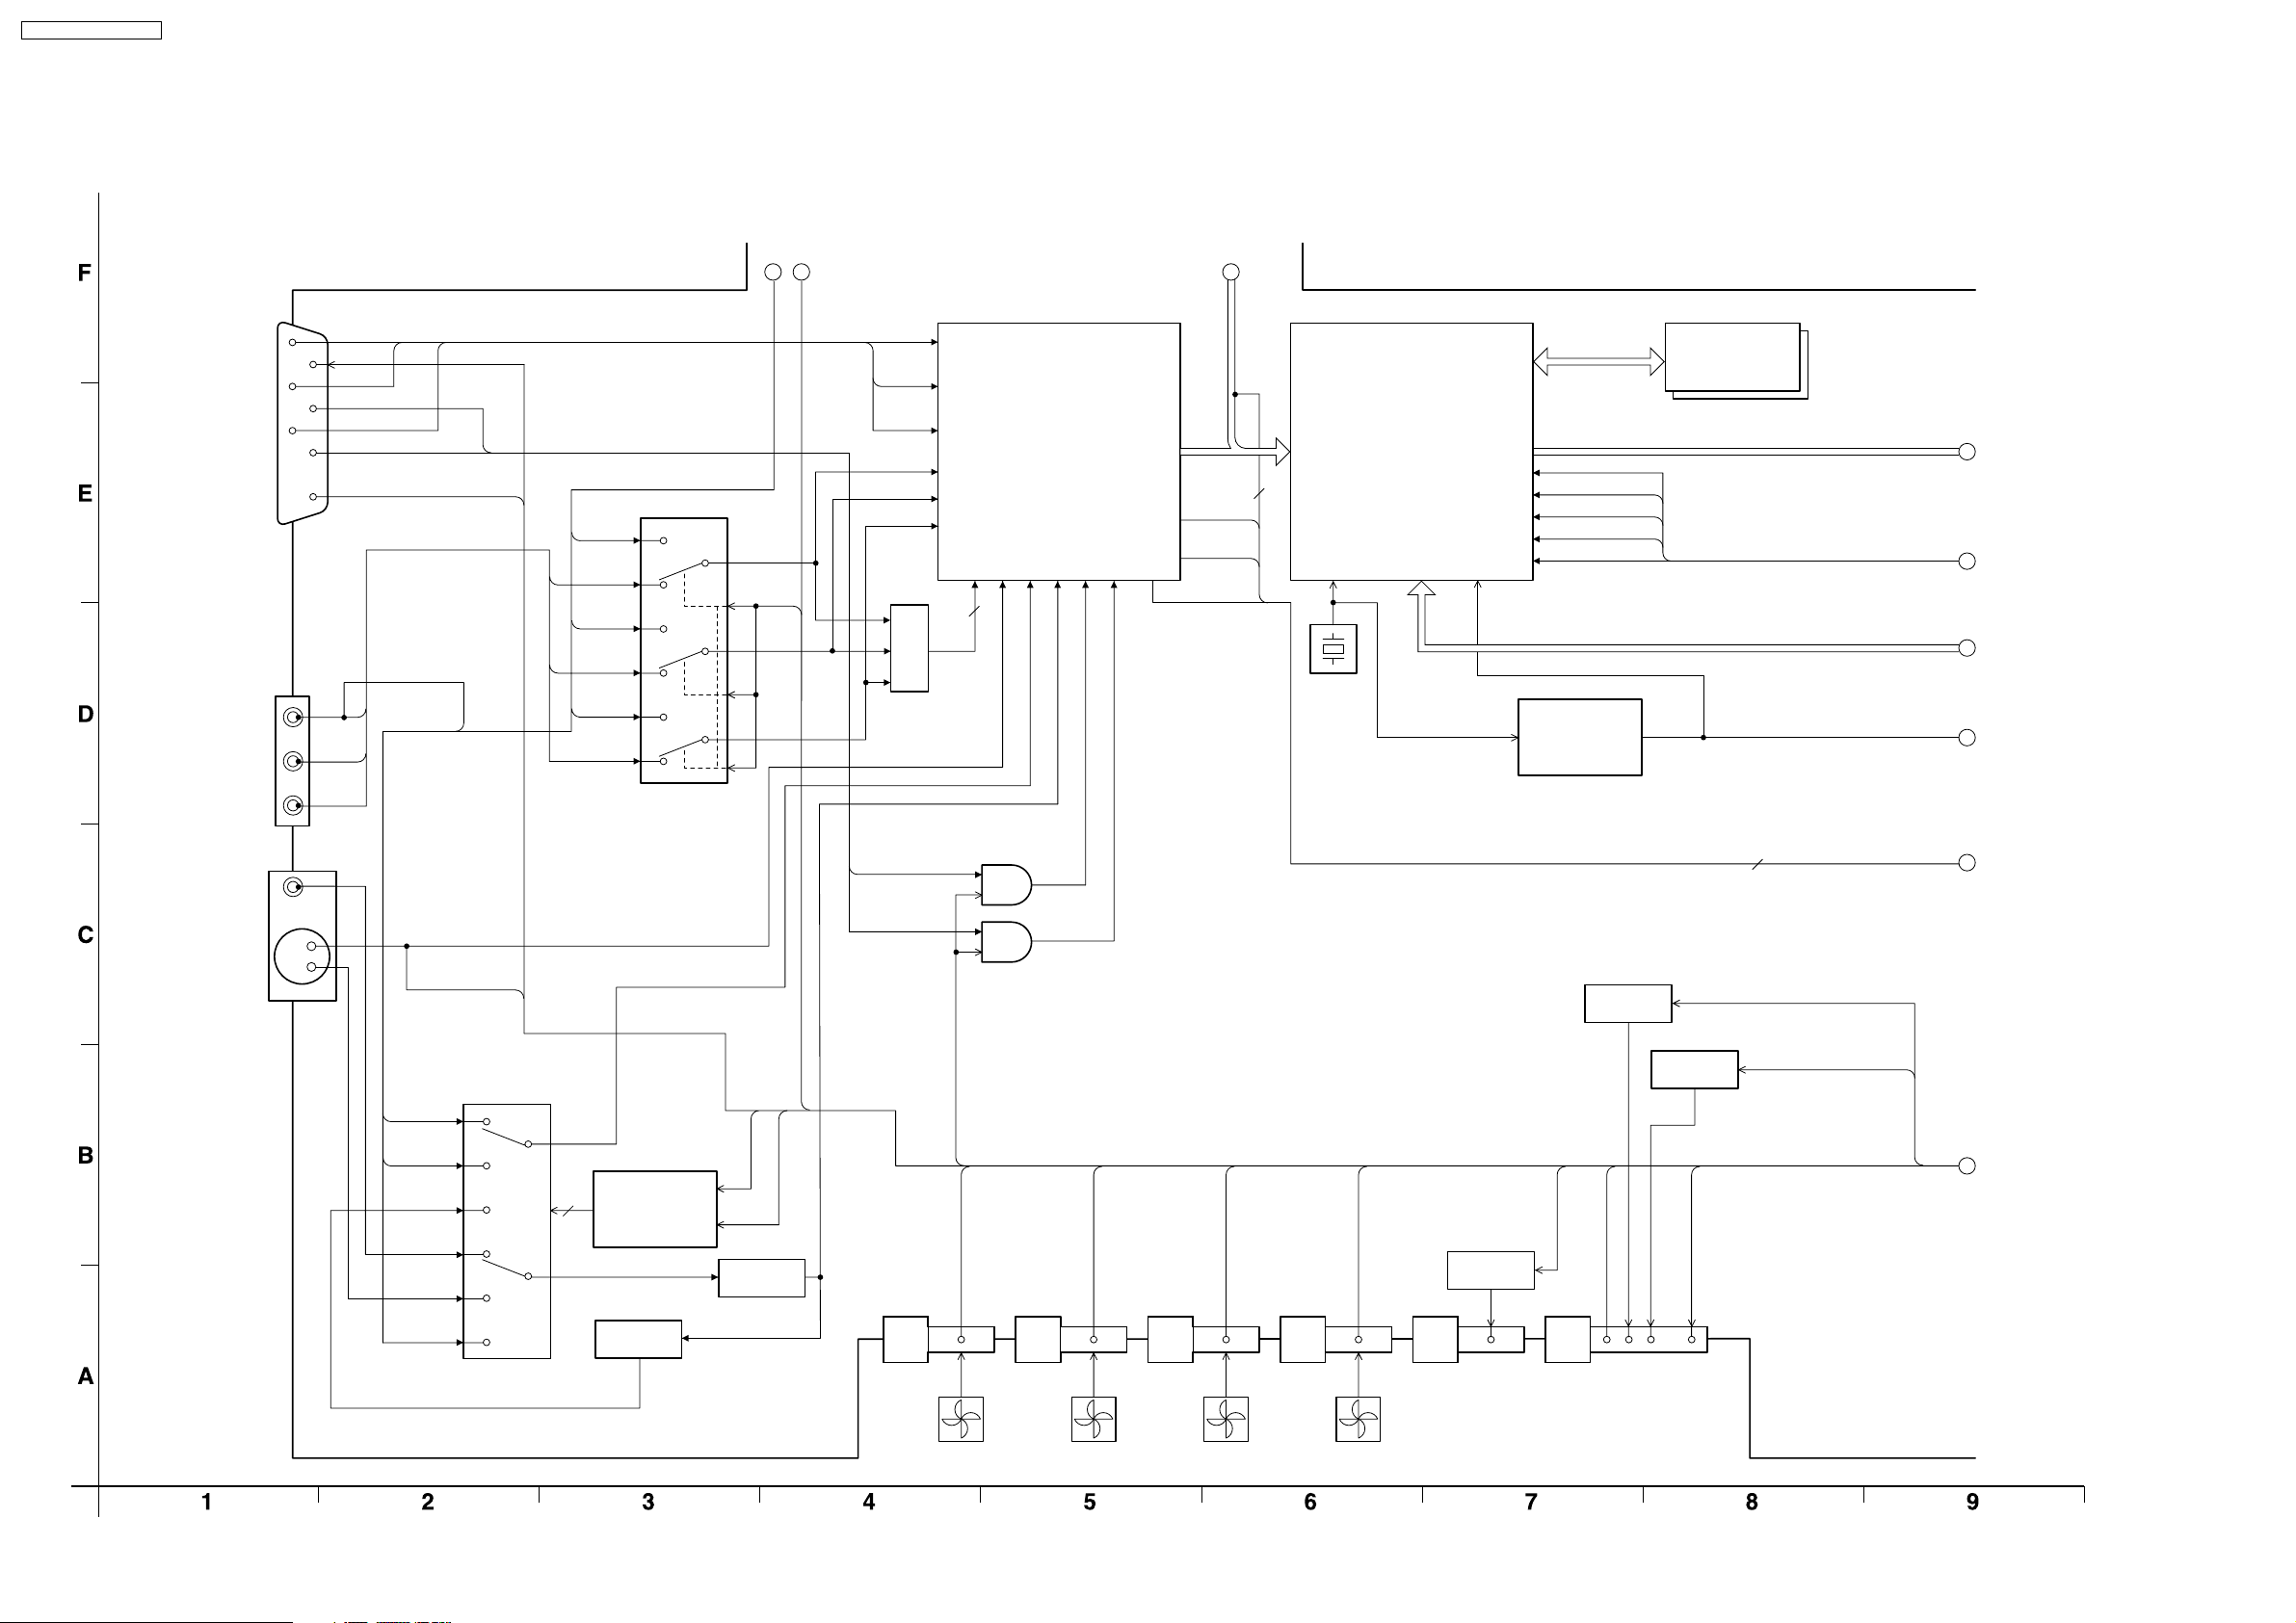
PT-AE700U / PT-AE700E
10.2. Signal Processing (1/3)
Signal Processing (1/3)
a b c
from/to (3/3)
PC IN
COMPONENT
IN
VIDEO IN
IC1001
1
2
3
R
12
G
13
B
14
15
Y1
RXDRGBIN
Y_SYNC
TXDRGBIN
HD
VD
G/Y-IN
Y1
B/P
B
R/P
R
IC1007
YUV_D
-IN
-IN
R
G
B
BPR
/HD
YP
LPF
Q1020, Q1021,
Q1023-Q1025,
Q1027
HD
YP
BPR
3
/SD
IC1137
VIDEO DECODER,
3ch A/D,
PLL
PLLHS
VIDEO_V
RGBHS
2
RESIZE,
KEYSTONE CORRECTION,
INTERLACE/PROGRESSIVE
TRANSFORMATION,
AI CONTROL,
NOISE REDUCTION
X001
(76 MHz)
IC1005 IC1006
OSDI
OSDG
OSDR
OSDB
OSDACT
MCLK
POCLK
IC1102
CLOCK
GENERATOR
64M SDRAM
(x2)
IC1008
1
2
3
4
5
5
S2 VIDEO
IN
VD
C
Y
VIDEO-IN-21PIN
SQUEEZE1
AC_SYNC
Y_SYNC
IC1004
2
VIDEO, SYNC
SW CONTROL
Q1117, Q1118
Q1016
LPF
(PT-AE700E only)
CTRL-1
Q1018
LPF
CTRL-2
A18
A-P.C.Board
IC1138
RGB_VIDEO
PFAN2
PBS
A17
LFAN1
EXHAUST
A16
LFAN2
POWER
A15
PFAN1
INTAKE
Q1034
A6
P-Module
P3
SW
Q1031
MAIN_STBY
LAMP_SENSE
A4
Q-Module
Q3
SW
Q1032
SW
PWMOUT
BLST
QUICK
6
40
Page 41
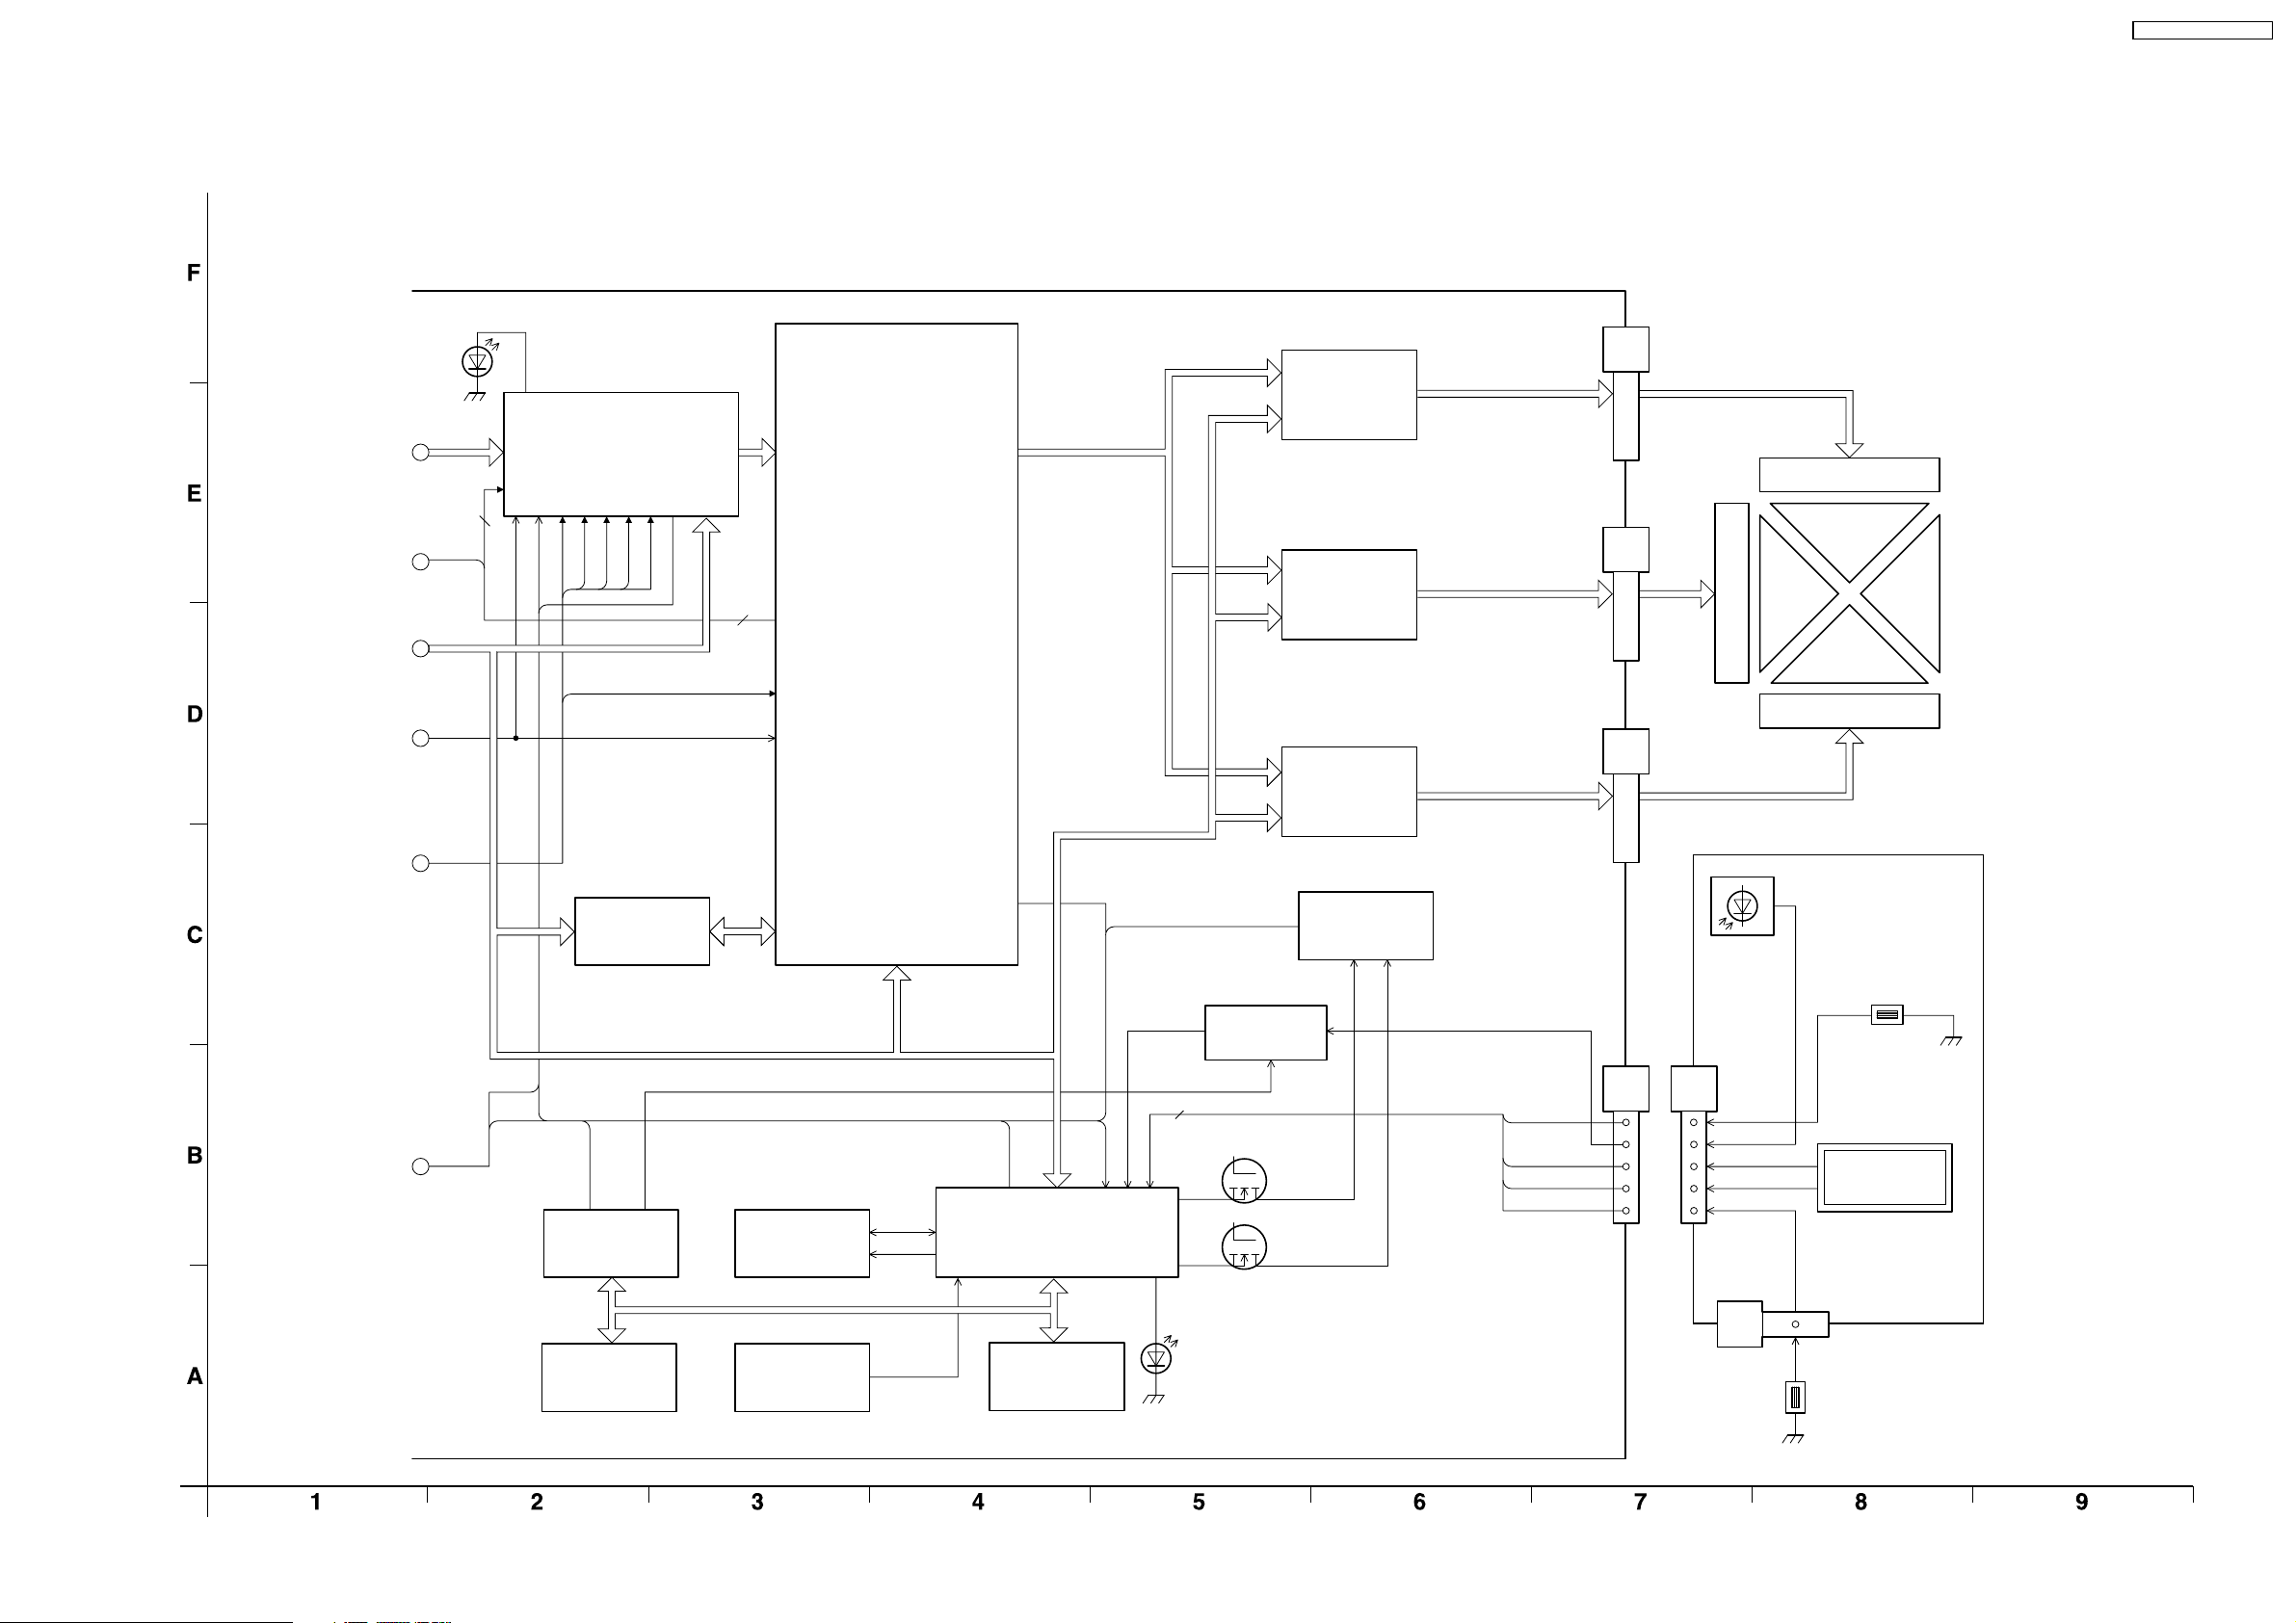
10.3. Signal Processing (2/3)
Signal Processing (2/3)
PT-AE700U / PT-AE700E
D1145
1
2
3
4
5
(FPGA ACT)
5
FPGACK
IC1032
COLOR MANAGEMENT,
DYNAMIC GAMMA,
IRIS CONTROL
(FPGA)
PLLHS
RGBHS
VIDEO_V
YUVHS
YUVVS
PLLHS
LCDCLK
IC1009
ONSCREEN
DISPLAY
IC1200
IC1051
LCD
DRIVER
IC1052
LCD
5
GAMMA CORRECTION,
COLOR UNEVENNESS
CORRECTION,
SYNC PROCESSOR,
PANEL TIMING
GENERATOR
DRIVER
IC1053
LCD
DRIVER
IC1021
D/A
CONVERTER
A1
R
LCD PANEL (R)
A2
G
LCD PANEL (G)
LCD PANEL (B)
A3
B
S-P.C.Board
IC1020
REMO_CFD
6
CF_SW
REGISTER
IC1012
IC1027
SRAM
IC1017
EEPROM
IC1016
RESET
SDA
SCL
IC1010
MICROPROCESSOR
IC1011
8M FLASH
4
Q1102
Q1101
D1024
(CPU ACT)
FLIP-FLOP
SDA2
SCL2
A-P.C.Board
REMO
A8 S01
THERMO2
KEY2
KEY1
THERMO1
S02
THERMOSENSOR
(EXHAUST AIR)
THERMOSENSOR
(INTAKE AIR)
SWITCHES
41
Page 42
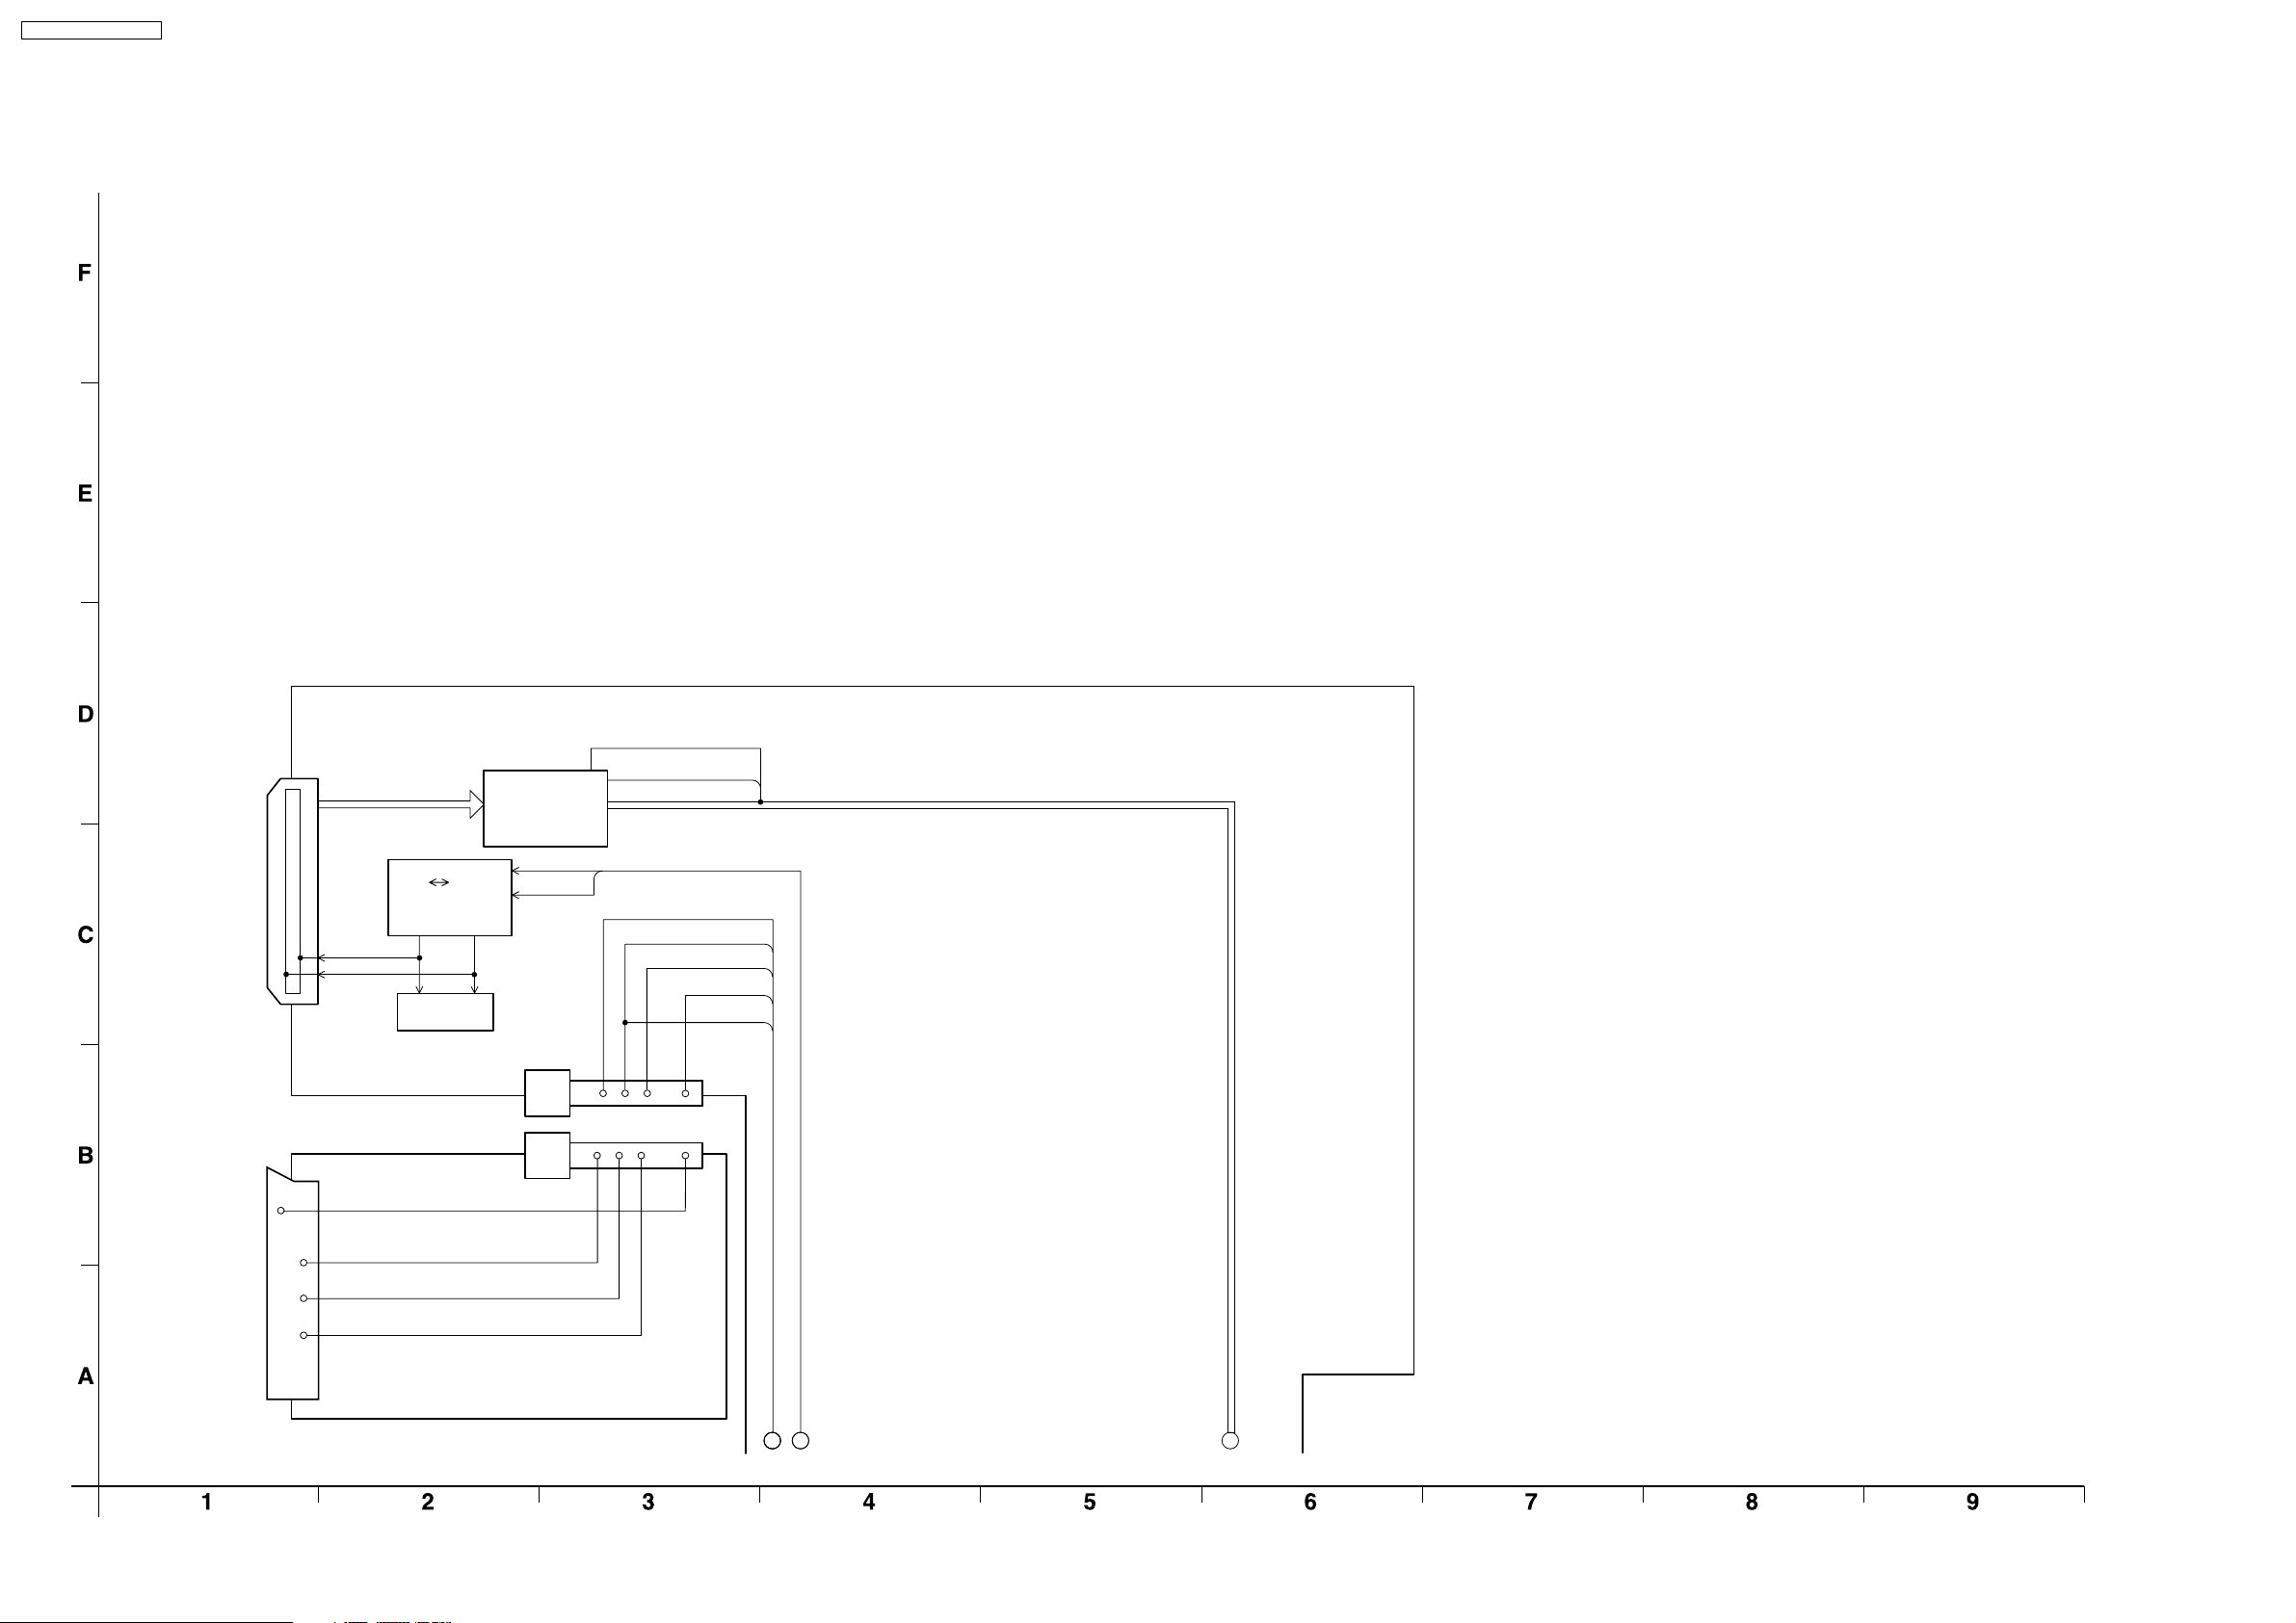
PT-AE700U / PT-AE700E
10.4. Signal Processing (3/3)
Signal Processing (3/3)
HDMI IN
SCART
A-P.C.Board
IC1107
Q1108, Q1109
5V 3.3V
LEVEL
CONVERTER
SCL
15
16
20
15
11
7
SDA
PnP
ADAPTER
IC1105
VIDEO IN
RED IN
GREEN IN
BLUE IN
3.3V_SDA
3.3V_SCL
A21
J1
YUVHS
YUVVS
R
-IN
R/P
G/Y-IN
B/P
B
-IN
VIDEO-IN-21PIN
AC_SYNC
J-P.C.Board (PT-AE700E only)
a
b
c
from/to (1/3)
42
Page 43
11 Schematic Diagram
PT-AE700U / PT-AE700E
43
Page 44
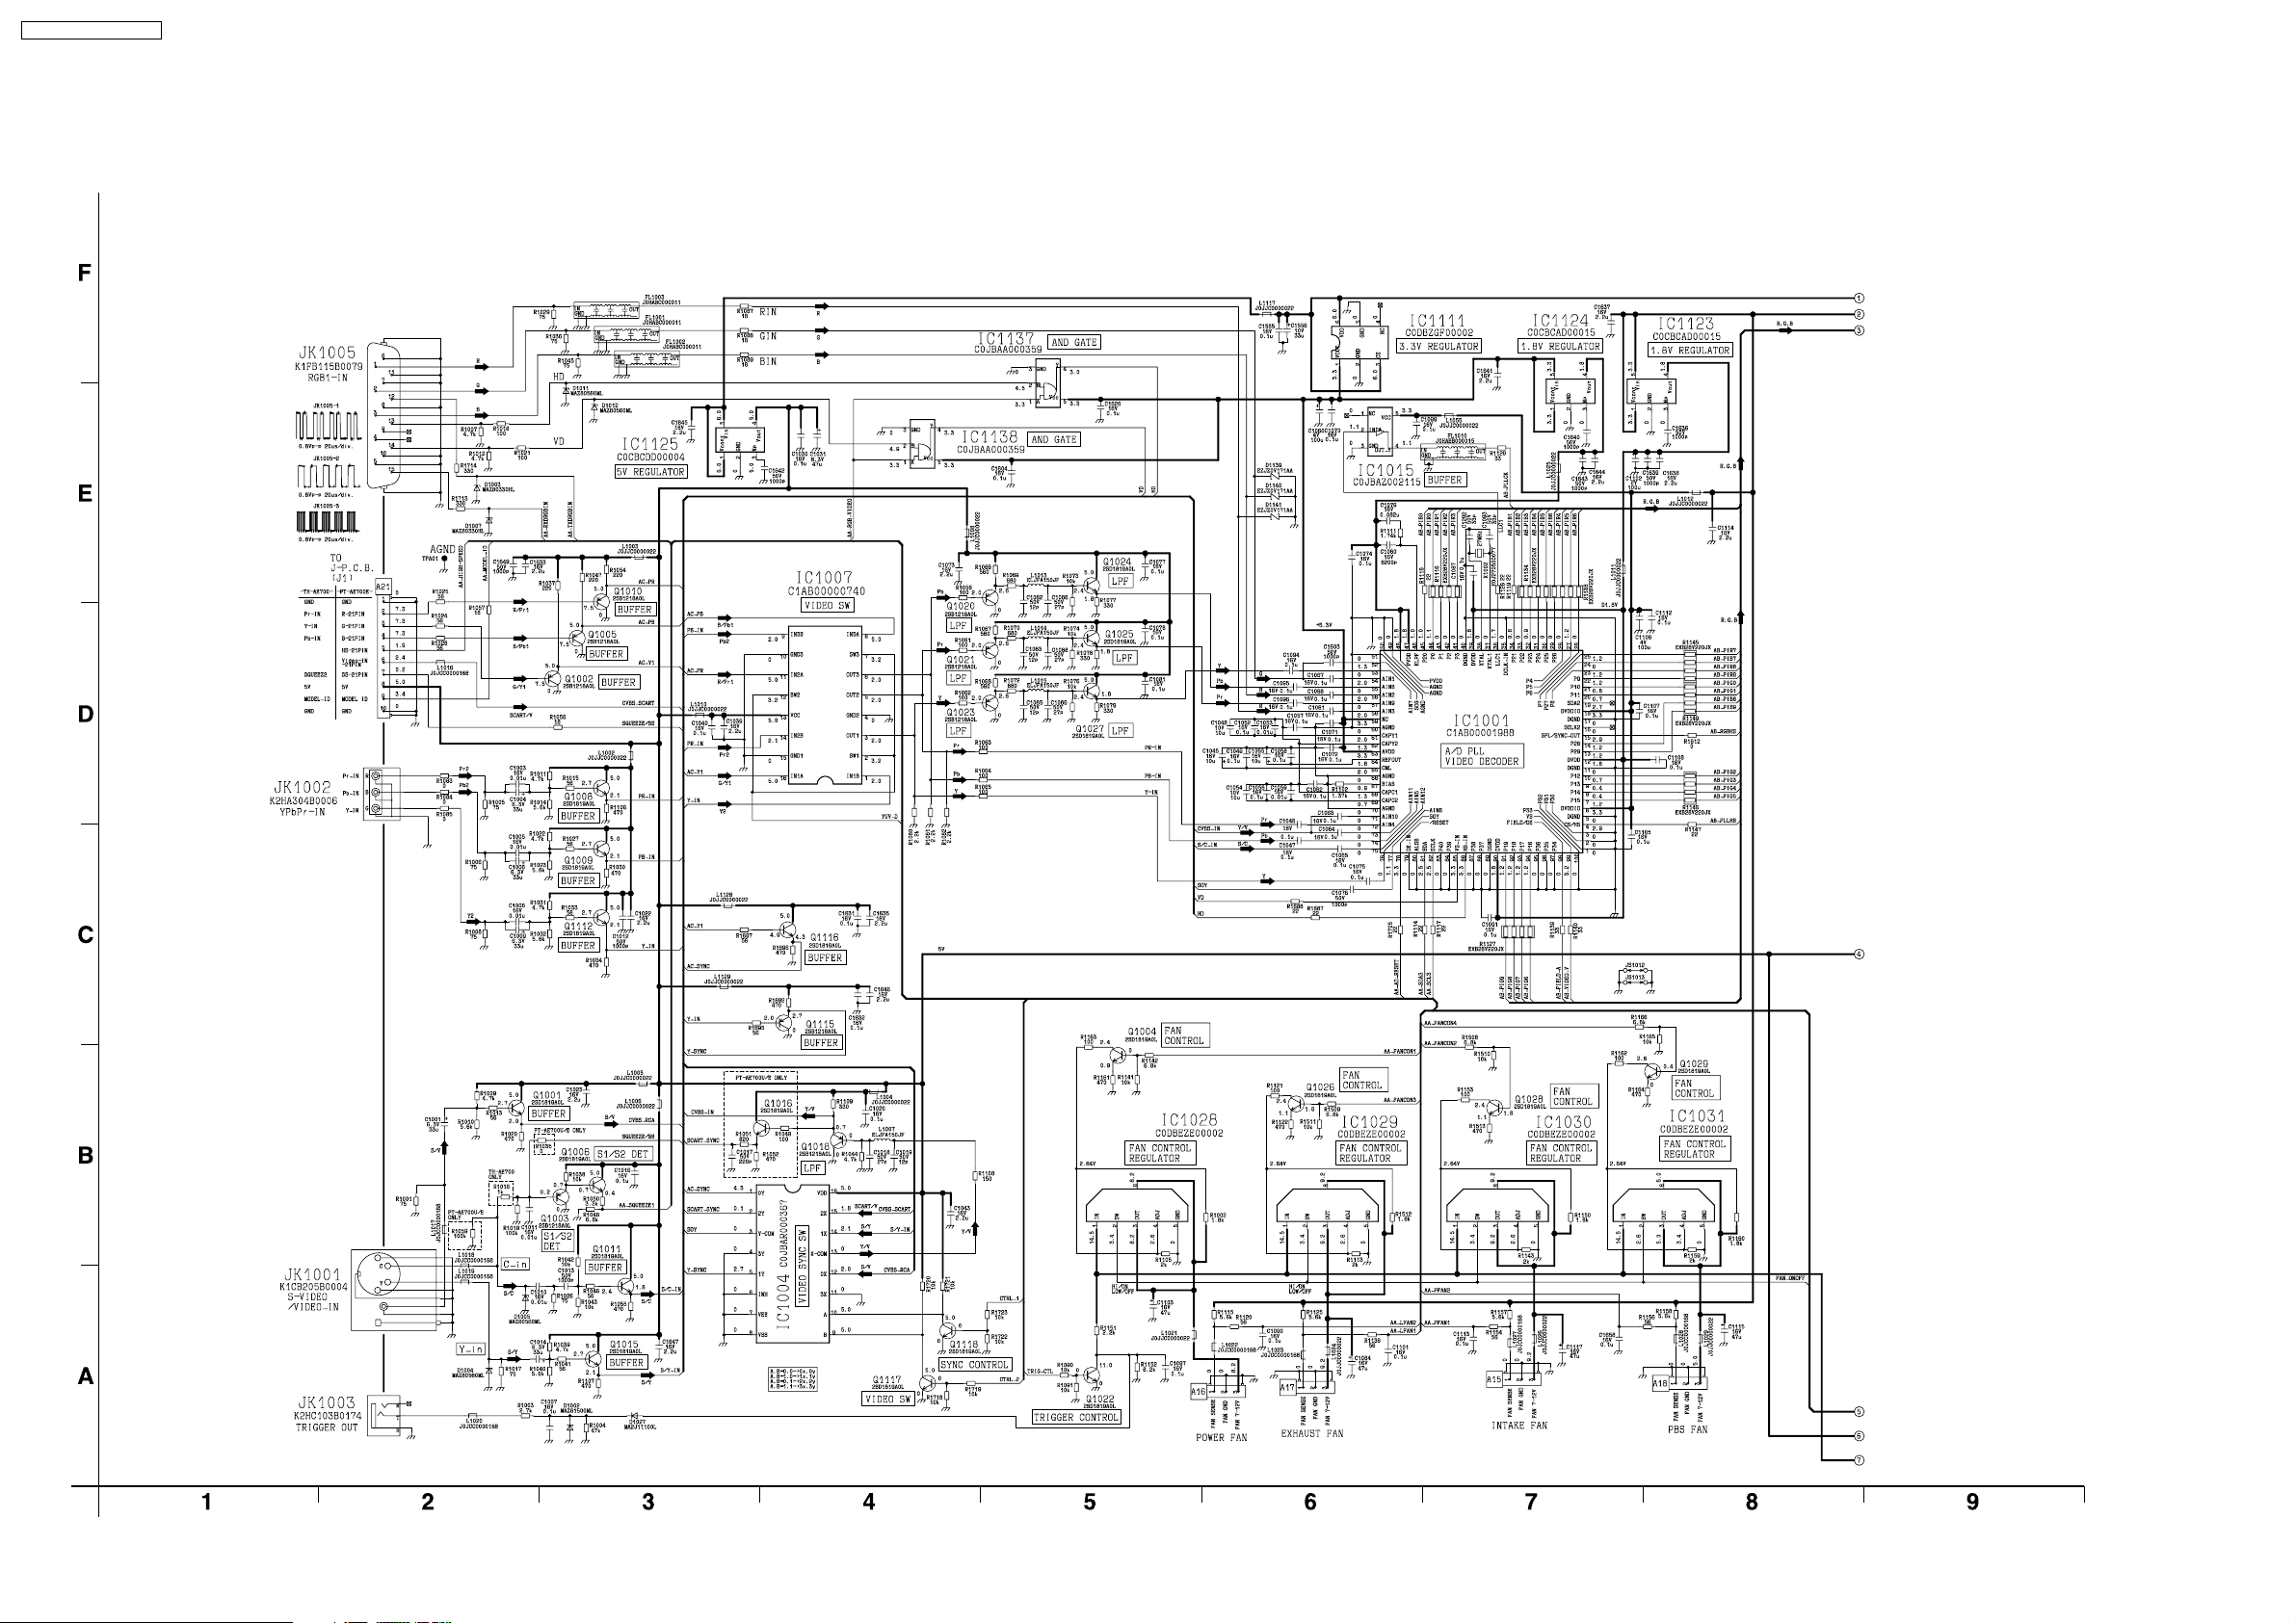
PT-AE700U / PT-AE700E
11.1. A-P.C.Board (1/6)
A-P.C.Board TXANP99PXNZ (1/6)
44
Page 45
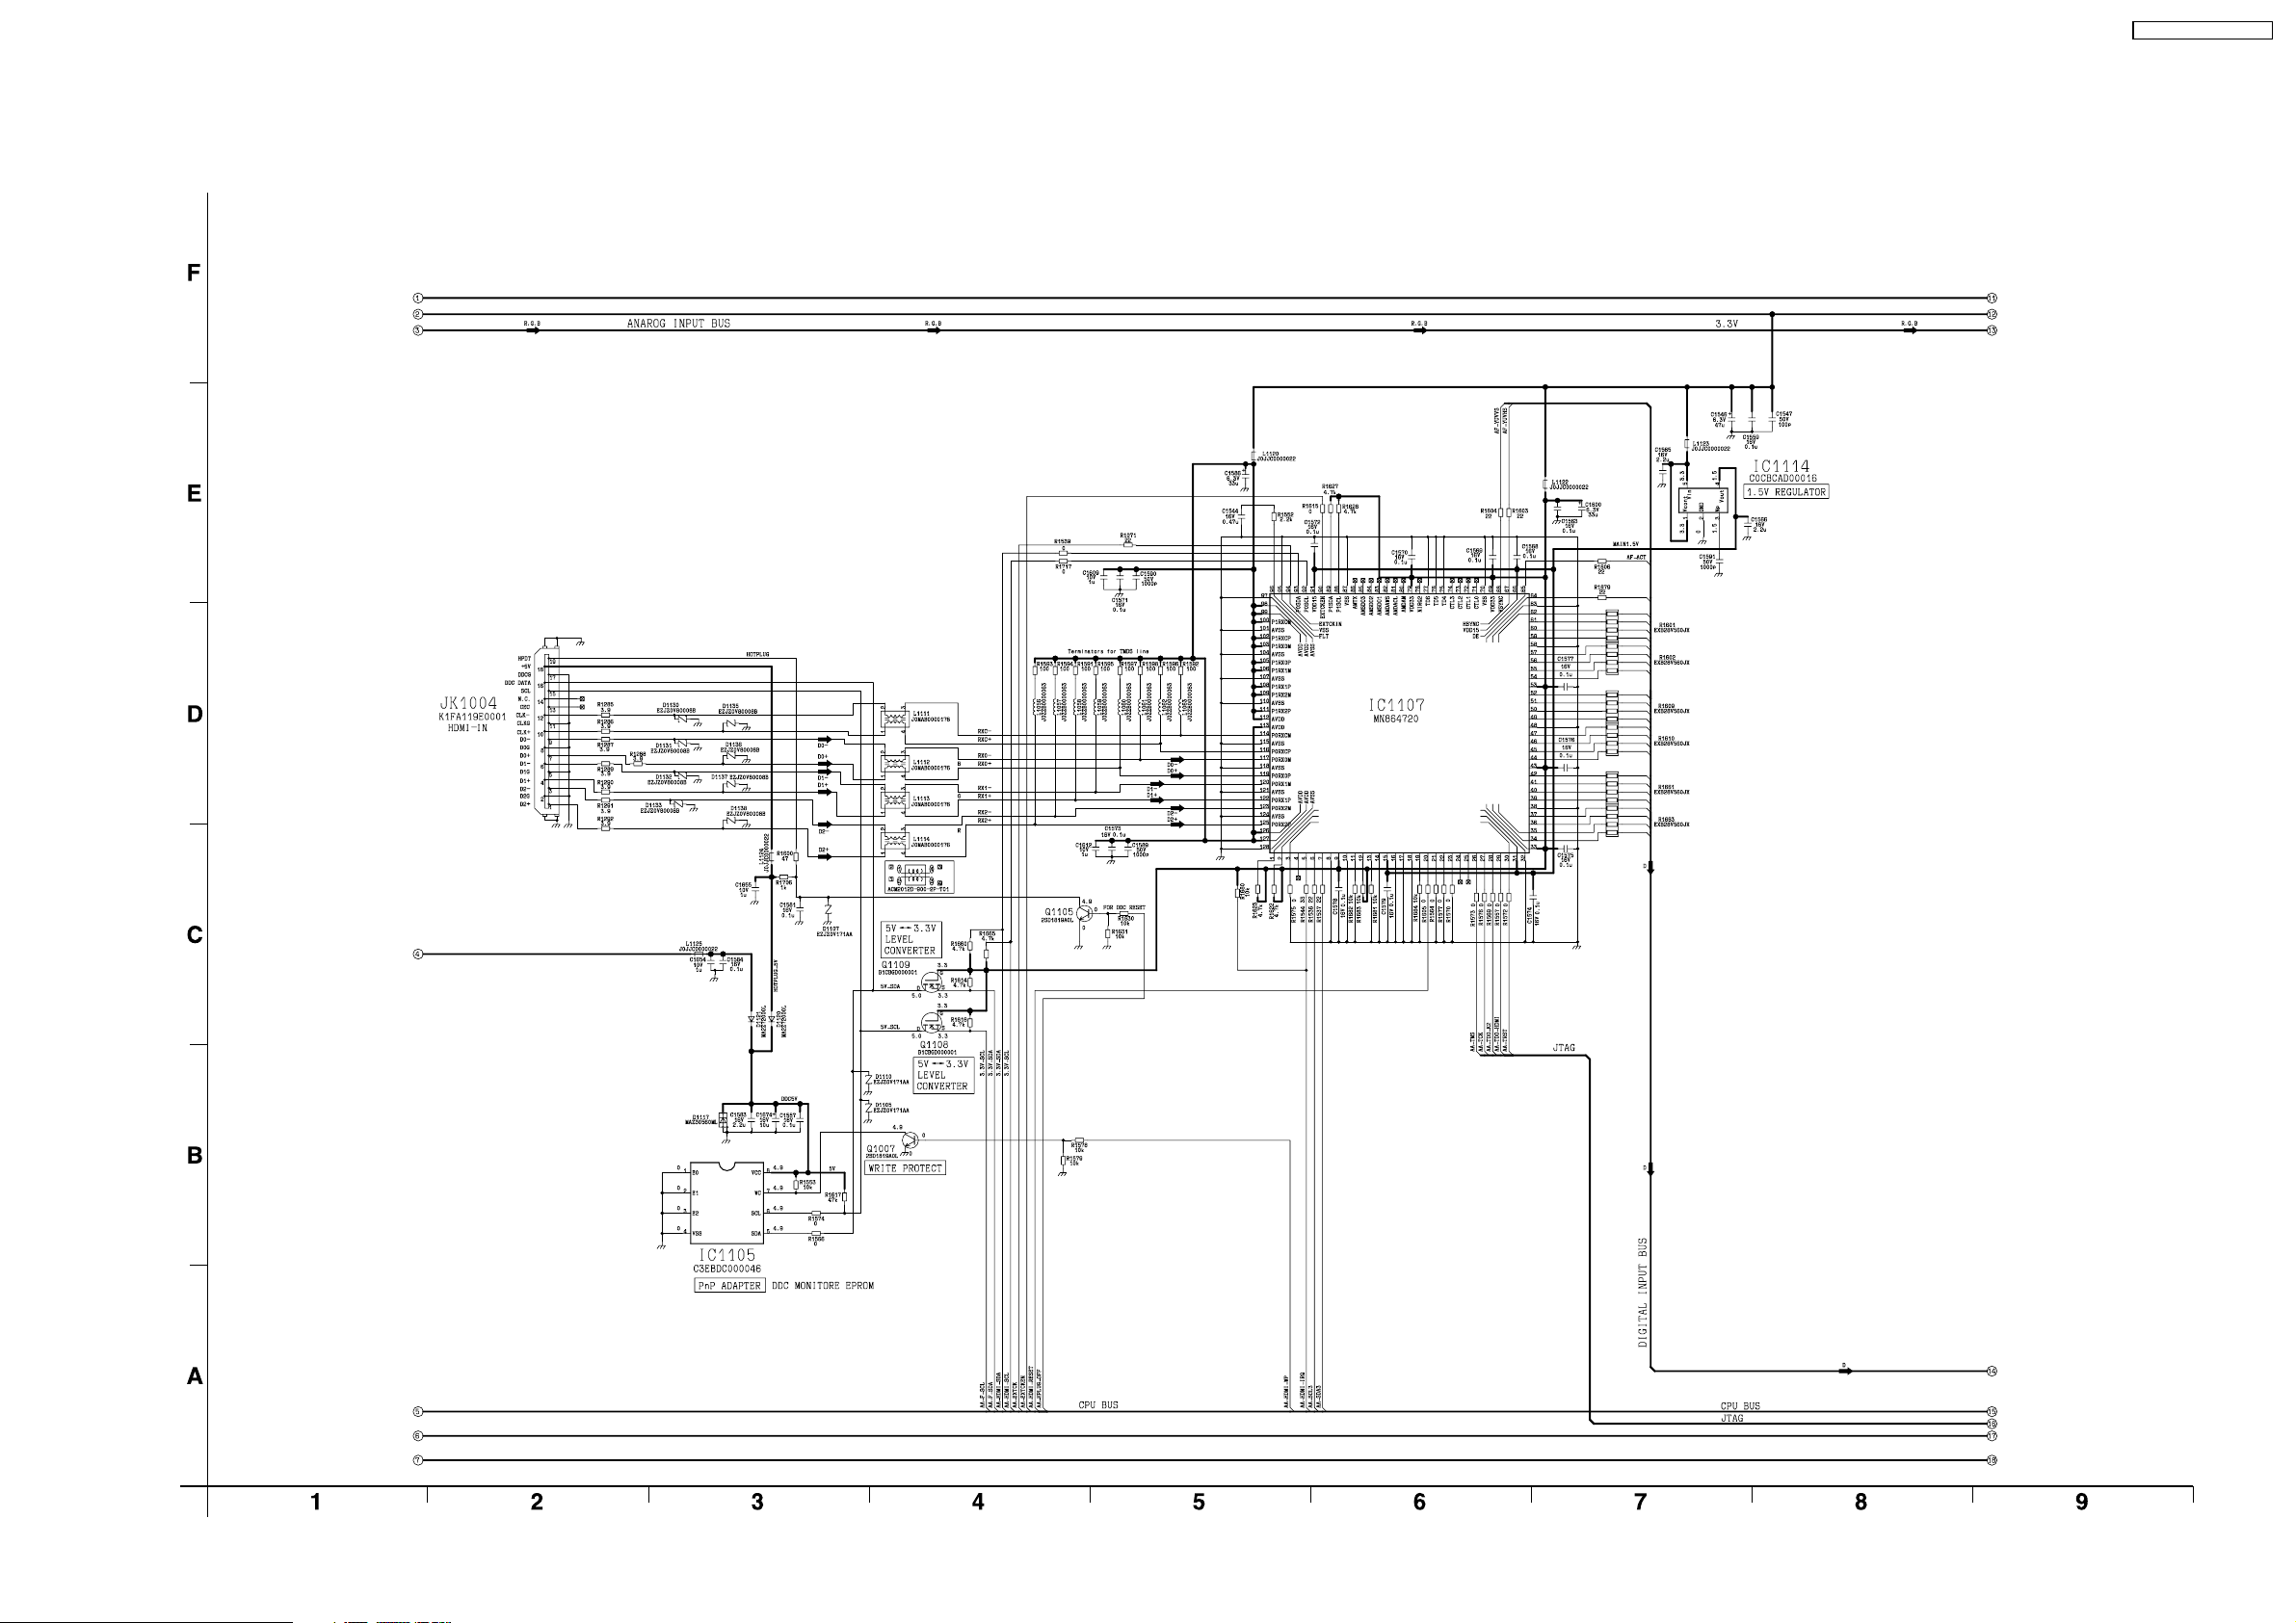
11.2. A-P.C.Board (2/6)
A-P.C.Board TXANP99PXNZ (2/6)
PT-AE700U / PT-AE700E
45
Page 46
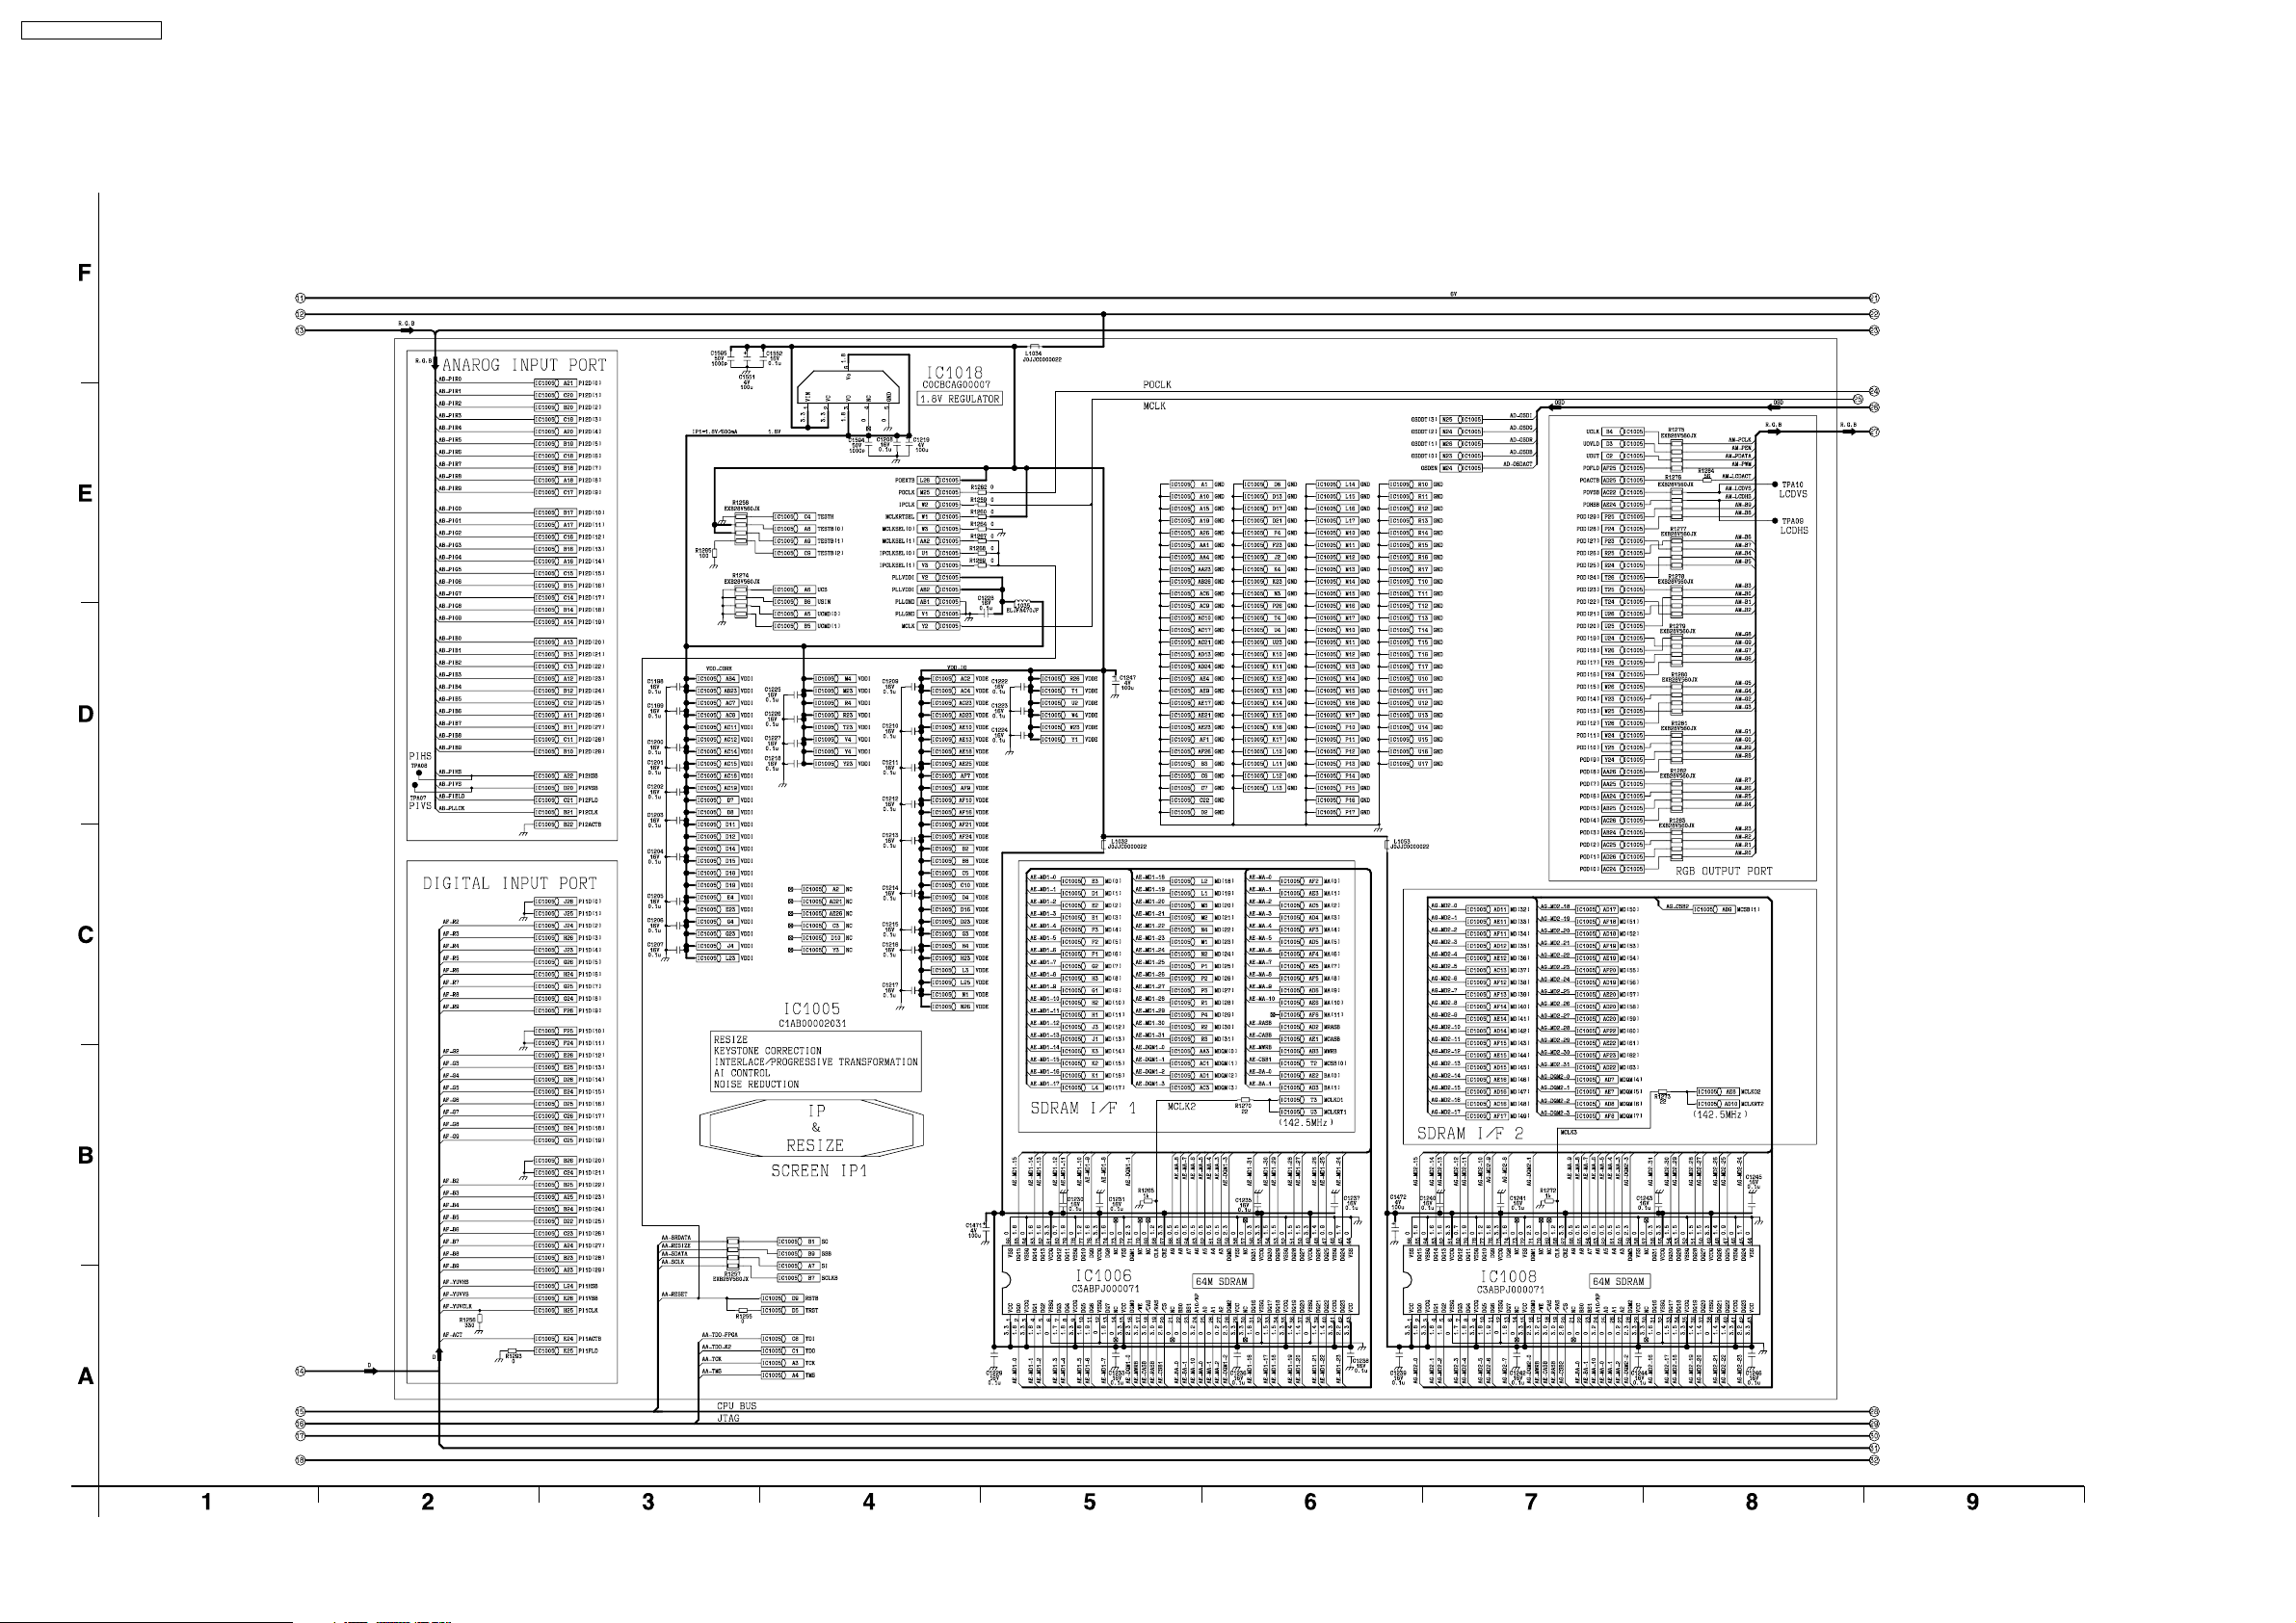
PT-AE700U / PT-AE700E
11.3. A-P.C.Board (3/6)
A-P.C.Board TXANP99PXNZ (3/6)
46
Page 47
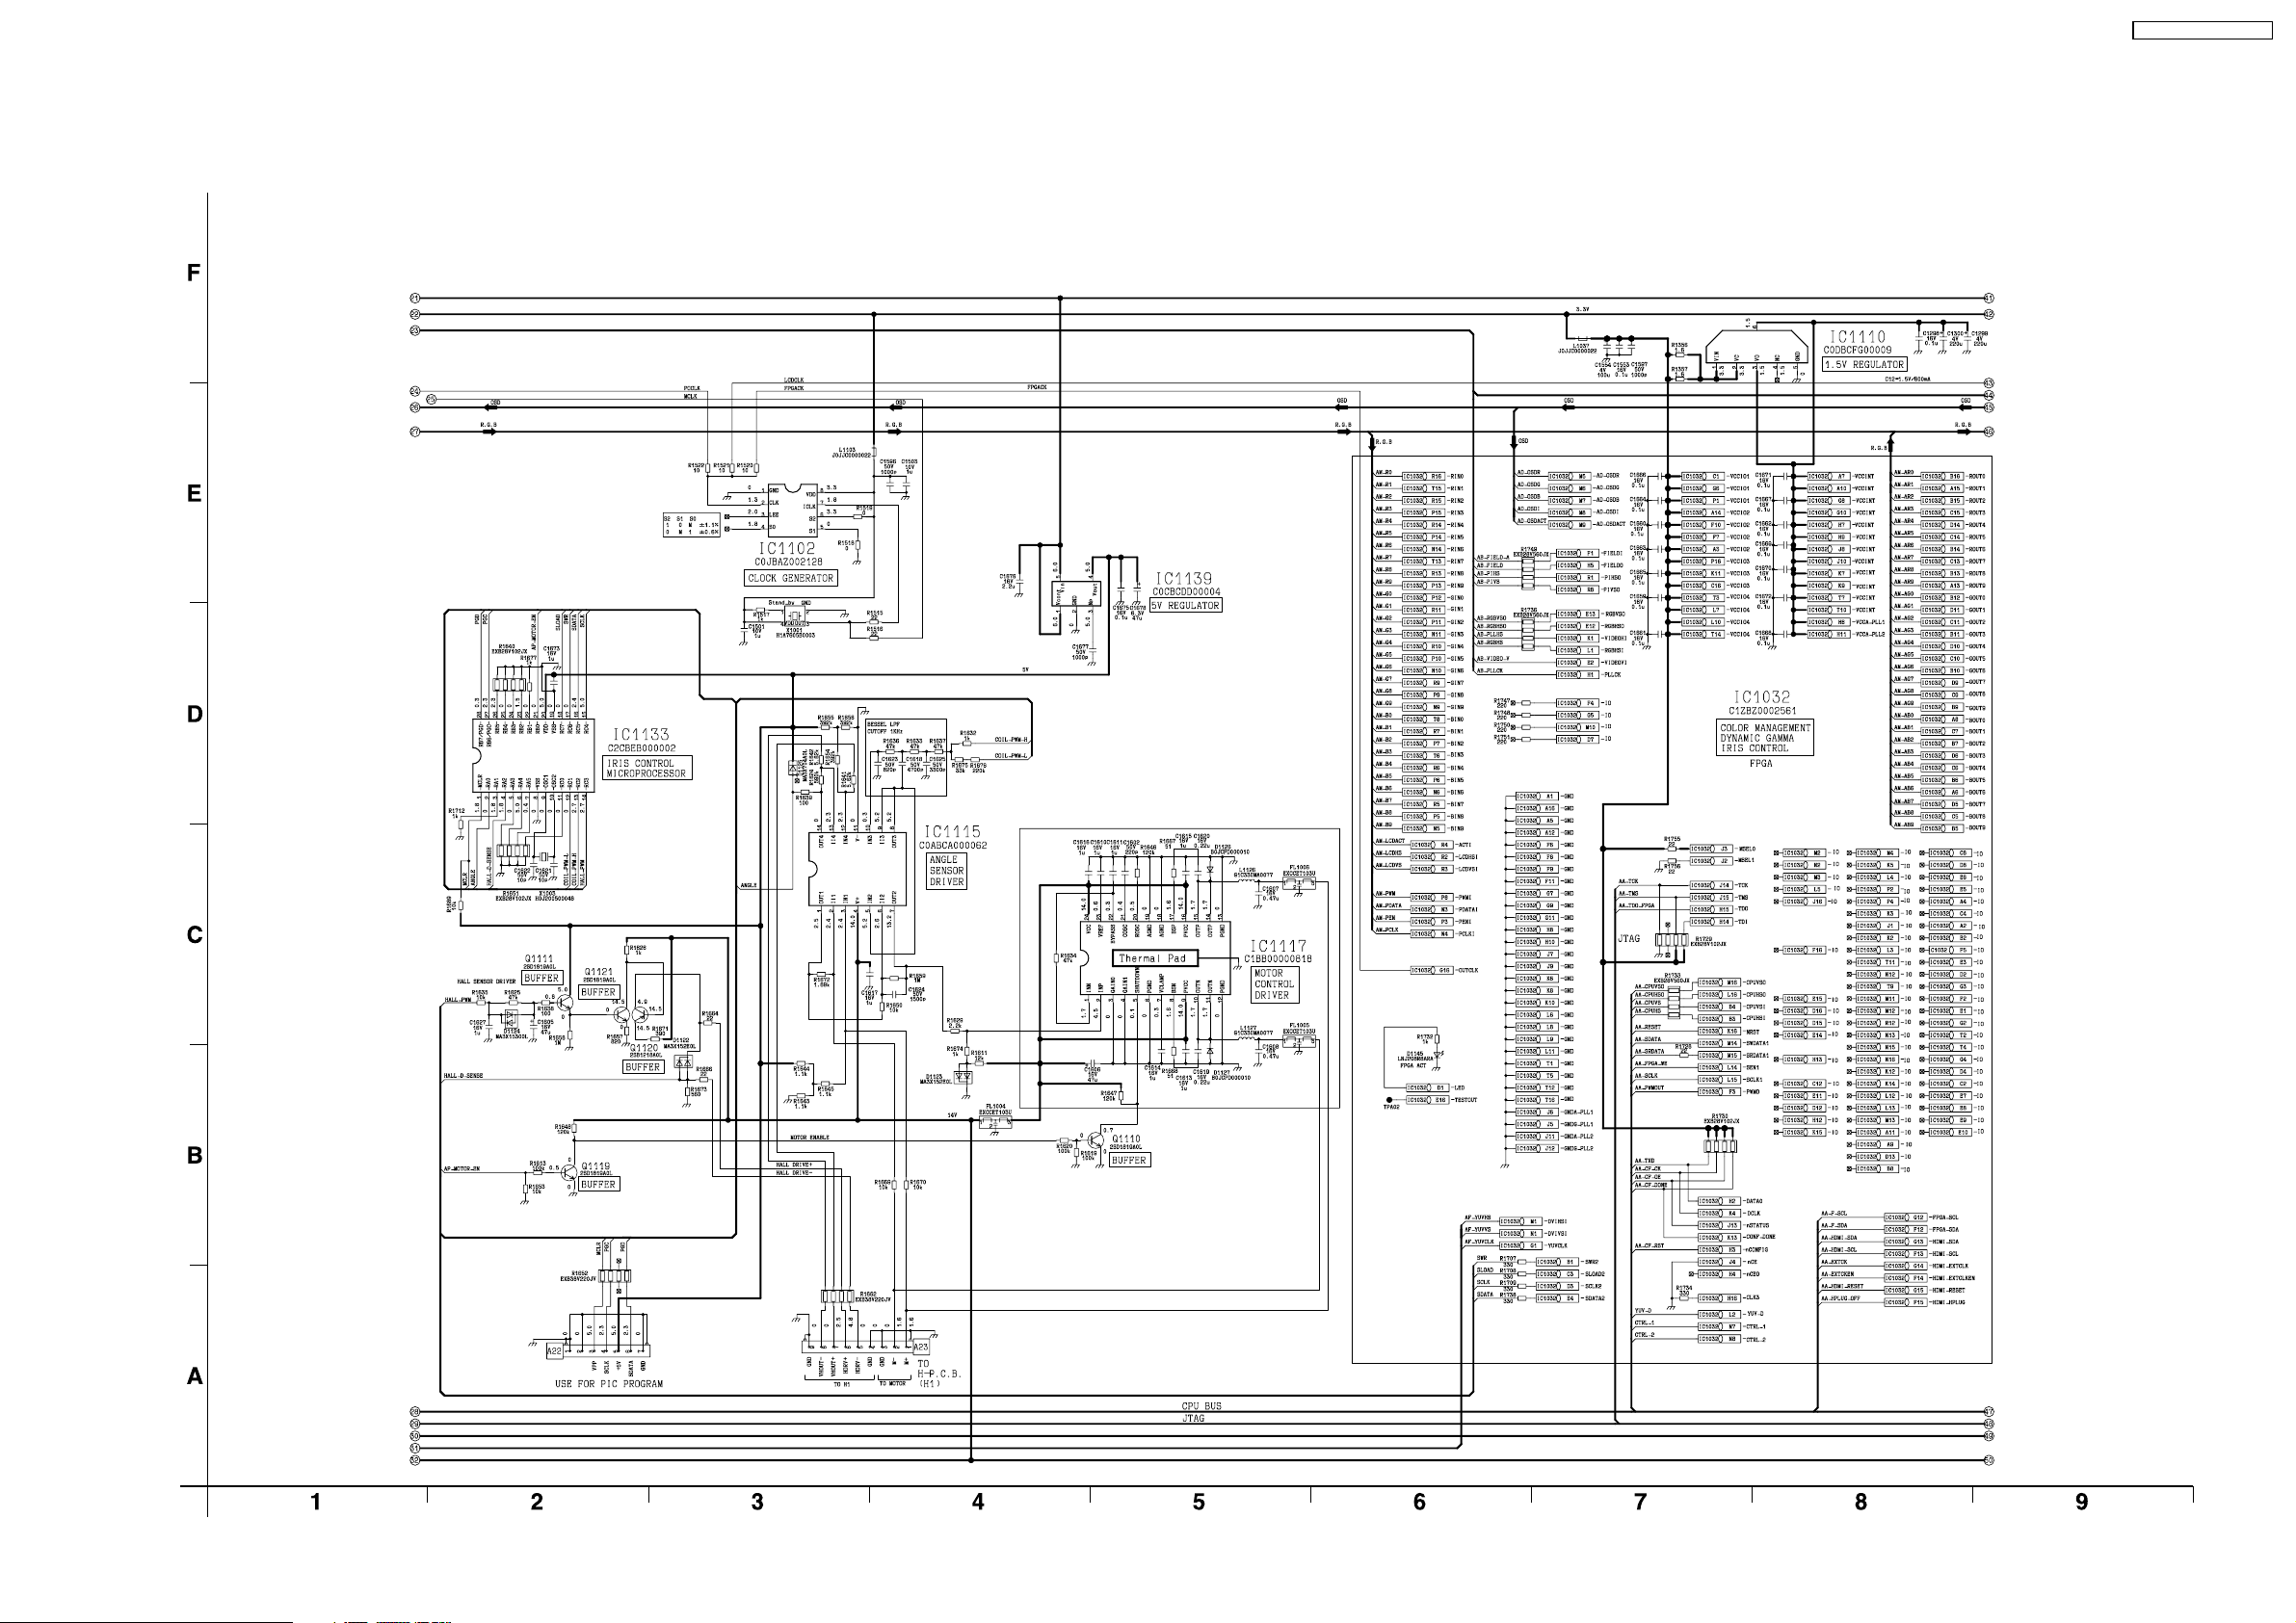
11.4. A-P.C.Board (4/6)
A-P.C.Board TXANP99PXNZ (4/6)
PT-AE700U / PT-AE700E
47
Page 48
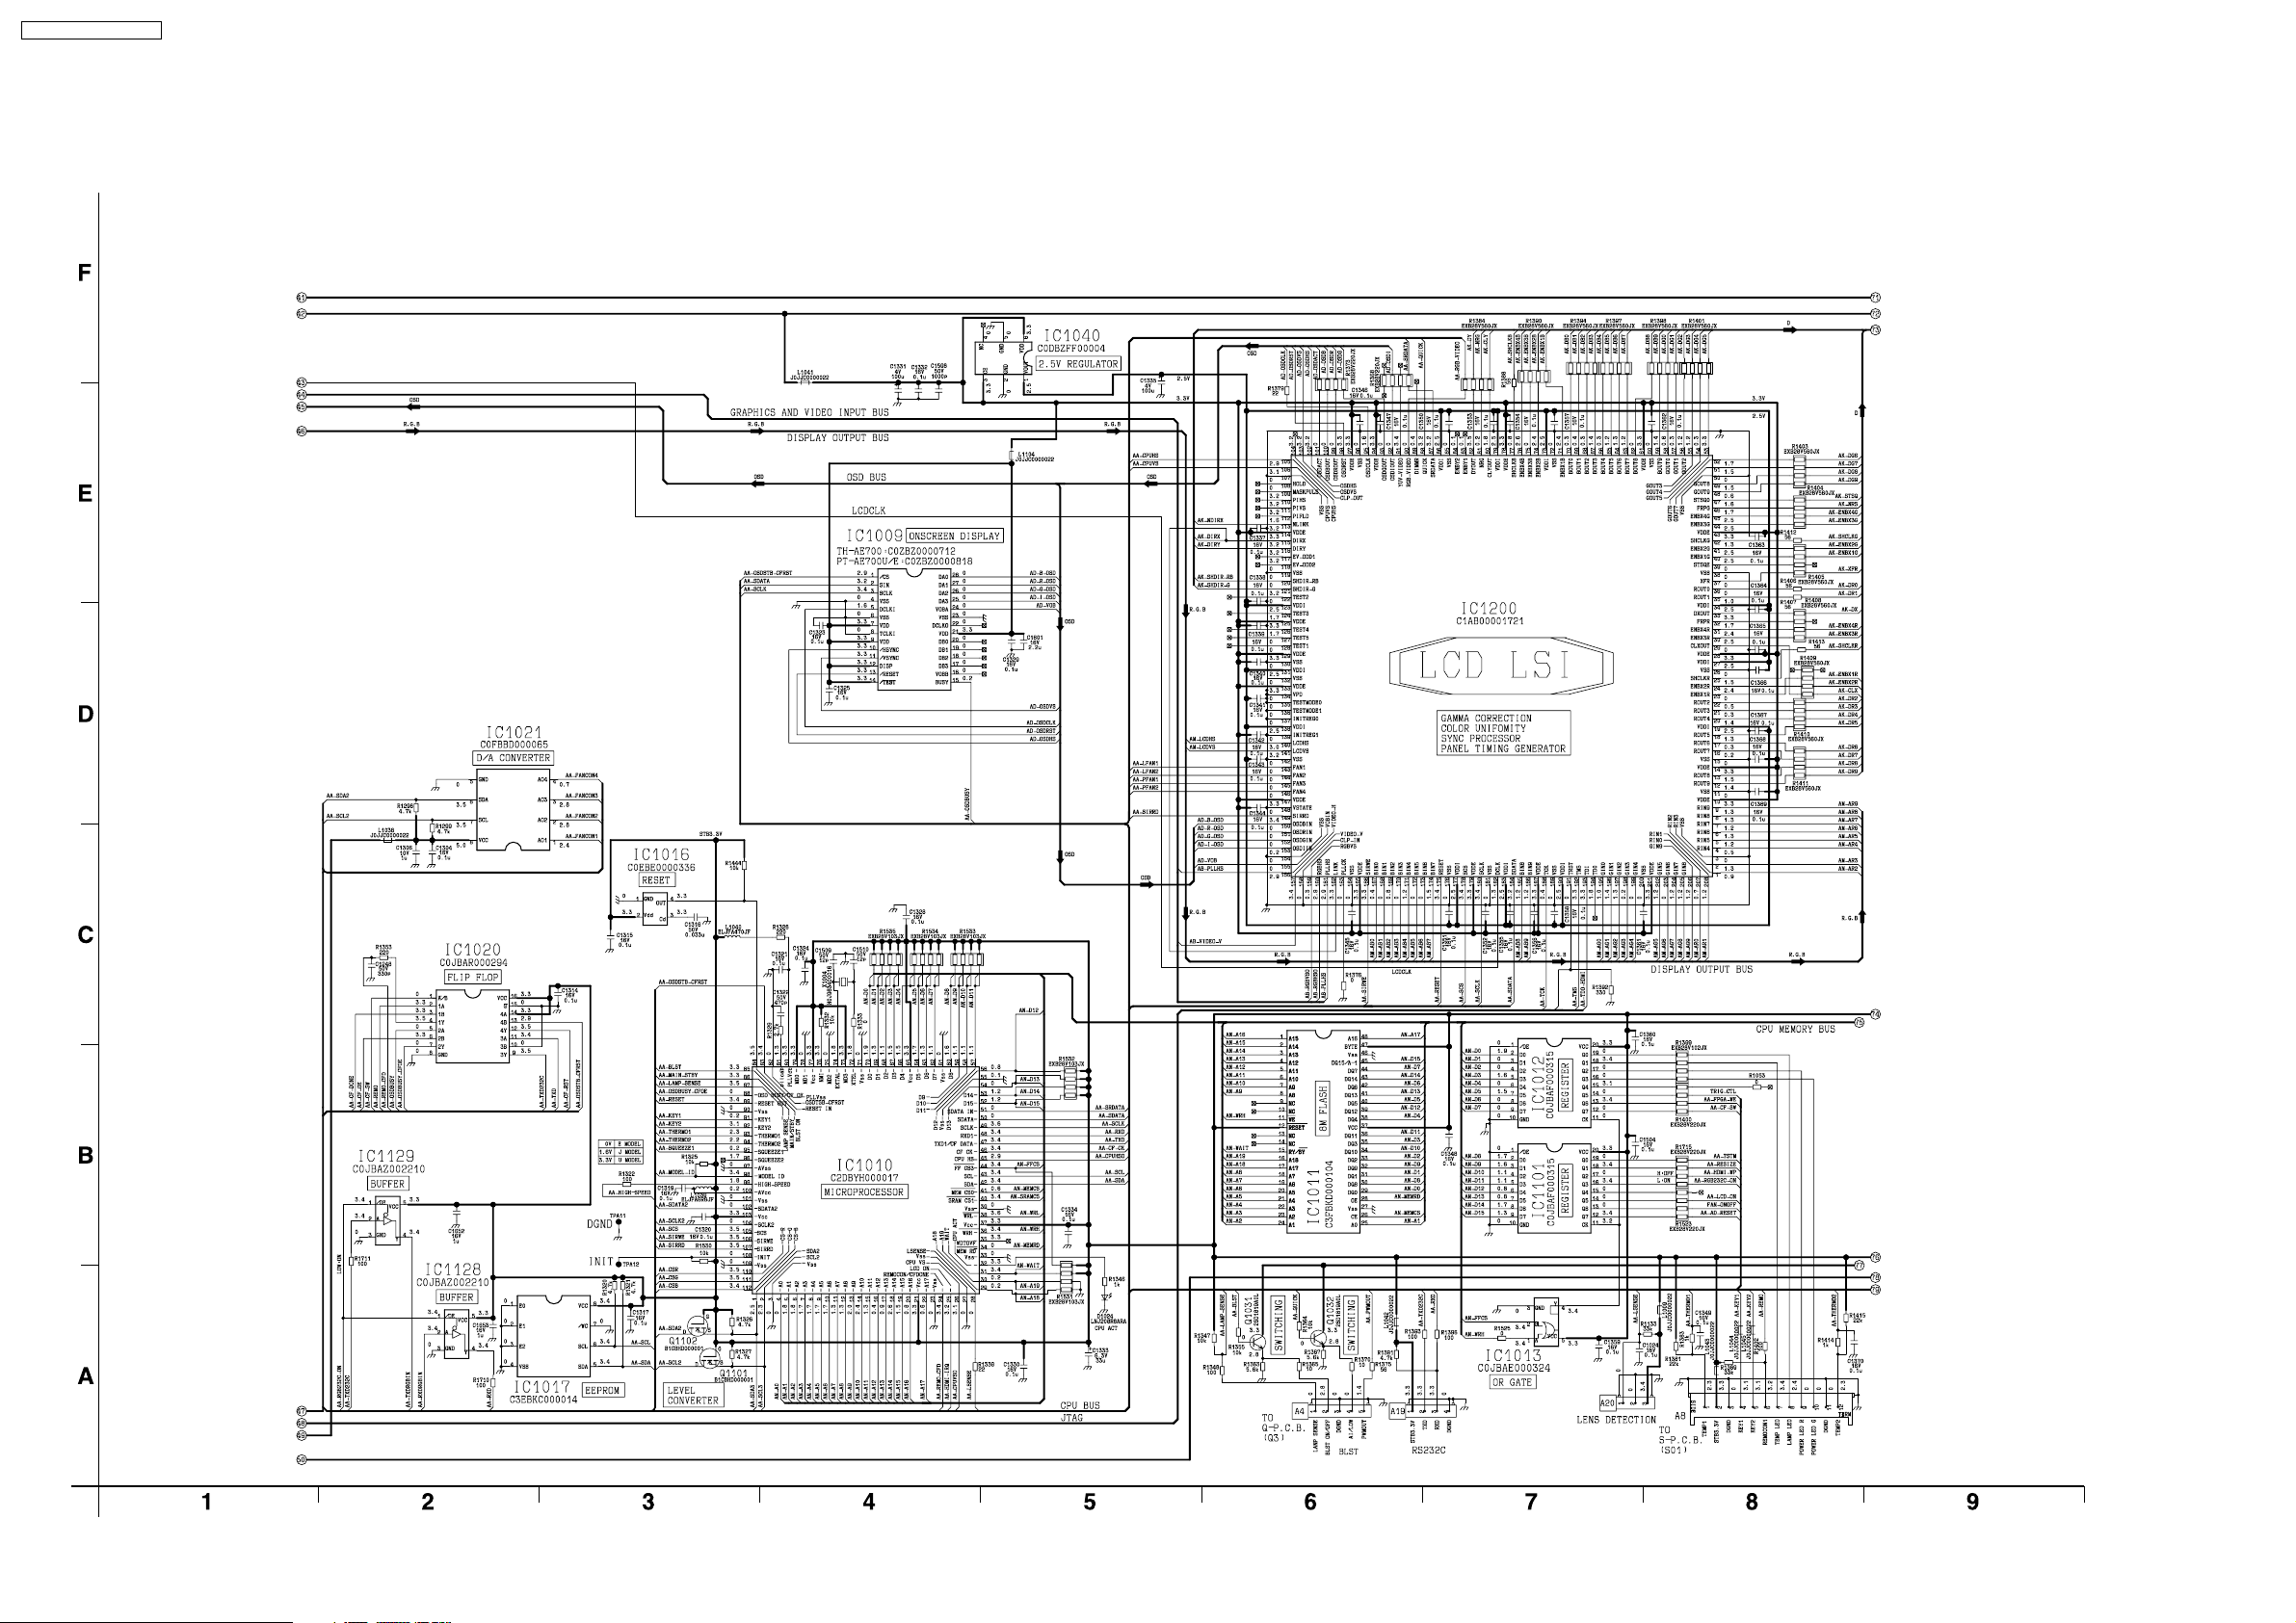
PT-AE700U / PT-AE700E
11.5. A-P.C.Board (5/6)
A-P.C.Board TXANP99PXNZ (5/6)
48
Page 49
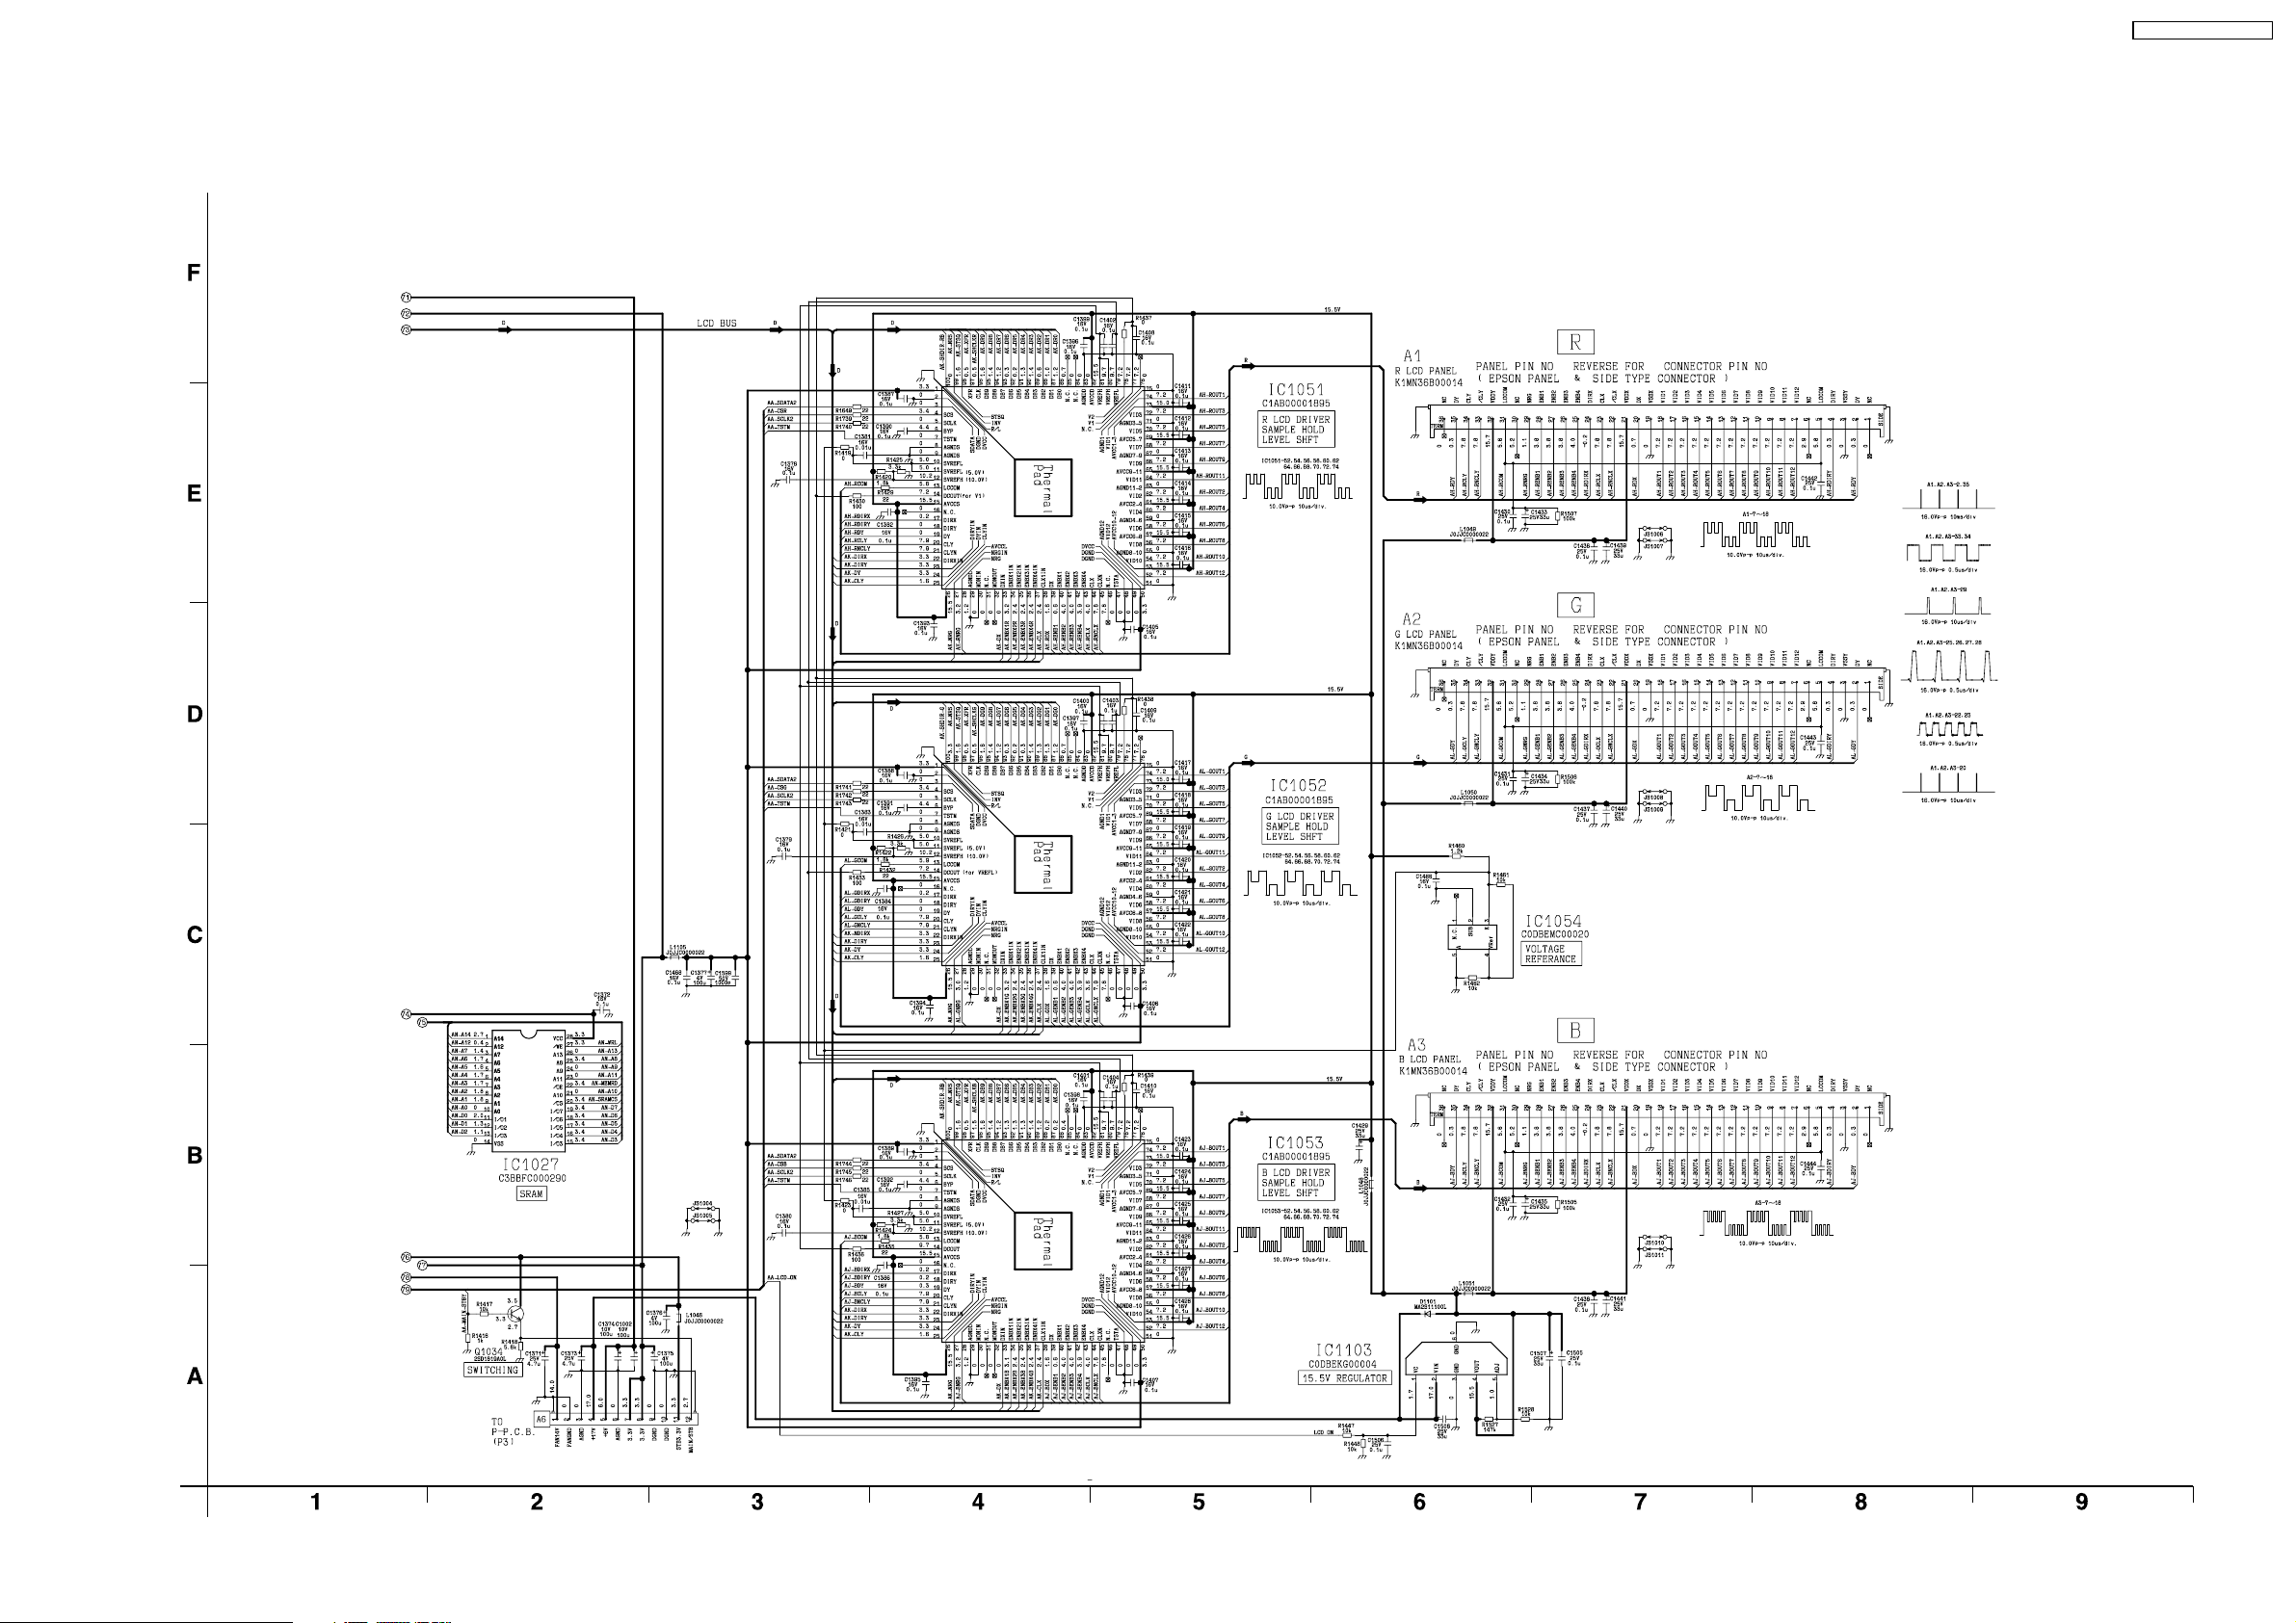
11.6. A-P.C.Board (6/6)
A-P.C.Board TXANP99PXNZ (6/6)
PT-AE700U / PT-AE700E
49
Page 50
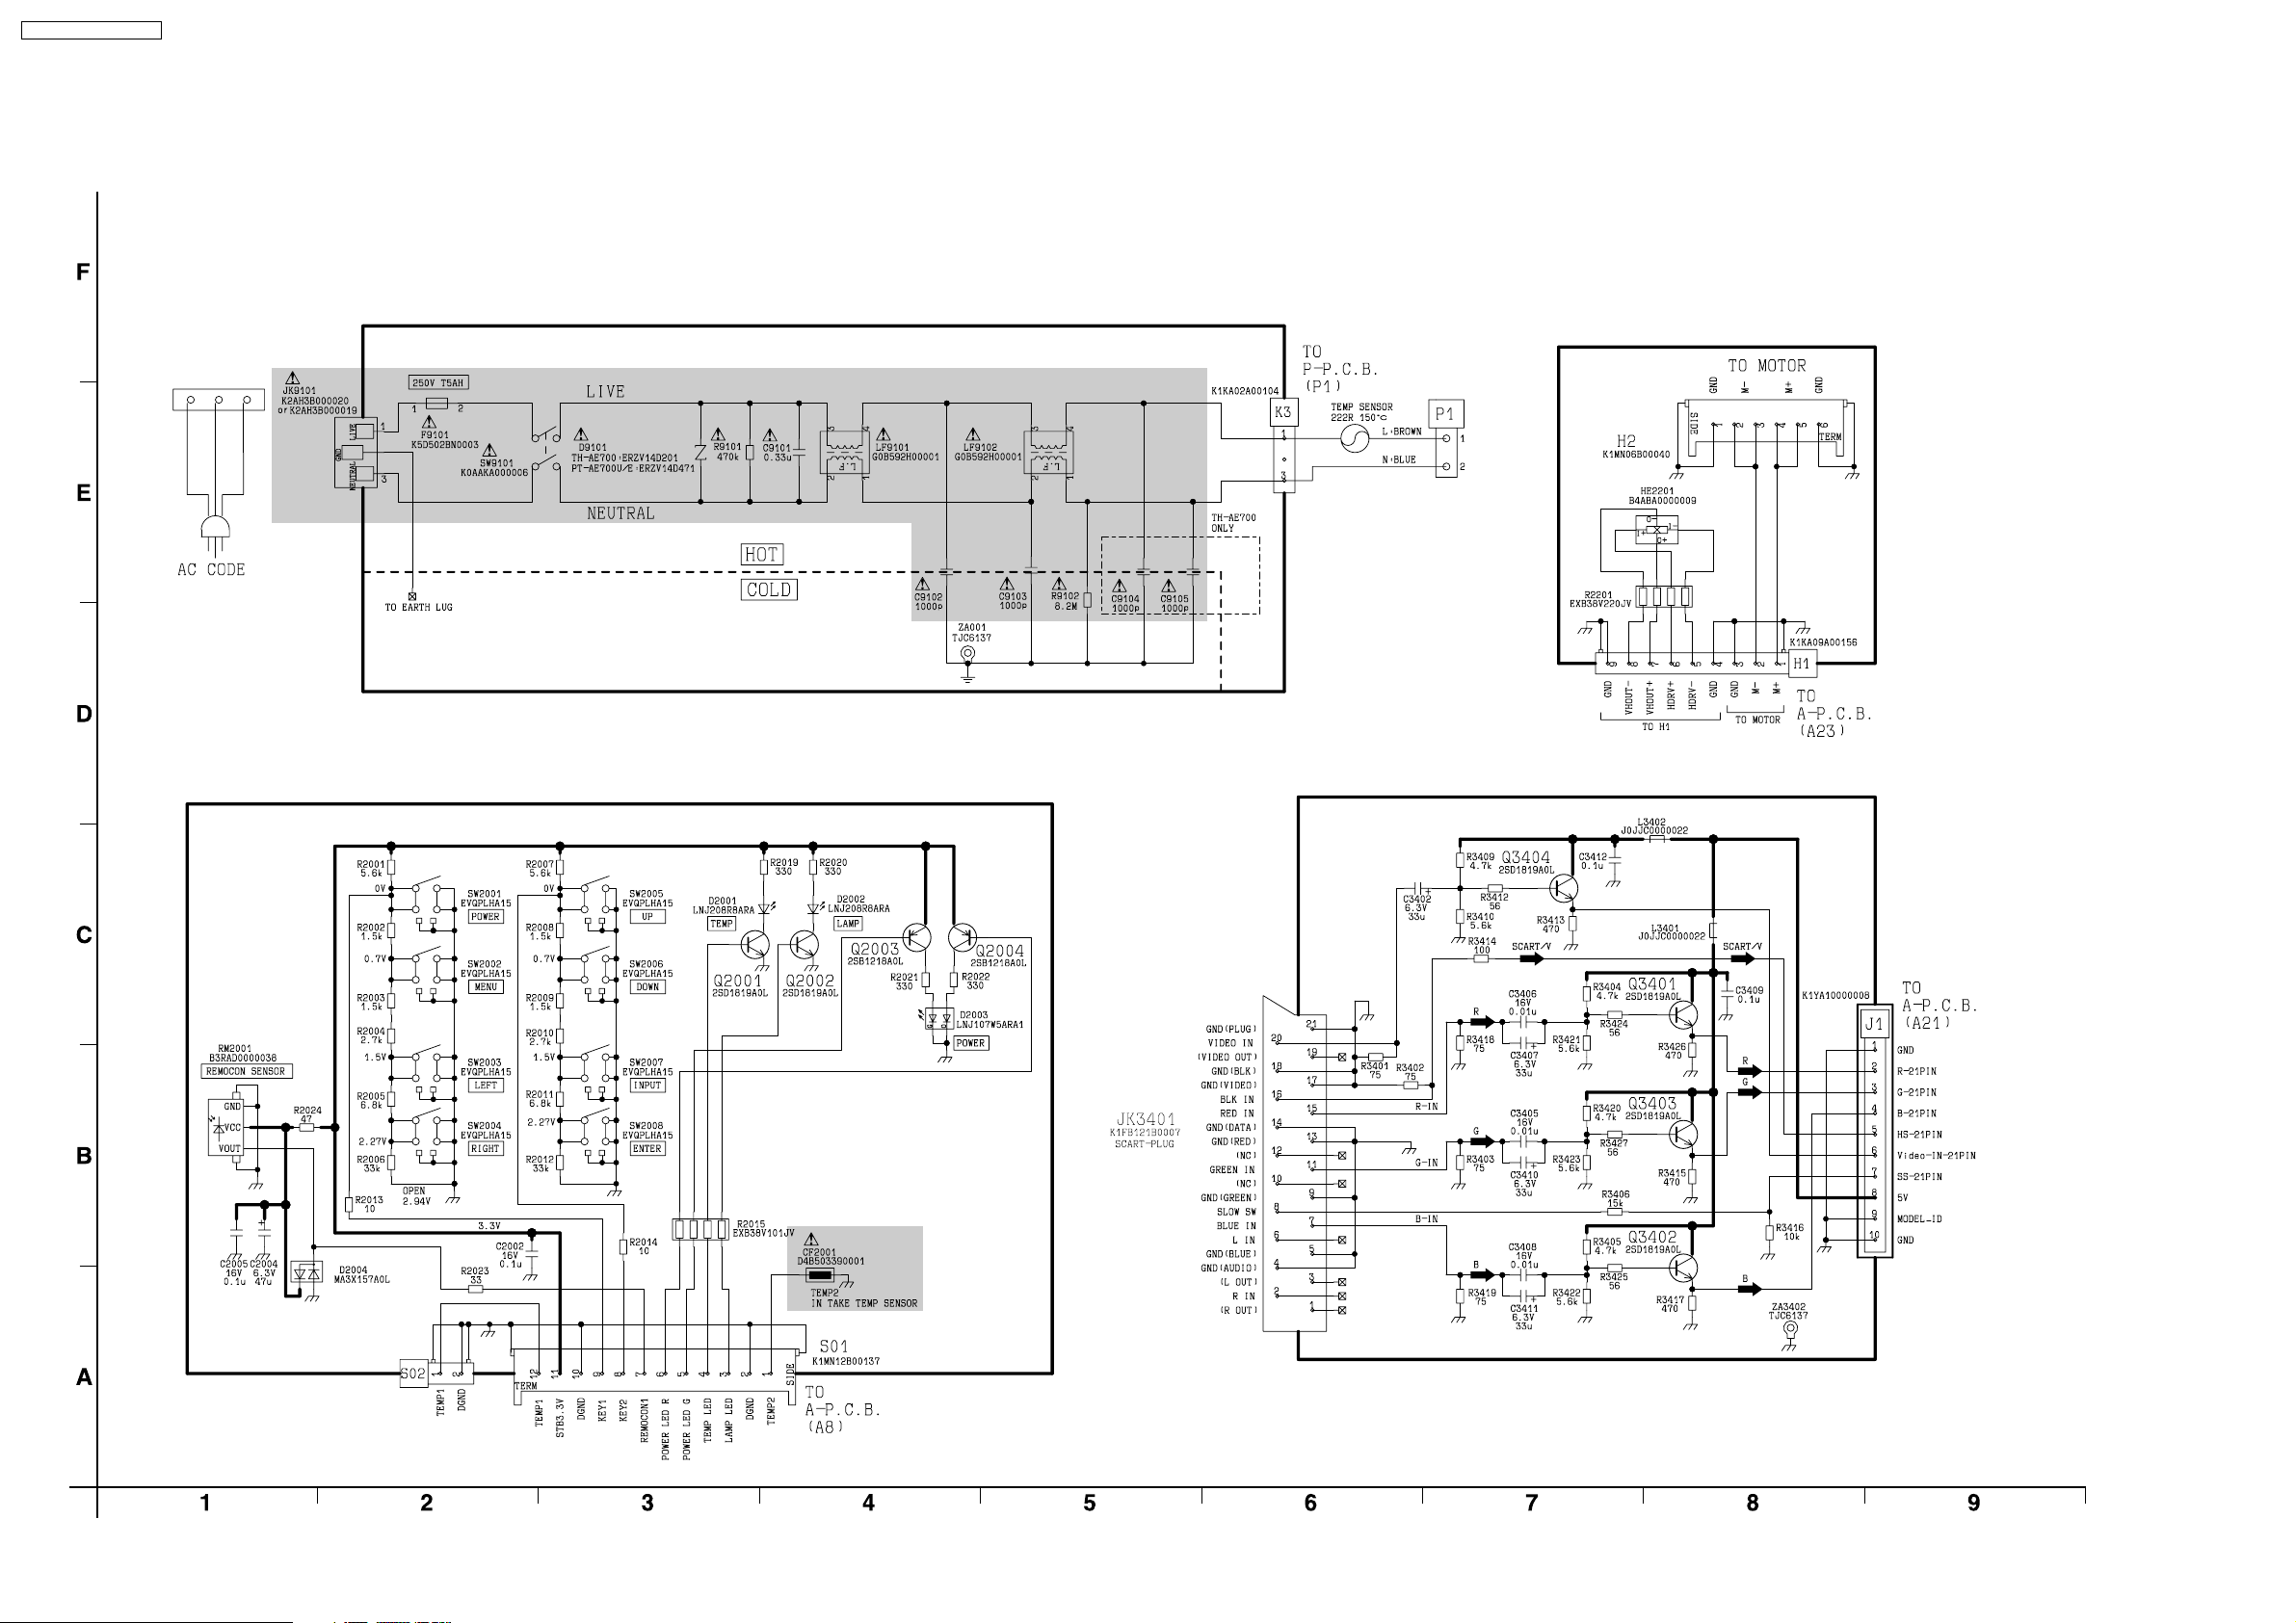
PT-AE700U / PT-AE700E
11.7. K-P.C.Board, S-P.C.Board, H-P.C.Board, J-P.C.Board
K-P.C.Board TXANP03PXNZ (PT-AE700U)
TXANP03PXQZ (PT-AE700E)
H-P.C.Board TNPA3412
S-P.C.Board TNPA3411 J-P.C.Board TNPA3417 (PT-AE700E only)
50
Page 51
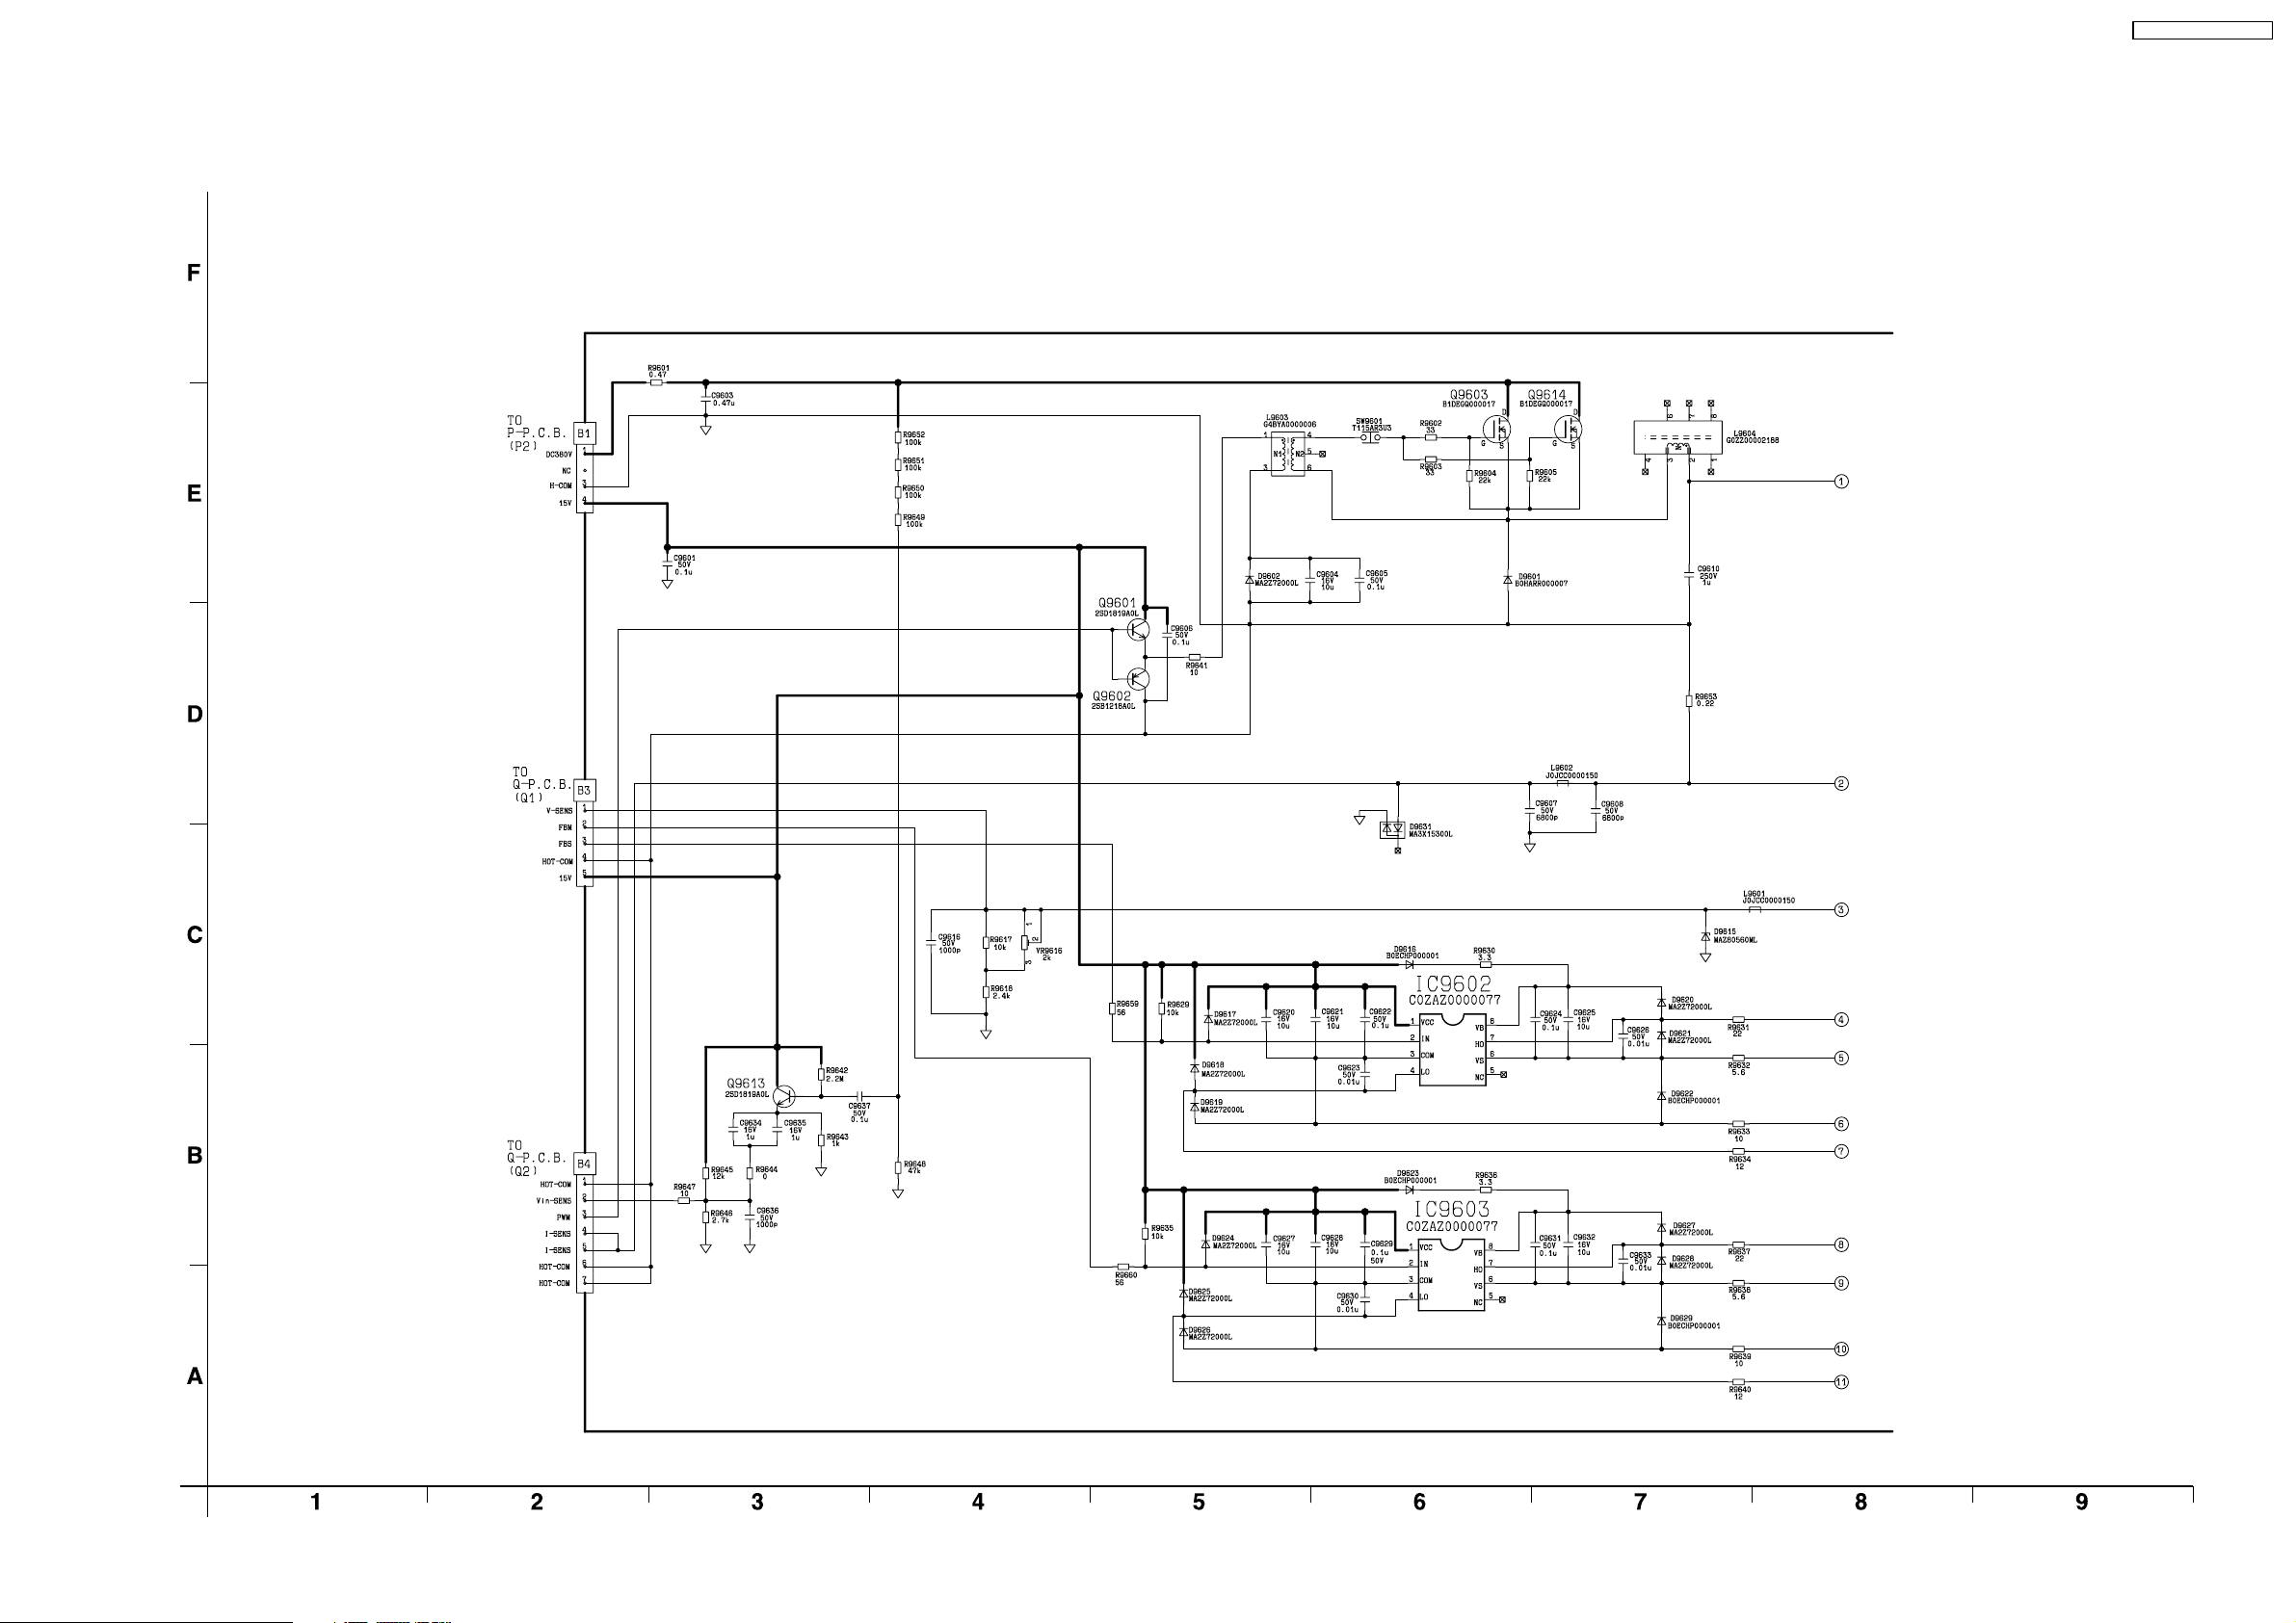
11.8. B-Module (1/2)
B-Module TXANP02VJY7 (1/2) Module Replacement
Only supplied components IC9602-03, Q9603-11, Q9614, D9601, D9604-09, D9611-12, D9616-29,
R9601, R9630-34, R9636-40, R9653, C9603, C9610, C9617-19, T9604, SW9601, S9602, TXJ/L2VJY7
PT-AE700U / PT-AE700E
51
Page 52
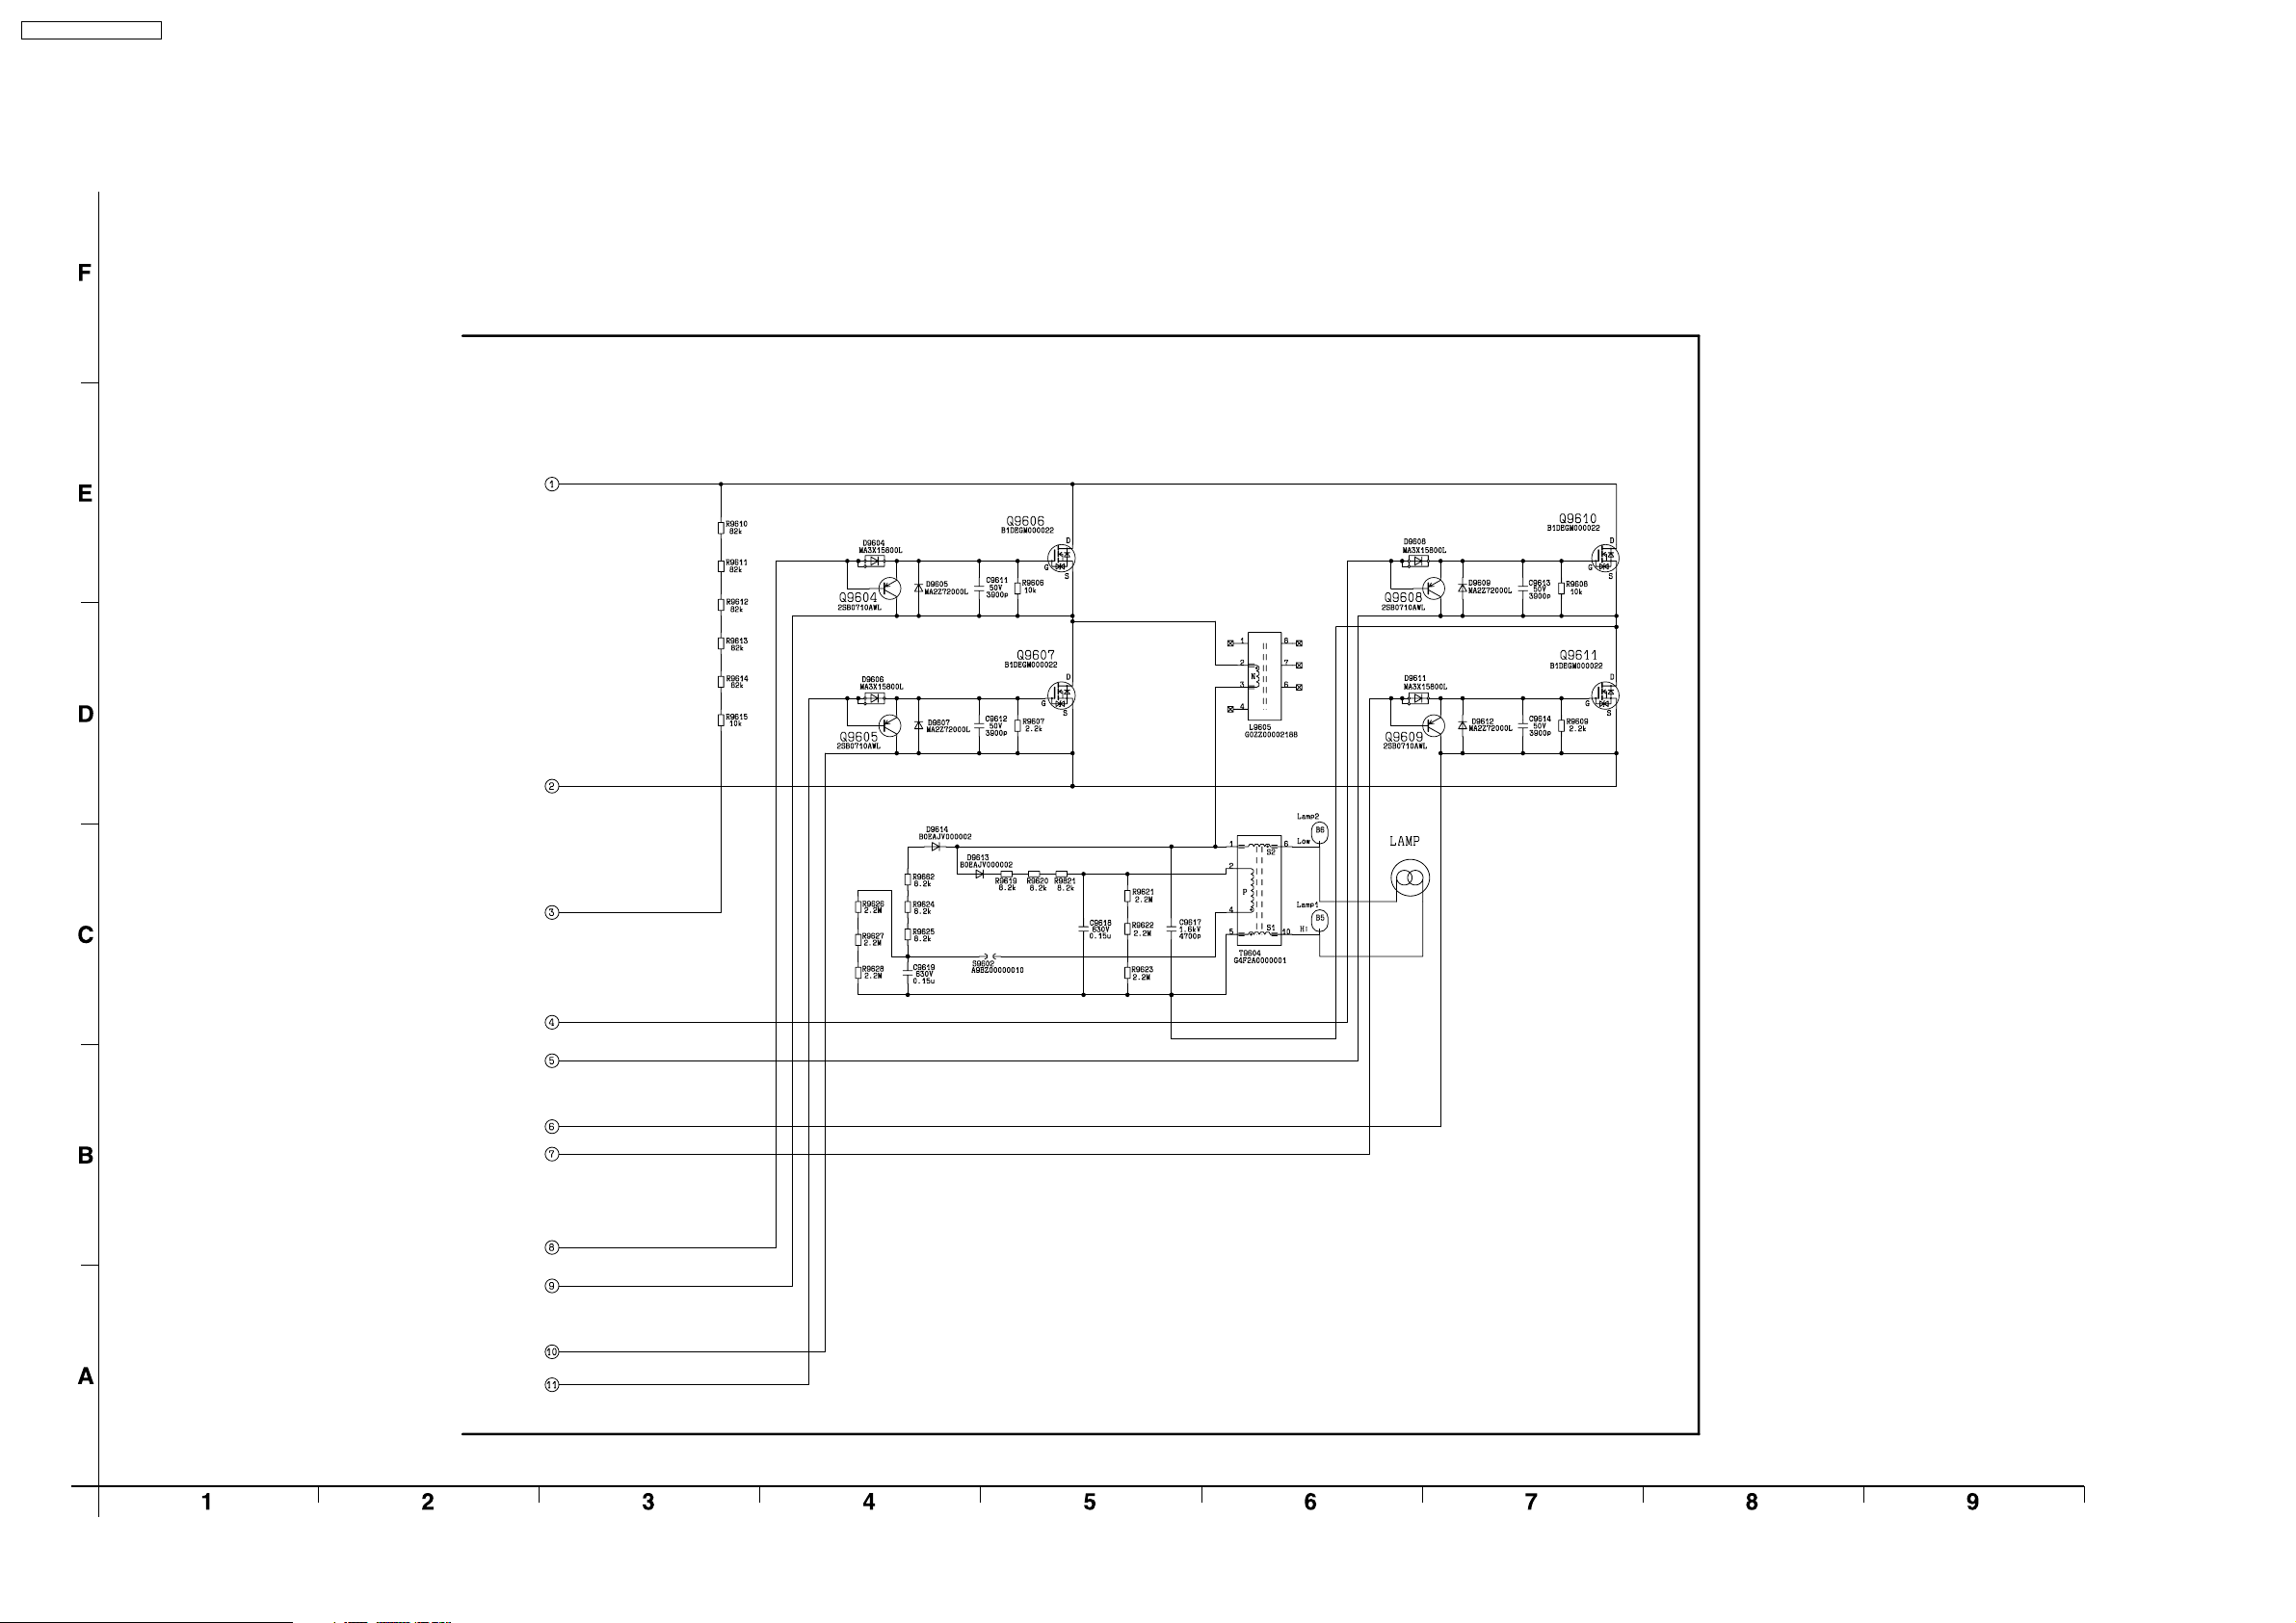
PT-AE700U / PT-AE700E
11.9. B-Module (2/2)
B-Module TXANP02VJY7 (2/2) Module Replacement
Only supplied components IC9602-03, Q9603-11, Q9614, D9601, D9604-09, D9611-12, D9616-29,
R9601, R9630-34, R9636-40, R9653, C9603, C9610, C9617-19, T9604, SW9601, S9602, TXJ/L2VJY7
TXJ/L2VJY7
52
Page 53
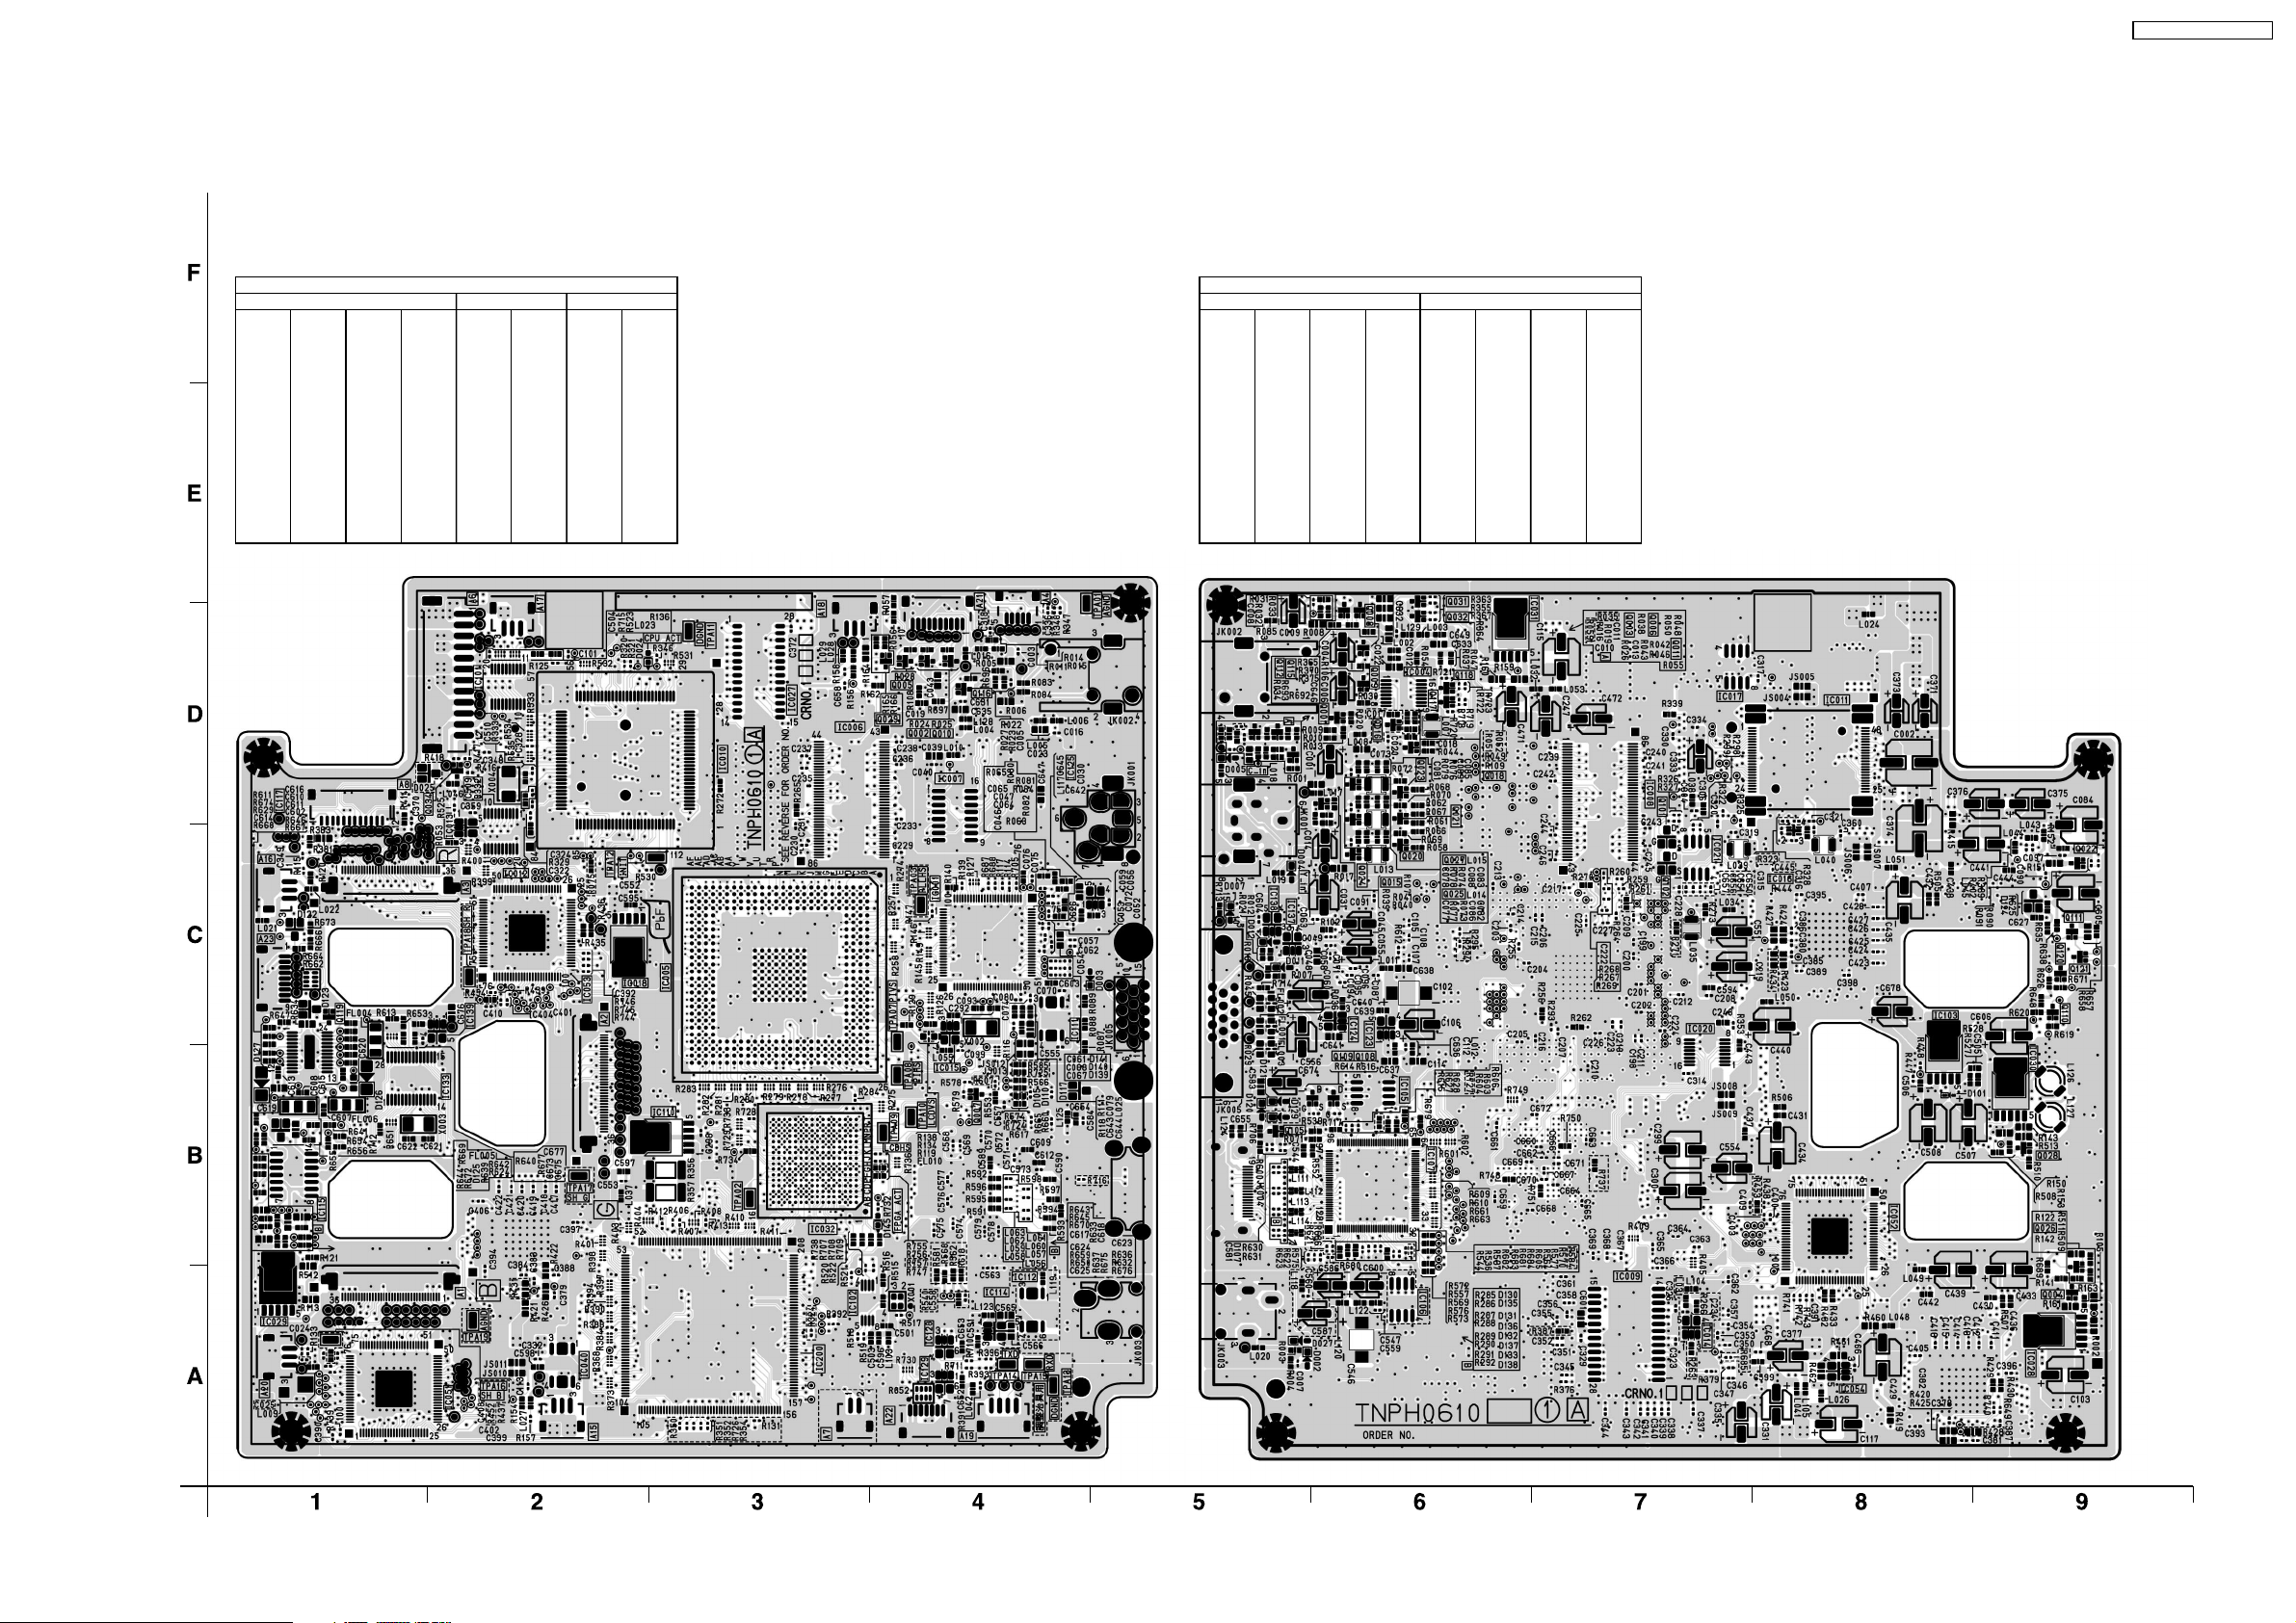
12 Circuit Boards
12.1. A-P.CBoard
PT-AE700U / PT-AE700E
A-P.C.Board TXANP99PXNZ
(Foil Side)
IC
IC1001
C-4
C-3
D-3
D-4
D-2
C-2
C-2
B-4
C-2
D-3
A-1
B-3
A-2
A-1
C-2
D-2
A-3
IC1110
IC1111
IC1112
IC1114
IC1115
IC1117
IC1125
IC1128
IC1129
IC1133
IC1139
IC1200
IC1005
IC1006
IC1007
IC1010
IC1012
IC1013
IC1015
IC1018
IC1027
IC1029
IC1032
IC1040
IC1051
IC1053
IC1101
IC1102
ADDRESS INFORMATION
A-P.C.Board (Foil Side)
B-3
C-4
A-4
A-4
B-1
D-1
C-5
A-4
A-4
B-1
C-2
A-3
TRANSISTOR
Q1002
D-4
Q1005
D-4
Q1007
B-4
Q1010
D-4
Q1029
D-4
Q1034
D-1
Q1116
D-4
Q1119
C-1
TP
TPA01
TPA02
TPA03
TPA07
TPA08
TPA09
TPA10
TPA11
TPA12
TPA13
TPA14
TPA15
TPA16
TPA17
TPA18
TPA19
D-4
B-3
C-4
B-4
B-4
B-4
B-4
D-3
C-2
A-4
A-4
A-4
A-2
B-2
C-2
A-2
A-P.C.Board TXANP99PXNZ
(Component Side)
IC
IC1004
D-6
D-7
A-7
D-8
A-7
C-8
D-7
B-7
C-7
A-9
B-9
D-6
B-8
C-8
B-6
A-6
B-6
IC1123
IC1124
IC1137
IC1138
IC1008
IC1009
IC1011
IC1014
IC1016
IC1017
IC1020
IC1021
IC1028
IC1030
IC1031
IC1052
IC1103
IC1105
IC1106
IC1107
ADDRESS INFORMATION
A-P.C.Board (Component Side)
C-6
C-6
C-5
C-5
TRANSISTOR
Q1001
D-6
Q1003
D-7
Q1004
A-9
Q1006
D-7
Q1008
D-6
Q1009
D-6
Q1011
D-7
Q1015
D-6
Q1016
D-6
Q1018
D-6
Q1020
C-6
Q1021
D-6
Q1022
C-9
Q1023
D-6
Q1024
D-6
Q1025
C-6
Q1026
B-9
Q1027
Q1028
Q1031
Q1032
Q1101
Q1102
Q1105
Q1108
Q1109
Q1110
Q1111
Q1112
Q1115
Q1117
Q1118
Q1120
Q1121
C-6
B-9
D-6
D-6
D-7
C-7
B-5
B-6
B-6
C-9
C-9
D-6
D-6
D-6
D-6
C-9
C-9
53
Page 54
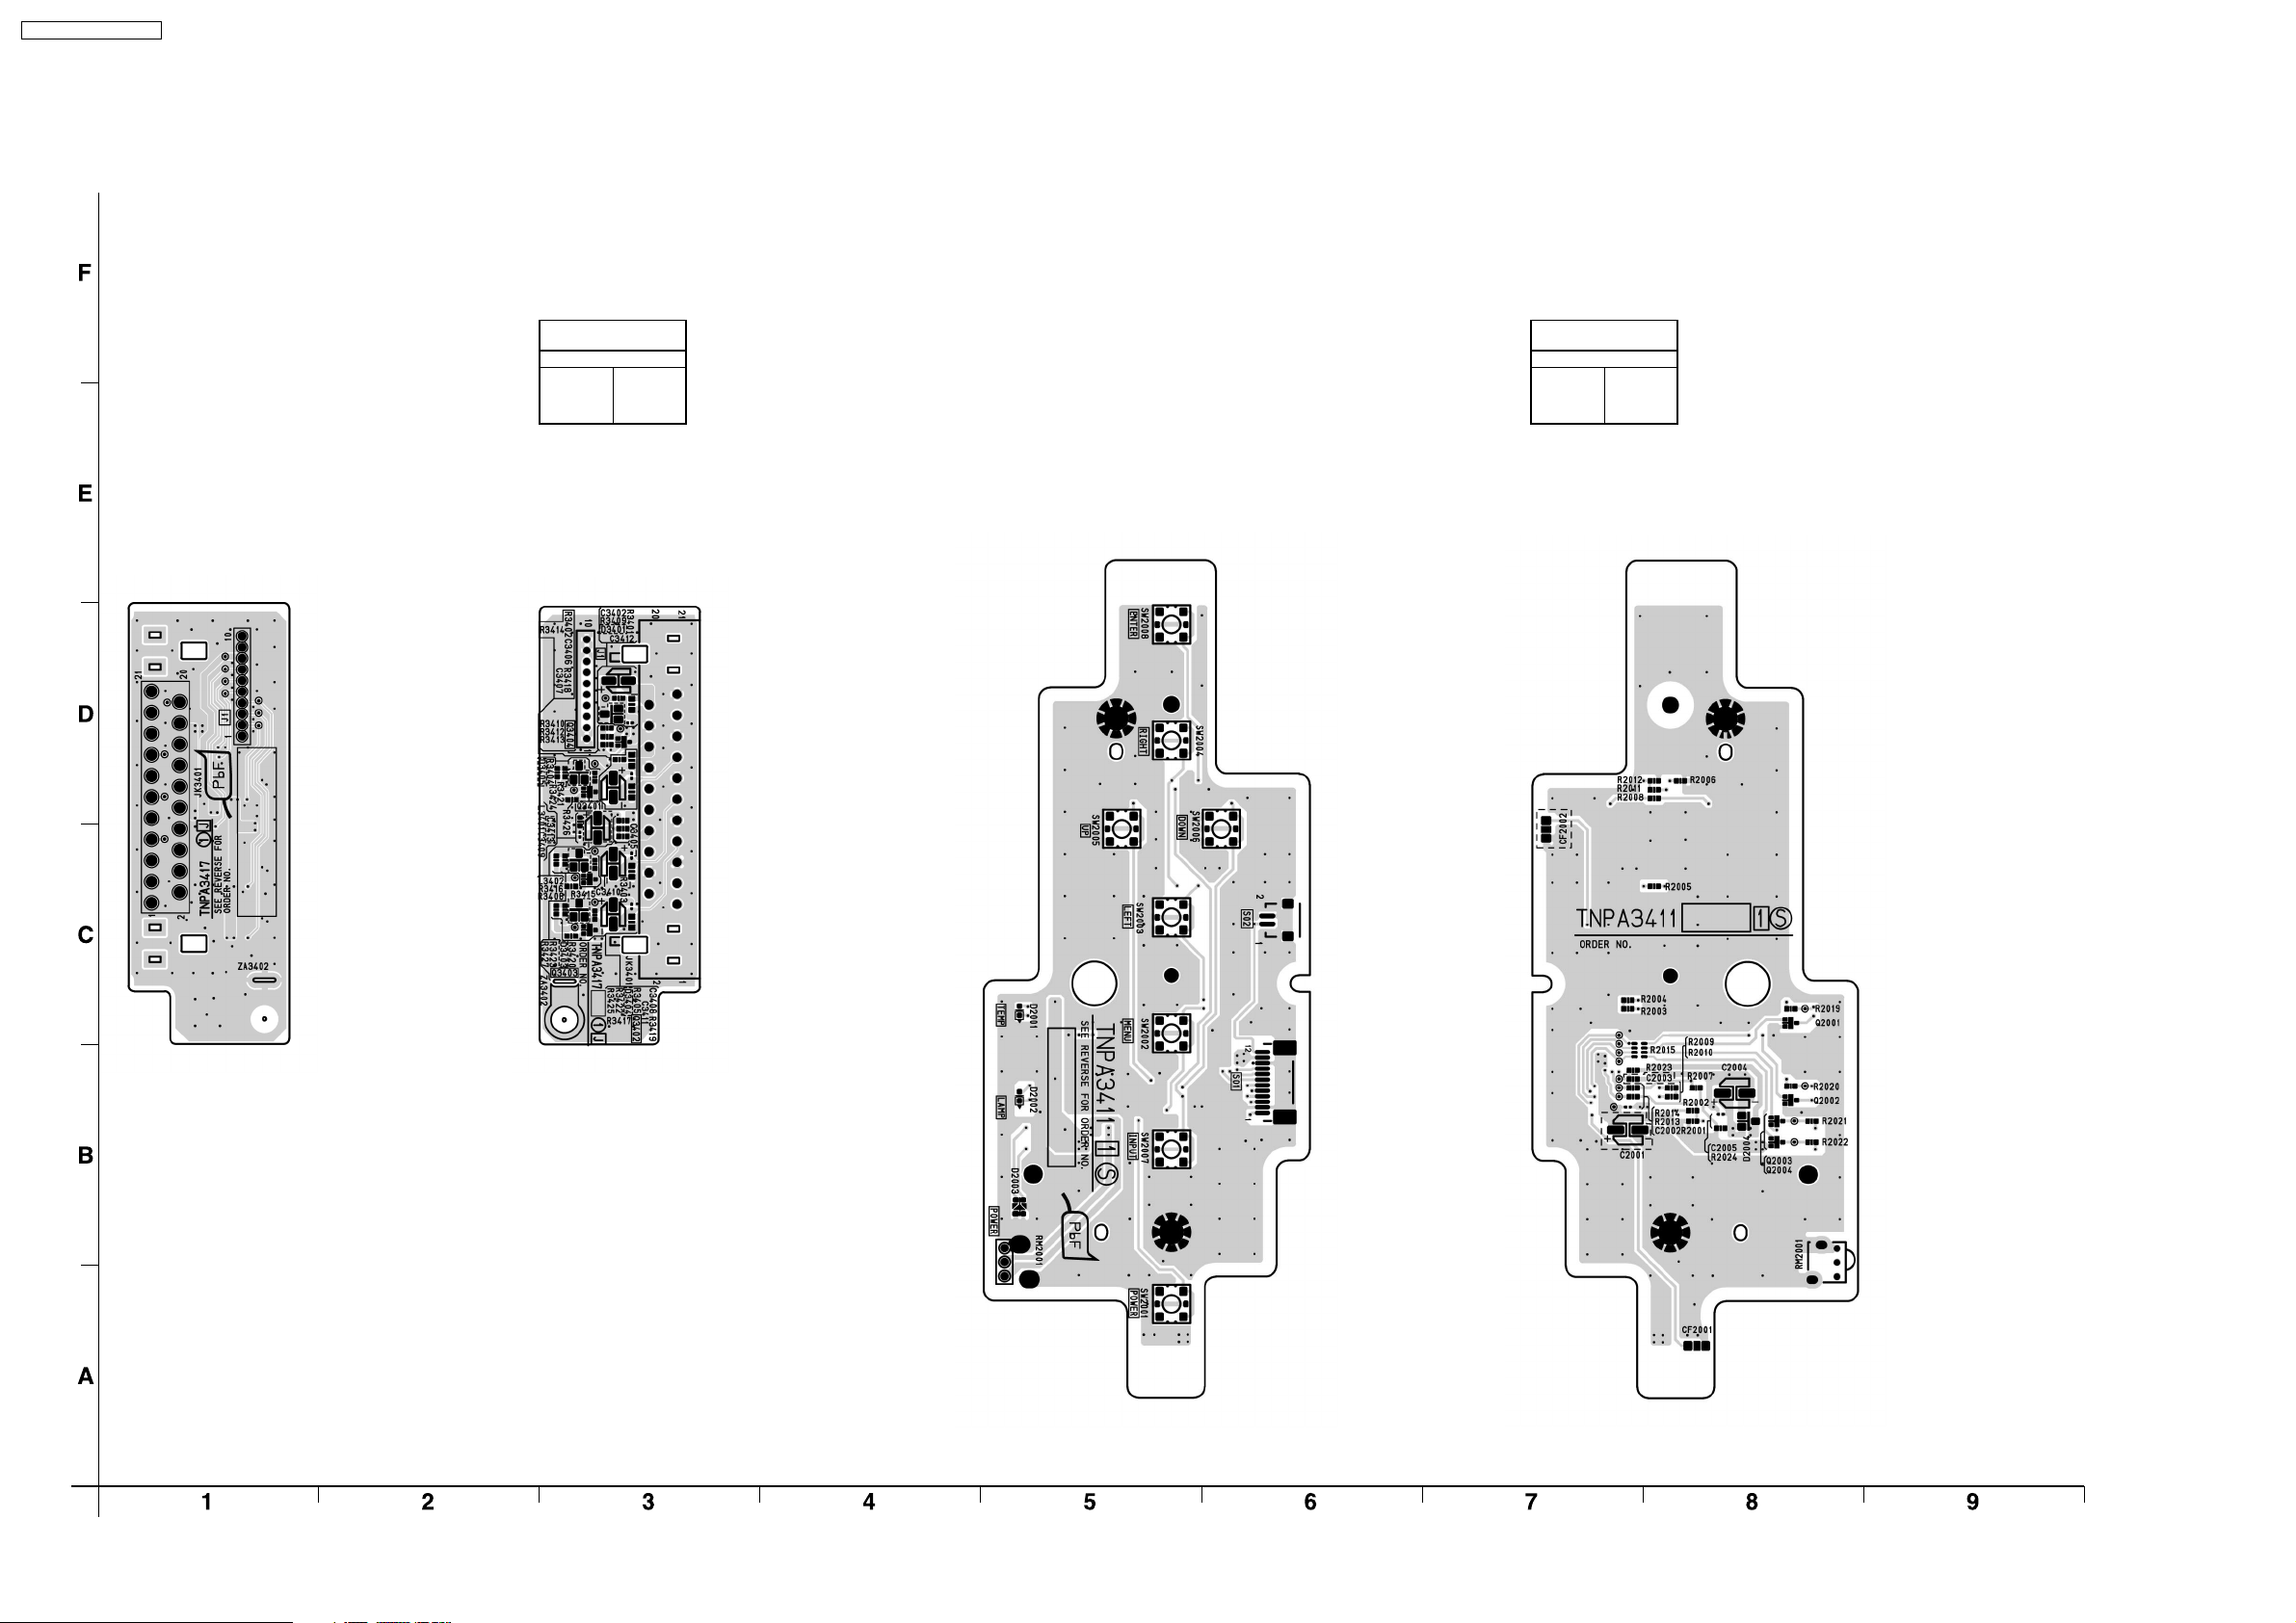
PT-AE700U / PT-AE700E
12.2. J-P.C.Board/S-P.C.Board
J-P.C.Board TNPA3417
(Foil Side)
(PT-AE700E only)
J-P.C.Board TNPA3417
(Component Side)
(PT-AE700E only)
J-P.C.Board
(Component Side)
TRANSISTOR
Q3401
Q3402
Q3403
Q3404
ADDRESS INFORMATION
D-3
C-3
C-3
D-3
S-P.C.Board TNPA3411
(Foil Side)
S-P.C.Board TNPA3411
(Component Side)
S-P.C.Board
(Component Side)
TRANSISTOR
Q2001
Q2002
Q2003
Q2004
ADDRESS INFORMATION
C-8
B-8
B-8
B-8
54
Page 55
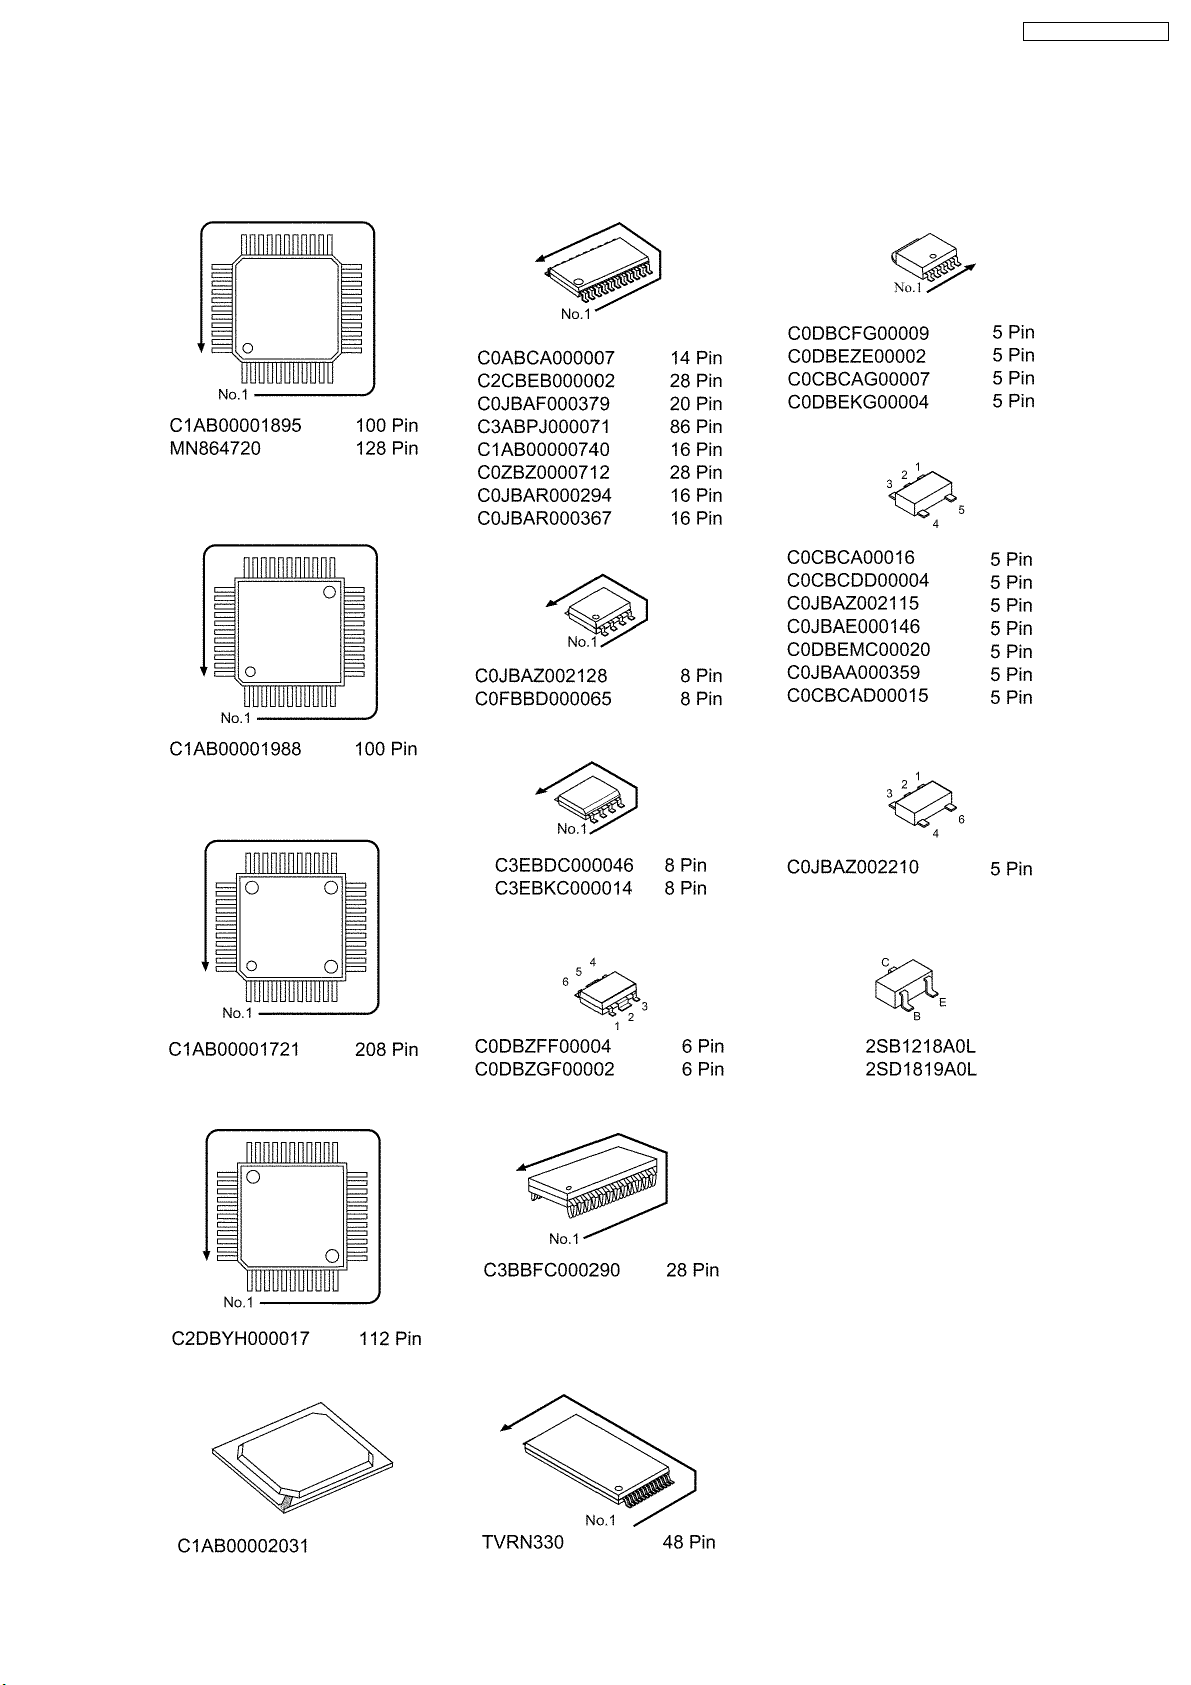
13 Terminal guide of ICs and transistors
PT-AE700U / PT-AE700E
55
Page 56
PT-AE700U / PT-AE700E
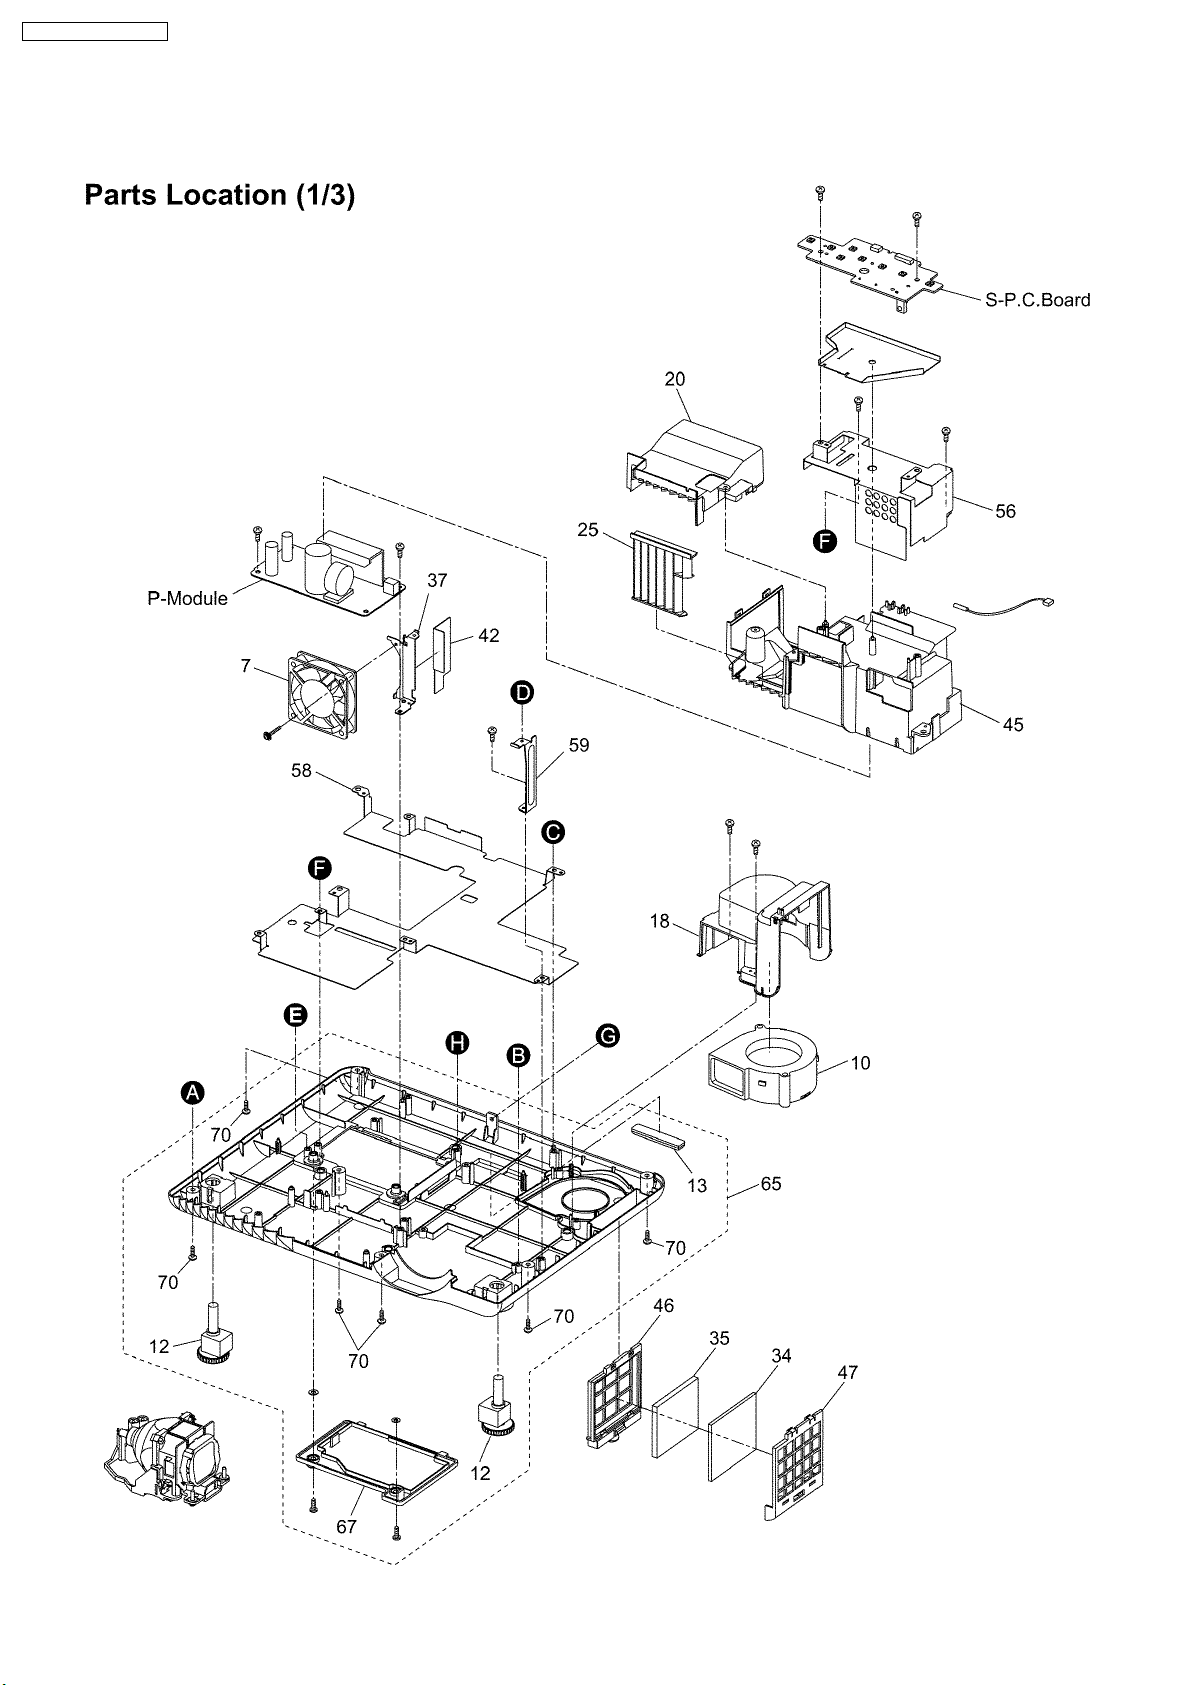
14 Exploded Views
56
Page 57
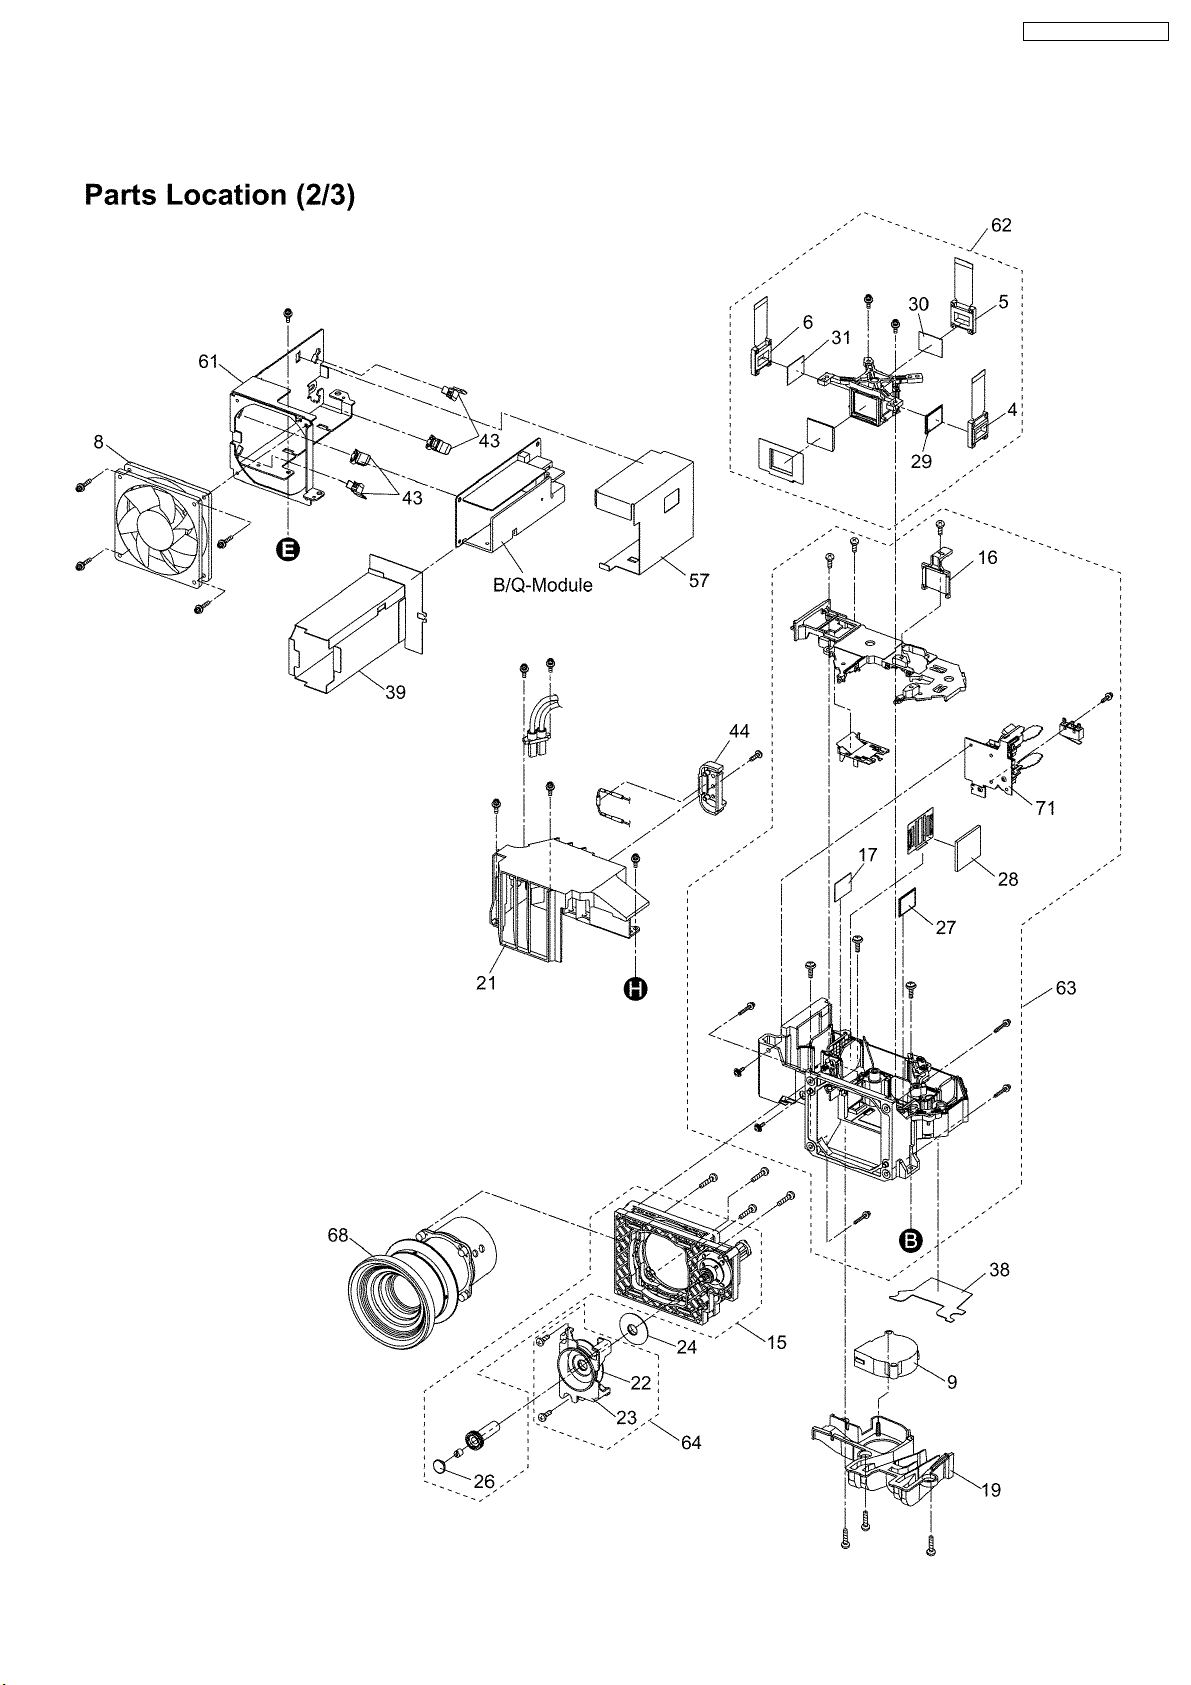
PT-AE700U / PT-AE700E
57
Page 58
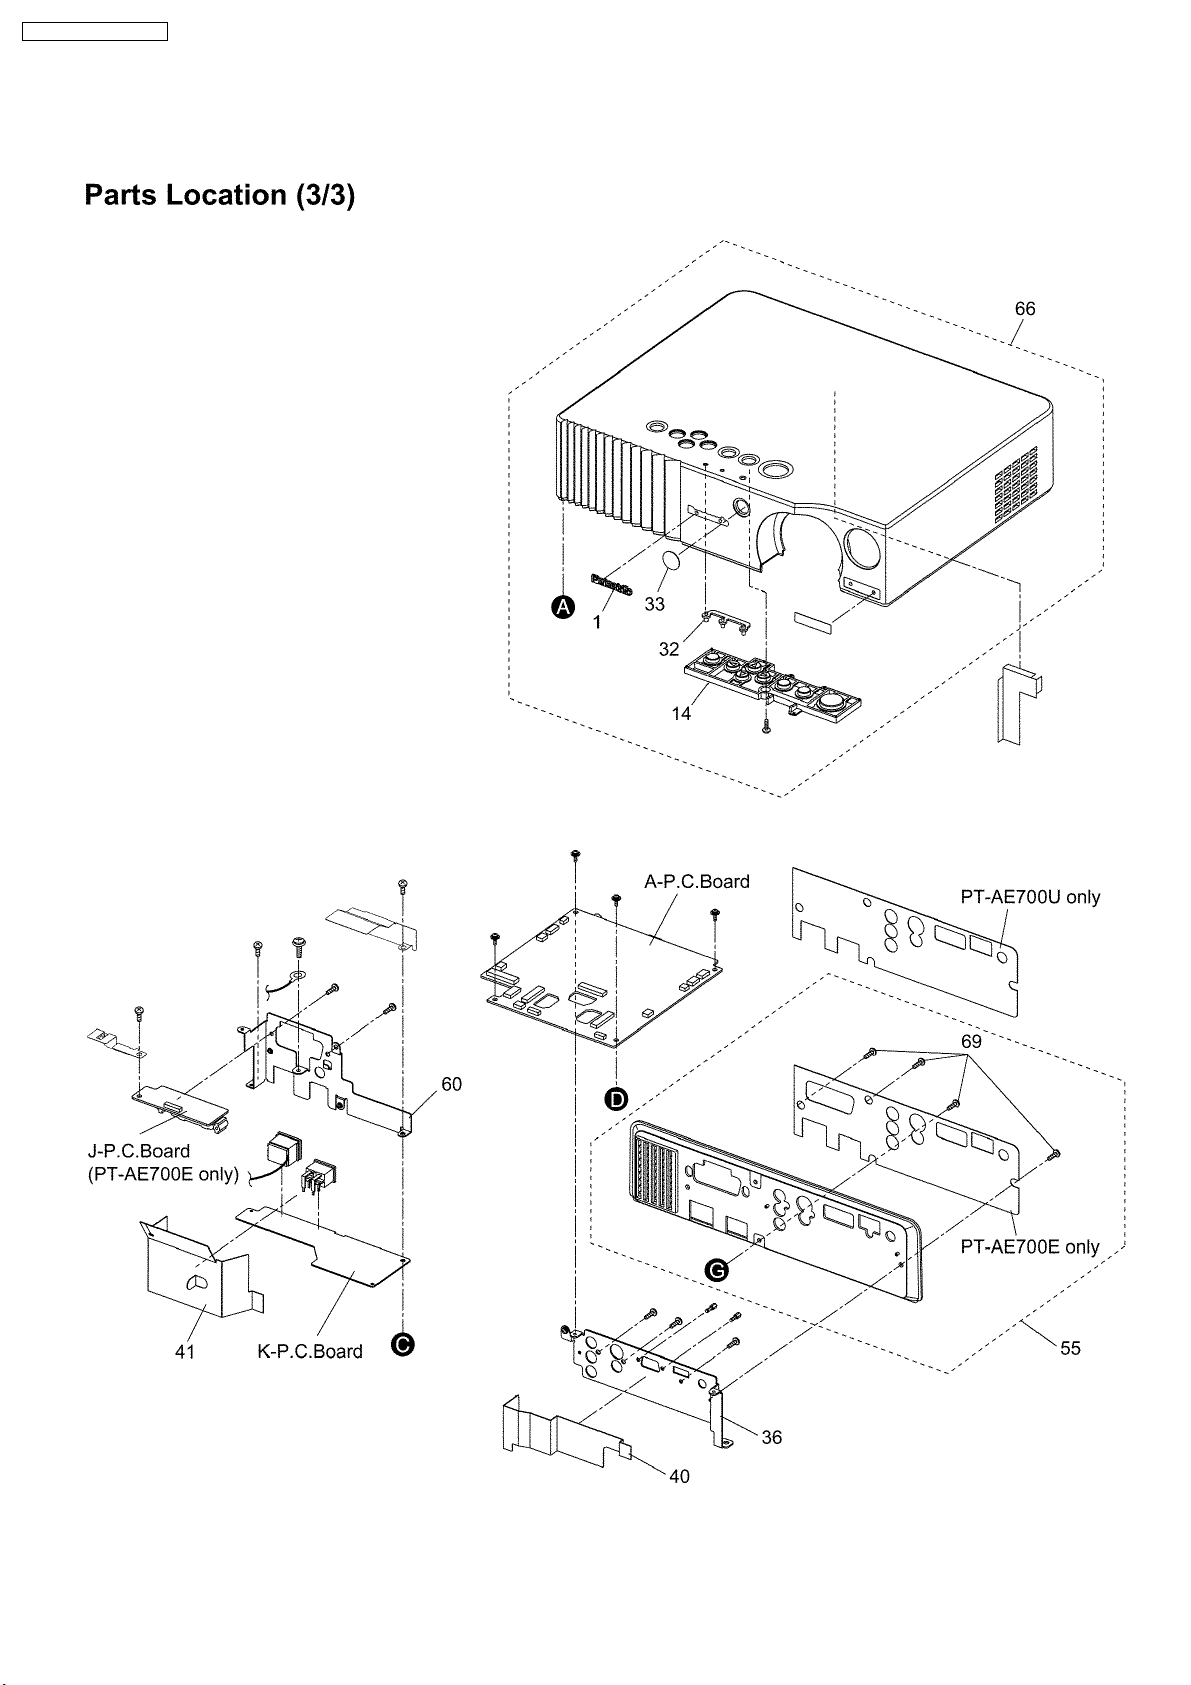
PT-AE700U / PT-AE700E
58
Page 59
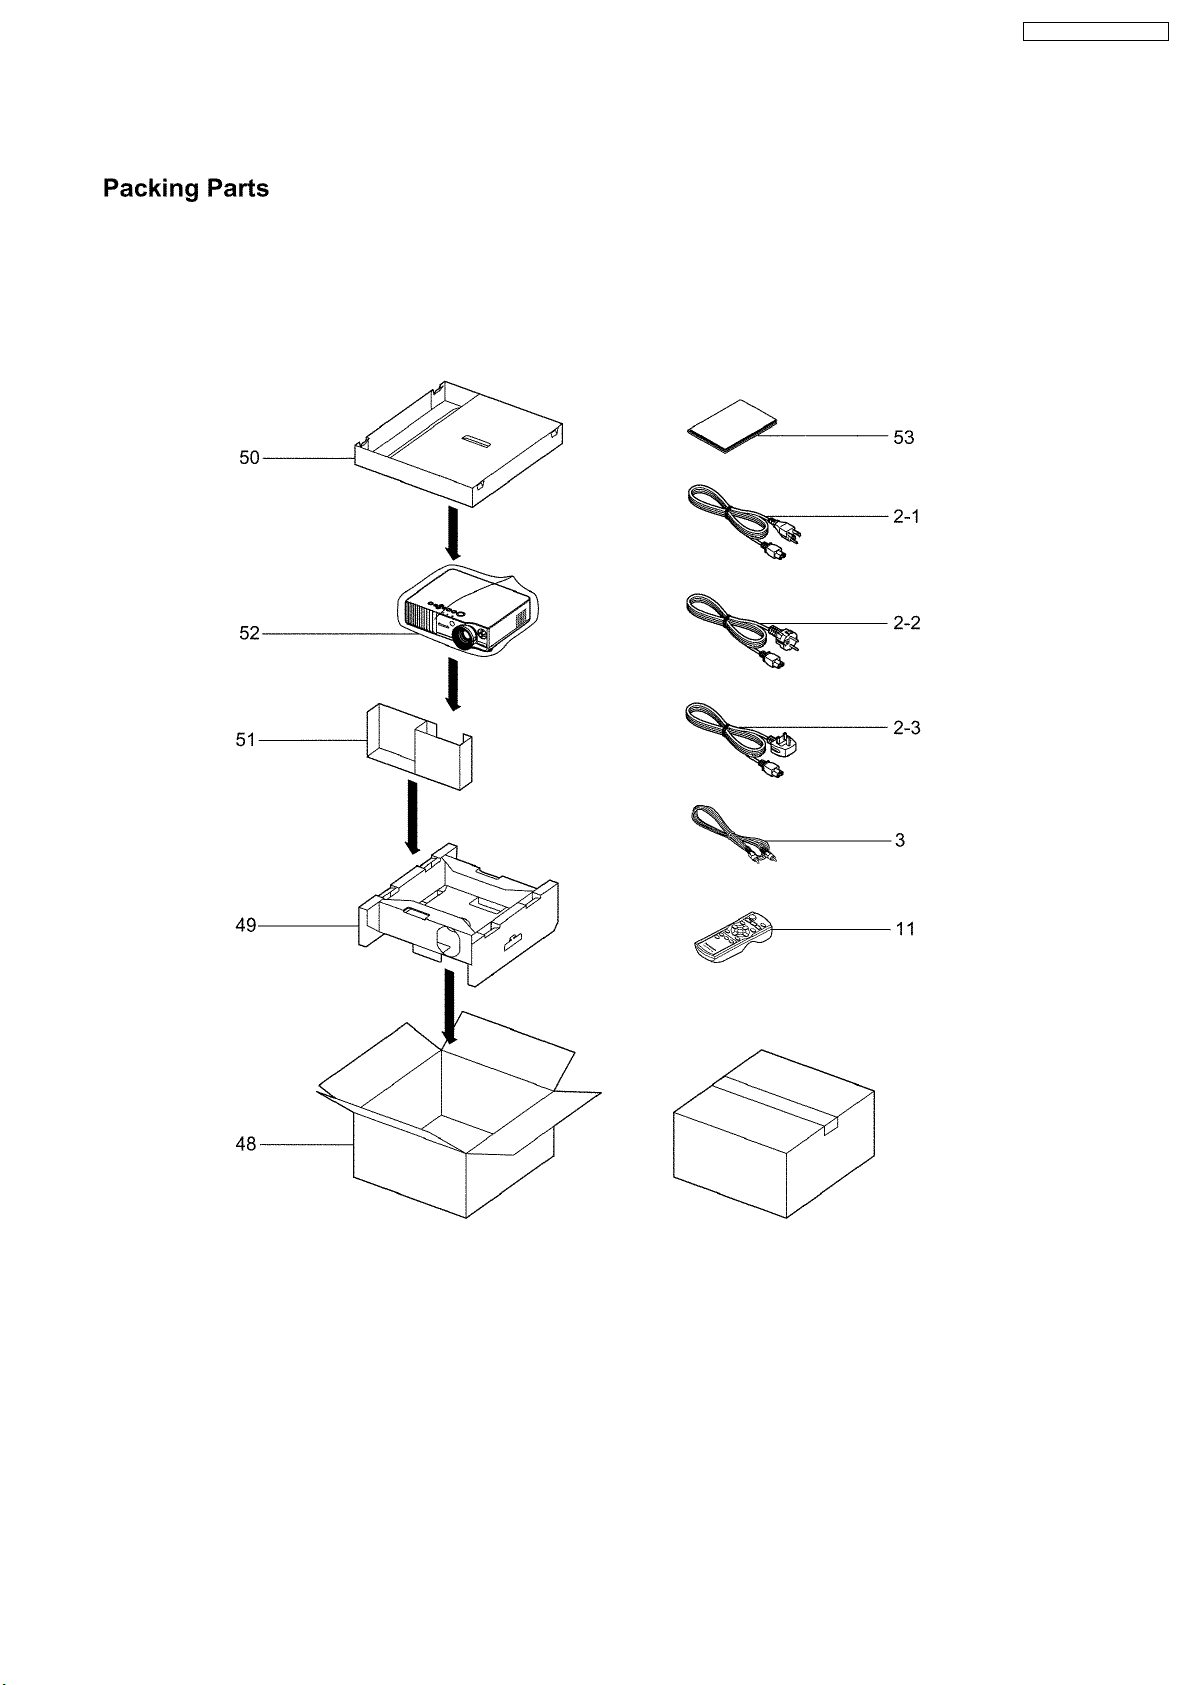
PT-AE700U / PT-AE700E
59
Page 60
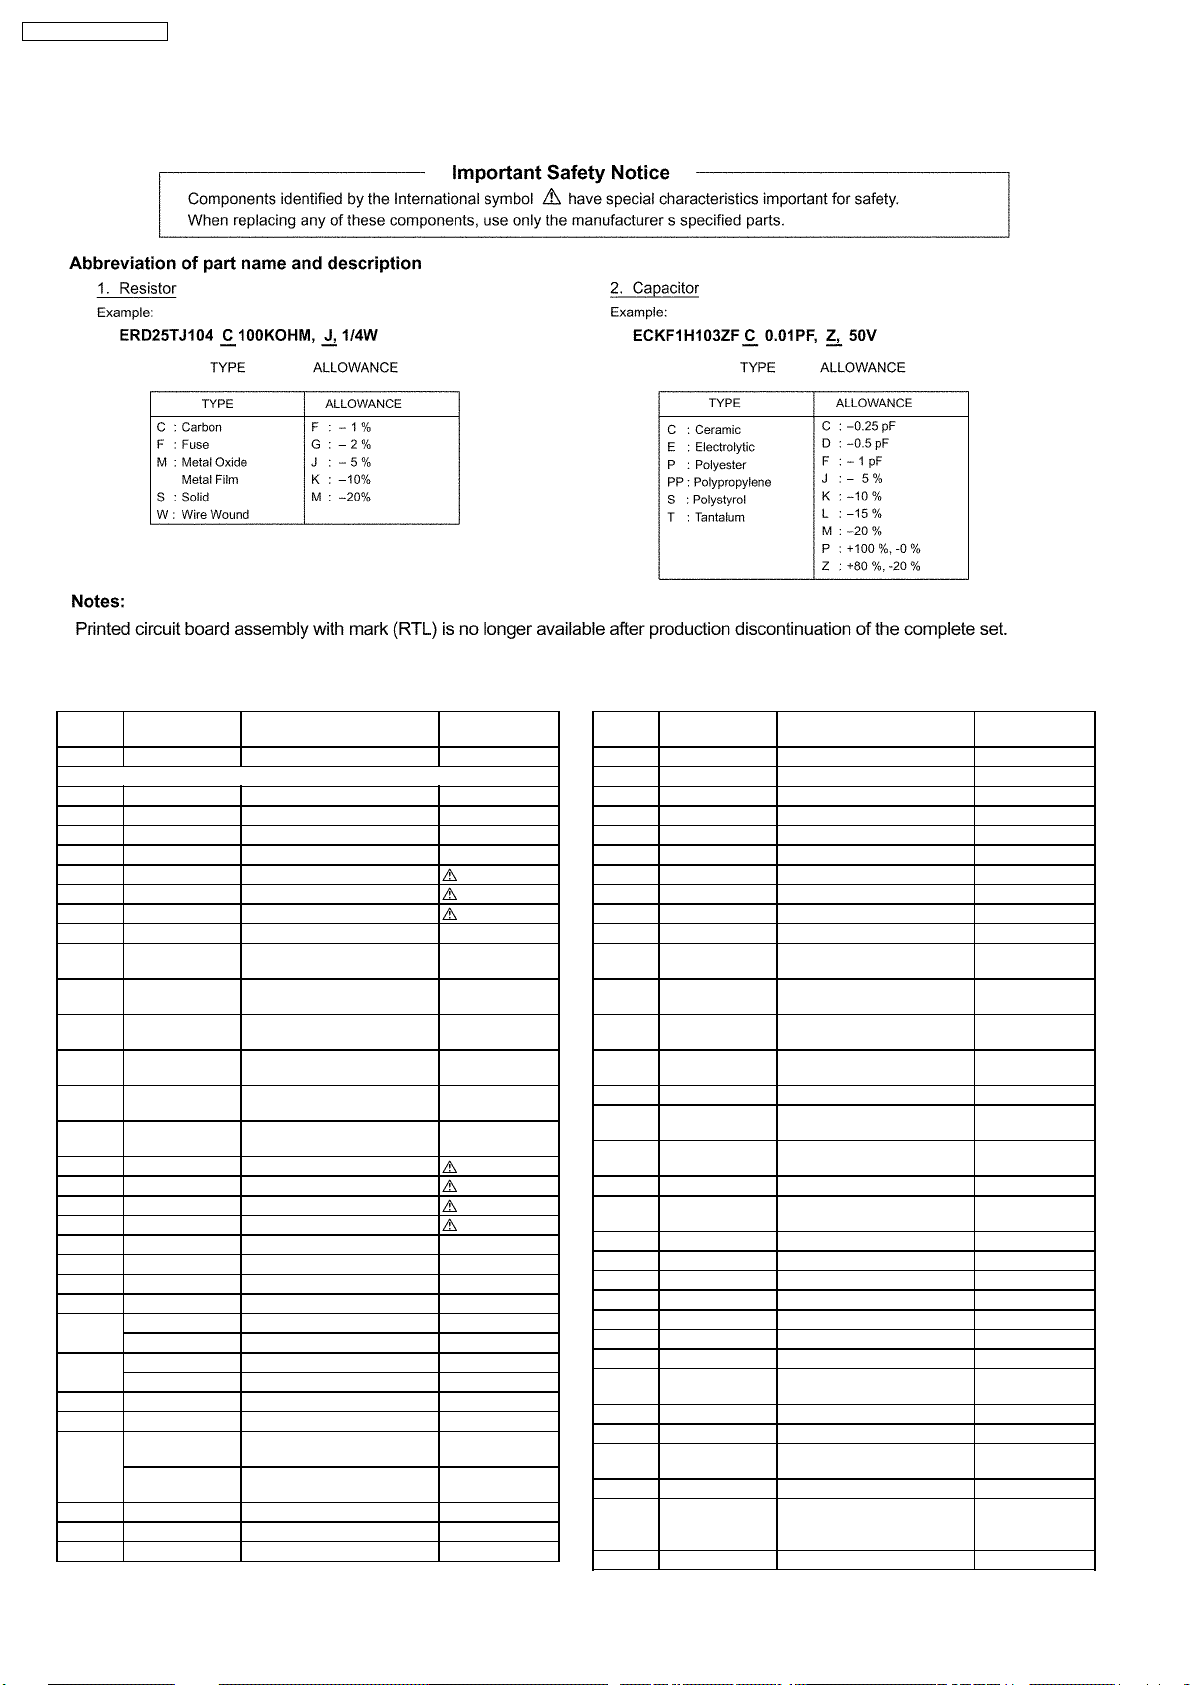
PT-AE700U / PT-AE700E
15 Replacement Parts List
Ref.
No.
1 DFGB0112ZA-0 PANASONIC BADGE
2-1 K2CG3FR00001 POWER CORD PT-AE700U
2-2 K2CM3FR00002 POWER CORD(EUROPE) PT-AE700E
2-3 K2CT3FR00003 POWER CORD(U.K) PT-AE700E
3 K2KA2FA00003 AV CABLE
4 L5BDAXQ00188 LIQUID CRYSTAL
5 L5BDAXQ00189 LIQUID CRYSTAL
6 L5BDAXQ00190 LIQUID CRYSTAL
4 L5BDAXQ00191 LIQUID CRYSTAL
5 L5BDAXQ00192 LIQUID CRYSTAL
6 L5BDAXQ00193 LIQUID CRYSTAL
7 L6FAKCEH0010 POWER FAN
8 L6FALEGH0012 VENTILATION FAN
9 L6FCHC9H0004 PBS FAN
10 L6FCLFCH0006 INHALATION FAN
11 N2QAEA000025 REMOTE CONTROLLER
12 TBLB0047 ADJUST LEG
13 TBLG3042 RUBBER LEG
14 TBXA44901 CONTROL BUTTOM
15 TEEC0035 SHIFUT MECHANISM UNIT
16 TEEC0036 POLARIZING PLATE/IN(G) OPTICAL LABEL
18 TEEC5173 INHALATION DUCT
19 TEEC5174 OPTICAL DUCT
20 TEEC5176 DUCT COVER
Part No. Part Name &
[MECHANICAL PARTS]
D4CDH5030002 TEMP SENSOR
J0KG00000052 CORE
TBMA160 LOGO BADGE
TBMF685 MODEL NAME PLATE PT-AE700U
TBMF686 MODEL NAME PLATE PT-AE700E
TBMF688 MODEL NO. LABEL PT-AE700U
TBMF689 MODEL NO. LABEL PT-AE700E
TEEC0037 POLARIZING PLATE/IN(G) OPTICAL LABEL
Description
DISPLAY(R)
DISPLAY(G)
DISPLAY(B)
DISPLAY(R)
DISPLAY(G)
DISPLAY(B)
Remarks
L3D07H-55G01
(RED MARK)
L3D07H-55G01
(NO MARK)
L3D07H-55G01
(BLUE MARK)
L3D07H-56G01
(RED MARK)
L3D07H-56G01
(NO MARK)
L3D07H-56G01
(BLUE MARK)
:TXZKG01VJY7A
:TXZKG01VJY7B
Ref.
No.
21 TEEC5179 LAMP HOUSE
22 TEEC5180 MASK MECHANISM 1
23 TEEC5181 MASK MECHANISM 2
24 TEEC5182 MASK MECHANISM 3
25 TEEC5183 SHADING LOUVER
26 TEFC5030 LENS SHIFT CAP
28 TKGP5240 PBS
29 TKGP5244 POLARIZING
30 TKGP5245 POLARIZING
31 TKGP5246 POLARIZING
27 TKGP5247 POLARIZING PLATE/IN(R) OPTICAL LABEL
17 TKGP5249 POLARIZING PLATE/IN(B)
27 TKGP5253 POLARIZING PLATE/IN(R) OPTICAL LABEL
32 TKKC5195 LED DIFFUSION PLATE
33 TKKC5199 REMOTE CONTROL
34 TKNE055 FILTER
35 TKNE056 ELECTRIFICATION FILTER
36 TKZF5037 TERMINAL METAL
37 TKZJ5059 POWER FAN INSTAL METAL
38 TMKX761 OPTICAL DUCT COVER
39 TMKX764-1 BALLAST INSULATION
40 TMKX765-1 SHADING SHEET
41 TMKX766-1 SHADING SHEET(K-PCB)
42 TMKX784 POWER FAN SHEET
Part No. Part Name &
TESD067 SPRING
THEC035N SCREW
THNX0389 NUT
TKGP5252 POLARIZING
TKKL5318 LENS CAP
TMKX100 WASHER
TMKX771 SHADING SHEET 2 (K-
TMKX790 SHADING SHEET PT-AE700U
TMKX793 COVER SHEET
Description
PLATE/OUT(R)
PLATE/OUT(G)
PLATE/OUT(B)
PLATE/OUT(B)
RECEIVER
SHEET
PCB)
Remarks
OPTICAL LABEL
:TXZKG01VJY7A
:TXZKG01VJY7B
OPTICAL LABEL
:TXZKG01VJY7B
:TXZKG01VJY7A
(SCART
TERMINAL)
60
Page 61
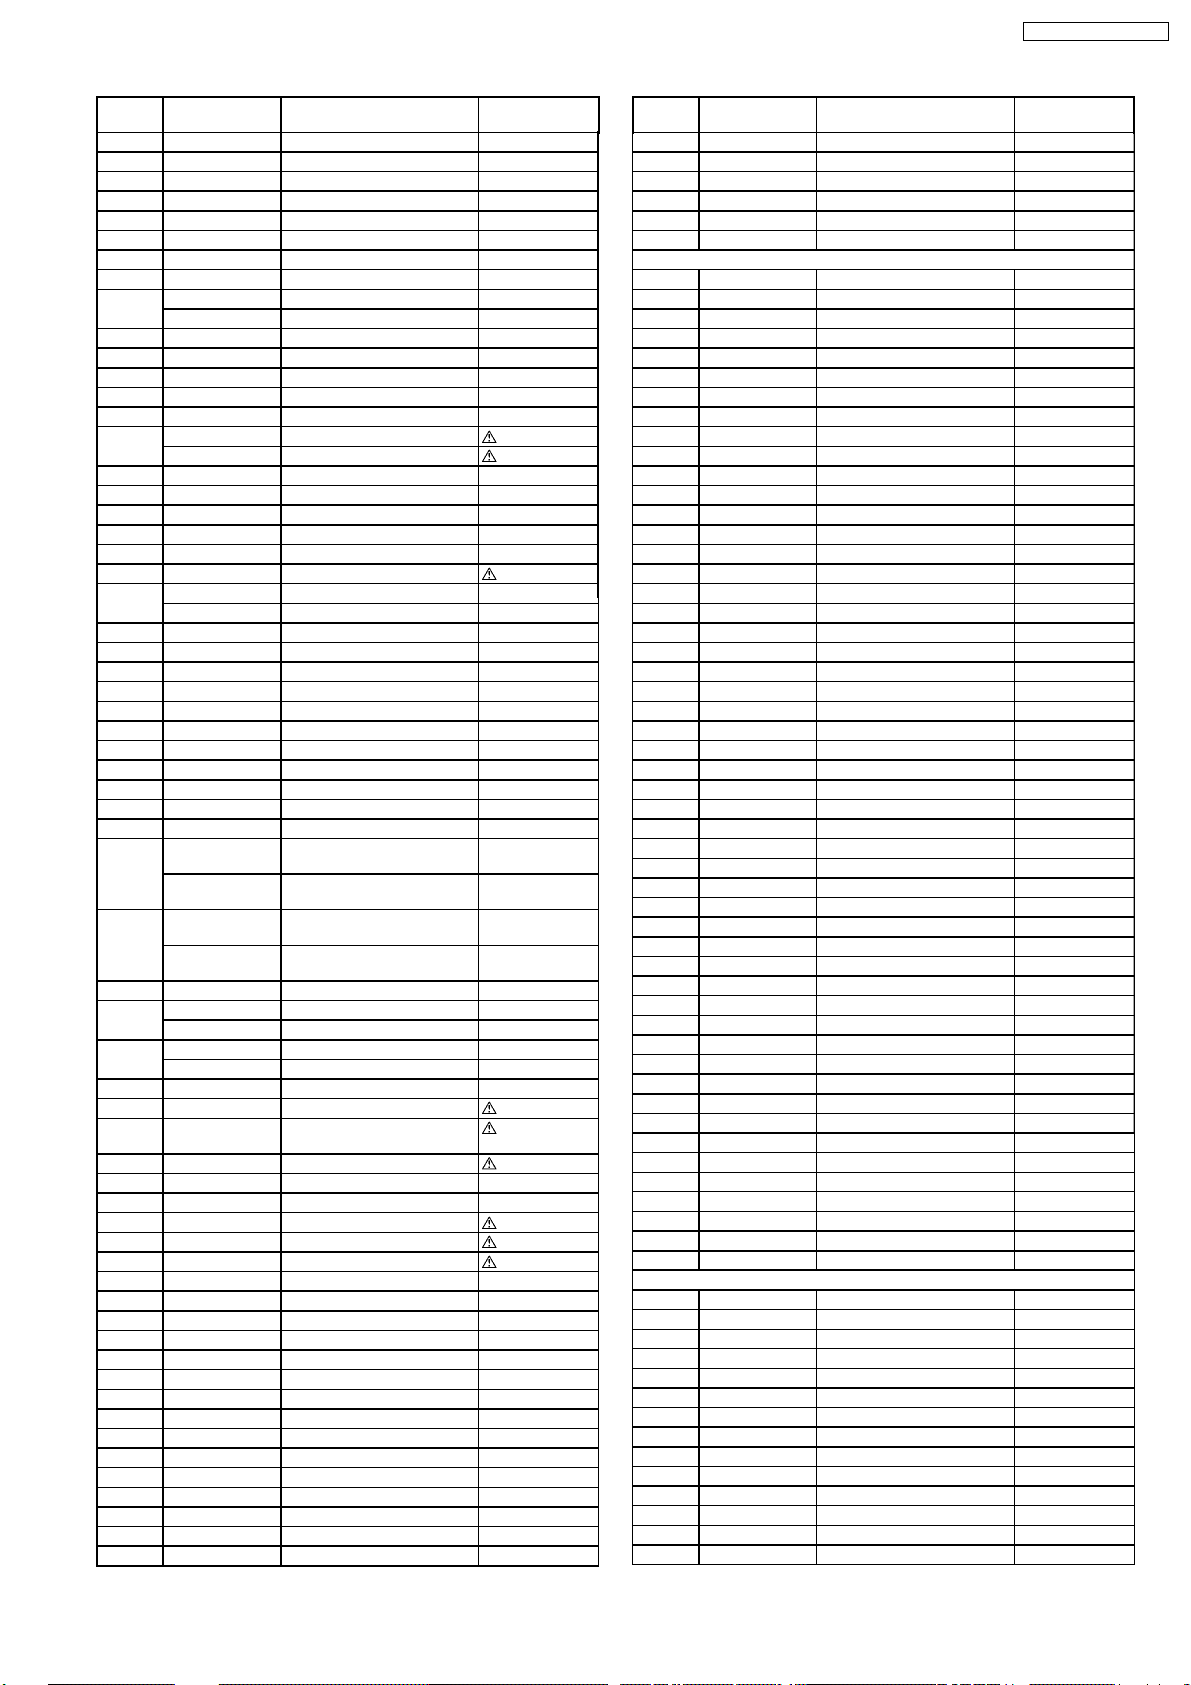
PT-AE700U / PT-AE700E
Ref.
No.
43 TMME241 SPACER
44 TMXC017 TEMP FUSE METAL
45 TMXE041 POWER BOX
46 TMZX5047 FILTER COVER 1
47 TMZX5048 FILTER COVER 2
48 TPCB68302 CARTON PT-AE700U
49 TPDF1317 PAD
50 TPDF1318 ACCESSORY CARTON
51 TPDF1349 REINFORCEMENT PAD
52 TPEH124-1 SET COVER
53 TQBJ0161 INSTRUCTION BOOK PT-AE700U
55 TTPA0392 TERMINAL COVER ASSY PT-AE700U
56 TUCC6005 POWER SHIELD METAL
57 TUCC6019 BALLAST SHEILD METAL
58 TUCX5180 BASE METAL
59 TUCX5181 GROUND METAL 1
60 TUWC053 INSTAL METAL(K-PCB)
61 TUXE237 BALLAST INSTAL METAL
62 TXFEC99VJY7A OPTICAL BLOCK (A) OPTICAL LABEL
63 TXFEC98VJY7A ANALYSIS BLOCK (A) OPTICAL LABEL
64 TXFEE01VJY7 MASK MECHANISM ASSY
65 TXFKF01PXNZ BOTTOM COVER PT-AE700U
66 TXFKF02PXNZ UPPER COVER PT-AE700U
67 TXFKL01VJY7 LAMP COVER ASSY
71 TXZEN01VJY7 IRIS UNIT ASSY
68 TXZPL01VJY7 LENS ASSY
69 XSB3+10FN SCREW
70 XTB3+12CFN SCREW
Part No. Part Name &
TMKX794 PLATE
TMME154 FUSE COVER
TMME244 SPACER
TPCB68303 CARTON PT-AE700E
TQB817002-1 SAFETY SHEET PT-AE700U
TQBJ0162 INSTRUCTION BOOK PT-AE700E
TQBJ7002-1 SHEET PT-AE700U
TQD1712010 SHEET
TQDJ18011 GUARANTEE CARD(USA) PT-AE700U
TQDJ18012 GUARANTEE CARD(CANADA) PT-AE700U
TQF86202 LABEL
TSXL429 FLEXIBLE CABLE(A8-S1)
TTPA0393 TERMINAL COVER ASSY PT-AE700E
TUCA5006 SCART TERMINAL PLATE PT-AE700E
TUCB5033 ALUMINUM SHEET 1
TUCB5034-1 ALUMINUM SHEET 2
TUCB5035 ALUMINUM SHEET 3
TXAJE01VJN7A LEAD WIRE(K-PCB)
TXFEC99VJY7B OPTICAL BLOCK (B) OPTICAL LABEL
TXFEC98VJY7B ANALYSIS BLOCK (B) OPTICAL LABEL
TXFKF01PXQZ BOTTOM COVER PT-AE700E
TXFKF02PXQZ UPPER COVER PT-AE700E
TXJ/B1VJV5 LEAD WIRE(B1-P2)
TXJ/ELVJY7 CABLE WITH INTERLOCK
TXJ/H1VJY7 LEAD WIRE(H1-A23Åj
TXJ/J1VJY7 LEAD WIRE(J-PCB) PT-AE700E
TXJ/L2VJY7 LAMP CABLE
TXJ/P1VJY7 LEAD WIRE(K1-P1) TEMP FUSE
TXJ/P3VJY7 LEAD WIRE(P3-A6)
TXJ/Q3VJY7 LEAD WIRE(Q3-A4)
XSN3+8FJK SCREW
XSN3+8FN SCREW
XTBT969FJK SCREW
XTN3+6G SCREW
XTN3+6GFJ SCREW
XTW3+8PFJ SCREW
XYN2+F6FJ SCREW
XYN2+J10FJ SCREW
XYN2+J4FJ SCREW
XYN3+F20FJ SCREW
XYN3+F8FJ SCREW
Description
SW
Remarks
:TXZKG01VJY7A
:TXZKG01VJY7B
:TXZKG01VJY7A
:TXZKG01VJY7B
Ref.
No.
IC1001 C1AB00001988 I.C
IC1004 C0JBAR000367 I.C
IC1005 C1AB00002031 I.C
IC1006 C3ABPJ000071 I.C
IC1007 C1AB00000740 I.C
IC1008 C3ABPJ000071 I.C
IC1009 C0ZBZ0000971 I.C
IC1010 C2DBYH000017 I.C
IC1011 TVRN329 I.C
IC1012 TC74LCX574TL I.C C0JBAF000315
IC1013 C0JBAE000324 I.C
IC1015 C0JBAZ002115 I.C
IC1016 C0EBE0000336 I.C
IC1018 C0CBCAG00007 I.C
IC1020 C0JBAR000294 I.C
IC1021 C0FBBD000065 I.C
IC1027 C3BBFC000290 I.C
IC1028 C0DBEZE00002 I.C
IC1029 C0DBEZE00002 I.C
IC1030 C0DBEZE00002 I.C
IC1031 C0DBEZE00002 I.C
IC1032 C1ZBZ0002561 I.C
IC1040 C0DBZFF00004 I.C
IC1051 C1AB00001895 I.C
IC1052 C1AB00001895 I.C
IC1053 C1AB00001895 I.C
IC1054 C0DBEMC00020 I.C
IC1101 TC74LCX574TL I.C C0JBAF000315
IC1102 C0JBAZ002128 I.C
IC1103 C0DBEKG00004 I.C
IC1105 C3EBDC000046 I.C
IC1107 MN864720 I.C
IC1110 C0DBCFG00005 I.C
IC1111 C0DBZGF00002 I.C
IC1114 C0CBCAD00016 I.C
IC1115 C0ABCA000062 I.C
IC1117 C1BB00000818 I.C
IC1123 C0CBCAD00015 I.C
IC1124 C0CBCAD00015 I.C
IC1125 C0CBCDD00004 I.C
IC1128 C0JBAZ002210 I.C
IC1129 C0JBAZ002210 I.C
IC1133 TVRN330 I.C
IC1137 C0JBAA000359 I.C
IC1138 C0JBAA000359 I.C
IC1139 C0CBCDD00004 I.C
IC1200 C1AB00001721 I.C
IC9602 C0ZAZ0000077 I.C
IC9603 C0ZAZ0000077 I.C
Q1001 2SD1819A TRANSISTOR 2SD1819AW
Q1002 2SB1218A TRANSISTOR
Q1003 2SB1218A TRANSISTOR
Q1004 2SD1819A TRANSISTOR 2SD1819AW
Q1005 2SB1218A TRANSISTOR
Q1006 2SD1819A TRANSISTOR 2SD1819AW
Q1007 2SD1819A TRANSISTOR 2SD1819AW
Q1008 2SD1819A TRANSISTOR 2SD1819AW
Q1009 2SD1819A TRANSISTOR 2SD1819AW
Q1010 2SB1218A TRANSISTOR
Q1011 2SD1819A TRANSISTOR 2SD1819AW
Q1015 2SD1819A TRANSISTOR 2SD1819AW
Q1016 2SD1819A TRANSISTOR
Part No. Part Name &
XYN3+J10FJ SCREW
XYN3+J12FJ SCREW
XYN3+J8FJ SCREW
XYN4+E8FJ SCREW
XZBT6532 BAG PT-AE700U
[INTEGRATED CIRCUIT]
Description
[TRANSISTORS]
Remarks
61
Page 62
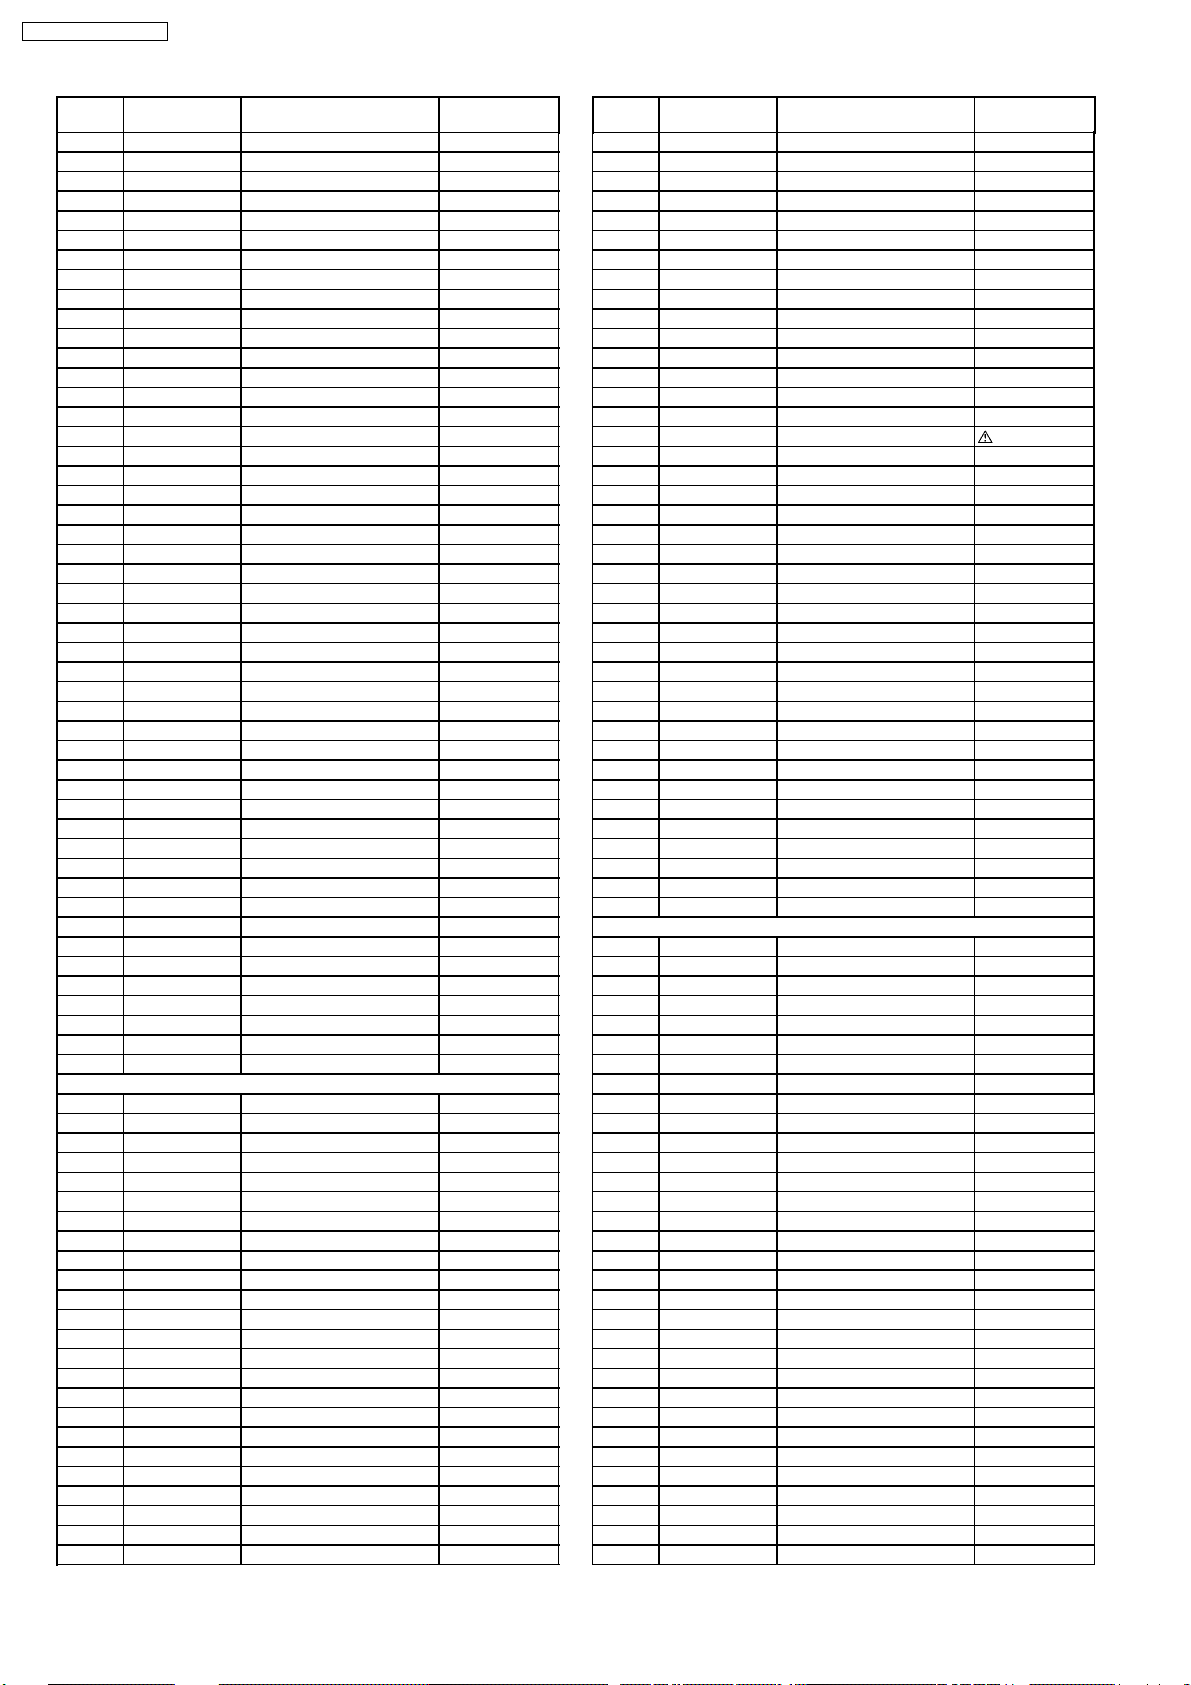
PT-AE700U / PT-AE700E
Ref.
No.
Q1018 2SB1218A TRANSISTOR
Q1020 2SB1218A TRANSISTOR
Q1021 2SB1218A TRANSISTOR
Q1022 2SD1819A TRANSISTOR 2SD1819AW
Q1023 2SB1218A TRANSISTOR
Q1024 2SD1819A TRANSISTOR 2SD1819AW
Q1025 2SD1819A TRANSISTOR 2SD1819AW
Q1026 2SD1819A TRANSISTOR 2SD1819AW
Q1027 2SD1819A TRANSISTOR 2SD1819AW
Q1028 2SD1819A TRANSISTOR 2SD1819AW
Q1029 2SD1819A TRANSISTOR 2SD1819AW
Q1031 2SD1819A TRANSISTOR 2SD1819AW
Q1032 2SD1819A TRANSISTOR 2SD1819AW
Q1034 2SD1819A TRANSISTOR 2SD1819AW
Q1101 B1CBHD000001 TRANSISTOR
Q1102 B1CBHD000001 TRANSISTOR
Q1105 2SD1819A TRANSISTOR 2SD1819AW
Q1108 B1CBHD000001 TRANSISTOR
Q1109 B1CBHD000001 TRANSISTOR
Q1110 2SD1819A TRANSISTOR 2SD1819AW
Q1111 2SD1819A TRANSISTOR 2SD1819AW
Q1112 2SD1819A TRANSISTOR 2SD1819AW
Q1115 2SB1218A TRANSISTOR
Q1116 2SD1819A TRANSISTOR 2SD1819AW
Q1117 2SD1819A TRANSISTOR 2SD1819AW
Q1118 2SD1819A TRANSISTOR 2SD1819AW
Q1119 2SD1819A TRANSISTOR 2SD1819AW
Q1120 2SB1218A TRANSISTOR
Q1121 2SD1819A TRANSISTOR 2SD1819AW
Q2001 2SD1819A TRANSISTOR 2SD1819AW
Q2002 2SD1819A TRANSISTOR 2SD1819AW
Q2003 2SB1218A TRANSISTOR
Q2004 2SB1218A TRANSISTOR
Q3401 2SD1819A TRANSISTOR PT-AE700E
Q3402 2SD1819A TRANSISTOR PT-AE700E
Q3403 2SD1819A TRANSISTOR PT-AE700E
Q3404 2SD1819A TRANSISTOR PT-AE700E
Q9603 B1DEGQ000017 TRANSISTOR
Q9604 2SB710A TRANSISTOR 2SB0710A
Q9605 2SB710A TRANSISTOR 2SB0710A
Q9606 B1DEGM000022 TRANSISTOR
Q9607 B1DEGM000022 TRANSISTOR
Q9608 2SB710A TRANSISTOR 2SB0710A
Q9609 2SB710A TRANSISTOR 2SB0710A
Q9610 B1DEGM000022 TRANSISTOR
Q9611 B1DEGM000022 TRANSISTOR
Q9614 B1DEGQ000017 TRANSISTOR
D1002 MAZ81500ML DIODE
D1003 MAZ80330HL DIODE
D1004 MA8056M DIODE MAZ80560M
D1005 MA8056M DIODE MAZ80560M
D1007 MAZ80330HL DIODE
D1011 MA8056M DIODE MAZ80560M
D1012 MA8056M DIODE MAZ80560M
D1024 LNJ208R8ARA LED
D1027 MA2J11100L DIODE
D1101 MA2S11100L DIODE
D1105 EZJZ0V171AA VARISTOR
D1107 EZJZ0V171AA VARISTOR
D1110 EZJZ0V171AA VARISTOR
D1117 MA3056M ZENER DIODE MAZ30560M
D1120 MA2Z72000L DIODE
D1121 MA2Z72000L DIODE
D1122 MA152WK DIODE MA3X152E
D1123 MA152WK DIODE MA3X152E
D1124 MA153A DIODE MA3X153A
D1125 MA704A DIODE MA3X704A
D1126 B0JCPD000010 DIODE
D1127 B0JCPD000010 DIODE
D1130 EZJZ0V80008B VARISTOR
Part No. Part Name &
Description
[DIODES]
Remarks
Ref.
No.
D1131 EZJZ0V80008B VARISTOR
D1132 EZJZ0V80008B VARISTOR
D1133 EZJZ0V80008B VARISTOR
D1135 EZJZ0V80008B VARISTOR
D1136 EZJZ0V80008B VARISTOR
D1137 EZJZ0V80008B VARISTOR
D1138 EZJZ0V80008B VARISTOR
D1139 EZJZ0V171AA VARISTOR
D1140 EZJZ0V171AA VARISTOR
D1141 EZJZ0V171AA VARISTOR
D1145 LNJ208R8ARA LED
D2001 LNJ208R8ARA LED
D2002 LNJ208R8ARA LED
D2003 LNJ107W5ARA1 LED
D2004 MA157A DIODE MA3X157A
D9101 ERZV14D471 VARISTOR
D9601 B0HASR000006 DIODE
D9604 MA158 DIODE
D9605 MA2Z72000L DIODE
D9606 MA158 DIODE
D9607 MA2Z72000L DIODE
D9608 MA158 DIODE
D9609 MA2Z72000L DIODE
D9611 MA158 DIODE
D9612 MA2Z72000L DIODE
D9616 D1FL40F4063 DIODE B0ECHP000001
D9617 MA2Z72000L DIODE
D9618 MA2Z72000L DIODE
D9619 MA2Z72000L DIODE
D9620 MA2Z72000L DIODE
D9621 MA2Z72000L DIODE
D9622 D1FL40F4063 DIODE B0ECHP000001
D9623 D1FL40F4063 DIODE B0ECHP000001
D9624 MA2Z72000L DIODE
D9625 MA2Z72000L DIODE
D9626 MA2Z72000L DIODE
D9627 MA2Z72000L DIODE
D9628 MA2Z72000L DIODE
D9629 D1FL40F4063 DIODE B0ECHP000001
L1002 J0JJC0000022 EMI FILTER
L1003 J0JJC0000022 EMI FILTER
L1004 J0JJC0000022 EMI FILTER
L1005 J0JJC0000022 EMI FILTER
L1006 J0JJC0000022 EMI FILTER
L1007 ELJFA150JF COIL
L1008 J0JJC0000022 EMI FILTER
L1009 J0JJC0000022 EMI FILTER
L1010 J0JJC0000022 EMI FILTER
L1011 J0JJC0000022 EMI FILTER
L1012 J0JJC0000022 EMI FILTER
L1013 ELJFA150JF COIL
L1014 ELJFA150JF COIL
L1015 ELJFA150JF COIL
L1016 J0JCC0000168 FILTER
L1017 J0JCC0000168 FILTER
L1018 J0JCC0000168 FILTER
L1019 J0JCC0000168 FILTER
L1020 J0JCC0000168 FILTER
L1021 J0JJC0000022 EMI FILTER
L1022 J0JCC0000168 FILTER
L1023 J0JCC0000168 FILTER
L1024 J0JJC0000022 EMI FILTER
L1025 J0JJC0000022 EMI FILTER
L1026 J0JJC0000022 EMI FILTER
L1027 J0JCC0000168 FILTER
L1028 J0JCC0000168 FILTER
L1029 J0JJC0000022 EMI FILTER
L1032 J0JJC0000022 EMI FILTER
L1034 J0JJC0000022 EMI FILTER
L1035 ELJFA470JF COIL
Part No. Part Name &
Description
[COILS]
Remarks
62
Page 63
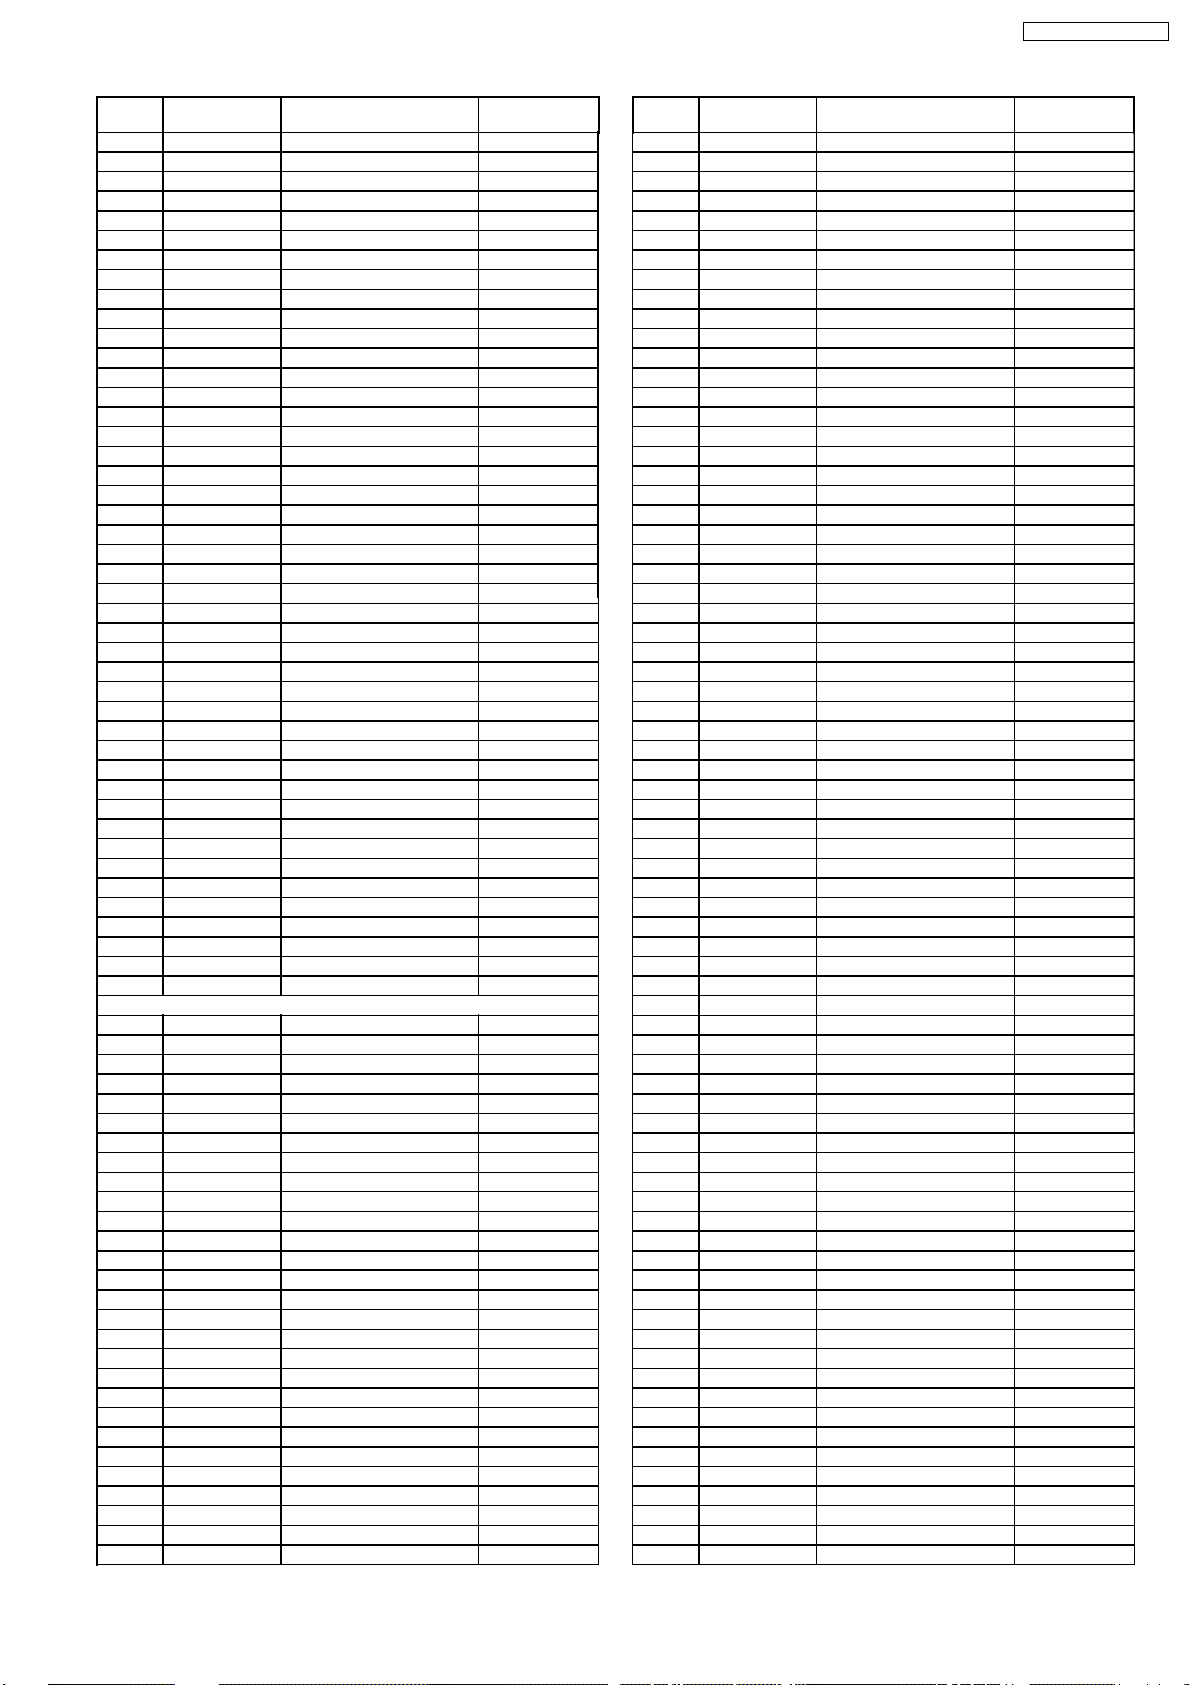
PT-AE700U / PT-AE700E
Ref.
No.
L1037 J0JJC0000022 EMI FILTER
L1038 J0JJC0000022 EMI FILTER
L1039 ELJFA6R8JF COIL
L1040 ELJFA470JF COIL
L1041 J0JJC0000022 EMI FILTER
L1042 J0JJC0000022 EMI FILTER
L1043 J0JJC0000022 EMI FILTER
L1044 J0JJC0000022 EMI FILTER
L1045 J0JJC0000022 EMI FILTER
L1046 J0JJC0000022 EMI FILTER
L1048 J0JJC0000022 EMI FILTER
L1049 J0JJC0000022 EMI FILTER
L1050 J0JJC0000022 EMI FILTER
L1051 J0JJC0000022 EMI FILTER
L1053 J0JJC0000022 EMI FILTER
L1055 J0JJC0000022 EMI FILTER
L1056 J0ZZB0000063 FILTER
L1057 J0ZZB0000063 FILTER
L1058 J0ZZB0000063 FILTER
L1059 J0ZZB0000063 FILTER
L1060 J0ZZB0000063 FILTER
L1061 J0ZZB0000063 FILTER
L1062 J0ZZB0000063 FILTER
L1063 J0ZZB0000063 FILTER
L1103 J0JJC0000022 EMI FILTER
L1104 J0JJC0000022 EMI FILTER
L1105 J0JJC0000022 EMI FILTER
L1111 J0MAB0000176 COIL
L1112 J0MAB0000176 COIL
L1113 J0MAB0000176 COIL
L1114 J0MAB0000176 COIL
L1117 J0JJC0000022 EMI FILTER
L1120 J0JJC0000022 EMI FILTER
L1122 J0JJC0000022 EMI FILTER
L1123 J0JJC0000022 EMI FILTER
L1124 J0JJC0000022 EMI FILTER
L1125 J0JJC0000022 EMI FILTER
L1126 G1C330MA0077 COIL
L1127 G1C330MA0077 COIL
L1128 J0JJC0000022 EMI FILTER
L1129 J0JJC0000022 EMI FILTER
L3401 J0JJC0000022 EMI FILTER PT-AE700E
L3402 J0JJC0000022 EMI FILTER PT-AE700E
R1001 ERJ6GEYJ750 M 75 OHM,J,1/10W
R1002 ERJ6ENF1801 M 1.8KOHM, 1/10W
R1003 ERJ3GEYJ272 M 2.7KOHMJ,J1/16W
R1004 ERJ3GEYJ473 M 47K OHM,J,1/16W
R1005 ERJ6ENF75R0 M 75 OHM, 1/10W
R1006 ERJ6ENF75R0 M 75 OHM, 1/10W
R1007 ERJ3GEYJ472 M 4.7KOHM,J,1/16W
R1008 ERJ6ENF75R0 M 75 OHM, 1/10W
R1009 ERJ3GEYJ472 M 4.7KOHM,J,1/16W
R1010 ERJ3GEYJ562 M 5.6KOHM,J,1/16W
R1011 ERJ3GEYJ472 M 4.7KOHM,J,1/16W
R1012 ERJ3GEYJ472 M 4.7KOHM,J,1/16W
R1013 ERJ3GEYJ560 M 56 OHM,J,1/16W
R1014 ERJ3GEYJ562 M 5.6KOHM,J,1/16W
R1015 ERJ3GEYJ560 M 56 OHM,J,1/16W
R1017 ERJ6GEYJ750 M 75 OHM,J,1/10W
R1018 ERJ3GEYJ101 M 100 OHM,J,1/16W D0GB101JA002
R1019 ERJ3GEYJ104 M 100KOHM,J,1/16W
R1020 ERJ3GEYJ471 M 470 OHM,J,1/16W
R1021 ERJ3GEYJ101 M 100 OHM,J,1/16W D0GB101JA002
R1022 ERJ3GEYJ472 M 4.7KOHM,J,1/16W
R1023 ERJ3GEYJ562 M 5.6KOHM,J,1/16W
R1024 ERJ3GEYJ560 M 56 OHM,J,1/16W
R1025 ERJ3GEYJ560 M 56 OHM,J,1/16W
R1026 ERJ6GEYJ750 M 75 OHM,J,1/10W
R1027 ERJ3GEYJ560 M 56 OHM,J,1/16W
R1028 ERJ3GEYJ560 M 56 OHM,J,1/16W
Part No. Part Name &
Description
[RESISTORS]
Remarks
Ref.
No.
R1029 ERJ6ENF75R0 M 75 OHM, 1/10W
R1030 ERJ3GEYJ151 M 150 OHM,J,1/16W
R1031 ERJ3GEYJ472 M 4.7KOHM,J,1/16W
R1032 ERJ3GEYJ562 M 5.6KOHM,J,1/16W
R1033 ERJ3GEYJ560 M 56 OHM,J,1/16W
R1034 ERJ3GEYJ151 M 150 OHM,J,1/16W
R1035 ERJ2GE0R00 M 0 OHM, 0.063W
R1036 ERJ6ENF75R0 M 75 OHM, 1/10W
R1037 ERJ3GEYJ221 M 220 OHM,J,1/16W
R1038 ERJ3GEYJ103 M 10K OHM,J,1/16W
R1039 ERJ3GEYJ472 M 4.7KOHM,J,1/16W
R1040 ERJ3GEYJ562 M 5.6KOHM,J,1/16W
R1041 ERJ3GEYJ560 M 56 OHM,J,1/16W
R1042 ERJ3GEYJ103 M 10K OHM,J,1/16W
R1043 ERJ3GEYJ103 M 10K OHM,J,1/16W
R1044 ERJ3GEYJ472 M 4.7KOHM,J,1/16W
R1045 ERJ6ENF75R0 M 75 OHM, 1/10W
R1046 ERJ3GEYJ560 M 56 OHM,J,1/16W
R1047 ERJ3GEYJ221 M 220 OHM,J,1/16W
R1048 ERJ3GEYJ682 M 6.8KOHM,J,1/16W
R1049 ERJ3GEYJ101 M 100 OHM,J,1/16W
R1050 ERJ3GEYJ332 M 3.3KOHM,J,1/16W
R1051 ERJ3GEYJ821 M 820 OHM,J,1/16W
R1052 ERJ3GEYJ471 M 470 OHM,J,1/16W
R1053 ERJ3GEY0R00 M0OHM,1/16W
R1054 ERJ3GEYJ221 M 220 OHM,J,1/16W
R1055 ERJ3GEYJ471 M 470 OHM,J,1/16W
R1056 ERJ3GEYJ180 M 18 OHM,J,1/16W
R1057 ERJ3GEYJ180 M 18 OHM,J,1/16W
R1058 ERJ3GEYJ101 M 100 OHM,J,1/16W D0GB101JA002
R1059 ERJ3GEYJ104 M 100KOHM,J,1/16W
R1061 ERJ3GEYJ101 M 100 OHM,J,1/16W D0GB101JA002
R1062 ERJ3GEYJ101 M 100 OHM,J,1/16W D0GB101JA002
R1063 ERJ3GEYJ101 M 100 OHM,J,1/16W D0GB101JA002
R1064 ERJ3GEYJ101 M 100 OHM,J,1/16W D0GB101JA002
R1065 ERJ3GEYJ101 M 100 OHM,J,1/16W D0GB101JA002
R1066 ERJ3GEYJ561 M 560 OHM,J,1/16W
R1067 ERJ3GEYJ561 M 560 OHM,J,1/16W
R1068 ERJ3GEYJ561 M 560 OHM,J,1/16W
R1069 ERJ3GEYJ681 M 680 OHM,J,1/16W
R1070 ERJ3GEYJ681 M 680 OHM,J,1/16W
R1071 ERJ3GEYJ220 M 22 OHM,J,1/16W
R1072 ERJ3GEYJ681 M 680 OHM,J,1/16W
R1073 ERJ3GEYJ103 M 10K OHM,J,1/16W
R1074 ERJ3GEYJ103 M 10K OHM,J,1/16W
R1076 ERJ3GEYJ103 M 10K OHM,J,1/16W
R1077 ERJ3GEYJ331 M 330 OHM,J,1/16W
R1078 ERJ3GEYJ331 M 330 OHM,J,1/16W
R1079 ERJ3GEYJ331 M 330 OHM,J,1/16W
R1080 ERJ3GEYJ222 M 2.2KOHM,J,1/16W
R1081 ERJ3GEYJ222 M 2.2KOHM,J,1/16W
R1082 ERJ3GEYJ222 M 2.2KOHM,J,1/16W
R1083 ERJ3GEY0R00 M0OHM,1/16W
R1084 ERJ3GEY0R00 M0OHM,1/16W
R1085 ERJ3GEY0R00 M0OHM,1/16W
R1087 ERJ3GEYJ180 M 18 OHM,J,1/16W
R1088 ERJ3GEYJ180 M 18 OHM,J,1/16W
R1089 ERJ3GEYJ180 M 18 OHM,J,1/16W
R1090 ERJ2GEJ103 M 10K OHM, 0.063W
R1091 ERJ2GEJ103 M 10K OHM, 0.063W
R1102 ERJ3EKF1371 M 1.37KOHM,0.063W
R1105 ERJ6ENF2001 M 2KOHM, 1/10W
R1106 ERJ3GEYJ151 M 150 OHM,J,1/16W
R1107 ERJ3GEYJ471 M 470 OHM,J,1/16W
R1108 ERJ3GEYJ151 M 150 OHM,J,1/16W
R1109 ERJ3GEYJ331 M 330 OHM,J,1/16W
R1111 ERJ3EKF1741 M 1.74KOHM,0.063W
R1113 ERJ6ENF2001 M 2KOHM, 1/10W
R1114 ERJ2GEJ220 M 22 OHM, 0.063W
R1115 ERJ2GEJ562 M 5.6KOHM, 0.063W
R1116 EXB28V220J RESISTOR ARRAY
R1117 ERJ2GEJ220 M 22 OHM, 0.063W
R1118 ERJ2GEJ220 M 22 OHM, 0.063W
Part No. Part Name &
Description
Remarks
63
Page 64
PT-AE700U / PT-AE700E
Ref.
No.
R1119 ERJ3GEYJ220 M 22 OHM,J,1/16W
R1120 ERJ3GEYJ560 M 56 OHM,J,1/16W
R1121 ERJ3GEYJ101 M 100 OHM,J,1/16W D0GB101JA002
R1122 ERJ6ENF4700 M 470 OHM, 1/10W
R1125 ERJ2GEJ562 M 5.6KOHM, 0.063W
R1126 ERJ3GEYJ220 M 22 OHM,J,1/16W
R1127 EXB28V220J RESISTOR ARRAY
R1129 ERJ3GEYJ330 M 33 OHM,J,1/16W
R1133 ERJ2GEJ333 M 33K OHM, 0.063W
R1134 EXB28V220J RESISTOR ARRAY
R1136 ERJ3GEYJ560 M 56 OHM,J,1/16W
R1138 EXB28V220J RESISTOR ARRAY
R1139 ERJ2GEJ330 M33OHM,0.063W
R1140 ERJ3GEYJ330 M 33 OHM,J,1/16W
R1141 ERJ3GEYJ103 M 10K OHM,J,1/16W
R1142 ERJ3GEYJ682 M 6.8KOHM,J,1/16W
R1143 ERJ6ENF2001 M 2KOHM, 1/10W
R1145 EXB28V220J RESISTOR ARRAY
R1146 EXB28V220J RESISTOR ARRAY
R1147 ERJ2GEJ220 M22OHM,0.063W
R1149 EXB28V220J RESISTOR ARRAY
R1150 ERJ6ENF1801 M 1.8KOHM, 1/10W
R1151 ERJ6GEYJ222 M 2.2KOHM,J,1/10W
R1152 ERJ3GEYJ822 M 8.2KOHM,J,1/16W
R1153 ERJ3GEYJ101 M 100 OHM,J,1/16W D0GB101JA002
R1154 ERJ3GEYJ560 M 56 OHM,J,1/16W
R1156 ERJ3GEYJ560 M 56 OHM,J,1/16W
R1157 ERJ2GEJ562 M 5.6KOHM, 0.063W
R1158 ERJ2GEJ562 M 5.6KOHM, 0.063W
R1159 ERJ6ENF2001 M 2KOHM, 1/10W
R1160 ERJ6ENF1801 M 1.8KOHM, 1/10W
R1161 ERJ6ENF4700 M 470 OHM, 1/10W
R1162 ERJ3GEYJ101 M 100 OHM,J,1/16W D0GB101JA002
R1163 ERJ3GEYJ101 M 100 OHM,J,1/16W D0GB101JA002
R1164 ERJ6ENF4700 M 470 OHM, 1/10W
R1165 ERJ3GEYJ103 M 10K OHM,J,1/16W
R1166 ERJ3GEYJ682 M 6.8KOHM,J,1/16W
R1255 ERJ2GE0R00 M 0 OHM, 0.063W
R1256 ERJ3GEYJ331 M 330 OHM,J,1/16W
R1257 EXB28V560J RESISTOR ARRAY
R1258 EXB28V560J RESISTOR ARRAY
R1259 ERJ2GE0R00 M 0 OHM, 0.063W
R1260 ERJ2GE0R00 M 0 OHM, 0.063W
R1262 ERJ3GEY0R00 M 0 OHM, 1/16W
R1264 ERJ2GE0R00 M 0 OHM, 0.063W
R1265 ERJ3GEYJ102 M 1K OHM,J,1/16W
R1267 ERJ2GE0R00 M 0 OHM, 0.063W
R1268 ERJ2GE0R00 M 0 OHM, 0.063W
R1269 ERJ2GE0R00 M 0 OHM, 0.063W
R1270 ERJ3GEYJ220 M 22 OHM,J,1/16W
R1272 ERJ3GEYJ102 M 1K OHM,J,1/16W
R1273 ERJ3GEYJ220 M 22 OHM,J,1/16W
R1274 EXB28V560J RESISTOR ARRAY
R1275 EXB28V560J RESISTOR ARRAY
R1276 EXB28V560J RESISTOR ARRAY
R1277 EXB28V560J RESISTOR ARRAY
R1278 EXB28V560J RESISTOR ARRAY
R1279 EXB28V560J RESISTOR ARRAY
R1280 EXB28V560J RESISTOR ARRAY
R1281 EXB28V560J RESISTOR ARRAY
R1282 EXB28V560J RESISTOR ARRAY
R1283 EXB28V560J RESISTOR ARRAY
R1284 ERJ2GEJ560 M56OHM,0.063W
R1285 ERJ2GEJ3R9X M 3.9 OHM, 0.063W
R1286 ERJ2GEJ3R9X M 3.9 OHM, 0.063W
R1287 ERJ2GEJ3R9X M 3.9 OHM, 0.063W
R1288 ERJ2GEJ3R9X M 3.9 OHM, 0.063W
R1289 ERJ2GEJ3R9X M 3.9 OHM, 0.063W
R1290 ERJ2GEJ3R9X M 3.9 OHM, 0.063W
R1291 ERJ2GEJ3R9X M 3.9 OHM, 0.063W
R1292 ERJ2GEJ3R9X M 3.9 OHM, 0.063W
R1293 ERJ2GE0R00 M 0 OHM, 0.063W
R1295 ERJ2GEJ101 M 100 OHM, 0.063W
Part No. Part Name &
Description
Remarks
Ref.
No.
R1298 ERJ2GEJ472 M 4.7KOHM, 0.063W
R1299 ERJ2GEJ472 M 4.7KOHM, 0.063W
R1320 ERJ2GEJ472 M 4.7KOHM, 0.063W
R1321 ERJ2GEJ472 M 4.7KOHM, 0.063W
R1322 ERJ2GEJ101 M 100 OHM, 0.063W
R1325 ERJ2GEJ103 M 10K OHM, 0.063W
R1326 ERJ2GEJ472 M 4.7KOHM, 0.063W
R1327 ERJ2GEJ472 M 4.7KOHM, 0.063W
R1328 ERJ2GEJ221 M 220 OHM, 0.063W
R1329 ERJ2GEJ272 M 2.7KOHM, 0.063W
R1332 ERJ2GEJ103 M 10K OHM, 0.063W
R1333 ERJ2GE0R00 M 0 OHM, 0.063W
R1339 ERJ3GEYJ220 M 22 OHM,J,1/16W
R1346 ERJ2GEJ102 M 1K OHM, 0.063W
R1347 ERJ2GEJ103 M 10K OHM, 0.063W
R1348 ERJ2GEJ101 M 100 OHM, 0.063W
R1353 ERJ2GEJ221 M 220 OHM, 0.063W
R1355 ERJ2GEJ103 M 10K OHM, 0.063W
R1356 ERJ1TYJ1R6U M 1.6 OHM, J, 1W
R1357 ERJ1TYJ1R6U M 1.6 OHM, J, 1W
R1363 ERJ2GEJ562 M 5.6KOHM, 0.063W
R1364 ERJ2GEJ103 M 10K OHM, 0.063W
R1365 ERJ6GEYJ100 M 10 OHM,J,1/10W
R1367 ERJ2GEJ562 M 5.6KOHM, 0.063W
R1368 EXB28V220J RESISTOR ARRAY
R1370 ERJ6GEYJ100 M 10 OHM,J,1/10W
R1373 EXB28V220J RESISTOR ARRAY
R1375 ERJ6GEYJ560 M 56 OHM,J,1/10W
R1376 ERJ2GE0R00 M 0 OHM, 0.063W
R1379 ERJ2GEJ220 M 22 OHM, 0.063W
R1381 ERJ6ENF2202 M 2.2KOHM, 1/10W
R1383 ERJ3GEYJ102 M 1K OHM,J,1/16W
R1384 EXB28V560J RESISTOR ARRAY
R1388 ERJ2GEJ560 M 56 OHM, 0.063W
R1389 ERJ2GEJ333 M 33K OHM, 0.063W
R1390 EXB28V560J RESISTOR ARRAY
R1391 ERJ2GEJ472 M 4.7KOHM, 0.063W
R1392 ERJ2GEJ331 M 330 OHM, 0.063W
R1393 ERJ2GEJ101 M 100 OHM, 0.063W
R1394 EXB28V560J RESISTOR ARRAY
R1396 ERJ2GEJ101 M 100 OHM, 0.063W
R1397 EXB28V560J RESISTOR ARRAY
R1398 EXB28V560J RESISTOR ARRAY
R1399 EXB28V102J RESISTOR ARRAY
R1400 EXB28V220J RESISTOR ARRAY
R1401 EXB28V560J RESISTOR ARRAY
R1402 ERJ2GEJ101 M 100 OHM, 0.063W
R1403 EXB28V560J RESISTOR ARRAY
R1404 EXB28V560J RESISTOR ARRAY
R1405 EXB28V560J RESISTOR ARRAY
R1406 ERJ2GEJ560 M 56 OHM, 0.063W
R1407 ERJ2GEJ560 M 56 OHM, 0.063W
R1408 EXB28V560J RESISTOR ARRAY
R1409 EXB28V560J RESISTOR ARRAY
R1410 EXB28V560J RESISTOR ARRAY
R1411 EXB28V560J RESISTOR ARRAY
R1412 ERJ2GEJ560 M 56 OHM, 0.063W
R1413 ERJ2GEJ560 M 56 OHM, 0.063W
R1414 ERJ3GEYJ102 M 1K OHM,J,1/16W
R1415 ERJ6ENF2202 M 2.2KOHM, 1/10W
R1416 ERJ2GEJ102 M 1K OHM, 0.063W
R1417 ERJ2GEJ103 M 10K OHM, 0.063W
R1418 ERJ2GEJ562 M 5.6KOHM, 0.063W
R1419 ERJ6GEY0R00 M 0 OHM,J,1/10W
R1420 ERJ6ENF1801 M 1.8KOHM, 1/10W
R1421 ERJ6GEY0R00 M 0 OHM,J,1/10W
R1422 ERJ6ENF1801 M 1.8KOHM, 1/10W
R1423 ERJ6GEY0R00 M 0 OHM,J,1/10W
R1424 ERJ6ENF1801 M 1.8KOHM, 1/10W
R1425 ERJ6ENF3301 M 3.3KOHM, 1/10W
R1426 ERJ6ENF3301 M 3.3KOHM, 1/10W
R1427 ERJ6ENF3301 M 3.3KOHM, 1/10W
R1429 ERJ3GEYJ220 M 22 OHM,J,1/16W
Part No. Part Name &
Description
Remarks
64
Page 65
PT-AE700U / PT-AE700E
Ref.
No.
R1430 ERJ3GEYJ101 M 100 OHM,J,1/16W D0GB101JA002
R1432 ERJ3GEYJ220 M 22 OHM,J,1/16W
R1433 ERJ3GEYJ101 M 100 OHM,J,1/16W D0GB101JA002
R1435 ERJ3GEYJ220 M 22 OHM,J,1/16W
R1436 ERJ3GEYJ101 M 100 OHM,J,1/16W D0GB101JA002
R1437 ERJ2GE0R00 M 0 OHM, 0.063W
R1438 ERJ2GE0R00 M 0 OHM, 0.063W
R1439 ERJ2GE0R00 M 0 OHM, 0.063W
R1444 ERJ2GEJ103 M 10K OHM, 0.063W
R1447 ERJ2GEJ103 M 10K OHM, 0.063W
R1448 ERJ2GEJ103 M 10K OHM, 0.063W
R1460 ERJ6GEYJ122 M 1.2KOHM,J,1/10W
R1461 ERJ6ENF1002 M 10KOHM, 1/10W
R1462 ERJ6ENF1002 M 10KOHM, 1/10W
R1505 ERJ3GEYJ104 M 100KOHM,J,1/16W
R1506 ERJ3GEYJ104 M 100KOHM,J,1/16W
R1507 ERJ3GEYJ104 M 100KOHM,J,1/16W
R1508 ERJ3GEYJ682 M 6.8KOHM,J,1/16W
R1509 ERJ3GEYJ682 M 6.8KOHM,J,1/16W
R1510 ERJ3GEYJ103 M 10K OHM,J,1/16W
R1511 ERJ3GEYJ103 M 10K OHM,J,1/16W
R1512 ERJ6ENF1801 M 1.8KOHM, 1/10W
R1513 ERJ6ENF4700 M 470 OHM, 1/10W
R1515 ERJ3GEYJ220 M 22 OHM,J,1/16W
R1516 ERJ3GEYJ220 M 22 OHM,J,1/16W
R1517 ERJ2GEJ102 M 1K OHM, 0.063W
R1518 ERJ2GE0R00 M 0 OHM, 0.063W
R1519 ERJ2GE0R00 M 0 OHM, 0.063W
R1520 ERJ2GEJ100 M 10 OHM, 0.063W
R1521 ERJ2GEJ100 M 10 OHM, 0.063W
R1522 ERJ2GEJ100 M 10 OHM, 0.063W
R1523 EXB28V220J RESISTOR ARRAY
R1525 ERJ2GE0R00 M 0 OHM, 0.063W
R1527 ERJ3EKF1473 M 147KOHM, 0.063W
R1528 ERJ3EKF1002 M 10KOHM, 1/16W
R1530 ERJ2GEJ103 M 10K OHM, 0.063W
R1531 EXB28V103J RESISTOR ARRAY
R1532 EXB28V103J RESISTOR ARRAY
R1533 EXB28V103J RESISTOR ARRAY
R1534 EXB28V103J RESISTOR ARRAY
R1535 EXB28V103J RESISTOR ARRAY
R1536 ERJ3GEYJ220 M 22 OHM,J,1/16W
R1537 ERJ3GEYJ220 M 22 OHM,J,1/16W
R1539 ERJ3GEY0R00 M 0 OHM, 1/16W
R1544 ERJ3GEYJ330 M 33 OHM,J,1/16W
R1552 ERJ3GEYJ222 M 2.2KOHM,J,1/16W
R1553 ERJ3GEYJ103 M 10K OHM,J,1/16W
R1557 ERJ3GEY0R00 M 0 OHM, 1/16W
R1564 ERJ2GE0R00 M 0 OHM, 0.063W
R1566 ERJ3GEY0R00 M 0 OHM, 1/16W
R1569 ERJ3GEY0R00 M 0 OHM, 1/16W
R1570 ERJ2GE0R00 M 0 OHM, 0.063W
R1572 ERJ3GEY0R00 M 0 OHM, 1/16W
R1573 ERJ3GEY0R00 M 0 OHM, 1/16W
R1574 ERJ3GEY0R00 M 0 OHM, 1/16W
R1575 ERJ2GE0R00 M 0 OHM, 0.063W
R1576 ERJ3GEY0R00 M 0 OHM, 1/16W
R1577 ERJ2GE0R00 M 0 OHM, 0.063W
R1578 ERJ2GEJ103 M 10K OHM, 0.063W
R1579 ERJ2GEJ103 M 10K OHM, 0.063W
R1591 ERJ3EKF1000 M 100 OHM, 1/16W
R1592 ERJ3EKF1000 M 100 OHM, 1/16W
R1593 ERJ3EKF1000 M 100 OHM, 1/16W
R1594 ERJ3EKF1000 M 100 OHM, 1/16W
R1595 ERJ3EKF1000 M 100 OHM, 1/16W
R1596 ERJ3EKF1000 M 100 OHM, 1/16W
R1597 ERJ3EKF1000 M 100 OHM, 1/16W
R1598 ERJ3EKF1000 M 100 OHM, 1/16W
R1600 ERJ3GEYJ470 M 47 OHM,J,1/16W
R1601 EXB28V560J RESISTOR ARRAY
R1602 EXB28V560J RESISTOR ARRAY
R1603 ERJ3GEYJ220 M 22 OHM,J,1/16W
R1604 ERJ3GEYJ220 M 22 OHM,J,1/16W
Part No. Part Name &
Description
Remarks
Ref.
No.
R1605 ERJ3GEY0R00 M0OHM,1/16W
R1606 ERJ3GEYJ220 M 22 OHM,J,1/16W
R1609 EXB28V560J RESISTOR ARRAY
R1610 EXB28V560J RESISTOR ARRAY
R1611 ERJ3GEYJ123 M 12K OHM,J,1/16W
R1612 ERJ2GE0R00 M 0 OHM, 0.063W
R1613 ERJ3GEYJ104 M 100KOHM,J,1/16W
R1614 ERJ2GEJ472 M 4.7KOHM, 0.063W
R1615 ERJ2GE0R00 M 0 OHM, 0.063W
R1616 ERJ2GEJ472 M 4.7KOHM, 0.063W
R1617 ERJ3GEYJ473 M 47K OHM,J,1/16W
R1619 ERJ3GEYJ104 M 100KOHM,J,1/16W
R1620 ERJ3GEYJ104 M 100KOHM,J,1/16W
R1622 ERJ2GEJ472 M 4.7KOHM, 0.063W
R1623 ERJ2GEJ472 M 4.7KOHM, 0.063W
R1624 ERJ3EKF5903 M 590KOHM, 1/16W
R1625 ERJ3GEYJ473 M 47K OHM,J,1/16W
R1626 ERJ3GEYJ102 M 1K OHM,J,1/16W
R1627 ERJ2GEJ472 M 4.7KOHM, 0.063W
R1628 ERJ2GEJ472 M 4.7KOHM, 0.063W
R1629 ERJ3GEYJ222 M 2.2KOHM,J,1/16W
R1630 ERJ2GEJ103 M 10K OHM, 0.063W
R1631 ERJ2GEJ103 M 10K OHM, 0.063W
R1632 ERJ3GEYJ102 M 1K OHM,J,1/16W
R1633 ERJ3GEYJ473 M 47K OHM,J,1/16W
R1634 ERJ6GEYJ473 M 47KOHM,J,1/10W
R1635 ERJ3GEYJ103 M 10K OHM,J,1/16W
R1636 ERJ3GEYJ473 M 47K OHM,J,1/16W
R1637 ERJ3GEYJ473 M 47K OHM,J,1/16W
R1638 ERJ3GEYJ101 M 100 OHM,J,1/16W D0GB101JA002
R1639 ERJ6GEYJ101 M 100 OHM,J,1/10W
R1640 EXB28V102J RESISTOR ARRAY
R1641 ERJ3EKF5621 M5.62KOHM, 1/16W
R1642 ERJ3EKF5621 M5.62KOHM, 1/16W
R1643 ERJ3EKF1101 M 1.1KOHM, 1/16W
R1644 ERJ3EKF1101 M 1.1KOHM, 1/16W
R1645 ERJ3EKF1101 M 1.1KOHM, 1/16W
R1646 ERJ3GEYJ124 M 120KOHM,J,1/16W
R1647 ERJ3GEYJ124 M 120KOHM,J,1/16W
R1648 ERJ3GEYJ124 M 120KOHM,J,1/16W
R1649 ERJ2GEJ220 M 22 OHM, 0.063W
R1650 ERJ3GEYJ103 M 10K OHM,J,1/16W
R1651 EXB28V102J RESISTOR ARRAY
R1652 EXB38V220J RESISTOR ARRAY
R1653 ERJ3GEYJ103 M 10K OHM,J,1/16W
R1654 ERJ3EKF3923 M 392KOHM, 1/16W
R1655 ERJ3EKF3923 M 392KOHM, 1/16W
R1656 ERJ3EKF3923 M 392KOHM, 1/16W
R1657 ERJ3GEYJ821 M 820 OHM,J,1/16W
R1658 ERJ6GEYJ105 M 1MOHM,J,1/10W
R1659 ERJ3GEYJ105 M 1M OHM,J,1/16W
R1660 ERJ2GEJ472 M 4.7KOHM, 0.063W
R1661 EXB28V560J RESISTOR ARRAY
R1662 EXB38V220J RESISTOR ARRAY
R1663 EXB28V560J RESISTOR ARRAY
R1664 ERJ3GEYJ220 M 22 OHM,J,1/16W
R1665 ERJ2GEJ472 M 4.7KOHM, 0.063W
R1666 ERJ3GEYJ220 M 22 OHM,J,1/16W
R1667 ERJ3GEYJ510 M 51 OHM,J,1/16W
R1668 ERJ3GEYJ510 M 51 OHM,J,1/16W
R1669 ERJ3EKF1002 M 10KOHM, 1/16W
R1670 ERJ3EKF1002 M 10KOHM, 1/16W
R1671 ERJ3GEYJ391 M 390 OHM,J,1/16W D0GB391JA002
R1672 ERJ3EKF1691 M1.69KOHM, 1/16W
R1673 ERJ3GEYJ561 M 560 OHM,J,1/16W
R1674 ERJ3GEYJ102 M 1K OHM,J,1/16W
R1675 ERJ3GEYJ333 M 33K OHM,J,1/16W
R1676 ERJ3GEYJ224 M 220KOHMJ,J1/16W
R1677 ERJ3GEYJ102 M 1K OHM,J,1/16W
R1679 ERJ3GEYJ220 M 22 OHM,J,1/16W
R1680 ERJ2GEJ103 M 10K OHM, 0.063W
R1681 ERJ2GEJ103 M 10K OHM, 0.063W
R1682 ERJ2GEJ103 M 10K OHM, 0.063W
Part No. Part Name &
Description
Remarks
65
Page 66
PT-AE700U / PT-AE700E
Ref.
No.
R1683 ERJ2GEJ103 M 10K OHM, 0.063W
R1684 ERJ2GEJ103 M 10K OHM, 0.063W
R1687 ERJ2GEJ220 M22OHM,0.063W
R1688 ERJ2GEJ220 M22OHM,0.063W
R1689 ERJ3GEYJ103 M 10K OHM,J,1/16W
R1692 ERJ3GEYJ471 M 470 OHM,J,1/16W
R1693 ERJ3GEYJ560 M 56 OHM,J,1/16W
R1696 ERJ3GEYJ471 M 470 OHM,J,1/16W
R1697 ERJ3GEYJ560 M 56 OHM,J,1/16W
R1705 ERJ2GEJ220 M22OHM,0.063W
R1706 ERJ3GEYJ102 M 1K OHM,J,1/16W
R1707 ERJ3GEYJ331 M 330 OHM,J,1/16W
R1708 ERJ3GEYJ331 M 330 OHM,J,1/16W
R1709 ERJ3GEYJ331 M 330 OHM,J,1/16W
R1710 ERJ2GEJ101 M 100 OHM, 0.063W
R1711 ERJ2GEJ101 M 100 OHM, 0.063W
R1712 ERJ3GEYJ102 M 1K OHM,J,1/16W
R1713 ERJ3GEYJ331 M 330 OHM,J,1/16W
R1714 ERJ3GEYJ331 M 330 OHM,J,1/16W
R1715 EXB28V220J RESISTOR ARRAY
R1717 ERJ3GEY0R00 M 0 OHM, 1/16W
R1718 ERJ2GEJ103 M 10K OHM, 0.063W
R1719 ERJ2GEJ103 M 10K OHM, 0.063W
R1720 ERJ2GEJ103 M 10K OHM, 0.063W
R1721 ERJ2GEJ103 M 10K OHM, 0.063W
R1722 ERJ2GEJ103 M 10K OHM, 0.063W
R1723 ERJ2GEJ103 M 10K OHM, 0.063W
R1728 ERJ2GEJ220 M22OHM,0.063W
R1729 EXB28V102J RESISTOR ARRAY
R1730 EXB28V102J RESISTOR ARRAY
R1732 ERJ2GEJ102 M1KOHM,0.063W
R1733 EXB28V560J RESISTOR ARRAY
R1734 ERJ3GEYJ331 M 330 OHM,J,1/16W
R1736 EXB28V560J RESISTOR ARRAY
R1738 ERJ3GEYJ331 M 330 OHM,J,1/16W
R1739 ERJ2GEJ220 M22OHM,0.063W
R1740 ERJ2GEJ220 M22OHM,0.063W
R1741 ERJ2GEJ220 M22OHM,0.063W
R1742 ERJ2GEJ220 M22OHM,0.063W
R1743 ERJ2GEJ220 M22OHM,0.063W
R1744 ERJ2GEJ220 M22OHM,0.063W
R1745 ERJ2GEJ220 M22OHM,0.063W
R1746 ERJ2GEJ220 M22OHM,0.063W
R1747 ERJ3GEYJ221 M 220 OHM,J,1/16W
R1748 ERJ3GEYJ221 M 220 OHM,J,1/16W
R1749 EXB28V560J RESISTOR ARRAY
R1750 ERJ3GEYJ221 M 220 OHM,J,1/16W
R1751 ERJ3GEYJ221 M 220 OHM,J,1/16W
R1755 ERJ2GEJ220 M22OHM,0.063W
R1756 ERJ2GEJ220 M22OHM,0.063W
R2001 ERJ3EKF5601 M 5.6KOHM, 1/16W
R2002 ERJ3EKF1501 M 1.5KOHM, 1/16W
R2003 ERJ3EKF1501 M 1.5KOHM, 1/16W
R2004 ERJ3EKF2701 M 2.7KOHM, 1/16W
R2005 ERJ3EKF6801 M 6.8KOHM, 1/16W
R2006 ERJ3EKF3302 M 33KOHM, 1/16W
R2007 ERJ3EKF5601 M 5.6KOHM, 1/16W
R2008 ERJ3EKF1501 M 1.5KOHM, 1/16W
R2009 ERJ3EKF1501 M 1.5KOHM, 1/16W
R2010 ERJ3EKF2701 M 2.7KOHM, 1/16W
R2011 ERJ3EKF6801 M 6.8KOHM, 1/16W
R2012 ERJ3EKF3302 M 33KOHM, 1/16W
R2013 ERJ3GEYJ100 M 10 OHM,J,1/16W
R2014 ERJ3GEYJ100 M 10 OHM,J,1/16W
R2015 EXB38V101J RESISTOR ARRAY
R2019 ERJ3GEYJ331 M 330 OHM,J,1/16W
R2020 ERJ3GEYJ331 M 330 OHM,J,1/16W
R2021 ERJ3GEYJ331 M 330 OHM,J,1/16W
R2022 ERJ3GEYJ331 M 330 OHM,J,1/16W
R2023 ERJ3GEYJ330 M 33 OHM,J,1/16W
R2024 ERJ3GEYJ470 M 47 OHM,J,1/16W
R2201 EXB38V220J RESISTOR ARRAY
R3401 ERJ6GEYJ750 M 75 OHM,J,1/10W PT-AE700E
Part No. Part Name &
Description
Remarks
Ref.
No.
R3402 ERJ6GEYJ750 M 75 OHM,J,1/10W PT-AE700E
R3403 ERJ6ENF75R0 M 75 OHM, 1/10W PT-AE700E
R3404 ERJ3GEYJ472 M 4.7KOHM,J,1/16W PT-AE700E
R3405 ERJ3GEYJ472 M 4.7KOHM,J,1/16W PT-AE700E
R3406 ERJ3GEYJ153 M 15KOHM,J,1/16W PT-AE700E
R3409 ERJ3GEYJ472 M 4.7KOHM,J,1/16W PT-AE700E
R3410 ERJ3GEYJ562 M 5.6KOHM,J,1/16W PT-AE700E
R3412 ERJ3GEYJ560 M 56 OHM,J,1/16W PT-AE700E
R3413 ERJ3GEYJ471 M 470 OHM,J,1/16W PT-AE700E
R3414 ERJ3GEYJ101 M 100 OHM,J,1/16W PT-AE700E
R3415 ERJ3GEYJ471 M 470 OHM,J,1/16W PT-AE700E
R3416 ERJ3GEYJ103 M 10K OHM,J,1/16W PT-AE700E
R3417 ERJ3GEYJ471 M 470 OHM,J,1/16W PT-AE700E
R3418 ERJ6ENF75R0 M 75 OHM, 1/10W PT-AE700E
R3419 ERJ6ENF75R0 M 75 OHM, 1/10W PT-AE700E
R3420 ERJ3GEYJ472 M 4.7KOHM,J,1/16W PT-AE700E
R3421 ERJ3GEYJ562 M 5.6KOHM,J,1/16W PT-AE700E
R3422 ERJ3GEYJ562 M 5.6KOHM,J,1/16W PT-AE700E
R3423 ERJ3GEYJ562 M 5.6KOHM,J,1/16W PT-AE700E
R3424 ERJ3GEYJ560 M 56 OHM,J,1/16W PT-AE700E
R3425 ERJ3GEYJ560 M 56 OHM,J,1/16W PT-AE700E
R3426 ERJ3GEYJ471 M 470 OHM,J,1/16W PT-AE700E
R3427 ERJ3GEYJ560 M 56 OHM,J,1/16W PT-AE700E
R9101 ERDS1TJ474 C 4.7KOHM, J,1/2W
R9102 D0A1825JA015 RESISTOR
R9601 ERX2SJR47 M0.47 OHM, J, 2W
R9630 ERJ14YJ3R3 M 3.3 OHM, J,1/4W
R9636 ERJ14YJ3R3 M 3.3 OHM, J,1/4W
R9653 D0XGR22KA001 RESISTOR
C1001 EEEHB0J330R E 33UF, 6.3V
C1002 EEEHB1A101P E 100UF, 10V
C1003 ECJ0EB1C103K C 0.01UF, 16V
C1004 EEEHB0J330R E 33UF, 6.3V
C1005 ECJ0EB1C103K C 0.01UF, 16V
C1006 EEEHB0J330R E 33UF, 6.3V
C1007 ECJ0EF1C104Z C 0.1UF, 16V
C1008 ECJ0EB1C103K C 0.01UF, 16V
C1009 EEEHB0J330R E 33UF, 6.3V
C1010 ECJ0EB1C103K C 0.01UF, 16V
C1011 ECJ0EB1C103K C 0.01UF, 16V
C1012 ECJ1XB1H102K C 1000PF, K, 50V
C1013 ECJ1XB1H102K C 1000PF, K, 50V
C1014 EEEHB0J330R E 33UF, 6.3V
C1016 ECJ0EF1C104Z C 0.1UF, 16V
C1017 ECJ1XC1H221J C 220PF, 50V
C1018 ECJ1VC1H270J C 27PF, J, 50V
C1019 ECJ1XC1H120J C 12PF, 50V
C1020 ECJ0EF1C104Z C 0.1UF, 16V
C1022 ECJ2XF1C225Z C 2.2UF, Z, 16V
C1023 ECJ2XF1C225Z C 2.2UF, Z, 16V
C1024 ECJ0EF1C104Z C 0.1UF, 16V
C1030 ECJ0EF1C104Z C 0.1UF, 16V
C1031 EEEHB0J470R E 47UF, 6.3V
C1039 ECJ2XF1C225Z C 2.2UF, Z, 16V
C1040 ECJ0EF1C104Z C 0.1UF, 16V
C1043 ECJ2XF1C225Z C 2.2UF, Z, 16V
C1045 EEEHB1C100R E 10UF, 16V
C1046 ECJ0EF1C104Z C 0.1UF, 16V
C1047 ECJ0EF1C104Z C 0.1UF, 16V
C1048 ECJ2FF1A106Z C 10UF, 10V
C1049 ECJ0EF1C104Z C 0.1UF, 16V
C1052 ECJ0EF1C104Z C 0.1UF, 16V
C1053 ECJ0EB1C103K C 0.01UF, 16V
C1054 ECJ2FF1A106Z C 10UF, 10V
C1055 EEEHB1C100R E 10UF, 16V
C1056 ECJ0EF1C104Z C 0.1UF, 16V
C1057 ECJ0EF1C104Z C 0.1UF, 16V
C1058 ECJ0EF1C104Z C 0.1UF, 16V
C1059 ECJ0EB1C103K C 0.01UF, 16V
C1060 EEEHB0G101R E 100UF, 4V
Part No. Part Name &
Description
[CAPACITORS]
Remarks
66
Page 67
PT-AE700U / PT-AE700E
Ref.
No.
C1061 ECJ0EF1C104Z C 0.1UF, 16V
C1062 ECJ0EF1C104Z C 0.1UF, 16V
C1063 ECJ0EF1C104Z C 0.1UF, 16V
C1064 ECJ0EF1C104Z C 0.1UF, 16V
C1065 ECJ0EF1C104Z C 0.1UF, 16V
C1067 ECJ0EF1C104Z C 0.1UF, 16V
C1068 ECJ0EF1C104Z C 0.1UF, 16V
C1070 ECJ0EF1C104Z C 0.1UF, 16V
C1071 ECJ0EF1C104Z C 0.1UF, 16V
C1072 ECJ0EF1C104Z C 0.1UF, 16V
C1073 ECJ2XF1C225Z C 2.2UF, Z, 16V
C1074 ECJ0EF1C104Z C 0.1UF, 16V
C1075 ECJ0EF1C104Z C 0.1UF, 16V
C1076 ECJ1XB1H102K C 1000PF, K, 50V
C1077 ECJ0EF1C104Z C 0.1UF, 16V
C1078 ECJ0EF1C104Z C 0.1UF, 16V
C1079 ECJ1VB1C823K C 0.82UF, 16V
C1080 ECJ0EB1C822K C 8200PF, 16V
C1081 ECJ0EF1C104Z C 0.1UF, 16V
C1082 ECJ1XC1H120J C 12PF, 50V
C1083 ECJ1XC1H120J C 12PF, 50V
C1084 EEEHB1C470P E 47UF, 16V
C1085 ECJ1XC1H120J C 12PF, 50V
C1086 ECJ1VC1H270J C 27PF, J, 50V
C1087 ECJ0EF1C104Z C 0.1UF, 16V
C1088 ECJ1VC1H270J C 27PF, J, 50V
C1089 ECJ1VC1H270J C 27PF, J, 50V
C1090 ECJ0EF1C104Z C 0.1UF, 16V
C1091 ECJ0EF1C104Z C 0.1UF, 16V
C1093 ECJ1XC1H330J C 33PF, J, 50V
C1094 ECJ0EF1C104Z C 0.1UF, 16V
C1095 ECJ0EF1C104Z C 0.1UF, 16V
C1096 ECJ0EF1C104Z C 0.1UF, 16V
C1097 ECJ0EF1C104Z C 0.1UF, 16V
C1099 ECJ0EF1C104Z C 0.1UF, 16V
C1101 ECJ0EF1C104Z C 0.1UF, 16V
C1102 EEFCD0D101R CAPACITOR
C1103 EEEHB1C470P E 47UF, 16V
C1105 ECJ0EF1C104Z C 0.1UF, 16V
C1106 EEEHB0G101R E 100UF, 4V
C1107 ECJ0EF1C104Z C 0.1UF, 16V
C1108 ECJ0EF1C104Z C 0.1UF, 16V
C1112 ECJ0EF1C104Z C 0.1UF, 16V
C1113 ECJ0EF1C104Z C 0.1UF, 16V
C1114 ECJ2XF1C225Z C 2.2UF, Z, 16V
C1115 EEEHB1C470P E 47UF, 16V
C1117 EEEHB1C470P E 47UF, 16V
C1198 ECJ0EF1C104Z C 0.1UF, 16V
C1199 ECJ0EF1C104Z C 0.1UF, 16V
C1200 ECJ0EF1C104Z C 0.1UF, 16V
C1201 ECJ0EF1C104Z C 0.1UF, 16V
C1202 ECJ0EF1C104Z C 0.1UF, 16V
C1203 ECJ0EF1C104Z C 0.1UF, 16V
C1204 ECJ0EF1C104Z C 0.1UF, 16V
C1205 ECJ0EF1C104Z C 0.1UF, 16V
C1206 ECJ0EF1C104Z C 0.1UF, 16V
C1207 ECJ0EF1C104Z C 0.1UF, 16V
C1208 ECJ0EF1C104Z C 0.1UF, 16V
C1209 ECJ0EF1C104Z C 0.1UF, 16V
C1210 ECJ0EF1C104Z C 0.1UF, 16V
C1211 ECJ0EF1C104Z C 0.1UF, 16V
C1212 ECJ0EF1C104Z C 0.1UF, 16V
C1213 ECJ0EF1C104Z C 0.1UF, 16V
C1214 ECJ0EF1C104Z C 0.1UF, 16V
C1215 ECJ0EF1C104Z C 0.1UF, 16V
C1216 ECJ0EF1C104Z C 0.1UF, 16V
C1217 ECJ0EF1C104Z C 0.1UF, 16V
C1218 ECJ0EF1C104Z C 0.1UF, 16V
C1219 EEEHB0G101R E 100UF, 4V
C1222 ECJ0EF1C104Z C 0.1UF, 16V
C1223 ECJ0EF1C104Z C 0.1UF, 16V
C1224 ECJ0EF1C104Z C 0.1UF, 16V
C1225 ECJ0EF1C104Z C 0.1UF, 16V
Part No. Part Name &
Description
Remarks
Ref.
No.
C1226 ECJ0EF1C104Z C 0.1UF, 16V
C1227 ECJ0EF1C104Z C 0.1UF, 16V
C1228 ECJ0EF1C104Z C 0.1UF, 16V
C1229 ECJ0EF1C104Z C 0.1UF, 16V
C1230 ECJ0EF1C104Z C 0.1UF, 16V
C1231 ECJ0EF1C104Z C 0.1UF, 16V
C1233 ECJ0EF1C104Z C 0.1UF, 16V
C1235 ECJ0EF1C104Z C 0.1UF, 16V
C1236 ECJ0EF1C104Z C 0.1UF, 16V
C1237 ECJ0EF1C104Z C 0.1UF, 16V
C1238 ECJ0EF1C104Z C 0.1UF, 16V
C1239 ECJ0EF1C104Z C 0.1UF, 16V
C1240 ECJ0EF1C104Z C 0.1UF, 16V
C1241 ECJ0EF1C104Z C 0.1UF, 16V
C1242 ECJ0EF1C104Z C 0.1UF, 16V
C1243 ECJ0EF1C104Z C 0.1UF, 16V
C1244 ECJ0EF1C104Z C 0.1UF, 16V
C1245 ECJ0EF1C104Z C 0.1UF, 16V
C1246 ECJ0EF1C104Z C 0.1UF, 16V
C1247 EEEHB0G101R E 100UF, 4V
C1248 ECJ1XC1H331J C 330PF, J, 50V
C1292 ECJ1XC1H330J C 33PF, J, 50V
C1298 ECJ0EF1C104Z C 0.1UF, 16V
C1299 EEEHB0G221P E 220UF, 4V
C1300 EEEHB0G221P E 220UF, 4V
C1304 ECJ0EF1C104Z C 0.1UF, 16V
C1306 ECJ1XF1A105Z C 100UF, 10V
C1314 ECJ0EF1C104Z C 0.1UF, 16V
C1315 ECJ0EF1C104Z C 0.1UF, 16V
C1316 ECJ1XF1H333Z C 0.033UF, 50V
C1317 ECJ0EF1C104Z C 0.1UF, 16V
C1319 ECJ0EF1C104Z C 0.1UF, 16V
C1320 ECJ0EF1C104Z C 0.1UF, 16V
C1321 ECJ0EF1C104Z C 0.1UF, 16V
C1322 ECJ1XC1H471J C 470PF, J, 50V
C1323 ECJ0EF1C104Z C 0.1UF, 16V
C1324 ECJ0EF1C104Z C 0.1UF, 16V
C1325 ECJ0EF1C104Z C 0.1UF, 16V
C1328 ECJ0EF1C104Z C 0.1UF, 16V
C1329 ECJ0EF1C104Z C 0.1UF, 16V
C1330 ECJ0EF1C104Z C 0.1UF, 16V
C1331 EEEHB0G101R E 100UF, 4V
C1332 ECJ0EF1C104Z C 0.1UF, 16V
C1333 EEEHB0J330R E 33UF, 6.3V
C1334 ECJ0EF1C104Z C 0.1UF, 16V
C1335 EEEHB0G101R E 100UF, 4V
C1337 ECJ0EF1C104Z C 0.1UF, 16V
C1338 ECJ0EF1C104Z C 0.1UF, 16V
C1339 ECJ0EF1C104Z C 0.1UF, 16V
C1340 ECJ0EF1C104Z C 0.1UF, 16V
C1341 ECJ0EF1C104Z C 0.1UF, 16V
C1342 ECJ0EF1C104Z C 0.1UF, 16V
C1343 ECJ0EF1C104Z C 0.1UF, 16V
C1344 ECJ0EF1C104Z C 0.1UF, 16V
C1345 ECJ0EF1C104Z C 0.1UF, 16V
C1346 ECJ0EF1C104Z C 0.1UF, 16V
C1347 ECJ0EF1C104Z C 0.1UF, 16V
C1348 ECJ0EF1C104Z C 0.1UF, 16V
C1349 ECJ0EF1C104Z C 0.1UF, 16V
C1350 ECJ0EF1C104Z C 0.1UF, 16V
C1351 ECJ0EF1C104Z C 0.1UF, 16V
C1352 ECJ0EF1C104Z C 0.1UF, 16V
C1353 ECJ0EF1C104Z C 0.1UF, 16V
C1354 ECJ0EF1C104Z C 0.1UF, 16V
C1355 ECJ0EF1C104Z C 0.1UF, 16V
C1356 ECJ0EF1C104Z C 0.1UF, 16V
C1357 ECJ0EF1C104Z C 0.1UF, 16V
C1358 ECJ0EF1C104Z C 0.1UF, 16V
C1359 ECJ0EF1C104Z C 0.1UF, 16V
C1360 ECJ0EF1C104Z C 0.1UF, 16V
C1361 ECJ0EF1C104Z C 0.1UF, 16V
C1362 ECJ0EF1C104Z C 0.1UF, 16V
C1363 ECJ0EF1C104Z C 0.1UF, 16V
Part No. Part Name &
Description
Remarks
67
Page 68
PT-AE700U / PT-AE700E
Ref.
No.
C1364 ECJ0EF1C104Z C 0.1UF, 16V
C1365 ECJ0EF1C104Z C 0.1UF, 16V
C1366 ECJ0EF1C104Z C 0.1UF, 16V
C1367 ECJ0EF1C104Z C 0.1UF, 16V
C1368 ECJ0EF1C104Z C 0.1UF, 16V
C1369 ECJ0EF1C104Z C 0.1UF, 16V
C1370 ECJ0EF1C104Z C 0.1UF, 16V
C1371 EEEHB1E4R7R E 4.7UF, 25V
C1372 ECJ0EF1C104Z C 0.1UF, 16V
C1373 EEEHB1E4R7R E 4.7UF, 25V
C1374 EEEHB1A101P E 100UF, 10V
C1375 EEEHB0G101R E 100UF, 4V
C1376 EEEHB0G101R E 100UF, 4V
C1377 EEEHB0G101R E 100UF, 4V
C1378 ECJ0EF1C104Z C 0.1UF, 16V
C1379 ECJ0EF1C104Z C 0.1UF, 16V
C1380 ECJ0EF1C104Z C 0.1UF, 16V
C1381 ECJ0EB1C103K C 0.01UF, 16V
C1382 ECJ0EF1C104Z C 0.1UF, 16V
C1383 ECJ0EB1C103K C 0.01UF, 16V
C1384 ECJ0EF1C104Z C 0.1UF, 16V
C1385 ECJ0EB1C103K C 0.01UF, 16V
C1386 ECJ0EF1C104Z C 0.1UF, 16V
C1387 ECJ0EF1C104Z C 0.1UF, 16V
C1388 ECJ0EF1C104Z C 0.1UF, 16V
C1389 ECJ0EF1C104Z C 0.1UF, 16V
C1390 ECJ0EF1C104Z C 0.1UF, 16V
C1391 ECJ0EF1C104Z C 0.1UF, 16V
C1392 ECJ0EF1C104Z C 0.1UF, 16V
C1393 ECJ0EF1C104Z C 0.1UF, 16V
C1394 ECJ0EF1C104Z C 0.1UF, 16V
C1395 ECJ0EF1C104Z C 0.1UF, 16V
C1396 ECJ0EF1C104Z C 0.1UF, 16V
C1397 ECJ0EF1C104Z C 0.1UF, 16V
C1398 ECJ0EF1C104Z C 0.1UF, 16V
C1399 ECJ0EF1C104Z C 0.1UF, 16V
C1400 ECJ0EF1C104Z C 0.1UF, 16V
C1401 ECJ0EF1C104Z C 0.1UF, 16V
C1402 ECJ0EF1C104Z C 0.1UF, 16V
C1403 ECJ0EF1C104Z C 0.1UF, 16V
C1404 ECJ0EF1C104Z C 0.1UF, 16V
C1405 ECJ0EF1C104Z C 0.1UF, 16V
C1406 ECJ0EF1C104Z C 0.1UF, 16V
C1407 ECJ0EF1C104Z C 0.1UF, 16V
C1408 ECJ0EF1C104Z C 0.1UF, 16V
C1409 ECJ0EF1C104Z C 0.1UF, 16V
C1410 ECJ0EF1C104Z C 0.1UF, 16V
C1411 ECJ0EF1C104Z C 0.1UF, 16V
C1412 ECJ0EF1C104Z C 0.1UF, 16V
C1413 ECJ0EF1C104Z C 0.1UF, 16V
C1414 ECJ0EF1C104Z C 0.1UF, 16V
C1415 ECJ0EF1C104Z C 0.1UF, 16V
C1416 ECJ0EF1C104Z C 0.1UF, 16V
C1417 ECJ0EF1C104Z C 0.1UF, 16V
C1418 ECJ0EF1C104Z C 0.1UF, 16V
C1419 ECJ0EF1C104Z C 0.1UF, 16V
C1420 ECJ0EF1C104Z C 0.1UF, 16V
C1421 ECJ0EF1C104Z C 0.1UF, 16V
C1422 ECJ0EF1C104Z C 0.1UF, 16V
C1423 ECJ0EF1C104Z C 0.1UF, 16V
C1424 ECJ0EF1C104Z C 0.1UF, 16V
C1425 ECJ0EF1C104Z C 0.1UF, 16V
C1426 ECJ0EF1C104Z C 0.1UF, 16V
C1427 ECJ0EF1C104Z C 0.1UF, 16V
C1428 ECJ0EF1C104Z C 0.1UF, 16V
C1429 EEEHB1E330P E 33UF, 25V
C1430 ECJ1XF1E104Z C 0.1UF, Z, 25V
C1431 ECJ1XF1E104Z C 0.1UF, Z, 25V
C1432 ECJ1XF1E104Z C 0.1UF, Z, 25V
C1433 EEEHB1E330P E 33UF, 25V
C1434 EEEHB1E330P E 33UF, 25V
C1435 EEEHB1E330P E 33UF, 25V
C1436 ECJ1XF1E104Z C 0.1UF, Z, 25V
Part No. Part Name &
Description
Remarks
Ref.
No.
C1437 ECJ1XF1E104Z C 0.1UF, Z, 25V
C1438 ECJ1XF1E104Z C 0.1UF, Z, 25V
C1439 EEEHB1E330P E 33UF, 25V
C1440 EEEHB1E330P E 33UF, 25V
C1441 EEEHB1E330P E 33UF, 25V
C1442 ECJ1XF1E104Z C 0.1UF, Z, 25V
C1443 ECJ1XF1E104Z C 0.1UF, Z, 25V
C1444 ECJ1XF1E104Z C 0.1UF, Z, 25V
C1466 ECJ0EF1C104Z C 0.1UF, 16V
C1468 ECJ0EF1C104Z C 0.1UF, 16V
C1471 EEEHB0G101R E 100UF, 4V
C1472 EEEHB0G101R E 100UF, 4V
C1501 ECJ1XF1A105Z C 100UF, 10V
C1503 ECJ1XF1A105Z C 100UF, 10V
C1504 ECJ0EF1C104Z C 0.1UF, 16V
C1505 ECJ1XF1E104Z C 0.1UF, Z, 25V
C1506 ECJ1XF1E104Z C 0.1UF, Z, 25V
C1507 EEEHB1E330P E 33UF, 25V
C1508 EEEHB1E330P E 33UF, 25V
C1509 ECJ1XC1H120J C 12PF, 50V
C1510 ECJ1XC1H120J C 12PF, 50V
C1544 ECJ1XF1C474Z C 0.47UF, Z, 16V
C1546 EEFCD0J470R CAPACITOR
C1547 ECJ1XC1H101J C 100PF, J, 50V
C1551 EEEHB0G101R E 100UF, 4V
C1552 ECJ0EF1C104Z C 0.1UF, 16V
C1553 ECJ0EF1C104Z C 0.1UF, 16V
C1554 EEEHB0G101R E 100UF, 4V
C1555 ECJ0EF1C104Z C 0.1UF, 16V
C1556 EEEHB1A330R E 33UF, 10V
C1557 ECJ0EF1C104Z C 0.1UF, 16V
C1559 ECJ0EF1C104Z C 0.1UF, 16V
C1563 ECJ0EF1C104Z C 0.1UF, 16V
C1565 ECJ2XF1C225Z C 2.2UF, Z, 16V
C1566 ECJ2XF1C225Z C 2.2UF, Z, 16V
C1568 ECJ0EF1C104Z C 0.1UF, 16V
C1569 ECJ0EF1C104Z C 0.1UF, 16V
C1570 ECJ0EF1C104Z C 0.1UF, 16V
C1571 ECJ0EF1C104Z C 0.1UF, 16V
C1572 ECJ0EF1C104Z C 0.1UF, 16V
C1573 ECJ0EF1C104Z C 0.1UF, 16V
C1574 ECJ0EF1C104Z C 0.1UF, 16V
C1575 ECJ0EF1C104Z C 0.1UF, 16V
C1576 ECJ0EF1C104Z C 0.1UF, 16V
C1577 ECJ0EF1C104Z C 0.1UF, 16V
C1578 ECJ0EF1C104Z C 0.1UF, 16V
C1579 ECJ0EF1C104Z C 0.1UF, 16V
C1581 ECJ0EF1C104Z C 0.1UF, 16V
C1583 ECJ2XF1C225Z C 2.2UF, Z, 16V
C1584 ECJ0EF1C104Z C 0.1UF, 16V
C1586 EEEHB0J330R E 33UF, 6.3V
C1589 ECJ1XB1H102K C 1000PF, K, 50V
C1590 ECJ1XB1H102K C 1000PF, K, 50V
C1591 ECJ1XB1H102K C 1000PF, K, 50V
C1594 ECJ1XB1H102K C 1000PF, K, 50V
C1595 ECJ1XB1H102K C 1000PF, K, 50V
C1596 ECJ1XB1H102K C 1000PF, K, 50V
C1597 ECJ1XB1H102K C 1000PF, K, 50V
C1598 ECJ1XB1H102K C 1000PF, K, 50V
C1599 ECJ1XB1H102K C 1000PF, K, 50V
C1600 EEEHB0J330R E 33UF, 6.3V
C1601 ECJ2XF1C225Z C 2.2UF, Z, 16V
C1602 ECJ1XC1H221J C 220PF, 50V
C1603 ECJ1XB1H102K C 1000PF, K, 50V
C1604 ECJ0EF1C104Z C 0.1UF, 16V
C1605 EEEHB1C470P E 47UF, 16V
C1606 EEEHB1C470P E 47UF, 16V
C1607 ECJ1XF1C474Z C 0.47UF, Z, 16V
C1608 ECJ1XF1C474Z C 0.47UF, Z, 16V
C1609 ECJ1XF1A105Z C 100UF, 10V
C1610 ECJ1XF1C105Z C 0.01UF, Z, 16V
C1611 ECJ1XF1C105Z C 0.01UF, Z, 16V
C1612 ECJ1XF1A105Z C 100UF, 10V
Part No. Part Name &
Description
Remarks
68
Page 69
PT-AE700U / PT-AE700E
Ref.
No.
C1613 ECJ1XF1C105Z C 0.01UF, Z, 16V
C1614 ECJ1XF1C105Z C 0.01UF, Z, 16V
C1615 ECJ1XF1C105Z C 0.01UF, Z, 16V
C1616 ECJ1XF1C105Z C 0.01UF, Z, 16V
C1617 ECJ1XF1C105Z C 0.01UF, Z, 16V
C1618 ECJ2XB1H472K C 2700PF, K, 50V
C1619 ECJ2XB1C224K C 0.22UF, K, 16V
C1620 ECJ2XB1C224K C 0.22UF, K, 16V
C1621 ECJ1XC1H100C C 10PF, 50V
C1622 ECJ1XC1H100C C 10PF, 50V
C1623 ECJ2VB1H821K C 820PF, 50V
C1624 ECJ2XB1H152K C 1500PF, K, 50V
C1625 ECJ2XB1H332K C 3300PF, K, 50V
C1626 ECJ0EF1C104Z C 0.1UF, 16V
C1627 ECJ1XF1C105Z C 0.01UF, Z, 16V
C1631 ECJ0EF1C104Z C 0.1UF, 16V
C1632 ECJ0EF1C104Z C 0.1UF, 16V
C1633 ECJ2XF1C225Z C 2.2UF, Z, 16V
C1635 ECJ2XF1C225Z C 2.2UF, Z, 16V
C1636 ECJ1XB1H102K C 1000PF, K, 50V
C1637 ECJ2XF1C225Z C 2.2UF, Z, 16V
C1638 ECJ2XF1C225Z C 2.2UF, Z, 16V
C1639 ECJ1XB1H102K C 1000PF, K, 50V
C1640 ECJ1XB1H102K C 1000PF, K, 50V
C1641 ECJ2XF1C225Z C 2.2UF, Z, 16V
C1642 ECJ1XB1H102K C 1000PF, K, 50V
C1643 ECJ1XB1H102K C 1000PF, K, 50V
C1644 ECJ2XF1C225Z C 2.2UF, Z, 16V
C1645 ECJ2XF1C225Z C 2.2UF, Z, 16V
C1646 ECJ2XF1C225Z C 2.2UF, Z, 16V
C1647 ECJ2XF1C225Z C 2.2UF, Z, 16V
C1649 ECJ1XB1H102K C 1000PF, K, 50V
C1652 ECJ1XF1C105Z C 0.01UF, Z, 16V
C1653 ECJ1XF1C105Z C 0.01UF, Z, 16V
C1654 ECJ1XF1A105Z C 100UF, 10V
C1655 ECJ1XF1A105Z C 100UF, 10V
C1658 ECJ0EF1C104Z C 0.1UF, 16V
C1659 ECJ0EF1C104Z C 0.1UF, 16V
C1660 ECJ0EF1C104Z C 0.1UF, 16V
C1661 ECJ0EF1C104Z C 0.1UF, 16V
C1662 ECJ0EF1C104Z C 0.1UF, 16V
C1663 ECJ0EF1C104Z C 0.1UF, 16V
C1664 ECJ0EF1C104Z C 0.1UF, 16V
C1665 ECJ0EF1C104Z C 0.1UF, 16V
C1666 ECJ0EF1C104Z C 0.1UF, 16V
C1667 ECJ0EF1C104Z C 0.1UF, 16V
C1668 ECJ0EF1C104Z C 0.1UF, 16V
C1669 ECJ0EF1C104Z C 0.1UF, 16V
C1670 ECJ0EF1C104Z C 0.1UF, 16V
C1671 ECJ0EF1C104Z C 0.1UF, 16V
C1672 ECJ0EF1C104Z C 0.1UF, 16V
C1673 ECJ1XF1C105Z C 0.01UF, Z, 16V
C1674 EEEHB1C100R E 10UF, 16V
C1675 ECJ0EF1C104Z C 0.1UF, 16V
C1676 ECJ2XF1C225Z C 2.2UF, Z, 16V
C1677 ECJ1XB1H102K C 1000PF, K, 50V
C1678 EEEHB0J470R E 47UF, 6.3V
C2002 ECJ0EF1C104Z C 0.1UF, 16V
C2004 EEEHB0J470R E 47UF, 6.3V
C2005 ECJ0EF1C104Z C 0.1UF, 16V
C3402 EEEHB0J330R E 33UF, 6.3V PT-AE700E
C3405 ECJ0EB1C103K C 0.01UF, 16V PT-AE700E
C3406 ECJ0EB1C103K C 0.01UF, 16V PT-AE700E
C3407 EEEHB0J330R E 33UF, 6.3V PT-AE700E
C3408 ECJ0EB1C103K C 0.01UF, 16V PT-AE700E
C3409 ECJ0EF1C104Z C 0.1UF, 16V PT-AE700E
C3410 EEEHB0J330R E 33UF, 6.3V PT-AE700E
C3411 EEEHB0J330R E 33UF, 6.3V PT-AE700E
C3412 ECJ0EF1C104Z C 0.1UF, 16V PT-AE700E
C9101 ECQU2A334MLA P 0.33UF, 250V
C9102 F1BAH1020016 CAPACITOR
C9103 F1BAH1020016 CAPACITOR
C9603 F0CZZ4740002 CAPACITOR
Part No. Part Name &
Description
Remarks
Ref.
No.
C9610 F0C2E1050002 CAPACITOR
C9617 F0C3C4720003 CAPACITOR
C9618 F0C2J1540004 CAPACITOR
C9619 F0C2J1540004 CAPACITOR
A1 K1MN36B00014 36P CONNECTOR
A2 K1MN36B00014 36P CONNECTOR
A3 K1MN36B00014 36P CONNECTOR
A4 K1KA05B00153 5P CONNECTOR
A6 K1KA12B00066 12P CONNECTOR
A7 K1KA02B00051 2P CONNECTOR
A8 K1MN12B00070 12P CONNECTOR
A15 TJS6A8780 3P CONNECTOR K1KA03B00006
A16 TJS6A8780 3P CONNECTOR K1KA03B00006
A17 TJS6A8780 3P CONNECTOR K1KA03B00006
A18 TJS6A8780 3P CONNECTOR K1KA03B00006
A19 K1KA04B00007 4P CONNECTOR
A20 TJS6A8780 3P CONNECTOR K1KA03B00006
A21 K1KA10B00126 10P CONNECTOR
A22 K1KA07B00041 7P CONNECTOR
A23 TJSF43709 CONNECTOR K1KA09B00048
H1 K1KA09A00156 9P CONNECTOR
H2 K1MN06B00040 6P CONNECTOR
K3 K1KA02A00104 2P CONNECTOR
S01 K1MN12B00137 12P CONNECTOR
S02 K1KA02B00051 2P CONNECTOR
F9101-1 EYF52BCY FUSE HOLDER
F9101-2 EYF52BCY FUSE HOLDER
F9101 K5D502BN0003 FUSE
FL1001 J0HABC000011 FILTER
FL1002 J0HABC000011 FILTER
FL1003 J0HABC000011 FILTER
FL1004 EXCCET103U EMI FILTER
FL1005 EXCCET103U EMI FILTER
FL1006 EXCCET103U EMI FILTER
FL1010 J0HABB000015 FILTER
HE2201 B4ABA0000009 HALL DEVICE
JK1001 K1CB205B0004 S-VIDEO/VIDEO IN
JK1002 K2HA304B0006 Y/Pb/Pr IN TERMINAL
JK1003 K2HC103B0174 TRIGGER OUT TERMINAL
JK1004 K1FA119E0001 HDMI IN TERMINAL
JK1005 K1FB115B0079 RGB1 IN TERMINAL
JK3401 K1FB121B0007 SCART TERMINAL PT-AE700E
JK9101 K2AH3B000019 AC INLET
JS1004 ERJ6GEY0R00 M 0 OHM,J,1/10W
JS1005 ERJ6GEY0R00 M 0 OHM,J,1/10W
JS1006 ERJ6GEY0R00 M 0 OHM,J,1/10W
JS1007 ERJ6GEY0R00 M 0 OHM,J,1/10W
JS1008 ERJ6GEY0R00 M 0 OHM,J,1/10W
JS1009 ERJ6GEY0R00 M 0 OHM,J,1/10W
JS1010 ERJ6GEY0R00 M 0 OHM,J,1/10W
JS1011 ERJ6GEY0R00 M 0 OHM,J,1/10W
JS1012 ERJ6GEY0R00 M 0 OHM,J,1/10W
JS1013 ERJ6GEY0R00 M 0 OHM,J,1/10W
LF9101 G0B592H00001 FILTER
LF9102 G0B592H00001 FILTER
RM2001 B3RAD0000038 REMOTE CONTROL
S9602 A9BZ00000010 SPARK GAP
SW2001 EVQPLHA15 SWITCH
SW2002 EVQPLHA15 SWITCH
SW2003 EVQPLHA15 SWITCH
SW2004 EVQPLHA15 SWITCH
SW2005 EVQPLHA15 SWITCH
SW2006 EVQPLHA15 SWITCH
SW2007 EVQPLHA15 SWITCH
SW2008 EVQPLHA15 SWITCH
SW9101 K0AAKA000006 AC SWITCH
SW9601 T115AR3U3 SWITCH
T9604 G4F2A0000001 TRANS
Part No. Part Name &
Description
[OTHERS]
TERMINAL
RECEIVER
Remarks
69
Page 70

PT-AE700U / PT-AE700E
Ref.
No.
X1001 H1A7605B0003 CRYSTAL
X1002 H0J270500077 CRYSTAL
X1003 H0J200500048 CRYSTAL
X1004 H0J983400016 CRYSTAL
ZA001 TJC6137 EARTH LUG
ZA3402 TJC6137 EARTH LUG PT-AE700E
RTL TNPA3411 CIRCUIT BOARD S
RTL TNPA3417 CIRCUIT BOARD J PT-AE700E
RTL TXANP03PXNZ CIRCUIT BOARD K PT-AE700U
RTL TXANP03PXQZ CIRCUIT BOARD K PT-AE700E
RTL TXANP99PXNZ CIRCUIT BOARD A
RTL TNPA3412 CIRCUIT BOARD H
Part No. Part Name &
ETXMM519MBG CIRCUIT BOARD P
TXANP02VJY7 BALLAST UNIT
Description
Remarks
70
 Loading...