

Page 1
Operating Instructions
Video Cassette Recorder
NV-SD400
Series
M
I
■ i
■■ y.i.
^<1 ■
.ssasessssiss^Se
1-CODE
K5863-1
■■ ■■■- -I-
...
- ■;■:. ;■ ■ • ■:f
VUS
PAL
Before attempting to connect, operate or adjust this product,
please read these instructions completely.
№iTmiOlNTCONTJtOL SYSTEM
Page 2
Dear Customer
May we take this opportunity to thank you for purchasing
this Panasonic Video Cassette Recorder.
We would particularly advise that you carefully study the
Operating Instructions before attempting to operate the unit
and that you note the listed precautions.
G-Code Programming System
Programming is now easier than ever: simply enter the
G-Code number provided in the programme schedule
column carried by newspapers and magazines.
•G-Code is a trademark applied for by Gemstar
Development Corp, G-Code system is manufactured
under licence from Gemstar Development Corporation,
AI Crystal View Control
Al circuit for automatic tape calibration and optimizing of
playback characteristics.
During playback the contrast of tapes recorded with good
level is automatically optimized.
Page 3

IMPORTANT
Your attention is drawn to the fact that
recording of pre-recorded tapes or discs
or other published or broadcast material
may infringe copyright laws.
WARNING
TO REDUCE THE RISK OF FIRE OR
SHOCK HAZARD, DO NOT EXPOSE
THIS EQUIPMENT TO RAIN OR
MOISTURE.
NV-SD400A: Australian model
NV-SD400EA: New Zealand model
FOR YOUR SAFETY
■ DO NOT REMOVE OUTER COVER.
To prevent electric shock, do not remove
cover. No user serviceable parts inside. Refer
servicing to qualified service personnel.
Contents
pésbfipti^^^
Controls and Connection Sockets
Infra-red Remote Controller
On Screen Display
............................................................
Siting Ujs
Connections
Tuning the TV to your VTR
Setting the Remote Controller for Operation
of your TV...................................................................... 11
Language Setting of On Screen Display
Setting the Clock of the VTR
Storing TV Broadcasts into your VTR
Preparations for G-Code Programming
Settings Using On Screen Display .............................. 13
.....................................................................
.................................
............................................
..........................................
.....................
.......................................
........................
....
.................... 16
4
6
8
9
10
12
13
14
HO (High Quality) Picture System
Video recorders carrying the HQ symbol mark feature the
new VHS High Quality Picture System. This system
assures complete compatibility with VTRs that use the
conventional VHS system.
Èasiippilr^iQ
Playback ........................................................................ 20
Manual Recording
.........................................................
22
Advanced Operations
Timer Recording ............................................................. 24
•G-Code Programming
Editing ............................................................................. 27
•Assembly Editing ................................................................ 27
Other Functions
........................................................
..............................................................
26
28
HelpfulHints
Before Requesting Service
Precautions...................................................................... 32
Specifications.................................................................. 33
............................................
29
(3)
Page 4
Controls and Connection Sockets
This gives a detailed explanation of the function of each button, switch and connection socket.
Q Cassette Compartment
Insert a video cassette here.
N/yN
To select the required programme position (TV
station).
REC
o
To start a recording.
PAUSE/STILL
o
During playback; Still picture.
During recording; To interrupt recording.
REW (REWIND)
In the stop mode; To rewind the tape
In the playback mode; To search backward
In the rewind mode; To obtain high speed picture
is lit.
PLAY
©
To start playback. is lit.
For the repeat playback function.
O FF (FAST FORWARD)
I n the stop mode: To fast forward the tape
In the playback mode: To search forward
In the fast forward mode; To obtain high speed picture
">t>" is lit.
© STOP
To stop any playback or recording.
© POWER Ci/I
Press to switch the unit from on to standby mode or
vice versa. In standby mode, the unit is still connected
to the mains.
© EJECT
T0 eject a video cassette.
© Infra-red Remote Control Receiver Window
0 Display
© CVC Indicator
When the Al function is on, this indicator lights up.
© CVC (Crystal View Control)
ON: Using the Al function, playback is performed in
the state which achieves optimum picture
quality in light of characteristics of a tape.
The CVC indicator is lit.
This control should normally be left in the ON
position,
OFF: Turn off the Al function.
The CVC indicator is not lit.
With certain tapes, the OFF position may result
in a better picture.
© TIMER REC
To turn the timer recording function on and off.
□ is lit or not lit.
Once operating timer recording function, the normal
VTR operation is not possible unless this button is set
to off.
Page 5
.o
c:
© ® ®
Controls and Connection Sockets
.Q.
b
co
Qi
o
© RFIN
To connect to the external aerial,
© VIDEO IN
To connect a video cable to a Movie Camera or
another video recorder.
© VIDEO OUT
To connect a video cable to a TV or another video
recorder.
© AC IN
TO connect to the main power supply.
© RFOUT
To connect to the aerial terminal on a TV set.
© AUDIO IN
To connect an audio cable to a Movie Camera or
another video recorder.
© AUDIO OUT
T0 connect an audio cable to a TV or another video
recorder.
© Video Playback Channel Selector
To select the video playback channel.
(5)
Page 6
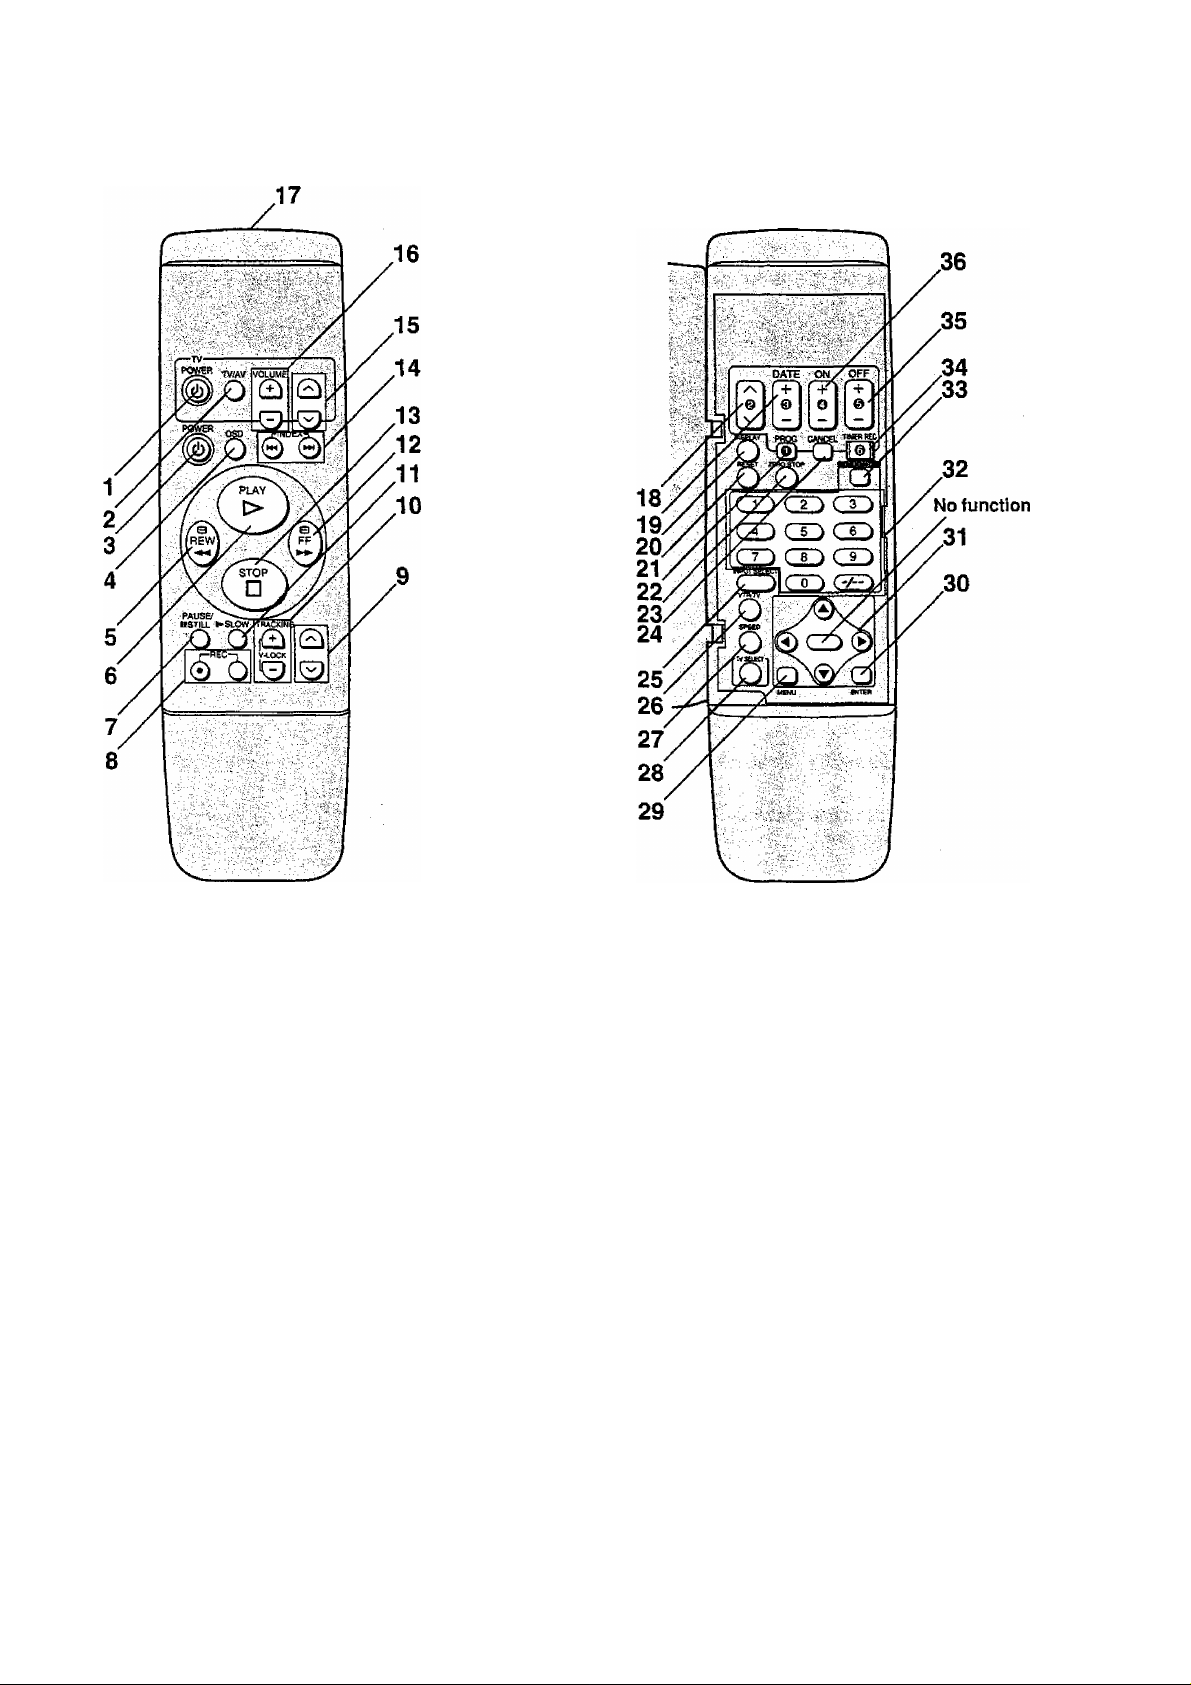
Infra-red Remote Controller
1 POWER (TV)
To switch the TV from on to standby mode or vice
versa. In standby mode, the TV is still connected to the
mains.
•With some TV models, it may only be possible to
switch the TV to standby mode using this button.
In this case, use TV/AV or v ^ (TV) to switch the
TV on.
2 TV/AV
To select the TV input.
3 POWER (VTR)
To switch the VTR from on to standby mode or vice
versa. In standby mode, the VTR is still connected to
the mains.
4 OSD
For the On Screen Display Function.
5 REW (REWIND)
In the stop mode: To rewind the tape
In the playback mode: To search backward
In the rewind mode: To obtain high speed picture
"«I” is lit.
6 PLAY
To start playback. "t>" is lit.
For the repeat playback function.
7 PAUSE/STILL
During playback; Still picture.
During recording: To interrupt recording.
8 REG
To start a recording.
•Press both buttons simultaneously.
9 V/\(VTR)
To select the required programme position (TV station)
of the VTR.
10 TRACKINGA^-LOCK
For manual tracking adjustment
The + and — buttons are used to adjust the tracking
when, for example, noise bars on the picture are better
removed manually than by the automatic digital
tracking control. After making a manual adjustment,
press both buttons together to return to automatic
digital tracking control.
For slow tracking adjustment
When noise bars appear during Still or Slow playback,
switch over to slow playback and adjust with the + or
- Button to reduce the noise bars.
For vertical locking adjustment
Use the + and - buttons to minimize any vertical jitter
during still-picture playback.
Page 7
c:
.o
11 SLOW
For the slow motion playback function. “0£>" is lit.
12 FF (FAST FORWARD)
I n the stop mode: To fast forward th e tape
In the playback mode: To search forward
In the fast forward mode: To obtain high speed picture
“»"islit
13 STOP
To stop any playback or recording.
14 INDEX
For the index search function.
15 \/^\(TV)
To select the required programme position (TV station)
of the TV.
16 VOLUME
To adjust the volume of the TV.
17 Infra-red Transmitter 18
To programme a timer recording,
19 DATE
To programme a timer recording.
20 DISPLAY
To change the indication on the VTR Display.
p»Clock-^Counter-»Remaining Tape Time —[
21 RESET
To reset the tape counter (elapsed time) to “0:00.00".
•The tape counter is automatically reset to "0:00.00"
when a video cassette is inserted.
22 PROG
To set and check timer programmes.
23 ZERO STOP
For the zero stop function.
24 CANCEL
To cancel the settings made for a timer recording.
25 INPUT SELECT
To select the “AV” external recording source.
26 VTR/TV
To select the VTR mode or TV mode.
27 SPEED
To select the tape speed desired for recording.
SP gives the best picture quality.
LP gives the longest recording time.
28 TV SELECT
To set the remote controller for operation of the TV.
29 MENU
To make OSD menu appear on the TV screen.
30 ENTER
To make selections from On Screen Display.
31 A T
To make selections from On Screen Display.
Infra-red Remote Controller
32 Programme Position Selector Buttons
•To select the programme positions (1-99).
19:(2D-*CD-C90
•To programme a G-Code number.
33 G-Code
For the G-Code programming.
34 TIMER REC
To turn the timer recording function on and off.
S is lit or not lit.
Once operating timer recording function, the normal
VTR operation is not possible unless this button is set
to off.
35 OFF
To programme a timer recording.
36 ON
To programme a timer recording.
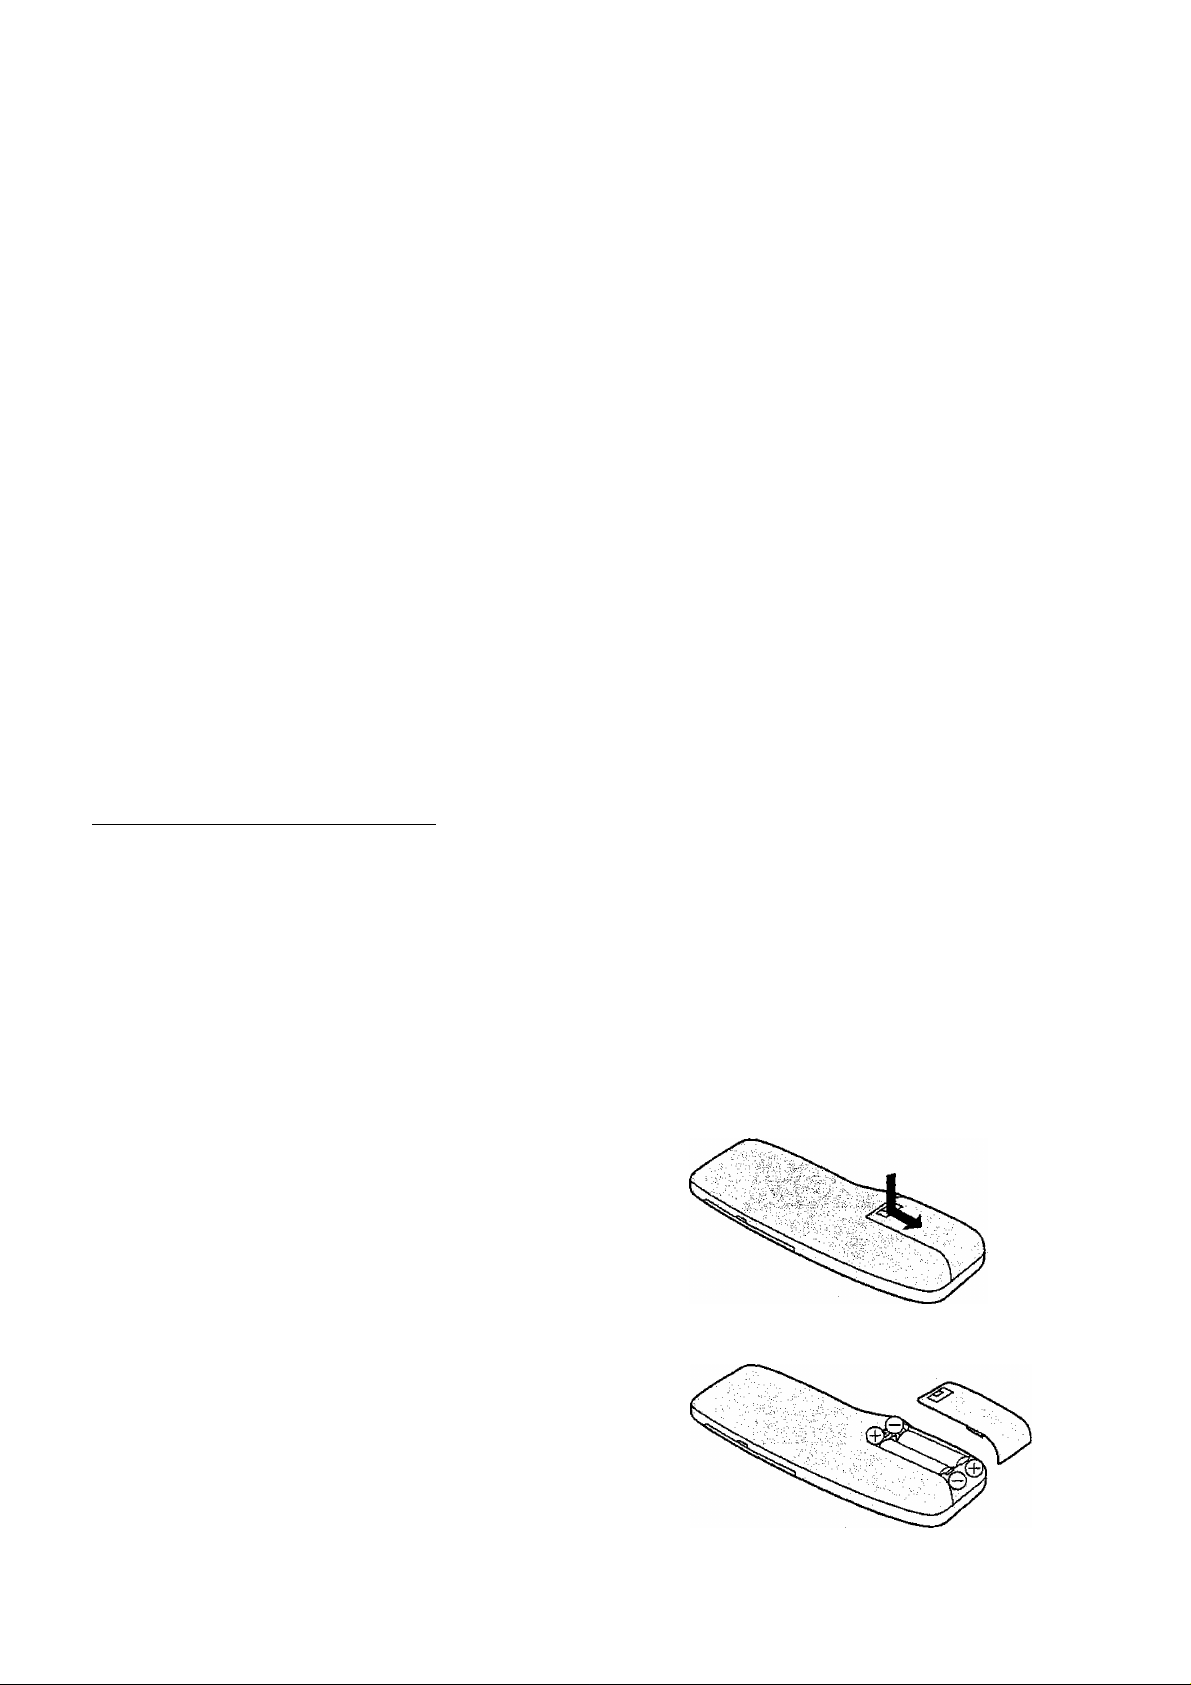
Power Source for the Remote Controller
The remote controller is powered by 2 "AA”, "UM3” or “R6"
size batteries. The life of the batteries is about one year,
although this depends on the frequency of use.
Precautions for Battery Replacement
•Load the new batteries with their polarity and ©)
aligned correctly.
• Do not apply heat to the batteries, or an internal
short-circuit may occur.
•If you do not intend to use the remote controller for a long
period of time, remove the batteries and store them in a
cool and dry place.
•Remove spent batteries immediately and dispose of
them.
• Do not use an old and a new battery together, and never
use an alkaline battery with a manganese battery.
Installing the Batteries
A
o
CO
0)
Q
{7}
Page 8
On Screen Display
Press OSD to make the On Screen Display appear on the
TV screen.
•To make this display disappear, press OSD again.
OSD
O
O Programme position
0
Tape running display
Stop, Eject
Rewind, Review
Fast Forward, Cue
Playback ►
Still Playback
Recording
Recording Pause
Slow Playback
0 Present timerrape counter
Present time
Tape counter
►►
II
•
!!•
Display
17:24
-2:35.47
Remaining Tape Time
Dew*
Index search
‘Only for NV-SD400A.
0 Tape speed indicator
0 Cassette-in indicator
Note:
On Screen Display may be disturbed or disappear during
special playback.
REMAIN 2:34
DEW
SOI
Page 9
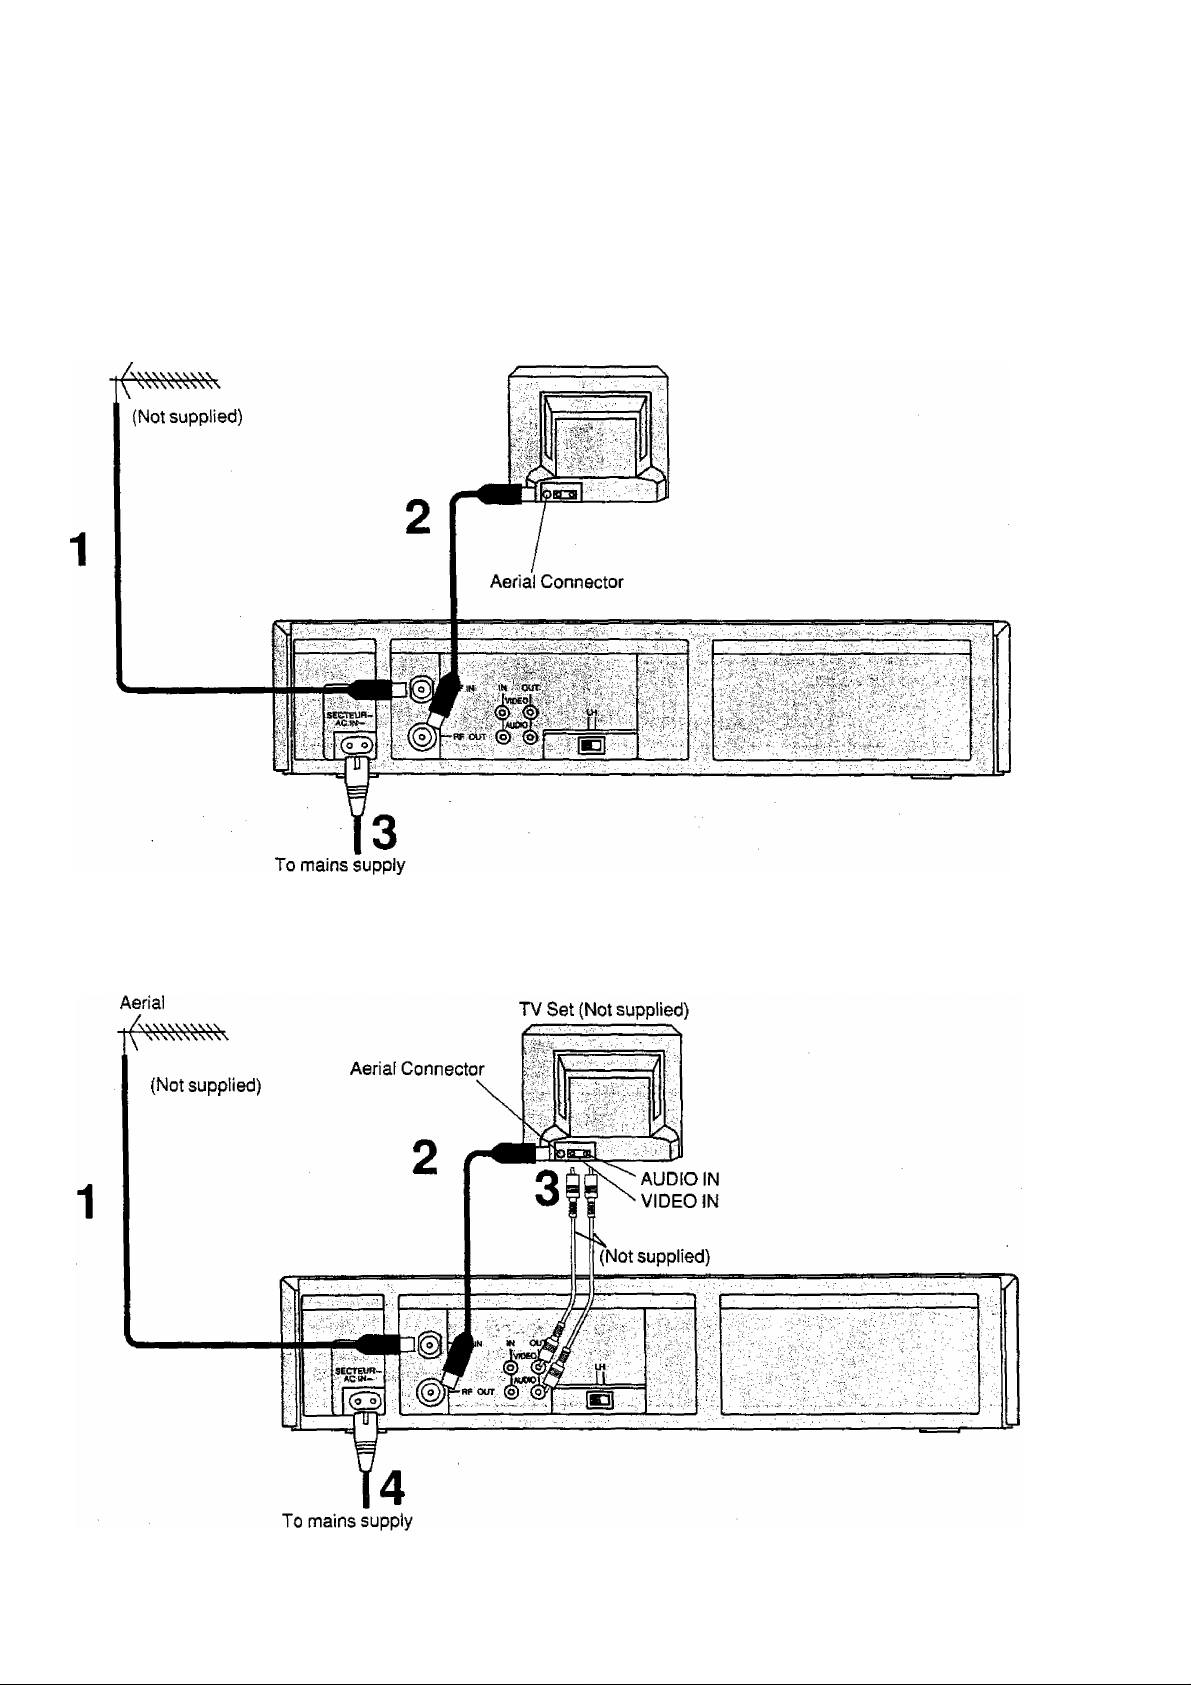
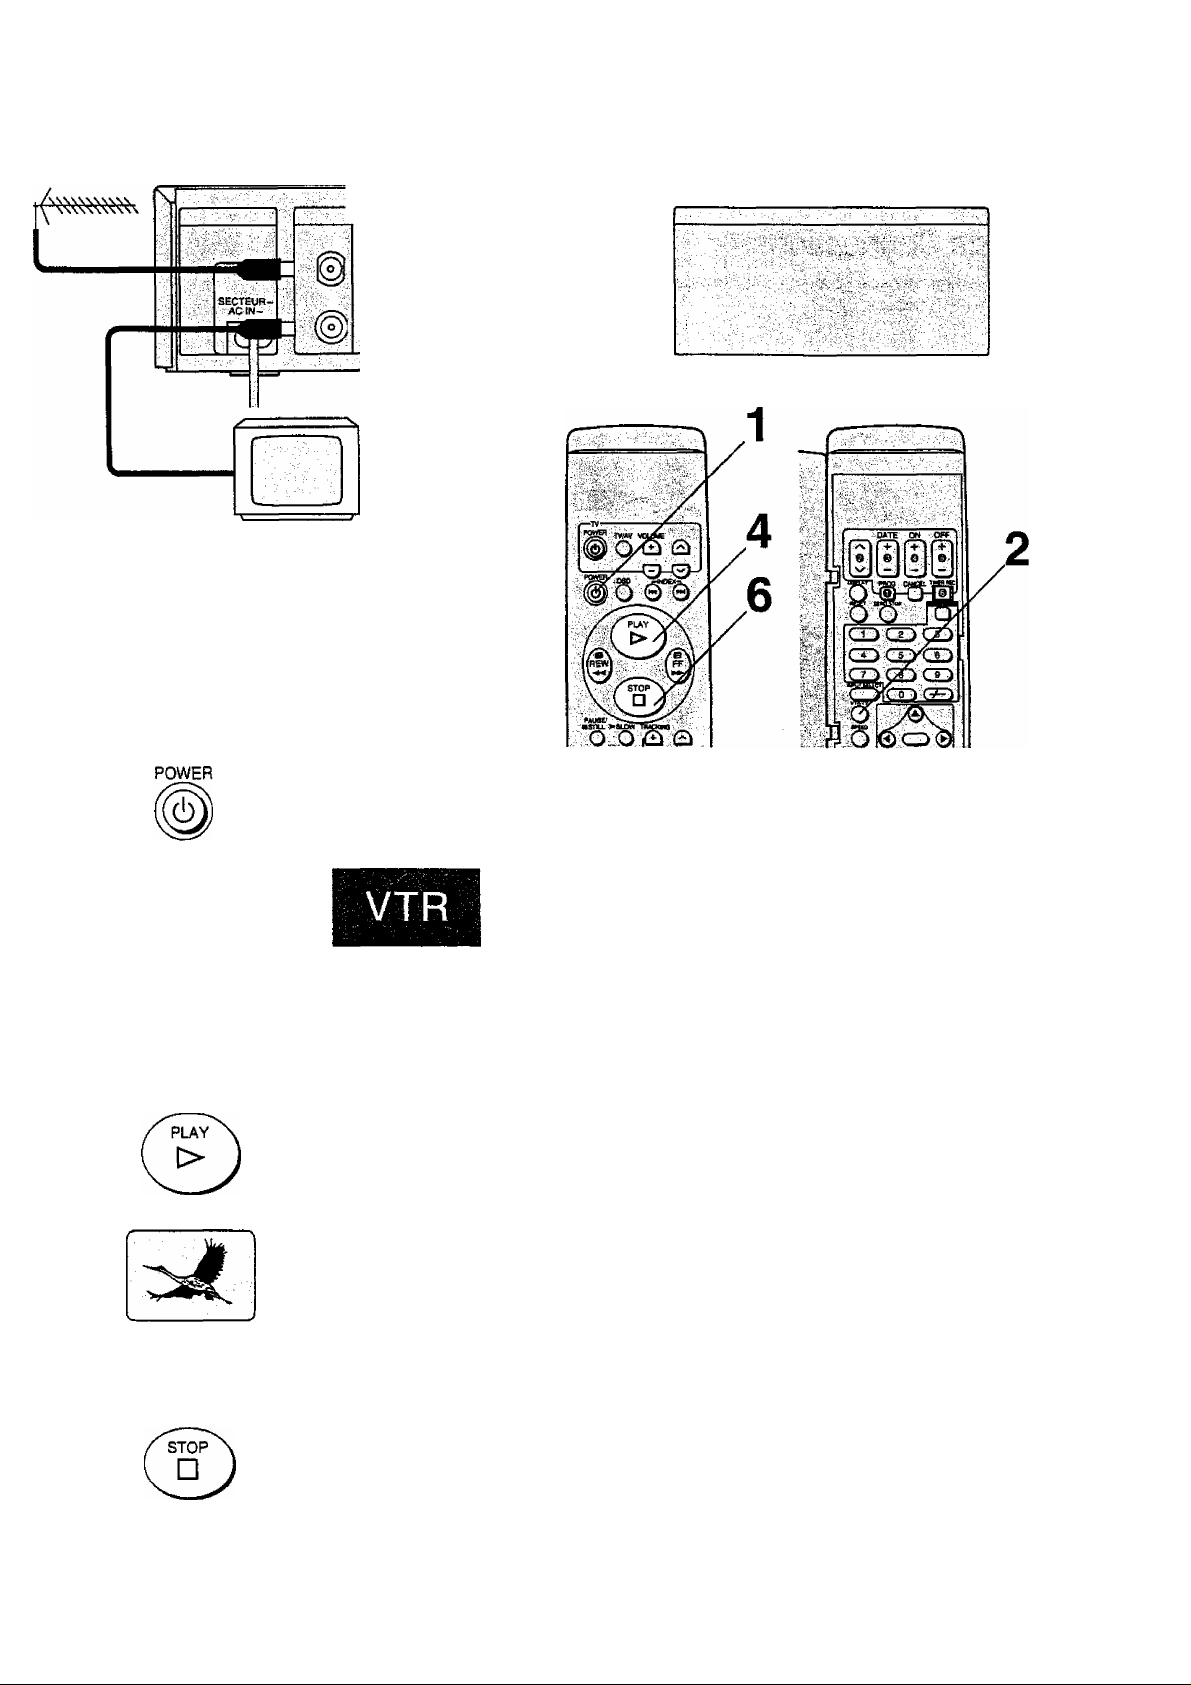
Connections
This tells you how to connect with an aerial, TV, etc.
Basic Connections
The following connections are required to record and play
back the VTR through TV set:
Aerial TV Set (Not supplied)
On Screen Display
Connections
§
C3)
.C
CO
Connection to a TV Set with the Audio/Video Input Sockets
(9)
Page 10
Tuning the TV to your VTR
■ — RF W : , IN - OÜT
itr- RF otiT io)
JyiDeql,
; ; @ №i
' ’ ^U0l3
1,5
it is possible to view the video picture on your TV in the
same way that you watch TV broadcasts.
H you have connected the VTR to the TV through the
video and audio input sockets then you do not need to
follow the procedure mentioned beiow. instead, simply
select AV mode on the television.
Operations
1
Display Symbol
Turn on the TV and VTR.
VTJVrV
o
LH
D
Select the VTR mode.
Select the video playback channel which is
not occupied with any TV station.
NV-SD400A: NV-SD400EA:
H: Channel 1 H: Channels
L; Channel 0 L; Channel 2
Insert a pre-recorded cassette tape and
press PLAY.
Select a programme number on the TV set
which you wish to use as the video viewing
channel. Then tune in the TV to the picture
from the cassette tape currently playing.
NV-SD400A:
In some areas channel 0 may be used by local TV station.
In this case switch to channel 1.
Stop the playback.
Page 11

Setting the Remote Controller for Operation of your TV
Tuning the TV to your VTR
Setting the Remote Controller
for Operation of your TV
You can operate some manufacturer of TVs (see following
table) using the supplied Remote Controller after this
TV Manufacturer
Panasonic/National
SONY
TOSHIBA
JVC
HITACHI
Operation Button
TV SELECT DISPLAY
o • 0
TVSELECT ppioG
o * ®
TVSEl^CT CANCEL
O * Q
TV^ECT TIMER REC
O * L®J
TV SELECT
O
TV SELECT
O *CID
TV SELECT
o
TV SELECT
O "CID
TV SELECT
§
.C
CD
CO
Preparation
Install the batteries in the remote controller. See page 7.
Operations
Turn on the TV.
1
Press corresponding operation button
to your TV manufacturer (see following
table) while keeping TV SELECT
pressed.
• If setting is correct, TV will be turned off
automatically.
MITSUBISHI
TV SELECT
O " CO
O " CO
TV SELECT
SHARP
0 "CO
TV SELECT
PHILIPS
O *<3:>
TVSELECT
NEC
O
TV SELECT
SANYO
O
When the TV manufacturer Is Panasonic/National or
MITSUBISHI:
When the TV’s power is turned off in step 2 above, turn it
back on and adjust the TV's volume using this remote
controller. The volume can be adjusted if the operation
button matches the manufacturer of TV.
If it is not possible to adjust the TV’s volume, try pressing
the other operation button to match the manufacturer of TV
again until the volume can be adjusted.
Note:
Some TV models cannot be operated using this remote
controller.
(11)
Page 12

Language Setting of On Screen Display
Preparations
•Confirm that the TV is on and the VTR viewing channel is
selected.
•Turn on the VTR.
• Press VTR/TV to select the VTR mode.
To View a Demonstration
1 Press MENU.
0«>H£NU
•LANGUAGE
CLOCKSET
TUNER PRESET
□
MENU
2 Select DEMONSTRATION.
0
□
ENTER
6.COOECH8ET
OPTION
DEMONSTRATION
SELECT ;Ba.ENTEn
: END ¡MENU
OSDMENU
LANGUAGE
CLOCKSET
TUNER PRESET .
O-CODECHSET
OPTION
•DEMONSTRATION
0
•During Demonstration mode, all the On Screen
Displays are displayed one after the other at about five
second intervals.
3 Press MENU to stop the Demonstration.
□
MENU
"n
To select the Desired Language
Select one of the two languages displayed: English and
Russian.
1 Press MENU.
□
MENU
2 Select LANGUAGE.
0
^ Q
enter
0
3 Selectthe desired language.
0
On Screen Display
^ OSDM
•LANGUAGE
CLOCK SET
TUNBt PRESET
Q.CODECKSET<
OPTXMt ;
DEMONSTRATION
SELECT . :Dn.E№rEn
END :MENU
C
OSDMENU
■LANGUAGE
CLOCKSET r
TUNSRPRESET
Q.COOECHSEr
OPnON
DEMONSTRATION : .
SELECT iK,ENTER
END :MEHU
L
—
LANGUAGE
•ENGU8K
pyCCKHA
----
Note:
The Menu Screen has a blue background. However, if there
is no signal input during AV is selected, the Menu Screen
may change to black and white when MENU is pressed.
This does not indicate a malfunction.
If this happens, either input a signal or select other
programme position.
^
0
4 Press MENU twice.
Q
MENU
L.
SELECT ;CB
END ;MENU
Page 13

Setting the Clock of the VTR
Language Setting of
On Screen Display
Setting the Clock of the VTR
The built-in clock is used to activate the timer for automatic
recording and must be set to the correct time.
The built-in digital clock employs the 24-hour system.
Preparation
•Confirm that the TV is on and the
VTR viewing channel is selected.
•Turn on the VTR.
•Press VTR/TV to select the VTR
mode.
Operations On Screen Display
1
О
MENU
20
• □
0
0 Set each item by pressing
ENTER
For Example:
Date; 16 th, October, 1999
Time; 20:15
' OSDMENU
«Language
CtOCKSET
TOMEBPflEaET
&.СООЕСНЗЕГ
OPTION
DEMCNSTNATION
SELECT :DB,№EB
END :MENU
L
OSOMENU
LANOUAQE
•CLOCK SET
TUHERPRESET
«ODECHSET,
OPTION
OEUONSTRATTON
SB.ECT -.ВаЕНТЕЯ
END : :MENU
n
M D 1 H:M
•. teas - 1; 1- a-00
SELECT;Sa ■ : -M-:l
STARTiMENU
Press MENU.
Select CLOCK SET.
A or T and ►.
Set Year “1999”.
.C
CO
Oi
Time Reset Function
If the clock is less than two minutes
slow or fast, it can easily be reset to
the proper time.
For example:
Resetting the clock to 12:00.00.
1 Select CLOCK SET from OSD
menu and press ENTER.
2 When the current clock display on
the VTR is between 11 ;58 to 12:01
press MENU as soon as you hear
the 12:00.00 time signal. This
resets the time to 12:00.00.
1 Set Month “10".
У 0 HUH
0
0
0
18» JlOr. 1, 0Л0.
SELECT.-BB -/+:Йв
: ' 3TART:MENU
t.
f~
CLOCK SET '
Y M .0 H:M
1M8 10 ;1вг ОЛЮ '
SELECr-.DS WU-'.BB
START;MENU
L
Set Date “16".
1
\ Set Time “20:15”.
Y I* □
19» 10 « -»ns..
SELECT; DB "-/+;BB
STAflT;M^U
Display Symbol
•When it is kept pressed, the
indication changes in 30-minute
steps.
•There is no need to press ►.
Press MENU.
•The clock will start.
О
MENU
Note:
The clock operates for at least 60 minutes by its backup system in the event of power
failure.
(13)
Page 14

storing TV Broadcasts into your VTR
Introduction
The VTR is fitted with its own tuner (just like a normal TV
set) and can be pre-set to receive up to 99 TV broadcast
stations.
Preparations
•Confirm that the TV is on and the VTR viewing channel is
selected.
•Turn on the VTR and select the programme position
except AV.
•Press VTR/TV to select the VTR mode.
Auto Tuning Procedure
Operations
1
o
MENU
DATE. ': ON OFF
2©
• Q
CO:?G12»..QD
©
PRE-PROGRAMMED TV CHANNELS
(NV-SD400A)
The local TV transmission channels 2,7,9 and 10
are factory-preset in this VTR, That is, if you can
receive television broadcasts on VHF channels 2,7,
9 and 10, these are already tuned on the programme
positions with the matching numbers.
However, it is possible to cancel these presettings
and tune the local TV broadcast channels on any
desired programme positions.
For alternative settings and tuning of additional TV
broadcasts channels, follow the Tuning Operations.
On Screen Dispiay
OSOMENU
•UAHGUAGE
CLDCKSET
TUMERPRESET
G.CODECHSE1
OPTION
demonstration
SELECT :9a.ENTSR
END :MENU
OSDMENU
LANGUAGE
CLOCK SET
■TUNER PRESET
G400ECHSET
OPTION
ENTER
DEMONSTRATION
SELECT 'aB,EKTER
END tUENU
Press MENU.
1 Select TUNER PRESET.
" I
; fTVHEOT
, fO
-
■y i y;"'-
Notes:
•The Auto Tuning is searching for TV station from VHF
minimum to UHF maximum and memorizing the data for
every programme position. The other programme
positions are skipped.
•The Auto Tuning takes seven or more minutes to
complete the search.
• If VTR is not correctly tuned by Auto Tuning, follow the
procedure on next page.
qWqI
MENU EKTER
r-
-----------CHI
.CLEAR, t.,..
-,AUTO TUNEwm”""
SEARCH
RNE
5ELECT-.DD
L
-
ON »OFF
•VL VH UHF
-/+.-W
Select AUTO TUNE and
'I
press ◄ or ►.
•When the Auto Tuning finished, On
Screen Display disappears and
programme position 1 is selected.
,
4)
Page 15

Storing TV Broadcasts into your VTR
Manual Tuning Procedure
1 Press MENU.
2 Select TUNER PRESET by pressing A or T and
ENTER.
3 Select CH by pressing A or T and then select the
programme position by pressing ◄ or ►.
4 Confirm that CLEAR is set to OFF.
5 Select BAND by pressing A or ▼ and then select TV
band VL, VH or UHF by pressing or ►.
6 Select SEARCH by pressing A or T and then press ►.
r
CMJ SEARCH VH;+i
J
•If the desired TV station is not be tuned, press ► again.
•Press MENU and repeat steps 3-6 for each
programme position you want to tune to a station.
7 Press MENU three times.
Channel Plan
NV-SD400A
NV-SD4Q0EA
NV-SD400A:
Broadcast TV Channel
0-5 5A-12
1-3
CH2 SEARCH VH
VHF
UHF
VH
21-69
4-11
Position tuned on VTR
21-69
Fine Tuning Procedure
1 Press MENU.
2 Select TUNER PRESET by pressing A or ▼ and
ENTER.
3 Select CH by pressing A or T and then select the
programme position by pressing ◄ or ►.
4 Select FINE by pressing A or T.
5 Press or ► to obtain the best tuning condition.
CH2
PtNE + -/+: •• AFC: ENTER
•To return the tuning to its former state, press ENTER.
6 Press MENU.
Blanking of Unoccupied Programme
positions
1 Press MENU.
2 Select TUNER PRESET by pressing A or ▼ and
ENTER.
3 Select CH by pressing A or T and then select the
programme position by pressing or ►.
4 Select CLEAR by pressing A or ▼.
5 Select ON by pressing ◄ or ►.
• Repeat steps 3-5 for another unoccupied programme
positions to skip during the selection of the programme
positions.
•To cancel the blanking of a programme position, select
that programme position and then select CLEAR OFF.
6 Press MENU twice.
§
0)
CO
J
2 ABC
7ATN
9TCN
10 TEN 10
28SBS 28
This table will be required when programming the G-Code.
2
7
9
(15)
Page 16

Preparations for G-Code Programming
Identification numbers must be set for G-Code
programming. Simply proceed with the G-Code
programming operation described on page 26, and the
identification numbers of the TV stations concerned will be
set automatically. This means that G*Code programming is
possible even without performing the operation described
on this page. However, you can follow the setting
procedure described below if you wish to set the
identification numbers of all the TV stations prior to actual
programming.
“Identification numbers” refer to the numbers used for
identifying the TV stations.
The programme positions on the VTR receiving the TV
stations are set in these identification numbers.
Have a newspaper or magazine on hand which lists today’s
local TV station programmes and G-Code numbers.
Preparations
•Set the clock of the VTR. See page 13.
•Store TV broadcasts into your VTR. See pages 14 and 15.
•Confirm that the TV is on and the VTR viewing channel is
selected.
•Turn on the VTR.
• Press VTR/TV to select the VTR mode.
Operations
On Screen Display
Press MENU.
1
□
MENU
Select G-CODE CH SET.
0
□
0
Select the identification number (001-255).
0
0
ENTER
OSD MENU
»LANGUAGE
CLOCK SET
TUNERPRE5ET
G.CODECHSET
OPTION
DEMCmSTRATtON
..»ELECT ' :B0.I
END . :MENU
r~
OSDMENU
LANGUAGE
CLOCK SET
TUNER PRESET
•O-CODECKSET
OPTION
: DEMONSTRATION
SELECT :aB.ENTER
END AtENU
G-CODE CH SET
SELECTrDD -/+;D0 :■
ENO;MENU
1
^ Press ◄ or ► and then select the ^ programme position (1-99, AV).
G-C(HIECH SET .
0
■;v.
T
%
I
p
ii-
,r-’
0 0
0
•To set the other TV stations, press or ► and then
repeat steps 3 and 4.
L
GUIDE CH
: . 001 :- ■
SELECTtOa
<;m.
END-.MENU
.. -
C Press MENU twice.
□
MENU
Note;
To receive satellite stations, the satellite receiver must be
connected to the VTR and programme position must be set
depending on the type of the connection mode.
AV: When the satellite receiver is connected to the
AudioA/ideo input sockets.
•When the satellite receiver is connected by means of the
RF coaxial cable, set to a free programme position
between 1 and 99.
B)
Page 17

For Example:
(NV-SD400A)
Preparations for G-Code Programming
TV Station
ABC
ATN
TCN
TEN
SBS
For Example:
(NV-SD400EA)
TV station
TV ONE
CHANNEL2
TV3
SKY TV MOVIES
Programme
Position on VTR
2
7
9
10
28
Programme
Position on VTR
1
2
3
4
Identification
Number
002
007
009
010
028/001
Identification
Number
001
002
003
004
■+-J
Cb
CO
SKY TV SPORTS
SKY TV NEWS
CTV
ACTION TV
5
6
7
005
006
007
008
(17)
Page 18

Settings Using On Screen Dispiay
Preparations
•Confirm that the TV is on and the VTR viewing channel is
selected.
•Turn on the VTR.
• Press VTR/TV to select the VTR mode.
To select the corresponding Cassette
Tape Length for displaying the
approximate remaining tape time
1 Press MENU.
□
MENU
2 Select OPTION,
On Screen Display
OS&MENU
LANQUAGE
CLOCKS
0
ENTER
3 Select TAPE SELECT.
0
0
TUtgER PRESET
Q.COOSCHSEr
•OPTtOH
DEMONSTRATION
SELECT ;DB,ENTER
END :MENU
-’TAPÈ'SELÈCT/
'""’"'lErei E24Q EHO
TAPESP^ «8P LP
BLUE BACK *ON OFF
SELECT:»
■ -/+ ;0a
END :MENU
4 Select the corresponding cassette tape length.
^ : . OPTION
•.TAPE SELECT.-
............
"'EfljS #E240 E2$0
TAPE SPEED
-BLUEBACK :
0 0
SELECTiDD
1. ■ ^
El 80: For E30, -60. -90. -120, -150 and -180 tapes
E240: For E240 tape
E260; For E260 and -300 tapes
•6P
«ON
:: n
LP
OFF
-v+ ;ea .
END:MENU
:
Page 19

Settings Using On Screen Display
To select the Desired Tape Speed for the manual recording
1 Select TAPE SPEED.
0
0
2 Select the desired tape speed.
0 0
V OPTION
TAPESELECT
-.TAPE SPEED BLT3ESACIC'
SELECTiBB
L:
r
TweSELECT -
•TAP6SPEED- SP »LP
BUOBiACX' ■ON OFF
'SEL£CT:8B ' ,
OPTION ■
•SP
• OH
E240 E2WI
■ T
E240 E2№
LP
OPF
-/+ iaa
END :UENU
END :MENU
For Blue Background Function
When BLUE BACK is ON, the screen will always have a
blue background when no signal is received or the received
signal is very weak,
1 Select BLUE BACK.
After All Settings are selected
Press MENU twice to make On Screen Display disappear.
Q
MENU
§
s
0)
CO
OPTION
TAPESELECT
•E1S0 EZ4a ‘ E2W
0
JWESREEQ «SP tP
*6t.UfiBACK,> •OH OFF
0
2 Select ON.
TAPESELECT
«E180
.TASeSREEQ
-SLOE BACK*
0 0
•When BLUE BACK is OFF, the blue background
function does not work.
• It is not possible to record the blue picture of the blue
background function.
SELECT: BS
• SP LP
•OH OFF
■
;0Q
END :MENU
OPTION 0
.'E240 EZSO
ENO^MEHU
(19)
Page 20

Playback
Operations Display Symbols
—tv—7——^—-T-
*5!^o;tvmv vauMEi - '
*1 ■=^3SKl^
2 X PLAY
IISTILL
PAUSE/
o
Insert a recorded cassette
tape.
Start viewing the picture.
Search forward by tapping
FF.
•To change back to normal playback,
press PLAY.
Search backward by tapping
REW.
•To change back to normal playback,
press PLAY.
View a still picture.
•To continue the normal playback,
press PLAY or PAUSE/STILL.
:20)
(►SLOW
^ O
STOP
□
View the slow motion picture.
•To continue the normal playback,
press PLAY.
Stop viewing the picture.
Page 21

other Playback Functions
Playback
To obtain High Speed Picture During Fast Forward or Rewind
Keep FF pressed during fast forward.
Keep REW pressed during rewind.
To playback the Recorded Part
Repeatedly
Keep PLAY pressed for more than 5 seconds.
Beginning
of Tape
rm n
Repeat Playback gjgpal Interruption
PLAY {at least 5 sec.)
End of
Recorded Part
EL H
o
REW
• Press STOP to release from Repeat Playback mode.
To return to a Specified Scene
1 Press RESET to set the counter to 0:00.00.
flKET
0
2 After playback, press ZERO STOP in the stop mode.
•The tape will be rewound or fast forwarded to 0:00.00.
ZERO^OP
0
To find the Beginning of Each Recording
For example:
Searching for the 2nd recorded segment in the forward
direction.
Press INDEX twice.
f-INDEX-i
(£) 0
•Afterfinding the specific recorded segment, playback
starts automatically.
•For the reverse direction, press INDEX
•Up to 20 Index signals can be searched for in both
directions.
•When the opposite INDEX button is pressed, the number
shall be decreased till 1.
•The figure on the display is decremented by 1 each time
an index signal is located.
Recording Index Signals
Index signals are recorded in following cases.
•When a recording is started by pressing REC.
•When REC is pressed during recording.
•When timer recording is activated.
Notes:
•Cue, review or slow playback will be automatically
released after 10 minutes, and still playback after
5 minutes.
•The INDEX search function can only work correctly, if the
index signals are spaced at least 3 minutes apart in the
SP mode and 5 minutes apart in the LP mode.
•In LP mode only:
1. During any playback mode other than normal
playback, the picture may have some noise bars, the
colour may be unstable, or a black and white picture
may appear.
2. When playing back a tape which was recorded on
another VTR, it may be necessary to adjust the
Tracking Control. In some cases the picture quality
may still be inferior. This is due to limitation of format.
(21)
Page 22

Manual Recording
Operations Display Symbols
1
3
0
VTR/TV
o
0
Insert a cassette tape.
• If it has already been inserted, press
POWER to turn the VTR on.
Select the VTR mode.
Select TV station.
Start recording.
STOP
n
Stop recording.
Page 23

To select the Desired Tape Speed
Press SPEED before recording.
SPEED
o
To interrupt Recording
Press PAUSE/STILL during recording.
Press again to continue recording.
PAUSE/
IISTILL
o
To record One TV Programme while
Viewing Another Programme
1 Refer to the manual recording operations steps 1 to 4.
2 Press VTR/TV to select the TV mode.
3 Select the TV programme on your TV set you wish to
view at the present time.
Manual Recording
To display the Approximate Remaining Tape Time
1 Select TAPE SELECT on OPTION on screen display
and select the corresponding cassette tape length. See
page 18.
On Screen Display
-.TAP6 SELECTTAPESPEED •SP LP :
BLUE BACK *ON OFF
MENU
E180: For E30, -60. -90. -120, -150 and -180 tapes
E240: ForE240tape
E260: For E260 and -300 tapes
2 Press DISPLAY.
DISPLAY
S£LECr:BB " -H-:Da
OPnOM ^
E340 Eieo
END -AIENU
o
p»Ciock-»Counter-»Remaining Tape Time
------------
1
CO
c
.o
5
0)
.O
CO
CQ
•The remaining tape time may not be displayed correctly
depending on the tape used.
Notes:
•When a video cassette with a broken off tab is inserted,
the "EST indication will flash to indicate that recording is
not possible.
•The recording pause mode will be automatically released
after 5 minutes. Revert back to the stop mode.
(23)
Page 24

Timer Recording
Up to 8 timer programmes can be recorded up to one
month in advance by setting the timer, including weekly and
daily programmes.
Preparations
• Insert a cassette tape with an intact erasure prevention
tab,
•Confirm that the TV is on and the VTR viewing channel is
selected,
•Turn on the VTR.
• Press VTR/TV to select the VTR mode.
For Example:
Timer programme number; 1
Programme position (channel); 2
Date; 27th, October
Starting time; 20;02
Ending time; 21:30
(Present date; 16th, October)
Operations
On Screen Display
^ Select Timer Programme number “1”
CH DATE ON OFF
1 ---------^ ,— w.— SP
PROG
SELECT:HI ■: .
Set Programme position (channel)
2
"2".
^ CH DATE ON OFF
/\
a-----------------SP
SELECT :0a
Q Set Date “27”.
DATE
+
CH DATE ON 0№
i 2 27WE -i-;— —SP
0
.SELECT:BD ; : -Af;aB
I
. __
Set Starting time “20:02”
r
ON
CH DATE ON OFF
2 27WE 20:02 —>- SP
4*
O
SELECT-.Ba
►When it is kept pressed, the indication changes in
30-minute steps.
;24)
Page 25

Timer Recording
Weekly Timer Recording
In step 3, select the desired day by pressing DATE —.
For example, SU (Sunday)
DATE
CH DATE ON OFF
"i"
Se^CT;DS -i+:t
Daily Timer Recording
For this timer function, several groups of days can be
selected.
@ Daily recording from Monday to Friday
Daily recording from Monday to Saturday
Daily recording from Sunday to Saturday
In step 3, select the desired days by pressing DATE —.
For example, ©
DATE
CM DATE ON OFF
If:- 2 SU-SA-—
------------------
+
€)
SELECT:fil -/+i8B
Timer Recording from External Signal
Source
If Timer Recording is performed by a unit connected to the
AudioA/ideo input sockets, select the AV indicator in step 2
for the programme position.
CM DATE ON
/\
it AV —— —:
©
--------------------
SP
Checking a Timer Programme
•The VTR must be turned on, or the timer recording
indicator “H" is lit.
•Confirm that the TV is on and the VTR viewing channel is
selected.
1 Press PROG.
PROG
2 Press VTR/TV to select the VTR
mode.
VTR/TV
r
... CH DATE ON■\OFF
37WE 20:03 21:30 SP
o' AV
SU-SA1(l:3<) 11 DO LP
SU 1SDO 1S:00 SP
S 14
19TU 22:15 23:30 LP
2STM
2
20:03 21:30 SP
H 4 30SA 19:10 19:55 SP
m
SELECT:SB
o
Cancelling a Timer Programme
•The VTR must be turned on, or the timer recording
indicator “Cg" is lit.
•Confirm that the TV is on and the VTR viewing channel is
selected.
1 Press PROG.
PROG
2 Press VTR/TV to select the VTR
mode.
VTH/TV
o
3 Press PROG repeatedly until the
desired timer programme number
is flashed on and off.
PROG
ss CA
4 Press CANCEL
CANCEL
:ancel
Q
CH DATE ON OFF
2 27WE 20;D2 21:30 3P
AV SU-SA 10:30 11.DO LP
14 SU 1S:00 1OD0 8P
5 19TU 22.TS 23:30 LP
2 2STH 2D-J)2 21:30 3P
4 30SA 19:10 19-.5S SP
CH OATS
OH OFF
2
27«E 20H32 21:30 8P
AV
SU.3A10:30 11:00 LP
14 SU
15:Q0 19,-00 SP
i 5
19TU 22:19 23:30 LP
f|
2 2STH 20:02
4 30SA
SR£CT;BB /
L
r
CH DATE ON OFF
2 27WE 10:02
AV
SU-SA 10:30 11:00 LP
U
SU 1S;00 19:00 SP
qU
' 2 28TH 20D2 21:30 $P
4
30SA 19:10 19D5 SP
'' ■
21 DO SP
19DS SP
-V+:0D
. .
21:30 SP
__
.
Selecting the Desired Tape Speed
Press ◄ and then select the desired tape speed by
pressing A or ▼ in any of steps 2-5.
CM DATE ON on-
2 27WE 20:02 21:30
0
0 ^
0
Setting other Programmes in succession
Repeat steps 1-5.
Note:
If a timer recording is not performed to the end (due to
insufficient tape or cancellation by the user), the
programmed timer recording data will be cancelled from the
memory by 4 a.m. two days later.
However, if the Timer Record Function is activated at that
time, the programmed timer recording data will be
cancelled at 4 a.m. the next day.
(25)
Page 26

G-Code Programming
Programming is now easier than ever: simply enter the
G“Code number provided in the programme schedule
column carried by newspapers and magazines.
G-Code numbers are numbers which are assigned to each
programme listed in the TV programme schedule carried in
newspapers and TV guides. When these numbers are
entered, the numbers are converted into the actual
programming.
Operations
Press G-CODE.
1
On Screen Display
□
Preparations
• Insert a cassette tape with an intact erasure prevention
tab.
•Confirm that the TV is on and the VTR viewing channel is
selected.
•Turn on the VTR.
• Press VTR/TV to select the VTR mode.
Enter a G-Code number.
Example: 123456
PROORAMME SET:EKTER
' if you have entered the wrong number, press
CANCEL and then enter the proper number.
0 Press ENTER.
□
ENTER
•Confirm that the number corresponds to the right
programme. If the display looks like this:
(¡MDATEON OFF
*^4,-17SU ISiOO 17:00 8P
SELECTiDO -/+:0D
r
.CHOATE ON OFF
rlTSU 1S:pO 17:00 SP
SELECT;Da
o«oDe
123458 —
ENO.-O.COOE
■ ,Q-CODE ,
. ;. 123485 ' .
END;T1M£R BEC
W+;Q0
END;CrCOOE
;6)
select the programme position of your VTR which
receives the TV station you entered at step 2 using
button 0 and then press ENTER.
•To make any corrections, use buttons 0-0 as the
same way on page 24.
Press TIMER REC.
TIMER REC
©
Notes:
•To select the desired tape speed, press SPEED before
programming.
•When the G-Code number is used for programming, the
recording time may be slightly longer than the actual
programme time.
• Repeat steps 2 and 3 if ‘‘PROGRAMME IS
INCOMPLETE." appears.
•When programming two or more programmes, repeat
steps 1-3 before pressing TIMER REC.
•The procedures for checking and cancelling a timer
programme are the same as on page 25.
Page 27

Editing
Assembly Editing
This function can be used to make up an edited tape from
other recordings or video sources.
A new scene can be added to the end of a previous one.
Preparations
•Connect a movie camera or another VTR to this VTR as
shown.
• Insert a recorded cassette tape with an intact erasure
prevention tab.
•Select the video source required by pressing INPUT
SELECT to set AV.
- V'Tie
AUDIO/VIDEO IN
Timer Recording
Editing
CO
c:
о
5
Cb
Operations
H Search for the end of the previous
■ recording.
Press PAUSeSTILL.
PAUSE/
HSTILL
О
O Press REC to switch the VTR from the
^ pause mode to the recording standby
mode. „REC
(§ 0
Start the new recording by pressing PAUSE/STILL again.
PAUSE/
lISTiLL
§
s
c
§
TO
о
(27)
Page 28

other Functions
Other Automatic Functions
Automatic playback
When a cassette without an erasure prevention tab is
inserted, the VTR starts playback automatically.
VTR-off playback
When the VTR is off, an inserted cassette can be played
back by pressing PLAY.
Automatic rewinding
When the tape reaches its end during recording (except for
timer recording) or playback, it will automatically be
rewound to the beginning.
Automatic switching off and ejection
When the VTR is switched off, an inserted cassette can be
ejected simply by pressing EJECT. The VTR will eject the
cassette and automatically turn itself off again.
^28)
Page 29

Before Requesting Service
Before requesting service, check the following points once again.
Message of On Screen Dispiay
Message of On Screen Display is displayed.
Other Functions
Before Requesting Service
MESSAGE
PLE ASE P UT IN
A VIDE O C AS SETTE .
PLE ASE S TOP THE TAPE.
PLE ASE S ET THE C LOCK.
PLE ASE U SE A C AS SETTE
TIM ER RE CO RDING
TIM ER PR OG RAMM ES AR E
VTR IS IN THE TIME R
DEW FORMED IN THE VTR.*
WIT H T AB .
HAS BEEN SET.
FUL L.
STA ND BY MO DE ,
‘Only for NV-SD400A.
CAUSE
REC is pressed without
cassette.
TUNER PRESET is selected
during playback.
PROG is pressed when the
clock is not set.
REC is pressed without tab of
Cassette.
TIMER REC is pressed with
no timer programmes.
G-CODE is pressed when
8 programmes have been
already set.
POWER is pressed during
timer standby mode.
Dew forms.
REMEDY
Put in a video cassette.
Stop the tape.
Set the clock.
Use a cassette with tab.
Set timer recording.
Cancel unneccessary programme.
Press TIMER REC to release from timer standby mode.
Wait until the message disappears.
£5
.c
X
Seif Test indication
This VTR has a self-diagnosis and display function. If the VTR detects trouble during installation or during use, the following
indications automatically appear in the VTR display. Indications are displayed in the form of a single English letter plus two
numbers such as [H01].
INDICATION CAUSE
U 1 0’ Dew forms.
Hoa
Some trouble has occurred.
(Numbers following H and F
Foa
differ according to the status
of the VTR.)
•Only forNV-SD400A.
Wait until the indication disappears.
Consult your for further advice.
REMEDY
X
(29)
Page 30

VTR wiH not operate correctly
SYMPTOM
VTR display is not
illuminated.
VTR display is
illuminated but VTR
will not operate.
A language which
you do not
understand appears
on the TV screen.
SYMPTOM
Picture noisy or not
in colour.
Horizontal bars or
lines run down the
screen.
CAUSE
Mains lead is not connected.
VTR is in timer mode.
Safety devices are operating.
Condensation may have
formed.
The Language Setting is set to
a language which you do not
understand.
Playback will not operate correctly
CAUSE
Tracking is not correct.
Video heads are clogged or
worn.
REMEDY CHECKED
Reconnect mains lead to VTR.
Press TIMER REC to operate VTR manually.
Disconnect mains lead and wait for 1 minute.
Reconnect mains supply and check functions.
Do not operate VTR for 1 hour.
Select the desired language. See page 12.
^ / V y ^ REMEDY CHECKED
Adjust the tracking. See page 6.
Consult your dealer for further advice.
=0)
Page 31

Precautions
Please read these cautions before you operate this VTR.
Avoid Sudden Changes in Temperature
If the VTR is suddenly moved from a cold place to a warm
place, condensation may form on the tape and inside the
VTR.
Humidity and Dust
Avoid places where there is high humidity or much dust,
which may cause damage to interna! parts.
Do Not Obstruct the Ventilation Holes
The ventilation holes prevent abnormal increase in
temperature. Do not block or cover these holes. Especially
avoid covering the holes with soft materials such as cloth or
paper.
Keep away from High Temperature
Keep the VTR away from extreme direct heat such as direct
sunlight, heating radiators, or closed automobiles.
Keep Magnets away
Never bring a magnet or magnetized object near the VTR
because it will adversely affect the performance of the VTR.
No Fingers or Other Objects Inside
Touching internal parts of this VTR is dangerous, and may
cause serious damage to the VTR. Do not attempt to
disassemble the VTR. There are no user serviceable parts
inside.
Keep Water away
Keep the VTR away from flower vases, tubs, sinks, etc.
CAUTION: If liquids are spilled into the VTR, serious
damage could occur, if you spill any liquid into the VTR,
consult qualified service personnel.
Lightning
To avoid damage by lightning, disconnect the aerial plug
from the VTR.
Video Head Clogging
The video heads place picture signals on the tape during
recording and read picture signals from the tape during
playback and they are, therefore, of critical importance for
the picture quality. If the VTR is used over extremely long
periods of time, these heads may become dirty and
clogged, in such a case, the signals can no longer be
recorded correctly, and the playback picture will be
distorted accordingly. This is the case, for example, during
the playback of a tape, the sound is reproduced normally,
but no picture is seen, or the picture is greatly distorted.
When such a symptom case occurs have the recorder
checked by qualified service personnel.
If Dew Condensation Forms in the VTR
Condensation may form in the VTR if:
•The VTR is in a room where the heater has just been
turned on.
•The VTR is in a room with steam or high humidity.
•The VTR is brought from cold surroundings into a
well-heated room.
•The VTR is suddenly brought from cool surroundings,
such as an air-conditioned room or car, to a place which is
hot and humid.
Model NV-SD400A;
When dew forms in the VTR, the Dew Indicator “ 6" on the
Display will flash on and off and all the function buttons are
made non-operational to protect the tape and the video
heads. When the Dew Indicator flashes, wait until this
indicator disappears.
•If dew condensation forms inside the VTR while the
POWER Switch is off, it will turn on automatically and the
Dew Indicator will flash on and off. As soon as the dew
condensation has been dissolved, the VTR will turn itself
off again.
Model NV-5D400EA;
This model does not incorporate a dew sensor.
Do not operate the VTR for at least 1 hour if any of the
above conditions occur.
Cleaning the VTR
Wipe the VTR with a clean, dry cloth. Never use cleaning
fluid, or other chemicals. And do not use compressed air to
remove dust.
Stacking
Place the VTR in a horizontal position, and do not place
anything heavy on it.
"2)
Page 32

Specifications
NV-SD400A/EA
Precautions
Specifications
Power Source;
Power Consumption:
Video Recording System:
Video Heads:
Tape Speed:
Tape Format:
Record/Playback Time:
VIDEO
Television System:
Modulation System:
Input Level:
Output Level;
AUDIO
Input Level:
Output Level;
Audio Track:
Video Horizontal Resolution:
SignaUtO'Noise Ratio;
240 V AC 50-60 Hz (NV-SD400A)
230 V AC 50-60 Hz (NV-SD400EA)
Approx. 19 watts
2 rotary heads, helical scanning system
4 heads
SP; 23.39 mm/sec.
LP; 11.7 mm/sec.
VHS tape
SP; 240 min. with NV-E240
LP; 480 min. with NV-E240
CCIR; 625 lines, 50 fields, PAL colour signal
Luminance; FM azimuth recording
Colour signal; converted subcarrier phase shift recording
VIDEO IN (PHONO); 1.0 Vp-p,
VIDEO OUT (PHONO); 1.0 Vp-p,
RF Modulated; VHF channel 0 or 1 (NV-SD400A),
VHF channel 2 or 3 (NV-SD400EA),
AUDIO IN (PHONO);
AUDIO OUT (PHONO);
1 track (Normal-mono only)
Colour: more than 240 lines (SP)
Video; more than 43 dB (SP)
Audio: more than 43 dB
-lOdBV,
-6dBV,
75 ohm, terminated
75 ohm, terminated
75 ohm
75 ohm
more than 47 kohm
less than 1 kohm
 Loading...