

Page 1
NV-MC20se
Operating Instructions
mac
AM.
Before attempting to connect, operate
acljust this product,
please read ttiese instructkms compk
VQT3416
Page 2

CONTENTS
Page
4 CONTROLS AND COMPONENTS
9 VHS-C MOVIE SYSTEM ACCESSORIES
10 THE POWER SUPPLY UNITS
13 THE VIDEO CASSETTE
14 ELECTRONIC VIEWFINDER
15 CAMERA RECORDING
19 PLAYBACK
23 CABLE CONNECTIONS
25 ASSEMBLE EDITING
26 DUBBING (COPYING)
27 TECHNIQUES FOR SHOOTING
•White Balance
•Focus
•Zooming
•Macro Close-Up
•Lighting
•Accessories
37 CAUTIONS
40 BEFORE REQUESTING SERVICE
41 SPECIFICATIONS
<2>
o
Page 3
IMPORTANT
Your attention is drawn to the fact that recording of
pre-recorded tapes or discs or other published or
broadcast material may infringe copyright laws.
WARNING
TO REDUCE THE RISK OF FIRE OR SHOCK
HAZARD, DO NOT EXPOSE THIS EQUIPMENT TO
RAIN OR MOISTURE.
NV-MC20A: Australian model
i-
NV-MC20EA: New Zealand model
VHS-C Movie NV-MC20
•The rating plate is on the bottom side of the VHS-C Movie.
AC Adaptor VW-AMC2
•The rating plate is on the bottom panel of the unit.
FOR YOUR SAFETY p
■ DO NOT REMOVE THE OUTER COVER. |
To prevent electric shock, do not remove the cover. No user |
serviceable parts inside. Refer servicing to qualified service |
personnel. |
Video recorders carrying the HQ symbol mark feature the new VHS
High Quality Picture System. This system assures complete
compatibility with VTRs that use the conventional VHS system.
is the safety information.
<3>
Page 4
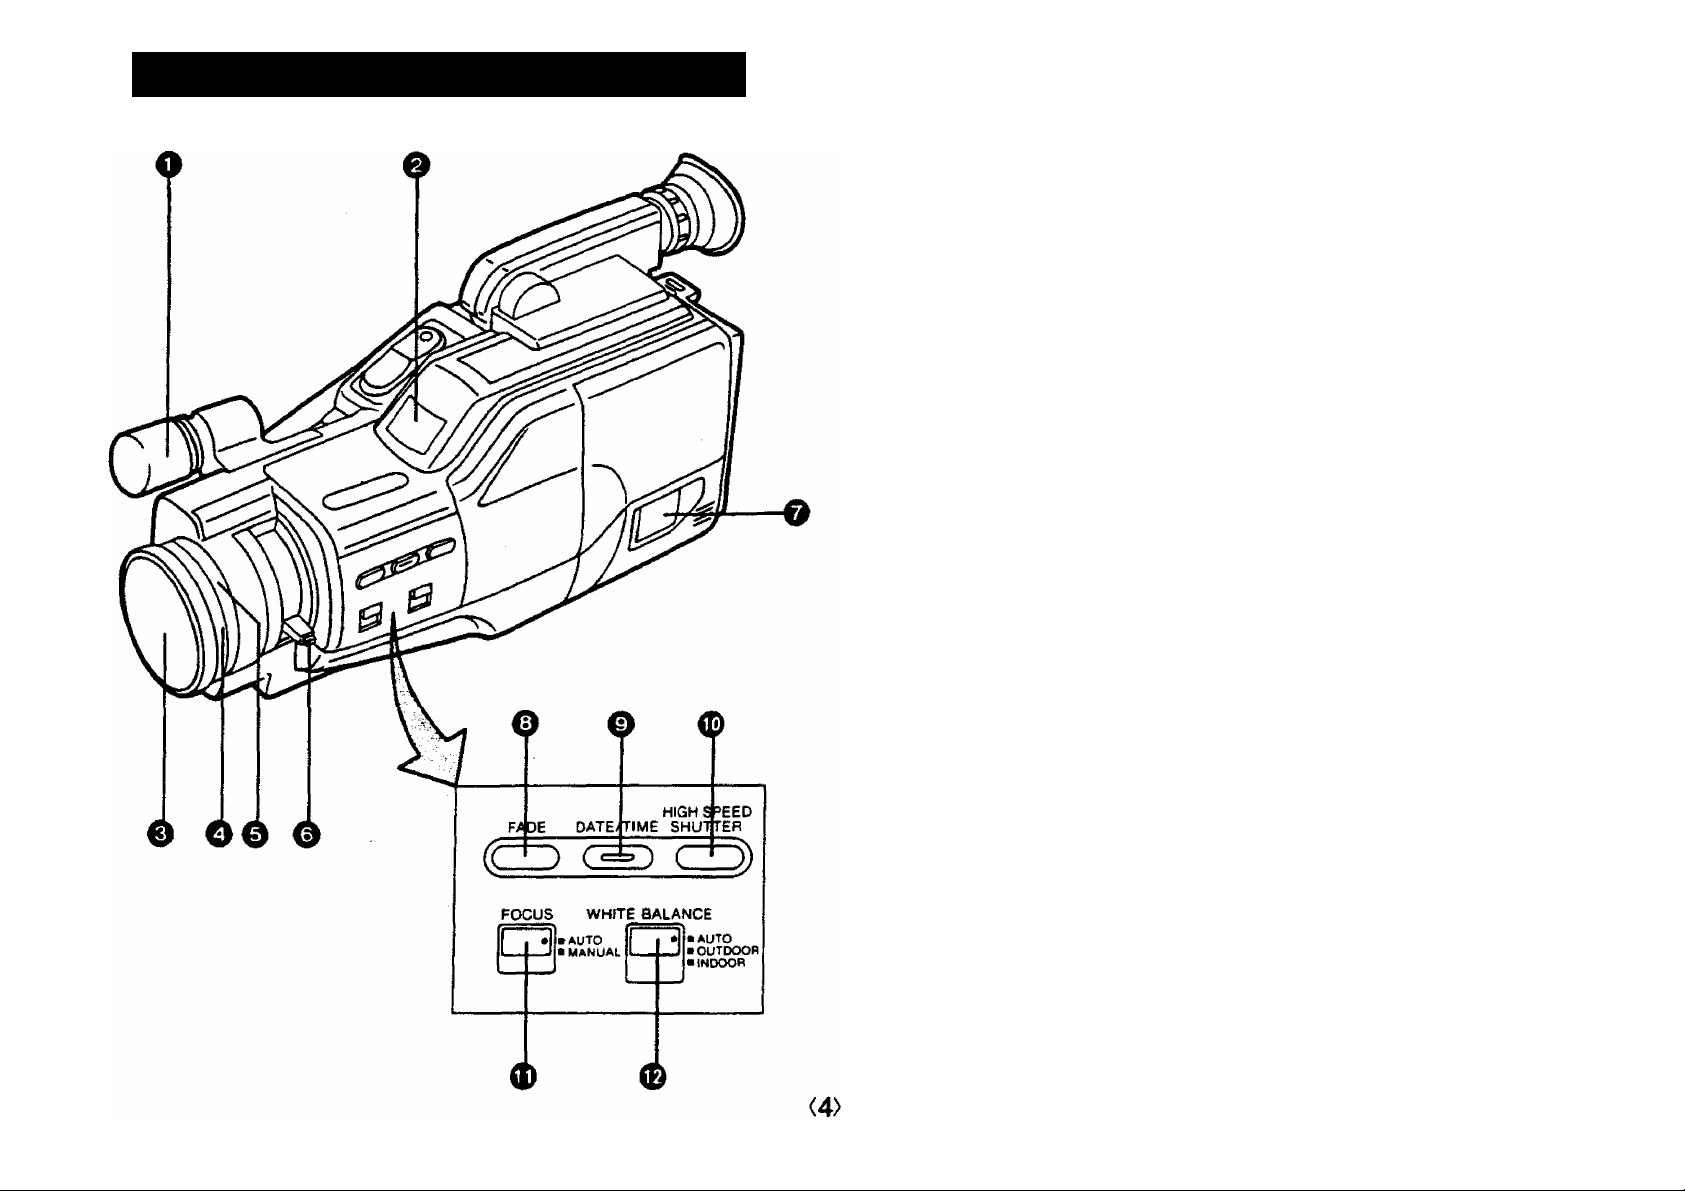
CONTROLS AND COMPONENTS
No. Name Page
O Built-in Microphone
@ White Balance Sensor Window
e Lens Cap .....................................................................
O Lens Hood
0 Focus Ring ........................................................................... 29
15
0 Manual Zoom Lever with Macro Button .................................. 30
0 Cassette Compartment
0 Fade Button
..........................................................................
..........................................................
13
31
0 Date/Time Selector ................................................................. 22
0 High Speed Shutter Selector
Focus Mode Selector
White Balance Mode Selector ............................................. 15
................................ — 32
..........................................................
15
Page 5
f-' ' -V
i''
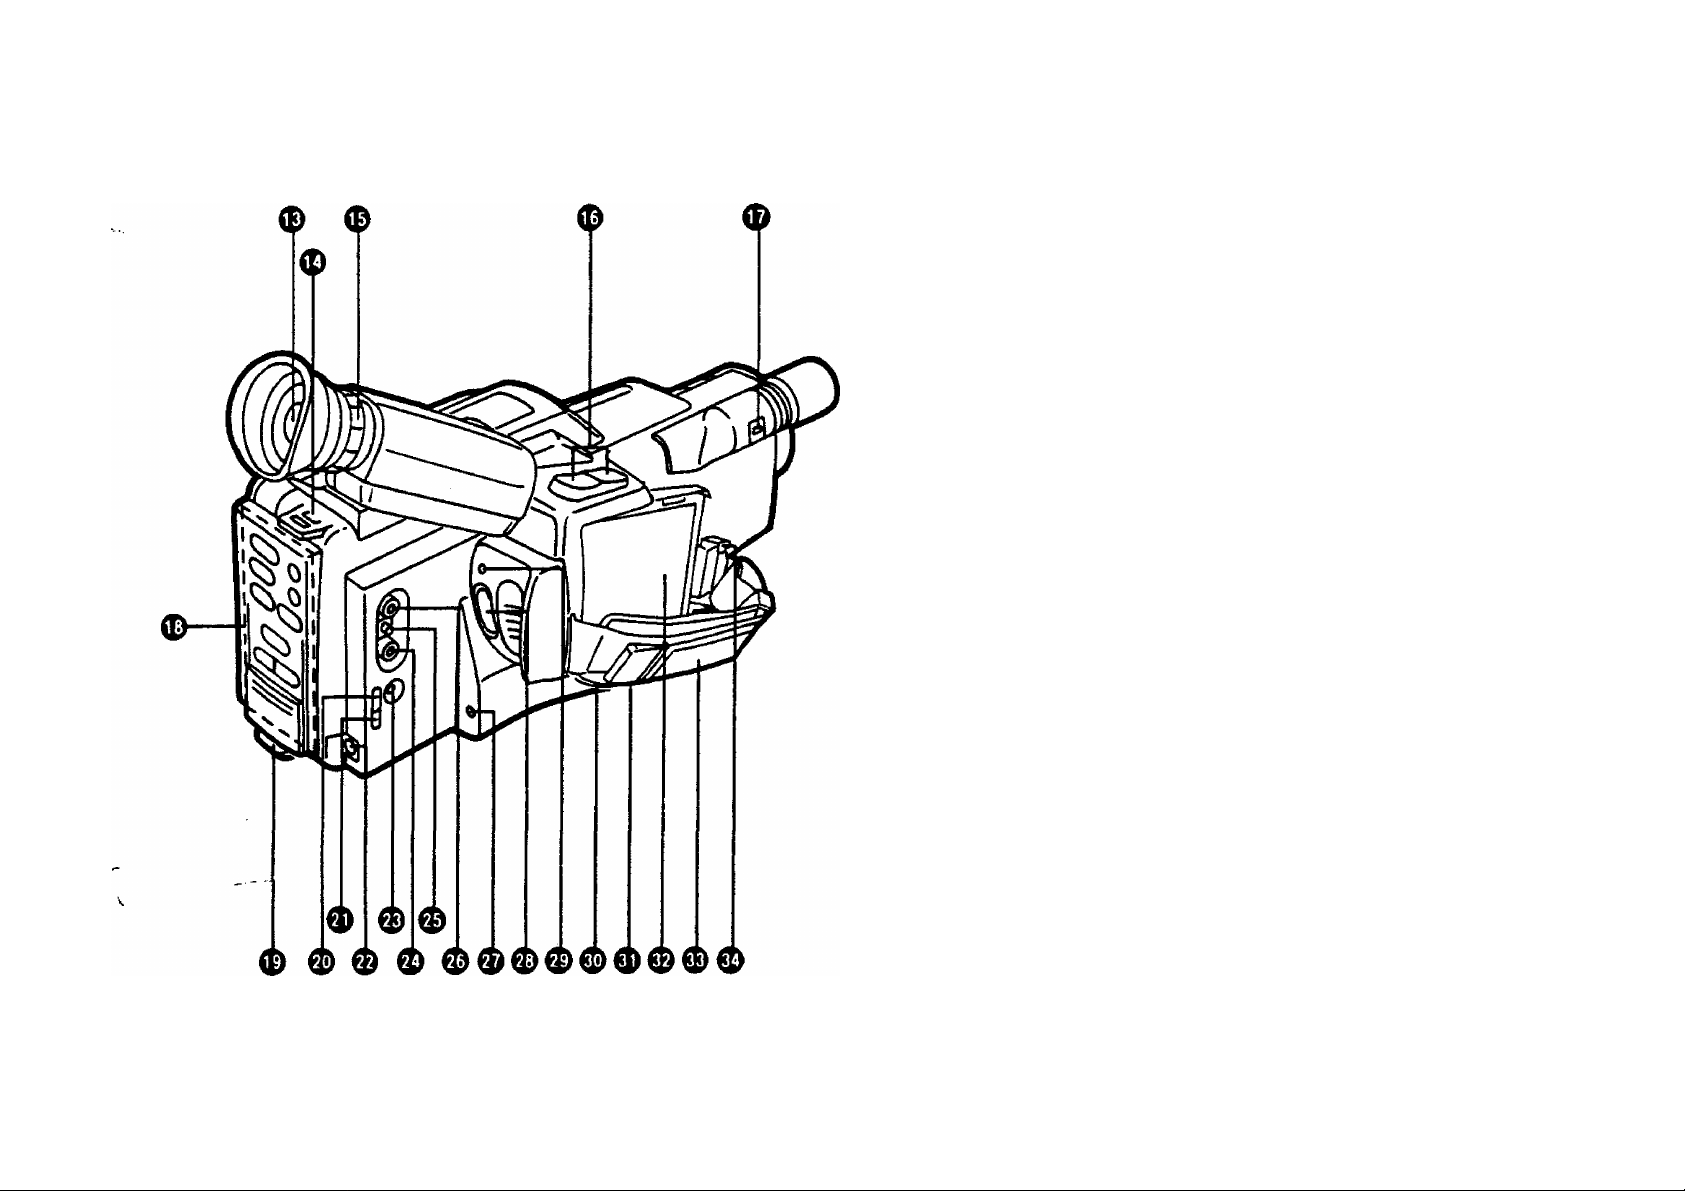
No. Name Page
0 Electronic Viewfinder
...................................................
14
0 Shoulder Strap Holder 33
0 Eyepiece Corrector Control
...................................................
14
0 Power Zoom Control Buttons ................................................ 30
0 Microphone Sensitivity Selector
............................................
16
0 General Operation Controls ..................................................... 6
0 Shoulder Strap Holder 33
0 Tracking Up/Date Set Button
.................................................
20
0 Tracking Down/Date Shift Button ........................................... 20
0 DC Input Socket
0 Remote Control Socket
....................................................................
.........................................................
12
33
0 Audio Output Socket ............................................................. 23
0 RF DC Output Socket
............................................................
24
0 Video Output Socket .............................................................. 23
0 Earphone Socket ................................................................... 33
0 Start/Stop Button ................................................................... 15
0 External Recording Indication Lamp ...................................... 15
0 Battery Compartment for Auto Date/Clock
............................
21
<5>
0 Tripod Receptacle .................................................................. 33
0 Battery Holder
.......................................................................
10
0 Grip Belt ................................................................................ 15
0 Battery Locking Lever
...........................................................
10
Page 6
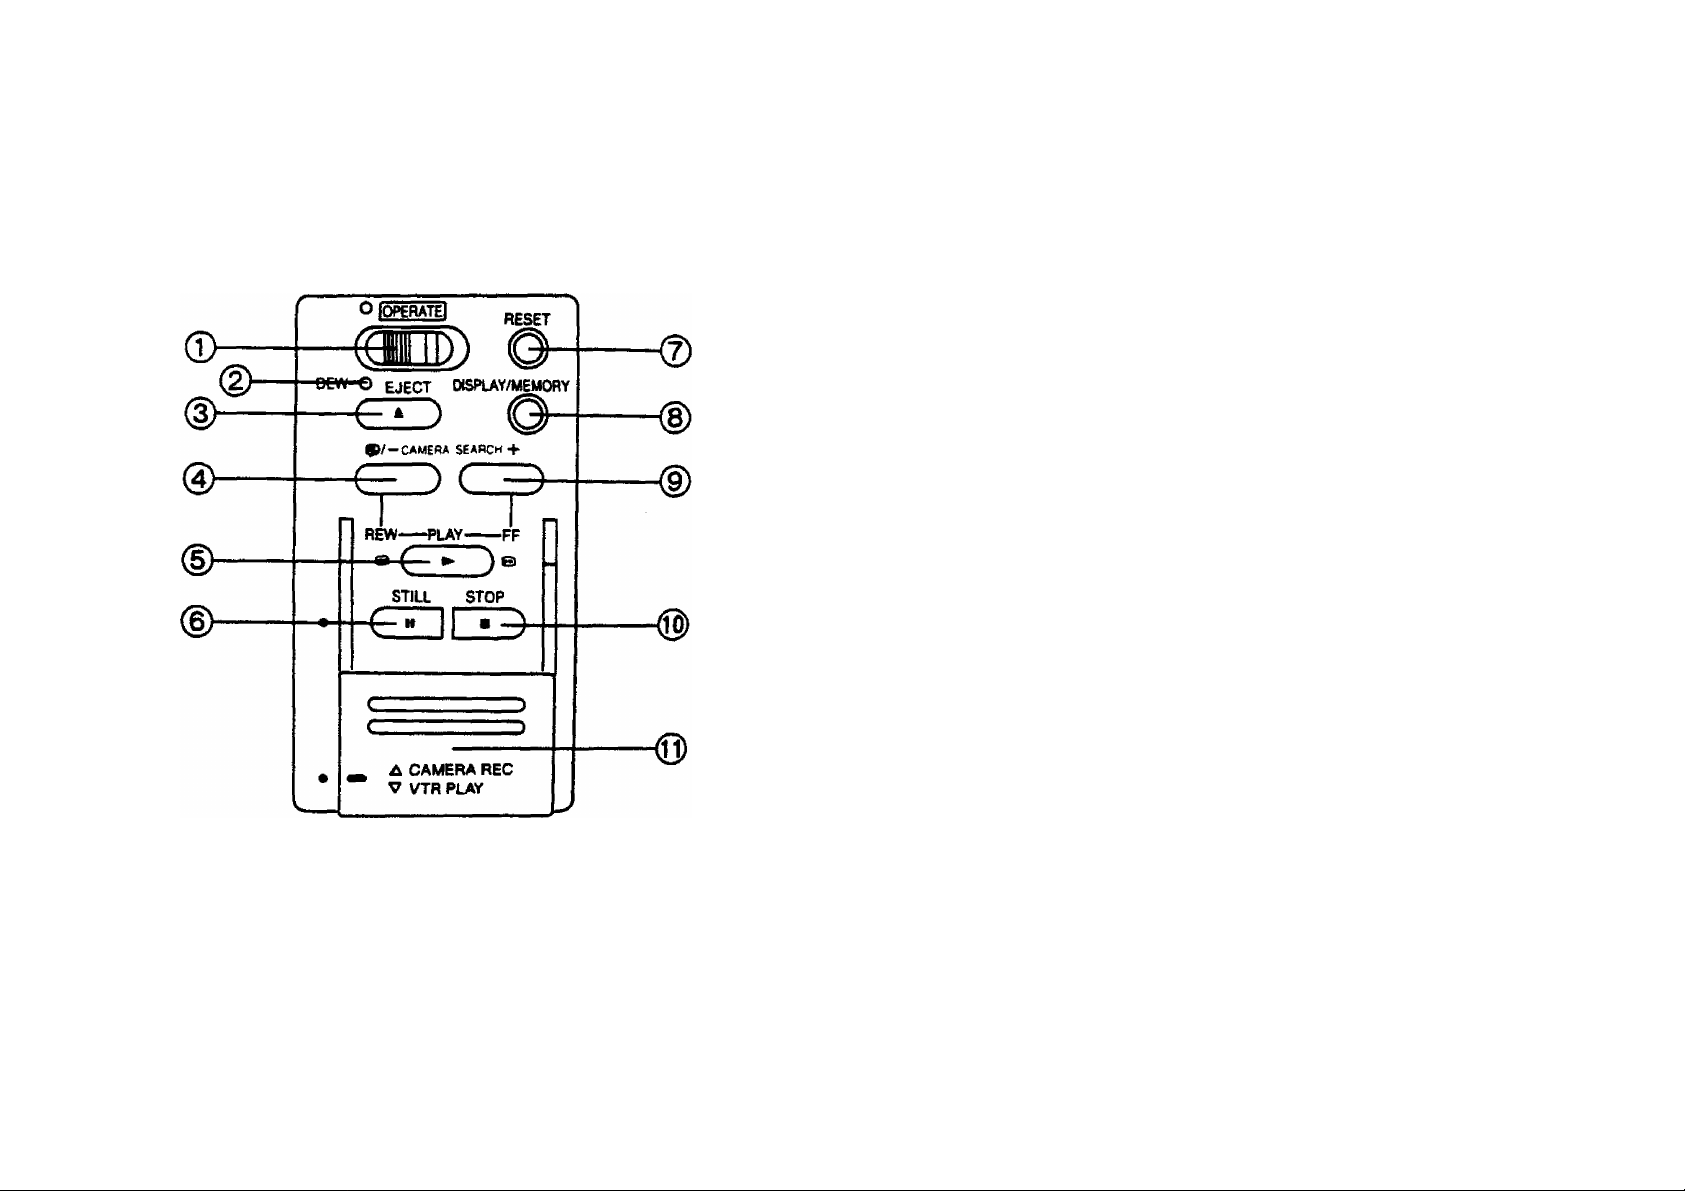
0 General Operation Controls
No. Name Page
® Operation On/Off Switch
(g) Dew Indicator ..................................................................... 37
(§) Eject Button ......................................................................... 13
(3) Rewind/Review Button
(5) Play Button .......................................................................... 19
(S) Still Button
® Reset Button ......................................................................... 20
(§) Display/Memory Button
@ Fast Forward/Cue Button
@ Stop Button .......................................................................... 19
® CameraATTR Selector Cover
(0) Function of the Camera/VTR Selector Cover
Closed
Open (as illustrated)
..........................................................................
...
.........................................
.......................................................
........................................................
...........
.........................
............................................ 20
.........
............................................
..................................................
For camera recording.
For other operations than
camera recording.
15
17
19
17
6
<6>
Page 7

Vi^wfinriAr The following indicahons are displayed fo thé £leetrw^Yiewfind«'(EVF)
г
О
о
о
Warning/Alarm Indications—'
There is little battery power left. The VHS-C Movie
"ВАТТ— will be turned off in a few minutes. Replace the
/ I \
—TAPE
\ I /
— END —
^ I
j ^ When condensation has formed inside the VHS-C
DEW— Movie, the “DEW” indication will flash and a few
i seconds later, the unit will turn itself off.
battery pack by a fully recharged one.
prevention tab of the cassette is not intact.
During recording, the tape has almost reached its
end. Replace the tape with a new one.
The indication will remain lit when the tape has
reached its end.
23;59
25 12 1990
It is impossible to record because the erasure
■E~I Q-
EZ] ИЗ-
О
Recording
Indication Lamp
©
O Remaining Battery Power Indications
E
------
F The ” indications begin to disappear from right to
left as the power of the battery pack weakens.
0 Counter Indications
M0501 Tape Counter
1:23 Lap Time Counter
© Clock Indications
O Date Indications
0Tape Running indications
REC Recording mode
PAUSE Recording Pause mode, Rec Review
> Play mode. Camera Search (In forward direction)
II
» Fast Forward/Cue mode
Still mode
^ Rewind/Review mode,
Camera Search (In reverse direction)
0 Manual White Balance Indications
OUT OUTDOOR
IN INDOOR
0 High Speed Shutter Mode Indications
1/500 '•^500 sec.
1/1000 1/1000 sec.
— o—
/1\
Video Head Clogging (see page 37).
•Some of the above indications may light up alternately at the same place in the EVF to
indicate the corresponding operating condition or warning.
<7>
Page 8

Precautions
•Avoid violent shocks and rough handling of the unit.
•Do not allow liquid to spill into the unit.
•Do not place heavy objects on the unit.
•When unplugging the mains cord or other connection cords, be
sure to grasp the plug, not the cord.
•When listening to a radio while the AC Adaptor is in operation, the
radio reception may be distorted. In this case, move the radio
away from the AC Adaptor.
Controls and Components
No. Name Page
<8>
O Charge (1) Indicator Lamp
@ Power Indicator Lamp
0 Charge (2) Indicator Lamp
............................................
.....................................
.
O CC Output Socket ......................................................
0 Battery Holder (2) ...............................................
0 Power Switch with Indicator Lamp
0 AC Mains Lead .............................................................. 10
0 Battery Holder {1) ............................................... 10
................................
i ^
10
10
12 ^
r )
Page 9

VHS-C MOVIE SYSTEM ACCESSORIES
Standard Accessories
AC Adaptor V W - A
Battery Pack
Shoulder Strap V P o 5LSf
Cassette Adaptor
AV Output Cable VFAoo'^^
Battery for Clock Operation
DC Input Cable Ao Ct^ I
Battery for Cassette Adaptor Operation
Optional Accessories
Pause Remote Control Unit (VW-RM1)
System Carrying Case (VW-SHMC4)
Car Battery Cord (VW-ACC5)
Carrying Bag (VW-CB10E)
RF Adaptor (VW-RF7E)
cA<^ ipHorvJ^ V S-cOOOb
I
CAUTION: TO REDUCE THE RISK OF FIRE OR SHOCK HAZARD AND ANNOYING INTERFERENCE, USE THE RECOMMENDED
ACCESSORIES ONLY.
)9>
^ is the safely information.
Page 10
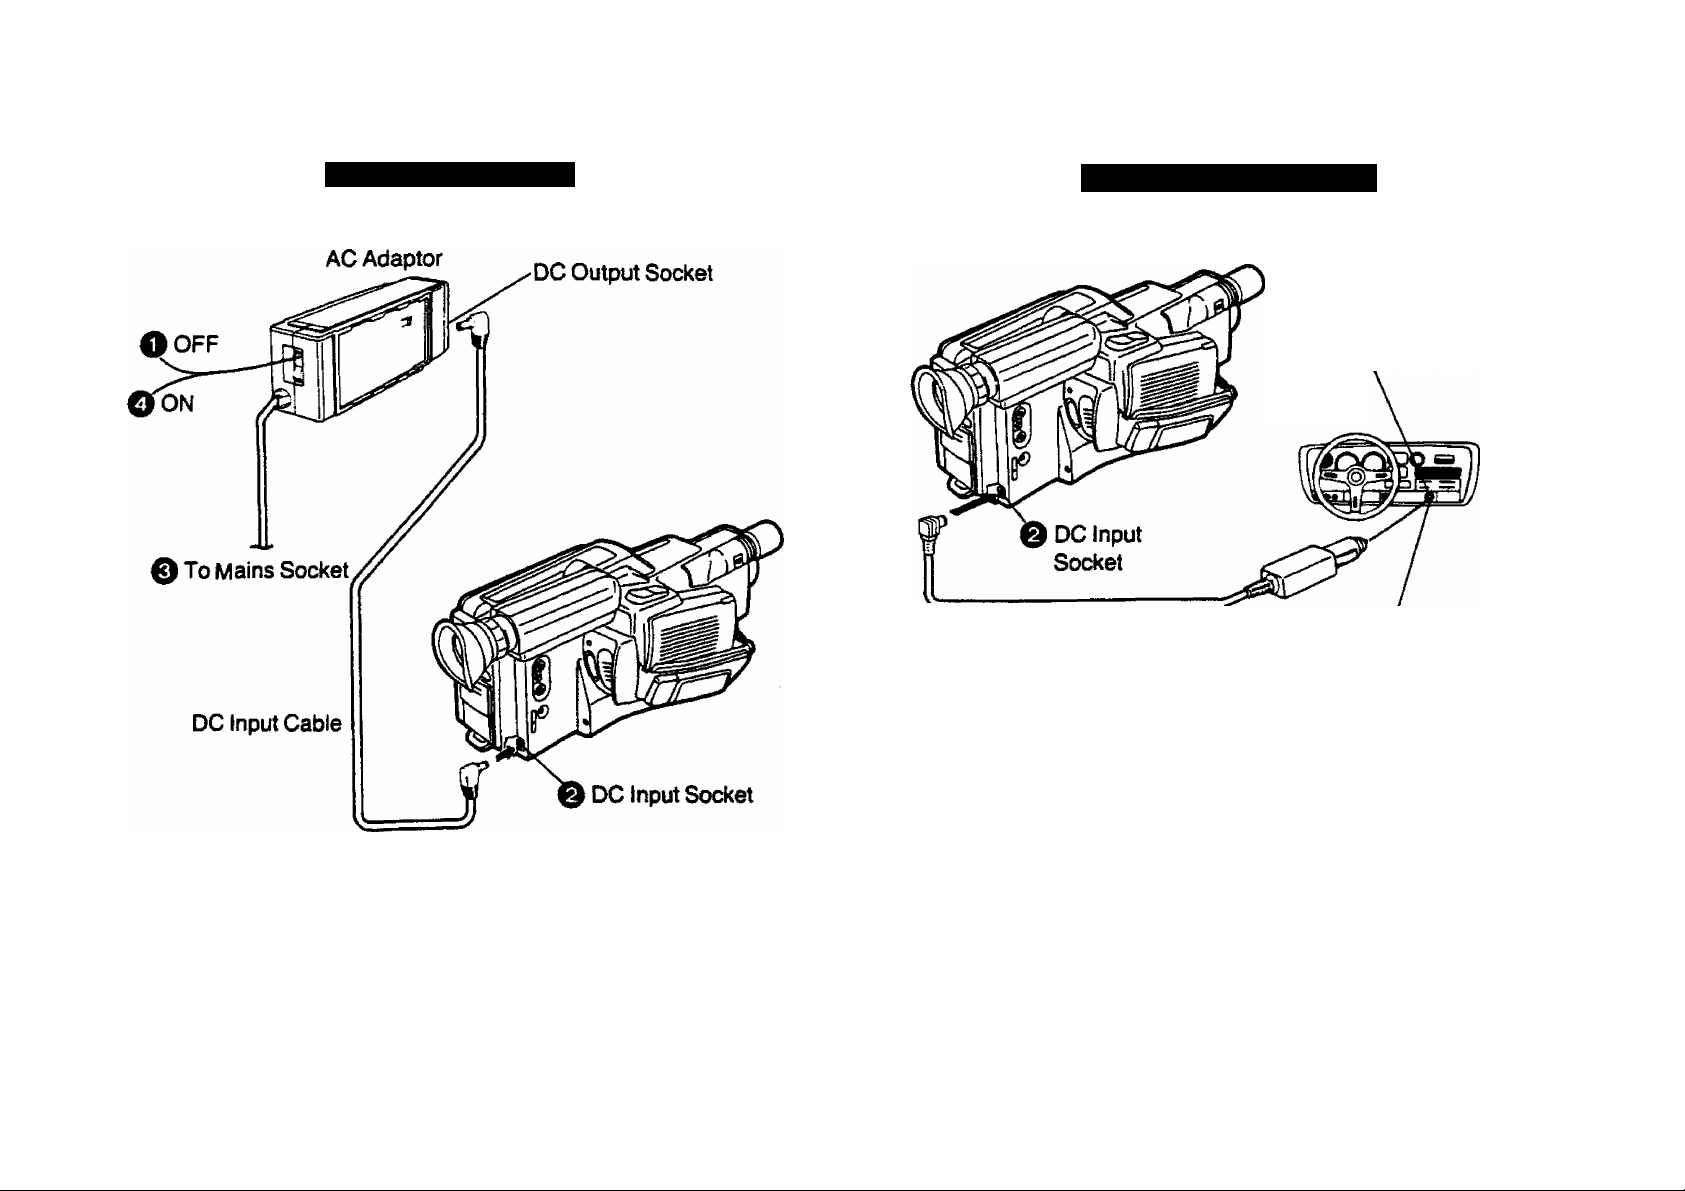
THE POWER SUPPLY UNITS
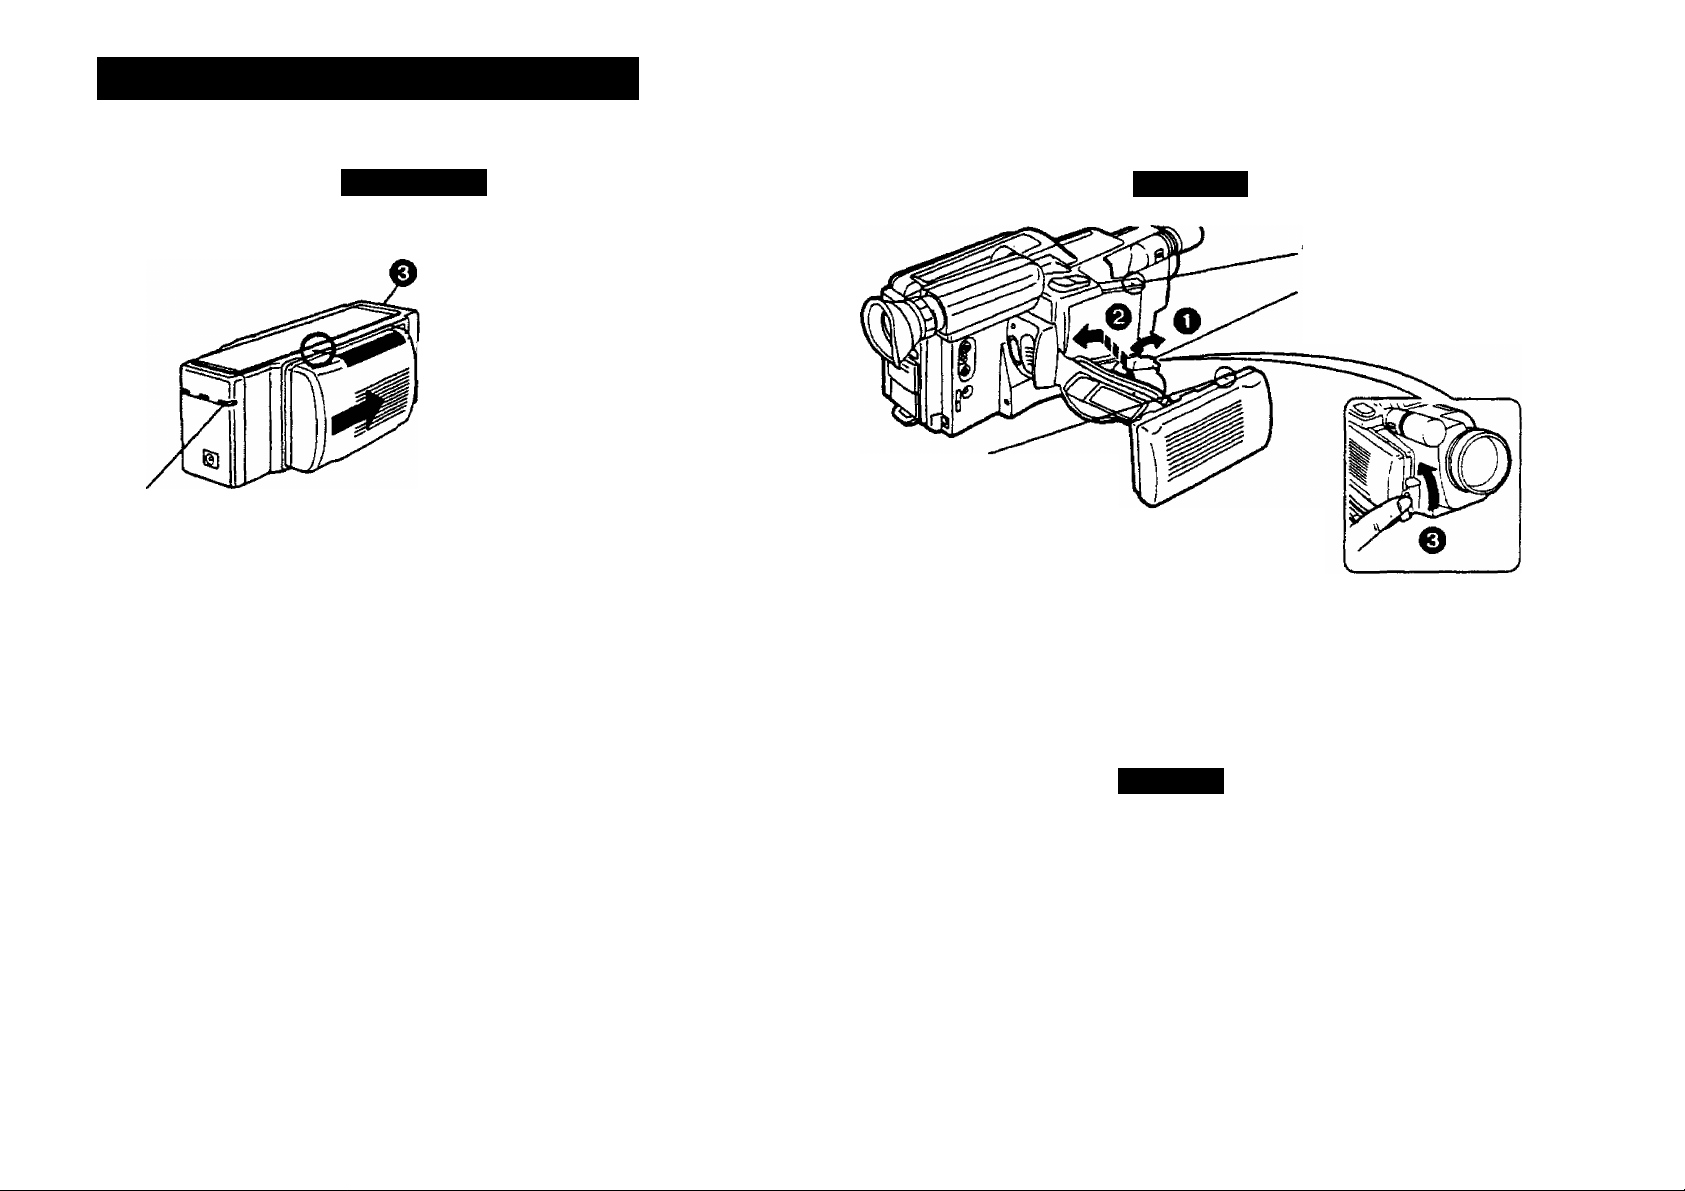
Battery Pack
Charging the Battery Pack
Power ON
0 To Mains
Socket
0 Attach the Battery Pack.
(Align the marks and slide
the Battery Pack in the
direction of the arrow.
‘CHARGE" Lamp
•When charging an exhausted battery pack, the Charging Indica
tor Lamp will go out about 90 minutes after charging starts.
However, the Battery Pack should be charged at least 3 hours for
extended use.
•The VHS-C Movie can be used continuously for approx. 60
minutes with a fully charged Battery Pack.
Attaching
»"Mark
Battery
Locking Lever
Mark
O Battery Locking Lever forward
and turn it down.
©Align the marks and slide the Battery Pack backward
0
Hold the part of the Battery Locking Lever where the belt is
attached and turn it up until it locks with as click.
To charge two Battery Packs simultaneously, attach one each to
the Battery Holder on either side of the AC Adaptor.
•Charging Indicator Lamp
Lit
......................
Not lit..
Flashing
..............
............
The Battery Pack is being charged.
Charging has been completed.
The Battery Pack is in the waiting condition for
charging. (When two Battery Packs are
attached, one of the lamps will be flashing.)
After the charging of the first Battery Pack is
completed, the lamp that was flashing will now
be lit, and the charging of the second Battery
Pack will start.
Removal
Wait about 10 seconds after turning the VHS-C Movie off with the
Operation On/Off Switch, before removing the Battery Pack. To
remove the Battery Pack, turn the Battery Locking Lever down and
slide the Battery Pack forward until it is released.
•If the Battery Pack is removed during recording or playback, the
tape remains wound around the video head cylinder and could
become damaged. Before removing the Battery Pack, put the
VHS-C Movie in the stop mode and then turn it off with the
Operation On/Off Switch.
<10>
Page 11

Cautions for Using Battery Packs
Be sure to charge the Battery Packs before using them.
: i^.ijj Ç3**
iïÂr'«;
»Pay attention to the following points to avoid danger.
1. Do not throw the Battery Pack into fire.
2. Do not short-circuit the poles of the connector.
3. Do not disassemble or reconstruct the Battery Pack.
4. Use only the supplied AC Adaptor to charge Battery Packs.
»Follow the instructions below to avoid damage to the Battery
Packs or reduction of their service life.
1. Never subject the Battery Packs to strong shocks or drop
them.
2. Do not recharge a Battery Pack that is already fully charged.
»During operation of the VHS-C Movie or during recharging, the
Battery Pack may become warm however this does not pose any
problem.
►The service life of a Battery Pack has its limits. If the operation
time of a Battery Pack in spite of normal recharging becomes so
short that its normal use for shooting is no longer possible, it
should be replaced with a new one.
»The function of the Battery Pack is based on a chemical reaction.
Use it according to its characteristics.
1. Charge the Battery Pack within a temperature range of
10°C~35‘’C. If charged at lower temperatures, the chemical
reaction cannot take place optimally, causing the performance
of the Battery Pack to deteriorate. At higher temperatures, the
Battery Pack cannot be charged completely.
2. Store the Battery Pack in cool and dry place. If exposed to
high temperatures for a long time, the battery life will be
shortened and the self*dtscharging process will be increased.
3. Charge the Battery Pack before using it because selfdischarging may occur if it has not been used for a tong period
of time.
4. When not using the Battery Pack, remove it from the VHS-C
Movie or the AC Adaptor.
•When the VHS-C Movie is not actually being used, remove the
Battery Pack to avoid reduction of its service life.
<11>
Page 12
АС Adaptor (supplied)
Car Battery Cord (optional)
1
0 Start the engine and
insert the car battery
cord.
•When a Battery Pack is attached to the AC Adaptor, the VHS-C
Movie cannot be supplied with power. Therefore, be sure to
remove the Battery Pack.
•Never use any other AC Adaptor than the specified one.
<12>
Car Battery Cord
VW-ACC5 (optional)
•The car battery cord can only be used with 12 V DC negativegrounded vehicles. 24 V DC or positive-grounded vehicles can
not be used.
•If the supplied voltage from the vehicle drops too low, the VHS-C
Movie will turn off automatically to prevent any malfunctioning.
When this happens, wait about 10 seconds before switching the
VHS-C Movie on again.
•It is not possible to recharge the Battery Pack by using the
vehicle's battery and/or the car battery cord.
To Cigarette Lighter
Socket
Page 13
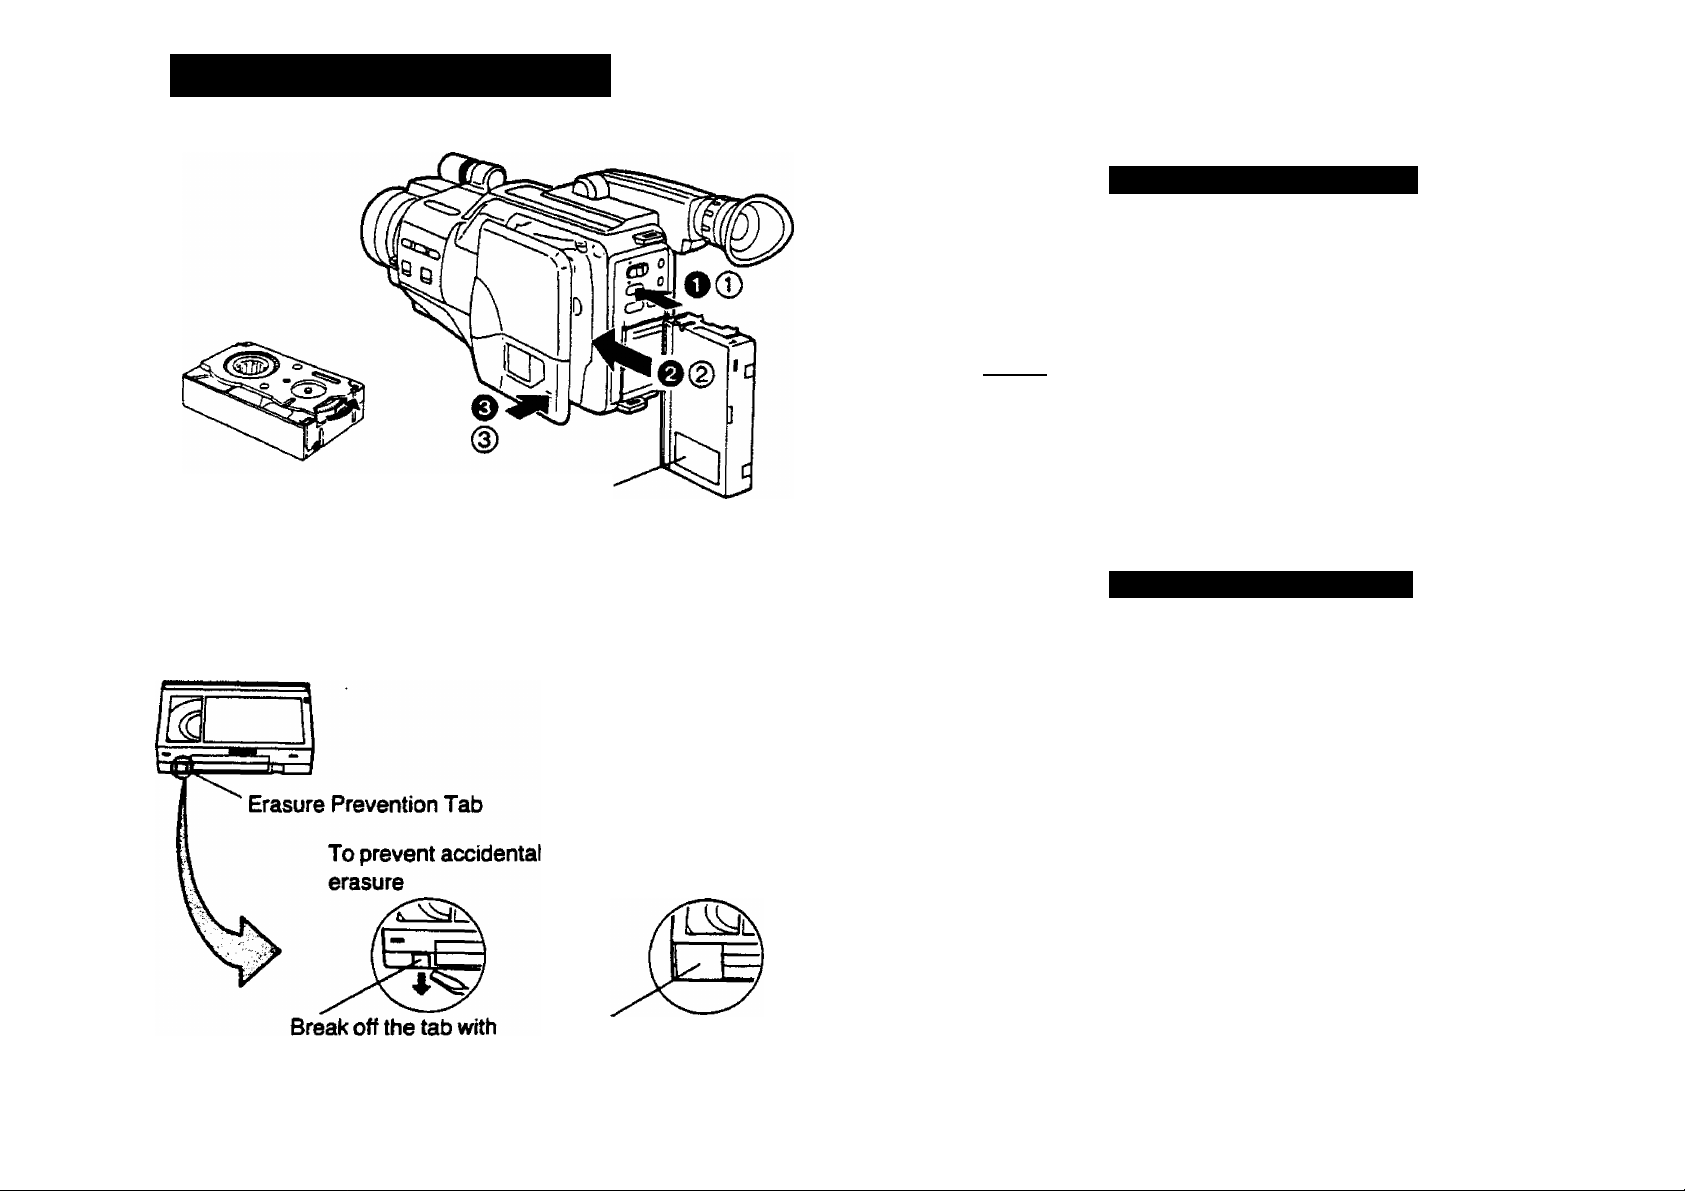
THE VIDEO CASSETTE
Window
Inserting the Video Cassette
O Press the Eject Button.
0 Insert the video cassette into the cassette compartment with its
window facing outside.
0 Push the cassette compartment cover inward, until it locks with
a click.
•Use IVHSM video cassettes only.
•When a power supply unit (Battery Pack, AC Adaptor or car
battery) is connected to the VHS-C Movie, the Eject Button
remains operative, even if the VHS-C Movie has been switched
off with the Operation On/Off Switch.
Before Inserting the cassette
Make sure that the tape is not loose. If it is loose, pull it in by turning
the cog wheel on the side of the cassette in the direction of the
arrow.
To record again
Cover the hole with
a screwdriver.
adhesive tape.
Removing a Video Cassette
® Press the Eject Button.
® Pull out the video cassette.
@ Push the cassette compartment cover inward, until it locks with
a click, to close the cassette compartment.
<13>
Page 14

The Electronic Viewfinder can be turned upward by a maximum of
180°. This is convenient for taking low-angle shots. The EVF can
also be moved back and forth.
Eyepiece Corrector
This control makes it possible for people who wear glasses to
adjust the eyepiece to their eyesight.
►Turn the Eyecap counterclockwise
to remove it.
Mark
•Turn the Eyecap so that its right side
faces left. Align the marks, and
insert and turn the Eyecap clock
wise until it locks with a click.
Eyepiece
Corrector
<14>
Page 15

CAMERA RECORDING
Preparation
1. Slide the CameraA/TR Selector Cover close so that it covers
the Tape Running Buttons.
2. Slide the Operation On/Off Switch to the right to turn the VHS-C
Movie on.
3. Insert a video cassette with the erasure prevention tab intact.
•A few seconds later, the VHS-C Movie will change over to the
recording pause mode.
0Set the White Balance Mode Selector to “AUTO”.
For more details, see page 27.
© Set the Focus Mode Selector to “AUTO".
For more details, see page 28.
© Place the VHS-C Movie in the shooting position.
(15>
•Grasp the Handgrip and adjust the length of the Grip Belt with
the Velcro tape closure to the size of your hand.
•Attach the Lens Cap to the Grip Belt,
©Press the Start/Stop Button.
•The Recording Indication “REC” is displayed on the EVF
screen and the Recording Indication Lamp below the EVF
screen is lit.
•The External Recording Indication Lamp on the back of the
Grip is also lit.
Page 16

Microphone Sensitivity Seiector
©To temporarily stop the recording (recording pause), press the
Start/Stop Button again.
©To finish the recording, put the VHS-C Movie in the recording
pause mode and then slide the Operation On/Off Switch
to the right again to turn the VHS-C Movie oft.
o—
•If the VHS-C Movie is left in the Record pause mode for more
than 6 minutes:
The VHS-C Movie will automatically switch over to the power off
mode to protect the tape and save battery power.
•When the tape reaches its end during recording, the VHS-C
Movie will automatically switch over to the stop mode.
Microphone Sensitivity Selector
The sensitivity of the Microphone can be increased by setting the
Microphone Sensitivity Selector to "HIGH”. Usually, this selector is
left in the "NORMAL" position.
•If this selector is switched from "HIGH” to "NORMAL" during
recording, the recording of the audio signal will be interrupted for
a few seconds. However, this is not due to any malfunction.
<16>
Page 17

Confiiming Record!^ Scenes
Camera Search for checking
longer recorded scenes.
Rec Review for a quick check
of the end of a recorded scene.
Camera Search Function (Sound is not reproduced)
In the recording pause mode, a recorded scene can be played
back at high speed in reverse direction by keeping the EVREW
Button pressed. Review Speed; and it can then be played back at
normal speed in forward direction by keeping the Button
pressed.
When the button is released, the VHS-C Movie will return to
recording pause mode.
Rec Review Function
Press the Rewind/Review Button whilst the VHS-C Movie is in the
recording pause mode.
•The last 3 seconds of the recorded scene will be played back and
the VHS-C Movie will again stop in the recording pause mode,
ready for further recording.
Camera Search
<17>
Page 18

t
During Recording
O Press the Start/Stop Button to stop the recording.
I
Recording Pause
0 Slide the Operation On/Off Switch to the right to turn the VHS-C
Movie off.
•The Operation Lamp will go off.
•No picture can be seen in the EVF.
•As the tape is left wound around the head cylinder, the VHS-C
Movie will automatically switch itself off after 2 days (about 48
hours) If it is left in this condition.
Recording Stop
0 Slide the Operation On/Off Switch to the right again to make the
VHS-C Movie ready for recording the next scene.
•It takes about five seconds for the picture in the EVF to
become stable.
(18>
Recording Pause
O Press the Start/Stop Button to start recording again.
•When the VHS-C Movie is in the recording pause mode, the use
of battery power can be temporarily suspended by operating the
Operation On/Off Switch. Operating this switch a second time will
put the VHS-C Movie back into the recording pause mode, so it
will be ready again to start recording.
Page 19

PLAYBACK
Fast Forward
Press the Fast Forward/Cue Button to rapidly wind the tape
forward.
•The tape will stop automatically when it reaches its end.
Rewind
Press the Rewind/Review Button to rewind the tape.
•The tape will stop automatically at the beginning of the tape.
Playback
Press the Play Button.
•The tape will be rewound automatically when it reaches the end.
Cue & Review Playback
When the Fast Fonvard/Cue Button or the Rewind/Review Button
is kept pressed while the VHS-C Movie is in the playback mode,
the tape will be played back at high speed in forward or reverse
direction.
Still Playback
When the VHS-C Movie is in the playback mode, press the Still
Button to view a still picture. To continue the normal playback,
press this button again.
Preparation
^ 1. Slide the Operation On/Off Switch to the right to turn the VHS-C
4 Movie on.
2. Insert a recorded tape.
3. Slide the CameraA/TR Selector Cover open so that the Tape
Running Controls become accessible.
4. For Playback via a TV set, see “CABLE CONNECTIONS" on
pages 23, 24.
To Finish Playback
Press the Stop Button.
<19>
Page 20

»Tracking Control
•When the playback picture contains noise bar distortion as shown
in the picture above, it can be eliminated by pressing the Tracking
Up or Down Button.
To return the tracking control to the former setting, press the two
buttons simultaneously.
•When playing back a tape which has been recorded on another
video recorder, it may not be possible to completely eliminate this
distortion.
• Noise which takes the form of horizontal bars appears in the Cue,
Review and Still playback modes. This is not an indication of a
malfunction.
• If the VHS-C Movie is left in the Still Playback mode, for more
than about 6 minutes, the VHS-C Movie will switch over to the
stop mode to protect the tape and the video heads.
Tape Counter and Memory Function
Press the Reset Button at a desired point and then press the
Display/Memory Button.
•The Tape Counter is reset to “0000" and the Memory Indicator
“M" appears.
After pressing the Stop Button to end the playback, press the
Rewind/Review Button.
•The tape will automatically stop at about the point where the Tape
Counter reads “0000”.
Counter Indication
By repeatedly pressing the Display/Memory Button, the Counter
Indication can be changed in the following sequence.
Lap Time
Memory appears Counter
with Tape Indication
Tape Counter
Indication
Counter (Real Time)
Indication appears
No indication
<20>
»The indication of the Lap Time Counter counts up only during
recording.
Page 21

Setting of the Date and Clock & Recording the Date/Clock indications
Cautions
How to Insert the Battery for the Clock Operation
O Reniove the lid on the bottom of the VHS-C Movie with a
screwdriver.
Q Insert the “LR1130" size battery with the polarities (© and ©)
aligned correctly and then replace the lid.
•The clock starts working as soon as the battery is inserted.
•When this battery is almost exhausted, the whole time and date
indication will flash.
•When this battery is completely exhausted, the indication
"PLEASE SET BATTERY” will appear.
•To make this indication disappear, press the Date/Time Selector
twice.
•If this indication is still displayed after the battery has been
replaced, turn the VHS-C Movie off and then on again.
CAUTION FOR BATTERY REPLACEMENT
•The life of the battery is about one year, however, it depends on
the frequency of use. Inspect and if necessary, replace the
battery once a year.
•Load the new battery with their polarities (© and 0) aligned
correctly.
•Do not apply heat to battery, or internal short-circuit may occur.
•Remove spent battery immediately and dispose of It.
The "LR1130” size battery (supplied) is necessary for the
operation of the built-in digital clock, and to memorize the
Date/Clock Indications when the VHS-C Movie is turned off.
<21>
Page 22

Setting of the Date and Clock
© When the Shift Button is kept pressed for more than about 2
seconds, the “Year” portion will start to flash. Then, at every
press of the Shift Button, the items to be set will flash in the
following sequence.
Year—»-Month-^Date—^Hour-* Minute —\
\
____________
___
________ __
□
0 When the Set Button is pushed, the flashing portion displayed
will be changed in the following sequence.
O When the Date/Time Selector is pushed, the
indication shown on the right will appear in
the EVF.
0:12
1. 1.1969
•If no battery is inserted, the indication "PLEASE SET
BATTERY” will light up. In this case, insert the battery as
described on page 21.
YEAR: 1989-^1990—.................................... —2088—r
t
__________________
MONTH: 1—>2“^
i
___________________1________________
DATE;
HOUR: 0—1—
..................................................
............................................ 12"' i
.............
—28—(29)—(30)—(31)—|
ii:________________j
I
—23—i
t____________________________________ I
MINUTE: 00—01—................................................ —59—t
i
___—______________
IIJ
_______________
I
•Repeat procedures Q and 0 until all five items have been set.
•Once the time and date are set, press the Shift Button in
response to a precise time signal so that the clock may begin to
function.
Recording the Date/Clock Indications
When the Date/Time Selector is pushed repeatedly, the indication
will change in the following sequence.
To record neither To record the
the Date nor the Date and Clock
Clock Indication: Indications:
15:38
20,10, 1990
____________________
To record only the
Date Indication;
—
-
20.10.1990
<22>
________
_J
Page 23

CABLE CONNECTIONS Connection to a TV Set with Video and Audio Input Sockets
r
When using the Battery Pack as power source
When using a car battery cord as power source
12VNEG GND
Car Battery
Cord (optional)
Video Output Socket
DC Input
Socket
TV Set with Separate Video
and Audio input Sockets (optional)
<23>
Audio Output Socket
To Video Input
Socket
AV Output Cable (supplied)
To Audio Input
Socket
Page 24

Connection to a TV Set erfthout Video and Audio input Sockets
The AC Adaptor and RF Adaptor are required
Before connecting the RF Adaptor to the VHS-C Movie, turn the
VHS-C Movie off with the Operation On/Off Switch.
Video Output Socket
RF DC Output
Socket
AC Adaptor
(supplied)
Audio Output
Socket
DC Input Socket
DC Output
DC Input Cable
(supplied)
TV/VTR Selector
VTR: Used for playing back a
video cassette on the
VHS-C Movie.
TV: Used for watching TV.
Socket RF Adaptor
To Mains
Socket
(optional)
To RF IN
NV-MC20A only:
FOR YOUR SAFETY;
Install any external aerial to AS 1417.1.
TV Set with RF Input
Socket (optional)
RFIN
1
Tune the selected programme
position of the TV set to UHF
channel 36.
PAL System Selector
Note: Only use the specified adaptors for the connections.
The VHS-C Movie cannot be used to record programmes
on TV.
For the Australia and New
Zealand region, set the RF
Converter Channel
Selector at "G" position.
<24>
Page 25

ASSEMBLE EDITING
DEW-O EJECT EXSPLAY/MEMORY
O iOPERAlU reset
(TO) o
CO O
®/—CAMERA SEARCH +
Cpcfp
REW
----
PLAY
------
FF
e
STia STOP
d][ZD
Preparation
1. Insert a video cassette with the erasure prevention tab intact.
2. Slide the CameraA/TR Select Cover open.
O Press the Play Button to locate the point where the new
recording is to be joined (Assemble Editing), and press the Still
Button at the desired point.
Q Slide the CameraA/TR Selector Cover close so that it covers
the Tape Running Buttons,
e Press the Start/Stop Button.
A CAMERA REG
V VTR PLAY
<25>
Page 26

DUBBING (COPYING)
Connection Of the VHS-C Movie with a Video Recorder
For Playback
Video
Output
Socket
Audio
Output
Socket
AV Output Cable
(supplied)
To Video Input
Socket
DC Input Cable
(supplied)
To Audio Input
^ Socket
AC Adaptor
(supplied)
DC Output
Socket
E
To Mains
Socket
O Place the VTR into the recording pause mode, at the point on
the tape where you wish to record the picture fronn the recorded
cassette in the VHS-C Movie recording.
0 Locate the exact point on the tape in the VHS-C Movie from
where you want to start copying and put the VHS-C Movie into
the still playback mode.
© Press the Still Button on the VHS-C Movie and the Pause/StitI
Button on the VTR to start the copying.
•The picture quality of a copied tape is inferior to that of the original
tape.
If the VTR used for copying features 2 tape speeds, select the
normal speed (SP mode) for the best result.
•When a tape, that was originally recorded on the VHS-C Movie
and that later has some scene added on a VTR by using the
Insert Editing function, is again played back on the VHS-C Movie,
the playback of the inserted part may be affected by uneven
colour and coloured stripes.
Connection of the VHS-C Movie to a VHS VTR Equipped with
Synchro Edit Function
Connect the Remote Control Socket of the VHS-C Movie and the
synchro edit socket of the recording VTR with the optional synchro
connection cable (VW-K1).
•When editing, it Is possible to operate the playback start and stop
of the VHS-C Movie with the recording start and stop of the
recording VTR.
•For the operation, refer to the operating instructions of the
recording VTR.
For Recording
TV Set
(optional)
<26>
Page 27

r
TECHNIQUES FOR SHOOTING
White Balance
The VHS-C Movie, like any other video camera, responds
differently to the colours depending on the weather and the time,
even under seemingly same sunlight. The adjustment necessary to
assure natural colour rendition is called “white balance adjustment”.
“AUTO” position .. The white balance is automatically
adjusted as the illumination changes.
WHITE BALANCE
• AUTO
to
In certain cases, the use of the preset positions is recommended:
“INDOOR”
“OUTDOOR”
...........................
.......................
When shooting under the light from
When shooting outdoors under the
a OUTDOOR
a INDOOR
incandescent light bulbs or halogen
lamps.
sunlight.
Cautions for Use of the Auto White Balance Adjustment Mode
In the Auto mode, the sensors built into the front of the VHS-C
Movie detect the colour temperature of the illumination of the scene
and automatically adjust the white balance. In the following
shooting conditions, the Auto mode may not provide exact white
balance adjustment.
1. When the illumination of the subject is different from the light
that falls on the VHS-C Movie.
2. When either the VHS-C Movie or the subject is in the shade.
3. When extremely bright light sources are used, such as
mercury-vapour lamps, natrium lamps or some types of
fluorescent lamps.
4. When the illumination is not bright enough (approx. 15 lux).
5. When the scene has strong red-coloured illumination, e.g.
during sunrise and sunset.
6. When intensive light hits only the red or the blue light sensor in
the window.
7. When there is some other light source that is outside the
sensing range of the white balance adjustment sensors, e.g.
snowy landscape, cloudy weather, incandescent light and
candlelight.
8. When there is some object placed in front of the sensor window
that prevents light from reaching it.
9. When shooting in the macro range, the Auto mode does not
operate. Therefore, use the “INDOOR” or “OUTDOOR" posi
tion.
(27)
Page 28

Auto Focus
Set the Focus Mode Selector to “AUTO”.
•While watching the picture in the EVF, aim the VHS-C Movie at
the subject on which you want to focus.
FOCUS
tAUTO
tMANUAL
Note
This Auto Focus system does not measure the actual distance but
adjusts the tens to the optimum focusing condition based on the
video signal. Therefore, the distance setting on the lens may be
different from the actual distance in some cases. However, this is
not an indication of a malfunction.
The focus will automatically be adjusted to the object within the
focusing zone.
Focusing Zone Frame.
<28>
Page 29

In the following shooting conditions, the Auto Focus system will not
Manual Focus
r
0Set the Focus Mode Selector to "MANUAL".
be able to provide stable and exact focus adjustment. Set the
Focus Mode Selector to “MANUAL” in such cases and adjust the
focus by turning the Focus Ring.
1. When shooting a subject through dirty glass.
2. When shooting subjects with shiny surfaces.
(The focusing zone frame may disappear.)
4'(
FOCUS
AUTO
'MANUAL
3. When shooting a subject with a part of it near and another part
far from the VHS-C Movie.
4. When shooting an oblique subject.
5. When shooting a subject with distinct horizontal stripes.
6. When shooting a flat subject such as a white wall.
7. When no part of the subject is within the focusing zone frame.
©Turn the Focus Ring to adjust the focus.
8. When shooting with the macro close-up function or with
special tenses or filters.
9. When shooting a fast-moving subject.
10. When shooting a dark subject.
(The focusing zone frame may go on and off.)
<29>
Page 30

Zooming
Power Zooming
To zoom to wide-angle, press the “W" Button.
To zoom to telephoto, press the “T" Button.
Macro Close-Up
WHITE BALANCE
4
FOCUS
4
AUTO
OUTDOOR
1 INDOOR
lAUTO
'MANUAL
Manual Zooming
Shooting Small Objects
The macro function allows shooting small plants and tiny insects. It
is also possible to shoot photos from a photo album.
(The focus can be adjusted within a distance of 1.2 m.)
O S©1 the White Balance Mode Selector to the “INDOOR" or
"OUTDOOR” position and set the Focus Mode Selector to
“MANUAL".
©Turn the Zoom Ring all the way down to the click stop.
© Press the Macro Button and again turn the Zoom Ring down.
Turn the Zoom Ring slowly and focus on the desired object.
<30>
Page 31

Lighting
r
(lux)
10-15
400-500
500-700
1000
2000
25000
32000
35000
65000
100000
Standard Values of Brightness
(Place or Daylight)
•Candlelight
•Office with fluorescent lamps
•Department store counter
•Sunlight one hour before sunset, clear day
•Sunlight one hour after sunrise, cloudy day.
•Sunlight at 10 AM, cloudy day
•Sunlight at noon, cloudy day
•Sunlight at 3 PM, clear day
•Sunlight at 10 AM, clear day
•Sunlight at noon, clear day
Fade-in and Fade-out
Fading out a scene to black is possible by keeping the Fade Button
pressed, and fading in from black is operated by releasing this
button.
The sound is also faded out and faded in together with the picture.
Fade In
FADE
Fade Out
<31>
Page 32

■ “f;.-'. .••'■■ ■'-. :^yy - -ir'; v■^ ■ .■ -;; t;** ^
'.j-rr-.. V
High Speed Shutter
The VHS-C Movie has 3 different shutter speeds;
HIGH SPEED
SHUTTER
1/50 s normal shutter speed
1/500 s electronic high speed shutter
1/1000 s electronic high speed shutter
By repeatedly pushing the High Speed Shutter Selector, the
shutter speed can be changed as follows:
1/500 sec.-^1/1000 sec.-*-Normal
For videographing of fast movements, the shutter speed can be set
to 1/500 or 1/1000 with the switch HIGH SPEED SHUTTER.
With a video recorder equipped with the playback functions super
still playback, super still advance and super fine slow motion,
sharp-contoured pictures can be played back in these functions
•The following conditions are required for shooting with the High
Speed Shutter function:
The subject must be brightly lit, with little shade, under sunlight or
some other illumination of more than 300 lux.
•If shooting under the illumination produced by fluorescent lamps,
the picture will be adversely influenced by flickering.
•If the picture is played back in the normal playback mode, the
movements may appear to be not very smooth.
•The playback picture will be slightly darker than the picture
recorded without using the High Speed Shutter function.
<32>
Page 33

How to Attach the Shoulder Strap
How to Mount the VHS-C Movie on a Tripod (optional)
r
About 2 cm of end of
strap should protrude.
Bottom side of the VHS-C Movie
•Place the tripod on
a stable surface,
with its legs fully
spread.
Howto Use the Pause Remote Control Unit and Earphone
Remote
Recording
Indicator
Control
Socket
O F’ass the end of the Shoulder Strap through the slit of the
Shoulder Strap Holder on the upper part of the rear of the
VHS-C Movie.
0 Securely attach the end of the strap.
0 Attach the other end of the Shoulder Strap at the lower part of
the rear of the VHS-C Movie in the same way as mentioned
above.
Pause Remote
Control Unit
<33>
Earphone
Earphone
Socket
Page 34

Playback on a VMS VTR
•Use the Cassette Adaptor (supplied).
For details about operating the Cassette Adaptor, see pages 35
and 36 of these Operating Instructions.
iWAC
(compact size) (VMS size)
Video Cassette Cassette Adaptor
<34>
Page 35

r
Loading a IVHSM Cassette
Before loading a VHS*C cassette into the
Cassette Adaptor, turn the cog wheel in
the direction of the arrow to pull in the
slack of the tape.
О Slide the Open Button in the direction of the arrow, and the
Compartment Cover will pop open.
0 Insert the IVHSB Cassette vertically.
0 Close the Compartment Cover firmly.
(Tape loading starts automatically. During loading, do not touch
the rotating part on the underside of the Cassette Adaptor.)
Take Out the IVUSB Cassette
O Slide the Open Button in the direction of the arrow. The tópe will
be retracted into the iVltS>B cassette and the Compartment
Cover will pop open. Do not touch the rotating part on the
underside of the Cassette Adaptor at this time.
0Take out the IVHSB cassette.
•Pushing the cassette from the underside of the adaptor will
make it easier to take It out.
e Close the Compartment Cover.
•During the loading of the tape, some mechanical noise can be
heard. However this is not an indication of a malfunction of the
Cassette Adaptor.
c
Stopper is retracted.
(When the Stopper is completely retracted, the tape loading in
the Cassette Adaptor is completed. It can now be inserted into a
VHS video recorder.)
<35>
Page 36

How to Load the Battery
O Slide the Battery Cover upward and remove it.
Load one “R6" size battery with the polarities correctly aligned
as shown in the illustration and replace the cover by pushing it
down until it locks with a click.
CAUTION FOR BATTERY REPLACEMENT
•If the tape loading time is getting longer, the battery is becoming
exhausted. Replace it with a new one.
•Load the new battery with their polarities (© and 0) aligned
correctly.
•Do not apply heat to battery, or internal short-circuit may occur.
•Remove spent battery immediately and dispose of it.
Cautions for Use
This Cassette Adaptor is made to exacting precision standards.
Dropping this Cassette Adaptor, exposing it to strong vibration
and shocks, disassembling or remodelling it will cause malfunc
tion. Never try to disassemble it.
Do not insert and eject this Cassette Adaptor on a VHS VTR
many times without running the tape, because this could cause
the tape to get loose, creased or scratched.
It is not possible to reverse this Cassette Adaptor for use.
When loading the VHS-C cassette into the Cassette Adaptor,
be careful not to touch the tape directly. After use, take out the
VHS-C cassette from the Cassette Adaptor.
Do not put the adaptor in the following places.
•Places with high humidity or much dust.
•Places exposed to direct sunlight or near heating equipment.
•Places with strong magnetic fields such as generated by
motors, transformers, magnets etc.
•Places with oily smoke or steam, e.g. in a kitchen.
Never insert the Cassette Adaptor into a VTR without a
IVHSW compact video cassette in It.
In the special playback modes (Slow Motion, Still Playback
etc.), the picture may be distorted by jitter and noise bars.
<36>
Page 37

CAUTIONS Please read these cautions before operating the VHS-C Movie.
r
c
Video Head Clogging
The video heads are the means by which the VHS-C Movie places
picture signals on the tape during recording, and reads picture
signals from the tape during playback. If these heads become dirty
and clogged from long use, the signals can no longer be recorded
correctly, and the playback picture will be distorted accordingly.
This is the case, for example, during the playback of a tape, the
sound of which is reproduced normally, but no picture is seen, or
the picture is greatly distorted. When such symptoms occur, have
the VHS-C Movie checked by qualified service personnel.
The VHS-C Movie is equipped with head clogging detection
function. When the heads are clogged, the O Indication in the
EVF will appear. As the accumulation of dirt on the heads may be
dislodged by the movement of the tape, it is F>ossible that this
indication sometimes appears, but may not reappear on the next
recording starts.
The head clogging detection function will be activated when the
shooting is started from the recording pause mode. However, it will
not be activated when shooting immediately after replacing the
cassette and after performing Camera Search or Playback.
If Condensation Forms Inside the VHS-C Movie
Condensation (dew) forms when warm air comes in contact with a
cold object, for example on a window in a heated room in winter.
Condensation may form in the VHS-C Movie and damage the tape
and the video heads, if:
•The VHS-C Movie is in a room where the heater has just been
turned on.
•The VHS-C Movie is in a room with steam or high humidity.
•The VHS-C Movie is brought from cold surroundings into a
well-heated room.
<37>
•The VHS-C Movie is suddenly brought from cool surroundings,
such as an air-conditioned room or car, to a place which is hot
and humid.
•When condensation has formed inside the VHS-C Movie, the
“DEW" indication in the EVF and the Dew Indication Lamp
located on the panel with the General Operation Controls will both
flash. A few seconds later, the unit will turn itself off to protect the
tape and the video heads.
After a while, turn the unit on again and make sure that the Dew
Mark is not displayed any more. Then, wait about 1 hour before
operating the VHS-C Movie again. Depending on the surrounding
conditions, it may take several hours before the VHS-C Movie
can be used again.
•As condensation forms gradually, it may take about 10-15
minutes before the VHS-C Movie turns itself off after a change of
working environment.
•In an extremely cold place, condensation may freeze and turn
into frost. In this case, it may take quite some time for the frost to
melt, turn Into dew and evaporate.
•When you bring the VHS-C Movie from a very cold place, e.g. the
ski slopes, into a heated room, keep it in a tightly closed plastic
bag or similar to prevent condensation from forming inside the
VHS-C Movie.
Keep the VHS-C Movie away from Oily Smoke and Steam
Protect the VHS-C Movie from Humidity and Dust
Surrounding Conditions
Use the VHS-C Movie under conditions where the temperatures
are between 0®C and 40°C, and where the humidity is between
20% and 80%. To avoid deformation of the outer case or other
damage, do not leave it exposed to direct sunlight for any length of
time, also never leave it in a closed automobile.
Page 38

h
Keep the VHS-C Movie Away from Heaters
Keep the VHS-C Movie Away from TV Sets
Do not place the VHS-C Movie near a TV set because it might
Impair the picture and sound quality of the recorded tape, and/or
adversely affect the performance of the VHS-C Movie.
Keep Magnets Away
Never bring a magnet or magnetized object such as fluorescent
lamps, motors, electric clocks and battery operated toys etc. close
to the VHS-C Movie because this could adversely affect its
performance.
Keep the VHS-C Movie Away from Areas with
Strong Electric Fields
The picture may become distorted, when the VHS-C Movie is used
in places with strong electric fields, such as near TV or radio
antennas.
No Fingers Inside
Touching internal parts of the VHS-C Movie is very dangerous and
may cause serious damage to the VHS-C Movie. Do not attempt to
disassemble it. For internal inspection, adjustment or repairs,
consult qualified service personnel.
Handle with Care
Never drop the VHS-C Movie or expose it to strong physical
shocks. Shocks during use may result in abnormal operation and
performance.
Appearance of Smear Distortion
Smear distortion is a peculiar characteristic of the CCD device. It
appears as a bright vertical stripe on the screen when the VHS-C
Movie is aimed at spot lights or other bright lights and light
reflecting objects. To avoid this problem, make sure not to aim the
VHS-C Movie at such strong light sources during shooting.
Never Put any Objects Inside
Never insert any object other than a video cassette into the VHS-C
Movie. If any object is dropped Into it or if any liquid is spilled into it,
consult qualified service personnel. Operating it with some foreign
matter inside may cause fire or electric shock.
<38>
Page 39

r
Cover the Lens with the Cap after Shooting
Keep the VHS-C Movie Away from Strong Light
Do not expose the VHS*C Movie to strong tight, because the heat
from it may cause deformation or other damage.
When the VHS-C Movie Is Not Being Used
Remove the video cassette and turn the VHS-C Movie off with the
Operation On/Off Switch.
Keep Insecticide Spray Away
Never spray things like insecticide on the lens and body of the
VHS-C Movie. Also, never leave rubber or vinyl objects in contact
with any part of it for a long time, because the colour might change
and the body surface might be damaged.
Never Place the VHS-C Movie with the Cassette
Compartment Side Facing Down
Never use the VHS-C Movie with the cassette compartment facing
down as this might cause uneven winding and slacking of the tape.
Cleaning the VHS-C Movie
•The body of the VHS-C Movie is made of plastic materials. Never
use benzine, thinner or other chemicals for cleaning, because the
colour might be changed and the case surface might be
damaged.
•Wipe the case and operation panel with a soft, clean cloth. For
persistent stains, use a cloth moistened with mild detergent and
water, and then wipe with a dry cloth.
•Clean the lens only with a blower brush (used for photo cameras)
or a special lens cleaning tissue (used for glasses and cameras).
o
<39>
Page 40

BEFORE REQUESTING SERVICE
Power Source
•The power does not turn on.
—Is the power supply unit correctly connected to the VHS-C
Movie?
•The power turns on, but it turns off again immediately.
—If the Battery Pack is exhausted, replace it with a fully charged
one.
—If condensation has formed, wait until it has dissolved.
Camera Recording
•The power is on, but no picture appears in the EVF.
—Is the lens covered with the lens cap?
•Camera recording cannot be performed.
—If the tab of the cassette is broken out, cover the tab hole with
adhesive tape.
•The picture is not clear.
—Is the eyepiece correctly adjusted to your eyesight?
—Is the lens surface dusty?
•The Auto Focus system does not provide optimum focus
adjustment.
—1s the Focus Mode Selector set to “AUTO"?
—For shooting conditions where the “AUTO" setting of the Focus
Mode Selector cannot provide optimum focus adjustment, set
the selector to "MANUAL" and adjust the focus.
Playback
•No playback picture is reproduced.
—Is the connection to the TV set correct?
—Is the TV set tuned to the video playback channel?
•The colours are not correct.
—Is the colour adjustment of the TV set correct?
•The playback picture is not in colour.
The playback picture has large amounts of “snow”.
—Adjust the tracking.
—If the tape is old, use a new tape.
(40>
Page 41

SPECIFICATIONS
NV-MC20A, EA
. Power Source:
n
1 Power Consumption:
Video Recording System:
Tape Speed:
Tape Format:
Recording/Playback
Time:
VIDEO
Television System:
Modulation System;
Output Level:
AUDIO
Output Level:
Audio Track:
Image Sensor:
Lens:
is the safety information.
DC 9.6 V
Recording mode; 7.2 W (Battery Operation) *
Camera Search Mode; 8.7 W (Battery Operation) ;
Rotary four heads, helical scanning system
23.39 mm/s
Hiac
30 min. with NV-EC30HG
CCIR; 625 lines, 50 fields PAL colour signal
Luminance; FM azimuth recording
Colour signal; Converted subcarrier phase shift recording
Video out (PHONO); 1.0 Vp-p,
Audio out (PHONO); -8 dB,
1 track (Normal-Mono)
V2-inch CCD Image Sensor
6:1 Power Zoom Lens with MACRO Function
Auto Iris
Auto Focus System F1,2 (9-54 mm)
Lens Front Diameter 49 mm
tape
75 ohm unbalanced
600 ohm unbalanced
c
<41 >
Page 42

Viewfinder:
Standard tllumination:
Minimum Required
Illumination:
Video Horizontal
Resolution:
Signal-to-Noise Ratio:
Audio Frequency
Response:
Operating Temperature:
Operating Humidity;
Weight:
Dimensions;
%-inch Electronic Viewfinder
1,400 Lux
10 Lux
Colour; More than 230 lines
Video; More than 40 dB
Audio; More than 41 dB
100-8,000 Hz
0"C-40°C
20%-80%
Approx. 1.3 kg (without Battery Pack)
124 (W) X140 (H) X 328 (D) mm
VW-AMC2A
Power Source:
Power Consumption:
DC Output:
AC 100-240 V, 50-60 Hz (Automatic voltage adjustment)
25 W
DC 9.6 V1.2 A (VHS-C Movie)
DC 9.6 V 0.86 A (Battery pack charging)
Weight:
Dimensions;
Approx. 0.56 kg
53(W)x68.5(H)x191 (D) mm
Weight and dimensions shown are approximate.
Specifications are subject to change without notice.
is the safety information.
<42>
 Loading...