

Page 1
Operating Instructions
Instrukcja obsługi
Digital Video Camera
Model No. NV-GS330
EP
Before use, please read these instructions completely.
Przed pierwszym włączeniem kamery prosimy o dokładne przeczytanie
instrukcji obsługi.
VQT1L41
Page 2

Information for your safety
WARNING:
TO REDUCE THE RISK OF FIRE, ELECTRIC
SHOCK OR PRODUCT DAMAGE,
≥ DO NOT EXPOSE THIS APPARATUS TO RAIN,
MOISTURE, DRIPPING OR SPLASHING AND
THAT NO OBJECTS FILLED WITH LIQUIDS,
SUCH AS VASES, SHALL BE PLACED ON THE
APPARATUS.
≥ USE ONLY THE RECOMMENDED
ACCESSORIES.
≥ DO NOT REMOVE THE COVER (OR BACK);
THERE ARE NO USER SERVICEABLE PARTS
INSIDE. REFER SERVICING TO QUALIFIED
SERVICE PERSONNEL.
CAUTION!
≥ DO NOT INSTALL OR PLACE THIS UNIT IN A
BOOKCASE, BUILT-IN CABINET OR IN
ANOTHER CONFINED SPACE. ENSURE THE
UNIT IS WELL VENTILATED. TO PREVENT RISK
OF ELECTRIC SHOCK OR FIRE HAZARD DUE
TO OVERHEATING, ENSURE THAT CURTAINS
AND ANY OTHER MATERIALS DO NOT
OBSTRUCT THE VENTILATION VENTS.
≥ DO NOT OBSTRUCT THE UNIT’S VENTILATION
OPENINGS WITH NEWSPAPERS,
TABLECLOTHS, CURTAINS, AND SIMILAR
ITEMS.
≥ DO NOT PLACE SOURCES OF NAKED
FLAMES, SUCH AS LIGHTED CANDLES, ON
THE UNIT.
≥ DISPOSE OF BATTERIES IN AN
ENVIRONMENTALLY FRIENDLY MANNER.
The socket outlet shall be installed near the
equipment and easily accessible.
The mains plug of the power supply cord shall
remain readily operable.
To completely disconnect this apparatus from
the AC Mains, disconnect the power supply
cord plug from AC receptacle.
Product Identification Marking is located on the
bottom of units.
Warning
Risk of fire, explosion and burns. Do not
disassemble.
Do not heat the batteries above the
following temperatures or incinerate.
Button-type battery 60 oC
Battery pack 60 oC
2
VQT1L41
ª Carefully read the Operating
Instructions and use the Movie
Camera correctly.
≥Injury or material damage resulting from any
kind of use that is not in accordance with the
operating procedures explained in these
Operating Instructions are the sole
responsibility of the user.
Try out the Movie Camera.
Be sure to try out the Movie Camera before
recording your first important event and check
that it records properly and functions correctly.
The manufacturer is not liable for loss of
recorded contents.
The manufacturer shall in no event be liable for
the loss of recordings due to malfunction or defect
of this Movie Camera, its accessories or
cassettes.
Carefully observe copyright laws.
Recording of pre-recorded tapes or discs or other
published or broadcast material for purposes
other than your own private use may infringe
copyright laws. Even for the purpose of private
use, recording of certain material may be
restricted.
≥U.S. Patent Nos. 6,836,549; 6,381,747;
7,050,698; 6,516,132; and 5,583,936.
≥This product incorporates copyright protection
technology that is protected by U.S. patents and
other intellectual property rights. Use of this
copyright protection technology must be
authorized by Macrovision, and is intended for
home and other limited viewing uses only
unless otherwise authorized by Macrovision.
Reverse engineering or disassembly is
prohibited.
≥SDHC Logo is a trademark.
≥miniSD Logo is a trademark.
≥Leica is a registered trademark of Leica
Microsystems IR GmbH and Dicomar is a
registered trademark of Leica Camera AG.
≥All other company and product names in the
operating instructions are trademarks or
registered trademarks of their respective
corporations.
Files recorded on SD Memory Card
It may not be possible to play back the files on
this Movie Camera recorded on and created by
other equipment or vice versa. For this reason,
check the compatibility of the equipment in
advance.
Page 3

Pages for reference
Pages for reference are indicated by dashes
either side of a number, for example:
The menu operation flow is indicated by >> in the
description.
-00-
ª EMC Electric and magnetic
compatibility
This symbol (CE) is located on the rating
plate.
Use only the recommended accessories.
≥Do not use any other Multi cables and USB
cables except the supplied one.
≥When you use the cable which are sold
separately, please make sure to use the one
whose length is less than 3 meters.
≥Keep the Memory Card out of reach of children
to prevent swallowing.
ENGLISH
Information on Disposal for Users of
Waste Electrical & Electronic Equipment
(private households)
This symbol on the products
and/or accompanying
documents means that used
electrical and electronic
products should not be
mixed with general
household waste.
For proper treatment,
recovery and recycling, please take these
products to designated collection points,
where they will be accepted on a free of
charge basis. Alternatively, in some
countries you may be able to return your
products to your local retailer upon the
purchase of an equivalent new product.
Disposing of this product correctly will help to
save valuable resources and prevent any
potential negative effects on human health
and the environment which could otherwise
arise from inappropriate waste handling.
Please contact your local authority for further
details of your nearest designated collection
point.
Penalties may be applicable for incorrect
disposal of this waste, in accordance with
national legislation.
For business users in the European
Union
If you wish to discard electrical and
electronic equipment, please contact your
dealer or supplier for further information.
Information on Disposal in other
Countries outside the European Union
This symbol is only valid in the European
Union.
If you wish to discard this product, please
contact your local authorities or dealer and
ask for the correct method of disposal.
3
VQT1L41
Page 4

Before opening the CD-ROM package, please read the following.
End User License Agreement (for USB Driver, SweetMovieLife
and MotionDV STUDIO)
You (“Licensee”) are granted a license for the Software defined in this End User Soft Agreement
(“Agreement”) on condition that you agree to the terms and conditions of this Agreement. If Licensee
does not agree to the terms and conditions of this Agreement, promptly return the Software to
Matsushita Electric Industrial Co., Ltd. (“Matsushita”), its distributors or dealers from which you made
the purchase.
Article 1 License
Licensee is granted the right to use the software, including the information recorded or described on the
CD-ROM, instruction manuals, and any other media provided to Licensee (collectively “Software”), but
all applicable rights to patents, copyrights, trademarks and trade secrets in the Software are not
transferred to Licensee.
Article 2 Use by a Third Party
Licensee may not use, copy, modify, transfer or allow any third party, whether free of charge or not, to
use, copy or modify the Software, except as expressly provided for in this Agreement.
Article 3 Restrictions on Copying the Software
Licensee may make a single copy of the Software in whole or a part solely for back-up purpose.
Article 4 Computer
Licensee may use the Software only on one computer, and may not use it on more than one computer.
Article 5 Reverse Engineering, Decompiling or Disassembly
Licensee may not reverse engineer, decompile, or disassemble the Software, except to the extent either
of them is permitted under law or regulation of the country where Licensee resides. Matsushita, or its
distributors will not be responsible for any defects in the Software or damage to Licensee caused by
Licensee’s reverse engineering, decompiling, or disassembly of the Software.
Article 6 Indemnification
The Software is provided “AS-IS” without warranty of any kind, either expressed or implied, including,
but not limited to, warranties of non-infringement, merchantability and/or fitness for a particular
purpose. Further, Matsushita does not warrant that the operation of the Software will be uninterrupted
or error free. Matsushita or any of its distributors will not be liable for any damage suffered by Licensee
arising from or in connection with Licensee’s use of the Software.
Article 7 Export Control
Licensee agrees not to export or re-export to any country the Software in any form without the
appropriate export licenses under regulations of the country where Licensee resides, if necessary.
Article 8 Termination of License
The right granted to Licensee hereunder will be automatically terminated if Licensee contravenes of any
of the terms and conditions of this Agreement. In the event, Licensee must destroy the Software and
related documentation together with all the copies thereof at Licensee’s own expense.
4
VQT1L41
Page 5

Contents
Information for your safety ................................... 2
Before using
Accessories.......................................................... 6
Optional................................................................ 6
Parts identification and handling .......................... 6
Fitting the lens cap............................................... 8
The grip belt......................................................... 9
Power supply ....................................................... 9
Charging time and recordable time .................... 11
Turning the camera on....................................... 11
Setting date and time ......................................... 12
Using the LCD monitor....................................... 13
Using the viewfinder........................................... 13
Quick Start ......................................................... 14
Inserting/removing a cassette............................ 15
Inserting/removing a card .................................. 16
Selecting a mode ............................................... 17
How to use the joystick ...................................... 17
Help mode.......................................................... 19
Switching the language ...................................... 19
Using the menu screen ...................................... 19
Adjusting LCD monitor/viewfinder ...................... 21
Using the remote control.................................... 22
Record mode
Check before recording...................................... 24
Recording on a tape........................................... 25
Recording check ................................................ 26
Blank search function......................................... 26
Recording still pictures on a card
while recording image onto a tape .................. 27
Recording still pictures onto a card
(Photoshot)...................................................... 27
Zoom in/out function .......................................... 29
Recording yourself ............................................. 30
Backlight compensation function ....................... 30
Colour night view function.................................. 31
Soft skin mode ................................................... 31
Tele macro function ........................................... 32
Fade in/fade out function ................................... 32
Wind noise reduction function............................ 33
Anti-Ground-Shooting (AGS) ............................. 33
Self-timer recording............................................ 34
Wide/4:3 Function .............................................. 34
Image stabilizer function .................................... 35
Guideline function .............................................. 35
Recording in various situations
(Scene mode).................................................. 36
Recording in natural colours
(White balance)............................................... 37
Manual focus adjustment ................................... 38
Manual shutter speed/aperture adjustment ....... 38
Playback mode
Playing back tape............................................... 40
Slow-motion playback/
frame-by-frame playback................................. 41
Variable-speed search function.......................... 41
Playback on TV .................................................. 42
Playing back card............................................... 43
Deleting files recorded on a card ....................... 44
Formatting a card............................................... 44
Protecting files on a card.................................... 45
Writing the printing data on a card
(DPOF setting) ................................................ 45
Edit mode
Recording from a tape onto a card..................... 46
Copying onto a DVD recorder or a VCR
(Dubbing)......................................................... 46
Using the DV Cable for Recording
(Digital Dubbing).............................................. 47
Audio dubbing .................................................... 48
Printing pictures by directly connecting to
the printer (PictBridge) .................................... 49
With a PC
Before Use......................................................... 51
Install/Connection............................................... 54
Software............................................................. 58
Others............................................................ 60
Menu
Menu list............................................................. 64
Menus related to taking pictures ........................ 66
Menus related to playback ................................. 66
Other menus ...................................................... 67
Others
Indications.......................................................... 68
Warning/alarm indications.................................. 69
Functions cannot be used simultaneously ......... 70
Before requesting repair
(Problems and solutions)................................. 71
Cautions for Use ................................................ 75
Explanation of terms .......................................... 79
Specifications
Specifications ..................................................... 81
5
VQT1L41
Page 6
Before using
(5)(6)
Before using
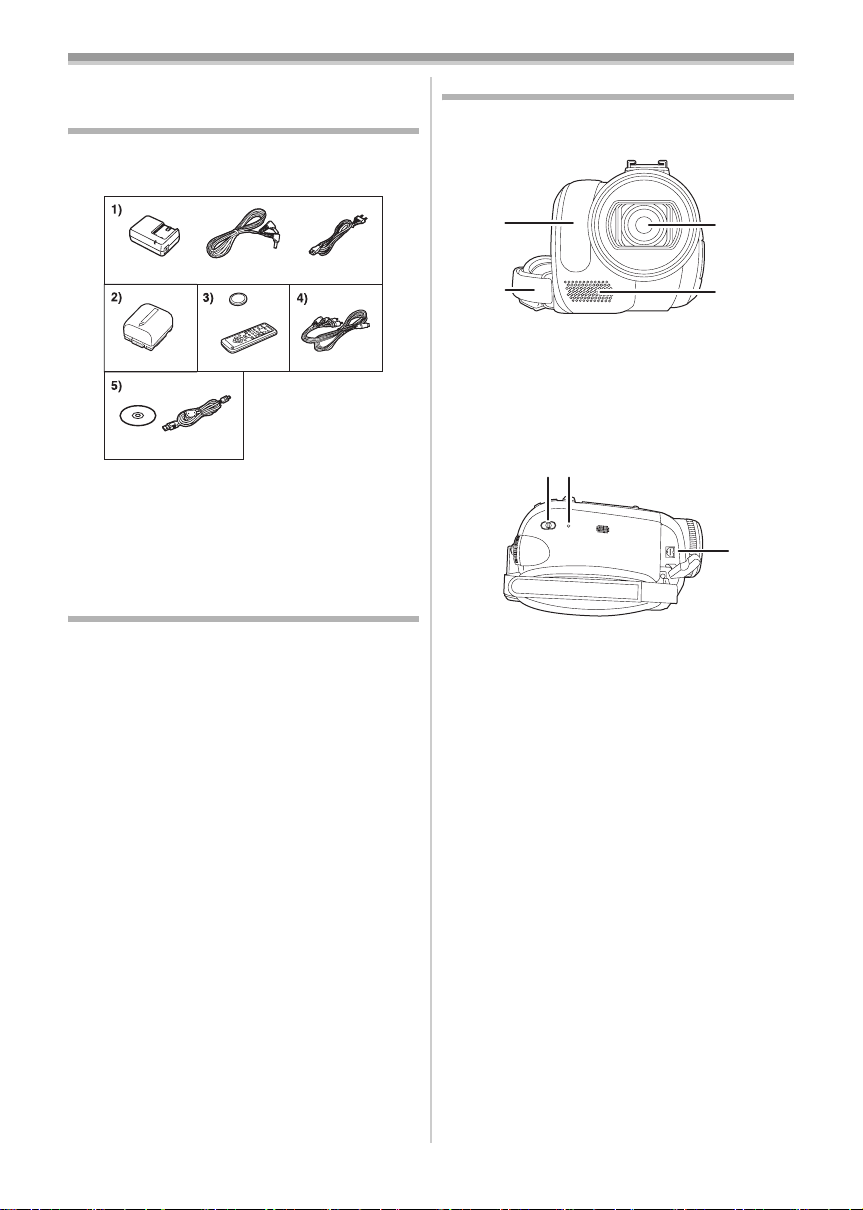
Accessories
The followings are the accessories supplied with
this product.
VSK0651B
K2GJ2DC00011
CR2025
N2QAEC000021
K2KZ4CB00011
1) AC adaptor, DC input lead, AC mains lead
-10-
2) Battery pack -9-
3) Remote control, button-type battery -22-
4) Multi cable -46-
5) USB cable and CD-ROM -49-, -51-
Optional
1) AC adaptor (VW-AD11E)
2) Battery pack (lithium/VW-VBG130/1320 mAh)
3) Battery pack (lithium/VW-VBG260/2640 mAh)
4) Battery pack (lithium/VW-VBG6°/5800 mAh)
5) Battery pack holder kit (VW-VH04)
6) Wide conversion lens (VW-LW3707M3E)
7) Tele conversion lens (VW-LT3714ME)
8) Filter kit (VW-LF37WE)
9) Video DC light (VW-LDC102E)
10) Light bulb for video DC light (VZ-LL10E)
11) Tripod (VW-CT45E)
12) DV cable (VW-CD1E)
≥Some optional accessories may not be
available in some countries.
° The battery pack holder kit VW-VH04 (optional)
is necessary.
K2CQ2CA00006
K2KZ9CB00001
Parts identification and handling
ª Camera
(1)
(2)
(1) White balance sensor -37-
Remote control sensor -23-
Grip belt -9-
(2)
Lens (LEICA DICOMAR)
(3)
(4) Microphone (built-in, stereo) -29-, -33-
Mode select switch [AUTO/MANUAL/
(5)
FOCUS]
(6)
Reset button [RESET] -74-
Audio-video/S-Video output terminal
(7)
[A/V]
-24-, -36-, -37-, -38-
-46-
≥Use the supplied Multi cable only, otherwise
audio may not be played back normally.
(3)
(4)
(7)
6
VQT1L41
Page 7
(8)
(9)
(10)
(11)
(12)
(13)
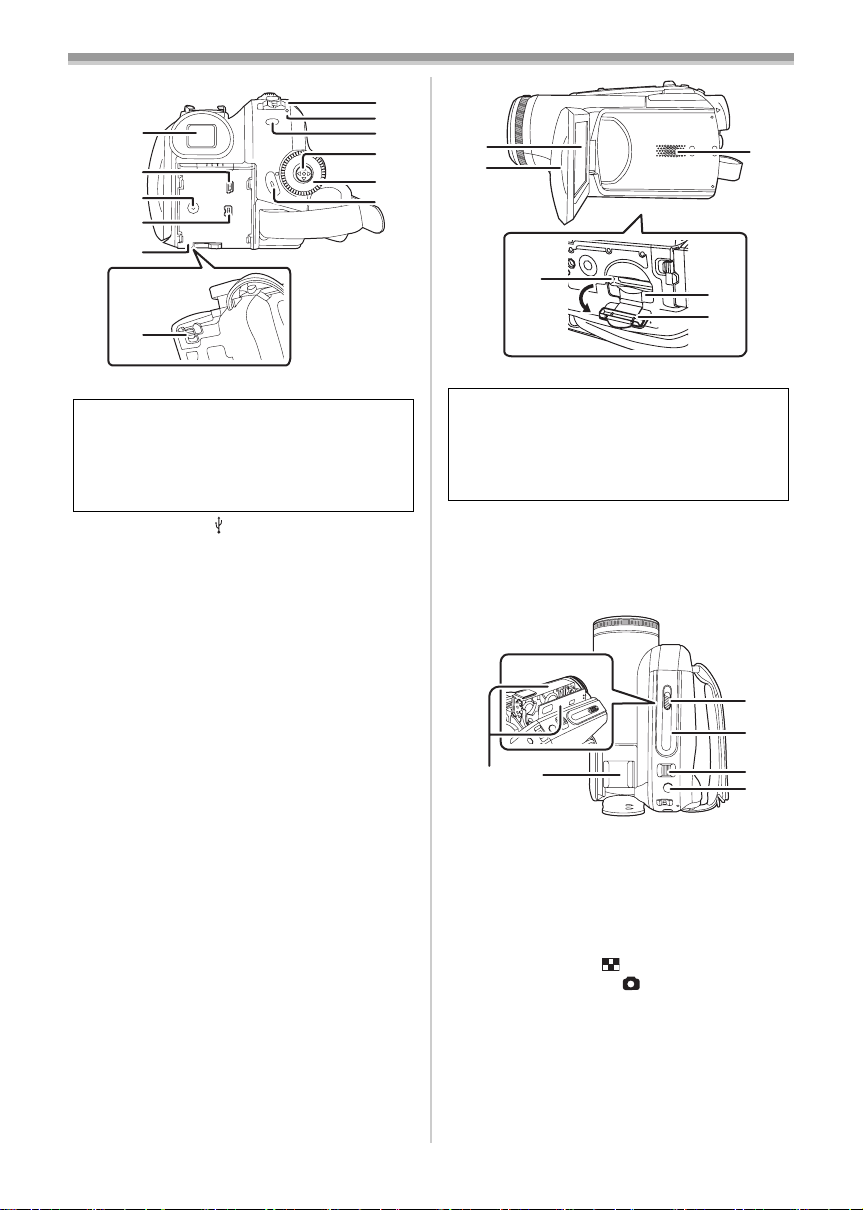
(8) Viewfinder -13-, -79-
Due to limitations in LCD production
technology, there may be some tiny bright or
dark spots on the Viewfinder screen.
However, this is not a malfunction and does
not affect the recorded picture.
(9)
USB terminal [ ] -49-, -58-
DC input terminal [DC/C.C.IN] -10-
(10)
(11)
DV output terminal [DV] -47-
Battery holder -10-
(12)
Battery release lever [BATTERY] -10-
(13)
Power switch [OFF/ON] -11-
(14)
Status indicator -11-
(15)
Menu button [MENU] -1 9-
(16)
(17)
Joystick -17-
Mode dial -17-
(18)
Recording start/stop button -25-
(19)
Before using
(14)
(15)
(16)
(17)
(18)
(19)
(20)
(21)
(23)
(20) LCD monitor -13-, -79-
(24)
(25)
Due to limitations in LCD production
technology, there may be some tiny bright or
dark spots on the LCD monitor screen.
However, this is not a malfunction and does
not affect the recorded picture.
(21) LCD monitor open part -13-
Speaker -40-
(22)
Card access lamp -16-
(23)
Card slot -16-
(24)
Card slot cover -16-
(25)
(22)
(28)
(29)
(26)
(27)
Cassette holder -15-
(26)
Accessory shoe
(27)
(30)
(31)
≥Accessories, such as a video DC light
(VW-LDC102E; optional), are attached here.
(28) Cassette eject lever [OPEN/EJECT] -15-
Cassette cover -15-
(29)
Zoom lever [W/T] -29-
(30)
Volume lever [s /VOLr] -40-
(31)
Photoshot button [ ] -27-
VQT1L41
7
Page 8
Before using
(32)
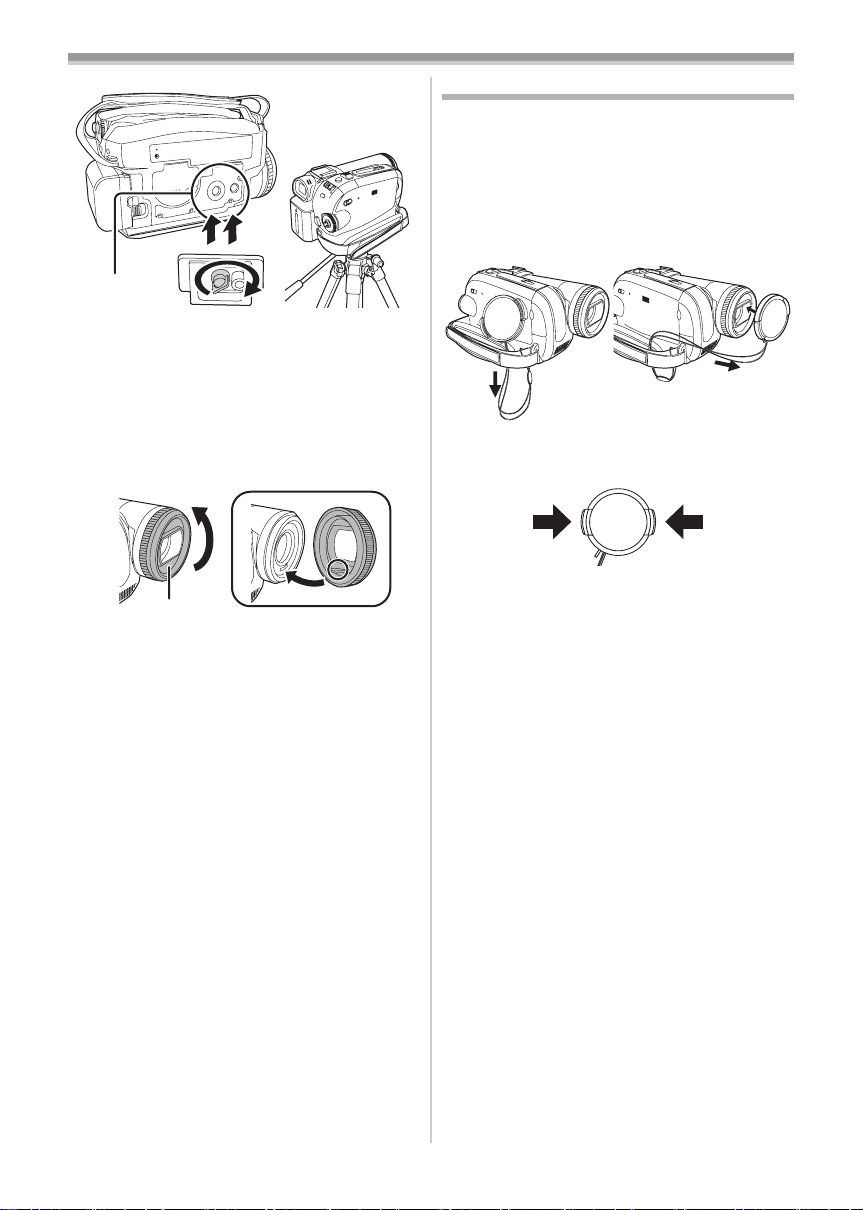
(32) Tripod receptacle
This is a hole for attaching the camera to optional
tripod/VW-CT45E. (Please carefully read the
operating instructions for how to attach the tripod
to the camera.)
≥You cannot open the card slot cover when the
tripod is used. Insert the card first and then
attach the tripod.
Fitting the lens cap
Fit the lens cap to protect the surface of the lens.
≥The lens cap and the lens cap cord come
pre-attached to the grip belt.
≥When not using the lens cap, pull the lens cap
cord in the direction of the arrow. 1
≥When you are not recording, be sure to cover
the lens with the lens cap for protection.
1
≥When you remove the lens cap, press the knobs
firmly.
2
2
1
(33)
(33) Lens hood
2
In order to remove the lens hood, rotate it
counterclockwise 1. In order to fit it, put into slot
2, and then rotate it clockwise.
≥Fit the MC protector or the ND filter of the Filter
Kit (VW-LF37WE; optional) in front of the lens
hood. Do not fit the other accessories on the
hood. (Except for the lens cap)
(Refer to the operating instructions for the Filter
Kit.)
≥When fitting the tele conversion lens
(VW-LT3714ME; optional) or the wide
conversion lens (VW-LW3707M3E; optional),
first remove the lens hood.
(Refer to the operating instructions for the tele
conversion lens or the wide conversion lens.)
≥When 2 lens accessories, such as the ND filter
and tele conversion lens, are fitted and the
[W/T] lever is pressed toward the [W] side, the 4
corners of an image will be darkened.
(Vignetting) (When fitting 2 lens accessories,
first remove the lens hood and then fit them.)
8
VQT1L41
Page 9

Before using
The grip belt
Adjust the belt length so it fits your hand.
1 Adjust the belt length and the pad position.
2
1
3
1 Flip the belt.
2 Adjust the length.
3 Fix the belt.
Power supply
ª Charging the battery
When this product is purchased, the battery is not
charged. Charge the battery before using this
product.
≥Battery charging time (
≥We recommend using Panasonic batteries. (
≥If you use other batteries, we cannot guarantee
the quality of this product.
≥If the DC input lead is connected to the AC
adaptor, then the battery will not get charged.
Remove the DC input lead from the AC adaptor.
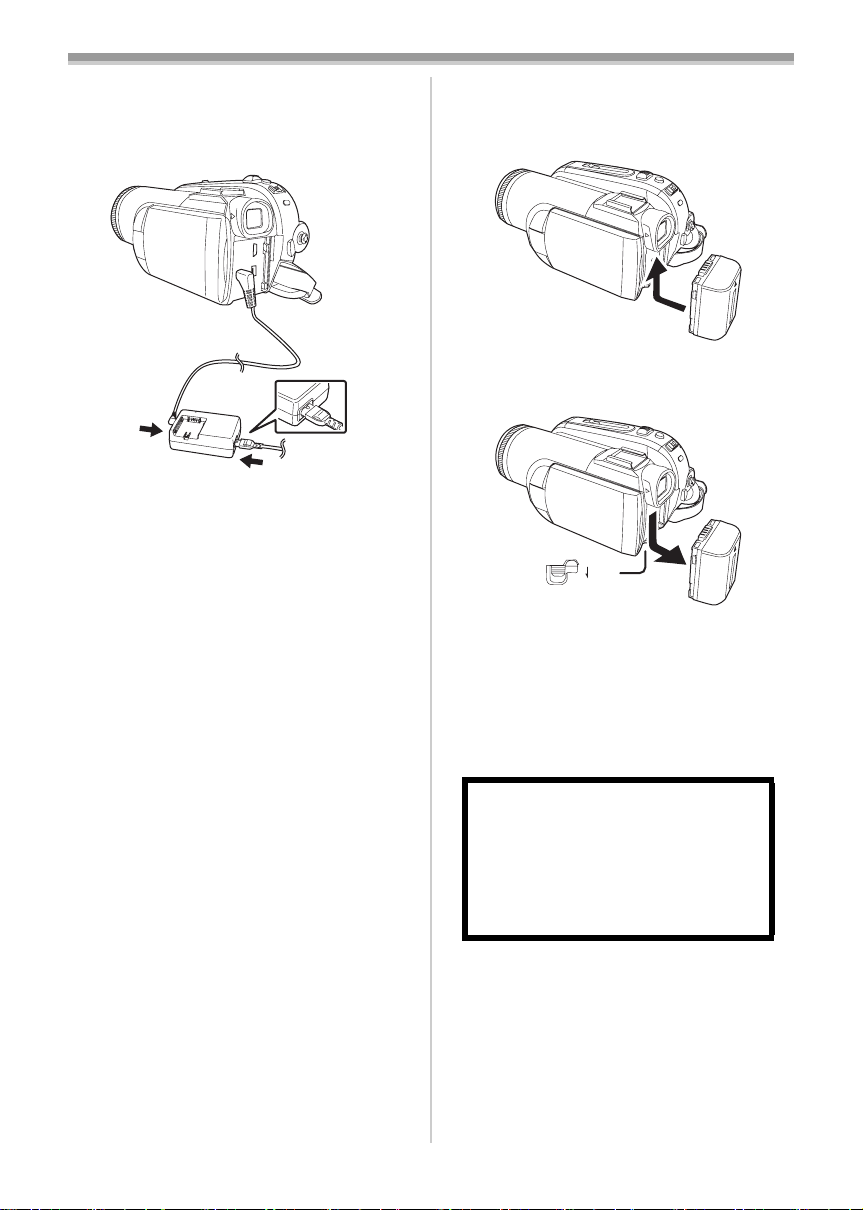
1 Connect the AC mains lead to the AC
adaptor and the AC mains socket.
2 Put the battery on the battery mount by
aligning the mark, and then securely plug it
in.
Charging lamp
ª
Lights up:Charging
Goes off: Charging completed
Flashing: The battery is over discharged
(discharged excessively). In a while,
the lamp will light up and normal
charging will start.
When the battery temperature is
excessively high or low, the [CHARGE]
lamp flashes and the charging time will
be longer than normal.
-11-)
-6-)
9
VQT1L41
Page 10
Before using
ª Connecting to the AC outlet
The unit is in the standby condition when the AC
adaptor is connected. The primary circuit is
always “live” as long as the AC adaptor is
connected to an electrical outlet.
1
1 Connect the AC mains lead to the AC
adaptor and the AC mains socket.
2 Connect the DC input lead to the AC
adaptor.
3 Connect the DC input lead to this product.
≥The output plug of the AC mains lead is not
completely connected to the AC adaptor
socket. As shown in 1, there is a gap.
≥Do not use the power cord for other
equipment since the power cord is exclusively
designed for the movie camera. Or do not use
the power cord of other equipment for the
movie camera.
Fitting the battery
ª
Push the battery against the battery holder and
slide it until it clicks.
ª
Removing the battery
While sliding the [BATTERY] lever, slide the
battery to remove it.
BATTERY
≥Hold the battery with your hand so it does not
fall.
≥Before removing the battery, be sure to set the
[OFF/ON] switch to [OFF].
≥Do not heat or expose to flame.
≥Do not leave the battery(ies) in an automobile
exposed to direct sunlight for a long period of
time with doors and windows closed.
10
VQT1L41
CAUTION
Danger of explosion if battery is
incorrectly replaced. Replace only with
the same or equivalent type
recommended by the manufacturer.
Dispose of used batteries according to
the manufacturer’s instructions.
Notice about the rechargeable battery
The battery is designated recyclable.
Please follow your local recycling regulations.
Page 11
Before using
Charging time and recordable time
The times shown in the tables below are for when
the temperature is 25 oC and the humidity is 60%.
If the temperature is higher or lower than 25 oC,
the charging time will become longer.
Supplied
battery/
(7.2 V/
640 mAh)
VW-VBG130
(7.2 V/
1320 mAh)
VW-VBG260
(7.2 V/
2640 mAh)
VW-VBG6
(7.2 V/
5800 mAh)
A Charging time
B Maximum continuously recordable time
C Actual recordable time
(The actual recordable time refers to the
recordable time on a tape when repeatedly
starting/stopping recording, turning the unit on/off,
moving the zoom lever, etc.)
“1 h 10 min” indicates 1 hour 10 minutes.
≥The charging time and recordable time shown in
the table are approximations. The times indicate
the recordable times when the viewfinder is
used. The times in parentheses indicate the
recordable times when the LCD monitor is used.
≥We recommend the Battery Pack VW-VBG130,
VW-VBG260 and VW-VBG6 for long time
recording (2 hours or more for continuous
recording, 1 hour or more for actual recording).
A 1 h 40 min
B 1 h 15 min
(1 h 10 min)
C 30 min
(30 min)
A 2 h 40 min
B 2 h 10 min
(2 h)
C 55 min
(55 min)
A 4 h 55 min
B 4 h 25 min
(4 h 5 min)
C 1 h 55 min
(1 h 50 min)
A 10 h 30 min
B 10 h 10 min
(9 h 25 min)
C 4 h 30 min
(4 h 10 min)
≥The actual time may become shorter than this.
The recordable time shown in the table are
approximations. The recordable time will
become shorter in the following cases:
≥When you use both the viewfinder and the
LCD monitor simultaneously while rotating
the LCD monitor frontward to record yourself,
etc.
≥When you use this camera with the LCD
monitor lit up with the [POWER LCD] setting.
≥The batteries heat up after use or charging. The
main unit of the movie camera being used will
also heat up. This is normal.
≥Along with the reduction of the battery capacity,
the display will change: # #
# # . If the battery
discharges, then ( ) will flash.
Turning the camera on
When the camera is turned on with the lens cap
fitted, the automatic white balance adjustment
-79-) may not function properly. Please turn the
(
camera on after removing the lens cap.
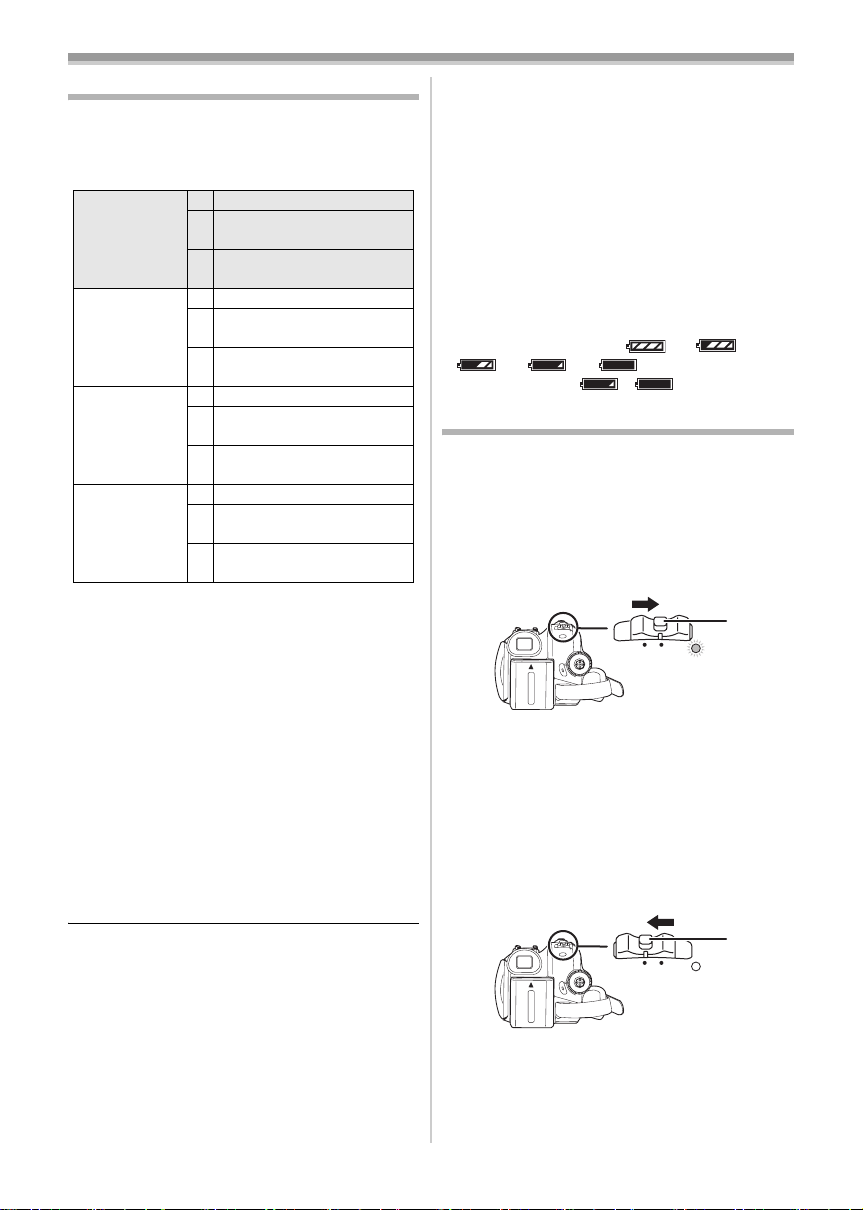
How to turn on the power
ª
While pressing the button 1, set the
1
[OFF/ON] switch to [ON].
1
ON
OFF
≥The Status indicator lights red and the power
turns on.
≥In Tape Recording Mode or Card Recording
Mode, if the [OFF/ON] switch is set to [ON]
while the LCD monitor is closed and the
viewfinder is retracted, the power turns off.
How to turn off the power
ª
1 While pressing the button 1, set the
[OFF/ON] switch to [OFF].
1
ON
OFF
≥Set the [OFF/ON] switch to [OFF] when not
using the camera.
≥The status indicator goes off when the power
turns off.
11
VQT1L41
Page 12
Before using
ª How to turn the power on and off with
the LCD monitor/viewfinder
When the power switch is set to [ON], the power
can be turned on and off with the LCD monitor
and the viewfinder when the unit is in Tape
Recording Mode or Card Recording Mode.
ON
OFF
1 Open the LCD monitor out or extend the
viewfinder to use. (
≥The LCD monitor or viewfinder will be
activated.
-13-)
2 Close the LCD monitor and retract the
viewfinder.
F
OF
ON
≥The power will not turn off unless the LCD
monitor is closed and the viewfinder is
retracted.
≥The Status indicator automatically goes off
and the power turns off. (If quick start is set to
-14-), the unit goes into quick start
[ON] (
standby mode and the Status indicator lights
green.)
≥The power does not turn off even if the
LCD monitor is closed and the viewfinder
is retracted while recording on a tape.
3 Open the LCD monitor or extend the
viewfinder to turn the power on and use the
movie camera again.
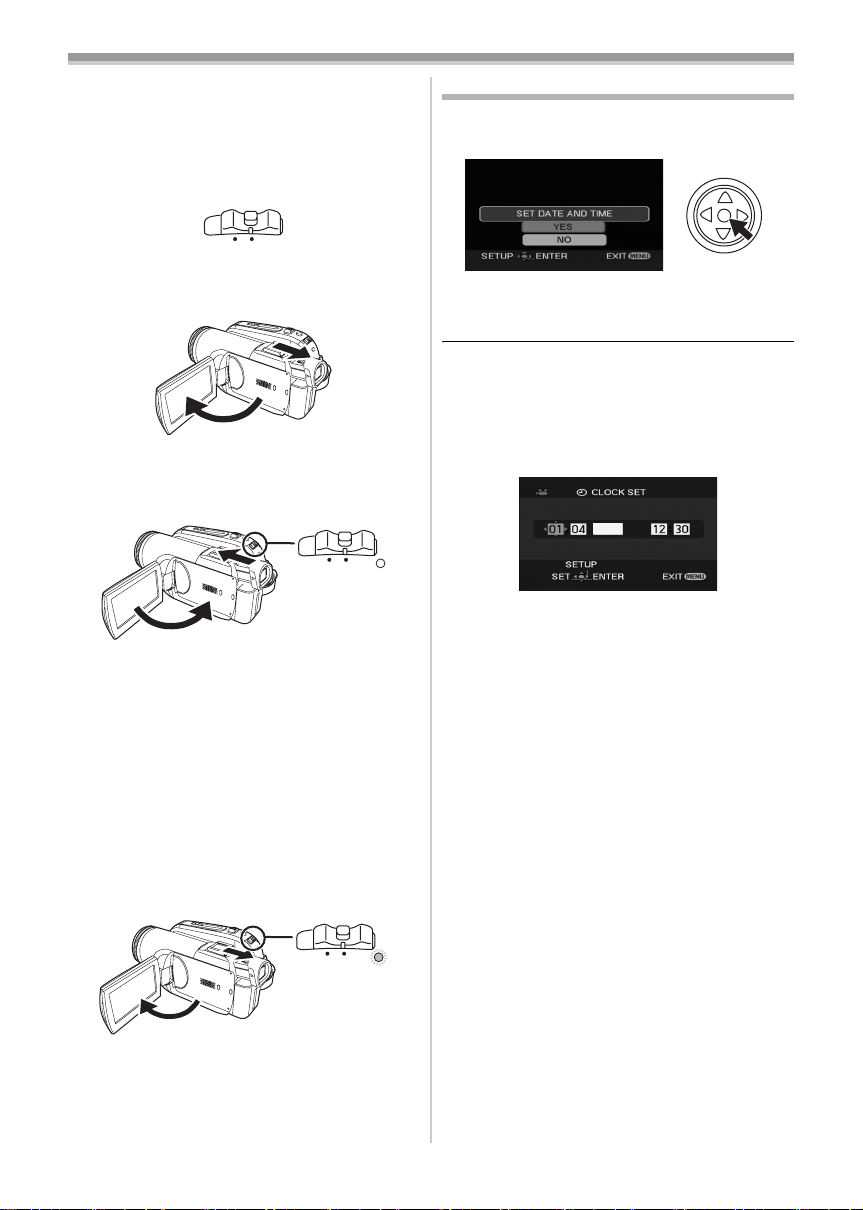
Setting date and time
When the movie camera is turned on for the first
time, [SET DATE AND TIME] will appear.
≥Select [YES] and press the centre of the
joystick. Do steps 2 and 3 below to set the date/
time.
If the screen shows the incorrect date/time, then
adjust it.
≥Set to Tape Recording Mode or Card
Recording Mode.
1 Set [BASIC] >> [CLOCK SET] >> [YES].
-19-)
(
2008
2 Move the joystick left or right in order to
select the item to be set. Then move the
joystick up or down to set the desired value.
≥The year will change as follows:
2000, 2001, ..., 2089, 2000, ...
≥The 24-hour clock is used.
3 Press the joystick to determine the setting.
≥The clock function starts at [00] seconds.
About date/time
ª
≥The date and time function are driven by a built-
in lithium battery.
≥Make sure to check the time before recording
because the built-in clock is not very accurate.
ON
OFF
≥The status indicator lights red and the power
turns on.
12
VQT1L41
Page 13

Before using
ª Recharging the built-in lithium battery
≥If [0] or [--] is appears when the camera is
turned on, then the built-in lithium battery has
run down. Use the steps below to charge the
battery. When turn on the power for the first time
after charging, [SET DATE AND TIME] will
appear. Select [YES] and set the date and time.
Connect the AC adaptor to the camera or attach
the battery to the camera, and the built-in lithium
battery will be recharged. Leave the camera as
is for approx. 24 hours, and the battery will drive
the date and time for approx. 6 months. (Even if
the [OFF/ON] switch is set to [OFF], the battery
is still being recharged.)
Using the LCD monitor
You can record the image while viewing it on the
opened LCD monitor.
1 Put a finger on the LCD monitor open part
and pull the LCD monitor out in the
direction of the arrow.
≥It can open up to 90o.
2 Adjust the angle of the LCD monitor
according to your preference.
Using the viewfinder
ª Extending the viewfinder
1 Pull out the viewfinder and extend it by
pinching the extension knob.
≥The viewfinder will be activated. (If the LCD
monitor is opened, the viewfinder will be
deactivated.)
Adjusting the field of view
ª
1 Adjust the focus by sliding the eyepiece
corrector knob.
12:30:4512:30:4512:30:45
1. 1. 20081. 1. 20081. 1. 2008
1 180o 2 90o
≥It can rotate up to 180o 1 towards the lens or
90o 2 towards the viewfinder.
≥The brightness and colour level of the LCD
monitor can be adjusted from the menu.
≥If it is forcibly opened or rotated, the camera
may be damaged or fail.
≥If the LCD monitor is rotated by 180o towards
the lens and the viewfinder is extended (when
recording yourself), the LCD monitor and the
viewfinder simultaneously light.
12:30:45
1. 1. 2008
≥You can adjust the brightness of the viewfinder
from the menu.
13
VQT1L41
Page 14

Before using
Quick Start
When quick start is ON the battery power is still
being consumed, even when the LCD monitor
and the viewfinder are closed.
The movie camera will resume recording/pause
mode about 1.7 seconds after the LCD monitor or
the viewfinder is reopended.
≥Please note in quick start mode approximately
half the pause recording power is being
consumed. Using quick start mode will reduce
the battery recording/playback time.
≥This is only activated in the following cases.
≥While using the battery
A tape or a card is inserted, while the Tape
Recording Mode is set.
A card is inserted, while the Card Recording
Mode is set.
≥While using the AC adaptor
quick start can be used even if a tape/card
is not inserted.
≥Set to Tape/Card Recording Mode.
1 Set [SETUP] >> [QUICK START] >> [ON].
-19-)
(
2 While the [OFF/ON] switch is still set to
[ON], close the LCD monitor and retract the
viewfinder.
ON
OFF
≥The Status indicator lights green and the unit
goes into quick start standby mode.
≥The movie camera will not go into quick start
standby unless the LCD monitor is closed and
the viewfinder is retracted.
3 Open the LCD monitor or extend the
Viewfinder.
To cancel Quick Start
ª
1 Set [SETUP] >> [QUICK START] >> [OFF].
-19-)
(
≥If the [OFF/ON] switch is set to [OFF] while the
unit is in quick start standby, the power turns off.
≥If the standby continues for approx. 30 minutes,
then the status indicator will go off and the
camera will be completely turned off.
≥In the following cases, quick start is cancelled
and the power turns off.
≥When the Mode dial is moved.
≥When the battery or AC adaptor is removed.
≥When both the tape and card are removed
while using the battery in Tape Recording
Mode.
≥When the card is removed while using the
battery in Card Recording Mode.
≥When the camera is quick-started with the white
balance on automatic, it may take some time
until the white balance is adjusted if the scene
being recorded has a light source different from
the scene last recorded. (When the colour night
view function is used, however, the white
balance of the scene last recorded is retained.)
≥If the power is turned on in quick start standby,
the zoom magnification becomes 1k and the
picture size may differ from what it was before
quick start standby.
≥If [POWER SAVE] (
and the unit automatically goes into quick start
standby mode, set the [OFF/ON] switch to
[OFF], then to [ON] again. Also, close the LCD
monitor and retract the viewfinder and then
open the LCD monitor or extend the viewfinder
again.
-66-) is set to [5 MINUTES]
OFF
≥The Status indicator lights red and the
camera is put into recording pause approx.
1.7 seconds after it is turned on.
14
VQT1L41
ON
Page 15
Before using
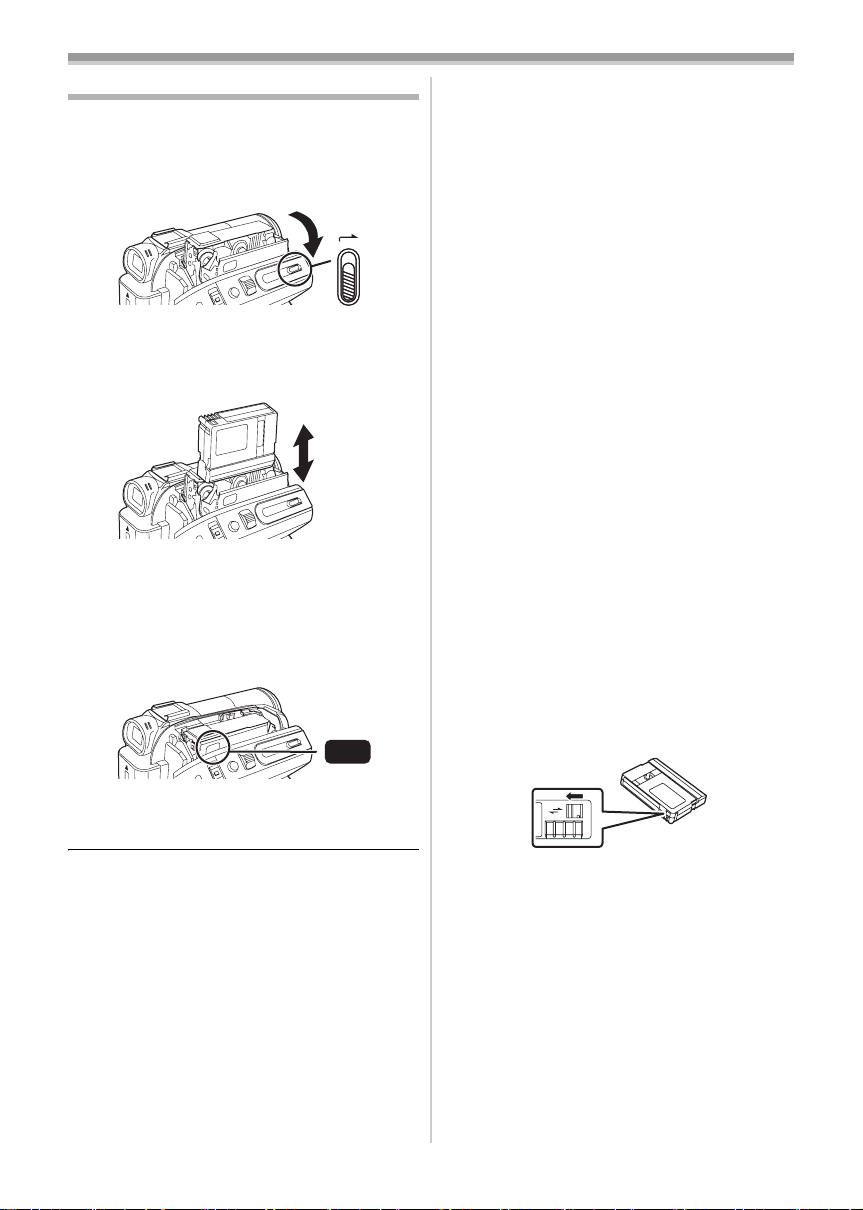
Inserting/removing a cassette
1 Fit the AC adaptor or the battery and turn on
the power.
2 Slide the [OPEN/EJECT] lever and open the
cassette cover.
OPEN/
EJECT
≥When the cover is fully opened, the cassette
holder will come out.
3 After the cassette holder is opened, insert/
remove the cassette.
≥When inserting a cassette, orient it as shown
in the figure, and then securely insert it as far
as it goes.
≥When removing, pull it straight out.
4 Push the [PUSH] mark 1 in order to close
the cassette holder.
1
PUSH
≥The cassette holder is housed.
5 Only after the cassette holder is completely
housed, close the cassette cover tightly.
≥When inserting a previously recorded cassette,
use the blank search function to find the position
where you want to continue recording. If you are
overwriting a previously recorded cassette, be
sure to find the position where you want to
continue recording.
≥When closing the cassette cover, do not get
anything, such as a cable, caught in the cover.
≥After use, be sure to rewind the cassette
completely, remove it and put it in a case. Store
the case in an upright position. (
-78-)
≥If the indicator of the condensation does not
display on the LCD monitor and/or viewfinder
and you notice condensation on the lens or the
main unit, do not open the cassette cover
otherwise condensation may be formed on the
heads or the cassette tape. (
When the cassette holder does not
ª
-75-)
come out
≥Close the cassette cover completely, and then
open it again completely.
≥Check if the battery has run down.
When the cassette holder cannot be
ª
housed
≥Set the [OFF/ON] switch to [OFF], then to [ON]
again.
≥Check if the battery has run down.
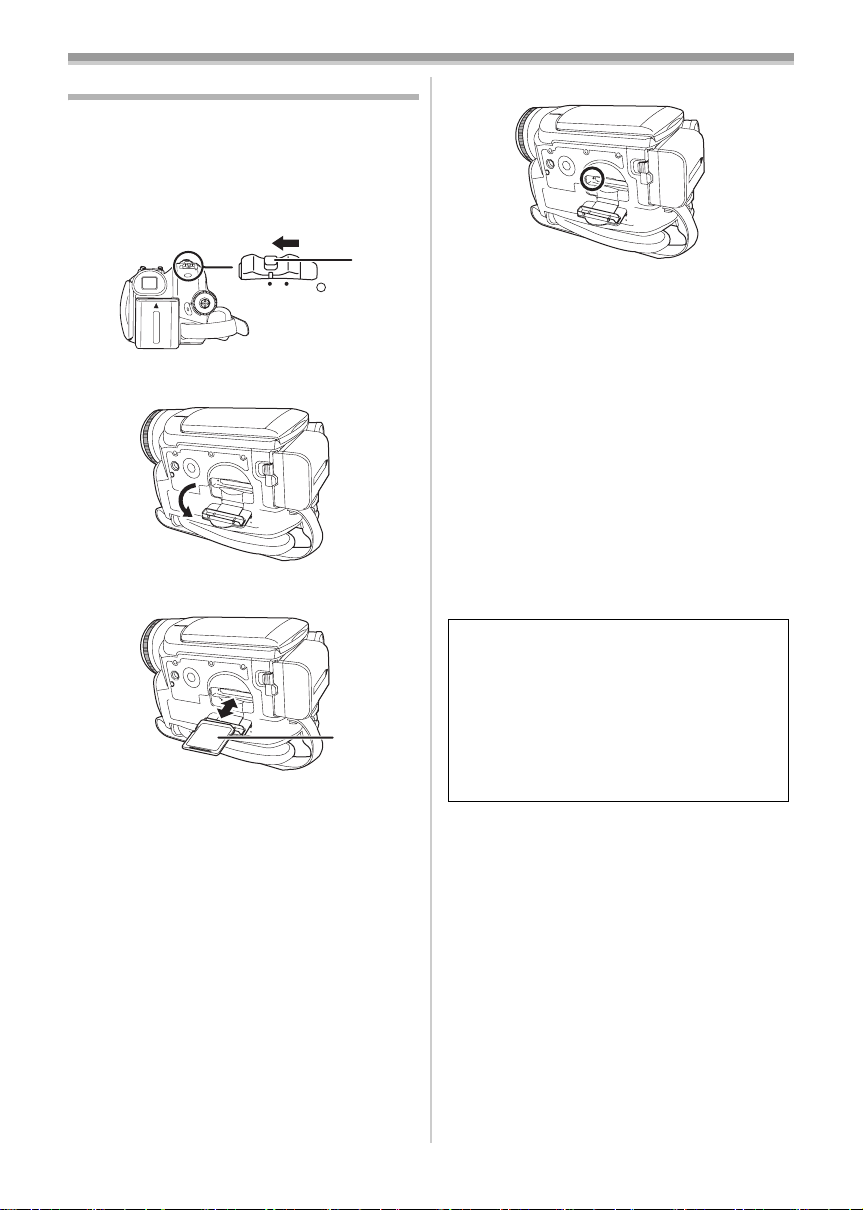
Accidental erasure prevention
ª
If the accidental erasure prevention slider 1 of a
cassette is opened (slide in the direction of the
[SAVE] arrow), the cassette cannot be recorded.
When recording, close the accidental erasure
prevention slider of the cassette (slide in the
direction of the [REC] arrow).
1
R E C
SAVE
15
VQT1L41
Page 16
Before using
Inserting/removing a card
Before inserting/removing a card, set the
[OFF/ON] switch to [OFF].
≥If the card is inserted or removed with the power
turned on, this camera may malfunction or the
data recorded on the card may be lost.
1 Turn off the power 1.
Card access lamp
ª
1
ON
OFF
≥Check that the Status indicator has gone off.
2 Open the card slot cover.
3 Insert/remove the card into/from the card
slot.
1
≥When inserting a card, face the label side 1
towards you and push it straight in with one
stroke as far as it goes.
≥When removing the card, press the centre of
the card and then pull it straight out.
4 Securely close the card slot cover.
Concerning the card
ª
≥Do not format the card with another movie
camera or any personal computer. This
operation may make the card unusable.
≥If you wish to use Memory Cards that are 4 GB,
SDHC Memory Cards only can be used.
≥Memory Cards greater than 4 GB without the
SDHC Logo are not compliant with the SD
specifications.
≥When the camera accesses the card (reading,
recording, playback, erasing, etc.), the access
lamp lights up.
≥If the following operations are performed when
the access lamp is lit, then the card or the
recorded data may be damaged or the camera
may malfunction.
≥Inserting or removing the card.
≥Operating the [OFF/ON] switch or the mode
dial.
≥Removing the battery or AC adaptor.
SD Card
ª
≥The memory capacity indicated on the SD Card
label corresponds to the total amount of
capacity to protect and manage the copyright
and the capacity available as conventional
memory for a movie camera, personal computer
or other equipment.
This unit is compatible with both SD Memory
cards and SDHC Memory cards. You can only
use SDHC Memory cards on devices that are
compatible with them. You cannot use SDHC
Memory cards on devices that are only
compatible with SD Memory cards.
(When using a SDHC Memory card on
another device, be sure to read the operating
instructions for that device.)
Concerning the write protection
ª
switch on the SD Card
≥The SD Card has a write protection switch on it.
If the switch is moved to [LOCK], you cannot
write to the card, erase the data on it, or format
it. If it is moved back, you can.
16
VQT1L41
Page 17
Before using
3
2
4
1
5
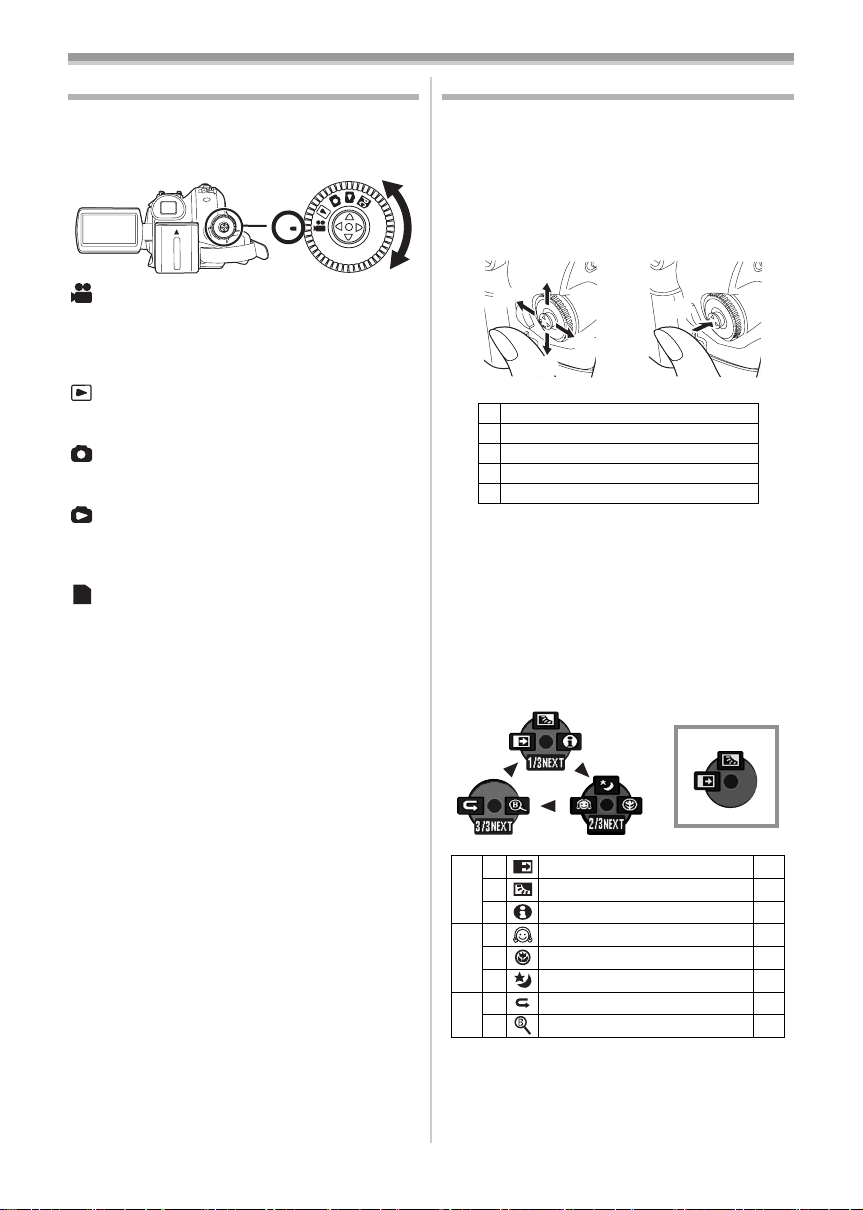
Selecting a mode
Rotate the mode dial to select the desired mode.
1 Rotate the mode dial.
≥Set your desired mode to 1.
1
: TAPE RECORDING MODE
Use this when you record the image on a tape.
(Also, you can simultaneously record still pictures
on a card while recording images on a tape.)
: TAPE PLAYBACK MODE
Use this to play back a tape.
: CARD RECORDING MODE
Use this to record still pictures on a card.
: CARD PLAYBACK MODE
Use this to play back the still pictures recorded on
a card.
: PC CONNECTION MODE
PC
You can view or edit the images recorded on a
card on your personal computer.
-51-
How to use the joystick
ª Basic joystick operations
Operations on the menu screen and selection
of files to be played back on the multi-image
display
Move the joystick up, down, left, or right to select
an item or file, and then push in the centre to set
it.
1 Select by moving up.
2 Select by moving down.
3 Select by moving left.
4 Select by moving right.
5 Determine by pushing the centre.
Joystick and screen display
ª
Push the centre of the joystick, and icons will be
displayed on the screen. Each time the joystick is
moved down, the indication changes.
(In the Tape playback mode or the Card Playback
Mode, the icons will be automatically displayed on
the screen.)
1) Tape recording mode
([AUTO/MANUAL/FOCUS] switch is set to
[AUTO])
1
2 Fade
3 Backlight compensation -30-
1/3
1 Help mode -19-
2 Soft skin mode
1 Tele macro -32-
2/3
3 Colour night view
2 Recording check
3/3
1 Blank search -26-
≥1 is displayed while recording on a tape.
-32-
-31-
-31-
-26-
17
VQT1L41
Page 18
Before using
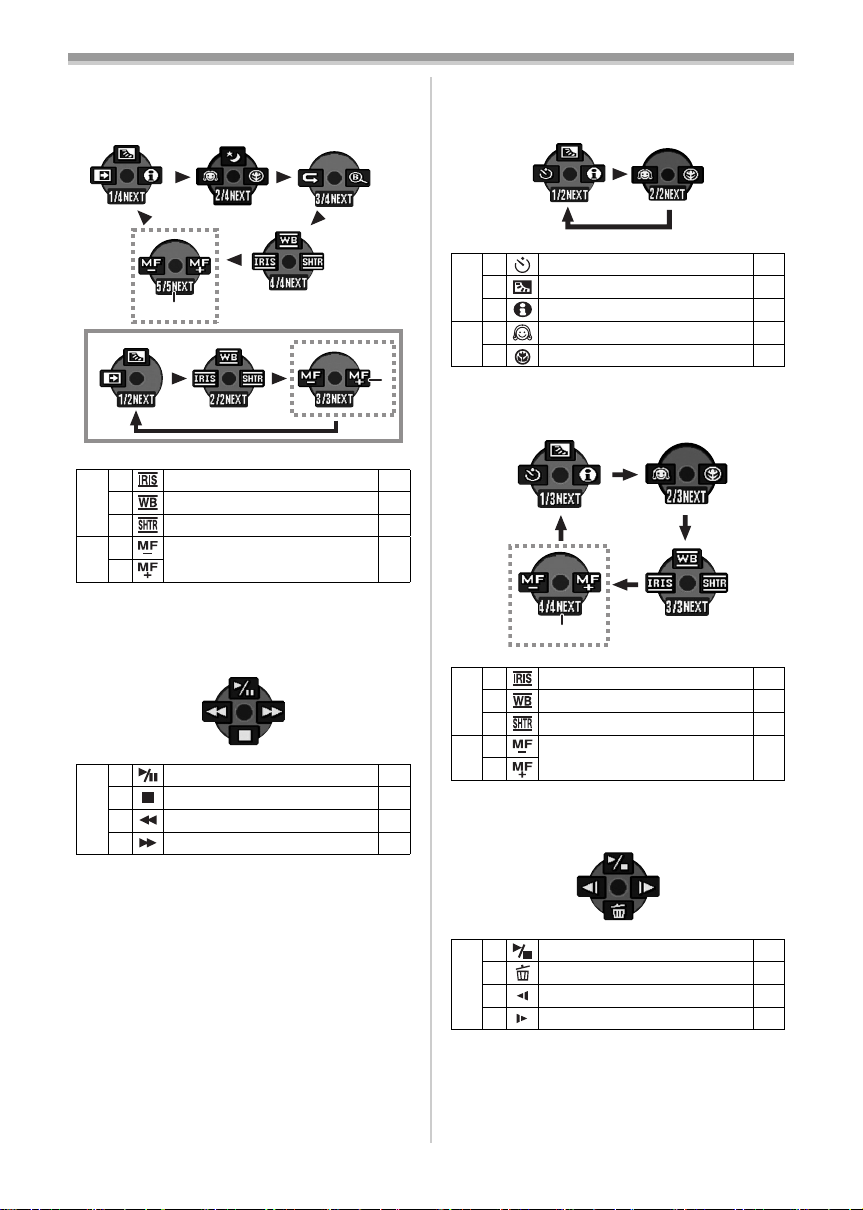
2) Tape recording mode
([AUTO/MANUAL/FOCUS] switch is set to
[MANUAL])
2
1
2 Iris or gain value
3 White balance -37-
4/4
1 Shutter speed -38-
2
5/5
Manual focus adjustment -38-
1
≥1 is displayed while recording on a tape.
≥2 is displayed only when the [AUTO/
MANUAL/FOCUS] switch is set to [FOCUS].
3) Tape playback mode
3 Playback/pause
4 Stop -40-
2 Rewind (review playback) -40-
1 Fast forward (cue playback) -40-
2
4) Card recording mode
([AUTO/MANUAL/FOCUS] switch is set to
[AUTO])
2 Self-timer recording
3 Backlight compensation -30-
1/2
1 Help mode -19-
2 Soft skin mode
2/2
1 Tele macro -32-
5) Card recording mode
([AUTO/MANUAL/FOCUS] switch is set to
[MANUAL])
-38-
2 Iris or gain value
3 White balance -37-
3/3
1 Shutter speed -38-
2
4/4
-40-
1
≥1 is displayed only when the [AUTO/
MANUAL/FOCUS] switch is set to [FOCUS].
6) Card Playback Mode
-34-
-31-
1
-38-
Manual focus adjustment -38-
18
VQT1L41
3 Slide show start/pause
4 Delete -44-
2 Playback the previous picture -43-
1 Playback the next picture -43-
-43-
Page 19
Before using
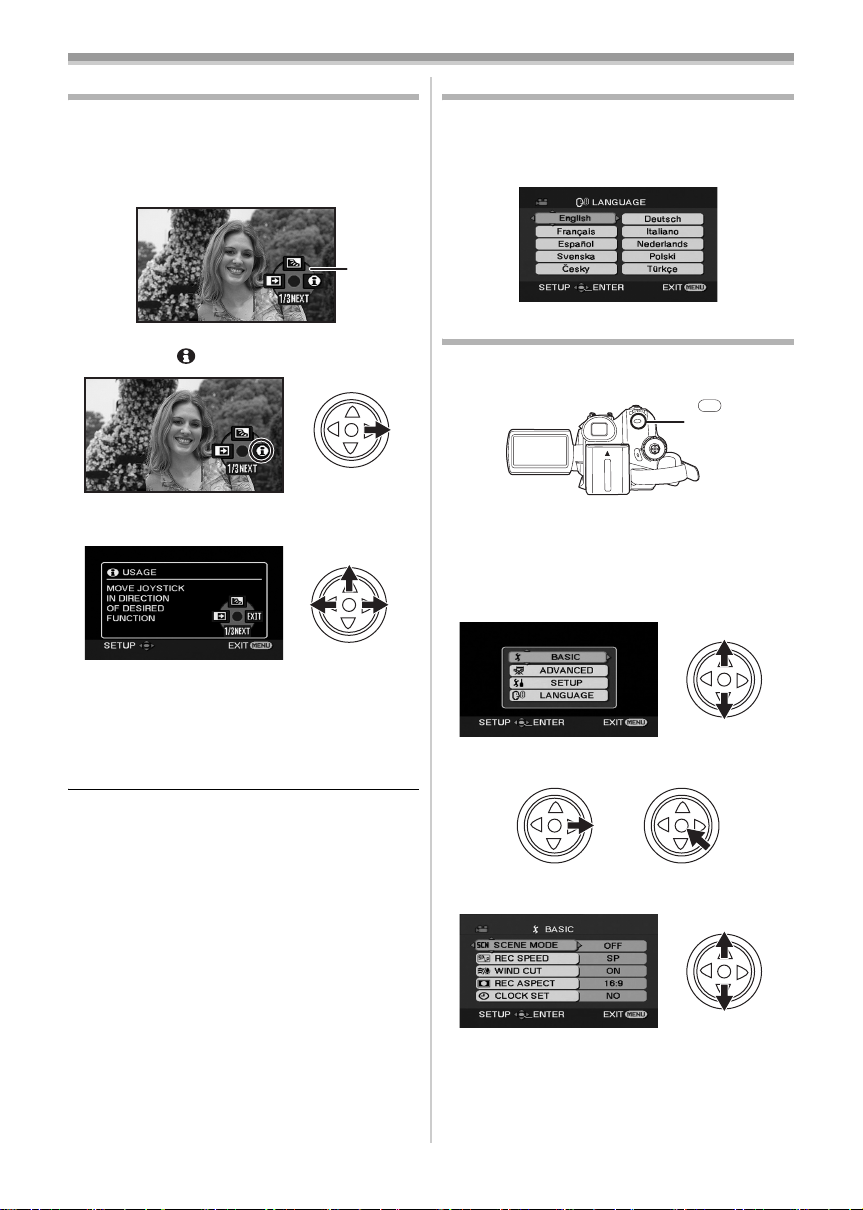
Help mode
Select an icon for an explanation of the function.
≥Set to Tape/Card Recording Mode.
1 Press the joystick to display the icon during
the recording pause. Move the joystick
down until icon 1 appears.
1
2 Move the joystick right to select the Help
mode icon [ ].
3 Move the joystick up, left, or right to select
the desired icon.
Switching the language
You can switch the language on the screen
display or the menu screen.
1 Set [LANGUAGE] >> select the desired
language.
Using the menu screen
For each individual menu, please refer to -64-.
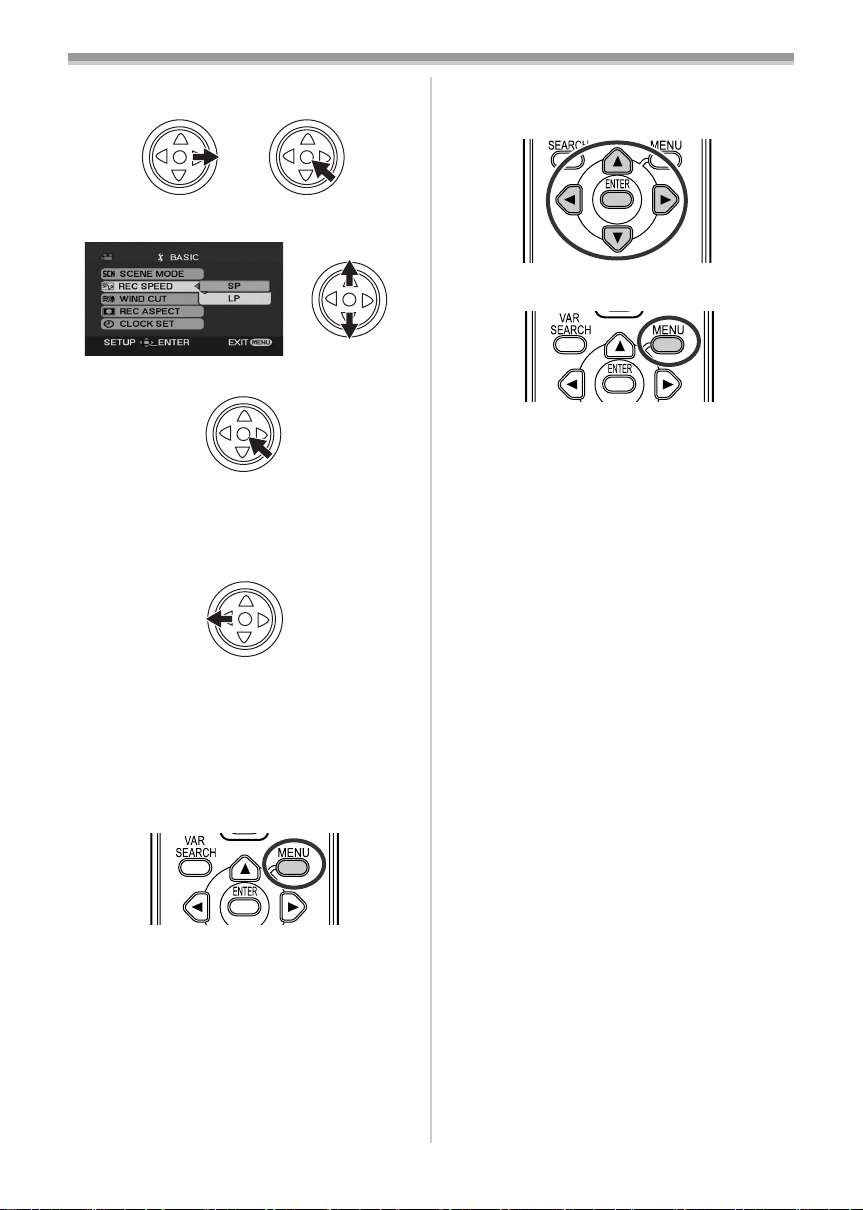
1 Press the [MENU] button.
MENU
≥The menu corresponding to the mode
selected by the mode dial is displayed.
≥Do not switch the mode dial when the menu is
displayed.
2 Move the joystick up or down in order to
select the top menu.
≥An explanation of the selected icon is
displayed on the screen.
≥Each time the joystick is moved down, the
indication changes.
To exit the Help mode
ª
Select [EXIT] icon or press the [MENU] button.
≥When the Help mode is used, it is not possible
to record or set the functions.
3 Move the joystick right or press it to set the
selection.
4 Move the joystick up or down in order to
select the sub-menu.
19
VQT1L41
Page 20
Before using
5 Move the joystick right or press it to set the
selection.
6 Move the joystick up or down in order to
select the item to be set.
7 Press the joystick to determine the setting.
ª
To exit the menu screen
Press the [MENU] button.
To get back to the previous screen
ª
Move the joystick left.
≥Use the direction buttons (3, 2, 1, 4) and
[ENTER] button in place of the joystick on the
main unit.
3 Press the [MENU] button to exit the menu
screen.
About the menu setting
ª
≥The menu is not displayed while recording on a
tape or a card. Also, you cannot record on a
tape or a card while the menu is displayed.
Operating with remote control
ª
The menu screen transition is the same as when
the buttons on the main unit are used.
1 Press the [MENU] button.
2 Select a menu item.
20
VQT1L41
Page 21

Before using
Adjusting LCD monitor/viewfinder
ª Adjusting the brightness and colour
level
Set [SETUP] >> [LCD SET] or [EVF SET] >>
1
[YES].
2 Move the joystick up or down in order to
select the item to be adjusted.
[LCD SET]
:Brightness of the LCD monitor
:Colour level of the LCD monitor
[EVF SET]
:Brightness of the viewfinder
3 Move the joystick left or right to move the
bar indication representing the brightness.
4 Press the [MENU] button or the joystick to
complete the settings.
≥When the LCD monitor is rotated by 180°
towards the lens, the brightness of the LCD
monitor cannot be adjusted.
≥To adjust the brightness of the viewfinder, close
the LCD monitor and extend the viewfinder to
activate it.
≥These settings will not affect the images actually
recorded.
In order to increase the brightness of
ª
the entire LCD monitor
Set [SETUP] >> [POWER LCD] >> [ON].
1
≥The [ ] indication appears on the LCD
monitor.
≥If the [POWER LCD] is set to [ON], the entire
LCD monitor will become approx. twice as
bright as the normal.
≥To cancel the [POWER LCD] function, set
[SETUP] >> [POWER LCD] >> [OFF].
≥This will not affect the images to be recorded.
≥If you turn on the camera when the AC adaptor
is used, the [POWER LCD] function will
automatically be activated.
≥You cannot use this function in PC Connection
Mode.
21
VQT1L41
Page 22
Before using
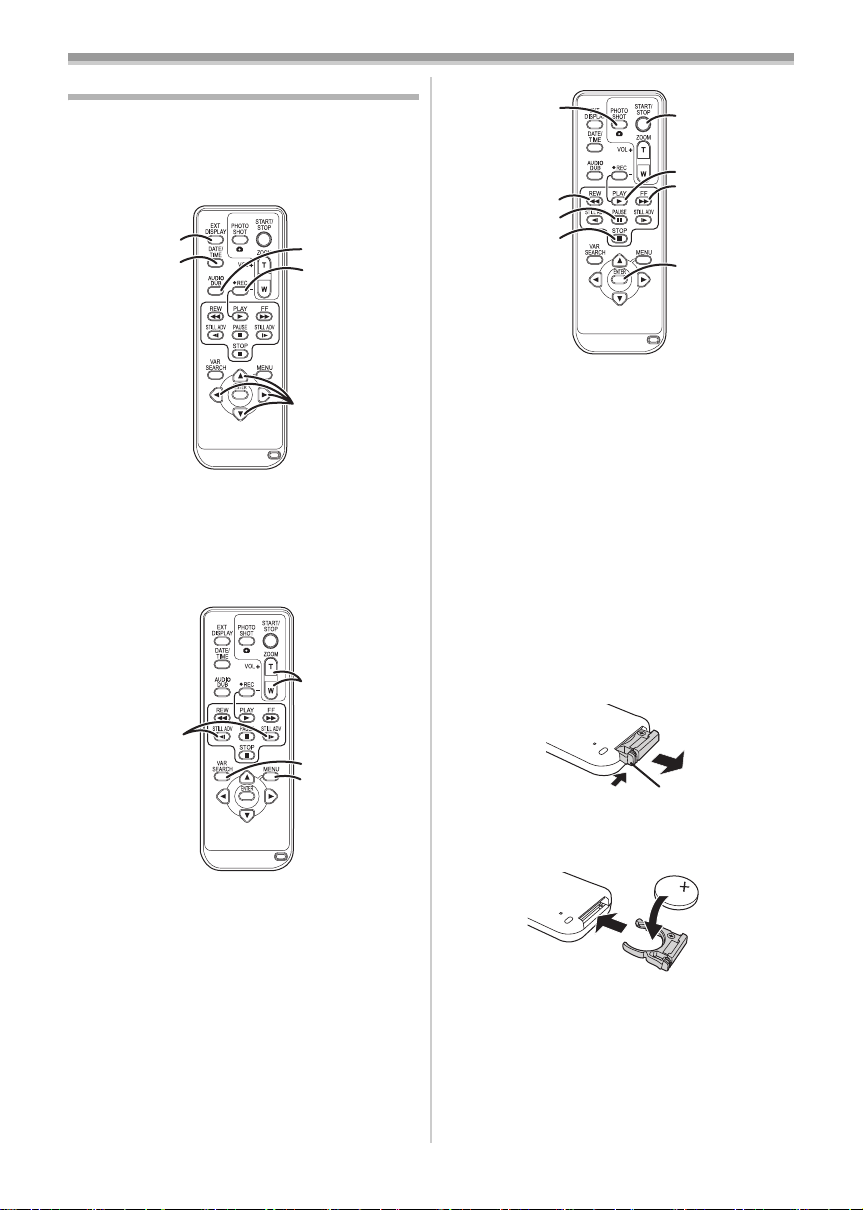
Using the remote control
ª Remote control
Using the remote control supplied will enable
controlling almost all the functions of this camera
to be controlled.
(1)
(2)
(1) On-screen display button [EXT DISPLAY]
-42-
Date/time button [DATE/TIME] -66-
(2)
(3)
Audio dubbing button [AUDIO DUB] -48-
Record button [¥REC] (not operable)
(4)
(5) Direction buttons [3, 2, 1, 4] -20-
(3)
(4)
(5)
(7)
(10)
(11)
(12)
(13)
Photoshot button [PHOTO SHOT] ¢
(10)
(11) Rewind/review button [6]
(12) Pause button [;]
(13) Stop button [∫]
(14) Recording start/stop button
(14)
(15)
(16)
(17)
[START/STOP] ¢
(15) Playback button [PLAY 1]
(16) Fast forward/cue button [5]
(17) Enter button [ENTER] -20-
¢ means that these buttons function in the same
manner as the corresponding buttons on the
movie camera.
Install a button-type battery
ª
Install the button-type battery supplied in the
remote control before using it.
1 While pressing the stopper 1, pull out the
battery holder.
(6)
(8)
(9)
(6)
Slow/frame-by-frame forward button
[E, D] (E: reverse, D: forward)
Zoom/volume button [ZOOM/VOL] ¢
(7)
(8) Search button [VAR SEARCH] -41-
(9)
Menu button [MENU] ¢ -20-
22
VQT1L41
1
2 Set the button-type battery with its (i) mark
facing upward and get the battery holder
back in place.
-41-
Page 23
CAUTION
Danger of explosion if battery is
incorrectly replaced. Replace only with
the same or equivalent type
recommended by the manufacturer.
Dispose of used batteries according to
the manufacturer’s instructions.
Warning
Keep the Button-Type battery out of the
reach of children. Never put ButtonType battery in mouth. If swallowed call
your doctor.
Before using
Selecting the remote control mode
ª
If 2 cameras are used simultaneously, set the
mode for one pair of movie camera and remote
control to [VCR1] and that of the other pair to
[VCR2]. This will prevent interference between
the 2 pairs. (The default setting is [VCR1]. When
the button-type battery is replaced, the setting will
revert to the default [VCR1].)
1 Setting on the camera:
Set [SETUP] >> [REMOTE] >> [VCR1] or
[VCR2].
2 Setting on the remote control:
2 1
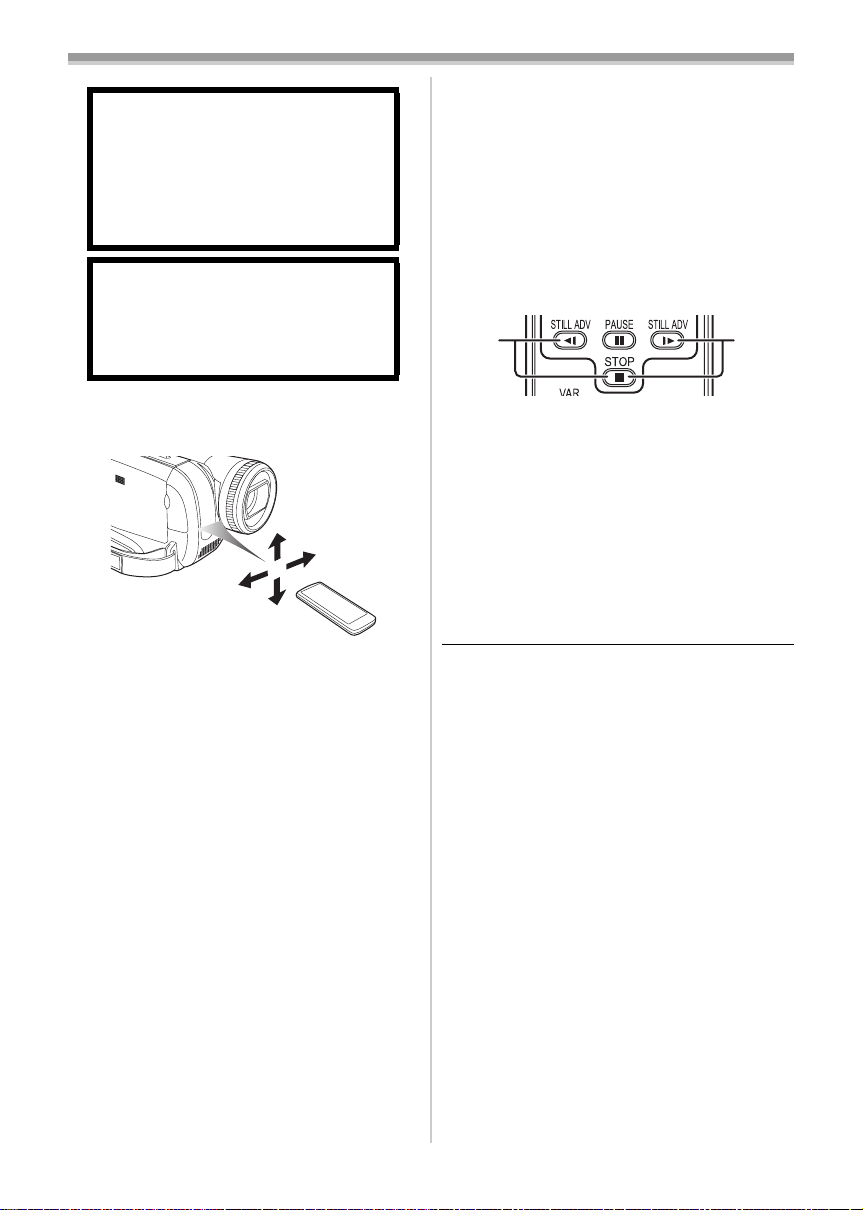
ª Remote control usable range
≥The distance between the remote control and
the camera: Within approx. 5 m
Angle: Approx. 10o up and 15o down, left, and
right
[VCR1]:
Press [D] and [∫] simultaneously. 1
[VCR2]:
Press [E] and [∫] simultaneously. 2
Concerning the button-type battery
ª
≥When the button-type battery runs down,
replace it with a new battery (part number:
CR2025). The battery is normally expected to
last about 1 year, but it depends on operation
frequency.
≥Keep the button-type battery out of the reach of
children.
≥If the remote control mode of the camera and
that of the remote control do not match with
each other, “REMOTE” will appear. When the
remote control is operated for the first time after
the camera is turned on, “CHECK REMOTE
MODE” (
impossible. Set the same remote control mode.
≥The remote control is intended for indoor
operation. Outdoors or under strong light, the
movie camera may not operate properly even
within the usable ranges.
-69-) will appear and operation is
23
VQT1L41
Page 24
Record mode
Record mode
Check before recording
Check the following before recording important
events such as weddings or when the movie
camera has not been used for a long time.
Conduct a test recording to make sure that the image
recording and the audio recording work properly.
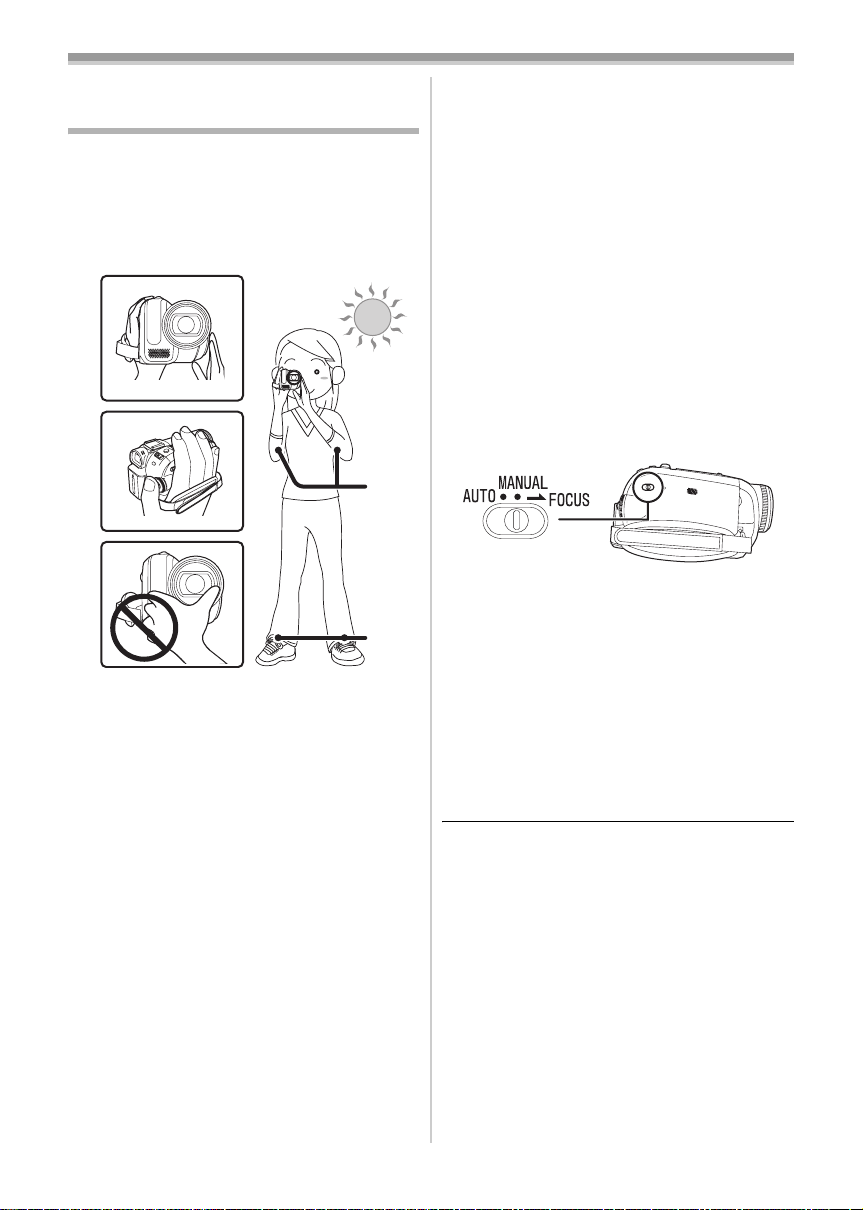
ª Basic camera holding
1)
2)
4)
3)
5)
1) Hold the camera with both hands.
2) Run your hand through the grip belt.
3) Do not cover the microphones or sensors with
your hands.
4) Keep your arms near your body.
5) Slightly open your legs.
≥When you are in the open air, record pictures
with the sunlight as far in the background as
possible. If the subject is backlit, it will become
dark in the recording.
Check points
ª
≥Remove the lens cap. (-8-)
(When the camera is turned on with the lens cap
fitted, the automatic white balance adjustment
may not function properly. Please turn the
camera on after removing the lens cap.)
≥Grip belt adjustment (
≥Open the LCD monitor or extend the viewfinder.
(Recording cannot start while the LCD monitor
and viewfinder are closed. Even if the LCD
monitor and viewfinder are closed during
recording, the power will not turn off until
recording stops.)
≥Adjusting LCD monitor/viewfinder (
24
VQT1L41
-9-)
-21-)
≥Power supply (
≥Insert a cassette/card (
≥Setting date/time (
≥Getting the remote control ready (
≥Setting SP/LP mode (
About auto mode
ª
≥Set the [AUTO/MANUAL/FOCUS] switch to
[AUTO], and colour balance (white balance) and
focusing will be adjusted automatically.
≥Auto white balance:
≥Auto focusing: -80-
≥Depending on the brightness of the subject etc.,
the aperture and shutter speed are
automatically adjusted for an optimum
brightness. (When set to the Tape recording
mode: The shutter speed is adjusted to a
maximum of 1/250.)
≥Colour balance and focus may not be adjusted
depending on light sources or scenes. If so,
manually adjust the white balance and focus.
≥Scene mode setting (
≥White balance setting (
≥Shutter speed setting (
≥Iris/gain value setting (
≥Focus setting (
Recording mode
ª
You can switch the tape recording mode.
≥Set to Tape Recording Mode.
-9-)
-15-, -16-)
-12-)
-22-)
-24-)
-79-
-36-)
-37-)
-38-)
-38-)
-38-)
1 Set [BASIC] >> [REC SPEED] >> [SP] or
[LP].
If the LP mode is selected, the recording time will
be 1.5 times the SP mode, but some functions will
be disabled.
≥We recommend using the SP mode for
important recording.
≥In order to fully exhibit the performances of the
LP mode, we recommend using Panasonic
cassettes marked LP mode.
≥It is not possible to dub audio onto image
recorded in the LP mode. (
≥In the LP mode, the picture quality will not be
degraded in comparison with the SP mode, but
mosaic noise may appear on the playback
image or some functions may be disabled.
≥Playback on other digital video equipment
or on digital video equipment without the LP
mode.
≥Playback of the image on other digital video
equipment recorded in the LP mode.
≥Slow/frame-by-frame playback.
-48-)
Page 25
Record mode
100
Recording on a tape
Remove the lens cap. (-8-)
(When the camera is turned on with the lens
cap fitted, the automatic white balance
adjustment may not function properly. Please
turn the camera on after removing the lens
cap.)
When this unit is purchased, the aspect ratio is
set to [16:9] for recording images compatible with
a wide-screen TV. To make this unit compatible
with regular TVs (4:3), change the
[REC ASPECT] setting before recording the
images (
when watching them on the connected TV (
≥Set to Tape Recording Mode.
1 Press the recording start/stop button to
2 Press the recording start/stop button again
-34-) or change the [TV ASPECT] setting
-42-).
start recording.
to pause recording.
;
ª
On-screen display in the tape
recording mode
1)
0h00m10s00f
100
R0:30
0.2
2)
3)¢
4)¢
5)¢
6)¢
¢These are only displayed when you press the
[ ] button half way while a card is inserted.
These are not displayed when using the remote
control.
1) Recording time elapse
2) Remaining tape indication
3) Still picture size
4) Card indication (
-68-)
5) Number of recordable still pictures
(When no picture can be recorded, this
indication will flash in red.)
6) Quality of still pictures
Concerning the remaining tape time
ª
indication on the screen
≥The remaining tape time is indicated in minutes.
(When it reaches less than 3 minutes, the
indication starts flashing.)
≥During a 15-second or shorter recording, the
remaining tape time indication may not be
displayed or the remaining tape time may not be
displayed correctly.
≥In some cases, the remaining tape time
indication may display remaining tape time that
is 2 to 3 minutes shorter than the actual
remaining tape time.
≥For the recording time on a tape, refer to
≥Carry out a recording check (
-26-) to verify that
-11-.
the image is recorded properly.
≥In order to find the unrecorded section, carry out
the blank search (
-26-).
≥If you want to preserve the original sound
recorded when audio dubbing (
-48-), set
[ADVANCED] >> [AUDIO REC] >> [12bit] to
take pictures.
25
VQT1L41
Page 26

Record mode
Recording check
The last image recorded is played back for 2 to
3 seconds. After checking, the camera will be set
to a recording pause.
≥Set to Tape Recording Mode.
1 Press the joystick to display the icon during
the recording pause. Move the joystick
down until icon 1 appears.
2 Move the joystick left to select the
recording check icon [ ].
1
≥The [RECORDING CHECK STARTED]
indication appears on the screen of the movie
camera.
Blank search function
Searches for the last part of the image recorded
(unused part of the tape). After the search is
finished, the blank search function is cancelled
and the camera is put into recording pause.
≥Set to Tape Recording Mode.
1 Press the joystick to display the icon during
the recording pause. Move the joystick
down until icon 1 appears.
2 Move the joystick right to select the blank
search icon [ ].
1
3 When the confirmation message appears,
select [YES] and press the centre of the
joystick.
Stopping blank search midway
ª
through
Move the joystick down to select the [∫] icon.
26
VQT1L41
≥If the cassette tape has no blank part, then the
camera will stop at the end of the tape.
≥The camera stops at a point approx. 1 second
before the end of the last image recorded.
When you start recording at that point, the
image can be recorded seamlessly from the last
image.
Page 27

Record mode
Recording still pictures on a card
while recording image onto a tape
You can record still pictures while recording
image onto a tape.
≥Set to Tape Recording Mode.
1 Press the [ ] button fully while recording
image onto a tape.
≥For the number of still pictures to be recorded
on a card, refer to
≥When recording pictures onto a card, the
recording start/stop button is disabled.
≥You can select a picture quality for still pictures
to be recorded. (
≥In order to record still pictures with higher
quality, we recommend using the Card
recording mode.
≥When recording still pictures, hold the movie
camera firmly with your hands and keep your
arms stationary at your side so as not to shake
the movie camera.
Select the size of still pictures to be
ª
recorded on a card in Tape Recording
Mode
Set [ADVANCED] >> [PICTURE SIZE] >>
1
select the desired picture size.
REC ASPECT [16:9]:
: 1280t720
1
: 640t360
REC ASPECT [4:3]:
: 1280t960
: 640t480
-82-.
-28-)
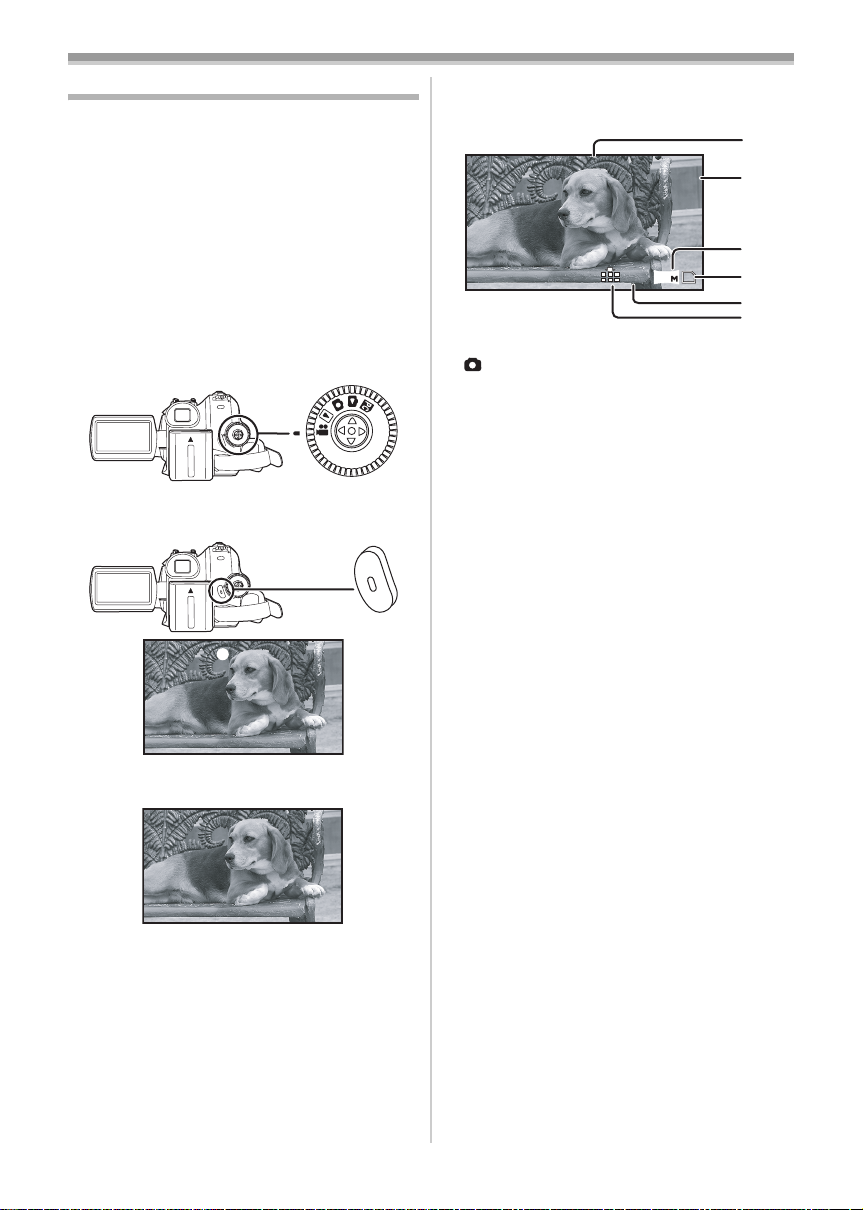
Recording still pictures onto a card
(Photoshot)
≥Set to Card Recording Mode.
1 Press the [ ] button halfway in order to
adjust focusing. (For auto focusing only)
≥If you set [O.I.S.] to [ON], then the image
stabilizer function will be more effective.
MEGA
([ (MEGA OIS)] will be indicated.)
≥The iris/gain value is fixed and this camera
focuses on the subject automatically.
1
2
1 Shutter chance mark
± (The white lamp flashes.):
¥ (The green lamp lights up.):
No mark: When focusing is unsuccessful
≥The shutter chance mark is indicated as
follows when the [ ] button is not pressed
halfway. Please use it as a guide for
recording.
¥ (The green lamp lights up.):
± (The white lamp lights up.):
2 Focus area
2 Press the [ ] button fully.
Focusing
When in focus
When in focus and a good
picture can be recorded
Almost in focus
27
VQT1L41
Page 28

Record mode
100
ª To record still pictures clearly
≥When zooming in on the subject with a
magnification of 4k or higher, it is difficult to
reduce the slight shaking from holding the
movie camera by hand. We recommend
decreasing the zoom magnification and
approaching the subject when recording.
≥When recording still pictures, hold the movie
camera firmly with your hands and keep your
arms stationary at your side so as not to shake
the movie camera.
≥You can record stable pictures without shaking
by using a tripod and the remote control.
≥For the number of still pictures to be recorded
on a card, refer to
≥The moving picture and sound cannot be
recorded.
≥While data are recorded on a card, do not
operate the mode dial.
≥When the access lamp is lit, do not insert or
remove a card.
≥Another product may degrade or not play back
data recorded on this camera.
≥If set [PICT.QUALITY] >> [ ], mosaic-pattern
noise may appear on a playback image
depending on the picture content.
≥When the [PICTURE SIZE] is set to other than
[ ] or [ ], the mega pixel recording mode
is set.
≥It is not possible to press the [PHOTO SHOT]
button on the remote control halfway.
On-screen display in the card
ª
-82-.
recording mode
1)
100
2.4
1) Still picture size
2) Card indication (
3) Number of recordable still pictures
(When no picture can be recorded, this
indication will flash in red.)
4) Quality of still pictures
-68-)
2)
3)
4)
Select the size of still pictures to be
ª
recorded on a card
Set [BASIC] >> [PICTURE SIZE] >> select
1
the desired picture size.
REC ASPECT [16:9]:
: 2048t1152
: 640t360
REC ASPECT [4:3]:
: 2048t1512
: 1600t1200
: 1280t960
: 640t480
≥When you purchase this unit, [REC ASPECT] is
set to [16:9]. The sides of pictures recorded
when [16:9] is set may be cut at printing. Check
before printing.
Select the picture quality for
ª
photoshot images
Set [BASIC] >> [PICT.QUALITY] >> select
1
the desired picture quality.
[ ]: High picture quality
[ ]: Normal picture quality
≥You can also change the picture quality on
[ADVANCED] >> [PICT.QUALITY] in the tape
recording mode.
Recording with a shutter operation
ª
effect
You can add a shutter operation simulating
sound.
1 Set [ADVANCED] >> [SHTR EFFECT] >>
[ON].
About the shutter chance mark
ª
≥The shutter chance mark does not appear in
manual focus mode.
≥When the subject is not easily focused, focus on
the subject manually.
≥You can record still pictures on the card even if
the shutter chance mark does not appear, but
pictures may be recorded without being
focused.
≥The shutter chance mark does not appear or
becomes difficult to be displayed in the following
cases.
≥When the zoom magnification is high.
≥When the movie camera is shaken.
≥When the subject is moving.
≥When the subject stands against the light
source.
≥When close subjects and far subjects are
included in the same scene.
≥When the scene is dark.
≥When there is a bright part in the scene.
≥When the scene is filled with only horizontal
lines.
28
VQT1L41
Page 29
Record mode
1t t W
T
5t t W
T
t W
T
t W
T
≥When the scene lacks contrast.
≥When recording on tape.
Concerning the focusing area
ª
≥When there is a contrasting object ahead or
behind the subject in the focus area, the subject
may not be focused. If so, move the contrasting
object out of the focus area.
≥Even when it is still difficult to focus, adjust the
focus manually.
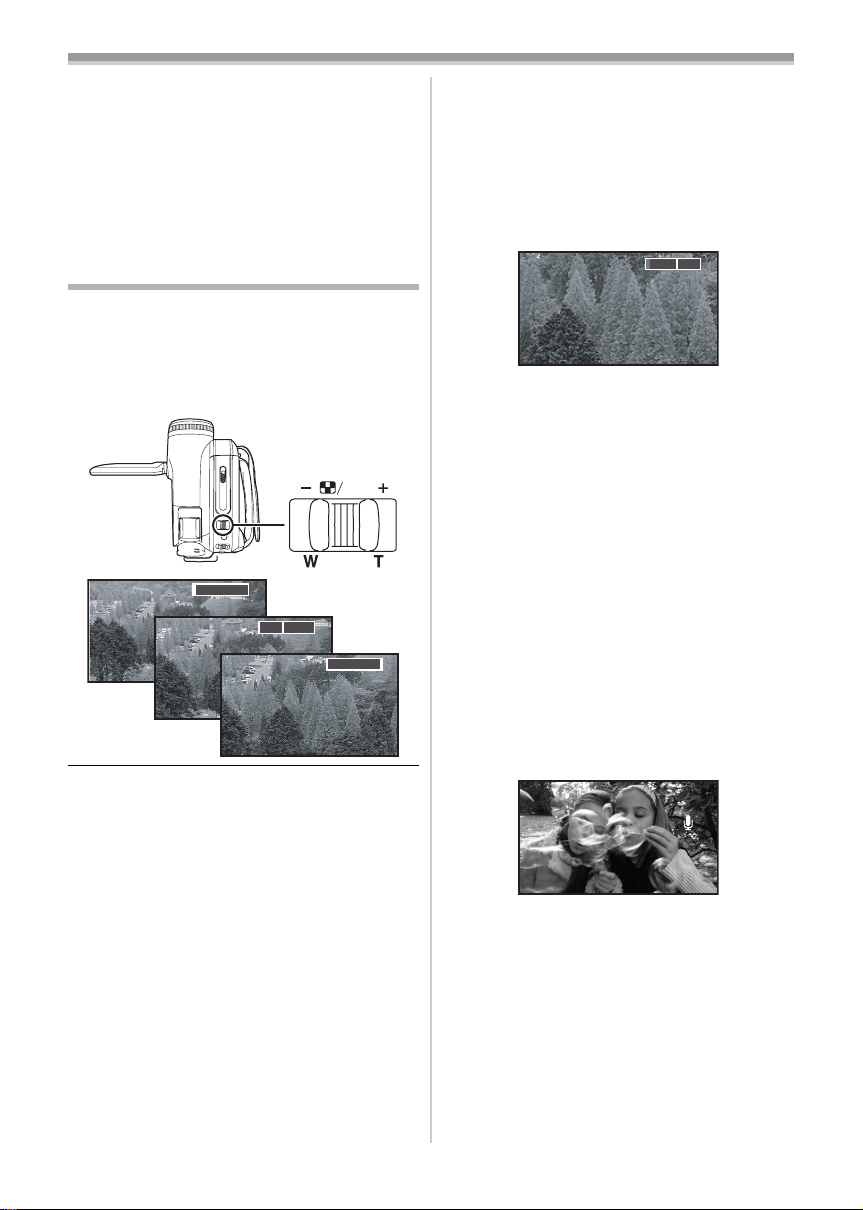
Zoom in/out function
You can zoom in up to 10t optically.
≥Set to Tape/Card Recording Mode.
1 Wide-angle recording (zoom out):
Push the [W/T] lever towards [W].
Close-up recording (zoom in):
Push the [W/T] lever towards [T].
VOL
1010t
≥When zooming in and taking a picture while
holding the movie camera by hand, we
recommend using the image stabilizer function.
≥When you are zooming on a faraway subject, a
sharper focus is achieved if the recording
subject is 1.0 metres or further from the movie
camera.
≥When the zoom speed is high, the subject may
not be focused easily.
≥When the zoom magnification is 1t, the movie
camera can focus on a subject approx. 4.0 cm
distant from the lens.
≥Be aware that a mechanical sound may be
recorded when the [W/T] lever is released while
zooming. Gently move the zoom lever back to
it's original possition before releasing it.
Digital zoom function
ª
If the zoom magnification exceeds 10 times, then
the digital zoom function will be activated. The
digital zoom function allows you to select a
magnification from 25t to 700t.
≥Set to Tape Recording Mode.
1 Set [ADVANCED] >> [D.ZOOM] >> [25t] or
[700t].
5050t
[OFF]: Optical zoom only (Up to 10t)
[25t]: Digital zoom (Up to 25t)
[700t]: Digital zoom (Up to 700t)
≥The larger the digital zoom magnification, the
more the image quality is degraded.
≥When the Card Recording mode is used, the
digital zoom function cannot be used.
About the variable speed zoom
ª
function
≥The zoom speed varies according to the amount
of movement of the [W/T] lever.
≥The variable speed zoom function cannot be
used with the remote control.
To use the zoom microphone function
ª
Interlocked with the zooming operation, the
microphone will collect sounds clearly far away
with the tele-shot or those in the vicinity with the
wide-angle shot.
≥Set to Tape Recording Mode.
1 Set [ADVANCED] >> [ZOOM MIC] >> [ON].
ZOOM
29
VQT1L41
Page 30

Record mode
ª
Recording yourself
You can record yourself while viewing the LCD
monitor. You can record persons in front of the
camera while presenting them the image. The
image is horizontally flipped as if you see a mirror
image. (However the image to be recorded is not
altered.)
≥Extend the viewfinder to see the picture
while recording.
1
Rotate the LCD monitor towards the lens side.
≥
When the Wide function is set, a vertically oriented
display appears on the viewfinder screen, this is
normal and not indicative of any trouble.
≥When the LCD monitor is rotated towards the
lens side, the icon will not be displayed even if
you push the centre of the joystick.
Backlight compensation function
This protects a backlit subject from being darkened.
≥Set to Tape/Card Recording Mode.
1 Press the joystick to display the icon. Move
the joystick down until icon 1 appears.
2 Move the joystick up to select the backlight
compensation icon [ ].
1
≥The [BACKLIGHT COMPENSATION ON]
indication appears on the screen of the movie
camera.
The image on the screen will become brighter.
≥
ª To return to normal recording
Select the [ ] icon again.
≥The [BACKLIGHT COMPENSATION OFF]
indication appears on the screen of the movie
camera.
≥The backlight compensation function is
cancelled when you turn off the power or
operate the mode dial.
≥The backlight compensation is cancelled when
you activate the colour night view function.
30
VQT1L41
Page 31

Record mode
Colour night view function
This function allows you to record colour subjects
in dark locations to stand out against the
background.
Attach the camera to a tripod, and you can record
images free from vibration.
≥Recorded scene is seen as if frames were
missed.
≥Set to Tape Recording Mode.
1 Press the joystick to display the icon. Move
the joystick down until icon 1 appears.
2 Move the joystick up to select the colour
night view icon [ ].
1
≥The [COLOUR NIGHT VIEW ON] indication
appears on the screen of the movie camera.
≥If it is difficult to focus, adjust the focus
manually. (
ª To cancel the colour night view
function
Select the [ ] icon again.
≥The [COLOUR NIGHT VIEW OFF] indication
appears on the screen of the movie camera.
-38-
)
Soft skin mode
This allows the skin colour to be recorded in a
softer tone. This is more effective if you record the
bust image of a person.
≥Set to Tape/Card Recording Mode.
1 Press the joystick to display the icon. Move
the joystick down until icon 1 appears.
2 Move the joystick left to select the soft skin
icon [ ].
11
≥The [SOFT SKIN MODE ON] indication
appears on the screen of the movie camera.
To cancel the soft skin mode
ª
Select the [ ] icon again.
≥The [SOFT SKIN MODE OFF] indication
appears on the screen of the movie camera.
≥If the background or anything else in the scene
has colours similar to the skin colour, they will
also be smoothed.
≥If the brightness is insufficient, the effect may
not be clear.
≥If set in a bright place, the screen may become
whitish for a while.
≥The colour night view function makes the signal
charging time of the CCD up to approximately
25k longer than usual, so that dark scenes (a
minimum of 1 lx) can be recorded brightly. For
this reason, bright dots that are usually invisible
may be seen, but this is not a malfunction.
≥The colour night view function is cancelled when
you turn off the power or operate the mode dial.
31
VQT1L41
Page 32

Record mode
B
Tele macro function
By focusing only on the subject and blurring the
background, the image can be impressive. This
camera can focus on the subject at a distance of
approx. 50 cm.
≥Set to Tape/Card Recording Mode.
1 Press the joystick to display the icon. Move
the joystick down until icon 1 appears.
2 Move the joystick right to select the tele
macro icon [ ].
1
≥The [TELE MACRO ON] indication appears
on the screen of the movie camera.
≥If the magnification is 10k or less, then it is
automatically set to 10k.
To cancel the tele macro function
ª
Select the [ ] icon again.
≥The [TELE MACRO OFF] indication appears on
the screen of the movie camera.
≥If a sharper focus cannot be achieved, adjust
the focus manually.
≥In the following cases, the tele macro function is
cancelled.
≥The zoom magnification becomes lower than
10k.
≥The power is off or the mode dial is operated.
Fade in/fade out function
Fade in
The image and audio gradually appear.
Fade out
The image and audio gradually disappear.
≥Set to Tape Recording Mode.
1 Press the joystick to display the icon. Move
the joystick down until icon 1 appears.
2 Move the joystick left to select the fade icon
[].
1
≥The [FADE ON] indication appears on the
screen of the movie camera.
3 Press the recording start/stop button.
Start recording. (fade in)
When you start recording, the image/audio
disappeared completely and the image/audio
gradually appears.
Pause recording. (fade out)
The image/audio gradually disappears. After the
image/audio completely disappears, recording
stops.
32
VQT1L41
Page 33

Record mode
ª To cancel fading
Select the [ ] icon again.
≥The [FADE OFF] indication appears on the
screen of the movie camera.
To select the colour for fade in/out
ª
The colour which appears in fading pictures can
be selected.
1 Set [ADVANCED] >> [FADE COLOUR] >>
[WHITE] or [BLACK].
≥While the fade in/fade out function is selected, it
takes several seconds to display the image
when you start recording images. Besides, it
also takes several seconds to pause recording.
Wind noise reduction function
This reduces the wind noise coming into the
microphone when recording.
≥Set to Tape Recording Mode.
1 Set [BASIC] >> [WIND CUT] >> [ON].
ª
To cancel the wind noise reduction
function
Set [BASIC] >> [WIND CUT] >> [OFF].
≥The default setting is [ON].
≥Reduces the wind noise depending on the wind
strength. (If this function is activated in strong
winds, the stereo effect may be reduced. When
the wind weakens, the stereo effect will be
restored.)
Anti-Ground-Shooting (AGS)
This function prevents unnecessary recording
when you forget to pause recording and walk with
the camera tilted upside down while recording
continues.
≥If the movie camera continues to be tilted
upside down from the normal horizontal position
while recording on a tape, it is automatically put
into recording pause.
AGS: Anti-Ground-Shooting
≥Set to Tape Recording Mode.
1 Set [SETUP] >> [AGS] >> [ON].
To cancel Anti-Ground-Shooting
ª
Set [SETUP] >> [AGS] >> [OFF].
≥The AGS function may activate and cause the
movie camera to pause the recording if you are
recording a subject right above or right below
you. In these cases, set [AGS] >> [OFF] then
continue the recording.
≥Use the recording start/stop button to pause or
stop the recording. The AGS function is only a
backup function for when you forget to pause
the recording.
≥The time it takes the camera to be put into
recording pause after being tilted upside down
varies depending on the operating conditions.
33
VQT1L41
Page 34

Record mode
Self-timer recording
You can record still pictures on a card using the
timer.
≥Set to Card Recording Mode.
1 Press the joystick to display the icon. Move
the joystick down until icon 1 appears.
2 Move the joystick left to select the self-timer
recording icon [ ].
1
≥The [SELF-TIMER ON] indication appears on
the screen of the movie camera.
3 Press the [ ] button.
≥After the [ ] indication flashes for
approx. 10 seconds, recording will start. After
recording, the self-timer will be cancelled.
≥If you press the [ ] button halfway and then
fully, the subject is focused when the button is
pressed halfway.
≥When you press the [ ] button fully, the
subject is focused just before recording.
To stop the timer midway through
ª
Press the [MENU] button.
≥The self-timer standby mode is cancelled when
you turn off the power or operate the mode dial.
Wide/4:3 Function
This allows you to record images compatible with
wide-screen TVs.
Wide Function
Images are recorded with a 16:9 aspect ratio.
4:3 Function
Images are recorded with a 4:3 aspect ratio.
≥Set to Tape/Card Recording Mode.
1 Wide Function
Set [BASIC] >> [REC ASPECT] >> [16:9].
4:3 Function
Set [BASIC] >> [REC ASPECT] >> [4:3].
To Cancel the Wide/4:3 Function
ª
Wide Function
Set [BASIC] >> [REC ASPECT] >> [4:3].
4:3 Function
Set [BASIC] >> [REC ASPECT] >> [16:9].
≥The default setting is [16:9].
≥In the wide-screen mode, the menu screens,
operation icons and other screen displays
appear horizontally oriented.
≥When images are played back on a TV screen,
the date/time indication may be erased in some
cases.
≥Depending on the TV, the picture quality may
deteriorate.
≥If still pictures recorded with a 4:3 aspect ratio
are played back when [TV ASPECT] is set to
[16:9], part of the operation icons and other
displays will appear on the black bands on the
left and right of the picture.
≥Concerning the TV to be connected and TV
used for playback.
≥When playing back images taken by this unit
on a TV screen, change the setting
established by Tape/Card playback mode
[SETUP] >> [TV ASPECT] to match the
aspect ratio (4:3 or 16:9) of the TV monitor to
be connected. (
≥Depending on the settings of the TV
connected, the images may not be displayed
properly. For more information, please read
the operating instructions for the TV.
-42-)
34
VQT1L41
Page 35

Record mode
Image stabilizer function
Reduces the image shaking due to hand
movement when recording.
≥Set to Tape/Card Recording Mode.
1 Set [ADVANCED] >> [O.I.S.] >> [ON].
ª
To cancel the image stabilizer function
Set [ADVANCED] >> [O.I.S.] >> [OFF].
≥When recording still pictures in the Card
Recording mode, pressing the [ ] button
halfway increases the effect of the image
stabilizer function. (MEGA OIS)
≥In the following cases, the image stabilizer
function may not work effectively.
≥When the digital zoom is used
≥When a conversion lens is used
≥When the camera is shaken greatly
≥When you record a moving subject while
tracking it
Guideline function
View the slope and the balance of the image
while recording.
You can check if the image is level while
recording motion pictures. The function can also
be used to estimate the balance of the
composition.
≥Set to Tape/Card Recording Mode.
1 Set [ADVANCED] >> [GUIDE LINES] >>
[ON].
ª
To Cancel the Guideline Function
Set [ADVANCED] >> [GUIDE LINES] >> [OFF].
≥The guide lines do not appear on the images
actually recorded.
35
VQT1L41
Page 36

Record mode
Recording in various situations
(Scene mode)
When you record images in different situations,
this mode automatically sets optimum shutter
speeds and apertures.
≥Set to Tape/Card Recording Mode.
1 Set the [AUTO/MANUAL/FOCUS] switch to
[MANUAL].
2 Set [BASIC] >> [SCENE MODE] >> select the
desired mode.
1)
3)
5)
1) [5] Sports mode
≥To record sports scenes or scenes where
there are quick motions
2) [ ] Portrait mode
≥To make persons stand out against the
background
3) [ ] Low light mode
≥To record dark scenes so they are brighter
4) [ ] Spotlight mode
≥To record subjects spotlit in a party or
theatre
5) [ ] Surf & snow mode
≥To record images at dazzling places such
as ski slopes and beaches
To cancel the scene mode function
ª
Set [BASIC] >> [SCENE MODE] >> [OFF] or set
the [AUTO/MANUAL/FOCUS] switch to [AUTO].
2)
4)
Sports mode
≥For slow-motion playback or playback pause
of recorded pictures, this mode presents free
of camera shakes.
≥During normal playback, the image
movement may not look smooth.
≥Avoid recording under fluorescent light,
mercury light or sodium light because the
colour and brightness of the playback image
may change.
≥If you record a subject illuminated with strong
light or a highly reflective subject, vertical
lines of light may appear.
≥If the brightness is insufficient, the sports
mode does not function. The [5] indication
flashes.
≥If this mode is used indoors, the screen may
flicker.
Portrait mode
≥If this mode is used indoors, the screen may
flicker. If so, change the scene mode setting
to [OFF].
Low light mode
≥Extremely dark scenes may not be able to be
recorded finely.
Spotlight mode
≥If the recording subject is extremely bright,
the recorded image may become whitish and
the periphery of the recorded image
extremely dark.
Surf & snow mode
≥If the recording subject is extremely bright,
the recorded image may become whitish.
36
VQT1L41
Page 37

Record mode
Recording in natural colours
(White balance)
The automatic white balance function may not
reproduce natural colours depending on the
scenes or lighting conditions. If so, you can adjust
the white balance manually.
≥Set to Tape/Card Recording Mode.
1 Set the [AUTO/MANUAL/FOCUS] switch to
[MANUAL].
2 Move the joystick up to select the white
balance icon [ ].
MNL
3 Move the joystick left or right in order to
select the white balance mode.
1)
1
AWB
3)
1
1) Auto white balance adjustment [ ]
2) Indoor mode (for recording under
incandescent lamps) [ ]
3) Outdoor mode [ ]
4) Manual adjustment mode [ ]
To restore to the automatic
ª
adjustment
Move the joystick left or right until the [ ]
indication appears. Or, set the [AUTO/MANUAL/
FOCUS] switch to [AUTO].
2)
1
4)
1
AWB
AWB
≥When the camera is turned on with the lens cap
fitted, the automatic white balance adjustment
may not function properly. Please turn the
camera on after removing the lens cap.
≥When setting both the white balance and the
iris/gain, set the white balance first.
≥Whenever recording conditions change, re-set
the white balance for correct adjustment.
To set the white balance manually
ª
Select [ ] in Step 3. Then, while viewing a white
subject on the entire screen, move the joystick up
to select the [ ] indication.
About flashing of the [ ] indication
ª
When the manual adjustment mode is
selected
≥Flashing indicates that the white balance
previously adjusted is stored. This setting is
stored until the white balance is adjusted again.
When white balance cannot be set in the
manual adjustment mode
≥White balance may not be adjusted properly in
the manual adjustment mode in dark places. If
so, use the auto white balance mode.
During setting in the manual adjustment mode
≥When the setting is completed, it will keep lit.
About the white balance sensor
ª
The white balance sensor detects the type of light
source during recording.
≥Do not cover the white balance sensor during
recording, or it may not function properly.
About the black balance adjustment
ª
This is one of the 3CCD system functions that
automatically adjusts the black when the white
balance is set in the manual adjustment mode.
When the black balance is being adjusted, the
screen will temporarily be black. (It is not possible
to adjust the black sensor manually)
1
2
3
1 Black balance adjustment (Flashes.)
2 White balance adjustment (Flashes.)
3 Adjustment completed (Lights up.)
37
VQT1L41
Page 38

Record mode
MF
MF
Manual focus adjustment
If auto focusing is difficult due to the conditions,
then manual focusing is available.
≥Set to Tape/Card Recording Mode.
1 Set the [AUTO/MANUAL/FOCUS] switch to
[MANUAL].
2 Set the [AUTO/MANUAL/FOCUS] switch to
[FOCUS].
MNL
MF
≥The [ ] indication and the manual focus
3 Move the joystick left or right in order to
MNL
[MF] indication is displayed.
adjust the focus.
MNL
MF
Manual shutter speed/aperture
adjustment
Shutter Speed
Adjust it when recording fast-moving subjects.
Aperture
Adjust it when the screen is too bright or too dark.
≥Set to Tape/Card Recording Mode.
1 Set the [AUTO/MANUAL/FOCUS] switch to
[MANUAL].
2 Move the joystick left or right to select the
aperture icon [ ] or shutter speed icon
[].
MNL
3 Move the joystick left or right in order to
adjust the shutter speed or aperture.
MNL
1/50
OPEN
OdB
MNL
1)
MNL
1/1000
2)
1/50
F2.0
0dB
≥When focused with a wide angle, the subject
may not be in focus when zoomed in. First,
zoom in on the subject, and then focus on it.
To restore to the automatic
ª
adjustment
Set the [AUTO/MANUAL/FOCUS] switch to
[AUTO] or [FOCUS].
38
VQT1L41
1) Shutter speed
2) (Aperture) Iris/gain value
ª
To restore to automatic adjustment
Set the [AUTO/MANUAL/FOCUS] switch to
[AUTO].
Page 39

Record mode
Manual shutter speed adjustment
≥Avoid recording under fluorescent light, mercury
light or sodium light because the colour and
brightness of the playback image may change.
≥If you increase the shutter speed manually, the
sensitivity lowers and accordingly the gain value
increases automatically, which may increase
the noises on the screen.
≥You may see vertical lines of light in the
playback image of a brightly shining subject or
highly reflective subject, but this is not a
malfunction.
≥During normal playback, image movement may
not look smooth.
≥When recording in the extremely bright place,
the colour of the screen may change or flickers.
If so adjust the shutter speed manually to 1/50
or 1/100.
Manual iris/gain adjustment
≥Set the shutter speed before setting the
aperture (iris/gain) when manually adjusting
both settings.
≥If the value does not become “OPEN”, you
cannot adjust the gain value.
≥If the gain value is increased, the noise on the
screen increases.
≥Depending on the zoom magnification, there are
iris values that are not displayed.
Shutter speed range
ª
1/50 to 1/8000 seconds: Tape Recording Mode
1/25 to 1/2000 seconds: Card Recording Mode
The shutter speed closer to 1/8000 is faster.
Iris/gain value range
ª
CLOSE (Closed), F16, ..., F2.0,
OPEN (Opened: F1.8) 0dB, ..., 18dB
Value closer to [CLOSE] darken the image.
Value closer to [18dB] brighten the image.
Values with dB are gain values.
39
VQT1L41
Page 40

Playback mode
Playback mode
Playing back tape
≥Set to Tape Playback Mode.
(An operation icon automatically appears on
the LCD monitor.)
1 Operate with joystick.
1/;: Playback/Pause
6: Rewind/Review playback (Reverts to
playback with the 1/; icon.)
5: Fast forward/Cue playback (Reverts to
playback with the 1/; icon.)
∫:Stop
≥The power will not turn off when the LCD
monitor and the viewfinder are closed and
retracted during Tape/Card playback mode.
≥During cue/review playback, fast-moving
images may show noise as a mosaic.
≥Before and after cue/review playback, the
screen may become black for a moment or
images may be disturbed.
To adjust volume
ª
Adjust the speaker volume for playback.
1 Move the [j /VOLi] lever to adjust the
volume.
VOL
Towards [i]: increases the volume
Towards [j]: decreases the volume
(Nearer the bar to [i], larger the volume.)
≥On the remote control, press the [T] button to
increase the volume or the [W] button to
decrease it.
≥When the adjustment is completed, the volume
indication will disappear.
≥If you do not hear the sound, check the settings
of [SETUP] >> [12bit AUDIO].
Repeat playback
ª
When the tape end is reached, the tape will be
rewound and played back again.
1 Set [ADVANCED] >> [REPEAT PLAY] >>
[ON].
≥The [ ] indication appears. (In order to
cancel the repeat playback mode, set
[REPEAT PLAY] >> [OFF] or turn off the
power.)
≥When you set [USB FUNCTION] >> [WEBCAM]
and then connect the USB cable, the repeat
playback mode is cancelled.
Settings on the audio
ª
≥If you cannot listen to the desired audio when
playing back a tape, check the settings in
[SETUP] >> [12bit AUDIO].
≥When you record and dub the audio in [12bit]
and set [SETUP] >> [12bit AUDIO] >> [MIX], the
audio will be played back in stereo sound
regardless of the settings in [AUDIO OUT].
40
VQT1L41
Page 41

Playback mode
Slow-motion playback/
frame-by-frame playback
≥Set to Tape Playback Mode. (Slow-motion
playback can only be performed by using
the remote control.)
Slow-motion playback
If the image is recorded in the SP mode, then it
will be played back at a speed approx. 1/5 the
normal speed.
If the image is recorded in the LP mode, then it
will be played back at a speed approx. 1/3 the
normal speed.
1 Press the [E] button or the [D] button on
the remote control.
≥If the slow-motion playback continues for
approx. 10 minutes or more, then the
playback will automatically stop. (10 minutes
of slow-motion playback is equivalent to
approx. 2 minutes in the SP mode or approx.
3 minutes in the LP mode.)
Frame-by-frame playback
1 During playback, press the [;] button on
the remote control.
2 Press the [E] button or the [D] button on
the remote control.
≥The pause icon appears for an instant.
Continuous frame-by-frame playback will start
after the pause icon disappears.
To return to normal playback
ª
Press the [PLAY 1] button on the remote control
or move t he joystick up to the [1] icon to start
playback.
Slow-motion playback
≥In the reversed slow-motion playback, the time
code indication may be unstable.
Frame-by-frame playback
≥Press and hold the [E] or the [D] button in the
playback pause, and then the images will
continuously be played back frame by frame.
Variable-speed search function
The speed of cue/review playback can be varied.
(This operation is only available when using
the remote control.)
≥Set to Tape Playback Mode and play back a
tape.
1 Press the [VAR SEARCH] button on the
remote control.
2 Press the [3] or [4] button to vary the
speed.
≥Pushing the [s /VOLr] lever towards [T]
(normal direction) or towards [W] (reversed
direction) of this camera during playback
pause also turns into the frame-by-frame
playback. If you keep pushing the lever, then
the images will continuously be played back
frame by frame.
≥The speeds for cue/review playback are 1/5k
(SP mode slow-motion playback only), 1/3k (LP
mode slow-motion playback only), 2k, 5k,
10k, 20k.
To return to normal playback
ª
Press the [VAR SEARCH] button or [PLAY 1]
button on the remote control.
≥Images may be shown in a mosaic-like pattern.
≥The sound is muted during search.
≥This function is cancelled when the operation
icon is displayed.
≥When you cue/review playback at 20k, the
speed switches to 10k near both ends of the
tape. ([10k] flashes on the screen.)
41
VQT1L41
Page 42

Playback mode
A/V
Playback on TV
Images recorded by this camera can be played
back on a TV.
≥Insert a recorded tape or card into this
camera.
≥Be sure that the power of the unit is turned off
before connecting it to a TV.
1 Connect the movie camera and a TV.
2
[AUDIO IN]
A/V
1
≥Connect the movie camera and a TV by using
the Multi cable 1.
≥If the TV has an S-Video terminal, then also
connect to this terminal 2. It allows you to
enjoy more beautiful images. (Do not forget to
also connect to the Video and Audio
terminals.)
2 Turn on this camera and set the mode dial
to the Tape Playback Mode (or Card
Playback Mode).
3 Select the input channel on the TV.
≥If the images are not played back correctly on
the TV (e.g. they are displayed vertically),
perform the menu operations in accordance
with the aspect ratio of the TV monitor.
Set [SETUP] >> [TV ASPECT] >> [16:9] or
[4:3].
[S-VIDEO IN]
[VIDEO IN]
4 Move the joystick up to select the [1/;]
icon to start playback.
≥The image and audio are output on the TV.
5 Move the joystick down to select the [∫]
icon to stop playback.
≥Whenever plugging in the S-Video terminal,
plug in the VIDEO IN terminal and AUDIO IN
terminal, too.
≥Use the AC adaptor to free you from worrying
about the battery running down.
If the image or audio from this camera
ª
is not output on the TV
≥Check that the plugs are inserted as far as they
go.
≥Check the [12bit AUDIO] settings. (
≥Check the connected terminal.
≥Check the TV’s input setting (input switch).
(For more information, please read the
operating instructions for the TV.)
To display the on-screen information
ª
-48-)
on the TV
The information displayed on the LCD monitor or
the viewfinder (operation icon, time code and
mode indication, etc.) can be displayed on the
TV.
(This operation is only available when using
the remote control.)
1 Press the [EXT DISPLAY] button on the
remote control.
≥Press the button again to erase the
information.
42
VQT1L41
Page 43

Playback mode
Playing back card
≥Set to Card Playback Mode.
(An operation icon automatically appears on
the LCD monitor.)
To display multiple playback files
ª
Multiple files on the card (6 files on 1 screen) are
displayed.
1 Move the [s /VOLr] lever to switch the
images.
1 Operate with joystick.
E: Plays back the previous picture
D: Plays back the next picture
1/∫: Slide show (Plays back the still pictures
on the card in order) start/pause
≥The power will not turn off when the LCD
monitor and the viewfinder are closed and
retracted during Tape/Card playback mode.
≥Even if the operation icon does not appear, the
previous or next picture can be displayed.
≥While the data on a card are played back, do
not operate the mode dial.
≥When the access lamp is lit, do not remove a
card.
≥It takes time to display the file depending on the
number of pixels of the file.
≥If you attempt to play back file recorded in a
different format or file data is defective, the
whole display becomes bluish and the
“UNPLAYABLE CARD’’ indication may appear
as warning.
≥When playing back still pictures recorded in 4:3
mode ( , , , ) on a wide-screen TV,
the picture quality may deteriorate.
≥When playing back a file recorded on other
equipment, the date and time display is different
from when it was recorded.
100‑0001
Towards [i]: Full-screen display
Towards [j]: Multi-screen display
≥In the multi-screen display,
≥Move the joystick to select a file (The
selected file will be encircled by a orange
frame) and press to determine it. The
selected file is full-screen displayed.
≥If there are 7 files or more, then move the
joystick. The next, or previous multi-screen
will be displayed.
About the compatibility of still
ª
(Displays 1 image.)
(Displays 6 files on 1 screen.)
pictures
≥The movie camera is compliant with the unified
standard DCF (Design rule for Camera File
system) established by JEITA (Japan
Electronics and Information Technology
Industries Association).
≥The file format supported by this movie camera
is JPEG. (Not all JPEG formatted files will be
played back.)
≥If an out-of-specs file is played back, the folder/
file name may not be displayed.
≥The movie camera may degrade or not play
back data recorded or created on another
product and another product may degrade or
not play back data recorded on the movie
camera.
43
VQT1L41
Page 44

Playback mode
Deleting files recorded on a card
The deleted files cannot be restored.
≥Set to Card Playback Mode.
1 Move the joystick left or right to select a file
to delete.
≥You can select a file in the multi-screen display.
After selecting the file, press the joystick and
display the operation icon.
2 Move the joystick down to select [ ].
Deleting still picture files recorded on
ª
a card by other equipment
≥A still picture file (other than JPEG) that cannot
be played back on the movie camera may be
erased.
Formatting a card
Please be aware that if a card is formatted, then
all the data recorded on the card will be erased.
Store important data on a personal computer, etc.
≥Set to Card Playback Mode.
1 Set [ADVANCED] >> [FORMAT CARD] >>
[YES].
2 When the confirmation message appears,
select [YES] and press the joystick in order
to format the card.
3 Move the joystick up or down in order to
select [DELETE 1 FILE] and then press it.
4 When the confirming message appears,
select [YES] and press the joystick.
≥In order to stop deletion, select [NO].
To delete all files
ª
1 Move the joystick down to select [ ].
2 Move the joystick up or down in order to
select [ALL FILES] and then press it.
3 When the confirming message appears,
select [YES] and press the joystick.
≥Do not turn off the power while deleting.
≥To delete files, use the AC adaptor or a
sufficiently charged battery.
≥In case of [ALL FILES], the deletion may take
time if there are many files on the card.
≥If the “CARD FULL” indication appears when
recording, the card is full and no further data
can be recorded. Insert a new card or set the
camera to Card Playback Mode and delete
unnecessary files.
≥If files conforming to DCF standard are deleted,
all the data related to the files will be deleted.
≥In order to stop formatting, select [NO].
≥Normally, it is not necessary to format the card.
If a message appears even though you insert
and remove the card several times, format it.
≥If the SD Card is formatted on other equipment,
it may take longer to record or you may not be
able to use the SD Card. In this case, format the
SD Card on this unit.
(Do not format it on a PC etc.)
≥Do not remove the card or turn off the power
while formatting.
≥This unit supports SD Memory Cards formatted
in FAT12 system and FAT16 system based on
SD Memory Card Specifications and SDHC
Memory Cards formatted in FAT32 system.
44
VQT1L41
Page 45

Playback mode
1
Protecting files on a card
Files recorded on a card can be locked so that they
may not be deleted by mistake. (Even if the files are
locked, they will be deleted if the card is formatted.)
≥Set to Card Playback Mode.
1 Set [BASIC] >> [PROTECT] >> [YES].
2 Move the joystick to select a file to be
locked, and then press it.
1
≥[ ] Indication 1 appears and the selected
file is locked. Press the joystick again, and
the lock will be cancelled.
≥2 or more files can be locked in succession.
To complete the settings
ª
Press the [MENU] button.
Writing the printing data on a card
(DPOF setting)
You can write the data of pictures to be printed,
number of copies, and other information (DPOF
data) onto the card.
≥Set to Card Playback Mode.
1 Set [ADVANCED] >> [DPOF SET] >> [SET].
2 Move the joystick to select a file to be set,
and then press it.
≥The number of prints 1 set to be in DPOF is
displayed.
3 Move the joystick up or down in order to
select the number of prints, and then press
it.
≥You can select from 0 to 999. (Selected
number of pictures can be printed as you set
the number of prints with the printer
supporting DPOF.)
≥2 or more files can be set in succession.
To complete the settings
ª
Press the [MENU] button.
≥DPOF setting made on another camera may not
be recognised by this camera. Please perform
the DPOF settings on your movie camera.
ª
To set so that all pictures are not
printed
Select [CANCEL ALL] in Step 1.
ª
What is DPOF?
DPOF stands for Digital Print Order Format. This
enables the printing information to be added to
the pictures on the card so that it can be used on
a system supporting DPOF.
45
VQT1L41
Page 46

Edit mode
A/V
2
(L2)
S
/
Edit mode
Recording from a tape onto a card
Still pictures can be recorded on a memory card
from scenes that have already been recorded on
a cassette.
≥Set to Tape Playback Mode.
≥Insert a tape which already has recorded
contents and a card.
1 Start playback.
2 Pause at the scene you wish to record, and
press the [ ] button.
≥Audio will not be recorded.
≥The size of still pictures recorded on a card
becomes [ ] (16:9) or [ ] (4:3). (This is not
mega pixel still-picture recording.)
≥If you set [TV ASPECT] >> [4:3], black bands
are added to the top and bottom of the picture
when wide pictures are recorded to the card.
-34-)
(
≥If you press the [ ] button without pausing,
blurred pictures may be recorded.
Copying onto a DVD recorder or a
VCR (Dubbing)
Pictures recorded by the movie camera can be
stored on a DVD-RAM or other such media. Refer
to the instructions for the recorder.
≥Place a recorded cassette in the movie
camera, and an unrecorded DVD-RAM or
cassette in the DVD recorder or VCR.
1 Connect the movie camera and the
recorder.
Connecting with the Multi cable
2
[AUDIO IN]
A/V
1
≥Connect the movie camera and the recorder
by using the Multi cable 1.
≥If the recorder has an S-Video terminal, then
also connect to this terminal 2. It allows you
to copy clearer image.
Connecting with the optional DV cable (Only
for equipment with a DV terminal)
(L2)
[S-VIDEO IN]
[VIDEO IN]
46
VQT1L41
2 Turn on the movie camera and set to Tape
Playback Mode.
3 Select the input channel on the TV set and
recorder.
4 Move the joystick up to select the [1/;]
icon to start playback. (Player)
≥The image and sound are reproduced.
5 Start recording. (Recorder)
6 Stop recording. (Recorder)
7 Move the joystick down to select the [∫]
icon to stop playback. (Player)
≥If you record (dub) images onto another video
device and then play them back on a widescreen TV, the images may be stretched
Page 47

Edit mode
vertically. In this case, refer to the operating
instructions for the device that you are recording
(dubbing) to or read the operating instructions
for the TV and set to 16:9 (full).
≥For more information, refer to the operating
instructions for your TV set and recorder.
≥When you do not need functional indications or
date and time indication, respectively set
[SETUP] >> [DISPLAY] >> [OFF] or set [BASIC]
>> [DATE/TIME] >> [OFF] in the Tape Playback
Mode.
(When you connect the movie camera and a
recorder with the DV cable, these indications
may not appear.)
When neither image nor sound from
ª
the movie camera is output to the TV
set
≥Check that the plugs are inserted as far as they
go.
≥Check the [12bit AUDIO] settings. (
≥Check the connected terminal.
-48-)
Using the DV Cable for Recording
(Digital Dubbing)
By connecting other digital video equipment with
DV terminal and the movie camera by using the
DV cable VW-CD1E (optional) 1, high-imagequality dubbing can be done in digital format.
This model cannot be used as a Recorder.
≥Set to Tape Playback Mode.
(Player/recorder)
1 Connect the movie camera and digital video
equipment with the DV cable.
1
2 Start playback. (Player)
3 Start recording. (Recorder)
4 Stop playback. (Player)
≥Do not plug or unplug the DV cable during
dubbing, or the dubbing may not be completed
properly.
≥Even if you use a device equipped with DV
terminals such as IEEE1394, you may not be
able to perform digital dubbing in some cases.
For more information, see the instructions for
equipment connected.
≥Regardless of the menu settings on the
recorder, digital dubbing is carried out in the
same mode as the [AUDIO REC] mode of the
playback tape.
≥The images on the recorder monitor may be
disturbed, but it does not affect the recorded
images.
47
VQT1L41
Page 48

Edit mode
Audio dubbing
You can add music or narration to the recorded
cassette.
(Audio dubbing can only be performed by
using the remote control.)
≥Set to Tape Playback Mode.
1 Find a scene that you want to add sound to,
and press the [;] button on the remote
control.
;
2 Press the [AUDIO DUB] button on the
remote control to make audio dubbing
ready.
A.DUB ;
3 Press the [;] button on the remote control
to start audio dubbing.
Before recording with audio dubbing
ª
≥Set to Tape Recording Mode.
≥When you want to preserve the original sound
taken during recording, set [ADVANCED] >>
[AUDIO REC] >> [12bit] to take pictures. (When
set [16bit], the sounds taken during recording
are erased after recording with audio dubbing.)
≥Set [BASIC] >> [REC SPEED] >> [SP] to take
pictures.
To play back the sound recorded with
ª
audio dubbing
You can switch between the sound recorded with
audio dubbing and the original sound.
Set [SETUP] >> [12bit AUDIO] >> [ST2] or [MIX].
[ST1]: It only plays back the original sound.
[ST2]: It only plays back the sound added by
audio dubbing.
[MIX]: It simultaneously plays back the original
sound and the sound added with audio
dubbing.
≥During audio dubbing, it is automatically set to
[ST2].
A.DUB ¥
≥Be sure that the sound is directed towards the
built-in microphone.
4 Press the [;] button on the remote control
to stop audio dubbing.
≥If a tape has a non-recorded portion when the
tape is dubbed, images and sounds may be
disturbed when this portion of the tape is played
back.
48
VQT1L41
Page 49

Edit mode
Printing pictures by directly
connecting to the printer (PictBridge)
To print pictures by directly connecting the movie
camera to the printer, use a printer compatible
with PictBridge. (Read the operating instructions
for the printer.)
≥Insert a card and set to Card Playback Mode.
1 Connect the movie camera and the printer
with the supplied USB cable.
1
1 USB cable
PictBridge
≥The [PictBridge] indication appears on the
screen of the movie camera.
(When the printer is being recognised, the
[PictBridge] indication blinks.)
≥When no card is inserted in the movie camera,
the [PictBridge] indication does not appear.
(You cannot print any pictures.)
≥When the movie camera and the printer are not
connected properly, the [PictBridge] indication
keeps blinking. (It will blink for over
approx.1 minute.) Connect the cable or check
the printer.
≥When images are displayed in multi-screen,
they cannot be printed.
≥Do not use any other USB connection cables
except the supplied one. (Operation is not
guaranteed with any other USB connection
cables.)
2 Select [SINGLE PRINT] or [DPOF PRINT].
≥If there is no file with a DPOF setting, you
cannot select [DPOF PRINT].
≥When you select [DPOF PRINT] for printing,
set the number of prints in DPOF setting.
≥When [DPOF PRINT] is selected, print after
you determine the paper size. (Step 6)
≥When [DPOF PRINT] is selected,date
printing is unavailable.
3 Move the joystick left and right to select a
desired picture, and then press it.
4 Select the desired number of prints.
≥You can set up to 9 prints.
5 Select the setting for date printing.
≥If the printer is not capable of date printing,
this setting is unavailable.
6 Select [PAPER SIZE].
[STANDARD]: Size specific to the printer
[4a5 INCH]
[5a7 INCH]
[4a6 INCH]
[A4]
≥You cannot set paper sizes not supported on
the printer.
7 Select [PAGE LAYOUT].
[STANDARD]: Layout set on the printer
[]: No frame
[]: With frame
≥You cannot set a layout not supported on the
printer.
8 Set [PRINT] >> [YES] to start printing.
49
VQT1L41
Page 50

Edit mode
ª When you stop printing halfway
Move the joystick down.
≥Avoid the following operations during printing.
These operations disable proper printing.
≥Disconnecting the USB cable
≥Removing the card
≥Switching the mode dial
≥Turning off the power
≥Check the settings for the paper size, quality of
print, etc. on the printer.
≥Still pictures recorded on other equipment may
not be printed.
When the movie camera and the printer are
≥
connected in the Tape Recording/Playback Mode,
the [ ] Indication may appear on the LCD
monitor. However, pictures cannot be printed.
≥The sides of pictures recorded when [16:9] is
set may be cut at printing. (When you purchase
this unit, [REC ASPECT] is set to [16:9].) When
using a printer with a trimming or borderless
function, cancel this setting. (Refer to the
operating instructions of the printer for details.)
≥Connect the printer directly to this unit. Do not
use a USB hub.
50
VQT1L41
Page 51

With a PC
With a PC
Before Use
ª Introduction
You can connect your personal computer to a
movie camera. You can transfer images
recorded with your movie camera to your
personal computer.
By controlling the movie camera from the
personal computer, the desired images from tape
or camera can be acquired into the personal
computer.
Notes on these instructions
ª
≥Microsoft®, Windows®, Windows Vista®,
Windows Media
DirectSound
or trademarks of Microsoft Corporation in the
United States and/or other countries.
≥IBM and PC/AT are registered trademarks of
International Business Machines Corporation of
the U.S.
®
, Core™ , Pentium® and Celeron® are the
≥Intel
registered trademarks or trademarks of the Intel
Corporation in the United States and other
countries.
≥Apple, Mac OS, iMovie/iMovie HD/iMovie ’08,
FireWire are either registered trademarks or
trademarks of Apple Inc. in the United States
and/or other countries.
≥Other names of systems and products
mentioned in these instructions are usually the
registered trademarks or trademarks of the
manufacturers who developed the system or
product concerned.
≥Microsoft product screen shot(s) reprinted with
permission from Microsoft Corporation.
≥The names of the products you are using may
differ from the names given in the text.
Depending on the operating environment and
other factors, the contents of the screens used
in these instructions may not necessarily match
what you will see on your screen.
≥Although the screens in these operating
instructions are shown in English for the sake of
example, other languages are supported as
well.
≥In this manual, the Panasonic make digital video
camera with USB terminal is referred to as
movie camera.
≥These instructions do not cover the basic
operations of the personal computer or define
any terms. For this information, refer to the
®
, DirectX®, DirectDraw®, and
®
are either registered trademarks
operating instructions which accompany your
personal computer.
Names and functions of packaged
ª
items
1) USB cable:
≥This cable is used to connect a personal
computer with your movie camera.
2) CD-ROM:
SweetMovieLife 1.1E (
MotionDV STUDIO 6.0E LE (
USB Driver (
DirectX
≥If the movie camera is connected to your
personal computer, you can send video
from the movie camera to the other parties
via the network. (Windows Vista, Windows
XP SP1/SP2, Windows 2000 SP4)
≥To activate SweetMovieLife/MotionDV
STUDIO, Microsoft DirectX 9.0b/9.0c should
be installed. If it is not installed in your
personal computer, you can install it from
the supplied CD-ROM. Click [DirectX] on
the CD launcher and then follow the
instruction message on the screen to install
it. (During installation of USB Driver,
SweetMovieLife or MotionDV STUDIO, you
can also install DirectX 9.0b.)
≥Using the SweetMovieLife software allows
you to easily import video on a tape to a
personal computer and then auto edit the
imported video. For advanced importing and
editing, use MotionDV STUDIO.
≥Using the MotionDV STUDIO software
allows you to capture the video recorded on
a tape or images viewed through the lens of
a camera.
-53-)
-55-)
-55-)
51
VQT1L41
Page 52

With a PC
ª Check before Use
The software available and the drivers required
vary depending on the OS of the personal
computer. Check the software used and the
drivers required using the table below and then
install them from the CD-ROM.
Purpose
of
use
Software
used
1) 1
2) 2 ¥
3
Installation of drivers
Windows
Vista XP
¥¥
°9
¥
°2, 9¥°1, 2, 3
¥
°1, 3¥°1, 5
2000
¥
USB
Driver
°1, 2, 5
Mac OS
¥
¥
°8
–
3) 2 ––––
3
4) 4
––––
USB
Driver
¥
°1, 4, 6
USB
Driver
°5, 7
–
¥: not required –: not available
1) Copying files in the card onto the personal
computer
≥PC connection mode
2) Capturing pictures on the tape to the
personal computer
≥Tape recording mode
≥Tape playback mode
3) Recording pictures on the personal
computer to the tape
≥Tape playback mode
4) Using the movie camera as a WEB camera
≥Tape recording mode
≥Tape playback mode
1 No software
(The movie camera is used as a removable
disc.)
2 SweetMovieLife/MotionDV STUDIO
(Connect with the DV cable (optional).)
iMovie 4/iMovie HD/iMovie ’08 (Connect
with the FireWire (DV) cable (not
supplied).)
3 SweetMovieLife/MotionDV STUDIO
(Connect with the USB cable (supplied).)
4 MSN Messenger/Windows Live Messenger
°1 If DirectX 9.0b/9.0c is not installed in the
personal computer you use, the installation of
[DirectX] is required.
°2 The personal computer you use should
comply with USB port (Hi-Speed
USB(USB 2.0)).
52
VQT1L41
°3 Available only on Windows XP SP2
°4 Available only on Windows XP SP1/SP2
°5 Available only on Windows 2000 SP4
°6 Not required for Windows XP SP2
°7 Available only on MSN Messenger
°8 Available only on Mac OS X v10.4
°9 Available only on Windows Vista Home Basic/
Home Premium
≥If using other brands of video editing software,
please consult with your retailer for
compatibility.
Operating environment
ª
≥Even if the system requirements mentioned in
these operating instructions are fulfilled, some
personal computers cannot be used.
≥A CD-ROM drive is required to install this
programme.
≥This software is not compatible with Microsoft
Windows 3.1, Windows 95, Windows 98/98SE,
Windows Me and Windows NT.
≥Operation on an upgraded OS is not
guaranteed.
≥Operation on an OS other than the one pre-
installed is not guaranteed.
SweetMovieLife 1.1E/
MotionDV STUDIO 6.0E LE for DV
OS:
IBM PC/AT compatible personal computer with
pre-installed;
Microsoft Windows Vista Home Basic/
Home Premium
Microsoft Windows XP Home Edition/
Professional SP2
Microsoft Windows 2000 Professional SP4
CPU:
Intel Pentium III 800 MHz or higher (including
compatible CPU)
(Intel Pentium 4 1.6 GHz or higher
recommended)
Graphic display:
High Colour (16 bit) or more
(32 bit recommended)
Desktop resolution of 1024k768 pixels or more
(1280k1024 pixels or more recommended)
Graphics card complying with DirectX 9.0b or
DirectX 9.0c, and DirectDraw overlay
Sound:
DirectSound Support
RAM:
Windows Vista: 512 MB or more (1 GB or more
recommended)
Windows XP/2000: 256 MB or more (512 MB or
more recommended)
Page 53

With a PC
Free hard disk space:
Ultra DMA – 33 or more (100 or more is
recommended)
640 MB or more
Separate free space is required for importing and
editing video.
[1 GB capacity is requied for a video of around 4
minutes in the AVI (DV-AVI) format.]
Interface:
DV (IEEE1394) terminal (IEEE1394.a)
USB port (Hi-Speed USB(USB 2.0)) (only
compatible with importing video)
Other requirements:
Mouse or equivalent pointing device
Software:
Windows Vista: DirectX 10
Windows XP/2000: DirectX 9.0b/9.0c
≥ If this software is installed on a personal
computer that does not support DirectX
versions above, the personal computer may not
operate properly. If you are unsure if your
personal computer is compatible, contact the
maker.
Windows Media Player 6.4 to 11
≥Supplied CD-ROM is available for Windows
only.
≥This software is not compatible with a multi-
CPU environment.
≥This software is not compatible with a multi-boot
environment.
≥Operation is not guaranteed on Microsoft
Windows XP Media Center Edition,
Tablet PC Edition and not compatible with 64 bit
operation systems.
≥If using Windows XP/2000, an administrative
account user only can use this software. If using
Windows Vista, administrative account and
standard account users only can use this
software. (An administrative account user
should install and uninstall this software.)
≥When 2 or more USB devices are connected to
a personal computer, or when devices are
connected through USB hubs or by using
extension cables, proper operation is not
guaranteed.
≥When connected to the keyboard USB terminal,
normal function may not be possible.
≥This instruction manual describes only the
procedures for installation, connection and
start-up. Please read the PDF-based
instructions for how to use the SweetMovieLife/
MotionDV STUDIO.
≥To view the installed operating instructions,
Adobe Acrobat Reader 5.0 or later or Adobe
Acrobat Reader 7.0 or later are required.
≥Before using for the first time, select [Readme
First] from [start] >> [All Programs (Programs)]
>> [Panasonic] >> [SweetMovieLife 1.1E]/
[MotionDV STUDIO 6.0E LE for DV], and read
any supplementary details or updates.
USB Driver
OS:
IBM PC/AT compatible personal computer with
pre-installed;
Microsoft Windows Vista Home Basic/
Home Premium/Ultimate/Business/Enterprise °
Microsoft Windows XP Home Edition/
Professional SP1/SP2 °
1
1
Microsoft Windows 2000 Professional SP4
CPU:
Windows Vista: Intel Pentium III 1.0 GHz or
higher
Windows XP/2000: Intel Pentium III 450 MHz or
higher
Graphic display:
High Colour (16 bit) or more
Desktop resolution of 800k600 pixels or more
RAM:
Windows Vista Home Basic: 512 MB or more
Windows Vista Home Premium/Ultimate/
Business/Enterprise: 1 GB or more
Windows XP/2000: 128 MB or more (256 MB or
more recommended)
Free hard disk space:
250 MB or more
Communication Speed:
56 kbps or faster is recommended
Interface:
USB port
Other requirements (to send/receive audio):
Sound card
Speaker or headphones
Mouse or equivalent pointing device
Software:
MSN Messenger 7.0 (Windows 2000)
Windows Live Messenger 8.1 (Windows Vista/
XP)
DirectX 9.0b/9.0c
°1 When your OS is Windows Vista/XP SP2,
the USB driver is not needed.
≥This software is not compatible with a multi-
CPU environment.
≥This software is not compatible with a multi-boot
environment.
≥Operation is not guaranteed on Microsoft
Windows XP Media Center Edition,
Tablet PC Edition and not compatible with 64 bit
operation systems.
53
VQT1L41
Page 54

With a PC
To use the movie camera as a Web Camera,
the following conditions must be met.
≥To upgrade Windows XP to SP2, click [start] >>
[All Programs] >> [Windows Update]. (Requires
internet connection.)
≥To upgrade Windows 2000 to SP4, click [start]
>> [Windows Update]. (Requires internet
connection.)
≥If the installed version is not latest, update it by
performing the Windows update.
≥Depending on the security setting on PC, proper
communication will not be possible.
≥The other parties also need to use same
Messenger software during the communication.
Card reader function
OS:
IBM PC/AT compatible personal computer with
pre-installed;
Microsoft Windows Vista
Microsoft Windows XP
Microsoft Windows 2000
CPU:
Windows Vista: Intel Pentium III 1.0 GHz or
higher
Windows XP/2000: Intel Pentium III 450 MHz or
higher
RAM:
Windows Vista Home Basic: 512 MB or more
Windows Vista Home Premium/Ultimate/
Business/Enterprise: 1 GB or more
Windows XP/2000: 128 MB or more (256 MB or
more recommended)
Interface:
USB port
Other requirements:
Mouse or equivalent pointing device
Install/Connection
ª Installing USB Driver
Install this when your OS is Windows XP SP1, or
Windows 2000 SP4.
(When your OS is Windows Vista/Windows XP
SP2, installing USB Driver is not needed.)
USB Driver is needed to be installed when you
connect the movie camera to the PC with the
supplied USB cable and use SweetMovieLife/
MotionDV STUDIO or Web Camera.
DirectX 9.0b is installed in your PC if it is not
installed beforehand. Applications which are
compatible with older version of DirectX may not
operate properly by installing DirectX 9.0b. In this
case, consult the manufacturers of the
applications disabled.
1 Insert the supplied CD-ROM into the
personal computer’s CD-ROM drive.
≥Quit all applications.
≥The [Setup Menu] screen appears.
2 Click [USB Driver].
≥The set up programme starts running.
3 You may be required to install DirectX 9.0b
depending on the environment of the
personal computer. In this case, click [Yes]
to install it.
54
VQT1L41
≥Reboot the computer after DirectX is
installed.
≥Do not take out the CD-ROM.
4 Finish installation by following the on-
screen instructions.
≥Click [Next] and proceed with installation.
≥After completing the installation, click
[Finish].
≥Reboot the computer to finish installing USB
Driver.
Page 55

With a PC
Depending on your personal computer, one of
the following screens may appear.
1 Your personal computer does not support USB
port (Hi-Speed USB(USB 2.0)) so the video on
tape cannot be imported from the video
camera to the personal computer with the
USB cable.
Cancel
≥You can use the Web Camera function.
2 The personal computer has recognised a
Hi-Speed USB(USB 2.0) driver other than the
Microsoft driver. Update the driver to make
sure that it operates properly. (
-56-)
3 The Hi-Speed USB(USB 2.0) driver may not
be recognised correctly. Update the driver to
make sure that it operates properly. (
ª
Installing SweetMovieLife 1.1E
-56-)
SweetMovieLife 1.1E is aimed at entry-level
users. Using this software, you can easily import
video recorded with a digital video camera to a
personal computer, create a title and add music
to the video and then perform auto edit on it.
For advanced importing and editing, use
MotionDV STUDIO.
DirectX 9.0b is installed in your PC if it is not
installed beforehand. Applications which are
compatible with older version of DirectX may not
operate properly by installing DirectX 9.0b. In this
case, consult the manufacturers of the
applications disabled.
≥When you use Windows 2000 (SP4) to connect
the personal computer and the movie camera
by USB cable and then use SweetMovieLife,
installing the USB driver is needed.
1 Insert the supplied CD-ROM into the
personal computer’s CD-ROM drive.
≥Quit all applications.
≥The [Setup Menu] screen appears.
2 Click [SweetMovieLife 1.1E].
≥After reading the displayed contents, please
carry out the installation according to
instructions.
3 Select the video system.
4 After the completion of setup, click on
[Finish].
≥Sample data is installed concurrently with the
SweetMovieLife.
≥After installation, if you click
[SweetMovieLife 1.1E] in the Setup Menu,
the uninstallation starts. Click [EXIT] in
the Setup Menu to close the Setup Menu.
Installing MotionDV STUDIO 6.0E LE
ª
MotionDV STUDIO allows more advanced editing
than SweetMovieLife. Using this software allows
you to capture video recorded on a tape or
images viewed through the lens of a camera.
You can also add a wide variety of special effects
such as fade, transition and titles.
DirectX 9.0b is installed in your PC if it is not
installed beforehand. Applications which are
compatible with older version of DirectX may not
operate properly by installing DirectX 9.0b. In this
case, consult the manufacturers of the
applications disabled.
55
VQT1L41
Page 56

With a PC
≥When you use Windows 2000 (SP4) to connect
the personal computer and the movie camera
by USB cable and then use MotionDV STUDIO,
installing the USB driver is needed.
1 Insert the supplied CD-ROM into the
personal computer’s CD-ROM drive.
≥Quit all applications.
≥The [Setup Menu] screen appears.
2 Click [MotionDV STUDIO 6.0E LE].
≥After reading the displayed contents, please
carry out the installation according to
instructions.
3 Select the video system.
Vista, Windows XP (SP2) or Windows 2000
(SP4), check the driver of the USB host controller.
≥It is required to use the driver for which
[Microsoft] is displayed on [Driver Provider]
in [Driver] tab.
(for Windows XP/2000)
1 Select [start] >> [Settings] >> [Control
Panel] to start [System].
≥[System Properties] is displayed.
2 Click [Hardware] tab and then click [Device
Manager].
3 Right-click [Enhanced Host Controller] etc.
in [Device Manager] and then select
[Properties].
≥The indication [Enhanced Host Controller] is
changed as [EHCI] depending on the host
controller you use.
4 Click [Driver] tab to check the description
on [Driver Provider].
4 After the completion of setup, click on
[Finish].
≥Sample data is installed concurrently with the
MotionDV STUDIO.
≥After installation, if you click [MotionDV
STUDIO 6.0E LE] in the Setup Menu, the
uninstallation starts. Click [EXIT] in the
Setup Menu to close the Setup Menu.
Connecting the movie camera to
ª
personal computer
Confirmation before connection
When you connect the personal computer and the
movie camera with the USB cable and then use
SweetMovieLife/MotionDV STUDIO on Windows
56
VQT1L41
≥If [Microsoft] is displayed on [Driver Provider],
the confirmation procedure is completed.
(for Windows Vista)
1 Select [start] >> [Control Panel] >> [System
and Maintenance] to start [Device Manager].
2 Right-click [Enhanced Host Controller] etc.
in [Device Manager] and then select
[Properties].
≥The indication [Enhanced Host Controller] is
changed as [EHCI] depending on the host
controller you use.
3 Click [Driver] tab to check the description
on [Driver Provider].
Page 57

≥If [Microsoft] is displayed on [Driver Provider],
the confirmation procedure is completed.
If a description other than [Microsoft] is
displayed
≥Update the driver with the following procedure.
(for Windows XP/2000)
1 Click [Update Driver...].
With a PC
4 Click [Standard Universal PCI to USB Host
Controller] and then click [Next].
5 Click [Finish].
≥The update of the driver is completed.
Connect the movie camera.
(for Windows Vista)
1 Click [Update Driver...].
2 Check [Install from a list or specific location
(Advanced)] and then click [Next].
≥When your OS is Windows 2000, click [Next]
after [Update Device Driver Wizard] appears.
3 (When your OS is Windows XP)
Check [Don’t search. I will choose the driver
to install] and then click [Next].
(When your OS is Windows 2000)
Check [Display a list of the known drivers
for this device so that I can choose a
specific driver] and then click [Next].
2 Click [Browse my computer for driver
software].
3 Click [Let me pick from a list of device
drivers on my computer]
4 Click [Standard Enhanced PCI to USB Host
Controller] and then click [Next].
5 Click [Close].
≥The update of the driver is completed.
Connect the movie camera.
57
VQT1L41
Page 58

With a PC
Software
ª Using SweetMovieLife 1.1E/MotionDV
STUDIO 6.0E LE
(Windows Vista, Windows XP SP2,
Windows 2000 SP4)
If you wish to capture data from a tape, set the
movie camera to tape playback mode and insert
the tape. If you wish to capture images from the
lens of the movie camera, set the movie camera
to the tape recording mode and remove the tape
and the card.
≥If a short-cut icon has been created on the
desktop during installation, it is also possible to
start by double-clicking on the icon.
≥Please read the PDF-based instructions for how
to use it.
≥The screen is the MotionDV STUDIO selection
screen.
About the PDF operating instructions for
SweetMovieLife/MotionDV STUDIO
For details on how to use the software
applications, read the help file.
1 Set [start] >> [All Programs (Programs)] >>
[Panasonic] >> [SweetMovieLife 1.1E] or
[MotionDV STUDIO 6.0E LE for DV] >>
[Manual(PDF format)].
1.1
6.0
≥Start the software and select [Help] >> [Help]
from the menu to display the help file.
≥You will need Adobe Acrobat Reader 5.0 or
later or Adobe Reader 7.0 or later to read the
PDF operating instructions.
With USB cable (supplied)
The personal computer should be compatible with
USB port (Hi-Speed USB(USB 2.0)).
1 Set the movie camera to tape playback
mode or tape recording mode.
≥You cannot use SweetMovieLife in tape
recording mode.
2 Set [BASIC] or [ADVANCED] >>
[USB FUNCTION] >> [MOTION DV].
3 Connect the movie camera to personal
computer with auxiliary USB cable.
1)
2)
1) USB cable
2) USB terminal
≥Do not use any other USB connection cables
except the supplied one. (Operation is not
guaranteed with any other USB connection
cables.)
4 Select [start] >> [All Programs (Programs)]
>> [Panasonic] >> [SweetMovieLife 1.1E]/
[MotionDV STUDIO 6.0E LE for DV] >>
[SweetMovieLife]/[MotionDV STUDIO LE for
DV].
1.1
6.0
58
VQT1L41
≥You cannot record the video edited by the PC
onto the tape in the movie camera.
Page 59

With a PC
With DV cable (optional)
1 Set the movie camera to tape recording
mode or tape playback mode.
≥You cannot use SweetMovieLife in tape
recording mode.
2 Connect the movie camera to personal
computer with auxiliary DV cable.
1)
2)
1) DV cable
2) DV terminal
3 Select [start] >> [All Programs (Programs)]
>> [Panasonic] >> [SweetMovieLife 1.1E]/
[MotionDV STUDIO 6.0E LE for DV] >>
[SweetMovieLife]/[MotionDV STUDIO LE for
DV].
Using the movie camera as a Web
ª
Camera
(Windows Vista, Windows XP SP1/
SP2, Windows 2000 SP4)
To upgrade Windows XP to SP2, click [start] >>
[All Programs (Programs)] >> [Windows Update].
If the movie camera is connected to your personal
computer, you can send video and sound from
the movie camera to the other parties via the
network. Audio may also be exchanged if the
personal computer is configured accordingly.
(You can use the microphone equipped with the
personal computer instead of the one on the
movie camera.)
≥Refer to page
-54- for the minimum
requirements.
Connecting the movie camera to personal
computer (For using as a Web Camera)
1 Install USB Driver. (-54-)
2 Set the movie camera to tape playback
mode or tape recording mode.
3 Set [BASIC] or [ADVANCED] >>
[USB FUNCTION] >> [WEBCAM].
4 Connect the movie camera to personal
computer with auxiliary USB cable.
1.1
6.0
1)
2)
3)
1) USB cable
2) USB terminal
3) The Web Camera mode screen
≥Do not use any other USB connection cables
except the supplied one. (Operation is not
59
VQT1L41
Page 60

With a PC
guaranteed with any other USB connection
cables.)
5 Start the MSN Messenger/Windows Live
Messenger.
≥Click [start] >> [All Programs (Programs)] >>
[MSN Messenger]/[Windows Live Messenger].
≥To send pictures recorded on a tape to other
personal computer using the MSN Messenger/
Windows Live Messenger, set [BASIC] >>
[USB FUNCTION] >> [WEBCAM] on tape
playback mode before connecting the movie
camera to your personal computer.
When you use the movie camera as a Web
Camera
When you use the movie camera as a Web
Camera in the tape playback mode, the indication
of the operation icon is different from the one in
usual operation.
12
1 In usual operation
2 In the Web Camera mode (Tape playback
mode)
≥Even if you move the joystick up/down/right/left
(, ∫, 5, 6), the selected direction on the
operation icon is not lit in yellow.
≥The operation icon blinks on instead of
appearing from the side of the screen when you
press the centre of the joystick.
Others
ª Copying files to a personal computer
-
Card reader function (Mass storage)
If you connect the movie camera to a personal
computer with the USB cable, you can use the
movie camera which includes a card as a external
drive of a personal computer and you can copy
files recorded on the card to the personal
computer with [Explorer] etc.
Copying files recorded on a card to a personal
computer
1 Select the PC connection mode on the
movie camera and then connect the movie
camera with the personal computer.
≥If the movie camera is connected in the PC
connection mode, the [Removable Disk] icon
representing the memory card drive is displayed
in [My Computer (Computer)].
2 Double-click the folder where the desired
file is saved in [Removable Disk].
≥Still pictures (JPEG format) are saved in
[100CDPFP] folder.
3 Drag and drop the file onto the destination
folder (hard disk of the personal computer).
60
VQT1L41
Page 61

With a PC
Note on the folder structure of the card
A card formatted with the movie camera is
composed by folders as described in the
illustration below.
DCIM
256
100CDPFP
MISC
[100CDPFP]: The images (IMGA0001.jpg, etc.) in
this folder are recorded in the JPEG
format.
[MISC]: Files in which DPOF data has been
set to the image are in this.
≥The other folders in the card are necessary
items in the folder structure. They have nothing
to do with actual operations.
Viewing files copied from a card
1 Open the folder to which still picture files
are copied.
2 Double-click a file you want to view.
≥The software activated to view still picture files
varies depending on the settings of the personal
computer you use.
To disconnect USB cable safely
ª
If USB cable is disconnected while computer is
on, error dialogue may appear. In such case click
[OK] and close the dialogue box. By following the
steps below you can disconnect the cable safely.
1 Double click the () icon in task tray.
3 Verify [Matshita DVC USB Device] is
selected and click [OK].
≥Click [Close], and you can safely disconnect the
cable.
Note on the driver name displayed
The driver name displayed will differ depending
on your OS, operating environment and the mode
of the movie camera.
The name is displayed as [USB Mass Storage
Device] or [Matshita DVC USB Device] in PC
connection mode.
≥Make sure movie camera’s function light is off
and disconnect the cable.
If you no longer need software or
ª
driver (Uninstall)
The screens may vary with the type of the OS. (In
this manual, explanation is offered with Windows
XP screen.)
1 Select [start] (>> [Settings]) >>
[Control Panel], select the software or the
driver from [Add or Remove Programs
(Applications)] or [Uninstall a program] to
uninstall.
≥Hardware disconnect dialogue appears.
2 Select [USB Mass Storage Device] and click
[Stop].
6.0
≥Uninstalling steps may vary depending on the
OS. Please refer to the user manual of your OS.
61
VQT1L41
Page 62

With a PC
ª Using on Macintosh
≥Even if the system requirements mentioned in
these operating instructions are fulfilled, some
personal computers cannot be used.
≥PowerPC is a trademark of International
Business Machines Corporation.
Operating environment on iMovie 4/
iMovie HD/iMovie ’08
OS:
With pre-installed;
Mac OS X v10.4
CPU:
PowerPC G5 (1.8 GHz or higher)
Intel Core Duo
Intel Core Solo
RAM:
64 MB or more
Interface:
DV (FireWire) terminal (IEEE1394.a)
≥Supplied CD-ROM is available for Windows
only.
≥iMovie/iMovie HD/iMovie ’08, included with any
new Macintosh or sold with iLife.
1 Set the movie camera to Tape Playback
Mode.
2 Connect the movie camera to your
Macintosh with the DV Interface Cable
(optional).
To disconnect USB cable safely
Drag [NO_NAME] or [Untitled] disk icon to the
[Trash], and then disconnect the USB cable.
≥For more information, please contact Apple Inc.
at http://www.apple.com.
Copying still pictures on PC
OS:
With pre-installed;
Mac OS X v10.4
1 Connect the movie camera to the personal
computer via the supplied USB cable.
2 Double-click [NO_NAME] or [Untitled]
displayed on the desktop.
≥Files are stored in [100CDPFP] folder in the
[DCIM] folder.
3 Using a drag-and-drop operation, move the
pictures you want to acquire or the folder
storing those pictures to any different
folder on the personal computer.
62
VQT1L41
Page 63

With a PC
ª Notes
≥Do not disconnect USB cable while the status
indicator of the movie camera is on. It may
freeze the software or destroy the data in
transfer.
≥When the movie camera is switched to the PC
connection mode while it is connected to the
personal computer, the operation mode of the
movie camera cannot be switched. In this case,
disconnect the USB cable. Switch the operation
mode of the movie camera and reconnect the
cable.
≥If the movie camera is used as a Web Camera,
the quality of the video to be exchanged will
depend on the Internet connection status.
≥In the Web Camera mode, video (picture)
cannot be recorded onto a tape or a card.
≥In the Web Camera mode, the audio may be
interrupted in the midway of communication
depending on the communication environment
or the performance of the personal computer.
≥If you connect the USB cable while you operate
a tape in the tape playback mode, the tape will
be stopped.
≥If you connect the USB cable in the Web
Camera mode (tape recording mode), the time
code indication, the SP/LP indication, or icons
disappear.
≥In the Web Camera mode (tape playback
mode), the operation icon is changed.
≥If the movie camera is used as a Web Camera
while virus checking software is running, the
movie camera’s operation may stop midway
through. In this case, exit the Messenger,
reconnect the movie camera and restart the
Messenger.
≥We recommend using AC adaptor as the power
source for the movie camera when connecting
to the personal computer. Data may be lost if
the battery power is lost while transferring.
≥Do not delete the folders in a card. The card
may not be recognized if deleted.
≥If you install the USB Driver while the USB cable
is being connected, or if you don’t follow these
operating instructions, the movie camera will not
be recognized correctly. In this case, delete the
driver from [Device Manager] as described
below, uninstall the driver, and re-install it.
Set the movie camera to tape recording mode,
tape playback mode or PC connection mode,
connect it to the personal computer, and delete
[DVC] or [Web-Camera] from [Device Manager].
63
VQT1L41
Page 64

Menu
Menu
Menu list
Menu figures and illustrations are provided for
easy-to-understand explanations, and so they are
different from the actual menu indications.
[TAPE RECORDING MENU]
ª
1) [BASIC]
[SCENE MODE]
[REC SPEED] -24-
[WIND CUT] -33-
[REC ASPECT] -34-
[CLOCK SET] -12-
2) [ADVANCED]
[PICT.QUALITY]
[PICTURE SIZE] -28-
[O.I.S.] -35-
[GUIDE LINES] -35-
[FADE COLOUR] -33-
[AUDIO REC] -66-
[USB FUNCTION] -58-
[D.ZOOM] -29-
[ZOOM MIC] -29-
-36-
-28-
ª [TAPE PLAYBACK MENU]
1) [BASIC]
[DATE/TIME]
-66-
[USB FUNCTION] -58-
2) [ADVANCED]
[REC DATA]
-66-
[PICT.QUALITY] -28-
[REPEAT PLAY] -40-
3) [SETUP]
[12bit AUDIO]
-48-
[AUDIO OUT] -66-
[DISPLAY] -66-
[REMOTE] -23-
[POWER LCD] -21-
[LCD SET] -21-
[EVF SET] -21-
[POWER SAVE] -66-
[TV ASPECT] -42-
4) [LANGUAGE] -19-
3) [SETUP]
[DISPLAY]
-66-
[DATE/TIME] -66-
[POWER SAVE] -66-
[QUICK START] -14-
[AGS] -33-
[REMOTE] -23-
[BEEP SOUND] -66-
[POWER LCD] -21-
[LCD SET] -21-
[EVF SET] -21-
[INITIAL SET] -67-
[DEMO MODE] -67-
4) [LANGUAGE] -19-
64
VQT1L41
Page 65

Menu
ª [CARD RECORDING MENU]
1) [BASIC]
[SCENE MODE]
-36-
[PICT.QUALITY] -28-
[PICTURE SIZE] -28-
[REC ASPECT] -34-
[CLOCK SET] -12-
2) [ADVANCED]
-35-
[O.I.S.]
[GUIDE LINES] -35-
[SHTR EFFECT] -28-
3) [SETUP]
[DISPLAY]
-66-
[DATE/TIME] -66-
[POWER SAVE] -66-
[QUICK START] -14-
[REMOTE] -23-
[BEEP SOUND] -66-
[POWER LCD] -21-
[LCD SET] -21-
[EVF SET] -21-
[INITIAL SET] -67-
ª [CARD PLAYBACK MENU]
1) [BASIC]
[DATE/TIME]
-66-
[PROTECT] -45-
2) [ADVANCED]
[DPOF SET]
-45-
[FORMAT CARD] -44-
3) [SETUP]
[DISPLAY]
-66-
[REMOTE] -23-
[POWER LCD] -21-
[LCD SET] -21-
[EVF SET] -21-
[POWER SAVE] -66-
[TV ASPECT] -42-
4) [LANGUAGE] -19-
4) [LANGUAGE] -19-
65
VQT1L41
Page 66

Menus related to taking pictures
ª [DATE/TIME]
This switches between date and time indications.
≥The movie camera automatically records the
date and time of picture taking on the tape/card.
≥You can also show or change the date/time
indication by repeatedly pressing the
[DATE/TIME] button on the remote control.
[AUDIO REC]
ª
Switches the audio (PCM audio) recording
systems.
[12bit]: Records audio in “12 bit 32 kHz 4 tracks”.
(The original audio signals can be kept
after the other audio signals are dubbed.)
[16bit]: Records audio in “16 bit 48 kHz 2 tracks”.
Audio can be recorded in higher quality.
(If audio signals are dubbed, then the
original audio signals will be erased.)
[DISPLAY]
ª
Set to [ON] and the display mode can be switched
to all functions. Set to [OFF] and it can be
switched to minimum display.
[BEEP SOUND]
ª
Set to [ON] and confirmation/alarm beeps are
issued as follows.
1 Beep
≥When you start recording
≥When you turn on the power
When the unit goes from quick start standby
≥
mode to recording pause
2 Beeps
≥When you pause recording
≥When you turn off the power
When the unit goes into quick start standby mode
≥
2 Beeps for 4 times
≥When a cassette with its erasure prevention tab
set to [SAVE] is inserted, condensation occurs
-75-), and at other times. Check the sentence
(
displayed on the screen. (
-69-)
Menu
[POWER SAVE]
ª
[OFF]: When about 5 minutes passed
[5 MINUTES]:When about 5 minutes passed
≥In the following cases, the power may not turn
off even when set [POWER SAVE] >>
[5 MINUTES].
≥When connecting to the AC outlet
(When using the AC adaptor)
≥When connecting the USB cable or the DV
cable to a personal computer or other
equipment
≥When in PC Connection Mode
without any operation, the standby
mode automatically will be set. In
the standby mode, [;] blinks and it
takes time more than usual to start
recording after you press the
recording start/stop button.
without any operation, the movie
camera automatically turns off to
protect the tape or to prevent the
battery from running down. When
you use the movie camera, turn it
on again.
Menus related to playback
ª [REC DATA]
Set to [ON] and the settings (shutter speed, iris/
gain values, and white balance settings (
etc.) used during the recordings are displayed
during playback.
≥If the [AUTO/MANUAL/FOCUS] switch was set
to [AUTO] when recording, [AUTO] appears on
the display.
When there is no data, [---] appears on the display.
≥
≥If data recorded on this unit is played back on
other equipment (or a tape recorded on other
equipment is played back on this unit), the
settings information is sometimes not displayed
normally.
[AUDIO OUT]
ª
This switches the sound to be played back.
[STEREO]: Stereo sound (main sound and sub
[L]: Left channel sound (main sound)
[R]: Right channel sound (sub sound)
sound)
-37-),
66
VQT1L41
Page 67

Other menus
ª [INITIAL SET]
When there is a menu that cannot be selected
depending on a combination of functions, set to
[YES] for changing the menu settings back to the
initial shipping condition.
(Language setting cannot be back to the initial
shipping condition.)
[DEMO MODE]
ª
If you set to [DEMO MODE] >> [ON] without
inserting a cassette and a card, the movie camera
is automatically set to the demonstration mode for
introducing its functions. If any button is pressed
or operated, the demonstration mode is
cancelled. If no operations take place for approx.
10 minutes, the demonstration mode
automatically starts. To terminate the
demonstration mode, insert a cassette or a card,
or set to [DEMO MODE] >> [OFF]. For normal
use, set this function to [OFF].
Menu
67
VQT1L41
Page 68

Others
Others
Indications
Various functions and the movie camera status
are shown on the screen.
Basic indications
: Remaining battery power
0h00m00s00f: Time code
15:30:45: Date/Time indication
Recording indications
R 0:45: Remaining tape time
≥Remaining tape time is indicated in minutes.
(When it reaches less than 3 minutes, the
indication starts flashing.)
SP: Standard Play mode
(Recording speed mode)
LP: Long Play mode
(Recording speed mode)
¥: Recording -25-
; (Green): Recording pause -25-
; (Green flash):
Standby mode
; (Red): Fade out
: POWER LCD
-21-
: Recording check -26-
16:9
: Wide mode -34-
: Automatic mode -24-
AUTO
: Manual mode -36-
MNL
MF: Manual focus -38-
5t:
Zoom magnification indication
: Backlight mode -30-
: OIS -35-
1/500: Shutter speed -38-
F2.4: F number -38-
6dB: Gain value -38-
: WEB CAMERA mode
(Recording)
-50-
: Soft skin mode -31-
: Tele macro -32-
: Fade (White) -32-
: Fade (Black) -32-
: Blank search -26-
: Colour night view function -31-
ZOOM
: Zoom microphone -29-
: Wind noise reduction -33-
5: Sports mode (Scene mode) -36-
: Portrait mode (Scene mode) -36-
: Low light mode (Scene mode)
: Spotlight mode (Scene mode)
-36-
: Surf & snow mode (Scene mode)
-36-
: Auto white balance -37-
AWB
-36-
-24-
-24-
: Indoor mode (recording under
incandescent lamp)
: Outdoor mode -37-
: White balance adjustment mode
-37-
Playback indications
1: Playback
-40-
;: Pause -40-
5: Fast-forward/Cue playback -40-
6: Rewind/Review playback -40-
D/E: Slow motion playback -41-
;1/2;: Frame-by-frame playback -41-
2t5: Variable-speed search -41-
: Repeat playback -40-
: WEB CAMERA mode (Playback)
A.DUB ¥: Audio dubbing -48-
A.DUB ;: Audio dubbing pause -48-
12bit, 16bit: Audio recording mode -66-
: Volume adjustment -40-
Card
± (White): Shutter chance mark
¥ (Green): Shutter chance mark -27-
: Self-timer recording -34-
: MEGA OIS -35-
MEGA
(White): Photoshot mode
(Green): While the card is being read
(Red): While photoshot recording is
-29-
(Red): While the card is being accessed
(Red flash):Using the card that cannot be
( ): Photoshot picture quality
18: Remaining number of photoshot
: Slide show playback
PictBridge: PictBridge mode -49-
100-0001: Folder/File display
No.00: File number
1: Number of DPOF Setting
: Protect setting -45-
: [640t360] Image size
: [1280t720] Image size
1
: [2048t1152] Image size
: [640t480] Image size
: [1280t960] Image size
: [1600t1200] Image size
: [2048t1512] Image size
-50-
activated
in PC Connection Mode
recognized or no card is inserted
pictures (When the remaining
number of photoshot pictures
reaches 0, the red indication
flashes.)
-37-
-27-
-28-
-43-
-45-
68
VQT1L41
Page 69

Others
≥For images not recorded with this unit, the
number of horizontal and vertical pixels may
differ so the image size is not displayed.
Warning/alarm indications
If any one of the following indications lights up or
flashes, please check the movie camera.
Confirmatory indications
Y: A cassette with the accidental erasure
prevention slider placed in the [SAVE]
position is inserted.
No cassette is inserted.
[--]/0:
The built-in battery is low.
°: The warning/alarm indication appears when
you record yourself. Turn the LCD monitor
towards the viewfinder and check the
warning/alarm indication.
: No card is inserted.
REMOTE :
An incorrect remote control mode has been
selected.
-23-
2END:
The tape came to the end during recording.
:: The video heads are dirty.
Textual indications
3DEW DETECT/3EJECT TAPE:
Condensation has occurred. Take out the
cassette and wait for a while. It takes some
time until the cassette holder opens, but this
is not a malfunction.
LOW BATTERY:
The battery is low. Recharge it.
NO TAPE:
No tape is inserted.
TAPE END:
The tape came to the end during recording.
CHECK REC TAB:
You are attempting to record pictures on a
tape with the accidental erasure prevention
slider placed in the [SAVE] position.
You are attempting audio dubbing or digital
dubbing on a tape with the accidental
erasure prevention slider placed in the
[SAVE] position.
CHECK REMOTE MODE:
An incorrect remote control mode has been
selected. This is only displayed at the first
operation of the remote control after
powering-on.
-23-
WRONG TAPE FORMAT:
You are attempting to play back a tape
section that has been recorded with a
-13-
-76-
-75-
-9-
-15-
different TV system. This cassette is
incompatible.
UNPLAYABLE CARD:
You are attempting to play back data not
compatible with this movie camera.
CLOSE CASSETTE DOOR:
The cassette cover is open. Close the
cassette cover.
-15-
UNABLE TO A.DUB (LP RECORDED):
Audio dubbing cannot be performed
because the original recording was in LP
mode.
UNABLE TO A.DUB:
You are attempting to perform audio
dubbing on a non-recorded tape.
CANNOT RECORD IN AGS MODE:
The AGS function is activated.
-33-
COPY PROTECTED:
Images cannot be recorded correctly
because the medium is protected by a copy
guard.
CARD ERROR:
This card is not compatible with this movie
camera.
You are attempting to format a failed card.
It displays, when you attempt to insert the
incompatible card to Card Slot.
NO CARD:
No card is inserted.
CARD FULL:
Card does not have sufficient memory
remaining.
Select Card Playback Mode and delete
unnecessary files.
NO DATA:
There are not any recorded files on the
card.
FILE LOCKED:
You are attempting to erase protected files.
CARD LOCKED:
The write protection switch on the SD Card
is set to [LOCK].
NEED HEAD CLEANING:
The video heads are dirty.
-76-
PUSH THE RESET SWITCH:
An irregularity in the equipment has been
detected. Press the [RESET] button (
This may solve the problem.
CHANGE MODE TO USE USB:
The USB cable is connected to the movie
camera in Card Recording Mode.
DISCONNECT USB CABLE:
You are attempting to turn the mode dial in
PC Connection Mode with the USB cable
connected to the movie camera. You are
attempting to record pictures on a tape/card
-74-).
69
VQT1L41
Page 70

Others
with the USB cable connected to the movie
camera.
NO INK IN PRINTER:
There is no ink. Check the connected
printer.
NO PAPER IN PRINTER:
There is no paper. Check the connected
printer.
PRINTER ERROR:
Check the connected printer.
PC DOES NOT SUPPORT USB2.0:
The movie camera is connected to a
personal computer that does not support
USB 2.0.
CAN NOT USE USB:
You are connecting the USB cable with the
DV cable connected.
CHANGE TO MANUAL MODE:
You are attempting to select the item on the
[SCENE MODE] when the [AUTO/
MANUAL/FOCUS] switch is set to [AUTO].
CAN NOT OPERATE (MOTION DV MODE):
You are attempting to change [D.ZOOM]
setting during MotionDV Mode.
-55-
Functions cannot be used
simultaneously
Some functions in the movie camera are disabled
or cannot be selected due to its specifications.
The table below shows examples of functions
restricted by conditions.
Functions Conditions which disable
≥Digital zoom
≥Fade
≥Backlight
compensation
≥Help mode
≥Recording
check
≥Blank search
≥Soft skin
≥Tele macro
≥Colour Night
View
≥Scene mode ≥When setting the [AUTO/
≥Change of
white balance
≥Adjusting the
shutter speed,
iris/gain
≥Variable-speed
search
≥Deleting files ≥When the write protect
≥Formatting ≥When the write protect
≥Audio dubbing ≥The section of a tape
the functions
≥When the Card Recording
mode is used
≥When the colour night
view function is used
≥When the iris/gain is set
≥While recording to a tape
≥While recording to a tape
≥When the Card Recording
mode is used
MANUAL/FOCUS] switch
to [AUTO]
≥When the colour night
view function is used
≥When digital zoom (10k
or higher) is used
≥When the colour night
view function is used
≥When the colour night
view function is used
≥When the scene mode is
used
≥During repeat playback
switch on the card is set
to [LOCK]
≥When the file is protected
switch on the card is set
to [LOCK]
recorded in LP mode
The blank section of a tape
≥
70
VQT1L41
Page 71

Others
Before requesting repair (Problems
and solutions)
Power/Body
1: The movie camera power cannot be turned
on.
• Is the battery fully charged? Use a fully
charged battery.
• The battery protection circuit may have
operated. Attach the battery to the AC adaptor
for 5 to 10 seconds. If the movie camera still
cannot be used, the battery is faulty.
• Is the LCD monitor opened or the viewfinder
extended?
2: The movie camera power is turned off
automatically.
• If you set [POWER SAVE] to [5 MINUTES] and
do not operate the movie camera for about
5 continuous minutes, the power is
automatically turned off for tape protection and
power conservation. To resume recording, turn
the [OFF/ON] switch to [OFF]. Then turn it to
[ON] again. (
[POWER SAVE] to [OFF], the power does not
automatically turn off.
3: The movie camera power does not stay on
long enough.
• Is the battery low? If the remaining battery
power indication is flashing or the message
“LOW BATTERY” is displayed, the battery has
run down. Charge the battery or attach a fully
charged battery. (
• Has condensation occurred? When you carry
the movie camera from a cold place into a
warm place, condensation may occur inside it.
If so, the power is turned off automatically,
disabling all operations except for taking
cassettes out. Wait until the condensation
indication disappears. (
-66-) Also, if you set
-9-)
-75-)
4: Battery runs down quickly.
• Is the battery fully charged? Charge it with the
AC adaptor. (-9-)
• Are you using the battery in an extremely cold
place? The battery is affected by ambient
temperature. In cold places, the operating time
of the battery becomes shorter.
• Has the battery worn out? The battery has a
limited life. If the operating time is still too short
even after the battery is fully charged,
depending on the usage, the battery has worn
out and can no longer be used.
5: The movie camera cannot be operated
though powered up.
The movie camera does not operate
normally.
• The movie camera cannot be operated unless
you open the LCD monitor or extend the
viewfinder.
• Remove the cassette and the card and then
press the [RESET] button. (
-74-) If normal
conditions are not restored yet, turn off the
power. Then, about 1 minute later, turn on the
power again. (Conducting the above operation
when the access lamp is on may destroy the
data on the card.)
6: The cassette cannot be removed.
• Does the Status indicator comes on when
opening the cassette cover? (
-15-) Make sure
that the battery and the AC adaptor are
properly connected. (
-10-)
• Is the battery in use discharged? Charge the
battery and remove the cassette.
• Close the cassette cover completely, and fully
open it again. (
-15-)
7: No operation other than cassette removal
can be performed.
• Has condensation occurred? Wait until the
condensation indication disappears. (
-75-)
8: The remote control does not function.
• Has the button-type battery of the remote
control run out? Replace it with a new buttontype battery. (
-22-)
• Is the setting on the remote control correct? If
the setting on the remote control is not in
agreement with the [REMOTE] setting on the
movie camera, the remote control does not
operate. (
-23-)
71
VQT1L41
Page 72

Others
Recording
1: Recording does not start although power is
supplied to the movie camera and the
cassette is correctly inserted.
• Is the accidental erasure prevention slider on
the cassette open? If it is open (set to [SAVE]),
recording cannot be performed. (
-15-)
• Is the tape wound to the end? Insert a new
cassette.
• Is the recording mode set? When in the
playback mode, recording cannot be
performed. (
-17-)
• Has condensation occurred? No operation
other than cassette removal can be performed
when condensation occurs. Wait until the
condensation indication disappears. (
-75-)
• Is the cassette cover open? If the cover is
open, the movie camera may not operate
normally. Close the cassette cover. (
-15-)
2: The screen has changed suddenly.
• Has the demonstration started? In the Tape
Recording mode, if you set [DEMO MODE] >>
[ON] without inserting a cassette and a card,
the demonstration starts. For normal use, set
this function to [OFF]. (
-67-)
3: A cassette cannot be inserted.
• Has condensation occurred? Wait until the
condensation indication disappears.
4: Auto focus function does not work.
• Is manual focus mode selected? If auto focus
mode is selected, focus is automatically
adjusted.
• There are some recording subjects and
surroundings for which the auto focus does not
operate correctly. (
focus mode to adjust the focus. (
-80-) If so, use the manual
-38-)
5: The camera arbitrarily stops recording.
• Is the AGS function activated? Record in the
normal horizontal position or set [AGS] to
-33-)
[OFF]. (
Indications
1: A sentence is displayed in red in the screen
centre.
• Read the contents and respond to them. (
-69-)
2: The time code becomes inaccurate.
0 The time code indication counter may not be
constant in the reversed slow-motion playback,
but this is not a malfunction.
3: The remaining tape time indication
disappears.
• The remaining tape time indication may
disappear temporarily during frame-by-frame
playback or other operation. If you continue
ordinary recording or playback, the indication is
restored.
4: The remaining tape time Indication does not
match the actual remaining tape time.
• If scenes of less than 15 seconds are
continuously recorded, the remaining tape time
cannot be correctly displayed.
• In some cases, the remaining tape time
indication may show remaining tape time that is
2 to 3 minutes shorter than the actual
remaining tape time.
5: A function indication such as mode
indication, remaining tape time indication,
or time code indication is not shown.
• If you set [SETUP] >> [DISPLAY] >> [OFF],
indications other than the tape running
condition, warning, and date indications
disappear.
72
VQT1L41
Page 73

Others
Playback (Sound)
1: Sound is not played back from the built-in
speaker of the movie camera.
0 Is the volume too low? During playback, push
the [s /VOLr] lever to display the volume
indication and adjust it. (
-40-)
2: Different sounds are reproduced at the
same time.
• Have you set [SETUP] >> [12bit AUDIO] >>
[MIX]? If you set [AUDIO REC] >> [12bit] and
dub audio to a recorded tape, you can hear the
sound on recording and the sound dubbed at a
later time. To hear the sounds separately, set
to [ST1] or [ST2]. (
-48-)
• Have you set [SETUP] >> [AUDIO OUT] >>
[STEREO] and reproduced a picture containing
the main sound and sub sound? Set to [L] to
hear main sound, and set to [R] to hear the sub
-66-)
sound. (
3: Audio dubbing cannot be performed.
• Is the accidental erasure prevention slider on
the cassette open? If it is open (set to [SAVE]),
audio dubbing cannot be performed. (
-15-)
• Are you attempting to edit a tape portion that
was recorded in LP mode? LP mode does not
allow audio dubbing. (
-24-)
4: The original sound was erased when audio
dubbing was performed.
• If you perform audio dubbing on a recording
made in [16bit] mode, the original sound will be
erased. If you wish to preserve the original
sound, be sure to select [12bit] mode when
recording.
5: Sounds cannot be played back.
• Although a cassette with no audio dubbing is
being played, have you set [SETUP] >>
[12bit AUDIO] >> [ST2]? To play back a
cassette with no audio dubbing, set
[12bit AUDIO] >> [ST1]. (
-48-)
• Is the variable speed search function working?
Press the [VAR SEARCH] button on the
remote control to cancel the variable speed
search function. (
-41-)
Playback (Pictures)
1: Although the movie camera is correctly
connected to a TV, playback images cannot
be seen.
The images are vertical.
• Have you selected video input on the TV?
Please read the operating instructions of your
TV and select the channel that matches the
input terminals used for the connection.
• Is the [TV ASPECT] setting correct? Change
the setting to match the aspect ratio of the TV.
[SETUP] >> [TV ASPECT] >> [16:9] or [4:3].
2: Mosaic-pattern noise appears on images
during cue or review playback.
• This phenomenon is characteristic of digital
video systems. It is not a malfunction.
3: Horizontal stripes appear on images during
cue and review playback.
• Horizontal stripes may appear depending on
the scene, but this is not a malfunction.
4: Playback picture is not clear.
• Are the heads of the movie camera dirty? If the
heads are dirty, playback image cannot be
clear. Clean the heads by using the head
cleaner for digital video . (
-76-)
• If the terminal for the Multi cable is soiled,
noises may appear on the screen. Wipe the soil
off the terminal with a soft cloth, and then
connect the cable to the A/V terminal.
• Is a picture containing a copyright protection
signal (copy guard) being recorded? When a
protected picture is played back by the movie
camera, mosaic-like patterns appear on the
picture.
73
VQT1L41
Page 74

Others
Card
1: Recorded pictures are not clear.
• Have you set [BASIC] >> [PICT.QUALITY] >>
[ ]? If recording is done with it set to [ ],
pictures with fine details may include a mosaiclike pattern. Set [PICT.QUALITY] >> [ ]. (
-28-
2: A file recorded on a card cannot be deleted.
• Is the file protected? Protected files cannot be
deleted. (
-45-)
• For the SD Card, if its write protect switch is set
to [LOCK], then deletion is disabled. (
-16-)
3: Photoshot playback images do not look
normal.
• The picture may be damaged. In order to
prevent the loss of image data, backing up on a
cassette or a personal computer is
recommended.
4: Even if a card is formatted, it cannot be
used.
• Either the movie camera or the card may be
damaged. Please consult a dealer. Use an SD
Card from 8 MB to 4 GB with this unit.
5: During playback, [UNPLAYABLE CARD] is
displayed.
• The image was either recorded in a different
format, or data is damaged.
6: If the SD card is inserted in another device,
it is not recognised.
• Check that the device is compatible with the
capacity or type of SD card (SD Memory Card/
SDHC Memory Card) that you inserted. (
-16-)
Refer to the operating instructions of the device
for details.
Others
1: The indication disappears, the screen is
frozen, or no operation can be performed.
• Turn off the power to the movie camera. If the
power cannot be turned off, press the [RESET]
)
button, or detach the battery or AC adaptor and
then reattach it. After that, turn on the power
again. If normal operation is still not restored,
detach the power connected, and consult the
dealer who you purchased the movie camera
from.
2: “PUSH THE RESET SWITCH” is displayed.
• An irregularity in the movie camera has been
automatically detected. Remove the cassette
or the card for data protection and then press
the [RESET] button with the boss A. The
movie camera will be activated.
RESET
A
• If you do not press the [RESET] button, the
power to the movie camera is turned off
automatically about 1 minute later.
• Even after you press the [RESET] button, the
indication may still appear repeatedly. If so, the
movie camera needs repair. Detach the power
connected, and consult the dealer who you
purchased the movie camera from. Do not
attempt to repair the appliance by yourself.
74
VQT1L41
Page 75

Others
3: Even if connected by the USB cable, the
movie camera is not recognised by the PC.
• Is the USB driver installed?
4: When the USB cable is disconnected, an
error message will appear on PC.
• To disconnect the USB cable safely, doubleclick the [ ] ( ) icon in the task tray and
follow the instructions on the screen.
5: The movie camera malfunctions on editing,
dubbing from digital video equipment, or
using “MotionDV STUDIO 6.0E LE for DV”
or “SweetMovieLife”.
• If a tape is recorded in multiple modes such as
SP and LP (recording mode), 12bit and 16bit
(sound recording mode), 4:3 and wide,
recorded and unrecorded parts, the movie
camera may malfunction at a point where the
mode switches. When you edit, do not record in
multiple modes.
6: Cannot see the PDF operating instructions
for SweetMovieLife/MotionDV STUDIO.
• Is Adobe Acrobat Reader 5.0 or later or Adobe
Reader 7.0 or later installed on the computer
that you are using? You will need Adobe
Acrobat Reader 5.0 or later or Adobe
Reader 7.0 or later to read the PDF operating
instructions for SweetMovieLife/MotionDV
STUDIO.
7: The warning/alarm indication [°] appears
when the camera is operated in the WEB
camera mode.
• Did you press the menu button or the recording
start/stop button? You cannot use the menu or
record onto the tape/card in the WEB camera
mode.
• Is the setting for the remote control correct?
• Did you attempt to play a tape without inserting
it? Insert a tape.
• Did you attempt to play a tape with copyright
protection (copy guard)? Pictures of the tape
with copyright protection (copy guard) cannot
be displayed on the PC. (The audio of the tape
can be played.)
• Is the USB driver installed?
-54-
-54-
Cautions for Use
ª About condensation
If you turn the movie camera on when
condensation occurs on the head or the tape,
condensation Indication [3] (yellow or red) is
displayed on the viewfinder or the LCD monitor
and the messages [3DEW DETECT] or
[3EJECT TAPE] (only when the tape is
inserted) appear. If so, follow the procedure
below.
1 Remove the tape if it is inserted.
≥It takes about 20 seconds to open the
cassette holder. This is not a malfunction.
2 Leave the movie camera with the cassette
cover closed to cool or warm it to the
ambient temperature.
≥The Status indicator blinks for about
1 minute and then the movie camera
automatically turns off. Leave it for about 1.5
to 2 hours.
3 Turn the movie camera on again, set it to
the Tape Recording/Playback Mode and
then check if the condensation indication
disappears.
Especially in cold areas, moisture may be frozen.
If so, it may take more time before the
condensation indication disappears.
Watch for condensation even before the
condensation Indication is displayed.
≥If the indicator of the condensation does not
display on the LCD monitor and/or viewfinder
and you notice condensation on the lens or the
main unit, do not open the cassette cover
otherwise condensation may be formed on the
heads or the cassette tape.
When the lens is fogged:
Set the [OFF/ON] switch to [OFF] and leave the
movie camera in this condition for about 1 hour.
When the lens temperature becomes close to the
ambient temperature, the fogging disappears
naturally.
75
VQT1L41
Page 76

Others
ª About dirty heads
If video heads (the parts that closely contact
with the tape) become dirty, normal recording
and playback are not properly performed.
Clean the heads with the digital video head
cleaner.
≥Insert the head cleaner into the movie camera,
set it to the Tape Playback Mode, and play it
back for about 10 seconds. (If you do not stop
the playback, it automatically stops about
15 seconds later.)
≥We recommend cleaning the heads periodically.
If the heads become dirty, “NEED HEAD
CLEANING” appears during recording. During
playback, moreover, the following symptoms
appear.
≥Mosaic-like noise appears partially or the
sound is interrupted.
≥Black or blue mosaic-like horizontal stripes
appear.
≥The whole screen becomes black and there is
no picture and sound.
When normal playback cannot be performed
even after the head cleaning
One possible cause is that normal recording
could not be performed because the heads were
dirty at the time of recording. Clean the heads,
and perform recording and playback again. If
normal playback can be performed, the heads are
clean. Before an important recording, be sure to
conduct a test recording to make sure that normal
recording can be performed.
≥If the heads become dirty soon after cleaning,
the problem may be attributable to the tape. If
so, try another cassette.
≥During playback, the picture or sound may be
interrupted momentarily, but this is not a
malfunction of the movie camera. (One possible
cause is that the playback is interrupted by dirt
or dust that momentarily adheres to the heads.)
About the movie camera
ª
≥When the movie camera is used for a long time,
the camera body becomes warm, but this is not
a malfunction.
Keep the Digital Video Camera as far away as
possible from electromagnetic equipment
(such as microwave ovens, TVs, video games
etc.).
≥If you use the Digital Video Camera on top of or
near a TV, the pictures and sound on the Digital
Video Camera may be disrupted by
electromagnetic wave radiation.
≥Do not use the Digital Video Camera near cell
phones because doing so may result in noise
adversely affecting the pictures and sound.
≥Recorded data may be damaged, or pictures
may be distorted, by strong magnetic fields
created by speakers or large motors.
≥Electromagnetic wave radiation generated by
microprocessors may adversely affect the
Digital Video Camera, disturbing the pictures
and sound.
≥If the Digital Video Camera is adversely affected
by electromagnetic equipment and stops
functioning properly, turn the Digital Video
Camera off and remove the battery or
disconnect AC adaptor. Then reinsert the
battery or reconnect AC adaptor and turn the
Digital Video Camera on.
Do not use the Digital Video Camera near
radio transmitters or high-voltage lines.
≥If you record near radio transmitters or
high-voltage lines, the recorded pictures and
sound may be adversely affected.
Do not spray insecticides or volatile
chemicals onto the movie camera.
≥If the movie camera is sprayed with such
chemicals, the camera body may become
deformed and the surface finish may peel off.
≥Do not keep rubber or plastic products in
contact with the movie camera for a long time.
When you use your movie camera in a sandy
or dusty place such as on a beach, do not let
sand or fine dust get into the body and
terminals of the movie camera. Also, protect
the movie camera from getting wet.
≥Sand or dust may damage the movie camera or
cassette. (Care should be taken when inserting
and removing a cassette.)
≥If sea water splashes onto the movie camera,
wet a soft cloth with tap water, wring it well, and
use it to wipe the camera body carefully. Then,
wipe it again thoroughly with a soft dry cloth.
76
VQT1L41
Page 77

Others
While carrying the movie camera, do not drop
or bump it.
≥A strong impact on the movie camera may
break its housing, causing it to malfunction.
Do not use benzine, paint thinner or alcohol
for cleaning the movie camera.
≥Before cleaning, detach the battery or pull out
the AC mains lead from the AC mains socket.
≥The camera body may be discoloured and the
surface finish may peel off.
≥Wipe the movie camera with a soft dry cloth to
remove dust and fingerprints. To remove
stubborn stains, wring well a cloth that is soaked
in a neutral detergent diluted with water and
wipe the movie camera with it. Afterwards, wipe
it with a dry cloth.
≥When you use a chemical dust cloth, follow the
instructions.
Do not use this movie camera for surveillance
purposes or other business use.
≥If you use the movie camera for a long time, the
internal temperature increases and,
consequently, this may cause malfunction.
≥This movie camera is not intended for business
use.
When you are not going to use movie camera
for an extended time
≥When storing the unit in a cupboard or a
cabinet, it is recommended that you put a
desiccant (silica gel) in with it.
About the battery
ª
The battery used in the movie camera is a
rechargeable lithium ion battery. This battery is
susceptible to temperature and humidity, and the
effect of temperature increases with increasing or
decreasing temperature. In the low temperature
range, the fully charged indication may not
appear, or the low battery indication may appear
about 5 minutes after the start of use. At high
temperature, moreover, the protection function
may work, disabling use of the movie camera.
Be sure to detach the battery after use
≥If the battery is left attached to the movie
camera, a minute amount of current is
consumed even when the movie camera power
is [OFF]. If the battery is left attached to the
movie camera for a long time, over-discharge
takes place. The battery may become unusable
after it is charged.
≥The battery should be stored in a cool place free
from humidity, with as constant temperature as
possible. (Recommended temperature: 15 oC to
25 oC, Recommended humidity: 40% to 60%)
≥Extremely high temperatures or low
temperatures will shorten the life of the battery.
≥If the battery is kept in a high-temperature, high-
humidity, or oily-smoky places, the terminals
may rust and cause malfunctions.
≥To store the battery for a long period of time, we
recommend you charge it once every year and
store it again after you have completely used up
the charged capacity.
≥Dust and other matter attached to the battery
terminals should be removed.
Prepare spare batteries when going out for
recording.
≥Prepare batteries appropriate to 3 to 4 times the
period during you want to record pictures in. In
cold places such as a ski resort, the period
during which you can record pictures is
shortened.
≥When you travel, do not forget to bring an AC
adaptor so that you can recharge the batteries
at your destination.
If you drop the battery accidentally, check to
see if the terminals are deformed.
≥Attaching a deformed battery to the movie
camera or AC adaptor may damage the movie
camera or AC adaptor.
Do not throw old battery into fire.
≥Heating a battery or throwing it into a fire may
result in an explosion.
≥If the operating time is very short even after the
battery has been recharged, the battery has
worn out. Please purchase a new battery.
77
VQT1L41
Page 78

Others
ª About the AC adaptor
≥If the battery is warm, charging requires more
time than normal.
≥If the temperature of the battery is extremely
high or extremely low, the [CHARGE] lamp may
continue flashing, and the battery may not be
charged. After the battery temperature has
decreased or increased sufficiently, recharging
starts automatically. So, wait for a while. If the
lamp still continues flashing even after the
recharging, the battery or AC adaptor may be
faulty. If so, please contact a dealer.
≥If you use the AC adaptor near a radio, radio
reception may be disturbed. Keep the AC
adaptor 1 metre or more away from radio.
≥When using the AC adaptor, it may generate
whirring sounds. However, this is normal.
≥After use, be sure to pull out the AC mains lead
from the AC mains socket. (If they are left
connected, a minute amount of current is
consumed.)
≥Always keep the electrodes of the AC adaptor
and battery clean.
About the cassette
ª
Never place the cassette in a high temperature
place.
≥The tape may be damaged, producing
mosaic-like noise at the time of playback.
When storing the cassette after use, be sure
to rewind the tape to the beginning and take it
out.
≥If the cassette is left for more than 6 months
(depending on the storage condition) in the
movie camera or stopped midway, the tape may
sag and be damaged.
≥Once every 6 months, wind the tape to the end
and then rewind it to the beginning. If the
cassette is left for 1 year or longer without
winding or rewinding, the tape may be deformed
by expansion or shrinkage attributable to
temperature and humidity. The wound tape may
stick to itself.
≥Dust, direct sunlight (ultraviolet rays), and
humidity may damage the tape. Such usage
may cause damage to the movie camera and
the heads.
≥After use, be sure to rewind the tape to the
beginning, put the cassette in the case to
protect it from dust, and store it upright.
Keep the cassette away from strong
magnetism.
≥Apparatuses using magnets such as magnetic
necklaces and toys have magnetic force that is
stronger than expected, and they may erase the
contents of a recording or may increase noise.
About the card
ª
When inserting or removing the card, always
set the [OFF/ON] switch to [OFF].
When the access lamp is illuminated (During
access to the card), do not pull out the card,
rotate the mode dial, turn off the power, or
cause any vibrations or impact.
Do not leave the card in places where there is
high temperature or direct sunlight, or where
electromagnetic waves or static electricity are
easily generated. Moreover, do not fold or
drop the card, and do not strongly vibrate it.
≥The card may break or the contents of the card
may be destroyed or erased.
≥Do not touch the terminals on the back of the
card.
≥Electrical noise, static electricity, or failure of the
movie camera or the card may damage or erase
the data stored on the card. We recommend
saving important data on a personal computer
by using a USB cable, PC card adaptor, and
USB reader/writer.
After use, be sure to remove the card from the
movie camera for storage.
≥After use, or when storing or carrying the card,
put it in the storage case.
≥Do not allow dust, water, or foreign substances
to adhere to the terminals on the back of the
card. Moreover, do not touch the terminals with
your hand.
≥Keep the Memory Card out of reach of children
to prevent swallowing.
Folder structure of the card
ª
The folder structure of the card formatted by
the movie camera will be displayed on the PC
as the illustration below.
256
78
VQT1L41
≥Up to 999 pictures can be recorded on
100CDPFP folder etc.
≥Files with the DPOF settings can be recorded
on MISC folder.
Page 79

Others
ª LCD monitor/viewfinder
LCD monitor
≥When the LCD monitor gets dirty, wipe it with a
dry soft cloth.
≥In a place with drastic temperature changes,
condensation may form on the LCD monitor.
Wipe it with soft dry cloth.
≥If your movie camera is extremely cold, the LCD
monitor is slightly darker than usual immediately
after you turn the power on. However, as the
internal temperature increases, it goes back to
normal brightness.
Extremely high precision technology is
employed to produce the LCD monitor
screen featuring a total of approximately
123,000 pixels. The result is more than
99.99% effective pixels with a mere 0.01% of
the pixels inactive or always lit. However,
this is not a malfunction and does not affect
the recorded picture.
Viewfinder
Extremely high precision technology is
employed to produce the viewfinder screen
featuring a total of approximately 113,000
pixels. The result is more than 99.99%
effective pixels with a mere 0.01% of the
pixels inactive or always lit. However, this is
not a malfunction and does not affect the
recorded picture.
Periodical check-ups
ª
≥To maintain the highest image quality, we
recommend replacing worn parts such as heads
after approx. 1000 hours of use. (This, however,
depends on operating conditions including
temperature, humidity and dust.)
Explanation of terms
ª Automatic white balance
White balance adjustment recognises the colour
of light and adjusts so the white colour will
become a pure white. The movie camera
determines the hue of light that comes through
the lens and white balance sensor, thereby
judging the recording condition, and selects the
closest hue setting. This is called automatic white
balance adjustment. However, since the movie
camera only stores white colour information
under several light sources, automatic white
balance adjustment does not function normally
under the other light sources.
1)
Outside of the effective range of automatic white
balance adjustment, the image will become
reddish or bluish. Even within the effective range
of automatic white balance adjustment, the
automatic white balance adjustment may not
function properly if there is more than one light
source. For light outside the functional auto white
balance adjustment range, use the manual white
balance adjustment mode.
1) The effective range of automatic white
balance adjustment on this movie camera
2) Blue sky
3) TV screen
4) Cloudy sky (rain)
5) Sunlight
6) White fluorescent lamp
7) 2 hours after sunrise or before sunset
8) 1 hour after sunrise or before sunset
9) Halogen light bulb
10) Incandescent light bulb
11) Sunrise or sunset
12) Candlelight
79
VQT1L41
Page 80

Others
ª White balance
The image recorded by the movie camera may
become bluish or reddish under the influence of
light sources. To avoid such phenomena, adjust
the white balance.
White balance adjustment determines the white
colour under different light sources. By
recognizing which is the white colour under
sunlight and which is the white colour under a
fluorescent lamp, the movie camera can adjust
the balance among the other colours.
Since white colour is the reference of all colours
(light), the movie camera can record pictures in a
natural hue if it can recognise the reference white
colour.
Auto focus
ª
Auto focus automatically moves the focusing lens
forward and backward inside the movie camera to
bring the subject into focus.
Auto focus has the following characteristics.
≥Adjusts so that the vertical lines of a subject are
seen more clearly.
≥Attempts to bring an object with higher contrast
into focus.
≥Focuses on the screen centre only.
Due to these characteristics, auto focus does not
work correctly in the following situations. Record
pictures in the manual focus mode.
Recording a subject with one end located
closer to the movie camera and the other end
farther away from it
≥As auto focus adjusts at the centre of an
image, it may be impossible to focus on a
subject that is located in both the foreground
and background.
Recording a subject behind dirty or dusty
glass
≥The subject behind the glass will not be
focused because the focus is on the dirty
glass.
Recording a subject that is surrounded by
objects with glossy surfaces or by highly
reflective objects
≥The recording subject may become blurry
because the movie camera focuses on the
objects with glossy surfaces or on highly
reflective objects.
Recording a subject in dark surroundings
≥The movie camera cannot focus correctly
because the light information that comes
through the lens decreases considerably.
Recording a fast-moving subject
≥As the focus lens-inside moves mechanically,
it cannot keep up with a fast-moving subject.
Recording a subject with little contrast
≥A subject with little contrast, such as a white
wall, may become blurry because the movie
camera achieves focus based upon the
vertical lines of an image.
80
VQT1L41
Page 81

Specifications
Specifications
Specifications
Digital Video Camera
Information for your safety
Power source:
DC 7.9/7.2 V
Power consumption:
Recording
5.2 W
Recording format:
Mini DV (Consumer-use digital video SD format)
Tape used:
6.35 mm digital video tape
Recording/playback time:
SP: 80 min; LP: 120 min (with DVM80)
Video
Recording system:
Digital component
Television system:
CCIR: 625 lines, 50 fields PAL colour signal
Audio
Recording system:
PCM digital recording
16 bit (48 kHz/2 ch), 12 bit (32 kHz/4 ch)
Image sensor:
1/6-inch 3CCD image sensor
[Effective pixels]
Moving picture: 630 Kk3 (4:3), 540 K
Still picture: 710 Kk3 (4:3), 540 Kk3 (16:9)/
Total: 800 Kk3
Lens:
Auto Iris, F1.8 to F2.8, Focal length; 3.0 mm to
30.0 mm, Macro (Full range AF)
Filter diameter:
37 mm
Zoom:
10:1 Power zoom
Monitor:
2.7-inch LCD
Viewfinder:
Colour electronic viewfinder
Microphone:
Stereo (with a zoom function)
Speaker:
1 round speaker
Standard illumination:
1,400 lx
Minimum required illumination:
8 lx (Low light mode: 1/50)
1 lx (Colour Night View Mode)
Video output level:
1.0 Vp-p, 75 ≠
S-Video output level:
Y Output: 1.0 Vp-p, 75 ≠
C Output: 0.3 Vp-p, 75 ≠
Audio output level (Line):
316 mV, 600 ≠
‰ 20 mm
k3 (16:9)/
USB:
Card reader/writer function, USB port (Hi-Speed
USB(USB 2.0))
No copyright protection support
PictBridge-compliant
Digital interface:
DV output terminal (IEEE1394, 4-pin)
Dimensions:
78.5 mm (W)k72.6 mm (H)k136.0 mm (D)
(excluding the projecting parts)
Mass:
Approx. 450 g (without supplied battery and DV
cassette)
Approx. 515 g (with supplied battery and DV
cassette)
Operating temperature:
oC to 40 oC
0
Operating humidity:
10% to 80%
Card memory functions
Recording media:
SD Memory Card: 8 MB/16 MB/32 MB/64 MB/
128MB/256MB/512MB/1GB/2GB (Maximum)
(FAT12 and FAT16 format corresponding)
SDHC Memory Card: 4 GB (Maximum)
(FAT32 format corresponding)
Please confirm the latest information on the
following website.
http://panasonic.
co.jp/pavc/global/cs
(This Site is English only.)
Still picture recording file format:
JPEG (Design rule for Camera File system, based
on Exif 2.2 standard), DPOF corresponding
Still picture size:
WEB camera
Compression:
Image size:
Frame rate:
t1512
2048
t1152
2048
1600
t1200
t960
1280
t720
1280
640
t480
t360
640
Motion JPEG
320k240 pixels (QVGA)
Approx. 6 fps
81
VQT1L41
Page 82

Specifications
AC adaptor VSK0651
Information for your safety
Power source:
AC 110V to 240V, 50/60Hz
Power consumption:
19 W
DC output:
DC 7.9 V, 1.4 A (Movie camera operation)
DC 8.4 V, 0.65 A (Battery charging)
Dimensions:
61 mm (W)k32 mm (H)k91 mm (D)
Mass:
Approx. 110 g
Specifications may change without prior notice.
Maximum number of still pictures recordable on an SD Card (optional)
16:9 mode:
PICTURE
SIZE
PICT.
QUALITY
8MB45951219 4 7
16 MB 100 200 29 46 11 18
32 MB 220 440 64 98 24 39
64 MB 440 880 130 200 51 81
128 MB 880 1760 250 390 99 155
256 MB 1760 3520 530 810 210 330
512 MB 3520 7040 1040 1600 410 650
1 GB 7040 14080 2090 3200 820 1290
2 GB 14080 28160 4250 6510 1680 2630
4 GB 28160 56320 8350 12780 3290 5170
¢
1
4:3 mode:
PICTURE
SIZE
PICT.
QUALITY
8MB45959155935
16 MB 100 200 21 35 13 21 8 13
32 MB 220 440 47 75 30 47 18 29
64 MB 440 880 98 155 63 98 39 62
128 MB 880 1760 185 300 120 185 75 120
256 MB 1760 3520 390 620 250 390 160 250
512 MB 3520 7040 780 1230 500 780 320 490
1 GB 7040 14080 1550 2470 1010 1550 630 990
2 GB 14080 28160 3160 5030 2050 3160 1290 2010
4 GB 28160 56320 6210 9870 4020 6210 2530 3950
≥¢ is displayed only in Tape Recording Mode.
≥The numbers shown in the table are approximations.
≥These figures vary depending on the subject being photographed.
82
VQT1L41
Page 83

Informacje dotyczące
bezpieczeństwa
OSTRZEŻENIE:
ABY UNIKNĄĆ POŻARU, PORAŻENIA PRĄDEM
LUB USZKODZENIA URZĄDZENIA,
≥ NIE NALEŻY GO WYSTAWIAĆ NA DZIAŁANIE
DESZCZU I WILGOCI, A TAKŻE NALEŻY JE
CHRONIĆ PRZED ZALANIEM I
ZACHLAPANIEM. NA URZĄDZENIU NIE
NALEŻY UMIESZCZAĆ JAKICHKOLWIEK
PRZEDMIOTÓW WYPEŁNIONYCH CIECZAMI,
TAKICH JAK WAZONY.
≥ NALEŻY KORZYSTAĆ WYŁĄCZNIE Z
ZALECANYCH AKCESORIÓW.
≥ NIE NALEŻY DEMONTOWAĆ OBUDOWY
URZĄDZENIA. WEWNĄTRZ URZĄDZENIA NIE
ZNAJDUJĄ SIĘ ELEMENTY NADAJĄCE SIĘ DO
SAMODZIELNEJ NAPRAWY. NAPRAWĘ
URZĄDZENIA NALEŻY ZLECIĆ
WYKWALIFIKOWANYM PRACOWNIKOM
SERWISU.
UWAGA!
≥ URZĄDZENIA NIE NALEŻY UMIESZCZAĆ W
ZAMKNIĘTEJ PRZESTRZENI, NP. NA PÓŁCE Z
KSIĄŻKAMI CZY W ZABUDOWANEJ SZAFCE.
NALEŻY ZAPEWNIĆ ODPOWIEDNIĄ
WENTYLACJĘ. ABY UNIKNĄĆ PORAŻENIA
PRĄDEM LUB POŻARU NA SKUTEK
PRZEGRZANIA, NIE NALEŻY ZAKRYWAĆ
OTWORÓW WENTYLACYJNYCH ZASŁONAMI
ANI INNYMI MATERIAŁAMI.
≥ NIE NALEŻY ZAKRYWAĆ OTWORÓW
WENTYLACYJNYCH GAZETAMI, OBRUSAMI,
ZASŁONAMI ITP.
≥ NIE NALEŻY UMIESZCZAĆ NA URZĄDZENIU
OTWARTYCH źRóDEŁ OGNIA, NP.
ZAPALONYCH ŚWIEC.
≥ NALEŻY UTYLIZOWAĆ AKUMULATOR W
SPOSÓB PRZYJAZNY DLA ŚRODOWISKA.
Urządzenie należy umieścić w pobliżu łatwo
dostępnego gniazda sieciowego.
Wtyczka kabla zasilania powinna być
dostępna w każdej chwili.
Aby w pełni odłączyć zasilanie urządzenia,
należy wyciągnąć wtyczkę kabla zasilania z
gniazda sieciowego.
Oznaczenie produktu znajduje się na spodzie
urządzeń.
POLSKI
Ostrzeżenie
Zagrożenie pożaru, wybuchu i oparzeń.
Nie demontować urządzenia.
Nie ogrzewać baterii powyżej
wskazanych temperatur i nie spalać.
Bateria guzikowa 60 oC
Pakiet baterii 60 oC
ª Należy uważnie zapoznać się z
instrukcją obsługi kamery i stosować
się do podanych w niej zaleceń.
≥Wyłączną odpowiedzialność za uszczerbek
na zdrowiu oraz wszelkie szkody materialne
wynikające z korzystania z urządzenia w
sposób niezgodny z instrukcją obsługi
ponosi użytkownik.
Testowanie kamery.
Przed wykonaniem pierwszego ważnego
nagrania należy przetestować kamerę, aby
stwierdzić, czy działa ona poprawnie i zapewnia
właściwą jakość nagrań.
Wyłączenie odpowiedzialności producenta za
utratę nagrań.
Producent nie ponosi w żadnym przypadku
odpowiedzialności za utratę nagrań spowodowaną
nieprawidłowym działaniem bądź usterką kamery,
dołączonych do niej akcesoriów oraz kaset.
Przestrzeganie praw autorskich.
Kopiowanie fabrycznie nagranych taśm oraz
innych materiałów rozpowszechnianych w formie
wydawnictw bądź poprzez emisję do celów
innych niż własny użytek może stanowić
naruszenie praw autorskich. W przypadku
niektórych materiałów zabronione jest także
kopiowanie na własny użytek.
≥Patenty USA nr 6,836,549; 6,381,747;
7,050,698; 6,516,132 i 5,583,936.
≥Ten produkt wykorzystuje technologię ochrony
praw autorskich chronioną patentami
zarejestrowanymi w USA i innymi prawami
własności intelektualnej. Korzystanie z
technologii ochrony praw autorskich podlega
wymogowi uzyskania zezwolenia od firmy
Macrovision i jest dozwolone tylko w przypadku
zastosowań domowych i innych ograniczonych
sposobów użytkowania, chyba że firma
Macrovision wyraźnie zaznaczyła inaczej.
Zabrania się inżynierii wstecznej oraz
demontażu urządzenia.
≥Logo SDHC jest znakiem towarowym.
≥Logo miniSD jest znakiem towarowym.
83
VQT1L41
Page 84

≥Leica jest zastrzeżonym znakiem towarowym
firmy Leica Microsystems IR GmbH, a Dicomar
jest zastrzeżonym znakiem towarowym firmy
Leica Camera AG.
≥Wszystkie pozostałe nazwy firm oraz
produktów wymienione w niniejszej instrukcji
obsługi są znakami towarowymi lub
zastrzeżonymi znakami towarowymi
odpowiednich podmiotów.
Pliki zapisywane na karcie SD
Odtwarzanie plików zapisanych przez inne
urządzenia za pomocą kamery może okazać się
niemożliwe, to samo dotyczy też sytuacji
odwrotnej. W związku z powyższym należy
zawczasu sprawdzić zgodność urządzeń.
Odsyłacze do innych stron
Odsyłacze do innych stron dokumentu podano w
postaci numeru strony umieszczonego między
myślnikami, np:
-00-
Kolejność operacji wykonywanych w menu
oznaczono symbolem >>.
ª Zgodność elektromagnetyczna
Na tabliczce znamionowej znajduje się
symbol CE.
Należy korzystać wyłącznie z zalecanych
akcesoriów.
≥Należy korzystać wyłącznie z kabli Multi i USB
dostarczonych wraz z urządzeniem.
≥W przypadku korzystania z kabla
sprzedawanego osobno należy pamiętać, że
jego długość nie powinna być większa niż
3 metry.
≥Kartę pamięci należy przechowywać w miejscu
niedostępnym dla dzieci, aby zapobiec jej
połknięciu.
Informacja dla użytkowników o
pozbywaniu się urządzeń elektrycznych i
elektronicznych (dotyczy gospodarstw
domowych)
Przedstawiony symbol
umieszczony na produktach
lub dołączonej do nich
dokumentacji informuje, że
niesprawnych urządzeń
elektrycznych lub
elektronicznych nie można
wyrzucać razem z
odpadami gospodarczymi.
Prawidłowe postępowanie w razie
konieczności pozbycia się urządzeń
elektrycznych lub elektronicznych, utylizacji,
powtórnego użycia lub odzysku
podzespołów polega na przekazaniu
urządzenia do wyspecjalizowanego punktu
zbiórki, gdzie będzie przyjęte bezpłatnie. W
niektórych krajach produkt można oddać
lokalnemu dystrybutorowi podczas zakupu
innego urządzenia.
Prawidłowa utylizacja urządzenia umożliwia
zachowanie cennych zasobów i uniknięcie
negatywnego wpływu na zdrowie i
środowisko, które może być zagrożone
przez nieodpowiednie postępowanie z
odpadami.Szczegółowe informacje o
najbliższym punkcie zbiórki można uzyskać
u władz lokalnych.
Nieprawidłowa utylizacja odpadów
zagrożona jest karami przewidzianymi w
odpowiednich przepisach lokalnych.
Użytkownicy biznesowi w krajach Unii
Europejskiej
W razie konieczności pozbycia się urządzeń
elektrycznych lub elektronicznych, prosimy
skontaktować się z najbliższym punktem
sprzedaży lub z dostawcą, którzy udzielą
dodatkowych informacji.
Pozbywanie się odpadów w krajach poza
Unią Europejską
Taki symbol jest ważny tylko w Unii
Europejskej.
W razie potrzeby pozbycia się niniejszego
produktu prosimy skontaktować się z
lokalnymi władzami lub ze sprzedawcą
celem uzyskania informacji o prawidłowym
sposobie postępowania.
84
VQT1L41
Page 85

Przed otwarciem opakowania z płytą CD-ROM należy zapoznać się z poniższymi informacjami.
Umowa Licencyjna Użytkownika Oprogramowania (dotyczy
sterownika USB, oprogramowania
SweetMovieLife/
MotionDV STUDIO)
Użytkownikowi (określanemu dalej jako “Licencjobiorca”) udziela się licencji na Oprogramowanie określone w
niniejszej Umowie Licencyjnej Użytkownika Oprogramowania (określanej dalej jako “Umowa”) pod warunkiem
przyjęcia warunków niniejszej Umowy. Jeśli Licencjobiorca nie wyraża zgody na warunki niniejszej Umowy,
powinien niezwłocznie zwrócić Oprogramowanie firmie Matsushita Electric Industrial Co., Ltd. (określanej
dalej jako “Matsushita”) bądź jej dystrybutorowi lub przedstawicielowi, u którego dokonał zakupu.
Artykuł 1 Licencja
Licencjobiorcy udziela się prawa do korzystania z oprogramowania, w tym informacji zapisanych bądź
opisanych na płycie CD-ROM, instrukcji obsługi oraz wszelkich innych materiałów dostarczonych
Licencjobiorcy (określanych łącznie jako “Oprogramowanie”). Licencjobiorcy nie zostają jednak przyznane
jakiekolwiek prawa do patentów, prawa autorskie, prawa do znaków towarowych ani prawa do tajemnic
handlowych związanych z Oprogramowaniem.
Artykuł 2 Korzystanie przez osoby trzecie
Licencjobiorca nie ma prawa kopiować, modyfikować ani przekazywać Oprogramowania, ani też zezwalać
osobom trzecim na korzystanie z Oprogramowania oraz jego kopiowanie i modyfikowanie, zarówno odpłatnie
jak i bezpłatnie, z wyjątkiem przypadków wyraźnie przewidzianych niniejszą Umową.
Artykuł 3 Ograniczenia dotyczące kopiowania oprogramowania
Licencjobiorca ma prawo wykonać jedną kopię całości lub części Oprogramowania wyłącznie jako kopię zapasową.
Artykuł 4 Komputer
Licencjobiorca ma prawo do korzystania z Oprogramowania wyłącznie na jednym komputerze, a instalowanie
go na innych komputerach jest zabronione.
Artykuł 5 Odtwarzanie kodu źródłowego, dekompilacja i dezasemblowanie
Licencjobiorca nie ma prawa do odtwarzania kodu źródłowego, dekompilacji oraz dezasemblowania
Oprogramowania z wyjątkiem przypadków dozwolonych przepisami prawa obowiązującymi w kraju
zamieszkania Licencjobiorcy. Firma Matsushita oraz jej dystrybutorzy nie będą ponosić odpowiedzialności za
jakiekolwiek usterki Oprogramowania bądź szkody poniesione przez Licencjobiorcę w wyniku odtwarzania
przez niego kodu źródłowego, dekompilacji bądź dezasemblowania Oprogramowania.
Artykuł 6 Zabezpieczenie i ochrona przed roszczeniami
Oprogramowanie jest dostarczane w takim stanie, w jakim się znajduje, bez jakichkolwiek gwarancji
wyraźnych lub domniemanych, a w szczególności gwarancji nienaruszania praw, przydatności handlowej
i/lub przydatności do określonego celu. Ponadto firma Matsushita nie gwarantuje nieprzerwanego bądź
bezbłędnego działania Oprogramowania. Firma Matsushita oraz jej dystrybutorzy nie będą również ponosić
odpowiedzialności za jakiekolwiek szkody poniesione przez Licencjobiorcę w wyniku korzystania z
Oprogramowania lub w związku z korzystaniem z niego.
Artykuł 7 Ograniczenia eksportowe
Licencjobiorca zobowiązuje się nie eksportować ani nie reeksportować Oprogramowania w jakiejkolwiek
postaci do innych krajów, bez stosownego zezwolenia eksportowego wydanego zgodnie z przepisami
obowiązującymi w kraju zamieszkania Licencjobiorcy.
Artykuł 8 Unieważnienie licencji
Prawa udzielone Licencjobiorcy na mocy niniejszej Umowy zostaną automatycznie wycofane w przypadku
naruszenia przez Licencjobiorcę jakichkolwiek postanowień Umowy. W takim przypadku Licencjobiorca ma
obowiązek na własny koszt zniszczyć Oprogramowanie oraz związaną z nim dokumentację, a także wszelkie
ich kopie.
85
VQT1L41
Page 86

Spis treści
Informacje dotyczące bezpieczeństwa.............. 83
Wprowadzenie
Akcesoria........................................................... 87
Opcjonalne akcesoria ........................................ 87
Wykaz elementów i zasady ich obsługi ............. 87
Zakładanie przykrywki obiektywu ..................... 89
Pasek uchwytu................................................... 90
Zasilanie............................................................. 90
Czas ładowania i czas nagrywania.................... 92
Włączanie kamery.............................................. 92
Ustawianie daty i godziny.................................. 93
Korzystanie z wyświetlacza LCD ....................... 94
Korzystanie z wizjera ......................................... 94
Szybki start........................................................ 95
Wkładanie/wyjmowanie kasety.......................... 96
Wkładanie/wyjmowanie karty ............................ 97
Wybór trybu pracy............................................. 98
Korzystanie z joysticka ...................................... 98
Tryb pomocy.................................................... 100
Zmiana języka.................................................. 100
Korzystanie z ekranu menu.............................. 100
Regulacja wyświetlacza LCD i wizjera............. 102
Korzystanie z pilota.......................................... 103
Tryb nagrywania
Sprawdzenie przed rozpoczęciem
nagrywania.................................................... 105
Nagrywanie na taśmie ..................................... 106
Spraw. nagrywania .......................................... 107
Funkcja szukania przerw ................................. 107
Rejestrowanie zdjęć na karcie podczas
nagrywania obrazu na taśmę ........................ 108
Wykonywanie zdjęć na karcie
(funkcja Photoshot) ....................................... 108
Funkcja zbliżania/oddalania (zoom)................. 110
Filmowanie samego siebie............................... 111
Funkcja kompensacji tylnego oświetlenia ....... 111
Funkcja obraz nocny kolor............................... 112
Soft Skin .......................................................... 112
Funkcja “Tele Makro” ...................................... 113
Funkcja przejścia ............................................. 113
Funkcja wyciszania szumu wiatru.................... 114
Anti-ground Shooting (AGS) ............................ 114
Zdjęcia z samowyzwalaczem .......................... 115
Funkcja panoramiczna/4:3............................... 115
Funkcja stabilizatora obrazu ............................ 116
Funkcja linii pomocy ........................................ 116
Zdjęcia w różnych sytuacjach
(tryb sceny).................................................... 117
Wykonywanie zdjęć w naturalnych kolorach
(balans bieli) .................................................. 118
Ręczne ustawianie ostrości ............................. 119
86
VQT1L41
Ręczne ustawianie szybkości migawki i
przesłony....................................................... 119
Tryb odtwarzania
Odtwarzanie z taśmy ....................................... 121
Odtwarzanie w zwolnionym tempie/
poklatkowe.................................................... 122
Funkcja przeszukiwania ze zmienną
prędkością..................................................... 122
Odtwarzanie na ekranie telewizora.................. 123
Odtwarzanie z karty ......................................... 124
Usuwanie plików zapisanych na karcie ........... 125
Formatowanie karty ......................................... 125
Ochrona plików zapisanych na karcie ............. 126
Zapisywanie danych drukowania na karcie
(ustawienie DPOF)......................................... 126
Tryb edycji
Nagrywanie z taśmy na kartę........................... 127
Kopiowanie za pomocą rejestratora
DVD lub magnetowidu
(kopiowanie synchroniczne) .......................... 127
Nagrywanie za pomocą kabla DV
(cyfrowe kopiowanie synchroniczne) ............ 128
Podkładanie dźwięku....................................... 129
Bezpośrednie drukowanie zdjęć na drukarce
(funkcja PictBridge) ....................................... 130
Z komputerem
Wprowadzenie................................................. 132
Instalacja i podłączenie.................................... 135
Oprogramowanie ............................................. 139
Inne.............................................................. 142
Menu
Lista menu ....................................................... 145
Menu związane z wykonywaniem zdjęć .......... 147
Menu związane z odtwarzaniem...................... 147
Inne menu ........................................................ 148
Inne
Wskaźniki......................................................... 149
Ostrzeżenia...................................................... 150
Funkcje, z których nie można korzystać
jednocześnie ................................................. 151
Typowe problemy i rozwiązania....................... 152
Wskazówki dotyczące użytkowania ................ 156
Słowniczek terminów....................................... 160
Dane techniczne
Dane techniczne .............................................. 162
Page 87

Wprowadzenie
(5)(6)
Wprowadzenie
Akcesoria
Poniżej przedstawiono akcesoria dostarczane
wraz z urządzeniem.
VSK0651B
K2GJ2DC00011
CR2025
N2QAEC000021
K2KZ4CB00011
1) Zasilacz sieciowy, kabel zasilania prądem
stałym i kabel sieciowy
2) Akumulator -90-
3) Pilot zdalnego sterowania z baterią
pastylkową
-103-
4) Multi cable -127-
5) Kabel USB i płyta CD-ROM -130-, -132-
Opcjonalne akcesoria
1) Zasilacz sieciowy (VW-AD11E)
2) Akumulator (litowy/VW-VBG130/1320 mAh)
3) Akumulator (litowy/VW-VBG260/2640 mAh)
4) Akumulator (litowy/VW-VBG6°/5800 mAh)
5) Zestaw futerału na pakiet akumulatorów
(VW-VH04)
6) Konwerter szerokokątny (VW-LW3707M3E)
7) Telekonwerter (VW-LT3714ME)
8) Zestaw filtrów (VW-LF37WE)
9) Lampa oświetlająca (VW-LDC102E)
10) Żarówka do lampy oświetlającej (VZ-LL10E)
11) Statyw (VW-CT45E)
12) Kabel DV (VW-CD1E)
≥Pewne akcesoria opcjonalne mogą być
niedostępne w niektórych krajach.
° Zestaw futerału na pakiet akumulatorów/VW-
VH04 (opcjonalny) jest wymagany.
K2CQ2CA00006
K2KZ9CB00001
-91-
Wykaz elementów i zasady ich
obsługi
ª Kamera
(1)
(2)
(1) Czujnik balansu bieli -118-
Czujnik zdalnego sterowania -104-
Pasek uchwytu -90-
(2)
(3)
Obiektyw (LEICA DICOMAR)
(4) Mikrofon (wbudowany, stereofoniczny)
-110-, -114-
(5)
Przełącznik wyboru trybu pracy [AUTO/
MANUAL/FOCUS]
Przycisk reset [RESET] -155-
(6)
(7)
Gniazdo wyjściowe audio-wideo/S-Video
-127-
[A/V]
-105-, -117-, -118-, -119-
≥Stosować tylko dołączony Multi cable. W
przeciwnym razie dźwięk może być
odtwarzany nieprawidłowo.
(3)
(4)
(7)
87
VQT1L41
Page 88

(8)
(9)
(10)
(11)
(12)
Wprowadzenie
(14)
(15)
(16)
(17)
(18)
(19)
(20)
(21)
(22)
(13)
(8) Wizjer -94-, -160-
W związku z ograniczeniami w zakresie
technologii wytwarzania ekranów
ciekłokrystalicznych, na ekranie wizjera
mogą występować niewielkie jasne lub
ciemne punkty. Nie jest to jednak oznaką
uszkodzenia i nie ma wpływu na
rejestrowany obraz.
(9)
Gniazdo USB [ ] -130-, -140-
Gniazdo zasilania [DC/C.C.IN] -91-
(10)
Gniazdo wyjściowe DV [DV] -128-
(11)
Uchwyt akumulatora -91-
(12)
Suwak zwalniania blokady akumulatora
(13)
[BATTERY]
(14)
Wyłącznik zasilania [OFF/ON] -92-
Wskaźnik trybu pracy -92-
(15)
Przycisk menu [MENU] -100-
(16)
Joystick -98-
(17)
Pokrętło wyboru trybu pracy -98-
(18)
(19)
Przycisk start/stop nagrywania -106-
-91-
(23)
Wyświetlacz LCD -94-, -160-
(20)
(24)
(25)
W związku z ograniczeniami w zakresie
technologii wytwarzania ekranów
ciekłokrystalicznych, na ekranie
wyświetlacza LCD mogą występować
niewielkie jasne lub ciemne punkty. Nie jest
to jednak oznaką uszkodzenia i nie ma
wpływu na rejestrowany obraz.
(21) Otwierana część wyświetlacza LCD -94-
Głośnik -121-
(22)
Kontrolka dostępu do karty -97-
(23)
Gniazdo karty -97-
(24)
Pokrywa gniazda karty -97-
(25)
(28)
(29)
(26)
(27)
(30)
(31)
88
VQT1L41
Kieszeń na kasetę -96-
(26)
(27)
Stopka do akcesoriów
≥Służy do podłączania akcesoriów, np. lampy
oświetlającej (VW-LDC102E; wyposażenie
opcjonalne).
(28) Suwak wysuwania kasety [OPEN/EJECT]
-96-
(29)
Pokrywa kieszeni na kasetę -96-
Regulator zoomu [W/T] -110-
(30)
Regulator głośności [s /VOLr] -121-
Przycisk migawki [ ] -108-
(31)
Page 89

Wprowadzenie
(32)
(32) Mocowanie do statywu
Otwór mocujący umożliwia umieszczenie kamery
na opcjonalnym statywie typu VW-CT45E.
(Należy uważnie zapoznać się z instrukcją
dotyczącą mocowania statywu do kamery.)
≥Pokrywy gniazda karty nie można otworzyć
podczas korzystania ze statywu, w związku z
czym kartę należy włożyć przed umocowaniem
statywu.
1
2
Zakładanie przykrywki obiektywu
Przykrywka obiektywu ma za zadanie chronić
jego obiektywu przed zarysowaniem.
≥Przykrywka obiektywu i linka mocująca są
fabrycznie przymocowane do paska uchwytu.
≥Jeśli przykrywka obiektywu nie jest używana,
należy pociągnąć linkę mocującą w kierunku
wskazanym strzałką. 1
≥W czasie, gdy kamera nie jest wykorzystywana
do filmowania, należy zawsze zakładać
przykrywkę na obiektyw.
1
≥Po zdjęciu przykrywki obiektywu, naciśnij
mocno pokrętła.
2
2
(33)
(33) Nasadka na obiektyw
Aby zdjąć nasadkę z obiektywu, należy obrócić ją
w kierunku przeciwnym do ruchu wskazówek
zegara 1. Aby ją zamocować, należy wsunąć ją
w szczelinę 2, a następnie obrócić w kierunku
zgodnym z ruchem wskazówek zegara.
Założyć osłonę obiektywu MC lub filtr ND z zestawu
≥
filtrów (VW-LF37WE; wyposażenie opcjonalne) na
nasadkę na obiektyw. Nie mocować na niej innych
akcesoriów. (oprócz przykrywki obiektywu)
(Zestaw filtrów został opisany w instrukcji obsługi.)
≥Mocując telekonwerter (VW-LT3714ME;
wyposażenie opcjonalne) lub konwerter
szerokokątny (VW-LW3707M3E; wyposażenie
opcjonalne), najpierw należy zdjąć nasadkę na
obiektyw.
(Patrz instrukcja obsługi telekonwertera lub
konwertera szerokokątnego.)
≥Jeśli na obiektyw założono 2 akcesoria, np. filtr
ND i telekonwerter, po przesunięciu regulatora
zoomu [W/T] w stronę pozycji [W] wszystkie
4 rogi obrazu ulegną zaciemnieniu.
(efekt winietowania) (Przy zakładaniu dwóch
akcesoriów obiektywu, należy najpierw zdjąć
pokrywę obiektywu.)
89
VQT1L41
Page 90

Wprowadzenie
Pasek uchwytu
Długość paska należy dopasować do dłoni.
1 Dopasuj długość paska i położenie
ochraniacza.
2
1
3
1 Poluzuj pasek.
2 Dopasuj długość paska.
3 Zaciśnij pasek.
Zasilanie
ª Ładowanie akumulatora
W chwili zakupu akumulator nie jest naładowany,
w związku z czym należy go naładować przed
rozpoczęciem korzystania z urządzenia.
≥Czas ładowania akumulatora (
≥Zaleca się korzystanie z akumulatorów firmy
Panasonic. (
≥W przypadku korzystania z akumulatorów
innych firm producent nie może
zagwarantować prawidłowego działania
urządzenia.
≥Jeśli do zasilacza sieciowego jest podłączony
kabel zasilania prądem stałym, akumulator nie
jest ładowany. Aby rozpocząć ładowanie,
należy odłączyć ten kabel od zasilacza.
-87-)
1 Podłącz kabel sieciowy do zasilacza
sieciowego i gniazda sieciowego.
2 Umieść akumulator w uchwycie,
korzystając z prowadnicy, a następnie
wsuń go do oporu.
-92-)
90
VQT1L41
Kontrolka ładowania
ª
Świeci: Trwa ładowanie
Nie świeci: Ładowanie zostało zakończone
Pulsuje: Akumulator uległ nadmiernemu
rozładowaniu. Po chwili kontrolka
zaświeci ciągłym światłem, co
oznacza rozpoczęcie normalnego
ładowania.
Zbyt wysoka lub zbyt niska
temperatura akumulatora jest
sygnalizowana pulsowaniem
kontrolki ładowania [CHARGE]. W
takim przypadku czas ładowania
ulega wydłużeniu.
Page 91

Wprowadzenie
ª Podłączanie do gniazda sieciowego
Po podłączeniu zasilacza sieciowego urządzenie
znajduje się w trybie gotowości. Gdy zasilacz jest
podłączony do gniazda sieciowego, obwód
pierwotny jest zawsze zasilany.
1
1 Podłącz kabel sieciowy do zasilacza
sieciowego i gniazda sieciowego.
2 Podłącz drugi koniec kabla do zasilacza
sieciowego.
3 Podłącz kabel zasilania prądem stałym do
urządzenia.
≥Wtyczka kabla sieciowego po stronie
zasilacza nie wsuwa się całkowicie w
gniazdo zasilacza. Jak widać na rys. 1,
pozostaje odstęp.
≥Nie należy podłączać kabla zasilania
dostarczonego wraz z kamerą do innych
urządzeń, ponieważ został on opracowany
specjalnie do współpracy z kamerą. Nie
należy również używać do zasilania kamery
kabli od innych urządzeń.
Zakładanie akumulatora
ª
Wsuń akumulator w uchwyt i dociśnij aż do
zablokowania.
Wyjmowanie akumulatora
ª
Przesuń suwak zwalniania blokady akumulatora
[BATTERY] i wysuń akumulator, aby go odłączyć.
BATTERY
≥Przytrzymaj akumulator, aby nie spadł.
≥Przed wyjęciem akumulatora zawsze należy
ustawić wyłącznik [OFF/ON] w pozycji [OFF].
≥Nie wystawiaj akumulatora na działanie
wysokiej temperatury lub ognia.
≥Nie należy pozostawiać akumulatora (-ów)
przez dłuższy czas w samochodzie z
zamkniętymi drzwiami i oknami, wystawionym
na bezpośrednie działanie promieni
słonecznych.
UWAGA
Niewłaściwa wymiana baterii może
spowodować rozlanie elektrolitu. Do wymiany
należy stosować wyłącznie baterie tego
samego lub równoważnego typu zgodnie z
zaleceniami producenta urządzenia. Zużyte
baterie należy zutylizować zgodnie ze
wskazówkami producenta.
Uwaga dotycząca akumulatora
Akumulator nadaje się do powtórnego przetworzenia.
Należy przestrzegać lokalnych przepisów w tym zakresie.
91
VQT1L41
Page 92

Wprowadzenie
Czas ładowania i czas nagrywania
Czasy podane w poniższej tabeli dotyczą
temperatury 25 oC i wilgotności 60%. Jeśli
temperatura jest wyższa lub niższa od 25 oC,
czas ładowania wydłuży się.
Dostarczony
akumulator/
(7,2 V/
640 mAh)
VW-VBG130
(7,2 V/
1320 mAh)
VW-VBG260
(7,2 V/
2640 mAh)
VW-VBG6
(7,2 V/
5800 mAh)
A Czas ładowania
B Maksymalny czas ciągłego nagrywania
C Rzeczywisty czas nagrywania
(Faktyczny czas nagrywania to czas nagrywania
na taśmie, w którym kilkukrotnie rozpoczyna się i
kończy nagrywanie, włącza i wyłącza urządzenie,
przesuwa regulator zoomu itp.)
“1 h 10 min” oznacza 1 godzinę i 10 minut.
≥W tabeli podano przybliżone czasy ładowania i
nagrywania. W tabeli podano osobno czas
nagrywania za pomocą wizjera oraz (w
nawiasie) za pomocą wyświetlacza LCD.
≥W przypadku długotrwałych nagrań (trwających
2 godziny lub dłużej bez przerwy albo 1 godzinę
lub dłużej rzeczywistego czasu nagrywania)
zaleca się korzystanie z akumulatorów VWVBG130, VW-VBG260 oraz VW-VBG6.
A 1 h 40 min
B 1 h 15 min
(1 h 10 min)
C 30 min
(30 min)
A 2 h 40 min
B 2 h 10 min
(2 h)
C 55 mi
(55 min)
A 4 h 55 min
B 4 h 25 min
(4 h 5 min)
C 1 h 55 min
(1 h 50 min)
A 10 h 30 min
B 10 h 10 min
(9 h 25 min)
C 4 h 30 min
(4 h 10 min)
≥Faktyczny czas może być krótszy. W tabeli
podano wartości przybliżone. Czas nagrywania
ulega skróceniu w nastepujących przypadkach:
≥Jednoczesnego korzystania z wizjera i
wyświetlacza LCD, co ma miejsce po
obróceniu ekranu w stronę obiektywu
(podczas nagrywania samego siebie) itp.
≥Korzystania z kamery z podświetlonym
wyświetlaczem LCD (po włączeniu opcji
[JASNOŚĆ LCD]).
Podczas pracy i ładowania akumulatory
≥
nagrzewają się, co jest normalnym zjawiskiem. To
samo dotyczy nagrzewania się korpusu kamery.
≥W miarę rozładowywania akumulatora zmienia
się symbol wyświetlany na ekranie: #
# # # . Całkowite
rozładowanie akumulatora jest sygnalizowane
pulsującym symbolem ( ).
Włączanie kamery
Jeśli w chwili włączania kamery na obiektywie
znajduje się przykrywka, automatyczna korekcja
balansu bieli (
W związku z tym kamerę należy włączać po
zdjęciu przykrywki obiektywu.
Włączanie zasilania
ª
1
Naciśnij i przytrzymaj przycisk 1, a następnie
ustaw wyłącznik [OFF/ON] w pozycji [ON].
≥Włączy się zasilanie i wskaźnik trybu pracy
zaświeci się na czerwono.
Jeśli w trybie nagrywania taśmy lub na karcie
≥
zostanie zamknięty wyświetlacz LCD lub wizjer,
kiedy wyłącznik [OFF/ON] jest ustawiony w
pozycji [ON], zasilanie zostanie wyłączone.
ª Wyłączanie zasilania
Naciśnij i przytrzymaj przycisk 1, a następnie
1
ustaw wyłącznik
-160-) może nie działać prawidłowo.
1
ON
OFF
[OFF/ON] w pozycji [OFF].
92
VQT1L41
1
ON
OFF
≥
Kiedy kamera nie jest używana, należy
ustawić wyłącznik [OFF/ON] w pozycji [OFF].
≥Po wyłączeniu zasilania zgaśnie wskaźnik
trybu pracy zgaśnie.
Page 93

Wprowadzenie
ª Włączanie i wyłączanie zasilania za
pomocą wyświetlacza LCD/wizjera
Kiedy wyłącznik zasilania jest ustawiony w
pozycji [ON], zasilanie można włączać i wyłączać
za pomocą wyświetlacza LCD i wizjera, kiedy
urządzenie znajduje się w trybie nagrywania
taśmy lub karty.
OFF
ON
1 Otwórz wyświetlacz LCD lub wysuń wizjer,
aby móc używać kamery. (
≥Wyświetlacz LCD lub wizjer zostaną
uaktywnione.
-94-)
2 Zamknąć wyświetlacz LCD i wsunąć wizjer.
F
OF
ON
≥Zasilanie nie wyłączy się, chyba że
wyświetlacz LCD zostanie zamknięty lub
wizjer zostanie wsunięty.
≥Wskaźnik trybu pracy zgaśnie automatycznie
i zostanie wyłączone zasilanie. (Jeśli
włączono szybki start - opcja [WŁĄCZ] (
urządzenie przełączy się w tryb gotowości
szybkiego startu, a wskaźnik trybu pracy
zaświeci się na zielono.)
≥Zasilanie nie wyłączy się w trakcie
nagrywania taśmy, pomimo zamknięcia
wyświetlacza LCD lub wsunięcia wizjera.
-95-),
3 Otwórz wyświetlacz LCD lub wysuń wizjer,
aby włączyć zasilanie i ponownie używać
kamery.
Ustawianie daty i godziny
Przy pierwszym włączeniu kamery, na
wyświetlaczu pojawi się komunikat
[SET DATE AND TIME].
≥Wybierz [YES] i naciśnij środkową część
joysticka. Wykonaj podane poniżej kroki 2 i 3,
aby ustawić datę/godzinę.
Jeśli na ekranie jest wyświetlana błędna data i
godzina, można ją skorygować.
Wybierz tryb nagrywania taśmy lub na karcie.
≥
1 Wybierz opcję [PODSTAWOWE] >>
[UST. ZEG.] >> [TAK]. (
2 Poruszając joystickiem w lewo lub w
prawo, wybierz ustawiany element, a
następnie ustaw żądaną wartość,
poruszając joystickiem w górę lub w dół.
≥Rok zmienia się w następujący sposób:
2000, 2001, ..., 2089, 2000, ...
≥Stosuje się 24-godzinny format czasu.
3 Naciśnij środkową część joysticka, aby
potwierdzić ustawienie.
≥Działanie zegara rozpoczyna się od
[00] sekundy.
Uwagi dotyczące daty i godziny
ª
≥Ustawienia daty i godziny są podtrzymywane
przez wbudowany akumulator litowy.
≥Przed rozpoczęciem nagrywania należy
sprawdzić godzinę, ponieważ wbudowany
zegar nie jest zbyt dokładny.
-100-)
2008
ON
OFF
≥Włączy się zasilanie i wskaźnik trybu pracy
zaświeci się na czerwono.
93
VQT1L41
Page 94

Wprowadzenie
ª Ładowanie wbudowanego
akumulatora litowego
≥Pojawienie się na wyświetlaczu symbolu [0]
lub [--] po włączeniu kamery oznacza
rozładowanie wbudowanego akumulatora
litowego. Należy wtedy wykonać poniższe
czynności, aby go naładować. Przy pierwszym
włączeniu zasilania po ładowaniu baterii, pojawi
się komunikat [USTAW DATĘ I GODZ.]. Wybierz
[TAK] i ustaw datę i godzinę.Podłącz zasilacz
sieciowy lub akumulator do kamery, aby
naładować wbudowany akumulator litowy.
Zostaw kamerę na ok. 24 godziny, dzięki
czemu akumulator będzie podtrzymać
ustawienia daty i godziny przez ok. 6 miesięcy.
(Akumulator jest ładowany nawet, jeśli
wyłącznik [OFF/ON] znajduje się w pozycji
[OFF].)
Korzystanie z wyświetlacza LCD
Rejestrowany obraz można wyświetlać na
otwartym ekranie LCD.
1 Umieść palec na części wyświetlacza LCD
służącej do otwierania i pociągnij go
zgodnie z kierunkiem wskazywanym przez
strzałkę.
≥Jasność i nasycenie kolorów wyświetlacza LCD
reguluje się za pomocą menu.
≥Posługiwanie się nadmierną siłą przy otwieraniu
bądź obracaniu wyświetlacza może
spowodować uszkodzenie kamery.
≥Obrócenie wyświetlacza LCD o 180o w kierunku
obiektywu, kiedy wizjer jest wysunięty (np. w
celu sfilmowania samego siebie) powoduje
jednoczesne podświetlenie wyświetlacza i
wizjera.
Korzystanie z wizjera
ª Wysuwanie wizjera
Chwyć wizjer za nasadkę i wysuń go.
1
≥Wizjer zostanie uaktywniony. (Po otwarciu
wyświetlacza LCD, wizjer zostanie
wyłączony.)
Regulacja ostrości widzenia
ª
Ustaw ostrość za pomocą suwaka korekcji
1
na nasadce.
≥Maksymalny kąt otwarcia wyświetlacza
wynosi 90o.
2 Ustaw wyświetlacz pod odpowiednim
kątem, zgodnie z własnymi upodobaniami.
1 180o 2 90o
≥Wyświetlacz można również obrócić o 180o
1 w kierunku obiektywu lub o 90o 2 w
kierunku wizjera.
94
VQT1L41
12:30:4512:30:4512:30:45
1. 1. 20081. 1. 20081. 1. 2008
12:30:45
1. 1. 2008
≥Za pomocą menu można wyregulować jasność
obrazu w wizjerze.
Page 95

Wprowadzenie
Szybki start
Kiedy funkcja szybkiego startu jest włączona,
zasilanie nadal jest pobierane, nawet po
zamknięciu wyświetlacza LCD i wsunięciu
wizjera.
Kamera wznowi nagrywanie/tryb pauzy około 1,7
sekundy po ponownym otwarciu wyświetlacza
LCD lub wysunięciu wizjera.
≥W trybie gotowości szybkiego nagrywania
kamera zużywa około połowę zasilania
zużywanego w trybie nagrywania z pauzą.
Korzystanie z trybu szybkiego nagrywania
skróci czas nagrywania/odtwarzania przy
zasilaniu z akumulatora.
≥Funkcja działa pod warunkiem.
≥Podczas korzystania z akumulatora
Włożenie kasety lub karty w trybie
nagrywania taśmy.
Włożenie karty w trybie nagrywania karty.
≥Podczas korzystania z zasilacza
sieciowego
Można używać funkcji szybkiego startu,
nawet jeśli nie włożono kasety/karty.
≥Włącz tryb nagrywania taśmy lub na karcie.
1 Wybierz opcję [USTAWIENIA] >>
[SZYBKI START] >> [WŁĄCZ]. (
2 Zamknij wyświetlacz LCD i wsuń wizjer przy
wyłączniku [OFF/ON] ustawionym w pozycji
[ON].
≥Urządzenie przejdzie w tryb gotowości
szybkiego startu i zaświeci się zielony
wskaźnik trybu pracy.
≥Kamera przełączy się w tryb gotowości
szybkiego startu dopiero po zamknięciu
wyświetlacza LCD i wsunięciu wizjera.
3 Otwórz wyświetlacz LCD lub wysuń wizjer.
-100-)
OFF
ON
Anulowanie szybkiego startu
ª
1 Wybierz opcję [USTAWIENIA] >>
[SZYBKI START] >> [WYŁĄCZ]. (
≥Jeżeli przełącznik [OFF/ON] jest ustawiony na
[OFF], gdy aparat znajduje się w trybie
oczekiwania (Standby) z szybkim startem,
zasilanie wyłącza się.
≥Jeśli kamera pozostaje w trybie gotowości
przez około 30 minut, wskaźnik trybu pracy
gaśnie, a kamera zostaje całkowicie wyłączona.
≥W następujących przypadkach funkcja
szybkiego startu i zasilanie zostają wyłączone.
≥Zmiana pozycji pokrętła wyboru trybu
pracy.
≥Wyjęcie akumulatora lub odłączenie
zasilacza sieciowego.
≥Wyjęcie kasety i karty w trybie nagrywania
taśmy podczas korzystania z akumulatora.
≥Wyjęcie karty w trybie nagrywania karty
podczas korzystania z akumulatora.
≥Po włączeniu kamery w trybie szybkiego startu
przy automatycznym balansie bieli ustawienie
właściwej korekcji może chwilę potrwać, jeśli
źródło światła jest inne niż w poprzedniej
scenie. (W przypadku korzystania z funkcji
obraz nocny kolor. zachowany zostaje balans
bieli z ostatniej zarejestrowanej sceny.)
≥Jeśli w trybie gotowości szybkiego startu
zostanie włączone zasilanie, ustawienie
powiększenia przyjmuje wartość 1k, a
rozdzielczość zdjęć może być inna od wybranej
przed trybem gotowości szybkiego startu.
≥Jeśli opcję [OSZCZ. EN.] (
[5 MINUT] i urządzenie automatycznie
przełączy się w tryb gotowości szybkiego
startu, należy ustawić przełącznik [OFF/ON] w
pozycję [OFF], a następnie ponownie w pozycję
[ON]. Można również zamknąć wyświetlacz
LCD i wsunąć wizjer, po czym jeszcze raz
otworzyć wyświetlacz LCD i wysunąć wizjer.
-147-) ustawiono na
-100-)
ON
OFF
≥Zaświeci się czerwony wskaźnik trybu pracy i
kamera przełączy się w tryb pauzy w
nagrywaniu ok. 1,7 sekundy po włączeniu.
95
VQT1L41
Page 96

Wprowadzenie
Wkładanie/wyjmowanie kasety
1 Podłącz zasilacz sieciowy lub zamocuj
akumulator i włącz zasilanie.
2 Przesuń suwak [OPEN/EJECT] i otwórz
pokrywę kieszeni na kasetę.
OPEN/
EJECT
≥Po całkowitym otwarciu pokrywy kieszeni
wysunie się uchwyt kasety.
3 Po wysunięciu uchwytu włóż lub wyjmij
kasetę.
≥Podczas wkładania kasety należy ją umieścić
w położeniu przedstawionym na rysunku, a
następnie wsunąć do oporu.
≥Podczas wyjmowania należy ją wyciągnąć na
wprost.
4 Naciśnij znak [PUSH] 1 aby zamknąć
uchwyt kasety.
1
PUSH
≥Uchwyt kasety zostanie wsunięty.
5 Po całkowitym wsunięciu uchwytu kasety
zamknij pokrywę kieszeni.
≥Po włożeniu kasety, na której były już
wykonywane nagrania, należy skorzystać z
funkcji szukania przerw, aby znaleźć punkt, od
którego ma być kontynuowane nagrywanie.
Podczas nagrywania na uprzednio zapisanej
kasecie należy uważać, aby znaleźć właściwą
pozycję, od której ma być kontynuowane
nagrywanie.
≥Podczas zamykania pokrywy kieszeni na
kasetę należy uważać, aby nie przyciąć np.
kabla.
≥Po użyciu kasetę należy przewinąć do
początku, wyjąć z kamery i umieścić w
pudełku. Pudełko należy przechowywać w
pozycji pionowej. (
-159-)
≥Jeśli na wyświetlaczu LCD lub w wizjerze nie
pojawi się wskaźnik skraplania, choć na
obiektywie lub urządzeniu widać skroploną
parę wodną, nie należy otwierać pokrywy
kieszeni, ponieważ para może osiąść na
głowicach lub taśmie. (
ª
Rozwiązywanie problemów z
-156-)
wysuwaniem uchwytu kasety
≥Należy zamknąć pokrywę kieszeni na kasetę do
samego końca, a następnie otworzyć ją
całkowicie.
≥Należy sprawdzić, czy akumulator nie uległ
całkowitemu rozładowaniu.
Rozwiązywanie problemów z
ª
wsuwaniem uchwytu kasety
≥Należy ustawić wyłącznik [OFF/ON] w pozycji
[OFF], a następnie ponownie w pozycji [ON].
≥Należy sprawdzić, czy akumulator nie uległ
całkowitemu rozładowaniu.
Zapobieganie przypadkowemu
ª
skasowaniu nagrań
Ustawienie suwaka blokady kasowania 1 kasety
w pozycji otwartej (przesunięcie go w kierunku
strzałki z napisem [SAVE]) uniemożliwia
nagrywanie na kasecie. Aby rozpocząć
nagrywanie, należy umieścić suwak w pozycji
otwartej (przesunąć go w kierunku strzałki z
napisem [REC]).
96
VQT1L41
1
R E C
SAVE
Page 97

Wprowadzenie
Wkładanie/wyjmowanie karty
Przed włożeniem/wyjęciem karty należy ustawić
wyłącznik [OFF/ON] w pozycji [OFF].
≥Włożenie lub wyjęcie karty przy włączonym
zasilaniu może spowodować uszkodzenie
kamery bądź utratę danych zapisanych na karcie.
1 Wyłącz zasilanie 1.
1
ON
OFF
≥Sprawdź, czy wskaźnik trybu pracy zgasł.
2 Otwórz pokrywę gniazda karty.
3 Włóż kartę do gniazda lub wyjmij kartę z
gniazda.
Kontrolka dostępu do karty
ª
≥Kontrolka dostępu świeci w czasie, gdy kamera
korzysta z karty (podczas odczytu, zapisu,
odtwarzania, usuwania itd.).
≥Aby zapobiec utracie zapisanych danych bądź
uszkodzeniu kamery, w czasie, gdy świeci
kontrolka dostępu, nie należy.
≥Wkładanie lub wyjmowanie karty.
≥Korzystać w wyłącznika [OFF/ON] lub
pokrętła wyboru trybu pracy.
≥Wyjmowanie akumulatora lub odłączanie
zasilacza sieciowego.
Karta SD
ª
≥Pojemność pamięci wskazana na etykiecie
karty SD odpowiada całkowitej pojemności
wymaganej w celu ochrony praw autorskich i
zarządzania nimi oraz pojemności pamięci
konwencjonalnej dostępnej z poziomu kamery,
komputera lub innego urządzenia.
1
≥Podczas wkładania karty etykieta 1 powinna
być skierowana w stronę użytkownika. Kartę
należy włożyć jednym ruchem na wprost, do
oporu.
≥Wyjmując kartę należy nacisnąć na jej środek
i wyciągnąć ją.
4 Zamknij całkowicie pokrywę gniazda karty.
Uwagi dotyczące karty
ª
≥Karty nie należy formatować za pomocą
innej kamery bądź komputera osobistego,
gdyż może to uniemożliwić dalsze
korzystanie z niej.
≥W przypadku korzystania z kart pamięci o
pojemności 4 GB, można używać wyłącznie
kart SDHC.
≥Karty pamięci o pojemności większej niż 4 GB
bez logo SDHC nie są zgodne ze
specyfikacjami kart SD.
Urządzenie to jest kompatybilne zarówno z
kartami pamięci SD, jak i kartami pamięci
SDHC. Z kart SDHC można korzystać tylko w
przypadku obsługujących je urządzeń. Nie
można stosować kart pamięci SDHC w
urządzeniach kompatybilnych wyłącznie z
kartami SD. (W przypadku korzystania z karty
pamięci SDHC w innym urządzeniu, należy
zapoznać się z jego instrukcją obsługi.)
Uwaga dotycząca przełącznika
ª
blokady zapisu na karcie SD
≥Karta SD jest wyposażona w przełącznik
blokady zapisu. Jeśli przełącznik znajduje się w
pozycji [LOCK], zapis na karcie oraz usuwanie
danych i formatowanie są niemożliwe. Aby
umożliwić powyższe operacje, należy umieścić
przełącznik w poprzedniej pozycji.
VQT1L41
97
Page 98

Wprowadzenie
3
2
4
1
5
Wybór trybu pracy
Pokrętło wyboru trybu pracy służy do ustawiania
żądanej funkcji kamery.
1 Obróć pokrętło wyboru trybu.
≥Aby wybrać żądany tryb pracy, należy ustawić
jego symbol obok znacznika 1.
1
:TRYB NAGRYWANIA TAŚMY
Tryb ten służy do nagrywania obrazu na taśmie.
(Ponadto umożliwia on zapisywanie zdjęć na
karcie podczas nagrywania ujęć filmowych na
taśmie.)
: TRYB ODTWARZANIA TAŚMY
Tryb ten służy to odtwarzania materiału z taśmy.
: TRYB NAGRYW. KARTY
Tryb ten służy do zapisywania zdjęć na karcie.
: TRYB ODTWARZANIA KARTY
Tryb ten służy do wyświetlania zdjęć zapisanych
na karcie.
: PODłąCZENIE DO KOMPUTERA
PC
Tryb ten umożliwia wyświetlanie lub edycję
obrazu zapisanego na karcie za pomocą
komputera osobistego.
-132-
Korzystanie z joysticka
ª Podstawowe funkcje joysticka
Wykonywanie operacji na ekranie menu i
wybór odtwarzanych plików na ekranie z
wieloma obrazami
Poruszając joystickiem w górę, w dół, w lewo lub
w prawo, wybiera się elementy i pliki. Wybór
potwierdza się poprzez naciśnięcie środkowej
części joysticka.
1 Wybór ruchem w górę.
2 Wybór ruchem w dół.
3 Wybór ruchem w lewo.
4 Wybór ruchem w prawo.
5 Potwierdzenie naciśnięciem
środkowej części.
Obsługa menu ekranowego za
ª
pomocą joysticka
Po naciśnięciu środkowej część joysticka na ekranie
wyświetlane są ikony. Każdy ruch joysticka w dół
powoduje zmianę trybu wyświetlania.
(W trybie odtwarzania taśmy lub z obrazu ikony
są wyświetlane na ekranie automatycznie.)
1) Tryb nagrywania taśmy
(Przełącznik [AUTO/MANUAL/FOCUS] w
pozycji [AUTO])
98
VQT1L41
1
2 Wygaszanie
3 Komp. przeciwośw. -111-
1/3
1 Tryb pomocy -100-
2 Soft Skin
1 Tele makro -113-
2/3
3 Kolorowych zdjęć nocnych
2 Spraw. nagrywania
3/3
1 Szukanie przerw -107-
≥Przy nagrywaniu na taśmie wyświetlany jest
symbol 1.
-113-
-112-
-112-
-107-
Page 99

Wprowadzenie
2) Tryb nagrywania taśmy
(Przełącznik [AUTO/MANUAL/FOCUS] w
pozycji [MANUAL])
2
1
2 Wartość przesłony lub
4/4
3 Balans bieli -118-
wzmocnienia
1 Szybkość migawki -119-
2
5/5
Ręczne ustawianie ostrości -119-
1
≥Przy nagrywaniu na taśmie wyświetlany jest
symbol 1.
≥2 jest wyświetlany, tylko jeśli przełącznik
[AUTO/MANUAL/FOCUS] jest ustawiony w
pozycji [FOCUS].
3) Tryb odtwarzania taśmy
3 Odtwarzanie/pauza
4 Stop -121-
2 Przewijanie (lub przewijanie z
podglądem)
1 Przewijanie (przewijanie z
podglądem)
2
-119-
-121-
-121-
-121-
4) Tryb nagryw. karty
(Przełącznik [AUTO/MANUAL/FOCUS] w
pozycji [AUTO])
2 Zdjęcia z samowyzwalaczem
3 Komp. przeciwośw. -111-
1/2
1 Tryb pomocy -100-
2 Soft Skin
2/2
1 Tele makro -113-
5) Tryb nagryw. karty
(Przełącznik [AUTO/MANUAL/FOCUS] w
pozycji [MANUAL])
1
2 Wartość przesłony lub
3/3
3 Balans bieli -118-
wzmocnienia
1 Szybkość migawki -119-
2
4/4
Ręczne ustawianie ostrości -119-
1
≥1 jest wyświetlany, tylko jeśli przełącznik
[AUTO/MANUAL/FOCUS] jest ustawiony w
pozycji [FOCUS].
6) Tryb odtwarzania karty
3 Pokaz slajdów
Rozpoczęcie/przerwanie
4 Kasowanie -125-
2 Odtwarzanie poprzedniego
obrazu
1 Odtwarzanie następnego
obrazu
-115-
-112-
-119-
-124-
-124-
-124-
99
VQT1L41
Page 100

Wprowadzenie
Tryb pomocy
Wybierz ikonę wyjaśniającą daną funkcję.
≥Włącz tryb nagrywania taśmy lub na karcie.
1 Naciśnij joystick, aby wyświetlić ikonę w
trakcie pauzy w nagrywaniu. Poruszaj
joystickiem w dół, aż pojawi się ikona 1.
1
2 Porusz joystickiem w prawo, aby wybrać
ikonę trybu pomocy [ ].
3 Poruszaj joystickiem w górę, w lewo lub w
prawo, aby wybrać żądaną ikonę.
Zmiana języka
Istnieje możliwość zmiany języka, w którym
wyświetlane jest menu ekranowe i menu główne.
1 Wybierz opcję [LANGUAGE] >> [Polski].
Korzystanie z ekranu menu
Informacje o poszczególnych menu znajdują się
na stronie
1 Naciśnij przycisk [MENU].
2 Poruszając joystickiem w górę lub w dół,
-145-.
MENU
≥Zostanie wyświetlone menu właściwe dla
trybu wybranego za pomocą pokrętła wyboru
trybu pracy.
≥Podczas wyświetlania menu nie należy
korzystać z pokrętła wyboru trybu pracy.
wybierz menu nadrzędne.
≥Na wyświetlaczu pojawi się wyjaśnienie
wybranej ikony.
≥Każdy ruch joysticka w dół powoduje zmianę
trybu wyświetlania.
Aby zakończyć korzystanie z trybu
ª
pomocy
Wybierz ikonę [EXIT] lub naciśnij przycisk
[MENU].
≥W trybie pomocy nie można nagrywać ani
ustawiać żadnych funkcji.
100
VQT1L41
3 Porusz joystickiem w lewo lub naciśnij jego
środkową część, aby potwierdzić wybór.
4 Poruszając joystickiem w górę lub w dół,
wybierz menu podrzędne.
 Loading...