

Page 1
Video Cassette Recorde r
NV-FJ730B
NV-FJ780B
Operating Instructions
INTELLIGENT TIMER
AUDIO
AV3 IN
EXT LINK
A.DUB
L MONO
R
www.panasonic.co.uk
Before attempting to connect, operate or adjust this
product, please read these instructions completely.
VQT9547
TIMER REC
CVC
REC/OTR
/6/
Contents
Safety Information
Dear Customer.............................................. .................................2
Caution...........................................................................................3
Controls and Components
Controls and Connectors ...............................................................4
Quick Start Guide
Checking the Accessories/Preparing the Remote Control.............5
Connections (with Scart leads) ......................................................6
Connections (without Scart leads) .................................................7
Auto Setup (For TV and VCR with Q Link Functions)....................8
Auto Setup (For TV and/or VCR without Q Link Functions)...........9
Removing Interference ................................................................10
Checking the Settings for Auto Setup .........................................11
Connecting the VCR to a Decoder/
Connecting the VCR to a Stereo Amplifier ................................12
Setting the Remote Control to Ope rate Your TV................ ..........13
VIDEO Plus+ Codes for Satellite Receivers/Cable TV.................14
Playback
When You Insert a Video Cassette (For NV-FJ780B). .................15
Playback.......................................................................................16
• Playback - Off Timer Function............................................. ..16
• To Play back S-VHS Cassette Tape
(SQPB=S-VHS Quasi Playback) ...........................................17
• Adjusting the Playback Picture..............................................17
EJECT
6
Recording.....................................................................................18
• (One Touch Record)..............................................................19
• (Direct TV Recording)............................................................19
• (AV2 EXT LINK Settings).......................................................20
The Menu System........................................................................21
Timer Recording.................................................. .........................22
• Programming with the On Screen Display (OSD)..................22
• Programming with the VIDEO Plus+ Function.......................23
Other Timer Recordings and Convenient Functions....................24
Intelligent Timer Function .............................................................25
Tape Library System (For NV-FJ780B)
Tape Library System (For NV-FJ780B)........................................27
• To Check What Programmes are Recorded on the Inserted
Video Cassette and To Play Back a Desired Programme....28
• To Check on Which Cassette a
Desired Programme Is Recorded..........................................29
• To Manually Enter or Editing a Title.......................................30
• To Delete the Tape Library Data . ..........................................31
Manual Tuning ............................................ .... .. .. .. ..... .. .. .. .... .. .. .. ..32
• To Record the Title When Recording from an
External Equipment (For NV-FJ780B) ...................................33
To Delete, Add or Move a Programme Position ..........................33
To Restart the Auto Setup ...........................................................34
To Restart the Download ............................................................34
To Return the VCR to the Shipping Condition ............................34
To Change the Owner ID ............................................................35
Setting the VCR’s Clock...................................... ............... ..........36
Other Convenient Functions (Various Settings)...........................37
• Settings for the Main Menu Item [Other settings] ..................38
Search Functions.........................................................................40
• Timer Record Confirmation (For NV-FJ730B) .......................40
• Intro-Jet Scan (For NV-FJ730B)............................................40
• VISS=VHS Index Search System (For NV-FJ730B)..............40
• VISS=VHS Index Search System (For NV-FJ780B)..............41
• To Find space to record (For NV-FJ780B) ............................41
• Intro-Jet Scan (For NV-FJ780B)............................................41
Editing..........................................................................................42
• Assemble Editing..................................................... ..............42
• Audio Dubbing....................... ................................................43
• Album Function......................................................................44
Glossary.......................................................................................45
Trouble Shooting..........................................................................46
Specifications...............................................................................47
Index ......................................................... .... .. .... .. ....... .Back Cover
Recording
Timer Recording
Manual Setup
Advanced Operations
Helpful Hints
Safety
Information
Components
Controls and
Guide
Quick Start
PlaybackRecordingTimer
Recording
System
Tape Library
Manual Setup
Advanced
Operations
Helpful Hints
Page 2
Information
Dear Customer
May we take this opportunity to thank you for purchasing this Panasonic Video Cassette Recorder.
We would particula rly ad vise that y ou c arefull y stu dy th e Ope rating Instruc tions befor e attem pting to op erate th e uni t and that you
note the listed precautions.
As this equipment gets hot during use, operate it in a well-ventilated place; do not install this equipment in a
confined space such as a bookcase or similar unit.
Caution for AC Mains Lead
For your safety please read the following text carefully
This appliance is supplied with a moulded three-pin mains plug for your safety and convenience.
A 5-ampere fuse is fitted in this plug.
Should the fuse need to be replac ed please ensure that the replacement fus e has a rating of 5-amperes an d it is approv ed by
ASTA or BSI to BS 1362.
Check for the ASTA mark Ï or the BSI mark Ì on the body of the fuse.
If the plug contains a removable fuse cover you must ensure that it is refitted when the fuse is replaced.
If you lose the fuse cover, the plug must not be used until a replacement cover is obtained.
A replacement fuse cover can be purchased from your local Panasonic Dealer.
IF THE FITTED MOULDED PLUG IS UNSUITABLE FOR THE SOCKET OUTLET IN YOUR HOME THEN THE FUSE
SHOULD BE REMOVED AND THE PLUG CUT OFF AND DISPOSED OF SAFELY. THERE IS A DANGER OF SEVERE
ELECTRICAL SHOCK IF THE CUT OFF PLUG IS INSERTED INTO ANY 13-AMPERE SOCKET.
If a new plug is to be fitted please observe the wiring code as shown below.
If in any doubt, please consult a qualified electrician.
IMPORTANT
The wires in this mains lead are coloured in accordance with the following code:
Blue: Neutral
Brown: Live
As the colours of the wire s in the m ai ns lea d of th is app lia nc e ma y no t co rres po nd w it h the col ou red m ark ing s i den tify in g the
terminals in your plug, proceed as follows:
The wire which is coloured BLUE must be connecte d to t he te rmi na l in the p lug w hich is marked with the letter N or co lo ured
BLACK.
The wire which is coloured BROWN must be connected to the terminal in the plug which is marked with the letter L or
coloured RED.
Under no circumstan ces shou ld either of t hese wir es be connec ted to the ear th termi nal of the thr ee pin plug , marked w ith the
letter E or the Earth Symbol Ó.
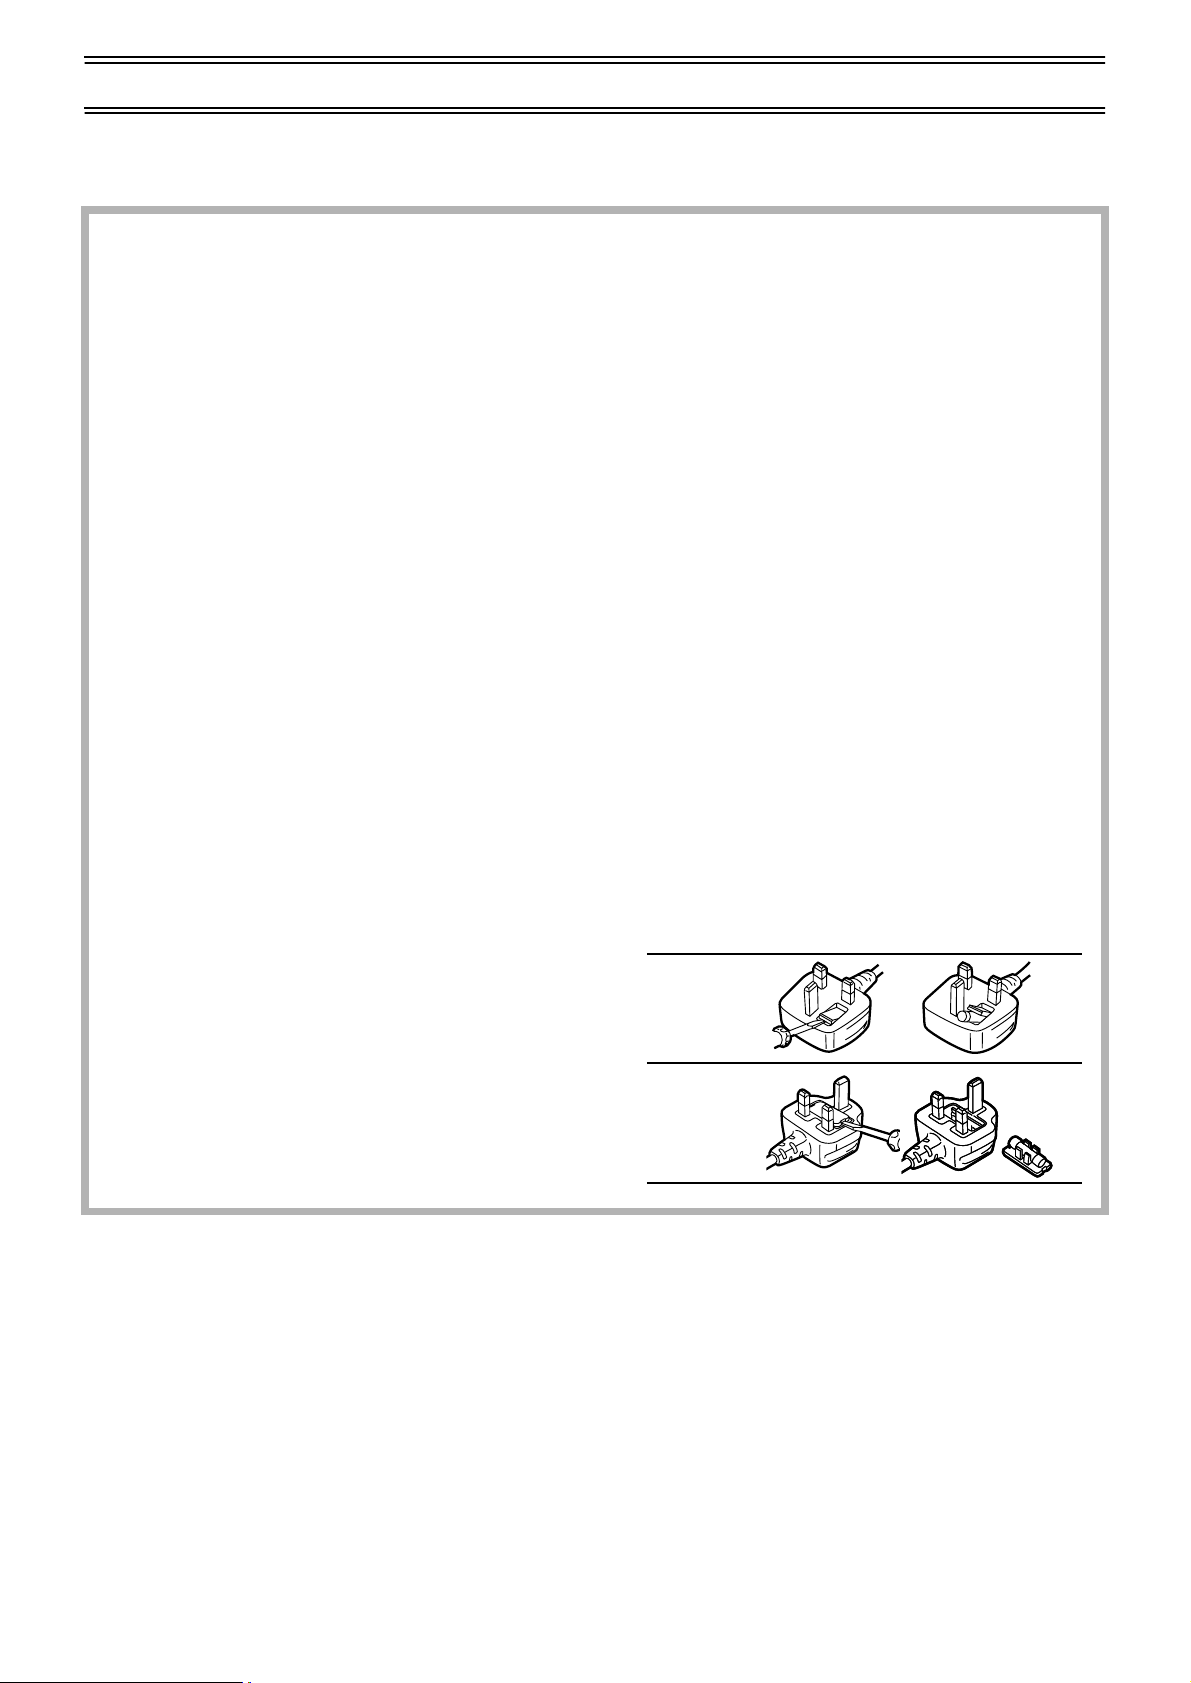
How to replace the Fuse
• There are two types of the AC mains lead assembly:
A and B as shown on the right.
1 Open the fuse compartment with a screwdriver.
2 Replace the fuse and fuse cover.
TYPE
TYPE
A
12
B
12
IMPORTANT
Your attention is drawn to the fact that the recording of pre-recorded tapes or discs or other published or broadcast material may
infringe copyright laws.
WARNING
To reduce the risk of fire electri c sh ock or product damage, do not expo se this equi pment to rain, moisture, dripping or spl as hing
and ensure that no objects filled with liquids, such as vases, shall be placed on the equipment.
FOR YOUR SAFETY
DO NOT REMOVE OUTER COVER.
To prevent electric shock, do not remove the cover. There are no user serviceable parts inside. Refer all servicing to qualified
service personnel.
For your safety, be sure not to connect or handle the equipment with wet hands.
2
Page 3
Caution
Be sure to read the cautions carefully before you operate this VCR.
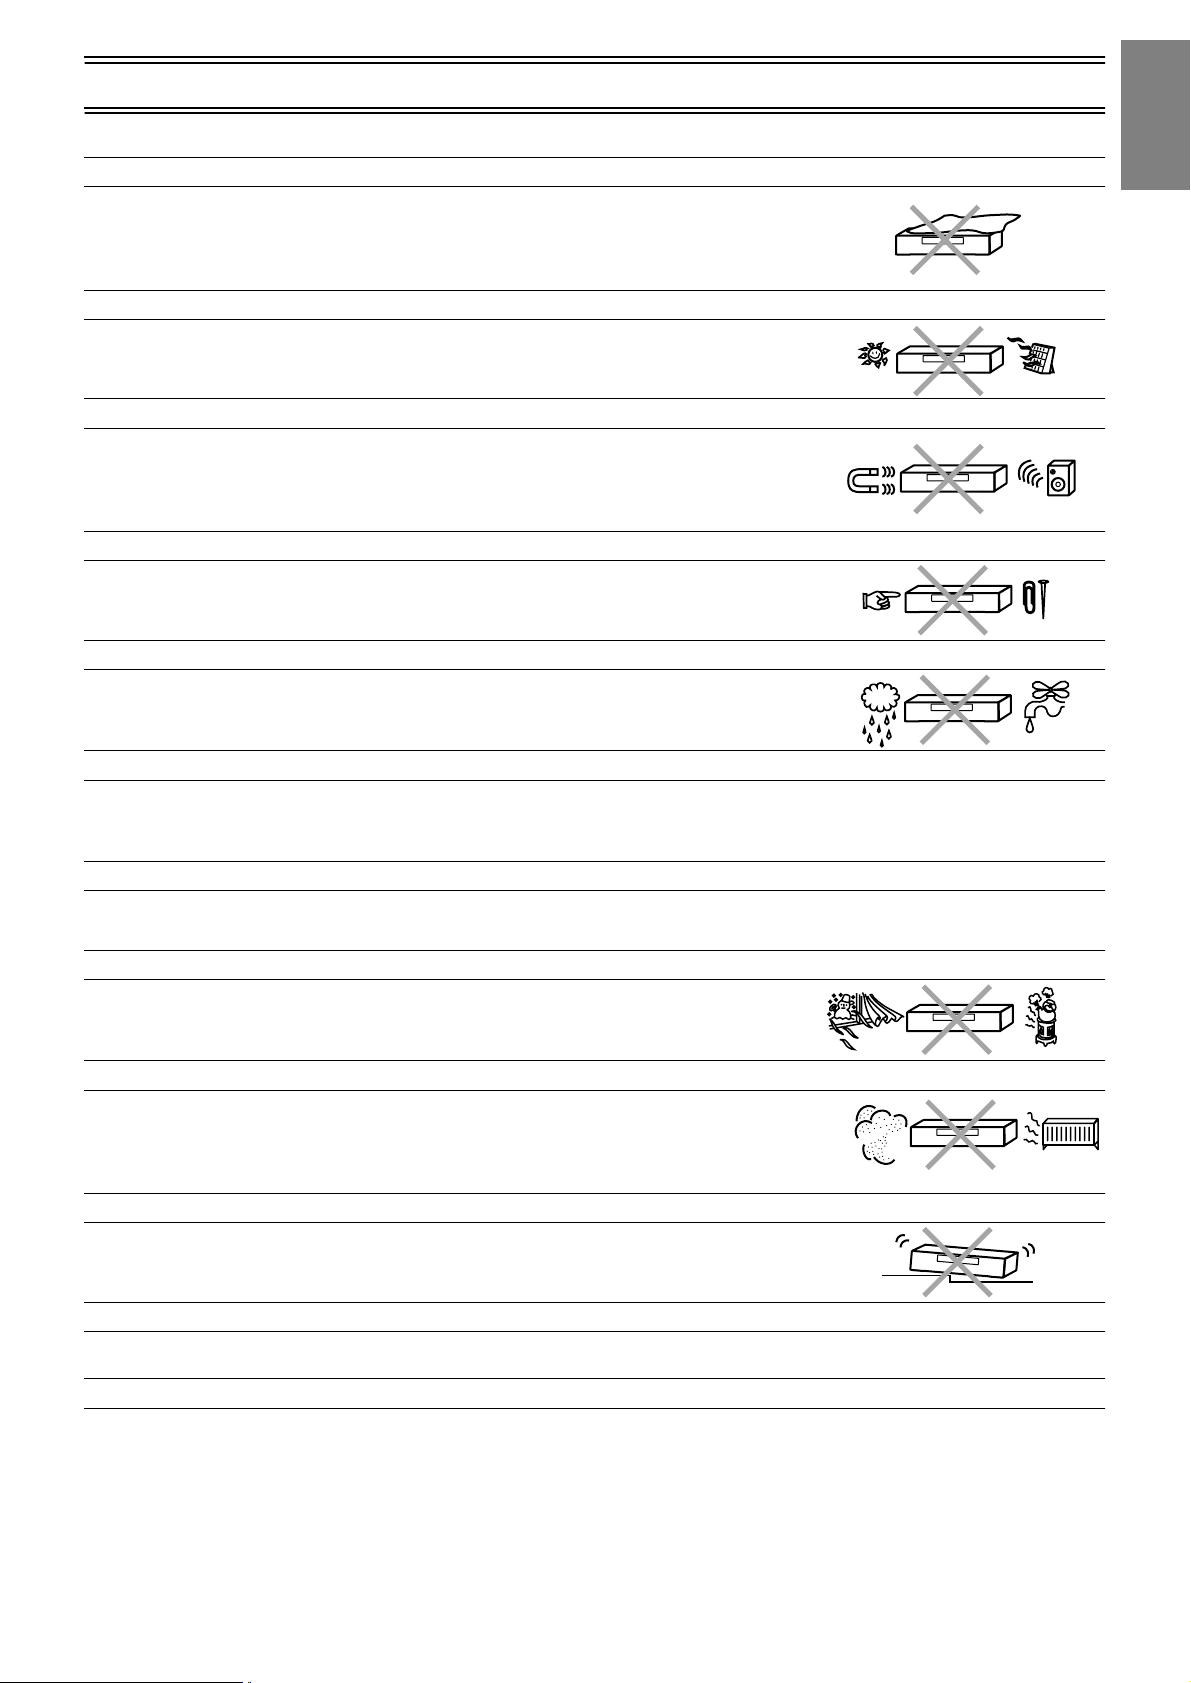
Do not cover the ventilation holes
The ventilation holes prevent excessive heat build-up inside the VCR during extended
periods of use.
Do not block these holes; es pecially avoid cov ering the m with sof t materia ls such as paper
or cloths.
Keep the VCR away from high temperatures
Keep the VCR away from sources of heat such as direct sunlight, heating radiators, or
closed vehicles.
Avoid magnets or magnetized objects
Never bring a magne t o r magne tized objec t clo se to t he VCR becau se thi s cou ld adv ersel y
affect the performance of the VCR. When using the VCR together with other equipment,
keep as much distanc e as poss ible betwe en them to p revent t hem from adve rsely affe cting
each other’s performance.
No fingers or other objects inside
Touching internal parts of the VCR is dangerous, and may cause serious damage.
Do not attempt to remove the cover as; there are no user serviceable parts inside.
Keep away from liquids
Keep the VCR away from all liquids.
Caution: If water or some ot her liq uid is spill ed int o the VC R, serio us da mage c ould occ ur.
If this happens, disconnect from the mains socket immediately and consult your dealer.
Video head clogging
The picture and sound can be lost or become distorted if video heads become clogged.
This may happen in c ertain enviro nmenta l conditi ons o r if old or dama ged or damp ta pes a re used or a fter lon g use of the VCR . If
this occurs then please consult your dealer. Note: Video Head Cleaning is NOT covered by the warranty.
Cleaning the VCR
Wipe the VCR with a clean, dry cloth. Never use any cleaning fluid or other chemicals.
Also do not use compressed air to remove dust.
Avoid sudden changes in temperature
If the VCR is moved from a cold to a warm place or if a heater is turned on, condensation
may form on the tape surface and inside the VCR.
If this happens, leave the VCR at room temperature for at least 1 hour before operating it.
Avoid humidity and dust
Do not use the VCR in very humid or dusty places.
This may cause damage to its internal parts.
Safety
Information
Stacking
Install the VCR in a horizontal position and do not place anything heavy on it.
Do not use cell phone near the VCR
Using a cell phone near the VCR may cause noise to adversely affect the picture and sound.
Condensation may form in the following cases:
• If the VCR is in a room that was very cold before a heater has just been turned on.
• If the VCR is in a room with steam or high humidity.
• If the VCR is brought from cold surroundings into a well-heated room.
• The VCR is suddenly brought from cool surroundings, such as an air-conditioned room or car, to a place, which is hot and
humid.
Note:
• In any of the above-mentioned conditions, do not operate the VCR for at least 1 hour.
This VCR is not equipped with a dew sensor.
3
Page 4
Controls and Components
0
U
V
STILL ALBUM
REPLAY
REC
VCR
DATE
CANCEL
SP/LP/EP
rsrsr
s
ON OFF
TV
SV/V
+
AV
–
MENU
EXIT
OK
PROG. / CHECK
TIMER
Á
LIBRARY/SEARCH
INDEX
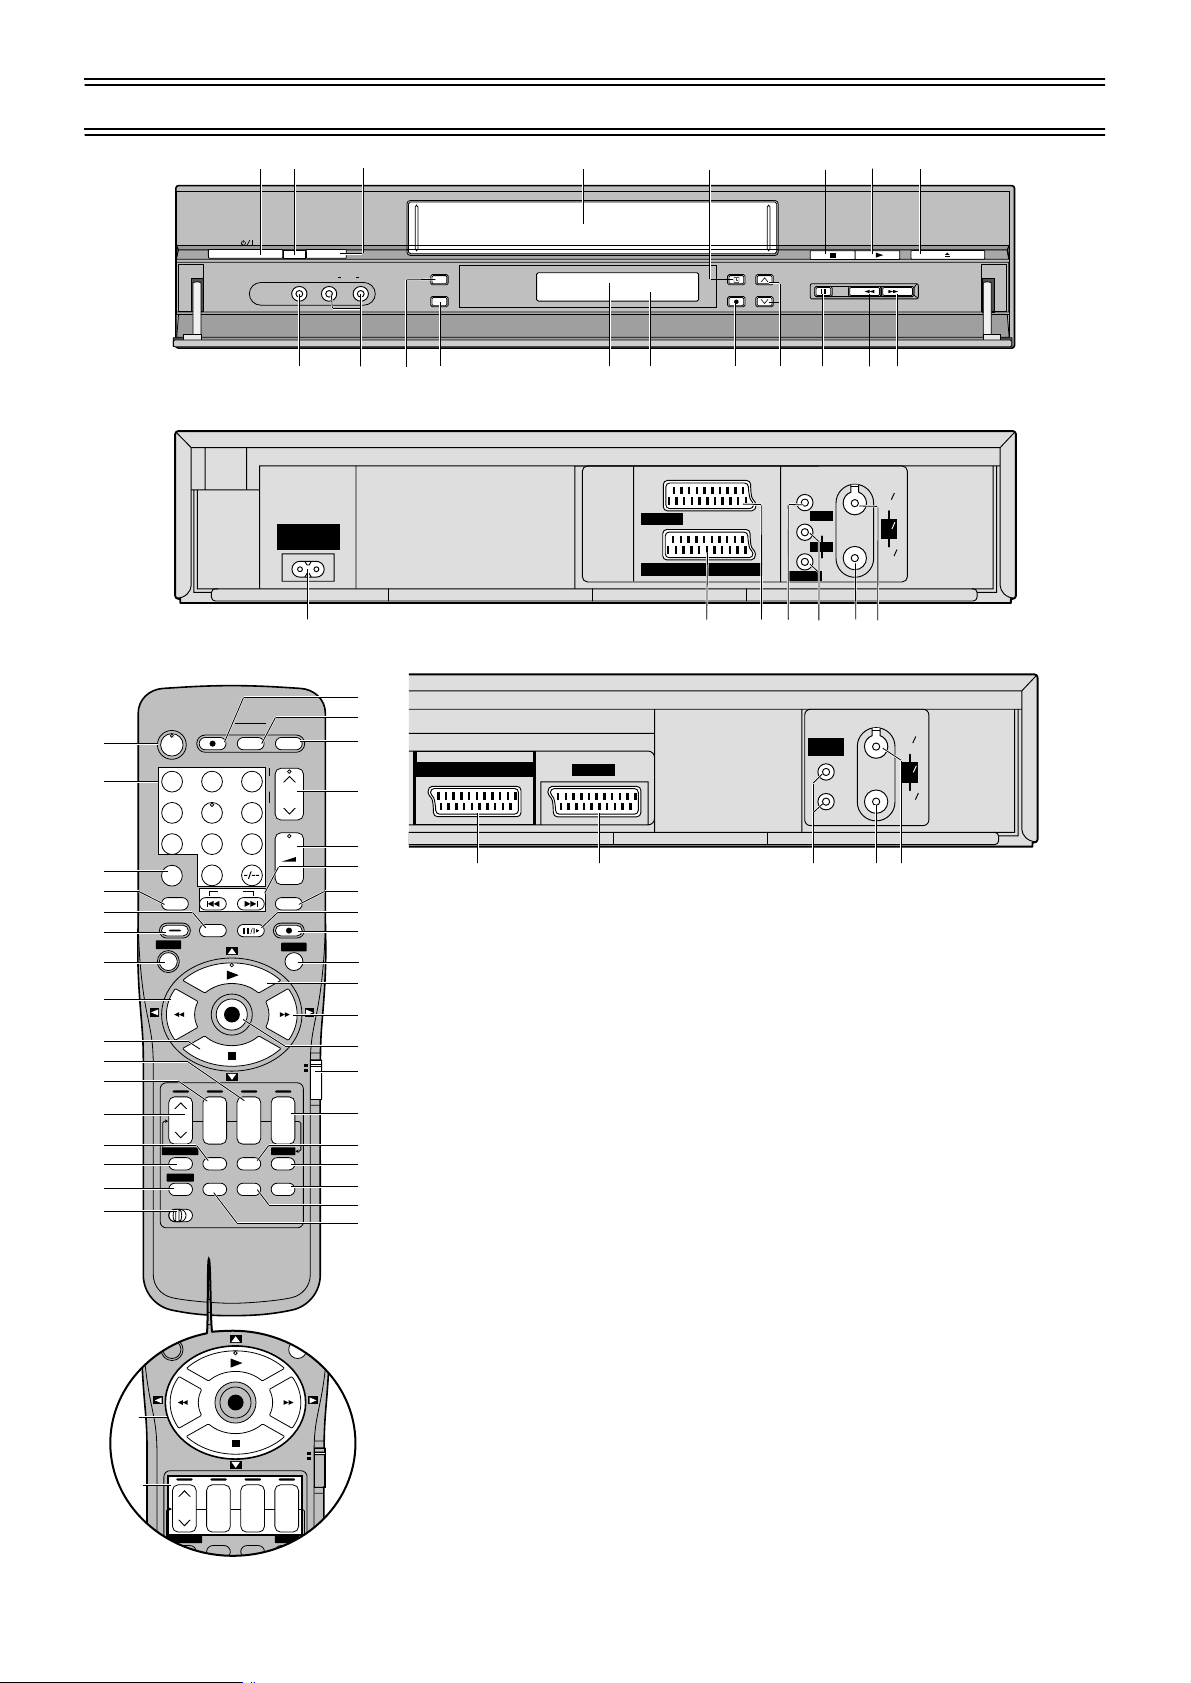
Controls and Connectors
1
2
3
4
5
6
7
8
9
:
;
<
=
>
?
@
4
LIBRARY/SEARCH
AV LINK
DIRECT TV REC TV ASPECT
Í
123
4
5
7809
INPUT SELECT
AV
INDEX
STILL ALBUM
REPLAY
MENU
OK
rsrsr
DATE
CANCEL
SP/LP/EP
AUDIO OSD/DISPLAY
PROG. / CHECK
I-TIMER
VCR
12
a
9
J
/6/
Y
EJECT
6
I8
AV3 IN
1
INTELLIGENT TIMER
VIDEO
L/MONO
Z
AUDIO
[
?
XW
\
A.DUB
EXT LINK
]
^
CVC
_
R
D
TIMER REC
REC/OTR
Q`
NV-FJ780B
IN
ENT
RF
ANT
OUT
SORTIE
)
OUT/SORTIE
VIDEO
L
/G
AUDIO
R /D
fh
)
AC I N
SECTEUR
~
~
AV1 (TV
AV2(DECODER/DECODEUR/EXT
bcdeg
NV-FJ730B
T
TV / TEXT
TRACKING/V-LOCK
+
–
6
VOLUME
+
–
SV/V
REC
VCR
ON OFF
s
TIMER
Á
RESET
EXIT
TV
S
R
Q
AV2(DECODER/DECODEUR/EXT
)
AV1 (TV
AUDIO
)
OUT/SORTIE
L
/G
R /D
IN
ENT
RF
ANT
OUT
SORTIE
P
O
+
N
M
L
K
J
I
H
G
F
E
D
C
B
A
cd fgh
(1) [VCR-ON/OFF]/[TV-ON/OFF] button
(2) [Numeric] buttons
(3) [AV/INPUT SELECT] button
(#p. 42, 43)
(4) [LIBRARY/SEARCH] button
(#p. 27, 40,41))
(5) [REPLAY] button (#p. 17)
(6) [STILL ALBUM] button (#p. 44)
(7) [MENU] button
(8) [Rewind] button
(9) [Stop] button
(10)[ON] button
(11)[DATE] button
(12)[CH] button
(13)[CANCEL] button (#p. 14, 24)
(14)[PROG./CHECK] button
(15)[I-TIMER] button (#p. 25, 26)
(16)[VCR 1/2] switch (#p. 39)
(17)[AUDIO] button (#p. 37)
(18)[OSD/DISPLAY] button (#p. 19, 37)
(19)[RESET] button (#p. 17)
(20)[TIMER] button
(21)[SP/LP/EP] button
(22)[OFF] button
(23)[VCR/TV] switch
(24)[OK] button
(25)[Fast Forward] button
(26)[Play] button
(27)[EXIT] button
(28)[REC] button
(29)[Pause/Slow] button
(30)[SV/V+]([VIDEO Plus+])* button
(#p. 14, 23)
(31)[INDEX] buttons (#p. 28, 40, 41)
(32)[VOLUME] button (#p. 13)
(33)[Channel] button/
[TRACKING/V-LOCK] button
(#p. 17)
(34)[TV/TEXT] button (#p. 13)
(35)[AV LINK/TV ASPECT] button
(#p. 13)
(36)[DIRECT TV REC] button (#p. 19)
(37)[Teletext] buttons (#p. 13)
(38)[Cursor] buttons
(39)Infra-red Remote Control Receiver
window
(40)Cassette compartment
(41)[EJECT] button (#p. 20, 35)
(42)VIDEO IN (AV3)
(43)AUDIO IN (AV3)
(44)[A.DUB] button (#p. 43)
(45)[EXT LINK] button (#p. 20)
(46)CVC (CVC Super) indicator (#p. 45)
(47)VCR display
(48)[REC/OTR] button (#p. 19)
(49)[Pause/Still] button
(50)AC Input socket
(51)AV2 21-pin Scart socket
(52)AV1 21-pin Scart socket
(53)VIDEO OUT socket
(For NV-FJ780B)
(54)AUDIO OUT socket
(55)RF OUT socket
(56)RF IN socket
* It may be displayed [VIDEO Plus+]
on some Remote Controls.
Page 5
Start Guide
Checking the Accessories/Preparing the Remote Control
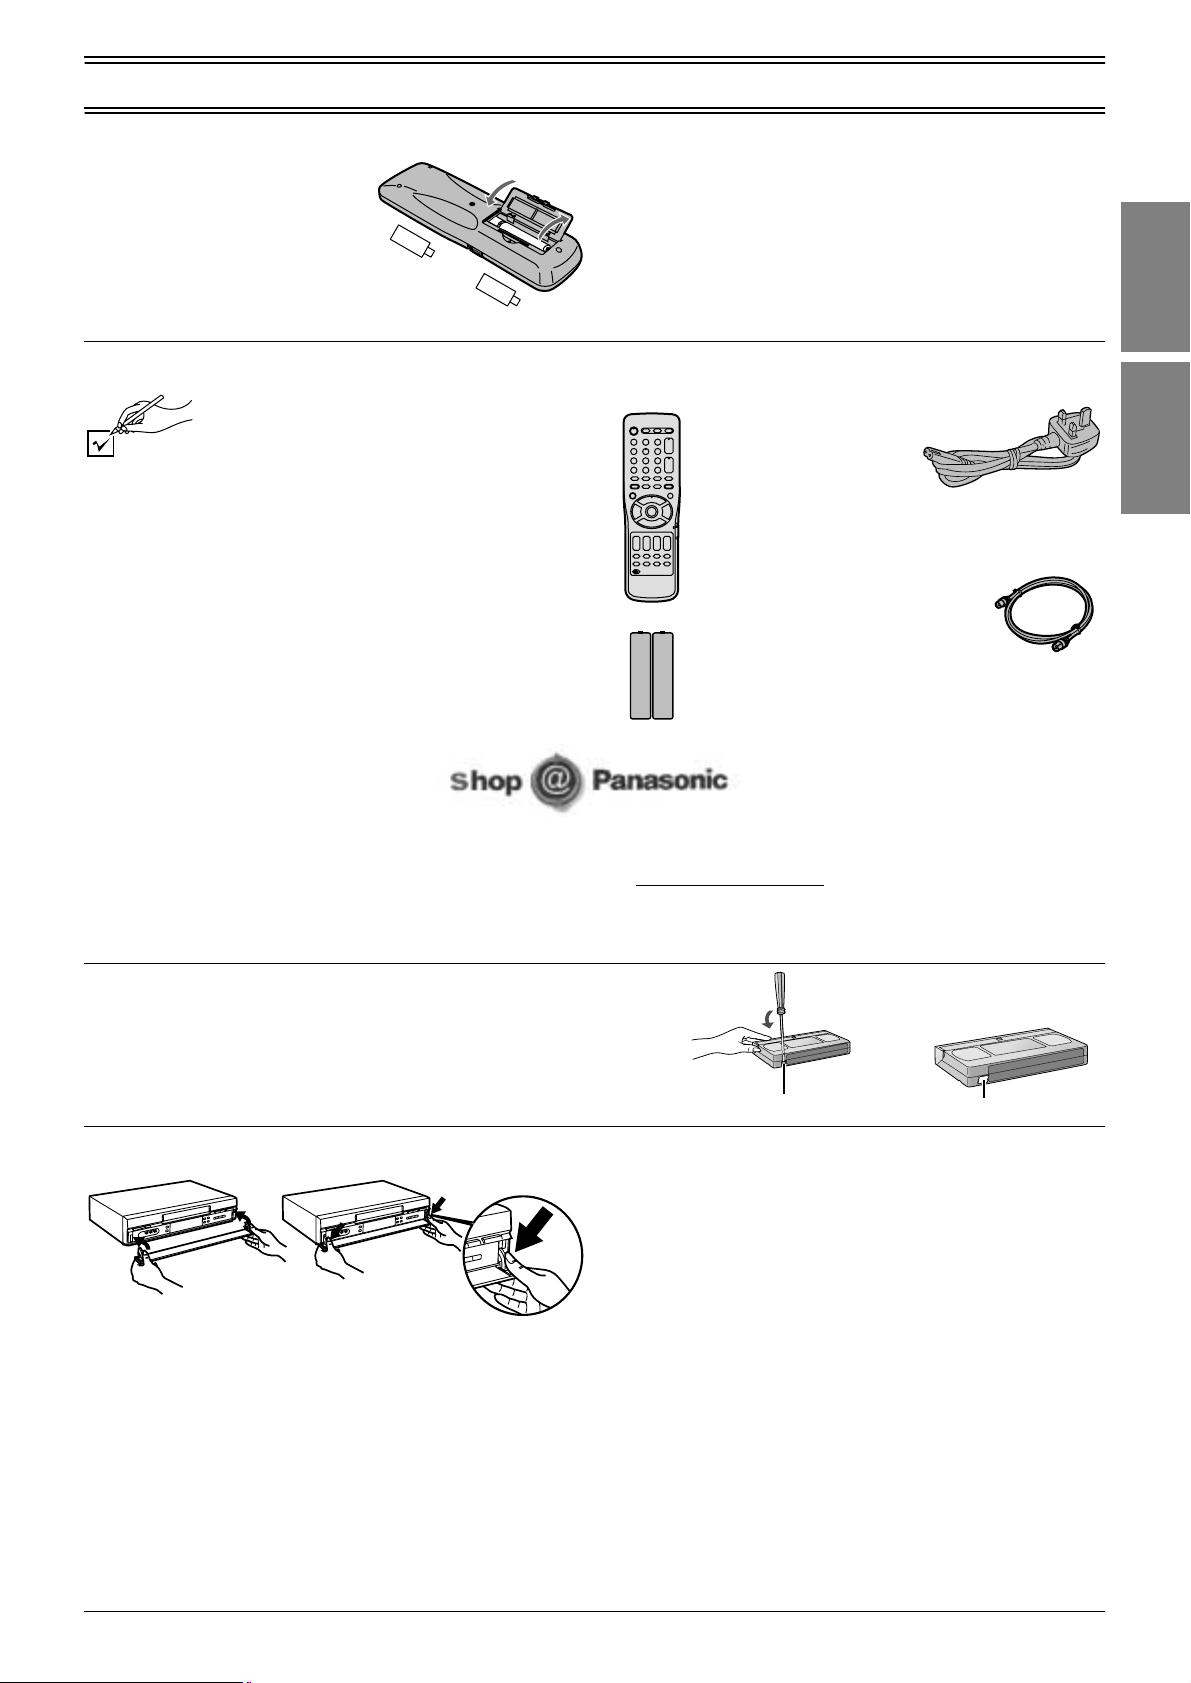
Inserting Remote Control Batteries
1 Open the battery cover and
insert the batteries with the +
and - correctly align ed.
2 Close the battery cover.
-
+
-
Check that you have the accessories shown
Tick off as you unpack
the accessories.
∏ Operating Instructions
VQT9547 (This Book)
∏ Quick Start Guide
VQC4083
∏ Guarantee Card
∏ Remote Control
N2QAKB000024
or
N2QAKB000041
∏ Batteries for the
Remote Control
R6 size
+
Notes for Battery Replacement:
• When the batteries are exhausted, remove them immediately
and dispose of them correctly.
• Do not mix old batteries with new batteries.
• Do not mix different battery types.
• Do not use rechargeable (Ni-Cd) batteries.
• Do not heat or short-circuit the batteries.
• When you do not use the remote control for a long time, take
out the batteries and store them in a cool, dry place.
∏ AC Mains lead
RJA0044-3C
∏ RF lead to connect VCR and TV
K2KF2BA00001,
VJA0728-A
or
K1TWACC00001
Components
Controls and
Guide
Quick Start
• Order accessory and consumable items for all Audio Visual Products with ease and confidence either by telephoning our
Customer Care Centre on 08705 357357 Mon-Fri 9:00am-5:30pm
• Or go on line through our Internet Accessory ordering application at www.panasonic.co.uk
• Most major credit and debit cards accepted.
• All enquires transactions and distribution facilities are provided directly by Panasonic UK Ltd.
• It couldn’t be simpler!
1 To Prevent Accidental Erasure of Recording
Break out the tab or the rear side of the tape.
2 To Allow the Tape to be Used Again for Recording
Cover the hole with 2 layers of tape.
If the front panel comes off
1
1 Insert the panel as show in the illustration.
2 Ensure the panel is parallel to the until, then press firmly
down and in on the levers until they click into place.
3 Check that t he panel now moves correctly .
• If it does not, remove it and repeat the above procedure.
2
Tape Care
Some do’s and dont’s on tape care.
DO:
1) Use a good quality branded tape, suc h as Pana so nic .
2) Keep in the box supplied with the tape, or a video case,
when not in use.
3) Try to use the whole tape when making recordings and
avoid re-recording over the same section of the tape
repeatedly as this will help prevent premature tape wear.
4) Take care to insert a tape correctly into the VCR to avoid
damage.
DO NOT:
1) Expose the tape to high humidity or temperature.
2) Expose to liquid.
3) Expose to dust particles by storing directly on a carpet for
example.
4) Use a damaged tape or attempt to repair it.
5) Dismantle the cassette housing.
6) Attempt to lift the front cassette flap or touch the tape
surface.
Erasure prevention tab
.
Adhesive tape
5
Page 6
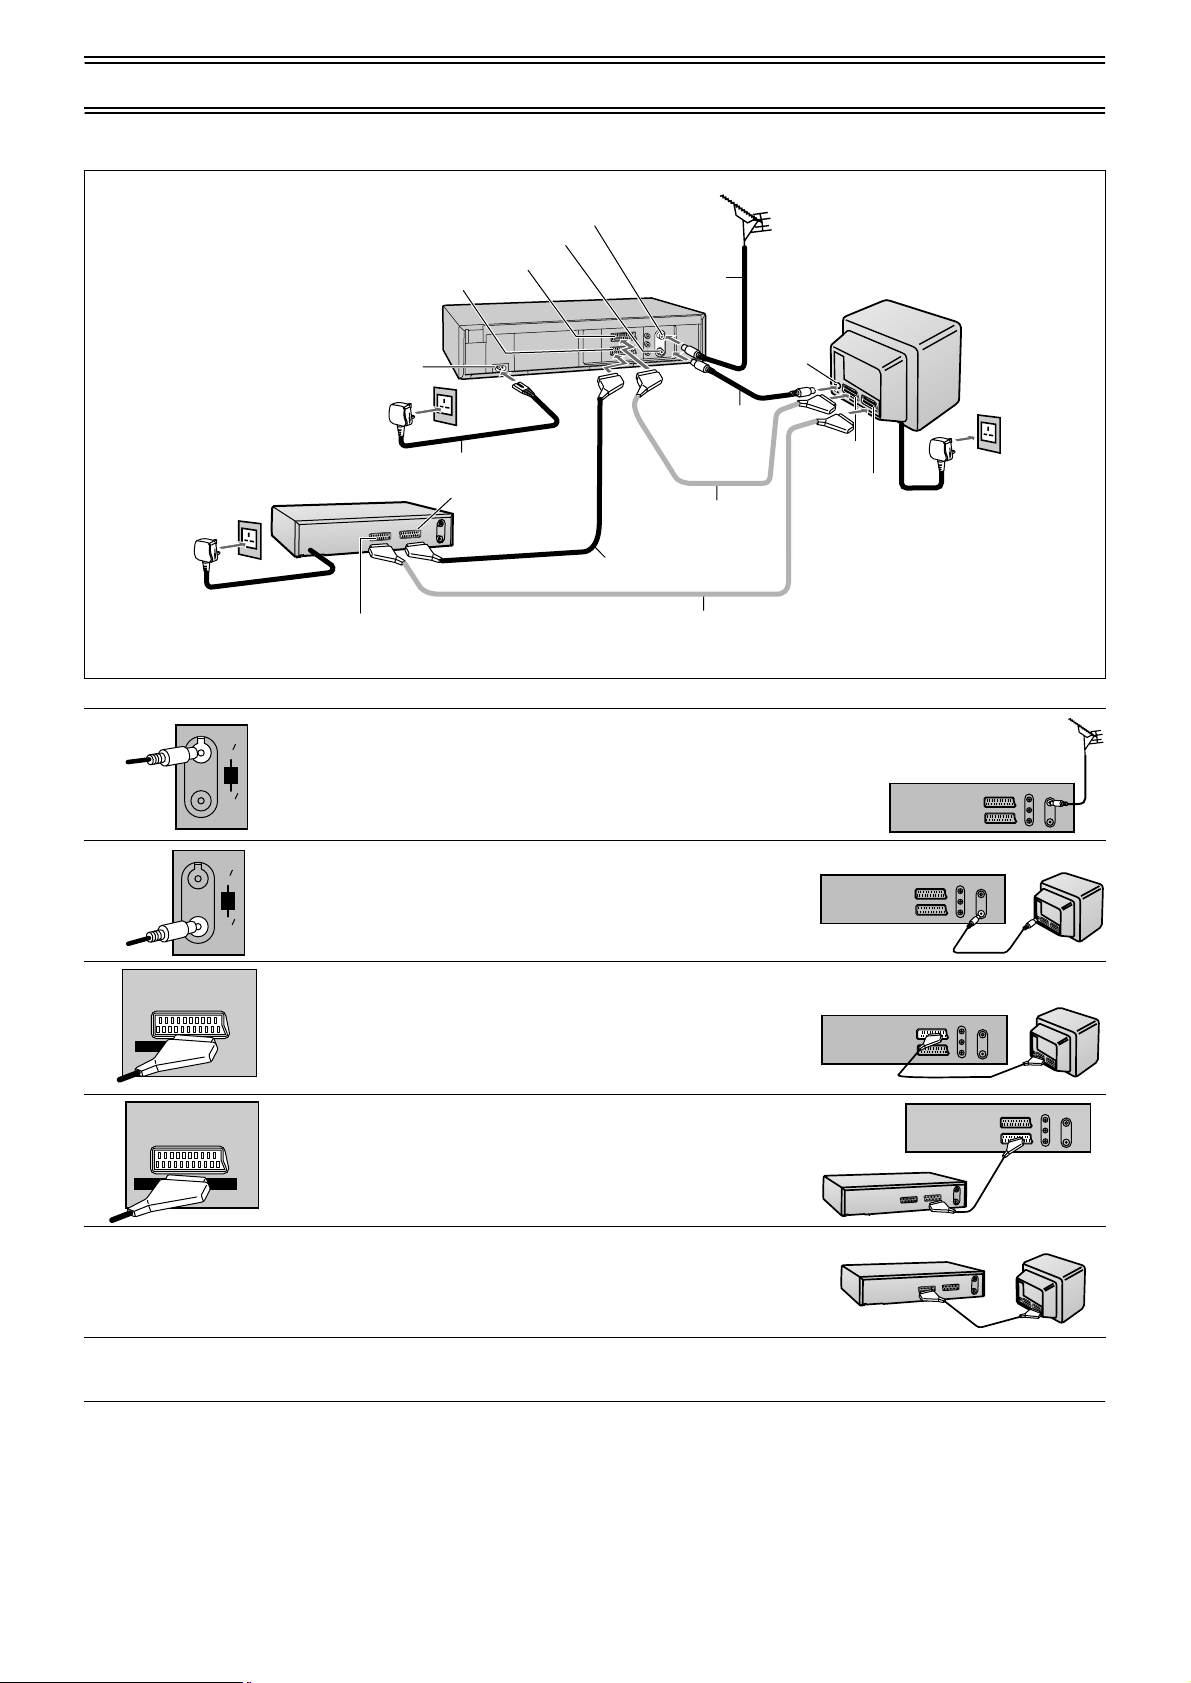
Follow the step-by-step guide below.
Connections (with Scart leads)
Example of NV-FJ780B
Satellite Receiver (not supplied)
To AC Mains socket
1
IN
ENT
RF
ANT
OUT
SORTIE
RF Input socket
RF Output socket
AV1 21-pin Scart socket
AV2 21-pin Scart socket
AC Input socket
Aerial
(not supplied)
6
AC Mains lead (supplied)
21-pin Scart socket
(VCR)
6
21-pin Scart socket (TV)
Necessary For TV with
Q Link
4
Necessary for Connecting
a Satellite Receiver
Optional Connection
Connect the aerial to the RF Input socket of the VCR.
2
RF lead
(supplied)
3
TV [with or without Q Link function]
1
Aerial Input
socket
AV2 socket
(not supplied)
AV1 socket
To AC Mains socket
6
5
Note:
21-pin Scart leads are not supplied.
VCR
2
3
AV1 (TV
4
AV2(DECODER/DECODEUR/EXT
5
6
Connect the RF lead from the RF Output socket of the VCR to
IN
ENT
the TV aerial input socket.
RF
ANT
OUT
SORTIE
Connect the AV1 21-pin scart socket to TV scart socket
(optional). If your TV d oes no t ha ve a s ca rt so ck et or you do not
)
have a scart lead, skip this step.
• This is necessary for Download from TV with Q Link function.
Connect the AV2 21-pin scart socket to the VCR Scart Socket
VCR
VCR
TVVCR
TV
on your Satellite Receiver/Digital Sat receiver. If you are not
connecting a Satellite Receiver, skip this step.
)
Connect the TV scart socket of your Satellite Receiver to the
Satellite Receiver
Satellite Receiver
TV
AV2 scart socket of your TV (optional).
If you are not connecting a Satellite Receiver, skip this step.
Plug the TV, VCR and Satellite Receiver into the mains as
shown at top of the page.
6
Page 7
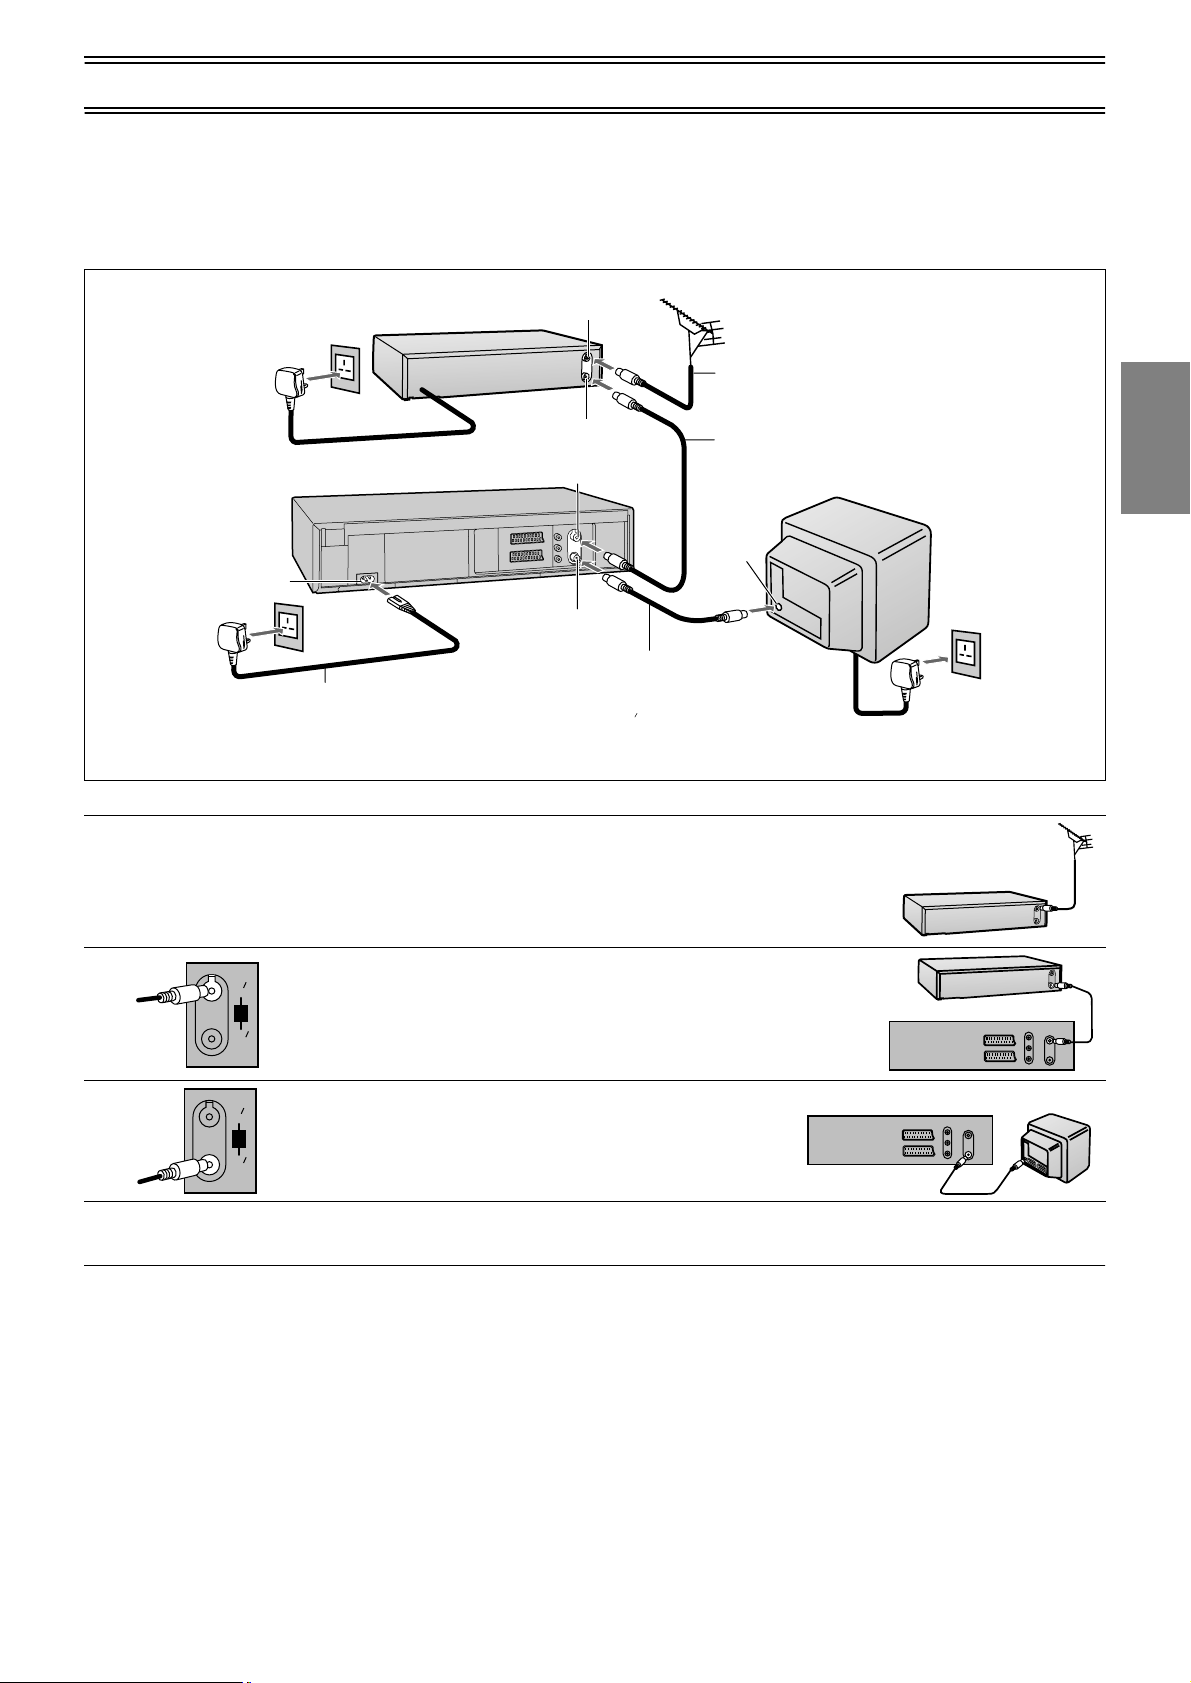
Connections (without Scart leads)
If you do not have any scart leads and your TV is not Q Link type, you can connect your VCR to a TV and
Satellite Receiver using RF leads.
Using this connection method may however be difficult to obtain a clear picture from the Satellite Receiver.
For this reason it is not recommended for inexperienced users.
(See preferred connection on page 6.)
AC Input socket
AC Mains lead (supplied)
Example of NV-FJ780B
1
Satellite Receiver (not supplied)
To AC Mains socket
4
4
Aerial Input socket
Aerial Output socket
RF Input socket
RF Output socket
RF lead (supplied)
• Must be connect ed to
watch TV channels.
Aerial
(not supplied)
RF lead
(not supplied)
Aerial In put
socket
3
Connect the aerial to the aerial input socket of the Satellite
Receiver.
• If you do not have a Satellite Receiver, connect the aerial to
the RF Input socket of the VCR and go to step 3.
1
2
TV (not supplied)
To AC Mains socket
Satellite Receiver
Guide
Quick Start
4
2
3
4
Connect the aerial from Satellite Receiver to the RF Input
IN
ENT
socket.
RF
ANT
OUT
SORTIE
Connect the RF Output socket to the TV aerial socket.
IN
ENT
RF
ANT
OUT
SORTIE
Plug the TV, VCR and Satellite Receiver into the mains as
Satellite Receiver
VCR
VCR
TV
shown at top of the page.
Notes:
• If you have an analogue satellite receiver, select [SKY ONE] or [SKY NEWS] on the receiver before starting Auto Setup.
After Auto Setup is complete, the sate lli te pos it ion will be s how n as [SAT] in the cha nne l lis ti ng to de note programmes from the
satellite receiver.
• If you have a digital satellite receiver, you can start Auto Setup with the receiver set to any channel.
We recommend to manually name the [SAT] position after Auto Setup is complete. (See page 32.)
7
Page 8
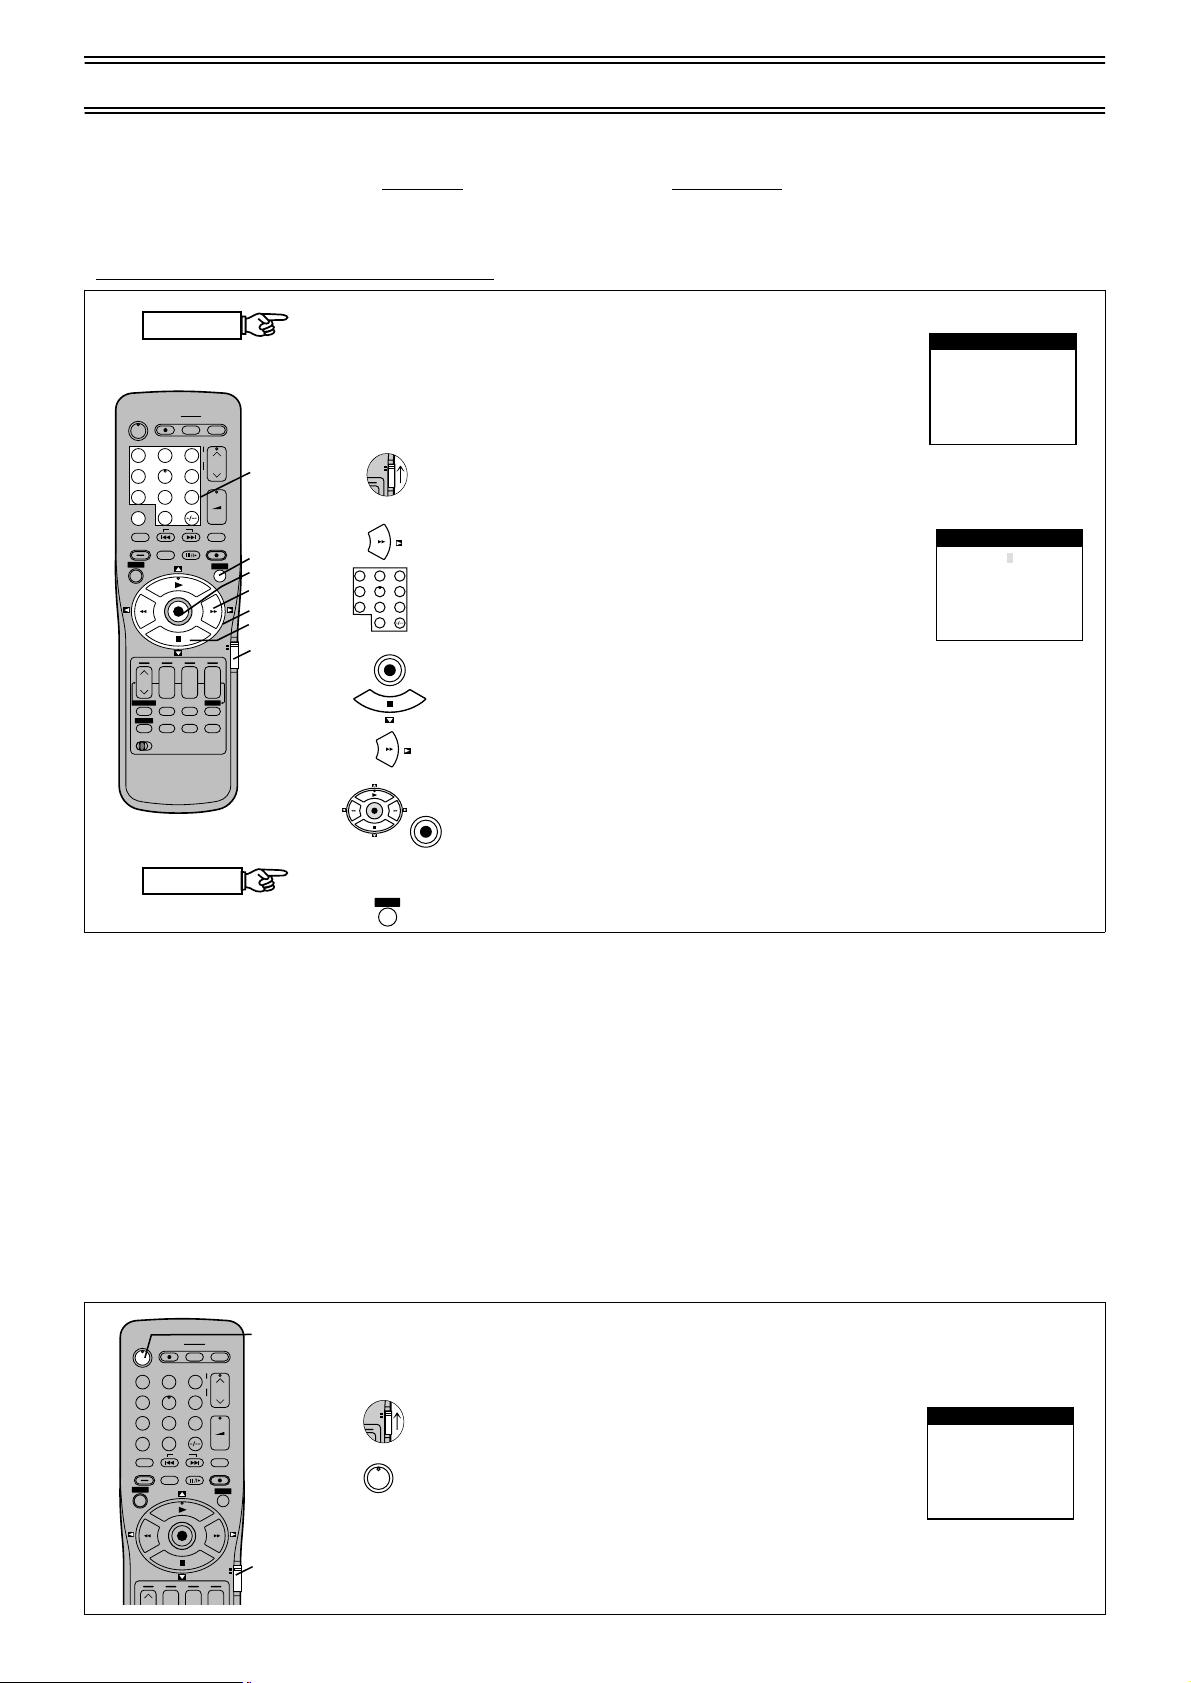
Auto Setup (For TV and VCR with Q Link Functions)
VCR
r
TV
VCR
r
TV
• If you do not have a Q Link TV, ignore this page and go to page 9.
The Preset Download function can automatically copy the tuning position of all available TV stations into the VCR’s memory
when you connect the VCR using a fully-wired
To Set Up this VCR with a brand-new Q Link TV
Perform the following operation steps exactly as described to ensure that the Preset Download function works correctly.
• First of all, make sure that the VCR is switched off
START
DIRECT TV REC TV ASPECT
Í
123
4
5
7809
INPUT SELECT
AV
LIBRARY/SEARCH
INDEX
STILL ALBUM
REPLAY
MENU
OK
rsrsr
DATE
CANCEL
PROG. / CHECK
I-TIMER
AUDIO OSD/DISPLAY
VCR
12
FINISH
AV LINK
TRACKING/V-LOCK
6
ON OFF
SP/LP/EP
+
–
TV / TEXT
VOLUME
SV/V
REC
VCR
s
TIMER
Á
RESET
3
+
–
+
8
EXIT
4,6
3,5
6
4
TV
2
1 Switch the TV on. The TV automatically starts to tune
- - - - - - - - - - - - - - - - - - - - - - - - - - - - - - - - - - - - - - - - - - - - - - - - - - - - - - - - - - - - - - - - - - - - - - - - - - - - - - - - - - - - - - - - - - - - - - - - - - - - - - - - - - - - - - - - - - - -
2 Set the [VCR/TV] switch to [VCR].
- - - - - - - - - - - - - - - - - - - - - - - - - - - - - - - - - - - - - - - - - - - - - - - - - - - - - - - - - - - - - - - - - - - - - - - - - - - - - - - - - - - - - - - - - - - - - - - - - - - - - - - - - - - - - - - - - - - -
3 When Download has fi nishe d, the s creen for the Ow ner
123
456
7809
- - - - - - - - - - - - - - - - - - - - - - - - - - - - - - - - - - - - - - - - - - - - - - - - - - - - - - - - - - - - - - - - - - - - - - - - - - - - - - - - - - - - - - - - - - - - - - - - - - - - - - - - - - - - - - - - - - - -
4 Press the [OK] button and the [Cursor] button (4).
- - - - - - - - - - - - - - - - - - - - - - - - - - - - - - - - - - - - - - - - - - - - - - - - - - - - - - - - - - - - - - - - - - - - - - - - - - - - - - - - - - - - - - - - - - - - - - - - - - - - - - - - - - - - - - - - - - - -
OK
5 Press the [Cursor] button (1).
- - - - - - - - - - - - - - - - - - - - - - - - - - - - - - - - - - - - - - - - - - - - - - - - - - - - - - - - - - - - - - - - - - - - - - - - - - - - - - - - - - - - - - - - - - - - - - - - - - - - - - - - - - - - - - - - - - - -
6 Press the [Cursor] buttons (3421) to select a letter
OK
- - - - - - - - - - - - - - - - - - - - - - - - - - - - - - - - - - - - - - - - - - - - - - - - - - - - - - - - - - - - - - - - - - - - - - - - - - - - - - - - - - - - - - - - - - - - - - - - - - - - - - - - - - - - - - - - - - - -
7 Enter [House No] and [Postcode] in the sa me way.
- - - - - - - - - - - - - - - - - - - - - - - - - - - - - - - - - - - - - - - - - - - - - - - - - - - - - - - - - - - - - - - - - - - - - - - - - - - - - - - - - - - - - - - - - - - - - - - - - - - - - - - - - - - - - - - - - - - -
8 Press the [EXIT] button to make the On Screen Display disappear.
EXIT
21-pin Scart lead to a TV equipped with the Q Link function.
.
all available TV stations and to adjust the clock.
(This is called Auto Setup function.)
• When the TV has finished its ow n auto setup, th e VCR
is automatically switched on, and the downloading of
the setup data from the TV to the VCR starts.
ID setting menu appears.
Press the [Cursor] button (1) and the [Numeric]
buttons to enter a 4-digit PIN number.
• Make sure that you will remember the PIN number
(make a note of it).
The cursor moves to [Name] .
and then press the [OK] button.
OK
Repeat this to enter the name.
On Screen Display
Download
Download in
progress,
please wait.
Position 67
Indication during downloading
Owner ID
PIN number :846¢
Name :¢¢¢¢¢¢¢¢¢¢¢¢¢¢
House No :¢¢¢¢¢¢¢¢¢¢¢
Postcode :¢¢¢¢¢¢¢¢¢¢¢
Menu for Owner ID setting
Panasonic VCR
Panasonic VCR
Hint:
• If you use a Panasonic Q Link TV and perform the operation step 1 above, starting the downloading of the setup data will
automatically display the [Download] indication. However, in case of a TV of another make, the [Download] indication may not
appear. In this case, select the AV input on your TV if you want to see the [Download] indication.
Notes:
• The explanations in this book refer to Panasonic Q Link TV and VCR, however they may also apply to other makes of TV and
VCR with similar functions to Q Link. (See page 45 for details.)
• If you accidentally switch on the VCR before the TV, down loading of the setup data from the TV may not be pe rformed correctl y.
In this case, follow the steps below.
1 Wait until the Auto Setup is complete on both the TV and the VCR.
2 Press the [MENU] button (7) to display the OSD Main menu from the VCR on the TV screen.
3 Press the [Cursor] buttons (38) (3421) to select [Tuning] and then [Download].
4 Press the [OK] button (24) twice. Downloading of the setup data from the TV to the VCR starts.
5 When the programme position and the current time appear in the VCR display, downloading is complete.
To Set Up this VCR with an existing Q Link TV
4
DIRECT TV REC TV ASPECT
Í
123
4
5
7809
INPUT SELECT
AV
LIBRARY/SEARCH
INDEX
STILL ALBUM
REPLAY
MENU
OK
rrr
AV LIN K
TRACKING/V-LOCK
+
–
6
TV / TEXT
VOLUME
+
–
SV/V
REC
EXIT
VCR
+
TV
1 Switch the TV on.
. . . . . . . . . . . . . . . . . . . . . . . . . . . . . . . . . . . . . . . . . . . . . . . . . . . . . . . . . . . . . . . . . . . . . . . . . . . . . . . . . . . . . . . . . . . . . . . . . . . . . . . . . . . . . . . . . . . . . . . . . . . . . . .
2 Select the AV input on your TV.
. . . . . . . . . . . . . . . . . . . . . . . . . . . . . . . . . . . . . . . . . . . . . . . . . . . . . . . . . . . . . . . . . . . . . . . . . . . . . . . . . . . . . . . . . . . . . . . . . . . . . . . . . . . . . . . . . . . . . . . . . . . . . . .
3 Set the [VCR/TV] switch to [VCR].
. . . . . . . . . . . . . . . . . . . . . . . . . . . . . . . . . . . . . . . . . . . . . . . . . . . . . . . . . . . . . . . . . . . . . . . . . . . . . . . . . . . . . . . . . . . . . . . . . . . . . . . . . . . . . . . . . . . . . . . . . . . . . . .
4 Press the [VCR-ON/OFF] button to switch the VCR
Í
. . . . . . . . . . . . . . . . . . . . . . . . . . . . . . . . . . . . . . . . . . . . . . . . . . . . . . . . . . . . . . . . . . . . . . . . . . . . . . . . . . . . . . . . . . . . . . . . . . . . . . . . . . . . . . . . . . . . . . . . . . . . . . .
on.
Downloading of the setup data starts automatically.
5 To setup the Owner ID, repeat the steps 3–8 above .
3
Download
Download in
progress,
please wait.
Position 67
Panasonic VCR
Indication during downloading
8
Page 9
1
VCR
r
TV
4
4
4,7
START
DIRECT TV REC TV ASPECT
Í
123
4
5
7809
INPUT SELECT
AV
LIBRARY/SEARCH
INDEX
STILL ALBUM
REPLAY
MENU
OK
rsrsr
DATE
CANCEL
PROG. / CHECK
I-TIMER
AUDIO OSD/DISPLAY
VCR
12
FINISH
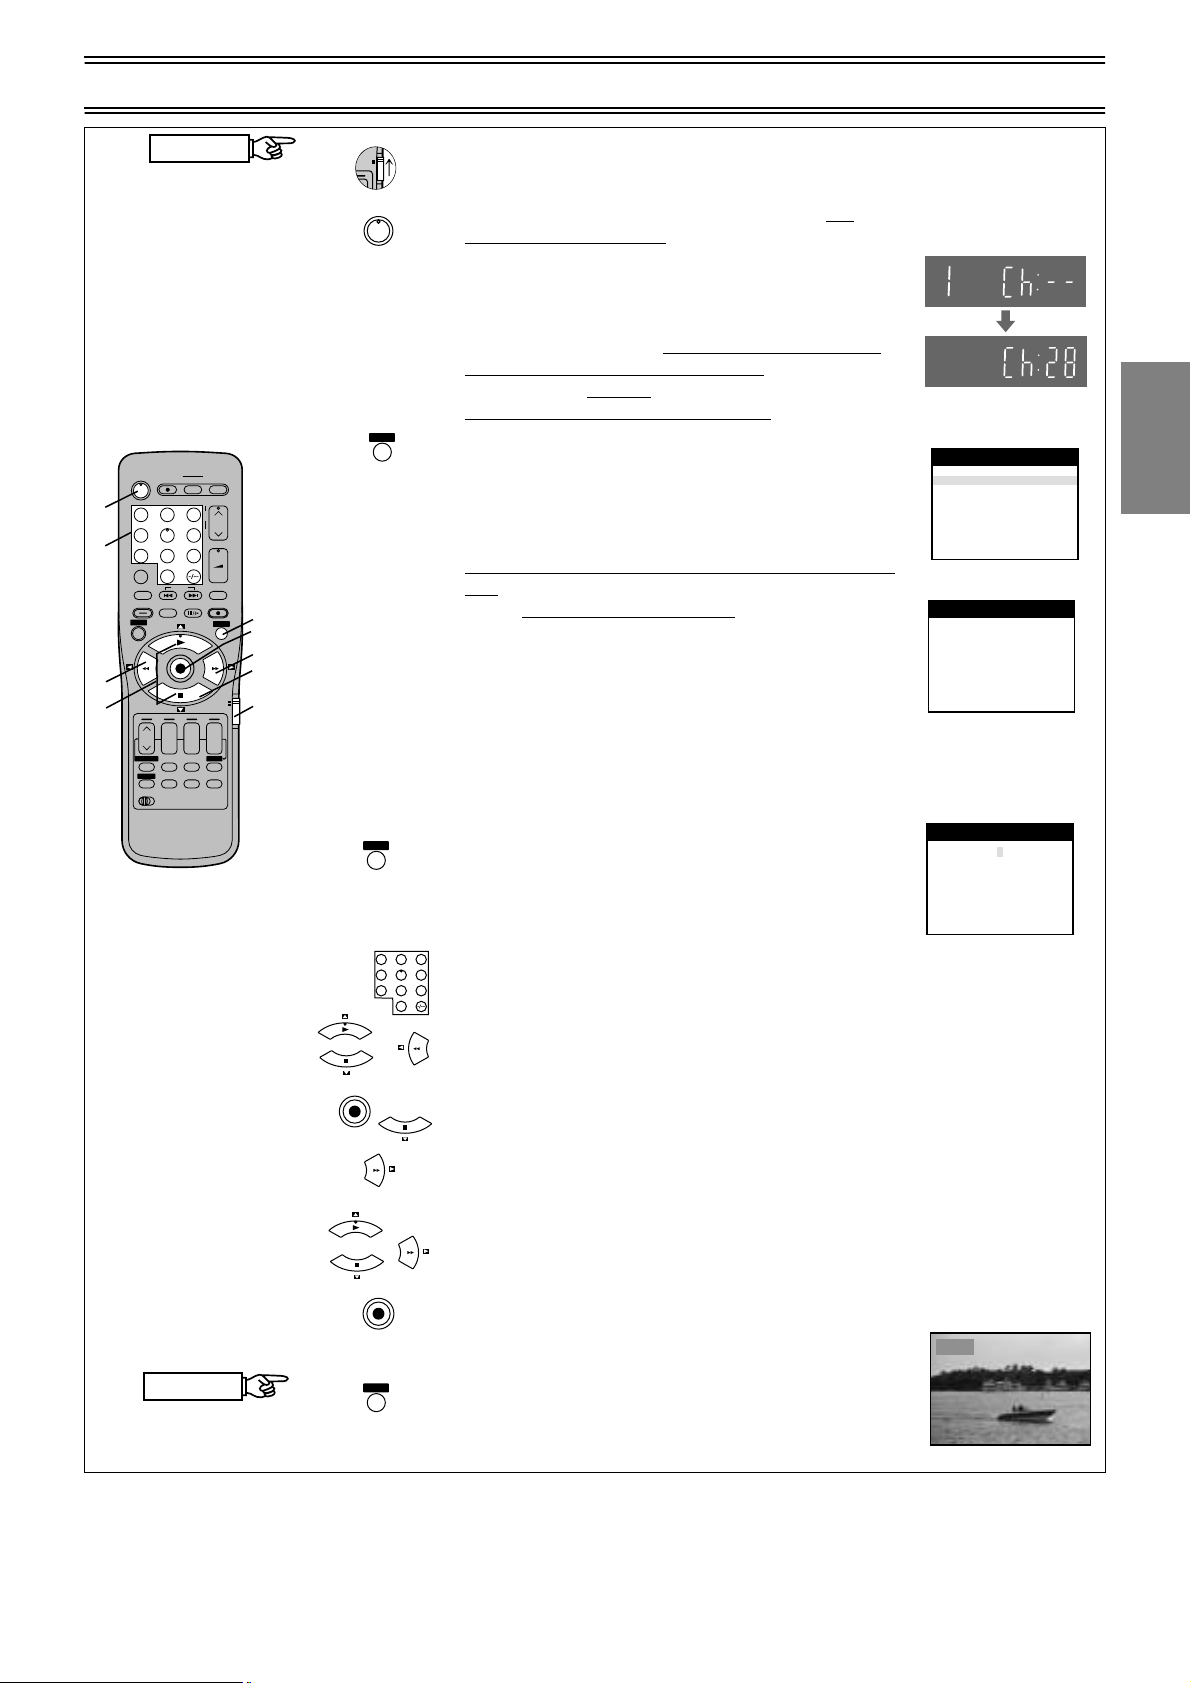
Auto Setup (For TV and/or VCR without Q Link Functions)
1 Set the [VCR/TV] switch to [VCR]. Turn on the TV, the n
press the [VCR-ON/OFF] button to switch the VCR on.
The VCR will now start Auto Setup.
AV LIN K
TRACKING/V-LOCK
6
ON OFF
SP/LP/EP
+
–
TV / TEXT
VOLUME
SV/V
REC
VCR
s
TIMER
Á
RESET
+
–
EXIT
TV
+
1,3,10
5,8
6,7
5
1
Í
indication will n ot a ppe ar.
In this case you can re-start
Auto Setup again. See page 34.
• In some cases, where the VCR has been connec ted to
your TV using the RF lead only (no Scart) the RF
output channel may interfere with the TV stations
transmitted in your are a. This may prevent you fr om
seeing the On Screen Display clearly.
• If Auto Setup has previously been completed this
for removing the interference
.
EXIT
Please refer to page 10
before restarting Auto Setup (page 34)
• If you want to cancel Auto Setup before it has finished,
press the [EXIT] button. You can restart Auto Setup
again, see page 34.
• The first digit of the VCR display will begin to flash.
After a while, it will stop flashing and the RF output
channel number will be displayed.
• If you have connected the VCR to the TV with a Scart
lead, you will see the screen on the right during Auto
- - - - - - - - - - - - - - - - - - - - - - - - - - - - - - - - - - - - - - - - - - - - - - - - - - - - - - - - - - - - - - - - - - - - - - - - - - - - - - - - - - - - - - - - - - - - - - - - - - - - - - - - - - - - - - - - - - - -
Setup. You can skip step
below.
2
2 Select an unused channel pre-set on your TV and tune
it to the RF output channel number shown on the VCR
display (or until you can clearly see the Auto Setup
screen shown on the right). Store the new video
playback channel (refer to the instructions for your TV).
• If you can see interference on the picture, you may
need to change the RF output channel . Follow the
- - - - - - - - - - - - - - - - - - - - - - - - - - - - - - - - - - - - - - - - - - - - - - - - - - - - - - - - - - - - - - - - - - - - - - - - - - - - - - - - - - - - - - - - - - - - - - - - - - - - - - - - - - - - - - - - - - - -
3 Press the [EXIT] button. The Owner ID screen will
EXIT
instructions on the next page to do this.
appear.
You can complete the Owner ID now or skip this step
and do it later. To do it later, press the [EXIT] button
- - - - - - - - - - - - - - - - - - - - - - - - - - - - - - - - - - - - - - - - - - - - - - - - - - - - - - - - - - - - - - - - - - - - - - - - - - - - - - - - - - - - - - - - - - - - - - - - - - - - - - - - - - - - - - - - - - - -
4 To set the Owner ID now, press the [Numeric] buttons
123
456
7809
again. Your VCR is now ready to use.
or [Cursor] buttons (34) to enter a four-digit PIN
number. If you make a mistake then press the [Cursor]
button (2) and the re-ent er t he co rrec t digit. Make sure
that you will remem ber the PIN numb er (mak e a not e of
- - - - - - - - - - - - - - - - - - - - - - - - - - - - - - - - - - - - - - - - - - - - - - - - - - - - - - - - - - - - - - - - - - - - - - - - - - - - - - - - - - - - - - - - - - - - - - - - - - - - - - - - - - - - - - - - - - - -
5 Press the [OK] button and the [Cursor] button (4).
OK
- - - - - - - - - - - - - - - - - - - - - - - - - - - - - - - - - - - - - - - - - - - - - - - - - - - - - - - - - - - - - - - - - - - - - - - - - - - - - - - - - - - - - - - - - - - - - - - - - - - - - - - - - - - - - - - - - - - -
it).
The cursor moves to [Name] .
6 Press the [Cursor] button (1).
- - - - - - - - - - - - - - - - - - - - - - - - - - - - - - - - - - - - - - - - - - - - - - - - - - - - - - - - - - - - - - - - - - - - - - - - - - - - - - - - - - - - - - - - - - - - - - - - - - - - - - - - - - - - - - - - - - - -
7 Press the [Cursor] buttons (34) to select a letter and
then press the [Cursor] button (1) to move to the next
letter.
- - - - - - - - - - - - - - - - - - - - - - - - - - - - - - - - - - - - - - - - - - - - - - - - - - - - - - - - - - - - - - - - - - - - - - - - - - - - - - - - - - - - - - - - - - - - - - - - - - - - - - - - - - - - - - - - - - - -
8 Press the [OK] button to finish setting your name.
- - - - - - - - - - - - - - - - - - - - - - - - - - - - - - - - - - - - - - - - - - - - - - - - - - - - - - - - - - - - - - - - - - - - - - - - - - - - - - - - - - - - - - - - - - - - - - - - - - - - - - - - - - - - - - - - - - - -
9 Enter the [House No] and [Postcode] in the same way.
- - - - - - - - - - - - - - - - - - - - - - - - - - - - - - - - - - - - - - - - - - - - - - - - - - - - - - - - - - - - - - - - - - - - - - - - - - - - - - - - - - - - - - - - - - - - - - - - - - - - - - - - - - - - - - - - - - - -
10 When you are happy with the info rmation that you hav e
OK
EXIT
Repeat these steps until you have entered your name.
entered, press the [EXIT] button to leave the Owner ID
screen. You will now see the TV picture.
Your VCR is now ready to use.
VCR Display
V
On Screen Display
Auto-Setup
Tuning
Auto-Setup
Auto setup is now complete
(Output channel is 28)
Owner ID
PIN number :846¢
Name :¢¢¢¢¢¢¢¢¢¢¢¢¢¢
House No :¢¢¢¢¢¢¢¢¢¢¢
Postcode :¢¢¢¢¢¢¢¢¢¢¢
BBC1
Panasonic VCR
: Ch 21
Panasonic VCR
Panasonic VCR
Guide
Quick Start
9
Page 10
If the clock setting menu appears after Auto Setup has finished (Auto clock set was not possible due to weak signal)
STILL ALBUM
REPLAY
REC
VCR
r
TV
MENU
OK
2
EXIT
1
VCR
TV
1 Press the [Cursor] buttons (3421) to set the correct
OK
- - - - - - - - - - - - - - - - - - - - - - - - - - - - - - - - - - - - - - - - - - - - - - - - - - - - - - - - - - - - - - - - - - - - - - - - - - - - - - - - - - - - - - - - - - - - - - - - - - - - - - - - - - - - - - - - - - - -
time and date.
2 Press the [OK] button to finish this setting.
OK
On Screen Display
Clock setting
Clock setting
Time
Date
: MAN.
: 0:00:00
:1.11.01
Panasonic VCR
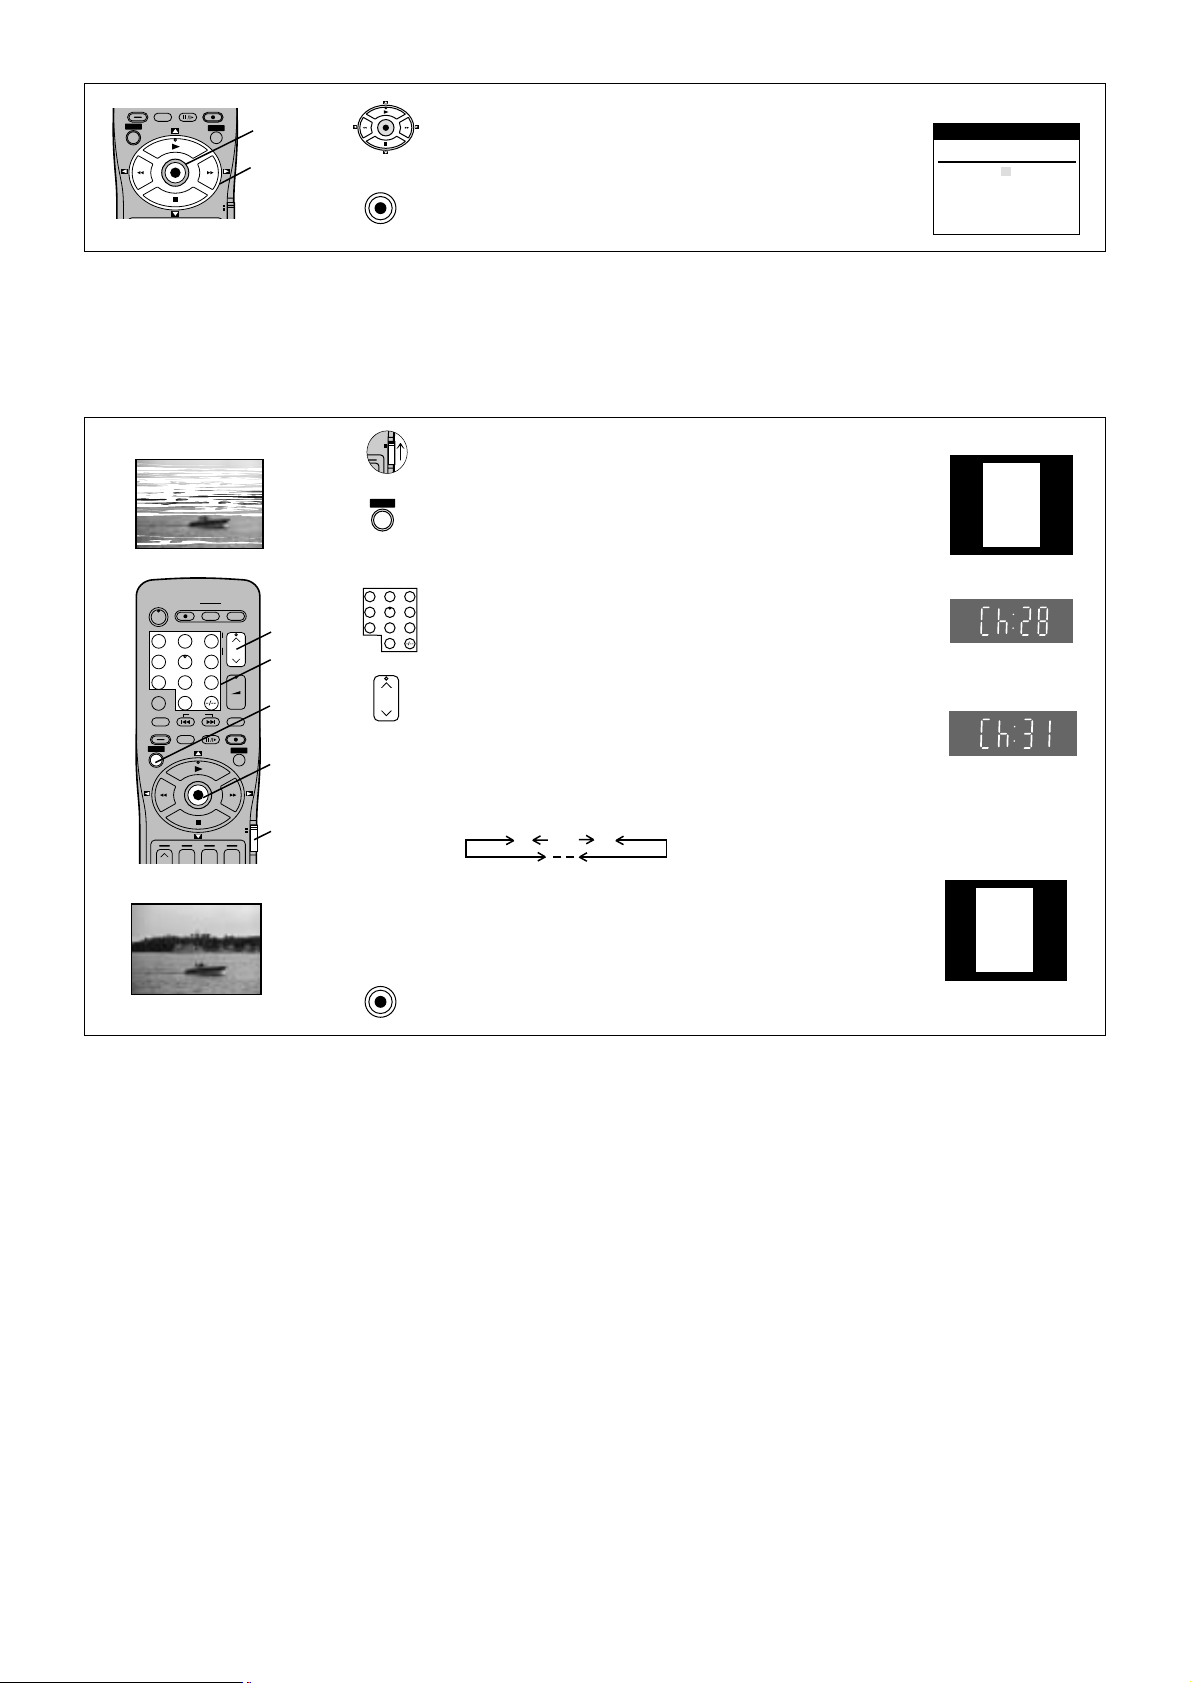
Removing Interference
In some cases, interference (lines or patterning) or a very poor picture may appear on the TV when the VCR is
connected. If this happens, foll ow the steps be low to chan ge the vide o playbac k channe l (RF output chan nel) to remov e
the interference.
TV screen
The picture with interference
AV LINK
DIRECT TV REC TV ASPECT
Í
123
4
7809
INPUT SELECT
AV
LIBRARY/SEARCH
STILL ALBUM
MENU
TRACKING/V-LOCK
6
5
INDEX
REPLAY
OK
rrr
+
–
TV / TEXT
VOLUME
+
–
SV/V
REC
EXIT
VCR
+
TV
The clear picture
1 Set the [VCR/TV] switch to [VCR].
- - - - - - - - - - - - - - - - - - - - - - - - - - - - - - - - - - - - - - - - - - - - - - - - - - - - - - - - - - - - - - - - - - - - - - - - - - - - - - - - - - - - - - - - - - - - - - - - - - - - - - - - - - - - - - - - - - - -
2 Press the [MENU] button for more than 5 seconds.
MENU
The RF output channel number is displayed on the
- - - - - - - - - - - - - - - - - - - - - - - - - - - - - - - - - - - - - - - - - - - - - - - - - - - - - - - - - - - - - - - - - - - - - - - - - - - - - - - - - - - - - - - - - - - - - - - - - - - - - - - - - - - - - - - - - - - -
VCR display.
3 Press the [Numeric] buttons or use the [Channel]
123
456
3
7809
3
button to select a channel number, which differs by 2
or 3 from the present channel number.
(For example, if the original channel number was 28,
enter 31.)
• Set the RF output channel of the VCR to [ss] (RF
2
OFF) when the VCR is connected to the TV via the
21-pin Scart cable.
5
Press the [Numeric (0)] but ton or [Cha nnel] b utton to
display [ss]. Skip the step 4, if using a 21-pin Scart
cable.
1
21
...
68
(RF OFF)
- - - - - - - - - - - - - - - - - - - - - - - - - - - - - - - - - - - - - - - - - - - - - - - - - - - - - - - - - - - - - - - - - - - - - - - - - - - - - - - - - - - - - - - - - - - - - - - - - - - - - - - - - - - - - - - - - - - -
4 Retune your TV until you receive the Test pattern.
It may be necessary to repeat steps 2 and 3 above
- - - - - - - - - - - - - - - - - - - - - - - - - - - - - - - - - - - - - - - - - - - - - - - - - - - - - - - - - - - - - - - - - - - - - - - - - - - - - - - - - - - - - - - - - - - - - - - - - - - - - - - - - - - - - - - - - - - -
5 Press the [OK] button to finish this setting.
OK
until you can see the Test pattern clearly.
On Screen Display
VCR
Ch:28
Test pattern indication
VCR display
Indication when the RF output
channel is 28 (example)
Indication after changing the RF
output channel to 31 (example)
VCR
Ch:31
Test pattern indication
10
Page 11
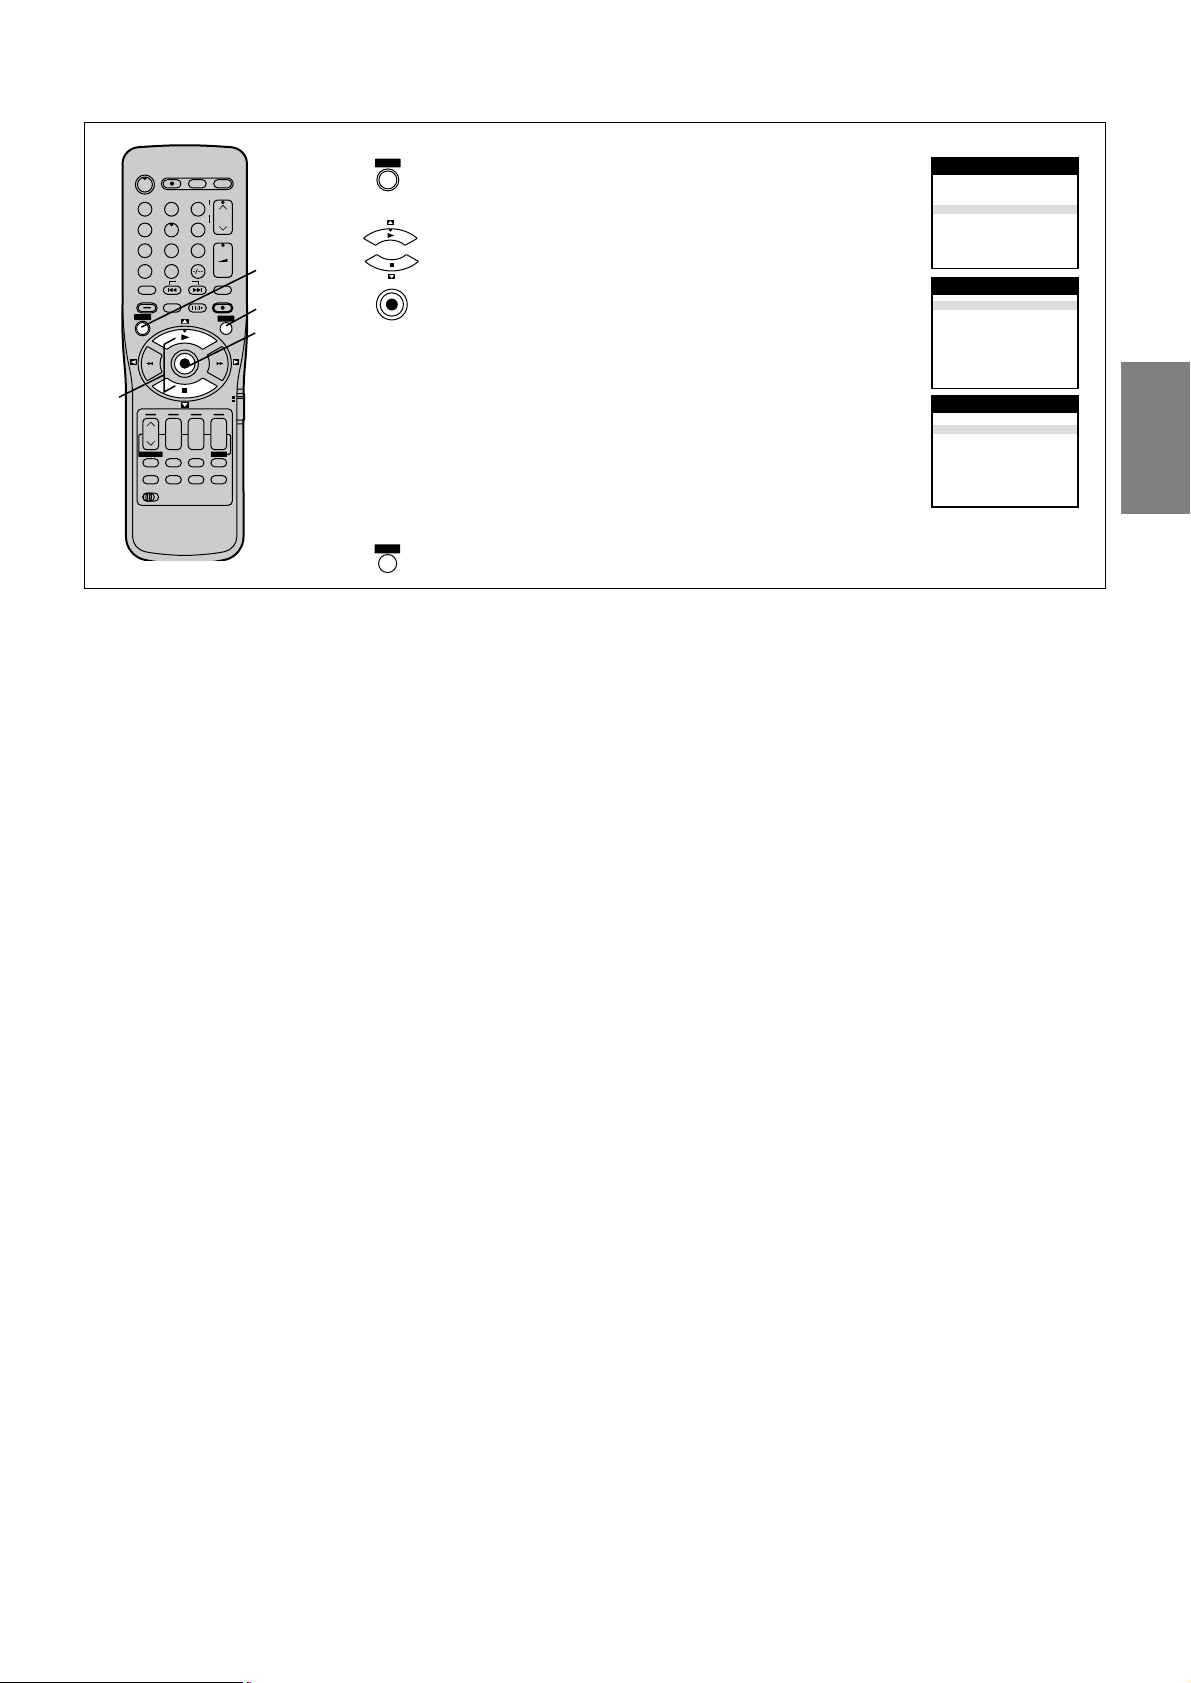
Checking the Settings for Auto Setup
To Confirm that the TV Stations Have Been Tuned Correctly by Auto Setup
MENU
EXIT
menu on the TV screen.
then press the [OK] button.
OK
then press the [OK] button to display the list of tuned
TV stations and confirm that all available TV stations
have been set correctly.
Positions 5 and 6 may differ from the example shown.
If Channel 5 is received, it is usually found on
programme position 5 and a connected satellite
Main menu
Timer recording
Tuning
Clock setting
Other settings
Tuning
Manual
Auto-Setup Restart
Download
Shipping condition
Owner ID
Tuning
receiver on programme position 6.
If Channel 5 is not received but a satellite receiver is
connected, then the satellite receiver is found on
programme position 5.
List of tuned TV stations
(example)
2,3
DIRECT TV REC TV ASPECT TV / TEXT
Í
123
4
5
7809
INPUT SELECT
AV
SEARCH
INDEX
STILL ALBUM
REPLAY
MENU
OK
rsrsr
DATE
CANCEL
PROG. / CHECK
RESET
AUDIO OSD/DISPLAY
VCR
12
TRACKING/V-LOCK
6
ON OFF
SP/LP/EP
+
–
TIMER
AV LIN K
VOLUME
+
–
SV/V
REC
EXIT
VCR
TV
s
Á
1 Press the [MENU] button to display the OSD Main
- - - - - - - - - - - - - - - - - - - - - - - - - - - - - - - - - - - - - - - - - - - - - - - - - - - - - - - - - - - - - - - - - - - - - - - - - - - - - - - - - - - - - - - - - - - - - - - - - - - - - - - - - - - - - - - - - - - -
2 Press the [Cursor] buttons (34) to select [Tuning]
- - - - - - - - - - - - - - - - - - - - - - - - - - - - - - - - - - - - - - - - - - - - - - - - - - - - - - - - - - - - - - - - - - - - - - - - - - - - - - - - - - - - - - - - - - - - - - - - - - - - - - - - - - - - - - - - - - - -
1
+
3 Press the [Cursor] buttons (34) to select [Manual]
4
2,3
- - - - - - - - - - - - - - - - - - - - - - - - - - - - - - - - - - - - - - - - - - - - - - - - - - - - - - - - - - - - - - - - - - - - - - - - - - - - - - - - - - - - - - - - - - - - - - - - - - - - - - - - - - - - - - - - - - - -
4 Press the [EXIT] button to exit the On Screen Display.
When the station names and/or channel numbers have not been set correctly.
See page 32 for details.
When no station has been found, confirm all connections of the VCR again and restart the Auto Setup.
See page 34 for details.
On Screen Display
Panasonic VCR
Panasonic VCR
Panasonic VCR
Pos Name Ch
1BBC1 22
2BBC2 23
3 ITV 24
4 CH4 25
5 CH5 26
6
----- --
7
----- --
8
----- --
-
-
-
Guide
Quick Start
Notes:
• If station name is [¢¢¢¢¢]:
The asterisks indicate that a station was found during Auto Setup but has not been named (due to weak signal).
The stations in the list with asterisk will need to be named manually. (See page 32.)
• If station name is [sssss]:
The dashes represent unused channel positions.
The stations in the list with dashes will need to be set manually. (See page 32.)
11
Page 12
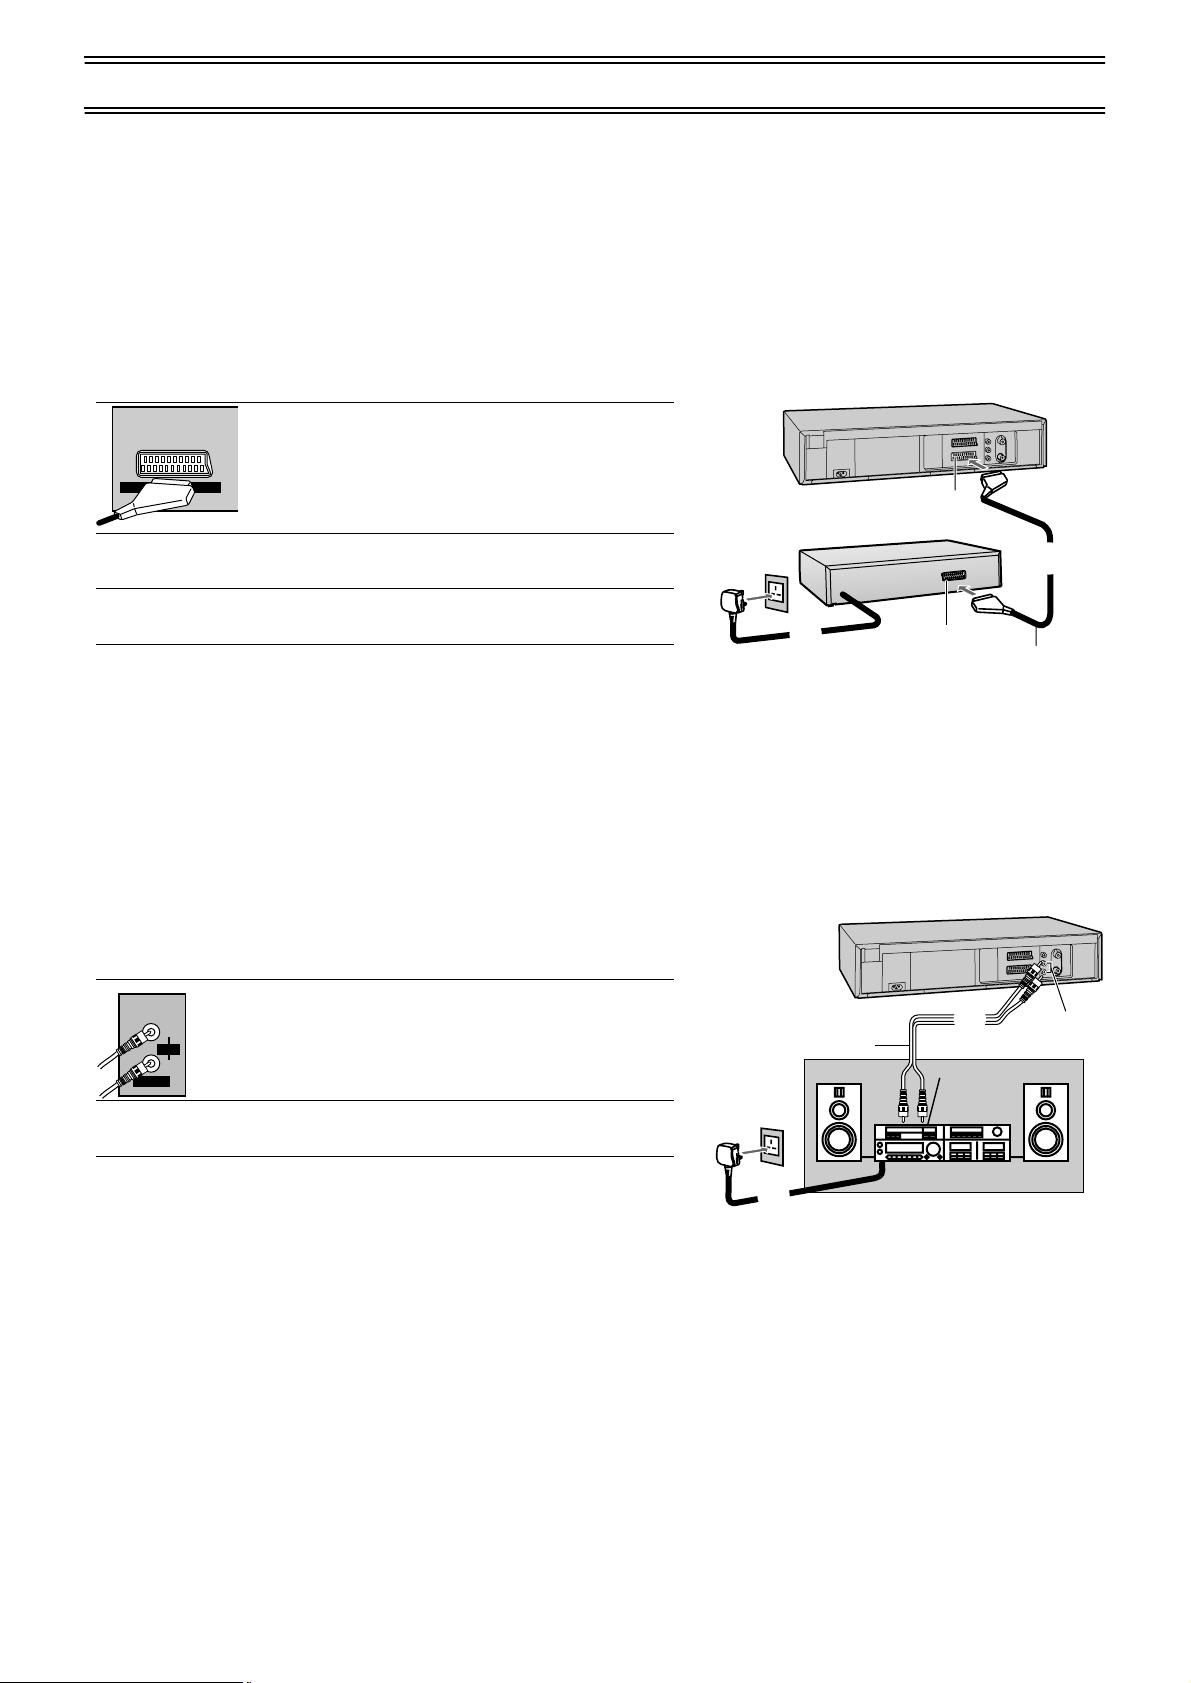
Connecting the VCR to a Decoder/Connecting the VCR to a Stereo Amplifier
To connect this VCR to a decoder or a stereo amplifier, make the connections shown in the illustration below.
For the connection to the TV, see pages 6–7.
For details about the connection, also read the operating instructions of the decoder or stereo amplifier.
Be sure to keep the VCR, TV and decoder or stereo amplifier switched off until you have finished all connections.
For your safety, do not connect or handle the equipment with wet hands.
To Connect the VCR to a Decoder
Decoder here refers to the device used to decode scrambled broadcasts (Cable TV).
Example of NV-FJ780B
1 Connect a 21-pin Scart lead (not supplie d) to the
AV2 21-pin Scart socket (51) on the VCR and to
AV2(DECODER/DECODEUR/EXT
)
the 21-pin Scart socket on the decoder.
(51)
2 Connect the decoder’s mains lead to an AC
mains socket.
3 Set [AV2] to [DECODER]. For details, see
page 39.
Hint:
• [RGB] means separate Red/Green/Blue colour signals. If you co nnect a
TV equipped with RGB input capability to the AV1 socket (52) on this
VCR, and a decoder equipped with RGB output capability to the AV2
socket (51), RGB signal will pass through the VCR to the TV.
To Connect the VCR to a Stereo Amplifier
1 Connect an Audio cable (not supplied) to the
L
/G
AUDIO
R /D
OUT/SORTIE
Audio Output sockets (54) on the VCR and to
Audio Input sockets on the stereo ampli fie r.
Decoder (not supplied)
2
To an AC mains socket
Audio cable (not supplied)
21-pin Scart socket
21-pin Scart cable
(not supplied)
Example of NV-FJ780B
1
Audio Input sockets
1
(54)
12
2 Connect the stereo amplifier’s mains lead to an
AC mains socket.
Stereo amplifier (not supplied)
2
To an AC mains socket
Page 13
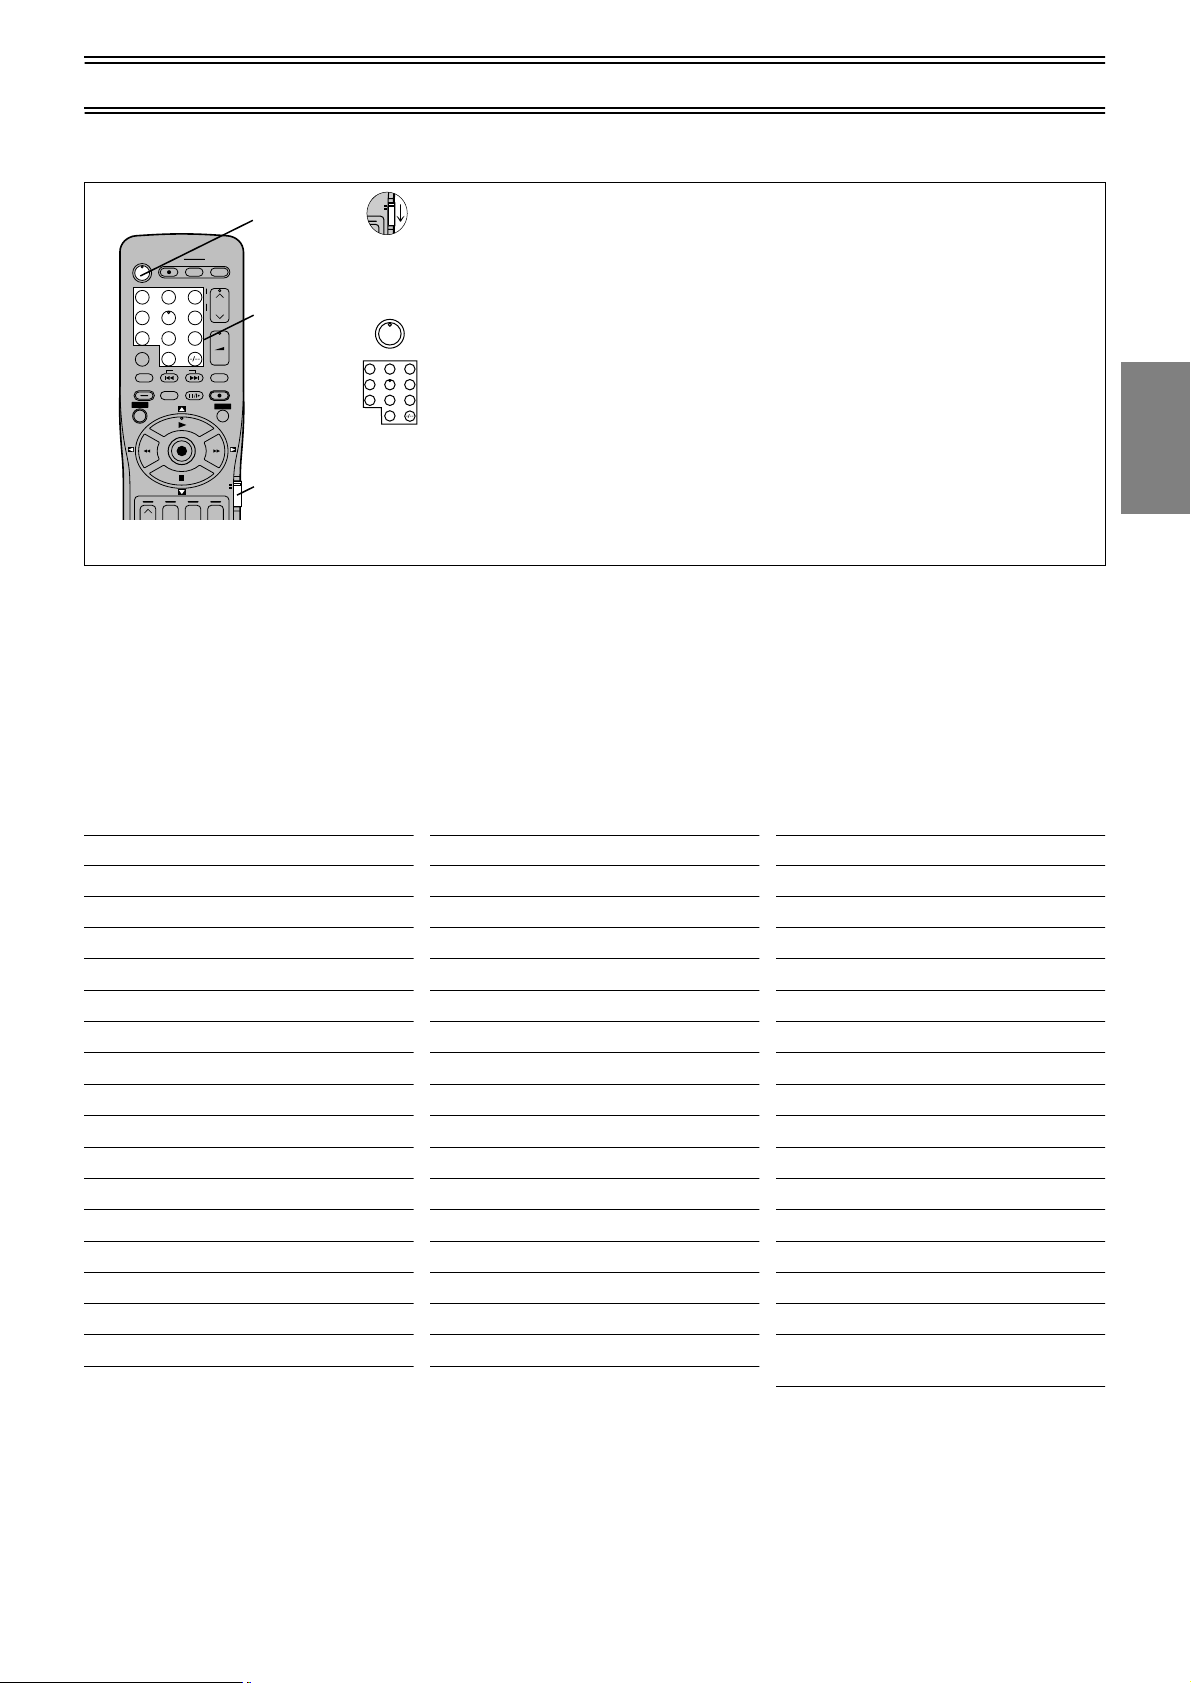
Setting the Remote Control to Operate Your TV
VCR
r
TV
The supplied remote control will operate most brands of TV, follow the settings below:
• Some TV models cannot be operated with this remote control.
1 Set the [VCR/TV] switch to [TV].
3
AV LIN K
DIRECT TV REC TV ASPECT
Í
123
4
7809
INPUT SELECT
AV
LIBRARY/SEARCH
STILL ALBUM
MENU
You can use the [TV-ON/OFF] (1), [Numeric] (2), [AV] (3)
[TV/TEXT] (34)
*1
*2
*3
*4
*5
TV / TEXT
TRACKING/V-LOCK
+
–
6
5
VOLUME
+
–
+
SV/V
INDEX
REPLAY
REC
EXIT
OK
VCR
TV
rrr
*4
, and [TV ASPECT] (35)*5 button for your TV operation.
To select desired AV input on the TV.
If your TV is equipped fo r Tele tex t rec ep tio n, y ou c an u se thes e bu tto ns t o change the teletext infor mat ion dis pl ay ed o n
the screen and select desired information. For details, refer to your TV’s operating instructions.
To adjust the volume of the TV.
To switch between normal TV mode and teletext mode.
To switch the screen format between the wide-screen and other formats.
..................................................................................................................................................
2 Find the brand name of your TV in the table below and de term in e the cod e
number for yo ur TV.
..................................................................................................................................................
3
3 While keeping the [TV-ON/ OFF] butt on press ed, use the [Numeric ] buttons
Í
123
456
7809
to enter the brand name’s code.
If there is more than one code listed for that brand name, try the first code.
Be sure to enter the code in the two-digit format.
Example: 01
..................................................................................................................................................
4 Check whether you can operate the TV correctly with the VCR’s remote
1
control.
If the TV cannot be operated properly:
In step 3, enter the other code listed for that manufacturer and repeat step 4.
*1
, [Channel] (33), [Teletext] (37)*2, [VOLUME] (32)*3,
Guide
Quick Start
List of TVs Compatible with the VCR’s Remote Control
Brand Name Code
Panasonic 01-04
AIWA 35
AKAI 27, 30
BLAUPUNKT 09
BRANDT 10, 15
BUSH 05, 06
CURTIS 31
DESMET 05, 31, 33
DUAL 05, 06
ELEMIS 31
FERGUSON 10
GOLDSTAR/LG 31
GOODMANS 05, 06, 31
GRUNDIG 09
HITACHI 22, 23, 31, 40, 41, 42
INNO HIT 34
Brand Name Code
IRRADIO 30
ITT 25
JVC 17, 39
LOEWE 07
METZ 28, 31
MITSUBISHI 06, 19, 20
MIVAR 24
NEC 36
NOKIA 25-27
NORDMENDE 10
ORION 37
PHILIPS 05, 06
PHONOLA 31, 33
PIONEER 38
PYE 05, 06
RADIOLA 05, 06
Brand Name Code
SABA 10
SALORA 26
SAMSUNG 31, 32
SANSUI 05, 31, 33
SANYO 21
SBR 06
SCHNEIDER 05, 06, 29, 30, 31
SELECO 06, 25
SHARP 18
SIEMENS 09
SINUDYNE 05, 06, 33
SONY 08
TELEFUNKEN 10-14
THOMSON 10, 15
TOSHIBA 16
WHITE WESTINGHOUSE
05, 06
13
Page 14
VIDEO Plus+ Codes for Satellite Receivers/Cable TV
VCR
r
TV
jj jjjjj
jjj
jjjjj jj/jj jj:jj jj:jj j jjj
jjjjj jj/jj jj:jj jj:jj j jjj
jjjjj jj/jj jj:jj jj:jj j jjj
jjjjj jj/jj jj:jj jj:jj j jjj
jjjjj jj/jj jj:jj jj:jj j jjj
jjjjj jj/jj jj:jj jj:jj j jjj
jjjjj jj/jj jj:jj jj:jj j jjj
jjj
jjjjj jj/jj jj:jj jj:jj j jjj
jjjjj jj/jj jj:jj jj:jj j jjj
jjj
jjjjj jj/jj jj:jj jj:jj j jjj
jjjjj jj/jj jj:jj jj:jj j jjj
jjj
jjjjj jj/jj jj:jj jj:jj j jjj
jjjjj jj/jj jj:jj jj:jj j jjj
jjjjj jj/jj jj:jj jj:jj j jjj
jjjjj jj/jj jj:jj jj:jj j jjj
jjjjj jj/jj jj:jj jj:jj j jjj
This VCR is not designed to control (switch on or change channel) your satellite receiver or Cable TV box, however, it can be
taught to recognise VIDEO Plus+ Cod es for Satel lite stati ons. The Sat ellite rec eiver or Cabl e TV box mu st be sw itched on and the
correct station selected. Some receivers have their own timer facility for this purpose. Please refer to your Satellite Receiver/
Cable TV box instructions for use of such timer facilities.
For your VCR to recognise the VIDEO Plus+ Codes for each satellite station, you must teach your VCR which channel or AV
input to record from for the first time. Otherwise when setting a VIDEO Plus+ recording, the [ss] symbol will appear in the
channel position indicating that the VCR does not know which channel position to set. Once you have set the channel/AV input
once the VCR will remember it whenever you use a VIDEO Plus+ Code for the station again.
1
3
3
4,6
5
7
DIRECT TV REC TV ASPECT
Í
123
4
5
7809
INPUT SELECT
AV
LIBRARY/SEARCH
INDEX
STILL ALBUM
REPLAY
MENU
rsrsr
DATE
CANCEL
PROG. / CHECK
I-TIMER
AUDIO OSD/DISPLAY
VCR
12
AV LIN K
OK
ON OFF
SP/LP/EP
TV / TEXT
TRACKING/V-LOCK
+
–
6
VOLUME
+
–
SV/V
REC
EXIT
VCR
TV
s
TIMER
Á
RESET
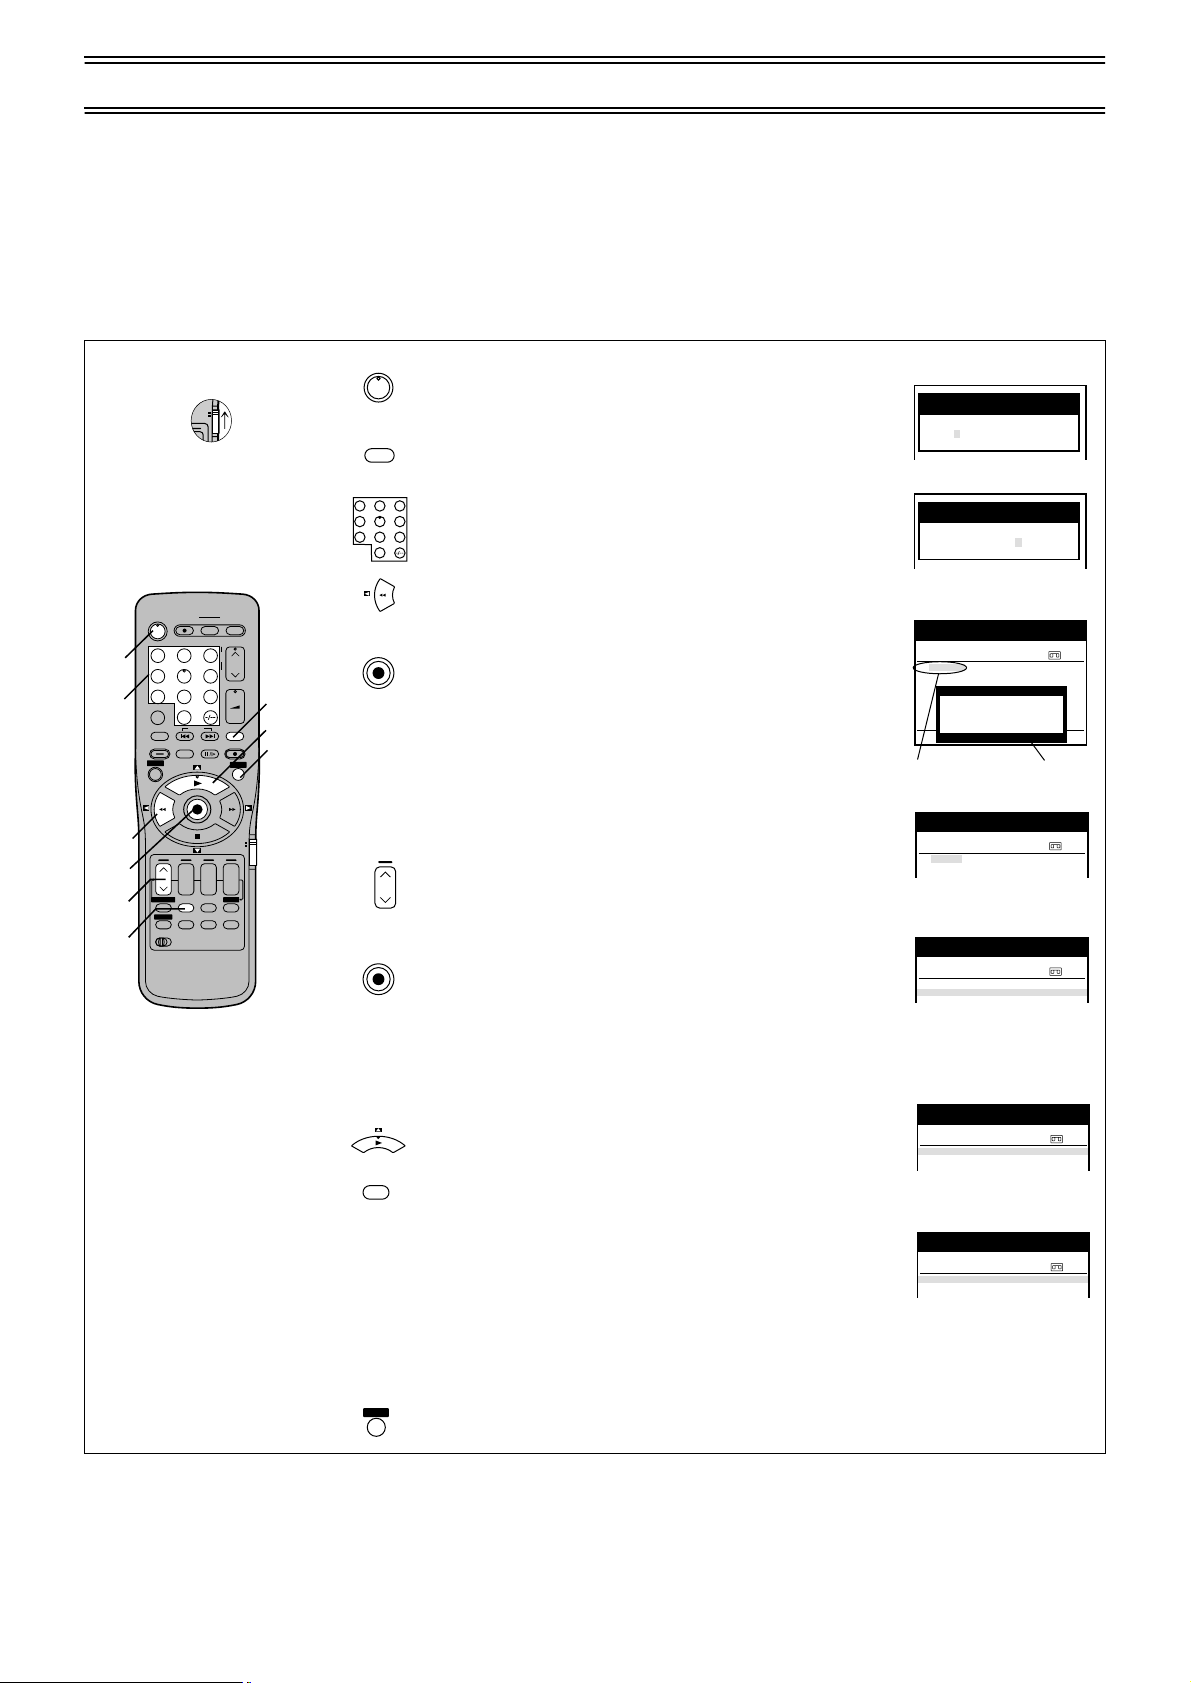
1 Turn on the TV and the VCR.
Í
- - - - - - - - - - - - - - - - - - - - - - - - - - - - - - - - - - - - - - - - - - - - - - - - - - - - - - - - - - - - - - - - - - - - - - - - - - - - - - - - - - - - - - - - - - - - - - - - - - - - - - - - - - - - - - - - - - - -
2 Press the [SV/V+]([VIDEO Plus+]) button.
- - - - - - - - - - - - - - - - - - - - - - - - - - - - - - - - - - - - - - - - - - - - - - - - - - - - - - - - - - - - - - - - - - - - - - - - - - - - - - - - - - - - - - - - - - - - - - - - - - - - - - - - - - - - - - - - - - - -
3 Enter a VIDEO Plus+ Code from a Satellite TV
+
SV/V
123
456
7809
Select video playback channel on the TV.
Guide for a satellite channel, e.g. Sky 1 using the
[Numeric] buttons.
If you make a mistake, use the [Cursor] butto n (2)
to go back.
- - - - - - - - - - - - - - - - - - - - - - - - - - - - - - - - - - - - - - - - - - - - - - - - - - - - - - - - - - - - - - - - - - - - - - - - - - - - - - - - - - - - - - - - - - - - - - - - - - - - - - - - - - - - - - - - - - - -
4 Press the [OK] button. [ss] will appear instead of
OK
a channel number/AV input.
2
7
+
9
On Screen Display
Video Plus+
– – – – – – – – –
Menu for entering the Plus Code
Video Plus+
9 2 0 2 1 6 – – –
Indication when the Plus Code
is entered
Timer recording
Pos Start Stop
Name DATE ON OFF PDC
1.
2.
3.
4.
5.
6.
7.
8.
ss
[
] indication Warning
Panasonic VCR
Panasonic VCR
Panasonic VCR
20:00 21:30 SP
Input invalid,
programme position
has not been set !
Total (SP) 140min
1/2
message
- - - - - - - - - - - - - - - - - - - - - - - - - - - - - - - - - - - - - - - - - - - - - - - - - - - - - - - - - - - - - - - - - - - - - - - - - - - - - - - - - - - - - - - - - - - - - - - - - - - - - - - - - - - - - - - - - - - -
5 Press the [CH] button to select the channel or AV
input that is to be used for recording from the
satellite channel.
Timer recording
Pos Start Stop
Name DATE ON OFF PDC
1.
A2 AV2
2.
3.
Indication when the settings
Panasonic VCR
20:00 21:30 SP
1/2
are concluded
- - - - - - - - - - - - - - - - - - - - - - - - - - - - - - - - - - - - - - - - - - - - - - - - - - - - - - - - - - - - - - - - - - - - - - - - - - - - - - - - - - - - - - - - - - - - - - - - - - - - - - - - - - - - - - - - - - - -
6 Press the [OK] button to memorise the setting.
OK
The VCR will now automatically set the
programme position or AV input correctly when a
VIDEO Plus+ recording is set for this satellite
station in the future.
Timer recording
Pos Start Stop
Name DATE ON OFF PDC
1.
AV2 27/10
2.
3.
Indication when SAT channel
is selected
Panasonic VCR
20:00 21:30 SP
1/2
14
- - - - - - - - - - - - - - - - - - - - - - - - - - - - - - - - - - - - - - - - - - - - - - - - - - - - - - - - - - - - - - - - - - - - - - - - - - - - - - - - - - - - - - - - - - - - - - - - - - - - - - - - - - - - - - - - - - - -
7 Press the [Cursor] button (3) to select the
programme that you have just set. Now press the
CANCEL
- - - - - - - - - - - - - - - - - - - - - - - - - - - - - - - - - - - - - - - - - - - - - - - - - - - - - - - - - - - - - - - - - - - - - - - - - - - - - - - - - - - - - - - - - - - - - - - - - - - - - - - - - - - - - - - - - - - -
[CANCEL] button to delete it from the timer
recording list. It is no longer needed.
8 Repeat steps 2–7 above until you have set and
deleted dummy timer recordings for each of the
Timer recording
Pos Start Stop
Name DATE ON OFF PDC
1.
AV2 27/10
2.
3.
Menu when the programme
to cancel is selected
Timer recording
Pos Start Stop
Name DATE ON OFF PDC
1.
2.
3.
Menu after the programming
has been cancelled
Panasonic VCR
20:00 21:30 SP
Panasonic VCR
1/2
1/2
satellite stations that you will make VIDEO Plus+
- - - - - - - - - - - - - - - - - - - - - - - - - - - - - - - - - - - - - - - - - - - - - - - - - - - - - - - - - - - - - - - - - - - - - - - - - - - - - - - - - - - - - - - - - - - - - - - - - - - - - - - - - - - - - - - - - - - -
EXIT
9 Press the [EXIT] button when you have finished.
recordings from.
Page 15
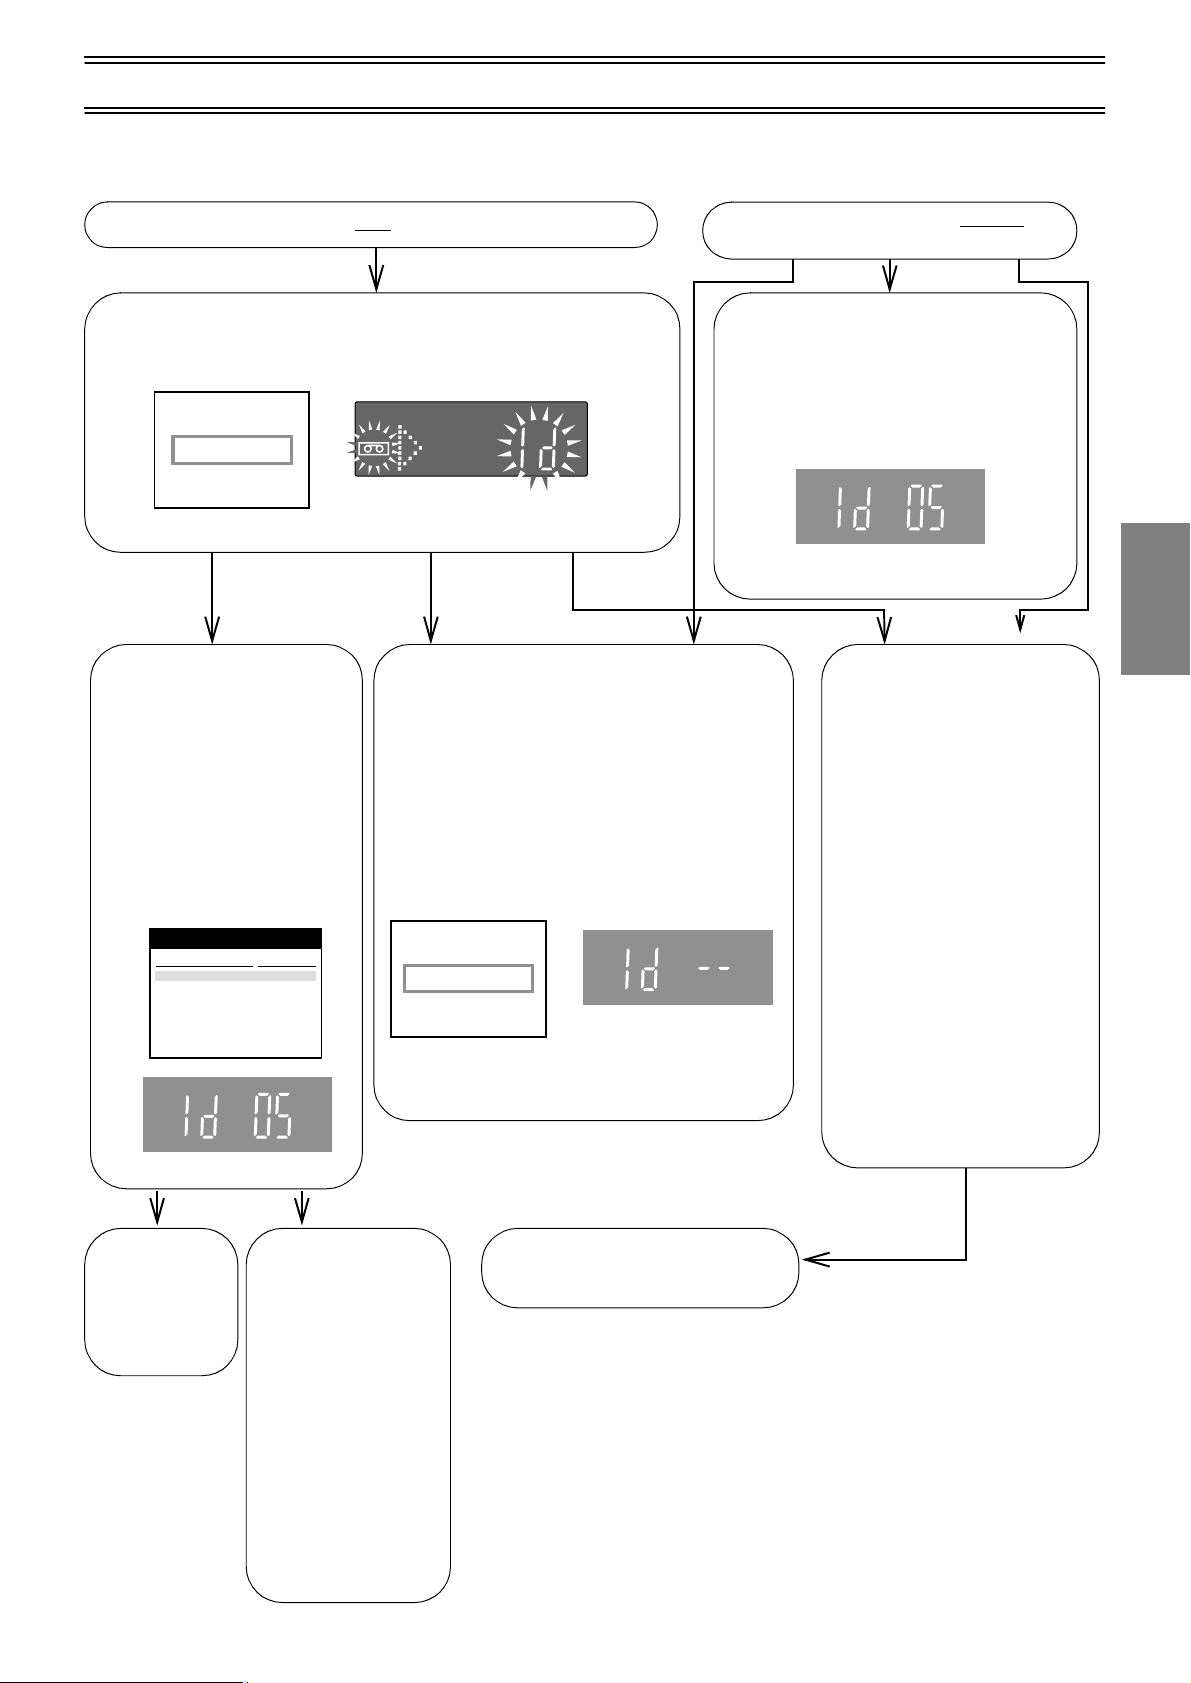
When You Insert a Video Cassette (For NV-FJ780B)
The Tape Library Sys t em mak es it easy to check what programmes are recorded on the in sert ed tape and lets you quickly sele ct
a programme for playback. For further details about the Tape Library System, see page 27.
When you insert a cassette with an erasure prevention tab:
As soon as you inse rt the ca ssette, the Casset te Numbe r Check s tarts
automatically. Wait a few moments until this check is completed.
On Screen Di splay
Checking tape number...
Please wait !
When inserting a cassette
that was recorded on this
VCR:
When the Cassette Number
Check is completed, the
cassette number and the
cassette’s contents (recorded
programmes) appear on the
On Screen Display, and the
cassette number appears on
the VCR display.
Content of tape: 5 1/1
Title
2 BBC2 (18:58) We 18.04.01
5 Find space to record 6
5 Intro-Jet Scan 6
(When loading cassette No. 5)
Panasonic VCR
Date
VCR display
The cassette number and tape co ntent s are
not displayed for the following types of
cassettes:
a. New (never used) cassettes.
b. Cassettes recorded on another VCR.
c. Cassettes whose cassette number was
deleted from the Library data.
d. Certain other kinds of cassettes.
In the above cases, the following indications
appear:
Tape ID could not
be detected
(This indication appears for
(This indication appears for
several seconds.)
several seconds.)
When you insert a cassette with out
erasure prevention tab:
As soon as you insert the cassette,
playback starts and th e cassette num ber
appears on the VCR display for several
seconds. However, the cassette number
and the cassette’s contents (recorded
programmes) do not appear on the On
Screen Display.
(When loading cassette No. 5)
If you want to cancel the
Cassette Number Check
midway:
Press the [Play] (26), [Stop]
(9), [EJECT] (41) or
[VCR-ON/OFF] (1) button
after the check has started.
• No Tape Library data
appears if you cancel the
Cassette Number Check.
(See page 29.)
• If you cancel the Cassette
Number Check midway and
then perform recording, a
different cassette number
may additionally be
recorded on the cassette.
However, this VCR will
automatically cancel t he
added cassette number(s)
when you play back the tape
from the beginning.
an
Playback
To select a
programme on
the inserted
cassette and
start playback,
see page 28.
To perform playback
without making use
of the Tape Library
functions, recording
or some other
function, press the
[EXIT] button (27) to
make the Tape
Library indications
disappear, and then
operate the VCR for
the desired function.
Pressing the [EXIT]
button (27) is
necessary even if th e
TV is not turned on.
To perform playback, recording or
some other function, operate the
VCR for the desired function.
15
Page 16

Playback
3,4
1
2
DIRECT TV REC TV ASPECT
Í
123
4
5
7809
INPUT SELECT
AV
LIBRARY/SEARCH
INDEX
STILL ALBUM
REPLAY
MENU
OK
rsrsr
DATE
CANCEL
SP/LP/EP
PROG. / CHECK
I-TIMER
AUDIO OSD/DISPLAY
VCR
12
AV LINK
TRACKING/V-LOCK
+
–
6
ON OFF
TIMER
RESET
TV / TEXT
VOLUME
+
–
SV/V
REC
EXIT
VCR
TV
s
Á
1 For Normal Playback:
Press the [Play] button.
- - - - - - - - - - - - - - - - - - - - - - - - - - - - - - - - - - - - - - - - - - - - - - - - - - - - - - - - - - - - - - - - - - - - - - - - - - - - - - - - - - - - - - - - - - - - - - - - - - - - - - - - - - - - - - - - - - - -
2 For Cue or Review Playback:
During playback, pres s and re lease t he [Fas t Forwa rd]
button or [Rewind] button.
• To return to normal playback, press the [Play] button.
• If you press and hold down th e [Fast Forward] button
+
or [Rewind] button, Cue or review playbac k continues
for as long as you keep the button pressed.
For High Speed Cue or Review Playback
(JET SEARCH):
During playback, pres s and re lease t he [Fas t Forwa rd]
button or [Rewind] button twice.
• During high-speed cue or review (Jet Search mode),
- - - - - - - - - - - - - - - - - - - - - - - - - - - - - - - - - - - - - - - - - - - - - - - - - - - - - - - - - - - - - - - - - - - - - - - - - - - - - - - - - - - - - - - - - - - - - - - - - - - - - - - - - - - - - - - - - - - -
the tape transport noise will increase. This is normal.
3 For Still Playback:
During playback, press the [Pause/Slow] button.
• To return to normal playback, press the [Play] button
- - - - - - - - - - - - - - - - - - - - - - - - - - - - - - - - - - - - - - - - - - - - - - - - - - - - - - - - - - - - - - - - - - - - - - - - - - - - - - - - - - - - - - - - - - - - - - - - - - - - - - - - - - - - - - - - - - - -
or the [Pause/Slow] button.
4 For Slow Playback:
During playback, keep the [Pause/Slow] button
pressed for more than 2 seconds.
• To return to normal playback, press the [Play] button.
VCR Display
To Stop Playback
Press the [Stop] button (9).
Fast-forwarding or Rewinding the Tape
Press the [Fast Forward] button (25) or [Rewind] button (8) in the stop mode.
• To stop fast-forwarding or rewinding, press the [Stop] button (9).
• To briefly view the picture during fast-forwarding or rewinding, press and hold down the corresponding button.
Cue, Review, Slow Playback, JET SEARCH, and Still Playback
• Cue, review, slow playback, or JET SEARCH will be automatically cancelled after 10 minutes, and still playback after 5 minutes.
SP and EP modes: Colour picture with horizontal noise bars.
LP mode: Black and white picture and picture distortion.
Playback - Off Timer Function
(To automatically stop playback and switch off after a given time)
If you set the playback duration, the playback will stop automatically.
After the set playback time has elapsed, the VCR automatically stops playback and switches off.
1 During normal play back, press the [Play] but ton on th e VCR
select the Playback-Off Timer Function.
2 Press the [Play] butto n repeatedly until the desired playback dura tion is
shown on the VCR display.
30 (min.) )60 )120 )180 )240 )Counter Display
3 To cancel this function, press the [Stop] button.
The tape stops and the display returns to normal.
for 2 seconds to
16
Page 17

To Play back a Recorded Part Repeatedly
Press the [Play] button (26) on the remote control for more than 5 seconds. The [R] indication appears on the On Screen
Display.
• If [OSD] is set to [OFF] (See page 39), the [R] indication will not appear in repeat playback mode.
To Cancel the Repeat Playback Mode:
Press the [Stop] button (9).
Replay Function (to replay approximately 10 seconds of tape again)
This function will operate from Play, Cue and Review modes.
During play (cue, review), press the [REPLAY] button (5).
The Tape will rewind or fast forward for about 10 seconds and playback again.
To Play back NTSC Video Cassettes on Your PAL TV (Quasi-NTSC Playback Function)
This VCR allows playback of tapes recorded in the NTSC system on a PAL system TV, in the normal way.
On some TVs, the playback picture may not be stable. The picture may also not completely fill the height of the screen.
To Play back S-VHS Cassette Tape (SQPB=S-VHS Quasi Playback)
It is also possible to play back tapes recorded on an S-VHS VCR.
• The picture quality will be similar to VHS playback.
• It is not possible to make an S-VHS recording with this VCR.
To reset the tape counter (elapsed time) to “0:00.00”
• The tape counter is automatically reset to “0:00.00” when a video cassette is inserted.
• The tape counter can also be reset to “0:00.00” by pressing the [RESET] button (19) on the remote control.
Convenient function to prevent unauthorized use (Child Lock Function)
This function deactivates all buttons on the VCR and the remote control.
Use this function, when you do not want other people to operate the VCR.
To Activate the Child Lock Function:
1 Hold down the [OK] (24) and the [OFF (i)] (22) buttons simultaneously until the “hold” indication appears in the VCR display.
• If you press a button while the Child Loc k func tion is on, the “hold” indicati on appea rs in the VCR displa y to info rm you th at no
operation is possible.
To Cancel the Child Lock Function:
1 Hold down the [OK] (24) and the [OFF (i)] (22) buttons simultaneously until the “hold” indication disappears.
• If you disconnect the power cable, the Child Lock function is automatically cancelled after the power backup time of
approximately 60 minutes has elapsed.
• If you cannot cancel the Child Lock function, press the [EXIT] button (27) and perform the operation 1.
Adjusting the Playback Picture
Under normal conditions, the VCR automatically adjusts the tracking for optimum performance. However, in some cases it
may be necessary to adjust it manually.
If the Picture Contains Noise Bars and It Is Not Clear to See (Tracking adjustment):
If noise bars appear during normal playback, slow playback or still playback, follow the operations below.
During normal or slow playback, press the [Channel] button (33) I (s) or J (i) until the bars noise disappear.
• If the noise bars appear during still playbac k, switc h the VCR ove r to the slow playb ack mode an d then adjust the tracki ng
as explained above.
Playback
To Return to Auto Tracking:
Press the [Channel] button (33) I (s) or J (i) simultaneously.
If the Still Picture Jitters or Jumps (V-Lock Adjustment):
If the still picture jitters or jumps, perfo rm the follow i ng.
During still playback , keep the [Chann el] button (33) I (s) or J (i) pressed unti l the picture
becomes stable.
Precautions:
• With certain TV models and tapes, it may not be possible to adjust the tracking.
• If you play back a cassette that was recorded on another unit of VCR, the picture quality may be inferior in the normal
playback, slow playback, and still playback, and it may need to manual adjust the tracking by above method. Also, on
some TVs, the picture may scroll up and down in the special playback functions.
However, these are not malfunctions.
TV screen
Playback picture
containing noise bars
17
Page 18

Recording
VCR
r
TV
1
2
DIRECT TV REC TV ASPECT
Í
123
4
5
7809
INPUT SELECT
AV
LIBRARY/SEARCH
INDEX
STILL ALBUM
REPLAY
MENU
OK
rsrsr
DATE
CANCEL
PROG. / CHECK
I-TIMER
AUDIO OSD/DISPLAY
VCR
12
AV LINK
TRACKING/V-LOCK
+
–
6
ON OFF
SP/LP/EP
TV / TEXT
VOLUME
+
–
SV/V
REC
EXIT
VCR
s
TIMER
Á
RESET
1 Insert a video cassette with an intact erasure
Í
- - - - - - - - - - - - - - - - - - - - - - - - - - - - - - - - - - - - - - - - - - - - - - - - - - - - - - - - - - - - - - - - - - - - - - - - - - - - - - - - - - - - - - - - - - - - - - - - - - - - - - - - - - - - - - - - - -
prevention tab.
• If it has already been inserted, press the [VCR-ON/
OFF] button to turn the VCR on.
AUDIO
AV3 IN VIDEO
R
L MONO
A.DUB
EXT LINK
TIMER REC
CVC
REC/OTR
VCR Display
6
/6/
2 Select the TV station using the [Chann el] button or
2
123
456
7809
4
+
- - - - - - - - - - - - - - - - - - - - - - - - - - - - - - - - - - - - - - - - - - - - - - - - - - - - - - - - - - - - - - - - - - - - - - - - - - - - - - - - - - - - - - - - - - - - - - - - - - - - - - - - - - - - - - - - - -
3 Press the [SP/LP/EP] button before recording.
5
SP/LP/EP
the [Numeric] buttons.
• To select the programme positions (1–99) of the
VCR.
Example:
9:
9
1
19:
9
• SP provides standard recording time and optimum
SP
picture quality.
LP provides doubled recording time with slightly
TV
3
reduced picture quality.
EP provides triple recording time with slightly
reduced picture quality.
Record/Playback time
SP: 240 min with NV-E240
LP: 480 min with NV-E240
- - - - - - - - - - - - - - - - - - - - - - - - - - - - - - - - - - - - - - - - - - - - - - - - - - - - - - - - - - - - - - - - - - - - - - - - - - - - - - - - - - - - - - - - - - - - - - - - - - - - - - - - - - - - - - - - - -
4 Press the [REC] button to start recording.
- - - - - - - - - - - - - - - - - - - - - - - - - - - - - - - - - - - - - - - - - - - - - - - - - - - - - - - - - - - - - - - - - - - - - - - - - - - - - - - - - - - - - - - - - - - - - - - - - - - - - - - - - - - - - - - - - -
REC
EP: 720 min with NV-E240
REC
5 Press the [Stop] button to stop recording.
To Pause Recording
- - - - - - - - - - - - - - - - - - - - - - - - - - - - - - - - - - - - - - - - - - - - - - - - - - - - - - - - - - - - - - - - - - - - - - - - - - - - - - - - - - - - - - - - - - - - - - - - - - - - - - - - - - - - - - - - - -
Press the [Pause/Slow] button during recording.
Press it again to continue recording.
REC
Notes:
• We do not recommend the use of tapes longer than E240 type as the tape can be too thin.
• The recording pause mode will be automatically cancelled after 5 minutes and return to the stop mode.
To Watch One TV Programme while Recording Another TV Programme
After pressing the [REC] button (28) to start recording, select on your TV the programme that you want to watch.
18
Page 19

To Display the Approximate Remaining Tape Time
The remaining tape time can be displayed in the VCR display.
1 Select the correct cassette tape length. See page 38.
2 Press the [OSD/DISPLAY] button (18) repeatedly until the Remaining Tape Time appears on the VCR display.
• Pressing the [OSD/DISPLAY] button (18) once makes the On Screen Display appear; after that, pressing it repeatedly
changes the indication in the following order:
Clock Counter
Remaining T ape Time
For certain cassettes, the remaining tape time may not be displayed correctly.
To Select the Recording Duration and Perform Timer Recording
(One Touch Record)
You can start recording and select the recording duration by repeatedly pressing a single button. This is very convenient, for
example when you want to start recording immediately but need to go out or want to go to bed.
After the selected recording duration has elapsed, recording stops and the VCR automatically switches off.
1 Press the [REC/OTR] button (48) to start recording.
2 Press the [REC/OTR] button (48) on the VCR
• Every time you press this button, the recording duration indicated in the VCR display changes in the following order.
Counter display
(normal recording mode)
240
(min.)
180
(min.)
30
(min.)
120
(min.)
repeatedly to select the desired recording duration.
60
(min.)
To Cancel the OTR Recording Before the End:
Press the [Stop] button (9).
To Immediately Record the Same TV Programme That You Are Viewing on the TV
(Direct TV Recording)
For correct operation of the Direct TV Recording function:
• Your TV must be equipped with the Q Link function.
• The VCR must be connected to the TV via a fully-wired 21-pin Scart cable.
This function immediately records the same programme that you are viewing on the TV.
The programme position selected on the VCR automatically changes to the TV programme that you are watching.
When you stop the recording, the VCR automatically switches back to the original programme position.
DIRECT TV REC TV ASPECT
Í
123
4
5
7809
INPUT SELECT
AV
LIBRARY/SEARCH
INDEX
STILL ALBUM
REPLAY
MENU
OK
AV LIN K
TRACKING/V-LOCK
+
–
6
TV / TEXT
VOLUME
+
–
SV/V
REC
EXIT
VCR
2
+
3
TV
1 Insert a video cassette with an intact erasure
prevention tab.
................................................................................................................
2 Press the [DIRECT TV REC] button.
DIRECT TV REC
• Recording of the TV programme that you are view ing
on the TV starts.
• In some cases, it may not be possible to change the
programme position on the TV during Direct TV
Recording.
................................................................................................................
3 Press the [Stop] button, to stop recording.
AUDIO
A.DUB
L MONO
R
AV3 IN VIDEO
CVC
EXT LINK
Recording
TIMER REC
6
/6/
REC/OTR
19
Page 20

External Timer Recording Control
(AV2 EXT LINK Settings)
The AV2 input of this VCR is equipped for future use with external equipment having external timer recording control such as
digital satellite receivers. The AV2 input can be set to [EXT LINK 1] or [EXT LINK 2] depending on the equipment to be
connected. Fully wired 21-pin cable is required. Refer also to the manufacture’s instruction for the external unit.
EXT LINK 1: The VCR recording start and stop time is controlled by a control signal sent via the 21-pin cable from the external
unit, for example Sky Digibox.
EXT LINK 2: The VCR will start recording when AV2 input detects the video signal and stop recording when the video signal is
switched off by the external unit.
1 Make sure that [AV2] is set to [EXT LINK 1] or
[EXT LINK 2] mode. (See page 39.)
................................................................................................................
2 Insert a v ideo cassette w ith an intact e rasure prevent ion
tab into the VCR.
................................................................................................................
3 Timer programming has to be set and switched to the
timer recording standby mode on the external
INTELLIGENT TIMER
AV3 IN
A.DUB
................................................................................................................
EXT LINK
4 Press the [EXT LINK] button on the VCR to switch the
EXT LINK
................................................................................................................
4,6
5 As long as a video picture is being transmitted by the
OK
................................................................................................................
6 To cancel the external control, turn off the timer
EXT LINK
equipment, refer to its operating instructions.
VCR over to the timer recor ding standby mode.
Satellite or Digital Receiver, the VCR will record it.
This notice is displayed on the TV screen.
(Only when [EXT LINK 2] i s selected)
To delete it, press the [OK] button.
recording standby mode of the VCR by pressing the
[EXT LINK] button again.
VCR Display
EXT Link
REC
EXT Link
REC
On Screen Display
VCR now recording
this programme
Notes:
• Make sure that the date and time of the external equipment are set correctly.
• To switch TV automatically to the picture from the VCR in playback mode, connect the AV1 socket of this VCR to the TV with a
21-pin cable as shown on page 6 (Optional Connection 3).
• Some external equipment may not work with this function, refer to the operating instructions for the external unit.
Convenient Automatic Functions
VCR Auto Power On
When you insert a video cassette, the VCR switches on automatically.
Auto Playback Start
When you insert a video cassette with a broken erasure prevention tab, playback starts automatically without pressing the [Play]
button (26).
VCR-off Playback
When the VCR is off, and you press the [Play] button (26) with a tape inserted. The VCR switches on and playback begins.
Auto Rewind
When the tape reaches the end, the VCR automatically rewinds it to the beginning.
• This function is disabled during timer recording and OTR.
Automatic Switch Off and Eject
When the VCR is switched off, a tape can be ejected by pressing the [EJECT] button (41).
The VCR will eject the cassette and automatically turn itself off again.
VCR-off Search (For NV-FJ730B)
When the VCR is off, with the tape left in, Intro-Jet Scan can be performed by pressing the [SEARCH] button (4).
To Eject the Video Cassette Using the Remote Control
Keep the [Stop] button (9) pressed for more than 3 seconds.
20
Page 21

The Menu System
jjjjj jj/jj jj:jj jj:jj j jjj
jjjjj jj/jj jj:jj jj:jj j jjj
jjjjj jj/jj jj:jj jj:jj j jjj
jjjjj jj/jj jj:jj jj:jj j jjj
jjjjj jj/jj jj:jj jj:jj j jjj
jjjjj jj/jj jj:jj jj:jj j jjj
jjjjj jj/jj jj:jj jj:jj j jjj
jjjjj jj/jj jj:jj jj:jj j jjj
Use this page as a reference guide to locate functions or settings within the menus.
Main menu
Timer recording
Tape Library
*
Tuning
Clock setting
Other settings
Panasonic VCR
* For NV-FJ780B only
Timer recording
Pos Start Stop
Name DATE ON OFF PDC
1.
2.
3.
4.
5.
6.
7.
8.
Total (SP) min
Library for tape: 5
Title
Panasonic VCR
Panasonic VCR
Date
A2 AV2 (10:52) Th 18.01.01
1 BBC1 ( 4:04) Fr 2.02.01
3 ¢¢¢03 ( 4:15) Fr 2.02.01
1 BBC1 (11:20) Tu 6.02.01
Tuning
Panasonic VCR
Manual
Auto-Setup Restart
Download
Shipping condition
Owner ID
1/2
------ Page 22
(For NV-FJ780B)
1/1
------ Page 27
------ Page 32
------ Page 34
------ Page 34
------ Page 34
------ Page 35
Recording
Clock setting
Clock setting
Time
Date
Other settings
Tape length
Audio playback
SQPB
VCR display
OSD
AV2
Remote
Other settings
Tape length
OSD
VCR display
AV2
Audio playback
Remote
Panasonic VCR
: AUTO
: 20:30:24
: 16.10.05
Panasonic VCR
: AUTO (2 E-240)
: NORMAL
: AUTO
: DIMMED
: 4:3
: NORMAL
: VCR 1
Panasonic VCR
: AUTO (2 E-240)
: 4:3
: DIMMED
: NORMAL
: NORMAL
: VCR 1
------ Page 36
(For NV-FJ730B)
------ Page 38
------ Page 38
------ Page 38
------ Page 38
------ Page 39
------ Page 39
------ Page 39
(For NV-FJ780B)
------ Page 38
------ Page 39
------ Page 38
------ Page 39
------ Page 38
------ Page 39
21
Page 22

VCR
r
TV
jjj
jjjjj jj/jj jj:jj jj:jj j jjj
jjjjj jj/jj jj:jj jj:jj j jjj
jjjjj jj/jj jj:jj jj:jj j jjj
jjjjj jj/jj jj:jj jj:jj j jjj
jjjjj jj/jj jj:jj jj:jj j jjj
jjjjj jj/jj jj:jj jj:jj j jjj
jjjjj jj/jj jj:jj jj:jj j jjj
jjjjj jj/jj jj:jj jj:jj j jjj
jjjjj jj/jj jj:jj jj:jj j jjj
jjjjj jj/jj jj:jj jj:jj j jjj
jjjjj jj/jj jj:jj jj:jj j jjj
jjjjj jj/jj jj:jj jj:jj j jjj
jjjjj jj/jj jj:jj jj:jj j jjj
jjjjj jj/jj jj:jj jj:jj j jjj
jjjjj jj/jj jj:jj jj:jj j jjj
Recording
Timer Recording
This function lets you programme the VCR to record when you are away from home or sleeping.
You can programme timer recordings in two different ways:
• By entering the information with the remote control while viewing the On Screen Display (OSD) on the TV screen.
(explained below) or;
• By entering the VIDEO Plus+ Code published alongside the TV programme listings in newspapers and magazines.
(See page 23.)
This VCR lets you set up to 16 TV programmes (including weekly and daily programmes) for unattended recording up to one
month in advance.
Programming with the On Screen Display (OS D )
This method offers easy step-by-step programming with the remote control while you view the prompts on the TV screen.
Example:
Programming the timer recording of a TV programme broadcast on
programme position 2 (BBC2) from 20:00 to 21:30 on 27 October.
1
2
3
1
DIRECT TV REC TV ASPECT
Í
123
4
5
7809
INPUT SELECT
AV
LIBRARY/SEARCH
INDEX
STILL ALBUM
REPLAY
MENU
OK
rsrsr
DATE
CANCEL
PROG. / CHECK
I-TIMER
AUDIO OSD/DISPLAY
VCR
12
AV LINK
TRACKING/V-LOCK
6
ON OFF
SP/LP/EP
+
–
TV / TEXT
VOLUME
SV/V
REC
VCR
s
TIMER
Á
RESET
•Insert a video cassette.
1 Press the [PROG./CHECK] button to display the
PROG. / CHECK
menu for programming timer recordings on the TV
MENU
screen.
• Alternatively, you can press the [MENU] button and
+
–
+
EXIT
TV
- - - - - - - - - - - - - - - - - - - - - - - - - - - - - - - - - - - - - - - - - - - - - - - - - - - - - - - - - - - - - - - - - - - - - - - - - - - - - - - - - - - - - - - - - - - - - - - - - - - - - - - - - - - - - - - - - - - -
2 Press the [CH] button to select the desired TV
8
2,7
4
5
6
9
OK
- - - - - - - - - - - - - - - - - - - - - - - - - - - - - - - - - - - - - - - - - - - - - - - - - - - - - - - - - - - - - - - - - - - - - - - - - - - - - - - - - - - - - - - - - - - - - - - - - - - - - - - - - - - - - - - - - - - -
3 Press the [DATE] button to set the date on which
- - - - - - - - - - - - - - - - - - - - - - - - - - - - - - - - - - - - - - - - - - - - - - - - - - - - - - - - - - - - - - - - - - - - - - - - - - - - - - - - - - - - - - - - - - - - - - - - - - - - - - - - - - - - - - - - - - - -
4 Press the [ON] button to set the starting time.
- - - - - - - - - - - - - - - - - - - - - - - - - - - - - - - - - - - - - - - - - - - - - - - - - - - - - - - - - - - - - - - - - - - - - - - - - - - - - - - - - - - - - - - - - - - - - - - - - - - - - - - - - - - - - - - - - - - -
5 Press the [OFF] button to set the ending time.
- - - - - - - - - - - - - - - - - - - - - - - - - - - - - - - - - - - - - - - - - - - - - - - - - - - - - - - - - - - - - - - - - - - - - - - - - - - - - - - - - - - - - - - - - - - - - - - - - - - - - - - - - - - - - - - - - - - -
6 Press the [SP/LP/EP] button to set the desired
r
DATE
s
r
ON
s
r
OFF
s
SP/LP/EP
then select [Timer recording].
station.
• As an alternative method, after pressing the [CH]
button, you can use the [Cursor] buttons (3421).
the TV programme will be broadcast.
• When it is kept pressed, the indication changes in
30-minute intervals.
On Screen Display
Timer recording
Pos Start Stop
Name DATE ON OFF PDC
1.
2.
3.
4.
5.
6.
7.
8.
Panasonic VCR
Total (SP) min
1/2
tape speed.
- - - - - - - - - - - - - - - - - - - - - - - - - - - - - - - - - - - - - - - - - - - - - - - - - - - - - - - - - - - - - - - - - - - - - - - - - - - - - - - - - - - - - - - - - - - - - - - - - - - - - - - - - - - - - - - - - - - -
• Regarding the [A] indication, refer to page 24.
7 Press the [Cursor] buttons (3421) to set PDC
OK
- - - - - - - - - - - - - - - - - - - - - - - - - - - - - - - - - - - - - - - - - - - - - - - - - - - - - - - - - - - - - - - - - - - - - - - - - - - - - - - - - - - - - - - - - - - - - - - - - - - - - - - - - - - - - - - - - - - -
8 Press the [OK] button to conclude the settings.
- - - - - - - - - - - - - - - - - - - - - - - - - - - - - - - - - - - - - - - - - - - - - - - - - - - - - - - - - - - - - - - - - - - - - - - - - - - - - - - - - - - - - - - - - - - - - - - - - - - - - - - - - - - - - - - - - - - -
9 Press the [TIMER (REC)] button to switch the VCR
OK
TIMER
Á
to [ON] or [sss] [OFF].
• See page 24 for PDC recording.
• To programme additional timer recordings, repeat
operation steps 2–8.
over to the timer recording standby mode.
Timer recording
Pos Start Stop
Name DATE ON OFF PDC
1. BBC2 27/10 20:00 21:30 SP
2.
3.
4.
5.
6.
7.
8.
Panasonic VCR
Total (SP) 90min
1/2
• Check that [Á] is lit on the VCR display. If it is
flashing, check the timer recording details again.
(See page 24.)
22
Page 23

Programming with the VIDEO Plus+ Function
VCR
r
TV
jjj
jjjjj jj/jj jj:jj jj:jj j jjj
jjjjj jj/jj jj:jj jj:jj j jjj
jjjjj jj/jj jj:jj jj:jj j jjj
jjjjj jj/jj jj:jj jj:jj j jjj
jjjjj jj/jj jj:jj jj:jj j jjj
jjjjj jj/jj jj:jj jj:jj j jjj
jjjjj jj/jj jj:jj jj:jj j jjj
jjj
jjjjj jj/jj jj:jj jj:jj j jjj
jjjjj jj/jj jj:jj jj:jj j jjj
jjjjj jj/jj jj:jj jj:jj j jjj
jjjjj jj/jj jj:jj jj:jj j jjj
jjjjj jj/jj jj:jj jj:jj j jjj
jjjjj jj/jj jj:jj jj:jj j jjj
jjjjj jj/jj jj:jj jj:jj j jjj
jj jjjjj
jjj
jjjjj jj/jj jj:jj jj:jj j jjj
jjjjj jj/jj jj:jj jj:jj j jjj
The VIDEO Plus+ Codes (numbers) make it easy to set the VCR for timer recording from TV channel and SAT channel.
The recording time may be slightly longer than the TV programme.
VIDEO Plus+ and PlusCode are registered trademarks of Gemstar Development Corporation.
The VIDEO Plus+ system is manufactured under license from Gemstar Development Corporation.
Example:
2
2
4
4
DIRECT TV REC TV ASPECT
Í
123
4
5
7809
INPUT SELECT
AV
LIBRARY/SEARCH
INDEX
STILL ALBUM
REPLAY
MENU
rsrsr
DATE
CANCEL
PROG. / CHECK
I-TIMER
AUDIO OSD/DISPLAY
VCR
12
AV LIN K
OK
SP/LP/EP
TV / TEXT
TRACKING/V-LOCK
+
–
6
VOLUME
ON OFF
TIMER
RESET
Programming a timer recording of a TV programme with the Video
Plus+ Code 920126
1 Press the [SV/V+]([VIDEO Plus+]) button to display
- - - - - - - - - - - - - - - - - - - - - - - - - - - - - - - - - - - - - - - - - - - - - - - - - - - - - - - - - - - - - - - - - - - - - - - - - - - - - - - - - - - - - - - - - - - - - - - - - - - - - - - - - - - - - - - - - - - -
2 Press the [Numeric] buttons to enter the
+
1
–
+
SV/V
3,5
REC
EXIT
4
VCR
TV
s
Á
- - - - - - - - - - - - - - - - - - - - - - - - - - - - - - - - - - - - - - - - - - - - - - - - - - - - - - - - - - - - - - - - - - - - - - - - - - - - - - - - - - - - - - - - - - - - - - - - - - - - - - - - - - - - - - - - - - - -
3 Press the [OK] button to display the programmed
- - - - - - - - - - - - - - - - - - - - - - - - - - - - - - - - - - - - - - - - - - - - - - - - - - - - - - - - - - - - - - - - - - - - - - - - - - - - - - - - - - - - - - - - - - - - - - - - - - - - - - - - - - - - - - - - - - - -
4 Press the [SP/LP/EP] button to set the desired
4
4
4
6
- - - - - - - - - - - - - - - - - - - - - - - - - - - - - - - - - - - - - - - - - - - - - - - - - - - - - - - - - - - - - - - - - - - - - - - - - - - - - - - - - - - - - - - - - - - - - - - - - - - - - - - - - - - - - - - - - - - -
5 Press the [OK] button again to conclude the
SV/V
123
456
7809
OK
SP/LP/EP
OK
rsrsr
DATE
OK
+
the menu for entering the PlusCode on the TV.
PlusCode.
• If you have entered a wrong digit, press the [Cursor]
button (2) and then enter the correct digit.
content.
tape speed.
• Regarding the [A] selected, refer to page 24.
• To extend the ending time or to make any
corrections, use the [Cursor] buttons (3421), the
ON OFF
[CH], [DATE], [ON] or [OFF] button.
s
• See page 24 for PDC recording.
settings.
• To programme additional timer recordings, repeat
- - - - - - - - - - - - - - - - - - - - - - - - - - - - - - - - - - - - - - - - - - - - - - - - - - - - - - - - - - - - - - - - - - - - - - - - - - - - - - - - - - - - - - - - - - - - - - - - - - - - - - - - - - - - - - - - - - - -
6 Press the [TIMER (REC)] button to switch the VCR
TIMER
Á
operation steps 1–5.
over to the timer recording standby mode.
• Check that [Á] is lit on the VCR display. If it is
flashing, check the timer recording details again.
(See page 24.)
On Screen Display
Video Plus+
9 2 0 1 2 6
Timer recording
Pos Start Stop
Name DATE ON OFF PDC
1. BBC2 27/10 20:00 21:30 SP
2.
3.
4.
5.
6.
7.
8.
Total (SP) min
Timer recording
Pos Start Stop
Name DATE ON OFF PDC
1. BBC2 27/10 20:00 21:30 SP
2.
3.
4.
5.
6.
7.
8.
Total (SP) 90min
Panasonic VCR
Panasonic VCR
Panasonic VCR
1/2
1/2
If [ss] Appears under [Pos/Name] after Entering a VIDEO Plus+ Code (Number)
Pos/Name is the Programme Position/TV Station Name.
Normally, the name of the TV station and the number of the programme position is displayed under [Pos/Name].
However, if the TV st atio n i nfo rmation was not automati ca lly s et d urin g Pre se t D own loa d or Auto Setup due to adverse reception
conditions, the [ss] indication appears instead. The [ss] will also appear, when using VIDEO Plus+ to record from a Satellite
broadcast for the first time. For each satellite station, you will have to set the Pos/Name on the primary recording.
In this case, follow the steps below to set the Pos/Name.
Press the [CH] button (12) repeate dly to s el ect the p rog ram me pos iti on o n whi ch the TV programme to
be recorded will be broadcast.
After you have entered the info rma tio n of a TV s tat ion , it rem ai ns store d in t he VCR ’s me mory, and you
do not need to enter it again in the future.
Timer recording
Pos Start Stop
Name DATE ON OFF PDC
1.
2.
3.
[ss] indication
Panasonic VCR
15:00 17:00 SP
1/2
To Suspend the Timer Recording Standby Mode
When you want to use the VCR for playback or manual recording before the programmed timer recording will be performed, you
can temporarily sus pen d th e timer recording standby m ode by pressing the [TIMER (REC )] b utto n (20) so tha t th e [ Á] in dic ati on
on the VCR display disappears.
However, after you have finished using the VCR, remember to reactivate the timer recording standby mode by pressing the
[TIMER (REC)] button (20) again, otherwise the programmed timer recording will not take place.
Note:
• If the VCR is not put in the timer recording standby mode at least 10 minutes before the programmed timer recording starting
time, the [Á] indicatio n fl ashes on the VCR d isp la y. Pre ss the [TIMER (REC)] bu tton (20) to put the VCR in the timer record ing
standby mode.
Cable-TV connection - Consult your cable operator for advice.
Timer
Recording
23
Page 24

Other Timer Recordings and Convenient Functions
TV
jjj
jjjjj jj/jj jj:jj jj:jj j jjj
jjjjj jj/jj jj:jj jj:jj j jjj
jjjjj jj/jj jj:jj jj:jj j jjj
jjjjj jj/jj jj:jj jj:jj j jjj
jjjjj jj/jj jj:jj jj:jj j jjj
jjjjj jj/jj jj:jj jj:jj j jjj
jjjjj jj/jj jj:jj jj:jj j jjj
TV
jjj
jjjjj jj/jj jj:jj jj:jj j jjj
jjjjj jj/jj jj:jj jj:jj j jjj
jjjjj jj/jj jj:jj jj:jj j jjj
jjjjj jj/jj jj:jj jj:jj j jjj
jjjjj jj/jj jj:jj jj:jj j jjj
jjjjj jj/jj jj:jj jj:jj j jjj
jjjjj jj/jj jj:jj jj:jj j jjj
jjjjj jj/jj jj:jj jj:jj j jjj
jjjjj jj/jj jj:jj jj:jj j jjj
jjjjj jj/jj jj:jj jj:jj j jjj
jjjjj jj/jj jj:jj jj:jj j jjj
jjjjj jj/jj jj:jj jj:jj j jjj
jjjjj jj/jj jj:jj jj:jj j jjj
jjjjj jj/jj jj:jj jj:jj j jjj
jjj
jjjjj jj/jj jj:jj jj:jj j jjj
jjjjj jj/jj jj:jj jj:jj j jjj
jjjjj jj/jj jj:jj jj:jj j jjj
jjjjj jj/jj jj:jj jj:jj j jjj
jjjjj jj/jj jj:jj jj:jj j jjj
jjjjj jj/jj jj:jj jj:jj j jjj
jjjjj jj/jj jj:jj jj:jj j jjj
jjj
jjjjj jj/jj jj:jj jj:jj j jjj
jjjjj jj/jj jj:jj jj:jj j jjj
jjjjj jj/jj jj:jj jj:jj j jjj
jjjjj jj/jj jj:jj jj:jj j jjj
jjjjj jj/jj jj:jj jj:jj j jjj
jjjjj jj/jj jj:jj jj:jj j jjj
jjjjj jj/jj jj:jj jj:jj j jjj
jjjjj jjjj jj jj jj jj j jjj
jjjjj jjjj jj jj jj jj j jjj
jjjjj jjjj jj jj jj jj j jjj
jjjjj jjjj jj jj jj jj j jjj
6.
jjjjj jj/jj jj:jj jj:jj j jjj
jjjjj jj/jj jj:jj jj:jj j jjj
jjjjj jj/jj jj:jj jj:jj j jjj
Setting the Recording Date/Day(s)
rsrsr
DATE
CANCEL
PROG. / CHECK
I-TIMER
AUDIO OSD/DISPLAY
VCR
12
ON OFF
SP/LP/EP
s
TIMER
RESET
Á
r
DATE
s
Press the [DATE] button to select the recording date (1 to 31), daily timer
recording date (Su-Sa, Mo-Sa or Mo-Fr) or weekly timer recording date
(Su to Sa) in operation step 3 (see page 22) when program ming a timer
recording with the On Screen Disp lay, or in operation step 4 (see page 23)
when progr amming with the VIDEO Plus+ Code.
Programming a timer recording (setting the date) is possible up to one month
•
ahead of the TV programme’s broadcasting date and time. Daily and weekly timer
recordings will continue until you cancel them.
Ensuring that a TV Programme Will Be Recorded until Its End (Auto SP/LP Change Function)
If the VCR determines that the remaining tape time is insufficient to record the whole programme, LP mode is automatically
selected to ensure that the programme will be recorded as long as possible.
Press the [SP/LP/EP] button to select [A] in operation step 6
rsrsr
DATE
CANCEL
PROG. / CHECK
I-TIMER
AUDIO OSD/DISPLAY
VCR
12
ON OFF
SP/LP/EP
s
TIMER
RESET
Á
SP/LP/EP
(see page 22) when programming a timer recording with the On Screen
Display, or in operation step 4 (see page 23) when programming with
the VIDEO Plus+ Code.
• This function cannot change the recording speed to the EP mode.
If the remaining tape time is still not sufficient even in the LP mode, the
•
programme cannot be recorded to its end.
• If the recording speed changes from SP to LP during a timer recording, some
brief picture distortion will occur at that point.
PDC Function
PDC stands for Programme Delivery Control.
If a TV programme, for example a football game runs longer than scheduled, is shortened or starts earlier or later, this function
synchronises the recording start and stop with the actual start and stop of the TV programme.
MENU
EXIT
OK
VCR
TV
Press the [Cursor] butto ns (3421) to ma ke the [ON] indication appe ar in
operation step 7 (see page 22) when programming a timer recording with
the On Screen Display, or in operation step 4 (see page 23) when
programming with the VIDEO Plus+ Code.
Conditions for correct operation of the PDC function:
[ON] must be displayed under [PDC] on the On Screen Display.
•
• The TV station must broadcast PDC signals.
OK
• The programme starting time must be set correctly to the starting time listed in the
newspaper/magazine.
On Screen Display
Timer recording
Pos Start Stop
Name DATE ON OFF PDC
1. BBC2 27/10 20:00 21:30 SP
2.
3.
4.
5.
6.
7.
8.
Timer recording
Pos Start Stop
Name DATE ON OFF PDC
1. BBC2 27/10 20:00 21:30 A
2.
3.
4.
5.
6.
7.
8.
Timer recording
Pos Start Stop
Name DATE ON OFF PDC
1. BBC2 27/10 20:00 21:30 SP ON
2.
3.
4.
5.
6.
7.
8.
Panasonic VCR
Total (SP) min
Panasonic VCR
Total (SP) min
Panasonic VCR
Total (SP) min
1/2
1/2
1/2
To Check, Change or Cancel Timer Recording Programmes
2
3
3
3
1
Note:
In the cases, below, the programming of a timer recording remains stored in the memory until 4 a.m. the next day.
However, this is not a malfunction.
• When a timer recording was not completed because there was not enough tape left.
• When you have stopped the timer recording before it had finished.
To Check the Total Timer Recording Programming Time
The total time indication for timer recording programming lets you check how many programmes
can be recorded by comparing it with the remaining tape time in the VCR display.
• The total time is calculated in the SP mode.
• The t otal time ca nnot be calc ulated when setting Daily/Weekly timer recording.
24
STILL ALBUM
MENU
PROG. / CHECK
-
REPLAY
OK
rsrsr
DATE
ON OFF
CANCEL
SP/LP/EP
TIMER
PROG. / CHECK
1 Press the [PROG./CHECK] button to display the timer
recording programmes on the TV screen.
REC
5
EXIT
- - - - - - - - - - - - - - - - - - - - - - - - - - - - - - - - - - - - - - - - - - - - - - - - - - - - - - - - - - - - - - - - - - - - - - - - - - - - - - - - - - - - - - - - - - - - - - - - - - - - - - - - - - - - - - - - - - - -
2,4
• When the VCR is in the timer recording standby mode for a
PDC recording, the On Screen Display may be distorted.
2 Press the [Cursor] buttons 34 to select the
3
VCR
3
TV
s
Á
- - - - - - - - - - - - - - - - - - - - - - - - - - - - - - - - - - - - - - - - - - - - - - - - - - - - - - - - - - - - - - - - - - - - - - - - - - - - - - - - - - - - - - - - - - - - - - - - - - - - - - - - - - - - - - - - - - - -
3 To change or cancel timer recording programmes, use
3
CANCEL
- - - - - - - - - - - - - - - - - - - - - - - - - - - - - - - - - - - - - - - - - - - - - - - - - - - - - - - - - - - - - - - - - - - - - - - - - - - - - - - - - - - - - - - - - - - - - - - - - - - - - - - - - - - - - - - - - - - -
4 Press the [OK] button to conclude the setting.
- - - - - - - - - - - - - - - - - - - - - - - - - - - - - - - - - - - - - - - - - - - - - - - - - - - - - - - - - - - - - - - - - - - - - - - - - - - - - - - - - - - - - - - - - - - - - - - - - - - - - - - - - - - - - - - - - - - -
5 Press the [EXIT] button to exit the On Screen Display.
rsrsr
DATE
OK
EXIT
programme that yo u want to change or c anc el a nd then
OK
press [OK] button.
the [Cursor] buttons 3421, the [CH], [DATE], [ON],
ON OFF
s
[OFF] or [CANCEL] button.
Timer recording
Pos Start Stop
Name DATE ON OFF PDC
1. BBC2 27/10 20:00 21:30 SP
2.
3.
4.
5.
6.
7.
8.
Timer recording
Pos Start Stop
Name DATE ON OFF PDC
1. 1 BBC2 20:00 21:30 SP
2.
3.
4.
5.
6.
7.
8.
7.
8.
Panasonic VCR
Total (SP) 90min
Panasonic VCR
Total (SP) 90min
Total (SP) 90min
1/2
1/2
Indication for a total timer recording
programming time of 90 minutes
Page 25

Intelligent Timer Function
MENU
1
jjjjj jj/jj jj:jj jj:jj jj jjj
jjjjj jj/jj jj:jj jj:jj jj jjj
jjjjj jj/jj jj:jj jj:jj jj jjj
jjjjj jj/jj jj:jj jj:jj jj jjj
jjjjj jj/jj jj:jj jj:jj jj jjj
jjjjj jj/jj jj:jj jj:jj jj jjj
jjjjj jj/jj jj:jj jj:jj jj jjj
1
jjjjj jj/jj jj:jj jj:jj jj jjj
jjjjj jj/jj jj:jj jj:jj jj jjj
jjjjj jj/jj jj:jj jj:jj jj jjj
jjjjj jj/jj jj:jj jj:jj jj jjj
jjjjj jj/jj jj:jj jj:jj jj jjj
jjjjj jj/jj jj:jj jj:jj jj jjj
jjjjj jj/jj jj:jj jj:jj jj jjj
Many TV programmes are broadcast as a series, like dramas or Soaps, on diffe rent days of the week. Th es e are often broadcast
on the same channel and time each day. The Intelligent Timer Function remembers the channel number along with the start and
end times of the last 8 programmes that you have recorded using Timer Recording or VIDEO Plus+.
By simply pressing the [I-TIMER] but ton (15) the details of the last 8 Timer Recording programmes are displayed on the screen
with today or tomorrows date, (depending on whether the time set has elapsed yet). The details of each of the 8 memorised
recordings can be used or changed to set a new timer recording.
Notes for using this function.
Details of up to 8 timer recordings are held in memory and are used to repeat a previous recording of a TV programme but on a
new date and time. The Intelligent Timer Function cannot be used until at least one timer recording or VIDEO Plus+ Programme
has been recorded.
Details of Weekly or Daily Timer Recording are not memorised and cannot be used with this function.
Using the Intelligent Ti mer function
Intelligent Timer Function has two different operation A and B.
Operation A — When you want to set the programme as it is:
On Screen Display
INTELLIGENT TIMER
Pos
Name Date Start Stop PDC
BBC2 27/10
Timer recording
Pos Start Stop
Name DATE ON OFF PDC
1. BBC2 27/10
2.
3.
4.
5.
6.
7.
8.
Panasonic VCR
20:00 21:30 SP ON
Panasonic VCR
20:00 21:30 SP ON
Total (SP) 90min
27/ 10/ 02
1/2
1,2
EXIT
OK
VCR
2
PROG. / CHECK
I-TIMER
VCR
rsrsr
DATE
ON OFF
CANCEL
SP/LP/EP
AUDIO OSD/DISPLAY
TIMER
RESET
TV
s
Á
1 Press the [I-TIMER] button to display the menu.
- - - - - - - - - - - - - - - - - - - - - - - - - - - - - - - - - - - - - - - - - - - - - - - - - - - - - - - - - - - - - - - - - - - - - - - - - - - - - - - - - - - - - - - - - - - - - - - - - - - - - - - - - - - - - - - - - - - -
2 Press the [Cursor] b utto ns 34 or [I-TIMER] button to
3
- - - - - - - - - - - - - - - - - - - - - - - - - - - - - - - - - - - - - - - - - - - - - - - - - - - - - - - - - - - - - - - - - - - - - - - - - - - - - - - - - - - - - - - - - - - - - - - - - - - - - - - - - - - - - - - - - - - -
3 Press the [TIMER (REC)] button to store the
I-TIMER
TIMER
Á
select the desired programme.
I-TIMER
programming and the VCR will switch to the timer
recording stand-by mode.
• The screen will change to the Timer re co rding listing.
Operation B — When you want to make changes to a timer recording:
3
2
1,2
DIRECT TV REC TV ASPECT
Í
123
4
5
7809
INPUT SELECT
AV
LIBRARY/SEARCH
INDEX
STILL ALBUM
REPLAY
MENU
rsrsr
DATE
CANCEL
PROG. / CHECK
I-TIMER
AUDIO OSD/DISPLAY
VCR
12
AV LIN K
OK
SP/LP/EP
TV / TEXT
TRACKING/V-LOCK
+
–
6
VOLUME
SV/V
ON OFF
TIMER
RESET
1 Press the [I-TIMER] button to display the menu.
- - - - - - - - - - - - - - - - - - - - - - - - - - - - - - - - - - - - - - - - - - - - - - - - - - - - - - - - - - - - - - - - - - - - - - - - - - - - - - - - - - - - - - - - - - - - - - - - - - - - - - - - - - - - - - - - - - - -
2 Press the [Cursor] b utto ns 34 or [I-TIMER] button to
+
–
+
3,4
REC
EXIT
VCR
TV
s
Á
- - - - - - - - - - - - - - - - - - - - - - - - - - - - - - - - - - - - - - - - - - - - - - - - - - - - - - - - - - - - - - - - - - - - - - - - - - - - - - - - - - - - - - - - - - - - - - - - - - - - - - - - - - - - - - - - - - - -
3
3 Press the [OK] button. To change the details
5
- - - - - - - - - - - - - - - - - - - - - - - - - - - - - - - - - - - - - - - - - - - - - - - - - - - - - - - - - - - - - - - - - - - - - - - - - - - - - - - - - - - - - - - - - - - - - - - - - - - - - - - - - - - - - - - - - - - -
4 When you are happy with all of the settin gs pres s the
- - - - - - - - - - - - - - - - - - - - - - - - - - - - - - - - - - - - - - - - - - - - - - - - - - - - - - - - - - - - - - - - - - - - - - - - - - - - - - - - - - - - - - - - - - - - - - - - - - - - - - - - - - - - - - - - - - - -
5 Press the [TIMER] button to switch the VCR over to
I-TIMER
select the desired programme. You can now use the
selected programme details if they are correct or
I-TIMER
change them if you need to adjust the date, etc.
OK
(date, etc.) press the [Cursor] buttons 21 to select
the item that you want to change. Then press the
123
456
OK
7809
[Cursor] buttons 34 or the [Numeric] buttons to
change the item.
• It is also possible to use the [CH], [DATE], [ON],
[OFF], or [SP/LP/EP] button to select each item
directly.
OK
TIMER
Á
[OK] button.
the timer recording stand-by mode.
Note:
• Check that the [Á] is lit on the VCR display.
If it is flashing, check the timer recording details again. (See page 24.)
INTELLIGENT TIMER
Pos
Name Date Start Stop PDC
BBC2 27/10
Timer recording
Pos Start Stop
Name DATE ON OFF PDC
1. BBC2 27/10
2.
3.
4.
5.
6.
7.
8.
Panasonic VCR
20:00 21:30 SP ON
Panasonic VCR
20:00 21:30 SP ON
Total (SP) 90min
27/ 10/ 02
Timer
Recording
1/2
25
Page 26

Protecting programmes
¢¢¢
1
1 Press the [I-TIMER] button to display the menu.
2
I-TIMER
Press the [Cursor] buttons 43 to select the program m e deta il s tha t you
want to protect, then pre ss the [Cursor ] button 1 to lock it. A lock s ymbol
appears to the left of the programme. Locked programmes cannot be
On Screen Display
INTELLIGENT TIMER
Pos
Name Date Start Stop PDC
BBC2 27/10 20:00 21:30 SP ON
BBC1 27/10 20:00 21:30 SP ON
05 28/10 10:30 11:30 EP
Panasonic VCR
27 / 10 / 02
sss
deleted.
Releasing the protection
1
I-TIMER
2 Press the [Cursor] buttons 43 to select the programme details that you
Press the [I-TIMER] button to display the menu.
INTELLIGENT TIMER
Pos
Name Date Start Stop PDC
BBC2 27/10
want to release, then press the [Cursor] button 2. The lock symbol
disappears.
Deleting the recording details
Locked programmes must be unlocked before they can be deleted (see above for details).
Press the [Cursor] buttons (38) 43 to select the programme details that you want to delete, then press the [Cancel ] but ton (13).
Notes:
• The Intelligent Timer Function can memorise the details of up to 8 timer recordings. If further timer recordings are made the
Intelligent Timer Function will memorise the details of the new recording and the details of the oldest recording will be lost. To
prevent losing a regularly used programme make sure the programme details are locked (see above).
• When Auto Setup Restart, Download Restart, shipping condition or etc. is done, all programmes of Intelligent Timer will be
deleted automatically even if the programmes are protected.
Panasonic VCR
27/ 10/ 02
20:00 21:30 SP ON
26
Page 27

Library System (For NV FJ780B)
Tape Library System (For NV-FJ780B)
This advanced system makes it quick and easy to check the contents of an inserted cassette. It can also be used to quickly
find out which cassette in your coll ection contains a desired programme.
Whenever a cassette with an intact erasure prevention tab is inserted, the VCR first performs a brief check and then shows the
number of the cassette and its contents on the On Screen Display. To start playback of the desired programme, simply select it
on the On Screen Display and press the [LIBRARY/SEARCH] button (4).
To index each recorded programme for the Tape Library System, this VCR automatically registers the Library data (cassette
number, title
*1
, name of TV station*2, recording time/date*3, etc.) in the VCR’s memory
*1
The name of the TV station or the programme position number is entered instead.
*4
when the recording is performed.
In case of a TV station with Teletext information, the title of the TV programme is entered automatically, provided the
[Title page] is correctly set. (See page 32.)
*2
In case of a TV station with Teletext information, the name of the TV station is registered automatically.
*3
The VCR’s clock must be set correctly.
*4
The VCR’s memory can hold a maximum of 128 programmes (or 30 tapes).
Precautions for Recording:
• We recommend that you use new tapes for recording.
• Each recorded programme should have length of at least 15 minutes in the SP or LP mode.
• Each recorded programme should have length of at least 25 minutes in the EP mode.
• No Tape Library data is registered during insert editing.
• If you copy a cassette with a cassette number, the tape library data may not be copied correctly. Therefore, the VCR’s Tape
Library System may not work correctly with su ch a copied cassette.
• When a new recording is made over existing recordings on a tape, the original programmes may be deleted from the list.
• The VCR’s power back-up system protects the Tape L ibrar y data i n the memory in case of a powe r failure a nd store s it for up to
5 years when the VCR is not connected to an AC mains socket.
• When the recording is completed and you eject the cassette, the cassette number remains displayed on
the VCR display for approximately 30 seconds. Be sure to write this number on the cassette label.
• When the VCR’s entire memory area has been used up by the Tape Library data, the indication
[Library memory full !] appears on the TV screen for several secon ds w hen Tape Library screen is opene d.
After this, recording is still possible but no new Tape Library data can be stored. In this case, delete the
Tape Library data that you do not need any more before making further recordings. (See page 31.)
VCR Display
Library memory
full !
How to Read the Tape Library Contents
Title:
In case of a TV station with Teletext information, the title
of the TV programme is entered automatically, provided
the [Title page] is correctly set.
TV Station Name:
For a TV programme that was broadcast with Teletext
information either when the broadcaster does not provide any
TV programme pages or the title page is not correctly set.
Programme Position Number:
For a TV programme that was broadcast without
Teletext information.
Content of tape: 5 1/2
Title
Football
2 BBC2 (18:58)
3
TV ch 21
Cassette Number
¢¢¢03 (19:08)
(19:18)
Panasonic VCR
Date
We 4.04.01
We 18.04.01
Sa 28.04.01
Fr 11.05.01
Recording Start Tim e
Recording Date
On Screen Display
Direct TV Rec:
For a TV programme recorded with the Direct TV Recording function.
Notes:
• If you press the [ON] button (10) on the Tape Library screen, the total number of titles and tapes registered in the VCR are
displayed.
• The total titles and total tapes of the VCR are automatically displayed when Tape Library screen is
opened if either the total number of titles are 120 or more (or the total number of tapes are 28 or more).
Content of tape: 28 1/1
Title
2 BBC2 (18:58) We 18.04.01
5 Find space to record 6
5 Intro-Jet Scan 6
Total Titles :121/128 (MAX)
Total Tapes : 28/30 (MAX)
Panasonic VCR
Date
System
Tape Library
27
Page 28

To Check What Programmes are Recorded on the Inserted Video Cassette and To
Play Back a Desired Programme
2
2
1,2
2
DIRECT TV REC TV ASPECT
Í
123
4
5
7809
INPUT SELECT
AV
LIBRARY/SEARCH
INDEX
STILL ALBUM
REPLAY
MENU
OK
rsrsr
DATE
CANCEL
PROG. / CHECK
I-TIMER
AUDIO OSD/DISPLAY
VCR
12
DIRECT TV REC TV ASPECT
Í
123
4
5
7809
INPUT SELECT
AV
LIBRARY/SEARCH
INDEX
STILL ALBUM
REPLAY
MENU
OK
rsrsr
DATE
CANCEL
PROG. / CHECK
I-TIMER
AUDIO OSD/DISPLAY
VCR
12
AV LINK
TRACKING/V-LOCK
6
ON OFF
SP/LP/EP
AV LINK
TRACKING/V-LOCK
6
ON OFF
SP/LP/EP
+
–
+
–
TV / TEXT
VOLUME
SV/V
REC
VCR
s
TIMER
Á
RESET
TV / TEXT
VOLUME
+
–
SV/V
REC
VCR
s
TIMER
Á
RESET
1 First, perform the operation steps explained on page 15.
- - - - - - - - - - - - - - - - - - - - - - - - - - - - - - - - - - - - - - - - - - - - - - - - - - - - - - - - - - - - - - - - - - - - - - - - - - - - - - - - - - - - - - - - - - - - - - - - - - - - - - - - - - - - - - - - - - - -
2 Then press the [Cursor] buttons (34) to select the
programme and then press the [LIBRARY/SEARCH]
button.
+
–
+
• After the selected programme has been found, the
current tape contents list disappears and playback
On Screen Display
Content of tape: 30 1/1
Title
2 BBC2 (18:58) We 18.04.01
5 Find space to record 6
5 Intro-Jet Scan 6
Panasonic VCR
Date
starts automatically.
EXIT
• When you select the [Find space to record] ind ication at
the bottom of the On Screen Display and press the
LIBRARY/SEARCH
TV
[LIBRARY/SEARCH] button, the VCR automatically
winds the tape to a position from which you can start
recording.
• When you select the [Intro-Jet Scan] indication at the
bottom of the On Screen Display and press the
[LIBRARY/SEARCH] button, Intro-Jet Scan starts.
- - - - - - - - - - - - - - - - - - - - - - - - - - - - - - - - - - - - - - - - - - - - - - - - - - - - - - - - - - - - - - - - - - - - - - - - - - - - - - - - - - - - - - - - - - - - - - - - - - - - - - - - - - - - - - - - - - - -
To Check the Cassette Number Again:
- - - - - - - - - - - - - - - - - - - - - - - - - - - - - - - - - - - - - - - - - - - - - - - - - - - - - - - - - - - - - - - - - - - - - - - - - - - - - - - - - - - - - - - - - - - - - - - - - - - - - - - - - - - - - - - - - - - -
1 Press the [LIBRARY/SEARCH] button.
LIBRARY/SEARCH
(See page 41.)
• Rewind the tape to its beginning.
• The Cassette Number Check starts automatically. Wait
a few moments until the check is completed. When it is
completed, the cassette number and its contents
Content of tape: 30 1/1
Title
2 BBC2 (18:58) We 18.04.01
5 Find space to record 6
5 Intro-Jet Scan 6
Panasonic VCR
Date
(recorded programmes) appear on the On Screen
+
EXIT
Display, and the cassette number appears on the VCR
display.
(Example: When Cassette
Number Check was
completed successfully)
If the cassette number does not appear and the following indication is
displayed:
- - - - - - - - - - - - - - - - - - - - - - - - - - - - - - - - - - - - - - - - - - - - - - - - - - - - - - - - - - - - - - - - - - - - - - - - - - - - - - - - - - - - - - - - - - - - - - - - - - - - - - - - - - - - - - - - - - - -
TV
2 Press the [INDEX] L bu tton once t o star t the sea rch for
INDEX
a programme. When playback starts, wait a few
Content of tape: -- 1/1
Title
moments and then press the [LIBRARY/SEARCH]
LIBRARY/SEARCH
button.
• If the cassette number still does not appear, rep eat this
Panasonic VCR
5 Intro-Jet Scan 6
Tape ID could not
Date
be detected
process until it appears.
Hint:
• Even after you have pressed the [Cursor] buttons (38) (34) to select the [Find space to record] and the VCR has located the
tape position from which to mak e a ne w rec ording , we recomme nd you to co nfirm t hat this t ape po sition is re ally suitab le, be fore
you start recording.
Note:
• In the case of certain cassettes, for example cassettes recorded on another NV-FJ780B model VCR or cassettes whose
cassette number was deleted from the Tape Library data, the cassette number and contents (recorded programmes) are not
displayed.
28
Page 29

To Check on Which Cassette a Desired Programme Is Recorded
If you press the [LIBRARY/SEARCH] button (4), operation steps 1, 2 are not necessary. In this case, start from the operation
step 3.
5
1
2
3
DIRECT TV REC TV ASPECT
Í
123
4
5
7809
INPUT SELECT
AV
LIBRARY/SEARCH
INDEX
STILL ALBUM
REPLAY
MENU
OK
rsrsr
DATE
CANCEL
PROG. / CHECK
I-TIMER
AUDIO OSD/DISPLAY
VCR
12
AV LIN K
TRACKING/V-LOCK
6
ON OFF
SP/LP/EP
+
–
TV / TEXT
VOLUME
SV/V
REC
VCR
s
TIMER
Á
RESET
MENU
1 Press the [MENU] button and then press the [Cursor]
buttons (34) to select [Tape Library].
+
–
+
- - - - - - - - - - - - - - - - - - - - - - - - - - - - - - - - - - - - - - - - - - - - - - - - - - - - - - - - - - - - - - - - - - - - - - - - - - - - - - - - - - - - - - - - - - - - - - - - - - - - - - - - - - - - - - - - - - - -
2 Press the [OK] button.
EXIT
OK
1,5
TV
- - - - - - - - - - - - - - - - - - - - - - - - - - - - - - - - - - - - - - - - - - - - - - - - - - - - - - - - - - - - - - - - - - - - - - - - - - - - - - - - - - - - - - - - - - - - - - - - - - - - - - - - - - - - - - - - - - - -
• If a cassette is already inserted, its cass ette numbe r and
contents appear.
• If no cassette is inserted, the lowest cassette number
and its contents appear.
3 Press the [Cursor] buttons (21) to display the contents
of each cassette one after another, and search for the
- - - - - - - - - - - - - - - - - - - - - - - - - - - - - - - - - - - - - - - - - - - - - - - - - - - - - - - - - - - - - - - - - - - - - - - - - - - - - - - - - - - - - - - - - - - - - - - - - - - - - - - - - - - - - - - - - - - -
desired programme.
4 After you have found out which cassette contains the
- - - - - - - - - - - - - - - - - - - - - - - - - - - - - - - - - - - - - - - - - - - - - - - - - - - - - - - - - - - - - - - - - - - - - - - - - - - - - - - - - - - - - - - - - - - - - - - - - - - - - - - - - - - - - - - - - - - -
desired programme, insert that cassette into the VCR.
On Screen Display
Main menu
Timer recording
Tape Library
Tuning
Clock setting
Other settings
Content of tape: 30 1/1
Title
2 BBC2 (18:58) We 18.04.01
5 Find space to record 6
5 Intro-Jet Scan 6
Library for tape: 5 1/1
Title
A2 AV2 (10:52) Th 18.01.01
BBC1 ( 4:04) Fr 2.02.01
1
¢¢¢03 ( 4:15) Fr 2.02.01
3
BBC1 (11:20) Tu 6. 02.01
1
Panasonic VCR
Panasonic VCR
Date
Panasonic VCR
Date
5 To play back the desired programme, press the [Cursor]
buttons (34) to select that programme and then press
the [LIBRARY/SEARCH] button.
LIBRARY/SEARCH
• After the selected programme has be en foun d, pla yback
starts automatically.
29
System
Tape Library
Page 30

To Manually Enter or Editing a Title
If you press the [LIBRARY/SEARCH] button (4), operation steps 1, 2 are not necessary. In this case, start from the operation
step 3.
1
2,7
3
5
DIRECT TV REC TV ASPECT
Í
123
4
5
7809
INPUT SELECT
AV
LIBRARY/SEARCH
INDEX
STILL ALBUM
REPLAY
MENU
OK
rsrsr
DATE
CANCEL
PROG. / CHECK
I-TIMER
AUDIO OSD/DISPLAY
VCR
12
AV LIN K
TRACKING/V-LOCK
6
ON OFF
SP/LP/EP
+
–
TV / TEXT
VOLUME
SV/V
REC
VCR
s
TIMER
Á
RESET
MENU
1 Press the [MENU] button and then press the [Cursor]
buttons (34) to select [Tape Library].
- - - - - - - - - - - - - - - - - - - - - - - - - - - - - - - - - - - - - - - - - - - - - - - - - - - - - - - - - - - - - - - - - - - - - - - - - - - - - - - - - - - - - - - - - - - - - - - - - - - - - - - - - - - - - - - - - - - -
2 Press the [OK] button.
- - - - - - - - - - - - - - - - - - - - - - - - - - - - - - - - - - - - - - - - - - - - - - - - - - - - - - - - - - - - - - - - - - - - - - - - - - - - - - - - - - - - - - - - - - - - - - - - - - - - - - - - - - - - - - - - - - - -
OK
3 Press the [Cursor] buttons (21) to display the
contents of each cassette one after another, and
search for the programme whose title you want to
+
–
+
EXIT
TV
- - - - - - - - - - - - - - - - - - - - - - - - - - - - - - - - - - - - - - - - - - - - - - - - - - - - - - - - - - - - - - - - - - - - - - - - - - - - - - - - - - - - - - - - - - - - - - - - - - - - - - - - - - - - - - - - - - - -
4 Press the [Cursor] b utto ns (34) to select the desired
8
- - - - - - - - - - - - - - - - - - - - - - - - - - - - - - - - - - - - - - - - - - - - - - - - - - - - - - - - - - - - - - - - - - - - - - - - - - - - - - - - - - - - - - - - - - - - - - - - - - - - - - - - - - - - - - - - - - - -
6
5 Press the [DATE] button.
1,4
- - - - - - - - - - - - - - - - - - - - - - - - - - - - - - - - - - - - - - - - - - - - - - - - - - - - - - - - - - - - - - - - - - - - - - - - - - - - - - - - - - - - - - - - - - - - - - - - - - - - - - - - - - - - - - - - - - - -
DATE
r
s
enter (or change).
programme.
• The menu for entering (or changing) the title
appears.
6 Press the [Cursor] buttons (3421) to enter (or
OK
change) the title.
• Up to 15 characters can be entered for one title.
On Screen Display
Main menu
Timer recording
Tape Library
Tuning
Clock setting
Other settings
Library for tape: 1 1/1
Title
1 BBC1 ( 9:07) Th 18.01.01
A2 AV2 ( 9:18) Th 18.01.01
A2 AV2 ( 9:23) We 7.02.01
4 ¢¢¢04 ( 0:01) Sa 6.01.01
Library Edit
Tape 1
Old title : A2 AV2 ( 9:18)
New title :
Library Edit
Tape 1
Old title : A2 AV2 ( 9:18)
New title : FOOTBALL
Panasonic VCR
Panasonic VCR
Date
Panasonic VCR
Panasonic VCR
• To correct an input error, press the [Cursor] button
(2) and enter the correct character.
- - - - - - - - - - - - - - - - - - - - - - - - - - - - - - - - - - - - - - - - - - - - - - - - - - - - - - - - - - - - - - - - - - - - - - - - - - - - - - - - - - - - - - - - - - - - - - - - - - - - - - - - - - - - - - - - - - - -
7 Press the [OK] button.
- - - - - - - - - - - - - - - - - - - - - - - - - - - - - - - - - - - - - - - - - - - - - - - - - - - - - - - - - - - - - - - - - - - - - - - - - - - - - - - - - - - - - - - - - - - - - - - - - - - - - - - - - - - - - - - - - - - -
8 Press the [EXIT] button to exit the On Screen Display.
EXIT
OK
• When you enter (or change) the title, the recording
start time, which was displayed before, disappears.
Hints:
• The letters which can be used for entering (or changing) the title are the following:
A B C D E F G H I J
K L M N O P Q R S T
U V W X Y Z ¢ s r
0 1 2 3 4 5 6 7 8 9
• If the title needs a blank space, select the blank between [Z] and [¢].
Library for tape: 1 1/1
Title
1 BBC1 ( 9:07) Th 18.01.01
FOOTBALL Th 18.01.01
A2 AV2 ( 9:23) We 7.02.01
4 ¢¢¢04 ( 0:01) Sa 6.01.01
Panasonic VCR
Date
30
Page 31

To Delete the Tape Library Data
If you press the [LIBRARY/SEARCH] button (4), operation steps 1, 2 are not necessary. In this case, start from the operation
step 3.
1 Press the [MENU] button and then press the [Cursor]
1
2,5,6
3
5
DIRECT TV REC TV ASPECT
Í
123
4
5
7809
INPUT SELECT
AV
LIBRARY/SEARCH
INDEX
STILL ALBUM
REPLAY
MENU
rsrsr
DATE
CANCEL
PROG. / CHECK
I-TIMER
AUDIO OSD/DISPLAY
VCR
12
AV LIN K
OK
ON OFF
SP/LP/EP
TV / TEXT
TRACKING/V-LOCK
+
–
6
VOLUME
+
–
SV/V
REC
EXIT
VCR
TV
s
TIMER
Á
RESET
MENU
- - - - - - - - - - - - - - - - - - - - - - - - - - - - - - - - - - - - - - - - - - - - - - - - - - - - - - - - - - - - - - - - - - - - - - - - - - - - - - - - - - - - - - - - - - - - - - - - - - - - - - - - - - - - - - - - - - - -
2 Press the [OK] button.
- - - - - - - - - - - - - - - - - - - - - - - - - - - - - - - - - - - - - - - - - - - - - - - - - - - - - - - - - - - - - - - - - - - - - - - - - - - - - - - - - - - - - - - - - - - - - - - - - - - - - - - - - - - - - - - - - - - -
+
3 Press the [Cursor] buttons (21) to search for the
- - - - - - - - - - - - - - - - - - - - - - - - - - - - - - - - - - - - - - - - - - - - - - - - - - - - - - - - - - - - - - - - - - - - - - - - - - - - - - - - - - - - - - - - - - - - - - - - - - - - - - - - - - - - - - - - - - - -
7
4 Press the [Cursor] buttons (34) to select the desired
1,4
- - - - - - - - - - - - - - - - - - - - - - - - - - - - - - - - - - - - - - - - - - - - - - - - - - - - - - - - - - - - - - - - - - - - - - - - - - - - - - - - - - - - - - - - - - - - - - - - - - - - - - - - - - - - - - - - - - - -
OK
5 Press the [CH] button.
OK
- - - - - - - - - - - - - - - - - - - - - - - - - - - - - - - - - - - - - - - - - - - - - - - - - - - - - - - - - - - - - - - - - - - - - - - - - - - - - - - - - - - - - - - - - - - - - - - - - - - - - - - - - - - - - - - - - - - -
6 When no programm e i s lef t an d t he message appears,
OK
EXIT
- - - - - - - - - - - - - - - - - - - - - - - - - - - - - - - - - - - - - - - - - - - - - - - - - - - - - - - - - - - - - - - - - - - - - - - - - - - - - - - - - - - - - - - - - - - - - - - - - - - - - - - - - - - - - - - - - - - -
EXIT
7 Press the [EXIT] button to exit the On Screen Display.
buttons (34) to select [Tape Library].
cassette whose Tape Library data you want to delete.
programme.
If you are sure to delete the prog ramme, press the [O K]
button.
If you want to delete all the prog rammes, rep eat abov e
procedures.
press the [OK] button.
• The cassette’s Tape Library data are now deleted
from the VCR’s Tape Library.
• If you want to keep the cassette number, press the
[EXIT] button instead of the [OK] button.
On Screen Display
Library for tape: 5 1/1
Title
A2 AV2 (10:52) Th 18.01.01
BBC1 ( 4:04) Fr 2.02.01
1
¢¢¢03 ( 4:15) Fr 2.02.01
3
BBC1 (11:20) Tu 6. 02.01
1
Library for tape: 5 1/1
Title
A2 AV2 (10:52) Th 18.01.01
1 BBC1 ( 4:04) Fr 2.02.01
Library for tape: 5 1/1
Title
Panasonic VCR
Date
Panasonic VCR
Date
Are you sure you want to
delete this title ?
Panasonic VCR
Date
Really delete tape
from library ?
Hint:
• Even if you delete a cassette’s contents from the Tape Library while that cassette is in the VCR, this does not erase the actual
programmes recorded on the cassette.
System
Tape Library
31
Page 32

VCR
r
TV
On S
Setu
Manual Tuning
This VCR has 99 Programme positions that can be tuned to receive TV stations.
In certain circumstances you may wish to tune in a station manually or rename a TV station.
Follow the steps below:
6
1
2,3,
5,7
DIRECT TV REC TV ASPECT
Í
123
4
5
7809
INPUT SELECT
AV
LIBRARY/SEARCH
INDEX
STILL ALBUM
REPLAY
MENU
OK
rsrsr
DATE
CANCEL
PROG. / CHECK
I-TIMER
AUDIO OSD/DISPLAY
VCR
12
AV LIN K
TRACKING/V-LOCK
6
ON OFF
SP/LP/EP
+
–
TV / TEXT
VOLUME
+
–
SV/V
REC
VCR
s
TIMER
Á
RESET
1 Press the [MENU] but ton to dis pl ay the M ain m enu on
- - - - - - - - - - - - - - - - - - - - - - - - - - - - - - - - - - - - - - - - - - - - - - - - - - - - - - - - - - - - - - - - - - - - - - - - - - - - - - - - - - - - - - - - - - - - - - - - - - - - - - - - - - - - - - - - - - - -
MENU
the TV screen.
2 Press the [Cursor] buttons (34) to select [Tuning]
- - - - - - - - - - - - - - - - - - - - - - - - - - - - - - - - - - - - - - - - - - - - - - - - - - - - - - - - - - - - - - - - - - - - - - - - - - - - - - - - - - - - - - - - - - - - - - - - - - - - - - - - - - - - - - - - - - - -
then press the [OK] button.
3 Press the [Cursor] buttons (34) to select [Manual]
OK
- - - - - - - - - - - - - - - - - - - - - - - - - - - - - - - - - - - - - - - - - - - - - - - - - - - - - - - - - - - - - - - - - - - - - - - - - - - - - - - - - - - - - - - - - - - - - - - - - - - - - - - - - - - - - - - - - - - -
then press the [OK] button to display the list of tuned
TV Statio ns.
4 Press the [Cursor] buttons (34) to select the po sition
that you want to tune manually.
- - - - - - - - - - - - - - - - - - - - - - - - - - - - - - - - - - - - - - - - - - - - - - - - - - - - - - - - - - - - - - - - - - - - - - - - - - - - - - - - - - - - - - - - - - - - - - - - - - - - - - - - - - - - - - - - - - - -
5 Press the [OK] button to display the Manual Tuning
- - - - - - - - - - - - - - - - - - - - - - - - - - - - - - - - - - - - - - - - - - - - - - - - - - - - - - - - - - - - - - - - - - - - - - - - - - - - - - - - - - - - - - - - - - - - - - - - - - - - - - - - - - - - - - - - - - - -
OK
menu.
6 Press the [Cursor] buttons (3421) to select the
+
8
EXIT
6
2,3,
OK
- - - - - - - - - - - - - - - - - - - - - - - - - - - - - - - - - - - - - - - - - - - - - - - - - - - - - - - - - - - - - - - - - - - - - - - - - - - -
123
456
7809
4,6
TV
- - - - - - - - - - - - - - - - - - - - - - - - - - - - - - - - - - - - - - - - - - - - - - - - - - - - - - - - - - - - - - - - - - - - - - - - - - - -
desired field.
Pos: To change the ord er in w hic h the T V stati ons
are assigned to the programme positions.
• Press the [Numeric] buttons to enter the number of
the desired programme position.
creen Display
Pos Name Ch
1 BBC1 22
2 BBC2 23
3 ITV 24
4CH4 25
5CH5 26
¢¢¢¢¢
6
7
----- --
8
----- --
Panasonic VCR
Panasonic VCR
30
-
-
Tuning
Manual
Auto-Setup Restart
Download
Shipping condition
Owner ID
Tuning
List of tuned TV stations
(example)
Pos : 4
Name : CH4
Channel : 25
NICAM : AUTO
Pos : 4
Name : CH4
Channel : 25
NICAM : AUTO
Name: To enter or change the name of a TV station.
OK
- - - - - - - - - - - - - - - - - - - - - - - - - - - - - - - - - - - - - - - - - - - - - - - - - - - - - - - - - - - - - - - - - - - - - - - - - - - -
123
456
7809
• Press the [Cursor] buttons (3421) to enter the
station name.
• If the station name needs a blank space, select the
blank between [Z] and [¢].
Channel: To enter newly available TV stations or
change the channel number of an existing
TV station.
• Press the [Numeric] buttons to enter the channel
number of the desired TV station.
Pos : 4
Name : CH4
Channel : 25
NICAM : AUTO
Pos : 4
Name : CH4
Channel : 25
NICAM : AUTO
• Wait a few moments until the desired TV station has
- - - - - - - - - - - - - - - - - - - - - - - - - - - - - - - - - - - - - - - - - - - - - - - - - - - - - - - - - - - - - - - - - - - - - - - - - - - -
been tuned.
NICAM: To select the type of sound to be heard/
recorded.
• Press the [Cursor] buttons (34) to select [AUTO].
• When you record a programme which is broadcast
with NICAM sound, the NICAM sound is
Pos : 4
Name : CH4
Channel : 25
NICAM : AUTO
automatically recorded.
• Select [OFF] if you want to record t he norm al (mono )
sound on the Hi-Fi audio tracks during a NICAM
broadcast, or if the stereo sound is distorted due to
- - - - - - - - - - - - - - - - - - - - - - - - - - - - - - - - - - - - - - - - - - - - - - - - - - - - - - - - - - - - - - - - - - - - - - - - - - - - - - - - - - - - - - - - - - - - - - - - - - - - - - - - - - - - - - - - - - - -
123
456
7809
- - - - - - - - - - - - - - - - - - - - - - - - - - - - - - - - - - - - - - - - - - - - - - - - - - - - - - - - - - - - - - - - - - - - - - - - - - - - - - - - - - - - - - - - - - - - - - - - - - - - - - - - - - - - - - - - - - - -
7 Press the [OK] button to finish the settings.
- - - - - - - - - - - - - - - - - - - - - - - - - - - - - - - - - - - - - - - - - - - - - - - - - - - - - - - - - - - - - - - - - - - - - - - - - - - - - - - - - - - - - - - - - - - - - - - - - - - - - - - - - - - - - - - - - - - -
8 Press the [EXIT] button to exit the On Screen Display.
OK
EXIT
poor reception conditions.
Title page (NV-FJ780B):
To change the Title Teletext Pag e (TV Guide
page) Number.
• Press the [Numeric] button or [Cursor] buttons (34)
to select the correct Teletext page number.
Pos : 4
Name : CH4
Channel : 25
NICAM : AUTO
Title page : 301
32
Page 33

To Record the Title When Recording from an External Equipment
VCR
r
TV
(For NV-FJ780B)
1 Connect the external eq uipment to the VC R via 21-pin
- - - - - - - - - - - - - - - - - - - - - - - - - - - - - - - - - - - - - - - - - - - - - - - - - - - - - - - - - - - - - - - - - - - - - - - - - - - - - - - - - - - - - - - - - - - - - - - - - - - - - - - - - - - - - - - - - - - -
Scart lead.
2 Press the [Cursor] b uttons (34) to sele ct AV1 or AV2
on the Tuning menu (Station list menu).
(See steps 1 to 3 on page 32.)
- - - - - - - - - - - - - - - - - - - - - - - - - - - - - - - - - - - - - - - - - - - - - - - - - - - - - - - - - - - - - - - - - - - - - - - - - - - - - - - - - - - - - - - - - - - - - - - - - - - - - - - - - - - - - - - - - - - -
3 Press the [OK] button to display the Manual Tuning
6
- - - - - - - - - - - - - - - - - - - - - - - - - - - - - - - - - - - - - - - - - - - - - - - - - - - - - - - - - - - - - - - - - - - - - - - - - - - - - - - - - - - - - - - - - - - - - - - - - - - - - - - - - - - - - - - - - - - -
2,4
4 Press the [Cursor] buttons (34) to select [AUTO].
OK
menu.
This VCR records the title when recording a
programme.
- - - - - - - - - - - - - - - - - - - - - - - - - - - - - - - - - - - - - - - - - - - - - - - - - - - - - - - - - - - - - - - - - - - - - - - - - - - - - - - - - - - - - - - - - - - - - - - - - - - - - - - - - - - - - - - - - - - -
5 Press the [OK] button to conclude the setting.
- - - - - - - - - - - - - - - - - - - - - - - - - - - - - - - - - - - - - - - - - - - - - - - - - - - - - - - - - - - - - - - - - - - - - - - - - - - - - - - - - - - - - - - - - - - - - - - - - - - - - - - - - - - - - - - - - - - -
6 Press the [EXIT] button to exit the On Screen Display.
OK
EXIT
If you do not want to record the title, set to [OFF].
3,5
DIRECT TV REC TV ASPECT
Í
123
4
5
7809
INPUT SELECT
AV
LIBRARY/SEARCH
INDEX
STILL ALBUM
REPLAY
MENU
OK
rsrsr
DATE
CANCEL
PROG. / CHECK
-
AV LIN K
TRACKING/V-LOCK
6
ON OFF
SP/LP/EP
+
–
TV / TEXT
VOLUME
SV/V
REC
VCR
s
TIMER
Á
+
–
+
EXIT
TV
Note:
• Depending on the input signal condition, the titles may not be got correctly.
To Delete, Add or Move a Programme Position
EXIT
OK
MENU
OK
rsr
DATE
the TV screen.
press the [OK] button.
then press the [OK] bu tton to dis play the list of tun ed TV
Stations.
TV station.
To delete a programme position [Delete]:
ON
s
Press the [CH] button (J, red).
To insert a blank programme position [Add]:
Press the [DATE] button (i, green).
To move a TV station to another programme position
[Move]:
Press the [ON] button (r, yellow), and then use the
[Cursor] buttons (34) to select the new
programme position to which you want to assig n the
TV station. If downloa ding has been pe rformed, only
the instruction indication [Delete] appears.
2,3,
4,5
1
5
5
DIRECT TV REC TV ASPECT
Í
123
4
5
7809
INPUT SELECT
AV
LIBRARY/SEARCH
INDEX
STILL ALBUM
REPLAY
MENU
OK
rsrsr
DATE
CANCEL
PROG. / CHECK
I-TIMER
AUDIO OSD/DISPLAY
VCR
12
AV LIN K
TRACKING/V-LOCK
6
ON OFF
SP/LP/EP
+
–
TV / TEXT
VOLUME
SV/V
REC
VCR
s
TIMER
Á
RESET
1 Press the [MENU] button to display the Main menu on
- - - - - - - - - - - - - - - - - - - - - - - - - - - - - - - - - - - - - - - - - - - - - - - - - - - - - - - - - - - - - - - - - - - - - - - - - - - - - - - - - - - - - - - - - - - - - - - - - - - - - - - - - - - - - - - - - - - -
2 Press the [Cursor] bu ttons (34) to select [Tunin g] then
- - - - - - - - - - - - - - - - - - - - - - - - - - - - - - - - - - - - - - - - - - - - - - - - - - - - - - - - - - - - - - - - - - - - - - - - - - - - - - - - - - - - - - - - - - - - - - - - - - - - - - - - - - - - - - - - - - - -
3 Press the [Cursor] buttons (34) to select [Manual]
+
–
+
EXIT
TV
- - - - - - - - - - - - - - - - - - - - - - - - - - - - - - - - - - - - - - - - - - - - - - - - - - - - - - - - - - - - - - - - - - - - - - - - - - - - - - - - - - - - - - - - - - - - - - - - - - - - - - - - - - - - - - - - - - - -
4 Press the [Cursor] buttons (34) to select the desired
- - - - - - - - - - - - - - - - - - - - - - - - - - - - - - - - - - - - - - - - - - - - - - - - - - - - - - - - - - - - - - - - - - - - - - - - - - - - - - - - - - - - - - - - - - - - - - - - - - - - - - - - - - - - - - - - - - - -
7
5 Follow the operations below.
2,3,6
5
- - - - - - - - - - - - - - - - - - - - - - - - - - - - - - - - - - - - - - - - - - - - - - - - - - - - - - - - - - - - - - - - - - - - - - - - - - - - - - - - - - - - - - - - - - - - - - - - - - - - - - - - - - - - - - - - - - - -
6 Press the [OK] button to conclude the settings.
- - - - - - - - - - - - - - - - - - - - - - - - - - - - - - - - - - - - - - - - - - - - - - - - - - - - - - - - - - - - - - - - - - - - - - - - - - - - - - - - - - - - - - - - - - - - - - - - - - - - - - - - - - - - - - - - - - - -
7 Press the [EXIT] button to exit the On Screen Display.
On Screen Display
Pos Name Ch
97
----- --
98
----- --
99
----- -AV1
AV2
Panasonic VCR
Pos Name Ch
1 BBC1 22
2 BBC2 23
3 ITV 24
4 CH4 25
5 CH5 26
6
¢¢¢¢¢
30
7
----- --
8
----- --
Add
Panasonic VCR
-
-
-
-
-
Move
Tuning
Title page : AUTO
Tuning
Delete
Indications for Delete,
Add and Move
Hint:
• If you have performed Manua l Tun ing to ente r TV s tations , the [ss] indi catio n may a ppear under [Pos/N ame] on t he On Screen
Display when programming a VIDEO Plus+ timer recording.
33
Manual Setup
Page 34

To Restart the Auto Setup
S
C
S
C
S
C
MENU
OK
OK
1
2,3
TILL ALBUM
MENU
REPLAY
1 Press the [MENU] button to display the Main menu on
RE
EXIT
OK
VCR
TV
- - - - - - - - - - - - - - - - - - - - - - - - - - - - - - - - - - - - - - - - - - - - - - - - - - - - - - - - - - - - - - - - - - - - - - - - - - - - - - - - - - - - - - - - - - - - - - - - - - - - - - - - - - - - - - - - - - - -
2,3,4
2 Press the [Cursor] buttons (34) to select [Tuning] then
- - - - - - - - - - - - - - - - - - - - - - - - - - - - - - - - - - - - - - - - - - - - - - - - - - - - - - - - - - - - - - - - - - - - - - - - - - - - - - - - - - - - - - - - - - - - - - - - - - - - - - - - - - - - - - - - - - - -
3 Press the [Cursor] buttons (34) to select [Auto-Setup
- - - - - - - - - - - - - - - - - - - - - - - - - - - - - - - - - - - - - - - - - - - - - - - - - - - - - - - - - - - - - - - - - - - - - - - - - - - - - - - - - - - - - - - - - - - - - - - - - - - - - - - - - - - - - - - - - - - -
4 Press the [OK] button again to actually start the Auto
To Restart the Download
the TV screen.
press the [OK] button.
Restart] then press the [OK] button to prepare for Auto
Setup start.
Setup.
On Screen Display
Tuning
Manual
Auto-Setup Restart
Download
Shipping condition
Owner ID
Auto-Setup
Tuning
Panasonic VCR
Panasonic VCR
: Ch 21
Panasonic VCR
Panasonic VCR
1
2,3
TILL ALBUM
MENU
REPLAY
1 Press the [MENU] button to display the Main menu on
RE
EXIT
2,3,4
OK
VCR
TV
- - - - - - - - - - - - - - - - - - - - - - - - - - - - - - - - - - - - - - - - - - - - - - - - - - - - - - - - - - - - - - - - - - - - - - - - - - - - - - - - - - - - - - - - - - - - - - - - - - - - - - - - - - - - - - - - - - -
2 Press the [Cursor] buttons (34) to sel ect [Tuni ng] then
- - - - - - - - - - - - - - - - - - - - - - - - - - - - - - - - - - - - - - - - - - - - - - - - - - - - - - - - - - - - - - - - - - - - - - - - - - - - - - - - - - - - - - - - - - - - - - - - - - - - - - - - - - - - - - - - - - -
3 Press the [Cursor] buttons (34) to select [Download]
- - - - - - - - - - - - - - - - - - - - - - - - - - - - - - - - - - - - - - - - - - - - - - - - - - - - - - - - - - - - - - - - - - - - - - - - - - - - - - - - - - - - - - - - - - - - - - - - - - - - - - - - - - - - - - - - - - -
4 Press the [OK] button again to actually start the
MENU
OKOKOKOK
OK
the TV screen.
press the [OK] button.
then press the [OK] button to prepare for Download
start.
Download.
Tuning
Manual
Auto-Setup Restart
Download
Shipping condition
Owner ID
Download
Download in
progress,
please wait.
Position 67
To Return the VCR to the Shipping Condition
Shipping condition resets the VCR back to the original factory settings.
This is useful if the VCR is going to be used in a new location as auto-setup will begin again when the unit is switched on (after
connecting to aerial and main s).
MENU
1 Press the [MENU] button to di splay t he Main men u on
1
2,3
TILL ALBUM
MENU
REPLAY
RE
EXIT
OK
VCR
TV
- - - - - - - - - - - - - - - - - - - - - - - - - - - - - - - - - - - - - - - - - - - - - - - - - - - - - - - - - - - - - - - - - - - - - - - - - - - - - - - - - - - - - - - - - - - - - - - - - - - - - - - - - - - - - - - - - - - -
2,3,4
2 Press the [Cursor] bu ttons 34 to select [Tunin g] then
- - - - - - - - - - - - - - - - - - - - - - - - - - - - - - - - - - - - - - - - - - - - - - - - - - - - - - - - - - - - - - - - - - - - - - - - - - - - - - - - - - - - - - - - - - - - - - - - - - - - - - - - - - - - - - - - - - - -
3 Press the [Cursor] buttons 34 to select [Shipping
OK
- - - - - - - - - - - - - - - - - - - - - - - - - - - - - - - - - - - - - - - - - - - - - - - - - - - - - - - - - - - - - - - - - - - - - - - - - - - - - - - - - - - - - - - - - - - - - - - - - - - - - - - - - - - - - - - - - - - -
4 Press the [OK] button to actually change the settings
OK
the TV screen.
press the [OK] button.
condition] then press the [OK] button to prepare for
resetting the VCR to the shipping condition.
back to the shipping condition.
• As resetting the VCR to the shipping condition
automatically resets the RF output channel to
channel 21, the VCR picture may no longer appear
on the TV.
• To re-tune the VCR, disconnect and reconnect the
AC Mains Cable.
Tuning
Manual
Auto-Setup Restart
Download
Shipping condition
Owner ID
Tuning
Manual
Auto-Setup Restart
Download
Shipping condition
Are you sure?
Owner ID
Panasonic VCR
Panasonic VCR
34
Page 35

To Change the Owner ID
OK
OK
EXIT
MENU
OK
123
456
7809
OK
4,6
1
6
2,3,
5,6
DIRECT TV REC TV ASPECT
Í
123
4
5
7809
INPUT SELECT
AV
LIBRARY/SEARCH
INDEX
STILL ALBUM
REPLAY
MENU
OK
rsrsr
DATE
CANCEL
PROG. / CHECK
I-TIMER
AUDIO OSD/DISPLAY
VCR
12
AV LIN K
TRACKING/V-LOCK
6
ON OFF
SP/LP/EP
+
–
TV / TEXT
VOLUME
SV/V
REC
VCR
s
TIMER
Á
RESET
1 Press the [MENU] button to di splay t he Main men u on
- - - - - - - - - - - - - - - - - - - - - - - - - - - - - - - - - - - - - - - - - - - - - - - - - - - - - - - - - - - - - - - - - - - - - - - - - - - - - - - - - - - - - - - - - - - - - - - - - - - - - - - - - - - - - - - - - - - -
2 Press the [Cursor] bu ttons 34 to select [Tunin g] then
+
–
+
EXIT
2,3,4
TV
- - - - - - - - - - - - - - - - - - - - - - - - - - - - - - - - - - - - - - - - - - - - - - - - - - - - - - - - - - - - - - - - - - - - - - - - - - - - - - - - - - - - - - - - - - - - - - - - - - - - - - - - - - - - - - - - - - - -
3 Press the [Cursor] buttons 34 to select [Owner ID]
7
- - - - - - - - - - - - - - - - - - - - - - - - - - - - - - - - - - - - - - - - - - - - - - - - - - - - - - - - - - - - - - - - - - - - - - - - - - - - - - - - - - - - - - - - - - - - - - - - - - - - - - - - - - - - - - - - - - - -
4 Use the [Numeric] buttons or [Cursor] buttons 34 to
- - - - - - - - - - - - - - - - - - - - - - - - - - - - - - - - - - - - - - - - - - - - - - - - - - - - - - - - - - - - - - - - - - - - - - - - - - - - - - - - - - - - - - - - - - - - - - - - - - - - - - - - - - - - - - - - - - - -
5 Press the [OK] button to conclude the setting.
- - - - - - - - - - - - - - - - - - - - - - - - - - - - - - - - - - - - - - - - - - - - - - - - - - - - - - - - - - - - - - - - - - - - - - - - - - - - - - - - - - - - - - - - - - - - - - - - - - - - - - - - - - - - - - - - - - - -
6 Use the [Cursor] buttons 3421, the [Numeric]
- - - - - - - - - - - - - - - - - - - - - - - - - - - - - - - - - - - - - - - - - - - - - - - - - - - - - - - - - - - - - - - - - - - - - - - - - - - - - - - - - - - - - - - - - - - - - - - - - - - - - - - - - - - - - - - - - - - -
7 Press the [EXIT] button to exit the On Screen Display.
To Display the Owner ID setting menu
Keep the [EJECT] button pressed for more than 5 seconds.
•The PIN number is not displayed.
•After 30 seconds, this menu automatically disap pea rs.
/6/
EJECT
6
EJECT
the TV screen.
press the [OK] button.
then press the [OK] button.
• The Owner ID menu appears.
enter the current [PIN number].
• After entering the correct [PIN number], you can
change the [Name], [House No] and [Postcode].
buttons and the [OK] button to select and change the
desired information.
On Screen Display
Tuning
Manual
Auto-Setup Restart
Download
Shipping condition
Owner ID
Owner ID
PIN number :¢¢¢¢
Name :STEVE¢¢¢¢¢¢¢¢¢
House No :
Postcode :
Owner ID
Name :STEVE
House No :BRACKNELL
Postcode :RG12 8FT
Panasonic VCR
Panasonic VCR
BRACKNELL¢¢
RG12 8FT¢¢¢
Panasonic VCR
35
Manual Setup
Page 36

Setting the VCR’s C l ock
VCR
r
TV
The clock will normally be set correctly during auto-setup or download however, in some circumstances the VCR cannot set the
clock automatically. In this case, follow the operation steps below to manually set the clock.
To Manually Adjust the Clock
On Screen Display
Example of NV-FJ780B
Main menu
Timer recording
Tape Library
Tuning
Clock setting
Other settings
Clock setting
Clock setting
Time
Date
Clock setting
Clock setting
Time
Date
: MAN.
: 20:30:24
: 16.10.05
: MAN.
: 20:30:24
: 16.10.05
Panasonic VCR
Panasonic VCR
Panasonic VCR
4
1
2,3,5
DIRECT TV REC TV ASPECT
Í
123
4
5
7809
INPUT SELECT
AV
LIBRARY/SEARCH
INDEX
STILL ALBUM
REPLAY
MENU
rsrsr
DATE
CANCEL
PROG. / CHECK
AV LIN K
OK
ON OFF
SP/LP/EP
TV / TEXT
TRACKING/V-LOCK
+
–
6
VOLUME
+
–
SV/V
REC
EXIT
VCR
TV
s
TIMER
MENU
1 Press the [MENU] button to di splay t he Main men u on
- - - - - - - - - - - - - - - - - - - - - - - - - - - - - - - - - - - - - - - - - - - - - - - - - - - - - - - - - - - - - - - - - - - - - - - - - - - - - - - - - - - - - - - - - - - - - - - - - - - - - - - - - - - - - - - - - - - -
the TV screen.
2 Press the [Cursor] buttons (34) to select [Clock
setting] then press the [OK] button.
OK
+
- - - - - - - - - - - - - - - - - - - - - - - - - - - - - - - - - - - - - - - - - - - - - - - - - - - - - - - - - - - - - - - - - - - - - - - - - - - - - - - - - - - - - - - - - - - - - - - - - - - - - - - - - - - - - - - - - - - -
3 Confirm that [Clock setting] is set to [MAN.], and then
6
- - - - - - - - - - - - - - - - - - - - - - - - - - - - - - - - - - - - - - - - - - - - - - - - - - - - - - - - - - - - - - - - - - - - - - - - - - - - - - - - - - - - - - - - - - - - - - - - - - - - - - - - - - - - - - - - - - - -
4
4 Use the [Cursor] buttons (3421) to set the date
2
4
- - - - - - - - - - - - - - - - - - - - - - - - - - - - - - - - - - - - - - - - - - - - - - - - - - - - - - - - - - - - - - - - - - - - - - - - - - - - - - - - - - - - - - - - - - - - - - - - - - - - - - - - - - - - - - - - - - - -
5 Press the [OK] button to conclude the settings.
- - - - - - - - - - - - - - - - - - - - - - - - - - - - - - - - - - - - - - - - - - - - - - - - - - - - - - - - - - - - - - - - - - - - - - - - - - - - - - - - - - - - - - - - - - - - - - - - - - - - - - - - - - - - - - - - - - - -
6 Press the [EXIT] button to exit the On Screen Display.
123
456
7809
OK
OK
EXIT
• The Clock setting menu appears on the TV.
press the [OK] button.
OK
and time.
• Instead of the [Cursor] buttons (3421), you can
also use the [Numeric] buttons to set the date and
time. (Set the [VCR/TV] switch to [VCR].)
To Activate the Automatic Time Correction Function
The correct time for the VCR clock can be automatically maintained when the VCR is tuned to a station that transmits a time
signal.
1
2,3
DIRECT TV REC TV ASPECT
Í
123
4
5
7809
INPUT SELECT
AV
LIBRARY/SEARCH
INDEX
STILL ALBUM
REPLAY
MENU
OK
rsrsr
DATE
AV LIN K
TRACKING/V-LOCK
+
–
6
ON OFF
TV / TEXT
VOLUME
+
–
SV/V
REC
EXIT
VCR
s
1 Press the [MENU] button to display the Main menu on
- - - - - - - - - - - - - - - - - - - - - - - - - - - - - - - - - - - - - - - - - - - - - - - - - - - - - - - - - - - - - - - - - - - - - - - - - - - - - - - - - - - - - - - - - - - - - - - - - - - - - - - - - - - - - - - - - - - -
MENU
the TV screen.
2 Press the [Cursor] buttons (34) to select [Clock
setting] then press the [OK] button.
OK
+
- - - - - - - - - - - - - - - - - - - - - - - - - - - - - - - - - - - - - - - - - - - - - - - - - - - - - - - - - - - - - - - - - - - - - - - - - - - - - - - - - - - - - - - - - - - - - - - - - - - - - - - - - - - - - - - - - - - -
3 Use the [Cursor] buttons (34) to set [AUTO].
5
- - - - - - - - - - - - - - - - - - - - - - - - - - - - - - - - - - - - - - - - - - - - - - - - - - - - - - - - - - - - - - - - - - - - - - - - - - - - - - - - - - - - - - - - - - - - - - - - - - - - - - - - - - - - - - - - - - - -
4 Press the [OK] button to conclude the setting.
2,4
• The Clock setting menu appears on the TV.
• Under adverse reception co nditions, etc., the
TV
OK
Automatic time correction function may not work.
In this case, the indication for [Clock setting] is
automatically reset to [MAN.].
If the reception conditions improve later on, it may be
- - - - - - - - - - - - - - - - - - - - - - - - - - - - - - - - - - - - - - - - - - - - - - - - - - - - - - - - - - - - - - - - - - - - - - - - - - - - - - - - - - - - - - - - - - - - - - - - - - - - - - - - - - - - - - - - - - - -
5 Press the [EXIT] button to exit the On Screen Display.
EXIT
possible to activate this function.
Example of NV-FJ780B
:AUTO
: 20:30:24
: 16.10.05
Panasonic VCR
Panasonic VCR
Main menu
Timer recording
Tape Library
Tuning
Clock setting
Other settings
Clock setting
Clock setting
Time
Date
Hints:
• If [Clock setting] is set to [AUTO] when you open the Clock screen, do not set it to [MAN.], otherwise, the automatic time
correcting function is deactivated.
• This VCR uses a 24 hour clock.
• In case of a power failure, an automatic back-up system maintains the clock for approximate 60 minutes.
• When [Clock setting] is set to [AUTO], the automatic time correction function checks and if necessary adjusts the time several
times every day. The automatic time correction function only works when the VCR is in standby, it does not work in the timer
recording mode.
36
Page 37

3
DIRECT TV REC TV ASPECT
Í
123
4
5
7809
INPUT SELECT
AV
LIBRARY/SEARCH
INDEX
STILL ALBUM
REPLAY
MENU
OK
rsrsr
DATE
CANCEL
PROG. / CHECK
I-TIMER
AUDIO OSD/DISPLAY
VCR
12
AV LIN K
TRACKING/V-LOCK
6
ON OFF
SP/LP/EP
Other Convenient Functions (Various Settings)
On Screen Display
Press the [OSD/DISPLAY] button (18), the following information will appear on the TV screen.
+
–
TV / TEXT
VOLUME
+
–
SV/V
REC
EXIT
VCR
s
TIMER
Á
RESET
+
TV
(1) TV station name
(2) NICAM or MONO Indicator
Automatic indication of the type of sound system which the programme
being watched (NICAM/MONO) is broadcast.
• If NICAM OFF is selected during manual tuning, [MONO] is always
displayed.
(3) Sound mode during playback (L/R)
At each press of the [AUDIO] button (17), the selected playback sound is indicated with L
(Left) and R (Right).
Stereo playback: The L and R indications are displayed.
Left audio channel playback: The L indication alone is displayed.
Right audio channel playback: The R indication alone is displayed.
Playback of normal audio track: Neither L nor R indication is displayed.
(4) Tape speed indicator
(5) Tape running display
Stop ∑
Rewind 6
Fast Forward 5
Playback !
Recording µ
Recording pause +
Repeat Playback R
Audio Dubbing ADUB
123
BBC1 NICAM
5
4
L R SP
0:00:29
6
(6) Present time/Tape counter/Remaining tape time/Index Search/One-Touch Recording
(OTR)/Playback Off Timer Function
Present time 17:24:31
Tape counter –2:35. 47
Remaining tape time REMAIN: 2:34
Index Search 5 02
One-Touch Recording (OTR) OTR 60
Playback Off Timer Function 30
Notes:
• If [OSD] is set to [OFF], none of the above indications appear.
• None of the above indications appear during special playback.
• During playback and when the AV input for the external source is selected, indications (1) and
(2) do not appear.
• Some of the above indications do not appear when using NTSC tapes.
Manual Setup
37
Page 38

Settings for the Main Menu Item [Other settings]
1
2,4
DIRECT TV REC TV ASPECT
Í
123
4
5
7809
INPUT SELECT
AV
LIBRARY/SEARCH
INDEX
STILL ALBUM
REPLAY
MENU
OK
rsrsr
DATE
CANCEL
PROG. / CHECK
I-TIMER
AUDIO OSD/DISPLAY
VCR
12
AV LIN K
TRACKING/V-LOCK
6
ON OFF
SP/LP/EP
+
–
TV / TEXT
VOLUME
SV/V
REC
VCR
s
TIMER
Á
RESET
1 Press the [MENU] button to di splay t he Main men u on
- - - - - - - - - - - - - - - - - - - - - - - - - - - - - - - - - - - - - - - - - - - - - - - - - - - - - - - - - - - - - - - - - - - - - - - - - - - - - - - - - - - - - - - - - - - - - - - - - - - - - - - - - - - - - - - - - - - -
2 Press the [Cursor] button (34) to select [Other
- - - - - - - - - - - - - - - - - - - - - - - - - - - - - - - - - - - - - - - - - - - - - - - - - - - - - - - - - - - - - - - - - - - - - - - - - - - - - - - - - - - - - - - - - - - - - - - - - - - - - - - - - - - - - - - - - - - -
3 Press the [Cursor] button (3421) to select the
+
–
+
5
EXIT
3
2,3
TV
MENU
the TV screen.
settings] then press the [OK] button.
OK
- - - - - - - - - - - - - - - - - - - - - - - - - - - - - - - - - - - - - - - - - - - - - - - - - - - - - - - - - - - - - - - - - - - - - - - - - - - -
desired field and item to be set, in the following order.
Tape length:
• Press the [Cursor] buttons (34) to select the tape
length to be used.
AUTO(2 E-240):For E30, -60, -90, -120 -180 and
-240 tapes
E-195: For E195 tape
E-260: For E260 tape
- - - - - - - - - - - - - - - - - - - - - - - - - - - - - - - - - - - - - - - - - - - - - - - - - - - - - - - - - - - - - - - - - - - - - - - - - - - -
E-300: For E300 tape
On Screen Display
Example of NV-FJ730B
Other settings
Tape length
Audio playback
SQPB
VCR display
OSD
AV2
Remote
Other settings
Tape length
Audio playback
SQPB
VCR display
OSD
AV2
Remote
Panasonic VCR
: AUTO (2 E-240)
: NORMAL
: AUTO
: DIMMED
: 4:3
: NORMAL
: VCR 1
Panasonic VCR
: AUTO (2 E-240)
: NORMAL
:AUTO
: DIMMED
: 4:3
: NORMAL
: VCR 1
Audio playback:
• Press the [Cursor] buttons (34) to select the type of
audio mode to be used during playback.
NORMAL: Normally set to this position.
MIX: Use this setting when playing back a
cassette tape on which audio dubbing
has been performed.
Other settings
Tape length
Audio playback
SQPB
VCR display
OSD
AV2
Remote
Panasonic VCR
: AUTO (2 E-240)
: NORMAL
:AUTO
: DIMMED
: 4:3
: NORMAL
: VCR 1
The Hi-Fi sound track with the original
sound and the normal sound track
(mono) with the audio-dubbed sound
- - - - - - - - - - - - - - - - - - - - - - - - - - - - - - - - - - - - - - - - - - - - - - - - - - - - - - - - - - - - - - - - - - - - - - - - - - - -
are played back together.
SQPB (For NV-FJ730B):
• Press the [Cursor] buttons (34) to select [AUTO],
[ON] or [OFF].
Normally set to [AUTO].
VCR automatically detects the format in which the
recording was made and sele cts the same form at for
playback.
However, picture distortion may appear.
Other settings
Tape length
Audio playback
SQPB
VCR display
OSD
AV2
Remote
Panasonic VCR
: AUTO (2 E-240)
: NORMAL
: AUTO
: DIMMED
: 4:3
: NORMAL
: VCR 1
In this case, set to [ON] or [OFF].
ON: Use this setting when playing back a
cassette tape recorded in the S-VHS format.
• Noisy playback pictures may appear
depending on the type of tape used.
• It is not possible to obtain the high
resolution that S-VHS is capable of.
• It is not possible to record in the S-VHS
format with this VCR.
OFF: Use this setting when playing back a
cassette tape recorded in the VHS format
only.
• For NV-FJ780B,VCR automatically detects the
format in wh ich the recor ding was made and selects
- - - - - - - - - - - - - - - - - - - - - - - - - - - - - - - - - - - - - - - - - - - - - - - - - - - - - - - - - - - - - - - - - - - - - - - - - - - -
the same format for playback.
VCR display:
• Press the [Cursor] buttons (34) to select the
desired setting.
• When the VCR is switched off, the brightness of the
Other settings
Tape length
Audio playback
SQPB
VCR display
OSD
AV2
Remote
Panasonic VCR
: AUTO (2 E-240)
: NORMAL
: AUTO
: DIMMED
: 4:3
: NORMAL
: VCR 1
VCR display is as follows:
ON: Display is brightly lit.
- - - - - - - - - - - - - - - - - - - - - - - - - - - - - - - - - - - - - - - - - - - - - - - - - - - - - - - - - - - - - - - - - - - - - - - - - - - -
DIMMED: Display is dimly lit.
38
Page 39

1
2,4
DIRECT TV REC TV ASPECT
Í
123
4
5
7809
INPUT SELECT
AV
LIBRARY/SEARCH
INDEX
STILL ALBUM
REPLAY
MENU
OK
rsrsr
DATE
CANCEL
PROG. / CHECK
I-TIMER
AUDIO OSD/DISPLAY
VCR
12
AV LINK
TRACKING/V-LOCK
+
–
6
ON OFF
SP/LP/EP
TV / TEXT
VOLUME
SV/V
REC
VCR
s
TIMER
Á
RESET
- - - - - - - - - - - - - - - - - - - - - - - - - - - - - - - - - - - - - - - - - - - - - - - - - - - - - - - - - - - - - - - - - - - - - - - - - - - -
OSD:
• Press the [Cursor] buttons (34) to select [4:3],
[OFF] or [16:9]. (Normally set to [4:3].)
• When using wide screen TV and selecting the wide
screen mode on the TV, indications do not appear.
+
–
+
5
EXIT
3
- - - - - - - - - - - - - - - - - - - - - - - - - - - - - - - - - - - - - - - - - - - - - - - - - - - - - - - - - - - - - - - - - - - - - - - - - - - -
2,3
Therefore, set to [16:9].
• Even if setting to [16:9], indications may be cut off
depending on the TV.
OFF: No indications appear.
AV2:
• Press the [Cursor] buttons (34) to select the type of
external source equi pment which is conn ected to th e
TV
VCR’s AV2 21-pin socket.
• Set the external source equipment as follows:
DECODER: When a decoder is connected.
EXT LINK 1:When a digital receiver which transmits
On Screen Display
Example of NV-FJ730B
Other settings
Tape length
Audio playback
SQPB
VCR display
OSD
AV2
Remote
Other settings
Tape length
Audio playback
SQPB
VCR display
OSD
AV2
Remote
Panasonic VCR
: AUTO (2 E-240)
: NORMAL
: AUTO
: DIMMED
: 4:3
: NORMAL
: VCR 1
Panasonic VCR
: AUTO (2 E-240)
: NORMAL
: AUTO
: DIMMED
: 4:3
: NORMAL
: VCR 1
a special control signal recordings via
the 21-pin Scart cable, for example the
F.U.N. receiver (TU-DSF30/S3) is
connected for the linked timer
recordings. (See page 20.)
EXT LINK 2:When external equipment with a timer
function is connected for the linked
timer recordings. (See page 20.)
NORMAL: When another VCR or a satellite
- - - - - - - - - - - - - - - - - - - - - - - - - - - - - - - - - - - - - - - - - - - - - - - - - - - - - - - - - - - - - - - - - - - - - - - - - - - -
receiver is connected.
Remote:
• Press the [Cursor] buttons (34) to select the
desired remote control mode.
VCR 1: Select this setting on both the VCR and the
remote control for normal use with one VCR.
VCR 2: Select this setting on both the VCR and the
Other settings
Tape length
Audio playback
SQPB
VCR display
OSD
AV2
Remote
Panasonic VCR
: AUTO (2 E-240)
: NORMAL
: AUTO
: DIMMED
: 4:3
: NORMAL
: VCR 1
remote control when using this VCR and
another Panasonic VCR in the same place.
This ensures that you can operate both
VCRs independently with their respective
remote control.
It also allows you to operate both VCRs with
a single remote control, simply by changing
the remote control mode on the remote
control.
VCR
12
• To change the remote control mode on the remote
control itself, change the position of the [VCR 1/2]
switch to match the setting made above.
If these settings ar e no t ma tc hed , the rem ote co ntrol
- - - - - - - - - - - - - - - - - - - - - - - - - - - - - - - - - - - - - - - - - - - - - - - - - - - - - - - - - - - - - - - - - - - - - - - - - - - - - - - - - - - - - - - - - - - - - - - - - - - - - - - - - - - - - - - - - - - -
4 Press the [OK] button to finish the settings.
- - - - - - - - - - - - - - - - - - - - - - - - - - - - - - - - - - - - - - - - - - - - - - - - - - - - - - - - - - - - - - - - - - - - - - - - - - - - - - - - - - - - - - - - - - - - - - - - - - - - - - - - - - - - - - - - - - - -
5 Press the [EXIT] button to exit the On Screen Display.
OK
EXIT
cannot be used to operate the VCR.
39
Manual Setup
Page 40

7809
+
Oerations
Search Functions
If you press the [LIBRARY/SEARCH] button (4) after a timer recording has finished, but before ejecting the cassette, the Timer
Record Confirmation will be activated instead of the Intro-Jet Scan.
Timer Record Confirmation (For NV-FJ730B)
• Each timer recording programming on the tape must be at least 15 minutes long. (25 minutes in the EP)
1 Press the [LIBRARY/SEARCH] button to display the
1,3
LIBRARY/SEARCH
STILL ALBUM
2
DIRECT TV REC TV ASPECT
Í
123
4
5
7809
INPUT SELECT
AV
INDEX
REPLAY
MENU
OK
rrr
DATE
AV LIN K
TRACKING/V-LOCK
+
–
6
ON OFF
TV / TEXT
VOLUME
+
–
SV/V
REC
EXIT
VCR
TV
LIBRARY/SEARCH
- - - - - - - - - - - - - - - - - - - - - - - - - - - - - - - - - - - - - - - - - - - - - - - - - - - - - - - - - - - - - - - - - - - - - - - - - - - - - - - - - - - - - - - - - - - - - - - - - - - - - - - - - - - - - - - - - - - -
Timer Record Confirmation menu.
2 Press the [Cursor] buttons (34) to select the
- - - - - - - - - - - - - - - - - - - - - - - - - - - - - - - - - - - - - - - - - - - - - - - - - - - - - - - - - - - - - - - - - - - - - - - - - - - - - - - - - - - - - - - - - - - - - - - - - - - - - - - - - - - - - - - - - - - -
3 Press the [LIBRARY/SEARCH] button to start the
LIBRARY/SEARCH
+
4
programme that you want to locate and play back.
search for the beginning of the selected programme.
• When the desired recorded programme has been
found, playback starts automatically.
• If, after playback has started, you want to search for
the beginning of the same or another programme,
press the [LIBRARY/SEARCH] button.
Playback stops, and the Timer Record Confirmation
menu appears.
- - - - - - - - - - - - - - - - - - - - - - - - - - - - - - - - - - - - - - - - - - - - - - - - - - - - - - - - - - - - - - - - - - - - - - - - - - - - - - - - - - - - - - - - - - - - - - - - - - - - - - - - - - - - - - - - - - - -
4 To Cancel the Timer Record Confirmation Search:
EXIT
Repeat the operations steps 2–3.
Press the [EXIT] button.
On Screen Display
Timer record confirmation
1. BBC1 27/10 17:46
2. BBC2 28/10 15:00
Panasonic VCR
Pos
Name Date Start
Intro-Jet Scan (For NV-FJ730B)
LIBRARY/SEARCH
1 Press the [LIBRARY/SEARCH] button to start the
1
2
3
INPUT SELECT
AV
LIBRARY/SEARCH
STILL ALBUM
MENU
REPLAY
INDEX
–
+
SV/V
REC
EXIT
- - - - - - - - - - - - - - - - - - - - - - - - - - - - - - - - - - - - - - - - - - - - - - - - - - - - - - - - - - - - - - - - - - - - - - - - - - - - - - - - - - - - - - - - - - - - - - - - - - - - - - - - - - - - - - - - - - - -
OK
VCR
TV
2 When you have found the prog ramme that you wan t to
- - - - - - - - - - - - - - - - - - - - - - - - - - - - - - - - - - - - - - - - - - - - - - - - - - - - - - - - - - - - - - - - - - - - - - - - - - - - - - - - - - - - - - - - - - - - - - - - - - - - - - - - - - - - - - - - - - - -
Intro-Jet Scan.
• After rewinding the tape to the beginning, the VCR
plays back the first section of each reco rdi ng at cue
speed, fast-forwarding between recordings.
view, press the [Play] button to start normal playback.
3 To Cancel the Intro-Jet Scan or to Stop Playback:
Press the [Stop] button.
VISS=VHS Index Search System (For NV-FJ730B)
Each programme recorded on the tape must be at least 5 minutes long.
1 To search for the beginning of a recording, press the
INDEX
[INDEX] button K (for searching ba ckward) and L
(for searching forward ).
You can press t he button twice or th ree times to loc ate
the second or third recording in either direction.
+
• The VCR fast-forwards or rewinds the tape and
searches for the specified index signal at the
beginning of the desired recording then playback
- - - - - - - - - - - - - - - - - - - - - - - - - - - - - - - - - - - - - - - - - - - - - - - - - - - - - - - - - - - - - - - - - - - - - - - - - - - - - - - - - - - - - - - - - - - - - - - - - - - - - - - - - - - - - - - - - - - -
starts automatically.
2 To Cancel the Index Search or to Stop Playback:
Press the [Stop] button.
1
2
DIRECT TV REC TV ASPECT
Í
123
4
5
7809
INPUT SELECT
AV
LIBRARY/SEARCH
INDEX
STILL ALBUM
REPLAY
MENU
AV LIN K
OK
TV / TEXT
TRACKING/V-LOCK
+
–
6
VOLUME
+
–
SV/V
REC
EXIT
VCR
TV
Intro-Jet Scan 2222
VCR Display
40
Page 41

VISS=VHS Index Search System (For NV-FJ780B)
Each programme recorded on the tape must be at least 5 minutes long.
1 Insert a recorded video cassette.
As soon as the cassette is inserted, the Cassette
Number Check starts. Wait a few moments until it is
- - - - - - - - - - - - - - - - - - - - - - - - - - - - - - - - - - - - - - - - - - - - - - - - - - - - - - - - - - - - - - - - - - - - - - - - - - - - - - - - - - - - - - - - - - - - - - - - - - - - - - - - - - - - - - - - - - - -
2 To search for the beginning of a recording, press the
INDEX
completed. (See page 15.)
[INDEX] button K (for searching ba ckward) and L
(for searching forward ).
You can press t he button twice or th ree times to loc ate
the second or third recording in either direction.
• The VCR fast-forwards or rewinds the tape and searches
for the specified index signal at the beginning of the desired
- - - - - - - - - - - - - - - - - - - - - - - - - - - - - - - - - - - - - - - - - - - - - - - - - - - - - - - - - - - - - - - - - - - - - - - - - - - - - - - - - - - - - - - - - - - - - - - - - - - - - - - - - - - - - - - - - - - -
recording then playback starts automatically.
3 To Cancel the Index Search or to Stop Playback:
Press the [Stop] button.
2
3
DIRECT TV REC TV ASPECT
Í
123
4
5
7809
INPUT SELECT
AV
LIBRARY/SEARCH
INDEX
STILL ALBUM
REPLAY
MENU
OK
rsrsr
DATE
CANCEL
PROG. / CHECK
I-TIMER
AUDIO OSD/DISPLAY
AV LIN K
TRACKING/V-LOCK
6
ON OFF
SP/LP/EP
+
TV / TEXT
–
VOLUME
TIMER
RESET
+
–
+
SV/V
REC
EXIT
VCR
TV
s
Á
To Find space to record (For NV-FJ780B)
• This function lets you search the position to record of the tape.
1 Insert a recorded video cassette.
If a cassette is already in the VCR, press the
LIBRARY/SEARCH
- - - - - - - - - - - - - - - - - - - - - - - - - - - - - - - - - - - - - - - - - - - - - - - - - - - - - - - - - - - - - - - - - - - - - - - - - - - - - - - - - - - - - - - - - - - - - - - - - - - - - - - - - - - - - - - - - - - -
[LIBRARY/SEARCH] button.
• As soon as the cassette is inserted, the Cassette Number
Check starts. Wait a few moments until it is completed.
(See page 15.)
2 Press the [Cursor] buttons (34) to select the [Find
space to record] indication and then press the
LIBRARY/SEARCH
[LIBRARY/SEARCH] button to start search.
1,2
2
INPUT SELECT
AV
LIBRARY/SEARCH
STILL ALBUM
MENU
REPLAY
0
–
+
SV/V
INDEX
REC
EXIT
OK
VCR
TV
VCR Display
On Screen Display
Content of tape: 30 1/1
Title
2 BBC2 (18:58) We 18.04.01
5 Find space to record 6
5 Intro-Jet Scan 6
Panasonic VCR
Date
Notes:
• Even after you have selected the [Find space to record] and the VCR has located the tape position from which to make a new
recording, we recommend you to confirm that this tape position is really suitable, before you start recording.
• You cannot select the item [Find space to record] when there is almost no space for recording on a videotape.
Intro-Jet Scan (For NV-FJ780B)
This VCR automatically records special index signals on the tape every time a recording starts. The Intro-Jet Scan function
makes use of these index signals to play back the beginning of each programme recorded on the cassette one after another at
high speed.
This lets you quickly and easily check the contents of a cassette and find a desired programme.
• Each programme recorded on the tape must be at least 15 minutes long (25 minutes in the EP mode).
1 Insert a recorded video cassette.
1,2
2
DIRECT TV REC TV ASPECT
Í
123
4
5
7809
INPUT SELECT
AV
LIBRARY/SEARCH
INDEX
STILL ALBUM
REPLAY
MENU
OK
rsrsr
DATE
CANCEL
PROG. / CHECK
I-TIMER
AUDIO OSD/DISPLAY
VCR
12
AV LIN K
TRACKING/V-LOCK
6
ON OFF
SP/LP/EP
+
–
TV / TEXT
VOLUME
SV/V
REC
VCR
s
TIMER
Á
RESET
LIBRARY/SEARCH
If a cassette is already in the VCR, press the
[LIBRARY/SEARCH] button.
• As soon as the cassette is inserted, the Cassette Number
Check starts. Wait a few moments until it is completed.
Content of tape: 30 1/1
Title
2 BBC2 (18:58) We 18.04.01
5 Find space to record 6
5 Intro-Jet Scan 6
(See page 15.)
+
–
+
3
EXIT
TV
- - - - - - - - - - - - - - - - - - - - - - - - - - - - - - - - - - - - - - - - - - - - - - - - - - - - - - - - - - - - - - - - - - - - - - - - - - - - - - - - - - - - - - - - - - - - - - - - - - - - - - - - - - - - - - - - - - - -
2 Press the [Cursor] buttons (34) to select the [Intro-
4
LIBRARY/SEARCH
If the [Intro-Jet Scan] indication does not appear on
the TV screen, press the [LIBRARY/SEARCH] button
to make it appear.
Jet Scan] indication and then press the [LIBRARY/
SEARCH] button to start Intro-Jet Scan.
• After rewinding the tape to the beginning, the VCR plays it
back at high speed for approximately 10 seconds. It then
Content of tape: 30 1/1
Title
5 Intro-Jet Scan 6
fast-forwards the tape to the next tape position marked by
an index signal (beginning of a programme), and every time
an index signal is found, the VCR switches over to high-
- - - - - - - - - - - - - - - - - - - - - - - - - - - - - - - - - - - - - - - - - - - - - - - - - - - - - - - - - - - - - - - - - - - - - - - - - - - - - - - - - - - - - - - - - - - - - - - - - - - - - - - - - - - - - - - - - - - -
speed playback (Cue) for about 10 seconds.
3 When you have found the prog ramme that you wan t to
- - - - - - - - - - - - - - - - - - - - - - - - - - - - - - - - - - - - - - - - - - - - - - - - - - - - - - - - - - - - - - - - - - - - - - - - - - - - - - - - - - - - - - - - - - - - - - - - - - - - - - - - - - - - - - - - - - - -
view, press the [Play] button to start normal playback.
4 To Cancel the Intro-Jet Scan or to Stop Playback:
Press the [Stop] button.
Panasonic VCR
Date
Panasonic VCR
Date
Advanced
Operations
41
Page 42

Editing
AV2(DECODER/DECODEUR/EXT
)
AV1 (TV
)
Assemble Editing
Assemble editing is the process of copying scenes from an external source such as a movie camera, to this VCR.
These scenes can be assembled in the order of your choice to create your own unique composition.
Preparations:
• Connect a video movie camera or a VCR to this VCR with an audio/
video cable or a 21-pin Scart cable, as shown in the illustration.
• Display the VCR picture on the TV.
• Insert the cassette on which you wish to record, and ensure that its
erasure prevention tab is intact.
• Set the [VCR/TV] switch (23) to [VCR].
• Press the [INPUT SELECT] button (3) to select the AV Input
(external input) [A1], [A2] or [A3] depending on the socket(s) on the
VCR to which the source unit has been connected.
A1: When connected to the AV1 21-pin Scart socket (52)
A2: When connected to the AV2 21-pin Scart socket (51)
• Make sure that [AV2] is set to [NORMAL]. (See page 39.)
A3: When connecting a mono source to the front inputs use the left
audio connector only.
• Use the L connector for operations in the normal (monaural)
mode.
Recording unit (this VCR)
Front
INTELLIGENT TIMER
AV3 IN
R
L/MONO
AUDIO
VIDEO
(43) (42)
Video movie camera Other VCR
Example of NV-FJ780B
Rear
(52) (51)
AV LIN K
2,5,6
1
7
DIRECT TV REC TV ASPECT
Í
123
4
7809
INPUT SELECT
AV
LIBRARY/SEARCH
STILL ALBUM
MENU
PROG. / CHECK
I-TIMER
VCR
12
5
INDEX
REPLAY
OK
rsrsr
DATE
ON OFF
CANCEL
SP/LP/EP
AUDIO OSD/DISPLAY
TV / TEXT
TRACKING/V-LOCK
+
–
6
VOLUME
+
–
SV/V
REC
EXIT
VCR
TV
s
TIMER
Á
RESET
1 Press the [Play] button to start playback.
- - - - - - - - - - - - - - - - - - - - - - - - - - - - - - - - - - - - - - - - - - - - - - - - - - - - - - - - - - - - - - - - - - - - - - - - - - - - - - - - - - - - - - - - - - - - - - - - - - - - - - - - - - - - - - - - - - - -
2 At the point where you want to join a new scene, press
the [Pause/Slow] button to put it in the still playback
+
- - - - - - - - - - - - - - - - - - - - - - - - - - - - - - - - - - - - - - - - - - - - - - - - - - - - - - - - - - - - - - - - - - - - - - - - - - - - - - - - - - - - - - - - - - - - - - - - - - - - - - - - - - - - - - - - - - - -
3
3 Press the [REC] button to put it in the recording pause
- - - - - - - - - - - - - - - - - - - - - - - - - - - - - - - - - - - - - - - - - - - - - - - - - - - - - - - - - - - - - - - - - - - - - - - - - - - - - - - - - - - - - - - - - - - - - - - - - - - - - - - - - - - - - - - - - - - -
REC
mode.
mode.
VCR Display
REC
4 Start playback on the source unit and search for the
point from which you want to record (copy) onto this
- - - - - - - - - - - - - - - - - - - - - - - - - - - - - - - - - - - - - - - - - - - - - - - - - - - - - - - - - - - - - - - - - - - - - - - - - - - - - - - - - - - - - - - - - - - - - - - - - - - - - - - - - - - - - - - - - - - -
5 When that point is reached, press the [Pause/Slow]
VCR.
REC
button again to start recording the new picture and
- - - - - - - - - - - - - - - - - - - - - - - - - - - - - - - - - - - - - - - - - - - - - - - - - - - - - - - - - - - - - - - - - - - - - - - - - - - - - - - - - - - - - - - - - - - - - - - - - - - - - - - - - - - - - - - - - - - -
6 To record (copy) additional scenes, press the [Pause/
sound from the playback unit.
REC
Slow] button to put this VCR in the recording pause
- - - - - - - - - - - - - - - - - - - - - - - - - - - - - - - - - - - - - - - - - - - - - - - - - - - - - - - - - - - - - - - - - - - - - - - - - - - - - - - - - - - - - - - - - - - - - - - - - - - - - - - - - - - - - - - - - - - -
mode and then perform above steps 4 and 5 again.
7 When you have finished recording, press the [Stop]
button.
Hint:
• The new sound is recorded on bot h th e Hi-F i audio tracks and the normal audio track. T he sound recorded on the normal audio
track is always in mono.
Note:
• If you leave the VCR in the reco rding p ause mode for mor e than 5 min utes in s tep 3 or 6, the VCR automat icall y sto ps to p rotect
the video heads.
42
Page 43

Audio Dubbing
The audio dubbing function lets you record new sound onto the normal (mono) audio track.
Although this erases the original sound on the normal audio track, the sound on the Hi-Fi audio tracks remains unchanged.
Use this function to add narration or background music to previously made recordings.
12
(43)
INTELLIGENT TIMER
AV3 IN
L/MONO
VIDEO
A.DUB
R
AUDIO
EXT LINK
A.DUB
3
A.DUB
3
5
6
Audio equipment or
Video movie camera
Preparations:
• Connect the audio equipment or a video movie camera to this VCR with an audio cable.
• Select the video playback channel/AV input on your TV.
• Insert the cassette on which the audio dubbing is to be performed, and ensure that its erasure prevention tab is intact.
• Press the [INPUT SELECT] button (3) to select th e AV Input (exte rnal inp ut) [A1], [A2] or [A3] depend ing on th e socket(s )
on the VCR to which you have connected the source unit.
A1: When connected to the AV1 21-pin Scart socket (52)
A2: When connected to the AV2 21-pin Scart socket (51)
• Make sure that [AV2] is set to [NORMAL]. (See page 39.)
A3: When connecting a mono source to the front inputs use the left audio connector only.
• Use the L connector for operations in the normal (monaural) mode.
AV LIN K
DIRECT TV REC TV ASPECT
2,5
1
6
Í
123
4
5
7809
INPUT SELECT
AV
LIBRARY/SEARCH
INDEX
STILL ALBUM
REPLAY
MENU
rsrsr
DATE
CANCEL
PROG. / CHECK
I-TIMER
AUDIO OSD/DISPLAY
VCR
12
OK
ON OFF
SP/LP/EP
TV / TEXT
TRACKING/V-LOCK
+
–
6
VOLUME
+
–
SV/V
REC
EXIT
VCR
TV
s
TIMER
Á
RESET
+
1 Press the [Play] button to start playback to search for
- - - - - - - - - - - - - - - - - - - - - - - - - - - - - - - - - - - - - - - - - - - - - - - - - - - - - - - - - - - - - - - - - - - - - - - - - - - - - - - - - - - - - - - - - - - - - - - - - - - - - - - - - - - - - - - - - - - -
the point from which you want to start audio dubbing.
2 At the point from which you want to perform audio
dubbing, press the [Pause/Slow] button to put it in the
- - - - - - - - - - - - - - - - - - - - - - - - - - - - - - - - - - - - - - - - - - - - - - - - - - - - - - - - - - - - - - - - - - - - - - - - - - - - - - - - - - - - - - - - - - - - - - - - - - - - - - - - - - - - - - - - - - - -
3 Press the [A.DUB] button on this VCR to put it in the
- - - - - - - - - - - - - - - - - - - - - - - - - - - - - - - - - - - - - - - - - - - - - - - - - - - - - - - - - - - - - - - - - - - - - - - - - - - - - - - - - - - - - - - - - - - - - - - - - - - - - - - - - - - - - - - - - - - -
A.DUB
still playback mode.
recording pause mode.
4 Start playback on the so urce un it so tha t yo u can he ar
- - - - - - - - - - - - - - - - - - - - - - - - - - - - - - - - - - - - - - - - - - - - - - - - - - - - - - - - - - - - - - - - - - - - - - - - - - - - - - - - - - - - - - - - - - - - - - - - - - - - - - - - - - - - - - - - - - - -
the sound.
5 When you reach the point from which y ou wan t to start
audio dubbing, pre ss the [Pause /Slow] but ton again to
- - - - - - - - - - - - - - - - - - - - - - - - - - - - - - - - - - - - - - - - - - - - - - - - - - - - - - - - - - - - - - - - - - - - - - - - - - - - - - - - - - - - - - - - - - - - - - - - - - - - - - - - - - - - - - - - - - - -
start recording the new sound or start your narration.
6 At the point where you want to stop audio dubbing,
ADUB 0:00:29
press the [Stop] button to finish recording.
Hints:
• For audio dubbing with narration, you can use the built-in microphone of the connected video movie camera.
• The new sound is recorded on the normal audio track. The original sound remains on the Hi-Fi audio tracks.
The sound recorded on the normal audio track is always in mono.
• To listen to the sound recorded with audio dubbing, press the [AUDIO] button (17) during playback to select the normal audio
track. (For details, refer to page 37.)
• To listen to the sound recorded with audio dubbing together with the original sound, first set [Audio playback] to [MIX] (for
details, refer to page 38) and then press the [AUDIO] button (17) during playback to select the mixed sound.
Advanced
Operations
43
Page 44

Album Function
The album functio n l ets y ou col le ct d es ire d s ce nes (b oth mo ving and still pictures) and create t he e qu iva le nt o f a pho to alb um on
a video cassette.
The pictures can b e c opi ed ont o th e c as set te from a video movie camera, a digital still camera or another VCR for a desired time
that you can select (3–20 seconds).
Preparations:
• Switch on VCR.
• Connect a digital still camera, a video movi e came ra or another
external source to the Video Input socket (42) and Audio Input
sockets (43) on the front panel of this VCR (AV1/AV2 cannot
be used with this function).
• Display the VCR picture on the TV.
• Insert a cassette with intact erasure prevention tab.
1 Press the [STILL ALBUM] button on the remote
1,3
5
DIRECT TV REC TV ASPECT
Í
123
4
5
7809
INPUT SELECT
AV
LIBRARY/SEARCH
INDEX
STILL ALBUM
REPLAY
MENU
OK
rsrsr
DATE
CANCEL
PROG. / CHECK
I-TIMER
AUDIO OSD/DISPLAY
VCR
12
AV LINK
TRACKING/V-LOCK
6
ON OFF
SP/LP/EP
+
–
TV / TEXT
VOLUME
+
–
SV/V
REC
VCR
s
TIMER
Á
RESET
STILL ALBUM
+
- - - - - - - - - - - - - - - - - - - - - - - - - - - - - - - - - - - - - - - - - - - - - - - - - - - - - - - - - - - - - - - - - - - - - - - - - - - - - - - - - - - - - - - - - - - - - - - - - - - - - - - - - - - - - - - - - - - -
EXIT
TV
2 Start playback on the source unit to search for the
- - - - - - - - - - - - - - - - - - - - - - - - - - - - - - - - - - - - - - - - - - - - - - - - - - - - - - - - - - - - - - - - - - - - - - - - - - - - - - - - - - - - - - - - - - - - - - - - - - - - - - - - - - - - - - - - - - - -
3 When that point is reac he d, p res s the [STILL ALBUM]
STILL ALBUM
- - - - - - - - - - - - - - - - - - - - - - - - - - - - - - - - - - - - - - - - - - - - - - - - - - - - - - - - - - - - - - - - - - - - - - - - - - - - - - - - - - - - - - - - - - - - - - - - - - - - - - - - - - - - - - - - - - - -
4 Repeat above step s 2 and 3 to rec ord oth er sce nes in
- - - - - - - - - - - - - - - - - - - - - - - - - - - - - - - - - - - - - - - - - - - - - - - - - - - - - - - - - - - - - - - - - - - - - - - - - - - - - - - - - - - - - - - - - - - - - - - - - - - - - - - - - - - - - - - - - - - -
control to put the VCR in the recording pause mode.
• The VCR automatically selects the AV Input
(external input) [A3] and then switches over to the
recording pause mode. The figure for the preset
recording time (seconds) appears on the VCR
display. The initial setting is [05] (5 seconds).
point from which you want to copy onto this VCR.
button on the remote cont rol o f this VCR aga in to sta rt
recording. The VCR records the picture (and sound)
for 5 seconds and the n au tom atically switches over to
the recording pause mode.
succession.
5 When you have recorded all of the desired scenes,
press the [Stop] button.
Recording unit (this VCR)
INTELLIGENT TIMER
R
L/MONO
AUDIO
VIDEO
AV3 IN
Digital still camera
Recording unit (this VCR)
AV3 IN
(42)
Video movie camera
INTELLIGENT TIMER
R
L/MONO
AUDIO
VIDEO
VCR Display
REC
REC
(43)
To Change the Recording Time:
REC
After step 1 or 3, press the [INDEX] L or [INDEX] K button (31)
to change the recording time.
You can set any time between [3] and [20] seconds.
Indication when the recording
time is set to [10]
Hints:
• If you connect a digital still camera, use a camera equipped with a video output socket. Use the cable supplied with the still
camera to connect it. For details, also read the operating instructions of the equipment to be connected.
• If you leave the VCR in the reco rding p ause mode for mor e than 5 min utes in s tep 1 or 3, the VCR automat icall y sto ps to p rotect
the video heads. In this case, press the [STILL ALBUM] button (6) again to put the VCR in the recording pause mode again.
• If you want to add background music or narration to the scenes recorded with the album function, perform Audio Dubbing as
explained on the previous page.
• Depending on the output system of the digital still camera, the pictures may not be recorded correctly (e.g. NTSC output).
44
Page 45

Hints
Glossary
What is PDC?
Programme Delivery Control adjusts the start and stop time of a timer recording automatically to ensure the recording starts and
finishes in line with the programme broadcast. This is useful when a programme over-runs the published times.
The station must be transmitting PDC and the exact time must be set for PDC to work.
The VCR detects whether a station is transmitting PDC only during the tuning process.
If PDC is introduced or discontinued by a station you will need to re-tune the VCR before it becomes aware of this.
PDC transmissions are not currently nation-wide so please check with your local broadcaster for more information.
OTR
One Touch Recording
This is a simple method for setting the recording duration quickly without using timer recording. It is especially useful if you have
started recording and want the recording to end automatically when you are not there, e.g.; when you go to bed.
*
If your TV is equipped with
the [Q Link]*1, [DATA LOGIC]
with a 21-pin Scart lead
• Q Link is an advanced sys tem th at offe rs a range of conveni ent fun cti ons s uc h a s auto ma tic c opy in g o f th e tu nin g p os iti on of a l l
available TV stations (in the sam e ord er as they are programmed on the TV) into your VCR’s memory (this is called Download)
if you connect the VCR to your TV with a fully-wired 21-pin Scart lead (not supplied). Depending on the manufacturer, the
equivalent of the Q Link function has a different name and may not work exactly the same.
*1
[Q Link] is a registered trademark of Panasonic.
*2
[DATA LOGIC] is a registered trademark of Metz.
*3
[Easy Link] is a registered trademark of Philips.
*4
[Megalogic] is a registered trademark of Grundig.
*5
[SMARTLINK] is a registered trademark of Sony.
For details, refer to your TV’s operating instructions or consult your dealer.
• Unlike in most commercially sold 21-pin Scart lead, in fully-wired 21-pin Scart lead all 21 pins of one plug are connected to the
matching pin of the plug on the other end of the lead. This type of lead is necessary for the Preset Download function to work.
2
, [Easy Link]*3, [Megalogic]*4 or [SMARTLINK]*5 function and
Q Link Function
When the VCR is connected via fully wired SCART to the TV, Q Link allows:
Download from the TV — Copies the tuning set-up from your TV to your VCR.
Direct TV Recording — the programmed being viewed on the TV can be recorded immediately by pressing the
[DIRECT TV REC] button (36) .
TV/VCR Auto switch On — whilst in standby mode pressing the [Play] (26), [SV/V+]([VIDEO Plus+]) (30) or
[PROG./CHECK] (14) button will turn the TV and VCR on.
Auto Switch Off — When the TV is turned off, the VCR will be turned off as well.
Only operates in Rewind, Stop mode or when no tape is inserted.
VISS=VHS Index Search System
An index signal is recorded on the tape at the start of each recording. It can be used to quickly find the start of a recording on a
tape.
OSD — On-Screen Display
The VCR model is shown on the TV screen when the OSD is on (menu setting) and the [OSD/DISPLAY] button (18) is pressed.
CVC Super — Crystal View Control Super
CVC Super gives the best picture quality possible by adjusting to the individual tape characteristics and [CVC] indicator appears
on the VCR display while the VCR is on.
NICAM Digital Broadcasting System
This is a 2 channel sound broadcast system which in most instances provides high quality stereo sound. Broadcasters can also
transmit two separate mono soundtracks on this system.
Recording Speed SP/LP/EP
SP Recording normal speed so that a 3-hour tape lasts for 3 hours (for best recording quality).
LP Recording at half the speed so that a 3-hour tape can last 6 hours (the quality of the recording is not as good as SP
recordings).
EP Recording at one third the speed so that a 3-hour tape can last 9 hours (the quality of the recording is not as good as SP
and LP recordings).
RGB Signals
The RGB signals are looped through from an external source only and are not recorded or produced by this VCR.
Tracking/V-Lock
Tracking and Vertical lock controls are used to make manual adjustments when the picture becomes unstable or contains noise
bars during Playback, Slow Playback and Still Playback modes.
45
Helpful Hints
Page 46

Trouble Shooting
I HAVE AN ON SCREEN MESSAGE.
You have attempted to carry out a function, which is not possible at this time. It may be that no tape is inserted and you have pressed the
[Play] button
Please follow the instructions as given on the display.
THE VCR DISPLAY IS NOT ILLUMINATED.
The AC mains lead has become disconnected.
Connect mains lead securely.
THE DISPLAY IS LIT, BUT THE VCR CANNOT BE OPERATED.
The VCR is in timer recording mode.
Press the [TIMER (REC)] button
Safety devices are operating.
Disconnect the mains, wait for 1 minute and reconnect. If problem persists, consult service engineer.
VCR PICTURE DOES NOT APPEAR ON THE SCREEN.
If connected via RF check, RF output channel and adjust if necessary. (See page 10 for details.)
If connected via SCART, check connections and choose appropriate AV channel on TV.
AUTO CLOCK SETTING DOES NOT OPERATE.
Teletext information is not available or cannot be read.
Set the clock manually. (See page 36 for details.)
DOWNLOAD CANNOT BE PERFORMED.
The VCR is not connected to a Q Link (or similar) TV via the 21-pin Scart connector.
Check Q Link compatibility and that Scart lead is fully wired.
THE PICTURE, DURING PLAYBACK, IS DISTORTED BLACK AND WHITE OR HAS HORIZONTAL NOISE BARS.
The tracking adjustment is not correct.
Adjust the tracking. (See page 17.)
The playback channel on the TV has not been tuned properly.
Re-tune the TV.
The video heads may be worn or clogged.
Consult service engineer.
THE PICTURE OF A RECORDED PROGRAMME IS DISTORTED OR MISSING.
The aerial or connection is defective.
Check connections and reconnect as necessary.
No programme was recorded because the VCR is not tuned correctly.
Re-tune the VCR.
Incorrect programme position was selected.
Select correct channel.
TIMER RECORDING DOES NOT OPERATE CORRECTLY.
Time and date were not set correctly. Re-set correctly.
The start or finish time was not set correctly. Re-set correctly.
The VCR was not put into timer recording mode.
Put VCR into timer recording mode.
RECORDING FROM AN EXTERNAL SOURCE IS NOT POSSIBLE.
The incorrect AV input was selected.
Check which AV input is in use and select this on the VCR.
The leads are not connected properly.
Check connections and adjust as necessary.
THE REMOTE CONTROL DOES NOT OPERATE CORRECTLY.
The remote signal cannot reach the VCR.
Point the remote at the front of VCR and make sure that there are no objects in the way.
The remote is too far from the VCR.
Move closer to the VCR or replace the batteries.
The batteries have been inserted incorrectly. Insert the batteries correctly.
The wrong remote control mode has been selected. Change the remote control mode.
The [VCR/TV] switch
THE TAPE LIBRARY SYSTEM DOES NOT WORK CORRECTLY (For NV-FJ780B)
The Cassette Number Check has failed.
The Cassette Number Check was cancelled midway.
Try to perform the Cassette Number Check again. (See page 29.)
The inserted cassette is new (unrecorded).
The inserted cassette was recorded on another VCR and does not have a cassette number.
The inserted cassette was recorded on a model NV-FJ780B VCR other than this unit.
The cassette number of the inserted cassette has been deleted from the Tape Library data.
The Library memory may be full.
#The Cassette Number Check is designed to fail whenever one of the above conditions applies; this is not a malfunction.
The recorded programme has not been registered in the Tape Library data.
The length of the recorded programme is less than 15 minutes in the SP or LP mode.
Record for more than 15 minutes in the SP or LP mode.
The length of the recorded programme is less than 25 minutes in the EP mode.
Record for more than 25 minutes in the EP mode.
No Tape Library data is registered when insert editing is performed in a previously recorded programme.
This is not a malfunction.
, or that you tried to change the details of a timer recording whilst it was being carried out.
(26)
to cancel the mode.
(20)
is on [TV]. Switch o ve r to [VCR].
(23)
46
Page 47

Specifications
NV-FJ780B
NV-FJ730B
Power Source: 220-240 V AC 50/60 Hz
Power Consumption: 18 W (NV-FJ780B)
18 W (NV-FJ730B)
Video Recording System: 2 rotary heads, helical scanning system
Video Heads: 4 heads
Audio Heads: 2 heads (Hi-Fi)
Tape Speed: SP; 23.39 mm/s
LP; 11.7 mm/s
Tape Format: VHS tape
Record/Playback Time: SP; 240 min with NV-E240
LP; 480 min with NV-E240
FF/REW Time: approx. 60 s with NV-E180
VIDEO
Television System:
CCIR; 625 lines, 50 fields, PAL colour signal
Modulation System:
Luminance; FM azimuth recording
Colour signal; converted subcarrier phase shift recording
Input Level:
AV1/AV2; 1.0 Vp-p, 75 ohm, terminated
VIDEO IN (AV3) (PHONO); 1.0 Vp-p, 75 ohm, terminated
Output Level:
AV1/AV2; 1.0 Vp-p, 75 ohm, terminated
RF Modulated; UHF channel (21-68), 75 ohm
AUDIO
Input Level:
AV1/AV2; `6 dBV, more than 10 kohm
AUDIO IN (AV3) (PHONO); `6 dBV, more than 10 kohm
Output Level:
AV1/AV2; `6 dBV, less than 1 kohm
AUDIO OUT (PHONO); `6 dBV, less than 1 kohm
Audio Track:
1 track (Normal-mono only), 2 channels (Hi-Fi sound-stereo)
Video Horizontal Reso lution: Colour; more than 240 lines (SP)
Signal-to-Noise Ra tio: Video; more than 43 dB (SP)
Dynamic Range: Audio; more than 90 dB/Hi-Fi
Audio Frequency Response:20 Hz-20 kHz/Hi-Fi
Wow and Flutter: 0.005% Wrms/Hi-Fi
Operating Temperature: 5eC–40eC
Operating Humidity: 35%–80%
Weight: 3.5 kg
Dimensions: 430 (W)k87 (H)k282 (D) mm
21-pin Scart Socket
The 21-pin Scart socket transmits both input and
output signals for picture and sound. TVs equipped
with the same type of socket can be connected here.
This type of socket is also called Peritel, Euro
Connector and Euro AV.
1 3 5 7 9 11 13 15 17 19
21
2468101214161820
AV1 Scart Socket (for Q Link connection)
11 Audio output CH2 (R) 12 No connection
12 Audio input CH2 (R) 13 Red ground
13 Audio output CH1 (L) 14 Blanking ground
14 Audio ground 15 Red
15 Blue ground 16 Blanking
16 Audio input CH1 (L) 17 Video output ground
17 Blue 18 Video input ground
18 Switching voltage 19 Video output
19 Green ground 20 Video input
10 Q Link data 21 Ground
11 Green
AV2 Scart Socket
11 Audio output CH2 (R) 12 Reserved
12 Audio input CH2 (R) 13 Red ground
13 Audio output CH1 (L) 14 Blanking ground
14 Audio ground 15 Red
15 Blue ground 16 Blanking
16 Audio input CH1 (L) 17 Video output ground
17 Blue 18 Video input ground
18 Switching voltage 19 Video output
19 Green ground 20 Video input
10 Control signal 21 Ground
11 Green
The Red, Green and Blue (RGB) video signals are
looped through only from an external source unit, for
example from a connected a pay-TV decoder, i.e. they
are not from tape playback.
Weight and dimensions shown are approximate.
Specifications are subject to change without notice.
47
Helpful Hints
Page 48

Index
ª
A
Audio ............................................................................. 37
Audio dubbing ...............................................................43
Auto Setup (with Q Link) ................................................. 8
Auto Setup (without Q Link) ............................................9
ª
B
Battery .............................................................................5
ª
C
Child lock ......................................................................17
Clock ............................................................................. 36
Condensation .................................................................. 3
Cue ...............................................................................16
CVC Super ....................................................................45
ª
D
Decoder ........................................................................12
DIMMED .......................................................................38
Direct TV recording .................................................19, 45
Download ...................................................................... 34
ª
E
EP ...........................................................................18, 45
Erasure protection ...........................................................5
EXT LINK ......................................................................20
ª
F
Fast forward ..................................................................16
ª
H
Hi-Fi ..............................................................................38
ª
I
Intelligent timer ..............................................................25
Intro-jet scan ...........................................................40, 41
ª
J
Jet Search ......................................................... ...... ..... .16
ª
L
LP ............................................................................ 18, 45
ª
M
Manual Tuning ..............................................................32
Menu ............................................................................. 21
MONO ........................................................................... 37
ª
N
NICAM ....................................................................37, 45
NTSC playback .............................................................17
ª
O
OSD ..................................................................37, 39, 45
OTR ..............................................................................19
Owner ID .......................................................................35
ª
P
PDC .............................................................................. 24
Playback .......................................................................16
Playback off timer .........................................................16
Pos ......................................................................... 23, 32
ª
Q
Q Link ................................................................... 6 , 8, 45
ª
R
Recording ..................................................................... 18
Remaining tape time ..................................................... 19
Remote control mode ...................................................39
Repeat playback ...........................................................17
Replay .......................................................................... 17
Review .......................................................................... 16
Rewind ..........................................................................16
RF ...............................................................................6, 7
ª
S
Scart lead .......................................................................6
Shipping condition ........................................................ 34
Slow playback ...............................................................16
SP ........................................................................... 18, 45
SQPB ...................................................................... 17, 38
Stereo ...........................................................................12
Still album ................................................. ..... ...... ......... 44
Still playback ................................................................. 16
Stop .............................................................................. 16
ª
T
Tape length ................................................................... 38
Tape Library System ....................................................27
Tape speed ................................................................... 18
Teletext .........................................................................13
Timer record confirmation ............................................. 40
Timer recording ............................................................22
Tracking ........................................................................ 17
TV Aspect ................................................. ..... ...... ..... ....13
ª
V
VCR display .................................................................. 38
VIDEO Plus+ ..........................................................14, 23
VISS ....................................................................... 40, 41
Matsushita Electric Industrial Co., Ltd.
http://www.panasonic.co.jp/global/
 Loading...