

Panasonic NR-B53VW2, NR-B53V2 Operating Instructions
Operating Instructions
Refrigerator-Freezer
(Household use)
English Deutsch
English 2-30
Thank you for purchasing this Panasonic product.
Please read these instructions carefully before using this
product. Please keep this manual for future reference.
Included installation Instructions.
Model No.
NR-B53V2
NR-B53VW2
NR-BG53V2
NR-
Svenska 176-204
Gratulerar till ditt inköp av denna Panasonic-produkt.
Läs noggrant igenom denna bruksanvisning före användningen.
Spara denna bruksanvisning för framtida bruk.
Anvisningar om installationen är inkluderade.
BG53VW2
Nederlands
Français Italiano Español Svenska Norsk Dansk Polski Česky
Deutsch 31-59
Wir danken Ihnen für den Kauf dieses Panasonic-Produkts.
Bitte lesen Sie diese Anweisungen vor der Benutzung dieses
Produkts sorgfältig durch. Bitte bewahren Sie diese Anleitung
für spätere Bezugnahme auf. Installationsanleitung enthalten.
Nederlands 60-88
Hartelijk dank voor uw aankoop van dit Panasonic product.
Lees deze aanwijzingen aandachtig door voordat u dit product in
gebruik neemt. Bewaar deze handleiding voor latere naslag.
Inclusief installatiehandleiding.
Français 89-117
Nous vous remercions d’avoir acheté un produit Panasonic.
Veuillez lire ce mode d’emploi attentivement avant d’utiliser
ce produit. Prière de conserver ce mode d’emploi pour toute
référence ultérieure. Instructions d’installation incluses.
Italiano 118-146
La ringraziamo per aver acquistato questo prodotto Panasonic.
Leggere attentamente le istruzioni prima di usare il prodotto.
Conservare il presente manuale per consultazioni future.
Le istruzioni per l'installazione sono incluse.
Español 147-175
Muchísimas gracias por haber adquirido este producto de Panasonic.
Lea atentamente estas instrucciones antes de usar este
producto. Guarde este manual para poder consultarlo en el
futuro. Se incluyen instrucciones para la instalación.
Norsk 205-233
Takk for at du valgte å kjøpe dette produktet fra Panasonic.
Les disse instruksjonene nøye før du bruker produktet.
Ta vare på denne håndboken i tilfelle du får bruk for den senere.
Instruksjoner for installasjon medfølger.
Dansk 234-262
Tak fordi du har valgt dette produkt fra Panasonic.
Læs venligst nærværende instruktioner, inden du tager dette
produkt i brug. Gem venligst denne brugsanvisning, inklusive
installationsanvisningerne, til fremtidig reference.
Polski 263-291
Dziękujemy za zakup produktu rmy Panasonic.
Prosimy o dokładne przeczytanie niniejszych instrukcji przed korzystaniem
z niniejszego produktu. Prosimy o zachowanie niniejszego podręcznika do
wykorzystania w przyszłości. Zawiera instrukcje instalacyjne.
Česky 292-320
Děkujeme vám za zakoupení tohoto produktu Panasonic.
Před použitím si důkladně přečtěte tyto pokyny.
Uschovejte tento návod pro budoucí využití.
Návod k instalaci je přiložen.
Introduction
Contents
Introduction
Installation
Operation
Appendix
Safety instructions ................................................................................................... 2
Caring for the environment .....................................................................................6
Installation ................................................................................................................. 7
Choosing the right location ........................................................................ 7
Removing the doors ..................................................................................8
Connecting the refrigerator to the water supply ......................................10
Installing the water lter...........................................................................12
Installing the refrigerator..........................................................................13
Preparations ............................................................................................14
Parts and their functions ....................................................................................... 15
Interior and foods stored ......................................................................... 15
For saving energy....................................................................................16
Temperature label (accessory) ................................................................ 16
Exterior and operation panel ................................................................... 17
Setting the temperature ......................................................................................... 19
Using the handy functions ....................................................................................20
How to use the Ice/Water dispenser ..................................................................... 22
Concerning the user alert functions ..................................................................... 22
Removing and re-installing ...................................................................................23
Cleaning and maintenance .................................................................................... 24
Cleaning .................................................................................................. 24
Changing the water lter ......................................................................... 25
Stopping the automatic ice-making ......................................................... 26
Checks after cleaning and maintenance ................................................. 26
When the refrigerator is not going to be used for a prolonged period .....26
When moving or transporting the refrigerator..........................................27
Troubleshooting ..................................................................................................... 28
Safety instructions
This appliance is intended to be used in household and similar applications such as
- staff kitchen areas in shops, ofces and other working environments;
- farm houses and by clients in hotels, motels and other residential type environments;
- bed and breakfast type environments;
- catering and similar non-retail applications.
This appliance can be used by children aged from 8 years and above and persons with
reduced physical, sensory or mental capabilities or lack of experience and knowledge if they
have been given supervision or instruction concerning use of the appliance in a safe way
and understand the hazards involved. Children shall not play with the appliance. Cleaning
and user maintenance shall not be made by children without supervision.
Do not
Make sure you do this Do not take apart
2
Indicates the appliance must be
earthed to prevent electric shock
Introduction
WARNING
WARNING: Do not use mechanical devices or other means to accelerate the
defrosting process, other than those recommended by the manufacturer.
WARNING: Do not damage the refrigerant circuit.
WARNING: Do not use electrical appliances inside the food storage
compartments of the appliance, unless they are of the type recommended by
the manufacturer.
Do not store volatile or ammable substances in the refrigerator.
WARNING: Keep ventilation openings, in the appliance enclosure or in the
built-in structure, clear of obstruction.
Indicates risk of death or serious injury.
● This can cause damage to the interior of the refrigerator or cause an explosion.
● Flammable substances such as benzene, thinners, alcohol, ether and Liquid
Petroleum Gas (LPG) can cause explosions.
● The refrigerant (R600a) used in the refrigerator and the gases in the insulation
material (cyclopentane) are both ammable. They also require special disposal
procedures.
● Before you dispose of the appliance, make sure none of the pipes on the back
are damaged. Refrigerant or gas leaks can cause re or explosion.
English
WARNING: Connect potable water supply only.
The new hose – sets supplied with the appliance are to be used and that old
hose – sets should not be reused.
The ice maker in refrigerator must be installed only by the manufacture or its
service agent except ice storage box.
● Ice maker type : EAU37119711, EAU37119712
Make sure the supply cord and plug are not squashed or damaged.
● A damaged power plug or cord can cause short-circuit, re or electric shock.
● If the supply cord is damaged, it must be replaced by the manufacturer, its
service agent or similarly qualied persons in order to avoid a hazard.
● DO NOT ATTEMPT TO REPLACE IT YOURSELF.
If LED or LED cover is damaged or if anything appears questionable, contact
your dealer or an authorized service centre.
● Do not attempt to repair, replace or disassemble any damaged parts, etc.
yourself.
3

Introduction
Do not use a multiple socket adaptor and plug several appliances into the
same socket adaptor.
Do not pin or bend the supply cord, or place heavy objects on it.
Do not unplug the refrigerator by pulling on the supply cord.
Do not place any water container on the top of the refrigerator.
Do not spray inammable gas near the refrigerator.
● This can cause overheating, re or short circuit.
● This increases the risk of re or electric shock. If the supply cord or plug of the
appliance is damaged, it must be replaced by the manufacturer, its service agent
or similarly qualied person in order to avoid a hazard.
● This can damage to the supply cord. Always grip the plug and pull rmly from the
socket.
● Water can damage insulation of electrical components and cause short circuit,
re or electric shock.
● This can cause explosion or re.
Do not spray water onto or into the refrigerator.
● This can cause re or electric shock.
Do not touch the power plug with wet hands.
● This can cause electric shock.
Do not install the refrigerator in a damp place, or where it may come into
contact with water.
● Deteriorated insulation of electrical parts can cause short circuit, electric shock or
re.
Do not store pharmaceuticals or other temperature-sensitive products in the
refrigerator.
● You should not store products that require strict temperature controls in the
refrigerator.
Do not let children climb, swing or hang on the refrigerator door.
● This can cause serious injury, as well as damaging the refrigerator.
Do not operate the refrigerator in the presence of explosive fumes or
ammable gas.
● This can cause explosion or re.
Do not store petrol or other ammable liquids and vapours in the refrigerator,
or use them near the appliance.
● This can cause explosion or re.
Do not touch the crusher blades of the icebox. Do not poke your ngers into
the hole where the ice is dispensed from the Ice/Water dispenser.
● Failure to do this may result in an injury to yourself.
Do not try to disassemble, repair or modify the refrigerator yourself.
● You may injure yourself – or others – with burns or electric shock, or damage
the refrigerator. If your appliance needs alterations or repair, please consult
authorized service centre.
Ensure that the refrigerator is plugged into an earthed mains socket. DO NOT
plug into an unearthed mains socket.
4
Introduction
Remove any dirt or dust from the plug’s pins before connecting to the power
supply.
● Dust build-up on the plug can cause insulation failure, especially in humid
conditions. This can cause short circuit, re or electric shock. Unplug the supply
cord and wipe it with a dry cloth. Never use a wet or damp cloth.
Plug your appliance into the socket, making sure the connection is secure.
● A loosely connected power plug can cause re or electric shock.
Install the refrigerator in a well-ventilated area.
● The more refrigerant there is in an appliance, the larger the room it should be
installed in. If there’s a refrigerant uid leak, and the appliance is in a small room,
the build up of combustible gases is more likely. This can cause re or explosion.
As a guide, for every 8 g of coolant, you’ll need at least 1 cubic metre of space in
the room. The data plate inside the appliance tells you how much refrigerant your
refrigerator contains.
Unplug the refrigerator before cleaning and servicing.
● Failure to do this can cause electric shock.
English
If you smell burning or see smoke coming from the refrigerator, disconnect
the power immediately and please consult authorized service centre.
LED RADIATION
DO NOT VIEW DIRECTLY WITH OPTICAL INSTRUMENTS
CLASS 1M LED PRODUCT
CAUTION
Do not put glass bottles or containers in the freezer.
Do not touch the inside walls of the freezer or items stored in the freezer with
wet hands.
Do not open or close the doors by taking hold of the door handles with both
hands.
Do not touch the ice maker with your hand or a tool.
Indicates risk of injury or damage to property.
● When the contents freeze, the glass may break.
● Your skin can become frozen onto the interior wall, or items stored in the freezer.
● This may cause personal injury.
● The ice maker rotates automatically. This may cause personal injury or trouble.
Do not put your hand or things in the ice shooter.
● This may cause personal injury or trouble.
5
Introduction
If there’s a power cut, avoid opening the refrigerator
frequently or putting unchilled food in it.
If you’re not going to use the refrigerator for a long
time, unplug it from the mains.
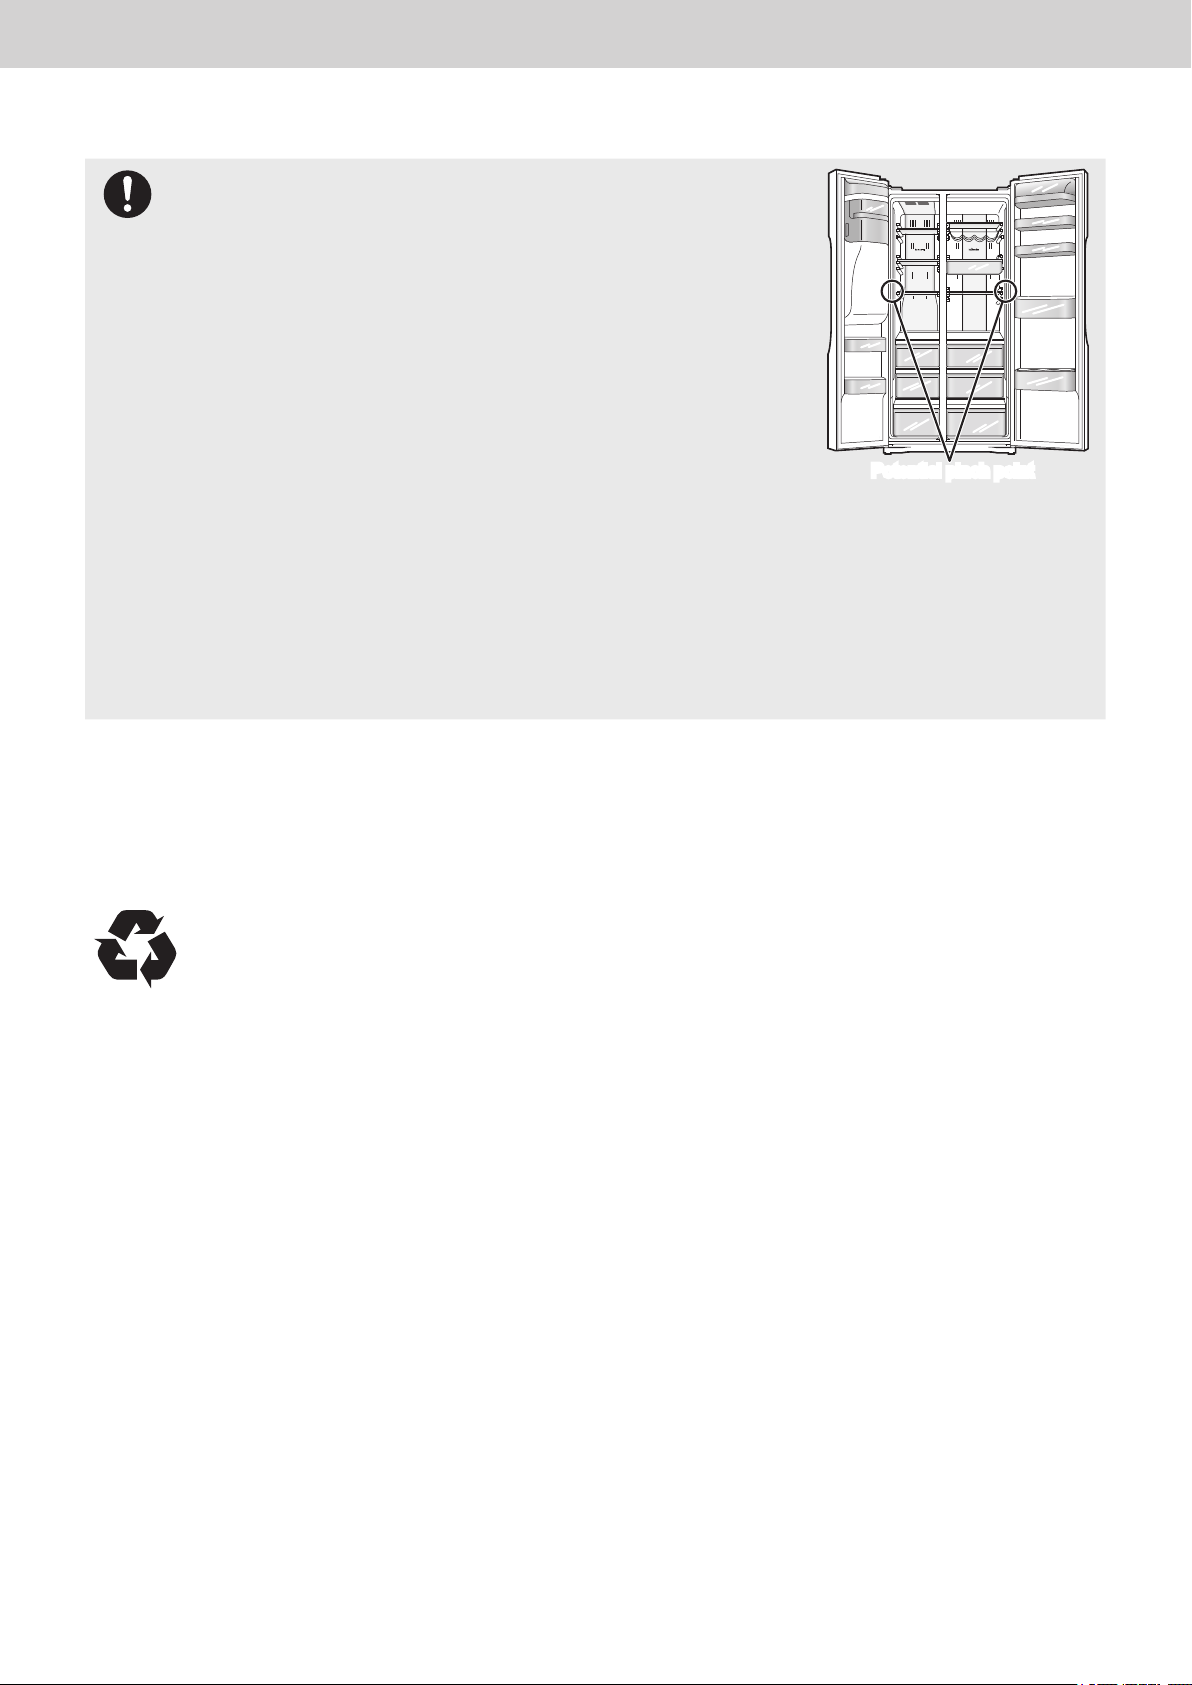
Also, be careful of the gap between the fridge and
freezer doors, especially if they are both open at the
same time.
When opening the refrigerator, be careful not to
pinch your ngers at the “pinch point” areas.
Keep children from touching the ice maker and icebox.
● This can cause the temperature in the refrigerator to
rise and spoil food stored inside.
● This may cause personal injury.
● This can cause personal injury.
● Otherwise, they may be injured.
Potential pinch point
Stop using this ice maker and contact an authorized service centre if
discoloured ice was made during use.
Caring for the environment
Disposing of the packaging
Please recycle where possible (e.g. cardboard, plastic bags, adhesive tape and polystyrene) and make
sure you dispose of all other packing materials safely.
Keep the packaging out of the reach of babies and young children, to avoid injury or suffocation.
Before disposing of your old appliance
Please follow either the disposal instructions from the manufacturer of the old appliance, or local disposal
regulations for the appliance. Where this is not available, please follow the three step instructions below.
1. Remove the plug from the socket.
2. Cut the supply cord off, and safely dispose of it with the mains plug still attached.
3. Until the old appliance is collected, or you take it to a Recycling Centre, make sure it’s out the reach of small children.
● Remove all sealing materials from the door and leave all the shelves and drawers in place.
This way, children are less likely to climb in and become trapped.
6
910 mm353 mm 430 mm
947 mm
910 mm322 mm 388 mm
977 mm
Installation
Choosing the right location
Install the refrigerator in a location which satises the following criteria:
● Where there is a main water supply line nearby
● Where the refrigerator will not be exposed to direct sunlight
● Where the refrigerator will be at a distance from heating appliances, cooking appliances and other
sources of heat
● A location which is well-ventilated and dry
● Where the oor is sturdy and level
Place a solid board underneath if the refrigerator is to be installed on top of a carpet or vinyl oor.
The board will protect the oor from becoming deformed and discoloured.
Installation
English
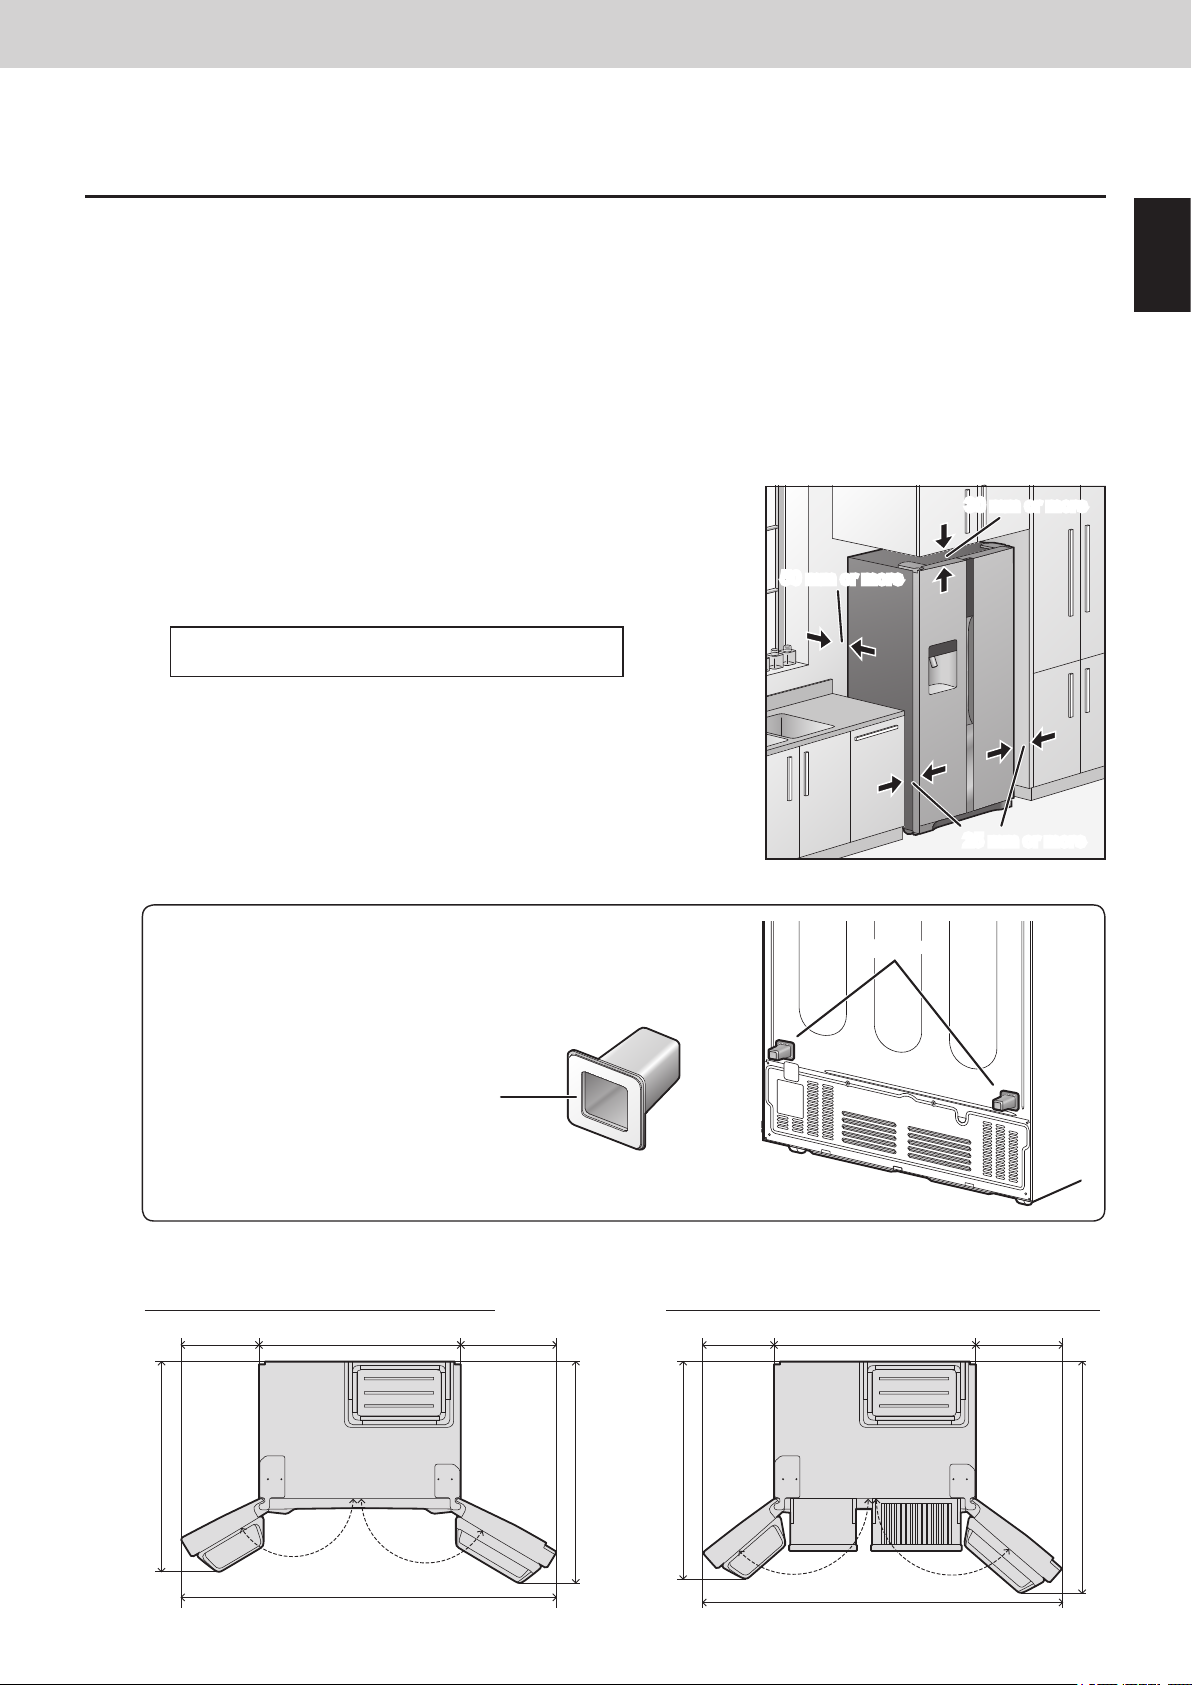
Provide clearance to allow heat to dissipate
Residual heat is always being emitted from the refrigerator while
it is operating.
Provide sufcient clearance around the refrigerator to allow this
heat to dissipate so that its cooling ability is not impaired.
Dimensions (mm): W915 × D710 × H1860
Installing the spacers
Install the spacers on the back panel of the refrigerator to
ensure the minimum amount of space required to allow the heat
generated by the refrigerator.
30 mm or more
50 mm or more
25 mm or more
Spacers
Attach to the back panel of the refrigerator
after removing the double-sided tape's
release liner.
When the doors are completely open
150˚
150˚
1693 mm
Spacer (accessory)
When the inside drawers have been taken out
992 mm
140˚
1035 mm
140˚
1620 mm
7
Installation
Removing the doors
If the refrigerator will not pass through a doorway or entrance, its doors can be removed.
Before removing the doors, be absolutely sure to check that the power of the refrigerator has been
turned off.
When you want to remove the doors, please contact your dealer, an authorized service centre or
CAUTION
access to our Web site (http://panasonic.net).
Panasonic or its Authorized agent cannot be held responsible if you remove the doors by
yourself.
Dimensions (mm): W910 × D610 × H1855 (Without Door)
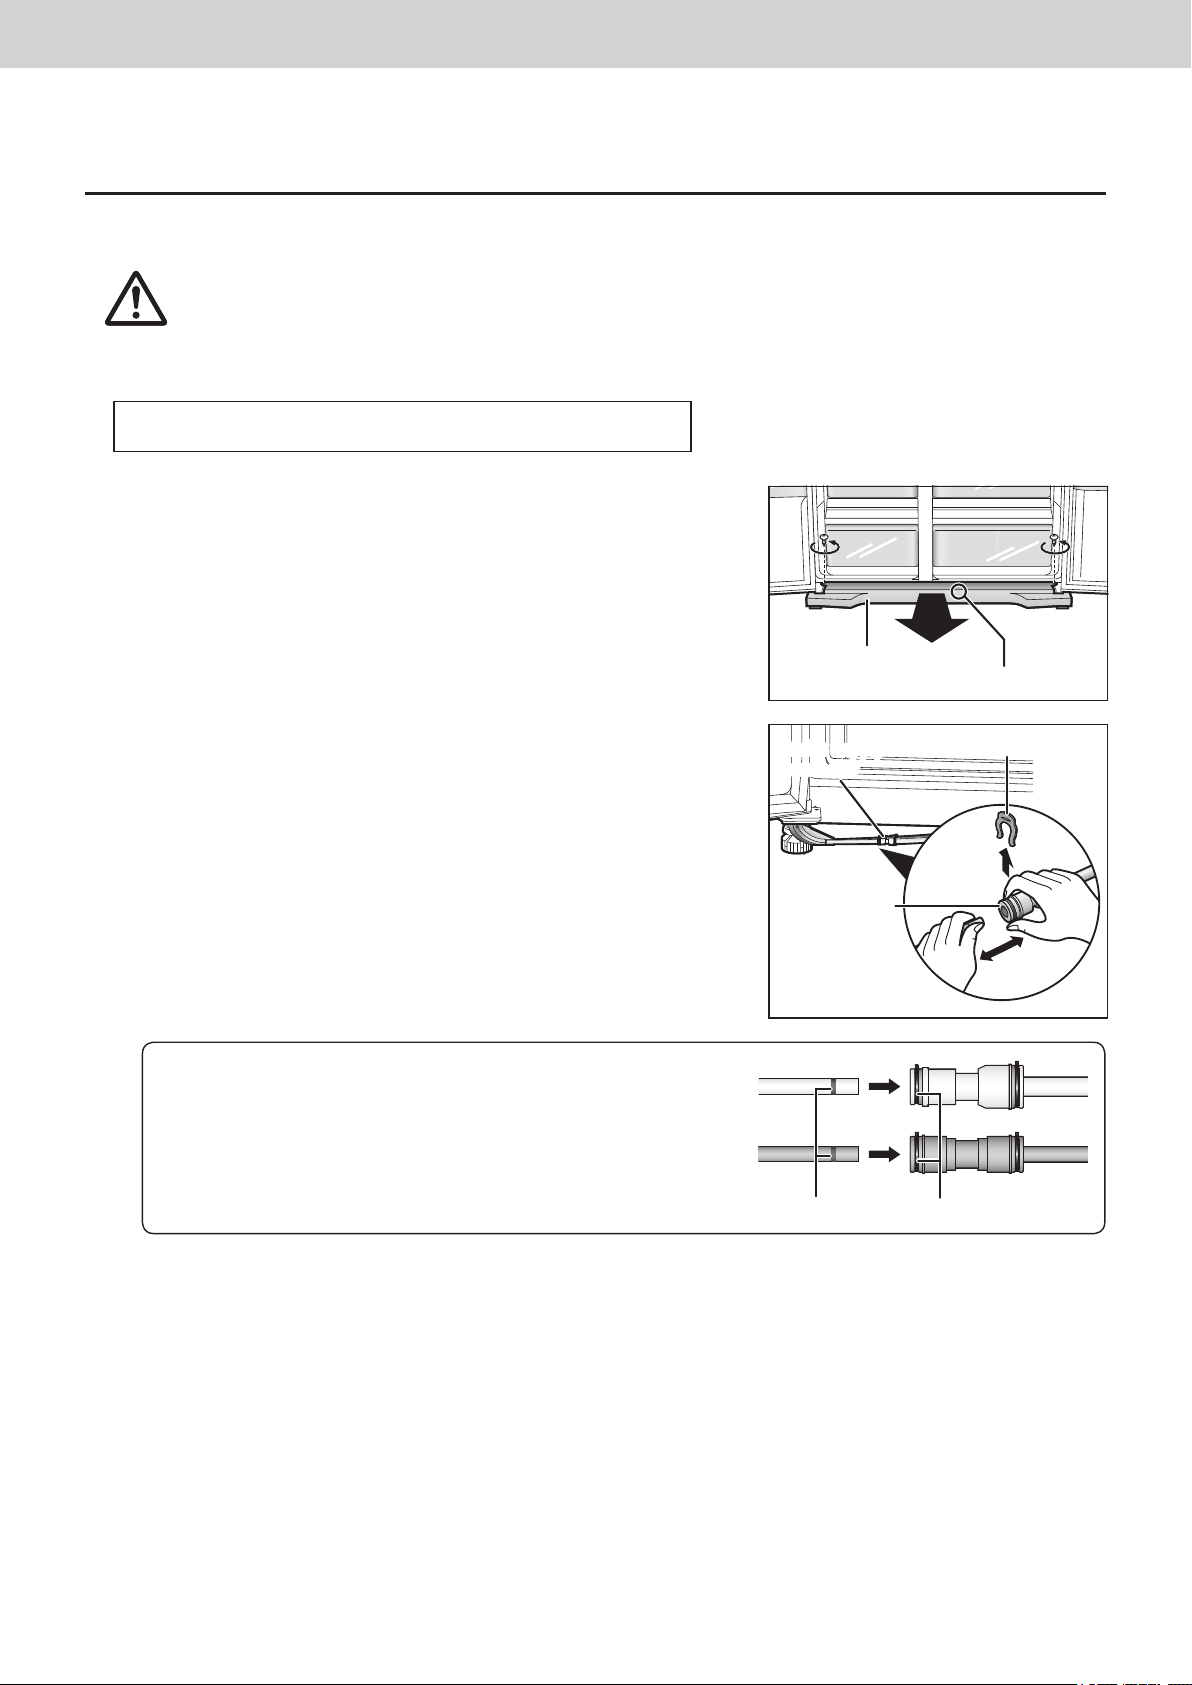
Removing the front grille
When the two doors are opened and the front grille is viewed from
above, two screws – one on the left and the other on the right – will
be seen.
Turn these screws counterclockwise, and remove them.
There is a connecting area slightly to the right of the centre of the
front grille on its bottom. Take hold of this area, and pull the grille
toward you to remove it.
Front grille
Connecting area
Disconnecting the water supply hoses
Remove the connecting ring (black) of the water supply connector,
pressing the coupler and pull the water supply hose free.
● There are two water supply hoses, one for the Ice dispenser and
one for the Water dispenser.
Disconnect both of them.
Reconnecting the water supply hoses
First insert the connecting ring (black) into the water supply
connector, and then insert the water supply hose.
Insert the water supply hose into the water supply connector until
the printed line on the hose is no longer visible.
● Two water supply hoses connect the same colour.
Water supply
connector
Coupler
Connecting ring
Connecting ringLine
8
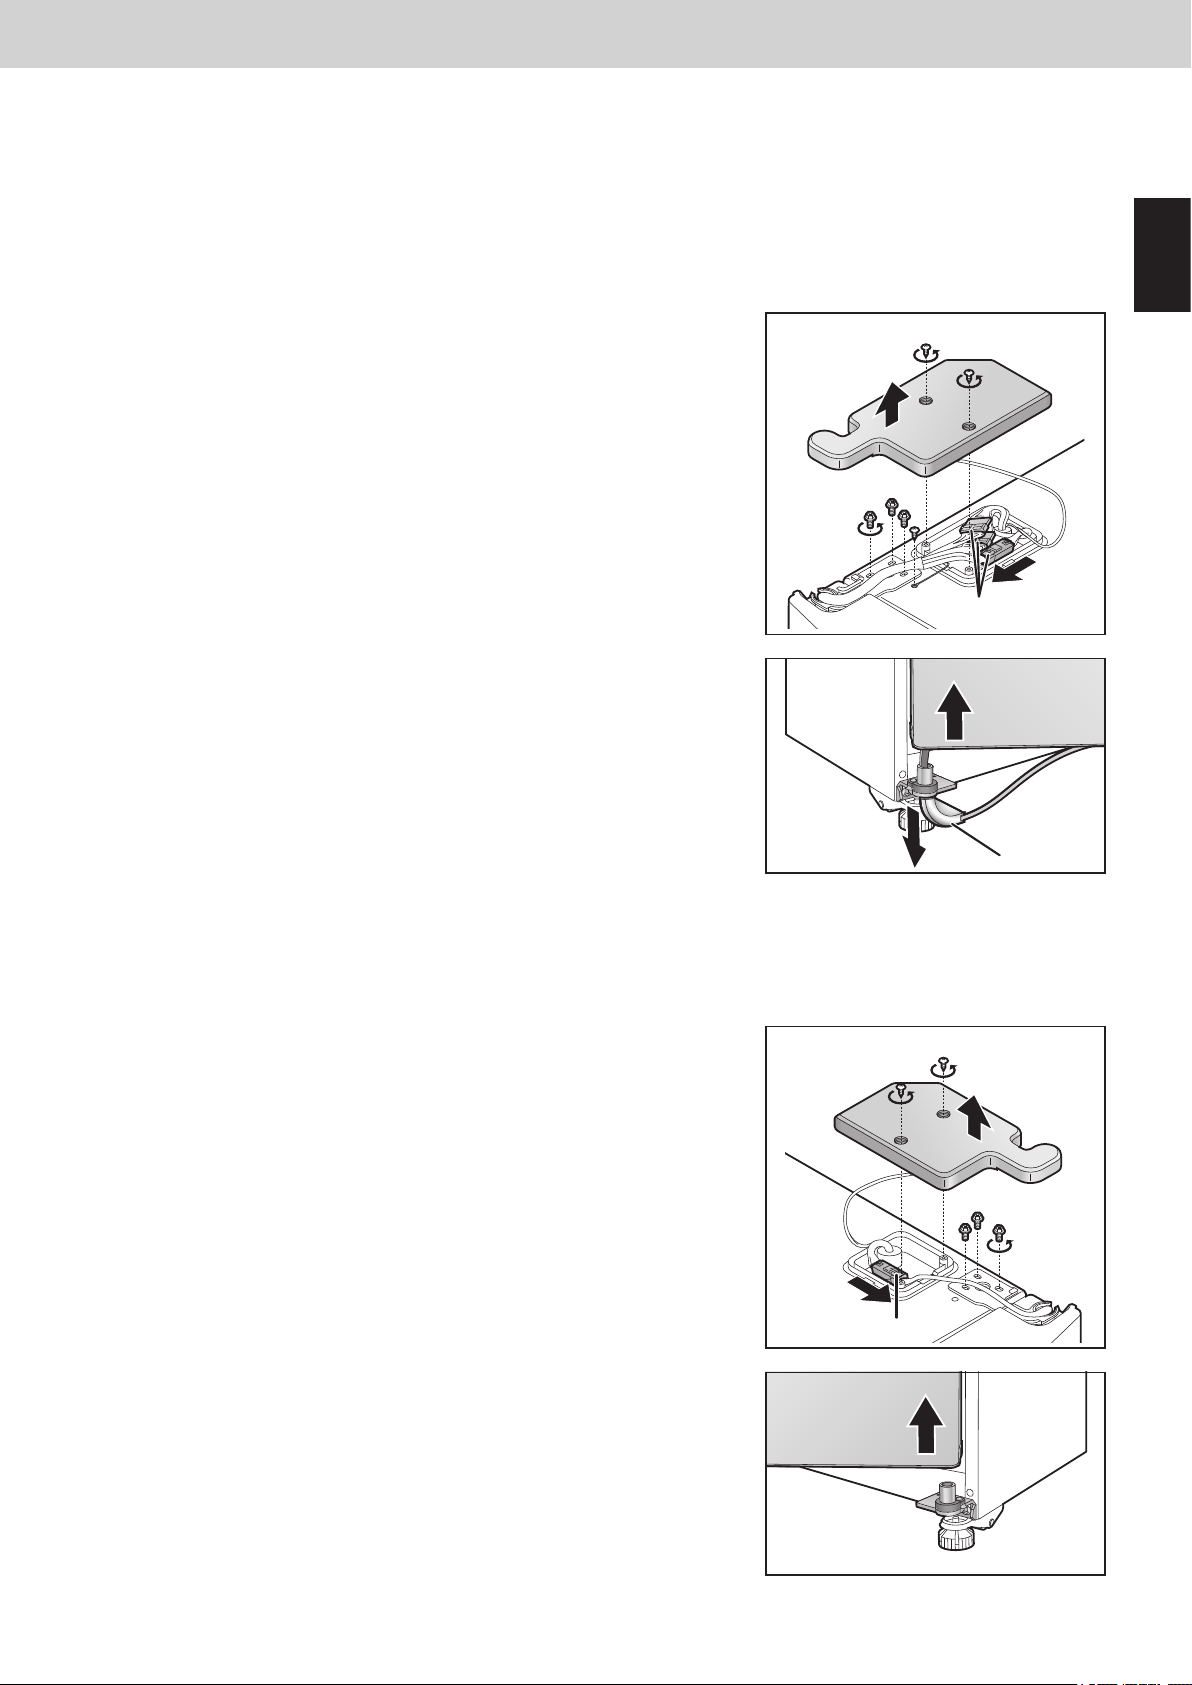
Removing the freezer door
When removing the door
● Ensure the door is in the closed position.
● Take care not to bend the hinges or damage the water supply hoses.
● Handle the removed door carefully to keep it safe from damage and impact.
1
Remove the top hinge cover.
Turn the hinge cover screw counterclockwise, and remove it.
2
Disconnect the connecting cable.
While pressing on the knob, pull out the cable in the direction
shown by the arrow.
3
Remove the top hinge.
Turn the hinge screws and the grounding screw
counterclockwise, and remove them.
● When removing the top hinge, take care to support the door
so that it will not topple forward.
Installation
English
1
3
2
Knob
4
Remove the hose guide, and remove the door.
Remove the hose guide from the bottom hinge in the direction
shown by the arrow.
And then lift the door straight up from the bottom hinge, and
remove it.
● Pull out the water supply hoses so that it is completely
disconnected.
Removing the fridge door
When removing the door
● Ensure the door is in the closed position.
● Handle the removed door carefully to keep it safe from damage and impact.
1
Remove the top hinge cover.
Turn the hinge cover screw counterclockwise, and remove it.
2
Disconnect the connecting cable.
While pressing on the knob, pull out the cable in the direction
shown by the arrow.
3
Remove the top hinge.
Turn the hinge screws counterclockwise, and remove them.
● When removing the top hinge, take care to support the door
so that it will not topple forward.
Hose guide
1
3
4
Remove the door.
Lift the door straight up from the bottom hinge, and remove it.
2
Knob
9
Installation
Attaching the doors and front grille
1
Follow the steps for removing the doors and grille in their reverse order.
2
Tighten up xing screws after checking that the door is parallel to the body and cold air does not
leak from around the gasket.
3
Tighten up screws to x hinges using both the screwdriver (Phillips head) and hex wrench.
4
When installing the front grille and top hinge cover, be sure not to get the hoses and cord caught
in.
When attaching the front grille, insert the hoses into the guides inside the front grille.
Connecting the refrigerator to the water supply
Before connecting the refrigerator
A water pressure in the range of approx. 150 kPa to 700 kPa (22 psi to 102 psi) is must be to use the Ice/
Water dispenser. If the refrigerator is to be installed in a location where the water pressure is below approx.
150 kPa (22 psi), install a pressure pump to boost the natural water pressure.
Connect potable water supply only.
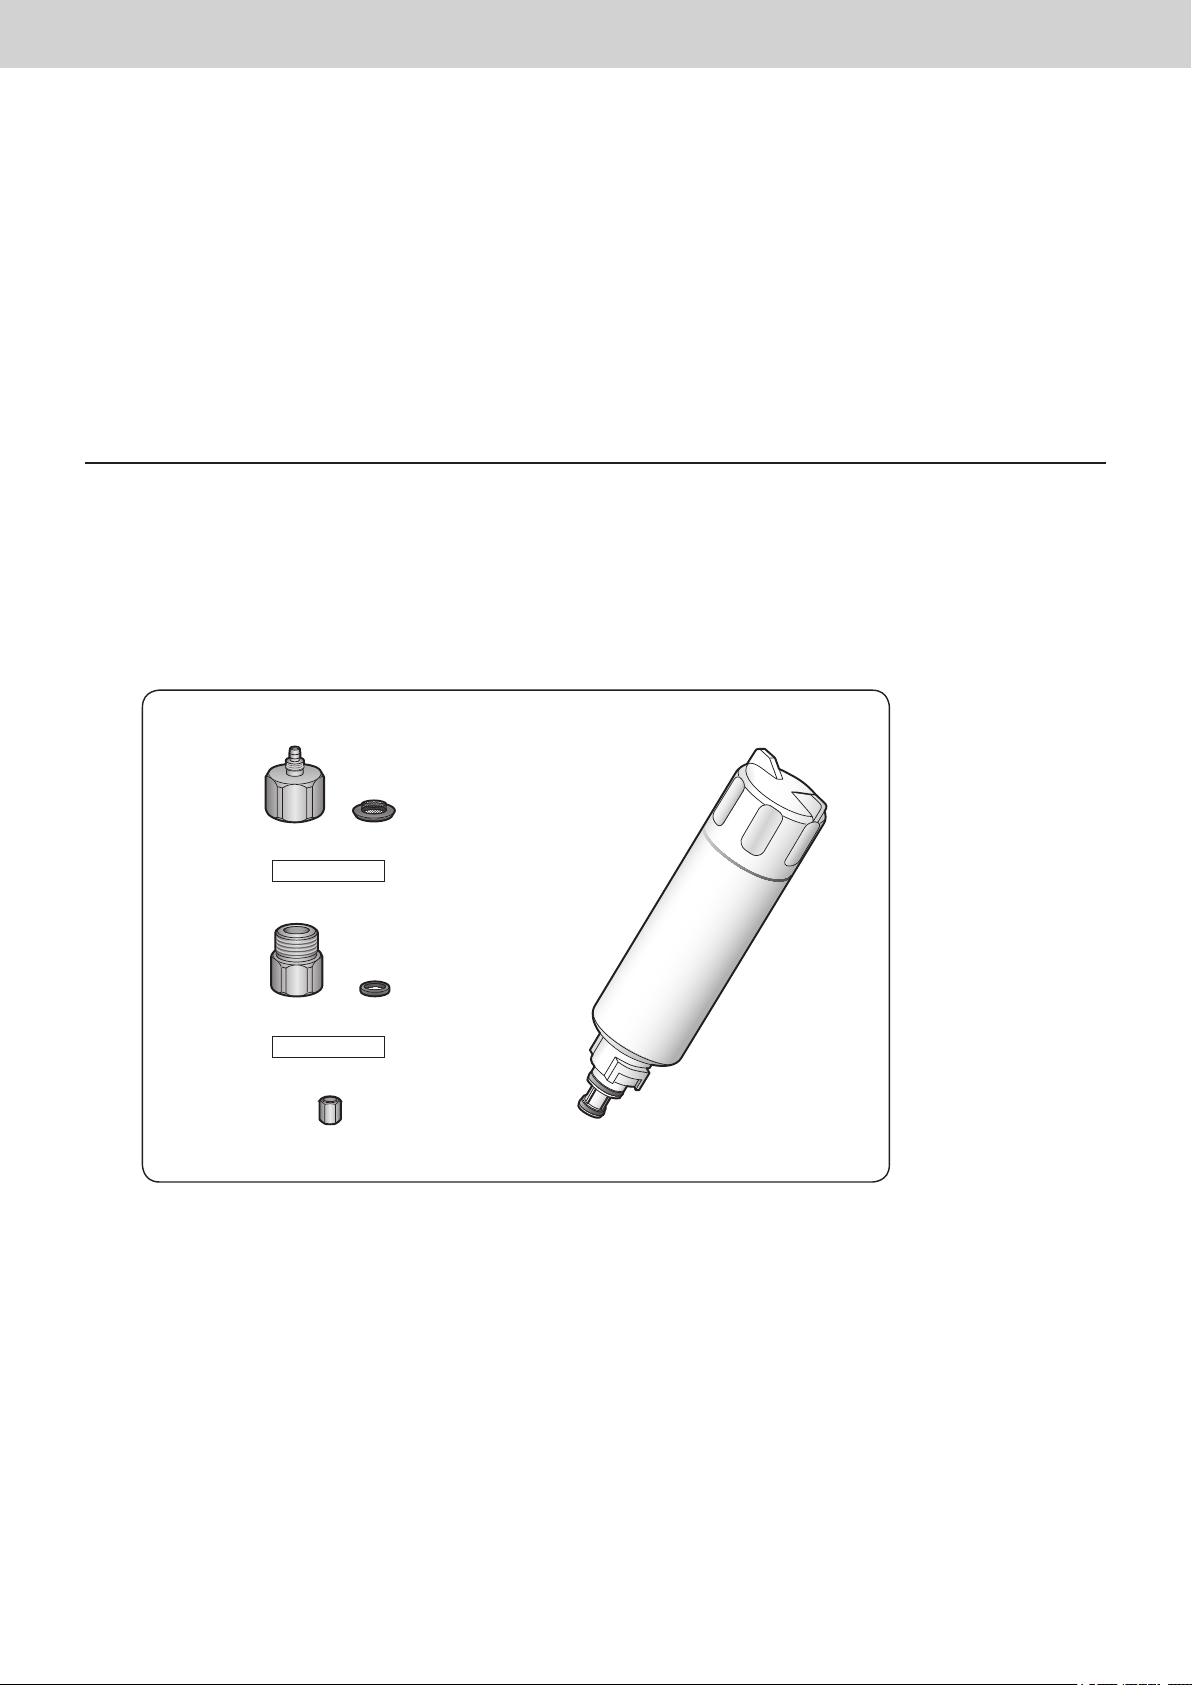
Parts required for the connection
Connection kit (accessory)
Hose connector (with strainer)
for G 3/4
Joint (with packing)
for G 1/2
Coupling hose connector
Water lter
10
 Loading...