

Page 1

Operating Instructions
Refrigerator-Freezer
(Household use)
English Deutsch
English 2-21
Thank you for purchasing this Panasonic product.
Please read these instructions carefully before using this
product. Please keep this manual for future reference.
Included installation Instructions.
Deutsch 22-39
Wir danken Ihnen für den Kauf dieses Panasonic-Produkts.
Bitte lesen Sie diese Anweisungen vor der Benutzung dieses
Produkts sorgfältig durch. Bitte bewahren Sie diese Anleitung für
spätere Bezugnahme auf. Installationsanleitung enthalten.
Nederlands 40-57
Hartelijk dank voor uw aankoop van dit Panasonic product.
Lees deze aanwijzingen aandachtig door voordat u dit product
in gebruik neemt. Bewaar deze handleiding voor latere naslag.
Inclusief installatiehandleiding.
Français 58-75
Nous vous remercions d’avoir acheté un produit Panasonic.
Veuillez lire ce mode d’emploi attentivement avant d’utiliser ce
produit. Prière de conserver ce mode d’emploi pour toute référence
ultérieure. Instructions d’installation incluses.
Italiano 76-93
La ringraziamo per aver acquistato questo prodotto Panasonic.
Leggere attentamente le istruzioni prima di usare il prodotto.
Conservare il presente manuale per consultazioni future.
Le istruzioni per l’installazione sono incluse.
Español 94-111
Muchísimas gracias por haber adquirido este producto de
Panasonic.
Lea atentamente estas instrucciones antes de usar este
producto. Guarde este manual para poder consultarlo en el
futuro. Se incluyen instrucciones para la instalación.
Model No.
Svenska 112-129
Gratulerar till ditt inköp av denna Panasonic-produkt.
Läs noggrant igenom denna bruksanvisning före
användningen. Spara denna bruksanvisning för framtida bruk.
Anvisningar om installationen är inkluderade.
Norsk 130-147
Takk for at du valgte å kjøpe dette produktet fra Panasonic.
Les disse instruksjonene nøye før du bruker produktet.
Ta vare på denne håndboken i tilfelle du får bruk for den
senere.
Instruksjoner for installasjon medfølger.
Dansk 148-165
Tak fordi du har valgt dette produkt fra Panasonic.
Læs venligst nærværende instruktioner, inden du tager dette
produkt i brug. Gem venligst denne brugsanvisning, inklusive
installationsanvisningerne, til fremtidig reference.
Polski 166-183
Dziękujemy za zakup produktu rmy Panasonic.
Prosimy o dokładne przeczytanie niniejszych instrukcji przed
korzystaniem z niniejszego produktu. Prosimy o zachowanie
niniejszego podręcznika do wykorzystania w przyszłości.
Zawiera instrukcje instalacyjne.
Česky 184-201
Děkujeme vám za zakoupení tohoto produktu Panasonic.
Před použitím si důkladně přečtěte tyto pokyny.
Uschovejte tento návod pro budoucí využití.
Návod k instalaci je přiložen.
NR-B29SG2
NR-B29SW2
NR-B32SG2
NR-B32SW2
Nederlands
Français Italiano Español Svenska Norsk Dansk Polski Česky
Page 2

Contents
Caring for the environment ...........................................2
Safety instructions ......................................................... 3
Installation ....................................................................... 6
Parts ................................................................................. 8
Control panel ..................................................................9
Setting the temperature ...............................................10
Using the handy functions .......................................... 11
User alert functions ...................................................... 14
Making ice cubes .......................................................... 14
Removing and attaching shelves ................................ 14
Care and Cleaning instructions ..................................15
Troubleshooting ........................................................... 17
FAQs ..............................................................................18
Specications ............................................................... 20
Caring for the environment
Disposing of the packaging
Please recycle where possible (e.g. cardboard, plastic bags, adhesive tape and polystyrene) and
make sure you dispose of all other packing materials safely.
Keep the packaging out of the reach of babies and young children, to avoid injury or suffocation.
Information on Disposal for Users of Waste Electrical & Electronic
Equipment (private households)
This symbol on the products and/or accompanying documents means that used electrical and electronic
products should not be mixed with general household waste.
For proper treatment, recovery and recycling, please take these products to designated collection points,
where they will be accepted on a free of charge basis. Alternatively, in some countries you may be able to
return your products to your local retailer upon the purchase of an equivalent new product.
Disposing of this product correctly will help to save valuable resources and prevent any potential negative
effects on human health and the environment which could otherwise arise from inappropriate waste
handling. Please contact your local authority for further details of your nearest designated collection point.
Penalties may be applicable for incorrect disposal of this waste, in accordance with national legislation.
For business users in the European Union
If you wish to discard electrical and electronic equipment, please contact your dealer or supplier for further
information.
Information on Disposal in other Countries outside the European Union
This symbol is only valid in the European Union.
If you wish to discard this product, please contact your local authorities or dealer and ask for the correct
method of disposal.
Before disposing of your old appliance
Please follow either the disposal instructions from the manufacturer of the old appliance, or local disposal
regulations for the appliance. Where this is not available, please follow the three step instructions below.
1. Remove the mains plug from the socket.
2. Cut the mains lead off, and safely dispose of it with the mains plug still attached.
3. Until the old appliance is collected, or you take it to a Recycling Centre, make sure it’s out the
reach of small children.
● Remove all sealing materials from the door and leave all the shelves and drawers in place.
This way, children are less likely to climb in and become trapped.
This appliance is intended to be used in household and similar applications such as
• staff kitchen areas in shops, ofces and other working environments;
• farm houses and by clients in hotels, motels and other residential type environments;
• bed and breakfast type environments;
• catering and similar non-retail applications.
22
Page 3
Safety instructions
For your safety, please read the following text carefully.
This appliance is supplied with a molded three pin mains plug for your safety and convenience.
A 13 ampere fuse is tted in this plug.
Should the fuse need to be replaced please ensure that the replacement fuse has a rating of 13 ampere and that it is
approved by ASTA or BSI to BS1362.
Check for the ASTA mark
If the plug contains a removable fuse cover you must ensure that it is retted when the fuse is replaced.
If you lose the fuse cover the plug must not be used until a replacement cover is obtained. A replacement fuse cover
can be purchased from your local Panasonic dealer.
If the tted molded plug is unsuitable for the socket outlet in your home then the fuse should be removed and the plug
cut off and disposed of safely.
There is a danger of severe electrical shock if the cut off plug is inserted into any 13-ampere socket.
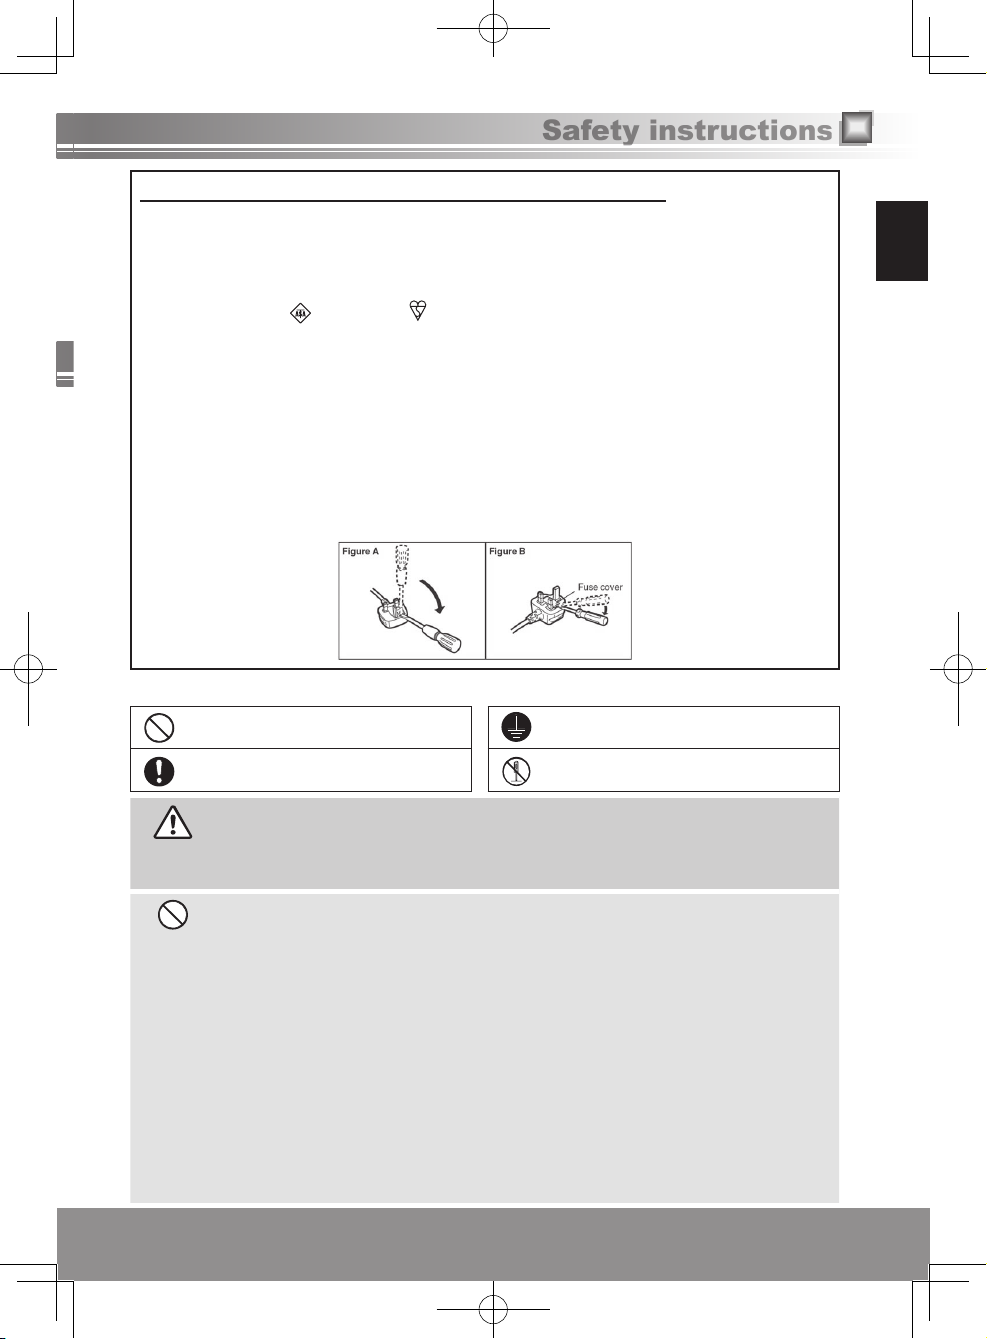
How to replace the fuse
The location of the fuse differs according to the type of AC mains plug (gures A and B).
Conrm the AC mains plug tted and follow the instructions below. Illustrations may differ from actual AC mains plug.
Open the fuse cover with a screwdriver and replace the fuse and close or attach the fuse cover.
What the symbols mean:
Do not
Make sure you do this Do not take apart
or the BSI mark on the body of the fuse.
Indicates the appliance must be earthed to
prevent electric shock
English
WARNING
Indicates risk of death or serious injury.
This appliance is not intended for use by persons (including children) with reduced physical, sensory or mental
capabilities, or lack of experience and knowledge, unless they have been given supervision or instruction concerning
use of the appliance by a person responsible for their safety.
Children should be supervised to ensure that they do not play with the appliance.
Do not use a multiple socket adaptor and plug several appliances into the same socket adaptor.
• This can cause overheating, re or short circuit.
Do not pinch, knot, or bend the mains lead, or place heavy objects on it.
• This increases the risk of re or electric shock. If the mains lead or plug of the appliance is damaged, it must be
replaced by the manufacturer, its service agent or similarly qualied person in order to avoid a hazard.
Do not unplug the refrigerator by pulling on the mains lead.
• This can damage to the mains lead. Always grip the mains plug and pull rmly from the socket.
Do not place any water container on the top of the refrigerator.
• Water can damage insulation of electrical components and cause short circuit, re or electric shock.
Do not spray inammable gas near the refrigerator.
• This can cause explosion or re.
Do not spray water onto or into the refrigerator.
• This can cause re or electric shock.
Do not touch the mains plug with wet hands.
• This can cause electric shock.
3
3
Page 4
Safety instructions (continued)
Do not install the refrigerator in a damp place, or where it may come into contact with water.
• Deteriorated insulation of electrical parts can cause short circuit, electric shock or re.
Do not store volatile or ammable substances in the refrigerator.
• Flammable substances such as benzene, thinners, alcohol, ether and Liquid Petroleum Gas (LPG) can cause
explosions.
Do not store pharmaceuticals or other temperature-sensitive products in the refrigerator.
• You should not store products that require strict temperature controls in the refrigerator.
Do not let children climb, swing or hang on the refrigerator door.
• This can cause serious injury, as well as damaging the refrigerator.
Do not operate the refrigerator in the presence of explosive fumes or ammable gas.
• This can cause explosion or re.
Do not store petrol or other ammable liquids and vapours in the refrigerator, or use them near the appliance.
• This can cause explosion or re.
-WARNING: Do not use mechanical devices or other means to accelerate the defrosting process, other than those
-WARNING: Do not use electrical appliances inside the food storage compartments of the appliance, unless they are of the
-WARNING: Do not damage the refrigerant circuit.
recommended by the manufacturer.
• This can cause damage to the interior of the refrigerator or cause an explosion.
type recommended by the manufacturer.
• This can cause explosion or re.
• This can cause explosion or re.
Do not try to disassemble, repair or modify the refrigerator yourself.
• You may injure yourself – or others – with burns or electric shock, or damage the refrigerator. If your appliance needs
alterations or repair, please consult authorized service centre.
Ensure that the refrigerator is plugged into an earthed mains socket. DO NOT plug into an unearthed mains
socket.
• A short circuit could cause an electrical shock.
Make sure the mains lead and plug are not squashed or damaged.
• A damaged mains plug or lead can cause short-circuit, re or electric shock.
• If the mains lead is damaged, it must be replaced by the manufacturer, its service agent or similarly qualied persons
in order to avoid a hazard.
• DO NOT ATTEMPT TO REPLACE IT YOURSELF.
Remove any dirt or dust from the mains plug’s pins before connecting to the power supply.
• Dust build-up on the mains plug can cause insulation failure, especially in humid conditions. This can cause short
circuit, re or electric shock. Unplug the mains lead and wipe it with a dry cloth. Never use a wet or damp cloth.
Plug your appliance into the socket, making sure the connection is secure.
• A loosely connected mains plug can cause re or electric shock.
Install the refrigerator in a well-ventilated area.
• The more refrigerant there is in an appliance, the larger the room it should be installed in. If there’s a refrigerant uid
leak, and the appliance is in a small room, the build up of combustible gases is more likely. This can cause re or
explosion. As a guide, for every 8
inside the appliance tells you how much refrigerant your refrigerator contains.
The refrigerant (R600a) used in the refrigerator and the gases in the insulation material (cyclopentane) are both
ammable. They also require special disposal procedures.
• Before you dispose of the appliance, make sure none of the pipes on the back are damaged. Refrigerant or gas leaks
can cause re or explosion.
Unplug the refrigerator before cleaning and servicing.
• Failure to do this can cause electric shock.
If you smell burning or see smoke coming from the refrigerator, disconnect the power immediately and please
consult authorized service centre.
• Failure to do this can cause re or electric shock.
g of coolant, you’ll need at least 1 cubic metre of space in the room. The data plate
44
Page 5
-WARNING: Keep ventilation openings, in the appliance enclosure or in the built-in structure, clear of obstruction.
• Failure to do this could result in re or explosion because refrigerant cannot disperse if it leaks.
LED RADIATION
DO NOT VIEW DIRECTLY WITH OPTICAL INSTRUMENTS CLASS 1M LED PRODUCT.
English
CAUTION
Indicates risk of injury or damage to property.
Do not put glass bottles or containers in the freezer.
• When the contents freeze, the glass may break.
Do not touch the inside walls of the freezer or items stored in the freezer with wet hands.
• Your skin can become frozen onto the interior wall, or items stored in the freezer.
Do not open or close the doors by taking hold of the door handles with both hands.
• This may cause personal injury.
If there’s a power cut, avoid opening the refrigerator frequently or putting unchilled
food in it.
• This can cause the temperature in the refrigerator to rise and spoil food stored inside.
If you’re not going to use the refrigerator for a long time, unplug it from the mains.
Also, be careful of the gap between the fridge and freezer doors, especially if they are
both open at the same time.
• This may cause personal injury.
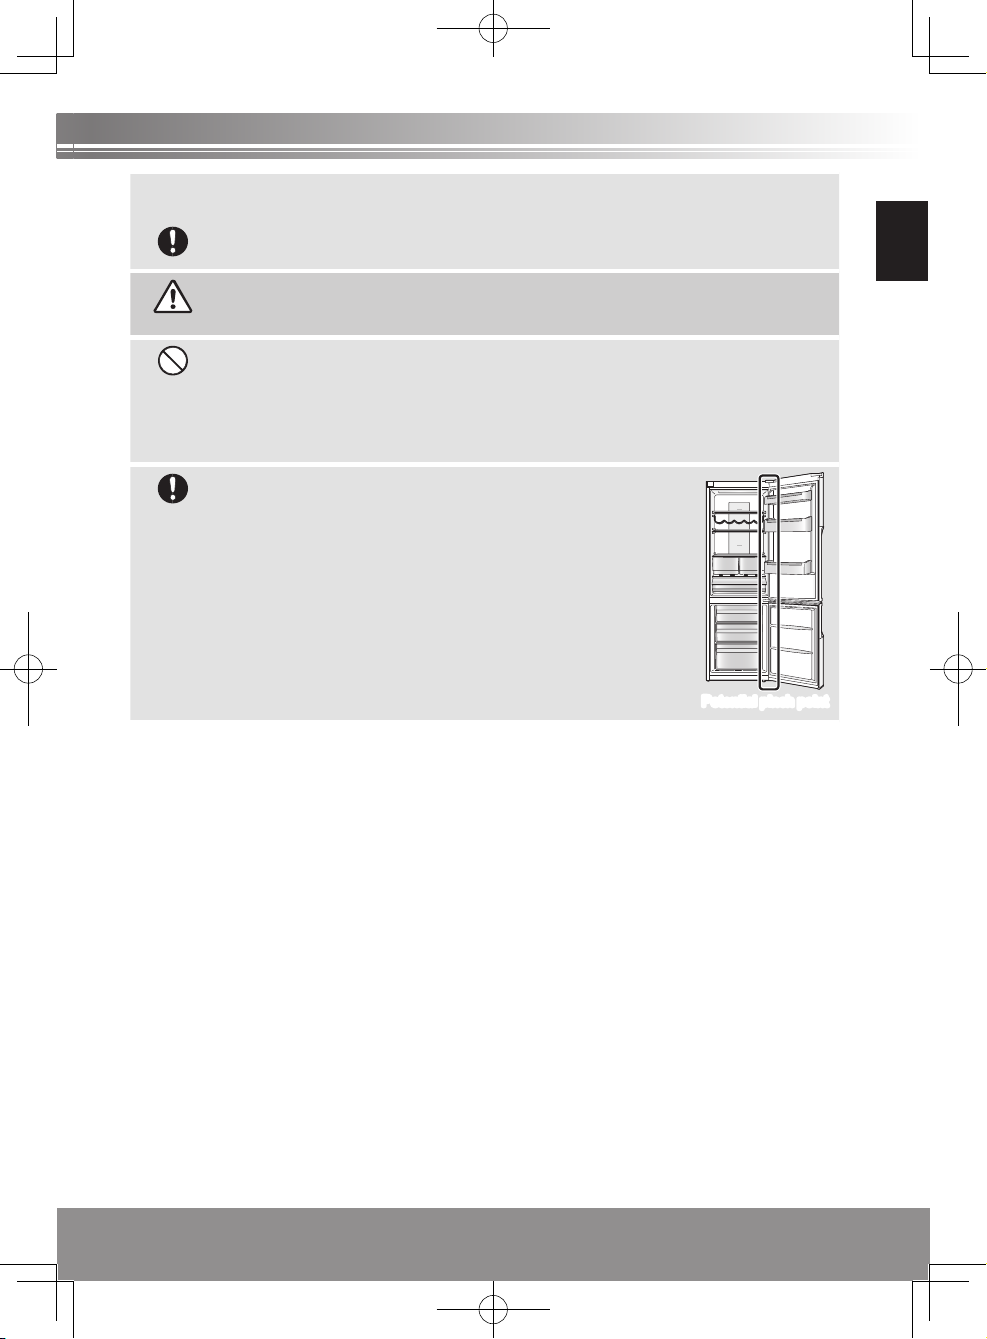
When opening the refrigerator, be careful not to pinch your ngers at the “pinch point”
areas. In particular, when opening the fridge door, be careful to avoid the potential
pinch point between the fridge and freezer doors.
• This can cause personal injury.
Potential pinch point
5
5
Page 6
Installation
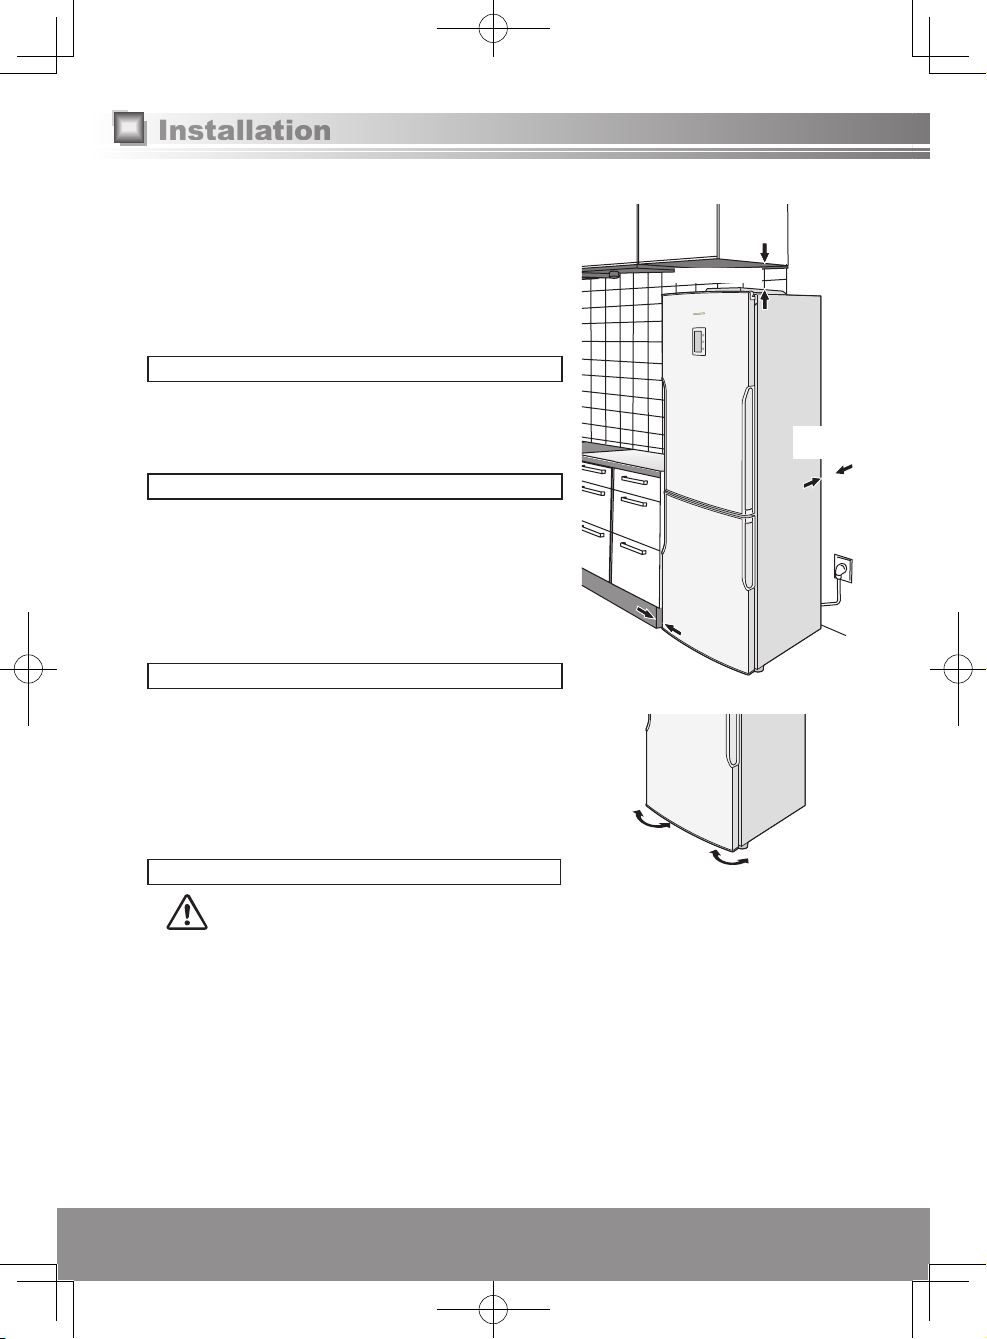
This section explains how to install your appliance for the most energy-efcient, safe and quiet operation.
Dimensions
NR-B29SG2/NR-B29SW2: W600 x D652 x H1898 (mm)
NR-B32SG2/NR-B32SW2: W600 x D652 x H2044 (mm)
Unpacking your appliance
Remove all packaging and tape.
Choosing the right location
Ventilation
As the appliance gives off heat during operation, it should be installed
in a well-ventilated, dry room with plenty of space above and behind it,
as shown in Figure 1.
If you can hear it vibrating, it needs more space.
Temperature
The room temperature affects the refrigerator’s energy-efciency, i.e.
how much electricity it uses to chill and freeze foods.
For the best results, install your refrigerator:
● away from direct sunlight
● away from radiators, cookers or other heat sources
● where the room temperature corresponds to the climate classication
for which the appliance is designed. Refer to the Specications
Section for your appliance’s climate classication.
Level
Install on a level oor that’s strong enough to support a fully loaded
refrigerator.
You can adjust the level of the refrigerator by screwing or unscrewing
the two adjustable front legs as shown in Figure 2.
This prevents vibration and noise.
If the appliance is to stand on a carpeted or vinyl oor, put a solid board
underneath it rst. This will protect your oor against possible colour
change due to heat given off by the appliance.
20 mm
or more
150 mm or more
Figure 1
40 mm
or more
WARNING
66
Refrigerator door
The refrigerator’s door hinges can be swapped over,
from the right side to the left, so that the doors open in
the opposite direction. If this is more convenient in your
home, please contact our service centre listed on the
attached sheet or access to our Web site
(http://panasonic.net).
We could not be held responsible if you replace the
hinges by yourself.
Parts for switching door opening direction are included
in the unit packaging.
Figure 2
Page 7
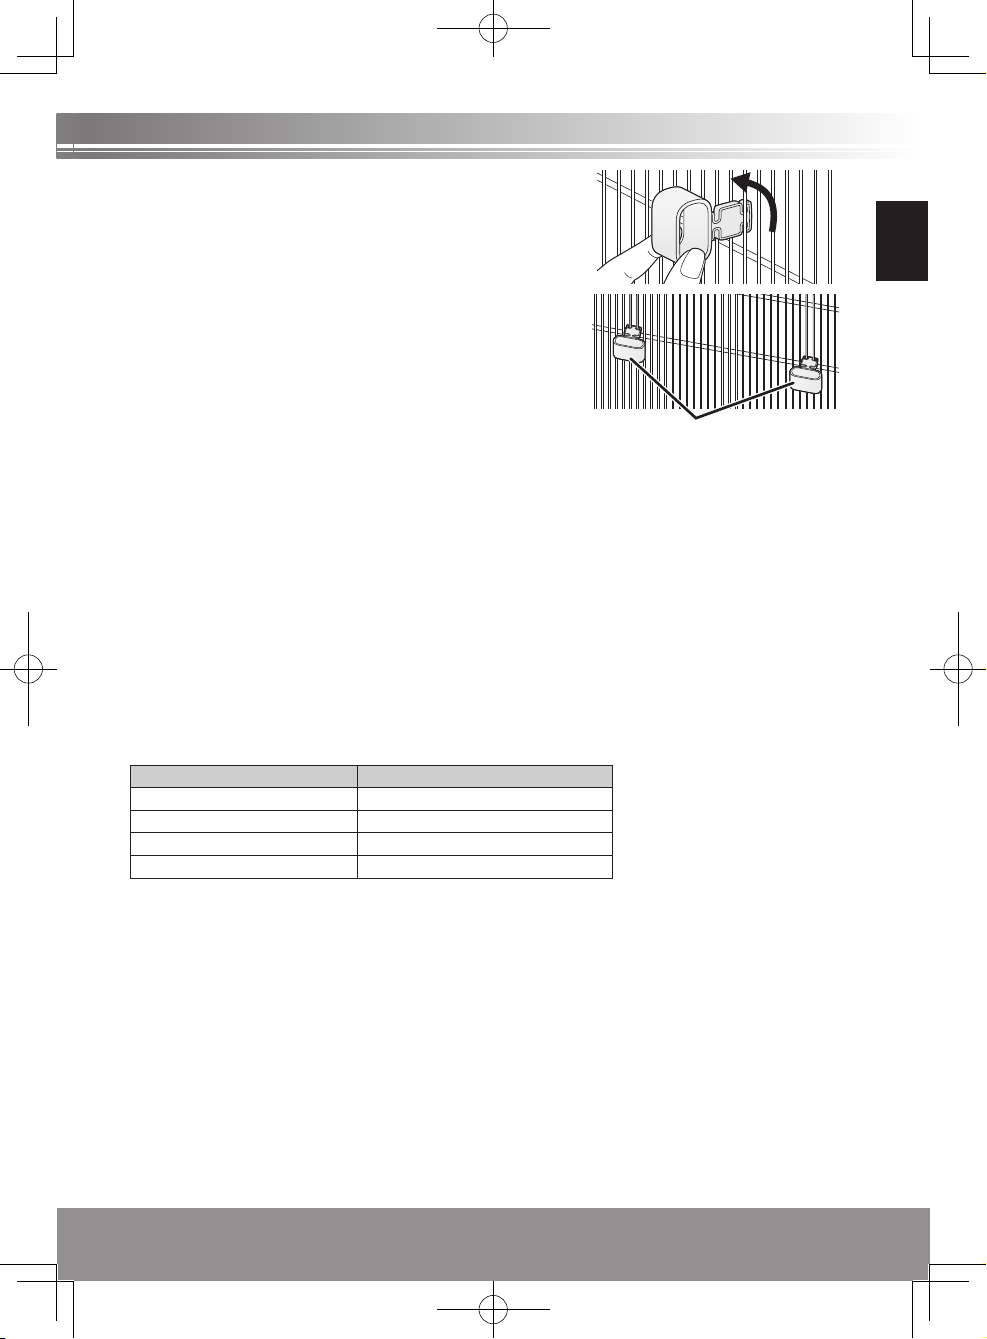
Installing the distance guides
To prevent the condenser (the black backside component with ns)
from touching the wall, put on two plastic distance guides in its place
rotating 90°.
Distance guides (accessories)
Cleaning
After installation, wipe the appliance clean with warm water.
Connecting the mains plug to the household mains socket
You can connect the mains plug immediately after installation.
After the appliance is plugged, all symbols will appear for a moment, and then the startup values will appear as -18 °C on
freezer temperature display and 4 °C on fridge temperature display.
All buttons on the control panel are touch-operated. (Only press to activate the button you want to operate.)
Notes:
• Cooling may take longer in the summer months or at other times when the room temperature is higher.
• If you need to unplug the refrigerator, wait at least 10 minutes before you plug it back in again. If not, you might damage
the compressor.
Ambient room temperature
You’ll nd your refrigerator’s climate classication on the rating plate in the left side of the fridge compartment. It shows
the room temperature the appliance is designed to work in.
Climate classication Permitted ambient temperature
SN (Extended Temperate) +10 °C to 32 °C
N (Temperate) +16 °C to 32 °C
ST (Subtropical) +16 °C to 38 °C
T (Tropical) +16 °C to 43 °C
English
For saving energy
1. Install the refrigerator in a dry, cool and well-ventilated location. The colder the ambient temperature, the better the
efciency. (Please refer to Page 6 for dimensions and clearance.)
2. The combination of drawers and shelves that result in the largest in volume and the most efcient use of energy for the
refrigerator.
• Remove the top two freezer drawers. (Leave the lowest freezer drawer.)
• Attach the drawers and shelves in the refrigerator to the positions illustrated on the section of “Parts” (P.8).
• Removing the chill compartment drawer improves the cold air circulation. Also, larger amount of food can be stored.
3. Set the Screen Saver Mode.
4. Do not over ll the refrigerator to allow the air to circulate.
5. Open the doors only when necessary and as briey as possible.
6. Occasionally clean the ventilation openings at the bottom of the refrigerator with a vacuum cleaner, etc.
(Take care not to damage the refrigerant pipe inside the cover.)
7. When setting to Super Freeze Mode or Super Cool Mode, power consumption will be increased.
7
7
Page 8
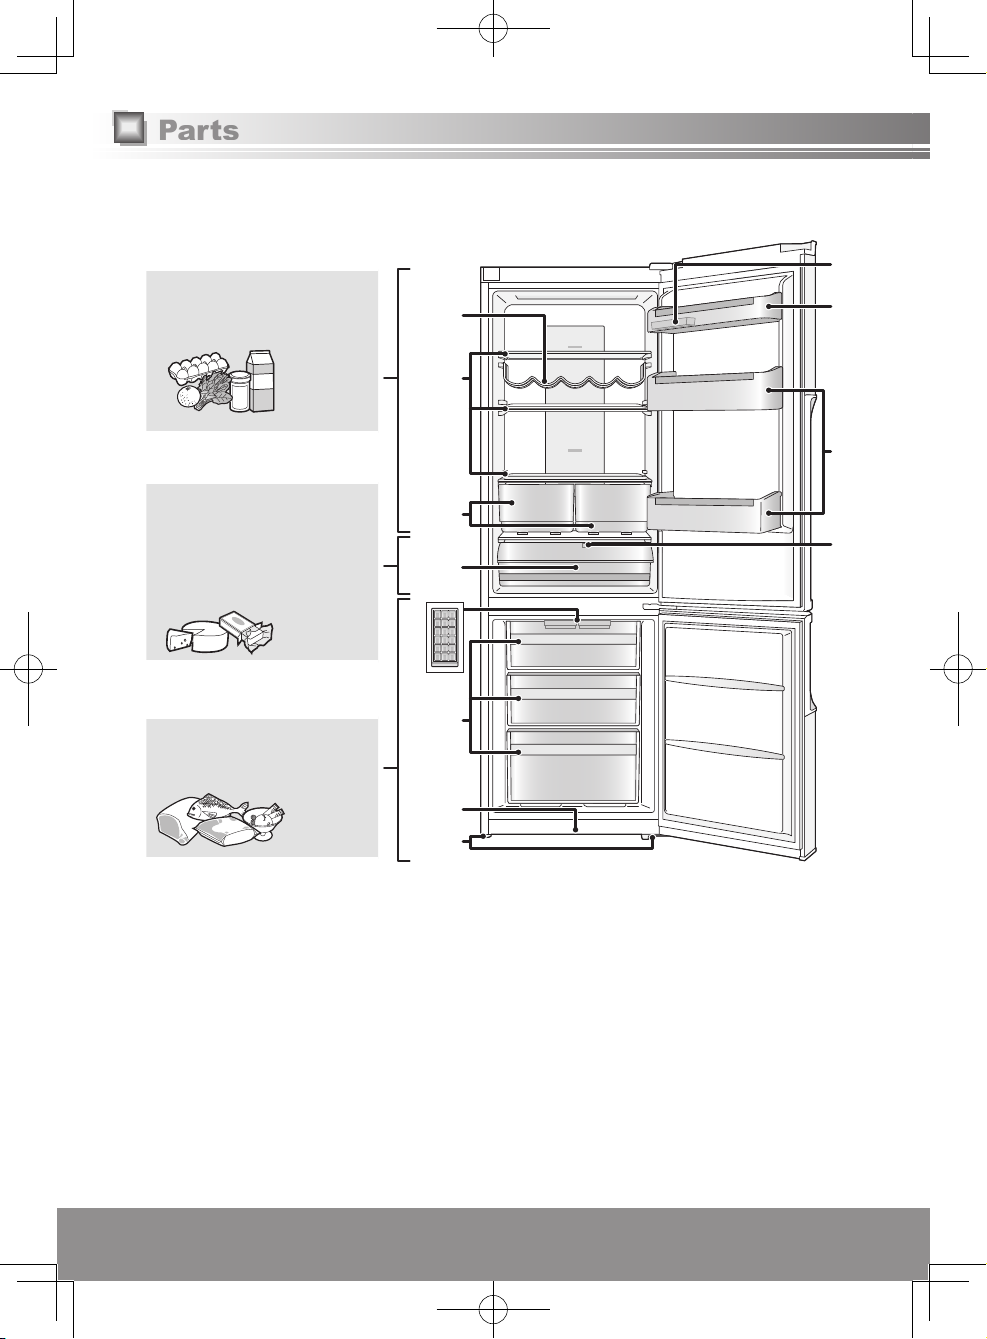
Parts
The illustration below is based on model NR-B29SG2, and may be slightly different to your refrigerator.
Fridge compartment
The temperature can be set in a
range from 2 °C to 8 °C.
Cooked food,
drinks, eggs,
cakes, dairy
products
Chill compartment
The temperature is lower by 1 °C
to 2 °C than that set for the fridge
compartment.
The details on how to use the chill
compartment, see page 10.
Cheese, butter,
sausage
Freezer compartment
The temperature can be set in a
range from -24 °C to -16 °C.
Frozen meat,
poultry, sh,
ice cream
5
1
2
3
4
6
7
8
9
:
;
<
1Wine Rack* 52 Ice trays 92 Egg trays
2Glass shelves** 6Freezer drawers :Door shelf**
3Crispers 7Kickplate ;Bottle shelves
4Chill compartment drawer 8Adjustable legs <Sliding part
*Following part is not included with model NR-B29SW2.
• Wine Rack
**Following parts are additionally included with models NR-B32SG2/NR-B32SW2.
• Glass shelf
• Door shelf
Note:
• You can change the positions where the door and bottle shelves are installed. Please use caution, however, because
stored food and beverages could fall out when the door is opened and closed depending on the shelf positions.
• Closing the door with the drawers (Crispers/Chill/Freezer drawers) open may cause the drawers to break.
88
Page 9
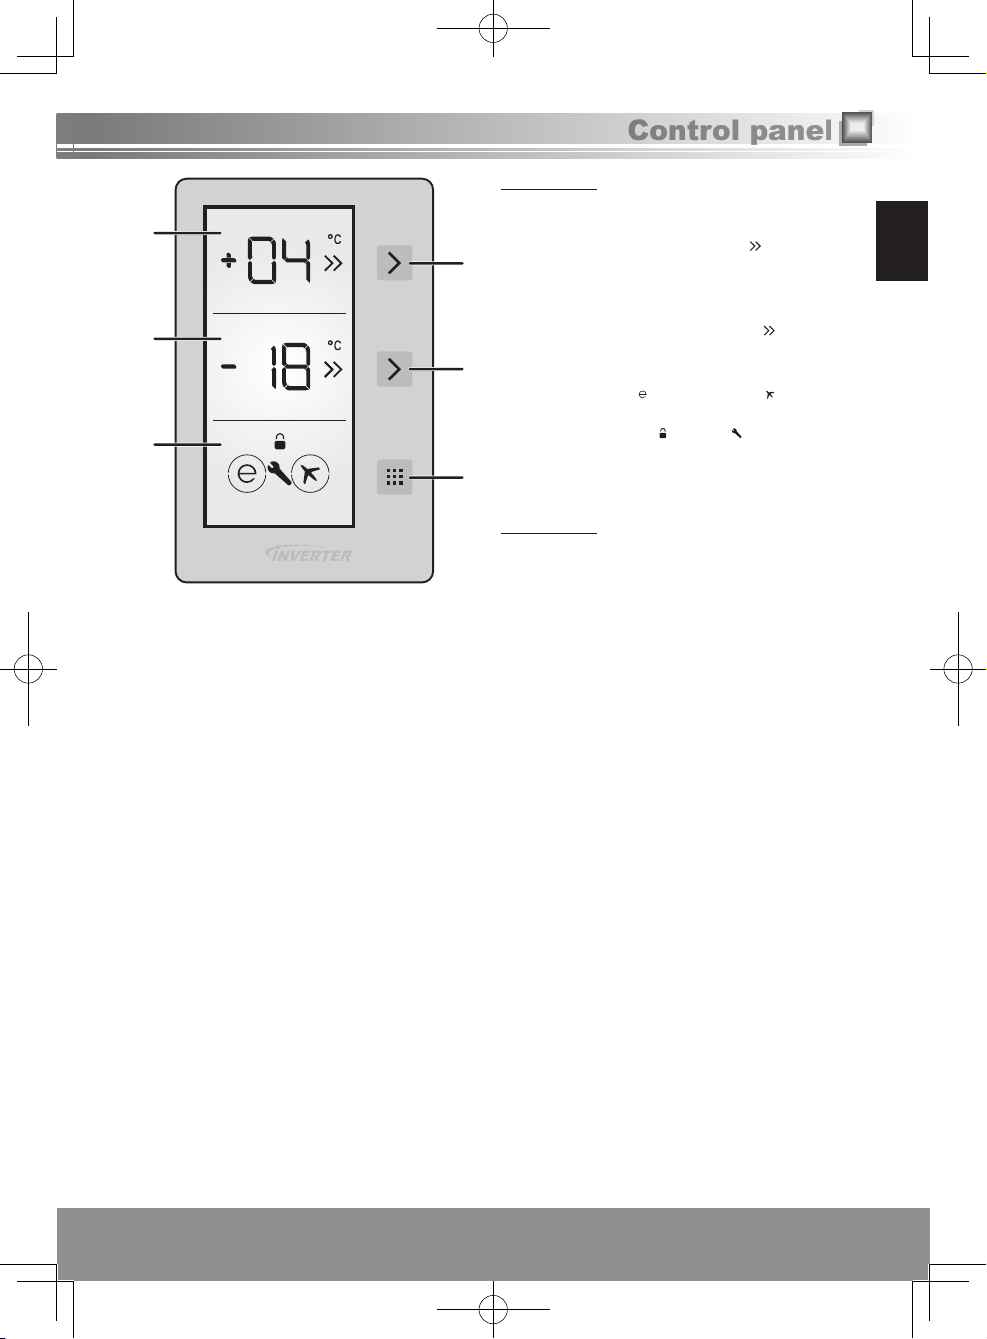
Control panel
Display area
1
Fridge temperature display
1
4
2
5
3
6
Notes:
• This refrigerator uses a microprocessor to control the temperature. The temperature inside the refrigerator varies
depending on such factors as changes in the room temperature, how frequently the doors are opened and closed, and
how much food is stored inside and how it is stored.
• The set temperature is displayed.
• While Super Cool Mode is activated,
alternately.
2
Freezer temperature display
• The set temperature is displayed.
• While Super Freeze Mode is activated,
alternately.
3
Function display
• When Eco Mode
circles are displayed around the marks.
• When the Child Lock
are activated, the marks for those functions are
displayed.
and Holiday Mode are set,
and alarm functions
Control area
4
Fridge selection button
5
Freezer selection button
6
Mode button
ashes
ashes
English
9
9
Page 10
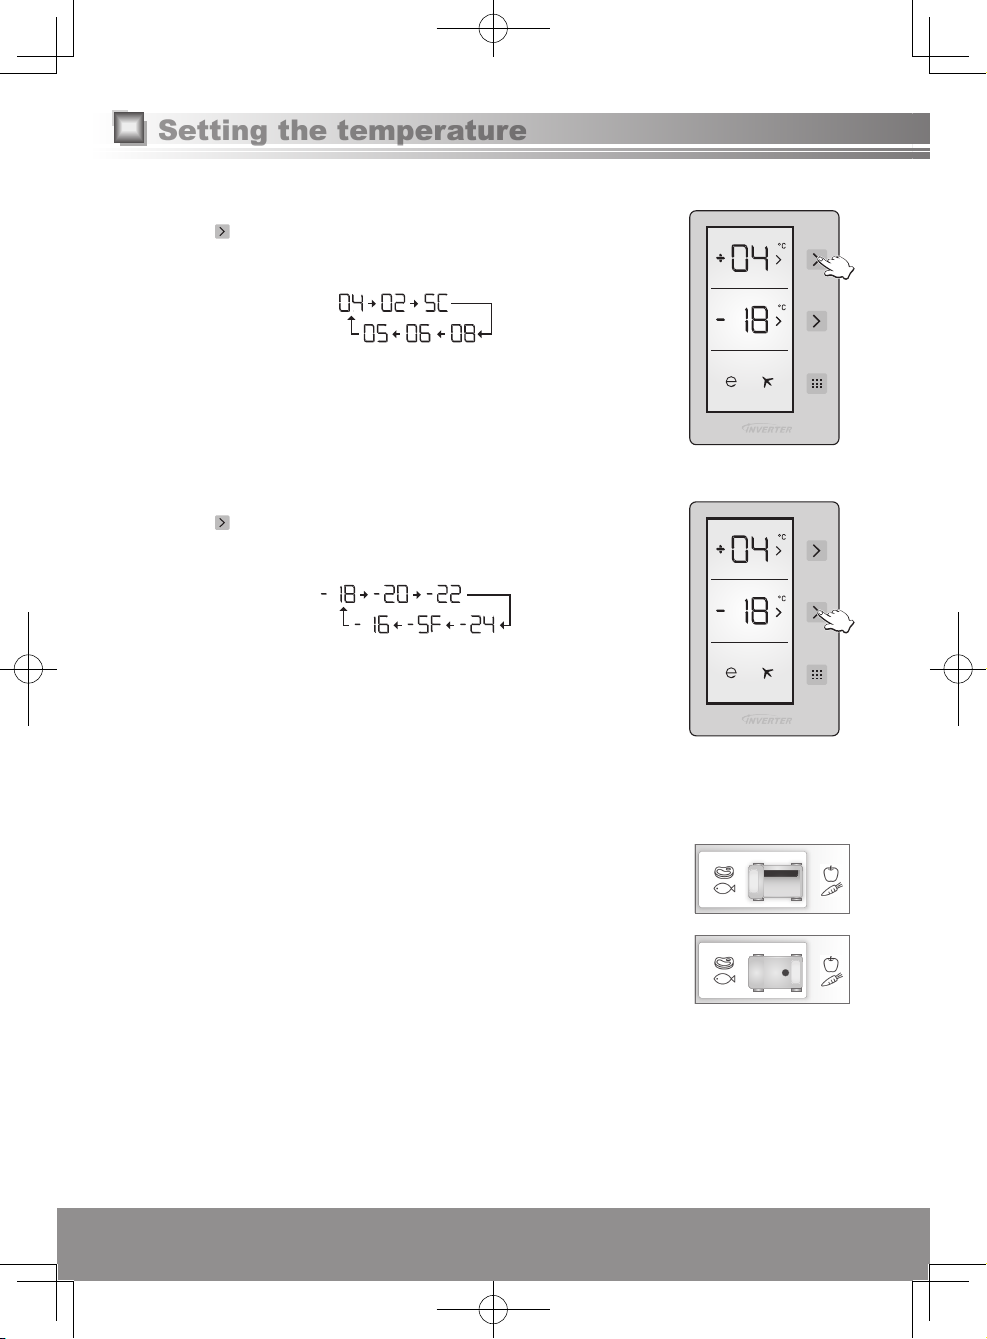
Setting the temperature
Fridge compartment
At the time of purchase, the temperature is set to 4 °C.
1
Press (upper) once and then press it again within 1 second.
• The temperature can be set.
2
Press the button repeatedly until the desired temperature is set.
• If no operation is performed for 1 second during the setting process, the set value will
ash and a beep will be heard indicating that the temperature is now set.
Note:
• When Super Cool Mode, Super Freeze Mode, Eco Mode, or Holiday Mode ends or is
cancelled, the unit returns to its previous settings.
Freezer compartment
At the time of purchase, the temperature is set to -18 °C.
1
Press (lower) once and then press it again within 1 second.
• The temperature can be set.
2
Press the button repeatedly until the desired temperature is set.
• If no operation is performed for 1 second during the setting process, the set value will
ash and a beep will be heard indicating that the temperature is now set.
Note:
• When Super Cool Mode, Super Freeze Mode, Eco Mode, or Holiday Mode ends or is
cancelled, the unit returns to its previous settings.
Chill compartment
You can adjust the temperature of the chill compartment by opening and closing the sliding part which is located inside
the compartment.
Open
Turn the sliding part to the opening position to set the compartment temperature lower by
1 °C to 2 °C than that set for the fridge compartment, and make the compartment work
as the chill compartment.
Closed
Turn the sliding part to the closing position to set the compartment temperature same
as that set for the fridge compartment, and make the compartment work as a part of the
fridge compartment.
• When this compartment is used as 0 °C compartment, keeping food in the chill compartment instead of the freezer or
refrigerator compartment allows food retain freshness and avour longer, while preserving its fresh appearance, When
chill compartment drawer becomes dirty, remove it and wash it with water. (Water freezes at 0 °C, but foods containing
salt or sugar freeze at temperature lower than that) Normally people use the chill compartment for raw sh, lightly
pickled and rice, etc...
• Pull the chill compartment drawer out toward you. the cover will open automatically.
Note:
• Do not put foods you want to freeze or ice trays in order to make ice.
1010
Page 11
Using the handy functions
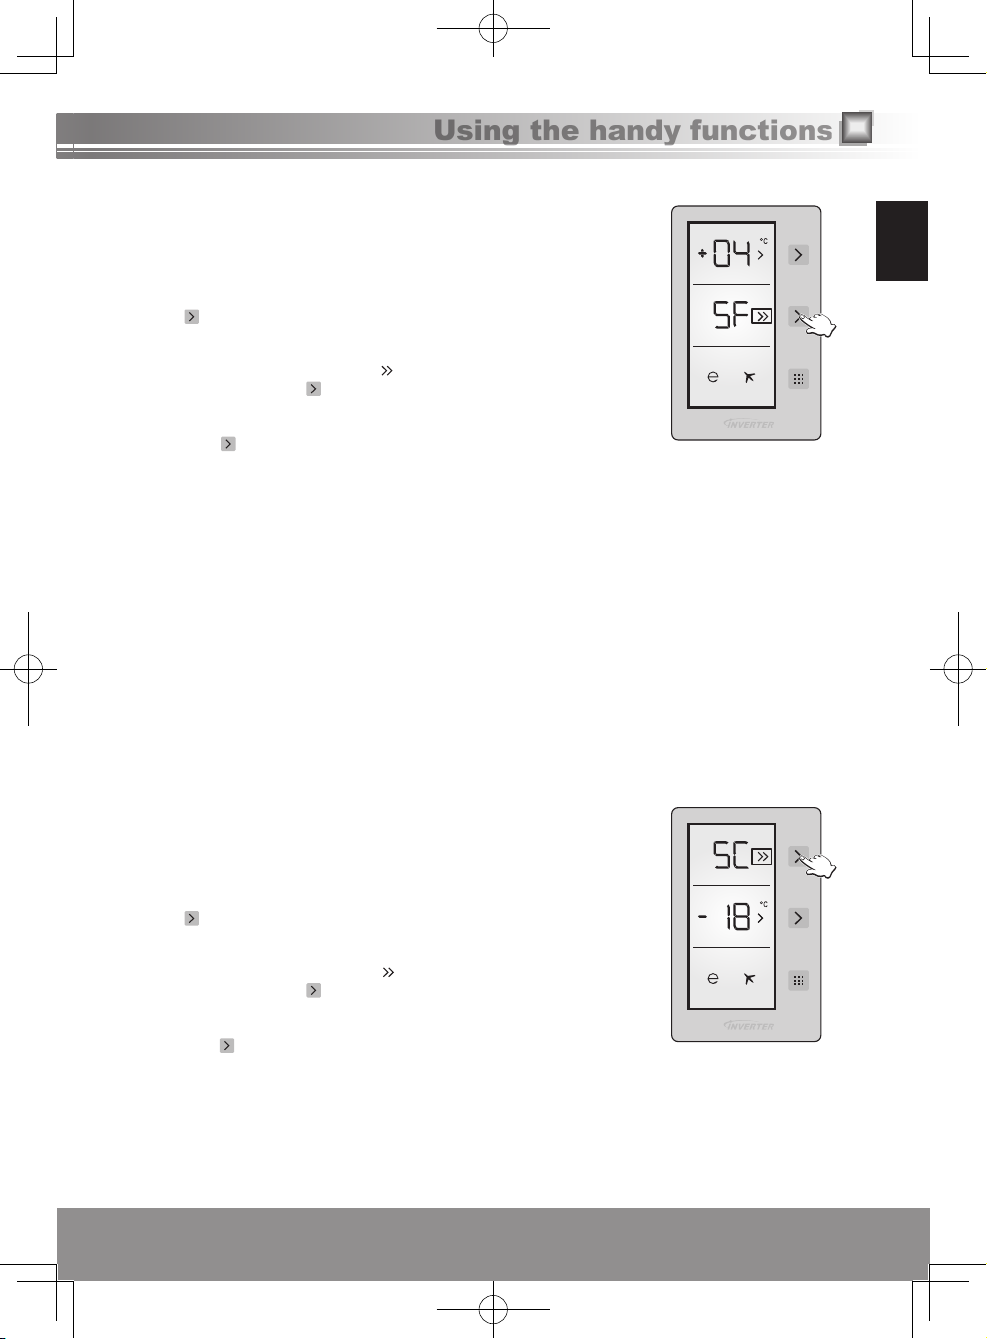
Super Freeze Mode
Features:
• In this mode, the freezer can be cooled rapidly, enabling the fresh foods, etc. which are
placed there to be frozen.
• Super Freeze Mode will automatically end after 24 hours or when the freezer sensor
temperature becomes lower than -32 °C.
Settings:
1. Press (lower) until “SF” is shown.
2. If no operation is performed for 1 second during the setting process, “SF” will ash and a
beep will be heard indicating that Super Freeze Mode is set.
• During this mode, “SF” is displayed, and ashes alternately.
• To release the mode, press (lower).
Notes:
• During this mode:
-By pressing (lower), Super Freeze Mode will be cancelled and the desired
temperature can be set.
-Eco Mode and Holiday Mode cannot be selected.
-The fridge temperature can be adjusted.
• The effect on the stored food can be reduced if setting Super Freeze Mode several hours
before storing the food in the freezer compartment.
• The alarm sounds 3 hours after setting Super Freeze Mode. You can then store a small
amount of food.
• The following items are recommended in order to exert the maximum freezing capacity.
1
Set the freezer temperature to -24 °C and the fridge temperature to 2 °C 24 hours
before storing the food.
2
Set Super Freeze Mode 10 hours before storing the food.
3
If you wish to store a large amount of food, remove the two top drawers from the
freezer and place the food directly on the glass shelf or put it in the lowest drawer of
the freezer.
(A bigger freezing capacity can be exerted if placing the food directly on the top glass
shelf.)
• The maximum freezing capacity within 24 hours is written in the rating label.
English
Super Cool Mode
Features:
• In this mode, fast food can be cooled before eating, a large amount of food can be cooled
and stored, and drinks can be cooled quickly.
• Super Cool Mode will automatically end after 8 hours or when the fridge sensor
temperature becomes lower than 0 °C.
Settings:
1. Press (upper) until “SC” is shown.
2. If no operation is performed for 1 second during the setting process, “SC” will ash and a
beep will be heard indicating that Super Cool Mode is set.
• During this mode, “SC” is displayed, and ashes alternately.
• To release the mode, press (upper).
Notes:
• During this mode:
-
By pressing
can be set.
-Eco Mode and Holiday Mode cannot be selected.
-The freezer temperature can be adjusted.
(upper), Super Cool Mode will be cancelled and the desired temperature
11
11
Page 12
Using the handy functions (continued)
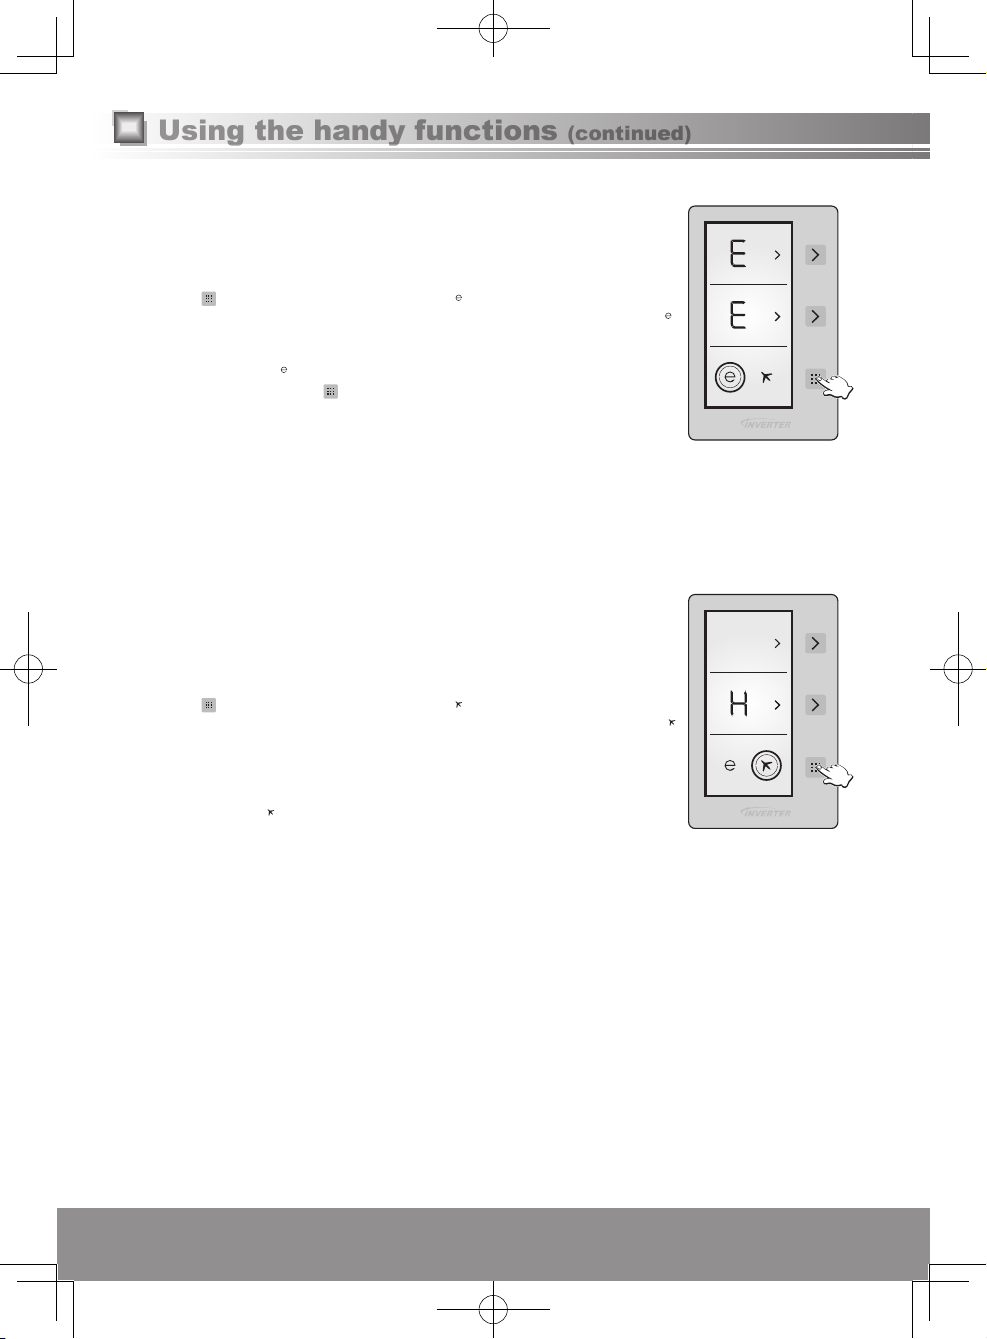
Eco Mode
Features:
• In this mode, the control unit operates the freezer and fridge economically.
• In this mode, the fridge temperature is automatically set to 4 °C and the freezer
temperature is automatically set to -18 °C.
Settings:
1. Press repeatedly until a circle appears around .
2. If no operation is performed for 1 second during the setting process, the circle around
ashes and a beep will be heard, indicating that Eco Mode is set.
• During this mode, “E” is displayed on the Fridge/Freezer temperature display, and a circle
is displayed around .
• To release the mode, press
Notes:
• During this mode:
-Freezer and fridge can be adjusted. When Eco Mode is released, the adjustment will be
maintained.
-Super Cool Mode and Super Freeze Mode can be selected. Eco mode is released
automatically, and the selected mode is activated.
-After releasing Eco Mode, Holiday Mode can be selected, and the selected mode is
activated.
Holiday Mode
Features:
• Set this mode when the fridge is not going to be used for a prolonged period such as during a long
vacation.
• In this mode, the fridge temperature is automatically set to 8 °C and the freezer
temperature is automatically set to -18 °C.
Settings:
1. Press repeatedly until a circle appears around .
2. If no operation is performed for 1 second during the setting process, the circle around
ashes and a beep will be heard, indicating that Holiday Mode is set.
• “H” is displayed on the Freezer temperature display. No indication appears on the Fridge
temperature display.
• During this mode, “H” is displayed on the Freezer temperature display, and a circle is
displayed around .
Notes:
• Before using this mode, empty out the fridge, and close its door.
• When this mode is ended, the fridge will resume operation with its previous settings.
-Freezer and fridge can be adjusted. When Holiday Mode is released, the adjustment will
be maintained.
-Super Cool Mode and Super Freeze Mode can be selected. Holiday mode is released
automatically, and the selected mode is activated.
-After releasing Holiday Mode, Eco Mode can be selected, and the selected mode is
activated.
.
1212
Page 13
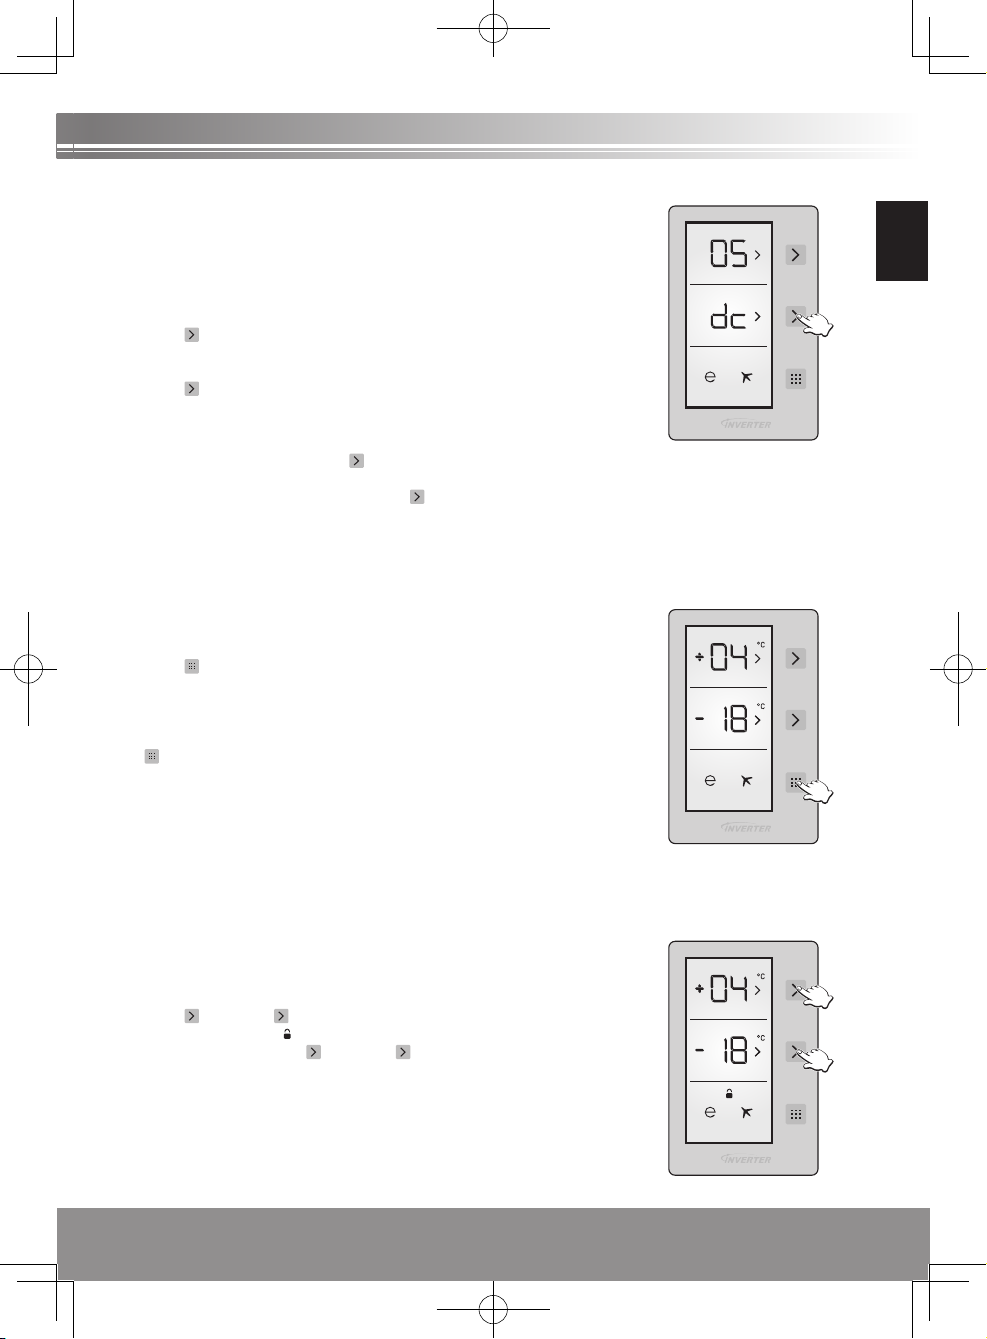
Drink Cool Mode
Features:
• Drinks can be cooled quickly in the freezer.
• This mode has a timer function, and can be set to beep when the timer reaches 5, 10,
15, 20, 25 or 30 minutes.
• Remove the bottles when the beep is heard. If bottles are left in the freezer for a long
time, their contents could freeze and the bottles might break.
Settings:
1. Press (lower) button for 5 seconds.
2. “dc” is displayed on the Freezer temperature display and “05” ashes on the Fridge
temperature display.
3. Press (upper) to adjust the time (05-10-15-20-25-30 minutes).
4. The selected time ashes on the display 3 times and a beep will be heard.
5. Countdown by minutes starts from the set time, and the remaining time ashes on the
display.
• To release Drink Cool Mode, press (lower) button for 5 seconds.
• When the set time comes, a beep will be heard, and both of the display indication
(Example: “00” and “dc”) ash until you press (lower).
Notes:
• When using this mode, check the temperature of the bottles regularly.
• When the bottles have cooled sufciently, remove them from the freezer.
Screen Saver Mode
Features:
• While setting this mode, the backlight of the display can be turned off to save energy.
Settings:
1. Press for 3 seconds to set the automatic Screen Saver function.
2. If no operation is performed for 5 seconds and any door is not opened, the backlight of
the display is turned off with all other marks and characters remaining on the display.
• The selected modes and functions are maintained.
• To set the automatic Screen Saver to off and keep the backlight of the display on, press
for 3 seconds.
Notes:
• When the automatic Screen Saver function is set to on and the display backlight is
turned off for a while, the display backlight will be turned on again and the set functions
are indicated on the display, if any button is pressed or any door is opened.
• When the Screen Saver and Child Lock are set to on, the Screen Saver is activated.
Therefore, while both of the functions are activated, the display backlight will be turned
on again when any button is pressed or any door is opened.
English
Child Lock function
Features:
• Setting Child Lock can keep children from changing the settings while playing with the
buttons.
Settings:
1. Press (upper) and (lower) for 5 seconds to set Child Lock.
• While Child Lock is set, is lit.
• To release the mode, press (upper) and (lower) for 5 seconds. You cannot change
the mode that is currently set until Child Lock is released.
Notes:
• If electricity is interrupted or the power plug is removed, Child Lock is released.
13
13
Page 14
User alert functions
User alert functions become active in the following situations.
Situation Details Alarm How to stop the alarm
Mode has ended.
Door ajar.
• The set time has been reached in Drink
Cool Mode.
• The fridge and/or freezer door has been
left ajar for more than 2 minutes.
Beeps continuously
Beeps every 5 seconds Close the door(s).
Press
.
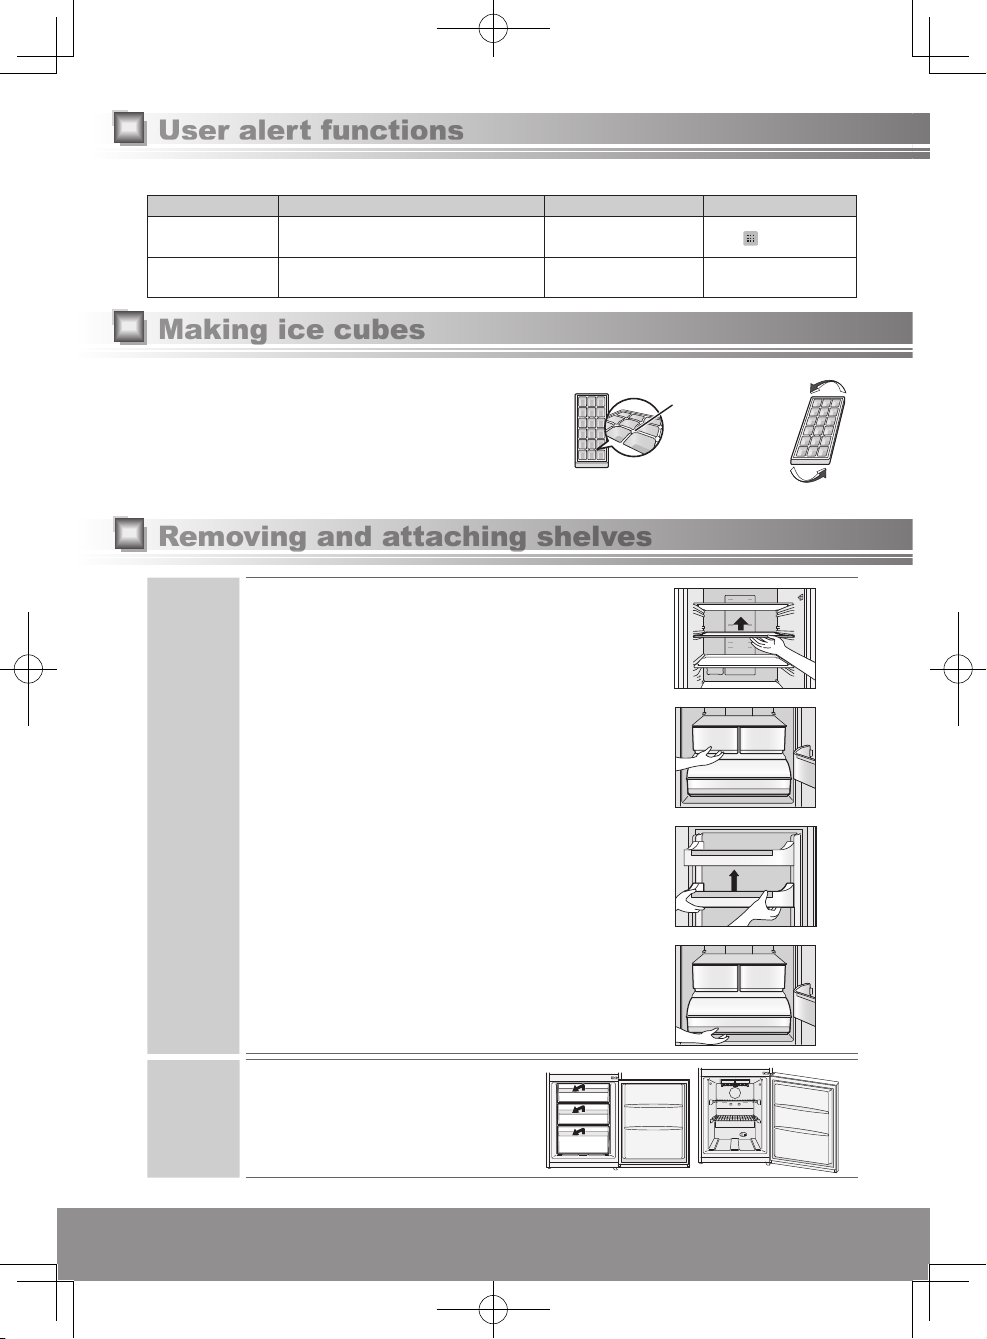
Making ice cubes
Open the freezer, pull out the upper drawer and take out the ice tray
on the ceiling. Fill water in the ice tray to the water level line and then
place back the ice tray.
When ice cubes are ready, pull out the upper drawer and take out the
ice tray. Slightly twist the ice tray by holding its two sides, the ice cubes
will drop from the ice tray. Then, put the ice tray back into its place.
Water level line
Removing and attaching shelves
Fridge
Freezer
Glass shelves
Lift the inner side of the shelf slightly and pull it out.
When removing the glass shelves, before pulling them out, remove
the door and bottle shelves rst if they are in the way.
When you remove the glass tray, open the door until it touches the
stopper.
Crispers
Pull the crispers towards you and pull it out.
Door shelves and bottle shelves
Lift it slightly and then remove it.
Chill compartment drawer
Pull out the drawer, hold the front part and lift it up diagonally, and
remove it.
Pull the drawer towards you, lift the front
slightly, and pull it out.
Having removed the drawer, you can store
food in the empty compartment.
1414
Page 15
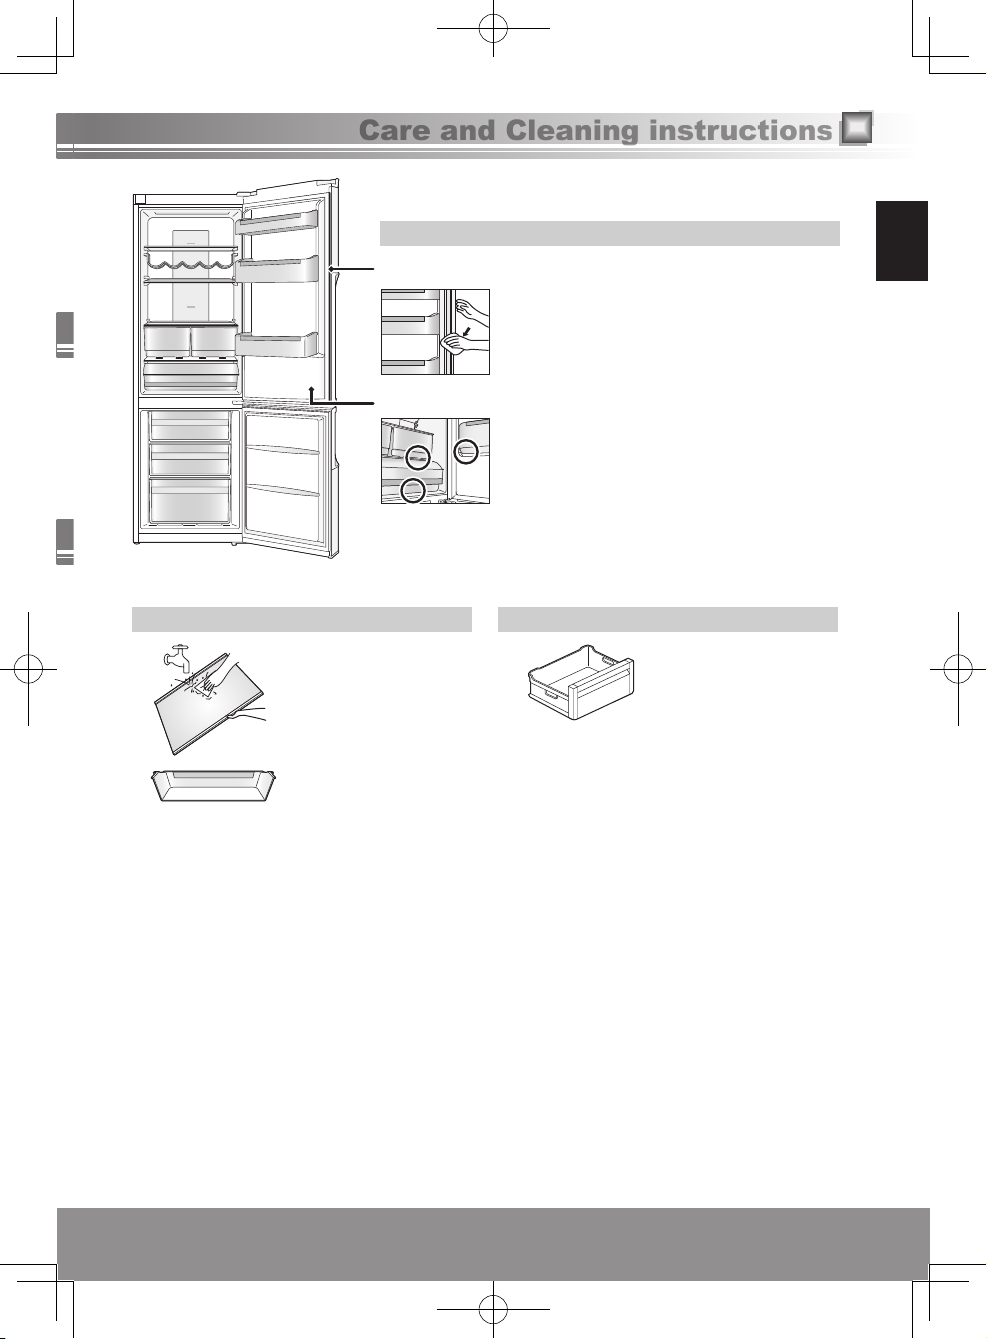
Care and Cleaning instructions
Daily cleaning
Wipe regularly with a dry cloth.
Places to pay particular attention to:
Door opening seal
If the seal gets dirty and damaged, cold air is more likely
to leak.
Bottle shelf
Wipe away any dirt and liquid before it builds up.
Each year, unplug your refrigerator, remove the shelves and give them a
thorough clean.
Parts you can wash with water
Fridge Freezer
● Glass shelves
● Door shelves
● Bottle shelves
● Egg trays
● Crispers
● Chill compartment drawer
English
● Freezer drawers
● Ice trays
Note:
• Do not use abrasive cleaners such as Bicarbonate of
Soda, as they can damage the plastic.
Cleaning the control panel
The refrigerator’s control panel is made of delicate materials. To protect its surfaces, do not clean it with solvent based
chemicals. Simply wipe it with a dry or slightly damp cloth.
Cleaning the outside of the refrigerator
Use a warm, damp, soft cloth to clean the outside of your refrigerator. For more stubborn marks, use a mild kitchen
detergent and wipe away with a soft damp cloth. Remove any remaining surface water with a dry cloth.
Notes for cleaning
When cleaning inside or outside your refrigerator, do not use:
● alkaline detergents - they can crack plastic parts.
● grinding dust, soap powder, oil-based cleaners, hot water, brushes, acids, benzenes, solvents or alcohol-based
solutions - all can damage the refrigerator’s surfaces and plastic parts.
Make sure you wipe off any stains from edible oils, which can also damage plastic parts.
15
15
Page 16
Care and Cleaning instructions (continued)
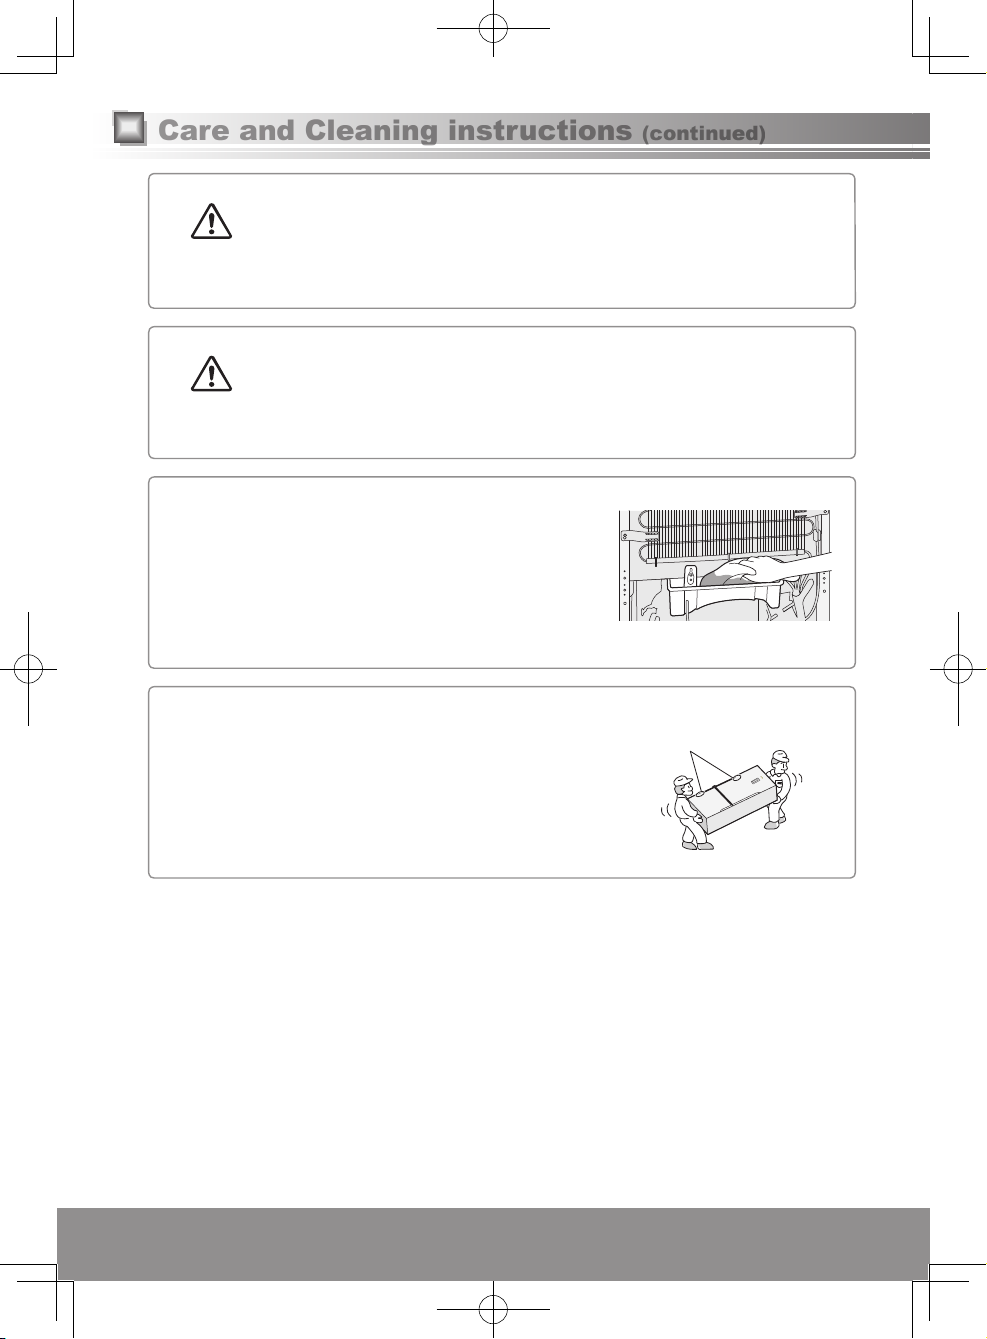
Maintenance check
● Is the mains lead damaged?
WARNING
CAUTION
Before moving or transporting your refrigerator
① Remove all items.
② Unplug it.
③ Raise the adjustable leg.
④ Pull, or ‘walk’ the refrigerator towards you.
⑤ Use a cloth, for example, to absorb the water in the evaporation pan.
● Does the mains plug get hot?
● Is the mains plug rmly in the mains socket?
If the mains lead or LED lamp is damaged, please consult an authorized service centre. DO NOT
attempt to replace these items yourself.
Extended disuse
If you’re not going to use the refrigerator for a long time, unplug it and clean the mains plug as
described above. Then leave the doors open for 2-3 days. This lets the interior dry out properly, and
prevents odour and the build up of mould.
Do not switch the refrigerator on and off repeatedly. It will last longer if you leave it switched on
during normal use.
(Lower back of the refrigerator)
Moving and transporting your refrigerator
At least two people are needed to carry the refrigerator safely.
① Tighten the adjustable legs.
② Hold the adjustable legs at one end, and corners at the
other, as shown.
Note:
• Do not carry the refrigerator by holding its doors.
Always transport the refrigerator in its normal upright position.
1616
Secure the doors with
adhesive tape
Page 17
Troubleshooting
Your fridge warns you if the temperatures for cooler and freezer are in improper levels or when a problem occurs in the appliance.
Warning codes are displayed in the Fridge/ Freezer temperature display.
Warning codes Meaning Details and countermeasures
Sr Failure/Warning There is/are some part(s) out of order or there is a failure in cooling
LF Freezer compartment is
not cold enough.
process.
• Call Service for assistance as soon as possible.
This caution will be seen especially after long term of power failure.
1. Do not freeze the foods that are thaw and use in short time period.
2. Set the freezer temperature to colder values or set the super freeze, until
the compartment gets to normal temperature.
3. Do not put fresh food until this failure is off.
English
LC Refrigerator
compartment is not cold
enough.
LF and LC Not cold enough. It is the combination of LF and LC error type.
HC Refrigerator
compartment is too
cold.
LOPO Low voltage When the power supply gets lower than 170 V, the appliance gets to steady
Ideal temperature for refrigerator compartment is +4°C. If you see this
warning your foods have risk of spoiling.
1. Set the refrigerator temperature to colder values or set the super cooling
mode until the compartment gets to normal temperature.
2. Do not open the door often until this failure is off.
• You will see this failure when rst starting the appliance. It will be off after
the compartments get normal temperature.
The foods start to freeze because of the too much cold temperature.
1. Check if the super cooling mode is on.
2. Decrease the refrigerator temperature values.
position.
• This is not a failure. This prevents any damages on the compressor. This
warning will be off after the voltage gets required level.
17
17
Page 18
FAQs
If you feel that the refrigerator is not working properly, check out the following points rst.
If the trouble persists, disconnect the mains plug and contact your dealer or an authorized service centre.
General
You hear unusual sounds from the
refrigerator.
You hear a sound after the
compressor has shut down.
You hear a sound after you have
opened or closed the door.
You hear the sound of air or water
owing after you have opened
the door.
You hear a continuous whining
sound.
The compressor is quite loud. • Has the food been packed too tightly together or is the room temperature high?
The compressor has been running
for a long time.
Condensation forms on the
outside of the refrigerator.
The outside of the refrigerator
feels hot to the touch.
The controls on the control panel
cannot be operated.
The alarm sounds. • The fridge and/or freezer door has been left ajar. Close the doors.
The LED light does not come on. • Has Holiday Mode been set?
• Has the refrigerator been installed on a sturdy and level oor?
• Have sufcient clearances been provided around the refrigerator?
• Is anything vibrating on the top of the refrigerator?
• It’s normal to hear some noises when the refrigerator starts or stops operation.
• This is normal, and is often caused by refrigerant owing back to the
compressor.
• This is normal, and is due to the difference in air pressure between the inside
and outside of the refrigerator.
• This is caused by refrigerant owing the internal pipework.
• This sound is heard while the fan for circulating the cold air is operating.
• Has the food been packed too tightly together or is the room temperature high?
In cases like these, the fan for circulating the cold air runs at high speed so it
makes a loud noise.
In cases like these, the compressor runs at high speed so it’s normal for the
compressor to be louder.
• When the mains plug has been connected for the rst time, the compressor
runs longer than usual in order to cool down the inside of the refrigerator until
the set temperatures are reached.
• Has Super Freeze Mode or Super Cool Mode been set?
• Have the doors been opened and closed frequently? Are the doors completely
shut?
• Have the food items been packed too tightly together or is the room
temperature high?
• When many food items are placed in the refrigerator at one time, the
compressor will need to run for a longer period.
• Condensation may form when the humidity in the room is high and is normal.
Wipe it off using a dry cloth.
• After the power of the refrigerator is turned on, the refrigerator may become
warm until the interior of the compartment is sufciently cooled down. The
refrigerator may become warm even after the compartments have been cooled
down. This is due to the operation of the heat radiation pipe equipped on the
refrigerator for the purpose of preventing condensation, and is not malfunction.
• Is the power to the refrigerator on?
In Holiday Mode, the LED light of the fridge does not come on.
• Is the power to the refrigerator on?
• If you need to change the LED, contact your dealer or an authorized service
centre.
1818
Page 19
Fridge and freezer
The fridge is not chilling (and the
freezer is not freezing).
The fridge is not chilling (and
the freezer is not freezing)
satisfactorily.
There is a difference between
the set temperature and actual
temperature.
Food in the fridge freezes. • Is the set temperature for the fridge too low?
Condensation forms in the fridge
and drawers.
It is hard to open the freezer door. • The door is sometimes difcult to open just after it has been closed.
It smells inside the refrigerator. • Were any food items with strong odours sealed before they were placed in the
• Is the power to the refrigerator on?
• Is the set temperature too high?
• Is the refrigerator exposed to direct sunlight or positioned near a heating
appliance?
• Have sufcient clearances been provided around the refrigerator?
• Have the food items been packed too tightly together or is the room
temperature high?
• Have the doors been opened and closed frequently?
Are the doors completely shut?
• Has Holiday Mode been set?
• When warm food is put inside the refrigerator, the temperature will rise
temporarily.
• During the cold season or when the room temperature is low, it may feel as if
the refrigerator is not chilling.
• When warm food is put inside the refrigerator, the temperature will rise
temporarily.
• Has the food been placed at the back of the fridge?
The area near the back wall is where the temperatures are coldest so avoid
placing food which may freeze easily here.
• Condensation may form when the door has been opened and closed frequently
or when it has not been shut completely, or when the room humidity is high.
Wipe off the condensation using a dry cloth.
• The difference in air pressure between the inside and outside of the freezer
may sometimes make it hard to open the freezer door. Wait a few moments,
and then try opening the door.
fridge?
Place the items inside a sealed container and store them.
• Odours may stick to the surfaces inside the refrigerator. Wipe the surfaces
using a soft cloth which has been dipped in lukewarm water.
English
19
19
Page 20

Specications
Product che (EU Regulation 1060/2010)
SUPPLIER'S NAME Panasonic
MODEL
CATEGORY 7 (Refrigerator-Freezer)
ENERGY EFFICIENCY CLASS A++
ANNUAL ENERGY CONSUMPTION 240 kWh/year
NET FRIDGE VOLUME 189 L 224 L
NET CHILL VOLUME 28 L
NET FREEZER VOLUME 72 L
STAR RATING OF THE FREEZER Four-star
'FROST FREE' COMPARTMENTS Fridge: Frost-free / Chill: Frost-free / Freezer: Frost-free
TEMPERATURE RISE TIME 18 hours
FREEZING CAPACITY 12 kg/24 h
CLIMATE CLASS T
AIRBORNE ACOUSTICAL NOISE
EMISSIONS
Other Information
TOTAL GROSS VOLUME 332 L 367 L
TOTAL NET VOLUME 289 L 324 L
OUTSIDE DIMENSIONS
WIDTH × DEPTH × HEIGHT
NET WEIGHT 77 kg 80 kg
RATED VOLTAGE 220 V - 240 V
RATED FREQUENCY 50 Hz
REFRIGERANT/CHARGE R600a/55 g R600a/60 g
BLOWING AGENT Cyclo-Pentane
Notes:
*1
The energy consumption per year is based on the standard test results for 24 hours.
Actual energy consumption vary depending on how the appliance is used and where it is located.
*2
Permitted ambient temperature: 16 °C to 43 °C
When the doors are completely open
NR-B29SG2-SE
NR-B29SG2-SF
NR-B29SG2-SB
600 mm x 652 mm x 1898 mm 600 mm x 652 mm x 2044 mm
NR-B29SW2-WE
NR-B29SW2-WF
NR-B29SW2-WB
*1
NR-B32SG2-SE
NR-B32SG2-SF
NR-B32SG2-SB
250 kWh/year
*2
42 dB
NR-B32SW2-WE
NR-B32SW2-WF
NR-B32SW2-WB
*1
1122 mm
120 º
299 mm
2020
Page 21
MEMO
English
21
21
Page 22
Inhaltsverzeichnis
Hinweise zur Entsorgung ............................................22
Sicherheitsanweisungen .............................................23
Montage ......................................................................... 25
Schematische Ansicht ................................................. 27
Display und Bedienfeld ................................................ 28
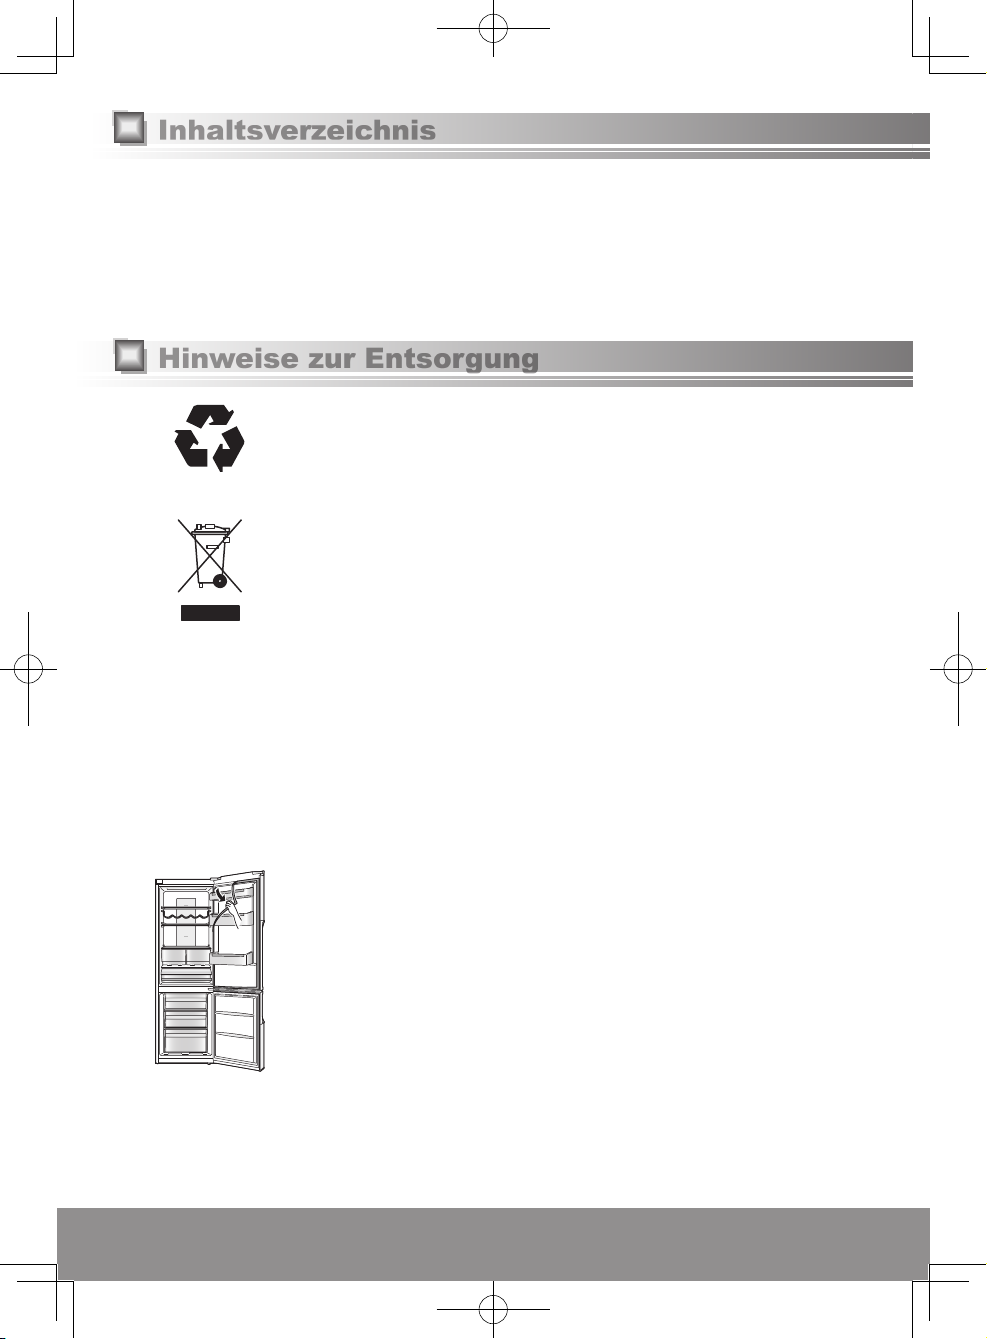
Einstellen der Temperatur ........................................... 29
Verwendung der Zusatzfunktionen ............................. 30
Hinweise zur Entsorgung
Entsorgung von Verpackungsmaterial
Stellen Sie sicher, dass alle Verpackungsmaterialien wie Kartons, Plastiktüten, Klebeband und Polystyrol
unmittelbar nach dem Auspacken des Kühlschrankes sicher entsorgt werden und außerhalb der Reichweite
von Babys und Kleinkindern sind. Kinder sollten niemals mit diesen Teilen spielen. Erstickungsgefahr!
Alle eingesetzten Materialien sind umweltverträglich und wieder verwertbar. Bitte helfen Sie mit: Entsorgen Sie die Verpackung
umweltgerecht. Über aktuelle Entsorgungswege informieren Sie sich bitte bei Ihrem Fachhändler oder der Gemeindeverwaltung.
Informationen zur Entsorgung von elektrischen und elektronischen
Altgeräten (private Haushalte)
Dieses Symbol auf den Produkten und/oder Begleitdokumenten bedeutet, dass elektrische und
elektronische Produkte nicht im allgemeinen Haushaltsmüll entsorgt werden sollten.
Bringen Sie diese Produkte zur ordnungsgemäßen Behandlung, Wiederverwertung und Recycling zu
entsprechenden Sammelpunkten, wo sie kostenlos entgegengenommen werden. In einigen Ländern
werden die Produkte bei Erwerb eines entsprechenden neuen Produkts vom Händler entgegengenommen.
Die ordnungsgemäße Entsorgung dieses Produkts trägt dazu bei, wertvolle Ressourcen zu sparen und negative
Auswirkungen auf die menschliche Gesundheit und die Umwelt aufgrund von ungeeigneter Abfallbehandlung zu
verhindern. Weitere Informationen zum nächstgelegenen Sammelpunkt erhalten Sie von Ihren lokalen Behörden.
Die nicht ordnungsgemäße Entsorgung kann nach nationaler Gesetzgebung mit Strafe belegt sein.
Für geschäftliche Benutzer in der europäischen Union
Weitere Informationen zur Entsorgung von elektrischen und elektronischen Altgeräten wenden Sie sich an
Ihren Händler oder Zulieferer.
Informationen zur Entsorgung in Ländern außerhalb der europäischen Union
Dieses Symbol gilt nur in der europäischen Union.
Informationen zur ordnungsgemäßen Entsorgung dieses Produkts erhalten Sie von Ihren lokalen
Behörden oder Ihrem Händler.
Bevor Sie Ihr Altgerät entsorgen
Bitte befolgen Sie entweder die Entsorgungsanweisungen des Altgeräte-Herstellers oder die
örtlichen Entsorgungsvorschriften für das Gerät. Sind diese nicht verfügbar, folgen Sie bitte den drei
nachstehenden Anweisungsschritten.
1. Den Netzstecker von der Steckdose abziehen.
2. Das Netzkabel abschneiden und mit noch angebrachtem Netzstecker sicher entsorgen.
3. Vergewissern Sie sich, dass das Altgerät außer Reichweite von Kleinkindern ist, bis es abgeholt
oder zu einem Recycling-Center gebracht wird.
● Entfernen Sie sämtliches Dichtungsmaterial von der Tür, und lassen Sie alle Regale und
Schubladen eingesetzt.
Dies soll verhindern, dass Kinder hineinklettern und eingeschlossen werden.
Benutzerwarnfunktionen .............................................33
Produktion von Eiswürfeln ..........................................33
Entfernen und Anbringen von Ablagen ...................... 33
Pege- und Reinigungshinweise ................................34
Fehlerbehebung ............................................................ 36
Fragen und Antworten .................................................37
Technische Daten ......................................................... 39
Dieses Gerät wurde zur Verwendung im Haushalt entwickelt, sowie für ähnliche Anwendungen wie
• Küchenbereiche für Angestellte in Geschäften, Büros und anderem Arbeitsumfeld;
• Bauernhäusern und für Kunden in Hotels, Motels und anderen Wohnumgebungen;
• Unterkünften im Bed-And-Breakfast Stil;
• Catering und ähnlichen Anwendungen im persönlichen Gebrauch.
2222
Page 23
Bedeutung der Symbole:
Bitte nicht tun
Unbedingt tun Nicht zerlegen
Sicherheitsanweisungen
Zeigt an, dass das Gerät zur Verhütung von
Stromschlägen geerdet werden muss
Weist auf Gefahr von Tod oder ernsthaften Verletzungen hin.
Dieses Gerät sollte nicht von Personen (einschließlich Kindern) mit eingeschränkten körperlichen, sensorischen oder
WARNUNG
-WARNUNG: Keine mechanischen Vorrichtungen oder andere Mittel außer den vom Hersteller empfohlenen verwenden, um
-WARNUNG: Keine Elektrogeräte außer den vom Hersteller empfohlenen in den Lebensmittelfächern des Geräts benutzen.
-WARNUNG: Achten Sie darauf, dass der Kältemittelkreis nicht beschädigt wird.
geistigen Fähigkeiten oder Unerfahrenheit und Unkenntnis des Geräts benutzt werden, außer unter der Aufsicht oder
Anleitung einer für ihre Sicherheit verantwortlichen Person.
Kinder sollten beaufsichtigt werden, um sicherzugehen, dass sie nicht mit dem Gerät spielen.
Verwenden Sie keine Mehrfach-Steckdosenadapter, und schließen Sie nicht mehrere Geräte an denselben
Steckdosenadapter an.
• Dies kann Überhitzen, Brand oder Kurzschluss verursachen.
Das Netzkabel nicht einklemmen, verknoten oder knicken, und auch keine schweren Gegenstände darauf stellen.
• Dies erhöht die Brand- oder Stromschlaggefahr. Falls das Netzkabel oder der Netzstecker des Geräts beschädigt
wird, muss das Teil vom Hersteller, dem Kundendienstvertreter oder einer ähnlich qualizierten Person
ausgewechselt werden, um Gefahren zu verhüten.
Den Kühlschrank nicht durch Ziehen am Netzkabel vom Stromnetz trennen.
• Dies kann eine Beschädigung des Netzkabels verursachen. Stets den Stecker fassen und kräftig von der Steckdose abziehen.
Keine Wasserbehälter auf den Kühlschrank stellen.
• Wasser kann die Isolierung von Elektroteilen beschädigen und einen Kurzschluss, Brand oder elektrischen Schlag verursachen.
Keine brennbaren Gase in der Nähe des Kühlschranks versprühen.
• Dies kann eine Explosion oder einen Brand verursachen.
Kein Wasser auf oder in den Kühlschrank sprühen.
• Dies kann einen Brand oder elektrischen Schlag verursachen.
Den Netzstecker nicht mit nassen Händen anfassen.
• Dies kann einen elektrischen Schlag verursachen.
Installieren Sie den Kühlschrank nicht an einem feuchten Ort oder einem Ort, wo er mit Wasser in Berührung kommen kann.
• Eine verschlechterte Isolierung von Elektroteilen kann einen Kurzschluss, elektrischen Schlag oder Brand verursachen.
Keine leichtüchtigen oder brennbaren Substanzen im Kühlschrank aufbewahren.
• Brennbare Substanzen, wie Benzol, Verdünner, Alkohol, Ether und Flüssiggas (LPG), können Explosionen verursachen.
Keine Arzneimittel oder andere temperaturempndliche Produkte im Kühlschrank aufbewahren.
• Sie sollten keine Produkte im Kühlschrank lagern, die strenge Temperaturkontrolle erfordern.
Lassen Sie Kinder nicht auf die Kühlschranktür klettern, damit schwingen oder sich daran hängen.
• Dies kann ernsthafte Verletzungen verursachen und den Kühlschrank beschädigen.
Den Kühlschrank nicht in Gegenwart von explosiven Dämpfen oder brennbaren Gasen betreiben.
• Dies kann eine Explosion oder einen Brand verursachen.
Kein Benzin oder andere brennbare Flüssigkeiten und Dämpfe im Kühlschrank lagern oder in der Nähe des Geräts benutzen.
• Dies kann eine Explosion oder einen Brand verursachen.
den Abtauvorgang zu beschleunigen.
• Dies kann eine Beschädigung der Innenteile des Kühlschranks verursachen oder zu einer Explosion führen.
• Dies kann eine Explosion oder einen Brand verursachen.
• Dies kann eine Explosion oder einen Brand verursachen.
Versuchen Sie nicht, den Kühlschrank selbst zu zerlegen, zu reparieren oder zu modizieren.
• Sie könnten sich selbst oder andere mit Verbrennungen oder elektrischen Schlägen verletzen oder den Kühlschrank
beschädigen. Falls Ihr Gerät Änderungen oder Reparaturen benötigt, konsultieren Sie bitte ein autorisiertes Kundenzentrum.
Deutsch
23
23
Page 24
Sicherheitsanweisungen (Fortsetzung)
Vergewissern Sie sich, dass der Kühlschrank an eine geerdete Netzsteckdose angeschlossen ist. NICHT an eine nicht geerdete Netzsteckdose anschließen.
• Ein Kurzschluss kann einen elektrischen Schlag verursachen.
Sicherstellen, dass Netzkabel und Netzstecker nicht zerquetscht oder beschädigt werden.
• Ein beschädigter Netzstecker bzw. ein beschädigtes Netzkabel kann einen Kurzschluss, Brand oder elektrischen Schlag verursachen.
• Falls das Netzkabel beschädigt wird, muss es vom Hersteller, dem Kundendienstvertreter oder einer ähnlich qualizierten Person ausgewechselt werden, um Gefahren zu verhüten.
• VERSUCHEN SIE NICHT, DAS KABEL SELBST AUSZUWECHSELN.
Die Steckerstifte vor dem Anschließen an die Stromversorgung von Schmutz oder Staub säubern.
• Staubablagerungen auf dem Stecker können, besonders bei feuchten Bedingungen, einen Isolationsausfall verursachen. Dies kann zu einem Kurzschluss, Brand oder
elektrischen Schlag führen. Ziehen Sie das Netzkabel ab, und wischen Sie es mit einem trockenen Tuch ab. Verwenden Sie keinesfalls ein nasses oder feuchtes Tuch.
Das Gerät so an die Steckdose anschließen, dass einwandfreier Anschluss gewährleistet ist.
• Ein lockerer Netzstecker kann einen Brand oder elektrischen Schlag verursachen.
Den Kühlschrank in gut belüfteter Umgebung installieren.
• Je mehr Kältemittel in einem Gerät vorhanden ist, desto größer sollte der Aufstellungsraum sein. Sollte Kältemittel auslaufen, wenn sich das Gerät in einem
kleinen Raum bendet, ist die Entstehung von brennbaren Gasen wahrscheinlicher. Dies kann einen Brand oder eine Explosion verursachen. Als Richtlinie
wird für jeweils 8
Das im Kühlschrank verwendete Kältemittel (R600a) und die im Isoliermaterial (Cyclopentan) enthaltenen Gase
sind brennbar. Sie erfordern außerdem spezielle Entsorgungsverfahren.
• Vergewissern Sie sich vor der Entsorgung des Geräts, dass keines der Rohre auf der Rückseite beschädigt ist.
Kältemittel- oder Gaslecks können einen Brand oder eine Explosion verursachen.
Vor der Reinigung und Wartung den Netzstecker des Kühlschranks abziehen.
• Nichtbeachtung kann zu einem elektrischen Schlag führen.
Falls Sie einen Brandgeruch feststellen oder Rauch aus dem Kühlschrank kommen sehen, ziehen Sie sofort das
Netzkabel ab, und konsultieren Sie bitte ein autorisiertes Kundenzentrum.
• Nichtbeachtung kann zu Feuer oder einem elektrischen Schlag führen.
-WARNUNG: Halten Sie die Lüftungsöffnungen im Gerätegehäuse bzw. in der Einbaustruktur frei von Hindernissen.
• Nichtbeachtung kann zu Feuer oder Explosion führen dasich das Kältemittel nicht verteilen kann, wenn es ausläuft.
LED-STRAHLUNG
LED-PRODUKTE DER KLASSE 1M NICHT DIREKT MIT OPTISCHEN INSTRUMENTEN BETRACHTEN.
g Kältemittel mindestens 1 m³ Raum benötigt. Das Datenschild im Inneren des Geräts gibt an, wie viel Kältemittel Ihr Kühlschrank enthält.
2424
ACHTUNG
Weist auf die Gefahr von Verletzungen oder Sachschäden hin.
Keine Flaschen oder Behälter aus Glas in den Gefrierraum legen.
• Wenn der Inhalt gefriert, kann das Glas brechen.
Berühren Sie die Innenwände des Gefrierraums oder die eingelagerten Waren nicht mit nassen Händen.
• Ihre Haut kann an der Innenwand des Gefrierraums oder den eingelagerten Waren festfrieren.
Öffnen oder schließen Sie die Türen nicht, indem Sie die Türgriffe mit beiden Händen fassen.
• Dies kann Verletzungen verursachen.
Vermeiden Sie bei einem Stromausfall häuges Öffnen des Kühlschranks oder das
Einlagern nicht gekühlter Lebensmittel.
• Dies kann zu einem Anstieg der Temperatur im Kühlschrank und zu Verderben der
eingelagerten Lebensmittel führen.
Wenn Sie beabsichtigen, den Kühlschrank längere Zeit nicht zu benutzen, trennen Sie
ihn vom Stromnetz.
Achten Sie auch auf den Spalt zwischen der Kühlraum- und Gefrierraumtür, besonders,
wenn beide gleichzeitig offen sind.
• Dies kann Verletzungen verursachen.
Achten Sie beim Öffnen des Kühlschranks darauf, dass Sie Ihre Finger nicht an den “Klemmpunkt”
– Bereichen einklemmen. Seien Sie besonders vorsichtig, wenn Sie die Kühlraumtür öffnen, um
den potenziellen Klemmpunkt zwischen den Kühlraum- und den Gefrierraumtüren zu vermeiden.
• Dies kann Verletzungen verursachen.
Potenzieller Klemmpunkt
Page 25

Montage
Dieser Abschnitt erklärt, wie Sie Ihr Gerät für Lärm-und Energiereduzierung und einen efzienten Betrieb aufstellen sollen.
Maße
NR-B29SG2/NR-B29SW2: B600 x T652 x H1898 (mm)
NR-B32SG2/NR-B32SW2: B600 x T652 x H2044 (mm)
Auspacken Ihres Gerätes
Entfernen Sie jegliche Verpackungsmaterialien vom Gerät, wie
Schaumabdeckungen und Klebebänder, die das Gerätezubehör innen und
außen schützen.
Die richtige Platzauswahl
Lüftung
Die Luft an der Rückwand des Geräts erwärmt sich. Die erwärmte Luft
muss ungehindert abziehen können. Daher sollte das Gerät in einem gut
gelüfteten, trockenen Raum mit ausreichend Freiraum (siehe Abb. 1) stehen.
Vergrößern Sie den Abstand, wenn eine Vibration zu hören ist.
Temperatur
Der Energieverbrauch und die efziente Leistung des Gerätes wird
durch die Umgebungstemperatur beeinusst.
Das Gerät sollte also folgendermaßen aufgestellt werden:
● nicht in direkter Sonneneinstrahlung;
● nicht neben Heizungen, Herd oder anderen Wärmequellen;
● nur dort, wo die Umgebungstemperatur der Klimaeinstufung
entspricht, für die das Gerät bestimmt ist. Bitte schauen Sie hierfür
in den Spezikationsabschnitt für die Klimaeinstufung Ihres Gerätes.
Nivellierung
Stellen Sie das Gerät auf einen ebenen Boden.
Bei unebenem Boden verstellen Sie bitte die vorderen Füße durch
drehen, wie in der Abbildung 2 beschrieben.
Dadurch werden Vibrationen und störende Geräusche verhindert.
Wenn das Gerät auf einem Teppich oder einen Vinylboden gestellt wird,
legen Sie zuerst eine feste Platte auf den Teppich oder Boden. Dies
verhindert Farbveränderung aufgrund von Erwärmung.
Kühlschranktür
Der Türanschlag kann von der rechten auf die linke
Seite gewechselt werden, so dass die Tür sich in
WARNUNG
die entgegengesetzte Richtung öffnet. Wenn Sie
dies wünschen, wenden Sie sich an den auf dem
beigelegten Blatt aufgeführten Kundendienst, oder
besuchen Sie unsere Website unter
(http://panasonic.net).
Wenn Sie den Anschlag selbst umbauen, können wir
keine Gewährleistung übernehmen.
In der Verpackung des Geräts gibt es Teile zum
Umstellen der Türöffnungsrichtung.
20 mm
oder mehr
150 mm oder mehr
Abbildung 1
Abbildung 2
40 mm
oder mehr
Deutsch
25
25
Page 26

Montage (Fortsetzung)
Installieren der Abstandstücke
Um zu verhindern, dass der Kondensator (schwarze, rückseitige Komponente
mit Lamellen) die Wand berührt, montieren Sie dort zwei Abstandstücke aus
Kunststoff, indem Sie sie um 90° drehen.
Abstandstücke (Zubehör)
Reinigung
Nach der Montage reinigen Sie das Gerät mit warmen Wasser.
Anschließen des Netzsteckers an die Netzsteckdose
Sie können den Netzstecker gleich nach der Montage anschließen.
Wenn das Gerät angeschlossen wird, werden für einen Moment alle Symbole angezeigt; daraufhin erscheinen die
Startwerte von -18 °C auf der Gefrierraumtemperaturanzeige und 4 °C auf der Kühlraumtemperaturanzeige.
Alle Tasten am Bedienfeld werden durch Berührung bedient. (Drücken Sie nur zum Aktivieren die Taste, die Sie
tatsächlich bedienen möchten.)
Hinweise:
• In den Sommermonaten oder zu anderen Zeiten, in denen die Raumtemperatur höher ist, kann der Kühlvorgang länger dauern.
• Wenn Sie den Kühlschrank vom Stromnetz trennen müssen, warten Sie mindestens 10 Minuten, bevor Sie ihn wieder
anschließen. Anderenfalls kann der Kompressor beschädigt werden.
Umgebungstemperatur
Die Klimaklasse nden Sie auf dem Typenschild auf der linken Seite des Kühlschrankes. Sie gibt die
Umgebungstemperaturen an, bei denen das Gerät betrieben werden kann.
Klimaklasse Zulässige Umgebungstemperatur
SN (subnormale) +10 °C zu 32 °C
N (normale) +16 °C zu 32 °C
ST (subtropische) +16 °C zu 38 °C
T (tropische) +16 °C zu 43 °C
Energiesparen
1. Den Kühlschrank in trockener, kühler und gut belüfteter Umgebung installieren. Je niedriger die Umgebungstemperatur,
desto höher die Efzienz. (Maße und Abstand siehe Seite 25.)
2. Kombination von Schubladen und Böden für höchstes Volumen und energiesparendste Nutzung des Geräts.
• Entfernen Sie die oberen zwei Gefrierfächer. (Das unterste Gefrierfach bleibt im Gerät.)
• Schubladen und Böden im Kühlschrank an den im Abschnitt “Schematische Ansicht” (S.27) dargestellten Positionen anbringen.
• Das Entfernen der Kühlraumschublade verbessert die Kaltluftzirkulation. Auch können größere Mengen an
Lebensmitteln gelagert werden.
3. Stellen Sie den Bildschirmschoner-Modus ein.
4. Das Gerät nicht überfüllen, damit die Luft zirkulieren kann.
5. Das Gerät nur öffnen, wenn erforderlich und so kurz wie möglich.
6. Die Lüftungsöffnungen am unteren Teil des Geräts mit einem Staubsauger reinigen usw.
(Dabei darf die Gefriermittelleitung unter der Abdeckung nicht beschädigt werden.)
7. Im Super-Gefriermodus oder Super-Kühlmodus ist der Energieverbrauch höher.
2626
Page 27
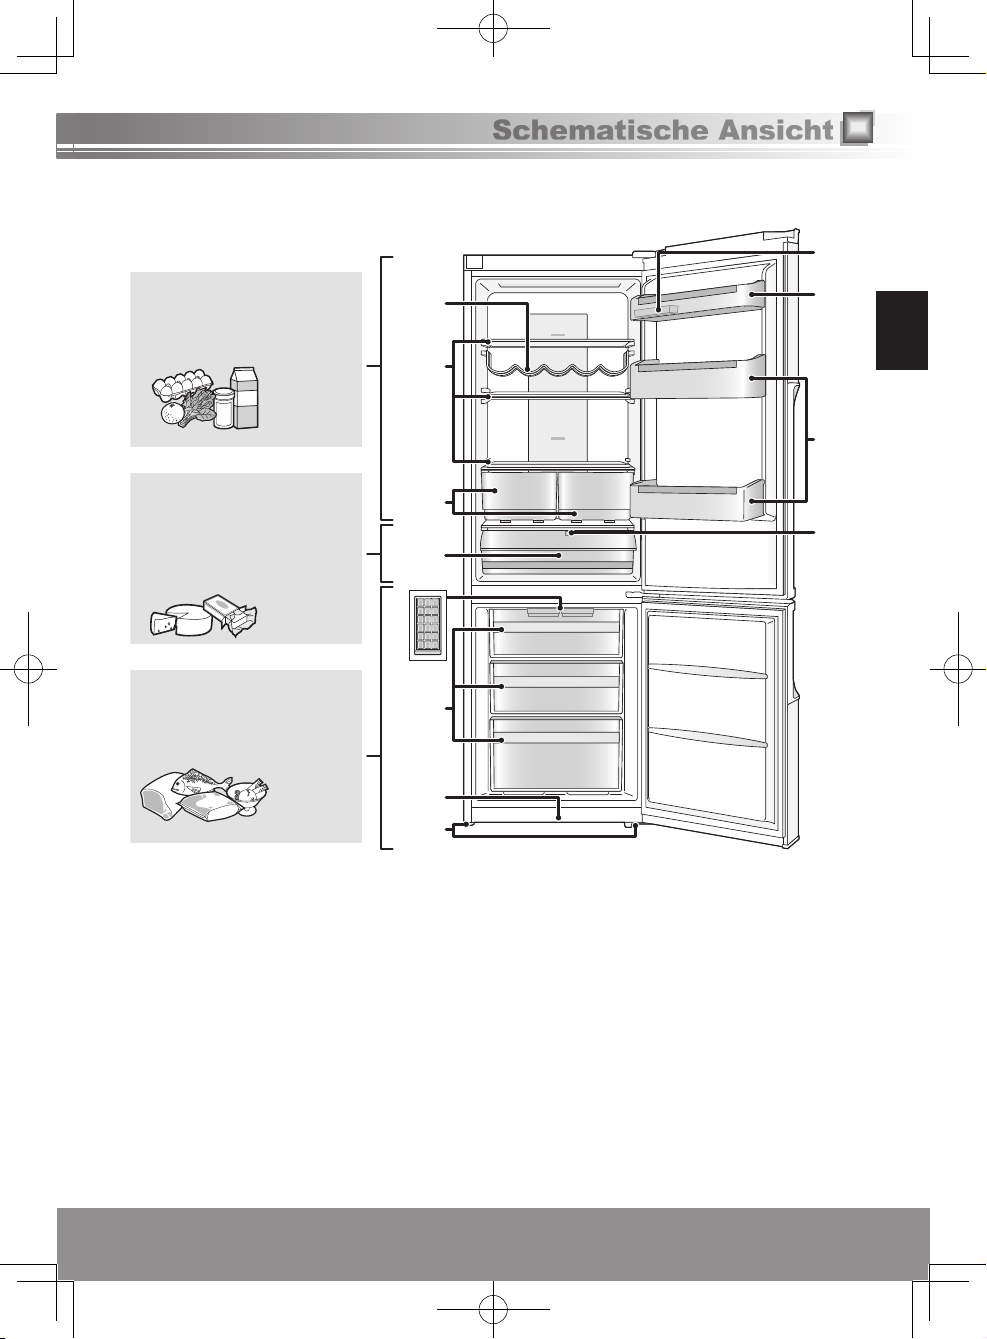
Schematische Ansicht
Die nachstehende Abbildung basiert auf dem Modell
sein.
Kühlraumfach
Die Temperatur kann in einem
Bereich von 2 °C bis 8 °C eingestellt
werden.
Gekochte
Speisen,
Getränke,
Eier, Kuchen,
Milchprodukte
Kühlraumfach
Die Temperatur ist um 1 °C bis 2 °C
niedriger als die des Kühlschrankfachs.
Einzelheiten zur Nutzung des
Kühlraumfachs nden Sie auf Seite 29.
Käse, Butter,
Wurst
5
Gefrierfach
Die Temperatur kann in einem
Bereich von -24 °C bis -16 °C
eingestellt werden.
Gefrorenes
Fleisch,
Geügel,
Fisch,
Eis
NR-B29SG2
1
2
3
4
6
7
8
und kann unterschiedlich von Ihrem aktuellen Kühlschrank
9
:
;
<
Deutsch
1Flaschenregal* 52 Eisschalen 92 Eierhalter
2Glasböden** 6Gefrierfächer :Türregale**
3Gemüsefächer 7Sockel ;Flaschenhalter
4Kühlraumschublade 8Verstellbare Füße <Schiebeteil
*Die folgenden Teile sind beim Modell NR-B29SW2 nicht enthalten.
• Flaschenregal
**Die folgenden Teile sind zusätzlich bei den Modellen NR-B32SG2/NR-B32SW2 enthalten.
• Glasboden
• Türregal
Hinweis:
• Sie können die Positionen für die Installation von Türfächern und Flaschenhaltern ändern. Lassen Sie jedoch Vorsicht
walten, da je nach Position der Fächer Lebensmittel und Getränke herausfallen können, wenn die Tür geöffnet und
geschlossen wird.
• Wird die Tür bei geöffnetem Fach (Gemüsefach/Kühlfach/Tiefkühlfach) geschlossen, kann das Fach beschädigt werden.
27
27
Page 28
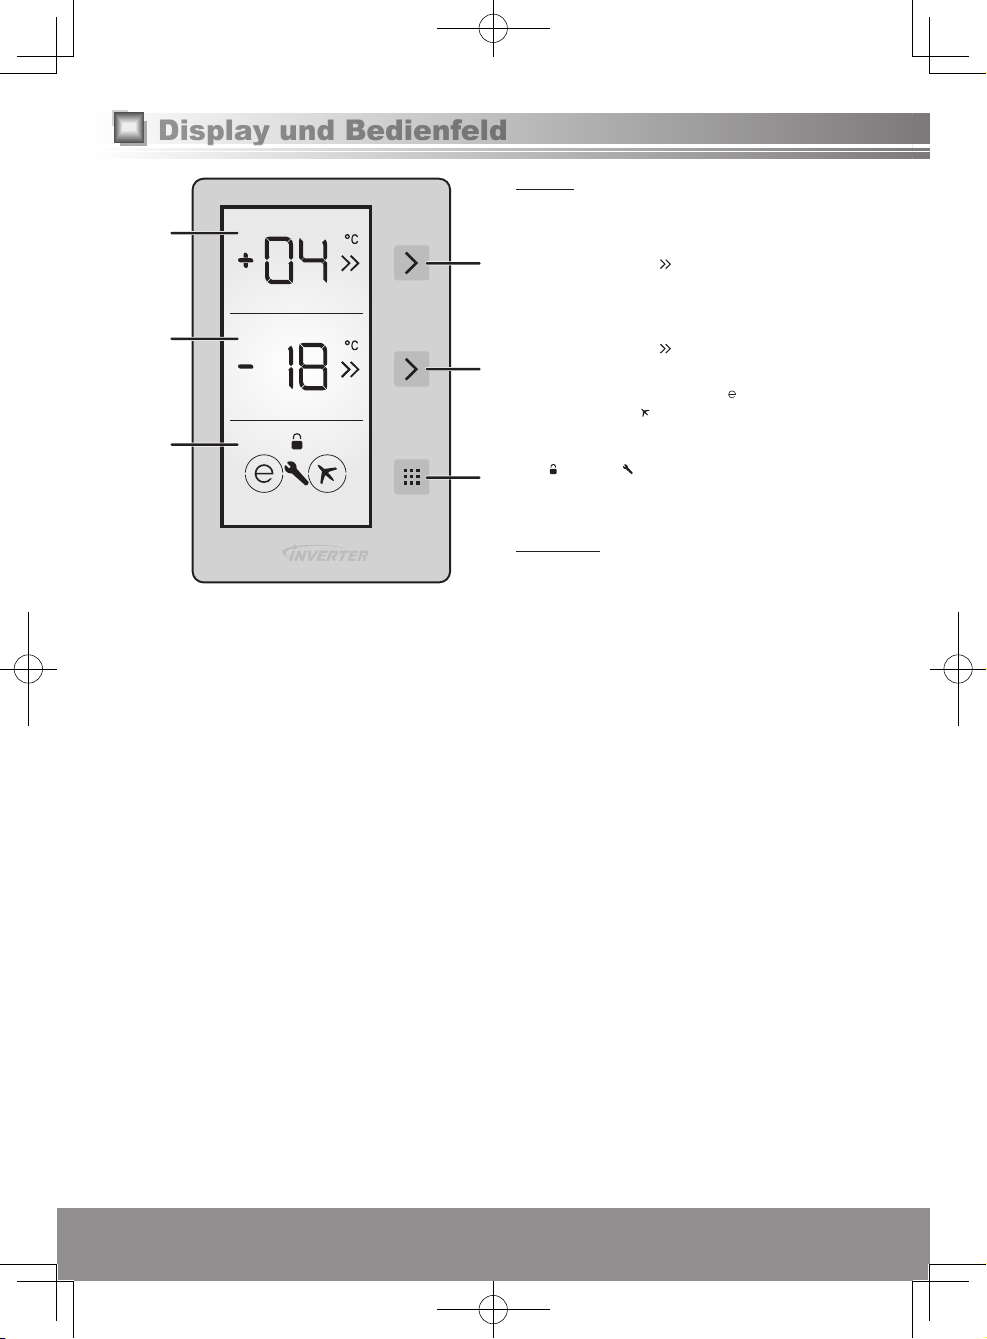
Display und Bedienfeld
Display
1
Kühlraumtemperaturanzeige
1
2
3
Hinweise:
• Dieser Kühlschrank verwendet einen Mikroprozessor zur Steuerung der Temperatur. Die Temperatur im Kühlschrank
variiert in Abhängigkeit von Faktoren wie Änderungen der Raumtemperatur, Häugkeit des Öffnens und Schließens der
Türen und Menge der im Inneren gelagerten Lebensmittel und Art und Weise der Lagerung.
• Die eingestellte Temperatur wird angezeigt.
• Bei aktiviertem Super-Kühlmodus blinken
4
5
6
abwechselnd zwei
2
Gefrierraumtemperaturanzeige
• Die eingestellte Temperatur wird angezeigt.
• Bei aktiviertem Super-Gefriermodus blinken
abwechselnd zwei
3
Funktionsanzeige
• Bei eingestelltem Öko-Modus
Urlaubsmodus erscheinen Kreise um die
Markierungen.
• Bei Aktivierung der Funktionen Kindersicherung
und Alarm werden die entsprechenden
Markierungen angezeigt.
-Symbole.
-Symbole.
Bedienfeld
4
Auswahltaste für Kühlraum
5
Auswahltaste für Gefrierraum
6
Modus-Taste
und
2828
Page 29
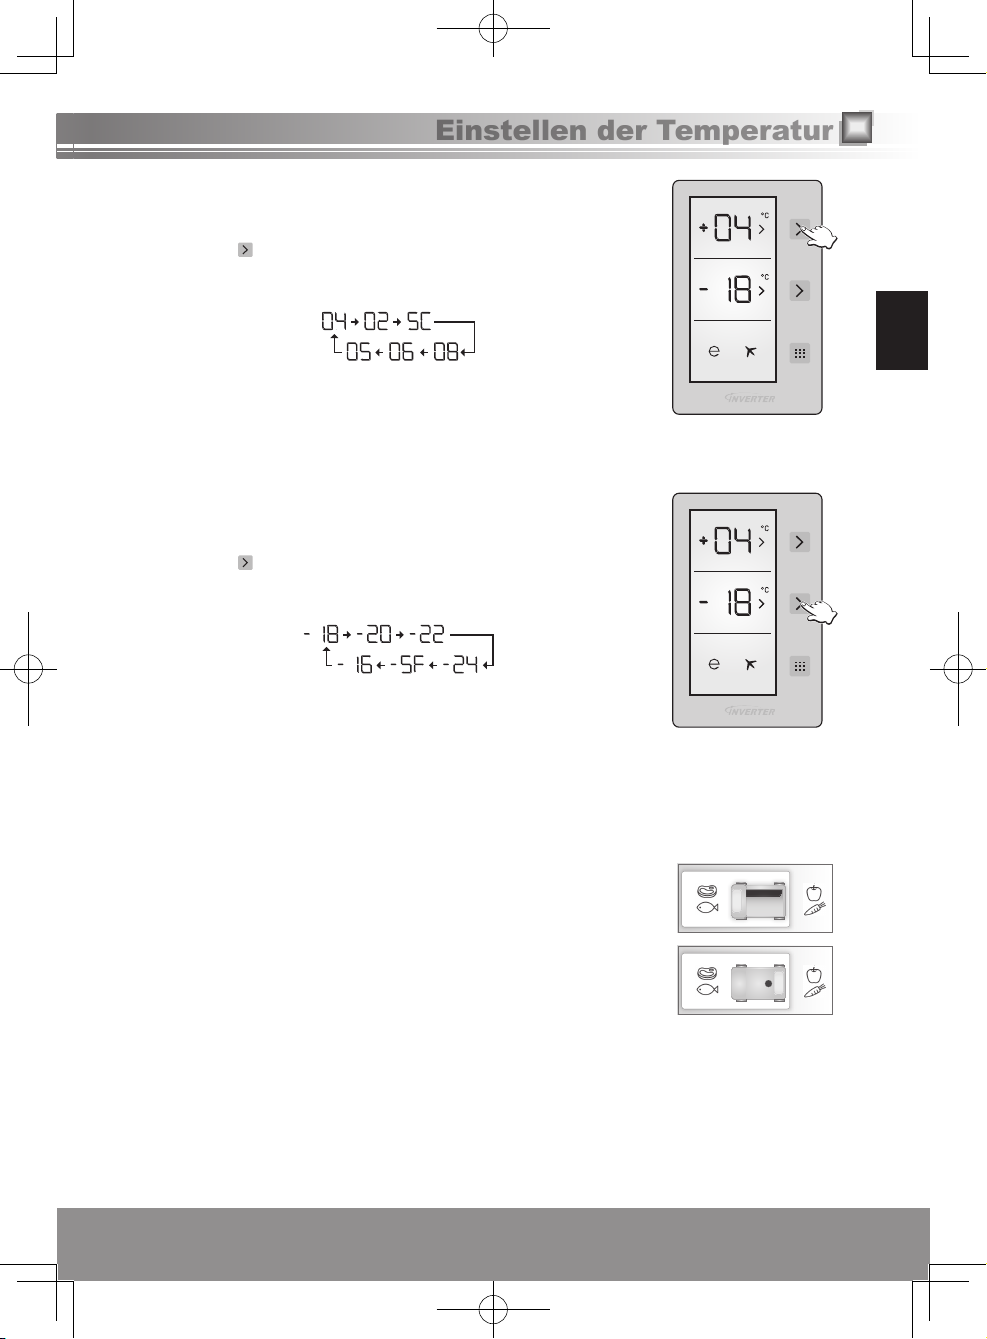
Einstellen der Temperatur
Kühlraumfach
Beim Erwerb ist die Temperatur auf 4 °C festgelegt.
1
Drücken Sie (oben) einmal und dann innerhalb 1 Sekunde erneut.
• Die Temperatur kann eingestellt werden.
2
Drücken Sie die Taste mehrmals, bis Sie die gewünschte Temperatur eingestellt haben.
• Wenn während der Einstellung 1 Sekunde lang keine Bedienungsaktion ausgeführt wird, blinkt der
Einstellwert und ein Piepton ist zu hören. Dies weist darauf hin, dass die Temperatur nun eingestellt ist.
Hinweis:
• Wenn der Super-Kühlmodus, Super-Gefriermodus, Öko-Modus oder Urlaubsmodus
beendet oder aufgehoben wird, kehrt das Gerät zu den früheren Einstellungen zurück.
Gefrierfach
Beim Erwerb ist die Temperatur auf -18 °C festgelegt.
1
Drücken Sie (unten) einmal und dann innerhalb 1 Sekunde erneut.
• Die Temperatur kann eingestellt werden.
2
Drücken Sie die Taste mehrmals, bis Sie die gewünschte Temperatur eingestellt haben.
• Wenn während der Einstellung 1 Sekunde lang keine Bedienungsaktion ausgeführt wird, blinkt der
Einstellwert und ein Piepton ist zu hören. Dies weist darauf hin, dass die Temperatur nun eingestellt ist.
Hinweis:
• Wenn der Super-Kühlmodus, Super-Gefriermodus, Öko-Modus oder Urlaubsmodus
beendet oder aufgehoben wird, kehrt das Gerät zu den früheren Einstellungen zurück.
Deutsch
Kühlraumfach
Die Temperatur des Kühlraumfachs lässt sich durch Öffnen und Schließen des Schiebeteils innerhalb des Fachs einstellen.
Offen
Drehen Sie das Schiebeteil in die geöffnete Position, um die Temperatur des Fachs
um 1 °C bis 2 °C unter die des Kühlschrankfachs abzusenken, so dass das Fach als
Kühlraumfach arbeitet.
Geschlossen
Drehen Sie das Schiebeteil in die geschlossene Position, um die Temperatur des Fachs
auf die gleiche Temperatur wie die des Kühlschrankfachs einzustellen, so dass das Fach
als Teil des Kühlschrankfachs arbeitet.
• Wenn dieses Fach als 0 °C-Fach genutzt wird, können Lebensmittel, die anstelle des Kühlschrankfachs im Kühlraumfach
aufbewahrt werden, ihre Frische, ihr Aroma und ihr frisches Aussehen länger halten. Wenn das Kühlraumfach verschmutzt wird,
sollte es entnommen und mit Wasser ausgespült werden. (Wasser gefriert bei 0 °C, aber salzhaltige Lebensmittel oder Zucker
haben einen niedrigeren Gefrierpunkt.) Normalerweise wird das Kühlraumfach für rohen Fisch, Eingelegtes, Reis usw. verwendet.
• Ziehen Sie die Kühlraumschublade zu sich hin; die Abdeckung öffnet sich automatisch.
Hinweis:
• Legen Sie keine Lebensmittel in dieses Fach, die eingefroren werden sollen, und verwenden Sie es nicht zum Herstellen von Eiswürfeln.
29
29
Page 30
Verwendung der Zusatzfunktionen
Super-Gefriermodus
Merkmale:
• Dieser Modus bewirkt eine rasche Abkühlung des Gefrierraums, um dort eingelagerte Frischkost usw.
einzufrieren.
• Der Super-Gefriermodus endet automatisch nach 24 Stunden oder wenn die Gefrierraumtemperatur unter
-32 °C sinkt.
Einstellungen:
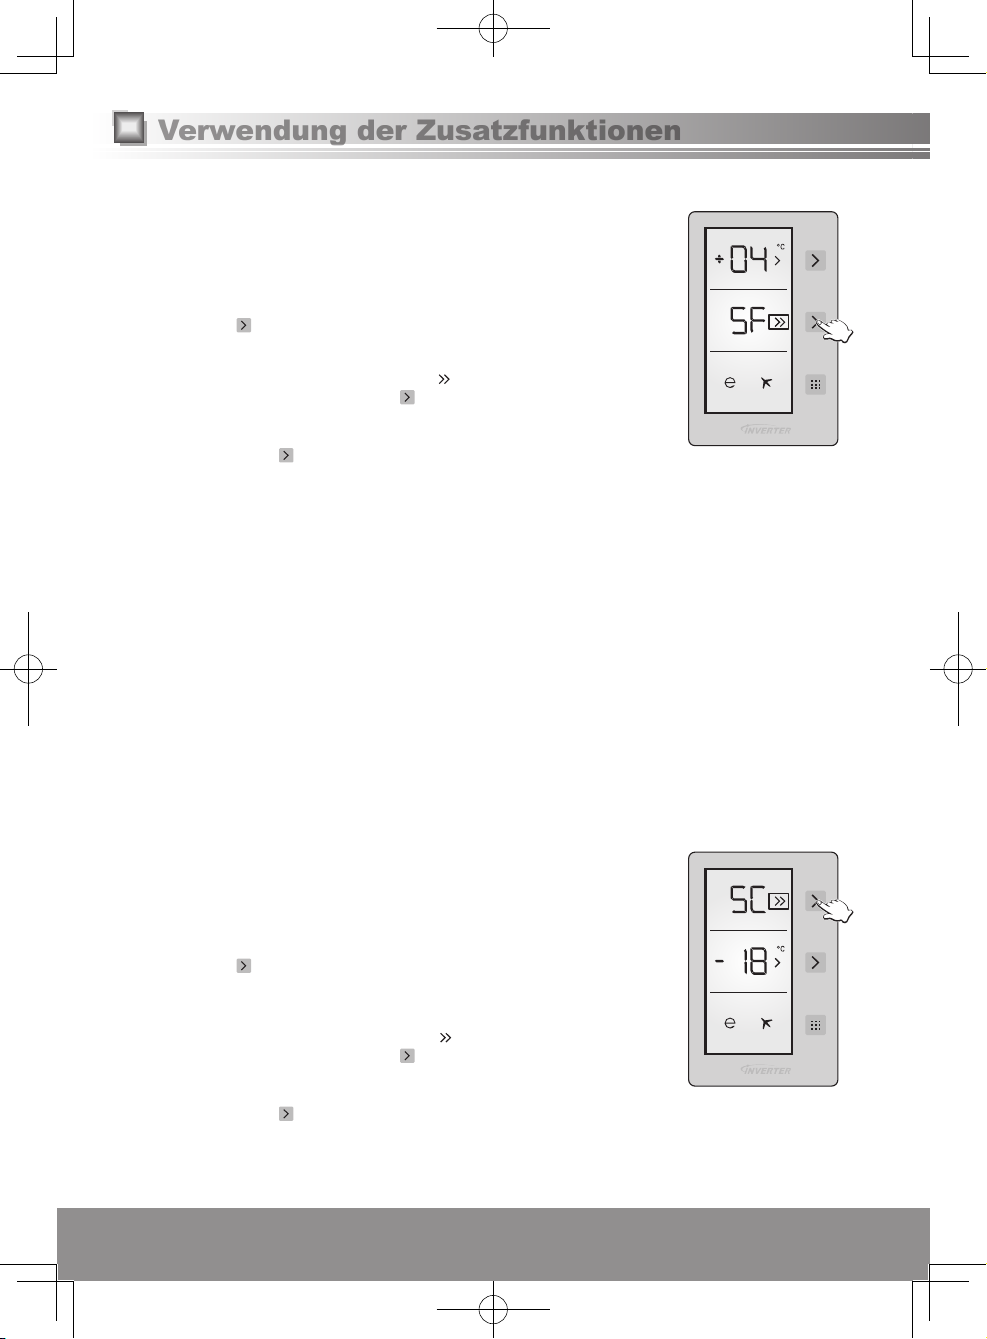
1. Drücken Sie
2.
Wenn während der Einstellung 1 Sekunde lang keine Bedienungsaktion ausgeführt wird, blinkt „SF“,
und ein Piepton ist zu hören. Dies weist darauf hin, dass der Super-Gefriermodus nun eingestellt ist.
• In diesem Modus wird „SF“ angezeigt, und zwei -Markierungen blinken abwechselnd.
• Um den Modus aufzuheben, drücken Sie
Hinweise:
• In diesem Modus:
-Durch Drücken von
gewünschte Temperatur kann eingestellt werden.
-Die Auswahl von Öko-Modus und Urlaubsmodus ist nicht möglich.
-Die Kühlraumtemperatur kann eingestellt werden.
• Die Wirkung auf die gelagerten Lebensmittel kann reduziert werden, wenn der SuperGefriermodus mehrere Stunden vor der Einlagerung der Lebensmittel im Gefrierfach
aktiviert wird.
• Der Alarm ertönt 3 Stunden nach dem Einstellen des Super-Gefriermodus. Nun können
Sie eine geringe Menge an Lebensmitteln einlagern.
• Folgende Punkte werden empfohlen, um die maximale Gefrierleistung auszunutzen.
1
Stellen Sie 24 Stunden vor dem Einlagern der Lebensmittel die Gefrierraumtemperatur auf -24 °C und die
Kühlraumtemperatur auf 2 °C ein.
2
Stellen Sie das Gerät vor dem Einfrieren von Lebensmitteln 10 Stunden lang auf den SuperGefriermodus.
3
Zum Lagern einer großen Menge von Lebensmitteln können die oberen beiden
Schubladen im Gefrierraum entnommen und die Lebensmittel direkt auf den
Glasboden oder in der untersten Schublade des Gefrierraums platziert werden.
(Wenn die Lebensmittel direkt auf dem obersten Glasboden platziert werden, ist eine
höhere Gefrierkapazität möglich.)
• Die maximale Gefrierkapazität innerhalb von 24 Stunden ist auf dem Typenschild vermerkt.
Super-Kühlmodus
Merkmale:
• In diesem Modus kann Fast Food vor dem Essen gekühlt, eine große Menge Lebensmittel
gekühlt und gelagert und Getränke schnell gekühlt werden.
• Der Super-Kühlmodus endet automatisch nach 8 Stunden oder wenn die Sensortemperatur
des Kühlschranks unter 0 °C sinkt.
Einstellungen:
1. Drücken Sie (oben), bis „SC“ erscheint.
2.
Wenn während der Einstellung 1 Sekunde lang keine Bedienungsaktion ausgeführt wird, blinkt
„SC“, und ein Piepton ist zu hören. Dies weist darauf hin, dass der Super-Kühlmodus nun
eingestellt ist.
• In diesem Modus wird „SC“ angezeigt, und zwei -Markierungen blinken abwechselnd.
• Um den Modus aufzuheben, drücken Sie (oben).
Hinweise:
• In diesem Modus:
-Durch Drücken von
gewünschte Temperatur kann eingestellt werden.
-Die Auswahl von Öko-Modus und Urlaubsmodus ist nicht möglich.
-Die Gefrierraumtemperatur kann eingestellt werden.
(unten), bis „SF“ erscheint.
(unten).
(unten) wird der Super-Gefriermodus abgebrochen, und die
(oben) wird der Super-Kühlmodus abgebrochen, und die
3030
Page 31

Öko-Modus
Merkmale:
• In diesem Modus betreibt die Steuerung den Kühlraum und den Gefrierraum auf ökonomische
Weise.
• In diesem Modus wird die Kühlraumtemperatur automatisch auf 4 °C und die
Gefrierraumtemperatur automatisch auf -18 °C eingestellt.
Einstellungen:
1. Drücken Sie mehrmals , bis um herum ein Kreis erscheint.
2.
Wenn während der Einstellung 1 Sekunde lang keine Bedienungsaktion ausgeführt wird, blinkt
der Kreis um , und ein Piepton ist zu hören. Dies weist darauf hin, dass der Öko-Modus nun
eingestellt ist.
• In diesem Modus wird auf der Kühlraum-/Gefrierraumtemperaturanzeige „E“ angezeigt,
und um herum erscheint ein Kreis.
• Um den Modus aufzuheben, drücken Sie .
Hinweise:
• In diesem Modus:
-Gefrierraum und Kühlraum können eingestellt werden. Wenn der Öko-Modus aufgehoben wird, bleibt
die Einstellung bestehen.
-Super-Kühlmodus und Super-Gefriermodus können ausgewählt werden. Der Öko-Modus wird
automatisch aufgehoben und der ausgewählte Modus wird aktiviert.
-Nach dem Aufheben des Öko-Modus kann der Urlaubsmodus ausgewählt werden, und der
ausgewählte Modus wird aktiviert.
Urlaubsmodus
Merkmale:
• Stellen Sie diesen Modus ein, wenn der Kühlschrank länge Zeit nicht verwendet wird, z. B.
während eines längeren Urlaubs.
• In diesem Modus wird die Kühlraumtemperatur automatisch auf 8 °C und die
Gefrierraumtemperatur automatisch auf -18 °C eingestellt.
Einstellungen:
1. Drücken Sie mehrmals , bis um herum ein Kreis erscheint.
2.
Wenn während der Einstellung 1 Sekunde lang keine Bedienungsaktion ausgeführt wird, blinkt der
Kreis um , und ein Piepton ist zu hören. Dies weist darauf hin, dass der Urlaubsmodus nun eingestellt
ist.
• Auf der Gefrierraumtemperaturanzeige erscheint „H“. Auf der Kühlraumtemperaturanzeige
wird nichts angezeigt.
• In diesem Modus wird auf der Gefrierraumtemperaturanzeige „H“ angezeigt, und um
herum erscheint ein Kreis.
Hinweise:
• Bevor Sie diesen Modus benutzen, sollten Sie den Kühlraum leeren und seine Tür
schließen.
• Wenn dieser Modus beendet wird, nimmt der Kühlschrank den normalen Betrieb mit den früheren Einstellungen
wieder auf.
-Ge
frierraum und Kühlraum können eingestellt werden. Wenn der Urlaubsmodus aufgehoben wird,
bleibt die Einstellung bestehen.
-Super-Kühlmodus und Super-Gefriermodus können ausgewählt werden. Der Urlaubsmodus wird
automatisch aufgehoben und der ausgewählte Modus wird aktiviert.
-Nach dem
Aufheben des Urlaubsmodus kann der Öko-Modus ausgewählt werden, und der
ausgewählte Modus wird aktiviert.
Deutsch
31
31
Page 32

Verwendung der Zusatzfunktionen (Fortsetzung)
Getränkekühlmodus
Merkmale:
• Getränke können im Gefrierraum schnell gekühlt werden.
• Dieser Modus verfügt über eine Zeitschaltfunktion und kann so eingestellt werden, dass
ein Piepton zu hören ist, wenn die Zeitschaltung 5, 10, 15, 20, 25 oder 30 Minuten erreicht.
• Entnehmen Sie die Flaschen, wenn der Piepton zu hören ist. Wenn Flaschen längere Zeit
im Gefrierraum verbleiben, kann ihr Inhalt gefrieren, und die Flaschen können zerbrechen.
Einstellungen:
1. Halten Sie 5 Sekunden lang die Taste
2. Auf der Gefrierraumtemperaturanzeige erscheint „dc“, und auf der Kühlraumtemperaturanzeige blinkt „05“.
3.
Drücken Sie (oben), um die Zeit einzustellen (05-10-15-20-25-30 Minuten).
4.
Die ausgewählte Zeit blinkt dreimal auf der Anzeige, und ein Piepton ist zu hören.
5. Der Countdown in Minuten beginnt mit der eingestellten Zeit, wobei die verbleibende Zeit auf der Anzeige blinkt.
• Um den Getränkekühlmodus aufzuheben, halten Sie 5 Sekunden lang die Taste (unten) gedrückt.
• Wenn der eingestellte Zeitpunkt erreicht wird, ist ein Piepton zu hören, und beide Anzeigen
(Beispiel: „00“ und „dc“) blinken, bis Sie (unten) drücken.
Hinweise:
• Überprüfen Sie bei Verwendung dieses Modus die Temperatur der Flaschen regelmäßig.
• Sind die Flaschen ausreichend gekühlt, entnehmen Sie sie aus dem Gefrierraum.
Bildschirmschoner-Modus
Merkmale:
• Bei Einstellung dieses Modus kann die Hintergrundbeleuchtung der Anzeige ausgeschaltet werden, um Energie zu sparen.
Einstellungen:
1.
Halten Sie 3 Sekunden lang gedrückt, um die automatische Bildschirmschonerfunktion einzustellen.
2. Wenn 5 Sekunden lang keine Bedienungsaktivität ausgeführt wird und keine Tür
geöffnet wird, wird die Hintergrundbeleuchtung der Anzeige ausgeschaltet; alle übrigen
Markierungen und Zeichen werden auch weiterhin angezeigt.
• Die ausgewählten Modi und Funktionen bleiben bestehen.
• Um den automatischen Bildschirmschoner auszuschalten und die Hintergrundbeleuchtung
zu aktivieren, halten Sie
Hinweise:
• Wenn die automatische Bildschirmschonerfunktion eingeschaltet ist und die
Hintergrundbeleuchtung der Anzeige über gewisse Zeit ausgeschaltet war und dann eine
Taste gedrückt oder eine Tür geöffnet wird, schaltet sich die Hintergrundbeleuchtung der
Anzeige wieder ein, und die Einstellungsfunktionen erscheinen auf der Anzeige.
• Wenn der Bildschirmschoner und die Kindersicherung eingeschaltet sind, wird der Bildschirmschoner
aktiviert. Wenn also beide Funktionen aktiviert sind, schaltet sich die Hintergrundbeleuchtung der
Anzeige wieder ein, sobald eine Taste gedrückt oder eine Tür geöffnet wird.
3 Sekunden lang gedrückt.
(unten) gedrückt.
Kindersicherungsfunktion
Merkmale:
• Durch Einstellen der Kindersicherung kann verhindert werden, dass Kinder die
Einstellungen ändern, indem sie mit den Tasten spielen.
Einstellungen:
1. Halten Sie (oben) und (unten) 5 Sekunden lang gedrückt, um die Kindersicherung
einzustellen.
• Wenn die Kindersicherung eingestellt wurde, leuchtet
• Um den Modus aufzuheben, halten Sie (oben) und (unten) 5 Sekunden lang gedrückt. Sie können den
gegenwärtig eingestellten Modus erst ändern, wenn Sie die Kindersicherung aufgehoben haben.
Hinweise:
• Bei einem Stromausfall oder wenn der Netzstecker aus der Steckdose gezogen wird, wird
die Kindersicherung aufgehoben.
3232
auf.
Page 33

Benutzerwarnfunktionen
In den folgenden Situationen werden Benutzeralarmfunktionen aktiv:
Situation Details Alarm
Modus wurde
beendet.
Tür offen.
• Im Getränkekühlmodus wurde der
eingestellte Zeitpunkt erreicht.
• Die Tür des Kühl- und/oder Gefrierraums wurde
länger als 2 Minuten geöffnet gehalten.
Piept ständig
Piept alle 5 Sekunden
Produktion von Eiswürfeln
Ausschalten des Alarms
Drücken Sie
Schließen Sie die
Tür(en).
.
Deutsch
Öffnen Sie den Gefrierraum, ziehen Sie die obere Schublade heraus
und entnehmen Sie die Eisschale an der Decke. Füllen Sie Wasser in
die Eisschale bis zur Wasserstandslinie, und stellen Sie die Eisschale
wieder in den Gefrierraum.
Wenn die Eiswürfel fertig sind, ziehen Sie das obere Fach und nehmen
Sie die Eisschale heraus. Erfassen Sie beide Seiten, und verdrehen
Sie die Eisschale leicht. Die Eiswürfel fallen aus der Eisschale. Dann
stellen Sie die Eisschale wieder zurück.
Entfernen und Anbringen von Ablagen
Kühlschrank
Glasböden
Heben Sie die innere Seite des Regales und ziehen Sie es heraus.
Wenn beim Entfernen der Glasböden die Türfächer und Flaschenhalter im
Weg sind, entfernen Sie diese zunächst, bevor Sie die Glasböden entfernen.
Wenn Sie den Glasboden entfernen, öffnen Sie die Tür, bis zum
Anschlag.
Gemüsefächer
Ziehen Sie die Gemüsefächer in Ihre Richtung und dann heraus.
Türfächer und Flaschenhalter
Heben Sie es leicht an und ziehen Sie es dann heraus.
Wasserstandslinie
Gefrierraum
Kühlraumschublade
Ziehen Sie die Schublade heraus, halten Sie sie an der Vorderseite
und heben Sie sie quer heraus, um sie zu entfernen.
Ziehen Sie das Fach zu sich, heben Sie leicht
die vordere Seite und ziehen Sie es heraus.
Nachdem Sie den Deckel entfernen, können
Sie Lebensmittel im leeren Fach einlagern.
33
33
Page 34

Pege- und Reinigungshinweise
Tägliches Reinigen
Reinigen Sie die Teile mit einem trockenen Tuch.
Orte, die leicht verschmutzt werden
Türdichtungsöffnung
Bei Verschmutzung kann die Dichtung leicht beschädigt
werden und die Kaltluft kann entweichen.
Flaschenhalter
Bei der Ansammlung von Schmutz und Flüssigkeiten
reinigen Sie diese sofort.
Ziehen Sie jährlich den Netzstecker und entfernen Sie die Regale zur
Reinigung.
Teile die mit Wasser gereinigt werden können
Kühlschrank Gefrierraum
● Glasböden
● Türregale
● Flaschenhalter
● Eierhalter
● Gemüsefächer
● Kühlraumschublade
● Gefrierfächer
● Eisschalen
Hinweis:
• Verwenden Sie keine agressiven Reinigungsmittel
wie z.B. Natriumbikarbonat, da diese die
Kunststoffoberäche beschädigen können.
Reinigung des Bedienfelds
Das Bedienfeld besteht aus speziellen Materialien. Um die Oberäche gegen Beschädigungen zu schützen, reinigen Sie
es nicht mit chemischen Lösungsmitteln. Stattdessen reinigen Sie es mit einem trockenen oder einem leicht feuchten Tuch.
Reinigung des Gerätegehäuses
Reinigen Sie das Gehäuse des Gerätes mit einem in warmen Wasser getauchten weichen Tuch. Wenn Flecken nicht
entfernt werden können, verwenden Sie neutrale Küchenreinigungsmittel und wischen Sie es mit einem in warmen
Wasser getauchten sanften Tuch ab. Wischen Sie alle Wassertropfen mit einem trockenen Tuch ab.
Reinigungshinweise
Reinigen Sie kein Geräteteil mit den folgenden Stoffen:
●
Alkalische oder schwach alkalische Reinigungsmittel Diese Stoffe können die Kunststoffteile porös und brüchig machen.
● Reibender Staub, Seifenpulver, Erdöl, heißes Wasser, Küchenreinigungsbürste, Säuerungsmittel, Benzin,
Lösungsmittel, Alkohol, usw. Diese Stoffe können die lackierte Oberäche und Kunstoffteile beschädigen.
Stellen Sie sicher, dass Ölecken entfernt werden. Es kann die Kunststoffteile porös und brüchig machen.
3434
Page 35

Wartungskontrolle
● Ist das Anschlusskabel beschädigt?
● Wird der Netzstecker heiß?
WARNUNG
● Ist der Netzstecker komplett in der Steckdose eingesteckt?
Wenn das Netzkabel oder die LED-Leuchte beschädigt ist, wenden Sie sich bitte an ein
zugelassenes Kundendienstzentrum. Versuchen Sie NICHT, diese Elemente selbst auszutauschen.
Lange Nichtbenutzung
Wenn Sie beabsichtigen, den Kühlschrank längere Zeit nicht zu benutzen, trennen Sie ihn wie oben
beschrieben vom Stromnetz, und reinigen Sie den Stecker wie oben erläutert. Lassen Sie die Türen
ACHTUNG
2 - 3 Tage lang geöffnet. Dadurch kann der Innenraum vollständig austrocknen, und Geruchs- und
Schimmelbildung wird vorgebeugt.
Schalten Sie den Kühlschrank hierfür nicht ab. Das kann die Lebensdauer des Kühlschrankes beeinträchtigen.
Vor dem Transport beachten
① Entfernen Sie jegliche Lebensmittel, Wasser und Eiswürfel aus dem
Kühlschrank.
② Ziehen Sie den Netzstecker.
③ Heben Sie die verstellbaren Füße. (Legen Sie eine Schutzplatte auf den
Boden, wenn dieser leicht verkratzt werden kann.)
④ Ziehen Sie den Kühlschrank an sich.
⑤ Nehmen Sie das Wasser aus dem Verdunstungskessel beispielsweise
mit einem Tuch auf.
Deutsch
(Unten hinten am Kühlschrank)
Beim Transport beachten
Das Gerät sollte von zwei oder mehr Personen getragen werden.
① Schrauben Sie die verstellbaren Füße rein.
② Halten Sie die verstellbaren Füße und die Ecken fest.
Siehe Abbildung.
Hinweis:
• Tragen Sie das Gerät nicht liegend oder durch Festhalten der Tür.
Transportieren Sie den Kühlschrank stets in normaler aufrechter Position.
Sichern Sie die Türen
mit Klebeband.
35
35
Page 36

Fehlerbehebung
Ihr Kühlschrank warnt Sie, wenn ungewöhnliche Temperaturen im Kühl- und Gefrierraum vorliegen oder wenn ein
Problem mit dem Gerät auftritt. Auf der Kühl-/Gefrierraumtemperaturanzeige erscheinen Warncodes.
Warncodes Bedeutung Einzelheiten und Gegenmaßnahmen
Sr Fehler/Warnung Ein oder mehrere Teile sind gestört, oder es liegt ein Fehler im Kühlprozess
LF Der Gefrierraum ist
nicht kalt genug.
LC Der Kühlraum ist nicht
kalt genug.
LF und LC Nicht kalt genug. Dies ist eine Kombination der Fehlertypen LF und LC.
HC Der Kühlraum ist zu
kalt.
LOPO Niedrige Spannung Wenn die Spannungsversorgung unter 170 V abfällt, tritt das Gerät in einen
vor.
• Wenden Sie sich so schnell wie möglich an den Kundendienst.
Diese Meldung erscheint häug nach einem längeren Stromausfall.
1. Frieren Sie keine angetauten Lebensmittel ein, sondern verbrauchen Sie
diese zügig.
2. Stellen Sie die Gefrierraumtemperatur auf einen niedrigeren Wert oder
auf Supergefrieren, bis der Gefrierraum wieder die normale Temperatur
erreicht hat.
3. Legen Sie keine frischen Lebensmittel in den Gefrierraum, bis die
Fehlermeldung erloschen ist.
Die ideale Temperatur für den Kühlraum beträgt is +4°C. Wenn Sie diese
Warnung sehen, können Ihre Lebensmittel verderben.
1. Stellen Sie die Kühlraumtemperatur auf einen niedrigeren Wert oder auf
Superkühlen, bis der Kühlraum wieder die normale Temperatur erreicht
hat.
2. Öffnen Sie die Tür nicht allzu häug, bis diese Fehlermeldung erloschen
ist.
• Diese Fehlermeldung erscheint, wenn das Gerät erstmals eingeschaltet
wird. Sie schaltet sich aus, wenn Kühl- und Gefrierraum ihre normale
Temperatur erreicht haben.
Lebensmittel beginnen bei zu niedriger Temperatur zu gefrieren.
1. Prüfen Sie, ob der Super-Kühlmodus aktiviert ist.
2. Senken Sie den Kühlraumtemperaturwert.
stabilen Zustand ein.
• Dies ist keine Störung. Diese Funktion verhindert Schäden am
Kompressor. Die Warnmeldung erlischt, wenn die Spannung wieder den
erforderlichen Pegel erreicht.
3636
Page 37

Fragen und Antworten
Wenn Sie das Gefühl haben, dass der Kühlschrank nicht ordnungsgemäß funktioniert, überprüfen Sie zuerst die folgenden Punkte.
Falls die Störung bestehen bleibt, ziehen Sie den Netzstecker ab, und wenden Sie sich an Ihren Fachhändler oder
autorisierten Servicehändler.
Allgemeines
Sie hören ungewöhnliche
Geräusche vom Kühlschrank.
Sie hören ein Geräusch, nachdem sich
der Kompressor abgeschaltet hat.
Sie hören ein Geräusch, nachdem
Sie die Tür geöffnet oder
geschlossen haben.
Sie hören das Geräusch eines Luftoder Wasserusses, nachdem Sie
die Tür geöffnet haben.
Sie hören ein anhaltendes
wimmerndes Geräusch.
Der Kompressor ist ziemlich laut.
Der Kompressor läuft über einen
langen Zeitraum.
Kondensation bildet sich an der
Außenseite des Kühlschranks.
Die Außenseite des Kühlschranks
fühlt sich heiß an.
Die Tasten am Bedienfeld können
nicht betätigt werden.
Der Alarm ertönt. • Die Tür des Kühlschranks und/oder des Gefrierraums wurde offen gelassen.
Die LED-Leuchte schaltet sich
nicht ein.
• Ist der Kühlschrank auf stabilem und ebenen Boden installiert worden?
• Sind ausreichende Abstände um den Kühlschrank vorhanden?
• Vibrieren irgendwelche Gegenstände auf dem Kühlschrank?
• Die Erzeugung von Geräuschen beim Starten oder Stoppen des
Kühlschrankbetriebs ist normal.
• Dies ist normal und wird oft durch das zum Kompressor zurückießende
Kältemittel verursacht.
• Dies ist normal und ist auf den Luftdruckunterschied zwischen der Innen- und
Außenseite des Kühlschranks zurückzuführen.
• Dies wird durch das in den internen Rohrleitungen ießende Kältemittel
verursacht.
• Dieses Geräusch ertönt, während der Kaltluft-Umwälzlüfter läuft.
• Sind die Lebensmittel zu dicht zusammengepackt, oder ist die Raumtemperatur hoch?
In solchen Fällen läuft der Kompressor mit hoher Drehzahl, und erzeugt dabei
ein etwas lauteres Betriebsgeräusch.
• Sind die Lebensmittel zu dicht zusammengepackt, oder ist die Raumtemperatur hoch?
In solchen Fällen läuft der Kompressor mit hoher Drehzahl, und erzeugt dabei
ein etwas lauteres Betriebsgeräusch.
• Wenn der Netzstecker zum ersten Mal angeschlossen worden ist, läuft der
Kompressor länger als gewöhnlich, um den Innenraum des Kühlschranks
abzukühlen, bis die eingestellten Temperaturen erreicht werden.
• Wurde der Super-Gefriermodus oder der Super-Kühlmodus eingestellt?
• Sind die Türen oft geöffnet und geschlossen worden? Sind die Türen
vollkommen geschlossen?
• Sind die Lebensmittel zu dicht zusammengepackt, oder ist die Raumtemperatur hoch?
• Wenn viele Lebensmittel gleichzeitig im Kühlgerät eingelagert werden, muss
der Kompressor länger laufen.
• Kondensation kann sich bilden, wenn die Luftfeuchtigkeit im Raum hoch ist. Dies
ist durchaus normal. Wischen Sie das Kondensat mit einem trockenen Tuch ab.
• Nach dem Einschalten des Kühlschranks wird das Gerät möglicherweise
warm, bis der Innenraum ausreichend heruntergekühlt ist. Auch nach dem
Herunterkühlen der Fächer kann sich der Kühlschrank erwärmen. Dies liegt
am Betrieb der Wärmeleitung, mit der der Kühlschrank zur Vermeidung von
Kondensation ausgestattet ist. Es handelt sich nicht um eine Fehlfunktion.
• Ist die Stromversorgung des Kühlschranks eingeschaltet?
Schließen Sie Türen.
• Wurde der Urlaubsmodus eingestellt?
Im Urlaubsmodus schaltet sich die LED-Leuchte des Kühlraums nicht ein.
• Ist der Kühlschrank eingeschaltet?
• Wenn Sie die LED austauschen müssen, wenden Sie sich an Ihren Händler
oder ein zugelassenes Kundendienstzentrum.
Deutsch
37
37
Page 38

Fragen und Antworten (Fortsetzung)
Kühlraum und Gefrierraum
Der Kühlraum (und der
Gefrierraum) funktioniert nicht.
Der Kühlraum (und der
Gefrierraum) funktioniert nicht
zufrieden stellend.
Es besteht ein Unterschied
zwischen der eingestellten und
der tatsächlichen Temperatur.
Lebensmittel im Kühlraum
gefrieren.
Kondensation bildet sich im
Kühlraum und in den Schubladen.
Die Gefrierraumtür lässt sich
schwer öffnen.
Es riecht unangenehm im
Kühlschrank.
• Ist die Stromversorgung des Kühlschranks eingeschaltet?
• Ist die eingestellte Temperatur zu hoch?
• Ist der Kühlschrank direktem Sonnenlicht ausgesetzt oder in der Nähe eines
Heizkörpers aufgestellt?
• Sind ausreichende Abstände um den Kühlschrank vorhanden?
• Sind die Lebensmittel zu dicht zusammengepackt, oder ist die
Raumtemperatur hoch?
• Sind die Türen oft geöffnet und geschlossen worden?
Sind die Türen vollkommen geschlossen?
• Ist der Kühlschrank auf den Urlaubsmodus eingestellt worden?
• Wenn warme Speisen in den Kühlschrank gestellt werden, steigt die
Temperatur vorübergehend.
• Während der kalten Jahreszeit oder bei niedriger Raumtemperatur kann es
den Anschein haben, dass der Kühlschrank nicht kühlt.
• Wenn warme Speisen in den Kühlschrank gestellt werden, steigt die
Temperatur vorübergehend.
• Ist die eingestellte Temperatur für den Kühlraum zu niedrig?
• Benden sich die Lebensmittel im hinteren Bereich des Kühlraums?
Der Bereich in der Nähe der Rückwand wird am kältesten, weshalb hier keine
Lebensmittel eingelagert werden sollten, die leicht gefrieren.
• Kondensation kann sich bilden, wenn die Tür oft geöffnet und geschlossen wird
oder nicht vollständig geschlossen worden ist, oder wenn die Luftfeuchtigkeit
im Raum hoch ist. Wischen Sie das Kondensat mit einem trockenen Tuch ab.
• Es kann sein, dass sich die Tür manchmal schwer öffnen lässt, wenn sie
gerade geschlossen wurde.
• Der Luftdruckunterschied zwischen dem Innenraum und der Außenseite des
Gefrierraums kann manchmal dazu führen, dass sich die Gefrierraumtür nur
schwer öffnen lässt. Warten Sie einen Augenblick, und versuchen Sie dann
erneut, die Tür zu öffnen.
• Sind stark riechende Lebensmittel vor der Einlagerung im Kühlraum versiegelt
worden?
Bewahren Sie die Lebensmittel in einen versiegelten Behälter auf.
• Gerüche können an den Oberächen des Kühlschrank-Innenraums haften.
Wischen Sie die Oberächen mit einem weichen Tuch ab, das Sie in
lauwarmes Wasser getaucht haben.
3838
Page 39

Technische Daten
Produktdatenblatt (EU Verordnung 1060/2010)
NAME DES LIEFERANTEN Panasonic
MODELLKENNUNG
KATEGORIE 7 (Kühl-Gefriergerät)
ENERGIEEFFIZIENZKLASSE A++
JÄHRLICHER ENERGIEVERBRAUCH 240 kWh/Jahr
NETTOKÜHLVOLUMEN 189 L 224 L
FRISCHEKÜHLFACH NETTOVOLUMEN 28 L
NETTOGEFRIERVOLUMEN 72 L
STERNEKENNZEICHNUNG DES
GEFRIERFACHS
ANGABE „FROSTFREI“ FÜR DIE
BETREFFENDEN FÄCHER
TEMPERATURANSTIEGSZEIT 18 Stunden
GEFRIERVERMÖGEN 12 kg/24 Stunden
KLIMAKLASSE T
LUFTSCHALLEMISSIONEN 42 dB
Weitere Informationen
GESAMTBRUTTOVOLUMEN 332 L 367 L
GESAMTNETTOVOLUMEN 289 L 324 L
AUSSENMASSE
BREITE x TIEFE x HÖHE
NETTOGEWICHT 77 kg 80 kg
NENNSPANNUNG 220 V - 240 V
NENNFREQUENZ 50 Hz
KÜHLMITTEL/LADUNG R600a/55 g R600a/60 g
GEBLÄSEMITTEL Cyclo-Pentane
Hinweise:
*1
Der Energieverbrauch pro Jahr basiert auf den Standardtestergebnissen für 24 Stunden.
Der tatsächliche Energieverbrauch weicht je nach Verwendung und Standort des Geräts ab.
*2
Zulässige Umgebungstemperatur: 16 °C bis 43 °C
Bei vollständig geöffneten Türen
NR-B29SG2-SE
NR-B29SG2-SF
NR-B29SG2-SB
Kühlbereich: Frostfrei / Chillerfach: Frostfrei / Gefrierbereich: Frostfrei
600 mm x 652 mm x 1898 mm 600 mm x 652 mm x 2044 mm
NR-B29SW2-WE
NR-B29SW2-WF
NR-B29SW2-WB
*1
NR-B32SG2-SE
NR-B32SG2-SF
NR-B32SG2-SB
250 kWh/Jahr
Vier-Sterne
*2
NR-B32SW2-WE
NR-B32SW2-WF
NR-B32SW2-WB
*1
Deutsch
120 º
299 mm
1122 mm
39
39
Page 40

Inhoudsopgave
Respect voor het milieu .............................................. 40
Veiligheidsvoorschriften ............................................. 41
Installatie ...................................................................... 43
Onderdelen ................................................................... 45
Bedieningspaneel ........................................................ 46
Instellen van de temperatuur ...................................... 47
Gebruik van de handige functies ............................... 48
Respect voor het milieu
Verwijderen van het verpakkingsmateriaal
Onmiddellijk nadat u de koelkast hebt uitgepakt, moet u zorgen dat alle verpakkingsmateriaal, zoals
karton, plastic zakken, plakband en polystyreen veilig verwijderd worden.
Houd verpakkingsmaterialen uit de buurt van baby´s en jonge kinderen om de kans op letsel of verstikking te voorkomen.
Informatie voor gebruikers over het verwijderen van elektrisch afval &
elektronische apparatuur (huishoudelijk gebruik)
Dit symbool op de producten en/of bijbehorende documenten betekent dat gebruikte, elektrische en
elektronische producten niet met algemeen huishoudelijk afval mogen worden weggegooid.
Voor de juiste behandeling, het opnieuw gebruiken en het recyclen dient u deze producten naar de daarvoor
aangewezen verzamelplaatsen te brengen, waar ze kosteloos in ontvangst worden genomen. In sommige landen
kunt u uw producten na aankoop van een vergelijkbaar nieuw product ook bij de betreffende winkelier inleveren.
Het op de juiste wijze inleveren van dit product draagt bij aan het besparen van waardevolle bronnen en
voorkomt mogelijke negatieve gevolgen voor de menselijke gezondheid en het milieu, die zouden kunnen
ontstaan als dit afval op een verkeerde manier behandeld wordt. Neem voor meer informatie over het
dichtstbijzijnde verzamelpunt bij u in de buurt contact op met de plaatselijke overheid.
Op een verkeerde behandeling van dit afval kan in navolging van nationale wetgeving een boete worden opgelegd.
Voor zakelijke gebruikers in de Europese Unie
Neem voor meer informatie over het weggooien van elektrische en elektronische apparatuur contact op met uw dealer.
Informatie over het weggooien van dit type afval in landen buiten de Europese Unie
Dit symbool is alleen geldig binnen de Europese Unie.
Neem contact op met uw plaatselijke autoriteiten als u zich van dit product wilt ontdoen, en vraag hen
naar de juiste manier hiervoor.
Omtrent de waarschuwingsfuncties .......................... 51
IJsblokjes maken ......................................................... 51
Legplaten verwijderen en plaatsen ............................ 51
Instructies voor onderhoud en reiniging .................. 52
Problemen oplossen ................................................... 54
Veelgestelde vragen .................................................... 55
Technische gegevens ................................................. 57
Alvorens uw oude apparaat te verwijderen
Volg de instructies van de fabrikant voor het weggooien van het oude apparaat, of volg de plaatselijke
regelgeving. Waar deze instructies niet voorhanden zijn, volgt u de volgende drie stappen:
1. Trek de stekker uit het stopcontact.
2. Snij het stroomsnoer van het apparaat af en gooi het snoer met stekker en al weg.
3. Zorg dat het oude apparaat buiten bereik van kinderen blijft, voordat het is opgehaald of voordat
u het naar het verzamelpunt wegbrengt.
●
Verwijder alle afdichtingsmaterialen van de deur, maar laat alle legplaten en laden op hun plaats.
Op deze manier zullen kinderen minder snel in de koelkast klimmen en bekneld raken.
Dit apparaat is bedoeld om gebruikt te worden voor het huishouden en soortgelijke toepassingen zoals:
• keukens in winkels, kantoren en andere werkomgevingen;
• boerderijen en gasten in hotels, motels en andere woonomgevingen;
• bed and breakfast omgevingen;
• catering en soortgelijke toepassingen buiten de detailhandel.
4040
Page 41

De betekenis van de symbolen:
Niet doen
Doe dit vooral wel Niet uit elkaar halen
Duidt op gevaar voor dood of ernstig letsel.
Dit apparaat is niet bestemd voor gebruik door personen (kinderen inbegrepen) met verminderde lichamelijke,
WAARSCHUWING
-WAARSCHUWING:
-WAARSCHUWING:
-WAARSCHUWING:
zintuigelijke of geestelijke vaardigheden of gebrek aan kennis of ervaring, tenzij onder direct toezicht of instructie in het
gebruik van het apparaat door een persoon die voor hun veiligheid verantwoordelijk is.
Op kinderen moet toezicht gehouden worden, om te zorgen dat ze niet met het apparaat spelen.
Gebruik geen verdeelstekkers en sluit niet al te veel apparaten aan op hetzelfde stopcontact.
• Dit kan leiden tot oververhitting, brand of kortsluiting.
Zorg dat het stroomsnoer niet bekneld of geknikt wordt, of in de knoop raakt, en plaats er geen zwaar voorwerp bovenop.
• Dat verhoogt het risico op brand of een elektrische schok. Als het stroomsnoer of de stekker van de koelkast is
beschadigd, moet dat onderdeel, om gevaar te vermijden, vervangen worden door een vertegenwoordiger of
onderhoudsdienst van de fabriek of door een erkende reparateur.
Trek nooit aan het stroomsnoer om de stekker van de koelkast uit het stopcontact te halen.
• Hierdoor kan het stroomsnoer beschadigen. Pak altijd de stekker vast en trek deze recht uit het stopcontact.
Plaats nooit een met water gevulde kan of vaas bovenop de koelkast.
• Gemorst water zou de isolatie van de elektrische onderdelen kunnen beschadigen, met als gevolg kortsluiting en
gevaar voor brand of een elektrische schok.
Sproei geen brandbaar gas in de buurt van de koelkast.
• Dit kan leiden tot een explosie of brand.
Sproei geen water op of in de koelkast.
• Dit kan leiden tot brand of een elektrische schok.
Raak de stroomstekker nooit met natte handen aan.
• Dit kan leiden tot een elektrische schok.
Installeer de koelkast niet op een vochtige plaats of waar de koelkast met water in aanraking komt.
• Aangetaste isolatie van elektrische onderdelen kan leiden tot kortsluiting, elektrische schok of brand.
Bewaar geen brandbare of vluchtige stoffen in de koelkast.
• Brandbare of licht ontvlambare stoffen zoals benzeen, thinner, spiritus, ether of LPG (vloeibaar petroleumgas) zouden
kunnen ontploffen.
Bewaar geen medicijnen of andere temperatuurgevoelige producten in de koelkast.
• Producten die voor hun werking erg temperatuurgevoelig zijn, kunt u beter niet in de koelkast bewaren.
Laat kinderen niet op de koelkast klimmen of aan de deur hangen.
• Dit kan leiden tot ernstig letsel, evenals beschadigingen aan de koelkast.
Gebruik de koelkast niet in een omgeving waar brandbare of licht ontvlambare gassen of dampen vrijkomen.
• Dit kan leiden tot een explosie of brand.
Bewaar geen benzine of andere brandbare vloeistoffen of dampen in de koelkast, en gebruik dergelijke stoffen
niet in de buurt van het apparaat.
• Dit kan leiden tot een explosie of brand.
Gebruik geen mechanische apparaten of andere middelen om het ontdooiproces te versnellen, anders dan de
mogelijkheden die worden aanbevolen door de fabrikant.
• Dit kan leiden tot beschadigingen aan de binnenkant van de koelkast, of leiden tot een explosie.
Gebruik geen elektrische apparaten in de voorraadladen aan de binnenkant van de koelkast, tenzij op aangeven
van de fabrikant.
• Dit kan leiden tot een explosie of brand.
Beschadig het koelcircuit niet.
• Dit kan leiden tot een explosie of brand.
Probeer de koelkast niet zelf te demonteren, te repareren of aan te passen.
• U kunt uzelf, of anderen, verwonden door brandplekken of een elektrische schok, of de koelkast beschadigen.
Raadpleeg een erkend servicecentrum als uw koelkast gerepareerd of gewijzigd moet worden.
Veiligheidsvoorschriften
Geeft aan dat het apparaat geaard moet worden
om een elektrische schok te voorkomen
Nederlands
41
41
Page 42

Veiligheidsvoorschriften (vervolg)
Zorg dat de koelkast altijd wordt aangesloten op een geaard stopcontact. IN GEEN GEVAL aansluiten op een niet-geaard stopcontact.
• Een kortsluiting kan leiden tot een elektrische schok.
Zorg dat het stroomsnoer en de stekker niet geklemd en onbeschadigd zijn.
• Een beschadigde stekker of een geknakt stroomsnoer kan leiden tot kortsluiting, brand of een elektrische schok.
• Als het stroomsnoer beschadigd is, moet u dit laten vervangen door de fabrikant, diens onderhoudsdienst of een ander daartoe bevoegd persoon, om een gevaarlijke situatie te voorkomen.
• VERVANG HET SNOER NIET ZELF.
Verwijder stof of vuil van de stekkerpennen voordat u de stekker in het stopcontact steekt.
• Stof of vuil op de stekker kan leiden tot isolatieproblemen, vooral onder vochtige omstandigheden. Dit kan leiden tot kortsluiting, brand of een
elektrische schok. Trek de stroomstekker uit het stopcontact en veeg hem schoon met een droge doek. Gebruik nooit een natte of vochtige doek.
Steek de stroomstekker stevig in het stopcontact.
• Een loszittende stroomstekker kan leiden tot brand of een elektrische schok.
Plaats de koelkast in een goed geventileerde ruimte.
• Hoe meer koelmiddel een apparaat bevat, des te groter de ruimte waarin u het apparaat moet plaatsen. Als er eventueel koelmiddel
zou gaan lekken terwijl het apparaat in een kleine ruimte staat, kunnen ontvlambare gassen zich gaan ophopen. Dit kan leiden tot
brand of een explosie. Als richtlijn geldt dat er voor elke 8 gram aan koelmiddel ten minste 1 kubieke meter vrije ruimte in het vertrek
moet zijn. Het informatieplaatje aan de binnenkant van de koelkast vermeldt hoeveel koelmiddel uw koelkast bevat.
Het koelmiddel (R600a) dat in deze koelkast wordt gebruikt en de gassen in het isolatiemateriaal (cyclopentaan)
zijn beide licht ontvlambaar. Hiervoor gelden ook speciale afvalprocedures.
• Voordat u deze koelkast wegdoet, dient u te controleren of de leidingen aan de achterzijde niet beschadigd zijn.
Lekkage van koelmiddel of gas kan leiden tot brand of een explosie.
Trek voor reinigings- en onderhoudswerkzaamheden de stekker uit het stopcontact.
• Nalaten hiervan kan leiden tot een elektrische schok.
Als u een brandlucht ruikt, of merkt dat er rook uit de koelkast komt, trek dan onmiddellijk de stekker uit het
stopcontact en neem contact op met een erkend servicecentrum.
• Nalaten hiervan kan leiden tot brand of een elektrische schok.
-WAARSCHUWING:
Zorg dat alle ventilatiesleuven van de koelkast zelf en de eventuele ombouw vrij zijn.
• Nalaten hiervan kan leiden tot brand of een explosie omdat koelmiddel zich niet kan verspreiden als het lekt.
LEDSTRALING
NIET RECHTSTREEKS BEKIJKEN MET OPTISCHE INSTRUMENTEN; LEDPRODUCT KLASSE 1M.
LET OP
Duidt op risico van lichamelijk letsel of materiële schade.
Plaats geen essen of potten van glas in de vrieskast.
• Wanneer de inhoud bevriest, kan het glas barsten.
Raak de binnenwanden van de vrieskast of de daarin geplaatste levensmiddelen niet met natte handen aan.
• Uw huid kan vastvriezen aan de binnenwand of aan de ingevroren levensmiddelen in het vriesvak.
Open of sluit de deuren niet door de handgrepen met beide handen vast te pakken.
• Dit kan leiden tot persoonlijk letsel.
Open de koelkast tijdens een stroomstoring niet te vaak, en plaats er geen ongekoelde
levensmiddelen in.
• Hierdoor kan de temperatuur in de koelkast stijgen, en kunnen de aanwezig levensmiddelen bederven.
Trek de stroomstekker uit het stopcontact als u van plan bent de koelkast geruime tijd
niet te gebruiken.
Pas ook op voor de opening tussen de deuren van de koelkast en de vrieskast, vooral
als die allebei tegelijk open staan.
• Dit kan leiden tot persoonlijk letsel.
Pas op dat uw vingers tijdens het openen van de koelkast niet bekneld raken in de
aangegeven “knelpunten”. Zorg vooral tijdens het openen van de koelkastdeuren voor
het vermijden van het mogelijke knelpunt tussen de koelkast en de koelkastdeuren.
• Dit kan leiden tot persoonlijk letsel.
4242
Mogelijk knelpunt
Page 43

Installatie
Dit hoofdstuk beschrijft op welke manier uw koelkast voor de meest energiezuinige, veilige en stille werking geïnstalleerd moet worden.
Afmetingen
NR-B29SG2/NR-B29SW2: B600 x D652 x H1898 (mm)
NR-B32SG2/NR-B32SW2: B600 x D652 x H2044 (mm)
Uw koelkast uitpakken
Verwijder alle verpakkingsmaterialen.
De juiste locatie kiezen
Ventilatie
Omdat de koelkast tijdens de werking warmte afgeeft, moet de
koelkast geplaatst worden in een goed geventileerde, droge ruimte met
voldoende ruimte aan de boven- en achterkant, zoals in afbeelding 1.
Als u de koelkast kunt horen trillen, is er meer ruimte nodig.
Temperatuur
De temperatuur van de ruimte is van invloed op het energieverbruik
van de koelkast voor het koelen en invriezen van levensmiddelen.
Plaats uw koelkast voor de beste resultaten:
● uit de buurt van direct zonlicht
● uit de buurt van radiatoren, fornuizen of andere warmtebronnen
waar de omgevingstemperatuur correspondeert met de klimaatclassicatie
●
waarvoor de koelkast is ontworpen. Raadpleeg het hoofdstuk “Technische
gegevens” voor de klimaatclassicatie van uw koelkast.
Waterpas
Plaats de koelkast op een vlakke ondergrond die sterk genoeg is voor
een volgeladen koelkast.
Het waterpas plaatsen van de koelkast bereikt u met de twee
verstelbare pootjes aan de voorkant, zoals in afbeelding 2.
Dit voorkomt trillingen en lawaai.
Leg op een tapijt- of vinylvloer eerst een stevige ondergrond voordat u de
koelkast daarop plaatst. Hierdoor wordt uw vloerbedekking beschermd
tegen verkleuringen als gevolg van de warmteafgifte van de koelkast.
20 mm
of meer
150 mm of meer
Afbeelding 1
40 mm
of meer
Nederlands
Koelkastdeur
De scharnieren van de koelkast kunnen van de
rechterkant naar de linkerkant worden omgezet, zodat
WAARSCHUWING
de deuren in tegengestelde richting openen. Neem
hiervoor contact op met onze onderhoudsdienst in de
bijlage, of ga naar (http://panasonic.net).
Wij zijn niet aansprakelijk als u de scharnieren zelf
omhangt.
Onderdelen voor het omwisselen van de draairichting
van de deur bevinden zich in de verpakking van het
apparaat.
Afbeelding 2
43
43
Page 44

Installatie (vervolg)
De afstandhouders installeren
Om te voorkomen dat de koeler (de zwarte achterkant met vinnen) de
muur raakt, plaatst u twee plastic afstandhouders die u 90° draait.
Afstandhouders (toebehoren)
Reinigen
Veeg de koelkast na het plaatsen schoon met warm water.
De stekker in het stopcontact steken
Onmiddellijk na de installatie kunt u de stekker in het stopcontact steken.
Na het aansluiten van het apparaat op een stopcontact, verschijnen gedurende enkele ogenblikken alle symbolen. Vervolgens
worden de opstarttemperaturen op het display weergegeven als -18 °C voor de vrieskast en 4 °C voor de koelkast.
Alle toetsen op het bedieningspaneel functioneren via tiptoetsbediening. (Alleen drukken voor het activeren van de toets
die u wilt bedienen.)
Opmerkingen:
• Het koelen kan langer duren in de zomermaanden of wanneer de omgevingstemperatuur hoger is.
• Als u de stekker van de koelkast uit het stopcontact moet trekken, wacht u dan minstens 10 minuten voordat u de
stekker weer in het stopcontact steekt. De kans bestaat anders dat de compressor van de koelkast beschadigt.
Kamertemperatuur
De klimaatklasse van de koelkast vindt u op het typeplaatje op de linkerzijkant van het koelgedeelte. Hierop staat de
omgevingstemperatuur aangegeven waarop de koelkast gebruikt kan worden.
Klimaatklasse Toegestane omgevingstemperatuur
SN (Uitgebreid Gematigd) +10 °C t/m 32 °C
N (Gematigd) +16 °C t/m 32 °C
ST (Subtropisch) +16 °C t/m 38 °C
T (Tropisch) +16 °C t/m 43 °C
Voor energiebesparing
1. Plaats de koelkast in een droge, koele, en goed geventileerde ruimte. Hoe kouder de omgevingstemperatuur, des te
efciënter de koelkast functioneert. (Ga naar pagina 43 voor afmetingen en vrije ruimte.)
2. De combinatie van laden en legplaten waardoor de grootste ruimte ontstaat en de koelkast de minste energie verbruikt.
• Verwijder de twee bovenste lades van de vrieskast. (Laat de onderste vrieskastlade op zijn plaats.)
• Plaats de laden en legplaten in de koelkast op de plaatsen zoals afgebeeld in het gedeelte “Onderdelen” (P.45).
• Als u de lades van het koelcompartiment verwijdert, kan de koude lucht beter circuleren. U kunt op die manier ook
grotere hoeveelheden voedsel bewaren.
3. Stel de schermbeveiligingsstand in.
4. Voor het behoud van de luchtcirculatie mag de koelkast niet te vol worden gevuld.
5. Open de deuren alleen wanneer dat noodzakelijk is en zo kort mogelijk.
6. Maak met de stofzuiger zo nu en dan de ventilatieopeningen aan de onderkant van de koelkast schoon, enz.
(Zorg dat u hierbij de koelleiding aan de binnenkant van de klep niet beschadigt.)
7. Wanneer u de “Diepvriesstand” of “extra koelstand” aanzet, neemt het stroomverbruik toe.
4444
Page 45

Onderdelen
Onderstaande afbeelding is gebaseerd op model NR-B29SG2 en kan enigszins verschillen met uw koelkast.
Koelkastvak
De temperatuur kan worden
ingesteld tussen de 2 °C en 8 °C.
Gekookte
etenswaren,
dranken,
eieren, gebak,
zuivelproducten
Koelcompartiment
De temperatuur ligt 1 °C tot 2 °C lager
dan de temperatuur die ingesteld is
voor het koelvak.
Zie pagina 47 voor meer informatie over
het gebruik van het koelcompartiment.
Kaas, boter,
worst
Diepvriesvak
De temperatuur kan worden ingesteld
tussen de -24 °C en -16 °C.
Ingevroren
vlees,
gevogelte,
vis, ijs
5
1
2
3
4
6
7
8
9
:
Nederlands
;
<
1Wijnrek* 52 ijsbakjes 92 eierbakjes
2Glazen legplaten** 6Diepvrieslades :Deurschappen**
3Groentelades 7Stootrand ;Flessenvakken
4Koelcompartimentlade 8Verstelbare pootjes <Schuivend deel
*Het volgende onderdeel wordt niet meegeleverd met model NR-B29SW2.
• Wijnrek
**De volgende onderdelen worden extra meegeleverd met de modellen NR-B32SG2/NR-B32SW2.
• Glazen legplaat
• Deurschap
Opmerking:
• U kunt de posities wijzigen waar de deur en de essenvakken geplaatst zijn. Wees echter voorzichtig omdat etenswaren
en dranken die zich in de koelkast bevinden, afhankelijk van hoe de planken geplaatst zijn, uit de koelkast kunnen
vallen wanneer de deur wordt geopend.
• Als u de deur sluit terwijl de lades (groentelades/koellades/vrieslades) geopend zijn, kunnen de lades beschadigd raken.
45
45
Page 46

Bedieningspaneel
Aanduidingsvenster
1
Temperatuurdisplay koelkast
1
2
3
Opmerkingen:
• Deze koelkast is voorzien van een microprocessor voor het regelen van de temperatuur. De temperatuur in de koelkast
varieert afhankelijk van factoren als wijziging in de kamertemperatuur, hoe vaak de deuren worden geopend en
gesloten, en hoeveel etenswaren en hoe deze in de koelkast zijn opgeslagen.
• De ingestelde temperatuur wordt weergegeven.
• Als de extra koelstand geactiveerd is, knipperen er
4
5
6
afwisselend twee -markeringen.
2
Temperatuurdisplay vrieskast
• De ingestelde temperatuur wordt weergegeven.
• Als de diepvriesstand geactiveerd is, knipperen er
afwisselend twee
3
Functiedisplay
• Als de Eco-stand
ingesteld zijn, worden er cirkels weergegeven rond
de markeringen.
• Als de kinderbeveiliging
geactiveerd zijn, worden de markeringen voor die
functies weergegeven.
-markeringen.
en de vakantiestand
en het alarm
Bedieningsknoppen
4
Koelkast selectietoets
5
Vrieskast selectietoets
6
Standtoets
4646
Page 47

Instellen van de temperatuur
Koelcompartiment
Ten tijde van aankoop is de temperatuur ingesteld op 4 °C.
1
Druk eenmaal op (hoog) en druk hier binnen 1 seconde nogmaals op.
• De temperatuur kan worden ingesteld.
2
Druk herhaaldelijk op deze toets tot de gewenste temperatuur ingesteld is.
• Als er tijdens het instelproces gedurende 1 seconde geen handeling wordt uitgevoerd, knippert
de ingestelde waarde en hoort u een pieptoon om aan te tonen dat de temperatuur ingesteld is.
Opmerking:
• Wanneer de extra koelstand, diepvriesstand, Eco-stand of vakantiestand wordt beëindigd
of geannuleerd, keert het apparaat terug naar de vorige instellingen.
Diepvriesvak
Ten tijde van aankoop is de temperatuur ingesteld op -18 °C.
1
Druk eenmaal op (laag) en druk hier binnen 1 seconde nogmaals op.
• De temperatuur kan worden ingesteld.
2
Druk herhaaldelijk op deze toets tot de gewenste temperatuur ingesteld is.
• Als er tijdens het instelproces gedurende 1 seconde geen handeling wordt uitgevoerd, knippert
de ingestelde waarde en hoort u een pieptoon om aan te tonen dat de temperatuur ingesteld is.
Opmerking:
• Wanneer de extra koelstand, diepvriesstand, Eco-stand of vakantiestand wordt beëindigd
of geannuleerd, keert het apparaat terug naar de vorige instellingen.
Koelcompartiment
U kunt de temperatuur van het koelcompartiment regelen door het schuivende deel in het compartiment te openen of te sluiten.
Open
Draai het schuivende deel naar de geopende positie om de temperatuur van het
compartiment 1 °C tot 2 °C lager te zetten dan de temperatuur die ingesteld is voor het
koelvak. Zo kunt u het compartiment gebruiken als koelcompartiment.
Gesloten
Draai het schuivende deel naar de gesloten positie om de temperatuur van het
compartiment en het koelvak gelijk te zetten. Zo kunt u het compartiment gebruiken als
een deel van het koelvak.
Nederlands
• Als u dit compartiment gebruikt als 0 °C-compartiment, blijft het bewaarde voedsel langer vers, behoudt het langer zijn
smaak en blijft het er fris uitzien. Als de koelcompartimentlade vuil is, dient u deze te verwijderen en te reinigen met
water (water bevriest bij 0 °C, maar voedsel dat zout of suiker bevat, begint pas te bevriezen bij lagere temperaturen).
Het koelcompartiment wordt vooral gebruikt voor het bewaren van verse vis, licht gepekeld voedsel, rijst enz.
• Trek de koelcompartimentlade naar u toe; het deksel opent automatisch.
Opmerking:
• Plaats in deze lade geen voedsel dat u wilt invriezen of ijslades om ijsblokjes te maken.
47
47
Page 48

Gebruik van de handige functies
Diepvriesstand
Functies:
• In deze stand kan de vrieskast snel vriezen, zodat verse etenswaren snel kunnen worden
ingevroren.
• De diepvriesstand wordt na 24 uur automatisch beëindigd of wanneer de temperatuur van
de vrieskastsensor lager wordt dan -32 °C.
Instellingen:
1. Druk op
2. Als er tijdens het instelproces gedurende 1 seconde geen handeling wordt uitgevoerd,
knippert “SF” en hoort u een pieptoon om aan te tonen dat de diepvriesstand ingesteld is.
• Tijdens deze stand wordt “SF” weergegeven en knipperen er afwisselend twee
-markeringen.
• Druk op (laag) om de stand te annuleren.
Opmerkingen:
• Tijdens deze stand:
-Door het indrukken van
gewenste temperatuur worden ingesteld.
-Het is niet mogelijk om de Eco-stand en de vakantiestand te selecteren.
-De koeltemperatuur kan worden aangepast.
• Het effect op de aanwezige levensmiddelen kan worden verminderd als u de
diepvriesstand al inschakelt enkele uren voordat u de levensmiddelen in de vrieskast
plaatst.
• Het alarm weerklinkt 3 uur na het instellen van de diepvriesstand. U kunt op dat moment
een kleine hoeveelheid voedsel bewaren.
• Voor het behalen van de maximale vriescapaciteit wordt u geadviseerd het volgende te
doen:
1
2
3
• De maximale vriescapaciteit binnen 24 uur staat aangegeven op het typeplaatje.
(laag) tot “SF” weergegeven wordt.
(laag) wordt de diepvriesstand geannuleerd en kan de
Stel 24 uur voor u voedsel wilt gaan bewaren de temperatuur van de vrieskast in op
-24 °C en de temperatuur van de koelkast op 2 °C.
Stel de diepvriesstand 10 uur voor het plaatsen van etenswaren in.
Voor het opslaan van meer etenswaren haalt u alle laden uit de vrieskast en legt u
de etenswaren rechtstreeks op de bodem van de vrieskast. (De vriescapaciteit kan
worden verhoogd door etenswaren rechtstreeks op de bovenste legplaat te plaatsen).
Extra koelstand
Functies:
• In deze stand kunnen etenswaren voor het nuttigen worden gekoeld, kan een grote
hoeveelheid levenswaren worden gekoeld en bewaard en kunnen dranken snel worden
gekoeld.
• De extra koelstand wordt na 8 uur automatisch beëindigd of wanneer de temperatuur van
de koelsensor lager wordt dan 0 °C.
Instellingen:
1. Druk op
2.
Als er tijdens het instelproces gedurende 1 seconde geen handeling wordt uitgevoerd, knippert “SC” en
hoort u een pieptoon om aan te tonen dat de extra koelstand ingesteld is.
• Tijdens deze stand wordt “SC” weergegeven en knipperen er afwisselend twee
-markeringen
• Druk op (hoog) om de stand te annuleren.
Opmerkingen:
• Tijdens deze stand:
-Door het indrukken van
gewenste temperatuur worden ingesteld.
-Het is niet mogelijk om de Eco-stand en de vakantiestand te selecteren.
-De vriestemperatuur kan worden aangepast.
4848
(hoog) tot “SC” weergegeven wordt.
(hoog) wordt de extra koelstand geannuleerd en kan de
Page 49

Eco-spaarstand
Functies:
• In deze stand bedient het bedieningselement de vriezer en de koelkast op een economische
manier.
• In deze stand wordt de temperatuur van de koelkast automatisch op 4 °C gezet en de
vrieskast automatisch op -18 °C.
Instellingen:
1. Druk herhaaldelijk op
2. Als er tijdens het instelproces gedurende 1 seconde geen handeling wordt uitgevoerd,
knippert de cirkel rond en hoort u een pieptoon om aan te tonen dat de Eco-stand
ingesteld is.
• Tijdens deze stand wordt “E” weergegeven op het temperatuurdisplay van de koelkast/
vrieskast en verschijnt er een cirkel rond .
• Druk op om de stand te annuleren.
Opmerkingen:
• Tijdens deze stand:
-De vries- en koelkast kunnen aangepast worden. Als de Eco-stand geannuleerd wordt,
blijven de aanpassingen behouden.
-U kunt een extra koelstand en een diepvriesstand activeren. Na het inschakelen van deze
stand, wordt de Eco-stand automatisch uitgeschakeld.
-Als de Eco-stand uitgeschakeld is, kan de vakantiestand geactiveerd worden.
tot er een cirkel weergegeven wordt rond .
Vakantiestand
Functies:
• Zet de koelkast in deze stand wanneer de koelkast langdurig niet gebruikt zal worden,
bijvoorbeeld wanneer u langdurig op vakantie bent.
• In deze stand wordt de temperatuur van de koelkast automatisch op 8 °C gezet en de
vrieskast automatisch op -18 °C.
Instellingen:
1. Druk herhaaldelijk op
2. Als er tijdens het instelproces gedurende 1 seconde geen handeling wordt uitgevoerd,
knippert de cirkel rond
ingesteld is.
• “H” wordt weergegeven op het temperatuurdisplay van de vrieskast. Er wordt niets
weergegeven op het temperatuurdisplay van de vrieskast.
• Tijdens deze stand wordt “H” weergegeven op het temperatuurdisplay van de vrieskast en
verschijnt er een cirkel rond
Opmerkingen:
• Haal de koelkast leeg en sluit de deur voordat u de vakantiestand inschakelt.
• Na het beëindigen van deze stand gaat de koelkast over op de vorige instellingen.
-De vries- en koelkast kunnen aangepast worden. Als de vakantiestand geannuleerd
wordt, blijven de aanpassingen behouden.
-U kunt een extra koelstand en een diepvriesstand activeren. Na het inschakelen van deze
stand, wordt de vakantiestand automatisch uitgeschakeld.
-Als de vakantiestand uitgeschakeld is, kan de Eco-stand geactiveerd worden.
tot er een cirkel weergegeven wordt rond .
en hoort u een pieptoon om aan te tonen dat de vakantiestand
.
Nederlands
49
49
Page 50

Gebruik van de handige functies (vervolg)
Drankkoelstand
Functies:
• Drankjes kunnen in de vrieskast snel worden gekoeld.
• Deze stand heeft een timerfunctie die ingesteld kan worden op 5, 10, 15, 20, 25 of 30 minuten.
• Verwijder de essen wanneer het piepgeluid hoorbaar is. Als essen langdurig in de
vrieskast blijven, kan de inhoud ervan bevriezen en kunnen de essen breken.
Instellingen:
1. Druk gedurende 5 seconden op
2. “dc” wordt weergegeven op het temperatuurdisplay van de vrieskast en “05” knippert op
het temperatuurdisplay van de koelkast.
3. Druk op
4. De geselecteerde tijd knippert 3 keer op het display, waarna er een pieptoon wordt geproduceerd.
5. De minutenaftelling start bij de ingestelde tijd en de resterende tijd knippert op het display.
• Druk gedurende 5 seconden op (laag) om de drankkoelstand te annuleren.
• Als de ingestelde tijd bereikt is, wordt er een pieptoon geproduceerd en knipperen beide
display-aanduidingen (bv. “00” en “dc”) tot u op
Opmerkingen:
• Controleer tijdens deze stand regelmatig de temperatuur van de essen.
• Haal de essen uit de vrieskast wanneer ze voldoende gekoeld zijn.
(hoog) om de tijd aan te passen (05-10-15-20-25-30 minuten).
Schermbeveiligingsstand
Functies:
• Als deze stand geactiveerd is, wordt de achtergrondverlichting van het display
uitgeschakeld om energie te besparen.
Instellingen:
1.
Druk gedurende 3 seconden op om de automatische schermbeveiligingsfunctie te activeren.
2. Als er gedurende 5 seconden geen handelingen uitgevoerd worden en er geen deur
geopend wordt, wordt de achtergrondverlichting van het display uitgeschakeld (alle
markeringen en tekens blijven zichtbaar op het display).
• De geselecteerde standen en functies blijven behouden.
• Om de automatische schermbeveiliging uit te schakelen en de achtergrondverlichting van
het display opnieuw in te schakelen, drukt u gedurende 3 seconden op
Opmerkingen:
• Als de automatische schermbeveiligingsfunctie ingeschakeld is en de achtergrondverlichting van het
display uitgeschakeld is, wordt de verlichting opnieuw ingeschakeld en worden de ingestelde functies
getoond op het display als u op een toets drukt of een deur opent.
• Als de schermbeveiliging en de kinderbeveiliging ingeschakeld worden, wordt de
schermbeveiliging geactiveerd. Dit betekent dat als beide functies geactiveerd zijn, de
achtergrondverlichting van het display opnieuw ingeschakeld wordt als u op een toets
drukt of een deur opent.
(laag).
(laag) drukt.
.
Kinderbeveiligingsfunctie
Functies:
• Als u de kinderbeveiliging inschakelt, kunnen kinderen de instellingen niet wijzigen als zij
met de toetsen spelen.
Instellingen:
1. Druk gedurende 5 seconden op
activeren.
• Terwijl de kinderbeveiliging geactiveerd is, brandt
• Druk gedurende vijf seconden op (hoog) en (laag) om de stand te annuleren. U kunt
de ingestelde stand pas wijzigen als de kinderbeveiliging uitgeschakeld wordt.
Opmerkingen:
• Als de stroom uitvalt of de stekker uit het stopcontact wordt getrokken, wordt de
kinderbeveiliging geannuleerd.
5050
(hoog) en (laag) om de kinderbeveiliging te
.
Page 51

Omtrent de waarschuwingsfuncties
De waarschuwingsfuncties voor de gebruiker worden in de volgende situaties geactiveerd:
Situatie Details Waarschuwingstoon
Stand is beëindigd.
Deur op een kier.
• De ingestelde tijd voor de drankkoelstand
is bereikt.
• De deur van de koelkast en/of de vrieskast
is langer dan 2 minuten geopend.
Piept continu
Piept elke 5 seconden
IJsblokjes maken
Open de vrieskast, trek de bovenste lade eruit en verwijder de ijslade
van het plafond. Vul het ijsbakje tot aan het aangegeven waterniveau
met water en plaats het ijsbakje daarna terug.
Wanneer de ijsblokjes klaar zijn, trekt u de bovenlade eruit en neemt u
het ijsbakje eruit. Verdraai het ijsbakje door het aan beide kanten vast te
houden, waarna de ijsklontjes uit het ijsbakje vallen. Plaats het ijsbakje
daarna weer terug in de vrieskastlade.
Legplaten verwijderen en plaatsen
Het stoppen van het
waarschuwingsgeluid
Druk op
Sluit de deur(en).
Randje van het
waterniveau
.
Nederlands
Koelkast
Vrieskast
Glazen legplaten
Trek de binnenkant van het schap een beetje omhoog, en trek het schap eruit.
Voor het verwijderen van de glazen legplaten dient u de eventueel
blokkerende deur en essenvakken eerst te verwijderen.
Zorg ervoor dat de deur geopend is tot tegen de stopper als u de
glasplaat wilt verwijderen.
Groentelades
Trek de groentelade naar u toe en daarna in zijn geheel uit de koelkast.
Deurvakken en essenvakken
Til het schap een beetje omhoog en trek het er daarna helemaal uit.
Koelcompartimentlade
Trek de lade uit de koelkast, neem het voorste deel vast en til het
diagonaal op om de doos te verwijderen.
Trek de lade naar u toe, de voorkant ervan
een beetje omhoog, en trek de lade eruit.
Nadat u de lade verwijderd hebt, kunt u in het
lege vak levensmiddelen bewaren.
51
51
Page 52

Instructies voor onderhoud en reiniging
Dagelijks reinigen
Regelmatig met een droge doek afvegen.
Plekken die extra aandacht nodig hebben:
De deurrubbers
Wanneer de deurrubbers vuil worden en beschadigd
raken, kan koude lucht uit de koelkast lekken.
Flessenvak
Veeg vuil en vloeistof weg voordat dit zich ophoopt.
Trek één keer per jaar de stekker uit het stopcontact, en haal de schappen uit de
koelkast om ze grondig te reinigen.
Onderdelen die met water gereinigd kunnen worden
Koelkast Vrieskast
● Glazen legplaten
● Deurschappen
● Flessenvakken
● Eierbakjes
● Groentelades
● Koelcompartimentlade
● Diepvrieslades
● IJsbakjes
Opmerking:
• Gebruik geen schuurmiddelen, zoals b.v. bicarbonaat
of soda, omdat de kunststof delen beschadigd kunnen
raken.
Reinigen van het bedieningspaneel
Het controlepaneel van de koelkast is van kwetsbare materialen gemaakt. Om het oppervlak niet te beschadigen, mag het niet
met chemische oplosmiddelen gereinigd worden. Reinig het in plaats daarvan met een zachte doek, die een beetje vochtig is.
De buitenkant van de koelkast reinigen
Reinig de buitenkant van de koelkast met een zachte doek, bevochtigd met warm water. Indien het vuil niet verwijderd
kan worden, neem dan een mild reinigingsmiddel en veeg het vuil weg met een zachte doek die bevochtigd is met warm
water. Veeg waterdruppels weg met een droge doek.
Opmerkingen voor het reinigen
Maak voor het reinigen van de binnen- en buitenkant van de koelkast geen gebruik van:
● Alkaline reinigingsmiddelen - hierdoor kunnen scheurtjes in de kunststof onderdelen ontstaan.
●
Schuurpoeder, zeeppoeder, reinigingsmiddelen op oliebasis, heet water, keukenborstels, zuur, benzine, verdunner,
oplosmiddelen of alcoholhoudende middelen Al deze substanties kunnen de oppervlakte en de kunststofdelen van de
koelkast beschadigen.
Zorg dat u alle keukenolieresten verwijdert. Deze kunnen barstjes in de kunststofdelen veroorzaken.
5252
Page 53

Onderhoudsinspectie
● Is het stroomsnoer beschadigd?
● Wordt de stekker heet?
● Zit de stekker goed in het stopcontact?
WAARSCHUWING
Als het netsnoer of het ledlampje beschadigd is, dient u contact op te nemen met een erkende
hersteldienst. Probeer deze stukken NIET zelf te vervangen.
Langdurig buiten gebruik
Trek de stekker uit het stopcontact als u van plan bent de koelkast geruime tijd niet te gebruiken.
Laat de deuren daarna gedurende 2-3 dagen open. Hierdoor droogt de binnenkant op de juiste
LET OP
wijze, en worden luchtjes en schimmelvorming voorkomen.
Zet de koelkast niet herhaaldelijk aan en uit. De koelkast gaat langer mee als deze tijdens
normaal gebruik gewoon aan laat staan.
Voordat u de koelkast verplaatst of vervoerd:
① Haal de koelkast helemaal leeg, inclusief lades e.d.
② Haal de stekker uit het stopcontact.
③ Verhoog de verstelbare voet.
④ Trek, of ‘duw’ de koelkast naar u toe.
⑤ Gebruik bijvoorbeeld een doek om het water in de waterbak te
absorberen.
Verplaatsen en vervoeren van uw koelkast
Voor het veilig verplaatsen van de koelkast zijn twee
personen nodig.
① Draai de verstelbare voeten aan.
② Houd de verstelbare voeten aan de ene kant vast, en de
hoeken aan de andere kant, zoals afgebeeld.
Opmerking:
• Verplaats de koelkast niet door het vasthouden van de deuren.
Verplaats de koelkast rechtopstaand.
Nederlands
(onderaan achterkant van de koelkast)
Maak de deuren vast
met plakband
53
53
Page 54

Problemen oplossen
Uw koelkast waarschuwt u als het temperatuurniveau van de koeler of de vriezer ongeschikt is of wanneer er een
probleem is met het apparaat. In dat geval worden er waarschuwingscodes weergegeven op het temperatuurdisplay van
de koelkast/vrieskast.
Waarschuwingscodes
Sr Fout/waarschuwing Bepaalde onderdelen zijn defect of er doet zich een fout voor in het
LF Het diepvriesvak is niet
LC Het koelcompartiment
LF en LC Niet koud genoeg. Dit is een combinatie van de foutmeldingen LF en LC.
HC Het koelcompartiment
LOPO Laag voltage Als de stroomtoevoer onder 170 V zakt, schakelt het apparaat over naar
Betekenis Details en tegenmaatregelen
koelproces.
• Neem zo snel mogelijk contact op met de onderhoudsdienst.
koud genoeg.
is niet koud genoeg.
is te koud.
Deze waarschuwing verschijnt veelal na een lange stroomonderbreking.
1. Vries voedsel dat ontdooid is niet opnieuw in en gebruik het binnenkort.
2. Verlaag de temperatuur van de vrieskast of activeer de diepvriesstand tot
de temperatuur van het vriesvak opnieuw normaal is.
3. Steek pas weer vers voedsel in de vrieskast als deze foutmelding
verdwenen is.
De ideale temperatuur voor het koelcompartiment is +4 °C. Als deze
waarschuwing verschijnt, is het mogelijk dat uw eten bedorven raakt.
1. Verlaag de temperatuur van de koelkast of activeer de extra koelstand tot
de temperatuur van het koelcompartiment opnieuw normaal is.
2. Laat de deur zo veel mogelijk gesloten tot deze foutmelding verdwenen
is.
• Deze foutmelding wordt weergegeven als het apparaat voor het eerst
ingeschakeld wordt. De melding verdwijnt als de compartimenten de
correcte temperatuur hebben bereikt.
Voedsel begint te bevriezen omdat de temperatuur te laag is.
1. Controleer of de extra koelstand geactiveerd is.
2. Verlaag de temperatuur van de koelkast.
een gebalanceerde stand.
• Dit is geen defect. Deze stand voorkomt dat de compressor beschadigd
raakt. Deze waarschuwing verdwijnt als het voltage opnieuw het
geschikte niveau bereikt.
5454
Page 55

Veelgestelde vragen
Als u merkt dat uw koelkast niet helemaal goed functioneert, controleert u dan eerst de volgende punten.
Als het probleem zich blijft voordoen trekt u de stekker uit het stopcontact en raadpleegt u uw leverancier of een erkende
onderhoudsdienst.
Algemeen
Er komen vreemde geluiden uit de
koelkast.
Er klinkt een geluid nadat de
compressor is gestopt.
Er klinkt een geluid nadat u de
deur opent of sluit.
Er klinkt een geluid van een
luchtstroom of stromend water
nadat u de deur opent.
Er klinkt een aanhoudende, hoge
janktoon.
Het geluid van de compressor
klinkt erg luid.
De compressor blijft erg lang
achtereen werken.
Er wordt condenswater gevormd
aan de buitenkant van de
koelkast.
De buitenkant van de koelkast
voelt heet aan.
De toetsen op het
bedieningspaneel werken niet.
Het waarschuwingsgeluid is
hoorbaar.
Het ledlampje gaat niet branden. • Is de vakantiestand ingesteld?
• Staat de koelkast op een stevige, vlakke ondergrond?
• Is er voldoende ruimte rondom de koelkast?
• Staat er iets te trillen bovenop de koelkast?
• Het is normaal dat er geluiden klinken wanneer een van de functies van de
koelkast start of stopt.
• Dit is normaal; veelal is dit het geluid van het koelmiddel dat naar de
compressor toestroomt.
• Dit is normaal; dit geluid wordt veroorzaakt door het verschil in luchtdruk
binnen en buiten de koelkast.
• Dit is het geluid van het koelmiddel dat door de buizen in de koelkast stroomt.
• Dit geluid klinkt wanneer de ventilator voor de circulatie van de koude lucht in
werking is.
• Is de koelkast erg vol of is de kamertemperatuur te hoog?
In deze situaties draait de ventilator voor het circuleren van de koude lucht op
volle snelheid, waardoor deze veel geluid maakt.
• Is de koelkast erg vol of is de kamertemperatuur te hoog?
In deze situaties draait de compressor op volle snelheid, waardoor deze meer
geluid maakt.
• Wanneer u de stroom voor het eerst inschakelt, blijft de compressor lang
achtereen werken om de gehele koelkast te koelen totdat de ingestelde
temperaturen worden bereikt.
• Is de diepvriesstand of de extra koelstand ingesteld?
• Zijn de deuren erg vaak geopend en gesloten? Zijn alle deuren wel goed dicht?
• Is de koelkast erg vol of is de kamertemperatuur erg hoog?
• Wanneer er veel levensmiddelen gelijktijdig in de koelkast worden geplaatst,
zal de compressor lang achtereen blijven werken.
• Er kan vocht uit de lucht condenseren wanneer de luchtvochtigheid in het
vertrek erg hoog is; dit is volkomen normaal. Veeg het condensvocht weg met
een droge doek.
• Nadat de koelkast is aangezet, kan de koelkast warm aanvoelen totdat de
binnenkant voldoende gekoeld is. De koelkast kan ook warm worden als de
binnenkant voldoende gekoeld is. Zo werkt de radiatorleiding van de koelkast
ter voorkoming van condens, en is geen storing.
• Staat de koelkast aan?
• De deur van de koelkast en/of de vrieskast is geopend. Sluit beide deuren.
In de vakantiestand gaat het ledlampje van de koelkast niet branden.
• Is de voeding van de koelkast ingeschakeld?
• Contacteer uw dealer of een erkend servicecentrum als het ledlampje
vervangen moet worden.
Nederlands
55
55
Page 56

Veelgestelde vragen (vervolg)
Koelkast en vrieskast
De koelkast koelt niet (en de
vrieskast vriest niet).
De koelkast koelt niet (en de
vrieskast vriest niet) voldoende.
Er is verschil tussen de ingestelde
temperatuur en de feitelijke
temperatuur.
De etenswaren in de koelkast zijn
bevroren.
Er is sprake van condensvorming
in de koelkast en in de laden.
De deur van de vrieskast gaat
moeilijk open.
Het ruikt niet lekker in de koelkast. • Zijn sterk ruikende etenswaren goed afgedekt voordat ze in de koelkast zijn
• Staat de koelkast aan?
• Staan de temperaturen te hoog ingesteld?
• Staat de koelkast in de volle zon of vlakbij een verwarmingsapparaat?
• Is er voldoende ruimte rondom de koelkast?
• Is de koelkast erg vol of is de kamertemperatuur erg hoog?
• Zijn de deuren erg vaak geopend en gesloten?
Zijn alle deuren goed dicht?
• Staat de koelkast in de vakantiestand?
• Wanneer er warme etenswaren in de koelkast worden geplaatst, zal de
temperatuur tijdelijk stijgen.
• Tijdens de wintermaanden of wanneer de kamertemperatuur laag is, lijkt het
alsof de koelkast niet koelt
• Wanneer er warme etenswaren in de koelkast worden geplaatst, zal de
temperatuur tijdelijk stijgen.
• Staat de temperatuur van de koelkast te laag ingesteld?
• Zijn de etenswaren achterin de koelkast geplaatst?
In het gedeelte bij de achterwand is de temperatuur het laagste, waardoor het
beter is etenswaren die snel bevriezen daar niet te plaatsen.
• Condensvorming treedt op wanneer de deur regelmatig wordt geopend en
gesloten of wanneer de deur niet goed gesloten is, of wanneer de vochtigheid
van de ruimte te hoog is. Veeg het overtollige condensvocht weg met een
droge doek.
• Nadat de deur net is gesloten, is het soms moeilijk deze meteen daarna weer
te openen.
• Het verschil in luchtdruk tussen de binnenkant en buitenkant van de vrieskast
kan het soms moeilijk maken de deur van de vrieskast te openen. Wacht
enkele ogenblikken en probeer het dan nogmaals.
geplaatst?
Plaats de etenswaren in een goed afsluitbare bak om ze te bewaren.
• Geuren kunnen aan de binnenwanden van de koelkast blijven hangen.
Neem de binnenwanden van de koelkast af met een zachte doek die u hebt
bevochtigd met lauwwarm water.
5656
Page 57

Technische gegevens
Productkaart (EU Regeling 1060/2010)
NAAM VAN DE LEVERANCIER Panasonic
TYPEAANDUIDING VAN DE
LEVERANCIER
CATEGORIE 7 (Koel-vrieskast)
ENERGIE-EFFICIËNTIEKLASSE A++
JAARLIJKS ENERGIEVERBRUIK 240 kWh/Jaar
NETTO INHOUD KOELGEDEELTE 189 L 224 L
NETTO INHOUD CHILL
COMPARTIMENTEN
NETTO INHOUD VRIESGEDEELTE 72 L
AANTAL STERREN DIEPVRIESRUIMTE Vier-Sterren
VERMELDING „NO-FROST” VOOR DE
DESBETREFFENDE RUIMTE
TIJD VOOR TEMPERATUURSTIJGING 18 Uur
VRIESVERMOGEN 12 kg/24 Uur
KLIMAATKLASSE T
GELUIDSEMISSIE VIA DE LUCHT 42 dB
Overige informatie
TOTALE BRUTO INHOUD 332 L 367 L
TOTALE NETTO INHOUD 289 L 324 L
AFMETINGEN BUITENKANT
BREEDTE x DIEPTE x HOOGTE
NETTO GEWICHT 77 kg 80 kg
NOMINALE SPANNING 220 V - 240 V
NOMINALE FREQUENTIE 50 Hz
KOELMIDDEL/VULLEN R600a/55 g R600a/60 g
BLAASMIDDEL
Opmerkingen:
*1
Het energieverbruik per jaar is gebaseerd op de standaard testresultaten gedurende 24 uur.
Het huidige energieverbruik varieert naargelang het gebruik van apparaat en waar het zich bevindt.
*2
Toegestane omgevingstemperatuur: 16 °C tot 43 °C
Wanneer de deuren volledig geopend zijn
NR-B29SG2-SE
NR-B29SG2-SF
NR-B29SG2-SB
Koelgebied: No Frost / Chill compartiment: No Frost / Diepvriesruimte: No Frost
600 mm x 652 mm x 1898 mm 600 mm x 652 mm x 2044 mm
NR-B29SW2-WE
NR-B29SW2-WF
NR-B29SW2-WB
*1
NR-B32SG2-SE
NR-B32SG2-SF
NR-B32SG2-SB
250 kWh/Jaar
28 L
*2
Cyclopentaan
NR-B32SW2-WE
NR-B32SW2-WF
NR-B32SW2-WB
*1
Nederlands
120 º
299 mm
1122 mm
57
57
Page 58

Table des matières
Protection de l’environnement .................................... 58
Consignes de sécurité ................................................. 59
Installation ..................................................................... 61
Identication des pièces .............................................. 63
Panneau de commande ...............................................64
Réglage de la température ........................................... 65
Utilisation des fonctions pratiques ............................. 66
Fonctions d’avertissement utilisateur ........................ 69
Production de glaçons ................................................. 69
Retrait et xation des étagères ...................................69
Consignes d’entretien et de nettoyage ......................70
Dépannage .................................................................... 72
Foire aux questions ...................................................... 73
Caractéristiques ...........................................................75
Protection de l’environnement
Mise au rebut des matériaux d’emballage
Veuillez recyclez dans la mesure du possible (p. ex. le carton, les sacs en plastique, le ruban adhésif et le
polystyrène) et assurez-vous que tous les autres matériaux d’emballage sont éliminés de façon sécurisée.
Conservez l’emballage hors de portée des bébés et des jeunes enfants pour éviter blessure et étouffement.
Informations relatives à la mise au rebut des déchets, destinées aux utilisateurs
d’appareils électriques et électroniques (appareils ménagers domestiques)
Lorsque ce symbole gure sur les produits et/ou les documents qui les accompagnent, cela signie que
les appareils électriques et électroniques ne doivent pas être jetés avec les ordures ménagères.
Pour que ces produits subissent un traitement, une récupération et un recyclage appropriés, envoyez-les
dans les points de collecte désignés, où ils peuvent être déposés gratuitement. Dans certains pays, il est
possible de renvoyer les produits au revendeur local en cas d’achat d’un produit équivalent.
En éliminant correctement ce produit, vous contribuerez à la conservation des ressources vitales et à la prévention
des éventuels effets négatifs sur l’environnement et la santé humaine, pouvant être dus à la manipulation
inappropriée des déchets. Veuillez contacter les autorités locales pour connaître le point de collecte le plus proche.
Des sanctions peuvent être appliquées en cas d’élimination incorrecte de ces déchets, conformément à la législation nationale.
Utilisateurs professionnels de l’Union européenne
Pour en savoir plus sur l’élimination des appareils électriques et électroniques, contactez votre revendeur ou fournisseur.
Informations sur la mise au rebut des déchets dans les pays ne faisant
pas partie de l’Union européenne
Ce symbole n’est reconnu que dans l’Union européenne.
Pour supprimer ce produit, veuillez contacter les autorités locales ou votre revendeur an de connaître la
procédure d’élimination à suivre.
Avant de vous débarrasser de votre ancien appareil
Veuillez suivre les instructions de mise au rebut données par le fabricant de votre ancien appareil, ou la
réglementation locale en matière de mise au rebut de ce type d’appareil. Si elles ne sont pas fournies,
suivez les instructions en trois étapes ci-dessous.
1. Débranchez la che électrique de la prise.
2.
Coupez le cordon d’alimentation et jetez-le de manière appropriée et sûre avec la che électrique toujours attachée.
3. Assurez-vous que l’ancien appareil est hors de portée des jeunes enfants pendant la période de
stockage précédant sa mise au rebut ou avant son transport vers un Centre de recyclage.
●
Retirez toutes les garnitures d’étanchéité de la porte et laissez les étagères et les tiroirs en place.
Ainsi, les enfants ne pourront pas facilement grimper à l’intérieur de l’équipement et s’enfermer.
Cet appareil est destiné à être utilisé dans des applications domestiques et analogues telles que :
• les coins cuisines réservés au personnel des magasins, bureaux et autres environnements professionnels ;
• les fermes et l’utilisation par les clients des hôtels, motels et autres environnements à caractère résidentiel ;
• les environnements de type chambres d’hôtes ;
• la restauration et autres applications similaires hormis la vente au détail.
5858
Page 59

Signication des symboles :
Ne pas faire
Assurez-vous de le faire Ne pas démonter
Signale un risque de mort ou de blessure grave.
Cet appareil n’est pas conçu pour être utilisé par des personnes (y compris des enfants) aux capacités physiques,
AVERTISSEMENT
-AVERTISSEMENT:
-AVERTISSEMENT:
-AVERTISSEMENT:
sensorielles ou mentales diminuées, ou manquant d’expérience ou de connaissances, sauf sous la surveillance d’une
personne responsable de leur sécurité qui leur a expliqué le fonctionnement de l’appareil.
Les enfants doivent être surveillés an qu’ils ne jouent pas avec l’appareil.
N’utilisez pas de prise multiple et ne branchez pas plusieurs appareils sur le même adaptateur de prise.
• Cela pourrait provoquer une surchauffe, un incendie ou un court-circuit.
Ne pas pincer, nouer ou tordre le cordon d’alimentation et ne pas placer un objet lourd dessus.
• Cela augmente les risques d’incendie ou de décharge électrique. Si le cordon électrique, la che électrique ou
l’appareil sont endommagés, ils doivent être remplacés par le fabricant, un réparateur agréé ou une personne de
qualication équivalente pour éviter tout danger.
Ne débranchez pas le réfrigérateur en tirant sur le cordon d’alimentation.
• Cela pourrait endommager le cordon d’alimentation. Saisissez toujours la che électrique et tirez fermement hors de la prise.
Ne posez aucun récipient contenant de l’eau sur le réfrigérateur.
• L’eau pourrait endommager l’isolation des composants électriques et provoquer un court-circuit, un incendie ou une décharge électrique.
Ne vaporisez jamais de gaz inammable à proximité du réfrigérateur.
• Il y a un risque d’explosion ou d’incendie.
Ne vaporisez jamais de l’eau à l’intérieur ou à l’extérieur du réfrigérateur.
• Il y a un risque d’incendie ou de décharge électrique.
Ne touchez pas la che d’alimentation électrique avec les mains mouillées.
• Vous pourriez recevoir une décharge électrique.
N’installez pas le réfrigérateur dans un endroit humide ou dans lequel il pourrait entrer en contact avec de l’eau.
• La détérioration de l’isolation des pièces électriques pourrait être à l’origine d’une décharge électrique ou d’un incendie.
Ne stockez pas de substances volatiles ou inammables dans le réfrigérateur.
• Les substances inammables telles que le benzène, les diluants, l’alcool, l’éther et le GPL peuvent provoquer des explosions.
Ne stockez pas de produits pharmaceutiques ou sensibles à la température dans le réfrigérateur.
• Les produits nécessitant un strict contrôle de température ne doivent pas être stockés dans le réfrigérateur.
Ne laissez pas les enfants grimper, se balancer ou se suspendre à la porte du réfrigérateur.
• Ils pourraient se blesser gravement et aussi endommager le réfrigérateur.
N’utilisez pas le réfrigérateur en présence de vapeurs explosives ou de gaz inammables.
• Il y a un risque d’explosion ou d’incendie.
Ne stockez pas d’essence ou tout liquide inammable ou pouvant dégager des vapeurs inammables, et ne les
utilisez pas près de l’appareil.
• Il y a un risque d’explosion ou d’incendie.
N’utilisez pas de système mécanique ou autre moyen pour accélérer le processus de dégivrage. N’utilisez que
les moyens recommandés par le fabricant.
• Cela pourrait endommager l’intérieur du réfrigérateur ou créer un risque d’explosion.
N’utilisez aucun appareillage électrique dans les compartiments de conservation des aliments de l’appareil, à
l’exception de ceux qui sont recommandés par le fabricant.
• Il y a un risque d’explosion ou d’incendie.
Veillez à ne pas endommager le circuit de réfrigérant.
• Il y a un risque d’explosion ou d’incendie.
N’essayez pas de démonter, de réparer ou de modier le réfrigérateur vous-même.
• Vous pourriez vous blesser (ou blesser une autre personne) par des brûlures ou des décharges électriques, ou
endommager le réfrigérateur. Si votre appareil nécessite une modication ou une réparation, veuillez vous adresser à
un centre de service après-vente agréé.
Consignes de sécurité
Indique que l’appareil doit être relié à la terre
pour éviter une décharge électrique
Français
59
59
Page 60

Consignes de sécurité (suite)
Assurez-vous que le réfrigérateur est branché sur une prise secteur reliée à la terre. NE PAS brancher l’appareil
sur une prise secteur qui n’est pas reliée à la terre.
• Un court-circuit pourrait occasionner une décharge électrique.
Veillez à ce que la che électrique et le cordon d’alimentation ne soient pas compressés ou endommagés.
• Une che électrique ou un cordon d’alimentation endommagés peuvent occasionner un court-circuit, un incendie ou une décharge électrique.
• Si le cordon d’alimentation est endommagé, il doit être remplacé par le fabricant, un agent agréé ou une personne de qualication équivalente pour éviter tout risque.
• NE TENTEZ PAS DE LE REMPLACER VOUS-MÊME.
Retirez toutes salissures ou poussières susceptibles de se trouver sur les broches de la che électrique avant de la brancher sur l’alimentation électrique.
• L’accumulation de poussière sur la che électrique pourrait se traduire par un défaut d’isolation, en particulier dans des
conditions de forte humidité. Cela peut provoquer un court-circuit, un incendie ou une décharge électrique. Débranchez
le cordon d’alimentation et essuyez-le avec un chiffon sec. N’utilisez jamais de chiffon mouillé ou humidié.
Branchez votre appareil à la prise en vous assurant que la connexion est sécurisée.
• Une che d’alimentation électrique mal branchée peut être à l’origine d’un incendie ou d’une décharge électrique.
Installez le réfrigérateur dans un endroit bien ventilé.
• Plus la quantité de réfrigérant est importante dans un appareil, plus la pièce dans laquelle il est installé doit être spacieuse. En cas de fuite de réfrigérant, si l’appareil
est dans une petite pièce, il y a un risque de formation de gaz combustibles. Il y a un risque d’incendie ou d’explosion. À titre indicatif, au moins 1 mètre cube d’espace
-AVERTISSEMENT:
dans la pièce est nécessaire pour 8
Le réfrigérant (R600a) utilisé dans le réfrigérateur et les gaz se trouvant dans le matériau isolant (cyclopentane)
sont inammables Ils nécessitent des procédures spéciques en cas de mise au rebut.
• Assurez-vous qu’aucun des tuyaux situés à l’arrière de l’appareil ne sont endommagés avant la mise au rebut. Une
fuite de réfrigérant ou de gaz pourrait provoquer un incendie ou une explosion.
Débranchez le réfrigérateur avant le nettoyage et l’entretien.
• Un manquement à cette consigne pourrait causer une décharge électrique.
Si une odeur de brûlé ou de la fumée émane du réfrigérateur, débranchez immédiatement la che électrique et contactez un centre de service après-vente agréé.
• Un manquement à cette consigne pourrait causer un incendie ou une décharge électrique.
Les orices d’aération situés à l’intérieur de l’appareil ou dans la structure intégrée ne doivent pas être obstrués.
• Sinon, cela pourrait causer un incendie ou une explosion car le réfrigérant ne peut pas se disperser s’il fuit.
RADIATION DEL
NE REGARDEZ PAS DIRECTEMENT AVEC DES INSTRUMENTS OPTIQUES UN PRODUIT DEL DE CLASSE 1M.
g de réfrigérant. La quantité de réfrigérant dans l’appareil est indiquée sur la plaque signalétique située à l’intérieur de l’appareil.
6060
ATTENTION
Indique un risque de blessures ou de dommages matériels.
Ne placez pas de bouteilles ou de récipients en verre dans le congélateur.
• Lorsque le contenu gèle, le verre peut se briser.
Ne touchez pas les parois internes du congélateur ni les produits stockés dans le congélateur avec les mains mouillées.
• Votre peau risque de geler contre les parois internes ou contre les produits stockés dans le congélateur.
Ne pas ouvrir ou fermer les portes en tenant les poignées des portes à deux mains.
• Cela pourrait occasionner des blessures corporelles.
En cas de coupure d’électricité, évitez d’ouvrir fréquemment le réfrigérateur ou d’y
placer des aliments non réfrigérés.
• Cela pourrait occasionner une hausse de température dans le réfrigérateur et gâcher les
aliments qui s’y trouvent.
Si le réfrigérateur reste inutilisé pendant longtemps, débranchez la che électrique de la prise secteur.
Faites également attention à l’espace entre les portes du réfrigérateur et du
congélateur, en particulier si deux portes sont ouvertes en même temps.
• Cela pourrait occasionner des blessures corporelles.
Lorsque vous ouvrez le réfrigérateur, veillez à ne pas vous pincer les doigts dans
une des “zones de pincement”. En particulier, lors de l’ouverture de la porte du
réfrigérateur, veillez à éviter les zones de pincement potentiel entre les portes du
congélateur.
• Cela peut occasionner des blessures corporelles.
Zones de pincement potentiel
Page 61

Installation
Cette section explique comment installer votre appareil pour qu’il fasse le moins de bruit possible et consomme le moins d’énergie possible.
Dimensions
NR-B29SG2/NR-B29SW2: L600 x P652 x H1898 (mm)
NR-B32SG2/NR-B32SW2: L600 x P652 x H2044 (mm)
Déballage de votre appareil
Retirez tous les emballages et toutes les bandes adhésives.
Choix de l’emplacement approprié
Ventilation
Sachant que l’appareil dégage de la chaleur pendant son utilisation, il doit
être installé dans une pièce bien ventilée et sèche, et un espace sufsant
doit être conservé autour de l’appareil, comme indiqué sur la Figure 1.
L’espace doit être plus important si un bruit de vibration est émis.
Température
La consommation d’énergie et l’efcacité de l’appareil, c.-à-d. la
quantité d’énergie qu’il utilise pour refroidir et congeler de la nourriture,
sont affectées par la température ambiante.
Pour des résultats optimums, votre réfrigérateur :
● ne doit pas être exposé à la lumière directe du soleil
● ne doit pas être installé à proximité de radiateurs, cuisinières ou
autres sources de chaleur
● doit uniquement être installé dans une pièce dont la température
ambiante correspond à la classe climatique dénie pour l’appareil.
Veuillez consulter la section des Caractéristiques pour connaître la
classe climatique de votre appareil.
Niveau
Installez l’appareil sur un sol bien horizontal et assez solide pour
supporter un réfrigérateur plein.
Corrigez les irrégularités du sol en agissant sur les deux pieds avant
ajustables comme indiqué dans la Figure 2.
Cela évitera les vibrations et le bruit.
Si l’appareil est placé sur une moquette ou un revêtement en vinyle,
posez d’abord une planche dure sur la moquette ou sur le revêtement.
Cela évitera une détérioration possible de la couleur due à la chaleur.
Porte du réfrigérateur
Il est possible de déplacer les charnières de la porte
du réfrigérateur de la droite vers la gauche an que
AVERTISSEMENT
la porte s’ouvre dans l’autre sens. Si cela est plus
commode dans votre maison, veuillez contacter notre
service après-vente énuméré sur la feuille jointe ou
accédez à notre site Web (http://panasonic.net).
Nous ne pourrions être tenus responsables si vous
remplaciez les charnières par vous-même.
Les pièces permettant de modier la direction
d’ouverture de la porte sont fournies dans l’emballage
de l’appareil.
20 mm
ou plus
150 mm ou plus
Figure 1
Figure 2
40 mm
ou plus
Français
61
61
Page 62

Installation (suite)
Mise en place des guides de maintien de la distance
Pour éviter que le condenseur (composant noir situé à l’arrière avec des
ailettes) ne touche la paroi, mettez en place deux guides de maintien de la
distance en les faisant pivoter de 90°.
Guides de maintien de la distance (accessoires)
Nettoyage
Après l’installation, nettoyez l’appareil en l’essuyant à l’eau tiède.
Branchement de la che d’alimentation électrique sur la prise électrique
Vous pouvez brancher la prise d’alimentation électrique immédiatement après l’installation.
Une fois l’appareil branché, tous les symboles apparaissent pendant un moment, puis les valeurs de démarrage apparaissent
à -18 °C sur l’afchage de la température du congélateur et à 4 °C sur l’afchage de la température du réfrigérateur.
Toutes les touches du panneau de commande sont tactiles. (Il suft d’appuyer dessus pour activer la touche que vous
souhaitez utiliser.)
Remarques :
• Le refroidissement peut prendre plus de temps en été ou à d’autres périodes où la température ambiante est élevée.
• Si vous avez besoin de débrancher le réfrigérateur, attendez au moins 10 minutes avant de le rebrancher. Vous pourriez
endommager le compresseur.
Température de la pièce
La classe climatique se trouve sur la plaque signalétique située sur le côté gauche du compartiment du réfrigérateur. Elle
indique les températures ambiantes sous lesquelles l’appareil peut être utilisé.
Classe climatique Température ambiante autorisée
SN (Tempérée élargie) +10 °C à 32 °C
N (Tempérée) +16 °C à 32 °C
ST (Subtropicale) +16 °C à 38 °C
T (Tropicale) +16 °C à 43 °C
Pour économiser de l’énergie
1. Installez le réfrigérateur dans un endroit sec, frais et bien ventilé. Plus la température ambiante est froide, meilleure est
l’efcacité. (Veuillez vous référer à la page 61 pour les dimensions et le dégagement.)
2. La combinaison des tiroirs et étagères qui fournit le plus grand volume et l’utilisation d’énergie la plus efciente pour le réfrigérateur.
• Retirez les deux tiroirs supérieurs du congélateur. (Laissez le tiroir inférieur du congélateur.)
• Attachez les tiroirs et les étagères aux positions illustrées dans la section des “Identication des pièces” (p.63).
• Le retrait du tiroir du compartiment de refroidissement améliore la circulation de l’air froid. Il est également possible
de stocker davantage d’aliments.
3. Réglez le mode Écran de veille.
4. Ne remplissez pas trop le réfrigérateur pour permettre à l’air de circuler.
5. Ouvrez les portes seulement si nécessaire et aussi brièvement que possible.
6. Nettoyez de temps en temps les orices d’aération au fond du réfrigérateur avec un aspirateur, etc.
(Faites attention de ne pas endommager le tuyau de réfrigérant à l’intérieur du couvercle.)
7. Une fois réglé en mode Super Freeze ou Super Cool, la consommation d’énergie augmente.
6262
Page 63

Identication des pièces
Le réfrigérateur illustré ci-dessous se réfère au modèle NR-B29SG2 et peut être légèrement différent du votre.
Compartiment du réfrigérateur
Vous pouvez régler la température
dans une plage comprise entre 2 °C
et 8 °C.
Plats cuisinés,
boissons,
œufs, gâteaux,
produits laitiers
Compartiment de refroidissement
La température est inférieure de 1 °C
à 2 °C à celle qui est réglée pour le
compartiment du réfrigérateur.
Pour connaître les détails sur
l’utilisation du compartiment de
refroidissement, veuillez vous référer
à la page 65.
Fromage,
beurre,
saucisses
Compartiment du congélateur
Vous pouvez régler la température
dans une plage comprise entre
-24 °C et -16 °C.
Viande
congelée,
volaille,
poisson, crème
glacée
5
1
2
3
4
6
7
8
9
:
;
Français
<
1Casier à vin* 52 plaques à glaçons 92 bacs à œufs
2Lampe à diode** 6Tiroirs du congélateur :Étagères de la porte**
3Bacs à légumes 7Garde-pied ;Étagères à bouteilles
4Tiroir du compartiment de refroidissement 8Pieds ajustables <Pièce coulissante
*La pièce suivante n’est pas fournie avec le modèle NR-B29SW2.
• Casier à vin
**Les pièces suivantes sont ajoutées aux modèles NR-B32SG2/NR-B32SW2.
• Étagère en verre
• Étagère de la porte
Remarque :
• Vous pouvez modier la position d’installation de la porte et des étagères à bouteilles. Soyez cependant vigilant, car les
aliments et les boissons pourraient tomber lors de l’ouverture et de la fermeture de la porte en fonction de la position
des étagères.
• Fermer la porte en laissant ouverts les tiroirs (bacs à légumes/compartiment de refroidissement/tiroirs du congélateur)
risque de casser les tiroirs.
63
63
Page 64

Panneau de commande
Zone d’afchage
1
Afchage de la température du réfrigérateur
1
2
3
Remarques :
• Ce réfrigérateur utilise un microprocesseur pour contrôler la température. La température à l’intérieur du réfrigérateur
varie en fonction de divers facteurs, comme la température ambiante, la fréquence d’ouverture et de fermeture des
portes, la quantité d’aliments stockés à l’intérieur et la manière dont ils sont stockés.
• La température réglée s’afche.
• Lorsque le mode Super Cool est activé, deux
4
5
6
repères
clignotent tour à tour.
2
Afchage de la température du congélateur
• La température réglée s’afche.
• Lorsque le mode Super Freeze est activé, deux
repères
clignotent tour à tour.
3
Afchage des fonctions
• Lorsque les modes Eco
réglés, des cercles viennent entourer les repères.
• Lorsque les fonctions Sécurité enfant
sont activées, les repères de ces fonctions
s’afchent.
Zone de commande
4
Touche de sélection du réfrigérateur
5
Touche de sélection du congélateur
6
Touche Mode
et Holiday sont
et Alarme
6464
Page 65

Réglage de la température
Compartiment du réfrigérateur
Au moment de l’achat, la température est réglée sur 4 °C.
1
Appuyez une fois sur (supérieur), puis une seconde fois à moins d’une seconde d’intervalle.
• Vous pouvez régler la température.
2
Appuyez à plusieurs reprises sur cette touche jusqu’à ce que vous ayez réglé la température de votre choix.
• Si vous n’effectuez aucune opération pendant 1 seconde au cours de la procédure de réglage, la
valeur de réglage clignote et un bip est émis, indiquant que la température est maintenant réglée.
Remarque :
• Si les modes Super Cool, Super Freeze, Eco ou Holiday se terminent ou sont annulés,
l’appareil revient aux réglages précédents.
Compartiment du congélateur
Au moment de l’achat, la température est réglée sur -18 °C.
1
Appuyez une fois sur (inférieur), puis une seconde fois à moins d’une seconde d’intervalle.
• Vous pouvez régler la température.
2
Appuyez à plusieurs reprises sur cette touche jusqu’à ce que vous ayez réglé la température de votre choix.
• Si vous n’effectuez aucune opération pendant 1 seconde au cours de la procédure de réglage, la
valeur de réglage clignote et un bip est émis, indiquant que la température est maintenant réglée.
Remarque :
• Si les modes Super Cool, Super Freeze, Eco ou Holiday se terminent ou sont annulés,
l’appareil revient aux réglages précédents.
Français
Compartiment de refroidissement
Vous pouvez régler la température du compartiment de refroidissement en ouvrant et en fermant la pièce coulissante se
trouvant à l’intérieur du compartiment.
Ouvert
Tournez la pièce coulissante sur la position d’ouverture an de régler la température du
compartiment à 1 ou 2 °C de moins que celle qui est réglée pour le compartiment du réfrigérateur,
puis faites fonctionner le compartiment en tant que compartiment de refroidissement.
Fermé
Tournez la pièce coulissante sur la position de fermeture an de régler la même
température que pour le compartiment du réfrigérateur, puis faites fonctionner le
compartiment en tant que compartiment du réfrigérateur.
• Tant que ce compartiment est utilisé comme compartiment à 0 °C, le stockage des aliments dans le compartiment de
refroidissement au lieu du compartiment du congélateur ou du réfrigérateur permet de conserver la fraîcheur et le goût
des aliments plus longtemps, tout en préservant leur aspect frais. Lorsque le tiroir du compartiment de refroidissement
se salit, retirez-le et lavez-le à l’eau. (L’eau gèle à 0 °C, mais les aliments contenant de l’eau ou du sucre gèlent à
une température inférieure). Le compartiment de refroidissement est généralement utilisé pour le poisson cru ou
légèrement fumé, le riz, etc.
• Tirez le tiroir du compartiment de refroidissement vers vous ; le couvercle s’ouvre automatiquement.
Remarque :
• Ne placez pas les aliments que vous souhaitez surgeler sur les plaques à glaçons pour faire de la glace.
65
65
Page 66

Utilisation des fonctions pratiques
Mode Super Freeze
Fonctionnalités :
• Dans ce mode, le congélateur peut être refroidi rapidement, ce qui permet de congeler les
aliments frais qui y sont placés.
• Le mode Super Freeze se termine automatiquement après 24 heures ou lorsque la
température du capteur du congélateur est inférieure à -32 °C.
Réglages :
1. Appuyez sur
2. Si vous n’effectuez aucune opération pendant 1 seconde au cours de la procédure de
réglage, « SF » clignote et un bip est émis, indiquant que le mode Super Freeze est réglé.
• Dans ce mode, « SF » s’afche et deux repères clignotent tour à tour.
• Pour désactiver ce mode, appuyez sur (inférieur).
Remarques :
• Pendant ce mode :
-En appuyant sur
régler la température de votre choix.
-Il est impossible de sélectionner les modes Eco et Holiday.
-Vous pouvez ajuster la température du réfrigérateur.
• L’effet sur les aliments stockés peut être réduit si vous activez le mode Super Freeze
plusieurs heures avant de ranger les aliments dans le compartiment du congélateur.
• L’alarme sonne 3 heures après que vous avez réglé le mode Super Freeze. Vous pouvez
ensuite ranger une petite quantité de nourriture.
• Les points suivants sont recommandés pour assurer la capacité de congélation maximale.
1
Réglez la température du congélateur à -24 °C et la température du réfrigérateur à
2 °C, 24 heures avant d’y ranger les aliments.
2
Activez le mode Super Freeze 10 heures avant de placer les aliments.
3
Si vous souhaitez stocker un grande quantité de nourriture, enlevez les deux tiroirs
supérieurs du congélateur et placez la nourriture directement sur l’étagère en verre ou
dans le tiroir inférieur du congélateur.
(La capacité de congélation peut être augmentée si les aliments sont placés
directement sur l’étagère en verre supérieure.)
• La capacité de congélation maximum en 24 heures est indiquée sur la plaque signalétique.
(inférieur) jusqu’à ce que « SF » s’afche.
(inférieur), vous annulez le mode de Super Freeze et vous pouvez
Mode Super Cool
Fonctionnalités :
• Dans ce mode, vous pouvez refroidir des aliments prêts à manger avant consommation,
vous pouvez refroidir et stocker une grande quantité de nourriture et refroidir rapidement
des boissons.
• Le mode Super Cool se termine automatiquement après 8 heures ou lorsque la
température du capteur du réfrigérateur est inférieure à 0 °C.
Réglages :
1. Appuyez sur
2. Si vous n’effectuez aucune opération pendant 1 seconde au cours de la procédure de
réglage, « SC » clignote et un bip est émis, indiquant que le mode Super Cool est réglé.
• Dans ce mode, « SC » s’afche et deux repères clignotent tour à tour.
• Pour désactiver ce mode, appuyez sur (supérieur).
Remarques :
• Dans ce mode :
-En appuyant sur
régler la température de votre choix.
-Il est impossible de sélectionner les modes Eco et Holiday.
-Vous pouvez ajuster la température du congélateur.
6666
(supérieur) jusqu’à ce que « SC » s’afche.
(supérieur), vous annulez le mode de Super Cool et vous pouvez
Page 67

Mode Eco
Fonctionnalités :
• Dans ce mode, l’unité de commande fait fonctionner le congélateur et le réfrigérateur de manière
économique.
• Dans ce mode, la température du réfrigérateur est automatiquement réglée sur 4 °C et
celle du congélateur sur -18 °C.
Réglages :
1. Appuyez à plusieurs reprises sur
2. Si vous n’effectuez aucune opération pendant 1 seconde au cours de la procédure de
réglage, le cercle entourant clignote et un bip est émis, indiquant que le mode Eco est
réglé.
• Dans ce mode, « E » apparaît sur l’affichage de la température du réfrigérateur/
congélateur et un cercle vient entourer .
• Pour désactiver ce mode, appuyez sur .
Remarques :
• Dans ce mode :
-Il est possible de régler le congélateur et le réfrigérateur. Le réglage est maintenu une fois
le mode Eco désactivé.
-Il est possible de sélectionner les modes Super Cool et Super Freeze. Le mode Eco est
automatiquement désactivé et le mode sélectionné est activé.
-Une fois le mode Eco désactivé, il est possible de sélectionner le mode Holiday et le
mode sélectionné est activé.
jusqu’à ce qu’un cercle vienne entourer .
Mode Holiday
Fonctionnalités :
• Activez ce mode si le réfrigérateur ne doit pas être utilisé pendant une période prolongée,
par exemple si vous partez longtemps en vacances.
• Dans ce mode, la température du réfrigérateur est automatiquement réglée sur 8 °C et
celle du congélateur sur -18 °C.
Réglages :
1. Appuyez à plusieurs reprises sur
2. Si vous n’effectuez aucune opération pendant 1 seconde au cours de la procédure de
réglage, le cercle entourant clignote et un bip est émis, indiquant que le mode Holiday
est réglé.
• « H » apparaît sur l’affichage de la température du congélateur. Aucune indication
n’apparaît sur l’affichage de la température du réfrigérateur.
• Dans ce mode, « H » apparaît sur l’affichage de la température du congélateur et un
cercle vient entourer .
Remarques :
• Avant d’utiliser ce mode, videz le réfrigérateur et fermez sa porte.
• Lorsque ce mode se termine, le réfrigérateur recommence à fonctionner avec les réglages
précédents.
-Il est possible de régler le congélateur et le réfrigérateur. Le réglage est maintenu une fois
le mode Holiday désactivé.
-Il est possible de sélectionner les modes Super Cool et Super Freeze. Le mode Holiday
est automatiquement désactivé et le mode sélectionné est activé.
-Une fois le mode Holiday désactivé, il est possible de sélectionner le mode Eco et le
mode sélectionné est activé.
jusqu’à ce qu’un cercle vienne entourer .
Français
67
67
Page 68

Utilisation des fonctions pratiques (suite)
Mode Drink Cool
Fonctionnalités :
• Vous pouvez rafraîchir rapidement des boissons dans le congélateur.
• Ce mode est doté d’une fonction de minuterie qui peut être congurée pour émettre un bip
lorsque que celle-ci atteint 5, 10, 15, 20, 25 ou 30 minutes.
• Retirez les bouteilles lorsque vous entendez le bip. Si vous laissez des bouteilles pendant
une période prolongée dans le congélateur, le contenu peut geler et les bouteilles se casser.
Réglages :
1. Appuyez sur la touche
2. « dc » apparaît sur l’afchage de la température du congélateur et « 05 » clignote sur
l’afchage de la température du réfrigérateur.
3. Appuyez sur
4. L’heure sélectionnée clignote à 3 reprises sur l’afchage et un bip est émis.
5. Un décompte par minutes commence à partir de l’heure dénie et le temps restant clignote sur l’afchage.
• Pour désactiver le mode Drink Cool, appuyez sur la touche
secondes.
• À l’heure définie, un bip est émis et les deux indications de l’affichage (exemple : « 00 » et
« dc ») clignotent jusqu’à ce que vous appuyiez sur
Remarques :
• Si vous utilisez ce mode, vériez régulièrement la température des bouteilles.
• Si les bouteilles sont sufsamment rafraîchies, retirez-les et du congélateur.
Mode Écran de veille
Fonctionnalités :
• En réglant ce mode, il est possible de désactiver le rétroéclairage de l’afchage an d’économiser l’énergie.
Réglages :
1. Appuyez sur pendant 3 secondes pour régler la fonction Écran de veille automatique.
2. Si vous n’effectuez aucune opération pendant 5 secondes et si aucune porte n’est
ouverte, le rétroéclairage de l’afchage est désactivé alors que tous les autres repères et
caractères restent sur l’afchage.
• Les modes et fonctions sélectionnés sont conservés.
• Pour désactiver la fonction Écran de veille automatique et laisser le rétroéclairage de
l’afchage allumé, appuyez sur
Remarques :
• Lorsque la fonction Écran de veille automatique est activée et le rétroéclairage de l’afchage
éteint pendant un moment, le rétroéclairage de l’afchage se rallume et les fonctions réglées
sont indiquées si vous n’appuyez sur aucune touche et n’ouvrez aucune porte.
• Lorsque l’Écran de veille et la Sécurité enfant sont activés, l’Écran de veille est activé. Par conséquent, bien que les deux
fonctions soient activées, le rétroéclairage de l’afchage se rallume si vous appuyez sur une touche et ouvrez une porte.
(inférieur) pendant 5 secondes.
(supérieur) pour régler l’heure (05-10-15-20-25-30 minutes).
(inférieur) pendant 5
(inférieur).
pendant 3 secondes.
Fonction Sécurité enfant
Fonctionnalités :
• Le réglage de la Sécurité enfant peut empêcher les enfants de modier les réglages
lorsqu’ils jouent avec les touches.
Réglages :
1. Appuyez sur
enfant.
• Lorsque la Sécurité enfant est sélectionnée,
• Pour désactiver ce mode, appuyez sur (supérieur) et (inférieur) pendant 5 secondes.
Vous ne pouvez pas modier le mode actuellement sélectionné avant de désactiver la
Sécurité enfant.
Remarques :
• Si l’électricité est coupée ou la prise électrique débranchée, la Sécurité enfant est
désactivée.
6868
(supérieur) et (inférieur) pendant 5 secondes pour régler la Sécurité
est allumé.
Page 69

Fonctions d’avertissement utilisateur
Les fonctions d’alerte utilisateur sont activées dans les situations suivantes.
Situation Détails Alarme
Le mode s’arrête.
Porte entrouverte.
• L’heure réglée a été atteinte en mode Drink Cool.
• La porte du réfrigérateur et/ou du congélateur
est entrouverte depuis plus de 2 minutes.
Émet un bip continu
Sonne toutes les 5
secondes
Production de glaçons
Comment arrêter l'alarme
Appuyez sur
Fermez la ou les portes.
.
Ouvrez le congélateur, tirez le tiroir du haut et retirez la plaque à
glaçons du plafond. Remplissez d’eau la plaque à glaçons jusqu’au
repère et remettez-la en place.
Lorsque les glaçons sont prêts, tirez le tiroir du haut et retirez la plaque à
glaçons. Tordez légèrement la plaque en la tenant par les deux extrémités
pour faire tomber les glaçons de la plaque à glaçons. Ensuite, remettez la
plaque à glaçons en place.
Retrait et xation des étagères
Réfrigérateur
Étagères en verre
Soulevez légèrement la partie centrale de l’étagère et tirez-la vers l’extérieur.
Avant de retirer les étagères en verre, retirez les étagères de la porte
et à bouteilles en premier lieu si elles se trouvent dans le passage.
Pour retirez la tablette en verre, ouvrez la porte jusqu’à ce qu’elle
touche la butée.
Bacs à légumes
Tirez les bacs à légumes vers vous et sortez-le.
Étagères de la porte et étagères à bouteilles
Soulevez-la légèrement puis retirez-la.
Tiroir du compartiment de refroidissement
Pour sortir le tiroir, maintenez sa partie avant et soulevez-le en
diagonale, puis retirez-le.
Repère de niveau d’eau
Français
Congélateur
Tirez le tiroir vers vous, soulevez légèrement
sa partie avant et tirez-le à l’extérieur.
Après avoir retiré le tiroir, vous pouvez stocker
des aliments dans le compartiment vide.
69
69
Page 70

Consignes d’entretien et de nettoyage
Nettoyage quotidien
Essuyez les pièces avec un chiffon sec.
Endroits qui se salissent facilement :
Joint d’ouverture de porte
En se salissant, le joint s’abîme facilement et une fuite
d’air froid est très probable.
Étagère à bouteilles
Si de la saleté et du liquide sont accumulés, essuyez
immédiatement.
Tous les ans, débranchez la che d’alimentation et retirez les étagères pour
effectuer un nettoyage minutieux.
Pièces qui peuvent être nettoyées avec de l’eau
Réfrigérateur Congélateur
● Étagères en verre
● Clayettes de porte
● Étagères à bouteilles
● Bacs à œufs
● Bacs à légumes
● Tiroir du compartiment de
refroidissement
● Tiroirs du congélateur
● Plaques à glaçons
Remarque :
• N’utilisez pas de produits de nettoyage abrasifs
tels que le bicarbonate de soude. Cela pourrait
endommager le plastique.
Nettoyage du panneau de commande
Le panneau de commande du réfrigérateur est fabriqué avec des matériaux spéciaux. Pour protéger la surface des dommages,
ne le nettoyez pas avec un solvant chimique. Au lieu de cela, essuyez-le avec un chiffon doux sec ou légèrement humidié.
Nettoyage de l’extérieur du réfrigérateur
Nettoyez la partie externe de l’appareil à l’aide d’un chiffon doux humidié à l’eau chaude. Si certaines taches résistent,
appliquez un produit de nettoyage de cuisine neutre puis essuyez avec un chiffon doux humidié à l’eau chaude. Essuyez
toute trace d’eau à l’aide d’un chiffon sec.
Remarques concernant le nettoyage
Aucune des substances suivantes ne doit être utilisée pour le nettoyage de l’appareil :
● Produit de lavage alcalin, de telles substances peuvent faire craqueler les parties en plastique.
●
Détergent pulvérisé, poudre de savon, huile fossile, eau chaude, brosse de cuisine, acide, benzène, diluants ou
solutions base d’alcool, etc. Ces substances pourraient endommager les peintures de surface et les parties en plastique.
Veillez à éliminez toute tache d’huile domestique. Cela pourrait également endommager les pièces en plastique.
7070
Page 71

Vérications d’usage
● Le cordon d’alimentation est-il endommagé ?
● La che électrique devient-elle chaude ?
AVERTISSEMENT
● La che électrique est-elle complètement insérée dans la prise ?
Si le cordon d’alimentation ou le voyant DEL est endommagé, consultez un centre d’assistance
agréé. N’ESSAYEZ PAS de remplacer ces éléments vous-même.
Non utilisation prolongée
S’il est prévu une longue période de non-utilisation de l’appareil, débranchez la che électrique,
effectuez un nettoyage comme décrit ci-dessus. Laissez la porte ouverte pendant 2 ou 3 jours. Cela
ATTENTION
permet à l’intérieur de sécher évite la formation de moisissures et de mauvaises odeurs.
De façon générale, n’éteignez pas le réfrigérateur. Sa durée de vie pourrait en être affectée.
Avant de déplacer ou de transporter le réfrigérateur
① Retirez tous les aliments.
② Débranchez-le.
③ Soulevez le pied ajustable.
④ Tirez le réfrigérateur vers vous.
⑤ Par exemple, utilisez un chiffon pour absorber l’eau du plateau
d’évaporation.
Déplacement et transport du réfrigérateur
Le transport de l’appareil nécessite au moins deux personnes.
① Vissez les pieds ajustables à fond.
② Maintenez le pied ajustable dune main et les coins de
l’autre, comme décrit.
Remarque :
• Ne portez pas l’appareil en le tenant par ses portes.
Ne transportez jamais le réfrigérateur en position couchée.
Français
(Partie inférieure, à l’arrière de l’appareil)
Sécurisez les portes
avec du ruban adhésif
71
71
Page 72

Dépannage
Votre réfrigérateur vous avertit si les températures du réfrigérateur et du congélateur sont à des niveaux incorrects ou
lorsque l’appareil rencontre un problème. Les codes d’avertissement apparaissent sur l’afchage de la température du
réfrigérateur/congélateur.
Codes
d’avertissement
Sr Échec/Avertissement Le processus de refroidissement ou une ou plusieurs pièces sont en panne.
LF Le compartiment du
LC Le compartiment du
LF et LC Pas assez froid. Il s’agit de la combinaison des types d’erreur LF et LC.
HC Le compartiment du
LOPO Basse tension Lorsque l’alimentation devient inférieure à 170 V, l’appareil arrive en
Signication Détails et contre-mesures
• Appelez dès que possible le service d’assistance.
congélateur n’est pas
assez froid.
réfrigérateur n’est pas
assez froid.
réfrigérateur est trop
froid.
Cette précaution doit être prise en particulier après une coupure de courant
prolongée.
1. Ne congelez pas les aliments décongelés et consommez-les rapidement.
2. Réglez la température du congélateur à une valeur inférieure ou
sélectionnez le mode Super Freeze jusqu’à ce que le compartiment
retrouve sa température normale.
3. N’y rangez pas d’aliments frais avant d’avoir réglé cette panne.
La température idéale du compartiment du réfrigérateur est de +4°C. Si
vous voyez cet avertissement, vos aliments risquent de se gâter.
1. Réglez la température du réfrigérateur à une valeur inférieure ou
sélectionnez le mode Super Cool jusqu’à ce que le compartiment
retrouve sa température normale.
2. N’ouvrez pas trop souvent la porte avant d’avoir réglé cette panne.
• Vous observerez cette panne en démarrant l’appareil pour la première
fois. Celle-ci sera réglée lorsque les compartiments auront retrouvé leur
température normale.
Les aliments commencent à se congeler en raison de la température trop
basse.
1. Vériez si le mode Super Cool est activé.
2. Baissez la valeur de la température du réfrigérateur.
position stable.
• Il ne s’agit pas d’une panne. Cela évite tout dommage au compresseur.
Cet avertissement est désactivé lorsque la tension a atteint le niveau
requis.
7272
Page 73

Foire aux questions
Si vous avez l’impression que votre réfrigérateur ne fonctionne pas correctement, vériez tout d’abord les points suivants.
Si le problème persiste, débranchez la che d’alimentation électrique et contactez votre revendeur ou un centre de service
après-vente agréé.
Général
Le réfrigérateur émet des bruits
inhabituels.
Vous entendez un son après
la mise hors service du
compresseur.
Vous entendez un son après avoir
ouvert ou fermé la porte.
Vous entendez un son d’air ou d’eau
qui coule après avoir ouvert la porte.
Vous entendez un bruit de
ventilation important en continu.
Le compresseur est assez
bruyant.
Le compresseur fonctionne
pendant longtemps.
De la condensation se forme sur
l’extérieur du réfrigérateur.
L’extérieur du réfrigérateur est
chaud au toucher.
Les commandes du panneau de
commande n’ont aucun effet.
L’alarme sonne. • La porte du réfrigérateur et/ou du congélateur est entrouverte. Fermez les
Le voyant DEL ne s’allume pas. • Le mode Holiday a-t-il été réglé ?
• Le réfrigérateur est-t-il bien installé sur un sol solide et plat ?
• Y a-t-il sufsamment d’espace tout autour du réfrigérateur ?
• Y a-t-il quelque chose qui vibre au sommet du réfrigérateur ?
• C’est normal d’entendre certains bruits quand le réfrigérateur se met en
marche ou s’arrête.
• Ceci est normal et c’est souvent dû au réfrigérant coulant en sens inverse vers
le compresseur.
• Ceci est normal et c’est dû à la différence de pression d’air entre l’intérieur et
l’extérieur du réfrigérateur.
• Ceci est dû au réfrigérant coulant dans les conduites internes.
• Ce son se fait entendre quand le ventilateur de circulation d’air froid est en marche.
• Avez-vous stocké beaucoup d’aliments ou la température de la pièce est-elle élevée ?
Dans des situations de ce type, le ventilateur de circulation d’air froid tourne
très vite et produit un bruit élevé.
• Avez-vous stocké beaucoup d’aliments ou la température de la pièce est-elle élevée ?
Dans de tels cas, le compresseur tourne très vite et c’est normal qu’il devienne
plus bruyant.
• Quand la che d’alimentation électrique est branchée pour la première fois, le
compresseur fonctionne plus longtemps que la normale pour refroidir l’intérieur
du réfrigérateur, jusqu’à ce que les températures choisies soient atteintes.
• Le mode Super Freeze ou Super Cool est-il réglé ?
• Les portes ont-elles été fréquemment ouvertes et fermées ? Les portes sontelles bien fermées ?
• Avez-vous stocké beaucoup d’aliments ou la température de la pièce est-elle élevée ?
• Quand beaucoup d’aliments sont placés dans le réfrigérateur en une fois, le
compresseur doit fonctionner plus longtemps.
• De la condensation peut se former si la pièce est très humide, et c’est normal.
Essuyez-la avec un chiffon sec.
• Après avoir mis en service le réfrigérateur, celui-ci peut devenir chaud jusqu’à
ce que l’intérieur du compartiment soit sufsamment refroidi. Le réfrigérateur
peut devenir chaud même une fois les compartiments refroidis. Ceci est dû au
fonctionnement du tuyau de rayonnement thermique équipé sur le réfrigérateur
an d’empêcher la condensation. Ce n’est pas défaut de fonctionnement.
• Le réfrigérateur est-il bien sous tension ?
portes.
En mode Holiday, le voyant DEL du réfrigérateur ne s’allume pas.
• Le réfrigérateur est-il sous tension ?
• Si vous devez changer de DEL, contactez votre revendeur ou un centre
d’assistance agréé.
Français
73
73
Page 74

Foire aux questions (suite)
Réfrigérateur et congélateur
Le réfrigérateur ne refroidit pas (et
le congélateur ne congèle pas).
Le réfrigérateur ne refroidit pas (et
le congélateur ne congèle pas) de
manière satisfaisante.
Il y a une différence entre
la température choisie et la
température réelle.
Des aliments gèlent dans le
réfrigérateur.
De la condensation se forme dans
le réfrigérateur et les tiroirs.
La porte du congélateur est dure
à ouvrir.
Il y a une odeur à l’intérieur du
réfrigérateur.
• Le réfrigérateur est-il bien sous tension ?
• La température est-elle réglée trop haut ?
• Le réfrigérateur est-il exposé directement aux rayons du soleils ou placé près
d’un appareil de chauffage ?
• Y a-t-il sufsamment d’espace tout autour du réfrigérateur ?
• Avez-vous stocké beaucoup d’aliments ou la température de la pièce est-elle
élevée ?
• Les portes ont-elles été fréquemment ouvertes et fermées ?
Les portes sont-elles bien fermées ?
• Le réfrigérateur est-il en mode Holiday ?
• Si des aliments chauds sont placés dans le réfrigérateur, la température monte
temporairement.
• Pendant la saison froide ou quand la température ambiante est basse, on peut
avoir l’impression que le réfrigérateur ne refroidit pas.
• Si des aliments chauds sont placés dans le réfrigérateur, la température monte
temporairement.
• La température du réfrigérateur est-elle réglée trop bas ?
• Les aliments ont-il été placés vers l’arrière du réfrigérateur ?
La zone située près de la paroi postérieure est la plus froide, et il vaut mieux
éviter d’y placer des aliments qui pourraient geler facilement.
• De la condensation peut se former si la porte est ouverte et fermée
fréquemment, ou si la porte n’est pas bien fermée ou si l’humidité de la pièce
est élevée. Essuyez la condensation à l’aide d’un chiffon sec.
• Il est parfois difcile d’ouvrir la porte juste après qu’elle a été fermée.
• La différence de pression d’air entre l’intérieur et l’extérieur du congélateur
peut parfois rendre la porte dure à ouvrir. Attendez un moment, puis essayez
d’ouvrir la porte.
• Les aliments qui sentent fort sont-ils bien fermés hermétiquement avant d’être
placés dans le réfrigérateur ?
Placez les produits à l’intérieur d’un conteneur étanche et stockez-les.
• Des odeurs peuvent coller aux surfaces internes du réfrigérateur. Essuyez les
surfaces à l’aide d’un chiffon doux trempé dans de l’eau tiède.
7474
Page 75

Caractéristiques
Fiche produit (Reglementation UE 1060/2010)
NOM DE LA MARQUE Panasonic
RÉFÉRENCE DU MODÈLE
CATÉGORIE 7 (Réfrigérateur-congélateur)
CLASSE D’EFFICACITÉ ÉNERGÉTIQUE A++
CONSOMMATION D’ÉNERGIE ANNUELLE 240 kWh/an
VOLUME UTILE DU RÉFRIGÉRATEUR 189 L 224 L
VOLUME UTILE DU BAC FRAÎCHEUR 28 L
VOLUME UTILE DU CONGÉLATEUR 72 L
NOMBRE D’ÉTOILES Quatre étoiles
MENTION «SANS GIVRE» POUR LES
COMPARTIMENTS CORRESPONDANTS
DURÉE DE MONTÉE EN TEMPÉRATURE 18 heures
POUVOIR DE CONGÉLATION 12 kg/24 heures
CLASSE CLIMATIQUE T
ÉMISSIONS ACOUSTIQUES DANS L’AIR 42 dB
Autres informations
VOLUME BRUT TOTAL 332 L 367 L
VOLUME TOTAL NET 289 L 324 L
DIMENSIONS EXTÉRIEURES
LARGEUR x PROFONDEUR x HAUTEUR
POIDS NET 77 kg 80 kg
TENSION NOMINALE 220 V - 240 V
FRÉQUENCE NOMINALE 50 Hz
RÉFRIGÉRANT/CHARGE R600a/55 g R600a/60 g
AGENT DE SOUFFLAGE Cyclopentane
Remarques :
*1
La consommation d’énergie annuelle est basée sur les résultats du test standard pendant 24 heures.
La consommation d’énergie réelle varie selon la façon dont l’appareil est utilisé et où il est localisé.
*2
Température ambiante autorisée : 16 °C à 43 °C
Avec les portes entièrement ouvertes
NR-B29SG2-SE
NR-B29SG2-SF
NR-B29SG2-SB
Réfrigérateur: Sans givre / Bac fraîcheur: Sans givre / Congélateur: Sans givre
600 mm x 652 mm x 1898 mm 600 mm x 652 mm x 2044 mm
NR-B29SW2-WE
NR-B29SW2-WF
NR-B29SW2-WB
*1
NR-B32SG2-SE
NR-B32SG2-SF
NR-B32SG2-SB
250 kWh/an
*2
NR-B32SW2-WE
NR-B32SW2-WF
NR-B32SW2-WB
*1
Français
120 º
299 mm
1122 mm
75
75
Page 76

Indice
Rispetto dell’ambiente ................................................. 76
Istruzioni di sicurezza .................................................. 77
Installazione ..................................................................79
Parti ................................................................................ 81
Pannello comandi ......................................................... 82
Impostazione della temperatura .................................. 83
Uso delle funzioni utili .................................................84
Rispetto dell’ambiente
Smaltimento del materiale di confezionamento
Riciclare tutto il materiale possibile (ad es. cartone, buste di plastica, nastro adesivo e polistirolo) e
accertarsi di smaltire in modo sicuro il resto del materiale di confezionamento.
Tenere il materiale di confezionamento lontano dalla portata di neonati e bambini per evitare infortuni o soffocamento.
Informazioni sullo smaltimento per utenti di apparecchiature elettriche ed
elettroniche usate (apparecchiature domestiche)
Questo simbolo riportato sui prodotti e/o nella documentazione di accompagnamento indica che i prodotti
elettrici ed elettronici usati non devono essere mescolati ai riuti domestici generici.
Per un corretto recupero, trattamento e riciclaggio, portare questi prodotti nei punti di raccolta designati,
dove verranno accettati gratuitamente. In alternativa, in alcuni paesi è possibile restituire i prodotti al
rivenditore locale al momento dell’acquisto di un nuovo prodotto equivalente.
Uno smaltimento corretto di questo prodotto contribuirà a far risparmiare preziose risorse e ad evitare potenziali
effetti negativi sulla salute umana e sull’ambiente che potrebbero essere causati, altrimenti, da uno smaltimento
inappropriato. Contattare l’autorità locale per ulteriori dettagli sul punto di raccolta designato più vicino.
In caso di smaltimento errato di questo materiale di scarto, potrebbero venire applicate delle sanzioni in
base alle leggi nazionali.
Per gli utenti aziendali nell’Unione Europea
Qualora si desideri smaltire apparecchiature elettriche ed elettroniche, contattare il proprio rivenditore o
fornitore per ulteriori informazioni.
Informazioni sullo smaltimento in paesi al di fuori dell’Unione Europea
Questo simbolo è valido solo nell’Unione Europea.
Qualora si desideri smaltire questo prodotto, contattare le autorità locali o il rivenditore e chiedere
informazioni sul metodo corretto di smaltimento.
Prima di smaltire il vecchio apparecchio
Seguire le istruzioni per lo smaltimento fornite dal produttore del vecchio apparecchio o le normative locali
per lo smaltimento degli elettrodomestici. Se non disponibili, seguire i tre passaggi illustrati di seguito.
1. Rimuovere la spina dalla presa elettrica.
2. Tagliare il cavo di alimentazione e smaltirlo correttamente con la spina attaccata.
3. Fino alla raccolta del vecchio apparecchio, o alla consegna presso un centro di recupero, tenere
l’apparecchio lontano dalla portata dei bambini.
● Rimuovere tutti i sigilli dalla porta e lasciare tutti i ripiani e i cassetti in posizione.
In questo modo, i bambini hanno meno probabilità di arrampicarsi all’interno e restare
intrappolati.
Questo elettrodomestico è stato progettato per uso interno, in ambienti come:
• cucine di ristoranti, ufci e altri ambienti lavorativi;
• agriturismi e camere d’albergo, motel e altri ambienti di tipo residenziale;
• bed and breakfast e simili;
• catering e altri ambienti per la vendita all’ingrosso.
Funzioni di avviso all’utilizzatore ................................ 87
Produzione di cubetti di ghiaccio ...............................87
Rimozione e installazione dei ripiani .......................... 87
Istruzioni per la cura e la pulizia .................................88
Risoluzione dei problemi .............................................90
Domandi frequenti ........................................................ 91
Speciche tecniche ......................................................93
7676
Page 77

Signicato dei simboli:
Non eseguire questa operazione
Eseguire sempre questa operazione Non smontare
Indica il rischio di infortuni gravi o morte.
L’apparecchio non è destinato ad essere utilizzato da persone (bambini inclusi) con capacità siche, sensoriali o mentali
AVVERTENZE
-AVVERTENZE:
-AVVERTENZE:
-AVVERTENZE:
ridotte, o con esperienza e competenze insufcienti, se non dietro sorveglianza e istruzioni di un soggetto responsabile
della loro incolumità.
I bambini devono sempre essere sorvegliati per evitare che giochino con l’apparecchio.
Non utilizzare adattatori per presa multipli e non collegare più apparecchi allo stesso adattatore per presa.
• In caso contrario, possono vericarsi surriscaldamento, incendi o cortocircuiti.
Non stringere, annodare o piegare il cavo di alimentazione e non appoggiarvi oggetti pesanti.
• Queste operazioni aumentano il rischio di incendi o scosse elettriche. Se il cavo di alimentazione o la spina sono
danneggiati, farli sostituire dal produttore, da un rappresentante autorizzato o da un tecnico qualicato per evitare pericoli.
Non scollegare il frigorifero tirando il cavo di alimentazione.
• Questa operazione può danneggiare il cavo di alimentazione. Impugnare sempre la spina ed estrarla con decisione
dalla presa elettrica.
Non appoggiare contenitori d’acqua sul frigorifero.
• L’acqua può danneggiare l’isolamento dei componenti elettrici e causare cortocircuiti, incendi o scosse elettriche.
Non spruzzare gas inammabili vicino al frigorifero.
• Ciò può causare esplosioni o incendi.
Non spruzzare acqua all’interno o all’esterno del frigorifero.
• In caso contrario, potrebbero vericarsi incendi o scosse elettriche.
Non toccare la spina di alimentazione con le mani bagnate.
• In caso contrario, potrebbero vericarsi scosse elettriche.
Non installare il frigorifero in luoghi umidi o dove possa entrare a contatto con l’acqua.
• Se l’isolamento delle parti elettriche è deteriorato, possono vericarsi cortocircuiti, scosse elettriche o incendi.
Non conservare sostanze volatili o inammabili nel frigorifero.
• Le sostanze inammabili come il benzene, i solventi, l’alcol, l’etere e il gas di petrolio liquefatto (GPL) possono
causare esplosioni.
Non conservare prodotti farmaceutici o sensibili alla temperatura nel frigorifero.
• I prodotti che richiedono un attento controllo della temperatura non devono essere conservati in frigorifero.
Non permettere ai bambini di arrampicarsi, dondolarsi o appendersi alla porta del frigorifero.
• In caso contrario, possono vericarsi infortuni gravi e danni al frigorifero.
Non utilizzare il frigorifero in presenza di fumi esplosivi o gas inammabili.
• Ciò può causare esplosioni o incendi.
Non conservare benzina o altri vapori e liquidi inammabili nel frigorifero e non utilizzarli in prossimità dell’apparecchio.
• Ciò può causare esplosioni o incendi.
Non utilizzare dispositivi meccanici o strumenti diversi da quelli consigliati dal produttore per accelerare lo sbrinamento.
• Tali operazioni potrebbero danneggiare l’interno del frigorifero o causare esplosioni.
All’interno degli scomparti per la conservazione degli alimenti, non usare apparecchi elettrici diversi da quelli
del tipo consigliato dal produttore.
• Ciò può causare esplosioni o incendi.
Non danneggiare il circuito refrigerante.
• Ciò può causare esplosioni o incendi.
Non provare a smontare, riparare o modicare da soli il frigorifero.
• Tali operazioni possono provocare infortuni, ustioni e scosse elettriche a sé stessi o ad altre persone e danneggiare il
frigorifero. Se l’apparecchio necessita di modiche o riparazioni, consultare un centro assistenza autorizzato.
Istruzioni di sicurezza
Indica che l’apparecchio deve essere provvisto di
messa a terra per evitare scosse elettriche
Italiano
77
77
Page 78

Istruzioni di sicurezza (continua)
Vericare che il frigorifero sia collegato a una presa elettrica dotata di messa a terra. NON collegarlo a una
presa elettrica priva di messa a terra.
• Un cortocircuitopotrebbe causare la scossa elettrica.
Vericare che la spina e il cavo di alimentazione non siano schiacciati o danneggiati.
• Un cavo di alimentazione o una spina danneggiati possono causare cortocircuiti, incendi o scosse elettriche.
• Se il cavo di alimentazione è danneggiato, farlo sostituire dal produttore, da un rappresentante autorizzato o da un
tecnico qualicato per evitare pericoli.
• NON TENTARE DI SOSTITUIRLO DA SOLI.
Rimuovere eventuale sporcizia o polvere dagli spinotti di alimentazione prima di collegare l’apparecchio alla presa elettrica.
• Gli accumuli di polvere sulla spina possono impedire l’isolamento, soprattutto in condizioni di umidità. In caso contrario, potrebbero vericarsi
cortocircuiti, incendi o scosse elettriche. Scollegare il cavo di alimentazione e pulirlo con un panno asciutto. Non usare mai un panno bagnato o umido.
Collegare l’apparecchio alla presa elettrica, vericando che il collegamento sia sicuro.
• Una spina di alimentazione collegata scorrettamente può causare incendi o scosse elettriche.
Installare il frigorifero in un’area ben ventilata.
• A un quantitativo maggiore di refrigerante nell’apparecchio, deve corrispondere uno spazio più ampio in cui collocare il frigorifero. In
caso di perdite di refrigerante, e se l’apparecchio si trova in uno spazio ristretto, l’accumulo di gas combustibili potrebbe vericarsi con
maggiore probabilità. Ciò può causare esplosioni o incendi. Di norma, per ogni 8 g di refrigerante, è necessario almeno 1 metro cubo di
spazio nel locale. Il quantitativo di refrigerante contenuto nell’apparecchio è indicato sulla targhetta dei dati che si trova al suo interno.
Il refrigerante utilizzato nel frigorifero (R600a) e i gas del materiale isolante (ciclopentano) sono inammabili e
richiedono procedure di smaltimento speciali.
• Prima di smaltire l’apparecchio, vericare che i tubi sul retro non siano danneggiati. Eventuali perdite di refrigerante o
gas possono causare incendi o esplosioni.
Scollegare il frigorifero prima della pulizia e della manutenzione.
• In caso contrario, potrebbero vericarsi scosse elettriche.
Se si avverte odore di bruciato o il frigorifero emette fumo, scollegare immediatamente la spina di alimentazione
e consultare un centro assistenza autorizzato.
• In caso contrario potrebbero vericarsi incendi o scosse elettriche.
-AVVERTENZE:
Mantenere le aperture di ventilazione della supercie esterna o della struttura interna dell’apparecchio prive di ostruzioni.
• In caso contrario potrebbero vericarsi incendi o esplosioni perchéil refrigerante non si può disperdere in caso di perdite.
RADIAZIONI LED
NON GUARDARE DIRETTAMENTE CON STRUMENTI OTTICI. PRODOTTO A LED CLASSE 1M.
7878
ATTENZIONE
Indica il rischio di lesioni o danni a oggetti.
Non inserire bottiglie o contenitori di vetro nel congelatore.
• Ghiacciandosi, il contenuto potrebbe rompere il vetro.
Non toccare le pareti interne del congelatore o gli alimenti al suo interno con le mani bagnate.
• La pelle potrebbe congelarsi e aderire alle pareti interne o agli alimenti.
Non aprire o chiudere le porte impugnando le maniglie con entrambe le mani.
• In caso contrario, potrebbero vericarsi infortuni.
In caso di interruzione della corrente, non aprire frequentemente il frigorifero e non
inserirvi nuovi alimenti.
• Tali operazioni potrebbero causare l’aumento della temperatura all’interno del frigorifero e il
deterioramento degli alimenti in esso conservati.
Se il frigorifero non deve essere utilizzato per un lungo periodo, scollegarlo dalla rete elettrica.
Inoltre, prestare attenzione allo spazio tra le porte del frigorifero e del congelatore,
soprattutto se vengono aperte contemporaneamente.
• In caso contrario, potrebbero vericarsi infortuni.
Aprendo il frigorifero, prestare attenzione a non schiacciarsi le dita nei punti che
possono provocare lesioni "da compressione". In particolare, aprendo la porta del
frigorifero, prestare attenzione al potenziale punto di compressione tra le porte del
frigorifero e del congelatore.
• In caso contrario, potrebbero vericarsi infortuni.
Potenziali punti di compressione
Page 79

Installazione
Questo paragrafo fornisce spiegazioni su come installare l’apparecchio in modo da ridurre il rumore e ottenere un funzionamento ad energia ottimizzata.
Dimensioni
NR-B29SG2/NR-B29SW2: Larghezza600 x Profondità652 x
Altezza1898 (mm)
NR-B32SG2/NR-B32SW2: Larghezza600 x Profondità652 x
Altezza2044 (mm)
Apertura delle confezione dell’apparecchio
Rimuovere tutte le protezioni e il nastro adesivo dalla confezione
dell’apparecchio.
Scegliere il luogo giusto in cui posizionarlo
Ventilazione
Poiché durante il funzionamento l’apparecchio disperde calore, è opportuno
installarlo in una stanza asciutta e ben ventilata con uno spazio sufciente nella
parte superiore e posteriore dell’apparecchio stesso come mostrato nella gura 1.
Lo spazio di apertura dovrebbe essere maggiore se si percepiscono
rumori da vibrazione.
Temperatura
La temperatura dell’ambiente inuisce sul consumo di energia e sulle
prestazioni del frigorifero, ad es. sulla quantità di elettricità utilizzata
per raffreddare o congelare gli alimenti.
Per ottenere i risultati migliori, l’apparecchio non deve pertanto:
● essere esposto direttamente alla luce del sole
● essere installato vicino a radiatori, fornelli o altre fonti di calore
● essere installato in un luogo in cui la temperatura ambiente non
corrisponda alla classicazione climatica per la quale l’apparecchio
è stato progettato. Per la classicazione climatica dell’apparecchio,
fare riferimento al paragrafo sulle Speciche tecniche.
Livello
Installare su un pavimento a livello e sufcientemente resistente per
supportare un frigorifero alla sua massima capienza.
Livellare le irregolarità del pavimento regolando con il cacciavite i due
piedini anteriori del frigorifero, come mostrato nella gura 2.
Ciò eviterà vibrazioni e rumore.
Se l’apparecchio deve essere posizionato sulla moquette o su un
pavimento in vinile, sistemare una tavola solida su questi ultimi prima
di procedere all’installazione del frigorifero. Ciò eviterà scolorimenti del
pavimento dovuti al calore emesso dall’apparecchio.
Porta del frigorifero
La posizione dei cardini della porta del frigorifero può
essere invertita da destra a sinistra, in modo che le porte di
AVVERTENZE
aprano nella direzione opposta. Se tale modica fosse più
adatta alle esigenze dell’ambiente in cui verrà posizionato
l’apparecchio, contattare il nostro centro assistenza
indicato nell’opuscolo allegato, o visitare il nostro sito web
(http://panasonic.net).
Non ci assumiamo alcuna responsabilità nel caso in cui i
cardini vengano invertiti personalmente dall’utente.
Le parti necessarie per invertire la direzione dell’apertura
della porta sono comprese nella confezione dell’unità.
20 mm
o più
150 mm o più
Figura 1
Figura 2
40 mm
o più
Italiano
79
79
Page 80

Installazione (continua)
Installazione delle guide di distanza
Per evitare che il condensatore (il componente posteriore nero con alette)
venga a contatto con la parete, applicare due guide di distanza di plastica
ruotate di 90°.
Pulizia
Dopo l’installazione, pulire l’appareccho con acqua calda.
Guide di distanza (accessori)
Collegamento della spina di alimentazione alla presa elettrica
È possibile collegare la spina subito dopo l’installazione.
Dopo aver collegato l’apparecchio, tutti i simboli compaiono per un momento, quindi vengono visualizzati i valori di avvio
-18 °C sul display della temperatura del congelatore e 4 °C sul display della temperatura del frigorifero.
Tutti i tasti sul pannello di controllo si attivano con un tocco (basta premere per attivare il pulsante che si desidera mettere
in funzione).
Note:
• Per il processo di raffreddamento potrebbero essere necessari tempi più lunghi durante i mesi estivi o quando la
temperatura ambiente è più elevata.
• Se occorre scollegare il frigorifero dalla presa elettrica, attendere almeno 10 minuti prima di ricollegarlo. In caso
contrario, il compressore potrebbe danneggiarsi.
Temperatura ambiente della stanza
La classe climatica è riportata sulla targhetta dei dati di potenza che si trova nel lato sinistro del comparto frigorifero; nella
targhetta sono indicate anche le temperature ambiente in base alle quali l’apparecchio può funzionare.
Classe climatica Temperatura ambiente consentita
SN (Temperato prolungato) da +10 °C a 32 °C
N (Temperato) da +16 °C a 32 °C
ST (Subtropicale) da +16 °C a 38 °C
T (Tropicale) da +16 °C a 43 °C
Risparmio energetico
1. Installare il frigorifero in un locale asciutto, fresco e ben ventilato. Più la temperatura ambiente è fresca, minore sarà il
consumo di energia. (Fare riferimento alla pagina 79 per dimensioni e spazio.)
2. La combinazione di cassetti e ripiani che risulterà maggior in volume comporterà un minore consumo energetico del frigorifero.
• Rimuovere i due cassetti superiori del congelatore (lasciare il cassetto inferiore del congelatore).
• Installare i cassetti e i ripiani all’interno del frigorifero nelle posizioni illustrate nel paragrafo “Parti” (P.81).
• Rimuovendo il cassetto dello scomparto freschi, la circolazione d’aria fredda migliora. Inoltre, è possibile conservare
alimenti in maggior quantità.
3. Impostare la modalità Salvaschermo.
4. Evitare di riempire eccessivamente il frigorifero per consentire una buona circolazione dell’aria.
5. Aprire le porte soltanto se necessario e per il minor tempo possibile.
6. Pulire periodicamente le aperture di ventilazione alla base del frigorifero con un aspirapolvere o altro strumento simile.
(Fare attenzione a non danneggiare il tubo del circuito refrigerante all’interno del coperchio.)
7. Quando si imposta la modalità Super Freeze o la modalità Super Cool, il consumo energetico è maggiore.
8080
Page 81

Parti
L’illustrazione sottostante è basata sul modello NR-B29SG2 e potrebbe non corrispondere al frigorifero acquistato.
Comparto frigorifero
È possibile impostare la temperatura
in un intervallo compreso tra 2 °C
e 8 °C.
Cibo cotto,
bevande, uova,
torte, prodotti
caseari
Scomparto freschi
La temperatura è inferiore di
1 °C-2 °C rispetto a quella impostata
per lo scomparto frigorifero.
Per i dettagli sull’uso dello scomparto
freschi, vedere pagina 83.
Formaggi,
burro, salsicce
Scomparto congelatore
È possibile impostare la temperatura
in un intervallo compreso tra -24 °C
e -16 °C.
Carne, pollame
pesce
surgelati,
gelato
1
2
3
4
5
6
7
8
9
:
;
<
Italiano
1Portabottiglie* 52 vaschette del ghiaccio 92 portauova
2Ripiani di vetro** 6
Cassetti del comparto congelatore
:Ripiani porta**
3Scomparti per frutta e verdura 7Piastra di rinforzo ;Ripiani delle bottiglie
4Cassetto scomparto freschi 8Piedini regolabili <Parte scorrevole
*Le seguenti parti non sono incluse nel modello NR-B29SW2:
• Portabottiglie
**I modelli NR-B32SG2/NR-B32SW2 dispongono inoltre delle seguenti parti aggiuntive.
• Ripiano in vetro
• Balconcino porta
Nota:
• È possibile modicare le posizioni in cui installare i ripiani della porta e i ripiani delle bottiglie. Si prega, tuttavia, di
prestare attenzione in quanto alimenti e bevande conservati possono cadere durante l’apertura e la chiusura della porta
a seconda delle posizioni del ripiano.
• Chiudendo la porta con i cassetti aperti (cassetti per frutta e verdura/freschi/congelatore), questi potrebbero
danneggiarsi.
81
81
Page 82

Pannello comandi
Area del display
1
Display della temperatura del frigorifero
1
2
3
Note:
• Questo frigorifero utilizza un microprocessore per controllare la temperatura. La temperatura all’interno del frigorifero
cambia a seconda di fattori come cambiamenti della temperatura ambiente, frequenza di apertura e chiusura delle porte
e quantità di alimenti conservati all’interno e modo di conservazione.
• Viene visualizzata la temperatura impostata.
• Mentre la modalità Super Cool è attivata, due
4
5
6
simboli
lampeggiano alternatamente.
2
Display della temperatura del congelatore
• Viene visualizzata la temperatura impostata.
• Mentre la modalità Super Freeze è attivata, due
simboli
lampeggiano alternatamente.
3
Display delle funzioni
• Quando sono impostate la modalità Eco
modalità Vacanza , i simboli sono cerchiati.
• Quando le funzioni Sicurezza bambini
sono attivate, vengono visualizzati i simboli delle
rispettive funzioni.
Area comandi
4
Pulsante di selezione del frigorifero
5
Pulsante di selezione del congelatore
6
Pulsante Modalità
e la
e allarme
8282
Page 83

Impostazione della temperatura
Scomparto frigorifero
Al momento dell’acquisto, la temperatura è impostata a 4 °C.
1
Premere (superiore) una volta e quindi premerlo di nuovo entro 1 secondo.
• È possibile impostare la temperatura.
2
Premere ripetutamente il pulsante no a impostare la temperatura desiderata.
• Se non si eseguono operazioni per 1 secondo durante la procedura di impostazione, il valore
impostato lampeggia e un segnale acustico indica che la temperatura è stata impostata.
Nota:
• Quando la modalità Super Cool, la modalità Super Freeze, la modalità Eco o la modalità
Vacanza termina o viene annullata, l’unità ritorna alle impostazioni precedenti.
Scomparto congelatore
Al momento dell’acquisto, la temperatura è impostata a -18 °C.
1
Premere (inferiore) una volta e quindi premerlo di nuovo entro 1 secondo.
• The temperature can be set.
2
Premere ripetutamente il pulsante no a impostare la temperatura desiderata.
• Se non si eseguono operazioni per 1 secondo durante la procedura di impostazione, il valore
impostato lampeggia e un segnale acustico indica che la temperatura è stata impostata.
Nota:
• Quando la modalità Super Cool, la modalità Super Freeze, la modalità Eco o la modalità
Vacanza termina o viene annullata, l’unità ritorna alle impostazioni precedenti.
Italiano
Scomparto freschi
È possibile regolare la temperatura dello scomparto freschi aprendo e chiudendo la parte scorrevole ubicata all’interno dello scomparto.
Aperto
Portare la parte scorrevole in posizione di apertura per impostare una temperatura dello
scomparto inferiore di 1 °C-2 °C rispetto a quella impostata per lo scomparto frigorifero;
in questo modo, lo scomparto funziona come scomparto freschi.
Chiuso
Portare la parte scorrevole in posizione di chiusura per impostare la temperatura dello
scomparto a un valore identico a quello dello scomparto frigorifero; in questo modo, lo
scomparto funziona come una parte dello scomparto frigorifero.
• Utilizzando questo scomparto come scomparto a 0 °C, e tenendo gli alimenti nello scomparto freschi invece che nello scomparto
congelatore o frigorifero, gli alimenti mantengono la freschezza e l’aroma più a lungo, preservando un aspetto fresco. Se il cassetto dello
scomparto freschi si sporca, rimuoverlo e lavarlo con acqua. (L’acqua congela a 0 °C, ma gli alimenti che contengono sale o zucchero
congelano a una temperatura inferiore) Normalmente, lo scomparto freschi viene utilizzato per pesce crudo, sottaceti, riso, ecc...
• Tirare il cassetto dello scomparto freschi verso di sé. Il coperchio si apre automaticamente.
Nota:
• Non inserire alimenti da congelare o vaschette del ghiaccio per fare il ghiaccio.
83
83
Page 84

Uso delle funzioni utili
Modalità Super Freeze
Caratteristiche:
• In questa modalità, il congelatore si raffredda velocemente, consentendo il congelamento
di alimenti freschi, ecc. presenti nel congelatore.
• La modalità Super Freeze termina automaticamente dopo 24 ore o quando la
temperatura del sensore del congelatore diventa inferiore a -32 °C.
Impostazioni:
1. Premere (inferiore) no a visualizzare “SF”.
2. Se non si eseguono operazioni per 1 secondo durante la procedura di impostazione,
“SF” lampeggia e un segnale acustico indica che la modalità Super Freeze è impostata.
• Durante questa modalità, viene visualizzato “SF” e due simboli lampeggiano
alternatamente.
• Per disattivare la modalità, premere (inferiore).
Note:
• In questa modalità:
-Premendo (inferiore), la modalità Super Freeze viene annullata ed è possibile
impostare la temperatura desiderata.
-Non è possibile selezionare la modalità Eco e la modalità Vacanza.
-È possibile regolare la temperatura del frigorifero.
• L’effetto sugli alimenti conservati potrebbe diminuire se la modalità Super Freeze viene
impostata diverse ore prima di riporre gli alimenti nello scomparto congelatore.
• L’allarme suona 3 ore dopo aver impostato la modalità Super Freeze. Quindi, è possibile
conservare una modica quantità di alimenti.
• Si consiglia di eseguire le seguenti operazioni per raggiungere la massima capacità di
congelamento.
1
24 ore prima di conservare gli alimenti, impostare la temperatura del congelatore a
-24 °C e la temperatura del frigorifero a 2 °C.
2
Impostare la modalità Super Freeze 10 ore prima di riporre gli alimenti.
3
Se si desidera congelare grandi quantitativi di alimenti, rimuovere i due cassetti
superiori dal congelatore e riporre gli alimenti direttamente sul ripiano in vetro o nel
cassetto inferiore del congelatore (collocando gli alimenti direttamente sul ripiano in
vetro, è possibile ottenere una maggiore capacità di congelamento).
• La capacità di congelamento massima in 24 ore è indicata sull’etichetta delle speciche.
Modalità Super Cool
Caratteristiche:
• In questa modalità, è possibile congelare cibi elaborati industrialmente prima di mangiarli,
è possibile congelare e conservare una grande quantità di alimenti ed è possibile
raffreddare velocemente le bevande.
• La modalità Super Cool termina automaticamente dopo 8 ore o quando la temperatura
del sensore del frigorifero diventa inferiore a 0 °C.
Impostazioni:
1. Premere (superiore) no a visualizzare “SC”.
2. Se non si eseguono operazioni per 1 secondo durante la procedura di impostazione,
“SC” lampeggia e un segnale acustico indica che la modalità Super Cool è impostata.
• Durante questa modalità, viene visualizzato “SC” e due simboli lampeggiano
alternatamente.
• Per disattivare la modalità, premere (superiore).
Note:
• In questa modalità:
-Premendo (superiore), la modalità Super Cool viene annullata ed è possibile
impostare la temperatura desiderata.
-Non è possibile selezionare la modalità Eco e la modalità Vacanza.
-È possibile regolare la temperatura del congelatore.
8484
Page 85

Modalità Eco
Caratteristiche:
• In questa modalità, l’unità di controllo attiva il congelatore e in frigorifero in modo
economicamente vantaggioso.
• In questa modalità, la temperatura del frigorifero è impostata automaticamente a 4 °C e la
temperatura del congelatore è impostata automaticamente a -18 °C.
Impostazioni:
1. Premere ripetutamente no a quando appare un cerchio intorno a .
2. Se non si eseguono operazioni per 1 secondo durante la procedura di impostazione,
il cerchio intorno a lampeggia e un segnale acustico indica che la modalità Eco è
impostata.
• Durante questa modalità, viene visualizzato “E” sul display della temperatura del
frigorifero/congelatore e viene visualizzato un cerchio intorno a .
• Per disattivare la modalità, premere .
Note:
• In questa modalità:
-È possibile regolare il congelatore e il frigorifero. Disattivando la modalità Eco, la
regolazione viene mantenuta.
-Non è possibile selezionare la modalità Super Cool e la modalità Super Freeze. La
modalità Eco viene disattivata automaticamente e viene attivata la modalità selezionata.
-Dopo aver disattivato la modalità Eco, è possibile selezionare la modalità Vacanza e la
modalità selezionata viene attivata.
Modalità Vacanza
Caratteristiche:
• Impostare questa modalità quando il frigorifero non viene utilizzato per un periodo prolungato di
tempo, come durante una lunga vacanza.
• In questa modalità, la temperatura del frigorifero è impostata automaticamente a 8 °C e la
temperatura del congelatore è impostata automaticamente a -18 °C.
Impostazioni:
1. Premere ripetutamente no a quando appare un cerchio intorno a .
2. Se non si eseguono operazioni per 1 secondo durante la procedura di impostazione, il
cerchio intorno a lampeggia e un segnale acustico indica che la modalità Vacanza è
impostata.
• “H” viene visualizzato sul display della temperatura del congelatore. Il display della
temperatura del frigorifero non visualizza alcuna indicazione.
• Durante questa modalità, viene visualizzato “H” sul display della temperatura del
congelatore e viene visualizzato un cerchio intorno a .
Note:
• Prima di utilizzare questa modalità, svuotare il frigorifero e chiudere la porta.
• Al termine di questa modalità, il frigorifero riprende il funzionamento con le impostazioni
precedenti.
-È possibile regolare il congelatore e il frigorifero. Disattivando la modalità Vacanza, la
regolazione viene mantenuta.
-Non è possibile selezionare la modalità Super Cool e la modalità Super Freeze. La
modalità Vacanza viene disattivata automaticamente e viene attivata la modalità
selezionata.
-Dopo aver disattivato la modalità Vacanza, è possibile selezionare la modalità Eco e la
modalità selezionata viene attivata.
Italiano
85
85
Page 86

Uso delle funzioni utili (continua)
Modalità raffreddamento bevande
Caratteristiche:
• È possibile raffreddare velocemente le bevande nel congelatore.
• Questa modalità ha una funzione timer ed è possibile impostare un segnale acustico
quando il timer raggiunge 5, 10, 15, 20, 25 o 30 minuti.
• Rimuovere le bottiglie al segnale acustico. Se le bottiglie vengono lasciate a lungo nel
congelatore, il loro contenuto potrebbe ghiacciarsi e le bottiglie potrebbero rompersi.
Impostazioni:
1. Premere il pulsante (inferiore) per 5 secondi.
2. “dc” viene visualizzato sul display della temperatura del congelatore e “05” lampeggia
sul display della temperatura del frigorifero.
3. Premere (superiore) per regolare il tempo (05-10-15-20-25-30 minuti).
4.
Il tempo selezionato lampeggia 3 volte sul display, quindi viene emesso un segnale acustico.
5. Il conto alla rovescia in minuti inizia a partire dal tempo impostato, mentre il tempo
rimanente lampeggia sul display.
• Per disattivare la modalità Raffreddamento bevande, premere (inferiore) per 5 secondi.
• Allo scadere del tempo impostato, viene emesso un segnale acustico ed entrambe le
indicazioni del display (esempio: “00” e “dc”) lampeggiano fino a quando si preme (inferiore).
Note:
• In questa modalità, vericare regolarmente la temperatura delle bottiglie.
• Quando le bottiglie si sono raffreddate sufcientemente, rimuoverle dal congelatore.
Modalità Salvaschermo
Caratteristiche:
• Impostando questa modalità, è possibile spegnere la retroilluminazione del display per
risparmiare energia.
Impostazioni:
1. Premere per 3 secondi per impostazione la funzione automatica Salvaschermo.
2.
Se non si eseguono operazioni per 5 secondi e non si aprono porte, la retroilluminazione
del display si spegne insieme a tutti gli altri simboli e caratteri del display.
• Le modalità e le funzioni selezionate vengono mantenute.
• Per disattivare il Salvaschermo automatico e tenere accesa la retroilluminazione del
display, premere
Note:
• Quando la funzione automatica Salvaschermo è attivata e la retroilluminazione del
display è spenta, la retroilluminazione del display si riaccende e le funzioni impostate
vengono indicate sul display se si preme un pulsante o si apre una porta.
• Quando le funzioni Salvaschermo e Sicurezza bambini sono attive, il Salvaschermo è
attivato. Pertanto, mentre entrambe le funzioni sono attivate, la retroilluminazione del
display si riaccende premendo un pulsante o aprendo una porta.
per 3 secondi.
Funzione Sicurezza bambini
Caratteristiche:
• La funzione Sicurezza bambini impedisce ai bambini di cambiare le impostazioni
giocando con i pulsanti.
Impostazioni:
1. Premere (superiore) e (inferiore) per 5 secondi per impostare la funzione
Sicurezza bambini.
• Mentre la funzione Sicurezza bambini è impostata, è acceso.
• Per disattivare la modalità, premere (superiore) e (inferiore) per 5 secondi. Non è
possibile cambiare la modalità correntemente impostata no a quando non si disattiva la
funzione Sicurezza bambini.
Note:
• In caso di interruzione della corrente o di estrazione della spina di alimentazione, la
funzione Sicurezza bambini viene disattivata.
8686
Page 87

Funzioni di avviso all’utilizzatore
Le funzioni di avviso all’utilizzatore diventano attive nelle seguenti situazioni.
Situazione Dettagli Allarme Come fermare l'allarme
La modalità è
terminata.
Porta socchiusa.
• Il tempo impostato è stato raggiunto nella
modalità Raffreddamento bevande.
• La porta del frigorifero e/o del congelatore
è rimasta aperta per oltre 2 minuti.
Suona in continuazione
Suona ogni 5 secondi
Premere
Chiudere la porta (o le
porte).
.
Produzione di cubetti di ghiaccio
Aprire il congelatore, estrarre il cassetto superiore ed estrarre la
vaschetta del ghiaccio sulla sommità. Riempire con acqua la vaschetta
del ghiaccio no alla linea di livello dell’acqua e rimettere a posto la
vaschetta del ghiaccio.
Quando i cubetti di ghiaccio sono pronti, estrarre il cassetto superiore
e prendere la vaschetta del ghiaccio. Girare leggermente la vaschetta
mantenendo i due lati con le mani; i cubetti di ghiaccio cadranno dalla
vaschetta. Quindi rimettere a posto la vaschetta del ghiaccio.
Linea di livello dell’acqua
Rimozione e installazione dei ripiani
Frigorifero
Ripiani di vetro
Sollevare leggermente il lato interno del ripiano e tirarlo fuori.
Quando si rimuovono i ripiani in vetro, prima di tirarli, rimuovere
prima i ripiani della porta e delle bottiglie se si trovano vicino.
Per rimuovere il ripiano in vetro, aprire la porta no toccare il
fermo.
Scomparti per frutta e verdura
Tirare verso di sé gli scomparti per frutta e verdura e toglierli.
Italiano
Congelatore
Ripiani della porta e ripiani delle bottiglie
Sollevarli leggermente, quindi rimuoverli.
Cassetto scomparto freschi
Estrarre il cassetto, tenere la parte anteriore e sollevarla
diagonalmente, quindi rimuoverlo.
Tirare il cassetto verso di sé, sollevarne
leggermente la parte anteriore e tirarlo fuori.
Dopo aver rimosso il cassetto, è possibile
conservare alimenti nello scomparto vuoto.
87
87
Page 88

Istruzioni per la cura e la pulizia
Pulizia quotidiana
Pulire le parti con un panno asciutto.
Punti che si sporcano facilmente
Guarnizione della porta
Quando si sporca, la guarnizione si danneggia facilmente
ed è probabile una fuoriuscita di aria fredda.
Ripiano delle bottiglie
Se ci sono degli accumuli di sporco e liquido, pulire
rimuovendoli subito.
A cadenza annuale, staccare la spina di alimentazione del frigorifero e rimuovere
i ripiani per la pulizia.
Parti che possono essere lavate con acqua
Frigorifero Congelatore
● Ripiani di vetro
● Ripiani della porta
● Ripiani delle bottiglie
● Portauova
● Scomparti per frutta e
verdura
● Cassetto scomparto freschi
● Cassetti del congelatore
● Vaschette del ghiaccio
Nota:
• Non utilizzare prodotti pulenti abrasivi come ad
esempio bicarbonato di soda poiché possono
danneggiare la plastica.
Pulizia del pannello comandi
Il pannello comandi del frigorifero è realizzato in materiale delicato. Per proteggere la sua supercie, non pulirlo con
solventi chimici. Pulirlo invece con un panno asciutto o un panno morbido leggermente umido.
Pulizia della supercie esterna dell’apparecchio
Pulire la supercie esterna dell’apparecchio con un panno morbido leggermente imbevuto di acqua calda. Se non è
possibile rimuovere delle macchie, applicare un detergente neutro per la pulizia di cucine, quindi rimuoverlo con un panno
morbido leggermente imbevuto di acqua calda. Eliminare tutte le gocce di acqua residue con un panno asciutto.
Annotazioni sulla pulizia
Non pulire la parte interna o esterna dell’apparecchio con le seguenti sostanze:
● detergenti alcanini - Questo tipo di sostanze può provocare spaccature delle parti di plastica.
● polvere abrasiva, sapone in polvere, olio fossile, acqua calda, spazzole, acido, benzene, solventi, o soluzioni a
base di alcol. Queste sostanze possono danneggiare la verniciatura della supercie e le parti di plastica.
Assicurarsi di eliminare qualsiasi macchia di olio edibile che può ugualmente intaccare le parti di plastica.
8888
Page 89

Controllo di manutenzione
● Il cavo dell’alimentazione è danneggiato?
● La spina di alimentazione si surriscalda?
AVVERTENZE
● La spina di alimentazione è inserita completamente nella presa?
Se il cavo di alimentazione o la spia LED sono danneggiati, consultare un centro assistenza
autorizzato. NON tentare di sostituire questi componenti da soli.
Mancato utilizzo per un periodo di tempo prolungato
Se il frigorifero non deve essere utilizzato per un lungo periodo, scollegarlo dalla rete elettrica e pulire
la spina di alimentazione come descritto in precedenza. Lasciare quindi le porte aperte per 2-3 giorni
ATTENZIONE
per fare in modo che l’interno si asciughi ed evitare la formazione di muffa o di odori sgradevoli.
Non accendere e spegnere ripetutamente l’apparecchio. Durerà più a lungo se viene lasciato
acceso durante il normale utilizzo.
Prima di spostare o trasportare l’apparecchio
① Rimuovere tutti gli alimenti.
② Staccare la spina di alimentazione.
③ Sollevare il piedino regolabile.
④ Tirare o far scivolare verso di sé il frigorifero.
⑤
Ad esempio, utilizzare un panno per assorbire l’acqua dalla vaschetta di
evaporazione.
(parte inferiore sul retro del frigorifero)
Spostare e trasportare l’apparecchio
L’apparecchio deve essere trasportato da almeno due persone.
①
Avvitare fermamente i piedini regolabili.
②
Tenere i piedini regolabili da un lato e gli angoli del
frigorifero dall’altro, come mostrato nella gura.
Nota:
• Non trasportare l’apparecchio tenendolo per le porte.
Trasportare sempre il frigorifero mantenendolo nella sua normale posizione verticale.
Italiano
Chiudere le porte ssandole
con del nastro adesivo
89
89
Page 90

Risoluzione dei problemi
Il frigorifero avvisa se le temperature del frigo e del congelatore sono a livelli non corretti o in caso di problemi
sull’apparecchio. Sul display della temperatura del frigorifero/congelatore vengono visualizzati codici di avviso.
Codici di avviso Signicato Dettagli e rimedi
Sr Problema/Avviso Una o più parti sono fuori servizio o si è vericato un problema in fase di
LF Lo scomparto del
congelatore non è
abbastanza freddo.
LC Lo scomparto del
frigorifero non è
abbastanza freddo.
LF e LC Raffreddamento
insufciente.
HC Lo scomparto del
frigorifero è troppo
freddo.
LOPO Tensione insufciente Se l’alimentazione scende sotto i 170 V, l’apparecchio si blocca.
raffreddamento.
• Contattare il centro assistenza al più presto possibile.
Questo avviso viene indicato in particolar modo dopo una prolungata
interruzione della corrente.
1. Non congelare alimenti scongelati, che devono essere utilizzati a breve.
2. Impostare la temperatura del congelatore su valori più bassi o impostare
la modalità Super Freeze no a quando lo scomparto torna alla
temperatura normale.
3. Non inserire alimenti freschi no alla risoluzione del problema.
La temperatura ideale per lo scompartimento del frigorifero è +4°C. Se
viene visualizzato questo avviso, gli alimenti rischiano di deteriorarsi.
1. Impostare la temperatura del frigorifero su valori più bassi o impostare la
modalità Super Cool no a quando lo scomparto torna alla temperatura
normale.
2. Non aprire la porta no a quando scompare l’avviso.
Si tratta della combinazione degli errori LF e LC.
• Questo problema viene segnalato al primo avvio dell’apparecchio. Le
indicazioni si spengono appena gli scomparti raggiungono la temperatura
normale.
Gli alimenti iniziano a congelare a causa della temperatura troppo elevata.
1. Controllare se è attiva la modalità Super Cool.
2. Ridurre i valori di temperatura del frigorifero.
• Non si tratta di un guasto. Questa procedura serve a prevenire danni al
compressore. L’avviso si spegne appena la tensione torna a un valore
sufciente.
9090
Page 91

Domandi frequenti
Se si ha motivo di ritenere che il frigorifero non funzioni correttamente, vericare innanzitutto i punti seguenti.
Se il problema persiste, scollegare la spina di alimentazione e contattare il rivenditore o un centro assistenza autorizzato.
Problemi generali
Il frigorifero emette un rumore
anomalo.
Si sente un rumore dopo lo
spegnimento del compressore.
Si sente un rumore dopo aver
aperto o chiuso la porta.
Si sente un rumore di aria o acqua
che circola dopo aver aperto il
frigorifero.
Si sente un sibilo continuo.
Il compressore è piuttosto
rumoroso.
Il compressore è in funzione da
molto tempo.
Sull’esterno del frigorifero si
forma condensa.
L’esterno del frigorifero è caldo
al tatto.
I comandi del pannello comandi
non funzionano.
Suona l’allarme. • La porta del frigorifero e/o del congelatore è rimasta aperta. Chiudere le porte.
La spia LED non si accende. • È stata impostata la modalità Vacanza?
• Il frigorifero è stato installato su un pavimento solido e in piano?
• Ci sono spazi sufcienti intorno al frigorifero?
• Qualche oggetto vibra sul frigorifero?
• Si tratta del normale rumore di funzionamento quando il frigorifero si avvia o
si arresta.
• Si tratta di un’operazione normale, spesso causata dalla circolazione di ritorno
del refrigerante al compressore.
• Si tratta di un’operazione normale, causata dalla differenza di pressione
dell’aria tra l’interno e l’esterno del frigorifero.
• Il rumore è causato dalla circolazione del refrigerante nei tubi interni.
• Il rumore si avverte quando la ventola per la circolazione dell’aria fredda è in funzione.
• Gli alimenti sono eccessivamente pressati o la temperatura ambiente è troppo elevata?
In questi casi, la ventola per la circolazione dell’aria fredda funziona ad alta
velocità ed emette un rumore maggiore.
• Gli alimenti sono eccessivamente pressati o la temperatura ambiente è troppo elevata?
In questi casi, il compressore funziona ad alta velocità ed è normale che sia
più rumoroso.
• Quando si collega la spina di alimentazione per la prima volta, il compressore
funziona più a lungo del normale per raffreddare l’interno del frigorifero no a
raggiungere le temperature impostate.
• È stata impostata la modalità Super Freeze o la modalità Super Cool?
• Le porte sono state aperte e chiuse frequentemente? Le porte sono
completamente chiuse?
• Gli alimenti sono eccessivamente pressati o la temperatura ambiente è elevata?
• Se il frigorifero contiene contemporaneamente molti alimenti, il compressore dovrà
funzionare più a lungo.
• La formazione di condensa è normale quando l’umidità dell’ambiente è
elevata. Eliminare la condensa con un panno asciutto.
• Una volta attivato, il frigorifero potrebbe restare caldo no a quando l’interno
dello scomparto non si sia sufcientemente raffreddato. Il frigorifero potrebbe
rimanere caldo anche dopo che gli scomparti si sono raffreddati. Ciò è dovuto
al funzionamento del tubo dissipatore di calore di cui è dotato il frigorifero per
evitare la formazione di condensa e non si tratta di un malfunzionamento.
• Il frigorifero è acceso?
In modalità Vacanza, la spia LED del frigorifero non si accende.
• Il frigorifero è acceso?
• Se occorre sostituire il LED, contattare il rivenditore o un centro assistenza
autorizzato.
Italiano
91
91
Page 92

Domandi frequenti (continua)
Frigorifero e congelatore
Il frigorifero non raffredda (e il
congelatore non congela).
Il frigorifero non raffredda (e il
congelatore non congela) in modo
soddisfacente.
C’è differenza tra la temperatura
impostata e la temperatura
effettiva.
Gli alimenti all’interno del
frigorifero congelano.
Nei cassetti porta frutta e porta
verdure si forma condensa.
L’apertura della porta del
congelatore è difcoltosa.
Vi sono odori all’interno del
frigorifero.
• Il frigorifero è acceso?
• La temperatura impostata è troppo alta?
• Il frigorifero è esposto alla luce solare diretta o si trova vicino a un apparecchio
di riscaldamento?
• Ci sono spazi sufcienti intorno al frigorifero?
• Gli alimenti sono eccessivamente pressati o la temperatura ambiente è
elevata?
• Le porte sono state aperte e chiuse frequentemente?
Le porte sono completamente chiuse?
• Il frigorifero è stato impostato in modalità Vacanza?
• Se all’interno del frigorifero vengono collocati alimenti caldi, la temperatura
aumenta temporaneamente.
• Durante la stagione fredda o quando la temperatura ambiente è bassa, si
potrebbe avere l’impressione che il frigorifero non raffreddi.
• Se all’interno del frigorifero vengono collocati alimenti caldi, la temperatura
aumenta temporaneamente.
• La temperatura impostata per il frigorifero è troppo bassa?
• Gli alimenti sono stati collocati nella parte sul fondo frigorifero?
La parte vicino alla parete posteriore del frigorifero è il punto in cui la
temperatura è più fredda. Si consiglia pertanto di non collocarvi alimenti poiché
qui potrebbero congelare facilmente.
• La zona Vitamin-Safe mantiene un elevato livello di umidità per conservare le
verdure fresche.
Eliminare la condensa con un panno asciutto.
• A volte l’apertura della porta è difcoltosa subito dopo la chiusura.
• Talvolta, la differenza di pressione dell’aria tra l’interno e l’esterno del
congelatore potrebbe rendere difcoltosa l’apertura. Attendere qualche istante
e riprovare ad aprire la porta.
• Gli alimenti con un odore forte sono stati sigillati prima di essere collocati nel
frigorifero?
Riporre gli alimenti all’interno di un contenitore sigillato e conservarli.
• Gli odori potrebbero aderire alle superci interne del frigorifero. Pulire le
superci con un panno morbido imbevuto di acqua tiepida.
9292
Page 93

Speciche tecniche
Scheda prodotto (Regolamento UE 1060/2010)
NOME DEL FORNITORE Panasonic
MODELLO
CATEGORIA 7 (Frigo-congelatore)
CLASSE DI EFFICIENZA ENERGETICA A++
CONSUMO ANNUO DI ENERGIA 240 kWh/anno
VOLUME UTILE FRIGORIFERO 189 L 224 L
VOLUME UTILE SCOMPARTIMENTO “CHILL”
VOLUME UTILE CONGELATORE 72 L
NUMERO DI STELLE CONGELATORE Quattro stelle
SCMPARTI “ANTIBRINA” Frigorifero: antibrina / Scompartimento chill: antibrina / Congelatore: antibrina
TEMPO DI RISALITA DELLA
TEMPERATURA
CAPACITÀ DI CONGELAMENTO 12 kg/24 ore
CLASSE CLIMATICA T
EMISSIONI DI RUMORE AEREO 42 dB
Altre informazioni
VOLUME TOTALE LORDO 332 L 367 L
VOLUME TOTALE NETTO 289 L 324 L
DIMENSIONI ESTERNE
LARGHEZZA x PROFONDITÀ x ALTEZZA
PESO NETTO 77 kg 80 kg
TENSIONE NOMINALE 220 V - 240 V
FREQUENZA NOMINALE 50 Hz
REFRIGERANTE/CARICA R600a/55 g R600a/60 g
AGENTE ESPANDENTE Ciclopentano
Note:
*1
Il consumo energetico all’anno si basa sui risultati di prove standard per 24 ore.
Il consumo di energia effettivo dipende dal modo in cui l’apparecchio è utilizzato e dal posto in cui è installato.
*2
Temperatura ambiente consentita: da 16 °C a 43 °C
A porte completamente aperte
NR-B29SG2-SE
NR-B29SG2-SF
NR-B29SG2-SB
600 mm x 652 mm x 1898 mm 600 mm x 652 mm x 2044 mm
NR-B29SW2-WE
NR-B29SW2-WF
NR-B29SW2-WB
*1
28 L
18 ore
*2
NR-B32SG2-SE
NR-B32SG2-SF
NR-B32SG2-SB
250 kWh/anno
NR-B32SW2-WE
NR-B32SW2-WF
NR-B32SW2-WB
*1
Italiano
120 º
299 mm
1122 mm
93
93
Page 94

Contenidos
Cuidado del medioambiente ........................................ 94
Instrucciones de seguridad ......................................... 95
Instalación ..................................................................... 97
Identicación de las piezas ......................................... 99
Panel de control .......................................................... 100
Ajuste de la temperatura ............................................ 101
Uso de las funciones prácticas ................................. 102
Funciones de alerta para el usuario .........................105
Cómo hacer cubitos de hielo ....................................105
Cómo extraer y colocar los estantes ........................ 105
Instrucciones de cuidado y limpieza ........................106
Solución de problemas ..............................................108
Preguntas más frecuentes ......................................... 109
Especicaciones .........................................................111
Cuidado del medioambiente
Eliminación del material de embalaje
Por favor, recicle siempre que sea posible (cartón, bolsas de plástico, cinta adhesiva y poliestireno) y
asegúrese de que el resto de materiales de embalaje se eliminen de forma segura.
Mantenga el material de embalaje fuera del alcance de niños y bebés, para evitar el riesgo de asxia.
Información para usuarios sobre la eliminación de equipos eléctricos y
electrónicos (doméstico)
Este símbolo, que puede incluirse en los productos y/o en los documentos adjuntos, signica que los
productos eléctricos y electrónicos que deban desecharse no deberían mezclarse con los residuos
domésticos generales.
Para efectuar un tratamiento, recuperación y reciclaje adecuados, lleve estos productos a los puntos de
recogida establecidos a tal efecto, donde podrá depositarlos sin coste alguno. De forma alternativa, en
algunos países también es posible retornar sus productos al distribuidor local, tras la compra de un nuevo
producto similar.
La correcta eliminación de este producto ayudará a proteger recursos valiosos y a evitar los posibles
efectos negativos sobre la salud de las personas y el medioambiente que podrían surgir a raíz de una
incorrecta gestión de los residuos. Por favor, póngase en contacto con la autoridad local para obtener
información adicional acerca del punto de recogida más cercano.
De acuerdo con la legislación nacional, podría recibir una multa si elimina este producto de forma incorrecta.
Para usuarios de negocios de la Comunidad Europea
Si desea desechar equipos eléctricos y electrónicos, póngase en contacto con su distribuidor o vendedor
para obtener información adicional.
Información sobre la eliminación en países fuera de la Comunidad Europea
Este símbolo sólo es válido en la Comunidad Europea.
Si desea desechar este producto, póngase en contacto con las autoridades locales o su vendedor y
pregunte por el método correcto de eliminación.
Antes de eliminar su electrodoméstico viejo
Siga las instrucciones de eliminación suministradas por el fabricante del electrodoméstico viejo o las
normas de eliminación de electrodomésticos de las autoridades locales. Cuando éstas no se encuentren
disponibles, siga los tres pasos indicados a continuación.
1. Desconecte la clavija de la toma de corriente.
2. Corte el cable de alimentación del electrodoméstico, dejando la clavija como está, y deséchelo.
3. Hasta que recojan el electrodoméstico viejo, o hasta que usted lo lleve a un centro de reciclaje,
asegúrese de ponerlo fuera del alcance de los niños.
●
Quite todos los materiales de sellado de la puerta y deje todos los estantes y cajones en su lugar.
De esta forma, los niños, probablemente, no se subirán al frigoríco ni quedarán atrapados en él.
Esta electrodoméstico está destinado para ser usado en hogares y como otras aplicaciones como
• Áreas de servicio de personal en restaurantes, ocinas y otros lugares de trabajo;
• Casas de campo y clientes en hoteles, moteles y otros tipos de lugares residenciales;
• Lugares como alojamientos;
• Servicios de comida y uso personal.
9494
Page 95

Signicado de los símbolos:
No
Asegúrese de hacer esto No desarme
Indica peligro de muerte o de lesiones graves.
Este aparato no ha sido diseñado para ser utilizado por personas (incluyendo niños) con discapacidades físicas,
ADVERTENCIA
-ADVERTENCIA:
-ADVERTENCIA:
-ADVERTENCIA:
sensoriales o mentales, o falta de experiencia o conocimiento, a menos que éstas sean supervisadas o hayan recibido
instrucciones relacionadas con el uso del aparato por parte de una persona responsable de su seguridad.
Los niños deberán ser supervisados para garantizar que no jueguen con el aparato.
No use un adaptador de múltiples tomas de corriente ni enchufe varios aparatos en el mismo adaptador de
tomas de corriente.
• Esto puede causar un sobrecalentamiento, un incendio o un cortocircuito.
No apriete, anude ni doble el cable de alimentación, y no ponga tampoco objetos pesados encima de él.
• Esto aumenta el riesgo de que se produzca un incendio o descarga eléctrica. Si se daña el cable de alimentación o la clavija del
electrodoméstico, estos deberán ser sustituidos por el fabricante, su agente de servicio o por una persona cualicada, para evitar riesgos.
No desenchufe el frigoríco tirando del cable de alimentación.
• Puede dañar el cable de alimentación. Agarre siempre la clavija y tire de ella rmemente para desconectarla de la toma.
No ponga ningún recipiente de agua encima del frigoríco.
• El agua puede dañar el aislamiento de los componentes eléctricos y causar un cortocircuito, un incendio o una descarga eléctrica.
No rocíe gas inamable cerca del frigoríco.
• Esto puede causar una explosión o un incendio.
No rocíe agua en el interior del frigoríco.
• Esto puede causar un incendio o una descarga eléctrica.
No toque la clavija de alimentación con las manos mojadas.
• Esto puede causar una descarga eléctrica.
No instale el frigoríco en un lugar húmedo ni donde pueda entrar en contacto con el agua.
• El deterioro del aislamiento de los componentes eléctricos puede causar un cortocircuito, una descarga eléctrica o un incendio.
No guarde sustancias volátiles o inamables en el frigoríco.
• Las sustancias inamables tales como bencina, diluyentes, alcohol, éter y gas licuado del petróleo (GLP) pueden
causar explosiones.
No guarde productos farmacéuticos ni otros productos sensibles a la temperatura en el frigoríco.
• En el frigoríco no deberá guardar productos que requieren un estricto control de la temperatura.
No deje que los niños se suban, se columpien o se cuelguen de la puerta del frigoríco.
• Esto podría causar graves lesiones, así como daños en el frigoríco.
No haga funcionar el frigoríco si hay gases explosivos o inamables.
• Esto puede causar una explosión o un incendio.
No guarde gasolina u otros líquidos o vapores inamables en el frigoríco, y no los use tampoco cerca del mismo.
• Esto puede causar una explosión o un incendio.
No use dispositivos mecánicos ni otros medios para acelerar el proceso de descongelación. Use solamente los
procesos recomendados por el fabricante.
• Esto puede causar daños en el interior del frigoríco o puede provocar una explosión.
No utilice aparatos eléctricos dentro de los compartimientos para guardar alimentos del electrodoméstico, a
menos que éstos sean del tipo recomendado por el fabricante.
• Esto puede causar una explosión o un incendio.
No dañe el circuito del refrigerante.
• Esto puede causar una explosión o un incendio.
No intente desarmar, reparar o modicar el frigoríco usted mismo.
• Si lo hace, puede resultar herido o herir a otras personas, sufriendo quemaduras o descargas eléctricas, o puede
dañarse el frigoríco. Si su electrodoméstico necesita ser reparado, consulte con su centro de servicio autorizado.
Instrucciones de seguridad
Indica que el aparato debe conectarse a tierra
para evitar descargas eléctricas
Español
95
95
Page 96

Instrucciones de seguridad (continuación)
Asegúrese de que el frigoríco esté enchufado a una toma de corriente conectada a tierra. NO lo conecte a una toma de corriente que no esté conectada a tierra.
• Un cortocircuito podría causar una descarga eléctrica.
Asegúrese de que el cable de alimentación y su clavija no estén aplastados ni dañados.
• Una clavija o un cable de alimentación dañados pueden causar un cortocircuito, un incendio o una descarga eléctrica.
• Si está dañado el cable de alimentación, éste deberá ser sustituido por el fabricante, su agente de servicio o
cualquier otra persona cualicada, para evitar riesgos.
• NO INTENTE SUSTITUIRLO USTED MISMO.
Quite la suciedad y el polvo de los conectores de la clavija antes de conectarla a la fuente de alimentación.
• El polvo acumulado en la clavija puede causar fallos en el aislamiento, especialmente en condiciones de humedad. Esto puede causar un cortocircuito,
un incendio o una descarga eléctrica. Desenchufe el cable de alimentación y límpielo pasando un paño seco. No use nunca un paño mojado o húmedo.
Enchufe su electrodoméstico en la toma de corriente, asegurándose de que la conexión sea segura.
• Una clavija de alimentación mal conectada puede causar un incendio o una descarga eléctrica.
Instale el frigoríco en un lugar bien ventilado.
• Cuanto más refrigerante tenga el electrodoméstico, mayor deberá ser la habitación donde sea instalado. Si hay una fuga de refrigerante, y
el electrodoméstico está colocado en una habitación pequeña, existe la posibilidad de que se acumulen gases combustibles. Esto puede
-ADVERTENCIA:
causar un incendio o una explosión. A modo de guía, por cada 8
en la habitación. La placa de características del interior del electrodoméstico le informará de cuánto refrigerante contiene su frigoríco.
El refrigerante (R600a) usado en el frigoríco y los gases del material aislante (ciclopentano) son inamables.
también requieren procedimientos especiales para su eliminación.
• Antes de desechar el electrodoméstico, asegúrese de que ninguno de los tubos de la parte posterior estén dañados.
Las fugas de refrigerante o de gas pueden causar un incendio o una explosión.
Desenchufe el frigoríco antes de limpiarlo o repararlo.
• De lo contrario, podría provocar una descarga eléctrica.
Si huele a quemado o ve que sale humo del frigoríco, desconecte inmediatamente el cable de alimentación y consulte al centro de servicio autorizado.
• De lo contrario, podría provocar un incendio o descarga eléctrica.
Mantenga las aberturas de ventilación, en la caja del aparato o en la estructura incorporada, libres de obstrucciones.
• De lo contrario, esto podría resultar en un incendio o explosión, debido a que el refrigerante no puede dispersarse si hay una fuga.
RADIACIÓN LED
NO MIRE DIRECTAMENTE CON INSTRUMENTOS ÓPTICOS PRODUCTO LED DE CLASE 1M.
g de refrigerante, usted necesitará un mínimo de 1 metro cúbico de espacio
9696
PRECAUCIÓN
Indica riesgo de lesiones o daños en la propiedad.
No ponga botellas o contenedores de cristal en el congelador.
• Cuando el contenido se congela, el cristal se puede romper.
No toque con las manos mojadas las paredes interiores del congelador ni los alimentos guardados en el mismo.
• Su piel podría congelarse al entrar en contacto con la pared interior o los artículos guardados en el congelador.
No abra ni cierre las puertas sujetando los tiradores con ambas manos.
• Esto puede causar lesiones.
Si hay un corte en la alimentación eléctrica, evite abrir con frecuencia el frigoríco o
poner alimentos sin enfriar en él.
• Esto puede provocar que la temperatura en el frigoríco aumente y que se estropeen los
alimentos del interior.
Si no va a usar el frigoríco durante mucho tiempo, desenchúfelo de la toma de corriente.
Además, tenga cuidado con la separación entre las puertas del frigoríco y del
congelador, especialmente si se abren ambas al mismo tiempo.
• Esto puede causar lesiones.
Cuando abra el frigoríco, tenga cuidado de no pillarse los dedos en las áreas de
“punto de compresión”. En particular, cuando abra la puerta del frigoríco, evite el
posible punto de compresión entre las puertas del frigoríco y del congelador.
• Esto puede causar lesiones.
Posible “punto de compresión”
Page 97

Instalación
Esta sección le explica cómo instalar su electrodoméstico para obtener un funcionamiento energéticamente ecaz, seguro y silencioso.
Dimensiones
NR-B29SG2/NR-B29SW2: A600 x F652 x Al.1898 (mm)
NR-B32SG2/NR-B32SW2: A600 x F652 x Al.2044 (mm)
Cómo desembalar su electrodoméstico
Quite todo el material de embalaje y la cinta adhesiva.
Cómo elegir la ubicación correcta
Ventilación
Debido a que el electrodoméstico emite calor durante su funcionamiento,
debería instalarse en una sala seca y bien ventilada, con espacio suciente
en la parte superior y posterior, tal y como se muestra en la Figura 1.
Si detecta vibraciones, el electrodoméstico requiere más espacio.
Temperatura
La temperatura ambiente afecta la eciencia energética del frigoríco, es decir,
la cantidad de electricidad que utiliza para enfriar y congelar los alimentos.
Para obtener un funcionamiento óptimo, instale su frigoríco:
● lejos de la luz solar directa.
● alejado de radiadores, cocina u otras fuentes de calor.
● en una ubicación donde la temperatura ambiente corresponda a la
clasicación de clima para la cual está diseñado el electrodoméstico.
Consulte la sección Especicaciones para conocer la clasicación de
clima de su electrodoméstico.
Nivel
Instale en un suelo nivelado y que sea lo sucientemente sólido para
soportar un frigoríco cargado.
Nivele los desniveles del suelo atornillando o desatornillando las dos
patas delanteras ajustables, tal y como se muestra en la Figura 2.
Esto evita la vibración y el ruido.
Si el electrodoméstico está colocado sobre un suelo enmoquetado o revestido
con vinilo, coloque primero una placa sólida bajo dicho electrodoméstico. Esto
evitará el cambio de color causado por la emisión de calor del electrodoméstico.
20 mm
o más
150 mm o más
Figura 1
40 mm
o más
Español
Puerta del frigoríco
Las bisagras de la puerta del frigoríco se pueden
cambiar del lado derecho al izquierdo, para que las
ADVERTENCIA
puertas se abran en la dirección opuesta. Si necesita
realizar este cambio, póngase en contacto con alguno
de los centros de servicio que aparecen en la hoja
adjunta o acceda a nuestro sitio Web
(http://panasonic.net).
Declinamos cualquier responsabilidad si sustituye usted
mismo las bisagras.
Se incluyen en el embalaje de la unidad bisagras de
dirección de apertura de la puerta.
Figura 2
97
97
Page 98

Instalación (continuación)
Instalación de los separadores
Para evitar que el condensador (el componente de color negro con aletas,
situado en la parte posterior) toque la pared, coloque los dos separadores de
plástico en su lugar, haciéndolos girar 90°.
Separadores (accesorios)
Limpieza
Después de la instalación, limpie el electrodoméstico con agua tibia.
Conexión de la clavija del cable de alimentación a la toma de corriente
Puede conectar la clavija de alimentación inmediatamente después de la instalación.
Una vez enchufado el electrodoméstico, aparecerán todos los símbolos durante un instante y se mostrarán los siguientes
valores iniciales: -18 °C en el indicador de ajuste del congelador y 4 °C en el indicador de ajuste del frigoríco.
Todos los botones del panel de control son táctiles. (Sólo es necesario pulsar para activar el botón que desea utilizar.)
Notas:
• La refrigeración puede requerir más tiempo en los meses de verano o cuando la temperatura ambiente sea elevada.
• Si necesita desenchufar el frigoríco, espere un mínimo de 10 minutos antes de volver a enchufarlo. En caso contrario,
podría dañar el compresor.
Temperatura ambiente
Encontrará la clasicación climática de su frigoríco en la placa de datos técnicos situada en el lado izquierdo del
compartimento del frigoríco. Muestra la temperatura ambiente para la cual está diseñado el electrodoméstico.
Clasicación climática Temperatura ambiente permitida
SN (Templado extendido) +10 °C a 32 °C
N (Templado) +16 °C a 32 °C
ST (Subtropical) +16 °C a 38 °C
T (Tropical) +16 °C a 43 °C
Para ahorrar energía
1. Instale el frigoríco en un lugar seco, fresco y bien ventilado. Cuanto más fría sea la temperatura ambiente, mejor
eciencia. (Por favor, consulte la página 97 para obtener información acerca de las dimensiones y el espacio.)
2. Combinación de cajones y estantes que ofrece el mayor volumen y el uso más eciente de la energía para el frigoríco.
• Retire los dos cajones superiores del congelador. (Deje el cajón inferior del congelador.)
• Coloque los cajones y estantes del frigoríco en las posiciones que se muestran en la sección “Identicación de las
piezas” (P.99).
• Si se extrae el cajón del compartimento de frío, mejora la circulación de aire frío. Asimismo, esto permite también
almacenar mayor cantidad de alimentos.
3. Ajuste el modo salvapantalla.
4. Para permitir que el aire circule, no sobrecargue el frigoríco.
5. Abra las puertas sólo cuando sea necesario y tan brevemente como sea posible.
6. Limpie, de vez en cuando, las aberturas de ventilación situadas en la parte superior del frigoríco, con
un aspirador, etc. (Evite dañar la tubería del refrigerante que se encuentra dentro de la cubierta.)
7. Cuando ajuste a Modo de supercongelación o superfrío, aumentará el consumo eléctrico.
9898
Page 99

Identicación de las piezas
La siguiente ilustración está basada en el modelo NR-B29SG2, y puede diferir ligeramente de su frigoríco.
Compartimiento del frigoríco
La temperatura puede ajustarse en
un rango de entre 2 °C y 8 °C.
Alimentos
cocinados,
bebidas,
huevos,
pasteles,
lácteos
Compartimento de frío
La temperatura es entre 1 °C y 2 °C
más baja que la ajustada para el
compartimento del frigoríco.
Para obtener más información sobre
cómo usar el compartimento de frío,
consulte la página 101.
Queso,
mantequilla,
embutido
Compartimiento del congelador
La temperatura puede ajustarse en
un rango de entre -24 °C y -16 °C.
Carne y
productos
avícolas
congelados,
pescado,
helado
5
1
2
3
4
6
7
8
9
:
;
<
Español
1Botellero* 52 Bandejas para hielo 92 Bandejas para huevos
2Estantes de cristal** 6Cajones del congelador :Estantes de puerta**
3Cajones para las verduras 7Zócalo ; Estantes para botellas
4
Cajón del compartimento de frío
8Patas ajustables < Pieza deslizante
*La siguiente pieza no se incorpora en el modelo NR-B29SW2.
• Botellero
**Las siguientes piezas se incorporan de forma adicional en los modelos NR-B32SG2/NR-B32SW2.
• Estante de vidrio
• Estante de puerta
Nota:
• Puede cambiar la posición de instalación de los estantes de la puerta y los estantes para botellas. Sin embargo, dependiendo de la
posición del estante, la comida y las bebidas almacenadas podrían caer al abrir o cerrar la puerta.
• Si se cierra la puerta con los cajones (conservación de verduras/frío/congelador) abiertos, estos podrían quebrarse.
99
99
Page 100

Panel de control
Área del visor
1
Indicador de temperatura del frigoríco
1
2
3
Notas:
• Este frigoríco usa un microprocesador para controlar la temperatura. La temperatura dentro del frigoríco varía en
función de factores como, por ejemplo, cambios en la temperatura de la sala, frecuencia de apertura y cierre de la
puerta, y cantidad de comida almacenada y forma de almacenamiento.
• Se muestra la temperatura ajustada.
• Si el modo superfrío está activado, parpadearán
4
5
6
dos marcas
2
Indicador de temperatura del congelador
• Se muestra la temperatura ajustada.
• Si el modo supercongelación está activado,
parpadearán dos marcas
3
Indicador de funciones
• Si el modo económico
están ajustados, se muestran círculos
alrededor de las marcas.
• Si las funciones de bloqueo para niños
están activadas, se muestran las marcas de
dichas funciones.
alternativamente.
y el modo de vacaciones
Área de control
4
Botón de selección del frigoríco
5
Botón de selección del congelador
6
Botón de modo
alternativamente.
y alarma
100100
 Loading...