

Page 1
Before operating this oven, please read these instructions completely and keep for future reference.
<ºЙ +Йд´ЙxЙ EтЙд SЙ±ЙЙxЙд ºЙд {Й½ю±Йд, EЮт{ЙªЙЙ <xЙ КxЙnжщЙЙе EтЙд {ЙЪ®ъТ iЙ®ъ½ю ºЙд {Йgш ±Йе +Йи®ъ ¦ЙК´Й¹ªЙ ¨Йе ºЙЖnщ¦ЙЗ Eдт К±ЙB +{ЙxЙд {ЙЙºЙ ®ъJЙе*
.
.ﺪﻳﺭﺍﺪﻬﮕﻧ ﺩﻮﺧ ﺩﺰﻧ ﻩﺪﻨﻳﺁ ﺭﺩ ﻪﻌﺟﺍﺮﻣ ﻯﺍ ﺮﺑ ﺍﺭ ﻥﺁ ﻭ ﺪﻴﻧﺍﻮﺨﺑ ﻞﻣﺎﻛ ﺭﻮﻃ ﻪﺑ ﺍﺭ ﻪﭼﺮﺘﻓﺩ ﻦﻳﺍ ﺐﻟﺎﻄﻣ ﺎﻔﻄﻟ ،ﻩﺎﮕﺘﺳﺩ ﻦﻳﺍ ﺯﺍ ﻩﺩﺎﻔﺘﺳﺍ ﺯﺍ ﻞﺒﻗ
.ﻞﺒﻘﺘﺴﻤﻟﺍ ﻲﻓ ﺎﻬﻴﻟﺍ ﻉﻮﺟﺮﻠﻟ ﺎﻬﺑ ﻅﺎﻔﺘﺣﻻﺍﻭ ﻞﻣﺎﻜﻟﺎﺑ ﺕﺎﻤﻴﻠﻌﺘﻟﺍ ﻩﺬﻫ ﺓءﺍﺮﻗ ﻰﺟﺮﻳ ،ﻥﺮﻔﻟﺍ ﺍﺬﻫ ﻞﻴﻐﺸﺗ ﻞﺒﻗ
F00038E71KP
iPress0808-1
Panasonic Corporation
Web Site: http://panasonic.net
Operating Instructions
|ÉSÉɱÉxÉ +xÉÖnäùÉ
ﺎﻤﻨﻫﺍﺭ ﻪﭼﺮﺘﻓﺩ
ﻞﻴﻐﺸﺘﻟﺍ ﺕﺍﺩﺎﺷﺭﺇ
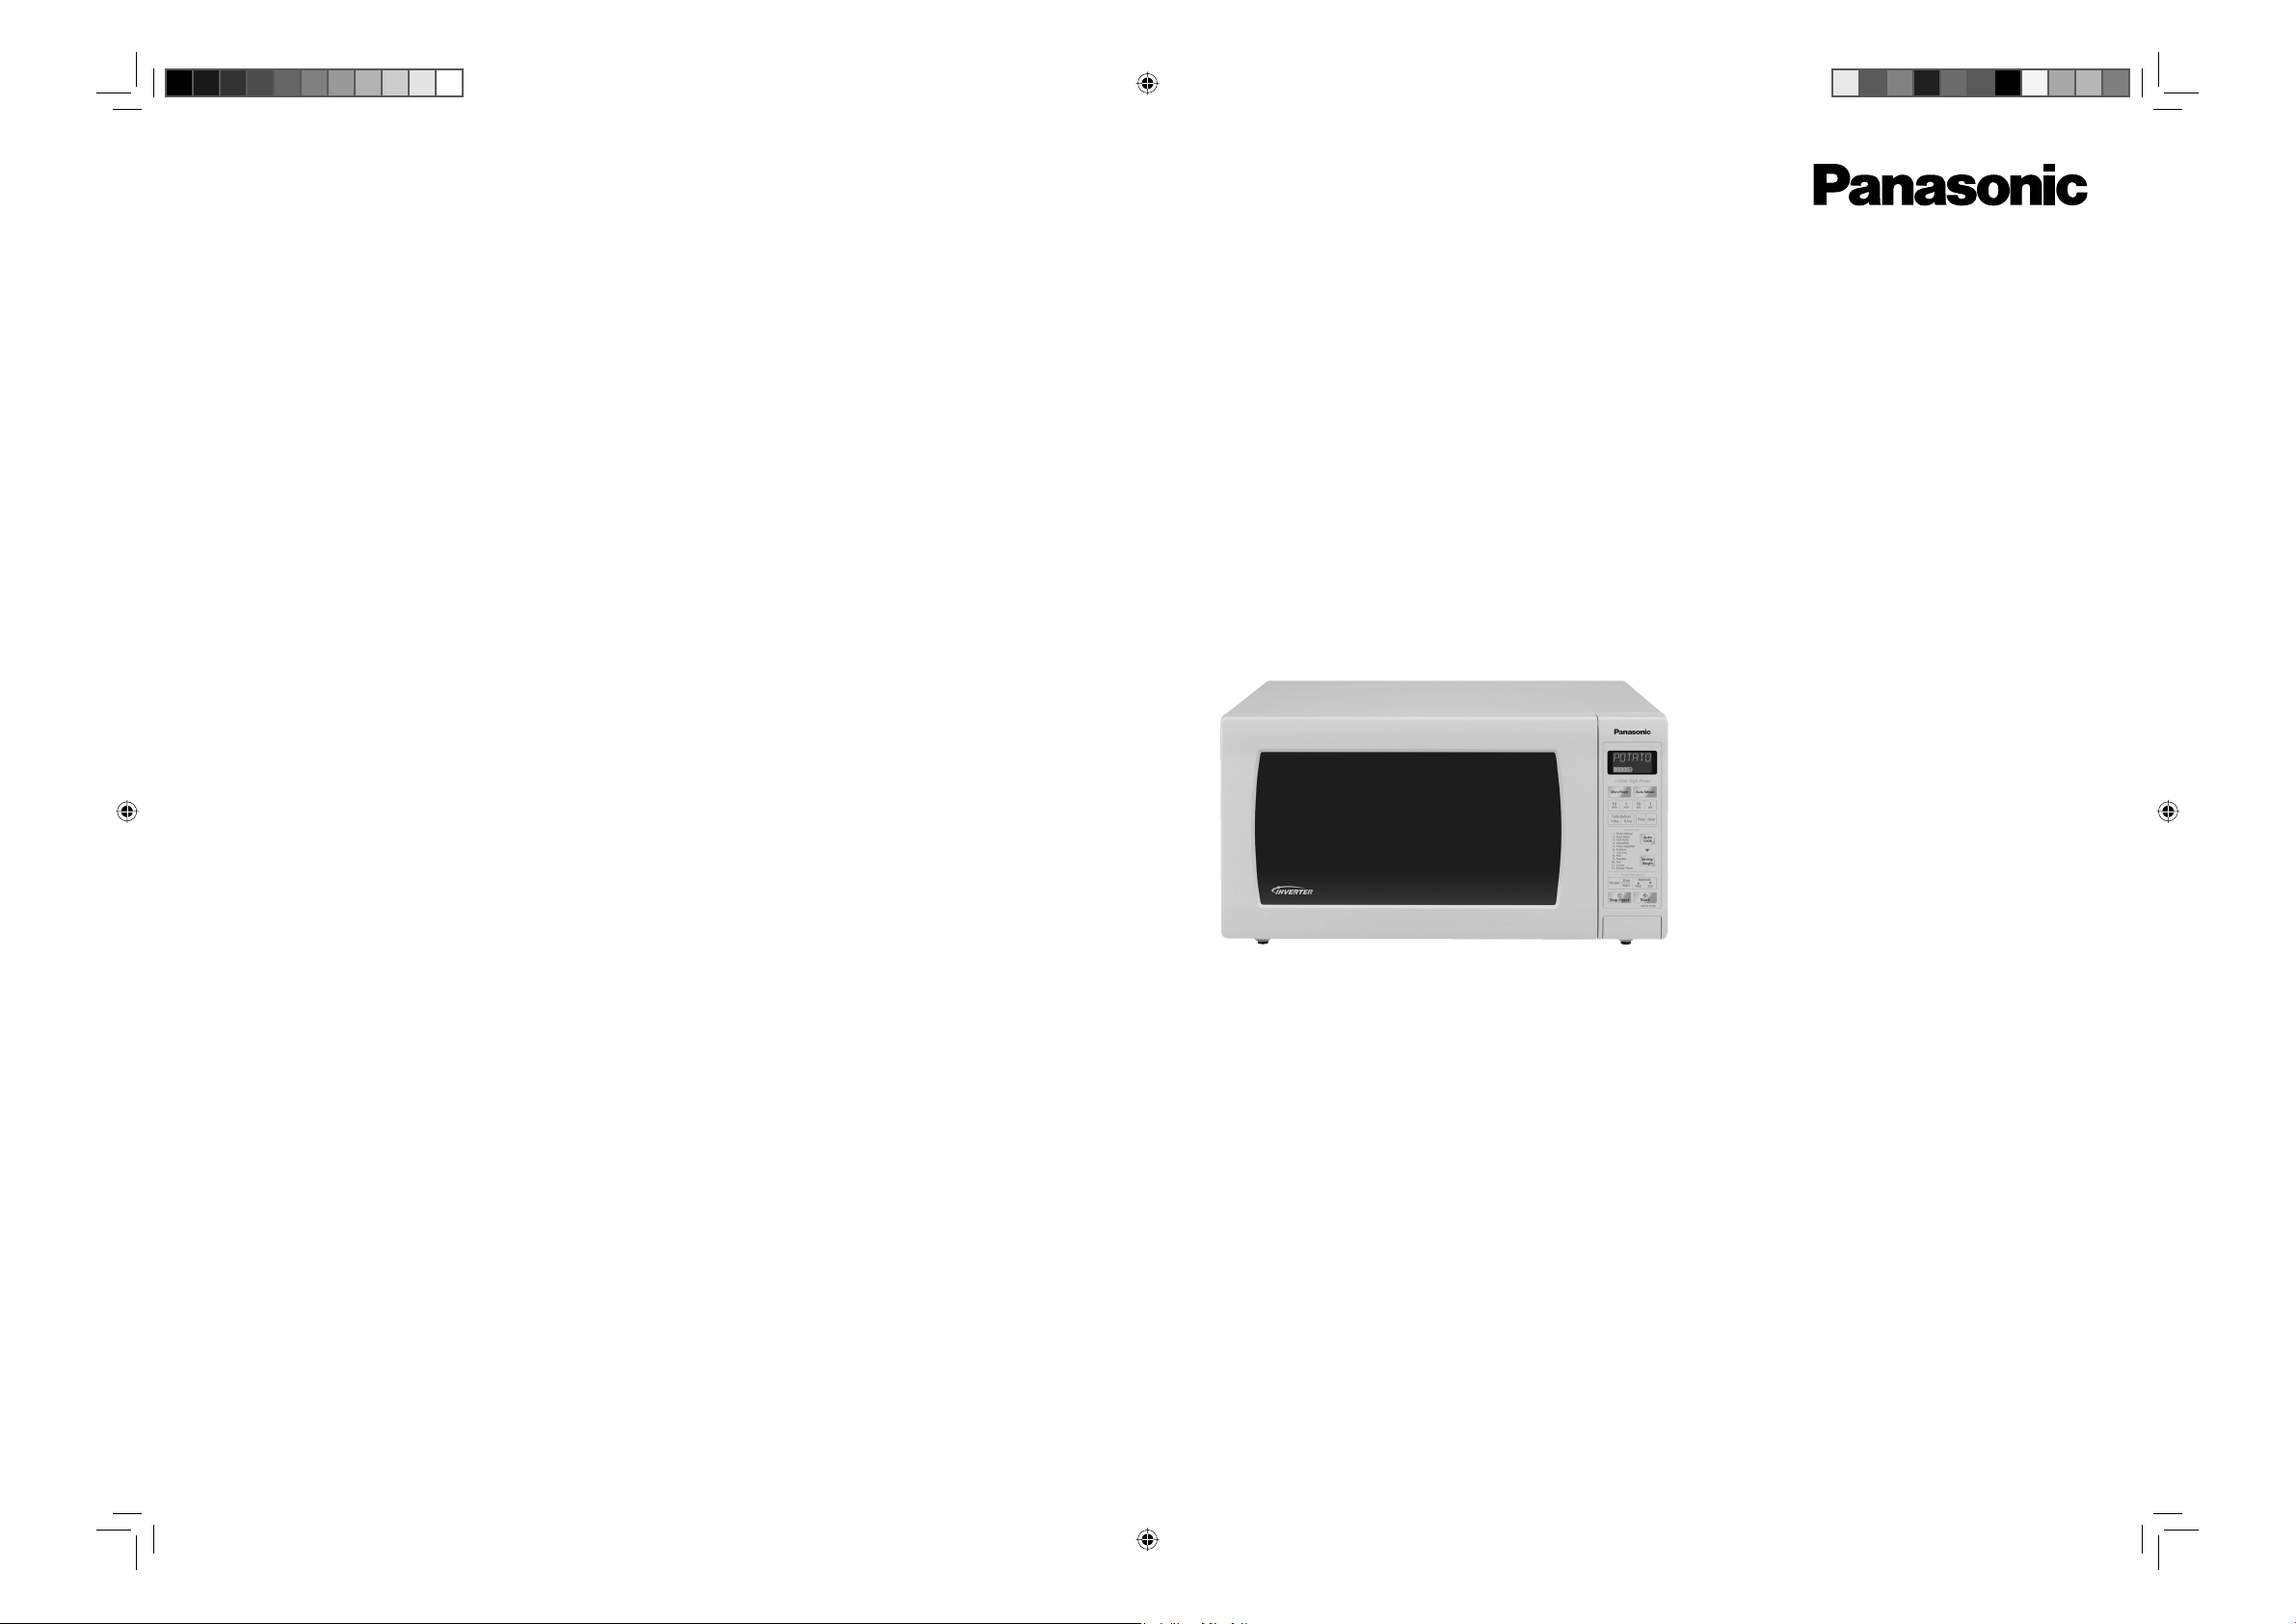
Microwave Oven
¨ÉÉ<GòÉä´Éä´É +Éä´ÉxÉ
ﻥﻭﻭﺍ ﻮﻳﻭﻭﺮﻜﺋﺎﻣ
ﻮﻳﻭﻭﺮﻜﻳﺎﻣ ﻕﺎﺟﺍ
Model: NN-ST757W
IP2118_38E71KP_Cov_00_080806.indd 1IP2118_38E71KP_Cov_00_080806.indd 1 2008-8-6 Jerry 11:23:172008-8-6 Jerry 11:23:17
Page 2

Safety Instructions
Precautions to be taken when
using Microwave Ovens for Heating
Foodstuffs
Inspection for Damage:
A microwave oven should only be used if an inspection
confirms all of the following conditions:
1. The door fits squarely and securely and opens and
closes smoothly.
English
2. The door hinges are in good condition.
3. The metal plates of a metal seal on the door are neither
buckled nor deformed.
4. The door seals are neither covered with food nor have
large burn marks.
Precautions:
Microwave radiation from microwave ovens can cause
harmful effects if the following precautions are not taken:
1. Never tamper with or deactive the interlocking devices on
the door.
2. Never poke an object, particularly a metal object, through
a grille or between the door and the oven while the oven
is operating.
3. Never place saucepans, unopened cans or other heavy
metal objects in the oven.
4. DO NOT let other metallic articles, e.g. fast food foil
containers, touch the side of the oven.
5. Clean the oven cavity, the door and the seals with water
and a mild detergent at regular intervals. Never use
any form of abrasive cleaner that may scratch or scour
surfaces around the door.
6. Always use the oven with the trays or cookware
recommended by the manufacturer.
7. Never operate the oven without a load (i.e. an absorbing
material such as food or water) in the oven cavity unless
specifically allowed in the manufacturer's literature.
8. For horizontally hinged doors, never rest heavy objects
such as food containers on the door while it is open.
9. DO NOT place sealed containers in the microwave
oven. Baby bottles fitted with a screw cap or a teat are
considered to be sealed containers.
10. The appliance is not intended for use by young children
or infirm persons without supervision.
11. Young children should be supervised to ensure that they
DO NOT play with the appliance.
Important Instructions
WARNING—To reduce the risk of burns, electric shock, fire,
injury to persons or excessive microwave energy:
1. Read all instructions before using microwave oven.
2. Some products such as whole eggs and sealed
containers - (for example, closed glass jars and sealed
baby bottles with teat) may explode and should not be
heated in microwave oven. Refer to cookbook for more
details.
3. Use this microwave oven only for its intended use as
described in this manual.
4. As with any appliance, close supervision is necessary
when used by children.
5. DO NOT operate this microwave oven, if it is not working
properly, or if it has been damaged or dropped.
6. To reduce the risk of fire in the oven cavity:
(a) DO NOT overcook food. Carefully attend microwave
oven if paper, plastic, or other combustible materials
are placed inside the oven to facilitate cooking.
(b) Remove wire twist-ties from bags before placing bag
in oven.
(c) If materials inside the oven should ignite, keep oven
door closed, turn oven off at the wall switch, or shut
off power at the fuse or circuit breaker panel.
7. DO NOT remove outer panel from oven.
Circuits
Your microwave ovens should be operated on a separate
circuit from other appliances. The voltage used must be the
same as specified on this microwave oven. Failure to do this
may cause the power board fuse to blow, and/or food to cook
slower.
DO NOT insert higher value fuse in the power board.
Earthing Instructions
This microwave oven must be earthed. In the event of an
electrical short circuit, earthing reduces the risk of electric
shock by providing an escape wire for the electric current.
This microwave oven is equipped with an earthing plug. The
plug must be plugged into an outlet that is properly installed
and earthed.
WARNING—Improper use of the earthing plug can result in
electric shock.
Warning
(a) The door seals and door seal areas should be cleaned with a damp cloth. The appliance should be inspected for
damage to the door seals and door seal areas and if these areas are damaged the appliance should not be operated
until it has been repaired by a service technician trained by the manufacturer.
(b) It is dangerous for anyone other than a service technician trained by the manufacturer to perform repair service.
(c) If the supply cord of this appliance is damaged, it must be replaced by the special cord available only from the
manufacturer.
(d) Before use, the user should check that whether the utensils are suitable for use in microwave ovens.
(e) Liquids or other foods must not be heated in sealed containers since they are liable to explode, at the same time it
should avoid the boiling liquids splash.
(f) Only allow children to use the oven without supervision when adequate instructions have been given so that the child is
able to use the oven in a safe way and understands the hazards of improper use.
- Eng-1 -
IP1208_38E70KP_Eng_07_070629.indd 1IP1208_38E70KP_Eng_07_070629.indd 1 2007-6-29 11:30:052007-6-29 11:30:05
Page 3

Installation and General Instructions
General Use
1. In order to maintain high quality, DO NOT operate the
oven when empty. The microwave energy will reflect
continuously throughout the oven if no food or water is
present to absorb energy.
2. If smoke is observed, press the Stop/Reset Pad and
leave door closed. Disconnect the power cord, or shut off
power at the fuse or circuit breaker panel.
3. DO NOT dry clothes, newspapers or other materials in
oven. They may catch on fire.
4. DO NOT use recycled paper products, as they may
contain impurities which may cause sparks and/or fires
when used.
5. DO NOT use newspapers or paper bags for cooking.
6. DO NOT hit or strike control panel. Damage to controls
may occur.
7. POT HOLDERS may be needed as heat from food
is transferred to the cooking container and from the
container to the glass tray. The glass tray can be very hot
after removing the cooking container from the oven.
8. DO NOT store flammable materials next to, on top of, or
in the oven. It could be a fire hazard.
9. DO NOT cook food directly on glass tray unless indicated
in recipes. (Food should be placed in a suitable cooking
utensil.)
10. DO NOT use this oven to heat chemicals or other nonfood products. DO NOT clean this oven with any product
that is labeled as containing corrosive chemicals. The
heating of corrosive chemicals in this oven may cause
microwave radiation leaks.
11. If glass tray is hot, allow to cool before cleaning or
placing in water.
Placement of Oven
1. The oven must be placed on a flat, stable surface. For
correct operation, the oven must have sufficient air flow.
Allow 15 cm of space on the top of the oven, 10 cm at
back and 5 cm on both sides. If one side of the oven is
placed flush to a wall, the other side or top must not be
blocked. DO NOT remove feet.
15cm
5cm
10cm
OPEN
(a) DO NOT block air vents. If they are blocked during
operation, the oven may overheat. If the oven
overheats, a thermal safety device will turn the
oven off. The oven will remain inoperable until it has
cooled.
(b) DO NOT place oven near a hot or damp surface
such as a gas stove, electric range or sink etc.
(c) DO NOT operate oven when room humidity is too
high.
2. This oven was manufactured for household use only.
Counter-top
Food
1. DO NOT use your oven for home canning or the heating
of any closed jar. Pressure will build up and the jar
may explode. In addition, the microwave oven cannot
maintain the food at the correct canning temperature.
Improperly canned food may spoil and be dangerous to
consume.
2. DO NOT attempt to deep fat fry in your microwave oven.
3. DO NOT boil eggs in their shell (unless otherwise stated
in cookbook). Pressure will build up and the eggs will
explode.
4. Potatoes, apples, egg yolks, whole squash and
sausages are examples of foods with nonporous skins.
This type of food must be pierced before cooking, to
prevent bursting.
5. When heating liquids, e.g. soup. sauces and beverages
in your microwave oven, overheating the liquid beyond
boiling point can occur without evidence of bubbling.
This could result in a sudden boil over the hot liquid.
To prevent this possibility the following steps should be
taken.
(a) Avoid using straight-sided containers with narrow
necks.
(b) DO NOT overheat.
(c) Stir the liquid before placing the container in the oven
and again halfway through cooking time.
(d) After heating, allow to stand in the oven for a short
time, stirring again before carefully removing the
container.
6. DO NOT USE A CONVENTIONAL MEAT
THERMOMETER IN THE MICROWAVE OVEN. To
check the degree of cooking of roasts and poultry
use a MICROWAVE THERMOMETER. Alternatively, a
conventional meat thermometer may be used after the
food is removed from the oven. If undercooked, return
meat or poultry to the oven and cook for a few more
minutes at the recommended power level. It is important
to ensure that meat and poultry are thoroughly cooked.
7. COOKING TIMES given in the cookbook are
APPROXIMATE. Factors that may affect cooking time
are preferred degree of moisture content, starting
temperature, altitude, volume, size, shape of food and
utensils used. As you become familiar with the oven, you
will be able to adjust for these factors.
8. It is better to UNDERCOOK RATHER THAN
OVERCOOK foods. If food is undercooked, it can always
be returned to the oven for further cooking. If food is
overcooked, nothing can be done. Always start with
minimum cooking times recommended.
9. Extreme care should be taken when cooking popcorn
in a microwave oven. Cook for minimum time as
recommended by manufacturer. Use the directions
suitable for the wattage of your microwave oven. NEVER
leave oven unattended when popping popcorn.
10. When heating food in plastic or paper containers, check
the oven frequently due to the possibility of ignition.
11. The contents of feeding bottles and baby food jars are
to be stirred or shaken and the temperature is to be
checked before consumption, in order to avoid burns.
English
- Eng-2 -
IP1208_38E70KP_Eng_07_070629.indd 2IP1208_38E70KP_Eng_07_070629.indd 2 2007-6-29 11:30:052007-6-29 11:30:05
Page 4
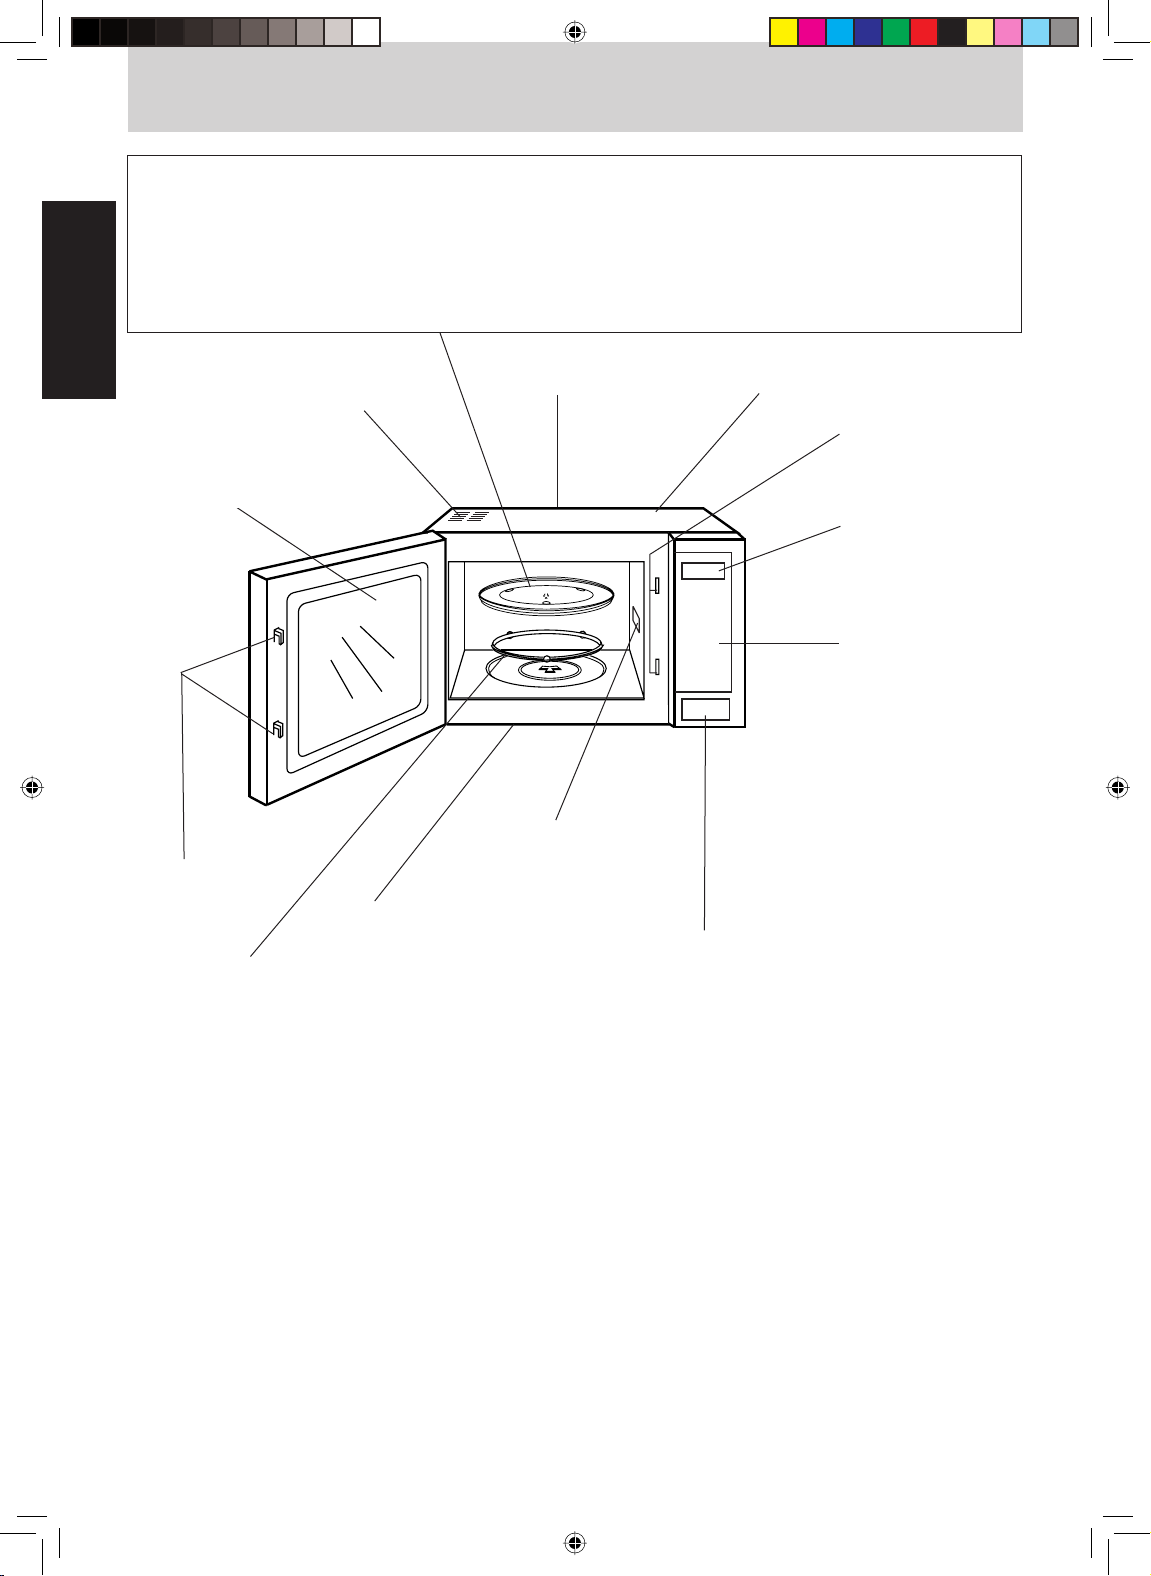
Feature Diagram
Glass Tray
1. Do not operate the oven without the Roller Ring and Glass Tray in place.
2. Only use the Glass Tray specifically designed for this oven. Do not substitute another Glass Tray.
3. If Glass Tray is hot, allow to cool before cleaning or placing in water.
4. Do not cook directly on Glass Tray. Always place food on a microwave-safe dish, or on a rack set in a microwave-safe dish.
5. If food or utensil on Glass Tray touches oven walls, causing the tray to stop moving, the tray will automatically rotate in
opposite direction. This is normal.
6. Glass Tray can rotate in either direction.
English
Oven Window with
Vapor Barrier Film
(do not remove)
Door Safety
Lock System
Roller Ring
1. The Roller Ring and oven floor
should be cleaned frequently to prevent
excessive noise and scratching of painted
surface.
2. The Roller Ring must always be used
together with the Glass Tray for cooking.
Exhaust Air Vents
External Air Vents
Identification Plate
Waveguide Cover
(do not remove)
Inlet Air Vents
Door Safety
Lock System
Display Window
Control Panel
Door Release Button
Press to open the door. Opening the door during
cooking will stop the cooking process without
cancelling the program. Cooking resumes as soon
as the door is closed and Start Pad is pressed. It
is quite safe to open the door at any time during a
cooking program and there is no risk of Microwave
exposure.
Oven Light:
Oven Light will turn on during cooking and also when door is opened.
- Eng-3 -
IP1208_38E70KP_Eng_07_070629.indd 3IP1208_38E70KP_Eng_07_070629.indd 3 2007-6-29 11:30:062007-6-29 11:30:06
Page 5
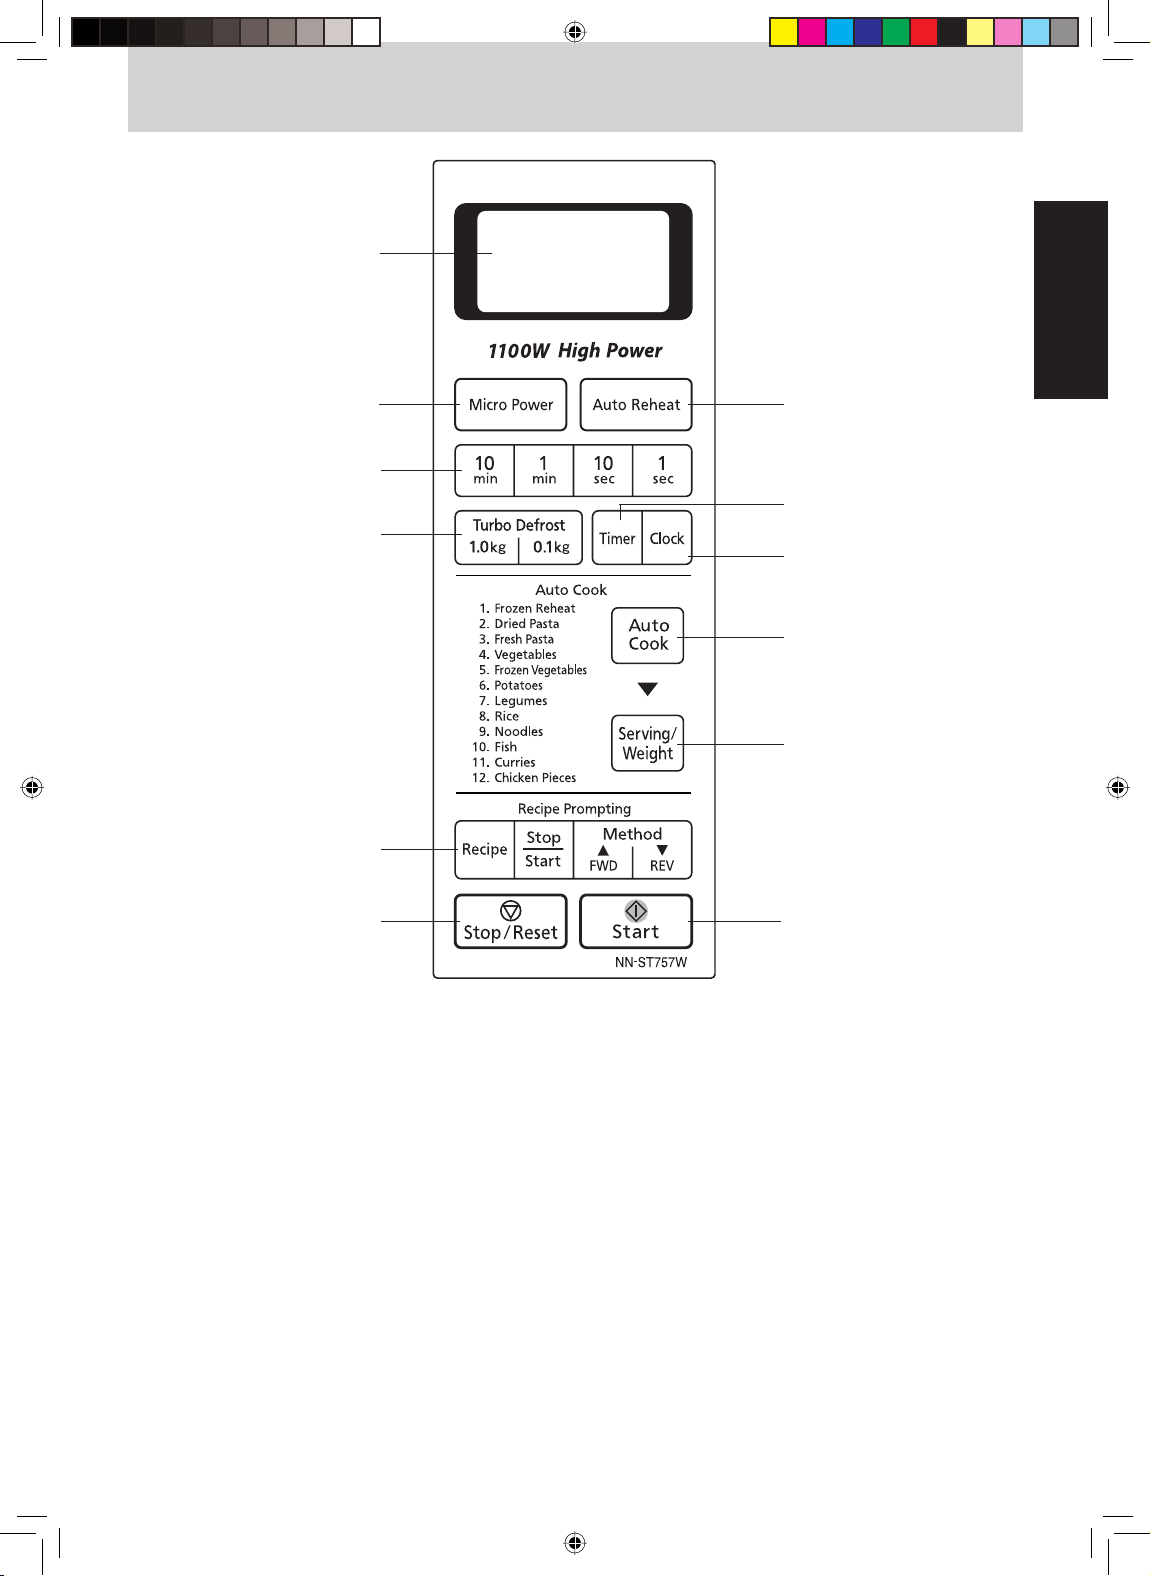
Control Panel
Display Window
Micro Power Pad (pg. 6)
Time Pads
Turbo Defrost Pad (pg. 9)
English
Auto Reheat Pad (pg. 9)
Timer Pad (pg. 8)
Clock Pad (pg. 7)
Auto Cook Pad (pg. 10)
Serving/Weight Pad
(pg. 10)
Recipe Prompting Pads
(pg. 15)
Before cooking: One tap clears
Stop/Reset Pad
your instructions.
During cooking: One tap
temporarily stops the cooking
process. Another tap cancels all
your instructions and time of day
appears in the Display Window.
Start Pad
One tap allows oven to begin
functioning. If door is opened or
Stop/Reset Pad is pressed once
during oven operation, Start Pad
must again be pressed to restart
oven.
Word Prompters
When pads are pressed, a beep sound is heard and the corresponding letter or word(s) appear and roll across the Display
Window. If a pad is pressed and no beep is heard, the unit does not or cannot accept the instruction. As each pad is pressed
the corresponding word(s) roll across the Display Window. Words will automatically appear to prompt the user to perform the
next step. It is not necessary to wait for the words to appear before pressing pads for the next step. A two beep sound is heard
between stages. At the end of any complete programme, the oven will beep five times and “ENJOY YOUR MEAL” will appear
in the Display Window.
- Eng-4 -
IP1208_38E70KP_Eng_07_070629.indd 4IP1208_38E70KP_Eng_07_070629.indd 4 2007-6-29 11:30:062007-6-29 11:30:06
Page 6
Let’s Start to Use Your Oven!
1 Plug in
Plug into a properly earthed electrical outlet. “WELCOME TO PANASONIC MICROWAVE OVEN COOKING” appears in
the Display Window. (This will immediately cease when any pad is pressed.)
2 Open Door
Open the door and place container with food on Glass Tray in the oven. Then close the door.
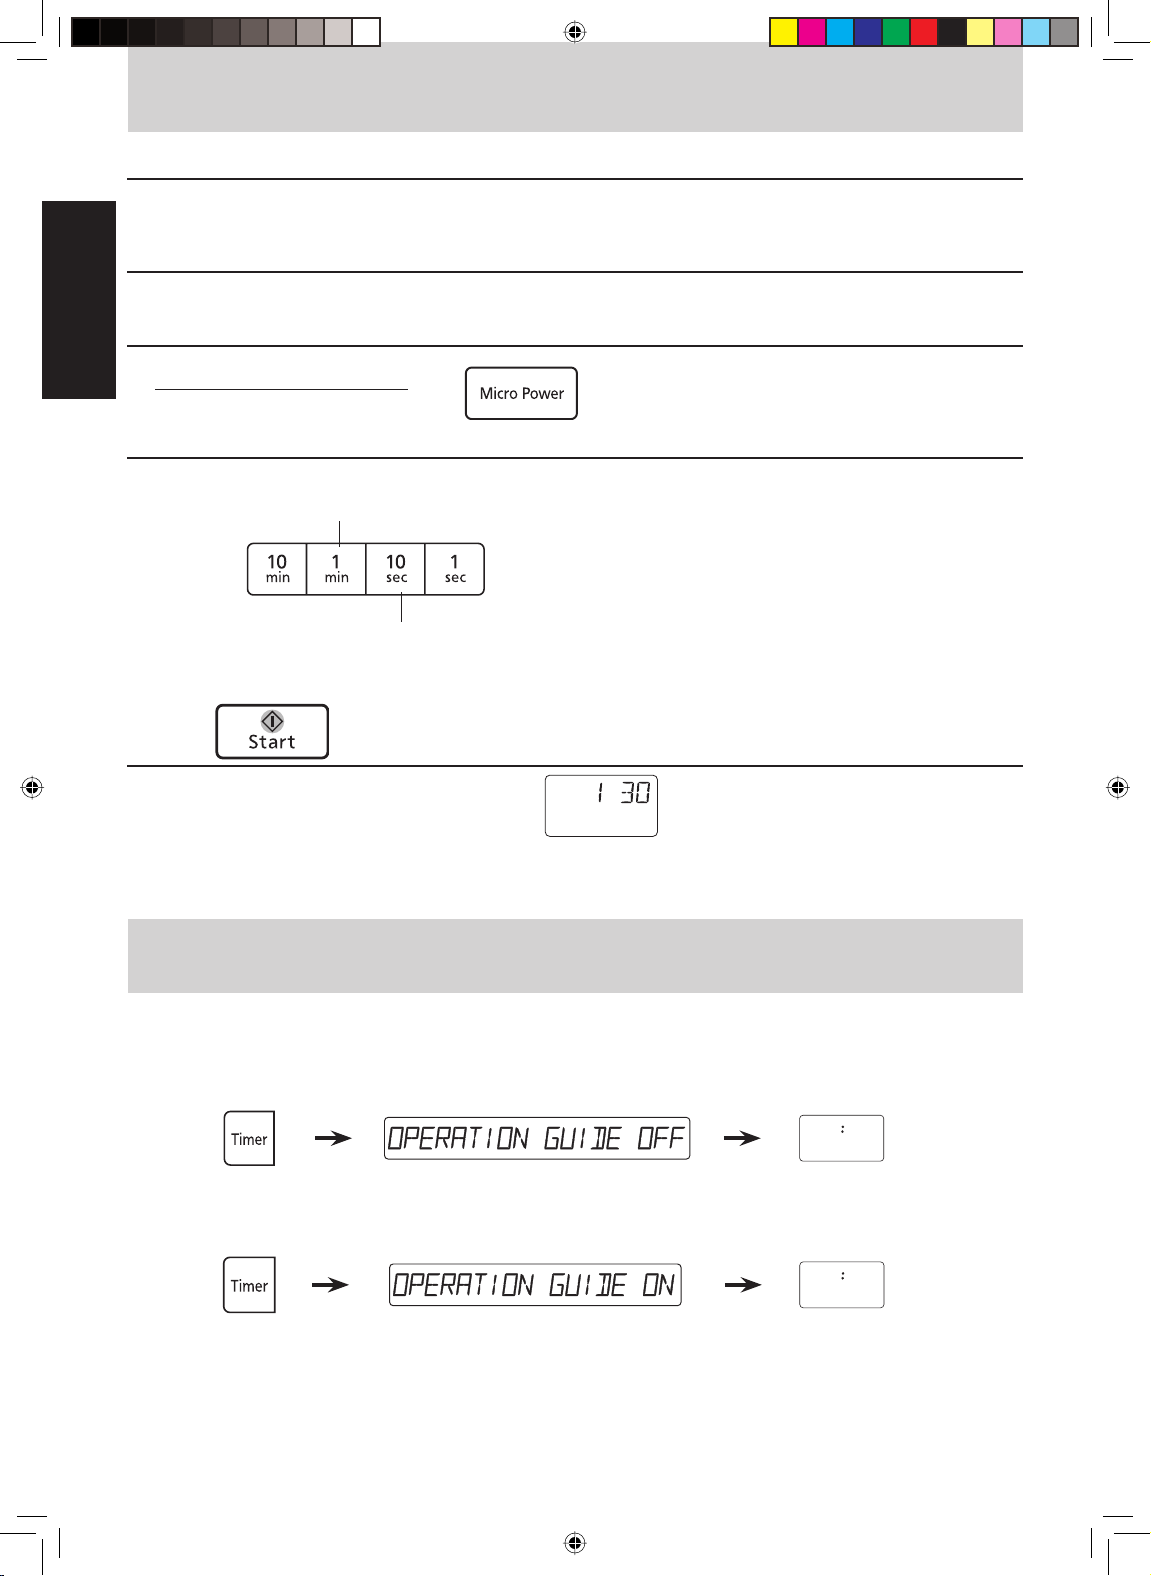
3 Select Power Level
English
e.g. P4
Press Micro Power Pad four times.
(see page 6 for Micro Power chart)
4 Set Time
e.g. 1 minute 30 seconds
Press numbered Time Pads
once
three times
5 Press
Verify your selection(s) in the Display Window.
MIN
SEC
Operation Guide in the Display Window
To assist you in programming your oven, the following operation will appear in the Display Window. When you become familiar
with your oven, the Operation Guide can be turned off.
To turn off:
Press 3 times. Display Window Colon or time of day appears
To turn on:
in the Display Window.
Press 3 times. Display Window Colon or time of day appears
- Eng-5 -
IP1208_38E70KP_Eng_07_070629.indd 5IP1208_38E70KP_Eng_07_070629.indd 5 2007-6-29 11:30:062007-6-29 11:30:06
in the Display Window.
Page 7
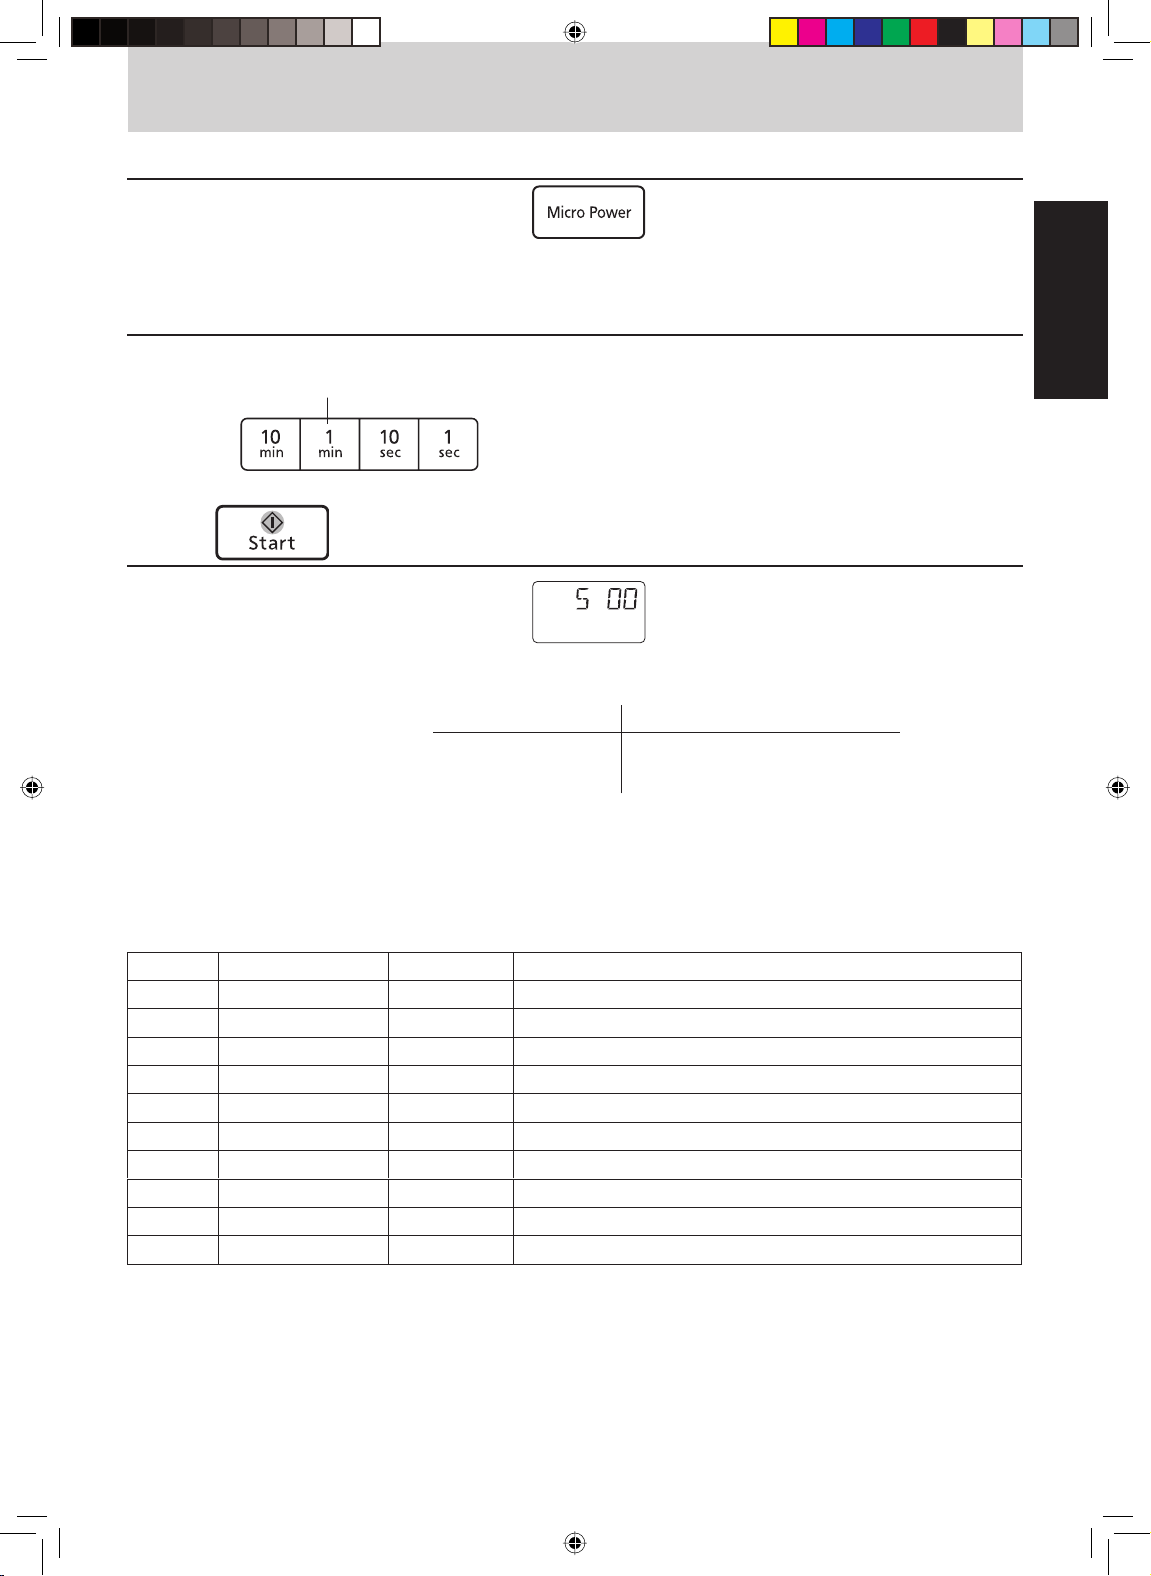
To Cook/Reheat/Defrost by Micro Power and Time
1 Select Power Level
Press Micro Power Pad until the
power level appears in the Display Window.
(see chart below)
Note: When selecting P10 on the first stage, you can start from step 2.
2 Set Cooking Time e.g. 5 minutes
(P10: up to 30 minutes, other powers: up to 99 minutes and 99 seconds for a single stage)
5 times
3 Press
Cooking will start.
The time in the Display Window will count down.
For more than one stage cooking,
Repeat steps 1 & 2 above then press Start. The maximum number of stages for cooking is 3. The oven will beep twice
between stages.
MIN
SEC
English
e.g. : Casserole Stage 1 Stage 2
P10 for 10 minutes to
bring to a boil
Micro Power:
The Micro Power Pad gives you a selection of different power levels representing decreasing amounts of microwave energy,
used for cooking foods at different speeds.
e.g.The lower the micro power setting, the more evenly the food cooks, although it will take a little longer.
To select the correct power level for cooking different foods, refer to the chart below.
Press POWER LEVEL WATTAGE EXAMPLE OF USE
1x P10 1100 W Boil water. Cook vegetables, rice, pasta and noodles. Reheating.
2x P9 1000 W Cook fresh fruits.
3x P8 900 W Cook cakes, desserts. Heat milk.
4x P7 800 W Cook pork, whole chicken and chicken pieces.
5x P6 700 W Cook beef, lamb and eggs. Melt butter.
6x P5 600 W Cook meatloaves. Melt chocolate.
7x P4 400 W Cook fish and seafood.
8x P3 300 W Thaw foods. Cook christmas pudding, corned beef, dried beans and peas.
9x P2 200 W Simmer soups, stews and casseroles (less tender cuts).
10x P1 100 W Keep cooked foods warm, simmer slowly.
P2 for 50 minutes to finish cooking
by simmering
- Eng-6 -
IP1208_38E70KP_Eng_07_070629.indd 6IP1208_38E70KP_Eng_07_070629.indd 6 2007-6-29 11:30:072007-6-29 11:30:07
Page 8

To Set Clock
You can use the oven without setting the clock.
1 Press
Colon will blink in Display Window.
English
2 Enter Time of Day
Enter time of day using Time Pads e.g. 12:35
Clock is a 12 hour display. There isn’t a.m. or p.m. setting.
twice
five times
Press once
three times
3 Press
Colon stops blinking; time of day is entered and locked into Display Window.
Notes: 1. Oven will not operate while colon is still blinking.
2. To reset time of day, repeat step 1 through 3.
3. The clock will keep the time of day as long as oven is plugged in and electricity is supplied.
4. Maximum time available is 12:59. Clock is 12 hour only.
To Use Child Safety Lock
This feature allows you to prevent operation of the oven by a young child; however, the door will open.
You can set Child Safety Lock when colon or time of day is displayed.
To set:
Colon or time of day
is displayed
Press 3 times. Display Window
To cancel:
Display Window Press 3 times. Colon or time of day
- Eng-7 -
IP1208_38E70KP_Eng_07_070629.indd 7IP1208_38E70KP_Eng_07_070629.indd 7 2007-6-29 11:30:072007-6-29 11:30:07
is displayed
Page 9

To Use Timer Pad
To Use as a Kitchen Timer
Press. Set desired amount of time.
(up to 99 minutes and 99 seconds)
To Set Standing Time
Set the desired
cooking programme.
(see Page 6)
Press. Set desired amount of standing time.
(up to 99 minutes and 99 seconds)
To Set Delay Start
English
Press Start.
Time will count down
without oven operating.
Press Start.
After cooking, standing
time will count down
without oven operating.
Set the desired
cooking programme.
(see Page 6)
Press. Set desired amount of delay time.
(up to 99 minutes and 99 seconds)
Notes:
1. If oven door is opened during the Standing Time, Delay Start or Kitchen Timer, the time in the Display Window will continue
to count down.
2. Delay Start cannot be programmed before any Auto Control function. This is to prevent the standing temperature of the
food from rising before defrosting or cooking begins. A change in the starting temperature could cause inaccurate results
and / or food may deteriorate.
Press Start.
Delayed time will count down.
Then cooking will start.
- Eng-8 -
IP1208_38E70KP_Eng_07_070629.indd 8IP1208_38E70KP_Eng_07_070629.indd 8 2007-6-29 11:30:072007-6-29 11:30:07
Page 10

To Defrost
Turbo Defrost or Weight Defrost
This feature allows you to defrost meat, poultry and seafood automatically by just setting the weight of the food.
1 Set Weight
The shape and size of the food will determine the maximum weight the oven can accommodate. The recommended
maximum weight of food depends on the oven cavity size. Weight must be programmed in kilograms and tenths of a
kilogram (max 3.0 kg).
English
Enter weight.
2 Press
Defrost time appears in the Display Window and begins to count down.
When cooking time is longer than 60 minutes, the time will appear in hours and minutes.
Note:
For further information, refer to next page.
Defrost by Micro Power and Time Setting
Step 1. Step 2. Step 3.
Press 8 times to P3.
(Defrost power level,page 6)
To Reheat Food Using Auto Reheat
1 Press
Press.Set time.
Until the desired weight appears in the Display Window.
NO. OF TAPS DISPLAY
1 250 g 200 - 300 g
2 450 g 400 - 500 g
3 650 g 600 - 700 g
4 850 g 800 - 900 g
RECOMMENDED
FOOD WEIGHT
2 Press
Reheating time appears in the Display Window and begins to count down.
For best results on Auto Reheat, follow these recommendations:
1. All foods must be precooked. Suitable for casseroles, plated dinners, soups, stews, pasta dishes (except lasagne), canned
foods.
2. Foods should be reheated from room temperature or refrigerator temperature. Do not reheat frozen foods on this setting.
3. Foods should be covered loosely but completely with plastic wrap or a casserole lid which does not snap seal.
4. Foods weighing less than 200 g and more than 900 g should be reheated by Micro Power and Time only.
5. All foods should have a covered stand time of 3 to 5 minutes at the end of reheating.
6. Do not reheat bread or pastry products; raw, uncooked or frozen foods; or beverages.
- Eng-9 -
IP1208_38E70KP_Eng_07_070629.indd 9IP1208_38E70KP_Eng_07_070629.indd 9 2007-6-29 11:30:072007-6-29 11:30:07
Page 11

To Cook Food Using Auto Cook
1 Press Auto Cook Pad
Press the Auto Cook Pad until the desired food category appears in the display window.
2 Press Desired Serving / Weight Pad
Press the desired serving / weight Pad until the desired food Serving/Weight appears in the display window.
(see below chart)
Pad Food Category Serving / Weight
1 tap 2 taps 3 taps 4 taps
Auto Cook 1. Frozen Reheat 250 g 450 g 650 g 850 g
2. Dried Pasta 150 g 250 g 375 g 500 g
3. Fresh Pasta 250 g 375 g 500 g 625 g
4. Vegetables 120 g 180 g 250 g 370 g
5. Frozen Vegetables 120 g 250 g 500 g 750 g
6. Potatoes 250 g 370 g 500 g 900 g
7. Legumes 1.0 cup 2.0 cup 3.0 cup 4.0 cup
8. Rice 1.0 cup 1.5 cup 2.0 cup 2.5 cup
9. Noodles 200 g 350 g 500 g 800 g
10. Fish 120 g 250 g 370 g 500 g
11. Curries 250 g 500 g 750 g —
12. Chicken Pieces 400 g 600 g 800 g 1000 g
English
3 Press
Cooking time appears in the Display Window and begins to count down.
- Eng-10 -
IP1208_38E70KP_Eng_07_070629.indd 10IP1208_38E70KP_Eng_07_070629.indd 10 2007-6-29 11:30:082007-6-29 11:30:08
Page 12

To Cook Food Using Auto Cook
REHEATING FROZEN FOODS BY AUTO COOK
(250 g - 850 g)
• Foods weighting less than 200 g and more than 900 g
should be heated by micro power and time.
• Foods should be reheated from freezer.
All foods must be precooked. Suitable foods include
•
casseroles, plated dinners, soups, stews, pasta dishes,
(except lasagne) and canned foods.
English
• Do not reheat bread or pastry items, raw or uncooked
foods or beverages.
• Cover foods loosely with plastic wrap or a lid, which does
not snap seal.
• During the cooking time, the oven will 'beep' and prompt
you to rearrange or stir. At the end of cooking time,
stir the food, check it is hot and allow standing 2 to 3
minutes.
To Operate: Press Auto Cook to Frozen Reheat. Select the
Serving/Weight, then press Start.
COOKING DRIED AND FRESH PASTA BY AUTO COOK
Dried Pasta (150 g - 500 g)
• Suitable for cooking dried pasta such as spaghetti,
fettuccine, macaroni, penne, spiral and various pasta
shapes.
• Place pasta in an appropriate size dish with boiling water.
Use the following as a guide:
Pasta Boiling Water Dish Size
150 g 4 cups 3-litre
250 g 5 cups 3-litre
350 g 6 cups 4-litre
• Add 1 tablespoon of oil, if desired, before cooking to
• At the end of the cooking time, cover and let stand for 5
• Leave dish uncovered.
• During cooking, the oven will 'beep' and instruct you to
500 g 8 cups 4-litre
prevent pasta from sticking together.
to 10 minutes, if required, before draining.
stir.
COOKING VEGETABLES BY AUTO COOK
(120 g - 370 g)
• Suitable for cooking all types of leaf, green and soft
varieties of vegetables, including broccoli, squash
cauliflower, cabbage, asparagus, beans, celery, zucchini,
spinach, capsicum or a mixture of these.
• All vegetables should be trimmed or prepared and cut
into evenly sized pieces.
• Add 1 tablespoon to
dehydrated or a softer cooked texture is desired.
• Place in a suitable size dish.
• Butter, herbs, etc., may be added before heating, but do
not salt vegetables until serving.
• Cover dishes securely with plastic wrap or a fitted lid.
• During the cooking time, the oven will ‘beep’ and prompt
you to stir and rearrange vegetables.
• At the completion of heating, stir larger quantities of
vegetables. Let stand, covered, for 2 to 3 minutes.
To Operate: Press Auto Cook to Vegetables. Select the
Serving/Weight, then press Start.
1
⁄4 cup of water to vegetables if
COOKING FROZEN VEGETABLES BY AUTO COOK
(120 g - 750 g)
• Suitable for all types of frozen vegetables.
• Place in a suitable size dish.
• Best results are achieved if large quantities are placed in
a single layer.
• Add 1 tablespoon to 1⁄4 cup water to vegetables, if
desired.
• Butter, herbs etc. may be added before heating, but do
not add salt until serving.
• Cover dishes securely with plastic wrap or a fitted lid.
• During the cooking time, the oven will ‘beep’ and prompt
you to stir and rearrange vegetables.
• At the end of the cooking time, stir vegetables and let
stand, covered, for 2 to 3 minutes.
To Operate: Press Auto Cook to Frozen Vegetables.
Select the Serving/Weight, then press Start.
To Operate: Press Auto Cook to Dried Pasta. Select the
Serving/Weight, then press Start.
Fresh Pasta (250 g - 625 g)
• Suitable for cooking fresh pasta such as fettuccine,
tagliatelle, tortellini, ravioli and agnolotti. (Gnocchi should
be cooked by manual MICRO POWER.)
• Place pasta in an appropriate size dish with boiling water.
Use the above chart as a guide:
• Follow Auto Cook directions as for dried pasta.
To Operate: Press Auto Cook to Fresh Pasta. Select the
Serving/Weight, then press Start.
- Eng-11 -
IP1208_38E70KP_Eng_07_070629.indd 11IP1208_38E70KP_Eng_07_070629.indd 11 2007-6-29 11:30:082007-6-29 11:30:08
Page 13

To Cook Food Using Auto Cook
COOKING POTATOES BY AUTO COOK
(250 g - 900 g)
• Suitable for cooking root vegetables such as potatoes,
sweet potatoes, pumpkin, onions, swede, carrots, turnip
and beetroot.
• All vegetables should be trimmed or prepared and cut
into even sized pieces.
• Add 1 tablespoon to
dehydrated or a softer cooked texture is desired.
• Place into an appropriate size dish and cover securely
with plastic wrap or a fitted lid.
• If desired, butter, herbs etc. may be added but do not
add salt until after cooking.
• Anytime during the cooking time, the oven will ‘beep’ and
prompt you to stir and rearrange the vegetables.
• At the completion of cooking, stir larger quantities of
vegetables. Let stand, covered, for 2 to 3 minutes.
To Operate: Press Auto Cook to Potatoes. Select the
Serving/Weight, then press Start.
1
⁄4 cup of water to vegetables if
COOKING LEGUMES BY AUTO COOK
(1 cup - 2.5 cups)
• Suitable for cooking chickpeas, split peas, dried beans
and peas and brown rice.
• Cover legumes with cold water and soak overnight,
drain.
• Place legumes and boiling water into an appropriate
sized dish. (See table for quantities)
Amount of
Legumes
1 cup 3 cups 2-litre
2 cups 4 cups 3-litre
3 cups 6 cups 4-litre
• During cooking the oven will beep and prompt you to stir.
• At the end of cooking time, allow legumes to stand for 5
To operate: Press Auto Cook to Legumes. Select the
Serving/Weight, then press Start.
4 cups 8 cups 4-litre
Remove covering.
minutes if required.
Amount of
Boiling Water
Dish Size
COOKING RICE BY AUTO COOK
(1 cup - 2.5 cups)
• Suitable for cooking short and long grain rice including
specialty rices.
• It is not suitable for cooking brown rice or wild rice.
• Place rice with water (at room temperature) in a suitable
dish. We recommend the following proportions of rice to
tap water:
Rice Water Dish Size
1 cup 2 cups 3-litre
1
⁄2 cups 3 cups 3-litre
1
2 cups 4 cups 4.5-litre
1
2
It may be necessary to adjust the water to your personal
preference.
• Using a large size dish will prevent the rice from boiling
• Do not cook rice in plastic dishes as incorrect cooking
• At the completion of the cooking time, let stand 5 to 10
• Leave dish uncovered.
To Operate: Press Auto Cook to Rice. Select the Serving/
Weight, then press Start.
⁄2 cups 5 cups 4.5-litre
over.
times may result.
minutes.
COOKING FRESH NOODLES BY AUTO COOK
(200 g - 800 g)
• Suitable for cooking fresh noodles such as Hokkien,
Singapore, Udon, Soba, Rice noodles.
• Select Noodles and boiling water as recommended in
chart beside in a suitable size dish.
• Cover securely with plastic wrap.
• The oven will beep during the cooking time and instruct
you to stir/remove cover. There is no need to re-cover
noodles.
• At the end of cooking time, drain and use as required.
Noodles Boiling Water Dish Size
200 g
350 g
500 g
To operate: Press Auto Cook to Noodles. Select the
Serving/Weight, then press Start.
800 g
1
⁄4 cup 1-litre
1
⁄4 cup 1.5-litre
1
⁄2 cup 2-litre
1
⁄2 cup 2.5-litre
English
- Eng-12 -
IP1208_38E70KP_Eng_07_070629.indd 12IP1208_38E70KP_Eng_07_070629.indd 12 2007-6-29 11:30:082007-6-29 11:30:08
Page 14

To Cook Food Using Auto Cook
COOKING FISH AUTO COOK
(120 g - 500 g)
• Suitable for cooking whole fish and fish fillets.
• Select fish suitable for microwave cooking and place in a
single layer in a shallow dish, with skin-side down.
• Add butter, spices, herbs, or lemon juice to flavour.
• Overlap thin edges of fillets to prevent overcooking.
• Shield the eye and tail area of whole fish with small
English
amounts of aluminum foil to prevent overcooking.
• Cover dish securely with plastic wrap or fitted lid that
does not snap seal.
• During the cooking time, the oven will ‘beep’ and prompt
you to turn over and rearrange.
• Allow large amounts of fish to stand for 3 to 5 minutes
after cooking before serving.
To Operate: Press Auto Cook to Fish. Select the Serving/
Weight, then press Start.
COOKING CURRIES BY AUTO COOK
(250 g - 750 g)
• Refer to chart below for quantities to use.
• Cut meat and vegetables into even size pieces.
• Place curry paste, meat, onion and hard vegetables into
a suitable size casserole dish, do not use plastic dishes.
Cover with plastic wrap.
• When oven beeps add remaining ingredients including
liquid and continue to cook by pressing Start.
• At the end of cooking time, allow to stand for 5-10
minutes.
COOKING CHICKEN PIECES BY AUTO COOK
(400 g - 1.0 kg)
• Suitable for cooking chicken pieces, such as wings,
thighs, drumsticks and breasts.
• Chicken pieces should be completely thawed before
cooking.
• Marinate chicken pieces before cooking for added flavour
and colour.
• Arrange chicken pieces skin side down with thicker,
meatier portions towards the edge of dish.
• Leave chicken pieces uncovered if desired.
• Halfway through the cooking time, the oven will 'beep'
and prompt you to turn over and re-arrange the chicken
pieces.
• Let stand 5 to 10 minutes at the completion of cooking.
To Operate: Press Auto Cook to Chicken Pieces. Select
the Serving/Weight, then press Start.
To Operate: Press Auto Cook to Curries. Select the
Serving/Weight, then press Start.
General Guide to Curries For Auto Cook
Serves Weight of meat
2 250 g 375 ml 200 g
4 500 g 500 ml 400 g
6 750 g 750 ml 600 g
Amount of liquid
(coconut milk, stock)
Weight of hard
vegetables
- Eng-13 -
IP1208_38E70KP_Eng_07_070629.indd 13IP1208_38E70KP_Eng_07_070629.indd 13 2007-6-29 11:30:082007-6-29 11:30:08
Page 15

To Use Recipe Prompting
Note:
Throughout Recipe Prompting, the oven will instruct you to set the cooking time and power level at each stage of the recipe.
Set the instructed power level and cooking time using the Micro Power pad and numbered Time pads. These settings are a
guide only. If you wish to change, the oven can accept a different power level and cooking time.
For further information about cooking any of these recipes, refer to the recipe section, from page 16 to 20.
The following recipes are programmed in Recipe Prompting:
Recipe Page of Book Recipe Page of Book
Beef Stroganoff 17 Green Peppercorn Chicken 16
Cheese Sauce 20 Herbed Vegetables 19
Cheesy Mashed Potatoes 18 Honey Sesame Drumsticks 17
Chicken Cacciatore 17 Lemon Pepper Fish 16
Chicken Curry 17 Peach Crumble 19
Chicken Risotto 19 Potato and Leek Soup 16
Chilli Beef 18 Potato Bake 18
Chinese Beef and Vegetables 18 Pumpkin Soup 16
Chocolate Brownies 20 Rich Chocolate Sauce 20
Chocolate Fudge 20 Seasoned Roast Lamb 18
Cinnamon Poached Pears 20 Spaghetti Meat Sauce 17
Creamy Beef Bacon Sauce 19 Speedy Nachos 16
Fragrant Coconut Rice 19 Sweet Berry Sauce 20
French Onion Beef Casserole 17 Tomato Vegetable Casserole 18
Garlic Prawns 16 Thai Vegetable Curry 19
English
INGREDIENT CONVERSION CHART
1
⁄4 cup 60 ml
1
⁄3 cup 85 ml
1
⁄2 cup 125 ml 1 teaspoon 5 ml
2
⁄3 cup 165 ml 2 teaspoons 10 ml
3
⁄4 cup 190 ml 3 teaspoons 15 ml
1
⁄4 teaspoon 1 ml
1
⁄2 teaspoon 2 ml
1 cup 250 ml 1 tablespoon 20 ml
1
1
⁄4 cups 310 ml 11⁄2 tablespoons 30 ml
1
1
⁄2 cups 375 ml 2 tablespoons 40 ml
2 cups 500 ml 3 tablespoons 60 ml
3 cups 750 ml 4 tablespoons 80 ml
31⁄2 cups 875 ml
4 cups 1-litre
6 cups 1.5-litre
8 cups 2-litre
All recipes are tested using standard measurement that appear in the above chart.
- Eng-14 -
IP1208_38E70KP_Eng_07_070629.indd 14IP1208_38E70KP_Eng_07_070629.indd 14 2007-6-29 11:30:092007-6-29 11:30:09
Page 16

To Use Recipe Prompting
To Use Recipe Prompting
This feature helps you to cook by following the instructions given in the Display Window.
The instructions for a total of 30 recipes are given (see following page).
English
1 Press
Until the desired recipe appears in the Display Window.
For the previous recipe, press .
Recipes are arranged alphabetically. The first time you use Recipe Prompting after plugging in your oven, the first recipe,
Beef Stroganoff, will appear. The next time you press the Recipe pad, the last recipe you selected will be displayed.
Once you have selected a recipe.
2 Press
The first instruction will scroll across the Display Window.
Press for the next instruction. Press for the previous instruction.
“ENJOY YOUR MEAL” appears in the Display Window at the end of each recipe.
HINTS WHILE USING RECIPE PROMPTING
Recipe Prompting
One tap: Stops scrolling of the Display Window.
Two taps: Restarts scrolling of the Display Window.
After you have programmed the recipe with micro power level and cooking time, press Start.
1. While instructions are in the Display Window, one tap will clear the Display Window and colon or
time of day will appear in the Display Window.
2. While setting power or time, previous instruction will appear in the Display Window by one tap.
Two taps make the colon or time of day appear in the Display Window.
3. While cooking, one tap stops the remaining cooking time counting down. The next instruction
will start scrolling by two taps.
Cooking will start by pressing this pad.
- Eng-15 -
IP1208_38E70KP_Eng_07_070629.indd 15IP1208_38E70KP_Eng_07_070629.indd 15 2007-6-29 11:30:092007-6-29 11:30:09
Page 17

Recipes
PUMPKIN SOUP
Serves: 4
Ingredients:
1 kg pumpkin, chopped and peeled
1 onion, diced
2 cups chicken stock
1 teaspoon curry powder
pepper
Method:
Place pumpkin and onion in 2-litre casserole dish. Cover and
cook on P10 for 12 minutes. Add chicken stock, curry powder
and pepper. Cook on P10 for 10 minutes. Cool slightly. Purée
pumpkin and liquid in a blender or food processor. Pour into
individual serving dishes and garnish with chives.
POTATO AND LEEK SOUP
Serves: 4 to 6
Ingredients:
800 g potatoes, peeled and diced
11⁄2 cups thinly sliced leeks
2 teaspoons fresh thyme
pepper
2 cups chicken stock
150 ml cream
Method:
Place potatoes, leeks, thyme and pepper in 4-litre casserole
dish. Cover and cook on P10 for 8 to 10 minutes. Stir in
chicken stock. Cover and cook on P10 for 14 to 16 minutes.
Purée soup mixture. Add cream, stir and serve hot or cold in
individual bowls.
SPEEDY NACHOS
Serves: 2 to 4
Pumpkin Soup
LEMON PEPPER FISH
Serves: 2
Ingredients:
300 g fish fillets
1
⁄4 cup lemon juice
Method:
Place fish, lemon juice and cracked black pepper in a 1-litre
casserole dish. Cook on P6 for 4 to 6 minutes. Let stand for
3 minutes before serving.
English
Ingredients:
1 (310 g) can red kidney beans, drained
1 cup chilli salsa
200 g packet corn chips
1 cup grated cheese
Method:
Mix kidney beans and salsa in a 1-litre dish. Place corn chips
in the base of a flat dish. Pour sauce over beans and top
with grated cheese. Cook on P10 for 4 to 5 minutes.
Note: Chilli salsa can be substituted with your favourite
tomato relish.
GARLIC PRAWNS
Serves: 2
Ingredients:
60 g butter
1 teaspoon minced garlic
1 tablespoon lemon juice
1 tablespoon chopped parsley
500 g peeled green prawns
Method:
Place butter and garlic in a 1-litre dish and cook on P10 for
30 to 50 seconds. Add lemon juice, parsley and prawns.
Cook on P6 for 5 to 7 minutes, stirring halfway through
cooking. Serve in individual ramekins.
- Eng-16 -
GREEN PEPPERCORN CHICKEN
Serves: 4
Ingredients:
500 g sliced chicken breast fillets
2 tablespoons green peppercorns
1 tablespoon seeded mustard
1 teaspoon chicken stock powder
2 tablespoons lemon juice
1
⁄2 cup cream
Method:
Place chicken in a 3-litre casserole dish. Cook on P7 for 8
to 10 minutes stirring halfway through cooking. Mix together
peppercorns, mustard, stock powder, lemon juice and cream.
Pour over chicken, stir. Cook on P10 for 2 to 3 minutes.
IP1208_38E70KP_Eng_07_070629.indd 16IP1208_38E70KP_Eng_07_070629.indd 16 2007-6-29 11:30:092007-6-29 11:30:09
Page 18

Recipes
CHICKEN CACCIATORE
Serves: 4
Ingredients:
440 g can tomatoes
1
⁄4 cup tomato paste
1 teaspoon minced garlic
1 onion, diced
English
2 teaspoons dried oregano
1 kg chicken drumsticks
Method:
Place all ingredients in a 2-litre casserole dish. Stir until
combined. Cover and cook on P7 for 10 to 12 minutes. Turn
chicken and stir. Cook on P7 for 10 to 12 minutes.
HONEY SESAME DRUMSTICKS
Serves: 3 to 4
Ingredients:
8 (1.3 kg) chicken drumsticks
1 teaspoon chopped garlic
1 teaspoon chopped ginger
1
⁄4 cup soy sauce
1
⁄4 cup honey
2 tablespoons sesame seeds
Method:
Place all ingredients in 2-litre bowl, stir until combined.
Marinate for at least 2 hours or overnight. Remove chicken
from marinade and place in shallow dish with the meatiest
ends to the outside. Cook on P7 for 18 to 20 minutes, turning
once during cooking.
To cook by Auto Cook:
Prepare as above. Refer to directions on page 13.
CHICKEN CURRY
Serves: 4
FRENCH ONION BEEF CASSEROLE
Serves: 4
Ingredients:
1 onion, chopped
1 teaspoon minced garlic
200 g diced potatoes
500 g beef, diced
2 carrots, diced
1
⁄3 cup tomato paste
1 cup beef stock
100 g whole button mushroom
1
⁄4 cup frozen peas
Method:
Place onion and garlic in 3-litre casserole dish. Cook on
P10 for 1 to 2 minutes. Add remaining ingredients, except
mushrooms and peas. Stir until combined. Cover and cook
on P10 for 8 minutes. Stir and cook on P4 for 28 to 30
minutes. Add mushrooms and frozen peas. Stir cook on P4
for 14 to 15 minutes.
SPAGHETTI MEAT SAUCE
Serves: 4 to 6
Ingredients:
500 g minced beef
1 onion, chopped
1 teaspoon minced garlic
1 (425 g) can tomatoes
1 cup tomato puree
2 beef stock cubes
1 teaspoon dried mixed herbs
pepper
Method:
Combine all ingredients in a 3-litre casserole dish. Cook on
P10 for 7 minutes, stir. Cook on P7 for 14 to 16 minutes. Stir
halfway through cooking. Serve with spaghetti.
Ingredients:
1 onion, chopped
2 tablespoons red curry paste
500 g chicken fillets, sliced
2 cups finely sliced vegetables
1 cup coconut milk
Method:
Place onion and curry paste in a 3-litre casserole dish.
Cook on P10 for 3 to 4 minutes. Add chicken and combine.
Cook on P7 for 6 minutes, stirring once during cooking. Add
vegetables and coconut milk. Stir well. Cover and cook on
P10 for 4 to 6 minutes. Serve with Jasmine rice.
IP1208_38E70KP_Eng_07_070629.indd 17IP1208_38E70KP_Eng_07_070629.indd 17 2007-6-29 11:30:102007-6-29 11:30:10
BEEF STROGANOFF
Serves: 4
Ingredients:
1 onion, sliced
1 teaspoon minced garlic
1 teaspoon paprika
750 g rump steak sliced thinly
2 tablespoons tomato sauce
2 tablespoons worcestershire sauce
1 beef stock cube
200 g sliced mushrooms
1
⁄3 cup sour cream
Method:
Place all ingredients (except sour cream and mushrooms) in
a 3-litre casserole dish. Stir until combined. Cook on P7 for 7
to 9 minutes, stirring once during cooking. Add mushrooms.
Stir and cook on P7 for 3 to 4 minutes. Stir through sour
cream.
- Eng-17 -
Page 19

Recipes
CHINESE BEEF AND VEGETABLES
Serves: 4 to 6
Ingredients:
500 g rump steak sliced
1 teaspoon chopped ginger
1 teaspoon chopped garlic
1 tablespoon soy sauce
1
⁄3 cup Hoisin sauce
1
⁄4 cup sweet chilli sauce
3 cups sliced vegetables
Method:
Place steak, ginger and garlic in a 3-litre casserole dish.
Cook on P10 for 1 minute. In 1-cup jug, combine soy sauce,
Hoisin sauce and sweet chilli. Add to meat mixture. Cook on
P10 for 3 to 4 minutes. Add the vegetables, cover and cook
on P10 for 3 to 5 minutes, stirring halfway through cooking.
Let stand for 5 minutes before serving.
SEASONED ROAST LAMB
Serves: 4 to 6
Ingredients:
1.4 kg leg of lamb
1 tablespoon seeded mustard
1 tablespoon rosemary
Method:
Place lamb fat side down on rack set in a 3-litre dish.
Brush with mustard and rosemary. Cook on P6 for 30 to 35
minutes, turn halfway through cooking. Stand, covered, for
15 minutes before slicing.
CHILLI BEEF
Serves: 4
Ingredients:
500 g topside beef mince
1 teaspoon minced garlic
1 (35 g) packet chilli seasoning mix
1 (400 g) can tomato purée
1 (440 g) can kidney beans, drained
Method:
Place all ingredients in a 3-litre dish. Mix well. Cook on P10
for 17 to 19 minutes. Stir halfway through cooking. Serve in
taco shells with chopped tomatoes and shredded lettuce or
with a salad and crusty bread.
Seasoned Roast Lamb
TOMATO VEGETABLE CASSEROLE
Serves: 4 to 6
Ingredients:
200 g mushrooms, sliced
1 eggplant, chopped
200 g zucchini, sliced
1 capsicum, sliced
1 onion, sliced
400 g can tomatoes
1
⁄2 cup tomato paste
1 tablespoon chopped basil
1 teaspoon minced garlic
Method:
Place mushrooms, eggplant, zucchini, capsicum and onion
in a 3-litre casserole dish. Cover. Cook on P10 for 6 minutes.
Add tomatoes, tomato purée, herbs and garlic. Re-cover and
cook on P10 for 6 to 8 minutes.
POTATO BAKE
Serves: 4 to 6
English
CHEESY MASHED POTATOES
Serves: 4
Ingredients:
500 g potatoes, peeled and diced
1
⁄4 cup water
1
⁄3 cup milk
1
⁄4 cup grated cheese
Method:
Place potatoes and water in a 2-litre casserole dish. Cover
and cook on P10 for 10 minutes.
Prepare as above. Cover with plastic wrap.
To Cook by Auto Cook:
Refer to Potatoes directions on page 12.
Drain. Mash potatoes with potato masher. Add milk and
grated cheese. Mix well. Cook on P10 for 1 minute. Stir well
before serving.
IP1208_38E70KP_Eng_07_070629.indd 18IP1208_38E70KP_Eng_07_070629.indd 18 2007-6-29 11:30:102007-6-29 11:30:10
Ingredients:
750 g peeled and sliced potatoes
250 ml cream
1
⁄4 cup milk
3 green onions, sliced
2 bacon rashers, chopped
1
⁄2 cup grated cheese
Method:
Combine potatoes, cream and milk in a 2-litre casserole dish.
Cook on P10 for 15 to 18 minutes. Top with green onions,
bacon and cheese. Cook on P10 for 5 minutes.
- Eng-18 -
Page 20

Recipes
HERBED VEGETABLES
Serves: 4 to 6
Ingredients:
200 g sliced snow peas
200 g sliced carrots
200 g sliced zucchini
2 tablespoons chopped fresh parsley
English
Method:
Place snow peas, carrots and zucchini in a 2-litre casserole
dish. Cover. Cook on P10 for 5 to 7 minutes, stirring once
during cooking. Sprinkle with parsley. Serve.
THAI VEGETABLE CURRY
Serves: 4
Ingredients:
1 onion, sliced
2 tablespoons green curry paste
3 cups sliced vegetables
440 g can chick peas, drained
1 cup coconut milk
1 tablespoon lemon juice
1 tablespoon soy sauce
1
⁄2 cup chopped nuts
Method:
Place onion and curry paste in a 3-litre casserole dish. Cook
on P10 for 2 minutes. Add vegetables, chick peas, coconut
milk, lemon juice and soy sauce. Cook on P10 for 8 to 10
minutes. Sprinkle with chopped nuts. Serve with jasmine rice.
HINT:
It is better to slightly undercook vegetables as they will
soften on standing. Allow to stand, covered, with plastic
wrap or a lid.
CHICKEN RISOTTO
Serves: 4
Ingredients:
1 onion, sliced
2 cups short grain rice
1 teaspoon dried oregano
1 teaspoon cracked black pepper
4 cups chicken stock
1
⁄4 green capsicum, sliced
1
⁄4 red capsicum, sliced
200 g mushrooms, sliced
1
⁄2 cup frozen peas
2 cooked chicken breast fillets, sliced
1
⁄4 cup grated parmesan cheese
Method:
Place onion, rice, oregano, pepper and chicken stock into a
4-litre dish. Cook on P10 for 17 to 19 minutes. Add remaining
ingredients, stir well and cook on P10 for 4 minutes. Serve.
HINT:
To reheat 2 cups of cooked rice:
Add 1 to 2 tablespoons of water or a knob of butter and
cook on P10 for 2 to 3 minutes.
CREAMY BEEF BACON SAUCE
Makes: Approximately 300 ml
Ingredients:
1 onion, chopped
3 beef bacon rashers, chopped
1 teaspoon minced garlic
300 ml cream
1
⁄4 cup Parmesan cheese
pepper
2 tablespoons chopped fresh parsley
1
⁄4 cup chicken stock
Method:
FRAGRANT COCONUT RICE
Serves: 4 to 6
Ingredients:
1 onion, chopped
2 cups long grain rice
500 ml chicken stock
400 ml coconut milk
1 teaspoon turmeric
Method:
Place all ingredients in a 3-litre casserole dish. Stir. Cook on
P10 for 15 to 18 minutes. Cover and let stand 10 minutes
before serving.
To Cook by Auto Cook:
Prepare as above. Refer to Rice directions on page 12.
IP1208_38E70KP_Eng_07_070629.indd 19IP1208_38E70KP_Eng_07_070629.indd 19 2007-6-29 11:30:102007-6-29 11:30:10
Place onion, beef bacon and garlic in a 2-litre casserole
dish. Cook on P10 for 4 to 5 minutes. Add cream, Parmesan
cheese, pepper, parsley and stock. Mix well. Cook on P10 for
3 to 4 minutes. Serve with cooked Fettuccine.
PEACH CRUMBLE
Serves: 6 to 8
Ingredients:
125 g butter
1 cup flour
1
⁄2 cup caster sugar
2 cups toasted muesli
1 cup shredded coconut
1 teaspoon cinnamon
1 (810 g) can peach slices, drained
Method:
Place butter in a 2-litre jug. Cook on P7 for 1 minute.
Add flour, sugar, muesli, coconut and cinnamon, stir until
combined. Place peaches into a 2-litre casserole dish. Place
crumble mixture on top of peaches and cook on P10 for 10 to
12 minutes. Serve with cream or ice cream.
- Eng-19 -
Page 21

Recipes
CHOCOLATE BROWNIES
Makes: 1 × 20 cm
square slice pan
Ingredients:
125 g butter
200 g chocolate
1 cup caster sugar
1 teaspoon vanilla essence
2 eggs
1 cup plain flour
Method:
Grease and line a 20 cm square pyrex dish. set aside. Melt
butter and chocolate in a 2-litre dish on P7 for 1
Stir in sugar, vanilla essence, eggs and flour. Spread into
prepared dish. Cook on P7 for 7 to 8 minutes. Refrigerate
until cold. Cut into squares.
1
⁄2 minute.
CHOCOLATE FUDGE
Makes: 1 × 20 cm square slice
Ingredients:
300 g chocolate pieces
1 (400 g) can condensed milk
1 cup chopped peanuts
Method:
Grease 20 cm square dish. Set aside. Place chocolate and
condensed milk in a 1-litre jug. Cook on P7 for 2 minutes.
Stir. Cook on P5 for 2 minutes. Add nuts and place in
prepared dish. Refrigerate and cut into squares when cold.
CINNAMON POACHED PEARS
Serves: 4
Ingredients:
1
⁄2 cup water
1
⁄4 cup caster sugar
1
⁄2 teaspoon cinnamon
4 pears, peeled and sliced
Method:
Combine water, caster suger and cinnamon in a 1-litre jug.
Cook on P10 for 2 minutes. Place the pears in 2-litre dish.
Pour over syrup and cover. Cook on P10 for 6 to 8 minutes.
SWEET BERRY SAUCE
Makes: Approximately 2 cups
Ingredients:
1
⁄2 cup caster sugar
1
⁄2 cup water
500 g berries
2 tablespoons water
1 tablespoon cornflour
Method:
Combine sugar and water in a 3-litre bowl. Cook on P10 for
2 to 3 minutes. Add berries. Cook on P10 for 3 to 4 minutes.
Blend water and cornflour. Mix into berry sauce. Cook on
P10 for 2 minutes. Serve hot or cold with ice cream.
CHEESE SAUCE
Make :11⁄2 cups
Ingredients:
40 g butter
2 tablespoons flour
11⁄2 cups milk
1
⁄2 cup grated cheese
Method:
Melt butter in a 1-litre jug on P10 for 30 seconds. Add flour
and mix well. Gradually stir in milk. Cook on P10 for 2 to 3
minutes. Stirring halfway through cooking. Add cheese and
cook on P10 for a further 1 to 11⁄2 minutes. Stir and serve
with vegetables for your choice.
HINT:
cooking sauces:
When making some sauces in the microwave oven, less
liquid maybe needed as less evaporation occurs with a
shorter cooking time.
RICH CHOCOLATE SAUCE
Makes: 11⁄4 cups
Ingredients:
200 g chocolate pieces
300 ml cream
Method:
Combine chocolate and cream in 1-litre jug. Cook on P10 for
2 minutes. Mix well. Serve over ice cream.
English
- Eng-20 -
IP1208_38E70KP_Eng_07_070629.indd 20IP1208_38E70KP_Eng_07_070629.indd 20 2007-6-29 11:30:112007-6-29 11:30:11
Page 22

Before Requesting Service
These things are normal
The oven causes
interference with my TV.
Steam accumulates on
English
the oven door and warm
air comes from the oven
vents.
I accidentally ran my
microwave oven without
any food in it.
Some radio and TV interference might occur when you cook with the microwave oven.
This interference is similar to the interference caused by small appliances such as
mixers, vacuums, hair dryers, etc. It does not indicate a problem with your oven.
During cooking, steam and warm air are given off from the food. Most of the steam
and warm air are removed from the oven by the air which circulates in the oven cavity
However, some steam will condense on cooler surfaces such as the oven door. This is
normal.
Running the oven empty for a short time will not damage the oven. However, we do not
recommend this.
PROBLEM POSSIBLE CAUSE REMEDY
Oven will not turn on.
Oven will not start cooking.
The oven is not plugged in securely. Remove plug from outlet, wait 10
Circuit breaker or fuse is tripped or
blown.
There is a problem with the outlet. Plug another appliance into the outlet
The door is not closed completely. Close the oven door securely.
Start was not pressed after
programming.
Another programme has already
been entered into the oven.
The programme has not been
entered correctly.
Stop/Reset has been pressed
accidentally.
seconds and re-insert.
Reset external circuit breaker or
replace external fuse.
to check if the outlet is working.
Press Start Pad.
Press Stop/Reset Pad to cancel
the previous programme and
programme again.
Programme again according to the
Operating Instructions.
Programme over again.
The word "LOCK" appears in
the display window.
The word "DEMO MODE"*
appears on the screen.
When the oven is turning on,
there is noise coming from the
Glass Tray.
* DEMO MODE is designed for retail store display. Cooking and other functions will not operate during the DEMO mode. If it
seems there is a problem with the oven, contact an authorised Service Centre.
IP1208_38E70KP_Eng_07_070629.indd 21IP1208_38E70KP_Eng_07_070629.indd 21 2007-6-29 11:30:112007-6-29 11:30:11
The Child Lock was activated by
pressing Start pad 3 times.
Clock Pad has been pressed 3
times.
The Roller Ring and oven bottom
are dirty.
- Eng-21 -
Deactivated Lock by pressing Stop/
Reset pad 3 times.
Deactivated mode by pressing
Clock Pad 3 times.
Clean these parts according to
“Care of Your Microwave Oven”
(see next page).
Page 23

Care of Your Oven
BEFORE CLEANING:
Remove plug from outlet. If impossible, leave
oven door open to prevent oven from accidentally
turning on.
Inside of the oven:
Wipe with a damp cloth. Mild
detergent may be used if the oven
gets very dirty. The use of harsh
detergent or abrasives is not
recommended.
Glass Tray:
Remove and wash in warm soapy
water or in a dishwasher. If grease
accumulates, clean with a nonabrasive nylon mesh scouring pad and
a non-abrasive cleanser.
AFTER CLEANING:
Be sure to replace the Roller Ring and Glass Tray
in the proper position and press Stop/Reset Pad to
clear the Display Window.
Outside oven surfaces and
back vents.
To prevent overheating
caused by blocked vents,
clean periodically with damp
cloth. To prevent damage to
the operating parts inside
the oven, water should not
be allowed to seep into
ventilation openings.
Control Panel:
• If it becomes wet, clean
with a soft, dry cloth. Do
not use harsh detergents
or abrasives on the Control
Panel.
English
Oven Door:
Wipe with a soft cloth when steam accumulates
inside or around the outside of the oven door. This
may occur when the microwave oven is operated
under high humidity conditions and in no way
indicates a malfunction of the unit or of microwave
leakage.
Roller Ring and oven cavity floor:
Wipe the bottom surface of the oven with mild
detergent water or window cleaner and dry.
Roller Ring may be washed in mild soapy water
or dishwasher. These areas should be kept
clean to avoid excessive noise and scratching of
painted surface .
Technical Specifications
Power Supply: 220 V 50 Hz 220 V 50-60 Hz 230-240 V 50 Hz
Power Consumption*: 5.4 A 1,150 W 5.1 A 1,150 W
Cooking Power*: 1,100 W
Outside Dimensions (H × W × D): 304 mm (H) × 555 mm (W) × 493 mm (D)
Oven Cavity Dimensions (H × W ×x D): 222 mm (H) × 418 mm (W) × 470 mm (D)
Glass Tray Diameter: Ø 380 mm
Operating Frequency: 2,450 MHz
Uncrated Weight: Approx. 14.3 kg
* IEC Test Procedure
Specifications subject to change without notice.
- Eng-22 -
IP1208_38E70KP_Eng_07_070629.indd 22IP1208_38E70KP_Eng_07_070629.indd 22 2007-6-29 11:30:112007-6-29 11:30:11
 Loading...