

Operating Instructions
Gebruiksaanwijzing
Mode d’emploi
Manuale di istruzioni
Instrucciones de funcionamiento
Bruksanvisning
Betjeningsvejledning
Käyttöohje
Instrukcja obsługi
Návod k obsluze
Kezelési útmutató
Microwave/Grill Oven
Magnetron/Grill Oven
Four à Micro-ondes-Gril
Forno a Microonde e Grill
Horno Microondas/Grill
Kombinationsugn med mikrovågor/grill
Mikrobølgeovn/Grill
Mikroaalto/Grilliuuni
Kuchenka Mikrofalowa z Grillem
Mikrovlnná / trouba/ Gril
Grillezős/mikrohullámú sütő
English
Nederlands
Français Italiano Español Svenska Dansk Suomi Polski Česky Magyar
FOR DOMESTIC USE ONLY
UITSLUITEND VOOR HUISHOUDELIJK GEBRUIK
À USAGE DOMESTIQUE UNIQUEMENT
PER USO DOMESTICO
SOLO PARA USO DOMÉSTICO
ENDAST FÖR HUSHÅLLSBRUK
KUN TIL BRUG I HJEMMET
AINOASTAAN KOTITALOUSKÄYTTÖÖN
TYLKO DO UŻYTKU DOMOWEGO
URČENO POUZE PRO POUŽITÍ V DOMÁCNOSTECH
KIZÁRÓLAG HÁZTARTÁSI HASZNÁLATRA
Model No.
NN-GD38HS
NN-GD36HM
NN-GD38HS

IMPORTANT SAFETY INSTRUCTIONS. Before operating this oven, please read these
instructions carefully and keep for future reference.
BELANGRIJKE VEILIGHEIDSINSTRUCTIES. Alvorens u deze microgolfoven gebruikt,
raden wij u ten zeerste aan deze gebruiksaanwijzing door te lezen en bij te houden voor
eventueel toekomstig gebruik.
INSTRUCTIONS DE SÛRETÉ IMPORTANTES. Avant d’utiliser le four à micro-ondes,
lisez attentivement les recommandations d’utilisation et conservez-les soigneusement.
ISTRUZIONI IMPORTANTI PER LA SICUREZZA. Prima di utilizzare il forno, leggere con
attenzione questo manuale e conservarlo per future consultazioni.
INSTRUCCIONES SOBRE SEGURIDAD IMPORTANTES. Antes de comenzar a utilizar su
horno microondas, lea cuidadosamente las siguientes instrucciones y guardelas para futuras
cuestiones.
VIKTIGA SÄKERHETSANVISNINGAR. Läs dessa instruktioner noga före användande av
ugnen och behåll dem för framtida bruk.
VIGTIGE SIKKERHEDSFORSKRIFTER. Læs betjeningsvejledningen omhyggeligt, før du
tager ovnen i brug, og opbevar den til fremtidig brug.
TÄRKEITÄ TURVALLISUUSTIETOJA. Ole hyvä ja lue tämä käyttöohje huolellisesti ja talleta
myöhempää tarvetta varten.
WAŻNE INSTRUKCJE BEZPIECZEŃSTWA. Przed włączeniem kuchenki prosimy o dokładne
przeczytanie instrukcji obsługi i o zachowanie jej na przyszłość.
DŮLEŽITÉ POKYNY K BEZPEČNOSTI. Pečlivě si je prosím přečtěte a uložte pro pozdější
použití.
INSTRUCŢIUNI DE SIGURANŢĂ IMPORTANTE: Înainte de utilizarea a acestui cuptor,
vă rugăm să citiţi cu atenţie aceste instrucţiuni şi să le păstraţi pentru referinţe ulterioare.

Thank you for purchasing this Panasonic appliance.
Contents
English
Safety Instructions ................................... 2-6
Disposal of Waste Products ....................... 7
Installation and Connection ........................ 8
Placement of your Oven ............................. 8
Important User Instructions ................... 9-11
Oven Accessories ..................................... 12
Parts of your Oven ................................... 13
Control Panel ............................................ 14
Setting the Clock ...................................... 15
Child Lock ................................................. 15
Cooking Modes......................................... 16
Microwave Cooking and Defrosting .......... 17
Defrosting Guidelines ............................... 18
Defrosting Chart ....................................... 19
Using the Quick 30 Function .................... 20
Using the Add Time Function.................... 21
Grilling ...................................................... 22
Combination Cooking ............................... 23
Using the Steam Plus Pot
(Manual Operation)................................... 24
Using the Steam Plus Pot......................... 25
Using the Timer ........................................ 26
Multi-stage Cooking .................................. 27
Steam Plus Programs.......................... 28-30
Auto Cook Programs ........................... 31-32
Turbo Defrost ....................................... 33-34
Reheating & Cooking Charts ............... 35-36
Cooking Charts with Steam Plus Pot........ 37
Recipes................................................ 38-40
Questions and Answers ............................ 41
Care of your Oven .................................... 42
Technical Specications ........................... 43
1 EN

Safety Instructions
Important safety instructions. Before operating this oven,
please read these instructions carefully and keep for
future reference.
This appliance can be used by children aged from
8 years and above and persons with reduced physical,
sensory and mental capabilities or lack of experience
and knowledge if they have been given supervision
or instruction by a person responsible for their safety
concerning the use of the appliance in a safe way
and understand the hazards involved. Children
shall not play with the appliance. Cleaning and user
maintenance shall not be made by children without
supervision. Keep the appliance and its cord out of
reach of children less than 8 years.
When this oven is installed, it should be easy to isolate
the appliance from the electricity supply by pulling out the
plug or operating a circuit breaker.
2 EN
If the supply cord is damaged, it must be replaced by the
manufacturer or its service agent or a similarly qualied
person in order to avoid a hazard.
Warning! The appliance should be inspected for damage
to the door seals and door seal areas and if these areas
are damaged the appliance should not be operated until
it has been repaired by a service technician trained by
the manufacturer.
Warning! Do not attempt to tamper with or make any
adjustments or repairs to the door, control panel housing,
safety interlock switches or any other part of the oven.
Do not remove the outer panel from the oven which gives
protection against exposure to microwave energy.

Safety Instructions
Repairs should only be by a qualied service person.
Warning! Do not place this oven near an electric or gas
cooker range.
Liquids and other foods must not be heated in sealed
containers since they are liable to explode.
Warning! Only allow children to use the oven without
supervision when adequate instructions have been given
so that the child is able to use the oven in a safe way and
understands the hazards of improper use.
This oven is intended for counter-top use only. It is not
intended for built-in use or for use inside a cupboard.
For Countertop use:
Oven must be placed on a at, stable surface 85 cm
above oor level. For proper operation, the oven must
have sucient air ow. Allow 15 cm of space on the top
of the oven, 10 cm at the back, 5 cm on one side, and
the other side must be opened more than 40 cm.
English
When heating food in plastic or paper containers, check
the oven frequently as these types of containers ignite if
overheated.
If smoke is emitted or a re occurs in the oven, press
Stop/Cancel button and leave the door closed in order to
stie any ames. Disconnect the power cord, or shut o
power at fuse or circuit breaker panel.
This appliance is intended to be used in household
applications only.
3 EN

Safety Instructions
Microwave heating of beverages can result in delayed
eruptive boiling, therefore care must be taken.
The contents of feeding bottles and baby food jars are to
be stirred or shaken. The temperature has to be checked
before consumption to avoid burns.
Do not cook eggs in their shells and whole hard-boiled
eggs by microwave. Pressure may build up and the
eggs may explode, even after the microwave heating has
ended.
Clean the inside of the oven, door seals and door seal
areas regularly. When food splatters or spilled liquids
adhere to the oven walls, door seals and door seal
areas wipe o with a damp cloth. Mild detergent may be
used if they get very dirty. The use of harsh detergent or
abrasive is not recommended.
Do not use commercial oven cleaners.
4 EN
When using the grill or combination mode, some foods
may inevitably splatter grease on to the oven walls. If the
oven is not cleaned occasionally, it may start to “smoke”
during use.
Failure to maintain the oven in a clean condition could
lead to deterioration of surfaces that could aect the
life of the appliance and possibly result in a hazardous
situation.
Warning! The accessible parts may become hot in grill
and combination use. Young children should be kept
away. Children should only use the oven under adult
supervision due to the temperatures generated.

Safety Instructions
A steam cleaner is not to be used for cleaning the
appliance.
Do not use harsh, abrasive cleaners or sharp metal
scrapers to clean the oven door glass since they can
scratch the surface, which may result in shattering of the
glass.
Exterior oven surfaces, including air vents on the cabinet
and the oven door will get hot during combination and
grilling, take care when opening or closing the door and
when inserting or removing food and accessories.
This appliance is not intended to be operated by means
of an external timer or separate remote-control system.
Only use utensils that are suitable for use in microwave
ovens.
The oven has two grill heaters situated in the top of the
oven. After using the grill, and combination functions, the
inside surfaces of the oven will be very hot. Care should
be taken to avoid touching the heating elements inside
the oven. To prevent burns, care should be taken to
avoid touching the inside surfaces of the oven.
English
This combination oven is intended for heating food and
beverages only. Take care when heating foods low in
moisture, e.g. bread items, chocolate, biscuits and
pastries. These can easily burn, dry out or catch on re if
cooked too long. We do not recommend heating foods
low in moisture such as popcorn or poppadoms. Drying
of food, newspapers or clothing and heating of warming
pads, slippers, sponges, damp cloths, wheat bags, hot
water bottles and similar may lead to risk of injury, ignition
or re.
5 EN

Safety Instructions
Users are advised to avoid a downward pressure on the
microwave oven door when in the open position. There is
a safety risk that the oven will tilt forward.
The oven lamp must be replaced by a service technician
trained by the manufacturer. Do not attempt to remove
the outer casing from the oven.
Caution! In order to avoid a hazard due to inadvertent
resetting of the thermal cut-out, this appliance must
not be supplied through an external switching device,
such as a timer, or connected to a circuit that is regularly
switched on and o by the utility.
6 EN

Disposal of Waste Products
Information on Disposal
for Users of Waste
Electrical & Electronic
Equipment (private
households).
This symbol on the products and/or
accompanying documents means that
used electrical and electronic products
should not be mixed with general
household waste.
For proper treatment, recovery and
recycling, please take these products to
designated collection points, where they
will be accepted on a free of charge basis.
Alternatively, in some countries you may
be able to return your products to your
local retailer upon the purchase of an
equivalent new product.
Disposing of this product correctly will
help to save valuable resources and
prevent any potential negative effects on
human health and the environment which
could otherwise arise from inappropriate
waste handling. Please contact your local
authority for further details of your nearest
designated collection point.
Penalties may be applicable for incorrect
disposal of this waste, in accordance with
national legislation.
For business Users in the
European Union
If you wish to discard electrical and
electronic equipment, please contact your
dealer or supplier for further information.
Information on Disposal in Other
Countries Outside the European
Union
This symbol is only valid in the European
Union.
If you wish to discard this product, please
contact your local authorities or dealer and
ask for the correct method of disposal.
English
7 EN

Installation and Connection
Examine Your Oven
Unpack the oven, remove all packing
material, and examine the oven for any
damage such as dents, broken door
latches or cracks in the door. If you nd any
damage, notify your dealer immediately.
Do not install a damaged oven.
Earthing Instructions
If your AC outlet is not grounded, it is the
personal responsibility of the customer to
have it replaced with a properly grounded
wall socket.
Placement of your Oven
This oven is intended for counter-top use
only. It is not intended for built-in use or use
inside a cupboard.
Counter-top Use:
1. Place the oven on a at and stable
surface more than 85 cm above the
oor.
2. When this oven is installed, it should be
easy to isolate the appliance from the
electricity supply by pulling out the plug
or operating a circuit breaker.
3. For proper operation, ensure a sufcient
air circulation for the oven.
Important!
This unit has to be properly earthed
for personal safety.
Operation Voltage
The voltage has to be the same as specied
on the label on the oven. If a higher voltage
than specied is used, it may cause a re or
other damages.
5. Do not place this oven near an electric
or gas cooker range.
6. The feet should not be removed.
7. This oven is only for household usage.
Do not use outdoors.
8. Avoid using the oven in high humidity.
9. The power cord should not touch the
outside of the oven. Keep the cord away
from hot surfaces. Do not let the cord
hang over the edge of a table or work
top. Do not immerse the cord, plug or
oven in water.
8 EN
4. Allow 15 cm of space on the top of the
oven, 10 cm at the back, 5 cm on one
side, and the other side must be opened
more than 40 cm.
5 cm
15 cm
counter top
10 cm
open
10. Do not block the air vents on the sides
and back of the oven. If these openings
are blocked during operation the oven
may overheat. In this case the oven is
protected by a thermal safety device
and resumes operation only after
cooling down.

Important User Instructions
English
Use of Your Oven
1. Do not use the oven for any
reason other than the preparation of
food. This oven is specically designed
to heat or cook food. Do not use this
oven to heat chemicals or other
non-food products.
2. When the oven is not being used,
do not store any objects inside the oven
in case it is accidentally turned on.
3. The appliance must not be operated by
microwave or combination without
food in the oven. Operation in this
manner may damage the appliance.
4. Before use, check that utensils/
containers are suitable for use in
microwave ovens.
5. The microwave oven is intended for
heating food and beverages only.
Take care when heating foods low in
moisture, e.g. bread items, chocolate,
biscuits and pastries. These can easily
burn, dry out or catch re if cooked
too long. We do not recommend
heating foods low in moisture such as
popcorn or poppodums. Drying of food,
newspapers or clothing and heating of
warming pads, slippers, sponges, damp
cloth, wheat bags, hot water bottles and
similar may lead to risk of injury, ignition
or re.
6. If smoke is emitted or a re occurs in the
oven, press Stop/Cancel and leave the
door closed in order to stie any ames.
Disconnect the power cord, or shut off
power at fuse or circuit breaker panel.
Heater Operation
1. Before using combination or grill
function for the rst time operate the
oven without food and accessories
(including glass turntable and roller ring)
on grill 1 for 5 minutes. This will allow
the oil that is used for rust protection to
be burned off. This is the only time that
the oven is operated empty.
Caution! Hot surfaces
All inside surfaces of the oven will
be hot.
2. Exterior oven surfaces, including air
vents on the cabinet and the oven door
will get hot during grill and combination
modes, take care when opening or
closing the door and when inserting or
removing food and accessory.
3. The oven has two heaters situated in
the top of the oven cavity.
Caution!
After using the combination and grill
function these surfaces will be very
hot. Care should be taken to avoid
touching the heating elements inside
the oven.
4. The accessible parts may become hot
in grill and combination use. Young
children less than 8 years of age should
be kept away, and children should only
use the oven under adult supervision
due to the temperatures generated.
Caution! Hot Surfaces
After cooking by these modes,
the oven accessories will be very
hot.
9 EN

Important User Instructions
Oven Light
When it becomes necessary to replace the
oven light, please consult your dealer.
Cooking Times
The cooking times given in the cookbook
are approximate. The cooking time depends
on the condition, temperature, amount of
food and on the type of cookware.
Begin with the minimum cooking time to
help prevent overcooking. If the food is not
sufciently cooked you can always cook it
for a little longer.
Important!
If the recommended cooking
times are exceeded the food
will be spoiled and in extreme
circumstances could catch re and
possibly damage the interior of the
oven.
Small Quantities of Foods
Small quantities of food or foods with low
moisture content can burn, dry out or catch
on re if cooked too long. If materials inside
the oven should ignite, keep the oven door
closed, turn the oven off and remove the
plug from the socket.
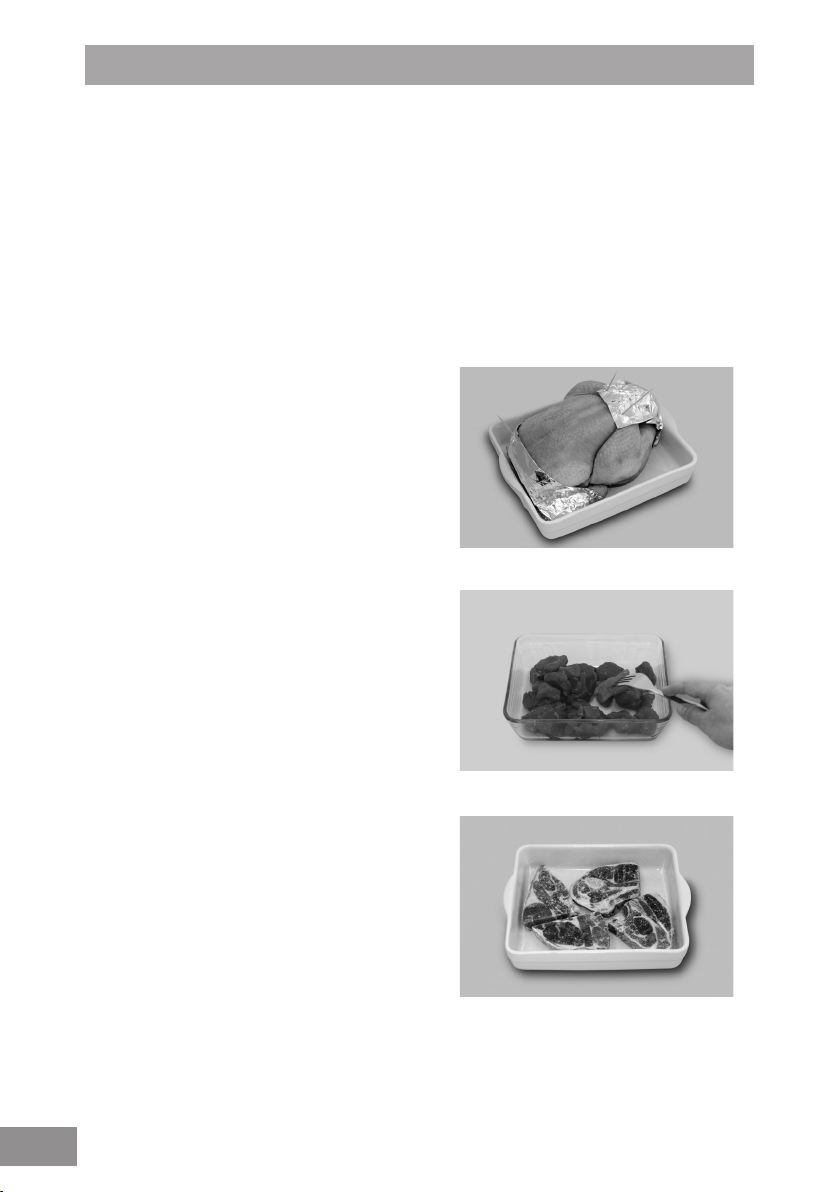
Piercing Skin
Food with non porous skins, such as
potatoes, egg yolks and sausages must be
pierced before cooking by microwave to
prevent bursting.
Meat Thermometer
Use a meat thermometer to check the
degree of cooking of roasts and poultry only
when the meat has been removed from
the oven. Do not use a conventional meat
thermometer in the oven because it may
cause sparking.
Eggs
Do not cook eggs in their shells and whole
hard-boiled eggs by microwave. Pressure
may build up and the eggs may explode,
even after the microwave heating has
ended.
10 EN

Important User Instructions
English
Liquids
When heating liquids, e.g. soup,
sauces and beverages in your oven,
overheating the liquid beyond boiling point
can occur without evidence of bubbling.
This could result in a sudden boil over of the
hot liquid.
To prevent this possibility the following steps
should be taken:
a Avoid using straight-sided
containers with narrow necks.
b Do not overheat.
c Stir the liquid before placing the
container in the oven and again
halfway through the cooking time.
d After heating, allow it to stand
in the oven for a short time, stir
again before carefully removing
the container.
Paper/Plastic
When heating food in plastic or paper
containers, check the oven frequently as
these types of containers ignite if
overheated.
Do not use recycled paper products
(e.g. kitchen roll) unless the paper
product is labelled as safe for microwave
oven use. Recycled paper products may
contain impurities which may cause sparks
and/or res during use.
Utensils/Foil
Do not heat any closed cans or bottles
because they might explode.
Metal containers or dishes with
metallic trim should not be used during
microwave cooking. Sparking will
occur.
If you use any aluminium foil, meat spikes
or metalware the distance between them
and the oven walls and door should be at
least 2 cm to prevent sparking.
Feeding Bottles/Baby Food Jars
The top and teat or lid must be
removed from feeding bottles or baby food
jars before placing in the oven.
The contents of feeding bottles and
baby food jars are to be stirred or shaken.
The temperature has to be checked
before consumption to avoid burns.
Fan Motor Operation
After using the oven the fan motor may
rotate for a few minutes to cool the electric
components. This is normal and you can
take out food even though the fan motor
operates. You can continue using the oven
during this time.
Remove wire twist-ties from roasting
bags before placing the bags in the
oven.
11 EN

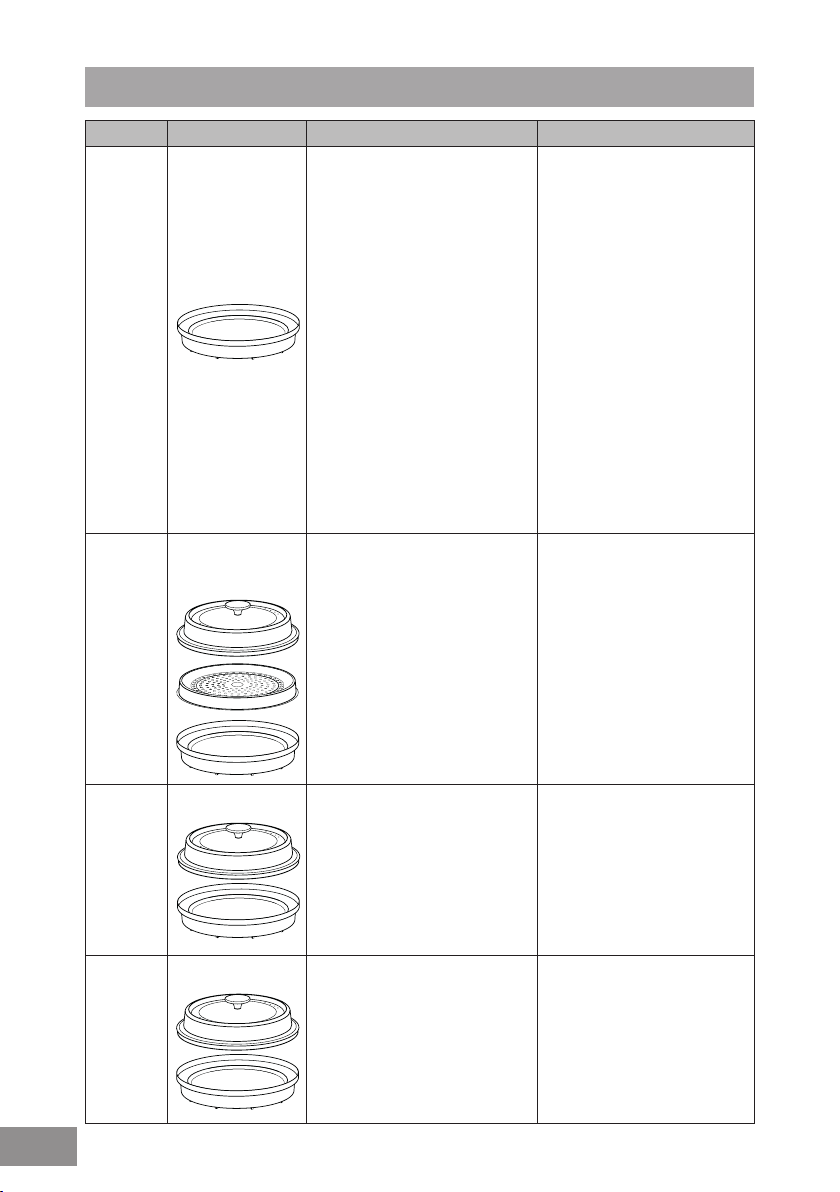
Oven Accessories
12 EN
Accessories
The oven comes equipped with a variety of
accessories. Always follow the directions
given for use of the accessories.
Glass Tray
1. Do not operate the oven without the
roller ring and the glass tray in
place.
2. Never use another type of glass
tray than the one specially designed for
this oven.
3. If the glass tray is hot, let it cool
before cleaning or placing in water.
4. The glass tray can turn in either
direction.
5. If the food or cooking vessel on the
glass tray touches the oven walls and
stops the tray rotating, the tray will
automatically rotate in the opposite
direction. This is normal.
6. Do not cook foods directly on the glass
tray.
Roller Ring
1. The roller ring and the oven oor should
be cleaned frequently to prevent noise
and build-up of remaining food.
2. The roller ring must always be used for
cooking together with the glass tray.
Wire Rack
1. The wire rack is used to facilitate
browning of small dishes and help with
the good circulation of the heat.
2. Do not use any metal container directly
on the wire rack in combination with
microwave.
3. Do not use the wire rack in microwave
mode only.
Steam Plus Pot
1. The Steam Plus Pot is specically
designed for this oven. The material of
the lid is stainless steel and the crispy
pot is aluminum. Although the lid and
crispy pot are metal, if placed in the
centre of the glass tray they can be
used safely. Do not use the Steam Plus
Pot in any other microwave ovens and
do not use in conventional ovens.
2. To use the Steam Plus Pot, the crispy
pot, steam tray and lid are used together
(Page 24).
3. The steam tray is placed inside the
crispy pot with the lid on top. Food is
placed on the steam tray. The steam
tray must always be used together with
the crispy pot and lid.
4. Always add 150 ml tap water in the base
of the crispy pot before using Steam
Plus.
5. Steam Plus Pot must only be used in
microwave mode. When using the crispy
pot alone as crispy grill, it can be used
in grill or combination modes.
6. The crispy pot and lid can be used
together (without the steam tray) for fry
or simmer functions.
7. Always use the crispy pot on the glass
tray. Do not use with the wire rack.
8. Always use oven gloves when handling
the accessories. After use the lid may
be hot. Take care when removing the
lid.
9. Ensure all food packaging is removed
before cooking.
10. Do not open the lid when your face is
very close to the Steam Plus Pot. Care
should be taken as steam may cause
injury. The lid must always be used
together with the crispy pot and steam
tray.
11. The red silicon seal may be removed.
Always re-position before use.
12. Always follow the instructions for using
the Steam Plus Pot. Failure to do so
may lead to risk of injury or damage to
the oven.
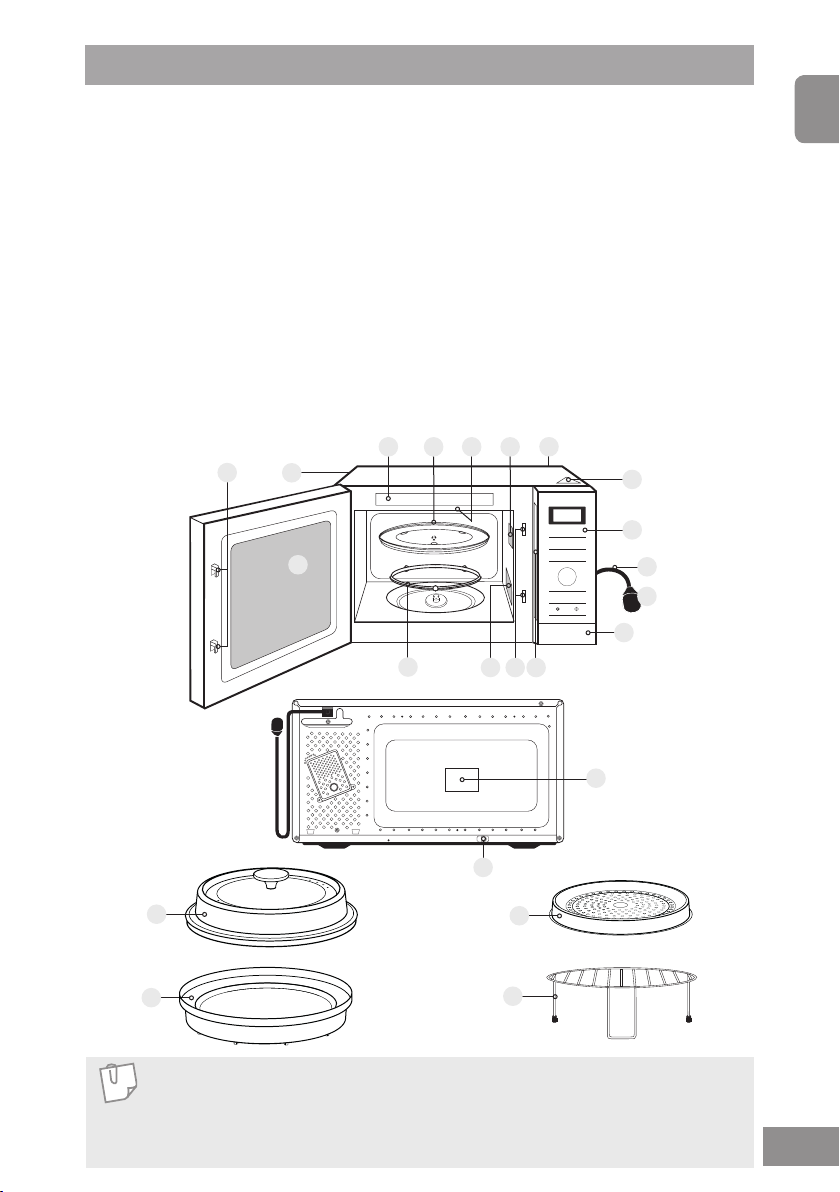
Parts of your Oven
1. Door release
Press to open the door. When you
open the oven door during cooking, the
cooking is stopped temporarily without
clearing earlier made settings. The
cooking is resumed as soon
as the door is closed and Start button
pressed.
2. Oven window
3. Door safety lock system
4. Oven air vent
5. Waveguide cover
(do not remove)
6. External oven air vents
7. Control panel
8. Power supply cord
9. Plug
3
6
10. Identication label
11. Glass tray
12. Roller ring
13. Grill elements
14. Caution label (hot surfaces)
15. Position your supplied auto program
menu label
16. Warning label
17. Stopper (irremovable)
The stopper ensures sufcient space
at the back of the oven to provide
adequate ventilation.
18. Lid
19. Steam tray
20. Crispy pot
21. Wire rack
15
11
13
6
4
English
14
7
2
12
18
20
5
10
3
17
19
21
8
9
1
16
Note
1.
The illustration is for reference only.
2.
The glass tray, wire rack, lid, steam tray and crispy pot are the only
accessories with this oven. All other cooking utensils mentioned in this manual
must be purchased separately.
13 EN
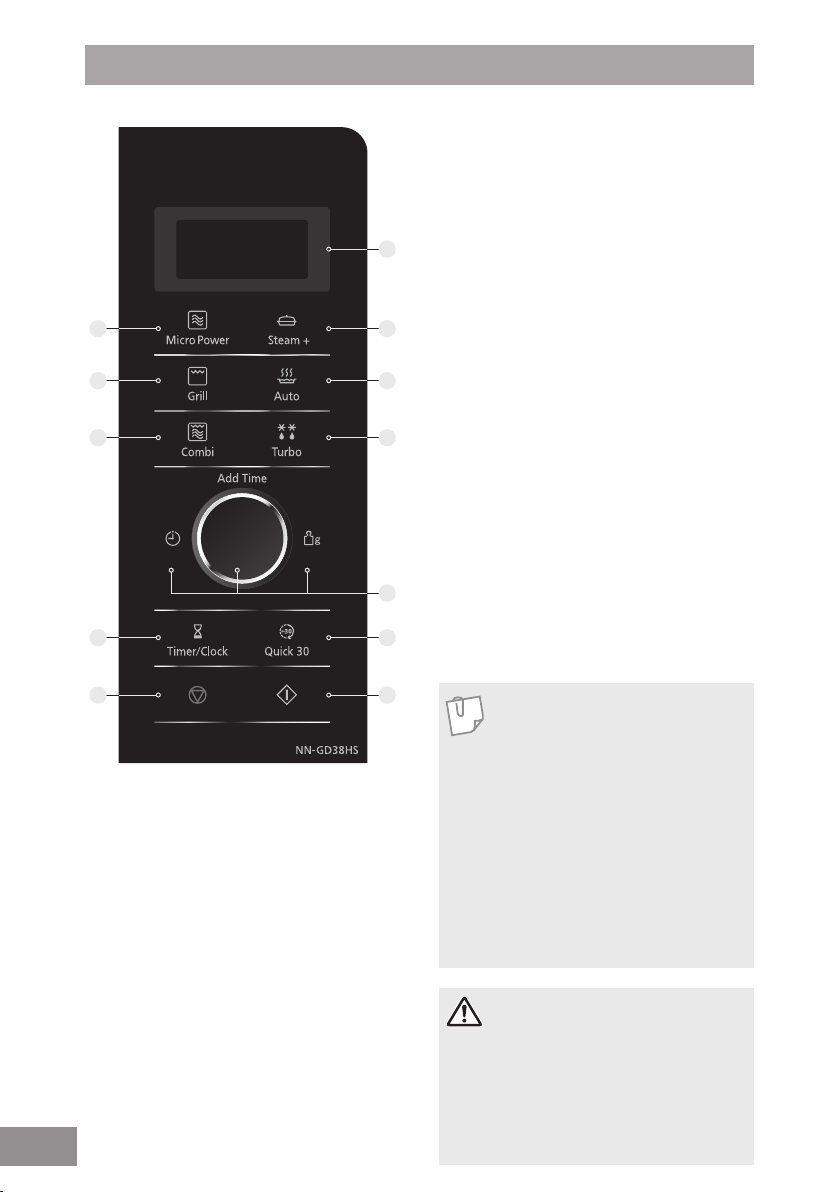
Control Panel
2
3
4
1. Display window
2. Micro Power button (page 17)
3. Grill button (page 22)
4. Combi button (page 23)
5. Turbo defrost button (page 33-34)
6. Auto programs button (page 31-32)
7. Steam Plus programs button (page 28-30)
8. Dial
1
7
6
5
8
Enter time or weight of food by turning the
dial. Use the dial for the Add Time function
(page 21).
9. Quick 30 button (page 20)
10. Timer/Clock button (page 15, 26)
11. Stop/Cancel button:
Before cooking:
One press clears your instuctions
During cooking:
One press temporarily stops the cooking
program. Another press cancels all your
instructions and the time of the day will
appear in the display.
12. Start button
Press to start operating the oven. If during
cooking the door is opened or Stop/Cancel is
pressed once, Start has to be pressed again
to continue cooking.
14 EN
10
11 12
The design of your control panel may vary from
the panel displayed (depending on colour), but the
words on the panel will be the same.
This oven is equipped with an energy saving
9
function.
Note
When in stand-by mode the
brightness of the display will be
reduced. The oven will enter
stand-by mode, when rst plugged
in and immediately after the last
operation has completed.
If an operation is set and Start
button is not pressed, after 6
minutes the oven will automatically
cancel the operation. The display
will revert back to clock mode.
Beep Sound
When a button is pressed correctly
a beep will be heard. If a button
is pressed and no beep is heard,
the unit has not or cannot accept
the instruction. At the end of any
complete program, the oven will
beep 5 times.
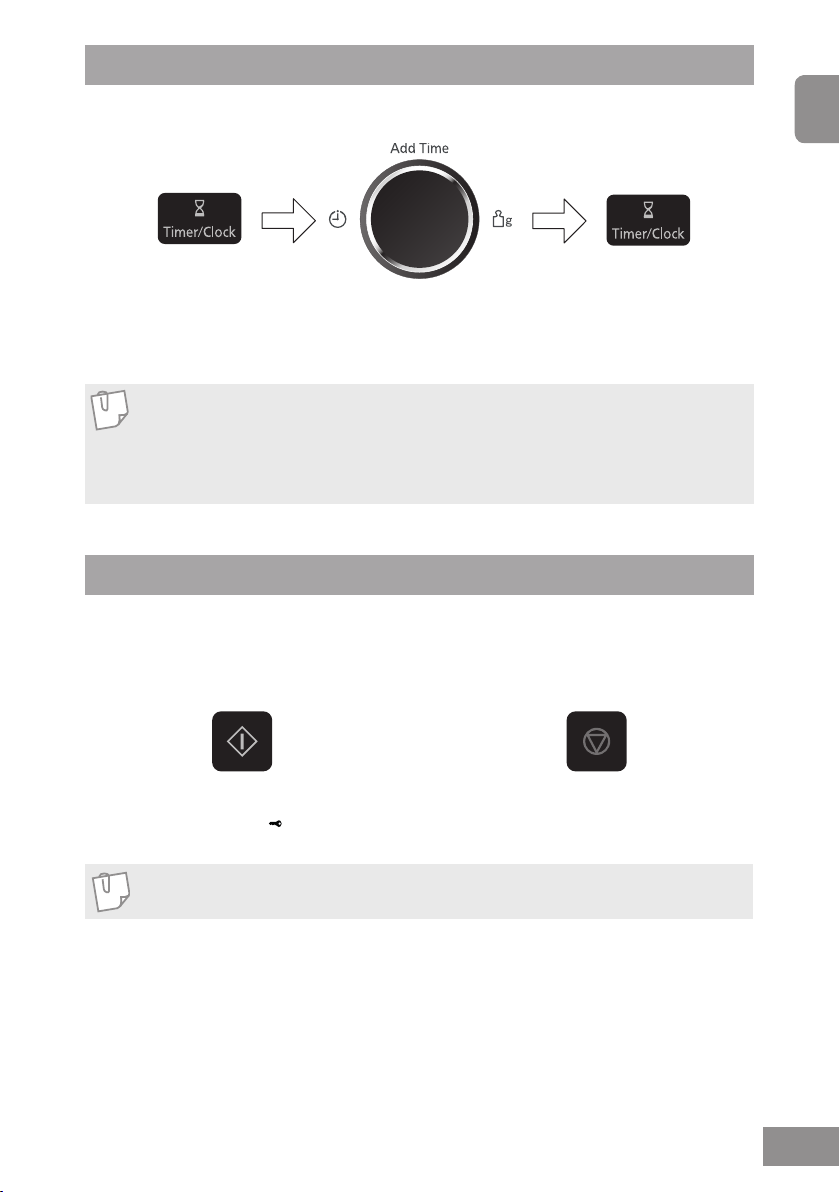
Setting the Clock
When the oven is rst plugged in “88:88” appears in display window.
English
Press Timer/Clock
twice
A colon starts
to blink.
Turn dial
Enter the time by turning the
dial. The time appears in the
display and the colon blinks.
Press Timer/Clock
The colon stops blinking.
Time of day is now locked
into the display.
Note
1. To reset time of day, repeat step 1 through to step 3, as above.
2. The clock will keep the time of day as long as the oven is plugged in and electricity
is supplied.
3. This is a 24 hour clock, ie 2pm = 14:00 not 2:00.
Child Lock
Using this system will make the oven controls inoperable; however, the door can be opened.
Child lock can be set when the display shows a colon or the time.
To set:
Press Start three times
The time of day will disappear. Actual time
will not be lost. ‘Key Icon’ is indicated in
the display.
Press Stop/Cancel three times
The time of day will reappear in the
display.
To cancel:
Note
To activate child lock, Start must be pressed 3 times within a 10 second period.
15 EN

Cooking Modes
The diagrams shown below are examples of the accessories. It may vary depending on
the recipe / dish used.
Cooking modes Uses
Defrosting
Microwave
Or
Steam Plus
Grill
•
Reheating
•
Melting: butter, chocolate,
•
cheese.
Cooking sh, vegetables,
•
fruits, eggs.
Preparing: stewed fruits,
•
jam, sauces, custards,
pastry, caramel, meat, sh.
Baking cakes without
•
colour.
Steaming sh, vegetables,
•
potatoes and chicken.
Frying sh llets, chicken
•
pieces and burgers.
Simmering risotto, sea food
•
pot and meat or vegetable
stews.
Grilling thin pieces of meat
•
or sh.
Grilling toast. Wire rack -
•
Accessories
to use
-
Steam Plus pot,
(crispy pot, steam
tray and lid).
Crispy pot and lid. -
Containers
Microwavable
(e.g. Pyrex®
dishes, plates
or bowls)
directly on the
glass tray.
No metal.
-
16 EN
Or
Combination
Or
Or
Browning of gratin dishes or
•
meringue pies.
Roasting meat steaks and
•
chicken pieces.
Browning and crisping
•
pizzas, quiches or potato
products.
Cooking lasagne, meat,
•
potato, or vegetable gratins.
Baking cakes and puddings
•
with browning.
Metal or
-
Wire rack No metal
Crispy pot
-
heatproof,
directly on the
glass tray.
No metal
Microwavable
and heatproof,
directly on the
glass tray.
No metal
Microwave Cooking and Defrosting
The glass tray must always be in position when using the oven.
Power
Press
Once
Twice Defrost 270 W
3 Times Medium 600 W
4 Times
5 Times Simmer 300 W
6 Times Warm 100 W
Wattage
Level
High 1000 W
Low
440 W
Press Micro Power
Select desired
power level. The
microwave indicator
lights and the
wattage appears in
the display.
Set the cooking
time using the
dial (1000 W power:
up to 30 minutes.
Other powers: up to
90 minutes).
Caution
The oven will automatically work on 1000 W microwave power if a cooking time is
entered without the power level previously being selected.
Notes
1. For multi-stage cooking refer to page 27.
2. Stand time can be programmed after microwave power and time setting. Refer to
using the timer page 26.
3. You can change the cooking time during cooking if required. Turn dial to increase
or decrease the cooking time. Time can be increased/decreased in
1 minute increments, up to 10 minutes. Turning the dial to zero will end cooking.
4. Do not use metal containers on microwave mode.
English
Press Start
The cooking
program will start
and the time in
the display will
count down.
17 EN
Defrosting Guidelines
Tips for Defrosting
Check the defrosting several times, even if
you use the auto programs. Observe the
standing times.
Standing Times
Individual portions of food may be cooked
almost immediately after defrosting. It is
normal for large portions of food to be
frozen in the centre. Before cooking,
allow to stand for a minimum of one hour.
During this standing time, the temperature
becomes evenly distributed and the food is
defrosted by conduction. N.B. If the food is
not going to be cooked immediately, store it
in the refrigerator. Never refreeze defrosted
food without rst cooking it.
Joints and Poultry
It is preferable to place the joints on an
upturned plate or plastic rack so that they
are not resting in the juices. It is essential
to protect delicate or projecting parts
of this food with small pieces of foil to
prevent these parts from cooking. It is not
dangerous to use small pieces of foil in
your oven, provided they do not come
into contact with the oven walls.
Bread
Loaves will require a standing time of
5-30 minutes to allow the centre to thaw.
Standing time can be shortened if slices are
separated and rolls and loaves cut in half.
Beep Sounds
Beeps will sound during the Turbo defrost
programs. The beeps are to remind you to
check, stir, separate the pieces, or shield
small parts. Failure to do this may result in
uneven defrosting.
18 EN
Minced Meat or Cubes of Meat
and Seafood
Since the outside of these foods quickly
defrosts, it is necessary to separate them,
break the blocks into pieces frequently while
defrosting and remove them when they
have defrosted.
Small Portions of Food
Chops and chicken pieces must be
separated as soon as possible so that they
defrost evenly throughout. Fatty parts and
the ends defrost more quickly. Place them
near the centre of the turntable or protect
them with small pieces of foil.
Defrosting Chart
English
Food
Bread rolls (3) 1 pce 85 g
Brioche large (3) 1 pce 400 g
Cheese (camembert) (3) 1 pce 250 g 270 W 7 mins 30 secs Stand 1 hour minimum
Cheese (feta) (3)
Cottage cheese
(quark) (3)
Croissants - brioche small
(1, 4)
Raisin roll (1, 4) 1 pce 120 g
Fish llets thin (2, 3) 4 pcs 500 g 270 W 10 - 15 mins
Fish llets thick (2, 3) 1 pce 380 g 270 W 12-14 mins
Fish steak without bone
(2, 3)
Fruit raspberry (1)
Fruits plums/apricots (1)
Hamburger (2,3)
Pastry puff (1,3)
Pastry shortcrust (1,3) 1 roll 500 g 270 W 4-5 mins
Pizza dough (1,3)
Shrimps prawns small (2)
Shrimps prawns large (2)
Ham cooked, lean (2) 4 slices 200 g 270 W 5-6 mins
Salami (2) 12 slices 250 g 270 W 8-9 mins
Desserts
Black forest (1)
Chocolate fondant (1) 1 pce 450 g 440 W 3 mins Stand 10 mins
Doughnuts (1, 4)
Wafes (1, 4)
Fruit tarte (3)
Weight/Quantity
1 slice 200 g
1 pot 250 g 270 W 8-10 mins Stand 10 mins
2 pcs 100 g
1 pce 450 g 270 W 10-12 mins
200 g
300 g
700 g
1 pce 100 g
2 pcs 200 g
1 roll 375 g
1 ball 240 g
200 g
450 g
300 g
1 pce 600 g
1 pce 50 g Combi 2; 1 min 20 secs
2 pcs 100 g Combi 2; 1 min 30 secs
1 pce 20 g
2 pcs 40 g
470 g
Time & mode Method
1000 W 20-30 secs
Combi 2; 3 mins 30 secs
270 W 7-8 mins Stand 20 mins minimum
Combi 2; 1 min &
2 mins Grill 1
Combi 2; 1 min 30 secs
& 3 mins Grill 1
270 W 6-8 mins Stand 15 mins
270 W 11-13 mins
270 W 20-22 mins
270 W 6-7 mins
270 W 10-12 mins
270 W 4-5 mins
270 W 4 mins 30 secs Stand 10 mins
270 W 7-9 mins
270 W 10-12 mins
270 W 15 mins
270 W 10-15 mins Stand 15 mins
Combi 2; 50 - 60 secs
Combi 2; 1 min 30 secs
270 W 8-10 mins Stand for 10 mins
Stand 5 mins
Stand 5 mins
Stand 1 min
Stand 1 min
Stand 15 mins
Stand 15 mins
Stand 10 mins
Stand time 20 mins in
refrigerator
Break the ice & drain several
times. Stand 10 mins
Stand 5 mins
Stand 3 min in oven
Add 1 min grill for more
crispness
1) Turn or stir at half time. (2) Separate and turn several times. (3) Remove packaging and place on a heat
resistant plate. (4) Place on wire rack, if required in a heatproof dish.
19 EN

Using the Quick 30 Function
This function allows you to quickly set cooking time in 30 second increments.
Press Quick 30 to set the desired
cooking time (up to 5 minutes).
Each press is 30 seconds.
Time appears in the display. Power
level is pre-set at 1000 W.
Press Start
The cooking will start and the time
in the display will count down.
At the end of cooking, ve beeps
will sound.
Note
1. If desired, you can use other power levels. Select desired power level before
pressing Quick 30.
2. After setting the time by Quick 30, you cannot use dial.
3. This function will not operate for 1 minute after manual cooking.
20 EN

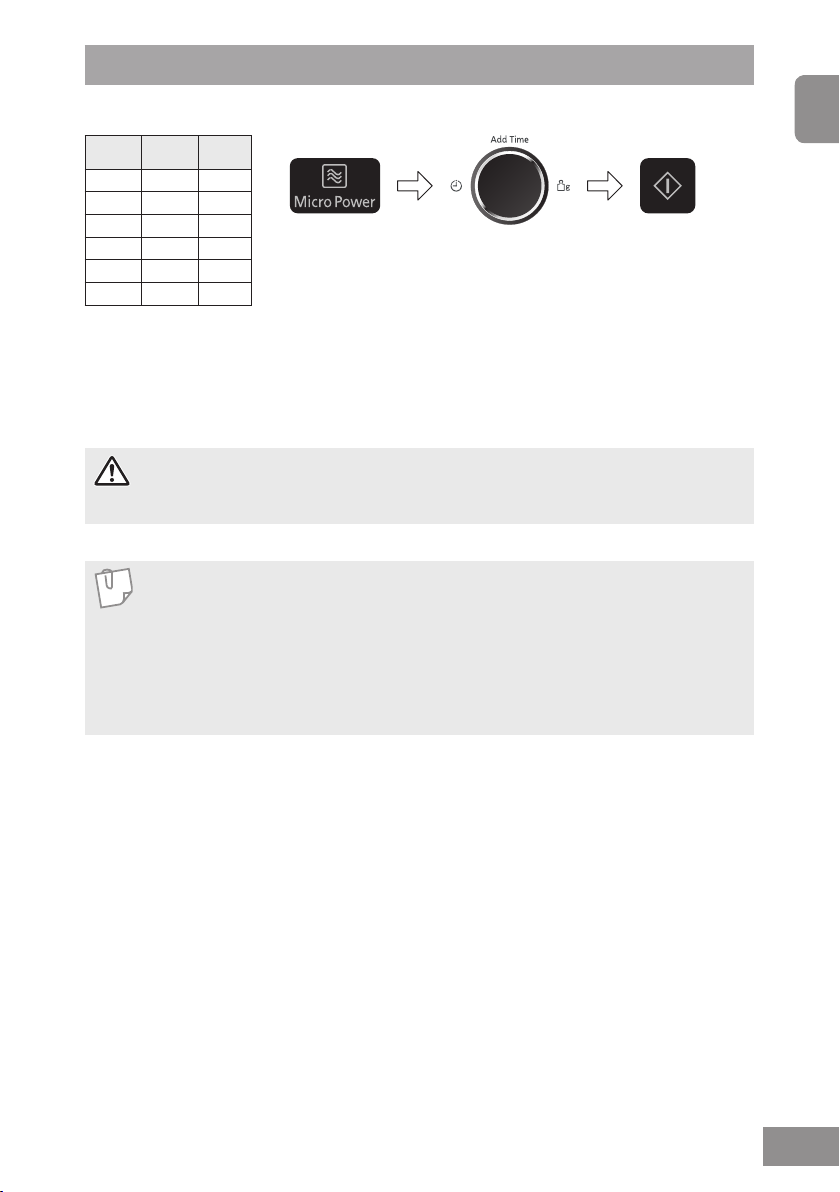
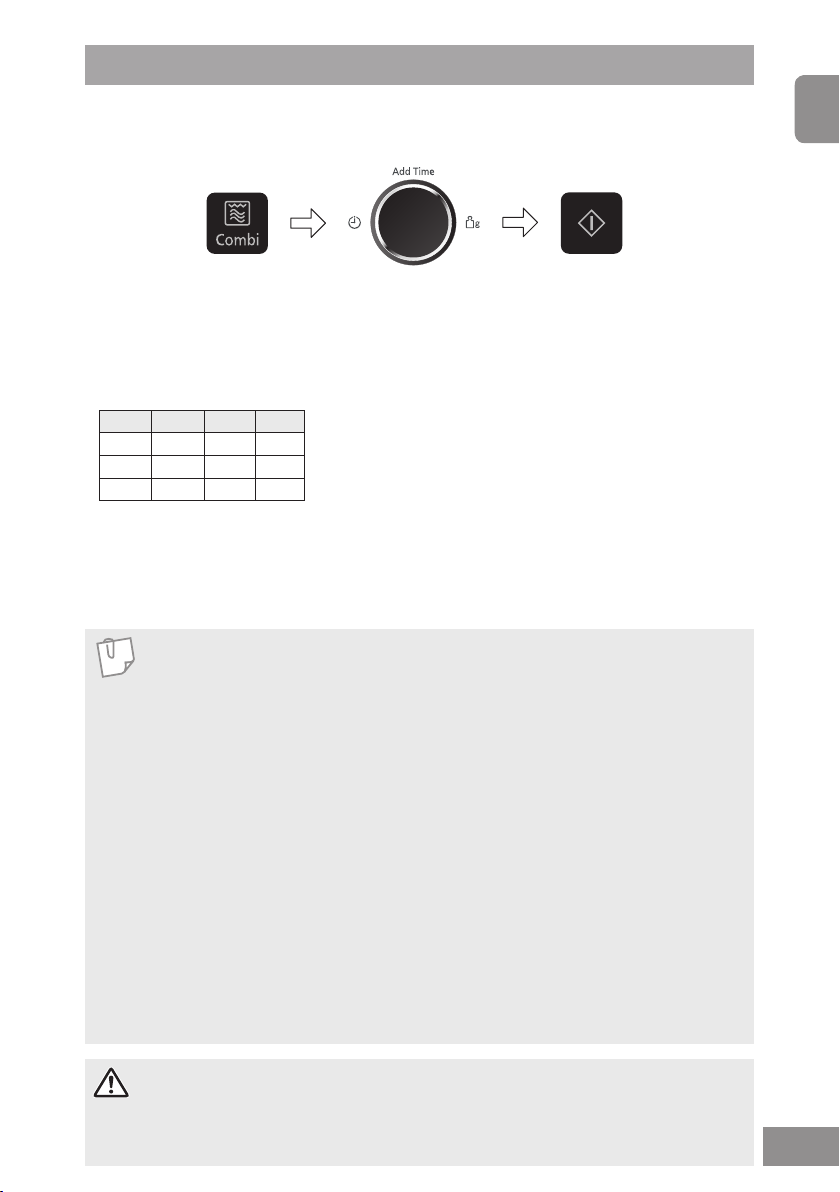
Using the Add Time Function
This feature allows you to add cooking time at the end of previous cooking.
English
After cooking, turn dial to
select Add Time function.
Maximum cooking time:
Microwave: 1000 W up to 30
minutes; other powers up to 90
minutes; Grill, Combination:
90 minutes
Press Start
Time will be added.
The time in the display
window will count
down.
Note
1. This function is only avaliable for Micro Power, Grill and Combination function and
it is not avaliable for Auto programs.
2. The Add Time function will not operate after 1 minute cooking.
3. The Add Time function can be used after the multi-stage cooking.
4. The power level is the same as the last stage. This function will not operate if the
last stage was standing time.
21 EN
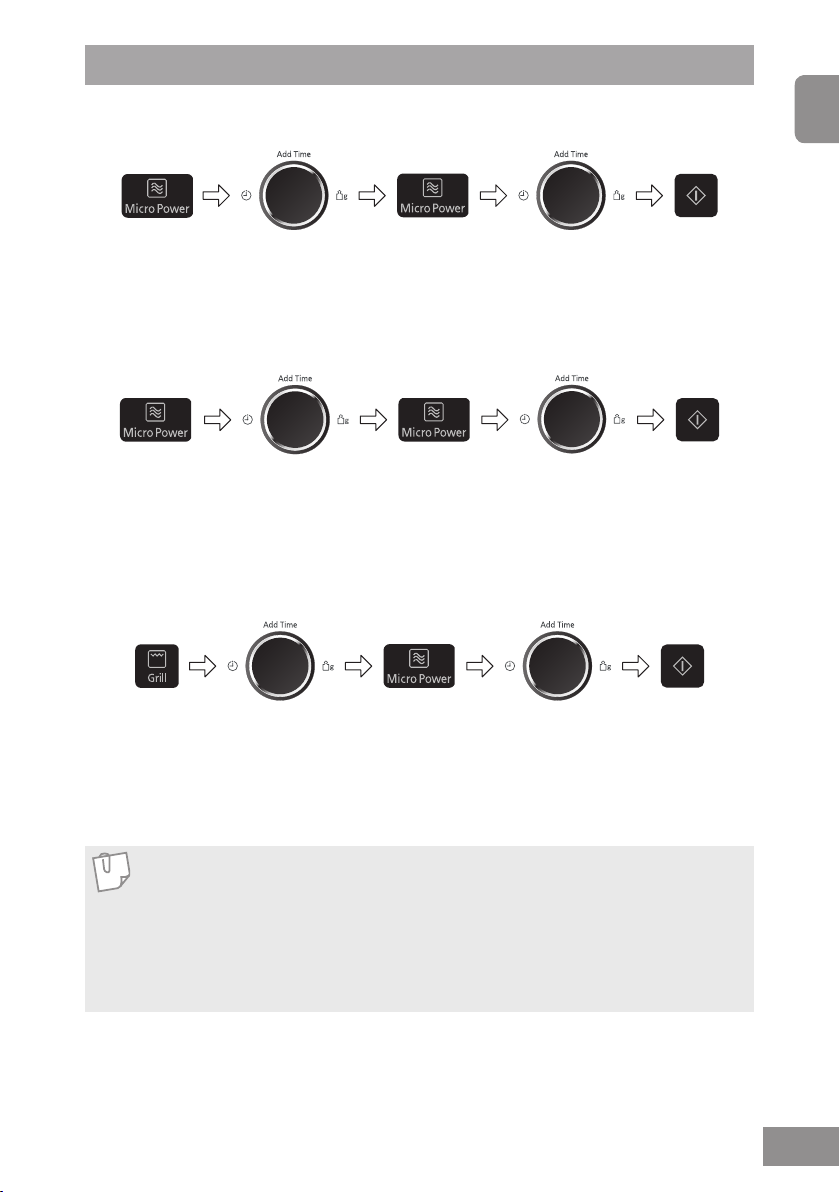
Grilling
The grill system on the oven gives fast efcient cooking for a wide variety of foods e.g. chops,
sausages, steaks, toast, etc. There are 3 different grill settings available. The glass turntable must
always be in position when using the oven.
Press
Once
Twice
3 Times
Press Grill to
select level
The grill indicator
lights and grill level
(1, 2 or 3) appears
in the display.
Power
Level
Grill 1
(High)
Grill 2
(Medium)
Grill 3
(Low)
Wattage
1000 W
Set time
Select Cooking time by
turning the dial. Time
can be set up to 90
minutes.
850 W
700 W
Press Start
The time counts
down in the display.
Adjusting Time During Cooking
You can change the cooking time during cooking if required. Turn dial to increase or decrease the cooking
time. Time can be increased/decreased in 1 minute increments, up to 10 minutes. Turning the dial to zero
will end cooking.
Notes
1. Place food on wire rack on turntable. Place a heatproof plate (Pyrex®) underneath
to catch fat and drips.
2. Never cover foods when grilling.
3. Do not attempt to preheat the grill.
4. The grill will only operate with the oven door closed. It is not possible to use the
grill function with the door open.
5. There is no microwave power on the grill only program.
6. Most foods require turning halfway during cooking. When turning food, open oven
door and carefully remove wire rack using oven gloves.
7. After turning, return food to the oven and close door. After closing oven door,
press Start. The oven display will continue to count down the remaining grilling
time. It is quite safe to open the oven door at any time to check the progress of
the food as it is grilling.
8. The grill will glow on and off during cooking - this is normal. Always clean the
oven after using the grill and before using the microwave or combination.
22 EN
Caution!
The wire rack must always be used with the glass tray in position. Remove wire
rack from oven by holding the rack and heatproof dish rmly. Use oven gloves when
removing accessories. Never touch the outside window or inside metal parts of the
door or oven when taking food in or out due to the high temperatures involved.
Combination Cooking
This combination mode is suitable for foods which are normally grilled and for reheating small
savoury items. The Grill will glow on and off during cooking - this is normal.
English
Select Combi level
Press Combi to select level.
The combination indicator lights,
and combination level (1, 2 or 3)
will appear in the display.
Press Level MW Grill
Once Combi 1 440 W High
Twice Combi 2 300 W High
3 Times Combi 3 300 W Medium
Set time
Select cooking time by
turning dial. Time can be
set up to 90 minutes.
When cooking by combination, the
microwave power cooks food quickly whilst
the grill gives traditional browning and
crisping.
Press Start
The time counts
down in the display.
Adjusting Time During Cooking
You can change the cooking time during cooking if required. Turn dial to increase or decrease
the cooking time. Time can be increased/decreased in 1 minute increments, up to 10 minutes.
Turning the dial to zero will end cooking.
Notes
1. The wire rack is designed to be used for combination and grilling.
Never attempt to use any other metal accessory except the one provided
with the oven. Place a heatproof dish underneath to catch any fat or drips.
2. Use the wire rack only as described. Do not use if operating the oven with
less than 200 g of food on a manual program. For small quantities do not
cook by combination, cook by grill or microwave only for best results.
3. Never cover foods when cooking on combination.
4. Do not preheat the grill on combination.
5. Arcing may occur if the incorrect weight of food is used, the wire rack has
been damaged, or a metal container has been used accidentally. Arcing
is ashes of blue light seen in the microwave. If this occurs, stop the oven
immediately.
6. Some foods should be cooked on combination without using the wire rack
i.e. roasts, gratins, pies and puddings. The food should be placed in a
heatproof non-metallic dish and placed directly onto the glass tray.
7. Do not use plastic microwave containers on combination programs
(unless suitable for combination cooking). Dishes must be able to withstand
the heat of the top grill - heatproof glass e.g. Pyrex® or ceramic are ideal.
8. Do not use your own metal dishes or tins, as the microwaves will not
penetrate the food evenly.
Caution!
The wire rack must always be used with the glass tray in position. Remove wire
rack from oven by holding the rack and heatproof dish rmly. Use oven gloves when
removing accessories. Never touch the outside window or inside metal parts of the
door or oven when taking food in or out due to the high temperatures involved.
23 EN
Using the Steam Plus Pot (Manual Operation)
Function Accessory to Use Concept Instructions
Crispy
grill
Steam
Crispy pot
Steam plus pot
(crispy pot, steam
tray and lid)
Some foods cooked by microwave
can have soft and soggy crusts.
The crispy pot accessory will
brown and crisp pizzas, quiches,
pies, breaded products just as
a conventional oven. The crispy
pot works in three ways: heating
the crispy pot by absorbing
microwaves, heating the food
directly by microwaves and
heating the food by the grill. The
base of the crispy pot absorbs
the microwaves and transfers
them into heat. Then the heat is
conducted through the crispy pot
to the food. The heating effect
is maximised by the non-stick
surface.
The Steam Plus accessories are
suitable for steaming vegetables,
potatoes, sh llets, whole sh,
chicken llets. Microwaves are
absorbed by the base of the crispy
pot which heats the water inside.
This creates steam which cooks
the food.
For best results, pre-heat the
crispy pot before using. Place
directly on the glass tray and
pre-heat on Microwave 1000 W
power for 3 minutes. To assist
browning, brush the pan with oil
before preheating for items such
as sausages and cordon bleu.
Remove the crispy pot from the
oven and place the food in the
crispy pot. Use oven gloves as
the crispy pot will be very hot.
For best results, it is important
that the food is placed on the
crispy pot immediately after pre-
heating. Performance cannot be
guaranteed with a time delay.
Please refer to cooking chart on
page 37.
Pour 150 ml tap water into the
crispy pot and place the steam
tray inside. Place food directly
on the steam tray. Cover with lid
and place directly on the glass
tray. Please refer to cooking
chart on page 37.
24 EN
Fry
Simmer
Crispy pot and lid
Crispy pot and lid
The crispy pot is used together
with the lid. Suitable foods such
as, sh llets, chicken pieces,
burgers are placed directly on the
crispy pot. The food is cooked
from the heat of the base of the
pan. The bottom side of the food
will be brown and crisp.
The crispy pot is used together
with the lid. It is suitable for
simmering risotto, seafood pot,
meat or vegetable stews or soups.
The food is cooked from the heat
of the base of the pan.
Place the food directly on the
crispy pot, cover with the lid
and place on the glass tray. It
is not necessary to pre-heat. If
required, turn or rearrange the
food during cooking. Please
refer to cooking chart on page
37.
Place the food directly in the
crispy pot, cover with the lid
and place on the glass tray. It
is not necessary to pre-heat. If
required, stir during cooking.
Please refer to recipes on
page 38.

Using the Steam Plus Pot
Care of the Steam Plus Pot
1. Never cut pizzas, quiches or any other
food directly in the crispy pot as this
will damage the non-stick surface.
2. After use, wash the Steam Plus Pot in
hot soapy water and rinse in hot water.
Do not use any abrasive cleaning
substances or scouring pads as this
will damage the surface of the crispy
pot.
3. The Steam Plus Pot is dishwasher
safe.
Note
1. For crispy grill mode, do not pre-heat the crispy pot for more than 5 minutes.
2. Always place the crispy pot in the centre of the glass tray and ensure it does not
touch the wall of the oven cavity. Failure to do so, may cause sparking which would
damage the cavity.
3. Always use the crispy pot on the glass tray. Do not use with the wire rack.
4. Always use oven gloves when handling the accessories.
5. Ensure all food packaging is removed before cooking.
6. Do not place any heat-sensitive materials on the hot crispy pot as this may cause
burning.
7. Do not use the Steam Plus Pot in any other microwave ovens and do not use in
conventional ovens.
8. Do not use the steam tray and the lid on their own.
9. For best results in crispy grill mode, use the crispy pot in combination grill and
microwave. Only Microwave mode (1000 W power) can be used for preheating the
crispy pot.
English
Caution!
Always use oven gloves when removing accessories. Always use lid when you using
steam, fry, or simmering functions. After cooking, do not open lid when your face is very
close to the accessory as steam may cause injury.
25 EN
Using the Timer
Delay Start Cooking
By using the timer, you are able to program delay start cooking.
Example
Press
Timer/Clock
Set the delay time by
turning the dial
(up to 9 hours).
Set the desired
cooking program
and cooking time.
Press Start
Note
1. Three stage cooking can be programmed including delay start cooking.
Example
Delay start: 1 hour 1000 W Power: 10 min 300 W Power: 20 min
Once 5 times
2. If the programmed delay time exceeds one hour, the time will count down in units
of minutes. If less than one hour, the time will count down in units of seconds.
3. Delay start cannot be programmed before an auto program.
4. If the oven door is opened during the delay time, the time in the display window
will continue to count down.
Stand Time
By using the timer, you can program stand time after cooking is completed or use to program the
oven as a minute timer.
Example
Set the desired
cooking program
and cooking time.
Press
Timer/Clock
Set desired amount of
time by turning the dial
(up to 9 hours).
Press
Start
26 EN
Note
1. Three stage cooking can be programmed including stand time.
Example
1000 W Power: 4 mins Stand time: 5 mins
Once
2. If the oven door is opened during the stand time or minute timer, the time in the
display window will continue to count down.
3. This feature may also be used as a minute timer. In this case press the timer,
set time and press Start.
4. Stand time cannot be programmed after an auto program.
5. If the programmed stand time exceeds one hour, the time will count down in units
of minutes. If less than one hour, the time will count down in units of seconds.
1000 W Power: 2 mins
Once
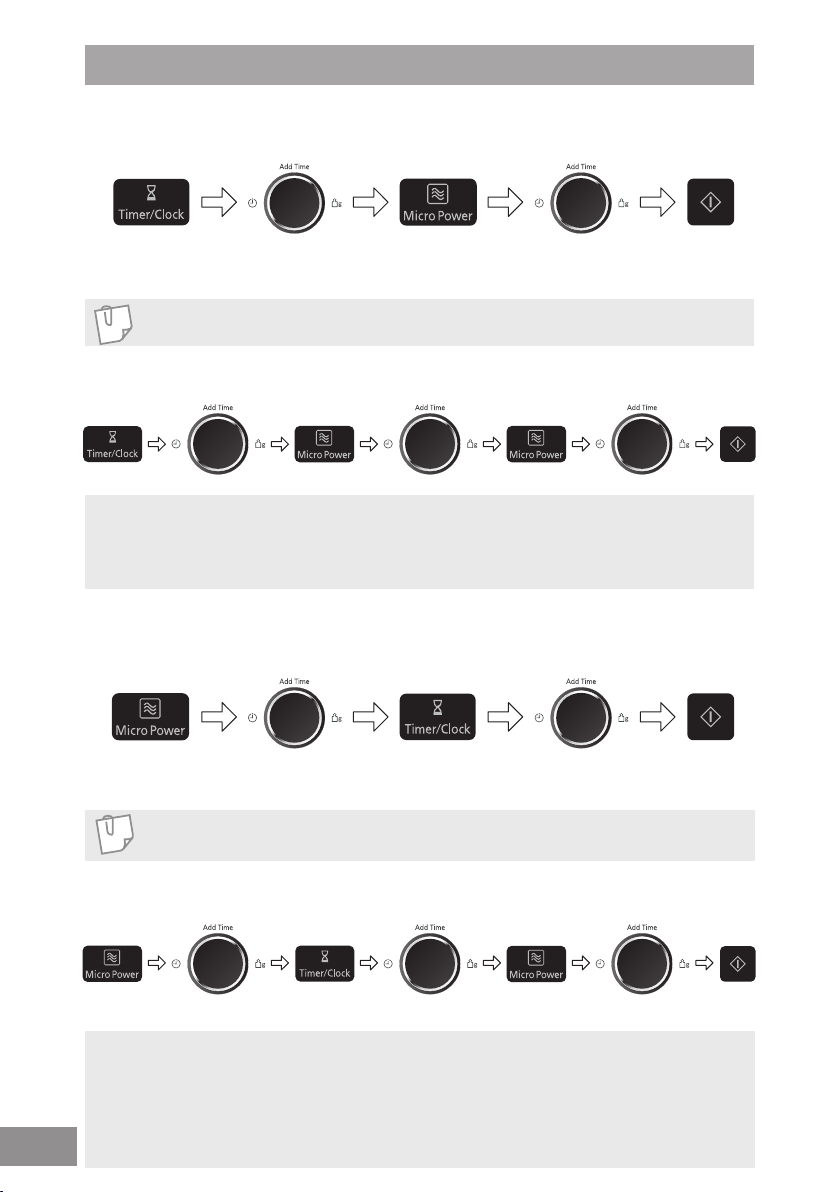
Multi-stage Cooking
2 or 3 Stage Cooking
Example:
English
Press Micro
Power
Select desired
power level.
Example: To defrost for 2 minutes and cook food on 1000 W power for 3 minutes.
Press Micro
Power twice to
select 270 W.
Example: To grill at Grill 3 for 4 minutes and cook food on 440 W power for 5 minutes.
Press Grill
Power 3 times
to select
Grill 3.
Set the cooking
time using the dial.
Set the
cooking time
to 2 minutes
using the dial.
Set the
cooking time
to 4 minutes
using the dial.
Press Micro
Power
Select desired
power level.
Press Micro
Power once to
select 1000 W
power.
Press Micro
Power four
times to select
440 W power.
Set the cooking
time using the dial.
Set the
cooking time
to 3 minutes
using the dial.
Set the
cooking time
to 5 minutes
using the dial.
Press Start
The cooking program
will start and the time
in the display will
count down.
Press Start
Press Start
Notes
1. For 3 stage cooking, enter another cooking program before pressing Start.
2. During operation, pressing Stop/Cancel once will stop the operation.
Pressing Start will re-start the programmed operation. Pressing Stop/Cancel twice
will stop and clear the programmed operation.
3. Whilst not operating, pressing Stop/Cancel will clear the selected program.
4. Auto programs cannot be used with multi-stage cooking.
27 EN
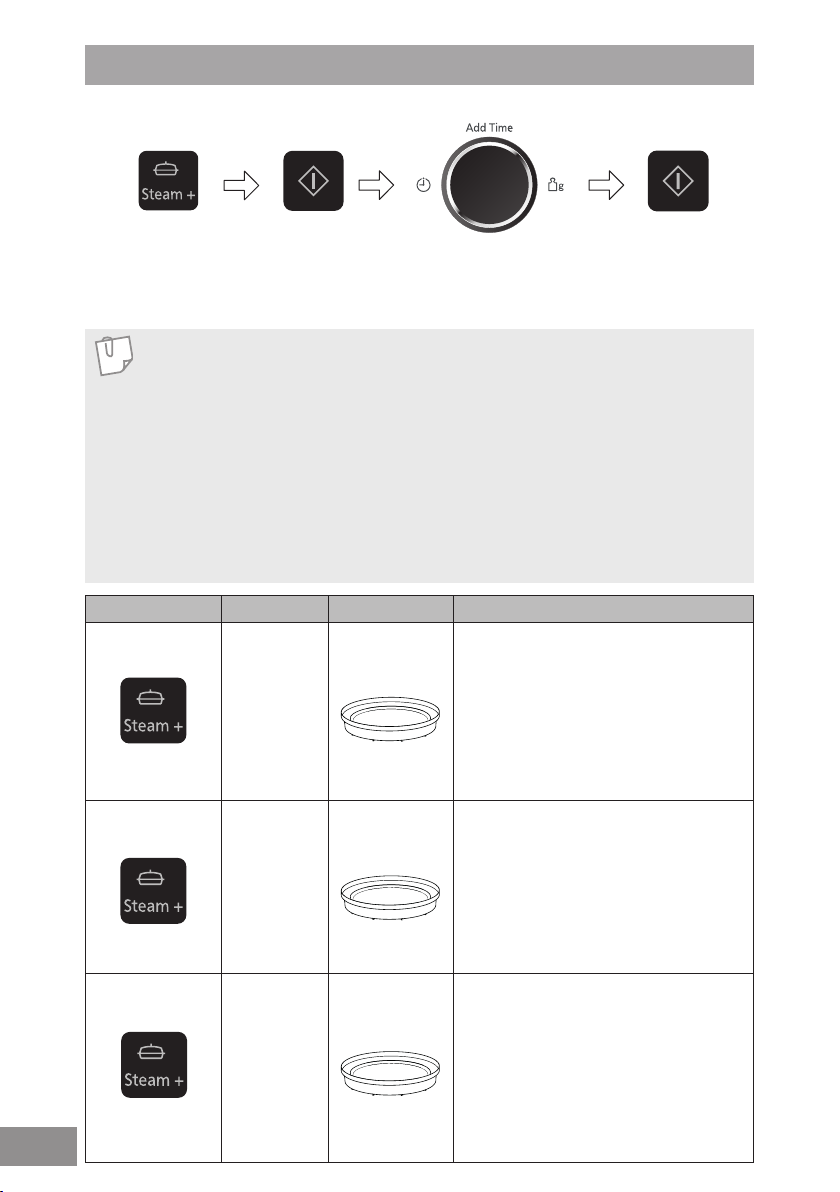
Steam Plus Programs
With this feature food can be cooked or reheated according to the weight. The weight
has to be entered in grams.
Select desired category
and place the crispy
pot in the oven directly
on the glass tray.
Press Start
to preheat
the crispy
pot.
After preheating beeps sound. Place
the food in the crispy pot and set
weight. Turning the dial slowly will count
up in 10 g steps. Turning the dial quickly
will count up in 100 g steps.
Note
1. The Steam Plus programs must only be used for foods described.
2. Only cook foods within the weight ranges described.
3. Always weigh the food rather than relying on the package information.
4. Only use the crispy pot accessory as indicated below.
5. Do not cover food when using the Steam Plus programs frozen pizza, frozen
potato products and chilled quiche as it will prevent the food browning.
6. Most foods benet from a standing time, after cooking with an Auto program,
to allow heat to continue conducting to the centre.
7. To allow for some variations that occur in food, check that food is thoroughly
cooked and piping hot before serving.
Program Weight Accessory Instructions
1. Frozen Pizza
1 Press
2. Frozen
Potato Products
2 Presses
120 g - 440 g
200 g - 500 g
For reheating and browning the top of
frozen pre-cooked pizza, bruschetta
and cheese baguette. Press Steam Plus
once. Remove all packaging and place the
pizza in the preheated crispy pot. Transfer
the pizza on to a cooling rack at the end of
cooking. This program is not suitable for deep
pan pizzas, stuffed crust pizzas or very thin
pizzas such as Flammekueche.
For reheating, crisping and
browning frozen potato products.
Press Steam Plus twice. After preheating
the crispy pot, spread out potato products
in the crispy pot. For best results, cook in a
single layer and stir at beep. This program is
not suitable for galettes, Pom’ Dauphine and
Pom’ Noisette.
Press
Start
28 EN
3. Chilled Quiche
3 Presses
150 g - 400 g
For reheating fresh pre-cooked quiche.
Press Steam Plus three times. Remove all
packaging and place the quiche in the
preheated crispy pot. Transfer the
quiche onto a cooling rack at the end of
cooking. Quiche with a high content of
cheese may be much hotter than
quiches with vegetables. This program is
not suitable for double-crust pies or deep
lled quiches or crustless quiches.

Steam Plus Programs
With this feature food can be steamed according to the weight. The weight has to be
entered in grams.
English
Set Weight
The Steam Plus and cooking
function indicators light and the
program number appears in the
display.
Set the weight of the food by using the
dial. Turning the dial slowly will count up
in 10 g steps. Turning the dial quickly will
count up in 100 g steps.
Note
1. The Steam Plus programs must only be used for foods described.
2. Only cook foods within the weight ranges described.
3. Always weigh the food rather than relying on the package information.
4. Only use the accessories as indicated on pages 29-30.
5. Most foods benet from a standing time, after cooking with an Auto program,
to allow heat to continue conducting to the centre.
6. To allow for some variations that occur in food, check that food is thoroughly
cooked and piping hot before serving.
Program Weight Accessories Instructions
4. Steam
Fish Fillets
4 presses
5.Steam
Chicken
Breasts
5 presses
200 g - 500 g
200 g - 800 g
To cook fresh sh llets e.g. cod, salmon or haddock.
Pour 150 ml tap water in the crispy pot. Place fresh
sh llets onto steam plate inside crispy pot. Cover
with lid and place on glass tray. Press Steam Plus
four times. Enter the weight of the fresh sh llets.
Press Start.
To cook fresh chicken breasts. Each chicken breast
portion should be between 100-250 g each. Pour
150 ml tap water in the crispy pot. Place fresh
chicken breasts onto steam plate inside crispy pot.
Cover with lid and place on glass tray. Press
Steam Plus ve times. Enter the weight of the fresh
chicken breasts. Press Start.
Press StartSelect desired category
29 EN

Steam Plus Programs
Program Weight Accessories Instructions
6. Steam
Potatoes
6 presses
7. Mussels
7 presses
8. Risotto
150 g - 500 g
250 g
(1 Portion)
500 g
(2 Portions)
500 g
(2 portions)
1000 g
(4 portions)
ingredients
For 500 g
60 g shallots, finely diced
1 tbsp butter
150 ml white wine
500 g mussels
To steam potatoes without skins. Peel potatoes and
cut into even sized pieces. Pour 150 ml tap water in
the crispy pot. Place prepared potatoes onto steam
plate inside crispy pot. Cover with lid and place on
glass tray. Press Steam Plus six times. Enter the
weight of the potatoes and press Start.
To cook fresh mussels in a white wine sauce, 250 g or
500 g. Prepare ingredients as outlined below. Wash,
scrub and remove beards from mussels. Discard any
that are open. Place butter and shallots in crispy pot.
Place on glass tray without lid. Press Steam Plus
seven times. Select 250 g or 500 g. Press Start. At
beeps, add mussels and wine and stir. Cover with lid,
place on glass tray and press Start.
For 250 g
40 g shallots, finely diced
1/2 tbsp butter
100 ml white wine
250 g mussels
For cooking risotto, 500 g or 1000 g. Prepare as
outlined in the recipe below. Press Steam Plus eight
times. Select 500 g or 1000 g. Press Start. Stir at
beeps.
30 EN
8 presses
ingredients
For 1000 g (4 portions)
40 g dried porchini mushrooms
1 onion
50 g butter
250 g Arborio rice
1 garlic clove
400 ml hot water with 1 vegetable
stock cube
30 g parmesan
Halve ingredients for 500 g
(2 portions)
Dish: none
Accessory: Steam Plus Pot
1. Soak the mushrooms as per manufacturer’s instructions using
400 ml water for 40 g, 200 ml for 20 g.
2. Add rice, chopped onion, butter, crushed garlic clove and chopped
soaked porcini mushrooms to the crispy pot.
3. Add vegetable stock and soaking water (150 ml for 4 portion recipe,
75 ml for 2 portion recipe). Cover with lid.
4. Place crispy pot on glass tray.
5. Stir in parmesan at end of cooking.

Auto Cook Programs
With this feature food can be cooked or reheated according to the weight. The weight has to be
entered in grams.
English
Set Weight
The auto and cooking function
indicators light and the program
number appears in the display.
Set the weight of the food by using the
dial. Turning the dial slowly will count up
in 10 g steps. Turning the dial quickly will
count up in 100 g steps.
Note
1. The Auto weight programs must only be used for foods described.
2. Only cook foods within the weight ranges described.
3. Always weigh the food rather than relying on the package information.
4. Only use the accessories as indicated on pages 31-32.
5. Do not cover food when using the chicken pieces program as it will prevent the
food browning and the heat of the grill will melt any plastic covering.
6. Most foods benet from a standing time, after cooking with an Auto program,
to allow heat to continue conducting to the centre.
7. To allow for some variations that occur in food, check that food is thoroughly
cooked and piping hot before serving.
Program Weight Accessories Instructions
9. Chilled Meal
200 g - 800 g
1 press
10. Frozen
Meal
200 g - 500 g
2 presses
To reheat a fresh plated meal or
casserole. All foods must be
pre-cooked. Foods should be at
refrigerator temperature approx. + 5°C.
Cover and press Auto cook once. Stir at
beeps. Stir again at end of program and
allow a few minutes standing time. Large
pieces of meat/sh in a thin sauce may
require longer cooking. This program is
not suitable for starchy food such as rice,
noodles or potatoes.
To reheat a frozen precooked meal or
casserole; All foods must be pre-cooked
and frozen (-18 °C); Cover. Press Auto
cook twice. Stir at beeps and cut the
blocks into pieces. Stir again at end of
program and allow a few minutes standing
time. Check temperature and cook further
minutes if necessary before eating. This
program is not suitable for portionable
frozen foods.
Press StartSelect desired category
31 EN

Auto Cook Programs
Program Weight Accessories Instructions
11. Fresh
Vegetables
3 presses
12. Fresh Fish
4 presses
13. Rice
5 presses
14. Chicken
Pieces
6 presses
200 g - 800 g
200 g - 800 g
100 g - 300 g
200 g - 700 g
To cook fresh vegetables.
Place prepared vegetables into a suitable
sized container. Sprinkle with 1 tbsp
water per 100 g vegetables. Cover with
pierced cling lm or a lid. Press Auto cook
three times. Stir at beeps. Drain after
cooking and season to taste.
For cooking llets or steaks of sh.
Place in a suitable sized container, add
1-3 tbsp (15-45 ml) water. Cover with
pierced cling lm or a lid. Press Auto cook
four times.
For cooking rice for savoury dishes
not rice puddings (Thai, Basmati,
Jasmine, Surinam, Arborio or
Mediterranean rice). Rinse the rice
thoroughly before cooking. Use a large
bowl. Add 2 times boiling water to rice.
Add salt if desired. Cover with a lid or
pierced cling lm. Press Auto cook ve
times. Stir at the beeps. Allow to stand for
5 minutes after cooking.
For cooking fresh chicken pieces with
bone e.g. thighs, drumsticks, quarters.
Place the chicken pieces skin side down
directly on the wire rack on glass tray. Place
a heatproof dish underneath to catch drips.
Press Auto cook six times. Do not cover.
Turn at beeps. Allow a few minutes standing
time at the end of the program.
32 EN

Turbo Defrost
This feature allows you to defrost minced meat, chops, chicken portions, meat joints
and bread. Press Turbo defrost to select the correct defrost category and then enter in
the weight of the food in grams
Foods should be placed in a suitable dish, whole chickens and joints of meat should be on an
upturned saucer or on a microwave safe plate. Chops, chicken portions and slices of bread
should be placed in a single layer. It is not necessary to cover the foods.
(see page 34).
English
The
Chaos theory
more even defrost. The Chaos system uses a random sequence of pulsing microwave energy
which speeds up the defrosting process. During the program the oven will beep to remind you
to check the food.
necessary. On hearing the rst beep you should turn and shield (if possible).
second beep you should turn the food or break it up.
1st Beep
Turn or Shield
principle is used in auto weight defrost programs to give you a quick and
It is essential that you turn and stir the food frequently and shield if
1st Beep
Turn or Shield
2nd Beep
Turn or break up
On the
Note
1. Check foods during defrosting. Foods vary in their defrosting speed.
2. It is not necessary to cover the food.
3. Always turn or stir the food especially when the oven “beeps”. Shield if necessary
(see point 5)
4. Minced meat/chops/chicken portions should be broken up or separated as soon
as possible and placed in a single layer.
5. Shielding prevents food cooking. It is essential when defrosting chickens and
joints of meat. The outside thaws out rst, so protect wings/breast/fat with smooth
pieces of aluminium foil secured with cocktail sticks.
6. Allow standing time so that the centre of the food thaws out (minimum 1-2 hours
for joints of meat and whole chickens).
33 EN

Turbo Defrost
With this feature you can defrost frozen food according to the weight.
Select the desired Turbo defrost
program
Auto program number appears in the
display. The microwave, auto cook
and turbo defrost indicators light.
Program
Min/Max
Weight
15. Small Pieces
150 g - 1000 g
1 press
16. Big Piece
400 g - 2000 g
2 presses
17. Bread
100 g - 800 g
3 presses
Set the weight of the frozen food
by using the dial
Turning the dial slowly will count
up in 10 g steps. Turning the dial
quickly will count up in 100 g steps.
Press Start
Remember to stir or
turn the food during
defrosting.
Suitable Food
Small pieces of meat, escallop, sausages, minced meat,
steak, chops, sh llets (each 100 g to 400 g). Press
Turbo defrost once. Turn/stir at beeps.
Big pieces of meat, whole chickens, meat joints. Press
Turbo defrost twice. Whole chickens and meat joints will
require shielding during defrosting. Protect wings, breast
and fat with smooth pieces of aluminum foil secured
with cocktail sticks. Do not allow the foil to touch the
walls of the oven. Standing time of 1-2 hours should be
allowed before cooking. Turn and shield at beeps.
Small or large loaves of bread, white or wholewheat.
Press Turbo defrost three times and turn at beeps.
Allow bread to stand for 5 minutes (white light bread) to
30 minutes (dense rye bread). Cut large loaves in half
during standing time. This program is not suitable for
sliced bread or sweet bread and rolls.
34 EN
Note
See page 18 for defrosting guidelines.

Reheating & Cooking Charts
Note
Always check that food is piping hot after reheating in the microwave. If unsure return to oven.
Foods will still require a
longer the stand time.
stand time,
especially if they cannot be stirred. The denser the food the
English
Food
Drinks - Coffee - Milk
1 mug (1) 240 ml
2 mugs (1) 470 ml
1 jug (1) 600 ml
Soup (chilled) (1, 2)
Soup (ambient) (1, 2)
Plated meals - Homemade
Vegetables (cooked) (1, 2)
Potato puree (1, 2)
Vegetable puree (1, 2)
Rice, quinoa, couscous (chilled)
(1, 2)
Pancakes (thick) (1, 2)
Paupiette with sauce (1, 2)
Stuffed cabbage parcels (1, 2)
Quarter roast chicken 1 pce 300 g 1000 W 3-4 mins -
Roast meat (1, 2) 2 slices 250 g 600 W 3 mins -
Sauce bolognese (1, 2) 210 g 600 W 3 mins (ambient) -
Sauce hollandaise (1, 2)
Babyfood (1, 2)
(small pot at room temperature)
Babyfood (vegetable puree)
(1, 2)
Weight/
Quantity
1000 W 4 mins 30 secs to
300 ml
1000 ml
300 ml
1000 ml
300 g
700 g 1000 W 5 - 6 mins –
250 g 1000 W 2 mins 1000 W 3 mins 30 secs
500 g 1000 W 3 mins 30 secs 1000 W 7 - 8 mins
300 g
600 g
200 g 1000 W 1 mins 50 secs 1000 W 4 min
300 g
1 pce
2 pcs
1 pce 1000 W 4 mins 30 mins
2 pcs 1000 W 7 mins & stand -
2 pcs 310 g - 1000 W 10 mins
4 pcs 710 g - 1000 W 16 - 17 mins
100 g 2 cubes - 1000 W 1 min 40 secs
300 g 6 cubes - 1000 W 4 mins 10 secs
120 g 600 W 40 secs 200 g 600 W 1 min -
250 g
100 g - 1000 W 1 mins 40 secs
Fresh
1000 W 1 min 30 secs
1000 W 2 min 30 secs
5 mins
1000 W 1 min 40 secs
1000 W 8 - 9 mins
1000 W 2 mins
1000 W 7 - 8 mins
1000 W 2 mins –
1000 W 2 mins 10 secs 1000 W 5 - 6 mins
1000 W 5 mins 30 secs 1000 W 8 - 9 mins
1000 W 2 mins 20 secs 1000 W 5 mins
1000 W 40-50 secs
1000 W 50-60 secs -
& stand
600 W 1 min -
1 min 30 secs
Frozen
1000 W 5 - 6 mins
1000 W 15 -16 mins
1000 W 1 min 20 -
30 secs
-
-
-
-
-
-
-
(1) turn or stir at half time. (2) cover (3) place on wire rack, if required in a heatproof dish.
(P) place on preheated crispy pot (3 min on 1000 W), greased if necessary.
35 EN

Reheating & Cooking Charts
Food
Gratins
Fish bordelaise
Lasagne
Moussaka
Noodles gratin with ham/tuna
Shepherd’s pie
Convenience foods
Cantonese rice (1, 2)
Chicken wings/bites
Knackis sausages (1, 2)
Croque monsieur (1, 3) 1 pce 150 g Combi 2; 4 mins 30 secs Combi 1; 4 mins 30 secs
Meat patties (1, 2)
Potatoes stuffed with cheese (3)
Risotto with mushroom (1, 2)
Sliced sausage with sauce (2) 2 pcs 220 g
Tagliatelle Bolognese (1, 2) 300 g
Baked Potatoes from raw (1, 3) 2 pcs 350 g Combi 1; 13 mins -
Weight/
Quantity
400 g
400 g Combi 1; 8 mins (3) Combi 1; 13-14 mins
600 g
350 g
450 g - 500 g Combi 1; 8-9 mins (3)
300 g - 350 g
400 g Combi 1; 6-7 mins Combi 1; 14 mins
600 g
500 g
6 pcs 250 g 1000 W 1 min 40 secs 1000 W 2 mins 30 secs
8 pcs 400 g
3 pcs 100 g 1000 W 30-40 secs 600 W 2 mins 30 secs
6 pcs 200 g 1000 W 1 min 600 W 3 mins 30 secs
1 pce 100 g
2 pcs 200 g 600 W 2 mins 600 W 5 mins
1 pce 140 g
2 pcs 240 g
600 g
Combi 1; 11 mins & 4 mins
Fresh Frozen
– Combi 1; 16-18 mins
Combi 1; 9-10 mins
& stand 3 min (3)
Combi 1; 7-8 min (3) Combi 1; 10-11 mins
Combi 1; 8 mins (3) Combi 1; 10-11 mins
Grill 1 on rack
-
1000 W 3 mins 1000 W 5-6 mins
600 W 1 min &
stand 2 mins
- Combi 1; 7 mins
- Combi 1; 9-10 mins
- 1000 W 7-8 mins
1000 W
1 min 30 secs-2 mins
1000 W
2 mins 20 secs
1000 W 13 mins &
4 mins Grill 1 on rack
1000 W 11 mins &
3 mins Grill 1 on rack
1000 W 13 mins &
5 mins Grill 1 on rack
1000 W 5 mins
600 W 1 mins
30 secs - 2 mins
-
1000 W 5 mins
36 EN
(1) turn or stir at half time. (2) cover (3) place on wire rack, if required in a heatproof dish.
(P) place on preheated crispy pot (3 min on 1000 W), greased if necessary.

Cooking Charts with Steam Plus Pot
English
Food
Crispy grill; use crispy pot
Bretzel with cheese/bacon (P)
Chicken nuggets (P, 1) 8 pcs 100 g – Combi 1; 3 mins
Cheese croissant (P)
Cordon bleu (P, 1)
Fish breaded (P, 1)
Galettes, vegetables (P, 1) 4 pcs 150 g - Combi 1; 4 mins
Meat/sausage roll (P) 2 pcs 160 g Combi 2; 5-6 mins Combi 1; 4 mins
Quiche onion (P) 1 pce 160 g
Quiche spinach (P) 1 pce 400 g Combi 1; 8 mins & stand 3 mins
Pancakes stuffed, rolled (P, 1) 2 pcs 240 g Combi 1; 3 mins Combi 1; 5 mins & stand 3 mins
Pizza freshup (P) 1 pce 300 g Combi 2; 3-5 mins Combi 2; 8-10 mins
Pizza piccolinis (P) 9 pcs 270 g – Combi 1; 6 mins & 5 mins grill 1
Pork pies (P)
Samosas (P, 1) 4 pcs 240 g Combi 2; 5 mins Combi 1; 8 mins 30 secs
Tortilla (P, 1)
Sausage from raw (P, 1) Thick
Thin
Steam; use crispy pot, steam tray and lid. Pour 150 ml tap water in the crispy pot.
Broccoli
Carrots
Courgettes
Peas and sweetcorn
Prawns
Whole mackrel
Whole sea bream
Fry; use crispy pot and lid.
Salmon (4) 2 pcs 280 g 1000 W 10-15 mins Sea bass (4) 2 pcs 180 g 1000 W 6-8 mins Burgers (1) 2 pcs 220 g 1000 W 10 mins Chicken thighs with skin (4) 4 pcs 500 g 1000 W 20 mins Schnitzel (1) 2 pcs 250 g 1000 W 10 mins Chicken breast with skin (4)
Duck breast with skin (4) 2 pcs 320 g 1000 W 20 mins Breaded sh (1) 2 pcs 300 g 1000 W 10 mins Fish ngers (1) 8 pcs 220 g - 1000 W 10 mins
(1) turn or stir at half time. (2) cover (3) place on wire rack, if required in a heatproof dish. (4) skin side down.
(P) place on preheated crispy pot (3 min on 1000 W), greased if necessary
Weight/
Quantity
1 pce 130 g Combi 2; 1 min 30 secs Combi 1; 3 mins
2 pcs 250 g – Combi 1; 3 mins 30 secs
1 pce 70 g Combi 2; 1 min Combi 2; 2 mins 30 secs
2 pcs 140 g Combi 2; 2 mins Combi 2; 3 mins
1 pce 100 g Combi 2; 5 mins Combi 1; 4 mins 30 secs
2 pcs 300 g Combi 2; 6 mins Combi 1; 8 mins
1 pce 140 g Combi 2; 4 mins 30 secs Combi 1; 5 mins 30 secs
2 pcs 280 g Combi 2; 5-6 mins Combi 1; 8 mins
1 pce 75 g Combi 1; 2 mins Combi 1; 3 mins 30 secs
2 pcs 150 g Combi 1; 2 mins Combi 1; 5 mins
1 pce 250 g Combi 1; 5 mins Combi 1; 7 mins
1 pce 500 g Combi 1; 6 mins 30 secs Combi 1; 10 mins
4 x 240 g Combi 2; 8 mins -
4 x 140 g Combi 2; 7 mins -
g
300
250 g 1000 W 12-14 mins
250 g 1000 W 8-10 mins
300 g 350 g 1000 W 13-15 mins
g
2 x 200
g
2 x 300
2 pcs 320 g
Fresh Frozen
Combi 1; 2 mins
stand time 2 mins
1000 W 10-12 mins
1000 W 14-16 mins
1000 W 18-20 mins
1000 W 25 mins -
Combi 1; 7 mins & stand 2 mins
1000 W 13-15 mins
-
-
-
-
-
-
37 EN

Minestrone Soup
ingredients
Serves 4-6
1 onion, chopped
2 cloves of garlic, chopped
15 ml olive oil
1 courgette, cut into 4
Recipes
lengthways sliced thinly
1 carrot, diced
2 stalks celery, sliced
600 ml vegetable stock
15 ml sugar
15 ml tomato puree
400 g canned tomatoes,
chopped
1 bay leaf
1 spring thyme
150 g canned chickpeas,
drained
Accessory: crispy pot & lid
Bouillabaisse
ingredients
Serves 4-6
45 ml olive oil
15 ml tomato puree
1 onion, chopped
1 small leek, sliced
2 garlic cloves, crushed
200 g canned tomatoes,
chopped
400 ml fish stock
75 ml dry white wine
2 sprigs thyme
salt and pepper
¼ orange peel, zested
2 saffron strands
5 ml chilli sauce
250 g cod,
skinned and cut into chunks
250 g mixed seafood
4 large fresh prawns
Accessory: crispy pot & lid
1. Combine all the ingredients in the Steam Plus pot. Cover with lid,
place on the glass tray and cook on 1000 W for 30 minutes, or
until vegetables are soft. Stir halfway through cooking time.
2. Leave to stand for 5 minutes before serving. Remove the bay leaf
and thyme. Season to taste.
1. Combine all the ingredients in the Steam Plus pot. Cover with lid,
place on the glass tray and cook on 1000 W for 20 minutes, or
until the sh is cooked.
2. Remove thyme before serving. Season to taste.
38 EN

Ratatouille
Recipes
ingredients
Serves 4
1 aubergine,
cut into small chunks
1 courgette,
cut small into chunks
1 onion, chopped
1 green pepper, sliced
1 red pepper, sliced
1 clove of garlic, peeled and
crushed
400 g canned tomatoes,
chopped
salt and pepper
Accessory: crispy pot & lid
1. Combine all ingredients in the Steam Plus pot. Cover with lid,
place on the glass tray and cook on 1000 W for 20-25 minutes, or
until vegetables are soft. Stir halfway through cooking time.
Season to taste.
Chorizo, Chickpea and Potato Stew
ingredients
Serves 4
1 tbsp olive oil
100 g chorizo, diced
1 onion, finely chopped
1 clove garlic, crushed
400 g canned chickpeas,
drained
500 g potato, diced
500 ml vegetable stock
1 small bunch parsley,
to garnish
Accessory: crispy pot & lid
1. Combine all the ingredients in the Steam Plus pot. Cover with lid,
place on the glass tray and cook on 1000 W for 40 minutes, or
until vegetables are soft. Stir halfway through cooking time.
2. Leave to stand for 5 minues before serving. Garnish with parsley.
Season to taste.
39 EN

Croque Monsieur
ingredients
Serves 1
4 slices bread, buttered
5 ml Dijon mustard
2 slices smoked ham
Recipes
100 g sliced cheese
Dish: none
Accessory: wire rack
Lasagne
ingredients
Serves 4
Meat Sauce:
1 onion, chopped
1 clove garlic, crushed
5 ml oil
400 g canned tomatoes,
chopped
150 ml red wine
30 ml tomato puree
5 ml mixed herbs
500 g beef mince
salt and pepper
Lasagne:
500 ml béchamel Sauce
100 g hard cheese e.g.
Cheddar, grated
5 ml mustard
salt and pepper
50 g Parmesan cheese,
grated
250 g fresh lasagne
Dish: 1 x 1.5 litre Pyrex®
casserole with lid + 1 x large
rectangular dish
1. Place the bread, buttered side up on the wire rack and cook on
Grill 1 for 4 minutes or until brown.
2. On one slice of the bread, spread the untoasted side with mustard
and top with ham and cheese. Cover with the other slice, browned
side uppermost. Place back on the wire rack, cook on Combi 2 for
1 minute 30 seconds to 2 minutes or until the cheese has melted.
1. Place onion, garlic and oil in the casserole. Cover with lid and place
on glass tray. Cook on 600 W for 3 minutes. Place all other meat
sauce ingredients in the casserole. Stir well. Cover with lid, cook on
1000 W for 10 minutes. Stir. Then 600 W for 15-20 minutes or until
cooked.
2. Add mustard, seasoning and grated cheese to white sauce. Cover
the base of the dish with a layer of Bolognese sauce, then a layer
of lasagne, (do not over lap the lasagne sheets), then a layer of
béchamel sauce. Repeat these layers twice more, ending with a
layer of béchamel sauce. Sprinkle Parmesan cheese over the top.
Place on the base of the oven and cook on Combi 1 for 10-15
minutes or until golden brown.
40 EN
Boston Brownies
ingredients
Serves 6
100 g chocolate for cooking
100 g butter
100 g brown sugar
100 g flour
50 g walnuts chopped
2 tbs cocoa powder
1 tsp of baking powder
1 sachet of vanilla sugar
2 eggs beaten
Dish: 16 X 20 cm
Accessory: Pyrex®- dish lined
with greaseproof paper
1. Place chocolate and butter in a bowl and cook on 600 W for
2 minutes or until chocolate has melted.
2. Stir in all the other ingredients and beat well.
3. Pour into dish and cook about 6 minutes on Combi 1 or until rm.
4. Allow to cool before cutting into squares.

Questions and Answers
Q: Why won’t my oven turn on?
A: When the oven does not turn on, check
the following:
1. Is the oven plugged in securely?
Remove the plug from the outlet, wait
10 seconds and reinsert.
2. Check the circuit breaker and the fuse
Reset the circuit breaker or replace the
fuse if it is tripped or blown.
3. If the circuit breaker or fuse is all right,
plug another appliance into the outlet.
If the other appliance works, there
probably is a problem with the oven.
If the other appliance does not work,
there probably is a problem with the
outlet. If it seems that there is a problem
with the oven, contact an authorised
Service Centre.
Q: My oven causes interference with my
TV. Is this normal?
A: Some radio, TV, Wi-Fi, cordless
telephone, baby monitor, blue tooth or
other wireless equipment interference
might occur when you cook with the
microwave oven. This interference
is similar to the interference caused
by small appliances such as mixers,
vacuums, blow dryers, etc. It does not
indicate a problem with your oven.
Q: The oven won’t accept my program.
Why?
A: The oven is designed not to accept an
incorrect program. For example, the
oven will not accept a fourth stage.
Q: Sometimes warm air comes from the
oven vents. Why?
A: The heat given off from the cooking food
warms the air in the oven cavity.
This warmed air is carried out of the
oven by the air ow pattern in the oven.
There are no microwaves in the air.
The oven vents should never be
blocked during cooking.
English
Q: Can I use a conventional oven
thermometer in the oven?
A: Only when you are using grill cooking
mode. The metal in some thermometers
may cause arcing in your oven and
should not be used on microwave and
combination cooking modes.
Q: There are humming and clicking
noises from my oven when I cook by
combination. What is causing these
noises?
A: The noises occur as the oven
automatically switches from microwave
power to grill to create the combination
setting. This is normal.
Q: My oven has an odour and generates
smoke when using the combination
and grill function. Why?
A: After repeated use, it is recommended
to clean the oven and then run the oven
without food, glass tray, and roller ring
on grill for 5 minutes. This will burn
off any food, residue or oil which may
cause an odour and/or smoking.
Q: The oven stops cooking by
microwave and ‘H97’ or ‘H98’ appears in
the display. Why?
A: This display indicates a problem with
the microwave generation system.
Please contact an authorised Service
Centre.
Q: The fan continues to rotate after
cooking. Why?
A: After using the oven, the fan motor may
rotate to cool the electrical components.
This is normal and you can continue
using the oven at this time.
41 EN

Care of your Oven
1. Turn the oven off before cleaning.
2. Clean the inside of the oven, door seals
and door seal areas regularly.
When food splatters or spilled liquids
adhere to the oven walls, door seals
and door seal areas wipe off with a
damp cloth. Mild detergent may be
used if they get very dirty. The use
of harsh detergent or abrasive is not
recommended.
Do not use commercial oven
cleaners.
3. Do not use harsh, abrasive cleaners or
sharp metal scrapers to clean the oven
door glass since they can scratch the
surface, which may result in shattering
the glass.
4. The outside oven surface should be
cleaned with a damp cloth. To prevent
damage to the operating parts inside the
oven, water should not be allowed to
seep into the ventilation openings.
5. If the control panel becomes dirty, clean
it with a soft, dry cloth. Do not use harsh
detergents or abrasives on the control
panel. When cleaning the control panel
leave the oven door open to prevent the
oven from accidentally turning on. After
cleaning press Stop/Cancel button to
clear display window.
6. If steam accumulates inside or around
the outside of the oven door, wipe with
a soft cloth. This may occur when the
oven is operated under high humidity
conditions and in no way indicates a
malfunction of the unit.
7. It is occasionally necessary to remove
the glass tray for cleaning. Wash
the tray in warm soapy water or in a
dishwasher.
8. The roller ring and oven cavity oor
should be cleaned regularly to avoid
excessive noise. Simply wipe the
bottom surface of the oven with mild
detergent and hot water then dry with
a clean cloth. The roller ring may be
washed in mild soapy water.
Cooking vapours collect during repeated
use but in no way affects the bottom
surface or roller ring wheels. After
removing the roller ring from the cavity
oor for cleaning, be sure to replace it in
the proper position.
9. When using the grill or combination
mode, some foods may inevitably
splatter grease on to the oven walls.
If the oven is not cleaned occasionally,
it may start to “smoke” during use.
10. A steam cleaner is not to be used for
cleaning.
11. This oven should only be serviced by
qualied personnel. For maintenance
and repair of the oven contact the
nearest authorised dealer.
12. Failure to maintain the oven in a clean
condition could lead to deterioration
of surfaces that could affect the life of
the appliance and possibly result in a
hazardous situation.
13. Keep air vents clean at all times.
Check that no dust or other material is
blocking any of the air vents on the top,
bottom or rear of the oven. If air vents
become blocked this could cause
overheating which would affect the
operation of the oven and possibly
result in a hazardous situation.
14. All oven accessories are dishwasher
safe.
42 EN

Technical Specications
Manufacturer Panasonic
Model
Power Supply 230 V 50 Hz
Operating Frequency: 2450 MHz
Maximum 2000 W
Input Power:
Output Power:
External Dimensions W x D x H (mm) 488 mm (W) x 395 mm (D) x 279 mm (H)
Interior Dimensions W x D x H (mm) 315 mm (W) x 353 mm (D) x 178 mm (H)
Uncrated Weight (approx.) 10 kg
Noise 57 dB
Weight and Dimensions shown are approximate.
This product is an equipment that fullls the European standard for EMC disturbances
(EMC = Electromagnetic Compatibility) EN 55011. According to this standard this product
is an equipment of group 2, class B and is within required limits. Group 2 means that radio-
frequency energy is intentionally generated in the form of electromagnetic radiation for
purpose of warming or cooking food. Class B means that this product may be used in normal
household areas.
Microwave 1050 W
Grill 1050 W
Microwave 1000 W (IEC-60705)
Grill 1000 W
NN-GD38HS / NN-GD36HM
English
Manufactured by: Panasonic Appliances Microwave Oven (Shanghai) Co., Ltd.
888, 898 Longdong Road. Pudong, Shanghai, 201203, China.
Imported by: Panasonic Marketing Europe GmbH
REP. EU: Panasonic Testing Centre
Winsbergring 15, 22525 Hamburg, Germany
43 EN

Hartelijk dank dat u voor een
Panasonic magnetronoven heeft gekozen.
Inhoud
Veiligheidsinstructies ............................... 2-6
Afvoeren aan Einde Levensduur ................ 7
Installatie en Aansluiting ............................. 8
Plaatsen van de Oven ................................ 8
Belangrijke Aanwijzingen voor
Gebruikers ............................................. 9-11
Ovenaccessoires ...................................... 12
Onderdelen van uw Oven ........................ 13
Bedieningspanelen ................................... 14
Instellen van de Klok ................................ 15
Kinderslot.................................................. 15
Kookstanden ............................................ 16
Koken en Ontdooien met de
Magnetronfunctie ...................................... 17
Ontdooien ................................................. 18
Gegevens Voor Ontdooien ....................... 19
De Quick 30 Functie Gebruiken ............... 20
De Add Time (extra tijd) Functie
Gebruiken ................................................. 21
Grillen ....................................................... 22
Nederlands
Combinatiekoken ...................................... 23
De Steam Plus Pan gebruiken
(handmatige bediening) ............................ 24
De Steam Plus Pan Gebruiken................. 25
De Timer Gebruiken ................................. 26
Voorbereiding in Meerdere Stappen ......... 27
Steam Plus Programma’s .................... 28-30
Automatische kookprogramma’s ......... 31-32
Turbo-ontdooiing .................................33-34
Gegevens voor Opwarmen en
Koken .................................................. 35-36
Bereidingstabellen Met Steam Plus
Pan ........................................................... 37
Recepten ............................................. 38-40
Vragen en Antwoorden ............................. 41
Verzorging van uw Magnetronoven .......... 42
Technische Specicaties .......................... 43
1 NL

Veiligheidsinstructies
Belangrijke veiligheidsinstructies. Lees ze a.u.b.
zorgvuldig door en bewaar ze zodat u ze opnieuw kunt
raadplegen wanneer nodig.
Dit apparaat mag gebruikt worden door kinderen in
de leeftijd van 8 jaar en ouder en mensen met
verminderde fysieke, zintuiglijke en mentale vermogens
of gebrek aan ervaring en kennis mits zij onder toezicht
staan of instructies hebben gekregen van iemand die
verantwoordelijk is voor hun veiligheid bij het gebruik
van het apparaat op een veilige wijze en zij de relevante
risico’s begrijpen. Kinderen mogen niet met het apparaat
spelen. Reiniging en gebruikersonderhoud mogen zonder
toezicht niet door kinderen uitgevoerd worden. Houd het
apparaat en zijn snoer buiten bereik van kinderen jonger
dan 8 jaar.
Wanneer de oven is geïnstalleerd dan moet op een
eenvoudige wijze de stroom middels een schakelaar
kunnen worden onderbroken of de stekker uit het
stopcontact worden gehaald.
2 NL
Gebruik dit apparaat niet, indien het net-snoer en/of
de stekker beschadigd zijn. Indien het apparaat niet
goed functioneert, beschadigd of gevallen is, mogen in
verband met de veiligheid reparaties uitsluitend door een
door de fabrikant erkende onderhouds-technicus worden
uitgevoerd.
Waarschuwing! De deurafdichtingen en de plaatsen
hieromheen moeten worden schoongemaakt met een
vochtige doek. Het apparaat moet gecontroleerd worden
op beschadigingen aan de deurafdichtingen en de
plaatsen rondom deze afdichtingen; indien er sprake
van beschadiging is, mag het apparaat niet gebruikt
worden totdat het door een door de fabrikant erkende
onderhoudstechnicus is gerepareerd.

Veiligheidsinstructies
Waarschuwing! Probeer niet zelf reparaties uit te voeren
aan de ovendeur, het bedieningspaneel, de veiligheidsvergrendelingsschakelaars of welk ander deel van de
magnetronoven dan ook. Verwijder de behuizing van de
magnetron-oven niet; deze biedt bescherming tegen
blootstelling aan magnetron (microgolf) energie.
Reparaties mogen uitsluitend door een door de fabrikant
erkende onderhoudstechnicus worden uitgevoerd.
Waarschuwing! Plaats de magnetronoven niet vlak naast
andere elektrische apparatuur of een gasfornuis.
Drank die in de magnetron is opgewarmd, kan nog
doorkoken wanneer het apparaat uit staat. Wees dus
voorzichtig wanneer u de beker uit de magnetron haalt.
Waarschuwing! Kinderen mogen de magnetronoven
uitsluitend onder toezicht gebruiken wanneer ze goed
zijn ingelicht zodat ze de oven op veilige wijze kunnen
bedienen en zich bewust zijn van de gevaren van onjuist
gebruik.
Nederlands
Deze oven is uitsluitend bestemd voor gebruik op een
werkblad. Hij is niet bedoeld als inbouwoven of voor
gebruik in een kast.
Voor gebruik op een kast:
De oven moet worden geplaatst op een vlak, stabiel
oppervlak 85 cm boven de vloer. Voor een goede
werking moet de oven beschikken over voldoende
luchtcirculatie, d.w.z. 5 cm aan één kant, de andere
kant open; 15 cm ruimte boven de oven, 40 cm aan de
achterkant.
Als u voedsel gaat verwarmen in kunststof of papieren
bakjes, dient u de oven regelmatig te controleren omdat
deze bakjes bij oververhitting vlam kunnen vatten.
3 NL

Veiligheidsinstructies
Als er rook uit de oven komt of er brand ontstaat, druk
dan op de knop Stop/Cancel en laat de deur dicht om
eventuele vlammen te smoren. Verwijder de netkabel of
schakel de stroom uit met de stroomschakelaar of door
de zekering te verwijderen.
Dit apparaat is uitsluitend bestemd voor huishoudelijk
gebruik.
Indien vloeistoen, zoals soep, sauzen en dranken
opgewarmd worden in uw magnetronoven, kunnen
deze zonder te gaan borrelen heter worden dan het
kookpunt. Hierdoor kan de hete vloeistof plotseling gaan
overkoken.
Schud zuigessen goed en roer de inhoud van de
potjes met babyvoeding een paar maal om. Controleer
de temperatuur, voor het nuttigen van het voedsel
zorgvuldig, om verbranden te voorkomen.
4 NL
Kook geen ongepelde eieren en verwarm geen
hardgekookte eieren met de magnetron functie. Er kan
een te hoge druk in de eieren ontstaan, waardoor ze
exploderen, zelfs na bereiding/verwarmen.
Houd de deurafdichtingen en de plaatsen hieromheen
schoon. Als er spatten en gemorste vloeistoen vast
zijn gaan zitten op de ovenwanden, deurafdichtingen
en de plaatsen hieromheen, moeten deze worden
schoongemaakt met een vochtige doek. Als zij zeer
vuil zijn geworden mag gebruik gemaakt worden van
een mild reinigingsmiddel. Het gebruik van agressieve
reinigings-middelen of schuursponsjes wordt niet
aanbevolen.
Gebruik geen commerciële ovenreinigers.

Veiligheidsinstructies
Bij het grillen of combinatie koken zullen sommige
voedselsoorten vetspatten op de ovenwanden
veroorzaken. Indien de oven niet van tijd tot tijd gereinigd
wordt, kan hij tijdens het gebruik gaan “roken”.
Als u de oven niet schoonhoudt, is het mogelijk dat
de kwaliteit van de oppervlakken vermindert waardoor
de levensduur van het toestel verkort en er mogelijk
gevaarlijke situaties ontstaan.
Waarschuwing! De toegankelijke onderdelen kunnen heet
worden wanneer u de stand gril of combinatie gebruikt.
Kinderen jonger dan acht jaar dient u uit de buurt van
de oven te houden. Kinderen mogen de oven uitsluitend
gebruiken onder toezicht van een volwassene omdat er
hoge temperaturen ontstaan.
Gebruik geen stoomreiniger voor het reinigen.
Gebruik geen ruwe, schurende reinigingsmiddelen of
scherpe metalen schrapers om de ruit van de ovendeur
te reinigen, aangezien deze het oppervlak kunnen
krassen en het glas kunnen doen barsten.
Nederlands
De buitenwanden van de magnetronoven, inclusief de
ventilatieopeningen en de ovendeur worden tijdens
gebruik van de combinatie en grill-functies heet; pas
dus op bij het openen of sluiten van de ovendeur en bij
het inbrengen of verwijderen van voedsel en accessoires.
Dit apparaat is niet geschikt voor gebruik met een
externe timer of met een afzonderlijk systeem voor
afstandsbediening.
Gebruik alleen vaatwerk dat geschikt is voor gebruik in
een magnetronoven.
5 NL

Veiligheidsinstructies
De oven heeft twee grillverwarmingselementen aan de
bovenkant en twee aan de onderkant van de oven.
Na gebruik van de stand grill, oven of combinatie is de
binnenkant van de oven zeer heet. Let er dus op dat u
het verwarmingselement in de oven niet aanraakt. Om
brandwonden te voorkomen, moet u de binnenkant van
de oven niet aanraken.
Deze magnetronoven is uitsluitend bedoeld voor het
verwarmen van eten en drinken. Wees voorzichtig bij
het verwarmen van voedsel met een laag vochtgehalte,
zoals brood, chocolade, koekjes en gebak. Deze kunnen
gemakkelijk aanbranden of uitdrogen en in brand vliegen
als u ze te lang verwarmt. We raden af om voedsel met
een laag vochtgehalte te verwarmen, zoals popcorn,
poppadoms of kroepoek. Het drogen van voedsel,
kranten of kleding en het verwarmen van kussens,
slippers, sponzen, vochtige doekjes, kruiken en dergelijke
6 NL
kan leiden tot letsel of brand.
Het wordt gebruikers afgeraden neerwaartse druk op de
magnetrondeur uit te oefenen wanneer deze openstaat.
Dit zou een veiligheidsrisico veroorzaken, omdat de
magnetron dan voorover kan kantelen.
De ovenlamp moet worden vervangen door een
onderhoudsmonteur van de fabrikant. Probeer niet om
de behuizing van de oven te verwijderen.
Voorzichtig! Om te voorkomen dat er gevaar ontstaat
door het onbedoeld resetten van de automatische
uitschakeling bij oververhitting, mag dit apparaat niet via
een extern schakelapparaat, zoals een timer, worden
gevoed en niet in een stroomcircuit zijn opgenomen dat
regelmatig wordt uitgeschakeld.

Afvoeren aan Einde Levensduur
Informatie Over
het Weggooien
van Elektrische
en Elektronische
Apparatuur
(Particulieren)
Dit symbool betekent in Europa dat
gebruikte elektrische en
elektronische producten niet bij het normale
huishoudelijke afval mogen.
Lever deze producten in bij de aangewezen
inzamelingspunten, waar ze gratis
worden geaccepteerd en op de juiste
manier worden verwerkt, teruggewonnen
en hergebruikt. In Nederland kunt u uw
producten bij uw winkelier inleveren bij
de aanschaf van een vergelijkbaar nieuw
product.
Wanneer u dit product op de juiste
manier als afval inlevert, spaart u
waardevolle hulpbronnen en voorkomt
u potentiële negatieve gevolgen voor
de volksgezondheid en het milieu, die
anders kunnen ontstaan door een onjuiste
verwerking van afval.
Neem contact op met uw gemeente voor
meer informatie over het dichtstbijzijnde
inzamelingspunt of raadpleeg www.nvmp.nl,
www.ictofce.nl of www.stibat.nl.
Voor Zakelijke Gebruikers in de
Europese Unie
Neem voor het weggooien van elektrische
en elektronische apparatuur contact op met
uw leverancier voor verdere informatie.
Informatie Over Verwijdering
van afval in landen buiten de
Europese Unie
Dit symbool is alleen geldig in de Europese
Unie.
Neem wanneer u dit product wilt
weggooien, contact op met de lokale
overheid of uw leverancier en vraag wat de
juiste verwijderingsmethode is.
Nederlands
7 NL

Installatie en Aansluiting
8 NL
Uw Magnetronoven Controleren
Pak uw magnetron uit, verwijder al het
verpakkingsmateriaal en controleer de
magnetron op schade zoals deuken,
beschadigde deurvergrendelingen of
barsten in de deur. Waarschuw uw
dealer onmiddellijk als u beschadigingen
waarneemt. Een beschadigde
magnetronoven mag niet worden
geïnstalleerd.
Aarding
Indien uw stopcontact niet is geaard, is het
de persoonlijke verantwoordelijkheid van de
klant om het te laten vervangen door een
goed geaarde wand-contactdoos.
Plaatsen van de Oven
Deze oven is uitsluitend bestemd voor
gebruik op een werkblad en is niet bedoeld
als inbouwoven of voor gebruik in een kast.
Plaatsing op een Meubel:
1. Zet het toestel op een platte, stevige
ondergrond, minimaal 85 cm boven de
vloer.
2. Wanneer de oven is geïnstalleerd
dan moet op een eenvoudige wijze de
stroom middels een schakelaar kunnen
worden onderbroken of de stekker uit
het stopcontact worden gehaald.
3. De magnetronoven kan alleen op
de juiste wijze functioneren indien er
voldoende ventilatie is.
4. Boven de magnetronoven moet een
ruimte worden vrij gelaten van 15 cm,
aan de achterzijde 10 cm, aan de zijkant
5 cm en aan de andere zijkant een
ruimte van meer dan 40 cm.
5 cm
15 cm
Plaatsing op een meubel
10 cm
Vrije
ruimte
Belangrijk!
Dit apparaat dient voor uw
persoonlijke veiligheid juist geaard
te worden aangesloten.
Bedrijfsspanning
Het voltage dient in overeenstemming te zijn
met de op het label van de oven opgegeven
spanning. Wanneer een hogere spanning
gebruikt wordt, kan dit brand of andere
beschadigingen veroorzaken.
5. Plaats de magnetronoven niet vlak
naast andere elektrische apparatuur of
een gasfornuis.
6. Verwijder de voetjes van de
magnetronoven niet.
7. Deze magnetronoven is uitsluitend
bestemd voor huishoudelijk gebruik.
Niet buitenshuis gebruiken.
8. Het is af te raden de magnetronoven in
een vochtige omgeving te gebruiken.
9. Het netsnoer mag niet in aanraking
komen met de buitenzijde van de
oven. Houd het snoer uit de buurt van
warme of hete oppervlakken. Laat het
snoer niet over de rand van een tafel of
aanrecht hangen. Dompel het snoer, de
stekker of de oven niet onder in water.
10. Blokkeer de ventilatieopeningen aan
de zijkanten en de achterkant van
de magnetronoven niet. Als deze
openingen geblokkeerd zijn terwijl de
magnetronoven in werking is, dan kan
hij oververhit raken. In dit geval is de
magnetronoven afgeschermd door
middel van een thermische beveiliging,
zodat hij alleen weer kan functioneren
als hij is afgekoeld.

Belangrijke Aanwijzingen voor Gebruikers
Gebruik van uw Magnetronoven
1. Gebruik de oven uitsluitend voor
het bereiden van voedsel. Deze
magnetronoven is speciaal ontworpen
voor het opwarmen en bereiden van
voedsel. Gebruik de magnetronoven
niet om chemische of andere niet
eetbare producten te verwarmen.
2. Wanneer u de magnetronoven niet
gebruikt, bewaar dan geen voorwerpen
in de oven. Er kan dan niets gebeuren
wanneer u de magnetronoven per
ongeluk aanzet.
3. Gebruik het apparaat niet met de functie
magnetron of combinatie zonder
dat zich hierin voedsel bevindt. Het
apparaat kan hierdoor beschadigd
raken.
4. Voor gebruik dient u er zich van te
verzekeren dat alle te gebruiken
hulpmiddelen (schalen/bakvormen
enz.) geschikt zijn voor gebruik in de
magnetronoven.
5. Deze magnetronoven is uitsluitend
bedoeld voor het verwarmen van eten
en drinken. Wees voorzichtig bij het
verwarmen van voedsel met een laag
vochtgehalte, zoals brood, chocolade,
koekjes en gebak. Deze kunnen
gemakkelijk aanbranden of uitdrogen
en in brand vliegen als u ze te lang
verwarmt. We raden af om voedsel met
een laag vochtgehalte te verwarmen,
zoals popcorn, poppadoms of kroepoek.
Het drogen van voedsel, kranten of
kleding en het verwarmen van kussens,
slippers, sponzen, vochtige doekjes,
kruiken en dergelijke kan leiden tot
letsel of brand.
6. Als er rook uit de oven komt of er brand
ontstaat, druk dan op de knop
Stop/wis en laat de deur dicht om
eventuele vlammen te smoren.
Verwijder de netkabel of schakel de
stroom uit met de stroomschakelaar of
door de zekering te verwijderen.
Verwarming
1. Voordat u de combinatie- of grillfunctie
voor het eerst gebruikt, moet u de oven
zonder voedsel en met de accessoires
(inclusief het glazen draaiplateau en
rolring) verwijderd op grill 1 gedurende
5 minuten laten werken. Hierdoor
verbrandt u de olie, die bestemd was als
bescherming tegen roest. Dit is de enige
keer dat u de oven mag gebruiken als
hij leeg is.
Pas op! Hete oppervlakten
Hete oppervlakken Alle
binnenoppervlakken van de oven
worden heet.
2. De buitenoppervlakken, waaronder de
ventilatieopeningen in de behuizing en
de ovendeur, worden heet bij gebruik
van de stand grill of combinatie.
Wees dus voorzichtig tijdens het
openen en sluiten van de deur en het
plaatsen of verwijderen van voedsel en
accessoires.
3. De oven heeft twee grill
verwarmingselementen aan de
bovenkant en twee aan de onderkant
van de oven.
Voorzichtig!
Na gebruik van de stand grill of
combinatie is de binnenkant van de
oven zeer heet. Let er dus op dat u
het verwarmingselement in de oven
niet aanraakt.
4. De toegankelijke onderdelen kunnen
heet worden wanneer u de stand grill
of combinatie gebruikt. Kinderen jonger
dan acht jaar dient u uit de buurt van
de oven te houden en kinderen mogen
de oven uitsluitend gebruiken onder
toezicht van een volwassene omdat er
hoge temperaturen ontstaan.
Pas op! Hete oppervlakten
Na gebruik van deze functies
zullen ook de oven toebehoren
zeer heet zijn.
Nederlands
9 NL

Belangrijke Aanwijzingen voor Gebruikers
Ovenverlichting
Voor vervanging van de lamp van de oven
moet u contact opnemen met uw dealer.
Kooktijden
De in het kookboek vermelde kooktijden
zijn bij benadering gegeven. Factoren, die
invloed hebben op de kookduur, zijn: de
begintemperatuur, de hoeveelheid voed sel
en de materialen die voor het koken worden
gebruikt.
Begin met de minimale kooktijd om te
voorkomen dat het voedsel te gaar wordt.
Als het voedsel niet gaar genoeg geworden
is, kunt u het altijd nog wat langer bereiden.
Opmerking!
Als u het voedsel langer kookt dan
de aanbevolen kooktijden, kan het
bederven, en in extreme gevallen
zelfs vlam vatten en de magnetron
oven beschadigen.
Kleine Hoeveelheden Voedsel
Kleine hoeveelheden voedsel met een
gering vochtgehalte kunnen uitdrogen, aan
branden of zelfs verbranden als ze te lang
doorkoken. Indien het voedsel in de oven
vlam vat, moet de ovendeur gesloten blij
ven, de magnetronoven uitgezet worden en
moet de stekker uit het stopcontact worden
genomen.
Niet-Poreuze Schil
Voedsel zonder poreuze schil, zoals
aardappelen, eierdooiers en worstjes,
moeten doorprikt worden alvorens ze met
de magnetron-functie te bereiden. Zo
voorkomt u dat ze exploderen.
Vleesthermometer
Indien u gebruik maakt van een
vleesthermometer voor vlees en
gevogelte, gebruik deze dan alleen
wanneer het voedsel buiten de
magnetronoven is. Gebruik geen
conventionele vleesthermometer binnen
de magnetronoven, omdat vonken kunnen
optreden.
Eieren
Kook geen ongepelde eieren en verwarm
geen hardgekookte eieren met de
magnetron functie. Er kan een te hoge druk
in de eieren ontstaan, waardoor ze explode
ren, zelfs na bereiding/verwarmen.
10 NL

Belangrijke Aanwijzingen voor Gebruikers
Vloeistoen
Indien vloeistoffen, zoals soep, sauzen
en dranken opgewarmd worden in uw
magnetronoven, kunnen deze zonder
te gaan borrelen heter worden dan het
kookpunt. Hierdoor kan de hete vloeistof
plotseling gaan overkoken.
Om dit te voorkomen, kunnen de volgende
stappen ondernomen worden:
a Gebruik geen rechte glazen of
bekers met smalle of toelopende
bovenkant.
b Niet te lang verwarmen.
c Roer de vloeistof om alvorens
deze in de oven te plaatsen en
roer halverwege de opwarmtijd
nogmaals om.
d Laat de vloeistof na het
verwarmen nog even in de oven
staan en roer goed om voordat u
de vloeistof uit de oven haalt.
Papier/Kunststof
Als u voedsel gaat verwarmen in kunststof
of papieren bakjes, dient u de oven
regelmatig te controleren omdat deze
bakjes bij oververhitting vuur kunnen vatten.
Gebruik geen gerecycled papier (b.v. keu
kenrol), tenzij het papierproduct geken
merkt is als zijnde veilig voor gebruik in
een magnetronoven. Onzuiverheden in
recycled papier kunnen in de magnetron
vonken en/of brand veroorzaken.
Keukengerei/Folie
Verwarm nooit gesloten potjes of essen
omdat deze kunnen exploderen.
Gebruik geen metalen bakjes of schotels
met metalen randen tijdens de magnetron-
functie. Hierdoor kunnen er vonken ont
staan.
Bij gebruik van aluminiumfolie, vleesspie
sen of andere metalen voorwerpen, moet de
af-stand tot de ovenwanden minimaal 2 cm
bedragen om vonkoverslag te voorkomen.
Zuigessen/Potjes Babyvoeding
De speen of deksel moeten verwijderd
worden van zuigessen of potjes
babyvoedsel alvorens ze in de
magnetronoven te plaatsen.
Schud zuigessen goed en roer de inhoud
van de potjes met babyvoeding een paar
maal om.
Controleer de temperatuur, voor het nutti
gen van het voedsel zorgvuldig, om ver
branden te voorkomen.
Ventilatormotor
Na gebruik van de oven kan de
ventilatormotor nog enkele minuten blijven
draaien om de elektrische onderdelen af te
koelen. Dit is normaal en u kunt het voedsel
uit de oven nemen wanneer de ventilator
nog draait. Ook kunt u de oven gewoon
blijven gebruiken.
Nederlands
Verwijder metalen sluitingen van braadzak
ken voordat u deze in de oven plaatst.
11 NL

Ovenaccessoires
12 NL
Accessoires
Er worden een aantal accessoires bij de
magnetronoven geleverd. Volg altijd de
aanwijzingen op over het gebruik van deze
accessoire.
Glazen Draaiplateau
1. Gebruik de magnetronoven niet zonder
de draairing en het glazen draaiplateau.
2. Gebruik uitsluitend het glazen
draaiplateau dat speciaal voor deze
magnetronoven ontworpen is.
3. Als het glazen draaiplateau heet is,
moet deze eerst afkoelen voordat u het
schoonmaakt of in water onderdompelt.
4. Het glazen draaiplateau kan in beide
richtingen draaien.
5. Indien het voedsel in de schaal op
het plateau de wanden van de oven
raakt, waardoor het draaien stopt, gaat
het draaiplateau automatisch in de
tegengestelde richting draaien. Dit is
normaal.
6. Bereid geen voedsel direct op het
glazen draaiplateau.
Draairing
1. De draairing en de ovenbodem moeten
regelmatig worden gereinigd om
ongewenste geluiden en het ophopen
van voedselresten te voorkomen.
2. Tijdens het koken moet de draairing
altijd samen met het glazen
draaiplateau worden gebruikt.
Grill Rooster
1. Het grill rooster wordt gebruikt voor
het bruiningsproces van kleine
hoeveelheden en zorgt bovendien voor
een goede circulatie van de warmte.
2. Plaats geen metalen voorwerpen direct
op het grill rooster in combinatie met
de magnetronfunctie.
3. Gebruik het grill rooster nooit als alleen
de magnetronfunctie gebruikt wordt.
Steam Plus Pan
1. De Steam Plus Pan is speciaal ontworpen
voor deze magnetron. Het deksel is
gemaakt van roestvrij staal en de crisp-
pan van aluminium. Hoewel het deksel en
de pan van metaal zijn, kunt u ze veilig
gebruiken als u ze midden op het glazen
plateau zet. Gebruik de Steam Plus Pan
niet in andere magnetrons en gebruik
hem niet in gewone ovens.
2. Bij gebruik van de Steam Plus Pan
worden de crisp-pan, stoompan en het
deksel gelijktijdig gebruikt (pagina 24).
3. De stoompan wordt in de crisp-pan
geplaatst met het deksel er bovenop. Het
voedsel wordt in de stoompan geplaatst.
U moet de stoompan altijd in combinatie
met de crisp-pan en het deksel gebruiken.
4. Giet altijd 150 ml leidingwater in de
bodem van de crisp-pan voordat u Steam
Plus gebruikt.
5. De Steam Plus Pan mag alleen in
de magnetronstand worden gebruikt.
Wanneer u de crisp-pan alleen gebruikt
om knapperig te braden, dan kan dat met
de grill- of combinatiestand.
6. De crisp-pan en het deksel kunnen
tezamen worden gebruikt (zonder de
stoompan) voor braden of sudderen.
7. Gebruik de crisp-pan altijd op het glazen
plateau. Gebruik niet met het rooster.
8. Gebruik altijd de ovenwanten wanneer u
de accessoires vastpakt. Het deksel kan
na gebruik heet zijn. Verwijder het deksel
voorzichtig.
9. Verwijder alle verpakkingsmateriaal van
het voedsel voordat u het gaat bereiden.
10. Open het deksel niet als uw gezicht zich
dichtbij de Steam Plus Pan bevindt. Wees
voorzichtig, stoom kan lichamelijk letsel
veroorzaken. U moet het deksel altijd
in combinatie met de crisp-pan en de
stoompan gebruiken.
11. De afdichting van rode siliconen mag u
verwijderen. Plaats het voor gebruik altijd
terug.
12. Volg bij het gebruik van de Steam Plus
Pan altijd de gebruiksaanwijzing. Als u dat
niet doet, loopt u kans op letsel of schade
aan de oven.

Onderdelen van uw Oven
1. Deur-ontgrendelknop
Indrukken om de deur te openen. Indien
u de deur tijdens het koken opent, wordt
het kookproces tijdelijk onderbroken,
zonder dat de eerder ingevoerde
instellingen verdwijnen. Het kookproces
zal direct hervat worden, zodra u de
deur weer gesloten heeft en op de
starttoets gedrukt heeft.
2. Doorkijkvenster
3. Veiligheids-
deurvergrendelingssysteem
4. Ventilatie-openingen
5. Golfgeleider (niet verwijderen)
6. Externe ventilatie-openingen
7. Bedieningspaneel
8. Stroomkabel
9. Stekker
10. Identicatie plaat
3
6
2
15
11. Glazen draaiplateau
12. Draairing
13. Grill-elementen
14. Waarschuwingslabel
(heet oppervlak)
15. Plaats hier het meegeleverde label
voor het automatisch programma
menu
16. Waarschuwingslabel
17. Stopper (niet verwijderbaar)
De stopper zorgt voor voldoende
ventilatieruimte aan de achterkant van
de oven.
18. Deksel
19. Stoompan
20. Crisp-pan
21. Grill rooster
6
11
12
4
13
14
7
1
5
10
3
Nederlands
8
9
16
17
18
20
19
21
Opmerking
1.
Deze afbeelding is alleen ter referentie.
2.
Het glazen draaiplateau, rooster, deksel, de stoompan en crisp-pan zijn de
enige accessoires bij deze oven. Elk ander kookgerei dat wordt genoemd in
deze handleiding moet afzonderlijk worden aangeschaft.
13 NL

Bedieningspanelen
2
3
4
10
11 12
1. Utileesvenster
2. Magnetronvermogen (pagina 17)
3. Grilltoets (pagina 22)
4. Combinatietoets (pagina 23)
5. Turbo-ontdooiknop (pagina 33-34)
6. Automatische kookprogramma’s
(pagina 31-32)
7. Knop voor Steam Plus programma’s
1
7
6
5
8
9
(pagina 28-30)
8. Draaiknop
Selecteer de tijd of het gewicht van het
voedsel door de draaiknop te draaien.
Gebruik de draaiknop om de Add Time
(extra tijd) functie te activeren (pagina 21).
9. Quick 30 knop (pagina 20)
10. Timer/Clock knop (pagina 15, 26)
11. Stop/Wistoets:
Voor het koken:
Met één druk op de toets wordt het
ingestelde programma gewist.
Tijdens het koken:
Met één druk op de toets wordt het
kookprogramma tijdelijk onderbroken. Indien
u de toets nogmaals indrukt, wordt het
ingestelde programma gewist en verschijnt de
tijd in het uitleesvenster.
12. Starttoets
Indrukken om de oven te starten. Als u tijdens
het koken de deur hebt geopend of eenmaal
op Stop/Annuleren hebt gedrukt, dan moet u
nogmaals op Start drukken om verder te gaan
met koken.
Deze oven is voorzien van een functie voor
energiebesparing.
14 NL
De uitvoering van het bedieningspaneel kan
afwijken van de afbeelding (afhankelijk van de
kleur). De functies zijn echter dezelfde.
Pieptoon
Zodra een toets wordt ingedrukt,
weerklinkt een piep. Indien er
geen piep te horen is dan is de
instelling niet correct. Zodra een
kookprogramma is voltooid, klinken
er vijf piepjes.
Opmerking
De helderheid van de display
vermindert als de stand-by mode
is ingeschakeld. De oven zal op de
stand-by mode over gaan als deze
voor het eerst wordt ingeplugd en
direct nadat de laatste handeling
ermee is verricht.
Als u een programma heeft ingesteld,
maar niet op de startknop drukt, dan
annuleert de oven het programma
automatisch na zes minuten. Op het
display wordt dan weer de tijd van de
dag weergegeven.

Instellen van de Klok
Wanneer de magnetronoven voor het eerst wordt ingeschakeld, verschijnt “88:88” in het
uitleesvenster.
Nederlands
Druk twee keer op Timer/
Clock
De dubbele punt gaat
knipperen.
Draaiknop
Selecteer de juiste tijd
door de draaiknop te
draaien. De tijd verschijnt
in het uitleesvenster en de
dubbele punt knippert.
Druk op Timer/Clock
De dubbele punt houdt
op met knipperen en de
tijd is in het geheugen
opgenomen.
Opmerkingen
1. Om de juiste tijd opnieuw in te stellen, herhaalt u stap 1 tot en met stap 3.
2. Als de magnetronoven op het stopcontact aangesloten is en van elektriciteit
voorzien wordt, zal de klok de tijd blijvend weergeven.
3. Dit is een 24-uurs-klok. Bij 02.00 s’middags = 14:00 uur en niet 2:00
Kinderslot
Met dit systeem worden de bedieningselementen buiten werking gesteld. De ovendeur kan echter
wel geopend worden. Het kinderslot kan ingesteld worden wanneer het uitleesvenster een dubbele
punt of de tijd weergeeft.
Instellen:
Druk driemaal op de starttoets.
De tijdsaanduiding verdwijnt. Het display
toont het sleutelsymbool.
Druk driemaal op de stop/wistoets.
De tijd verschijnt weer in het
uitleesvenster.
Opheffen:
Opmerking
Om het kinderslot te activeren moet u de startknop 3 keer binnen 10 seconden indrukken.
15 NL

Kookstanden
In de tekeningen hieronder ziet u voorbeelden van de accessoires. Dit kan variëren naargelang het
recept/de schaal.
Kookstanden Toepassingen
Ontdooien
•
Opwarmen
Magnetron
•
Smelten: boter, chocolade,
•
kaas.
Vis, groente, fruit koken.
•
Bereiden: gestoofd fruit, jam,
•
saus, custard, gebak, karamel,
vlees, vis
• Cakes bakken zonder kleur.
Te gebruiken
accessoires
-
Ovengerei
Geschikt voor
magnetron
(bijv. Pyrex®
schalen, borden
of kommen)
rechtstreeks
op het glazen
draaiplateau.
Geen metaal.
Of
Steam +
Grill
Of
Combinatie
Of
Vis, groenten, aardappels en
•
kip stomen.
Het bakken van vislets,
•
stukjes kip en burgers.
• Het laten sudderen van risotto,
een zeevruchtenpotje en een
groente of vlees stoofschotel.
Grillen van dunne stukjes
•
vlees of vis.
Brood roosteren.
•
Bruinen van gratinschotels of
•
schuimtaarten.
• Biefstuk en stukken kip roosteren.
• Bruinen en knapperig maken
van pizza’s, quiches of
aardappelproducten.
Steam Plus
Pan (Crisp-pan,
stoompan en
deksel).
Crisp-pan en
deksel.
Rooster -
Metaal of.
-
Rooster Geen metaal.
Crisp-pan
hittebestendig,
rechtstreeks
op het glazen
draaiplateau.
Geen metaal.
-
16 NL
Geschikt voor
Of
Bereiden van lasagne, vlees,
•
aardappels of groentegratins.
Cakes en desserts bakken en
•
bruinen.
-
magnetron en
hittebestendig,
rechtstreeks
op het glazen
draaiplateau.
Geen metaal.

Koken en Ontdooien met de Magnetronfunctie
Het glazen draaiplateau dient tijdens het gebruik van de magnetronoven, altijd op de juiste positie
geplaatst te zijn.
Tikken Vermogen Wattage
1 Tikken Hoog
2 Tikken Ontdooien 270 W
3 Tikken Medium 600 W
4 Tikken Laag
5 Tikken Sudderen 300 W
6 Tikken Warmhouden 100 W
Waarschuwing!
Als er tijdens het instellen van de tijd geen stand voor het vermogen is ingesteld, zal de
magnetronoven automatisch in de stand 1000 W functioneren.
Opmerking
1. Voor voorbereidingen in meerdere stappen, raadpleegt u pagina 27.
2. U kunt de rusttijd
ingesteld. Raadpleeg pagina 26 voor het gebruik van de timer.
3.
Indien nodig kunt u tijdens de bereiding de bereidingstijd wijzigen. Gebruik de
draaiknop Tijd/Gewicht om de bereidingstijd te verlengen of te verkorten. U kunt
de tijd maximaal 10 minuten verhogen/verlagen in stappen van 1 minuut. Als u de
draaiknop op nul zet, dan beëindigt u de bereiding.
4. Gebruik geen metalen ovengerei in de magnetronstand.
1000 W
440 W
Druk de toets voor
magnetronvermogen
in verschijnen in het
uitleesvenster. Bepaal
het gewenste vermogen.
De magnetron-wijzer en
het wattage verschijnen
in het utileesvenster.
Stel de uitsteltijd
in door de
draaiknop
te draaien.
(1000 W tot 30
minuten; andere
vermogensniveaus
tot 90 minuten;
Grill, Combinatie:
90 minuten.
programmeren nadat u het magnetronvermogen en de tijd heeft
Druk de
starttoets in
Het kookproces
zal starten en
de tijd in het
uitleesvenster
zal gaan aftellen.
Nederlands
17 NL

Ontdooien
Tips Voor het Ontdooien
Controleer het ontdooien een aantal
malen, zelfs indien u de automatische
toetsen gebruikt. Houd rekening met de
nagaarperiode.
Nagaartijden
Afzonderlijke porties voedsel kunnen
praktisch onmiddellijk na het ontdooien
bereid worden. Het is normaal dat grotere
porties voedsel in het midden nog bevroren
zijn. Alvorens te gaan bereiden minimaal
een uur laten staan. Tijdens de rusttijd,
wordt de temperatuur gelijkmatig verdeeld
en wordt het voedsel door geleiding
ontdooid. Opmerking: Indien het voedsel
niet onmiddellijk bereid wordt, moet het in
de koelkast bewaard worden. Ontdooid
voedsel mag nooit opnieuw ingevroren
worden zonder dat het eerst gekookt is.
Braadstuk en Gevogelte
Plaats de braadstukken bij voorkeur op een
omgekeerd bord of plastic rooster, zodat
ze niet in hun sappen komen te liggen. Het
is van essentieel belang om delicate of
uitstekende delen van dit vlees af te dekken
met kleine stukjes folie, om te voorkomen
dat deze delen gaan koken. Het is niet
gevaarlijk om kleine stukjes folie in uw
magnetron te gebruiken, mits deze niet
in contact komen met de wanden van de
magnetron.
Brood
Een heel brood moet 5 tot 30 minuten
rusten zodat het middelste deel kan
ontdooien. De rusttijd kan worden verkort
door het brood in sneden te snijden of kleine
broodjes in twee te delen.
Pieptoon
Tijdens de automatische ontdooiing hoort
u een pieptoon. Deze pieptoon herinnert u
eraan om het voedsel te controleren, erin te
roeren, te scheiden of te bedekken. Als u dit
niet doet, kan het zijn dat het voedsel niet
gelijkmatig ontdooid is.
18 NL
Gehakt of Brokjes Vlees en Vis
Omdat de buitenkant van dit soort voedsel
snel ontdooit, moeten zij van elkaar
gescheiden worden; breek het blok in
regelmatige stukken tijdens het ontdooien
en verwijder de stukjes die reeds ontdooid
zijn.
Kleine Porties Voedsel
Koteletten en stukken kip moeten zo snel
mogelijk van elkaar gescheiden worden,
zodat zij gelijkmatig en volledig ontdooien.
Vettige delen en de uiteinden ontdooien
sneller. Leg deze in de buurt van het midden
van het draaiplateau of dek ze af.

Gegevens Voor Ontdooien
Levensmiddel
Kadetjes (3) 1 stuk 85 g
Brioche groot (3) 1 stuk 400 g
Kaas (camembert) (3) 1 stuk 250 g 270 W 7 min 30 sec 1 uur rusten minimum
Kaas (feta) (3)
Hüttenkäse (quark) (3)
Croissants - brioche klein
(1, 4)
Kofebroodje rozijnen
(1, 4)
Visllets dun (2, 3) 4 stuk 500 g 270 W 10 - 15 min
Vismoot met been (2, 3) 1 stuk 450 g 270 W 10-12 min
Fruit framboos (1)
Fruit pruimen/abrikozen (1)
Hamburger (2,3)
Gebak, bladerdeel (1,3)
Gebak, kruimeldeeg (1,3) 1 roll 500 g 270 W 4-5 min
Pizzadeeg (1,3)
Garnalen, klein (2)
Garnalen, groot (2)
Gekookte ham, mager (2) 4 plakjes 200 g 270 W 5-6 min
Delicatessen, vet - salami
(2)
Gewicht/
Hoeveelheid
1 plak 200 g
1 pot 250 g
2 stuk 100 g
1 stuk 120 g
200 g
300 g
700 g
1 stuk 100 g
2 stuk 200 g
1 roll 375 g
1 bol 240 g
200 g
450 g
300 g
12 plakken 250 g 270 W 8-9 min
Tijd en programma Methode
1000 W 20-30 sec
Combi 2; 3 min 30 sec
270 W 7-8 min 20 min rusten minimum
270 W 8-10 min 10 min rusten
Combi 2; 1 min en
2 min Grill 1
Combi 2; 1 min 30 sec
en 3 min Grill 1
270 W 6-8 min 15 min rusten
270 W 11-13 min
270 W 20-22 min
270 W 6-7 min
270 W 10-12 min
270 W 4-5 min
270 W 4 min 30 sec 10 min rusten
270 W 7-9 min
270 W 10-12 min
270 W 15 min
5 min rusten
5 min rusten
1 min rusten
1 min rusten
15 min rustenVisllets dik (2, 3) 1 stuk 380 g 270 W 12-14 min
15 min rusten
10 min rusten
Permanent tijd 20 min in
de koelkast
Het ijs breken en meer-
dere malen afgieten. 10
min rusten.
5 min rusten
Desserten
Zwartwoudtaart (1)
Chocoladetaart (1) 1 stuk 450 g 440 W 3 min 10 min rusten
Doughnuts (1, 4)
Wafel (1, 4)
Fruittaart (framboos) (3) 470 g 270 W 8-10 min 10 min rusten
1 stuk 600 g
1 stuk 50 g Combi 2; 1 min 20 sec
2 stuk 100 g Combi 2; 1 min 30 sec
1 stuk 20 g
2 stuk 40 g
270 W 10-15 min 15 min rusten
Combi 2; 50 - 60 sec
Combi 2; 1 min 30 sec
3 min rusten in de oven
Voeg 1 min grill voor meer
knapperigheid
Nederlands
(1) Halverwege omdraaien of roeren. (2) Meerdere malen scheiden en omkeren. (3) Verpakking verwijderen
en op hittebestendige schotel leggen. (4) Op rooster, indien nodig, in een hittebestendige schotel plaatsen.
19 NL

De Quick 30 Functie Gebruiken
Met deze functie kunt u snel de bereidingstijd instellen in stappen van 30 seconden.
Druk op Quick 30 om de gewenste
bereidingstijd (maximaal 5 minuten)
in te stellen. Elke keer indrukken
verlengt de tijd met 30 seconden.
De tijd verschijnt op het display.
Het vermogen is vooraf ingesteld
op 1000 W.
Druk op Start
Het kookprogramma begint en de
kooktijd op het display begint af te tellen.
Aan het einde van de bereiding klinkt de
pieptoon 5 keer.
Opmerking
1. Andere vermogensniveaus kunnen naar wens worden gebruikt. Selecteer het
gewenste vermogensniveau voordat u op Quick 30 drukt.
2. Nadat u de tijd via Quick 30 hebt ingesteld, kunt u de draaiknop niet gebruiken.
3. Na handmatig koken werkt deze functie één minuut lang niet.
20 NL

De Add Time (extra tijd) Functie Gebruiken
Selecteer na het koken via de draaiknop de Add Time functie.
Nederlands
Selecteer na het koken via de
draaiknop de Add Time functie.
Maximale bereidingstijd: Magnetron
1000 W tot 30 minuten; andere
vermogensniveaus tot 90 minuten; Grill,
Combinatie: 90 minuten
Druk op Start
Tijd wordt toegevoegd De
tijd op het display telt af.
Opmerking
1. Deze functie is alleen beschikbaar voor Magnetron, Grill en Combinatie, en niet
voor automatische programma's.
2. De Add Time functie werkt niet na een bereidingstijd van één minuut.
3. De Add Time functie kan worden gebruikt na bereiden van voedsel in meerdere
stappen.
4. Het vermogensniveau is gelijk aan als tijdens de laatste stap. Deze functie werkt
niet als de laatste stap rusttijd is.
21 NL

Grillen
Het grillsysteem van de oven zorgt voor snel en efciënt bereiden van uiteenlopende
producten, bijv. koteletten, worst, biefstuk, toast, etc. Er zijn 3 verschillende instellingen
beschikbaar voor de grill. Het glazen draaiplateau moet altijd aangebracht zijn wanneer
u de oven gebruikt.
Druk op de Grilltoets om de
grillinstelling te kiezen.
De grill-wijzer en het Grill
niveau (1, 2 of 3) verschijnen
in het uitleesvenster.
Tikken Vermogen Wattage
1 Drukken Grill 1 (hoog) 1000 W
2 Drukken Grill 2 (Medium) 850 W
3 Drukken Grill 3 (Laag) 700 W
Tijd instellen
Selecteer de bereidingstijd door
de draaiknop te draaien. De
tijd kan worden ingesteld tot
maximaal 90 minuten.
Druk op Start. De tijd
zoals weergegeven in
het uitleesvenster gaat
aftellen.
De tijd Wijzigen Tijdens de Bereiding
Indien nodig kunt u tijdens de bereiding de bereidingstijd wijzigen. Met behulp van de draaiknop kunt u de bereidingstijd verlengen of verkorten. U kunt de bereidingstijd met 10 minuten
verlengen/verkorten in stappen van 1 minuut. Als u de draaiknop op nul zet, dan beëindigt u
de bereiding.
Opmerkingen
1. Plaats het gerecht op het rooster, en plaats deze op het draaiplateau. Plaats de
vuurvaste plaat (Pyrex®) onder het rooster, om eventueel vet en druppels op te
vangen.
2. Tijdens het grillen dienen gerechten nooit afgedekt te zijn.
3. De grill niet voorverwarmen.
4. De grill functioneert uitsluitend als de ovendeur gesloten is. Het is niet mogelijk
om de grillfunctie te gebruiken als de deur open is.
5. Voor het programma grillen is geen magnetronvermogen beschikbaar.
6. Bij de meeste gerechten is het noodzakelijk om deze, nadat ongeveer de
helft van de bereidingstijd versteken is, te draaien. Voor het draaien van de
gerechten moet u, nadat u de deur geopend heeft, heel voorzichtig en met
ovenhandschoenen, het rooster uit de magnetron nemen.
7. Na het draaien, zet u het gerecht weer in de oven en sluit u de deur. Na het
sluiten van de deur dient op Start gedrukt te worden. Het uitleesvenster van
de magnetronoven zal doorgaan met het aftellen van de resterende tijd. U
kunt zonder gevaar en op ieder moment de deur van de oven openen om te
controleren hoever de bereiding gevorderd is.
8. Tijdens het bereidingsproces kan de grill afwisselend gloeien - dit is normaal.
De magnetronoven dient na het grillen en voor het gebruik van de magnetron - of
combinatiefunctie, altijd gereinigd te worden.
22 NL
Waarschuwing!
Het grill rooster dient altijd met het glazen draaiplateau, in de juiste positie, te worden
gebruikt. Neem het grill rooster uit de oven door het rooster en de vuurvaste plaat/
schaal goed vast te houden. Gebruik ovenhandschoenen voor het uitnemen van
accessoires. In verband met de hoge temperaturen dient u voorzichtig te zijn bij
het plaatsen en of uitnemen van gerechten. Raak het glas aan de buitenzijde of de
metalen delen aan de binnenkant van de oven derhalve niet aan.

Combinatiekoken
De combinatiestand is geschikt voor voedsel dat gewoonlijk gegrild wordt en voor het
opwarmen van hartige hapjes. De grill gloeit op en dooft weer tijdens het grillen - dit is
normaal.
Nederlands
Selecteer het combinatieniveau
Druk op de Combinatietoets om de
combinatie-instelling te kiezen.
De combinatie-wijzer en de
combinatie-instelling (1, 2 of 3)
verschijnen in het uitleesvenster.
Indrukken Instelling MW Grill
1 Drukken Combi 1 440 W Hoog
2 Drukken Combi 2 300 W Hoog
3 Drukken Combi 3 300 W Medium
Tijd instellen
Selecteer de
bereidingstijd door de
draaiknop te draaien. De
tijd kan worden ingesteld
tot maximaal 90 minuten.
Tijdens het combinatiekoken, zal de
magnetron de gerechten snel prepareren,
terwijl met het gebruik van de Grill de
gerechten gebruind en knapperig worden.
Druk op Start.
De tijd zoals
weergegeven in het
uitleesvenster gaat
aftellen.
De tijd Wijzigen Tijdens de Bereiding
Indien nodig kunt u tijdens de bereiding de bereidingstijd wijzigen. Met behulp van de draaiknop kunt u de bereidingstijd verlengen of verkorten. U kunt de bereidingstijd met 10 minuten
verlengen/verkorten in stappen van 1 minuut. Als u de draaiknop op nul zet, dan beëindigt u
de bereiding.
Opmerkingen
1. Het grill rooster is ontwikkeld om bij de functie combinatie en grillen te worden gebruikt.
Gebruik nooit een andere metalen accessoire, anders dan die bij de oven geleverd worden.
Plaats onder het grill rooster een vuurvaste plaat om eventueel vet en druppels op te
vangen.
2. Gebruik het grillrooster alleen zoals in de instructies is beschreven. Gebruik het grill
rooster niet voor het bereiden van gerechten met een gewicht van < 200 gram of als
de oven handmatig ingesteld staat. Voor optimale resultaten bij het bereiden van kleine
hoeveelheden kunt u de functies grill of alleen magnetron gebruiken, maar nooit de functie
combinatie.
3. Tijdens het bereiden van gerechten met de functie combinatie dienen gerechten nooit
afgedekt te zijn.
4. De grill bij de functie combinatie niet voorverwarmen.
5. Bij een onjuist gewicht van gerechten of als het grill rooster beschadigd is of er per ongeluk
een metalen bakje in de oven geplaatst is, kan het voorkomen dat er vonkontlading is.
Vonkontlading is herkenbaar als blauwe lichtitsen in de magnetron. Indien dit voorkomt,
dient de oven onmiddellijk uitgeschakeld te worden.
6. Sommige gerechten dienen zonder het gebruik van het grill rooster in de stand combinatie
bereid te worden, bijv. rollades, gratins, taarten en desserts. Deze gerechten dienen op een
vuurvaste niet metalen plaat/schaal geplaatst te worden, direct op het draaiplateau.
7. Gebruik geen kunststof (plastic) magnetron schaaltjes bij het bereiden van gerechten in het
programma combinatie (tenzij geschikt voor combinatiekoken). De schalen dienen bestand
te zijn tegen de hitte van de boven-grill - vuurvast glas bijv. Pyrex® of keramiek zijn hiervoor
uiterst geschikt.
8. Gebruik uw eigen metalen schaaltjes of bakjes niet omdat de microgolven het gerecht dan
niet gelijkmatig kunnen verwarmen.
Waarschuwing!
Het grill rooster dient altijd met het glazen draaiplateau, in de juiste positie, te worden gebruikt.
Neem het grill rooster uit de oven door het rooster en de vuurvaste plaat/schaal goed vast te
houden. Gebruik ovenhandschoenen voor het uitnemen van accessoires. In verband met de
hoge temperaturen dient u voorzichtig te zijn bij het plaatsen en of uitnemen van gerechten.
Raak het glas aan de buitenzijde of de metalen delen aan de binnenkant van de oven derhalve
niet aan.
23 NL

De Steam Plus Pan gebruiken
(handmatige bediening)
Functie
Crisp-
grill
Stoom
Te gebruiken
accessoire
Crisp-pan Sommige etenswaren krijgen een
Steam Plus
Pan (Crisp-pan,
stoompan en
deksel)
zachte, kleffe korst als ze in de
magnetron worden bereid. Met de
crisp-pan bakt u pizza’s, quiches,
pasteitjes en broodproducten net
zo mooi bruin en krokant als in een
conventionele oven. De crisp-pan
werkt op drie manieren: de crisp-pan
wordt verwarmd door het absorberen
van de microgolven en het voedsel
wordt direct verwarmd door de
microgolven en door de grill. De
bodem van de crisp-pan absorbeert
de microgolven en zet deze om in
warmte. Vervolgens wordt de warmte
via de crisp-pan overgebracht op het
voedsel. Het verwarmingseffect is
maximaal dankzij de anti-aanbaklaag.
De Steam Plus accessoires zijn
geschikt voor het stomen van
groenten, aardappels, vislets, hele
vis, kiplet. Microgolven worden
geabsorbeerd door de bodem van
de crisp-pan die het water verwarmt.
Hierdoor ontstaat de stoom die het
voedsel kookt.
Concept Instructies
Voor het beste resultaat verwarmt
u de crisp-pan vóór het gebruik.
Plaats hem rechtstreeks op het
glazen draaiplateau en verwarm
hem 3 minuten lang voor op een
vermogen van 1000 W. Voor
een mooiere bruine laag wrijft
u de pan in met olie voordat u
bijvoorbeeld worstjes of cordon
bleu voorverwarmt. Verwijder de
crisp-pan uit de oven en leg het
voedsel in de crisp-pan. Gebruik
ovenwanten, want de crisp-pan
wordt zeer heet. Voor het beste
resultaat is het belangrijk dat u het
voedsel direct na het voorwarmen
op de crisp-pan plaatst. Als te
lang wordt gewacht is een goed
resultaat niet gegarandeerd. Zie
de kooktabel op pagina 37.
Giet 150 ml leidingwater in de
crisp-pan en plaats de stoompan
in de crisp-pan. Plaats het voedsel
rechtstreeks in de stoompan.
Breng het deksel aan en plaats het
geheel rechtstreeks op het glazen
draaiplateau. Zie de kooktabel op
pagina 37.
24 NL
Braden
Sud-
deren
Crisp-pan en
deksel
Crisp-pan en
deksel
De crisp-pan wordt tezamen met
het deksel gebruikt. Geschikte
voedingsproducten zoals vislets,
stukken kip, hamburgers worden
rechtstreeks in de crisp-pan geplaatst.
Het voedsel wordt gekookt door de
warmte die uit de bodem van de pan
komt. De onderkant van het voedsel
wordt bruin en krokant.
De crisp-pan wordt tezamen met het
deksel gebruikt. De pan is geschikt
voor het laten sudderen van risotto,
zeebanket, vlees, groentenstoofpot of
soep. Het voedsel wordt gekookt door
de warmte die uit de bodem van de
pan komt.
Plaats het voedsel rechtstreeks
in de crisp-pan, breng het deksel
aan en plaats op het glazen
draaiplateau. Voorverwarmen
is niet nodig. Het voedsel kan
tijdens het koken omgekeerd of
anders neergelegd worden. Zie de
kooktabel op pagina 37.
Plaats het voedsel rechtstreeks
in de crisp-pan, breng het deksel
aan en plaats op het glazen
draaiplateau. Voorverwarmen is
niet nodig. Roer tijdens het koken,
indien nodig. Zie de recepten op
pagina 38.

De Steam Plus Pan Gebruiken
Onderhoud van de Steam
Plus pan
1. Snij pizza’s, quiches of ander voedsel
nooit rechtstreeks in de crisp-pan, dit
beschadigt de anti-aanbaklaag.
2. Was de Steam Plus Pan na gebruik af
in warm zeepsop en spoel af met warm
water. Gebruik geen schuurmiddelen
of schuursponsjes want hiermee
beschadigt u het oppervlak van de
crisp-pan.
3. De Steam Plus Pan is geschikt voor de
vaatwasser.
Opmerking
1. Voor gebruik in de crisp-grill stand mag de crisp-pan niet langer dan 5 minuten
worden voorverwarmd.
2. Plaats de crisp-pan in het midden van het glazen draaiplateau en voorkom dat
het de wand van de ovenruimte raakt. Zo niet, dan kan de ovenruimte beschadigd
raken door vonkoverslag.
3. Gebruik de crisp-pan altijd op het glazen plateau. Gebruik niet met het rooster.
4. Gebruik altijd ovenwanten om accessoires te verwijderen.
5. Verwijder alle verpakkingsmateriaal van het voedsel voordat u het gaat bereiden.
6. Plaats geen warmtegevoelig materiaal in de hete crisp-pan, want dit kan brand
veroorzaken.
7. Gebruik de Steam Plus Pan niet in andere magnetrons en gebruik hem niet in
gewone ovens.
8. Gebruik de stoompan en het deksel niet afzonderlijk.
9. Gebruik de crisp-pan met de combinatiegrill en magnetron voor het beste
resultaat. Alleen de magnetronstand (vermogen 1000 W) kan worden gebruikt voor
voorverwarmen van de crisp-pan.
Nederlands
Voorzichtig!
Gebruik altijd ovenwanten om accessoires te verwijderen. Gebruik altijd het deksel
wanneer u de stoom-, braad- of sudderfuncties gebruikt. Open na het koken het deksel
niet als uw gezicht zich dichtbij de accessoire bevindt, want stoom kan lichamelijk letsel
veroorzaken.
25 NL

De Timer Gebruiken
Koken met Startvertraging
Met de timer toets kunt u instellen wanneer de oven het programma gaat starten.
Voorbeeld
Druk op
Timer
Stel de uitsteltijd in door
de draaiknop te draaien
(tot 9 uur).
Stel het gewenste
kookprogramma
en de kooktijd in.
Druk op
Start
Opmerking
1. 3-fase koken kan samen met het koken met
geprogrammeerd.
startvertraging worden
Voorbeeld
Startvertraging: 1 uur
2.
Als de ingestelde vertragingstijd langer is dan 1 uur, dan wordt de tijd in minuten
afgeteld. Als de tijd minder is dan 1 uur dan wordt de tijd in seconden afgeteld.
3. De
startvertraging kan niet voor automatische programma’s worden geprogrammeerd.
4. Als u de ovendeur opent tijdens de uitsteltijd, dan blijft de tijd in het display aftellen.
1000 W vermogen: 10 min 300 W vermogen : 20 min
1 Keep 5 Keep
Wachttijd Na het Koken
Met behulp van de Timer toets kunt u de rusttijd programmeren nadat het voedsel is bereid. U
kunt de oven ook instellen als kookwekker.
Voorbeeld
Stel het gewenste
kookprogramma en
de kooktijd in.
Druk op
Timer/Clock
Stel de uitsteltijd in
door de draaiknop te
draaien (tot 9 uur).
Druk op
Start
26 NL
Opmerking
1. 3-fase koken kan samen met de wachttijd worden geprogrammeerd.
Voorbeeld
1000 W vermogen: 4 min Wachttijd: 5 min
1 Drukken 1 Drukken
2.
Als de ovendeur tijdens de wachttijd of minuut timer wordt geopend, dan wordt het
aftellen van de tijd in het displayvenster voortgezet.
3.
Deze functie kunt u ook gebruiken als kookwekker. Druk in dit geval op de Timer
toets, stel de tijd in en druk op start.
4.
Het is niet mogelijk om rusttijd te programmeren na een automatisch programma.
5. Als de geprogrammeerde rusttijd langer is dan één uur, dan telt het display af in
minuten. Als de rusttijd minder is dan één uur, dan telt het display af in seconden.
1000 W vermogen: 2 min

Voorbereiding in Meerdere Stappen
Voorbereiding in 2 of 3 Stappen
Voorbeeld
Nederlands
Druk op Micro
Power
Bepaal het gewenste
vermogen.
Voorbeeld: om 2 minuten te ontdooien en 3 minuten het voedsel te bereiden op 1000 W vermogen.
Druk eenmaal
op de toets
Micro Power
om 270 W te
selecteren.
Voorbeeld: om 4 minuten te grillen op laag vermogen en 5 minuten het voedsel te bereiden op 440 W
vermogen.
Druk driemaal
op de Grill
toets om
vermogen 3 te
selecteren.
Stel de
bereidingstijd
in met behulp
van de
draaiknop.
Stel de
bereidingstijd
in op 2
minuten met
behulp van de
draaiknop.
Stel de
bereidingstijd
in op 4
minuten met
behulp van de
draaiknop.
Druk op Micro Power
Bepaal het gewenste
vermogen.
Druk eenmaal
op de toets
Micro Power
om het 1000 W
vermogen te
selecteren.
Druk eenmaal
op de toets
Micro Power
om het 440 W
vermogen te
selecteren.
Stel de
bereidingstijd in
met behulp van
de draaiknop.
Stel de
bereidingstijd
in op 3
minuten met
behulp van de
draaiknop.
Stel de
bereidingstijd
in op 5
minuten met
behulp van de
draaiknop.
Druk op Start
Het kookproces
zal starten en
de tijd in het
uitleesvenster
zal gaan aftellen.
Druk op
Start
Druk op
Start
Opmerking
1. Om voedsel te bereiden in 3 stappen, voert u een ander kookprogramma in
voordat u op Start drukt.
2. Als u tijdens de bereiding eenmaal op Stop drukt, wordt de bereiding stopgezet.
Als u terug op Start drukt, loopt het programma voort. Als u tweemaal op Stop
drukt, wordt het programma stopgezet en geannuleerd.
3. Als u op Stop drukt terwijl de oven niet in gebruik is, wordt het geselecteerde
programma gewist.
4. Voor het bereiden van voedsel in meerdere stappen kunnen geen automatische
programma’s worden gebruikt.
27 NL

Steam Plus programma’s
Met deze functie kan voedsel worden bereid of worden opgewarmd overeenkomstig het
gewicht. Het gewicht moet worden ingevoerd in gram.
28 NL
Selecteer de
gewenste categorie
en plaats de crisppan in de oven,
rechtstreeks op het
glazen draaiplateau.
Druk op Start voor
voorverwarmen
van de crisp-pan.
Na het voorwarmen klinkt een pieptoon.
Plaats het voedsel in de crisp-pan en stel
het gewicht in. De knop langzaam draaien
stelt het gewicht in stappen van 10 g in. De
knop langzaam draaien stelt het gewicht in
stappen van 100 g in.
Opmerking
1. De Steam Plus programma’s kunnen alleen gebruikt worden voor het vermelde
voedsel.
2. Bereid enkel de voorgeschreven hoeveelheden.
3. Het is beter het voedsel zelf te wegen dan af te gaan op de informatie die op de
verpakking vermeld staat.
4. Gebruik de crisp-pan uitsluitend zoals hieronder beschreven.
5. Dek voedsel niet af wanneer u Steam Plus programma’s gebruikt voor bevroren
pizza, bevroren aardappelproducten en gekoelde quiche omdat het voedsel
anders niet kan bruinen.
6. De meeste levensmiddelen moeten rusten na bereiding met een automatisch
programma, om ervoor te zorgen dat de warmte doordringt tot het midden.
7. Doordat er in voedsel variaties kunnen voorkomen, controleer altijd of het voedsel
volledig gekookt en gloeiendheet is voordat u deze serveert.
Programma Gewicht Toebehoren Instructies
1. Diepvriespizza
1 Drukken
2. Diepvries
aardappel-
producten
2 Drukken
3. Gekoelde
quiche
3 Drukken
120 g - 440 g
200 g - 500 g
150 g - 400 g
Voor opwarmen en bruinen van bevroren
voorgebakken pizza, bruschetta en
stokbrood met kaas. Druk één keer op
Steam Plus. Verwijder alle verpakking en leg
de pizza in de voorverwarmde crisp-pan. Leg
de pizza na het koken op een koelrooster. Dit
programma is niet geschikt voor panpizza’s,
pizza’s met gevulde korst of zeer dunne
pizza’s zoals Flammekueche.
Voor opwarmen, krokant maken
en bruinen van bevroren
aardappelproducten. Druk twee keer op
Steam Plus. Spreid na voorverwarmen van
de crisp-pan, de aardappelproducten uit in
de crisp-pan. Bak ze in één laagje en roer ze
om zodra de pieptoon klinkt. Dit programma
is niet geschikt voor galettes, Pom’ Dauphine
en Pom’ Noisette.
Voor opwarmen van voorgebakken verse
quiche. Druk drie keer op Steam Plus.
Verwijder alle verpakking en leg de quiche in
de voorverwarmde crisp-pan. Leg de quiche
na het koken op een koelrooster. Quiche die
veel kaas bevat kan veel heter worden dan
een quiche met groenten. Dit programma is
niet geschikt voor beklede pasteien/taarten,
of diep gevulde quiches, of quiches zonder
korst.
Druk op
Start

Steam Plus Programma’s
Met deze functie kan voedsel worden gestoomd overeenkomstig het gewicht. Het gewicht moet
worden ingevoerd in gram.
Nederlands
De indicators voor Steam Plus en
koken en het programmanummer
verschijnen op het display.
Gewicht instellen
Stel het gewicht van het voedsel in met de
draaiknop. De knop langzaam draaien stelt
het gewicht in stappen van 10 g in. De
knop langzaam draaien stelt het gewicht in
stappen van 100 g in.
Druk op StartSelecteer de gewenste categorie
Opmerking
1. De Steam Plus programma’s kunnen alleen gebruikt worden voor het vermelde
voedsel.
2. Bereid enkel de voorgeschreven hoeveelheden.
3. Het is beter het voedsel zelf te wegen dan af te gaan op de informatie die op de
verpakking vermeld staat.
4. Gebruik alleen de accessoires die vermeld worden op pagina 29-30.
5. De meeste levensmiddelen moeten rusten na bereiding met een automatisch
programma, om ervoor te zorgen dat de warmte doordringt tot het midden.
6. Doordat er in voedsel variaties kunnen voorkomen, controleer altijd of het voedsel
volledig gekookt en gloeiendheet is voordat u deze serveert.
Programma Gewicht Toebehoren Instructies
4. Vislets
stomen
4 Drukken
200 g - 500 g
Voor het bereiden van verse vislets, bijv. kabeljauw,
zalm of schelvis. Giet 150 ml leidingwater in de
crisp-pan. Leg de verse vislets op de stoomplaat
in de crisp-pan. Breng het deksel aan en plaats het
geheel op het glazen draaiplateau. Druk vier keer op
Steam Plus. Voer het gewicht van de verse vislets
in. Druk op Start.
5. Kiplets
stomen
5 Drukken
200 g - 800 g
Bereiden van verse kiplets. Elke portie kiplet moet
tussen 100-250 g wegen. Giet 150 ml leidingwater in
de crisp-pan. Leg de verse kiplets op de stoomplaat
in de crisp-pan. Breng het deksel aan en plaats het
geheel op het glazen draaiplateau. Druk vijf keer op
Steam Plus. Voer het gewicht van de verse kiplets
in. Druk op Start.
29 NL

Steam Plus Programma’s
Programma Gewicht Toebehoren Instructies
6. Aardap-
pels stomen
6 Drukken
150 g - 500 g
Geschilde aardappels stomen. Schil de aardappels
en snij ze in even grote stukken. Giet 150 ml
leidingwater in de crisp-pan. Leg de aardappels op
de stoomplaat in de crisp-pan. Breng het deksel aan
en plaats het geheel op het glazen draaiplateau. Druk
zes keer op Steam Plus. Voer het gewicht van de
aardappels in en druk op Start.
7. Mosselen
250 g
(1 Portie)
500 g
(2 Porties)
7 Drukken
8. Risotto
500 g
(2 Porties)
1000 g
(4 Porties)
8 Drukken
ingrediënten
Voor 1000 g (4 porties)
40 g gedroogd
eekhoorntjesbrood
1 ui
50 g boter
250 g arboriorijst
1 teentje knoook
400 ml heet water met 1 blokje
groentebouillon
30 g Parmezaanse kaas
Halveer de ingrediënten voor
500 g (2 porties)
Schaal: geen
Accessoire: Steam Plus Pan
Verse mosselen in witte wijnsaus bereiden, 250 g of
500 g. Bereid de ingrediënten voor zoals hieronder
beschreven. Was en schrob de mosselen en ontdoe
ze van de baard. Gooi geopende mosselen weg. Doe
boter en sjalotjes in de crisp-pan. Leg op het glazen
draaiplateau, zonder deksel. Druk zeven keer op
Steam Plus. Selecteer 250 g of 500 g. Druk op Start.
Voeg de mosselen en wijn toe wanneer de pieptoon
klinkt en roer ze om. Breng het deksel aan, plaats op
het glazen draaiplateau en druk op Start.
ingrediënten
Voor 500 g
60 g sjalotjes, jn gesneden,
1 el boter
150 ml witte wijn
500 g mosselen
Voor koken van risotto, 500 g of 1000 g. Bereid zoals
beschreven in het onderstaande recept. Druk acht
keer op Steam Plus. Selecteer 500 g of 1000 g. Druk
op Start. Omroeren zodra de pieptoon klinkt.
1. Laat het eekhoorntjesbrood overeenkomstig de aanwijzingen van
producent inweken. Gebruik 400 ml water voor 40 g 200 ml voor
20 g.
2. Voeg de rijst, gesneden ui, boter, het geplet teentje knoook en de
geweekte en het gesneden eekhoorntjesbrood toe aan de crisp-
pan.
3. Voeg de groentebouillon en het weekwater toe (150 ml voor 4
porties, 75 ml voor 2 porties). Dek af met het deksel.
4. Zet de crisp-pan op het glazen draaiplateau.
5. Roer de Parmezaanse kaas in aan het einde van de bereiding.
Voor 250 g
40 g sjalotjes, jn gesneden
1/2 el boter
100 ml witte wijn
250 g mosselen
30 NL

Automatische Kookprogramma’s
Met deze functie kunt u gerechten bereiden door alleen het gewicht in te stellen. De instelling van
het gewicht dient in grammen geprogrammeerd te worden.
Nederlands
categorie. Het automatische
indicatielampje en het
programmanummer
verschijnen in het display.
Gewicht instellen
Stel het gewicht van het voedsel in met de
draaiknop. De knop langzaam draaien stelt het
gewicht in stappen van 10 g in. De knop langzaam
draaien stelt het gewicht in stappen van 100 g in.
Opmerking
1.
De automatische gewichtsprogramma’s kunnen alleen gebruikt worden voor het vermelde
voedsel.
2.
Bereid enkel de voorgeschreven hoeveelheden.
3.
Het is beter het voedsel zelf te wegen dan af te gaan op de informatie die op de
verpakking vermeld staat.
4.
Gebruik alleen de accessoires die vermeld worden op pagina 31-32.
5.
Bedek bij automatische combi-programma’s het voedsel niet, want anders kan het
gerecht niet bruinen en kan het zijn dat de plastic folie smelt door de hitte van de grill.
6.
De meeste levensmiddelen moeten rusten na bereiding met een automatisch
programma, om ervoor te zorgen dat de warmte doordringt tot het midden.
7.
Doordat er in voedsel variaties kunnen voorkomen, controleer altijd of het voedsel
volledig gekookt en gloeiendheet is voordat u deze serveert.
Programma Gewicht Toebhoren Instructies
9. Verse
kant-en-klaar
maaltijd
200 g - 800 g
1 Drukken
10. Dieovries-
maaltijd
200 g - 500 g
2 Drukken
Opwarmen van een verse maaltijd of
een ovenschotel. Al de ingrediënten
moeten voorgekookt zijn. De ingrediënten
moeten op een koelkasttemperatuur
van ongeveer + 5 °C zijn. Bedekken,
op Automatisch bereiden drukken en
omdraaien bij pieptoon. Op het einde
van het programma omroeren en enkele
minuten laten rusten. Het is mogelijk dat
grote stukken vis / vlees in een dunne
saus langer moeten koken. Dit programma
is niet geschikt voor zetmeelrijk voedsel
zoals rijst, noedels of aardappelen.
Om een diepvriesmaaltijd of
ovenschotel op te warmen. Alle
ingrediënten moeten voorgekookt en
ingevroren (-18°C) zijn. Bedekken. Druk
tweemaal op Automatisch bereiden.
Bij pieptoon roeren en grote stukken in
stukjes snijden. Op het einde van het
programma omroeren en enkele minuten
laten rusten. Temperatuur controleren
en langer laten koken indien nodig. Dit
programma is niet geschikt voor in kleine
porties ingevroren voedsel.
Druk op Start Selecteer de gewenste
31 NL

Automatische Kookprogramma’s
Programma Gewicht Toebhoren Instructies
11. Verse
Groente
3 Drukken
12. Fresh Vis
4 Drukken
13. Rijst
5 Drukken
14. Kipdelen
6 Drukken
200 g - 800 g
200 g - 800 g
100 g - 300 g
200 g - 700 g
Verse groenten bereiden. Leg de
schoongemaakte groenten in een
magnetronbak. Besprenkel de groenten
met 1 eetlepel water per 100 g. Bedek
de bak met magnetronfolie of een deksel.
Druk driemaal op Automatisch bereiden.
Omroeren zodra de pieptoon klinkt.
Omroeren zodra de pieptoon klinkt. Na
bereiding afgieten en naar wens kruiden.
Vislets of vismoten bereiden. Leg de
vis in een magnetronbak en voeg 1-3
eetlepels (15-45 ml) water toe. Bedek de
bak met magnetronfolie of een deksel.
Druk viermaal op Automatisch bereiden.
Voor het bereiden van rijst voor
gekruide gerechten, niet voor
rijstpudding (Thaise, Basmati-,
jasmijn-, Surinaamse, Arborio- of
mediterrane rijst). Eerst grondig
spoelen. Gebruik een grote kom. Voeg
1 theelepel zout en tweemaal zoveel
water als rijst toe. Bedek de bak met
magnetronfolie of een deksel. Druk
vijfmaal op Automatisch bereiden. Tekst
2x moet 1x zijn. Vijf minuten laten rusten.
Voor het bereiden van verse kip met bot,
zoals bouten, drumsticks en vleugels.
Leg de stukken kip met het vel omlaag
rechtstreeks op het rooster op het glazen
draaiplateau. Plaats een vuurvaste schaal
om druppels op te vangen. Druk zes keer
op de knop Auto. Niet afdekken. Omdraaien
zodra de pieptoon klinkt. Laat na aoop van
het programma enkele minuten staan.
32 NL

Turbo-Ontdooiing
Deze functie is geschikt voor het ontdooien van gehakt, karbonades, kipdelen,
braadstukken en brood. Tik op Turbo om de juiste ontdooicategorie te selecteren en
voer vervolgens het gewicht van het voedsel in gram
Plaats het voedsel in een geschikte schaal. Hele kippen en braadstukken moet u op een
omgekeerde schaal of bord leggen die geschikt zijn voor de magnetron. Karbonades, kipdelen
en sneetjes brood moet u in één laag neerleggen. U hoeft het voedsel niet af te dekken.
(zie pagina 34).
Nederlands
In automatische ontdooiprogramma’s wordt het beginsel van de
zorgen voor een snellere en gelijkmatigere ontdooiing. Het chaossysteem gebruikt pulserende
magnetronenergie in een willekeurige volgorde om het ontdooiproces te versnellen. Tijdens
het programma piept de oven om u eraan te herinneren dat u het voedsel moet controleren.
Het is belangrijk dat u het voedsel regelmatig omkeert of omroert en indien nodig
afdekt. Zodra u het eerste piepje hoort, moet u het voedsel omkeren en afdekken
(indien mogelijk).
1e piep
Omkeren of afdekken
Bij het tweede piepje moet u het voedsel omkeren of verdelen.
1e piep
Omkeren of afdekken
chaostheorie
2e piep
Omkeren of verdelen
toegepast om te
Opmerking
1. Controleer het voedsel tijdens het ontdooien. De ontdooisnelheid van voedsel
varieert.
2. U hoeft het voedsel niet af te dekken.
3. Keer of roer het voedsel regelmatig om, vooral wanneer de oven “piept”. Indien
nodig afdekken (zie punt 5).
4. Gehakt/karbonades/kipdelen moet u verdelen of scheiden zodra dit mogelijk is
en in één laag verspreiden.
5. Door delen af te dekken, voorkomt u dat ze worden gekookt. Dit is zeer
belangrijk bij hele kip en braadstukken. De buitenkant dooit eerst. Daarom moet
u vleugels/borst/vet afdekken met stukjes aluminiumfolie die u vastprikt met
tandenstokers.
6. Laat het voedsel even rusten, zodat de het binnenste kan uitdooien (minimaal
1-2 uur voor braadstukken en hele kippen).
33 NL

Turbo-Ontdooiing
Met deze functie kunt u bevroren voedsel, op basis van het gewicht, ontdooien.
selecteer het gewenste programma
voor turbo-ontdooiing.
Nummer van automatisch programma
verschijnt in uitleesvenster. De
indicatorlampjes voor magnetron,
automatische bereiding en turbo-
ontdooiing beginnen te branden.
Stel het gewicht van het
bevroren voedsel in met de
draaiknop.
Het gewicht wordt bepaald in
stappen van 10 g als u langzaam
aan de knop draait. Het gewicht
wordt bepaald in stappen van 100 g
als u snel aan de knop draait.
Programma Gewicht Instructies
15. Kleine
Stukjes
150 g - 1000 g
Kleine stukjes vlees, kalfsoesters, gehakt, vislet,
steaks, koteletten (van 100 g tot 400 g per stuk). Druk
eenmaal op Turbo-ontdooiing. Omdraaien / omroeren
zodra de pieptoon klinkt.
1 Drukken
16. Grote
stukken
2 Drukken
17. Brood
400 g - 2000 g
100 g - 800 g
Grote stukken vlees, braadstukken, hele kip.
Druk tweemaal op Turbo-ontdooiing. Hele kip en
braadstukken moeten worden bedekt tijdens het
ontdooien. Bescherm kippenvleugels, kippenborst
en vet met effen aluminiumfolie dat u bevestigt met
tandenstokers. Zorg ervoor dat het aluminiumfolie de
wanden van de oven niet aanraakt. Laat 1 tot 2 uur
rusten voordat u met de bereiding begint. Draai het
vlees om wanneer u de pieptoon hoort en bedek het
vlees opnieuw.
Kleine of grote broden, wit of volkoren. Druk driemaal
op Turbo-ontdooiing en draai het brood om bij de
pieptoon. Laat het brood 5 minuten (luchtig wit brood)
tot 30 minuten (compact roggebrood) rusten. Snijd
tijdens de rusttijd grote broden in twee. Dit programma
is niet geschikt voor gesneden brood of zoete broodjes.
3 Drukken
Druk op Start.
Vergeet niet om
tijdens het ontdooien,
het gerecht c.q. het
voedsel te draaien of
te roeren
34 NL
Belangrijk
Zie ontdooien-tips op bladzijde 18.

Gegevens Voor Opwarmen en Koken
Aandachtspunten
Zorg ervoor dat de levensmiddelen altijd stomend heet zijn na opwarming in de magnetronoven.
Als u niet zeker bent, plaats ze dan terug in de oven. Voedsel heeft een rusttijd nodig, vooral als het
niet kan worden geroerd. Hoe compacter het voedsel is, hoe langer de rusttijd.
Nederlands
Voedsel
Dranken - Kofe - Melk
1 kop (1) 240 ml
2 koppen (1) 470 ml
1 kan (1) 600 ml
Soep (gekoeld) (1, 2)
Soep (kamertemp) (1, 2)
Gewicht/
Hoeveelheid
300 ml
1000 ml
300 ml
1000 ml
Vers Diepvries
1000 W 1 min 30 sec
1000 W 2 min 30 sec
1000 W 4 min 30 sec -
5 min
1000 W 1 min 40 sec
1000 W 8 - 9 min
1000 W 2 min
1000 W 7 - 8 min
1000 W 5 - 6 min
1000 W 15 -16 min
Kant-en-klare gerechten- zelfgemaakt
Groenten (gekookt) (1, 2)
Aardappelpuree (1, 2)
Groentenpuree (1, 2)
Rijst, quinoa, couscous
(gekoeld) (1, 2)
Pannenkoek (dik) (1, 2)
Paupiette met saus (1, 2)
(rundsroulade)
Gevulde kooltasjes (1, 2)
¼ gegrilde kip 1 stuk 300 g 1000 W 3-4 min Gebraad - gehaktgebraad (1, 2) 2 plakken 250 g 600 W 3 min Bolognesesaus (1, 2) 210 g 600 W 3 min (kamertemp) -
Botersaus (1, 2)
Babyvoeding (1, 2)
(kleine pot op kamertemp)
Babyvoeding (groentepuree)
(1, 2)
300 g
700 g 1000 W 5 - 6 min –
250 g 1000 W 2 min 1000 W 3 min 30 sec
500 g 1000 W 3 min 30 sec 1000 W 7 - 8 min
300 g
600 g
200 g 1000 W 1 min 50 sec 1000 W 4 min
300 g
1 stuk 1000 W 40-50 sec
2 stuk 1000 W 50-60 sec -
1 stuk
2 stuk 1000 W 7 min en rusten 2 stuk 310 g - 1000 W 10 min
4 stuk 710 g - 1000 W 16 - 17 min
100 g 2 blokjes - 1000 W 1 min 40 sec
300 g 6 blokjes - 1000 W 4 min 10 sec
120 g 600 W 40 sec 200 g 600 W 1 min -
250 g
100 g - 1000 W 1 min 40 sec
1000 W 2 min –
1000 W 2 min 10 sec 1000 W 5 - 6 min
1000 W 5 min 30 sec 1000 W 8 - 9 min
1000 W 2 min 20 sec 1000 W 5 min
1000 W 1 min 20 -
30 sec
1000 W 4 min
30 min en rusten
600 W 1 min -
1 min 30 sec
-
-
-
-
-
-
-
(1) Halverwege omdraaien of roeren. (2) Afdekken (3) Op rooster, indien nodig, in een hittebestendige
schotel plaatsen. (P) Op de voorverwarmde crisp-pan plaatsen (3 min op 1000 W), ingevet indien nodig.
35 NL

Gegevens Voop Opwarmen en Koken
Voedsel
Gratins
Vis bordelaise
Lasagne
Moussaka
Noedelgratin met ham/ tonijn
Jagerschotel
Snacks
Gebakken rijst (1, 2) 500 g
Kipvleugels/-brokjes
Knackis sausages (1, 2)
Croque monsieur (1, 3) 1 stuk 150 g Combi 2; 4 min 30 sec Combi 1; 4 min 30 sec
Hamburgers (1, 2)
Aardappel gevuld met kaas (3)
Rissotto met champignon (1, 2) 600 g - 1000 W 7-8 min
Worstplakken in saus (2) 2 stuk 220 g
Tagliatelle bolognese (1, 2) 300 g
Gebakken aardappel,
van rauw (1, 3)
(1) Halverwege omdraaien of roeren. (2) Afdekken (3) Op rooster, indien nodig, in een hittebestendige
schotel plaatsen. (P) Op de voorverwarmde crisp-pan plaatsen (3 min op 1000 W), ingevet indien nodig
Gewicht/
Hoeveelheid
400 g
400 g Combi 1; 8 min (3) Combi 1; 13-14 min
600 g
350 g
450 g - 500 g Combi 1; 8-9 min (3)
300 g - 350 g
400 g Combi 1; 6-7 min Combi 1; 14 min
600 g
6 stuk 250 g 1000 W 1 min 40 sec 1000 W 2 min 30 sec
8 stuk 400 g
3 stuk 100 g 1000 W 30-40 sec 600 W 2 min 30 sec
6 stuk 200 g 1000 W 1 min 600 W 3 min 30 sec
1 stuk 100 g
2 stuk 200 g 600 W 2 min 600 W 5 min
1 stuk 140 g - Combi 1; 7 min
2 stuk 240 g - Combi 1; 9-10 min
2 stuk 350 g Combi 1; 13 min -
Combi 1; 11 min & 4 min
Vers Diepvries
– Combi 1; 16-18 min
Combi 1; 9-10 min
en 3 min rusten (3)
Combi 1; 7-8 min (3) Combi 1; 10-11 min
Combi 1; 8 min (3) Combi 1; 10-11 min
Grill 1 op rooster
-
1000 W 3 min 1000 W 5-6 min
600 W 1 min en
2 min rusten
1000 W 1 min
30 sec - 2 min
1000 W
2 min 20 sec
1000 W 13 min &
4 min Grill 1 op rooster
1000 W 11 min &
3 min Grill 1 op rooster
1000 W 13 min &
5 min Grill 1 op rooster
1000 W 5 min
600 W 1 min
30 sec - 2 min
-
1000 W 5 min
36 NL

Bereidingstabellen Met Steam Plus Pan
Voedsel
Afgrillen; gebruik de crisp-pan
Bretzel met kaas/spek (P)
Kipnuggets (P, 1) 8 stuk 100 g – Combi 1; 3 min
Kaascroissant (P)
Cordon bleu (P, 1)
Vis, gepaneerd( P, 1)
Galettes, groeten (P, 1) 4 stuk 150 g - Combi 1; 4 min
Worst, van rauw (P) 2 stuk 160 g Combi 2; 5-6 min Combi 1; 4 min
Quiche, ui (P) 1 stuk 160 g
Quiche, spinazie (P) 1 stuk 400 g
Pannenkoek, gevuld,
gerold (P, 1)
Pizza, vers (P) 1 stuk 300 g Combi 2; 3-5 min Combi 2; 8-10 min
Pizza piccolinis (P) 9 stuk 270 g – Combi 1; 6 min & 5 min grill 1
Pork pie (P)
Samosas, rund (P, 1) 4 stuk 240 g Combi 2; 5 min Combi 1; 8 min 30 sec
Tortilla, ui (P, 1)
Frankfurtworst (P, 1) Dik
Dun
Stoom; gebruik de crisp-pan, steamer en deksel. Giet 150 ml leidingwater in de crisp-pan.
Broccoli
Wortels 250 g 1000 W 12-14 min
Courgettes 250 g 1000 W 8-10 min
Erwten en zoete maïs 300 g -
Garnalen 350 g 1000 W 13-15 min
Hele makreel
Hele zeebrasem
Braden; gebruik de crisp-pan en het deksel.
Zalm (4) 2 stuk 280 g 1000 W 10-15 min Zeebaars (4) 2 stuk 180 g 1000 W 6-8 min Hamburgers (1) 2 stuk 220 g 1000 W 10 min Kippenbouten met vel (4) 4 stuk 500 g 1000 W 20 min Schnitzel (1) 2 stuk 250 g 1000 W 10 min Kiplet met vel (4)
Eendlet met vel (4) 2 stuk 320 g 1000 W 20 min Gepaneerde vis (1) 2 stuk 300 g 1000 W 10 min Vissticks (1) 8 stuk 220 g - 1000 W 10 min
Gewicht/
Hoeveelheid
1 stuk 130 g Combi 2; 1 min 30 sec Combi 1; 3 min
2 stuk 250 g – Combi 1; 3 min 30 sec
1 stuk 70 g Combi 2; 1 min Combi 2; 2 min 30 sec
2 stuk 140 g Combi 2; 2 min Combi 2; 3 min
1 stuk 100 g Combi 2; 5 min Combi 1; 4 min 30 sec
2 stuk 300 g Combi 2; 6 min Combi 1; 8 min
1 stuk 140 g Combi 2; 4 min 30 sec Combi 1; 5 min 30 sec
2 stuk 280 g Combi 2; 5-6 min Combi 1; 8 min
2 stuk 240 g Combi 1; 3 min
1 stuk 75 g Combi 1; 2 min Combi 1; 3 min 30 sec
2 stuk 150 g Combi 1; 2 min Combi 1; 5 min
1 stuk 250 g Combi 1; 5 min Combi 1; 7 min
1 stuk 500 g Combi 1; 6 min 30 sec Combi 1; 10 min
4 x 240 g Combi 2; 8 min -
4 x 140 g Combi 2; 7 min -
g
300
g
2 x 200
g
2 x 300
2 stuk 320 g
Vers Diepvries
Combi 1; 2 min
stand time 2 min
1000 W 10-12 min
1000 W 14-16 min
1000 W 18-20 min
1000 W 25 min -
Combi 1; 7 min en 2 min rusten
Combi 1; 8 min en 3 min rusten
Combi 1; 5 min en 3 min rusten
1000 W 13-15 min
-
-
-
-
-
-
Nederlands
(1) Halverwege omdraaien of roeren. (2) Afdekken (3) Op rooster, indien nodig, in een hittebestendige
schotel plaatsen. (P) Op de voorverwarmde crisp-pan plaatsen (3 min op 1000 W), ingevet indien nodig.
(4) Vissenhuid naar beneden.
37 NL

Minestronesoep
ingrediënten
4-6 personen
1 ui,
2 teentjes knoook,
jngesneden
15 ml olijfolie
1 courgette, over de lengte
dunnetjes in vieren gesneden
Recepten
1 wortel, in blokjes gesneden
2 steeltjes selderij, gesneden
600 ml groentebouillon
15 ml suiker
15 ml tomatenpuree
400 g gesneden tomaten uit blik
1 laurierblad
1 takje tijm
150 g kikkererwten uit blik,
uitgelekt
Accessoire: Crisp-pan en deksel
Bouillabaisse
ingrediënten
4-6 personen
45 ml olijfolie
15 ml tomatenpuree
1 ui, gesnipperd
1 kleine prei, gesneden
2 teentjes knoook, geplet
200 g gesneden tomaten uit blik
400 ml visbouillon
75 ml droge witte wijn
2 takjes tijm
zout en peper
¼ sinaasappelschil, geraspt
2 saraandraadjes
5 ml chilisaus
250 g kabeljauw, ontveld en in
stukken gesneden
250 g gemengd zeebanket
4 grote verse garnalen
Accessoire: Crisp-pan en deksel
1. Combineer alle ingrediënten in de Steam Plus pot. Breng het
deksel aan, plaats het geheel op het glazen draaiplateau en kook
30 minuten op 1000 W of totdat de groenten zacht zijn. Roer het
gerecht halverwege de bereidingstijd een keer door.
2. Laat 5 minuten rusten alvorens te serveren. Verwijder het
laurierblad en de tijm. Breng op smaak.
1. Combineer alle ingrediënten in de Steam Plus pot. Breng het
deksel aan, plaats het geheel op het glazen draaiplateau en kook
20 minuten op 1000 W of let erop dat de vis niet te gaar wordt.
2. Verwijder het laurierblad en de tijm. Breng op smaak.
38 NL

Ratatouille
Recepten
ingrediënten
4 personen
1 aubergine, in kleine stukjes
gesneden
1 courgette, in kleine stukjes
gesneden
1 ui, gesnipperd
1 groene paprika, gesneden
1 rode paprika, gesneden
1 teentje knoook, gepeld en
geplet
400 g gesneden tomaten uit blik
zout en peper
Accessoire: Crisp-pan en deksel
1. Combineer alle ingrediënten in de Steam Plus pan. Breng het
deksel aan, plaats het geheel op het glazen draaiplateau en kook
20-25 minuten op 1000 W of totdat de groenten zacht zijn. Roer
het gerecht halverwege de bereidingstijd een keer door. Breng op
smaak.
Stoofschotel met chorizo, kikkererwten en
aardappels
ingrediënten
4 personen
1 el olijfolie
100 g chorizo, in blokjes gesneden
1 ui, gesnipperd
1 teentje knoook, geplet
400 g kikkererwten uit blik,
uitgelekt
500 g aardappel, in blokjes
gesneden
500 ml groentebouillon
1 klein bosje peterselie voor
garnering
1. Combineer alle ingrediënten in de Steam Plus pot. Breng het
deksel aan, plaats het geheel op het glazen draaiplateau en kook
40 minuten op 1000 W of totdat de groenten zacht zijn. Roer het
gerecht halverwege de bereidingstijd een keer door.
2. Laat 5 minuten rusten alvorens te serveren. Garneer met
peterselie Breng op smaak.
Accessoire: Crisp-pan en deksel
39 NL

Tosti
ingrediënten
1 Persoon
4 sneetjes brood met boter
5 ml dijonmosterd
2 plakken gerookte ham
100 g gesneden kaas
Recepten
Schaal: geen
Accessoire: rooster
Lasagne
ingrediënten
4 Persoon
Vleessaus:
1 ui, gesnipperd
1 teentje knoook, geplet
5 ml olie
400 g gesneden tomaten uit blik
150 ml rode wijn
30 ml tomatenpuree
5 ml gemengde kruiden
500 g rundergehakt
zout en peper
Lasagne:
500 ml béchamelsaus
100 g geraspte harde kaas, bijv.
cheddar
5 ml mosterd
zout en peper
50 g Parmezaanse kaas, geraspt
250 g verse lasagne
1. Leg het brood met de beboterde zijde omhoog op het rooster en
rooster 4 minuten op gril 1 totdat het brood gebruind is.
2. Bestrijk de niet-geroosterde zijde van één sneetje brood met
mosterd en beleg dit met ham en kaas. Leg het andere sneetje er
bovenop, met de geroosterde zijde naar boven. Leg terug op het
rooster en zet voor één minuut en 30 seconden tot 2 minuten of
totdat de kaas is gesmolten op Combi 2.
1. Doe de ui, knoook en olie in de ovenschotel. Breng het deksel aan
en plaats het geheel op het glazen draaiplateau. Kook 3 minuten op
600 W Voeg alle overige ingrediënten voor de vleessaus toe. Roer
alles goed door elkaar. Breng het deksel aan en stel de oven in op
10 minuten, stand 1000 W. Doorroeren. Vervolgens 15-20 min op
600 W of totdat alles gaar is.
2. Voeg de mosterd zout en peper en geraspte kaas aan de
Béchamelsaus toe. Bedek de bodem van de schaal met een laag
Bolognesesaus, dan een laag lasagne (lasagnevellen niet laten
overlappen) en vervolgens een laag hete béchamelsaus. Herhaal
deze lagen nog twee keer en eindig met een laag béchamelsaus.
Bestrooi met Parmezaanse kaas.. Plaats op de bodem van de oven
en kook 10-15 minuten op Combi 1 of totdat het gerecht goudbruin
is.
40 NL
Schaal: 1 x 1.5 litre Pyrex®
ovenschotel met deksel + 1 x
grote rechthoekige schaal
Boston Brownies
Ingrediënten
6 Personen
100 g chocolade voor
100 g boter
100 g bruine suiker
100 g bloem
50 g gehakte walnoten
2 el cacaopoeder
1 tl bakpoeder
1 zakje vanillesuiker
2 geklopte eieren
Keukengerei: 16 x 20 cm Pyrex-
schotel bedekt met vetvrij papier
1. Voeg de chocolade en boter samen in een kom en kook
gedurende 2 minuten op 600 W of tot de chocolade is gesmolten.
2. Roer alle andere ingrediënten erbij en klop grondig op.
3. In de schotel gieten en ongeveer 6 minuten, of tot gestijfd, op
Combi 1 bakken.
4. Laten afkoelen en in rechthoeken snijden.

Vragen en Antwoorden
V: Waarom kan de oven niet worden
ingeschakeld?
A: Controleer het volgende wanneer de
oven niet kan worden ingeschakeld:
1. Is de stekker goed aangesloten? Neem
de stekker uit het stopcontact, wacht
tien seconden en steek de stekker weer
in het stopcontact.
2. Controleer de zekering en de
stroomonderbreker. Schakel de
stroomonderbreker in of vervang de
zekering als hij uitgeschakeld resp.
doorgeslagen is.
3. Indien de stroomonderbreker of de
zekering in orde zijn, probeer dan een
ander apparaat op het stopcontact aan
te sluiten. Indien het andere apparaat
werkt, is er waarschijnlijk een probleem
met de oven. Indien het andere
apparaat niet werkt, is er waarschijnlijk
een probleem met het stopcontact.
Indien het er naar uitziet dat er een pro
bleem met de oven is, moet contact
opgenomen worden met een erkend
servicecentrum.
V: Mijn magnetronoven stoort mijn
TV-toestel. Is dit normaal?
A: Bij apparaten met wi, bluetooth of een
andere draadloze verbinding - zoals
radio’s, tv’s, draadloze telefoons,
babyfoons etc. - kan er interferentie
ontstaan wanneer u kookt met de
magnetronoven. Dezelfde interferentie
kan zich voordoen met andere
huishoudelijke apparaten, zoals mixers,
stofzuigers, haardrogers, etc. Het
betekent niet dat er een probleem is met
uw oven.
V: De oven accepteert mijn programma
niet. Waarom?
A: De oven is zodanig ontworpen dat
hij een onjuiste programmering niet
accepteert. Zo accepteert de oven geen
vierde kookfase.
V: Kan ik in de oven gebruik maken van
een gewone thermometer?
A: Dit kan uitsluitend tijdens het grillen.
Het metaal in sommige thermometers
kan vonkontlading in uw oven
veroorzaken en mag niet gebruikt
worden tijdens magnetron en
combinatie koken.
V: Soms komt er warme lucht uit de
ventilatie-openingen van de oven.
Waarom?
A: De warmte afkomstig van het bereiden
van het voedsel verwarmt de lucht in de
oven. Deze warme lucht wordt de oven
uitgeleid via het luchtstroompatroon
in de oven. Deze lucht bevat geen
magnetronstraling. De ventilatie-
openingen van de oven mogen nooit
geblokkeerd worden.
V: Tijdens het combinatie koken hoor
ik zoemende en klikkende geluiden in
de oven. Wat is de oorzaak van deze
geluiden?
A: Deze geluiden worden veroorzaakt door
het automatisch overschakelen van de
oven van magnetronoven op grill voor
het realiseren van de juiste combinatie-
afstellingen. Dit is normaal.
V: Tijdens het combinatie koken of
grillen komt er een onaangenaam
luchtje uit mijn oven. Waarom?
A: Na herhaaldelijk gebruik bevelen wij u
aan om de magnetronoven te reinigen
en zonder voedsel, glazen plateau of
draairing gedurende 5 minuten de grill
aan te zetten. Op deze manier worden
alle voedselrestjes, vetaanslag etc.,
die de luchtjes en/of rook veroorzaken,
weggebrand.
V: De magnetronfunctie van mijn oven
werkt niet meer en de melding ‘H97’ en
‘H98’ verschijnt in de display.
A: Dit betekent dat er een probleem is met
het systeem dat de microgolven opwekt.
Neem contact op met een erkend
onderhoudscentrum.
V: De ventilator blijft draaien na het koken.
Hoe komt dit?
A: De ventilator kan blijven draaien als de
oven uit is om de elektrische onderdelen
af te koelen. Dit is normaal en u kunt de
oven gewoon blijven gebruiken.
Nederlands
41 NL

Verzorging van uw Magnetronoven
1. Zet de oven uit alvorens hem te
reinigen.
2. Houd de deurafdichtingen en de
plaatsen hieromheen schoon. Als er
spatten en gemorste vloeistoffen vast
zijn gaan zitten op de ovenwanden,
deurafdichtingen en de plaatsen
hieromheen, moeten deze worden
schoongemaakt met een vochtige
doek. Als zij zeer vuil zijn geworden
mag gebruik geamaakt worden van
een mild reinigingsmiddel. Het gebruik
van agressieve reinigings-middelen of
schuursponsjes wordt niet aanbevolen.
gebruik geen commerciële
ovenreinigers.
3. Gebruik geen ruwe, schurende
reinigingsmiddelen of scherpe metalen
schrapers om de ruit van de ovendeur
te reinigen, aangezien deze het
oppervlak kunnen krassen en het glas
kunnen doen barsten.
4. De buitenzijde van de oven moet
worden schoongemaakt met een
vochtige doek. Ter voorkoming van
schade aan de onderdelen binnen
in de oven, mag er geen water via
de ventilatie-openingen naar binnen
sijpelen.
5. Indien het bedieningspaneel vuil
wordt, moet dit met een zachte, droge
doek gereinigd worden. Gebruik
geen agressieve reiningingsmiddelen
of schuursponsjes op het
bedieningspaneel. Bij het reinigen van
het bedieningspaneel moet de ovendeur
open blijven om te voorkomen dat de
oven per ongeluk wordt ingeschakeld.
Druk na het reinigen op de stop/wis
toets om het uitleesvenster te wissen.
6. Indien er aan de binnenkant van de
ovendeur of rondom de buitenkant
hiervan stoomvorming plaatsvindt, veeg
deze dan weg met een zachte doek. Dit
kan het geval kunnen zijn, wanneer de
magnetronoven wordt gebruikt in een
ruimte met een hoge vochtigheidsgraad;
dit duidt niet op foutief functioneren van
het apparaat.
7. Van tijd tot tijd moet het glazen
draaiplateau verwijderd worden om
het schoon te maken. Reinig het
draaiplateau in warm water met een
afwasmiddel of in een vaatwasmachine.
8. De draairing en de ovenbodem moeten
regelmatig worden gereinigd om
ongewenste geluiden te voorkomen.
Verwijder het vuil op de bodem van
de magnetronoven met een mild
schoonmaakmiddel en heet water,
en maak hem daarna droog met
een schone doek. De draairing moet
worden afgewassen in een mild sopje.
Bij een regelmatig gebruik zetten zich
kookdampen vast op de bodem en/
of de wielen van de draairing, maar
tasten deze op geen enkele wijze aan.
Wanneer u de draairing uit de uitsparing
in de grondplaat haalt om hem schoon
te maken, let er dan goed op dat de
draairing weer in de juiste positie terug
geplaatst wordt.
9. Bij het grillen of combinatie koken
zullen sommige voedselsoorten
vetspatten op de ovenwanden
veroorzaken. Indien de oven niet van
tijd tot tijd gereinigd wordt, kan hij
tijdens het gebruik gaan “roken”.
10. Gebruik geen stoomreiniger voor het
reinigen.
11. De magnetronoven mag uitsluitend door
gekwaliceerd servicepersoneel worden
gerepareerd. Neem voor onderhoud en
reparaties van de oven contact op met
de dichtsbij-zijnde erkende dealer.
12. Houd ventilatie-openingen altijd vrij.
Controleer dat stof of andere materialen
de ventilatie-openingen boven-, onder-
of achteraan de oven niet blokkeren.
Een blokkering van de ventilatie-
openingen kan leiden tot oververhitting
en de werking van de oven hinderen.
13. Als u de oven niet schoonhoudt, is
het mogelijk dat de kwaliteit van de
oppervlakken vermindert waardoor de
levensduur van het toestel verkort en er
mogelijk gevaarlijke situaties ontstaan.
14. Alle oven accessoires zijn geschikt voor
de vaatwasser.
42 NL

Technische Specicaties
Fabrikant Panasonic
Model
Netvoeding 230 V 50 Hz
Stroomverbruik: 2450 MHz
Maximum 2000 W
Ingangsvermogen:
Uitgangsvermogen:
Buitenafmetingen B x D x H (mm) 488 mm (B) x 395 mm (D) x 279 mm (H)
Binnenafmetingen B x D x H (mm) 315 mm (B) x 353 mm (D) x 178 mm (H)
Gewicht: 10 kg
Geluidsniveau: 57 dB
Magnetron 1050 W
Grill 1050 W
Magnetron 1000 W (IEC-60705)
Grill 1000 W
Gewicht en afmetingen zijn bij benadering.
Dit produkt voldoet aan de Europese standaard (EN 55011) voor EMC interferentie ‘s ( EMC =
Elektromagnetische Compabiliteit ) Overeenkomstig deze standaard behoort dit produkt tot de
groep 2 apparatuur, klasse B en voldoet deze aan alle vereiste normen. Groep 2 houdt in dat
de Frequentie energie wordt opgewekt in de vorm van elektromagnetische straling bedoeld
voor het verwarmen en koken van voedsel. Groep B wil zeggen dat dit produkt toegepast kan
worden voor normaal huishoudelijk gebruik.
Manufactured by: Panasonic Appliances Microwave Oven (Shanghai) Co., Ltd.
888, 898 Longdong Road. Pudong, Shanghai, 201203, China.
NN-GD38HS / NN-GD36HM
Nederlands
Imported by: Panasonic Marketing Europe GmbH
REP. EU: Panasonic Testing Centre
Winsbergring 15, 22525 Hamburg, Germany
43 NL

Merci d'avoir fait l'achat d'un four micro-ondes Panasonic
Sommaire
Consignes de Sécurité ............................ 2-6
Évacuation des Déchets ............................. 7
Installation et Raccordement ...................... 8
Emplacement du Four ................................ 8
Consignes D’utilisation Importantes ...... 9-11
Accessoires du Four ................................. 12
Parties du Four ........................................ 13
Panneau de Commandes ......................... 14
Afchage de L’heure ................................. 15
Verrouillage de Sécurité Enfant ................ 15
Modes de Cuisson .................................... 16
Cuisson et Décongélation en
Micro-ondes ............................................. 17
Conseils pour la décongélation ................ 18
Tableaux de Décongélation ...................... 19
Utilisation de la Fonction Quick 30 ........... 20
Utilisation de la Fonction Ajouter
du Temps .................................................. 21
Le Mode Gril ............................................. 22
Le Mode Combiné .................................... 23
Utilisation du Récipient Steam Plus
(Fonctionnement Manuel)......................... 24
Utilisation du Récipient Steam Plus.......... 25
Fonction Minuteur ..................................... 26
Cuisson en Plusieurs Étapes.................... 27
Programmes Steam Plus .................... 28-30
Programmes de Cuisson
Automatique ........................................ 31-32
Décongélation Turbo ...........................33-34
Tableaux de Réchauffage & Cuisson ..35-36
Tableaux de Cuisson avec le Récipient
Steam Plus ............................................... 37
Recettes .............................................. 38-40
Questions et Réponses ............................ 41
Entretien de L’appareil .............................. 42
Fiche Technique ....................................... 43
Français
1 FR

Consignes de Sécurité
� Instructions de sûreté importantes. Avant d’utiliser le four
à micro-ondes, lisez attentivement les recommandations
d’utilisation et conservez-les soigneusement.
� Cet appareil peut être utilisé par les enfants à partir de
8 ans et par les personnes présentant des handicaps
moteurs, sensoriels et mentaux ou ayant un manque
d’expérience ou de connaissances lorsqu’elles sont
supervisées ou instruites par une personne responsable
de leur sécurité relative à l’utilisation de l’appareil de
manière sûre et lorsqu’elles comprennent les risques que
cela présente. Cet appareil n’est pas un jouet. L’appareil
ne peut être ni nettoyé ni entretenu par des enfants sans
supervision. Gardez l’appareil et son cordon hors de
portée des enfants de moins de 8 ans.
� Une fois le four installé, il faut pouvoir facilement couper
son alimentation électrique, soit en retirant la prise murale
soit en actionnant un disjoncteur ou un fusible.
2 FR
� N’utilisez pas l’appareil si la prise ou le cordon
d’alimentation est endommagé, s’il ne fonctionne pas
correctement, s’il est abîmé ou s’il est tombé. il est
dangereux de coner la réparation de l’appareil à une
personne autre qu’un technicien formé par le fabricant
� Attention! Nettoyez les joints d’étanchéité de la porte à
l’aide d’un linge humide. Vériez si l’appareil ne présente
pas de défaut au niveau des joints d’étanchéité. Si c’est
le cas, ne l’utilisez plus avant que ceux-ci aient été
réparés par un technicien agréé par le fabricant.
� Attention! Il ne faut laisser les enfants utiliser le four qu’à
la seule condition qu’ils en connaissent le fonctionnement
et soient à même de comprendre les dangers d’une
utilisation inappropriée.

Consignes de Sécurité
� Attention! Ne tentez jamais de modier, d’ajuster ou de
réparer la porte, le boîtier du panneau de commandes,
les commutateurs de verrouillage de sécurité ou tout
autre élément du four. Ne retirez pas le capot du four, car
il sert de protection contre les micro-ondes émises par le
four.
� Conez exclusivement les réparations à du personnel
qualié.
� Attention! Ne placez pas le four à proximité d’une
cuisinière au gaz ou électrique.
� Les aliments et les liquides ne doivent pas être chaués
dans des récipients fermés hermétiquement car ceux-ci
risquent d’exploser.
� Ce four est conçu pour être posé sur une table ou un
plan de travail. Il ne doit pas être encastré dans une
colonne ou un placard.
Français
Utilisation sur un plan de travail :
� Poser le four sur une surface plate et stable à plus de 85
cm au-dessus du sol. Laissez un espace de 15 cm en
haut du four, de 10 cm à l’arrière, de 5 cm d’un côté du
four et d’au moins 40 cm de l’autre côté.
� Si vous réchauez des aliments dans des barquettes
en plastique ou en papier, surveillez régulièrement la
cuisson, car ces matériaux ont tendance à s’enammer
en cas de surchaue.
� Si vous constatez la présence de fumée ou de ammes
dans le four, appuyez sur le bouton Arrêter/Annulation et
laissez la porte fermée de manière à étouer les ammes.
Débranchez le cordon d’alimentation ou coupez le
courant au niveau du coupe-circuit ou du disjoncteur.
3 FR

Consignes de Sécurité
� Cet appareil est destiné à un usage domestique
uniquement.
� Lorsque les boissons sont chauées au micro-ondes,
une ébullition éruptive peut se produire tardivement.
Il faut donc prendre des précautions lors de la
manipulation du récipient.
� Mélangez ou agitez le contenu des biberons et des petits
pots. Vériez toujours la température des aliments avant
de les proposer à l’enfant an d’éviter qu’il se brûle.
� Ne cherchez pas à cuire des œufs coques ou des
œufs durs dans votre four à micro-ondes. Ils risquent
d’exploser sous l’eet de la pression, que ce soit
pendant ou même après la cuisson.
� Veillez à ce que l’intérieur du four et les joints de la
porte soient toujours propres. Enlevez les projections
d’aliments ou les éclaboussures présentes sur les parois
intérieures du four et sur les joints de la porte à l’aide
d’un linge humide. Si le four est très sale, nettoyez-le à
l’aide d’un produit de nettoyage non décapant.
4 FR
� Ne pas utiliser les décapants classiques pour four.
� Lorsque vous utilisez les modes gril ou combiné, des
éclaboussures de graisse viennent inévitablement salir
les parois. Si le four n’est pas régulièrement nettoyé, de
la fumée peut s’en échapper lors de l’utilisation.
� Il est indispensable de maintenir propre l’intérieur du four.
Le non respect de cette consigne peut entraîner une
détérioration notable des revêtements susceptible de
réduire la durée de vie de votre appareil et pourrait même
présenter un danger.

Consignes de Sécurité
� Avertissement! Les parties accessibles peuvent devenir
chaudes en mode gril et combiné. Tenir éloignés les
enfants de moins de 8 ans. Les enfants ne devraient
pouvoir utiliser le four que sous la surveillance d’un
adulte, ce en raison des températures générées.
� N’utilisez pas de nettoyeur vapeur dans le four.
� Ne pas utiliser d’éponge grattante ou de tampons
abrasifs pour nettoyer la partie vitrée de la porte du four,
sous peine de la rayer et de la fragiliser.
� Les parois extérieures du four, les ouvertures d’aération
sur le châssis et la porte du four deviennent très chaudes
lors de la cuisson en mode four, gril et combiné. Prenez
garde de ne pas vous brûler lors de l’ouverture et de la
fermeture de la porte ou lors de l’insertion ou du retrait
d’aliments et d’accessoires
� Cet appareil n’est pas destiné à fonctionner au moyen
d’une minuterie externe ou d’une télécommande
séparée.
Français
� Utilisez uniquement des ustensiles et plats convenant aux
fours à micro-ondes.
� Le four dispose de deux résistances de gril situées dans
le haut du four et de deux résistances situées dans
le fond du four. Après avoir utilisé les fonctions gril et
combiné, les surfaces intérieures du four seront très
chaudes. Prenez soin d’éviter de toucher les résistances
de chauage situées à l’intérieur du four. Pour ne pas
vous brûler, prenez garde de ne pas toucher les parois
intérieures du four.
5 FR

Consignes de Sécurité
� Ce four à micro-ondes est conçu pour la cuisson
d’aliments et de boissons uniquement. Prenez garde
lorsque vous cuisez des aliments à faible teneur en
humidité, par exemple du pain, du chocolat, des
biscuits et des pâtisseries. Ceux-ci peuvent facilement
brûler, sécher ou s’enammer si leur cuisson dure trop
longtemps. Nous ne recommandons pas la cuisson
d’aliments à faible teneur en humidité comme le
popcorn ou les poppadoms. L’assèchement d’aliments,
de journaux ou de vêtements et le réchauement de
coussins chauants, de pantoues, d’éponges, de linges
humides, de sacs de grain, de bouillottes et d’objets
similaires peuvent entraîner des risques de blessures,
d’inammation ou d’incendie.
� Á titre de sécurité, il est conseillé aux utilisateurs d’éviter
toute pression vers le bas sur la porte du four microondes lorsque celle-ci est ouverte, car le four risque alors
de basculer vers l’avant.
6 FR
� La lampe du four doit être remplacée par un technicien
de service formé par le fabricant. Ne tentez pas de retirer
l’enveloppe extérieure du four.
� Attention! An d’éviter un risque dû à la réinitialisation
intempestive du coupe-circuit thermique, cet appareil ne
doit pas être alimenté par un dispositif de commutation
externe, comme un temporisateur, ou être connecté à
un circuit qui est régulièrement activé et désactivé par le
service.

Évacuation des Déchets
Informations Relatives
à L’évacuation des
Déchets, Destinées
aux Utilisateurs
D’appareils Électriques
et Électroniques
(Appareils
Electroménagers)
Lorsque ce symbole gure sur les
produits et/ou les documents qui les
accompagnent, cela signie que les
appareils électriques et électroniques ne
doivent pas être jetés avec les ordures
ménagères.
Pour que ces produits subissent un
traitement, une récupération et un
recyclage appropriés, envoyez-les dans
les points de collecte désignés, où ils
peuvent être déposés gratuitement. Dans
certains pays, il est possible de renvoyer
les produits au revendeur local en cas
d’achat d’un produit équivalent.
En éliminant correctement ce produit,
vous contribuerez à la conservation des
ressources vitales et à la prévention
des éventuels effets négatifs sur
l’environnement et la santé humaine qui
pourraient survenir dans le cas contraire.
An de connaître le point de collecte
le plus proche, veuillez contacter vos
autorités locales.
Des sanctions peuvent être appliquées
en cas d’élimination incorrecte de ces
déchets, conformément à la législation
nationale.
Utilisateurs Professionnels de
L’Union Européenne
Pour en savoir plus sur l’élimination des
appareils électriques et électroniques,
contactez votre revendeur ou fournisseur.
Informations sur L’évacuation
des Déchets Dans les Pays ne
Faisant pas Partie de L’Union
Européenne
Ce symbole n’est reconnu que dans
l’Union européenne.
Pour vous débarrasser de ce produit,
veuillez contacter les autorités locales
ou votre revendeur an de connaître la
procédure d’élimination à suivre.
Français
7 FR

Installation et Raccordement
Vériez l’état du four à
micro-ondes
Déballez le four et débarrassez-le de
l’ensemble du matériel d’emballage.
Examinez soigneusement l’appareil an de
détecter toute déformation, défectuosité du
système de fermeture de la porte ou défaut
au niveau de la porte elle-même. Prévenez
immédiatement votre revendeur si l’appareil
est endommagé. N’installez pas un four à
micro-ondes abîmé.
Instructions pour la mise à la
terre
Si la prise murale n’est pas mise à la terre,
le client se doit de la faire remplacer par une
prise murale correctement mise à la terre.
Emplacement du Four
Ce four est conçu pour être posé sur une
table ou un plan de travail. Il ne doit pas être
encastré dans une colonne ou un placard.
Espacement nécessaire:
1. Poser le four sur une surface plate et
stable à plus de 85 cm au-dessus du
sol.
2. Une fois le four installé, il faut pouvoir
facilement couper son alimentation
électrique, soit en retirant la prise
murale soit en actionnant un disjoncteur
ou un fusible.
3. An de garantir une utilisation
optimale du four, veillez à ce qu’il soit
sufsamment ventilé.
4. Laissez un espace de 15 cm en haut du
four, de 10 cm à l’arrière, de 5 cm d’un
côté du four et d’au moins 40 cm de
l’autre côté.
5 cm
15 cm
10 cm
Important!
Pour votre sécurité, il est tres
important que cet appareil soit
correctement mis à la terre.
Précaution concernant la tension
d’alimentation
Utiliser une tension identique à celle
spéciée sur le four micro-ondes. Si on
utilise une tension supérieure à celle
indiquée, l’appareil risque de prendre feu ou
d’être endommagé d’une autre manière.
5. Ne placez pas le four à proximité d’une
cuisinière au gaz ou électrique.
6. Ne retirez pas les pieds du four.
7. Ce four est destiné uniquement à un
usage domestique. Ne l’utilisez pas à
l’extérieur.
8. N’utilisez pas le four dans une pièce
dont le taux d’humidité est très élevé.
9. Evitez tout contact entre le cordon
d’alimentation et l’extérieur de l’appareil
et éloignez-le de toute surface
chaude. Ne le laissez pas pendre sur
le bord d’une table ou d’un plan de
travail. Evitez de mouiller le cordon
d’alimentation, la prise ou le four.
10. N’obstruez pas les ouvertures d’aération
situées sur le côté et à l’arrière du four
de manière à éviter toute surchauffe
du four. Un dispositif thermique de
sécurité protège le four en cas de
surchauffe. S’il s’en clenche, le four ne
pourra fonctionner à nouveau qu’après
refroidissement.
8 FR
Plan de travail
Côté libre

Consignes D’utilisation Importantes
Utilizzazione del vostro forno
1. Utilisez le four exclusivement à des ns
culinaires. Ce four est spécialement
conçu pour chauffer ou cuire des
aliments. Ne l’utilisez pas pour
réchauffer des produits chimiques ou
tout autre produit non alimentaire.
2. Ne placez dans le four aucun objet et
ce même si vous ne l’utilisez pas, car
celui-ci pourrait être fortuitement mis en
route.
3. N’utilisez jamais le four sans y placer
prealablement des aliments. Sinon
vous risquez d’endommager l’appareil.
4. Vériez si les ustensiles et les plats
utilisés conviennent aux fours à
microondes.
5. Ce four à micro-ondes est conçu pour
la cuisson d’aliments et de boissons
uniquement. Prenez garde lorsque
vous cuisez des aliments à faible
teneur en humidité, par exemple du
pain, du chocolat, des biscuits et des
pâtisseries. Ceux-ci peuvent facilement
brûler, sécher ou s’enammer si leur
cuisson dure trop longtemps. Nous
ne recommandons pas la cuisson
d’aliments à faible teneur en humidité
comme le popcorn ou les poppadoms.
L’assèchement d’aliments, de journaux
ou de vêtements et le réchauffement
de coussins chauffants, de pantoues,
d’éponges, de linges humides, de
sacs de grain, de bouillottes et d’objets
similaires peuvent entraîner des
risques de blessures, d’inammation ou
d’incendie
6. Si vous constatez la présence de fumée
ou de ammes dans le four, appuyez
sur le bouton Arrêter/Annulation et
laissez la porte fermée de manière à
étouffer les ammes. Débranchez le
cordon d’alimentation ou coupez le
courant au niveau du coupe-circuit ou
du disjoncteur.
Utilisation des Résistances
1. Avant d’utiliser le mode combiné
ou gril pour la première fois, faites
fonctionner le four sans y placer
d’aliment ou accessoires (notamment
le plateau tournant en verre et la
bague de rotation) en mode gril
pendant 1 à 5 minutes. Cette opération
permet d’éliminer l’huile de protection
antirouille. C’est la seule fois où le four
doit être utilisé à vide.
Attention! Surfaces
Brülantes
Toutes les surfaces intérieures du
four seront brûlantes.
2. Les parois extérieures du four, les
ouvertures d’aération sur le châssis
et la porte du four deviennent très
chaudes lors de la cuisson en mode
four, gril et combiné. Prenez garde de
ne pas vous brûler lors de l’ouverture
et de la fermeture de la porte ou lors
de l’insertion ou du retrait d’aliments et
d’accessoires
3. Le four dispose de deux résistances de
gril situées dans le haut du four et de
deux résistances situées dans le fond
du four
Attention!
Après avoir utilisé les fonctions gril et
combiné, les surfaces intérieures du
fourseront très chaudes. Prenez soin
d’éviter de toucher les résistances
de chauffage situées à l’intérieur du
four.
4. Les parties accessibles peuvent devenir
chaudes en mode gril etcombiné. Les
jeunes enfants de moins de 8 ans
doivent être tenus à l’écart, et ils ne
devraient utiliser le four que sous la
supervision d’un adulte, ce en raison
des températures élevées générées.
Français
Attention! Surfaces
Brûlantes
Après la cuisson par ces modes, les
diérents accessoires du four sont
également très chauds.
9 FR

Consignes D’utilisation Importantes
Lampe du four
Si vous devez remplacer la lampe du four,
adressez-vous á vorte revendeur.
Temps de cuisson
TIls dépendent des conditions, de la
température, de la quantité de nourriture
ainsi que du type de récipient utilisé.
Commencez toujours par le temps de
cuisson minimum: si un plat n’est pas assez
cuit, vous pourrez toujours le remettre dans
le four pour terminer la cuisson.
Important!
Il vaut mieux éviter la surcuisson.
Les aliments n’attachent pas mais
peuvent brûler, se dessécher et
même dans des cas extrémes,
prendre feu et endommager votre
four.
Petites Quantités de Nourriture
Si vous cuisez trop longtemps de petites
quantités de nourriture ou des aliments
peu riches en eau, ceux-ci peuvent
se dessécher, voire brûler ou même
prendre feu. Si des aliments prennent feu,
maintenez la porte fermée, arrêtez le four et
débranchez le cordon d’alimentation.
Percer
Les aliments á peau ou enveloppe
imperméable tels que les pommes de terre,
les jaunes d’œuf et les saucisses doivent
étre piqués avant d’être cuits dans le four
micro-ondes an d’éviter qu’ils n’eclatent.
Thermométre á Viande
Si vous employez un thermométre á viande
pour vérier le température de cuisson des
rôtis et des volailes, ne l’utilisez qu’une fois
cez derniers sortis du four.
Œufs
Ne cherchez pas à cuire des œufs coques
ou des œufs durs dans votre four à microondes. Ils risquent d’exploser sous l’effet de
la pression, que ce soit pendant ou même
après la cuisson.
10 FR

Consignes D’utilisation Importantes
Liquides
Si on chauffe un liquide épais qui n’a
pas été remué, il risque de déborder et
d’occasionner des projections brûlantes
pendant et après le réchauffage.
Pour éviter cet inconvénient, respectez les
règles suivantes:
a Evitez d’utiliser des récipients à bords
droits et/ou goulot étroit.
b Ne surchauffez pas les liquides.
c Remuez le liquide avant de le mettre
dans le four et à mi-cuisson.
d Une fois le liquide réchauffé, laissez-le
reposer un court instant dans le four,
puis mélangez-le de nouveau avant de
retirer précautionneusement le récipient
du four.
Papier/Plastique
Si vous réchauffez des aliments dans
des barquettes en plastique ou en papier,
surveillez régulièrement la cuisson, car ces
matériaux ont tendance à s’enammer en
cas de surchauffe.
N’utilisez aucun papier recyclé (par exemple
du papier essuie-tout), sauf s’il est stipulé
qu’il convient aux fours à micro-ondes.
En effet, les papiers recyclés contiennent
des impuretés qui peuvent provoquer des
étincelles ou s’enammer en cours de
cuisson.
Avant de placer un sac dans le four, retirez
les liens métalliques de fermeture.
Ustensiles/Papier Aluminium
Ne réchauffez pas des canettes ou des
bouteilles fermées, car celles-ci pourraient
exploser.
Evitez d’utiliser des récipients en métal ou
avec des dorures dans votre four à microondes, car ceux-ci provoqueraient des
étincelles.
Si vous utilisez du papier aluminium ou une
barquette métallique, la distance entre ces
matériaux et les parois du four doit être de 2
cm minimum an d’éviter les étincelles.
Biberons et Aliments pour Bébés
Enlevez toujours le capuchon, la tétine ou
le couvercle des biberons ou des petits pots
pour bébés avant de les placer dans le four.
Mélangez ou agitez le contenu des biberons
et des petits pots.
Vériez toujours la température des
aliments avant de les proposer à l’enfant
an d’éviter qu’il se brûle.
Fonctionnement du Ventilateur
Après l’utilisation du four, le moteur du
ventilateur peut se mettre à fonctionner
pour refroidir les pièces électriques. Ceci
est normal et vous pouvez retirer les mets
cuisinés même si le ventilateur tourne. Vous
pouvez continuer à utiliser le four pendant
ce temps.
Français
11 FR

Accessoires du Four
Accessoires
Le four est fourni avec toute une série
d’accessoires. Utilisez-les toujours
conformément aux instructions.
Plateau Tournant en Verre
1. Utilisez le four uniquement si l’anneau à
roulettes et le plateau tournant en verre
sont en place.
2. N’utilisez jamais un autre plateau tournant
en verre que celui spécialement conçu
pour votre four.
3. Si le plateau tournant en verre est chaud,
attendez qu’il refroidisse pour le nettoyer
ou le plonger dans l’eau.
4. Le plateau tournant en verre peut pivoter
dans les deux sens.
5. Si les aliments ou le plat disposés sur le
plateau tournant en verre touchent les
parois du four et l’empêchent de tourner,
celui-ci pivote automatiquement en sens
inverse. C’est normal.
6.
Ne cuisez pas d’aliments sur le
plateau tournant en verre.
Anneau á Roulettes
1. Nettoyez régulièrement l’anneau
àroulettes et la sole du four an de réduire
les nuisances dues aux bruits ainsi que
l’accumulation de particules de nourriture.
2. Utilisez toujours l’anneau à roulettes
avec le plateau tournant en verre pour la
cuisson des aliments.
Trépied Métallique
1. Le trépied métallique facilite la coloration
des petits plats et favorise la circulation de
la chaleur.
2. En mode combine ou micro-ondes, ne
mettez jamais de contenant métallique en
contact direct avec le trépied métallique.
3. N‘utilisez pas le trépied métallique en
mode micro-ondes uniquement.
Récipient Steam Plus
1. Récipient Steam Plus est conçu
spéciquement pour ce four. Le couvercle
est en acier inoxydable alors que le
cuiseur-rôtisseur est en aluminium. Bien
que le couvercle et le cuiseur soient
métalliques, ils peuvent être utilisés sans
risque s’ils sont placés au centre du
plateau en verre. N’utilisez pas le cuiseur
Steam Plus dans un autre four microondes et ne l’utilisez jamais dans un four
classique.
2. Pour utiliser le récipient Steam Plus, le
Plat Crispy, le plat vapeur et le couvercle
s’utilisent ensemble (page 24).
3. Le plat vapeur est placé à l’intérieur
du Plat Crispy avec le couvercle sur le
dessus. Les aliments sont placé dans
le plat vapeur. Le plateau vapeur doit
toujours être utilisé avec le cuiseur-
rôtisseur et le couvercle.
4. Toujours ajouter 150 ml d’eau du robinet
au fond du Plat Crispy avant d’utiliser
Steam Plus.
5. Le récipient Steam Plus doit uniquement
être utilisé en mode micro-ondes. Quand
le cuiseur rôtisseur est utilisé seul comme
gril il peut être utilisé en mode gril ou
combiné.
6. Le Plat Crispy et le couvercle peuvent
être utilisés ensemble (sans le plat
vapeur) pour les fonctions de friture ou de
mijotage.
7. Utilisez toujours le Plat Crispy sur le plat
en verre. Ne l’utilisez pas avec la grille.
8. Utilisez toujours des maniques lors de
la manipulation des accessoires. Le
couvercle peut être chaud après son
utilisation. Faites attention lorsque vous
l’enlevez.
9. Assurez-vous que tous les emballages
alimentaires sont retirés avant la cuisson.
10. N’ouvrez pas le couvercle si votre visage
est à proximité sur récipient Steam Plus.
Il faut faire attention car la vapeur peut
provoquer des blessures.
11. Le joint rouge en silicone peut être enlevé.
Replacez-le toujours avant l’utilisation.
12. Respectez toujours les instructions
d’utilisation du cuiseur Steam Plus. Si
les consignes ne sont pas respectées,
il existe un risque de blessure ou
d’endommagement du four.
12 FR
 Loading...