

Limited Warranty
Exchange Program
Waffle
34
7
9
8
98
10 11
12
13
14
15
16
17
18
18
19
19
32
33
Caracteristiques
Gaufres
Programme De Remplacement
56
7
20 21
22 23
24
25
26
27
28
29
30
30
31
31
34
2
IMPORTANT SAFEGUARDS
toaster oven.
as they may creating electrical shock hazard.
17. Before using this appliance, move it 10 to 15cm (4 to 6 inches) away from
the wall or
been placed on top of the appliance. Do not use on surfaces where heat may
cause a problem.
any object on the counter top. Remove any object that may have
3

18. Extreme caution should be exercised when using containers constructed of
other than metal or glass.
19. Replace cardboard lids on food containers with aluminum foil; cardboard lids
may burn. When using aluminum foil, keep foil from touching heating elements.
20. Do not store any materials, other than manufacturer’s recommended
accessories, in this oven when not in use.
21. Do not place any of the following materials in the oven: paper, cardboard,
plastic, etc.
22. Do not cover crumb tray or any part of the oven with metal foil. This will cause
overheating of the oven.
23. In order to turn the appliance off, press the power button in the same way as
for manual use even when you use the automatic cooking menu.
24. Do not use water on grease fires; smother fire or use dry chemical or
foam type extinguisher.
25. Do not put food too close to the heating elements to prevent smoking,
spattering, and the possibility of fats on foods catching fire.
26. Always make sure the toaster oven is turned off before opening the oven door.
27. Always use a pot holder or oven mitt to install or remove the oven tray or any
cooking container.
28. Do not allow food to contact heater.
29. Keep interior of the toaster oven and crumb tray clean.
A. A short power supply cord is provided to reduce the risk resulting from
becoming entangled in or tripping over a longer cord.
B. Extension cords are available and may be used if care is exercised in their use.
C. If an extension cord is used, (1) the marked electrical rating of the extension
cord should be at least as great as electrical rating of the appliance, and (2) the
longer cord should be arranged so that it will not drape over the countertop or
tabletop where it could be pulled on by children or tripped over unintentionally.
This appliance has a polarized plug (one blade is wider than the other).
intended to fit into a polarized outlet only one
the outlet, reverse the plug. If it still does not
way. If the plug does not fit fully into
fit, contact a qualified electrician.
This plug is
Do not attempt to modify the plug in any way.
4

17. Avant d’utiliser cet appareil, prendre garde à respecter une distance de
15 cm (4 à 6 pouces ) du mur ou de tout objet se trouvant à proximité.
Au cas où un objet aurait été placé sur l’appareil, le retirer. Ne pas utiliser sur
des surfaces craignant la chaleur.
18. Il convient de faire extrêmement attention lors de l’utilisation de récipients faits
de matériaux autres que des métaux ou du verre.
19. Remplacer les couvercles en carton sur les récipients alimentaires par de
l’aluminium, car les couvercles en carton risquent de brûler. Lors de l’utilisation
d’aluminium, prendre garde à ce que l’aluminium ne touche pas les éléments
chauffants.
20. Lorsque le four n’est pas utilisé, ne pas ranger de matériaux à l’intérieur, à part
les accessoires recommandés par le fabricant.
21. Ne pas placer les matériaux suivants dans le four : papier, carton, plastique, etc.
22. Ne pas recouvrir le ramasse-miettes ni d’autres parties du four avec de
l’aluminium. Cela provoquerait une surchauffe du four.
23. Pour éteindre le four, appuyer sur la touche d’alimentation de la même manière
que lors de l’utilisation manuelle même avec le menu de cuisson automatique.
24. Ne pas utiliser d’eau pour éteindre des graisses qui brûlent ; étouffer le feu ou
utiliser un agent chimique en poudre ou un extincteur à mousse.
25. Ne pas placer les aliments trop près des éléments chauffants pour éviter la
production de fumée, des éclaboussures et la possibilité que les graisses
prennent feu.
26.
Toujours veiller à ce que le four grille-pain soit éteint avant d’ouvrir la porte du four.
27.
Toujours utiliser une poignée ou des gants isolants pour installer ou retirer la
grille du four ou quelque récipient contenant des aliments.
28.
Éviter que la nourriture touche l’élément chauffant.
Garder l’intérieur du four grill-pain et du ramasse-miettes propres.
29.
10 à
CONSERVEZ CES INSTRUCTIONS
A. L’appareil est équipé d’un cordon d’alimentation court afin de réduire le risque
d’emmêlement ou de trébuchement en raison d’un cordon trop long.
B. Il existe des rallonges et celles-ci peuvent être utilisées à condition de faire
preuve de prudence.
C. Si une rallonge est utilisée, (1) les caractéristiques électriques de la rallonge
doivent être au moins égales à celles de l’appareil et (2) le cordon plus long doit
être disposé de sorte à ne pas pendre de la table ou du comptoir afin que les
enfants ne puissent pas tirer dessus et pour éviter tout risque de trébuchement.
Cet appareil est équipé d’une fiche polarisée (une broche est plus longue que
l’autre). Afin de réduire le risque de décharge électrique, cette fiche doit être
branchée dans une prise polarisée, dans un seul sens. Si la fiche ne s’enfonce
pas entièrement dans la prise, retourner la fiche. Si cela ne marche toujours pas,
faire appel à un électricien compétent.
Ne tenter de modifier la fiche d’aucune façon.
6

(120 to 260 ).
( ).
250 to 500
Features
Ŗ In addition to the toaster function, its oven function
allows you to bake cakes and tarts quickly and
easily without preheating.
Ŗ En plus de la fonction grille-pain, la fonction four
permet de cuire rapidement des gâteaux et des
tartes sans pré-chauffage.
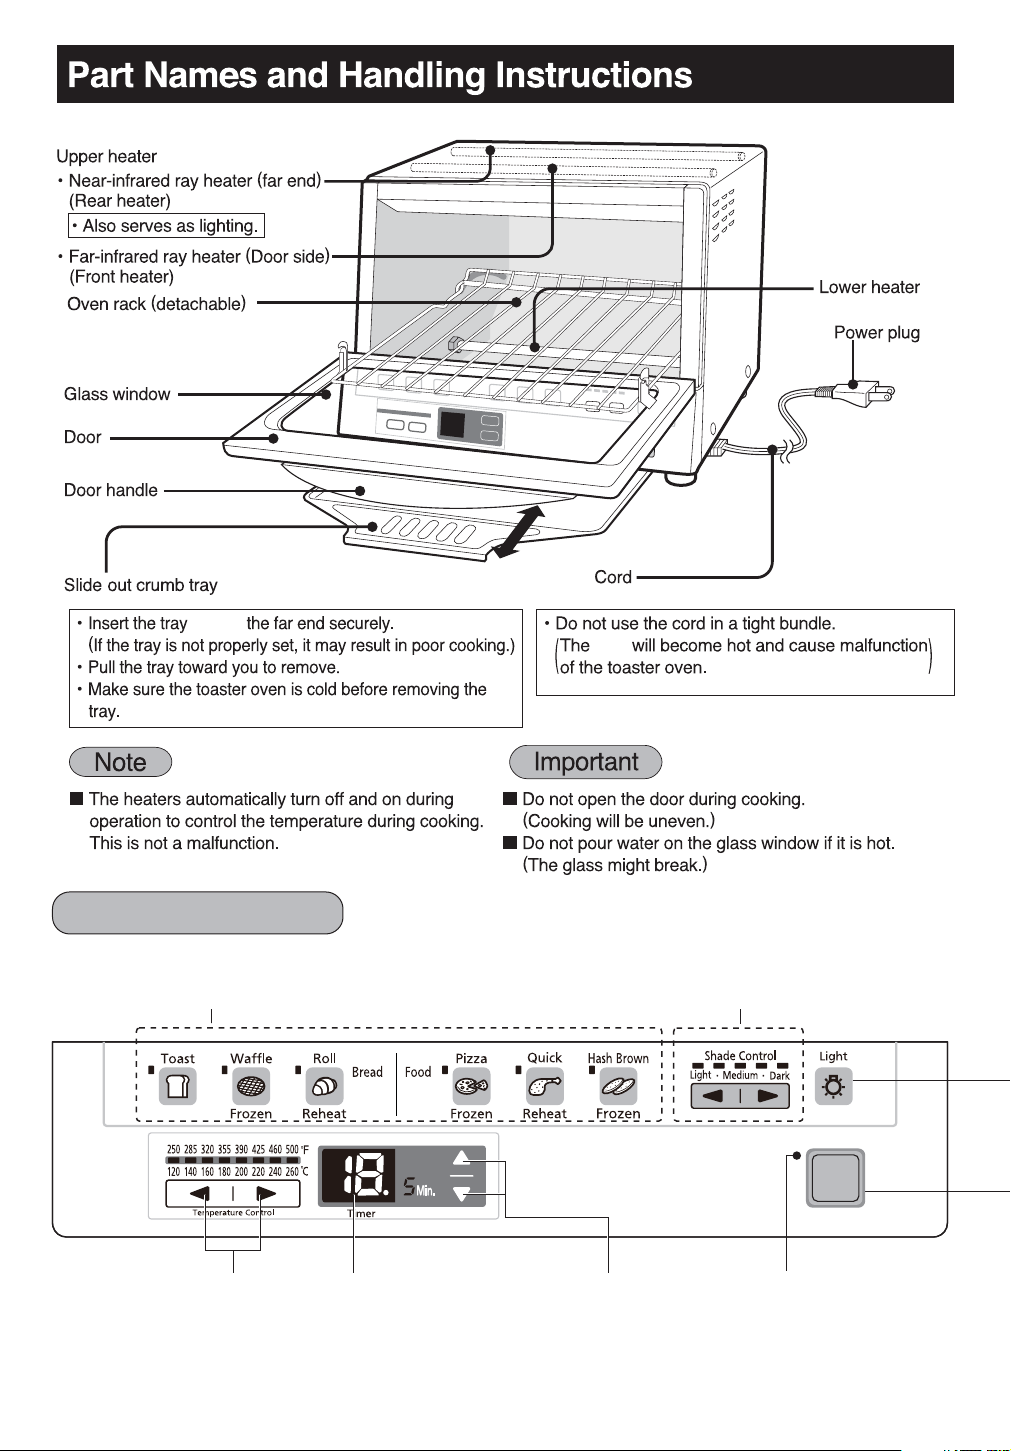
Far-infrared ray
heater (Front heater
Infrarouges lointains
(élément chauffant
avant)
)
Heats the surface of
food efficiently.
Chauffe efficacement la
surface des aliments.
Ŗ Press the recipe you want and
adjust the degree of browning.
Then, the microprocessor
automatically controls the power
and cooking time according to the
recipe, to ensure a good result.
Ŗ Appuyer sur la touche souhaitée
et régler le degré de brunissage.
Le microprocesseur contrôle
alors automatiquement la
puissance et la durée de cuisson
en fonction de la recette pour
garantir un résultat réussi.
Near-infrared ray
heater (Rear heater
Infrarouges proches
(élément chauffant
arrière)
)
Also serves
as lighting
Sert également
d'éclairage
Heats the inside of food efficiently.
* The interior of the toaster oven is brighter than
conventional products while the power is on.
Chauffe efficacement l’intérieur des aliments.
* L’intérieur du four grille-pain est plus éclairé que
l'intérieur des produits traditionnels lorsqu’il est
en marche.
22.5 cm
(9 inches)
22,5 cm
(9 pouces)
IMPORTANTES MESURES DE SÉCURITÉ / Caractéristipues
7
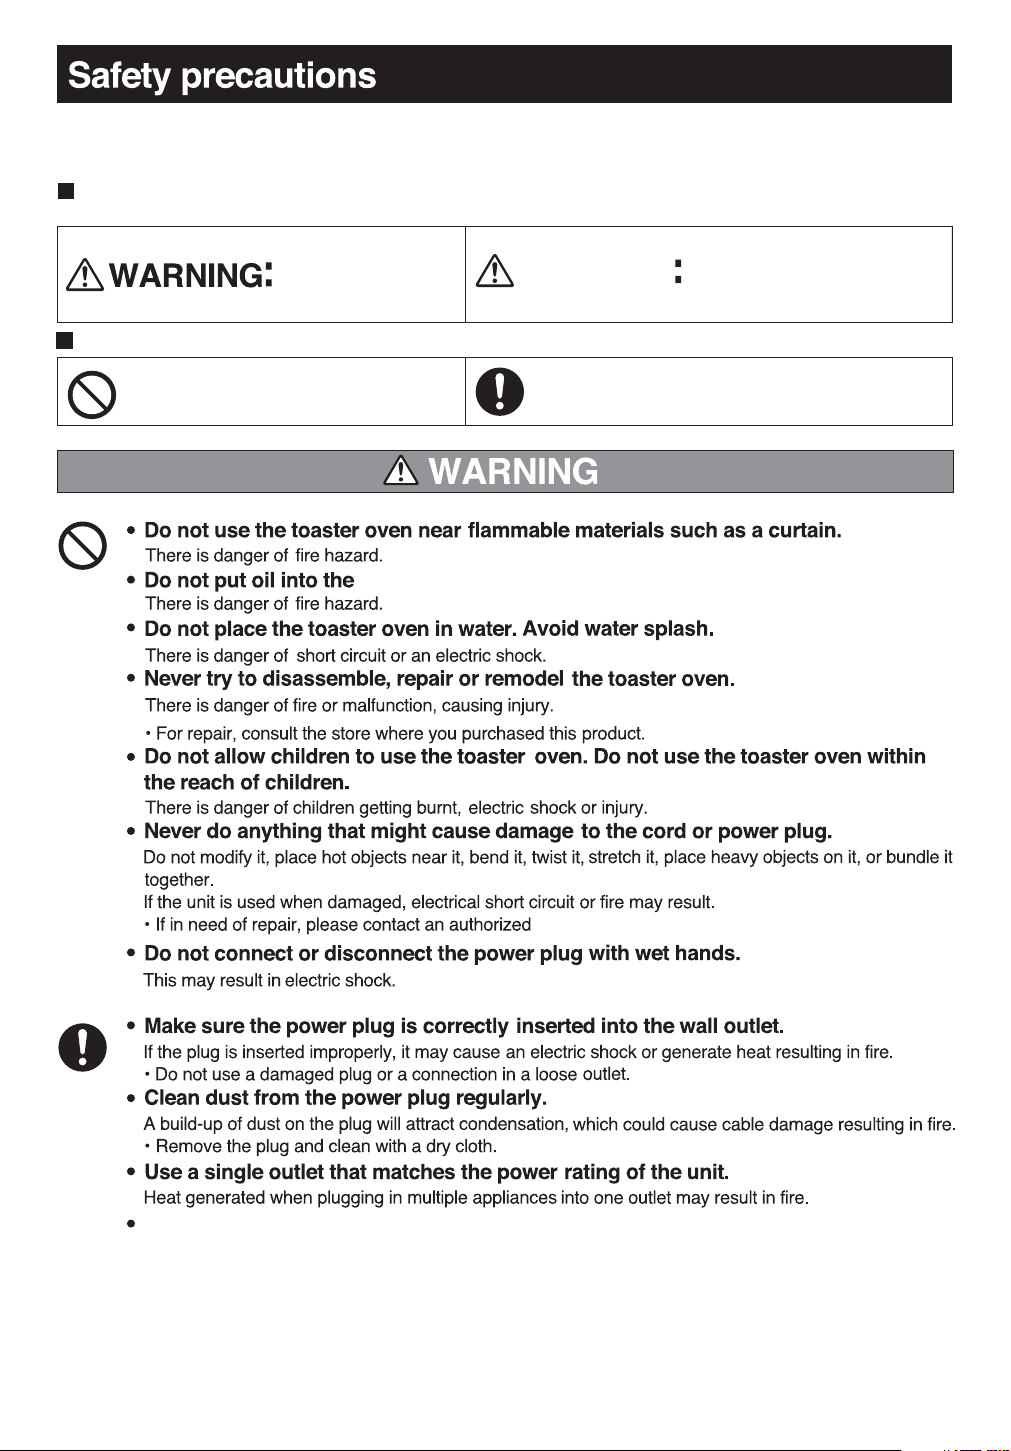
Please observe these precautions fully.
In order to prevent accidents or injuries to the user, other people, and damage to property,
please follow the instructions below.
The following chart indicates the degree of damage caused by improper operation.
Indicates serious
injury or death.
CAUTION
The symbols are classified and explained as follows.
This symbol indicates prohibition.
.
oven tray.
This symbol indicates requirement that
.
must be followed.
Indicates risk of jnjury or
property damage.
Service center.
This appliance can be used by children aged from 8 years and above and persons
with reduced physical,sensory or mental capabilities, or lack of experience and
knowledge if they have been given supervision or instruction concerning use of
the appliance in a safe way and understand hazards involved. Children shall not
play with the appliancel. Cleaning and user maintenance shall not be made by
children unless they are older than 8 and supervised. Keep the appliance and its
cord out of reach of children less than 8 years.
(It may cause burns, injury or electric shock.)
8
CAUTION
Do not broil raw fish or meat directly.
There is a chance the oil will catch fire.
Ŗ When grilling fish or meat, wrap in foil.
(See page 17.)
Do
not leave
unattended,
There is a chance the food will catch fire.
Ŗ When you need to leave, make sure to
turn
off the
Ŗ In
particular, when baking something
that is
the toaster
progress of
the toaster oven
when it is in use.
power button.
easily catch fire, do not leave
apt to
oven
unattended. Watch the
cooking.
Rear: more
than 10 cm
(
Do not put flammable materials
on /
There is danger of smoking, fire or burns.
under
the toaster oven.
Do not use this unit except for
cooking.
There is danger of fire hazard.
Do not bake bread with butter or jam.
There is a chance the bread will catch fire.
Do not heat more than necessary.
Overheating will cause the food to catch fire.
Ŗ Set the automatic cooking keys and timer
correctly.
Always use with a crumb tray.
There is danger of fire or injury hazard.
Ŗ Make sure the crumb tray is clean and set
correctly when using the appliance.
Always clean the unit after use.
Ŗ Otherwise It may cause smoke or fire.
If the food you are cooking emits
smoke or
power
catches fire, turn off the
button, then
disconnect the
power plug.
Ŗ Ŗ Do not open the door until the flame dies
down.
If air enters the interior of the toaster
oven,
the flame will become larger.
Ŗ Do not pour water on the toaster oven.
(The glass window will break.)
When unplugging the unit, pull by
the power
Electric shock and short circuit may result in
fire.
plug – not the cord.
When the unit is not in use, unplug
power plug from the wall outlet.
the
Deteriorating insulation may result in an
electric shock
and/or fire.
This appliance is not intended to be
operated by means of an external
timer or separate remote-control
system.
Do not use the toaster oven near wall
or
cabinet.
The wall or cabinet could become deformed
or
discolored.
Ŗ Keep the toaster oven away from flammable
materials
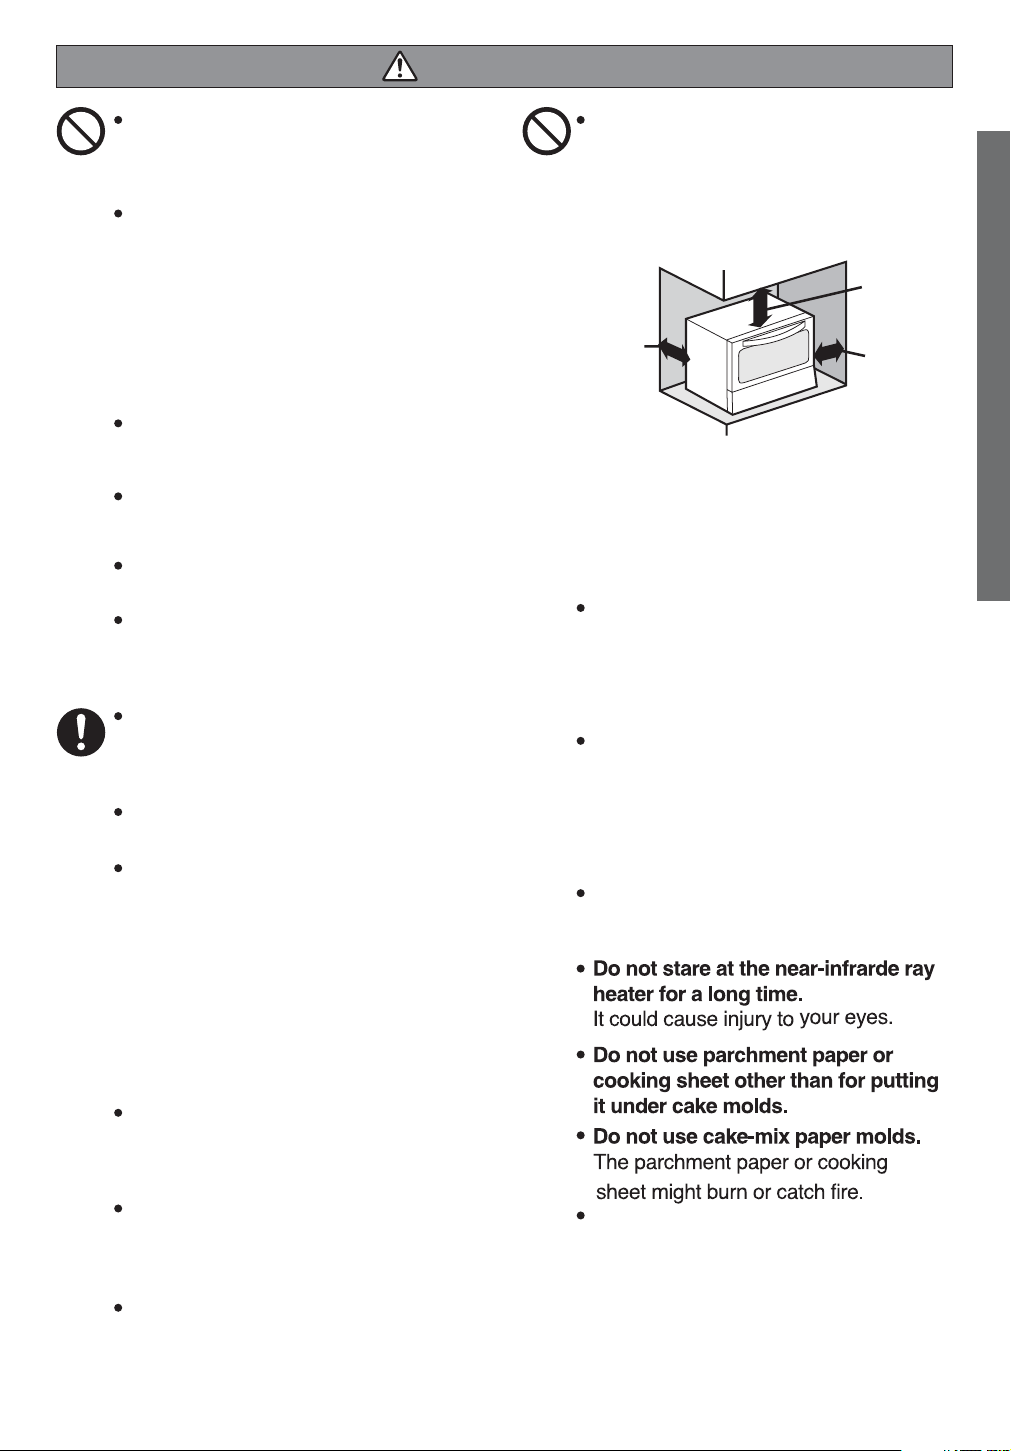
4 inches )
One side (right or left) of the toaster oven
should be
Ŗ Ŗ Keep the toaster oven further away from the
wall than
cabinet is coated
(wooden wall or cabinet ) as follows:
Top: more
than 15 cm
(
6 inches
Side: more
than 10 cm
(
4 inches
Set-up standard
free from any obstacle.
indicated above, if the wall or
with
vinyl or resin.
Do not place the unit on unstable
surfaces or
affected by heat.
There is danger of a fire hazard.
Ŗ Do not place the toaster oven on carpet.
surfaces that can be
It may cause fire.
Do not touch the metallic parts or the
glass
window during or immediately
after use.
There is danger of getting burnt.
Ŗ Ŗ Make sure the toaster oven is not hot before
p
erforming maintenance.
Do not heat canned or bottled goods
directly.
There is danger of burns or injury.
Do not use the appliance for any
purpose other than those described
in these instructions.
There is danger of burns or injury.
Panasonic will not accept any liability if the
appliance is subject to improper use, or
failure to comply with these instructions.
Safety precautions
)
)
9
-
toward
Operation panel
cord
Using automatic cooking key for cooking(See page 12.
Six automatic cooking keys
Set the temperature
for timer cooking
Rough estimate, required cooking
time is displayed
(
common to auto/timer
)
10
)
Select the color of browning
Using the time
(
cooking
See page 16.
Set time in one min.
intervals after 10 min.
r for
Power
)
off/on
Power on lamp
Accessory
1 oven tray
oven rack
Ŗ The tray has a grooved
(
The food might get groove patterns on its bottom.
Ŗ It is good practice to put a sheet of aluminum foil on the oven tray to prevent
stains.
Ŗ It is advisable to put a sheet of aluminum foil on the tray, pressing it with fingers
along the grooves to ensure that frozen pizza or cold fried food can be crispy
cooked.
surface for warming cold fried food effic
)
iently.
Part Names and Handling Instructions
Ŗ It smells when using the product initially,but it won’t smell after repeated using.
Lighting (near-infrared ray heater serves also as lighting.)
Ŗ Press the light button to turn on the near-infrared ray heater to brighten the interior of the toaster oven so
that you can check the food. The heater will automatically turn off after a certain time.
Ŗ The length of time the near-infrared ray heater is kept on varies with the heating condition.
Ŗ You cannot turn off the lighting manually.
Ŗ Do not press the light button successively.
(The temperature inside the toaster oven will rise which will affect the cooking result.)
Power off/on
Ŗ Press to turn on the toaster oven (lamp comes on).
Ŗ Press to turn off the toaster oven during operation (lamp goes out).
Ŗ Press after use (lamp goes out).
Power
off/on
11

Cooking using automatic cooking keys
Preparations
Insert the power plug into the wall outlet.
Put the food inside the toaster oven.
Power
off/on
1
Press any of the automatic
Press [Power off/on] (Red power lamp comes on.)
cooking keys.
2
Within 30 seconds,
3
use the keys to adjust
the color of browning.
2
(
Operating procedure
Power
off/on
1
2
3
)
1
How to set the color of browning (Using the shade control)
Light
Lighter Darker
Small amount
Small size
Ŗ Lighting of the lamps occur in intervals every time the button is pressed.
Ŗ The color of browning varies with the type and quantity of food and the size (weight) of each piece.
Ŗ Once the toaster oven is set to a color of browning, the next round of cooking will be performed at this setting.
The setting stored in memory will be lost if the power plug is removed.
The color of browning will be set to medium when the power is turned on.
Medium
Standard
material
Dark
Large amount
Large size
Cooking starts and the standard cooking time is displayed.
The displayed time counts down in increments of 0.5 minutes
during cooking.
Min.
Note: For a while after cooking starts, the cooking time blinks. During this time, the baking time is checked.
When the cooking time is confirmed, the displayed time stays on.
When cooking is finished, the buzzer sounds and the power is automatically
turned off.
Take out the food with a pot holder (oven mitt).
After use:
Ŗ
Power
Turn off unit by pressing the power button. The lamp goes out. Remove the power plug.
off/on
12

Toast
Bread can be toasted to your desired color of browning.
(
1 –4 slices
How to place food inside
If you want to toast, place it at the center
of oven rack.
FrozenWaffle
(
1 – 4 slices
How to place food inside
Remove frost from the surface of frozen
bread and place it on the oven rack.
Frozen bread can also be toasted to your desired color of browning.
)
)
Cooking note:
The color of browning varies with type, size and thickness
of bread.
Bread containing a lot of sugar will brown darker.
Set the level to the Light side.
The surface of a thick slice of bread will brown a
darker.
Standard cooking time: 2–3 min.
* Cooking time may vary according to shade control
Cooking note:
The color of browning varies with the type, size and
thickness of bread. In addition, the inside of bread might
not heat enough in some cases.
The cooking of frozen bread takes time because the
toaster oven defrosts frozen bread by turning the heater
on and off repeatedly.
The toaster oven performs optimal heating.
It might take longer when the color of browning is set to
Dark than when set to Light.
When cooking bread containing a lot of sugar, set to the
Light side.
Standard cooking time: 4–5 min.
* Cooking time may vary according to shade control setting.
little
setting.
Cooking using automatic cooking keys
Reheat Roll
(1–
4 pieces
Frozen Pizza
Baking pizza up to (9 inches)22.5cm in diameter.
(12.5-22.5cm)
How to place food inside
Place aluminum foil on the oven tray.
(See page 11.)
Remove frost from the surface of
pizza and place the
tray.
Place the tray inside the toaster oven.
frozen pizza on the
Rolls can be reheated without browning.
)
(5 –
the
Cooking note:
When cooking bread containing a lot of sugar, set the
level of browning to the Light side.
Use the timer when warming stuffed or cooked bread
such as hamburgers or the like.
Standard cooking time: 2–3 min.
* Cooking time may vary according to shade control
9 inches)
Cooking note:
If cooking a large pizza, the side closer to the door
might not bake enough.
Make sure to put it toward the far end.
Standard cooking time: 12–14 min.
* Cooking time may vary according to shade control
setting.
setting.
13


Preparations
Power
off/on
Power
off/on
(200 C)
on.
Power
off/on
Power off/on.
repeating
Power off/on.

Points for cooking with timer
Cooking time
Ŗ There is no need for preheating.
Ŗ The standard time varies with the temperature, quality, quantity of food and material of the cooking tray.
Adjust properly by watching how the food is heated.
Ŗ If it takes more than 25 minutes to cook food, set the temperature and timer again, checking the result
from time to time.
Ŗ If you cook in succession, the food might not brown enough or the inside might not heat properly.
Ŗ It is advisable to open the door and keep it open for a while to cool down the inside of the toaster oven,
before starting the cooking again.
Ŗ If the food is not sufficiently heated, use the timer to heat it further, checking the result from time
to time.
* In particular, when baking cakes, cool down the inside of the toaster oven before cooking.
Cooking temperature
Ŗ If food is heated at the same temperature as used for a large oven, it might bake too much
of the difference in the interior size. Adjust the temperature properly watching how the food is
Ŗ For food that has been cooked using a toaster oven without temperature control function, set the
cooking temperature to 460 °F–500 °F (240 °C–260°C) and use the timer, cook and watch the
of baking.
When baking commercial frozen food
Ŗ Use the frozen food key for the toaster oven.
Ŗ Do not rely too much on the power level and refer cooking time written on the package.
When baking tall food items such as cakes
Ŗ Any tall food is browned easily. When the food is browned properly, cover it with a foil before baking
further.
Ŗ Cut a sheet of aluminum foil into a size a little larger than the mold and use it, because large pieces of
foil make it difficult to bake the food properly.
Baking mold for cakes
Ŗ Avoid using molds made of porcelain or heat-resistant glass, or those with a metal hook.
because
heated.
result
Cooking using the timer
Important
Ŗ Do not try to bake meat or fish which oozes oil without wrapping. When baking meat or fish, wrap it in a
foil to prevent oil from splashing, and put it on the oven tray.
Ŗ Do not use the toaster oven for steaming.
(Steam will cause malfunction of the toaster oven.)
Ŗ Do not use parchment paper or cooking sheeting other than for
putting it under cake molds.
Cut away excess parchment paper or cooking sheeting from
under the cake molds.
(They might catch fire when in contact with the heater.)
Ŗ Do not use paper baking molds for cake mix.
(There is a danger of fire.)
Ŗ When cooking with foil, such as when baking cakes or large potatoes, use caution to prevent the
foil from coming in contact with the heater.
(The foil might melt away and adhere to the surface of the heater, causing malfunction of the toaster
oven.)
Parchment paper
(cooking sheeting)
Note
Ŗ When cooking at a low temperature 250 °F–285 °F(120 °C–140 °C) , the heater will stay off for
about 3
minutes. This is
not a malfunction.
17

Cooking guide
Automatic cooking Cooking results may vary. Adjust shade control to your individual preferences.
Key
Toast
Frozen
Waffle
Reheat
Roll
Frozen
Pizza
Reheat
Quick
Frozen
Hash
Browns
Bagels
Bread, Frozen
Bagels, Frozen
Garlic Bread, Frozen
Waffles, Frozen
French Toast, Frozen
Hot Dog Rolls
Hamburger Buns
Cinnamon Rolls
Frozen Pizza
Frozen Chicken Nuggets
Frozen Fish Sticks
Frozen Fish Fillets
Egg Rolls
Chicken Wings
Pizza
Hot Dogs
Hot Sandwiches
Frozen Hash Browns
Frozen French Fries
Frozen Onion Rings
Quantity
1–4 slices 2–3 min.
1–4 slices
1–4 Rolls
1–4 Buns
1–4 Rolls
Up to 9 inches
Up to tray range
Up to tray range
Up to tray range
Oven tray
—daerB
—
—
—
—
—
—
—
Manual cooking Cooking results may vary. Adjust temperature and time settings to your individual preferences.
Standard
cooking time
4–5 min.
2–3 min.
12–14 min.
5–7 min.
4–6 min.
NoteRecipes
Place sliced surface up.
Place sliced surface up.
Recipes
Cooking, Refrigerated Dough 10–20 min.
Cinnamon Rolls, Refrigerated Dough
Muffins
* If it takes more than 25 minutes to cook a food item, set the temperature and timer again by watching the result of heating.
355 °F(180 °C)
320 °F(160 °C)
320 °F(160 °C)
Time
17–22 min.
10–15 min.
Set the temperature according to the instruction
on the food package to avoid burning.
No preheat necessary.
etoNerutarepmeT
Maintenance: Remove the power plug and make sure the toaster oven is cold.
Wipe clean the exterior and interior of the toaster oven with a well-wrung towel.
* Do not use benzene, thinner or polishing powder; otherwise, the surface will be damaged.
Ŗ When the toaster oven is severely stained or dirty, wipe with a towel saturated with a diluted
solution of neutral kitchen detergent.
Ŗ When cleaning the bottom of the interior, remove the oven rack and crumb tray.
* Do not touch the heaters to avoid damaging them.
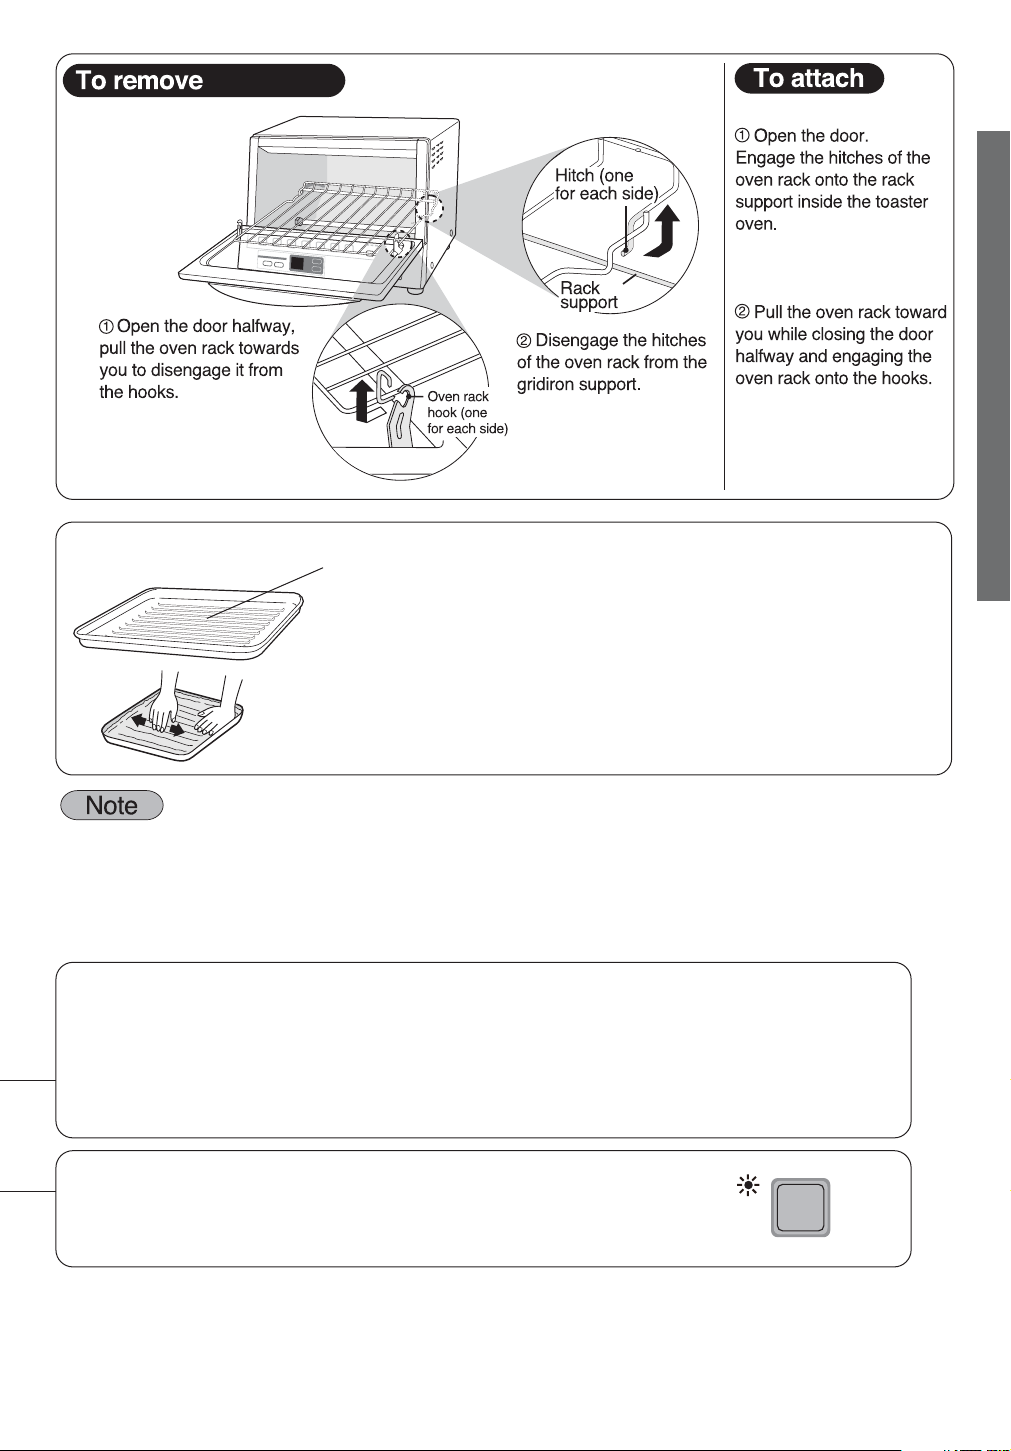
Crumb tray, oven tray, oven rack(See page 11 for how to remove.
Wash them with a diluted solution of neutral kitchen detergent and sponge and dry well.
* Do not use metal brush or nylon brush.
(
The surfaces of the trays or gridiron might be damaged.
)
* In particular, wash the crumb tray frequently.
not use a dirty tray; the baked may burn or might result in a lighter color of browning
Do
on the lower surface of food.
)
18

Troubleshooting
If...
The toaster oven cannot be turned on
when the power button is pressed.
The automatic cooking function does
not function properly.
The heater turns on and off.
The heater turns off during cooking.
Light color of browning on the bottom
surface of bread.
appears on display (self-check function):
Check to see if the power plug is securely inserted into
the wall outlet.
The plug has been disconnected.
Ŗ Read “Cooking using automatic cooking keys”.
(See pages 12 to 15.)
It is not a malfunction.
The heater is automatically turned on and off
by the microprocessor to control the cooking temperature.
It is not a malfunction.
The heater may stay off for about 3 minutes if low-temperature
cooking is carried out immediately after high-temperature cooking.
Check the crumb tray if properly cleaned.
Ŗ Clean the crumb tray.
Possible cause and how to fix
Ŗ
Please contact service center listed in the warranty.
Any other servicing should be performed by an authorized service representative.
Gooking guide / Maintenance / Troubleshooting / Specifications
Specifications
zH 06 V 021ylppuS rewoP
Power consumption
Temperature control (approx.)
Timer
Dimensions
X D X
(
W
(
approx.)
Weight (approx.)
Cord length
Ŗ The power consumption is about 0.4 W when the power plug is inserted into the wall outlet
without the Power button pressed.
Outer dimensions
H)
Inner dimensions
Oven tray (inner dimensions)
33.0 x 30.5 x 26.0 cm (13 x 12 x 10.2 inches)
26.0 x 25.0 x 10.5 cm (10.2 x 9.8 x 4.1inches)
23.5 x 23.5 x 1.8 cm (9.3 x 9.3 x 0.7inches)
250 – 500 °F (12
93 cm (36.6 inches)
1300 W
0 – 260°C)
0.5 –25 min
7.5 lbs (3.4 kg)
19

Mesures de sécurité
Pour éviter des accidents ou des blessures à l’utilisateur ou d’autres personnes,
et des dommages matériels, prière de respecter les consignes suivantes.
Le tableau suivant indique le degré de risque dû à une manipulation incorrecte.
Indique un risque de blessure sérieuse ou mortelle.
:
Indique un risque de blessure ou de dommages matériels si
:
l’appareil est mal utilisé.
Ce symbole indique une interdiction.
Ce symbole indique une condition à respecter.
20
Cet appareil peut être utilisé par des enfants de 8 ans et plus et des personnes
ayant des capacités physiques, sensorielles ou mentales, ou manquent
d'expérience et de connaissances si elles ont été formées et encadrées ou
instruits sur l'utilisation de l'appareil d'une manière sécuritaire et conscients
des risques encourus. Les enfants ne doivent pas jouer avec l'appareil.
Le nettoyage et l’entretien utilisateur ne doivent pas être effectués par des
enfants, sauf s'ils sont âgés de plus 8 ans et supervisé. Gardez l'appareil et
son cordon d’alimentation hors de la portée des enfants de moins de 8 ans.
Cela peut causer des brûlures, des blessures ou un choc électrique.

ATTENTION
Ne pas faire griller directement la
viande ou
L’huile risquerait de s’enflammer.
Ŗ Pour griller du poisson ou de la viande,
l’enrouler
(voir page 29).
le poisson.
dans du papier aluminium
Ne pas laisser le four grille-pain sans
surveil lance lorsqu’il est en marche.
Les aliments risquent de prendre feu.
Ŗ Veillez à mettre le bouton d'alimentation
sur arrêt lorsque vous partez.
Ŗ En particulier, ne laissez pas le four grille-
pain sans surveillance lorsque les aliments
à cuire sont susceptibles de s'enflammer
facilement. Surveillez la progression de la
cuisson.
Ne pas placer de matériaux
inflammables
sur le four grille-pain
ou en dessous.
Cela représente un risque de fumée,
d'incendie ou de brûlures.
Utiliser cet appareil uniquement
p
our cuisiner.
Cela représente un risque d'incendie.
Ne pas cuire du pain avec du beurre
ou de
la confiture.
Le pain risquerait de prendre feu.
Ne pas chauffer plus que nécessaire.
La nourriture surchauffée risquerait de
prendre feu.
égler adéquatement les touches de cuisson
Ŗ R
automatique ainsi que la minuterie.
Toujours utiliser avec le
ramasse-miettes.
Cela représente un risque d'incendie ou de
blessures.
Ŗ Assurez-vous que le tiroir ramasse miettes
est propre et correctement en place lors de
l'utilisation de l'appareil.
Toujours nettoyer l’appareil après
utilisation.
Ŗ Autrement cela pourrait causer de la fumée
ou un incendie.
Si les aliments en train de cuire
génèrent une
éteindre le four au
feu,
fumée ou prennent
moyen de la
touche d’alimentation puis
débrancher la fiche.
Ŗ Ne pas ouvrir la porte tant que les flammes
ne sont
Si de l’air pénètre à l’intérieur du four
grille-pain,
Ŗ Ne pas verser d’eau sur le four grille-pain.
(La vitre en verre éclaterait.)
pas éteintes.
la flamme sera avivée.
Lors du débranchement de l’appareil,
sur la fiche et non pas sur le
tirer
cordon.
Une décharge électrique et un court-circuit
pourraient
provoquer un incendie.
Lorsque l’appareil n’est pas utilisé,
débrancher la fiche de la prise murale.
Une isolation détériorée peut provoquer une
décharge
électrique, un incendie ou les deux.
L’appareil ne doit pas être contrôlé au
moyen d’une minuterie externe ou
d’une télécommande séparée.
Ne pas utiliser le four grille-pain à
proximité
Cela risquerait de déformer ou de décolorer
le mur ou
Ŗ Tenir le four grille-pain à l’écart des matériaux
inflammables (mur
respectant
À l’arrière :
plus de
10 cm
(4,0 po)
Un côté (gauche ou droit) du four grille-pain
devrait être
Ŗ Ŗ Si le mur ou le meuble est recouvert de vinyle
ou de
pain (p
ci-dessus).
d’un mur ou d’un meuble.
le meuble.
le en bois) en
eub
les distances suivantes :
résine, éloigner davantage le four grille-
ar rapport aux indications mentionnées
ou m
Norme d’installation
entièrement dégagé.
Ne pas placer l’appareil sur une
surface
susceptible
instable ou sur une surface
d’être affectée par la
chaleur.
Cela pourrait provoquer un incendie.
Il existe un risque d’incendie.
Ŗ Ne pas placer le four grille-pain sur une
moquette.
Ne pas toucher les parties métalliques
ni la
vitre en verre pendant
ni juste
Il existe un risque de brûlure.
ŖŖ S
chaud avant
après.
’assurer que le four grille-pain n’est pas
de procéder à l’entretien.
l’utilisation
Ne pas réchauffer directement des
aliments
Cela représente un risque de brûlures ou
de blessures.
en boîte ou en bouteille.
Ne pas regarder trop longtemps le
rayon des infrarouges prochs.
Utiliser du papier sulfurisé ou du
papier cuisson uniquement au
fond des moules pour la cuisson
de gâteaux.
Ne pas utiliser de moules en carton
fournis avec les préparations pour
gâteaux.
N’utilisez pas l'appareil à d'autres fins
autres que celles décrites dans ce
manuel.
Cela représente un risque de brûlures
ou de blessures.
Panasonic décline toute responsabilité
si l'appareil est mal utilisé ou les
instructions du manuel ne sont pas
respectées.
En haut :
plus de
15 cm
(6,0 po)
Sur le côté :
plus de
10 cm
(4,0 po)
21

Panneau de commandes
Cuisson à l’aide des touches de cuisson automatique (voir page 24)
Six touches de cuisson automatique
Régler la température
pour la cuisson avec
minuterie
22
Cuisson à l'aide de la
minuterie (voir page 28)
La durée de cuisson nécessaire
approximative est affichée
(commun à auto et minuterie)
Sélectionner la couleur de brunissage
Régler le temps par
intervalles d’une minute
après 10 minutes
Voyant
d’alimentation
Power
off/on

Accessoire
1 plaque
Ŗ La plaque a une surface rainurée pour réchauffer efficacement Aliments frits
froids.
(Il est possible que les aliments prennent la marque des rainures.)
Ŗ Il est recommandé de placer une feuille d’aluminium sur la plaque pour éviter
les taches.
Ŗ I
l est conseillé d’étendre une feuille d’aluminium sur la plaque en appuyant le
long des rainures avec les doigts afin de s’assurer que les pizzas congelées ou
Aliments frits froids soient bien croustillantes.
Ŗ Une odeur de brûlé se fera sentir lors de la première utilisation de l’appareil,
mais ça disparaîtra au fur et à mesure des utilisations.
Éclairage (l’élément chauffant à infrarouges proches sert également d’éclairage)
Ŗ Appuyer sur la touche [Light] (d’éclairage) pour allumer l’élément chauffant à infrarouges proches afin
d’éclairer
automatiquement au bout d’un certain temps.
Ŗ La durée d’activation de l’élément chauffant à infrarouges proche
Ŗ Il est impossible d’éteindre manuellement la lumière.
Ŗ Ne pas appuyer de façon répétée sur la touche [Light] (d’éclairage.)
(La température à l’intérieur du four grille-pain augmenterait affectant ainsi les résultats de la cuisson.)
[Power off/on] (marche/arrêt).
Ŗ Appuyer sur cette touche pour allumer le four grille-pain (le voyant s’allume).
Ŗ Appuyer sur cette touche pour éteindre le four grille-pain pendant le fonctionnement (le voyant s’éteint).
Ŗ Appuyer sur cette touche après utilisa
l’intérieur du four grille-pain pour vérifier la cuisson des aliments. L’élément chauffant s’éteindra
s varie en fonction de l’état du chauffage.
tion (le voyant s’éteint).
Power
off/on
Noms des pièces et instructions pour la manipulation
23

Cuisson à l’aide des touches de cuisson automatique
Préparatifs
Brancher la fiche dans la prise.
Placer les aliments dans le four grille-pain.
Appuyer sur la touche [Power off/on] (marche/arrêt)
Power
off/on
1
Appuyer sur l’une des touches
(le voyant rouge s’allume).
2
de cuisson automatique.
2
Dans les 30 secondes suivantes, utiliser les touches
3
pour régles l'intensité du brunissage.
2
3
(Marche à suivre)
1
Power
off/on
1
Comment régler l’intensité du brunissage (à l’aide du contrôle de brunissage)
Light
Pâle
Petite quantité
Petite taille
Ŗ Le voyant s'allume par intervalle à chaque fois que la touche est enfoncée.
Ŗ Le brunissage varie en fonction du type et de la quantité de nourriture et de la taille (poids) de chaque morceau.
Ŗ Une fois que le four grille-pain est réglé sur une intensité de brunissage, la prochaine cuisson sera effectuée selon
ce réglage.
Le réglage mémorisé sera annulé si la prise est débranchée.
L’intensité de brunissage est réglée sur le niveau [medium] (moyen) lorsque l’appareil est mis en marche.
Medium
Taille
normale
Dark
Foncé
Grande quantité
Grande taille
La cuisson est lancée et la durée moyenne de cuisson est affichée.
La durée affichée effectue un compte à rebours par intervalle de 0,5 minute pendant
la cuisson.
Min.
Remarque : Pendant quelques instants après le début de la cuisson, la durée de la cuisson clignote. Pendant cette
opération, la durée est vérifiée. Une fois la durée de cuisson confirmée, celle-ci reste affichée.
Une fois la cuisson terminée, l’avertisseur sonore retentit et le four s’éteint
automatiquement.
Sortir la nourriture avec une poignée (ou gants isolants).
Après l’utilisation :
Ŗ
Power
Éteindre le four en appuyant sur la [power off/on] (marche/arrêt).Le voyant s’éteint. Débrancher la
off/on
24
fiche.

Gaufres
gaufres
Le
[Light](pâle)
Waffle
Le
[Dark] (foncé)
[Light](pâle).
[Light](pâle).
[Light](pâle).
25

Frozen Pizza
(Pizza congelée)
12,5 à 22,5cm (5 à 9 pouces)
Cuisson d’une pizza jusqu’à 22,5cm (9 pouces) de diamètre.
Comment arranger les aliments à l’intérieur
Recouvrir la plaque d’une feuille d’aluminium
(voir page 23).
Retirer tout cristaux de glace de la surface de la pizza
et placer la pizza congelée sur la plaque.
Mettre la plaque dans le four grille-pain.
Reheat Quick
(Réchauffage rapide)
Comment arranger les aliments à l’intérieur
Recouvrir la plaque d’une feuille d’aluminium
(voir page 23).
Placez les aliments frits froids dans un plateau
et placez celui-ci dans le four grille-pain.
Frozen Hash Browns
(Pommes de terre rissolées congelées)
Remarque sur la cuisson :
Lors de la cuisson d’une grande pizza, le côté proche
de la porte risque de ne pas être suffisamment cuit.
S’assurer de bien placer la pizza au fond du four.
Durée moyenne de cuisson : 12 à 14 minutes.
* La durée de cuisson peut varier en fonction du
réglage de [Shade Control] (
brunissage.)
l’intensité de
Réchauffer des aliments frits.
Remarque sur la cuisson :
L’intérieur des aliments risque de ne pas être
suffisamment chaud s’ils ont été mis au four très
froids.
Chauffer davantage (voir page 27).
Durée moyenne de cuisson : 5 à 7 minutes.
* La durée de cuisson peut varier en fonction du
réglage de [Shade Control] (l’intensité de
brunissage.)
Cuisson des pommes de terre rissolées.
(Jusqu’à la capacité maximale de la plaque)
Comment arranger les aliments à l’intérieur
Retirer tout cristaux de glace la surface des pommes de
terre rissolées. Les mettre sur la plaque en prenant
garde de bien les espacer, sinon elles risquent de trop
se gonfler ou de se ramollir pendant le réchauffage.
Remarque :
26
Remarque sur la cuisson :
Durée moyenne de cuisson : 4 à 6 minutes.
* La durée de cuisson peut varier en fonction du
réglage de [Shade Control] (l’intensité de
brunissage.)

[power off/on] (marche/arrêt).
[power off/on] (marche/arrêt).
24
24
Cuisson à l’aide des touches de cuisson automatique
24
27

Préparatifs
Brancher la fiche dans la prise murale.
Placer les aliments au centre du four grille-pain.
Ŗ Placer les gros aliments, comme des pizzas ou des gâteaux, ou les
aliments multiples comme des biscuits, au fond du four car ceux proches
de la porte risquent de ne pas être suffisamment cuits.
Power
off/on
Power
off/on
Appuyer sur la touche [Power off/on]
(marche/arrêt).
Sélectionner la température de cuisson.
Régler la minuterie.
Sur pression de la touche, la
cuisson est lancée.
Un compte à rebours débute
par intervalles de 0,
5 minute.
Lorsque la durée est écoulée,
l’avertisseur sonore retentit et l’élément chauffant est automatiquement désactivé.
Retirer les aliments du four grille-pain
à l’aide d’une poignée.
Le voyant s’allume.
Power
off/on
Ajuster la température de cuisson en
fonction de la recette (voir page 30).
(Le voyant de 390 °F (200 °C) s’allume en
premier.)
Ajuster la durée de cuisson en fonction de la
recette (voir page 30).
La durée affichée
augmente (0 0,5 1)
Min.
La durée affichée
diminue (0 25 24)
Ŗ On peut sélectionner une durée de cuisson
jusqu’à 10 minutes par intervalle de 0,5
minutes. Il est possible de sélectionner jusqu’à
25 minutes par intervalle de une minute au-delà
de 10 minutes.
Ŗ Maintenir la touche enfoncée pour augmenter
ou diminuer rapidement la valeur.
Ŗ Lorsque la minuterie est réglée sur « 0 »
pendant la cuisson, le four grille-pain est
automatiquement désactivé dans les 3 secondes.
* On peut modifier librement la température et la
durée pendant la cuisson.
évelÉelbiaF
Ŗ Pour interrompre la cuisson en cours
Appuyer sur la touche [Power off/on] (marche/arrêt).
(Le voyant de l’élément chauffant s’éteint.)
Ŗ Pour poursuivre la cuisson sans interruption
Régler le four grille-pain en commençant par l’étape 2 de la marche à suivre.
Ŗ Après utilisation
Appuyer sur la touche [Power off/on] Le voyant rouge s’éteint. Débrancher la fiche.
(marche/arrêt).
28

surveillant
460 °F–500 °F
( )
Cuisson avec la minuterie
250 °F–285 °F ( )
29

Jusqu’à 22,5 cm(9 pouces)
355 °F( )
320 °F( )
320 °F( )
30
23

Si…
Impossible de mettre le four grille-pain
en marche en appuyant sur la touche
d’alimentation.
Cause éventuelle et comment y remédier
Vérifier que la fiche est bien enfoncée dans la prise murale.
La fonction de cuisson automatique ne
fonctionne pas correctement.
L’élément chauffant se met en marche
puis s’arrête.
L’élément chauffant s’arrête pendant la
cuisson.
Un brunissage trop faible sur la surface
inférieure du pain.
apparaît sur l’affichage (fonction d’autocontrôle) :
La fiche a été débranchée.
Ŗ Lire la section « Cuisson à l’aide des touches de cuisson
automatique ». (Voir pages 24 et 27.)
Ce n’est pas le signe d’un mauvais fonctionnement.
L’élément chauffant est automatiquement activé puis désactivé
par le microprocesseur pour contrôler la température de cuisson.
Ce n’est pas le signe d’un mauvais fonctionnement.
Il est possible que l’élément chauffant soit désactivé pendant 3
minutes si une cuisson à basse température est effectuée juste
après une cuisson à haute température.
Vérifier que le ramasse-miettes a été correctement nettoyé.
Ŗ Nettoyer le ramasse-miettes.
Ŗ
Prière de contacter un centre de service après-vente répertorié dans la garantie.
Tout autre entretien doit être effectué par un centre de service agréé.
Alimentation
Entretien / Dépannage / Caractéristiques techniques / Guide de cuisson
1 0 V 60 Hz
Consommation électrique
Commande de température (environ)
Minuterie
Dimensions extérieures
33,0 x 30,5 x 26,0 cm
(13,0 x 12,0 x 10,2 pouces)
1300 W
250 à 500 °F (120 à 260 °C)
0,5 à 25 min
Dimensions
x
(L
P x H)
(env.)
Dimensions intérieures
Plaque (dimensions intérieures)
Poids (env.)
Longueur du cordon
26,0 x 25,0 x 10,5 cm
(10,2 x 9,8 x 4,1 pouces)
23,5 x 23,5 x 1,8 cm
(9,3 x 9,3 x 0,7 pouces)
7,5 lbs (3,4 kg)
93 cm (36,6 pouces)
Ŗ La consommation électrique est d’environ 0,4 W lorsque la fiche est branchée mais sans que
le four soit allumé au moyen de la touche d’alimentation.
31

Limited Warranty (ONLY FOR U.S.A. AND PUERTO RICO)
Panasonic Consumer Marketing Company of North America,
Division of Panasonic Corporation of North America
One Panasonic Way, Secaucus, New Jersey 07094
Panasonic Kitchen Appliance
Limited Warranty
Limited Warranty Coverage (For USA and Puerto Rico Only)
If your product does not work properly because of a defect in materials or
workmanship, Panasonic Consumer Marketing Company (referred to as
“the warrantor”) will, for the length of the period indicated on the chart
below, which starts with the date of original purchase (“warranty period”), at
its option either (a) repair your product with new or refurbished parts, (b)
replace it with a new or a refurbished equivalent value product, or (c)
refund your purchase price. The decision to repair, replace or refund will be
made by the warrantor.
Product or Part Name Labor Parts
Bread Maker, Rice Cookers (Fuzzy Logic),
Meat Grinder, Toaster Oven,
Large Capacity Rice Cookers
(SR-42 series)
During the “Labor” warranty period there will be no charge for labor. During
the “Parts” warranty period, there will be no charge for parts.
This warranty only applies to products purchased and serviced in the
United States or Puerto Rico. This warranty is extended only to the original
purchaser of a new product which was not sold “as is”.
Carry-In or Mail in Service:
To find a service center please visit http://www.panasonic.com/help or call
1-800-211-PANA (7262).
IF REPAIR IS NEEDED DURING THE WARRANTY PERIOD, THE
PURCHASER WILL BE REQUIRED TO FURNISH A SALES
RECEIPT/PROOF OF PURCHASE INDICATING DATE OF PURCHASE,
AMOUNT PAID AND PLACE OF PURCHASE. CUSTOMER WILL BE
CHARGED FOR THE REPAIR OF ANY UNIT RECEIVED WITHOUT
SUCH PROOF OF PURCHASE.
Limited Warranty Limits And Exclusions
This warranty ONLY COVERS failures due to defects in materials or
workmanship, and DOES NOT COVER glass, plastic parts, temperature
probes (if included) and normal wear and tear or cosmetic damage. The
warranty ALSO DOES NOT COVER damages which occurred in shipment,
or failures which are caused by products not supplied by the warrantor, or
failures which result from accidents, misuse, abuse, neglect, bug
infestation, mishandling, misapplication, alteration, faulty installation, set-up
adjustments, maladjustment of consumer controls, improper maintenance,
power line surge, lightning damage, modification, or commercial use (such
as in a hotel, office, restaurant, or other business), rental use of the product,
service by anyone other than a factory service center or other authorized
servicer, or damage that is attributable to acts of God.
THERE ARE NO EXPRESS WARRANTIES EXCEPT AS LISTED UNDER
“LIMITED WARRANTY COVERAGE”.
THE WARRANTOR IS NOT LIABLE FOR INCIDENTAL OR
CONSEQUENTIAL DAMAGES RESULTING FROM THE USE OF THIS
PRODUCT, OR ARISING OUT OF ANY BREACH OF THIS WARRANTY.
(As examples, this excludes damages for lost time, travel to and from the
servicer, loss of or damage to media or images, data or other memory or
recorded content. The items listed are not exclusive, but for illustration
only.)
ALL EXPRESS AND IMPLIED WARRANTIES, INCLUDING THE
WARRANTY OF MERCHANTABILITY, ARE LIMITED TO THE PERIOD
OF THE LIMITED WARRANTY.
Some states do not allow the exclusion or limitation of incidental or
consequential damages, or limitations on how long an implied warranty
lasts, so the exclusions may not apply to you.
1 yr. 1 yr.
6 Months 6 Months
This warranty gives you specific legal rights and you may also have other
rights which vary from state to state. If a problem with this product
develops during or after the warranty period, you may contact your dealer
or Service Center. If the problem is not handled to your satisfaction, then
write to:
PARTS AND SERIVCE, WHICH ARE NOT COVERED BY THIS LIMITED
WARRANTY, ARE YOUR RESPONSIBILITY.
Consumer Affairs Department
Panasonic Consumer Marketing Company
661 Independence Pkwy
Chesapeake, VA 23320
Customer Services Directory (United States and Puerto Rico)
Obtain Product Information and Operating Assistance;
locate your nearest Dealer or Service Center; purchase
Parts and Accessories; or make Customer Service and
Literature requests by visiting our Web Site at:
http://www.panasonic.com/help
or, contact us via the web at:
http://www.panasonic.com/contactinfo
You may also contact us directly at:
1-800-211-PANA (7262)
Monday-Friday 9am-9pm, Saturday-Sunday 10am-7pm EST
For hearing or speech impaired TTY users, TTY: 1-877-833-8855
Accessory Purchases (United States and Puerto Rico)
Purchase Parts, Accessories and Instruction Books online for all
Panasonic Products by visiting our Web Site at:
http://www.pstc.panasonic.com
Or, send your request by E-mail to:
npcparts@us.panasonic.com
You may also contact us directly at:
1-800-332-5368 (Phone) 1-800-237-9080 (Fax Only)
(Monday-Friday 9am-9pm EST)
Panasonic National Parts Center
20421 84th Avenue South
Kent, WA 98032
(We accept Visa, MasterCard, Discover Card, American
Express)
For hearing or speech impaired TTY users, TTY: 1-866-605-1277
As of Feb 2012
32

Panasonic Canada Inc.
5770 Ambler Drive, Mississauga, Ontario L4W 2T3
PANASONIC PRODUCT – LIMITED WARRANTY
EXCHANGE PROGRAM
Panasonic Canada Inc. warrants this product to be free from defects in material and workmanship under normal
use and for a period as stated below from the date of original purchase agrees to, at its option either (a) repair
your product with new or refurbished parts, (b) replace it with a new or a refurbished equivalent value product, or
(c) refund your purchase price. The decision to repair, replace or refund will be made by Panasonic Canada Inc.
Electric Rice Cooker
Electric Thermo Pot
Automatic Bread Maker
Electric Fish Roaster
Toaster Oven
This warranty is given only to the original purchaser, or the person for whom it was purchased as a gift, of a Panasonic brand product
mentioned above sold by an authorized Panasonic dealer in Canada and purchased and used in Canada, which product was not sold “as is”,
and which product was delivered to you in new condition in the original packaging.
IN ORDER TO BE ELIGIBLE TO RECEIVE WARRANTY SERVICE HEREUNDER, A PURCHASE RECEIPT
OR OTHER PROOF OF DATE OF ORIGINAL PURCHASE, SHOWING AMOUNT PAID AND PLACE OF
PURCHASE IS REQUIRED
LIMITATIONS AND EXCLUSIONS
This warranty ONLY COVERS failures due to defects in materials or workmanship, and DOES NOT COVER normal
wear and tear or cosmetic damage. The warranty ALSO DOES NOT COVER damages which occurred in shipment, or
failures which are caused by pr oducts not supplied by Panasonic Canada Inc., or failures which result from accidents,
misuse, abuse, neglect, mishandling, misapplication, alteration, faulty installation, set-up adjustments, misadjustment of
consumer controls, improper maintenance, po wer line surge, lightning damage, modification, introduction of sand,
humidity or liquids, commercial use such as hotel, office, restaurant, or other business or rental use of the product, or
service by anyone other than a Authorized Servicer, or damage that is attributable to acts o f God.
THIS EXPRESS, LIMITED WARRANTY IS IN LIEU OF ALL OTHER WARRANTIES, EXPRESS OR IMPLIED,
INCLUDING ANY IMPLIED WARRANTIES OF MERCHANTABILITY AND FITNESS FOR A PARTICULAR
PURPOSE. IN NO EVENT WILL PANASONIC CANADA INC. BE LIABLE FOR ANY SPECIAL, INDIRECT OR
CONSEQUENTIAL DAMAGES RESULTING FROM THE USE OF THIS PRODUCT OR ARISING OUT OF ANY
BREACH OF ANY EXPRESS OR IMPLIED WARRANTY.
and from the Authorized Servicer, loss of or damage to media or images, data or other memory or recorded content. This list of items is not
exhaustive, but for illustration only.)
(As examples, this warranty excludes damages for lost time, travel to
One (1) year
One (1) year
One (1) year
One (1) year
One (1) year
Limited Warranty / EXCHANGE PROGRAM
In certain instances, some jurisdictions do not allow the exclusion or limitation of incidental or consequential
damages, or the exclusion of implied warranties, so the above limitations and exclusions may not be applicable.
This warranty gives you specific legal rights and you may have other rights which vary depending on your
province or territory.
CONTACT INFORMATION
For product information and operation assistance, please contact:
Our Customer Care Centre: Telephone #: 1-800-561-5505
Fax #: (905) 238-2360
Email link: “Support ĺ contact us ĺ email” on www.panasonic.ca
For defective product exchange within the warranty period, please contact the original dealer or our
Customer Care Centre.
33

Panasonic Canada Inc.
5770, Ambler Drive, Mississauga (Ontario) L4W 2T3
PRODUIT PANASONIC – GARANTIE LIMITÉE
PROGRAMME DE REMPLACEMENT
Panasonic Canada Inc. garantit que ce produit est exempt de défauts de matériaux et de main-d’œuvre dans
un contexte d’utilisation normale pendant la période indiquée ci-après à compter de la date d’achat original
et, dans l’éventualité d’une défectuosité, accepte, à sa discrétion, de (a) réparer le produit avec des pièces
neuves ou remises à neuf, (b) remplacer le produit par un produit neuf ou remis à neuf d’une valeur
équivalente ou (c) rembourser le prix d’achat. La décision de réparer, remplacer ou rembourser appartient à
Panasonic Canada Inc.
Cuiseurs de riz électriques
Bouilloires électriques
Machines à pain Panasonic
ôtissoires pour poisson
R
Fours grille-pain
La présente garantie n’est fournie qu’à l’acheteur original d’un des produits de marque Panasonic indiqués plus haut, ou à la personne
l’ayant reçu en cadeau, vendu par un détaillant Panasonic agréé au Canada et utilisé au Canada. Le produit ne doit pas avoir été
« vendu tel quel » et doit avoir été livré à l’état neuf dans son emballage d’origine.
POUR ÊTRE ADMISSIBLE AUX SERVICES A U TITRE DE LA PRÉSENTE GARANTIE, LA
PRÉSENTATION D’UN REÇU D’ACHAT OU DE TOUTE AUTRE PIÈCE JUSTIFICATIVE DE LA DATE
D’ACHAT ORIGINAL, INDIQUANT LE MONTANT PAYÉ ET LE LIEU DE L’ACHAT
RESTRICTIONS ET EXCLUSIONS
Un (1) an
Un (1) an
Un (1) an
Un (1) an
Un (1) an
, EST REQUISE.
La présente garantie COUVRE SEULEMENT les défaillances attribuables à un défaut des matériaux ou à un vice de
fabrication et NE COUVRE PAS l’usure normale ni les dommages esthétiques. La présente garantie NE COUVRE
PAS NON PLUS les dommages subis pendant le transport, les défaillances causées par des produits non fournis par
Panasonic Canada Inc. ni celles résultant d’un accident, d’un usage abus
if ou impropre, de négligence, d’une
manutention inadéquate, d’une mauvaise application, d’une altération, d’une installation ou de réglages impropres,
d’un mauvais réglage des contrôles de l’utilisateur, d’un mauvais entretien, d’une surtension temporaire, de la foudre,
d’une modification, de la pénétration de sable, de liquides ou d’humidité, d’une utilisation commerciale (dans un hôtel,
un bureau, un restaurant ou tout autre usage par affaires ou en location), d’une réparation effectuée par une entité autre
qu’un centre de service Panasonic agréé ou encore d’une catastrophe naturelle.
CETTE GARANTIE LIMITÉE ET EXPRESSE REMPLACE TOUTE AUTRE GARANTIE, EXPRESSE OU
IMPLICITE, INCLUANT LES GARANTIES IMPLICITES DU CARACTÈ RE ADÉQUAT POUR LA
COMMERCIALISATION ET UN USAGE PARTICULIER. PANASONI
C CANADA INC. N’AURA
D’OBLIGATION EN AUCUNE CIRCONSTANCE POUR TOUT DOMMAGE DIRECT, INDIRECT OU
CONSÉCUTIF RÉSULTANT DE L’UTILISATION DE CE PRODUIT OU DÉCOULANT DE TOUTE
DÉROGATION À UNE GARANTIE EXPRESSE OU IMPLICITE.
relatifs à une perte de temps, le transport jusqu’à et depuis un centre de service agréé, la perte ou la détérioration de supp
d’images, de données ou de tout autre contenu en mémoire ou enregistré. Cette liste n’est pas exhaustive et n’est fournie qu’à des fins
explicatives.)
(À titre d’exemples, cette garantie exclut les dommages
Certaines juridictions ne reconnaissent pas les exclusions ou limitations de dommages indirects ou
consécutifs, ou les exclusions de garanties implicites. Dans de tels cas, les limitations stipulées ci-dessus
peuvent ne pas être applicables. La présente garantie vous confère des droits précis; vous pourriez aussi
avoir d’autres droits pouvant varier selon votre province ou territoire de résidence.
DEMANDE DE RENSEIGNEMENTS
Pour tout renseignement sur les produits et de l’assistance technique, veuillez communiquer avec :
Centre de service à la clientèle : Téléphone : 1-800-561-5505
Télécopieur : (905) 238-2360
Lien courriel : « Soutien client ĺ contactez-nous ĺ courriel »
à www.panasonic.ca
Pour le remplacement d’un produit défectueux couvert par la garantie, veuillez communiquer avec le
revendeur d’origine ou notre centre de service à la clientèle.
34
orts ou

Memo
35

Panasonic Canada Inc.
5770 Ambler Drive,
Mississauga, Ontario, L4W 2T3
www.panasonic.ca
Panasonic Consumer Electronics Company
Division of Panasonic Corporation
of North America
One Panasonic Way, Secaucus, New Jersey 07094
www.panasonic.com
© Panasonic Manufacturing (Xiamen) Co.,Ltd. 2012
Printed in China
Imprimé en Chine
BZ51-1751
PMX0912K10912
 Loading...