

Panasonic NA-140VZ4 Operating Instructions
Read Before Using 02
SAFETY PRECAUTIONS 04
Washing Instructions 12
Optional Functions 22
Maintenance 28
Troubleshooting 31
Installation Instructions 36
Operating Instructions
& Installation Instructions
Washing Machine
(Domestic use)
Model No.
NA - 140VZ4
®
Thank you for purchasing this appliance.
- For optimum performance and safety, please read these instructions
carefully.
- Before connecting, operating or adjusting this appliance, please read the
instructions completely. Please keep this manual for future reference.
NA-140VZ4_English.indb 1 2012-12-27 17:58:50
2 - Read Before Using
Electrical Connection (UK and Republic of Ireland only)
For your safety, please read the
following text carefully.
This appliance is supplied with a mould
three pin mains plug for your safety and
convenience.
A 13-ampere fuse is fitted in this plug.
Should the fuse need to be replaced,
please ensure that the replacement fuse
has a rating of 13 ampere and that it is
approved by ASTA or BSI to BS1362.
Check for the ASTA mark
or the BSI
mark
on the body of the fuse.
If the plug contains a removable fuse cover
you must ensure that it is refitted when the
fuse is replaced.
If you lose the fuse cover, the plug must
not be used until a replacement cover is
obtained. A replacement fuse cover can be
purchased from your local dealer.
Warning
If the fitted mould plug is unsuitable
for the mains socket in your home
then the fuse should be removed
and the plug cut off and disposed
of safely.
There is a danger of severe
electrical shock if the cut off plug is
inserted into any 13-ampere socket.
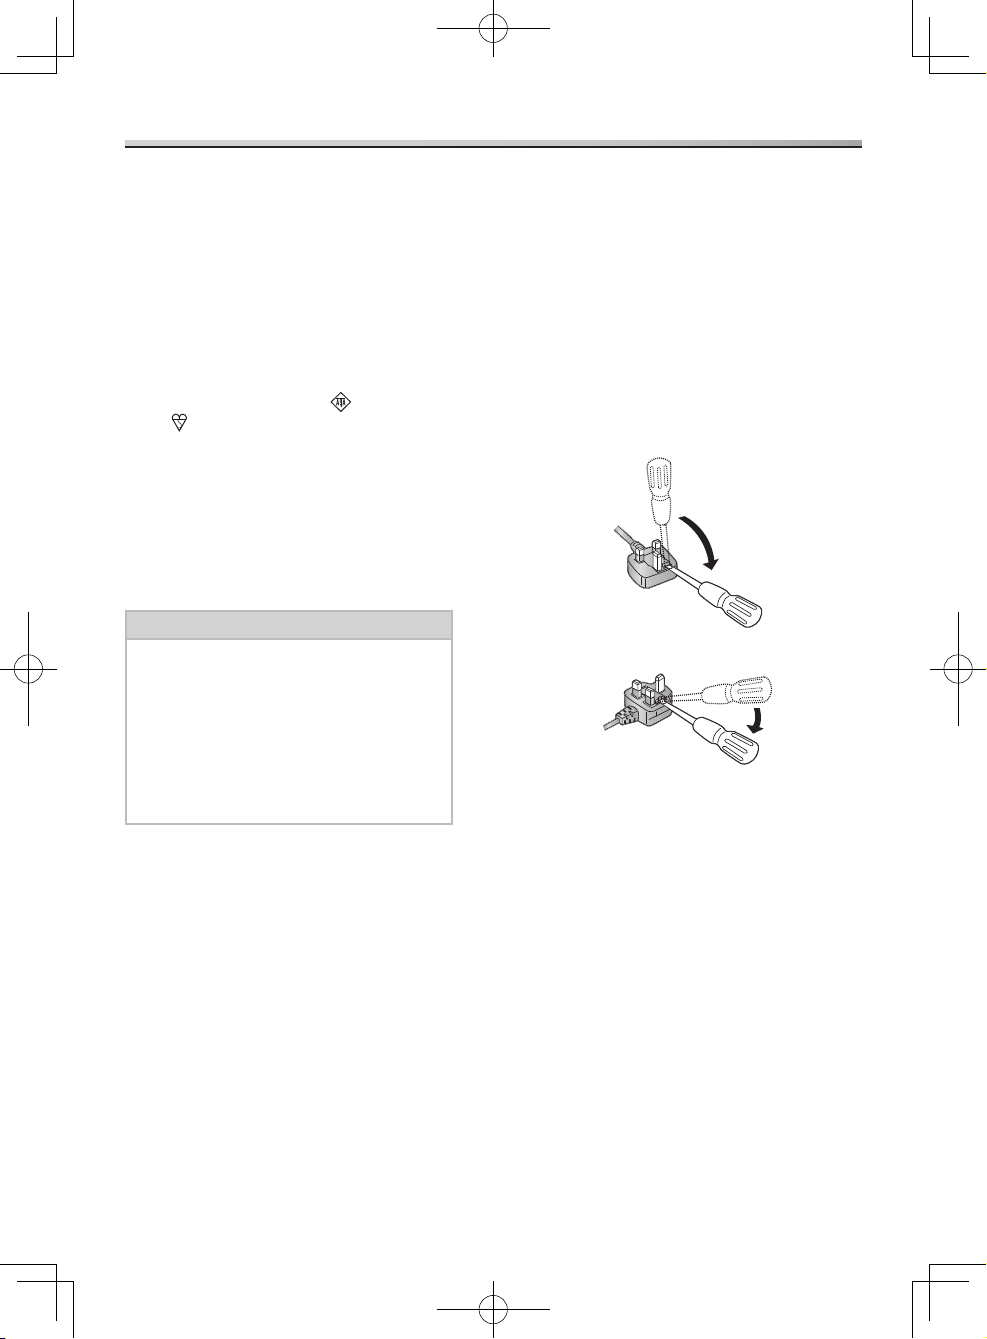
How to replace the fuse
The location of the fuse differs according
to the type of AC mains plug (figures A and
B).
Confirm the AC mains plug fitted and follow
the instructions below. Illustrations may
differ from actual AC mains plug.
Open the fuse cover with a screwdriver
and replace the fuse and close or attach
the fuse cover.
Figure A -
Figure B -
NA-140VZ4_English.indb 2 2012-12-27 17:58:50

Read Before Using - 3
Contents
Read Before Using
Electrical Connection (UK and
Republic of Ireland only) .........2
SAFETY PRECAUTIONS ........4
Checking Your Washing Machine . . 6
Your washing machine .............6
Accessories......................6
Before You Start Washing ........7
Before use, check .................7
Before initial use . . . . . . . . . . . . . . . . . .7
Preparing the laundry ..............7
Using the Buttons and Dial .......8
Buttons and dial ..................8
Display .........................9
Adding Detergent and Other
Chemicals ...................10
Detergent compartment ...........10
Softener compartment.............11
Prewashing compartment ..........11
Washing Instructions
Washing.....................12
Steam programme ...............14
Selecting the Programme .......16
Details of Programmes .........18
Washing Delicates.............20
Wool and Delicates programmes ....20
Delicate laundry loads.............20
Tips for washing delicates..........20
Washing Bedding .............21
Bedding programme . . . . . . . . . . . . . .21
Optional Functions: Option ......22
Setting display language...........22
Setting other Option functions.......23
Speed/Eco......................23
Easy Ironing ....................24
Stain Master ....................24
Extra Rinse . . . . . . . . . . . . . . . . . . . . .24
Prewash .......................24
Mode ..........................25
Buzzer.........................25
Operation Sound.................25
Brightness ......................25
Optional Functions: Others ......26
Te mperature, spin speed, and time...26
Child safety lock .................26
After Starting Washing..........27
Required time ...................27
Changing settings ................27
Unlocking the door ...............27
Maintenance
Maintenance .................28
Cleaning the outside of the
appliance.......................28
Cleaning the drum................28
Cleaning the detergent drawer ......28
Cleaning the door seal and window . .29
Cleaning the drain filter ............29
Cleaning the water-supply filter......30
Preventing a frozen water-supply
hose ..........................30
Troubleshooting
Fault Checklist................31
Error Display .................35
Installation Instructions
Choosing the Right Location .....36
Carrying the appliance ............36
The right place for the appliance.....36
Installing a built-in washing machine..37
Moving and Installing...........38
Removing the anchor bolts .........38
Moving the appliance .............38
Levelling the appliance . . . . . . . . . . . .39
Connecting Hoses and Power
Supply . . . . . . . . . . . . . . . . . . . . . . 40
Hoses and cable lengths...........40
Water-supply hose ...............40
Water-drain hose.................41
Connecting to the power supply .....41
Checking After Installation.......42
Installation checklist ..............42
Test run after installation ...........43
Power and Water Consumption...44
Consider the Environment.......45
Specifications ................46
NA-140VZ4_English.indb 3 2012-12-27 17:58:50

4 - Read Before Using
SAFETY PRECAUTIONS
Please read and follow these safety
precautions.
WARNING
This describes issues which could
cause death or serious injury.
General Use
This appliance can be used by children aged from 8 years and above and
persons with reduced physical, sensory
or mental capabilities or lack experience
and knowledge if they have been given
supervision or instruction concerning
use of the appliance in a safe way and
understand the hazards involved.
Children shall not play with the
appliance.
Cleaning and user maintenance shall not
be made by children without supervision.
Do NOT place a stand or a chair close to the appliance.
Children may be able to reach the
control panel or climb onto or into the
appliance.
Turn off the water supply to the appliance if it is not going to be used
for a prolonged period, such as during
a holiday. This is especially important
if there is no drainage around the
appliance.
If the water supply is left on, the water
pressure may unnecessarily increase
and result in a leak.
Do NOT install the appliance in a damp location or in a location exposed to the
weather.
This may result in malfunction,
deterioration, electric shock, or fire.
Do NOT pour or spill water directly onto any part of the appliance.
This may result in malfunction, electric
shock, or fire.
Keep sources of ignition, such as candles or cigarettes, away from the
appliance.
They may cause a fire or damage to the
appliance.
Keep flammable materials away from the appliance, for example, gasoline,
thinner, alcohol, or clothing soaked with
these materials.
They may cause an explosion or a fire.
Power source and cable
Unplug the mains lead when cleaning the appliance.
Check the mains lead and mains plug for any damage.
If the mains lead is damaged, it must be
replaced by the manufacturer, its service
agent or similarly qualified persons to
avoid a hazard.
Do NOT use a mains plug adaptor or extension cable. There is a possibility of
overheating which may cause a fire. Use
an unused household mains socket, fully
rated at AC 220 V to 240 V. If you are
not sure, contact a qualified electrician.
ENSURE the mains plug is fully inserted into the household mains socket. If the
mains plug is not fully pushed in, a loose
connection may overheat and cause an
electric shock or fire.
Do NOT touch the mains lead or mains plug with wet hands.
Possibility of an electric shock.
Do NOT pull the mains lead but hold the mains plug to unplug the appliance.
Otherwise, there is possibility of damage
to the mains lead, which may lead to an
electric shock or fire.
NA-140VZ4_English.indb 4 2012-12-27 17:58:50

Read Before Using - 5
SAFETY PRECAUTIONS
To Prevent Injury
The installation of the appliance should be done by the manufacturer’s dealer or
service agent.
If the installation, test run and inspection
of the appliance are not carried out
following the installation method outlined
in these instructions, the manufacturer
will not be liable for any accident or
damage caused.
Do NOT dismantle, repair or modify the appliance.
There is a possibility the appliance may
malfunction which may result in a fire or
an injury. If repairs are needed, contact
your local Customer Communication
Centre.
Do NOT touch the laundry inside the drum until it has completely stopped,
as there is a possibility of injury. Keep
children away from the rotating laundry.
CAUTION
This describes issues which could
cause injury or damage your
belongings.
General Use
Prior to use, turn on the tap and check the hose and connections for any leaks.
Improper connection could cause leaks.
The new hose-sets supplied with the appliance are to be used and that old
hose-sets should not be reused.
This appliance is only suitable for textiles labelled washing machine washable.
Do NOT connect to the hot water supply. This appliance works ONLY with cold
water.
Do NOT apply pesticide, hair spray or deodorant to the appliance.
Do NOT put any electrical equipment, for example, TVs, radios or battery
chargers, on or near the appliance.
Do NOT put too much laundry or detergent into the appliance.
This may cause damage to the
appliance.
REMOVE the anchor bolts before installing the appliance using a spanner
supplied or similar tool. The anchor bolts
are used to transport the appliance.
If the anchor bolts are not removed, the
appliance will strongly vibrate during
use.
To Prevent Injury
Do NOT climb onto the appliance. This may cause injury or damage to the
appliance.
Keep fingers away from the door hinge when opening and closing the door.
Do NOT slide your hand (or unprotected foot) underneath the appliance when in
use.
Check all washing and remove all objects such as nails, pins, coins, clips,
metal wires, etc.
They may cause damage to other
laundry or the appliance.
Do NOT use the appliance to wash waterproof sheets or clothing. There
is a possibility of excessive vibration
or failure during the spin cycle that
may result in an injury, damage to the
appliance or a water leak.
BE CAREFUL when draining hot water or any detergent out of the drum.
BE CAREFUL not to get laundry caught in the door seal when it is closed. This
may result in a water leak or damage to
the laundry during the wash cycle.
NA-140VZ4_English.indb 5 2012-12-27 17:58:50
6 - Read Before Using
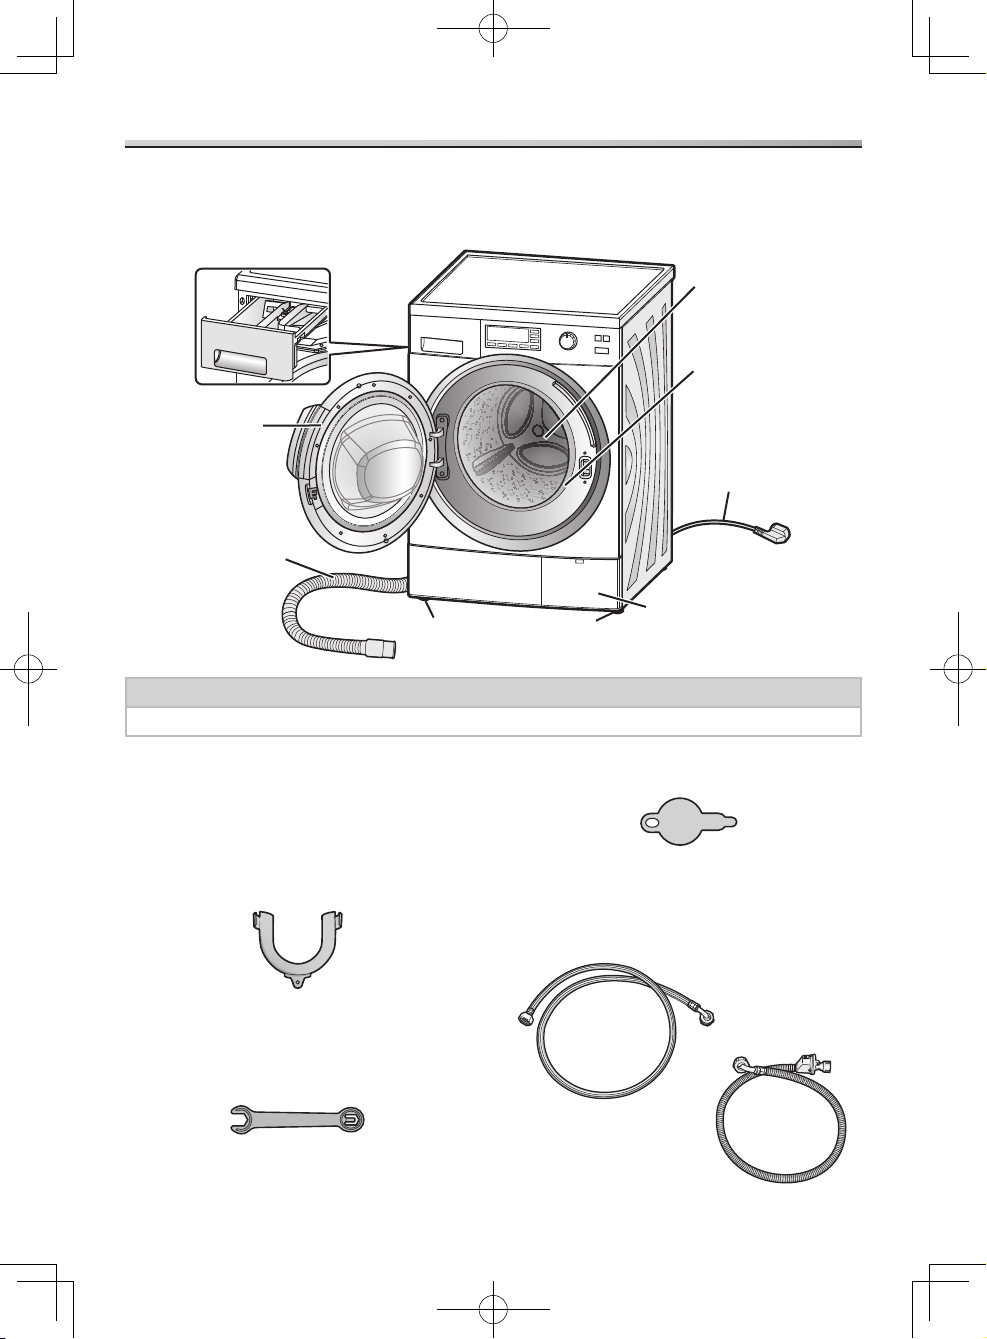
Checking Your Washing Machine
Your washing machine
Caution
Do NOT bend the mains lead when the appliance is running.
Accessories
Make sure that all the accessories are
supplied with the appliance.
Elbow (see page 41)
For fixing the water-drain hose
Spanner (see pages 38-39)
End A is for adjusting the stand. End B is
for the anchor bolts.
A
B
Cover cap (x4) (see pages 38-39)
Water-supply hose (see page 40)
Either one of these hoses is supplied with
the appliance.
Detergent drawer
(see page 10)
Door
Water-drain hose
Adjustable stands
(see page 39)
Drain filter cover
(see page 29)
Mains lead/
Mains plug
Door seal
Drum
(Washing/
spin-drying tub)
Standard
Hose
Hose with
water-supply valve
(Not available for UK models)
NA-140VZ4_English.indb 6 2012-12-27 17:58:52
Read Before Using - 7
Before You Start Washing
The language displayed on the LCD can be
changed. For more details, see page 22.
Before use, check
For the appliance’s initial operation or
after a prolonged period of non-operation,
perform the following procedures:
Secure the water-supply hose.1.
Open the tap.2.
Connect the power.3.
Make sure that the water-drain hose 4.
is positioned towards a drain.
For more details, see page 41.
Before initial use
The default setting is the 40 ºC Cotton
programme. For the appliance’s initial
operation, operate it WITHOUT any
detergent or clothing to rinse out residue or
moisture.
Note
There may be drops of water or
condensation in the appliance due
to the factory inspection prior to
shipment. This is not a malfunction.
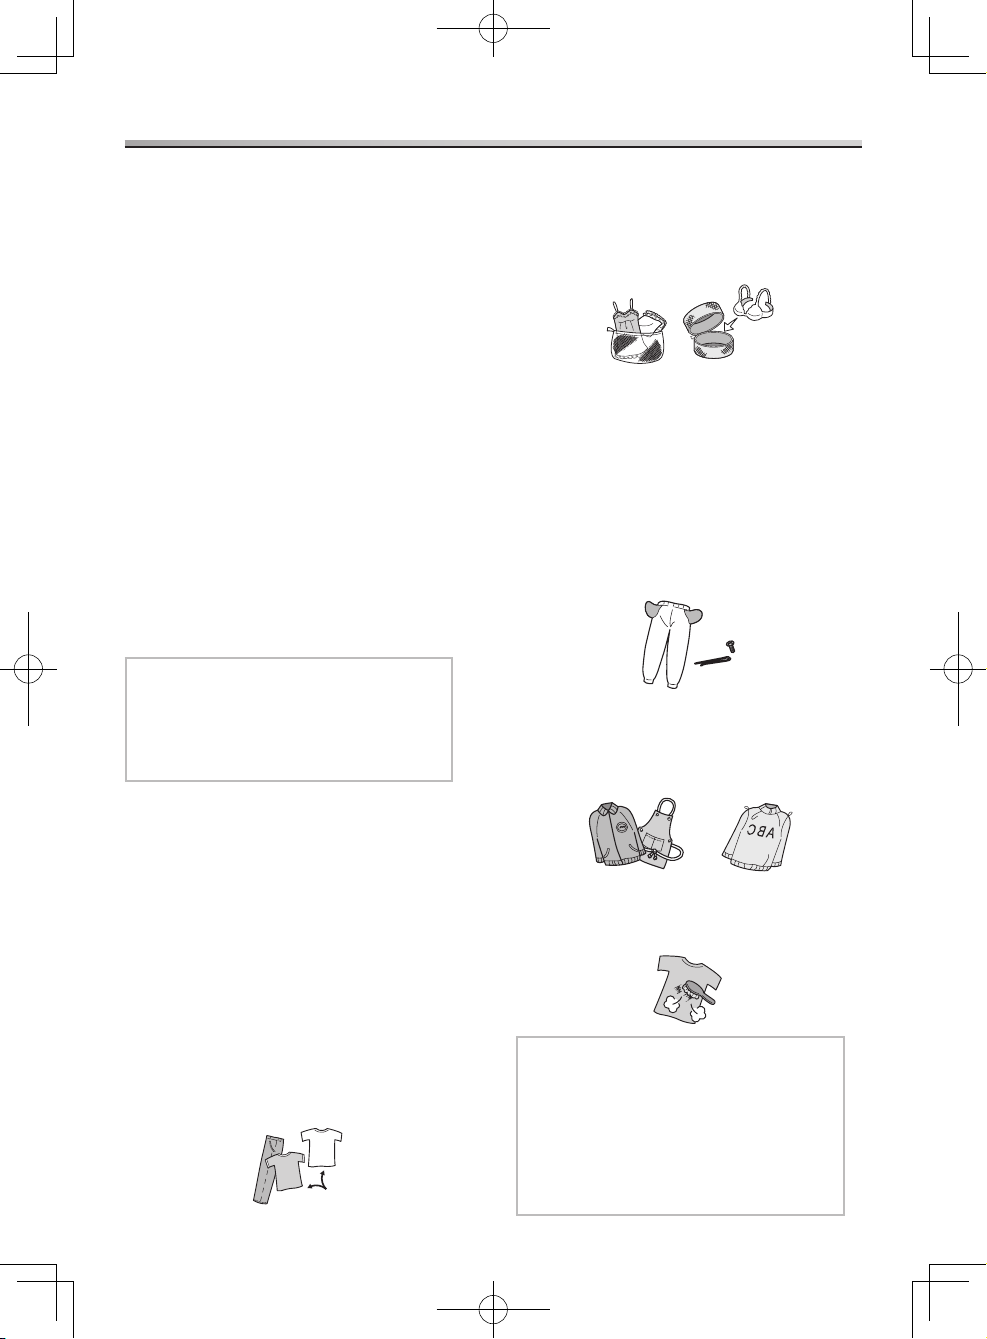
Preparing the laundry
Sorting clothing
Read clothing washing labels to help you sort them into different loads.
Sort the laundry by colour, by type of fabric, and by how soiled it is. Doing
so will help you choose the correct
programme and temperature for each
wash.
Clothes that are not colour fast should be washed separately. Wash denim
separately.
You should put bras with metal wires, tights, lace clothing and small items of
clothing into a laundry net to prevent
them or the appliance from getting
damaged.
Treating stains
Apply stain remover to stained portions.
For dirt and solid stains, wash lightly by
hand first.
Check clothing
Check that pockets on clothing do not contain any objects that may damage
the clothes or the appliance.
To avoid clothes being damaged, check and tie up loose strings, close zips, turn
clothing with raised fabrics and zips
inside out.
Remove any hair, animal fur, sand, and other materials with a brush before
washing.
Note
Do not wash clothes that are heavily
stained with large quantities of
vegetable oil or cosmetic oil (aroma oil,
etc.) Failure to observe this may result
in the door seal swelling, causing
the water to overflow and leading to
malfunctions.
NA-140VZ4_English.indb 7 2012-12-27 17:58:52
8 - Read Before Using
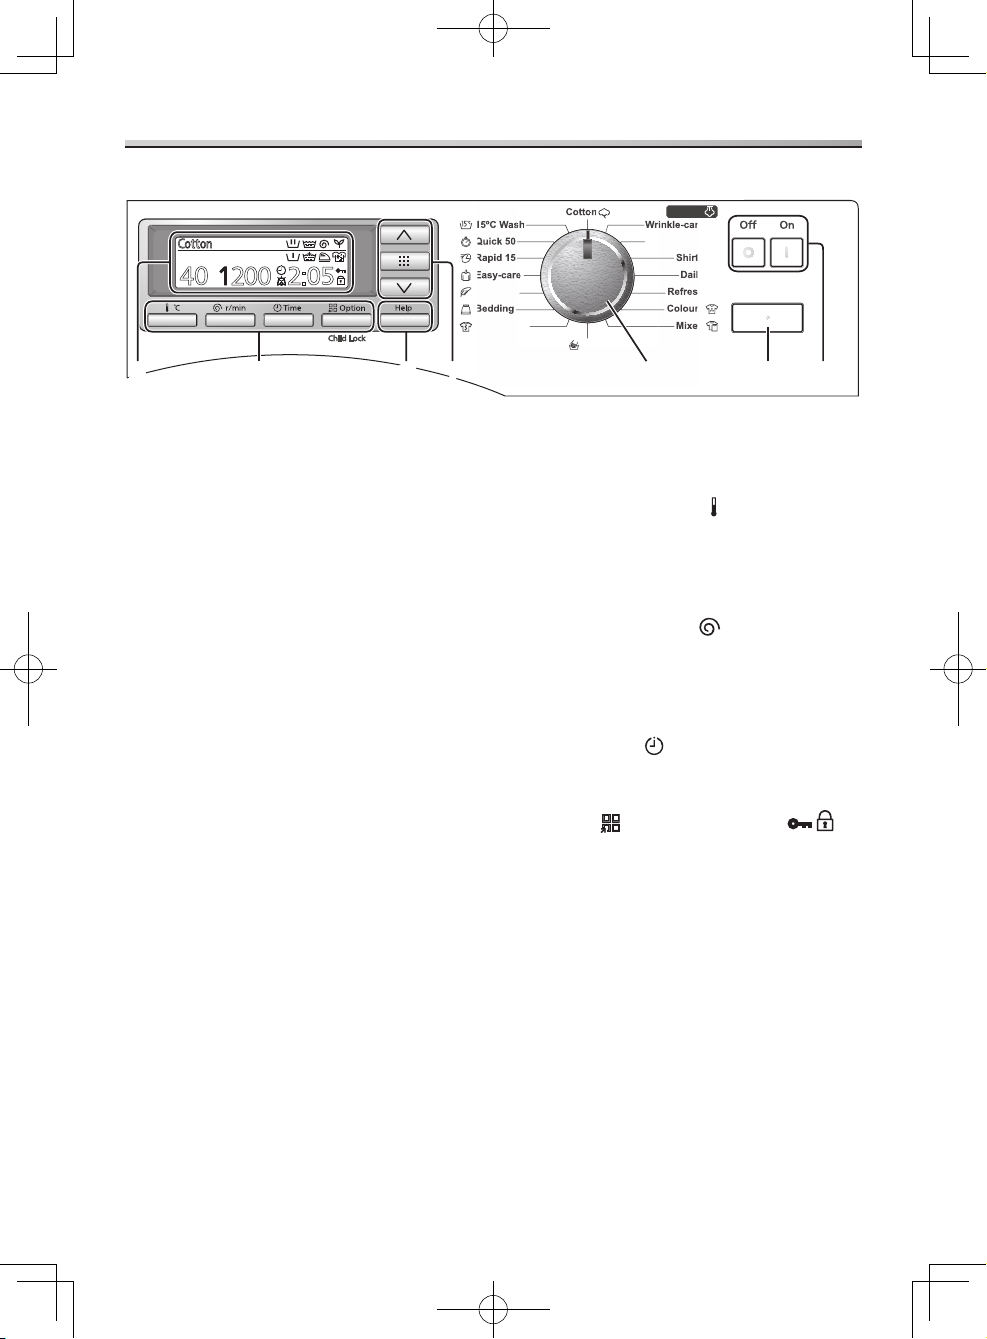
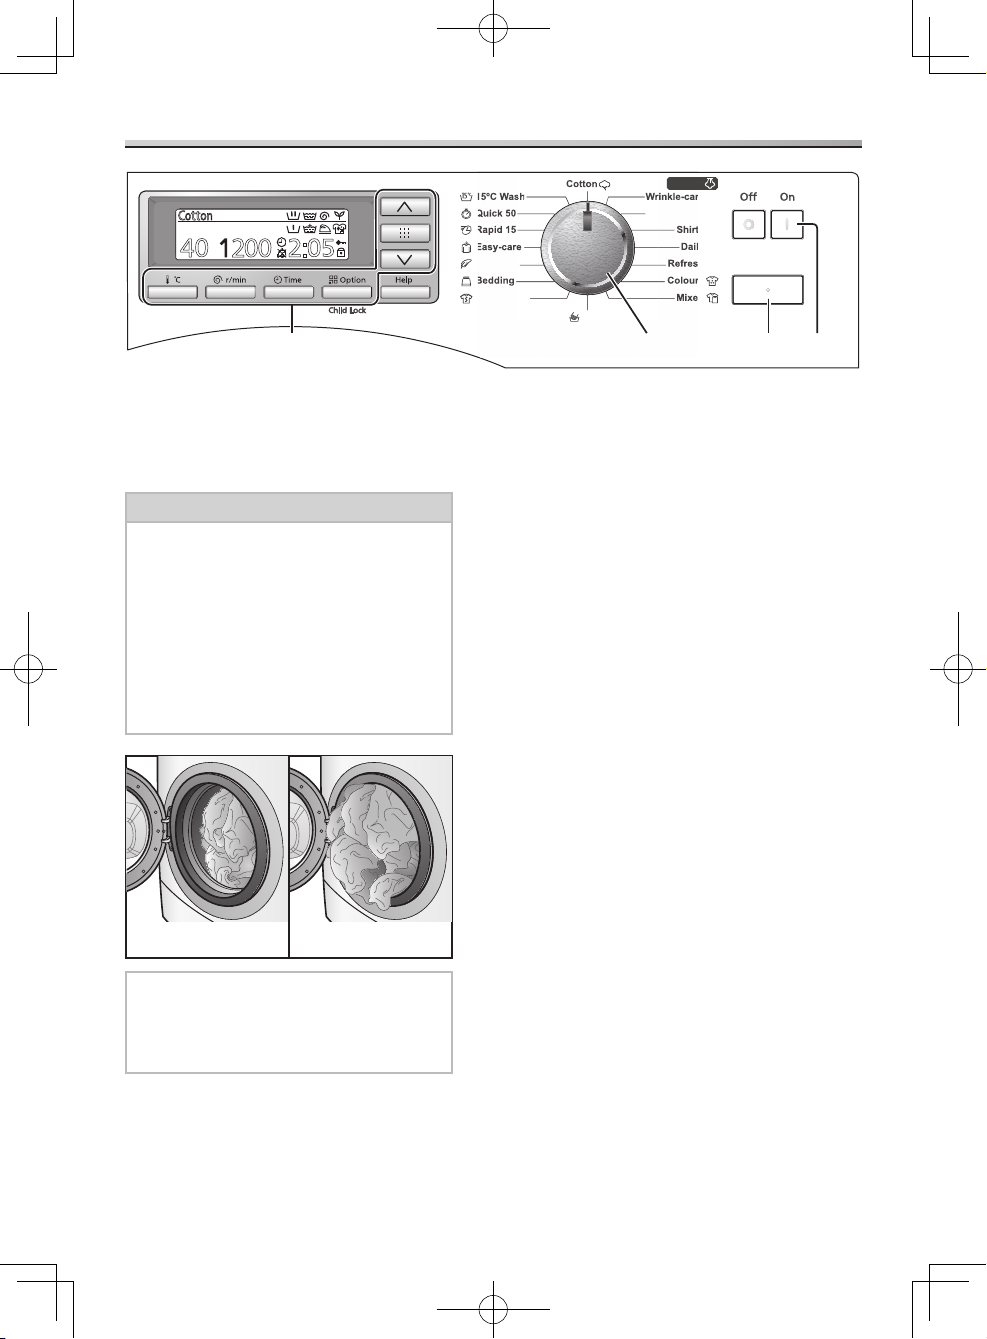
Using the Buttons and Dial
Buttons and dial
Cotton
15ºC Wash Wrinkle-care
Rapid 15
Quick 50
Shirts
Bedding
Refresh
Daily
Colours
Easy-care
Mixed
Start/Pause
0
Shirt
g
Refresh
Daily
Colour
Mixe
Cotto
Wrinkle-care
Allergy-care
Delicates
Sportswear
Wool
Steam
2
C
otton
4
0
2
00
2:
05
1
2
2
6
6
7
7
5
4
4
3
Power buttons1.
If you do not press the Start button within 10 minutes after the appliance
has been switched on, the appliance
automatically switches itself off.
After the appliance is switched off, the “Panasonic” logo is displayed for
approximately for 3 secs. The unit
appliance cannot be turned on until after
the logo disappears.
Start/Pause button2.
Press this button to start or pause the
wash programme.
Programme selection dial3.
Use this dial to choose the best
programme for the laundry. (See pages
16-17.)
Display4.
This display shows the various settings,
help, and error messages.
Optional function buttons5.
Use these buttons in conjunction with
the selection buttons to set the wash.
Temperature button For choosing water temperatures
ranging from cold to 90 ºC.
You can choose hotter temperatures for
whites, cottons, or soiled laundry.
Spin speed button For choosing the spin speed for the
programme you have selected. (The
maximum spin speed of model NA140VZ4 is 1400 r/min.)
Time button For presetting the time for when the
wash is to finish. (See page 26.)
Option -
/Child Lock button
For selecting options (see pages 22-26),
for example, Mode and Stain Master, or
setting Child Lock (see page 26), which
activates the door and button locks.
NA-140VZ4_English.indb 8 2012-12-27 17:58:54
Read Before Using - 9
Using the Buttons and Dial
Help button6.
Press this button to display a description of the currently selected programme.
Press the button again to return to the Main screen, or press an optional
function button to move to its respective
function screen.
Selection buttons7.
Press the -
or button to
move to the next selection, or to scroll
the texts (for example, Help and Error
text).
Press the -
button to set the
currently selected selection in the
display.
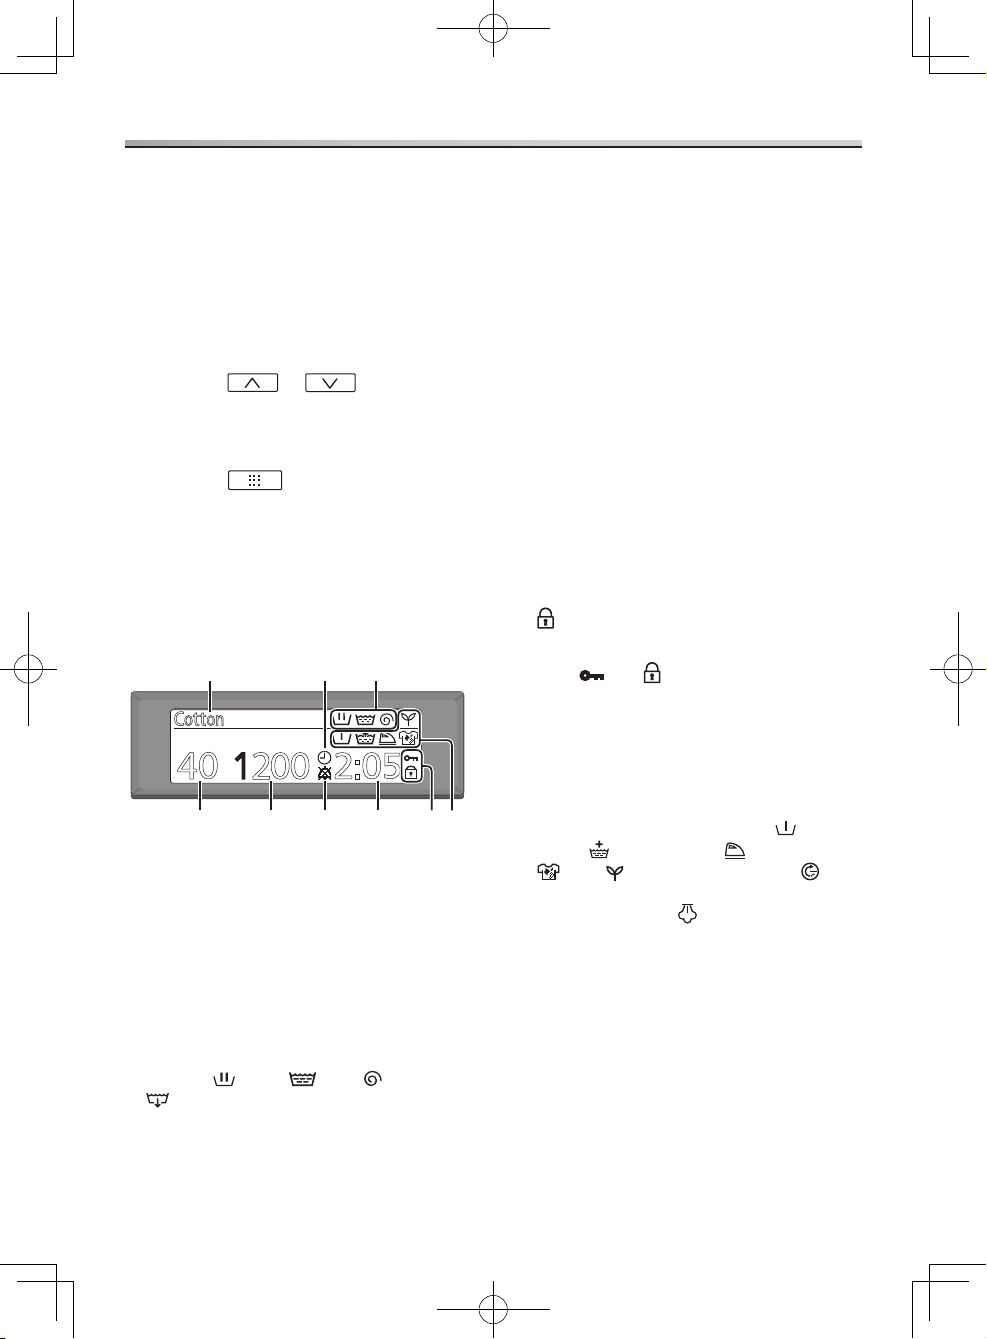
Display
Main screen with all icons displayed
C
otton
4
0
2
00
2:
05
1 2
6
7 89
5
4
3
Programme1.
Time2.
This indicator is displayed if the time
for when the wash is to finish has been
preset.
Process3.
This indicator shows the current process of the programme. The process consists
of wash
, rinse , spin , and drain
.
The indicator goes off when the wash is finished.
Temperature4.
Spin speed5.
Buzzer off6.
This indicator is displayed if the buzzer
is set not to sound when the wash
finishes. For details on setting the
buzzer, see pages 23 and 25.
Remaining time7.
This indicator shows the approximate time until the washing finishes. For
example, ‘1:18’ means 1 hour and 18
minutes.
The time is acquired from the weight of the laundry measured when washing
starts.
Lock8.
- is displayed if the door is locked. (See
page 27.)
Both -
and
are displayed if the child
safety lock is activated. (See page 26.)
Option functions9.
These indicators are displayed when
their respective functions have been
programmed. The option functions that
display here are the Prewash
, Extra
Rinse , Easy Ironing , Stain Master
, Eco , and Speed functions .
Steam indicator The Steam function becomes
operational when the Wrinkle-care,
Allergy-care, Shirts, Daily and Refresh
programmes are used. When you select
these programmes, the Steam symbol
lights up at the same position with the
Easy Ironing symbol.
Moreover, during Wrinkle-care and
Refresh programmes, the Steam symbol
flashes on and off, indicating that Steam
operations are under way.
NA-140VZ4_English.indb 9 2012-12-27 17:58:55
10 - Read Before Using
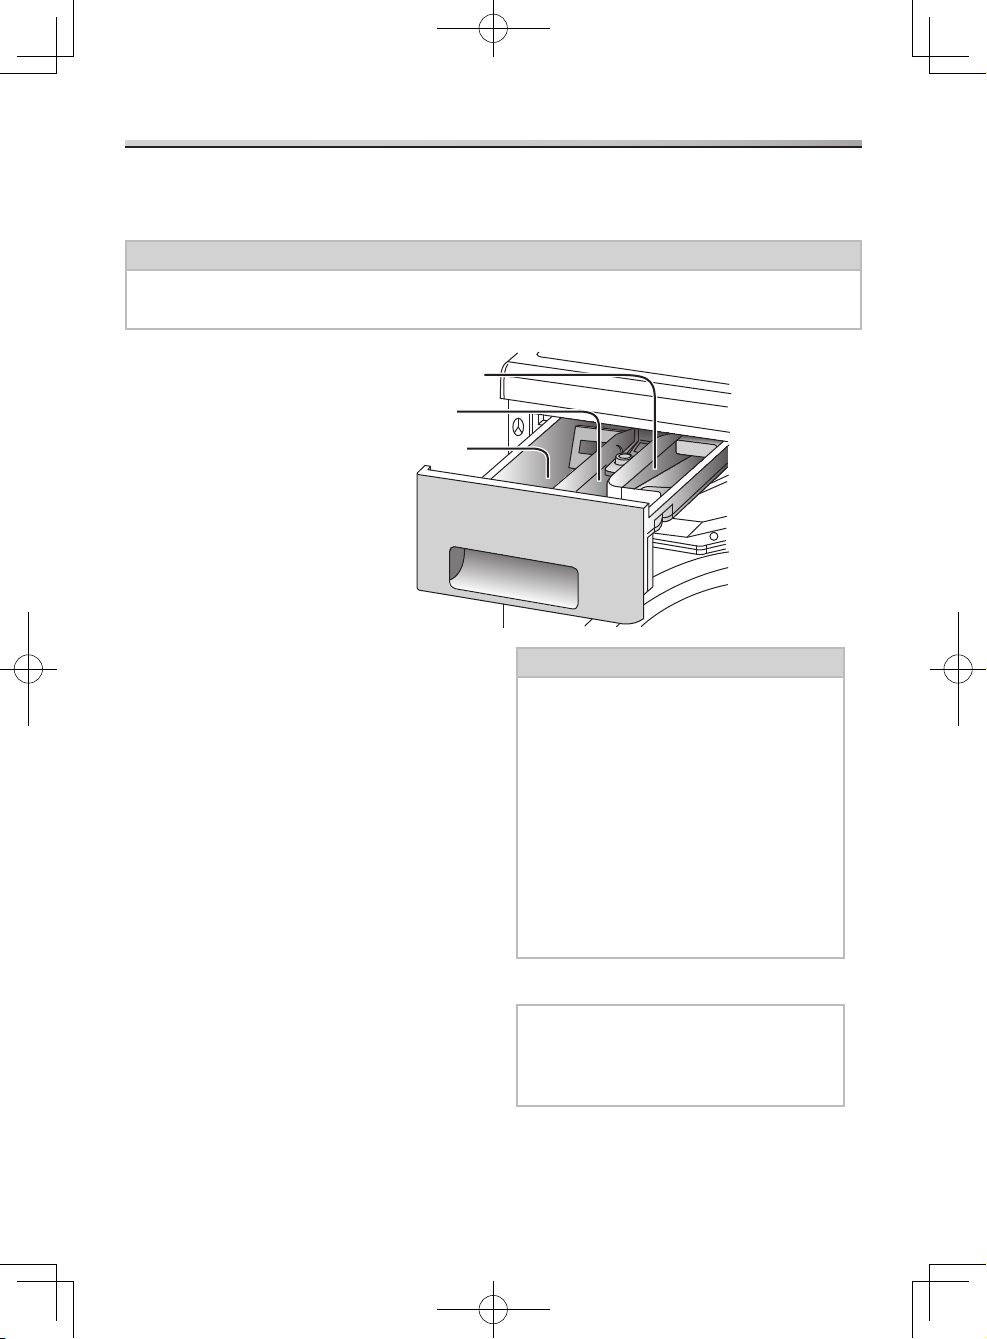
Adding Detergent and Other Chemicals
Detergent compartment
The following detergents and additives may
be added to this compartment:
Detergent Water softening agent Stain remover Tub cleaning detergent or bleach -
If you use multiple chemicals in this
compartment for washing, add them in the
following order:
1. Detergent
2. Water softening agent
3. Stain remover
Detergent
Use only detergents that are recommended
for fully-automated washing machines.
Please use low suds detergents.
Caution
If the instructions on the package
indicate that detergent should be
placed in the drum, do NOT put it
into the detergent drawer.
These detergents may not flow well
and remain in the detergent drawer.
Do not overfill with detergent. Failure
to observe this may result in the
detergent blocking the water supply,
causing the water to overflow from
the front of the detergent drawer and
leading to malfunctions.
Liquid detergent1.
Note
Do NOT use liquid detergent with the
Prewash function. It may flow away
during the prewash.
For the Wool programme, use mild liquid
detergent.
Pull out the detergent drawer and add detergent or softener to the correct
compartment. Check the packages for the appropriate recommended amounts.
Caution
Do NOT use the appliance when the detergent drawer is removed.
This may result in a water leak.
Prewashing compartment
Softener compartment
Detergent compartment
NA-140VZ4_English.indb 10 2012-12-27 17:58:55
Read Before Using - 11
Adding Detergent and Other Chemicals
Powdered detergent2.
Detergent reaches the drum only when
water flushes through the detergent
drawer. If you forgot to add detergent, use
the Option button to run the Drain only
function of the Mode function. (See page
25.)
Then, add detergent and start washing
again.
To prevent powdered detergent from
remaining in the drawer, perform the
following:
Dry the inside of the drawer with a cloth. Make sure that the detergent is not -
lumpy when you add it as this may
cause a blockage over time.
Amount of Detergent
The amount of detergent you should use
depends on the following factors:
How soiled the laundry is The amount of the laundry Water hardness -
The amount of foam varies according to
the amount and type of detergent, how
soiled the laundry is, and the hardness and
temperature of the water.
Water softening agent
If you live in a hard water area, we
recommend the usage of a water softening
agent. For more details on water hardness,
contact your local water authority.
Use of a water softening agent can help
reduce the amount of detergent that is
required for each wash and help prevent
the formation of limescale deposits, which
may damage the appliance.
Softener compartment
The following additives may be added to
this compartment:
Fabric softener Laundry starch -
Fabric Softener
To prevent static, add softener before you
start washing. It will be automatically added
in the final rinse cycle.
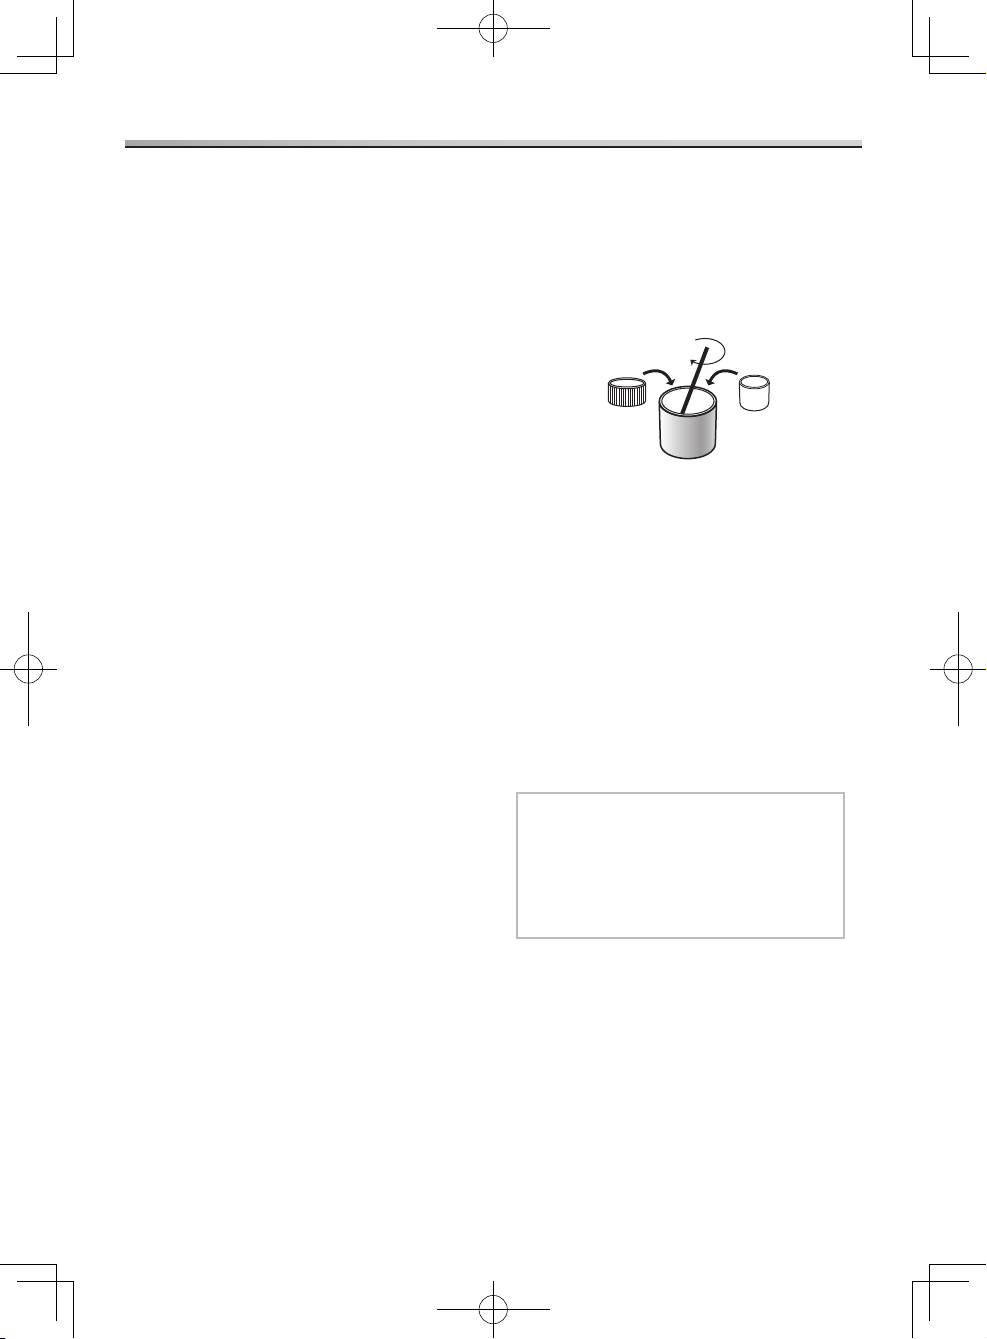
Dilute concentrated softeners before you
add them. Add up to only 130 ml to the
compartment to avoid overflowing.
Rinse out the remaining softener with
a splash of water or a damp cloth after
washing. If it sticks to the compartment,
pull out the drawer and clean it out. (See
page 28.)
Laundry starch
Simply add laundry starch to the softener
compartment. It will be automatically added
to the clothing as part of the final rinsing
process. Make sure that you do not fill the
compartment over the MAX level.
If it is hard to pour, you can dilute the
starch slightly with water before adding it.
Note
After using starch, clean the detergent
drawer, especially the softener cover
(see page 28). Then, run the Rapid 15
programme WITHOUT detergent to
remove any excess starch in the drum.
Prewashing compartment
Detergent for prewashing
Whenever you use any programmes with
the Prewash function, always put detergent
for the prewash in this compartment.
Undiluted
softener
Water
NA-140VZ4_English.indb 11 2012-12-27 17:58:55
12 - Washing Instructions
Washing
Open the door and put the laundry 1.
into the drum.
For details about preparing and sorting
the laundry, see pages 7, 16, and 17.
Caution
Make sure to place the laundry within the drum so that it does not
get caught in the door.
Failure to observe this may result in damage to the door seal,
leading to malfunctions.
Do NOT overload the drum. -
This may cause excessive vibration
or damage to the appliance.
Correct
Incorrect
Note
When loading a big amount of laundry,
make sure to evenly distribute the
laundry throughout the drum.
Close the door and press the On 2.
button.
The “Panasonic” logo will be displayed
in the display for about 2 seconds.
Turn the programme selection dial 3.
either way to select the programme.
A wash time will be displayed.
15°C Wash programme
This programme achieves the same
cleaning strength with 15 °C lowtemperature washing as 40 °C programme
(except for greasy filth).
Select optional functions.4.
For details and setting procedures for each function, see pages 22-26.
For more details about available functions and settings for each
programme, see pages 18-19.
Add detergent to the detergent 5.
drawer.
(See pages 10-11.)
Press the Start button.6.
After the appliance starts, the wash load
is assessed. Calculations of assessed
wash loads are based upon normal
clothing volumes. Actual results may
vary to some degree due to differences
in types and sizes of clothing.
After about 30 seconds, a new wash
time is displayed and water begins to
flow in.
Cotton
15ºC Wash Wrinkle-care
Rapid 15
Quick 50
Shirts
Bedding
Refresh
Daily
Colours
Easy-care
Mixed
Start/Pause
0
Shirt
g
Refresh
Daily
Colour
Mixe
Cotto
n
h
Wrinkle-care
Allergy-care
Delicates
Sportswear
Wool
Steam
2
C
otton
4
0
2
00
2:
05
632
44
NA-140VZ4_English.indb 12 2012-12-27 17:58:56
Washing Instructions - 13
Washing
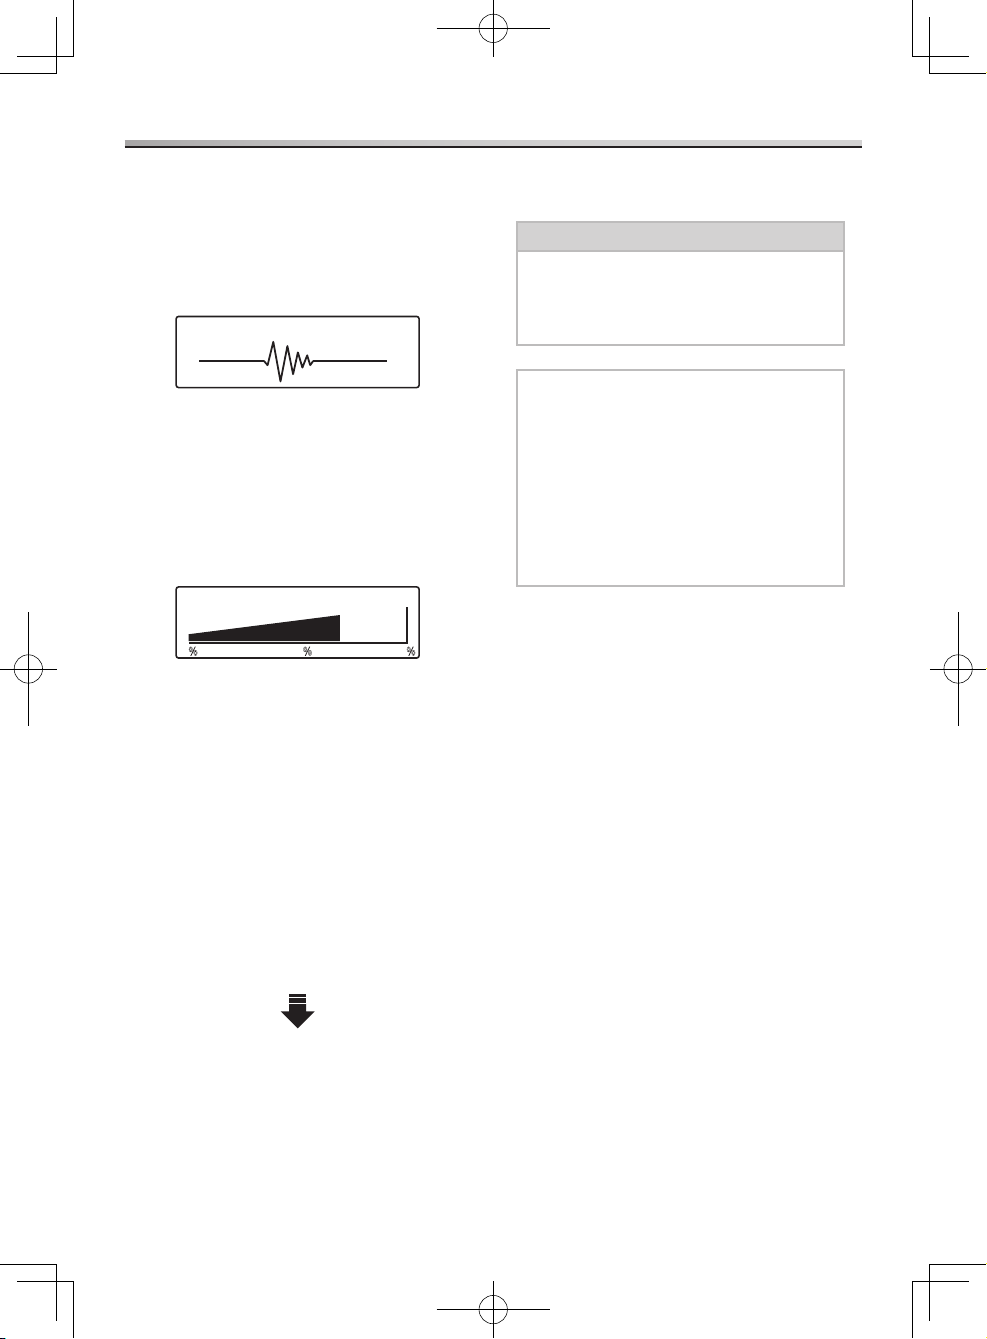
Assessment of wash loads
After the appliance starts, the wash time
for the rated wash load is displayed, and
then the amount of laundry in the drum
is assessed. During assessment, the
following screen is displayed.
After about 30 seconds, the wash load
is displayed as a percentage of the
wash capacity for the programme. Wash
loads are calculated based upon normal
clothing volumes. Actual results may
vary to some degree due to differences
in types and sizes of clothing.
0
%
50
%
100
%
After about 5 seconds, a new wash time is
displayed and water begins to flow in.
Wash loads are not assessed for the
following programmes.
Wool programme Rapid 15 programme Shirts programme Sportswear programme Bedding programme Wrinkle-care programme Daily programme Refresh programme -
The buzzer will sound when the
programme has finished, and the door
will unlock immediately.
The Option function can be used to turn the
buzzer on or off. (See pages 23 and 25.)
Caution
After a high temperature wash, be
careful to not burn yourself when
handling the laundry or touching
the inside of the drum.
Note
If the detergent is not completely removed from the laundry by using
the basic programme, use the Extra
Rinse function.
With the Eco and the Speed functions, if the load is big, the
laundry may stick to the inside of the
drum. This is normal.
Remove the laundry and rearrange where
necessary. Do not leave it in the drum too
long after the programme ends, because
colours may run.
Assessing Wash Load
Wash Capacity
NA-140VZ4_English.indb 13 2012-12-27 17:58:57
14 - Washing Instructions
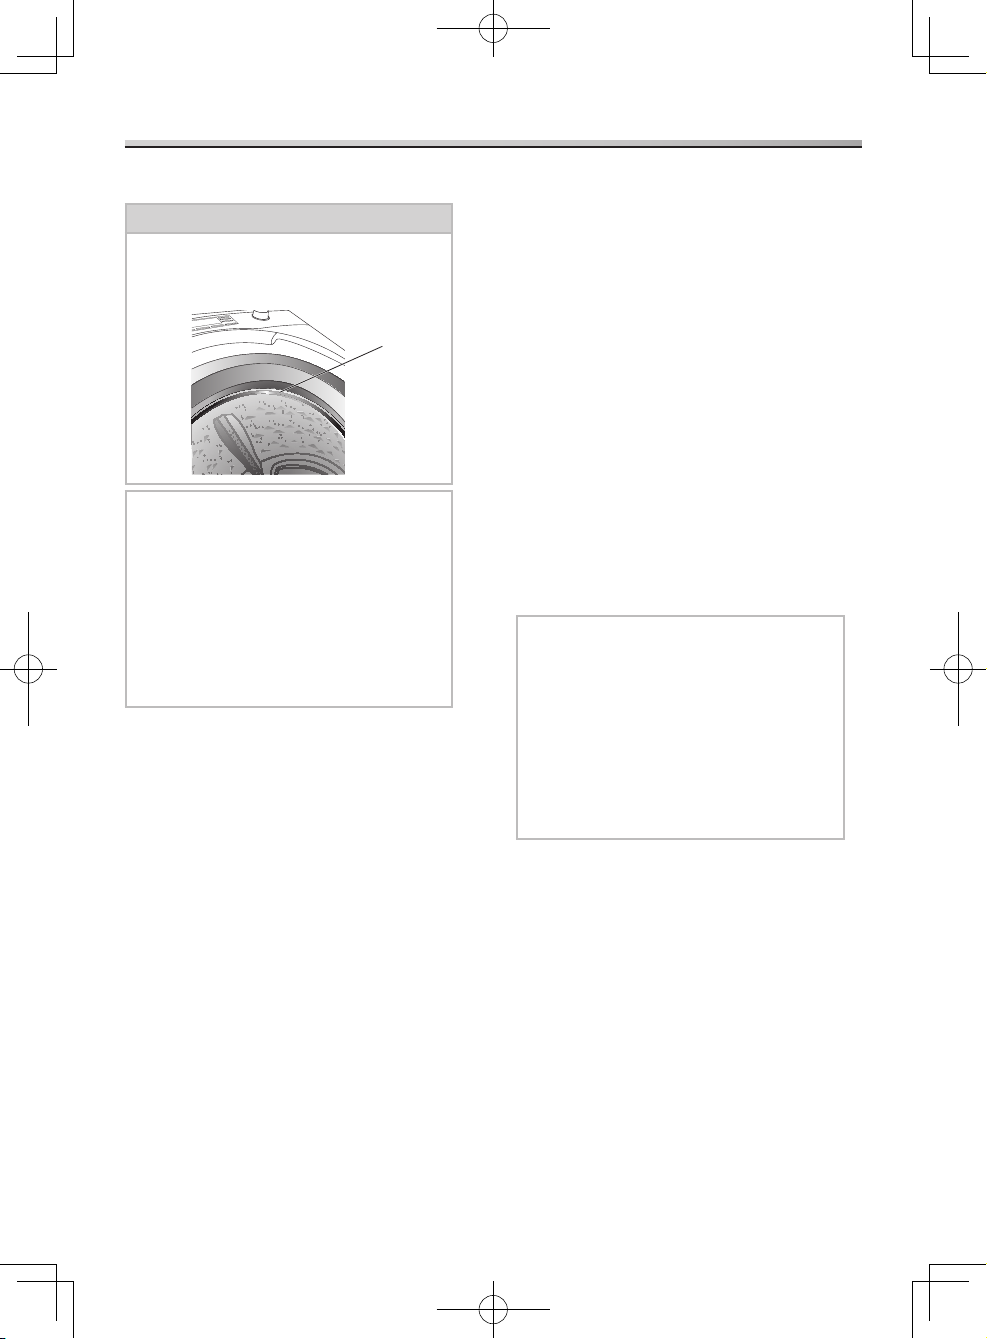
Washing
Steam programme
Caution
BE CAREFUL The metal ring
might be hot after using a Steam
programme.
Note
When temporarily halting a Steam programme, if the inside of the drum
is hot, the door will not open.
If you want to take items out of the drum while it is still operating, turn
off the power once, select the Cotton
programme and redo the Drain
operations.
Wrinkle-care programme
Use of the dedicated Steam programme
will help to alleviate the wrinkling of
clothing.
Washable
Dry items which are slightly creased Freshly washed and spun items – 1.5 kg
or less
Non washable
Delicate clothes like wool and silk -
Allergy-care programme
The effects of high-temperature washing
and steam operations help to alleviate the
effects of allergies caused by mites and
pollen.
Washable
For items that need to be gentle to the skin, for example, underwear, sheets,
towels, and baby clothes – 5 kg or less
Shirts programme
The Steam effects that take place during
the spin-drying cycle that follows the
dedicated Shirts washing cycle helps to
reduce wrinkles in clothing.
Washable
Cotton and cotton blend at shirts and blouses – 2 kg or less
Daily programme
The Steam effects that take place during
the spin-drying cycle that follows the
Cotton washing cycle helps to reduce
wrinkles in clothing.
Washable
Daily washing for cotton, linen and cotton blend items – 2 kg or less
Note
Smaller loads give a better result. -
Remove items as soon as the programme has finished and then
tumble dry using the Smoothing or
Gentle smoothing programme or
place on a hanger to dry.
You cannot switch between cycles using Mode.
Metal ring
NA-140VZ4_English.indb 14 2012-12-27 17:58:57

Washing Instructions - 15
Washing
Refresh programme
Use of the dedicated Steam programme
will help to lessen odours in clothing.
Washable
Dry items only – 1.5 k - g or less
Non washable
Delicate clothes like wool and silk -
Note
Smaller loads give a better result. -
If you set a Steam programme with dry laundry, at the end of the cycle
the laundry will feel humid. The items
may need to be dried.
Remove items as soon as the programme has finished and dry
them on hangers.
This is not a Washing programme, so it will not get rid of stains.
Do not use detergents or fabric softeners.
The Refresh programme will lessen cigarette and other water-soluble
odours.
If you continuously use the Refresh programme, the temperature inside
the drum rises high and the door may
not open soon after the operation is
completed.
NA-140VZ4_English.indb 15 2012-12-27 17:58:58
 Loading...