

Page 1

Operating
Instructions
COMMERCIAL VACUUM CLEANER
MC-V300
Panasonic.
Before operating your vacuum cteaner. please read these Inatructfona completefy.
Page 2

CONSUMER INFORMATION
Please read IMPORTANT SAFETY INSTRUCTIONS on page 4 before use. Read and understand all instructions.
TO OUR VALUED CUSTOMER
We are very pleased to welcome you to the Panasonic family of products. Thank you for
purchasing this product. Our intent is that you become one of our many satisfied customers.
Proper assembly and safe use of your vacuum cleaner are your responsibiUties.
Your cleaner is intended only for household use. The cleaner should be stored in a dry,
indoor area. Read the Operating Instructions carefully for important use and safety infor
mation.
Special care is required when vacuuming certain types of carpet or floor covering. Always
check the carpet or floor covering manufacturer's recommended cleaning Instructions
before vacuuming.
PLEASE PAY CLOSE ATTENTION TO THE
WARNING AND CAUTION STATEMENTS THAT
ARE FOUND THROUGHOUT THIS MANUAL.
WARNING statements are designed to alert you
to the possibility of personal injury, toss of human
A
mRNING
life, and/or damage to the vacuum cleaner and/or
personal property if the instructions given are not
followed.
CAUTION statements are designed to alert you
A
A
TO AVOID ELECTRIC SHOCK
Never vacuum damp or wet surfaces or liquids.
DO NOT store machine outdoors.
Replace worn or frayed power cord immediately.
TO AVOID ACCIDENTS
Except for hand-held cleaners, keep machine on floor - not chairs, tables, steps, stairs, etc.
Store machine promptly after each use to prevent accidents such as tripping over power cord or machine.
Use machine and accessories only in a manner intended by the manufacturer.
The use of an extension cord is not recommended.
®1998 Matsushita Electric Industrial Co., Ltd. All rights reserved.
CAUTION
WARNING
to the possibility of damage to the vacuum clean
er and/or personal property if the instructions
given are not followed.
-2-
Page 3

TABLE OF CONTENTS
CONSUMER INFORMATION ........................................................................ 2
IMPORTANT SAFETY INSTRUCTIONS ....................................................... 4
GROUNDING INSTRUCTIONS ..................................................................... 5
PARTS IDENTIFICATION ............................................................................. 6
Feature Chart ............................................................................................ 6
TO ASSEMBLE CLEANER ............................................................................ 7
Attaching Handle to Vacuum Cleaner ....................................................... 7
Attachment Assembly, Tools-on-Board..........
SPECIAL FEATURES OF CLEANER ............................................................ 9
Carpet Height Selector............................................................................... 9
Edge Cleaning Feature.............................................................................. 9
Motor Protector........................................................................................... 9
TO OPERATE CLEANER............................................................................ 10
On/Off Switch........................................................................................... 10
Handle Adjustments ;............................................................................... 10
Attachments .............................................................................................11
ROUTINE CARE OF CLEANER .................................................................. 12
Replacing Electrostatic Secondary Filter
Replacing Electrostatic Exhaust Filter
Changing the Dust Bag............................................................................ 13
Removing/lnstalling the Lower Plate
..........................:....................... 14
Replacing the Headlight Bulb .................................................................. 14
Replacing the Belt.................................................................................... 15
Cleaning the Agitator
.................
;........................................................... 15
Replacing the Agitator.............................................................................. 16
Cleaning Exterior and Attachments ......................................................... 17
Removing Clogs....................................................................................... 17
BEFORE REQUESTING SERVICE............................................................. 18
WARRANTY
........
.......................................................................................... 19
WHAT TO DO WHEN SERVICE IS NEEDED
..........................................
.................................................
....................................................
.............................................
8
12
12
1 '
20
- 3-
Page 4

IMPOFnANT SAFETY INSTRUCTIONS
When using vacuum cleaner, basic precautions should always
be followed, including the following:
READ ALL INSTRUCTIONS BEFORE
USING THIS VACUUM CLEANER
WARNING
To reduce the risk of fire, electrical shock, injury:
1. DO NOT leave vacuum cleaner when plugged in. Unplug from outlet when
not in use and before servicing.
2. To reduce the risk of fire, electric shock - DO NOT use outdoors or on wet
surfaces.
3. DO NOT allow to be used as a toy. Close attention is necessary when
used by or near children.
4. Use only as described in this manual. Use only manufacturer’s recom
mended attachments.
5. DO NOT use with damaged cord or plug. If vacuum cleaner is not working
as it should, has been dropped, damaged, left outdoors, or dropped into water,
return it to an authorized Panasonic Servicenter.
6. DO NOT pull or carry by cord, use cord as a handle, close door on cord, or
pull cord around sharp edges or corners. DO NOT run vacuum cleaner over
cord. Keep cord away from heated surfaces.
7. DO NOT unplug by pulling on cord. To unplug, grasp the plug, not the
cord.
8. DO NOT handle plug or vacuum cleaner with wet hands.
9. DO NOT put any objects into openings. DO NOT use with any opening
blocked: keep free of dust, lint, hair, and anything that may reduce air flow.
10. Keep hair, loose clothing, fingers, and alt parts of body away from openings
and moving parts.
11. DO NOT pick up anything that is burning or smoking, such as cigarettes,
matches, or hot ashes.
12. DO NOT use without dust bag and/or filters in place.
13. Turn off all controls before unplugging.
14. Use extra care when cleaning on stairs.
15. DO NOT use cleaner to pick up flammable or combustible liquids such as
gasoline or use in areas where they may be present.
16. Connect to a properly grounded outlet only. See “Grounding Insructions.
SAVE THESE INSTRUCTIONS
-4 -
Page 5

GROUNDING INSTRUCTIONS
This vacuum cleaner must be grounded. If It should malfunction or breakdown,
grounding provides a path of least resistance for electric current to reduce the risk of
electric shock. This vacuum cleaner is equipped with a cord having an equipment
grounding conductor and grounding plug. The plug must be plugged into an appro
priate outlet that is properly installed and grounded in accordance with all local codes
and ordinances.
DANGER
Improper connection of the equipment-grounding conductor can result in a risk of
electric shock. Check with a qualified electrician or service person if you are in doubt
as to whether the outlet is property grounded. Do not modify the plug provided with
the vacuum cleaner - if it will not fit the outlet, have a proper outlet installed by a qual
ified electrician.
This vacuum cleaner is for use on a nominal 120-volt circuit, and has a grounding plug
that looks like the plug illustrated in sketch A in the following Figure. Make sure that
this vacuum cleaner is connected to an outlet having the same configuration as the
plug.
No adapter should be used with this vacuum cleaner.
Note: Before you plug in your Panasonic vacuum cleaner, make sure that the voltage
indicated on the rating plate located at the back of the vacuum cleaner is the same as
your local supply.
-5 -
Page 6

PARTS IDENTIFICATION
FEATURE CHART
(PANASONIC UPRIGHT VACUUM CLEANER)
FEATURES POWER
Model
MC-V300
120V.AC(60Hz)
10.0 Amps
TOOLS
-ON
BOARD
Yes
HEADUGHT CORD
LENGTH
Yes 50 Ft. 4 Position Yes
-6-
CARPET
HEIGHT
ADJUST
MOTOR
PROTECTOR
Page 7
TO ASSEMBLE CLEANER
A
DO NOT plug Into electrical supply until assembly is complete. Failure to do so could
result in electrical shock or injury.
WARNING
Electrical Shock Hazard.
«rmCHING HANDLE TO VACUUM CLEANEFH*
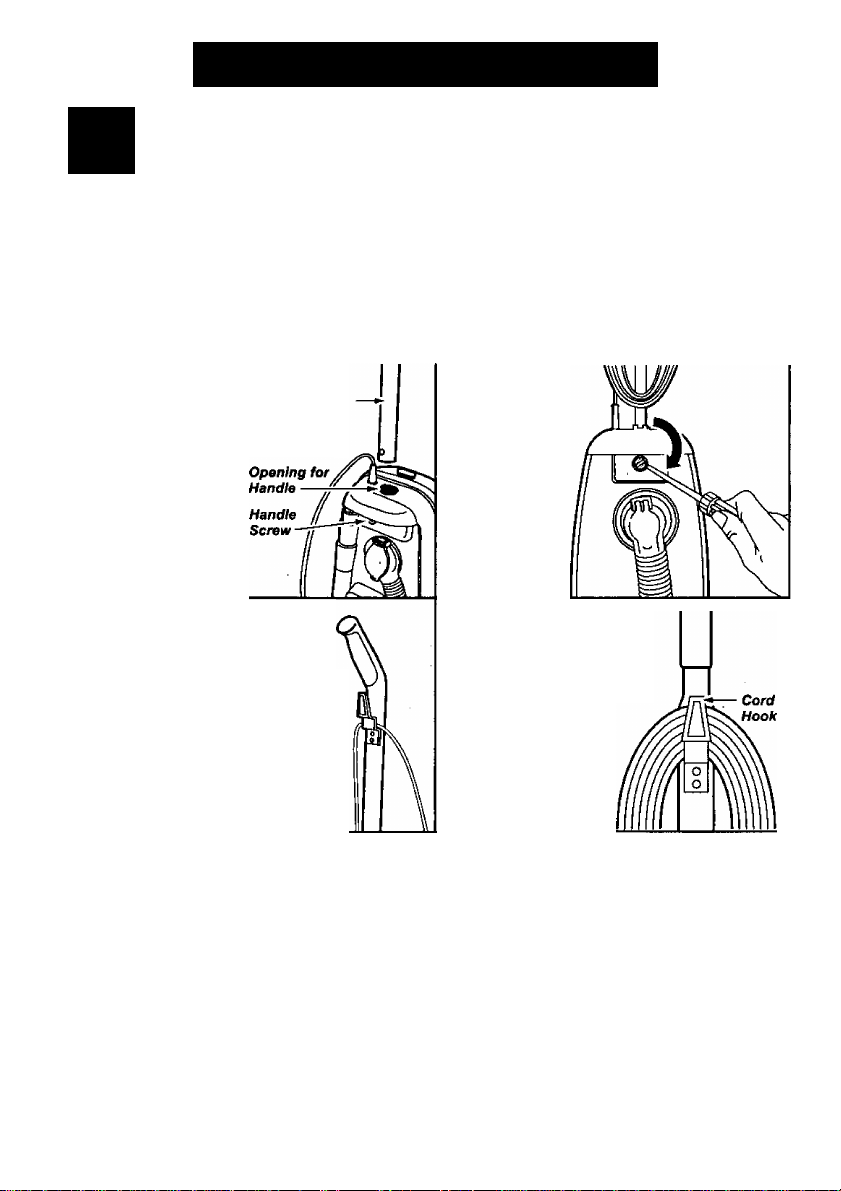
The vacuum cleaner main body and handle are packed separately.
1. The handle screw has
been installed for shipping
purposes. Please remove
the screw before inserting the han
dle. Insert the han
dle as shown in the
illustration. Ensure
that the cord hook
is on the back side
of the handle
before inserting.
3. There is a recessed area
between the cord hook base and
the handle that is designed to
secure the power cord during vacu
uming.
Always push the power cord down
into this recessed area to help
keep the power cord from hanging
near the nozzle and being dam
aged by the agitator.
Handle
2. Insert the
screw that you
have removed.
Be sure the
screw is tight
ened, but not
overtight
ened.
4. Loosely wrap the power
cord around cord hook.
Secure the plug head to the
cord by pushing the power
cord into the retainer on
the plug head. Place
the cord wrap around
the bottom loop of
the cord.
- 7 -
Page 8

ATTACHMENT ASSEMBLY. Tools-on-Boattl
A
DO NOT get the power cord caught under the nozzle when using the vacuum or
attachments as it can be damaged by the agitator as it revolves.
CAUTION
ATTACHMENTS
Suction Control Slide ^ w
Crevice
Tool
Telescoping
Wand
Zi
a
, Dusting
Brush —
Uf^olstery Tool
H Raised _
Wand
The attachments should be conveniently positioned on the
back of the cleaner for easy access. Some of the attachments
may already be assembled. Assemble the hose and attach
ments to the cleaner as follows:
. Insert the crevice tool, cleaning end down, into the end of the
telescoping wand nearest the locking ring. A slight twist of the
crevice tool will lock it into place.
Place the telescoping wand on the back of the cleaner with
the locking ring and the crevice tool up, and the bot
tom resting on the ledge near the rear wheel. Crevice
Insert the hose into the back of the vacuum
cleaner as shown here in the illustration.
To attach the wand to the hose for use, align the
two (2) raised tabs on the wand with the “J” slots
in the hose. After guiding the tabs along the
grooves, twist te lock in piace.
^ f tSU - - ^ ^
"J
fgl) Slot Hose
OD
Tefescop/ng
№and
Ousting
Brush
Upholstery
Toot
-8-
Agitator
(Underneath)
Page 9
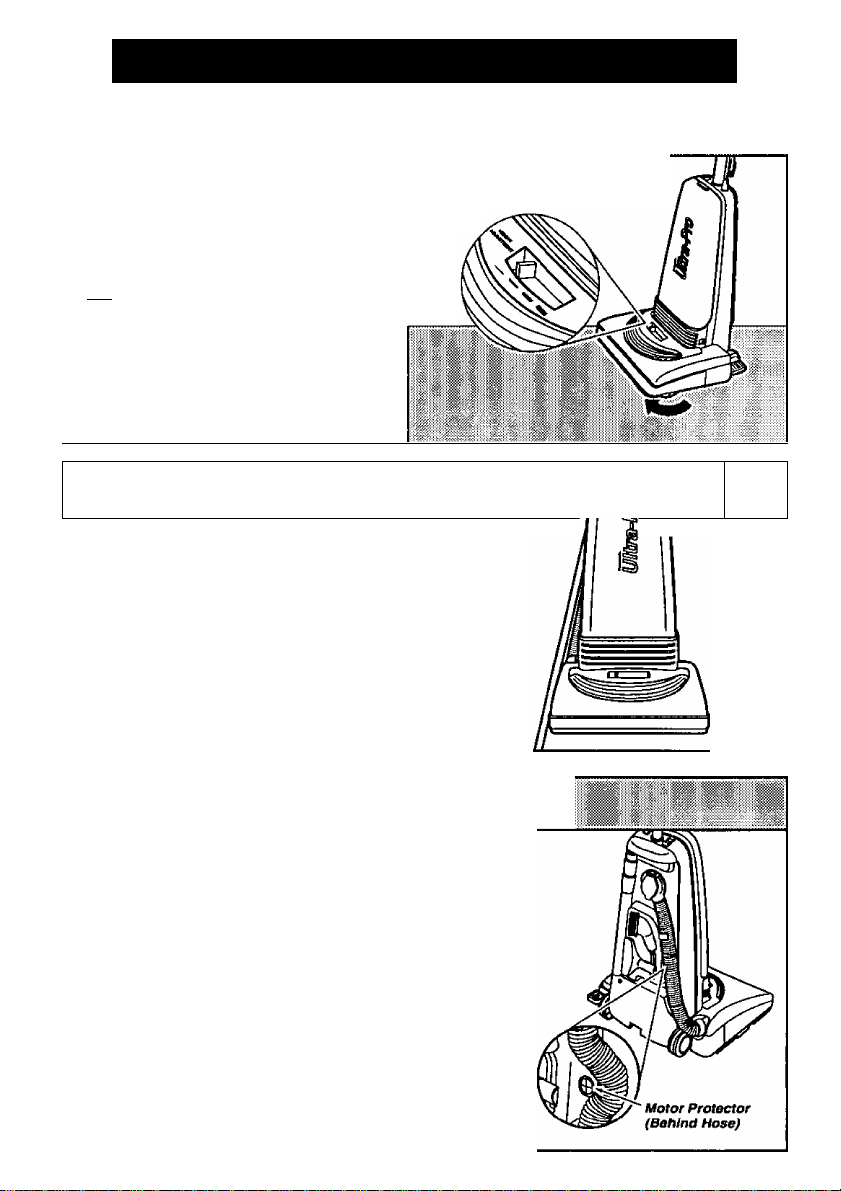
SPECIAL FEATURES OF CLEANER
This feature allows for adjustments to efficiently and safely clean many different
types of floors. To select a pile height setting, turn off
cleaner and tilt back slightly then slide the adjustment
lever to the desired setting.
SUGGESTED CARPET HEIGHT SETTINGS
lllllll : shag carpet, long pile, plush, scatter rugs,
medium to long pile,
short to medium pile,
very lovi/ pile.
i ..
w
■' ■■
■
EDGE CLEANIf 4G FEATURE
нннннннннннн:;:-™™^™^^^
.
............ ... ... ... ... .... ... ... ... ... .... ... ... ... -.... ..... ....
The edge cleaning feature provides for
improved cleaning of carpets near walls
and furniture.
:M©iT®RRR0TECPlR
This vacuum has a motor protector by-pass valve which
automatically opens to provide cooling air to the motor when
a clog prevents the normal flow of air to the motor. The by
pass valve opens to prevent the motor from overheating and
possibly causing damage to the vacuum. When open, a
change of sound will be noticed as air rushes through the
valve opening. If this occurs, turn the vacuum off and unplug
the power cord from the outlet. Check for a full dust bag or
clogs as described In the REMOVING CLOGS section.
The motor protector by-pass valve may open when using
attachments or when cleaning new carpet, due to reduced
air flow by the attachments themselves or by new carpet
fuzz filling the bag quickly or a full dust bag.
■
ill|H
lUI'""
-9-
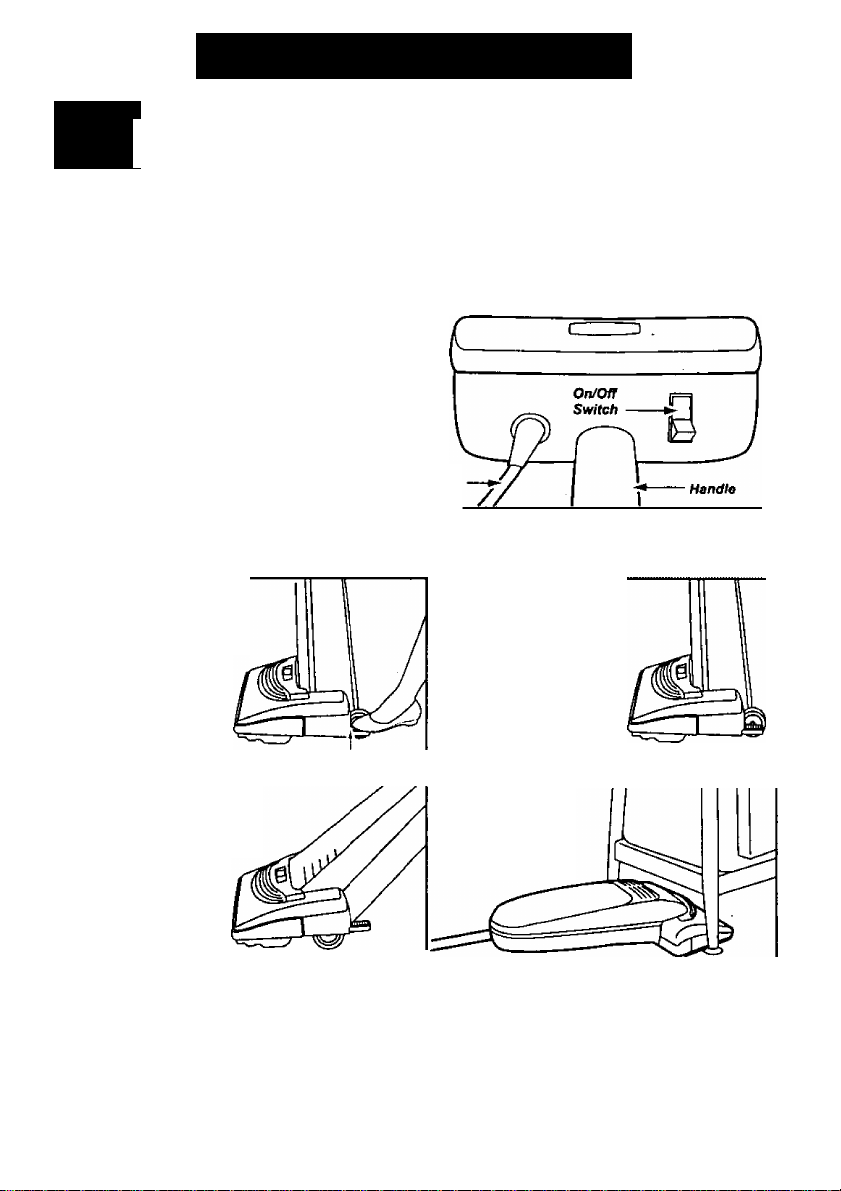
Page 10
TO OPERATE CLEANER
A
DO NOT use outlets above counters. Damage to items in the surrounding areas could
occur. Be sure the switch is in the off position white plugging the cord in.
1. Plug the power cord into a 120V outlet.
2. To start the vacuum cleaner, push the switch
to the ON position.
3. To stop the vacuum cleaner, push the switch
to the OFF position.
The handle may be low
ered to any position
required. Just step on
the handle release
pedal as indicated
by the illustration
and lower the
handle as desired.
CAUnON
..
■Ill
Í.
HANDliE ADJUSTMENTS
ON/OFF SWrrCH
■ Power Cord
1. Upright position
The handle locks in this
position for storage.
The handle should
always be in an
upright position
when the attach
Pedal
ments are used.
«i
2. Middle position
This position is for normal
cleaning.
Low position
This position is
used for cleaning
under furniture.
- 10 -
Page 11
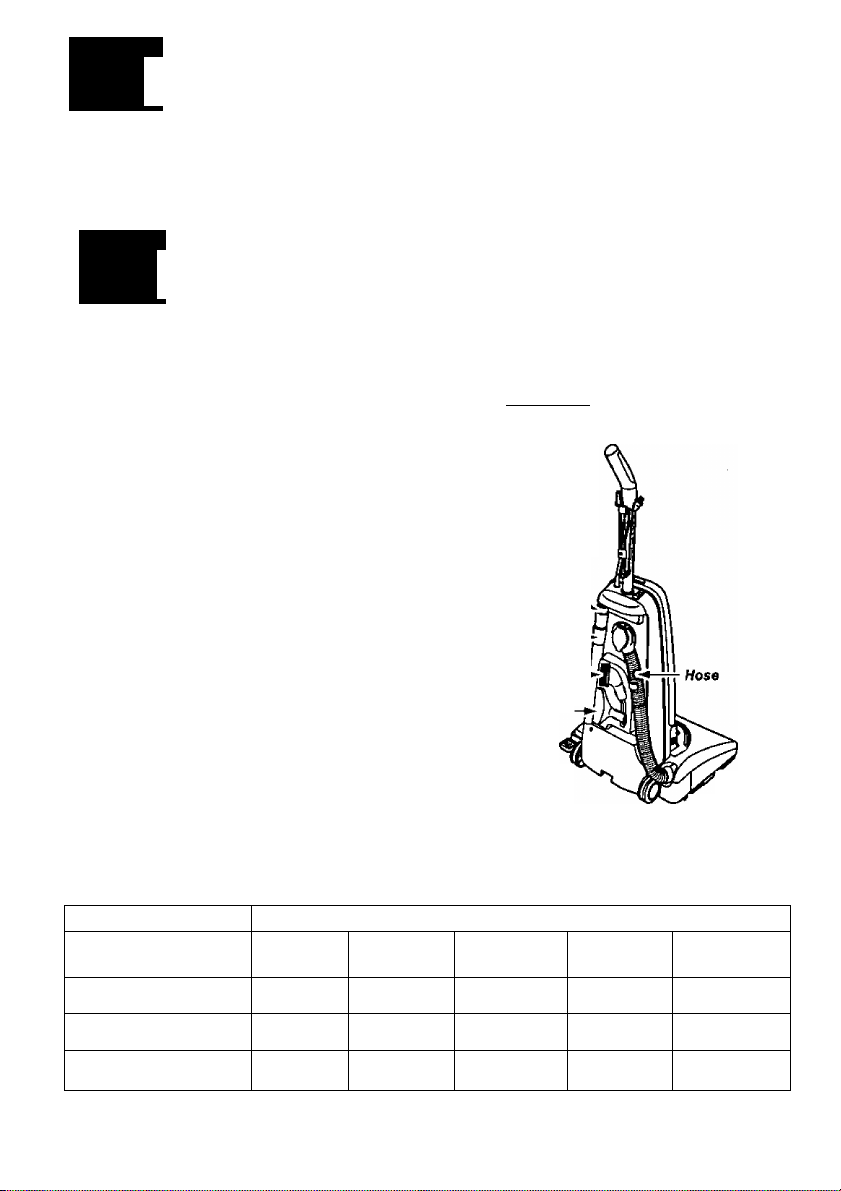
A
DO NOT place hands or feet underneath the unit when using the attachment tools. The
agitator begins to rewIve rapidly when using attachments.
WARNING Personal Injury Hazard when Using Attachments.
rAWAGI^MENTSi
^;ss?’^flssssssii flsssi
A
When using the attachments, the agitator begins rotating. DO NOT allow the cleaner to
remain in just one place for a period of time, as the agitator may damage the floor sur
face. Avoid placing the cleaner on furniture, the fringed area of ruga, deep pile carpet
ing, or carpeted stairs. The ideal position for the cleaner when using attachments is
for the unit tobe on a level area with the handle In the full upright position. See the
HANDLE ADJUSTMENTS section.
Remove the loviier end of the stretch hose from the cleaner by grasp
ing the hose collar, twisting and pulling straight up. Once the hose
has been removed it can be used as is, or the telescoping wand can be
used for further reach. Remove the telescoping wand from the storage
position on the vacuum cleaner. Remove the crevice tool from the tele
scoping wand by pulling out while twisting slightly. To extend the wand,
turn the locking ring to the UNLOCK position, as indicated
on the locking ring and pull it out to full length. Lock the
locking ring by turning it to the LOCK position. The
tools can be attached to the hose or the end of the Telescoping
wand. When connecting the attachments to the hose
or the wand, always twist as you push down. If addition
al reach is required, the dusting brush or upholstery tool
can be attached to the end of the crevice tool by sim
ply sliding it over the narrow end of the crevice tool. The
attached hose end swivels at the back of the cleaner to make
cleaning easier in all directions.
When using the attachments, DO NOT overextend your reach with
the hose as it could tip die cleaner over.
When attaching the wand to the hose and storing the attachments follow the direc
tions given in the ATTACHMENT ASSEMBLY section.
CAUTION
Dusting I
Brush
------
Upholstery!
Tool -
1
f
'Agitator
(Underneath)
ATTACHMENT USE
CLEANING AREA
ATTACHMENT
CREVICE TOOL X X X X X
DUSTING BRUSH & X X X X
UPHOLSTERY
TOOL
‘Always clean attachments before using on fabrics. Attachments used in dirty areas, such as .
under a refrigerator, should not be used on other surfaces until they are washed. They could leave
marks. See the CLEANING EXTERIOR AND ATTACHMENTS section.
Furniture*
X X X
Between
Cushions* Drapes* Stairs Walls
- 11 -
Page 12

ROUTINE CARE OF CLEANER
Performing the following tasks will keep your new Panasonic vacuum cleaner operating at peak
performance levels and will ensure these high levels for years to come. Check the BEFORE
REQUESTING SERVICE section in this manual for recommendations on performing some of
these tasks to help solve various problems that may occur.
A
Always disconnect electrical supply before performing any service and/or cleaning of the
vacuum cleaner. Failure to do so could result in electrical shock or personal injury from
cleaner suddenly starting. DO NOT operate the cleaner without the secondary filter. Be
sure the secondary filter is properly Installed. Failure to do so could result in motor fail
ure.
The white and grey secondary electrostatic filter
must be replaced when dirty. It should be
replaced regularly depending on use condi
tions. The filter CANNOT be washed as It.
will lose its dust trapping ability. If the
secondary electrostatic filter, located at
the bottom of the bag cavity is dirty,
remove it by pulling forward out from
under the ribs. Replace the filter, white side
up, by sliding it back into place under the .
ribs in the bag cavity.
‘This filter cannot be cleaned and should be. replaced at least four times each year if the
cleaner is used at least one hour each day.
REPLAaNG
'■■i-.Sli.: ÌSS-;
The white electrostatic exhaust filter must be
replaced when dirty. It should be replaced regularly
depending on use conditions. The filter CANNOT
be washed as it will lose its dust trapping ability.
Press the handle release pedal to let the upper por
tion of the cleaner lay back against the floor. Grasp
the exhaust panel with a hand on each side, press
inward and pull the panel forward. Lift the white
electrostatic filter to remove. Replace the electrosta
tic filter, carefully positioning it so the slits fit around
the four raised pins. Replace the exhaust panel.
Return the cleaner to the upright position.
WARNtNG
Electrical Shock or Personal Injury Hazard.
f=e™
Sacandary |
lectrostatlc
Filter
.-STB
______..
*This filter cannot be cleaned and should be replaced at least four times each year if
the cleaner Is used at least one hour each day.
- 12-
Page 13

CHANGING THE DUSTIBAG
Always operate the vacuum with a genuine Panasonic Type U3 Standard or U6
Electrostatic dust bag installed. Panasonic dust bags may be ordered through any
authorized Panasonic dealer. An optional cloth bag is available.
1. Press the release
button located on the
top of the bag cover.
Pull the bag cover
forward. Remove
and lay aside.
3. Spread out the end
of the new dust bag.
NOTE: Pull carefully so
as not to tear the bag at
the folds.
5. Reinsert the tab
provided on the
end of the dust
cover into
the groove
on the dust
compart
ment to
allow the
cover to
rotate closed.
NOTE: The dust cover must be
completely and correctly installed
for proper operation.
Cover
Body
Positioning
Slot
Bag Cover
Positioning Tab
2. To remove the dust
bag, grasp the cardboard
portion of the dust bag and
pull it out.
4. Attach the new dust bag onto
the bag holder by holding the
cardboard portion and push
ing back as iilustrated.
6. Rotate
the dust
cover up into
the closed
position and
press into place.
NOTE: The dust bag
should not be caught
between the
lower edge of
the dust cover
and the gasket
as indicated by
the arrow in the
iiiustration.
- 13 -
Page 14

A
When the lower plate Is removed for any reason, before reinstalling, be sure that all elec
trical wires are routed In a manner that prevents them from coming Into contact with the
lower plate, lower plate screws, or any moving parts. Be sure that the wires are not
pinched in any way when the lower plate is reinstalled.
WARNING
Electric Shock or Personal Infury Hazard.
№EMcMNCiSALUNGlfRtATE
Before replacing any parts, disconnect the vac
uum cleaner from the electrical outlet.
Replacing some of the parts in this section involves
the removal and installation of the lower plate. Always
place paper under nozzle anytime the lower plate is
removed to protect the floor surface.
To Remove Lower Plate.
Start by placing the handle in the upright position.
See the HANDLE ADJUSTMENTS section. Turn the
vacuum cleaner over, exposing the underside. Release the
lower plate by removing the two (2) screws and pressing Inward on
the two (2) locking tabs that secure the lower plate, as shown in the illus
tration. Remove the lower plate and remove any residue that may exist in the belt area.
To Reinstall Lower Plate.
Hook the front end of tower plate into the slots on the front of the nozzle housing. Press the
lower plate into place until the locking tabs snap into place then replace the two (2) screws.
NOTE: To ensure maximum cleaning efficiency, the belt should be checked regularly to make
sure it is in good condition. Check to see if the belt is stretched, cracked, or if excessive slippage
has occurred. Replace if necessary.
Two *
Screws
Two Locking Tabs
Lower
Plate
iREPimCIMGiME4READlllGlFnBUl!B
1. Remove the lower plate using the procedure in
the REMOVING/INSTALLING THE LOWER
PLATE section.
2. Grasp the bulb socket, wiggle the socket back and
forth while pulling it up out of the nozzle housing. To
remove the old bulb, push it In toward the bulb socket
while turning counterclockwise, then remove.
3. Install the new bulb by pushing it in toward the
bulb socket and turning it clockwise. Use any stan
dard bayonet base appliance bulb rated at 130 Volts
AC/15 Watts.
NOTE: Do not use a bulb rated over 130 Volts AC/
15 Watts. During extended use, heat from the bulb could overheat the surrounding plastic parts.
4. Reinsert the bulb sodtet into the nozzle housing by pushing it back down into the slot.
Replace the lower plate as outlined in the REMOVING/INSTALLING THE LOWER PLATE section.
- 14 -
Page 15

REPLACINGTHE BELf
A
Be careful when removing agitator. The belt tension is high. Faiiure to do so could result
in personal Injury from agitator releasing quidcty and snapping away.
Unplug and turn the unit over. Remove the lower plate as described in the REMOVING/
INSTALLING THE LOWER PLATE section.
WARNING
Personal Injury Hazard.
Remove the agitator, carefully lift it out, and remove the
worn or broken belt from the brush pulley and motor shaft.
NOTE: The two end caps may come off along with the two
washers as you lift the agitator out. DO NOT lose the two
small washers.
Loop the new belt around the motor shaft and loop it
around the brush pulley. See illustration for correct belt
routing. Use only a Panasonic Type UB8 drive belt.
Before reinserting the agitator make sure the end
caps/washers are on correctly. See illustration in
the REPLACING THE BRUSHES section.
After checking the end caps, reinstall the agitator back into the housing grooves. After installing
the agitator, turn it by hand making sure that the belt Is not twisted or pinched and all rotating
parts turn freely. Replace the lower plate as described in the REMOVING/INSTALLING THE
LOWER PLATE section.
INGTHE AGfTATOR
Switch off the vacuum cleaner and unplug the power
cord before cleaning the agitator. In order to keep the
cleaning efficiency high, clean the agitator regularly.
Remove the lower plate if necessary. See the REMOV
ING/INSTALLING THE LOWER PLATE section
for the proper procedure.
Agitator - Cut off any carpet pile and lint
entangled around the agitator with a pair of
scissors as illustrated.
- 15 -
Page 16

REiiAaNCirME'^ilGmiBBi
1. When to replace the agitator.
The agitator should be replaced when the brushes
are worn. Brushes should be checked by holding a card
across the lower plate, see Illustration. If the bristles on
the agitator 00 NOT touch the card, you SHOULD'
replace the agitator for best cleaning results.
2. How to replace the agitator.
Place.Wie vacuum cleaner handle in the upright position.
See the HANDLE ADJUSTMENTS section. Remove the lower'
plate as outlined in the REMOVING/INSTALLING THE LOWER
PLATE section. After the lower plate is removed, carefully lift up the agitator until it clears both
sides of the.nozzle housing. While holding the agitator up, remove the belt.
NOTE: The two end caps may come off along with the two washers as you lift the agitator out.
DO NOT lose the two small washers. Look at the exploded view of the agitator below for correct .
assembly of the parts.
3. To replace the agitator.
Place the belt over the belt pulley on the brush unit. NOTE: There is a place for the belt to fit on
one end of the agitator only. Replace both washers and end caps, see illustration below for cor
rect assembly. After assembling the belt, washers and end caps place the agitator back Into the
nozzle housing by aligning each end cap.
After completing the assembly, rotate the agitator, turning it by hand to assure that
it rotates smoothly and the part is assembled correctly.
Replace the lower plate as outlined in the REMOVING/INSTALLING THE LOWER PLATE section.
AGfTATOR ASSEMBLY
End Cap
Washer
Beit Pulley
Brush Unit
- 16-
Page 17

^^■ït
----------
CLEANING EKrERK)R^Dn
1. Unplug cord from wall outlet. DO NOT drip water on cleaner.
2. Clean exterior using a clean, soft cloth that has been dipped in a solution of mild liquid
detergent and water and wrung dry. Wipe dry after cleaning.
3. To reduce static electricity and dust build-up, wipe outer surface of cleaner and attachments.
4. Wash attachments in warm soapy water, rinse and air dry. DO NOT clean In dishwasher or
clothes washer.
DO NOT USE ATTACHMENTS IF THEY ARE WET.
-
A
Attachments used in dirty areas, such as under a refrigerator, shouid not be used
on other surfaces untii they are washed. They couid ieave marks.
CAUTION
REMC^NG CLOGS
The hose located on the back of the vacuum cleaner carries the dirt from the nozzle
up to the dust bag. If the hose should become clogged;
1. Unplug the power cord from the outlet
before checking the airflow passages. Pull
open the suction inlet cover and check for
clogging in this area.
2. Disconnect the hose from the back of the
vacuum and check hose for clogging. Plug in
the vacuum cleaner and turn it on. While run
ning the vacuum cleaner with the hose discon
nected, stretch the hose in and out to remove
the clog. Re-insert the hose into the opening
on the lower body from which it was removed.
Press firmly to assure connection,
3. If the clog still exists, turn the vacuum
cleaner OFF and unplug the power cord. Turn
the vacuum cleaner over, exposing the under
side. Remove the lower plate, check the noz
zle area and remove any visible clogs.
Reinstall the tower plate. See the REMOVING/
INSTALLING THE LOWER PLATE section for
detailed instructions.
- 17-
Clean-Out
Port Cover
Page 18

BEFORE REQUESTING SERVICE
A
WARNING
Disconnect the electrical supply before servicing or cleaning the unit Failure to do
so could result in electric shock or personal injury from cleaner suddenly starting.
Electric Shock or Personal Injury Hazard.
Review this chart to find do-it-yourself solutions for minor performance
problems. Any service needed, other than those described in these
Operating Instructions, should be performed by an authorized service
representative.
PROBLEM POSSIBLE CAUSE POSSIBLE SOLUTION
Cleaner will
not run.
Poor job of dirt
pickup.
1. Unplugged at wall outlet.
2. On/Off switch not turned on.
3. Tripped circuit breaker/blown
fuse at household service panel.
1. Full or clogged dust bag.
2. Broken belt.
3. Carpet height setting incorrect.
4. Clogged hose or nozzle.
5. Hose not inserted fully.
6. Worn agitator.
7. Hole in hose.
8. Dust cover improperly installed.
9. Belt not installed on motor shaft. 9. Install belt on motor shaft.
1. Plug in firmly. Push On/Off
switch to On.
2. Push On/Off switch to On.
3. Reset circuit breaker or replace
fuse.
1. Change bag.
2. Replace belt.
3. Set in the correct position.
4. Clean hose or nozzle area.
5. Insert hose.
6. Replace agitator.
7. Replace hose.
8. Properly install dust cover.
Dust escapes
the paper bag.
Light will
not work.
Cleaner picks up
moveable rugs or
pushes too hard-
1. Bag improperly installed.
2. Bag torn.
1. Burned out light bulb. 1. Replace light bulb.
1. Wrong carpet height setting. 1. Adjust setting.
- 18-
1. Properly install bag.
2. Replace bag.
Page 19

WARRANTY
Panasonic Commercial Vacuum Cleaner
Limited Warranty
Panasonic Home and Commercial Products Company {referred to as “the warrantor")
will repair this product with new or refurbished parts free of charge, in the U.S.A. or
Puerto Rico, for one {1) year from the date of original purchase, in the event of a defect
in materials or workmanship.
This Limited Warranty Excludes both Labor and Parts for the following Items: dis
posable dust bags, filters, belts, light bulbs, agitator brushes and batteries (if supplied).
Carry-in or mail-in service in the U.S.A. can be obtained during the warranty period by
contacting a Panasonic Services Company (PASC) Factory Servicenter listed in the
Servicenter Directory, or by calling toll free, 1-888-350-9590, or by contacting your sell
ing distributor. Carry-In or mail-in service in Puerto Rico can be obtained during the
warranty period by calling the local Panasonic Sales Company telephone number listed
in the Servicenter Directory.
This warranty is extended only to the original purchaser. A purchase receipt or other
proof of date of original purchase will be required before warranty performance is ren
dered.
This warranty only covers failures due to defects in materials and workmanship which
occur during normal use and does not cover damages which occur in shipment, or fail
ures which are caused by products not supplied by the warrantor, or failures which
result from accident, misuse, abuse, neglect, mishandling, misapplication, faulty instal
lation, improper operation or maintenance, alteration, modification, power line surge,
improper voltage supply, lightning damage, or service by anyone other than a
Panasonic Authorized Servicenter, or damage that is attributable to acts of God.
LIMITS AND EXCLUSIONS:
There are no express warranties except as listed above.
THE WARRANTOR SHALL NOT BE LIABLE FOR INCIDENTAL OR CONSEQUEN
TIAL DAMAGES RESULTING FROM THE USE OF THIS PRODUCT, OR ARISING
OUT OF ANY BREACH OF THIS WARRANTY. ALL EXPRESS AND IMPLIED WAR
RANTIES, INCLUDING THE WARRANTIES OF MERCHANTABILITY AND FITNESS
FOR A PARTICULAR PURPOSE, ARE LIMITED TO THE APPLICABLE WARRANTY
PERIOD SET FORTH ABOVE.
Some states do not allow the exclusion or limitation of incidental or consequential dam
ages, or limitations on how long an implied warranty lasts, so the above exclusions or
limitations may not apply to you.
This warranty gives you specific legal rights and you may also have other rights which
vary from state to state. If a problem with this product develops during or after the war
ranty period, you may contact your dealer or Servicenter. If the problem is not handled
to your satisfaction, then write to the Customer Satisfaction Center at the listed address
on the back cover.
- 19-
Page 20

WHATTO DO WHEN SERVICE IS NEEDED
If your Panasonic Vacuum Cleaner needs service, look in the yellow pages of
the telephone book under HOME APPLIANCE SERVICE for your nearest
Panasonic Services Company (“PASC”) Factory Servicenter, or PASC autho
rized Servicenter, or call 1 -8)38-350-9590, toll free to find a convenient servicen
ter. DO NOT send the product to the Executive or Regional Sates offices. They
are NOT equipped to make repairs.
If you ship the product
Carefully pack and send it prepaid, adequately Insured and preferably in the original carton.
Attach a postage-, paid letter to the outside of the carton, which contains a description of your
complaint. DO NOT send the product to the Executive or Regional Sales Offices. They are
NOT equipped to make repairs.
Customer’s Record
Model No.
Serial No.
Dealer’s Address .
Date of Purchase
leofSn^
__________
Mopetatirw asslst^toe^with a consumer
|<MJ^Mtf?SAnSF%Crnb^
......................
^ ^ I
PANASONIC HOME & COMMERCIAL PRODUCTS
COMPANY, DIVISION OF MATSUSHITA ELECTRIC
CORPORATION OF AMERICA
One Panasonic Way
4A-4
Secaucus, New Jersey 07094
Dealer's Name
Panasonic Services Co. M
AC01ZAPPZ0U
C01ZAPP00U00
Printed in U.S.A,
-20-
Page 21

Instrucciones
de operación
COMMERCIAL ASPIRADORA
MC-V300
Panasonic.
Antes Ó9 user su sspirsdofs. Iss comptetjwsnts sotos kistrucctonss por towor
Page 22

Información para consumidor
Por favor, lea “Instrucciones importantes de seguridad” en la página 4 antes de usar su aspiradora. Lea y comprenda todas las instrucciones.
A NUESTRO CONSUMIDOR ESTIMADO
Nos da mucho gusto a presentarle a la familia de productos de Panasonic. Le damos las gracias
por comprar este producto. Estammos resueltos a hacerle uno de nuestros muchos
consumidores satisfechos.
Montaje correcto y uso seguro de su aspiradora son sus responsabilidaes. Su aspiradora
está fabricada para ei uso a domicilio únicamente. Debe guardar la aspiradora en un lugar
seco y debajo de techo. Lea tas “Instrucciones de operación” con cuidado para la infor
mación importante de uso y la información de seguridad.
Se requiere el cuidado especial cuando pasa la aspiradora sobre ciertas clases de alfom
bra o cubierta de piso. Siempre revise Ud las instrucciones de la limpieza recomendada
de_fabrican_te_para la alfombra o la cubierta de piso antes de pasar la aspiradora.
Favor de prestar mucha atención a las
secciones AVERTENCIA y CUIDADO que
están encontradas por este manual.
Las secciones AVERTENCIA están Inclui
das para llamarle atención a la posibilidad
A
AVERTENCIA
de la lesión corporal, la pérdida de vida
humana, y/o el daño a la aspiradora y/o el
daño a las propiedades personales si las
instrucciones dadas no están seguidas.
Las secciones CUIDADO están incluidas
para llamarle atención a la posibilidad del
A
A
PARA EVITAR CHOQUE ELECTRICO
Nunca pase la aspiradora en las superficies húmedas o mojadas ni aspire los líquidos.
No mantenga la aspiradora a la intemperie.
Cambio en seguida un cordón eléctrico gastado o raido.
PARA EVITAR ACCIDENTES
Excepto tas aspiradoras a mano, mantenga la aspiradora sobre el suelo • no sobre las sillas, las mesas, los
escalones, las escaleras, etc.
Mantenga la aspiradora en un lugar seguro en seguida después de cada uso para evitar accidentes como
tropiezo con cordón eléctrico o con aspiradora.
Use la a^radora y los accesorios únicamente en manera descrita en este manual.
No recomiende un cordón eléctrico adicional.
<91998 Matsushita Electric Industrial Co., Ltd. Todos los derechos están reservados.
CUIDADO
AVERTENCIA
daño a la aspiradora, y/o dei daño a ias
propiedades personales si las instruc
ciones dadas no están seguidas.
-2-
Page 23

Tabla de contenido
INFORMACION PARA CONSUMIDOR ......................................................... 2
INSTRUCCIONES IMPORTANTES DE SEGURIDAD
INSTRUCCIONES PARA HACER CONEXIÓN ATIERRA
IDENTIFICACIÓN DE PIEZAS ....................................................................... 6
Diagrama de características
.....................................................................
..................................
.........................
4
5
6
PARA ARMAR LA ASPIRADORA
Colocación del mango a la aspiradora.................................................... 7
Montaje de accesorios incluidos ...........................................................
CARACTERÍSTICAS ESPECIALES DE LA ASPIRADORA ....................... 9
Selector para el nivel de alfombra
Característica de limpieza para orillas ................................................... 9
Protector de motor
PARA OPERAR LA ASPIRADORA
Interruptor de encendido/apagado
Ajustes del mango ................................................................................... 10
Accesorios
CUIDADO DE RUTINA DE LA ASPIRADORA
Cambiar del filtro secundario de electrostático ......................................
Cambiar del filtro de escape de electrostático
Cambio de la bolsa para polvo................................................................ 13
Cambiar/Insertar de la placa de base
Cambio de la bombilla ............................................................................. 14
Cambio del agitador................................................................................. 15
Limpieza del agitador............................................................................... 15
Cambio de la correa ................................................................................ 16
Limpieza del exterior y de los accesorios
Quitar de los residuos de basura en los conductos
...........................................
....................................................................................
.................................................................
.........................................................
.............................................................
.......
.................................................... 10
;.................................................. 11
............................................
.......................................
.....................................................
...............................................
...............................
8
9
12
12
12
7
9
10
14
17
17
ANTES DE PEDIR SERVICIO
GARANTIA ................................................................................................... 19
CUANDO NECESITA SERVICIO ................................................................ 20
.....................................................................
- 3 -
18
Page 24

Instrucciones importantes de seguridad
Cuando usa su aspiradora, debe seguir las
instrucciones incluso las siguientes:
Lea todas las instrucciones
antes de usar esta aspiradora
AVERTENCIA
Para reducir et riesgo de incendio, choque eléctrico o lesión corporal:
1. No abandone la aspiradora cuando está conectada. Desconéctela cuando no la
está usando y antes de darle servicio.
2. Para reducir el riesgo de incendio o choque eléctrico no use la aspiradora al aire
libre ni sobre las superficies mojadas.
3. No permita que los niños jueguen con la aspiradora. Se requiere tener mayor
cuidado cuando sea usada en la proximidad de niños o por niños.
4. Use la aspiradora únicamente en la manera descrita en este manual. Use única
mente con los accesorios recomendados por la fábrica.
5. No use la aspiradora si el cordón eléctrico o el enchufe está dañado. Si la aspi
radora no está funcionando adecuadamente o si se ha le caído, está dañada, ha esta
do expuesta a la intemperie o si se le ha caído al agua, devuélvala a un Centro de
Servicio de Panasonic autorizado.
6. No hale ni transporte ia aspiradora por el cordón; no use el cordón como mango;
no cierre puertas sobre el cordón; no hale el cordón sobre rebordes agudos ni
esquinas; no pase la aspiradora sobre el cordón. Mantenga el cordón alejado de
superficies calientes.
7. No desconecte la aspiradora tirando del cordón eléctrico. Para desconectarla, hale
el enchufe, no el cordón.
8. No toque la aspiradora ni el enchufe con las manos mojadas.
9. No coloque objetos en las aberturas. No use la aspiradora si alguna abertura está
bloqueada; manténgala libre de polvo, pelusa, cabellos, o cualquier cosa que puede
disminuir el flujo de aire.
10. Mantenga el cabello, la ropa suelta, los dedos y todas las partes del cuerpo aleja
dos de las aberturas y piezas mecánicas,
11. No use la aspiradora para levantar objetos que se está quemando o emitiendo
humo, como cigarrillos, cerillos o cenizas calientes.
12. No use la aspiradora sin tener insertados la bolsa para polvo y/o los filtros.
13. Antes de desconectar la aspiradora, apáguela siempre.
14. Tenga cuidado mayor cuando usa la aspiradora sobre los escalones.
15. No use la aspiradora para aspirar líquidos inflamables o combustibles como gasoli
na ni la use en lugares donde éstos podrían estar presentes.
16. Conecte solamente a un enchufe con una toma a tierra apropiada. Véase
“Instrucciones para hacer conexión a tierra".
Guarde estas instrucciones
-4-
Page 25

Instrucciones para hacer conexión a tierra
Esta aspiradora tiene que estar haciendo conexión a tierra. Si la aspiradora malfunciona o descompone, la toma a tierra provee un paso de la menor resistencia para la
corriente de electricidad para reducir el riesgo del choque eléctrico. Esta aspiradora
está equipada con un conductor a tierra y enchufes a tierra. El enchufe tiene que
estar enchufado en un enchufe apropiado que está instalado apropiadamante y
hecho conexión a tierra de conformidad con los códigos y ordenanzas locales.
PELIGRO
Se puede resultar el riesgo del choque eléctrico con la conexción inadecuada del
equipo de la toma a tierra. Consulte a un electrista certificado o a un dependiente en
un centro de servicio si tiene dudas de que el enchufe esté conecado adecuada
mente. No modifique el enchufe provisto de la aspiradora - no cabrá en el enchufe
en la pared, haga instalar un enchufe adecuado en la pared por un electrista com
petente.
Esta aspiradora está hecha para el circuito nominal de voltio 120 y tiene una toma a
tierra que parece como el enchufe ilustrado en aspiradora esté conectada a un
enchufe en la pared que tenga la misma configuración como el enchufe en la aspi
radora.
No use un adaptador con esta aspiradora.
Nota: Antes de conectar su aspiradora Panasonic, asegúrese de que el votaje indicado
en el voltímetro en la parte posterior de la aspiradora sea del mismo voltaje que el de
su casa.
-5-
Page 26

Identificación de piezas
Sujetador
del cordón
Cordon eléctrico
Gancho
del cordón
Mango para
transportar
Herramienta
Tubo
telescópico
Cepiilo para
sacudir
Herramienta
para tapices
f
Pedai de
liberación
del mango
Números
de series del modelo
Cubierta de
portillo
para limpieza
Manguera
giratoría de
lista para usar
Protector de
motor (Detrás
de ia manguera)
Agitador
Diagrama de características
(Aspiradora vertical Panasonic)
Características
Modelo
MC-V300
Voltaje
120V AC{60Hz)
10.0 Amps
Herra
mientas
induídas
Si Si
-6-
Luz
Extensión
de cordón
15,25 m
Ajuste de
nivel de la
alfombra
4 Position
Protector
de motor
Si
Page 27

Para armar la aspiradora
A
No conecte la aspiradora hasta que termine de armarla. De lo contrario podría causar un
choque eléctrico o lesión personal.
AVERTENCIA
Peligro de choque eléctrico.
El cuerpo prínicpal de la aspiradora y el mango están empaquetados separados.
1. El tornillo del mango ha sido
insertado para el embalaje.
Retire el tornillo antes de Inser*
tar el mango. Inserte el mango
de manera que está
demonstrada en el dia- Abertura para
grama. Asegúrese de el mango
que la sujetador del I
cordón estén en la Tomillo ^
parte posterior del
mango antes de insertar.
3. Hay un área especial entre el
sujetador del cordón eléctrico y
el mango para asegurar el cordón
eléctrico cuando pasa la aspirado
ra.
Siempre guarde el cordón eléctrico
en el área especial para que el
córdon eléctrico no esté cercano a
la boquilla y que el agitador no lo
daño.
Mango
2. Inserte el
tornillo que acaba
de retirar.
Asegúrese de
apretarlo pero
no demasiado.
4. Enrolle el cordón eléctrico
alrededor la sujetador del
cordón. Presione la ranura
del enchufe sobre el cordón
eléctrico para asegurarlo.
Coloque el gancho de)
cordón alrededor del lazo
inferior del cordón.
Sujetador
del cordón
-7 -
Page 28

Page 29

Características especiales de la aspiradora
sfí!ísss®isste;®;íSsíS ■ •' ■ si>ssssssss&íi®asssisssssa3^ss^
Esta características es para los ajustes para ta limpieza eficiente y segura de
muchos tipos de suelos. Para seleccionar un ajuste del nivel
de la alfombra, apague la aspiradora y incline hacia
atrás un poquito y mueve el ajuste a la posición
dedeada.
LAS POSICIONES SUGERIDAS PARA EL NIVEL
DE LA ALFOMBRA
: pelo áspero y lanudo, pelo largo,
felpa, alfombras o tapetes irregulares.
: pelo mediano o poco largo.
: pelo corto o mediano.
: pelo muy corto.
i ^ A
Use la característica de limpieza para oril
las para aspirar con facilidad cerca de ias
paredes y los muebles.
ensticade
limpieza t
Protectorlde motor
Esta aspiradora tiene una válvula de desviación que sirve como
protector de motor que se abre automáticamente para proveer un
flujo de aire al motor cuando un zueco impida que circule el aire al
motor. Si se abre la válvula bypass para impedir que se recalente
el motor y que no haga daño a la aspiradora, se notará un cambio
de sonido mientras el aire pasa por la abertura de la válvula.
Cuando ocurre, apague la aspiradora y desenchufe el cordón del
tomacorriente. Revise si la bolsa para polvo esté llena o haya
residuos como se describe en la sección “Quitar los residuos".
Se puede abrir la válvula de desviación del protector del
motor cuando se utilizan los accesorios o cuando se pasa la
aspiradora en una nueva alfombra a causa del flujo reducido
por los mismos accesorios o la pelusa de la nueva alfombra
llenando la bolsa rápidamente o una bolsa de polvo llena.
MBvapillá!
Protector de
mofor (Altrás
de la manguera)
*
- 9 -
Page 30

Para operar la aspiradora
A
No use tos enchufes localizados sobre toa muebles. Los objetos cercanos podrían resul
tar dañados. Asegúrese de que el interruptor esté en la posición "OFF“ antes de conec
tar la aspiradora.
1. Conecte el cordón en un enchufe de 120 f
vatios. Л.
2. Para arrancar la aspiradora, mueve el control
del mango a la posición “ONV
3. Para apagar la aspiradora, mueve el control
del mango a la posición "OFF".
CUIDADO
. i X 1
■
/ ^ 1
1
______
)
Mango
Ajüstes del mango
Puede bajar el mango a
cualquier posición que
requiera. Pise en el pedal
de liberación del
mango como se ve en
el diagrama y baje el
mango al nivel
deseado.
Pedal
1. Posición vertical
El mango traba en esta
posición para el alma
cenaje. El mango
debe estar en posición
vertical cuando se
usan tos accesorios.
2. Posición mediana
Esta posición es para la
limpieza normal.
3. Posición baja
Esta posición es
para la limpieza
debajo de los mué
bles.
- 10-
Page 31

A
No coloque las manos o los pies debajo de la aspiradora cuando se usan los accesorios.
El agitador empieza a girar rápido cuando se usan los accesorios.
AVERTENCIA
Acc^ríos
A
Cuando usa los accesorios, el agitador empieza a girar. No permita que la aspiradora
se quede en el mismo lugar por mucho tiempo porque el agitador puede dañar el
suelo. No coloque la aspiradora sobre los muebles, las orillas de alfombra con fran
jas, las alfombras de pelo alto o los escalones con alfombra. La posición ideal de la
aspiradora cuando se usan los accesorios es para que la aspiradora esté en una
superficie firme al mismo nivel con el mango en la posición vertical. Véase en la sec
ción los “Ajustes del mango”.
Retire el extremo inferior de ia manguera expansible de ia aspiradora suje
tando el coilar de ia manguera y firandoi y tirando de la manguera hacia
arriba. Después de quitar ia manguera, se puede utiiízarlo sóio o se puede
utiiizar el tubo telescópico para más extensión. Quite el tubo telescópico
del compartimiento de almacenaje en la aspiradora. Para quitar la her
ramienta para hendiduras del tubo telescópico, gire y tire hacia afuera un
poquito. Para extender el tubo, gire el anillo para asegurar Hg^ramlenta
a la posición "UNLOCK” como se indica en ei anillo para
asegurar y tíre hacía afuera a la extensión máxima. Gire el
anillo para asegurar hasta la posición “LOCK" para asegú
ralo. Se puedeinsertar las herramientas en ia manguera o
en el extremo del tubo. Al insertar los accesorios en la
manguera o en el tubo, siempre gire y extensión, se puede
insertar la herramienta para polvo o la herramienta para
tapices en el extremo estrecho. El extremo de la manguera
en el posterior de la aspiradora gira para que se pueda limpiar en
todas las direcciones.
Al usar los accesorios no extenda la manguera más que la extensión
máxima porque puede venir hacia abajo la aspiradora.
Almanece los accesorios en su posición aproprada como se ve el diagrama y devuel
va la manguera a la boquilla.
CUIDADO
para hendiduras^
Tubo
re/«scópfco
Cepillo para
sacudir
___
Herramienta
para tapices
_
Manguera
Ì
Agitador
(Abajo)
Uso de accesorios
Área para limpiar
Accesorio Mueble*
Herramienta .
para hendiduras^ ^
Cepillo para A
sacudir “3
Cepillo para H
tapices
*Antes de usar los sccesotios sobre telas, siempre limpíelos. Los accesorios que se usan en las áreas
sucias como el refrigerador no deben estar usados hasta que estén limpiados. Pueden ensuciar las telas.
Véase la sección “Limpieza del exterior y los accesorios”.
X X
X
X
Entre
cojines* Cortinas*
X X
X X
X X
- 11 -
Escaleras Paredes
X
X
Page 32

Cuidado de rutina de ia aspiradora
Siguiendo las instrucciones dadas, se nueva aspiradora Panasonic funcionará al nivel máximo y
continuará funcionando por mucho años en el futuro. Lea la sección "Antes de pedir servicio" en
este manual para las recomendaciones para arreglar unos problemas que puedan ocurrir.
A
Cuando le da servicio a la aspirados y/o limpia la aspiradora siempre desconéctela del
enchufe en la pared. De lo contrario podría causar un choque eléctrico o lesión corporal
cuando la aspiradora arranca de repente. No use la aspiradora sin el filtro secundario de
espuma y caucho. Asegúrese de que el filtro secundario de espuma y caucho esté bien
instalado. De lo contrario podría dañar el motor.
Este filtro secundario de electrostático se
tiene que cambiar cuando esté sucio. Debe
cambiarse periódicamente según las condi
ciones de uso, El filtro no se puede lavar
pues prderiá su capacidad para atra
par altrapar polvo. Si el filtro secun
dario de electrostático localizado al
fondo de la cavidad de la bolsa para
povio está sucio sáquelo tirando de él
hacia adelante por debajo de las estrías
en la cavidad de la bolsa para polvo.
*No se puede limpiar este filtro y se debe cambiar a lo menos cuatro veces por año si se
usa la aspiradora a lo menos una hora por día.
rb*-eambiar
Este filtro se tiene que cambiar esté sucio. Debe cam
biarse periódicamente según las condiciones de uso. El
filtro no se puede lavar pues prderiá su capacidad
para atrapar altrapar polvo. Oprima el pedal de lib
eración del mango con el fin de que la parte superior de
la aspiradora se inclíne completamente hacia atrás hasta
que quede sobre el piso. Tome el panel de escape de
aire por los extremos con ambas manos, empuje hacia
adentro y tire del panel hacia adelante, Levante el filtro
blanco electrostático para retíralo. Reponga el filtro blan
co electrostático cuando esté seco, colocándolo con
cuidado de manera que las ranuras queden bien instal
adas sobre los pernos salientes. Reponga el panel de
escape. Coloque la aspiradora en la posición vertical.
*No se puede limpiar este filtro y se debe cambiar a lo menos cuatro veces por año si se
usa la aspiradora a lo menos una hora por dia.
AVERTENCIA
ре1шШХ) de escape dei6i6CtrosiBtico
■
Peligro de choque eléctrico o lesión
corporal.
iFBFl
1
- 12 -
Page 33

C^bio cte la bolsa para polvo
Siempre opere la aspiradora con una bolsa para polvo Panasonic Type U3 regular o U6
electrostática insertada. Puede pedir las bolsas para polvo en cualquier Centro
Autorizado de Panasonic. Se puede condeguir una boisa opcionai de teia.
1. Oprima el botón de lib
eración ubiacado en ia
parte superior de
ia cubierta de la
bolse. Tire de la
cubierta de la
bolsa hacía el
frente. Retíreles
y déjela a un
lado.
3. Desdoble la bolsa
con cuidado para que no
se rompa.
Nota: Extiéndala con
cuidado para que la
bolsa no se rasgue en
los pliegues.
Botón do
liberación
Cubierta
de la bolsa ■
■
pr-
m
□ o
CD
CD
5. Inserte la lengüeta
en la parte inferior
de la cubierta
para polvo otra
vez en la ranu
ra en el com
partimiento
para polvo
para que la
cubierta
cerrada
pueda girar.
Nota: La cubierta para polvo tiene
que estar insertada completa y correcta
mente para que la aspiradora funcione bien.
posición
del cuerpo
Pestaña de
posición de la
cubierta de la bolsa
2. Para cambiar la bolsa
para polvo, hale la parte
de cartón de la bolsa y tire
hacia frente.
4. Coloque la nueva bolsa para
polvo en el collar para bolsa. Hale
la parte de cartón y empuje
hacia atrás. Véase el diagra
ma.
6. Gire la
cubierta para '
polvo hacia arri
ba hasta que esté
en la posición cer
rada y aprétela bien.
Nota: Asegúrese de que
la parte inferior de la bolsa
para polvo no esté
localizada entre el
borde de la cubier
ta para polvo y la
junta. Véase la
flecha en el diagrama.
- 13-
Page 34

A
Cuando la placa de base está quitada para cualquier razón, antes de reinsertar, asegúrese de
que todos los alambres eléctricos estén localizados en un lugar donde no pueden tocar la
placa de base, los tornUlos para la placa de base, u otra pieza que /nueve. Cuando cambia la
placa de base, asegúrese de que la placa de base no dañe los alambres eléctricos.
AVERTENCIA
Peligro de choque eléctrico o lesión
corporei.
Antes de cambiar algunas piezas, desconecte la
aspiradora del enchufeen la pared. Dos *
« . . . Tom//tos
Para cambiar unas de estas piezas en esta sec
ción, hay que quitar y cambiar la placa de base. Siempre
coloque un periódico debajo de la boquilla cuando
quita la placa de base para proteger el suelo.
Para quitar la placa de base.
Primero coloque el mango en la posición vertical.
Véase la sección de “Ajustes del mango". Invierta
la aspiradora de manera que la placa de base mire
hacia arriba. Suelte la placa de base por quitar los dos (2)
tornillos y empujar hacia adentro en las dos (2) lengüetas para ase
gurar que aseguran la placa de base, véase el diagrama. Quite la placa
de base y el residuo de basura si hay alguno en el área de correa.
Para cambiar la placa de base.
Coloque el extremo delantero de la placa de base en las ranuras en el extremo delantero del
montaje de boquilla. Empuje ia placa de base en la posición apropiada hasta que las lengüetas
para asegurar estén aseguradas y ahora reemplace los dos (2) tornillos.
Nota: Para el rendimiento máximo, hay que revisar la correa con regularidad para que la correa
esté en buenas condiciones. Revise si la correa esté suelta o tenga grietas. Cambíela cuando
sea necesario.
Dos lengüetas
para asegurar
Placa
de base
IGiffibio:déíÉ^inbi
1. Quite la placa de base de manera descrita en la
sección "Cambiar/lnsertar de la placa de base’’.
2. Hale la bombilla moviéndola de lado a lado mien
tras la levanta del montaje de boquilla. Para quitar la
bombilla vieja empújela y déla vuelta para la izquier
da y quítela de la abertura.
3. Para insertar la bombilla nueva, inserte y dé
vuelta para la derecha hasta que asegure en la aber
tura. Use una bombilla especial para los elec
trodomésticos de 130 volts AC/15 vatios.
Nota: No use una bombilla de más de 130 volts АС/
15 vatios. Durante un uso alargado, el calor de la
bombilla puede dañar las piezas plásticas cercanas.
4. Otra vez inserte el montaje de bombilla en el montaje de boquilla. Aprételo hacia abajo en la
ranura. Inserte la placa de base otra vez de manera descrita en la sección de “Cambiar/lnsertar
de la placa de base”.
- 14 -
Page 35

А
podría sufrir una iesión corporei si el agitador se libera rápidamente y sale disparado.
Desconecte la aspiradora y inviértala de manera de que la placa de base mira hacia arriba.
Quite ia placa de base de manera descrita en la sección “Cambiar/lnsertar de la placa de
base”.
Antes de insertar el agitador otra vez. asegúrese de que tapas de los extremos y las arandelas
estén insertadas de la manera correcta. Véase el diagrama en la sección “Cambiar los cepillos”.
AVERTENCIA Peligro de lesión corporal.
Tenga cuidado cuando quita e agitador. La tensión de ia correa es atta. De lo contrario
Quíte el agitador, levántelo con cuidado y quíte la correa
de la polea y del eje de transmisión del motor si está rota
o en malas condiciones.
Nota: Los dos tapas de los extremos pueden salir con las
dos arandelas cuando levanta el agitador. No pierda estas
dos arandelas pequeñas.
Ensarte la correa nueva sobre el eje de transmisión del
motor y ensártela sobre la polea. Véase el diagrama para
la manera correcta de ensarte la correa. Use únicamente
una correa Panasonic UB8.
Instalción de la agitador
Después de revisar los tapas de los externos, Inserte otra vez el agitador en las ranuras en la
base de la aspiradora. Después de Insertar el agitador, gire a mano el agitador para asegurarse
de que gire libremente. Inserte otra vez la placa de base de la manera descrita en la sección
“Cambiar/lnsertar de la placa de base”.
ÍH[npiezádei<agitador
Apague la aspiradora y desconecte el cordón elécticro
antes de limpiar el agitador. Para mantener el mayor
rendimiento, limpie el agitador con regularidad. SI es
necesario, quite la placa de base. Véase la sección
“Cambiar/lnsertar de la placa de base" para la manera
apropiada.
Agitador - Corte con tijeras el pelo de
alfombra y la pelusa enredados alrededor
del agitador. Véase el diagrama.
- 15 -
Page 36

-СаШ!о.1У&нЖн1
,,■■íífe■^íí;■;;т^■ís*íííssíííí^^
1. Cuando cambia el agitador.
Cambie el agitador cuando el cepillo esté en matas
condiciones. Revise el cepillo con una tarjeta puesta en la
mano en la placa de base. Véase el diagrama. Sí el cepillo
del montaje no toca la tarjeta, cambie el agitador
para la mejor limpieza.
2. Cómo cambia el agitador.
Coloque el mango de la aspiradora en la posición vertical.
Véase la sección de los “Ajustes del mango". Quite la placa
de base de manera descrita en la sección "Cambiar/Insertar
de la placa de base". Después de quitar la placa de base, levante con cuidado el agitador hasta
que no toque los dos lados del compartimiento de boquilla. Cuando levanta el agitador, quíte la
correa.
Nota: Cuando levanta el agitador los dos tapas de los externos pueden liberarse con las dos
arandelas. No pierda las dos arandelas pequeñas. Véase el diagrama grande abajo de la vísta
del agitador para la manera correcta para insertar las piezas.
3. Para cambiar el agitador.
Coloque la correa alreadeor de la polea en el agitador. Nota: Hay un lugar especial para que la
correa quepa únicamente en un extremo del agitador. Inserte ambos arandelas y sorportes para
cepillo. Véase el diagrama abajo para la manera de instalación correcta. Después de insertar la
correa, las arandelas y los tapas de los extremos, inserte el agitador en el compartimiento de
boquilla y alinee cada tapa del extremo.
Después de terminar de insertar el montaje, gire a mano el agitador para asegurarse de
que gire libremente y la pieza esté instalada de la manera correcta.
Cambie la placa de base de la manera descrita en la sección de “Cambiar/Insertar de la placa de
base".
1; i
Tapa del
extremo Arandela
Montaje de agitador
Polea para correa
Unidad do cep///o
- 16 -
Tapa del
extremo
Page 37

1. Desconecte el cordón eléctrico del enchufe en la pared. No choree agua sobre I
aspiradora.
2. Limpie el exterior con un trapo suave y limpio, que ha sido exprimido después de remojar en
una solución de agua y detergente líquido ligero. Seque el exterior con un trapo seco después
de limpiar.
3. Para reducir la electricidad estática y la acumulación de polvo, limpie la superficie exterior y
los accesorios.
4. Limpie los accesorios en el agua tibia y jabonosa, enjuague y deje secar al aire libre. No lave
los accesorios en el lavaplatos ni en la lavadora para ropa.
No use los accesorios si están mojados.
A
0й11агШ1оё1ШиЬисшЛе^1Шига%г1^Ь8^(^
CUIDADO
Los accesorios que se usan en áreas sucias como debajo dei refrigerador no
deben usarse en otras superficies sin antes estar lavados. Podrían dejar marcas.
SÍV.- míMíy -k::-
La manguera localizada en la parte posterior de la aspiradora transporta el polvo de la
boquilla hast qe llegue a la bolsa para polvo. Sí la manguera está atascada:
1. Desconecte el cordón eléctrico del enchufe
antes de revisar los conductos de aire. Baje
la cubierta del portillo para limpieza y revise el
residuo de basura en esta área.
2. Quite la manguera de la parte posterior de
la aspiradora revise sí hay residuos de
basura. Conecte la aspiradora y arránquela.
Mientras la aspiradora funciona con la
manguera desconectada, estire la manguera
al máximo y luego permita que se encoja
hasta su tamaño normal para quitar el residuo
de basura. Inserte nuevamente la manguera
en la abertura de la parte inferior de donde la
refirió. Empuje con firmeza para asegurarse
de que quede bien conectada.
Portino
para
limpieza
3. Si aún hay un residuo de basura, aprete el
botón de encendido/apagado en la posición
"OFF" y desconecte el cordón elécrico.
Invierta la aspiradora de manera que la placa
de base mire hacia arriba. Quite la placa
baja, revise el área de la boquilla y quite los
residuos visibles. Instaleotra vez la placa
baja. Inserte la manguera corta para boquilla
y la placa de base otra vez. Para más
detalles, véase la sección "Cambiar/Insertar
de la placa de base”.
Cubierta del portino
para limpieza
Manguera
expanslblel
- 17 -
Page 38

Antes de pedir servicio
Peligro de choque eléctrico y lesión
A
AVERTENCIA
Desconecte la aspiradora antes de darle servicio o limpiaría. De lo contrario podría pro
ducirse un choque eléctrico o causar lesión personal si la aspiradora arranca de repente.
Consulte este cuadro para encontrar soluciones que usted mismo puede
realizar cuando tenga problemas menores de rendimiento. Cualquier ser
vicio que necesita aparte de otros descritos en este manual tiene que ser
hecho por un representante de servicio autorizado.
personal.
PROBLEMA
La aspiradora
no funciona.
No aspira satis
factoriamente.
La basura de
sale de la bolsa
para polvo.
La luz no
funciona.
La aspiradora
levanta tapetes o
es difícil empujar.
CAUSA POSIBLE SOLUCIÓN POSIBLE
1. Está desconectada del enchufe.
2. El interruptor de encendido/
apagado ne está en LA
posición “ON".
3. Cortacircuitos botado o fusible
quemado en el tablero de
servicio de la residencia.
1. Bolsa para polvo llena.
2. Correa rota.
3. La posición incorrecta del nivel
de la alfombra.
4. Manguera 0 boquilla atascada.
5. Manguera no está bien insertada.
6. Agitador desgastado. 6. Cambie el agitador.
7. Manguera rota.
8. La cubierta para polvo no está,
bien cerrada.
9. Correa no está ¡nstalda en el
eje del motor.
1. La bolsa no está bien cerrada.
2. Bolsa rota.
1. Bombilla fundida.
1. Ajuste incorrecto de nivel de pelo
de la alfombra.
1. Conecte bien. Prete el interruptor
de encendido/apagado a la
posición “ON".
2. Prete el interruptor de encendido/
apagado a la posición “ON".
3. Reestablezca el cortacircuitos
0 cambie el fusible.
1. Cambie la bolsa.
2. Cambie la correa.
3. Mueva a la posición correcta.
4. Revise la manguera o la boquilla.
5. Inserte bien la manguera.
7. Cambie la manguera.
8. Cierre bien la cubierta para polvo.
9. Instale la correa en el eje del
motor.
1. Cierre bien la bolsa.
2. Cambie la bolsa.
1. Cambie la bombilla.
1. Ajuste el nivel.
- 18-
Page 39

Garantía
La garantía límite de la aspiradora
comercial Panasonic
Panasonic Home and Commercial Products Company (referido como garante)
arreglará este producto gratis con las piezas nuevas o restauradas en los Estados
Unidos o en Puerto Rico por un año de la fecha de compra original en caso de un
defecto en las materias o en el montaje del producto.
Esta garantía limite excluye ambos el labor y las piezas para lo siguiente: tas bol
sas para polvo, los filtros, las correas, las bombillas, los cepillos para agitador, y las
pilas (si están incluidas).
En los Estados Unidos puede llevar o mandar este producto por correo para darle ser
vicio durante el período de garantía. Consulte el Servicenter Directory para un
Panasonic Services Company (PASC) Factory Servicenter o llame al 1-888-350-9590,
o póngase en contacro con su distribudor vendedor. En Puerto Rico puede llevar o
mandar por correo este producto durante el período de garantía por llamar al número
de teléfono local de la Panasonic Sales Company en el Servicenter Directory.
Se ofrece únicamente la garantía al comprador original. Se necesitan el recibo de
compra u otra prueba de la fecha de compra para obtener asistencia incluida en la
garantía.
Esta garantía incluye únicamente los defectos en materias o en el montaje que ocurre
durante el uso normal y no incluye los daños causados por transporte o problemas que
son causados por los productos que no son Panasonic o problemas que resultan en
los accidentes, el mal uso, el abuso el descuido, manejo malo, la aplicación mala,
alteración, modificación de este producto, la sobretensión en la corriente eléctrica, el
voltaje inadecuado, daño resultado por los rayos, o el arreglado por alguien que no
está autorizado por Panasonic, o los daños resulatods por los actos de Dios.
Límites y exclusiones:
No hay garantías espresadas excepto las descritas arriba. El garante no será respons
able de los daños incidentales o consiguientes resultados del uso de este producto o
violación de esta garantía. Todas las garantías expresadas o implícitas incluso tas
garantías de comercio y del propósito particular están limitadas por eí período de
garantía descrito arriba.
Algunos estados no permiten el límite o la exclusión de daños incidentales o consigu
ientes ni límite del tiempo de la garantía por eso los límites o exclusiones descritos arri
ba no le son aplicables a usted.
Esta garantía le da ciertos derechos legales y es posible que usted tenga otros dere
chos que varían de estado a estado. Si un problema con este problema ocurre durante
o después del período de la garantía, puede informarse en su tienda o a su Centro de
Servicio. Si el problema no se resuelve a su satisfacción, escriba al Customer
Satisfaction Center en la dirección incluida en la última página de este manual.
- 19 -
Page 40

Cuando necesita sencido
S¡ su aspiradora Panasonic necesita servicio, busque el Centro de Servicio
Panasonic o un Centro de Servicio PASC autorizado más cercano bajo
“Servicio de Eléctrodomésticos" en las páginas amarillas de la guía de teléfonos
o llame gratis al 1-888-350-9590 para encontrar un centro de servicio conve
niente.
OFFICES. No están equipadas para arreglar estos productos.
No mande el producto a las EXECUTIVE o REGIONAL SALES
Si manda el producto
Empaquete con cuidado en el cartón original sí posible y mándelo prepagado y con seguro sufi
ciente. Ponga una carta con sellos en la que describe su problema con el producto en el exterior
del cartón. No mande el producto a las EXECUTIVE o REGIONAL SALES OFFICES. No
están equipadas para arreglar estos productos.
Récord de Comprador
Número de Modelo
Número de Serie
Dirección del Vendedor
Fecha de Compra
p 'pp^ctó deben^itiír' o llamar: a!:|
OUSrrOMER SAn^RACnON
DEFWmSEPfr^:
PANASONIC HOME & COMMERCIAL PRODUCTS
COMPANY, DIVISION OF MATSUSHITA ELECTRIC
CORPORATION OF AMERICA
One Panasonic Way
4A-4
Secaucus, New Jersey 07094
Nombre del Vendedor
Panasonic Services Co.
thorásialdíaf
dtaa ata^semana
AC01ZAPPZ0U
C01ZAPP00U00
Impreso en BUA
-20-
 Loading...