

Page 1
Operating Instructions
Vacuum Cleaner (domestic)
Model No.
MC-UL592
MC-UL594
We would recommend that you carefully study these Operating Instructions before attempting to operate the unit
and that you note the Important Safety Instructions.
Please keep this Operating Instructions in a safe place with your Authorised Dealer Service booklet.
This product complies with the European directives 2006/95/EC and 2004/108/EC.
Page 2

TABLE OF CONTENTS
PAGE
CAUTION FOR AC MAINS LEAD (UK and Republic of Ireland only)
IMPORTANT SAFETY INSTRUCTIONS FOR THE USER
PARTS IDENTIFICATION
HOW TO ASSEMBLE YOUR VACUUM CLEANER
A) Handle Assembly / Hose Assembly / Mains Lead Storage
B) Features
* Automatic Height Adjustment
* Edge Cleaning
* Overload Protection
* Filter Cleaning System
* Upper and Lower Cord Storage Hooks
* Auto Beater Bar Stop
HOW TO OPERATE YOUR VACUUM CLEANER
A) Mains Lead Release
B) ON/OFF Switch
C) Carpet / Floor Selector
D) Handle Lock / Release By Foot Pedal
E) Filter Cleaning System
F) Using Tools with Removable Hose
.............................................................................................. 3
.................................................................................................................. 4
.................................................................................................................................................................... 5
............................................................................................................................ 6
....................................................................................................... 6
.................................................................................................................................................................................... 6
............................................................................................................................................... 6
...................................................................................................................................................................... 7
............................................................................................................................................................. 7
......................................................................................................................................................... 7
................................................................................................................................ 7
........................................................................................................................................................... 7
............................................................................................................................... 8
.................................................................................................................................................................. 8
......................................................................................................................................................................... 8
.............................................................................................................................................................. 8
...................................................................................................................................... 8
.............................................................................................................................................................. 9
............................................................................................................................................ 9
MAINTENANCE AND SERVICING
* Dust Bin Cleaning
* Maintaining The HEPA Filter Unit
* To Clean the Pre-Filter
* Replacing HEPA Exhaust Filer
* Thermal Protector
* Removing and Installing Lower Plate
* Replacing Belt
* Cleaning Beater Bar
* Cleaning Exterior and Tools
* Removing Clogs
BEFORE REQUESTING SERVICE
SPECIFICATIONS
VACUUM CLEANER CONSUMABLES / ACCESSORIES
(For UK and Republic of Ireland customers only)
..................................................................................................................................................................... 14
..................................................................................................................................................................... 10
........................................................................................................................................................................... 14
.................................................................................................................................................................. 15
........................................................................................................................................................................ 16
.............................................................................................................................................................................. 17
.................................................................................................................................................... 10
.............................................................................................................................................. 12
.............................................................................................................................................................. 12
.................................................................................................................................................. 13
........................................................................................................................................ 14
...................................................................................................................................................... 15
................................................................................................................................................... 17
.............................................................................................................. 18
2
Page 3
CAUTION FOR AC MAINS LEAD ( UK and Republic of Ireland only)
FOR YOUR SAFETY PLEASE READ THE FOLLOWING TEXT CAREFULLY
This appliance is supplied with a moulded three pin mains plug for your safety and convenience.
A 13-ampere fuse is fitted in this plug.
Should the fuse need to be replaced please ensure that the replacement fuse has a rating of 13-ampere and that it is approved
by ASTA or BSI to BS1362.
Check for the ASTA mark or the BSI mark on the body of the fuse.
If the plug contains a removable fuse cover you must ensure that it is refitted when the fuse is replaced.
If you lose the fuse cover the plug must not be used until a replacement cover is obtained.
A replacement fuse cover can be purchased from your local Panasonic Dealer.
IF THE FITTED MOULDED PLUG IS UNSUITABLE FOR THE SOCKET OUTLET IN YOUR HOME THEN THE FUSE SHOULD
BE REMOVED AND THE PLUG CUT OFF AND DISPOSED OF SAFELY.
THERE IS A DANGER OF SEVERE ELECTRICAL SHOCK IF THE CUT OFF PLUG IS INSERTED INTO ANY 13-AMPERE
SOCKET.
If a new plug is to be fitted please observe the wiring code as shown below.
If in any doubt please consult a qualified electrician.
IMPORTANT: The wires in this mains lead are coloured in accordance with the following code:
Blue : Neutral
Brown : Live
As the colours of the wire in the mains lead of this appliance may not correspond with the coloured markings identifying the
terminals in your plug, proceed as follows:
The wire which is coloured BLUE must be connected to the terminal in the plug which is marked with the letter N or coloured
BLACK.
The wire which is coloured BROWN must be connected to the terminal in the plug which is marked with the letter L or coloured
RED.
Under no circumstances should either of these wires be connected to the earth terminal of the three pin plug, marked with the
letter E or the Earth Symbol
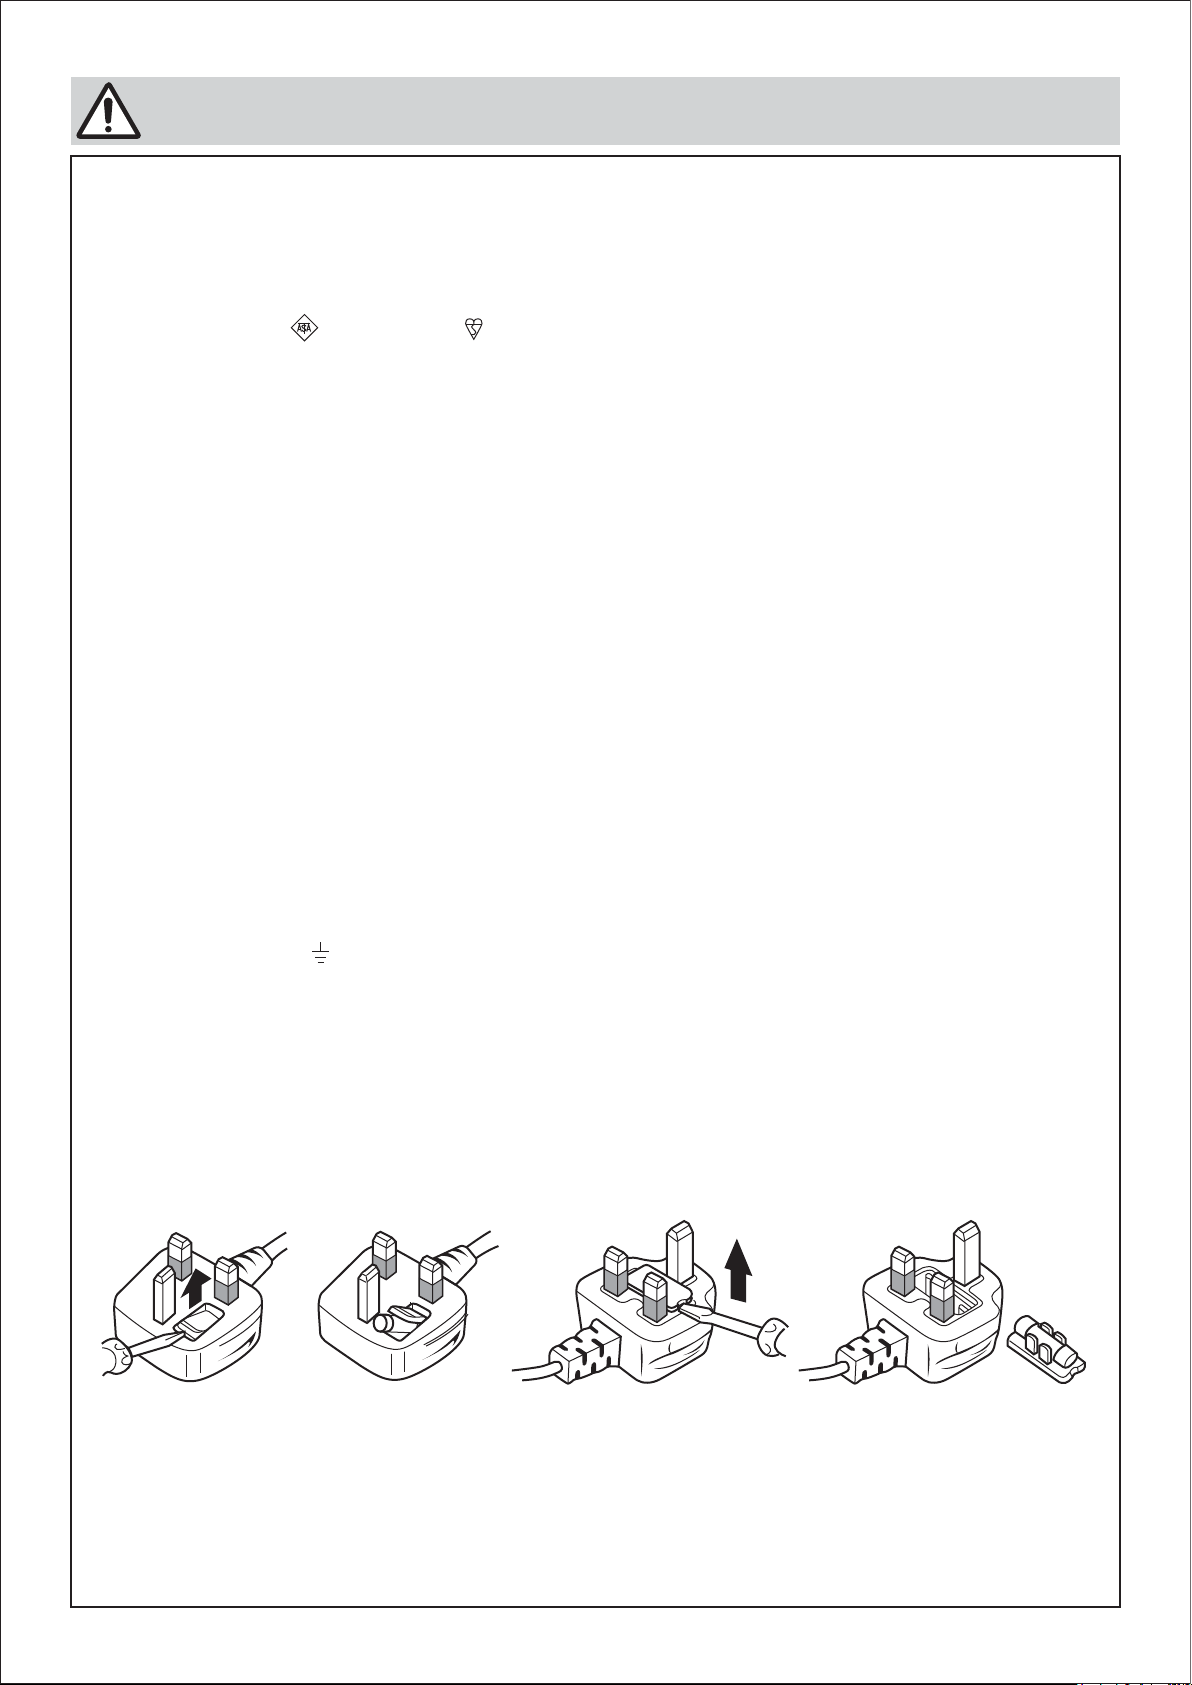
How to replace the Fuse:
• There are two types of the supplied AC Mains Lead : A and B as shown below.
1) Open the fuse compartment with a screwdriver.
2) Replace the fuse and fuse cover if detachable.
TYPE A TYPE B
3
Page 4
IMPORTANT SAFETY INSTRUCTIONS FOR THE USER
Before using the vacuum cleaner, please observe these basic precautions.
WARNING: To reduce the risk of fire, electric shock or injury:
■
Do not leave the vacuum cleaner plugged into the socket outlet. The plug must be removed from the socket outlet before cleaning
or maintaining the appliance.
■
This appliance is not intended for use by persons (including children) with reduced physical, sensory or mental capabilities, or lack
of experience and knowledge, unless they have been given supervision or instruction concerning use of the appliance by a person
responsible for their safety.
■
Children should be supervised to ensure that they do not play with the appliance.
■
Do not use if the mains lead or mains plug is damaged. If the vacuum cleaner is not working as it should be, or has been dropped,
damaged, left outdoors, or come into contact with water, consult an authorised Panasonic Service Centre.
■
If the mains lead is damaged, it must be replaced by Panasonic, its service agent or similarly qualified person in order to avoid a
hazard.
■
Do not pull or carry by the mains lead, use mains lead as a handle, close a door on the mains lead, pull mains lead around sharp
edges or corners. Do not run vacuum cleaner over the mains lead. Keep the mains lead away from heated surfaces.
■
Do not handle plug or vacuum cleaner with wet hands.
■
Do not put any object into openings. Do not use with any opening blocked; keep free of dust, lint, hair and anything that may block
or reduce air flow.
■
Keep hair, loose clothing, fingers, and all parts of body away from openings and moving parts.
■
Do not use the vacuum cleaner without filters and dust bin.
■
Turn off all controls before unplugging.
■
Do not use to pick up flammable or combustible materials, or other that may become so or use in areas where they may be present.
■
This appliance should be serviced by an authorised Panasonic Service Centre, and only genuine Panasonic spare parts should be
used.
■
Use extra care when cleaning on stairs. Always keep the back side of the vacuum cleaner touch to the stair to prevent the cleaner
from falling.
■
To prevent damaging carpeted floors, tiled floors, Linoleum, etc. do not leave the beater bar rotating in the same place for too long.
■
Keep bare feet and hands away from the beater bar (It may cause injury).
NOTE: This vacuum cleaner is designed for general domestic use only and is not suitable for use in a garage, garden or
to suck up liquids.
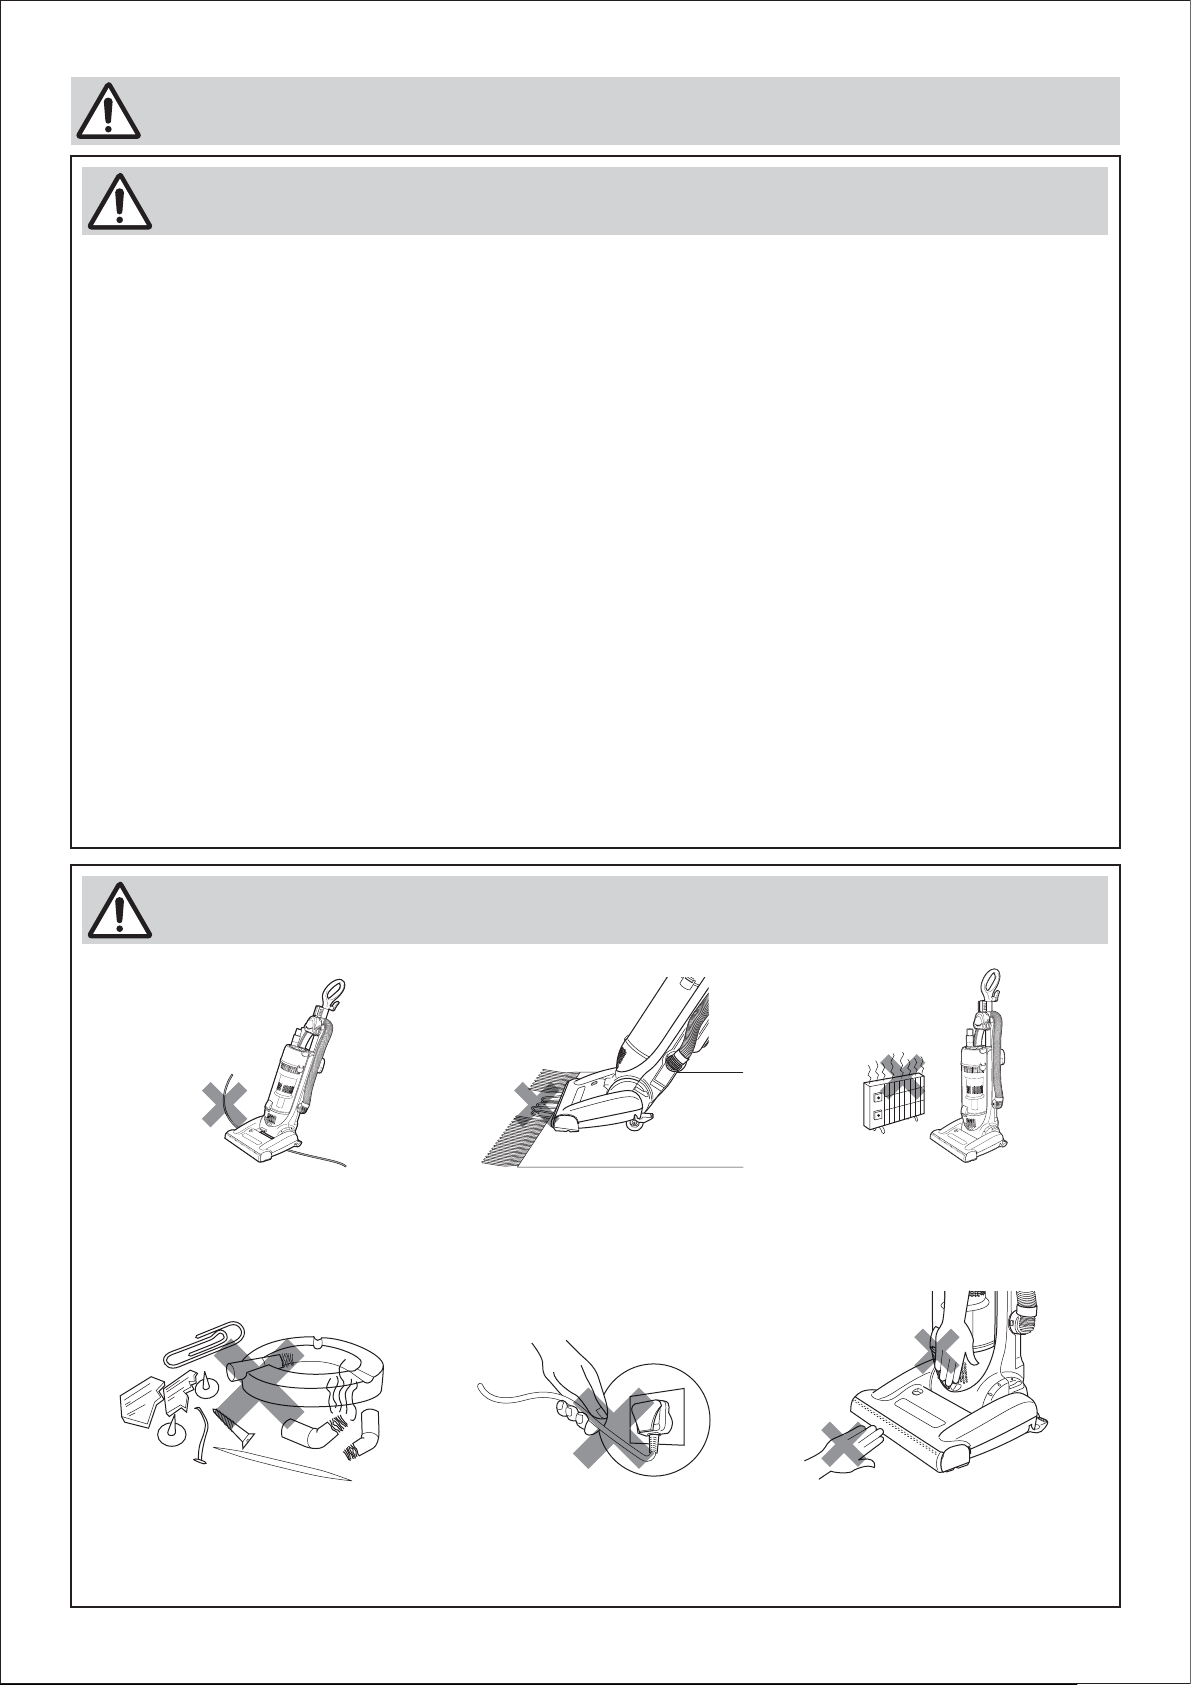
CAUTIONS: Obey the following instructions in order to avoid any injury or physical damage to property.
1. To avoid any possible damage to the
mains lead, never run over the mains
lead or allow it to become caught in
the beater bar when using the vacuum
cleaner.
2. Do not run the vacuum cleaner over
tassels or fringes of rugs or mats as
they could get caught up in the beater
bar and may cause damage to the
brush and belt.
3. Keep the vacuum cleaner away from
heat sources such as radiators, fire,
direct sunlight, etc.
4. To avoid damaging the machine,
never let the vacuum cleaner pick
up wet matter, mud, burning ashes
or large and sharp objects.
4
5. Do not pull on the mains lead when
disconnecting the appliance from the
socket outlet, always pull on the plug
body itself.
6. To avoid injury keep your fingers
and hand away from the beater bar
and never put them at the exhaust
area.
Page 5
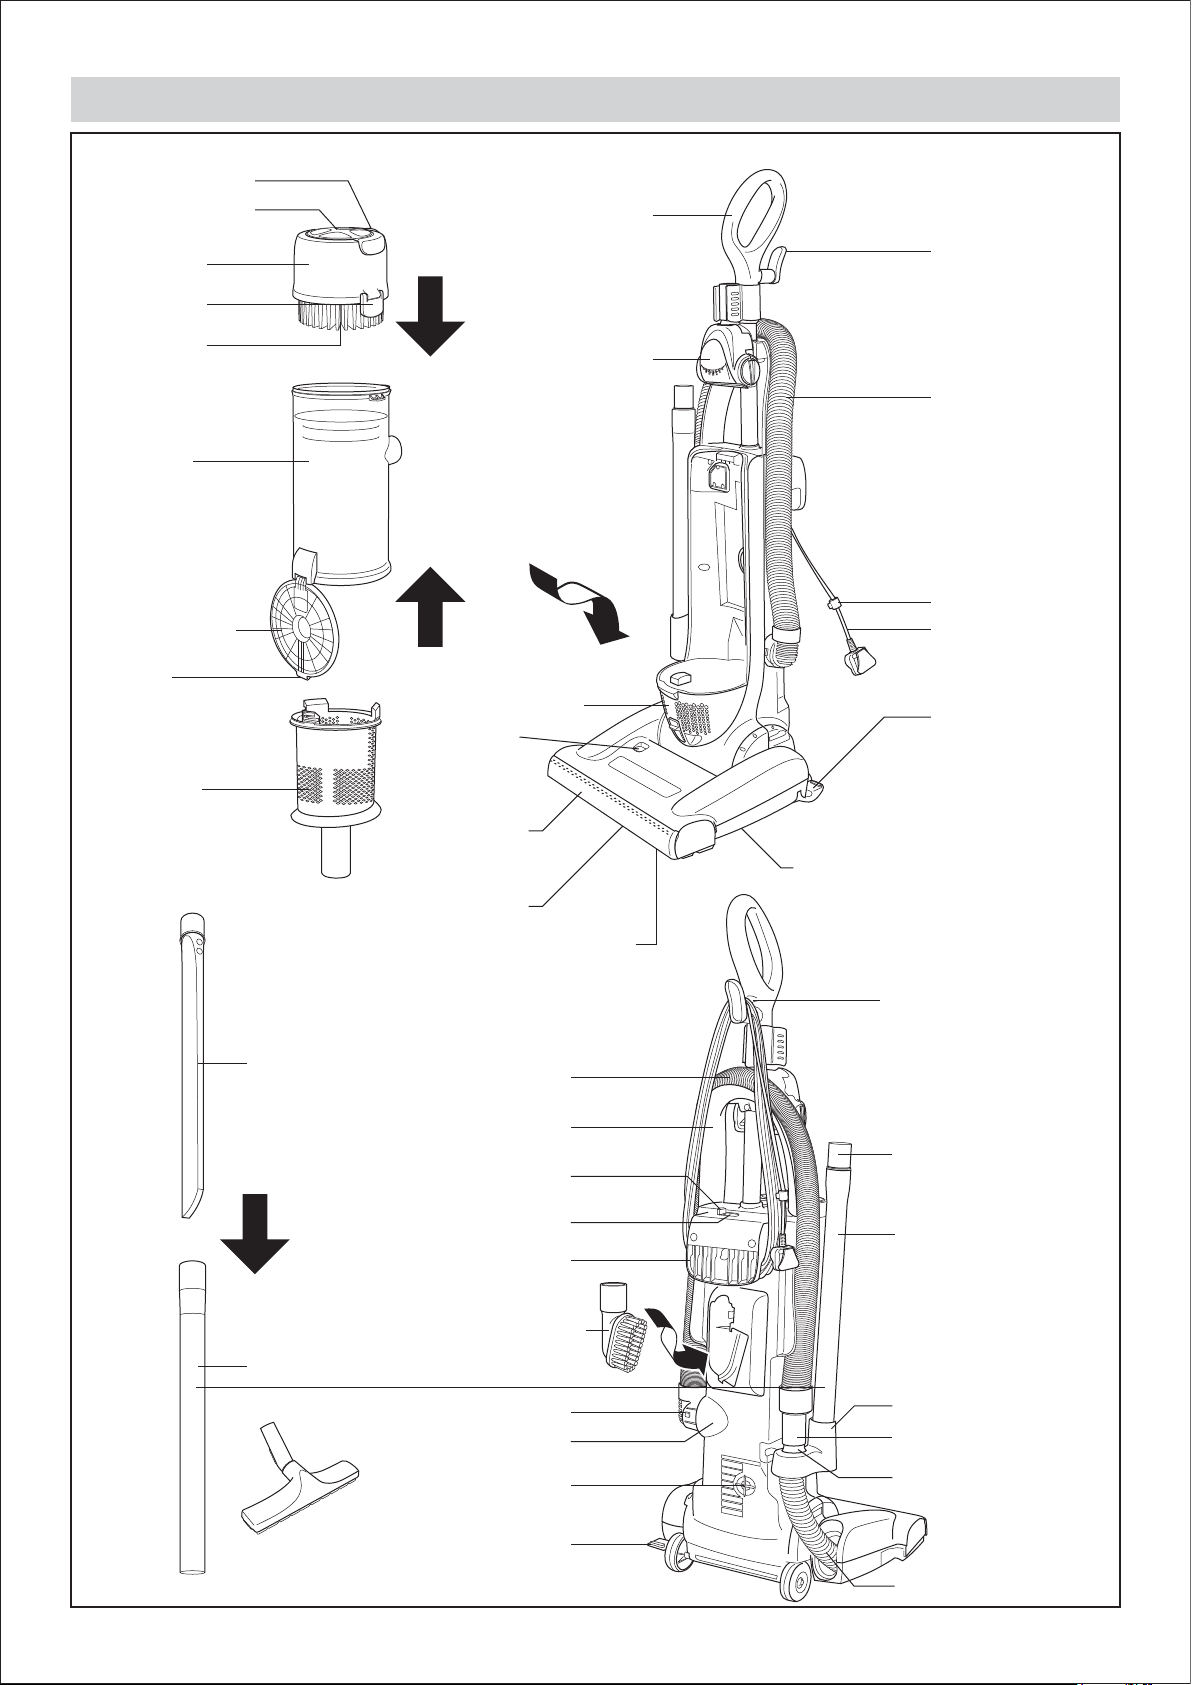
PARTS IDENTIFICATION
Dust Bin Handle
Filter Refresher
Handle
Lid
Buckle
HEPA
Filter Unit
Dust Bin
Dust Bin Plate
Latch
Pre-Filter
Filter Cover
Overload
Protection
Reset Button
Upper Cord
Storage Hook
Mini Turbine
Nozzle
Hose
Mains Lead Hook
Mains Lead
Foot Pedal
(Handle release)
Furniture Guard
Beater Bar (inside)
Crevice
ON/OFF Switch
Floor/Carpet Selector
Lower Cord Storage Hook
(Carrying Handle)
Extension Wand
(Additional 1 pc only for MC-UL594)
Connection Pipe
Hose
Hose Hook
Dusting Brush
Suction Inlet
Nozzle
Belt (inside)
Cord Clip
Crevice
Extension Wand
Extension Wand Holder
Curved Wand
Floor Nozzle
(Only for MC-UL594)
Air Protector
Foot Pedal
(Handle release)
Curved Wand Holder
Nozzle Hose
5
Page 6
HOW TO ASSEMBLE YOUR VACUUM CLEANER
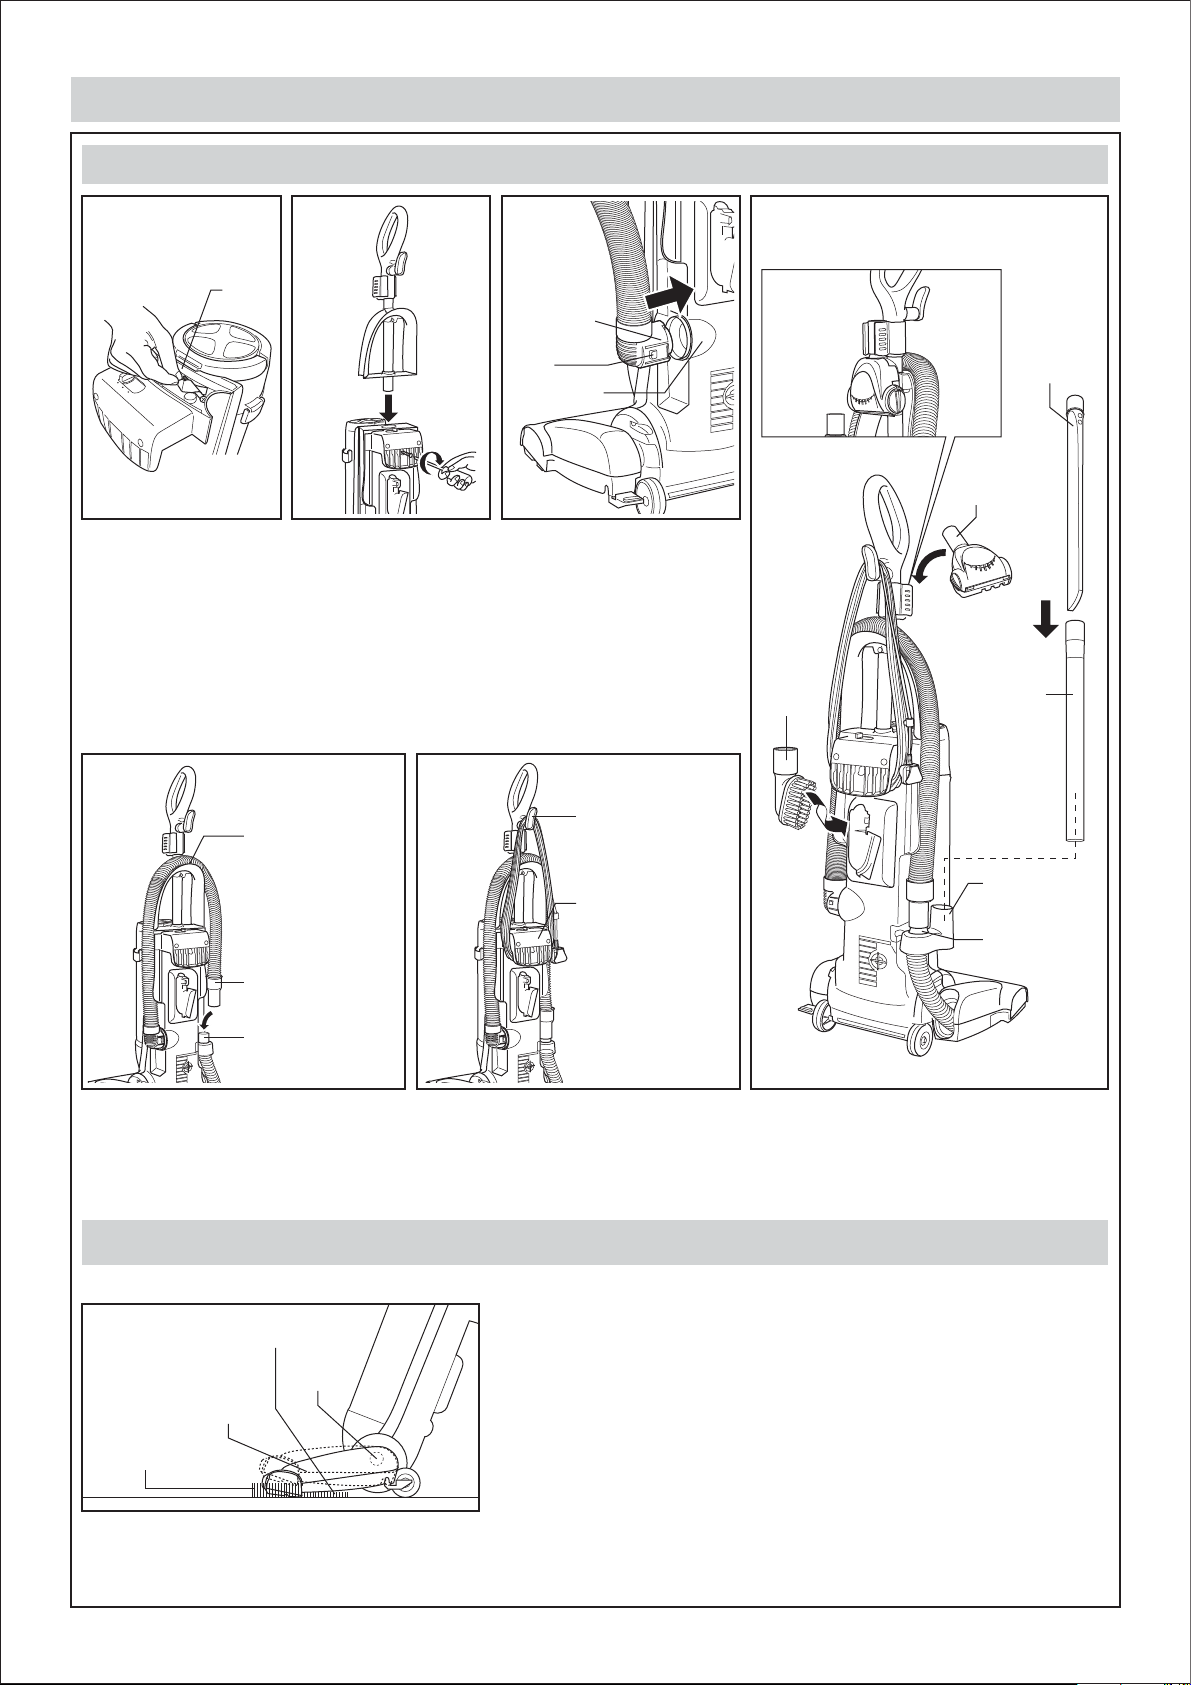
A) HANDLE ASSEMBLY / HOSE ASSEMBLY / MAINS LEAD STORAGE
Tape
Connection
Pipe
OFF FLOOR CARPET
Hook
Suction Inlet
Crevice
Mini Turbine
Nozzle
1. Remove tape and
screw from the body.
2. Insert the base of the
handle into the top of
the vacuum cleaner
body as shown.
Push in handle and
tighten the screw.
IMPORTANT:
Do not overtighten the
screw.
Hose Hook
Curved Wand
Curved Wand
Holder
4. Set the hose around the hose hook
and insert the curved wand to the
curved wand holder.
3. Insert the connection pipe
to suction inlet. Ensure
that the 2 hooks of the
connection pipe are
completely fitted into the
suction inlet.
Upper Cord
Storage Hook
Lower Cord
Storage Hook /
Carrying
Handle
5. Turn the upper cord storage hook in
the upright position and wind the
mains lead around the upper and
lower cord storage hooks.
Dusting
Brush
Extension
Wand
Extension
Wand Holder
Curved Wand
Holder
6. Insert the tools to its location as shown.
B) FEATURES
Automatic Height Adjustment
Shallow Pile Carpet
Pivot Point
Nozzle
Deep Pile
Carpet
6
• Your Panasonic vacuum cleaner is designed with an Automatic Height
Adjustment, which adjusts the cleaning head to the proper height of any
carpet pile. This system allows you to move from one carpeted area to
another, without having to make time consuming manual adjustments.
Page 7

Edge Cleaning
Overload Protection
Overload Protection
Reset Button
• Edge cleaning feature enables improved cleaning of carpets near walls
and furniture.
• The overload protection inside the nozzle stops the nozzle motor when
the beater bar jams to prevent belt breakage.
NOTE:
The vacuum cleaner motor will continue to run.
TO CORRECT PROBLEM:
• Switch the unit off.
• Unplug the mains lead.
• Check nozzle areas for excessive lint build up or jamming.
• Clean jammed area.
TO RESET:
• Press reset button on top of the nozzle. Plug in and turn on vacuum
cleaner.
Filter Cleaning System
Filter
Refresher
Upper and Lower Cord Storage Hooks
Upper Cord
Storage Hook
Mains Lead
Lower Cord
Storage Hook
(Carrying Handle)
Mains Lead
Hook
• Rotate the filter refresher 2 full turns before and after cleaning.
• This will remove fine dust from the filter for improved and long lasting
suction power.
• While storage the vacuum cleaner, turn the upper cord storage hook in
the upright position and wind the mains lead around the upper and lower
cord storage hooks as shown.
• In order to have a proper arrangement of mains lead while storage the
vacuum cleaner, it is advisable to use the mains lead hook as shown in
the diagram.
Auto Beater Bar Stop
Beater Bar : On Beater Bar : Off
• This model is fitted with an auto beater bar stop.
• While operating the vacuum cleaner at the “CARPET” position, the beater
bar will automatically stop rotating when the body of the vacuum cleaner
was put at the upright position as shown.
7
Page 8

OFF FLOOR CARPET
HOW TO OPERATE YOUR VACUUM CLEANER
OFF FLOOR CARPET
A) MAINS LEAD RELEASE
1. Turn the upper cord storage hook to release the mains lead.
IMPORTANT:
To avoid any possible damage to the mains lead, never run over the mains lead or allow it to become caught in the beater bar.
2. Fix the mains lead into the cord clip to help secure it
during use and turn back the upper cord hook in the
upright position.
B) ON / OFF SWITCH
• Plug the mains lead into the wall socket.
Switch Knob
• Slide the switch knob to the right to the selected position to turn the
vacuum cleaner on.
• When finished vacuuming, slide the switch knob to the left until the “OFF”
position.
• Unplug the mains lead from the outlet when not in use.
C) CARPET / FLOOR SELECTOR
• Switch Knob should be placed in “FLOOR” position when using vacuum
cleaner on bare floors and when using tools. The beater bar does not
rotate in the “FLOOR” position but rotate only in the “CARPET” position.
• Switch Knob should be placed in “CARPET” position when using vacuum
cleaner on carpeted floors.
D) HANDLE LOCK / RELEASE BY FOOT PEDAL
To unlock the handle of the vacuum cleaner, step on the foot pedal. To return into the upright position, simply put the handle back.
Foot Pedal Foot Pedal
1. Upright position
The handle should be in an upright
position for storage and when cleaning
tools are used.
8
2. Middle position
For normal cleaning, step the foot
pedal and pull back the handle to a
comfortable angle and release the
foot pedal.
3. Low position
For cleaning under furniture, step the
foot pedal again and the handle may
now be lowered almost to the floor
as shown.
Page 9

CAUTION
To prevent damaging carpeted floors, tiled floors, Linoleum, etc., do not leave the beater bar rotating in the same
place for too long.
E) FILTER CLEANING SYSTEM
• Rotate the filter refresher 2 full turns before and after cleaning.
• This will remove fine dust from the filter for improved and long lasting
suction power.
Filter
Refresher
F) USING TOOLS WITH REMOVABLE HOSE
• To remove hose from curved wand holder, grasp the curved wand,
Hose
Curved Wand
twisting and pulling straight out.
• With the hose free from the curved wand holder, it now can be used to
attach tools.
1 2
Crevice
Dusting
Brush
3
Mini
Turbine
Nozzle
Curved Wand
Holder
Hose
Extension
Wand
Extension
Wand
4
• Attach tools to suit your cleaning needs.
• The Crevice 1 can be used on the following items:
• Furniture • Cushions
• Curtains • Stairs
• Walls
• The Dusting Brush 2 can be used on following items:
• Furniture • Curtains
• Stairs • Walls
・ Shelves
• The Mini Turbine Nozzle 3 can be used on the following items:
• Cushions • Stairs
• Bed Sheet
• The Floor Nozzle 4 can be used on following items:
• Stairs
• Floors
• To reinstall hose to the curved wand holder, insert the curved wand to the
curved wand holder and push down to a press fitting.
2
Dusting
Brush
Floor Nozzle
(An additional extension
wand and floor nozzle
only for MC-UL594)
9
Page 10

MAINTENANCE AND SERVICING
DUST BIN CLEANING
CAUTION
While using the tools, hold the handle with one hand to avoid pulling
the vacuum cleaner over.
While using the tools, always grasp the curved wand and not the tools
or the hose.
WARNING
Disconnect the electrical supply before servicing or cleaning the vacuum cleaner.
Failure to do so could result in electrical shock or personal injury from vacuum cleaner suddenly starting.
Dust Bin
Handle
Upper Filter
Dust Intake
Connection
Electrical Shock or Personal Injury Hazard
• Always empty the dust bin when dust level reached the “MAX” line.
• Grasp the handle on the top of the dust bin. Lift up and out to remove
dust bin from vacuum cleaner.
・ Remove any clogs that might be located at the dust intake connection.
• Remove any clogs that might be located at the upper filter.
CAUTION
Be sure to hold the dust bin over a rubbish container prior to
Rubbish Container
releasing the dust bin plate.
• Press latch and the dust bin plate will open and the dust will fall out.
10
• Close the dust bin plate.
• After the dust bin is empty of dust, firmly close the dust bin plate.
Make sure you hear a “click” sound to indicate that the dust bin plate is
fully latched.
Page 11

• Clean up outer dust bin with clean, soft cloth that has been dipped in
water and wrung dry.
• Place dust bin back into vacuum cleaner by inserting the bottom first and
tilting back.
• Push forward and lower dust bin handle to lock dust bin in place.
NOTE:
Lid Holding
Bracket
Hinge
• A lid holding bracket is located on the hinge area of the dust bin.
• This bracket may release in order to prevent damage to the dust bin or
the dust bin plate due to the dust bin was dropped or the dust bin plate
getting any impact.
• To reassemble, put the hinge of the dust bin plate to its original location
as shown.
• Slide the lid holding bracket to its original location as shown and push
until you hear a “click” sound.
NOTE:
• Push the lid holding bracket using both palm if the lid holding bracket is
difficult to push in.
11
Page 12

MAINTAINING THE HEPA FILTER UNIT
Lid
Pull to release Pull to release
HEPA Filter
Unit
Buckle
Dust Bin
TO CLEAN THE PRE-FILTER
• Check HEPA filter unit frequently and clean when dirty.
• Remove HEPA filter unit from dust bin by pulling both buckle as shown.
• Clean HEPA filter unit by gently tapping over a rubbish container.
Tap on Lid several sides to ensure best cleaning.
DO NOT clean the HEPA filter unit by brush or clean it with water.
• Reinstall the HEPA filter unit as per reverse procedure.
• Remove HEPA filter unit from dust bin. Refer to maintaining the HEPA
filter unit (as above).
• Press the latch to open the dust bin plate.
•
Grasp the pre-filter and turn it clockwise and pull the pre-filter out as shown.
Clean by gently tapping over a rubbish container.
Pre-Filter Tab
Pre-Filter
Dust Bin Slot
• Install the pre-filter to the dust bin, aligning the pre-filter tabs to the dust
bin slots. Each Pre Filter Tabs is different shape and adjust it to match
Dust Bin Slot, then turn counter-clockwise to the lock position until you
hear a “click” sound
as shown
.
• After the dust bin is empty, firmly close the dust bin plate.
Make sure you hear a “click” sound to indicate that the dust bin plate is
fully latched.
• Reassemble the HEPA filter unit. Place dust bin unit back into vacuum
cleaner by inserting the bottom first and tilting back.
Refer to dust bin cleaning (pg.10).
12
Page 13

REPLACING HEPA EXHAUST FILTER
HEPA
Exhaust Filter
Buckle
Filter Cover
• The HEPA exhaust filter removes dirt from exhaust air.
• Check HEPA exhaust filter after emptying dust bin
Replace when dirty.
• Lay down the vacuum cleaner as shown.
• To remove filter cover, slide upwards the buckle as shown.
• By holding the filter cover as shown, pull it out towards you.
• Grasp the HEPA exhaust filter and pull out to remove it.
HEPA
Exhaust Filter
Filter Cover
• To install a new HEPA filter or replace the current one, put it into its
original position.
• Place the filter cover to the body as shown and press into its original
location.
• Slide down the buckle as shown.
WARNING
Do not operate vacuum cleaner with a clogged exhaust filter or
without the exhaust filter cover properly installed.
Important:
If HEPA Exhaust Filter become too dirty, it causes that air suction fall down.
HEPA Exhaust Filter cannot be cleaned and should be replaced at least
once a year.
13
Page 14
THERMAL PROTECTOR
• This vacuum cleaner has a thermal protector which automatically trips to protect the vacuum cleaner from overheating.
• If a clog prevents the normal flow of air to the motor, the thermal protector trips and turns the motor off automatically.
This allows the motor to cool in order to prevent possible damage to the vacuum cleaner.
TO CORRECT PROBLEMS:
• Turn the vacuum cleaner off and unplug the power cord from the outlet to allow the vacuum cleaner to cool and the thermal
protector to reset automatically.
• Check for and remove clogs, if necessary. Also check and replace any clogged filters and empty dust bin if necessary.
• Wait approximately sixty (60) minutes and plug the vacuum cleaner in and turn back on to see if the motor protector has reset.
WARNING Electrical Shock or Personal Injury Hazard
Disconnect the electrical supply before servicing or cleaning the vacuum cleaner.
Failure to do so could result in electrical shock or personal injury from vacuum cleaner suddenly starting.
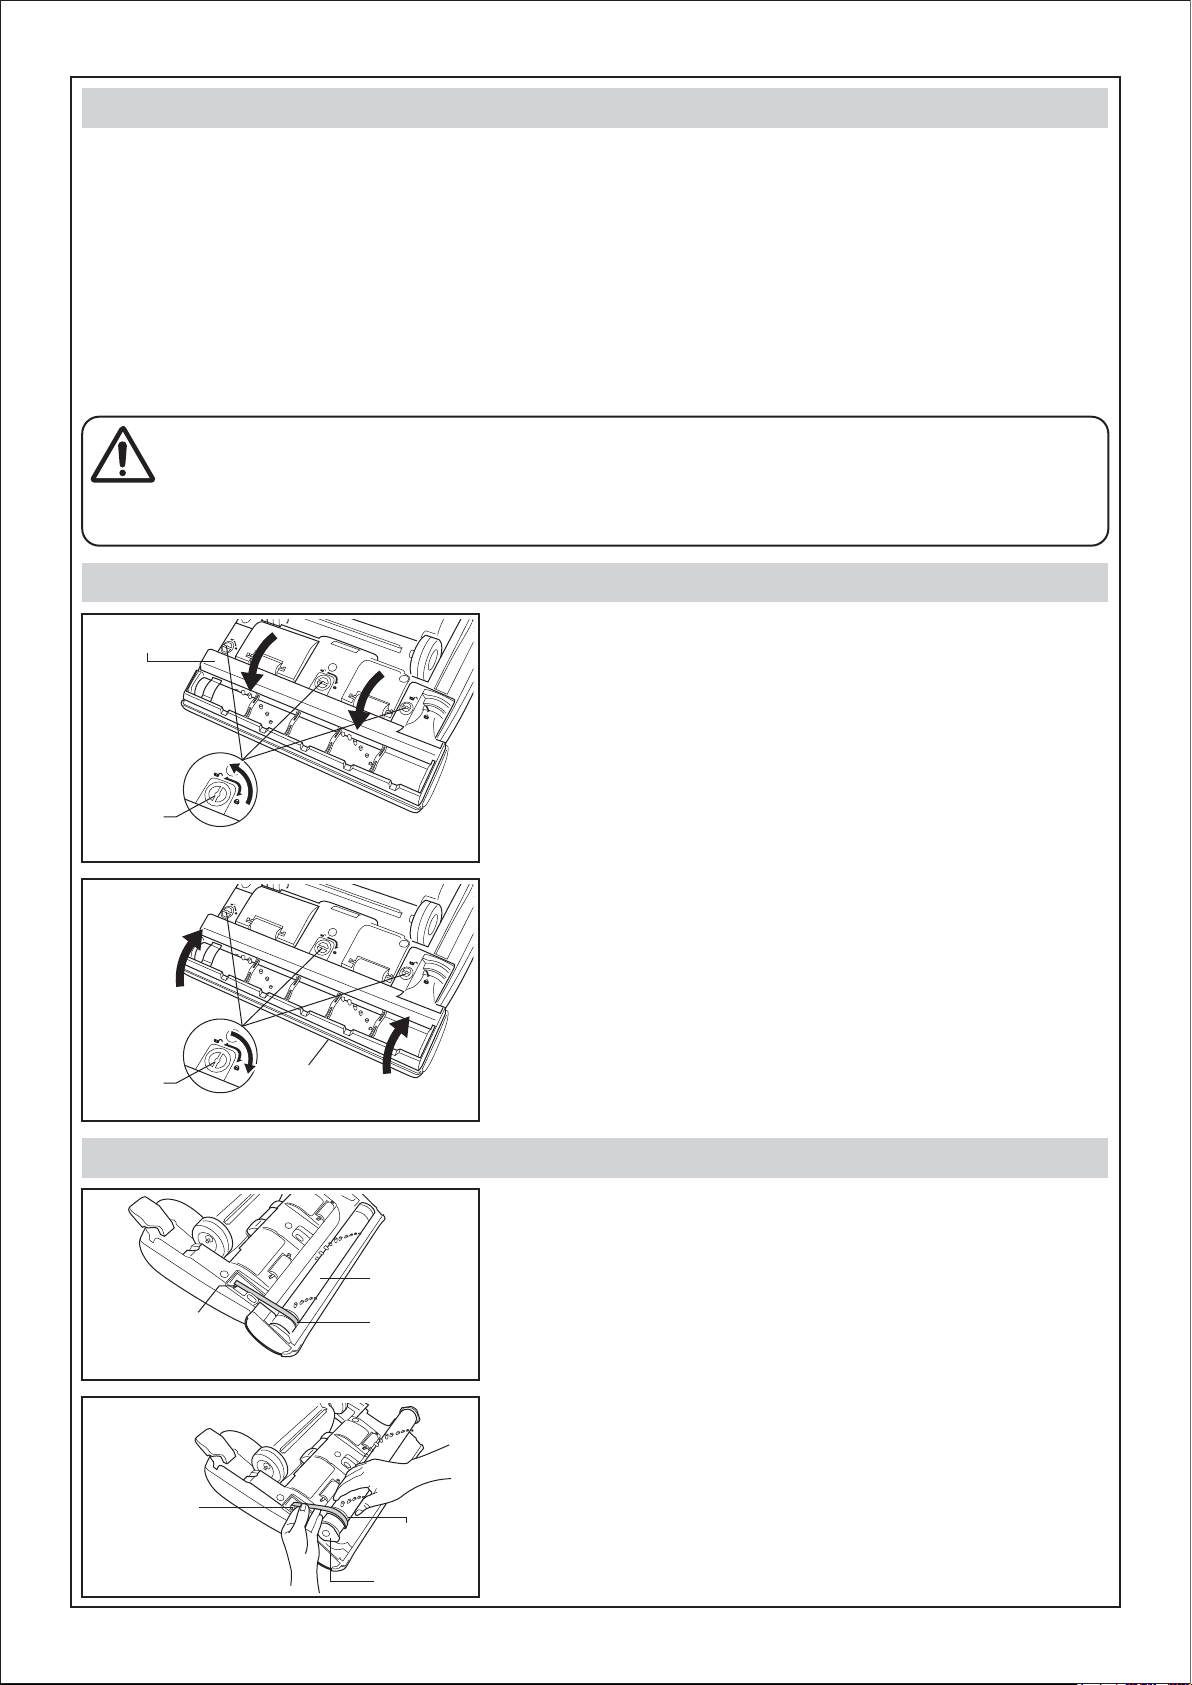
REMOVING AND INSTALLING LOWER PLATE
Lower Plate
Latches
Latches
Lower Plate
REPLACING BELT
• Before servicing any parts, unplug the mains lead from electrical outlet.
• Always place paper under nozzle whenever lower plate is removed to
protect the floor.
• Place body in upright position and turn vacuum cleaner over to expose
lower plate.
• Release lower plate by rotating the lower plate latches to the UNLOCK
position.
• Remove lower plate and remove any residue that may exist in belt area.
• Reinstall lower plate by hooking front end of lower plate into slots on front
of nozzle.
• Press lower plate onto nozzle and secure by rotating the lower plate
latches to the LOCK position.
• Replace the belt if excessive slipping occurs.
Motor Shaft
14
Motor Shaft
• Remove lower plate. See “Removing and Installing Lower Plate”.
Beater Bar
Belt
• Remove beater bar by gripping the belt side of the beater bar carefully
lifting out as shown.
• Remove worn or broken belt.
• Clean beater bar and the end caps.
Beater Bar
Belt Groove
End Cap
Page 15

End Cap
• Loop new belt around motor shaft and beater bar belt groove.
• Reinstall the beater bar by inserting the end cap of the beater bar to the
slot for both side.
Slot
CLEANING BEATER BAR
a) Beater Bar for Nozzle
Beater Bar
Nozzle
• After reinstalling the beater bar, turn it by hand to make sure that belt is
not twisted or pinched and that all rotating parts turn freely.
• Reinstall lower plate. See “Removing and Installing Lower Plate”.
• Clean beater bar for Nozzle and Mini Turbine Nozzle after every five uses.
• Turn vacuum cleaner over, exposing the beater bar for Nozzle.
• Cut off any carpet pile and lint entangled around beater bar for Nozzle
and Mini Turbine Nozzle with a pair of scissors.
b) Beater Bar for Mini Turbine Nozzle
Beater Bar
CLEANING EXTERIOR AND TOOLS
• Unplug the mains lead from electrical outlet.
• Clean exterior using a clean, soft cloth that has been dipped in water and wrung dry.
• Dry wipe after above cleaning.
• DO NOT drip water on the vacuum cleaner.
• DO NOT clean tools in dishwasher or clothes washer.
• Wash tools in warm water, rinse and air dry.
• DO NOT use tools if they are wet.
15
Page 16

REMOVING CLOGS
If the vacuum cleaner does not seem to have adequate suction, first check if
the dust bin is full or if a filter is clogged.
• Check the hose area.
Curved Wand
Connection
Pipe
Hook
Suction Inlet
Curved Wand
Holder
Nozzle Hose
Nozzle
• Remove hose by grasping the curved wand, twisting, and pulling straight
off. Then, press both hooks and pull out the connection pipe from the
suction inlet.
• Visually inspect the hose and the base area into which the hose is
connected.
• Remove any visible clog.
• Re-connect the connection pipe to the suction inlet.
• Plug in the vacuum cleaner and turn it on.
• Stretch the hose to maximum length and then allow the hose to return to
its storage length.
• Re-connect the curved wand to the curved wand holder.
• Turn off and unplug the vacuum cleaner.
• Remove dust bin and check upper filter and dust intake for clogs.
• If the dust bin, upper filter, dust intake connection and the hose areas
are free of clogs, check the nozzle area.
Upper
Filter
Dust intake
connection
・ If the above areas are free of clogs, check the Nozzle Hose area.
Disconnect the top of the Nozzle Hose from Curved Wand Holder by
gently pressing the top of the Nozzle Hose. Keep
Nozzle Hose straight
and check inside of Nozzle Hose for clogs as shown.
・ After cheking the Nozzle Hose, reconnect the top of the Nozzle Hose to
Curved Wand Holder by gently pressing the top of the Nozzle Hose.
• Return the vacuum cleaner to the upright position before plugging into
an electrical outlet.
16
Page 17

BEFORE REQUESTING SERVICE
WARNING Electrical Shock or Personal Injury Hazard
Disconnect the electrical supply before servicing or cleaning the vacuum cleaner.
Failure to do so could result in electrical shock or personal injury from vacuum cleaner suddenly starting.
Review this chart to find do-it-yourself solutions for minor performance problems.
Any service needed, other than those described in these Operating Instructions, should be performed by an authorised
service representative.
PROBLEM POSSIBLE CAUSE POSSIBLE SOLUTION
Vacuum Cleaner won’t
run.
Poor job of dirt
pick-up.
Beater bar does not
turn.
SPECIFICATIONS
Specifications
Power source
Max. input
Nominal input
Dimensions (L x W x H)
Net weight
Dusting brush
Extension wand
1. Unplugged at socket outlet.
2. Mains plug fuse blown.
3. Thermal protector tripped.
1. Full or clogged dust bin.
2. Worn beater bar.
3. Clogged nozzle.
4. Clogged hose.
5. Hole in hose.
6. Hose not inserted fully.
7. Dirty filters.
1. Switch knob at “FLOOR” position.
2. Broken belt.
3. Overload Protection Reset Button on the Nozzle
tripped.
MC-UL592
1400 W
8.6 kg
1 pc
1. Plug in firmly, turn on vacuum cleaner.
2. Check fuse and replace it if blown.
3. Unplug vacuum cleaner, allow to cool and thermal
protector will reset itself.
1. Empty dust bin.
2. Take to your nearest Panasonic Service Center.
3. Check for clogs.
4. Check for clogs.
5. Take to your nearest Panasonic Service Center.
6. Check hose connection.
7. Clean or change the Dust Compartment Filter Kit
(page 18).
8. Change the Exhaust Filter (page 18).
1. Move switch knob to the “CARPET” position.
2. Replace belt.
3. Push the Overload Protection Reset Button to reset.
MC-UL594
230 - 240 V ~ 50 Hz
1500 W
1200 - 1300 W
391 mm x 372 mm x 1100 mm
8.8 kg
✔
2 pcs
Crevice
Floor nozzle
-
✔
✔
• Design and specifications may be changed without prior notice.
• Weight and dimensions shown are approximate.
REMINDER FOR CUSTOMER
The model and serial number of this product may be found on the name plate located at the rear of your vacuum cleaner.
You should note that the model and serial number in the spaces provided and retain this book as a permanent record of your purchase.
Model Number : _________________________________________________________
Serial Number : _________________________________________________________
Date Purchased : _________________________________________________________
Where Purchased : _________________________________________________________
17
Page 18

VACUUM CLEANER CONSUMABLES / ACCESSORIES
(For UK and Republic of Ireland customers only)
DESCRIPTION MC-UL592 MC-UL594
Exhaust filter
Mini Turbine Nozzle
Extension wand
Crevice
Dusting brush
Floor nozzle
Belt
YMV72K95000
YMV96Q95000
YMV40P7X030
YMC61RXB030
YMV88R95000
-
YMV28S95000
YMV89Q95000
Beater bar ass’y
Handle unit
Handle screw
Upper filter
Dust compartment filter kit
Pre-filter
Dust compartment cover kit
YMV0VK96000
YMV0UK96000
YMV92R95000
YMV97B95000
YMV54B95000
YMV34K95000
YMV0VK95000
YMV43K95000
YMV0UK95000
Hose ass’y
NOTE: Specifications are subject to change without prior notice.
18
YMV94P96000
YMV94P95000
Page 19
Sales and Support Information
Customer Care Center
• For customers within the UK: 0844-844-3868
• For customer within the Republic of Ireland: 01 289 8333
• Visit our website for product information.
• E-mail: customer.care@panasonic.co.uk
Direct sales at Panasonic UK
Customer Care Center
• Order accessory and consumable items for your product with
ease and confidence by telephoning our Customer Care Center
Mon - Thu 9:00am - 5:30pm, Fri 9:30am - 5:30pm.
(Except public holidays).
• Or go on line through our Internet Accessory ordering application
at : www.pas-europe.com
• Most major credit and debit cards accepted.
• All enquiries transactions and distribution facilities are provided
directly by Panasonic UK Ltd.
• It couldn’t be simpler!
• Also available through our internet is direct shopping for a wide
range of finished products, take a browse on our website for
further details.
Information on Disposal for Users of Waste Electrical and Electronic Equipment
(private households)
This symbol on the products and/or accompanying documents means that used electrical and electronic products
should not be mixed with general household waste.
For proper treatment, recovery and recycling, please take these products to designated collection points, where they
will be accepted on a free of charge basis. Alternatively, in some countries you may be able to return your products to
your local retailer upon the purchase of an equivalent new product.
Disposing of this product correctly will help to save valuable resources and prevent any potential negative effects on
human health and the environment which could otherwise arise from inappropriate waste handling. Please contact your
local authority for further details of your nearest designated collection point.
Penalties may be applicable for incorrect disposal of this waste, in accordance with national legislation.
Information on Disposal in other Countries outside the European Union
This symbol is only valid in the European Union.
If you wish to discard this product, please contact your local authorities or dealer and ask for the correct method of disposal.
19
Page 20

Pursuant to at the directive 2004/108/EC, article 9 (2)
Panasonic Testing Centre
Panasonic Service Europe, a division of
Panasonic Marketing Europe GmbH
Winsbergring 15, 22525 Hamburg, FR. Germany
PanasonicManufacturingMalaysiaBerhad(6100-K)
No.3, Jalan Sesiku 15/2, Shah Alam Industrial Site,
40200 Shah Alam, Selangor Darul Ehsan, Malaysia.
© Panasonic Corporation 2009
http://panasonic.net/
V01Z95200
A0110-1Printed in Malaysia
 Loading...