

Page 1

VACUUM CLEANER (HOUSEHOLD)
1
Clean with cold water every month
Limpiar el filtro con agua fría cada mes
See page 31
Ver pàgina 31
Aspiradora (Domestico)
Model No. / N° de modelo
MC-UL429
Operating Instructions
Instrucciones de operación
Before operating your vacuum cleaner, please read these instructions completely.
Antes de usar su aspiradora, lea completamente estas instrucciones por favor.
Page 2
Problems? Questions?
CALL
1-855-726-2495
Panasonic Helpline
PLEASE DO NOT RETURN UNIT TO THE STORE
Problemas? Preguntas?
LLAMAR
1-855-726-2495
Línea de ayuda de Panasonic
NO DEVUELVA ESTE UNIDAD A LA TIENDA
© 2013 Panasonic Appliances Company of America,
Division of Panasonic Corporation of North America
All rights reserved / Tous droits réservés / Todos los derechos están reservados
- 2 -
www.panasonic.comU.S. 1-855-726-2495 (TOLL FREE)
Page 3

TABLE OF CONTENTS /
CONSUMER INFORMATION / Información para el consumidor .................................. 4-5
IMPORTANT SAFETY INSTRUCTIONS / Instrucciones importantes de seguridad .... 6-7
PARTS IDENTIFICATION / Identificación de piezas..........................................................8
CONSUMABLE PARTS / Partes consumibles ..............................................................9
FEATURE CHART / Diagrama de características..........................................................9
ASSEMBLY / Ensamble .................................................................................................. 10
Attaching Handle / Ensamble del mango .................................................................. 10
Attaching Hose / Conectando la manguera .............................................................. 12
Tool Storage / Almacenaje de accesorios ..................................................................13
TO OPERATE VACUUM CLEANER / Para utilizar la aspiradora .................................. 14
Power Cord / Cordón eléctrico.................................................................................... 15
Cord Reel / Cordón retractor ...................................................................................... 16
On/Off Switch / Interruptor prendido/apagado............................................................ 17
Adjusting the Handle / Ajuste del Mango.................................................................. 17
Using Tools / Uso de los Accesorios ........................................................................ 18
Tools / Accesorios ...................................................................................................... 22
FEATURES / Características ........................................................................................ 23
Edge Cleaning / Limpieza de orillas .......................................................................... 23
Automatic Adjusting Nozzle / Boquilla de ajuste automático .................................. 23
Carpet/Bare Floor Selector / Selector alfombra/piso ................................................ 24
Thermal Protector / Protector termal ........................................................................ 25
Tabla de contenido
ROUTINE CARE OF VACUUM CLEANER / Cuidado de rutina de la aspiradora ........ 26
Emptying Dust Bin / Vaciar el contenedor de polvo.................................................. 27
Cleaning Pre-Filter / Limpieza del pre-filtro .............................................................. 29
Cleaning Primary Filter / Limpieza del filtro primario .............................................. 31
Replacing HEPA Media Exhaust Filter / Cambio del filtro de escape HEPA .......... 33
Replacing Belt / Remplazo de la correa .................................................................... 34
Cleaning Agitator / Limpieza del Agitador.................................................................. 38
Removing Clogs / Remover Obstrucciones .............................................................. 39
Cleaning Exterior and Tools / Limpieza del exterior y de las herramientas ............ 41
BEFORE REQUESTING SERVICE / Antes de pedir servicio .................................. 42-43
WARRANTY / Garantía ............................................................................................ 44-47
WHAT TO DO WHEN SERVICE IS NEEDED / Cuando necesita servicio .................... 48
- 3 -
www.panasonic.comU.S. 1-855-726-2495 (TOLL FREE)
Page 4
CONSUMER INFORMATION
Please read IMPORTANT SAFETY INSTRUCTIONS on page 6 before
use. Read and understand all instructions.
TO OUR VALUED CUSTOMER
We are very pleased to welcome you to the Panasonic family of products. Thank you for
purchasing this product. Our intent is that you become one of our many satisfied customers.
Proper assembly and safe use of your vacuum cleaner are your responsibilities. Your vacuum
cleaner is intended only for household use. The vacuum cleaner should be stored in a dry,
indoor area. Read the Operating Instructions carefully for important use and safety
information.
Special care is required when vacuuming certain types of carpet or floor covering. Always
check the carpet or floor covering manufacturer's recommended cleaning instructions before
vacuuming.
PLEASE PAY CLOSE ATTENTION TO ALL
WARNING AND CAUTION STATEMENTS.
WARNING statements are designed to alert you to
the possibility of personal injury, loss of human
WARNING
CAUTION
life, and/or damage to the vacuum cleaner and/or
personal property if the instructions given are not
followed.
CAUTION statements are designed to alert you to
the possibility of damage to the vacuum cleaner
and/or personal property if the instructions given
are not followed.
WARNING
TO AVOID ELECTRICAL SHOCK
Never vacuum damp or wet surfaces or liquids.
DO NOT store vacuum cleaner outdoors.
Replace worn or frayed power cord immediately.
Unplug from outlet when not in use and before servicing.
TO AVOID ACCIDENTS
• Except for hand-held vacuum cleaners, keep vacuum cleaner on floor - not chairs, tables, steps,
stairs, etc.
• Store vacuum cleaner promptly after each use to prevent accidents such as tripping over power cord
or vacuum cleaner.
• Use vacuum cleaner and accessories only in a manner intended by the manufacturer.
• Do not use an extension cord.
• Do not pull the vacuum cleaner beyond its power cord length. The plug might be damaged which can
cause electrical sparking and fire.
- 4 -
www.panasonic.comU.S. 1-855-726-2495 (TOLL FREE)
Page 5
Información para el consumidor
Por favor, lea “Instrucciones importantes de seguridad” en la página 7 antes
de usar su aspiradora. Lea y comprenda todas las instrucciones.
A NUESTRO ESTIMADO CONSUMIDOR
Nos da mucho gusto el presentarle a la familia de productos Panasonic. Le damos las gracias
por comprar este producto. Estamos resueltos a hacer de usted uno de nuestros muchos
consumidores satisfechos.
El montaje correcto y uso seguro de su aspiradora son sus responsabilidades. Su aspiradora
está fabricada para el uso de domicilio únicamente. Debe guardar la aspiradora en un lugar
seco y bajo techo. Lea las “Instrucciones de operación” con cuidado para la información
importante de uso y la información de seguridad.
Se requiere el cuidado especial cuando pasa la aspiradora sobre ciertas clases de alfombra o
cubierta de piso. Siempre revise las instrucciones de la limpieza recomendadas por el
fabricante para la alfombra o la cubierta de piso antes de pasar la aspiradora.
Preste mucha atención por favor a todos
los avisos y a todas las advertencias
Las secciones ADVERTENCIA están
incluídas para llamarle la atención a la
posibilidad de la lesión corporal, la pérdida
ADVERTENCIA
CUIDADO
de vida humana, y/o el daño a la aspiradora
y/o el daño a las propiedades personales si
las instrucciones dadas no son seguidas.
Las secciones CUIDADO están incluídas
para llamarle la atención a la posibilidad
de daño a la aspiradora, y/o del daño a las
propiedades personales si las
instrucciones dadas son están seguidas.
ADVERTENCIA
PARA EVITAR CHOQUE ELÉCTRICO
Nunca pase la aspiradora en las superficies húmedas o mojadas ni aspire líquidos.
No mantenga la aspiradora a la intemperie.
Cambie en seguida un cordón eléctrico gastado o roído.
Desconéctela cuando no la está usando y antes de darle servicio.
PARA EVITAR ACCIDENTES
• Excepto las aspiradoras a mano, mantenga la aspiradora sobre el suelo - no sobre las sillas, las
mesas, los escalones, las escaleras, etc.
• Mantenga la aspiradora en un lugar seguro después de cada uso para evitar accidentes como
tropiezo con cordón eléctrico o con aspiradora.
• Use la aspiradora y los accesorios únicamente en manera descrita en este manual.
• No utilice una extensión.
• No tire de la aspiradora más allá de la longitud del cable eléctrico. El enchufe puede ser dañado y
puede causar un encendido.
- 5 -
www.panasonic.comU.S. 1-855-726-2495 (TOLL FREE)
Page 6

IMPORTANT SAFETY INSTRUCTIONS
When using your vacuum cleaner, basic precautions should always be followed,
including the following:
Read all instructions in this manual before assembling or using your vacuum
cleaner.
WARNING
1. Use your vacuum cleaner only as described in this manual. Use only with Panasonic
recommended attachments.
2. Disconnect electrical supply before servicing or cleaning out the brush area.
3. Do not leave vacuum cleaner when plugged in. Unplug from outlet when not in use
and before servicing.
4. To reduce the risk of electrical shock - Do not use outdoors or on wet surfaces.
5. Do not allow to be used as a toy. Close attention is necessary when used by or near
children.
6. Do not use with a damaged cord or plug. If vacuum cleaner is not working as it
should, has been dropped, damaged, left outdoors, or dropped in water, return it to a
Panasonic Service Center.
7. Do not pull or carry by cord, use cord as a handle, close a door on cord, or pull cord
around sharp edges or corners. Do not run vacuum cleaner over cord. Keep cord
away from heated surfaces.
8. Do not unplug by pulling on cord. To unplug, grasp the plug, not the cord.
9. Do not handle plug or vacuum cleaner with wet hands.
10.Do not put any objects into openings.
11. Do not use with any opening blocked; keep free of dust, lint, hair, and anything that
may reduce air flow.
12.Keep hair, loose clothing, fingers, and all parts of body away from openings and
moving parts.
13.Turn off all controls before unplugging.
14.Use extra care when cleaning on stairs. Do not put on chairs, tables, etc. Keep on floor.
15.Do not use vacuum cleaner to pick up flammable or combustible liquids (gasoline,
cleaning fluid, perfumes, etc.), or use in areas where they may be present. The fumes
from these substances can create a fire hazard or explosion.
16.Do not pick up anything that is burning or smoking, such as cigarettes, matches, or hot
ashes.
17.Do not use vacuum cleaner without dust bin and/or filters in place.
18.Unplug before connecting air turbine (if applicable).
19. Hold plug when rewinding onto cord reel. DO NOT allow plug to whip when rewinding.
20.You are responsible for making sure that your vacuum cleaner is not used by anyone
who is unable to operate it properly.
To reduce the risk of fire, electrical shock, and injury:
SAVE THESE INSTRUCTIONS
THIS VACUUM CLEANER IS INTENDED FOR HOUSEHOLD USE ONLY
NOTE: Before you plug in your Panasonic vacuum cleaner, make sure that the voltage
indicated on the rating plate located at the back of the vacuum cleaner is the same as
your local electrical supply.
- 6 -
www.panasonic.comU.S. 1-855-726-2495 (TOLL FREE)
Page 7

Instrucciones importantes de seguridad
Cuando use su aspiradora, debe sequir las siguientas instrucciones basicas:
Lea todas las instrucciones en este manual antes de armar o usar su aspiradora.
ADVERTENCIA
Para reducir el riesgo de incendio, choque eléctrico, lesiones:
1. Use su aspiradora solamente como se describe en este manual. Use solamente con
accesorios Panasonic recomendados.
2. Desconecte la fuente de electricidad antes de hacer el servicio o limpiar el área del cepillo.
3. No deje la aspiradora cuando está enchufada. Desenchúfela del tomacorriente cuando no
está en uso y antes de hacer el servicio.
4. Para reducir el riesgo de choque eléctrico - No la use afuera o sobre superficies mojadas.
5. No permita que se le use como un juguete. Gran atención es necesaria cuando es usada
por o cerca de niños.
6. No la use con un cordón o tomacorriente dañados. Si la aspiradora no está trabajando
como debe, ha sido volteada, dañada, dejada afuera, o dejada caer en el agua, retórnela a
un Centro de Servicio Panasonic.
7. No tire o arrastre del cordón, no use el cordón como una manija, no cierre la puerta sobre
el cordón, o tire del cordón alrededor de bordes afilados o esquinas. No pase la aspiradora
sobre el cordón. Mantenga el cordón lejos de superficies calientes.
8. No desenchufe tirando del cordón. Para desenchufar, tome la ficha, no el cordón.
9. No tome la ficha o la aspiradora con las manos mojadas.
10. No ponga ningún objeto en las aberturas.
11. No la use con ninguna abertura bloqueada; manténgala libre de polvo, hilachas, pelo, y
cualquier cosa que pueda reducir la circulación de aire.
12. Mantenga los cabellos, ropas sueltas, dedos, y todas las partes del cuerpo lejos de las
aberturas y partes movibles.
13. Apague todos los controles antes de desenchufar.
14. Use precaución extra cuando esté limpiando escaleras. No la coloque sobre sillas, mesas,
etc. Manténgala sobre el piso.
15. No use la aspiradora para levantar líquidos inflamables o combustibles (gasolina, fluido de
limpiar, perfumes, etc.), o use en áreas donde pueden estar presentes. Los vapores de
estas substancias pueden crear un peligro de incendio o explosión.
16. No levante nada que esté ardiendo o soltando humo, tal como cigarrillos, fósforos, o
cenizas calientes.
17. No use la aspiradora sin la contenedor para el polvo y/o filtros en su lugar.
18. Desconecte antes de conectar la turbina de aire (si aplica).
19. Tome la ficha cuando arrolle sobre el carrete del cordón. No permita que la ficha golpee
20. Usted es responsable por estar seguro que su aspiradora no es usada por alguien incapaz
de operarla apropiadamente.
GUARDE ESTAS INSTRUCCIONES
Esta aspiradora está diseñada para uson en el hogar solamenta
NOTA: Antes de enchufar su aspiradora Panasonic, esté seguro de que el voltaje
indicado en la placa de clase ubicada en la parte de atrás de la aspiradora es el mismo
que el de su proveedor local de electricidad.
- 7 -
www.panasonic.comU.S. 1-855-726-2495 (TOLL FREE)
Page 8
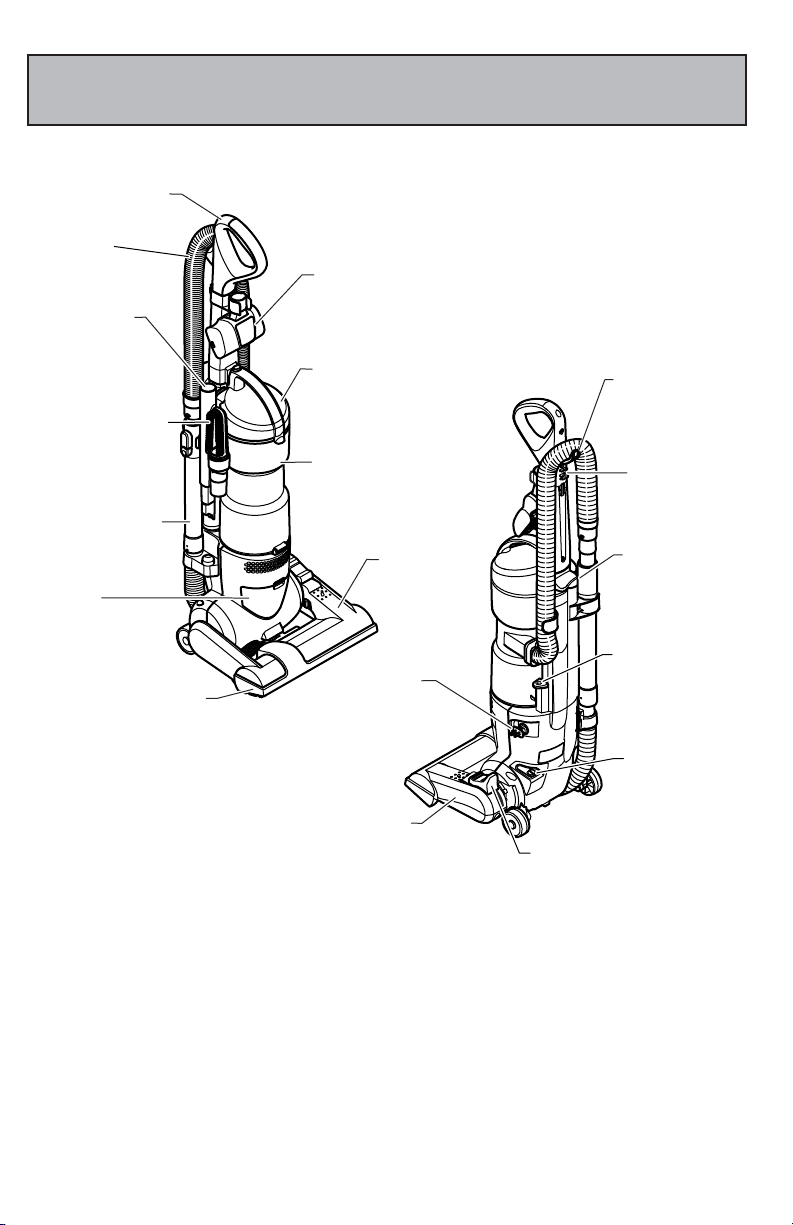
Belt (inside)
Correa (dentro)
Handle
Mango
Dust Bin
Contenedor de
la basura
Furniture Guard
Protector de muebles
Primary Filter (inside)
Filtro primario (dentro)
Exhaust Filter
(inside)
Filtro de escape
(dentro)
Telescopic
Crevice Tool
Herramienta
para hendiduras
telescopíca
Telescopic Wand
Tubo telescópico
Hose
Manguera
Nozzle
Boquilla
Power Cord
Cordón eléctrico
On/Off Switch
Interruptor de
encendidoapagado
Cord Rewind
Button
Botón de
retracción
Carrying
Handle
Mango para
transportar
Hose Holder
Soporte de la
manguera
Locking Notch
Hendidura de
fijación
Carpet/Bare Floor Selector
Control para alfombra/sin
alfombra
Pet Glide™
Pet Glide™
Fan/Blind Brush
Cepillo para
ventilador y
persianas
PARTS IDENTIFICATION
Identificación de piezas
- 8 -
www.panasonic.comU.S. 1-855-726-2495 (TOLL FREE)
Page 9
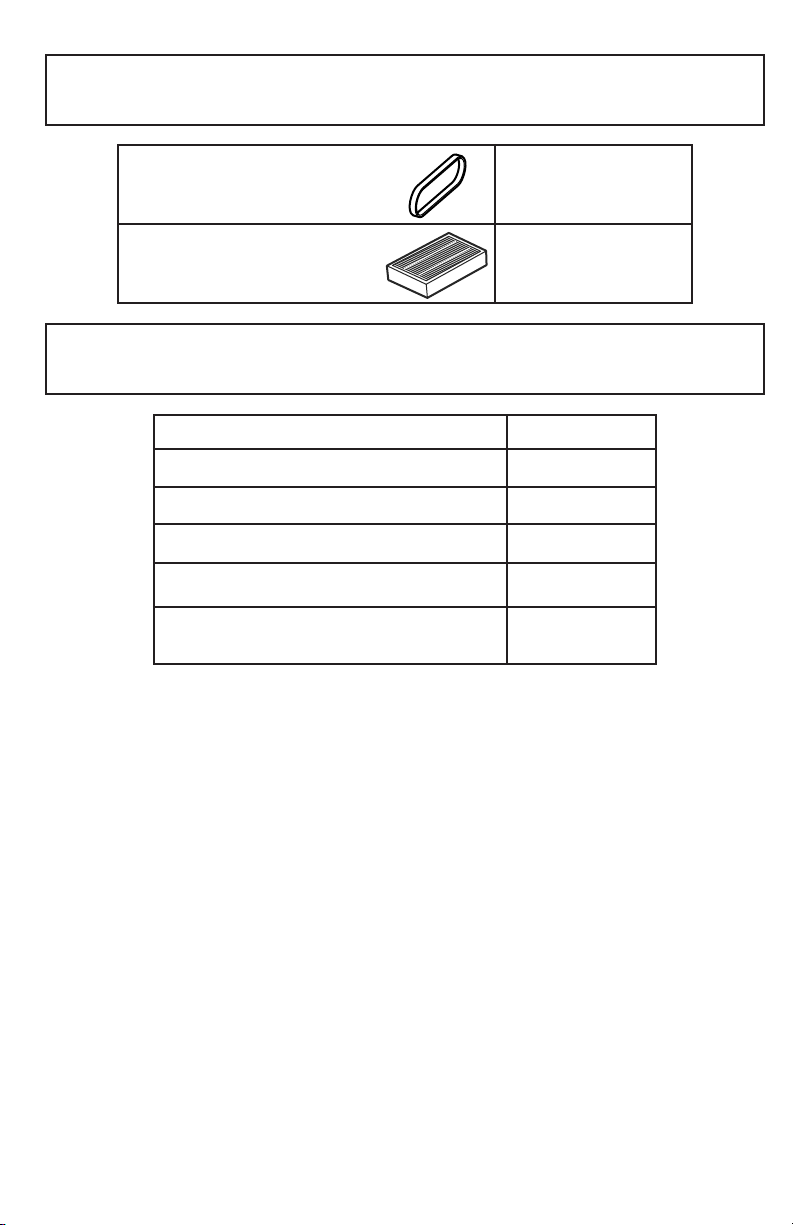
CONSUMABLE PARTS
Partes Consumibles
Belt (Type UB12) / Correa MC-V390B
HEPA Media Exhaust Filter
Filtro de escape MC-V194H
FEATURE CHART
Diagrama de características
Power / Voltaje
Amps / Amperios 12.0
Power Cord / Cordón electrico
Thermal Protector / Protector termal Yes / Sí
Cord Reel / Cordón Retractor Yes / Sí
Carpet/Bare Floor Selector
Control para alfombra/sin alfombra
120V AC (60 Hz)
7.3 m (24 ft.)
Yes / Sí
- 9 -
www.panasonic.comU.S. 1-855-726-2495 (TOLL FREE)
Page 10
Handle
Mango
Handle Screw
Tornillo del mango
ASSEMBLY / Ensamble
WARNING
Electrical Shock Hazard
Do not plug into the electrical supply
until the assembly is complete. Failure
to do so could result in electrical shock
or injury.
Attaching Handle /
ADVERTENCIA
Peligro de choque eléctrico
No conecte en la fuente eléctrica hasta
que el ensamble este completo. La falta
de hacerlo podría dar lugar a choque eléctrico o lesión.
Colocación del mango
➢ DO NOT plug in until assembly is
complete.
No la conecte hasta que la aspiradora
no este completamente ensamblada.
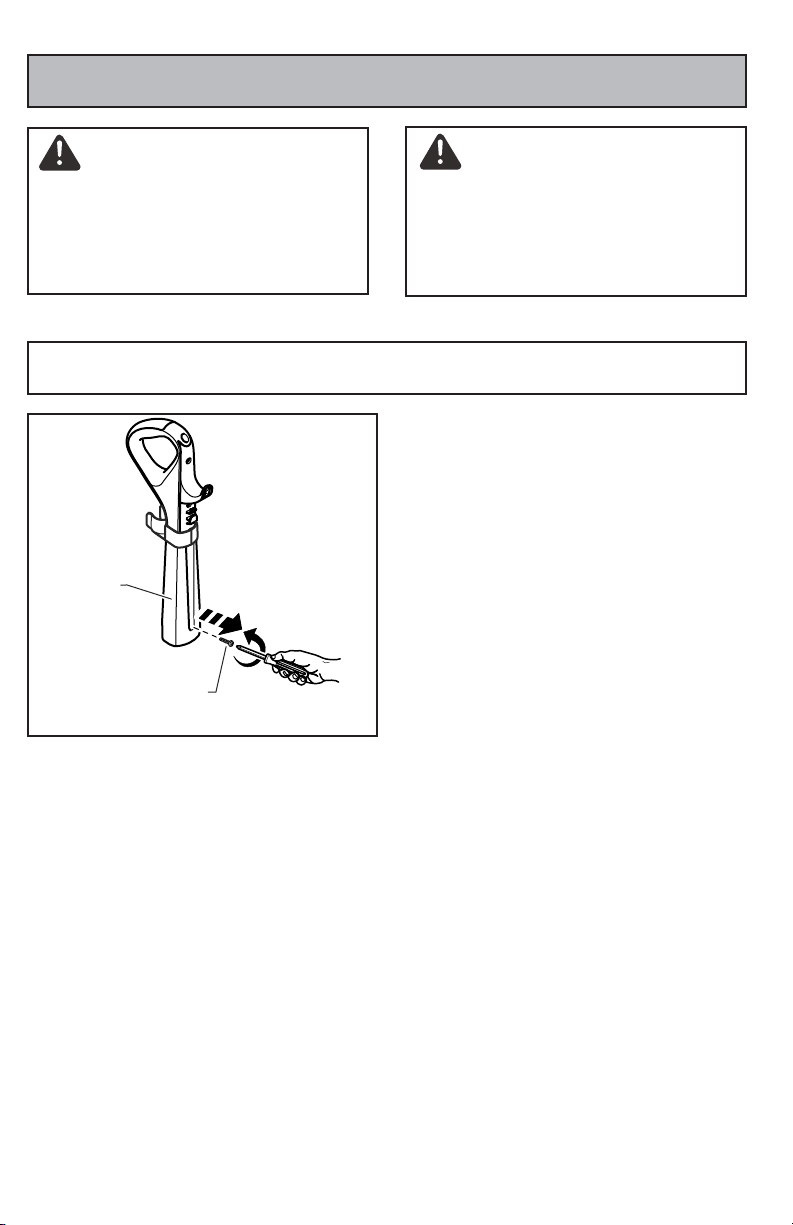
➢ Remove handle screw from handle.
Remueva el tornillo del mango
➢ Insert handle with locking notch to
the back of the vacuum cleaner as
shown.
Inserte el mango con el hendidura de
fijación hacia atrás de la aspiradora
como se muestra en la ilustración.
- 10 -
www.panasonic.comU.S. 1-855-726-2495 (TOLL FREE)
Page 11

➢ Insert handle screw.
Locking Notch
Hendidura de
fijación
Inserte el tornillo.
➢ Tighten handle screw.
Apriete el tornillo.
CAUTION
Do not overtighten.
Overtightening could strip the screw
holes.
Do not operate the vacuum cleaner
without the screw in place.
PRECAUCIÓN
No apriete demasiado.
Si lo aprieta demasiado podría arruinar
los orificios para el tornillo
No opere la aspirador sin tener instalado el tornillo.
- 11 -
www.panasonic.comU.S. 1-855-726-2495 (TOLL FREE)
Page 12

Attaching Hose / Conectando la manguera
Nozzle Hose
Manguera de
la boquilla
Wand Button
Botón del tubo
Wand Holder
Soporte del tubo
Hose Holder
Soporte de la
manguera
Hose Holder
Soporte de la
manguera
Hose
Manguera
Nozzle Hose
Manguera de
la boquilla
“J” Slot
Ranura en "J”
Raised Tab
Lengüeta levantada
Hose
Manguera
Telescopic Wand
Tubo telescópico
➢ Remove the hose from the nozzle
hose.
Extraiga la manguera de la boquilla.
➢ Insert the tab on the telescopic
wand into the “J” slot on the hose.
Twist the wand to lock in place.
Inserte el perno del tubo telescópico
en la ranura tipo “J” de la manguera.
De vuelta hasta que apriete en su
lugar.
➢ Place the wand into the wand
holder and press firmly onto nozzle
hose.
Colocar el tubo en el soporte para el
tubo y presiónelo firmemente en la
manguera de la boquilla.
NOTE / NOTA:
➢ Wand button must be aligned with
the opening in the wand holder,
facing outward as shown.
El botón de tel tubo debe estar
alineado con la abertura en el soporte
del tubo, hacia afuera como se
muestra.
➢ Route hose in the hose holders as
shown.
Acomode la manguera en los soportes
como se muestra.
- 12 -
www.panasonic.comU.S. 1-855-726-2495 (TOLL FREE)
Page 13

Tool Storage / Almacenaje del accesorios
Fan/Blind Brush
Cepillo para
ventilador y
persianas
Telescopic
Crevice Tool
Herramienta
para hendiduras
telescopíco
Clip
Cerrojo
Handle
Mango
Pet Glide™
Pet Glide™
FAN/BLIND BRUSH
CEPILLO PARA VENTILADOR Y
PERSIANAS
➢ Insert fan/blind brush into the
vacuum cleaner tool holder as
shown.
Inserte el cepillo para ventilador y
persianas en el porta accesorios como
se muestra.
TELESCOPIC CREVICE TOOL
HERRAMIENTA PARA HENDIDURAS
TELESCOPÍCA
➢ Insert
telescopic crevice tool into
vacuum cleaner tool holder.
Inserte la herramienta para
hendiduras telescopíca dentro del
porta accesorios de la aspiradora
PET GLIDE™
➢ Place the Pet Glide™ into the clip
located on the handle.
Coloque el Pet Glide ™ en el clip que se
encuentra en el mango.
U.S. 1-855-726-2495 (TOLL FREE)
- 13 -
www.panasonic.com
Page 14
TO OPERATE VACUUM CLEANER
PARA UTILIZAR LA ASPIRADORA
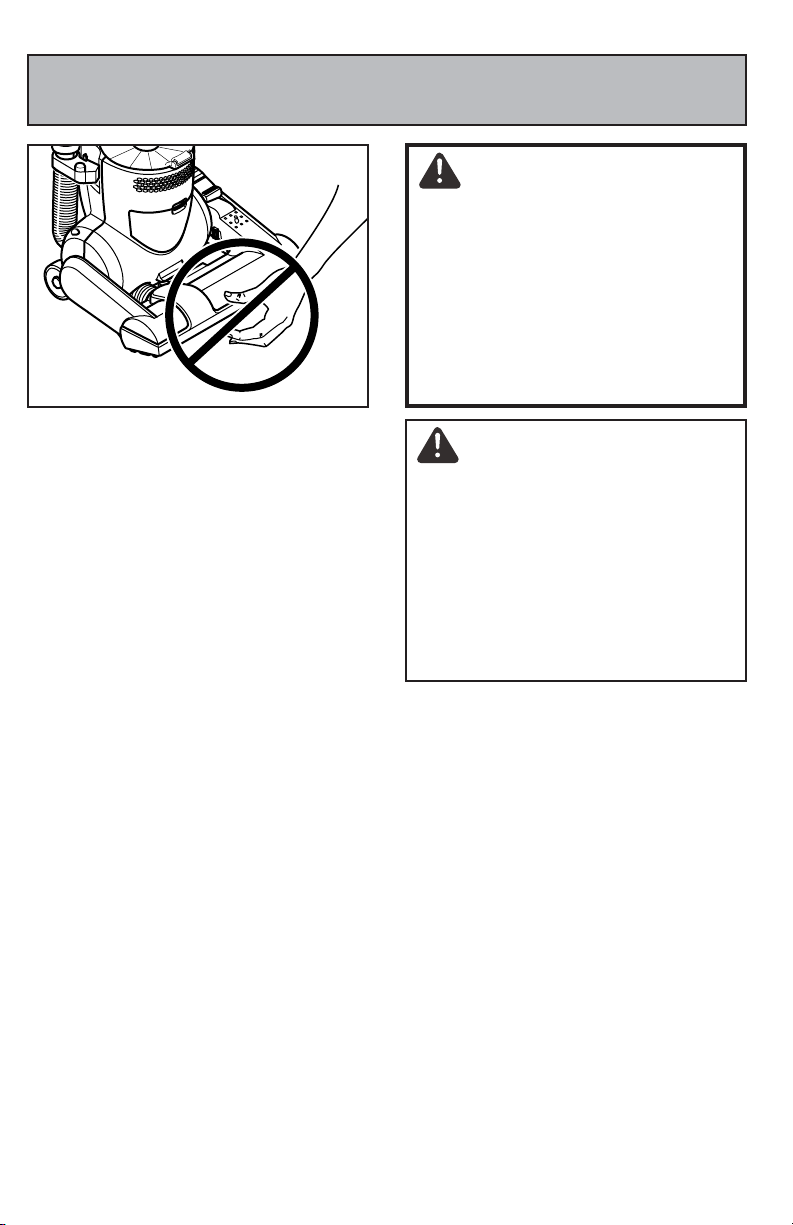
CAUTION
Moving parts! To reduce the risk of
personal injury, DO NOT touch the
brush when vacuum cleaner is on.
Contacting the brush while it is
rotating can cut, bruise or cause
other injuries. Always unplug from
electrical outlet before servicing.
Use caution when operating near
children.
PRECAUCIÓN
¡Piezas móviles! Para reducir el riesgo
de daños corporales, no toque el
agitador cuando la aspiradora está
prendida. Entrar en contacto con el
agitador mientras que está girando
puede cortar, contusionar o causar otras
lesiones. Desenchufe siempre del
enchufe eléctrico antes de dar
mantenimiento.
Tenga cuidado al usar la cerca de niños.
- 14 -
- 14 -
www.panasonic.comU.S. 1-855-726-2495 (TOLL FREE)
Page 15
Power Cord /
NOTE: To reduce the risk of electrical shock, this vacuum cleaner has a polarized
plug, one blade is wider than the other. This plug will fit in a polarized outlet only
one way. If the plug does not fit fully in the outlet, reverse the plug. If it still does not
fit, contact a qualified electrician to install the proper outlet. DO NOT CHANGE THE
PLUG IN ANY WAY. Only use outlets near the floor.
NOTA: Para reducir el riesgo de choque eléctrico, esta aspiradora tiene un enchufe
polarizado, una lámina es más ancha que la otra. Este enchufe cabrá de una forma
polarizada al enchufe solamente. Si el enchufe no cabe completamente en el enchufe,
invierta el enchufe. Si todavía no cabe, contacte a un electricista calificado para que
instale el enchufe apropiado. NO CAMBIE EL ENCHUFE DE NINGUNA MANERA. Utilice
solamente los enchufes cerca del piso.
Cordón eléctrico
WARNING
Personal Injury and Product Damage
Hazard
• DO NOT place hands or feet under
the vacuum cleaner at any time.
• DO NOT plug in if switch is in ON
position. Personal injury or property
damage could result.
• The cord moves rapidly when
rewinding. Keep children away and
provide a clear path when rewinding
the cord to prevent personal injury.
• DO NOT use outlets above counters. Damage from cord to items in
surrounding area could occur.
• When any abnormality/failure
occurs, stop using the product
immediately and disconnect the
power plug.
ADVERTENCIA
Peli gro de lesión per so nal y daño al
pro ducto
• No ponga las manos o los pies debajo
de la aspiradora por ningún motivo.
• NO enchufe la aspi ra dora si el inte rrup tor está en la posi ción ON. Podría
cau sar lesión per so nal o daño a la
propiedad.
• El cor dón eléc trico se mueve
rápi da mente durante el enro lla
miento. Man tenga ale ja dos a los
niños y ase gure espa cio libre
suficiente para evi tar lesio nes
per so na les al enro llar el cor dón.
• NO use los en chu fes lo ca li za dos
so bre los mue bles. Los ob je tos
cer ca nos po drí an re sul tar da ña dos.
• Cuando alguna anormalidad/
desperfecto ocurra, pare de usar el
producto inmediatamente y
desconéctelo del toma corriente.
- 15 -
www.panasonic.comU.S. 1-855-726-2495 (TOLL FREE)
Page 16

Handle
Mango
Locking Notch
Hendidura de
fijación
Cord Rewind Button
Botón de retracción
Cord Reel / Cordón Retractor
➢ Pull power cord out of vacuum
cleaner to desired length.
Tire del cor dón para sacarlo de la
aspiradora hasta tener la lon gi tud
dese ada.
➢ Plug the polarized power cord into
a 120 Volt outlet located near the
floor.
Conecte el cordón eléctrico polarizado
en un enchufe de 120 voltios que se
encuentre cerca del piso
➢ Make sure the power cord is placed
into the locking notch as shown.
Asegure el cordón en la hendidura de
fijación que esta en el mango como se
muestra en la ilustración.
To Rewind / Para Enro llar:
➢ Turn off and unplug the vacuum
cleaner.
Apega y des co necte la aspi ra dora.
➢ Remove cord from locking notch.
Desprenda el cable de la hendidura
de fijación.
➢ Hold the plug while rewinding to
prevent damage or injury from the
moving cord.
Sujete el enchufe mien tras enro lla el
cor dón para impe dir daño o lesión
corpo ral por el movi miento del cor dón.
➢ Press the cord rewind button
allowing cord reel to retract.
Presione el botón de retracción para
que el cordón se retracte
automáticamente.
- 16 -
www.panasonic.comU.S. 1-855-726-2495 (TOLL FREE)
Page 17

On/Off Switch
Interruptor de
encendidoapagado
On/Off Switch / Interruptor prendido/apagado
➢ To turn vacuum cleaner on or off,
press on the on/off switch.
Para encender o apagar la aspiradora,
presionar la interruptor de encendido/
apagado.
Adjusting the Handle / Ajustes del mango
➢ Step on nozzle top and pull back to
change handle position.
Coloque su pie izquierdo en la
boquilla de la aspiradora. Jale hacia
atrás el mango para desenganchar el
mango.
➢ Move vacuum cleaner to upright
position for storage and tool use.
Mueva la aspiradora a la posición
vertical para el almacenaje o usar los
accesorios.
➢ Move vacuum cleaner to middle
position for normal use.
Mueva la aspiradora a la posición
mediana para el uso normal.
➢ Use low position for cleaning under
furniture.
Mueva la aspiradora a la posición
mediana para el uso normal.
➢ Step on nozzle top and lower
handle towards the floor to change
from normal use position to low
position.
Pise en la parte superior de la boquilla
y baje la manija hacia el suelo para
cambiar de la posición normal a la
posición baja.
- 17 -
www.panasonic.comU.S. 1-855-726-2495 (TOLL FREE)
Page 18

Wand
Tubo
Hose
Manguera
Nozzle Hose
Manguera de
la boquilla
Using Tools / Uso de los accesorios
NOTE: Hold the handle to support the
vacuum cleaner when using tools,
storing or removing telescopic crevice
tool, and disconnecting or attaching
the hose.
NOTA: Sostenga el mango de la
aspiradora cuando use ó vaya a usar los
accesorios, almacene o desprenda la
herramienta de hendiduras telescópica, o
la manguera y cuando los desconecte.
➢ Disconnect the hose & wand from
the vacuum cleaner.
Desconecte la manguera y el tubo de
la aspiradora.
➢ Pull the wand gently in the direction
of the arrow to disconnect.
Tire del tube suavemente en la
dirección de la flecha para
desconectarla.
➢ It may be necessary to slightly twist
the hose handle to loosen from the
nozzle hose.
Puede ser necesario ajustar
levemente la manija de la manguera
para aflojarla de la manguera de la
boquilla.
CAUTION
• DO NOT overextend your reach with
hose as it could tip vacuum cleaner.
CUIDADO
• No extienda demasiado la extensión
de la manguera porque puede causar
que la aspiradora vuelque.
- 18 -
www.panasonic.comU.S. 1-855-726-2495 (TOLL FREE)
Page 19

➢ Telescopic crevice tool, fan/blind
Pet Glide™
Pet Glide™
Fan/Blind Brush
Cepillo para ventilador
y persianas
Wand
Tubo
Hose
Manguera
Telescopic Crevice Tool
Herramienta para
hendiduras telescopíca
brush, or Pet Glide™ can attach to
either wand or hose.
La herramienta de hendiduras
telescópica, el cepillo para ventilador y
persianas o la Pet Glide ™ pueden
conectarse al tubo o la manguera.
CAUTION
Selector should be placed in BARE
FLOOR (TOOLS) position when
using vacuum cleaner on bare floors
and when using tools. Incorrect
setting my cause floor or carpet
damage.
Do not leave the vacuum cleaner in
one location with the agitator
running. Floor or carpet damage
may occur.
CUIDADO
Se debe colocar el selector en la
posición para BARE FLOOR (TOOLS)
cuando pasa la aspiradora en los
suelos sin alfombra y cuando se usan
las herramientas.
No deje la aspiradora en un solo lugar
con el agitador funcionando. Podrían
producirse daños al piso o alfombra.
- 19 -
www.panasonic.comU.S. 1-855-726-2495 (TOLL FREE)
Page 20

Button
Botón
Press Here
Presione aquí
1
2
➢ The telescopic wand length is
adjustable and requires no
assembly. To adjust, simply press
the wand button and slide the wand
to the desired setting.
La longitud de tubo telescópico es
ajustable y no requiere ningún
ensamblado. Para ajustar,
simplemente presione el botón y
deslice el tubo telescópico al ajuste
deseada.
➢ Release button and continue to
slide wand until it locks into
position.
Suelte el botón y continúe deslizando
el tubo telescópico hasta que bloquea
en su posición.
TELESCOPIC CREVICE TOOL
HERRAMIENTA PARA ENDIDURAS
TELESCÓPICA
➢ Extend the telescopic crevice tool
for additional reach.
Extienda de la herramienta de
hendiduras telescópica para alcance
adicional.
➢ Press button and slide telescopic
crevice tool to retract.
Presione el botón y deslice la boquilla
para retraer la herramienta
telescópica de hendiduras.
- 20 -
www.panasonic.comU.S. 1-855-726-2495 (TOLL FREE)
Page 21

Tab
Lengüeta
FAN/BLIND BRUSH
CEPILLO PARA VENTILADOR Y
PERSIANAS
To clean fans /
Para limpiar los
ventiladores::
➢ Rotate the fan/blind brush and lock
into place.
Gire el cepillo para ventilador y
persianas y asegure en su lugar.
➢ Attach the fan/blind brush to the
telescopic wand.
Coloque el cepillo para ventilador y
persianas en el tubo telescópico.
To clean blinds / Para limpiar las
persianas:
➢ The brush of the fan/blind brush can
be rotated for cleaning blinds.
Para limpiar las persianas el cepillo
para ventilador y persianas se puede
girar.
➢ Press tabs on side of the fan/blind
brush.
Presione las lengüetas al lado del
cepillo para ventilador y persianas.
➢ Rotate brush until tabs snap into
place.
Gire el cepillo hasta que las lengüetas
encajen en su lugar.
- 21 -
www.panasonic.comU.S. 1-855-726-2495 (TOLL FREE)
Page 22

Tools
➢ The telescopic crevice tool may be
used on the following items:
La herramienta para hendiduras
telescópica se puede utilizar en los
puntos siguientes:
• Furniture / Muebles
• Cushions / Cojines
• Drapes / Cortinas
• Stairs / Escaleras
• Walls / Paredes
➢ The fan/blind brush may be used on
the following items:
Cepillo para ventilador y persianas e
puede utilizar en los puntos siguientes:
• Furniture / Muebles
• Drapes / Cortinas
• Stairs / Escaleras
• Walls / Paredes
• Ceiling fans / Ventiladores de techo
• Blinds / Persianas
➢ The Pet Glide™ may be used on the
following items:
El cepillo para pelo de animales puede
ser usada en los siguientes lugares:
• Furniture / Muebles
• Stairs / Escaleras
• Rugs / Alfombras
• Bedding / Ropa de cama
• Pet Beds / Camas para mascotas
Note: The Pet Glide™ is not for use on
animals.
Nota: El Pet Glide ™ no debe usarse en
animales.
Note: Always clean tools before using.
Nota: Siempre limpie las herramientas antes de usarlas.
- 22 -
www.panasonic.comU.S. 1-855-726-2495 (TOLL FREE)
Page 23

FEATURES / Características
Shallow Pile Carpet
Alfombra de pelo corto
Deep Pile Carpet
Alfombra de pelo largo
Nozzle
Boquilla
Pivot Point
Botón de liberación
Edge Cleaning / Limpieza de orillas
This model is equipped with an edge
cleaning feature for cleaning carpet
edges near baseboards and stationary
furniture.
Este modelo esta equipa de un limpiador
para orillas; characterística para limpiar
las orillas de la alfombra serca de las
paredes y muebles.
Automatic Adjusting Nozzle /
Boquilla de ajuste automático
➢ The nozzle of your Panasonic
vacuum cleaner automatically
adjusts to any carpet pile height.
La boquilla de su aspiradora vertical
Panasonic se ajusta automáticamente
a la altura de cualquier pelo de
alfombra.
➢ Feature allows nozzle to float evenly
over carpet pile surfaces.
Esta característica permite que la
boquilla flote fácilmente en las
superficies del pelo de alfombra.
➢ No manual adjustments required.
No se requieren los ajustes manuales.
- 23 -
www.panasonic.comU.S. 1-855-726-2495 (TOLL FREE)
Page 24

Carpet/Bare Floor
Selector
Control para
alfombra/sin
alfombra
Carpet/Bare Floor Selector / Selector alfombra-piso
➢ Selector should be placed in BARE
FLOOR (TOOLS) position when
using vacuum cleaner on bare
floors and when using tools. The
agitator does not rotate in the BARE
FLOOR (TOOLS) position.
Se debe colocar el selector en la
posición para BARE FLOOR
(TOOLS) cuando pasa la aspiradora
en los suelos sin alfombra y cuando
se usan las herramientas. El agitador
no rueda en la posición para BARE
FLOOR (TOOLS).
CAUTION
Inncorrect setting may damage floor.
CUIDADO
La selección incorrecta podría dañar el piso.
➢ Selector should be placed in
CARPET position when using
vacuum cleaner on carpeted floors.
Se debe colocar el selector en la
posición para CARPET cuando pasa
la aspiradora en los suelos con
alfombra.
- 24 -
www.panasonic.comU.S. 1-855-726-2495 (TOLL FREE)
Page 25

Thermal Protector / Protector termal
➢ This vacuum cleaner has a thermal protector which automatically trips to protect
the vacuum cleaner from overheating.
Esta aspiradora esta equipada con un protector térmico que automáticamente se
activa para proteger su aspiradora de sobrecalentamiento.
➢ If a clog prevents the normal flow of air to the motor, the thermal protector turns
the motor off automatically. This allows the motor to cool in order to prevent
possible damage to the vacuum cleaner.
Si existen obstrucciones que impiden el flujo normal de aire al motor, el protector
térmico desconecta el motor automáticamente. Esto permite que el motor se enfrié
para prevenir posible daño a su aspiradora.
TO CORRECT PROBLEM:
PARA CORREGIR EL PROBLEMA:
➢ Turn the vacuum cleaner off and unplug the power cord from the outlet to allow
the vacuum cleaner to cool and the thermal protector to reset.
Apague y desenchufe la aspiradora para permitir que se enfrié y el protector térmico
se reactive.
➢ Check for and remove clogs, if necessary (See REMOVING CLOGS p. 39). Also
check and replace any clogged filters and empty dust bin, if necessary.
Revise y limpie la aspiradora de obstrucciones en los conductos (Ver QUITANDO LOS
RESIDUOS DE BASURA EN LOS CONDUCTOS, pàg 39). Revise y cambie cualquier
filtro obstruido y vacié el contenedor de basura si es necesario.
➢ Wait approximately fifty (50) minutes and then plug the vacuum cleaner in and
turn back on to see if the motor protector has reset.
Espere cincuenta (50) minutos, enchufe la aspiradora, encienda para ver si el protector
térmico se a reactivado.
- 25 -
www.panasonic.comU.S. 1-855-726-2495 (TOLL FREE)
Page 26

ROUTINE CARE OF VACUUM CLEANER
Cuidado de rutina de la aspiradora
Performing the tasks in the following sections will keep your new Panasonic vacuum cleaner
operating at peak performance levels and will ensure these high levels for years to come.
Check the BEFORE REQUESTING SERVICE section in this manual for recommendations on
performing some of these tasks to help solve various problems that may occur.
Siguiendo las instrucciones dadas, su nueva aspiradora Panasonic funcionará al nivel máximo y
continuará funcionando por muchos años en el futuro. Lea la sección ANTES PEDIR SERVICIO en
este manual para las recomendaciones para arreglar unos problemas que puedan ocurrir.
WARNING Electrical Shock or Personal Injury Hazard
Disconnect the electrical supply before servicing or cleaning the vacuum cleaner.
Failure to do so could result in electrical shock or personal injury from vacuum
cleaner suddenly starting.
ADVERTENCIAPeligro de choque eléctrico y lesión personal.
Desconecte la aspiradora antes de darle servicio o limpiarla. De lo contrario podría
producirse un choque eléctrico o causar lesión personal si la aspiradora arranca de
repente.
- 26 -
www.panasonic.comU.S. 1-855-726-2495 (TOLL FREE)
Page 27

Emptying Dust Bin /
MAX
MAX
Dust Bin
Release Button
Botón de
liberación del
contenedor de
polvo
“MAX” Line
Linea “MAX”
Vaciar el contenedor de polvo
➢ Always empty the dust bin when
dirt level reaches the “MAX” line.
Siempre vacíe el contenedor de polvo
cuando el nivel de basura alcanza la
línea "MAX".
➢ Grasp the handle on the top of the
dust bin.
Levante el cerrojo del canasto de
basura
➢
Press the dust bin release button.
Presionar el botón de liberación del
contenedor de polvo.
➢ Lift up and out to remove dust bin
from vacuum cleaner.
Saque el contenedor de polvo
tomando la manija ubicada en la porte
superior del canasto de basura.
CAUTION
Be sure to hold the dust bin over a
proper trash container prior to
releasing the door of the dust bin.
CUIDADO
Esté seguro de mantener el
contenedor de polvo sobre un basurero
apropiado antes de soltar la puerta del
cubo de basura.
➢ Pull slightly and press downwards
on the dust bin door latch and the
dust bin will open and the debris
will fall out.
Jale ligeramente y presione hacia
abajo el pestillo de la cubierta del cubo
de basura y se abrirá dejando caer los
restos.
- 27 -
www.panasonic.comU.S. 1-855-726-2495 (TOLL FREE)
Page 28

➢ Remove any clogs that might be
Door Latch
Seguro de la puerta
Door
Puerta
located in the pre-filter. (See
CLEANING PRE-FILTER, p. 29)
Saque cualquier obstáculo que
pudiera estar ubicado a la entrada del
canasto de basura o el pre-filtro. (Ver
LIMPIEZA DEL PRE-FILTRO, pàg. 29)
➢ Shake the dust bin to release any
debris that might hang in the prefilter.
Sacuda el contenedor del polvo para
soltar cualquier desecho que pueda
colgar en el pre-filtro.
TO REPLACE DUST BIN
PARA REEMPLAZAR EL CONTENEDOR
DE POLVO
➢ After the dust bin is empty of
debris, firmly close the door. Make
sure you hear a “click” sound to
indicate that the door is fully
latched.
Después de basear el contenedor de
polvo, cierre la puerta firmemente.
Asegúrese de oír un “clic” esto
indicara que la puerta esta
completamente cerrada
➢ Place dust bin back into vacuum
cleaner by inserting the bottom first
and tilting back.
Colocar nuevamente el contenedor de
polvo en la aspiradora, colocando
primero la parte inferior e inclinándolo al
ensamblar
➢ Push forward and lower dust bin
handle to lock dust bin in place.
Empuje hacia adelante y abajo la
manija del cubo de basura para
asegurarlo en su lugar.
➢ Make sure you hear a “click” sound
to indicate that the dust bin is fully
latched.
Asegúrese de oír un “clic” esto
indicara que el contenador de polvo
esta completamente cerrada.
- 28 -
www.panasonic.comU.S. 1-855-726-2495 (TOLL FREE)
Page 29

Cleaning Pre-Filter / Limpieza del Pre-Filtro
LOCKED (For Use)
CERRADO (Para Usar)
UNLOCKED (For Cleaning)
ABIERTO (Para Vaciar)
UNLOCKED
(For cleaning)
ABIERTO
(Para vaciar)
Pre-filter
Pre-filtro
➢ Make sure the dust bin is empty.
Vacié el cubo de basura.
➢ Rotate dust bin lid assembly to
unlock (as indicated on the lid), and
lift off.
Rotar la tapa superior del contenedor
de polvo hacia la izquierda (como esta
indicado en la tapa), y levantarla.
➢ Grasp pre-filter and rotate counter-
clockwise to remove.
Tome el pre-filtro y gírelo a la izquierda
para removerlo.
➢ Clean pre-filter by gently tapping
over a trash container.
Limpie el pre-filtro golpeándolo
suavemente sobre un contenedor de
basura.
➢ Rinse with water only as needed, do
not use any detergent or soap.
Enjuague con agua solamente, no
utilice ningún detergente o jabón.
➢ Allow pre-filter to dry for 24 hours
before placing back into vacuum
cleaner.
Permita que el filtro seque por 24
horas antes de instalarlo en la
aspiradora.
- 29 -
www.panasonic.comU.S. 1-855-726-2495 (TOLL FREE)
Page 30

To Reinstall:
LOCKED (For Use)
CERRADO (Para Usar)
Tabs
Langüetas
Slots
Ranuras
LOCKED (For Use)
CERRADO (Para Usar)
UNLOCKED (For Cleaning)
ABIERTO (Para Vaciar)
Para reinstalar:
➢ Align the slot on the pre-filter with
the alignment tab inside dust bin.
Alinee la ranura del pre-filtro con la
lengüeta localizada dentro del cubo de
basura.
➢ Rotate pre-filter clockwise to lock in
place.
Gire el pre-filtro hacia la derecha hasta
asegurarlo en su lugar.
➢ Reinstall dust bin lid and turn to
locked position (as indicated on the
lid).
Reinstalar la tapa del contenedor de la
basura tapa y gire a la posición
correcta (como se indica en la tapa).
- 30 -
www.panasonic.comU.S. 1-855-726-2495 (TOLL FREE)
Page 31

Cleaning Primary Filter / Limpiar el filtro primario
Dust Bin Lid Latch
Cierre de tapa del
compartimiento de
polvo
Dust Bin Lid
Tapa del
compartimiento
de polvo
Primary Filter
Filtro primario
It is recommended to clean the filter
with cold water at least every (1)
month. Check the primary filter
frequently and clean when dirty.
Es recomendable limpiar el filtro con agua
fría por lo menos cada 1 mes. Revisar el
filtro primario y limpiarlo cuando sea
necesario.
➢ Turn off and unplug the vacuum
cleaner.
Apague la aspiradora y desconectarla.
➢ Remove dust bin (See EMPTYING
DUST BIN, p. 27).
Quite el compartimiento de polvo (ver
VACIAR EL COMPARTIMIENTO DE
POLVO, pàg 27).
➢ Pull the dust bin lid latch and open
the lid.
Jale del cierre de la tapa del compartimiento de polvo y abra la tapa.
➢ Remove the primary filter.
Quite el filtro primario.
➢ Wash with cold water only, DO NOT
use detergent or soap.
Lavar con agua fría solamente, no
utilizar detergente o jabón.
➢ Once the filter is washed clean,
squeeze by hand and allow to air
dry.
Una vez el filtro es lavado y limpio,
exprímalo con la mano y permita que
seque.
➢ Allow filter to dry for 24 hours
before placing back into vacuum
cleaner.
Permita que el filtro seque por 24
horas antes de instalarlo en la
aspiradora.
NOTE: When the cleaning of the filter
no longer restores vacuum cleaner
suction to full power, replace the filter.
NOTA: Una vez que haya limpiado el
filtro, y la aspiradora no alcanza la
potencia máxima de succión, necesitará
reemplazar el filtro.
- 31 -
www.panasonic.comU.S. 1-855-726-2495 (TOLL FREE)
Page 32

DO NOT operate without primary filter
Primary Filter
Filtro primario
installed.
NO utilice su aspiradora sin el filtro
primario.
DO NOT wash in the dishwasher.
NO LO lave en la lavadora de trastes.
DO NOT install damp.
NO LO instale húmedo.
TO REPLACE FILTER
PARA REMPLAZAR LOS FILTRO
➢ Place the primary filter into the dust
bin lid.
Poner el filtro primario dentro de la
tapa del contenedor de polvo.
➢ Close the dust bin lid. Be sure the
lid snaps in place. A noticeable
“click” should be heard.
Cierre la tapa del compartimiento de
polvo. Asegúrese de que los broches
de presión de la tapa estén en su
lugar. Un “clic sensible” debe ser oído.
➢ Reinstall the dust bin into the
vacuum cleaner (See EMPTYING
DUST BIN, p. 27).
Reinstale el compartimiento de polvo
en la aspiradora (ver VACIAR EL
COMPARTIMIENTO DE POLVO,
pàg 27).
- 32 -
www.panasonic.comU.S. 1-855-726-2495 (TOLL FREE)
Page 33

Replacing HEPA Media Exhaust Filter
Air Flow
Exhaust Filter
Filtre de salida
Cambo del filtro de escape HEPA
The HEPA media exhaust filter removes dirt from exhaust air. Check filter after
emptying dust bin. Replace when dirty.
El filtro de escape HEPA quita el polvo del aire reciclado. Revisar el filtro después de
cambiar la bolsa de polvo. Reemplazar cuando este sucio.
Filter cannot be cleaned and should be replaced at least once each year. Part
Number: MC-V194H
No se debe limpiar el filtro se debe cambiar a lo menos una vez cada año. Número de
parte: MC-V194H
➢ Turn off and unplug the vacuum
cleaner.
Apague y desconecté la aspiradora.
➢ Press latch to remove exhaust filter
cover.
Presione la lengüeta para quitar la
cubierta del filtro de escape
➢ Grasp the exhaust filter and pull out
to remove.
Tome el filtro de salida y jale hacia
afuera para sacarlo.
➢ Place the new filter into the vacuum
cleaner with the foam seal down.
Colocar el nuevo filtro en la aspiradora
con el sello de espuma hacia abajo.
➢ Be sure air flow arrow on filter is
pointing upward.
Asegurarse que la flecha de flujo de
aire en el filtro este apuntando hacia
arriba.
- 33 -
www.panasonic.comU.S. 1-855-726-2495 (TOLL FREE)
Page 34

➢ Reinstall the exhaust filter cover by
Slot
Ranura
Tab
Lengüeta
Four Screws
Cuatro Tornillos
inserting the tab into the slot in the
vacuum cleaner.
Reinstalar la cubierta del filtro de
escape insertar la lengüeta en la
ranura de la aspiradora.
➢ Press firmly to snap exhaust filter
cover into place.
Presione firmemente para cerrar la
cubierta del filtro en su lugar.
➢ Make sure you hear a “click” sound
to indicate that the filter cover is
fully latched.
Asegúrese de oír un “clic” esto
indicara que la cubierta del filtro esta
completamente cerrada.
Replacing Belt / Cambio de la correa
➢ Replace belt whenever a burning
rubber smell caused by excessive
slippage occurs.
Remplace la correa cuando huela a
llanta quemada esto causado por el
excesivo resbalamiento de la correa.
➢ Turn off and unplug the vacuum
cleaner.
Apague y desconecte la aspiradora.
➢ Lay vacuum cleaner on floor with
the bottom up and nozzle flat.
Recostar la aspiradora con la parte de
atrás hacia arriba y la boquilla plana.
➢ Remove nozzle hose from body by
(1) pressing in locking tab and (2)
sliding up and out of retaining slot
(see REMOVING CLOGS, p. 39).
Remueva la manguera de la boquilla
(1) presionando en la pestaña de
bloqueo y (2) deslizando hacia arriba y
fuera de la ranura de retención (Ver
QUITANDO LOS RESIDUOS DE
BASURA EN LOS CONDUCTOS,
pàg 39).
- 34 -
www.panasonic.comU.S. 1-855-726-2495 (TOLL FREE)
Page 35

Four Screws
Cuatro Tornillos
➢ Remove the four screws from the
Belt
Correa
Motor Shaft
Eje del motor
Agitator
Agitador
nozzle cover.
Remover los cuatro tornillos del plato
inferior.
➢ Next place the vacuum in the
upright position standing on the
handle. This will minimize wheel
interference when removing nozzle
bottom plate.
Después coloque la aspiradora en
posición vertical sobre el mango. Esto
minimizara la interferencia de la
ruedas cuando remueva el plato
inferior.
➢ Remove nozzle bottom plate by
rotating upward.
Remueva el plato inferior rotando la
parte trasera hacia arriba.
CAUTION
Motor shaft may be hot.
CUIDADO
El eje del motor puede estar caliente.
➢ Lay vacuum cleaner on floor with
the bottom up with nozzle flat.
Acueste la aspiradora con la parte
trasera hacia arriba y la boquilla plana.
➢ Remove agitator by carefully lifting
out.
Sacar el agitador levantándolo
cuidadosamente.
➢ Remove worn or broken belt.
Saque la correa gastada o rota.
➢ Clean agitator and the end caps
(see CLEANING AGITATOR, p. 38).
Limpie el agitador y las tapas del
extremo (Ver LIMPIEZA DEL
AGITADOR, pàg 38).
- 35 -
www.panasonic.comU.S. 1-855-726-2495 (TOLL FREE)
Page 36

Carpet/Bare Floor
Selector Shaft
elector alfombra-piso
S
Motor Shaft
Eje del motor
Belt
Correa
➢ Loop new belt (part number
Belt
Correa
Motor Shaft
Eje del motor
End Cap
Tapa del
extremo
Agitator
Agitador
Groove
Ranura
2
1
Slots
Ranuras
Tabs
Lengüetas
MC-V390B, Type UB12) around
motor shaft and agitator belt
groove. Make sure belt is routed in
the belt guide as shown. See
illustration for correct belt routing.
Coloque la nueva correa (numero del
parte MC-V390B, Tipo UB12) en el eje
del motor y la polea del agitador.
Asegurarse que la correa esté en su
ruta en la guía de la correa como se
muestra. Mire la ilustración para la
colocación correcta.
➢ Reinstall agitator back into nozzle
by placing end caps into grooves.
Coloque el agitador en las ranuras de
la boquilla.
➢ After reinstalling the agitator, turn it
by hand to make sure that belt is
not twisted or pinched and that all
rotating parts turn freely.
Después de instalar el agitador, gírelo
con la mano para asegurarse que la
correa no esté torcida ni apretada y
que rueden libremente todas las
piezas.
➢ Place the vacuum cleaner in the
upright position standing on the
handle. This will minimize wheel
interference when installing lower
plate.
Coloque la aspiradora en posición
vertical sobre el mango. Esto
minimizara la interferencia de la
ruedas cuando instale el plato inferior.
➢ Reinstall lower plate by (1) aligning
tabs on front edge of lower plate
with slots in the nozzle and (2)
rotating to installed position.
Reinstale el plato inferior (1) alineando
las lengüetas en el frente del plato
inferior con las ranuras en la boquilla
(2) Gire a la posición correcta.
- 36 -
www.panasonic.comU.S. 1-855-726-2495 (TOLL FREE)
Page 37

Four Screws
Cuatro Tornillos
➢ Lay vacuum cleaner on the floor
with the bottom up and nozzle flat.
Acueste la aspiradora con la parte
trasera hacia arriba y la boquilla plana.
➢ Install the four screws to the nozzle
cover.
Instale los cuatro tornillos en el plato
inferior.
➢ Route nozzle hose to hose holder.
Align nozzle hose bracket with
retaining bracket on body and slide
down until it clicks into place.
Coloque la manguera de la boquilla en
el soporte de la manguera. alineando
el soporte de la manguera con el
retenedor del soporte, deslizar en el
soporte hasta oir in click.
➢ Return the vacuum cleaner to the
upright position before plugging
into an electrical outlet.
Regresar la aspiradora a la posición
vertical antes de conectarla en el
enchufe.
- 37 -
www.panasonic.comU.S. 1-855-726-2495 (TOLL FREE)
Page 38

Cleaning Agitator / Limpieza del agitador
➢ Clean agitator after every five uses
and every time the belt is replaced.
Limpie el agitador después de cada
cinco utilizaciones y cada vez que se
cambia la correa.
➢ Remove lower plate. (See
REPLACING BELT, p. 34)
Quite el plato inferior (Ver CAMBIO
DE LA CORREA, pàg 34).
➢ Cut off any hair, thread, string,
carpet pile, and lint entangled
around agitator with a pair of
scissors.
Corte con unas tijeras cabello, hilo,
cuerda, el pelo de alfombra, y pelusa
envueltos en el agitador.
➢ Remove agitator. (See REPLACING
BELT, p. 34)
Quite el agitador. (Ver CAMBIO DE LA
CORREA, pàg 34).
➢ Remove any string or debris
located on the end caps, washers
or agitator shaft.
Quite los hilos o los residuos ubicados
en los tapas del extremo, en las
arandelas o en el eje del agitador.
➢ Reinstall agitator and lower plate.
(See REPLACING BELT, p. 34)
Reemplace el agitador y el plato
inferior. (Ver CAMBIO DE LA
CORREA, pàg 34).
- 38 -
www.panasonic.comU.S. 1-855-726-2495 (TOLL FREE)
Page 39

Removing Clogs
Hose Inlet
Entrada de
la manguera
Nozzle Hose
Manguera de
la boquilla
Suction Inlet
Entrada de
succión
Quitando los residuos de basura en los conductos
If the vacuum cleaner does not seem to have adequate suction, first check if the
dust bin is full or if a filter is clogged.
Si con si dera que la aspi ra dora no aspira bien asegúrese primero de que el contenedor de
polvo no esté lleno y que el filtro no esté atascado.
➢ Turn off and unplug the vacuum
cleaner.
Apague y desconecté la aspiradora.
➢ Remove dust bin and check for
clogs.
Remueva el contenedor de polvo y
revise por obstáculos.
➢ Check the hose inlet area.
Examine la zona de la man guera.
➢ Visually inspect the tools, the hose,
and the nozzle hose area into which
the hose is connected.
Exa mine visualmente las herramientas,
la manguera, y la zona del soporte de
la manguera donde se inserta la
manguera.
➢ Check the suction inlet area.
Revisar la área de entrada de succión.
➢ Remove any visible clog.
Retire cual quier mate rial bloqueante.
➢ Reinstall the dust bin into the
vacuum cleaner (See EMPTYING
DUST BIN, p. 27).
Reinstale el compartimiento de polvo
en la aspiradora (ver VACIAR EL
COMPARTIMIENTO DE POLVO,
pàg 27).
- 39 -
www.panasonic.comU.S. 1-855-726-2495 (TOLL FREE)
Page 40

Hose
Manguera
➢ Plug in the vacuum cleaner and turn
2
1
3
it on.
Conecte y prenda la aspiradora.
➢ Stretch the hose to maximum length
and then allow the hose to return to
its storage length.
Estire la manguera a la longitud
máxima y permita que regrese a la
longitud normal.
➢ If the dust bin and filter areas and
the hose areas are free of clogs,
check the nozzle area.
Si el contenedor de polvo, áreas de
filtrado y áreas de la manguera están
libres de obstáculos, revise el área de
la boquilla.
➢ Remove nozzle hose from body by
(1) pressing in locking tab and (2)
sliding up and out of retaining slot.
Remueva la manguera de la boquilla
(1) presionando en la pestaña de
bloqueo y (2) deslizando hacia arriba y
fuera de la ranura de retención.
➢ Inspect inlet of nozzle hose and
clear any obstructions.
Inspeccionar la manguera que este
libre de obstrucciones.
➢ Replace nozzle hose by sliding
down on retaining bracket until you
hear a click.
Remueva la manguera de la boquilla
deslizando hacia abajo de el soporte
hasta oir un click.
➢ Return the vacuum cleaner to the
upright position before plugging
into an electrical outlet.
Regresar la aspiradora a la posición
vertical antes de conectarla al enchufe.
- 40 -
www.panasonic.comU.S. 1-855-726-2495 (TOLL FREE)
Page 41

Cleaning Exterior and Tools
Limpieza del exterior y de las herramientas
➢ Turn off and unplug the vacuum cleaner.
Apague y descortece la aspiradora.
➢ Clean exterior using a clean, soft cloth that has been dipped in a solution of mild
liquid detergent and water and wrung dry.
Limpie la parte exterior con un trapo suave y limpio que se ha metido en una solución
de detergente líquido y agua y se ha escurrido hasta que esté medio humedo.
➢ DO NOT drip water on the vacuum cleaner and wipe dry after cleaning.
No deje caer el agua en la aspiradora, seque con un trapo después de limpiarla.
➢ DO NOT clean tools in dishwasher or clothes washer.
No limpie las herramientas en el lavaplatos ni en la lavadora de ropa.
➢ Crevice tool may be washed in warm soapy water, rinse and air dry.
La herramienta para hendiduras puede ser lavada en el agua jabonosa tibia, enjuague
y secar al aire.
➢ DO NOT use tools if they are wet.
No use las herramientas si están mojadas.
- 41 -
www.panasonic.comU.S. 1-855-726-2495 (TOLL FREE)
Page 42

BEFORE REQUESTING SERVICE
WARNING Electrical Shock or Personal Injury Hazard
Disconnect the electrical supply before servicing or cleaning the vacuum cleaner.
Failure to do so could result in electrical shock or personal injury from vacuum
cleaner suddenly starting.
Review this chart to find do-it-yourself solutions for minor performance problems. Any
service needed, other than those described in these Operating Instructions, should be
performed by an authorized service representative.
PROBLEM POSSIBLE CAUSE POSSIBLE SOLUTION
Vacuum Cleaner 1. Unplugged at wall outlet. 1. Plug in firmly, push on/off switch
won’t run. to on. (pages 16 & 17)
Poor job of dirt 1. Full or clogged dust bin. 1. Empty dust bin. (page 27)
pick-up. 2. Dirty filters. 2. Change/clean filters. (pages 29-33)
2. ON/OFF switch not turned ON. 2. Push ON/OFF switch to ON. (page
17)
3. Tripped circuit breaker/blown 3. Reset circuit breaker or replace
fuse. fuse at household service panel.
4. Tripped thermal protector. 4. Reset thermal protector. (page 25)
3. Hose not inserted fully. 3. Insert hose fully. (page 12)
4. Clogged nozzle or dust bin. 4. Clean nozzle or dust bin. (page 39)
5. Clogged hose. 5. Clean hose. (page 39)
6. Carpet/Bare floor selector in 6. Select CARPET position. (page 24)
BARE FLOOR position.
7. Worn agitator. 7. Replace agitator. (page 34)
8. Hole in hose. 8. Replace hose.
9. Broken/misplaced belt. 9. Replace/fix belt. (page 34)
10. Belt not installed on motor 10. Install belt on motor shaft. (page 34)
shaft.
Agitator not turning 1. Carpet/Bare floor selector in 1. Select CARPET position. (page 24)
Air flow restricted 1. Tool use restricts air flow. 1. Check tools.
with attachment use, 2. New carpet fuzz clogged 2. Check REMOVING CLOGS
or sound changes. air path. clean hose. (page 39)
U.S. 1-855-726-2495 (TOLL FREE) www.panasonic.com
BARE FLOOR position.
2. Belt installed incorrectly. 2. Check REPLACING BELT. (page
34)
3. Broken belt. 3. Replace belt. (page 34)
- 42 -
Page 43

Antes de pedir servicio
ADVERTENCIA
Desconecte la aspiradora antes de darle servicio o limpiarla. De lo contrario podría producirse un
choque eléctrico o causar lesión personal si la aspiradora arranca de repente.
Consulte este cuadro para encontrar soluciones que usted mismo puede realizar cuando tenga
problemas menores de rendimiento. Cualquier servicio que necesita aparte de otros descritos en
este manual tiene que ser hecho por un representante de servicio autorizado.
Peligro de choque eléctrico y lesión personal.
PROBLEMA CAUSA POSIBLE SOLUCIÓN POSIBLE
La aspiradora no 1. Está desconectada. 1. Conecte bien, oprima selector
funciona. de encendido/apagado a la
2. Interruptor de encendido/ 2. Coloque el interruptor de encen
apagado no está en la posición dido/apagado en la posición ON.
ON. (page 17)
3. Cortacircuitos botado o fusible 3. Restablezca el cortacircuitos o
quemado en el tablero de cambie el fusible.
servicio de la residencia.
4. Protector termal botado. 4. Desconecte la aspiradora, deje
No aspira 1. Contenedor de polvo llena o 1. Vacie el contenedor de polvo.
satisfactoriamente. atascada. (page 27)
2. Filtros de seguridad. 2. Cambie/limpie los filtros.
3. La manguera no está bien 3. Inserte bien la manguera.
insertada. (page 12)
4. Boquilla, o contenendor de 4. Limpiar boquilla o contenador
polvo, atascada. de polvo. (page 39)
5. Manguera atascado. 5. Limpiar manguera. (page 39)
6. Selector alfombra-piso del 6. Seleccione la posición de
agitador en posición BARE CARPET. (page 24)
FLOOR.
7. Agitador desgastado. 7. Cambie el agitador. (page 34)
8. Manguera rota. 8. Cambie la manguera.
9. Correa rota. 9. Cambie la correa. (page 34)
10. Correa no está instalda en el 10. Instale la correa en el eje del
eje del motor. motor. (page 34)
posición ON. (pages 16 & 17)
enfriar el protector termal se
reajusta por si solo. (page 25)
(pages 29-33)
El ensamble del 1. Selector alfombra-piso del 1. Seleccione la posición de
agitador no gira. agitador en posición BARE CARPET. (page 24)
Restricción del flujo 1. El uso de los accesorios limita 1. Revise USO DE LOS
de el uso de el flujo de aire. ACCESORIOS. (page 35)
los accesorios. 2. La pelusa de una alfombra 2. Revise CÓMO ELIMINAR LOS
Cambio de sonido. nueva obstruye el paso de aire. RESIDUOS DE BASURA EN
U.S. 1-855-726-2495 (TOLL FREE) www.panasonic.com
FLOOR.
2. Correa rota. 2. Cambie la correa. (page 34)
3. Correa instalada 3. Revise CAMBIO DE LA
incorrectamente. CORREA. (page 34)
LOS CON-DUCTOS y limpie la
manguera. (page 39)
- 43 -
Page 44

LIMITED WARRANTY (ONLY FOR U.S.A. AND PUERTO RICO)
Panasonic Consumer Marketing Company of North America,
Division of Panasonic Corporation of North America
One Panasonic Way, Secaucus, New Jersey 07094
Panasonic Vacuum Cleaner
Limited Warranty
Limited Warranty Coverage (For USA and Puerto Rico Only)
If your product does not work properly because of a defect in materials or workmanship, Panasonic
Consumer Marketing Company of North America (referred to as “the warrantor”) will, for the length
of the period indicated on the chart below, which starts with the date of original purchase (“warranty
period”), at its option either (a) repair your product with new or refurbished parts, (b) replace it with a
new or a refurbished equivalent value product, or (c) refund your purchase price. The decision to
repair, replace or refund will be made by the warrantor.
Product or Part Name Parts Labor
Vacuum Cleaner 1 yr. 1 yr.
During the “Labor” warranty period there will be no charge for labor. During the “Parts” warranty
period, there will be no charge for parts.
This Limited Warranty Excludes both Labor and Parts for the following items which require
normal replacement: Disposable Dust Bag, Filters, Belts, Light Bulbs, Agitator Brushes and
Batteries (if supplied).
This warranty only applies to products purchased and serviced in the United States or Puerto Rico.
This warranty is extended only to the original purchaser of a new product which was not sold “as is”.
Carry-In or Mail in Service:
To find a service center please visit http://www.panasonic.com/help or call 1-855-726-2495.
IF REPAIR IS NEEDED DURING THE WARRANTY PERIOD, THE PURCHASER WILL BE
REQUIRED TO FURNISH A SALES RECEIPT/PROOF OF PURCHASE INDICATING DATE OF
PURCHASE, AMOUNT PAID AND PLACE OF PURCHASE. CUSTOMER WILL BE CHARGED
FOR THE REPAIR OF ANY UNIT RECEIVED WITHOUT SUCH PROOF OF PURCHASE.
Limited Warranty Limits And Exclusions
This warranty ONLY COVERS failures due to defects in materials or workmanship, and DOES NOT
COVER normal wear and tear or cosmetic damage. The warranty ALSO DOES NOT COVER
damages which occurred in shipment, or failures which are caused by products not supplied by the
warrantor, or failures which result from accidents, misuse, abuse, neglect, mishandling,
misapplication, alteration, faulty installation, set-up adjustments, misadjustment of consumer
controls, improper maintenance, power line surge, lightning damage, modification, introduction of
sand, humidity or liquids, commercial use such as hotel, office, restaurant, or other business or
rental use of the product, or service by anyone other than a Factory Service Center or other
Authorized Servicer, or damage that is attributable to acts of God.
THERE ARE NO EXPRESS WARRANTIES EXCEPT AS LISTED UNDER “LIMITED WARRANTY
COVERAGE”.
U.S. 1-855-726-2495 (TOLL FREE) www.panasonic.com
- 44 -
Page 45

THE WARRANTOR IS NOT LIABLE FOR INCIDENTAL OR CONSEQUENTIAL DAMAGES
RESULTING FROM THE USE OF THIS PRODUCT, OR ARISING OUT OF ANY BREACH OF THIS
WARRANTY. (As examples, this excludes damages for lost time, travel to and from the servicer,
loss of or damage to media or images, data or other memory or recorded content. The items listed
are not exclusive, but for illustration only.)
ALL EXPRESS AND IMPLIED WARRANTIES, INCLUDING THE WARRANTY OF
MERCHANTABILITY, ARE LIMITED TO THE PERIOD OF THE LIMITED WARRANTY.
Some states do not allow the exclusion or limitation of incidental or consequential damages, or
limitations on how long an implied warranty lasts, so the exclusions may not apply to you.
This warranty gives you specific legal rights and you may also have other rights which vary from
state to state. If a problem with this product develops during or after the warranty period, you may
contact your dealer or service center. If the problem is not handled to your satisfaction, then write to:
Consumer Affairs Department
Panasonic Consumer Marketing Company
661 Independence Pkwy
Chesapeake, VA 23320
PARTS AND SERVICE, WHICH ARE NOT COVERED BY THIS LIMITED WARRANTY, ARE
YOUR RESPONSIBILITY.
Customer Services Directory (United States and Puerto Rico)
Obtain Product Information and Operating Assistance; locate your nearest Dealer
or Service Center; purchase Parts and Accessories; or make Customer Service
and Literature requests by visiting our Web Site at:
http://www.panasonic.com/help
or, contact us via the web at:
http://www.panasonic.com/contactinfo
You may also contact us directly at:
1-855-726-2495
Monday-Friday 9am-9pm, Saturday-Sunday 10am-7pm EST
For hearing or speech impaired TTY users, TTY: 1-877-833-8855
Accessory Purchases (United States and Puerto Rico)
Purchase Parts, Accessories and Instruction Books online for all Panasonic Products by
visiting our Web Site at: http://www.pstc.panasonic.com
Or, send your request by E-mail to: npcparts@us.panasonic.com
You may also contact us directly at:
1-800-332-5368 (Phone) 1-800-237-9080 (Fax Only)
(Monday-Friday 9am-9pm EST)
Panasonic National Parts Center
20421 84th Avenue South,
Kent, WA 98032
(We accept Visa, MasterCard, Discover Card, and American Express)
For hearing or speech impaired TTY users, TTY: 1-866-605-1277
U.S. 1-855-726-2495 (TOLL FREE) www.panasonic.com
- 45 -
Page 46

Garantía Limitada
(SOLO PARA ESTADOS UNIDOS Y PUERTO RICO)
Panasonic Consumer Marketing Company of North America,
Division of Panasonic Corporation of North America
One Panasonic Way, Secaucus, New Jersey 07094
Aspiradora Panasonic
Garantía Limitada
Cobertura de la Garantía Limitada (Solo para USA y Puerto Rico)
Si su producto no funciona apropiadamente debido al defecto en materiales o mano de obra,
Panasonic Consumer Marketing Company of North America (referido como el “ Emisor de la
garantía”) podrá, por la duración del periodo indicado en la tabla de abajo, la cual inicia con la fecha
de la compra original (“periodo de garantía”), las opciones (a) de reparar su producto con partes
nuevas o restauradas, (b) reemplazo con un nuevo o restaurado producto de valor equivalente, o
(c) rembolsar el precio pagado. La decisión de reparar, reemplazar o rembolsar será realizada por
el Emisor de la garantía.
Producto o Nombre de la parte Partes Mano de obra
Aspiradora 1 año 1 año
Durante el periodo de la garantía de ‘Mano de Obra, no habrá cargo por esta labor. Durante el
periodo de la garantía de “Partes”, no habrá cargo por las partes.
Esta Garantía Limitada, excluye ambas garantías de “partes’ y “mano de obra” de los
siguientes objetos que requieren el reemplazo normal: Bolsa de polvo, Filtros, Bandas, Bulbos
de luz, Cerdas del Agitador y baterías (si son proveídas).
Esta Garantía solo aplica a productos comprados y servicios en Estados Unidos y Puerto Rico.
Esta Garantía es extendida solo al comprador original del producto nuevo que no ha sido vendido “
como es.”
Llevar al centro de atención o Servicio por correo:
Para encontrar un centro de servicio, favor de visitar http://www.panasonic.com/help o llamar al
1-855-726-2495.
SI NECESITA REPARACION DURANTE EL PERIODO DE GARANTIA, A EL COMPRADOR SE
LE REQUERIRA PROVEER EL RECIBO DE COMPRA/PRUEBA DE LA COMPRA INDICANDO
LA FECHA DE LA COMPRA, CANTIDAD PAGADA Y EL LUGAR DE COMPRA. A EL CLIENTE
SE LE CARGARA POR LA REPARACION DE CUALQUIER UNIDAD RECIBIDA SIN EL
COMPROBANTE DE COMPRA.
Limites y exclusiones de la Garantía Limitada
Esta Garantía SOLO CUBRE fallas debido a defectos en materiales o mano de obra, y NO CUBRE
daños por uso normal o cosméticos. La Garantía TAMBIEN NO CUBRE daños que ocurran en el
envio, o fallas que son causadas por productos no proveídos por el Emisor de la Garantía, o por
fallas resultantes por accidentes, mal uso, abuso, negligencia, mal manejo, mal aplicación,
alteración, mal instalación, falla en ajustes, mal ajuste de los controles del consumidor,
mantenimiento inapropiado, falla en la línea eléctrica, daño por descarga eléctrica, modificación,
introducción de área, humedad o líquidos, uso comercial como en los Hoteles, oficinas,
restaurantes u otros negocioso uso en renta del producto, o servicio por otro que no sea el Centro
de Servicio de la Fabrica y otro Centro de Servicio Autorizado o daños que son atribuibles a los
actos de Dios.
NO HAY GARANTIAS EXPRESS, EXCEPTO LAS ENLISTADAS BAJO “LA COBERTURA DE LA
GARANTIA LIMITADA”.
U.S. 1-855-726-2495 (TOLL FREE) www.panasonic.com
- 46 -
Page 47

EL EMISOR DE LA GARANTIA NO ES RESPONSIBLE POR INCIDENTES O DANOS
RESULTANTES POR EL USO DE ESTE PRODUCTO, O EL SURGIMIENTO FUERA DEL
ALCANCE DE ESTA GARANTIA. (Como ejemplo, excluye los daños de perdida de tiempo, viaje
hacia y del Centro de Servicio, la perdida de medios o imágenes, datos u otra memoria o registros.
Los aspectos enlistados no son exclusivos, solo como ilustración)
TODA GARANTIA EXPRES Y AMPLIADA, INCLUYENDO LA GARANTIA DE
COMERCIALIZACION, SON LIMITADAS AL PERIODO DE LA GARANTIA LIMITADA
Algunos estados no permiten la exclusión o limitación por incidentes o daños consecuentes, o
limitaciones en cuánto tiempo una garantía implicada dura, así que las exclusiones tal vez no le
apliquen.
Esta garantía le da derecho legales específicos y tal vez tenga otros derechos que pueden variar de
estado en estado. Si se desarrolla un problema con este producto durante o después del periodo de
la garantía, puede contactar a su Proveedor o Centro de Servicio. Si el problema no es manejado a
su satisfacción, entonces escriba al:
Consumer Affairs Department
Panasonic Consumer Marketing Company
661 Independence Pkwy
Chesapeake, VA 23320
PARTES Y SERVICIOS QUE NO ESTAN CUBIERTO POR ESTA GARANTIA LIMITADA, SON SU
RESPONSABILIDAD.
Directorio de Servicio a Clientes (Estados Unidos y Puerto Rico)
Obtenga información del Producto y Asistencia del operador; localice su agente
mas cercano o Centro de Servicio; compra de partes y accesorios; o solicite un
Servicio para Cliente y Literatura, visitando nuestro sitio Web:
http://www.panasonic.com/help
o, contáctenos vía web a:
http://www.panasonic.com/contactinfo
Usted también puede contactarnos directamente a:
1-855-726-2495
Lunes-Viernes 9am-9pm, Sabado-Domingo 10am-7pm Tiempo del Este
Para usuarios TTY con problemas de audición y habla: 1-877-833-8855
Compra de Accesorios (Estados Unidos y Puerto Rico)
Compra de Partes, Accesorios y libros de instrucción por Internet para todos los
Productos de Panasonic visitando nuestro sitio web: http://www.pstc.panasonic.com
O envie su requisición por correo: npcparts@us.panasonic.com
Usted también puede contactarnos directamente al:
1-800-332-5368 (teléfono) 1-800-237-9080 (Solo fax)
(Lunes-Viernes 9am-9pm Tiempo del Este)
Panasonic National Parts Center
20421 84th Avenue South,
Kent, WA 98032
(Aceptamos Visa, MasterCard, Discover Card, y American Express)
Para usuarios TTY con problemas de audición y habla: 1-866-605-1277
U.S. 1-855-726-2495 (TOLL FREE) www.panasonic.com
- 47 -
Page 48

WHAT TO DO WHEN SERVICE IS NEEDED
If your Panasonic Vacuum Cleaner needs service, look in the yellow pages of the telephone book under
HOME APPLIANCE SERVICE for your nearest Panasonic Customer Experience Group (“PCEG”) Factory
Servicenter, or PCEG authorized Servicenter, or call, 1-855-726-2495 toll free to find a convenient
servicenter. DO NOT send the product to the Executive or Regional Sales offices. They are NOT equipped
to make repairs.
Carefully pack and send it prepaid, adequately insured and preferably in the original carton. Attach a
postage-paid letter to the outside of the carton, which contains a description of your complaint. DO NOT
send the product to the Executive or Regional Sales Offices. They are NOT equipped to make repairs.
PANASONIC HOME AND HEALTH COMPANY
DIVISION OF PANASONIC CORPORATION OF NORTH AMERICA
If you ship the product
One Panasonic Way
Secaucus, New Jersey 07094
World Wide Web Address
http://www.panasonic.com
Cuando necesita servicio
Si su aspiradora Panasonic necesita servicio, busque el Centro de Servicio Panasonic o un Centro de Servicio
PASC autorizado más cercano bajo "Servicio de Eléctrodomésticos" en las páginas amarillas de la guía de
teléfonos o llame gratis al 1-855-726-2495 para encontrar un centro de servicio conveniente. No mande el producto
a las Executive o Regional Sales Offices. No están equipadas para arreglar estos productos.
Empaquete con cuidado en el cartón original es posible y mándelo prepagado y con seguro suficiente. Ponga una
carta con sellos en la que describe su problema con el producto en el exterior del cartón. No mande el producto a
las Executive o Regional Sales Offices. No están equipadas para arreglar estos productos.
DIVISION OF PANASONIC CORPORATION OF NORTH AMERICA
Si manda el producto
PANAMEX COMPANY
One Panasonic Way
Secaucus, New Jersey 07094
World Wide Web Address
http://www.panasonic.com
ACØ1ZDYWZØUØ Imprimé au Mexique
Printed in Mexico
CØ1ZDYWØØUØØ REV A Impreso en Mexico
- 48 -
 Loading...