

Page 1
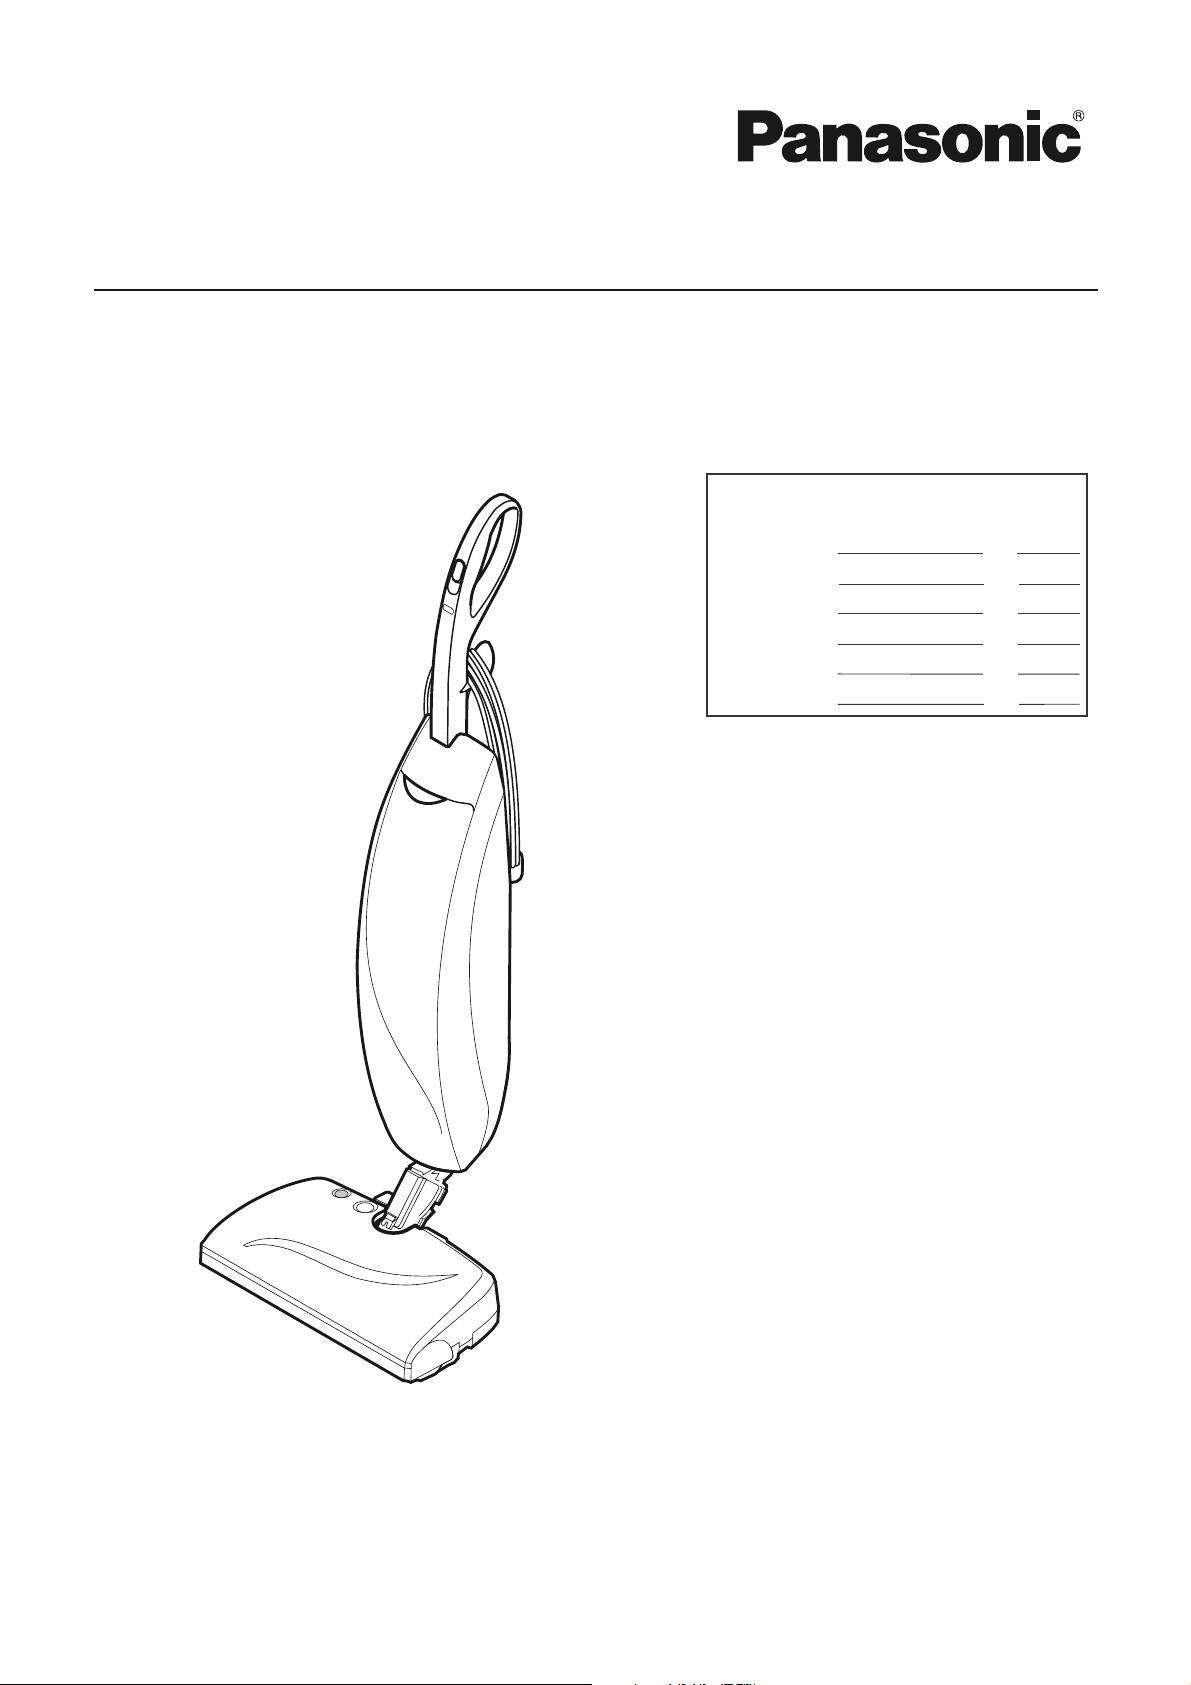
Operating Instructions
Vacuum Cleaner (Domestic)
Model No. MC-UG614
We would advise that you carefully study these Operating Instructions before attempting
to operate the vacuum cleaner and that you note the Important Safety Instructions.
Please keep in a safe place with your Authorised Dealer Service booklet.
This product complies with the directive 2006/95/EC and 2004/108/EC
.
Literature
Development:
Technology:
Codes Engineer
Quality:
Consumer Affiars:
Service:
Page 2

-2-
Page
• Caution for AC Mains Lead (UK and Ireland only)............................2
• Important Safety Instructions for the User ........................................3
• Cautions............................................................................................3
• Identification of main parts ................................................................4
ASSEMBLY INSTRUCTIONS
A) How to attach the handle ............................................................5
B) Mains lead ...................................................................................5
PERFORMANCE FEATURES
A) Motor protection system ..............................................................6
B) Belt reset button...........................................................................6
HOW TO OPERATE YOUR VACUUM CLEANER
A) Mains lead ...................................................................................7
B) Handle release.............................................................................7
C) ON/OFF switch ............................................................................7
D) Suggested pile height settings.....................................................8
E) Vacuuming tips ............................................................................8
F) Vacuum cleaner stabilizer................................................................. 9
G) How to use the accessories ......................................................10
H) How to install the hose ..............................................................10
TABLE OF CONTENTS
Page
TOOLS ....................................................................11
MAINTENANCE AND SERVICING
A) Vacuum cleaner storage..................................12
B) Cleaning exterior .............................................12
C) Dust bag replacement .....................................13
D) Exhaust filter replacement ...................................14
E) Secondary filter cleaning ................................14
F) Clog removal ...................................................15
G) Nozzle care......................................................16
H) Belt changing and agitator cleaning ................16
I) Agitator cleaning..............................................17
J) When to replace the agitator ...........................17
K) Replace belt.....................................................18
L) Troubleshooting...............................................19
• Specifications......................................................20
• Consumables / Accessories................................21
• Disposal information ...........................................22
FOR YOUR SAFETY PLEASE READ THE FOLLOWING TEXT CAREFULLY
This appliance is supplied with a moulded three pin mains plug for your safety and convenience.
A 13 amp fuse is fitted in this plug.
Should the fuse need to be replaced please ensure that the replacement fuse has rating of 13 amps and that it is approved by
ASTA or BSI to BS1362.
Check for the ASTA mark or the BSI mark on the body of the fuse.
If the plug contains a removable fuse cover you must ensure that it is refitted when the fuse is replaced.
If you lose the fuse cover the plug must not be used until a replacement cover is obtained.
A replacement fuse cover can be purchased from your local Panasonic Dealer.
IF THE FITTED MOULDED PLUG IS UNSUITABLE FOR THE SOCKET OUTLET IN YOUR HOME THEN THE FUSE SHOULD
BE REMOVED AND THE PLUG CUT OFF AND DISPOSED OF SAFELY. THERE IS A DANGER OF SEVERE ELECTRICAL
SHOCK IF THE CUT OFF PLUG IS INSERTED INTO ANY 13 AMP SOCKET.
If a new plug is to be fitted please observe the wiring code as shown below.
If in any doubt please consult a qualified electrician.
IMPORTANT: The wires in this mains lead are coloured in accordance with the following code:
Blue : Neutral
Brown : Live
As the colours of the wire in the mains lead of this appliance may not correspond with the coloured markings identifying the terminals in your plug, proceed as follows:
The wire which is coloured BLUE must be connected to the terminal in the plug which is marked with the letter N or coloured
BLACK.
The wire which is coloured BROWN must be connected to the terminal in the plug which is marked with the letter L or coloured
RED.
Under no circumstances should either of these wires be connected to the earth terminal of the three pin plug, marked with the
letter E or the Earth Symbol
How to replace the Fuse:
• There are two types of the supplied AC Mains Lead : A and B as shown below.
1 Open the fuse compartment with a screwdriver.
2 Replace the fuse and fuse cover if detachable.
CAUTION FOR AC MAINS LEAD (UK and Ireland only)
TYPE A TYPE B
ASA
Page 3
-3-
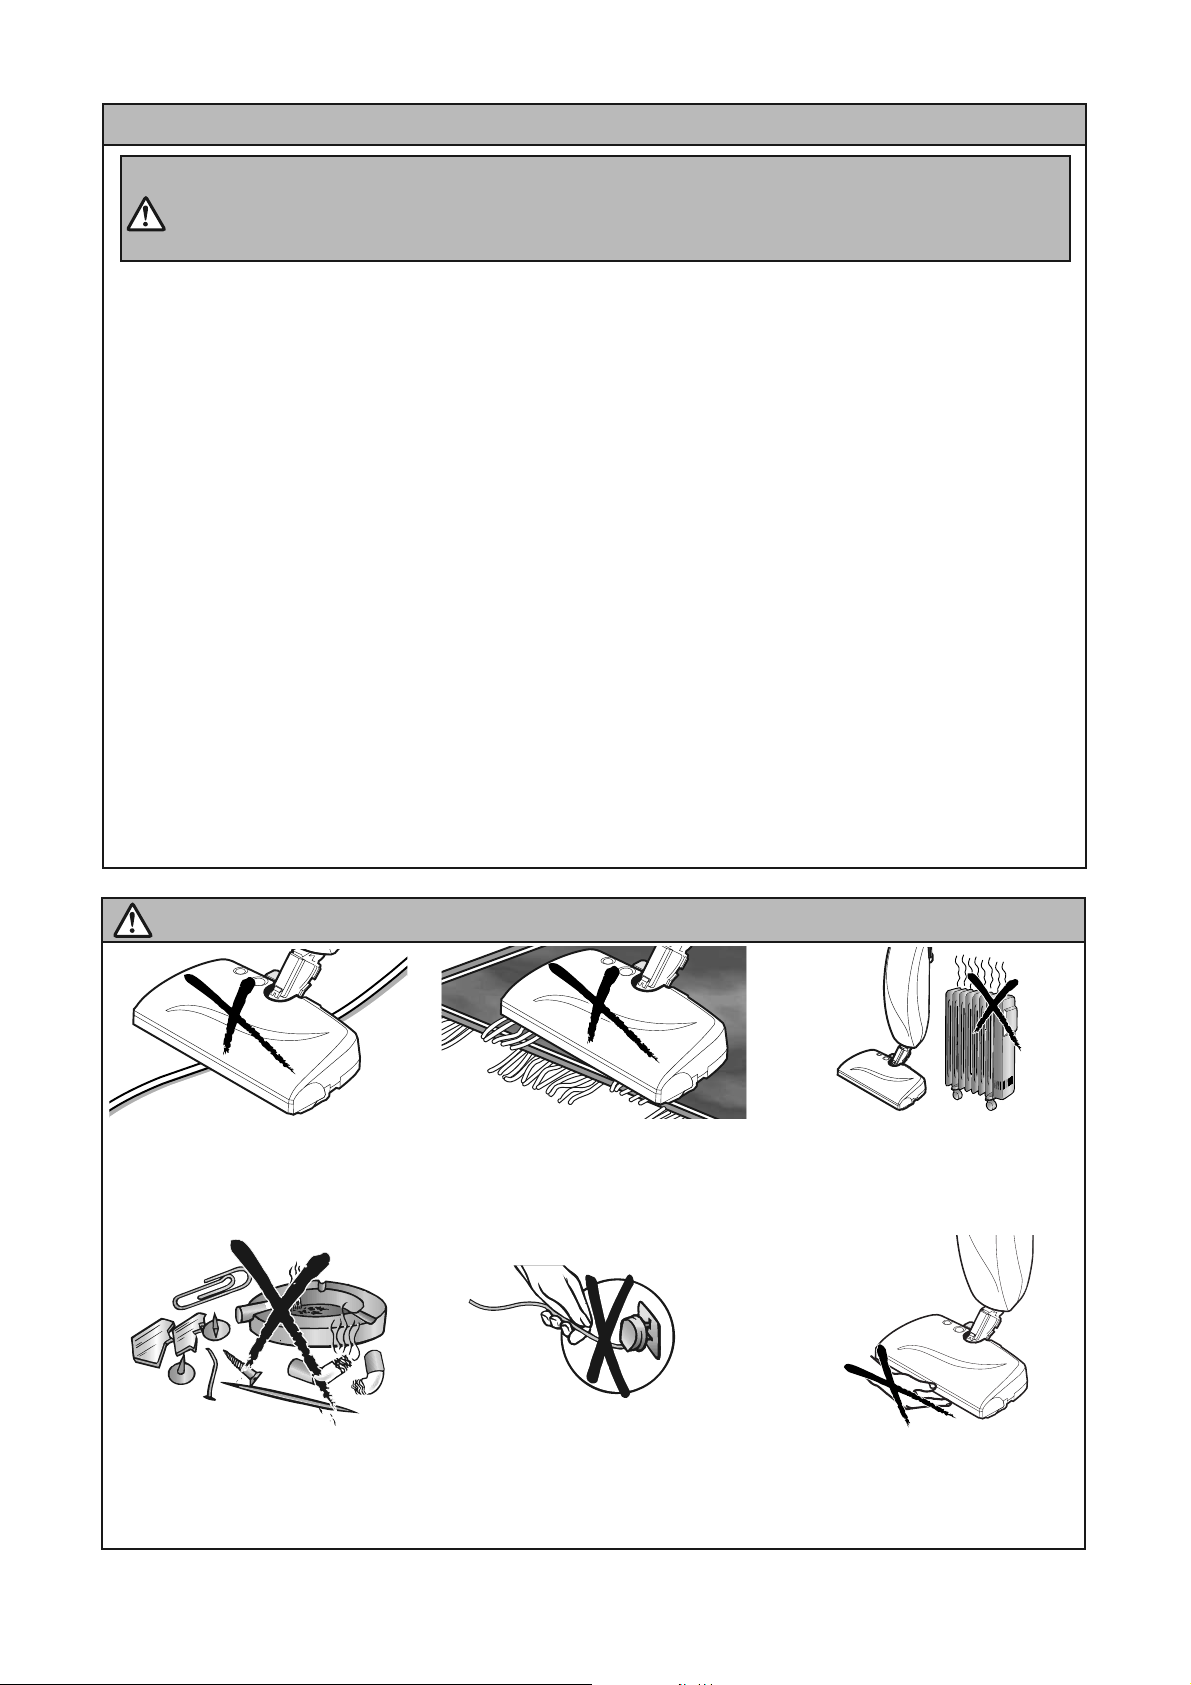
• Do not leave the vacuum cleaner plugged into mains socket. Unplug from the socket when not in use and before cleaning the appliance or undertaking maintenance operations.
• This appliance is not intended for use by infirm persons (including children) with reduced physical, sensory or mental capabilities,
or lack of experience and knowledge of the product, unless they have been given supervision or instruction concerning use of the
appliance by a person responsible for their safety. If not, may cause an electrical shock, fire or injury.
• Children should be supervised to ensure that they do not play with the appliance. If not, may cause an electrical shock, fire or injury.
• Do not use if the mains lead or mains plug is damaged. If the vacuum cleaner is not working as it should be, or has been dropped,
damaged, left outdoors, or come into contact with water, consult an authorised Panasonic Service Centre.
• Do not pull or carry by the mains lead, use the mains lead as a handle, close a door on the mains lead, pull the mains lead around
sharp edges or corners. Do not run over the mains lead with the vacuum cleaner. Keep the mains lead away from heated surfaces.
• Do not handle plug or vacuum cleaner with wet hands.
• Do not put any object into openings. Do not use with any opening blocked; keep free of dust, lint, hair and anything that may block
or reduce air flow.
• Keep hair, loose clothing, fingers, and all parts of body away from openings and moving parts.
• Do not use the vacuum cleaner without filters and /or dust bin in place.
• Do not use wet filters after wash, see E) Secondary Filter Cleaning.
• Turn off all controls before unplugging.
• Do not use to pick up flammable or combustible materials, or others that may become so or use in areas where they may be present.
• This appliance should be serviced by an authorised Panasonic Service Centre, and only genuine Panasonic spare parts should be
used.
• Use extra care when cleaning on stairs. Keep hold of the handle to prevent the vacuum cleaner from falling.
• To prevent damaging carpeted floors, tiled floors, Linoleum, etc. Do not leave the agitator rotating in the same place for too long.
• Keep bare feet and hands away from the agitator. (It may cause injury)
NOTE: This vacuum cleaner is designed for general household use only and is not suitable for use in a garage,
garden or to suck up liquids.
IMPORTANT SAFETY INSTRUCTIONS FOR THE USER
Before using the vacuum cleaner, please read these basic precautions.
WARNING: To reduce the risk of fire, electric shock, or injury.
1. To avoid any possible damage to
the mains lead, never run over the
mains lead or allow it to become
caught in the agitator when using
the vacuum cleaner.
2. Do not run the vacuum cleaner over
tassels or fringes of rugs or mats as they
could get caught up in the agitator and
may cause damage to belt.
3. Keep the vacuum cleaner away
from heat sources such as radiators,
fires, direct sunlight, etc.
4. To avoid damaging the vacuum
cleaner, never let the vacuum
cleaner pick up wet matter, mud,
burning ashes or large and sharp
objects.
5. Do not pull on the mains lead when
disconnecting the appliance from the
mains socket, always pull on the plug
body itself.
6. To avoid injury, keep your fingers
and hands away from the agitator,
and never put them between the body
parts.
CAUTIONS
Page 4

-4-
IDENTIFICATION OF MAIN PARTS
Quick Release Upper Cord Hook
Carrying Handle
HEPA Exhaust Filter Cover(Filter Inside)
Model/Serial Numbers
Handle
OFF/FLOOR/CARPET Switch
Mains Lead
Dust Bag Cover (Dust Bag Inside)
Swivel
Clean Out/Hose Connector Port
Pile Height Indicator
Belt Reset Button
Handle Release Pedal
Height Adjustment Pedal
Nozzle
Furniture Guard
Page 5
-5-
B) MAINS LEAD
11
Make sure that cord hook is rotated in the upright
position as shown.
Insert mains lead beneath cord clip on rear of handle
unit.
Wrap mains lead loosely around cord hook and carry
handle.
Lock the plug onto the mains lead.
A) HOW TO ATTACH THE HANDLE
Remove the handle screw from the rear of the
handle unit.
Insert the handle assembly in the handle opening as
shown in the illustration.
Using screwdriver, tighten handle screw.
NOTE: It may be necessary to adjust the handle
slightly to align the screw hole.
12
11
ASSEMBLY INSTRUCTIONS
Handle
Handle
Screw
Handle
Handle
Screw
Screw
Hole
Cord Clip
Cord Hook
Carry Handle
Mains Lead
Cord
Lock
Page 6

-6-
11
BELT OVERLOAD PROTECTOR
The agitator drive system has built-in protection
against motor damage should the agitator jam.
If the agitator slows down or stops, the belt overload
protector shuts off the agitator motor.
The vacuum cleaner suction motor will continue to
run.
To correct problem:
Turn off and unplug vacuum cleaner, remove
obstruction, then press BELT RESET BUTTON.
Allow 20 seconds to pass before attempting reset.
NOTE: If the problem persists, have the vacuum
cleaner serviced by a qualified Panasonic
technician.
B) BELT RESET BUTTON
THERMAL PROTECTOR - SUCTION
MOTOR
This vacuum cleaner has a thermal protector which
automatically trips to protect the vacuum cleaner
suction motor. If a clog prevents the normal flow of
air to the motor, the thermal protector turns the
motor off automatically.
This allows the motor to cool in order to prevent
possible damage to the vacuum cleaner.
The motor may re-start unexpectedly when it cools.
To reset thermal protector:
Turn the vacuum cleaner off and unplug the mains
lead from the socket to allow the vacuum cleaner to
cool and the thermal protector in the suction motor
to reset.
Check for and remove clogs, and replace bag if
necessary (See CLOG REMOVAL, page 15). Also
check and replace any clogged filters. Wait
approximately 40-50 minutes before restarting
vacuum cleaner.
PERFORMANCE FEATURES
11
BYPASS VALVE
This vacuum cleaner has a motor protector bypass
valve which prevents motor overheating and
damage.
The valve opens to provide cooling air when a clog
or full bag prevents normal air flow to the vacuum
cleaner suction motor.
You will notice a change of sound as air rushes
through the valve opening.
To correct problem install a new dust bag/or
locate and remove the clog (see clog removal,
page 15).
NOTE: The bypass valve may open when cleaning
new carpet due to reduced airflow caused by the
new carpet lint filling the dust bag quickly.
Note: Do not block bypass valve.
A) MOTOR PROTECTION SYSTEM
Bypass
Valve
Belt Reset
Button
Page 7

-7-
C) ON/OFF SWITCH
B) HANDLE RELEASE
Release the handle by pressing down on the foot pedal
with your foot and pulling back and down on the handle
with your hand.
CAUTION
To prevent damaging carpeted floors, tiled
floors, linoleum, etc. Do not leave the agitator
rotating in the same place for too long.
OFF - Turns both suction and agitator motors off.
FLOOR - Turns on the suction motor only. In this
position the agitator assembly does not revolve.
Use this setting for cleaning hardwood and tile floors
and when any attachments (tools) are used.
CARPET - Turns on both the suction and the
agitator motors.
NOTE: After use, unplug the mains lead from the
socket and store the vacuum cleaner in the upright
(vertical) position.
11
A) MAINS LEAD
11
12
Turn the quick release upper cord hook to either side
and down to release the mains lead.
Detach the plug from the mains lead and pull the
cord off the quick release upper cord hook.
Be sure the mains lead is locked under the cord clip
on the rear of the handle.
Plug the mains lead into a 240 Volt mains socket
located near the floor.
Note: To store mains lead, turn upper cord hook
to the up position, then wrap cord loosely
around quick release cord hook and carrying
handle. Refer to VACUUM CLEANER STORAGE
(page 12 ).
11
HOW TO OPERATE YOUR VACUUM CLEANER
Cord Clip
Mains Lead
OFF/FLOOR/
CARPET
Switch
Selector
Window
Page 8

-8-
To select a pile height setting:
Select a pile height setting by pressing the HEIGHT
ADJUST pedal on the rear of the nozzle. The pile
height setting shows in the indicator window.
Attention: Refer to your carpet manufacturer’s
cleaning recommendations. Some more delicate
carpets may require that they be vacuumed with the
agitator turned off to prevent carpet damage.
D) SUGGESTED PILE HEIGHT SETTINGS
There are four (4) pile height settings on the vacuum
cleaner. For best deep down cleaning, use the XLO
setting. However, you may need to raise the height to
make some jobs easier, such as scatter rugs and
some deep pile carpets, and to prevent the vacuum
cleaner from shutting off.
Suggested settings are:
HI – Shag, deep pile, or scatter rugs.
MED – Medium to deep pile.
LO – Low to medium pile.
XLO – Most low pile carpets, bare floors, and
delicate carpets that require agitator to be turned off.
NOTE: Height adjustments should be made with the
unit in the use position.
CARPET EDGES
Guide either side of the nozzle along the wall.
NOTE: For best cleaning results, keep the airflow passage clear. Unplug the
vacuum cleaner from the mains socket before
checking.
See CLOG REMOVAL (page 15).
E) VACUUMING TIPS
WARNING
Personal Injury Hazard
Use care if vacuum cleaner is placed on stairs.
If it falls, personal injury or property damage
could result.
11
11
CARPET EDGES
Guide either side of the nozzle along the wall.
Indicator Window
Height Adjust Pedal
Page 9

-9-
F) VACUUM CLEANER STABILIZER
The stabilizer provided will add stability to the unit
when sitting on unlevel surfaces or when using the
attachment hose and accessories.
12
CAUTION: When the vacuum cleaner
handle is left in the upright (vertical)
position on tilted or unlevel surfaces,
insert stabilizer into the slot just beneath
the height adjustment pedal (as shown).
13
11
REPLACE VACUUM CLEANER STABILIZER:
1. Return stabilizer to vacuum by inserting it into the
holder on the filter cover when finished.
11
12
DIRECTIONS FOR USE:
1. Remove stabilizer from filter cover holder.
2. Insert stabilizer into slot provided on the vacuum
cleaner beneath the height adjustment pedal.
Note: Before moving the vacuum cleaner on the
floor surface, always remove the stabilizer from the
slot and return it to the filter cover holder.
CAUTION
Do Not Move the vacuum cleaner across the
floor with the stabilizer in place. Failure to
remove the stabilizer during floor cleaning may
result in damage to the carpet or floor surface.
Vacuum
Stabilizer
Filter
Cover
Vacuum Stabilizer
Slot
Page 10

-10-
G) HOW TO USE THE ACCESSORIES
CAUTION:
While using the accessories, hold the vacuum
cleaner handle with one hand to avoid pulling
the vacuum cleaner over.
To prevent damage to carpeted floors when using tools,
lock handle in the upright position. The agitator will
automatically shut off.
NOTE: After using the accessories, disconnect the hose from the connector pipe.
To avoid accidental injury, keep children
away from the agitator while in operation.
Connect any of the accessories, as indicated.
14
12
13
Lift out accessories needed.
11
Insert the smaller hose cuff such that corresponding
arrows on the cuff and port align (Arrow on port to
“UNLOCK” icon on cuff). Turn cuff clockwise until port
arrow aligns with “LOCK” icon on cuff.
To remove the hose, turn cuff counter-clockwise. When
port arrow and cuff “UN-LOCK” icon realign, pull cuff
straight out.
After hose is removed, close clean out/hose connect
port door until it snaps.
To connect the hose, open clean out / hose connect
port door.
12
13
14
11
H) HOW TO INSTALL THE HOSE
Clean out/hose
connect port
Hose cuff
(Small)
Page 11

-11-
TOOLS
Fabric Brush
Dusting
Brush
The crevice tool may be used on the following
items:
• Furniture
• Cushions
• Drapes
• Stairs
• Walls
The combination brush may be used on the
following items:
• Furniture
• Drapes
• Stairs
• Walls
Note: Always clean tools before using.
The Air Turbine may be used on the following
items:
• Furniture
• Stairs
The vacuum stabilizer must be inserted into the
vacuum cleaner beneath the height adjustment
pedal prior to using any tool.
Page 12

-12-
A) VACUUM CLEANER STORAGE
WARNING
Electrical Shock And Personal Injury Hazard
Wrapping the mains lead too tightly puts stress on
the mains lead and can cause damage to the mains
lead. A damaged mains lead is an electrical shock
hazard and could cause personal injury or damage.
Place the handle in the upright position.
Unplug the mains lead from the mains socket.
Gather the mains lead and wrap it loosely around the
upper cord hook and carry handle.
Lock the plug onto the mains lead.
Store the vacuum cleaner in a dry, indoor area, on the
floor with the handle locked in the upright position.
Mains Lead
Carry Handle
Cord Hook
11
MAINTENANCE AND SERVICING
Always follow all safety precautions when cleaning and servicing the vacuum cleaner.
WARNING
Electrical Shock And Personal Injury Hazard
Disconnect from electrical supply before servicing or cleaning the vacuum cleaner. Failure to do so could result in electrical shock or personal injury from vacuum cleaner suddenly starting.
CAUTION
Moving parts! To reduce the risk of
personal injury, DO NOT touch the agitator
when vacuum cleaner is on. Contacting the
agitator while it is rotating can cut, bruise,
or cause other injuries. Always unplug from
electrical socket before servicing.
Use caution when operating near children.
Unplug mains lead from mains socket.
Clean exterior using a clean, soft cloth that has been
dipped in a solution of mild liquid detergent and water,
then wrung dry. DO NOT drip water on vacuum
cleaner. Wipe dry after cleaning.
To reduce static electricity and dust build-up, wipe
outer surface of vacuum cleaner.
B) CLEANING EXTERIOR
WARNING
Electrical Shock And Personal Injury Hazard
Disconnect electrical supply before servicing or
cleaning the vacuum cleaner. Failure to do so
could result in electrical shock or personal injury
from vacuum cleaner suddenly starting.
Page 13

-13-
14
15
16
C)
DUST BAG REPLACEMENT
CAUTION
Electrical Shock And Personal Injury Hazard
Always disconnect the vacuum cleaner from mains socket before carrying out any service or maintenance
on the vacuum cleaner.
12
11
Hold the new dust bag as shown and push dust bag
collar opening completely over the dust bag holder
as far as it will go.
Dust Bag
Chamber
Dust Bag
Holder
Secondary
Filter
13
Check the dust bag holder and the secondary filter
for dirt or clogs.
Insert cover tab in bottom and rotate the bag cover
closed. You will hear a distinct snap when cover is
securely latched.
Tuck the bag into the dust bag chamber. Be sure the
bottom and sides of the dust bag are completely
within bag chamber prior to closing the bag cover.
Insert fingers in the latch recess at the top of the dust
bag cover and pull to open. Remove dust bag cover
from front of vacuum cleaner.
Grasp the dust bag collar and pull gently, carefully
removing the dust bag from the dust bag holder.
NOTE: Always operate vacuum cleaner with genuine Panasonic Type U-13 dust bag. Use replacement dust
bag AMC-D1EP (TYPE U-13).
Dust Bag Cover
Dust Bag
Collar
Tuck Dust Bag
In All Around
2
1
Cover Tab
Secondary Filter
Under Dust Bag
Page 14

-14-
D) EXHAUST FILTER REPLACEMENT
The HEPA exhaust filter must be replaced when
dirty. It should be replaced regularly depending on
use conditions. The filter CANNOT be washed as it
will lose its dust trapping ability.
NOTE: See VACUUM CLEANER
CONSUMABLES/ACCESSORIES (page 21) for the
exhaust filter number.
Remove exhaust filter cover by pressing the release
tab on the cover and rotating out from vacuum
cleaner.
12
11
Remove the filter cartridge from cover.
Place new filter cartridge into cover making sure that
airflow arrow on side of cartridge points into cover.
Place foam seal of filter against the vacuum cleaner
body.
Replace the exhaust filter cover by placing bottom
tabs in slots and rotating in until cover snaps into
place.
E) SECONDARY FILTER CLEANING
WARNING
Electrical Shock Hazard
Unplug mains lead from electrical socket. Do not
operate the vacuum cleaner without the
secondary filter. Be sure the filter is dry and
properly installed to prevent motor failure and/or
electrical shock.
SECONDARY FILTER
Check secondary filter frequently and clean when
dirty.
If the secondary filter, located in the bottom of the dust
bag chamber, is dirty, remove it by pulling forward out
from under the ribs.
Wash the foam filter in warm soapy water, rinse and dry
thoroughly by squeezing the filter in your hand and
letting it air dry.
DO NOT wash in the dishwasher.
DO NOT install damp.
DO NOT use vacuum cleaner without secondary filter
and dust bag.
Replace the secondary filter by sliding it back into place
under the ribs in the dust bag chamber.
11
Press
Filter
Cover
Release
Tab
Place Seal Side
Against Vacuum
Cleaner Body
Exhaust
Filter
1
Exhaust
Filter Cover
2
AIRFLOW
Secondary
Filter
Dust Bag
Removed For Clarity
Page 15

-15-
Open clean out/Hose connect port door.
Locate clean out/hose connect port.
F)CLOG REMOVAL
WARNING
Electrical Shock And Personal Injury Hazard
Disconnect electrical supply before performing maintenance to the vacuum cleaner. Failure to do so could result in electrical shock or personal injury from vacuum cleaner suddenly starting.
Remove any clog seen from dirt path.
After dirt path is cleared close door until it snaps.
12
13
14
11
Clean Out/Hose
Connect Port
Page 16

-16-
H) BELT CHANGING AND AGITATOR CLEANING
Turn nozzle upside down and unscrew four (4)
nozzle cover screws. Turn nozzle top side up.
Press release pedal and lower the handle.
Lift rear latches up.
Grasp the side latches and pull out. Lift cover
upward from back to remove.
Lift agitator assembly out and remove worn belt.
Check and clean end cap areas. See AGITATOR
ASSEMBLY (page 17) for picture of complete
agitator assembly.
End Cap
Cut off any carpet pile, hair or lint entangled around
the agitator and remove any string or debris located
near the end caps.
16
11
13
14
12
15
G) NOZZLE CARE
Always follow all safety precautions when performing
maintenance to the nozzle.
WARNING
Electrical Shock Or Personal Injury Hazard
Always turn off and unplug vacuum cleaner
before
performing maintenance to the vacuum cleaner
.
Failure to do so could result in electrical shock or
personal injury from vacuum cleaner suddenly
starting.
11
Screws
Handle
Release
Pedal
Rear
Side
Latch
Latches
Side
Latch
Base
End Cap
Page 17

-17-
TO CLEAN AGITATOR:
NOTE: In order to keep cleaning efficiency high and to
prevent damage to your vacuum cleaner, the agitator
must be cleaned every time the belt is changed.
The agitator must also be cleaned according to the
following schedule:
Vacuum Cleaner Use Clean Agitator
HEAVY - every week
(used daily)
MODERATE - every month
(used 2-3 times/week)
LIGHT - every 2 months
(used 1 time/week)
IMPORTANT
Turn off and unplug vacuum cleaner from mains
socket. Check and remove hair, string and lint build-up
frequently in the nozzle agitator and end cap areas.
Remove any dirt or debris in the belt path area or in
the brush roller area.
Carefully remove any string or debris located on the
agitator or end caps.
AGITATOR ASSEMBLY
J) WHEN TO REPLACE THE AGITATOR
TO CHECK THE BRUSHES
When brushes are worn to the level of the base support
bars, replace the agitator assembly.
TO REPLACE AGITATOR ASSEMBLY
Remove nozzle cover, belt and agitator assembly. See
BELT CHANGING AND AGITATOR CLEANING (page
16).
Replace agitator assembly.
Reinstall belt and nozzle cover. See REPLACE BELT
(page 18).
WARNING
Electrical Shock Or Personal Injury Hazard
Always turn off and unplug vacuum cleaner
before performing maintenance to the vacuum cleaner
.
Failure to do so could result in electrical shock or personal injury from vacuum cleaner suddenly starting.
I)
AGITATOR CLEANING
End Cap
Belt Path
Agitator
End Cap
New Brushes
Worn Brushes
Base
Support
Bar
Page 18

-18-
K) REPLACE BELT
Install new belt over motor drive, then over belt path.
11
12
13
Place agitator assembly into nozzle base.
Rest cover on front edge of base as shown.
Rotate cover back. Press cover firmly until side
latches snap into place.
Make sure there is no gap between the cover and
base and that the rear latches are snapped in place.
Turn nozzle upside down and replace four (4) cover
screws.
NOTE: The screws closest to the agitator are
longer than the rear screws.
Motor
Agitator
Belt Path
End Cap
Drive
Page 19

-19-
Vacuum cleaner won’t run. 1. Unplugged at mains socket. 1. Plug in firmly, select the desired
setting on the touch control.
2. Tripped circuit breaker replace 2. Reset circuit breaker or fuse.
at household service panel.
3. Thermal protector tripped. 3. Allow vacuum cleaner to cool
40-50 minutes. (page 6)
4. Defective mains socket. 4. Check with a good appliance
or lamp. Have socket properly
serviced.
Poor job of dirt pick-up. 1. Full or clogged dust bag. 1. Change bag. (page 13)
2. Wrong pile height setting. 2. Adjust setting. (page 8)
3. Worn agitator. 3. Replace agitator. (page 17)
4. Clogged nozzle or bag holder. 4. See CLOG REMOVAL. (page 15)
5. Motor protection system 5. Check for clogs. (page 15)
activated.
6. Dirty secondary filter and/or 6. Clean or change filters.
exhaust filter. (page 14)
Vacuum cleaner picks up 1. Wrong pile height setting. 1. Adjust setting. (page 8)
moveable rugs or pushes too
hard.
Agitator does not turn. 1. Handle in full upright position. 1. Move handle from upright
position.
2. Belt protector tripped. 2. Reset belt protector. (page 6)
Sound changes. 1. New carpet fuzz clogged air path. 1. See BYPASS VALVE (page 6).
2. See CLOG REMOVAL (page 15).
PROBLEM POSSIBLE CAUSE POSSIBLE SOLUTION
Before contacting your Panasonic service centre, check the following points:
NOTE: Failure to correctly maintain your product, for example regular cleaning and unblocking, may result in a charge
if referred to a service agent for attention.
L) TROUBLESHOOTING
WARNING
Disconnect electrical supply before performing maintenance to the vacuum cleaner. Failure to do so could
result in electrical shock or personal injury.
Page 20

-20-
MODEL NO. MC-UG614
POWER SOURCE 230-240V / 50Hz
MAX. INPUT POWER 1000w
MOTOR PROTECTION YES
HOSE YES
TURBINE UNIT YES
DUSTING BRUSH
YES
CREVICE TOOL YES
EXHAUST FILTER HEPA Material
DIMENSIONS (W x L x H) 311x422x930 mm
NET WEIGHT 6.0 kg
SPECIFICATIONS
Page 21

-21-
DESCRIPTION MC-UG614
Exhaust filter HEPA Part number
AC38KBRMZØØØ
Secondary filter Part number
AC37KDKTZØØØ
Crevice tool Part number
AC6ØRZFZVU6
Dusting brush Part number
AC63RCXWZVØ6
Belt Part number
AC28SCRE1ØØØ
Turbine unit Part number
AC80SCXZZVØ7
Agitator unit Part number
AC84RDRRZØØØ
Hose assembly Part number
AC94PDRRZVØ7
Stabilizer Part number
AC70QDRRZUØ3
Tool bag kit Part number
AC75RDRRZUEØ
Dust Bag Kit Part number
AMC-D1EP TYPE U-13
Vacuum Cleaner Consumables / Accessories
For customers within the UK and the Republic of Ireland:
Note: Specifications are subject to change without notice.
Direct Sales at Panasonic U.K.
· Order accessory and consumable items for your product with ease and confidence by phoning
our Customer Communications Centre Monday - Thursday 9:00am - 5:30pm, Friday 9:30am - 5:30pm
(Excluding public holidays).
· Or go on line through our Internet Accessory ordering application at www.pas-europe.com
· Most major credit and debit cards accepted.
· All enquiries transactions and distribution facilities are provided directly by Panasonic U.K.
· It couldn’t be simpler!
· Also available through our Internet is direct shopping for a wide range of finished products. Take a
browse on our website for further details.
Sales and support information
Customer Communications Centre
· For customers within the U.K.: 0844 844 3899
· For customers within Ireland: 01289 8333
· For further support on your product, please visit our website: www.panasonic.co.uk
Page 22

-22-
Information on Disposal for Users of Waste Electrical & Electronic Equipment
(private households)
This symbol on the products and/or accompanying documents means that used electrical and
electronic products should not be mixed with general household waste.
For proper treatment, recovery and recycling, please take these products to designated collection
points, where they will be accepted on a free of charge basis. Alternatively, in some countries you
may be able to return your products to your local retailer upon the purchase of an equivalent new
product.
Disposing of this product correctly will help to save valuable resources and prevent any potential
negative effects on human health and the environment which could otherwise arise from inappropriate waste handling. Please contact your local authority for further details of your nearest designated collection point.
Penalties may be applicable for incorrect disposal of this waste, in accordance with national legislation.
Information on Disposal in other Countries outside the European Union
This symbol is only valid in the European Union.
If you wish to discard this product, please contact your local authorities or dealer and ask for the correct method
of disposal.
Page 23

-23-
Page 24

http://www.panasonic.net/
©
2011
Pursuant to the directive 2004/108/EC, article 9 (2)
Panasonic Testing Centre
Panasonic Service Europe, a division of
Panasonic Marketing Europe GmbH
Winsbergring 15, 22525 Hamburg, F.R. Germany
CØ1ZDRR3ØEØØ
ACØ1ZDRRZØEØ
Printed in Mexico
REMINDER FOR CUSTOMER
The model and serial number of the product may
be found on the nameplate located at the back of
your vacuum cleaner. You should note the model
and serial number in the spaces provided and retain this book for future reference.
Model Number: ....................................
Serial Number:......................................
Date Purchased: ..................................
Where Purchased:................................
 Loading...