

Page 1
M282737F
ITEM NUMBER : 282737
SERIAL NUMBER: _____________
TM
Owner’s Manual
I nstructions for Assembly , Te stin g, O peration, S ervicing, and Storage
Tow Behind Sprayer: For outdoor use with agricultural
pesticides and other liquids**
WARNING
READ and UNDERSTAND the O wner’s Ma n ual comp letely before using thi s sprayer.
Assemble, test, and use only in accordance with the Owner’s Manual instructions.
READ and FOLLOW chemical label instructions. Pesticides are hazardous chemicals.
KNOW emerge ncy procedures BEFORE handli ng chemicals. Sprayer leaks, bodily
chemical contact, poi soning, and spills require im mediate response.
AVOID inha l ing, ingesting, or coming into conta ct wi th a ny c hemicals.
WEAR persona l pr otective gear when filling, using, cleaning, a nd servi cing the
sprayer.
KEEP spra yer a nd spray ma terials away from children and pets. Pesticides are
especially toxic to them.
EXERCISE CAUTION in v ehicle handling whe n towing fi lled sprayer to avoi d loss o f
control or spra yer overturning.
DO NO T TURN ON P OWER to s p r ayer until re ady to s pray in order to a void
uni ntentional spray release.
Impr oper use of the sprayer or handli ng of chemicals c ould result in se r i ous inj ur y
or illness to the ope rator or ne a rby persons/a nimals, or c ould cause damage to the
environment.
** T his sprayer is recommended for use in spraying non-fl ammable liquids such as pesticides , water for plants/trees
or dust control, i ce control chemicals , or wat er-based non-flam mable sealants or stains for outdoor wood surfa ces.
Howeve r, WE REC OMM END THAT THE SPR AYE R NOT BE USED FOR OT HER PURPOSES ONC E IT HAS
BEEN USED FOR SPRAYING PESTICIDES. Any chemical will leave some residual in the tank liner or sprayer
components, even after the spraye r has been properly cle aned. T hese residual chemicals can have unexpected
effects on futur e uses. For example, spraying water or other liquids t hat are contaminated wit h residual pes ticide
may result in unforeseen haza rds to plant or animal life.
Any Questions, Comments, Problems, or Parts Orders
Call NorthStar Customer Service 1-800-270-0810
©Northern Tool and Equipment Company
Page 2

Hazard Signal Word Definitions
2
Page 3

Table of Contents
Intended Use ................................................................................................................................. 4
Summary of Important Safety Information................................................................................5
During Assembly
During Use
• General Chemical Safety
• Chemical Application S afety
• Towing Safety
• C h em i cal Acci d en t Pro ced u res
Warning Label Locations..............................................................................................................7
Component Inventory
Unpacking.....................................................................................................................................8
Unpacking t he Manual Bag.............................................................................................................9
Asse mbl y
Step One: Attach t he tongue to the cart base........................................................................................10
Step Two: Attach the hitch mount to the tongue...................................................................................10
Step Three: Attach the cart base to the sprayer......................................................................................10
Step Four: Attach wheels to cart base.................................................................................................11
Step Five: Attach pressure gauge .......................................................................................................11
Step Si x: Attach gun hos e to spray gun and pump.................................................................................11
Step Seven: Attach gun cli ps t o tank ..................................................................................................12
Step Eight: Attach drain cap to tank...................................................................................................12
Step Nine: Attach hose guide to tank..................................................................................................12
Step Ten: Attach sprayer to vehicle....................................................................................................13
Step Eleven: Connect power cords to vehicle battery .............................................................................13
Step Twelve: Check and test completed assembly.................................................................................16
Machine Components..................................................................................................................17
Operation
Important Safety Information - Operati on ................................................................................18
• General Chemical Safety
• Chemical Application S afety
• Towing Safety
• C h em i cal Acci d en t Pro ced u res
Preparing the Sprayer for Each Use........................................................................................22
Using the Sprayer
Step One: Assess wind conditions and clear work area......................................................................23
Step Tw o : Fi ll the spr aye r...........................................................................................................24
Step Three: Operat e the sprayer ....................................................................................................26
Step Four: Clean sprayer and decontaminate after use.......................................................................29
Storage ..........................................................................................................................................30
Preparing for st o rage
Removing from storage
Troubleshooting...........................................................................................................................31
Specifications................................................................................................................................32
Parts Breakdown – Exploded View............................................................................................33
3
Page 4

Intended Use
The sprayer is intended for use in spraying agricult ural pesticides and other nonf lammable liquids.
SPRAYING PESTICIDES:
Pesticides are hazardo us chemi cals that must be handle d w ith caution as di rected
throughout this manual and on the pesticide label. Pesticides are regulated by the United
S ta t es Environmental P rotect ion Agency (EPA) and defined as:
An y s u b s t a n ce o r mi xtu r e o f s u bst a n ces i n t en d ed f o r p r even ti n g , des tr o yi n g , r ep elling, or mitigating any
pest. Though often misunderstood t o refer only to insecticides, t he term pesti cide is a comprehensive
term that applies t o i nsecticides, herbicides , fungici des, and various other subs tances used to cont rol
pests.
The spra yer is intended for use in spr ayi ng pesticides in li quid form only. The spra ye r is
N OT intended f or use in spr ayi ng pestici de s in dry or ae rosolized f orm, or f or use w ith
fumigants.
S ome formul ati ons of l iquid pe sticides do not r e main in solution a nd shoul d be agi tated
to maintain a uniform mix. This sprayer is equipped with an agitator that should be used
when sprayi ng pes tici des classified as “fl owable” ( “F” or “L”), “wettable powder” (“WP”
or “W”), “emulsion” (“EC” or “E”), “m icroencap s ulated” ( “M”), or water dispersible
granules (“WDG” or “D F”). (S ee pesticide label to de termine its cl as sifi cation. )
This sprayer c omes equi pped with a spot spr a y gun for a pplying pe sticides on selected
plants. If you wish to spray large ground a reas, a br o ad cast bo om (Item #27 3011) i s
available as an optional accessory.
SPRAYING OTHER LIQUIDS:
I n a dditi on to spr ayi ng pestici de s, thi s sprayer may be used to spray ot he r non-flammable
li quids. Exampl e uses i nc lude: wate ring pl ant s/tr e es or spraying wa te r for dust cont rol,
applyin g ice control chemicals, or applyi ng water -base d, non-flammable sea lant or stain
to out door wood surfa c es.
However, WE RECOMMEND THAT THE SPRAYER NOT B E US ED FOR
OTHER PURPOSES ONCE IT HAS ALREADY BEEN US ED FOR SPRAYING
PESTICIDES . Any chemi cal will l eave some residual in the ta nk liner or sprayer
component s, e ven af t e r the sprayer has been pro pe rly cleaned. T hese residua l chemi c a ls
can have unexpected effects on fut ure uses. For exampl e , spraying wa ter or other li quids
that are contami nated with residual pesticide may result in u nf or eseen hazards to plant or
animal lif e.
Contact Nort hS t ar Cus t omer Service at 1-800-270-0810 for an y questions
abou t t he appropriate use of the sprayer and/or opti onal access ories.
4
Page 5

Summary of Impo rtant Safety Information
WARNING
Re ad a nd under s t and this owner’s manual com plete ly before using the sp rayer. Read
each ch emica l label’s instruct ions b ef ore handling th e ch emical.
Im prop er use of the sprayer or handli ng of che mic als co ul d re sul t i n se ri ous i n ju ry o r
illness for the operator o r nearby p ersons/anim als, or cause damage to the enviro nment.
L I STED BELOW is a s u m mar y of sa fety i nfo rm atio n o f part icu lar import an ce. S ee ind ividua l
sections of this o wne r’s manu al for more de t ails.
-------------------------------------- DURING ASSEMBLY --------------------------------------
• EXE RCI S E CAUTIO N when a ttach i n g remote swi tch to b a ttery t ermin al s . F ollow the steps listed in the
Assembly section of this manual in exact s equence when connecting t he sprayer’s remote switch bat tery cl amps to
the battery terminals. C a u ti on m u s t be exer ci s ed to a vo id co n t a ct w i th batt er y a ci d a n d to pr even t s p a r ki n g .
• CHECK and TEST comp leted assembly as directed in this manual. Serious injury could result from chem ical
leaks if spray er is improperly assembled.
• DO NO T MO DIFY spray er des ig n .
------------------------------------- DURING OPERATION -------------------------------------
G enera l Chem ic a l Saf ety
• RE A D a nd FO LLO W each chemi ca l l a b el’s ins tructions an d wa rni ng s.
• AVOID inh aling, ingesting, or coming into contact with an y chemicals.
• KN O W a pp li ca bl e li cen s ing an d reg u lat o ry requi rements for the chem ical you plan to use.
• KN O W emerg ency procedures befo re h a ndl i ng ch emi ca l s . Care ful ly review “Chemical Accident Procedures”
listed below and later in this manual. Also see First Aid instructions on the chemical label.
• WEAR pro tectiv e cl o thi ng , ey e pro tectio n , a nd ch emica l res i s t ant g lov es when filling, using and cleaning the
sp ray er. Wear ad d it i o n al p ro t ecti v e g ear, s u ch as facem as k o r ap ro n , as reco mm en ded on t h e ch em ical l ab el .
• EXE RCI S E EXT RA CAUT IO N a round ch i ldren and p ets. P es t ici d es are es p eci all y t o x i c t o them. K eep
sprayer and spray materials away from them at all times.
• DO NOT MI X O R POU R chemicals i n a n en cl o s ed, unventil a ted a rea
• DO NOT USE fl a mm a b le or co rro s ive chemica l s in the sprayer.
• FL U SH the sp ray er befo re s w i tchi ng chemi ca l s i n order to prevent dangerous chemical interactions.
• S T ORE p esti ci des in a correctl y labeled co nta i ner a nd in a secure l o ca tion.
• MON I TO R the hea l th of opera to rs frequ ently ex po s ed to pes ti ci des , as reco mm en d ed by the ch emi cal label o r
lo cal/ feder al reg u l ati o n s .
Chemical Application Safety
Before Spraying
• IN S P ECT and P REPA RE s p ra y er befo re ea ch us e as directed in this manual.
• DO NO T TURN ON PO W E R to sprayer until ready to spray i n order to avoid unintent ional spray release.
• WE AR ADDIT I O NAL PE RSO NAL PRO T E CTIVE EQUIPMENT if you will be sp ray ing o verh ead or
fogging. You will be exposed to much more chemical fal lout i n these applicat ions . W ear chemical resistant head
and neck protecti on, full face mask or hal f face mas k with sealed goggles , and consider us ing a res pirator.
• DO NO T SPRAY wh en wind sp eed exceeds 4 MP H in order to minimize spray drift.
• CLEAR work area of people/ pets and POST warning notices to rest ri ct acces s fo r t h e p erio d r eco m m en d ed on
chem ical l ab el .
• KEE P sprayer and spray away from ch ildren / pets. P esticides can be especially toxic to children and animals.
• DO NOT ALLOW an yon e youn ger th an 16 to operate sp rayer s i n ce p es t ici d es are es p eci all y t o x i c t o ch il d ren .
During Spraying
• DO NO T OVERAPP L Y p esti cide. Apply at rat e r ecomm en d ed b y ch emi cal m an u fact u rer. E x ces s p es t i cide can
be dangerous to humans/animals, damage desi rable pl ants, and contaminate soil and wat er sources.
• DO NO T EAT, DRI NK, SMOK E, RUB YOUR E YES, or T O UCH YOUR BARE SKI N whil e h and lin g
chemi cals and spraying.
• NE VER PO INT THE S PRAY G UN at peop l e or ani mal s.
• AL W AYS H O L D THE SP RAY G UN FIRML Y when spray i n g a t hi gher pressures to prevent gun from
whipping. Keep good footi ng and balance at all times.
• E XERCIS E E XT RA CAUTIO N wh en sp ray ing near areas acces si bl e to chi l dren a nd pets .
• CLEAN up spills immediately per instructions on the chemical label.
5
Page 6

Summary of Important Safety Information (continued)
TURN O FF veh i cle and s et brake or b lo ck wheels , TURN OFF p ower to sprayer, and REL IEVE s ys tem
•
pressure befor e leaving spraye r unattended.
• S E E Troubles hootin g section of this man u al before attempting an y repairs. Wea r personal protective
equipment and follow sa fety ins tructions.
After Spraying
• CL EAN sp ra y er i m medi a tel y a fter us e acco rd i n g to th e direct ion s p ro v i d ed in th i s manu al .
• DECO NT AMINATE yo u rsel f af ter you are done spraying and have cleaned the sprayer. W ash all exposed areas
of the body with soap and water, and remove and launder cl othi ng.
• DI S P O SE O F o r ST ORE rema i ni ng chem i ca l s in secure s to ra g e with co rrectl y ma rked co nta i ner.
Towing Sa fe ty
• READ towi ng s afety i n s tructi on s in your t owing vehicle manual .
• DO NOT ALLOW d rivers you n ger th an 16 to operate the towing vehicle with the filled sprayer attached.
• MAKE S URE SPRAYE R IS S E CURE L Y ATT ACH E D to vehicl e.
• EXE RCI S E CAUTIO N in vehicl e h and lin g when towi n g f illed sprayer to avoi d l oss of control or overturning.
o Keep s peed to a mini mum s o you can maintain control. R educe speed pri or to turns.
o Al l o w fo r wid er turns and for more d i sta n ce t o sto p .
o Avoid an y sud den steering maneuvers, st arts, or stops t hat could create sway.
• SLOW DO WN and EXERCIS E E XT RA CAUT I ON on sloped o r u neven terrain . Pick the most level route
possible. Drive up and down slopes when necessary, rather than across. Use a vehicle equipped wit h a roll over
protecti on syst em (ROPS ) if you will be working on non-level t errain.
• BE AWARE of the added length of the sprayer, visibility may be reduced when making turns or backing up.
• DO NO T RI DE or TRANS PO RT cargo on th e s p rayer.
• CO MP L Y WIT H a ll l o ca l, s ta t e, an d federa l to win g req ui rements if y ou w ill be to wing on pub li c ro a d s.
• TURN O FF b oth sp ray er an d vehi cl e, and SET BRAKES or BLOCK WHEE LS before l eavi ng unattend ed.
Chem ical accident proced ures
Im mediate response is necessary in the event of sprayer le aks, bodily chemical conta ct , poiso ning, or spills.
Sp rayer leak If the sp rayer d evelops a l eak, immediately stop sprayin g. Turn off power to the
sprayer and fol low direct ions below, as applicable.
Bodily chemical
contact
Poison ing b y
ingestion or
inhalation
Chemical spills Chemical spills must be quickly con tained and properly clean ed up.
Pers o nal co n ta m i nat i o n can o ccur when ch em i ca l s s pl a s h, sp i l l, or sp ra y
d i rectly onto a pers o n.
1. Immediately follow F irst Aid instructions on chemical label.
General p ro ced ur es can i n cl u d e:
a) Eyes – immediately flush with water.
b) S kin – wash all contaminated skin surfaces with soap and water.
c) C lot hing – remove contam inated clothing. Dispose of heavily
contaminated clothi ng per chemical label i nst ructions.
2. Seek med i cal ad v i ce if in s tru ct ed o n t h e l ab el o r t h e v i ct im ex p eri en ces
symptoms of harmful effects. B ring the chemical label for re fer ence.
In case of poison ing from ingestion or in h alation:
If the victim h as collapsed or is not breathing, call 911. Ot h er wis e:
1. If you are the victim, immediately seek assistance from nearby personnel
because you may becom e incapacitat ed.
2. Immediately follow first aid instructions on chemical label.
3. C all a poison cont rol cent er for further advice. In the U.S., call 1-800-222-1222.
Have th e ch em i cal lab el av ai l ab le fo r referen ce.
R efer t o the ch emi cal label for any s p eci fi c cl ean-u p i n s t r ucti o n s .
Gener al procedures include:
1. Controlling the spill by s toppi ng t he source of the spill.
2. Containing the spill so that it does not spread and get into water sources.
3. C l e a ni ng up the spill immediately.
4. Seeking addition al advice from:
- Chemical manufacturer. S ee ch em i cal l ab el fo r con tact i n fo rm at io n.
- State pesticide r egulatory agency. In the U.S. , call the National Pesticide Info.
Ctr. at 800-858-7378 for assistance in contacting your state’s agency.
6
Page 7

Warning Label Lo cation
WARNING
READ and UNDERSTAND the O wner’s Ma n ual comp letely before using thi s sprayer.
Assemble, test, and use only in accordance with the Owner’s Manual instructions.
READ and FOLLOW chemical label instructions. Pesticides are hazardous chemicals
which must be handled carefully.
KNOW emerge ncy procedures BEFORE handli ng chemicals. Sprayer leaks, bodily
chemical contact, poi soning, and spills require im mediate response.
AVOID inha l ing, ingesting, or coming into conta ct wi th a ny c hemicals.
EXERCISE CAUTION in v ehicle handling. Vehi cl e will be less stable and handle very
differently with filled sprayer attached.
DO NO T TURN ON P OWER to s p r ayer until re ady to s pray in order to a void
uni ntentional spray release.
Impr oper use of the sprayer or handli ng of chemicals c ould result in se r i ous inj ur y
or illness to the ope rator or ne a rby persons/a nimals, or c ould cause damage to the
environment.
7
Page 8
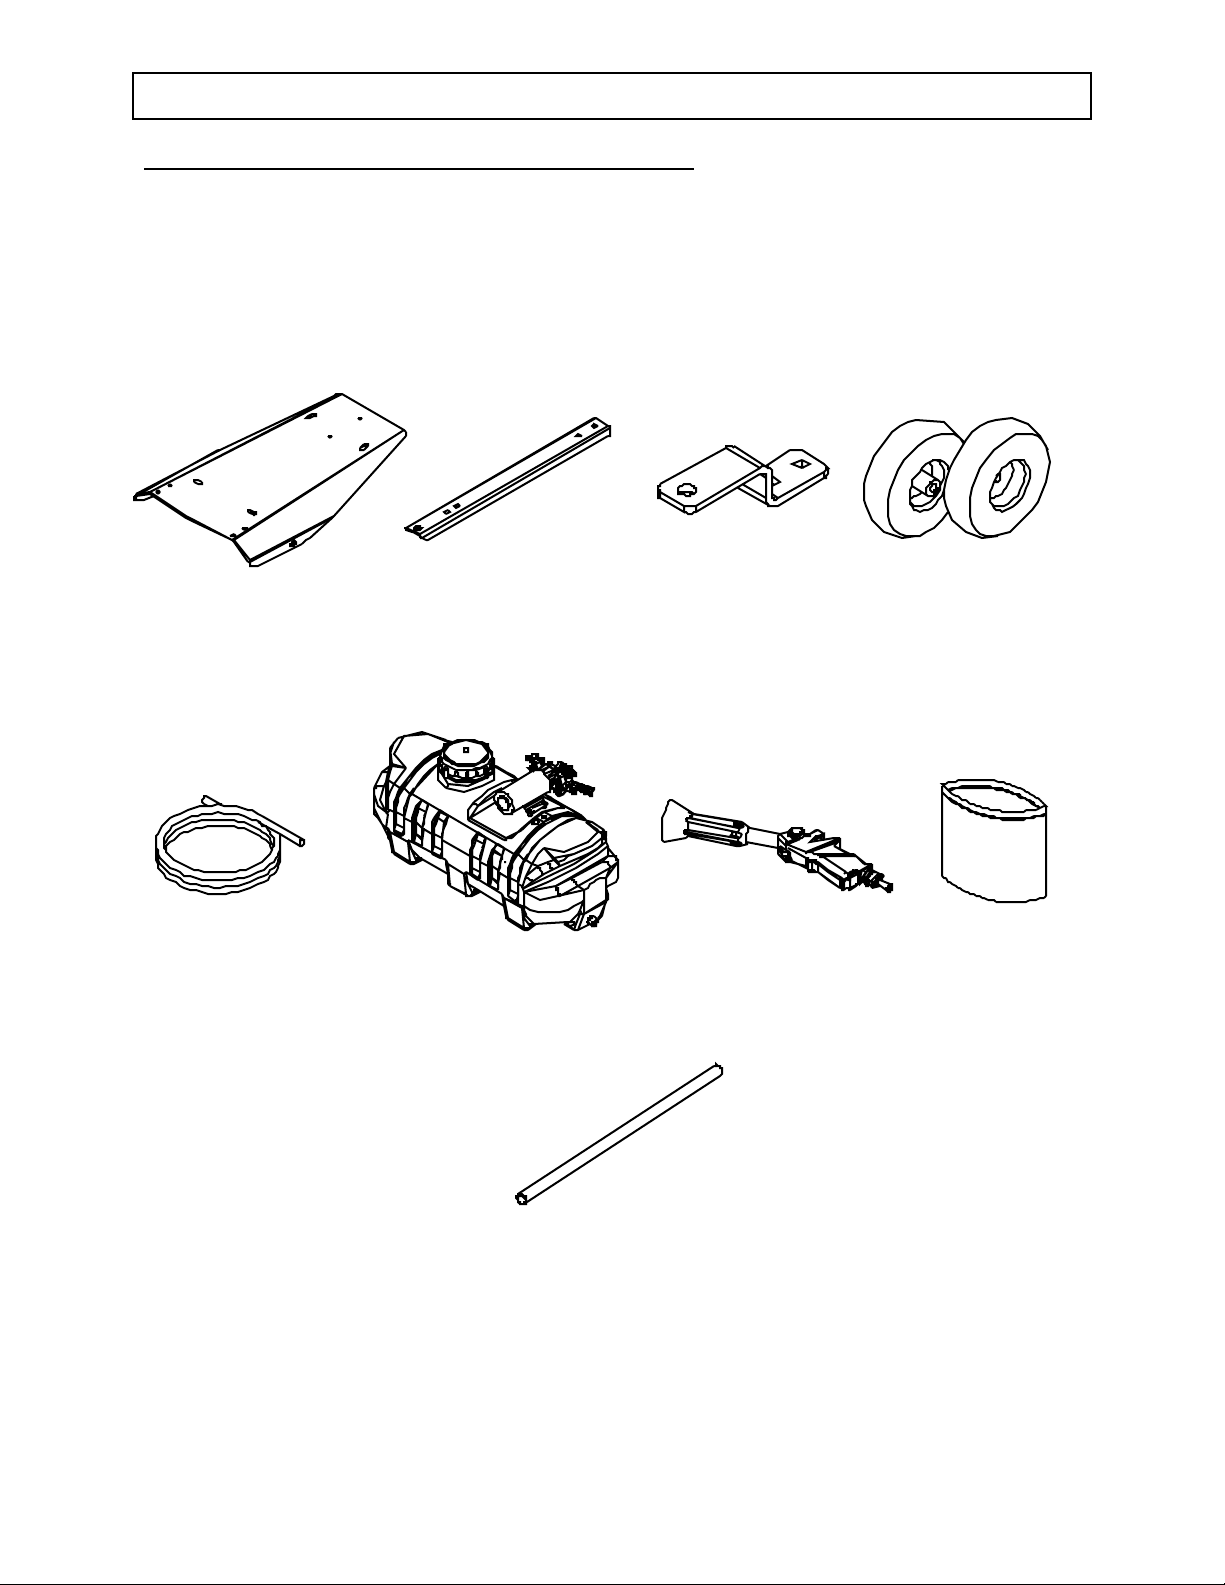
Unpacking
Closely in spect all con tent s in the ship ping carton.
Note that some parts are shipped inside the tank.
• If you have damaged components: Contact the freight company that delivered the unit and
file a claim.
• If you have missing components: Contact NorthStar Customer Service at 1-800-270-0810.
Cart Base
42 0” Gun Ho s e
Tongue Hitch
Spray Gun
Sprayer
Tires
Manual B a g
Axle
8
Page 9
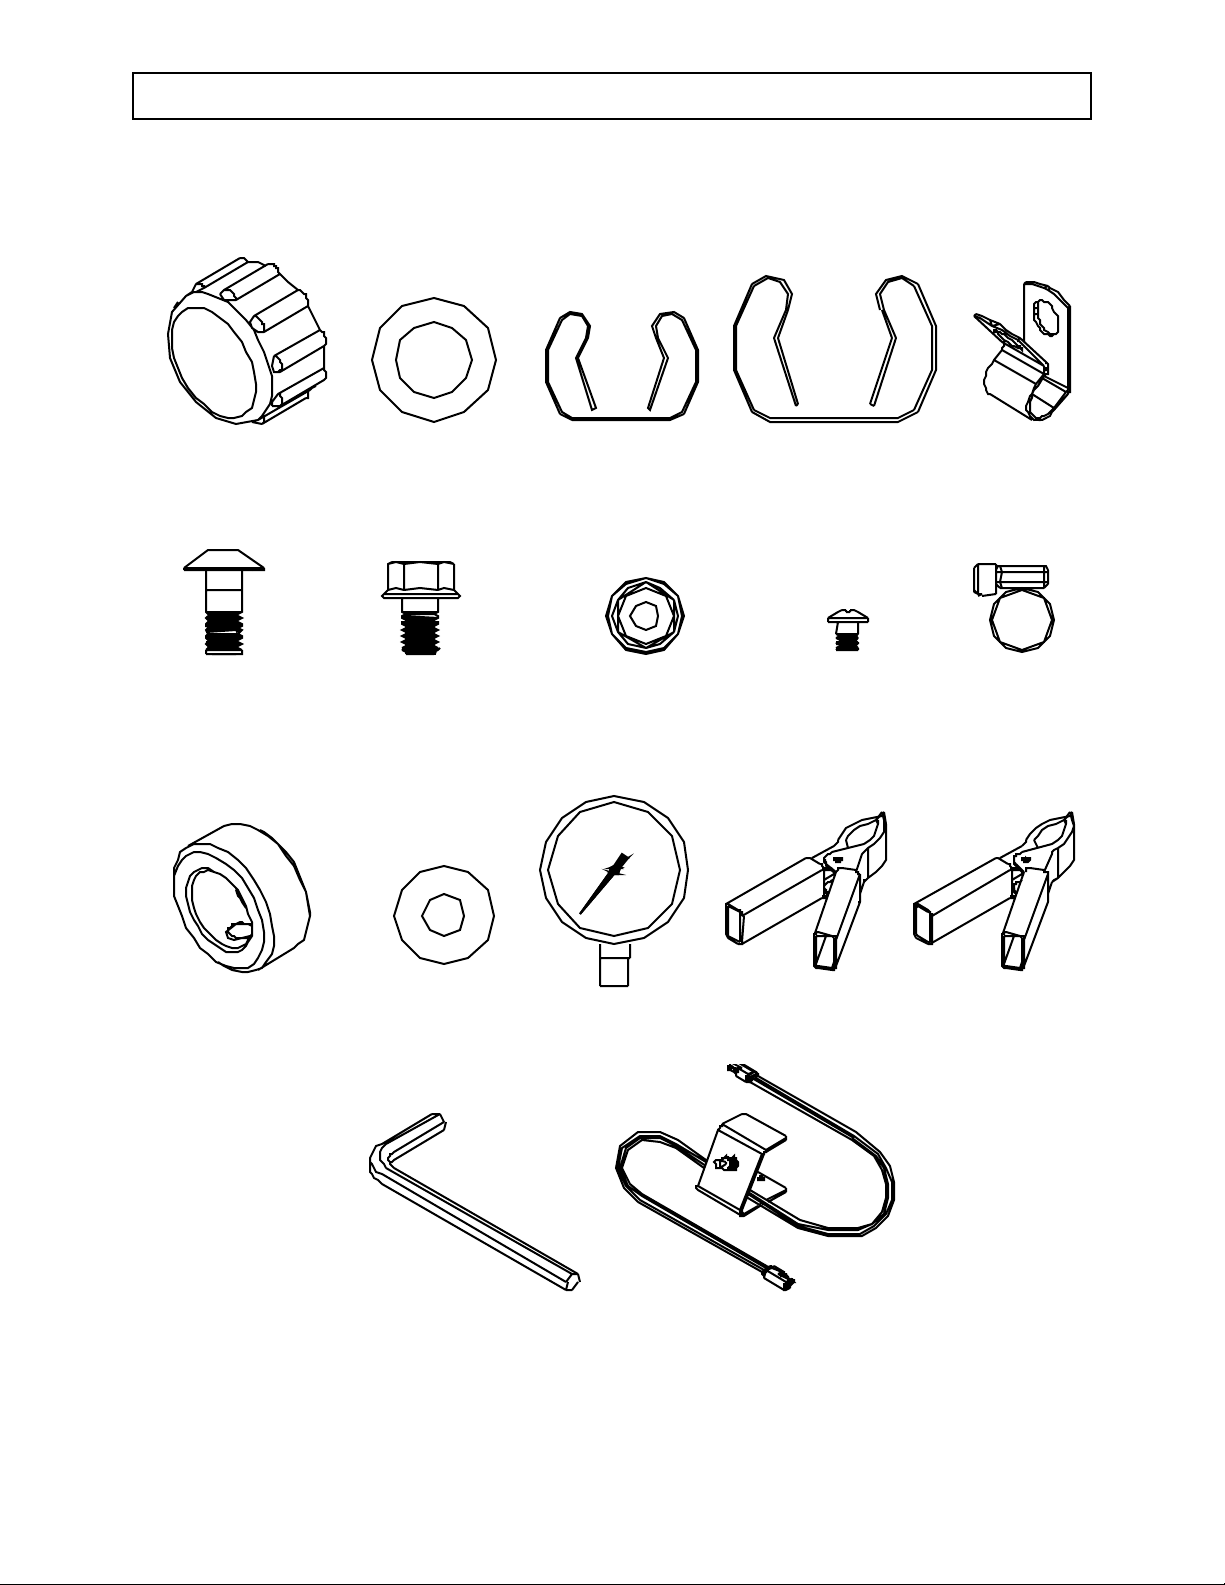
Unpacking the Manual Bag
N
T he following items a re found in the m anual bag.
Drain Cap Rubber Washer Gun Clip Large Gun Clip
5/16 x ¾”
Carr. Bolt (4)
Wheel Retainer (2)
5/16 x ½”
Flange Bolt (5)
5/16 Flat
Washer (4)
5/16 Flange Nut (4)
Screw (2)
02346
Pressure Gauge Positive Battery
Clamp - Red
#10 x ¼”
Hose Guide
Hose Clamp (4)
egative Battery
Clamp - Black
Remote SwitchHex Wrench
9
Page 10
Assembly
e
r
r
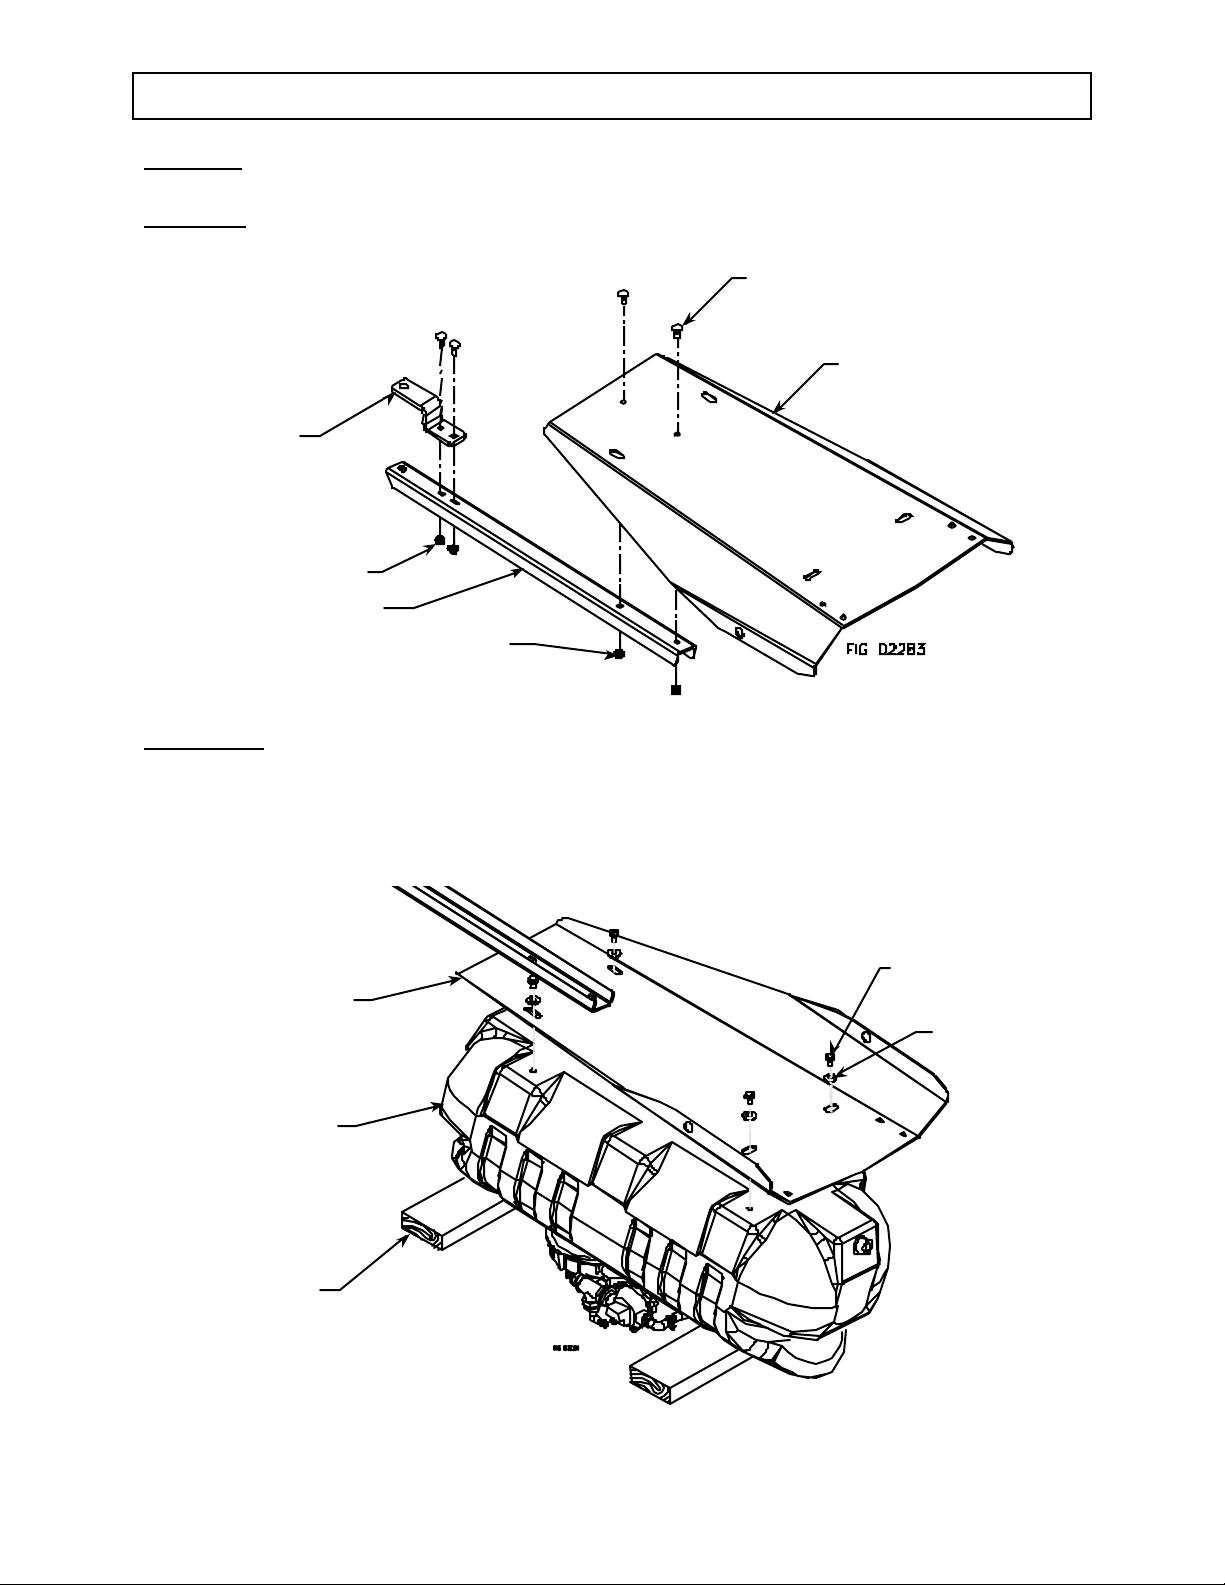
Step One: A ttach the to ngue to the ca rt base
Fasten with (2) 5/16 x ¾” carriage bolts and (2) 5/16 flange nuts. Tighten to 20 ft-lbs.
Step Two: Attach the hitch mount to the tongue
Fasten with (2) 5/16 x ¾” carriage bolts and (2) 5/16 flange nuts. Tighten to 20 ft-lbs.
5/16 x ¾ ” Carriage bolt
Cart base
Hitch
5/16 Fl ange nut
Tongue
5/16 Fl ange nut
Step Three: Attach t he cart base to the sprayer
Note: To protect the pump from damage, place two wood planks or spacers under the sprayer to
keep the pump from resting on the ground.
Using (4) 5/16 flat washers, loosely thread (4) 5/16 x ½” flange bolts into the inserts in the
bottom of the sprayer. Center the sprayer on the cart base and tighten to 10 ft-lbs.
5/16 x ½ ”
Cart bas
Spraye
Wood pl anks
or s p acers
(Not included)
Flange bolt
5/16 Fl at
washe
10
Page 11

Assembly (continued)
e
k
e
e
e
r
Step Fo ur: Att ach wheels to cart base
1. Slide axle into holes on bottom of cart.
2. Slide tires and wheel retainers onto the axle.
3. Tighten wheel retainers with supplied hex wrench.
Cart bas
Wood plan
or s p acer
(Not included)
Axl
Step Fi ve: Attach pres sure g auge
1. Remove and discard the plug in the gauge port.
2. Thread in gauge. Hand tighten, then turn 2 full turns with a wrench.
Step Six: Attach gun hose to sp ray gun and pump
1. Install hose clamps on hose. Follow hose clamp installation instructions below.
2. Using 2 hose clamps, attach one end of the gun hose to the pump hose barb.
3. Using 2 hose clamps, attach the other end of the gun hose to the spray gun.
Wheel
retaine
Tir
Gun hos
Hose cl amps
Spray gun
Hose cl amps
11
02171
Pressure gauge
Plug
Hose Clamp Ins tructions :
i) S lide hose clamp over
the end of the hose.
ii) P ush t he hose onto the
hose barb.
iii) Slide the hose clamp
over t he hose barb.
iv ) Tigh ten th e ho s e clam p
Page 12

Assembly (continued)
#10
ew
Step Sev en: Attach gun clips to tank
Fasten one gun clip and one large gun clip to the sprayer tank with (2) #10 x 1/4” screws.
Step Eight: A ttach d rain cap to ta nk
Press the rubber washer into the drain cap, then thread the drain cap onto the tank.
Gun clip
x ¼” scr
Large gun clip
Rubber washer
01535
Drai n cap
Step N in e: Attach hose gu ide to tan k
1. Route gun hose around sprayer and through hose guide.
2. Attach hose guide to tank with (1) 5/16 x 1/2” flange bolt.
Gun hose
5/16 x ½ ” Bolt
Hose guide
02206
12
Page 13

Assembly (continued)
Step Ten: Attach sp rayer to vehicle
Secure the sprayer to the tow vehicle with a hitch pin (not included, call 800.270.0810 and order
Item# 2501946).
Hitch pin (not included)
Step Ele ven : Con nect po wer cor ds to ve hicle battery
WARNING
Batteries are hazardous because they contain caust ic acid, can emit explosive
gases, and can cause electric shock.
Caution must be exercised when making connections to a battery to avoid sho ck
and contact with the acid, and to prevent any sparking that could lead to an
explosion.
ALWAYS follow the safety instructions and ste ps listed be low in exact sequence
wh en conn ectin g the spr ayer’s remote swit ch to the battery t er minals.
1. Prepar atory safet y Preparator y sa fet y st eps:
• ALWAYS use eye protectio n
• NEVER smoke or work near sparks or other sources of ignition.
• NEVER t o uch both bat tery terminals at the same time or with an y non-
insulated too ls.
• I f batt ery aci d contacts skin or clothing, fl us h i mmediately wit h wate r and
neutralize with baking soda.
13
Page 14

Assembly (continued)
e
e
y
y
2. Identify s prayer’s
power cords
3. Separ ate power
cords
Identify the power cords shipped with the spra yer.
Th e re are three power cords for th e sprayer that you will ev e ntually connect end to
end to p o wer t he sprayer. Locate and identify t hese th r ee cords:
a) The battery power cord and th e pum p power co rd
are s hipped co nnect ed
toge ther to the spra yer .
b) T h e remo te switch po wer cord is packed separately in the Manual Bag.
Batter
po wer cor d
P u m p p o wer co rd
Remote switch
po wer cor d
Disconnect the battery power co rd from the pump power co rd.
Batter
po wer cor d
P u m p p o wer co rd
4. P repare wire ends Prepare the wire ends of the sprayer’s bat tery power cord fo r conne ction to
the vehicle batte ry:
a) Determine the type of end connectors you need to connect to your vehicle’s
battery terminals.
b) Inst al l b a t te ry cl a m ps (su ppl i ed) or e nd conne ct ors of your ch oos i ng o n t he
bare ends of the sprayer’s battery power cord wires.
To install battery clamps:
1. Remove red plastic handle
shield fr om red batt e ry cla mp
Hoop
Prongs
Str i p ½”
and slide onto red wire
2. Strip red batt ery cord wire ½”
3. Insert bare wire under raised h oop
on red battery clamp handle
Red wir
Handl
shield
4. Use a pliers to press hoop down and crimp wire
5. Fold prongs over wire insulation to hold wire in place
6. Push plast ic handle shield back over battery clamp han dle
7. Repeat fo r black wire and black battery clamp.
14
Page 15

Assembly (continued)
d
5. Connect po wer cord
to battery
6. Ve rify con ne ction
7. Connect a ll thr ee
power cord together
Connect the sprayer’s bat te ry power cord to the vehicle bat tery using the
following procedure:
a) Disconnect the vehicle battery ground wire.
b) Conne c t the re m o te switch ’s red b a ttery cla mp or red w ire connec tor to the
positive (+) terminal of the b a ttery.
c) C onnect the re m o te switch ’s black battery clamp or black wire connector to
the negative (-) t ermi nal of the battery.
d) Reconnect the vehicle battery ground wire.
WARNING: Always connect in this sequence to avoid possible shock.
Verify a complete connec t ion has be en made by ch ecking with a DC voltmeter ,
or briefly connecting to the pump power cord and listening for pump act ivation.
Connect the three sprayer power cords toge ther.
a) Check to be su re the pow er sw itch is in the “OFF ” pos i ti on on the rem ote
switch power co r d.
b) Conne c t the on e end of the re mo te switch power c or d to the b atter y power
cord and the other en d to th e pump power co r d.
To Ba ttery
Battery power co r
8. Attach remote s witch
to vehicle
9. Disconnect afte r use
Remote switch
po wer cor d
P u m p p o wer co rd
01981
Usin g supplied velcro pa ds, affix remote switch to vehicle in a po sit ion that is
ea sily reache d from the driver’s seat .
AFTER EACH USE, disconnect power to the sprayer by disc onnecting the
sprayer’s rem ote swit ch power co rd from the battery power cord
– t he battery
po wer cord may remain connected to the b a ttery.
NOTE: It is impo rt ant to disconnect power t o the sprayer when not i n use for
safety reasons. ALWAYS verify that the power has been disconnected or the
remote switc h is in the OFF po sition before adding chemicals or servicing .
15
Page 16

Assembly (continued)
10. To disconnect
permanently
When it is neces sary to dis conne ct the sprayer’s bat tery po wer cord from t he
batter y, use the following proc ed ur e:
1. Disconnect sprayer’s remote switch power cord from the battery power cord
2. Disconnect t he battery power cord from the vehicle battery as follows:
a) Disconnect vehicle battery ground wire.
b) Dis co nnect t he bat t ery cord’s black battery c lamp or bl ac k wire
connector fr om th e negative(-) terminal of t he ve hi cl e ba ttery.
c) Discon n ect the battery cor d’s red battery clamp or red wire
connector fr om th e positive(+) terminal of the vehi cle b attery .
d) Reconnect t he vehicle battery ground wire.
WARNING: Always connect in this sequence to avoid possible shock.
Step Twelve: Check a nd test complet ed assembly.
WARNING
C heck and test completed as s e mbly
Ser ious injury c ould r e sult from chemical leaks if sprayer is improperly
as s embled or the des ign of the s prayer i s modi fi ed.
Follow the steps belo w to ensure the sp rayer is prop erly a ssem bled. Never
modify th e spra yer de sign.
.
1. Check assemb ly Chec k assembly to assur e the sprayer is prop erly assembled and in safe
worki ng conditi on :
a) Check th at th e gun clip screws are tight, hose clamps are secure, an d tan k
s tra ps are prope rl y fastene d .
b) While it is unlikely t hat factory as s embled c omponents bec ome loos e, they
should also be checked to m ake sur e th ey are tight.
2. Test with water Test the sy stem for leak s with wate r:
1) First read the instr uct ions in th is Owner’s Manual for Op eration of the
sprayer
2) Fill the ta nk with wate r per th e instr uction s in this manual.
Impo rtant: The sp ra y e r shou ld be OFF when you fill the tank .
3) Ch eck fo r leaks througho ut the system by operating th e spray er per th e
instr uctions in th is manual:
a) Turn th e sprayer ON. (See Operat io n Inst ructions)
b) Op er ate the spray gun. ( See Op erat ion Inst r uction s)
c) Adjust th e pressur e through it s full range – to m axim um and back. (See
Ope ration Ins tru ctio ns )
4) If a leak is detected, fix the leak and re-test the system with water.
16
Page 17

Machine Components
1.) Remot e Switch. Th e remote switch allows the operato r to safely turn ON/OFF t h e spray er .
2.) Hitch Mount. The hi tc h mou nt co nne c ts t he ve hic l e hi tc h to the s pra y e r.
3.) P um p Power Co rd. The pump power cord connects the remote switch to the pump.
4.) Gun Hos e. The 420” gu n hose transfers chemic al fr om the pump to the spray g u n.
5.) Spr ayer Ta n k. The s p ra yer tank hold s the che mi c al .
6.) Fi ll Cap. The fill cap has a ball check to allow a ir to enter the tank as the chemical is dispen sed, but
does not allow chemical to escape the tank.
7.) Sprayer Pump. T he spray er pump makes the chemical flow to the spray gun an d the nozzle.
8.) Agitat ion Hos e. T he agitation hose combines t h e bypa s s and primi ng hos e to send th e l i quid ba ck to
th e tan k to ke ep the c hemical mi xed.
9.) Pressure Gauge. The gauge is an indicator of th e pressure in the system.
10.) Pre ssure Adjust m e n t Kno b . Turn t he pres su re ad j u s tmen t k nob to regu l ate the sp ray e r’s pres s u re.
11.) P r iming Hose. The pri ming h ose tra nsfers c hemi cals fr om the pump bac k to the tan k w hile priming.
12.) Suc tion Tube. T he suction tube is the inlet line for th e pump. The suction tube has a suction strain er
to pre vent debris from entering the pump.
13.) P r iming Valve. The pr iming valv e performs three functions. First, it allows the pump to prime itself
wh en open. Second, it helps keep the chemical well circulat ed when the valve is left o pen. Third, it
will r e lie ve th e system pressure by opening t he valve.
14.) Bypass Hose. Th e bypa ss hose transfers liquid from pum p t o tank wh en t he system is up t o pressur e.
15.) Hos e Wrap . Th e built-in ho se wrap prov ides a sto rage locat ion for the gun hose on the ta nk.
16.) Gun Clips. Use the gun clips t o store t he spray gun.
17.) Tires. The tires have a wide tread to p revent turf damage.
18.) Spray Gun. The spray gun has three spraying mo des; stream, cone, fog (see operat ion instruction s).
19.) Batte ry Po wer Cord. The batt ery power cord con nects the veh icle battery to the remote switch. This
cord rem ain s co nnected t o the batt ery wh en the sprayer is not in use.
20.) Batte ry Clamps. Use th e batt ery clam p s to con nect the battery power cord to the batt ery.
17
Page 18

Operation – Impo rtant Safety Information
No w th at you hav e complet ed and test ed your assembly, th er e is some im portant safety and health
information you need to know with regard t o handling and spraying chemicals, as well as vehicle
ha ndling with the sprayer attached.
WARNING
Carefully read and make sure you underst an d th e fo llowing safety info rmation before
using t he s prayer.
General Ch emical Sa fety:
WARNING
P esticides are hazardous chemicals.
Heed the war nings below a nd follow a ll instructio ns carefully .
Im prop er h a ndling o f chemicals ca n r e sult in serious injury or illness,
or cause damage to the enviro nme n t.
• C h e mical la bel. ALWAYS READ a nd FOLLOW all chemical label in structions.
• Li censing/re gulation. Refer to any app licable licensing restrictions or st ate/federal regulations
with regard to the ap p licatio n of th e particular chemical you plan to use.
• Emergency proce du res. Before h andlin g chemicals, carefully review the “Chemical Accident
P rocedures” listed lat er in this sect ion, as well as the “Statement of Practical Treatm ent ” on the
chem ical label.
• Inhalation/contact. ALWAYS tak e precaut ions to avoid inhaling or comin g into con tact with
t he chemical.
• P er s onal protective equipment. ALW AYS wear prot ective clothing, ey e protection, and
ch emical-resistant gloves when filling, using and cleaning the sprayer. Wear addit iona l
prot ective gear (such as facemask or ap r on) as r ecomm ended on the chemical label.
• Children/pets. Pest icides can be especially toxic to children and animals. ALWAYS exercise
extra caution around children. Keep sp r ayer and all spr ay mater ials away from children and
animals.
• Ventilation. ALWAYS ensure t here is adequate vent ilation when mixing, pouring, or spraying.
• Flammables. NEVE R use an y flammable chemicals in the spray er.
• Corrosives. DO NOT use corrosive chemicals in the spr ayer. They can weaken the sprayer an d
its parts, resulting in leaks. Check with th e chemical manufact urer to ensure chem ical is
co mpat ible with all components of the spra yer.
• C h e mical int erac tio n. ALW AYS flush the spray er before switching chemicals. Different
chem icals may interact dangerously with each other.
• Chemical storage. ALWAYS store pest icides in a pro p er ly labeled contain er and in a secure
location per the manufacturer’s reco mmendat ions.
• Health monitor ing. Monit or the health of operators who are frequently exposed to pest icides, as
recommended by the ch em ical label or lo cal/federal regulatio n s.
18
Page 19

Operation – Impo rtant Safety Information (co ntinued)
C hemica l Applicat ion Safe ty:
WARNING
Ca ution mus t be used wh en spray i ng che micals to avoid unsa fe expos ure to
humans and the environment
Heed the war nings below a nd follow a ll instructio ns carefully .
• Sp rayer prep. ALWAYS inspect and prepare the sprayer before use accordin g to th e
directions provided in this ma nual.
• Kee p spraye r off. Do not t urn on power to the sprayer until ready t o spray in order to avoid
unin tentional spray relea se.
• Overhead sp rayi ng or f oggi ng. We a r a ddition a l per sona l protective equipm ent if yo u will be
spr aying ov erhead or fogging. You will be exposed to much mor e pestic ide fa llout in these
applicati ons . Wear c hemical resi stan t head and neck pr o tec tion, full face mask or half face
mas k with sealed goggl es, and consi der using a dust/mist res pir ator.
• Wind sp eed. NE VER spray wh en wind speed exceeds 4 MP H in order to minimize spr ay
drift.
• Clear are a/post. A LWAYS kee p the work area clear of pe ople a nd pe ts. POS T warni ng
notices to r estrict access by th e public for th e perio d reco mmended on chemical label.
• Op erator age. You mu st be 16 years of age or older to o perate this sp rayer. Pes ticides are
espe cia lly toxic to children.
.
B efore Spr ay i ng
D uring Sp r ayi n g
• Overapplication. DO NOT overapply pesticide. Apply at a rat e recommended by chemical
manufacturer. Excess pesticide can be dangerous to humans, damage desirable plants, and
contaminate soil and water sources.
• Never point gun. NEVER point the spray gun at people or animals.
• Use firm grip. ALW AYS hold t he spray gun with a firm grip when spraying at higher
pr essures i n orde r t o prevent gun f rom wh ipping. K ee p good footing and balance at all times .
• Children/pets. ALWAYS exer cise extr a caution when spraying near areas accessible to
children and pets.
• Eating/smoking. DO NOT eat , drink, smoke, rub your eyes, or touch any part of your bare
skin while handling chemicals and spra ying.
• Heat/flames. DO NOT spray near open flames or sources of heat.
• Spills. ALWAYS clean up spills immediat ely p er instr uction s on the chem ic a l labe l.
• Unattended. ALWAYS turn off vehicle and set brake or block wh eels, turn off p ower to
sprayer, and relieve syst em pressure before leav ing sprayer unatten ded.
• Troublesh ooting. ALWAYS refer to the safet y instruct ions in t he Troubleshooting Section
before attemptin g any repairs.
A fter Spr a yi ng
• Clean s prayer. ALWAYS clean th e sp r ayer im m ediately after use according to th e directions
provided in this manual.
• Decon taminate . ALWAYS decontam inate y o urself immediately after yo u are f in ished
spraying an d handling chemicals. Wash all expo sed areas of th e body with soap and water
and remove and launde r clot hing.
• Chem ical di sposal/stora ge. AL WAYS dispose of or st ore r emaining chemicals properly as
recommended on the chem ical label.
19
Page 20

Operation – Impo rtant Safety Information (co ntinued)
Towing Safety:
WARNING
Th e filled spr ayer is very heavy. It c a n crush and cause serious
injury if it rolls out of control or tips over.
Follow the in structions below for safely towing the sprayer.
• Read v ehi cl e in stru ct i o ns . Review towing safety instructions in your t owing vehicle manual.
• Driver age. You must be 16 years of age or older to operat e the towing vehicl e with the sprayer at tached.
• S ecurel y a tta ched . M ake sure sprayer is securely atta ched to the towing vehicle befor e towing.
• Tires. Make sure sprayer ti res are fully i nflated and in good repair before towing. Do not over inflate.
Serious injury could occur if ti re explodes. Keep wheel and lug nuts ti ghtened to speci fied torque.
• Vehicle handling. Be aware that vehicle handling will be affe cted when towing the filled sprayer.
Exercise caution t o avoid loss of control or sprayer overturning:
o Keep s peed to a mini mum s o you can maintain control at all times. Reduce speed prior to turns.
o Al l o w fo r wid er turns and for more d i sta n ce t o sto p .
o Avoid an y sud den steering maneuvers, st arts, or stops t hat could create sway.
• Roug h o r slo ped t errain. Slow down and exercise extra caution on rough or sloped terrai n in order to
reduc e risk of rollover. Pi ck the most level route possible when transporting across fields. Drive up and
down slopes that cannot be avoided, rather than across. Use a vehicle equipped wit h a Rol l Over
Protection System (ROP S ) if you will be operating on non-level t errain.
• Added length. Be aware of the added l ength o f t he sprayer.
• Reduced visib ility. Be aware that visibility may be reduced with sprayer attached. Be extra cautious
when backing up or turning.
• Ride / transport. Never ride or transport cargo on t he sprayer.
• Under the influence. Never tow or operate this sprayer whil e under the influenc e o f alcohol, drugs, or
medication
• On public r o ads. If towing on a public road, make sure to comply with all local, state, and federal towing
requi rem ents. It is the sole respons ibility of the purchaser to obt ain licensing, trailer lights, safety chains or
sign ag e as n eed ed t o co m p l y .
• Unattended. Turn off both the sprayer and the towing vehi cle, and set the brake or bl ock the wheels,
before leavi ng the sprayer unattended.
Chem ical accident proced ures:
WARNING
Befo re you fill the sprayer, rev ie w t he following inf orm at ion with rega r d
t o handling accidents.
Chemical spills, sprayer le aks, per sonal cont amin at ion, and poisoning are
accident situat ions which you may encounter . A ll req u ir e an immediate
response – See instruct ions below.
Sp rayer leak In th e eve nt th at the sp rayer develops a leak whil e spraying chemi cals, you
must immediately stop spra ying.
Turn off po wer to the sprayer and fo llow the directions below, as
app licable.
20
Page 21

Operation – Impo rtant Safety Information (co ntinued)
Bodily chemical
conta ct
Poisoning by
ingestion or
inhalation
Chemical spills Chemical spills must be quickly containe d and pro pe rly cleaned up.
Perso nal c o ntaminat ion ca n occ ur when c hem ica ls sp las h, sp ill, or spray
d i re ctly onto a person.
1. Follow the emer gen cy first aid instruction s on the chemical label listed in the
“F i r st Aid ” or “Sta teme nts o f P r a ctic a l Treatment” s ection.
Gen eral p rocedures include:
a) Eyes – immediat ely flush with water or follow other directions as specified
on the chem ical label.
b) Sk in – imm ediately wash all contaminated skin surfaces with soap
and wat er , or follow dir ections as specif ied on th e chemical label.
c) Clothing – remove contaminated clothing immediately. Dispose of heavily
contaminated clot hing per the instructions o n the chem ical label for safe
chem ical/cont ainer disposal.
2. Seek medical adv ice if inst r ucted on th e label, or if th e victim ex periences
sym pto ms of h a rmf ul ef f ects such as bur nin g, swe lling, nausea, c hest pain,
dif f iculty breathin g, dizziness or conf usion. Wh en seeking medical advice, be
sure t o bring the che mical product label.
In case o f poisoning from inges tion or inhalation :
IF THE VICTIM HAS COLL APSE D OR IS NOT BREATHING, CALL 911.
Othe rwise:
1. If you are the victim, immediately seek assistance from near by person n el
because you may beco m e incapacit ated.
2. Follow the emergency f irst aid instructio ns o n the chem ical label in the “First
A i d” or “Sta teme nt of Pra cti c a l T r e atment” section.
3. Call a poison control center for further advice. In the U.S., call 1-800-222-
1222 to be automa ticall y linked to the ne are st certified poison control
cen ter. Have the chem ical label available f o r refer ence.
Refer to th e chemical label fo r an y specific clean-up instructions with regard t o
the chemical spilled.
Gen eral p rocedures include:
1. Control the spill by stopp ing the source of the sp ill. If the source of the spill
is a contain er leak, place the leaking cont ainer in a larger, watertight
co ntainer. Keep unprote ct ed people away from the spill site .
2. Contain th e spill so that it does not spre a d and ge t into wat er source s. Use a
shovel or other tool to make a dike around the spill with soil, so d, or abso rbent
material.
3. C l e an up the spill imme diate ly - - Absorbent materials lik e ground corncobs
or p et litte r should be sprea d on the spill area to soak up the p e stic ide. The
contaminated mat er ial sho uld th en shoveled into a leakproof container. Do
not flush the spill area with water until you receive advice as dir ected belo w.
4. Seek additional advice f rom th e chemical m anuf acturer an d your st ate’s
pest icide regulatory agency regarding decont aminatio n of the spill sit e:
- C hemic al ma nufactur e r . The che mical label provid es con tac t
info rmati on for the chemical ma nufa c tu rer .
- State pesticide regulatory agency. In the U. S., call the Nation a l Pesticide
I nformation C enter at 1- 800-858-7378 for assistanc e in determini ng
how to cont act your stat e’s pesticide regulatory agency.
21
Page 22

Operation – Preparing the Sprayer for Each Use
r
If the spray er has been used previously, it must be pr ep ared BEFORE EACH SUBSEQUENT USE.
WARNING
Read inst r uctions below car ef ully fo r inspectin g and preparin g the sp rayer.
Dama ged or clogged e quipment c ould r esul t in leaks or unc ont r olled spray.
Leaks co uld r esult in injur y to the operator o r bystan ders fro m chemical ex posur e,
or cause damage to the enviro nme n t.
Important safety rules:
• Pow er off . Make sure all power is OFF befo r e cleaning, in specting, o r servicing the spray er.
• Guards / shields. Make sure all guards and shields ar e replaced after servicing the sprayer.
• Repl acemen t parts. I f a part needs replacement, only use parts that meet th e manufacturer’s
specifications. Replacement parts that do not meet specifications may result in a safety hazard
or po or opera ti o n o f th e s prayer .
1. Ensure sprayer
attached
2. Ensure tan k
em pty
3. Clean suct ion
strainer
Ensure the spr ay e r i s se curel y a ttached to th e towing veh i cle .
Ensure the sprayer has bee n thor oughl y flushed and drained of all residual
chemical from prio r uses .
Clean the suction strai ner of any chemical resi due.
It is important to clean the suct ion st r ainer before each use to ensure it is not
clogged and to prevent r esi dual chemical from cont amin ating sprayer cont ent s.
IMPORTANT: Th e strain er must be accessed by reaching into the tank, so th e
tank must be em pty t o avoid immersing your hand in chemicals.
a) Open fill ca p on top of tank.
b) USI NG RUBBER GLOVES, reach into the tank and pull the suctio n
strainer o f f t he en d of the suction tube. (See figure belo w.)
c) Run the suction strainer under fresh water to remove debris.
d) Replace the suct ion st r ainer o nto the end of the suctio n tube.
Fill cap
),*
Suction straine
(Inside t ank)
4. Inspe ct &
repair
Insp ect and test the sprayer thoroughly:
a) Inspect hoses for exposed mesh and holes. Replace all worn or damaged hoses.
b) I n spect tank an d fittings for cr acks and leaks. Replace all damaged fittin gs with
original NorthStar parts.
c) Che ck t o be sure all other nuts, bolts, a nd scre ws a re tight.
d) Check wheels and tires. Make sure wheel lugs are tight and t ires ar e inflated.
e) Pa rtially fill tank with plain water and spray to test fo r leaks. Repair as needed.
IMPORT AN T: Afte r any repai r work has bee n done, ALWAYS t e st for leaks
with water one final time before using.
22
Page 23

Operation – Using the Sprayer
Step One: A ssess wind conditions a nd clear work a rea.
Before you decide t o spray, you must determine whether wind conditions are suitable. You must
also rest r ict access to the work area to en sure the safety of byst anders.
WARNING
Do not spr ay if wind sp eeds are gr eater t h an 4 MPH or if th ere are
bystanders in t he intended spray area.
1. Assess wind s peed Assess weather con ditions to ensure that it i s not too windy t o spray.
DO NOT SPR AY if wind speeds are gre ater than 4 MPH.
Visible indication of wind speed:
I f l eav es ar e in const ant mot ion or there is an y branch movement, DO NOT
spray because th e win d is too st rong.
2. Clear work a rea Clea r the work area of all bystan ders an d pets.
Restrict access by th e public for the period recommen ded on ch emical label.
23
Page 24

Operation - Using the Sprayer (continued)
Step Two: Fill the sprayer .
ALWAYS wear personal protective equip m ent as directed on the
ch emical labe l when handling pesticides.
Long pants and sleeves, chemical resistant gloves, an d eye prot ection are
strongl y recommende d. A dditi onal protectiv e ge ar ma y be requir ed
d epe nd i ng on the pa r ti cu l a r pestic i d e.
Fill th e sp rayer u sing the f ollowing steps:
WARNING
1. Review safety
inf ormation
2. C hoose safe
mixing/
loading area
3. W ear per so n al
prot ect ive
equipment
4. Turn off
sprayer and
vehicle
5. Remove fill
cap
R e view the “ O pe ration – Important Safety Information” re l ated to Gen era l
Chemical Safety and Chem ical Accident Procedures provided in this manual.
Choose a safe pesticide mixing and loading area.
- Choose an outdoor, well-vent ilated area away from unprotect ed people, animals,
food, and other items t hat mig h t b eco me contami n ated.
Wear personal pr ote ctive equipme nt as directed on the chemical label.
- Note that addit ional equipment may be specified for mixing and loadin g activities.
Turn OFF power to the s prayer before filling.
- The v ehicle should also be off , with brake set or wheels blo cked to prevent
unin tended movem ent.
Remove the fill cap located on top of the spraye r.
Fill cap
),*
6. Ensure tank
flushed
E nsure tank is f lushed of all c hemic als fr om prior uses.
- Chemicals can int er act dangerously when mixed, an d residue chem icals are also a
heal th hazard .
24
Page 25

Operation - Using the Sprayer (continued)
p
7. C hec k d ra i n
Be fore filling tank, ensure drain ca p is secu rely tightened.
cap
8. Fill tank Add pes ticide to tank through fill cap:
a) Confirm the chemical/water dilution ratio s specified on the chemical label.
b) Deter mine chemical and water volumes needed for the p lanned app lication,
taking into consideration that maximum tank capacity is 16 gallons.
Note: Only purchase and mix as much chem ical as you need for the
planned application in order to minim ize chemical overapplication and
the need for storing unused chemicals.
c) Add chemical to the ta nk through the fill cap.
If the chemical is not pre-mixe d, add water and pesticide conc entrate in the
order prescribed on the label.
Drai n ca
9. Ensure
chemical
mixed
10. Repl ace f i l l
cap
CHEMI CAL
),*
E nsur e c hemical is thoroughly mixed in tank.
- Sti rring device s hould be made of metal or plas tic, non-chemical absorbing
mat er ial, and then p r operly cleaned and stored after use.
Re place fill cap and tighten securely.
25
Page 26

Operation - Using the Sprayer (continued)
valve lever
e
Step Three: Operat e the sp rayer.
ALWAYS wear personal protective equip m ent as directed on the
chem ical label when spraying.
Long pants and sleeves, chemical-r esist ant gloves, and eye p rotection are
strongl y recommende d. A dditi onal protectiv e ge ar ma y be requir ed
d epe nd i ng on the pa r ti cu l a r pestic i d e.
WARNING
1. Review safety
inf ormation
2. Wear personal
prot ect ive
equipment
R e view the “ O pe ration – Important Safety Information” related to Chemical
Application Safet y and ATV Vehicle Handling Safety provided in th is manual.
Wear personal pr ote ctive equipme nt as directed on the chemical label.
WARNING: Wear addition al per sonal protective equipment if you will be
spr aying ov erhead or fogging. You will be exposed to much mor e pestic ide
fallout in these applicat ions. Wear chemical resistant head and neck prot ection,
full f ace m ask or half face m ask with sealed goggles, and consider using a
dust/mist r espi rator.
3. Open p r im in g
T urn priming va lve lever so that it is in-line w ith t he pr iming hose.
valve
Priming
Priming
hos
4. Turn on po wer Turn on the po wer to the sprayer.
1. Verify the batt ery p ower cord is connected to the remot e switch power cord
and that th e remote switch power cord is connected to the pump power cord.
2. Tur n the remote switch to the “O N ” p osition.
01542
5. Ensure flow
through priming
hose
Note: The pum p will start a utomatically wh en power is turn ed on . Running
the pum p dry will void all warranties.
Once chemical is flo wing through t he priming ho se, cl ose the priming valve.
Primi ng valve
01542
26
Page 27

Operation - Using the Sprayer (continued)
6. Operate sp r ay
gun (as needed
for applic ation)
Proper Operation of the Spray Gun
Cone and St ream spray pattern instructions
1. Pull the ch oke back. Squeeze the t r igger to begin sprayin g.
2. The spray patt ern is determined by how far the trigger is pulled back. The
spray begins at a wide cone and progressively becomes a straight stream
when the trigger is pulled all the way back .
3. Once the desired spray p att ern is achieved, press the trigger lock to hold the
position of the trigger. To release t he trigger lock, pull the trigger back until
t he lock disengages.
4. Wh en the gun is not in use, act ivate the safety lock by releasin g the trigger
an d pressing the safety lock pin. This will lock the tr igger in the off po sition
t o prevent accidental spraying.
Additi onal orifice and
sp are O -ring s tor age
Choke pulled back
Trigger
T rigger lock
Safety lock
S wiv el co n necti o n
Fog and Stream spray patt er n instructions
1. Push the choke all the way forward.
2. Squeeze the trigger to begin spraying. Set the trigger to a wide cone spray
patt ern. This will ac hiev e the be st atomize d mist.
3. Pull the trigger a ll the way back to change to a str a ight stream.
Choke pushed forw ard
Note: Operating pr e ssure o f the pump will v a r y dep e nding on the orifice size
used. 110 psi is achieved with the small orifice. The medium and large orifices
achieve 50 and 2 ps i , re s pectively. (A dditi onal ori fi ce s are located under the
yel l ow pl u g on the t op of t he gun.)
IMPORTANT: A LWAYS hold t he spra y gun with a fi rm grip when s praying
at hi gher pressure s in orde r t o prevent gun from wh ipp ing. Keep good footing
and balan ce at all times.
Note: It is not unu sual for the op erator to b e exposed to chem ical d rips while
adjusting the spray pattern – gloves should be chem ical resistant.
27
Page 28

Operation - Using the Sprayer (continued)
7 . Adjust p ressure
and ag it ation as
needed
-Rotate the pre ssure adjustment knob until the spr ayer is runnin g at the
desired press ure.
-Open primi ng valve to circulate flo w b ack to the tank a nd cre ate ag itatio n.
Open until desired amount of agi tation is achieved.
Pressure adjustm ent knob
Primi ng valve
0154 2
8. Le aving
unattended
If the sprayer must b e left unattended at any time :
a) Disco nn ect po wer to the sprayer.
b) R elieve system pressure by depres s i ng the gun tr igge r.
c) Turn off th e vehicle. Set brak e or block the wheels.
9. D iscontinue use if
clogged or
inope rati ve
If the sprayer becomes clogged or inoperative during u s e, discontinue use
immediately.
- DO N OT attempt to service while c hemicals ar e in the spray er and po wer is
connected.
- Return to service area to review inst ructions for troubleshooting befo re
attempting to ser vice.
Note: A reserve, clean container capabl e of holding at least 16 gallons should be kept for use w hen the sprayer
tank needs to be emptied temporari ly for repai rs. It is advis able to pur chase a reserve t ank suitabl e for
pesticide storage from Northern T ool and Equi pment for use in these circumstances. T he container
should be properly label ed as to its contents if it is used.
28
Page 29

Operation - Using the Sprayer (continued)
Step Fo ur: C lean sprayer and decontaminate af ter use.
W hen done using the sprayer, it is important to clean the spray er and decontaminate yourself . Do
not store the sprayer with chem icals in the tank, as it is unsafe and could also result in damage to the
equipment .
WARNING
Clean-up and decontamination procedures must be fo llowed after each use.
Improper equipm ent clean- up and disposal of chemicals can r esult in dangerous
chem ical exposure to h umans and the enviro nment, as well as equipment damage.
Per so nal deco ntami nation is required after spraying to minimi ze un s afe exposure
to chemicals and pot entia l illness.
1. D rain tank If th e re is exce ss pes ticide left in the t a nk, dr a in the ta n k:
a) Disconnect power to t he sprayer and relieve system pressure by depressing the
gun trigger.
b) Find a suitable container in which to dr ain the unused pesticide. P lace it under
the tank dra in hole.
c) While wea ri ng rubber gloves , ey e prot ection, and all ot her re quir ed pe rsonal
protective equipment, remove the drain cap and allow pest icide to drain into
container.
d) When tan k sto ps draining, r eplace drain cap. T ighten securely.
2. Unused chemi cal Prope rly store or dis pose of u nused chemi cal:
a) If t he unused pesticide is to be st ored for f uture use:
Store all unused pest icide in it s o r iginal, o r a suitably m arked, cont ain er in a
secure lo cation out of th e reach o f childr en & animals.
b) If r emainin g p e stic ide is to be dispo sed:
P roperly dispose of the remain ing ch em ical and its container p er the chem ical
man ufacturer’s recomm endation an d accor ding to local hazardo us waste
dispos al regulations.
3. Fl u s h sp rayer
4. Decon taminate
& la unde r
Flush the spraye r per the chemical manufacturer’s recommendati ons. A
general pr oce dure is as fol lo ws:
a) Add fresh water to the tank.
b) Reco nnect power to the spray er.
c) Operate the spray gun and discharge all rinse water on to an area that can
accept dilut e pest icide application.
d) Add 5 gallo ns of the chem ical m anuf acturer’ s recomm en ded cleaning
solutio n . Operat e t he spray gun , collecting t he d ischarg ed solutio n if
recommended by the manuf acturer.
e) After flushing, disconnect power to the sprayer and be sure all system pressure
is relieved by squeezing the gun trigger .
f) Dispo se of cleaning solutio n dischar ge as recommended by the manufacturer
of the solution.
Decon taminate yourself after you are fini shed handling chemi cals:
a) Remove all clothing worn during spraying and chemical handling.
b) Wash all exposed parts of th e bo dy with so ap and wat er.
c) Launder clothing separately from other wash.
29
Page 30

Storage
Pr ep are the spr ayer for end- of-season storage by running RV ant ifreeze through the system.
Th is will keep int e rna l parts lubricated, protect again st corrosion, and keep the unit from freezing.
CAU TION
Th e sprayer will be damaged if it freezes.
P rotect the spray er from f r eezing dur in g storage by following the instruct ions
below.
Prep aring for storage:
1. Add a ntifreeze
2. Spr a y br i e fl y
Removin g from storage:
1. Drain
2. Flush with
water
3. Disposal
Pour 1 gallon of RV antifr e eze into the tank .
Note: RV an tifreeze is non-toxic and biodegradable and genera lly safer for
the enviro nment than automotiv e an tifreeze.
Turn on th e pump motor and squeeze the gun trigger briefly until fluid
sprays.
Drain the antifr eeze left in the tank thro ugh the tan k dr ain hole into a
suitable co nt ainer.
Fill the tank with fresh water an d r un through th e system . Operate the
spray gun unt il the s ystem i s completely fl us hed. Be s ure to set up
containers to cap tu re the antif reeze flus h w ater.
Dispose of the antifr eeze and f lush wat er pr operly.
30
Page 31

Troubleshooting
WARNING
Befo re tr ouble sh oot ing or attempting to se rvic e, read the follo wing safety r ules to
avo id accidental expo sure to chemical and also risk of electr ic shock.
Note: A reserve, clean container capable of holding at least 16 gallons should be kept for use when the
sprayer tank needs to be em ptied temporarily for repairs. It is advisable to purchase a reserve tank
suitable for pesticide storage from Northern Tool and Equipment for use in these circumstances. The
container should be properly labeled as to its contents if it is used.
Before attempting to service the sprayer:
1. Pe rsonal
prot ect ive
equipment
2. Review
troub leshooting
table
3. Empty and flush If the cause li sted for you r proble m is Cl og ged i ntake tube, Clog ged su ction
4. Disconnect
power/relieve
pressure
5. Perform repai rs Follow the directions provi de d in the troubleshooting table to re pair the
6. Te st after
servicing
Wear personal pr ote ctive equipme nt as directed on the chemical label whi le
servicing your sprayer .
Review the Troubleshooting Table below for the type of problem you are
experiencing . However, DO NOT attempt to repair until the steps liste d below
are followed.
str a iner, or Wor n spra y gun nozzl e: empty the ta nk a nd fl u s h t he spraye r w i th
water as dir ected in the sectio n , “Operat ion – Step Four ”.
- I n o rder to avo id accidental expo sure to chemicals, n ever a ttempt to
unclog the intake tube or suction strainer, or service the spray gun nozzle,
until the tank has been emptied and th e spraye r flushed with wa ter.
Di sconn e ct power t o th e spraye r an d be sure a ll system pressu re i s relie ve d
by s queezing the gun trigger.
sprayer.
NOTE : Never try to unclog th e sprayer nozzle by blowin g throu gh it.
A fte r servicing, A L W A YS test the spr a ye r for l eaks with plain water before
using.
PROBLEM CAUSE SOLUTION
Bad electrical connection Check batt ery connections.
Short in wires Check condition of wires.
Pump will not turn on
Low pressur e
Low flow
M oto r hooked to batt ery
incorrectly
Wo rn spr ay gun n ozzle Replace spray gun.
I mproper pressure adjus tm ent Tighten pressure adjus t m ent knob.
Clogged intake tube Remove obstruction.
Clogged suction st rainer Clean suction st r ainer.
Obst ruct ion in inlet/out let valves Clean inlet/out let valves.
Leak in the system Tight en leakin g hose clamps or fittin gs.
31
Ensure red wire is connected to positiv e
batter y te rminal. If not, co rre ct wiri ng,
then remove pump head and tighten
offset bearing.
Page 32

Specifications
Electrical System Requirements
Elec tric a l connection………………. 12 VDC
Amp draw fro m pump……………... 15.0 Amps
Sprayer Specifications
Maximum GP M……………………. 2.0 GPM
Continuous Press ure……………….. 20 0 P SI
Pressure Adju stm ent……………….. 0-2 00 PSI
Tank Maximum Capa city…………. . 16 Gallons
Overall Dimensions……………….. . 34.0”L x 14.5”W x 20.5”H
D ry Weight / W eig ht full of w at er …. 60 lb. / 188 l b.
Compo nent Materials*
Tank............................… Polyethylene, EPDM
Suct ion Tube...............… P olypropylene , PVC, Stainless Steel
Hose............................… PVC
Pump...........................… Polypropylene, Viton, Sanoprene
Valves.........................… PVC, Buna-N
Gun and Nozzle..........… Nylon, P o lyacetal
*Befo re us ing an y ch em i cal, check to ens u r e t h e ch em i cal i s co m p at ible wi th all mat eri als i n th e s y st em .
The manufacturer reserves the right to make improvements in design and/or
c hanges in specificati ons at any ti me w ithout incurrin g any obl i gation to inst all
them on units pre vious ly sold.
Any Questio ns, Comments, Pro blems or Parts Orde rs
Call NorthStar Customer Service 1-800-270-0810
32
Page 33

Exploded View – 282737 – Rev. F
Item Part# Description Qty Item Par t# Description Qty
1 778134 Spray gun 1 20 35363 Velcro 2
2 30746 Hose clamp 10 21 5250 Switch 1
3 30290 420” Gun hose 1 22 5253 Insulated female spade 2
4 35118 Pressure gauge 1 23 37694 Remote switch 2-way connector 1
5 37652 200 PSI Pressure regulator 1 24 37693 2-Way connector 1
6 30290 3/8” Hose, 12” 1 25 777461 Positive battery clamp, red 1
7 30290 3/8” Hose, 12” 1 26 777462 Negative battery clamp, black 1
8 5329 Hose barb tee 1 27 778036 Hitch mount 1
9 30160 1/2” Hose, 15” 1 28 778038 Tongue 1
10 777119 Large hose clamp 2 29 52035 Gun clip 1
11 30290 3/8” Hose, 12” 1 30 777110 Hose guide 1
12 36565 Intake tube 1 31 777358 Large gun clip 1
13 777468 16 Gallon tank 1 32 778190 Cart base 1
14 37679 3/8” Hose barb 1 33 37689 Suction strainer 1
15 37678 Ball valve 1 34 5232 Rubber washer 1
16 82061 #10-24 x 1” Screw 4 35 37680 Drain cap 1
17 37659 Pumptec Pump Series 114 1 36 2278 Tire 2
18 778143 Tank lid 1 37 778039 Axle 1
19 34026 Switch bracket 1 38 305200 Locking Collar 2
Any Questions, Comments, Problems or Parts Orders
Call NorthStar Cu stom er S ervice 1-800-270-0810
33
 Loading...