

Panasonic LUMIX DMC-TZ3 Operating Instructions
Operating Instructions
Digital Camera
Model No. DMC-TZ2
DMC-TZ3
Before connecting, operating or adjusting this product, please read
the instructions completely.
This manual is based on the DMC-TZ3 model. Product illustrations
and screens may vary.
For USA assistance, please call: 1-800-272-7033 or send e-mail to : digitalstillcam@us.panasonic.com
For Canadian assistance, please call: 1-800-99-LUMIX (1-800-995-8649) or
send e-mail to: lumixconcierge@ca.panasonic.com
PCP
VQT1B61-1
Dear Customer,
Thank you for choosing Panasonic!
You have purchased one of the most
sophisticated and reliable products on the
market today. Used properly, we’re sure
it will bring you and your family years of
enjoyment. Please take time to fill in the
information below.
The serial number is on the tag located
on the underside of your Camera. Be sure
to retain this manual as your convenient
Camera information source.
Model No.
Serial No.
Information for Your Safety
WARNING:
TO REDUCE THE RISK OF FIRE,
ELECTRIC SHOCK OR PRODUCT
DAMAGE,
• DO NOT EXPOSE THIS APPARATUS
TO RAIN, MOISTURE, DRIPPING
OR SPLASHING AND THAT NO
OBJECTS FILLED WITH LIQUIDS,
SUCH AS VASES, SHALL BE
PLACED ON THE APPARATUS.
• USE ONLY THE RECOMMENDED
ACCESSORIES.
• DO NOT REMOVE THE COVER
(OR BACK); THERE ARE NO USER
SERVICEABLE PARTS INSIDE.
REFER SERVICING TO QUALIFIED
SERVICE PERSONNEL.
Carefully observe copyright laws.
Recording of pre-recorded tapes or
discs or other published or broadcast
material for purposes other than your
own private use may infringe copyright
laws. Even for the purpose of private
use, recording of certain material may
be restricted.
A lithium ion/polymer battery that is recyclable powers the product you
have purchased. Please call 1-800-8-BATTERY for information on how
to recycle this battery.
THE SOCKET OUTLET SHALL BE
INSTALLED NEAR THE EQUIPMENT
AND SHALL BE EASILY ACCESSIBLE.
CAUTION
Danger of explosion if battery is
incorrectly replaced. Replace only
with the same or equivalent type
recommended by the manufacturer.
Dispose of used batteries according to
the manufacturer’s instructions.
Warning
Risk of fire, explosion and burns. Do not
disassemble, heat above 60 °C (140 °F)
or incinerate.
Marking sign is located on bottom of the
unit.
THE FOLLOWING APPLIES ONLY IN
THE U.S.A.
FCC Note: (U.S. only)
This equipment has been tested and
found to comply with the limits for a
Class B digital device, pursuant to
Part 15 of the FCC Rules. These limits
are designed to provide reasonable
protection against harmful interference
in a residential installation. This
equipment generates, uses, and can
radiate radio frequency energy and, if
not installed and used in accordance
with the instructions, may cause harmful
interference to radio communications.
However, there is no guarantee that
interference will not occur in a particular
installation. If this equipment does
cause harmful interference to radio
or television reception, which can be
determined by turning the equipment off
and on, the user is encouraged to try to
correct the interference by one or more
of the following measures:
• Reorient or relocate the receiving
antenna.
• Increase the separation between the
equipment and receiver.
• Connect the equipment into an outlet
on a circuit different from that to which
the receiver is connected.
• Consult the dealer or an experienced
radio/TV technician for help.
FCC Caution: To assure continued
compliance, follow the
attached installation
instructions and use only
shielded interface cables
with ferrite core when
connecting to computer or
peripheral devices.
Any changes or modifications not
expressly approved by the party
responsible for compliance could void
the user’s authority to operate this
equipment.
Declaration of Conformity
Trade Name: Panasonic
Model No.: DMC-TZ2
DMC-TZ3
Responsible party: Panasonic
Corporation of
North America One
Panasonic Way,
Secaucus, NJ 07094
Support Contact: Panasonic Consumer
Electronics Company
1-800-272-7033
This device complies with Part 15 of the
FCC Rules. Operation is subject to the
following two conditions: (1) This device
may not cause harmful interference,
and (2) this device must accept any
interference received, including
interference that may cause undesired
operation.
DMC-TZ2
DMC-TZ3
THE FOLLOWING APPLIES ONLY IN
CANADA
This Class B digital apparatus complies
with Canadian ICES-003.
2 VQT1B61 VQT1B61 3

-If you see this symbolInformation on Disposal in other
Countries outside the European
Union
This symbol is only valid in the
European Union. If you wish to discard
this product, please contact your local
authorities or dealer and ask for the
correct method of disposal.
About the battery pack
Battery pack (Lithium ion battery pack)
• Use the specified unit to recharge the
battery pack.
• Do not use the battery pack with
equipment other than the specified
unit.
• Do not get dirt, sand, liquids, or other
foreign matter on the terminals.
• Do not touch the plug terminals (+ and
−) with metal objects.
• Do not disassemble, remodel, heat or
throw into fire.
If any electrolyte should come into
contact with your hands or clothes, wash
it off thoroughly with water.
If any electrolyte should come into
contact with your eyes, never rub the
eyes. Rinse eyes thoroughly with water,
and then consult a doctor.
About the battery charger
CAUTION!
DO NOT INSTALL OR PLACE THIS
UNIT IN A BOOKCASE, BUILTIN CABINET OR IN ANOTHER
CONFINED SPACE. ENSURE THE
UNIT IS WELL VENTILATED. TO
PREVENT RISK OF ELECTRIC
SHOCK OR FIRE HAZARD DUE
TO OVERHEATING, ENSURE
THAT CURTAINS AND ANY OTHER
MATERIALS DO NOT OBSTRUCT THE
VENTILATION VENTS.
Battery charger
This battery charger operates on AC
between 110V and 240 V.
But
• In the U.S.A. and Canada, the battery
charger must be connected to a 120V
AC power supply only.
• When connecting to an AC supply
outside of the U.S.A. or Canada, use
a plug adaptor to suit the AC outlet
configuration.
Quick start guide
The battery is not charged
when the camera is
shipped. Charge the
battery and set the clock
before use.
When you do not use the
card (sold separately), you
can record or play back
pictures on the built-in
memory (P.26).
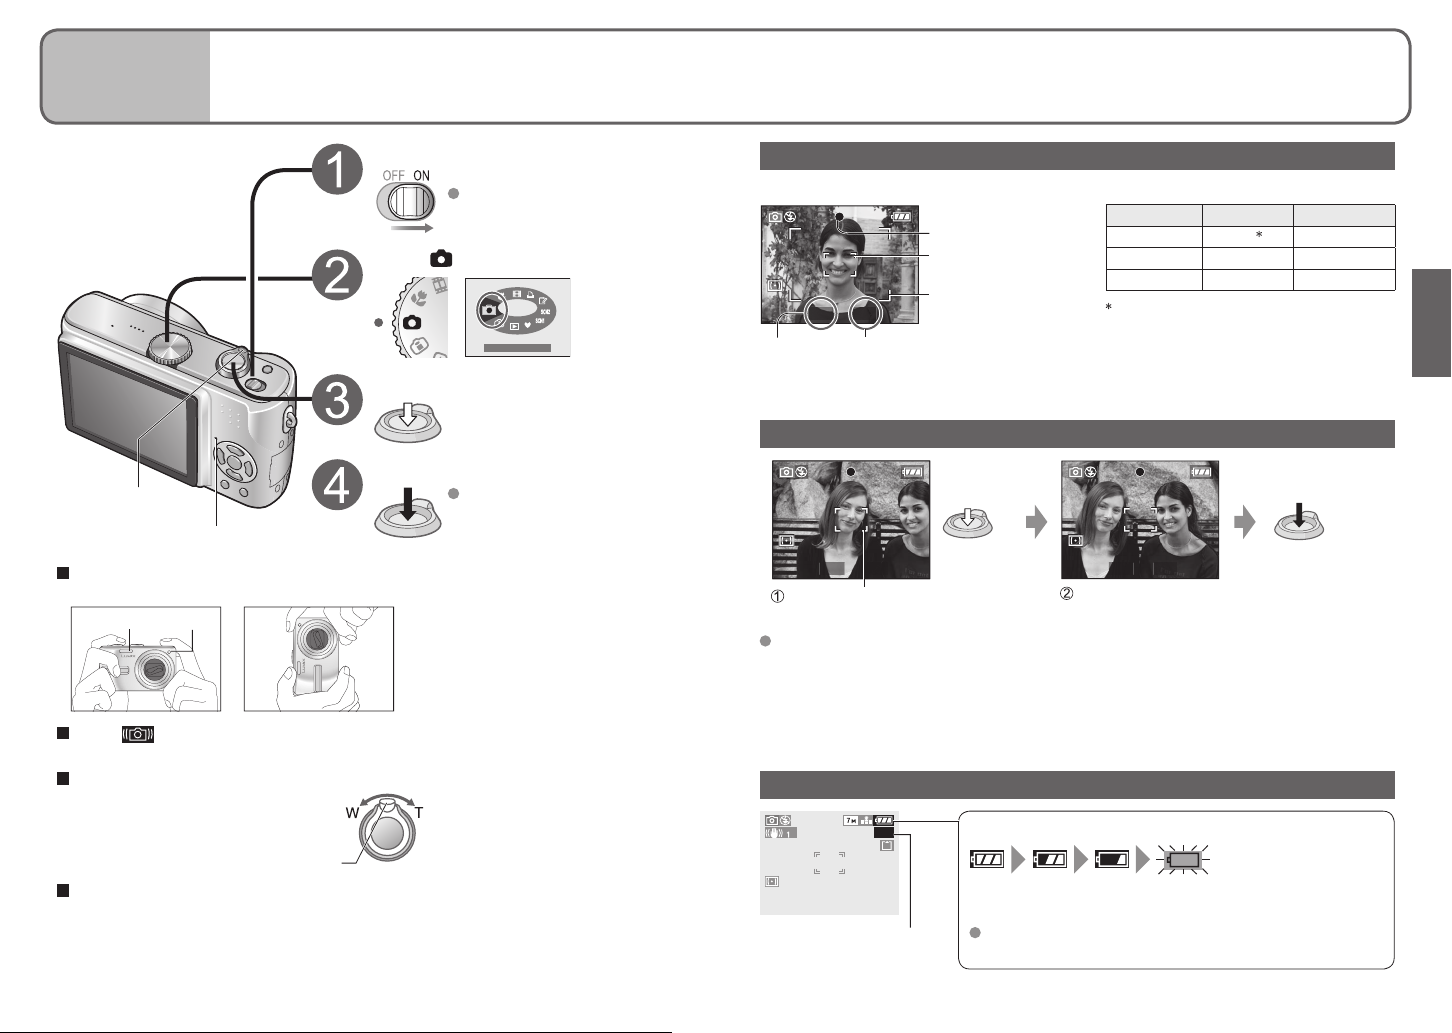
Camera
ON/OFF Switch
Charge the battery
Insert the battery
and the card
Set the mode dial
to
Press the shutter button and
take pictures
Note
Example screens displayed in this manual are for DMC-TZ3 model.
3
DMC-TZ2:
1ST DAY
10:00 MAR.15.2007
To play back the pictures
1. Set the mode dial to .
2. Select the picture
you want to view.
Previous Next
4 VQT1B61 VQT1B61 5
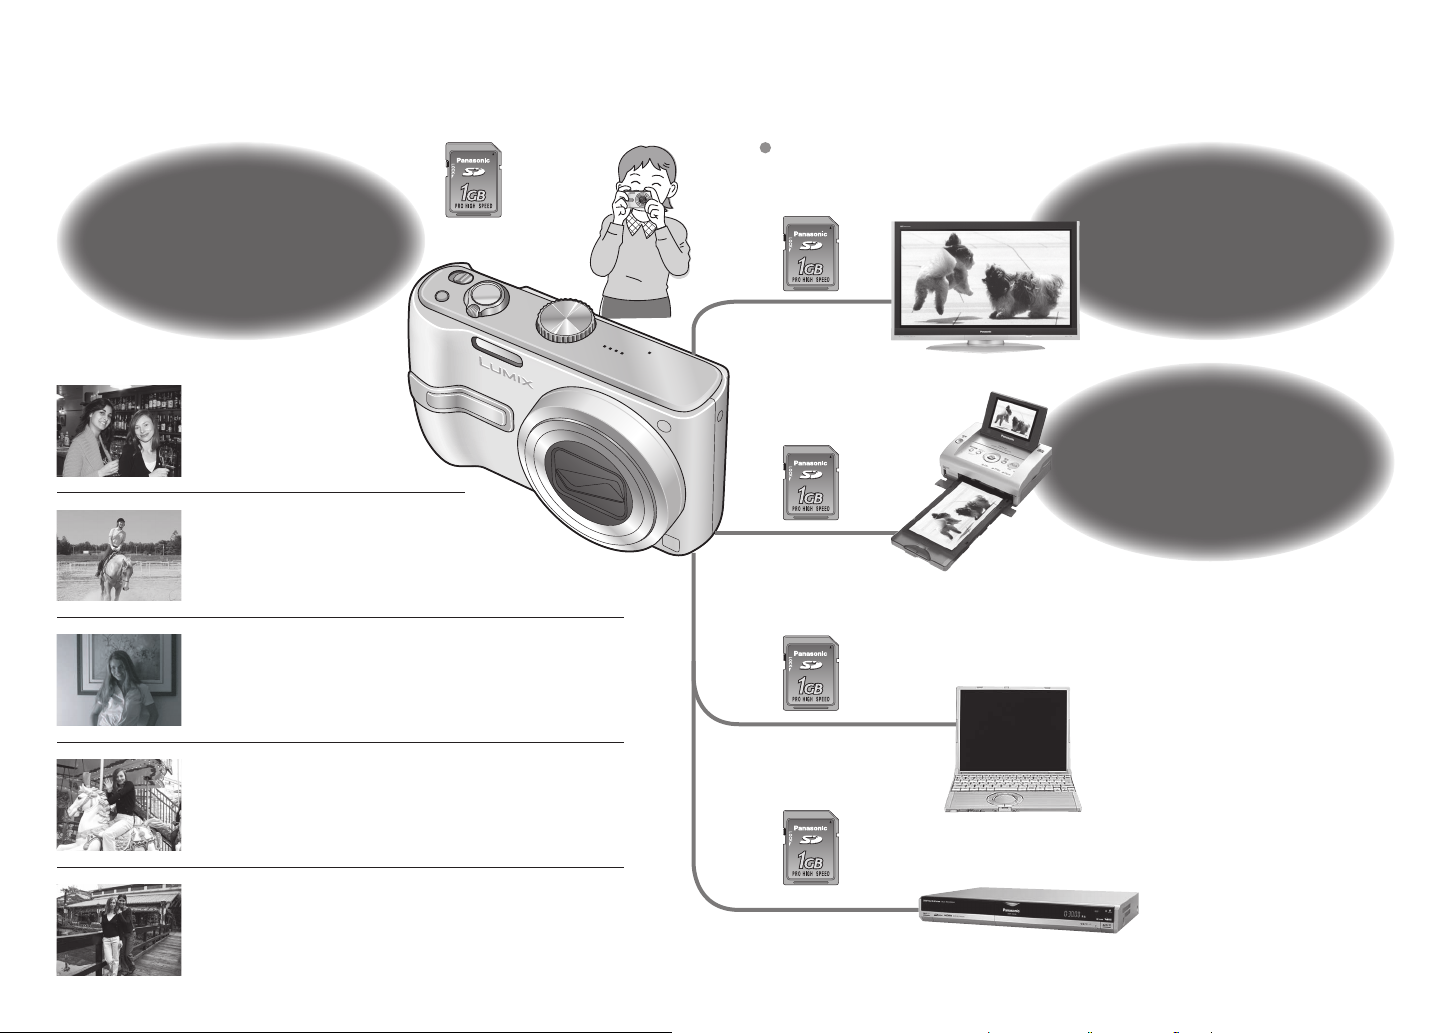
Record, view, save those precious moments.
Cards may be inserted directly
into devices with SD memory
card slots.
Record
(P.24)
Zoomed-in pictures
Close-up pictures of people
in distance
[10x optical zoom] (P.27)
Clear pictures
Prevents blurring from shaky hands
[Optical Image Stabilizer] (P.39)
Beautiful pictures
Dark places, moving subjects
[Intelligent ISO] (P.46)
Motion pictures
Capture moving scenes
[Motion Picture Mode] (P.47)
Create photos (still pictures) from your favorite motion
pictures (P.63)
SD memory card
(Sold separately)
Alternatively,
connect with AV
cable (supplied)
Alternatively,
connect with USB
connection cable
(supplied)
Alternatively,
connect with USB
connection cable
(supplied)
On TV screen
With your printer
Connect directly to easily print pictures at home (P.76)
Use a PictBridge-compatible printer.
At digital photo center
Give card to shop assistant to print pictures. (P.68)
View
(Playback) on
large screen
(P.79)
Print
at home, or at
a digital photo center
(P.68, 76)
Save and enjoy your
pictures!
On computer
Send by e-mail, save to hard disk.
Print out pictures.
Holiday pictures
Useful features for travel – ‘TRAVEL DATE’ (P.48)
‘WORLD TIME’ (P.49)
‘CLIPBOARD’ (P.58)
Alternatively,
connect with AV
cable (supplied)
With DVD recorder
Save to DVD or hard disk
6 VQT1B61 VQT1B61 7

Contents
Before use
Preparations
Basics
Applications
(Record)
Applications
(View pictures)
10
14
24
33
61
Before use .......................................... 10
Read first (10)
To prevent damage and faults (10)
Charging battery ............................... 14
Inserting battery and card ............... 15
Taking pictures ................................. 24
Adjusting the focus (25)
Problems with adjusting focus (25)
Checking remaining battery and memory
capacity (25)
Picture save destination (26)
Changing recording information
display ............................................... 33
Making LCD monitor easier to see .. 34
Taking pictures with self-timer ........ 35
Taking pictures with flash ................ 36
Taking pictures with exposure
compensation ................................... 38
Optical image stabilizer ................... 39
Taking pictures according to the
scene ................................................. 40
Scene types (41)
Avoiding subject blurring
(Intelligent ISO) ................................. 46
Taking close-up pictures
(MACRO mode) ................................. 46
Viewing as list (Multi playback/
Calendar playback) ........................... 61
Viewing motion pictures/
pictures with audio ........................... 62
Creating still pictures from motion
pictures (DMC-TZ3 only) .................. 63
Standard Accessories ....................... 11 Names of parts ................................... 12
Setting the clock and language ....... 16
Know the different menus ............... 17
Taking pictures with zoom ............... 27
Taking pictures with SIMPLE MODE 28
Backlight compensation (28)
‘SIMPLE MODE’ menu (29)
Taking motion pictures .................... 47
Useful features for travel ................. 48
Recording holiday duration
(TRAVEL DATE) (48)
Registering local time at your overseas
destination (WORLD TIME) (49)
Using REC menu .............................. 50
W.BALANCE (50)
SENSITIVITY (51)
ASPECT RATIO (51)
PICT.MODE (52)
PICT.SIZE (52)
QUALITY (53)
AUDIO REC. (53)
METERING MODE (53)
AF MODE (54)
Using PLAY menu ............................. 64
DUAL DISPLAY (DMC-TZ3 only) (64)
SLIDE SHOW (64)
FAVORITE (65)
ROTATE DISP./ROTATE (66)
DATE STAMP (66)
DPOF PRINT (68)
Mode dial (13)
Using menus ..................................... 18
Using SETUP menu .......................... 20
Viewing your pictures instantly
(REVIEW) ........................................... 30
Viewing your pictures (Play) ........... 31
Deleting pictures .............................. 32
BURST (54)
CONT.AF (55)
AF ASSIST LAMP (56)
SLOW SHUTTER (56)
D.ZOOM (56)
COL. MODE (57)
CLOCK SET (57)
Quick setting (57)
Taking/viewing clipboard pictures
(CLIPBOARD) .................................... 58
Taking clipboard pictures (58)
Viewing clipboard pictures (59)
CLIPBOARD menu (60)
PROTECT (69)
AUDIO DUB. (70)
RESIZE (70)
TRIMMING (71)
ASPECT CONV. (72)
COPY (73)
FORMAT (73)
Connecting with
other devices
Others
74
80
Using with computer ........................ 74
Folder and file names on computer (75)
List of LCD monitor displays ........... 80
Message displays ............................. 82
Q&A Troubleshooting ........................ 84
Usage cautions and notes ............... 90
Recording picture/time capacity ..... 92
Printing .............................................. 76 Viewing on TV screen ....................... 79
Specifications ................................... 94
Optional accessories ....................... 96
Digital Camera Accessory Order Form
(For USA Customers) ....................... 97
Request for Service Notice
(For USA Only) .................................. 98
Limited Warranty (For USA Only) .... 99
Customer Services Directory
(For USA Only) ................................ 101
Index ................................................ 104
8 VQT1B61 VQT1B61 9
Before use
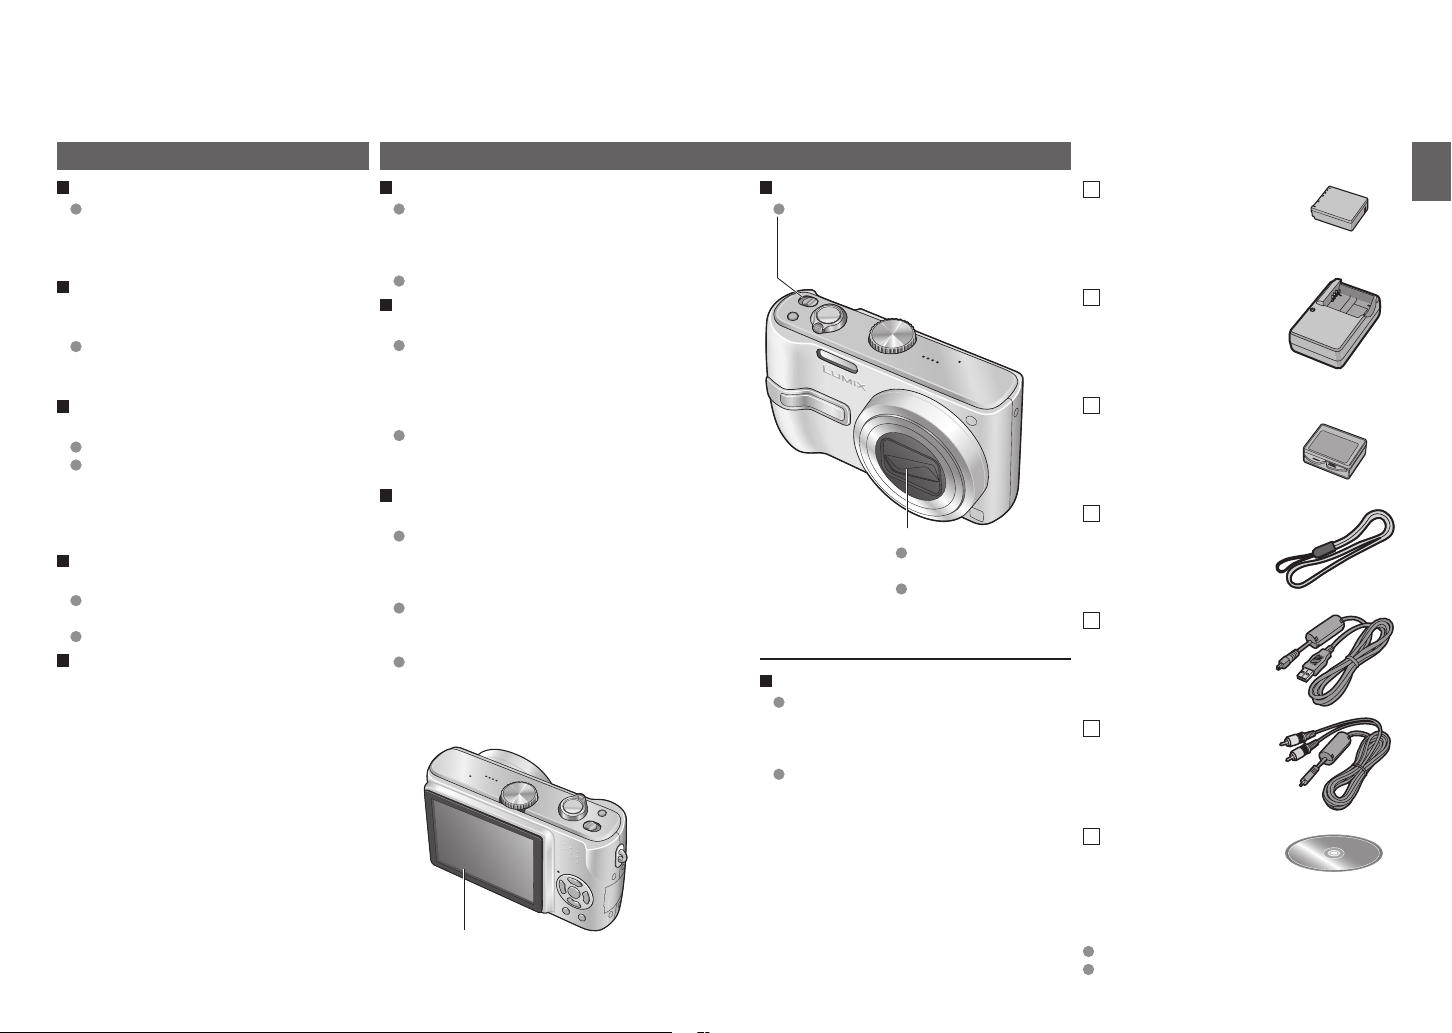
Standard
Accessories
Read first
Do a test shot first!
Check first to see if you can take
pictures and record sounds (motion
pictures/pictures with audio)
successfully.
We will not compensate for failed/
lost recording or for direct/indirect
damage.
Panasonic will not provide
compensation even if damage is
caused by faults with camera or card.
Certain pictures cannot be played
back
Pictures edited on a computer
Pictures taken or edited on a different
camera
(Pictures taken or edited on this camera
may also not be able to be played back
on other cameras)
Software on the CD-ROM supplied
The following actions are prohibited:
Making duplicates (copying) for sale or
rent
Copying onto networks
LCD monitor characteristics
Extremely high precision technology is
employed to produce the LCD monitor
screen. However there may be some dark
or bright spots (red, blue or green) on the
screen. This is not a malfunction.
The LCD monitor screen has more than
99.99% effective pixels with a mere
0.01% of the pixels inactive or always lit.
The spots will not be recorded on pictures
on the built-in memory or a card.
To prevent damage and faults
Avoid shocks, vibration, and pressure
Avoid exposing the camera to strong
vibration or shock; e.g. dropping or
hitting the camera, or sitting down with
the camera in your pocket.
Do not press the lens or the LCD monitor.
Do not get the camera wet or insert
foreign objects
Do not expose the camera to water,
rain, or seawater.
(If camera gets wet, wipe with a soft,
dry cloth. Wring cloth thoroughly first if
wet with seawater, etc)
Avoid exposing lens and socket to dust
or sand, and do not allow liquids to leak
into gaps around buttons.
Avoid condensation caused by sudden
changes in temperature and humidity
When moving between places of
different temperature or humidity, place
camera into a plastic bag and allow to
adjust to conditions before use.
If the lens clouds up, switch off the
power and leave for about two hours to
allow camera to adjust to conditions.
If the LCD monitor clouds up, wipe with
a soft, dry cloth.
LCD monitor
When transporting
Switch off power.
We recommend using a genuine leather
case (DMW-CT3, sold separately).
Lens
Do not leave in direct
sunlight.
If dirty, clean with soft,
dry cloth.
Optional accessories (P.96)
Cards are optional. You can record
or play back pictures on the built-in
memory when you are not using a card.
(P.26)
If any accessories are lost, customers
in the USA should contact Panasonic’s
parts department at 1 800 833-9626
and customers in Canada should
contact 1 800 99-LUMIX (1-800-995-
8649) for further information about
obtaining replacement parts.
Part numbers are as of January 2007
Battery Pack
CGA-S007A
(P.14)
(referred to in this manual as ‘battery’)
Battery Charger
DE-A45B
(P.14)
(referred to in this manual as ‘charger’)
Battery Carrying
Case
VYQ3680
(P.91)
Strap
VFC4090
(P.12)
USB Connection
Cable
K1HA08CD0007
(P.74, 76)
AV Cable
K1HA08CD0008
(P.79)
CD-ROM
The following software on the CD-ROM
is referred to in this manual as ‘supplied
software’.
LUMIX Simple Viewer
PHOTOfunSTUDIO -viewer-
10 VQT1B61 VQT1B61 11

Mode dial
Names of parts
Strap eyelet
Camera ON/OFF switch
(P.18)
Optical image stabilizer
button (P.39)
Shutter button (P.24)
Zoom lever (P.27)
Flash (P.36)
Lens barrel
Lens (P.11)
Speaker (P.22)
Microphone
(P.47, 53, 70)
LCD monitor
● Checking remaining battery/
memory capacity, etc (P.25)
● Changing display (P.33)
● Display contents list (P.80)
Status indicator (P.15, 24)
DISPLAY/LCD MODE
button (P.33, 34)
FUNC (Quick setting P.57)/
delete (P.32) button
Release lever (P.15)
Card/Battery door (P.15)
DIGITAL/AV OUT socket
(P.74, 76, 79)
DC IN socket (P.74, 76)
Always use a genuine Panasonic AC
adaptor (DMW-AC5PP: optional).
Tripod receptacle
Self-timer
indicator
(P.35)/AF
assist lamp
(P.56)
Strap
(supplied)
Align to correct mode
NORMAL PICTURE mode
Take pictures (P.24).
INTELLIGENT ISO mode
Take pictures according to motion
and brightness of subject (P.46).
PLAYBACK mode
View/edit pictures previously
taken (P.31, 61)
SIMPLE MODE
For beginners (P.28).
Up/down/left/right
selection
Up▲
right►◄left
down▼
In this manual, direction buttons
to be pressed will be shown in
white, or with ▲▼◄►.
Self-timer (P.35)
View previously
taken picture
immediately
(Review) (P.30)
NORMAL PICTURE
(Displayed on screen when
mode changed)
SCENE mode
Take pictures according to scene
(P.40).
CLIPBOARD mode
Take/view pictures as memos
(P.58).
PRINT mode
Print (P.76).
MOTION PICTURE mode
Take motion pictures (P.47).
MACRO mode
Take close-up pictures (P.46).
● Exposure
compensation (P.38)
● Auto bracket (P.38)
● White balance fine
adjustment (P.50)
● Backlight
compensation (P.28)
● Flash (P.36)
● MENU/SET
(menu display/set) (P.18)
DMC-TZ3 only
12 VQT1B61 VQT1B61 13
Preparations
2
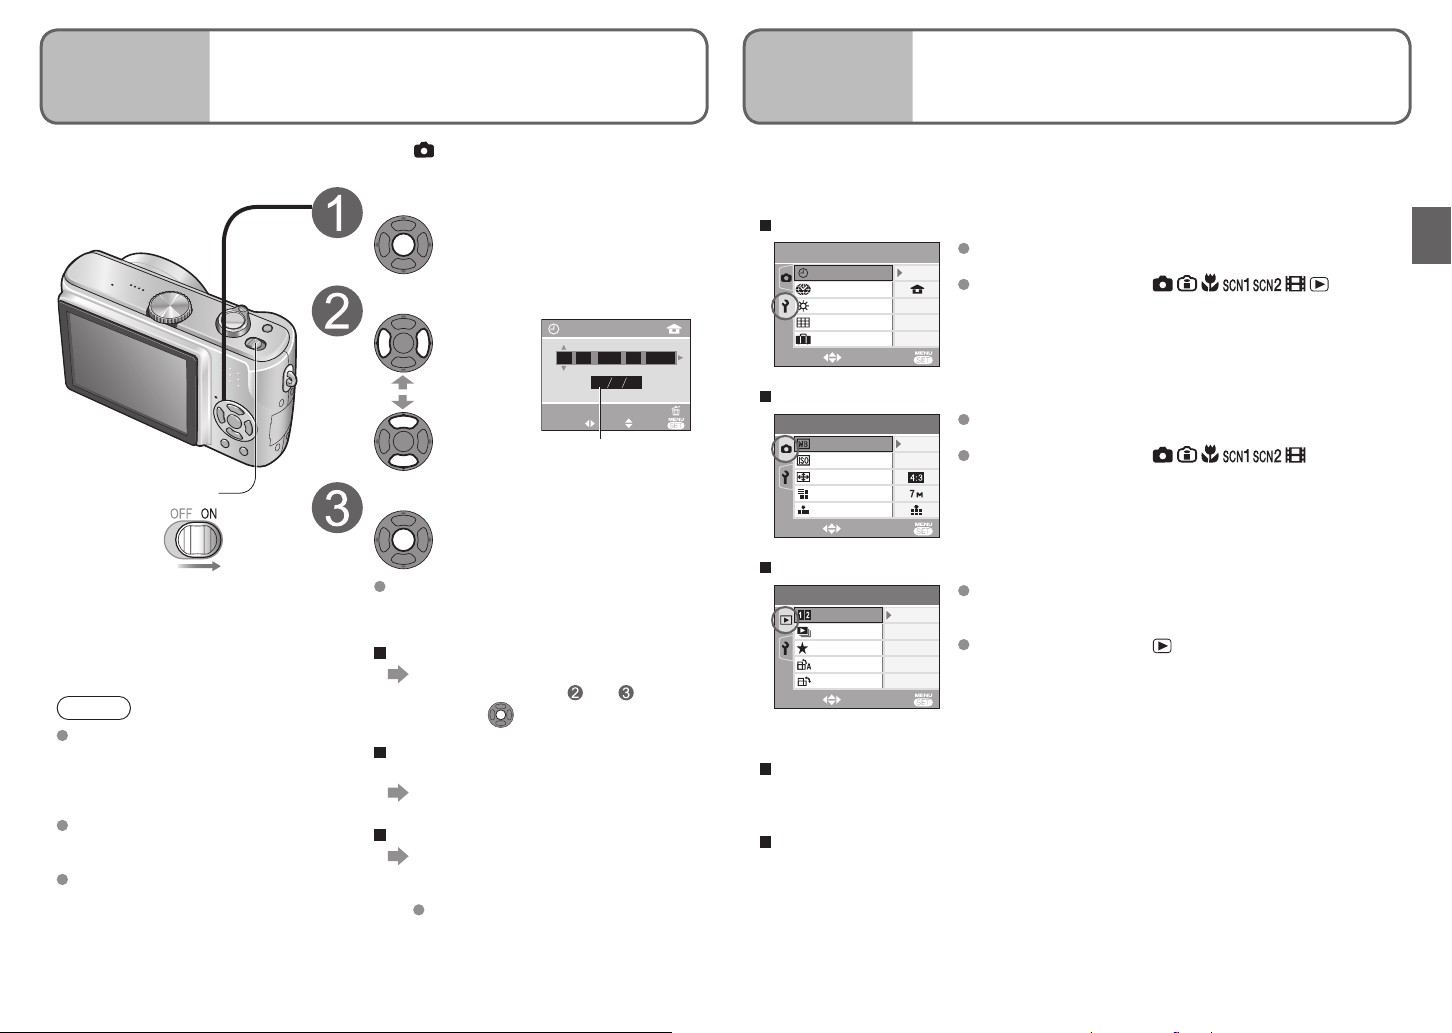
Inserting battery and card
Preparations
1
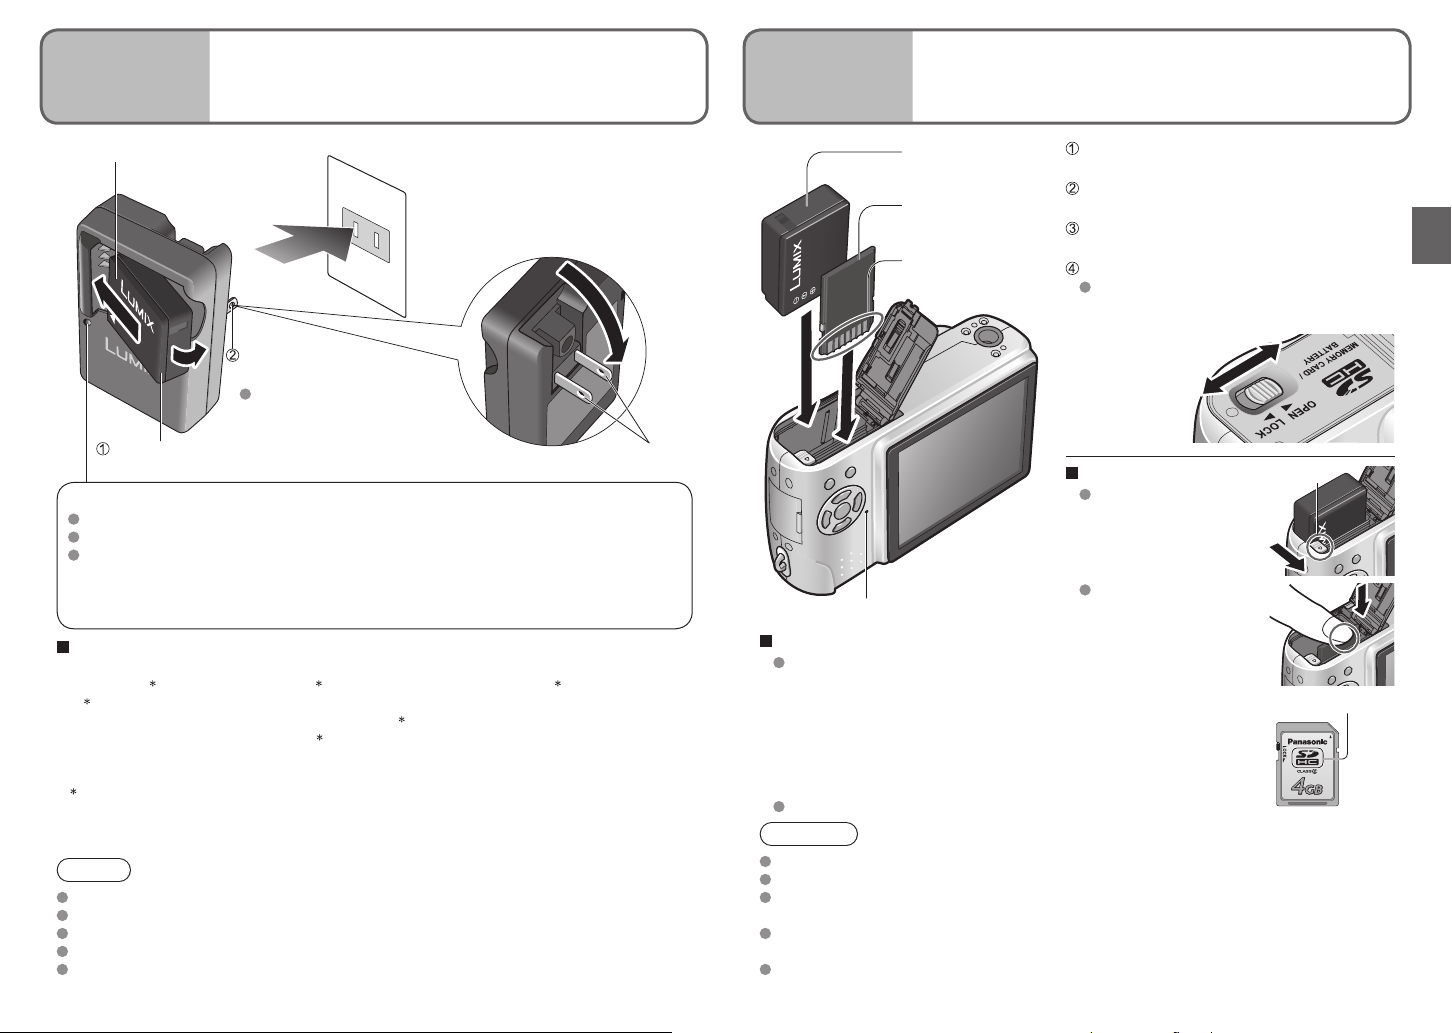
Charging battery
Always charge before first use! (not sold pre-charged)
Battery (model-specific)
Charger
(model-specific)
Indoor electrical outlet
(charge at room temperature of 1035°C (50°F-95°F))
Battery
(check orientation)
Card
(check orientation)
Do not touch
connector
Set the camera ON/OFF switch to
OFF
Slide to the ‘OPEN’ position and
open the lid
Completely insert battery and card
(both click into place)
Close lid
Slide to the ‘LOCK’ position.
OPEN
Fold out pins and
plug into electrical outlet.
Disconnect charger and
battery when charging is
Connect to charger.
(Ensure ‘LUMIX’ faces outwards.)
Charging light (CHARGE)
On: Charging in progress (approx. 120 min.)
Off: Charging complete
If light is flashing…
● Battery temperature is too high/too low → Battery may still be charged, but it will
take longer as it must adjust to the room temperature.
● Battery/charger connector is dirty → clean with dry cloth.
Approximate battery life
Number of pictures:
270 [300
1 Values based on CIPA standards. (P.91)
(Number reduced if intervals longer – 67 [75
Playback time: Approx. 260 [280
Above figures may be reduced if intervals between recording are longer; if flash, zoom,
or POWER LCD are used frequently; or in colder climates (depends on actual usage).
2 DMC-TZ2
2
] (at 30-sec intervals) 1 (equivalent to approx. 135 [150
complete.
2
] mins
2
] mins)
2
] pictures if 2-minute intervals)
plug
To remove
To remove battery,
Status indicator
Compatible memory cards (sold separately)
The following SD standard-based cards (Panasonic brand
recommended)
● SD memory cards, 8MB-2GB
● SDHC memory cards (4GB) → (P.96)
(4GB (or greater) cards without the SDHC logo are not of SD standard.)
→ For recording picture/time capacity, see (P.92)
→ For model numbers and types,
see http://panasonic.co.jp/pavc/global/cs (This Site is English only.)
MultiMediaCards (still images only)
Caution
Note
Battery will be warm during charging and for some time thereafter.
Battery will run out if not used for long periods of time, even after being charged.
Battery can be topped up even if not fully depleted.
Do not disassemble or modify the charger.
Please purchase a new battery if battery life becomes significantly reduced.
14 VQT1B61 VQT1B61 15
Always use genuine Panasonic batteries.
If you use other batteries, we cannot guarantee the quality of this product.
Do not remove card or battery while power is ‘ON’ or while status indicator is on
(Camera may cease operating correctly, or card/recorded contents may be damaged).
The reading/writing speed of a MultiMediaCard is slower than an SD memory card. When a
MultiMediaCard is used, the performance of certain features may be slightly slower than advertised.
Keep the Memory Card out of reach of children to prevent swallowing.
LOCK
lever
move lever in direction
of arrow.
To remove card,
press down in center.
SDHC logo
SDHC memory
card
Preparations
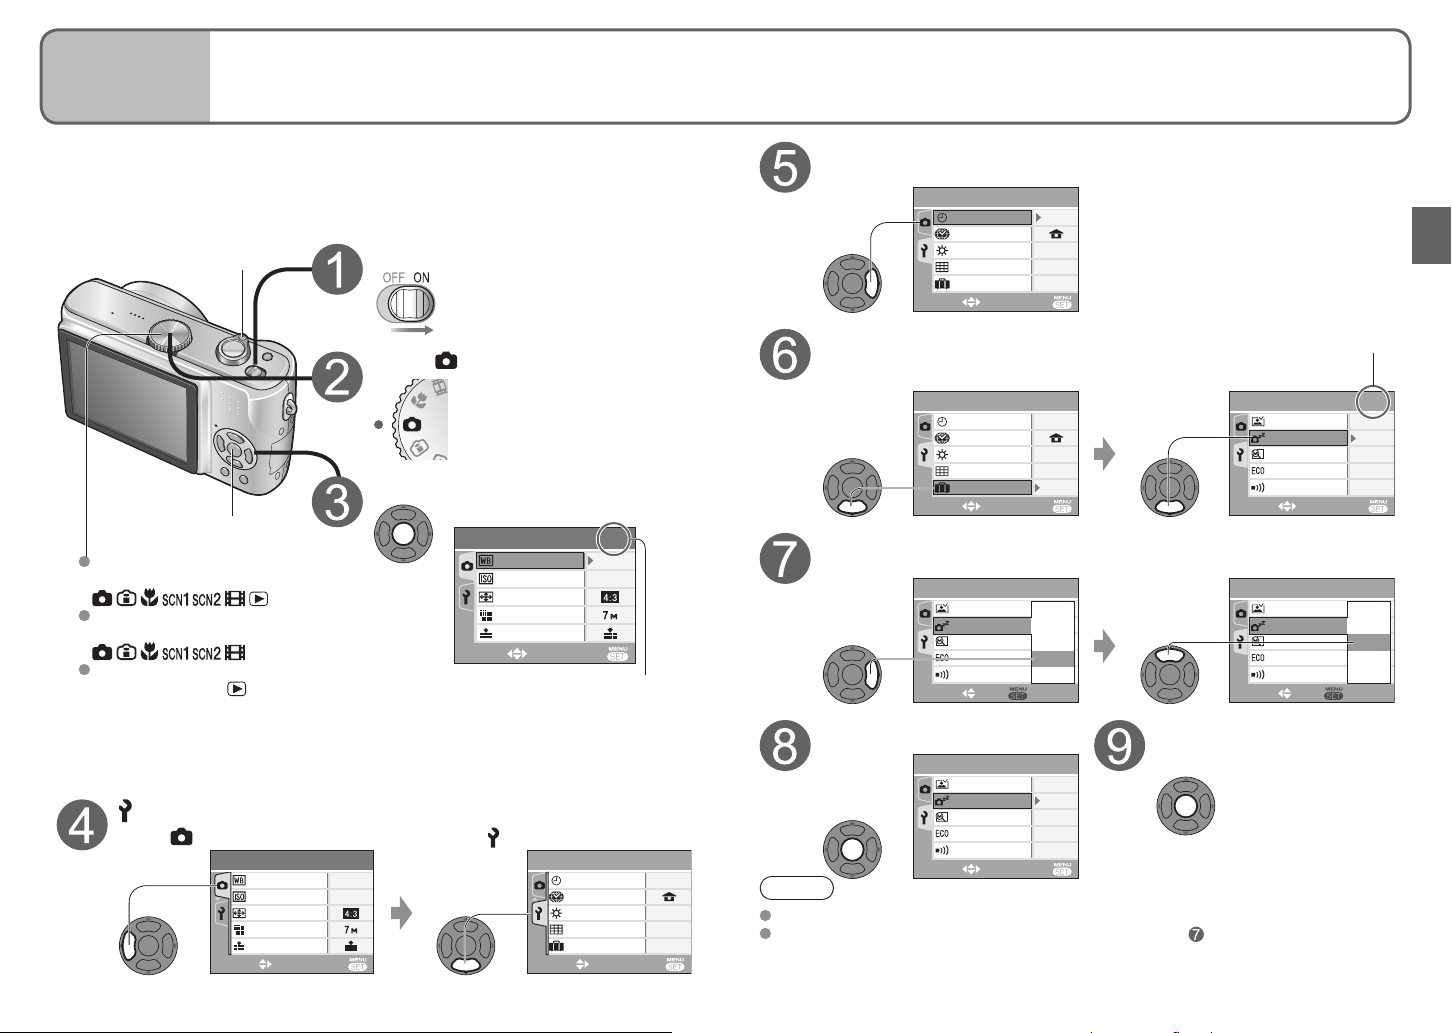
3
Setting the clock and language
Preparations
4
Know the different menus
to get more out of your camera
Set mode dial (P.13) to NORMAL PICTURE mode before turning on power.
‘PLEASE SET THE CLOCK’ will be displayed when power is turned on for the first time.
While this message is displayed
This camera contains a range of menus to enable you to set your photography and
playback preferences, and to make the camera easier and more fun to use.
The ‘SETUP’ menu in particular contains important functions, such as for time and power
source. Please check these settings before use.
Making the camera more convenient to use (SETUP menu) (P.20)
Power
Press
Adjust year, month, date, time
Select
Adjust
CLOCK SET
:..
JAN
1000
DMY
CANCEL
Select to change
date format
Set
Press
2007
EXITSELECT SET
SETUP
CLOCK SET
WORLD TIME
MONITOR
GUIDE LINE
TRAVEL DATE
SELECT
OFF
EXIT
Changing photography preferences (REC menu) (P.50)
REC
W.BALANCE
SENSITIVITY
ASPECT RATIO
PICT.SIZE
QUALITY
SELECT EXIT
AWB
AUTO
Make settings for ease of use such as adjusting the clock
1
/
4
and changing the beep sounds.
Applicable modes (P.13):
± 0
Make settings such as white balance, sensitivity, aspect
1
/
3
ratio, and picture size.
Applicable modes (P.13):
(Screen example: DMC-TZ3)
Using your pictures (PLAY menu) (P.64)
Note
Failure to set the clock will mean
correct date will not be printed
(P.76) when printing pictures in
digital photo center or when using
DATE STAMP (P.66).
Time is displayed in 24-hour
format. Year can be set between
2000 and 2099.
Clock settings will be saved for
approx. 3 months even after
battery is removed, provided a
fully-charged battery was installed
Turn on power again and check time
display.
To change time setting
Select ‘CLOCK SET’ from SETUP
menu (P.18), perform and above,
and press .
To set local time at overseas
destination
‘WORLD TIME’ (P.49)
To set language
Select LANGUAGE (P.22) from SETUP
menu (P.20), and set to language
displayed on the monitor.
Example of SETUP menu setting
(P.18)
PLAY
DUAL DISPLAY
SLIDE SHOW
FAVORITE
ROTATE DISP.
ROTATE
SELECT EXIT
OFF
ON
The following menus are also included:
To make photography settings to fit certain scenes, e.g. night
→ SCENE menu (P.40)
To easily change settings such as picture quality, for beginners
→ SIMPLE MODE menu (P.29)
Make settings for using the pictures you have taken,
1
/
3
including rotating, protecting, trimming, and handy settings
for printing your pictures (DPOF).
Applicable modes (P.13):
(Screen example: DMC-TZ3)
in camera for the 24 hours
beforehand.
16 VQT1B61 VQT1B61 17
Preparations
5
Using menus
Explanation of settings method for SETUP menu, REC menu, and PLAY menu.
(Screen example: DMC-TZ3)
Here is explained an example of changing the ‘POWER SAVE’ setting from ‘5 MIN.’ to ‘2
MIN.’ from SETUP menu.
(‘POWER SAVE’ is a function to extend battery life by automatically turning the camera
off if no operations are performed for a certain period.)
Zoom lever
Turn on the power
Move across to the items
Highlight ‘CLOCK SET’
SETUP
CLOCK SET
WORLD TIME
MONITOR
GUIDE LINE
TRAVEL DATE
SELECT
EXIT
1
± 0
OFF
/
4
Set to
Select the correct item
Press ▼ and move beyond the
Page 2 displayed
bottom item Move down to ‘POWER SAVE’
1
10MIN.
EXIT
± 0
OFF
2
1SEC.
OFF
5MIN.
1MIN.
OFF
2MIN.
OFF
5MIN.
2
1SEC.
2MIN.
OFF
OFF
/
4
/
4
SETUP
AUTO REVIEW
POWER SAVE
ZOOM RESUME
ECONOMY
BEEP
SELECT
SETUP
AUTO REVIEW
POWER SAVE
ZOOM RESUME
ECONOMY
BEEP
SELECT SET
Finish
/
4
Press
SETUP
CLOCK SET
WORLD TIME
MONITOR
Bring up the menu
MENU/SET
SETUP menu
Applicable modes:
REC menu
Applicable modes:
PLAY menu
Applicable modes:
REC menu is displayed.
1
REC
W.BALANCE
SENSITIVITY
ASPECT RATIO
PICT.SIZE
QUALITY
AWB
AUTO
/
3
SELECT EXIT
First page of three currently
displayed. (Zoom lever can be
used to scroll through pages.)
Select this item
Displays settings Highlight ‘2 MIN.’
Select this setting
Select SETUP menu
Select
1
REC
W.BALANCE
SENSITIVITY
ASPECT RATIO
PICT.SIZE
QUALITY
18 VQT1B61 VQT1B61 19
/
3
AWB
AUTO
EXITSELECT
Select
SETUP
CLOCK SET
WORLD TIME
MONITOR
GUIDE LINE
TRAVEL DATE
1
/
4
Note
± 0
OFF
EXITSELECT
To restore default settings → ‘RESET’ (P.22)
For certain items, there may be no settings selection (step ) (e.g. ‘ROTATE’ on PLAY
menu), or actual display may differ from that above (e.g. ‘WORLD TIME’ on SETUP
menu).
GUIDE LINE
TRAVEL DATE
SELECT EXIT
SETUP
AUTO REVIEW
POWER SAVE
ZOOM RESUME
ECONOMY
BEEP
SELECT SET
SETUP
AUTO REVIEW
POWER SAVE
ZOOM RESUME
ECONOMY
BEEP
SELECT
EXIT
2
1SEC.
5MIN.
OFF
OFF
2
1SEC.
OFF
5MIN.
1MIN.
OFF
2MIN.
OFF
5MIN.
10MIN.
/
4
/
4

Preparations
6
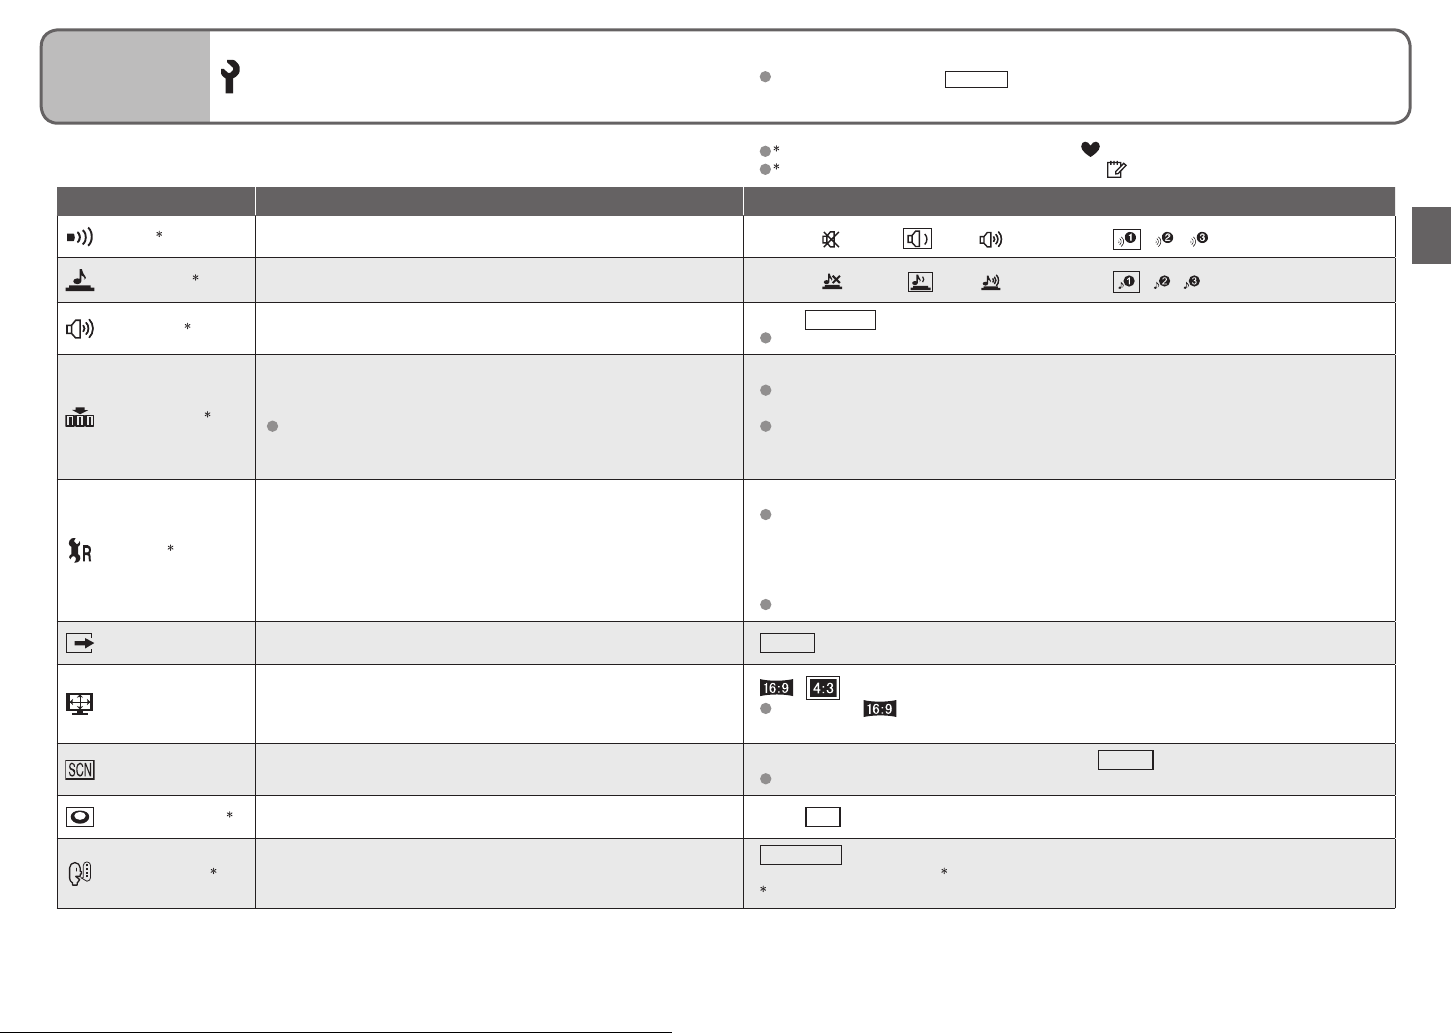
Using SETUP menu
Make general camera settings such as adjusting the clock, extending the battery
life, and changing the beep sounds. (Settings method → P.18)
Default setting outlined:
‘CLOCK SET’, ‘AUTO REVIEW’, ‘POWER SAVE’ and ‘ECONOMY’ are important for
clock setting and battery life. Be sure to check these before use.
Item Uses, operations Settings, notes
1, 2
CLOCK SET
WORLD TIME
Set the date and time. Set the date/month/year and time (P.16).
1, 2
Set the local time at an overseas destination (P.49)
1 Settings also reflected in SIMPLE MODE (P.28).
2 Settings also reflected in CLIPBOARD mode (P.58).
3 DMC-TZ3 only.
(DESTINATION) / (HOME)
MONITOR
1, 2
GUIDE LINE
TRAVEL DATE
AUTO REVIEW
POWER SAVE
ZOOM RESUME
ECONOMY
Adjust the brightness of the LCD monitor (7 levels). -3 · · ±0 · · +3
Change the pattern of the guide lines displayed when taking
pictures.
Display recording information or histogram together with guide
lines (P.33).
1, 2
Record the number of days elapsed in your travels.
Automatically display pictures immediately after taking
them.
Select display time (seconds).
‘ZOOM’ is useful for checking focus.
Automatically shut off power while not in use.
(Saves battery consumption)
To restore: Press the shutter button halfway, or turn on the
power again.
1, 2
Remember the zoom ratio when turning power off.
Restrict battery consumption when recording.
(Dims LCD monitor, automatically shuts off monitor when not
in use.)
Monitor also shut off during flash battery charging.
Status indicator is illuminated while monitor is off.
To restore: Press any button.
REC. INFO. (Recording information): OFF / ON HISTOGRAM: OFF / ON
PATTERN: /
‘PATTERN’ cannot be selected in CLIPBOARD mode (P.58). Recording information
and histogram cannot be displayed.
Not displayed in SIMPLE MODE.
OFF / SET (P.48)
OFF / 1SEC. / 3SEC. / ZOOM
second)
In ‘SELF PORTRAIT’ scene mode (P.42), ‘AUTO BRACKET’ 3 (P.38), ‘BURST’ mode
(P.54), or pictures with audio (P.53, 70), auto review performed regardless of setting.
Motion pictures cannot be automatically reviewed.
OFF / 1 MIN. / 2 MIN. / 5 MIN. / 10MIN. (Set time before POWER SAVE is initiated)
Cannot be used in the following cases:
When using AC adaptor (DMW-AC5PP, sold separately), when connected to computer/
printer, during motion picture recording/playback, during slideshows (exception: set to
10 minutes while slideshow is paused and during ‘MANUAL’ slideshows)
Setting fixed to ‘2 MIN.’ in ‘ECONOMY’, and to ‘5 MIN.’ in SIMPLE MODE (P.28) and
CLIPBOARD (P.58).
OFF / ON
OFF / LEVEL 1 (turned off after approx. 15 seconds of inactivity)/LEVEL 2 (turned off
after approx. 15 seconds, or approx. 5 seconds of inactivity after recording)
Cannot be used in the following cases:
When using SIMPLE MODE, CLIPBOARD mode ,or AC adaptor (DMW-AC5PP, sold
separately), when menu screen is displayed, when using self-timer setting or during
motion picture recording.
LCD monitor not dimmed when using ‘POWER LCD’ or ‘HIGH ANGLE’ (P.34).
3
(displays for 1 second, then at 4x zoom for 1
Focus position cannot be stored.
Released and cannot be set when using ‘SELF PORTRAIT’ scene mode.
20 VQT1B61 VQT1B61 21
Preparations
6
Using SETUP menu (Continued)
Default setting outlined:
1 Settings also reflected in SIMPLE MODE (P.28).
2 Settings also reflected in CLIPBOARD mode (P.58).
Item Uses, operations Settings, notes
BEEP
1, 2
Change or mute beep sounds.
Volume:
(mute) / (low) / (high) Tone: / /
SHUTTER
VOLUME
1, 2
2
NO. RESET
RESET
2
VIDEO OUT
TV ASPECT
SCENE MENU
DIAL DISPLAY
Change or mute shutter sounds.
Adjust volume of sound from speakers (7 levels).
Reset image file numbers and start again from ‘0001’.
1
File numbers and folder numbers (P.75)
Reset SETUP menu (P.20) and REC menu items (P.50) to
their default settings.
Change the video output format when connected to a TV, etc.
Change the aspect ratio when connected to a TV, etc
(PLAYBACK mode only).
Display scene menu when mode dial is set to SCN1 or SCN2.
1, 2
Display mode dial operation on screen. OFF / ON (display)
Volume:
0 · · LEVEL3 · · LEVEL6
Cannot be used to adjust TV speaker volume when connected to TV.
YES/NO
Numbers cannot be reset once folder number reaches 999. In this case, save all
necessary pictures to your computer, and format the built-in memory/card. (P.73)
To reset folder number to 100:
First, format (P.73) the built-in memory or card, and reset the file numbers using NO.
RESET. Then, select ‘YES’ on the folder number reset screen.
RESET REC. SETTINGS? (YES/NO) RESET SETUP PARAMETERS? (YES/NO)
Resetting SETUP parameters causes the following to be reset: Birthdays in BABY
(P.42) and PET modes (P.44), ‘TRAVEL DATE’ (P.48), ‘WORLD TIME’ (P.49), ‘ZOOM
RESUME’ (P.20), ‘FAVORITE’ in PLAY menu (set to ‘OFF’) (P.65), ‘ROTATE DISP.’ (set
to ‘ON’) (P.66), CLIPBOARD menu (INITIAL DISP.) (set to ‘ON’) (P.60)
(Only ‘BEEP’ is reset in the SIMPLE MODE menu.)
Folder numbers and clock settings will not be reset.
NTSC / PAL
When set to , pictures will be displayed vertically long on LCD monitor when
connecting AV cable (supplied) (P.79).
OFF (use previously selected scene mode) / AUTO (displays scene menu)
To display scene menu when set to ‘OFF’: Press ‘MENU/SET’.
(mute) / (low) / (high) Tone: / /
/
1, 2
LANGUAGE
22 VQT1B61 VQT1B61 23
Change display language.
ENGLISH / DEUTSCH (German) / FRANÇAIS (French) / ESPAÑOL (Spanish) /
ITALIANO (Italian) / 中文 (Chinese) / 日本語 (Japanese)
Not displayed on DMC-TZ3P/DMC-TZ2P.
Basics
1
Taking pictures
Please set the clock before taking pictures (P.16).
Turn on the power
Status indicator illuminated for
approx. 1 second.
Set to (NORMAL PICTURE mode)
NORMAL PICTURE
Adjust the focus
Press halfway
Take a picture
Zoom lever
Status indicator
Press fully
Holding the camera
Horizontally
Flash Lamp
Vertically
When (jitter alert) is displayed
Use the Optical image stabilizer (P.39), a tripod, or the self-timer (P.35).
Focus range (To take pictures from close range→P.46)
When set to maximum W (1X):
Distance of at least 50 cm
(1.64 feet) from subject
Zoom lever
To use flash (P.36)
Take care not to shake the
camera.
● Do not block the flash or the lamp
(P.12). Do not look at them from close
range.
● Do not touch the lens.
● Stand with your arms close to your
body and with your legs apart.
When set to maximum T (maximum
zoom): Distance of at least 2 m
(6.56 feet) from subject
Display on screen
Adjusting the focus
Press the shutter button halfway, ensuring that the subject is aligned with the AF area.
Focus display
AF area (normal)
AF area (when dark or
F3.3 1/30
value
(If red: Could not achieve optimal exposure → Use flash (P.36) or change ‘SENSITIVITY’
(P.51).)
Shutter speedAperture
using digital zoom)
Focus In focus Not in focus
Focus display On Flashing
AF area Green Red/white
Sound Double beep Multiple beep
Images outside of the focus range may
not be in full focus even if the light
remains on.
Problems with adjusting focus (subject not in center, etc)
Hold down
halfway
First adjust focus
according to subject
Readjust focus if not correctly adjusted initially.
Subjects/environments which may make focusing difficult:
● Fast-moving or extremely bright objects, or objects with no color contrast
● Taking pictures through glass or near objects emitting light. In dark, or with significant
jitter.
● When too close to object or when taking pictures of both distant and close objects
together in the same picture
F3.3 1/30F3.3 1/30
Return to desired
composition
Press fully
Checking remaining battery and memory capacity
300
Pictures remaining
Remaining battery
(flashes red)
(Status indicator flashes when LCD monitor is off)
Recharge or replace battery (P.14).
Not displayed when using AC adaptor (DMW-AC5PP,
sold separately).
24 VQT1B61 VQT1B61 25

Basics
1
Taking pictures (Continued)
Basics
2
Taking pictures with zoom
Picture save destination
Pictures will be saved to a card if one is inserted, or to the built-in memory if not.
300
Card
Built-in memory
Pictures may be copied between cards and the built-in memory (P.73).
It is recommended that you copy important pictures to your computer (as
electromagnetic waves, static electricity, or faults may cause data to be damaged).
Cards
Always format (P.73) cards in this camera before first use.
If the switch on the card is set to ‘LOCK’, operations such
as formatting, copying, and deleting cannot be performed.
Compatible memory cards → (P.15)
Recording picture/time capacity → (P.92)
Built-in memory (approx. 12.7 MB)
Used as a temporary save destination when you have no card.
May take longer to access than cards.
Clipboard pictures (P.58) are saved to built-in memory.
Recording picture capacity estimates (default settings)
Save destination
Pictures (DMC-TZ3) 2 68 135 270 550
Pictures (DMC-TZ2) 3 81 160 320 660
The number of pictures that may be recorded varies greatly according to aspect settings
(P.51), picture size (P.52), and quality (P.53) settings, in addition to the capacity of the
card. (For more details: P.92)
26 VQT1B61 VQT1B61 27
When in operation
are Illuminated red.
Card Built-in memory
This means that an operation is in progress, such as the
recording, reading, or deleting of pictures. Do not turn off the
power or remove the battery, card, or AC adaptor (DMWAC5PP, sold separately) (this may cause damage to or loss
of data).
Switch (LOCK)
Built-in memory memory card (Example)
12.7 MB 256 MB 512 MB 1 GB 2 GB
Subjects can be enlarged by ten times with ‘Optical zoom’ and up to 15 (13.8 ) times with
‘Extended optical zoom’. ‘Digital zoom’ can then be used to multiply this effect by four
times further. (28-280 mm: 35 mm film camera equivalent)
Enlarge (Tele) Restore (Wide)
Turn to W sideTurn to T side
Zoom types
Type Optical zoom
Max.
enlargement
Picture quality No loss No loss Deteriorates by factor of enlargement
Conditions None
Screen display
1
DMC-TZ3 only, 2 DMC-TZ2 only (Zoom ratio depends on ASPECT RATIO and PICT.SIZE.)
10x
Extended optical zoom (EZ)
1
2
, 13x
1
40x (including optical zoom: 10x)
2
60x
‘D. ZOOM’ (P.56) set to ‘ON’ in REC
menu
Displays digital zoom area
Within digital zoom area AF area
becomes larger when pressing
shutter button halfway
, 13.8x
15x
1
12.6x
, 12x, 11.6x
Select picture size
(P.52) marked with
displayed
Digital zoom
(including extended optical zoom: 15x)
What is Extended optical zoom (EZ)?
If, for example, set to ‘3M EZ’ (equivalent to 3 million pixels), a picture will only be taken
of a 3M-sized central part of a 7M (equivalent to 7.2 million pixels)
the picture can be enlarged further.
Entering digital zoom area
Once the bar stops before the digital zoom area,
continue to hold the zoom lever, or release it once
then push it again.
Bar stops momentarily
To recall zoom ratio from time power was turned off
The enlargement ratio displayed in the bar on screen is an estimate.
Adjust the focus after adjusting the zoom.
Do not block the lens barrel (P.12) movement while zooming.
Zoom cannot be adjusted during motion picture recording.
A greater degree of distortion may be generated by taking wider-angled pictures of
close objects, while using more telescopic zoom may result in more coloring appearing
around the outlines of objects.
The camera may make a rattling noise and vibrate when the zoom lever is operated – this
is not a fault.
When using extended optical zoom, zoom movement may stop momentarily near
maximum W (1x), but this is not a fault.
The Optical image stabilizer may be less effective when using digital zoom. It is
recommended that you use a tripod and the self-timer (P.35).
3 area, meaning that
3
DMC-TZ2: 6M
Digital zoom area
‘ZOOM RESUME’ (P.20)
DMC-TZ2
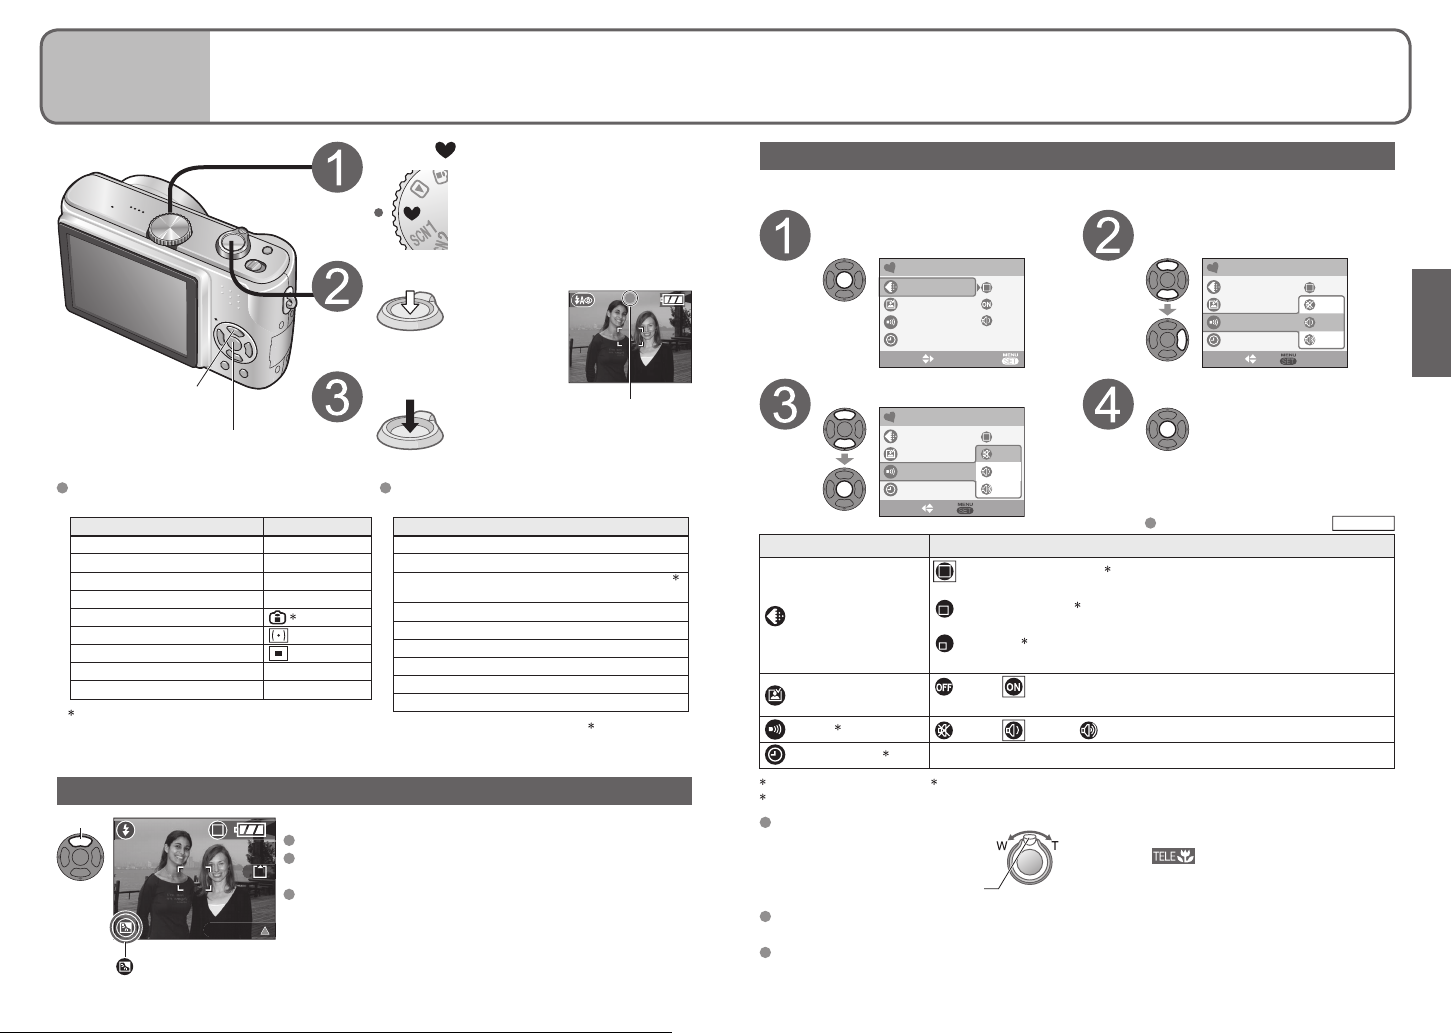
Basics
3
Taking pictures with SIMPLE
MODE
This mode is designed for beginners to easily take pictures.
Only major functions and menu items are displayed.
Set to
‘SIMPLE MODE’ menu
Use the menu to change settings such as picture quality and beep sounds.
Display SIMPLE MODE
menu
Adjust the focus
Press halfway
Backlight compensation
MENU/SET
The settings for the following functions are
Take a picture
Green when
focus aligned
Press fully
The following functions cannot be used.
fixed.
SELFTIMER (P.35) OFF/10 SEC.
POWER SAVE (P.20) 5 MIN.
STABILIZER (P.39) MODE1
W.BALANCE (P.50) AWB
SENSITIVITY (P.51)
METERING MODE (P.53)
AF MODE (P.54)
AF ASSIST LAMP (P.56) ON
COL.MODE (P.57) STANDARD
1
Same as with ISO LIMIT ‘800’ setting in
Intelligent ISO mode (P.46).
Item Setting
1
BURST mode (P.54)
Digital zoom (P.27)
Exposure compensation/AUTO BRACKET 2
(P.38)
White balance fine adjustment (P.50)
AUDIO REC. (P.53)
CONT.AF (P.55)
ECONOMY (P.20)
HIGH ANGLE (P.34)
GUIDE LINE (P.33)
Item
2
DMC-TZ3 only
Backlight compensation (SIMPLE MODE only)
Press
BACKLIGHT
Displayed when compensation is on.
28 VQT1B61 VQT1B61 29
Prevents subjects being dark when background is light.
To cancel compensation: Press ▲ again.
3
Using flash (FORCED FLASH ON) is recommended
(P.36)
Adjust using ‘EXPOSURE’ (P.38), except for in SIMPLE
MODE.
Select desired setting Finish
Item Setting
PICT.MODE
AUTO REVIEW
3
BEEP
CLOCK SET
1
6M for DMC-TZ2 model. 2 Extended optical zoom (P.27) available.
3
Settings changes reflected in other modes.
Focus range
Max. W: Distance of at least 5 cm
(0.16 feet) from subject
Flash can be set to ‘AUTO/RED-EYE’ or ‘FORCED OFF’ (‘FORCED FLASH ON’ or
‘FORCED OFF’ when using backlight compensation).
Recording picture capacity (P.92)
SIMPLE MODE
PICT.MODE
AUTO REVIEW
BEEP
CLOCK SET
SIMPLE MODE
PICT.MODE
AUTO REVIEW
BEEP
CLOCK SET
SELECT SET
EXITSELECT
OFF
LOW
HIGH
ENLARGE (4:3, 7M
for printing to 8”x10”size, letter size etc.
4”x6”/10x15cm
for printing regular sizes.
E-MAIL
2
2
(4:3, 0.3M EZ, Standard):
for attaching to emails or using in homepage.
OFF / ON:
Displays picture for approx. 1 second after taking
OFF / LOW / HIGH
3
Change the date and time (P.16)
Max. T: Distance of at least 1 m (3.28 feet)
from subject (
Zoom lever
(2 m (6.56 feet) unless max. T)
Select desired item
(Screen shows beep setting change)
SIMPLE MODE
PICT.MODE
AUTO REVIEW
BEEP
CLOCK SET
SELECT SET
Default setting outlined:
1
, Fine):
(3:2, 2.5M EZ, Standard):
displayed)
OFF
LOW
HIGH
Deleting instantly
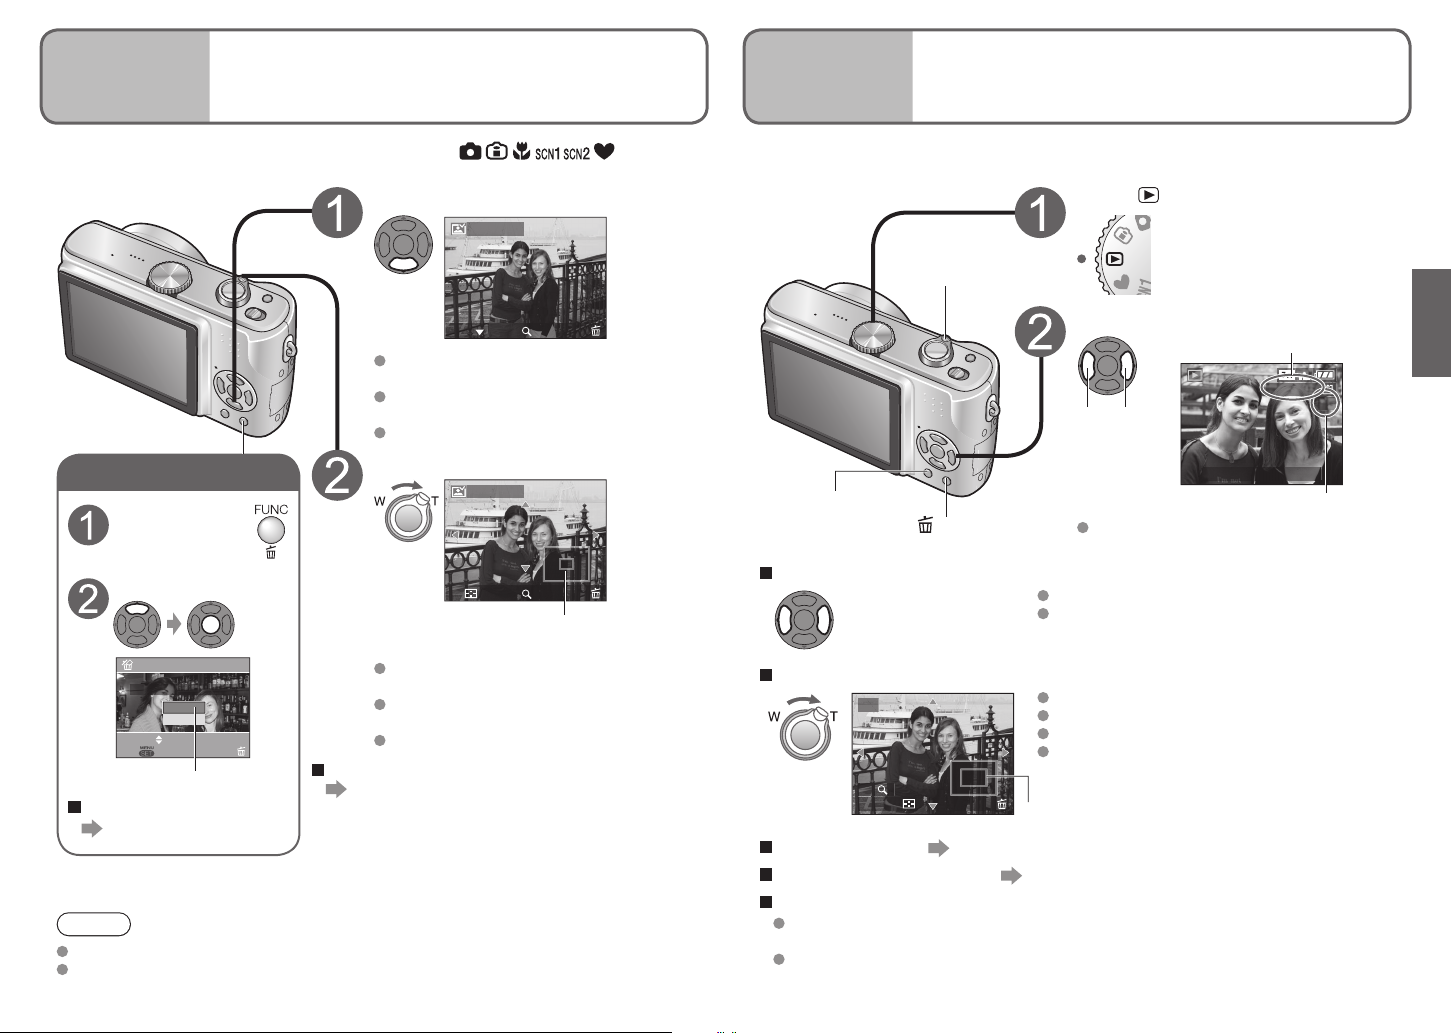
Basics
4
Viewing your pictures instantly
(REVIEW)
Pictures can be checked while still in a recording mode ( ).
Basics
5
Viewing your pictures (Play)
Display picture
REVIEW1X
When there is no card inserted, the pictures played back from the built-in memory.
(Clipboard pictures can only be played back in CLIPBOARD mode (P.59).)
Set to
Enlarge
View as list (P.61)
Scroll through pictures
File number
100-0001
Previous Next
10:00 MAR.15.2007
Picture number
Returns to the first picture after the final
picture.
Holding down increases the picture scroll rate.
Cannot be used when using ‘REVIEW’ (P.30) or
‘Multi playback’ (P.61).
Zoom ratio: 1x/2x/4x/8x/16x
To reduce zoom: Turn lever towards W side
Move zoom position: ▲▼◄►
Enlarging picture will reduce display quality.
Current zoom position (displayed for 1 sec.)
1/3
While picture is
displayed
Select ‘YES’
Highlight ‘YES’ in orange
DELETE SINGLE
DELETE THIS PICTURE?
YES
NO
SELECT
SET
MULTI/ALL
To delete several or all
(P.32)
EXIT
Most recently taken picture will be
displayed for about 10 seconds.
To close: Press ▼ or press the shutter
button halfway.
To view previous/next picture: ◄►
DELETE
4X
Enlarge picture (4x/8x)
REVIEW4X
Turn to
T side
1X
Current zoom position (displayed
for 1 sec.)
Picture is enlarged as you turn zoom lever
towards T.
To reduce zoom: Turn lever towards W
side.
To move zoom position: ▲▼◄►
To display portrait pictures vertically
(P.66)
DELETE
8X
Change information
display (P.33)
Delete (P.32)
To fast-forward (rewind)
Hold down until the desired
picture number is displayed
To enlarge (playback zoom)
2X
Turn to
T side
4X
CANCEL
DELETE
To playback as list (P.61)
To display picture vertically (P.66)
To print
Note
Deleted pictures cannot be recovered.
Motion pictures cannot be reviewed in this way. View in PLAYBACK mode (P.62).
30 VQT1B61 VQT1B61 31
Using own printer:
● Direct connection → (P.76) ● Connection via computer → (P.74)
At photo shops → Give card to shop assistant.
Basics
6
Set to PLAYBACK mode . Pictures deleted will be from card if card is inserted, or from
Basics
6
Basics
6
Deleting pictures
Basics
1
Basics
1
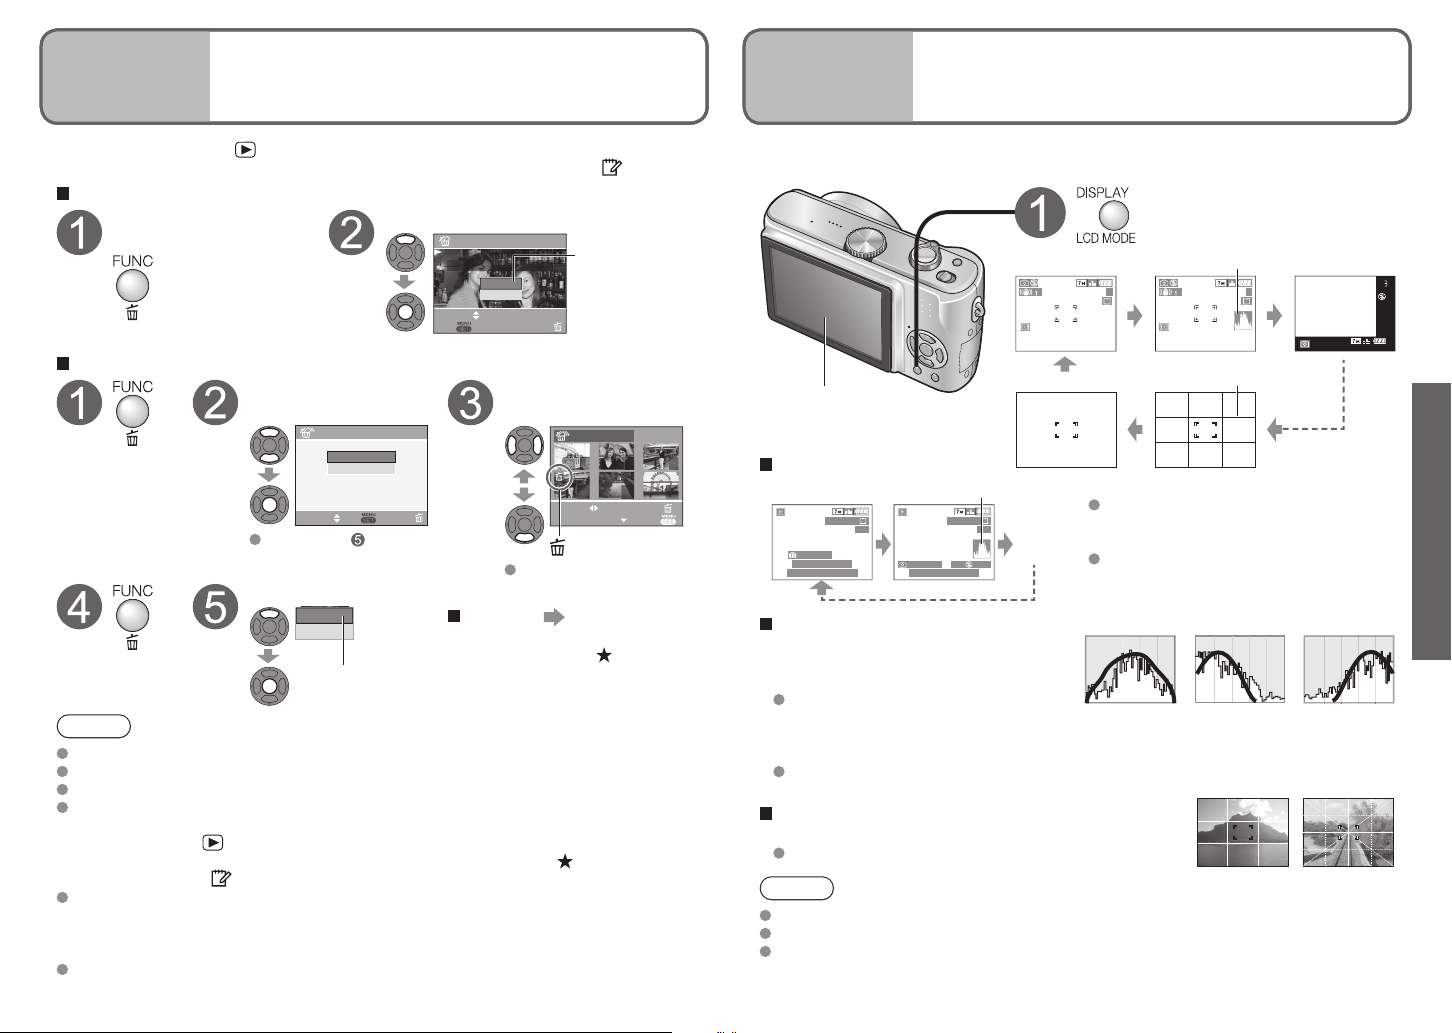
Applications
(Record)
1
Changing recording information
display
built-in memory if not. To delete clipboard pictures, set to CLIPBOARD mode .
To delete 1 picture
While picture is
displayed (P.31)
Press
To delete multiple (up to 50) or all pictures
Select type of
deletion
MULTI/ALL DELETE
Press twice
SELECT SET CANCEL
Skip to step if
selecting ‘ALL DELETE’
Select ‘YES’
MULTI DELETE
ALL DELETE
DELETE SINGLE
DELETE THIS PICTURE?
YES
NO
SELECT
SET
MULTI/ALL
Select the pictures to
delete (Repeat)
To release: Press ▼ again
Highlight ‘YES’
in orange
MULTI DELETE
7
8 9
10 11 12
SELECT
MARK/UNMARK
Picture selected
DELETE
EXIT
Select ‘YES’
Press
YES
NO
Highlight ‘YES’ in
orange
To cancel
To cancel ‘ALL DELETE’ or ‘ALL
DELETE EXCEPT ’, press
‘MENU/SET’.
Note
Deleted pictures cannot be recovered.
Do not turn off the power during deletion.
Use a sufficiently charged battery or an AC adaptor (DMW-AC5PP, sold separately).
When deleting all pictures from built-in memory, pictures actually deleted differ
according to mode.
PLAYBACK mode : All pictures in built-in memory, except clipboard picture
If ‘FAVORITE’ (P.65) setting is ‘ON’, you can ‘ALL DELETE EXCEPT (FAVORITE)’.
CLIPBOARD mode : All clipboard pictures
Pictures cannot be deleted in the following cases:
● Protected pictures (P.69) (Release the protection before deleting)
● Card switch is in ‘LOCK’ position.
● Pictures not of DCF standard (P.90)
May take time depending on number of pictures deleted.
32 VQT1B61 VQT1B61 33
Change between different LCD monitor displays, such as histograms.
Press to change display
Histogram (DMC-TZ3 only)
3 3
LCD monitor
Display in PLAYBACK mode
Histogram
100-0001
1/3
3RD DAY
1 month 10 days
10:00 MAR.15.2007
Histogram
Shows brightness of subject as graph,
useful for exposure compensation (P.38),
etc. (Display shown is an estimate.)
Histogram from time of recording
is displayed in orange if different to
histogram in playback, for example when
recording with flash or in dark locations.
Histogram may differ between times of recording and playback, or from histograms
made with image editing software.
Guide lines
Reference for composition (e.g. balance) when recording.
‘GUIDE LINE’ settings (P.20)
100-0001
ISO
1/30F3.3
10:00 MAR.15.2007
No display
During playback zoom (P.31), motion
1/3
No
display
100
AWB
picture playback (P.62), slideshow (P.64):
Display on/off
During multi playback, calendar playback
(P.61), DUAL DISPLAY (DMC-TZ3 only)
(P.64): Display cannot be changed
(Example)
OK Dark Bright
Guide lines
Note
Display cannot be changed during menu (P.17) display.
In SIMPLE MODE, display can only be turned on and off.
Histograms cannot be displayed in SIMPLE MODE (P.28), MOTION PICTURE mode
(P.47), or CLIPBOARD mode (P.58).
 Loading...