

Page 1

DIGITAL
PLEASE READ BEFORE USE AND SAVE.
KX-TM80-W
Page 2
Before Initiai Use
Please read IMPORTANT SAFETY
INSTRUCTIONS on pages 30-32 before
use.
Read and understand all instructions.
Thank you for purchasing the Panasonic automatic telephone
answering system with futi-digitai memory.
I--------------------------------------------------------1
I Attach your purchase receipt here. |
For your future reference
Serial No.
(found on the bottom of the unit)
Name and address of dealer
►To order accessories, call 1-800-332-5368.
______________________
Date of purchase
_____________________
Page 3

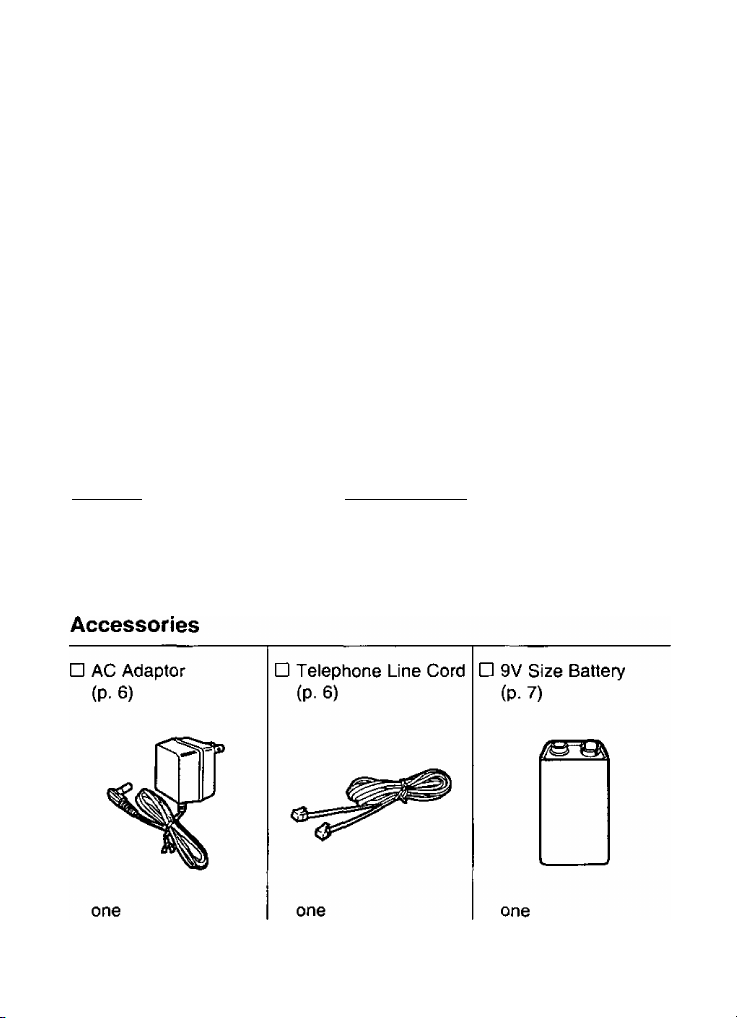
Contents
Location of Controls ................................................................... 4
Display..................................................................................... 5
Setting Up................................................................................... 6
Connection............................................................................... 6
Battery Installation................................................................... 7
_________________
Recording a Greeting Message
Day and Time Adjustment
Selecting the Number of Rings
Automatic Answering Operation ...............................................13
Setting the Unit to Answer Calls.............................................13
Listening to Messages ..............................................................14
Erasing Messages ....................................................................16
Recording a Memo Message
Remote Operation ....................................................................18
Setting the Security Code Number.........................................19
Voice Menu Operation
Direct Remote Operation
Battery Replacement.................................................................25
Before Requesting Help ...........................................................26
FCC and Other Information.......................................................28
..........................................................
.............................................
....................................................
.............................................
...................................................
.......................................................
10'
12
17
20
22
8
Important Safety Instructions
....................................................
30
3
Page 4

Looaiifloini of CoBHiroSs
Display
Page 5

Display
The battery is not installed or battery power
is low. Install a new battery (p. 7, 25).
u
C
I u
on
. r
I L
c4u5i
n
~CAUS]
~CALL§\
1
CALLi\
~caHS\
The answering function is turned on and no
messages are recorded.
The answering function is turned off.
3 messages have been recorded.
3 messages including new message(s)
have been recorded (p. 14).
Memory is full. Erase some or all messages
(P- 16).
The unit is answering an outside call.
The unit is being operated from a remote
phone.
Page 6

Connection
OUSE ONLY Panasonic AC ADAPTOR KX-A17.
oThe AC adaptor must remain connected at all times. (It may feel warm
during use. This is normal.)
oTo prevent misoperation, do not connect a pulse telephone (20 pps) to
the same line.
Page 7
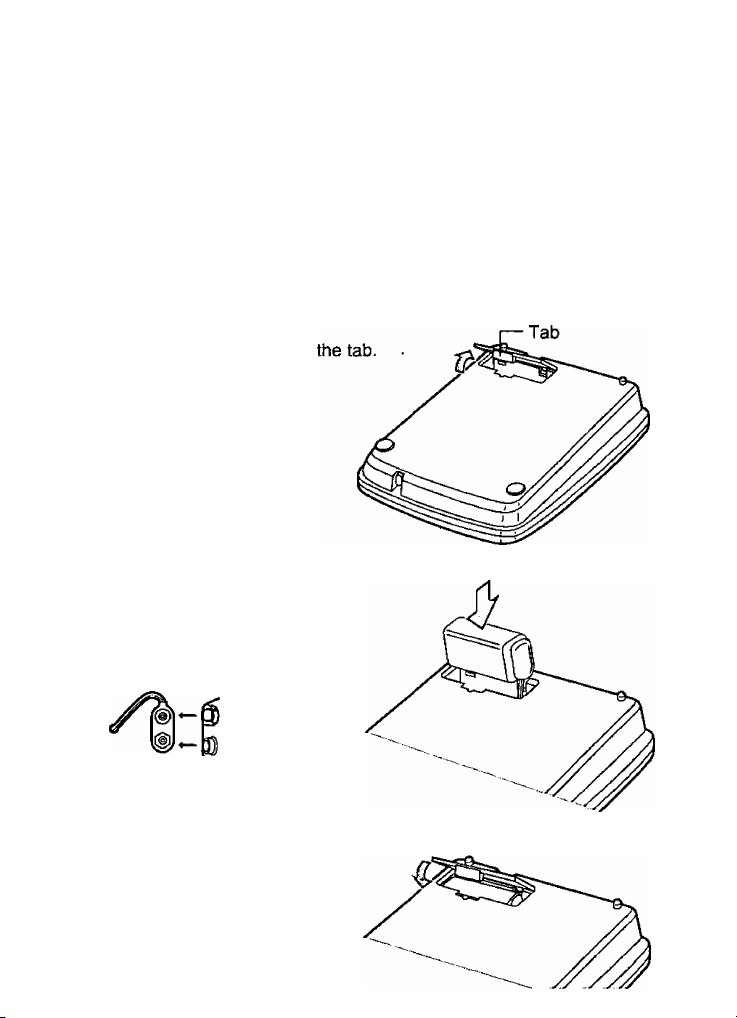
Battery Installation
Install the included 9V size battery in the unit.
If the battery power is low or the battery is not installed, “Lo” flashes.
Replace with a new one. (If “Lo” flashes after installing a new battery, it will
disappear after 10 seconds. Simply disconnect the AC adaptor cord and
reinsert it again without removing the battery.)
The new battery’s retention time is approximately 1 day for recorded
messages and the clock {p. 10) during a power failure.
Open the cover by pushing
1
Install the battery in the battery compartment.
Snap on the terminals of
the battery to the battery
clip.
Close the cover.
Page 8
[) Setting Up
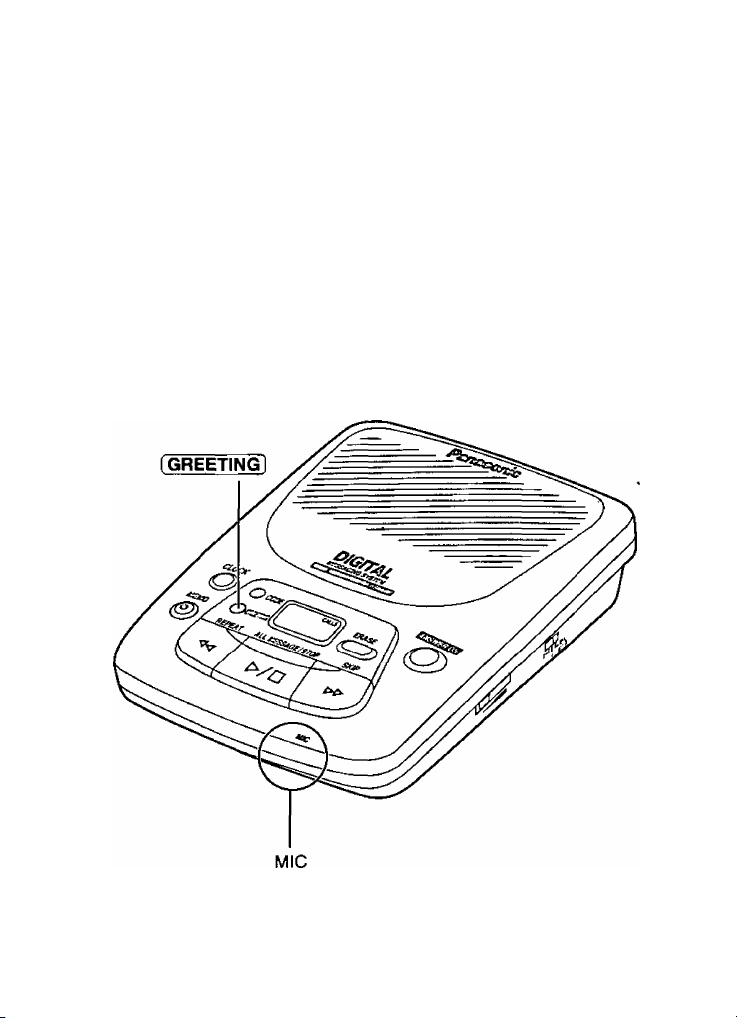
Recording a Greeting Message
You must record a greeting message (announcement) up to 30 seconds. It
a greeting message is not recorded, the unit will not answer calls.
All messages (greeting, incoming, memo, etc.) are stored in digital
memory. Total recording time is about 10 minutes. (The caller’s recording
time is up to 1 minute.)
We recommend you record a brief greeting message leaving more time
in memory.
Page 9

Press and hold (greeting).
1
After a long beep, speak clearly 20 cm (8") away from the MIC
(microphone) pressing (GREETING).
oThe display counts down the remaining recording time.
When finished, release (GREETING).
oA short beep sounds and the recorded greeting message is played.
oTo change the greeting message, repeat from step 1.
To check the greeting message
Press and release (GREETING).
oThe recorded greeting is played.
©Press (GREETING) again to stop playback.
o“A/o announcement" is heard if a greeting message has not been
recorded.
Sample of greeting message
“Hello, this is (your name and/or number). Sorry, I cannot take your call.
Please leave a message after the long beep. (Your recording time is
1 minute.) Thank you."
Page 10

i) Setting Up
Day and Time Adjustment
Voice Day/Time Stamp: During playback a synthesized voice will
announce the day and time when each message was recorded.
10
Page 11

Press and hold (clock] until a long beep is heard.
1
oThe previously set day is heard and displayed.
Press (SKIP] or [REPEAT] until the current day is announced and
displayed. Display
^1: Sunday 2: Monday
Press and release (CLOCK).
oA beep and “AM" or “PM" is heard and the previously set hour is
displayed.
Press (SKIP] or [REPEAT] until the current hour is displayed.
o“AM” or “PM" is heard when changed to AM or PM.
Press and release (CLOCK).
oA beep is heard and the previously set minute is displayed.
Press [SKIP] or (REPEAT] until the current minute is displayed.
6
©Pressing and holding (SKIP) or (REPEAT) will change the minute
display quickly.
"J Press and release [CLOCK],
©The current day/time is heard.
........................
i
H 7: Saturday
>lf you did not complete each step within 8 seconds, the unit will end the
programming mode automatically. Start from step 1.
»The accuracy of the clock is approximately ±60 seconds a month at
room temperature.
To check the day/time
Press and release (CLOCK].
ll
Page 12

[) Setting Up
Selecting the Number of Rings
You can select the number of rings before your answering system
answers a call, “2",“4” or “TOLL SAVER (Factory preset)”.
Set the RINGER Selector to 2, 4 or TOLL SAVER.
2: The unit answers a call after the 2nd ring.
4: The unit answers a call after the 4th ring.
TOLL SAVER: Toll Saver function is selected.
Toll Saver
When you call the unit from a touch tone telephone:
If the unit answers after the 2nd ring; There is at least one new
message*.
If the unit answers after the 4th ring; There are no new messages.
Hang up immediately when you hear the 3rd ring. This saves you
the toll charge for the call.
*lf you have not listened to the day/time stamp at the end of the new
message, the message is still treated as a new message and the
unit answers the call after the 2nd ring.
12
Page 13

Aytomatic AnswerSing Operatiomi
When a call is received, the unit plays back your greeting message and
records the caller’s incoming message.
The caller’s recording time is up to 1 minute. {The unit will send a short
beep at 55 seconds, then 3 short beeps at the end of 1 minute to alert the
caller.)
o|f no greeting message has been recorded, the unit will not answer
calls.
oThe total recording time {including the greeting message) is about
10 minutes.
oA maximum of 62 messages can be recorded.
o|f the remaining recording time is less than 30 seconds or the unit
records 62 messages, the display will show “Fu”. The unit will answer
the call after 15 rings and announce “Memory is full", then terminate
after 8 seconds. Erase some or all messages (p. 16).
Setting the Unit to Answer Calls
Press (ANSWER ON] to turn on the answering function.
oThe display shows “0" and “Answer function
is ON.” is heard.
o|f you do not want the unit to answer calls,
press [ANSWER ON] again to turn off.
The display shows “
-----------
” and “Answer
[Answer ON)
Page 14

LDStening t© iViessages
When new incoming messages have been recorded, the display shows the
total number of recorded messages and the NEW MESSAGE indicator
lights.
Press and release [all message/stoFI to listen to all the recorded
messages.
oThe unit announces the number of incoming messages and plays them
back.
oTo listen to only the new messages you can skip the reviewed message
by pressing [SKIP}.
o|f there are no messages, “No message" is heard.
oAt the end of the last message “End of message(s)” is heard.
oAli of the recorded messages are saved until you erase them.
14
Page 15

During playback:
To repeat
the message
To skip
the message
To stop
the operation
oA tone is heard after you press any of the above keys.
Press and release (REPEAT) to repeat the
current message.
Press and hold (REPEAT) for 2 seconds to
repeat the previous message.
Press and release (SKIP) to skip to the next
message.
Press and release (ALL MKSAGE/STOP) to
stop playback.
Monitoring incoming calls
While a call is being recorded, you can monitor it through the speaker.
To answer the call, lift the handset of the telephone connected to the same
line.
oYou can adjust the volume by using the VOLUME selector {p. 14).
o|f the answering machine does not stop working when you lift the
handset, press [ ALL^ESSAGE/STOP ].
15
Page 16

Erasing a specific message
You may erase a specific message in memory.
Press and release [ERASE) while the message you want to erase is being
played.
oA tone is heard.
oThe unit erases the message.
oThe unit continues to play the next message.
Erasing ali messages
You may erase all the recorded messages in memory after listening to
them. If there are any messages in memory you have not listened to, the
unit announces “A/ew messages” and you cannot erase them.
Press and hold [ERASE] until a long beep is heard while the message is
not being played.
oThe display shows “0”.
*lf you have not listened to the day/time stamp at the end of the new
message (For example, you have skipped/stopped new message
playback by pressing [SKiPViSTOPU. the message remains a new
message.
*lf the NEW MESSAGE indicator is lit, there is a new message.
16
Page 17

Recordnog ai iVilemo EViessag©
You may record a personal message in memory.
Press and release
oA long beep is heard.
2 After the long beep, speak clearly into the MIC (microphone).
oJhe display counts up the recording time.
0 When finished, press [MEMO],
oA beep is heard.
o|f your memo message is less than 1 second, 3 beeps will be heard and
it can not be recorded.
17
Page 18

¡Remote Operation
You can operate the answering function from any touch tone phone.
The synthesized voice menu will guide on you how to operate the unit
(p. 20).
Summary of remote operation
oDo not press “#” button for a few seconds. Some long distance services
use “#" for other purposes and these services may take priority over the
remote operation.
oFor your convenience, you can use a dial card on pages 33-34.
oEven if the voice menu has started, other command buttons can be used.
©During message playback, only 7, 8, 9, 0 and * keys can be used.
18
Page 19

Setting the Security Code Number
The security code prevents unauthorized persons from accessing your unit
and listening to your messages. Choose any 3-digit number (111-999).
Factory preset is “888”.
Press and hold [CODE] until a long beep is heard.
1
©The display flashes the 1st digit number preset.
Press [SKIP] or [REPEAT] until the desired number is displayed.
2
Press and release [CODE).
3
©A beep is heard.
©The display flashes the 2nd digit number preset.
Repeat steps 2 and 3 to set the 2nd digit number.
©A beep is heard.
©The display flashes the 3rd digit number preset.
Repeat steps 2 and 3 to set the 3rd digit number.
©A beep is heard.
To check the security
code number
Press and release [code].
©The current security code
number is displayed
digit by digit.
CODE
Page 20

[) Remote Operation
Voice Menu Operation
Call your unit.
Enter your security code.
i
Press 1 to play messages.
Press 2 to play announcement
{Greeting message).
Press 4 to record message
(Memo message).
Press 0 to stop.
Press [^.
——-£>J
Press 0.
—&H
Press 7 to play previous
message.
Press 8 to repeat message.
Press 9 to skip message.
Press -X- to erase.
Press 0 to stop.
o|f you want to skip this
voice menu, press 0.
Play announcement.
Record message.
Press 3 for other voice menu.
Press 5 to record new
announcement {Greeting
message).
Press 6 for room monitor.
Press # to answer off.
Press 0 to stop.
Press 3 for other voice menu.
20
Press [^.
Press [^.
Press [^.
Press [s].
Press 0.
Press
C>- Record announcement.
r
__
Room monitor
\
Answer function is off.
\
Page 21

Message playback
The unit plays back all the recorded messages. At the end
of the last message, ‘"End of messages" is heard.
Greeting Message (announcement) playback
The unit plays back the greeting message.
Recording a Memo Message
Record your personal message. When finished, press j^.
Current operation stop
The unit stops the current operation. Press another function
key.
Recording a Greeting Message (announcement)
Re-record your greeting message. When finished,
press [^.
Room Monitor
You can monitor the sound around the unit for about
15 seconds.
Turning off the answering system.
The unit is turned off and cannot record message.
21
Page 22

[> Remote Operation
Direct Remote Operation
Once you have entered your security code, you can also control your unit
by direct remote command instead of using the voice menu. To end the
remote operation, hang up.
List of the direct command
MESSAGE
PLAYBACK
GREETING
MESSAGE
PLAYBACK
NEXT VOICE
MENU
MEMO
MESSAGE
RECORDING
GREETING
MESSAGE
RECORDING
ROOM
MONITOR
PREVIOUS
MESSAGE LZ-
PLAYBACK
{During
playback)
oAll the recorded messages are played back.
2
oThe current greeting message
(announcement) is played.
oThe next voice menu is played.
S
oYou can leave your own message (up to
s
5
1 minute) after “Record Message." and a
long beep is heard.
When finished press
oYou can record a new greeting message (up
to 30 seconds) after “Record
announcement." and a long beep is heard.
When finished press
oAfter “Room monitor” is heard you can
monitor the sound around the unit for
15 seconds.
To continue press 0 again.
oThe previous message is played back.
22
Page 23

REPEAT
(During 1 0
playback)
oThe current message is repeated from the
beginning.
SKIP m
(During LZJ
playback)
STOP
ERASE
(During
playback)
ANSWERING
FUNCTION
OFF
u
©The current message is skipped and the next
message is played.
©The current operation is stopped. Press
another function key.
©The current message is erased.
©The answering function is turned off.
"Answer function is off" is heard.
23
Page 24

[) Remote Operation
Turning on the answering function
Ci) Call your unit and wait for 15 rings.
oThe unit answers and “Answer function is off.” is heard. (If no greeting
message has been recorded, 3 beeps are heard. Record the greeting
message*.)
(2) Enter your security code.
When you hear the voice menu, hang up or enter the direct command.
—*lf no greeting message has been recorded,
® Call your unit and wait for 15 rings.
oThe unit answers and 3 beeps are heard.
(g) Enter your security code.
©Voice menu starts.
(3) Press (T).
@ After “Record announcement." and a long beep is heard, record a
•greeting message (up to 30 seconds).
eg) Press 0.
(§) Hang up.
When memory is full
The unit will answer after the 15th ring and announce “Memory is full.”.
After 8 seconds the unit will automatically terminate the call.
To record new incoming messages;
CD Call your unit and wait for 15 rings.
o“Memory is full." is heard.
@ Enter your security code.
©Voice menu starts.
@ Press [T] to play back recorded messages.
@ Press @ to erase messages.
(5) Hang up.
24
Page 25

Batfiery Replacememit
If the battery power is low, “Lo" flashes. Replace with a new one. (If “Lo”
flashes after installing a new battery, it will disappear after 10 seconds.
Simply disconnect the AC adaptor cord and reinsert it again without
removing the battery.)
The new battery’s retention time is approximately 1 day for recorded
messages and the clock (p. 10) during a power failure.
Open the cover and install the battery. Then close the cover (p. 7).
Snap on the terminals of
the battery to the battery
clip.
Precautions:
The battery should be used correctly, otherwise the unit may be
damaged due to battery leakage.
*Do not charge, short-circuit, disassemble, heat or dispose in fire.
®To avoid losing your greeting and messages saved in memory, the
AC adaptor must remain connected.
»Disconnect the telephone line cord before opening the battery
compartment cover.
»Replace the battery with a new one once a year to prevent
operation failures.
®Do not install a Nickel-Cadmium battery in the unit.
25
Page 26

Before Reqyestimig Help
Problem Remedy
The unit does not work. oCheck the setting up (p. 6).
©Check power source.
During message playback or
monitoring a cal) no sounds
are heard.
You can not record a
greeting message.
Any sounds (announcement,
beep etc.) are not heard from
the unit.
3 short beeps are heard
when operating the unit.
The answering function is on,
but no messages are
recorded.
You can not erase all the
messages and “New
messaged is heard.
When you lift the handset of
the branch telephone after
the unit answers a cal), the
greeting does not stop.
©Adjust the VOLUME selector.
©Connect ONLY Panasonic AC
ADAPTOR KX-A17.
©The unit rejected your code or
operation. Try again.
©Record the greeting message (p. 8).
©Memory is full. Erase some or all
messages.
©Listen to all the messages and
day/time stamps and try again.
©Press [ALL MESSAGE/STOPI. then vou
can answer a call (p. 15).
26
Page 27

Problem
You cannot operate the
answering function from a
touch tone phone.
Remedy
oTurn the answering function on (p. 24).
©Press your correct security code.
©Press a button after the greeting
message playback and a long beep.
©Press each button for more than
1 second to produce a long tone.
©In some areas, a remote touch tone
phone may not function due to
telephone line conditions.
1 cannot turn the unit on from
the touch tone phone.
“Lo" is flashing on the
display.
After a power failure the
greeting message is lost.
“Lo” is still flashing on the
display even when installing
a new battery.
While operating the unit, the
AC adaptor feels warm.
1 cannot use the unit during a
power failure.
If you cannot solve your
problem.
©If no greeting message has been
recorded, you can not turn on the unit.
Record the greeting message before
hanging up (p. 24).
©A battery is not installed in the unit or
battery power is low. Install a new
battery (p. 7, 25).
©Disconnect the AC adaptor cord and
then reinsert it without removing the
battery, “Lo" will disappear after
10 seconds.
©These are normal conditions.
©Call our customer satisfaction center at
201-348-9090.
27
Page 28

FCC aod OSher
If requested by the telephone
company, inform them as follows:
FCC Registration No.
(found on the bottom of the unit)
Ringer Equivalence ......................0.1 B
The particular telephone line to
which the equipment is connected.
This unit must not be connected to
a coin operated line.
If you are on a party line, check
with your local telephone company.
Ringer Equivalence No. (REN):
The REN is useful in determining
the quantity of devices you may
connect to your telephone line and
still have all of those devices ring
when your telephone number is
called. In most, but not all areas,
the sum of the REN’s of all devices
connected to one line should not
exceed five (5.0). To be certain of
the number of devices you may
connect to your line, as determined
by the REN, you should contact
your local telephone company to
determine the maximum REN for
your calling area.
In the event terminal equipment
causes harm to the telephone
network, the telephone company
should notify the customer, if
possible, that service may be
stopped.
However, where prior notice is
impractical, the company may
temporarily cease service providing
that they:
(a) Promptly notify the customer.
(b) Give the customer an
opportunity to correct the
problem with their equipment.
(c) Inform the customer of the right
to bring a complaint to the
Federal Communication
Commission pursuant to
procedures set out in FCC
Rules and Regulations
Subpart E of Part 68.
The Telephone Company may
make changes in its
communications facilities,
equipment, operations or
procedures, where such action is
reasonably required in the
operation of its business and is not
inconsistent with the rules and
regulations in FCC Part 68.
If such changes can be reasonably
expected to render any customer
terminal equipment incompatible
with telephone company
communications facilities, or require
modification or alteration of such
terminal equipment, or otherwise
materially affect its use or
performance, the customer shall be
given adequate notice in writing, to
allow the customer an opportunity
to maintain uninterrupted service.
When programming emergency
numbers and/or making test calls to
emergency numbers:
1. Remain on the line and briefly
explain to the dispatcher the
reason for the call before
hanging up.
2. Perform such activities in the offpeak hours, such as early
morning hours or late evenings.
28
Page 29

CAUTION:
Any changes or modifications not
expressly approved by the party
responsible for compliance could
void the user’s authority to operate
this device.
This device complies with Part 15
of the FCC Rules. Operation is
subject to the following two
conditions: (1) This device may not
cause harmful interference, and (2)
this device must accept any
interference received, including
interference that may cause
undesired operation.
Note:
This equipment has been tested
and found to comply with the limits
for a Class B digital device,
pursuant to Part 15 of the FCC
Rules. These limits are designed to
provide reasonable protection
against harmful interference in a
residential installation. This
equipment generates, uses, and
can radiate radio frequency energy
and, if not installed and used in
accordance with the instructions,
may cause harmful interference to
radio communications. However,
there is no guarantee that
interference will not occur in a
particular installation. If this
equipment does cause harmful
interference to radio or television
reception, which can be determined
by turning the equipment off and
on, the user is encouraged to try to
correct the interference by one or
more of the following measures;
—Reorient or relocate the receiving
antenna.
—Increase the separation between
the equipment and receiver.
—Connect the equipment into an
outlet on a circuit different from
that to which the receiver is
connected.
—Consult the dealer or an
experienced radioAV technician
for help.
oEnvironment—do not place the
unit in rooms where the
temperature is less than 5'’C
(41“F) or greater than 40°C
(104'’F). AllowlOcm (4")
clearance around the unit for
proper ventilation. Avoid
excessive smoke, dust,
mechanical vibration, shock, or
direct sunlight.
o Routine care—wipe the unit with
a soft cloth. Do not use benzine,
thinner, or any abrasive powder.
When you left the unit unused for
long time, unplug the AC adaptor
from the outlet.
o|f there is any trouble—
disconnect the unit from the
telephone line and connect a
known working phone. If the
known working jDhone operates
properly, have your unit repaired
by one of the authorized
Panasonic Factory Service
Centers. If the known working
phone does not operate properly,
consult with your telephone
company.
29
Page 30

lÛOS
When using this unit, basic
safety precautions should
always be followed to reduce
the risk of fire, electric shock, or
personal injury.
1. Read and understand all
instructions.
2. Follow all warnings and
instructions marked on this
unit.
3. Unplug this unit from AC
outlets before cleaning. Do
not use liquid or aerosol
cleaners. Use a damp cloth
for cleaning.
4. Do not use this unit near
water, for example, near a
bath tub, wash bowl, kitchen
sink, or the like.
5. Place this unit securely on a
stable surface. Serious
damage and/or injury may
result if the unit falls.
6. Do not cover slots and
openings on the unit. They
are provided for ventilation
and protection against
overheating. Never place the
unit near radiators, or in a
place where proper
ventilation is not provided.
7. Use only the power source
marked on the unit. If you
are not sure of the type of
power supplied to your
home, consult your dealer or
local power company.
8. Do not place objects on the
power cord. Install the unit
where no one can step or
trip on the cord.
9. Do not overload wall outlets
and extension cords. This
can result in the risk of fire
or electric shock.
10. Never push any objects
through slots in this unit.
This may result in the risk of
fire or electric shock. Never
spill any liquid on the unit.
11. To reduce the risk of electric
shock, do not disassemble
this unit. Take the unit to an
authorized servicenter when
service is required. Opening
or removing covers may
expose you to dangerous
voltages or other risks.
Incorrect reassembly can
cause electric shock when
the unit is subsequently
used.
12. Unplug this unit from the
wall outlet and refer
servicing to an authorized
servicenter when the
following conditions occur:
A. When the power supply
cord or plug is damaged
or frayed.
B. If liquid has been spilled
into the unit.
30
Page 31

C. If the unit has been
exposed to rain or water.
D. If the unit does not work
normally by following the
operating instructions.
Adjust only controls
covered by the operating
instructions. Improper
adjustment may require
extensive work by an
authorized servicenter.
E. If the unit has been
dropped or physically
damaged.
F. If the unit exhibits a
distinct change in
performance.
13. During thunderstorms, avoid
using telephones except
cordless types. There may
be a remote risk of an
electric shock from lightning.
14. Do not use this unit to report
a gas leak, when in the
vicinity of the leak.
SAVE THESE
INSTRUCTIONS
CAUTION:
To reduce the risk of fire or
injury to persons, read and
follow these instructions.
1. Use only the battery
specified.
2. Do not dispose of the battery
in a fire. They may explode.
Check with local waste
management codes for
special disposal instructions.
3. Do not open or mutilate the
battery. Released electrolyte
is corrosive and may cause
burns or injury to the eyes or
skin. The electrolyte may be
toxic if swallowed.
4. Exercise care in handling
battery in order not to short
the battery to conductive
materials such as rings,
bracelets, and keys. The
battery and/or conductor
may overheat and cause
burns.
5. Do not recharge the battery
provided with or identified for
use with this product. The
battery may leak corrosive
electrolyte or explode.
6. Do not attempt to rejuvenate
the battery provided with or
identified for use with this
product by heating. Sudden
release of battery electrolyte
may occur causing burns or
31
Page 32

irritation to the eyes or skin.
Remove the battery from
7.
this product if the product
will not be used for a long
period of time (several
months or more). During this
time the battery could leak in
the product.
Discard the “dead” battery
8.
as soon as possible. A
“dead” battery may leak in
the product.
9.
Do not store this product, or
the battery provided with or
identified for use with this
product, in high temperature
areas. Battery that are
stored in a freezer or
refrigerator for the purpose
of extending shelf life should
be protected from
condensation during storage
and defrosting. Battery
should be stabilized at room
temperature prior to use
after cold storage.
WARNING:
TO PREVENT FIRE OR
SHOCK HAZARD, DO NOT
EXPOSE THIS PRODUCT TO
RAIN OR ANY TYPE OF
MOISTURE.
32
Page 33

OPERATION FROM TONE PHONE
•When you press a button, press firmly
for more than 1 second.
To record your memo message (up to
1 minute),
(5) Press 0CD Speak after a long beep.
(D When finished, press
To re-record the greeting message (up
to 30 seconds),
® Press [5].
@ Speak after a long beep.
@ When finished, press
33
Page 34

(
-----
--------------------------------------
No.
1 Piaying Message
2 Playing Back Greeting Message
3 Playing Next Voice Menu
4
5 Recording New Greeting
6 Room Monitor
7
8
9
0
* Erasing the Message
Li_
34
Remote Command
Recording Memo Message
Message
Previous Message Playback
Repeat the Message
Skip the Message
Stop the Operation
Answer Off
_________________________
\
To turn the answering function on
® Call your unit and wait for 15 rings.
(2) Enter your security code.
@ When you hear the voice menu,
hang up or enter the direct
command.
o|f the greeting message is not
recorded, record it before hanging
up.
/
Page 35

For product service
• Panasonic Servicenters are listed in the servicenter directory.
•Call 1-800-545-2672 for the location of an authorized servicenter.
When you ship the product
•Carefully pack your unit, preferably in the original carton.
•Attach a letter, detailing the symptom, to the outside of the carton.
Symptom
•Send the unit to an authorized servicenter, prepaid and adequately
insured.
•Do not send your unit to the Matsushita Consumer Electronics Company
listed on the next page or to executive or regional sales offices. These
locations do not repair consumer products.
35
Page 36

Matsushita Consumer Electronics Company,
Division of Matsushita Electric Corporation of America
One Panasonic Way, Secaucus, New Jersey 07094
Panasonic Sales Company (“PSC”),
Division of Matsushita Electric of Puerto Rico, Inc.
Ave. 65 de Infantería, Km. 9.5, San Gabriel Industrial Park
Carolina, Puerto Rico 00985
Printed in Taiwan
PQQX11597ZA-BO F0296H0 ©
 Loading...