

Page 1
Digital Answering System
Model No.
KX-TM150ALB
Operating Instructions
PLEASE READ BEFORE USE AND SAVE.
DIGITAL
Caller ID Compatibility
PQQX12356ZA-BM 01.3.22 3:56 PM y[W 1
Page 2
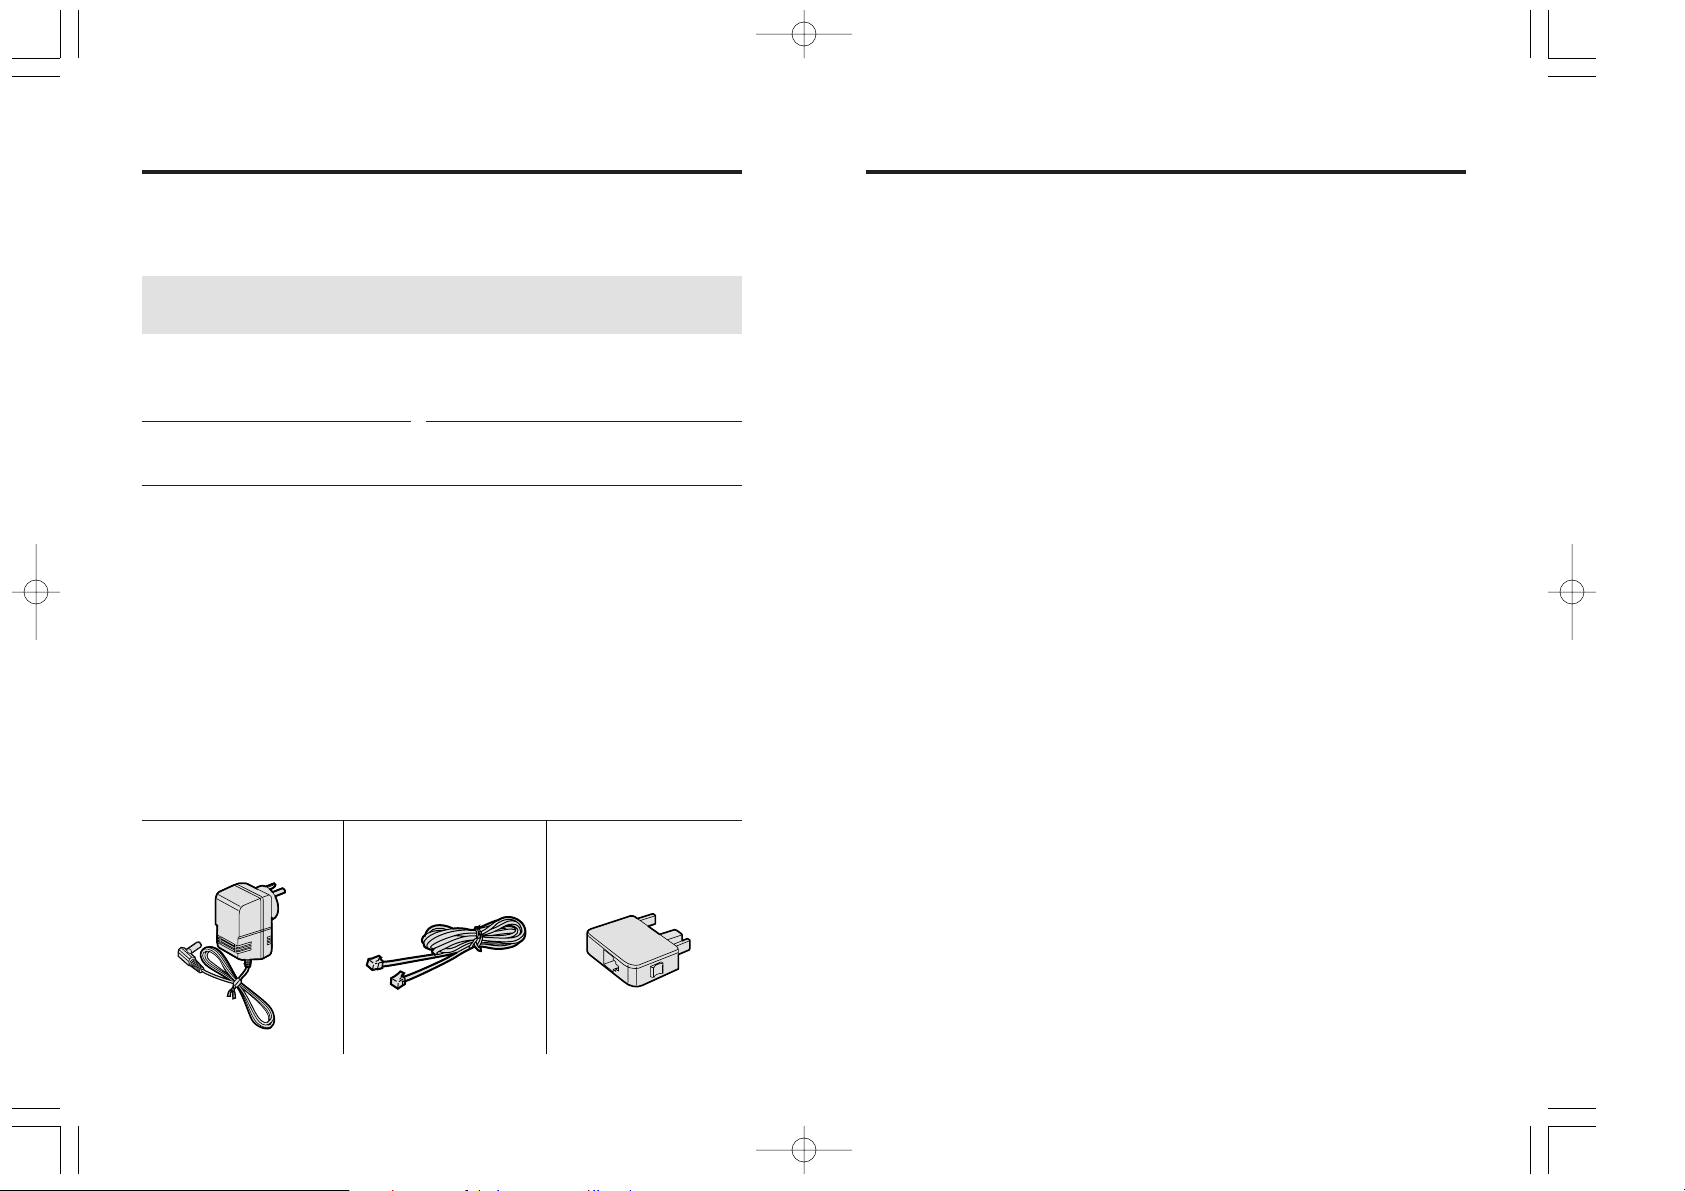
∑ AC Adaptor (p. 7)
one
∑ Telephone Line
Cord (p. 7)
one
For Australia only
∑ Telephone Plug
(p. 7)
one
Before Initial Use Contents
2 3
Thank you for purchasing your new Panasonic digital
answering system.
Serial No. Date of purchase
(found on the bottom of the unit)
Name and address of dealer
Accessories (included)
For your future reference
Location of Controls . . . . . . . . . . . . . . . . . . . . . . . . . . . . . . 4
Display. . . . . . . . . . . . . . . . . . . . . . . . . . . . . . . . . . . . . . . . . 5
Settings . . . . . . . . . . . . . . . . . . . . . . . . . . . . . . . . . . . . . . . . 7
Connections. . . . . . . . . . . . . . . . . . . . . . . . . . . . . . . . . . . . 7
Greeting Message . . . . . . . . . . . . . . . . . . . . . . . . . . . . . . . 8
Programming Summary . . . . . . . . . . . . . . . . . . . . . . . . . . . 10
Day and Time Adjustment . . . . . . . . . . . . . . . . . . . . . . . . . 11
Selecting the Number of Rings. . . . . . . . . . . . . . . . . . . . . . 12
Automatic Answering Operation . . . . . . . . . . . . . . . . . . . . 13
Setting the Unit to Answer Calls. . . . . . . . . . . . . . . . . . . . . 13
Listening to Messages . . . . . . . . . . . . . . . . . . . . . . . . . . . . 15
Erasing Messages. . . . . . . . . . . . . . . . . . . . . . . . . . . . . . . . 17
Recording Your Telephone Conversation . . . . . . . . . . . . . 18
Caller ID Service . . . . . . . . . . . . . . . . . . . . . . . . . . . . . . . . . 19
Using the Caller List . . . . . . . . . . . . . . . . . . . . . . . . . . . . . . 20
Viewing the Caller List . . . . . . . . . . . . . . . . . . . . . . . . . . . . 20
Calling Back from the Caller List. . . . . . . . . . . . . . . . . . . . . 22
Editing the Caller’s Phone Number. . . . . . . . . . . . . . . . . . . 23
Erasing the Caller List Information . . . . . . . . . . . . . . . . . . . 24
Remote Operation from a Touch Tone Phone. . . . . . . . . . 25
Setting the Remote Code. . . . . . . . . . . . . . . . . . . . . . . . . . 25
Voice Menu . . . . . . . . . . . . . . . . . . . . . . . . . . . . . . . . . . . . 26
Direct Remote Operation . . . . . . . . . . . . . . . . . . . . . . . . . . 28
Before Requesting Help . . . . . . . . . . . . . . . . . . . . . . . . . . . 30
Safety Instructions . . . . . . . . . . . . . . . . . . . . . . . . . . . . . . . 32
Important Information (For Australia only) . . . . . . . . . . . . 34
After subscribing to Caller ID Service from your telephone operator
(where available), this unit will display a caller’s phone number.
Attach or keep original receipt to assist with any repair under warranty.
PQQX12356ZA-BM 01.3.22 3:56 PM y[W 2
Page 3

5
Display “
4
Location of Controls
SUN 12:00AM
5 new calls
10 messages
SUN 12:00AM
0 message
No items stored
5 new calls
X=New W=Old
0211115555
In the stand-by mode, the display shows the
current day and time, the number of new calls and
recorded messages. (Ex. 5 new calls have been
received and 10 messages have been recorded.)
When the clock needs adjusting, the day and time
flash (p. 11).
The Caller List is empty.
This display will be shown when
(CALLER\ID/DIAL)
is pressed. To search from the most recent call,
press VOLUME/SEARCH (_) (New key). To
search from the oldest call, press
VOLUME/SEARCH (^) (Old key) (p. 20).
When a call is received, the display shows the
caller’s phone number after the first ring.
0355667788
11:20A JAN12 a3
This is an example of information from the Caller
List.
The display shows:
—the caller’s phone number,
—the time and date of the last call
(Ex. Jan. 12, 11:20 AM), and
—the number of times called (Ex. 3 times).
MESSAGING SYSTEM
FUNCTION/EDIT
REC
CALLER ID/DIAL
2WAY REC
ERASE
REPEAT
VOLUME/SEARCH
SKIP
FF
REW
STOP
NEW MESSAGE
ANSWER
CHECK
MIC
GREETING
VOICE MENU
/
TIME DAY STAMP
CALLER ID
ANSWER ON
VOLUME/SEARCH (^), (_)
Buttons (p. 10, 14, 15, 20)
ANSWER Indicator (p. 13, 15, 17)
Display (p. 5)
(FUNCTION/EDIT) Button
(p. 10, 23)
(GREETING\REC)
(Record) Button (p. 8)
(CALLER\ID/DIAL) Button (p. 20)
(ANSWER\ON) Button (p. 13)
(GREETING\CHECK)
Button (p. 9)
(ERASE) Button
(p. 9, 17, 24)
(2WAY\REC) (Record)
Button (p. 18)
MIC (Microphone)
(p. 8)
(STOP) Button
(p. 8, 10, 14,
16, 18, 20)
(NEW\MESSAGE) Button (p. 15, 18)
(SKIP/FF) (Fast Forward) Button (p. 11, 16)
(REPEAT/REW) (Rewind) Button (p. 11, 16)
012345678901234
56789
PQQX12356ZA-BM 01.3.22 3:56 PM y[W 4
Page 4
7
Settings “
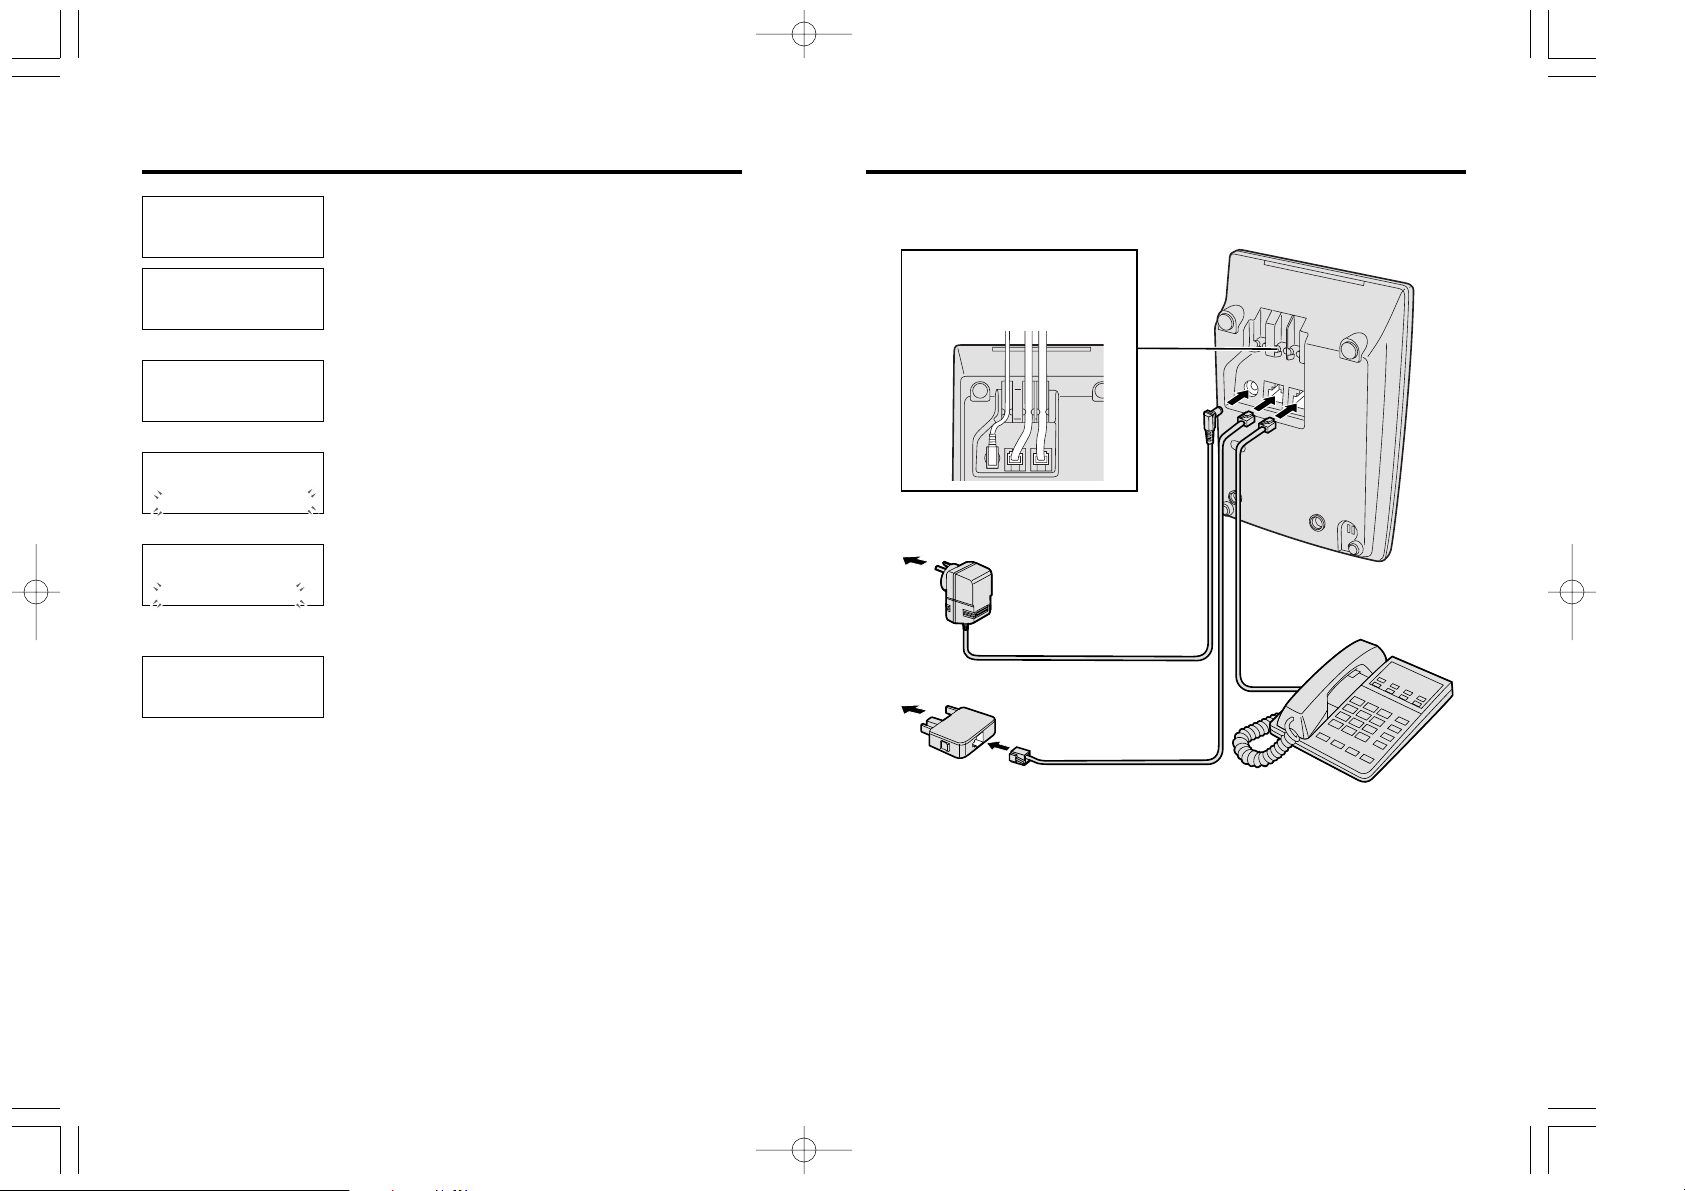
Fasten the cords to
prevent them from being
disconnected.
Connections
To Power Outlet
(AC 230–240 V, 50 Hz)
AC
Adaptor
Telephone Plug
(For Australia only)
Telephone
Line Cord
≥USE ONLY WITH Panasonic AC ADAPTOR PQLV1AL.
≥The AC adaptor must remain connected at all times. (It is normal for the
adaptor to feel warm during use.)
≥If your unit is connected to a PBX which does not support Caller ID
services, you cannot access those services.
≥KX-TM150ALB will not answer incoming calls on your FaxAbility number
(New Zealand only).
6
“ Display
SUN 12:00AM
5 new calls
Message full
0233334444
- Answering -
Low
∫∫∫∫∫
High
Message memory is full. (“Message full”
flashes.) Erase some, or all, of the messages
(p. 17).
The answering system is recording a message
(p. 13). (“– Answering –” flashes.)
The display shows the volume level.
You can select from 9 levels (0–8) (p. 14, 15).
Greeting check
00-12
A greeting message is being played (p. 9). The
display shows the elapsed time.
Ex. Volume level: 5
Greeting record
Recording error
SUN 12:00AM
2way recording
Recording error
Your greeting message or your telephone
conversation was not recorded correctly.
Record it again (p. 8, 18).
To Socket
PQQX12356ZA-BM 01.3.22 3:56 PM y[W 6
Page 5
98
“
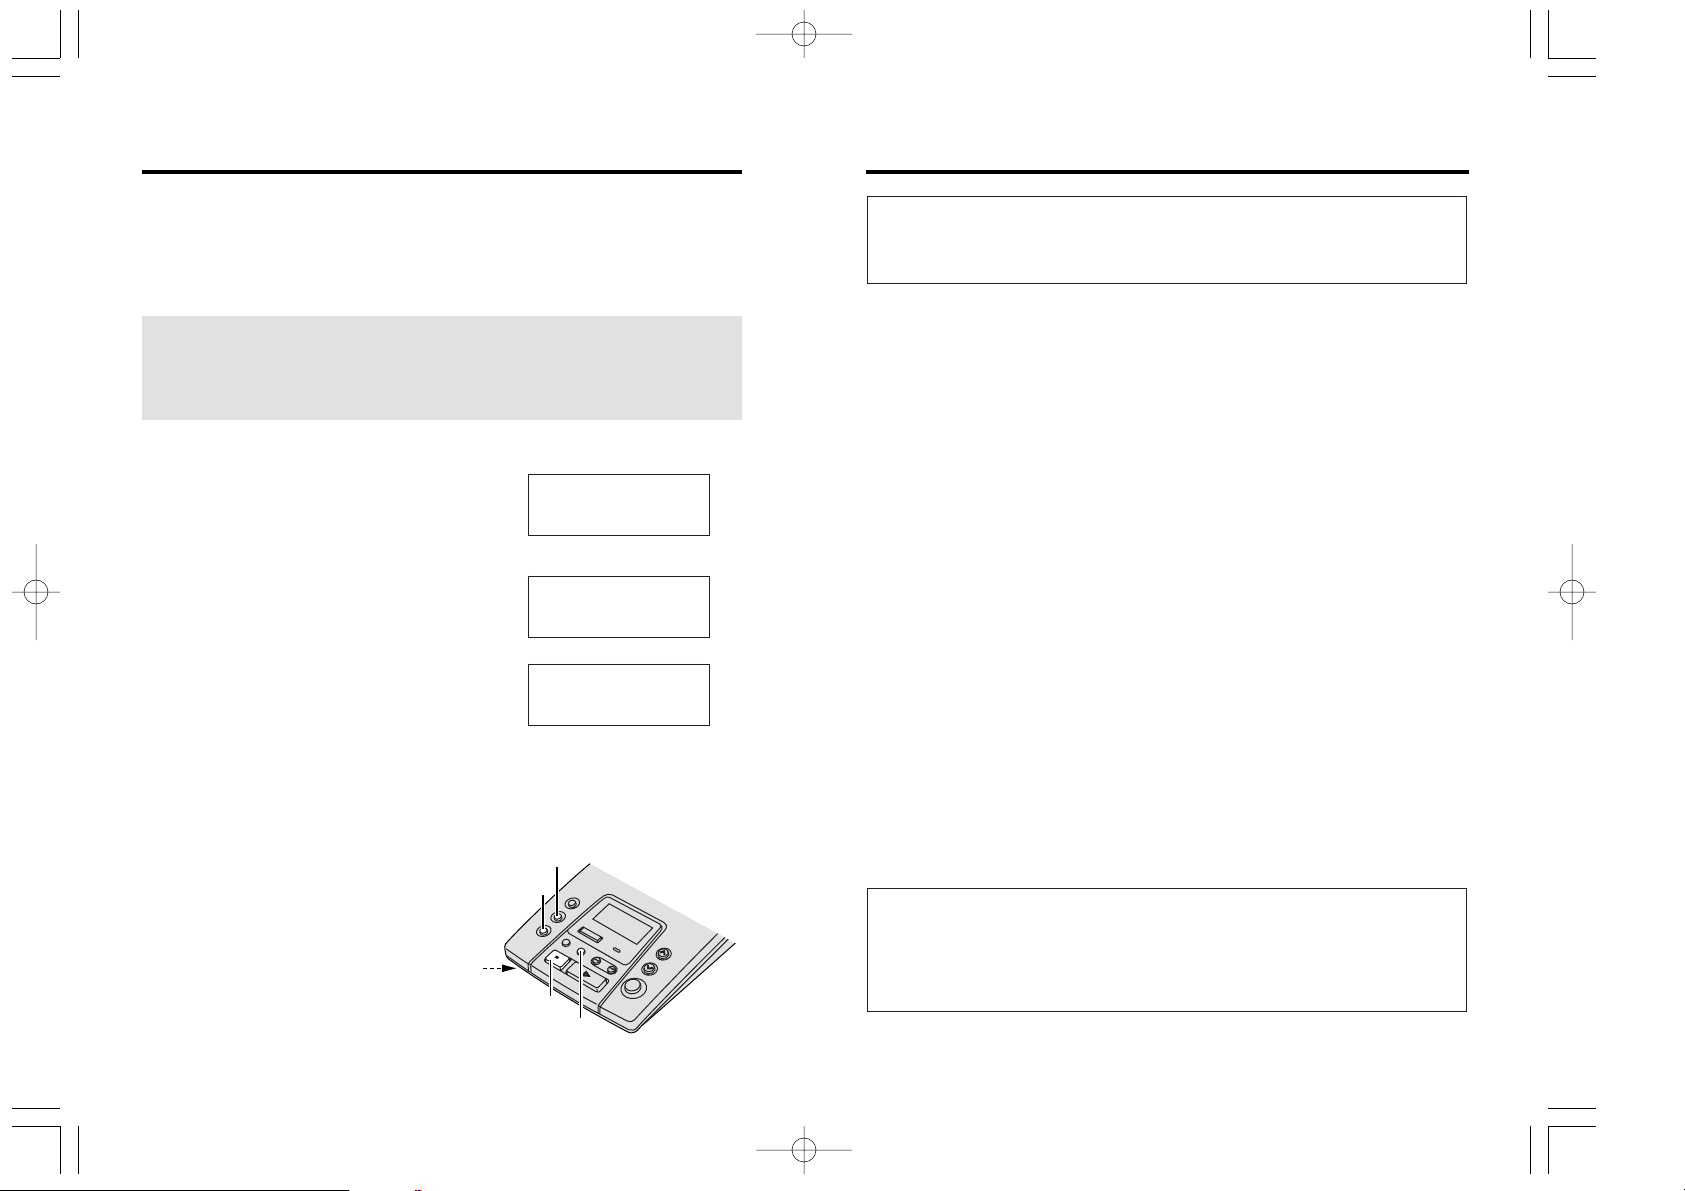
To check the greeting message
Press (GREETING\CHECK).
≥The greeting is played back and the display shows the elapsed time.
To erase the recorded greeting message
Press (GREETING\CHECK)
“
(ERASE) while the message is being played.
≥The unit will answer calls with a pre-recorded greeting.
Pre-recorded greeting message
If you do not record a greeting message (p. 8), one of two messages will
be played when a call is received, depending on the remaining recording
time.
To check the pre-recorded greeting, press
(GREETING\CHECK).
≥A pre-recorded greeting will be played as follows.
“Hello, we are not available now. Please leave your name and phone number
after the beep. We will return your call.”
When “Message full” is displayed:
“Hello, we are not available now. Please call again. Thank you for your call.”
Flash Memory Message Backup
Messages are stored indefinitely on a “ flash memory” IC chip and will
not be affected by power failures. All messages are saved until you
erase them.
Greeting message sample
“Hello, this is (your name and/or number). Sorry I cannot take your call.
Please leave a message after the beep. Thank you.”
“ Settings
Greeting Message
You can record a personal greeting message of up to 2 minutes. If a
greeting message is not recorded, one of two pre-recorded greetings will
be played when a call is received (p. 9).
To record a greeting message
All messages (greeting, incoming, etc.) are stored in digital memory
(p. 9). The total recording time is about 15 minutes. We recommend
you record a brief greeting message (see sample on next page) in
order to leave more time for recording new messages.
1
Press (GREETING\REC) to start the
recording mode.
≥“Press RECORD again to record greeting”
is heard.
2
Within 5 seconds, press (GREETING\REC)
again to record your greeting.
≥A long beep sounds.
3
After the long beep, talk clearly, about
20 cm away from the MIC (microphone).
≥The display shows the elapsed
recording time.
≥If you record for over 2 minutes, the
unit will automatically stop recording.
4
When finished, press (STOP).
≥A beep sounds.
≥To change the message,
start again from step 1.
Greeting record
00-00
SUN 12:00AM
0 message
Greeting record
00-12
PQQX12356ZA-BM 01.3.22 3:56 PM y[W 8
(GREETING\CHECK)
(GREETING\REC)
MIC
(STOP)
(ERASE)
Page 6

Press VOLUME/SEARCH (^) or (_) for the desired settings.
1110
“
If a power failure occurs or the AC adaptor is disconnected for more
than 10 minutes, the adjusted day/time will be erased.
For Caller ID service users (p. 19)
≥The Caller ID information will re-set the clock after the first ring if the
adjusted time is incorrect.
≥The Caller ID information will automatically adjust the clock for
daylight saving time.
Day and Time Adjustment
Voice Day/Time Stamp: During playback, a synthesised voice will
announce the day and time that each message was recorded.
1
Press (FUNCTION/EDIT) until “Day/time”
is displayed.
≥The current setting is displayed.
2
Press (SKIP/FF) or (REPEAT/REW) to
move the cursor.
≥Each time you press
(SKIP/FF), the
cursor moves in this order:
Day
“
Hour“ Minute.
3
Press VOLUME/SEARCH (^) or (_)
until the desired setting is displayed.
≥Each time you press the button, the
display changes as follows.
Day: Sun
“
Mon “ Tue “ Wed
“
“
Thu “ Fri “ Sat “ Sun
Hour: 12AM
“
1AM “ ... “ 11AM
“
“
12PM “ ... “ 11PM “ 12AM
Minute:00
“
01 “ ... “ 59 “ 00
4
Press (FUNCTION/EDIT).
≥A beep sounds and the clock starts
working.
Day/time
SUN 1:00PM
Day/time
SUN 12:00AM
FUNCTION=Next
≥The display will return to the stand-by mode.
≥To exit the programming mode, press
(STOP) or wait for 60 seconds.
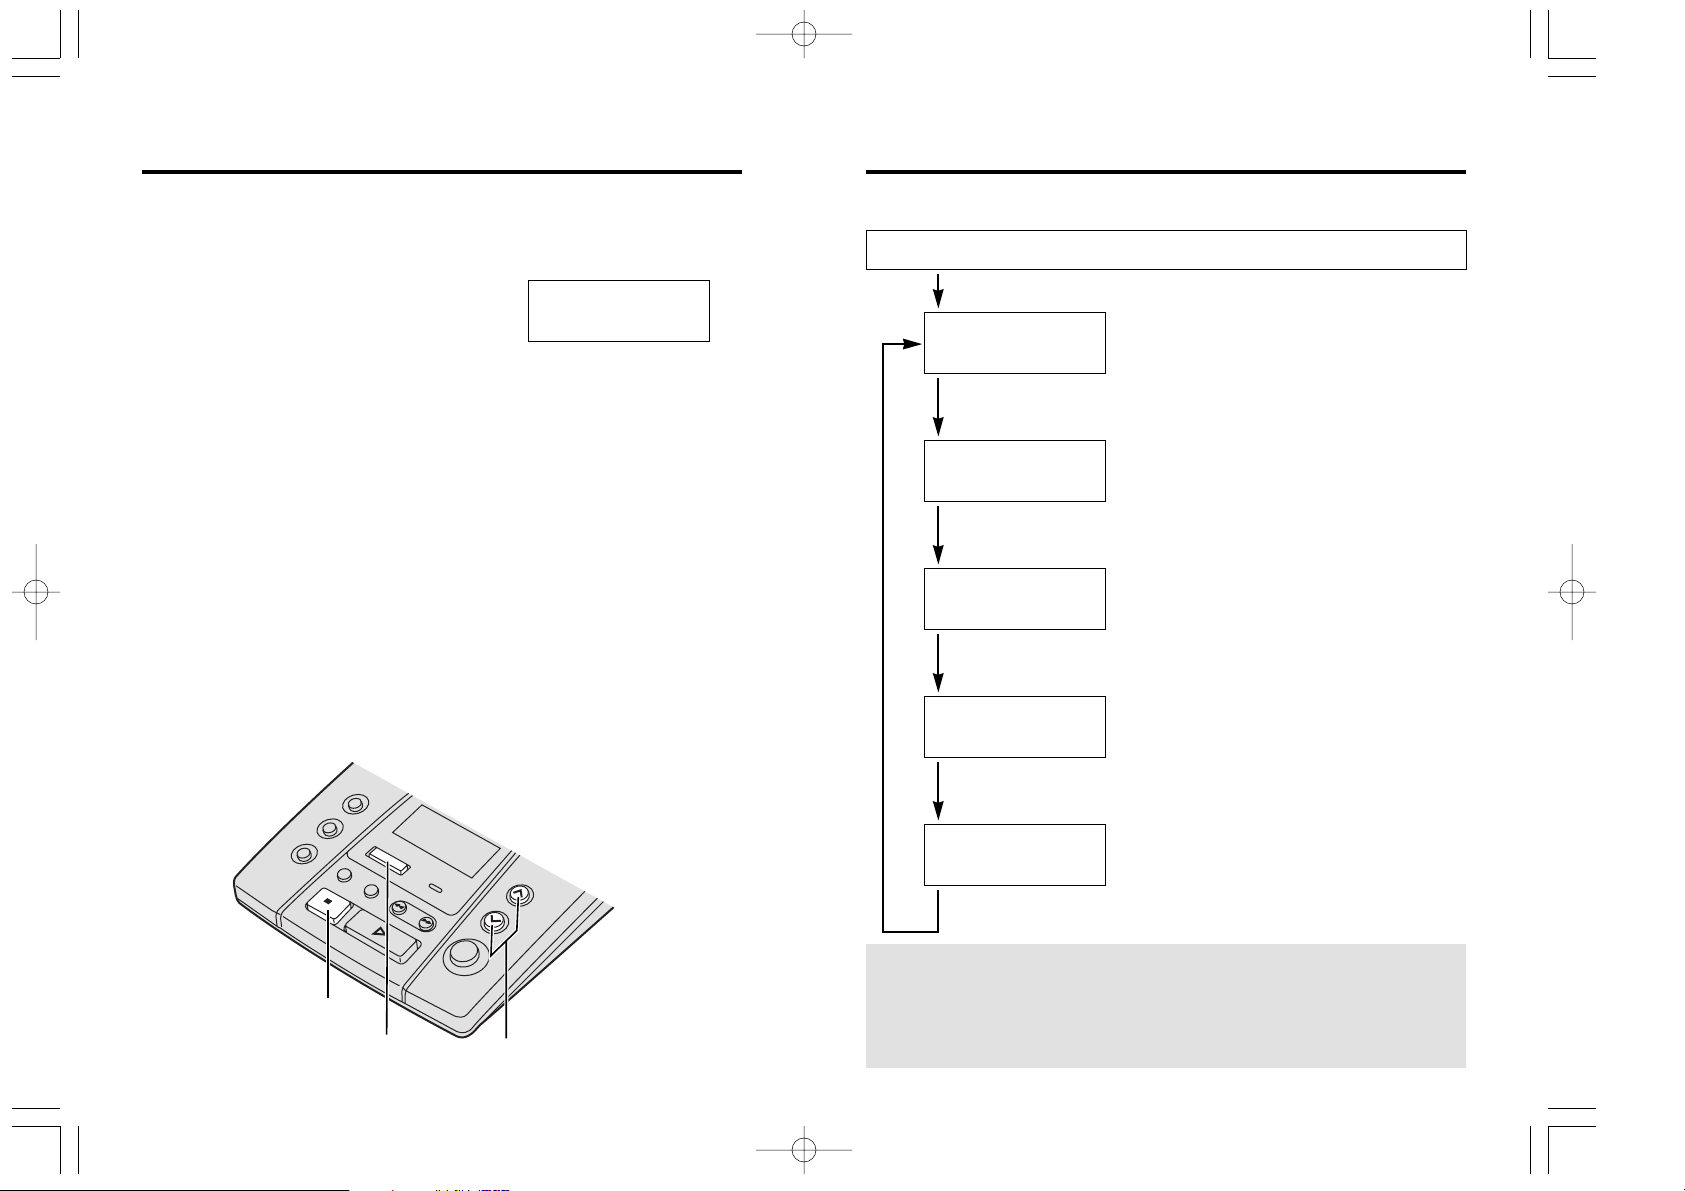
Press
(FUNCTION/EDIT) to enter the programming mode.
“ Settings
Programming Summary
You can program the following functions. See the page numbers below for
details.
Press
(FUNCTION/EDIT).
Number of rings
:Toll saver
FUNCTION=Next
Remote code
:11
FUNCTION=Next
Day/time
SUN 12:00AM
FUNCTION=Next
Press (FUNCTION/EDIT).
Press
(FUNCTION/EDIT).
Press (FUNCTION/EDIT).
To adjust the day and time,
see page 11.
To select the number of rings,
see page 12.
To set the remote code,
see page 25.
≥You can exit the programming mode any time by pressing
(STOP) or
waiting for 60 seconds.
Day/time
SUN 12:00AM
FUNCTION=Next
Day/time
SUN 1:00PM
FUNCTION=Save
PQQX12356ZA-BM 01.3.22 3:56 PM y[W 10
Page 7

1312
Automatic Answering Operation “
When the unit answers a call, a greeting message is played and the
caller’s message is recorded. While recording, “- Answering -” will be
displayed.
≥The total recording time (including the greeting message and 2-way
recording) is about 15 minutes. If messages are recorded in noisy
rooms, the time may be shortened by up to 3 minutes.
≥A maximum of 64 messages (including the greeting message and
2-way recording) can be recorded.
≥The maximum recording time per caller is 3 minutes. If a caller
records for over 3 minutes, the unit will announce “Thank you for your
call” and the call will be disconnected.
Setting the Unit to Answer Calls
Press (ANSWER–ON) to turn on the answering system.
≥The ANSWER indicator lights, and “Answer set” and the current day/time
are heard.
≥The unit will announce the remaining recording time if it is less than
5 minutes.
≥If you hear “Memory full”, “Message full” is displayed and the
ANSWER indicator flashes rapidly, erase some, or all, of the messages
(p. 17).
(STOP)
VOLUME/SEARCH (^), (_)
ANSWER Indicator
(ANSWER\ON)
“ Settings
Selecting the Number of Rings
You can select the number of times the unit rings before the answering
system answers a call, from “2” to “7” or “Toll saver”. Your unit comes from
the factory set to “Toll saver”.
*Toll saver
When you call the unit from a touch tone telephone:
If the unit answers on the 2nd ring, there is at least one new message.
If the unit answers on the 4th ring, there are no new messages.
Hang up when you hear the 3rd ring. This will save you the toll
charge for the call.
1
Press (FUNCTION/EDIT) until “Number
of rings” is displayed.
≥The current setting is displayed.
2
Press VOLUME/SEARCH (^) or (_)
until the desired setting is displayed.
2–7: The unit will answer after
the selected number of
rings.
Toll saver: Toll saver* function is
selected.
3
Press (FUNCTION/EDIT).
≥A beep sounds.
≥The display will return to the stand-by
mode.
Number of rings
:Toll saver
FUNCTION=Next
Number of rings
:2
FUNCTION=Save
Number of rings
:2
≥To exit the programming mode, press (STOP) or wait for 60 seconds.
PQQX12356ZA-BM 01.3.22 3:56 PM y[W 12
Page 8

15
Listening to Messages “
You can see the total number of recorded messages on the display. If the
ANSWER indicator flashes, new messages have been recorded.
Listening to only new messages
Press (NEW\MESSAGE) briefly.
≥The unit announces the number of new messages and plays them back.
≥If there are no new messages, “No new messages” is heard.
Listening to all recorded messages
Press and hold (NEW\MESSAGE) until a short beep sounds.
≥If there are no messages, “No messages” is heard.
To adjust the speaker volume (9 levels):
While using the answering system, press VOLUME/SEARCH (^) or (_).
≥The display shows the volume level.
(STOP)
VOLUME/SEARCH (^), (_)
(NEW\MESSAGE)
(SKIP/FF)
(REPEAT/REW)
14
≥If you do not want the unit to answer calls, press (ANSWER–ON) again to
turn off the answering system. The ANSWER indicator light goes out and
“Answer off” is heard.
≥You can also turn on the answering system remotely using any other
phone (p. 29).
Monitoring incoming calls
While a call is being recorded, you can monitor it through the speaker.
To answer the call, lift the handset of the telephone connected to the same
line. The unit stops recording.
≥You can adjust the volume by pressing VOLUME/SEARCH
(^) or (_).
≥If the answering machine does not stop recording when you lift the
handset, press
(STOP).
≥KX-TM150ALB will not answer incoming calls on your FaxAbility number
(New Zealand only).
“ Automatic Answering Operation
PQQX12356ZA-BM 01.3.22 3:56 PM y[W 14
Page 9

Press (STOP).
≥To resume playback, press
(NEW\MESSAGE).
≥If you do not press any button for 60 seconds or if you
press
(STOP) again, the unit will return to the stand-by
mode.
To repeat from the beginning of the message
Press
(REPEAT/REW) briefly.
≥If you press within 5 seconds of playback, the
previous message will be played.
To rewind part of the message
Press and hold
(REPEAT/REW) until you reach the
desired place.
≥At the beginning of the message, 3 short beeps will
sound.
1716
Erasing Messages
1
Press (ERASE).
≥“Press ERASE again to erase all
messages” is heard.
2
Within 5 seconds, press
(ERASE) again.
≥A beep sounds and
“No messages” is heard.
≥The display shows
“0 message”.
≥After the announcement, the
display will return to the
stand-by mode.
The unit will announce the remaining recording time after playback, if it is
less than 5 minutes. New messages cannot be recorded when:
—“Memory full” is heard.
—“Message full” is displayed.
—the ANSWER indicator flashes rapidly.
Erase some, or all, of the messages. We recommend you erase
unnecessary messages after each playback.
Erasing a specific message
Press (ERASE) while the message you want to erase is being played.
≥The unit erases the message.
≥A short beep will sound and the unit will continue to play the next
message.
Erasing all messages
All recorded messages, except the greeting message, can be erased at
one time.
≥The information in the Caller List will not be erased. To erase the Caller
List information, see page 24.
(ERASE)
“ Listening to Messages
During playback
To skip to the next message
Press
(SKIP/FF) briefly.
To cue to part of the message
Press and hold
(SKIP/FF) until you reach the desired
place.
≥The message will be heard at twice the normal speed.
≥At the end of the message, 3 short beeps will sound.
To repeat/
rewind
message
To skip/cue
message
To stop
operation
For Caller ID service users (p. 19)
After listening to new incoming messages, “√” will be added to the call
entries in the Caller ID Caller List (p. 21).
≥During playback, the display shows which message is being played.
(Ex. While the first message is being played back, “Message 1” is
displayed.)
≥At the end of the last message, “End of final message” is heard. The
unit will announce the remaining recording time if it is less than
5 minutes.
≥All recorded messages are saved until you erase them.
PQQX12356ZA-BM 01.3.22 3:56 PM y[W 16
Page 10

1918
Caller ID Service
≥Caller information cannot be displayed in the following cases:
—If the caller dialled from an area which does not provide a Caller ID
service, the display will show “Out of area”.
—If the caller has requested not to display his/her information, the
display will show “Private caller”.
≥If your unit is connected to a PBX system which does not support Caller
ID services, you cannot access those services.
To check the number of new calls
You have received 5 new calls.
You have received no new calls.
SUN 12:00AM
5 new calls
10 messages
SUN 12:00AM
10 messages
This unit is compatible with a Caller ID service offered by your telephone
company. If you subscribe to a Caller ID service, the calling party’s
information will be displayed after the first ring.
The unit can record information of up to 50 different callers, including the
time and date the call was received and the number of times called, in the
Caller List. The Caller List information is sorted by the most recent to the
oldest call. When the 51st call is received, the oldest call is deleted.
Using the list, you can automatically call back a caller.
How caller information is displayed when a call is received
The display shows the caller’s phone number after the first ring.
Recording Your Telephone Conversation
You can record your telephone conversation in memory. The recording
time is only limited by the available memory.
1
During a conversation, press
(2WAY\REC).
≥A short beep sounds.
2
Continue your conversation.
≥“2way recording” and the
elapsed recording time are
displayed.
3
When you finish recording the
conversation, press
(STOP) or
(2WAY\REC).
≥A beep sounds.
≥The recorded
conversation is stored
as a new message.
To listen, press
(NEW\MESSAGE)
briefly
(p. 15).
SUN 12:00AM
2way recording
00-00
SUN 12:00AM
2way recording
00-27
When you record your 2-way telephone conversation, you should inform
the other party that the conversation is being recorded.
For New Zealand Users Only
All persons using this device for recording telephone conversations
shall comply with New Zealand law. This requires that at least one party
to the conversation is to be aware that it is being recorded. In addition,
the principles enumerated in the Privacy Act 1993 shall be complied
with in respect to the nature of the personal information collected, the
purpose for its collection, how it is to be used and what it disclosed to
any other party.
0211115555
012345678901234
56789
If the phone
number has
15 digits or less:
If the phone
number has
16 digits or more:
PQQX12356ZA-BM 01.3.22 3:56 PM y[W 18
(STOP)
(2WAY\REC)
(NEW\MESSAGE)
Page 11
2120
“
Ex. When you search from the most recent call:
Press (CALLER\ID/DIAL) to enter the list.
To return to the previous
caller, press
VOLUME/SEARCH (^).
To exit the Caller List,
press
(STOP).
≥The display will return to the
stand-by mode.
Press VOLUME/SEARCH (_).
Press VOLUME/SEARCH (_).
Press VOLUME/SEARCH (_).
Press VOLUME/SEARCH (_).
Press VOLUME/SEARCH (_).
Display meaning:
√ : You have checked this caller information, called back the
caller or played back the message.
a2–a9 : The number of times they called (up to 9).
After checking, “a2” – “a9” will be replaced with “√”.
2 new calls
X=New W=Old
0222333444
3:10P JUN10
0244448888
11:50A JUN10 √
0123456789
1:54P JUN 9 a2
0333557799
10:38A JUN 9 √
Using the Caller List
Viewing the Caller List
To check who has called you, follow the steps below.
1
Press (CALLER\ID/DIAL) to enter the list.
≥The number of new calls will be shown.
2
To search from the most recent to oldest call, press
VOLUME/SEARCH (_) (New key).
To search from the oldest to most recent call, press
VOLUME/SEARCH (^) (Old key).
≥To move between callers, press VOLUME/SEARCH (_) or (^).
3
To exit the list, press (STOP).
≥The display will return to the stand-by mode.
≥Once new calls have been checked, “√” will be added.
≥When you answer a call, it will be treated as new and “√” will not be
added.
≥If “No items stored” is displayed in step 1, the Caller List is empty.
Press
(STOP) to exit the list.
≥If more than one call is received from the same caller, the date and time
of the last call will be recorded. Also, when the same caller calls again,
the call entry with “√” will be deleted.
5 new calls
X=New W=Old
PQQX12356ZA-BM 01.3.22 3:56 PM y[W 20
(STOP)
(CALLER\ID/DIAL)
VOLUME/SEARCH (^), (_)
Page 12

2322
“
1
Press (CALLER\ID/DIAL) to enter
the list.
2
Press VOLUME/SEARCH (_) or (^)
repeatedly to find the desired caller.
3
Press (FUNCTION/EDIT) to select a
pattern.
Each time you press
(FUNCTION/EDIT),
the pattern will change.
a –
b
4
After editing the number, you can
continue with calling back procedures.
To call back, press
(CALLER\ID/DIAL)
(p. 22).
Editing the Caller’s Phone Number
The unit can edit a phone number into one of 2 patterns.
Area code
Phone no.
Phone no.
0276543210
11:20A JAN12 a3
5 new calls
X=New W=Old
0276543210
11:20A JAN12 a3
76543210
11:20A JAN12 a3
a
b
“ Using the Caller List
Calling Back from the Caller List
5 new calls
X=New W=Old
0234567890
11:20A JAN12 a3
0234567890
- Now dialing -
Lift up the TEL
handset
and talk
1
Press (CALLER\ID/DIAL) to enter
the list.
2
Press VOLUME/SEARCH (_) or (^)
repeatedly to find the desired caller.
3
Press (CALLER\ID/DIAL).
≥The displayed phone number is
dialled automatically.
4
After dialling, two short beeps are
heard and the display shows “Lift
up the TEL handset and talk”.
≥After 10 seconds, the display will
return to the stand-by mode.
≥If you want to dial a number without the first two digits, press
(EDIT)
(p. 23).
≥If a phone number is not displayed in the caller information, you cannot
call back that caller.
≥The phone number may not be dialled if you lift the handset before you
press
(CALLER\ID/DIAL) or when “– Now dialing –” is being
displayed.
5
Lift the handset of the telephone connected to the same line and talk.
PQQX12356ZA-BM 01.3.22 3:56 PM y[W 22
Page 13

2524
Remote Operation from a Touch Tone Phone
“
You can operate the answering system from any touch tone phone. A
synthesised voice menu will guide you on how to operate the unit (p. 26).
Summary of remote operation
1
Call your unit from a touch tone phone.
≥The greeting message is played.
2
Enter your remote code during or after the greeting message.
(See below.)
≥The number of new messages is heard.
3
After 3 seconds, the voice menu will start (p. 26).
Follow the menu or enter the direct commands (p. 28, 29).
4
To end remote operation, hang up.
≥The messages are saved.
Setting the Remote Code
The remote code prevents unauthorised people from accessing your unit
and listening to your messages. Choose any 2-digit number (00–99). The
factory preset remote code is “11”. If you do not program your own remote
code, you can use “11”.
1
Press (FUNCTION/EDIT) until “Remote
code” is displayed.
≥The current remote code is displayed.
2
Press VOLUME/SEARCH (^) or (_)
until the desired code is displayed.
≥If you want to clear the code, press
(ERASE)
.
3
Press (FUNCTION/EDIT).
≥A beep sounds.
Remote code
:11
FUNCTION=Next
Remote code
:23
FUNCTION=Save
Remote code
:23
≥To exit the programming mode, press (STOP) or wait for 60 seconds.
“ Using the Caller List
1
Press (CALLER\ID/DIAL) to enter
the list.
2
Press (ERASE).
≥A short beep sounds.
3
Press (ERASE) again.
≥A beep sounds and
all entries are erased.
≥After a few seconds,
the display will return
to the stand-by mode.
To erase all entries in the Caller List
Before erasing all entries, make sure that “0 new call” is displayed.
0 new call
X=New W=Old
Press ERASE for
all clear
All clear
Erasing the Caller List Information
After checking the Caller List, you can erase some or all of the entries.
To erase a specific caller from the Caller List
1
Press (CALLER\ID/DIAL) to enter
the list.
2
Press VOLUME/SEARCH (_) or (^)
repeatedly to find the caller you want
to erase from the Caller List.
3
Press (ERASE).
≥A beep sounds and the information
is erased.
≥After a few seconds, the display will
show the previous caller information.
5 new calls
X=New W=Old
0355556666
12:20A JAN12 √
Clear
PQQX12356ZA-BM 01.3.22 3:56 PM y[W 24
(ERASE)
(CALLER\ID/DIAL)
VOLUME/SEARCH
(^), (_)
Page 14

2726
“
≥3 seconds after playback, the voice menu will start again from the
beginning.
≥If you hear “Memory full” after playback, erase some, or all, of the
messages (p. 28).
Recording a Greeting Message
You can re-record your greeting message.
1. Press (7).
You will hear a voice prompt followed by a long beep.
2. After the beep, talk for up to 2 minutes.
3. When you finish recording, press (9).
4. Your greeting will be played back for confirmation.
≥You can re-record the greeting message again by pressing
(7) instead of (9) in step 3.
All Message Playback
All recorded messages are played back.
At the end of the last message, “End of final message” is
heard. The unit will announce the remaining recording time
if it is less than 5 minutes.
New Message Playback
Only new messages are played back.
At the end of the last message, “End of final message” is
heard. The unit will announce the remaining recording time
if it is less than 5 minutes.
Recording a Memo Message
You can leave a personal message.
1. Talk after you hear “Please leave your message”.
2. When you finish recording, hang up.
Erasing All Messages
All recorded messages (except greeting message) are
erased.
“ Remote Operation from a Touch Tone Phone
Voice Menu
The shaded boxes are voice prompts.
Press 1 to play back all messages.
Press 2 for other functions.
Press (2).
Press (1).
All message
playback.
Press 1 to play back new messages.
Press 2 for other functions.
Press (2).
Press (1).
New message
playback.
Press 1 to erase all messages.
Press 2 for other functions.
Press (2).
Press (1).
Press 1 to record your greeting.
Press 2 for other functions.
Press (2).
Press (1).
Press 7 to record
your greeting.
Press 9 to end
recording.
Press (2).
Press (1).
Press 1 to record your message.
Press 2 for other functions.
Please leave
your message.
PQQX12356ZA-BM 01.3.22 3:56 PM y[W 26
Page 15

2928
Turning on the answering system
Call your unit and wait for 15 rings.
≥The unit will answer and the greeting message will be played.
≥The answering system will turn on. Hang up or enter the remote code for
other options.
≥When turning on the answering system using a rotary or pulse service
telephone, you cannot enter the remote code for other options.
Skipping the greeting message
After calling your unit, press ($) during the greeting message.
≥The unit skips the rest of the greeting message and you can start
recording your message after the long beep.
(0)
ANSWERING
SYSTEM OFF
≥“Answer off” is heard. The unit hangs up
and will not answer calls until turned on
again.
“ Remote Operation from a Touch Tone Phone
Direct Remote Operation
Once you have entered the remote code, you can also control your unit by
direct commands instead of using the voice menu. To end the remote
operation, hang up anytime.
Direct commands
(2)
(9)
(4)
(5)
(1)
NEW MESSAGE
PLAYBACK
ALL MESSAGE
PLAYBACK
REPEAT
(During playback)
SKIP
(During playback)
STOP
GREETING
MESSAGE
RECORDING
ERASING A
SPECIFIC
MESSAGE
(During playback)
ERASING ALL
MESSAGES
≥Only new messages are played back.
≥All messages are played back.
≥The current message is repeated.
≥The current message is skipped.
The next message is played.
≥Operation is stopped temporarily.
≥To resume operation, enter a direct
command within 15 seconds, or the voice
menu will start.
≥A long beep sounds.
≥After the beep, talk immediately for up to
2 minutes.
≥The recording is stopped.
≥The recorded message is played.
≥The current message is erased.
≥A short beep will sound and the next
message will be played.
≥All recorded messages are erased.
≥A beep sounds and “No messages” is heard.
(7)
(9)
RECORD
¤¤
($) (4)
($) (5)
PQQX12356ZA-BM 01.3.22 3:56 PM y[W 28
Page 16

31
Problem
You cannot operate the
answering system from a
touch tone phone.
While recording a greeting
message, a telephone
connected to the same line
starts to ring and stops
recording.
During playback, a telephone
connected to the same line
starts to ring and stops
playback.
Remedy
≥Make sure to enter the correct remote
code.
≥The answering system may not
respond if the tones are too short to
activate the unit. Press each button
firmly.
≥The answering system is off. Turn it
on (p. 29).
≥To answer the call, lift the handset.
The recording will stop. Start again
from the beginning after hanging up.
≥To answer the call, lift the handset.
To resume playback, press
(NEW\MESSAGE) after hanging up.
30
Before Requesting Help
Remedy
≥Check the settings (p. 7–12).
≥Unplug the AC adaptor to reset.
Plug in and try again.
≥Do not pause for over 60 seconds
while programming.
≥To answer the call, lift the handset.
Start again from the beginning after
hanging up.
≥If the caller is not stored in the Caller
List, the unit will not display the caller’s
information.
≥Do not pause for over 60 seconds
while searching.
≥Press VOLUME/SEARCH
(^) to
increase volume.
≥If a power failure occurs, programmed
information may be erased.
Reprogram if necessary.
≥Memory is full. Erase some, or all, of
the messages (p. 17).
≥Memory is full. Erase some, or all, of
the messages (p. 17).
Problem
The unit does not work.
You cannot program function
items, such as the dialling
mode.
While programming or
searching, a telephone
connected to the same line
starts to ring and stops the
program/search.
The unit does not display the
caller’s phone number whose
message is being played.
The display goes to the
stand-by mode while viewing
the Caller List.
During message playback or
monitoring a call, no sound is
heard.
Previously programmed
information is erased.
The answering system is on,
but incoming messages are
not recorded.
“Message full” is
displayed, the ANSWER
indicator flashes rapidly, and
no new messages are
recorded.
PQQX12356ZA-BM 01.3.22 3:56 PM y[W 30
Page 17

3332
Safety Instructions
Take special care to follow the safety suggestions listed below.
Safety
1) The unit should be connected to a power supply only of the type
described in the operating instructions or as marked on the unit.
2) When left unused for a long period of time, the unit should be
unplugged from the household AC outlet.
3) To minimize the possibility of lightning damage when you know that a
thunderstorm is coming, we recommend that you:
a) Unplug the telephone line cord from the phone jack.
b) Unplug the power supply cord from the AC power outlet.
Installations
Environment
1) Do not use this unit near water—for example, near a bathtub,
washbowl, sink, etc. Damp basements should also be avoided.
2) The unit should be kept away from heat sources such as radiators,
kitchen range, etc. It also should not be placed in rooms where the
temperature is less than 5oC or greater than 40oC.
Placement
1) Do not place heavy objects on top of this unit.
2) Care should be taken so that objects do not fall onto, and liquids are
not spilled into, the unit. Do not subject this unit to excessive smoke,
dust, mechanical vibration or shock.
3) Place the unit on a flat surface.
WARNING:
TO PREVENT FIRE OR SHOCK HAZARD, DO NOT EXPOSE THIS
PRODUCT TO RAIN OR ANY TYPE OF MOISTURE.
When a failure occurs which results in the internal parts becoming
accessible, disconnect AC adaptor immediately and return this unit to the
place of purchase or service centre.
If there is any trouble, disconnect the unit from the telephone line and
connect a known working phone. If the known working phone operates
properly, do not reconnect the unit to the telephone line until the trouble
has been repaired. If the known working phone does not operate properly,
consult with your telephone company.
This equipment has been tested and found to comply with AS/NZS 3548:
1995 limits for electromagnetic interference. Any modifications to any part
of the system or to any peripherals may void the EMC compliance of the
system or the peripherals.
WARNING:
This equipment will be inoperable if mains power fails.
For New Zealand Users Only
The grant of a Telepermit for any item of terminal equipment
indicates only that Telecom has accepted that the item complies
with minimum conditions for connection to its network. It indicates no
endorsement of the product by Telecom, nor does it provide any sort
of warranty. Above all, it provides no assurance that any item will
work correctly in all respects with another item of Telepermitted
equipment of a different make or model, nor does it imply that any
product is compatible with all of Telecom’s network services.
This device only responds to Distinctive Alert cadence(s) DA1 &
DA3.
PQQX12356ZA-BM 01.3.22 3:56 PM y[W 32
Page 18

3534
Important Information (For Australia only)
Instructions to customer
Installation
Attached to this apparatus is an approval label. This label is evidence that
it is a “Permitted Attachment” which has been authorised to be connected
to your telephone service.
Conditions relating to connection and operation of this Permitted
Attachment are contained in Telecommunications General By-Law 220 (5).
You are authorised to install this Permitted Attachment yourself by
plugging it into the line socket of any regular telephone. You may connect
it in place of your existing telephone or to any spare telephone socket
installed in your premises.
To disconnect your existing telephone you must first remove its plug from
the line socket. You can then insert the plug of your Permitted Attachment
into the socket and use your equipment.
If the plug of your existing telephone cannot be readily removed, you will
have to remove the screw securing it. To do this proceed as follows:
1. Loosen screw “A” sufficiently to remove the socket cover. (See Fig. 1.)
2. Remove screw “B” and withdraw the plug. (See Fig. 2.)
3. Replace screw “B”. (See Fig. 3.) Ensure that it screws completely into
the socket recess. (If the screw is too long, increase the hole depth or
replace the screw with one 5 mm shorter.)
4. Replace socket cover and tighten screw “A”. (See Fig. 4.)
If you are satisfied with the operation of your telephone service after
plugging in your Permitted Attachment, your installation is completed.
You will be unable to connect this Permitted Attachment if your telephone
service consists only of a wall phone or an old style telephone which is not
connected by means of a modern plug and socket. In such cases a new
socket will need to be installed.
Should the Permitted Attachment not operate when plugged into a socket,
it is either faulty or unsuitable for operation with your telephone service. It
should be returned to the store where purchased.
Service difficulties
If at any time a fault occurs on your telephone service carry out the
following checks before you call for service:
≥Disconnect the Permitted Attachment and try using the service with the
normal telephone.
≥If the telephone service then operates satisfactorily, the fault is in your
Permitted Attachment. Leave the Permitted Attachment disconnected
and report the fault to its supplier or agent to arrange for repair.
≥If when using the telephone the service is still faulty, report the fault to
“Service Difficulties and Faults” for attention.
You are required to keep this Permitted Attachment in good working order
while it is connected to your telephone service. Its construction or internal
circuit must not be modified in any way without permission.
SOCKET
SCREW “A”
PLUG
Fig. 1
TELEPHONE CORD
Connect to the PLUG
as shown in Fig. 1.
SCREW
“B”
Fig. 2
SCREW
“B”
Fig. 3
SOCKET
SCREW “A”
Fig. 4
PQQX12356ZA-BM 01.3.22 3:56 PM y[W 34
Page 19

PQQX12356ZA-BM FM0899SA0 D
Printed in Malaysia
Kyushu Matsushita Electric Co., Ltd.
1-62, 4-chome, Minoshima, Hakata-ku, Fukuoka 812-8531, Japan
PQQX12356ZA-BM 01.3.22 3:56 PM y[W 36
 Loading...