

Page 1

THA19(e).fm Page 1 Tuesday, July 18, 2006 2:24 PM
Installation Manual
Expandable Digital Cordless Handset
Model No.
Thank you for purchasing a Panasonic cordless telephone.
This handset is an accessory handset for use with Panasonic base units
KX-TH111/KX-TH112. You must register this handset with your base
unit before it can be used.
This installation manual describes only the steps needed to register and
begin using the handset. Please read the base unit’s operating
instructions for further details.
KX-THA19
Charge the battery for 6 hours before initial use.
Please read this Installation Manual before using the unit and save for
future reference.
For assistance, visit our website:
http://www.panasonic.com/phonehelp for customers in the U.S.A. or
Puerto Rico.
PQQX15314ZB DM0506MK1076
Page 2
THA19(e).fm Page 2 Tuesday, July 18, 2006 2:24 PM
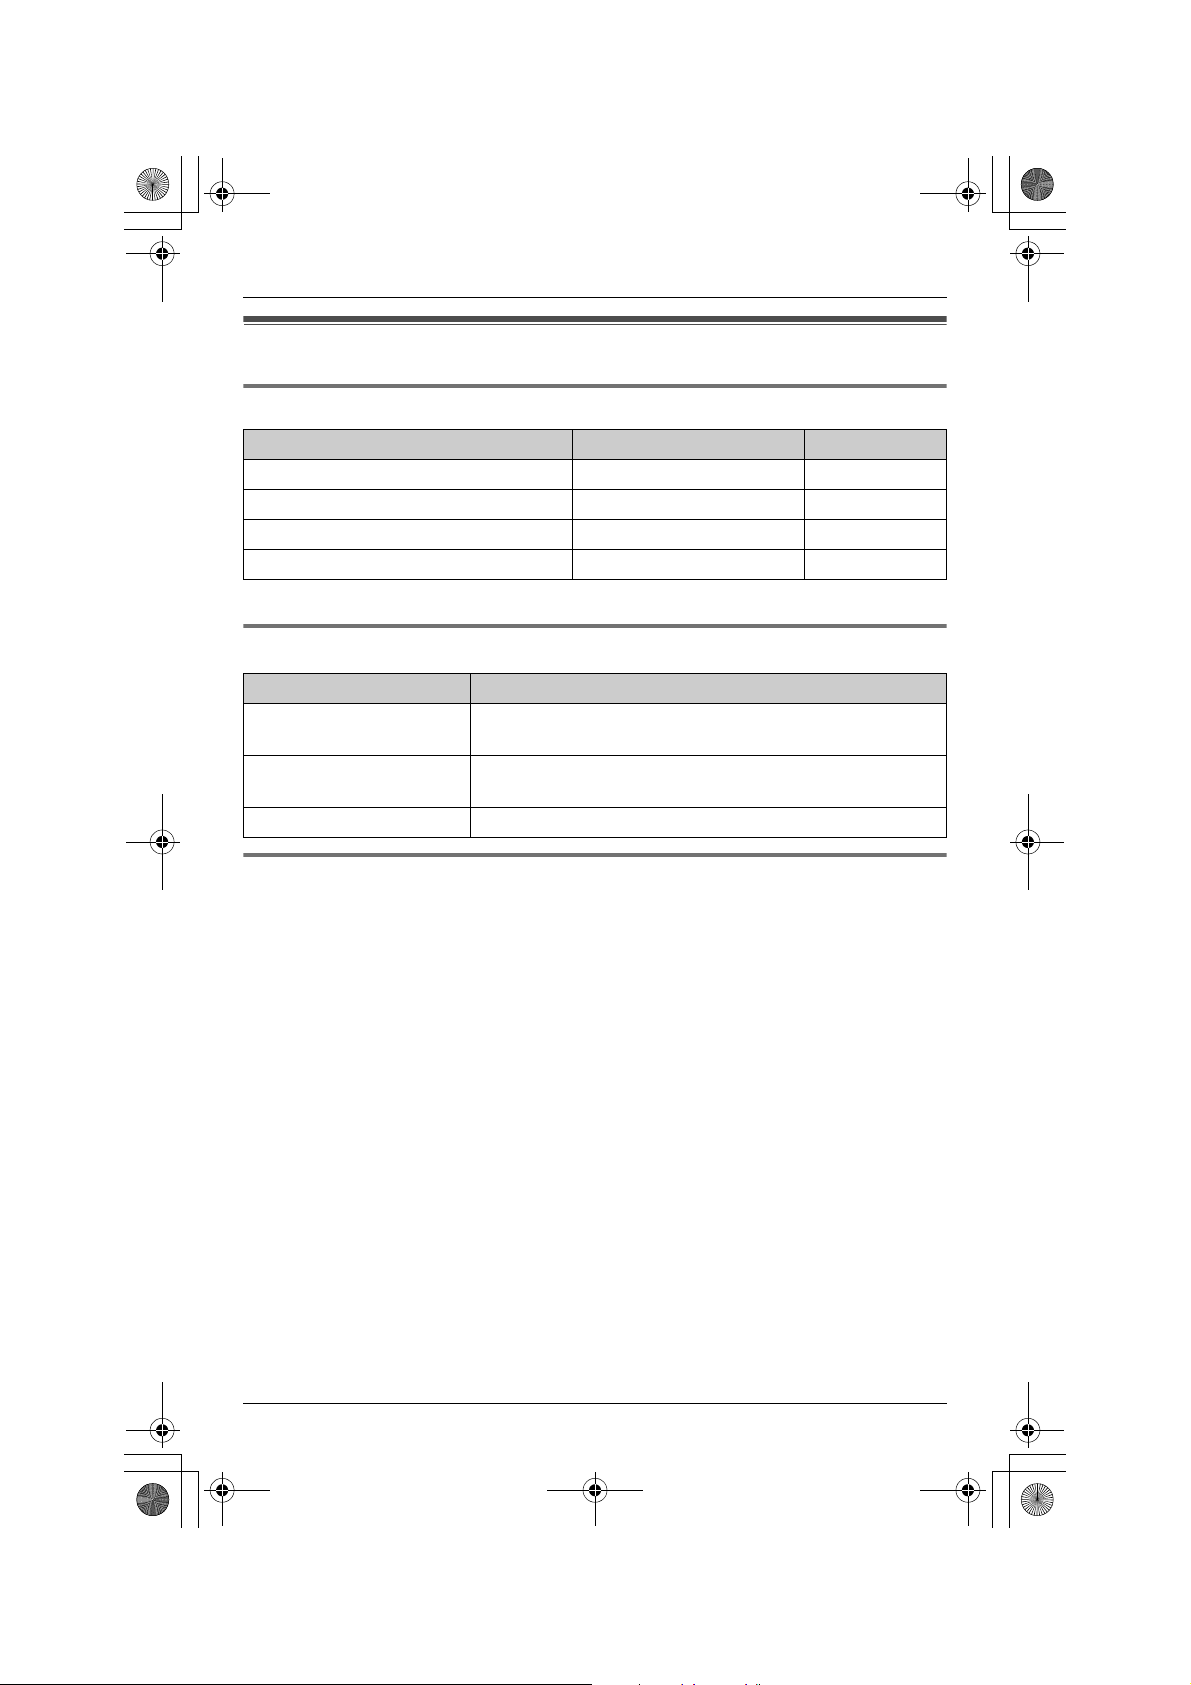
Accessory information
Included accessories
Accessory item Order number Quantity
Charger PQLV30048ZS 1
AC adaptor for charger PQLV206X 1
Battery HHR-P104 1
Handset cover
*1 The handset cover comes attached to the handset.
*1
Additional/replacement accessories
Accessory item Order number
Rechargeable nickel metal
hydride (Ni-MH) battery
Corded headset KX-TCA86, KX-TCA88HA, KX-TCA91, KX-TCA92,
Belt clip PQKE10404Z1
HHR-P104
KX-TCA93, KX-TCA94, or KX-TCA95
PQYNTHA19R 1
Sales and support information
L To order additional/replacement accessories, call 1-800-332-5368.
L TTY users (hearing or speech impaired users) can call 1-866-605-1277.
2 For assistance, please visit http://www.panasonic.com/phonehelp
Page 3
THA19(e).fm Page 3 Tuesday, July 18, 2006 2:24 PM
Setting up the handset
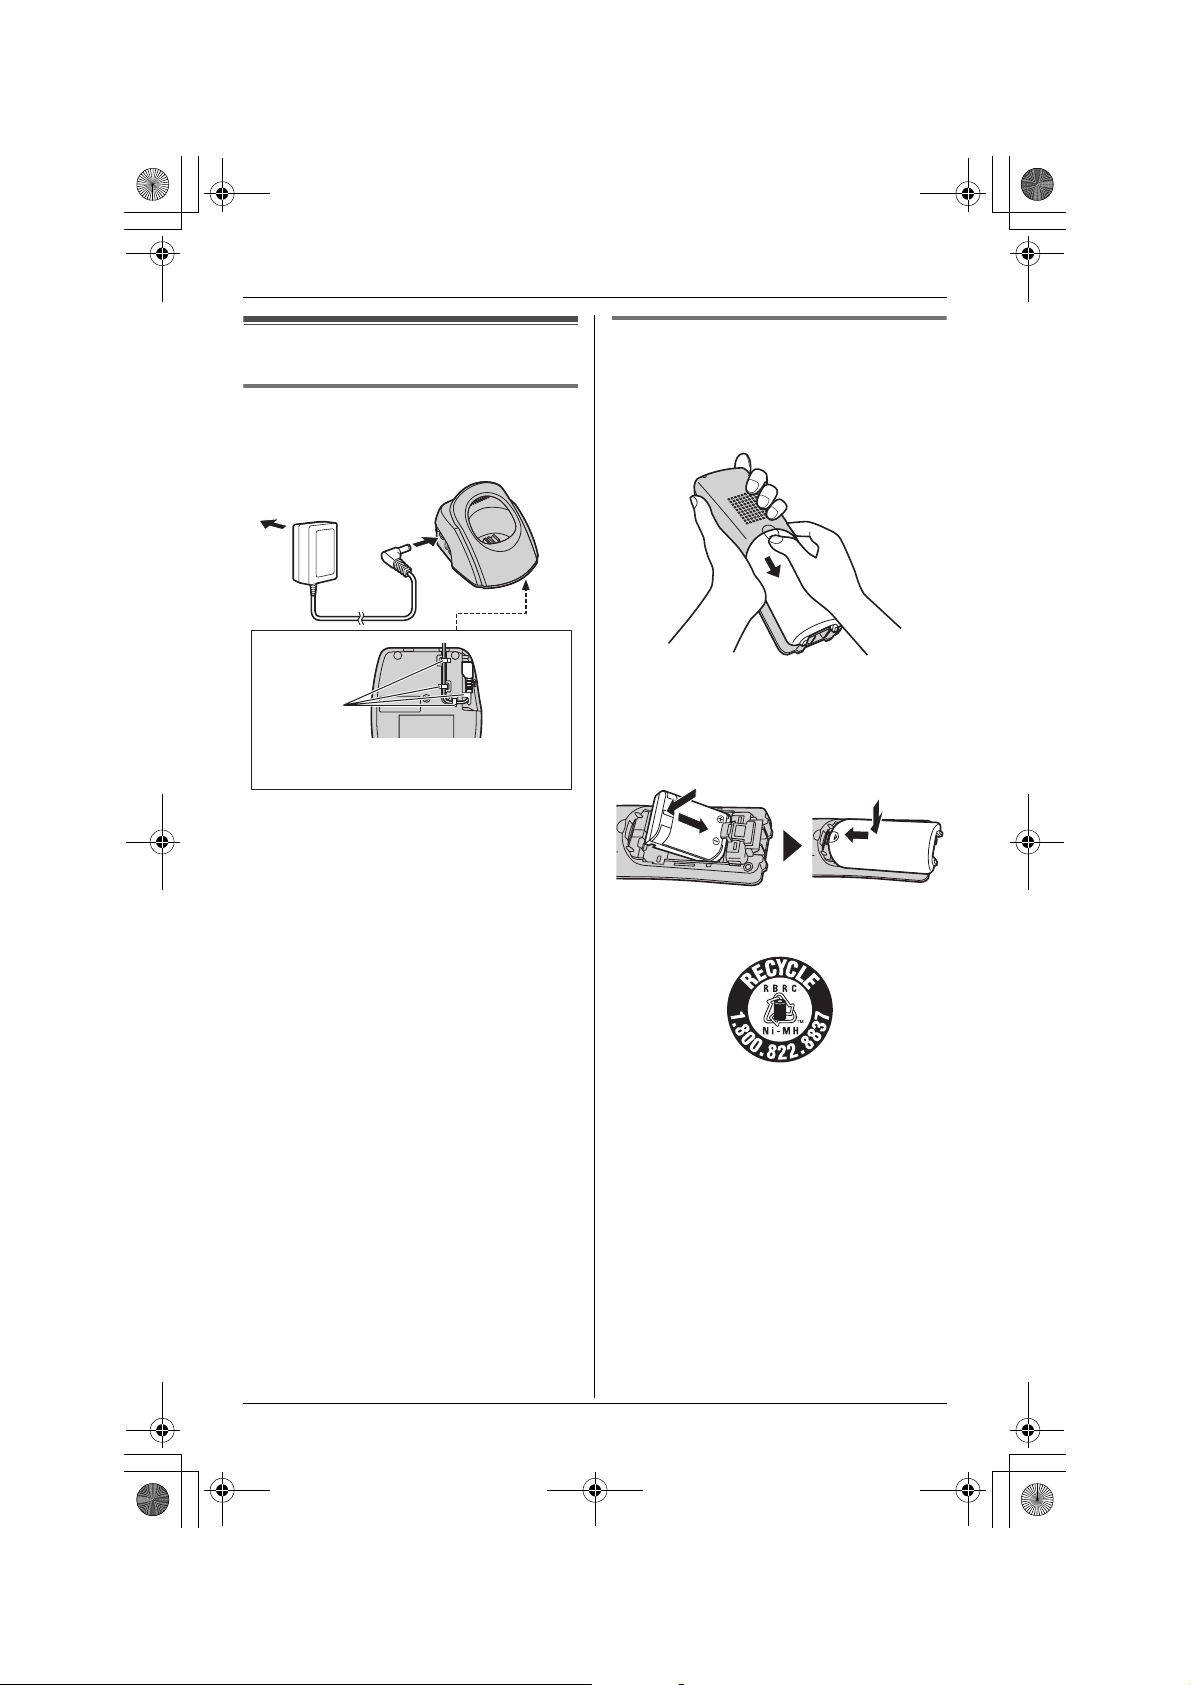
Connecting the charger
L Use only the included Panasonic AC
adaptor PQLV206.
(120 V AC, 60 Hz)
Bottom of
the charger
Hooks
Fasten the AC adaptor cord to prevent
it from being disconnected.
Note:
L The AC adaptor must remain connected
at all times. (It is normal for the adaptor
to feel warm during use.)
L The AC adaptor should be connected to
a vertically oriented or floor-mounted AC
outlet. Do not connect the AC adaptor to
a ceiling-mounted AC outlet, as the
weight of the adaptor may cause it to
become disconnected.
Battery installation
1 Press the notch of the handset cover
firmly, and slide it in the direction of the
arrow.
2 Insert the battery (A), and press it
down until it snaps into position (B).
Then close the handset cover (C, D).
B
A
Attention:
C
D
A nickel metal hydride battery that is
recyclable powers the product you have
purchased.
Please call 1-800-8-BATTERY (1-800822-8837) for information on how to
recycle this battery.
For assistance, please visit http://www.panasonic.com/phonehelp 3
Page 4
THA19(e).fm Page 4 Tuesday, July 18, 2006 2:24 PM
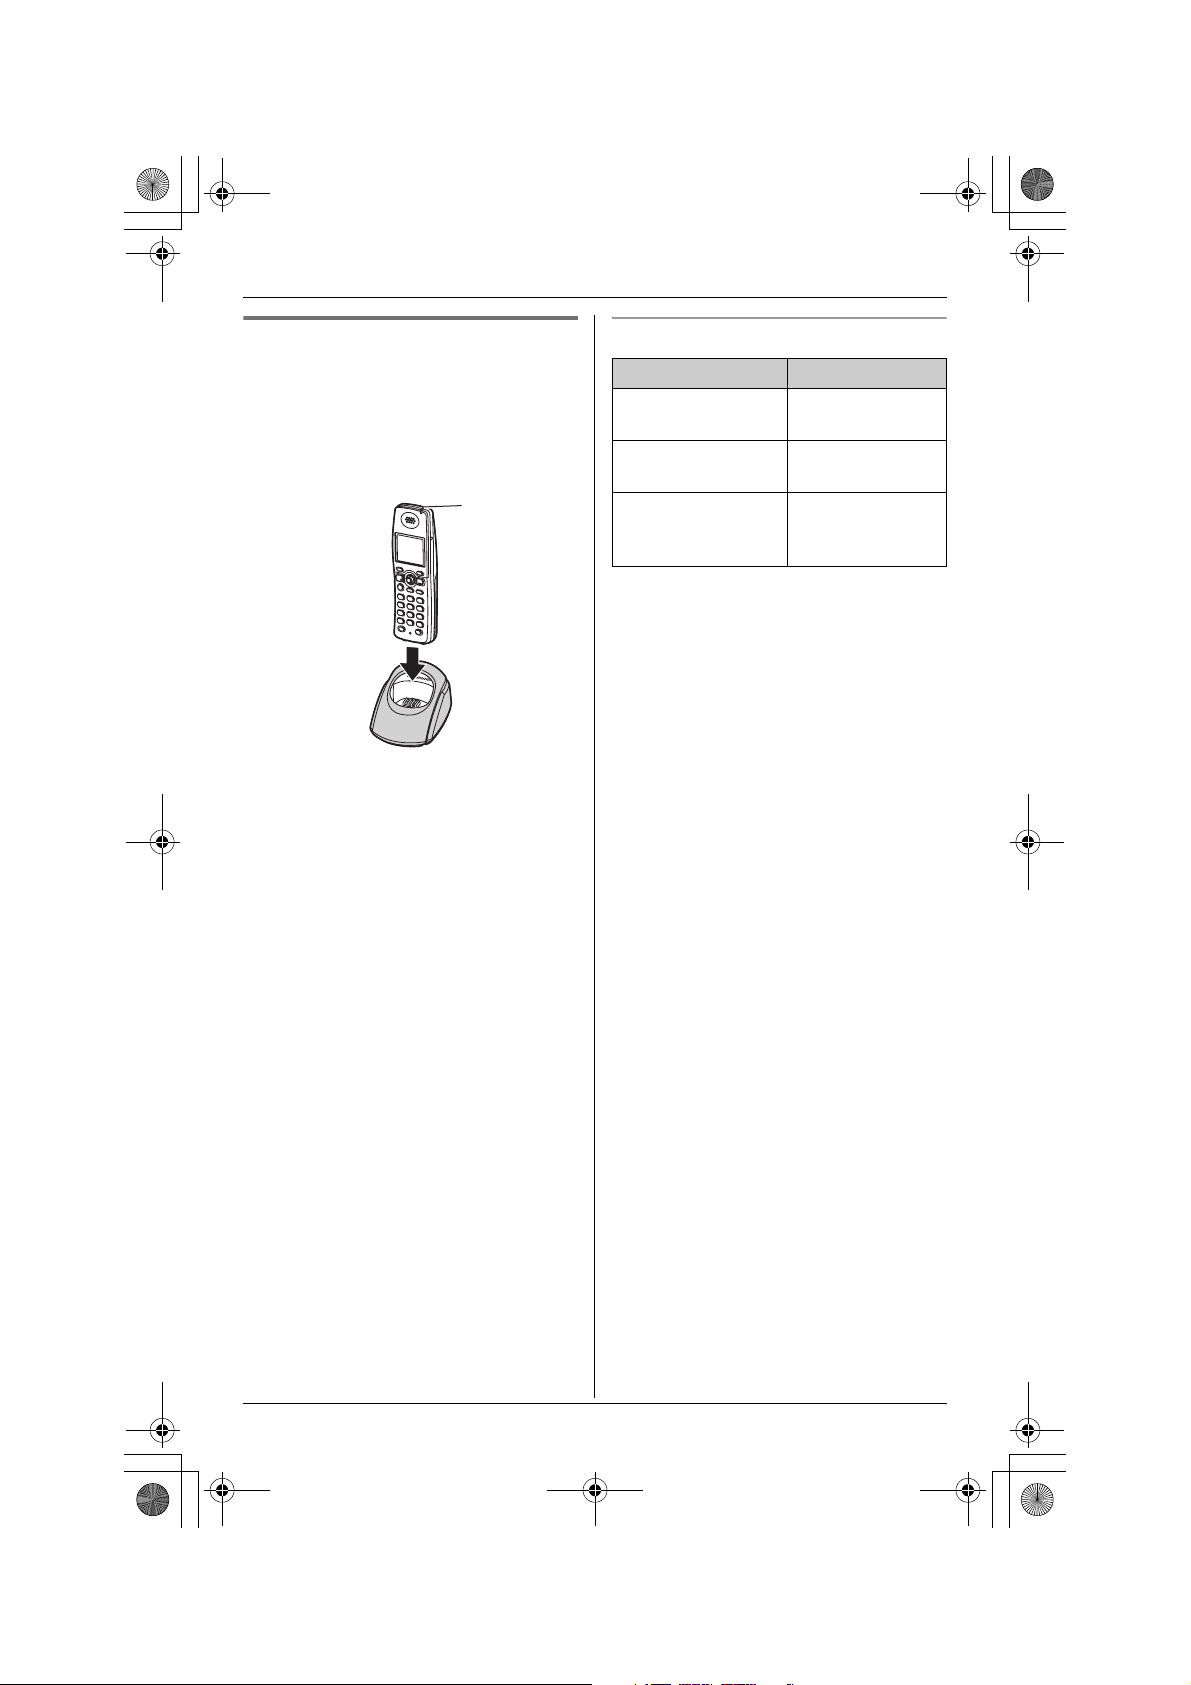
Battery charge
Place the handset on the charger for 6
hours before initial use.
While charging, the charge indicator on the
handset lights in amber. When the battery
is fully charged, the indicator lights in
green.
Charge
indicator
Note:
L If you want to use the handset
immediately, charge the battery for at
least 15 minutes.
L To ensure that the battery charges
properly, clean the charge contacts of
the handset and charger with a soft, dry
cloth once a month. Clean more often if
the unit is subject to the exposure of
grease, dust, or high humidity.
Panasonic battery performance
Operation Operating time
While in use
(talking)
While not in use
(standby)
While using the
clarity booster
feature
Note:
L The handset can be left on the charger
without any ill effect on the battery.
L The battery level may not be displayed
correctly after you replace the battery. In
this case, place the handset on the
charger and let charge for 6 hours.
Up to 4.5 hours
Up to 7 days
Up to 3.5 hours
4 For assistance, please visit http://www.panasonic.com/phonehelp
Page 5
THA19(e).fm Page 5 Tuesday, July 18, 2006 2:24 PM
Registration
Register the handset to a KX-TH111/KXTH112 base unit.
1 Base unit:
Press and hold {INTERCOM} until the
IN USE indicator flashes.
L After the IN USE indicator starts
flashing, the rest of the procedure
must be completed within 2 minutes.
2 Handset:
Press {OK}, then wait until a beep
sounds.
Changing the display language
1 {MENU} (center of joystick) i
{#}{1}{1}{0}
2 Select the desired setting.
3 Press the center of joystick to save. i
{OFF}
For assistance, please visit http://www.panasonic.com/phonehelp 5
Page 6

THA19(e).fm Page 6 Tuesday, July 18, 2006 2:24 PM
Headset (optional)
Connecting the corded headset
Connecting a headset to the handset
allows hands-free phone conversations.
We recommend using the Panasonic
headset noted on page 2.
L Headset shown is KX-TCA86.
Switching a call between the headset
and handset speakerphone
To switch to the handset speakerphone,
press {s}.
To return to the headset, press {C}.
Wall mounting
1 Drive the screws (not included) into the
wall using the wall mount template as a
guide.
25.2 mm
(1 inch)
Screws
(120 V AC,
60 Hz)
2 Mount the charger (A), then slide it
down (B) and to the right (C) until it is
secure.
A
B
C
Wall mount template for the charger
25.2 mm
(1 inch)
6 For assistance, please visit http://www.panasonic.com/phonehelp
Page 7

THA19(e).fm Page 7 Tuesday, July 18, 2006 2:24 PM
Specifications
General
Operating environment:
5 °C – 40 °C (41 °F – 104 °F)
Handset
Frequency:
2.402 GHz – 2.48 GHz
®
Bluetooth
Bluetooth wireless technology 1.2
Dimensions:
Approx. height 160 mm x width 49 mm x
depth 33 mm (6
x 15/16 inches)
Mass (Weight):
Approx. 169 g (0.37 lb.)
Power output:
125 mW (max.)
Power supply:
Ni-MH battery (3.6 V, 830 mAh)
compliance
5
/16 inches x 115/16 inches
Charger
Dimensions:
Approx. height 71 mm x width 88 mm x
depth 99 mm (2
13
/16 inches x 315/32 inches
x 329/32 inches)
Mass (Weight):
Approx. 103 g (0.23 lb.)
Power consumption:
Standby: Approx. 0.17 W
Maximum: Approx. 3.0 W
Power supply:
AC adaptor (120 V AC, 60 Hz)
Note:
L Design and specifications are subject to
change without notice.
L The illustrations in these instructions
may vary slightly from the actual
product.
Trademarks
L The Bluetooth word mark and logos are
owned by the Bluetooth SIG, Inc. and
any use of such marks by Panasonic is
under license. Other trademarks and
trade names are those of their
respective owners.
For assistance, please visit http://www.panasonic.com/phonehelp 7
Page 8

A
THA19(e).fm Page 8 Tuesday, July 18, 2006 2:24 PM
FCC and other information
This equipment is hearing aid compatible as
defined by the FCC in 47 CFR Section
68.316.
When you hold the phone to your ear, noise
might be heard in your Hearing Aid. Some
Hearing Aids are not adequately shielded from
external RF (radio frequency) energy. If noise
occurs, use an optional headset accessory or
the speakerphone option (if applicable) when
using this phone. Consult with your
audiologist or Hearing Aid manufacturer about
the availability of Hearing Aids which provide
adequate shielding to RF energy commonly
emitted by digital devices.
WHEN PROGRAMMING EMERGENCY
NUMBERS AND(OR) MAKING TEST CALLS
TO EMERGENCY NUMBERS:
1) Remain on the line and briefly explain to
the dispatcher the reason for the call.
2) Perform such activities in the off-peak
hours, such as early morning or late
evenings.
This device complies with Part 15 of the FCC
Rules. Operation is subject to the following
two conditions:
(1) This device may not cause harmful
interference, and (2) this device must accept
any interference received, including
interference that may cause undesired
operation.
Privacy of communications may not be
ensured when using this phone.
CAUTION:
ny changes or modifications not expressly
approved by the party responsible for
compliance could void the user’s authority to
operate this device.
NOTE:
This equipment has been tested and found to
comply with the limits for a Class B digital
device, pursuant to Part 15 of the FCC Rules.
These limits are designed to provide
reasonable protection against harmful
interference in a residential installation. This
equipment generates, uses, and can radiate
radio frequency energy and, if not installed
and used in accordance with the instructions,
may cause harmful interference to radio
communications. However, there is no
guarantee that interference will not occur in a
particular installation. If this equipment does
cause harmful interference to radio or
television reception, which can be determined
by turning the equipment off and on, the user
is encouraged to try to correct the
interference by one or more of the following
measures:
– Reorient or relocate the receiving antenna.
– Increase the separation between the
equipment and receiver.
– Connect the equipment into an outlet on a
circuit different from that to which the
receiver is connected.
– Consult the dealer or an experienced
radio/TV technician for help.
FCC RF Exposure Warning:
The product complies with FCC radiation
exposure limits set forth for an uncontrolled
environment. The handset may be carried
and operated with only the optional specific
belt-clip. Other non-tested belt-clips or similar
body-worn accessories may not comply and
must be avoided. The handset must not be
collocated or operated in conjunction with any
other antenna or transmitter.
8 For assistance, please visit http://www.panasonic.com/phonehelp
Page 9

THA19(e).fm Page 9 Tuesday, July 18, 2006 2:24 PM
CAUTION:
Installation
L
Operating the product near 2.4 GHz
electrical appliances may cause
interference. Move away from the electrical
appliances.
L
The AC adaptor is used as the main
disconnect device. Ensure that the AC outlet
is installed near the product and is easily
accessible.
Battery
To reduce the risk of fire or injury to persons,
read and follow these instructions.
L
Use only the battery(ies) specified.
L
Do not dispose of the battery(ies) in a fire.
They may explode. Check with local waste
management codes for special disposal
instructions.
L
Do not open or mutilate the battery(ies).
Released electrolyte is corrosive and may
cause burns or injury to the eyes or skin. The
electrolyte may be toxic if swallowed.
L
Exercise care when handling the
battery(ies). Do not allow conductive
materials such as rings, bracelets or keys to
touch the battery(ies), otherwise a short
circuit may cause the battery(ies) and/or the
conductive material to overheat and cause
burns.
L
Charge the battery(ies) provided, or
identified for use with the product only, in
accordance with the instructions and
limitations specified in this manual.
Notice
WARNING:
L
To prevent the risk of fire or electrical shock,
do not expose the product to rain or any type
of moisture.
L
Unplug the product from power outlets if it
emits smoke, an abnormal smell, or makes
an unusual noise. These conditions can
cause fire or electric shock. Confirm that
smoke has stopped emitting and contact the
Panasonic Call Center at 1-800-211-PANA
(1-800-211-7262).
For assistance, please visit http://www.panasonic.com/phonehelp 9
Page 10

THA19(e).fm Page 10 Tuesday, July 18, 2006 2:24 PM
Customer services
Customer Services Directory
Obtain Product Information and Operating Assistance; locate your nearest Dealer or
Servicenter; purchase Parts and Accessories; or make Customer Service and
Literature requests by visiting our Web Site at:
http://www.panasonic.com/consumersupport
or, contact us via the web at:
http://www.panasonic.com/contactinfo
You may also contact us directly at: 1-800-211-PANA (1-800-211-7262),
Monday-Friday 9 am-9 pm; Saturday-Sunday 10 am-7 pm, EST.
TTY users (hearing or speech impaired users) can call 1-877-833-8855.
Accessory Purchases
Purchase Parts, Accessories and Instruction Books online for all Panasonic
Products by visiting our Web Site at:
http://www.pasc.panasonic.com
or, send your request by E-mail to:
npcparts@us.panasonic.com
You may also contact us directly at:
1-800-332-5368 (Phone) 1-800-237-9080 (Fax Only)
(Monday - Friday 9 am to 9 pm, EST.)
Panasonic Services Company
20421 84th Avenue South, Kent, WA 98032
(We Accept Visa, MasterCard, Discover Card, American Express, and Personal
Checks)
TTY users (hearing or speech impaired users) can call 1-866-605-1277.
Service in Puerto Rico
Panasonic Puerto Rico, Inc.
San Gabriel Industrial Park, Ave. 65 de Infantería, Km. 9.5,
Carolina, Puerto Rico 00985
Phone (787)750-4300, Fax (787)768-2910
10 For assistance, please visit http://www.panasonic.com/phonehelp
Page 11

THA19(e).fm Page 11 Tuesday, July 18, 2006 2:24 PM
Warranty
PANASONIC CONSUMER
ELECTRONICS COMPANY, DIVISION
OF PANASONIC CORPORATION OF
NORTH AMERICA
One Panasonic Way,
Secaucus, New Jersey 07094
PANASONIC PUERTO RICO, INC.
San Gabriel Industrial Park,
Ave. 65 de Infantería, Km. 9.5,
Carolina, Puerto Rico 00985
Panasonic Telephone Products
Limited Warranty
Limited Warranty Coverage
If your product does not work properly because of a defect in materials or
workmanship, Panasonic Consumer Electronics Company or Panasonic Puerto
Rico, Inc. (collectively referred to as “the warrantor”) will, for the length of the period
indicated on the chart below, which starts with the date of original purchase
(“Limited Warranty period”), at its option either (a) repair your product with new or
refurbished parts, or (b) replace it with a new or a refurbished product. The decision
to repair or replace will be made by the warrantor.
Parts Labor
One (1) Year One (1) Year
During the “Labor” Limited Warranty period there will be no charge for labor. During
✄
the “Parts” Limited Warranty period, there will be no charge for parts. You must
mail-in your product prepaid during the Limited Warranty period. This Limited
Warranty excludes both parts and labor for batteries, antennas, and cosmetic parts
(cabinet). This Limited Warranty only applies to products purchased and serviced in
the United States or Puerto Rico. This Limited Warranty is extended only to the
original purchaser and only covers products purchased as new.
Mail-In Service
For assistance in the continental U.S.A. in obtaining repairs please ship the product
prepaid to:
Panasonic Services Company Customer Servicenter
4900 George McVay Drive Suite B Door #12 McAllen, TX 78503
For assistance in Puerto Rico call Panasonic Puerto Rico, Inc. (787)-750-4300 or
fax (787)-768-2910.
For Limited Warranty service for headsets if a headset is included with this product
please call Panasonic Call Center at 1-800-211-PANA (1-800-211-7262).
When shipping the unit carefully pack, include all accessories, and send it prepaid,
adequately insured and preferably in the original carton. Include a letter detailing
the complaint and provide a day time phone number where you can be reached.
For assistance, please visit http://www.panasonic.com/phonehelp 11
Page 12

THA19(e).fm Page 12 Tuesday, July 18, 2006 2:24 PM
IF REPAIR IS NEEDED DURING THE LIMITED WARRANTY PERIOD THE
PURCHASER WILL BE REQUIRED TO FURNISH A SALES RECEIPT/PROOF
OF PURCHASE INDICATING DATE OF PURCHASE, AMOUNT PAID AND
PLACE OF PURCHASE. CUSTOMER WILL BE CHARGED FOR THE REPAIR
OF ANY UNIT RECEIVED WITHOUT SUCH PROOF OF PURCHASE.
Limited Warranty Limits And Exclusions
This Limited Warranty ONLY COVERS failures due to defects in materials or
workmanship, and DOES NOT COVER normal wear and tear or cosmetic damage.
The Limited Warranty ALSO DOES NOT COVER damages which occurred in
shipment, or failures which are caused by products not supplied by the warrantor,
or failures which result from accidents, misuse, abuse, neglect, bug infestation,
mishandling, misapplication, alteration, faulty installation, set-up adjustments,
misadjustment of consumer controls, improper maintenance, power line surge,
lightning damage, modification, introduction of sand, humidity or liquids,
commercial use such as hotel, office, restaurant, or other business or rental use of
the product, or service by anyone other than a Factory Servicenter or other
Authorized Servicer, or damage that is attributable to acts of God.
THERE ARE NO EXPRESS WARRANTIES EXCEPT AS LISTED UNDER
“LIMITED WARRANTY COVERAGE”. THE WARRANTOR IS NOT LIABLE FOR
INCIDENTAL OR CONSEQUENTIAL DAMAGES RESULTING FROM THE USE
OF THIS PRODUCT, OR ARISING OUT OF ANY BREACH OF THIS LIMITED
WARRANTY. (As examples, this excludes damages for lost time, lost calls or
messages, cost of having someone remove or re-install an installed unit if
applicable, travel to and from the servicer. The items listed are not exclusive, but
are for illustration only.) ALL EXPRESS AND IMPLIED WARRANTIES,
INCLUDING THE WARRANTY OF MERCHANTABILITY, ARE LIMITED TO THE
PERIOD OF THE LIMITED WARRANTY.
Some states do not allow the exclusion or limitation of incidental or consequential
damages, or limitations on how long an implied warranty lasts, so the exclusions
may not apply to you.
This Limited Warranty gives you specific legal rights and you may also have other
rights which vary from state to state. If a problem with this product develops during or
after the Limited Warranty period, you may contact your dealer or Servicenter. If the
problem is not handled to your satisfaction, then write to the warrantor’s Consumer
Affairs Department at the addresses listed for the warrantor.
PARTS AND SERVICE, WHICH ARE NOT COVERED BY THIS LIMITED
WARRANTY, ARE YOUR RESPONSIBILITY.
12 For assistance, please visit http://www.panasonic.com/phonehelp
Page 13

THA19(e).fm Page 13 Tuesday, July 18, 2006 2:24 PM
If you need assistance with setup or operation
1 Visit our website: http://www.panasonic.com/phonehelp
2 Contact us via the web at: http://www.panasonic.com/contactinfo
3 Call us at: 1-800-211-PANA (1-800-211-7262)
TTY users (hearing or speech impaired users) can call 1-877-833-8855.
When you ship the product
L Carefully pack your unit, preferably in the original carton.
L Attach a letter, detailing the symptom, to the outside of the carton.
L Send the unit to Panasonic Services Company Customer Servicenter, prepaid and
adequately insured.
L Do not send your unit to Panasonic Consumer Electronics Company listed below or to
executive or regional sales offices. These locations do not repair consumer products.
Panasonic Consumer Electronics Company,
Division of Panasonic Corporation of North America
One Panasonic Way, Secaucus, New Jersey 07094
Panasonic Puerto Rico, Inc.
San Gabriel Industrial Park, Ave. 65 de Infantería, Km. 9.5,
Carolina, Puerto Rico 00985
Copyright:
This material is copyrighted by Panasonic Communications Co., Ltd., and may be
reproduced for internal use only. All other reproduction, in whole or in part, is prohibited
without the written consent of Panasonic Communications Co., Ltd.
© 2006 Panasonic Communications Co., Ltd. All Rights Reserved.
For assistance, please visit http://www.panasonic.com/phonehelp 13
Page 14

THA19(sp).fm Page 1 Tuesday, July 18, 2006 2:32 PM
Manual de instalación
Teléfono Inalámbrico Digital Expandible
Modelo N°.
Gracias por adquirir un teléfono inalámbrico Panasonic.
Este auricular es un accesorio para usarse con las unidades base Panasonic
KX-TH111/KX-TH112.
de poder usarlo.
Este manual de instalación sólo describe los pasos necesarios para registrar y
comenzar a usar el auricular. Lea las instrucciones de operación de la unidad
base para obtener mayores detalles.
Debe registrar este auricular en su unidad base antes
KX-THA19
Cargue la batería durante 6 horas antes de utilizar por primera vez.
Lea este manual de instalación antes de usar la unidad y guárdelo para
consultarlo en el futuro.
Para obtener ayuda, visite nuestro sitio web:
http://www.panasonic.com/phonehelp
Puerto Rico.
para clientes de Estados Unidos o
Page 15

THA19(sp).fm Page 2 Tuesday, July 18, 2006 2:32 PM
Información de los accesorios
Accesorios incluidos
Accesorio Número de pedido Cantidad
Carga PQLV30048ZS 1
Adaptador para corriente (para el cargador) PQLV206X 1
Batería HHR-P104 1
Tapa del auricular
*1 La cubierta del auricular viene unida a él.
*1
Accesorios adicionales y de reemplazo
Accesorio Número de pedido
Batería recargable níquel
metal hídrica (Ni-MH)
Audífono alámbrico KX-TCA86, KX-TCA88HA, KX-TCA91, KX-TCA92, KX-TCA93,
Gancho para el cinturón PQKE10404Z1
HHR-P104
KX-TCA94, o KX-TCA95
PQYNTHA19R 1
Información de ventas y respaldo
L
Para pedir accesorios adicionales y de reemplazo, llame al 1-800-332-5368.
L
Los usuarios TTY (usuarios con impedimentos auditivos o del habla) pueden llamar al 1-866-605-1277
(2)
.
Page 16

THA19(sp).fm Page 3 Tuesday, July 18, 2006 2:32 PM
Instalación del auricular
Conexión del cargador
L
Use sólo el adaptador para corriente
Panasonic PQLV206 incluido.
(120 V CA, 60 Hz)
Parte inferior
del cargador
Ganchos
Fije bien el cable del adaptador de CA
para que no se desconecte.
Nota:
L
Los adaptadores para corriente deben
permanecer conectados todo el tiempo. (Es
normal que el adaptador se caliente durante
su uso.)
L
El adaptador para corriente debe estar
conectado a un enchufe de corriente
orientado verticalmente o en una toma de
corriente alterna montada en el piso. No
conecte el adaptador para corriente alterna a
una toma de corriente montada en el techo,
ya que el peso del adaptador puede hacer
que se desconecte.
Instalación de la batería
1
Oprima firmemente el seguro de la cubierta
del auricular y deslícelo en dirección de la
flecha.
2
Inserte la batería (A), y presiónela hasta
que encaje en el compartimiento (B).
Después, cierre la tapa del auricular (C,
D
).
B
A
C
D
(3)
Page 17

THA19(sp).fm Page 4 Tuesday, July 18, 2006 2:32 PM
Carga de la batería
Coloque el auricular en el cargador durante
horas
antes de usarlo por primera vez.
Mientras se carga, el indicador de carga del
auricular se ilumina en color ámbar. Cuando la
batería está completamente cargada, el
indicador se ilumina en verde.
Indicador
de carga
Nota:
L
Si desea utilizar el auricular de inmediato,
cargue la batería durante un mínimo de 15
minutos.
L
Para asegurarse de que la batería se cargue
correctamente, limpie los contactos de carga
del auricular y el cargador con un paño
suave y seco una vez al mes. Límpielos con
mayor frecuencia si la unidad está sujeta a
grasa, polvo o un alto nivel de humedad.
6
Rendimiento de la batería Panasonic
Operación
Mientras esté en uso
(hablando)
Mientras no esten uso
(en espera)
Mientras use la función
de amplificador de
claridad
Nota:
L
El auricular puede dejar en el cargador sin
efectos dañinos para la batería.
L
Es posible que el nivel de la batería no se
muestre correctamente después de que la
reemplace. En este caso, coloque el
auricular en el cargador y permita que se
cargue durante 6 horas.
Tiempo de
funcionamiento
Hasta 4,5 horas
Hasta 7 días
Hasta 3,5 horas
(4)
Page 18

THA19(sp).fm Page 5 Tuesday, July 18, 2006 2:32 PM
Registro
Registre el auricular en una unidad base KXTH111/KX-TH112.
1
Unidad base:
Oprima y mantenga oprimido {INTERCOM}
hasta que el indicador de IN USE parpadee.
L
Después de que el indicador de IN USE
comience a parpadear, debe completar el
resto del procedimiento en menos de 2
minutos.
2
Auricular:
Oprima {OK}, y después espere hasta que
se emita un pitido.
Para cambiar el idioma de la
pantalla
1
{
MENU} (centro del joystick) i
{#}{1}{1}{0}
2
Seleccione la configuración deseada.
3
Oprima el centro de joystick para guardar.
i {
OFF
}
Audífono (opcional)
Cómo conectar el audífono
alámbrico
La conexión de un audífono al auricular permite
tener conversaciones a manos libres.
Recomendamos que utilice el audífono
Panasonic que se especifica en la página 2.
L
El modelo mostrado aquí es un KX-TCA86.
Cómo cambiar una llamada entre el
audífono y el altavoz del auricular
Para cambiar al altavoz del auricular, pulse
{s}
.
Para volver al audífono, oprima
{C}
.
(5)
Page 19

THA19(sp).fm Page 6 Tuesday, July 18, 2006 2:32 PM
Montaje en la pared
1
Coloque los tornillos (no incluidos) en la
pared usando como guía la plantilla para
instalación.
25,2 mm
(1 pulgada)
Tornillos
(120 V CA,
60 Hz)
2
Coloque el cargador (A), y después
deslícelo hacia abajo (B) y a la derecha
(C) hasta que esté seguro.
A
B
Plantilla de montaje en la pared
25,2 mm
(1 pulgada)
C
Especificaciones
Generalidades
Ambiente de operación:
5 °C a 40 °C (41 °F a 104 °F)
Auricular
Frecuencia:
2,402 GHz a 2,48 GHz
Aprobación de Bluetooth
Tecnología inalámbrica Bluetooth 1.2
Dimensiones:
Aprox. 160 mm de alto x 49 mm de ancho x 33
mm de profundidad (6
pulgadas x 15/16 pulgadas)
Peso:
Aprox. 169 g (0,37 lb.)
Salida de potencia:
125 mW (máx.)
Suministro de energía:
Batería de Ni-MH (3,6 V, 830 mAh)
Carga
Dimensiones:
Aprox. 71 mm de alto x 88 mm de ancho x 99
mm de profundidad (213/16 pulgadas x 315/32
pulgadas x 329/32 pulgadas)
Peso:
Aprox. 103 g (0,23 lb.)
Consumo de energía:
En espera: Aprox. 0,17 W
Máximo: Aprox. 3,0 W
Suministro de energía:
Adaptador para corriente alterna (120 V CA, 60
Hz)
Nota:
L
El diseño y las especificaciones están
sujetos a cambio sin previo aviso.
L
Las ilustraciones de estas instrucciones
pueden ser ligeramente diferentes al
producto.
Marcas registradas
L
La marca y logotipos de Panasonic son
propiedad de Bluetooth SIG, Inc. y cualquier
®
5
/16 pulgadas x 115/16
(6)
Page 20

THA19(sp).fm Page 7 Tuesday, July 18, 2006 2:32 PM
uso de dicha marca y logotipos se hace bajo
licencia de la misma. Las otras marcas
comerciales y nombres comerciales
pertenecen a sus propietarios respectivos.
(7)
 Loading...