

Page 1
THA13(e).book Page 1 Monday, September 11, 2006 3:34 PM
Operating Instructions
Home Communication System
Cordless Camera
Model No.
KX-THA13
Indoor Use Only
This unit is an accessory unit for use with the KX-TH102 base unit. You
must register this unit with your base unit before it can be used.
Please read these Operating Instructions before using the unit and save
for future reference.
For assistance, visit our website:
http://www.panasonic.com/phonehelp for customers in the U.S.A. or
Puerto Rico.
PQQX14791WA DM1105PN3096
Page 2
THA13(e).book Page 2 Monday, September 11, 2006 3:34 PM
Table of Contents
Introduction
Feature highlights. . . . . . . . . . . . . . . . . . 3
Accessory information . . . . . . . . . . . . . . 4
Expanding your phone system . . . . . . . . 5
Important safety instructions . . . . . . . . . 8
For best performance . . . . . . . . . . . . . . . 9
Preparation
Controls . . . . . . . . . . . . . . . . . . . . . . . . 11
Setting up the cordless camera . . . . . . 12
Handset display items . . . . . . . . . . . . . 14
Symbols used in these operating
instructions . . . . . . . . . . . . . . . . . . . . . . 14
Registering the cordless camera . . . . . 15
Monitoring using a
Handset
Video monitor using a handset. . . . . . . 16
Picture gallery. . . . . . . . . . . . . . . . . . . . 20
Before Monitoring using
your Computer
Installing the MULTI TALK V Camera
Utility. . . . . . . . . . . . . . . . . . . . . . . . . . . 21
Enabling monitoring from a computer . 21
Registering the cordless camera to your
computer . . . . . . . . . . . . . . . . . . . . . . . 22
Accessing images from the cordless
camera . . . . . . . . . . . . . . . . . . . . . . . . . 23
Index
Index. . . . . . . . . . . . . . . . . . . . . . . . . . . 49
Monitoring using your
Computer
Video monitor using your computer . . . 26
Useful Settings while
Monitoring
Useful settings while monitoring . . . . . . 30
Useful Information
System requirements for your
computer . . . . . . . . . . . . . . . . . . . . . . . 38
Wall mounting. . . . . . . . . . . . . . . . . . . . 39
Troubleshooting . . . . . . . . . . . . . . . . . . 42
FCC and other information . . . . . . . . . . 44
Specifications . . . . . . . . . . . . . . . . . . . . 45
Customer services . . . . . . . . . . . . . . . . 46
Warranty. . . . . . . . . . . . . . . . . . . . . . . . 47
2 For assistance, please visit http://www.panasonic.com/phonehelp
Page 3

THA13(e).book Page 3 Monday, September 11, 2006 3:34 PM
Introduction
Feature highlights
Thank you for purchasing the Panasonic Home Communication System
Cordless Camera.
Important:
L For information about other compatible Panasonic units, see page 5.
L In these operating instructions, the term “handset” is used to refer to the KX-THA11
Cordless Handset, the KX-THA12 Cordless Video Camera Handset, the KX-THA16
Cordless Video Camera Station, or the KX-THA17 Cordless Video Camera Handset
with A/V Output.
Video monitor
Using the cordless camera and handset
You can monitor the room where the cordless camera is located when:
– you access the cordless camera using the handset (page 16).
– the cordless camera pages the handset when it detects motion and/or sound (page 17).
– the cordless camera user pages the handset using the call button (page 19).
L The cordless camera is compatible for KX-THA12/ KX-THA16/ KX-THA17.
Using the cordless camera and your computer
You can view the room where the cordless camera is located when:
– you access the cordless camera using your computer (page 26).
– the cordless camera notifies your computer with a pop-up message when it detects
motion and/or sound (page 27).
– the cordless camera user notifies your computer with a pop-up message using the call
button (page 29).
L To view the images using your computer, you must first install the MULTI TALK V
Camera Utility software included with your base unit. Refer to the “Installation Guide for
MULTI TALK V Software” for installation details.
For assistance, please visit http://www.panasonic.com/phonehelp 3
Page 4
THA13(e).book Page 4 Monday, September 11, 2006 3:34 PM
Introduction
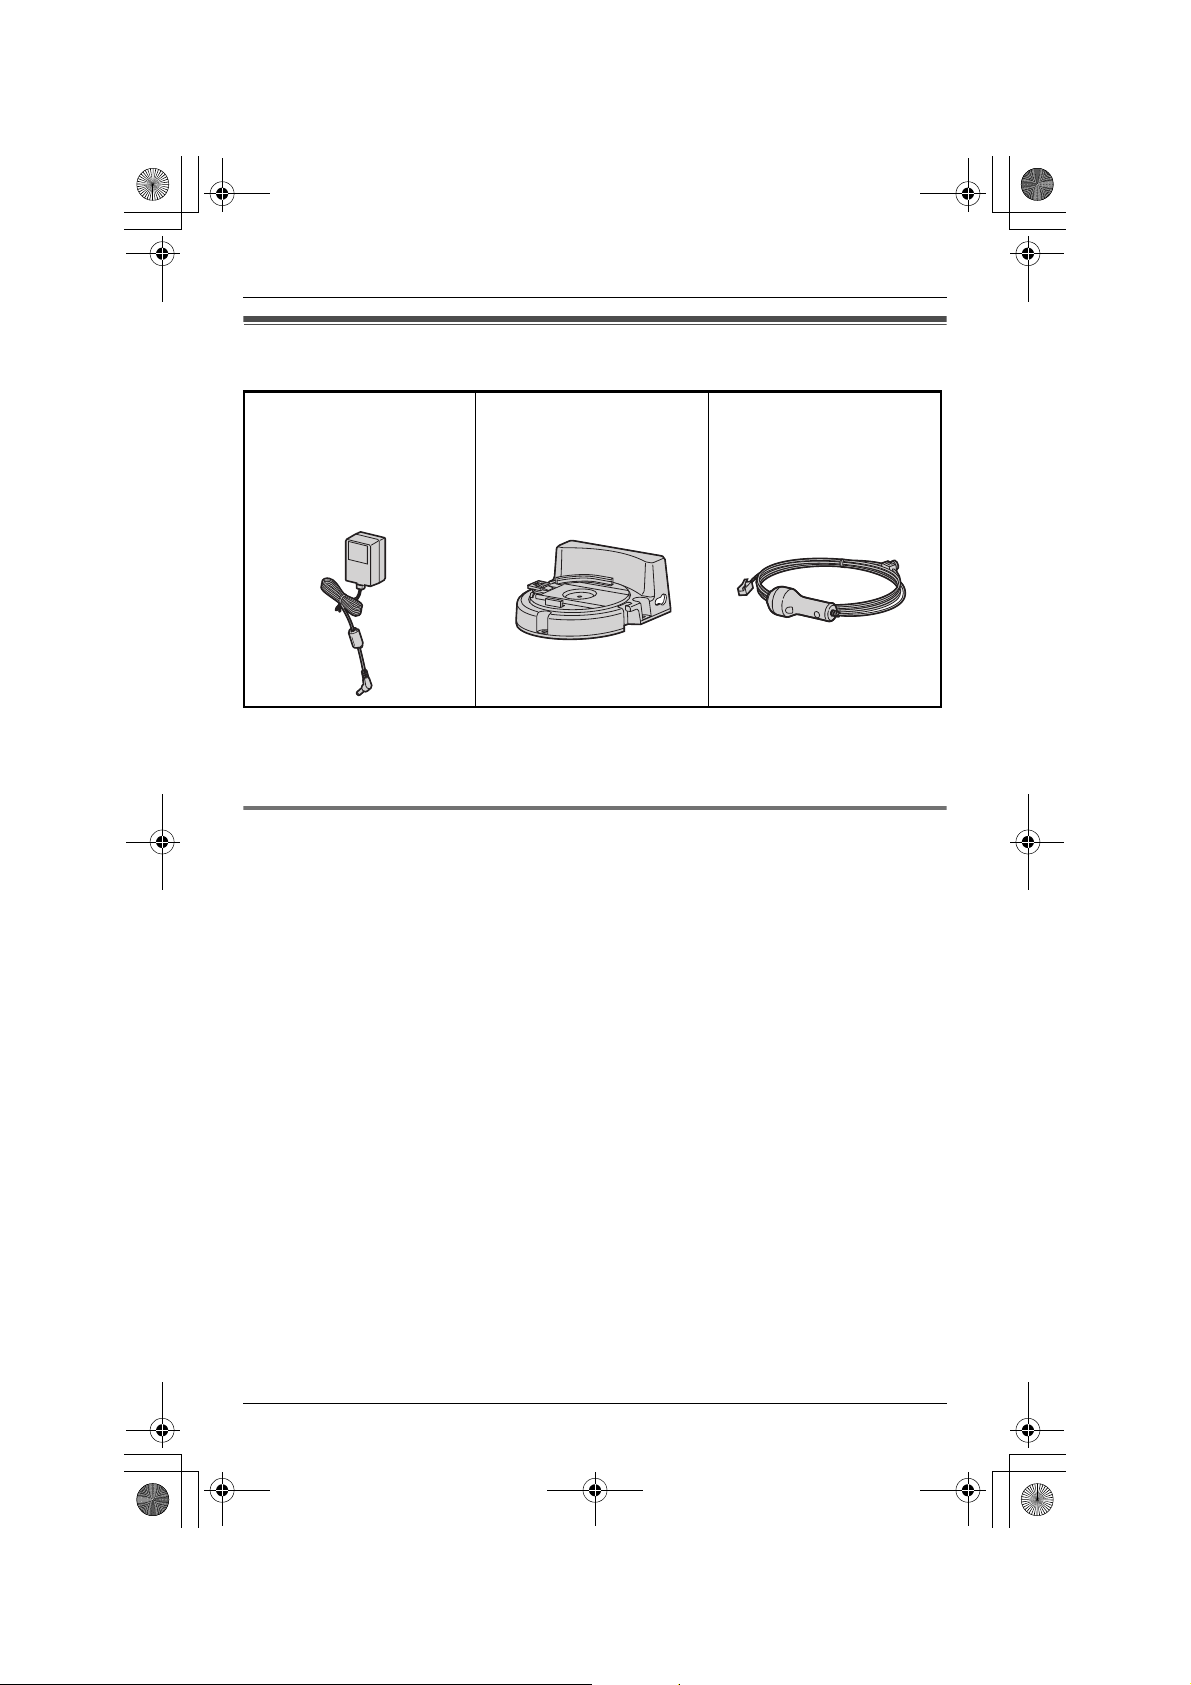
Accessory information
A AC adaptor for cordless
camera
PQLV203
(Order No.
PQWE1THA13M)
Note:
L You can expand your phone system by registering additional compatible Panasonic
units (page 5).
A Wall mounting adaptor
for cordless camera
(Order No. PQLP10267Z)
A Call button for cordless
camera
(Order No. PQLP10270Z)
Sales and support information
L To order these accessories, call 1-800-332-5368.
L TTY users (hearing or speech impaired users) can call 1-866-605-1277.
4 For assistance, please visit http://www.panasonic.com/phonehelp
Page 5

THA13(e).book Page 5 Monday, September 11, 2006 3:34 PM
Introduction
Expanding your phone system
You can expand the phone system by registering the following units to a single base unit:
max. 18
Handsets: max. 8 Other devices: max. 10
Cordless handset
KX-THA11
(Monochrome display
type)
Cordless camera
KX-THA13: max. 2
(For monitoring)
Cordless video camera
handset
KX-THA12
(Color display type)
Cordless video camera
station
KX-THA16
(Large color display
type)
Cordless video camera
handset with A/V
output
KX-THA17
(Color display type with
audio/video output
jack)
Note:
L Headset and cellular phone must have Bluetooth capability and must be compatible to
the home communication system. For more details and the list of compatible cellular
phones, please visit: www.panasonic.com/MultiTalkV
USB adaptor
KX-THA14
(For data link)
Other
Bluetooth
compatible
devices
(Optional)
®
Headset
Cellular
phone:
max. 5
For assistance, please visit http://www.panasonic.com/phonehelp 5
Page 6

THA13(e).book Page 6 Monday, September 11, 2006 3:34 PM
Introduction
Various features using the optional units
Video phone
AB
Your home
Video monitor
This feature allows you and the
person you are talking to to see
each other in real time for an
outside call using the handsets.
If you have additional units (A,
B), you can also make a video
call during an intercom call.
A KX-THA12/KX-THA17
B KX-THA16
This feature allows you to
monitor the room where the
cordless camera (A) is located
from the units (B, C).
You can also monitor the room
between the units (B, C).
A KX-THA13
B KX-THA12/KX-THA17
C KX-THA16
CA B
Cellular connection (Bluetooth compatible)
Your cellular phone
BAC
This feature allows you to make
or answer cellular calls using
your unit (A, B, C, and the base
unit), if you have Bluetooth
compatible cellular phones.
A KX-THA11
B KX-THA12/KX-THA17
C KX-THA16
6 For assistance, please visit http://www.panasonic.com/phonehelp
Page 7

THA13(e).book Page 7 Monday, September 11, 2006 3:34 PM
Data link feature
A CB D
Video phone using TV
Introduction
This feature allows you to access
the Internet or another computer
by connecting the units (A, B,
C, and the base unit) with the
USB cable or a USB adaptor (D)
to your computer.
A KX-THA11
B KX-THA12/KX-THA17
C KX-THA16
D KX-THA14
This feature allows you to use
your TV to see the other person
during a video call.
A KX-THA17
TV
A
Your home
For assistance, please visit http://www.panasonic.com/phonehelp 7
Page 8

THA13(e).book Page 8 Monday, September 11, 2006 3:34 PM
Introduction
Important safety
instructions
When using the product, basic safety
precautions should always be followed to
reduce the risk of fire, electric shock, or
personal injury.
1. Read and understand all instructions.
2. Keep these instructions.
3. Heed all warnings.
4. Follow all instructions.
5. After taking away the dust on the lens,
wipe the lens with a cotton bud.
6. Do not install near any heat sources
such as radiators, heat registers,
stoves, or other devices (including
amplifiers) that produce heat.
7. Protect the AC adaptor cord from being
walked on or pinched particularly at
plugs, convenience receptacles, and
the point where they exit from the unit.
8. Do not touch the unit or the AC adaptor
during lightning storms.
9. Unplug the unit when unused for long
periods of time.
10. Refer all servicing to qualified service
personnel. Servicing is required when
the unit has been damaged in any way,
such as the AC adaptor cord or plug is
damaged, the unit does not operate
normally, or has been dropped.
SAVE THESE
INSTRUCTIONS
CAUTION:
Installation
L Do not touch the plug with wet hands.
L The AC adaptor is used as the main
disconnect device. Ensure that the AC
outlet is installed near the product and is
easily accessible.
WARNING:
L To prevent the risk of fire or electrical
shock, do not expose the product to rain
or any type of moisture.
L Unplug the product from power outlets if
it emits smoke, an abnormal smell, or
makes an unusual noise. These
conditions can cause fire or electric
shock. Confirm that smoke has stopped
and contact the Panasonic Call Center
at 1-800-211-PANA (1-800-211-7262).
Medical
L Consult the manufacturer of any
personal medical devices, such as
pacemakers or hearing aids, to
determine if they are adequately
shielded from external RF (radio
frequency) energy. (The product
operates in the frequency range of 2.402
GHz to 2.48 GHz, and the power output
is 125 mW (max.).) Do not use the
product in health care facilities if any
regulations posted in the area instruct
you not to do so. Hospitals or health care
facilities may be using equipment that
could be sensitive to external RF energy.
8 For assistance, please visit http://www.panasonic.com/phonehelp
Page 9
THA13(e).book Page 9 Monday, September 11, 2006 3:34 PM
For best performance
Location
This unit communicates using radio
waves.
For maximum distance and noise-free
operation, we recommend placing the
product away from electrical appliances.
Environment
L Keep the product away from electrical
noise generating devices, such as
fluorescent lamps and motors.
L The product should be kept free from
excessive smoke, dust, high
temperature, and vibration.
L The product should not be exposed to
direct sunlight.
L Do not place heavy objects on top of the
product.
L The product should be kept away from
heat sources such as heaters, kitchen
stoves, etc. It should not be placed in
rooms where the temperature is less
than 5 °C (41 °F) or greater than 40 °C
(104 °F). Damp basements should also
be avoided.
L Operating near 2.4 GHz electrical
appliances may cause interference.
Move away from the electrical
appliances.
Routine care
L Wipe the outer surface of the product
with a soft moist cloth. Do not use
benzine, thinner, or any abrasive
powder.
Conditions for using the
cordless camera
L The cordless camera is intended for
indoor use only. Prolonged exposure to
direct sunlight or halogen light may
damage CMOS sensor.
Introduction
L Use the cordless camera in a bright
place such as under daylight or a well-lit
room.
L Do not use the cordless camera in the
following places:
– near incandescent lamps.
– near any electrical appliance that
emits a strong radio signal.
– where the subject of the picture is
against a light source or in front of a
mirror.
– in places where temperature varies
greatly, such as near an air
conditioner or heater.
– any place exposed to oil or steam
such as a kitchen.
– where an object such as glass can
cause temperature change due to
reflection.
L In darker environments other than
daylight or in a well-lit room, the
smoothness of motion decreases in
order to keep the appropriate brightness
and sharpness of images. In such
environments, the smoothness of
motion may not increase/decrease
much even if you change the display
sharpness settings (page 30).
L When using the cordless camera,
please take into consideration the rights
of others with regard to privacy.
L When you move the cordless camera
from a cold place to a warm place, wait a
little while to let the cordless camera
adapt to the change in environment
before use. In this case, condensation
such as the formation of dew may occur,
resulting in error or malfunction.
Operating conditions for the
cordless camera
To use the sensor detection feature of the
cordless camera, you need to change the
detection mode (page 32).
For assistance, please visit http://www.panasonic.com/phonehelp 9
Page 10
THA13(e).book Page 10 Monday, September 11, 2006 3:34 PM
Introduction
Audio detection
The cordless camera features a sensor
that detects human voices such as a baby
cry. Sounds other than human voices may
be difficult to detect. To use this feature,
confirm that the cordless camera is located
in a place where it can easily detect
voices. Once the sensor has detected
sound, the cordless camera pages the
handset or notifies your computer with a
pop-up message.
Motion detection
The cordless camera features a sensor
that detects motion by sensing
temperature variations in the room where it
is placed in. When an object (a person,
animal, etc.) enters the range of the
sensor, the sensor can detect the
temperature variation caused by the
object. Once the sensor has detected
motion, the cordless camera pages the
handset or notifies your computer with a
pop-up message.
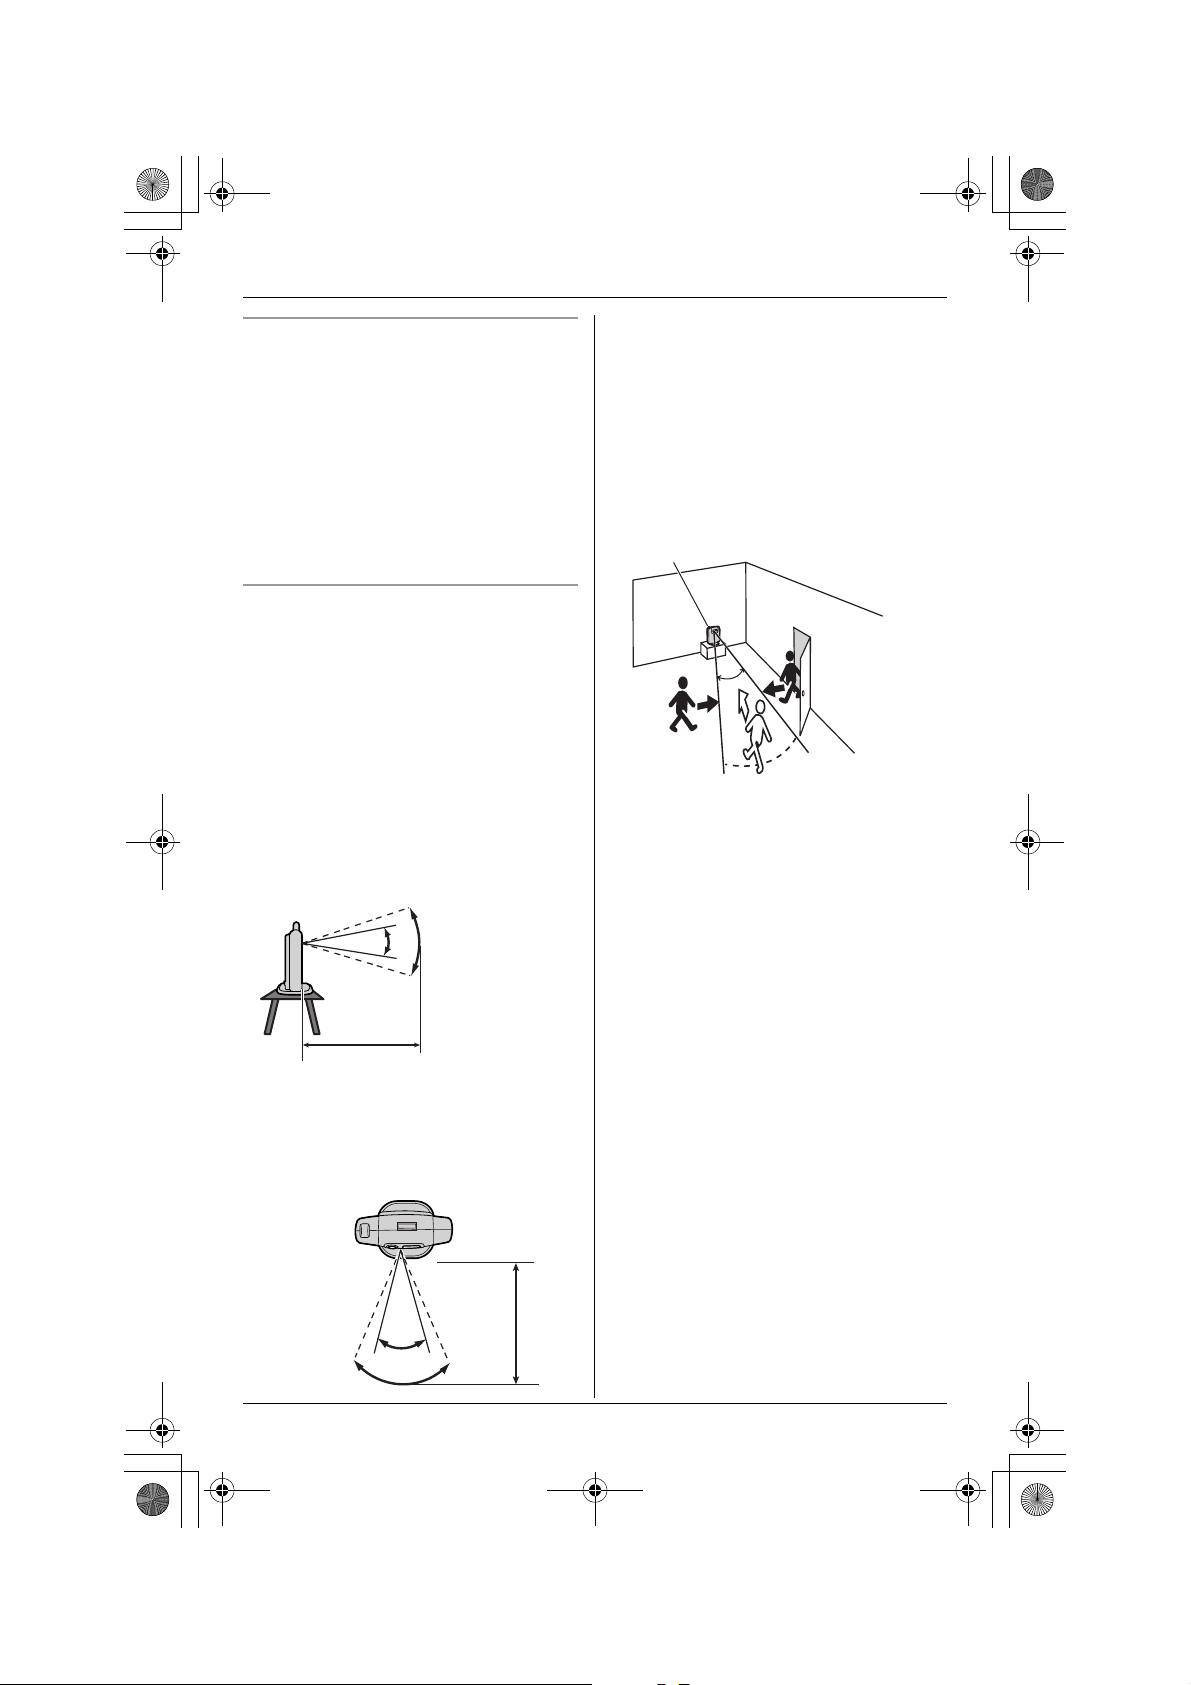
N Vertical detection range
B
A
C
A Vertical angle: Approx. 20°
B Photograph angle: Approx. 35°
C Distance: Approx. 5 m (16.4 feet)
N Horizontal detection range
D Horizontal angle: Approx. 30°
E Photograph angle: Approx. 46°
F Distance: Approx. 5 m (16.4 feet)
N Motion detection range
Motion across the cordless camera’s
detection range (A) can be easily
detected, but motion toward the cordless
camera (B) is difficult to detect.
Cordless
camera
A
A
B
Note:
L Locate the cordless camera where the
objects often pass across the detection
range.
L Do not install the cordless camera in a
place where the temperature is high.
The cordless camera detects objects by
the difference in temperature between
the moving objects (such as human) and
their surroundings. If the cordless
camera is located where the
temperature between them is slight, the
sensor is not responsive to motion even
within the detecting range.
L The cordless camera may respond to
temperature changes caused by air
movement due to opening/closing doors
or from outside breezes.
D
E
F
10 For assistance, please visit http://www.panasonic.com/phonehelp
Page 11
THA13(e).book Page 11 Monday, September 11, 2006 3:34 PM
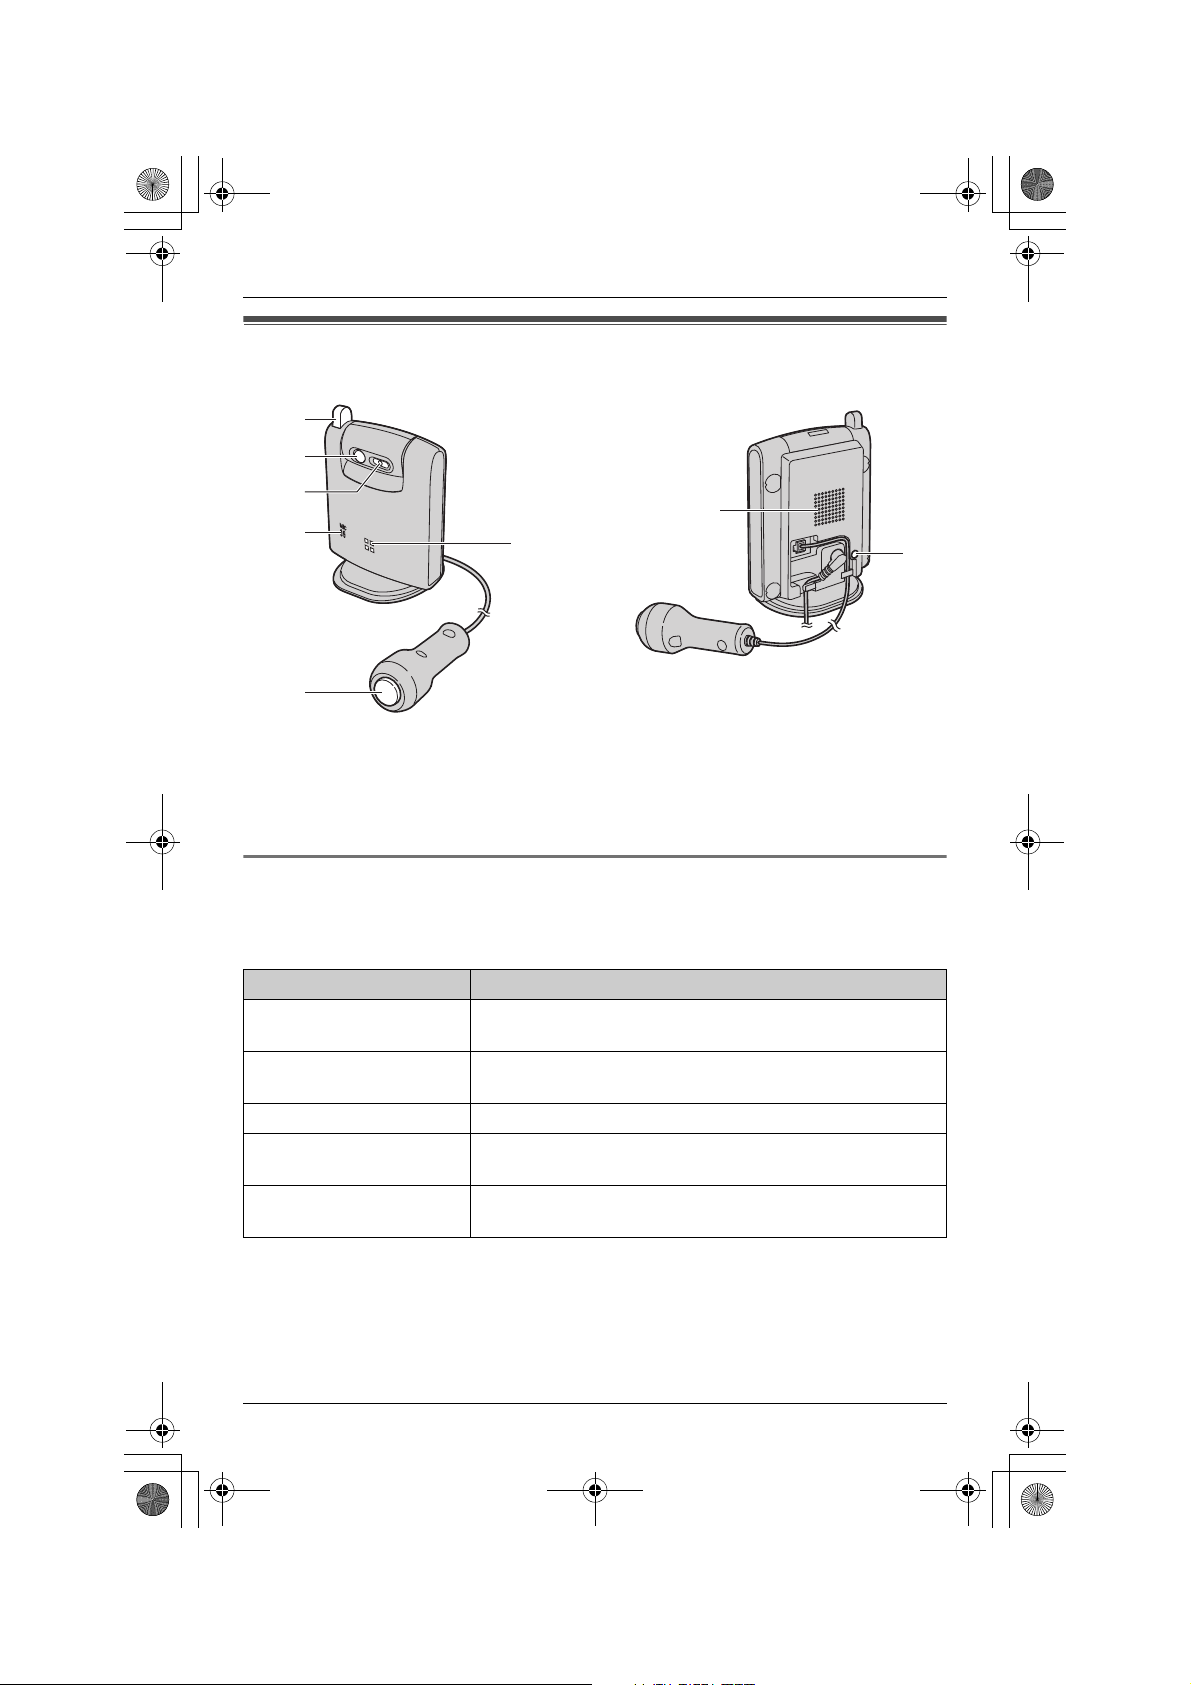
Controls
A
B
Preparation
C
D
E
A Antenna
B Sensor
C Camera lens
D MIC (Microphone)
F
E {Call button}
F Indicator
G Speaker
H PROG. (Program)
G
H
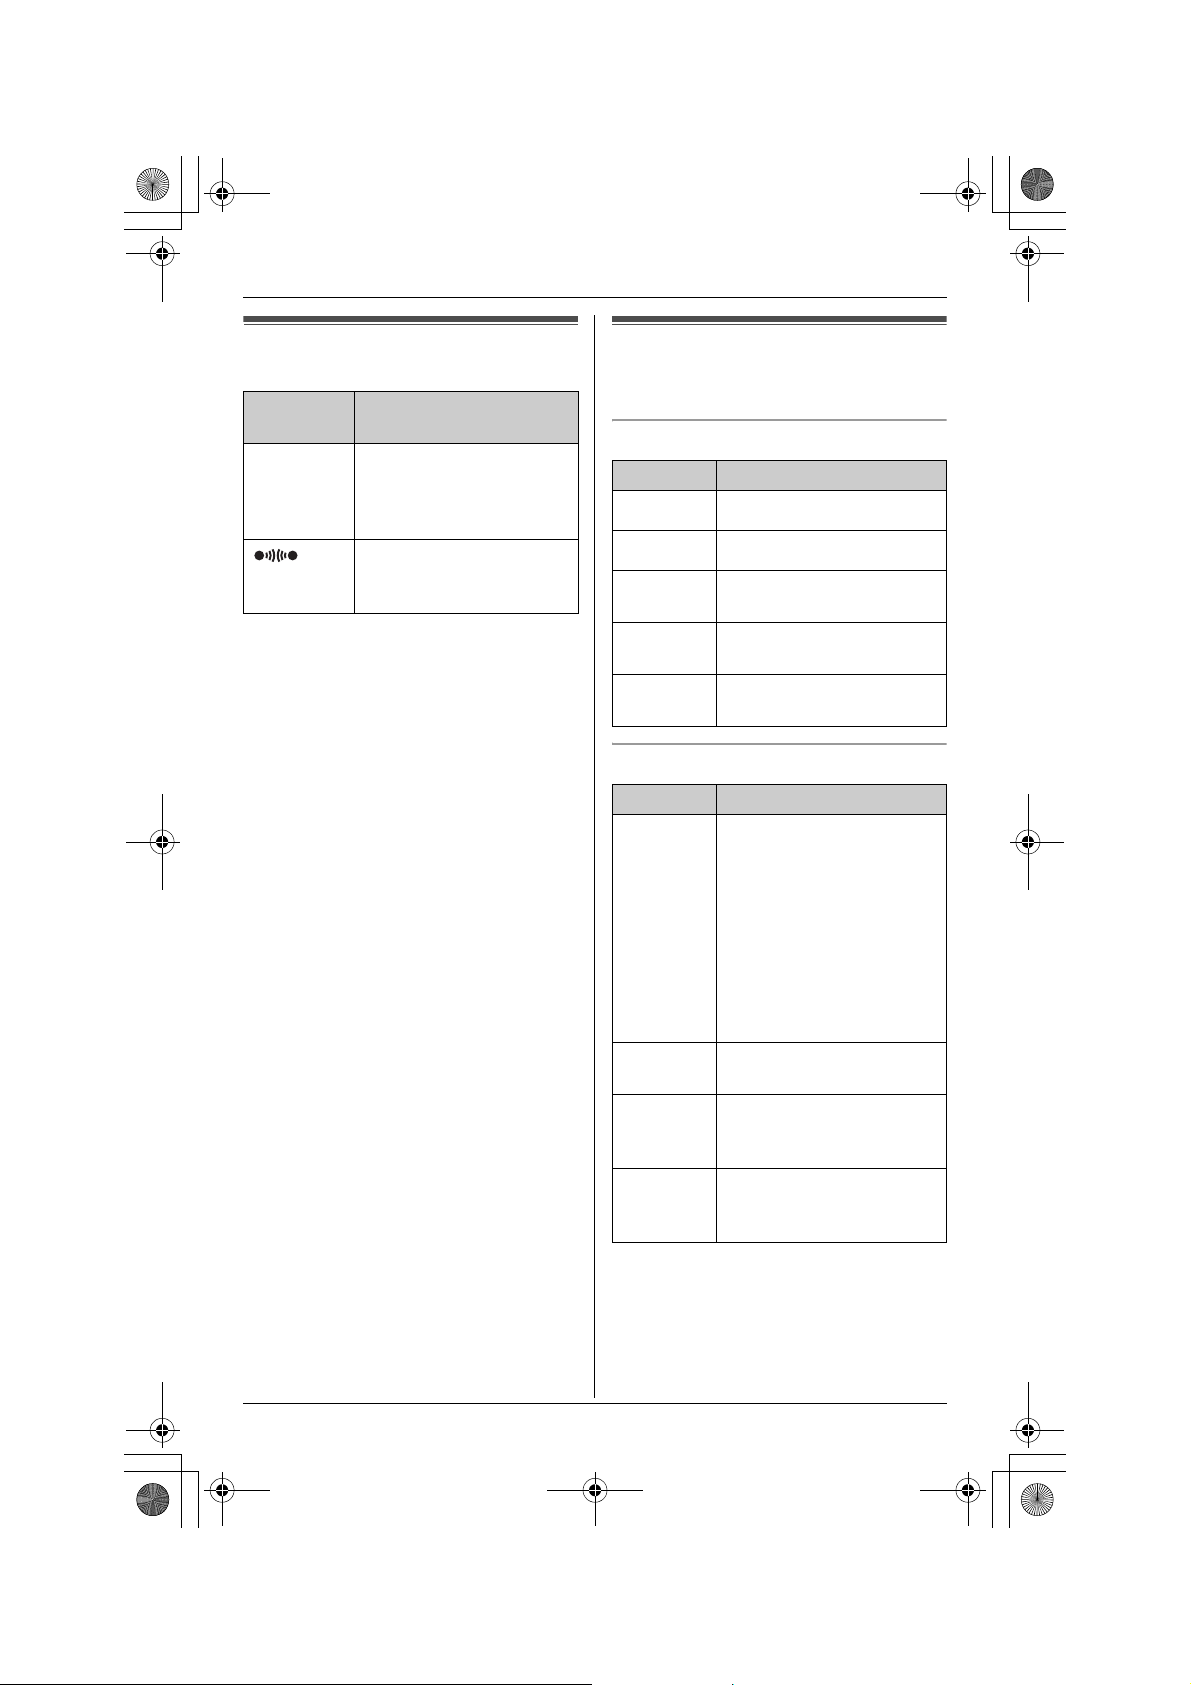
Understanding the cordless camera indicator
The cordless camera indicator shows the status as follows. You can select when the
cordless camera indicator turns on (page 35). The default setting is “Always on” (The
indicator lights at all times).
Status Description
Red, flashing rapidly The cordless camera is not registered. Register the
cordless camera (page 15).
Red, flashing The cordless camera is out of range. Locate the cordless
camera near the base unit.
Yellow-green The cordless camera is registered and in standby mode.
Yellow-green, flashing
rapidly
Yellow-green, flashing The cordless camera is connected and sending the live
The camera sensor responds and the cordless camera is
paging the handset and/or your computer.
video to the handset or your computer.
*1
*1
*1 Only when the cordless camera indicator setting is “Always on”.
For assistance, please visit http://www.panasonic.com/phonehelp 11
Page 12
THA13(e).book Page 12 Monday, September 11, 2006 3:34 PM
Preparation
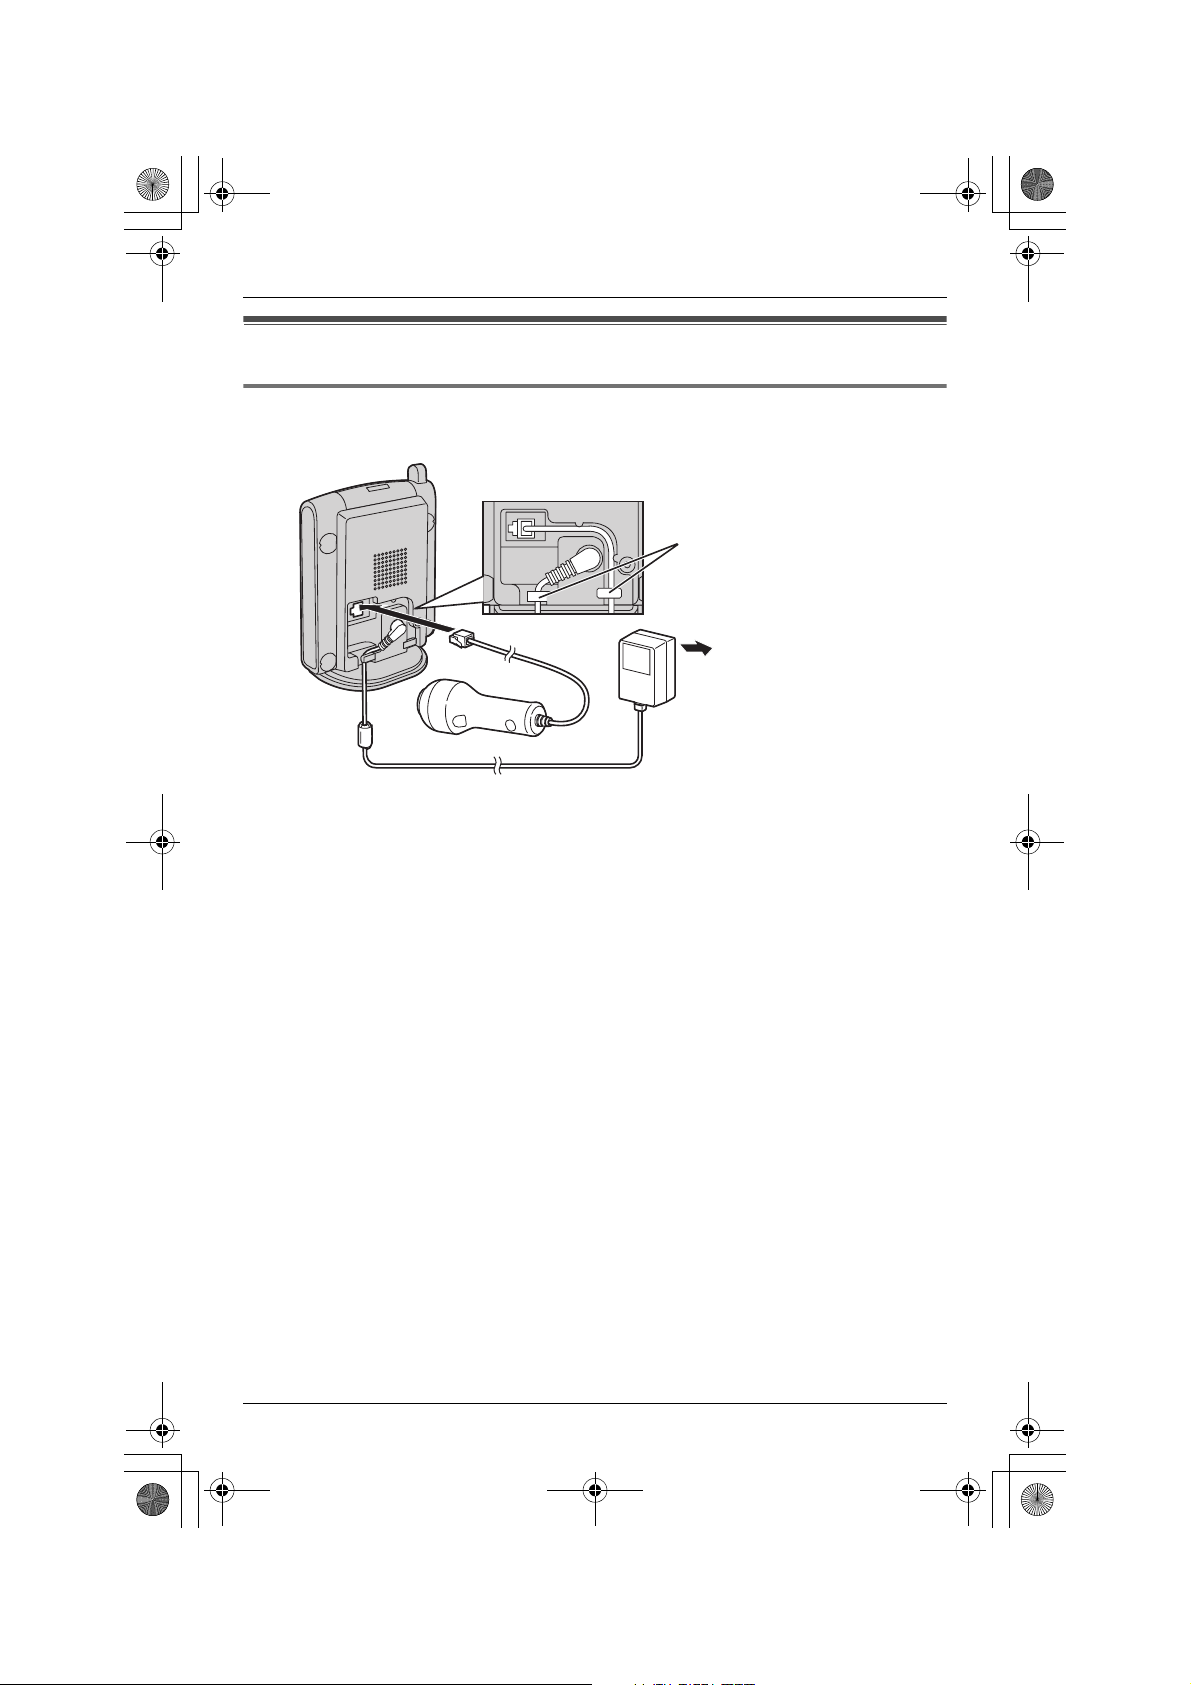
Setting up the cordless camera
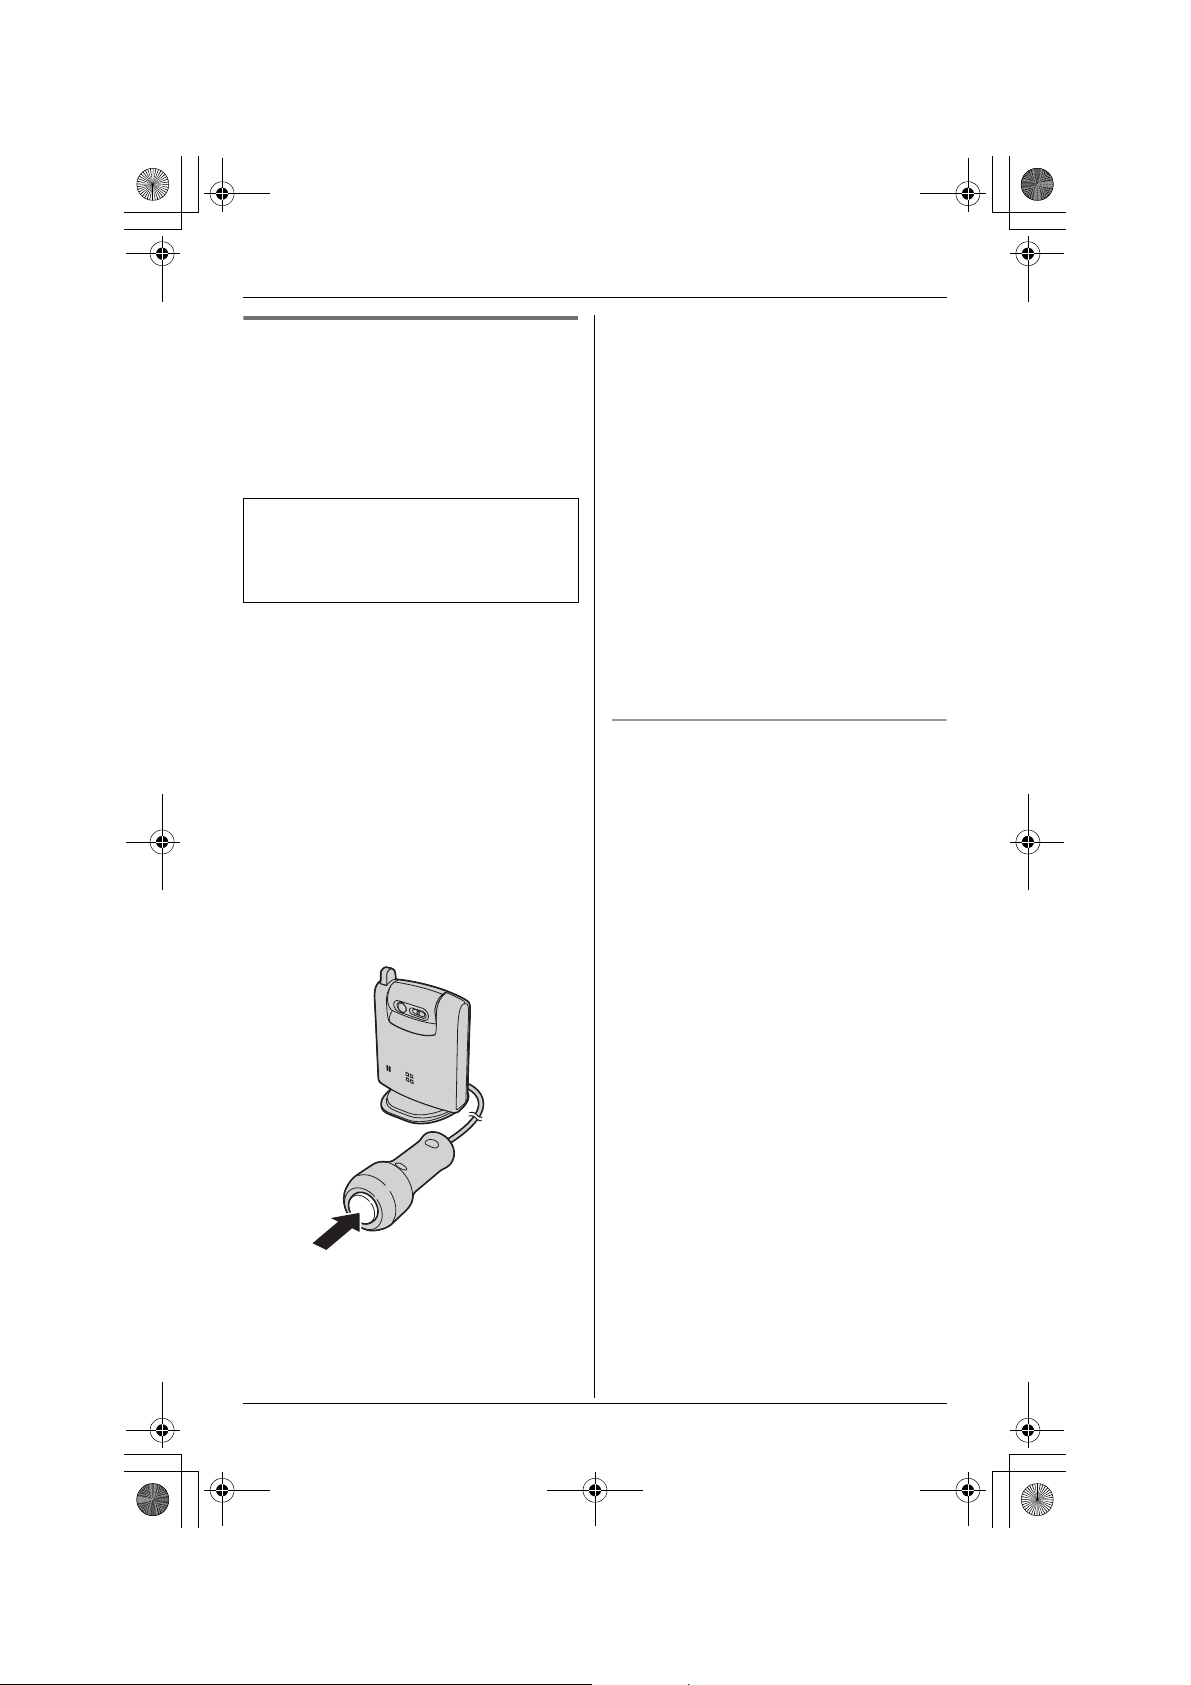
Connecting the AC adaptor and the call button
Use only the included Panasonic AC adaptor PQLV203.
Hooks
(120 V AC, 60 Hz)
Note:
L When the AC adaptor is connected, the indicator lights red and starts flashing.
L The AC adaptor must remain connected at all times. (It is normal for the adaptor to feel
warm during use.)
L The AC adaptor should be connected to a vertically oriented or floor-mounted AC outlet.
Do not connect the AC adaptor to a ceiling-mounted AC outlet, as the weight of the
adaptor may cause it to become disconnected.
L For information of the cordless camera location, see page 9.
12 For assistance, please visit http://www.panasonic.com/phonehelp
Page 13
THA13(e).book Page 13 Monday, September 11, 2006 3:34 PM
Preparation
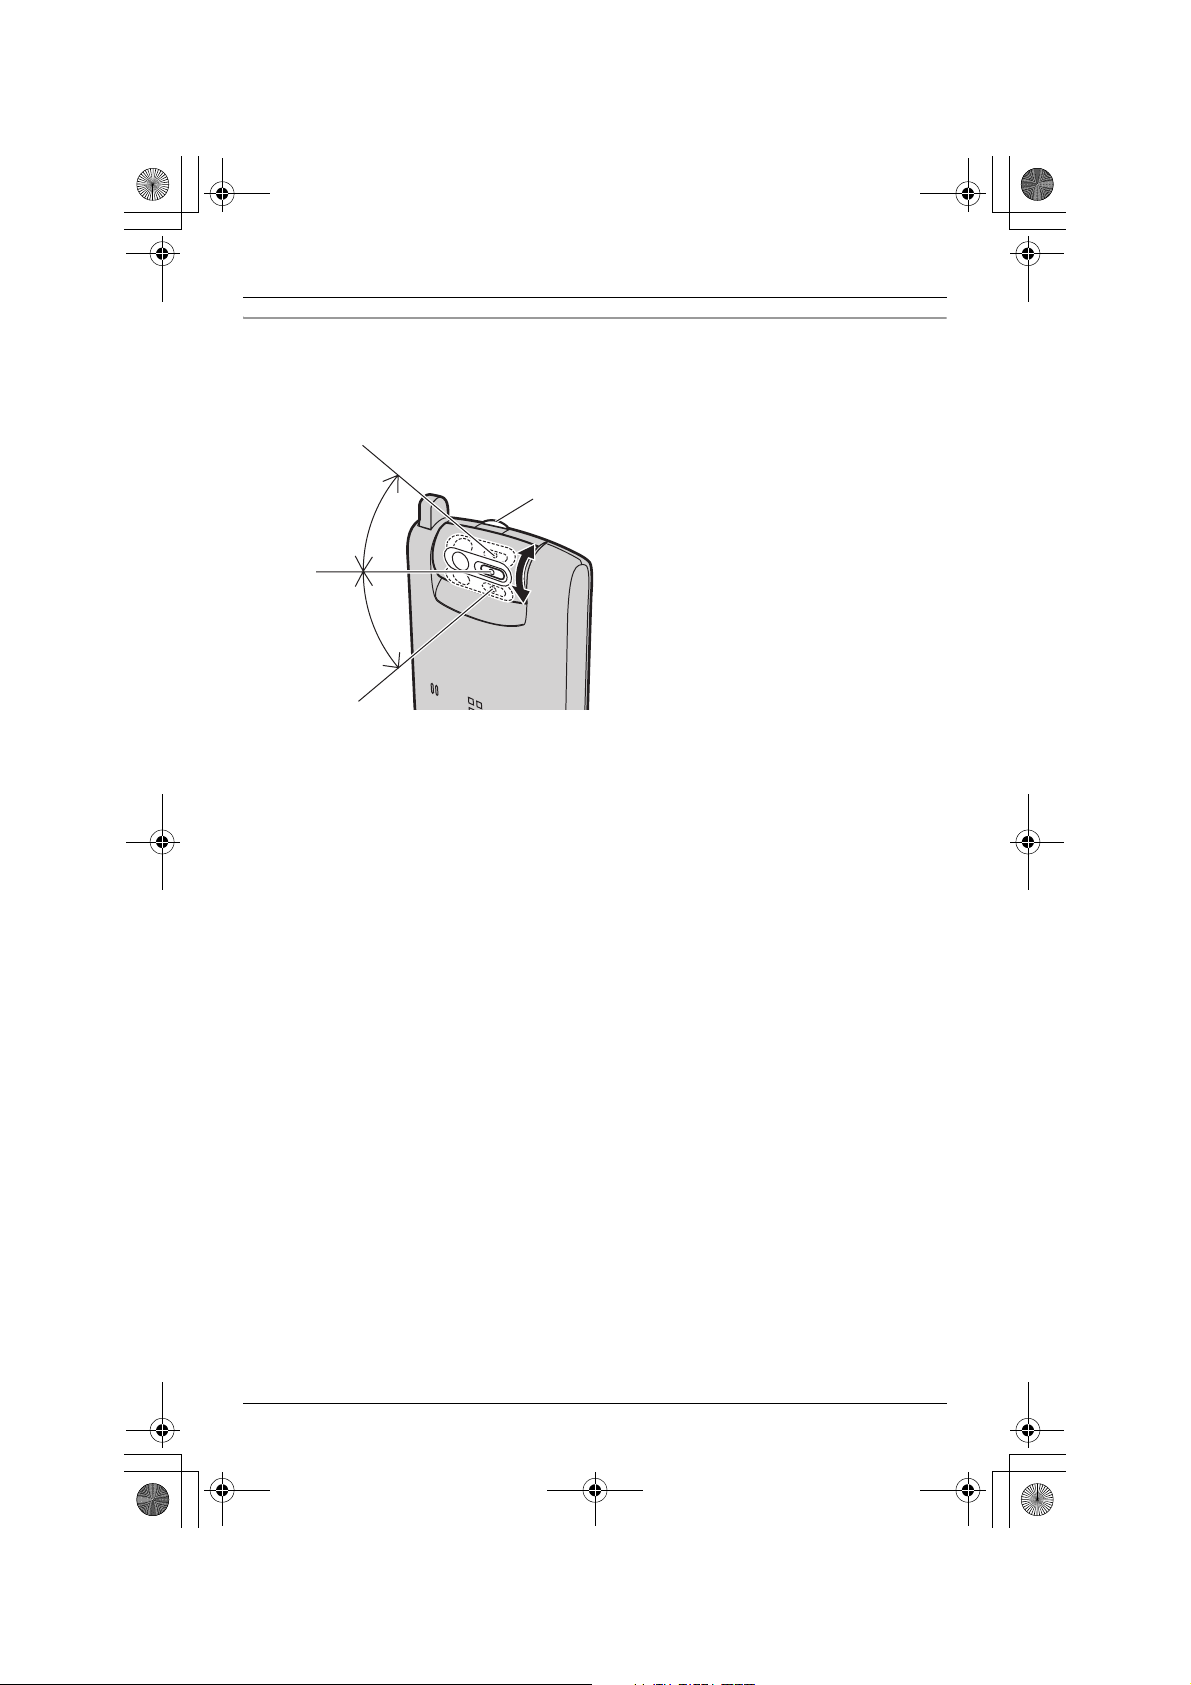
Adjusting the cordless camera lens angle
Aim the camera lens by pushing the tab (A) and rotating the lens forward or backward.
L Using the handset or your computer, confirm that the area you want to monitor from the
cordless camera is displayed (page 16, 26).
Approx. 40°
A
Approx. 40°
Note:
L Do not touch the camera lens and sensor (page 11).
For assistance, please visit http://www.panasonic.com/phonehelp 13
Page 14
THA13(e).book Page 14 Monday, September 11, 2006 3:34 PM
Preparation
Handset display items Symbols used in these
operating instructions
Displayed
item
z The cordless camera
Meaning
detects motion and/or
sound, or its {Call
button} is pressed.
You are talking with the
other party when
monitoring.
Symbols used at the end of titles
Symbol Meaning
o
Y
p
j
Z
Symbols used for operations
Operate with the base unit.
Operate with the handset.
Operate with the cordless
video camera station.
Operate with the cordless
camera.
Operate with your
computer.
Symbol Meaning
Example:
“Viewer”
i Proceed to the next
Example:
{MENU}
Example:
[Top]
Base unit and handset:
Press the navigator key up
or down to select the words
in quotations shown on the
display.
Your computer:
Click on the words in
quotations shown in the
browser to select the
setting.
operation.
The words in the brackets
show button names on the
base unit and handset.
The words in the brackets
show tabs and button
names on your computer.
14 For assistance, please visit http://www.panasonic.com/phonehelp
Page 15
THA13(e).book Page 15 Monday, September 11, 2006 3:34 PM
Preparation
Registering the cordless
camera
1 Base unit:
Press and hold {INTERCOM} until it
starts flashing and a beep sounds.
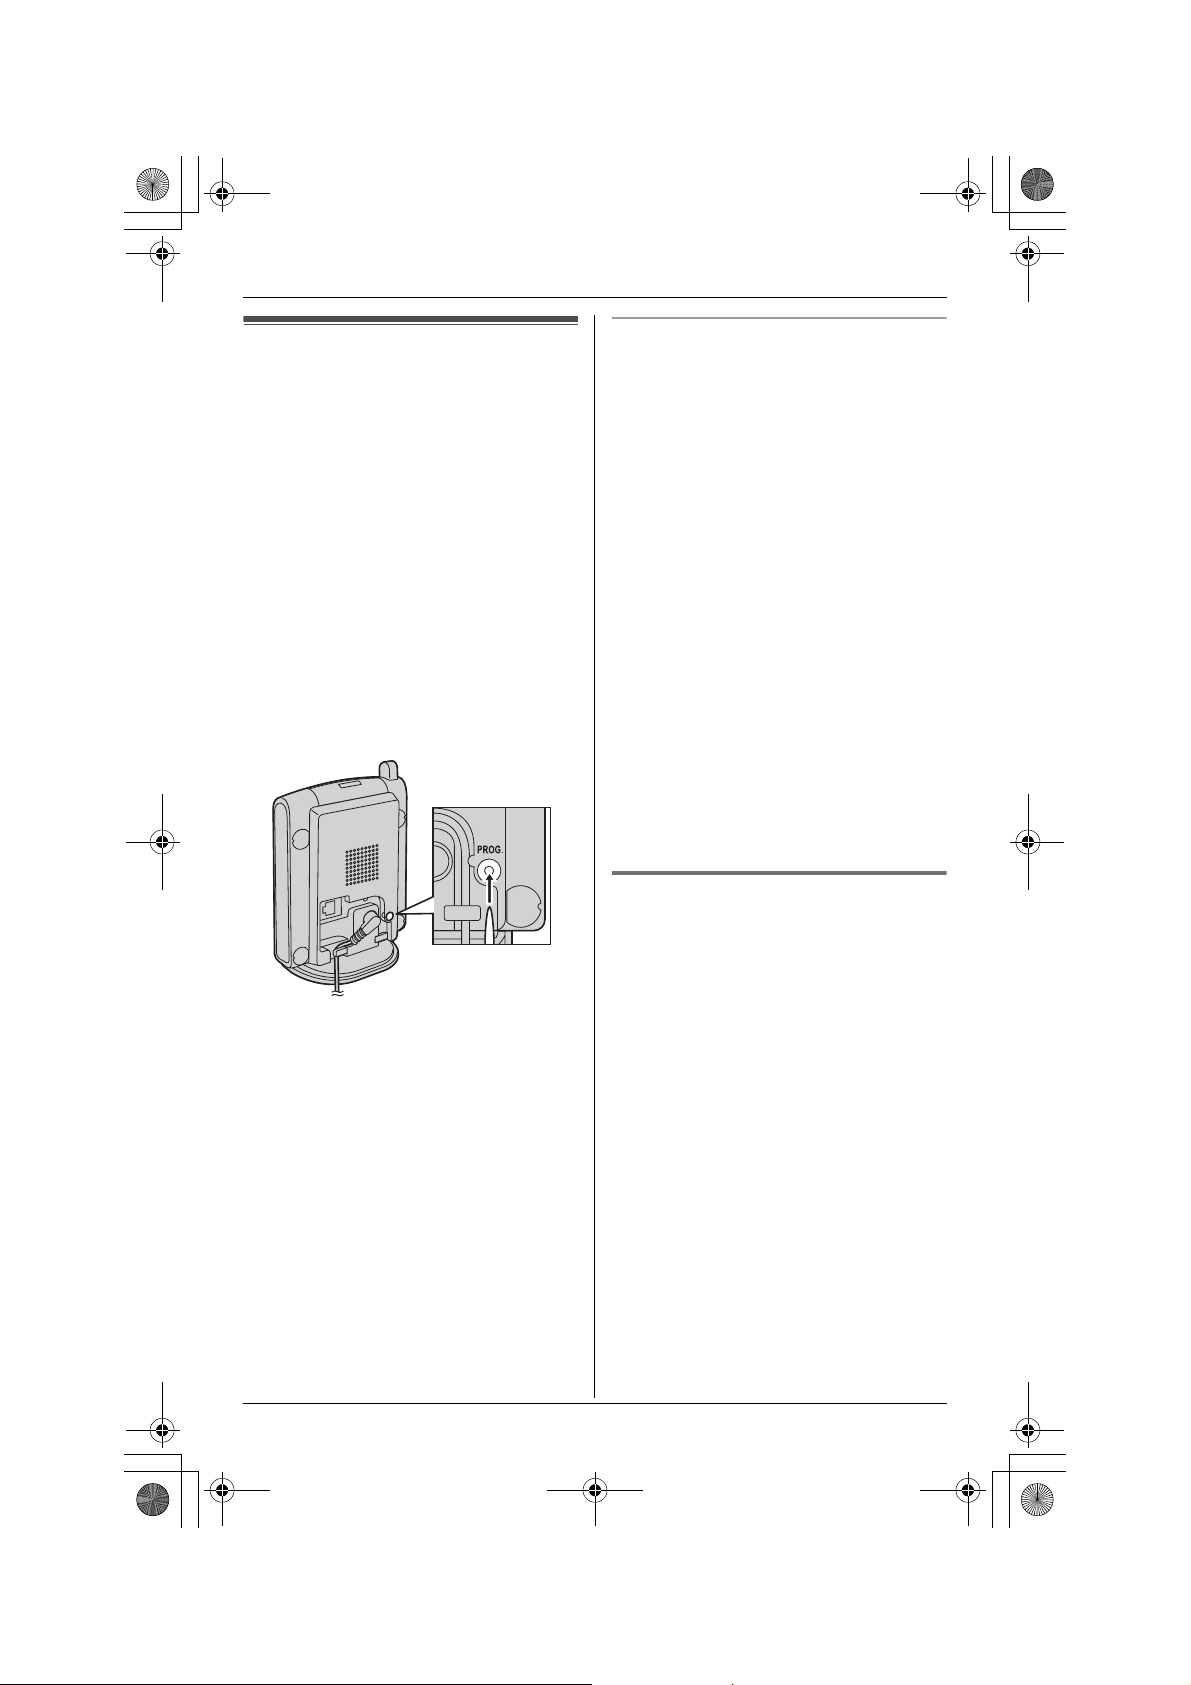
2 Cordless camera:
Press PROG. (program) on the back
side of the cordless camera with a
pointed object such as a pen until a
beep sounds and the indicator on the
cordless camera turns yellow-green
and starts flashing.
L When the registration is done
successfully, the cordless camera
beeps and the indicator stops
flashing but remains lit up (page 11).
Resetting the cordless camera
If you reset the cordless camera, the
cordless camera is canceled from the base
unit.
Press and hold PROG. (program) on the
back side of the cordless camera with a
pointed object such as a pen until a beep
sounds. With the pen still holding PROG.,
wait until the indicator on the cordless
camera starts flashing in yellow-green
then turns into orange (flashing).
When resetting is completed, the indicator
flashes rapidly in red.
Note:
L When the resetting is completed, all the
images in the cordless camera are
erased.
L To use the cordless camera after
resetting, you need to deregister to
erase the cordless camera information
from the base unit and then reregister it
to the base unit.
Deregistering a cordless
camera o
The base unit can cancel a registered
cordless camera.
Note:
L You can customize the name for the
cordless camera (page 32).
For assistance, please visit http://www.panasonic.com/phonehelp 15
1 {MENU} i h i {SET}
2 “Deregistration” i {SET}
3 Select the desired unit. i {SET}
4 {3}{3}{5} i {SET} i {STOP}
Page 16
THA13(e).book Page 16 Monday, September 11, 2006 3:34 PM
Monitoring using a Handset
Video monitor using a
– KX-THA17: cordless video camera
handset with A/V output
handset
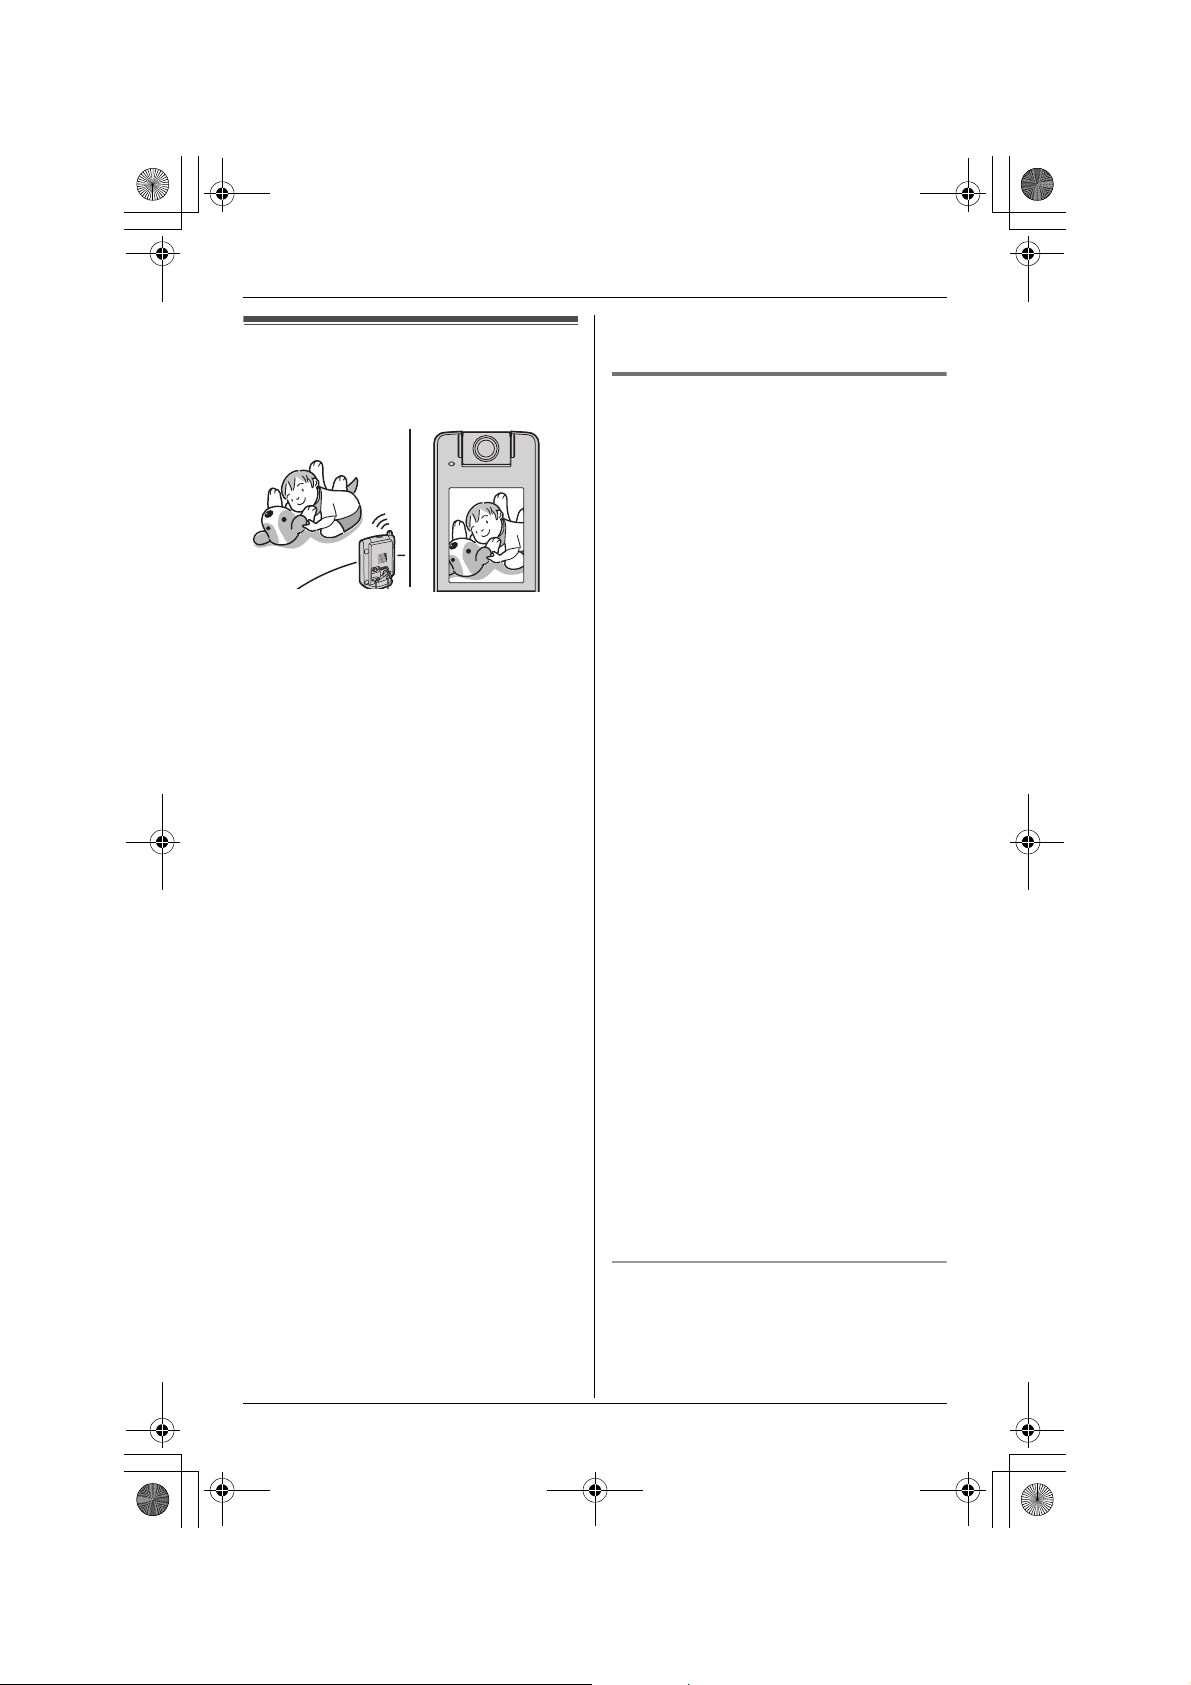
This feature allows the handset to monitor
the image and sound of the room where
the cordless camera is located. The
monitored camera does not ring, allowing
you to easily monitor a baby’s room, for
example, from different areas of the
house.
You can monitor the room when:
– you access the cordless camera using
the handset (“Monitoring the room
Y pj”, page 16).
– the cordless camera pages the handset
when it detects motion and/or sound
(“Cordless camera sensor Y pj”,
page 17).
– the cordless camera user pages the
handset using the call button (“Cordless
camera call button Y pj”, page 19).
Important:
L For information of the cordless camera
location, see page 9.
L Before you start monitoring, confirm that
the camera lens of the cordless camera
has been adjusted to the correct angle.
L Only 1 person can access the cordless
camera at a time.
L The model No. for the compatible
Panasonic units are the followings:
– KX-THA12: cordless video camera
handset
– KX-THA16: cordless video camera
station
Monitoring the room Y pj
KX-THA12/KX-THA17:
1 {MENU} (F2) i H i {SELECT}
2 “Camera & Audio” i {SELECT}
3 Select the desired unit. i {SELECT}
L To start/finish talking with the other
party, press {2WAY}.
4 Press {OFF} to stop monitoring.
KX-THA16:
1 {MONITOR} (F5)
2 “Camera & Audio” i {SELECT}
3 Select the desired unit. i {SELECT}
L To start/finish talking with the other
party, press {2WAY}.
4 Press {OFF} to stop monitoring.
Note:
L Once the handset user presses {2WAY}
in step 3, the cordless camera user can
talk with the handset user. Speak clearly
into the MIC on the cordless camera.
L You can page the handset by pressing
{Call button} while the handset is
monitoring the cordless camera
regardless of the cordless camera
detection mode setting.
L When {Call button} is pressed while
monitoring with the handset, {2WAY}
flashes on the display to notify you that
the cordless camera is paging you.
Press {2WAY} to answer the page.
Adjusting receiver/speaker volume
Press {^} or {V} while monitoring.
16 For assistance, please visit http://www.panasonic.com/phonehelp
Page 17
THA13(e).book Page 17 Monday, September 11, 2006 3:34 PM
Monitoring using a Handset
Taking a picture of the displayed image
while monitoring
Press {CAPTURE} when the desired
image is displayed.
L A title is assigned to the image and the
image is saved.
Note:
L To view the image, see “Picture gallery”
on page 20.
Cordless camera sensor Y pj
The cordless camera can page the
handset when it detects motion and/or
sound. Then the paged handset user can
answer the page to monitor the live video
from the cordless camera.
And also, the cordless camera takes
pictures (a total of 4 pictures, default) at
the time of detection and stores them. You
can view the images stored in the cordless
camera using the handset, then select and
save the desired images into the handset.
To use this feature, select “Motion &
Audio”, “Motion only”, or “Audio
only” in the cordless camera detection
mode beforehand (page 32).
L Each of the registered compatible
Panasonic units (KX-THA12/KX-THA16/
KX-THA17) can be paged from the
cordless camera. The base unit and a
compatible Panasonic handset (KXTHA11) cannot be paged.
1 Cordless camera:
The cordless camera detects motion
and/or sound.
L The cordless camera produces a
camera tone and takes pictures.
L The cordless camera pages the
handset for 30 seconds.
2 KX-THA12/KX-THA16/KX-THA17:
Press {s} to answer the page.
L You can monitor the room where the
cordless camera is located.
L To start/finish talking with the other
party, press {2WAY}.
3 KX-THA12/KX-THA16/KX-THA17:
Press {OFF} to stop monitoring.
Note:
L The cordless camera can store the last
50 images from the most recent images
to the oldest. When the 51st image is
stored, the oldest image is automatically
erased (default, page 33). The number
of images the cordless camera can store
may decrease depending on memory
size, sharpness, etc. You can save the
desired images into your handset before
images are erased.
If “Camera detect” is displayed
If you do not answer the page from the
cordless camera, “Camera detect” is
displayed on the handset.
This lets you know if you should monitor
the cordless camera which paged you.
KX-THA12/KX-THA17:
1 {MENU} (F2) i H i {SELECT}
2 “Camera & Audio” i {SELECT}
3 Select the unit (indicated by z). i
{SELECT}
4 Press {OFF} to stop monitoring.
KX-THA16:
1 {MONITOR} (F5)
2 “Camera & Audio” i {SELECT}
3 Select the unit (indicated by z). i
{SELECT}
4 Press {OFF} to stop monitoring.
For assistance, please visit http://www.panasonic.com/phonehelp 17
Page 18
THA13(e).book Page 18 Monday, September 11, 2006 3:34 PM
Monitoring using a Handset
Viewing and saving images from the
cordless camera into the handset
You can view the images stored in the
cordless camera and save them in the
handset.
KX-THA12/KX-THA17:
1 Start monitoring (page 16). i
{MENU}
2 “Stored images” i {SELECT}
3 Select the desired image.
L To zoom in, press {ZOOM}
repeatedly. To return to the original
view, press {WIDE}.
4 To store the displayed image;
{MENU} i “Save image” i
{SELECT}
L A title is assigned to the image and
the image is saved in the handset.
L To save other items, repeat from step
3.
5 Press {OFF} when finished.
KX-THA16:
1 Start monitoring (page 16). i
{MENU}
Note:
L To view the image, see “Picture gallery”
on page 20.
Erasing all images in the cordless
camera
KX-THA12/KX-THA17:
1 Start monitoring (page 16). i
{MENU}
2 “Stored images” i {SELECT}
3 {MENU}i “All erase” i
{SELECT} i {YES}
4 Press {OFF} after “All erased” is
displayed.
KX-THA16:
1 Start monitoring (page 16). i
{MENU}
2 “Stored images” i {SELECT}
3 {ALL ERASE} i {YES}
4 Press {OFF} after “All erased” is
displayed.
2 “Stored images” i {SELECT}
3 Select the desired image.
L To zoom in, press {ZOOM}
repeatedly. To return to the original
view, press {WIDE}.
4 To store the displayed image, press
{SAVE}.
L A title is assigned to the image and
the image is saved in the handset.
L To save other items, repeat from step
3.
5 Press {OFF} when finished.
18 For assistance, please visit http://www.panasonic.com/phonehelp
Page 19
THA13(e).book Page 19 Monday, September 11, 2006 3:34 PM
Monitoring using a Handset
Cordless camera call button
Y pj
The cordless camera can page the
handset when you press {Call button}.
Then the paged handset user can answer
the page to monitor the live video from the
cordless camera.
To use this feature, select “Call
button” (default) in the cordless
camera detection mode beforehand
(page 32).
L Each of the registered compatible
Panasonic units (KX-THA12/KX-THA16/
KX-THA17) can be paged from the
cordless camera. The base unit and a
compatible Panasonic handset (KXTHA11) cannot be paged.
1 Cordless camera:
Press {Call button}.
L The cordless camera produces a
camera tone.
L To stop paging, press {Call button}
again.
L The cordless camera pages the
handset for 30 seconds.
2 KX-THA12/KX-THA16/KX-THA17:
Press {s} to answer the page.
L You can monitor the room where the
cordless camera is located.
L You can also talk with the cordless
camera user. To finish talking, press
{2WAY}.
3 Cordless camera:
When the handset user answers, speak
clearly into the MIC.
4 KX-THA12/KX-THA16/KX-THA17:
Press {OFF} to stop monitoring.
Note:
L When {Call button} is pressed, the
cordless camera does not take pictures.
If “Camera detect” is displayed
If you do not answer the page from the
cordless camera, “Camera detect” is
displayed on the handset.
This lets you know if you should monitor
the cordless camera which has paged you.
To monitor the cordless camera, see page
17.
For assistance, please visit http://www.panasonic.com/phonehelp 19
Page 20
THA13(e).book Page 20 Monday, September 11, 2006 3:34 PM
Monitoring using a Handset
Picture gallery
You can view all images you stored in the
handset. Pictures are displayed with a
different size depending on which size you
selected when you take a picture.
Important:
L You can use your computer with the
MULTI TALK V USB Utility to view, copy,
edit, and save the images. Refer to the
help section of the MULTI TALK V USB
Utility application for more information.
KX-THA12/KX-THA17:
1 {MENU} (F2) i v i {SELECT}
2 “Viewer” i {SELECT}
3 Press {^} or {V} to select the desired
image.
L To display the title list, press
{MENU}, then select “Title list”,
and press {SELECT}. To return to the
image list, press {MENU}, then select
“Image list”, and press
{SELECT}.
L To zoom in, press {ZOOM}. To return
to the original view, press {WIDE}.
4 {OFF}
KX-THA16:
1 {CAMERA VIEWER}
2 “Viewer” i {SELECT}
3 Press {^} or {V} to select the desired
image.
L To display the title list, press {TITLE
LIST}. To return to the image list,
press {IMAGE LIST}.
L
To zoom in, press {ZOOM}. To return
to the original view, press {WIDE}.
4 {OFF}
20 For assistance, please visit http://www.panasonic.com/phonehelp
Page 21
THA13(e).book Page 21 Monday, September 11, 2006 3:34 PM
Before Monitoring using your Computer
Installing the MULTI
TALK V Camera Utility
MULTI TALK V Camera Utility enables you
to use your computer to register a cordless
camera in order to view cordless camera
images with a web browser. Before you
use the cordless camera, you must install
the MULTI TALK V Camera Utility software
included with your base unit. Refer to the
“Installation Guide for MULTI TALK V
Software” for details.
Note:
L When you connect your computer to
your computer network using a MULTI
TALK V device, you need to install the
MULTI TALK V USB Driver and Utility.
Refer to the “Installation Guide for
MULTI TALK V Software” for more
information.
L For Windows XP users, you cannot start
the MULTI TALK V Camera Utility after
using the “Fast User Switching” function.
Make sure all users are logged off, then
log on again.
L If your computer network uses fixed IP
addresses, you need to assign a specific
IP address to the cordless camera.
Refer to “Setting an IP address to the
cordless camera manually (“Static”)”
(page 24).
L You cannot use a global IP address for
the cordless camera.
Enabling monitoring
from a computer
You can allow the cordless camera to be
monitored using a computer. The default
setting is “Off”.
Important:
If you turn this feature “On”, you cannot use
the video phone feature during an
intercom call.
Base unit
1 {MENU} i h i {SET}
2 “PC camera access” i {SET}
3 “On” i {SET} i {STOP}
Note:
L You can program this setting using the
direct command. Press {MENU} i
{#}{6}{5}{0} i “On” i {SET} i
{STOP}.
For assistance, please visit http://www.panasonic.com/phonehelp 21
Page 22

THA13(e).book Page 22 Monday, September 11, 2006 3:34 PM
Before Monitoring using your Computer
3 Enter the cordless camera’s MAC
Registering the cordless
camera to your computer
Before registering the cordless camera to
your computer, confirm that:
– the base unit is connected to your
computer network (refer to the
“Installation Guide for MULTI TALK V
Software” for more information).
– the cordless camera’s AC adaptor is
plugged in.
– the cordless camera is registered to the
base unit and its indicator is yellowgreen (refer to the operating instructions
of the base unit for more information).
address, then click [OK].
L The MAC address is printed on the
1 Click [Start].
2 N For Windows XP users:
Point to [All Programs], point to
[Panasonic], point to [MULTI TALK
V], then click [MULTI TALK V
Camera Utility].
N For Windows 98SE, Windows Me,
and Windows 2000 users:
Point to [Programs], point to
[Panasonic], point to [MULTI TALK
V], then click [MULTI TALK V
Camera Utility].
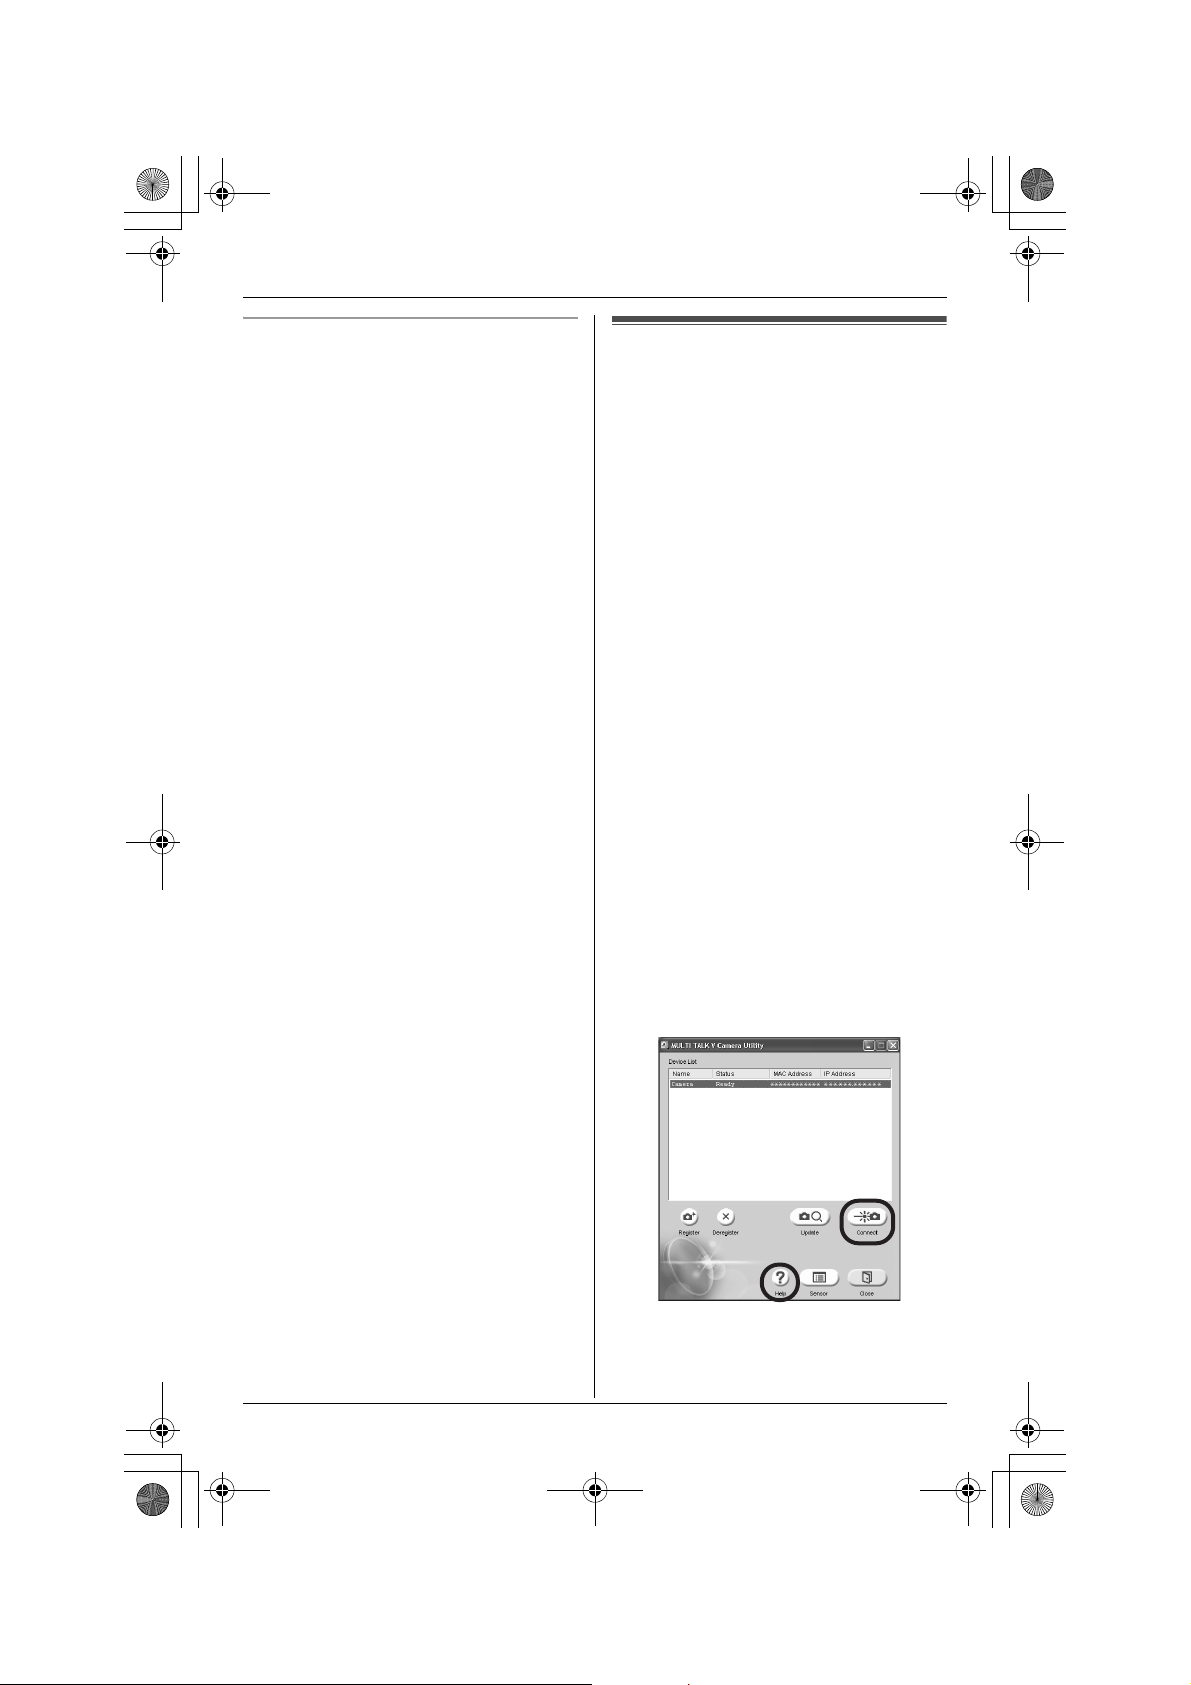
LThe MULTI TALK V Camera Utility
window is displayed.
LWhen registering a cordless
camera for the first time, the
Register Device dialog box is
displayed. Confirm the instructions
in the dialog box, then click [OK] to
continue.
L When the cordless camera is
L To view images from the cordless
4 Click [Close].
Note:
L If an error occurred, “Not ready” and
an error code may be displayed in the
status column of the Device List. Refer
to the error code section of the Help file
for information on error codes.
L If you notice that a different MULTI TALK
V device has been registered to this
application, erase it from the Device List
by clicking [Deregister].
label found on the bottom of the
cordless camera.
successfully registered, “Ready” is
displayed in the status column of the
Device List.
camera, continue from step 3 of
“Accessing images from the cordless
camera”, page 23.
22 For assistance, please visit http://www.panasonic.com/phonehelp
Page 23
THA13(e).book Page 23 Monday, September 11, 2006 3:34 PM
Before Monitoring using your Computer
Registering an additional cordless
camera
To register an additional cordless camera,
click [Register] after performing step 3.
Enter the cordless camera’s MAC
address, then click [OK].
Note:
L Up to 8 cordless cameras can be
registered to the MULTI TALK V Camera
Utility.
Accessing images from
the cordless camera
Before viewing images from the cordless
camera, confirm that you have registered
the cordless camera to your computer.
1 Click [Start].
2 N For Windows XP users:
Point to [All Programs], point to
[Panasonic], point to [MULTI TALK
V], then click [MULTI TALK V
Camera Utility].
N For Windows 98SE, Windows Me,
and Windows 2000 users:
Point to [Programs], point to
[Panasonic], point to [MULTI TALK
V], then click [MULTI TALK V
Camera Utility].
L You can also start the MULTI TALK V
Camera Utility by clicking its icon in
the system tray.
L The search animation ends and the
status of the Device List is “Ready”.
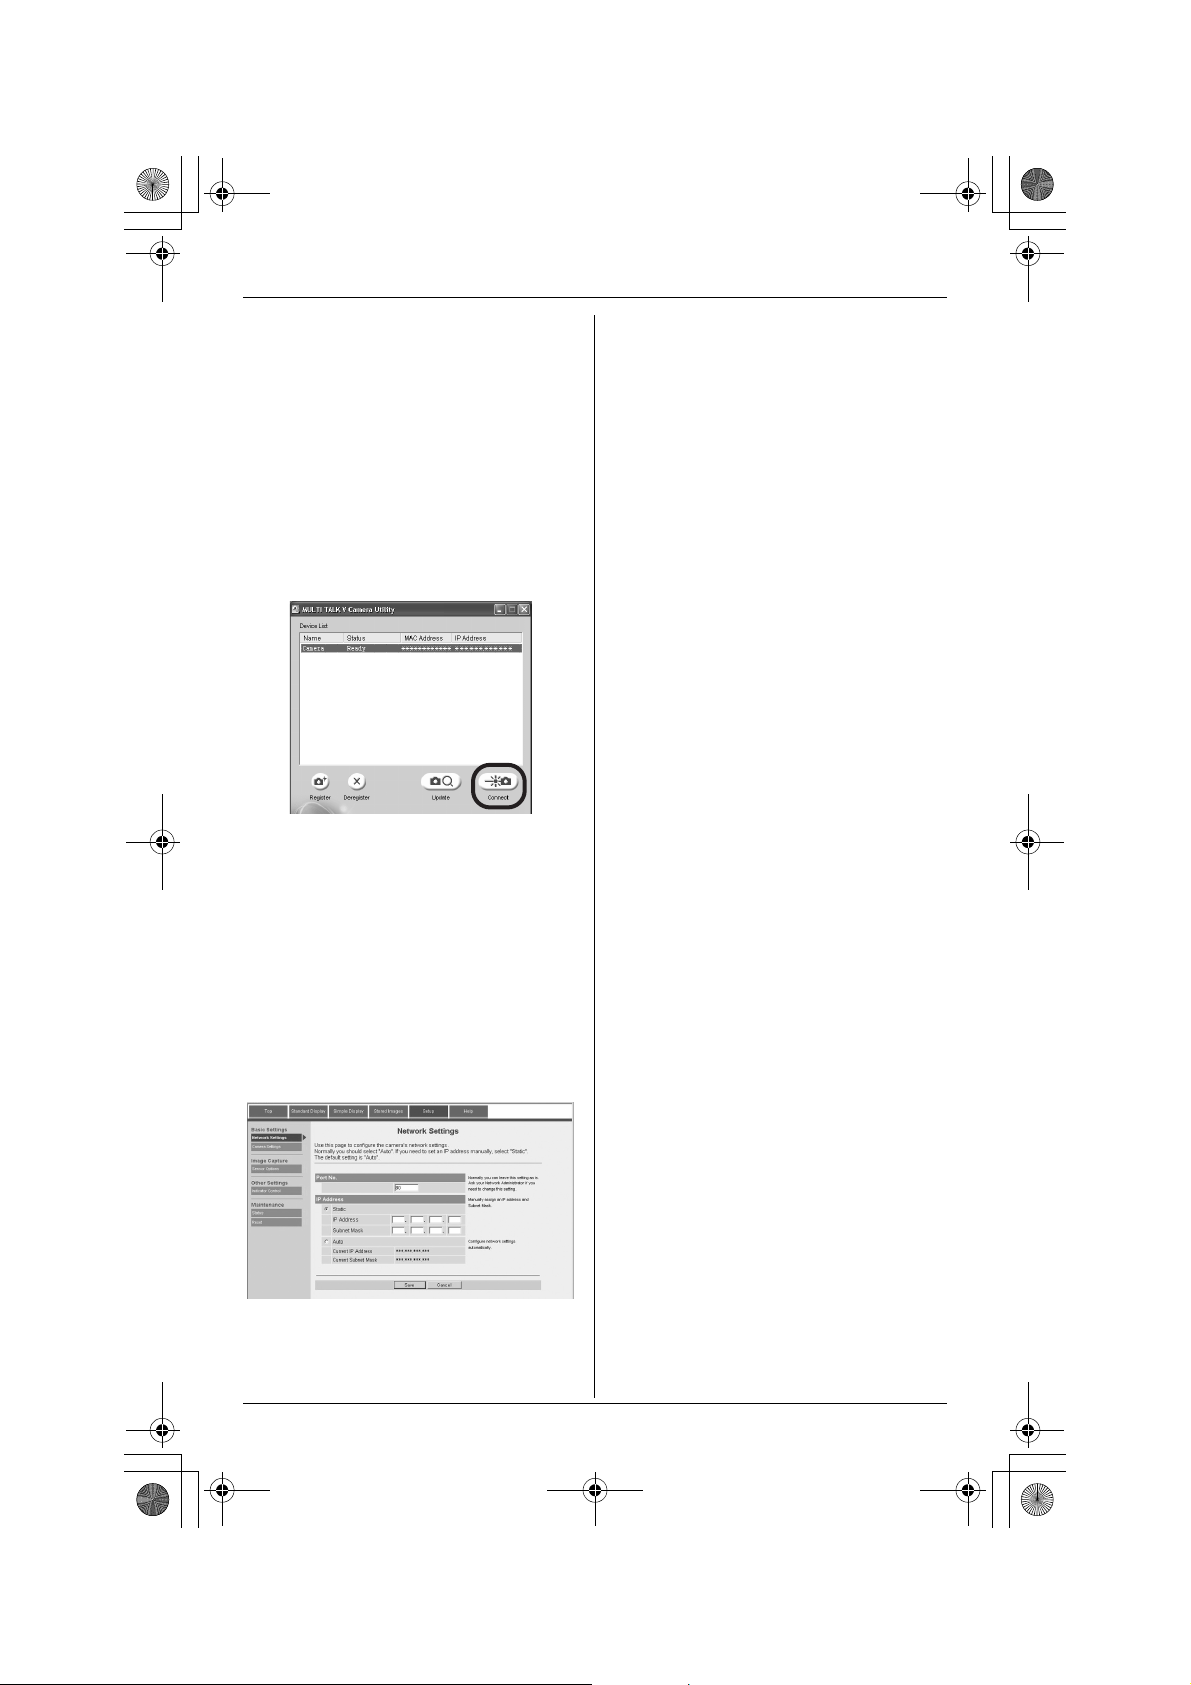
3 Select the desired cordless camera in
the Device List, then click [Connect].
L Your web browser opens and the
camera image is displayed.
L To view the MULTI TALK V Camera
Utility help file, click [Help].
For assistance, please visit http://www.panasonic.com/phonehelp 23
Page 24

THA13(e).book Page 24 Monday, September 11, 2006 3:34 PM
Before Monitoring using your Computer
Note:
L You can connect to up to 2 cordless
cameras using your browser at a time.
Setting an IP address to the cordless
camera manually (“Static”)
If your network uses automatic IP address
assignments (DHCP), you do not need to
change any settings. If your network uses
fixed IP addresses, follow the steps below
to assign an IP address to the cordless
camera manually.
Note:
L If you were able to access the cordless
camera using the procedure described
in “Accessing images from the cordless
camera”, page 23, the cordless camera
has been assigned an IP address
automatically and you do not need to
change any settings.
N For Windows 98SE and Windows
1 Click [Start], point to [Settings],
2 Double-click [Network].
3 Select [TCP/IP] with adaptor in use,
1 Display the TCP/IP Properties window.
N For Windows 2000 and Windows
XP users:
1 Click [Start], click [Control Panel],
under Category View, click
[Network and Internet
Connections], then click [Network
Connections].
LFor Windows 2000, click [Start],
point to [Settings], then click
[Network and Dial-up
Connections].
2 Right-click [Local Area
Connection] in use, then click
[Properties].
3 Click [Internet Protocol (TCP/IP)],
then click [Properties].
Me users:
then click [Control Panel].
then click [Properties].
2 Make a note of your IP address and
subnet mask for future reference.
3 Select “Obtain an IP address
automatically”.
24 For assistance, please visit http://www.panasonic.com/phonehelp
Page 25
THA13(e).book Page 25 Monday, September 11, 2006 3:34 PM
Before Monitoring using your Computer
4 Click [OK], then click [OK].
L Windows 2000 and Windows XP
users need to wait for about 1 minute
to obtain an IP address.
L Windows 98SE and Windows Me
users need to restart the computer.
5 Follow the procedure described in
“Registering the cordless camera to
your computer”, page 22.
6 Select the desired cordless camera in
the Device List, then click [Connect].
7 When [Standard Display] page is
displayed in your web browser, click
[Setup] tab.
8 Select “Static”.
9 Enter a valid IP address and subnet
mask.
L The IP address should be a local
(private) IP address. You cannot use
a global IP address for the cordless
camera.
10 Click [Save].
11 Click [Restart].
12 Repeat step 1.
13 Select “Use the following IP
address:” (for Windows Me/98SE,
“Specify an IP address:”), then
return the IP address and subnet
mask to their original settings (the
settings you noted in step 2).
14 Click [OK], then click [OK].
LWindows Me and Windows 98SE
users need to restart the computer.
Note:
L If you have set the IP address for the
cordless camera inappropriately, you will
not be able to connect to the cordless
camera. In this event, you must reset the
cordless camera to its factory default
settings and assign a valid IP address
following the procedure on page 24. To
reset the cordless camera, see
“Resetting the cordless camera” on
page 15.
L If your browser is configured to use a
proxy server, you cannot access the
cordless camera properly. See if a proxy
server is used or not with the following
procedure.
N For Windows XP users:
Start up the web browser (for
example, Internet Explorer 6.0) and
click [Tools] i [Internet Options...]
i [Connections] tab i [LAN
Settings...]. If the “Use a proxy
server for your LAN...” check
box is checked, turn it off by clicking
the check box.
N For Windows 98SE, Windows Me,
and Windows 2000 users:
Start up the web browser (for
example, Internet Explorer 6.0) and
click [Tools] i [Internet Options...]
i [Connections] tab i [LAN
Settings...]. If the “Use a proxy
server” check box is checked, turn it
off by clicking the check box.
For assistance, please visit http://www.panasonic.com/phonehelp 25
Page 26
THA13(e).book Page 26 Monday, September 11, 2006 3:34 PM
Monitoring using your Computer
Video monitor using your
computer
L Before you start monitoring, confirm that
the camera lens of the cordless camera
has been adjusted to the correct angle.
L Only 1 person can access the cordless
camera at a time.
L While monitoring the cordless camera
with your computer, you can view the
room, but no sound can be heard.
Accessing the cordless camera
jZ
This feature allows you to monitor the view
from the cordless camera using your
computer. The monitored camera does not
ring, allowing you to easily monitor a
baby’s room, for example, from different
areas of the house.
You can view the room when:
– you access the cordless camera using
your computer (“Monitoring the room
jZ”, page 27).
– the cordless camera notifies your
computer with a pop-up message when
it detects motion and/or sound
(“Cordless camera sensor jZ”, page
27).
– the cordless camera user notifies your
computer with a pop-up message using
the call button (“Cordless camera call
button jZ”, page 29).
Important:
L To use this feature, you must install the
MULTI TALK V Camera Utility software
in your computer. Refer to the
“Installation Guide for MULTI TALK V
Software” for installation details.
L Before monitoring using your computer,
confirm that the base unit is connected
to your computer or computer network
(refer to the “Installation Guide for
MULTI TALK V Software” for more
information).
L For information of the cordless camera
location, see page 9.
1 Start up the web browser on your
computer (refer to the “Installation
Guide for MULTI TALK V Software” for
camera utility details).
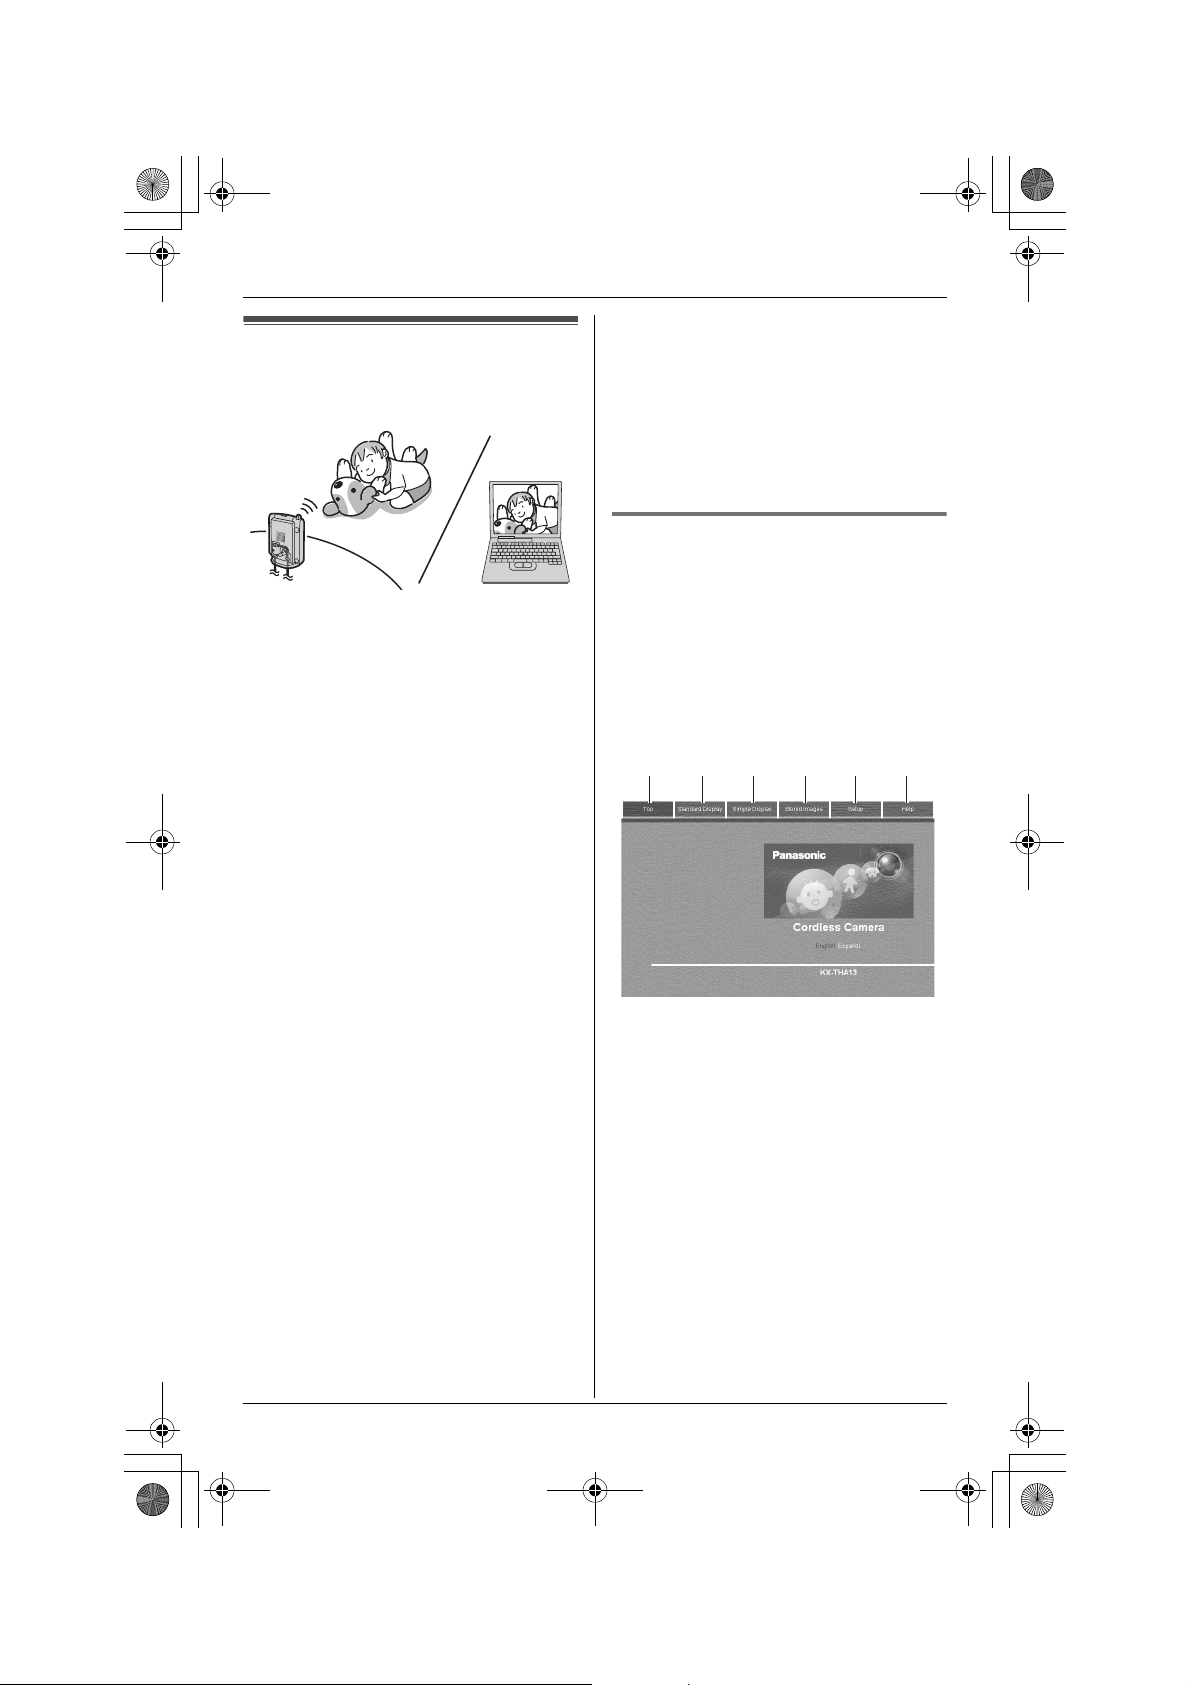
2 Click the following tabs to display each
page.
123456
1 [Top]: Displays the camera model
number. You can change the language
for the browser temporarily.
2 [Standard Display]: Displays a view of
the room where the cordless camera is
located and the display settings. You
can change the display settings
temporarily.
3 [Simple Display]: Displays only a view
of the room where the cordless camera
is located.
4 [Stored Images]: Displays stored
images that the cordless camera took
at the time of detection.
5 [Setup]: Displays the items of the
cordless camera settings.
26 For assistance, please visit http://www.panasonic.com/phonehelp
Page 27
THA13(e).book Page 27 Monday, September 11, 2006 3:34 PM
Monitoring using your Computer
6 [Help]: Displays the help page.
Browser language
1 Access the cordless camera (page 26).
2 Click [Setup] tab at the top of the page.
3 Click [Camera Settings].
4 Select the desired setting (Default:
“English”), then click [Save].
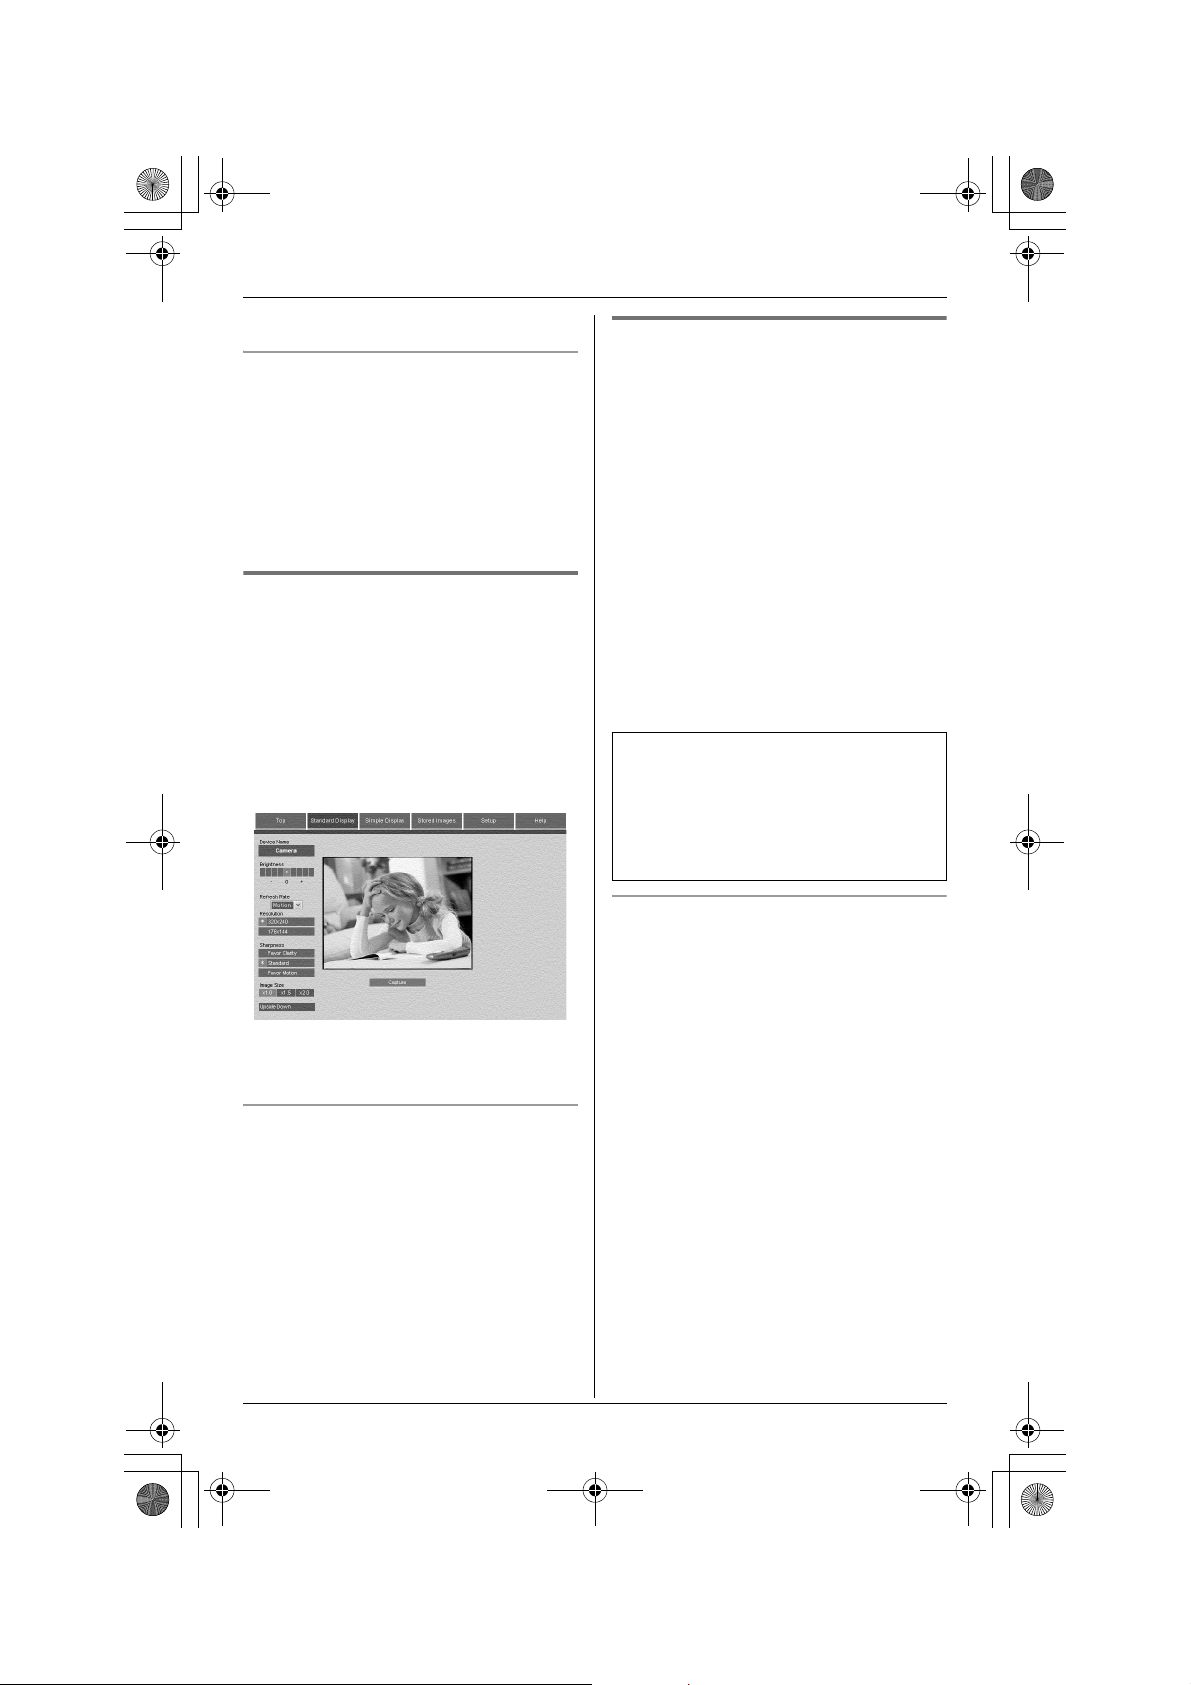
Monitoring the room jZ
1 Access the cordless camera (page 26).
2 Click [Standard Display] tab at the top
of the page.
L The display settings are shown on the
left of the web browser. You can
change them by clicking the desired
setting if necessary.
Cordless camera sensor jZ
The cordless camera can notify your
computer when it detects motion and/or
sound. Then the notified computer user
can answer the notification to view the live
video from the cordless camera.
And also, the cordless camera takes
pictures (a total of 4 pictures, default) at
the time of detection and stores them. You
can view the images stored in the cordless
camera using the computer, then select
and save the desired images into the
computer.
Note:
L You can change the number of pictures
that the cordless camera takes at the
time of detection (page 37).
To use this feature, select “Motion &
Audio Detection”, “Motion
Detection Only”, or “Audio
Detection Only” in the cordless
camera detection mode beforehand
(page 32).
3 Close the web browser to stop
monitoring.
Taking a picture of the displayed image
while monitoring
Click [Capture] when the desired image is
displayed.
L When you click [Capture], an additional
web browser opens displaying that
image. To save the image, follow the
instructions on the web browser.
For assistance, please visit http://www.panasonic.com/phonehelp 27
Displaying the detection pop-up
message
This feature allows your computer to
display the pop-up message when the
cordless camera detects motion and/or
sound or {Call button} is pressed. You
can view the room where the cordless
camera is located by clicking it.
1 Start up the MULTI TALK V Camera
Utility.
2 Click [Sensor].
3 Check [Use Sensor].
L Click [Browse] if you want to turn on
the paging tone (in WAV file format)
that is heard from your computer.
4 Click [OK].
Page 28

THA13(e).book Page 28 Monday, September 11, 2006 3:34 PM
Monitoring using your Computer
Answering the detecting notification
with your computer
1 Cordless camera:
The cordless camera detects motion
and/or sound.
L The cordless camera produces a
camera tone and takes pictures.
L The cordless camera notifies your
computer with a paging tone if you
turn the paging tone on for pop-up
messages (page 27).
2 Your computer:
When the cordless camera notifies your
computer, the pop-up message is
displayed.
To monitor the cordless camera, click
[Connect].
Viewing and saving images from the
cordless camera into the computer
1 Access the cordless camera (page 26).
2 Click [Stored Images] tab at the top of
the page.
L You can view the images by clicking
[First], [<Prev], [Play], [Next>], or
[Last].
3 To save the desired image, follow the
instructions on the web browser.
Erasing all images in the cordless
camera
1 Access the cordless camera (page 26).
2 Click [Setup] tab at the top of the page.
L You can view the room where the
cordless camera is located.
3 Click [Sensor Options].
4 Click [Erase All Images].
3 Your computer:
Close the web browser to stop
monitoring.
Note:
L The cordless camera can store the last
50 images from the most recent images
to the oldest. When the 51st image is
stored, the oldest image is automatically
erased (default, page 33). The number
of images the cordless camera can store
may decrease depending on memory
size, sharpness, etc. You can save the
desired images into your computer
before images are erased.
28 For assistance, please visit http://www.panasonic.com/phonehelp
Page 29

THA13(e).book Page 29 Monday, September 11, 2006 3:34 PM
Monitoring using your Computer
Cordless camera call button
jZ
The cordless camera can notify your
computer when you press {Call button}.
Then the notified computer user can
answer the notification to view the live
video from the cordless camera.
To use this feature, select “Call
Button Only” (default) in the cordless
camera detection mode beforehand
(page 32).
1 Cordless camera:
Press {Call button}.
L The cordless camera produces a
camera tone.
L To stop paging, press {Call button}
again.
L The cordless camera notifies your
computer with a paging tone if you
turn the paging tone on for pop-up
messages (page 27).
2 Your computer:
When the cordless camera notifies your
computer, the pop-up message is
displayed.
To monitor the cordless camera, click
[Connect].
Note:
L When {Call button} is pressed, the
cordless camera does not take pictures.
L You can view the room where the
cordless camera is located.
3 Your computer:
Close the web browser to stop
monitoring.
For assistance, please visit http://www.panasonic.com/phonehelp 29
Page 30

THA13(e).book Page 30 Monday, September 11, 2006 3:34 PM
Useful Settings while Monitoring
Useful settings while
monitoring
The words in the quotations (for example,
“Audio only”) are based on the handset
display. You may find them slightly
different when you operate with your
computer.
Important:
L The model No. for the compatible
Panasonic units are the followings:
– KX-THA12: cordless video camera
handset
– KX-THA16: cordless video camera
station
– KX-THA17: cordless video camera
handset with A/V output
Display settings Y pZ
Selecting image zoom
Handset
KX-THA12/KX-THA16/KX-THA17:
Your computer
After accessing the cordless camera (page
26), you can change the image size
temporarily by clicking the desired setting
on the [Standard Display] page of the
web browser.
Adjusting the display sharpness
Handset
KX-THA12/KX-THA17:
1 Start monitoring (page 16). i
{MENU}
2 “Sharpness” i {SELECT}
3 Select the desired sharpness.
L If you want to improve the display
sharpness, move the cursor to the
right (the smoothness of motion
decreases).
L If you want to improve the
smoothness of motion, move the
cursor to the left (the image clarity
decreases).
1 Start monitoring (page 16). i
{MENU}
2 “Zoom” i {SELECT}
3 Press {ZOOM} to zoom in (1.5 x zoom)
on the image.
L Press {ZOOM} again for 3 x zoom.
When viewing at 3 x zoom, you can
press {^}, {V}, {<}, or {>} to select
the viewable area.
L To return to the original view, press
{WIDE}.
4 {SAVE}
Note:
L When you finish monitoring, the saved
image size returns to its original view.
4 {SAVE}
KX-THA16:
1 Start monitoring (page 16). i
{SHARPNESS}
2 Select the desired sharpness.
L If you want to improve the display
sharpness, move the cursor to the
right (the smoothness of motion
decreases).
L If you want to improve the
smoothness of motion, move the
cursor to the left (the image clarity
decreases).
3 {SAVE}
30 For assistance, please visit http://www.panasonic.com/phonehelp
Page 31

THA13(e).book Page 31 Monday, September 11, 2006 3:34 PM
Useful Settings while Monitoring
Your computer
“Favor Clarity”: Improves the display
sharpness but the smoothness of motion
decreases.
“Standard” (Default): Sets standard
sharpness level.
“Favor Motion”: Improves the
smoothness of motion but the image clarity
decreases.
1 Access the cordless camera (page 26).
2 Click [Setup] tab at the top of the page.
3 Click [Camera Settings].
4 Select the desired sharpness, then click
[Save].
Note:
L You can also change the sharpness
temporarily by clicking the desired
setting on the [Standard Display] page
of the web browser.
Adjusting the display brightness
Handset
KX-THA12/KX-THA17:
1 Start monitoring (page 16). i
{MENU}
Your computer
After accessing the cordless camera (page
26), you can change the brightness
temporarily by clicking the desired setting
on the [Standard Display] page of the
web browser.
Displaying the image upside down
You can turn the camera image upside
down. This feature is useful when you
mount the cordless camera upside down
(page 40).
Handset
KX-THA12/KX-THA17:
1 Start monitoring (page 16). i
{MENU}
2 “Upside down” i {SELECT}
KX-THA16:
Start monitoring (page 16). i {UPSIDE
DOWN}
Your computer
After accessing the cordless camera (page
26), you can turn the image upside down
by clicking [Upside Down] on the
[Standard Display] page of the web
browser.
2 “Brightness” i {SELECT}
3 Press {>} to improve the brightness.
Press {<} to decrease the brightness.
4 {SAVE}
KX-THA16:
1 Start monitoring (page 16). i
{BRIGHTNESS}
2 Press {>} to improve the brightness.
Press {<} to decrease the brightness.
3 {SAVE}
For assistance, please visit http://www.panasonic.com/phonehelp 31
Page 32

THA13(e).book Page 32 Monday, September 11, 2006 3:34 PM
Useful Settings while Monitoring
Cordless camera settings
Y
pZ
Select the cordless camera you want to
change the settings while monitoring.
Changing the cordless camera name
Handset
KX-THA12/KX-THA16/KX-THA17:
1 Start monitoring (page 16). i
{MENU}
2 “Camera setting” i {SELECT}
3 “Device name” i {SELECT}
4 Enter the desired device name (max.10
characters). (Default: “Camera”) i
{SAVE} i {OFF}
Your computer
1 Access the cordless camera (page 26).
2 Click [Setup] tab at the top of the page.
3 Click [Camera Settings].
4 Enter the desired device name (max. 10
characters) (Default: “Camera”), then
click [Save].
Setting the cordless camera detection
mode
This setting determines when the cordless
camera notifies the handset and/or your
computer.
–“Motion & Audio”: The cordless
camera detects motion and sound.
–“Motion only”: The cordless camera
detects motion only.
–“Audio only”: The cordless camera
detects sound only.
–“Call button” (Default): The cordless
camera notifies the handset and/or your
computer when its {Call button} is
pressed.
–“Off”: Turn this feature off.
Handset
KX-THA12/KX-THA16/KX-THA17:
1 Start monitoring (page 16). i
{MENU}
2 “Camera setting” i {SELECT}
3 “Sensor options” i {SELECT}
4 “Select sensor” i {SELECT}
5 Select the desired setting. (Default:
“Call button”) i {SAVE} i
{OFF}
Your computer
1 Access the cordless camera (page 26).
2 Click [Setup] tab at the top of the page.
3 Click [Sensor Options].
4 Select the desired setting for “Select
Sensor” (Default: “Call Button
Only”), then click [Save].
32 For assistance, please visit http://www.panasonic.com/phonehelp
Page 33

THA13(e).book Page 33 Monday, September 11, 2006 3:34 PM
Useful Settings while Monitoring
Selecting the motion detection
sensitivity
Handset
KX-THA12/KX-THA16/KX-THA17:
1 Start monitoring (page 16). i
{MENU}
2 “Camera setting” i {SELECT}
3 “Sensor options” i {SELECT}
4 “Sensitivity” i {SELECT}
5 “Motion detect.” i {SELECT}
6 Select the desired setting. (Default:
“Normal”) i {SAVE} i {OFF}
Your computer
1 Access the cordless camera (page 26).
2 Click [Setup] tab at the top of the page.
3 Click [Sensor Options].
4 Select the desired setting for “Motion
Sensor Sensitivity” (Default:
“Normal”), then click [Save].
Adjusting the audio detection
sensitivity
Handset
KX-THA12/KX-THA16/KX-THA17:
1 Start monitoring (page 16). i
{MENU}
2 “Camera setting” i {SELECT}
3 “Sensor options” i {SELECT}
Your computer
1 Access the cordless camera (page 26).
2 Click [Setup] tab at the top of the page.
3 Click [Sensor Options].
4 Select the desired setting for “Audio
Sensor Sensitivity” (Default:
“Normal”), then click [Save].
Selecting the method of saving the
cordless camera images
This setting determines what happens
when the cordless camera’s memory
becomes full.
–“Overwrite image” (Default): The
cordless camera replaces the oldest
image with a new image in its memory.
–“No overwrite”: New images are not
saved.
L After saving the desired images into
your handset or your computer, you can
erase all other images (page 18, 28).
Handset
KX-THA12/KX-THA16/KX-THA17:
1 Start monitoring (page 16). i
{MENU}
2 “Camera setting” i {SELECT}
3 “Sensor options” i {SELECT}
4 “Memory full” i {SELECT}
5 Select the desired setting. (Default:
“Overwrite image”) i {SAVE}
i {OFF}
4 “Sensitivity” i {SELECT}
5 “Audio detect.” i {SELECT}
6 Select the desired setting. (Default:
“Normal”) i {SAVE} i {OFF}
For assistance, please visit http://www.panasonic.com/phonehelp 33
Page 34

THA13(e).book Page 34 Monday, September 11, 2006 3:34 PM
Useful Settings while Monitoring
Your computer
1 Access the cordless camera (page 26).
2 Click [Setup] tab at the top of the page.
3 Click [Sensor Options].
4 Select the desired setting for “Memory
Full” (Default: “Overwrite Image”),
then click [Save].
Adjusting the cordless camera speaker
volume
Handset
KX-THA12/KX-THA16/KX-THA17:
1 Start monitoring (page 16). i
{MENU}
2 “Camera setting” i {SELECT}
3 “Speaker volume” i {SELECT}
4 Select the desired volume. (Default:
“6”) i {SAVE} i {OFF}
Selecting the cordless camera tone
You can select the camera tone that is
heard from the cordless camera:
– when the cordless camera detects
motion and/or sound.
– when {Call button} of the cordless
camera is pressed.
Your computer
1 Access the cordless camera (page 26).
2 Click [Setup] tab at the top of the page.
3 Click [Sensor Options].
4 Select the desired setting for “Tone
Pattern” (Default: “Tone 1”), then
click [Save].
Note for handset and computer:
L When customizing the camera tone, the
selected tone sounds from the cordless
camera.
Adjusting the cordless camera tone
volume
You can select the camera tone volume of
the cordless camera:
– when the cordless camera detects
motion and/or sound.
– when {Call button} of the cordless
camera is pressed.
Handset
KX-THA12/KX-THA16/KX-THA17:
1 Start monitoring (page 16). i
{MENU}
2 “Camera setting” i {SELECT}
3 “Tone volume” i {SELECT}
Handset
KX-THA12/KX-THA16/KX-THA17:
1 Start monitoring (page 16). i
{MENU}
2 “Camera setting” i {SELECT}
3 “Camera tone” i {SELECT}
4 Select the desired setting. (Default:
“Tone 1”) i {SAVE} i {OFF}
34 For assistance, please visit http://www.panasonic.com/phonehelp
4 Select the desired volume. (Default:
“2”) i {SAVE} i {OFF}
Your computer
1 Access the cordless camera (page 26).
2 Click [Setup] tab at the top of the page.
3 Click [Sensor Options].
4 Select the desired setting for “Volume”
(Default: “Medium”), then click [Save].
Page 35

THA13(e).book Page 35 Monday, September 11, 2006 3:34 PM
Useful Settings while Monitoring
Setting the cordless camera indicator
You can change the cordless camera
indicator setting.
For the status and meaning of the cordless
camera indicator, see page 11.
–“Always on” (Default): The indicator
lights at all times.
–“During access”: The indicator turns
on when the cordless camera is
accessing the handset and/or your
computer.
–“Always off”: The indicator is turned
off.
Handset
KX-THA12/KX-THA16/KX-THA17:
1 Start monitoring (page 16). i
{MENU}
2 “Camera setting” i {SELECT}
3 “Indicator” i {SELECT}
4 Select the desired setting. (Default:
“Always on”) i {SAVE} i {OFF}
Your computer
Resetting the cordless camera settings
to their default settings
Handset
KX-THA12/KX-THA16/KX-THA17:
1 Start monitoring (page 16). i
{MENU}
2 “Camera setting” i {SELECT}
3 “Reset camera” i {SELECT}
4 {3}{3}{5} i {OK} i {OFF}
Note:
L The cordless camera settings other than
sharpness and brightness settings are
reset to their default settings.
L Stored images are retained even if the
cordless camera is reset.
Your computer
1 Access the cordless camera (page 26).
2 Click [Setup] tab at the top of the page.
3 Click [Reset].
1 Access the cordless camera (page 26).
2 Click [Setup] tab at the top of the page.
3 Click [Indicator Control].
4 Select the desired setting for
“Indicator Control” (Default:
“Always On”), then click [Save].
For assistance, please visit http://www.panasonic.com/phonehelp 35
4 Click [Reset Camera].
Note:
L The settings for [Camera Settings],
[Sensor Options], and [Indicator
Control] are reset to their default
settings.
L Stored images are retained even if the
cordless camera is reset.
Page 36

THA13(e).book Page 36 Monday, September 11, 2006 3:34 PM
Useful Settings while Monitoring
Selecting the image resolution
Your computer
1 Access the cordless camera (page 26).
2 Click [Setup] tab at the top of the page.
3 Click [Camera Settings].
4 Select the desired setting for “Image
Resolution” (Default: “320x240”),
then click [Save].
Note:
L You can also change the image
resolution temporarily by clicking the
desired setting on the [Standard
Display] page of the web browser.
Selecting the refresh rate
You can select the desired interval to
refresh the displayed camera image.
Your computer
1 Access the cordless camera (page 26).
2 Click [Setup] tab at the top of the page.
Selecting the interval for taking
pictures when the sensor is triggered
You can select how often images are
stored after the cordless camera detects
motion and/or sound.
Your computer
1 Access the cordless camera (page 26).
2 Click [Setup] tab at the top of the page.
3 Click [Sensor Options].
4 Select the desired setting for “Image
Rate” (Default: “1 sec.”), then click
[Save].
3 Click [Camera Settings].
4 Select the desired setting for “Refresh
Rate” (Default: “Motion”), then click
[Save].
Note:
L You can also change the refresh rate
temporarily by clicking the desired
setting on the [Standard Display] page
of the web browser.
36 For assistance, please visit http://www.panasonic.com/phonehelp
Page 37

THA13(e).book Page 37 Monday, September 11, 2006 3:34 PM
Useful Settings while Monitoring
Selecting the number of images to be
stored in the cordless camera
You can select how many images to be
stored in the cordless camera when the
cordless camera detects motion and/or
sound.
Your computer
1 Access the cordless camera (page 26).
2 Click [Setup] tab at the top of the page.
3 Click [Sensor Options].
4 Select the desired setting for “No.of
Images to Store” (Default: “4”), then
click [Save].
Selecting the sharpness of images to
be stored by the cordless camera
You can select the desired sharpness of
images that the cordless camera stores at
the time of detection.
Your computer
1 Access the cordless camera (page 26).
2 Click [Setup] tab at the top of the page.
3 Click [Sensor Options].
Settings for your network Z
Normally you should check “Auto”. If you
need to assign a specific IP address and
subnet mask, check “Static”, then enter
the IP address and subnet mask you wish
to assign to the cordless camera. Refer to
the “Installation Guide for MULTI TALK V
Software” for IP address setting.
Your computer
1 Access the cordless camera (page 26).
2 Click [Setup] tab at the top of the page.
3 Click [Network Settings].
4 Select the desired setting. (Default:
“Auto”)
L If you check “Auto”, skip to step 6.
5 Enter a valid IP address and subnet
mask.
6 Click [Save].
About help page Z
You can access help information for each
operation by clicking the [Help] tab of the
web browser.
4 Select the desired sharpness for
“Sharpness” (Default: “Standard”),
then click [Save].
For assistance, please visit http://www.panasonic.com/phonehelp 37
Page 38

THA13(e).book Page 38 Monday, September 11, 2006 3:34 PM
Useful Information
System requirements for your computer
The following system requirements must be met in order to use the MULTI TALK V
software.
Item Description
®
Operating System Microsoft
Microsoft Windows 2000, or Microsoft Windows XP
CPU For Windows 98SE and Windows Me: Pentium
or faster
For Windows 2000: Pentium 200 MHz or faster
For Windows XP: Pentium 300 MHz or faster
RAM For Windows 98SE and Windows Me: 64 MB (128 MB or
more recommended)
For Windows 2000 and Windows XP: 128 MB
HDD 50 MB available disk space
Resolution 800 x 600 or higher resolution display
Others Video adaptor with high color (16 bit) or higher
CD-ROM drive
10/100 Mbps network card installed (necessary for LAN
interface users)
Browser: Internet Explorer 5.0 or later (necessary when
monitoring the cordless camera)
Windows® 98SE, Microsoft Windows Me,
®
166 MHz
Trademarks
L Microsoft and Windows are either registered trademarks or trademarks of Microsoft
Corporation in the United States and/or other countries.
L Pentium is a trademark or registered trademark of Intel Corporation or its subsidiaries in
the United States and/or other countries.
L Screen shots are reprinted with permission from Microsoft Corporation.
L All other trademarks identified herein are the property of their respective owners.
38 For assistance, please visit http://www.panasonic.com/phonehelp
Page 39

B
C
THA13(e).book Page 39 Monday, September 11, 2006 3:34 PM
Useful Information
Wall mounting
The cordless camera can be mounted by the following way:
– Standard mounting
– Upside down mounting
CAUTION:
L For information of the cordless camera location, see page 9.
L Confirm the detection range of the cordless camera before installing the cordless
camera on the wall (page 9).
L Confirm the MAC address on the bottom of the cordless camera before installing the
wall mounting adaptor. This MAC address is needed when you use the MULTI TALK V
Camera Utility software.
L Mount the cordless camera on the stable location where the unit can be adequately
supported when installing.
L The AC adaptor should be connected to a vertically oriented or floor-mounted AC outlet.
Do not connect the AC adaptor to a ceiling-mounted AC outlet, as the weight of the
adaptor may cause it to become disconnected.
L Do not mount the cordless camera on a soft material. It may fall down, break or
cause injury.
L Do not mount the cordless camera on the following places: plaster board, ALC
(autoclaved lightweight cellular concrete), concrete block, plywood less than 25 mm (1
inch) thick, and etc.
L Do not pull the call button wire after you mount the cordless camera on the wall.
L After mounting the cordless camera on the wall, speak loudly and clearly into the MIC
when talking with the handset user.
Connecting the wall mounting adaptor
A Slide the cordless camera into the wall mounting adaptor in the direction of the arrow
until it clicks into the place.
B Tuck the call button wire into the hole on the side of the wall mounting adaptor.
C Fasten the call button wire to the hook of the wall mounting adaptor.
A
For assistance, please visit http://www.panasonic.com/phonehelp 39
Page 40

THA13(e).book Page 40 Monday, September 11, 2006 3:34 PM
Useful Information
Mounting the cordless camera on the wall
Drive the screws (not included) into the wall at a recommended height of 1.8 m (5.9 feet)
or below using the wall template as a guide, then mount the camera securely on the
screws.
Connect the AC adaptor to power outlet (page 12).
L To aim the camera lens, see page 13.
L The image may be seen upside down when mounting upside down. To compensate for
this, change the camera setting to display images upside down (page 31).
Standard mounting Upside down mounting
50.8 mm
(2 inches)
50.8 mm
(2 inches)
Screws
Screws
(120 V AC, 60 Hz)
(120 V AC, 60 Hz)
About the screws for wall mounting
L Use the recommended screw size below.
L Drive the mounting screws leaving enough length from the wall to hook the cordless
camera.
Space
Max. 9.3 mm
23
(
/64 inch)
Wall mount template for the cordless camera
Max. 4.5 mm
(11/64 inch)
50.8 mm
(2 inches)
40 For assistance, please visit http://www.panasonic.com/phonehelp
Page 41

THA13(e).book Page 41 Monday, September 11, 2006 3:34 PM
Useful Information
Removing the wall mounting adaptor
Press and hold the hold button (A) on the left side of the wall mounting plate. Slide the
cordless camera to the right (B).
A
B
For assistance, please visit http://www.panasonic.com/phonehelp 41
Page 42

THA13(e).book Page 42 Monday, September 11, 2006 3:34 PM
Useful Information
Troubleshooting
Problem Cause & solution
The cordless camera
does not work.
The cordless camera’s
indicator is flashing
rapidly in red.
The cordless camera’s
indicator lights in orange.
The cordless camera’s
indicator is flashing
rapidly in orange.
I cannot read the
language displayed by
the MULTI TALK V
Camera Utility
application.
The image is faint. L The camera lens is dirty. Clean it with a soft dry cloth.
The image sent from the
cordless camera is poor.
The image sent from the
cordless camera is dark
and difficult to see.
I cannot connect to the
cordless camera, the
image distorts, or the
image is slow.
L Check the connections (page 12).
L The cordless camera is not registered to the base unit.
Register the cordless camera to the base unit (page
15).
L The link between the cordless camera and your
computer could not be established. The resources
available for wireless communication are limited. Wait
for other users to finish and try again.
L If you do not intend to view the images using your
computer, set the “PC camera access” to “Off” (page
21) with the base unit.
L The IP address which has been assigned for the
cordless camera is invalid. Check the connections
(page 22).
L You can change the application’s display language to
English, French, or Spanish. Right-click the MULTI
TALK V Camera Utility icon in the task tray, then click
the desired language.
L Adjust the display sharpness or brightness setting
(page 30, 31).
L The place where the cordless camera is located is dark.
Improve lighting.
L Adjust the display brightness setting (page 31).
L There is a strong sunlight or a backlight in the place
where the cordless camera is located. Try shading the
camera’s location.
L The cordless camera has lost communications with the
base unit. Move the cordless camera closer to the base
unit, and try again.
L There is an obstacle such as concrete wall. Move the
cordless camera to the place without an obstacle.
L A microwave or wireless LAN appliance is in use. Move
the cordless camera closer to the base unit or use the
cordless camera away from those appliances, and try
again.
42 For assistance, please visit http://www.panasonic.com/phonehelp
Page 43

THA13(e).book Page 43 Monday, September 11, 2006 3:34 PM
Problem Cause & solution
The camera sensor is not
responding or fails to
respond.
The camera sensor does
not respond.
L The camera sensor is dirty. Clean it with a soft dry cloth.
L The moving object may be out of the detecting range of
the cordless camera.
L The camera sensor does not respond unless the
detection mode is set to “Motion & Audio”, “Motion
only”, or “Audio only” beforehand. Change the
detection mode (page 32).
L While a handset or a computer user is monitoring the
cordless camera, the cordless camera stops detecting
motion and/or sound.
The camera sensor
responds but a person is
L The cordless camera cannot take a picture when a
person passes in front of the cordless camera too fast.
not shown.
The pictures are not
stored in the cordless
camera.
L If a handset or a computer user starts monitoring the
cordless camera while it is taking pictures after
detection, the cordless camera stops taking pictures.
L You selected “No Overwrite” for the method of saving
the cordless camera images and the cordless camera’s
memory became full. Erase unnecessary images (page
18, 28) or change the setting to “Overwrite image”
(page 33).
I pressed {Call button}
but the cordless camera
does not page the
handset or notify my
computer.
L The call button does not work unless the detection
mode is set to “Call button”. Change the detection
mode to “Call button” (page 32).
L While a handset or a computer user is monitoring the
cordless camera, you cannot page them by pressing
{Call button}. Wait until the handset or the computer
user end monitoring.
“Camera detect” is
displayed on the handset
or a pop-up message
(“Notification”) is
displayed on your
computer.
L When the cordless camera detected motion and/or
sound or the call button of the cordless camera was
pressed, you were not near the handset or your
computer and could not answer the page. After you
monitor the cordless camera which paged you, the
indication disappears.
Useful Information
For assistance, please visit http://www.panasonic.com/phonehelp 43
Page 44

A
THA13(e).book Page 44 Monday, September 11, 2006 3:34 PM
Useful Information
FCC and other information
This device complies with Part 15 of the
FCC Rules. Operation is subject to the
following two conditions:
(1) This device may not cause harmful
interference, and (2) this device must
accept any interference received,
including interference that may cause
undesired operation.
CAUTION:
ny changes or modifications not
expressly approved by the party
responsible for compliance could void the
user’s authority to operate this device.
FCC RF Exposure Warning:
The product complies with FCC radiation
exposure limits set forth for an
uncontrolled environment. To comply with
FCC RF exposure requirements, the
product must be installed and operated
20 cm (8 inches) or more away from all
person’s body (excluding extremities of
hands, wrist and feet). The product must
not be collocated or operated in
conjunction with any other antenna or
transmitter.
Notice
NOTE:
This equipment has been tested and
found to comply with the limits for a Class
B digital device, pursuant to Part 15 of
the FCC Rules. These limits are
designed to provide reasonable
protection against harmful interference in
a residential installation. This equipment
generates, uses, and can radiate radio
frequency energy and, if not installed and
used in accordance with the instructions,
may cause harmful interference to radio
communications. However, there is no
guarantee that interference will not occur
in a particular installation. If this
equipment does cause harmful
interference to radio or television
reception, which can be determined by
turning the equipment off and on, the
user is encouraged to try to correct the
interference by one or more of the
following measures:
− Reorient or relocate the receiving
antenna.
− Increase the separation between the
equipment and receiver.
− Connect the equipment into an outlet
on a circuit different from that to which
the receiver is connected.
− Consult the dealer or an experienced
radio/TV technician for help.
44 For assistance, please visit http://www.panasonic.com/phonehelp
Page 45

THA13(e).book Page 45 Monday, September 11, 2006 3:34 PM
Useful Information
Specifications
Operating environment 5 °C – 40 °C (41 °F – 104 °F)
Frequency 2.402 GHz – 2.48 GHz
Bluetooth compliance Bluetooth wireless technology 1.2
Dimensions Approx. height 124 mm x width 86 mm x depth 68 mm
Mass (Weight) Approx. 150 g (0.33 lb.)
Power consumption Standby: Approx. 4.4 W
Power output 125 mW (max.)
Power supply AC adaptor (120 V AC, 60 Hz)
Number of pixels 300,000 pixels (
Illuminance 10 lux (min.)
Focus Fixed 0.48 m (18
Photograph angle Vertical angle: Approx. 35°
Motion sensor detection
system
Motion sensor detection
angle
7
/8 inches x 33/8 inches x 211/16 inches)
(4
Maximum: Approx. 4.7 W
1
/5 inch CMOS sensor)
29
/32 inches) – Infinity
Horizontal angle: Approx. 46°
Pyroelectric infrared sensor
When ambient temperature is approx. 20 °C (68 °F)
Vertical angle: Approx. 20°
Horizontal angle: Approx. 30°
Distance: Approx. 5 m (16.4 feet)
Note:
L Design and specifications are subject to change without notice.
L The illustrations in these instructions may vary slightly from the actual product.
Trademarks
L The Bluetooth word mark and logos are owned by the Bluetooth SIG, Inc. and any use
of such marks by Panasonic is under license.
For assistance, please visit http://www.panasonic.com/phonehelp 45
Page 46

THA13(e).book Page 46 Monday, September 11, 2006 3:34 PM
Useful Information
Customer services
Customer Services Directory
Obtain Product Information and Operating Assistance; locate your nearest
Dealer or Servicenter; purchase Parts and Accessories; or make Customer
Service and Literature requests by visiting our Web Site at:
http://www.panasonic.com/consumersupport
or, contact us via the web at:
http://www.panasonic.com/contactinfo
You may also contact us directly at:
1-800-211-PANA (1-800-211-7262),
Monday-Friday 9 am-9 pm; Saturday-Sunday 10 am-7 pm, EST.
TTY users (hearing or speech impaired users) can call 1-877-833-8855.
Accessory Purchases
Purchase Parts, Accessories and Instruction Books online for all
Panasonic Products by visiting our Web Site at:
http://www.pasc.panasonic.com
or, send your request by E-mail to:
npcparts@us.panasonic.com
You may also contact us directly at:
1-800-332-5368 (Phone) 1-800-237-9080 (Fax Only)
(Monday - Friday 9 am to 8 pm, EST.)
Panasonic Services Company
20421 84th Avenue South, Kent, WA 98032
(We Accept Visa, MasterCard, Discover Card, American Express, and
Personal Checks)
TTY users (hearing or speech impaired users) can call 1-866-605-1277.
Service in Puerto Rico
Panasonic Puerto Rico, Inc.
San Gabriel Industrial Park, Ave. 65 de Infantería, Km. 9.5,
Carolina, Puerto Rico 00985
Phone (787)750-4300, Fax (787)768-2910
46 For assistance, please visit http://www.panasonic.com/phonehelp
Page 47

THA13(e).book Page 47 Monday, September 11, 2006 3:34 PM
Warranty
Useful Information
PANASONIC CONSUMER
ELECTRONICS COMPANY, DIVISION
OF PANASONIC CORPORATION OF
NORTH AMERICA
One Panasonic Way,
Secaucus, New Jersey 07094
PANASONIC PUERTO RICO, INC.
San Gabriel Industrial Park,
Ave. 65 de Infantería, Km. 9.5,
Carolina, Puerto Rico 00985
Panasonic Telephone Products
Limited Warranty
Limited Warranty Coverage
If your product does not work properly because of a defect in materials or
workmanship, Panasonic Consumer Electronics Company or Panasonic Puerto
Rico, Inc. (collectively referred to as “the warrantor”) will, for the length of the period
indicated on the chart below, which starts with the date of original purchase
(“Limited Warranty period”), at its option either (a) repair your product with new or
refurbished parts, or (b) replace it with a new or a refurbished product. The decision
to repair or replace will be made by the warrantor.
Parts Labor
One (1) Year One (1) Year
✄
During the “Labor” Limited Warranty period there will be no charge for labor. During
the “Parts” Limited Warranty period, there will be no charge for parts. You must
mail-in your product prepaid during the Limited Warranty period. This Limited
Warranty excludes both parts and labor for batteries, antennas, and cosmetic parts
(cabinet). This Limited Warranty only applies to products purchased and serviced in
the United States or Puerto Rico. This Limited Warranty is extended only to the
original purchaser and only covers products purchased as new.
Mail-In Service
For assistance in the continental U.S.A. in obtaining repairs please ship the product
prepaid to:
Panasonic Services Company Customer Servicenter
4900 George McVay Drive Suite B Door #12 McAllen, TX 78503
For assistance in Puerto Rico call Panasonic Puerto Rico, Inc. (787)-750-4300 or
fax (787)-768-2910.
For Limited Warranty service for headsets if a headset is included with this product
please call Panasonic Call Center at 1-800-211-PANA (1-800-211-7262).
When shipping the unit carefully pack, include all accessories, and send it prepaid,
adequately insured and preferably in the original carton. Include a letter detailing
the complaint and provide a day time phone number where you can be reached.
IF REPAIR IS NEEDED DURING THE LIMITED WARRANTY PERIOD THE
PURCHASER WILL BE REQUIRED TO FURNISH A SALES RECEIPT/PROOF
OF PURCHASE INDICATING DATE OF PURCHASE, AMOUNT PAID AND
PLACE OF PURCHASE. CUSTOMER WILL BE CHARGED FOR THE REPAIR
OF ANY UNIT RECEIVED WITHOUT SUCH PROOF OF PURCHASE.
For assistance, please visit http://www.panasonic.com/phonehelp 47
Page 48

THA13(e).book Page 48 Monday, September 11, 2006 3:34 PM
Useful Information
Limited Warranty Limits And Exclusions
This Limited Warranty ONLY COVERS failures due to defects in materials or
workmanship, and DOES NOT COVER normal wear and tear or cosmetic damage.
The Limited Warranty ALSO DOES NOT COVER damages which occurred in
shipment, or failures which are caused by products not supplied by the warrantor,
or failures which result from accidents, misuse, abuse, neglect, bug infestation,
mishandling, misapplication, alteration, faulty installation, set-up adjustments,
misadjustment of consumer controls, improper maintenance, power line surge,
lightning damage, modification, introduction of sand, humidity or liquids,
commercial use such as hotel, office, restaurant, or other business or rental use of
the product, or service by anyone other than a Factory Servicenter or other
Authorized Servicer, or damage that is attributable to acts of God.
THERE ARE NO EXPRESS WARRANTIES EXCEPT AS LISTED UNDER
“LIMITED WARRANTY COVERAGE”. THE WARRANTOR IS NOT LIABLE FOR
INCIDENTAL OR CONSEQUENTIAL DAMAGES RESULTING FROM THE USE
OF THIS PRODUCT, OR ARISING OUT OF ANY BREACH OF THIS LIMITED
WARRANTY. (As examples, this excludes damages for lost time, lost calls or
messages, cost of having someone remove or re-install an installed unit if
applicable, travel to and from the servicer. The items listed are not exclusive, but
are for illustration only.) ALL EXPRESS AND IMPLIED WARRANTIES,
INCLUDING THE WARRANTY OF MERCHANTABILITY, ARE LIMITED TO THE
PERIOD OF THE LIMITED WARRANTY.
Some states do not allow the exclusion or limitation of incidental or consequential
damages, or limitations on how long an implied warranty lasts, so the exclusions
may not apply to you.
This Limited Warranty gives you specific legal rights and you may also have other
rights which vary from state to state. If a problem with this product develops during or
after the Limited Warranty period, you may contact your dealer or Servicenter. If the
problem is not handled to your satisfaction, then write to the warrantor’s Consumer
Affairs Department at the addresses listed for the warrantor.
PARTS AND SERVICE, WHICH ARE NOT COVERED BY THIS LIMITED
WARRANTY, ARE YOUR RESPONSIBILITY.
48 For assistance, please visit http://www.panasonic.com/phonehelp
Page 49

THA13(e).book Page 49 Monday, September 11, 2006 3:34 PM
Index
A Accessing the cordless camera: 26
Answering the notification: 28, 29
Answering the page: 17, 19
Audio detection sensitivity: 33
C Call button: 12, 19, 29
Camera angle: 13
Camera indicator: 11 , 35
Camera range: 10
Camera tone: 34
CAPTURE: 17, 27
Connection
AC adaptor: 12
Wall mounting adaptor: 39
Cordless camera settings
Audio detection sensitivity: 33
Camera indicator: 35
Camera tone: 34
Camera tone volume: 34
Detection mode: 32
Device name: 32
Image resolution: 36
Interval for taking pictures: 36
Motion detection sensitivity: 33
Number of images to be stored: 37
Refresh rate: 36
Resetting: 35
Saving method: 33
Sharpness of the images to be
stored: 37
Speaker volume: 34
D Deregistration: 15
Detection mode: 32
Detection pop-up message: 27
Device name: 32
Display settings
Brightness: 31
Image zoom: 30
Sharpness: 30
Upside down: 31
E Erasing images: 18, 28
H Help page: 26, 37
I Image resolution: 36
Installation of MULTI TALK V Camera
Utility: 21
Interval for taking pictures: 36
Index
M Memory full: 33
Motion detection sensitivity: 33
MULTI TALK V Camera Utility: 21
MULTI TALK V Camera Utility help file:
23
N Network settings: 37
Notifying your computer: 27, 29
Number of images to be stored: 37
O Operating conditions: 9
P Paging a handset: 17, 19
PC camera access: 21
Picture gallery: 20
R Refresh rate: 36
Registering the cordless camera: 15,
22
Resetting the cordless camera: 35
S Saving method: 33
Saving the images: 18, 28
Sharpness of the images to be stored:
37
Specifications: 45
Stored images: 18, 28
T Taking a picture: 17, 27
Troubleshooting: 42
TTY: 4, 46
V Video monitor: 16, 26
Viewing the images: 18, 28
Volum e
Camera speaker: 34
Camera tone: 34
W Wall mounting: 39
Wall mounting adaptor: 39
Warranty: 47
For assistance, please visit http://www.panasonic.com/phonehelp 49
Page 50

THA13(e).book Page 50 Monday, September 11, 2006 3:34 PM
Notes
For assistance, please visit http://www.panasonic.com/phonehelp 50
Page 51

THA13(e).book Page 51 Monday, September 11, 2006 3:34 PM
If you need assistance with setup or operation
1 Visit our website: http://www.panasonic.com/phonehelp
2 Contact us via the web at: http://www.panasonic.com/contactinfo
3 Call us at: 1-800-211-PANA (1-800-211-7262)
TTY users (hearing or speech impaired users) can call 1-877-833-8855.
When you ship the product
L Carefully pack your unit, preferably in the original carton.
L Attach a letter, detailing the symptom, to the outside of the carton.
L Send the unit to Panasonic Services Company Customer Servicenter, prepaid and
adequately insured.
L Do not send your unit to Panasonic Consumer Electronics Company listed below or to
executive or regional sales offices. These locations do not repair consumer products.
We recommend keeping a record of the following information for future reference.
Serial No. Date of purchase
(found on the bottom of the unit)
Name and address of dealer
Attach your purchase receipt here.
Panasonic Consumer Electronics Company,
Division of Panasonic Corporation of North America
One Panasonic Way, Secaucus, New Jersey 07094
Panasonic Puerto Rico, Inc.
San Gabriel Industrial Park, Ave. 65 de Infantería, Km. 9.5,
Carolina, Puerto Rico 00985
Copyright:
This material is copyrighted by Panasonic Communications Co., Ltd., and may be
reproduced for internal use only. All other reproduction, in whole or in part, is prohibited
without the written consent of Panasonic Communications Co., Ltd.
© 2005 Panasonic Communications Co., Ltd. All Rights Reserved.
Page 52

THA13(sp-sp).book Page 1 Monday, September 11, 2006 3:26 PM
Manual de instrucciones
Cámara inalámbrica para el sistema
de comunicación residencial
Modelo N°
Sólo para usarse en interiores
KX-THA13
Esta unidad es un accesorio para usarse con la unidad base KX-TH102. Debe
registrar esta unidad en su unidad base antes de poder usarla.
Lea este manual de instrucciones antes de usar la unidad y guárdelo para
consultarlo en el futuro.
Para obtener ayuda, visite nuestro sitio web:
http://www.panasonic.com/phonehelp
Puerto Rico.
para los clientes de Estados Unidos o
Page 53

THA13(sp-sp).book Page 2 Monday, September 11, 2006 3:26 PM
Tabla de Contenido
Introducción
Funciones más importantes . . . . . . . . . . . . . 3
Información de los accesorios. . . . . . . . . . . . 4
Expansión de su sistema telefónico . . . . . . . 5
Instrucciones importantes de seguridad . . . . 8
Para obtener un rendimiento óptimo. . . . . . . 9
Preparación
Controles . . . . . . . . . . . . . . . . . . . . . . . . . . . 11
Instalación de la cámara inalámbrica . . . . . 12
Elementos de la pantalla del auricular . . . . 14
Símbolos que se utilizan en este manual de
instrucciones . . . . . . . . . . . . . . . . . . . . . . . . 14
Para registrar la cámara inalámbrica . . . . . 15
Monitoreo utilizando un
auricular
Monitor de video utilizando un auricular . . . 16
Galería de imágenes . . . . . . . . . . . . . . . . . . 19
Antes de monitorear usando
su computadora
Instalación de la Utilidad Cámara de MULTI
TALK V . . . . . . . . . . . . . . . . . . . . . . . . . . . . 20
Cómo habilitar el monitoreo desde una
computadora . . . . . . . . . . . . . . . . . . . . . . . . 20
Cómo registrar la cámara inalámbrica en su
computadora . . . . . . . . . . . . . . . . . . . . . . . . 21
Para acceder a imágenes desde la cámara
inalámbrica . . . . . . . . . . . . . . . . . . . . . . . . . 22
Índice analítico
Índice analítico . . . . . . . . . . . . . . . . . . . . . . 44
Monitoreo usando su
computadora
Monitoreo de video usando su
computadora . . . . . . . . . . . . . . . . . . . . . . . . 25
Funciones útiles durante el
monitoreo
Funciones útiles durante el monitoreo . . . . 29
Información útil
Requisitos del sistema para su
computadora . . . . . . . . . . . . . . . . . . . . . . . . 37
Instalación en la pared . . . . . . . . . . . . . . . . 38
Solución de problemas . . . . . . . . . . . . . . . . 41
Especificaciones . . . . . . . . . . . . . . . . . . . . . 43
(2)
Para obtener ayuda, visite http://www.panasonic.com/phonehelp
Page 54

THA13(sp-sp).book Page 3 Monday, September 11, 2006 3:26 PM
Introducción
Funciones más importantes
Gracias por adquirir la cámara inalámbrica para el Sistema de comunicación
residencial de Panasonic.
Importante:
L
Para obtener información acerca de otras unidades Panasonic compatibles, consulte página 5.
L
En este manual de instrucciones, el término “auricular” se utiliza para referirse al auricular
inalámbrico KX-THA11, el auricular con videocámara inalámbrica KX-THA12, la estación
inalámbrica con videocámara KX-THA16 o la auricular inalámbrico con videocámara y salida
para A/V KX-THA17.
Monitor de video
Cómo usar la cámara y auricular inalámbricos
Puede monitorear la habitación donde la cámara inalámbrica se ubica cuando:
– accede a la cámara inalámbrica usando el auricular (página 16).
– la cámara inalámbrica localiza el auricular cuando detecta movimiento o sonido (página 17).
– el usuario de la cámara inalámbrica localiza el auricular usando el botón de llamada (página 18).
L
La cámara inalámbrica es compatible con KX-THA12/KX-THA16/KX-THA17.
Cómo usar la cámara inalámbrica y su computadora
Puede ver la habitación donde la cámara inalámbrica se ubica cuando:
– accede a la cámara inalámbrica usando su computadora (página 26).
– la cámara inalámbrica le envía una notificación a su computadora con un mensaje emergente
cuanto detecta movimiento y sonido (página 27).
– el usuario de la cámara inalámbrica usa el botón de llamada para notificarle a su computadora
mediante un mensaje emergente (página 28).
L
Para ver las imágenes usando su computadora, primero debe instalar el software de la Utilidad
Cámara de MULTI TALK V que se incluye con su unidad base. Consulte la “Installation Guide for
MULTI TALK V Software” para ver los detalles de la instalación.
Para obtener ayuda, visite http://www.panasonic.com/phonehelp
(3)
Page 55

THA13(sp-sp).book Page 4 Monday, September 11, 2006 3:26 PM
Introducción
Información de los accesorios
A
Adaptador de corriente para
la cámara inalámbrica
PQLV203
(Núm. de pedido
PQWE1THA13M)
Nota:
L
Puede expandir su sistema telefónico registrando unidades adicionales compatibles con
Panasonic (página 5).
A
Adaptador de montaje en la
pared para la cámara
inalámbrica
(Núm. de pedido
PQLP10267Z)
A
Botón de llamada para la
cámara inalámbrica
(Núm. de pedido
PQLP10270Z)
Información de ventas y soporte
L
Llame al 1-800-332-5368 para pedir estos accesorios.
(4)
Para obtener ayuda, visite http://www.panasonic.com/phonehelp
Page 56

THA13(sp-sp).book Page 5 Monday, September 11, 2006 3:26 PM
Introducción
Expansión de su sistema telefónico
Puede expandir el sistema telefónico registrando las siguientes unidades en una sola unidad base:
máx. 18
Auricular: máx. 8 Otros dispositivos: máx. 10
Auricular inalámbrico
KX-THA11
(Tipo pantalla
monocromática)
Cámara inalámbrica
KX-THA13: máx. 2
(Para monitoreo)
Auricular inalámbrico con
videocámara
KX-THA12
(Tipo pantalla en color)
Estación inalámbrica con
videocámara
KX-THA16
(Tipo pantalla grande en
color)
Auricular inalámbrico con
videocámara y salida
para A/V
KX-THA17
(Tipo pantalla en color
con salida para audio y
video)
Nota:
L
El audífono y el teléfono celular deben tener capacidad para Bluetooth y deben ser compatibles
con el sistema de comunicación residencial. Para obtener más detalles y la lista de teléfonos
celulares compatibles, visite: www.panasonic.com/MultiTalkV
Adaptador USB
KX-THA14
(Para el enlace de datos)
Otros
dispositivos
compatibles
con
Bluetooth
(Opcionales)
®
Audífono
Teléfono
celular:
máx. 5
Para obtener ayuda, visite http://www.panasonic.com/phonehelp
(5)
Page 57

THA13(sp-sp).book Page 6 Monday, September 11, 2006 3:26 PM
Introducción
Diversas funciones con el uso de las unidades opcionales
Videollamada
Esta función permite que usted y la
persona con quien habla se vean
mutuamente en tiempo real mientras
se encuentran en una llamada
externa usando los auriculares.
Si tiene unidades adicionales (
B
), también puede hacer una
videollamada durante una llamada
de intercom.
AB
Su hogar
Monitor visual
CA B
A
KX-THA12/KX-THA17
B
KX-THA16
Esta función le permite monitorear la
habitación en la que se ubica la
cámara inalámbrica (A) desde las
unidades (
También puede monitorear la
habitación entre las unidades (B,
C
).
A
B
C
B, C
KX-THA13
KX-THA12/KX-THA17
KX-THA16
A
,
).
Conexión celular (compatible con Bluetooth)
Su teléfono celular
BAC
(6)
Para obtener ayuda, visite http://www.panasonic.com/phonehelp
Esta función le permite hacer o
contestar llamadas celulares usando
su unidad (
base), si tiene teléfonos celulares
compatibles con Bluetooth.
A
B
C
A, B, C
KX-THA11
KX-THA12/KX-THA17
KX-THA16
y la unidad
Page 58

THA13(sp-sp).book Page 7 Monday, September 11, 2006 3:26 PM
Función del enlace de datos
AB C D
Videollamada usando el televisor
Introducción
Esta función le permite acceder al
Internet o a otra computadora
conectando las unidades (A, B, C
y la unidad base) con el cable USB o
D
un adaptador USB (
computadora.
A
KX-THA11
B
KX-THA12/KX-THA17
C
KX-THA16
D
KX-THA14
Esta función le permite usar su
televisor para ver a la otra persona
durante una videollamada.
A
KX-THA17
) a su
A
Su hogar
Televisor
Para obtener ayuda, visite http://www.panasonic.com/phonehelp
(7)
Page 59

THA13(sp-sp).book Page 8 Monday, September 11, 2006 3:26 PM
Introducción
Instrucciones importantes
de seguridad
Cuando utilice el producto, tendrá que tomar
siempre las precauciones que se indican a
continuación para reducir el riesgo de incendio,
descargas eléctricas o lesiones personales.
1. Lea y entienda todas las instrucciones.
2. Guarde estas instrucciones.
3. Obedezca todas las advertencias.
4. Siga todas las instrucciones.
5. Después de retirar el polvo de la lente,
límpiela con un algodón.
6. No instale el producto cerca de ninguna
fuente de calor como radiadores, registros
de calefacción, estufas u otros dispositivos
(incluyendo amplificadores) que produzcan
calor.
7. Proteja el cable del adaptador de corriente
alterna para evitar pisarlo o pellizcarlo, en
especial en los enchufes, receptáculos de
conveniencia y en el punto en que sale de
la unidad.
8. No toque la unidad ni el adaptador de
corriente alterna durante las tormentas
eléctricas.
9. Desconecte la unidad cuando no la vaya a
utilizar por periodos prolongados de
tiempo.
10. Refiera todo servicio de reparación al
personal de servicio calificado. Se requiere
servicio de reparación cuando la unidad ha
resultado dañada en cualquier forma, como
cuando el cable del adaptador o el enchufe
de corriente alterna resultan dañados, o la
unidad no funciona normalmente o se cae.
GUARDE ESTAS
INSTRUCCIONES
PRECAUCIÓN:
Instalación
L
No toque el enchufe con las manos mojadas.
L
El adaptador de corriente alterna se usa
como el dispositivo principal de
desconexión. Asegúrese de que la toma de
corriente alterna esté instalada cerca del
producto y tenga fácil acceso.
ADVERTENCIA:
L
Para evitar el riesgo de un incendio o
descarga eléctrica, no exponga el producto a
la lluvia ni a ningún tipo de humedad.
L
Desenchufe el producto de las tomas de
corriente si emite humo o un olor anormal, o
si hace algún ruido inusual. Estas
condiciones pueden provocar fuego o
descarga eléctrica. Confirme que ya no
emita humo y comuníquese con el Centro de
llamadas de Panasonic al 1-800-211-PANA
(1-800-211-7262).
Médicas
L
Consulte al fabricante de cualquier
dispositivo médico personal como los
marcapasos o aparatos para la sordera, a fin
de determinar si están adecuadamente
protegidos contra la energía externa de
radiofrecuencia. (El producto funciona en el
rango de frecuencia de 2,402 GHz a 2,48
GHz, y su salida de potencia máxima es de
125 mW.) No utilice el producto en
instalaciones de atención médica si existe
algún reglamento en el área que lo prohíba.
Los hospitales y las instalaciones de
atención médica pueden utilizar equipos
sensibles a la energía de radiofrecuencia
externa.
(8)
Para obtener ayuda, visite http://www.panasonic.com/phonehelp
Page 60

THA13(sp-sp).book Page 9 Monday, September 11, 2006 3:26 PM
Para obtener un
rendimiento óptimo
Ubicación
Esta unidad se comunica utilizando ondas de
radio.
Para obtener un funcionamiento a la distancia
máxima y sin ruido, recomendamos que
coloque el producto alejado de aparatos
eléctricos.
Medio ambiente
L
Mantenga el producto alejado de
dispositivos que generen ruido eléctrico,
como lámparas fluorescentes y motores.
L
El producto debe mantenerse libre de humo,
polvo, alta temperatura y vibración
excesivos.
L
El producto no debe exponerse a la luz
directa del sol.
L
No coloque objetos pesados sobre el
producto.
L
El producto debe mantenerse alejado de las
fuentes de calor como calentadores, estufas,
etc. No debe colocarse en habitaciones con
temperaturas inferiores a 5 °C (41 °F) o
superiores a 40 °C (104 °F). También debe
evitar colocarlo en sótanos húmedos.
L
La proximidad de aparatos eléctricos de 2,4
GHz puede causar interferencia. Aléjelo de
los aparatos eléctricos.
Cuidado de rutina
L
Limpie la superficie externa del producto con
un paño suave y húmedo. No utilice bencina,
disolvente o polvo abrasivo.
Condiciones para utilizar la cámara
inalámbrica
L
La cámara inalámbrica está diseñada sólo
para usarse en interiores. La exposición
prolongada a la luz directa del sol o a la luz
halógena puede dañar el sensor CMOS.
Introducción
L
Utilice la cámara inalámbrica en un sitio bien
iluminado con luz de día o luz artificial.
L
No use la cámara inalámbrica en los
siguientes lugares:
– cerca de lámparas incandescentes.
– cerca de cualquier aparato eléctrico que
emita una fuerte señal de radio.
– en sitios donde el objetivo de la imagen
esté contra una fuente de luz o frente a un
espejo.
– en lugares donde la temperatura varíe
mucho, como cerca de un aire
acondicionado o calentador.
– en cualquier sitio expuesto al aceite o al
vapor, como una cocina.
– donde algún objeto como el vidrio pueda
causar un cambio de temperatura debido
al reflejo.
L
A fin de mantener el brillo y definición de las
imágenes, la continuidad del movimiento se
reduce en espacios más oscuros que los
iluminados por luz de día o luz artificial. En
estos espacios, es posible que la
continuidad del movimiento no se
incremente o se reduzca mucho aunque
cambie la configuración de la definición de la
pantalla (página 29).
L
Al usar la cámara inalámbrica, tenga en
cuenta el derecho a la privacidad que tienen
los demás.
L
Cuando mueva la cámara inalámbrica de un
lugar frío a uno cálido, espere un poco para
permitir que se adapte al cambio ambiental
antes de usarla. En este caso, puede
formarse condensación y producirse un error
o una falla de funcionamiento.
Condiciones de operación para la
cámara inalámbrica
Para usar la función de detección de la cámara
inalámbrica, es necesario que cambie el modo
de detección (página 31).
Detección de audio
La cámara inalámbrica incluye un sensor que
detecta las voces humanas, como la de un
bebé que llora. Puede ser difícil detectar los
Para obtener ayuda, visite http://www.panasonic.com/phonehelp
(9)
Page 61

THA13(sp-sp).book Page 10 Monday, September 11, 2006 3:26 PM
Introducción
sonidos que no sean de voces humanas. Para
usar esta función, confirme que la cámara
inalámbrica se ubique en un lugar donde pueda
detectar las voces humanas con facilidad. Una
vez que el sensor detecta sonido, la cámara
inalámbrica localiza el auricular o le notifica a
su computadora por medio de un mensaje
emergente.
Detección de movimiento
La cámara inalámbrica incluye un sensor que
detecta el movimiento por medio de las
variaciones de temperatura en la habitación en
la que se coloca. Cuando un objeto (una
persona, un animal, etc.) entra en el alcance
del sensor, éste puede detectar la variación de
temperatura que causa dicho objeto. Una vez
que el sensor detecta movimiento, la cámara
inalámbrica localiza el auricular o le notifica a
su computadora por medio de un mensaje
emergente.
N
Rango de detección vertical
B
A
C
A
Ángulo vertical: Aprox. 20°
B
Ángulo fotográfico: Aprox. 35°
C
Distancia: Aprox. 5 m (16,4 pies)
N
Rango de detección horizontal
N
Alcance de detección de movimiento
Es fácil detectar el movimiento a través del
alcance de detección de la cámara inalámbrica
A
), pero es difícil detectar el movimiento hacia
(
la cámara inalámbrica (B).
Cámara
inalámbrica
A
A
B
Nota:
L
Ubique la cámara donde los objetos pasen a
través del alcance de detección.
L
No instale la cámara inalámbrica en un lugar
donde la temperatura sea alta. La cámara
inalámbrica detecta los objetos por medio de
la diferencia de temperatura entre los
objetos en movimiento (como los humanos)
y lo que los rodea. Si la cámara inalámbrica
se ubica donde hay poca diferencia de
temperatura entre ellos, el sensor no
responderá al movimiento, aunque sea
dentro del alcance de detección.
L
Es posible que la cámara inalámbrica
responda a los cambios de temperatura
causados por el movimiento del aire debido
a la apertura y cierre de puertas, o a brisas
del exterior.
D
E
D
Ángulo horizontal: Aprox. 30°
E
Ángulo fotográfico: Aprox. 46°
F
Distancia: Aprox. 5 m (16,4 pies)
(10)
Para obtener ayuda, visite http://www.panasonic.com/phonehelp
F
Page 62

THA13(sp-sp).book Page 11 Monday, September 11, 2006 3:26 PM
Controles
A
B
Preparación
C
D
E
A
Antena
B
Sensor
C
Lente de la cámara
D
MIC (Micrófono)
F
E{Botón llamada
F
Indicador
G
Altavoz
H
PROG. (Programa)
G
H
}
Funcionamiento del indicador de la cámara inalámbrica
El indicador de la cámara inalámbrica muestra el siguiente estado. Puede seleccionar cuándo
desea que el indicador de la cámara inalámbrica se encienda (página 34). La configuración
predeterminada es “
Estado Descripción
Rojo, parpadeando
rápidamente
Rojo, parpadeando La cámara inalámbrica está fuera de alcance. Colóquela cerca
Amarillo verdoso La cámara inalámbrica está registrada y en modo de espera.
Amarillo verdoso,
parpadeando rápidamente
Amarillo verdoso,
parpadeando
Siempre encend.
La cámara inalámbrica no está registrada. Registre la cámara
inalámbrica (página 15).
de la unidad base.
El sensor de la cámara responde y la cámara inalámbrica está
localizando el auricular o su computadora.
La cámara inalámbrica está conectada y enviando video en vivo
al auricular o a su computadora.
” (El indicador está iluminado todo el tiempo).
*1
*1
*1 Sólo cuando la configuración del indicador de la cámara inalámbrica está “
Para obtener ayuda, visite http://www.panasonic.com/phonehelp
Siempre encend.
(11)
”.
Page 63

THA13(sp-sp).book Page 12 Monday, September 11, 2006 3:26 PM
Preparación
Instalación de la cámara inalámbrica
Para conectar el adaptador de corriente alterna y el botón de llamada
Use sólo el adaptador de corriente alterna Panasonic PQLV203 incluido.
Ganchos
(120 V CA, 60 Hz)
Nota:
L
Cuando el adaptador de corriente alterna está conectado, el indicador se ilumina y comienza a
parpadear.
L
El adaptador de corriente alterna debe permanecer conectado todo el tiempo. (Es normal que el
adaptador se caliente durante su uso.)
L
El adaptador de corriente alterna debe estar conectado a una toma de corriente alterna orientada
verticalmente o montada en el piso. No conecte el adaptador de corriente alterna a una toma de
corriente alterna montada en el techo, ya que su peso puede hacer que se desconecte.
L
Para obtener información acerca de la ubicación de la cámara inalámbrica, consulte la página 9.
(12)
Para obtener ayuda, visite http://www.panasonic.com/phonehelp
Page 64

THA13(sp-sp).book Page 13 Monday, September 11, 2006 3:26 PM
Preparación
Para ajustar el ángulo de la lente de la cámara inalámbrica
Dirija la lente de la cámara empujando la lengüeta (A) y haciendo girar la lente hacia adelante o
hacia atrás.
L
Use el auricular o su computadora para confirmar que se muestre el área que desea monitorear
desde la cámara inalámbrica (página 16, 25).
Aprox. 40°
Aprox. 40°
Nota:
L
No toque la lente y el sensor de la cámara (página 11).
A
Para obtener ayuda, visite http://www.panasonic.com/phonehelp
(13)
Page 65

THA13(sp-sp).book Page 14 Monday, September 11, 2006 3:26 PM
Preparación
Elementos de la pantalla del
auricular
Elementos
de la
pantalla
z
Significado
La cámara inalámbrica
detecta movimiento o sonido,
{
Botón llamada} está
o su
oprimido.
Está hablando con la otra
persona cuando está
monitoreando.
Símbolos que se utilizan en
este manual de
instrucciones
Símbolos que se utilizan al final de los
títulos
Símbolo Significado
o
Y
p
j
Z
Símbolos que se utilizan para las
operaciones
Símbolo Significado
Ejemplo:
Visor
“
i
Ejemplo:
{
MENÚ
Ejemplo:
[Arriba]
Funciona con la unidad base.
Funciona con el auricular.
Funciona con la estación de la
videocámara inalámbrica.
Funciona con la cámara
inalámbrica.
Funciona con su
computadora.
Unidad base y auricular:
”
Oprima la tecla navegadora
hacia arriba o abajo para
seleccionar las palabras entre
comillas que aparecen en la
pantalla.
Su computadora:
Haga clic en las palabras
entre comillas que aparecen
en el navegador para
seleccionar la función.
Continúe con la siguiente
operación.
Las palabras entre corchetes
}
muestran los nombres de los
botones en la unidad base y
auricular.
Las palabras entre corchetes
muestran los nombres de las
pestañas y los botones en su
computadora.
(14)
Para obtener ayuda, visite http://www.panasonic.com/phonehelp
Page 66

THA13(sp-sp).book Page 15 Monday, September 11, 2006 3:26 PM
Preparación
Para registrar la cámara
inalámbrica
1
Unidad base:
Oprima y mantenga oprimido {INTERCOM}
hasta que comience a parpadear y se emita
un pitido.
2
Cámara inalámbrica:
Oprima PROG. (programa) con una pluma u
otro objeto puntiagudo en la parte posterior
de la cámara inalámbrica hasta que
escuche un pitido y el indicador de la
cámara inalámbrica cambie a amarillo
verdoso y comience a parpadear.
L
Cuando realice con éxito el registro, la
cámara inalámbrica emitirá un pitido y el
indicador dejará de parpadear y
permanecerá encendido (página 11).
Cómo reiniciar la cámara inalámbrica
Si reinicia la cámara inalámbrica, se cancelará
su registro en la unidad base.
Oprima y mantenga oprimido PROG.
(programa) con una pluma u otro objeto
puntiagudo en la parte posterior de la cámara
inalámbrica hasta que escuche un pitido.
Continúe oprimiendo PROG. con la pluma, y
espere hasta que el indicador de la cámara
inalámbrica comience a parpadear en amarillo
verdoso y después parpadee en anaranjado.
Una vez que el reinicio esté completo, el
indicador parpadeará rápidamente en rojo.
Nota:
L
Una vez que el reinicio esté completo, todas
las imágenes de la cámara inalámbrica se
borrarán.
L
Para usar la cámara inalámbrica después de
reiniciarla, es necesario que cancele su
registro para borrar su información de la
unidad base, y que después la registre de
nuevo en la unidad base.
Para cancelar el registro de una
cámara inalámbrica
La unidad base puede cancelar una cámara
inalámbrica registrada.
1
{
MENU} i h i {SET
o
}
Nota:
L
Puede personalizar el nombre de la cámara
inalámbrica (página 31).
Para obtener ayuda, visite http://www.panasonic.com/phonehelp
2
“
Cancela registro” i {
3
Seleccione la unidad deseada. i {SET
4
{3}{3}{5} i {
SET} i {STOP
SET
}
}
}
(15)
Page 67

THA13(sp-sp).book Page 16 Monday, September 11, 2006 3:26 PM
Monitoreo utilizando un auricular
Monitor de video utilizando
un auricular
Esta función permite que el auricular monitoree
la imagen y el sonido de la habitación donde se
ubica la cámara inalámbrica. La cámara
monitoreada no timbra, lo cual le permite
monitorear fácilmente la habitación de un bebé,
por ejemplo, desde diferentes áreas de la casa.
Puede monitorear la habitación cuando:
– accede a la cámara inalámbrica usando el
auricular (“Para monitorear la habitación
Ypj”, página 16).
– la cámara inalámbrica localiza el auricular
cuando detecta movimiento o sonido
(“Sensor de la cámara inalámbrica
página 17).
– el usuario de la cámara inalámbrica localiza
el auricular usando el botón de llamada
(“Botón de llamada de la cámara inalámbrica
Ypj”, página 18).
Importante:
L
Para obtener información acerca de la
ubicación de la cámara inalámbrica, consulte
la página 9.
L
Antes de comenzar a monitorear, confirme
que la lente de la cámara inalámbrica esté
ajustada en el ángulo correcto.
L
Sólo una persona puede tener acceso a la
cámara inalámbrica a la vez.
L
Los números de modelos de las unidades
Panasonic compatibles son los siguientes:
– KX-THA12: auricular inalámbrico con
videocámara
– KX-THA16: estación inalámbrica con
videocámara
– KX-THA17: auricular inalámbrico con
videocámara y salida para A/V
(16)
Para obtener ayuda, visite http://www.panasonic.com/phonehelp
Ypj”,
Para monitorear la habitación
Y
pj
KX-THA12/KX-THA17:
1
{
MENÚ} (F2) i H i {SELEC.
2
“
Cámara y sonido” i {
3
Seleccione la unidad deseada. i
{
SELEC.
}
L
Para comenzar o terminar de hablar con
el otro usuario, oprima
4
Oprima {OFF} para dejar de monitorear.
KX-THA16:
1
{
MONITOR} (F5)
2
“
Cámara y sonido” i {
3
Seleccione la unidad deseada. i
{
SELEC.
}
Para comenzar o terminar de hablar con
L
el otro usuario, oprima {2VÍAS}.
4
Oprima {OFF} para dejar de monitorear.
Nota:
L
Una vez que el usuario del auricular oprima
{
2VÍAS} en el paso 3, el usuario de la
cámara inalámbrica podrá conversar con el
usuario del auricular. Hable claramente en el
MIC de la cámara inalámbrica.
L
Mientras el auricular monitorea la cámara
inalámbrica, puede buscar el auricular
{
oprimiendo
modo de detección en el que se encuentre la
cámara inalámbrica.
L
Cuando se oprime {Botón llamada}
mientras se emplea el auricular para
monitorear,
para avisarle que la cámara inalámbrica le
busca. Oprima {2VÍAS} para contestar la
llamada de búsqueda.
Ajuste del volumen del receptor y el altavoz
Oprima
Botón llamada} sin importar el
{
2VÍAS} parpadea en la pantalla
{^}
o
{V}
mientras monitorea.
SELEC.
{
2VÍAS}.
SELEC.
}
}
}
Page 68

THA13(sp-sp).book Page 17 Monday, September 11, 2006 3:26 PM
Cómo tomar una fotografía de la imagen
que se muestra mientras monitorea
Oprima {CAPTUR.} cuando aparezca la
imagen que desea.
L
Se le asigna un título a la imagen y ésta se
guarda.
Nota:
L
Para ver la imagen, consulte “Galería de
imágenes” en la página 19.
Sensor de la cámara inalámbrica
Y
pj
La cámara inalámbrica puede buscar el
auricular cuando detecta movimiento o sonido.
Entonces, el usuario del auricular localizado
puede contestar la llamada de búsqueda para
monitorear el video en vivo desde la cámara
inalámbrica.
Y además, la cámara inalámbrica toma
fotografías (un total de 4 fotografías,
predeterminado) en el momento de la
detección y las almacena. Puede ver las
imágenes almacenadas en la cámara
inalámbrica usando el auricular, y después
seleccionar y guardar las que desee en el
auricular.
Para usar esta función, seleccione “
y sonido
sonido
detección de la cámara inalámbrica (página
31).
”, “
Sólo movimiento
” de antemano en el modo de
Movim.
” o “
Sólo
2
3
Nota:
L
Si aparece “
Si no contesta la llamada de búsqueda de la
cámara inalámbrica, aparece
“
Detecc.cámara
Esto le permite saber si debe monitorear la
cámara inalámbrica que le envió la llamada de
búsqueda.
KX-THA12/KX-THA17:
1
2
L
Cada una de las unidades Panasonic
compatibles registradas (KX-THA12/KXTHA16/KX-THA17) se puede buscar desde
la cámara inalámbrica. No es posible buscar
la unidad base y los auriculares Panasonic
compatibles (KX-THA11).
3
4
KX-THA16:
1
1
Cámara inalámbrica:
La cámara inalámbrica detecta el
movimiento o el sonido.
L
La cámara inalámbrica produce un tono
de cámara y toma fotografías.
L
La cámara inalámbrica localiza el
auricular durante 30 segundos.
2
3
4
Monitoreo utilizando un auricular
KX-THA12/KX-THA16/KX-THA17:
Oprima
{s}
para contestar la llamada de
búsqueda.
L
Puede monitorear la habitación donde la
cámara inalámbrica se ubica.
L
Para comenzar o terminar de hablar con
el otro usuario, oprima {2VÍAS}.
KX-THA12/KX-THA16/KX-THA17:
Oprima {OFF} para dejar de monitorear.
La cámara inalámbrica puede almacenar las
últimas 50 fotografías, desde la más reciente
hasta la más vieja. Cuando se almacene la
imagen número 51, la imagen más vieja se
borrará automáticamente (predeterminado,
página 32). El número de imágenes que
puede almacenar la cámara inalámbrica se
puede reducir dependiendo del tamaño de la
memoria, la definición, etc. Puede guardar
las imágenes que desee en su auricular
antes de que se borren.
Detecc.cámara
” en el auricular.
{
MENÚ} (F2) i H i {SELEC.
“
Cámara y sonido” i {
Seleccione la unidad (indicada por z). i
{
SELEC.
}
Oprima {OFF} para dejar de monitorear.
{
MONITOR} (F5)
“
Cámara y sonido” i {
Seleccione la unidad (indicada por z). i
{
SELEC.
}
Oprima {OFF} para dejar de monitorear.
”
SELEC.
SELEC.
}
}
}
Para obtener ayuda, visite http://www.panasonic.com/phonehelp
(17)
Page 69

THA13(sp-sp).book Page 18 Monday, September 11, 2006 3:26 PM
Monitoreo utilizando un auricular
Cómo ver y guardar las imágenes de la
cámara inalámbrica en el auricular
Puede ver las imágenes almacenadas en la
cámara inalámbrica y guardarlas en el
auricular.
KX-THA12/KX-THA17:
1
Comience a monitorear (página 16). i
{
MENÚ
}
2
“
Imágenes guard” i {
3
Seleccione la imagen deseada.
L
Para hacer un acercamiento, oprima
{
ZOOM} repetidas veces. Para volver a
la imagen original, oprima {ANCHO}.
4
Para almacenar la imagen que se muestra;
{
MENÚ} i “
{
SELEC.
Se le asigna un título a la imagen y ésta
L
se guarda en el auricular.
L
Para guardar otros elementos, repita
desde el paso 3.
5
Oprima {OFF} cuando termine.
KX-THA16:
1
Comience a monitorear (página 16). i
{
MENÚ
2
“
Imágenes guard” i {
3
Seleccione la imagen deseada.
L
Para hacer un acercamiento, oprima
{
ZOOM} repetidas veces. Para volver a
la imagen original, oprima
4
Para almacenar la imagen mostrada,
oprima
L
Se le asigna un título a la imagen y ésta
se guarda en el auricular.
L
Para guardar otros elementos, repita
desde el paso 3.
5
Oprima {OFF} cuando termine.
Nota:
L
Para ver la imagen, consulte “Galería de
imágenes” en la página 19.
Guardar imagen” i
}
}
{
GUARDAR}.
SELEC.
SELEC.
{
ANCHO}.
}
}
Cómo borrar todas las imágenes de la
cámara inalámbrica
KX-THA12/KX-THA17:
1
Comience a monitorear (página 16). i
{
MENÚ
}
2
“
Imágenes guard” i {
3
{
MENÚ}i “Borrar todo” i
{
SELEC.} i {SÍ
4
Oprima {OFF} después de que aparezca
Todo borrado
“
KX-THA16:
1
Comience a monitorear (página 16). i
{
MENÚ
}
2
“
Imágenes guard” i {
3
{
BORRAR TODO} i {SÍ
4
Oprima {OFF} después de que aparezca
“
Todo borrado
”.
”.
SELEC.
}
}
SELEC.
}
}
Botón de llamada de la cámara
inalámbrica
La cámara inalámbrica puede buscar el
auricular cuando usted oprime
llamada}. Entonces, el usuario del auricular
localizado puede contestar la llamada de
búsqueda para monitorear el video en vivo
desde la cámara inalámbrica.
Para usar esta función, seleccione “
llamada
en el modo de detección de la cámara
inalámbrica (página 31).
L
Cada una de las unidades Panasonic
compatibles registradas (KX-THA12/KXTHA16/KX-THA17) se puede buscar desde
la cámara inalámbrica. No es posible buscar
la unidad base y los auriculares Panasonic
compatibles (KX-THA11).
1
Cámara inalámbrica:
Oprima {Botón llamada}.
L
La cámara inalámbrica produce un tono
de cámara.
Y
pj
{
Botón
Botón
” (predeterminado) de antemano
(18)
Para obtener ayuda, visite http://www.panasonic.com/phonehelp
Page 70

THA13(sp-sp).book Page 19 Monday, September 11, 2006 3:26 PM
L
Para dejar de buscar, oprima de nuevo
{
Botón llamada}.
L
La cámara inalámbrica busca el auricular
durante 30 segundos.
Galería de imágenes
Puede ver todas las imágenes que almacenó
en el auricular. Las imágenes se muestran con
un tamaño diferente, dependiendo del tamaño
que haya seleccionado al tomar la fotografía.
Importante:
L
KX-THA12/KX-THA17:
1
2
2
KX-THA12/KX-THA16/KX-THA17:
Oprima
{s}
para contestar la llamada de
búsqueda.
L
Puede monitorear la habitación donde la
cámara inalámbrica se ubica.
L
También puede hablar con el usuario de
la cámara inalámbrica. Para terminar de
{
hablar, oprima
3
Cámara inalámbrica:
Cuando el usuario del auricular responda,
hable claramente en el MIC.
4
KX-THA12/KX-THA16/KX-THA17:
Oprima {OFF} para dejar de monitorear.
Nota:
L
Cuando se oprime {Botón llamada}, la
cámara inalámbrica no toma fotografías.
Si aparece “
Si no contesta la llamada de búsqueda de la
cámara inalámbrica, aparece
Detecc.cámara
“
Esto le permite saber si debe monitorear la
cámara inalámbrica que le envió la llamada de
búsqueda.
Para monitorear la cámara inalámbrica
consulte la página 17.
Detecc.cámara
2VÍAS}.
”
” en el auricular.
3
4
KX-THA16:
1
2
3
4
Monitoreo utilizando un auricular
Puede usar su computadora con la Utilidad
USB de MULTI TALK V para ver, copiar,
editar y guardar las imágenes. Consulte la
sección de ayuda de la Utilidad USB de
MULTI TALK V para obtener mayor
información.
{
MENÚ} (F2) i v i {SELEC.
“
Visor” i {
Oprima
imagen deseada.
L
Para mostrar la lista de títulos, oprima
{
MENÚ}, seleccione “
y oprima
de imágenes, oprima {MENÚ}, después
seleccione “
{
SELEC.}.
L
Para hacer un acercamiento, oprima
{
ZOOM}. Para volver a la imagen
original, oprima {ANCHO}.
{
OFF
}
{
CÁMARA VISOR
“
Visor” i {
Oprima
imagen deseada.
L
Para mostrar la lista de títulos, oprima
{
LISTA TÍTULOS}. Para volver a la lista
de imágenes, oprima
L
Para hacer un acercamiento, oprima
{
ZOOM}. Para volver a la imagen
original, oprima {ANCHO}.
{
OFF
}
SELEC.
}
{^}
o
{V}
para seleccionar la
Lista títulos
{
SELEC.}. Para volver a la lista
Lista imágenes
}
SELEC.
}
{^}
o
{V}
para seleccionar la
{
LISTA IMÁGEN.}.
}
”
” y oprima
Para obtener ayuda, visite http://www.panasonic.com/phonehelp
(19)
Page 71

THA13(sp-sp).book Page 20 Monday, September 11, 2006 3:26 PM
Antes de monitorear usando su computadora
Instalación de la Utilidad
Cámara de MULTI TALK V
La Utilidad Cámara de MULTI TALK V le
permite utilizar su computadora para registrar
una cámara inalámbrica a fin de ver las
imágenes de dicha cámara con un navegador
de Internet. Antes de utilizar la cámara
inalámbrica, primero debe instalar el software
de la Utilidad cámara de MULTI TALK V que se
incluye con su unidad base. Consulte la
“Installation Guide for MULTI TALK V Software”
para obtener detalles.
Nota:
L
Cuando conecte su computadora a su red de
computadoras usando un dispositivo MULTI
TALK V, será necesario que instale el
Controlador y la Utilidad de USB MULTI
TALK V. Consulte la “Installation Guide for
MULTI TALK V Software” para obtener más
información.
L
Para usuarios de Windows XP, no es posible
iniciar la Utilidad cámara de MULTI TALK V
después de utilizar la función “Cambio rápido
de usuario”. Asegúrese de que todos los
usuarios se hayan desconectado, y después
conéctese de nuevo.
L
Si su red de computadoras utiliza
direcciones IP fijas, es necesario que asigne
una dirección IP específica a la cámara
inalámbrica. Consulte “Cómo configurar
manualmente una dirección IP para la
cámara inalámbrica (“
página 22.
L
No es posible utilizar una dirección de IP
global para la cámara inalámbrica.
Estática
”)” en la
Cómo habilitar el monitoreo
desde una computadora
Puede permitir que se monitoree la cámara
inalámbrica usando una computadora. La
configuración predeterminada es “
Importante:
L
Si configura esta función en “
no es posible utilizar la función de video
teléfono durante una llamada de
intercomunicador.
Unidad base
1
{
MENU} i h i {SET
2
“
Acceso cámara PC” i {
3
“
Encendido” i {
Nota:
L
Puede programar esta función usando el
comando directo. Oprima
{#}{6}{5}{0} i “Encendido” i {
i {
STOP}.
SET} i {STOP
Apagado
Encendido
}
SET
{
MENU} i
”.
”,
}
}
SET}
(20)
Para obtener ayuda, visite http://www.panasonic.com/phonehelp
Page 72

THA13(sp-sp).book Page 21 Monday, September 11, 2006 3:26 PM
Antes de monitorear usando su computadora
3
Cómo registrar la cámara
inalámbrica en su
computadora
Antes de registrar la cámara inalámbrica en su
computadora, confirme que:
– la unidad base esté conectada a su red de
computadoras (consulte la “Installation
Guide for MULTI TALK V Software” para
obtener más información).
– el adaptador para corriente de la cámara
inalámbrica está conectado.
– la cámara inalámbrica está registrada en la
unidad base y su indicador está amarillo
verdoso (consulte el manual de
instrucciones de la unidad base para obtener
más información).
1
Haga clic en
2
N
Para usuarios de Windows XP:
Apunte a
a
[Panasonic]
V]
, y después haga clic en
Cámara de MULTI TALK V]
N
Para usuarios de Windows 98SE,
Windows Me y Windows 2000:
Apunte a
[Panasonic]
y después haga clic en
de MULTI TALK V]
L
Aparece la ventana de la Utilidad
cámara de MULTI TALK V.
L
Al registrar una cámara inalámbrica por
primera vez, aparece el cuadro de
diálogo de Registar dispositivo.
Confirme las instrucciones del cuadro
de diálogo, y después haga clic en
[Aceptar]
[Inicio]
.
[Todos los programas]
, apunte a
[Programas]
, apunte a
para continuar.
[MULTI TALK
[Utilidad
.
, apunte a
[MULTI TALK V]
[Utilidad Cámara
.
, apunte
,
4
Nota:
L
L
Introduzca la dirección MAC de la cámara
inalámbrica, y después haga clic en
[Aceptar]
L
L
L
Haga clic en
Si ocurre un error, es posible que aparezca
No listo
“
columna de estado de la Lista de
dispositivos. Consulte la sección de códigos
de error del archivo de Ayuda para obtener
información acerca de los códigos de error.
Si observa que un dispositivo MULTI TALK V
diferente se ha registrado en esta aplicación,
bórrelo de la Lista de dispositivos haciendo
clic en
.
La dirección MAC se imprime en la
etiqueta que se encuentra en la parte
inferior de la cámara inalámbrica.
Cuando la cámara inalámbrica se registra
correctamente, aparece “
columna de estado de la Lista de
dispositivos.
Para ver imágenes desde la cámara
inalámbrica, continúe desde el paso 3 de
“Para acceder a imágenes desde la
cámara inalámbrica”, en la página 22.
[Cerrar]
” y un código de error en la
[Cancelar registro]
Listo
” en la
.
.
Para obtener ayuda, visite http://www.panasonic.com/phonehelp
(21)
Page 73

THA13(sp-sp).book Page 22 Monday, September 11, 2006 3:26 PM
Antes de monitorear usando su computadora
3
Para registrar una cámara inalámbrica
adicional
Para registrar una cámara inalámbrica
adicional, haga clic en
efectuar el paso 3. Introduzca la dirección MAC
de la cámara inalámbrica, y después haga clic
[Aceptar]
en
Nota:
L
Se pueden registrar hasta 8 cámaras
inalámbricas en la Utilidad Cámara de
MULTI TALK V.
.
[Registro]
después de
Seleccione la cámara inalámbrica que
desee de la Lista de dispositivos, y después
haga clic en
L
Su navegador de Internet se abre y
aparece la imagen de la cámara.
Para acceder a imágenes
desde la cámara
inalámbrica
L
Antes de ver las imágenes de la cámara
inalámbrica, confirme que la haya registrado en
su computadora.
1
Haga clic en
2
N
Para usuarios de Windows XP:
Apunte a
a
[Panasonic]
, y después haga clic en
V]
Cámara de MULTI TALK V]
N
Para usuarios de Windows 98SE,
Windows Me y Windows 2000:
Apunte a
[Panasonic]
y después haga clic en
de MULTI TALK V]
L
También puede iniciar la Utilidad
Cámara de MULTI TALK V haciendo clic
en el icono correspondiente en la
bandeja del sistema.
L
La animación de búsqueda termina y el
estado de la Lista de dispositivos es
“
[Inicio]
.
[Todos los programas]
, apunte a
[Programas]
, apunte a
.
Listo
”.
, apunte
[MULTI TALK
[Utilidad
.
, apunte a
[MULTI TALK V]
[Utilidad Cámara
,
Para ver el archivo de ayuda de la
Utilidad Cámara de MULTI TALK V, haga
clic en
Nota:
L
Puede conectarse hasta con 2 cámaras
inalámbricas a la vez usando su navegador.
Cómo configurar manualmente una
dirección IP para la cámara inalámbrica
(“
Estática
Si su red utiliza asignaciones automáticas de
direcciones IP (DHCP), no es necesario
cambiar la configuración. Si su red utiliza
direcciones IP fijas, realice los siguientes
pasos para asignar una dirección IP a la
cámara inalámbrica de forma manual.
Nota:
L
Si pudo acceder a la cámara inalámbrica
usando el procedimiento descrito en “Para
acceder a imágenes desde la cámara
inalámbrica”, en la página 22, la cámara
inalámbrica ya tiene una dirección IP
asignada automáticamente y no es
necesario que cambie ninguna
configuración.
[Conectar]
[Ayuda]
”)
.
.
(22)
Para obtener ayuda, visite http://www.panasonic.com/phonehelp
Page 74

THA13(sp-sp).book Page 23 Monday, September 11, 2006 3:26 PM
Antes de monitorear usando su computadora
1
Abra la ventana de Propiedades de TCP/IP.
N
Para usuarios de Windows 2000 y
Windows XP:
1
Haga clic en
de control]
haga clic en
Internet]
[Conexiones de red]
L
Para Windows 2000, haga clic en
[Inicio]
después haga clic en
red y de acceso telefónico]
2
Haga clic con el botón derecho en la
[Conexión de área local]
uso, y después haga clic en
[Propiedades]
3
Haga clic en
IP)]
, y después haga clic en
[Propiedades]
[Inicio]
, haga clic en
, en la pantalla de Categoría,
[Conexiones de red e
, y después haga clic en
.
, apunte a
[Configuración]
[Conexiones de
.
[Protocolo Internet (TCP/
.
[Panel
.
que esté en
, y
N
Para usuarios de Windows 98SE y
Windows Me:
1
Haga clic en
[Configuración]
[Panel de control]
2
Haga doble clic en
3
Seleccione
uso, y después haga clic en
[Propiedades]
[Inicio]
, apunte a
, y después haga clic en
.
[Red]
.
[TCP/IP]
con el adaptador en
.
2
Tome nota de su dirección IP y máscara de
sub-red para referencia futura.
3
Seleccione “
IP automáticamente
4
Haga clic en
[Aceptar]
en
L
Los usuarios de Windows 2000 y
Windows XP deben esperar
aproximadamente un minuto para
obtener la dirección IP.
L
Los usuarios de Windows 98SE y
Windows Me deben reiniciar la
computadora.
5
Siga el procedimiento descrito en “Cómo
registrar la cámara inalámbrica en su
computadora” en la página 21.
Para obtener ayuda, visite http://www.panasonic.com/phonehelp
Obtener una dirección
”.
[Aceptar]
.
, y después haga clic
(23)
Page 75

THA13(sp-sp).book Page 24 Monday, September 11, 2006 3:26 PM
Antes de monitorear usando su computadora
6
Seleccione la cámara inalámbrica que
desee de la Lista de dispositivos, y después
haga clic en
7
Cuando aparezca la página
estándar]
haga clic en la pestaña
8
Seleccione “
9
Introduzca una dirección de IP y máscara
de sub-net válida.
L
La dirección de IP debe ser una dirección
de IP local (privada). No es posible utilizar
una dirección de IP global para la cámara
inalámbrica.
10
Haga clic en
11
Haga clic en
12
Repita el paso 1.
13
Seleccione “
dirección IP:
98SE, “
IP:
y la máscara de sub-red a su
configuración original (la configuración
que anotó en el paso 2).
[Conectar]
en su navegador de Internet,
Estática
[Guardar]
[Reiniciar]
Usar la siguiente
Especificar una dirección
”), y después devuelva la dirección IP
.
[Vista
[Configuración]
”.
.
.
” (para Windows Me/
14
Haga clic en
clic en
L
Nota:
L
Si configuró incorrectamente la dirección de
IP para la cámara inalámbrica, no podrá
conectarse a ella. En este caso, debe
devolver la cámara inalámbrica a su
configuración predeterminada de fábrica y
asignar una dirección de IP válida siguiendo
el procedimiento en la página 22. Para
reiniciar la cámara inalámbrica, consulte
“Cómo reiniciar la cámara inalámbrica” en la
.
página 15.
L
Si su navegador está configurado para
utilizar un servidor proxy, no podrá obtener
acceso a la cámara inalámbrica
correctamente. Verifique si se está utilizando
un servidor proxy o no con el siguiente
procedimiento.
N
Para usuarios de Windows XP:
Abra el navegador de internet (por
ejemplo, Internet Explorer 6.0) y haga clic
en
Internet...]
i [Configuración de LAN...]
Utilizar un servidor proxy para
“
su LAN...
haciendo clic en la casilla de verificación.
N
Para usuarios de Windows 98SE,
Windows Me, y Windows 2000:
Abra el navegador de internet (por
ejemplo, Internet Explorer 6.0) y haga clic
en
Internet...]
i [Configuración LAN...]
servidor proxy
apáguelo haciendo clic en la casilla de
verificación.
[Aceptar]
[Aceptar]
Los usuarios de Windows Me y
Windows 98SE y deben reiniciar la
computadora.
[Herramientas] i [Opciones de
i la pestaña
” está marcado, apáguelo
[Herramientas] i [Opciones de
i la pestaña
, y después haga
.
[Conexiones]
[Conexiones]
. Si “
” está marcado,
. Si
Usar
(24)
Para obtener ayuda, visite http://www.panasonic.com/phonehelp
Page 76

THA13(sp-sp).book Page 25 Monday, September 11, 2006 3:26 PM
Monitoreo usando su computadora
L
Monitoreo de video usando
su computadora
Esta función le permite monitorear la vista
desde la cámara inalámbrica usando su
computadora. La unidad monitoreada no
timbra, lo cual le permite monitorear fácilmente
la habitación de un bebé, por ejemplo, desde
diferentes áreas de la casa.
Puede ver la habitación cuando:
– accede a la cámara inalámbrica usando su
computadora (“Para monitorear la habitación
jZ
”, página 26).
– la cámara inalámbrica le envía una
notificación a su computadora con un
mensaje emergente cuanto detecta
movimiento y sonido (“Sensor de la cámara
jZ
inalámbrica
– el usuario de la cámara inalámbrica usa el
botón de llamada para notificarle a su
computadora mediante un mensaje
emergente (“Botón de llamada de la cámara
inalámbrica
Importante:
L
Para usar esta función, debe instalar el
software de la Utilidad Cámara de MULTI
TALK V en su computadora. Consulte la
“Installation Guide for MULTI TALK V
Software” para ver los detalles de la
instalación.
L
Antes de monitorear usando su
computadora, confirme que la unidad base
esté conectada a ella o a la red de
computadoras (consulte la “Installation
Guide for MULTI TALK V Software” para
obtener más información).
”, página 27).
jZ
”, página 28).
L
L
L
Para obtener información acerca de la
ubicación de la cámara inalámbrica, consulte
la página 9.
Antes de comenzar a monitorear, confirme
que la lente de la cámara inalámbrica esté
ajustada en el ángulo correcto.
Sólo una persona puede tener acceso a la
cámara inalámbrica a la vez.
Mientras monitorea la cámara inalámbrica
con su computadora, es posible ver la
habitación pero no se puede escuchar
ningún sonido.
Para obtener ayuda, visite http://www.panasonic.com/phonehelp
(25)
Page 77

THA13(sp-sp).book Page 26 Monday, September 11, 2006 3:26 PM
Monitoreo usando su computadora
Cómo acceder a la cámara
inalámbrica
1
Abra el navegador de Internet de su
computadora (consulte la “Installation Guide
for MULTI TALK V Software” para obtener
detalles acerca de la herramienta de la
cámara).
2
Haga clic en las siguientes pestañas para
mostrar cada página.
123456
1
[Arriba]
la cámara. Puede cambiar temporalmente
el idioma del navegador.
2
[Vista estándar]
habitación donde se ubica la cámara
inalámbrica y la configuración de la
pantalla. Puede cambiar la configuración
de la pantalla temporalmente.
3
[Vista simple]
la habitación donde se ubica la cámara
inalámbrica.
4
[Imágenes guard.]
almacenadas que tomó la cámara
inalámbrica en el momento de la detección.
5
[Configuración]
de la configuración de la cámara
inalámbrica.
6
[Ayuda]
jZ
: Muestra el número de modelo de
: Muestra una vista de la
: Muestra sólo una vista de
: Muestra las imágenes
: Muestra los elementos
: Muestra la página de ayuda.
Idioma del navegador
1
Acceda a la cámara inalámbrica (página
26).
2
Haga clic en la pestaña
la parte superior de la página.
3
Haga clic en
4
Seleccione la configuración deseada
(Predeterminada: “
haga clic en
[Ajuste cámara]
[Guardar]
Para monitorear la habitación
1
Acceda a la cámara inalámbrica (página
26).
2
Haga clic en la pestaña
la parte superior de la página.
L
La configuración de la pantalla se
muestra a la izquierda del navegador de
Internet. De ser necesario, puede
cambiarlos haciendo clic en la
configuración deseada.
3
Cierre el navegador de Internet para dejar
de monitorear.
Cómo tomar una fotografía de la imagen
que se muestra mientras monitorea
Haga clic en
imagen que desea.
L
Cuando hace clic en
navegador de Internet que muestra esa
imagen. Para guardar la imagen, siga las
instrucciones del navegador de Internet.
[Capturar]
[Configuración]
.
English
[Capturar]
”), y después
.
[Vista estándar]
cuando aparezca la
, se abre otro
jZ
de
de
(26)
Para obtener ayuda, visite http://www.panasonic.com/phonehelp
Page 78

THA13(sp-sp).book Page 27 Monday, September 11, 2006 3:26 PM
Monitoreo usando su computadora
Sensor de la cámara inalámbrica
jZ
La cámara inalámbrica puede notificarle a su
computadora cuando detecta movimiento o
sonido. Entonces, el usuario de la
computadora notificada puede contestar la
notificación para ver el video en vivo desde la
cámara inalámbrica.
Y además, la cámara inalámbrica toma
fotografías (un total de 4 fotografías en forma
predeterminada) en el momento de la
detección y las almacena. Puede ver las
imágenes almacenadas en la cámara
inalámbrica usando la computadora, y después
seleccionar y guardar las que desee en la
computadora.
Nota:
L
Puede cambiar el número de imágenes que
toma la cámara inalámbrica en el momento
de la detección (página 36).
Para usar esta función, seleccione
Detección de movimiento y sonido
“
“
Detección de movimiento
” o “
solamente
solamente
detección de la cámara inalámbrica (página
31).
Cómo mostrar el mensaje emergente
Esta función permite que su computadora
muestre el mensaje emergente cuando la
cámara inalámbrica detecte el movimiento o el
sonido, o al oprimir
ver la habitación donde la cámara inalámbrica
se ubica haciendo clic en ella.
1
Inicie la Utilidad Cámara de MULTI TALK V.
2
Haga clic en
3
Marque
L
Haga clic en
encender el tono de búsqueda (en
formato de archivo WAV) que se escucha
en su computadora.
4
Haga clic en
Detección de sonido
” de antemano en el modo de
{
Botón llamada}. Puede
[Sensor]
[Usar sensor]
[Aceptar]
.
.
[Examinar]
.
si desea
”,
Cómo contestar la notificación de detección
con su computadora
1
Cámara inalámbrica:
La cámara inalámbrica detecta el
movimiento o el sonido.
L
La cámara inalámbrica produce un tono
de cámara y toma fotografías.
L
La cámara inalámbrica le notifica a su
computadora con un mensaje emergente
si enciende el tono de búsqueda para
mensajes emergentes (página 27).
2
Su computadora:
Cuando la cámara inalámbrica le notifica a
su computadora, aparece el mensaje
emergente.
Para monitorear la cámara inalámbrica,
haga clic en
L
Puede ver la habitación donde la cámara
inalámbrica se ubica.
3
Su computadora:
Cierre el navegador de Internet para dejar
de monitorear.
Nota:
L
La cámara inalámbrica puede almacenar las
últimas 50 fotografías, desde la más reciente
hasta la más vieja. Cuando se almacene la
imagen número 51, la imagen más vieja se
borrará automáticamente (predeterminado,
página 32). El número de imágenes que
puede almacenar la cámara inalámbrica se
puede reducir dependiendo del tamaño de la
memoria, la definición, etc. Puede guardar
las imágenes que desee en su computadora
antes de que se borren.
[Conectar]
.
Para obtener ayuda, visite http://www.panasonic.com/phonehelp
(27)
Page 79

THA13(sp-sp).book Page 28 Monday, September 11, 2006 3:26 PM
Monitoreo usando su computadora
Cómo ver y guardar las imágenes de la
cámara inalámbrica en la computadora
1
Acceda a la cámara inalámbrica (página
26).
2
Haga clic en la pestaña
de la parte superior de la página.
[Imágenes guard.]
1
2
L
Puede ver las imágenes haciendo clic en
[Primera], [<Ant.], [Reproducir]
[Sgte.>]
o
[Última]
3
Para guardar la imagen deseada, siga las
instrucciones del navegador de Internet.
.
,
Cámara inalámbrica:
Oprima {Botón llamada}.
L
La cámara inalámbrica produce un tono
de cámara.
L
Para dejar de buscar, oprima de nuevo
{
Botón llamada}.
L
La cámara inalámbrica le notifica a su
computadora con un mensaje emergente
si enciende el tono de búsqueda para
mensajes emergentes (página 27).
Su computadora:
Cuando la cámara inalámbrica le notifica a
su computadora, aparece el mensaje
emergente.
Para monitorear la cámara inalámbrica,
haga clic en
[Conectar]
.
Cómo borrar todas las imágenes de la
cámara inalámbrica
1
Acceda a la cámara inalámbrica (página
26).
2
Haga clic en la pestaña
la parte superior de la página.
3
Haga clic en
4
Haga clic en
[Opciones de sensor]
[Borrar todas las imágenes]
[Configuración]
.
de
Botón de llamada de la cámara
inalámbrica
La cámara inalámbrica puede notificarle a su
computadora cuando usted oprime
llamada
computadora notificada puede contestar la
notificación para ver el video en vivo desde la
cámara inalámbrica.
Para usar esta función, seleccione “
llamada solamente
antemano en el modo de detección de la
cámara inalámbrica (página 31).
jZ
}
. Entonces, el usuario de la
” (predeterminado) de
{
Botón
Botón
L
Puede ver la habitación donde la cámara
inalámbrica se ubica.
3
Su computadora:
Cierre el navegador de Internet para dejar
de monitorear.
.
Nota:
L
Cuando se oprime {Botón llamada}, la
cámara inalámbrica no toma fotografías.
(28)
Para obtener ayuda, visite http://www.panasonic.com/phonehelp
Page 80

THA13(sp-sp).book Page 29 Monday, September 11, 2006 3:26 PM
Funciones útiles durante el monitoreo
Funciones útiles durante el
monitoreo
Las palabras entre comillas (por ejemplo “
”) se basan en la pantalla del auricular.
sonido
Es posible que sean ligeramente diferentes
cuando trabaje con su computadora.
Importante:
L
Los números de modelos de las unidades
Panasonic compatibles son los siguientes:
– KX-THA12: auricular inalámbrico con
videocámara
– KX-THA16: estación inalámbrica con
videocámara
– KX-THA17: auricular inalámbrico con
videocámara y salida para A/V
Funciones de la pantalla YpZ
Cómo seleccionar el acercamiento de
imágenes
Auricular
KX-THA12/KX-THA16/KX-THA17:
1
Comience a monitorear (página 16). i
{
MENÚ
}
2
“
Zoom” i {
3
Oprima {ZOOM} para hacer un
acercamiento (acercamiento de 1,5 x) en la
imagen.
L
Oprima {ZOOM} de nuevo para un
acercamiento de 3 x. Al hacer el
acercamiento de 3 x, puede oprimir
{V}, {<}
visible.
L
Para volver a la imagen original, oprima
{
ANCHO}.
SELEC.
}
o {>} para seleccionar el área
Sólo
{^}
,
Su computadora
Después de acceder a la cámara inalámbrica
(página 26), puede cambiar temporalmente el
tamaño de la imagen haciendo clic en la
función que desee en la página
estándar]
Cómo ajustar la nitidez de la pantalla
Auricular
KX-THA12/KX-THA17:
1
2
3
4
KX-THA16:
1
2
3
del navegador de Internet.
Comience a monitorear (página 16). i
{
MENÚ
}
“
Nitidez” i {
Seleccione la nitidez que desee.
L
Si desea mejorar la definición de la
pantalla, mueva el cursor a la derecha (se
reduce la continuidad del movimiento).
L
Si desea mejorar la continuidad del
movimiento, mueva el cursor a la
izquierda (se reduce la claridad de la
imagen).
{
GUARDAR
Comience a monitorear (página 16). i
{
NITIDEZ
Seleccione la nitidez que desee.
L
Si desea mejorar la definición de la
pantalla, mueva el cursor a la derecha (se
reduce la continuidad del movimiento).
L
Si desea mejorar la continuidad del
movimiento, mueva el cursor a la
izquierda (se reduce la claridad de la
imagen).
{
GUARDAR
SELEC.
}
}
}
[Vista
}
4
{
GUARDAR
Nota:
L
Al terminar de monitorear, el tamaño
seleccionado de la imagen vuelve a la vista
original.
}
Para obtener ayuda, visite http://www.panasonic.com/phonehelp
(29)
Page 81

THA13(sp-sp).book Page 30 Monday, September 11, 2006 3:26 PM
Funciones útiles durante el monitoreo
Su computadora
“
Fav. claridad
pantalla pero reduce la continuidad del
movimiento.
Estándar
“
nivel de nitidez estándar.
Fav. movimiento
“
del movimiento pero reduce la claridad de la
imagen.
1
Acceda a la cámara inalámbrica (página
26).
2
Haga clic en la pestaña
la parte superior de la página.
3
Haga clic en
4
Seleccione la nitidez que desee, y después
haga clic en
Nota:
L
También puede cambiar temporalmente la
nitidez de la imagen haciendo clic en la
función que desee en la página
estándar]
Cómo ajustar el brillo de la pantalla
Auricular
KX-THA12/KX-THA17:
”: Mejora la nitidez de la
” (Predeterminado): Configura el
”: Mejora la continuidad
[Configuración]
[Ajuste cámara]
[Guardar]
del navegador de Internet.
.
.
[Vista
Su computadora
Después de acceder a la cámara inalámbrica
(página 26), puede cambiar temporalmente el
brillo haciendo clic en la función que desee en
la página
Internet.
Cómo mostrar la imagen al revés
Puede voltear la imagen de la cámara al revés.
Esta función es útil cuando se monta la cámara
inalámbrica al revés (página 39).
de
Auricular
KX-THA12/KX-THA17:
1
2
KX-THA16:
Comience a monitorear (página 16). i
{
INVERT.
Su computadora
Después de acceder a la cámara inalámbrica
(página 26), puede voltear la imagen al revés
haciendo clic en
estándar]
[Vista estándar]
Comience a monitorear (página 16). i
{
MENÚ
}
“
Invertir” i {
}
[Invertir]
del navegador de Internet.
del navegador de
SELEC.
}
en la página
[Vista
1
Comience a monitorear (página 16). i
{
MENÚ
}
2
“
Brillo” i {
3
Oprima {>} para aumentar el brillo. Oprima
{<}
para disminuir el brillo.
4
{
GUARDAR
KX-THA16:
1
Comience a monitorear (página 16). i
{
BRILLO
2
Oprima {>} para aumentar el brillo. Oprima
{<}
para disminuir el brillo.
3
{
GUARDAR
(30)
SELEC.
}
}
}
}
Para obtener ayuda, visite http://www.panasonic.com/phonehelp
Page 82

THA13(sp-sp).book Page 31 Monday, September 11, 2006 3:26 PM
Funciones útiles durante el monitoreo
Funciones de la cámara inalámbrica
Y
pZ
Seleccione la cámara inalámbrica cuya
configuración desea cambiar mientras la
monitorea.
Cómo cambiar el nombre de la cámara
inalámbrica
Auricular
KX-THA12/KX-THA16/KX-THA17:
1
Comience a monitorear (página 16). i
{
MENÚ
}
2
“
Ajuste cámara” i {
3
“
Nom. disposit.” i {
4
Introduzca el nombre del dispositivo
deseado (con un máximo de 10 caracteres).
(Predeterminado: “
{
GUARDAR} i {OFF
Su computadora
1
Acceda a la cámara inalámbrica (página
26).
2
Haga clic en la pestaña
la parte superior de la página.
3
Haga clic en
4
Introduzca el nombre del dispositivo
deseado (con un máximo de 10 caracteres)
(Predeterminado: “
haga clic en
[Ajuste cámara]
[Guardar]
SELEC.
SELEC.
Camera
”) i
}
[Configuración]
Camera
”), y después
.
}
}
de
.
Configuración del modo de detección de la
cámara inalámbrica
Esta configuración determina cuando la
cámara inalámbrica le notifica al auricular o a
su computadora.
Movim. y sonido
–“
inalámbrica detecta el movimiento o el
sonido.
Sólo movimiento
–“
inalámbrica detecta sólo el movimiento.
Sólo sonido
–“
detecta sólo el sonido.
Botón llamada
–“
cámara inalámbrica le notifica al auricular o a
su computadora cuando se oprime su
{
Botón llamada}.
Apagado
–“
Auricular
KX-THA12/KX-THA16/KX-THA17:
1
Comience a monitorear (página 16). i
{
MENÚ
2
“
Ajuste cámara” i {
3
“
Opciones sens.” i {
4
“
Selecc.sensor” i {
5
Seleccione la configuración deseada.
(Predeterminado: “
{
GUARDAR} i {OFF
Su computadora
1
Acceda a la cámara inalámbrica (página
26).
2
Haga clic en la pestaña
la parte superior de la página.
3
Haga clic en
4
Seleccione la configuración deseada
Seleccionar sensor
“
“
Botón llamada solamente
después haga clic en
”: Apaga esta función.
}
”: La cámara
”: La cámara
”: La cámara inalámbrica
” (Predeterminado): La
SELEC.
SELEC.
SELEC.
Botón llamada
}
[Configuración]
[Opciones de sensor]
” (Predeterminada:
[Guardar]
}
}
}
”) i
de
.
”), y
.
Para obtener ayuda, visite http://www.panasonic.com/phonehelp
(31)
Page 83

THA13(sp-sp).book Page 32 Monday, September 11, 2006 3:26 PM
Funciones útiles durante el monitoreo
Cómo seleccionar la sensibilidad de la
detección de movimiento
Auricular
KX-THA12/KX-THA16/KX-THA17:
1
Comience a monitorear (página 16). i
{
MENÚ
}
2
“
Ajuste cámara” i {
3
“
Opciones sens.” i {
4
“
Sensibilidad” i {
5
“
Detecc. movim.” i {
6
Seleccione la configuración deseada.
(Predeterminado: “
{
GUARDAR} i {OFF
Su computadora
1
Acceda a la cámara inalámbrica (página
26).
2
Haga clic en la pestaña
la parte superior de la página.
3
Haga clic en
4
Seleccione la configuración deseada
“
Sensibilidad del sensor de
movimiento
Normal
“
[Guardar]
Ajuste de la sensibilidad de detección del
audio
Auricular
KX-THA12/KX-THA16/KX-THA17:
1
Comience a monitorear (página 16). i
{
MENÚ
2
“
Ajuste cámara” i {
3
“
Opciones sens.” i {
4
“
Sensibilidad” i {
5
“
Detecc. sonido” i {
[Opciones de sensor]
” (Predeterminada:
”), y después haga clic en
.
}
SELEC.
SELEC.
SELEC.
SELEC.
Normal
”) i
}
[Configuración]
SELEC.
SELEC.
SELEC.
SELEC.
}
}
}
}
.
}
}
}
}
6
1
2
3
4
Cómo seleccionar el método para guardar
las imágenes de la cámara inalámbrica
Esta función determina lo que pasa cuando la
memoria de la cámara inalámbrica se llena.
–“
de
–“
L
KX-THA12/KX-THA16/KX-THA17:
1
2
3
4
5
Seleccione la configuración deseada.
(Predeterminado: “
{
GUARDAR} i {OFF
Su computadora
Acceda a la cámara inalámbrica (página
26).
Haga clic en la pestaña
la parte superior de la página.
Haga clic en
Seleccione la configuración deseada
“
Sensibilidad del sensor de
sonido
” (Predeterminada: “
después haga clic en
Sobrescr. imag.
cámara inalámbrica reemplaza la imagen
más vieja con una imagen nueva en la
memoria.
No sobrescribir
no se guardan.
Después de guardar las imágenes que
desee en su auricular o su computadora,
puede borrarlas todas (página 18, 28).
Auricular
Comience a monitorear (página 16). i
{
MENÚ
}
“
Ajuste cámara” i {
“
Opciones sens.” i {
“
Memoria llena” i {
Seleccione la configuración deseada.
(Predeterminado: “
i {
GUARDAR} i {OFF
Normal
”) i
}
[Configuración]
[Opciones de sensor]
[Guardar]
” (Predeterminado): La
”: Las imágenes nuevas
SELEC.
SELEC.
SELEC.
Sobrescr. imag.
.
Normal
.
}
}
}
}
”), y
”)
de
(32)
Para obtener ayuda, visite http://www.panasonic.com/phonehelp
Page 84

THA13(sp-sp).book Page 33 Monday, September 11, 2006 3:26 PM
Funciones útiles durante el monitoreo
Su computadora
1
Acceda a la cámara inalámbrica (página
26).
2
Haga clic en la pestaña
la parte superior de la página.
3
Haga clic en
4
Seleccione la configuración deseada
“
Memoria llena
“
Sobrescribir imagen
haga clic en
Ajuste del volumen del auricular de la
cámara inalámbrica
Auricular
KX-THA12/KX-THA16/KX-THA17:
1
Comience a monitorear (página 16). i
{
MENÚ
2
“
Ajuste cámara” i {
3
“
Volumen altav.” i {
4
Seleccione el volumen deseado.
(Predeterminado: “6”) i {GUARDAR}
i {
[Opciones de sensor]
[Guardar]
}
OFF
}
[Configuración]
” (Predeterminada:
”), y después
.
SELEC.
}
SELEC.
}
Cómo seleccionar el tono de la cámara
inalámbrica
Puede seleccionar el tono que se va a
escuchar desde la cámara inalámbrica:
– cuando la cámara inalámbrica detecta el
de
movimiento o el sonido.
{
.
– cuando se oprime
cámara inalámbrica.
Auricular
KX-THA12/KX-THA16/KX-THA17:
1
Comience a monitorear (página 16). i
{
MENÚ
}
2
“
Ajuste cámara” i {
3
“
Tono cámara” i {
4
Seleccione la configuración deseada.
(Predeterminado: “
{
GUARDAR} i {OFF
Su computadora
1
Acceda a la cámara inalámbrica (página
26).
2
Haga clic en la pestaña
la parte superior de la página.
3
Haga clic en
4
Seleccione la configuración deseada
“
Patrón de tono
Tono 1
“
[Guardar]
Nota para el auricular y la computadora:
L
Al personalizar el tono de la cámara, el tono
seleccionado se emite desde la cámara
inalámbrica.
”), y después haga clic en
.
Botón llamada} en la
SELEC.
}
SELEC.
}
Tono 1
”) i
}
[Configuración]
[Opciones de sensor]
” (Predeterminada:
.
de
Para obtener ayuda, visite http://www.panasonic.com/phonehelp
(33)
Page 85

THA13(sp-sp).book Page 34 Monday, September 11, 2006 3:26 PM
Funciones útiles durante el monitoreo
Ajuste del volumen del tono de la cámara
inalámbrica
Puede seleccionar el volumen de tono que
desee para la cámara inalámbrica:
– cuando la cámara inalámbrica detecta el
movimiento o el sonido.
{
– cuando se oprime
cámara inalámbrica.
Auricular
KX-THA12/KX-THA16/KX-THA17:
1
Comience a monitorear (página 16). i
{
MENÚ
}
2
“
Ajuste cámara” i {
3
“
Volumen tono” i {
4
Seleccione el volumen deseado.
(Predeterminado: “2”) i {GUARDAR}
i {
OFF
}
Su computadora
1
Acceda a la cámara inalámbrica (página
26).
2
Haga clic en la pestaña
la parte superior de la página.
3
Haga clic en
4
Seleccione la configuración deseada
“
Volumen
Intermedio
“
[Guardar]
Configuración del indicador de la cámara
inalámbrica
Puede cambiar la configuración del indicador
de la cámara inalámbrica.
Para el estado y significado del indicador de la
cámara inalámbrica, consulte la página 11.
Siempre encend.
–“
indicador está encendido todo el tiempo.
Durante acceso
–“
enciende cuando la cámara inalámbrica está
accediendo al auricular o a su computadora.
Siempre apagad.
–“
apaga.
” (Predeterminada:
.
(34)
Botón llamada} en la
SELEC.
}
SELEC.
}
[Configuración]
[Opciones de sensor]
”), y después haga clic en
” (Predeterminado): El
”: El indicador se
”: El indicador se
Para obtener ayuda, visite http://www.panasonic.com/phonehelp
de
.
Auricular
KX-THA12/KX-THA16/KX-THA17:
1
Comience a monitorear (página 16). i
{
MENÚ
}
2
“
Ajuste cámara” i {
3
“
Indicador” i {
4
Seleccione la configuración deseada.
(Predeterminado: “
i {
GUARDAR} i {OFF
Su computadora
1
Acceda a la cámara inalámbrica (página
26).
2
Haga clic en la pestaña
la parte superior de la página.
3
Haga clic en
4
Seleccione la configuración deseada
“
Control de indicador
(Predeterminada: “
y después haga clic en
Cómo reiniciar las funciones de la cámara
inalámbrica a su configuración
predeterminada
Auricular
KX-THA12/KX-THA16/KX-THA17:
1
Comience a monitorear (página 16). i
{
MENÚ
2
“
Ajuste cámara” i {
3
“
Restablec.cám.” i {
4
{3}{3}{5} i {OK} i {OFF
Nota:
L
Las funciones de la cámara inalámbrica
además de la definición y brillo se reinician a
su configuración predeterminada.
L
Las imágenes almacenadas se conservan
aunque la cámara inalámbrica se reinicie.
[Control de indicador]
}
SELEC.
}
SELEC.
}
Siempre encend.
}
[Configuración]
.
”
Siempre encendido
[Guardar]
SELEC.
SELEC.
}
.
}
}
”)
de
”),
Page 86

THA13(sp-sp).book Page 35 Monday, September 11, 2006 3:26 PM
Funciones útiles durante el monitoreo
Su computadora
1
Acceda a la cámara inalámbrica (página
26).
2
Haga clic en la pestaña
la parte superior de la página.
3
Haga clic en
4
Haga clic en
Nota:
L
La configuración de
[Opciones de sensor]
indicador]
predeterminada.
L
Las imágenes almacenadas se conservan
aunque la cámara inalámbrica se reinicie.
Cómo seleccionar la resolución de la
imagen
Su computadora
1
Acceda a la cámara inalámbrica (página
26).
2
Haga clic en la pestaña
la parte superior de la página.
3
Haga clic en
4
Marque la configuración deseada para
“
Resolución de imagen
(Predeterminada: “
haga clic en
Nota:
L
También puede cambiar temporalmente la
resolución de la imagen haciendo clic en la
función que desee en la página
estándar]
[Restablecer]
[Restablecer cámara]
se reinicia a su configuración
[Ajuste cámara]
[Guardar]
del navegador de Internet.
[Configuración]
.
[Ajuste cámara]
, y
[Control de
[Configuración]
.
”
320x240
”), y después
.
[Vista
.
Cómo seleccionar la velocidad de
actualización
Puede seleccionar el intervalo deseado para
actualizar la imagen que muestra la cámara.
de
,
de
Su computadora
1
Acceda a la cámara inalámbrica (página
26).
2
Haga clic en la pestaña
la parte superior de la página.
3
Haga clic en
4
Seleccione la configuración deseada para la
“
Veloc. actualiz.
Movimiento
“
[Guardar]
Nota:
L
También puede cambiar temporalmente la
velocidad de actualización haciendo clic en
la función que desee en la página
estándar]
Cómo seleccionar el intervalo para tomar
fotografías cuando el sensor se activa
Puede seleccionar la frecuencia con la que se
almacenan las imágenes después de que la
cámara inalámbrica detecta un movimiento o
sonido.
Su computadora
1
Acceda a la cámara inalámbrica (página
26).
2
Haga clic en la pestaña
la parte superior de la página.
3
Haga clic en
4
Seleccione la configuración deseada para
“
Velocidad de imagen
(Predeterminada: “
haga clic en
[Ajuste cámara]
”), y después haga clic en
.
del navegador de Internet.
[Opciones de sensor]
[Guardar]
[Configuración]
.
” (Predeterminada:
[Configuración]
”
1 seg.
”), y después
.
de
[Vista
de
.
Para obtener ayuda, visite http://www.panasonic.com/phonehelp
(35)
Page 87

THA13(sp-sp).book Page 36 Monday, September 11, 2006 3:26 PM
Funciones útiles durante el monitoreo
Cómo seleccionar el número de imágenes
que se almacenarán en la cámara
inalámbrica
Puede seleccionar cuántas imágenes desea
almacenar en la cámara inalámbrica cuando
ésta detecte movimiento o sonido.
Su computadora
1
Acceda a la cámara inalámbrica (página
26).
2
Haga clic en la pestaña
la parte superior de la página.
3
Haga clic en
4
Seleccione la configuración deseada para
Cantidad de imágenes a almacenar
“
(Predeterminada: “4”), y después haga clic
en
[Guardar]
Cómo seleccionar la nitidez de las
imágenes que se almacenarán en la cámara
inalámbrica
Puede seleccionar la nitidez que desee tener
en las imágenes que la cámara inalámbrica
almacena durante la detección.
Su computadora
1
Acceda a la cámara inalámbrica (página
26).
2
Haga clic en la pestaña
la parte superior de la página.
3
Haga clic en
[Opciones de sensor]
.
[Opciones de sensor]
[Configuración]
.
[Configuración]
.
de
”
de
Configuración para su red
Normalmente debe marcar “
asignar una dirección de IP y máscara de subred específicas, marque “
después introduzca la dirección de IP y
máscara de sub-red que desea asignar a la
cámara inalámbrica. Consulte la “Installation
Guide for MULTI TALK V Software” para ver la
configuración de la dirección de IP.
Su computadora
1
Acceda a la cámara inalámbrica (página
26).
2
Haga clic en la pestaña
la parte superior de la página.
3
Haga clic en
4
Seleccione la configuración deseada.
(Predeterminado: “
L
Si marca “
5
Introduzca una dirección de IP y máscara
de sub-net válida.
6
Haga clic en
[Ajustes red]
Auto
[Guardar]
Estática
[Configuración]
Auto
”, vaya al paso 6.
.
Acerca de la página de ayuda
Puede acceder a la información de ayuda para
cada operación haciendo clic en la pestaña de
[Ayuda]
del navegador de internet.
Auto
.
”)
Z
”. Si necesita
”, y
de
Z
4
Seleccione la nitidez que desea para
“
Nitidez
y después haga clic en
(36)
” (Predeterminada: “
[Guardar]
Para obtener ayuda, visite http://www.panasonic.com/phonehelp
Estándar
.
”),
Page 88

THA13(sp-sp).book Page 37 Monday, September 11, 2006 3:26 PM
Información útil
Requisitos del sistema para su computadora
El sistema debe cumplir con los siguientes requisitos a fin de las herramientas software MULTI
TALK V.
Artículo Descripción
Sistema operativo
CPU
RAM
HDD
Resolución
Otros
Microsoft® Windows® 98SE, Microsoft Windows Me, Microsoft
Windows 2000, o Microsoft Windows XP
Para Windows 98SE y Windows Me: Pentium® 166 MHz o más
rápido
Para Windows 2000: Pentium 200 MHz o más rápido
Para Windows XP: Pentium 300 MHz o más rápido
Para Windows 98SE y Windows Me: 64 MB (se recomiendan
128 MB o más)
Para Windows 2000 y Windows XP: 128 MB
50 MB de espacio disponible en disco
Pantalla con resolución de 800 x 600 o mayor
Adaptador de video con alta resolución (16 bits) o mayor
Unidad de CD-ROM
Tarjeta de red de 10/100 Mbps instalada (necesario para los
usuarios de interfases LAN)
Navegador: Internet Explorer 5.0 o posterior (necesario para
monitorear la cámara inalámbrica)
Marcas registradas
L
Microsoft y Windows son marcas registradas de Microsoft Corporation en los Estados Unidos y
otros países.
L
Pentium es una marca registrada de Intel Corporation o sus subsidiarias en los Estados Unidos
y otros países.
L
Las imágenes de las pantallas se han reproducido con permiso de Microsoft Corporation.
L
Todas las demás marcas registradas que se identifican en el presente documento son propiedad
de sus respectivos dueños.
Para obtener ayuda, visite http://www.panasonic.com/phonehelp
(37)
Page 89

B
C
THA13(sp-sp).book Page 38 Monday, September 11, 2006 3:26 PM
Información útil
Instalación en la pared
La cámara inalámbrica se puede instalar de la siguiente forma:
– Instalación estándar
– Instalación al revés
PRECAUCIÓN:
L
Para obtener información acerca de la ubicación de la cámara inalámbrica, consulte la página 9.
L
Confirme el alcance de detección de la cámara inalámbrica antes de instalarla en la pared
(página 9).
L
Confirme la dirección MAC en la parte inferior de la cámara inalámbrica antes de instalar el
adaptador de instalación en la pared. Esta dirección MAC se requiere al utilizar el software de la
Utilidad Cámara de MULTI TALK V.
L
Instale la cámara inalámbrica en una ubicación estable en la que la unidad se pueda apoyar
adecuadamente al instalarla.
L
El adaptador de corriente alterna debe estar conectado a una toma de corriente alterna orientada
verticalmente o montada en el piso. No conecte el adaptador de corriente alterna a una toma de
corriente alterna montada en el techo, ya que su peso puede hacer que se desconecte.
L
No instale la cámara inalámbrica sobre un material suave. Es posible que se caiga, se
rompa o cause lesiones.
L
No instale la cámara inalámbrica en los siguientes lugares: tabla roca, concreto celular ligero
tratado en autoclave, bloques de concreto, madera laminada de menos de 25 mm (1 pulgada) de
grosor, etc.
L
No jale el cable del botón de llamada después de montar la cámara inalámbrica en la pared.
L
Después de instalar la cámara inalámbrica en la pared, hable fuerte y claro en el MIC con el
usuario del auricular.
Para conectar el adaptador de instalación
A
Deslice la cámara inalámbrica en dirección de la flecha en el adaptador de instalación en la
pared hasta que oiga un clic que indique que ya está en su sitio.
B
Acomode el cable del botón de llamada en el orificio que está en un lado del adaptador de
instalación en la pared.
C
Asegure el cable del botón de llamada al gancho del adaptador de instalación en la pared.
A
(38)
Para obtener ayuda, visite http://www.panasonic.com/phonehelp
Page 90

THA13(sp-sp).book Page 39 Monday, September 11, 2006 3:26 PM
Información útil
Cómo instalar la cámara inalámbrica en el techo
Coloque los tornillos (no incluidos) en la pared a una altura recomendada de 1,8 m (5,9 pies) o mas
abajo usando como guía la plantilla para instalación, y después instale la cámara en los tornillos
hasta que quede asegurada.
Conecte el adaptador de corriente alterna a la toma de corriente (página 12).
L
Para dirigir la lente de la cámara, consulte la página 13.
L
Es posible que la imagen se vea al revés cuando la cámara se instale al revés. Para compensar
esto, cambie la configuración de la cámara para que muestre las imágenes de cabeza (página
30).
Instalación estándar Instalación al revés
50,8 mm
(2 pulgadas)
50,8 mm
(2 pulgadas)
Tornillos
Tornillos
(120 V CA, 60 Hz)
(120 V CA, 60 Hz)
Acerca de los tornillos para la instalación en la pared
L
Utilice el tamaño de tornillo que se recomienda abajo.
L
Coloque los tornillos de instalación dejando suficiente espacio desde la pared para ganchar la
cámara inalámbrica.
Espacio
Max. 9,3 mm
23
(
/64 pulgada)
Plantilla de montaje en la pared para la cámara inalámbrica
Para obtener ayuda, visite http://www.panasonic.com/phonehelp
Max. 4,5 mm
(11/64 pulgada)
50,8 mm
(2 pulgadas)
(39)
Page 91

THA13(sp-sp).book Page 40 Monday, September 11, 2006 3:26 PM
Información útil
Para desconectar el adaptador de montaje
Oprima y mantenga oprimido el botón (A) del lado izquierdo de la placa de montaje en la pared.
Deslice la cámara inalámbrica a la derecha (B).
A
B
(40)
Para obtener ayuda, visite http://www.panasonic.com/phonehelp
Page 92

THA13(sp-sp).book Page 41 Monday, September 11, 2006 3:26 PM
Solución de problemas
Problema Causa y solución
La cámara inalámbrica no
funciona.
El indicador de la cámara
inalámbrica parpadea
rápidamente en rojo.
El indicador de la cámara
inalámbrica se ilumina en
anaranjado.
El indicador de la cámara
inalámbrica parpadea
rápidamente en anaranjado.
No es posible leer el idioma
que aparece en la aplicación
de la Utilidad Cámara de
MULTI TALK V.
La imagen es débil.
La imagen que envía la
cámara inalámbrica es
mala.
La imagen que envía la
cámara inalámbrica es
oscura y es difícil verla.
No es posible conectarse a
la cámara inalámbrica, la
imagen se distorsiona o la
imagen es lenta.
L
Revise las conexiones (página 12).
L
La cámara inalámbrica no está registrada en la unidad base.
Registre la cámara inalámbrica en la unidad base (página
15).
L
No fue posible establecer el enlace entre la cámara
inalámbrica y su computadora. Los recursos disponibles para
la comunicación inalámbrica están limitados. Espere a que
los demás usuarios terminen e inténtelo de nuevo.
L
Si no piensa mostrar las imágenes usando su computadora,
ajuste el “
la unidad base.
L
La dirección de IP que se asignó a la cámara inalámbrica no
es válida. Verifique las conexiones (página 21).
L
Puede cambiar el idioma de la aplicación a inglés, francés o
español. Haga clic con el botón derecho del mouse en el
icono de la Utilidad Cámara de MULTI TALK V en la bandeja
de tareas, y después haga clic en el idioma que desee.
L
La lente de la cámara está sucia. Límpiela con un paño suave
y seco.
L
Ajuste la función de definición o brillo de la pantalla (página
29, 30).
L
El sitio donde se ubica la cámara inalámbrica está oscuro.
Mejore la iluminación.
L
Ajuste la función de brillo de la pantalla (página 30).
L
Hay luz solar o contraluz fuerte en el sitio donde se ubica la
cámara inalámbrica. Trate de reducirla en el sitio donde se
ubica la cámara.
L
La cámara inalámbrica perdió la comunicación con la unidad
base. Acerque la cámara inalámbrica a la unidad base e
inténtelo de nuevo.
L
Existe un obstáculo, como una pared de concreto. Mueva la
cámara inalámbrica a un sitio donde no haya obstáculos.
L
Un microondas o un aparato de LAN inalámbrica está en uso.
Acerque la cámara inalámbrica a la unidad base o utilice la
cámara inalámbrica lejos de esos aparatos, e inténtelo de
nuevo.
Acceso cámara PC
” a “
Información útil
Apagado
” (página 20) en
Para obtener ayuda, visite http://www.panasonic.com/phonehelp
(41)
Page 93

THA13(sp-sp).book Page 42 Monday, September 11, 2006 3:26 PM
Información útil
Problema Causa y solución
El sensor de la cámara no
responde o deja de
responder.
El sensor de la cámara no
responde.
El sensor de la cámara
responde pero no aparece
ninguna persona.
Las fotografías no se
almacenen en la cámara
inalámbrica.
{
Al oprimir
la cámara inalámbrica no
busca el auricular ni le
notifica a su computadora.
Detecc.cámara
“
en el auricular o un mensaje
emergente
Notificación
(“
en el monitor de su
computadora.
Botón llamada},
” aparece
”) aparece
L
El sensor de la cámara está sucio. Límpiela con un paño
suave y seco.
L
Es posible que el objeto en movimiento esté fuera del alcance
de detección de la cámara inalámbrica.
L
El sensor de la cámara no responde a menos que el modo de
detección esté configurado para “
movimiento
modo de detección (página 31).
L
La cámara inalámbrica deja de detectar el movimiento o el
sonido mientras el usuario de un auricular o computadora la
monitorea.
L
La cámara inalámbrica no puede tomar una fotografía cuando
las personas pasan frente a ella demasiado rápido.
L
La cámara inalámbrica deja de tomar fotografías si el usuario
de un auricular o de una computadora comienza a
monitorearla mientras está tomándolas después de realizar la
detección.
L
Usted seleccionó “
guardar las imágenes de la cámara inalámbrica, y se llenó la
memoria de ésta. Borre las imágenes innecesarias (página
18, 28) o cambie la configuración a “
(página 32).
L
El botón de llamada no funciona a menos que el modo de
detección esté configurado en “
modo de detección a “
L
Aunque el usuario de un auricular o computadora está
monitoreando la cámara inalámbrica, no es posible buscarlo
oprimiendo
auricular o la computadora termine de monitorear.
L
Cuando la cámara inalámbrica detecta algún movimiento y/o
sonido, o cuando se oprime el botón de llamada de la cámara
inalámbrica, usted no se encuentra cerca del auricular o de su
computadora y no puede contestar la llamada de búsqueda.
La indicación desaparece después de monitorear la cámara
inalámbrica que lo buscó.
” o “
{
Botón llamada}. Espere a que el usuario del
Movim. y sonido
Sólo sonido
No sobrescribir
Botón llamada
” de antemano. Cambie el
Botón llamada
”, “
Sólo
” como el método de
Sobrescr. imag.
”. Cambie el
” (página 31).
”
(42)
Para obtener ayuda, visite http://www.panasonic.com/phonehelp
Page 94

THA13(sp-sp).book Page 43 Monday, September 11, 2006 3:26 PM
Especificaciones
Información útil
Ambiente de operación
Frecuencia
Aprobación de Bluetooth
Dimensiones
Peso
Consumo de energía
Salida de potencia
Suministro de energía
Número de pixeles
Iluminancia
Enfoque
Ángulo fotográfico
Sistema de detección con
sensor de movimiento
Ángulo de detección del
sensor de movimiento
5 °C a 40 °C (41 °F a 104 °F)
2,402 GHz a 2,48 GHz
Tecnología inalámbrica Bluetooth 1.2
Aprox. 124 mm de alto x 86 mm de ancho x 68 mm de
profundidad (4
Aprox. 150 g (0,33 lb.)
En espera: Aprox. 4,4 W
Máximo: Aprox. 4,7 W
125 mW (máx.)
Adaptador para corriente alterna (120 V CA, 60 Hz)
300.000 pixeles (sensor CMOS de 1/5 pulgada)
10 lux (min.)
Fijo de 0,48 m (1829/32 pulgadas) al infinito
Ángulo vertical: Aprox. 35°
Ángulo horizontal: Aprox. 46°
Sensor infrarrojo piroeléctrico
Cuando la temperatura ambiental es de aprox. 20 °C (68 °F)
Ángulo vertical: Aprox. 20°
Ángulo horizontal: Aprox. 30°
Distancia: Aprox. 5 m (16,4 pies)
7
/8 pulgadas x 33/8 pulgadas x 211/16 pulgadas)
Nota:
L
El diseño y las especificaciones están sujetos a cambio sin previo aviso.
L
Las ilustraciones de estas instrucciones pueden ser ligeramente diferentes al producto.
Marcas registradas
L
La marca y logotipos de Panasonic son propiedad de Bluetooth SIG, Inc. y cualquier uso de dicha
marca y logotipos se hace bajo licencia de la misma.
Para obtener ayuda, visite http://www.panasonic.com/phonehelp
(43)
Page 95

THA13(sp-sp).book Page 44 Monday, September 11, 2006 3:26 PM
Índice analítico
Índice analítico
A
Acceso a la cámara de la computadora: 20
Adaptador de instalación en pared: 38
:
: 12, 18,
28
:
12
:
36
:
36
:
32
10
28
:
35
:
31
:
31
:
35
:
35
G
I
M
:
N
,
P
R
S
T
U
V
Alcance de la cámara
Ángulo de la cámara: 13
Ayuda de la Utilidad Cámara de MULTI
:
TALK V
B
Borrado de imágenes: 18, 28
Botón de llamada
Búsqueda un auricular: 17, 18
C
Cancelación del registro: 15
Capturar: 17, 26
Cómo acceder a la cámara inalámbrica: 26
Cómo contestar la llamada de búsqueda
17, 18
Cómo contestar la llamada de la
notificación
Cómo notificar a su computadora: 27, 28
Cómo registrar la cámara inalámbrica: 15
21
Condiciones de operación: 9
Conexión
Configuración de la red: 36
E
Especificaciones: 43
F
Funciones de la cámara inalámbrica
22
: 27,
Adaptador CA
Adaptador de instalación en pared: 38
Indicador de la cámara: 34
Intervalo para tomar fotografías
Método para guardar los datos: 32
Modo de detección
Nitidez de las imágenes que se
almacenarán
Nombre del dispositivo
Número de imágenes que se
almacenarán
Reinicio: 34
Resolución de la imagen
Sensibilidad de detección del audio: 32
Sensibilidad de detección del
movimiento
Tono de la cámara: 33
Tono del volumen de la cámara: 34
Velocidad de actualización
Volumen del altavoz: 33
Funciones de la pantalla
Brillo
:
30
Invertir: 30
:
29
Nitidez
Tamaño de la imagen: 29
Galería de imágenes: 19
Guardar las imágenes: 18, 28
Imágenes almacenadas: 18, 28
Indicador de la cámara: 11, 34
Instalación de la Utilidad Cámara de MULTI
:
TALK V
Instalación en la pared
Intervalo para tomar fotografías: 35
Memoria llena: 32
Mensaje emergente de detección: 27
Método para guardar los datos
Modo de detección: 31
Monitor de video: 16, 25
Nitidez de las imágenes que se
almacenarán: 36
Nombre del dispositivo
Número de imágenes que se almacenarán
36
Página de ayuda: 26, 36
Reinicio de la cámara inalámbrica: 34
Resolución de la imagen: 35
Sensibilidad de detección del audio: 32
Sensibilidad de detección de movimiento
32
Solución de problemas
Tomar fotografías: 17, 26
Tono de la cámara
Utilidad Cámara de MULTI TALK V: 20
Velocidad de actualización: 35
Ver imágenes
Volumen
20
:
33
: 18,
28
Altavoz de la cámara
Tono de la cámara
:
:
:
:
34
38
:
32
31
:
41
:
33
:
(44)
Para obtener ayuda, visite http://www.panasonic.com/phonehelp
Page 96

THA13(sp-sp).book Page 45 Monday, September 11, 2006 3:26 PM
Notas
Para obtener ayuda, visite http://www.panasonic.com/phonehelp
(45)
 Loading...