

Quick Guide
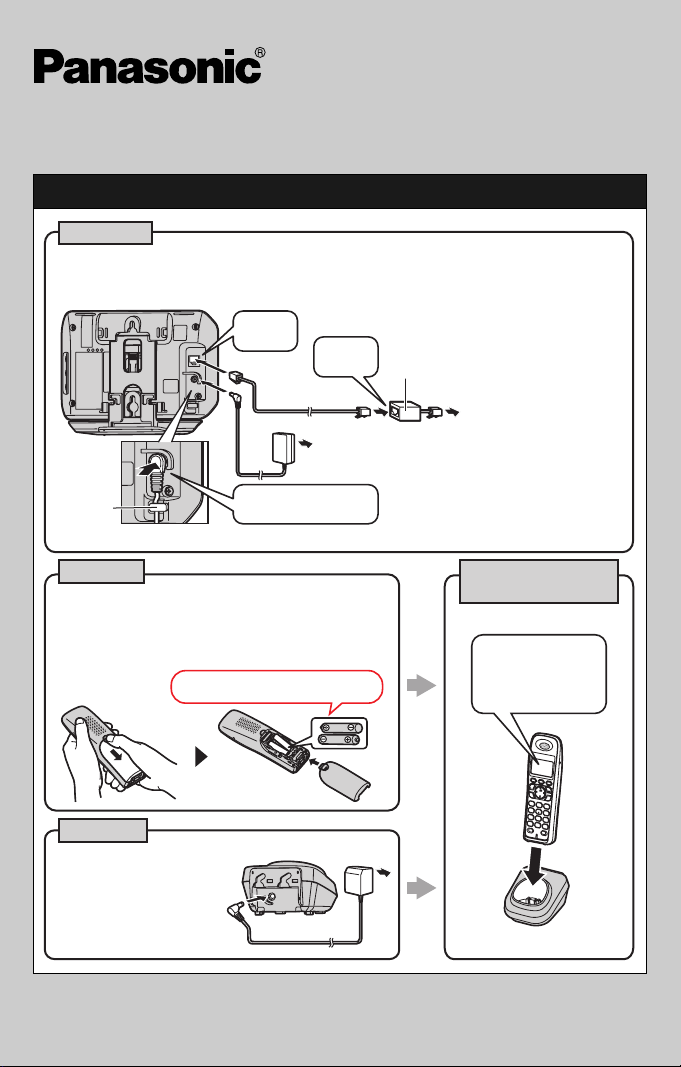
Setting up
Base unit
L Use only the supplied Panasonic AC adaptor PQLV207.
L Use only the supplied telephone line cord.
Model No. KX-TH1211
KX-TH1212
“Click”
“Click”
(120 V AC, 60 Hz)
Hook
Handset
L USE ONLY Ni-MH batteries AAA (R03) size.
L
Do NOT use Alkaline/Manganese/Ni-Cd batteries.
L Confirm correct polarities (S, T) when
installing the batteries.
Rechargeable Ni-MH ONLY
Charger
L Use only the supplied
Panasonic AC adaptor
PQLV209.
Press plug firmly.
(120 V AC, 60 Hz)
DSL/ADSL filter
(For DSL/ADSL service users)
To single-line
telephone jack
(RJ11C)
CHARGE FOR
ABOUT 7 HOURS
Confirm
“Charging” is
displayed.
For further information, visit http://www.panasonic.com/help
PNQW1013ZA DM0208SY0
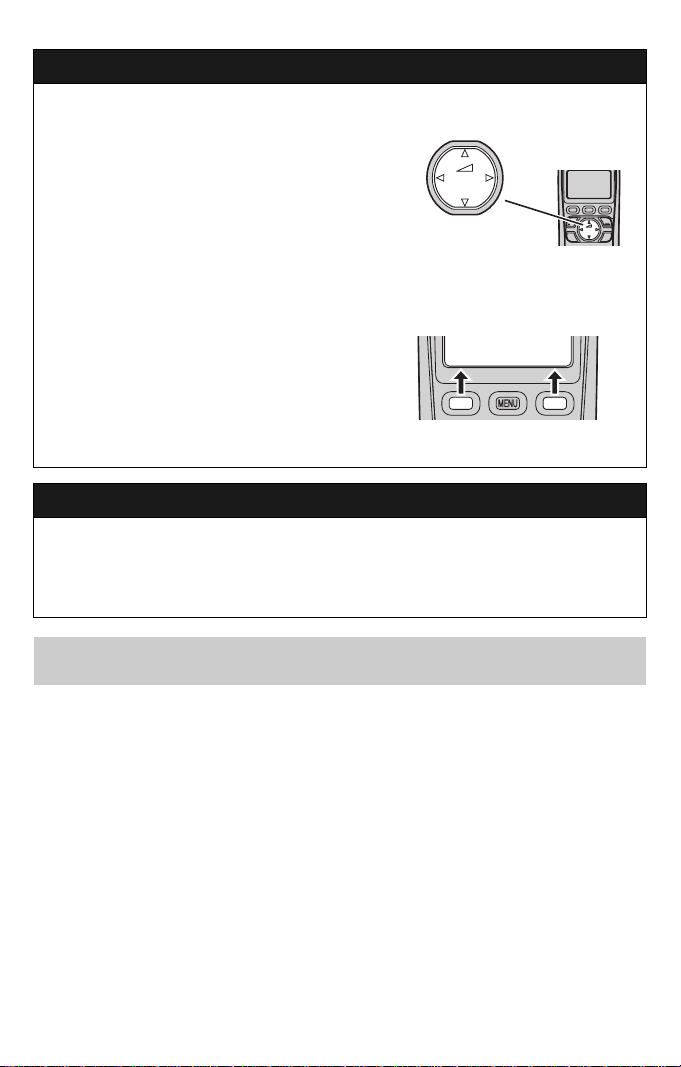
Operating tips
Using the navigator key
The handset navigator key can be used to
navigate through menus and to select items
shown on the display by pressing {^}, {V},
{<}, or {>}.
To adjust the receiver or speaker volume,
press {^} to increase the volume, or press {V}
to decrease the volume repeatedly while
talking.
Soft keys
The handset features 2 soft keys. By pressing
a soft key, you can select the feature shown
directly above it on the display.
{Select}, {Save}, {OK}, and additional other
functions are assigned to soft keys. Pay
attention to soft keys to find functions you
need during handset operation.
Volume up
{<}{>}
Volume down
Date and time (Handset)
1 {MENU} i {#}{1}{0}{1}
2 Enter the current month, date, and year.
3 Enter the current hour and minute (12-hour clock format).
4 {AM/PM}: Select “AM” or “PM”. i {Save} i {OFF}
{^}
{V}
View Phone
K
CID book
L
For further information, visit http://www.panasonic.com/help or refer to operating
instructions.
– 2 –
Link to cell
Registering a cellular phone
Your cellular phone must be Bluetooth® wireless technology compatible with this
product, so that you can use the handset to make or answer calls using a cellular line.
For more details, please visit at: www.panasonic.com/LinkToCell
LIf the cellular phone is too close to the base unit during a cellular call, you may hear
noise. For best performance, we recommend placing the cellular phone between
0.6 m to 3 m (2 feet to 10 feet) away from the base unit.
1 Base unit:
Press and hold {CELL 1} or {CELL 2}
until the LINK TO CELL indicator flashes
red.
LAfter the LINK TO CELL indicator starts
flashing, the rest of the procedure must
be completed within 5 minutes.
2 Your cellular phone:
While the LINK TO CELL indicator is
flashing red, follow the instructions of
your cellular phone to enter the
registration mode.
LDepending on your cellular phone, it
may ask you to enter the base unit PIN
(default: “0000”).
3 Base unit:
Wait until the LINK TO CELL indicator lights green to complete registration.
LIt may take more than 10 seconds to complete registration.
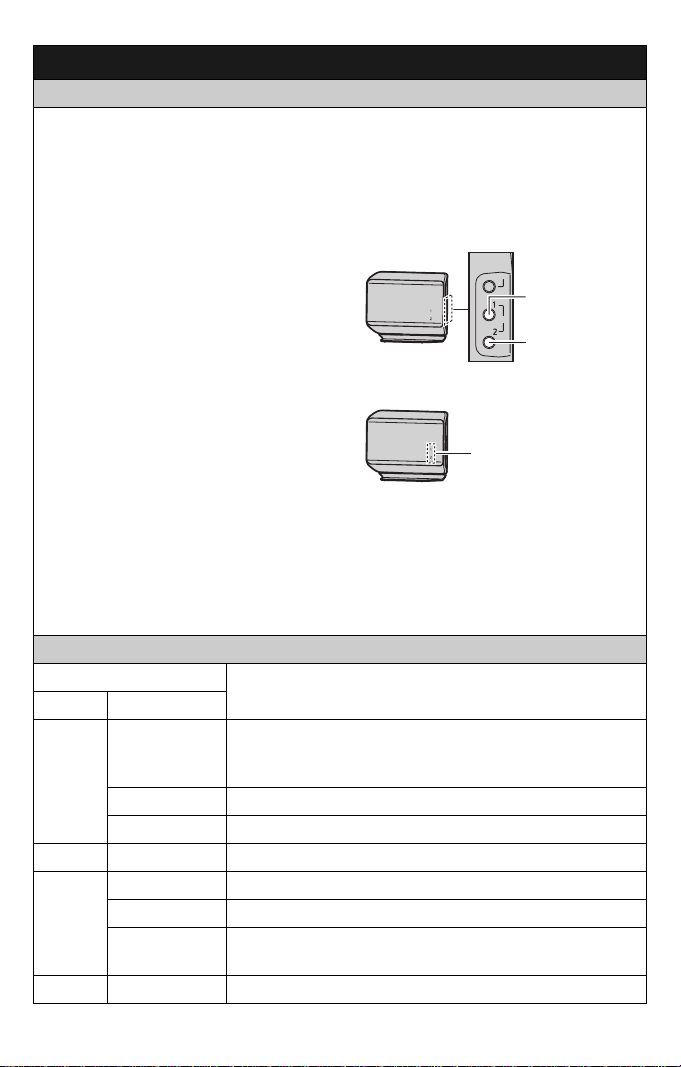
Base unit: LINK TO CELL indicator 1, 2
Status
Color Light pattern
Green On – On for about 2 seconds during initial startup. (Normal)
Flashing The cellular line is in use.
Flashing rapidly
Amber Flashing A cellular call is on hold.
Red On
Flashing The base unit is registering a cellular phone.
Flashing rapidly
Light off — A cellular phone is not registered to the base unit.
Meaning
– The cellular phone is connected. Ready to make/
receive cellular calls.
A cellular call is being received.
A cellular phone is registered but not connected to the base unit.
The base unit is searching for the registered cellular
phone to connect.
HANDSET
LOCATOR
{CELL 1}
CELL
{CELL 2}
LINK TO CELL
indicator 1, 2
– 3 –

Link to cell
Auto connection to the cellular phone
The unit connects to the cellular phone at regular intervals if the connection is lost. You
can set how often the base unit tries to resume the connection. The default setting is
“1min”.
Handset:
1 {MENU} i {#}{6}{3}{2}
2 {V}/{^}: Select the desired setting.
3 {Save} i {OFF}
Note:
LDepending on your cellular phone, it may ask you if you accept the connection
requirement from the base unit. Refer to the operating instructions of your cellular
phone for further operations.
Disconnecting/connecting the cellular phone manually
When you make or answer calls with your cellular phone, we recommend you
disconnect it from the base unit, otherwise received audio may not be heard on your
cellular phone. You can also manually reconnect the cellular phone to the base unit
without waiting for the auto connection feature to resume the connection.
Base unit:
Press {CELL 1} or {CELL 2} to disconnect/connect.
Storing your area code (Handset)
You need to add your area code when making cellular calls to a phone number in your
area. Once you store your area code, the area code is automatically added to the
beginning of the 7-digit phone number when making cellular calls.
1 {MENU} i {#}{6}{3}{3}
2 Enter the 3-digit area code.
3 {Save} i {OFF}
Trademarks
LBluetooth is either a registered trademark or a trademark of the Bluetooth SIG, Inc.
Other trademarks and trade names are those of their respective owners.
For further information, visit http://www.panasonic.com/help or refer to operating
instructions.
– 4 –

Basic operations (Handset)
Making/Answering calls
Making cellular calls 1 Dial the phone number. i {Cell}
Making landline calls Dial the phone number. i {C}/{s}
Answering calls {C}/{s}
To hang up {OFF}
To adjust the receiver or
speaker volume
Making a cellular call using
the redial list
Making a landline call using
the redial list
To adjust the handset ringer
volume (cellular line)
To adjust the handset ringer
volume (landline)
LWhen only 1 cellular phone is registered, the
unit starts dialing.
2 When 2 cellular phones are registered:
{V}/{^}: Select the desired cellular phone. i
{Select}
Press {^} or {V} repeatedly while talking.
1 {REDIAL} i {V}/{^}: Select the desired phone
number. i {Cell}
LWhen only 1 cellular phone is registered, the
unit starts dialing.
2 When 2 cellular phones are registered:
{V}/{^}: Select the desired cellular phone. i
{Select}
{REDIAL} i {V}/{^}: Select the desired phone
number. i {C}
1 {MENU} i {#}{6}{2}{8}
2 {V}/{^}: Select the desired cellular line. i
{Select}
3 {V}/{^}: Select the desired volume. i {Save}
i {OFF}
1 {MENU} i {#}{1}{6}{0}
2 {V}/{^}: Select the desired volume. i {Save}
– 5 –

Basic operations (Handset)
Shared phonebook
Adding entries 1 {Phonebook} i {Add}
2 Enter the party’s name (16 characters max.). i
{Next}
3 Enter the party’s phone number (32 digits max.).
i {Next} i {Save} i {OFF}
LTo enter a name, see the character table in the
operating instructions.
Making calls (cellular line) 1 {Phonebook} i {Search} i {V}/{^}: Select
the desired entry. i {Cell}
LWhen only 1 cellular phone is registered, the
unit starts dialing.
2 When 2 cellular phones are registered:
{V}/{^}: Select the desired cellular phone. i
{Select}
Making calls (landline) {Phonebook} i {Search} i {V}/{^}: Select
the desired entry. i {C}
For further information, visit http://www.panasonic.com/help or refer to operating
instructions.
– 6 –

Frequently asked questions
Question Cause/solution
Why can I not register a
cellular phone to the base
unit?
Why can I not hear a dial
tone? (cellular line)
Why can I not hear a dial
tone? (landline)
How can I increase the
handset volume level?
Why is the conversation
noisy or cutting off?
Can I add another
accessory handset to my
base unit?
Can I keep batteries
charging all the time?
How can I answer a call
waiting call (2nd call)?
LDepending on the compatibility of the cellular phone,
you may not be able to register it to the base unit.
LConfirm that the Bluetooth feature of your cellular
phone is turned on. You may need to turn this feature
on depending on your cellular phone.
LMake sure that the LINK TO CELL indicator lights
green and the cellular phone is connected to the base
unit (page 4).
LMake sure the telephone line cord is connected
properly.
LIf you are using a splitter to connect the unit, remove
the splitter and connect the unit to the wall jack
directly. If the unit operates properly, check the splitter.
LDisconnect the base unit from the telephone line and
connect the line to a known working telephone. If the
working telephone operates properly, contact our
service personnel to have the unit repaired. If the
working telephone does not operate properly, contact
your service provider/telephone company.
LPress navigator key {^} repeatedly while talking.
LTry to relocate the base unit so that distance from
location to use the handset will be minimized.
LIf the same problem occurs even if the handset is next
to the base unit, send your unit for service.
LYes, you can add up to 6 handsets (including the
handset(s) sold with your own base unit) to a single
base unit.
LTo purchase accessory handset (KX-TGA930/
KX-TGA935), please visit http://www.panasonic.com
or call 1-800-332-5368. TTY users (hearing or speech
impaired users) can call 1-866-605-1277.
LYou can leave the handset on the charger anytime.
This will not harm the batteries.
LPress {CALL WAIT} when you hear call waiting tone.
For further information, visit http://www.panasonic.com/help or refer to operating
instructions.
– 7 –

Quick troubleshooting
Handset shows:
“No link to base. Reconnect AC adaptor.”
Move closer to the base unit. Unplug and then plug AC adaptor
properly to both the base unit and AC outlet.
“No link to base. Reconnect AC adaptor.” is still
displayed.
Remove the batteries from the handset, and then insert the batteries
into the handset again.
“No link to base. Reconnect AC adaptor.” is still
displayed.
Try to re-register the handset (page 9).
Re-registration failed.
Your telephone may need service.
Please visit http://www.panasonic.com/help for further troubleshooting.
– 8 –

Registering a handset to a base unit
The supplied handset and base unit are pre-registered. If for some reason the
handset is not registered to the base unit, register the handset.
Handset
{MENU} i {#}{1}{3}{0}
Base unit
Press and hold {HANDSET
LOCATOR} for 4 seconds.
LThe next step should be completed
within 90 seconds.
LWhile registering, “Base
registering” is displayed on all
registered handsets.
Handset
Press {OK}, then press {OFF} after a
long beep sounds.
5
Press LOCATOR
on base for 4sec
Then press OK
HANDSET
LOCATOR
5
Press LOCATOR
on base for 4sec
Then press OK
L
{HANDSET
LOCATOR}
CELL
L
{MENU}
For further registration information, visit
http://www.panasonic.com/RegisterYourHandset
– 9 –
{OK}

IMPORTANT!
If your product is not
working properly. . .
1 Read this Quick Guide or Operating
Instructions
L If you lost the Operating Instructions, you can
download a copy at
http://www.panasonic.com/help
2 Visit our website:
http://www.panasonic.com/help
L FAQs and troubleshooting hints are available.
3 Contact us via the web at:
http://www.panasonic.com/contactinfo
4 Call us at:
1-800-211-PANA (1-800-211-7262)
L Monday - Friday 9:00am - 9:00pm (EST),
Saturday/Sunday 10:00am - 7:00pm (EST)
To order a replacement battery,
please call: 1-800-332-5368
Or visit:
http://www.panasonic.com/batterystore
 Loading...