

Panasonic KX-TGP551 User Manual

User Guide
SIP Cordless Phone
Model No.
KX-TGP551
Thank you for purchasing a Panasonic product.
If you move to another location, please contact customer support (855-277-4800 or
http://www.panasonic.com/cloud) to inform us of a change to your E911 address.
You can configure some of the features of this unit through the Web user interface. See
“Programming through the Web user interface”, page 39.
Please read this guide before using the unit and save it for future reference.
Document Version: 2011-03

Table of Contents
Introduction
About this guide . . . . . . . . . . . . . . . . . . . . . . . . . 4
About the Web user interface . . . . . . . . . . . . . . . 4
Emergency calls . . . . . . . . . . . . . . . . . . . . . . . . . 4
Additional/replacement accessories . . . . . . . . . . 4
Expanding your phone system . . . . . . . . . . . . . . 4
Getting Started
Controls (Handset) . . . . . . . . . . . . . . . . . . . . . . . 5
Controls (Base unit) . . . . . . . . . . . . . . . . . . . . . . 6
Understanding the indicators on the base unit . . 7
Display . . . . . . . . . . . . . . . . . . . . . . . . . . . . . . . . 8
Initial settings . . . . . . . . . . . . . . . . . . . . . . . . . . . 9
Y Making and Answering Calls using
the Handset
Making calls . . . . . . . . . . . . . . . . . . . . . . . . . . . 11
Using the speakerphone . . . . . . . . . . . . . . . . . . 11
Adjusting the receiver or speaker volume . . . . . 11
Making a call using the redial list . . . . . . . . . . . 11
Editing/erasing/storing a number in the redial list
. . . . . . . . . . . . . . . . . . . . . . . . . . . . . . . . . . . . . 11
Answering calls . . . . . . . . . . . . . . . . . . . . . . . . . 12
Auto talk . . . . . . . . . . . . . . . . . . . . . . . . . . . . . . 12
Adjusting the handset ringer volume. . . . . . . . . 12
Temporary handset ringer off . . . . . . . . . . . . . . 12
Hold. . . . . . . . . . . . . . . . . . . . . . . . . . . . . . . . . . 12
Making another call during a call . . . . . . . . . . . 12
Useful features during a call . . . . . . . . . . . . . . . 12
Transferring calls to an outside party . . . . . . . . 13
Conference calls . . . . . . . . . . . . . . . . . . . . . . . . 14
: Making and Answering Calls
using the Base Unit
Making calls . . . . . . . . . . . . . . . . . . . . . . . . . . . 15
Using the speakerphone . . . . . . . . . . . . . . . . . . 15
Off-hook monitor . . . . . . . . . . . . . . . . . . . . . . . . 15
Adjusting the receiver or speaker volume . . . . . 15
Making a call using the redial list . . . . . . . . . . . 15
Editing/erasing/storing a number in the redial list
. . . . . . . . . . . . . . . . . . . . . . . . . . . . . . . . . . . . . 16
Answering calls . . . . . . . . . . . . . . . . . . . . . . . . . 16
Adjusting the base unit ringer volume. . . . . . . . 16
Temporary base unit ringer off . . . . . . . . . . . . . 16
Hold. . . . . . . . . . . . . . . . . . . . . . . . . . . . . . . . . . 16
Making another call during a call . . . . . . . . . . . 16
Useful features during a call . . . . . . . . . . . . . . . 17
Transferring calls to an outside party . . . . . . . . 17
Conference calls . . . . . . . . . . . . . . . . . . . . . . . . 18
Y Phonebook using the Handset
Using the phonebook . . . . . . . . . . . . . . . . . . . . 19
Adding entries . . . . . . . . . . . . . . . . . . . . . . . . . . 19
Finding and calling a phonebook entry. . . . . . . 19
Editing entries . . . . . . . . . . . . . . . . . . . . . . . . . . 20
Erasing entries . . . . . . . . . . . . . . . . . . . . . . . . . 20
Chain dial . . . . . . . . . . . . . . . . . . . . . . . . . . . . . 20
Speed dial. . . . . . . . . . . . . . . . . . . . . . . . . . . . . 20
Export/import phonebook entries . . . . . . . . . . . 21
: Phonebook using the Base Unit
Using the phonebook . . . . . . . . . . . . . . . . . . . . 22
Adding entries. . . . . . . . . . . . . . . . . . . . . . . . . . 22
Finding and calling a phonebook entry. . . . . . . 22
Editing entries . . . . . . . . . . . . . . . . . . . . . . . . . . 23
Erasing entries . . . . . . . . . . . . . . . . . . . . . . . . . 23
Chain dial . . . . . . . . . . . . . . . . . . . . . . . . . . . . . 23
Speed dial. . . . . . . . . . . . . . . . . . . . . . . . . . . . . 23
Copying base unit phonebook entries . . . . . . . 24
Export/import phonebook entries . . . . . . . . . . . 24
Y Programming using the Handset
Programmable settings. . . . . . . . . . . . . . . . . . . 25
Call forward . . . . . . . . . . . . . . . . . . . . . . . . . . . 28
Do not disturb . . . . . . . . . . . . . . . . . . . . . . . . . . 29
Block anonymous calls . . . . . . . . . . . . . . . . . . . 29
Call block (Caller ID service users only) . . . . . . 29
Anonymous calls (Block Caller ID) . . . . . . . . . . 30
Changing the handset name . . . . . . . . . . . . . . 30
Date and time . . . . . . . . . . . . . . . . . . . . . . . . . . 30
Updating the base unit software . . . . . . . . . . . . 31
: Programming using the Base
Unit
Programmable settings. . . . . . . . . . . . . . . . . . . 32
Call forward . . . . . . . . . . . . . . . . . . . . . . . . . . . 35
Do not disturb . . . . . . . . . . . . . . . . . . . . . . . . . . 36
Block anonymous calls . . . . . . . . . . . . . . . . . . . 36
Call block (Caller ID service users only) . . . . . . 36
Anonymous calls (Block Caller ID) . . . . . . . . . . 37
Date and time . . . . . . . . . . . . . . . . . . . . . . . . . . 37
Updating the base unit software . . . . . . . . . . . . 37
Programming through the Web User
Interface
Programming through the Web user interface . 39
Registering a Unit
Registering a unit . . . . . . . . . . . . . . . . . . . . . . . 40
Special Features
Using Caller ID service. . . . . . . . . . . . . . . . . . . 41
Caller list . . . . . . . . . . . . . . . . . . . . . . . . . . . . . . 41
Voice mail service. . . . . . . . . . . . . . . . . . . . . . . 43
Intercom Features
Intercom features between handsets . . . . . . . . 44
2
Document Version 2011-03

Intercom features between the handset and base
unit . . . . . . . . . . . . . . . . . . . . . . . . . . . . . . . . . . 45
Handset locator. . . . . . . . . . . . . . . . . . . . . . . . . 46
Useful Information
Belt clip . . . . . . . . . . . . . . . . . . . . . . . . . . . . . . . 47
Wall mounting . . . . . . . . . . . . . . . . . . . . . . . . . . 47
Error messages. . . . . . . . . . . . . . . . . . . . . . . . . 48
Troubleshooting . . . . . . . . . . . . . . . . . . . . . . . . 49
Specifications . . . . . . . . . . . . . . . . . . . . . . . . . . 54
Open Source Software
Open Source Software . . . . . . . . . . . . . . . . . . . 55
Customer Support
Customer support . . . . . . . . . . . . . . . . . . . . . . . 61
Index
Index . . . . . . . . . . . . . . . . . . . . . . . . . . . . . . . . 62
Table of Contents
Document Version 2011-03
3
Introduction
About this guide
This guide explains how to operate and customize KX-TGP551. Please be sure your network is
configured for KX-TGP551. Contact your administrator about the network settings and available features.
About the Web user interface
You can configure some of the features of this unit through the Web user interface (page 39). You can
access this interface from a web browser on any computer connected to the network. Contact your
administrator for further information.
Emergency calls
All lines including unassigned lines are available for emergency calls if the phone numbers are
configured in the Web user interface. Availability depends on your phone system. Contact your
administrator for further information.
Additional/replacement accessories
Please contact your nearest Panasonic dealer for sales information.
Accessory item Order number
Rechargeable
batteries
Headset KX-TCA60, KX-TCA93, KX-TCA94
*1 Replacement batteries may have a different capacity from that of the supplied batteries.
HHR-4DPA
L To order, please call 1-800-332-5368 or visit
http://www.panasonic.com/batterystore
Battery type:
– Nickel metal hydride (Ni-MH)
– 2 x AAA (R03) size for each handset
*1
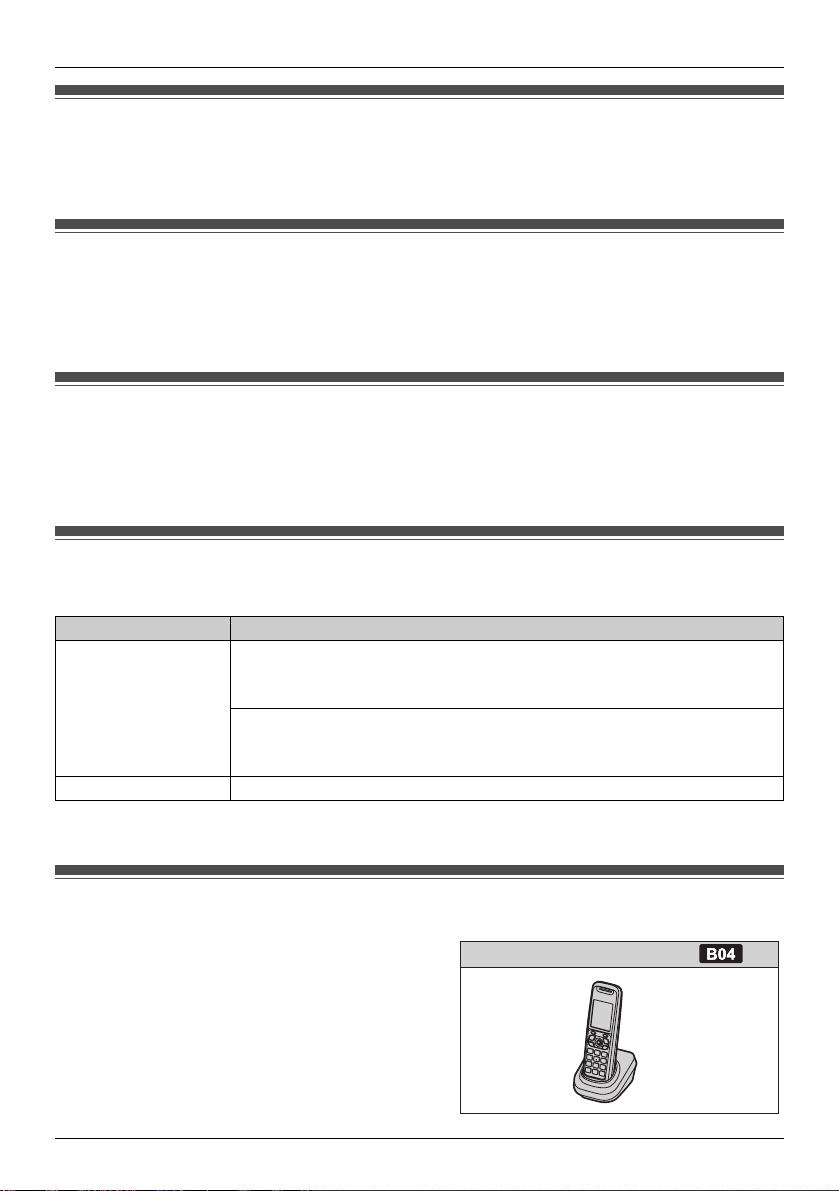
Expanding your phone system
You can expand your phone system by registering
optional handsets (6 max.) to a single base unit.
4
Document Version 2011-03
B04
Handset (optional): KX-TPA50
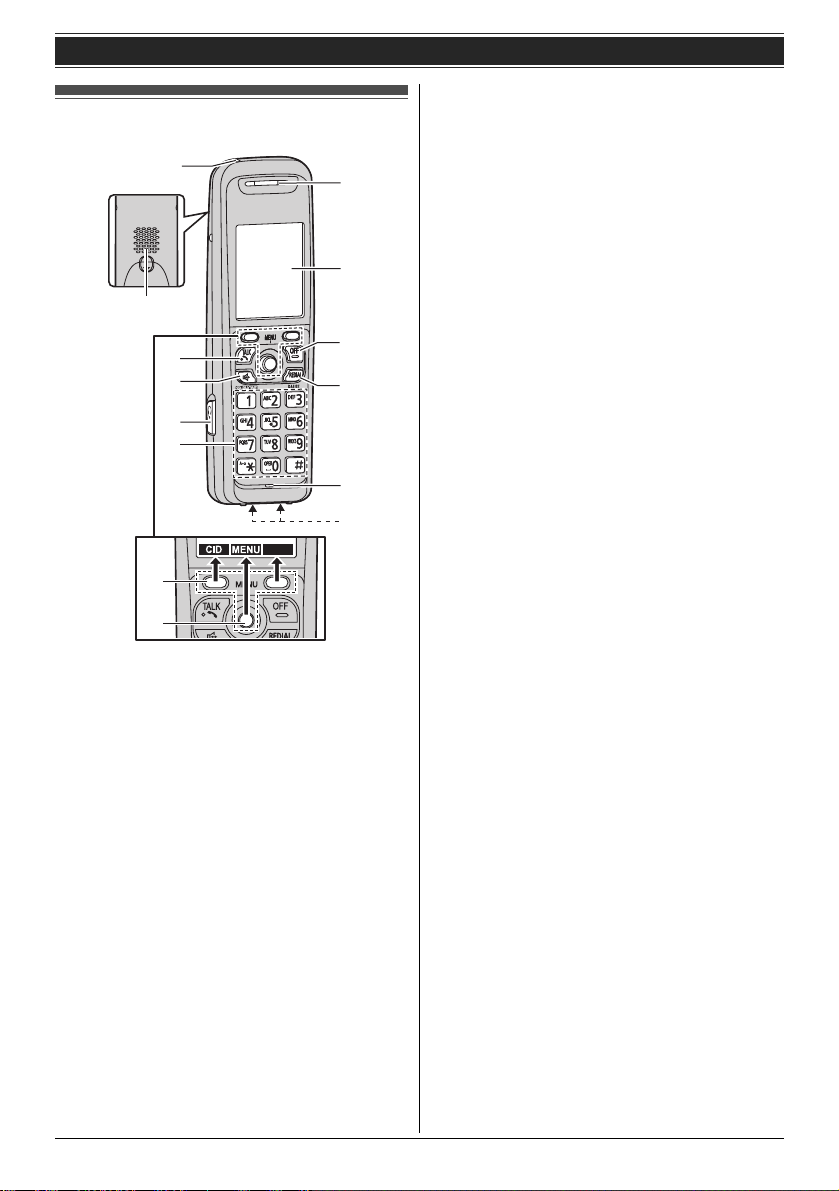
Controls (Handset)
A
B
C
D
E
F
LINE
A
B
G
H
I
J
K
L
Getting Started
■ Control type
A Soft keys
The handset features 2 soft keys and a joystick.
By pressing a soft key, or by pressing the center
of the joystick, you can select the feature shown
directly above it on the display.
B Joystick
By pushing the joystick ({^}, {V}, {<}, or {>})
repeatedly, you can:
– scroll through (up, down, left, or right) various
lists or items
– adjust the receiver or speaker volume (up or
down) while talking
L As all multiple items cannot be displayed on
screen at the same time, you can quickly
search for the desired item to move screens
by pushing the joystick right or left, instead of
scrolling down or up line by line (page 9).
A Charge indicator
Ringer indicator
Message indicator
B Speaker
C {C} (TALK)
D {s} (SP-PHONE: Speakerphone)
E Headset jack
F Dial keypad
G Receiver
H Display
I {OFF}
J {REDIAL} {PAUSE}
K Microphone
L Charge contacts
*1 A 3.5 second pause is inserted each time
{PAUSE} is pressed. It is useful when you want
to operate voice mail service without listening to
pre-recorded announcement, for example.
Repeat as needed to create longer pauses.
*1
Document Version 2011-03
5
Getting Started
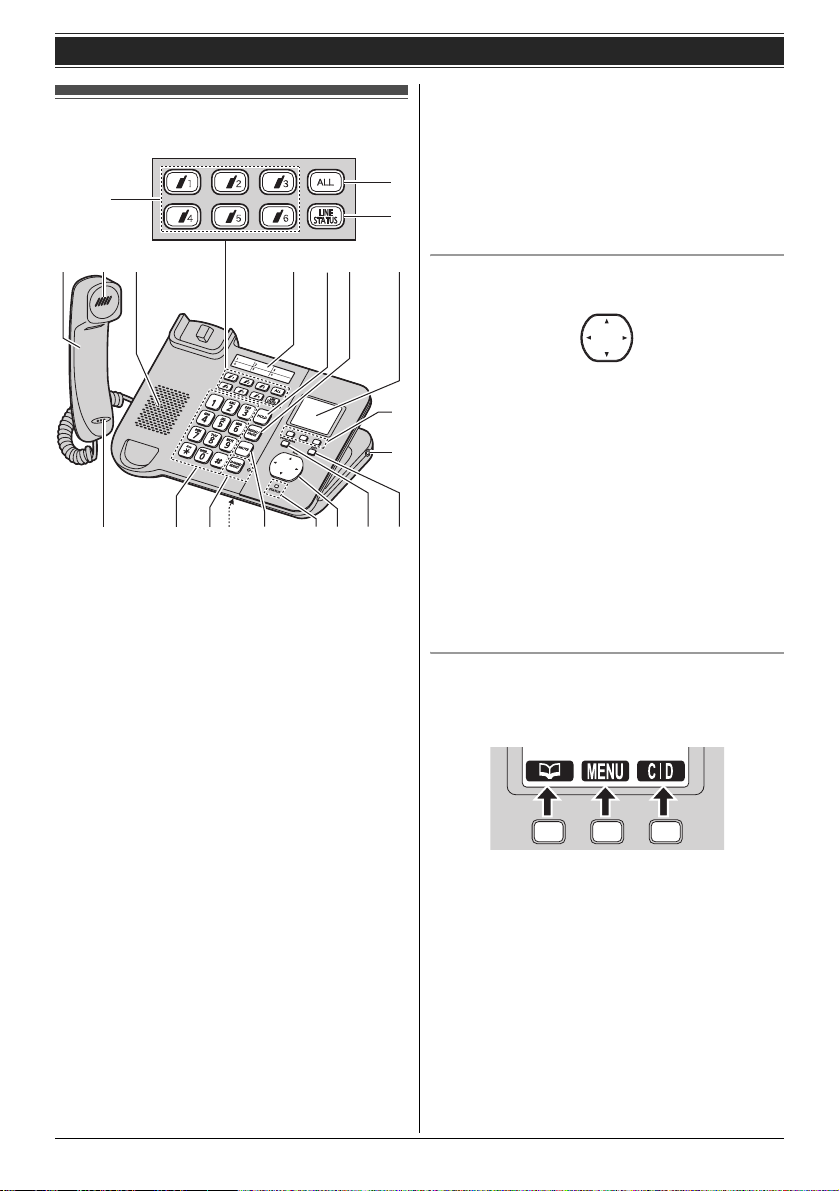
Controls (Base unit)
D
*1 A 3.5 second pause is inserted each time
{PAUSE} is pressed. It is useful when you want
to operate voice mail service without listening to
pre-recorded announcement, for example.
Repeat as needed to create longer pauses.
E
*2 Your phone system needs to support voice mail.
Contact your administrator for further
F
information.
ABC HI
MNOMPQRST
A Corded handset
B Receiver
C Speaker
D Handset paging buttons ({j} – {k})
Handset status indicators
E Handset paging button {ALL}
F {LINE STATUS}
G Index sticker
H {HOLD}
I {REDIAL} {PAUSE}
J Display
K Soft keys
L Headset jack
M Microphone
N Dial keypad
O {SP-PHONE} {HEADSET}
SP-PHONE indicator
P {MUTE}
Q STATUS indicator
R Navigator key ({^}/{V}/{<}/{>})
VOL. (Volume: {^}/{V})
S {VOICE MAIL}
VOICE MAIL indicator
T {EXIT}
*1
*2
G
J
Navigator key/volume key
{^}
{<}{>}
{V}
■ Scrolling through lists or items
K
By pressing this key ({^}, {V}, {<}, or {>})
repeatedly, you can scroll through (up, down,
L
left, or right) various lists or items.
■ Adjusting the volume
By pressing this key ({^} or {V}) repeatedly, you
can adjust the receiver or speaker volume (up or
down) while talking.
■ Moving the cursor
By pressing this key ({^}, {V}, {<}, or {>})
repeatedly, you can move the cursor to edit a
number or name.
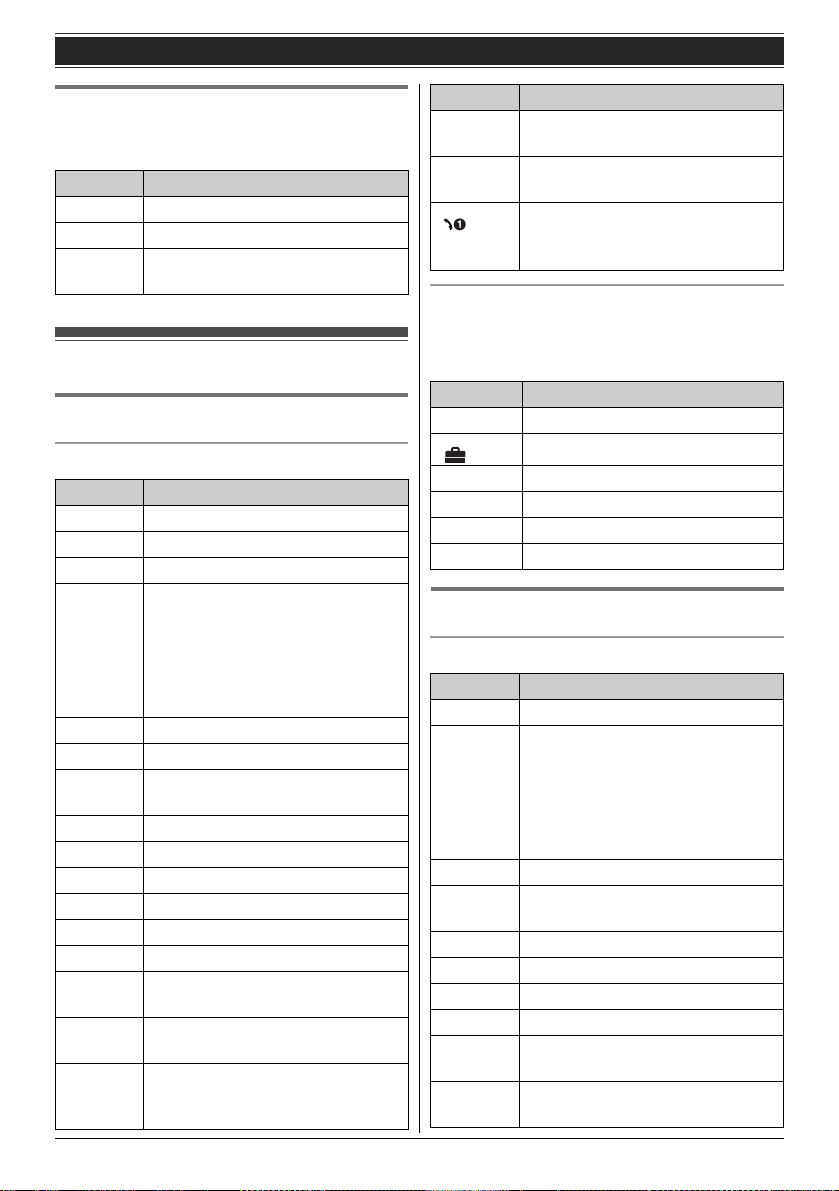
Soft keys
The base unit features 3 soft keys. By pressing a
soft key, you can select the feature shown directly
above it on the display.
6
Document Version 2011-03

Getting Started
Understanding the indicators on the base unit
STATUS indicator
During the startup process you may notice that the STATUS indicator on the base unit is flashing. This
indicates that the base unit is booting up with your phone system. You may find the following flash
patterns helpful:
Status
Color Light pattern
Green On L The base unit is connected to the Internet. The startup process is
Flashing L The base unit is downloading data. Do not disconnect the Ethernet
Red On L When the base unit is turned on, the STATUS indicator lights in red
Flashing L The base unit is registering a handset.
Amber On L The base unit’s IP address may conflict with the IP addresses of
Flashing L The base unit is obtaining an IP address or is obtaining
Flashing
rapidly
Off — L The base unit power is off.
Meaning
complete and you may now make and receive internet calls.
cable or AC adaptor from the base unit until the STATUS indicator
stops flashing and lights in steady green.
for about 10 seconds.
other devices on your local network. Contact your administrator for
further information.
configurations. Please wait.
L The base unit is registering with your phone system. Please wait.
L If the STATUS indicator continues flashing, check the following:
– Network settings may not be correct. Contact your administrator.
– Many installation issues can be resolved by resetting all the
equipment. First, shut down your modem, router, hub, base unit,
and computer. Then turn the devices back on one at a time in this
order: modem, router, hub, base unit, computer.
– If you cannot access Internet Web pages using your computer,
check to see if your phone system is having connection issues in
your area.
– For more troubleshooting help, contact your administrator.
L Unplug the base unit’s AC adaptor to reset the unit, then reconnect
the AC adaptor. If the STATUS indicator is still flashing rapidly, there
may be a problem with the base unit hardware. Contact customer
support.
L The Ethernet cable is not connected properly. Connect it.
L Your network devices (hub, router, etc.) are turned off. Check the
LEDs for the link status of the devices.
L The base unit power is booting up.
Document Version 2011-03
7
Getting Started
Handset status indicators
The handset status indicators on the base unit
show the status of each handset as follows:
Status Meaning
Light off The handset is free.
Light on The handset is in use.
Flashing The handset is paging the base
unit or being paged by it.
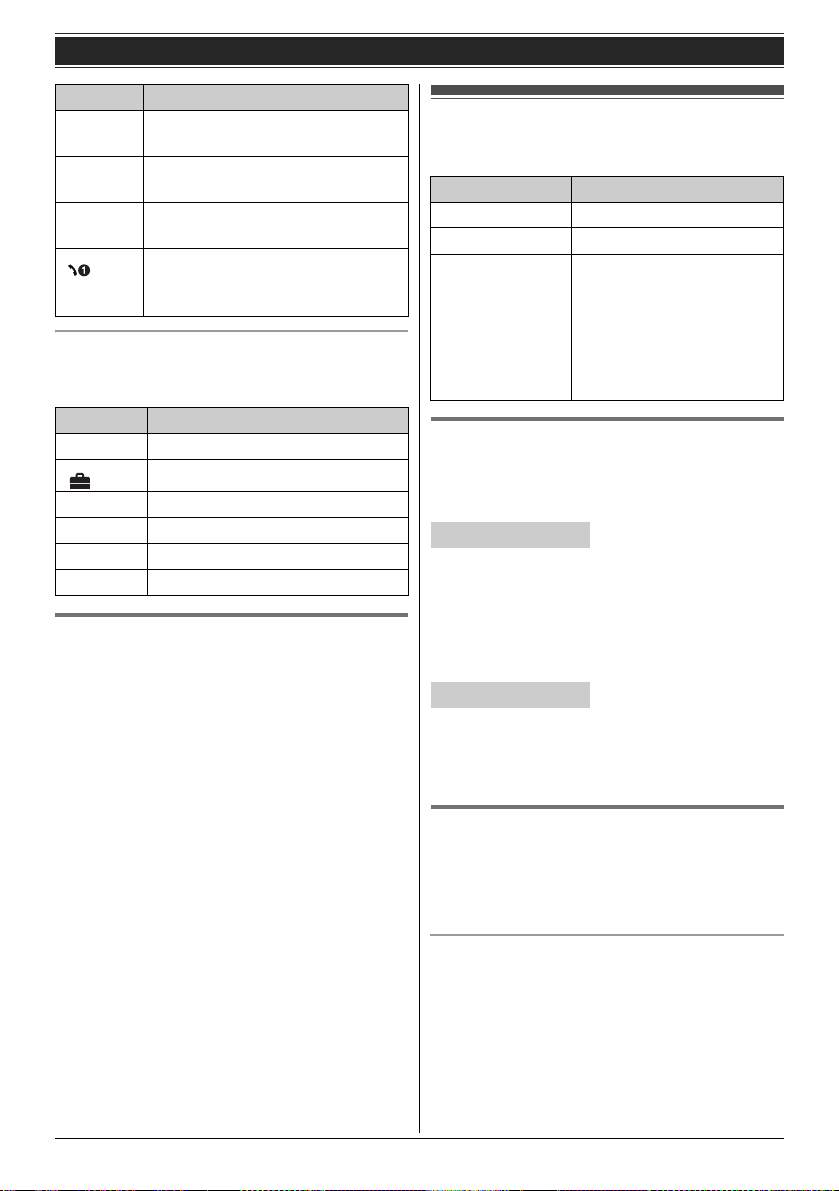
Display
Handset display items
Display items
Item Meaning
w Within range of the base unit
_ Out of range of the base unit
l The line is available.
C The line is in use.
L When flashing:
The call is put on hold.
L When flashing rapidly:
An incoming call is now being
received.
s Speaker is on. (page 11)
~ Ringer volume is off. (page 12)
y The line is set to allow other units
to join the call. (page 11, 12)
m Handset number
& Battery level
$ Blocked call (page 29)
n Block anonymous call (page 29)
o Call forward (page 28)
p Do not disturb (page 29)
q Anonymous calls (Block Caller ID)
(page 30)
6 The line has received new voice
mail messages. (page 43)
,! Handset 1 is in use.
“1”–“6”: Handset
“0”: Base unit
Item Meaning
s The shared line is in use. (page
13)
t The line is now registering the
VoIP server.
Line number (8 max.)
L When receiving a call, the last 4
digits are displayed.
Main menu icons
The following icons are shown when you press
down on the center of the joystick in standby
mode.
Icon Feature
m Line status
IP service
# New Voice Mail
x Intercom
" Initial settings
C Phonebook
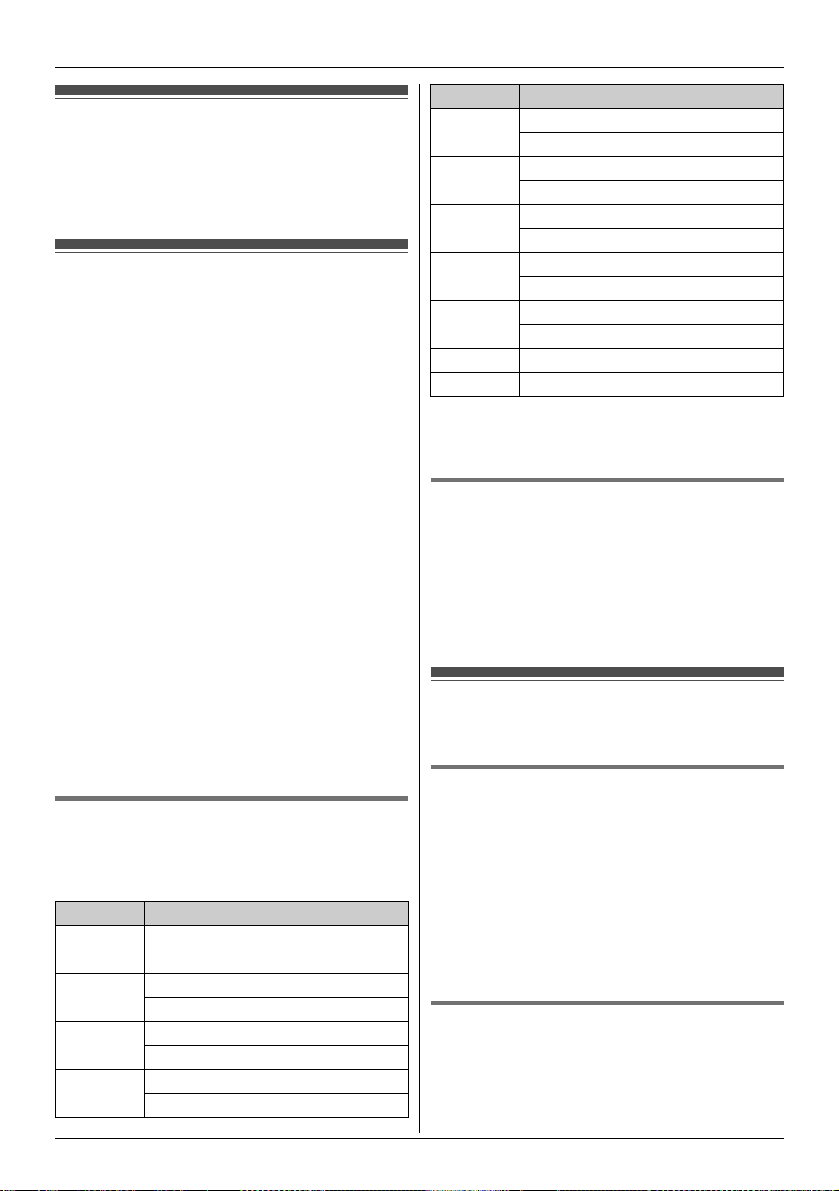
Base unit display items
Display items
Item Meaning
l The line is available.
C The line is in use.
L When flashing:
The call is put on hold.
L When flashing rapidly:
An incoming call is now being
received.
~ Ringer volume is off. (page 16)
y The line is set to allow other units
to join the call. (page 15, 16)
$ Blocked call (page 36)
n Block anonymous call (page 36)
o Call forward (page 35)
p Do not disturb (page 36)
q Anonymous calls (Block Caller ID)
(page 37)
6 The line has received new voice
mail messages. (page 43)
8
Document Version 2011-03
Item Meaning
,! Handset 1 is in use.
“1”–“6”: Handset
s The shared line is in use. (page
17)
t The line is now registering the
VoIP server.
Line number (8 max.)
L When receiving a call, the last 4
digits are displayed.
Main menu icons
The following icons are shown when you press
{MENU} (middle soft key) in standby mode.
Icon Feature
m Line status
IP service
( Ringer settings
" Initial settings
C Phonebook
W Caller list
Temporarily switching the handset
display mode
You can select to display either a single item or
multiple items on one screen at a time for the
phonebook list, caller list, and redial list.
You can temporarily switch the handset display
mode as follows by pressing the right soft key
shown when viewing the lists with:
– {MULTI}: Multiple items are shown on one
screen at a time.
– {SINGLE}: An item is shown on one screen at a
time. You can confirm the detailed information.
Note:
L When in multiple display mode, you can move
screens by pushing the joystick right or left,
without scrolling down or up through the list:
– Push the joystick right to go to the next
screen.
– Push the joystick left to return to the previous
screen.
Getting Started
Initial settings
Symbol meaning:
Symbol Meaning
Y Perform with the handset.
: Perform with the base unit.
Example:
{V}/{^}: “Off”
Display language
You can select either “English” or “Español”
as the display language. The default setting is
“English”.
Y Handset
1 {MENU} (center of joystick) i
{#}{1}{1}{0}
2 {V}/{^}: Select your desired setting.
3 Press down the center of the joystick to save.
i {OFF}
: Base unit
1 {MENU} (middle soft key) i {#}{1}{1}{0}
2 {V}/{^}: Select your desired setting.
3 Press the middle soft key to save. i {EXIT}
Confirming your phone number(s)
You may have more than one phone number,
depending on your phone system. The numbers
can be shared with multiple units (page 13, 17).
Contact your administrator for further information.
Confirming the line status of VoIP server
The unit shows all available phone numbers in
your phone system and their current status. You
can select a line to make a call.
Handset: Push the
joystick down or up to
select the words in
quotations.
Base unit: Press {V} or
{^} to select the words in
quotations.
Document Version 2011-03
9

Getting Started
Y Handset
1 {LINE} (right soft key)
2 {V}/{^}: Select the desired line.
L The display shows the current status of the
line. See page 8 for details.
L To select the line to make a call, press
{C}.
3 {OFF}
: Base unit
1 {LINE STATUS}
2 {V}/{^}: Select the desired line.
L The display shows the current status of the
line. See page 8 for details.
L To select the line to make a call, lift the
corded handset.
3 {EXIT}
10
Document Version 2011-03

Y
Making and Answering Calls using the Handset
Making calls
1 Lift the handset and dial the phone number.
L To correct a digit, press {CLEAR}.
2 Press {CALL} or {C}.
L The unit selects the default line configured
by your administrator.
L You can also select the line manually as
follows:
{LINE} i {V}/{^}: Select the desired line.
i {CALL}
3 When you finish talking, press {OFF} or place
the handset on the charger.
Note:
L If y is displayed during the call, other units may
join the conversation (page 13, 17). Contact
your administrator for further information.
L A maximum of 3 lines can be used at a time.
L To use the optional headset, plug the headset
into the headset jack before performing step 1.
Using the speakerphone
1 Dial the phone number and press {s}.
L The unit selects the default line configured
by your administrator.
L You can also select the line manually as
follows:
{LINE} i {V}/{^}: Select the desired line.
i {s}
L Speak alternately with the other party.
2 When you finish talking, press {OFF}.
Note:
L For best performance, use the speakerphone in
a quiet environment.
L To switch back to the receiver, press {C}.
Adjusting the receiver or speaker volume
Push the joystick up or down repeatedly while
talking.
Making a call using the redial list
The last 10 phone numbers dialed are stored in the
redial list (each 32 digits max.).
1 {REDIAL}
2 {V}/{^}: Select the desired phone number.
3 {C}/{s}
L If {s} is pressed and the other party’s line is
engaged, the unit automatically redials
multiple times. While the handset is waiting
to redial, the ringer indicator flashes. To
cancel, press {OFF}.
Editing/erasing/storing a number in the redial list
1 {REDIAL}
2 {V}/{^}: Select the desired phone number. i
{MENU}
3 Proceed with the desired operation.
■ Editing a number before calling:
{V}/{^}: “Edit and Call” i {SELECT}
i Use the joystick to move the cursor. i
Edit the number. i Press {CALL} or
{C}.
■ Erasing a number:
{V}/{^}: “Erase” i {SELECT} i
{V}/{^}: “Yes” i {SELECT} i {OFF}
■ Storing a number to the phonebook:
{V}/{^}: “Save phonebook” i
{SELECT} i To store the name, continue
from step 3, “Editing entries”, page 20.
Note:
L When editing:
– To erase a number, place the cursor on the
number, then press {CLEAR}.
– To insert a number, place the cursor to the
right of where you want to insert the number,
then press the appropriate dial key.
Document Version 2011-03
11

Y
Making and Answering Calls using the Handset
Answering calls
When a call is being received, the ringer indicator
on the handset flashes rapidly. The last 4 digits of
the line number on which the call is being received
are displayed.
1 Lift the handset and press {CALL}, {C}, or
{s} when the unit rings.
L You can also answer the call by pressing
any dial key from {0} to {9}, {*}, or {#}.
(Any key answer feature)
2 When you finish talking, press {OFF} or place
the handset on the charger.
Note:
L If the auto talk feature is turned off (page 12),
you can select which line answers when more
than one call is being received:
{CALL} i {V}/{^}: Select the desired line.
i Press {CALL}, {C}, or {s}.
L If y is displayed during the call, other units may
join the conversation (page 13, 17). Contact
your administrator for further information.
Auto talk
You can answer calls simply by lifting the handset
off the charger. You do not need to press {CALL}
or {C}. To turn this feature on, see page 26.
Adjusting the handset ringer volume
■ While the handset is ringing for an incoming
call:
Push the joystick up or down repeatedly to
select the desired volume.
■ Programming the volume beforehand:
1 {MENU} (center of joystick) i
{#}{1}{6}{0}
2 {V}/{^}: Select the desired volume.
3 {SAVE} i {OFF}
Temporary handset ringer off
While the handset is ringing for a call, you can turn
the ringer off temporarily by pressing {~}.
Hold
This feature allows you to put an outside call on
hold.
1 Press {HOLD} during an outside call.
2 To release hold, press {HOLD} or {C}.
Note:
L If a call is kept on hold for more than 9 minutes,
an alarm tone starts to sound and the ringer
indicator on the handset flashes. If the outside
party hangs up the call, the unit disconnects the
line and goes into standby mode.
Making another call during a call
You can make a call using the other line by holding
the 1st call.
1 Press {HOLD} to put the 1st call on hold.
2 Dial the phone number. i {CALL}
3 To return to the 1st call, press {SWITCH}.
Useful features during a call
Mute
While mute is turned on, you can hear the other
party, but the other party cannot hear you.
1 Press {MUTE} during an outside call.
2 To return to the conversation, press {MUTE}
again.
Note:
L{MUTE} is a soft key visible on the display
during a call.
12
Document Version 2011-03

Y
Making and Answering Calls using the Handset
Call waiting
This feature allows you to receive calls while you
are already talking on the phone. If you receive a
call while on the phone, the 2nd caller’s
information is displayed on the handset that is in
use after you hear the interrupt tone (page 27).
The feature depends on your phone system.
Contact your administrator for further information.
1 Press {SWITCH} to answer the 2nd call.
2 To switch between calls, press {SWITCH}.
Call share
Joining a call
You can join an existing outside call. Availability
depends on your phone system. Contact your
administrator for further information.
Important:
L The line must be set to allow other units to join
through the Web user interface (“Privacy
Mode”). y is displayed on the unit currently in
use when it is allowed to join the call. Contact
your administrator for further information.
1 Press {LINE} when the other unit is on an
outside call.
2 {V}/{^}: Select the desired line to join. i
{SELECT}
Sharing line numbers among multiple base
units
If you have multiple base units, shared line
number(s) may be assigned to selected units by
your administrator. While the shared line is being
used by other units, s is displayed when viewing
the line status (page 9). Availability depends on
your phone system. Contact your administrator for
further information.
Note:
L This feature is explained as “Enable Shared
Call” in the Web user interface.
Transferring calls to an outside party
Outside calls can be transferred to an outside
party. To transfer outside calls to another unit, see
“Transferring calls”, page 44, 46.
1 During an outside call, press {MENU}.
2 {V}/{^}: “Transfer” i {SELECT}
3 Dial the phone number.
L To correct the number, press {CANCEL} to
clear the number and enter again.
4 Wait for the paged party to answer.
L If the paged party does not answer, press
{CANCEL} 2 times to return to the outside
call.
5 {TRANS}
Note:
L In step 3, you can dial the phone number from
the phonebook:
{C} i {V}/{^}: Select the desired entry. i
{CALL}
Transferring a call without speaking
to the outside party
1
During an outside call, press {MENU}.
2 {V}/{^}: “Blind transfer” i {SELECT}
3 Dial the phone number.
L To correct the number, press {CANCEL} to
clear the number and enter again.
4 {TRANS}
L The outside call rings at the other unit.
Note:
L In step 3, you can dial the phone number from
the phonebook:
{C} i {V}/{^}: Select the desired entry. i
{CALL}
Document Version 2011-03
13

Y
Making and Answering Calls using the Handset
Conference calls
Multiple people can establish a conference call.
1 During an outside call, press {MENU}.
2 {V}/{^}: “Conference” i {SELECT}
3 Dial the phone number.
L To correct the number, press {CANCEL} to
clear the number and enter again.
4 Wait for the paged party to answer.
L If the paged party does not answer, press
{CANCEL} 2 times to return to the outside
call.
5 {CONF}
L If you want to add a new party to the
conference, perform from step 1.
Note:
L In step 3, you can dial the phone number from
the phonebook:
{C} i {V}/{^}: Select the desired entry. i
{CALL}
14
Document Version 2011-03

:
Making and Answering Calls using the Base Unit
Making calls
1 Dial the phone number.
L To correct a digit, press {CLEAR}.
2 Lift the corded handset.
L The unit selects the default line configured
by your administrator.
L You can also select the line manually as
follows:
{LINE} i {V}/{^}: Select the desired line.
i Lift the corded handset.
3 When you finish talking, place the corded
handset on the cradle.
Note:
L You can also dial the phone number after lifting
the corded handset.
L If y is displayed during the call, other units may
join the conversation (page 13, 17). Contact
your administrator for further information.
L A maximum of 3 lines can be used at a time.
Using the headset (optional)
First, plug the headset into the headset jack. Then
press {SP-PHONE/HEADSET} instead of using
the corded handset in steps 2 and 3, “Making
calls”, page 15.
L To end the call, press {SP-PHONE/HEADSET}.
L{SP-PHONE/HEADSET} is stated as {SP-
PHONE} in the following steps through this User
Guide.
Using the speakerphone
1 Dial the phone number and press {SP-
PHONE}.
L The unit selects the default line configured
by your administrator.
L You can also select the line manually as
follows:
{LINE} i {V}/{^}: Select the desired line.
i Press {CALL} or {SP-PHONE}.
2 When the other party answers, speak into the
base unit microphone.
L Speak alternately with the other party.
3 When you finish talking, press {SP-PHONE}.
Note:
L For best performance, use the speakerphone in
a quiet environment.
L To switch to the receiver, lift the corded handset.
Off-hook monitor
You can let other people in the room listen to a
conversation through the speaker while continuing
the conversation using the corded handset.
During a conversation with the corded handset,
press {SP-PHONE}.
L While the feature is turned on, the SP-PHONE
indicator on the base unit lights.
L To return to the private call, press {SP-PHONE}.
Adjusting the receiver or speaker volume
Press {^} or {V} repeatedly while talking.
Making a call using the redial list
The last 10 phone numbers dialed are stored in the
redial list in each unit (each 32 digits max.).
1 {REDIAL}
2 {V}/{^}: Select the desired phone number.
3 Lift the corded handset or press {SP-
PHONE}.
L If {SP-PHONE} is pressed and the other
party’s line is engaged, the unit
automatically redials multiple times. While
the base unit is waiting to redial, the SPPHONE indicator on the base unit flashes.
To cancel, press {EXIT}.
Document Version 2011-03
15

:
Making and Answering Calls using the Base Unit
Editing/erasing/storing a number in the redial list
1 {REDIAL}
2 {V}/{^}: Select the desired phone number. i
{MENU}
3 Proceed with the desired operation.
■ Editing a number before calling:
{V}/{^}: “Edit and Call” i {SELECT}
i Press {<} or {>} to move the cursor.
i Edit the number. i Lift the corded
handset.
■ Erasing a number:
{V}/{^}: “Erase” i {SELECT} i
{V}/{^}: “Yes” i {SELECT} i {EXIT}
■ Storing a number to the phonebook:
{V}/{^}: “Save phonebook” i
{SELECT} i To store the name, continue
from step 3, “Editing entries”, page 23.
Note:
L When editing:
– To erase a number, place the cursor on the
number, then press {CLEAR}.
– To insert a number, place the cursor to the
right of where you want to insert the number,
then press the appropriate dial key.
Answering calls
The last 4 digits of the line number on which the
call is being received are displayed.
1 Lift the corded handset or press {CALL} or
{SP-PHONE} when the unit rings.
2 When you finish talking, place the corded
handset on the cradle. When the
speakerphone is used, press {SP-PHONE}.
Note:
L You can select which line answers when more
than one call is being received:
{CALL} i {V}/{^}: Select the desired line.
i Lift the corded handset or press {CALL} or
{SP-PHONE}.
L If y is displayed during the call, other units may
join the conversation (page 13, 17). Contact
your administrator for further information.
16
Document Version 2011-03
Adjusting the base unit ringer volume
■ While the base unit is ringing for an
incoming call:
Press {^} or {V} repeatedly to select the desired
volume.
■ Programming the volume beforehand:
1 {MENU} (middle soft key) i
{#}{1}{6}{0}
2 {V}/{^}: Select the desired volume.
3 {SAVE} i {EXIT}
Temporary base unit ringer off
While the base unit is ringing for a call, you can
turn the ringer off temporarily by pressing {~}.
Hold
This feature allows you to put an outside call on
hold.
1 Press {HOLD} during an outside call.
L If you are using the corded handset, you can
place it on the cradle.
2 To release hold, lift the corded handset, or
press {HOLD} or {SP-PHONE}.
Note:
L If a call is kept on hold for more than 9 minutes,
an alarm tone starts to sound. If the outside
party hangs up the call, the unit disconnects the
line and goes into standby mode.
Making another call during a call
You can make a call using the other line by holding
the 1st call.
1 Press {HOLD} to put the 1st call on hold.
L If you are using the corded handset, place
the corded handset on the cradle.

:
Making and Answering Calls using the Base Unit
2 Dial the phone number.
3 Proceed with the desired operation.
■ When you are using the corded handset:
Lift the corded handset.
■ When you are using the speakerphone:
Press {SP-PHONE}.
4 To return to the 1st call, press {SWITCH}.
Useful features during a call
Mute
While mute is turned on, you can hear the other
party, but the other party cannot hear you.
1 Press {MUTE} during an outside call.
2 To return to the conversation, press {MUTE}
again.
Call waiting
This feature allows you to receive calls while you
are already talking on the phone. If you receive a
call while on the phone, the 2nd caller’s
information is displayed on the base unit that is in
use after you hear the interrupt tone (page 33).
The feature depends on your phone system.
Contact your administrator for further information.
1 Press {SWITCH} to answer the 2nd call.
2 To switch between calls, press {SWITCH}.
Call share
Joining a call
You can join an existing outside call. Availability
depends on your phone system. Contact your
administrator for further information.
Important:
L The line must be set to allow other units to join
through the Web user interface (“Privacy
Mode”). y is displayed on the unit currently in
use when it is allowed to join the call. Contact
your administrator for further information.
1 Press {LINE STATUS} when the handset is
on an outside call.
2 {V}/{^}: Select the desired line to join. i
{SELECT}
Sharing line numbers among multiple base
units
If you have multiple base units, shared line
number(s) may be assigned to selected units by
your administrator. While the shared line is being
used by other units, s is displayed when viewing
the line status (page 9). Availability depends on
your phone system. Contact your administrator for
further information.
Note:
L This feature is explained as “Enable Shared
Call” in the Web user interface.
Transferring calls to an outside party
Outside calls can be transferred to an outside
party. To transfer outside calls to a handset, see
“Transferring calls”, page 46.
1 During an outside call, press {MENU}.
2 {V}/{^}: “Transfer” i {SELECT}
3 Dial the phone number.
L To correct the number, press {CANCEL} to
clear the number and enter again.
4 Wait for the paged party to answer.
L If the paged party does not answer, press
{CANCEL} 2 times to return to the outside
call.
5 {TRANS}
Note:
L In step 3, you can dial the phone number from
the phonebook:
{C} i {V}/{^}: Select the desired entry. i
{CALL}
Transferring a call without speaking
to the outside party
During an outside call, press {MENU}.
1
2 {V}/{^}: “Blind transfer” i {SELECT}
3 Dial the phone number.
L To correct the number, press {CANCEL} to
clear the number and enter again.
4 {TRANS}
L The outside call rings at the other unit.
Document Version 2011-03
17

:
Making and Answering Calls using the Base Unit
Note:
L In step 3, you can dial the phone number from
the phonebook:
{C} i {V}/{^}: Select the desired entry. i
{CALL}
Conference calls
Multiple people can establish a conference call.
1 During an outside call, press {MENU}.
2 {V}/{^}: “Conference” i {SELECT}
3 Dial the phone number.
L To correct the number, press {CANCEL} to
clear the number and enter again.
4 Wait for the paged party to answer.
L If the paged party does not answer, press
{CANCEL} 2 times to return to the outside
call.
5 {CONF}
L If you want to add a new party to the
conference, perform from step 1.
Note:
L In step 3, you can dial the phone number from
the phonebook:
{C} i {V}/{^}: Select the desired entry. i
{CALL}
18
Document Version 2011-03
Using the phonebook
The phonebook allows you to make calls without
having to dial manually. You can add 100 names
and phone numbers to the phonebook.
Adding entries
1 {MENU} (center of joystick)
2 {V}/{^}: “Phonebook” i {SELECT}
3 {ADD}
4 Enter the party’s name (16 characters max.).
i {OK}
5 Enter the party’s phone number (32 digits
max.). i {OK}
L If you do not need to assign the ringer ID, go
to step 8.
6 {V}/{^}: “Set Ringer ID” i {SELECT}
7 {V}/{^}: Select the desired setting (page 41).
i {OK}
8 {SAVE}
L To add other entries, repeat from step 4.
9 {OFF}
Note:
L In step 3, you can also press {MENU}. i
{V}/{^}: “New entry” i {SELECT}
L If you select “No Ringer ID” (default), the unit
uses the ringer tone you selected on page 27
when a call is received from that caller.
Character table for entering names
While entering characters, you can switch
between uppercase and lowercase by pressing
{*}.
Key Character
{1} Space # & ’ ( )
; ,–./1
{2} ABC2
abc2
{3} DEF3
def 3
{4} GHI 4
ghi 4
Y
Phonebook using the Handset
Key Character
{5} JKL5
jkl5
{6} MN O6
mn o6
{7} PQRS7
pqrs7
{8} TUV8
tuv8
{9} WX Y Z 9
wxyz9
{0} Space 0
{#} #
L To enter another character that is located on the
same dial key, push the joystick right to move
the cursor to the next space.
Correcting a mistake
Use the joystick to move the cursor to the
character or number you want to erase, then press
{CLEAR}. Enter the appropriate character or
number.
L Press and hold {CLEAR} to erase all characters
or numbers.
Finding and calling a phonebook entry
Scrolling through all entries
{MENU} (center of joystick)
1
2 {V}/{^}: “Phonebook” i {SELECT}
3 {V}/{^}: Select the desired entry.
4 {C}
L You can also select the line manually as
follows:
{LINE} i {V}/{^}: Select the desired line.
i Press {CALL} or {C}.
Searching by first character
(alphabetically)
{MENU} (center of joystick)
1
2 {V}/{^}: “Phonebook” i {SELECT}
Document Version 2011-03
19
 Loading...