

Page 1
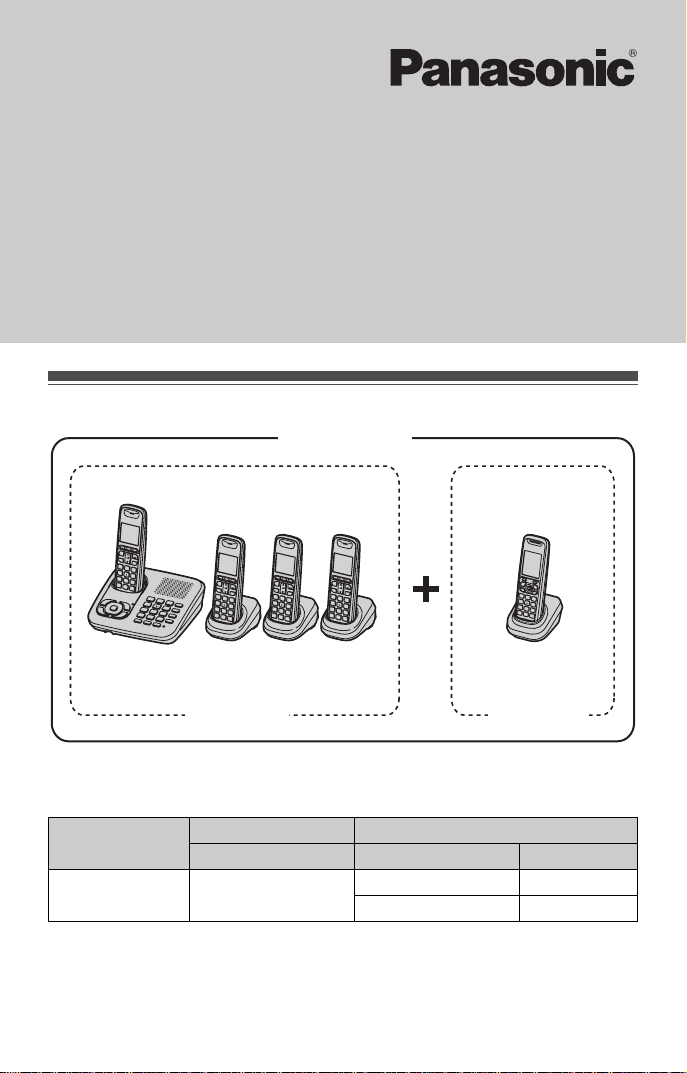
Expandable Digital Cordless Answering System
Model No. KX-TG6440
This model includes:
– a base unit with four handsets: Model No. KX-TG6444 (Handset’s Part No.:
KX-TGA641)
– one handset (Part No.: KX-TGA740)
The instructions for all units supplied here are contained in the operating
instructions of the KX-TG6444.
Please read the operating instructions before using these units.
Product information
KX-TG6440
Handset’s Part No. is KX-TGA641.
KX-TG6444 KX-TGA740
Note:
LThe handsets have been pre-registered to work with the base unit.
Model No.
KX-TG6440 KX-TG6441 KX-TGA641 4
Base unit Handset
Part No. Part No. Quantity
KX-TGA740 1
PNQW1490ZA DM1208DM0
Page 2
Accessory information
Supplied accessories
No. Accessory item/Order number Quantity
1 AC adaptor/PQLV219Z 5
2 Telephone line cord/PQJA10075Z 1
3 Wall mounting adaptor/PNKL1010Z1 1
4 Rechargeable batteries/HHR-4DPA
(Part No. HHR-65AAABU or N4DHYYY00002)
5 Handset cover
PNYNTGA641SR (Pearl silver)
PNYNTGA641TR (Black metallic) 4
6 Belt clip/
PNKE1029Z1 (Black metallic)
PNKE1029Z2 (Pearl silver) 1
7 Charger
PNWETG6432T (KX-TGA641: Black metallic)
PNWETG6440S (KX-TGA641: Pearl silver) 1
PNWETG7432B (KX-TGA740: Black) 1
*1 The handset cover comes attached to the handset.
*1
/
10
1
4
2
– 2 –
Page 3

Controls
See “Controls” in the operating instructions of the KX-TG6444 product.
KX-TGA740 handset
A Charge indicator
Ringer indicator
Message indicator
B Speaker
C Soft keys
D {C} (TALK)
E {s} (SP-PHONE: Speakerphone)
F Headset jack
G Dial keypad ({*}: TONE)
H Receiver
I Display
J {OFF}
K Joystick
L {FLASH} {CALL WAIT}
M Microphone
N Charge contacts
B
A
C
D
E
F
G
H
I
C
J
K
L
M
N
For KX-TGA740 handset feature overview
Main feature differences
Feature KX-TGA740 KX-TGA641
Display size 2.1 inches 1.8 inches
Control type
(page 4)
Display mode
(page 5)
Message list
(page 5)
Note:
LFor some features, the operations are slightly different from the descriptions in the
operating instructions (page 6).
3 soft keys
(Middle soft key: Center of
joystick)
Joystick
(Up/down/left/right)
r —
r —
3 soft keys
Navigator key/
? (Volume) key(Up/down)
– 3 –
Page 4

Control type
NKX-TGA740 NKX-TGA641
Soft keys
Joystick
Soft keys
Navigator key
Function KX-TGA740 KX-TGA641
Using soft keys Left, center of
Scrolling through various lists or
joystick
{V}/{^}
*1
, right
*2
Left, middle, right
{V}/{^}
items
Adjusting the receiver or speaker
{V}/{^}
*2
{V}/{^}
volume:
– while talking
– while listening to messages
Moving the cursor (right or left) to
{>}/{<}
*3
{V}/{^}
edit number or name
Skipping or repeating during
{>}/{<}
*4
message playback
*1 Pressing down the center of the joystick.
*2 Pushing the joystick down or up.
*3 Pushing the joystick right or left.
*4 To skip messages, push the joystick right.
To repeat messages, push the joystick left.
—
– 4 –
Page 5

Display mode
Y ou can select to display either a single
item or multiple items on one screen at
a time for the following features:
– menu list, phonebook list, caller list,
redial list, message list, and call block
list
– handset top menu icons in function
menu
The following icons are shown when you
press down on the center of the joystick in
standby mode.
Icon Feature
W Caller list
s Answering device
# V.M. access
x Intercom
" Initial setting
! Customer support
The display mode can be switched
temporarily or set by programming.
NSwitching temporarily:
You can temporarily switch the display
mode as follows by pressing the right
soft key shown when viewing the lists or
selecting menu icons:
– {MULTI}: Multiple entries/all menu
icons are shown on one screen at a
time.
– {SINGLE}: An entry/a menu icon is
shown on one screen in large
characters at a time.
Note:
LWhen “Multi items” is selected as
the display mode, you can switch the
screen to confirm the detailed
information by pressing {SINGLE}.
NBy programming:
You can set the unit to always show a
single item or multiple items beforehand
by selecting “Single item” or “Multi
items” as the display mode setting.
Select the desired setting:
–“Multi items”: Multiple entries/all
menu icons are shown on one screen
at a time.
–“Single item”: An entry/a menu
icon is shown on one screen in large
characters at a time.
The default setting is “Multi items”.
1 {MENU} (center of joystick) i
{#}{1}{9}{2}
2 {V}/{^}: Select the desired
setting.i {SAVE}
3 {OFF}
Note:
LWhen {MULTI} or “Multi items” is
selected as the display mode, you
can move screens by pushing the
joystick right or left, without scrolling
down or up through the list:
– Push the joystick right to go to the
next screen.
– Push the joystick left to return to the
previous screen.
Listening to messages using
the handset
Listening to messages from the
message list
You can select the item to play back.
1 {MENU} (center of joystick) i
{#}{3}{2}{9}
2 {V}/{^}: Select the desired item from
the message list. i {PLAY}
LYou can erase the selected
message as follows: {ERASE}
i {V}/{^}: “Yes” i {SELECT}
3 When finished, press {OFF}.
Note:
LIf the item has already been heard,
“Q” is displayed, even if it was heard
using another handset.
– 5 –
Page 6

LIf the unit cannot receive caller
information, “Msg.” is displayed in the
message list.
LWhen you play a message from the
message list, the playback operations
are as shown below:
– If you press {1} or push the joystick
left, the currently playing message
is played back from the beginning.
– If you press {2} or push the joystick
right, the unit stops message
playback and the display goes back
to the message list.
Operational differences for
some features
The following features include different
operations from the descriptions in the
operating instructions. The differences
are described in the boxed text.
Shared phonebook: Searching by
first character (alphabetically)
1 {C}
2 Press the dial key ({0} – {9}, {*},
or {#}) which contains the
character you are searching for.
3 {V}/{^}: Scroll through the
phonebook if necessary.
4 {C}
Call block (Caller ID subscribers
only): Storing unwanted callers
NFrom the caller list:
1 {MENU} (center of joystick) i
{#}{2}{1}{3}
2 {V}/{^}: Select the entry to be
blocked. i {SELECT}
LTo edit the number , press {EDIT}
repeatedly until the phone
number is shown in the 10-digit
format.
3 {SAVE}
4 {V}/{^}: “Call block” i
{SELECT}
5 {V}/{^}: “Yes” i {SELECT}
i {OFF}
Caller list: Editing a caller’s phone
number before calling back
1 {MENU} (center of joystick) i
{#}{2}{1}{3}
2 {V}/{^}: Select the desired entry.
i {SELECT}
3 Press {EDIT} repeatedly until the
phone number is shown in the
desired format.
4 {C}
Caller list: Storing caller information
to the phonebook
1 {MENU} (center of joystick) i
{#}{2}{1}{3}
2 {V}/{^}: Select the desired entry.
i {SELECT}
LTo edit the number , press {EDIT}
repeatedly until the phone
number is shown in the desired
format.
3 {SAVE}
4 {V}/{^}: “Phonebook” i
{SELECT}
5 Continue from step 2, “Editing
entries”, in the operating
instructions.
– 6 –
 Loading...