

Page 1
TG954x_(en)_QG.fm Page 1 Thursday, June 27, 2013 4:13 PM
Quick Guide
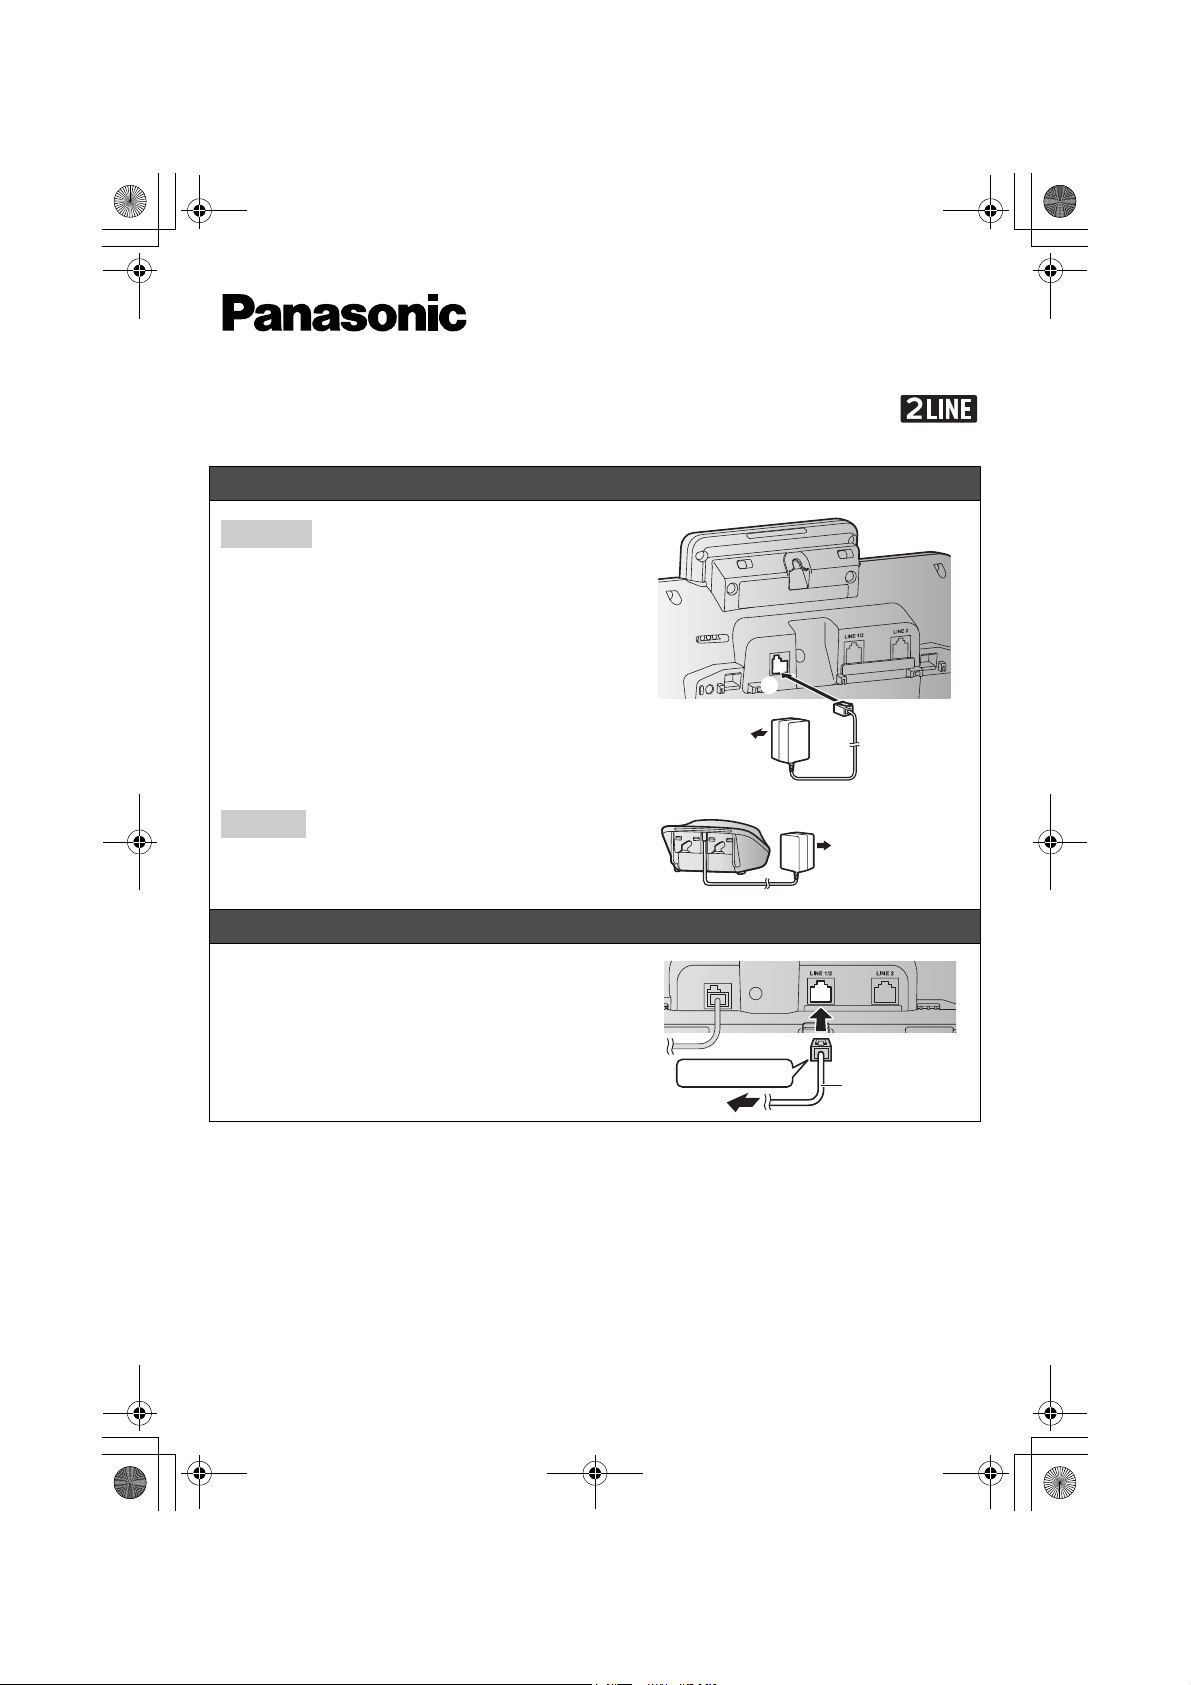
Connecting the AC adaptor
Base unit
1 Connect the AC adaptor plug to the unit until you hear
a click.
2 Connect the AC adaptor to the power outlet.
LUse only the supplied Panasonic AC adaptor
PNLV234.
Model No. KX-TG9541/KX-TG9542
1
2
Charger
1 Connect the AC adaptor to the power outlet.
Connecting the telephone line cord
NTo connect to a 2-line telephone jack
1 Connect the “GREEN” plug telephone line cord (4-wire
cord) (1) to the unit, then to the 2-line telephone jack
(RJ14C) (2) until you hear a click.
Printed in China
1
1
“GREEN” plug
2
1
PNQW3675ZA TT0713MU0 (E)
Page 2
TG954x_(en)_QG.fm Page 2 Thursday, June 27, 2013 4:13 PM
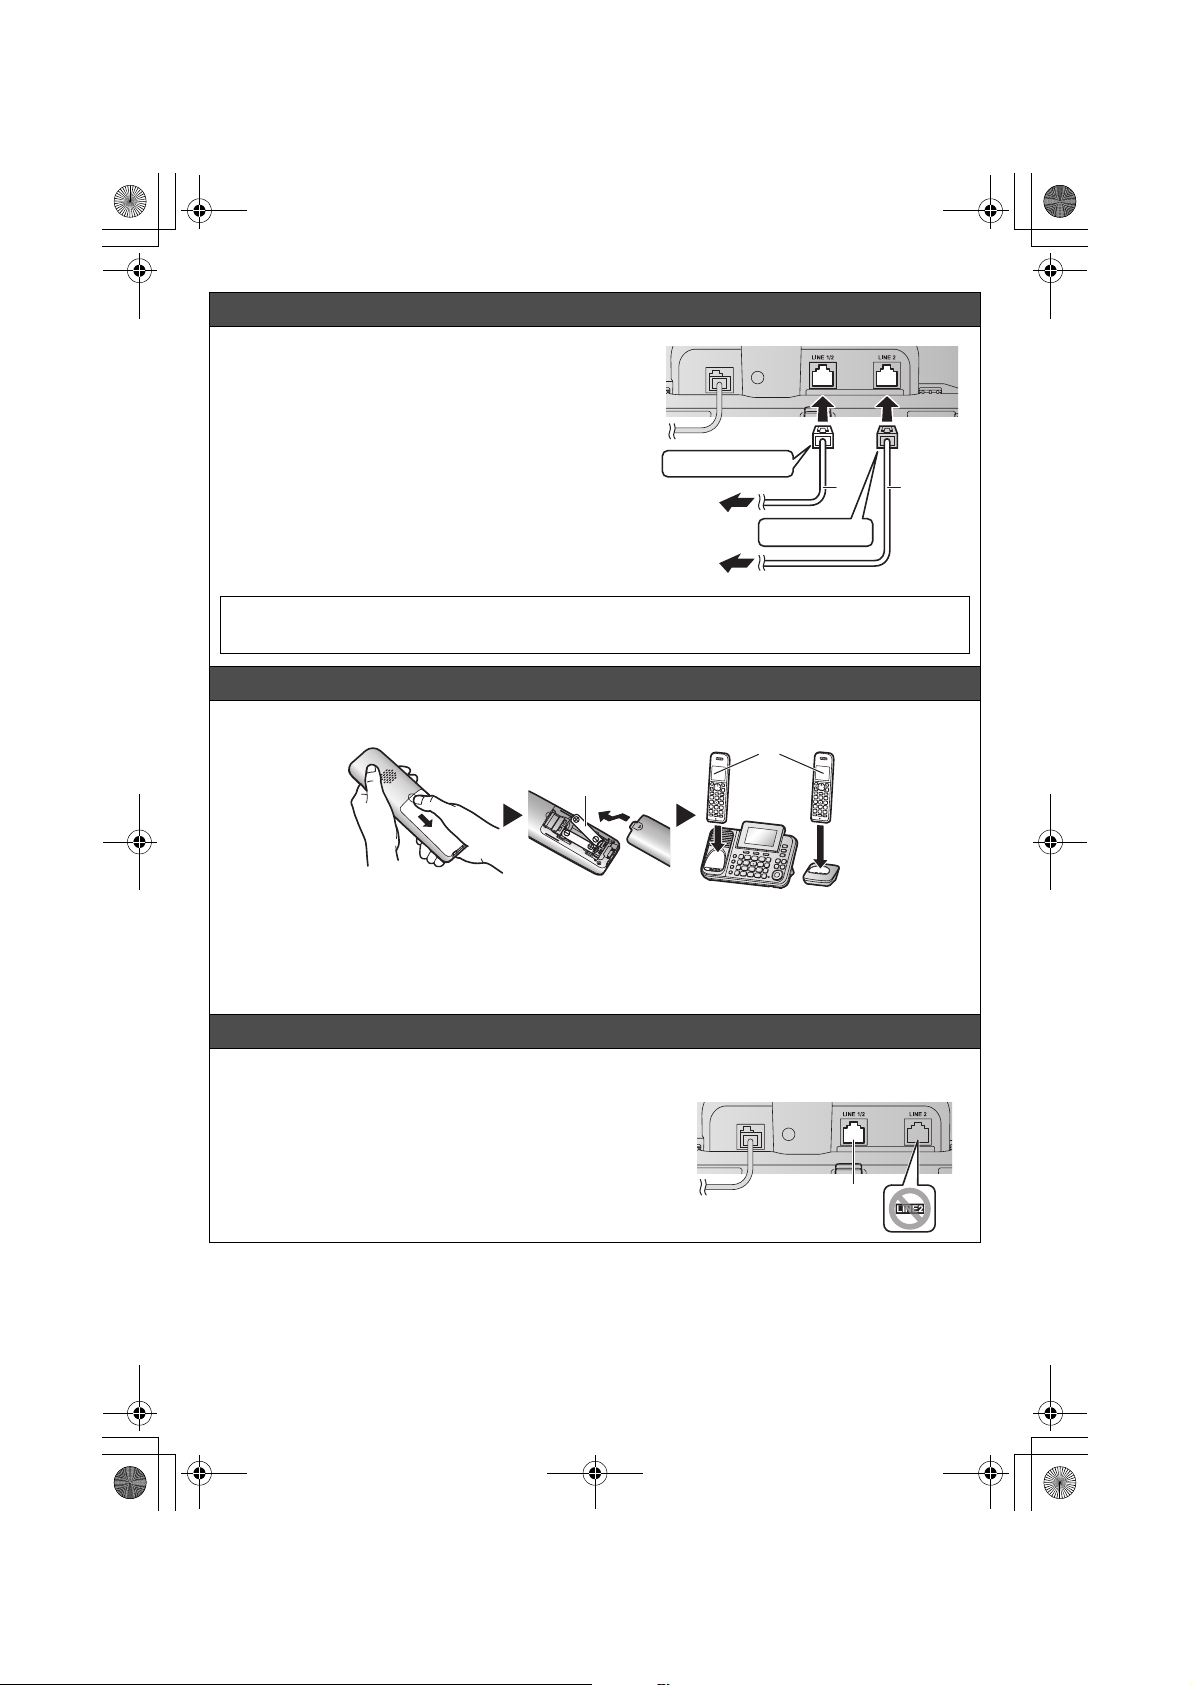
Connecting the telephone line cord
NTo connect to 2 single-line telephone jacks
1 For Line 1: Connect the “Transparent” plug telephone
line cord (2-wire cord) (1) to the unit, then to the Line
1 single-line telephone jack (RJ11C) (2) until you hear
a click.
2 For Line 2: Connect the “GREEN” plug telephone line
cord (4-wire cord) (3) to the unit, then to the Line 2
single-line telephone jack (RJ11C) (4) until you hear
a click.
If you subscribe to a DSL/ADSL service, attach a DSL/ADSL filter to the telephone line between the base
unit and the telephone line jack. Refer to the operating instructions for connections.
“Transparent” plug
2
“GREEN” plug
4
12
1
3
Battery installation/Battery charging
Charge for about 7 hours.
2
1
Note:
LUSE ONLY Ni-MH batteries AAA (R03) size (1).
LDo NOT use Alkaline/Manganese/Ni-Cd batteries.
LConfirm correct polarities (S, T).
LFollow the directions on the display to set up the unit.
LConfirm “Charging” is displayed (2).
Using the unit as a single-line telephone only
1 Connect the “Transparent” plug telephone line cord (2-wire
cord) to LINE 1/2.
Handset/Base unit:
LTo use line 1 only: {MENU}(25) s {r}: “Line1” s
{SAVE} s {OFF}/{EXIT}
LTo erase the message “Check tel line2”:
{MENU}(19)
– 2 –
1
Page 3
TG954x_(en)_QG.fm Page 3 Thursday, June 27, 2013 4:13 PM
Operating tips
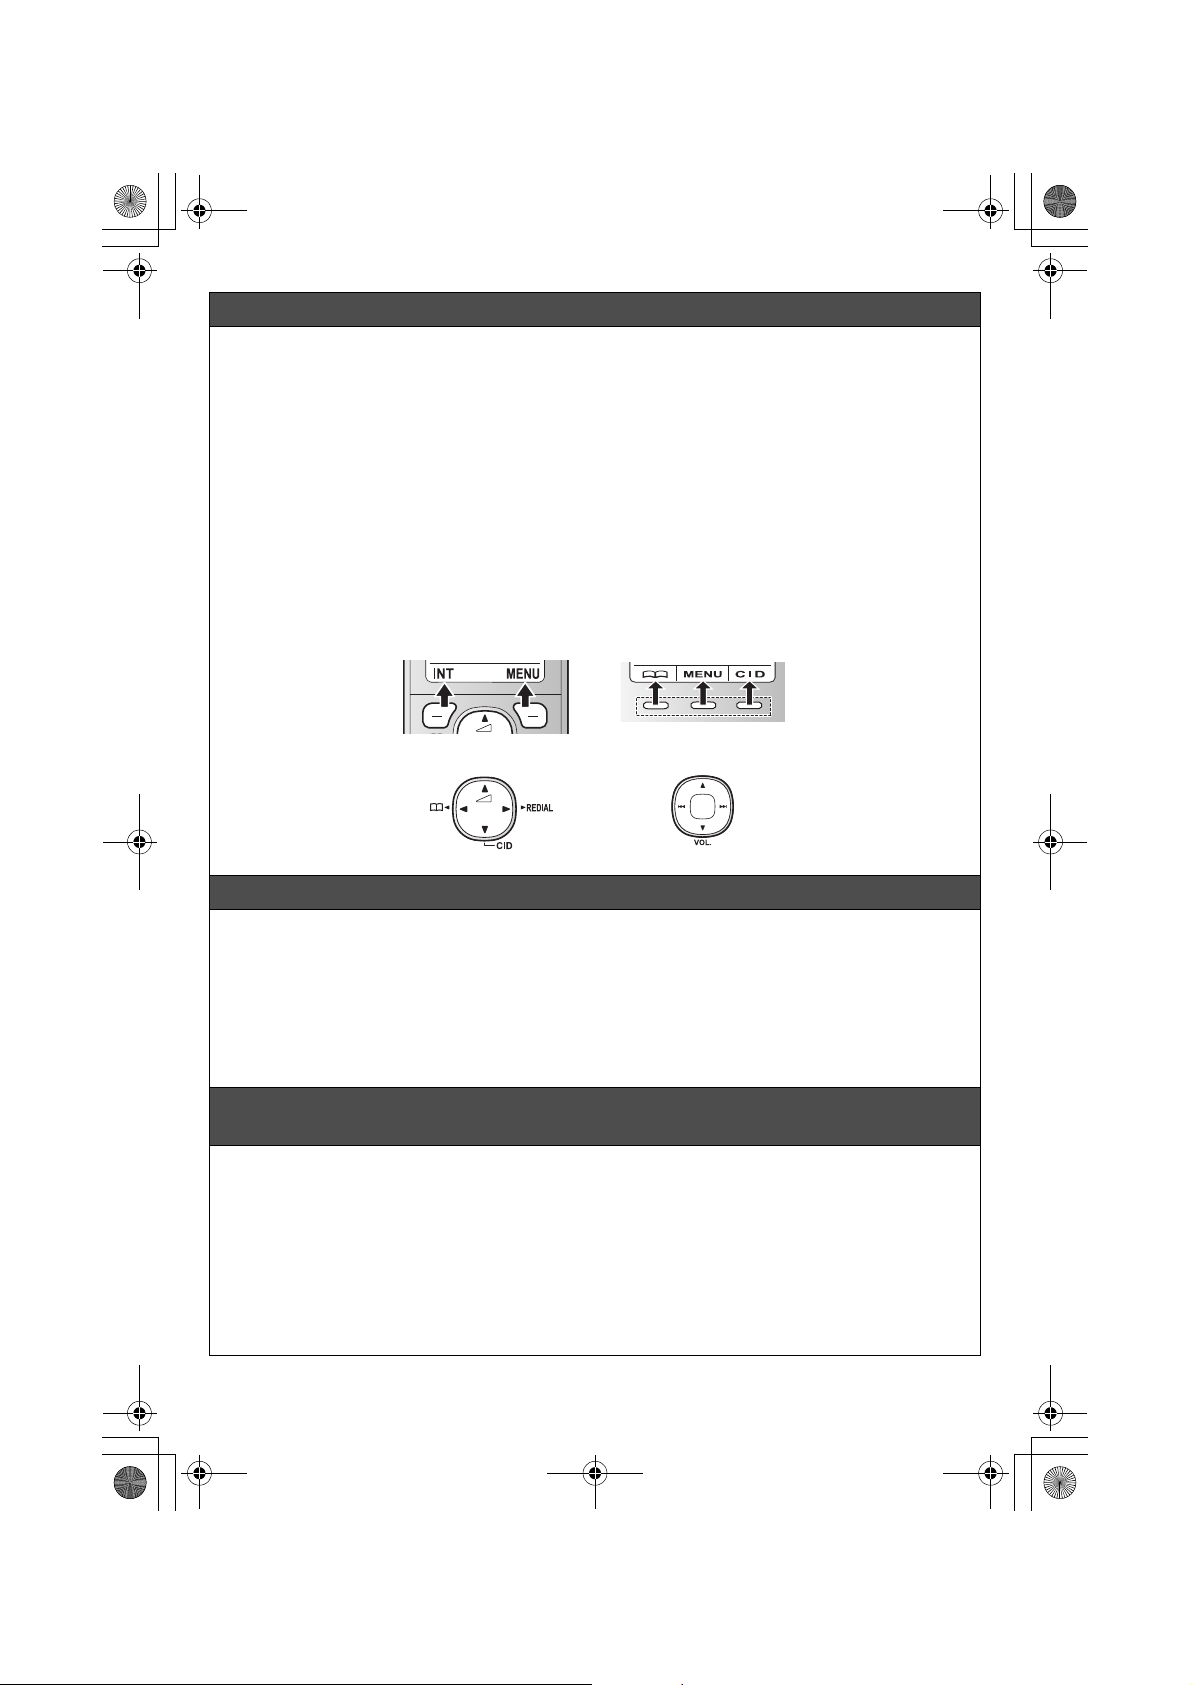
Soft keys
By pressing a soft key, you can select the feature shown directly above it on the display. Pay attention to the
display to see what functions the soft keys are assigned during operation.
Navigator key
Handset:
− {^}, {V}, {<}, or {>}: Scroll through various lists and items.
− ? (Volume: {^} or {V}): Adjust the receiver or speaker volume while talking.
− {<} C: View the phonebook entry.
− {>} REDIAL: View the redial list.
− {V} CID (Caller ID): View the caller list.
Base unit:
− {^}, {V}, {7}, or {8}: Scroll through various lists and items.
− VOL. (Volume: {^} or {V}): Adjust the speaker volume while talking.
− {7}/{8}: Repeat/skip messages during playback.
Handset Base unit
{7}
{^}
{8}
{V}
{^}
{<}{>}
{V}
Date and time (Handset/Base unit)
1 {MENU}(1)1
2 Enter the current month, date, and year. s {OK}
3 Enter the current hour and minute (12-hour clock format).
4 Proceed with the operation for your unit.
Handset: *: Select “AM” or “PM”. s {SAVE}
Base unit: {AM/PM}: Select “AM” or “PM”. s {SAVE}
5 Proceed with the operation for your unit.
Handset: {OFF}
Base unit: {EXIT}
Recording your greeting message for the answering system for the
landline (Handset/Base unit)
If you use a pre-recorded greeting message, you do not need to record your own greeting message.
1 For line 1: {MENU}(3)21
For line 2: {MENU}(3)22
2 {r}: Select the desired greeting message. s {SELECT}
3 {r}: “Yes” s {SELECT}
4 After a beep sounds, speak clearly about 20 cm (8 inches) away from the microphone (2 minutes max.).
5 Press {STOP} to stop recording.
6 Proceed with the operation for your unit.
Handset: {OFF}
Base unit: {EXIT}
– 3 –
Page 4

TG954x_(en)_QG.fm Page 4 Thursday, June 27, 2013 4:13 PM
Link to cell
You can use the unit to make or answer calls using a cellular line. Your cellular phones must have
Bluetooth
site: http://www.panasonic.com/link2cell
LLocate your cellular phone near the base unit. If the cellular phone is too close to the base unit during a
Pairing a Bluetooth cellular phone (Handset/Base unit)
1 For CELL 1: {MENU}(6241
2 Your cellular phone:
3 Wait until a long beep sounds.
4 Proceed with the operation for your unit.
Note:
LMake sure that your cellular phone is set to connect to this product automatically. Refer to your cellular
Trademarks
LThe Bluetooth
®
wireless technology that is compatible with this product. For more details, please visit our Web
cellular call, you may hear noise. For best performance, we recommend placing the cellular phone
between 0.6 m to 3 m (2 feet to 10 feet) away from the base unit.
1
2
1 Cell line
2 Cell phone service providers
For CELL 2: {MENU}(6242
For CELL 3: {MENU}(6243
For CELL 4: {MENU}(6244
LAfter the corresponding CELL indicator on the base unit starts flashing, the rest of the procedure must
be completed within 5 minutes.
While the corresponding CELL indicator is flashing, follow the instructions of your cellular phone to enter
the pairing mode.
LDepending on your cellular phone, it may ask you to enter the base unit PIN (default: “0000”).
LIt may take more than 10 seconds to complete pairing.
LWhen the CELL indicator lights up, the cellular phone is connected to the base unit. You are ready to
make cellular calls.
Handset: {OFF}
Base unit: {EXIT}
phone’s operating instructions.
®
word mark and logos are owned by the Bluetooth SIG, Inc. and any use of such marks by
Panasonic Corporation is under license. All other trademarks identified herein are the property of their
respective owners.
– 4 –
Page 5

TG954x_(en)_QG.fm Page 5 Thursday, June 27, 2013 4:13 PM
Link to cell
Base unit: CELL indicators
Status Meaning
On A cellular phone is connected. Ready to make/receive cellular calls.
Flashing − The cellular line is in use.
− Phonebook entries are being copied from a cellular phone.
− The base unit is searching for the paired cellular phone.
− A cellular call is put on hold.
Flashing rapidly A cellular call is being received.
Light off − A cellular phone is not paired to the base unit.
Handset: Link to cell display items
t A cellular line is in use.
LWhen flashing: The cellular call is put on hold.
LWhen flashing rapidly: A cellular call is being received.
dxe A cellular phone is connected.*1 Ready to make/receive cellular calls.
LWhen turned off: A cellular phone is not connected to the base unit.
*1 Corresponding cellular line(s) is(are) indicated next to the item.
uvYZ A cellular call is being done on that line.
Connecting/disconnecting the cellular phone (Handset/Base unit)
Auto connection to the cellular phone
The unit connects to the cellular phone at regular intervals if the connection is lost. To change the interval
(default: “1 min”), see the operating instructions.
LWhen you are using a cellular line or a Bluetooth headset, the base unit loses its connection from other
Bluetooth devices (cellular phone or headset). To automatically resume the connection to cellular phones,
leave the auto connection on.
Connecting/disconnecting the cellular phone manually
If you will not be using the paired cellular phone’s link to cell feature temporarily (for example, you do not
want the unit to ring when your cellular line receives a call), you can disconnect your cellular phone from the
base unit. If you want to use it again, reconnect the cellular phone to the base unit.
LEven if a paired cellular phone was disconnected from the base unit, if it is brought within the base unit’s
range during the auto connection interval, it may automatically connect to the base unit.
LA disconnected cellular phone is not unpaired from the base unit, so pairing it to the base unit again is
unnecessary.
1 To connect/disconnect:
For CELL 1: {MENU}(6251 (A long beep sounds.)
For CELL 2: {MENU}(6252 (A long beep sounds.)
For CELL 3: {MENU}(6253 (A long beep sounds.)
For CELL 4: {MENU}(6254 (A long beep sounds.)
2 Proceed with the operation for your unit.
Handset: {OFF}
Base unit: {EXIT}
− A cellular phone is not connected to the base unit.
– 5 –
Page 6

TG954x_(en)_QG.fm Page 6 Thursday, June 27, 2013 4:13 PM
Basic operations
Making/Answering calls (Handset)
Making cellular calls 1 Dial the phone number. s {CELL}
LWhen only 1 cellular phone is paired, the unit starts dialing.
2 When 2 or more cellular phones are paired:
{r}: Select the desired cellular phone. s {SELECT}
Making landline calls Dial the phone number. s {C}/{s}
Answering calls {C}/{s}
To hang up {OFF}
To adjust the receiver or speaker
volume
Making a call using the redial list 1 {>} REDIAL s {r}: Select the desired phone number.
Making/Answering calls (Base unit)
Making cellular calls Dial the phone number. s Press the desired cellular line key
Making landline calls Dial the phone number. s {s}
Answering calls {s}
To hang up {s}
To adjust the speaker volume Press {^} or {V} repeatedly while talking.
Making a call using the redial list 1 {REDIAL} s {r}: Select the desired phone number.
Adjusting the ringer volume (Handset/Base unit)
To adjust the handset ringer volume
(cellular line/landline)
Press {^} or {V} repeatedly while talking.
2 To make a cellular call:
When only 1 cellular phone is paired: {CELL}
or
When 2 or more cellular phones are paired:
{CELL} s {r}: Select the desired cellular phone. s
{SELECT}
To make a landline call:
{C}
({CELL 1} to {CELL 4}).
2 To make a cellular call: Press the desired cellular line key
({CELL 1} to {CELL 4}).
To make a landline call: {s}
Press {^} or {V} repeatedly to select the desired volume while
ringing.
– 6 –
Page 7

TG954x_(en)_QG.fm Page 7 Thursday, June 27, 2013 4:13 PM
Basic operations
Phonebook (Handset)
Adding entries 1 {<} C s {MENU}
2 {r}: “Add new entry” s {SELECT}
3 Enter the party’s name (16 characters max.). s {OK}
4 Enter the party’s phone number (24 digits max.). s {OK}
5 {r}: Select the desired group. s {SELECT} 2 times s {OFF}
Making calls 1 {<} C s {r}: Select the desired entry.
2 To make a cellular call:
When only 1 cellular phone is paired: {CELL}
or
When 2 or more cellular phones are paired:
{CELL} s {r}: Select the desired cellular phone. s
{SELECT}
To make a landline call:
{C}
Phonebook (Base unit)
Adding entries 1 {C} s {MENU}
2 {r}: “Add new entry” s {SELECT}
3 Enter the party’s name (16 characters max.). s {OK}
4 Enter the party’s phone number (24 digits max.). s {OK}
5 {r}: Select the desired group. s {SELECT} 2 times s {EXIT}
Making calls 1 {C} s {r}: Select the desired entry.
2 To make a cellular call: Press the desired cellular line key
({CELL 1} to {CELL 4}).
To make a landline call: {s}
Answering system for the landline (Base unit)
Answering on/off To turn on/off:
Listening to messages For line 1: Press {P} (PLAY1).
Answering system for the landline (Handset)
Listening to messages To listen to new messages:
For line 1: Press {L1}(ANSWER ON/OFF).
For line 2: Press {L2}(ANSWER ON/OFF).
For line 2: Press {P} (PLAY2).
For line 1: {MENU}(3231
For line 2: {MENU}(3232
To listen to all messages:
For line 1: {MENU}(3241
For line 2: {MENU}(3242
– 7 –
Page 8

TG954x_(en)_QG.fm Page 8 Thursday, June 27, 2013 4:13 PM
Using Bluetooth devices
Copying phonebook entries from a Bluetooth cellular phone (phonebook transfer)
(Handset/Base unit)
You can copy phonebook entries from the paired cellular phones or other cellular phones (not paired) to the
unit’s phonebook.
1 {MENU}(618
2 To copy from paired cellular phones:
{r}: Select the desired cellular phone. s {SELECT}
LCopied items are stored to the group (“Cell 1” to “Cell 4”) which the cellular phone is paired to.
To copy from other cellular phones (not paired):
{r}: “Other cell” s {SELECT} s {r}: Select the group you want to copy to. s {SELECT}
3 When “Use the cell to transfer phone book” is displayed: Go to step 4.
When “Select mode” menu is displayed:
{r}: Select “Auto” or “Manual”. s {SELECT}
“Auto”: Download all entries from the cellular phone automatically. Go to step 5.
“Manual”: Copy entries you selected.
L“Select mode” menu is displayed only when the cellular phone supports PBAP (Phone Book Access
Profile) for Bluetooth connection.
LSome cellular phones may require you to perform an operation on the cellular phone even if you select
“Auto”.
4 Cellular phone:
Follow the instructions of your cellular phone to copy phonebook entries.
LFor other cellular phones (not paired), you need to search for and select the base unit. The base unit PIN
(default: “0000”) may be required.
LThe entries being copied are displayed on the unit.
5 Wait until “Completed” is displayed.
6 Proceed with the operation for your unit.
Handset: {OFF}
Base unit: {EXIT}
– 8 –
Page 9

TG954x_(en)_QG.fm Page 9 Thursday, June 27, 2013 4:13 PM
Using Bluetooth devices
Using a Bluetooth wireless headset (optional) for landline calls
By pairing a Bluetooth headset to the base unit, you can have a hands-free conversation wirelessly for
landline calls.
LWhile someone is using a cellular line, the Bluetooth headset connection is not available.
Pairing a headset to the base unit (Handset/Base unit)
1 Your headset:
Set your headset to pairing mode.
LRefer to your headset operating instructions.
2 {MENU}(621
1 Pair using the handset or base unit.
2 Paring
3 If your headset PIN is “0000”, go to step 4.
If your headset PIN is other than “0000”, press {CLEAR}, then enter your headset PIN.
LTypically, default PIN is “0000”. Refer to the headset operating instructions.
4 Press {OK}, then wait until a long beep sounds. s {OFF}/{EXIT}
LWhen the HEADSET indicator on the base unit lights up, the headset is available for use.
Operating a Bluetooth wireless headset using a landline (Base unit)
Refer to your headset operating instructions for headset operations.
NAnswering landline calls with your headset
To answer a landline call, turn on your headset referring to your headset operating instructions.
When you finish talking, turn off your headset referring to your headset operating instructions.
LIf you cannot hang up the call using your headset, press {s} on the base unit 2 times.
NSwitching between the base unit and your headset
You can switch between the base unit and your headset:
− during a landline call with the base unit speakerphone.
− during an intercom call between the base unit and handset.
− while listening to messages recorded on the base unit answering system.
NTo switch to your headset:
Press {HEADSET} on the base unit.
NTo switch to the base unit:
Press {s} on the base unit.
1
2
– 9 –
Page 10

TG954x_(en)_QG.fm Page 10 Thursday, June 27, 2013 4:13 PM
Frequently asked questions
Question Cause/solution
Why is _ displayed? LThe handset is too far from the base unit. Move closer.
LThe base unit’s AC adaptor is not properly connected. Reconnect AC
adaptor to the base unit.
LThe handset is not registered to the base unit. Register it.
1 Handset: {MENU}(13)
2 Base unit: Press and hold {LOCATOR} for about 5 seconds until
the registration tone sounds.
3 Handset: Press {OK}, then wait until a long beep sounds.
Why am I unable to pair a cellular
phone to the base unit?
Why is there no dial tone?
(cellular line)
How can I increase the handset
volume level?
Why is the conversation noisy or
cutting off?
Can I add another accessory
handset to my base unit?
Can I keep the batteries charging
all the time?
How can I answer a call waiting
call (2nd call)?
LDepending on the compatibility of the cellular phone, you may not be
able to pair it to the base unit. For more information, please visit
http://www.panasonic.com/link2cell
LConfirm that the Bluetooth feature of your cellular phone is turned on.
You may need to turn this feature on depending on your cellular
phone.
LMake sure that the CELL indicator lights up and the cellular phone is
connected to the base unit.
LThe cellular phone has not been paired to the base unit. Pair the
cellular phone.
LPress the navigator key {^} repeatedly while talking.
LTry to relocate the base unit so that distance to the handset is
minimized.
LIf the same problem occurs even if the handset is next to the base
unit, call Panasonic customer support at
1-800-211-PANA (1-800-211-7262).
LYes, you can add up to 6 handsets (including the handset(s) sold with
your base unit) to a single base unit.
LTo purchase additional accessory handset(s) (KX-TGA950),
please visit: http://www.pstc.panasonic.com
or call 1-800-332-5368. TTY users (hearing or speech impaired users)
can call 1-866-605-1277.
LYou can leave the handset on the base unit or charger anytime. This
will not harm the batteries.
LPress {CALL WAIT} when you hear the call waiting tone.
– 10 –
 Loading...