

Panasonic KX-TG2403B User Manual
PLEASE READ BEFORE USE
AND SAVE.
2.4GHz Cordless Phone
Model No. KX-TG2403B
Pulse-or-tone dialing capability
Operating Instructions
1 Getting Started
2 Making/Answering Calls
3 Speed Dialer
4 One-Touch Dialer
5 Special Features
6 Things You Should Know
7 Referencia rápida
Contents by Section
Attach your purchase receipt here.
For your future reference
Serial No. Date of purchase
(found on the bottom of the unit)
Name and address of dealer
For product service
• Panasonic Servicenters are listed in the servicenter directory.
• Call 1-800-211-PANA(7262) for the location of an authorized
servicenter.
• Panasonic’s e-mail address for customer inquiries:
consumerproducts@panasonic.com
for customers in the USA or Puerto Rico ONLY
When you ship the product
• Carefully pack your unit, preferably in the original carton.
• Attach a letter, detailing the symptom, to the outside of the carton.
Symptom
• Send the unit to an authorized servicenter, prepaid and adequately
insured.
• Do not send your unit to the Panasonic Consumer Electronics Company
listed below or to executive or regional sales offices. These locations do
not repair consumer products.
Panasonic Consumer Electronics Company,
Division of Matsushita Electric Corporation of America
One Panasonic Way, Secaucus, New Jersey 07094
Panasonic Sales Company,
Division of Matsushita Electric of Puerto Rico, Inc.
Ave. 65 de Infantería, Km. 9.5, San Gabriel Industrial Park
Carolina, Puerto Rico 00985
Printed in Malaysia PQQX12978ZA-BM SM0101NA1021
Charge the battery for about
6 hours before initial use.
Panasonic World Wide Web address: http://www.panasonic.com
for customers in the USA or Puerto Rico

Getting Started
1
1-A Accessories
To select the dialing mode TONE (preset) or PULSE
You can program the dialing mode using the handset near the base
unit. The TALK indicator light must be off before programming.
(#) twice (PULSE)
Press PROGRAM
á \ AUTO Ü \ OR \
(*) twice (TONE)
\ PROGRAM á.
•To cancel during programming, press PROGRAM
á. Start again
from the beginning.
•If 3 beeps sound during programming, a wrong key was pressed.
Start again from the beginning.
1-C Settings
1-B Location of Controls
Handset
Base unit
AC Adaptor ....................one
Order No. PQLV1Z
Telephone Line Cord
.......................................one
Belt Clip .........................one
Order No. PQKE10127Z1
• For extra orders, call 1-800-332-5368.
•USE ONLY WITH Panasonic AC ADAPTOR PQLV1 (Order No. PQLV1Z).
•The AC adaptor must remain connected at all times. (It is normal for the
adaptor to feel warm during use.)
•To connect a standard telephone on the same line, see section 6-G.
2
Raise the antennas.
3
Charge the battery
for 6 hours.
•See section 6-A for more
details.
•The IN USE/CHARGE
indicator lights.
1
Connect as shown.
Back Side
Antenna
(1-C)
Antenna
(1-C)
Cradle Lock Switch (1-D)
(HANDSETÒLOCATOR)
Button (5-E)
Charge Contacts (6-A)
IN USE/CHARGE
Indicator (1-C, 5-E)
TALK
4
P
A
U
S
E
PAUSE
F
L
A
S
H
FLASH
T
O
N
E
TONE
7
8
9
0
CHCH
R
E
DIAL
REDIAL
1
2
3
5
6
AUTO
PROGRAM
D
IR
E
C
T
DIRECT
LOUD LOUD
R
IN
G
E
R
RINGER
O
N
O
F
F
Navigator Key
(LOUD/RINGER , ,
AUTO , PROGRAM )
(
1-C, 2-A, 2-B, 3-A, 4-A,
5-F
)
TALK Indicator (2-A)
RECHARGE
Indicator (6-A)
Antenna
(FLASH) Button (5-A, 5-F)
(TONE) Button
(5-C)
(TALK) Button
(2-A)
Charge Contact
(6-A)
Charge Contact
(6-A)
(CH) (Channel)
Button (2-A)
Headset Jack
(6-C)
(PAUSE) Button
(5-D)
(REDIAL) Button (2-A)
(DIRECT) Button (4-A)
IN USE/CHARGE
Indicator
AC Adaptor
Telephone Line Cord
Power Outlet
(AC 120 V, 60 Hz)
Raise the
antennas.
Fasten the
cords to
prevent them
from being
disconnected.
Single-Line Telephone
Jack (RJ11C)
Hooks
Hooks
STOP
Wall Mounting Adaptor ..one
Order No. PQKL10038Z3
Getting Started
Section 1
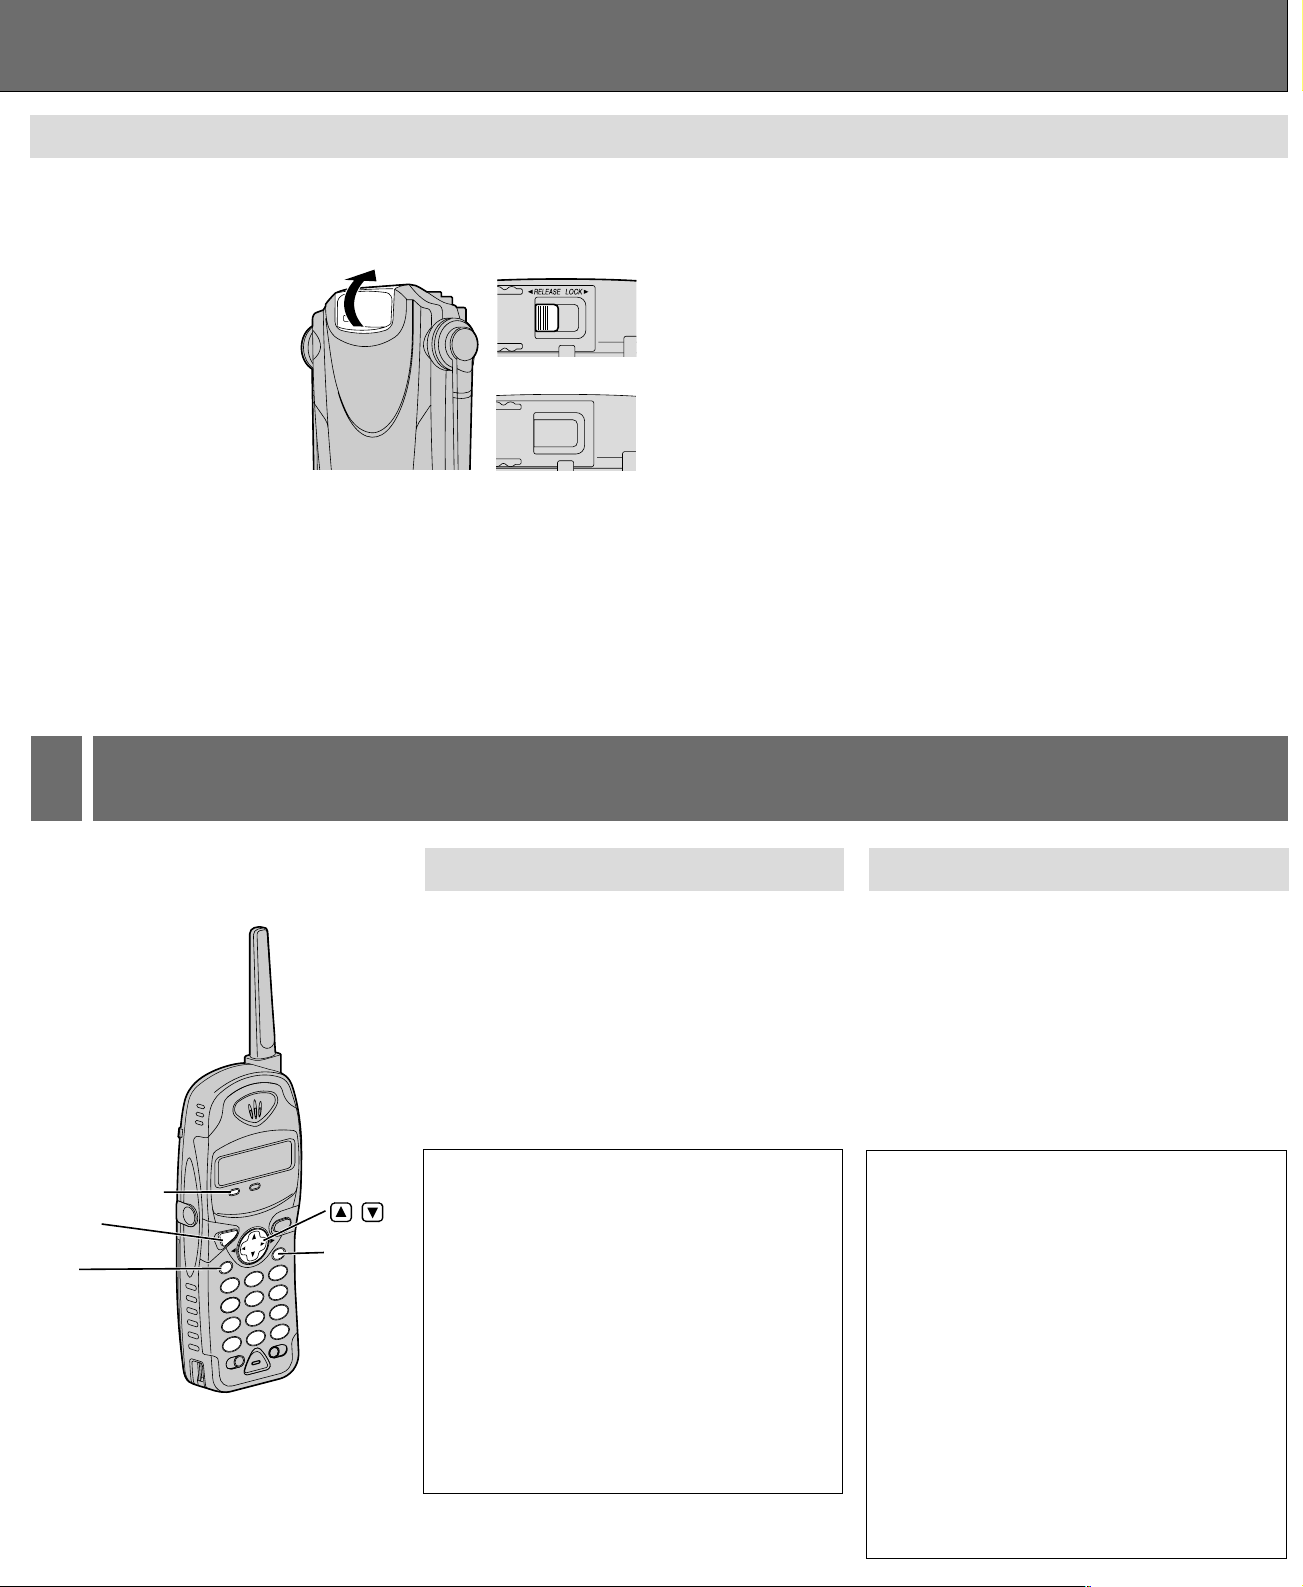
Selecting the ringer volume
The TALK indicator light must be off.
•To select HIGH (preset) or LOW,
press
Ñ or Ö.
Each time you press
Ñ or Ö, the ringer
volume will change and the selected volume
will ring.
•To turn the ringer OFF,
press and hold
Ö until 2 beeps sound.
•To turn the ringer ON,
press
Ñ.
The ringer will sound at the HIGH level.
•When you replace the battery, the selected
ringer volume setting will return to the factory
set.
To redial the last number dialed
Press (TALK) \ (REDIAL).
To select the receiver volume
3 levels (HIGH, MEDIUM, LOW) are available.
Press
Ñ or Ö while talking.
•Each time you press
Ñ or Ö, the volume level
will change.
If noise interferes with the
conversation
Press (CH) to select a clearer channel or move
closer to the base unit.
1-D Wall Mounting
If the handset is off the base unit,
press
(TALK).
•You can also answer a call by pressing any dialing
button
(0) to (9), (*) or (#) (— Any Key Talk).
OR
If on the base unit, just lift up.
2-B Answering Calls2-A Making Calls
1
Press (TALK).
•The TALK indicator lights.
•If an alarm tone sounds, see 6-F.
2
Dial a phone number.
3
To hang up, press (TALK) or place the
handset on the base unit.
•The indicator light goes out.
• For best operating performance, see
section 6-D.
This unit can be mounted on a wall phone plate.
1
Adjust the angle of the cradle:
#Slide the lock
switch to
“RELEASE”.
$Rotate the cradle
90° until it faces
straight up.
%Slide the lock
switch to “LOCK”
with the cradle
facing straight up.
2
Connect the AC adaptor.
3
#Tuck the telephone line
cord inside the wall
mounting adaptor.
$Connect the telephone
line cord to the unit.
%Install the adaptor by
pushing it in the
direction of the arrow.
•The word “UP” should face
upward.
4
Connect the telephone line
cord. Mount the unit, then
slide down.
•Raise the antennas.
Section 2
Making/Answering Calls
2
(REDIAL)
TALK Indicator
(TALK)
(CH)
,
 Loading...