

Page 1
D816
DIGITAL SUPER HYBRID SYSTEM
D1232
DIGITAL SUPER HYBRID SYSTEM
®
Digital Super Hybrid System
User Manual
Panasonic
Panasonic
Model
KX-TD816C
KX-TD1232C
Please read this manual before using Digital Super Hybrid System.
Page 2

Thank you for purchasing the Panasonic Telephone System.
2 User Manual
Page 3
System Components
Model No. Description
System Components
Service Unit KX-TD816
KX-TD1232
KX-T7220
KX-T7230
KX-T7235
KX-T7250
Telephone
Optional
Equipment
User-supplied
Equipment
KX-T7420
KX-T7425
KX-T7431
KX-T7433
KX-T7436
KX-T7240
KX-T7440
KX-T7441
Single Line Telephones
Digital Super Hybrid System (Main Unit)
Digital Proprietary Telephone
Digital Proprietary Telephone with 2-line Display
Digital Proprietary Telephone with 6-line Display
Digital Proprietary Telephone
Digital Proprietary Telephone
Digital Proprietary Telephone
Digital Proprietary Telephone with 1-line Display
Digital Proprietary Telephone with 3-line Display
Digital Proprietary Telephone with 6-line Display
Digital DSS Console
Digital DSS Console for Attendant
Digital DSS Console with Answer and Release
buttons
For your future reference
SERIAL NO.
(found on the bottom of the unit)
DATE OF PURCHASE
NAME OF DEALER
DEALER'S ADDRESS
DEALER'S TEL. NO.
User Manual 3
Page 4

Attention
Attention
When using the KX-T7200 and KX-T7400 series, keep the following conditions in
mind:
• If there is an y trouble, unplug th e extension l ine and connect a kno wn workin g phone. If the
known working phone operates properly, have the defective phone repaired by a specified
Panasonic Fa cto ry Ser vic e Center. If the known working phone does not operate properly,
check the Digital Super Hybrid System and the internal extension wiring.
• Keep the u nit a way from heat ing appl iances a nd elect rical n oise gene rating de vices such as
fluorescent lamps and motors.
• The unit should be kept free of dust, moisture and vibration, and should not be exposed to
direct sunlight.
• Do not use benzine, thi nner , or a ny abrasi v e po wder to clean t he cabinet. Wipe it with a so ft
cloth.
• Do not use any handset other than a Panasonic handset.
WARNING
TO PREVENT FIRE OR SHOCK HAZARD, DO NOT EXPOSE THIS PRODUCT TO
RAIN OR ANY TYPE OF MOISTURE.
4 User Manual
Page 5

Introduction
Who Should Use This Manual
This manual is designed for users of Digital Super Hybrid System KX-TD816 and KXTD1232. It is to be used after the system is installed and System Programming is completed.
The focus is Digital Proprietary Telephones (DPTs);
KX-T7220/KX-T7230/KX-T7235/KX-T7250/KX-T7420/KX-T7425/KX-T7431/
KX-T7433/KX-T7436, Digital DSS Consoles; KX-T7240/KX-T7440/
KX-T7441, Single Line Telephones (SLTs) and their features. The step-by-step procedures
required to activate each feature are discussed in detail. Illustrations of the KX-TD816 and the
KX-TD1232 systems and the required System Pro gramming are prov ided under separat e cover
in the Installation Manual and the Programming Guide.
Construction of This Manual
This manual consists of the following sections:
(Section 1) DPT Overview
Provides configuration information on DPTs. It provides an illustration of each telephone,
identifies th eir f eature b ut tons, s upplie s backgr ound inf ormati on on the se feature buttons, and
provides initial settings.
(Section 2) Station Programming
Provides the steps requi r ed to ass ign features to DPT flexible b ut to ns and to the DPT system.
(Section 3) User Programming
Provides the steps required to assign some features to the system.
(Section 4) Station Features and Operation (DPT/SLT)
Provides background information on the DPT/SLT features and lists the steps required to
activate each feature.
(Section 5) DSS Console Features
Provides configuration information on the DSS Console. It gives background information on
the DSS Console features and lists the steps required to activate each feature.
(Section 6) Appendix
Provides Display Examples, a Feature Number List, Tone List, and other information are
explained in this section.
(Section 7) Index
Provides the important wo rds and phrases to help you access the required information ea sily.
Introduction
Features and Capabilities
KX-TD816 and KX-TD1232 systems are soph isticated and powerfu l s yst ems t hat sa ti sfy just
what you expect of an office communications system. Some of the remarkable features are
listed below.
Automatic Callback Busy (Camp-On) informs you when the selected outside line or the
called party becomes idle.
User Manual 5
Page 6

Introduction
Call Log, Incoming (— Option) allows you to confirm the incoming outsid e call informati on
on the display. You can also call back the caller by selecting one of the memorized numbers.
This feature is available only for the KX-T7230, KX-T7235, KX-T7433 and KX-T7436.
Call Log, Outgoing redials by sel ecting one of the last fi v e outsi de calls you made, accordi ng
to the number i nformation o n the disp lay. This feat ure is a v ailable only for KX- T7436 and KXT7235.
Conference, Unattended When you are in a conference with two outside parties, you can
leave t he conferenc e and allo w the other two parti es to continue the con v ersation. You can also
return to the conference.
Data Line Security prohibi ts v arious tones, such as c all wa iting t one or hol d recall tone, fr om
sounding at the ext ension in the data communication mode. I t a ls o bl ocks overriding by other
extensions, such as Executive Busy Override.
Doorphone and Door Opener (— Option) enables the conversation between you and a
visitor at door. You can also unlock the door a few seconds from your phone.
Executive Busy Override allows you to enter into an existing conversation at an extension/
outside line.
Full One-Touch Dialing allows you to have easy access to a desired party or system feature
by pressing just one button.
Message Waiting allows you to leave a message notification for another extension. The
message waiting lamp (MESSAGE indicator) gives a visual indication that a message
notificat ion has been receiv ed. Even if the Messa ge button is not pro vided or assigned, a special
tone after going off-hook indicates that a message notification has been received.
Paralleled Telephone Connection allows you to connect your DPT in parallel with a SLT.
Each telephone can have the same extension number so that you can use either telephone. If
the eXtra Device Port (XDP) feature is av ailable through System Programming, each telephon e
can be connected to t he same e xt ensio n port but hav e different extensio n numbe rs so t hat th e y
can act as completely different extensions.
System Feature Access Menu allows you to access various features easily by following the
display on the LCD and pressing corresponding buttons. This feature is available only for the
KX-T7431, KX-T7433, KX-T7436 and KX-T7235.
VPS Integration (— Option) enables forwarding any incoming call to V oice Mail. Recording
or Playing back the message(s) is also available. To use Voice Mail services, installing a Voice
Processing System (VPS) is required.
Terms used in the Descriptions
Feature N umbers
A feature number is an access code for various functions when programming or executing
features using proprietary or single line telephones connected to the system. You can access
available features by dialing the corresponding feature number (and additional number, if
required).
There are two types of feature numbers as follows:
• Flexible feature number
• Fixed feature number
While fixed feature numbers cannot be changed, flexible feature numbers can be changed.
Refer to the Programming Guide for details. In this manual, the default numbers are used to
6 User Manual
Page 7

Introduction
describe each operati on and illustrat ion. Use the ne w programmed number if you have c hanged
a flexible feature number. The lists of fixed numbers and default flexible feature numbers are
shown in the Appendix.
If you use a dial pulse (DP) type single line telephone (SLT);
It is not possible to access features that have " " or "#" in their feature numbers.
Tones
Various tone types, such as Confirmation to ne, Dial tone , Call Waiting tone, etc. are explained
in the Appendix.
Display
The display example s are in each operat ion ste p, if req uired. The dis play i nform ation list i s in
the Appendix for your convenience.
Programming Guide Refer enc es
The related and r equi re d programming titles are no ted for your reference in t he Programming
Guide. System Programmi ng should be done by t he extension which c onnected to Jack numbe r
01 or the System Manager. A KX-T7431, KX-T7433, KX-T7436, KX-T7230 and KX-T7235
can be used for this programming. Station Programming is individual programming at your
own proprie tary tele phone (PT). You can customize the e xtension t o your needs using an y type
of proprietary telephon e.
Features Guide References
The related feature titles are noted for your reference in the Features Guide.
User Manual References
The related feature titles are noted for your reference in this manual.
Warning
Warning t o the customer regarding the system pa ssword.
a) Please maintain the se crecy of the password. Because a person who kno ws the passw ord
can easily take o ver the con trol of any PBX syste m in the market and he may proceed to
commit toll fraud.
b) Please select the dealer whom you can trust for the installation and maintenance.
c) Please change the password periodically.
d) We strongly recommend that you set the system password to 7 digits for maximum
protection against "hackers".
User Manual 7
Page 8

Introduction
Information
This Class A digital apparatus complies with Canadian ICES-003.
Notice:
The Industry Canada label identifies certified equipment. This certification means that the
equipment meets tele communications netw ork protecti ve, ope rational and saf ety requirements
as prescribed in the appropriate Terminal Equipment Technical Requirements document(s).
The Department does not guarantee the equipment will operate to the user's satisfaction.
Before installing this equipment, users should ensure that it is permissible to be connected to
the facilities of th e loca l telecommunications company. The equipment must also be installed
using an accepta ble method of conne ction. The customer should be aw are that complia nce with
the above conditions may not prevent degradation of service in some situations.
Repairs to certified equipment should be coordinated by a representative designated by the
supplier. Any repairs or alterations made by the user to this equipment, or equipment
malfunctions, may give the telecommunications company cause to request the user to
disconnect the equipment.
Users should ensure for their own protection that the electrical ground connections of the
power util ity, telephone l ines and inte rnal meta llic wate r pipe syste m, if prese nt, are con nected
together. This precau tion may be particularly important in rural areas.
Caution:
Users should not attempt to make such connections themselves, but should contact the
appropriate electric inspection authority, or electrician, as appropriate.
Notice:
The Ringer Equivalence Number (REN) assigned to each terminal device provides an
indication of the maximum number of terminals allowed to be connected to a telephone
interface. The termination on an interface may consist of any combination of devices subject
only to the requirement that the sum of the Ringer Equi valence Numbe rs of all the dev ices does
not exceed 5.
The Ringer Equivalence Number of This Unit:
(found on the bottom of the unit)
8 User Manual
Page 9

Introduction
Renseignements
Cet appareil numérique de la classe A est conforme à la norme NMB-003 du Canada.
AVIS:
L'étiquette d'Industrie Canada identifie le matériel homologué. Cette étiquette certifie que le
matériel est conforme aux normes de protection, d'exploitation et de sécurité des réseaux de
télécommunications, comme le prescr iv ent les docume nts concernant les exi gences techni ques
relativ es au maté riel ter minal. Le Ministè re toutefoi s n'ass ure pas que le matériel fonctionne ra
à la satisfaction de l'utilisateur.
Avant d'installer ce matériel, l'utilisateur doit s'assurer qu'il est permis de le raccorder aux
installations de l'entreprise locale de télécommunications. Le matériel doit également être
installé en suivant une méthode acceptée de raccordement. L'abonné ne doit pas oublier qu'il
est possible que la conformité aux conditions énoncées ci-dessus n'empêchent pas la
dégradation du service dans certaines situations.
Les réparations de matériel homologué doivent être coordonnées par un représentant désigné
par le fournisseur. L'entreprise de télécommunications peut demander à l'utilisateur de
débrancher un appa reil à l a sui te de répa rati ons ou de modifications ef fe ctuées par l'ut ilis ateur
ou à cause de mauvais fonctionnement.
Pour sa propre protection, l'utilisateur doit s'assurer que tous les fils de mise à la terre de la
source d'éner gie électri que, des lign es téléphoni ques et des canalisati ons d'eau mét alliques, s 'il
y en a, sont raccordés ensemble. Cette précaution est particulièrement importante dans les
régions rurales.
Avertissement:
L'utilisateur ne doit pas tenter de faire ces raccordements lui-même; il doit avoir recours à un
service d'inspection des installations électriques, ou à un électricien, selon le cas.
AVIS:
L'indice d'équivalence de la sonnerie (IES) assigné à chaque dispositif terminal indique le
nombre maximal de termin aux qui peuvent être raccordés à une i nterface. La te rminaison d'une
interface téléphonique peut consister en une combinaison de quelques dispositifs, à la seule
condition que la so mme d'i ndices d'équivalence de la sonnerie de tous les dispositifs n'excède
pas 5.
L'indice d'équivalence de la sonnerie de cet appareil est:
(inscrit sur le dessous de l'appareil)
User Manual 9
Page 10

Table of Contents
Table of Contents
1 DPT Overview
1.1 Configuration............................................................................................................... 16
1.1.1 Configuration..............................................................................................................16
1.1.2 Location of Controls................................................................................................... 17
1.1.3 Connection.................................................................................................................. 26
1.1.4 Feature Buttons........................................................................................................... 28
1.1.5 Initial Setting for KX-T7400 Series ........................................................................... 34
1.1.6 Initial Setting for KX-T7200 Series ........................................................................... 39
1.1.7 LED Indication....................................... .................................................................... 43
2 Station Programming
2.1 Station Programming Instructions ............................................................................ 46
2.1.1 Station Programming Instructions.............................................................................. 46
2.2 Station Programming.................................................................................................. 52
2.2.1 Initial Settings............................................................................................................. 52
2.2.2 Flexible Button Assignment ....................................................................................... 54
2.2.3 Phantom Extension Ringing On/Off Set .................................................................... 56
2.2.4 Ringing Tone Selection for CO Buttons..................................................................... 57
2.2.5 Ringing Tone Selection for Intercom Calls................................................................ 58
2.2.6 Self-Extension Number Confirmation........................................................................ 59
2.2.7 Station Programming Data Default Set...................................................................... 60
2.2.8 Station Speed Dialing Number/Name Assignment [KX- T7235/KX-T7431/ KX-T7433/
KX-T7436 only]........................................................................................................ 61
3 User Programming
3.1 User Programming Instructions................................................................................. 70
3.1.1 General Programming Instructions............................................................................. 70
3.1.2 Programming Methods............................................................................................... 74
3.2 User Programming...................................................................................................... 76
3.2.1 [000] Date and Time Set............................................................................................. 76
3.2.2 [001] System Speed Dialing Number Set ................................................................... 79
3.2.3 [002] System Speed Dialing Name Set...................................................................... 82
3.2.4 [003] Extension Number Set...................................................................................... 85
3.2.5 [004] Extension Name Set.......................................................................................... 88
3.2.6 [017] DISA User Codes.............................................................................................. 91
4 Station Features and Operation (DPT/SLT)
4.1 Before Operating ......................................................................................................... 94
4.1.1 Before Operating........................................................................................................ 94
4.2 Basic Operations.......................................................................................................... 97
4.2.1 Making Calls .............................................................................................................. 97
4.2.2 Receiving Calls........................................................................................................... 99
4.3 Station Features and Operation............................................................................... 100
4.3.1 Absent Message Capability...................................................................................... 100
4.3.2 Account Code Entry................................................................................................. 103
4.3.3 Alternate Calling — Ring / Voice............................................................................. 107
10 User Manual
Page 11

Table of Contents
4.3.4 Answering, Direct Outside Line [PT only]............................................................... 109
4.3.5 Automatic Callback Busy (Camp-On)......................................................................110
4.3.6 Background Music (BGM) [PT only].......................................................................113
4.3.7 Busy Station Signaling (BSS)...................................................................................114
4.3.8 Call Forwarding — SUMMARY ..............................................................................116
4.3.9 Call Forwarding — All Calls ....................................................................................118
4.3.10 Call Forwarding — Busy ........................................................................................119
4.3.11 Call Forwarding — No Answer ..............................................................................120
4.3.12 Call Forwarding — Busy / No Answer...................................................................122
4.3.13 Call Forwarding — to Outside Line........................................................................124
4.3.14 Call Forwarding — Follow Me...............................................................................126
4.3.15 Call Forwarding — CANCEL.................................................................................128
4.3.16 Call Hold.................................................................................................................130
4.3.17 Call Hold, Exclusive [PT only]...............................................................................132
4.3.18 Call Hold Retrieve...................................................................................................134
4.3.19 Call Park..................................................................................................................136
4.3.20 Call Pickup, Directed..............................................................................................138
4.3.21 Call Pickup, Group..................................................................................................139
4.3.22 Call Pickup, Outside Line.......................................................................................140
4.3.23 Call Pickup Deny.....................................................................................................141
4.3.24 Call Splitting ...........................................................................................................142
4.3.25 Call Transfer — to Extension..................................................................................144
4.3.26 Call Transfer — to Outside Line.............................................................................147
4.3.27 Call Waiting.............................................................................................................149
4.3.28 Call Waiting from Central Office............................................................................152
4.3.29 Camp-On Transfer to Phantom Extension ..............................................................154
4.3.30 Conference ..............................................................................................................156
4.3.31 Conference, Unattended [PT only]...................................................... ....................160
4.3.32 CTI (Computer Telephony Integration) Code Entry...............................................162
4.3.33 Data Line Security...................................................................... ......... ....................163
4.3.34 Direct Inward System Access (DISA)..................................................................... 165
4.3.35 Do Not Disturb (DND)............................................................................................169
4.3.36 Do Not Disturb (DND) Override.............................................................................172
4.3.37 Doorphone Call.......................................................................................................174
4.3.38 Electronic Station Lockout...................................................................................... 177
4.3.39 Emergency Call....................................................................................................... 179
4.3.40 Executive Busy Override — Extension...................................................................180
4.3.41 Executive Busy Override — Outside Line [PT only]..............................................182
4.3.42 Executive Busy Override Deny...............................................................................184
4.3.43 External Feature Access..........................................................................................185
4.3.44 Flash [PT only]........................................................................................................187
4.3.45 Full One-Touch Dialing [PT only] ..........................................................................188
4.3.46 Handset Microphone Mute [PT only].....................................................................189
4.3.47 Hands-free Answerback [PT only]..........................................................................190
4.3.48 Hands-free Operation [PT only]..............................................................................191
4.3.49 Intercom Calling......................................................................................................193
4.3.50 Live Call Screening (LCS) [PT only]......................................................................195
4.3.51 Lockout....................................................................................................................202
4.3.52 Log-In / Log-Out.....................................................................................................203
User Manual 11
Page 12

Table of Contents
4.3.53 M essage Waiting..................................................................................................... 205
4.3.54 M icrophone Mute [PT only]................................................................................... 209
4.3.55 Night / Day (Lunch / Break) Service...................................................................... 210
4.3.56 Off-Hook Call Announcement (OHCA) ................................................................ 215
4.3.57 Off-Hook Call Announcement (OHCA) —Whisper [PT only] ............................. 219
4.3.58 Off-Hook Monitor [PT only].................................................................................. 223
4.3.59 One-Touch Dialing [PT only]................................................................................. 225
4.3.60 Operator Call .......................................................................................................... 226
4.3.61 Outward Dialing, Line Access — SUMMARY ..................................................... 227
4.3.62 Paging — SUMMARY........................................................................................... 230
4.3.63 Paging — ANSWER .............................................................................................. 234
4.3.64 Paging — Deny [PT only]...................................................................................... 235
4.3.65 Paging and Transfer................................................................................................ 236
4.3.66 Paralleled Telephone Connection........................................................................... 240
4.3.67 Phantom Extension................................................................................................. 242
4.3.68 Pickup Dialing (Hot Line)...................................................................................... 246
4.3.69 Privacy Release [PT only] ...................................................................................... 248
4.3.70 Pulse to Tone Conversion....................................................................................... 250
4.3.71 Quick Dialing ......................................................................................................... 251
4.3.72 Redial, Last Number............................................................................................... 252
4.3.73 Redial, Saved Number [PT only]............................................................................ 253
4.3.74 Secret Dialing [PT only]......................................................................................... 254
4.3.75 Station Program Clear ............................................................................................ 255
4.3.76 Station Speed Dialing............................................................................................. 257
4.3.77 System Speed Dialing............................................................................................. 259
4.3.78 Timed Reminder..................................................................................................... 261
4.3.79 Toll Restriction Override — SUMMARY.............................................................. 264
4.3.80 Toll Restriction Override by Account Code Entry................................................. 265
4.3.81 Toll Restriction Override for System Speed Dialing.............................................. 266
4.3.82 Trunk Answer From Any Station (TAFAS)............................................................ 267
4.3.83 Two-Way Recording into Voice Mail [PT only]..................................................... 268
4.3.84 Uniform Call Distribution (UCD) .......................................................................... 270
4.3.85 Voice Mail Integration............................................................................................ 271
4.3.86 Voice Mail Transfer [PT only]................................................................................ 274
4.3.87 Walking COS.......................................................... ......... ....................................... 276
4.4 Operator / Manager Service Features ..................................................................... 278
4.4.1 Operator/Manager Service Features......................................................................... 278
4.4.2 Background Music (BGM) — External................................................................... 279
4.4.3 Call Log Lock Control, Incoming............................................................................ 282
4.4.4 Hotel Application — Room Status (operator only).................................................. 283
4.4.5 Live Call Screening Password Control..................................................................... 286
4.4.6 Outgoing Message (OGM)....................................................................................... 287
4.4.7 Remote Station Lock Control................................................................................... 296
4.4.8 System Working Report............................................................................................ 297
4.4.9 Timed Reminder, Remote (Wake-Up Call) .............................................................. 300
4.5 Special Display Features ........................................................................................... 308
4.5.1 Special Display Features.......................................................................................... 308
4.5.2 Call Forwarding / Do Not Disturb (KX-T7436 / KX-T7235 only).......................... 309
4.5.3 Call Log, Incoming (KX-T7436 / KX-T7433 / KX-T7235 / KX-T7230 only) ....... 311
12 User Manual
Page 13

Table of Contents
4.5.4 Call Log Lock, Incoming (KX-T7436 / KX-T7433 / KX-T7235 / KX-T7230 only)..317
4.5.5 Call Log, Outgoing (KX-T7436 / KX-T7235 only)..................................................319
4.5.6 Call Monitoring in Station Hunting (KX-T7436 / KX-T7235 only) ........................320
4.5.7 KX-T7235 Display Features.....................................................................................322
4.5.8 KX-T7235 Display Features - Call Directory...........................................................324
4.5.9 KX-T7235 Display Features - System Feature Access Menu...................................325
4.5.10 KX-T7431 / KX-T7433 / KX-T7436 Display Features.......................................... 334
4.5.11 KX-T7431 / KX-T7433 / KX-T7436 Display Features - Call Directory................337
4.5.12 KX-T7431 / KX-T7433 / KX-T7436 Display Fea tu res - System Feature Access Menu ..342
5 DSS Console Features
5.1 Configuration..............................................................................................................348
5.1.1 Configuration.............................................................................................................348
5.1.2 Location of Controls..................................................................................................349
5.1.3 Feature Buttons ............................... ........................................................................ ..351
5.2 Station Programming.................................................................................................352
5.2.1 Station Programming Instructions.............................................................................352
5.2.2 Extension Number Assignment.................................................................................354
5.2.3 One-Touch Dialing Assignment ................................................................................355
5.2.4 One-Touch Access Assignment for System Features................................................356
5.3 DSS Console Features ................................................................................................357
5.3.1 Direct Station Dialing................................................................................................357
5.3.2 One-Touch Dialing....................................................................................................358
5.3.3 One-Touch Access for System Features....................................................................359
5.3.4 Call Transfer.......................................................................................... ......... ...........360
5.3.5 ANSWER and RELEASE Buttons Operation [KX-T7441 only].............................361
6 APPENDIX
6.1 APPENDIX .................................................................................................................364
6.1.1 Display Examples......................................................................................................364
6.1.2 Feature Number List..................................................................................................371
6.1.3 Tone List.................................................................................................................... 375
6.1.4 Troubleshooting.........................................................................................................377
7 Index...............................................................................................379
User Manual 13
Page 14

Table of Contents
14 User Manual
Page 15

DPT Overview
Section 1
DPT Overview
Note: All illustrations used in the initial setting are
based on model KX-T7235.
User Manual 15
Page 16
DPT Overview
1.1 Configuration
1.1.1 Configuration
Panasonic Digi tal Proprietary Telephones (DPTs) are ava ilable to utiliz e various fe atures of the
KX-TD816 and KX-TD1232 System, in addition to supporting basic telephone services
(making and receiving calls).
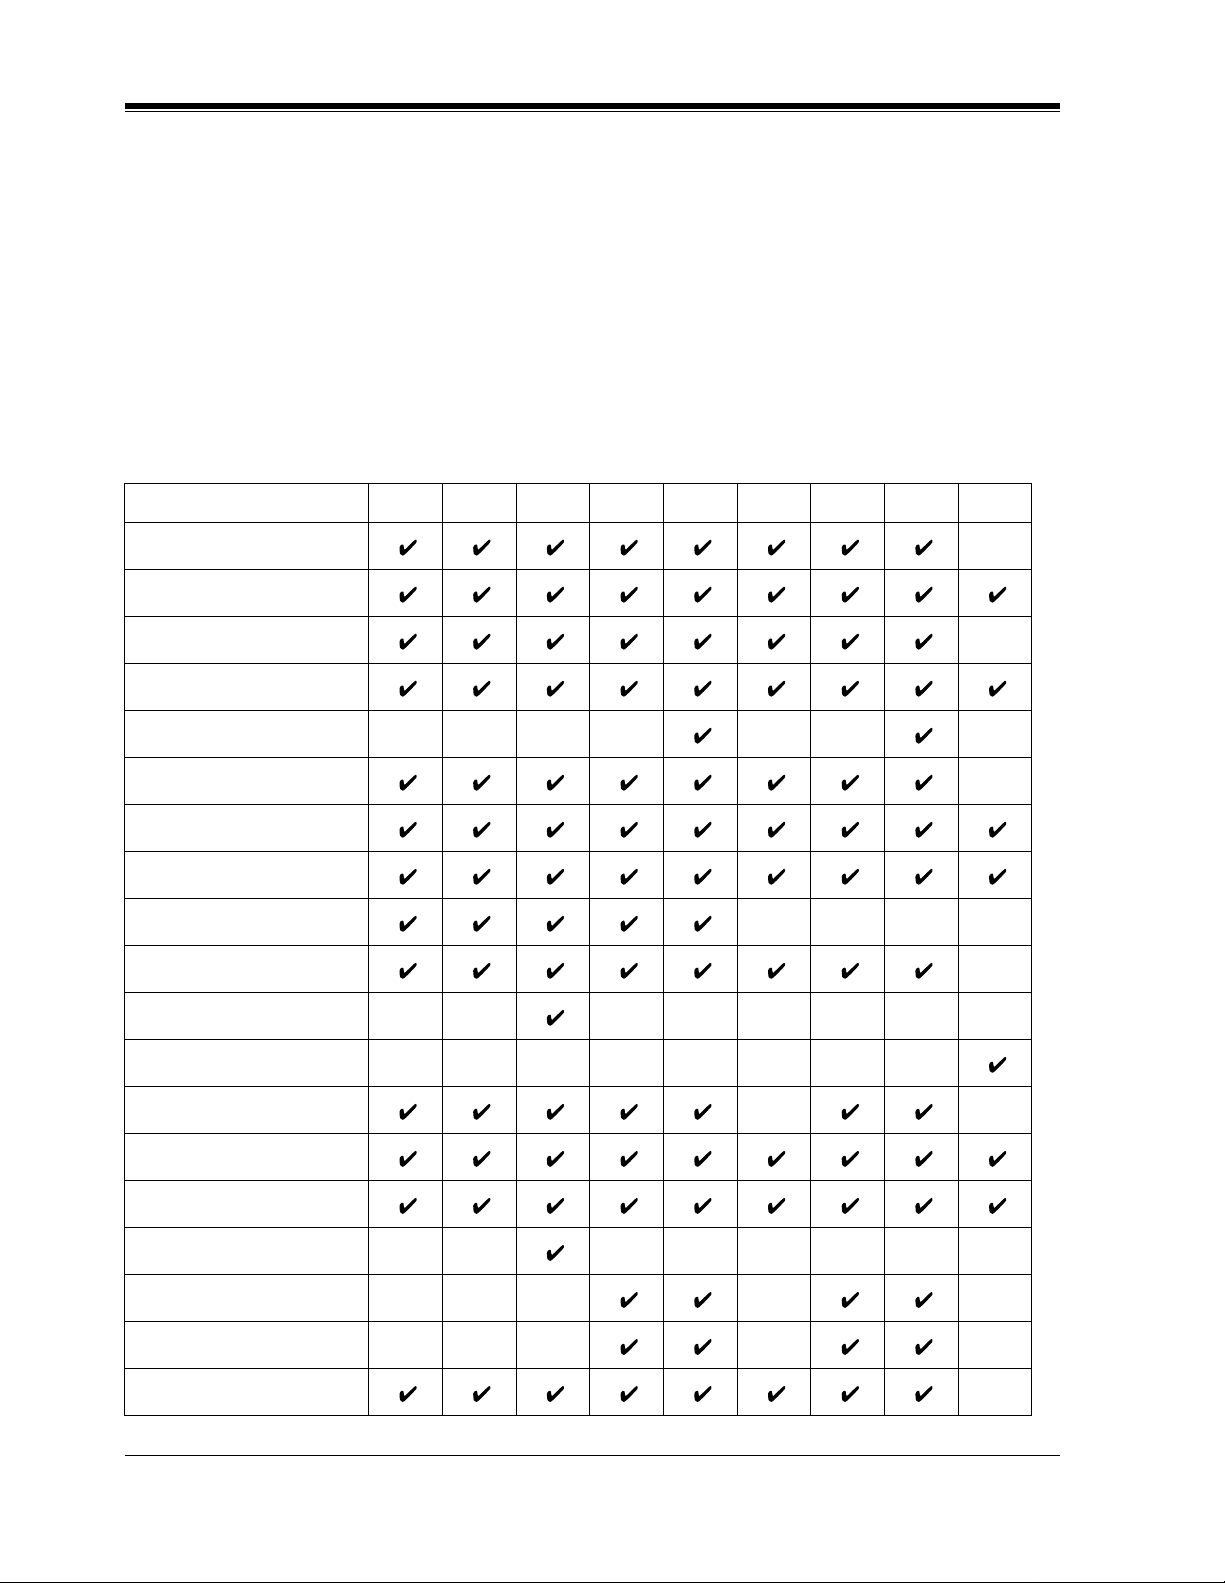
There are nine DPT models.
KX-T7420 KX-T7425 KX-T7431 KX-T7433 KX-T7436
KX-T7400 Series
Display
None None
Soft Buttons
and
Function Buttons
Jog Dial YesYesYesYesYes
CO Buttons1224122424
Fixed Feature
Buttons
Display
Soft Buttons
and
Function Buttons
None None None 3 Soft Buttons
Refer to the "Fixed Buttons" in 1.1.4 Feature Buttons
KX-T7200 Series
KX-T7220 KX-T7230 KX-T7235 KX-T7250
None
None 3 Soft Buttons
16 char./line,
2-line LCD
16 char./line,
1-line LCD
Tilt-up,
24 char./line,
6-line LCD
3 Soft Buttons/
10 Function
Buttons
Tilt-up,
16 char./line,
3-line LCD
None
None
Tilt-up,
24 char./line,
6-line LCD
3 Soft Buttons/
10 Function
Buttons
Speakerphone Yes Yes Yes Monitor only
CO Buttons 24 24 12 6
Fixed Feature
Buttons
Refer to the "Fixed Buttons" in 1.1.4 Feature Buttons
16 User Manual
Page 17
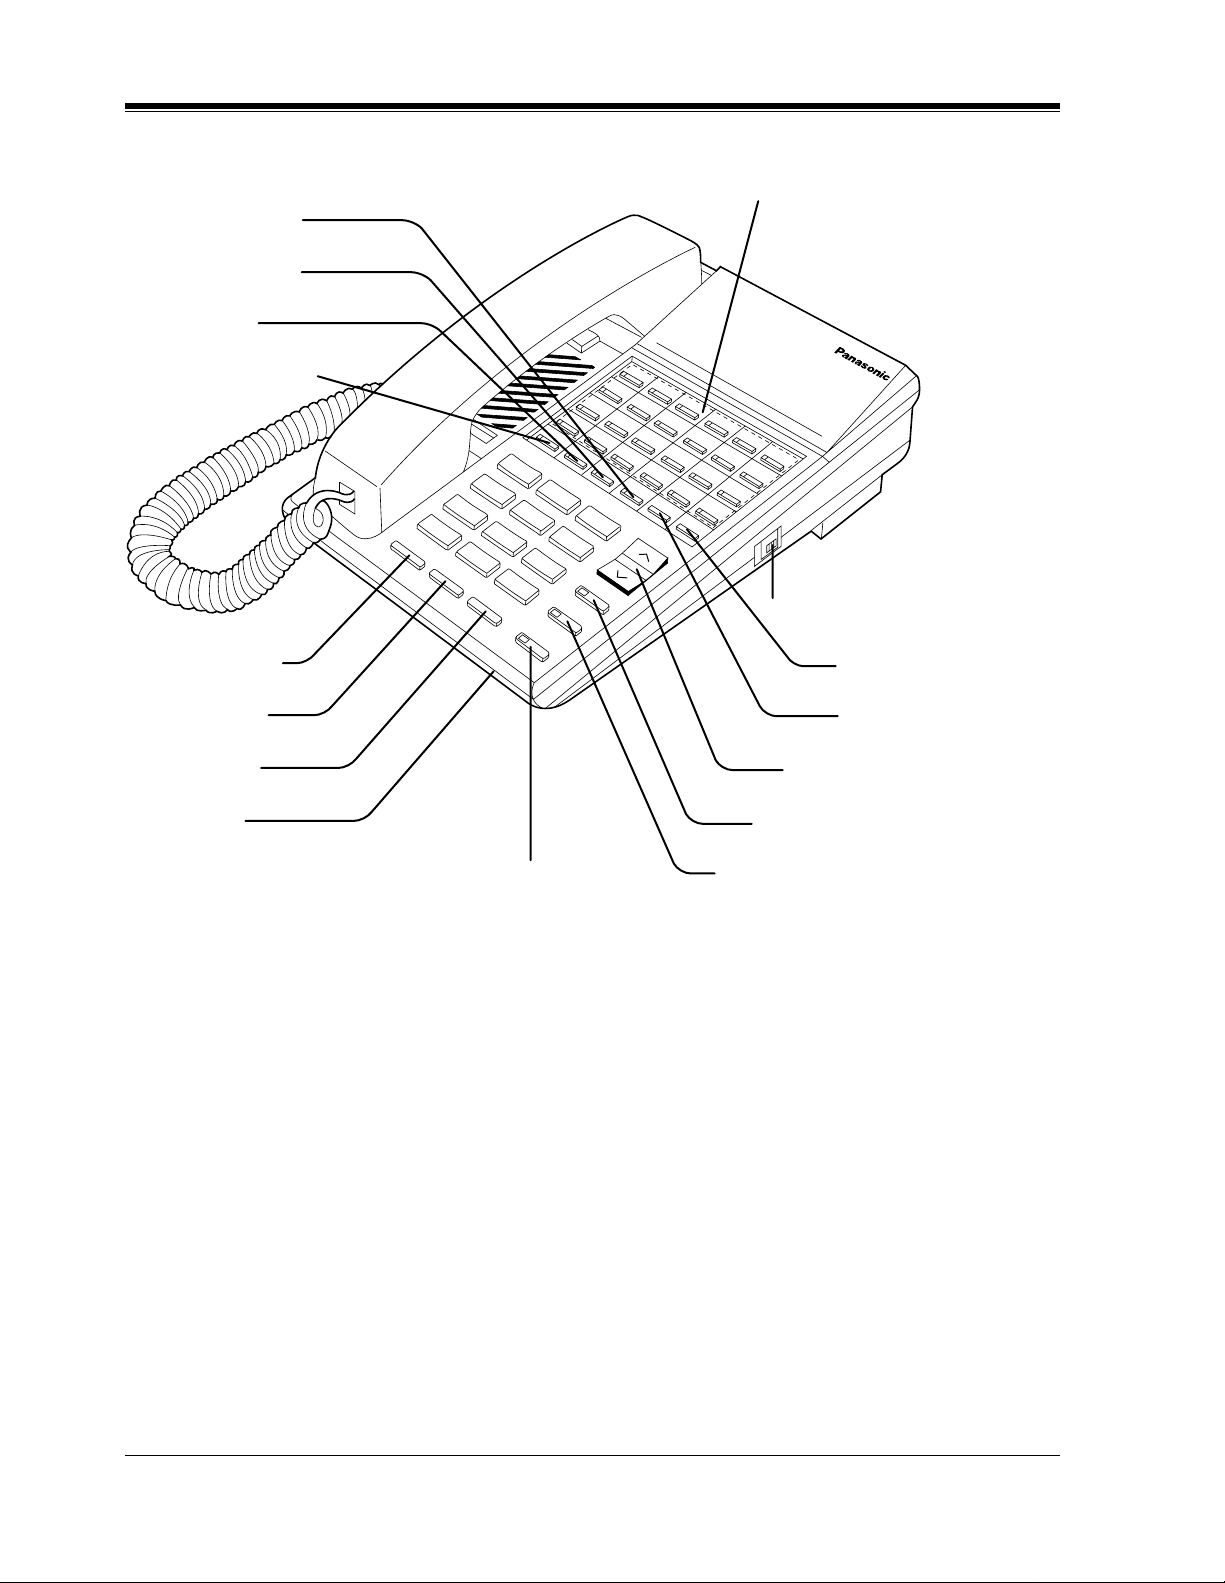
1.1.2 Location of Controls
KX-T7420
PROGRAM Button
FWD/DND Button
CONF Button
INTERCOM Button
DPT Overview
Flexible CO Buttons
(Outside lines 01 through 12)
PAUSE Button
TRANSFER Button
REDIAL Button
HOLD Button
SP-PHONE Button
MESSAGE Button
AUTO DIAL/STORE Button
RINGER Volume Selector
Used to adjust the ringer volume.
AUTO ANSWER/MUTE Button
FLASH Button
Jog Dial
Microphone
User Manual 17
Page 18
DPT Overview
KX-T7425
PROGRAM Button
FWD/DND Button
CONF Button
INTERCOM Button
Flexible CO Buttons
(Outside lines 01 through 24)
PAUSE Button
TRANSFER Button
MESSAGE Button
AUTO DIAL/STORE Button
EDIAL Button
OLD Button
P-PHONE Button
Microphone
RINGER Volume Selector
Used to adjust the ringer volume.
AUTO ANSWER/MUTE Button
FLASH Button
Jog Dial
18 User Manual
Page 19
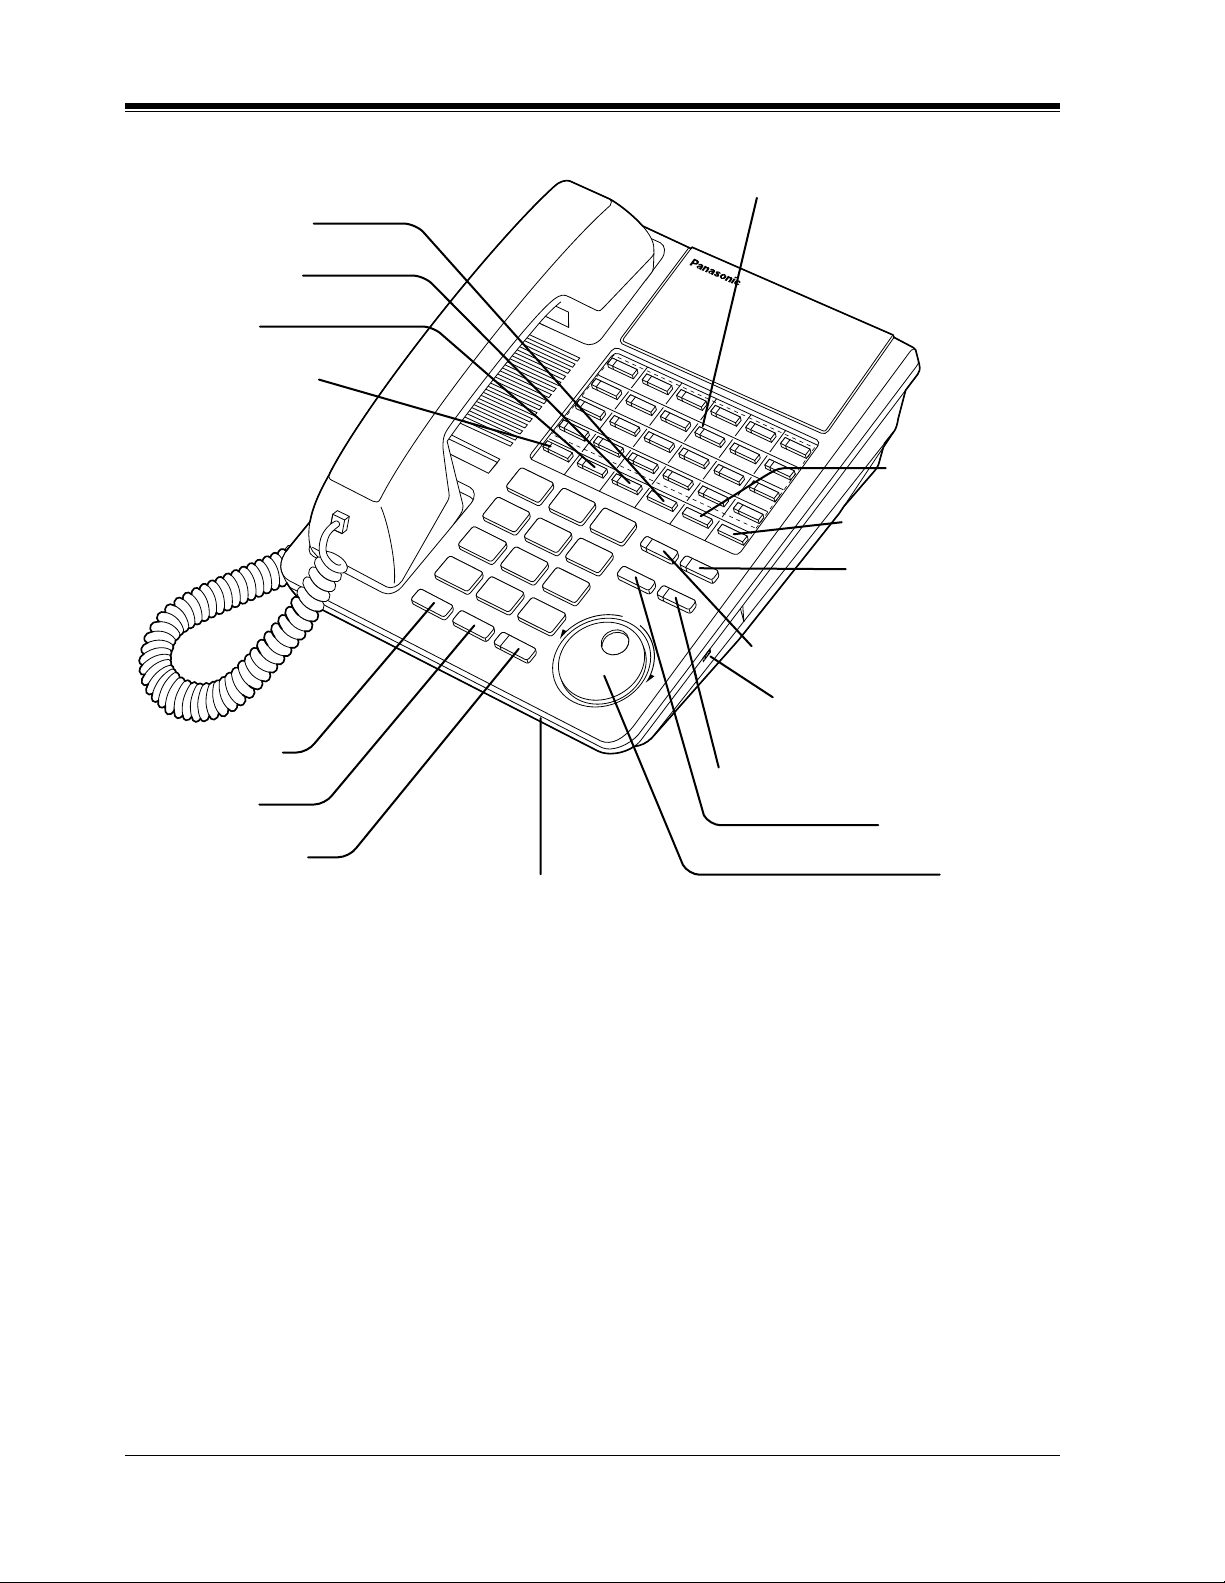
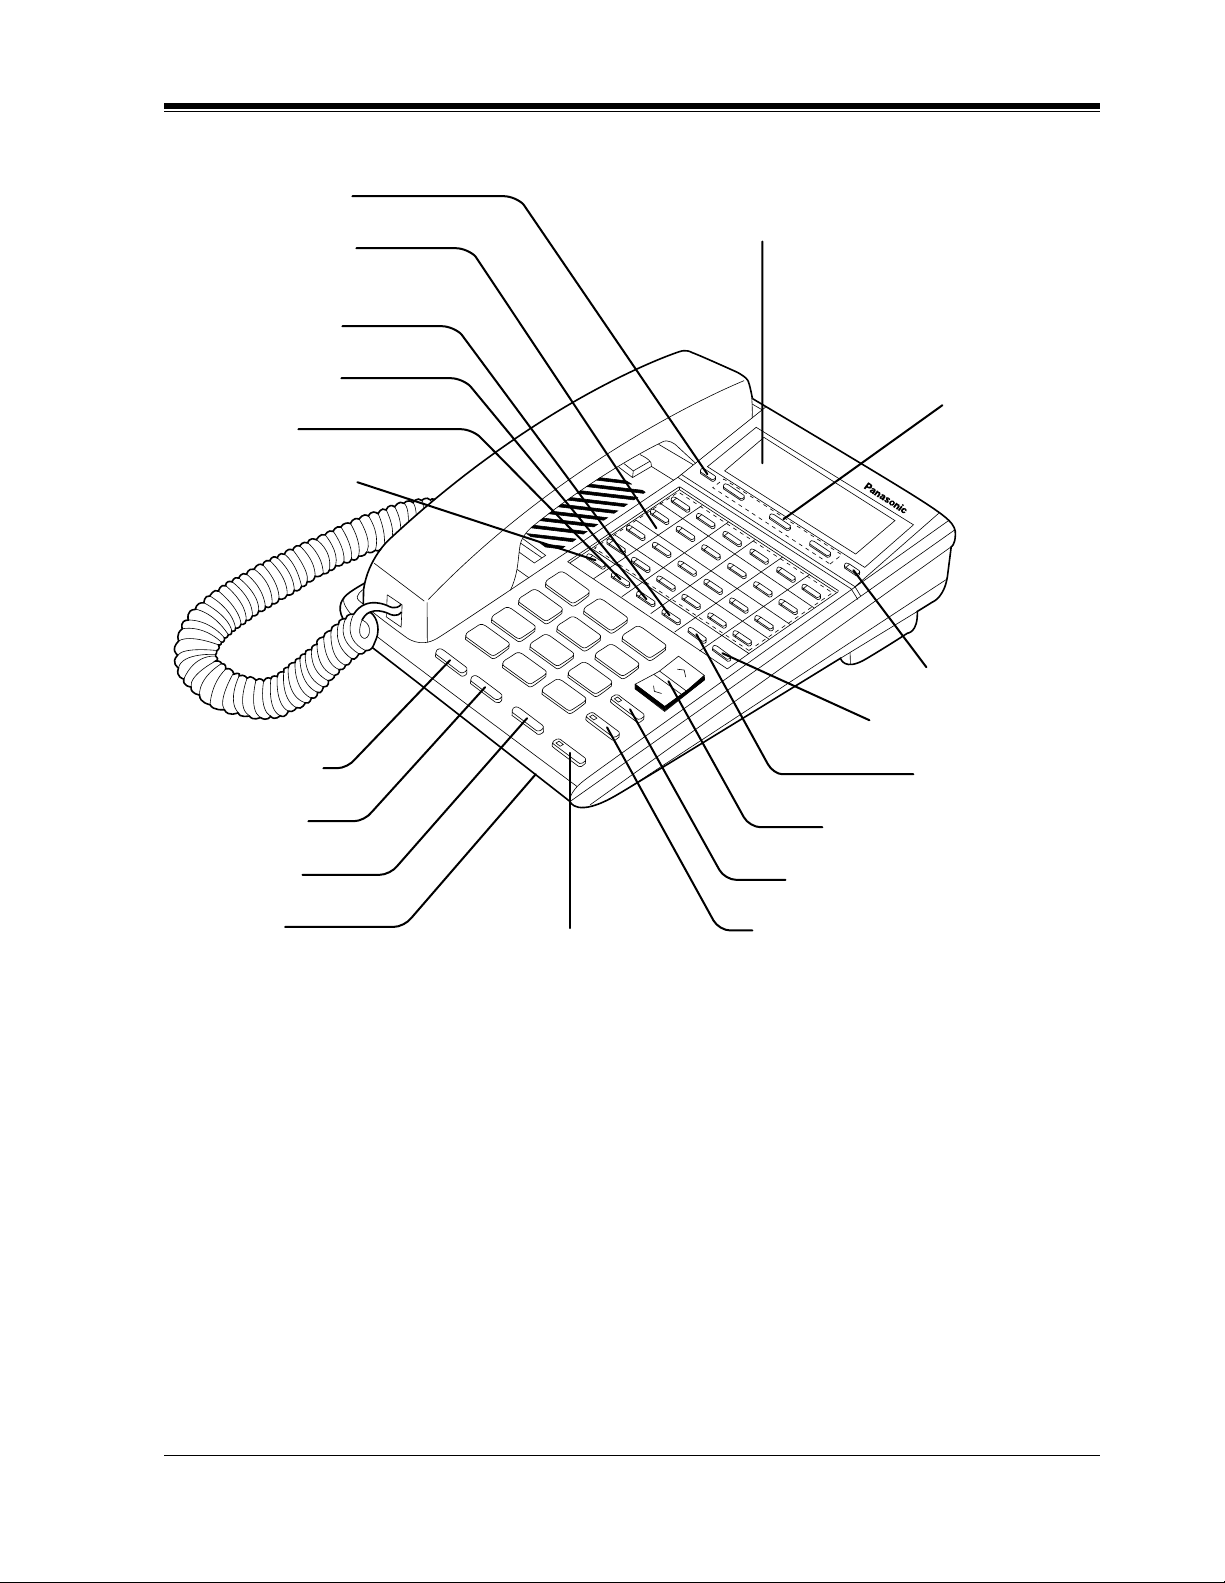
KX-T7431
Flexible CO Buttons
(Outside lines 01 through 12)
PROGRAM Button
FWD/DND Button
CONF Button
INTERCOM Button
DPT Overview
Display (Liquid Crystal Display)
With 16-character/1-line readout:
Shows the date, time, dialed number or name,
call duration time, etc. In Programming mode,
it shows the programming messages.
SELECT Button
MODE Button
PAUSE Button
REDIAL Button
HOLD Button
SP-PHONE Button
TRANSFER Button
MESSAGE Button
AUTO DIAL/STORE Button
AUTO ANSWER/MUTE Button
FLASH Button
Jog Dial
Microphone
User Manual 19
Page 20
DPT Overview
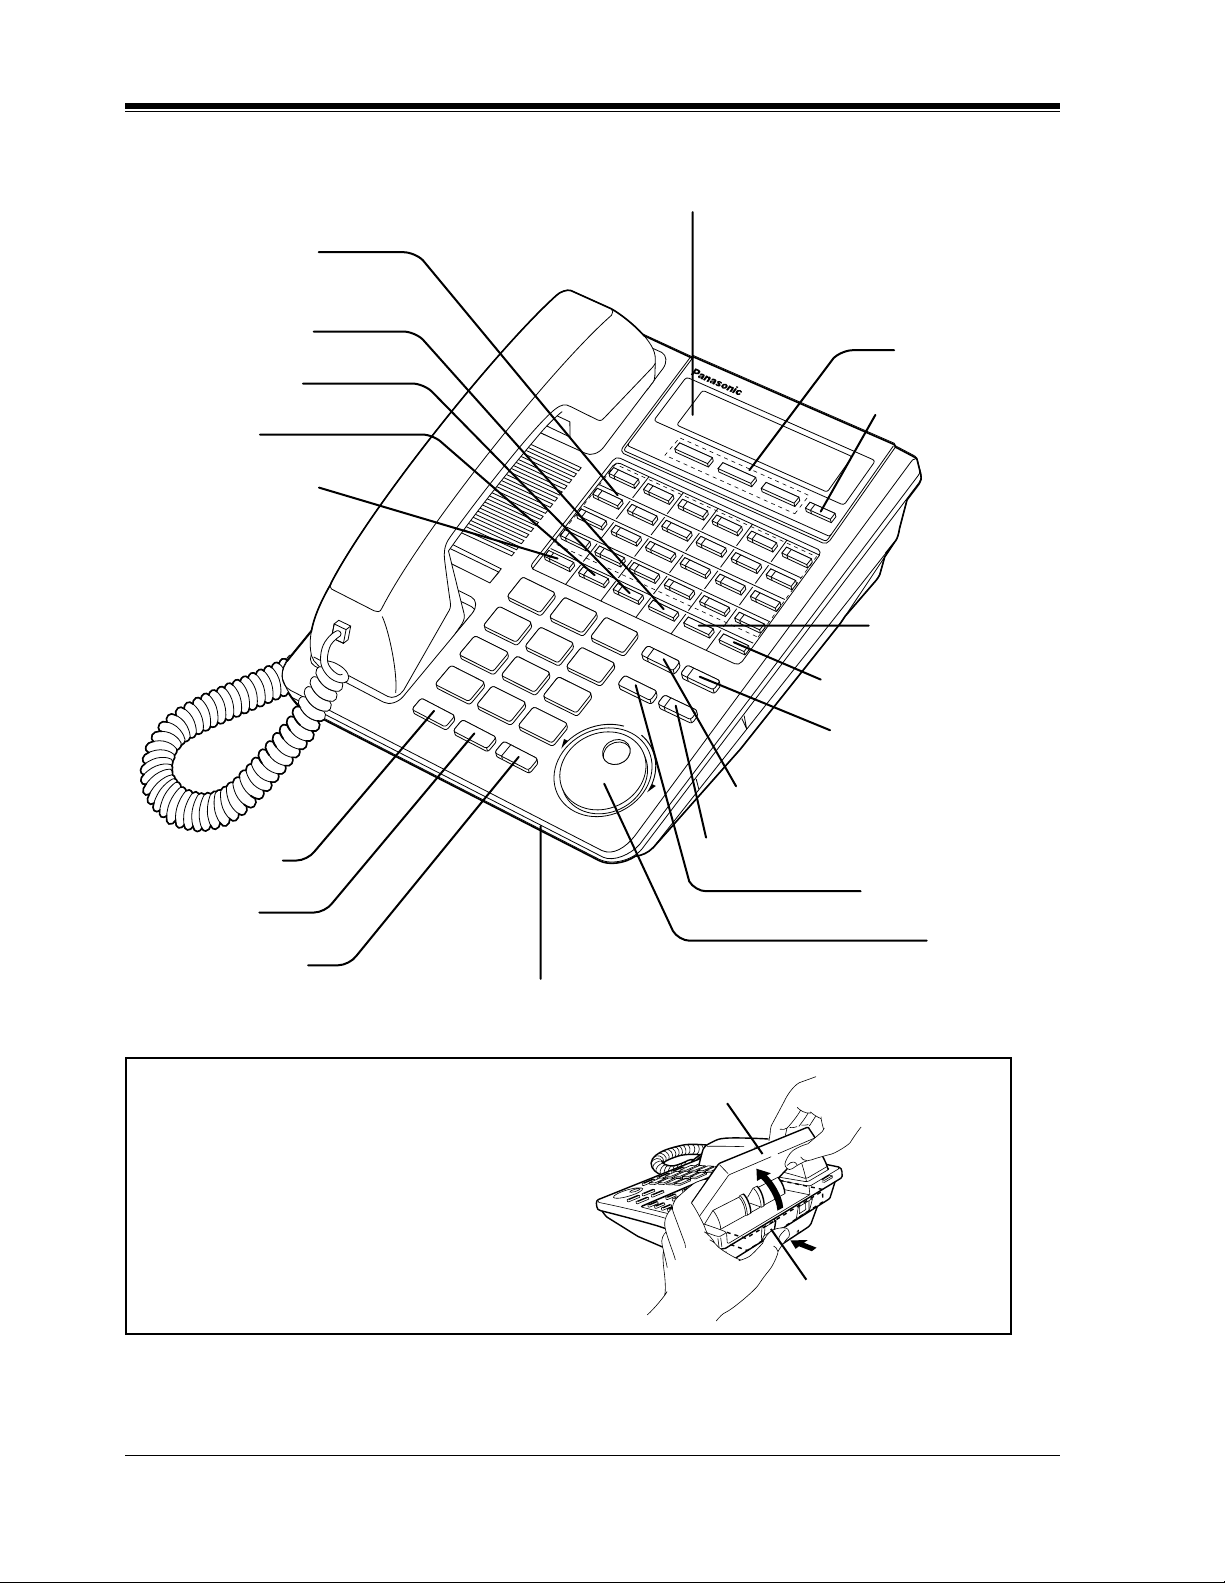
KX-T7433
Flexible CO Buttons
(Outside lines 01 through 24)
PROGRAM Button
FWD/DND Button
CONF Button
INTERCOM Button
Display (Liquid Crystal Display)
With 16-character/3-line readout:
Shows the date, time, dialed number or
name, call duration time, etc. In
Programming mode, it shows the
programming messages.
Soft Buttons
(S1 through S3)
SHIFT Button
PAUSE Button
EDIAL Button
OLD Button
P-PHONE Button
To lift or set down the display:
– To lift the display
1 Press the LCD ADJ button.
2 Lift up the display.
– To set down the display
1 Press the LCD ADJ button.
2 Press down the display.
TRANSFER Button
MESSAGE Button
AUTO DIAL/STORE Button
AUTO ANSWER/MUTE Button
FLASH Button
Jog Dial
Microphone
LCD
LCD ADJ button
20 User Manual
Page 21
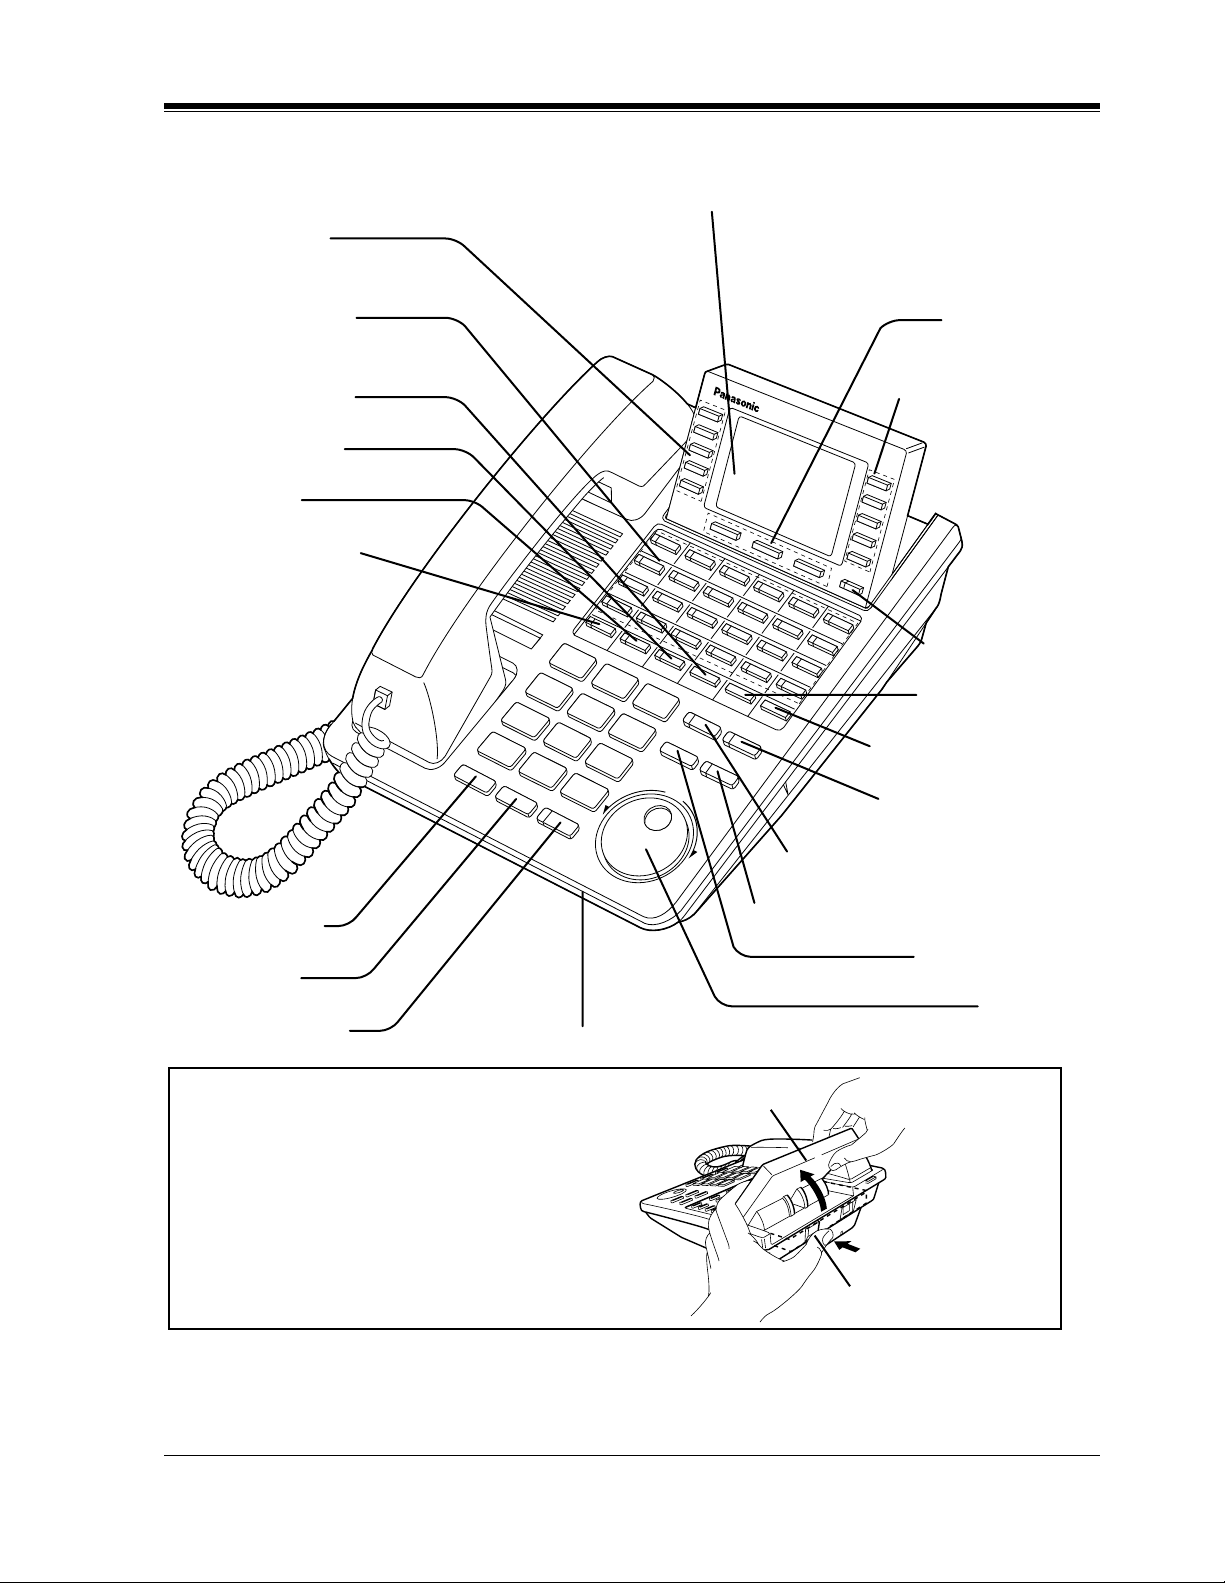
KX-T7436
Function Buttons
(F1 through F5)
Flexible CO Buttons
(Outside lines 01 through 24)
DPT Overview
Display (Liquid Crystal Display)
With 24-character/6-line readout:
Shows the date, time, dialed number or name,
call duration time, etc. In Programming mode,
it shows the programming messages.
Soft Buttons
(S1 through S3)
PROGRAM Button
FWD/DND Button
CONF Button
INTERCOM Button
REDIAL Button
HOLD Button
SP-PHONE Button
Function Buttons
(F6 through F10)
SHIFT Button
PAUSE Button
TRANSFER Button
MESSAGE Button
AUTO DIAL/STORE Button
AUTO ANSWER/MUTE Button
FLASH Button
Jog Dial
Microphone
To lift or set down the display:
LCD
– To lift the display
1 Press the LCD ADJ button.
2 Lift up the display.
– To set down the display
1 Press the LCD ADJ button.
2 Press down the display.
LCD ADJ button
User Manual 21
Page 22
DPT Overview
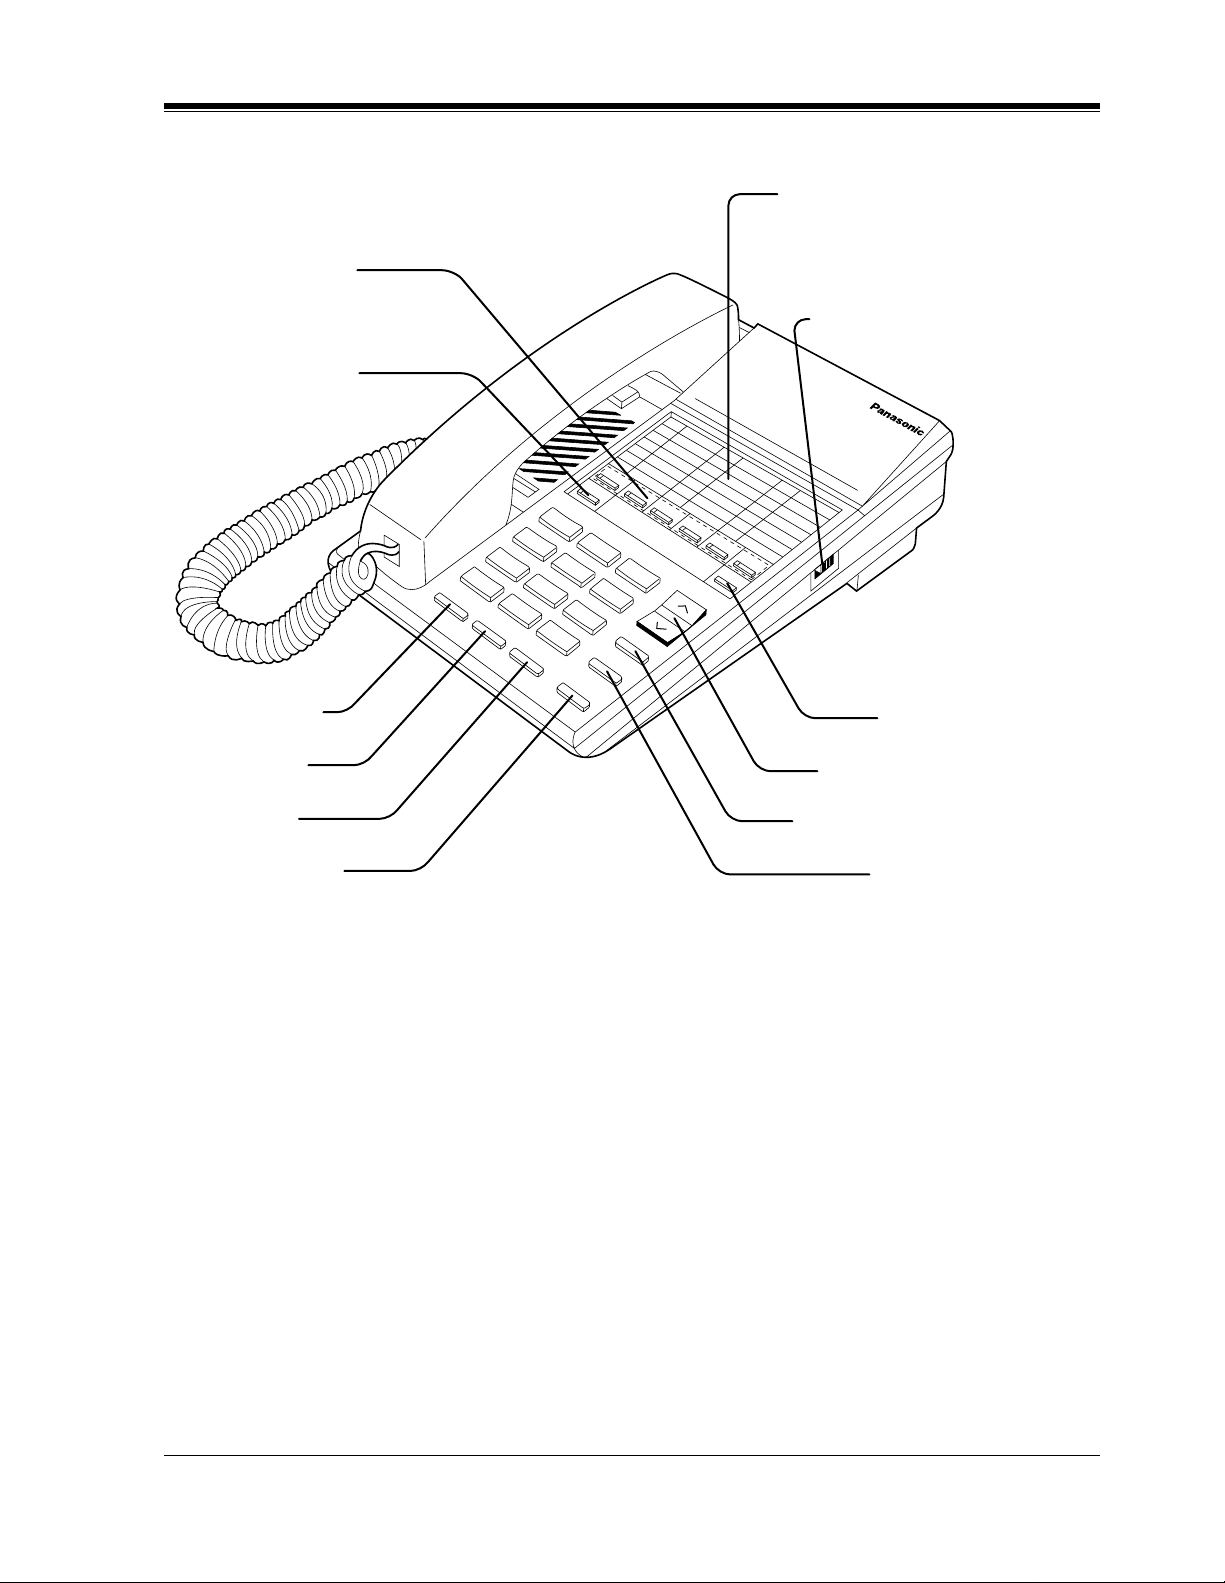
KX-T7220
MESSAGE Button
FWD/DND Button
CONF Button
INTERCOM Button
Flexible CO Buttons
(Outside lines 01 through 24)
RINGER Volume Selector
Used to adjust the ringer volume.
EDIAL Button
LASH Button
OLD Button
icrophone
SP-PHONE Button
TRANSFER Button
PROGRAM Button
VOLUME Control Button
AUTO DIAL/STORE Button
AUTO ANSWER/MUTE Button
22 User Manual
Page 23
KX-T7230
R
F
H
M
PROGRAM Button
DPT Overview
Flexible CO Buttons
(Outside lines 01 through 24)
MESSAGE Button
FWD/DND Button
CONF Button
INTERCOM Button
EDIAL Button
Display (Liquid Crystal Display)
with 16-characters/2-line readout:
Shows the date, time, dialed number or
name, call duration time, etc. In
Programming mode, it shows the
Programming instructions.
Soft Buttons
(S1 through S3)
SHIFT Button
TRANSFER Button
PAUSE Button
LASH Button
OLD Button
icrophone
AUTO ANSWER/MUTE Button
VOLUME Control Button
AUTO DIAL/STORE Button
SP-PHONE Button
User Manual 23
Page 24
DPT Overview
KX-T7235
Function Buttons
(F1 through F5)
PROGRAM Button
MESSAGE Button
FWD/DND Button
CONF Button
INTERCOM Button
REDIAL Button
FLASH Button
HOLD Button
Microphone
SP-PHONE Button
Display (Liquid Crystal Display)
with 24-characters/6-line readout:
Shows the date, time, dialed number or
name, call duration time, etc. In
Programming mode, it shows the
Programming instructions.
Function Buttons
(F6 through F10)
SHIFT Button
Soft Buttons
(S1 through S3)
Flexible CO Buttons
(Outside lines 01 through 12)
TRANSFER Button
PAUSE Button
VOLUME Control Button
AUTO DIAL/STORE Button
AUTO ANSWER/MUTE Button
To lift or set down the display:
LCD
– To lift the display
1 Press the LCD ADJ button.
2 Lift up the display.
– To set down the display
1 Press the LCD ADJ button.
2 Press down the display.
LCD ADJ button
24 User Manual
Page 25
KX-T7250
R
F
H
M
Flexible CO Buttons
(Outside lines 01 through 06)
INTERCOM Button
DPT Overview
Memory Card
Pull out the card and write down the
names or phone numbers associated
with automatic dialing numbers.
RINGER Volume Selector
Used to adjust the ringer volume.
RINGER
HIGH
LOW
ONááá
EDIAL Button
LASH Button
OLD Button
ONITOR Button
PROGRAM Button
VOLUME Control Button
AUTO DIAL/STORE Button
TRANSFER Button
User Manual 25
Page 26

DPT Overview
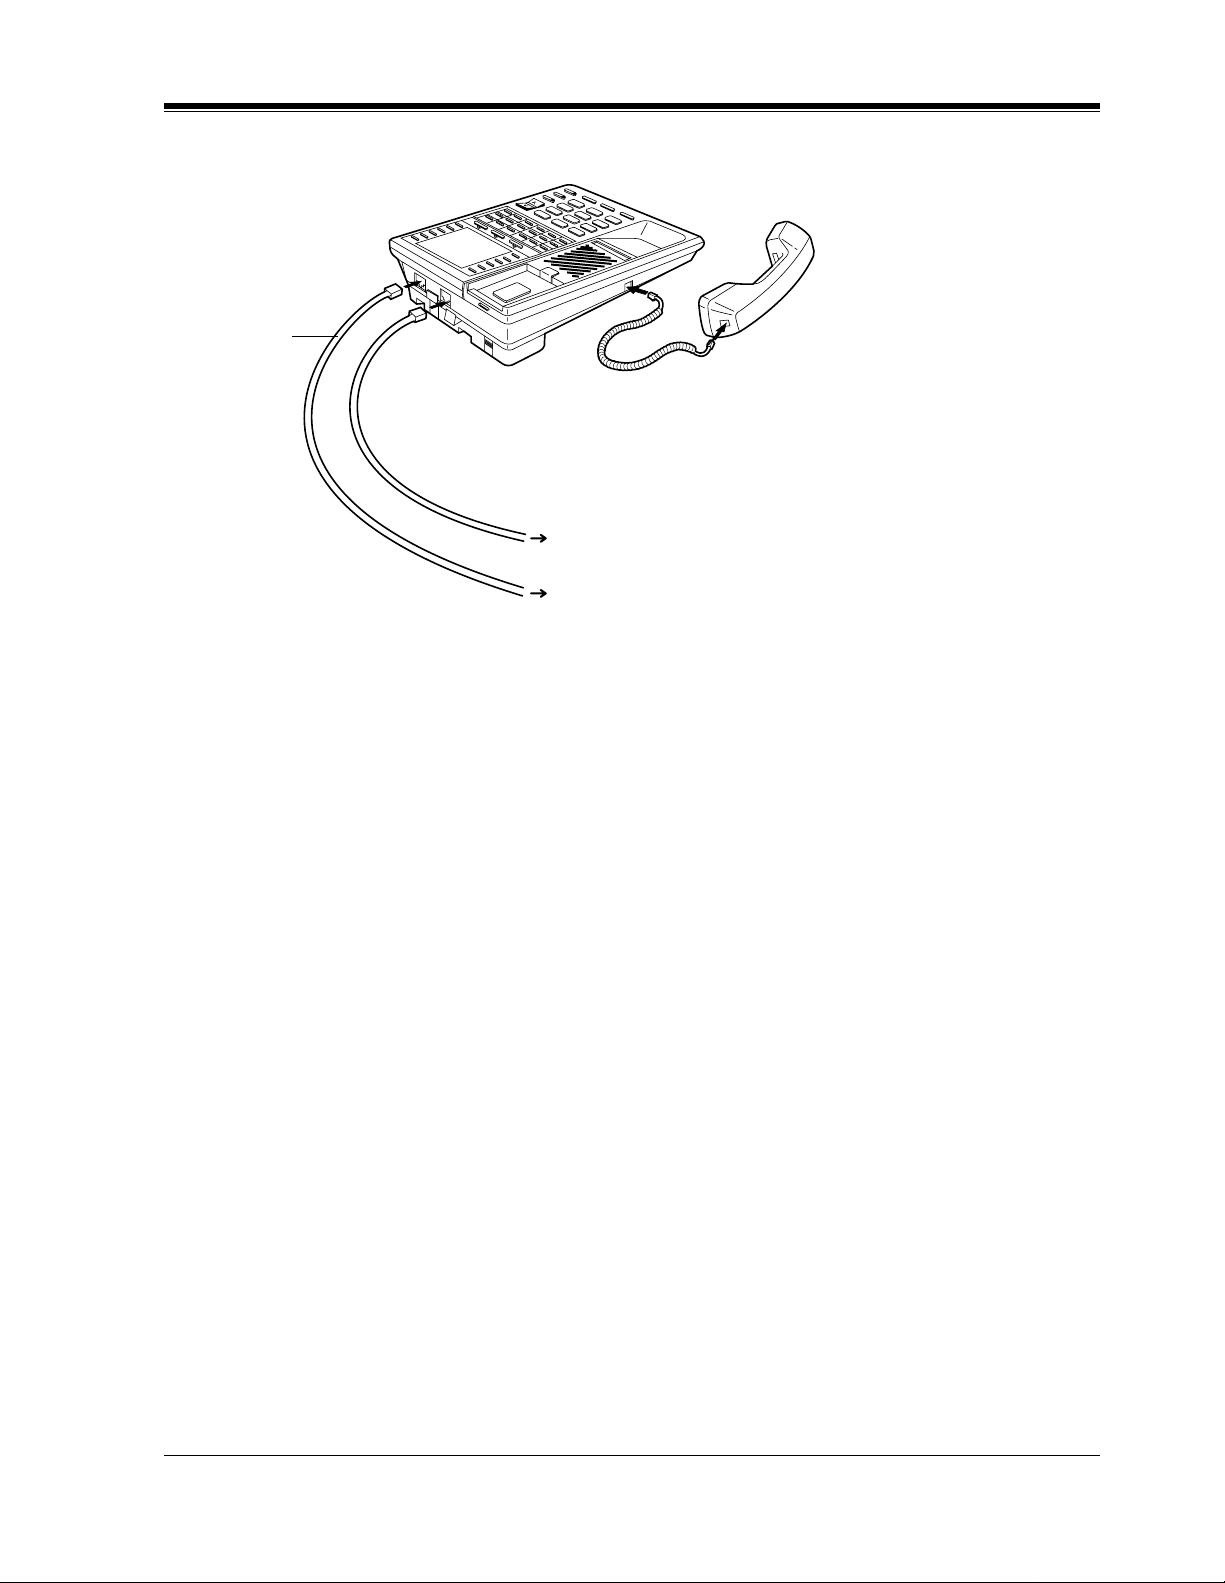
1.1.3 Connection
Connect as shown.
KX-T7400 Series DPTs
The included
telephone
line cord
→ Connect to the KX-TD816/KX-TD1232 System.
→ Connect to a single line telephone jack,
Telephone Answering Machine, or FAX for
XDP* or parallel connections.
<Back Vie w>
* XDP(eXtra Device Port) expands the number of telephones available in the system by allowing an
extension port to contain two telephones. For more details, please consult with your dealer.
26 User Manual
Page 27
KX-T7200 Series DPTs
The included
telephone
line cord
Connect to a single line telephone jack, Telephone Answering
Machine, or FAX for XDP* or parallel connections.
Connect to the KX-TD816/KX-TD1232 System.
* XDP(eXtra Device Port) expands the number of telephones available in the system by allowing an
extension port to contain two telephones. For more details, please consult with your dealer.
DPT Overview
User Manual 27
Page 28
DPT Overview
1.1.4 Feature Buttons
Digital proprietary telephones (DPTs) have the following types of Feature Buttons:
• Fixed Buttons
• Flexible Buttons
Fixed Buttons
Fixed buttons have specific functions permanently assigned to them. These default function
assignments cannot be changed. The following table lists the fixed buttons located on each
DPT model.
Feature Button T7420 T7425 T7431 T7433 T7436 T7220 T7230 T7235 T7250
AUTO ANSWER/MUTE
AUTO DIAL/STORE
CONF
FLASH
Function buttons
FWD/DND
HOLD
INTERCOM
Jog Dial
MESSAGE
MODE
MONITOR
PAUSE
PROGRAM
REDIAL
SELECT
SHIFT
Soft buttons
SP-PHONE
28 User Manual
Page 29
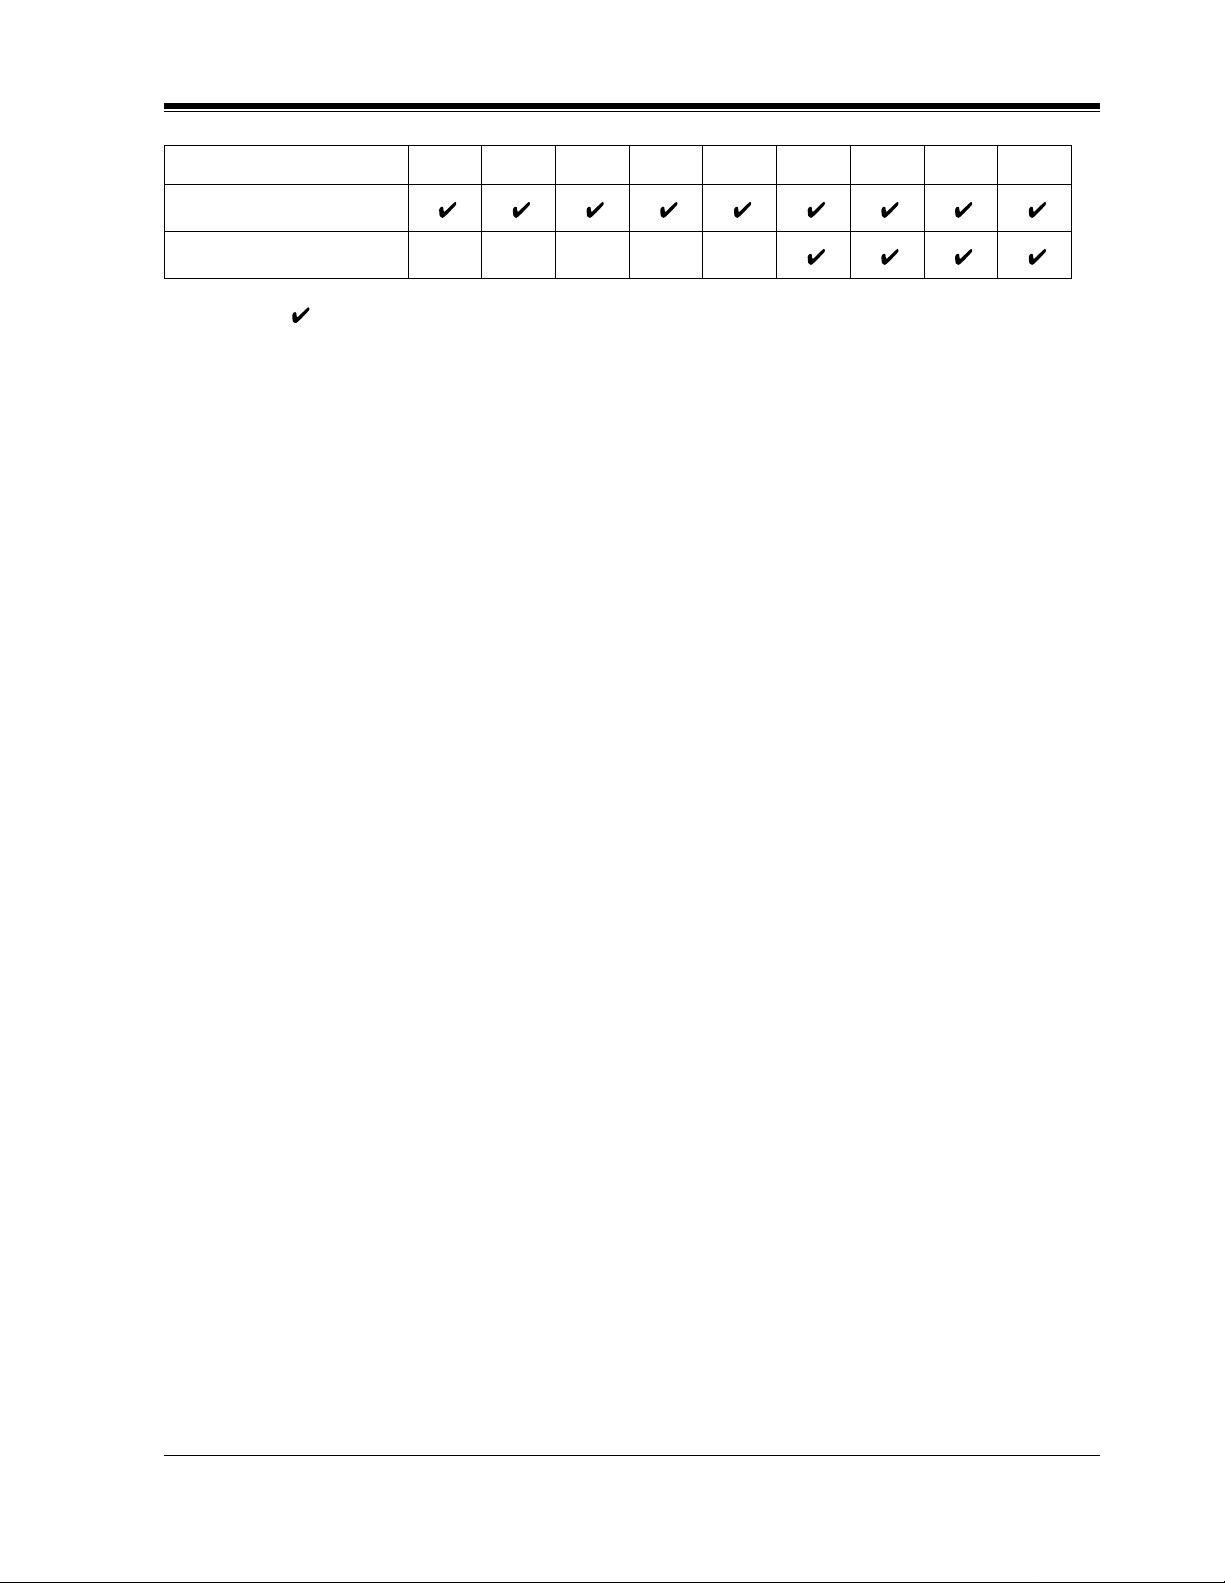
Feature Button T7420 T7425 T7431 T7433 T7436 T7220 T7230 T7235 T7250
TRANSFER
VOLUME
" " indicates the button is available.
Usage
AUTO ANSWER/MUTE Button
Used for Hands-free answer back; or it turns the microphone off during a conversation.
AUTO DIAL/STORE Button
Used for System Speed Dialing or storing program changes.
CONF (Conference) Button
Used to establish a three-party conference.
FLASH Button
Sends an External Feature Access sig nal to the centr al off ice or host PBX t o access their s ystem
features. If a PBX is not bei ng used, this button can be us ed t o disconnect the current call and
start another call without hanging up.
Function (F1 through F10) Buttons
Used to perform the corresponding displayed function or operation.
FWD/DND (Call Forwarding/Do Not Disturb) Button
Used to program the Call Forwarding feature or set the Do Not Disturb (DND) feature.
HOLD Button
Used to place a call on hold.
INTERCOM Button
Used to make or receive extension calls.
Jog Dial
Used to adjust the volume of the handset receiver, headset, ringer and speaker. It also adjusts
the display contrast. Refer to "Initial Setting for KX-T7400 Series" in this section.
For KX-T7431, KX-T7433 and KX-T7436 users, it is also used to select data from the Call
Directory and the System Feature Access Menu.
MESSAGE Button
Used to leave a notification to a busy extension or call back the message notification sender.
MODE Button
Used to shift the display in order to access various features.
MONITOR Button
Used for a hands-free dialing operation.
PAUSE Button
Inserts a pause in speed dial numbers or in One-Touch dial numbers.
PROGRAM Button
Used to enter and exit the Programming mode.
With the KX-T7220 and KX-T7250, it can also be used as the PAUSE button.
REDIAL Button
Used for the Last Number Redial.
DPT Overview
User Manual 29
Page 30

DPT Overview
SELECT Button
Used to select the displayed function or to call the displayed phone number.
SHIFT Button
Used to access the second and third level of Soft Button functions.
Soft (S1 through S3) Buttons
Used to perform the function or operation that appears on the bottom line of the display.
SP-PHONE (Speakerphone) Button
Used for a h ands-free speakerphone operation.
TRANSFER Button
Transfers a call to another extension or external destination.
VOLUME Control Button
Used to adjust the volume of the handset receiver, headset, ringer and speaker; it also adjusts
the display contrast. Refer to 1.1.6 I nitial Settin g for KX-T72 00 Series.
30 User Manual
Page 31

Flexible Buttons
Flexible Buttons do not have specific features permanently assigned to them. Features are
assigned to Flexible Buttons through System or Station Programming. "Flexible Button
Assignment" is addressed in "Station Programming". The three types of Flexible Buttons are
as follows:
• Flexible CO buttons (located on PT o nly)
• Flexible DSS buttons (located on DSS Console only)
• Programmable Feature (PF) buttons (located on DSS Console, KX-T7240, only)
The following table outlines the features that can be assigned to the F lexible Buttons:
Features to be assigned
Single-CO
Group-CO
Loop-CO
DPT Overview
Button CO DSS PF
DSS (Direct Station Selection)
Phantom Extension
ONE-TOUCH (One-Touch Dialing)
MESSAGE (Message Waiting)
MESSAGE (Another/Phantom Extension)
FWD/DND (Call Forwarding/Do Not Disturb)
SAVE (Saved Number Redial)
ACCOUNT (Account Code Entry)
CONF (Conference)
Voice Mail (VM) Transfer
Log-In / Log-Out
Two-Way Record*
Two-Way Transfer*
LCS (Live Call Screening)*
LCS (Live Call Screening) Cancel*
Night / Day (Lunch/Brea k) Service
User Manual 31
Page 32

DPT Overview
* A vailable when the Digital Supe r Hybrid Sys tem is connect ed to a Digit al Proprie ta ry
" " indicates that the feature is available.
Line Access Buttons
The follo wing three type s of CO but tons can be used to seize a ou tside line whe n making a call.
• Single-CO (S-CO) button
• Group-CO (G-CO) button
• Loop-CO ( L-CO) button
Conditions
• A flexible CO button can be assigned as a Line Access Button (S-CO, G-CO or L-CO) in
either System/Statio n Programming. Once a fle xible CO button is as signed as a Line Access
Button, it provides the line status condition by lighting patterns and green/red indication.
Please refer to "LED Indic ation" in this section.
• You can set the G-CO and L-CO button s on one telephone. Incomi ng and outgoing calls on
the line are shown on the button in the following priority.
S-CO > G-CO > L-CO
Telephone capable Panasonic Voice Processing System(one that supports digital
proprietary telephone integration;e.g., KX-TVP100).
Single-CO (S-CO) button
An S-CO button is a outside li ne access butto n. This allows you to ac cess a specifi c outside line
by pressing an S-CO button. An incoming outside call can be directed to an S-CO button.
Conditions
• The same outside line cannot be assigned to more than one S-CO button on a PT.
• It is possible to assign the same outside line to an S-CO button, a G-CO button and an L-
CO button respectively.
User Manual References
2.2.2 Flexible Button Assignment
4.3.61 Outward Dialing, Line Access — SUMMARY
32 User Manual
Page 33

Group-CO (G-CO) button
T o support ef ficie nt utilization of out side lines, a group of outs ide lines (outside line group) can
be assigned to a CO button. This button is referred to as Group-CO (G-CO) button. Any
incoming calls from any outside line in the same trunk group arrive at the G-CO button. To
make a outside call, you can access an idle outside line in the trunk group by simply pressing
the assigned G-CO button.
Conditions
• It is possible to assign the same outside line to an S-CO button, a G-CO button, and an LCO button.
• It is necessary to program the extension for making and/or receiving calls in outside line
groups.
• When your extension is assigned as an incoming call destination for a outside line, you
cannot receiv e an y incoming outside calls unless a G-CO, L-CO or S-CO button assoc iated
with the outside line is assigned.
User Manual References
2.2.2 Flexible Button Assignment
4.3.61 Outward Dialing, Line Access — SUMMARY
DPT Overview
Loop-CO (L-CO) button
All outside lines can be assigned to a flexible CO button on a proprietary telephone. The
assigned button serves as an L-CO button. An incoming call on any outside line arrives at the
L-CO button, unless there are S-CO or G-CO buttons associated with the line or unless the
button is already in use. To make a outside call, you simply press the dedicated L-CO button.
Pressing the L-CO b utton provi des the same operati on as dialing an automat ic line access co de.
User Manual References
2.2.2 Flexible Button Assignment
4.3.61 Outward Dialing, Line Access — SUMMARY
User Manual 33
Page 34

DPT Overview
1.1.5 Initial Sett ing for KX-T7400 Series
The Jog Dial can be used for the display contrast and the volume control. Rotate the Jog Dial
in either direction as desired. The c ontrast or the volume level will chan ge as follows.
Left
(counter-clockwise)
Level decreases
Right
(clockwise)
Level increases
Display Contrast Adjustment
The MODE button and the Jog Dial for KX-T7431 users, and a Soft button and the Jog Dial
for KX-T7433 and KX-T7436 users are used to adjust the display cont ra st . The c ont rast level
is indicated on the display by the number of asterisks.
7431
While on-hook;
MODE
Press MODE six times.
<PT Display Example>
Contrast:***
(-contrast level 3)
Rotate Jog Dial in the desired direction.
7433 / 7436
While on-hook or during a conversation;
CONT
S 1
S 2
Press CONT (S1).
S 3
Rotate Jog Dial in the desired direction.
<PT Display Example>
Contrast:***
(-contrast level 3)
34 User Manual
Page 35

DPT Overview
When using the headset
The Panasonic Digital Super Hybrid System supports the use of a headset with a proprietary
telephone (PT). When you use the headset (optional), you should switch the selection mode
first. Selection is explained in the "Handset / Headset Selection" in Station Programming.
To change to the headset mode
Press: [PROGRAM] [ 9] [9] [9] [2] [STO RE] [PROGRAM].
Changing the ringing tone of a CO button / Intercom calls
There are eight ringer frequencies available for each CO (Single-CO, Group-CO, Loop-CO)
button and INTERCOM button. If you wish to cha nge them, refer to "Ringing Tone Selection
for CO Buttons", "Ringing Tone Selection for Intercom Calls" in Station Programming.
Volume Control — Handset Receiver/Headset/Ringer/Speaker
Allows you to adjust the following volumes as required.
— Handset Receiver volume (levels 1 through 4)
— Headset volume (levels 1 through 4)
— Ringer volume (levels 0 through 3)
— Speaker volume (levels 1 through 12)
If your digital p roprietary te lephone is pro vided with a d isplay (displ ay DPT), the v olume le vel
is indicated on the display by the nu mber of asterisks. For ringer volume adjustment, three
levels (OFF/LOW/HIGH) are available with the KX-T7420 and KX-T7425.
To adjust the handset receiver volume
Display PT
Lift the handset.
Rotate Jog Dial in the desired direction.
<PT Display Example>
Handset:***
(-volume level 3)
• You may also adjust the handset receiv er volume during a con vers ation using the hand set
receiver.
User Manual 35
Page 36

DPT Overview
Display PT
Be sure the headset is connnected.
To adjust the headset volume
SP-PHONE
Press SP-PHONE.
To adjust the ringer volume
7433 / 7436
While the telephone is ringing;
Rotate Jog Dial in desired direction.
<PT Display Example>
Ringer:***
Rotate Jog Dial in the desired direction.
<PT Display Example>
Headset:***
(-volume level 3)
(-volume level 3)
7433 / 7436
While the telephone is idle and on-hook;
RING
S 1
The telephone will ring.
S 2
Press RING (S2).
S 3
Rotate Jog Dial in the desired direction.
The telephone will stop ringing in about 4 seconds.
When the volume level is 0 (no "*" indication), the
display shows "RNGOFF".
36 User Manual
Page 37

7431
While the telephone is idle and on-hook;
MODE
DPT Overview
Press MODE five times.
<PT Display Example>
Ringer:***
7420 / 7425
Adjust the RINGER Volume Selector lever to
the desired setting (OFF/LOW/HIGH).
OFF HIGH
LOW
Rotate Jog Dial in the desired direction.
The telephone will stop ringing in about 4 seconds.
When the volume level is 0, no "*" is indicated.
(-volume level 3)
To adjust the speaker volume
74XX
SP-PHONE
Press SP-PHONE.
Rotate Jog Dial in the
desired direction.
<PT Display Example>
SP:************
(-volume level 12)
You may also adjust the speaker volume while listening to
background music (BGM On mode), receiving a voice call,
receiving a page or hearing a call progress tone such as a dial tone.
User Manual 37
Page 38

DPT Overview
Conditions
• If the ringer volume of the KX-T7431 is set to OFF, the display while on-hook is as
follows.
Ring Off 12:00P
• By pressing " ", the display changes to show your extension number and name.
101: john Smith
38 User Manual
Page 39

1.1.6 Initial Setting fo r KX-T72 00 Series
Display Contrast Adjustment (KX-T7230 and KX-T7235 only)
A Soft button and the VOLUME Control button are used to adjust the display contrast. The
contrast le vel is indi cated on the displ ay by the number of asterisks. You can adjust the c ontrast
level under the following conditions:
a) When on-hook, or
b) During an outside/intercom call.
7230 / 7235
DPT Overview
CONT
S 1
S 2
Press CONT (S1).
S 3
Press VOLUME (UP /DOWN ) Control button.
<PT Display Example>
Contrast:***
VOLUME
(-contrast level 3)
When using the headset
The Panasonic Digital Super Hybrid System supports the use of a headset with a proprietary
telephone (PT). When you use the headset (optional), you should switch the selection mode
first. Sele ction is expl ained in the "Handset / Headset Selection" in Station selecti on mode first.
Selection is explained in the "Handset / Headset Selection" in Station Programming.
To change to the headset mode
Press: [PROGRAM] [ 9] [9] [9] [2] [STO RE] [PROGRAM].
Changing the ringing tone of a CO button / Intercom calls
There are eight ringer frequencies available for each CO (Group-CO, Loop-CO, Single-CO)
button and INTERCOM button. If you wish to cha nge them, refer to "Ringing Tone Selection
for CO Buttons" or "Ringing Tone Selection for Intercom Calls" in Station Programming.
Volume Control — Handset Receiver/Headset/Ringer/Speaker
Allows you to adjust the following volumes as necessary:
— Handset Receiver volume (level 1 through 3)
— Headset volume (level 1 through 3)
— Ringer volume (level 0 through 3)
— Speaker volume (level 1 through 12)
User Manual 39
Page 40

DPT Overview
Display PT
If your digital proprietary telephone is provided with a display (display DPT), the volume level
is indicated on the display by the number of asterisks. For ringer volume adjustment, three
levels (OFF/LOW/HIGH) are available with the KX-T7220 and KX-T7250.
To adjust the handset receiver volume
VOLUME
Lift the handset.
To adjust the headset volume
Display PT
Be sure the headset is connected.
SP-PHONE
Press SP-PHONE.
Press VOLUME (UP /DOWN ) Control button.
<PT Display Example>
Handset:***
(-volume level 3)
You may also adjust the handset receiver volume
during a conversation using the handset receiver.
VOLUME
Press VOLUME (UP /DOWN ) Control button.
<PT Display Example>
Headset:***
(-volume level 3)
40 User Manual
Page 41

To adjust the ringer volume
7230 / 7235
While the telephone is ringing;
VOLUME
Press VOLUME (UP /DOWN ) Control button.
<PT Display Example>
Ringer:***
7230 / 7235
While the telephone is idle and on-hook;
DPT Overview
(-volume level 3)
RING
S 1
Press RING (S2).
The telephone will ring.
The telephone will stop ringing in about 4 seconds.
When the volume level is 0 (no "*" indication), the display shows "RNGOFF".
7220 / 7250
Adjust the RINGER Volume Selector lever to
the desired setting (OFF/LOW/HIGH).
S 2
S 3
OFF HIGH
LOW
VOLUME
Press VOLUME (UP /DOWN ) Control button.
User Manual 41
Page 42

DPT Overview
72XX
To adjust the speaker volume
SP-PHONE
MONITOR
Press SP-PHONE
or MONITOR.
VOLUME
Press VOLUME (UP /DOWN ) Control button.
<PT Display Example>
SP:************
(-volume level 12)
You may also adjust the speaker volume while listening to
background music (BGM On mode), receiving a voice call,
receiving a page or hearing a call progress tone such as a dial tone.
42 User Manual
Page 43

1.1.7 LED Indication
The Light Emitting Diode (LED) buttons indicate the line conditions with lighting patterns.
Flashing light patterns
Slow flashing
(60 flash/min)
Moderate flashing
(120 flash/min)
Rapid flashing
(240 flash/min)
LED Indication on the INTERCOM Button
The table below shows the lighting patterns for intercom line conditions.
INTERCOM button Intercom Line Condition
DPT Overview
1 s
Off
Green On
Green slow flashing
Green moderate flashing
Green rapid flashing
Idle
Intercom call / Conference established
Intercom cal l hold
Intercom call exclusive hold / Consultation hold
Incoming intercom/doorphone call
LED Indication on the CO Button
The table below shows the lighting patterns for CO line conditions.
CO Button Outside Line Condition
Off
Green On
Green slow flashing
Green moderate flashing
Green rapid flashing
Red On
Red slow flashing
Idle
You are using the line.
You have a held call.
You have one of the following:
(1) Exclusive hold,
(2) Outside-to-Outside line call, or
(3) Conference, unattended
Privacy Release possible* / Hold Recall /
Incoming call
Other-use / Log-out
Other-hold*
— Items marked with "*" are only available on the Single-CO button.
User Manual 43
Page 44

DPT Overview
BLF on DSS Button
LED Indication on the FWD/DND Button
The Busy Lamp Field (BLF) indicat or b utton is red whe n the corr esponding exte nsion is b usy.
This is available for Direct Stati on Selection (DSS) buttons on DSS consoles and for flexible
CO buttons assigned as DSS buttons on proprietary telephones.
The table below shows the lighting patterns for the FWD/DND Button.
System Programming [990]
Area (09), Bit (4,3)
11 (default)
10
01
00
Programming Guide Reference
[990] System Additional Information
When Call Forwarding
(FWD) is set
Red Slow Flashing
Red On
Red On
Red Slow Flashing
When Do Not Disturb
(DND) is set
Red On
Red On
Red Slow Flashing
Red Slow Flashing
44 User Manual
Page 45

Station Programming
Section 2
Station Programming
Note: All illustr ati ons used in thi s sectio n ar e based on
model KX-T7235.
User Manual 45
Page 46

Station Programming
2.1 Station Programming Instructions
2.1.1 Station Programming Instructions
Station Programming allows you, the proprietary telephone (PT) users, to program certain
features from your telephone individually. To program, you need to switch your telephone to
the Station Programming mode. During programming mode, your telephone is in the busy
condition to both inside and outside callers. If you want to make a normal call handling
operation, you must finish the programming mode.
Programming Mode Display
When you enter into the St ation Progr amming mode, the display sho ws the f ollo wing message
as the initial programming mode;
PT-PGM Mode
We recommend a PT with display for Station Programming to avoid mis-operation.
The display also gives you helpful or stored data information related to your programming
steps. In this section, we note the displ ay example in the programming steps, if requ ir ed. You
can also refer to the "Display Examples" in the Appendix (Section 6).
Entering Station Programming mode
PT
Be sure that the telephone is idle and on-hook.
PROGRAM
9 9
Press PROGRAM.
The STORE indicator lights.
If 99 is not dialed within 5 seconds after the PROGRAM button is
pressed, the Station Programming mode is canceled.
<PT Display Example>
PT-PGM Mode
If there is no entry within one minute, the Station Programming mode
is canceled and normal call handling mode resumes automatically.
Dial 99.
-
Initial programming display
46 User Manual
Page 47

Exiting Station Programming mode
PT
When the display shows the initial programming mode;
PROGRAM
or
Press PROGRAM or lift the handset.
To exit the Station Programming mode, press PROGRAM. You are in
the call handling mode.
Station Programming
User Manual 47
Page 48

Station Programming
Confirming the assigned function data
— Be sure that you are in the Station Programming mode: Press [PROGRAM] [9] [9].
PT
program access number
Enter the program access number.
Press HOLD (END).
Enter the program access number* as follows.
- 1:Preferred Line Assignment
- 2:Preferred Line Assignment
-
-
- 3:Full One-Touch Dialing Assignment
- 4:Intercom Alert Assignment
- 5:Call Waiting Tone Type Assignment
- 6:Self-Extension Number Confirmation
- 7:Live Call Screening Mode Set
-81:Initial Display Selection
-82:Bilingual Display Selection
- 9:Handset/Headset Selection
-01:Remote Station Look Control (
-02:Call Log Lock Control, Incoming (
-03:Live Call Screening Password Control (
- #:Station Programming Data Default Set
HOLD
The display shows the initial programming mode.
Outgoing
Incoming
†
-
Operator / Manager only)
-
Operator / Manager only)
†
-
Operator / Manager only)
The display shows the programmed data.
<PT Display Example>
When you press [5], the display shows:
C.W. Tone1
* A programming access number is required to program/confirm the function data by Station Programming.
† : Available when the Digital Super Hybrid System is connected to a Digital Proprietary Telephone capable Panasonic
Voice Processing System (one that supports digital proprietary telephone integration; e.g., KX-TVS100)
(- The Call Waiting tone is currently programmed to Tone 1.)
— To exit the Station Programming mode: Press [PROGRAM] or lift the handset.
— If you wish to change the data, follo w the pro gramming proced ure expla ined in this sect ion.
48 User Manual
Page 49

Station Programming
Confirming the assigned data on the Flexible button
— Be sure that you are in the Station Programming mode: Press [PROGRAM] [9] [9].
PT
HOLD
Press the desired Flexible
(CO,DSS,PF) button.
Press HOLD (END).
The display shows the initial programming mode.The display shows the current status.
— To exit Station Programming mode: Press [PROGRAM] or lift the handset.
— If you wish to c hange th e data, follo w the programmin g proc edure e xplai ned in t his sec tion.
Clearing the data on the Flexible button
— Be sure that you are in the Station Programming mode: Press [PROGRAM] [9] [9].
PT
AUTO DIAL
2
STORE
Press the desired Flexible
(CO, DSS, PF) button that
you wish to clear.
Dial 2.
Press STORE.
The STORE indicator lights.
The display shows the initial programming mode.
— To exit Station Programming mode: Press [PROGRAM] or lift the handset.
— The lists on the foll o wi ng page s a re the b utt ons and pro gramming a cce ss number s use d for
Station Programming. Detailed operating instructions are explained on each page in this
section.
User Manual 49
Page 50

Station Programming
Station Programming [Flexible Button Assignment]
PROGRAM
(Station Programming)
Direct Station Selection (DSS) Button
1
One-Touch Dialing Button
2
9
9
CO
DSS
PF
CO
INT
Phantom
Function
(F1 - F10)
CO
INT
Phantom
3
Message Waiting (MESSAGE) Button
4
FWD/DND Button
5
SAVE Button
6
Account Button
70
Conference (CONF) Button
71
Log-In / Log-Out Button
72
Phantom Extension Button
73
Night Button
8
Voice Mail (VM) Transfer Button
Two-Way Record Button
90
Two-Way Transfer Button
91
Live Call Screening (LCS) Button
92
Live Call Screening (LCS) Cancel Button
93
Single-CO (S-CO) Button
0
Loop-CO (L-CO) Button
Group-CO (G-CO) Button
#
(Ringing Tone Selection for CO Button)
(Ringing Tone Selection for Intercom Calls)
(Phantom Extension Ringing On/Off Set)
(Station Speed Dialing Number / Name Assignment)
[KX-T7235/KX-T7431/KX-T7433/KX-T7436 only]
PROGRAM
(Exit)
: Available when the Digital Super Hybrid System is connected to a Digital Proprietary Telephone capable Panasonic
Voice Processing System (one that supports digital proprietary telephone integration; e.g., KX-TVS100).
50 User Manual
Page 51

Station Programming [Function Assignment]
Station Programming
PROGRAM
9
9
1
2
3
4
5
6
7
8
8 2
9
0
0
0
#
(Preferred Line Assignment - Outgoing)
(Preferred Line Assignment
(Full One-Touch Dialing Assignment)
(Intercom Alert Assignment)
(Call Waiting Tone Type Assignment)
(Self-Extension Number Confirmation)
(Live Call Screening Mode Set)
(Initial Display Selection)
1
(Bilingual Display Selection)
(Handset / Headset Selection)
(Remote Station Lock Control)
1
-
see "Operator / Manager Service Features" (Section 4.4)
2
(Call Log Lock Control, Incoming)
-
see "Operator / Manager Service Features" (Section 4.4)
3
(Live Call Screening Password Control)
-
see "Operator / Manager Service Features" (Section 4.4)
(Station Programming Data Default Set)
(Station Speed Dialing Number / Name Assignment)
PROGRAM
-
Incoming)
(Exit)
: Available when the Digital Super Hybrid System is connected to a Digital Proprietary Telephone capable Panasonic
Voice Processing System(one that supports digital proprietary telephone integration; e.g., KX-TVS100).
User Manual 51
Page 52

Station Programming
2.2 Station Programming
2.2.1 Initial Settings
The original settin g are s hown in bold letters in t he sha ded box es. Fin d and mark your desi red
selections for programming.
— Be sure that you are in the Station Programming mode : Press [PROGRAM] [9] [9].
PT
To enter the programme mode
To continue
programming input
Follow programming input.
Item Selection Programming Input
Preferred Line Assignment
–
Outgoing
Which line do you prefer to
seize when you go off-hook
to make calls?
AUTO DIAL
STORE
Press STORE.
No line
An idle outside line
A pre-assigned outside line
The Intercom line
The STORE indicator lights.
The display shows the initial
programming mode.
1 1
1
1
1
2
3
01–08 (for KX-TD816)
01–48 (for KX-TD1232)
INTERCOM
Outside line no.
52 User Manual
Page 53

Station Programming
Item Selection Programming Input
Preferred Line Assignment
– Incoming
Which line do you prefer to
seize when you go off-hook
to receive calls?
Full One-Touch Dialing
Assignment
Which way do you prefer to
dial the One-Touch Dialing
feature?
Intercom Alert Assignment
Which way do you prefer to
receive an intercom call?
Call Waiting Tone Type
Assignment
Do you prefer to distinguish the
Call Waiting tone from an outside
line and an intercom call?
Live Call Screening Mode Set
Which voice mail service do
you prefer when a caller is
recording a message in your
mailbox?
No line
A ringing line
A pre-assigned outside line
Going Off-hook and then pressing
the One-Touch Dialing button.
Pressing the One-Touch
Dialing button.
Ringing
Directly – the party's voice is
heard without ringing.
No. Use the same tone.
(Call Waiting Tone 1)
Yes. Use a different tone.
(Call W aiting Tone 2)
You can monitor the message
through the telephone speaker.
(Hands-free mode)
Only an alert tone is heard.
(Private mode)
12
2
2
Outside line no.
32
01–08 (for KX-TD816)
01–48 (for KX-TD1232)
3
3
4
4
5
5
7
7
1
2
1
2
1
2
1
2
Initial Display Selection
Caller ID
18 1
Which display do you prefer
when a call is received?
Bilingual Display Selection
Outside line name
DID extension name
English
8
8
1
18
2
2
3
1
Which language display do
you prefer?
Handset/Headset Selection
French
Handset
28
9
1
2
Which equipment will you
use as a receiver?
Headset
9
2
— To exit the Station Programming mode: Press [PROGRAM] or lift the handset.
User Manual 53
Page 54

Station Programming
2.2.2 Flexible Button Assignment
— Be sure that you are in the Station Programming mode: Press [PROGRAM] [9] [9].
PT
To continue
Press the desired
Flexible (CO, DSS
or PF) button you
wish to assign as
the Account button.
Follow programming
input.
Button
Direct Station Selection (DSS)
One-Touch Dialing
MESSAGE
FWD/DND (Forward/Do Not Disturb)
SAVE
Account
CONF (Conference)
Log-In/Log-Out
Phantom Extension
Night
Voice Mail Transfer *
Two-Way Record *
Two-Way Transfer *
Live Call Screening *
Live Call Screening Cancel *
Single-CO
Loop-CO
2
2
2
2
2
programming input
AUTO DIAL
STORE
Press STORE.
Programmable Button
CO
DSS PF
The STORE indicator lights.
The display shows the initial
programming mode.
Programming Input
Extension no.
1
1
Desired no.*
2
3
4
5
6
7 0
1
7
7
2
7
3
Voice mail extension no.
8
9 0
9 1
2
9
3
9
Outside line no.
0
Phantom extension no.
Voice mail extension no.
Voice mail extension no.
(max. 16 digits)
01–08 (for KX-TD816)
01–48 (for KX-TD1232)
Group-CO
Outside line group no.
(1–8)
— To exit the Station Programming mode: Press [PROGRAM] or lift the handset.
54 User Manual
Page 55

Station Programming
Conditions
• *1 " ", "#", FLASH, PAUSE, SECRET (INTERCOM) and — (CONF) can also be stored.
– If you do not wa nt to displa y the stored number , pr ess the SECRET (INTERCOM) butto n
before and after the numbers you wish to conceal.
– If you store an exte rnal p arty' s number, you should f irs t s tore a lin e acces s nu mber (9, 81
to 88).
– If you need to enter an ac coun t code, you c an ente r the s pecified account code befor e the
line access number.
<Example>
SECRET
49
Account code feature no.
2
This button is used for the voice m ail integration feature.
• *
• To exit the mode at any time, lift the handset.
1234
Account code
9
Account code delimiter#Automatic line
access number
[ 123 4567 ]
Phone number
User Manual 55
Page 56

Station Programming
2.2.3 Phantom Extension Ringing On/Off Set
Allows you to assign a ringing On/Off function on a Phantom button (default: On).
— Be sure that you are in the Station Programming mode: Press [PROGRAM] [9] [9].
PT
(Phantom)
Press Phantom you
wish to turn On/Off the
ringing.
— To exit the Station Programming mode: Press [PROGRAM] or lift the handset.
Press the same Phantom
again.
The display shows
the current status.
<PT Display Example>
Ring On
or
1
Dial 1or 2.
-1: Ring Off
-2: Ring On
AUTO DIAL
2
STORE
Press STORE.
The STORE indicator lights.
The display shows the initial
programming mode.
56 User Manual
Page 57

2.2.4 Ringing To ne Selection for CO Buttons
Allows you to assign a ringer frequency to each CO (default: tone type 2).
— Be sure that you are in the Station Programming mode: Press [PROGRAM] [9] [9].
PT
Station Programming
tone type no.
Press CO button
which you wish to
change the ringing tone.
Press the same
CO button again.
Enter the tone type number
(1 through 8).
Press STORE.
The STORE indicator lights.
The display shows the current
status.
The display shows the initial
programming mode.
The display shows the selected tone type number and you hear
the selected tone until the STORE button is pressed.
<PT Display Example>
Tone Type-X
(-x:tone type number)
If you want to change the tone type, enter another tone type
number.
— To exit the Station Programming mode: Press [PROGRAM] or lift the handset.
AUTO DIAL
STORE
User Manual 57
Page 58

Station Programming
2.2.5 Ringing Tone Selection for Intercom Calls
Allows you to assign a ringer frequency for intercom call (default: tone type 3).
— Be sure that you are in the Station Programming mode: Press [PROGRAM] [9] [9].
PT
INTERCOM INTERCOM
Press INTERCOM.
Press INTERCOM again.
tone type no.
Enter the tone type number
(1 through 8).
AUTO DIAL
STORE
Press STORE.
The STORE indicator lights.
The display shows the current
status.
The display shows the initial
programming mode.
The display shows the selected tone type number and you hear
the selected tone until the STORE button is pressed.
<PT Display Example>
Tone Type-X
(-x:tone type number)
If you want to change the tone type, enter another tone type
number.
— To exit the Station Programming mode: Press [PROGRAM] or lift the handset.
58 User Manual
Page 59

2.2.6 Self-Extension Number Confirmation
Allows you to display your extension port physical number and extension number.
— Be sure that you are in the Station Programming mode: Press [PROGRAM] [9] [9].
Station Programming
PT
Dial 6.
<PT Display Example>
Jack01<=>EXT101
extension port
physical number
— To exit the Station Programming mode: Press [PROGRAM] or lift the handset.
6
HOLD
Press HOLD (END).
The display shows the initial programming
mode.
User Manual 59
Page 60

Station Programming
2.2.7 Station Programming Data Default Set
Allows you to return each of the following items assigned by Station Programming to their
default settings.
a) Bilingual Display Selection (default: English)
b) Call Waiting Tone Type Assignment (default: Tone 1)
c) Full One-Touch Dialing Assignment (default: on)
d) Handset/H eadset Selection (default: Handset)
e) Initial Display Selection (default: Caller ID)
f) Intercom Alert Assignment (default: Ring Call)
g) Live Call Screen Mode Set (default: Hands-free)
h) Preferred Line Preference — Incoming (default: Ringing Line)
i) Preferred Line Preference — Outgoing (default: INTERCOM Line)
— Be sure that you are in the Station Programming mode: Press [PROGRAM] [9] [9].
PT
Dial #.
<PT Display Example>
Clear Ready?
AUTO DIAL
STORE
Press STORE.
The STORE indicator lights.
The display shows the initial programming
mode.
— To exit the Station Programming mode: Press [PROGRAM] or lift the handset.
60 User Manual
Page 61

Station Programming
2.2.8 Station Speed Dialing Number/Name Assignment [KX-T7235/
KX-T7431/KX-T7433/KX-T7436 only]
Allows you to assign frequen tly dialed numbers and names to each Function bu tton on your PT.
For KX-T7235 and KX-T7436 users
To store a number
— Be sure that you are in the Station Programming mode: Press [PROGRAM] [9] [9].
7235 / 7436
F1
F2
F3
F4
PT-PGM Mode
F5
Press Function (F1-F10).
F6
F7
F8
F9
F10
Enter the desired number
(extension number,
phone number, etc.).
The STORE indicator light turns off.
The display shows the current status.
(If nothing is stored, "Not Stored" is displayed.)
<PT Display Example>
9-123-4567
CLR NEXT
(—Outside number, 123-4567,
is now programmed.)
desired number
AUTO DIAL
STORE
Press STORE.
The STORE indicator lights.
The display shows the initial
programming mode.
Up to 16 digits, consisting of 0 through 9, , #, FLASH, PAUSE, INTERCOM,
("[" or "]" : secret) and CONF (-:hyphen), can be stored.
To store the telephone number of an outside party, the line access code (9 or 81
through 88) must be stored as the leading digit.
To erase the entry, press the CLR (S2) button.
To store a name, press the NEXT(S3) button and go to step 3 in "To store a name"
as described in the following procedure.
— To exit the Station Programming mode: Press [PROGRAM] or lift the handset.
User Manual 61
Page 62

Station Programming
To store a name
— Be sure that you are in the Station Programming mode: Press [PROGRAM] [9] [9].
7235 / 7436
F1
F2
F3
F4
PT-PGM Mode
F5
Press Function (F1-F10). Press NEXT (S3).
The STORE indicator light turns off.
The display shows the current status.
F6
F7
F8
F9
F10
S 1
S 2
The display shows the current status.
(If nothing is stored, "Not Stored" is displayed.)
<PT Display Example>
Mike Graham
AUTO DIAL
STORE
Press STORE.
The STORE indicator lights.
The display shows the initial
programming mode.
NEXT
S 3
CLR NEXT
desired name
Enter the name.
(
-
Name is now
programmed.)
Refer to the Combination Tables 1 and 2 in 2.2.8 Station Speed Dialing Number/Name
Assignment [KX-T7235/KX-T7431/KX-T7433/KX-T7436 only] for information on how to
enter each character.
— To exit the Station Programming mode: Press [PROGRAM] or lift the handset.
62 User Manual
Page 63

For KX-T7431 and KX-T7433 users
To store a number
— Be sure that you are in the Station Programming mode: Press [PROGRAM] [9] [9].
7431 / 7433
station speed dial no.
Dial .
The STORE indicator light turns off.
The display shows the current status.
(If nothing is stored, "Not Stored" is displayed.)
<PT Display Example>
9-123-4567
CLR NEXT
Enter a station speed dial
number (0 through 9).
(—Outside number, 123-4567,
is now programmed.)
desired number
Enter the desired number
(extension number,
phone number, etc.).
The STORE indicator lights.
The display shows the initial
programming mode.
Station Programming
AUTO DIAL
STORE
Press STORE.
Up to 16 digits, consisting of 0 through 9, , #, FLASH, PAUSE, INTERCOM,
("["or "]" : secret) and CONF (–:hyphen), can be stored.
To store the telephone number of an outside party, the line access code (9 or 81
through 88) must be stored as the leading digit.
To erase the entry, press the CLR (S2) button or TRANSFER button.
— CLR (S2) button: for KX-T7433 users
— TRANSFER button: for KX-T7431 users
To store a name, press the NEXT (S3) button (KX-T7433) or MODE button (KXT7431) and go to step 4 in "To store a name" as described in the following procedure.
— To exit the Station Programming mode: Press [PROGRAM] or lift the handset.
User Manual 63
Page 64

Station Programming
To store a name
— Be sure that you are in the Station Programming mode: Press [PROGRAM] [9] [9].
7431 / 7433
station speed dial no.
Dial .
Enter a station speed dial
number (0 through 9).
The STORE indicator light turns off.
The display shows the current status.
(If nothing is stored, "Not Stored" is displayed.)
<PT Display Example>
-
Name is now
Mike Graham
(
programmed.)
CLR NEXT
AUTO DIAL
desired name
STORE
Enter the name.
Press STORE.
The STORE indicator lights.
The display shows the initial
programming mode.
MODE
NEXT
S 1
-
NEXT(S3) button: for KX-T7433 users
-
MODE button: for KX-T7431 users
S 2
Press NEXT (S3) or MODE.
or
S 3
Refer to the Combination Tables 1 and 2 in 2.2.8 Station Speed Dialing Number/Name
Assignment [KX-T7235/KX-T7431/KX-T7433/KX-T7436 only] for information on how to
enter each character.
— To exit the Station Programming mode: Press [PROGRAM] or lift the handset.
Combination Table
Each character can be entered by using the dial key pad, various buttons or the Jog Dial for
storing names.
Combination T able 1 shows the combin ation of the ke ys and the number of ti mes to press the
SELECT (A UTO ANSWER/MUTE) butt on, or the combination of the k ey and the SHIFT and
Soft buttons to enter each character. (The AUTO ANSWER/MUTE button becomes the
SELECT button when using the overlay.)
To enter a character, find the key and number of times to press the SELECT button or the
corresponding SHIFT and So ft button combinati on from the table. Press the corresponding k ey
first, then press the SELECT button the required number of times. Or you can use the SHIFT
button and a Soft button (S1 through S3) instead of the SELECT button.
64 User Manual
Page 65

Station Programming
Combination Table 2 shows the combination of keys and the number of pulses to move the
Jog Dial (click tones) to the right. To enter a character , fin d the ke y an d number puls es to rot ate
the Jog Dial. Press the co rrespondi ng ke y f irst, th en rotate t he Jog Dial t he require d number of
times. Or, if you kee p rotati ng the Jog Dia l after pressi ng an y diali ng ke y, all of the characters
in the table will be displayed.
Combination Table 1
SHIFT &
Soft
Combination
S1 SHIFT
+ S1
S2 SHIFT
+ S2
S3 SHIFT+ S3SHIFT+
SHIFT+
S1
SHIFT+
SHIFT+
S2
Pressing
SELECT
(Times)* 0123456 7 8
Keys
11QqZz!?
2 2AaBbC c
33DdEeFf
4 4GgHhI i
55JjKkLl
66MmNnOo
77PpQqRrSs
88TtUuVv
99WwXxYyZz
00 .,':;
/+-=<>
##$%&@()
* If your telephone is a KX-T7431, do not use the provided SELECT butto n. Use the AUTO ANSWER
/ MUTE button which becomes the SELECT button when using the overlay.
User Manual 65
Page 66

Station Programming
Combination Table 2
Rotating
Jog Dial
(Pulses)0123456 7 8
keys
11QqRrSsTt
2 2AaBbC c D d
33DdEeFfGg
44GgHhIiJj
55JjKkLlMm
66MmNnOoPp
77PpQqRrSs
88TtUuVvWw
99WwXxYyZz
00 !?.,':;
/+-=<>#$
##$%&@()Aa
<Example>
— Using the SELECT button;
See Combination Table 1.
1) Press 6 and then press the SELECT button once to enter "M".
2) Press 4 and then press the SELECT button six times to enter "i".
3) Press 5 and then press the SELECT button four times to enter "k".
4) Press 3 and then press the SELECT button four times to enter "e".
— Using the SHIFT button and a Soft button;
See Combination Table 1.
1) Press 6 and then press the S1 button to enter "M".
2) Press 4 and then press the SHIFT and S3 button to enter "i".
3) Press 5 and then press the S2 button to enter "k".
4) Press 3 and then press the S2 button to enter "e".
— Using the Jog Dial (With a KX-T7431 / KX-T7433 / KX-T7436 only)
See Combination Table 2.
1) Press 6 and then rotate the Jog Dial one one pulse to enter "M".
2) Press 4 and then rotate the Jog Dial six one pulse to enter "i".
3) Press 5 and then rotate the Jog Dial four one pulse to enter "k".
4) Press 3 and then rotate the Jog Dial four one pulse to enter "e".
66 User Manual
Page 67

Station Programming
OR
1) Press 2 and then rotate the Jog Dial until "M"appears.
2) Press 2 and then rotate the Jog Dial until "i"appears.
3) Press 2 and then rotate the Jog Dial until "k"appears.
4) Press 2 and then rotate the Jog Dial until "e"appears.
Note
• Pressing the SHIFT button alternates between capital and lower case letters. Once this
button is pressed, that letter SHIFT mode remains until SHIFT is pressed again.
• To erase the last word (to backspace), press the CONF button.
(The CONF button becomes the " "(backspace) key when using the overlay.)
• To erase all o f the data, pr ess the CLR (S 2) button.
• If you keep rotating the Jog Dial, all of the characters will be displayed in order.
<Example> If you rotate th e Jog Di al aft er pres si ng 2, all of the characters will appear
in the following order:
A a B b ... Z z (space) ! ? . , ' : ; / + – = < > # $ % & @ ( ) A a B b ...
Conditions
• The default is "Not Stored".
• Up to 10 dialing numbers and names can be assigned. Each dialing number has a maximum
of 16 digits and each name has a maximum of 10 characters.
User Manual 67
Page 68

Station Programming
68 User Manual
Page 69

User Programming
Section 3
User Programming
User Manual 69
Page 70

User Programming
3.1 User Programming Instructions
3.1.1 General Programming Instructions
User Programming allows you, any extension user who knows the User Programming
Password, to program the following system features from your telephone individually.
• [000] Date and Time Set
• [001] System Speed Dialing Number Set
• [002] System Speed Dialing Name Set
• [003] Extension Number Set
• [004] Extension Name Set
• [005] Flexible CO Button Assignment
• [006] Operator / Manager Extension Assignment
• [007] DSS Console Port and Paired Telephone Assignment
• [008] Absent Messages
• [009] Quick Dial Number Set
• [012] ISDN Extension Number Set
• [013] ISDN Extension Name Set
• [014] VM Name Set
• [017] DISA User Codes
To program, you need to switch your telephone to the User Programming mode.
During the programming mode, your telephone is in a busy condition for outside callers.
If you want to make a normal call operation, you must finish the programming mode.
Default Setting
This system has default factory settings. Any required changes can be written in the
"Programming Tables."
Required Telephone Set
One of the following Proprietary Telephone (PT) sets with display is required for User
Programming:
• Digital Proprietary Telephone (DPTs): KX-T7436, KX-T7433,
KX-T7431, KX-T7235, KX-T7230.
Soft Buttons and SHIFT Button on the Display PT
Three soft buttons are provided just below the display of the following Digital Proprietary
Telephones (DPTs): KX-T7230, KX-T7235, KX-T7433, KX-T7436.
Functions of these Soft buttons vary as the programming procedures advance step by step.
Those functions that are currently assigned to the buttons are shown on the lower line of the
display. If the SHIFT button indicator is on, two functions are available for each Soft button.
T o al ternate bet ween the t wo functi ons, press th e SHIFT but ton on the r ight side of the displa y.
70 User Manual
Page 71

User Programming
Using the Overlay
A programming overlay is packed with the telephone at the factory. This overlay should be
used at all times in the programming mode since the functions of the telephone keys change
during programming.
Location of Controls with the Overlay
The pictures belo w sho w the functions of th e buttons of the KX-T7433, KX-T7436, KX-T7230
and KX-T7235 in the programming mode. KX- T7431 is the same as KX-T743 3 except f or the
Soft and SHIFT buttons.
User Manual 71
Page 72

User Programming
KX-T7431
MODESELECT
KX-T7433
KX-T7230
SECRET
PQRS
PROGRAM
PROGRAM CLEAR
ABC DEF
JKL MNOGHI
TUV WXYZ
OPER
ENDPREV NEXT
Soft-1 Soft-2 Soft-3
SHIFTSoft-1 Soft-2 Soft-3
PAUSE
STORE
FLASH SELECT
SHIFT
KX-T7436
KX-T7235
SECRET
PQRS
PROGRAM
PROGRAM CLEAR
ABC DEF
JKL MNOGHI
TUV WXYZ
OPER
ENDPREV NEXT
Soft 1 Soft 2 Soft 3
SHIFTSoft-1 Soft-2 Soft-3
PAUSE
STORE
FLASH SELECT
SHIFT
SECRET PAUSE CLEAR
ABC
DEF
2
JKL
MNO
5
TUV
WXY
8
OPER
0
FLASHPREV END
3
VOLUME
6
STORE
9
SELECT
NEXT
GHI
PRS
1
4
7
SECRET PAUSE CLEAR
ABC
DEF
2
JKL
MNO
5
TUV
WXY
8
OPER
0
FLASHPREV END
3
VOLUME
6
STORE
9
SELECT
NEXT
GHI
PRS
1
4
7
72 User Manual
Page 73

User Programming
Before entering the user programming mode
Before entering the user programming mode, confirm that:
• Your telephone is on-hook, and
• No calls are on hold at your telephone.
Entering the user programming mode
To enter the User Programming mode:
Press PROGRAM + + + User Programming Password (default:1234)
• The display shows the Initial Message: USR-PGM NO?
Note
• If nothing is entered within five seconds after the PROGRAM button is pressed,
programming mode is canceled.
• During the programming mode, your extension is treated as a busy extension.
• Only one proprietary telephone can be in programming mode at any one time.
• The User Programming Password is not shown on the display for security reason. The
password can be changed by System Programming.
Programming Guide References
[120] User Password
In this section, programs [001] through [004] are explained. Please consult with your dealer
when you need to change the following programs:
• [005] Flexible CO Button Assignment
• [006] Operator / Manager Extension Assignment
• [007] DSS Console Port and Paired Telephone Assignment
• [008] Absent Messages
• [009] Quick Dial Number Set
• [012] ISDN Extension Number Set
• [013] ISDN Extension Name Set
• [014] VM Name Set
User Manual 73
Page 74

User Programming
3.1.2 Programming Methods
Advancing to the next stage
When "USR-PGM NO? " is displayed, you can select one of the following:
• To go to program [000], press the NEXT button.
• To go to another program, enter the 3-digit program address.
Rotation of jack number
Each jack of the Di git al Super Hybrid System supports t he connection of a digital pr opr ie tary
telephone and a single lin e device with dif fe re nt extension numbers (eXtra Device Port: XDP
function). To program this function it is necessary to assign two parts for each jack. The first
part of jack one is 01-1. The second part of jack one is 01-2. The first part of jack two is 02-1
and so on. The NEXT and PREV buttons can be used to move from jack to jack as required.
Example
NEXT
#01-1
PREV
Note
The first pa rt of a jack is fo r a DPT of a XDP-assig ned jack. The seco nd part is for a single line
device. Program [600] EXtra Device Port assigns which jacks are XDP.
#01-2
NEXT
PREV
NEXT
#02-1 #02-2......
PREV
Entering Characters
You can enter characters to store names for speed dial numbers, extension numbers, etc., by
using the dialing key pad and buttons.
Each of the twelve dialing keys on the dialing key pad represents seven characters. Refer to
2.2.8 Station Speed Dialing Number/Name Assignment [KX- T7235/KX-T7431/ KX-T7433/
KX-T7436 only].
Storing your data
Press STORE to store your data.
• The STORE indicator lights red and a confirmation tone sounds.
* Confirmation tone (one beep)
After pres sing STORE, you will hear a beep. This informs you that storage has been
completed successfully.
* Alarm tone (three beeps)
If you hear this alarm, your entry is not valid.
74 User Manual
Page 75

User Programming
Making another selection within the same program address
• To go to the next selection, press NEXT.
• To go to the previous selection, press PREV.
• To make a specific selection, press SELECT and then enter the number.
Accessing another program address
After pressing STORE, you can access ano ther program by one of th e following two methods :
a)
To go to the next program address:
• Larger program address
<KX-T7200 series>
Press Soft 1 (SKP+) or VOLUME (DOWN).
<KX-T7400 series>
Rotate the Jog Dial counterclockwise.
• Smaller program address
<KX-T7200 series>
Press SHIFT + Soft 1 (SKP-) or VOLUME (UP).
<KX-T7400 series>
Rotate the Jog Dial clockwise.
b) To go to a specific program address:
Press END, then enter the program address.
Returning to the operation mode
1. Lift the handset while in programming mode.
2. When the Initial M essage: USR-PGM NO? is displayed, press the PROGRAM button.
(To display the Initial Message, press END.)
User Manual 75
Page 76

User Programming
3.2 User Programming
3.2.1 [000] Date and Time Set
Notice
It is assumed that you have read Section 3.1 "User Programming Instructions". Soft button
usage is explained in that section, the refore no references will be made to them in the follo wing
instructions. The soft buttons can be used in place of the overlay keys at any time.
Description
Sets the current date and time.
Selection
• Year: 00 through 99
• Month: Jan. through Dec.
• Day: 1 through 31
• Day of the week: SUN / MON / TUE / WED / THU / FRI / SAT
• Hour: 01 through 12
• Minute: 00 through 59
• AM / PM
• Hour format: 12 or 24
Default
'93 Jan. 1 FRI 12:00 AM 12
76 User Manual
Page 77

Programming
Display PT
User Programming
<Date Setting>
0 0 0
Dial 000. Enter the year
<PT Display>
000 DATE / TIME
SELECT
Keep pressing SELECT until
the desired month is displayed.
<Time Setting>
STORE
NEXT
NEXT
Press NEXT.
<PT Display Example>
01 Jan. 1 MON
day
Enter the day
(01 through 31).
To change the current entry, press
CLEAR and enter the new day.
hour
year
(last 2 digits).
To change the current entry, press
CLEAR and enter the new year.
Press →.Press →.
Keep pressing SELECT until
the desired day of the week is
displayed.
minute
Press →.
SELECT
Press STORE.
<PT Display Example>
12:00 AM 12
Press →. Press SELECT for
Press NEXT.
SELECT
Press SELECT for
AM or PM.
Enter the hour
(00 through 12).
To change the current entry,
press CLEAR and enter the
new hour.
SELECT
Press →.
12 or 24 (hour
format).
Press →.
Enter the minute
(00 through 59).
To change the current entry,
press CLEAR and enter the
new minute.
STORE
Press STORE.
Press END.
END
User Manual 77
Page 78

User Programming
Conditions
• After changing an entry, you can press STORE. You do not have to perform the rest of th e
steps.
• To return to the previous field, press in steps 4 through 9 and steps 13 through 18.
• If you hear an alarm after pressing STORE, check that the date is valid.
• The clock starts immed i ately after the STORE button is presse d.
• You cannot leave an entry empty.
Features Guide References
Display, in Idle
78 User Manual
Page 79

3.2.2 [001] System Speed Dialing Number Set
Description
Used to program the System Speed Dialing numbers. These numbers are available for any
extension user in the system.
Selection
• Speed dial numbers: 000 through 499
• Telephone number: 24 digits (max.)
Default
All speed dial numbers — Not Stor e d
User Programming
User Manual 79
Page 80

User Programming
Programming
Display PT
NEXT
001
Dial 001. Enter a speed dial number
<PT Display> <PT Display>
001 SYS SPD DIAL
Repeat these steps
telephone no.
Enter a telephone number.
To delete the current entry, press CLEAR.
To change the current entry, press CLEAR
and enter the new number.
Press STORE.
Press NEXT.
SPD Code?→
STORE
speed dial no.
(000 through 499).
To enter speed dial number 000,
you can also press NEXT.
<PT Display Example>
000:Not Stored
<To continue:> [When SELECT is pressed]
NEXT
PREV
SELECT
Press NEXT or
PREV or SELECT.
speed dial no.
Enter the desired speed
dial number
(000 through 499).
<To end:>
END
Press END.
Conditions
• Each speed dial number ha s a maximum of 24 digits . The v alid characters are 0 thr ough 9,
, and # keys, and the FLASH, PAUSE, SECRET and
"–"(hyphen) buttons.
— To store the flash signal, press FLASH.
Note
: The Stored flash will only be effective during an established call.
— To store a hyphen, press the "–" button.
80 User Manual
Page 81

User Programming
— To store a pause, press PAUSE.
(Refer to Pulse to Tone Conversion in the Features Guide)
— To store a feature number to convert pulse signals to DTMF (Dual Tone MultiFrequency) signals, press the and # keys. (Refer to Pulse to Tone Conversion in the
Features Guide.)
— To prevent displaying of all or part of the number, press SECRET before and after the
secret number, or your entry will not be stored. (Refer to Secret Dialing in the Features
Guide.)
• If you are storing an e xter nal nu mber, enter the line acce ss cod e ( def ault : 9, 8 1 thr ough 88)
before the number. When dialing, a pause is automatically inserted after the code.
• If you are storing an account code, enter the account code before the line access code. (Refer
to Account Code Entry in the Features Guide.)
• It is possible to store a number con sisting of 25 digi ts or more by storing it in two speed dial
numbers. The line access code should be stored in the first speed dial number.
• T o access another spe ed dial number in step 3 thr ough 6, press SELECT and start with step
3.
• To display parts of the number which have scrolled off the display, press or .
• Program [002] "System Speed Dialing Name Set" is used to name the speed dial numbers.
User Manual References
4.3.77 System Speed Dialing
4.5.8 KX-T7235 Display Features - Call Directory
4.5.11 KX-T7431 / KX-T7433 / KX-T7436 Display Features - Call Directory
User Manual 81
Page 82

User Programming
3.2.3 [002] System Speed Dialing Name Set
Description
Assigns names to the system speed dial numbers assigned in program [001] "System Speed
Dialing Number Set." The KX-T7431, KX-T743 3, KX-T7235 and KX-T7436 sho w the stored
name during System Speed Dialing.
Selection
• Speed dial number: 000 through 499
• Name: 10 characters (max.)
Default
All speed dial numbers — Not Stored
82 User Manual
Page 83

Programming
Display PT
User Programming
NEXT
002
Dial 002. Enter a speed dial number
<PT Display> <PT Display>
002 SYS SPD NAME
Repeat these steps
name
Enter a name.
To delete the current entry, press CLEAR.
To change the current entry, press CLEAR
and enter the new name.
Press STORE.
Press NEXT.
SPD Code?→
STORE
speed dial no.
(000 through 499).
To enter speed dial number 000,
you can also press NEXT.
<PT Display Example>
000:Not Stored
<To continue:> [When SELECT is pressed]
NEXT
PREV
SELECT
Press NEXT or
PREV or SELECT.
speed dial no.
Enter the desired speed
dial number
(000 through 499).
<To end:>
END
Press END.
Conditions
• Speed dial numbers are programmed in program [001] "System Speed Dialing Number
Set."
• Each name has a maximum of 10 characters.
• For entering characters , see 2.2.8 Station Speed Dialing Number/Name Assig nment [KX-
T7235/KX-T7431/KX-T7433/KX-T7436 only].
User Manual 83
Page 84

User Programming
User Manual References
4.3.77 System Speed Dialing
4.5.8 KX-T7235 Display Features - Call Directory
4.5.11 KX-T7431 / KX-T7433 / KX-T7436 Display Features - Call Directory
84 User Manual
Page 85

3.2.4 [003] Extension Number Set
Description
Assigns an extension number to each extension.
Selection
• Jack number:
KX-TD816 - 01 through 16 (-1 / -2)
KX-TD1232 - 01 through 64 (-1 / -2)
(-1 = first part, -2 = second part)
• Extension Number: 2 through 4 digits
Default
KX-TD816
Jack 01-1 through 16-1 = 101 through 116;
Jack 01-2 through 16-2 = 201 through 216
KX-TD1232
Jack 01-1 through 64-1 = 101 through 164;
Jack 01-2 through 64-2 = 201 through 264
User Programming
User Manual 85
Page 86

User Programming
Programming
Display PT
003
NEXT
jack no.
Dial 003. Enter a jack number.
Press NEXT.
<PT Display> <PT Display>
003 EXT NUMBER
Repeat these steps
extension no.
Enter the extension no.
Press STORE.
Jack NO?→
STORE
To delete the current entry, press CLEAR.
To change the current entry, press CLEAR
and enter the new name.
To enter jack number 01, you can
also press NEXT.
To select the second part (-2), press
NEXT after entering the jack number.
<PT Display Example>
#01-1:EXT101
<To continue:> [When SELECT is pressed]
NEXT
jack no.
PREV
SELECT
Press NEXT or
PREV or SELECT.
Enter the desired
jack number.
<To end:>
END
Press END.
Conditions
• There is a maximum of 32 extension numbers for KX-TD816, and 128 extension number s
for KX-TD1232. Each extension number can be two, three, or four digits, consisting of 0
through 9. The and # keys cannot be used.
• For the KX-TD1232, j ack numbers 0 1 through 32 ar e for the Mast er System and 33 through
64 are for the Slave, if available.
• An extension number is invalid if the first or second digits do not match with the program
[100] "Flexible Numberi ng, (01 )- (16 ) 1 st thr oug h 16th hundr ed extension blocks" setting.
86 User Manual
Page 87

If one digit is assig ned as t he leadin g digit, s ome ext ensions have two digit s and some ha v e
three digits. If two digits are assigned, some have three digits and some have four digits.
• Two extension numbers can be assigned per jack. If eXtra Device Port (XDP) is disabled
for the jack in pr ogram [60 0] "EXt ra Device Port" the e xt ensio n nu mber of t he secon d part
(XX-2) is not available. (XX= jack number)
• For an explanation of jack numbering, see "Rotation of jack number".
• A double entry or incompatible entry is invalid including the program [012] "ISDN
Extension Number Set", [118] "Voice Mail Extension Number Assignment", [124]
"Phantom Extension Number Assignment" and [813] "Floating Number Assignment".
Valid entry examples are: 10 and 11; 10 and 110. Invalid entry examples are: 10 and 106;
210 and 21.
• Program [004] "Extension Name Set" is used to name the extension numbers.
User Manual References
4.3.49 Intercom Calling
4.5.8 KX-T7235 Display Features - Call Directory
4.5.11 KX-T7431 / KX-T7433 / KX-T7436 Display Features - Call Directory
User Programming
User Manual 87
Page 88

User Programming
3.2.5 [004] Extension Name Set
Description
Assigns names to the extension numbers programmed in program [003] Extension Number
Set.
Selection
• Jack number:
KX-TD816 – 01 through 16 (-1 / -2)
KX-TD1232 – 01 through 64 (-1 / -2)
(-1 = first part, -2 = second part)
• Name: 10 characters (max.)
Default
All extension ports — Not Stored
88 User Manual
Page 89

Programming
Display PT
004
User Programming
NEXT
jack no.
Dial 004. Enter a jack number.
Press NEXT.
<PT Display> <PT Display>
004 EXT NAME SET
Repeat these steps
name
Enter a name.
Press STORE.
Jack NO?→
STORE
To delete the current entry, press CLEAR.
To change the current entry, press CLEAR
and enter the new name.
To enter jack number 01, you can
also press NEXT.
To select the second part (-2), press
NEXT after entering the jack number.
<PT Display Example>
#01-1:Not Stored
<To continue:> [When SELECT is pressed]
NEXT
PREV
SELECT
Press NEXT or
PREV or SELECT.
extension no.
Enter the desired
extension number.
<To end:>
END
Press END.
Conditions
• There is a maximum of 32 names for KX-TD 816 and 128 names for KX-TD1232.
Each name has a maximum of 10 characters.
• For entering characters, see Section 2.2.8 Station Speed Dialing Number/Name
Assignment [KX-T7235/KX-T7431/KX-T7433/KX-T7436 only].
• Program [003] Extension Number Set is used to assign extension numbers.
User Manual 89
Page 90

User Programming
• For the KX-TD1232, Jack numbers 01 through 32 ar e for the Master Syst em and 33 through
64 are for the Slave, if available.
• For an explanation of jack numbering, see "3.1.2 Programming Methods".
User Manual References
4.3.49 Intercom Calling
4.5.8 KX-T7235 Display Features - Call Directory
4.5.11 KX-T7431 / KX-T7433 / KX-T7436 Display Features - Call Directory
90 User Manual
Page 91

3.2.6 [017] DISA User Codes
Description
Assigns the Direct Inward System Access (DISA) User Codes and a Class of Service (COS) to
each code. The code COS determines the toll restriction level of the DISA caller.
Warning
When you enable the Outside-Outside Line Call feature of DISA function, if a third party
discover s the passw ord (a DISA Use r Code) of the s ystem, you ha v e a risk th at the y will mak e
illegal phone calls using your telephone line, and the cost may be charged to your account.
In order to avoid this problem, we strongly recommend the following points:
1: Carefully maintain the secrecy of the password.
2: Specify a complicated password as long and random as you can make it.
3: Change the password frequently.
Selection
• DISA user code number: 01 through 32
• DISA user code: 4 through 10 digits
• COS number: 1 through 8
User Programming
Default
All DISA user code numbers - DISA user code=Blank; COS number=8
User Manual 91
Page 92

User Programming
Programming
Display PT
017
NEXT
DISA user code no.
Dial 017. Enter a DISA user code number (01-32).
Press NEXT.
<PT Display> <PT Display>
017 USER CODES
Repeat these steps
DISA user code
Enter a DISA user
code (Blank or 4-10
digits).
Press →.
User Code NO?→
COS no.
Enter COS
number (1-8).
Press STORE.
To delete the current entry, press CLEAR.
To change the current entry, press CLEAR
and enter the new name.
<To end:>
END
STORE
To enter user code number 01, you
can also press NEXT.
<PT Display Example>
01: C:8
<To continue:> [When SELECT is pressed]
NEXT
PREV
SELECT
Press NEXT or
PREV or SELECT.
DISA user code no.
Enter the desired
DISA user code number.
Press END.
Conditions
• This setting is requi re d if Trunk (Outside line) Security mode is selected in p rog ram [ 809]
DISA Security Type.
• Each code should be unique and composed of four through ten numeri cal digits, 0 thr ough
9.
User Manual References
4.3.34 Direct Inward System Access (DISA)
92 User Manual
Page 93

Station Features and Operation (DPT/SLT)
Section 4
Station Features and Operation (DPT/SLT)
User Manual 93
Page 94

Station Features and Ope ration (DPT/SLT)
4.1 Befor e Operating
4.1.1 Before Operating
What kind of telephone do you use?
In this manual, you will find your way to operate the feature depending on the telephone you
use. Please use the proper operation for your telephone.
If you use a Panasonic proprietary telephone which has the special function button and/or
the display, you will follow the operation with the button or display for easy access.
• If you use a Panasonic proprietary telephone which does not have the function button,
you may change one of the unused buttons to another button. Refer to 2.2 Station
Programming.
• A Panasonic proprietary telephone has the Light Emitting Diode (LED) button
indicators, so you can see the line conditions by the lighting patterns.
• If "Idle Line Preference — Outgoing", "No Line Preference — Outgoing" or "Prime
Line Preference (CO Line) — Outgo ing" is a ssigne d o n the e xtens ion, it is not possible
to have a ccess to any DPT f eatures after si mply going of f-hook. To access DPT features,
press the INTERCOM button after going off-hook.
If you use singl e line de vices suc h as a si ngle l ine te lephone or dat a termi nal, you will f ollow
the steps which enter the feature num ber.
• If you use a dial pulse (DP) type singl e line de vi ce which does not ha ve t he " " and "#"
keys, it is impossible to access features that have " " or "#" in their feature numbers.
• When the "Pickup Dialing (Hot Line)" feature is set on your telephone, the dialing
sequence should be done within a certain period of time (Pickup Dial Waiting Time —
default: 1 s) after lifting the handset.
This time can be changed by System Programming.
If you use a ISDN telephone which are connected to the optional ISDN Line Unit, KXTD284, can perform features in this section. However, there are some exceptions.
94 User Manual
Page 95

Operation Step Box
In this section, oper ations for e xtension users are described usi ng the follo wing Operation St ep
Box.
Applicable telephone:
Both PT and SLT users
can follow the operation
steps below.
PT and SLT
7230 / 7235 / 7433 / 7436
Station Features and Operation (DPT/SLT)
Applicable telephone:
KX-T7230, KX-T7235,
KX-T7433 and KXT7436 users can execute
not only the button
operation but also the
display operation below.
Wait for an answer
2
Dial 2.
and talk.
Note
• If your telephone is not noted in th e operating step box (e x., only "PT" is not ed), this means
your telephone does not have the ability to execute that feature.
• If your telephone has the abilit y to perform severa l operations for one featur e, you can select
the method according to your needs.
• In this manual, the default feature numbers are used to describe each operation and
illustration. Use the new programmed numbers if default feature numbers are changed by
System Programming.
• For proprietary telephone operations, all button illustrations are based on the model K XT7235.
Description of Symbols Used
In this section, many symbols are used. Most symbols do not need a description, but some
symbols do. They are as follows.
BSS
S3S2S1
Press BSS (S1).
Wait for an answer
and talk.
Operation steps
Lift the handset, or press the SP-PHONE or MONITOR button. (Off-hook)
Replace the handset, or press the SP-PHONE or MONITOR button. (On-hook)
User Manual 95
Page 96

Station Features and Ope ration (DPT/SLT)
Flash the hookswitch on a single line telephone.
Tones which vary depending on the condition (Refer to 6.1.3 Tone List).
96 User Manual
Page 97

4.2 Basic Operations
4.2.1 Making Calls
Intercom Calling
You can make a call to another extension.
Any T elephone
extension no.
or
Station Features and Operation (DPT/SLT)
(DSS)
Lift the handset or press
SP-PHONE/MONITOR.
Outward Dialing
You can make a call to an outside party using one of the following line access methods.
a) Line Access, Automatic (default: 9)
b) Line Access, Individual (CO button)
c) Line Access, Outside Line Group (default: 81 through 88)
Any T elephone
Lift the handset or press
SP-PHONE/MONITOR.
Dial extension number. Press DSS.
The INTERCOM indicator light turns green.
(CO)
line access code
For PT: Press CO assigned
as Loop-CO /
Group-CO / Single-CO.
For any telephone: Dial the line access
code (9 or 81 through 88).
For PT
For any
telephone
Dial tone
Talk.
Dial the phone number.
Hang up or press
SP-PHONE/MONITOR.
phone no.
Talk.
Hang up or press
SP-PHONE/MONITOR.
The selected CO indicator
light turns green.
The display shows the
phone number.
User Manual 97
Page 98

Station Features and Ope ration (DPT/SLT)
Conditions
<PT>
• There are four types of Line Prefe rence fo r outgoi ng calls (— Idle Line/No Line/Prime
Line/Prime INTERCOM Line). Each preference can be selected by Station or System
Programming.
• With the KX-T7431, KX-T7433, KX-T7436 or KX-T7235, you can execute the
"Intercom Calling" feature to extensions by using the "Extension Dialing" display
feature.
• Helpful hints for the Handsfree (speakerphone) operation are noted in the "Handsfree
Operation" feature.
User Manual References
2.2.1 Initial Settings
4.3.48 Hands-free Operation [PT only]
4.3.49 Intercom Calling
4.3.61 Outward Dialing, Line Access — SUMMARY
4.5.8 KX-T7235 Display Features - Call Directory
4.5.11 KX-T7431 / KX-T7433 / KX-T7436 Display Features - Call Directory
98 User Manual
Page 99

4.2.2 Receiving Calls
Station Features and Operation (DPT/SLT)
Any T elephone
Lift the handset or press SP-PHONE
/MONITOR.
Conditions
<PT>
• There are three types of Line Pr efere nce for in comin g calls (— No Line/Prime Outside
Line/Ringing Line). Each preference can be selected by Station Programming.
• Helpful hints for the Handsfree (speakerphone) operation are noted in the "Handsfree
Operation" feature.
Programming Guide References
[400] Outside Line Connection Assignment
[603-604] DIL 1:N Extension and Delayed Ringing —— Day / Night
PT
(CO) INTERCOM
or
Press a rapid flashing CO or INTERCOM.
The CO or INTERCOM indicator light
turns steady green.
User Manual References
2.2.1 Initial Settings
4.3.4 Answering, Direct Outside Line [PT only]
4.3.48 Hands-free Operation [PT only]
User Manual 99
Page 100

Station Features and Ope ration (DPT/SLT)
4.3 Station Features a nd Operation
4.3.1 Absent Message Capability
You can select one of nine pre-programmed Absent Messages (1-9) for your extension. The
display PT users c alli ng your e xtens io n see the message you select . Ab sent messages are used
to inform the party calling to your extension of the reason for your absence. By default,
Messages No. 1-6 are provided with default messages and the other three messages are left
blank.
100 User Manual
 Loading...