

Page 1
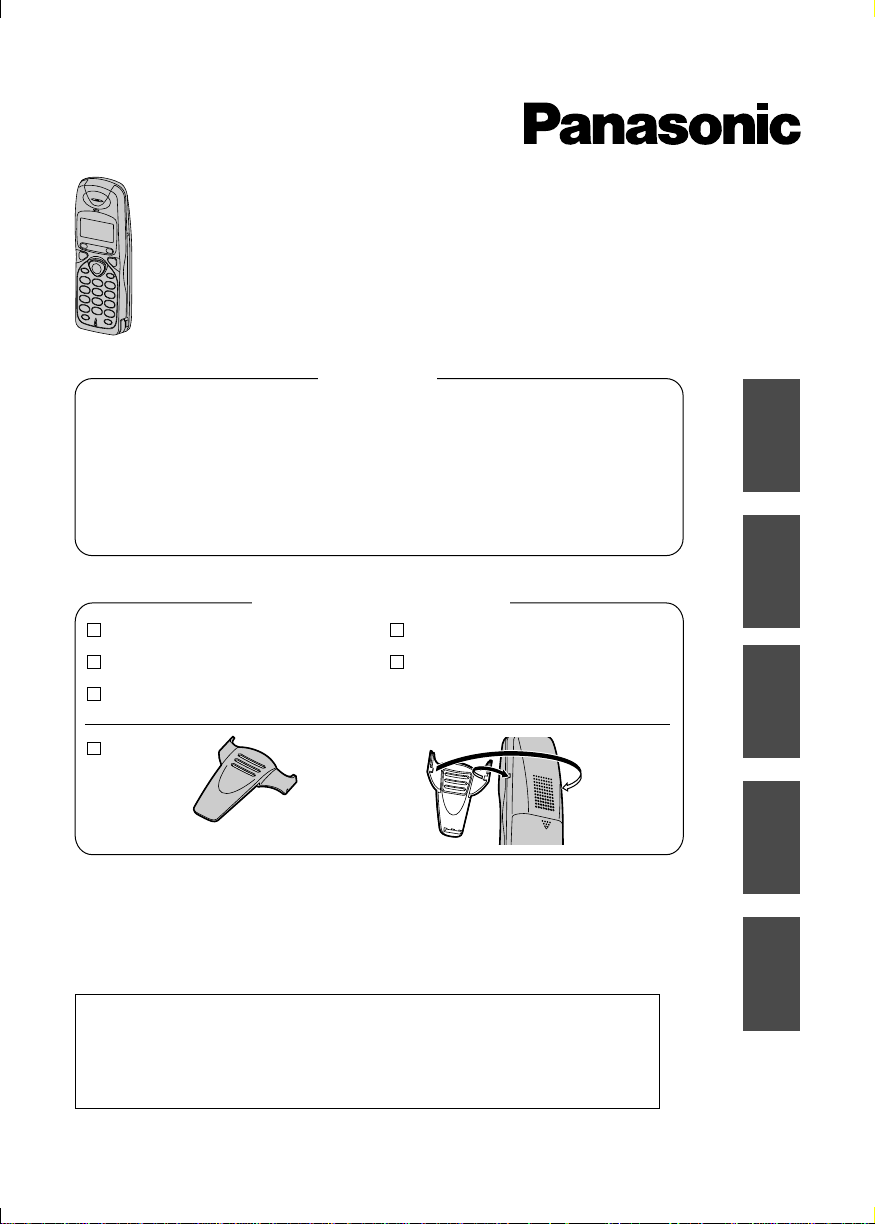
DECT Portable Station
Operating Instructions
Model KX-TD7580
Contents
Setting Up................................. 2
Turning the Power On and
Display......................................3
Operation.................................. 4
Using the Phonebook............... 6
Handset Programming.............13
Important Information...............18
Specifications........................... 20
English............................... 21-40
Deutsch.............................. 41-60
Français..............................61-80
Nederlands.......................81-100
Svensk.............................101-120
Accessories (included)
AC Adaptor
Handset Cover
Charger
Belt Clip
– Thank you for purchasing a DECT Handset (= Portable Station PS).
– Charge the battery for about 15 hours before initial use.
– This manual is designed to be used with your Handset and a Panasonic
KX-TD816/KX-TD1232 system.
– In this manual, the last letter of each model number is omitted.
To attach
Batteries
Operating Instructions
English Deutsch Svensk
Français
Nederlands
The handset supports the single line telephone (SLT) features.
Please refer to the appropriate section in the User Manual for
the KX-TD816/1232 system to operate the handset.
Some of the features are not available.
Page 2

Setting Up
Handset (PS)
Headset Jack (Please
use only a Panasonic
headset.)
Back
Speaker
(Phonebook)
Button
(Talk)
Button
(Speakerphone)
Button
Navigator Key
( , , , )
(Capital Change)
Button
Charge Contact
R
(Recall) Button
Receiver
Display
(Function/OK)
Button
C
3
3
2
2
1
1
4
4
7
7
R
6
6
5
5
9
9
8
8
0
0
INTINT
(OFF/Power)
Button
(Clear)
C
Button
(Pause)
Button
Charge Contact
Microphone
Insert and charge the batteries for about 15
hours as shown below.
To power
outlet
AC Adaptor
2
Mount the charger
securely on the wall.
Use the template below for wall
mounting.
Screws
30 mm
30 mm
Page 3
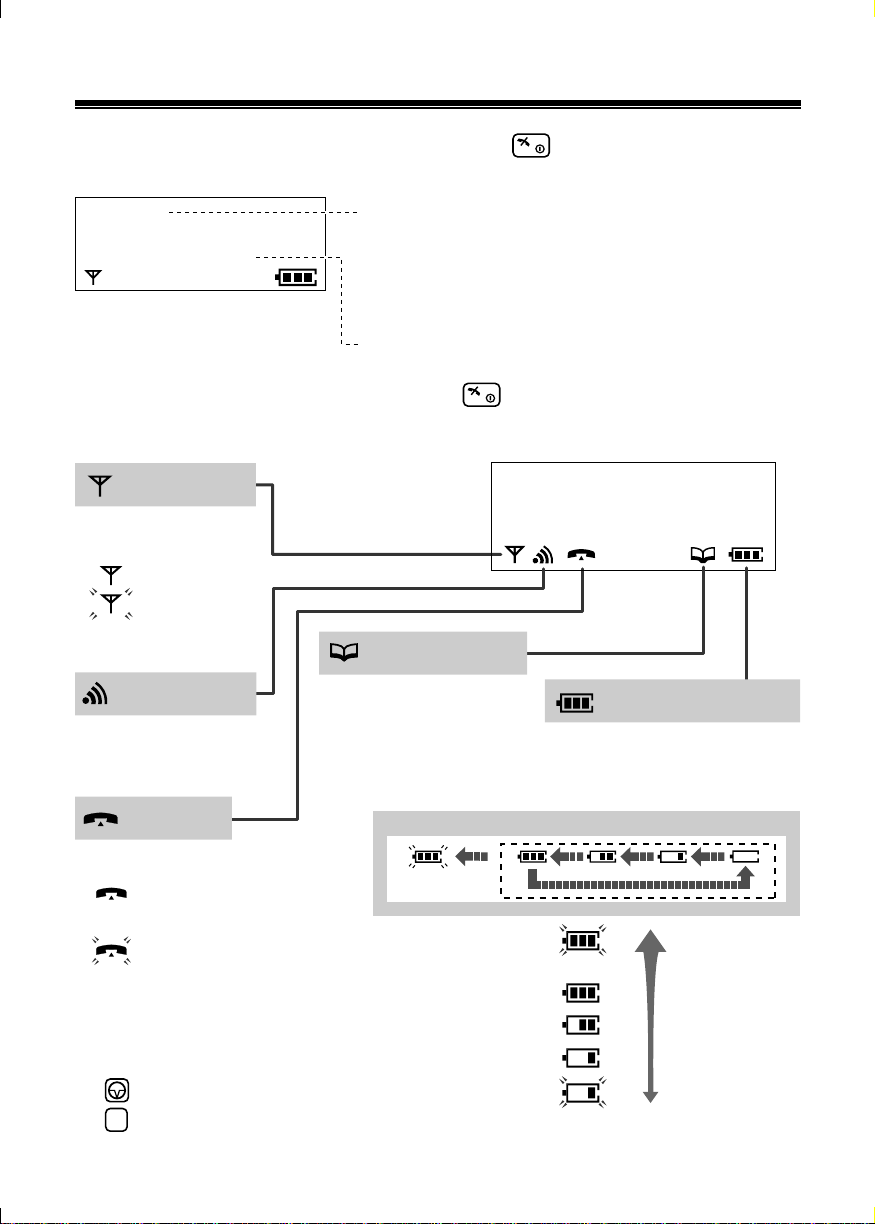
Turning the Power On and Display
To turn the power ON, press and hold .
Before using the handset, turn the power ON.
Base 1
15.05 13:58
●
To turn the power OFF, press and hold until a beep sounds.
● To change the display language, see page 13.
In-range icon
Displays when the
handset is:
in range.
out of range.
(Flashing)
Intercom icon
Flashes when receiving
the internal call.
Talk icon
The current connected base unit number:
You can choose whether to display the
base unit number, extension number or no
display in the standby mode by
programming (p. 13).
The current date and time
ABCDEFGHIabcdefg
1234567890123456
Phonebook icon
Displays when storing
or viewing phonebook
items.
Full <During charge>
Shows the battery strength.
During charging the battery,
battery icon is as shown below.
Battery Strength
Displays when:
making or
answering a call.
receiving an outside
(Flashing)
call.
Characters
P is pressed while dialling.
R
F is pressed while dialling.
(Flashing)
(Flashing)
(Flashing)
Fully charged.
High
Medium
Low
Needs to be
charged.
3
Page 4
Operations
Basic Calling
To an extension
extension no.
/
●
While talking, you can switch back and forth between the hands-free phone
conversation (press ) and the receiver (press ).
●
Predialling : You can dial first, and then go off-hook.
Redialling
To redial the last number
/ /
To redial using the redial list
Select the redial number
Receiving Calls
To an outside party
8 1
0
/
8—8
Select "Redial."
//
phone no.
–
9
0
●
Quick Answer: If you set the quick answer feature ON (p. 13), you can answer
a call by lifting the handset off the charger without pressing a button.
●
When receiving a call from a caller registered in the phonebook, the caller's
name and phone number will appear on the display.
/
/
/
/
Transferring Calls
While talking
To an extension
R
Notes
●
If you misdial, press . To cancel, press and hold or press .
●
You can also hang up by placing the handset on the charger.
4
extension no.
To an outside party
8 1
0
/
8—8
C
phone no.
C
Page 5

Tone Signalling
During an outside call, you can transmit tone signals automatically using the
keypad (e.g., to control answering system remotely).
While dialling
/
Select "Go to TONE."
Clearing the Number in the Redial Memory
To clear the selected number
/
/
Select the redial
number.
Select "Clear."
To clear all numbers
/
Select "All Clear."
/
Adjusting the Receiver/Speaker Volume
While talking
(to increase) (to decrease)
/
Turning the Handset Ringer off Temporarily
While ringing
(press and hold.)
●
The ringer will turn back on for the next call.
●
This function will not work when the handset is on the charger.
Setting the Key Lock
You can lock the handset dialling buttons. Only incoming calls are accepted until
the key lock is cancelled. While locked, "[X]" will be shown on the display.
To set
(press and hold.)
To cancel
(press and hold.)
5
Page 6
Using the Phonebook
You can store up to 100 names and phone numbers in the phonebook. All
phonebook items are sorted by the first word in alphabetical order. Using the
phonebook, you can make a call by selecting a name on the display.
●
If the phonebook is locked (p. 6), enter the 4-digit handset PIN to go to the
phonebook list.
●
You can exit the phonebook setting mode anytime by pressing .
●
When programming is completed, a beep sounds.
Using the Private Category Feature
You can select the display backlight colour and ringer type for each private
category (p. 13). When receiving a call, you can easily figure out who has called.
(For example, Category 1 for family, Category 2 for friends and Category 9 for
business.)
If you do not assign an item to any private category number, the handset will ring
in the preset ringer type and light in the preset colour when receiving a call.
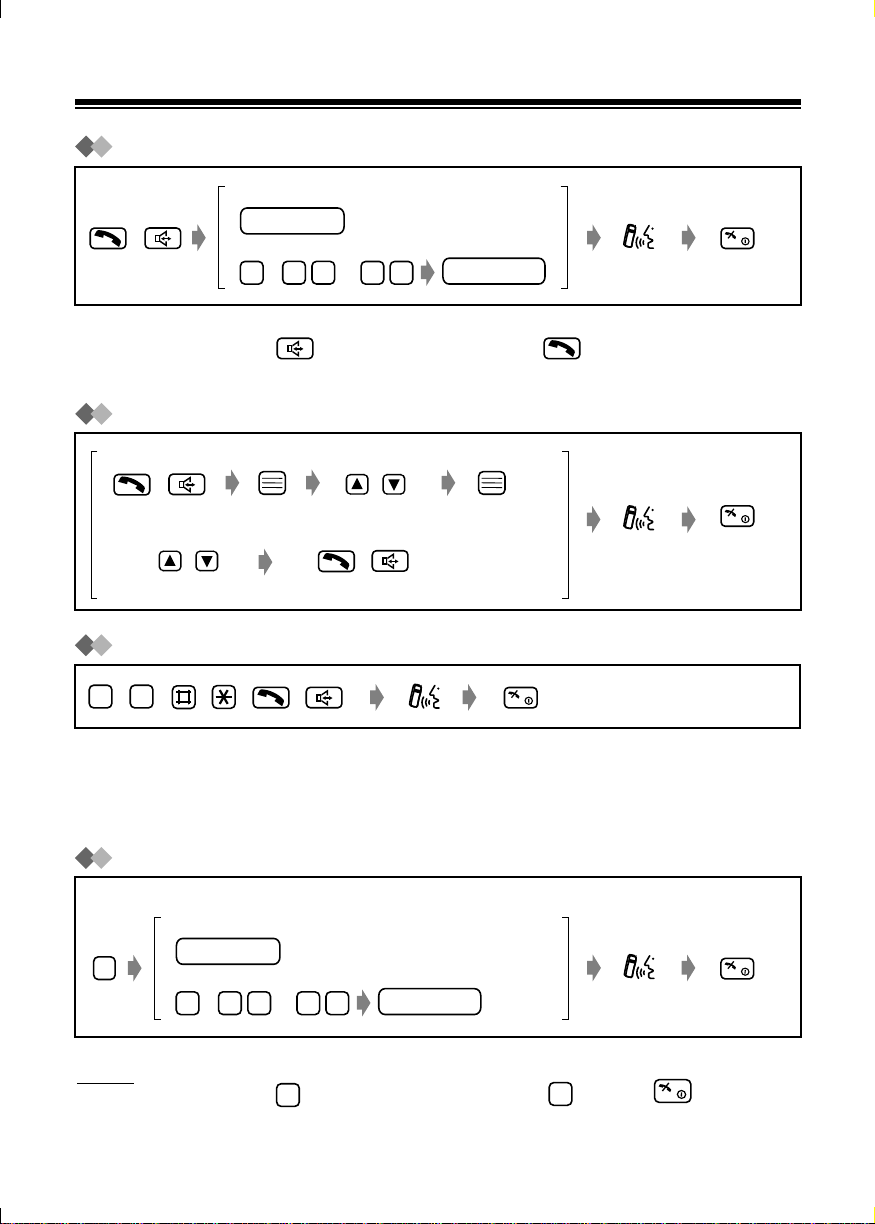
Storing Names and Numbers in the Phonebook
<If required>
/
Select "New
Phonebook."
phone no.
Enter the phone
number
(max. 24 digits).
If a pause is required for dialling, press .
A space can be stored in a phone number counting as one digit.
1
*
Select the desired
private category
number or OFF.
Handset PIN
Enter the 4-digit
handset PIN.
/ /
2
*
name
Enter name
(max. 16
characters).
Select "Save."
*
2
*1 If the display shows ''Memory Full,'' the display will return to the standby
mode. Clear other stored items in the phonebook (p. 10).
*2 See the steps for entering names and symbols (p. 7).
6
Page 7

Storing a Redial or Predial Number
<Redial number>
/
Select the desired
redial number.
name
Enter name
(max. 16
characters).
2
*
<Predial Number>
phone no.
Enter the desired
phone number.
Confirm the number.
/
Select "Save
Phonebook."
/
Select the desired
private category
number or OFF.
<If required>
Handset PIN
Enter the 4-digit
handset PIN.
/
Select "Save."
Entering Characters
The dialling buttons can be used to enter letters and character symbols. The
letters are printed on the dialling buttons.
Selecting the Character Mode
While entering a name
/
ABC
0-9
ΑΒΓ
AÄÅ
Alphabet
Numeric
Greek
Extended
Select the desired
Character Mode.
See the "Character
Mode Table" on the
next page.
For example, to enter "Anne'':
A n en
2
336666
7
Page 8

Character Mode Table
Buttons ABC (Alphabet)
# & ’ ( ) , – . / # & ’ ( ) , – . / # & ’ ( ) , – . /
1
A B C
2
a b c
D E F
3
d e f
G H I
4
g h i
J K L
5
j k l
M N O
6
m n o
P Q R S
7
p q r s
T U V
8
t u v
W X Y Z
9
w x y z
0-9 (Numeric)
2
2
3
3
4
4
5
5
6
6
7
7
8
8
9
9
ABC (Greek) AÄÅ (Extended)
# & ’ ( ) , – . /# & ’ ( ) , – . /# & ’ ( ) , – . /11
ΑΒΓ
ΑΒΓ
∆ΕΖ
∆ΕΖ
ΗΘΙ
ΗΘΙ
ΚΛΜ
ΚΛΜ
ΝΞΟ
ΝΞΟ
ΠΡΣ
ΠΡΣ
ΤΥΦ
ΤΥΦ
ΧΨΩ
ΧΨΩ
A À Á Â Ã Ä Å Æ B C Ç
a à á â ã ä å æ b c ç
D E È É Ê Ë E F
d e è é ê ë e f
G G H I Ì Í Î Ï I
g g h i ì í î ï
J K L
j k l
M N Ñ O Ò Ó Ô Õ Ø
m n ñ o ò ó ô õ ø
P Q R S S ß
p q r s s ß
T U Ù Ú Û Ü U V
t u ù ú û ü u v
W X Y Z
w x y z
blank
0
blank
To move the cursor to the left.
To move the cursor to the right. (To enter another character using the
same dialling button, move the cursor to the next space.)
To erase the character. To erase all characters, press and hold.
C
To shift from capital to lower case, press . Each time you press ,
the mode will change.
0
0
blank
blank
blank
blank
8
Page 9

Finding Items in the Phonebook
<If required> <To search for a name by initial>
Handset PIN
Enter the
Handset PIN.
●
To dial, go to Option 1.
●
To edit an item, go to Option 2.
●
To clear an item, go to Option 3.
–
01
Press the dialling
button for the first
letter of the
desired name.
Ex. To find "Felix," press repeatedly
until the first item under "F" is displayed.
Select the desired
name.*
/
2
3
*1 If ''No Numbers Stored'' is displayed, the phonebook is empty. The handset
will return to the standby mode.
*2 All phonebook items are sorted in the following order:
Character Symbol Number
Option 1: Dialling from the Phonebook
/
9
Page 10

Option 2: Editing an Item in the Phonebook
<To edit the name>
namename
Enter the name*
(max. 16 characters).
Select "Save."
Select "Edit."
<To edit the number>
phone no.
Enter the phone
number
(max. 24 digits).
/
/ /
Select the desired
category number
or OFF.
* See the steps for entering names and symbols (p. 7).
Option 3: Clearing an Item from the Phonebook
/ /
Select "Clear."
After a few seconds, the display will show
the next item.
Select "YES."
10
Page 11

Using the Hot Key Dial Feature
The dialling buttons (1-9) function as one-touch dials. You can assign up to 9
phone numbers from the phonebook items into dialling buttons as hot key dials.
Storing Phonebook Items as Hot Key Dials
<If required>
Handset PIN
Enter the 4-digit
handset PIN.
/
Select the desired
hot key number.
If already stored an item, "✓"
will be displayed on the left of
the hot key number.
Dialling a Stored Number
<To search a number>
–
9
1
Press and hold
a hot key number.
/
Select the
desired number.
Select the
desired item.
/
Select "Save"
or "Overwrite."
/
//
Select "Reg.
To Hot Key."
11
Page 12

Clearing an Item in the Hot Key Dial
–
1
9
Press and hold
a hot key number.
/ /
Select the desired
number.
Select "Clear."
Locking the Phonebook
See page 13.
While "YES" is at
the arrow.
12
Page 13

Handset Programming
You can programme the following function items. The display shows the
instructions. After selecting ''Setting Handset,'' the main menu is displayed.
Most items in the main menu have a sub-menu. The sub-menu is shown after
selecting the item in the main menu. Main menu items are written in bold and submenu items are under each main menu item.
Handset Programming Menu
Ringer Option
Ringer Volume To adjust the handset ringer volume
External Call To select the ring type for the calls from an
Internal Call To select the ring type for the calls from an
Private Call To select the ring type of private category
Tone Option
Key Tone ON/OFF To set the key tone ON/OFF
Range Alarm To set the range warning alarm ON/OFF
Display Option
Standby Display To select the standby mode display
Select Language To select the display language
Backlight Color To select the display backlight color
Private Color To select the private category backlight color
LCD Contrast To select the display contrast
Call Option
Phonebook Lock To set the phonebook lock
Other Option
Change Hset PIN To change the handset PIN
Quick Answer To set the quick answer feature
Registration
Cancel Base To cancel the base unit
Register H/Set To register a handset in the base unit
Select Base To select the base unit access
Memory Clear To return to the initial setting
....................
..................
.......
..........
outside line
........
extension
......
...
............
...
...
...
........
..........
......
...
..........
............
......
13
Page 14

While Programming:
●
You can press to go to the next menu of the function menu instead of
pressing .
●
To return to the previous step during programming, press or .
●
You can exit the programming mode any time by pressing .
●
When programming is completed, a beep sounds.
C
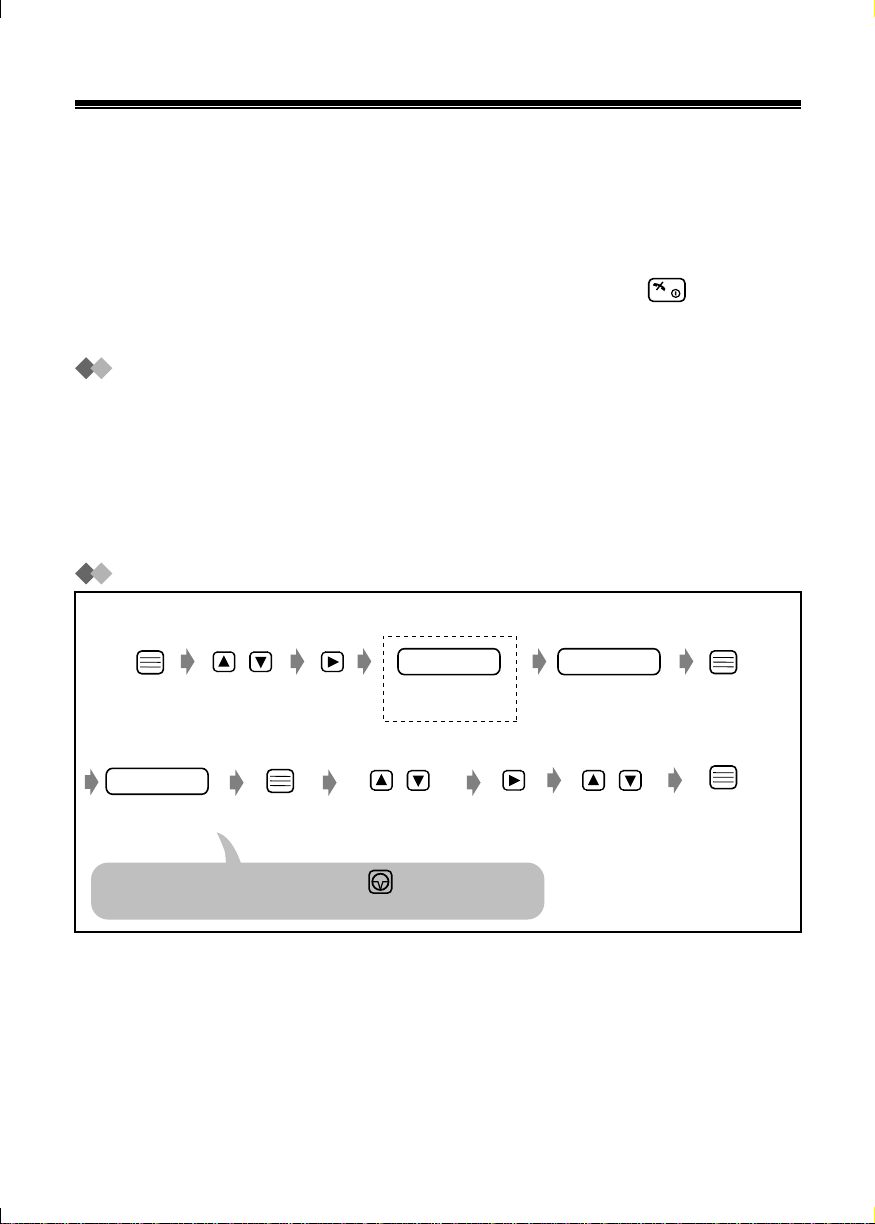
To Change the Initial Settings
/
Select the
desired item.
Option
Ringer Option
/
Select "Setting
Handset."
Item
Ringer Volume
Ring Outside
Ring Internal
/
Select the
desired option.
/
Select the
desired setting.
Description Setting*
6 levels are available.
When set to OFF, the handset will
not ring.
You can select the ringer type for
the calls from an outside line.
You can select the ringer type for
the calls from an extension.
1
Level
Level 3
OFF
Ringer no.
Ringer 1
Ringer no.
Ringer 3
14
Page 15

Option
Item
Description Setting*
1
Ringer Option Private Call
Tone Option
Key Tone ON/OFF
Range Alarm
Display Option
Standby Display
Select Language
Backlight Color
Private Color
You can select the handset ring
type (20 types) for each private
category.*
2
You can turn on/off the handset key
sound (key tone, confirmation tone,
error tone).
You can turn on/off the range
warning alarm.
You can choose whether to display
the currently connected base unit
number, extension number or no
display while in the standby mode.
You can choose one of 12 display
languages.
You can set the display backlight
colour to green, orange, or red.
You can select the display backlight
colour (red, orange, or green) for
each private category.*
2
Ringer no.
Ringer 1
ON
OFF
ON
OFF
Base Number
Extn Number
OFF
Language
English
Green
Orange
Red
Green
Orange
Red
LCD Contrast
You can select the display contrast
level from 1 to 3.
1
2
3
15
Page 16

Option
Item
Description Setting*
1
Call Option
Other OptionOther Option
Phonebook Lock
Change Hset PIN
Quick Answer
Registration
Cancel Base
Register H/Set
Select Base
Memory Clear
1
*
The initial setting is in gray.
2
*
You must choose the desired private category.
3
*
You must enter the handset PIN.
You can prohibit anyone from
entering the phonebook.*
3
When locked, you cannot dial from
the phonebook.
ON
OFF
You can programme a 4-digit handset PIN (Personal
Identification Number).
See p. 17 to set the PIN.
You can answer a call by lifting the
handset off the charger without
pressing a button.
ON
OFF
For details, consult your dealer.
For details, consult your dealer.
You can change the base unit (1-4).
Base No.
Auto (All connected
terminals)
You can clear the settings on the
YES
handset. They will return to their
initial settings.*
3
NO
16
Page 17

Setting the PIN
In the "Setting Handset" mode
/ /
Select "Other
Option."
Select "Change
Hset PIN."
old PIN new PIN
Enter the current
4-digit handset
PIN.
Enter the new
4-digit PIN
TWICE.
17
Page 18

Important Information
Battery Information
After your Panasonic batteries are fully charged:
Operation
Approx. Ni-MH battery life
While in use (Talk)
While not in use (Standby)
●
Battery life may be shortened depending on usage conditions, such as:
– when talking in speakerphone mode, using headset and ambient temperature.
●
Clean the handset and the charger contacts with a soft, dry cloth once a month. Clean more
often if the unit is subject to grease, dust or high humidity. Otherwise the batteries may not
charge properly.
●
The batteries cannot be overcharged.
●
Read "Important Notice Concerning the Correct Use and Charging of Ni-MH Batteries."
Replacing the Batteries
If " " flashes after a few telephone calls even when the handset batteries have been fully
charged, it is time to replace the batteries with new ones (p. 2).
Before replacing the batteries, turn the power off to prevent memory loss (p. 3). Make sure you charge
the new batteries for about 15 hours in order to display the battery strength prompt correctly.
Caution:
To reduce the risk of fire or injury to persons, read and follow these instructions.
1. Use only the batteries specified.
2. Do not use non-rechargeable batteries.
3. Do not mix old and new batteries.
4. Do not dispose of the batteries in a fire. They may explode. Check with local waste management
codes for special disposal instructions.
5. Do not open or mutilate the batteries. Released electrolyte is corrosive and may cause burns or
injury to the eyes or skin. The electrolyte may be toxic if swallowed.
6. Exercise care in handling the batteries in order not to short the batteries with conductive materials
such as rings, bracelets, and keys. The batteries and/or conductor may overheat and cause burns.
7. Charge the batteries provided with or identified for use with this product only in accordance with the
instructions and limitations specified in this manual.
Up to 15 hours
Up to 150 hours
Important Notice Concerning the Correct Use and Charging of Ni-MH Batteries
Batteries, due to their construction, undergo some wear and tear. The lifetime of a battery also
depends on correct maintenance. Charging and discharging are the most important factors. You
should take notice of the following to maintain the life of the battery as long as possible.
Ni-MH batteries have a kind of memory, the "memory effect." If fully charged batteries are used
several times only for 15 minutes in the handset and then recharged, the capacity of the batteries will
be reduced to 15 minutes due to the memory effect. Therefore you should discharge the batteries
completely, i.e. use them in the handset until " " on the display starts flashing. Then recharge
them as described in the manual. After the memory effect has occurred, it is possible to achieve
almost complete capacity of the Ni-MH batteries by charging and discharging several times one after
another.
18
Page 19

Ni-MH batteries can also self-discharge. This self-discharge depends on the ambient temperature. At
temperatures under 0°C, the self-discharge will be the lowest. High humidity and high temperatures
support the self-discharge. Also long-term storage will lead to self-discharge. A dead Ni-MH battery
should not be disposed of normally. They contain toxic heavy metal hydride and therefore should be
recycled.
Pay special attention to the safety suggestions listed below.
Safety
1) Power source: The AC adaptor should be connected to a power supply only of the type as marked
on the AC adaptor.
2) Non use periods: When the Handset is not being used, turn the power off. When left unused for a
long period of time, the charger should be unplugged from the household AC outlet.
Installations
Environment
1) Water and moisture: Do not use the Handset and the charger near water—for example, near a
bathtub, washbowl, sink, etc. Damp basements should also be avoided.
2) Heat: The Handset and the charger should be kept away from heat sources such as radiators,
kitchen ranges, etc. They also should not be placed in rooms where the temperature is less than 5
ºC or greater than 40 ºC.
Placement
1) Stacking: Do not place heavy objects on top of the Handset and the charger.
2) Foreign material: Care should be taken so that objects do not fall onto and liquids are not spilled
into the Handset and charger. Do not subject the Handset and charger to excessive smoke, dust,
mechanical vibration, or shock.
3) Surface: Place the charger on a flat surface. If the charger is mounted on the wall, install it straight.
For Best Performance
Operating Range
1) The range of operation depends on the topography of your office, weather or usage conditions,
because signals are transmitted between the Cell Station (CS) and the Handset by radio waves.
2) Normally, you get greater range outdoors than indoors. If there are obstacles such as walls, noise
may interfere with your telephone calls. In particular, high metal shelves or reinforced concrete
walls will restrict your operating range.
3) A Handset may not work when it is too far from the CS depending on the structure of the building.
Noise
Occasional noise or interference may occur due to electromagnetic radiation from objects such as
refrigerators, microwave ovens, faxes, TVs, radios, or personal computers. If noise disturbs your
telephone calls, keep the Handset away from these electrical appliances.
WARNING:
TO PREVENT THE RISK OF FIRE OR ELECTRIC SHOCK DO NOT EXPOSE THIS PRODUCT TO
RAIN OR ANY OTHER TYPE OF MOISTURE.
TO REDUCE THE RISK OF ELECTRIC SHOCK, DO NOT DISASSEMBLE THIS UNIT. TAKE THE
UNIT TO AN AUTHORISED SERVICE CENTER WHEN SERVICE IS REQUIRED.
19
Page 20

Specifications
Radio Access Method: Multi Carrier TDMA-TDD
Frequency Band: 1,880-1,900 MHz
Number of Carriers: 10
Carrier Spacing: 1,728 kHz
Channel spacing: 1,728 kHz
Bit rate: 1,152 kbps
Carrier Multiplex: TDMA, 24 (T×12, R×12) slots per frame
Frame Length: 10 msec
Modulation: GFSK
Voice Coding: 32 kbps ADPCM (CCITT G.721)
Transmission Output: Max. 250 mW
●
Specifications are subject to change.
●
The illustrations used in this manual may slightly differ from the original device.
0682
This device is a DECT Portable station operating in the frequency band of
1880 MHz to 1900 MHz.
This device cpmplies with the requirements of the directive 1999/5/EC.
The usage of this device is generally allowed in all the EU countries.
Manufacturer:
Kyushu Matsushita Electric (U.K.) Ltd.
Pencarn Way, Duffryn, Newport, South Wales, NP10 8YE, United Kingdom
© Kyushu Matsushita Electric Co., Ltd. All Rights Reserved.
Printed in the United Kingdom PSQX2470ZA KK0301AH0
 Loading...