

Page 1

Digital Super Hybrid System
User Manual
Model No.
KX-TD612NZ
Thank you for purchasing a Panasonic Digital Super Hybrid System, Model KX-TD612.
Please read this manual before connecting the Digital Super Hybrid System and save
this manual for future reference.
Version 3
Page 2

Thank you for purchasing the Panasonic Digital Super Hybrid System.
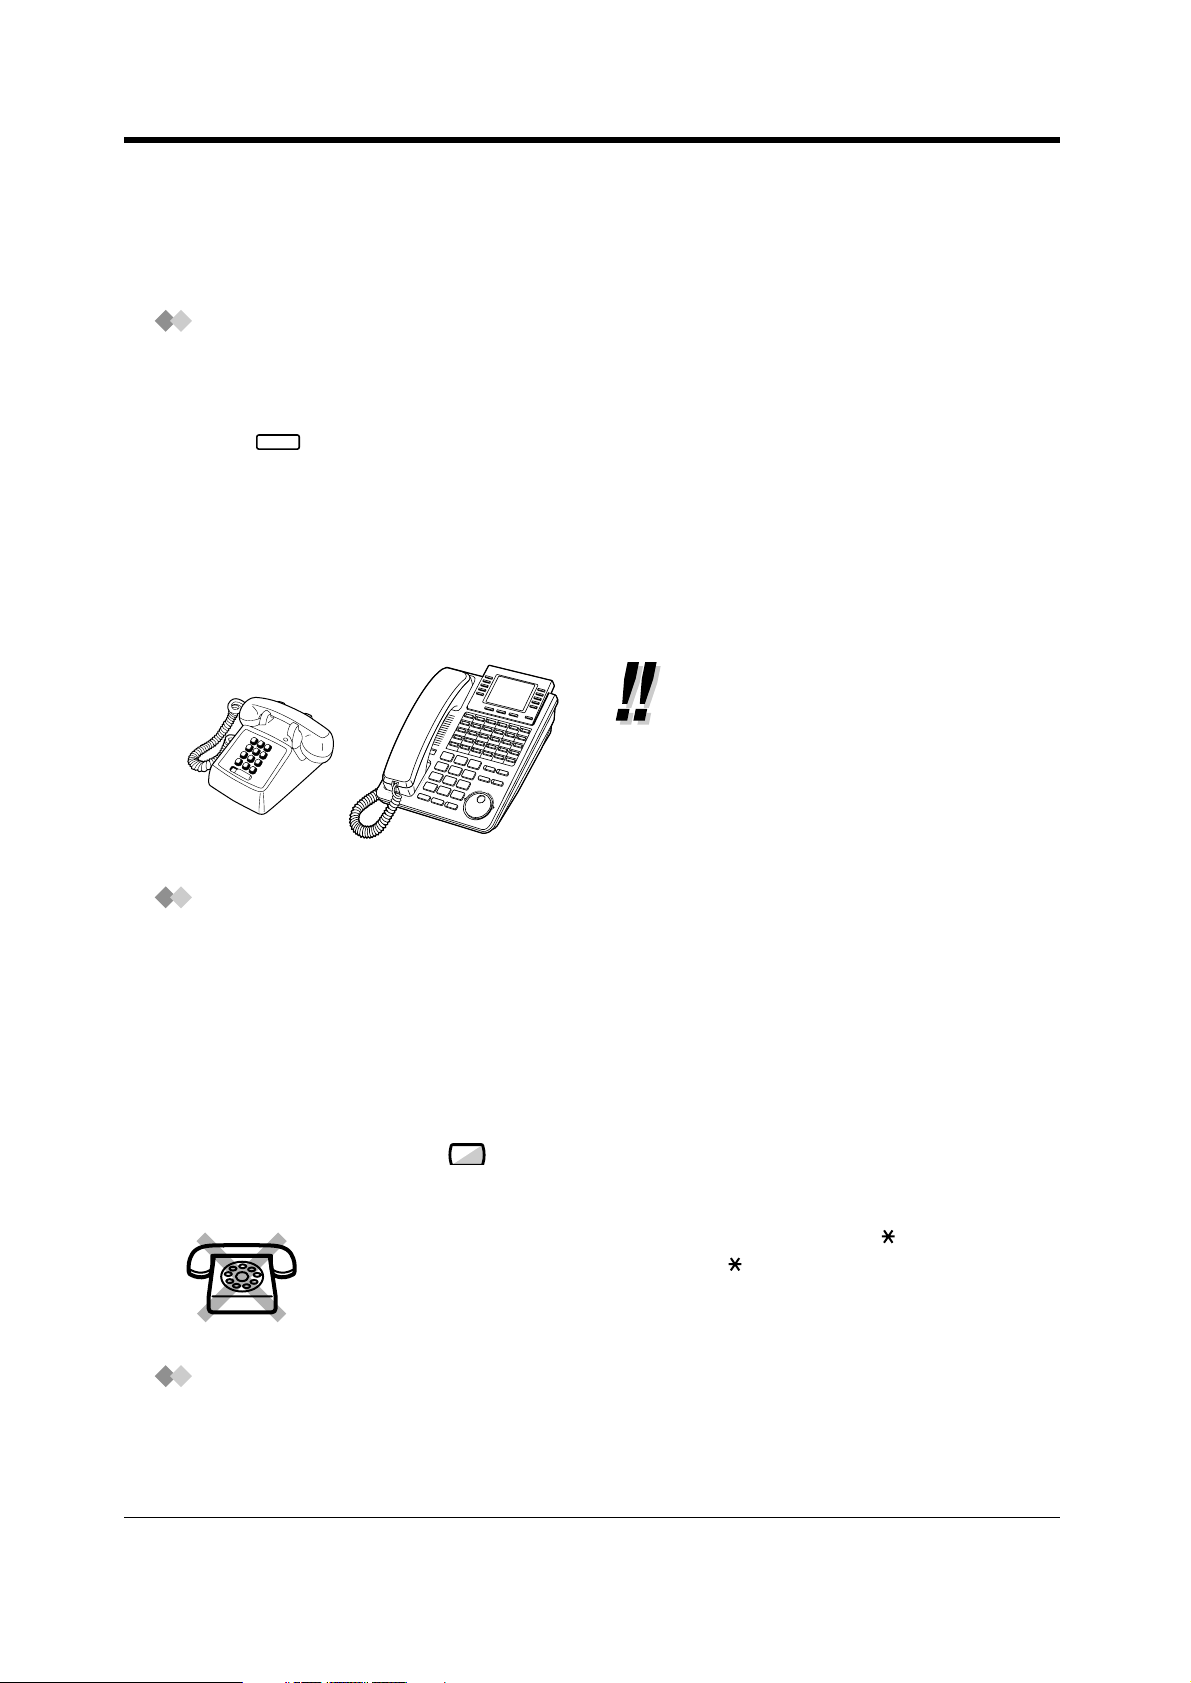
Telephones
This system can connect digital Panasonic
digital proprietary telephones. Single line
devices such as a single line
telephone, facsimile, cordless
telephone, voice processing
system, etc. can also be
connected.
This system can double the extension capacity
by connecting a digital proprietary telephone
and a single line telephone. The digital
proprietary telephone can share the extension
with another single line telephone.
Furthermore, you can connect
a Panasonic digital proprietary
EXtra Device Port (XDP)
telephone and a single line
telephone to one jack and use
them as individual extensions.
1.3.1 Connection Example 1.4.1 Adding Another Telephone in Parallel
Saves on telephone charges
(Automatic Route Selection)
This system chooses the most cost-effective
carrier based on the outside number dialled
and the time called.
A
(Station Message Detail Recording)
This system can record or print out call
information: date, time, extension no., dialled
no., duration, etc.
B
Date
24/06/00
24/06/00
Call Record
Time
10:03
11:07
223
Ext
123
• • • • • • •
• • • • • • •
• • • • • • •
Page 31 Consult your dealer
Automatic Selection
of CLIP/COLP
This system provides you to let the calling/
called party know your CO line number or
the extension number assigned by the system
programming.
0123456789012345
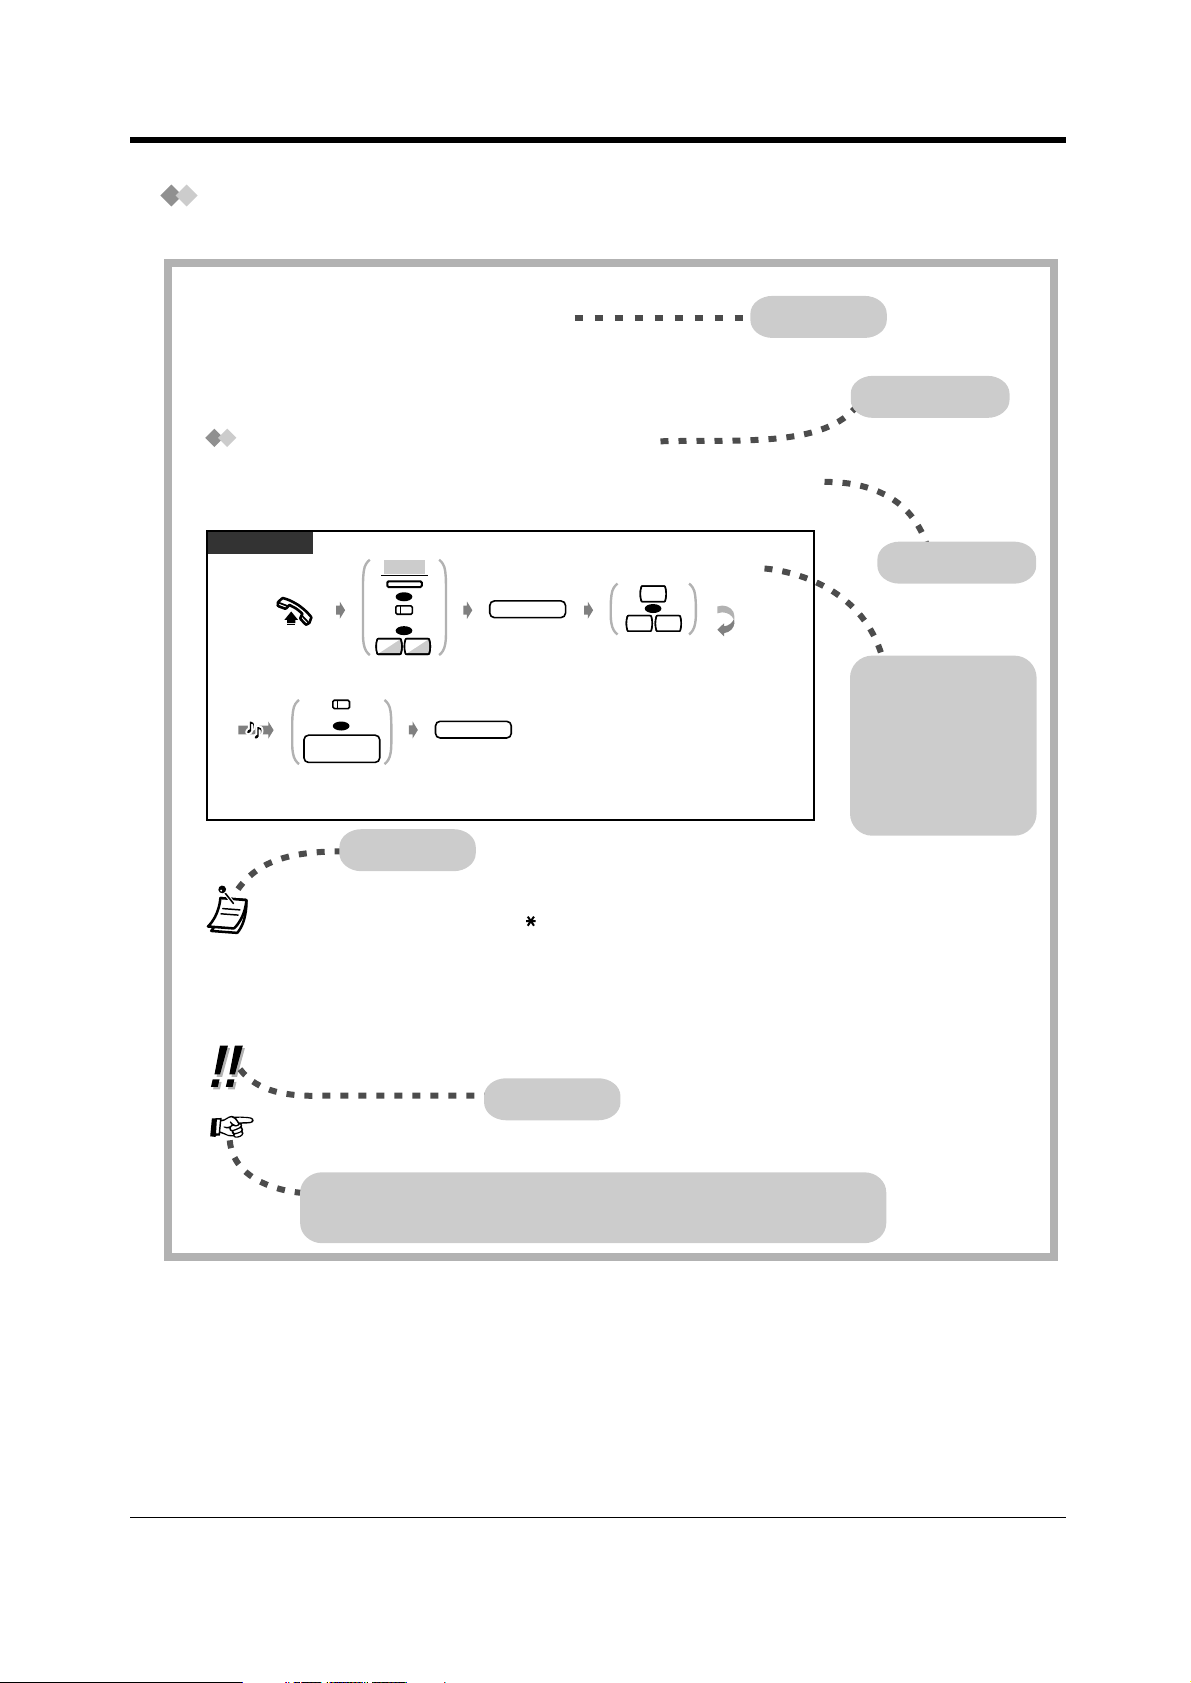
2.8.5 Automatic Selection of Calling/Connected
You can forward incoming calls to your
personal message box to let callers leave their
voice message when you cannot answer the
phone.
2.6.1 Built-in Voice Message
Built-in Voice Message
Hello, this
is 204. Please
leave your
message.
Line Identification Presentation (CLIP/COLP)
2 User Manual
Page 3

Note
• This product is designed to interwork with the:
– pan-European Integrated Services Digital Network (ISDN) using ISDN basic access.
– Public Switched Telephone Network (PSTN) of New Zealand.
• In this manual, the two-letter suffix of each model number is omitted.
IMPORTANT
If there is something unclear in this manual, please consult your dealer.
User Manual 3
Page 4
Important Information
Important Information
WARNING
THIS UNIT MAY ONLY BE INSTALLED AND SERVICED BY QUALIFIED SERVICE PERSONNEL.
WHEN A FAILURE OCCURS WHICH RESULTS IN THE INTERNAL PARTS BECOMING
ACCESSIBLE, DISCONNECT THE POWER SUPPLY CORD IMMEDIATELY AND RETURN THIS
UNIT TO YOUR DEALER.
DISCONNECT THE TELECOM CONNECTION BEFORE DISCONNECTING THE POWER
CONNECTION PRIOR TO RELOCATING THE EQUIPMENT, AND RECONNECT THE POWER
FIRST.
THIS UNIT IS EQUIPPED WITH AN EARTHING CONTACT PLUG. FOR SAFETY REASONS THIS
PLUG MUST ONLY BE CONNECTED TO AN EARTHING CONTACT SOCKET WHICH HAS BEEN
INSTALLED ACCORDING TO REGULATIONS.
THE POWER SUPPLY CORD IS USED AS THE MAIN DISCONNECT DEVICE. ENSURE THAT
THE SOCKET-OUTLET IS LOCATED/INSTALLED NEAR THE EQUIPMENT AND IS EASILY
ACCESSIBLE.
TO PREVENT FIRE OR SHOCK HAZARD, DO NOT EXPOSE THIS PRODUCT TO RAIN OR
MOISTURE.
Static sensitive devices are used. To protect
printed circuit boards from static electricity, do
not touch connectors indicated to the right. To
discharge body static, touch ground or wear a
grounding strap.
Warning: Static sensitive connectors
4 User Manual
Page 5

Important Information
Safety Instructions
When using your telephone equipment, basic safety precautions should always be followed to reduce
the risk of fire, electric shock and injury to persons, including the following:
1. Do not use this product near water, for example, near a bathtub, washbowl, kitchen sink or laundry
tub, in a wet basement or near a swimming pool.
2. Avoid using a telephone (other than a cordless type) during an electric storm. There may be a
remote risk of electric shock from lightning.
3. Do not use the telephone to report a gas leak in the vicinity of the leak.
4. Use only the power cord and batteries indicated in this manual. Do not dispose of batteries in a
fire. They may explode. Check with local codes for possible special disposal instructions.
SAVE THESE INSTRUCTIONS
PTC 200 User Warnings
• The grant of a Telepermit for any item of terminal equipment indicates only that Telecom has
accepted that the item complies with minimum conditions for connection to its network. It
indicates no endorsement of the product by Telecom, nor does it provide any sort of warranty.
Above all, it provides no assurance that any item will work correctly in all respects with another
item of Telepermitted equipment of a different make or model, nor does it imply that any product
is compatible with all of Telecom's network services.
• This equipment shall not be set to make automatic calls to the Telecom "111" Emergency
Service.
• The equipment is not designed to reproduce the cadence applied to the line port at the
extension port(s).
• Under power failure conditions, this telephone may not operate. Please ensure that a separate
telephone, not dependent on local power, is available for emergency use in emergencies.
• Difficulties may be experienced with this device ringing some types of telephone connected to
it. If this problem occurs, it should be referred to the equipment installer. The matter should not
be referred to Telecom Faults Service.
• Devices designed to respond to particular ringing cadences may not respond when used with
this equipment.
• Some parameters required for compliance with Telecom's Telepermit requirements are
dependent on the equipment (PC) associated with this device. In order to operate within the
limits for compliance with Telecom's Specifications, the associated equipment shall be set to
ensure that calls are answered between 3 and 30 seconds of receipt of ringing.
• In the event of any problem with this device, it is to be disconnected, and a CPE item connected
to one of its terminal ports may be connected directly in its place. The user should then arrange
for the product to be repaired. Should the matter be reported to Telecom as a wiring fault, and
the fault be proven to be due to this product, a call-out charge will be incurred.
User Manual 5
Page 6

Important Information
The following icons are used frequently in this manual.
!!
!!
Notice
• The Digital Proprietary Telephone is abbreviated as "DPT".
• The Single Line Telephone is abbreviated as "SLT".
• "Console" is a generic designation for Digital DSS Console (KX-T7240/KX-T7440) and Digital
Attendant Console (KX-T7441).
ConditionsHints
6 User Manual
Page 7

Attention
• Keep the unit away from heating appliances and electrical noise generating devices such as
fluorescent lamps, motors and televisions. These noise sources can interfere with the
performance of the unit.
• This unit should be kept free of dust, moisture, high temperature (more than 40 °C) and vibration,
and should not be exposed to direct sunlight.
• Never attempt to insert wires, pins, etc., into the vents or holes of this unit.
• If there is any trouble, disconnect the unit from the telephone line. If you have an ISDN line, plug
an ISDN telephone directly into it; if you have an analogue CO line, plug a regular telephone
directly into it. If the telephone operates properly, do not reconnect the unit to the line until the
trouble has been repaired. If the telephone does not operate properly, chances are that the trouble
is in the telephone system, and not in the unit.
• Do not use benzine, thinner, or any abrasive powder to clean the cabinet. Wipe it with a soft cloth.
The serial number of this product may be found on the label affixed to the unit. You
should note the model number and the serial number of this unit in the space provided
and retain this manual as a permanent record of your purchase, to aid in identification in
the event of theft.
Attention
MODEL NO.:
SERIAL NO.:
DATE OF PURCHASE
NAME OF DEALER
DEALER’S ADDRESS
DEALER’S TEL. NO.
For your future reference
User Manual 7
Page 8

Table of Contents
Table of Contents
1Overview
1.1 Capacity ...................................................................................................................12
1.1.1 Capacity ............................................................................................................................... 12
1.2 Names and Locations ............................................................................................. 13
1.2.1 Names and Locations .......................................................................................................... 13
1.3 Connection Example............................................................................................... 16
1.3.1 Connection Example ............................................................................................................ 16
1.4 Adding Another Telephone in Parallel (EXtra Device Port [XDP] )..................... 17
1.4.1 Adding Another Telephone in Parallel .................................................................................. 17
1.5 Restarting the System ............................................................................................ 19
1.5.1 Restarting the System.......................................................................................................... 19
2Operation
2.1 Before Operating the Telephones..........................................................................22
2.1.1 Before Operating the Telephones ........................................................................................ 22
2.1.2 For ISDN Extension Users ...................................................................................................28
2.2 Making Calls ............................................................................................................ 29
2.2.1 Basic Calling ........................................................................................................................ 29
2.2.2 Easy Dialling ........................................................................................................................ 32
2.2.3 Redial ................................................................................................................................... 37
2.2.4 When the Dialled Line is Busy or There is No Answer......................................................... 39
2.2.5 Calling without Restrictions .................................................................................................. 46
2.2.6 Changing the Mode.............................................................................................................. 48
2.2.7 Integrated Services Digital Network (ISDN) Service Access................................................ 50
2.2.8 To Access Another Party Directly from Outside (Direct Inward System Access [DISA])...... 52
2.3 Receiving Calls........................................................................................................59
2.3.1 Answering Calls ................................................................................................................... 59
2.3.2 Answering Hands-free (Hands-free Answerback) ................................................................ 61
2.3.3 Answering a Call Ringing at Another Telephone (Call Pickup) ............................................ 62
2.3.4 Answering a Call via an External Speaker (Trunk Answer From Any Station [TAFAS]) ....... 64
2.3.5 Deflecting a Call (Call Deflection) ........................................................................................66
2.4 During a Conversation............................................................................................68
2.4.1 Call Duration ........................................................................................................................ 68
2.4.2 Holding a Call....................................................................................................................... 69
2.4.3 Retrieving a Call on a Telephone Answering Machine (TAM) .............................................. 76
2.4.4 Terminal Portability (TP) for ISDN Extension ....................................................................... 77
2.4.5 Talking to Two Parties Alternately (Call Splitting)................................................................. 78
2.4.6 Transferring a Call ................................................................................................................ 79
2.4.7 Answering a Call Waiting ..................................................................................................... 82
2.4.8 Three-party Conversation..................................................................................................... 84
2.4.9 Saving a Number (Notebook Function) ................................................................................ 86
2.4.10 Mute ................................................................................................................................... 87
8 User Manual
Page 9

Table of Contents
2.4.11 Letting Other People Listen to the Conversation (Off-Hook Monitor) ................................. 88
2.5 Using ISDN Additional Services ............................................................................89
2.5.1 Transferring a Call from ISDN Line to ISDN Line (ISDN Call Transfer)................................ 89
2.5.2 Multi-party Conversation through ISDN Line (ISDN Conference) ........................................ 92
2.5.3 Forwarding Your Calls without Occupying Your CO Line (ISDN Call Forwarding) ............... 94
2.6 Before Leaving Your Desk...................................................................................... 96
2.6.1 Built-in Voice Message......................................................................................................... 96
2.6.2 Forwarding Your Calls (Call Forwarding) ........................................................................... 105
2.6.3 Forwarding Calls from a Hunting Group..............................................................................113
2.6.4 Showing an Absent Message on the Caller's Telephone Display (Absent Message Capability)
115
2.6.5 Preventing Other People from Using Your Telephone (Electronic Station Lockout) ............118
2.6.6 Leaving a Hunting Group (Log-In/Log-Out).........................................................................119
2.7 Making/Answering an Announcement ................................................................120
2.7.1 Paging ................................................................................................................................ 120
2.7.2 Paging a Person and Transferring a Call ........................................................................... 124
2.7.3 Answering a Paged Announcement ................................................................................... 126
2.8 Setting the Telephone According to Your Needs ...............................................128
2.8.1 Setting the Alarm (Timed Reminder).................................................................................. 128
2.8.2 Refusing Incoming Calls (Do Not Disturb [DND])............................................................... 130
2.8.3 Receiving a Call Waiting (Call Waiting/Off-Hook Call Announcement [OHCA]/Whisper OHCA)
132
2.8.4 Denying the Paged Announcement (Paging — DENY) ..................................................... 133
2.8.5 Automatic Selection of Calling/Connected Line Identification Presentation (CLIP/COLP) . 134
2.8.6 Preventing Your Number Being Displayed on the Called Party's Telephone (Calling Line
Identification Restriction [CLIR])....................................................................................... 137
2.8.7 Preventing Your Number Being Displayed on the Calling Party's Telephone (Connected Line
Identification Restriction [COLR]) ..................................................................................... 138
2.8.8 Denying Other People the Possibility of Picking up Your Calls (Call Pickup Deny) ........... 139
2.8.9 Denying Other People the Possibility of Joining Your Conversation (Executive Busy Override
Deny)................................................................................................................................ 140
2.8.10 Turning on the Background Music.................................................................................... 141
2.8.11 Day/Night Service............................................................................................................. 142
2.8.12 Checking the Day/Night Service Status ........................................................................... 144
2.8.13 Setting the Parallel Connected Telephone Ringer (Parallelled Telephone)...................... 145
2.8.14 Clearing the Feature Settings at Your Extension (Station Programme Clear).................. 147
2.8.15 Identifying Malicious Callers (Malicious Call Identification [MCID]).................................. 148
2.8.16 Setting the Maximum Number of Busy Extension for a Hunting Group (Busy on Busy) .. 149
2.9 Using User-supplied Equipment..........................................................................150
2.9.1 If a Doorphone/Door Opener is Connected........................................................................ 150
2.9.2 If a Host PBX is Connected................................................................................................ 154
2.9.3 If a Voice Processing System is Connected....................................................................... 155
2.9.4 If CTI Service is Used ........................................................................................................ 162
2.9.5 If an External Relay is Connected...................................................................................... 163
2.9.6 If a Second Ringer is Connected ....................................................................................... 164
2.10 Using the Display Proprietary Telephone .........................................................165
2.10.1 Calling Using the Call Log (Incoming Call Log) [KX-T7433, KX-T7436, KX-T7230, KX-T7235
only].................................................................................................................................. 165
2.10.2 Recording a Call Log [KX-T7433, KX-T7436, KX-T7230, KX-T7235 only] ...................... 167
2.10.3 Using the KX-T7431, KX-T7433, KX-T7436 or KX-T7235 ............................................... 168
User Manual 9
Page 10

Table of Contents
2.11 Accessing the Internet (Internet Access).......................................................... 181
2.11.1 Accessing the Internet (Internet Access).......................................................................... 181
3 Operator Operation
3.1 Extension Control ................................................................................................. 184
3.1.1 Switching Level of Service ................................................................................................. 184
3.1.2 Changing the Settings........................................................................................................ 186
3.2 System Control...................................................................................................... 187
3.2.1 Forwarding a Waiting Call (Automatic Overflow/Hurry-up Transfer) .................................. 187
3.2.2 Turning on the External Background Music ....................................................................... 188
3.2.3 Recording Company Greeting Outgoing Messages ........................................................... 189
3.2.4 Using the ANSWER/RELEASE Button [KX-T7441 only] ................................................... 192
3.2.5 Printing the System Working Report .................................................................................. 193
4 Customising Your Phone & System
4.1 Customising Your Phone (Station Programming).............................................. 196
4.1.1 Customising Your Phone (Station Programming)............................................................... 196
4.1.2 Initial Settings ..................................................................................................................... 197
4.1.3 Customising the Buttons .................................................................................................... 200
4.1.4 Charge Fee Management [Pre-assigned extension only] .................................................. 204
4.2 Customising Your System.................................................................................... 206
4.2.1 Customising Your System .................................................................................................. 206
4.2.2 Date and Time Set (000) .................................................................................................... 213
4.2.3 System Speed Dialling and Intelligent Call Handling Number Set (001)............................ 214
4.2.4 System Speed Dialling and Intelligent Call Handling Name Set (002) ............................... 216
4.2.5 Extension Number Set (003).............................................................................................. 217
4.2.6 Extension Name Set (004) ................................................................................................. 218
5 Appendix
5.1 Troubleshooting .................................................................................................... 220
5.1.1 Troubleshooting .................................................................................................................. 220
5.2 Feature Number List .............................................................................................224
5.2.1 Feature Number List .......................................................................................................... 224
5.3 Directory ................................................................................................................ 229
5.3.1 Directory............................................................................................................................. 229
5.4 What is This Tone? ............................................................................................... 238
5.4.1 What is This Tone?............................................................................................................. 238
5.5 Specifications........................................................................................................ 242
5.5.1 Specifications ..................................................................................................................... 242
6 Index
6.1 INDEX .....................................................................................................................246
10 User Manual
Page 11

Section 1
Overview
This section briefly outlines your system.
Overview
User Manual 11
Page 12
Overview
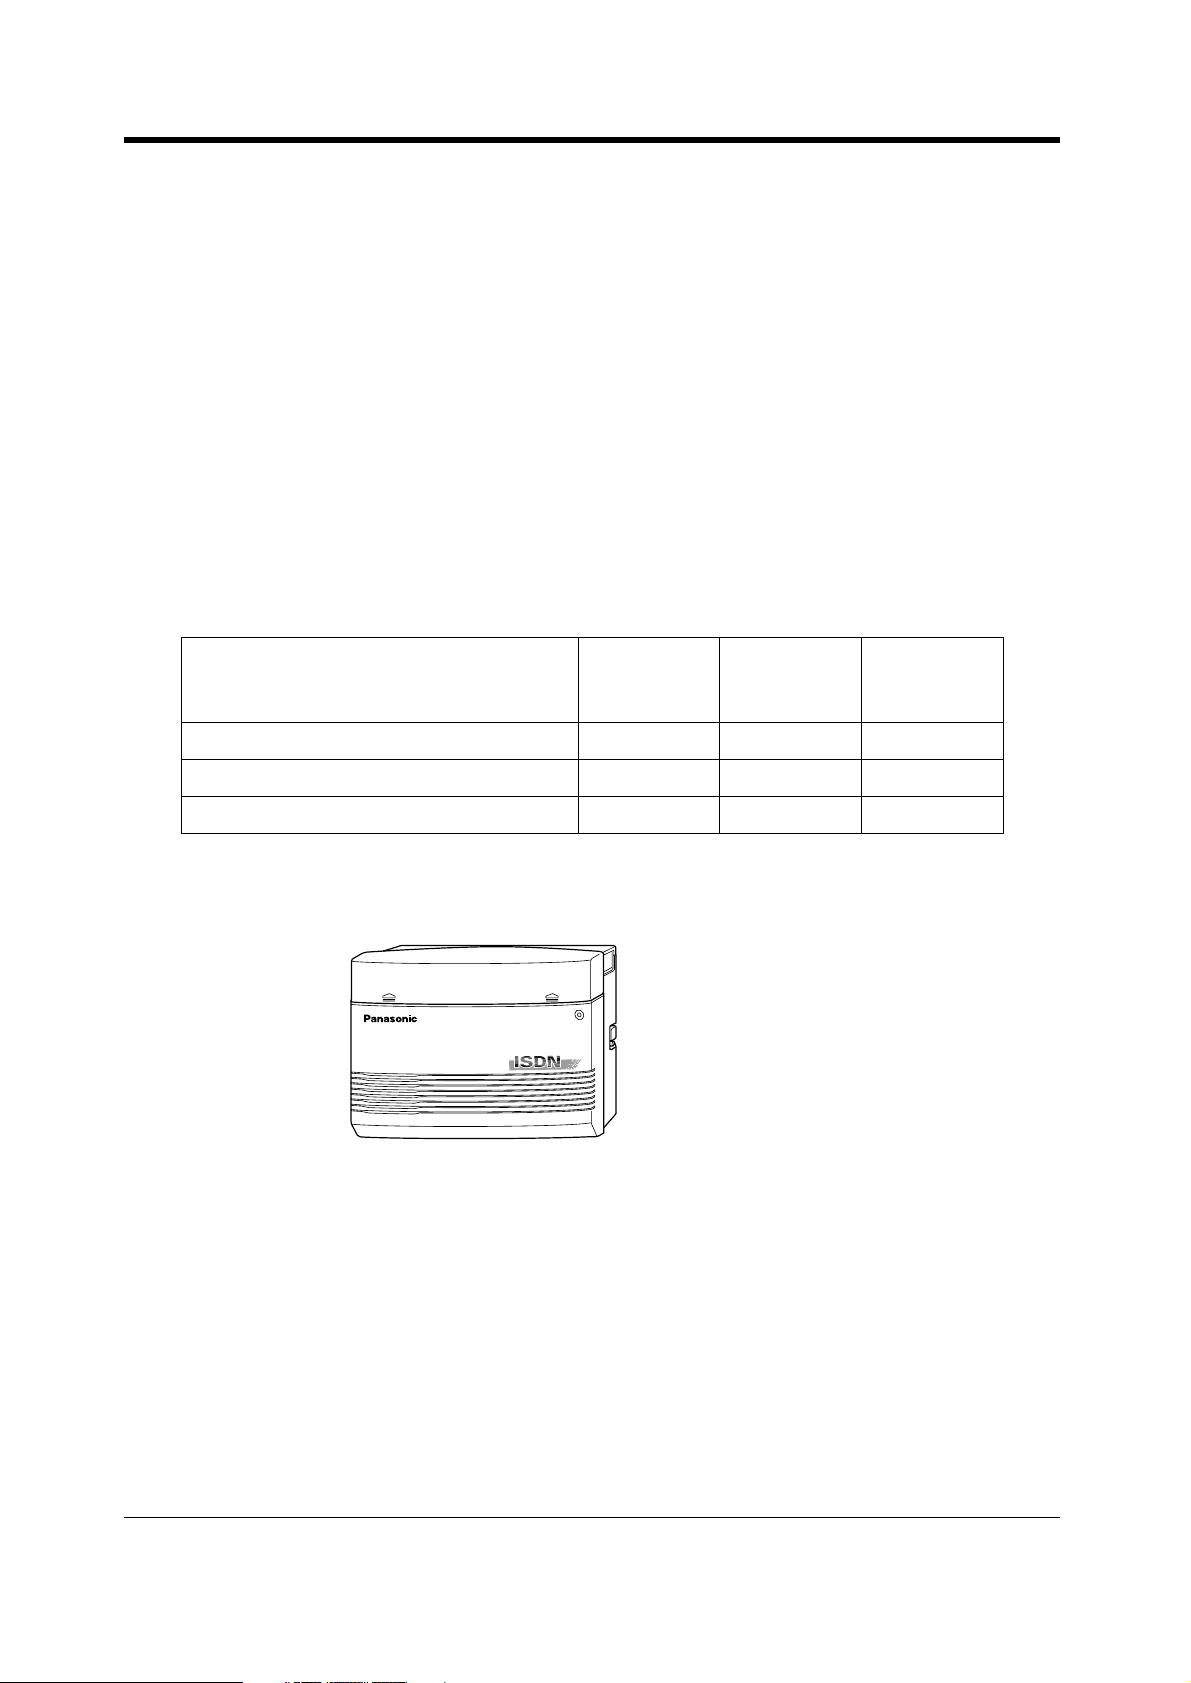
1.1 Capacity
1.1.1 Capacity
You can connect the following number of extensions and outside lines to your system.
Basic
System
KX-TD612
CO line (ISDN (BRI) line)
(Analogue CO Line)
Extension line
* ISDN (BRI) port 2 and ISDN (BRI) port 3 can be selected to be used for a CO line or ISDN extension
line (Default : port 2 — CO line/port 3 — Extension). The maximum capacity of the system depends
on the line selection. See below.
Line Selection ISDN CO Line
3 ISDN (BRI) ports are selected for CO line 6 0 12
2 ISDN (BRI) ports are selected for CO line 4 8 12
1 ISDN (BRI) port is selected for CO line 2 16 12
4 (2)
—
12
Module
Expansion
2 (1)
1
—
Extension
ISDN
Line
Maximum
Capacity
6 (3)*
1
12
Extension
Line
12 User Manual
Page 13
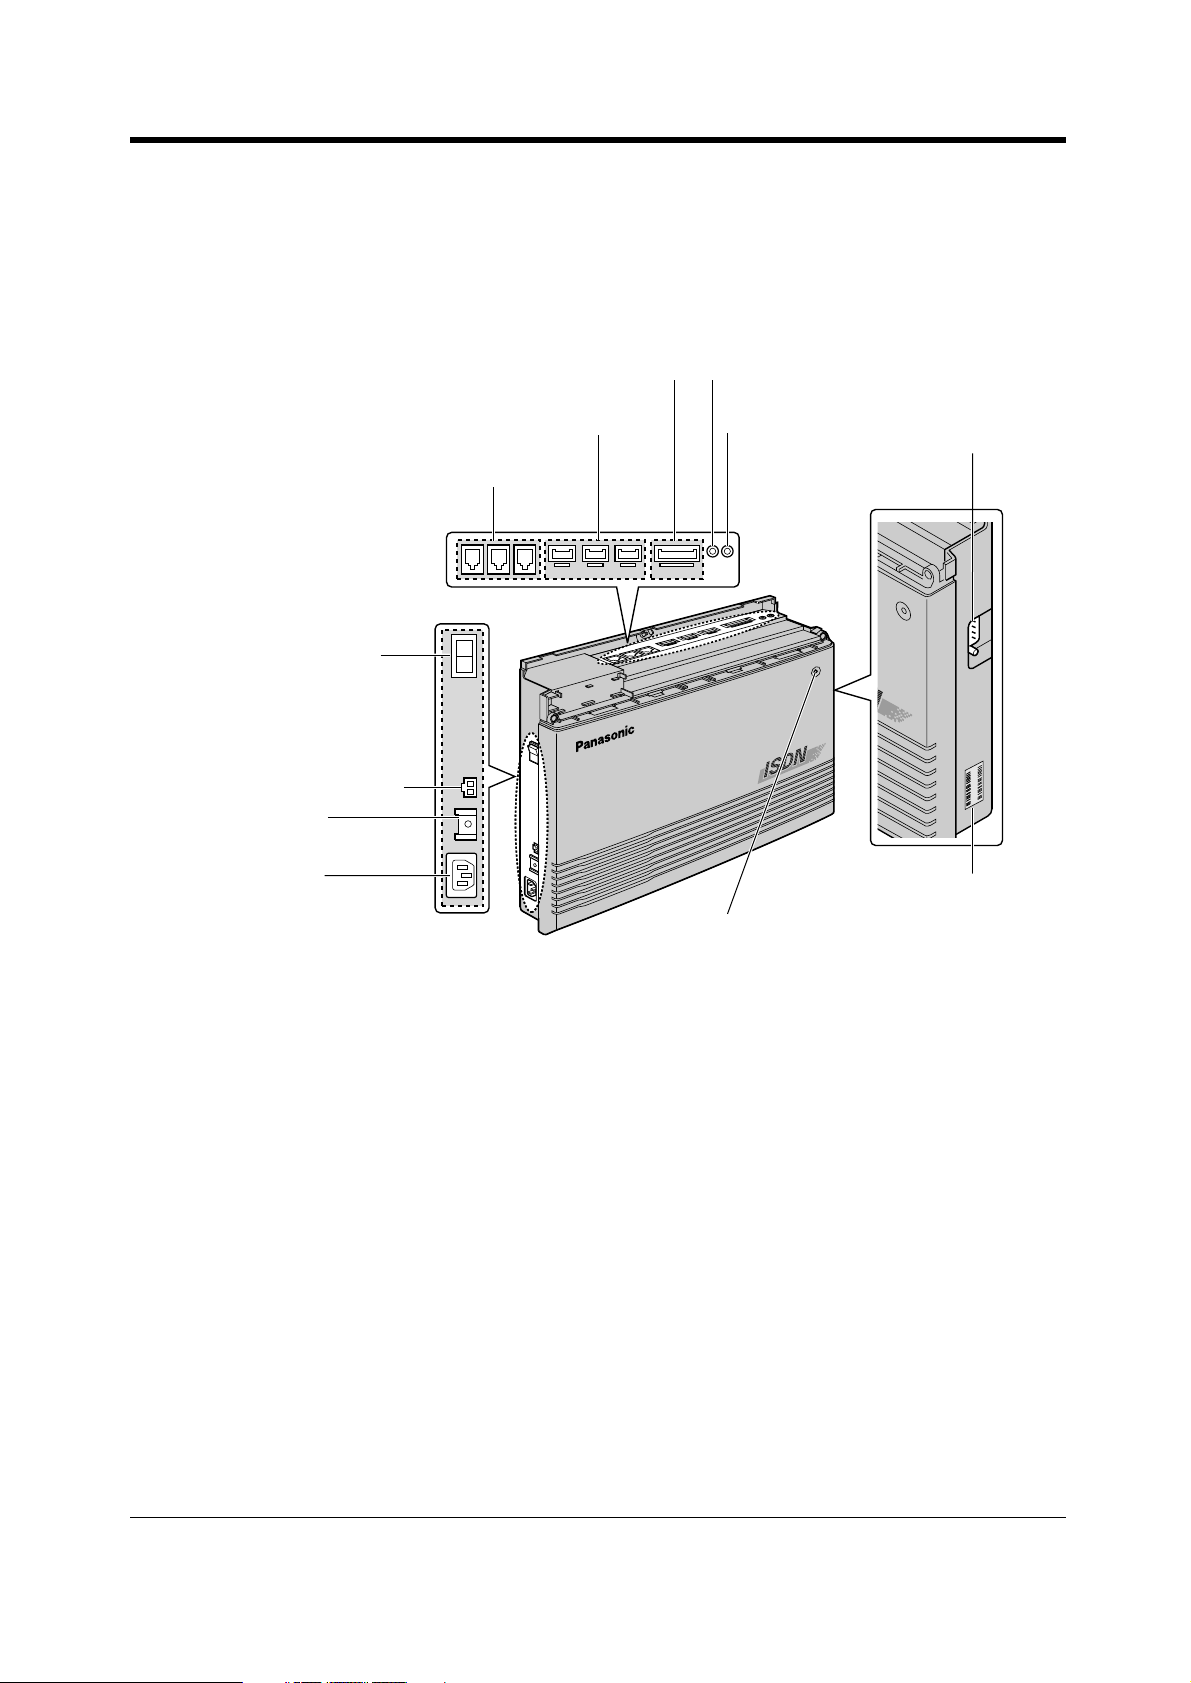
1.2 Names and Locations
1.2.1 Names and Locations
KX-TD612
Overview
External Equipment Connector
Extension Connectors
ISDN (BRI) Line Modular Jacks
Power Switch
Battery Interface
Ground
Terminal
AC Inlet
External Music Jack
Paging Jack
Power Indicator
Serial Interface
(RS-232C)
ABC1234567
KX-TD612XX
Serial Number
User Manual 13
Page 14
Overview
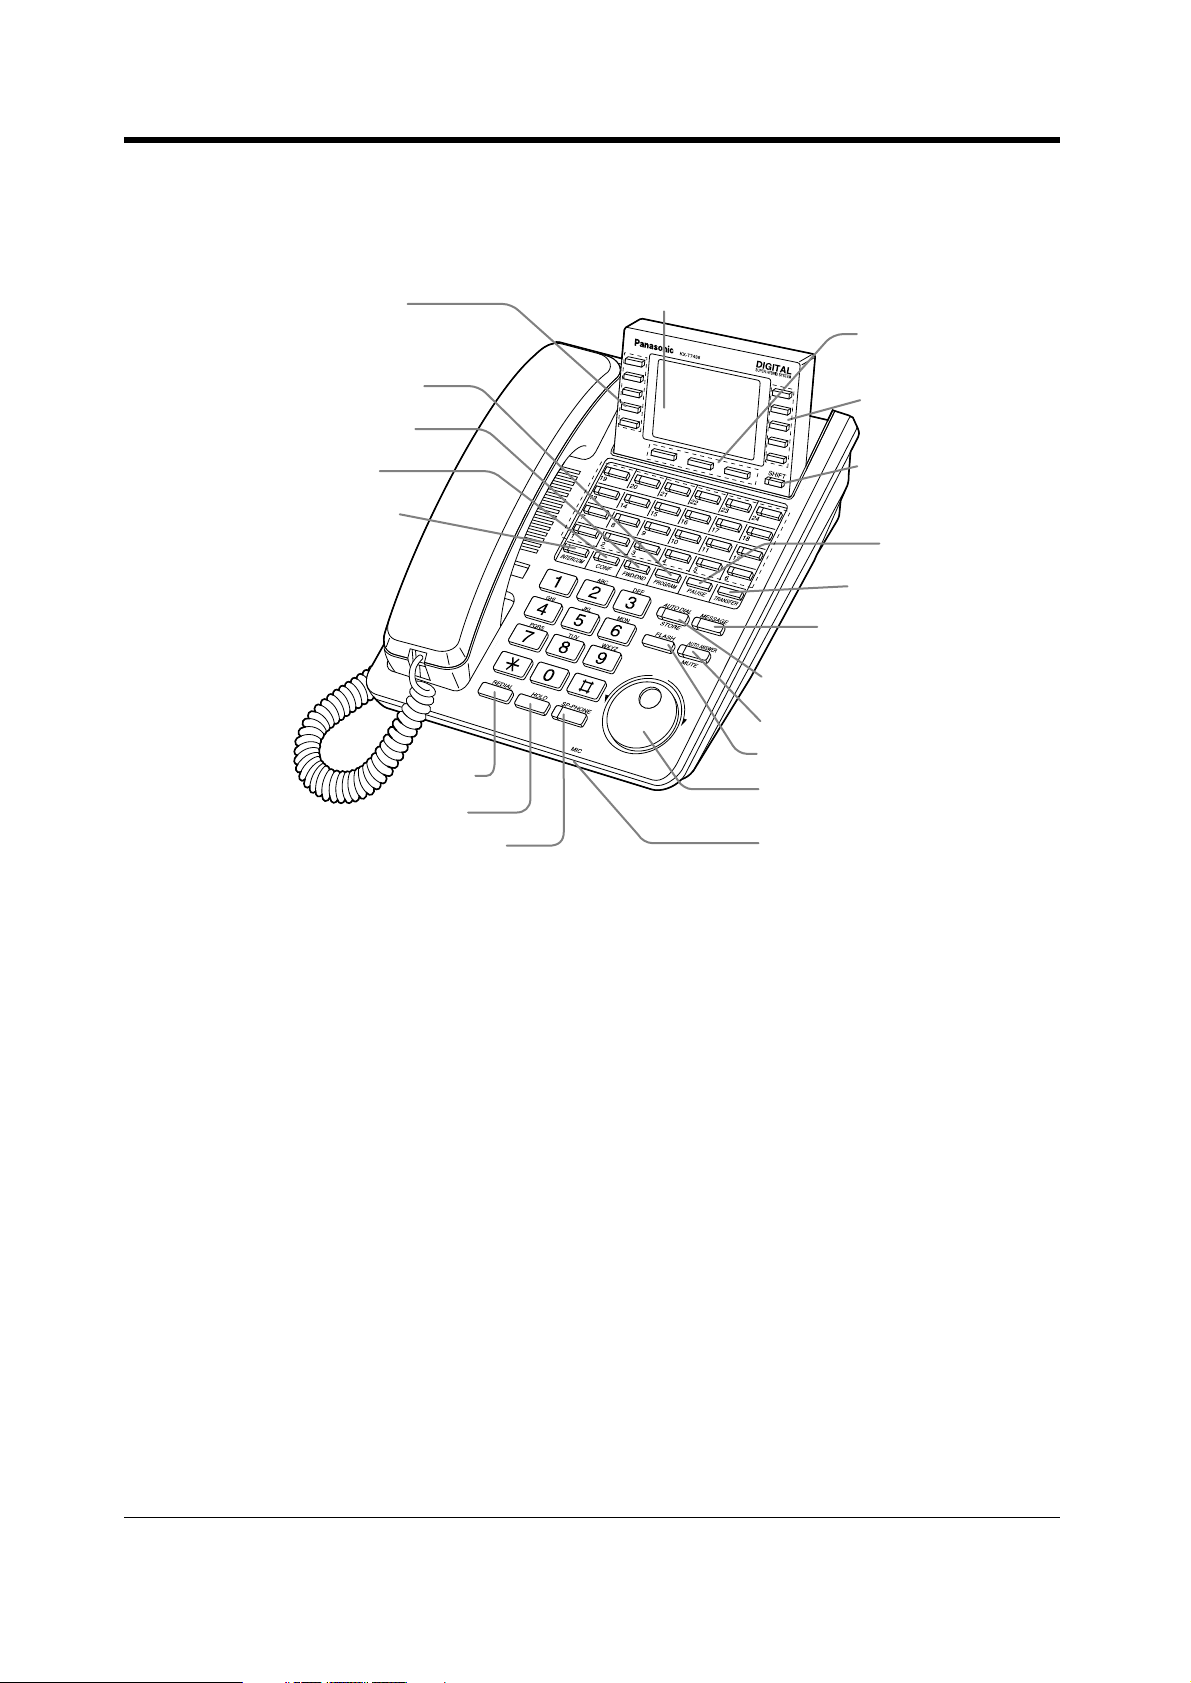
A Digital Proprietary Telephone (Example: KX-T7436)
Function
PROGRAM
FWD/DND
CONF
INTERCOM
REDIAL
HOLD
SP-PHONE
Display
Soft
Function
SHIFT
PAUSE
TRANSFER
MESSAGE
AUTO DIAL / STORE
AUTO ANSWER / MUTE
FLASH
Jog Dial
Microphone
14 User Manual
Page 15
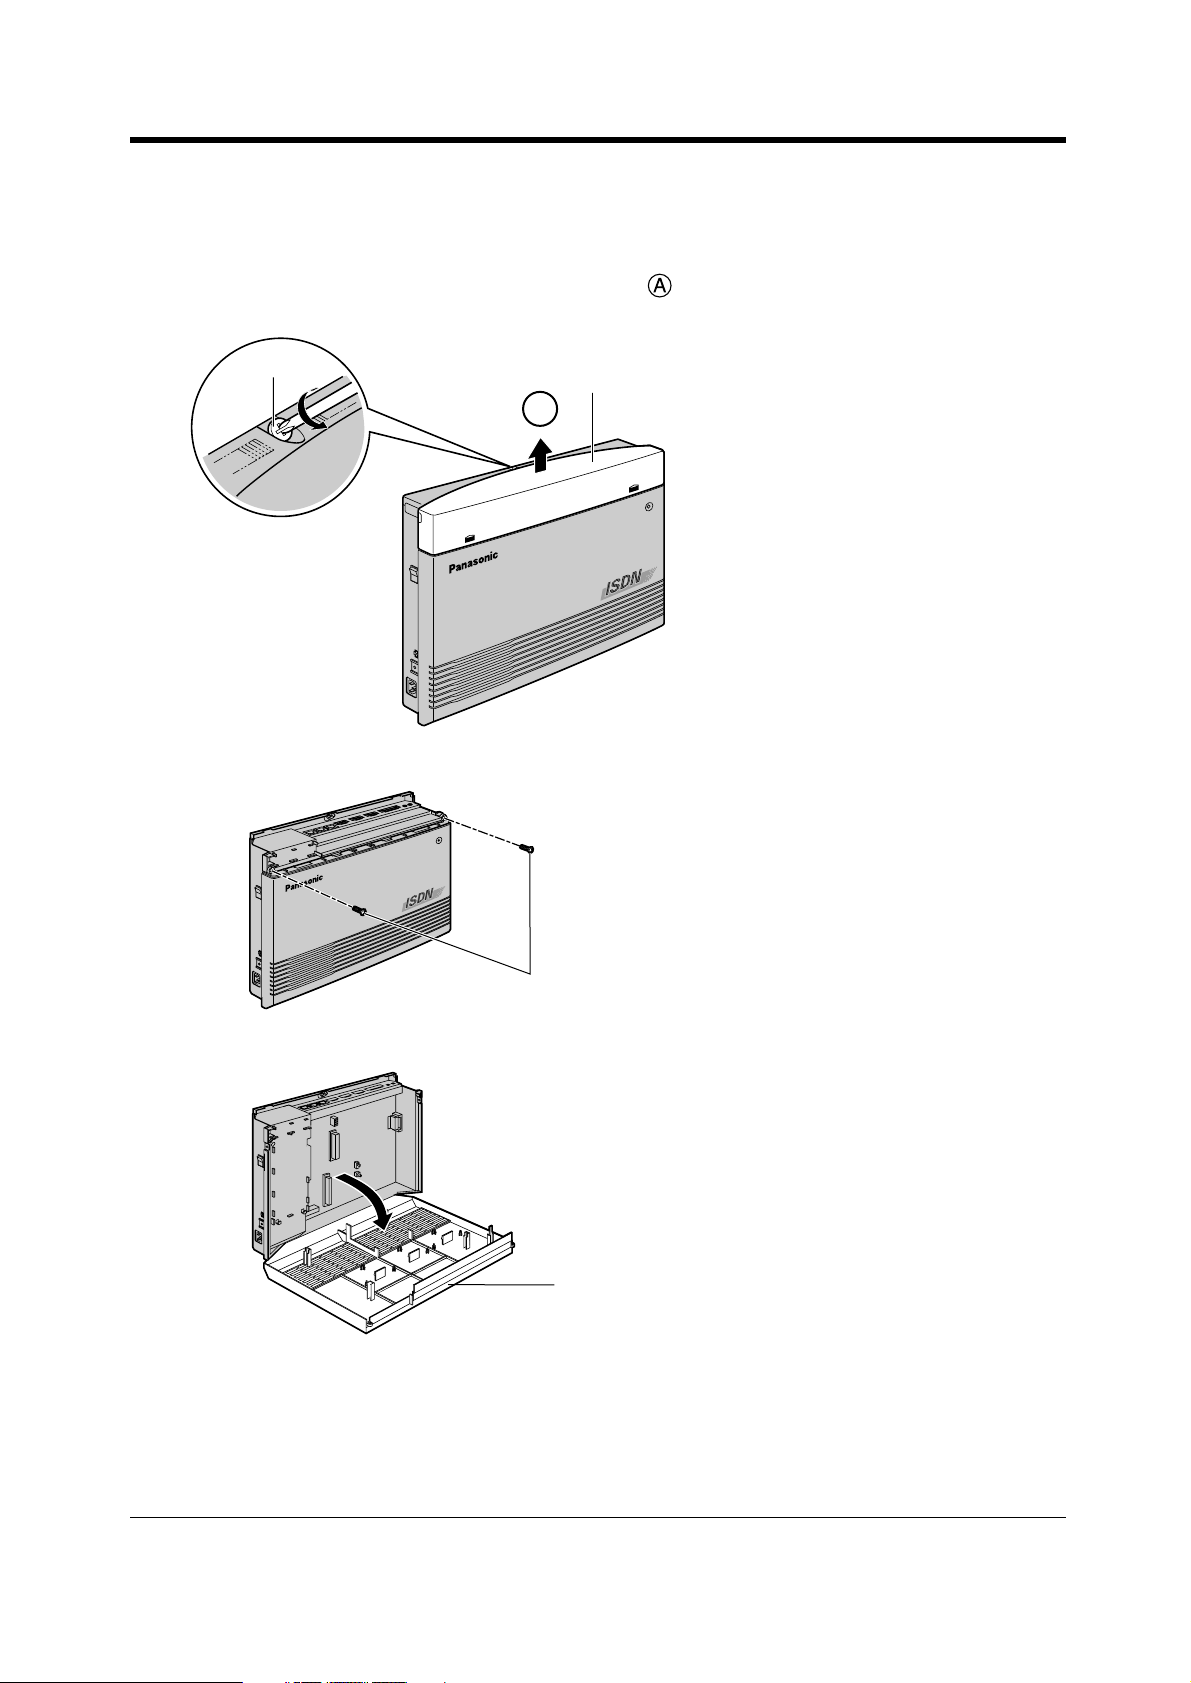
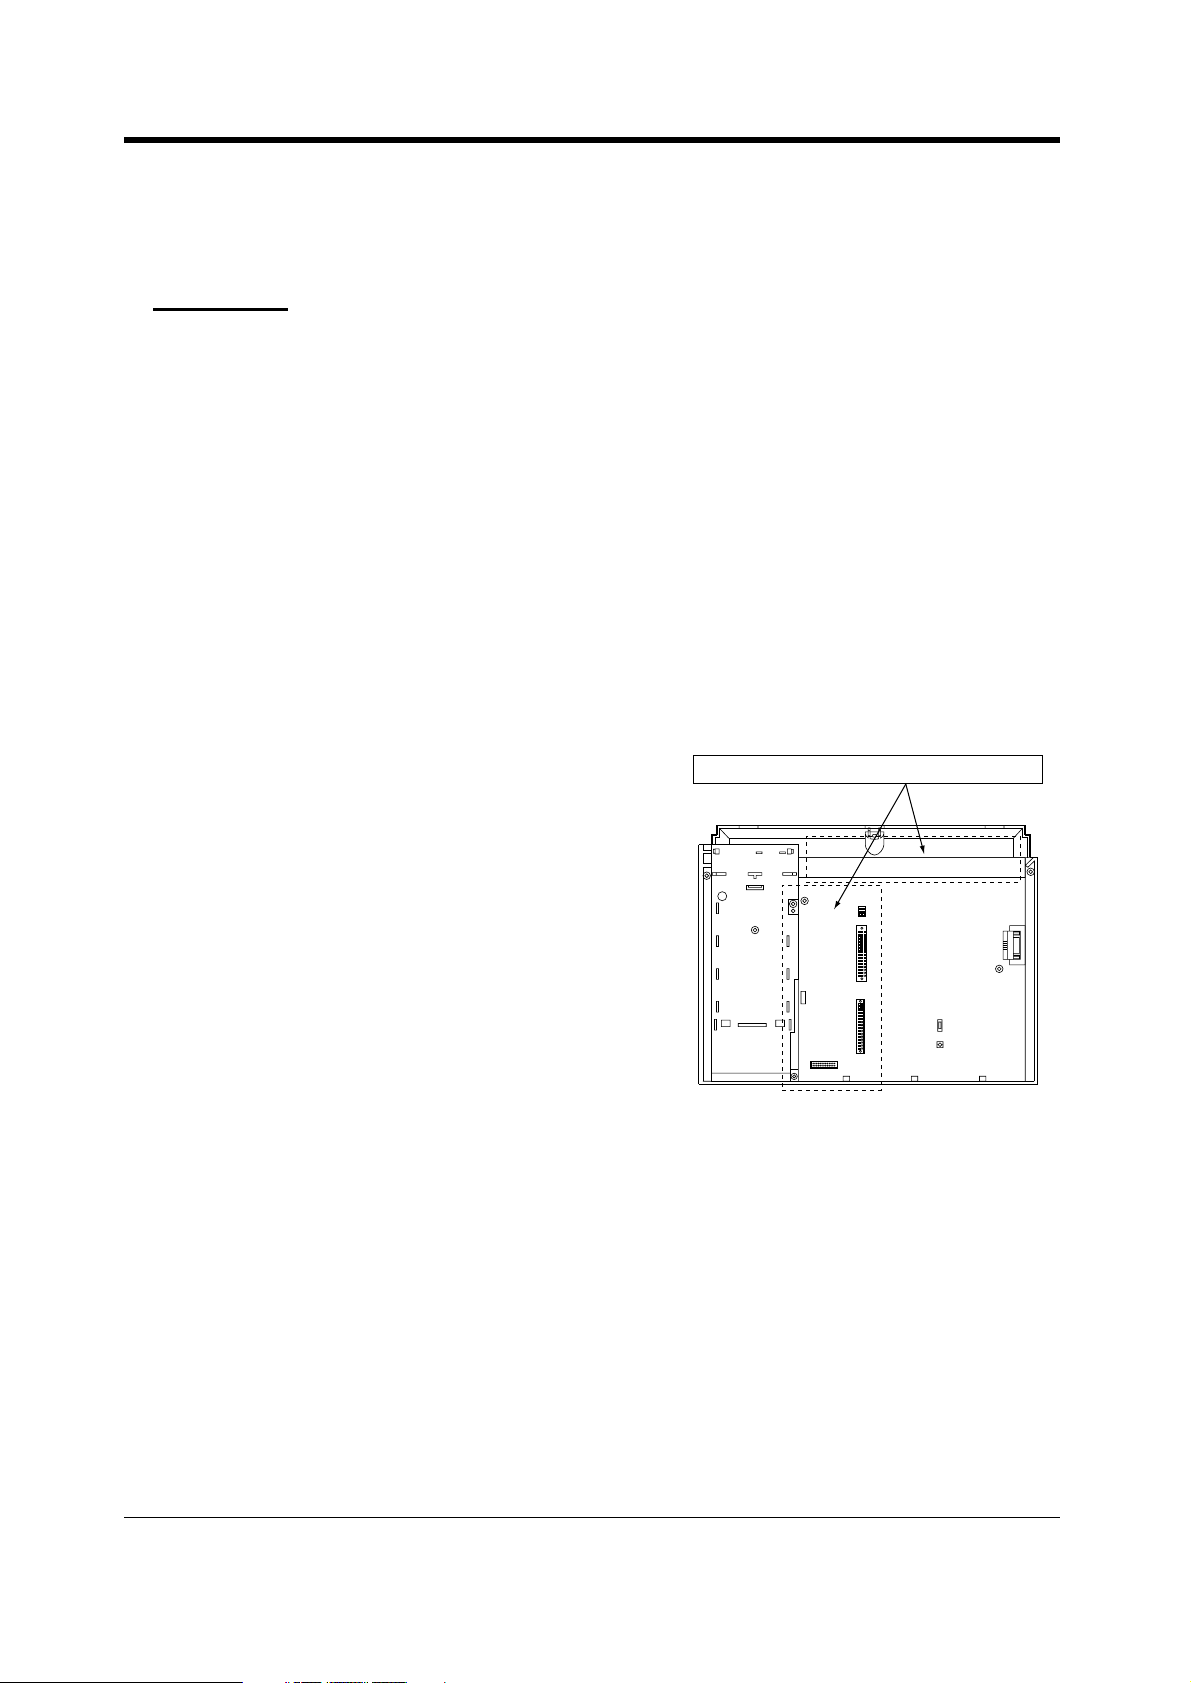
To open the front cover
1. Loosen the screw on the top front cover of the main unit.
The screw is attached to the front cover with springs so that it will not be lost.
2. Open the top front cover in the direction of arrow .
Overview
Screw
Top Front Cover
A
3. Loosen the 2 screws of the both sides of the unit.
Screws
4. Open the front cover.
Front Cover
To close the front cover
1. Reverse the steps above.
User Manual 15
Page 16
Overview
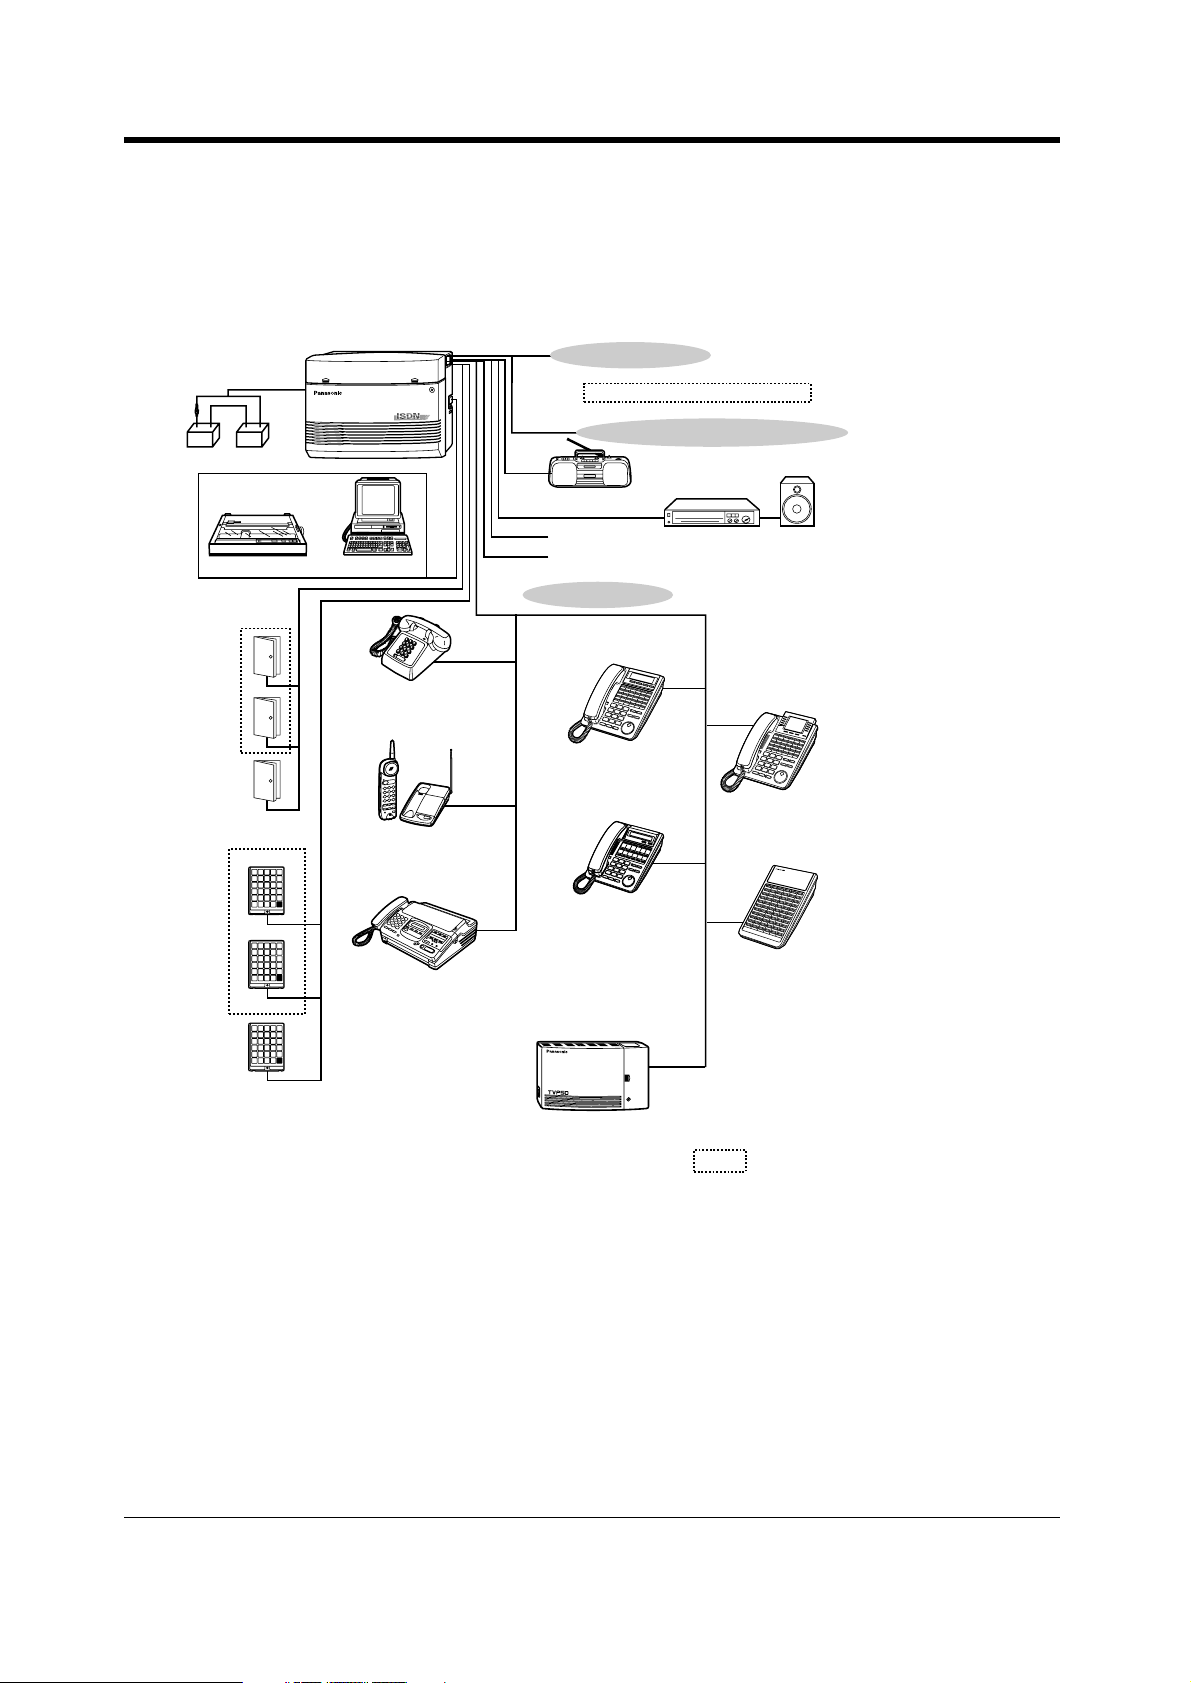
1.3 Connection Example
1.3.1 Connection Example
This diagram shows you a connection example including optional equipment.
3 ISDN (BRI) Lines
To ISDN (BRI) port 1-2 (initial)
To ISDN (BRI) port 3 (additional)
(Lightning Protectors)
1 Analogue CO Line (optional)
Car Batteries
External Music Source
Printer
Door Openers
Panasonic
Panasonic
Panasonic
Doorphones
KX-T30865
or Computer
Single Line Telephone
Cordless Phone
Facsimile
External Relay
Second Ringer Relay
12 Extension lines
KX-T7433
KX-T7431
VOICE PROCESSING SYSTEM KX-TVP50
POWER
Voice Processing System
Amplifier
Speaker
KX-T7436
KX-T7440
: needs optional card.
16 User Manual
Page 17
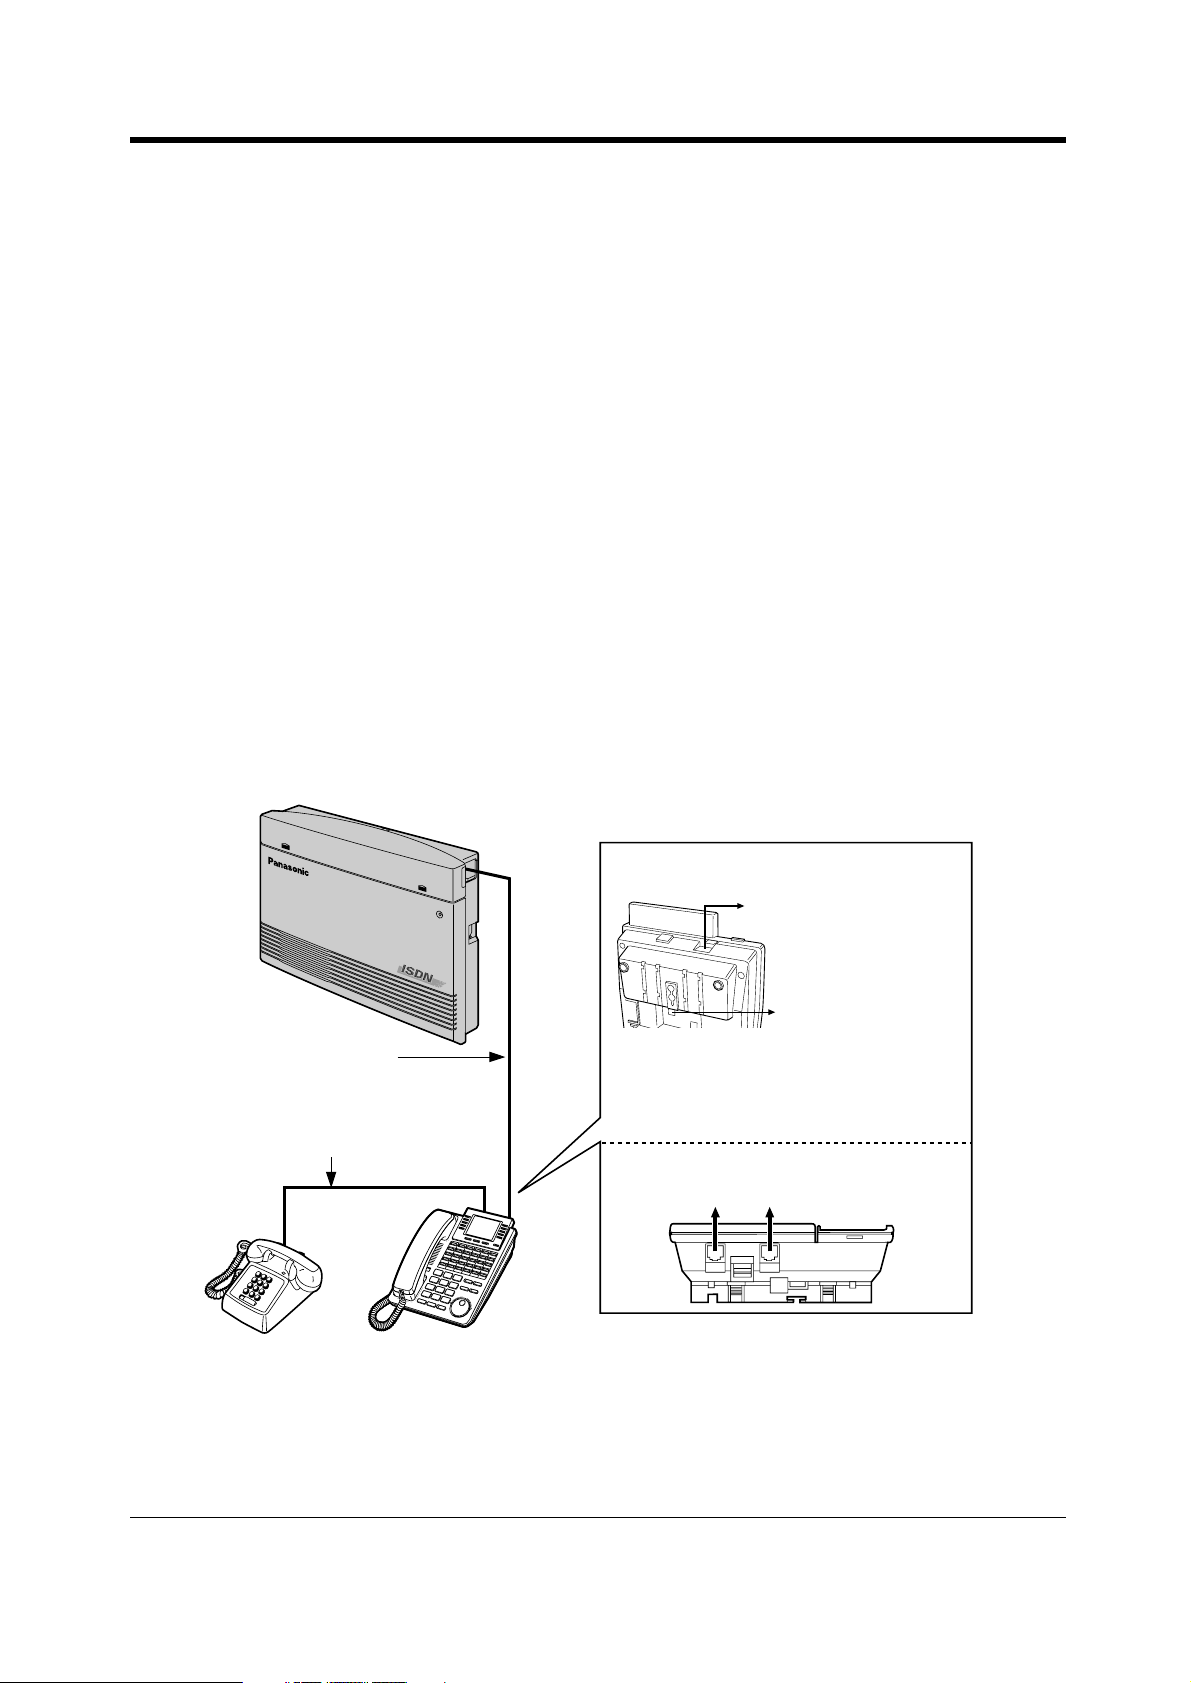
Overview
1.4 Adding Another Telephone in Parallel (EXtra
Device Port [XDP] )
1.4.1 Adding Another Telephone in Parallel
A Panasonic digital proprietary telephone and a single line telephone, including a facsimile, cordless
telephone, etc., can be connected to 1 extension jack in parallel. There are 2 types of parallel
connections.
• EXtra Device Port (XDP)
A digital proprietary telephone and a single line telephone
Each telephone has a different extension number and can work individually. For more information,
contact your dealer.
• Parallelled Telephone Connection
Any digital proprietary telephone and a single line telephone
These telephones share the same extension number.
To ring the single line telephone, set to ring (on) if necessary. (Refer to 2.8.13 Setting the Parallel
Connected Telephone Ringer (Parallelled Telephone) in this manual.)
Three examples of the parallel connections are shown below. System programming is required to
determine the type of connection. Consult your dealer.
Method 1
<Back of the KX-T7400 Series DPTs>
To single line telephone
To system
4-conductor wiring cord
Connect pins “A”, “B”, “H” and “L”.
2-conductor wiring cord
Connect pins “A” and “B”.
Note: Ensure the cords are inserted in the
grooves to prevent damage to the
connectors, for both wall mounting and
desktop positioning.
<Back of the KX-T7200 Series DPTs>
To system To single line telephone
Digital Proprietary Telephone Single Line Telephone
User Manual 17
Page 18
Overview
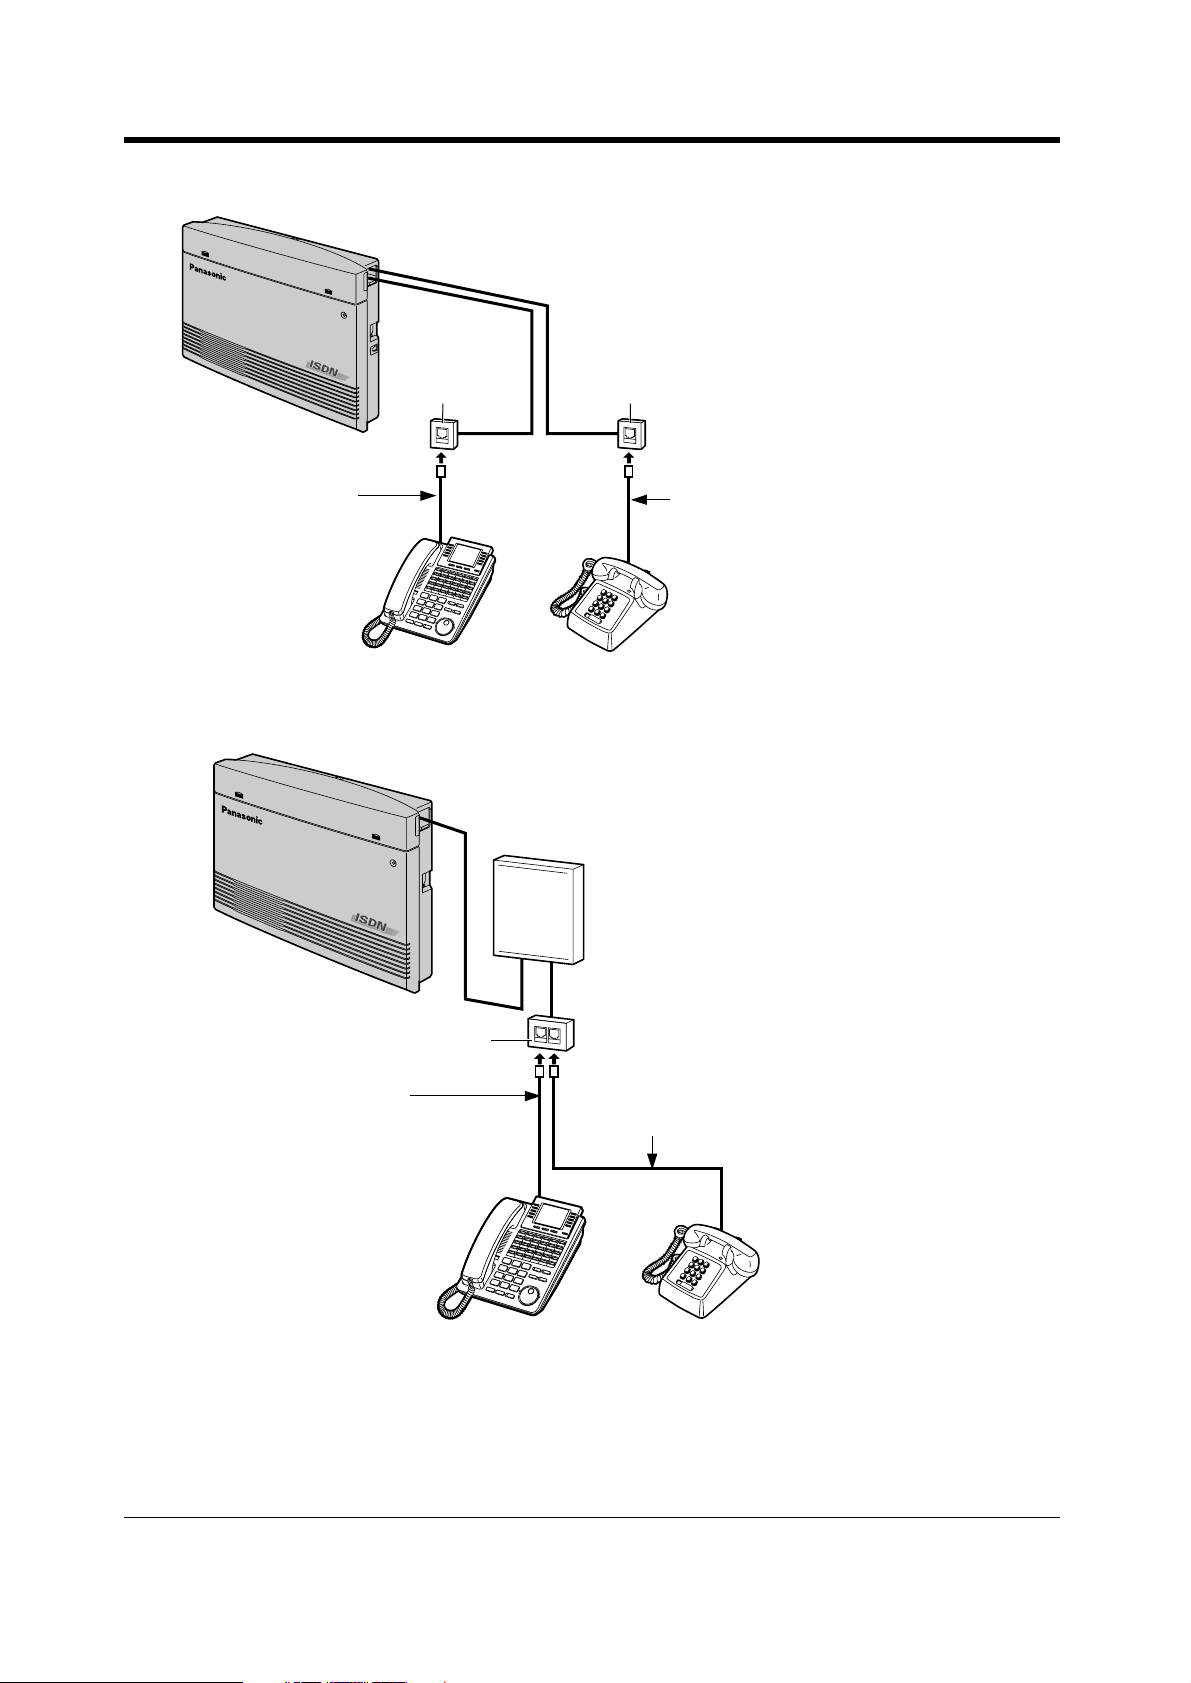
Method 2
4-conductor wiring cord
Connect pins “H” and “L” only.
(“A” and “B” are not required.)
Digital Proprietary Telephone Single Line Telephone
Method 3
Modular
Socket
Modular
Socket
2-conductor wiring cord
Connect pins “A” and “B”.
Distribution
Frame
Double Modular Socket
4-conductor wiring cord
For a digital proprietary telephone:
Connect pins “H” and “L” only.
(“A” and “B” are not required.)
Digital Proprietary Telephone Single Line Telephone
2-conductor wiring cord
Connect pins “A” and “B”.
18 User Manual
Page 19

1.5 Restarting the System
1.5.1 Restarting the System
After starting the system, if it does not operate properly, restart. Only the following will be cleared.
If your system does not operate properly, consult your dealer.
• Automatic Callback Busy (Camp-On) is cleared.
• Calls in system parking zones are cleared.
• Calls on Hold are terminated.
• Calls in progress are terminated.
• Calls on Exclusive Hold are cleared.
Using the Power Switch
1. Turn the power switch "OFF" once, and then turn it "ON".
Overview
Power Switch
User Manual 19
Page 20

Overview
20 User Manual
Page 21

Section 2
Operation
This chapter shows you how to operate each feature
step by step. Read this chapter to become familiar with
the many useful features of this system.
Operation
User Manual 21
Page 22
Operation
2.1 Before Operating the Telephones
2.1.1 Before Operating the Telephones
What kind of telephone can be used?
You can use a single line telephone (SLT), such as a rotary pulse telephone or a Panasonic digital
proprietary telephone (DPT) such as the KX-T7436. Operate the feature depending on the telephone
you are using. If you are using a Panasonic digital proprietary telephone with a special function button
such as and/or has a display, you can follow the operation with the button or display messages
for easy programming.
If you use a large display telephone (e.g. KX-T7436), you can follow the displayed messages to
operate the features.
If your telephone does not have function buttons and/or a display, you may operate the unit by
entering a feature number instead. Follow the available operation with your telephone. If you use a
console, you can use the buttons on the console as the buttons on the connected digital proprietary
telephone.
REDIAL
• If you use a Panasonic digital
proprietary telephone which does not
have function buttons, you may
change one of the unused flexible
buttons to a function button. Refer to
Refer to 4.1.3 Customising the
Buttons (Customising Your Phone &
System).
Feature Numbers
To operate certain features, you need to enter specified feature numbers (and an additional
parameter, if required).
There are two types of feature numbers as follows:
• Flexible feature number
• Fixed feature number
Fixed feature numbers cannot be changed. However, you can change the flexible numbers to other
numbers for easier use. If you want to change the numbers, consult your dealer. In this manual, the
default numbers (factory installed) are used for operations.
A flexible number is shown as (half-shaded key). Use the new programmed number if you have
changed the feature number. Write the new number in 5.2 Feature Number List (Appendix).
If you use a single line telephone which does not have the or # keys;
it is not possible to access features that have or # in their feature numbers.
9
Tones
You will hear various tones, during or after an operation, for confirmation. Refer to 5.4.1 What is This
Tone? (Appendix).
22 User Manual
Page 23
Operation
RING
BGM
CONT
WED JAN01 03:00P
Extension STA Speed
Features SYS Speed
Call Log
Display
In this manual, you will see "the display ...". This refers to the display of a Panasonic digital proprietary
telephone. If your telephone is not a Panasonic digital proprietary telephone with a display, the
message will not be displayed.
If you use a Panasonic digital proprietary telephone with display, the display helps you confirm the
settings. For example, when you set the Do Not Disturb feature, the display shows "Do Not Disturb".
Some digital proprietary telephones also give you easy access to operations. A message is displayed
depending on the operation. By pressing the corresponding button on the side or bottom of the
display, or rotating a jog dial, you can access the desired feature. For example, if turning background
music on becomes available, "BGM" will be shown on the display. Follow the instructions in each
operation.
W
E
D
J
A
N
0
1
0
3
:
0
0
E
P
x
t
e
n
s
i
o
n
F
e
S
a
T
t
A
u
r
S
e
p
s
e
e
C
d
a
S
l
Y
l
S
L
S
o
p
g
e
e
d
CONT
RING
Furthermore, depending on the digital proprietary
telephone with display, you can operate features or make
calls using the display message. Refer to 2.10 Using
the Display Proprietary Telephone.
BGM
Your Extension Number
If you use a Panasonic digital proprietary telephone with display, you can check your own extension
number on the display. Refer to 4.2.1 Customising Your System.
Restrictions
Some features may be restricted at your extension under system programming. Consult your
manager or dealer.
User Manual 23
Page 24

Operation
Icon Descriptions
The following icons show you the feature availability, notes and action to operate the features.
While operating the unit, you can easily refer to the Icons noted on the inside back cover of this
manual.
This feature cannot be operated
with a single line telephone.
Related Programming Title
See "Programming", if necessary.
Off-hook (one of the following).
• Lift the handset.
• Press the SP-PHONE button.
• Press the MONITOR button.
(To start talking, lift the
handset.)
On-hook (one of the following).
• Hang up.
• Press the SP-PHONE button.
• Press the MONITOR button.
Press the corresponding function
button on the digital proprietary
telephone. (See to "When You Use
a Panasonic Digital Proprietary
Telephone".)
891
to
8 4
(Recall)
(CO)
OR
OR
Seize an external line (one of the
following).
• Press the CO button.
• Dial automatic line access
number 9.
• Dial outside line number 81 to
84.
Press the Call button on the
Doorphone.
Press the Recall button on a single
line telephone.
Wait for an answer.
desired no.
Enter the required number.
Tal k.
<Example>
account code
Enter the account code.
extension no.
Dial an extension number. You will hear a confirmation, dial,
ring or ringback tone.
C. Tone: confirmation tone
D. Tone: dial tone
R. Tone: ring tone
R. B. Tone: ringback tone
phone no.
Dial the telephone number. One short beep
When You Use a Panasonic Digital Proprietary Telephone
If you use a Panasonic digital proprietary telephone and the DSS Console, they may have some of
the useful function buttons listed below. These buttons make operations simple. The illustrations may
differ from the buttons on your telephone.
24 User Manual
Page 25
Operation
ANSWER
AUTO ANSWER
MUTE
AUTO DIAL
STORE
(CO)
CONF
(DSS)
ANSWER: Used to answer an
incoming call.
AUTO ANSWER/MUTE: Used to
receive an incoming intercom call in
the hands-free mode or mute the
microphone during a conversation.
AUTO DIAL/STORE: Used for System
Speed Dialling or storing programme
changes.
CO: Used to make or receive an
outside call. A Loop-CO button
supports all lines. Pressing this button
seizes an idle line automatically.
(Button assignment is required.)
(Only the CO "number" (e.g. 1, 2) may
be shown on some telephones.)
CONF (Conference): Used to establish
a three-party conversation.
DSS: Used to access the extension.
(Only the "S" may be shown on some
telephones.)
INTERCOM
MESSAGE
MODE
PAUSE
PROGRAM
(PF)
INTERCOM: Used to make or receive
an intercom call.
MESSAGE: Used to leave a message
waiting indication or call back the party
who left the message waiting indication
/used to replay voice messages.
MODE: Used to shift the display to
access various features.
PAUSE: Used to insert a pause during
dialling.
PROGRAM: Used to enter and exit the
Station Programming mode.
Programmable Feature: Located on
the upper part of the CO button or on
the Console. Assigns the desired
button and used to access the stored
function. Mostly used as a one-touch
dialling button.
(Only the "F and number" may be
shown on some telephones.)
FLASH
FWD/DND
R (FLASH): Sends a flash signal to the
Central Office or a host PBX to access
their features (External Feature
Access). This button is applicable
when the PBX has CO lines, not when
it only has ISDN lines.
Function: Located beside the display.
Used to perform the displayed function
or operation.
Call Forwarding/Do Not Disturb:
Used to perform Call Forwarding or Do
Not Disturb.
Jog Dial: Used to adjust the volume
and the display contrast or select
desired items for each function.
REDIAL
RELEASE
SELECT
SHIFT
REDIAL: Used to redial.
RELEASE: Used to disconnect the
line.
SELECT: Used to select the displayed
function or to call the displayed phone
number.
SHIFT: Used to access the second
level of Soft Button functions.
User Manual 25
Page 26
Operation
HOLD
HOLD: Used to place a call on hold. VOICE CALL/MUTE: Used to monitor
VOICE CALL
MUTE
an intercom call automatically, but it
cannot be used for hands-free
conversations. It also mutes the
handset microphone during a
conversation.
SP-PHONE
Speakerphone: Used for the handsfree operation.
Soft: Used to perform a function or
operation appearing on the bottom line
of the display.
TRANSFER
TRANSFER: Used to transfer a call to
another party.
MONITOR
MONITOR: Used for hands-free
dialling. You can monitor the party's
voice hands-free.
If the term is in parentheses like (Account) in this section, it means a flexible button has been made into
an "Account" button.
Using a Jog Dial
The Jog Dial can be used for the display contrast and the volume control or you can search for
desired items on the display. Rotate the Jog Dial in the either direction as desired. The contrast or the
volume level and the items will change as follows:
Left
(counter-clockwise)
Right
(clockwise)
Level decreases
To the previous item
Level increases
To the next item
26 User Manual
Page 27
How to Follow the Steps
A sample operation is shown below.
Operation
2.2.5 Calling without Restrictions
Using an account code To an extension refusing the call
Using an account code (Account Code Entry)
An Account Code gives information about outside calls for accounting and billing purposes. You may
not be able to make an outside call without an account code entry. A mode is assigned to each user.
Ask your manager for your mode.
DPT/SLT
ACCNT
#
OR
9 9
Press # or dial 99.
C.Tone
Off-hook.
line access
Press CO or enter
line access number
(9 or 81-84).
Press “ACCNT”,
Account or dial 49.
(CO)
OR
no.
OR
(Account)
OR
4 9
Enter phone number.
Enter account code
(max. 10 digits).
phone no.
account code
Conditions
•
A Panasonic digital proprietary telephone user can enter an account code during a
conversation or when hearing a reorder tone after the other party hangs up.
• If you enter the wrong code, press the “ ” key while entering the account code and then
re-enter the code.
• To cancel the entry, press the Account button while entering the code.
• For your convenience, you can store the code with the phone number in memory (e.g.
Speed dialling).
• If you hear a reorder tone, the entered account code is wrong. Enter the correct code.
• You may give a specified account cord to extension users and check their telephone usage.
You can specify an account cord to each client and check the call duration.
Feature title
Sub feature title
Description
Operation steps
The description of the
icons are explained
in "2.1.1 Before
Operating the
Telephones — Icon
Descriptions."
Customising Your Phone
• 4.1.3 Customising the Buttons
Create or re-arrange an Account button.
Hints
Programming References: The related or required programming is noted.
To program, see “Customising Your Phone & System”.
User Manual 27
Page 28

Operation
2.1.2 For ISDN Extension Users
ISDN extensions include ISDN terminal equipment such as telephones, facsimiles or personal
computers connected to the ISDN (BRI) port (port 2 and port 3) on the main unit KX-TD612. A
maximum of 8 ISDN extensions can be connected to each ISDN (BRI) port with point-to-multipoint
configuration. However, only 2 units can be used simultaneously. Terminal equipment can be
addressed individually with Multiple Subscriber Numbers (MSN). The MSN consists of the ISDN
extension number and an additional digit, 00 through 99. If MSN is not assigned, all equipment on
the same ISDN (BRI) Extension bus are called simultaneously.
Network
Termination
ISDN Extensions
• A primary and a secondary Class of Service (COS) can be assigned per port.
To Central Office
28 User Manual
Page 29
2.2 Making Calls
2.2.1 Basic Calling
— Calling another extension
— Calling an external party
Calling another extension
To another extension (Intercom Call)
DPT/SLT
extension no.
OR
(DSS)
Off-hook.
Enter extension
number or press DSS.
Operation
Talk.
<Example>
When you call Mr. Thomas....
Mr. Thomas's extension number is 123.
DPT/SLT
1 32
Off-hook.
• The DSS button light shows the current status as follows:
Off: The extension is idle.
Red on: You or another extension is using the line.
• Hands-free operation
You can have a conversation in the hands-free mode using the SP-PHONE button. You can
then perform other tasks at the same time.
• Do you have an extension directory?
Complete the directory in 5.3 Directory and make a photo copy for your reference.
• For quick operation
If you are an operator or dial some extensions frequently, the DSS button is useful.
• Confirming the dialled number before connecting
You can go off-hook after confirming the number you dialled. If you misdial, press " " to
clear each number from the right or press the R (FLASH) button to clear all numbers.
Talk.Dial 123.
User Manual 29
Page 30
Operation
Customising Your Phone
• 4.1.3 Customising the Buttons
Create or re-arrange a DSS button.
Customising Your System
• 4.2.3 System Speed Dialling and Intelligent Call Handling Number Set (001)
• 4.2.4 System Speed Dialling and Intelligent Call Handling Name Set (002)
To an operator (Operator Call)
DPT/SLT
Off-hook.
6 1
6 2
Dial 0, 61 or 62 as you
desire.
0
OR
OR
Idle operator
Operator 1
Operator 2
Calling an external party
You have to seize an outside line before dialling an outside phone number because external calls are
made via your system.
Select one of the following methods:
• Press an idle button.
• Dial automatic line access number .
An idle line is selected automatically.
• Dial outside line number to .
A specific line is selected.
DPT/SLT
(CO)
9
1
4
(CO)
OR
OR
phone no.
891
Off-hook.
to
8 4
Seize an external line
(CO, 9 or 81-84).
Talk.Enter phone number.
30 User Manual
Page 31

Operation
• The CO button light shows the current status as follows:
Off: The line is idle.
Green on: You are using the line.
Red on: The line is in use.
• CO1 to CO7 correspond to outside line numbers 81 to 84 respectively.
CO 1,2 : 81
CO 3,4 : 82
CO 5,6 : 83
CO 7 : 84
• Emergency call
You can dial pre-programmed emergency numbers without any restrictions.
Consult your dealer.
• Hands-free operation
You can have a conversation in the hands-free mode using the SP-PHONE button. You can
then perform other tasks at the same time.
Helpful hints for hands-free operation
Use your telephone in a quiet room for best performance.
If the other party has difficulty hearing you, decrease the volume.
If you and the other party talk at the same time, parts of your conversation will be lost. To
avoid this, talk alternately.
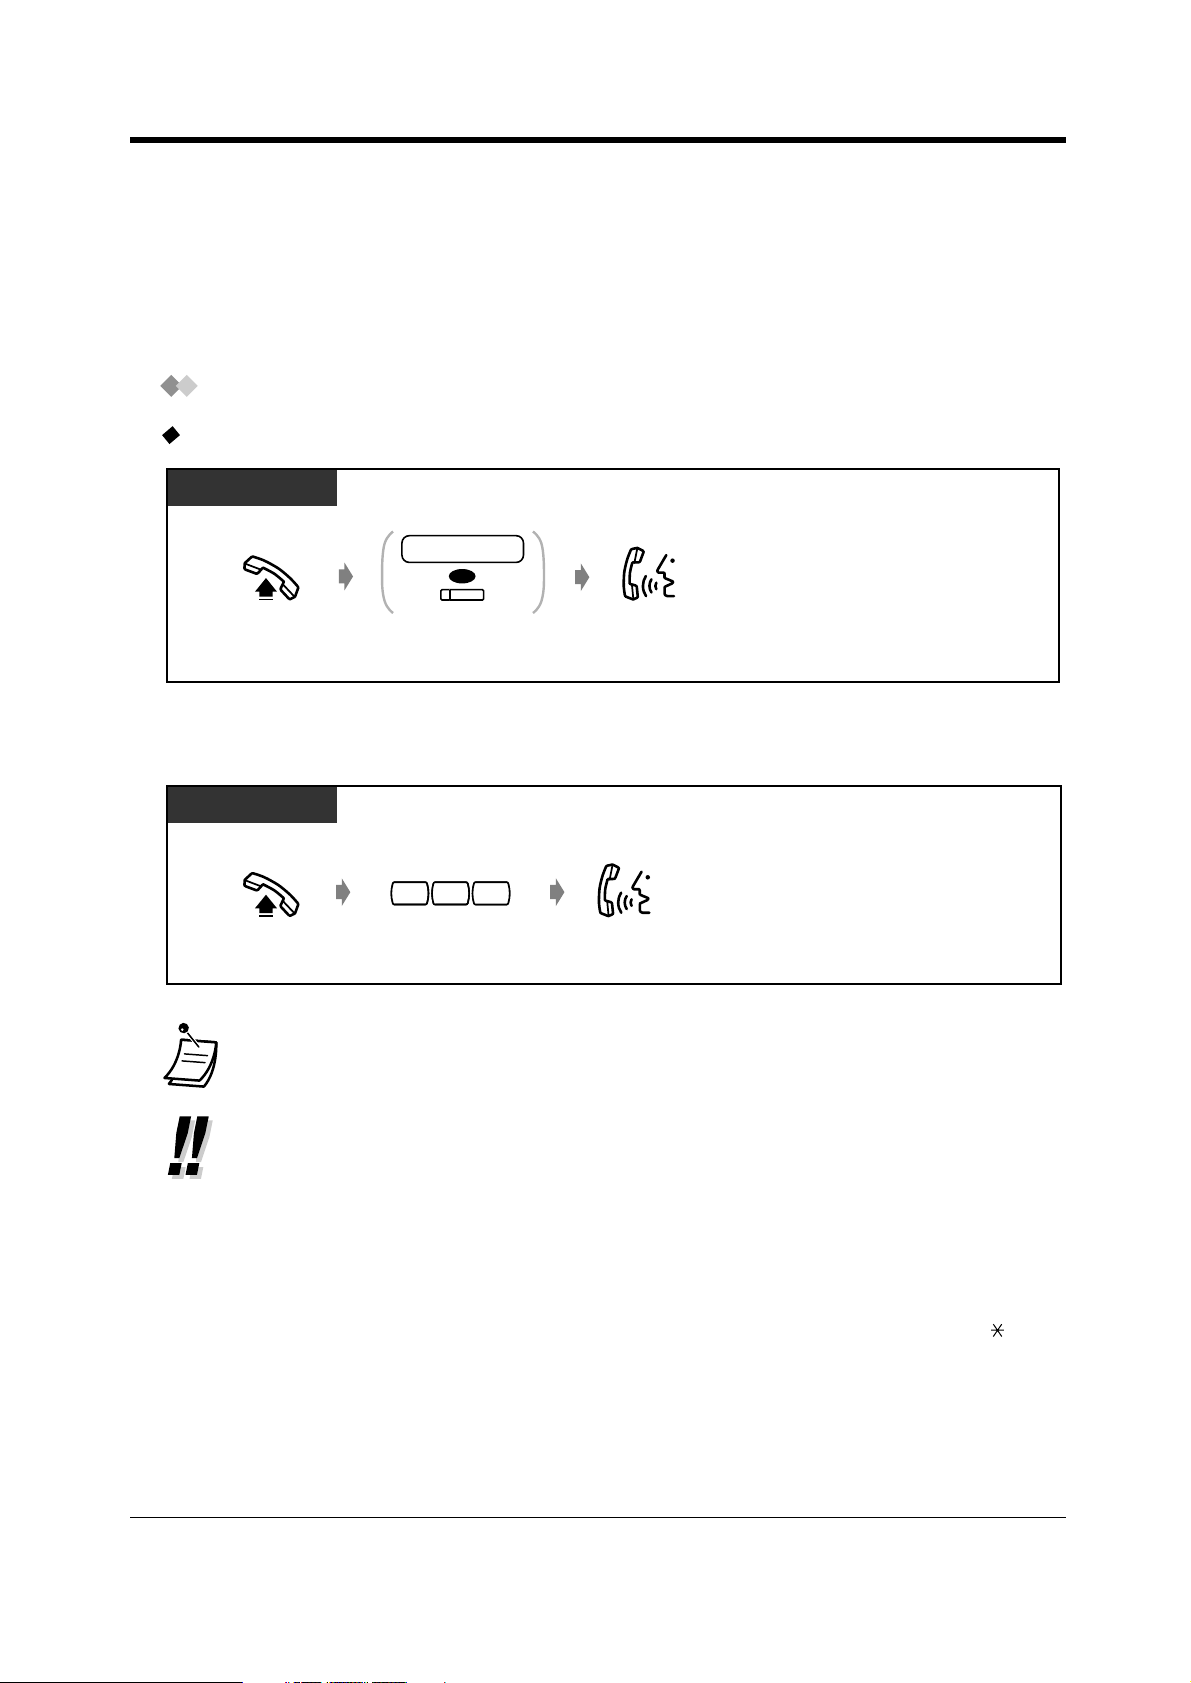
• To select the less expensive line automatically, dial "9" or press the Loop-CO button to
seize a line. (Automatic Route Selection)
• Confirming the dialled number before connecting
You can go off-hook after confirming the number you dialled. If you misdial, press " " to
clear each number from the right or press the R (FLASH) button to clear all numbers.
• Call information
The following information can be referred to by repeatedly pressing the CO button in use.
Phone number (outgoing call) or call duration (incoming call)
Meter
Call charge
• To call another party without hanging up, just press the terminate button, re-access an
outside line and dial the new phone number.
Customising Your Phone
• 4.1.2 Initial Settings — Preferred Line Assignment — Outgoing
Select the seized line when going off-hook.
• 4.1.3 Customising the Buttons
Create or re-arrange the terminate button.
• 4.1.4 Charge Fee Management [Pre-assigned extension only]
User Manual 31
Page 32

Operation
2.2.2 Easy Dialling
This is convenient for frequently dialled phone numbers.
— With one touch button
— Using numbers stored at your extension
— Using numbers stored in the system
— To a pre-set party by going off-hook
— Using a quick dialling number
— To a phantom extension
With one touch button (One-Touch Dialling)
DPT
(One-Touch
Dialling)
Off-hook.
Customising Your Phone
• 4.1.2 Initial Settings—Full One-Touch Dialling Assignment
Allow or cancel the one-touch operation while on-hook. (Default: Allow)
• 4.1.3 Customising the Buttons
Create or re-arrange the One-Touch Dialling button and store the desired number,
phone number, feature number, etc.
Press One-Touch
Dialling.
• To dial to a third party with holding the present call, refer to 2.4.2 Holding a Call —
One-touch dialling with automatic hold.
Using numbers stored at your extension (Station Speed Dialling)
You can store up to 10 numbers at your extension for your personal use.
To store a phone number
DPT/SLT
Off-hook.
6#0
Dial 60.
station speed
dial no.
Enter station speed
dial number (0-9).
desired no.
C.Tone
Enter the desired
number (max. 24 digits).
Enter a line access number (9 or 81 to 84) as
the first digit before an external party number.
Dial #.
On-hook.
32 User Manual
Page 33

•"", "#", PAUSE, SECRET and HYPHEN can also be stored as digits.
• 2.10.3 Using the KX-T7431, KX-T7433, KX-T7436 or KX-T7235 — storing the names
and numbers for station speed dialling.
To dial
DPT/SLT
Operation
station speed
dial no.
Enter station speed
dial number (0-9).
Off-hook.
6
Dial 6 .
Using numbers stored in the system (System Speed Dialling)
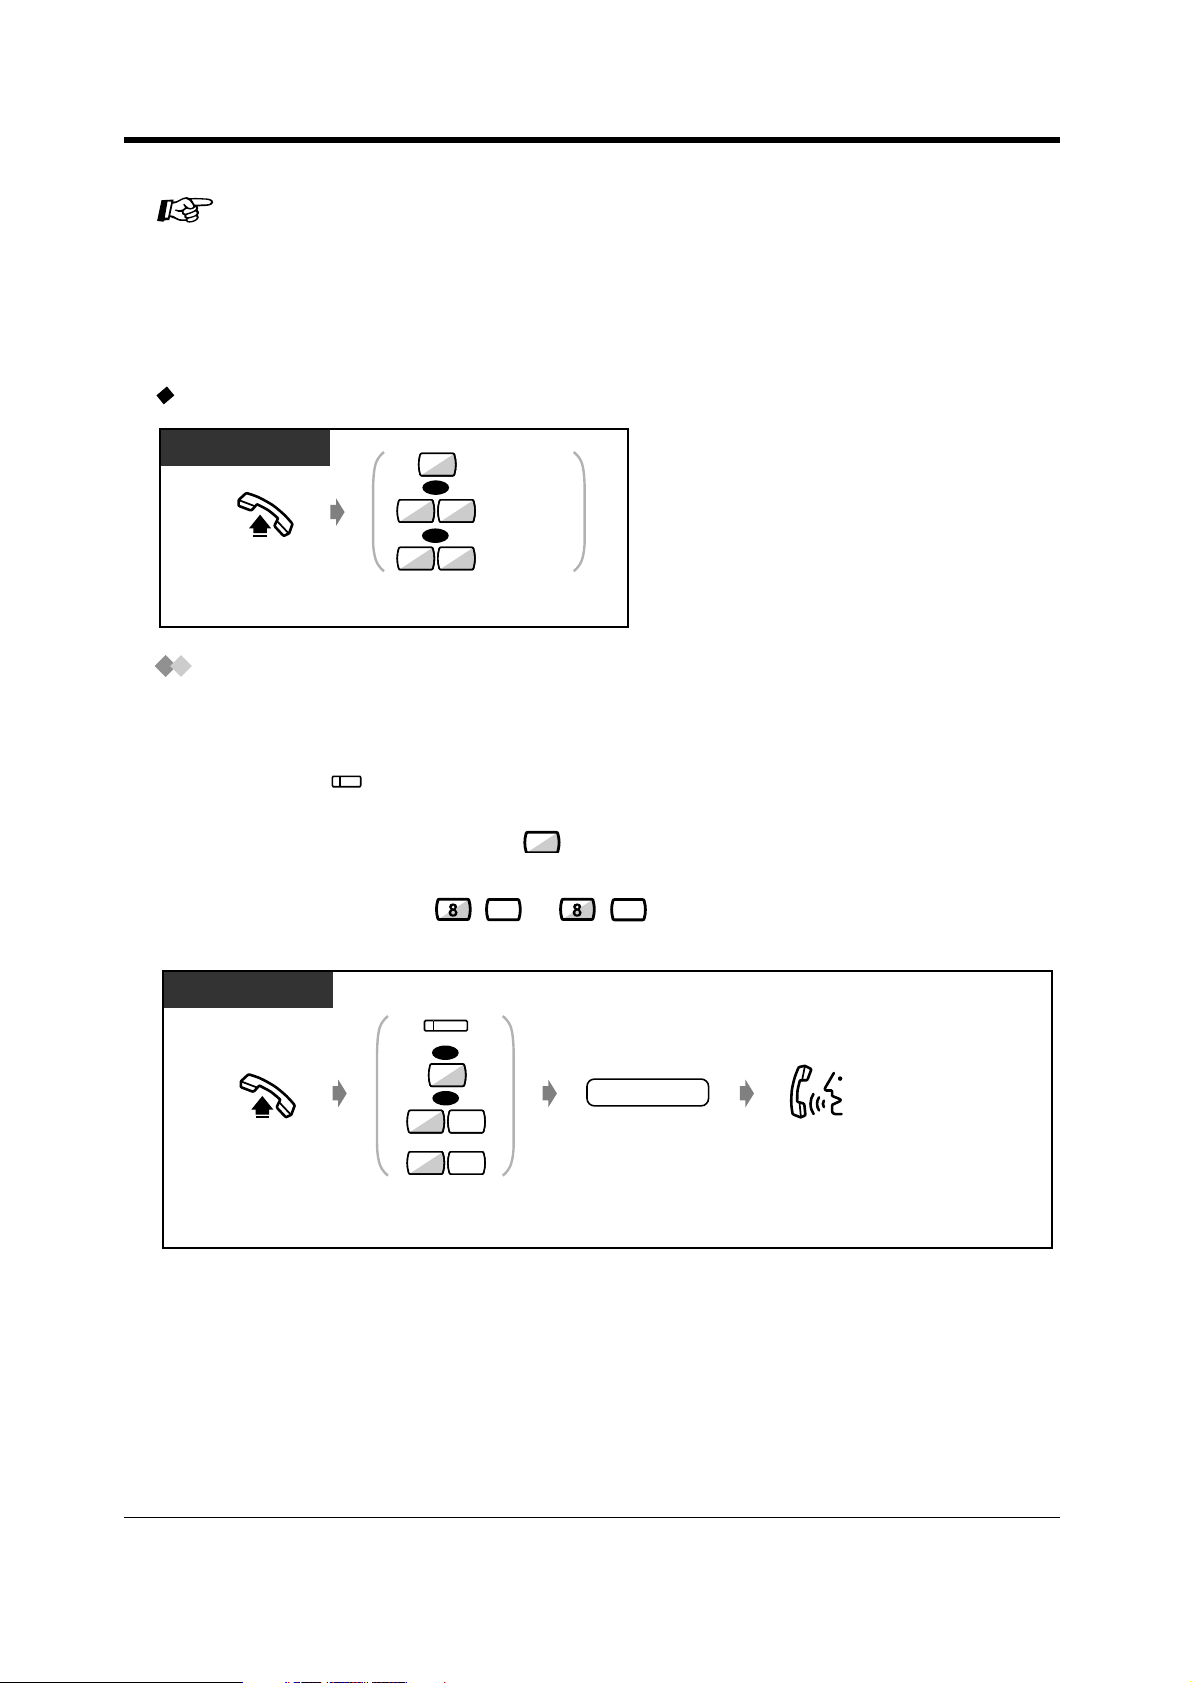
Up to 500 parties can be stored in the system. Refer to the directory in 5.3.1 Directory.
To dial
DPT/SLT
AUTO DIAL
STORE
OR
Off-hook. Press AUTO DIAL
or dial .
• If a DDI/CLIP key is assigned to a flexible button on your digital proprietary telephone
(DPT), you can easily make a call with this key. Up to 24 DDI/CLIP keys can be located on
a DPT, and the key is linked to the location number of System Speed Dialling number. One
System Speed Dialling number can be assigned per CO button. To make a call, press the
DDI/CLIP key.
• More than one speed dial number can be used for long telephone numbers, if the number
is divided when stored.
<Dialling Example>
If the number is divided and stored in system speed dial numbers 001 and 002:
AUTO DIAL
STORE
00
AUTO DIAL
1
STORE
system speed
dial no.
Enter system speed dial
number (000-499).
00
2
• To store a phone number, refer to 4.2.3 System Speed Dialling and Intelligent Call
Handling Number Set (001).
User Manual 33
Page 34

Operation
Customising Your System
• 4.2.3 System Speed Dialling and Intelligent Call Handling Number Set (001)
• 4.2.4 System Speed Dialling and Intelligent Call Handling Name Set (002)
Customising Your Phone
• 4.1.2 Initial Settings—Full One-Touch Dialling Assignment
Allow or cancel the one-touch operation while on-hook. (Default: Allow)
• 4.1.3 Customising the Buttons
Create or re-arrange a DDI/CLIP key.
To a pre-set party by going off-hook (Pickup Dialling)
You can make an outside call simply by going off-hook if you pre-assigned a telephone number.
To store a phone number
DPT/SLT
Off-hook.
To set/cancel
DPT/SLT
Off-hook.
To dial
7 4#2
Dial
742
.
7
4
Dial 74.
desired
party’s no.
Enter the desired
party’s number
(max. 24 digits).
Enter a line access number (9 or 81 to 84) as
the first digit before an external party number.
Set
1
OR
Cancel
0
Dial 1 to set
or 0 to cancel.
Dial #.
C.Tone
On-hook.
C.Tone
On-hook.
DPT/SLT
Off-hook.
34 User Manual
Page 35

• You can set or cancel this feature by simply pressing the Pickup Dialling button. If set, the
button light turns red.
• To call another party, dial the desired party's phone number before the pre-set line is
connected.
(Default: 1 second)
• " " can also be stored as a digit.
• If there is a new message which is not yet replayed, the Pickup Dialling feature does not
work.
Customising Your Phone
• 4.1.3 Customising the Buttons
Create or re-arrange a Pickup Dialling button.
Using a quick dialling number (Quick Dialling)
DPT/SLT
Operation
quick dialling no.
Off-hook.
Enter quick dialling
number.
• The quick dialling number is determined by system programming. Consult your dealer.
• Make use of "Quick Dialling" in 5.3.1 Directory.
To a Phantom extension
You can call extensions associated with
a Phantom extension. The call arrives at
all extensions who have the
corresponding Phantom extension
button.
123
123
123
123
User Manual 35
Page 36

Operation
To call to a phantom extension
DPT/SLT
(Phantom)
OR
phantom
extension no.
Press Phantom or enter
phantom extenison number.
To answer
DPT
OR
(Phantom)
Off-hook or
press Phantom.
• The Phantom extension button light shows the current status as follows:
Off: Idle
Red on: You are calling a phantom extension.
Flashing green: Incoming call
• To set ringing or not, refer to "Customising Your Phone".
Customising Your Phone
• 4.1.3 Customising the Buttons
Create or re-arrange a Phantom extension button.
36 User Manual
Page 37

2.2.3 Redial
This is convenient when calling the same external party again.
— Redialling the last number you dialled
— Saving the number and redialling
• Up to 24 digits can be programmed and redialled. The line access number is not counted
as a digit.
• Automatic Redial:
This is a special feature for the digital proprietary telephones, that provides automatic
redialling of the last dialled, saved number or outgoing call log, if the called party is busy. If
the Last Number Redial, Saved Number Redial, Outgoing Call Log operation or Notebook
function is performed handsfree, the telephone set will hang up and try again after a predetermined period of time. Detailed operations for redialling the last deialled or saved
number are shown below. To redial using the Outgoing Call Log, refer to 2.10.3 Using the
KX-T7431, KX-T7433, KX-T7436 or KX-T7235 — Using the KX-T7436/Using the KXT7235.
Customising Your Phone
• 4.1.2 Initial Settings—Full One-Touch Dialling Assignment
Allow or cancel the one-touch operation while on-hook. (Default: Allow)
Operation
Redialling the last number you dialled (Last Number Redial)
To dial
DPT/SLT
REDIAL
OR
#
Off-hook.
To dial automatically (Automatic Redial)
DPT
SP-PHONE
Press SP-PHONE.
Press REDIAL or dial #.
REDIAL
OR
#
Press REDIAL or dial #.
User Manual 37
Page 38

Operation
• To cancel the Automatic Redial, go off-hook or press CO, INTERCOM, 0 through 9, ,
or # button.
Saving the number and redialling (Saved Number Redial)
The saved number is programmed until another number is stored.
To save
DPT
PT
During a conversation or while hearing a busy tone
AUTO DIAL
STORE
(Save)
Press STORE.
Press Save.
To dial
DPT
(Save)
Off-hook.
Press Save.
To dial automatically (Automatic Redial)
DPT
SP-PHONE
Press SP-PHONE.
(Save)
Press Save.
• To cancel the Automatic Redial, go off-hook or press CO, INTERCOM, 0 through 9, ,
or # button.
Customising Your Phone
• 4.1.3 Customising the Buttons
Create or re-arrange a SAVE button.
38 User Manual
Page 39

Operation
2.2.4 When the Dialled Line is Busy or There is No Answer
— Reserving a busy line
— Completing a call to a busy party on an
— Leaving a message waiting indication
— Joining an existing call
ISDN line
— Sending a call waiting tone
Reserving a busy line (Automatic Callback Busy)
You can set the telephone to receive callback ringing when a dialled line becomes idle.
When you answer the callback ringing:
For an outside call: The line is seized.
For an intercom call: The called extension starts ringing automatically.
DPT/SLT
While hearing a busy tone
C.BCK
OR
6
Press “C.BCK” or dial 6.
To answer a callback ringing and call
C.Tone
On-hook.
DPT/SLT
Outside call
phone no.
Off-hook. Enter phone number.
Intercom call
Off-hook.
To cancel
DPT/SLT
4 6
C.Tone
Off-hook.
Dial 46.
• If you do not answer a callback ringing during 4 callback rings, this feature will be cancelled.
On-hook.
User Manual 39
Page 40

Operation
• If you connect to an ISDN line, the busy party will automatically be dialled.
"CCBS" will be displayed instead of "C.BCK". Refer to "Completing a call to a busy party on
an ISDN line" right below.
Completing a call to a busy party on an ISDN line (Completion of Calls to
Busy Subscriber [CCBS])
You can set the telephone to receive call-back ringing when a busy called party on an ISDN line
becomes free. When you answer the call-back ringing, the called party's telephone number is
automatically dialled.
DPT/SLT
While hearing an indication tone*
CCBS
OR
6
Press “CCBS” or dial 6.
To answer and call
DPT/SLT
Off-hook.
To cancel
DPT/SLT
Off-hook.
C.Tone
7 1 3
Dial 713.
On-hook.
C.Tone
On-hook.
• If you do not answer a callback ringing during 4 callback rings, this feature will be cancelled.
• * Indication tone
1 s
40 User Manual
Page 41

• Availability of this feature depends on your telephone company.
• The CCBS feature is in accordance with the ETS 300 359. (ETS: European
Telecommunication Standard)
Sending a call waiting tone (Busy Station Signalling [BSS])
The party will know your call is waiting.
DPT/SLT
While hearing a busy tone
BSS
OR
2
Press “BSS” or dial 2.
• If "BSS" is not displayed or you hear a reorder tone, this feature has not been set at the
other party's phone. This feature is only available if the called extension has set the "Call
Waiting" feature.
• Depending on the other party's telephone, the "Off-Hook Call Announcement (OHCA)"
and the "Whisper OHCA" functions can be applied. You can talk to the other party through
the speaker and the microphone (OHCA) or you can send a call announcement through the
handset (Whisper OHCA), while they are having another conversation using the handset.
Operation
User Manual 41
Page 42

Operation
Leaving a message waiting indication (Message Waiting)
The called extension receives a message waiting
indication (MESSAGE button light turns on and/or
indication tone is emitted when going off-hook) to call you
back.
To leave a message waiting indication
DPT/SLT
When the called extension is busy or does not answer
MESSAGE
OR
4
Press MESSAGE
or dial 4.
C.Tone
On-hook.
To leave/cancel a message waiting indication
PT and SLTDPT/SLT
Leave
1
OR
Cancel
0
0 to cancel.
Off-hook.
0
7
Dial 70. Dial 1 to leave or
T7431
MODE
Press MODE until
“Feature Access”
is displayed.
Rotate Jog Dial
until “MSG Off”
or “MSG On”
is displayed.
→
MSG Off ext
Press SELECT.
“MSG On”: Leave
“MSG Off”: Cancel.
SELECT
MODE
extension no.
extension no.
Enter extension
number.
extension no.extension no.
Enter
extension number.
C.Tone
On-hook.
C.Tone
On-hook.
42 User Manual
Page 43

T7433
SHIFT
FEAT
→
MSG Off ext
MSG On ext
MENU
SEL
SEL
Operation
Press SHIFT until
“FEAT” is displayed.
extension no.extension no.
Enter
extension number.
T7436/T7235
Features
Press “Features”.
C.Tone
On-hook.
Press “FEAT”.
C.Tone
On-hook.
OR
NEXT
Rotate Jog Dial or
press “NEXT” until the
following is displayed.
Rotate Jog Dial until
“MSG Off” or “MSG On”
is at the arrow.
Message Off (ext)
Message On
Press “Message On” to leave
or “Message Off” to cancel.
Press “SEL”.
“MSG On”: Leave
“MSG Off”: Cancel
Cancel
(
ext)
Leave
extension no.extension no.
Enter
extension number.
To check and select the party
DPT
While on-hook
MESSAGE
Press MESSAGE
until the desired extension appears.
User Manual 43
Page 44

Operation
To call back
• The extension number and name are shown in the received order.
• You can also select the party who left the voice message in your mail box of a voice
processing system. Refer to 2.9.3 If a Voice Processing System is Connected.
• Single line telephone users will hear ring tone 5 as message waiting indication while onhook.
5 s
• If the indication for the Built-in Voice Message is left at the same time, "Voice Message"
will be displayed (for DPT with display user only). Refer to 2.6.1 Built-in Voice Message.
DPT/SLT
MESSAGE
OR
SLT
7 20
Off-hook. Off-hook.
Press MESSAGE or dial 702.
• SLT users can change the call back operation style by system programming (default: offhook and dial 702). Consult your dealer.
• Dial tone 4 will be heard when going off-hook.
1 s
• If the indication for the Built-in Voice Message is left at the same time, you will hear dial tone
5 when going off-hook. Pressing the MESSAGE button enables you to replay newly stored
voice messages in the order of arrival. Refer to 2.6.1 Built-in Voice Message.
1 s
• If the rest of recording time for the Built-in Voice Message feature becomes less than 5
minutes, dial tone 6 will be heard when going off-hook.
1 s
44 User Manual
Page 45

To clear all message waiting indications
DPT/SLT
Operation
your extension
no.
Enter your
extension number.
C.Tone
On-hook.
Off-hook.
7 00
Dial 700.
Customising Your Phone
• 4.1.3 Customising the Buttons
Create or rearrange a MESSAGE button.
Joining an existing call (Executive Busy Override)
You can call the party who is talking with another on the telephone or add a third party to your existing
conversation.
To join
DPT
Outside call Intercom call
Off-hook. Press
corresponding CO.
(CO)
C.Tone
Talk.
DPT/SLT
Over
OR
3
Press “Over” or dial 3.
C.Tone
Talk.
To disconnect one party and talk with another when one of these parties is an outside
call
DPT
PT
(CO)
OR
INTERCOM
Press other party's
CO or INTERCOM.
C.Tone
Talk.
• You can also deny others the possibility of joining your conversation (Default: Allow). Refer
to "2.8.9 Denying Other People the Possibility of Joining Your Conversation (Executive
Busy Override Deny)".
User Manual 45
Page 46

Operation
2.2.5 Calling without Restrictions
— Using an account code — To an extension refusing the call
Using an account code (Account Code Entry)
An Account Code gives information about outside calls for accounting and billing purposes. You may
not be able to make an outside call without an account code entry. A mode is assigned to each user.
Ask your manager for your mode.
DPT/SLT
ACCNT
#
OR
9 9
Press # or dial 99.
C.Tone
Off-hook.
(CO)
line access
Press CO or enter
line access number
(9 or 81-84 ).
Press “ACCNT”,
Account or dial 49.
OR
no.
OR
(Account)
OR
4
9
Enter account code
(max. 10 digits).
phone no.
Enter phone number.
account code
• A Panasonic digital proprietary telephone user can enter an account code during a
conversation or when hearing a reorder tone after the other party hangs up.
• If you enter the wrong code, press the " " key while entering the account code and then
re-enter the code.
• To cancel the entry, press the Account button while entering the code.
• For your convenience, you can store the code with the phone number in memory (e.g.
Speed dialling).
• If you hear a reorder tone, the entered account code is wrong. Enter the correct code.
• You may give a specified account code to extension users and check their telephone usage.
You can specify an account code to each client and check the call duration.
Customising Your Phone
• 4.1.3 Customising the Buttons
Create or re-arrange an Account button.
46 User Manual
Page 47

To an extension refusing the call (DND Override)
DPT/SLT
While hearing the DND tone
Over
OR
2
Press “Over” or dial 2.
Operation
User Manual 47
Page 48

Operation
2.2.6 Changing the Mode
— Alternating the calling method
— Changing the dialling mode from pulse to tone
Alternating the Calling Method (Alternate Calling — Ring/Voice)
The calling method, either ring or voice, is set by the
called extension when an intercom call is received.
However, you can change the method temporarily.
Ring-calling (Default):
You can call the other party with a ring.
Voice-calling:
You can talk to the other party immediately after a
confirmation tone.
For voice-calling
DPT/SLT
After dialling
Voice
OR
Press “Voice” or .
C.Tone
Talk.
For ring-calling
Ring
Ring
Hello
OR
DPT/SLT
After dialling
Tone
OR
Press “Tone” or .
• If the called party uses a single line telephone, only Ring-Calling is available.
• You can switch the desired calling method only once during a call.
Customising Your Phone
• 4.1.2 Initial Settings—Intercom Alert Assignment
Which way do you prefer to receive an intercom call?
48 User Manual
Page 49

Operation
Changing the dialling mode from pulse to tone (Pulse to Tone Conversion)
To access services such as computer telephone services, Voice Mail, etc., that require a tone, you
can temporarily change the dialling mode from Pulse to Tone.
DPT/SLT
After the line is connected
Dial #.
#
desired no.
Enter desired number.
User Manual 49
Page 50

Operation
2.2.7 Integrated Services Digital Network (ISDN) Service
Access
You can reach the ISDN Key Pad Protocol Service from your extension. The service depends on the
contract with your telephone company.
If your telephone has an ISDN SERVICE button
DPT
(CO)
OR
OR
891
to
8 3
Off-hook.
Seize an external line
(CO, 9 or 81-83).
If your telephone does not have an ISDN SERVICE button
(ISDN SERVICE)
Press “ISDN SERVICE” button.
DPT
(CO)
OR
OR
FWD/DND FWD/DND
ISDN Service no.
891
to
3
8
Off-hook. Seize an external line
(CO, 9 or 81-83).
Press FWD/DND
button.
Enter ISDN Service
number (max. 32 digits).
Press FWD/DND
button.
DPT/SLT
7 2 9
Off-hook. Dial 729.
ISDN Port no.
Enter ISDN Port
number (1, 2 or 3).
• At the end of the procedure, a voice prompt tells you that the acceptance of the service is
completed depending on each Integrated Digital Services Network.
ISDN Service no.
Enter ISDN Service
number (max. 32 digits).
Wait for
5 seconds.
50 User Manual
Page 51

Customising Your Phone
• 4.1.3 Customising the Buttons
Create or re-arrange an ISDN SERVICE button.
Operation
User Manual 51
Page 52

Operation
2.2.8 To Access Another Party Directly from Outside (Direct
Inward System Access [DISA])
This feature is possible if an optional card KXTD61291 is installed in the main unit. This feature
allows an outside caller to access specific system
features as if the caller is an extension in the
system. The caller can have direct access to
features below.
— Placing an incoming call to extensions such as
(1) Extension (2) ISDN extension (3) Hunting
Group (4) Phantom extension (5) External pager
(for Trunk Answer From Any Station [TAFAS]) (6)
Voice Mail extension. The caller also has the
option of dialling the route for an extension using 1
digit number (DISA Automated Attendant (AA)
number) via DISA calls.
— Calling an external party.
— Setting or cancelling the "Call Forwarding — to
CO Line, All Calls" feature.
— Call forward to outside line ("Call Forwarding —
to CO Line, All Calls" and "Call Forwarding — to
CO Line, No Answer") in accordance with preselected CLIP and DDI/MSN numbers.
An outgoing message (OGM) greets the caller and gives information about how to access an
extension. You do not need the operator's assistance.
You may not be able to access the features without a DISA user code depending on the security
mode.
Non Security Mode: Any caller can make outside or intercom calls.
Trunk Security Mode (Default): A pre-assigned DISA security code must be entered to make
outside calls.
All Security Mode: A pre-assigned DISA security code must be entered to make both outside and
intercom calls.
This prevents the caller from making unauthorised calls. However, when making an outside call by
Call Forwarding — to Outside (CO) Line, the call is allowed (exception). Ask your manager for the
mode assigned to your system.
• An optional voice message card KX-TD61291 is required to enable DISA function.
• This feature is available only for DTMF (Touch Tone) telephone user.
• The outside-outside line call is only available when the DISA call is made with an ISDN line.
However, when calling to an external party by the Call Forwarding — to CO Line feature,
the call is allowed exceptionally even if the DISA call is made with an analogue CO line.
WARNING
When you enable the Outside-Outside Line Call feature of DISA function, if a third party discovers the
password (a DISA User Code) of the system, you have a risk that they will make illegal phone calls
52 User Manual
Page 53

using your telephone line, and the cost may be charged to your account.
To prevent this problem from occurring, we strongly recommend the following points:
1: Carefully maintain the secrecy of the password.
2: Specify a complicated password with several digits.
3: Change the password frequently (at least once per month).
Note
• Be sure to assign Intelligent Call Handling table beforehand. Otherwise, outside callers cannot
access DISA. (Refer to 4.2.3 System Speed Dialling and Intelligent Call Handling Number Set
(001)) Consult your manager for a detailed assignment.
Calling an extension
Any Outside Telephone
In Non Security Mode or Trunk Security Mode
Operation
DISA
phone no.
DISA OGM
Enter DISA
phone number.
In All Security Mode
DISA
phone no.
DISA OGM
Enter DISA
phone number.
extension no.
Enter the desired
extension number.
1
DISA user
code
Enter pre-assigned
DISA user code
(4-10 digits).
extension no.
D.Tone
Enter the desired
extension number.
User Manual 53
Page 54

Operation
Calling an external party
Any Outside Telephone
In Non Security Mode
DISA
phone no.
Enter DISA
phone number.
DISA OGM
line access
no.
Enter line
access number
(9 or 81-84).
D.Tone
phone no.
Enter phone
number of the
external party.
In Trunk Security Mode
1
DISA
phone no.
Enter DISA
phone number.
DISA OGM
line access
no.
Enter line
access
number
(9 or 81-84).
D.Tone
DISA user
code
Enter pre-assigned
DISA user code
(4-10 digits).
phone no.
D.Tone
Enter phone
number of the
external party.
In All Security Mode
1
DISA
phone no.
Enter DISA
phone number.
DISA OGM
DISA user
code
Enter pre-assigned
DISA user code
(4-10 digits).
D.Tone
line access
no.
Enter line
access
number
(9 or 81-84).
phone no.
D.Tone
Enter phone
number of the
external party.
• *1: If you dial a wrong DISA user code, dial and try again from this point.
• If you enter a wrong DISA user code 3 times, the line will be disconnected automatically.
• In case a destination of Intercept Routing is not assigned, the call which was made by DISA
function will be disconnected automatically when it is over a programmed time period.
• If Built-in Automated Attendant service is set, you can access the desired extension
simply by pressing 1 digit number (0-9) according to the outgoing message.
• You can select either to direct a call to the pre-programmed Intercept Routing destination
or to disconnect it without respect to the pre-programmed Intercept Routing destination
(default: direct the call to the pre-programmed Intercept Routing destination) when a caller
dials nothing for the pre-determined period of time (default: 5 s later) after hearing DISA
OGM. System Programming is required. Consult your dealer.
54 User Manual
Page 55

To start a new conversation
Any Outside Telephone
To dial a different number during a conversation with an outside party or
while hearing the ringback, reorder, or busy tone
desired no.
D.Tone
Dial .
Enter desired number.
Enter a line access number (9 or 81 to 84)
as the first digit when calling an external party.
Setting or cancelling the "Call Forwarding to CO Line, All Calls" feature
To set
Any Outside Telephone
Operation
In Non Security Mode or Trunk Security Mode
DISA
phone no.
DISA OGM
Enter DISA
phone number.
In All Security Mode
1
DISA
phone no.
Enter DISA
phone number.
DISA OGM
DISA user
code
Enter pre-assigned
DISA user code
(4-10 digits).
D.Tone
07 1 6
Dial 7106 during
DISA OGM or D.Tone.
line access
no.
Enter line access
number (9 or 81-84).
C.Tone
On-hook.
2
Voice MSG Access Code
Enter the Voice Message
Access Code.
phone no.
Enter phone
number.
2
#
Dial #.
User Manual 55
Page 56

Operation
To cancel
Any Outside Telephone
In Non Security Mode or Trunk Security Mode
DISA
phone no.
Enter DISA
phone number.
In All Security Mode
DISA
phone no.
Enter DISA
phone number.
DISA OGM
DISA OGM
1
DISA user
code
Enter pre-assigned
DISA user code
(4-10 digits).
D.Tone
07 1 0
Dial 7100 during
DISA OGM or D.Tone.
C.Tone
On-hook.
2
Voice MSG Access Code
Enter the Voice Message
Access Code.
2
Call forward to outside line ("Call Forwarding to CO Line, All Calls" and "Call
Forwarding to CO Line, No Answer") in accordance with pre-selected CLIP and
DDI/MSN numbers
To store a pre-selected CLIP or DDI/MSN number
Any Outside Telephone
In Non Security Mode or Trunk Security Mode
DISA
phone no.
DISA OGM
Enter DISA
phone number.
In All Security Mode
DISA
phone no.
DISA OGM
Enter DISA
phone number.
1
DISA user
code
Enter pre-assigned
DISA user code
(4-10 digits).
D.Tone
8117 1
Dial 7181 during
DISA OGM or D.Tone.
CLIP
1
1
OR
DDI/MSN
2
Dial 1 to select
CLIP or 2 to select
DDI/MSN.
#
C.Tone
Dial #.
2
Voice MSG Access Code
Enter the Voice Message
Access Code.
1
1
TO
1
3
Enter a
location
number.
On-hook.
CLIP no.
DDI/MSN no.
Enter a CLIP number
or DDI/MSN number
(max. 24 digits).
OR
2
56 User Manual
Page 57

To delete a pre-selected CLIP or DDI/MSN number
Any Outside Telephone
In Non Security Mode or Trunk Security Mode
Operation
DISA
phone no.
DISA OGM
Enter DISA
phone number.
Dial 7180 during
DISA OGM or D.Tone.
In All Security Mode
1
1
2
Dial 1 to select CLIP or 2 to select DDI/MSN,
and then enter a location number (1-3).
To select All, dial 0.
DISA
phone no.
Enter DISA
phone number.
DISA OGM
1
DISA user
code
Enter pre-assigned
DISA user code
(4-10 digits).
D.Tone
To activate a pre-selected CLIP or DDI/MSN number
Any Outside Telephone
In Non Security Mode or Trunk Security Mode
DISA
phone no.
Enter DISA
phone number.
DISA OGM
Dial 7191 during
DISA OGM or D.Tone.
87 1 0
CLIP
OR
DDI/MSN
OR
0
2
Voice MSG Access Code
Enter the Voice Message
Access Code.
1
1
TO
1
3
All
2
1
17 1 9
Voice MSG Access Code
Enter the Voice Message
Access Code.
2
C.Tone
On-hook.
2
In All Security Mode
DISA
phone no.
DISA OGM
Enter DISA
phone number.
1
DISA user
code
Enter pre-assigned
DISA user code
(4-10 digits).
D.Tone
Dial 1 to select CLIP or 2 to select DDI/MSN,
and then enter a location number (1-3).
To select All, dial 0.
1
1
2
CLIP
OR
DDI/MSN
OR
0
All
1
TO
3
1
1
C.Tone
On-hook.
User Manual 57
Page 58

Operation
To cancel an activation of a pre-selected CLIP or DDI/MSN number
Any Outside Telephone
In Non Security Mode or Trunk Security Mode
DISA
phone no.
DISA OGM
Enter DISA
phone number.
In All Security Mode
DISA
phone no.
DISA OGM
Enter DISA
phone number.
1
DISA user
code
Enter pre-assigned
DISA user code
(4-10 digits).
D.Tone
7 1 9 0
Dial 7190 during
DISA OGM or D.Tone.
CLIP
1
1
OR
DDI/MSN
2
Dial 1 to select CLIP or 2 to select DDI/MSN,
and then enter a location number (1-3).
To select All, dial 0.
2
Voice MSG Access Code
Enter the Voice Message
Access Code.
1
1
TO
1
3
OR
All
0
C.Tone
• *1: If you dialled a wrong DISA user code, dial and try again.
• *2: You can re-try by dialling when you dialled a wrong feature number or voice message
access code. System Programming is required. Consult your dealer.
• These settings can be performed regardless of the type of DISA security mode.
• Even though you cancel the forwarding destination, this operation cancels the "Call
Forwarding — to CO Line, All Calls" feature only. Any other Call Forwarding features and
Do Not Disturb (DND) will not be cancelled.
2
On-hook.
58 User Manual
Page 59

2.3 Receiving Calls
2.3.1 Answering Calls
DPT/SLT
Operation
Off-hook.
Select one of the following methods:
· Lift the handset to receive the preferred line.
(Default: Ringing line is selected.)
· Press the SP-PHONE or MONITOR* button.
· Press the flashing CO or green INTERCOM button directly.
Talk.
* When going off-hook using the MONITOR button, you have to lift the handset to talk to
the other party.
• Hands-free operation
You can have a conversation in the hands-free mode with the SP-PHONE button. You can
perform other tasks at the same time.
Helpful hints for the hands-free operation
Use your telephone in a quiet room for best performance.
If the other party has difficulty hearing you, decrease the volume.
If you and the other party talk at the same time, parts of your conversation will be lost. To
avoid this, talk alternately.
• If the Incoming Call Log feature is available, you may confirm the caller's phone number
and name before answering an outside call.
Pressing the SHIFT button or " " displays the outside line number and either the outside
line name or the name of the DDI/MSN number.
<Example>
0111111111
John Thomas
Extension STA Speed
Features SYS Speed
Call Log
SHIFT
CO01 Panasonic
Extension STA Speed
Features SYS Speed
Call Log
SHIFT
The caller's information from your telephone company will only be sent to the pre-assigned
extension.
• If a DDI/CLIP key is assigned to a flexible button on your digital proprietary telephone
(DPT), the LED indicator of the key flashes green when receiving a call from the CLIP
number, or with the DDI/MSN number, you assigned at System Speed Dialling and
Intelligent Call Handling table. You can answer the call by pressing the flashing DDI/CLIP
key.
User Manual 59
Page 60

Operation
Customising Your Phone
• 4.1.2 Initial Settings —
Preferred Line Assignment — Incoming
Select the seized line when going off hook.
Intercom Alert Assignment
Select the Calling method, either ring or the other party's voice.
• 4.1.3 Customising the Buttons
Create or re-arrange a CO button or a DDI/CLIP key, and change the ringing tone for
each CO button.
60 User Manual
Page 61

2.3.2 Answering Hands-free (Hands-free Answerback)
You can answer an intercom call without going off-hook as soon as the line is
connected. You will hear the caller talking without the phone ringing.
To set/cancel
DPT
While on-hook
AUTO ANSWER
MUTE
Press AUTO
ANSWER.
Operation
• The AUTO ANSWER button light shows the current status as follows:
On: Set.
Off: Not set.
User Manual 61
Page 62

Operation
2.3.3 Answering a Call Ringing at Another Telephone (Call
Pickup)
You can answer an incoming call that is ringing at another extension from your phone without leaving
your desk.
Extension Group
An extension group is used for group paging and group pickup features. An extension can belong to
several extension groups.
The following types are available:
Outside (CO) Call Pickup: Picks up an outside call.
Group Call Pickup: Picks up a call within your extension group.
Directed Call Pickup: Picks up a specified extension's call.
DPT/SLT
CO or Group
Off-hook.
Directed
Call
T7431
Group Call Pickup only
MODE
Press MODE until
“Feature Access”
is displayed.
Rotate Jog Dial
until “C.Pickup GRP”
is displayed.
T7433
Group Call Pickup only
SHIFT
Press SHIFT until
“FEAT” is displayed.
FEAT
Press “FEAT”.
4
OR
4 0
Dial 4 for an outside call
or 40 for group.
4 1
Dial 41 for directed call.
Rotate Jog Dial until
“C.Pickup GRP” is
at the arrow.
Outside call
Group
Directed
→
C.Pickup GRP
Press SELECT.
C.Tone
extension no.
Enter extension
number.
SELECT
MODE
→
C.Pickup GRP
Call Park 0-9
MENU
Press “SEL”.
Talk.
C.Tone
C.Tone
Talk.
SEL
C.Tone
Talk.
62 User Manual
Page 63

T7436/T7235
● Group Call Pickup only
Operation
Features
Press “Features”.
OR
NEXT
Rotate Jog Dial or
press “NEXT” until the
following is displayed.
C.Pickup Group
Press “C.Pickup Group”.
C.Tone
Talk.
• If you receive a call waiting tone, you can ask a third party to pick up your second call
with Directed Call Pickup.
• You can also deny other people the possibility of picking up your calls. Refer to 2.8 Setting
the Telephone According to Your Needs.
User Manual 63
Page 64

Operation
2.3.4 Answering a Call via an External Speaker (Trunk
Answer From Any Station [TAFAS])
You can answer an incoming outside call paged through an external speaker from any extension.
DPT/SLT
4 4
C.Tone
Off-hook.
T7431
Dial 44.
Talk.
MODE
Press MODE until
“Feature Access”
is displayed.
T7433
SHIFT
Press SHIFT until
“FEAT” is displayed.
C.Tone
T7436/T7235
Rotate Jog Dial
until “Page-E ANS
is displayed.”
FEAT
Press “FEAT” .
Talk.
→
Page-E ANS
Press SELECT.
Rotate Jog Dial
until “Page-E ANS”
is at the arrow.
SELECT
MODE
C.Tone
→
Page-E ANS
Page-GRP ANS
MENU
Press “SEL”.
On-hook.
SEL
Features
OR
PREV
Press “Features”. Press “Page-Ext Answer”.
Rotate Jog Dial or
press “PREV” until the
following is displayed.
Page-Ext Answer
C.Tone
Talk.
64 User Manual
Page 65

• You can also receive a paged announcement via a speaker with this operation.
Operation
User Manual 65
Page 66

Operation
2.3.5 Deflecting a Call (Call Deflection)
This is only available for the DPT with display which has more than two lines. If,
for example, you cannot answer the call because you are so busy, you can
transfer the call you are currently receiving to your personal message box (Builtin Voice Message) or your mail box (Voice Processing System).
To deflect a call to your personal message box
DPT
When receiving a call
<Display Example: KX-T7433>
0123456789
BV
Press "BV".
• If a call cannot be deflected because the voice message resource is busy, "BV.BOX Busy"
will be displayed for 3 seconds.
• If a call cannot be deflected because the voice message resource is full, "Voice Msg
Full" will be displayed for 3 seconds.
• If the OGM for your personal message box has not been stored, you cannot deflect the call.
• If you have set Call Forwarding — No Answer, "EXT" will be displayed at the bottom line.
To forward the call to the destination extension, press "EXT".
• If you have set Call Forwarding — to CO Line, No Answer, "CO" will be displayed at the
bottom line. To forward the call to the destination, press "CO". Availability of this feature
depends on the ISDN service of your telephone company.
• This feature is not available for Intelligent Call Handling 1:N calls.
To deflect a call to your mailbox
DPT
When receiving a call
<Display Example: KX-T7433>
0123456789
VM
Press "VM".
66 User Manual
Page 67

Operation
• If a call cannot be transferred because the voice mail resource is busy, "265: Busy" will
be displayed for 3 seconds. ("265" is the example of your voice mail extension number.)
• System programming is required. Ask your dealer.
• If you have set Call Forwarding — No Answer, "EXT" will be displayed at the bottom line.
To forward the call to the destination extension, press "EXT".
• If you have set Call Forwarding — to CO Line, No Answer, "CO" will be displayed at the
bottom line. To forward the call to the destination, press "CO" . Availability of this feature
depends on the ISDN service of your telephone company.
• This feature is not available for Intelligent Call Handling 1:N calls.
User Manual 67
Page 68

Operation
2.4 During a Conversation
2.4.1 Call Duration
You can see the call duration during the conversation.
To view the call duration*
DPT
During a conversation
(CO)
Press CO.
• * A digital proprietary telephone users may change the displayed message as follows by
pressing the CO button.
<Display example>
CO02 00:03'30
Extension STA Speed
Features SYS Speed
Call Log
LOG
<KX-T7230>
<KX-T7433/KX-T7436/KX-T7235>
68 User Manual
Page 69

2.4.2 Holding a Call
— Holding
— One-touch dialling with automatic hold
— Denying other people the possibility of retrieving your held calls
— Holding in a system parking zone
• If a call is not retrieved within a specified time, you will hear an alarm as a reminder.
• If a call is not retrieved within fifteen minutes, it is automatically disconnected.
Holding (regular)
DPT
During a conversation
HOLD
C.Tone
Press HOLD. On-hook.
Operation
SLT/ISDN Extn.
During a conversation
5 0
C.Tone
Off-hook.
Press R key.
Dial 50.
On-hook.
• If you hold a call at your ISDN extension, this can be cancelled at other ISDN extensions
connected to the same ISDN extension port.
User Manual 69
Page 70

Operation
To retrieve a call
DPT
At the holding extension
Off-hook.
For an outside call from another extension
(CO)
OR
INTERCOM
Press CO or
INTERCOM.
Talk.
Off-hook.
(CO)
Press CO.
C.Tone
Talk.
For an intercom call from another extension
holding ext no.
Enter holding
extension number.
Off-hook.
5 1
Dial 51.
SLT
At the holding extension
5 0
Off-hook.
Dial 50.
For an outside call from another extension
5 3
Off-hook.
Dial 53.
Talk.
held line no.
Enter held line
number (1-7).
C.Tone
Talk.
C.Tone
Talk.
For an intercom call from another extension
holding ext no.
Enter holding
extension number.
C.Tone
Talk.
Off-hook.
5 1
Dial 51.
70 User Manual
Page 71

ISDN Extn.
At the holding extension
Operation
5 0
Off-hook.
Dial 50.
Talk.
For an outside call from another extension
held line no.
Enter held line
number (1-7).
C.Tone
Talk.
Off-hook.
5 3
Dial 53.
For an intercom call from another extension
holding ext no.
Enter holding
extension number.
C.Tone
Talk.
Off-hook.
5 1
Dial 51.
• The CO or INTERCOM button light shows the current status as follows:
Flashing green: Your held call
Flashing red: Another extension's held call
• A single line telephone user can hold either an intercom call or an outside call at one time.
• A digital proprietary telephone user can hold an intercom call and multiple outside calls.
• To hold multiple intercom calls, use the "Call Park" feature.
One-touch dialling with automatic hold
You can dial to a third party with holing the present call.
DPT
(
One-Touch Dialling
with Auto Hold
)
Press One-Touch Dialling
with Auto Hold.
Customising Your Phone
• 4.1.3 Customising the Buttons
Create or re-arrange a One-Touch Dialling with Auto Hold button.
User Manual 71
Page 72

Operation
Denying other people the possibility of retrieving your held calls (Exclusive
Call Hold)
Only the held extension can retrieve the call.
DPT
During a conversation
HOLD HOLD
C.Tone
Press HOLD. Press HOLD
To retrieve a call
DPT
again.
On-hook.
(CO)
OR
INTERCOM
Off-hook.
Press CO or
INTERCOM.
Talk.
Holding in a system parking zone (Call Park)
You can park a call and perform other operations. The parked call can be retrieved by any extension.
Up to 10 calls can be parked.
To set
DPT
During a conversation
TRANSFER
5 2
Dial 52.Press TRANSFER. Enter parking
parking zone no.
C.Tone
On-hook.
zone number (0-9).
72 User Manual
Page 73

SLT
During a conversation
Operation
(Recall)
T7431
During a conversation
TRANSFER
Press
TRANSFER
extension no.
parking zone no.
Enter parking
zone number (0-9).
.
Press MODE until
“Feature Access”
is displayed.
T7433
During a conversation
5 2
Dial 52.Press Recall. Enter parking
MODE
C.Tone
parking zone no.
zone number (0-9).
Rotate Jog Dial
until “Call Park”
is displayed.
On-hook.
C.Tone
Call Park
→
On-hook.
0-9
Press SELECT.
SELECT
MODE
TRANSFER
TRANSFER
→
Call Park 0-9
CM OGM PLAY 1-9
MENU
Press “SEL”.
.
SHIFT
Press SHIFT until
“FEAT” is displayed.
SEL
FEAT
Press “FEAT”.Press
extension no.
parking zone no.
Enter parking
zone number (0-9).
C.Tone
Rotate Jog Dial until
“Call Park” is at the arrow.
On-hook.
User Manual 73
Page 74

Operation
T7436/T7235
During a conversation
TRANSFER
Press
TRANSFER
.
Call Park (O-9)
Press “Call Park”.
ISDN Extn.
During a conversation
Press R key.
Press “Features”.
5 2
Dial 52.
Features
extension no.
parking zone no.
Enter parking
zone number (0-9).
Rotate
C.Tone
parking zone no.
Enter parking
zone number (0-9).
NEXT
Jog Dial
until the following is displayed.
C.Tone
OR
or press “
On-hook.
NEXT
On-hook.
”
To retrieve
DPT/SLT/ISDN Extn.
Off-hook.
T7431
MODE
Press MODE until
“Feature Access”
is displayed.
Rotate Jog Dial
until “Call Park”
is displayed.
5 2
Dial 52. Enter stored parking
stored parking
zone no.
zone number.
→
Call Park 0-9
Press SELECT.
SELECT
C.Tone
MODE
Enter stored parking
zone number (0-9).
Talk.
stored parking
zone no.
C.Tone
Talk.
74 User Manual
Page 75

T7433
SHIFT
FEAT
→
Call Park 0-9
CM OGM PLAY 1-9
MENU
Operation
SEL
Press SHIFT until
“FEAT” is displayed.
Press “FEAT”.
Rotate Jog Dial until
“Call Park” is at the arrow.
Press “SEL”.
stored parking
zone no.
Enter stored parking
zone number (0-9).
C.Tone
Talk.
T7436/T7235
Features
OR
Call Park (O-9)
NEXT
Press “Features”.
Rotate Jog Dial or
press “NEXT” until the
following is displayed.
Press “Call Park”.
• If you hear a busy tone when entering the zone number, the zone is in use. Enter
another number.
stored parking
zone no.
Enter stored parking
zone number (0-9).
C.Tone
Talk.
User Manual 75
Page 76

Operation
2.4.3 Retrieving a Call on a Telephone Answering Machine
(TAM)
Retrieves a call on Telephone Answering Machine (TAM) regardless of the extension group.
DPT/SLT
7 8
2
C.Tone
Off-hook.
Dial 728.
Talk.
76 User Manual
Page 77

2.4.4 Terminal Portability (TP) for ISDN Extension
The ISDN extension users can move to anywhere on the same ISDN (BRI) line with holding a call. If
your ISDN extension is on the ISDN (BRI) line connected to the port 2, you cannot move to the ISDN
(BRI) line connected to the port 3.
To move with holding a call
ISDN Extn.
During a conversation
PARK
Operation
Set the PARK feature
depending on your
ISDN equipment.
PARK
Set the PARK feature
again.
Disconnect the ISDN equipment
from the ISDN (BRI) line.
Talk.
Connect the ISDN equipment
to the same ISDN (BRI) line.
User Manual 77
Page 78

Operation
2.4.5 Talking to Two Parties Alternately (Call Splitting)
When talking to 1 party while the other party is on hold, you can swap the calls back and forth
(alternately).
DPT
During a conversation with a held call
when either party is an outside party
(CO)
OR
INTERCOM
SLT
During a conversation
with a held call
(Recall)
Press Recall.
ISDN Extn.
During a conversation
with a held call
During a conversation with a held call
when both parties are an extension party
HOLD
Press HOLD.Press CO or INTERCOM.
Press R key.
78 User Manual
Page 79

2.4.6 Transferring a Call
— Transferring to an extension — Transferring to an external party
Transferring to an extension
DPT
During a conversation
extension no.
TRANSFER
Press TRANSFER.
C.Tone
Enter extension
number or press DSS.
OR
(DSS)
Talk.
The destination is confirmed before
sending. This can be disregarded.
Operation
On-hook.
SLT
During a conversation
(Recall)
Press Recall.
ISDN Extn.
During a conversation
C.Tone R.B.Tone
Press R key.
C.Tone
Enter extension
number.
extension no.
Enter extension
number.
Talk.
The destination is confirmed before
sending. This can be disregarded.
On-hook.
extension no. TRANSFER
Talk.
The destination is confirmed before
sending. This can be disregarded.
Press TRANSFER On-hook.
OR
Transferring to an external party
Some extensions may be restricted from performing this function.
User Manual 79
Page 80

Operation
DPT
During a conversation
TRANSFER
C.Tone
SLT
During a conversation
(CO)
OR
line access
no.
Press CO or enter
line access number
(9 or 81-84).
phone no.
Enter phone number.Press TRANSFER.
Talk.
The destination is confirmed before
sending. This can be disregarded.
On-hook.
(Recall)
C.Tone
line access
no.
number (9 or 81-84).
Enter phone number.Press Recall. Enter line access
phone no.
Talk.
The destination is confirmed before
sending. This can be disregarded.
ISDN Extn.
During a conversation
line access
no.
C.Tone
Press R key. Enter line access
number (9 or 81-84).
• If you misdial, press the R (FLASH) button (digital proprietary telephone only), and reenter the number.
• To return to the held call before the destination answers, press the TRANSFER button,
corresponding CO, INTERCOM button, or the Recall (SLT only).
• To return to the conversation after completing the transfer to an external party, press
the corresponding CO button.
• If you hear an alert tone, the destination extension did not answer the call. Answer the call.
phone no.
R.B.Tone
Enter phone number
.
The destination is confirmed before
sending. This can be disregarded.
Talk.
TRANSFER
Press TRANSFER
On-hook.
OR
On-hook.
• If you transfer a call with the DSS button or One-Touch Dialling with Auto Hold
button, you do not have to press the Transfer button (One-Touch Transfer).
80 User Manual
Page 81

• 4.1.3 Customising the Buttons
Create or re-arrange a DSS and One-Touch Dialling with Auto Hold button.
Operation
User Manual 81
Page 82

Operation
2.4.7 Answering a Call Waiting
During a conversation, a call waiting tone or voice announcement through the speaker or the handset
occurs when an outside call is received or another extension is letting you know another call is
waiting. To activate this feature, refer to 2.8.3 Receiving a Call Waiting (Call Waiting/Off-Hook Call
Announcement [OHCA]/Whisper OHCA). (Default: No tone) You can answer the second call by
disconnecting the current call or placing it on hold.
To talk to the new party
DPT
While hearing a tone
HOLD
Disregard this step if you
terminate the current call.
(CO)
OR
INTERCOM
Press CO or INTERCOM.Press HOLD.
Disregard this step if both
parties are extensions.
SLT
While hearing a tone
(Recall)
Press Recall and dial 50. On-hook. Off-hook.
Disregard this step if you
terminate the current call.
5 0
• Depending on the other party's telephone, the "Off-Hook Call Announcement (OHCA)"
and the "Whisper OHCA" functions can be applied. You can talk to the other party through
the speaker and the microphone (OHCA) or you only receive a call announcement through
the handset (Whisper OHCA), while they are having another conversation using the
handset.
• The calling extension's name or number is displayed for 5 seconds in 10 second intervals
before answering a call.
• As far as it is an intercom, Intelligent Call Handling 1:1 or 1:N call, ISDN extension users
can receive a call when (1) both channels of ISDN extension port are used for conversation,
and (2) there is no held call at the ISDN extension port.
The user can answer the call by disconnecting the current call or placing it on hold.
However, when answering the call by placing the current call on hold, the user cannot
transfer nor make a conference involving the held call. When there is a call on wait, no new
call can be made by placing the current call on hold.
For any further operating information, refer to the instruction manual of your ISDN
extension.
82 User Manual
Page 83

Customising Your Phone
• 4.1.2 Initial Settings—Call Waiting Tone Type Selection
Determine the tone depending on the second party, either an outside call or an
extension.
Operation
Default
Special Tones
Extension
Outside
15 s
5 s
User Manual 83
Page 84

Operation
2.4.8 Three-party Conversation
— Adding a third party during a conversation
— Leaving a conference
Adding a third party during a conversation (Conference)
DPT
CONF CONF
desired
party’s no.
Enter desired
party’s number.
Press a CO button or enter a line access number
(9 or 81-84) before an external phone number.
Talk.
SLT
desired
party’s no.
(Recall)
Press Recall.
party’s number.
Enter a line access number (9 or 81-84)
before an external phone number.
Talk.
(Recall)
Press Recall.
C.Tone
Press CONF.Press CONF.
Talk.
3
C.Tone
Dial 3.Enter desired
Talk.
ISDN Extn.
desired
party’s no.
C.Tone
Press R key. Press CONFERENCE.
Press
Enter desired
party’s number.
Enter a line access number (9 or 81-84)
before an external phone number.
CONFERENCE
C.Tone
Talk.Talk.
84 User Manual
Page 85

To talk to one party by disconnecting the other when one of these parties is an
outside call
DPT
(CO)
OR
INTERCOM
Press CO or
INTERCOM.
C.Tone
Talk.
Leaving a conference
The other two parties can continue their conversation.
Operation
DPT/SLT/ISDN Extn.
When you are talking with two extensions or
one extension party and one external party
On-hook.
To return
DPT
While the others are talking
(CO)
Press CO.
Customising Your Phone
• 4.1.3 Customising the Buttons
Create or re-arrange a Conference button.
DPT
When you are talking with two external parties
(Unattended Conference)
CONF
Press CONF.
Some extensions may be restricted
from performing this function.
User Manual 85
Page 86

Operation
2.4.9 Saving a Number (Notebook Function)
You can store a desired outside phone number in memory during a conversation
or while on-hook. You can dial the stored number easily.
To store
DPT
PT
During a conversation with an outside party or on-hook status
AUTO DIAL
STORE
Press STORE.
AUTO DIAL
STORE
Press STORE.
phone no.
Enter phone number.
(max. 24 digits)
To dial
DPT
(Save)
Off-hook.
Press Save.
To dial automatically (Saved Number Redial)
DPT
SP-PHONE
(Save)
(Save)
Press Save.
Press SP-PHONE.
Press Save.
• You do not have to store a line access number before the phone number. An outside line is
automatically accessed.
• " " and "#" can also be stored as a digit.
Customising Your Phone
• 4.1.3 Customising the Buttons
Create or re-arrange a SAVE button.
86 User Manual
Page 87

2.4.10 Mute
You can disable the microphone or the handset to consult privately with others
in the room while listening to the other party on the phone through the speaker
or the handset.
There are 2 types of mute as follows:
Handset Mute:
During a conversation using the handset. This function is available for the
KX-T7400 series telephone users only.
Microphone Mute:
During a conversation using the microphone.
To set/cancel
DPT
AUTO ANSWER
MUTE
OR
VOICE CALL
MUTE
Press MUTE.
Operation
• The AUTO ANSWER/MUTE or VOICE CALL/MUTE button light shows the current status
as follows:
Flashing red: Mute
Off: Normal
User Manual 87
Page 88

Operation
2.4.11 Letting Other People Listen to the Conversation (OffHook Monitor)
You can let other people in the room listen to the conversation through the
speaker while continuing the conversation using the handset.
To set/cancel
DPT
SP-PHONE
Press SP-PHONE.
• This feature is only available during a conversation using the handset.
• The SP-PHONE button light shows the current status as follows:
On: The voice is heard through the speaker.
Off: The voice is heard through the handset.
88 User Manual
Page 89

Operation
2.5 Using ISDN Additional Services
2.5.1 Transferring a Call from ISDN Line to ISDN Line (ISDN
Call Transfer)
You can transfer your calls to an ISDN line without occupying the CO lines.
ISDN Call Hold
You have to let the central office hold a call from an ISDN line as the first step to use the ISDN Call
Transfer service or the ISDN Conference service. ISDN Call Hold enables you to hold a call, and to
make a call to other external party using only one channel of ISDN (BRI) line.
To transfer
DPT
During a conversation through an ISDN line
TRANSFER
Press TRANSFER.
C.Tone
5
D.Tone
Dial 5 .
SLT
During a conversation through an ISDN line
(Recall)
Press Recall.
C.Tone
5
D.Tone
Dial 5 .
ISDN Extn.
During a conversation through an ISDN line
5
C.Tone
D.Tone
phone no.
Enter phone number.
The destination is confirmed before
sending. This can be disregarded.
phone no.
Enter phone number.
The destination is confirmed before
sending. This can be disregarded.
phone no.
Talk.
On-hook.Talk.
On-hook.
Press R key. Dial 5 .
Enter phone number.
The destination is confirmed before
sending. This can be disregarded.
On-hook.Talk.
User Manual 89
Page 90

Operation
• The availability of this feature is depending on the contract with your telephone company.
• System programming is required. Consult your dealer.
• It is impossible to seize any other CO line during ISDN Call Hold.
• After completing the ISDN Call Transferring service, the CO line will be released. You
cannot return to the held call.
• If you go on-hook except for while hearing ringback tone or during a conversation
with the third party, ISDN Call Hold will be canceled and the system will hold the call.
• To return to the conversation before the destination answers, press TRANSFER
(DPT), Recall (SLT), or R key (ISDN Extn.).
• It is possible to make a call by using One-Touch Dialling. If the dialled number starts with
0, 81, 82, or 83, these numbers will be disregarded automatically, even in the case that it
is not a line access number.
• If your extension has been restricted, you might not be able to transfer a call to an
external party. Restricted will be displayed, and you will hear reorder tone.
• Automatic Route Selection (ARS) will not be applied to the call dialled after 5 .
• The number dialled after 5 will not be recorded to Station Message Detailed Recording
(SMDR). The charge fee will be counted inclusively as the original call you made or you
receive.
If the destination is busy or you misdial
DPT/SLT/ISDN Extn.
While hearing a busy tone or other tone
(CO)
OR
On-hook. Talk.
Press CO or off-hook.
To split the calls
DPT SLT ISDN Extn.
During ISDN Call Hold During ISDN Call Hold During ISDN Call Hold
TRANSFER
(Recall)
Press TRANSFER.
Press Recall.
Press R key.
90 User Manual
Page 91

•"1st Party" will be displayed during the conversation with original party.
•"2nd Party" will be displayed during the conversation with new party.
Operation
User Manual 91
Page 92

Operation
2.5.2 Multi-party Conversation through ISDN Line (ISDN
Conference)
You can add one or more parties to your conversation using only one channel of ISDN line.
ISDN Call Hold
You have to let the central office hold a call from an ISDN line as the first step of the ISDN Conference
feature or the ISDN Call Transfer feature. ISDN Call Hold enables you to hold a call, and to make a
call to other external party using only one channel of ISDN (BRI) line.
To add a party
DPT
During a conversation through an ISDN line
TRANSFER
C.Tone
Press TRANSFER.
5
Dial 5 .
D.Tone
Enter the new party's
phone number.
SLT
During a conversation through an ISDN line
(Recall)
Press Recall.
C.Tone
5
D.Tone
Dial 5 .
new party's
phone no.
Enter the new
party's phone
number.
ISDN Extn.
During a conversation through an ISDN line
new party's
phone no.
Talk.
Talk.
Press Recall. Dial 3.
Press CONF.
(Recall)
CONF
C.Tone
Talk.
3
C.Tone
Talk.
Press R key.
C.Tone
5
Dial 5 .
D.Tone
new party's
phone no.
Enter the new
party's phone
number.
Talk.
CONFERENCE
Press CONFERENCE.
C.Tone
Talk.
92 User Manual
Page 93

Operation
• The availability of this feature is depending on the contract with your telephone company.
• System programming is required. Consult your dealer.
•If CONF (more-than-three-party conversion) is selected in system programming, you can
add more parties by proceeding the same steps above. The maximum number of the
parties depends on your telephone company. Other CONF features, such as dropping or
isolating a specific party, are not supported.
•If 3PTY (three-party conversation) is selected in system programming, you cannot activate
ISDN Call Hold during ISDN Conference.
• If you go off-hook during conference, the line is disconnected.
User Manual 93
Page 94

Operation
2.5.3 Forwarding Your Calls without Occupying Your CO
Line (ISDN Call Forwarding)
You can forward your calls to outside party without occupying the CO lines of your system. This is
only available for Intelligent Call Handling 1:1 calls.
To set
DPT/SLT
7 1 0
Off-hook. Press FWD/DND
or dial 710.
#
C.Tone
Dial #.
T7436/T7235
FWD/DND
Off-hook. Press
FWD/DND.
FWD/DND
OR
Make your selection.
On-hook.
FWD-CO Line
FWD-NA-CO Line
Make your selection.
6
OR
OR
To CO line
(All Call)
To CO line
(No Answer)
(
→dial)
(
→dial)
(Max. 24 digits)
line access
no.
Enter line access
number (0 or 81-83).
(Max. 24 digits)
line access
no.
Enter line access
number (0 or 81-83).
phone no.
Enter phone
number.
phone no.
Enter phone
number.
#
C.Tone
Dial #.
On-hook.
94 User Manual
Page 95

To cancel
DPT/SLT
7 1 0
Off-hook. Press FWD/DND
or dial 710.
T7536/T7235
FWD/DND
OR
0
Dial 0.
Operation
C.Tone
On-hook.
FWD/DND Cancel
Press "FWD/DND Cancel".
C.Tone
On-hook.
Off-hook.
FWD/DND
Press FWD/DND.
• The availability of this feature is depending on the contract with your telephone company.
• System programming is required (default: disable). Consult your dealer.
• If this feature is enabled, ISDN Call Forwarding is operated prior to the usual Call
Forwarding to Outside feature.
• If the network rejects the activation of ISDN Call Forwarding, the incoming call will be
disconnected.
User Manual 95
Page 96

Operation
2.6 Before Leaving Your Desk
2.6.1 Built-in Voice Message
— Recording, replaying, or deleting Outgoing Messages
— Setting or canceling the Built-in Voice Message function
— Leaving, replaying, or deleting voice messages
This function is only available if an optional card KX-TD61291 is installed in the main unit KX-TD612.
Installing this optional card enables you to use these features.
• Internal/External (Intelligent Call Handling 1:1) callers forwarded to your message box can
leave their messages in it.
• External callers guided by company outgoing messages can leave their messages in the
company (operator) message box. (Refer to 3.2.3 Recording Company Greeting Outgoing
Messages.)
• Replay or delete the recorded messages from your extension. A password is necessary for
remote replaying or deleting through CO lines.
• The Direct Message function:
Allows you to leave a voice message in other extension's personal voice message box, even
if the extension has not been set to forward an incoming call to its personal message box, or
has not recorded any OGM.
Extension/Company OGM:
Used for the greeting message or guidance when you cannot answer the incoming calls. (Refer to
3.2.3 Recording Company Greeting Outgoing Messages)
Timed Reminder OGM:
Often used as a wake-up call which is played when answering the Timed Reminder alarm. Each
extension can record 1 Timed Reminder OGM. (Refer to 2.8.1 Setting the Alarm (Timed Reminder))
You can also play back the recorded message for confirmation.
Call Log
You can refer the call log. Up to 128 call information can be logged. This is owned jointly with the Call
Log – Incoming. As for the call information of the Built-in Voice Message, the call information will be
logged per calling even when the several calls from the same telephone number. However, the oldest
call information will be overwritten by the 129th call regardless of the ordinary call log or that of the
Built-in Voice Message. (Refer to 2.10.1 Calling Using the Call Log (Incoming Call Log) [KX-T7433,
KX-T7436, KX-T7230, KX-T7235 only])
Note
• Be sure to assign the Intelligent Call Handling table beforehand. Otherwise, outside caller cannot
access the company message box. (Refer to 4.2.3 System Speed Dialling and Intelligent Call
Handling Number Set (001)) Consult your dealer for detailed assignment.
• When the call information of the Built-in Voice Message is overwritten, the voice message itself is
deleted at the same time.
• If you set the Voice Mail feature, the functions of the Built-in Voice Message (BV) will be disabled
except for the following.
(1) Company Greeting OGM for DISA feature
(2) Recording, replaying, or deleting Company Greeting OGM
96 User Manual
Page 97

Operation
• Only the operator is possible to replay/delete the voice messages stored in the company
message box. (Default: Operator=Jack 1-1)
• Only 1 call can have access to 1 voice message resource. When someone is recording a
message or OGM with the same resource, your access will be rejected and you will hear a
reorder tone/warning tone (when using SOFT key on digital proprietary telephone).
• The LED indicator of the MESSAGE button is lit red, if there are any voice messages not
yet heard.
• If a call fails to have access to the voice message box, with an internal call, the extension
will ring, with an external call, the extension assigned in system programming will ring. Ask
your manager.
• You can choose the total recording time for the Built-in Voice Message feature (including
OGM such as OGM for Built-in Voice Message, UCD message and Timed Reminder
message) out of 60 minutes/30 minutes/20 minutes. (Default : 30 minutes) Ask your dealer.
• When the rest of recording time becomes less than 5 minutes, Voice Msg Full will be
displayed, and you will hear dial tone 6 when going off-hook.
1 s
• The callback of Automatic Callback Busy (Camp-On) and Hold Recall cannot be forwarded.
Recording, replaying, or deleting Outgoing Messages
To record the extension Outgoing Message (OGM)/Timed Reminder OGM
DPT
SHIFT
Press SHIFT until
“FEAT” is displayed.
Extension OGM
1
OR
Timed Reminder OGM
2
Make your selection.
FEAT
Press “FEAT”.
Rotate Jog Dial until “EXT
OGM REC” is at the arrow.
AUTO DIAL
STORE
Record a
message.
Press STORE.
<Display Example: KX-T7433>
→
EXT OGM REC 1/2
EXT OGM DEL 1/2
MENU
Press “SEL”.
C.Tone C.Tone
Confirm the
message.
EL
SEL
On-hook.
User Manual 97
Page 98

Operation
DPT/SLT
Extension OGM
Timed Reminder OGM
C.Tone
Record a
message.
Off-hook.
7 2 2
7 2 2 1 1
OR
7 2 2
7 2 2
7 2 2 1 2
Make your selection.
• If you set the Timed Reminder feature without recording an OGM, you will hear dial tone 3
at a pre-set time. (Refer to 2.8.1 Setting the Alarm (Timed Reminder))
1 s
To replay OGM/Timed Reminder OGM
DPT
SHIFT
FEAT
<Display Example: KX-T7433>
EXT OGM PLAY 1/2
→
EXT OGM REC 1/2
MENU
SEL
SL
On-hook.
Press SHIFT until
FEAT
“
” is displayed.
Extension OGM
1
OR
Timed Reminder OGM
2
Make your selection.
Press “FEAT”.
Rotate Jog Dial until
“EXT OGM PLAY
C.Tone C.Tone
Confirm the message.
” is at the arrow.
Press “SEL”.
On-hook.
98 User Manual
Page 99

DPT/SLT
Operation
7 2 2
7 2 22 2 2 22 1
7 2 2
7 2 2
7 2 2
7 2 2 2 2
Off-hook.
C.Tone C.Tone
Confirm the message.
To delete OGM/Timed Reminder OGM
DPT
SHIFT
FEAT
Extension OGM
OR
Timed Riminder OGM
Make your selection.
On-hook.
<Display Example: KX-T7433>
→
EXT OGM DEL 1/2
Ext-BGM On/Off
MENU
SEL
SEL
Press SHIFT until
“FEAT” is displayed.
Extension OGM
1
OR
Timed Reminder OGM
2
Make your selection.
DPT/SLT
Off-hook.
Press “FEAT”.
C.Tone
7 2 2
7 2 2 3 1
7 2 2
OR
7 2 2
7 2 2
7 2 2 3 2
Make your selection.
Rotate Jog Dial until “EXT
OGM DEL” is at the arrow.
On-hook.
Extension OGM
Timed Reminder OGM
Press “SEL”.
C.Tone
On-hook.
User Manual 99
Page 100

Operation
• You can record or delete an OGM only when no one else is using this feature such as
replaying/recording/deleting a voice message or an OGM. If you try to record an OGM when
someone else is using this feature, you will hear a reorder tone, and OGM BUSY will be
indicated on the display (for Digital Proprietary Telephone user only).
Setting or canceling the Built-in Voice Message function
To set the voice message function
DPT/SLT
7 1 0
7 01
FWD/DND
OR
All Calls
2
Busy
3
No Answer
4
Busy/No Answer
5
7 2 5
7 52
C.Tone
Off-hook.
On-hook.
Press FWD/DND button
or dial 710.
Make your selection.
Dial 725.
• If an OGM is not stored for your personal message box, an incoming call cannot be
forwarded. Your extension will ring.
• If you set this feature, dial tone 2 will sound when you go off-hook.
1 s
• This feature cancels other types of Call Forwarding, Do Not Disturb (DND) and Do Not
Disturb (DND) for Intelligent Call Handling 1:1 Call.
To cancel the voice message function
DPT/SLT
FWD/DND
Off-hook.
OR
7 1 0
7 01
Press FWD/DND button
or dial 710.
0
Dial 0.
C.Tone
On-hook.
100 User Manual
 Loading...