

Panasonic KX-TD208E Technical data

Digital Super Hybrid System
This manual provides a special information about the KX-T7400 Series and other added and
changed features.
Please refer to this along with the KX-TD208E Operating Instructions.
The last letter “E” or “E-B”of each model number is omitted in this manual.
For Model
KX-TD208E
Additional Operating Instructions
for KX-T7400 Series
and
Added and Changed Features
for the Operating Instructions

2
Contents
User Manual Addendum for KX-T7400 Series
Configuration . . . . . . . . . . . . . . . . . . . . . . . . . . . . . . . . . . . . . . . . . . . . . . . . 4
Location of Controls . . . . . . . . . . . . . . . . . . . . . . . . . . . . . . . . . . . . . . 4
Connection . . . . . . . . . . . . . . . . . . . . . . . . . . . . . . . . . . . . . . . . . . . . . 7
Wall Mounting . . . . . . . . . . . . . . . . . . . . . . . . . . . . . . . . . . . . . . . . . . 8
Feature Button Descriptions . . . . . . . . . . . . . . . . . . . . . . . . . . . . . . . . 9
Initial Setting . . . . . . . . . . . . . . . . . . . . . . . . . . . . . . . . . . . . . . . . . . . 10
Display Contrast Adjustment . . . . . . . . . . . . . . . . . . . . . . . . . . . 10
When using a headset . . . . . . . . . . . . . . . . . . . . . . . . . . . . . . . . . 10
Changing the ringing tone of a CO button . . . . . . . . . . . . . . . . . 11
Volume Control — Handset Receiver/Headset/Ringer/Speaker. . . 1 1
Station Programming . . . . . . . . . . . . . . . . . . . . . . . . . . . . . . . . . . . . . . . . . 13
Station Speed Dialling Number/Name Assignment . . . . . . . . . . . . . . 13
Features . . . . . . . . . . . . . . . . . . . . . . . . . . . . . . . . . . . . . . . . . . . . . . . . . . . 18
Handset Microphone Mute . . . . . . . . . . . . . . . . . . . . . . . . . . . . . . . . 18
Special Display Features . . . . . . . . . . . . . . . . . . . . . . . . . . . . . . . . . . . . . . 19
1) Call Directory . . . . . . . . . . . . . . . . . . . . . . . . . . . . . . . . . . . . . . . . 22
2) System Feature Access Menu . . . . . . . . . . . . . . . . . . . . . . . . . . . . 27
Added and Changed Features for Operating Instructions
Added Features
Section 2.2 Initial Settings
Customising the Buttons on Your Telephone . . . . . . . . . . . . . . . . . . 32
Section 2.6 Others
Before Leaving Your Desk . . . . . . . . . . . . . . . . . . . . . . . . . . . . . . . . 33
Denying Receiving Calls – Rejecting Incoming Calls
(Do Not Disturb (DND)) . . . . . . . . . . . . . . . . . . . . . . . . . . . . . . . . 34
Caller Identification Services . . . . . . . . . . . . . . . . . . . . . . . . . . . . . . . 35
Selecting the CLIP/COLP numbers . . . . . . . . . . . . . . . . . . . . . . . . . . 37
ISDN Network Service Access . . . . . . . . . . . . . . . . . . . . . . . . . . . . . 38
Section 3.1 System Management
Accessing Other Networks . . . . . . . . . . . . . . . . . . . . . . . . . . . . . . . . 39
Direct Dialling In (DDI) . . . . . . . . . . . . . . . . . . . . . . . . . . . . . . . . . . 40
Forwarding a Doorphone Call . . . . . . . . . . . . . . . . . . . . . . . . . . . . . . 41

3
Contents
Section 3. System Programming
[205] DTMF Sending PAUSE Time . . . . . . . . . . . . . . . . . . . . . . . . . 42
[517] Call Forwarding by ISDN Service . . . . . . . . . . . . . . . . . . . . . . 42
[614]-[615] Doorphone Call Forwarding – Day/Night . . . . . . . . . . . . 42
[708] LCR Modify Removed Digit . . . . . . . . . . . . . . . . . . . . . . . . . . 43
[709] LCR Modify Added Number . . . . . . . . . . . . . . . . . . . . . . . . . . 43
[902] System Additional Information . . . . . . . . . . . . . . . . . . . . . . . . 44
Other added items. . . . . . . . . . . . . . . . . . . . . . . . . . . . . . . . . . . . . . . . . . . . 45
Changed Features
Section 3.1 System Management
Least Cost Routing (LCR) . . . . . . . . . . . . . . . . . . . . . . . . . . . . . . . . . 47
Section 3. System Programming
[404] CLIP/COLP Number Assignment . . . . . . . . . . . . . . . . . . . . . . 50
[412] ISDN DDI Number/Extension Number Transformation . . . . . . 50
Other changed items . . . . . . . . . . . . . . . . . . . . . . . . . . . . . . . . . . . . . . . . . . 52
Section 3.14 Programming Table
4
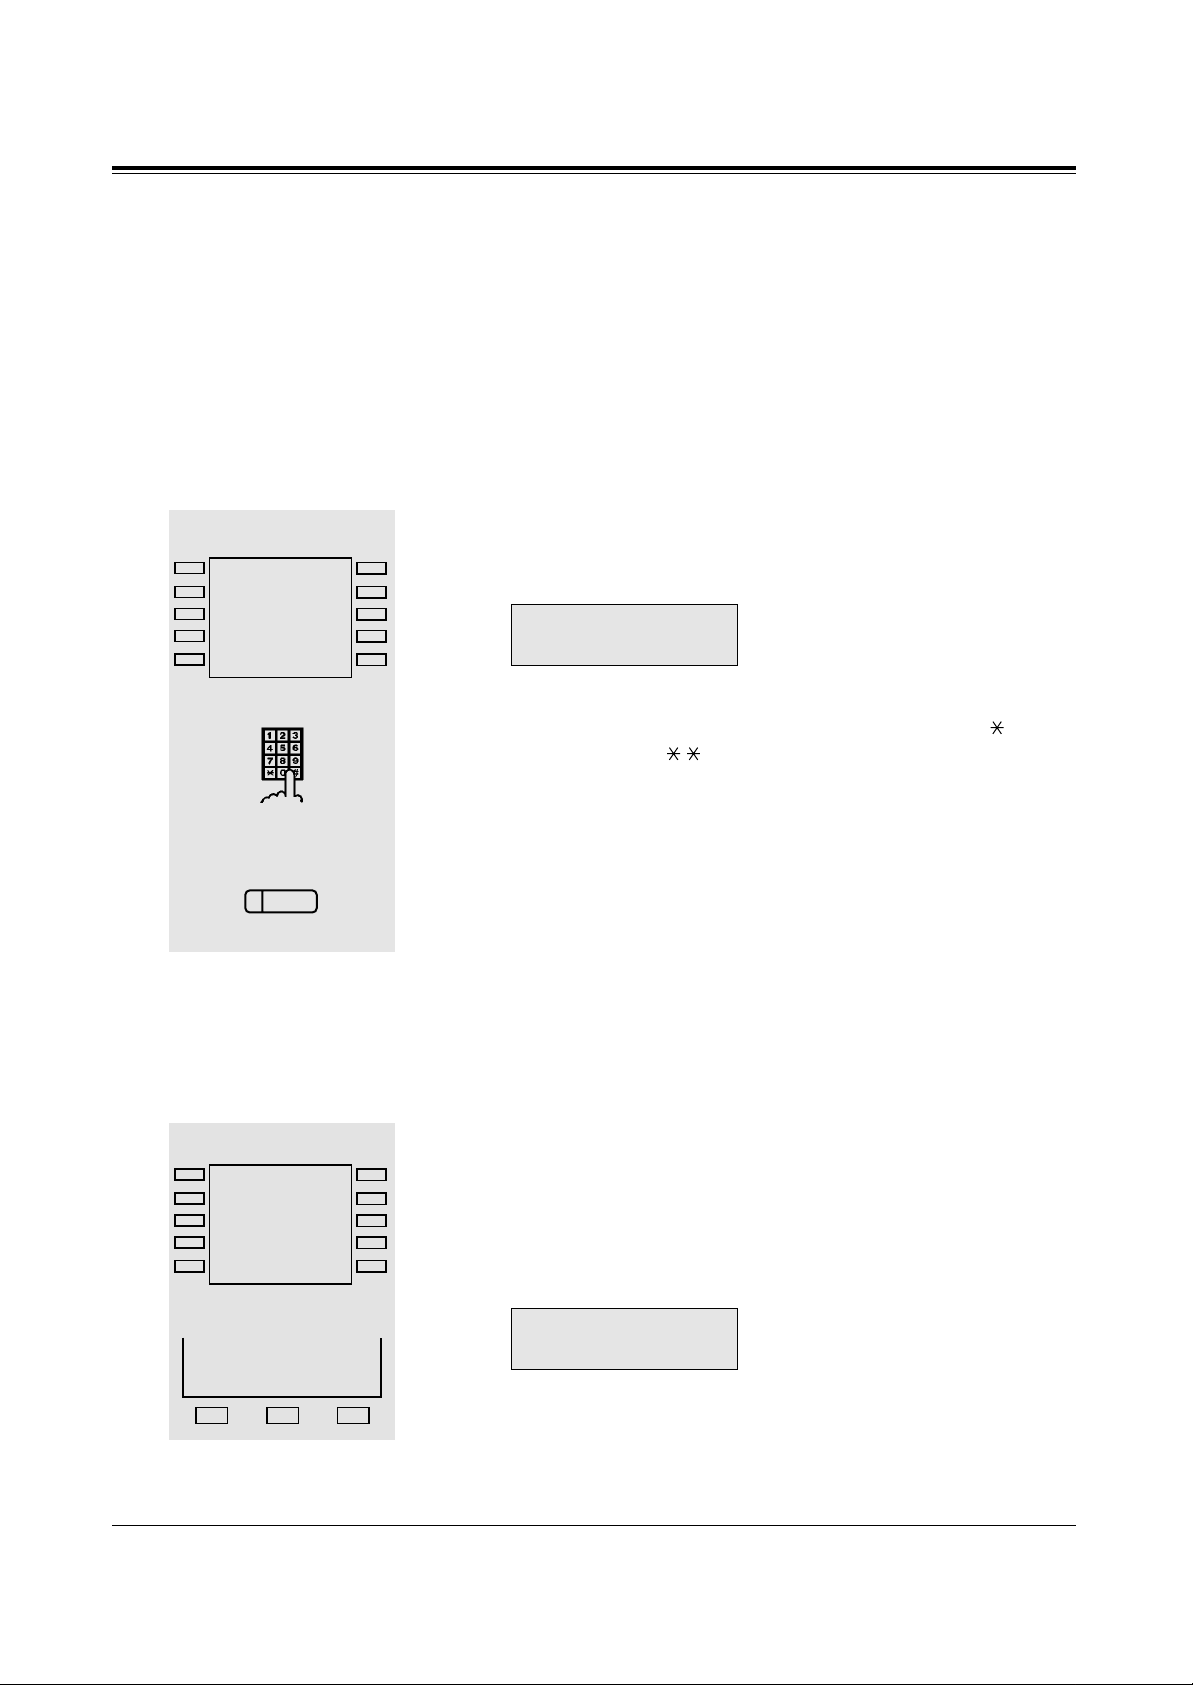
Configuration
Location of Controls
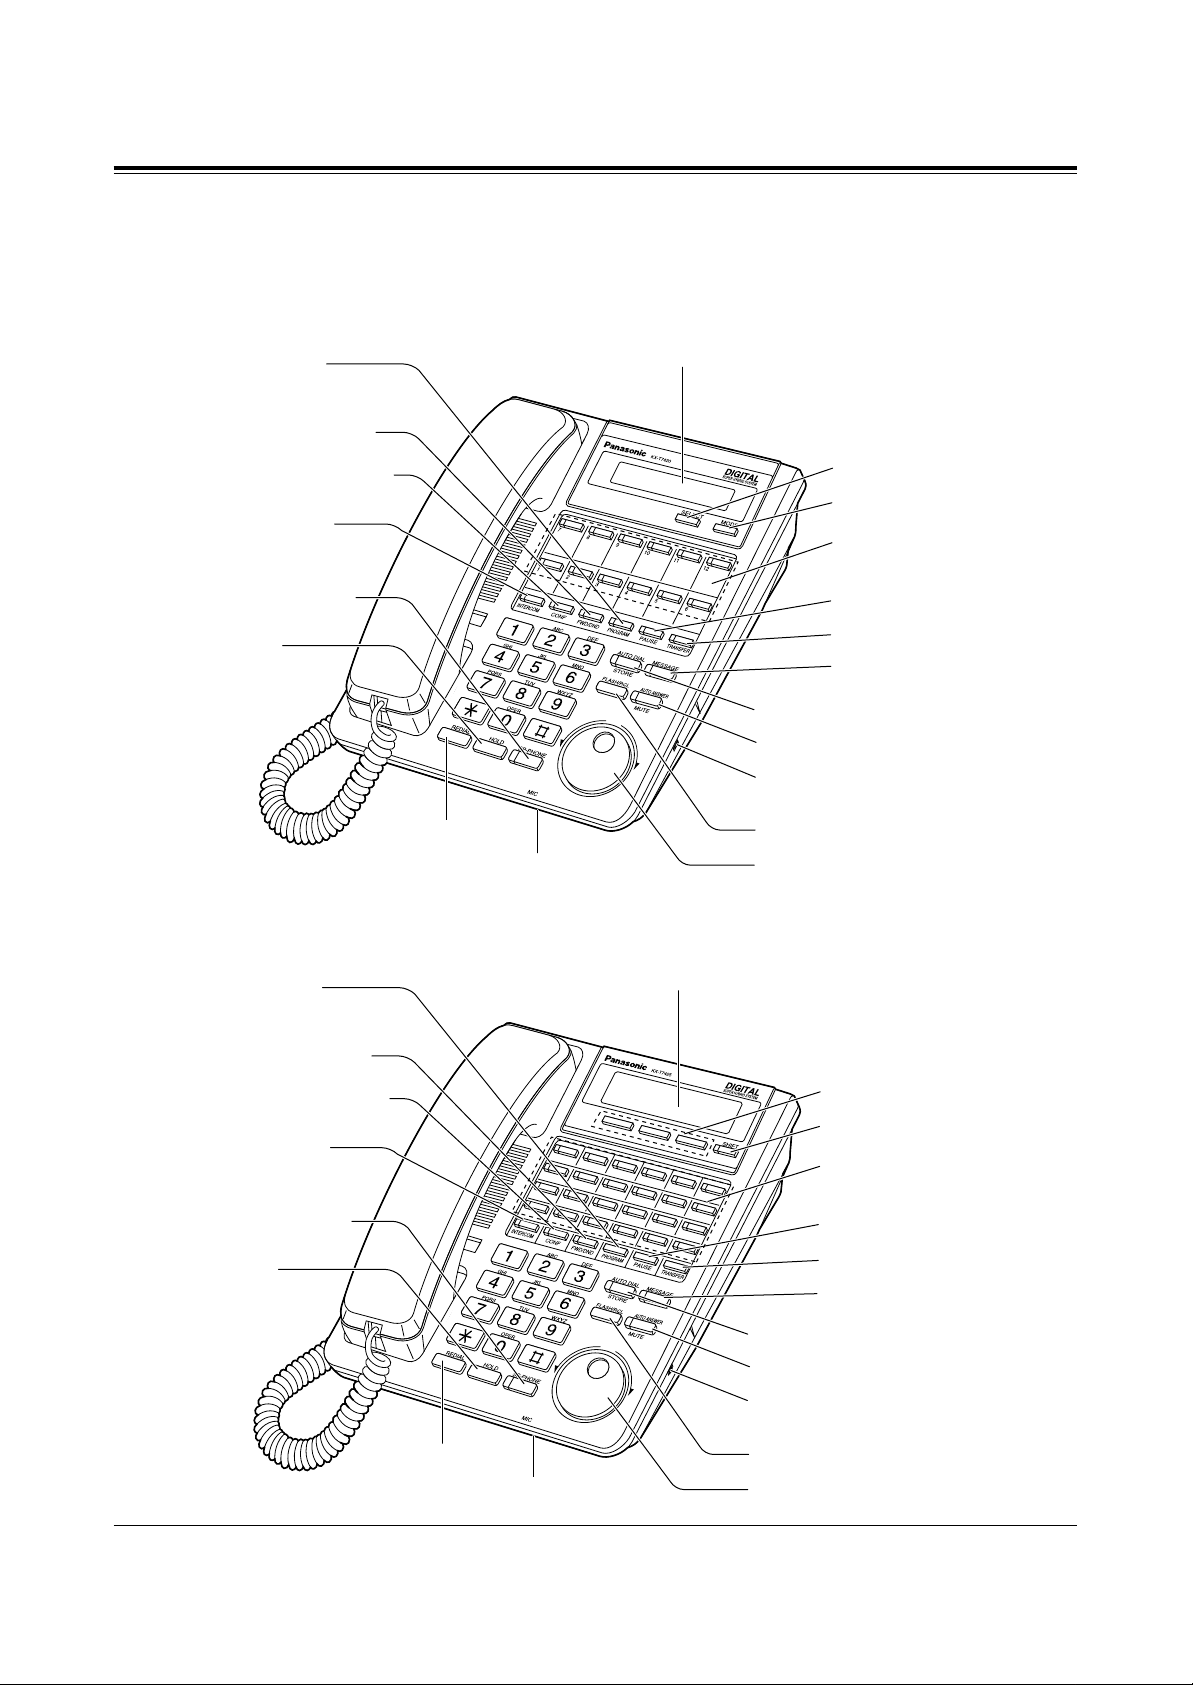
■ KX-T7431: Digital Proprietary Telephone
LCD (Liquid Crystal Display)
With 16-character/1-line readout:
Shows the date, time, dialed number or name,
call duration time, etc. It also shows the
messages for programming or feature access.
PROGRAM button
FWD/DND (Call Forwarding
/Do Not Disturb) button
CONF (Conference) button
INTERCOM button
TRANSFER button
REDIAL button
HOLD button
SP-PHONE
(Speakerphone) button
Flexible Outside (CO)
Line buttons (01 through 12)
MIC (Microphone)
PAUSE button
MODE button
SELECT button
MESSAGE button
FLASH/RCL button
AUTO DIAL/STORE button
AUTO ANSWER/MUTE button
Jog Dial
RINGER Volume Selector
Used to adjust the ringer volume.
1
2
3
4
5
6
12
11
10
9
8
7
13
14
15
16
17
18
24
23
22
21
20
19
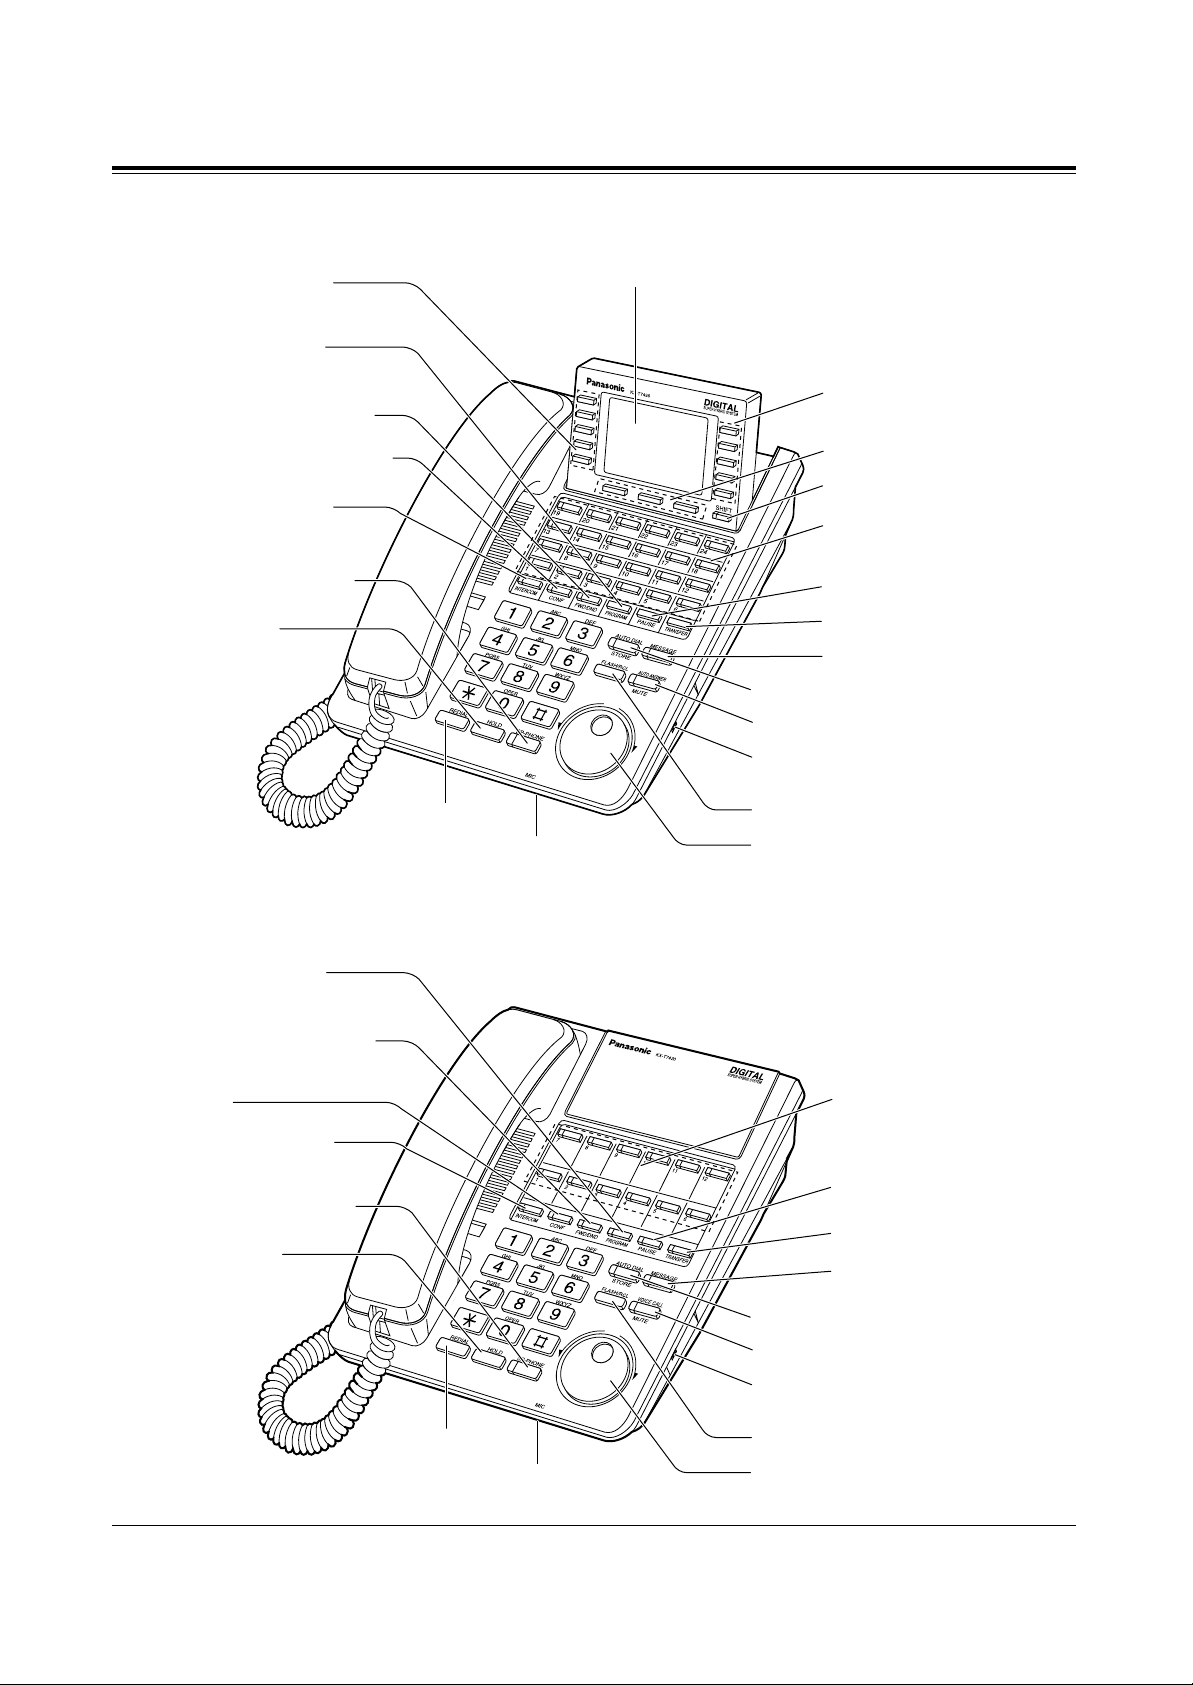
LCD (Liquid Crystal Display)
With 16-character/3-line readout:
Shows the date, time, dialed number or name,
call duration time, etc. It also shows the
messages for programming or feature access.
PROGRAM button
FWD/DND (Call Forwarding
/Do Not Disturb) button
CONF (Conference) button
INTERCOM button
TRANSFER button
REDIAL button
HOLD button
SP-PHONE
(Speakerphone) button
Flexible Outside (CO)
Line buttons (01 through 24)
MIC (Microphone)
PAUSE button
SHIFT button
SOFT buttons (S1 through S3)
MESSAGE button
FLASH/RCL button
AUTO DIAL/STORE button
AUTO ANSWER/MUTE button
Jog Dial
RINGER Volume Selector
Used to adjust the ringer volume.
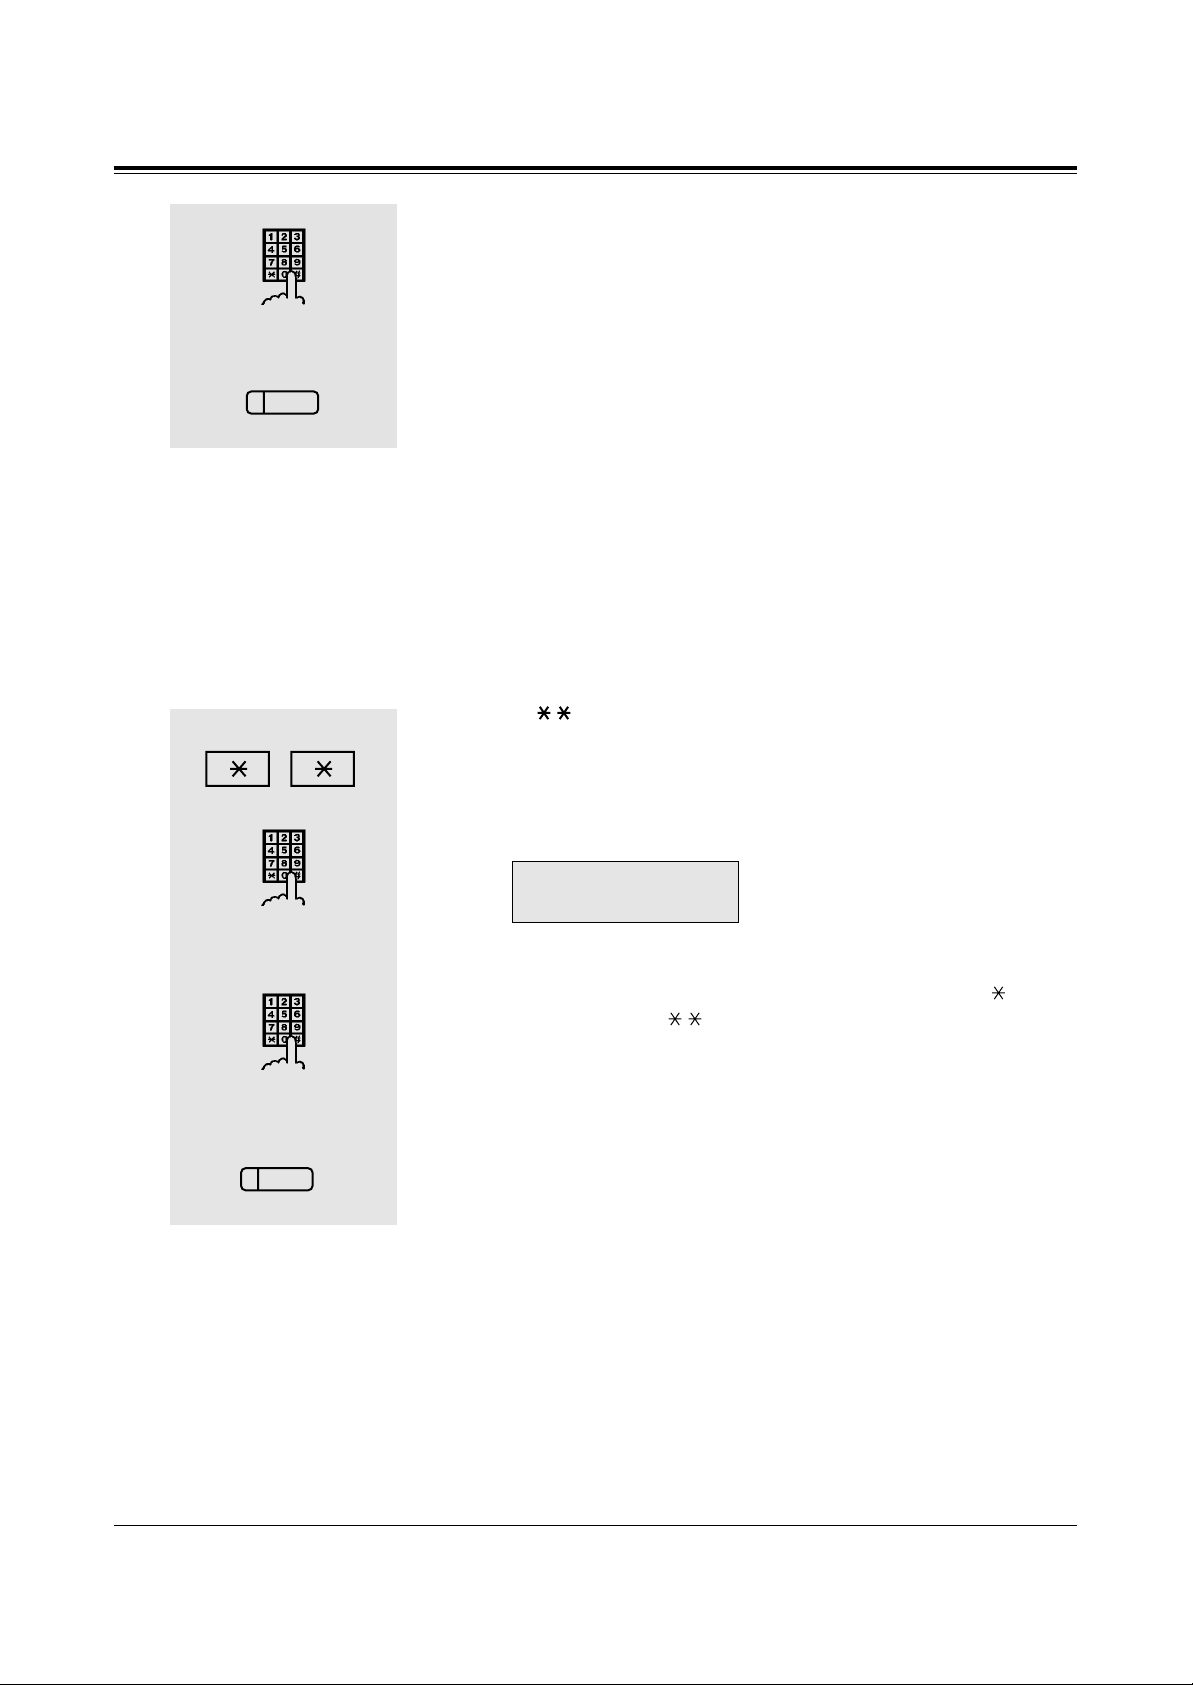
■ KX-T7433: Digital Proprietary Telephone
5
Configuration
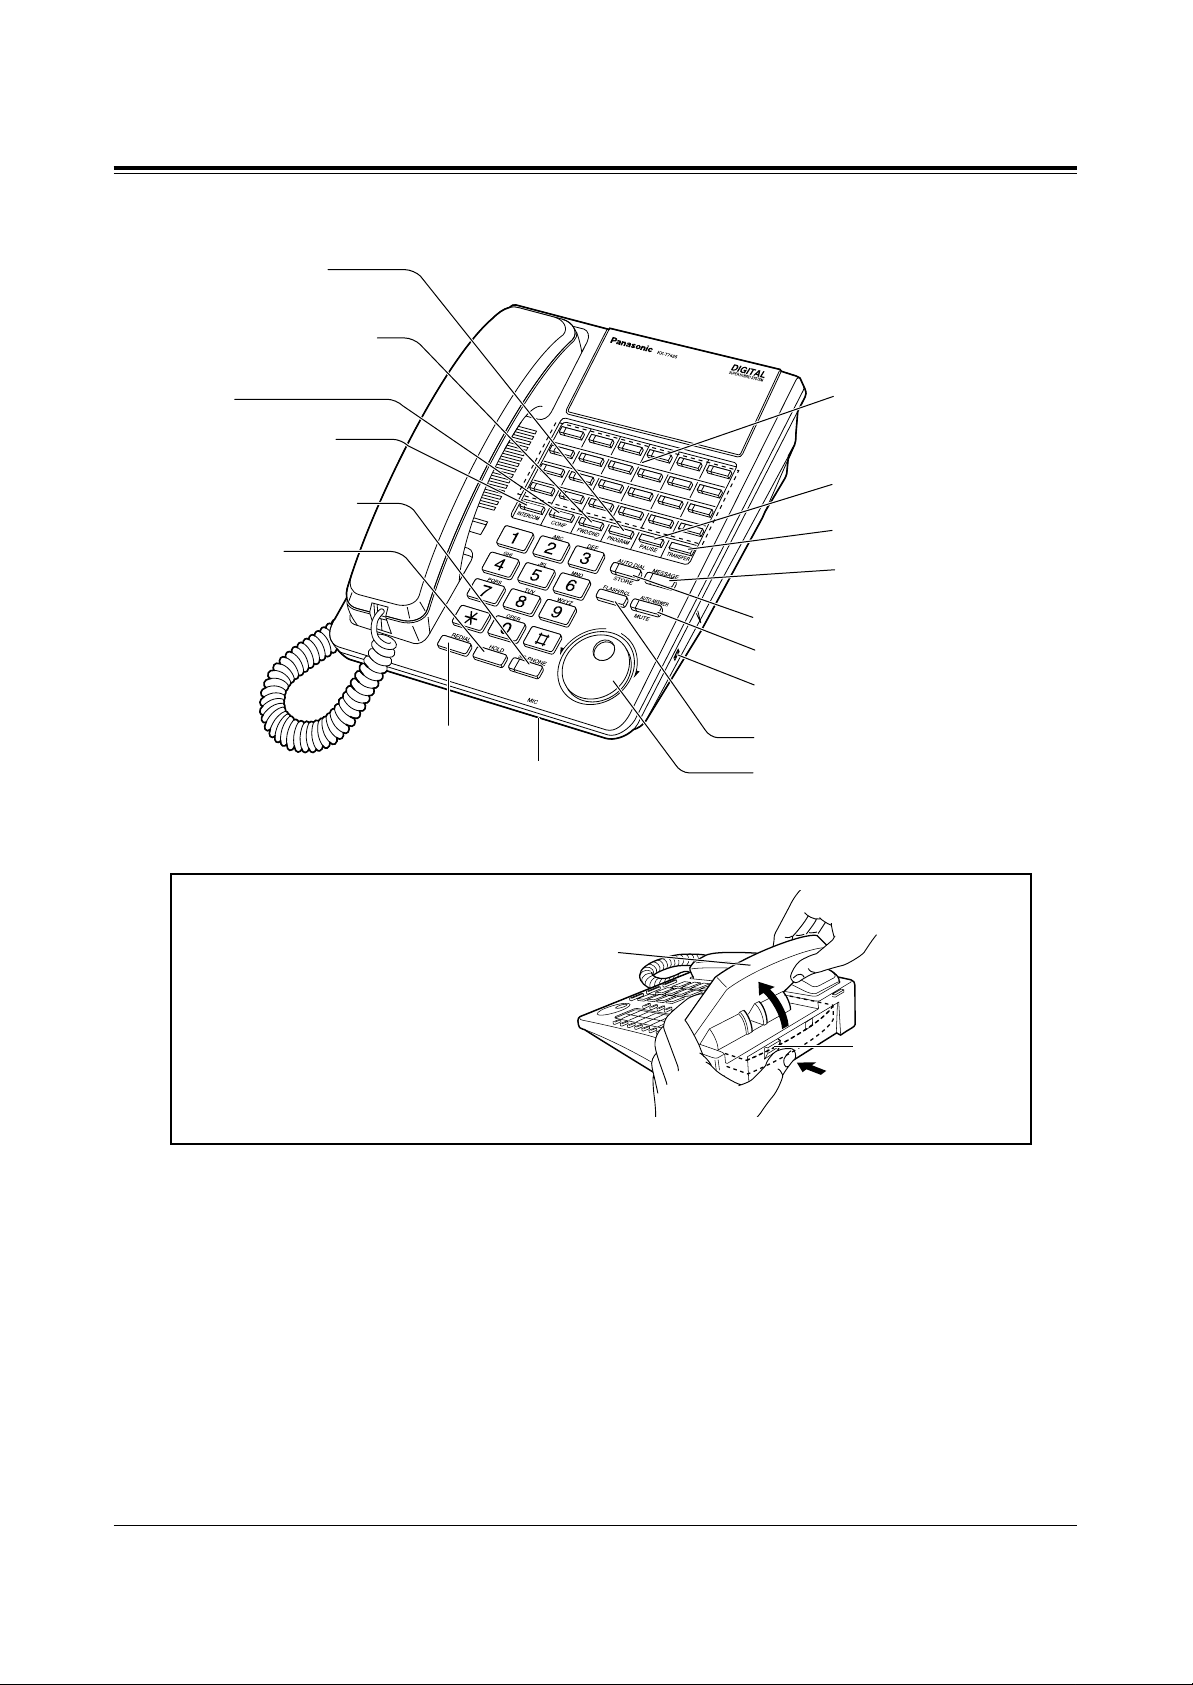
LCD (Liquid Crystal Display)
With 24-character/6-line readout:
Shows the date, time, dialed number or name,
call
duration time, etc. It also shows the messages for
programming or feature access.
PROGRAM button
FWD/DND (Call Forwarding
/Do Not Disturb) button
CONF (Conference) button
INTERCOM button
TRANSFER button
REDIAL button
HOLD button
SP-PHONE
(Speakerphone) button
Flexible Outside (CO)
Line buttons (01 through 24)
MIC (Microphone)
PAUSE button
SHIFT button
SOFT buttons (S1 through S3)
Function buttons
(F6 through F10)
Function buttons
(F1 through F5)
FLASH/RCL button
AUTO DIAL/STORE button
AUTO ANSWER/MUTE button
Jog Dial
RINGER Volume Selector
Used to adjust the ringer volume.
MESSAGE button
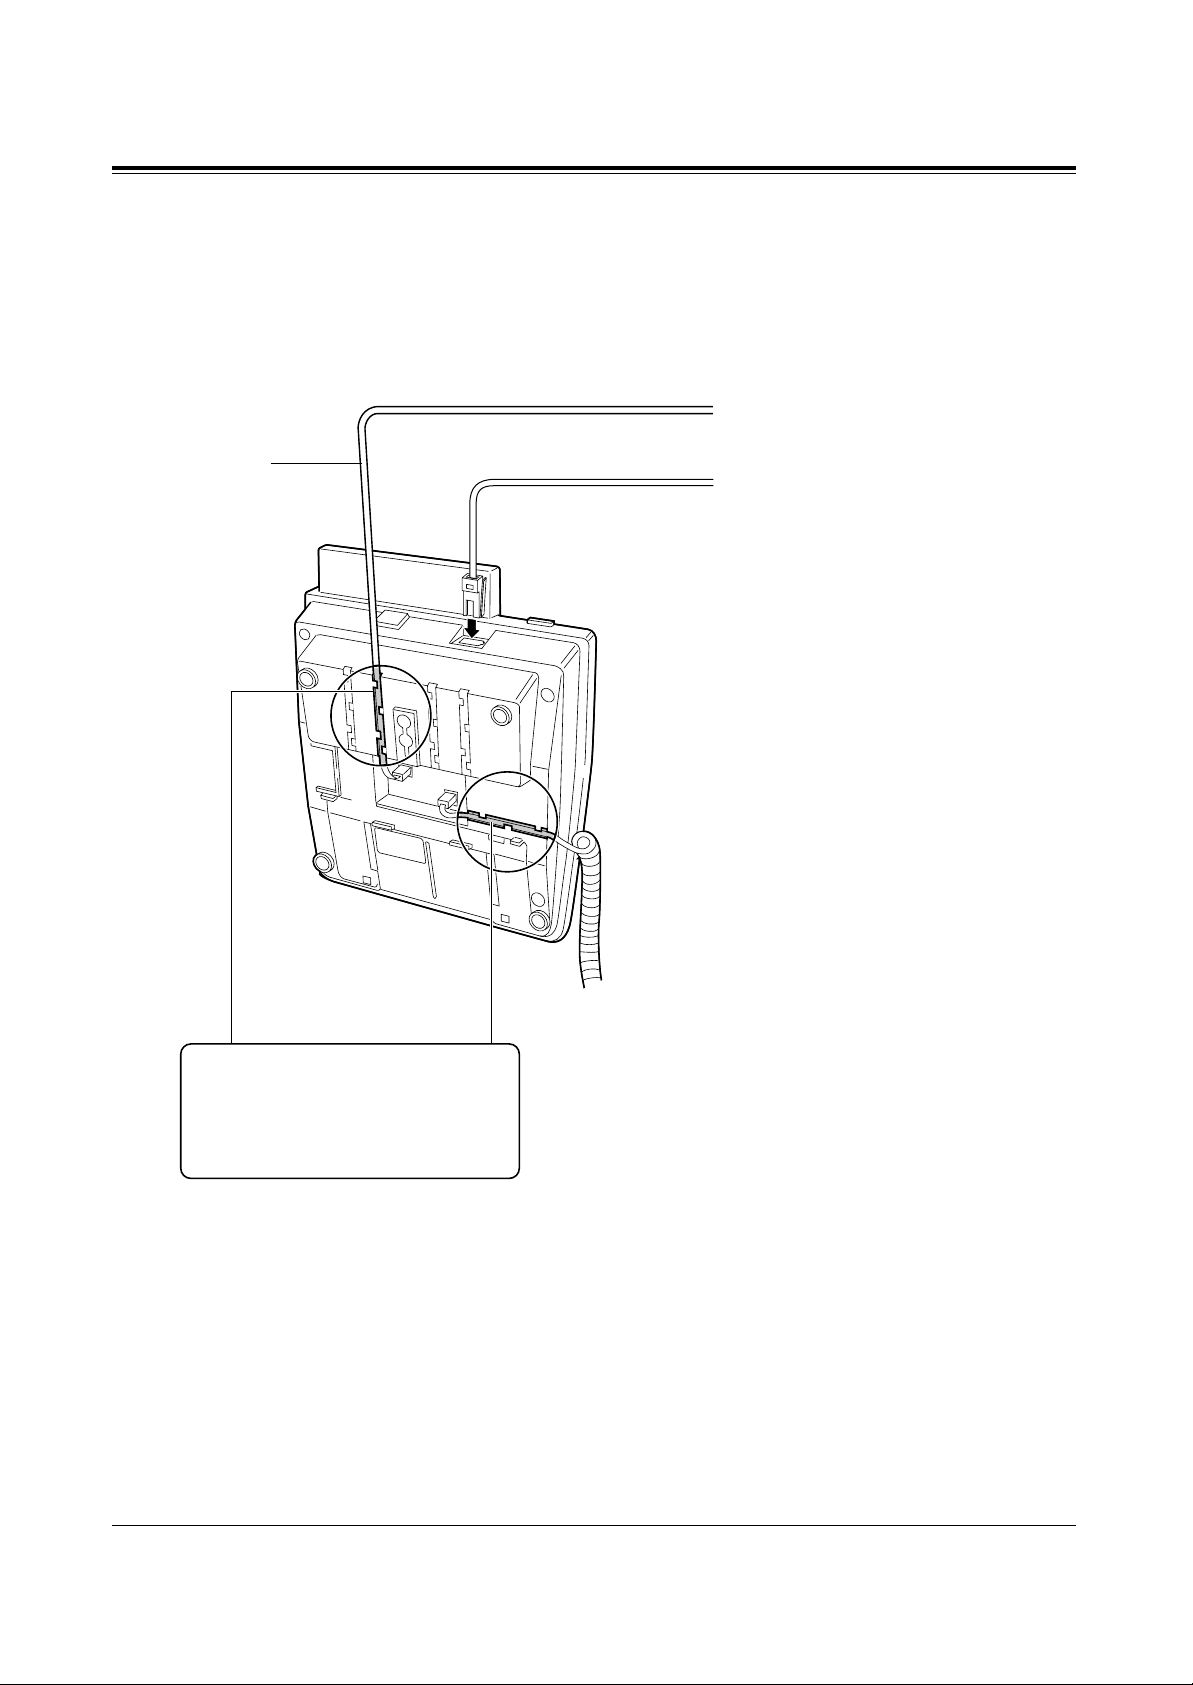
■ KX-T7436: Digital Proprietary Telephone
FLASH/RCL button
PROGRAM button
FWD/DND (Call Forwarding
/Do Not Disturb) button
CONF (CONFERENCE)
button
INTERCOM button
TRANSFER button
REDIAL button
HOLD button
SP-PHONE
(Speakerphone) button
MESSAGE button
Flexible Outside (CO)
Line buttons
(01 through 12)
AUTO DIAL/STORE button
VOICE CALL/MUTE button
Jog Dial
MIC (Microphone)
PAUSE button
RINGER Volume Selector
Used to adjust the ringer volume.
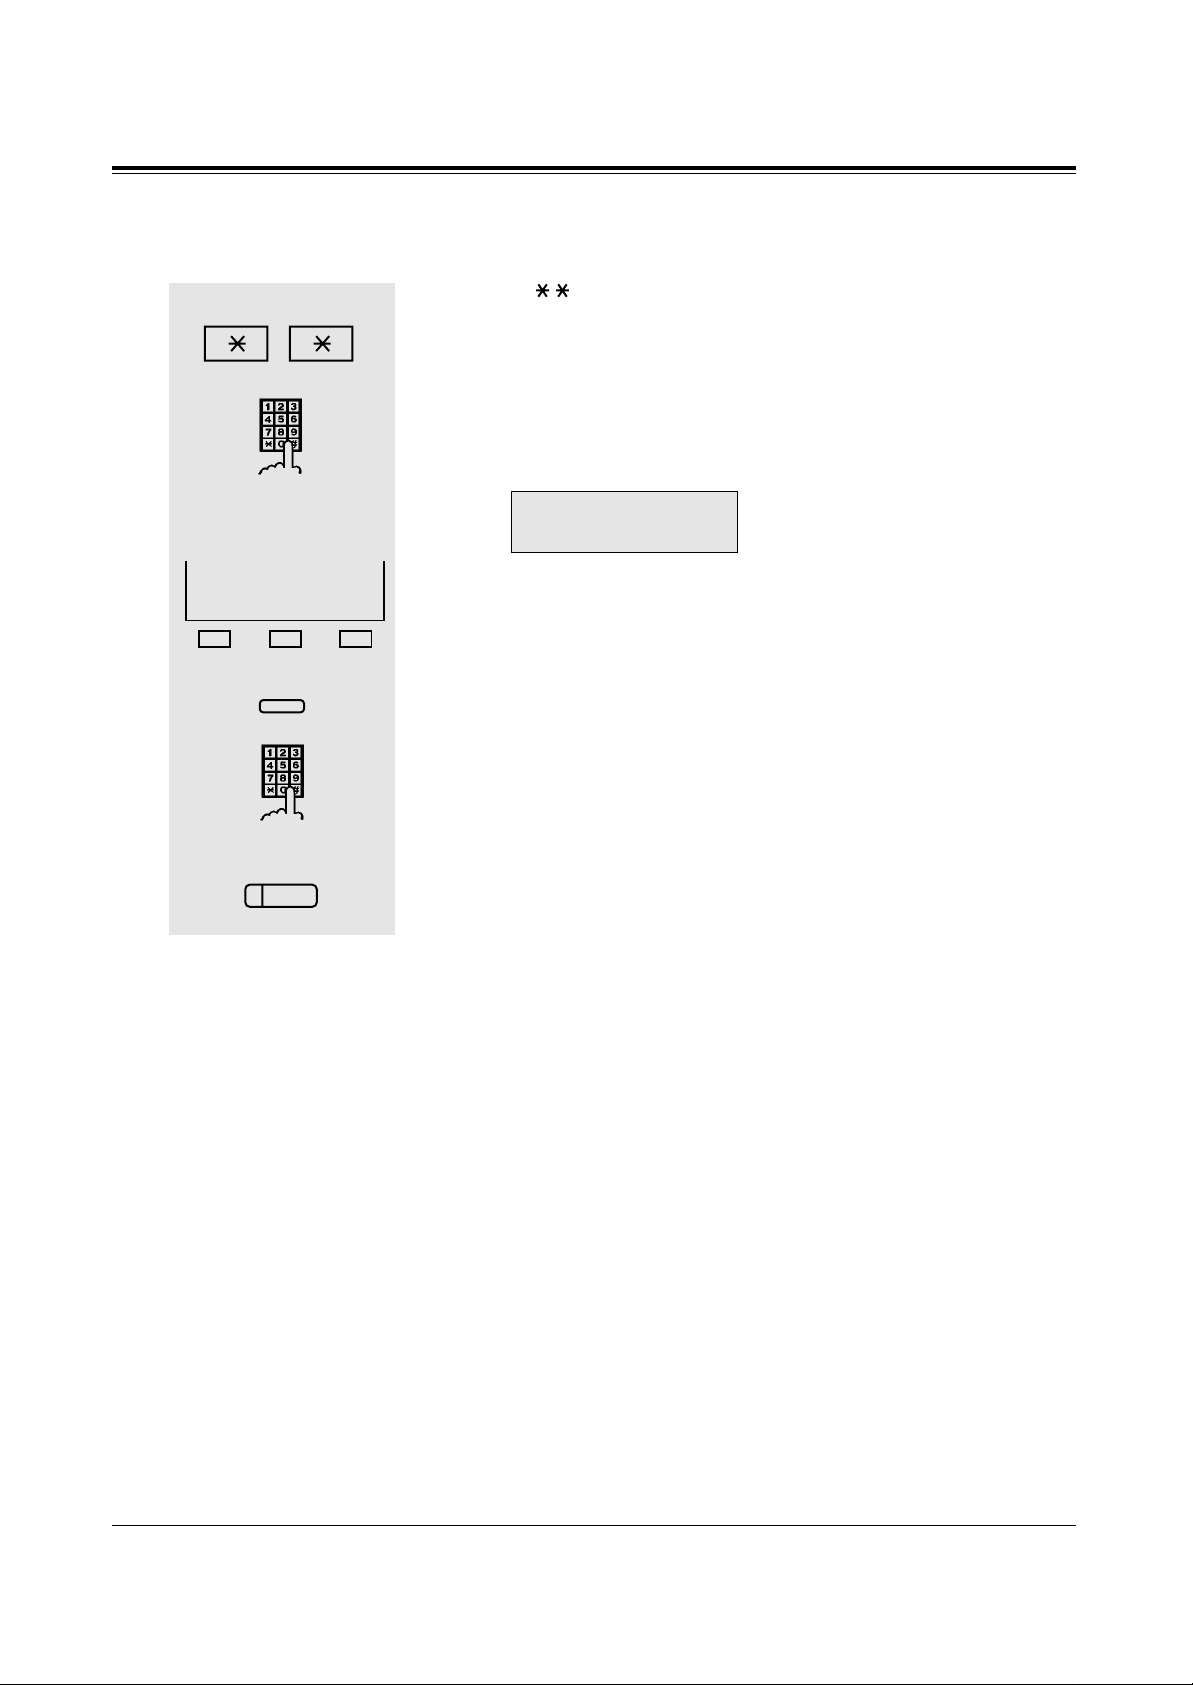
■ KX-T7420: Digital Proprietary Telephone
6
Configuration
To raise or lower the display of
KX-T7433/KX-T7436:
– To raise the display
1. Press the LCD ADJ button.
2. Raise the display.
– To lower the display
1. Press the LCD ADJ button.
2. Lower the display.
LCD ADJ button
LCD
1
2
3
4
5
6
12
11
10
9
8
7
13
14
15
16
17
18
24
23
22
21
20
19
PROGRAM button
FWD/DND (Call Forwarding
/Do Not Disturb) button
CONF (CONFERENCE)
button
INTERCOM button
TRANSFER button
REDIAL button
HOLD button
SP-PHONE
(Speakerphone) button
MESSAGE button
Flexible Outside (CO)
Line buttons
(01 through 24)
MIC (Microphone)
PAUSE button
FLASH/RCL button
AUTO DIAL/STORE button
AUTO ANSWER/MUTE button
Jog Dial
RINGER Volume Selector
Used to adjust the ringer volume.
■ KX-T7425: Digital Proprietary Telephone
→
→
7
Configuration
Connection
Connect as shown.
■ KX-T7431/KX-T7433/KX-T7436/KX-T7420/KX-T7425
Connect to a standard telephone,
telephone answering machine, or
FAX for XDP* or parallel
connections (TO TEL).
The telephone
line cord
<Back View>
Connect to a Digital Super Hibrid
System (TO MAIN UNIT).
* XDP (eXtra Device Port) expands the number of
telephones available in the system by allowing an
extension port to contain two telephones. For more
details, please consult with your dealer.
CAUTION
Ensure the cords are inserted in
the grooves to prevent damage to
the connectors.
8
Configuration
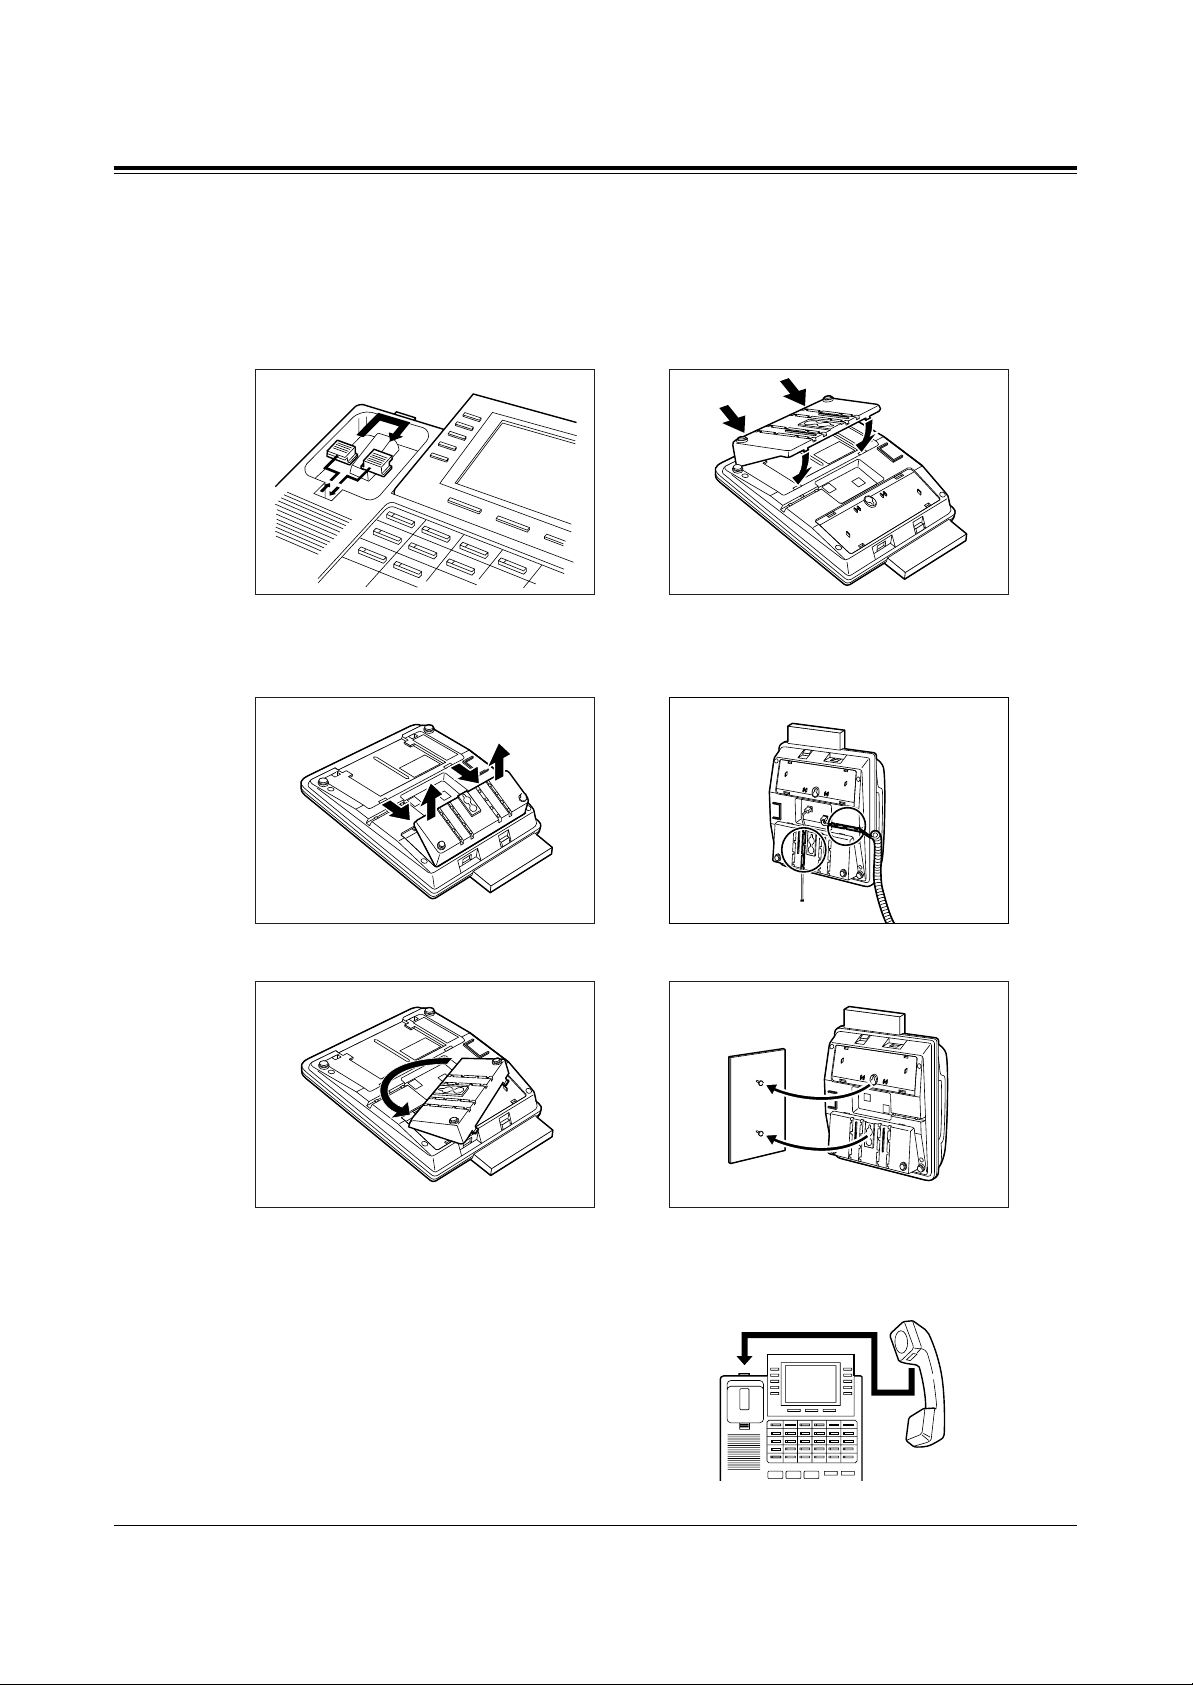
Wall Mounting
1. Disconnect the handset cord first.
Remove the handset hook by pulling it
up. Turn it around and re-insert it.
4. Insert the stand in the centre slots.
2. Remove the attached stand. 5. Insert the included tel line cord. (Ensure the
cord is inserted in the groove to prevent
damage to the connector.)
6. Mount the unit on the wall.
To place the handset down temporarily
during a conversation, hook it over the top
edge of the phone as shown.
3. Turn it around 180 degrees.

9
Configuration
Feature Button Descriptions
■ KX-T7431/KX-T7433/KX-T7436/KX-T7420/KX-T7425
AUTO ANSWER/MUTE button
Used for intercom auto answer; or it turns
the microphone off during a conversation.
AUTO DIAL/STORE button
Used for speed dialling or storing
program changes.
CONFERENCE button
Used to establish a three-party conference.
FLASH/RCL button
This button can be used to send a Recall
signal to the local exchange or disconnect
the current call and start another call.
Flexible Outside (CO) Line buttons
Used to make or receive an outside call,
or access a feature if the button is
assigned (e.g. One touch dialling button).
Function buttons (F1 through F10)
(KX-T7436 only)
Used to perform the corresponding
displayed function or operation.
FWD/DND (Call Forwarding/Do Not Disturb)
button
Used to perform a Call Forwarding
feature or set the Do Not Disturb (DND)
feature.
HOLD button
Used to place a call on hold.
INTERCOM button
Used to make or receive extension calls.
Jog Dial
Used to adjust the volume of the handset
receiver, headset, ringer and speaker, or to
adjust the display contrast. Refer to
“Initial Setting” in this manual. It is also
used to select data from the Call Directory
and the System Feature Access Menu for
KX-T7431, KX-T7433, KX-T7436.
MESSAGE button
Used to leave a notification to a busy
extension or call back the message
notification sender.
MODE button (KX-T7431 only)
Used to change the display in order to
access various features.
PAUSE button
Used to insert a pause in speed dial
numbers or in other one-touch dial
numbers.
PROGRAM button
Used to enter and exit the programming
mode.
REDIAL button
Used for the redialling the last number or
redialling automatically.
SELECT button (KX-T7431 only)
Used to select a displayed feature or to
call a displayed phone number.
SHIFT button
Used to alternate the selection of Soft
Button functions.
Soft buttons (S1 through S3)
Used to perform the function or operation
that appears on the bottom line of the
display.
SP-PHONE (Speakerphone) button
Used for a handsfree speakerphone
operation.
TRANSFER button
Used to transfer a call to another
extension or external destination.
VOICE CALL/MUTE button
(KX-T7420 only)
Used for intercom auto answer, but it
cannot be used for handsfree
conversations. It also turns the
microphone off during a conversation.
10
Configuration
Left
(counter-clockwise)
Level decreases
Right
(clockwise)
Level increases
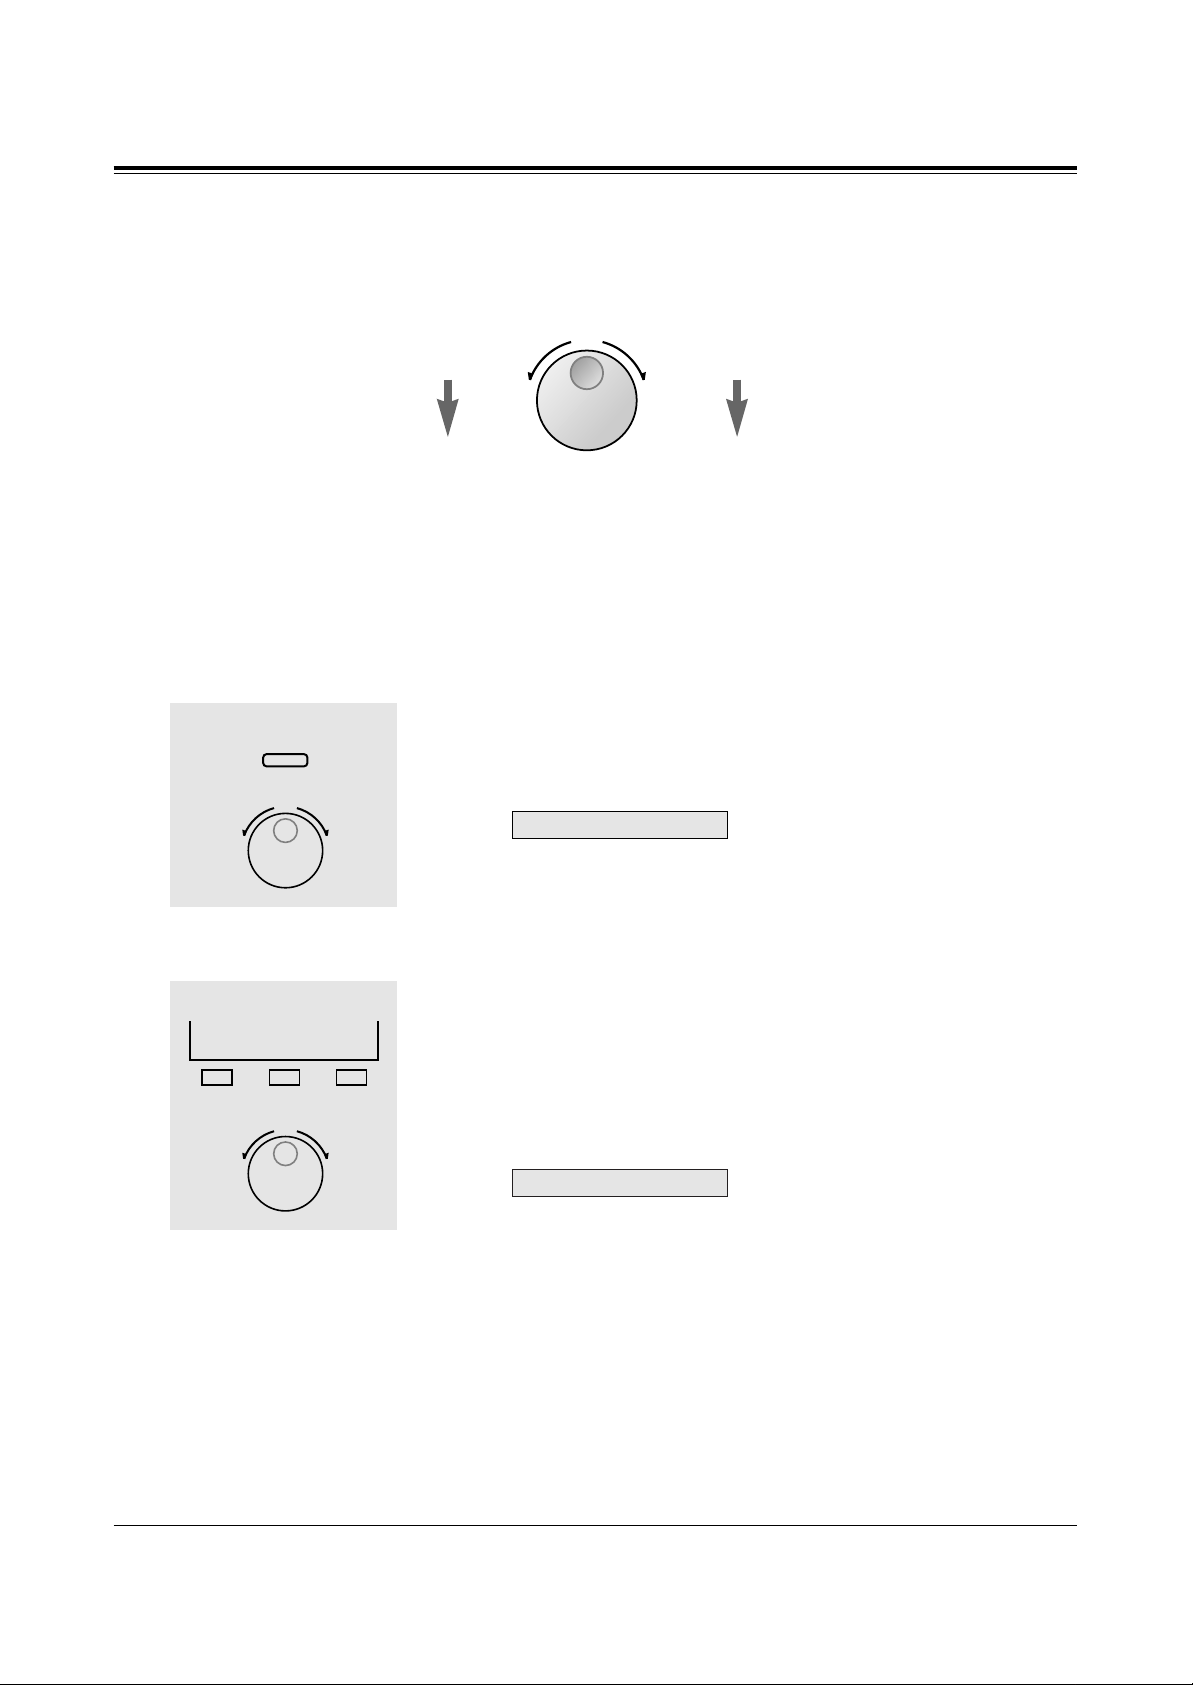
Initial Setting
The Jog Dial can be used for the display contrast and the volume control. Rotate the Jog
Dial in either direction as desired. The contrast or the volume level will change as follows.
Display Contrast Adjustment
The MODE button and the Jog Dial for KX-T7431 users, and a Soft button and the Jog Dial
for KX-T7433 and KX-T7436 users are used to adjust the display contrast. The contrast
level is indicated on the display by the number.
– KX-T7431
While on-hook
1. Press the MODE button six times.
• The display shows:
<Example>
(— contrast volume level 3)
2. Rotate the Jog Dial in the desired direction.
– KX-T7433 and KX-T7436
While on-hook or during a conversation
1. Press the CONT (S1) button.
2. Rotate the Jog Dial in the desired direction.
• The display shows:
<Example>
(— contrast volume level 3)
When using a headset
The Panasonic Digital Super Hybrid System supports the use of a headset with a proprietary
telephone (PT). When you use a headset (optional), you should switch the selection mode
first. Selection is explained in the “Handset/Headset Selection” in Initial Settings (Section 2
in the KX-TD208 Operating Instructions).
To change to the headset mode
Press: [PROGRAM] [9] [9] [8] [2] [STORE] [PROGRAM].
Contrast: 3
Contrast: 3
1
2
MODE
1
2
S 1 S 2 S 3
CONT
11
Configuration
Changing the ringing tone of a CO button
There are eight ringer frequencies available for each CO (Loop-CO, Single-CO) button. If
you wish to change them, refer to the “Distinguishing the ringing tone for each CO button”
in the Initial Settings (Section 2 in the KX-TD208 Operating Instructions).
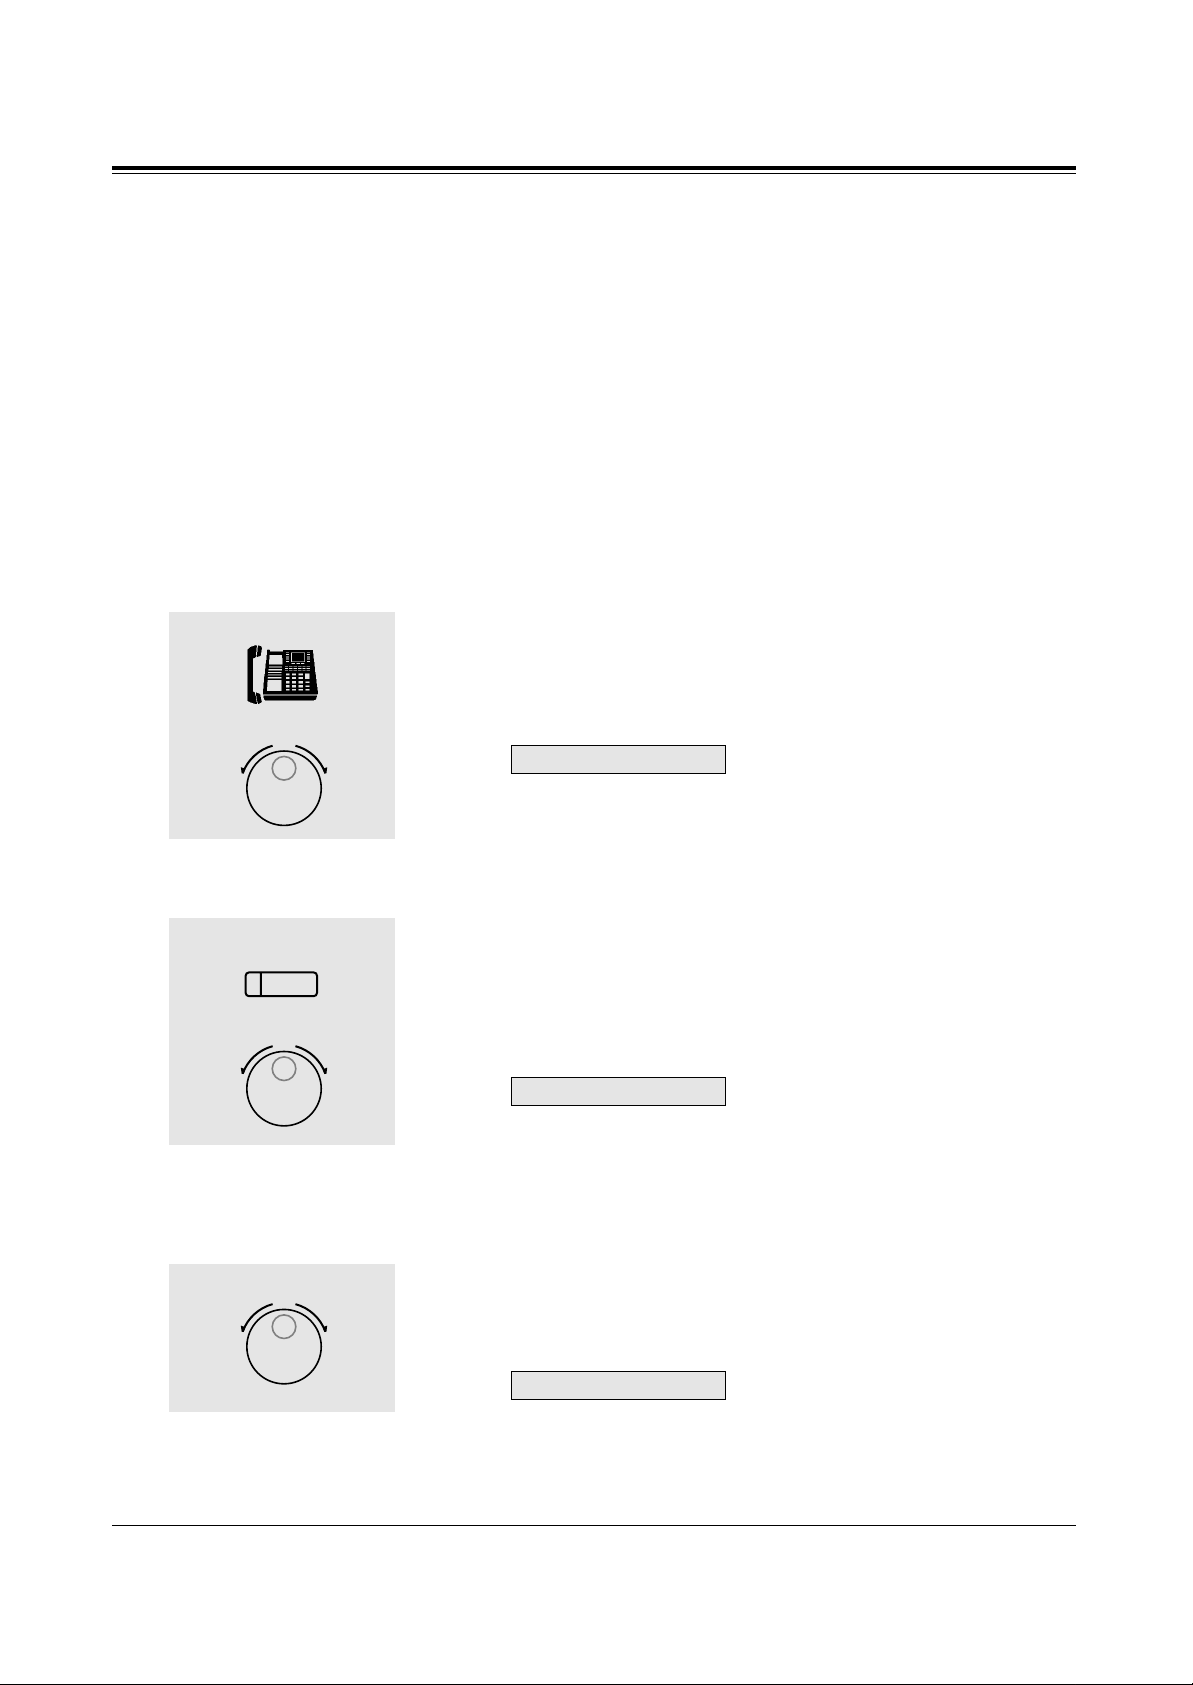
Volume Control — Handset Receiver/Headset/Ringer/Speaker
Allows you to adjust the following volumes as required.
– Handset Receiver volume (levels 1 through 4)
– Headset volume (levels 1 through 4)
– Ringer volume (levels 0 through 3)
– Speaker volume (levels 1 through 12)
To adjust the handset receiver volume
1. Lift the handset.
2. Rotate the Jog Dial in the desired direction.
• The display shows:
<Example>
(— volume level 3)
• You may also adjust the handset receiver volume during a
conversation using the handset receiver.
To adjust the headset volume
Be sure the headset is connected.
1. Press the SP-PHONE button.
2. Rotate the Jog Dial in the desired direction.
• The display shows:
<Example>
(— volume level 3)
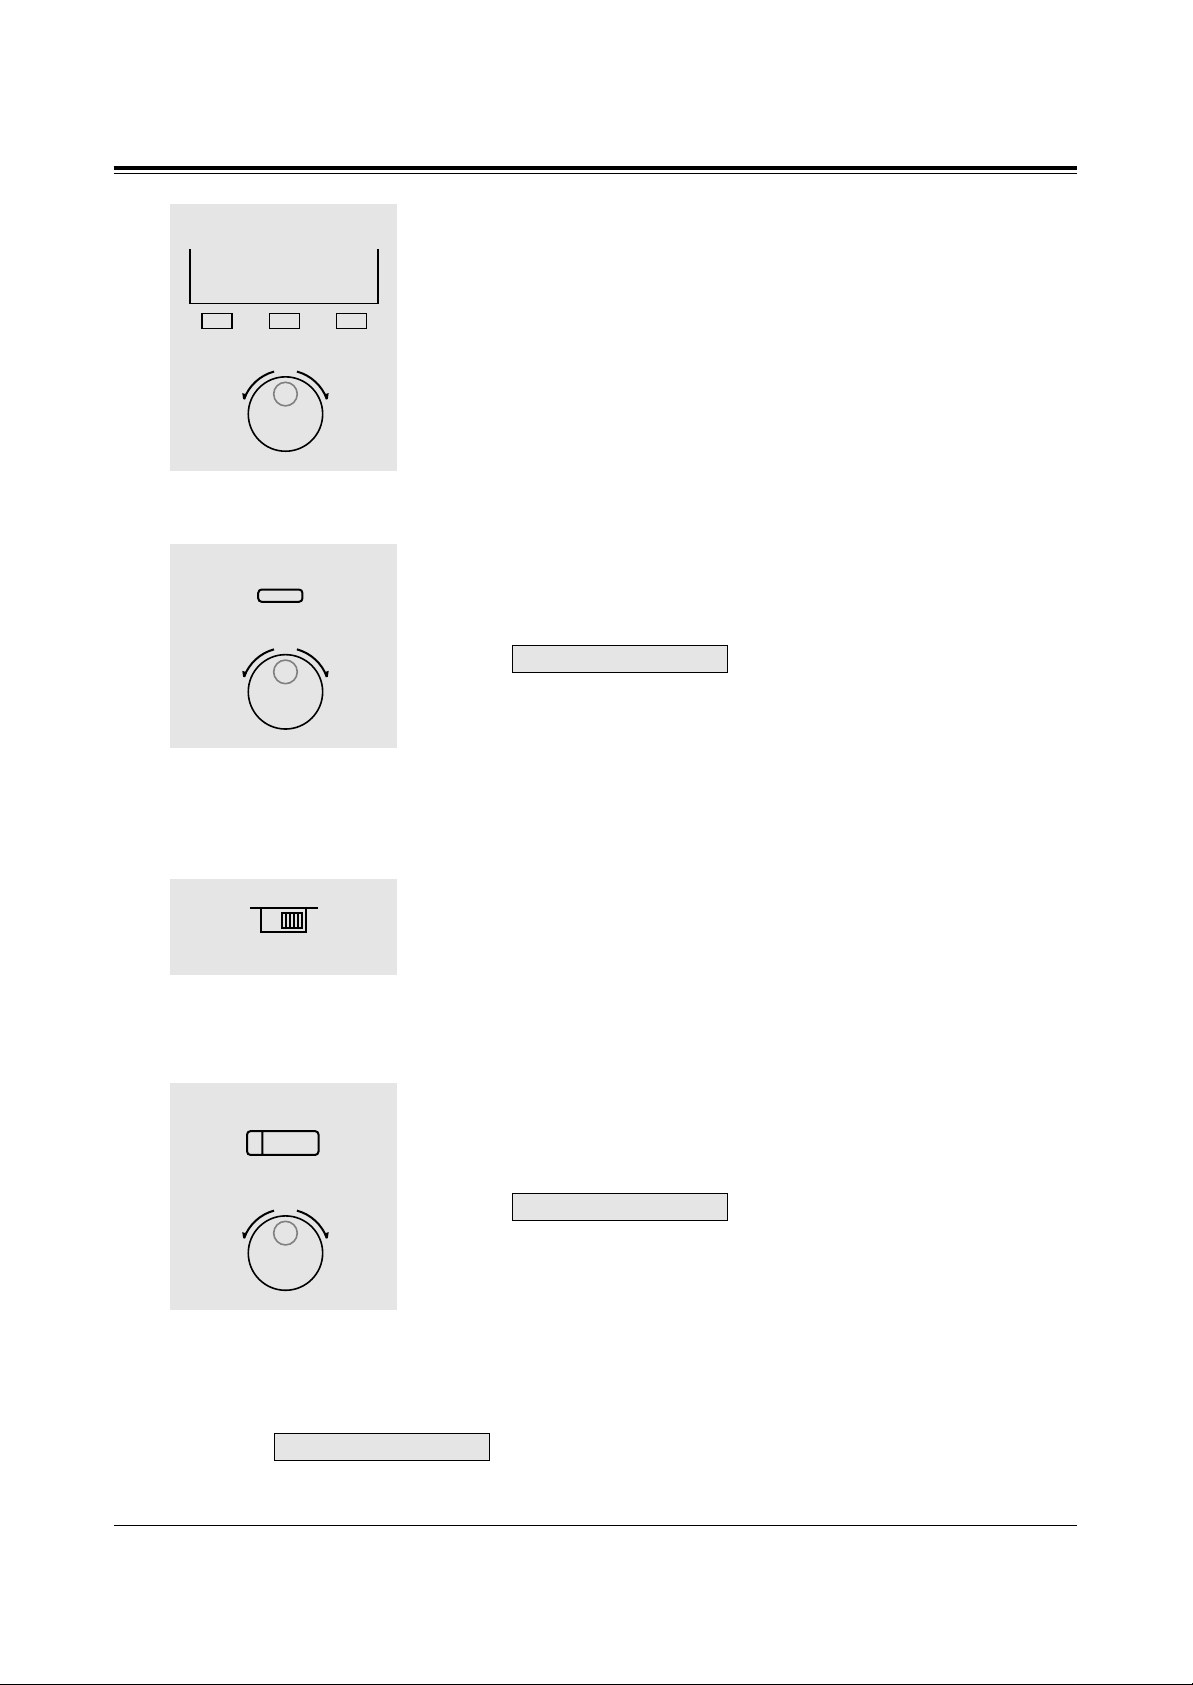
To adjust the ringer volume
– KX-T7433 and KX-T7436
While the telephone is ringing
1. Rotate the Jog Dial in the desired direction.
• The display shows:
<Example>
(— volume level 3)
Ringer: 3
Headset: 3
Handset: 3
1
2
1
2
SP-PHONE
1
12
Configuration
While the telephone is idle and on-hook
1. Press the RING (S2) button.
• The telephone will ring.
2. Rotate the Jog Dial in the desired direction.
• The telephone will stop ringing in about 4 seconds.
• When the volume level is 0, the display shows “RING OFF”.
– KX-T7431
While the telephone is idle and on-hook
1. Press the MODE button five times.
• The display shows:
<Example>
(— volume level 3)
2. Rotate the Jog Dial in the desired direction.
• The telephone will stop ringing in about 4 seconds.
– KX-T7420 and KX-T7425
1. Adjust the RINGER Volume Selector lever to the desired setting
(OFF/LOW/HIGH).
To adjust the speaker volume
1. Press the SP-PHONE button.
2. Rotate the Jog Dial in the desired direction.
• The display shows:
<Example>
(— volume level 12)
• You may also adjust the speaker volume while listening to the
background music (BGM On mode), receiving a voice call, or
receiving a page.
Conditions
• If the ringer volume of the KX-T7431 is set to OFF, the display while on-hook is as
follows.
Ring off 12:00
SP:12
Ringer: 3
1
2
S 1
S 2
S 3
RING
1
2
MODE
1
OFF • • • HIGH
LOW
1
2
SP-PHONE
13
Station Programming
Station Speed Dialling Number/Name Assignment
Allows you to assign numbers and names that are used frequently to Function buttons on
your telephone. You can store extension numbers, telephone numbers and features access
numbers.
For KX-T7436 users
To store a number
– Be sure that you are in the Station Programming mode: Press [PROGRAM][9][9].
1. Press a Function button (F1 through F10).
• The STORE indicator light turns off.
• The display shows the current status.
<Example>
(— The outside call, 431-2111,
is now programmed.)
2. Enter the desired number (up to sixteen digits).
• Up to sixteen digits, consisting of “0 through 9” and “ ”, can
be stored. Enter “ ” for a pause.
• To store the telephone number of an outside party, the ISDN
port access code (9, 81 or 82) must be stored as the leading
digit.
• To erase the entry, press the CLR (S2) button.
3. Press the STORE button.
• The STORE indicator lights.
• The display shows the initial programming mode.
– To exit the Station Programming mode: Press [PROGRAM] or lift the handset.
To store a name
– Be sure that you are in the Station Programming mode: Press [PROGRAM][9][9].
1. Press a Function button (F1 through F10).
• The STORE indicator light turns off.
• The display shows the current status.
2. Press the NEXT (S3) button.
• The display shows the current status.
<Example>
(— The name is now
programmed.)
Mike
CLR NEXT
9-431-2111
CLR NEXT
1
2
3
desired number
PT-PGM Mode
F5
F4
F3
F2
F1
F10
F9
F8
F7
F6
AUTO DIAL
STORE
2
S 1 S 2 S 3
NEXT
1
PT-PGM Mode
F5
F4
F3
F2
F1
F10
F9
F8
F7
F6
14
Station Programming
3. Enter the name (10 characters max.).
• Refer to the Combination Table on page 15 on how to enter
each character.
4. Press the STORE button.
• The STORE indicator lights.
• The display shows the initial programming mode.
– To exit the Station Programming mode: Press [PROGRAM] or lift the handset.
3
4
name
AUTO DIAL
STORE
For KX-T7431 and KX-T7433 users
To store a number
– Be sure that you are in the Station Programming mode: Press [PROGRAM][9][9].
1. Press .
2. Enter the Station Speed Dial number (0 through 9).
• The STORE indicator light turns off.
• The display shows the current status.
<Example>
(— The outside call, 431-2111,
is now programmed.)
3. Enter the desired number (up to sixteen digits).
• Up to sixteen digits, consisting of “0 through 9” and “ ”, can
be stored. Enter “
”
for a pause.
• To store the telephone number of an outside party, the ISDN
port access code (9, 81 or 82) must be stored as the leading
digit.
• To erase the entry, press the CLR (S2) button or TRANSFER
button.
– CLR (S2) button: for KX-T7433 users
– TRANSFER button: for KX-T7431 users
4. Press the STORE button.
• The STORE indicator lights.
• The display shows the initial programming mode.
– To exit the Station Programming mode: Press [PROGRAM] or lift the handset.
9-431-2111
CLR NEXT
1
4
2
Station Speed Dial number
3
desired number
AUTO DIAL
STORE
15
Station Programming
Combination Table
Characters can be entered using the dial key pad, various buttons or the Jog Dial for storing
names.
Combination Table 1 shows the combination of keys and the number of times to press the
SELECT (AUTO ANSWER/MUTE) button, or the combination of keys and the SHIFT and
Soft buttons to enter characters. (The AUTO ANSWER/MUTE button becomes the
SELECT button when using the overlay.)
To enter a character, find the key and number of times to press the SELECT button or the
corresponding SHIFT and Soft button combination on the table. Press the corresponding key
first, then press the SELECT button for the required number of times. Or, you can use the
SHIFT button and a Soft button (S1 through S3) instead of the SELECT button.
Combination Table 2 shows the combination of keys and the number of clicks to move the
Jog Dial to the right.
To enter a character, find the key and number of clicks to rotate the Jog Dial. Press the
corresponding key first, then rotate the Jog Dial for the required number of times. Or, if you
keep rotating the Jog Dial after pressing any dialling key, all the characters in the table will
be displayed.
To store a name
– Be sure that you are in the Station Programming mode: Press [PROGRAM][9][9].
1. Press .
2. Enter the Station Speed Dial number (0 through 9).
• The STORE indicator light turns off.
• The display shows the current status.
<Example>
(— The outside call, 431-2111,
is now programmed.)
3. Press the NEXT (S3) button or MODE button to store a name.
– NEXT (S3) button: for KX-T7433 users
– MODE button: for KX-T7431 users
4. Enter the name (10 characters max.).
• Refer to the Combination Table on the page 15 on how to enter
each character.
5. Press the STORE button.
• The STORE indicator lights.
• The display shows the initial programming mode.
– To exit the Station Programming mode: Press [PROGRAM] or lift the handset.
9-431-2111
CLR NEXT
1
2
Station Speed Dial number
3
5
4
name
S 1 S 2 S 3
NEXT
MODE
or
AUTO DIAL
STORE
16
Station Programming
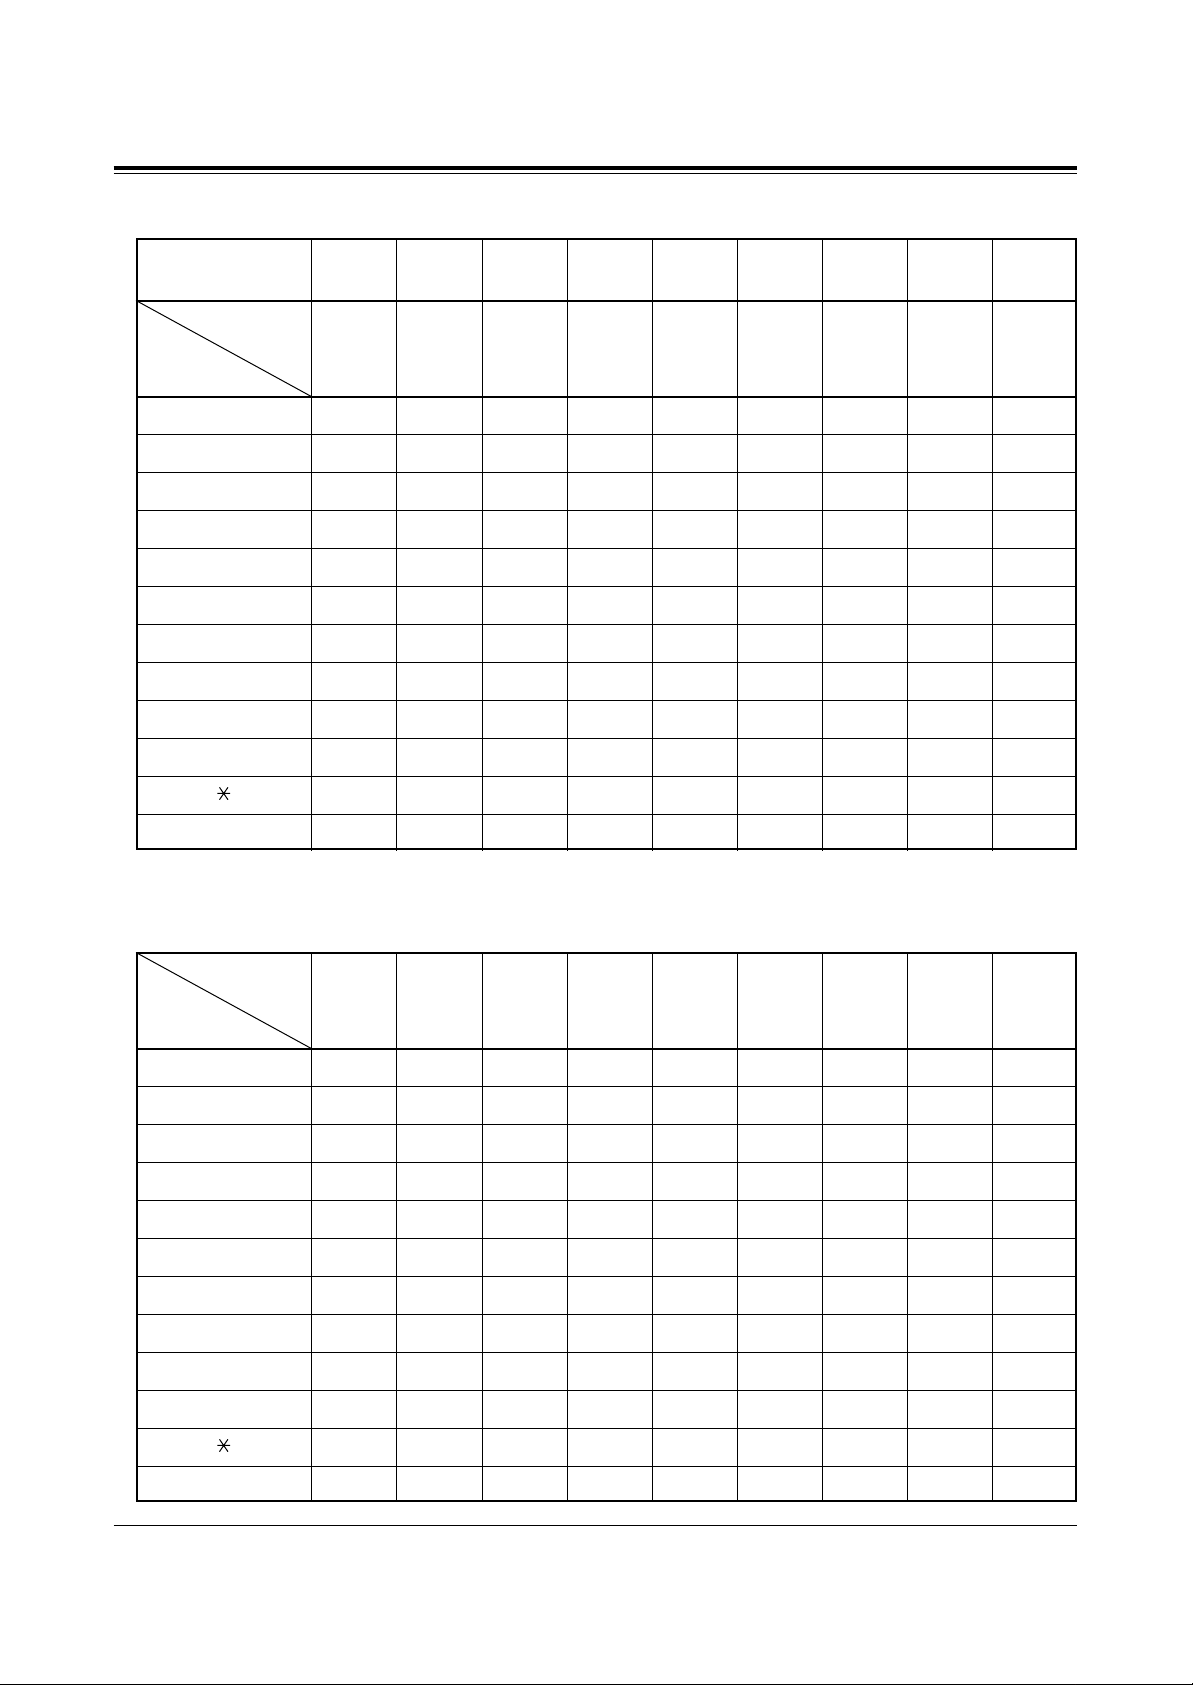
Combination Table 1
Keys 012345678
1 1QqZz ! ?
22AaBbCc
3 3DdEeF f
4 4GgHh I i
55JjKkLl
6 6MmNnOo
7 7PpQqRrSs
8 8T tUuVv
9 9WwXxYyZz
00 .,’:;
*/+–=<>
##$%&@()
SHIFT & Soft
Combination
SHIFT+
SHIFT+
S2
SHIFT+
SHIFT+
S1
SHIFT
+ S3
S3
SHIFT
+ S2
S2
SHIFT
+ S1
S1
Pressing
SELECT*
(Times)
* If your telephone is a KX-T7431, do not use the provided SELECT button. Use the AUTO ANSWER/MUTE
button which becomes the SELECT button when using the overlay.
Combination Table 2
Keys 012345678
11QqRrSsTt
2 2AaBbCcDd
3 3DdEeF fGg
4 4GgHh I i J j
55JjKkLlMm
6 6MmNnOoPp
77PpQqRrSs
8 8T tUuVvWw
99WwXxY
yZz
00 !?.,’:;
*/+–=<>#$
##$%&@()Aa
Rotating Jog Dial
(Clicks)

17
Station Programming
<Example> To enter “Mike”,
– Using the SELECT button (With a KX-T7431/KX-T7433/KX-T7436/KX-T7235)
See Combination Table 1.
1. Press 6 and then press the SELECT button once to enter “M”.
2. Press 4 and then press the SELECT button six times to enter “i”.
3. Press 5 and then press the SELECT button four times to enter “k”.
4. Press 3 and then press the SELECT button four times to enter “e”.
– Using the SHIFT button and a Soft button (With a KX-T7433/KX-T7436/KX-T7235)
See Combination Table 1.
1. Press 6 and then press the S1 button to enter “M”.
2. Press 4 and then press the SHIFT and S3 button to enter “i”.
3. Press 5 and then press the SHIFT and S2 button to enter “k”.
4. Press 3 and then press the SHIFT and S2 button to enter “e”.
– Using the Jog Dial (With a KX-T7431/KX-T7433/KX-T7436/KX-T7420/KX-T7425)
See Combination Table 2.
1. Press 6 and then rotate the Jog Dial one click to enter “M”.
2. Press 4 and then rotate the Jog Dial six clicks to enter “i”.
3. Press 5 and then rotate the Jog Dial four clicks to enter “k”.
4. Press 3 and then rotate the Jog Dial four clicks to enter “e”.
OR
1. Press 2 and then rotate the Jog Dial until “M” appears.
2. Press 2 and then rotate the Jog Dial until “i” appears.
3. Press 2 and then rotate the Jog Dial until “k” appears.
4. Press 2 and then rotate the Jog Dial until “e” appears.
Notes
•Pressing the SHIFT button alternates between capital and lower case letters. Once this
button is pressed, the SHIFT mode remains until SHIFT is pressed again.
•To erase the last letter (to backspace), press the CONF (Conference) button.
(The CONF (Conference) button becomes the “←” (backspace) key when using the
overlay).
•To erase all the data, press the CLR (S2) button.
•If you keep rotating the Jog Dial, all of the characters will be displayed in order.
<Example> If you rotate the Jog Dial after pressing 2, all the characters will appear in the
following order:
A a B b .... Z z 0 (space) ! ? . , ’ : ; * / + – = < > # $ # $ % & @ ( ) A a ....
Conditions
• The default is “Not Stored”.
• Up to ten dialling numbers and names can be assigned. Each dialling number has a
maximum of sixteen digits and each name has a maximum of ten characters.
18
Features
Handset Microphone Mute
Allows the KX-T7400 series telephone user to turn off the handset microphone so you can
consult privately with others in the room. You will still be able to hear the other party.
Setting
During a conversation using the handset
1. Press the AUTO ANSWER/MUTE or VOICE CALL/MUTE
button.
• The AUTO ANSWER/MUTE or VOICE CALL/MUTE
indicator light flashes red slowly.
Cancelling
When handset microphone mute is established
1. Press the AUTO ANSWER/MUTE or VOICE CALL/MUTE
button.
• The AUTO ANSWER/MUTE or VOICE CALL/MUTE
indicator light turns off.
Conditions
• This feature is only available during a conversation with the handset.
• You can also turn off the microphone of your telephone during a handsfree conversation
(Microphone Mute).
1
AUTO ANSWER
MUTE
1
AUTO ANSWER
MUTE

19
Special Display Features
A Panasonic digital proprietary telephone with a large display, KX-T7431, KX-T7433 and
KX-T7436, allows you to make a call or operate a feature using the display message.
For operation of the features marked “*”, refer to the corresponding feature in the KX-TD208
Operating Instructions.
1) Call Directory
Extension (Extension Dialling)
STA Speed (Station Speed Dialling)
SYS Speed (System Speed Dialling)
Call Log (Call Log, Outgoing (KX-T7436 only))
2) System Feature Access Menu
The System Feature Access Menu provides a display of the system features which appear in
alphabetical order. The available features are as follows:
Absent Message Capability Executive Busy Override
Automatic Callback Busy Log-in / Log-out
Call Log Message Waiting
Call Park Night Service On / Off
Call Pickup Paging – Group, Deny
Call Waiting Paralleled Telephone Connection
Door Opener Station Feature Clear
Doorphone Call Timed Reminder
Electronic Station Lockout
3) Call Forwarding/Do Not Disturb (KX-T7436 only)*
You can also access the Call Forwarding and Do Not Disturb features. Go off-hook and
press the FWD/DND button.
4) Call Log, Incoming (KX-T7433/KX-T7436 only)*

20
Special Display Features
List for Display Operation with a Soft button
For KX-T7431, KX-T7433 and KX-T7436
2.3 Making Calls
Quick Dialling
Dialling with a System Speed Dialling Button (System Speed Dialling)
Dialling with a Station Speed Dialling Button (Station Speed Dialling)
2.6 Others
Before Leaving Your Desk
Showing Your Message on the Calling Party’s Display (Absent Message Capability)
Leaving a Message Notification (Message Waiting)
Switching the Day/Night Calling Mode (Night Service)
Setting the Paralleled SLT to Ring (Paralleled Telephone Connection)
For KX-T7433 and KX-T7436
2.3 Making Calls
When the Dialled Line is Busy
Sending a Call Waiting Tone to a Busy Extension (Busy Station Signalling)
Making Your Telephone Ring Back Automatically When a Line Becomes Free
(Automatic Callback Busy – Camp On)
2.4 Receiving Calls
Picking up a Call
Picking up a Call Ringing at Another Extension (Call Pickup) Group Call Pickup
2.5 During a Conversation
Placing a Call on Hold
Placing a Call in a System Parking Area (Call Park)
Paging – group paging
2.6 Others
Turning On the Background Music (Background Music (BGM))
Calling with Account Codes (Account Code Entry)
Calling an Extension which Denies Receiving Calls (Do Not Disturb Override)
Caller Identification Services (for KX-T7230/KX-T7235)
Recording the Caller’s Information Automatically (Incoming Call Log)
For KX-T7436
2.6 Others
Before Leaving Your Desk
Forwarding a Call (Call Forwarding) – Setting/Cancelling
21
Special Display Features
Left
(counter-clockwise)
To the previous
item
Right
(clockwise)
To the next
item
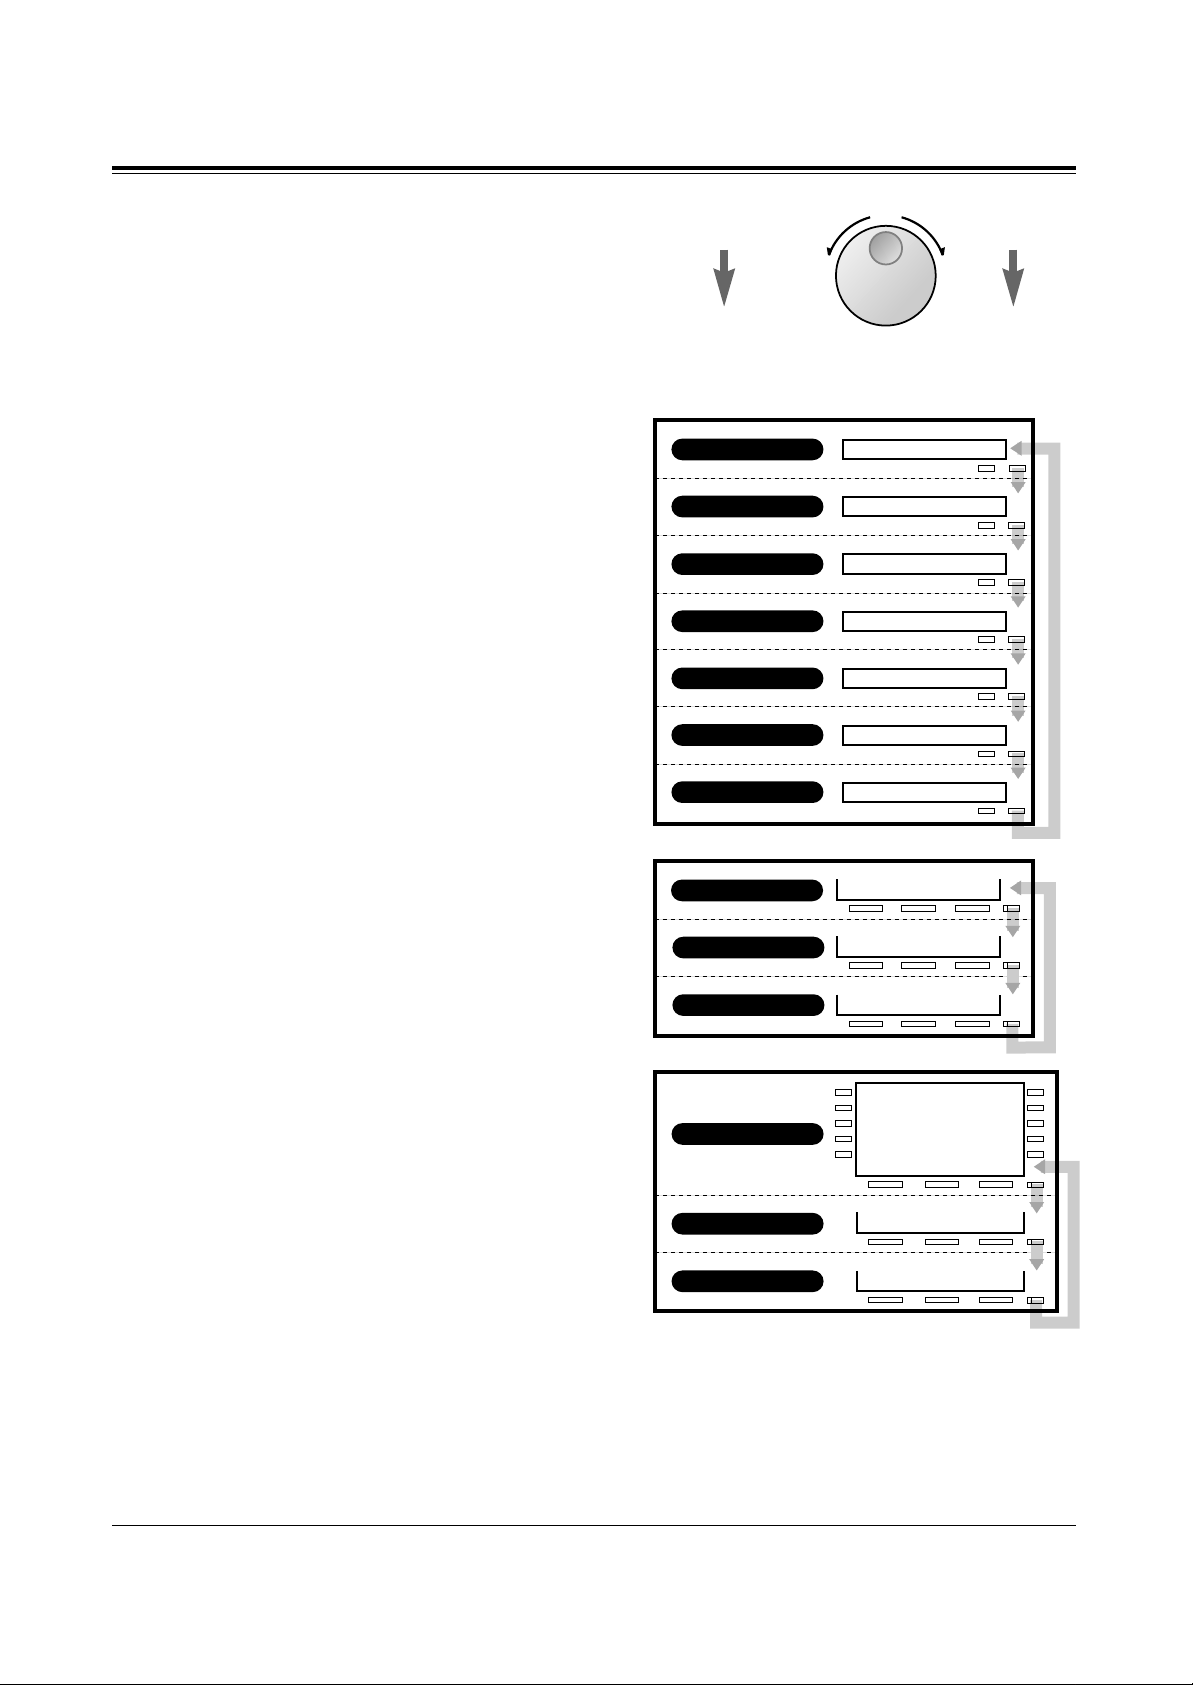
Jog Dial Operation
You can search for desired items by
using the Jog Dial on the corresponding
display menu. Rotate the Jog Dial in
either direction as desired. The items
will be displayed as follows.
Jog Dial Operation Display
– KX-T7431
While idle, the display changes as follows
by pressing the MODE button.
The Jog Dial operation is available in the
second through seventh displays.
MODE
MODE
1 Jan 15:00
System Speed
Station Speed
Extension
Feature
Ringer: 3
Contrast: 3
MODE
MODE
MODE
MODE
MODE
Initial display
Second display
Third display
Forth display
Fifth display
Sixth display
Seventh display
– KX-T7433
While idle, the bottom line of the display
changes by pressing the SHIFT button as
follows. The Jog Dial operation is
available in the third display.
– KX-T7436
The Jog Dial operation is available after
pressing a Function button on the third
line. To use the Soft buttons, use the
bottom line in the third display which
appears by pressing the SHIFT button as
follows.
RING BGM
CONT
1 Jan 15:00
Extension STA Speed
Features SYS Speed
Call Log
NEW9
OLD6
EXT FEAT
STA
SHIFT
SHIFT
SHIFT
Initial display
Second display
Third display
RING BGM
CONT
NEW9
OLD6
EXT FEAT
STA
SHIFT
SHIFT
SHIFT
Initial display
Second display
Third display
Conditions
• The sixth and seventh displays of the KX-T7431 are used for the ringer volume and
display contrast adjustments. For details, refer to the “Initial Setting” in this manual.
• The second display of the KX-T7433 and KX-T7436 is used to call back the caller by
checking the call log data (Call Log, Incoming). For operation, refer to the corresponding
feature in the KX-TD208 Operating Instructions.
 Loading...