

Page 1
Digital Super Hybrid System
KX-TD816E
KX-TD1232E
User Manual Addendum
for
KX-TD7590CE
In this manual, the suffix “E” or “CE” of each model number is omitted.
Page 2

Table of Contents
1 Operation ......................................................................................................................3
1.1 Operation Outline....................................... ...... ....... ...... ...... ....... ............................................... 3
1.2 Redial..... ...... ................................................................. ...... ....... ...... ....... .................................. 4
2 Selecting the Feature Buttons on the Display ...........................................................5
3 PS Programming ...... ...................... ...................... .. ...................... ...................... .. ........6
4 PBX Programming......................................................................................................17
Note
This guide shows you the additional features for the DECT Portable Station (KX-TD7590)
Please refer to this guide in addition to the current User Manual.
2
Page 3
1 Operation
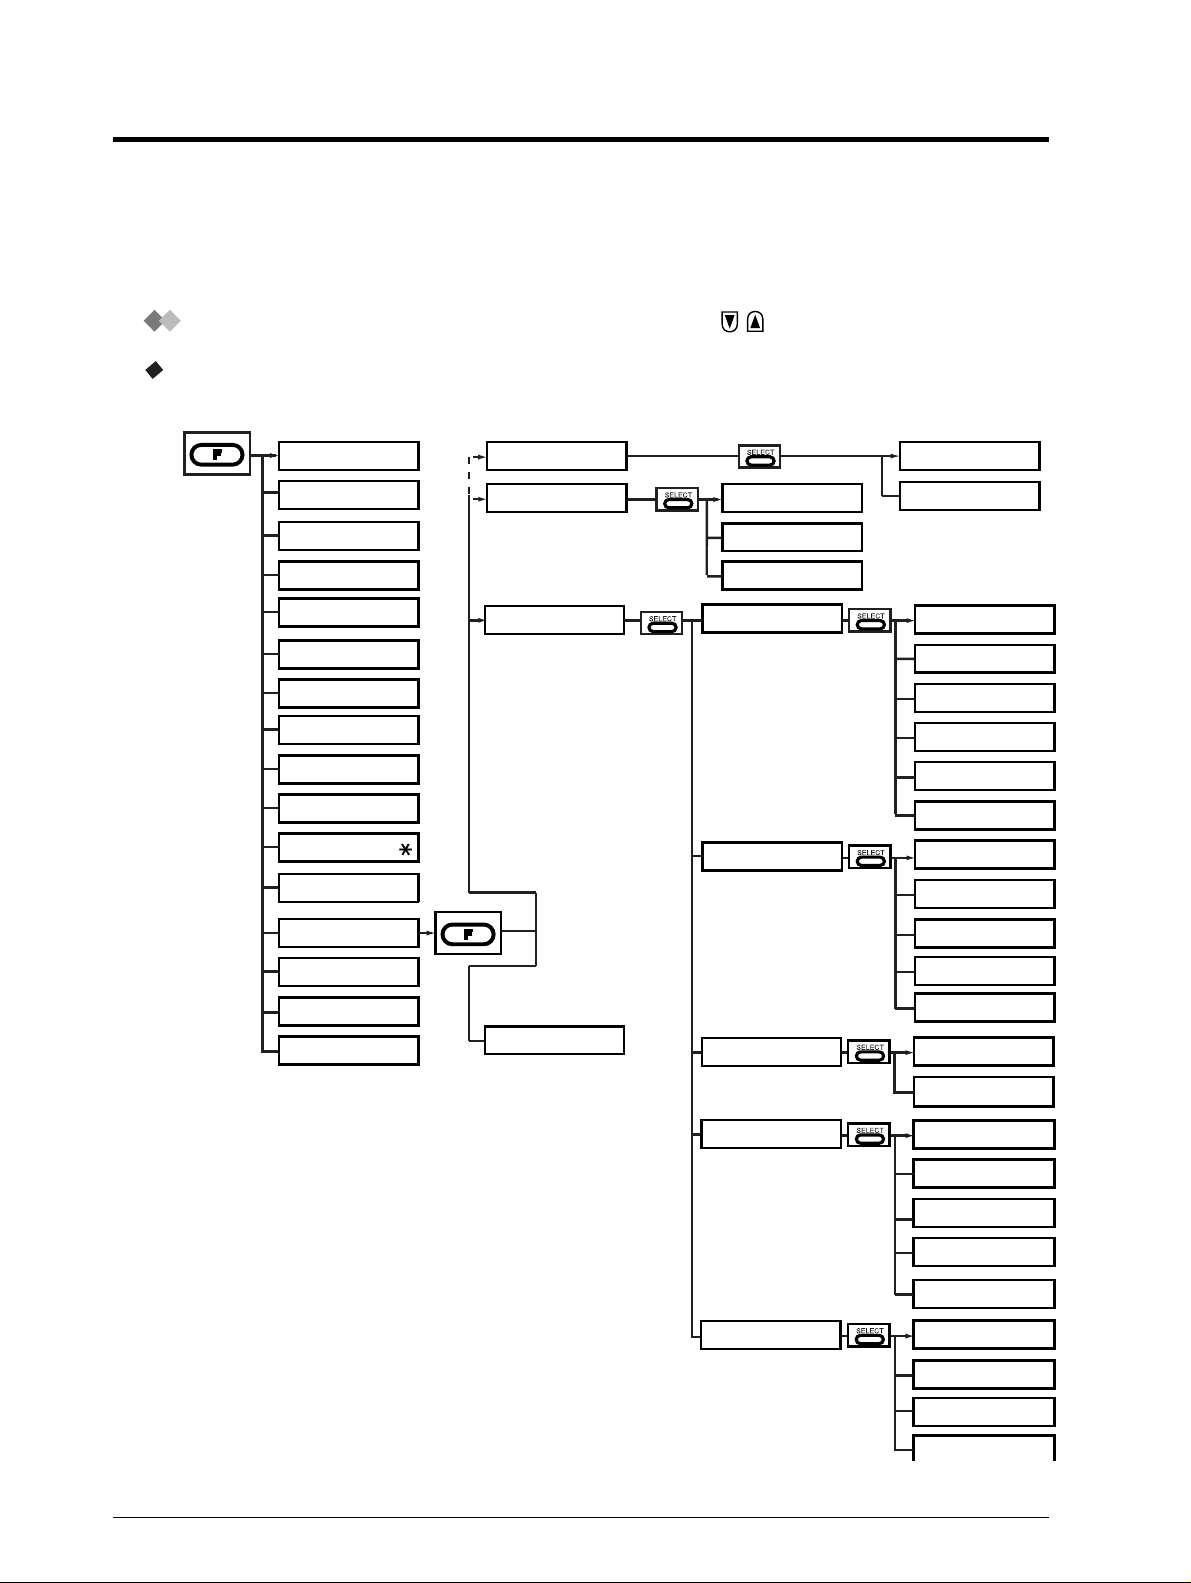
1.1 Operation Outline
How to navigate through the LCD menu using keys
Using the FUNCTION button
Operation Outline
PAUSE (KEY1)
1
FWD/DND (KEY2)
MESSAGE (KEY3)
CONF (KEY4)
*
1
*
1
*
INITIAL SETTING
MODIFY BOOK
3
*
PS-DIALING
SHORTCUT
PBX-STA-DIALING
LANGUAGE
REGISTRATION
6
*
4
*
TONE (KEY5)
1
FLASH/R (KEY6)
HOLD (KEY7)
FKEY LIST (KEY8)
REDIAL (KEY9)
PS-PROGRAM (KEY0)
WAVESEARCH (KEY )
EDIT MODE (KEY#)
PROGRAM (FNCT)
F1 EDIT (F1)
F2 EDIT (F2)
F3 EDIT (F3)
1
*
: Only displayed during a call.
2
*
: Displayed on Directories
*
1
*
2
*
PS-PROGRAM
PBX-PROGRAM
(except the PBX Extension Dialling Directory)
or in pre-dialling.
3
*
: After registering PS, it is not displayed.
4
*
: For use by the dealer.
5
*
: Only displayed when "AUTO ANSWER" is assigned.
6
*
: Only displayed within cell range.
7
*
: Only displayed when the PS is registered.
8
*
: Only displayed when handset is assigned to
more than one DECT system.
ANSWER SETTING
DISPLAY SETTING
6
*
BEEP SETTING
DECT-SYS SETTING
SECURITY SETTING
RING PATTERN-INT
RING PATTERN-CO
VIBRATION&RING
QUICK ANSWER
AUTO ANSWER
AUTO ANS DELAY
BACKLIGHT
LANGUAGE
STANDBY DISPLAY
DATE/TIME DISPLY
LCD CONTRAST
KEY TONE
RANGE WARNING
REGISTRATION
LANGUAGE DELETE
CANCEL DECT-SYS
DECT-SYS LOCK
ACCESS DECT-SYS
DIRECTORY LOCK
5
*
6
*
6
*
4
*
7
*
8
*
ALL PS-BOOK DEL
PS PASSWORD
MEMORY CLEAR
3
Page 4
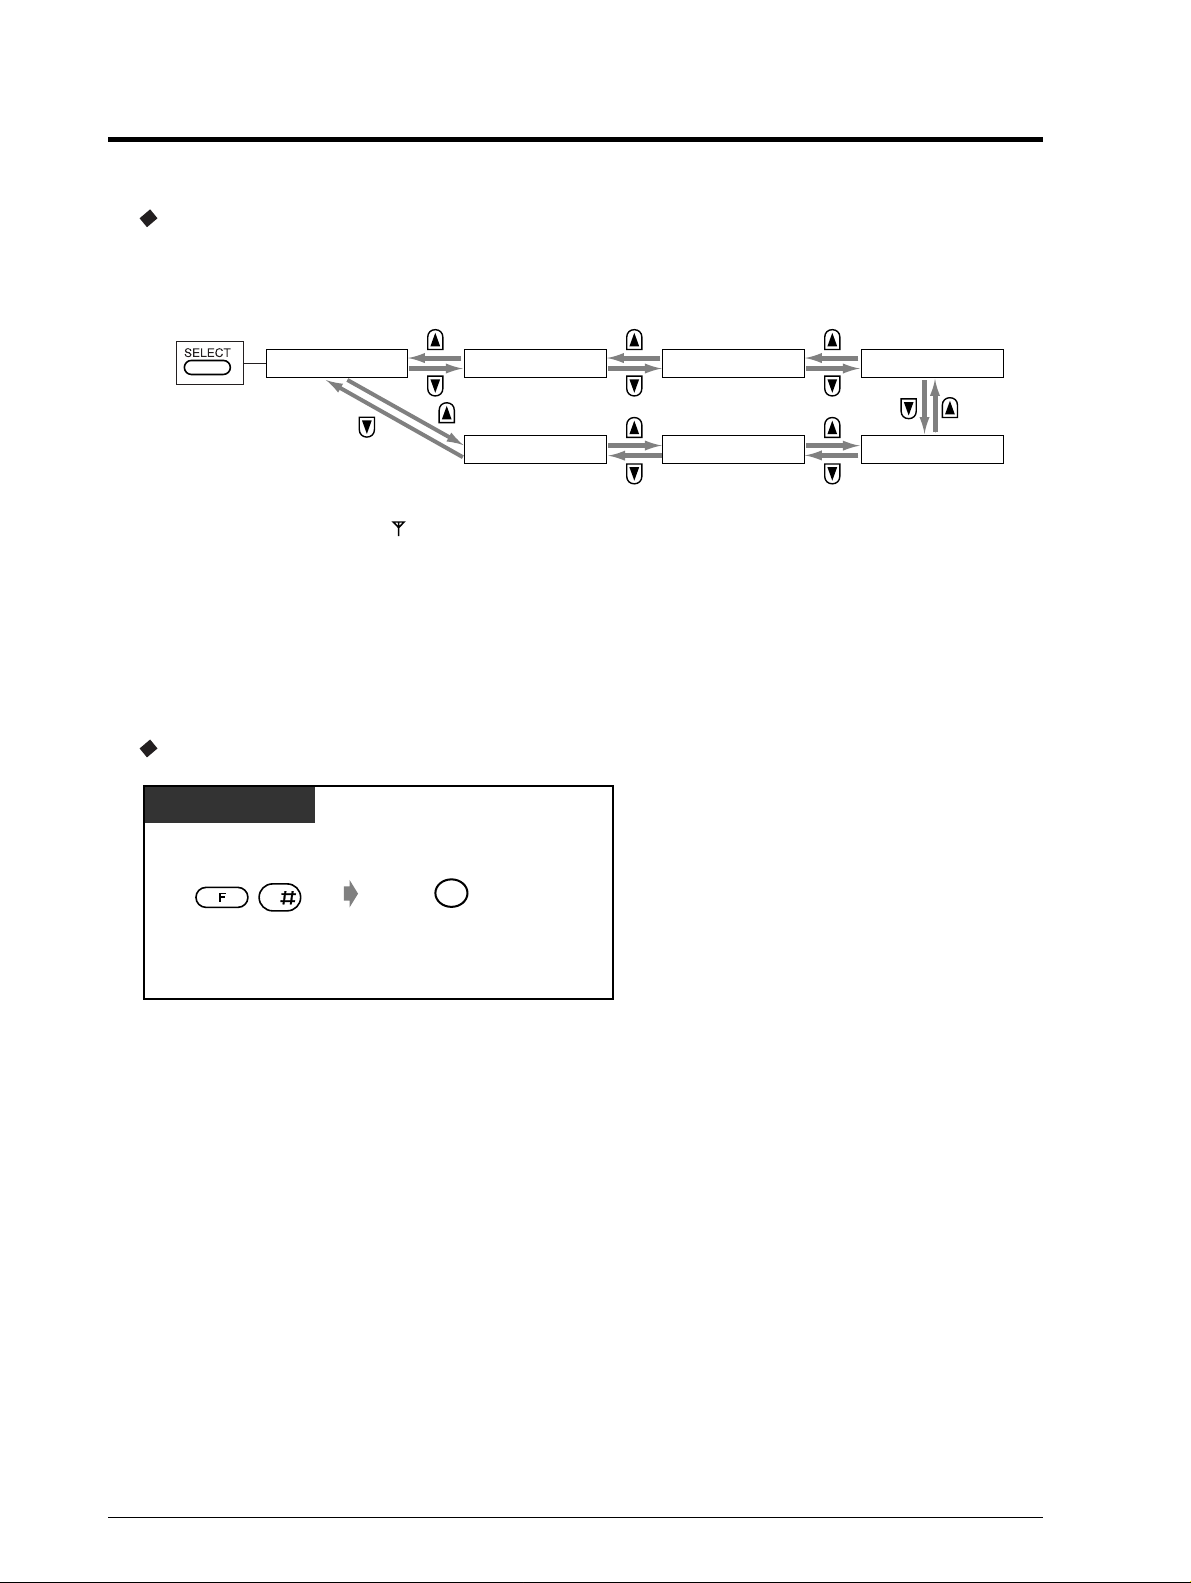
Using the SELECT button
(Directories)
PS Dialling Directory
PS-DIALING
6
*
: It is displayed only when " " is displayed.
Outgoing Log Directory
OUTGOING LOG
Back Menu
1.2 Redial
To clear all numbers in the call log
PS
F3
PBX Station Speed
Dialling Directory
6
*
PBX-STA-DIALING
SHORTCUT
SHORTCUT Directory
for PBX Feature Number
and Setting Display of
PS Programming
6
*
PBX Extension
Dialling Directory
PBX-EXT-DIALING
PBX-SYS-DIALING
PBX System Speed
Dialling Directory
6
*
6
*
Press FUNCTION and then
# while the call log is displayed.
Press F3.
4
Page 5
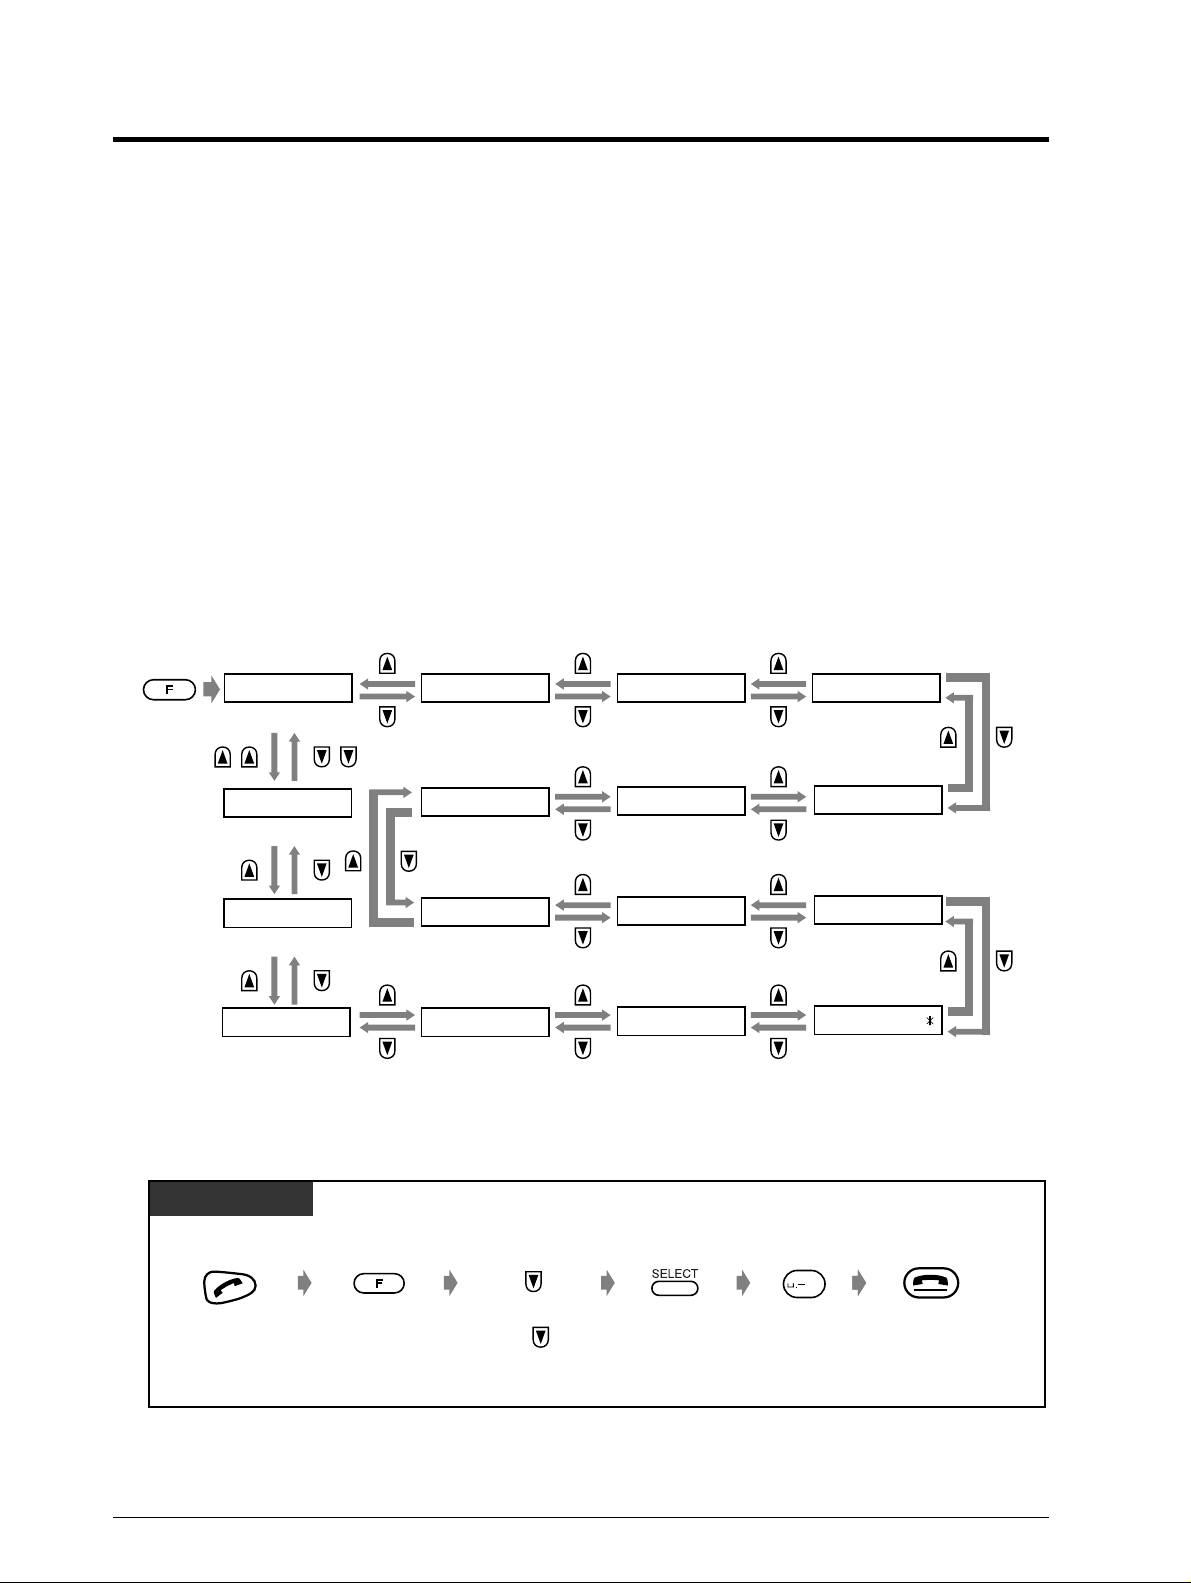
2 Selecting the Feature Buttons on the Display
The following buttons can be activated using display operations when they are available.
PAUSE (KEY1) Button
FWD/DND (KEY2) Button
MESSAGE (KEY3) Button
CONF (Conference) (KEY4) Button
TONE (KEY5) Button
FLASH/RCL (KEY6) Button
HOLD (KEY7) Button
FKEY LIST (KEY8) Button
REDIAL (KEY9) Button
PS-PROGRAM (KEY0) Button
WAVESEARCH (KEY*) Button
EDIT MODE (KEY#) Button
PROGRAM (FNCT) Button
F1 EDIT (F1) Button
F2 EDIT (F2)Button
F3 EDIT (F3) Button
PAUSE (KEY1) FWD/DND (KEY2)
PAUSE Button FWD/DND Button
F3 EDIT (F3)
F3 EDIT Button
F2 EDIT (F2)
F2 EDIT Button
F1 EDIT (F1)
F1 EDIT Button
HOLD (KEY7)
HOLD Button
FKEY LIST (KEY8)
FKEY LIST Button
PROGRAM (FNCT)
PROGRAM Button
<Example>
To cancel the Do Not Disturb feature
PS
PS
MESSAGE (KEY3)
MESSAGE Button
FLASH/R (KEY6)
FLASH/RCL Button
REDIAL (KEY9)
REDIAL Button
EDIT MODE (KEY#)
EDIT Button
CONF (KEY4)
CONF Button
TONE (KEY5)
TONE Button
PS-PROGRAM(KEY0)
PS-PROGRAM
Button
WAVESEARCH(KEY )
WAVESEARCH
Button
Press TALK.
Press
FUNCTION.
“ FWD/DND” is
displayed.
0
Press SELECT.Press until
Press 0.
Press CANCEL.
5
Page 6
3 Handset (PS) Programming
You may be required to enter a PS Programming password when entering the security setting
mode.
And you may be required to enter a DECT System Lock password when entering the DECT-SYS
Setting mode.
Once the password is entered you can proceed to the next step.
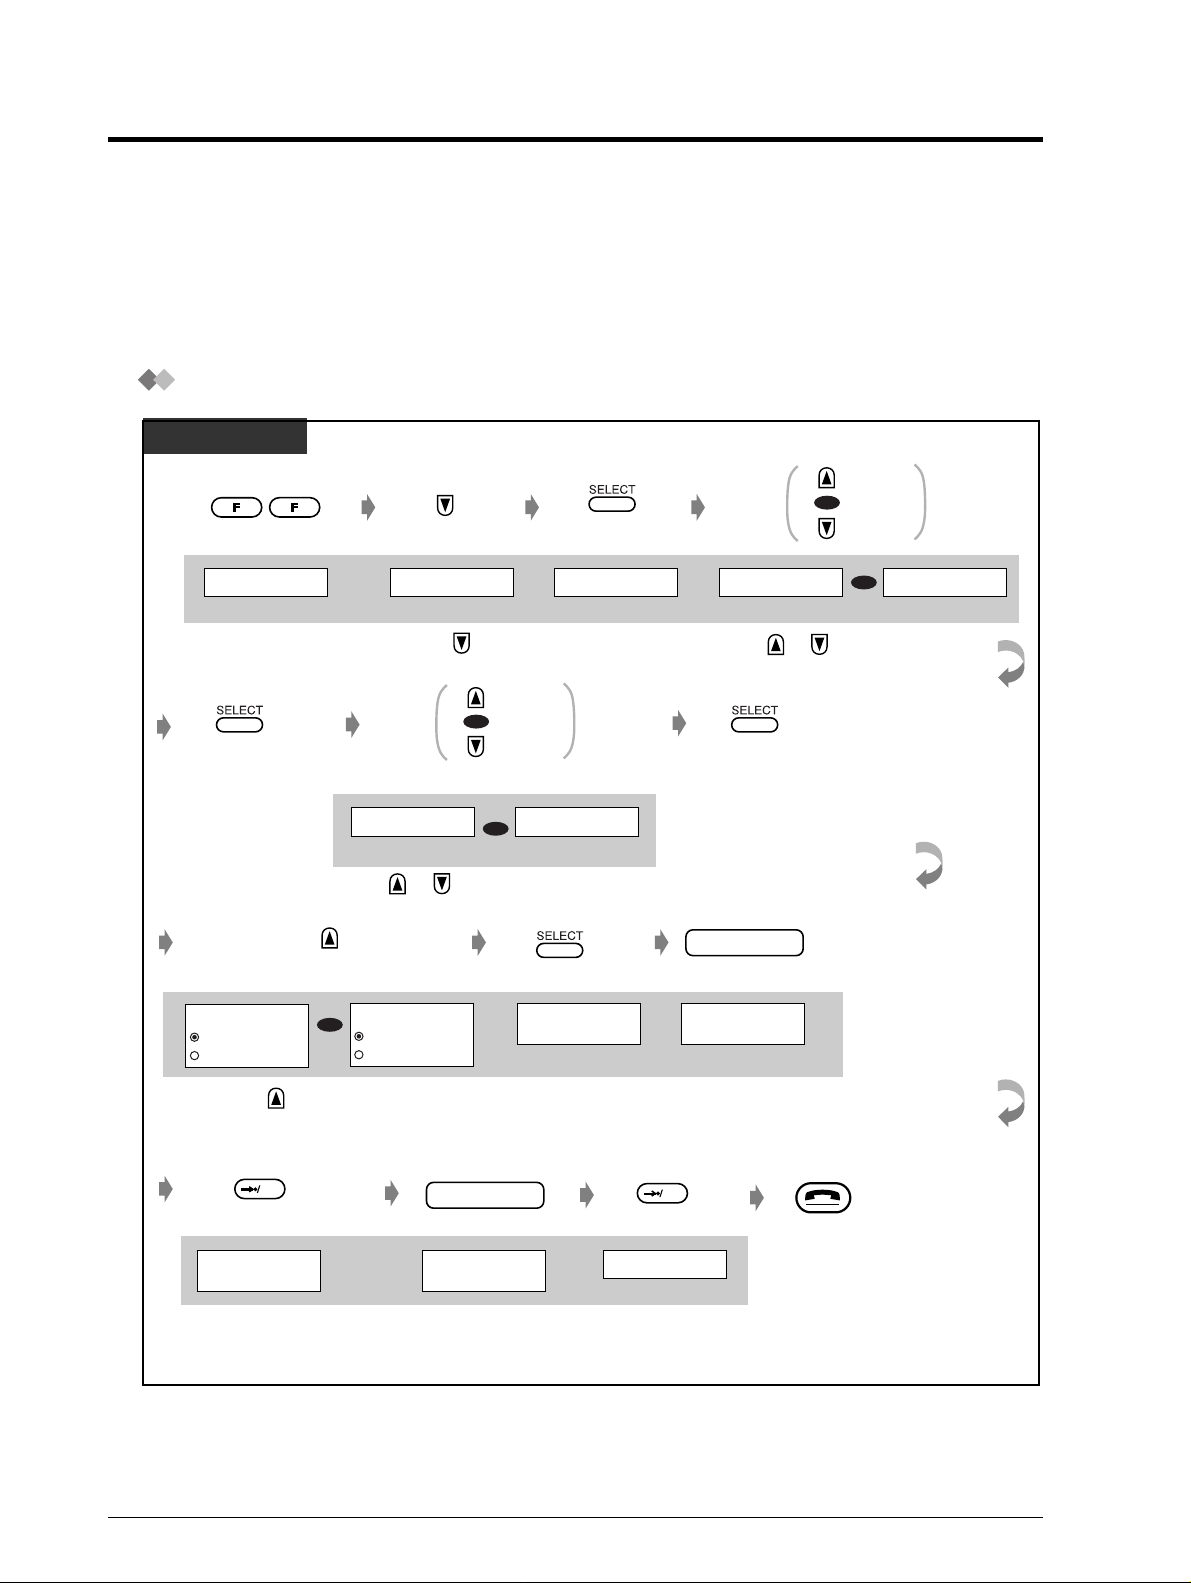
To set the PS Programming / DECT System Lock password
PS
Previous
OR
Next
MODIFY BOOK
Press FUNCTION
twice.
PS PASSWORD DECT-SYS LOCK
Press SELECT..
PS PASSWORD
ENABLE
DISABLE
Press to select "ENABLE" .
Press or until the display above appears.
DECT-SYS LOCK
OR
ENABLE
DISABLE
PS-PROGRAM
Press .
OR
Previous
Next
OR
ENTER PASSWO RD
_ _ _ _
=
Press SELECT.
ANSWER SETTING
Press SELECT.
SECURITY SETTING
Press or until the display
above appears .
Press SELECT..
OR
password
ENTER PASSWO RD
=
* * * *
Enter password
(4 digits).
DECT-SYS SETTING
OK
REENTER PASS WO RD
_ _ _ _
=
Press OK.
password
REENTER PASS WO RD
=
* * * *
Enter same
password again.
OK
LOCKED
Press OK.
Press CANCEL.
6
Page 7
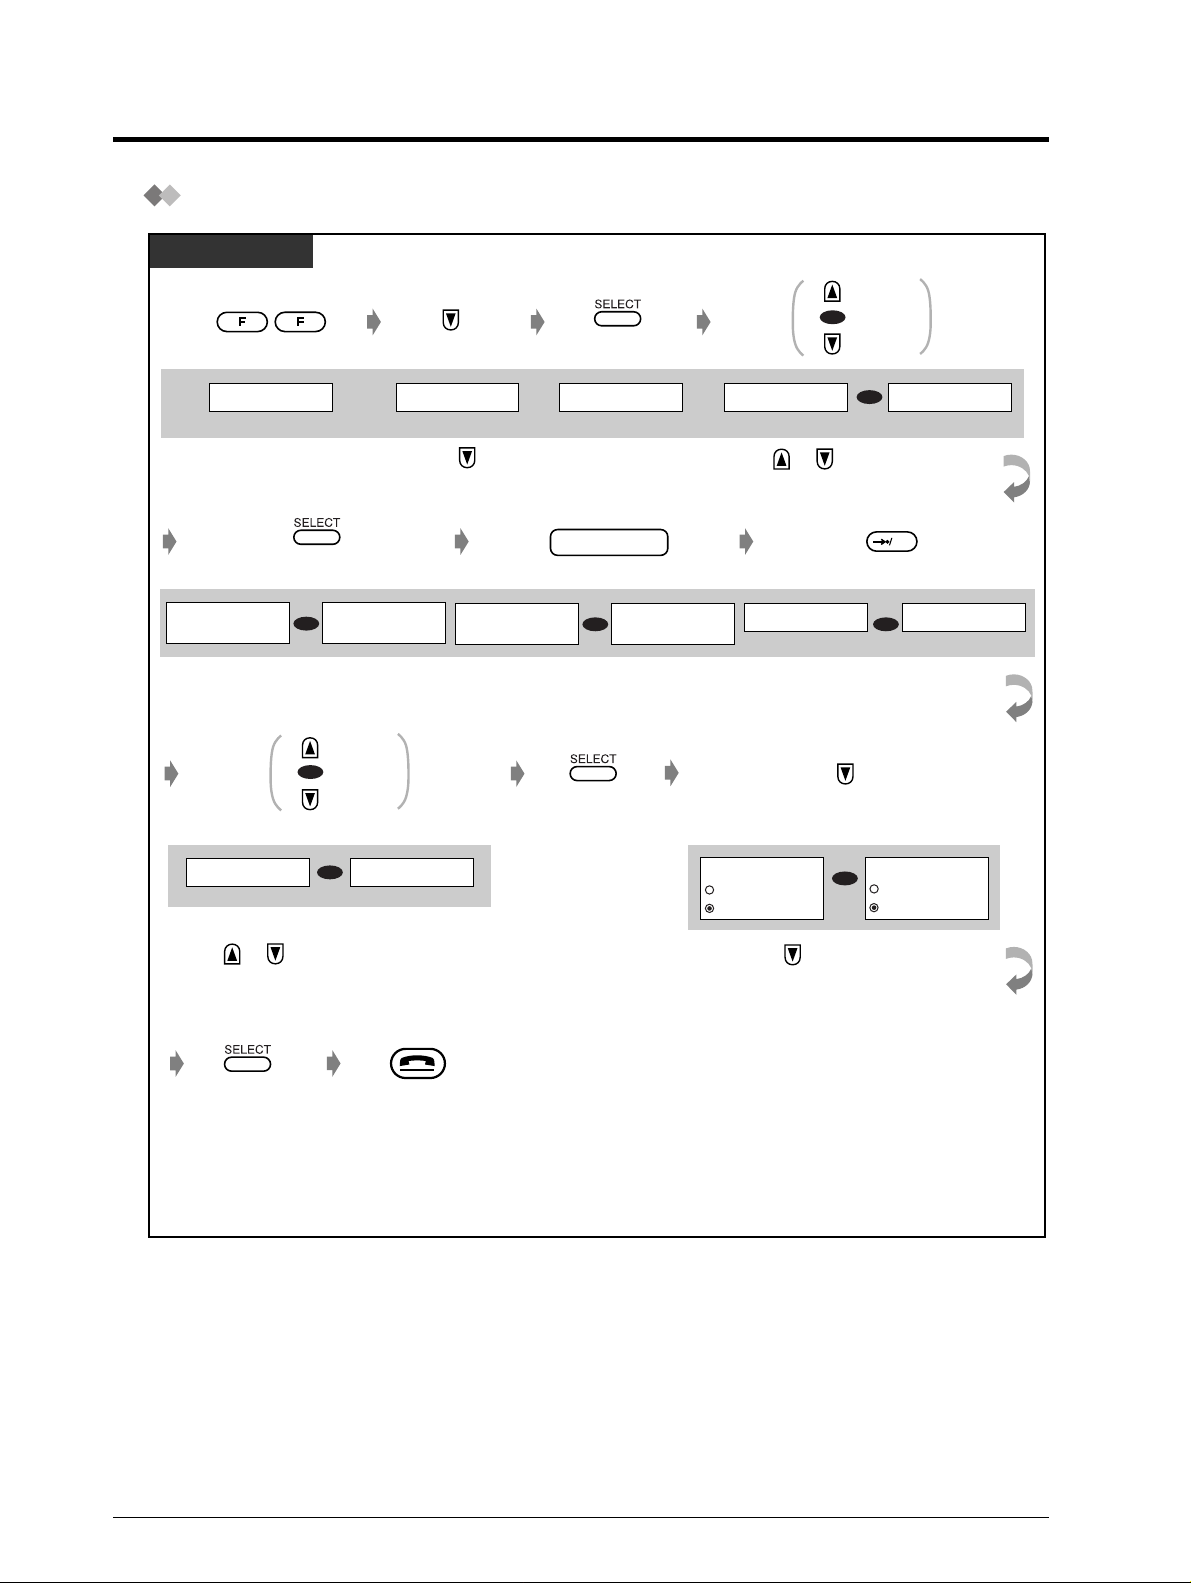
To cancel the PS Programming / DECT System Lock password
PS
Previous
OR
Next
MODIFY BOOK
Press FUNCTION
PS-PROGRAM
Press .
twice.
PS PASSWORD
_ _ _ _
=
DECT-SYS LOCK
OR
PASSWORD=
_ _ _ _
PS PASSWORD
=
* * * *
Press SELECT.
Previous
OR
Next
PS PASSWORD
DECT-SYS LOCK
OR
Press or until the display above appears .
ANSWER SETTING
Press SELECT.
password
DECT-SYS LOCK
OR
PASSWORD=
Enter password
(4 digits).
Press SELECT.
SECURITY SETTING
Press or until the display
above appears .
DIRECTORY LOCK
* * * *
PS PASSWORD
ENABLE
OR
DISABLE
Press to select "DISABLE" .
DECT-SYS SETTING
OR
OK
REGISTRATION
OR
Press OK.
DECT-SYS LOCK
ENABLE
DISABLE
Press SELECT.
Press CANCEL.
7
Page 8

To change the initial settings
PS
MODIFY BOOK PS-PROGRAM
ANSWER SETTING
Previous
OR
Next
<Example>
BEEP SETTING
KEY TONE
Press FUNCTION
twice.
Previous
OR
Next
<Example>
RANGE WARNING
Press or until
the desired item is
displayed. *
Categories*
2
1
ANSWER SETTING
Press .
To continue
RANGE WARNING
ON
@@@
OFF
Press SELECT. Press SELECT.
Display
RING PATTERN-INT
BELL1
CHANGE=SELECT
RING PATTERN-CO
BELL1
Press SELECT.
Previous
OR
Next
RANGE WARNING
ON
@@@
OFF
Press or until
the desired item is
displayed.
Item Selection*
You may choose from
the 6 Ring Tones or
4 Melodies.
(Ringer Pattern
Selection)
CHANGE=SELECT
Press or until
the desired item is
displayed. *
1
Press CANCEL.
Ringer pattern no.
Ringer pattern 1
(BELL1)
3
Press SELECT.
Menu no.
- INT
1
- CO
1
14
*
1
2
Ring and vibrate at the
same time
(RING & VIB)
Vibrate for 5 seconds
then ring
(VIB→RING)
Not use the vibration
33
1
VIBRATION & RING
OFF
CHANGE=SELECT
How you are alerted
to a call. *
4
(Vibration and Ring
Type Selection)
and ring mode (OFF)
Do you prefer to answer
QUICK ANSWER
ON
OFF
an incoming call by just
lifting your ringing PS
off the Charger?
(Quick Answering
Yes (ON)
No (OFF)
1
44
Mode Set)
8
Page 9

Categories*
1
Display
Item Selection*
3
Menu no.
14
*
ANSWER SETTING
DISPLAY SETTING
AUTO ANSWER
OFF
CHANGE=SELECT
AUTO ANS DELAY
6S
CHANGE=SELECT
BACKLIGHT
ON
OFF
LANGUAGE
AUTO
CHANGE=SELECT
Do you prefer to answer
a call without pressing
CO, TALK or INT
buttons when using
the headset?
(Automatic Answer
Mode Set)
Select the number of
seconds before
answering a call
automatically
when using the headset.*
(Automatic Answ er Delay
Selection)
Do you prefer the
keypad backlight?
(Keypad Backlight
Mode Set)
Do you prefer to
change the display
language?
(Display Language
Selection)
No (OFF)
Answer all calls. (INT/CO)
Answer only intercom calls.
(INT ONLY)
5
6 s
Yes (ON)
No (OFF)
English
German (Deutsch)
French (FRANCAIS)
Italian (ITALIANO)
Spanish (ESPANOL)
seconds
1
55
1
66
1
22
2
2
Dutch (NEDERLANDS)
Auto (English)*
6
Extension no. (EXTN)
STANDBY DISPLAY
SYS-NO.&EXT
CHANGE=SELECT
Which standby display
do you prefer?
7
*
(Standby Display
Selection)
DECT system no.
(SYS-NO.)
DECT system and extension
no. (SYS-NO.&EXTN )
3
2
None of these (OFF)
Which display do you
DATE/TIME DISPLY
TIME
DATE
prefer in the Standby
mode? *
7
(Date / Time Display
Selection)
Date and time (TIME)
Date (DATE)
2
4
9
Page 10

Categories*
1
Display
Item Selection*
3
Menu no.
14
*
DISPLAY SETTING
BEEP SETTING
DECT-SYS SETTING
LCD CONTRAST
LIGHT
DARK
KEY TONE
ON
OFF
RANGE WARNING
ON
OFF
REGISTRATION
DECT-SYS1
DECT-SYS2
LANGUAGE DELETE
Deutsch
FRANCAIS
Preferred contrast level from the 12 levels
available. (LCD Contrast Selection)
- default: Level 7
Do you prefer to
Yes (ON)
hear the key tone?
(Key Tone Set)
No (OFF)
Do you prefer an
audible warning when
Yes (ON)
out of range?(Range
Warning Setting)
No (OFF)
DECT-SYS1
Which DECT system
are you registering? *
(Registration)
8
DECT-SYS2
DECT-SYS3
DECT-SYS4
German (Deutsch)
French (FRANCAIS)
Do you prefer to delete
the language ? *
9
Italian (ITALIANO)
Spanish (ESPANOL)
2
5
33
1
3
2
11
4
2
4
CANCEL DECT-SYS
DECT-SYS1
DECT-SYS2
DECT-SYS LOCK
ENABLE
DISABLE
ACCESS DECT-SYS
AUTO
CHANGE=SELECT
Dutch (NEDERLANDS)
This programming is for dealer only.
This program cancels the PS registration.
Use this function only when the PBX program
(PS Termination) fails to cancel the registration *
(PS Registration Cancellation)
Do you prefer to use the
DECT System Lock
Yes (ENABLE)
Password?
(DECT System Lock
Password Set)
No (DISABLE)
To access a different
11
DECT system(1 to 4)
*
DECT System no.
(DECT System
Selection)
AUTO (All connected
terminals)
3
10
4
4
4
5
4
10
Page 11

Categories*
1
Display
Item Selection*
3
Menu no.
14
*
SECURITY SETTING
DIRECTORY LOCK
ON
OFF
DELETE?
NO
YES
PS PASSWORD
ENABLE
DISABLE
INITIALIZE DATA?
NO
YES
To lock / unlock the PS
dialling directory.
12
*
Lock (ON)
(Directory Lock
Control)
Unlock (OFF)
Select "YES" and press the SELECT button to delete
all items stored in the PS Dialling directory .
(ALL PS-BOOK DEL)
Do you prefer to use
the PS Programming
13
password?
*
(PS Programming
Password Set)
Yes (ENABLE)
No (DISABLE)
The following settings will be returned to their default
settings.
- Ringer volume
- Receiver volume
- PS Programming items
(except: Selecting the DECT System;
Cancelling the PS Registration;
Setting the PS Programming Password;
Setting the DECT System LOCK)
Select "YES" and press the SELECT button
after the display on the left appears.
(Memory Clear)
1
55
2
5
3
5
5
4
11
Page 12

•*1 Setting Categories: there are five settings. You must display the destined setting
on this step to select the desired item.
2
If the password has been assigned, it is required only when "SECURITY
•*
SETTING" or "DECT-SYS SETTING" is selected.
3
Selection: the default is in gray.
•*
4
If you set the ringer volume off / vibration on mode or meeting mode using the
•*
UP / DOWN button, the PS doesn't ring regardless of this setting.
5
The display of this item is only displayed when "Automatic Answer Mode Set" is
•*
set to "INT/CO" or "INT ONLY".
Notice
If you set "INT/CO" or "INT ONLY" to the Automatic Answer Mode (PS
Programming) and connect the headset, your phone will answer incoming calls
automatically . If you leave PS unattended with the headset connected, the following
problems will occur.
1. The PS will answer calls and calling party will be charged even though you are
not there to take the call.
2. Depending on the line, even if the calling party disconnects the call, the DECT
line will remain connected until you disconnect the call manually or the battery
expires. The PBX trunk may also remain connected to the network. Please note the
follo wing;
a. Please set "INT/CO" or "INT ONLY" to the Automatic Answer Mode only when
necessary.
b. If you are using the "INT/CO" or "INT ONLY" setting in the Automatic Answer
Mode and you take off the headset, please pull the headset jack out.
The Automatic Answer Mode is not available while the PS is on the charger.
6
If the setting is still "AUTO", the display language will depend on the setting of the
•*
system.
7
The display of this item is displayed only when " " is displayed.
•*
8
This display is used for PS registration and not displayed if all DECT Systems are
•*
registered. For details, consult your dealer.
9
If the displayed language is deleted, the language assigned to "AUTO" will be
•*
displayed.
10
The display of this item is displayed only when the PS is registered.
•*
11
The display of this item is only displayed when more than two fixed terminals are
•*
connected.
12
If "ON" is selected, "ENABLE" of "PS PASSWORD" is selected automatically.
•*
Even if "OFF" is selected, "DISABLE" is not selected automatically.
13
If "DISABLE" is selected, the PS Dialling Directory is unlocked.
•*
12
Page 13

•*14 You can easily access each setting in the PS-PROGRAM mode by pressing menu numbers in
order as follows:
<Example>
0
PAUSE (KEY1)
1
( ): These numbers are
displayed on the
top line of the display
as below.
ANSWER SETTING
1
1
111
1
RING PATTERN-INT
2
BACKLIGHT
1
RING PATTERN-INT
BELL1
CHANGE=SELECT
1
BACKLIGHT
ON
OFF
2
LANGUAGE
AUTO
CHANGE=SELECT
3
STANDBY DISPLAY
OFF
CHANGE=SELECT
1
MELODY4
BELL1
BELL2
1
NEDERLANDS
AUTO
ENGLISH
1
SYS-NO.&EXTN
OFF
EXTN
13
Page 14

To edit the labels of the flexible CO buttons
You can ass ign two names (short and full) to each Flexible CO button.
The short one is displayed on the bottom line on LCD. The full one is displayed for 3 seconds when
you reconfirm the Flexible CO buttons by pressing FUNCTION + 8 (FKEY LIST Displa y).
Flexible CO buttons for PS functions
PS
F1 F2 F3 F1
<Example>
PAUSE (KEY1)
F1 EDIT
PBX
PS
To <1> or <2>
Press FUNCTION.
Press the flexible
CO button.
<To assign a PS function>
Previous
OR
Next
1-TOUCH DIAL
NONE
PS-DIAL
NONE
PS-DIAL
PS NEW ENTRY
Press or until
the desired item is
displayed.
<To change a PS function or edit a label>
F1
DIAL
PS-DIAL
EDIT
NEW
NONE
PS-DIAL
PS NEW ENTRY
Press F1.*
F2
Press F1.
STORED
Press SELECT.
Previous
OR
Next
PBX-EXT-DIAL
SHORTCUT
SHORTCUT NEW
Press or until
the desired item is
displayed.
Next
STORED
Press SELECT.
name
14
DIAL
PS-DIAL
Press F2.
OK
STORED
Press OK.
DIAL
PS-DIAL
Press to edit
the full name.
Press CANCEL.
DIAL
Press SELECT.
BOOK
Edit name.
Page 15

Flexible CO buttons assigned by PBX
PS
F1 F2 F3
<Example>
PAUSE (KEY1)
F1 EDIT
PBX
PS
F2
DECT-SYS
DECT-SYS1
DECT-SYS2
Previous
OR
Next
DECT-SYS
DECT-SYS3
DECT-SYS4
To <1>, <2> or <3>
Press FUNCTION.
<To store>
NOT STORED
NEW
Press SELECT.
OK
STORED
Press OK.
<To edit>
PS16
PS BOSS
EDIT
DEL
Press the flexible
CO button.
F1
NOT STORED
NOT STORED
Press F1.
Press CANCEL.
F2
PS16
PS BOSS
Press F2.
Next
NOT STORED
NOT STORED
Press to store
the full name.
Next
PS16
PS BOSS
Press or until
the desired item is
displayed.
Press SELECT.
<Example>
PS16
name
PS16
Enter name.
The short name
- max. 4 characters
The full name
- max. 14 characters
name
PS17
Press SELECT. Press SELECT.
OK
STORED
Press OK.
Press F2.
Press CANCEL.
Press to edit
the full name.
<To delete>
F3
PS16
PS BOSS
EDIT
DEL
Press SELECT.
DELETED
Press F3.
Edit name.
15
Page 16

• You can edit the pre-assigned name on the flexible CO button as you like.
• If the flexib le CO button has been assigned as a PBX function, it has higher priority than a
PS function, even if the flexible CO button has been assigned a PS function.
16
Page 17

4 PBX Programming
To enter the PBX programming mode
PS
MODIFY BOOK PT-PGM ModePS-PROGRAM
Press FUNCTION
twice.
programming
input
Follow programming
input.
Item Selection Programming Input
Which line do you prefer to
seize when you go off-hook
to make calls?
(Preferred Line Assignment
-Outgoing)
Press .
Press CANCEL.
No line
An idle outside line
A pre-assigned outside line
The Intercom line
PBX-PROGRAM
Press .
Press SELECT.
11
11
11
2
3
11
INT'
11
OK
OK
Outside line no.
(01-54)
OK
OK
To clear the setting of the "Preferred Line Assignment Outgoing"
To check your extension number
OK
for return to
+
(
6
7
previous display
)
17
Page 18

Customising the Buttons
You can change the flexible CO buttons to the following function buttons.
PS
MODIFY BOOK PT-PGM ModePS-PROGRAM
Press FUNCTION
twice.
To continue
F1 F2 F3
Press CO.
programming
Follow programming
input.
Button Programming Input
Loop-CO
Group-CO
Single-CO
Direct Station Selection (DSS)
One-Touch Dialling
PBX-PROGRAM
Press . Press .
input
OK
Press OK. Press CANCEL.
Outside line group no.
0
11
2
Outside line no.
Extension no.
Desired no.*
Press SELECT.
(1-8)
(01-54)
1
(max. 24 digits)
Message
FWD/DND (Forward/Do Not Disturb)
Save
Account
Conference
Log-In/Log-Out
Voice Mail Transfer *
Two-Way Record*
Two-Way Transfer *
2
2
2
One-Touch Dialling with Auto Hold
Terminate
18
3
4
5
6
7
8
8
8
8
8
Receiving group no.
0
2
Voice mail extension no.
Voice mail extension no.
3
Voice mail extension no.
4
Desired no.*
1
(max. 24 digits)
9
Page 19

1
•*
" ", "#" , FLASH/RC L, PAUSE, SECRE T (Inter com) and "— " (Conf erenc e) can als o be
stored.
– If you do not want to display the stored number, enter "[ ]" as SECRET by pressing
the INTERCOM button before and after the numbers you wish to conceal.
– If you store an external party's number, you should first store a line access number
(9, 81 to 88).
– If you need to enter an account code, you can enter the specified account code before
the line access number.
<Example>
1234
Account code feature no.49Account code
2
These buttons are used for the voice mail integration feature.
•*
• To exit the mode at any time, press the CANCEL button.
Account code delimiter#Automatic line
9
access number
SECRET
[ 123 4567 ]
Phone number
19
Page 20

Charge Fee Management
[pre-assigned extension only]
PS
MODIFY BOOK PT-PGM ModePS-PROGRAM
Press FUNCTION
twice.
88
Dial 8. Enter ID code
ID code
(4 digits).
Item
Viewing, clearing or
printing each extension
charge, outside charge
or account code
charge.
Press .
To continue
programming
input
Follow programming
input.
Extension no.
1
OR
Extension no.Outside line no.
22
OR
Extension no.Account table no.
33
PBX-PROGRAM
Press .
Press SELECT.
7
Press FUNCTION
and then 7.
Programming Input
Viewing
(01-54)
(001-128)
Clearing
Print out
7
Press FUNCTION
and then 7 again.
CLR
Press CANCEL.
OK
77
77
77
Viewing, clearing or
printing total extension
charge, total outside
charge or total account
code charge.
Assigning an accont
code.
• You cannot print out the account code charge of the account table number (001) by SMDR.
20
Extension no.
44
OR
Outside line no.
5
OR
Account table no.
66
Extension no.Account table no. Extension no.New account no.
77
(001-128)
Viewing
Clearing
Print out
CLR
CLR
OK
(10 digits)
OK
Page 21

Page 22

Copyright:
This manual is copyrighted by Kyushu Matsushita Electric Co., Ltd. (KME).
Under the applicable copyright laws, this manual may not be reproduced in any form,
in whole or part, without the prior written consent of KME and its licensee.
2000 Kyushu Matsushita Electric Co., Ltd. All Rights Reserved.
Printed in the United Kingdom
PSQX2271ZA
KK1000GW0
 Loading...