

Panasonic KX-TCD705HK User Manual

Digital Cordless Phone
Model No. KX-TCD705HK
Operating Instructions
Charge the batteries for approx. 10 hours before initial use.
Caller ID Compatible
PLEASE READ BEFORE USE AND SAVE
KX-TCD705_HongKong 12/7/01 2:29 pm Page 1
For your future reference
Serial No. Date of purchase
(found on the bottom of the unit)
Name and address of dealer
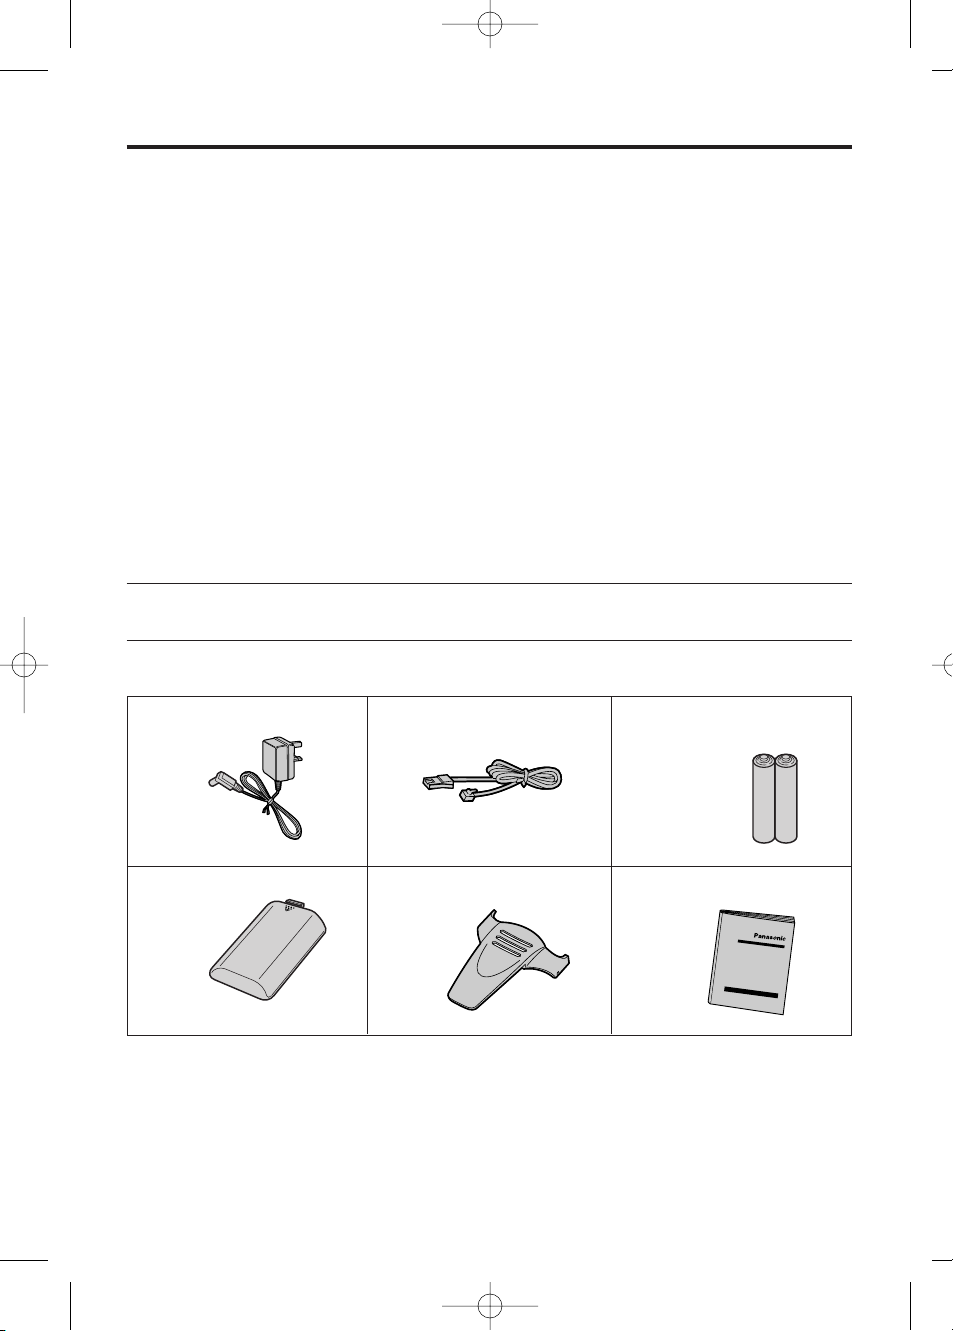
Accessories (included).
2
Dear purchaser,
You have acquired a KX-TCD705HK, which is a product made in regard with the
European Standards for Cordless Telephones (DECT). DECT technology is
characterized by high-security protection against interceptions as well as high-quality
digital transmission.
This telephone was designed for a wide range of applications.
For example, this telephone can be used within a network of base units and handsets,
constituting a telephone system which:
• operates up to 6 handsets at one base unit
• allows an intercom between handsets
• allows the operation of a handset at up to 4 base units, expanding the
communication radio area.
This telephone may be used for:
• operating several handsets
• operating at several base units
• connecting the base unit to a PBX.
AC Adaptor
PQLV1EZ
one
Telephone Line Cord
one
Batteries
Panasonic AA(R6)P-6P or BYD
N4DH33B00001
two (AA size)
Battery Cover
one
Belt Clip
one
Operating Instructions
one
KX-TCD705_HongKong 12/7/01 2:29 pm Page 2
3
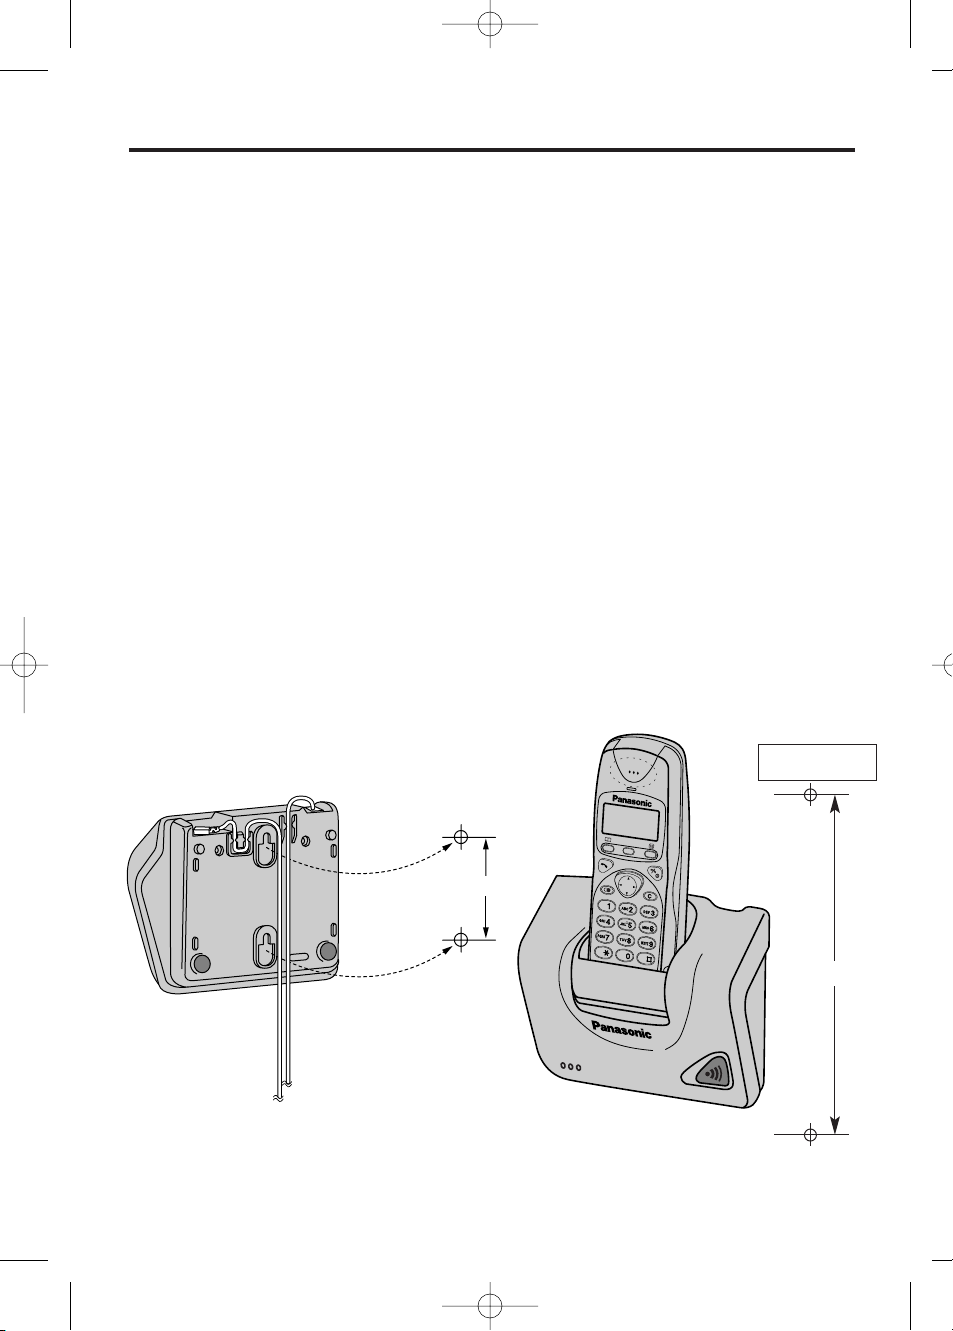
This unit can be mounted on a wall.
• Install screws using the wall template below.
• Connect the line cord, and AC Adaptor.
• Arrange the wires as shown, then mount the unit.
6cm
6cm
WALL TEMPLATE
Environment
1) Do not use this unit near water—for example, near a bathtub, washbowl, sink, etc.
Damp basements should also be avoided.
2) The unit should be kept away from heat sources such as radiators, cookers, etc. It also
should not be placed in rooms where the temperature is less than 5°C or greater than
40°C.
3) The AC adaptor is used as the main disconnect device, ensure that the AC outlet is
located/installed near the unit and is easily accessible.
Placement
1) Do not place heavy objects on top of this unit.
2) Care should be taken so that objects do not fall onto, and liquids are not spilled into,
the unit. Do not subject this unit to excessive smoke, dust, mechanical vibration or
shock.
3) Place the unit on a flat surface.
◆◆ Safety instructions
Take special care to follow the safety suggestions listed below.
WARNING:
TO PREVENT THE RISK OF FIRE OR ELECTRICAL SHOCK, DO NOT EXPOSE THIS
PRODUCT TO RAIN OR ANY TYPE OF MOISTURE.
◆◆ Wall Mounting
KX-TCD705_HongKong 12/7/01 2:29 pm Page 3

Contents
4
Chapter 1
Preparation
Chapter 3
Programmable Functions
(On the Handset)
Chapter 2
Basic Operations
Handset Programming........................36
Setting Alarm .......................................36
Setting Ringer Options .......................36
Select Handset Ringer Volume........36
Select Ringer Patterns.....................36
Setting Tone Options ..........................37
Setting Display Options......................37
Select the Standby Mode Display ...37
Select the Talk Mode Display ..........37
Setting Call Options ............................37
Set Direct Call Number....................37
Set Direct Call ON/OFF...................37
Select Call Prohibition .....................37
Setting Other Options .........................38
Set Auto Talk ON/OFF.....................38
Select Battery Type .........................38
Select Handset PIN .........................38
Registration..........................................38
Registering a Handset to a
Base Unit .........................................38
Cancelling a Base Unit ....................38
Select Base Unit ..................................38
Reset Handset .....................................38
Making Calls ........................................12
Auto Redial ..........................................14
To Select the Receiver/Speaker
Volume..................................................14
Direct Call.............................................15
Answering Calls ..................................16
Using the Phonebook ........................17
Storing Names and Numbers in the
Phonebook ...........................................18
Finding Items in the Phonebook......21
Dialling from the Phonebook ...........21
Editing an Item in the Phonebook ...22
Phonebook Copy .............................23
Storing Phonebook Items as Hot
Key Dials..........................................25
Dialling a Stored Number ................25
Clearing an Item in the Hot Key Dial .26
Caller ID Service ..................................27
Using the Caller List............................28
Paging/Intercom ..................................31
For Optional Multi-Unit Users ............33
Special Features..................................34
How to Use the Pause Feature
(For Analog PBX Line/Long
Distance Service Users)..................34
Using the Recall Feature.................34
Setting the Key Lock ON/OFF.........35
Getting Started .....................................6
Connections ......................................6
Installing the Batteries in the
Handset .............................................7
Battery Charge...................................7
Battery Information ............................7
Battery Replacement .........................8
Base Unit Location ............................8
Location of Controls...........................9
Displays .............................................10
Basic Start-up Operations................11
KX-TCD705_HongKong 12/7/01 2:29 pm Page 4

5
Chapter 4
Programmable Functions
(On the Base Unit)
Base Programming .............................42
Bell Selection.......................................42
Select Flash Mode...............................43
Select Base Unit Ringer Volume........44
Select Pause Timing ...........................44
Set Base Unit PIN ................................45
Call Restriction ....................................45
Setting the Clock .................................46
Setting the Date ...................................46
Cancelling a Handset ..........................46
Reset Base Unit ...................................46
Using an Optional Headset.................47
Using the Belt Clip ..............................47
Option Covers......................................48
Before Requesting Help......................49
Adding Another phone........................51
Chapter 5
Useful Information
KX-TCD705_HongKong 12/7/01 2:29 pm Page 5
6
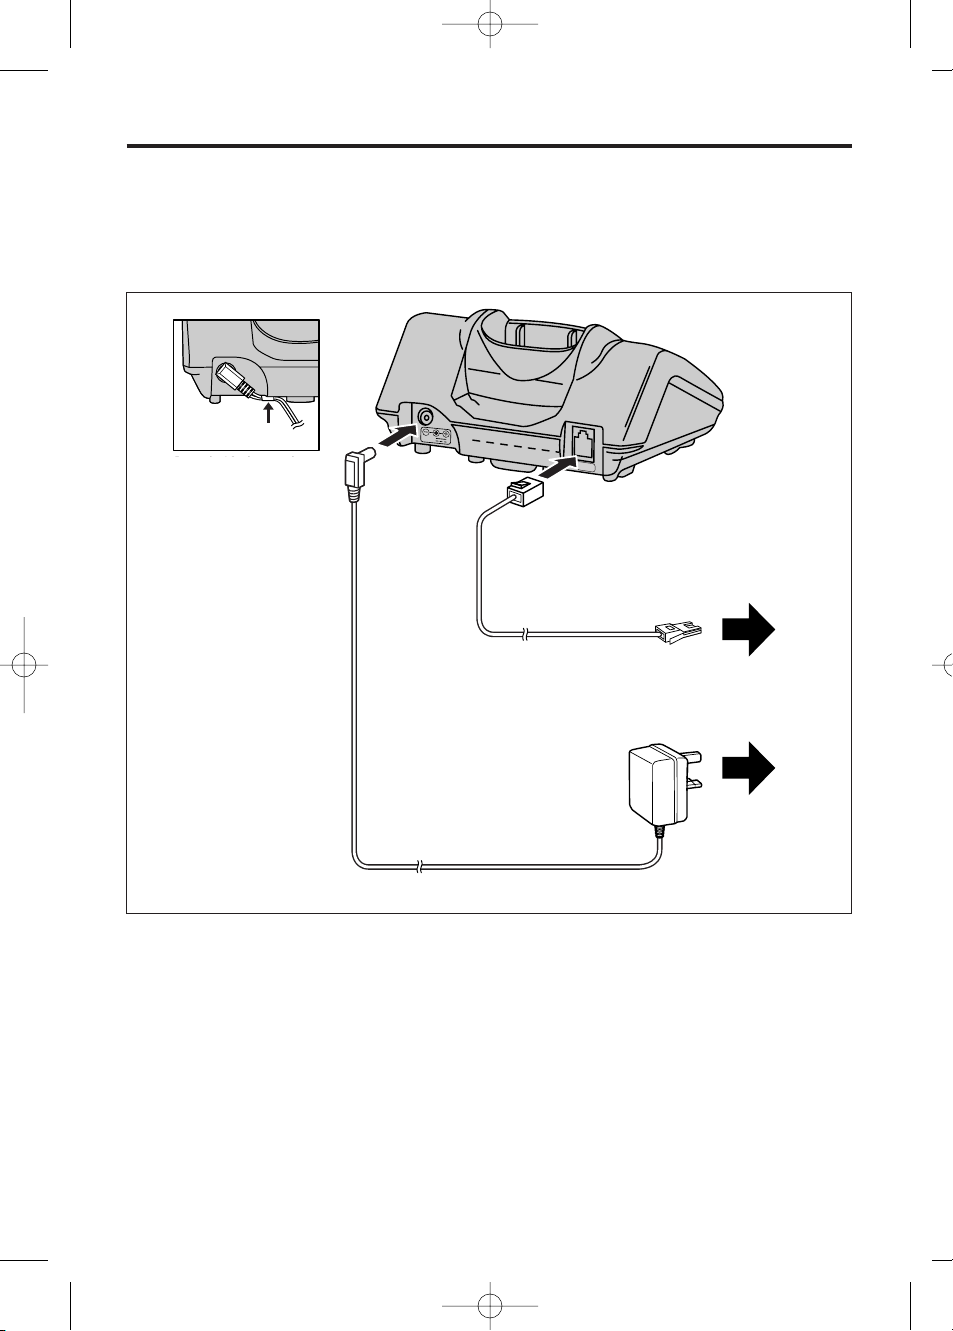
◆◆ Connections
Plug in the AC Adaptor and the telephone line cord to the rear of the unit. Then connect
the cord as shown.
Getting Started
USE ONLY WITH Panasonic AC ADAPTOR PQLV1E.
• The AC Adaptor must remain connected at all times. (It is normal for the adaptor to feel
warm during use.)
• To connect a standard telephone on the same line, see page 51.
• If your unit is connected to a Telephone line or PBX which does not support Caller ID
services, you cannot access those services.
To Mains Outlet
(AC 220-240V, 50Hz)
AC Adaptor
Telephone Line Cord
To Telephone Socket
Fasten the AC adaptor
cord to prevent it from
being disconnected
KX-TCD705_HongKong 12/7/01 2:29 pm Page 6
Fasten the AC adaptor cord
to prevent it from being
disconnected
Hook
9v
LINE
7
➡
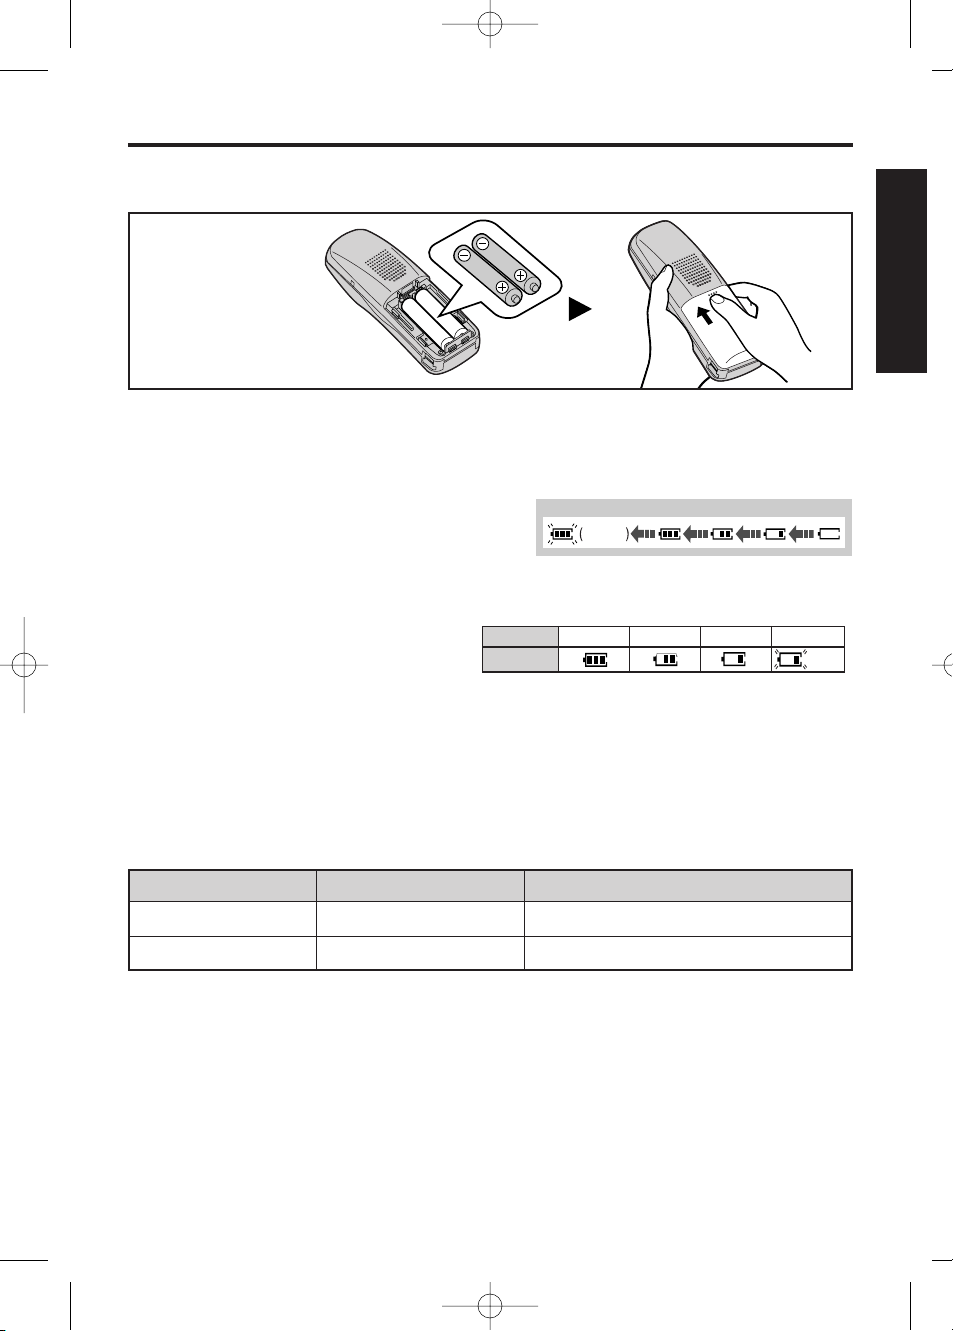
◆ Installing the Batteries in the Handset
◆ Battery Strength
You can check the present battery
strength on the display.
◆ Recharge
When “Û” flashes or the unit beeps every 15 seconds, recharge the batteries.
Chapter 1
◆ Battery Information
After your batteries are fully charged:
• Battery life may vary depending on usage conditions, such as:
– when viewing the Caller ID Caller List,
– when the handset is in the speakerphone mode and
– ambient temperature.
• Clean the handset charge contacts with a soft, dry cloth once a month. Clean
more often if the unit is subject to grease, dust or high humidity. Otherwise the
batteries may not charge properly.
• If the batteries are fully charged, you do not have to place the handset on the base unit
until “Û” flashes. This will maximise the battery life.
• The batteries cannot be overcharged.
Operation Ni-MH battery life (Included) Ni-Cd battery life (optional)
While in use (Talk) Up to about 20 hours Up to about 12 hours (based on 800m/A per hour)
While not in use (Standby) Up to about 160 hours Up to about 100 hours
◆ Battery Charge
At the time of shipment, the batteries are not
charged. To charge, place the handset on the
base unit. Please charge the batteries for
approximately 10 hours before initial use.
During charging, the battery icon is as shown.
• If the
rechargeable
batteries are not
inserted correctly,
the handset will
not work.
KX-TCD705_HongKong 12/7/01 2:29 pm Page 7
Full
Low
Flashing
Battery strength Fully charged Medium Low No power
Battery icon
Ò
Ú
Û
Û
(Flashing)

8
◆ Battery Caution:
To reduce the risk of fire or injury to persons, read and follow these instructions.
1. Use only the batteries specified.
2. Do not use non-rechargeable batteries.
3. Do not mix old and new batteries.
4. Do not dispose of the batteries in a fire, they may explode. Check with local waste
management codes for special disposal instructions.
5. Do not open or mutilate the batteries. Released electrolyte is corrosive and may cause
burns or injury to the eyes or skin. The electrolyte may be toxic if swallowed.
6. Exercise care in handling the batteries in order not to short the batteries with
conductive materials such as rings, bracelets, and keys. The batteries and/or
conductor may overheat and cause burns.
7. Charge the batteries provided with or identified for use with this product only in
accordance with the instructions and limitations specified in this manual.
➡ Getting Started
◆ Battery Replacement
If “Û” flashes after a few telephone calls even when the handset batteries have been
fully charged, it is time to replace the batteries with new ones. Remember to charge the
new batteries after replacement (see page 7).
• Discard defective batteries as soon as possible. Defective batteries may leak into
the unit.
• On replacing the batteries, ensure that the correct battery type selection is
programmed (see page 38).
For maximum distance and noise-free operation, the recommended base unit location
is:
• Away from electrical appliances such as TV, radio, personal computer or another
telephone.
• In a convenient high and central location.
◆ Base Unit Location
KX-TCD705_HongKong 12/7/01 2:29 pm Page 8

Location of Controls
9
7
1
0
3
2
4
6
8
9
5
Á (Phonebook)
Button
O (Talk) Button
Headset Jack
Navigator key
( , , , )
%(Speakerphone)
Button
$(Tone/Capital)
Button
Charge Contact
M (Recall) Button
Microphone
Charge Contact
Speaker
Back side
N(intercom) Button
W (Clear) Button
P (Off/Power) Button
Y (Function/OK) Button
X (Redial/Pause)
Button
Display
S U T V
◆◆ Base Unit
◆ Handset
Receiver
Charge Contacts
Page Button
KX-TCD705_HongKong 12/7/01 2:29 pm Page 9

Displays
10
P ‘Pause’ is selected while dialling.
The direct call icon is displayed when
this mode is turned on.
F M is pressed while dialling.
[X] The key lock icon is displayed when
key lock is set on the handset. In this
mode, the keypad is disabled.
ABCDEFGHIabcdefg
1234567890123456
ÎÏÔÍ Á Ò
◆ Characters/Symbols
◆ Display Backlight
The handset has a backlight display. The display will light when you start using the
handset and when a call is received. The handset display light will stay on for about 10
seconds after pressing a button or lifting the handset off the base unit. You can change
the backlight colour for identifying callers by setting the private category feature (page17).
◆ Lighted Handset Keypad
The handset dialling buttons will light when you press a button, lift the handset off the
base unit or receive a call. The lights will go out about 10 seconds after pressing a button,
lifting the handset or answering a call.
◆◆ Handset Display
◆ Icons
Î The in-range icon indicates that the
handset is in range of the base unit.
It flashes when the handset is out of
range.
Ï The page/intercom icon is displayed
when paging or using the intercom.
It flashes when another unit pages
the handset.
The talk icon is displayed when
making or answering calls. It flashes
when an external call is being
received.
Ô The call prohibition icon is
displayed when this mode is
turned on.
Á The phonebook icon is displayed
when storing or viewing the
phonebook items.
Ò The battery icon indicates the
battery strength.
KX-TCD705_HongKong 12/7/01 2:29 pm Page 10

◆ Making a Call
(For further information on making calls, see pages 12-15)
1. ZO or %.
2. Dial a phone number.
The dialled number is displayed.
(If a number is entered incorrectly, ZP).
After a few seconds, the display will start showing the length of the call.
11
◆ Terminating a Call
1. To hang up, ZP.
• After a few seconds, the display returns to the standby mode.
• If the handset is placed on the base or charger during a call, the call is
disconnected.
• The dialled number is stored in the redial memory.
◆◆ Turning the Power On
1. Z and hold P
• A confirmation tone sounds.
• All possible configurations briefly appear.
• When button is released, the display will change to the standby mode.
➀ The current connected base unit number is displayed
• You can choose whether to display the base unit number, handset number or no
display in the standby mode (see page 37).
➁ The number of New Caller ID calls received are displayed.
Basic Start-up Operations
◆ Answering a Call
(For further information on answering calls, see page 16.)
During Incoming call:
1. ZO
• You can also answer a call by pressing any dialling button K to I, $, L
or N (-Any Key Answer).
Or Z%and when the other party answers, talk into the microphone.
After a few seconds, the display will start showing the length of the call.
◆ Turning the Power Off
Make sure that the unit is in the standby mode.
1. Z and hold P until a long beep sounds.
• The display will go blank. (On location of the handset in the base unit, the battery
icon will display even after power off).
Base 1
10 New Calls
Î ÏÔÍ Á Ò
➀
➁
Note: Z shows that you should press the following key(s).
KX-TCD705_HongKong 12/7/01 2:29 pm Page 11
Making Calls ➡
12
Note: for basic making calls operation, see page 11.
◆◆ To Dial after Confirming the Entered Number
With this feature you are able to confirm the entered number before you start dialling.
1. Enter a phone number (maximum 24 digits)
If number is not entered correctly:
To clear one digit, ZWbriefly.
To clear all digits, Z and hold W.
2. Phone number confirmed, ZO or %.
(After a few seconds, the display will start showing the length of the
call).
3. To end call, ZP.
(After a few seconds, the display returns to the standby mode).
• Note: If “Δ flashes and an error tone sounds after pressing O or %,
move closer to the base unit. Then try again.
• You can choose whether to display the length of the call or phone number in the talk
mode by programming (page 37).
◆ To Have a Hands-Free Phone Conversation (Using
Digital Speakerphone)
1. Z%
• The button lights.
2. Enter a phone number.
• The dialled number is displayed.
3. When the other party answers, talk into the microphone.
4. To hang up, ZP.
ABCDEFGHIabcdefg
0123456789012345
Î ÏÔÍ Á Ò
ABCDEFGHIabcdefg
0123456789012345
Î Ï ÔÍ Á Ò
ABCDEFGHIabcdefg
00-00-31
Î Ï ÔÍ Á Ò
Base 1
A2 New calls
A03.08.21:06
Î ÏÔÍ Á Ò
Handset Digital Speakerphone
For best performance, please note the following:
• Talk alternately with the caller in a quiet room.
• If the other party has difficulty hearing you, ZUor S to decrease or increase
the speaker volume.
• If the other party’s voice from the speaker cuts in/out during a conversation, ZU
to decrease the speaker volume.
• While talking, you can switch to the hands-free phone conversation by pressing %.
To switch back to the receiver, Z%or O.
KX-TCD705_HongKong 12/7/01 2:29 pm Page 12

➡ Making Calls
◆ To Redial the Last Number Dialled
There are two ways to redial the last number dialled.
1. ZO or %.
2. ZX.
(The last number dialled is displayed and automatically redialled).
• After a few seconds, the length of call is displayed.
OR
1. ZOor %.
2. ZY
3. Select ‘Redial’.
4. ZY
(The last number dialled is displayed and automatically redialled).
◆ To Redial after Confirming the Numbers in Redial Memory
The unit automatically stores the last 10 numbers dialled into redial memory.
1. ZX.
(The last number dialled is displayed).
• If the same number has been stored in the phonebook, the name
will also be displayed.
2. ZSor U to select required number
(To exit the list, ZW).
3. ZOor %.
The number is redialled automatically.
(After a few seconds the length of call is displayed).
• If a number is not selected within one minute, redial mode is
cancelled and display returns to standby mode.
• If ‘No Stored Memory’ is displayed in step 1, the redial memory
is empty.
◆ To Edit/Clear Numbers in the Redial List
To edit and clear numbers in the redial memory, ZX, select number and then follow
from step 2 (pages 29 and 30). ‘Editing the Caller’s Name / Phone Number’, ‘To Clear an
Individual Entry in the Caller ID List’ and ‘To Clear All Entries in the Caller ID List’.
13
ABCDEFGHIabcdefg
01234567890
Î Ï ÔÍ Á Ò
ABCDEFGHIabcdefg
00-00-00
Î Ï ÔÍ Á Ò
ABCDEFGHIabcdefg
01234567890
Î Ï ÔÍ Á Ò
ABCDEFGHIabcdefg
00-00-00
Î Ï ÔÍ Á Ò
Chapter 2
KX-TCD705_HongKong 12/7/01 2:29 pm Page 13

➡
◆ Auto Redial
When speakerphone is turned on and redial used, the number is dialled automatically. If
the number is busy, the unit goes into auto redial mode. The unit automatically repeats the
call (max. 12 times) until the called party answers the call.
Make sure that the unit is in the standby mode.
1. Z%.
2. ZX.
• The last redial number is displayed and dialled to outside line.
• The Mic on handset is mute until a ‘busy tone’ or ‘ring back tone’
is detected.
• If a busy tone is detected, the unit releases the outside line and returns to the standby
mode. The speakerphone button LED flashes. After 40 seconds, the speakerphone
LED turns steady on and the number is redialled automatically.
• If a ring back tone is detected, the mic is not mute, “–Muting–” is cleared from the 1st
line, the unit finishes Auto Redial and display goes to conversation.
• If the user presses % during Auto Redial, redial is cancelled and unit returns to
speakerphone.
• If a busy tone or ring back tone is not detected within 30 seconds, the unit finishes
Auto Redial procedure and unit returns to standby.
◆ To Select the Receiver Volume or Speaker Volume
during conversation
3 levels are available during conversation or when using the headset (high, medium or
low).
6 levels are available in the speakerphone mode.
1. During conversation, ZSor U to select level
S = receiver volume up
U = receiver volume down.
• After a few seconds, the display returns to the length of call.
14
–Muting–
0223456789
Î Ï ÔÍ Á Ò
Receiver Volume
LOW HIGH
ASetting Base
Î Ï ÔÍ Á Ò
KX-TCD705_HongKong 12/7/01 2:29 pm Page 14

➡ Making Calls
◆ Direct Call
You can store one number into memory and then call this number by pressing O or %.
(See pages 37, 39).
◆ Hot Key Dialling
You can assign up to 9 numbers from the phonebook as Hot Key Dials. After numbers have
been stored (see page 25) you can press buttons A to I and then ZOor % to
call the number.
◆ Dialling a Number from the Phonebook or Caller ID List
• Dialling a number from the Phonebook (see page 21).
• Dialling a number from the Caller ID List (see page 29).
15
KX-TCD705_HongKong 12/7/01 2:29 pm Page 15
Answering Calls
For basic answering call operation, see page 11.
• The handset and base unit will not ring if both ringer volumes are set to OFF
(pages 36, 44).
◆◆ Auto Talk
If you set the Auto Talk Feature to ON (page 38), you can answer a call by lifting
the handset off the base unit without pressing O or %.
◆ To Turn the Handset Ringer Off Temporarily
When an external call is incoming, user can turn off ringer
temporarily.
1. During incoming call, Z and hold U.
(‘Ring Off’ is displayed and the handset stops ringing).
2. Answer call by pressing O, K-I, $, L or N
(-Any Key Answer).
• The ringer will turn back on for the next call.
• This function will not work when the handset is on the base
unit or if an internal call is incoming
• If ‘Ringer Off’ is selected, Caller ID cannot be displayed.
16
Ring Off
ASetting H/set
ASetting Base
Î Ï
ÔÍ
Ò
ABCDEFGHIabcdefg
00-00-00
Î Ï ÔÍ Á Ò
KX-TCD705_HongKong 12/7/01 2:29 pm Page 16
 Loading...