

Page 1
MAIN
Section 1
Panasonic
KX-TBC10
CALLER ID BOX
'pÍEaÍ"'r£AD’b^^^^^^
USE AND SAVE
.....................
INSTRUCCIONES
OEOPERACION
Éa^R Ufc LEER LAS iÑsTRUCCIONÉS
ANTES 0EU6AR a APARATO
Y GUARDARLAS.
Panasonic World Wido Wob addrtts; Mla;/Avw«.panasome.com
lor cuHomofs in tlif USA or Poorlc Rico
^ uomenisDyòeciion ^
1. Main
2. Settings
3. Basic
4. Using
5. Advanced
6. Useful
7 Important 14. FCC
a. Alastes
9. Operxión
16. Utilizando
11. Funciones
12. Información
13. Importante
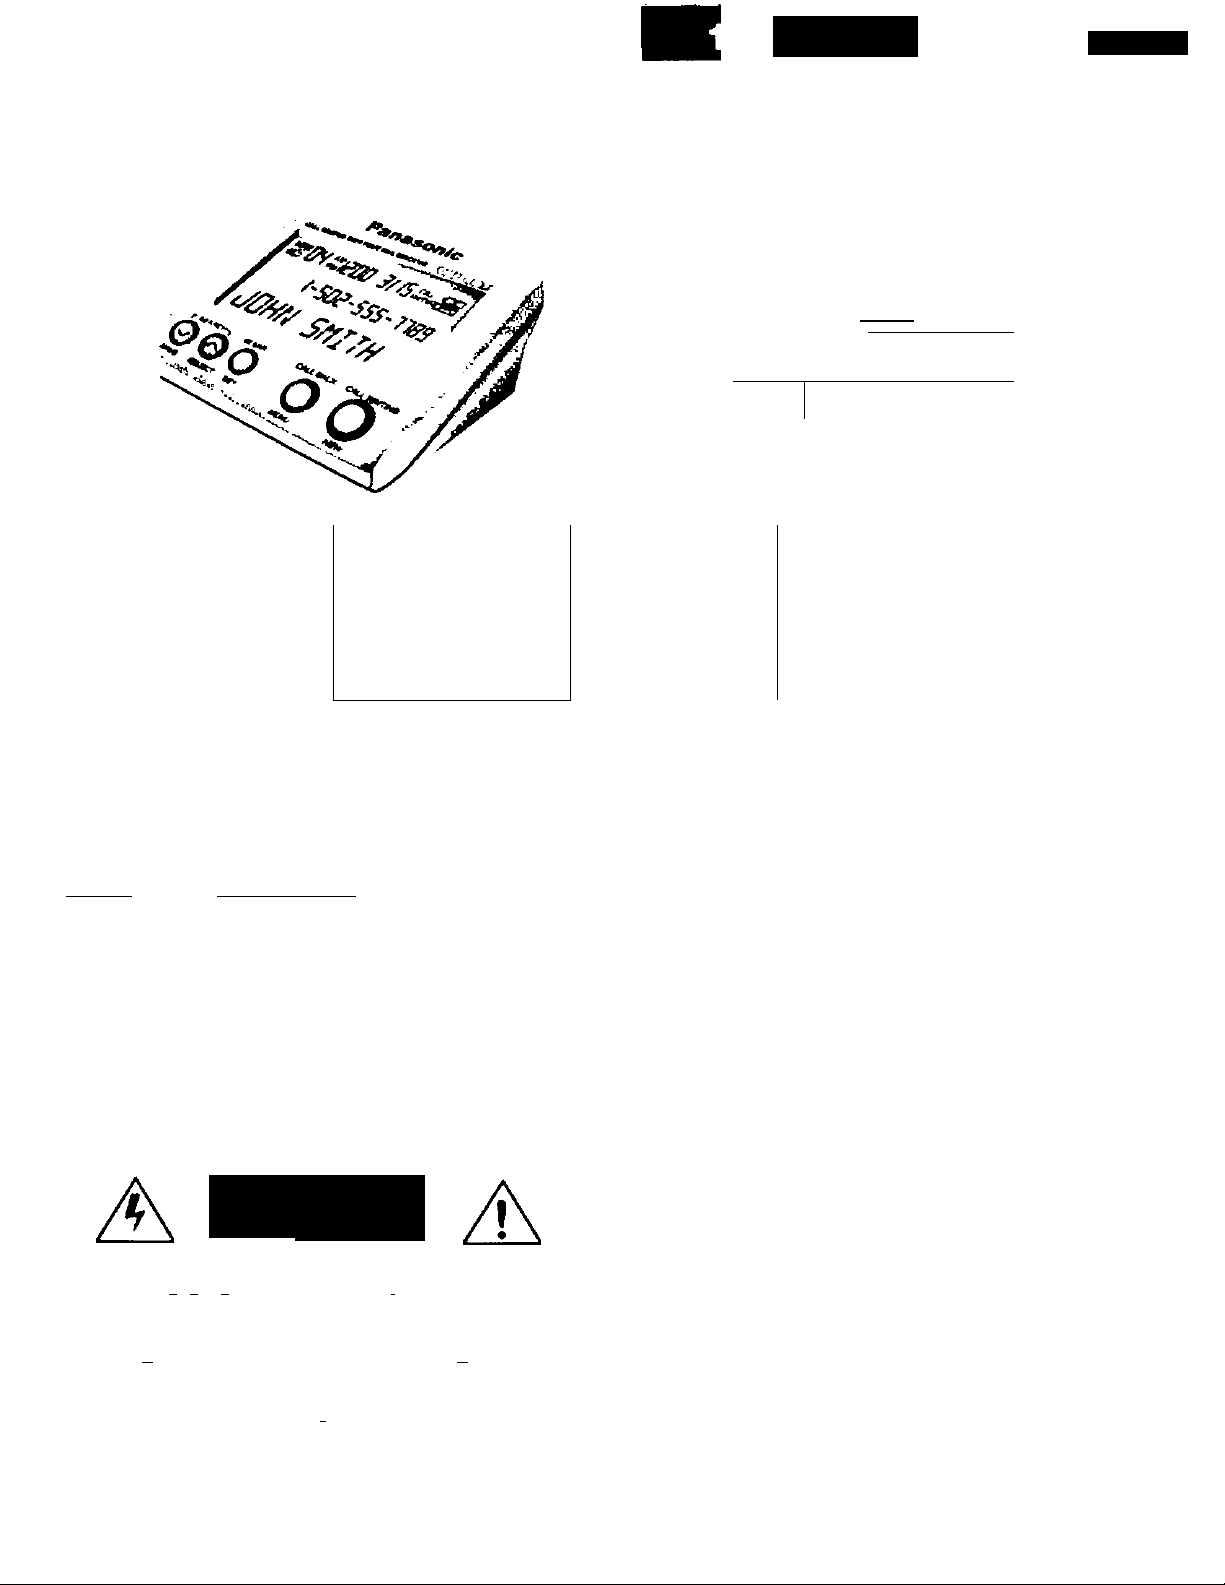
1-A Location of Controls
ItKMte'iui'l'YMt
Amá'»'9
•vavtf.VMe
(•hmw
■VhmWtm>r-4'OaMmHC<C>
5?OS»i:00 3/15^'^«- +
LJOhn 5niTH
Mttm , Mu Mas MS4 wamiM
y
(?)
m
HU»V
K*KS
OOHV.'fcWF
amr.
. wumuiB fcawa»
Panasonic
tMMSMM
SIN «e oo 3/15
1-505-5'
l-502-555-ne9.
Mnc'vnc« •
rfÜASIÁKh
iXWV SMf
jjDHN 5niTH
o“^è o 7.T
•70 i VMCH
Panasonic
1-505-555-1189
o
O :•/
mt
1
ftutal
> > A«4 M». MI.« « I
íX^lÍíT JW*W
T
.%iv* Mt.W
__
1—
Ml naTur;
mu
n.,
* * »• ’¡Mir
S
ea'
Cn'№iV>«4W
№^M«tV.(n
.AtVk^Knr
•»•«ipaMr
'■n»Vua>
•«sA« * Vtnta a i«t«
WWOIMW
Attach your purchaao roeolpt horo. / Colequo aquí su roforonela de compra.
For your *u(üt» nTatinr* •' Para su tutu^ roisre^a
Siria. No
No Oetein
iY<>Aa »n №• bcilui" vi Ihl itnf I
i«r lo pan» rliAof 0» IO wnowi
Name «iixl adiyeiK cr dMipr
Nombra y dl(e(od^ del '
For produci Mrviee
•OnUS«(«I i-ax>-2lMMK«7M2l M №Bb' it-« iK«nvi M m lumsnpio««rrL« ce'tie:. v
and »■'nai io KTaumirpr.-Ki j*t«a iMwenr
WMn you chip iha produci
• CakAìv r-er** vn>>r unr pataaovrir^va^'iaiinuM-n
• Anarl* a lnn»f iaUlrp TO irVK*^\ In Ih» suWJt pa:(r(.
I ccocoscnario
....
■ Sera ne bTd k in aiOcrno larvci ciripr ^tpal9 and aieciakiy huoc
• Do A« MAC you jne lo ire Panaacnc Ccnatrer EiacooiiKa Conpany i$ioc Detw or
19 nieua» or'•potili iaeaoyoi rruM walryulorce-ccatrxosLnrproouia
Dalo o< curcriM»
F»era 30 Aqouoooi
dMlpr
.......
......
..............................
..................................
WARNING/ADVERTENCIA
RISK OF ELECTRIC SHOCK
DO NOT OPEN
RIESGO OE CHOQUE ELECTRICO
WARNMC ' I ;
'•e war-aeveMO« pan» rtM»
AMimiiCU Pnaa'Miei'ereagoMcricojpMieircs.nc-taweo.avnpSc
• Pwa •ufanneno • e jniape. «nMie » at -Oidy ncnad:
■»Mm »**»ien## #:*«RWÉerepià.i» m^eeeiw»
K»e*TeiO»:*be«Wìwg»»r«»e«<Wj
Saw m tUiad k «h*>ar rt*k« a act9Mi
iStoinAa» • a TidatT <»
r«|»f reaab Umatmbacac Ovtottu <r *roa « rf^aatr»¥t urate-aMxern<r
PanMonlc Consumer E(ectror>ics Company.
Dhrieaon or Mataushita Electric CorporaWon of America
Ona Parwaorv Way SaeauexA. New Jersey 07DP4
NO ABRA LA UNIOAO
’ >. . I > nor ranwc cA«r V S}>
> »rvcf^o ic oiilF«a lennoa pTKrre
..........
Panasonic Sales Company.
Oimlon of MttautMla Electric of Puerto Rico. Irtc.
Ava 65 0» 1« hnlaniena. iCm 9.5. San Qabrial IndustnM Pani
POOX12S6SZA
Ceieano. Puerto Rteo 0096S
Primed «Ì Monco AA0800AVO
Page 2
SETTINGS
INSTALLATION/ADJUSTMENTS
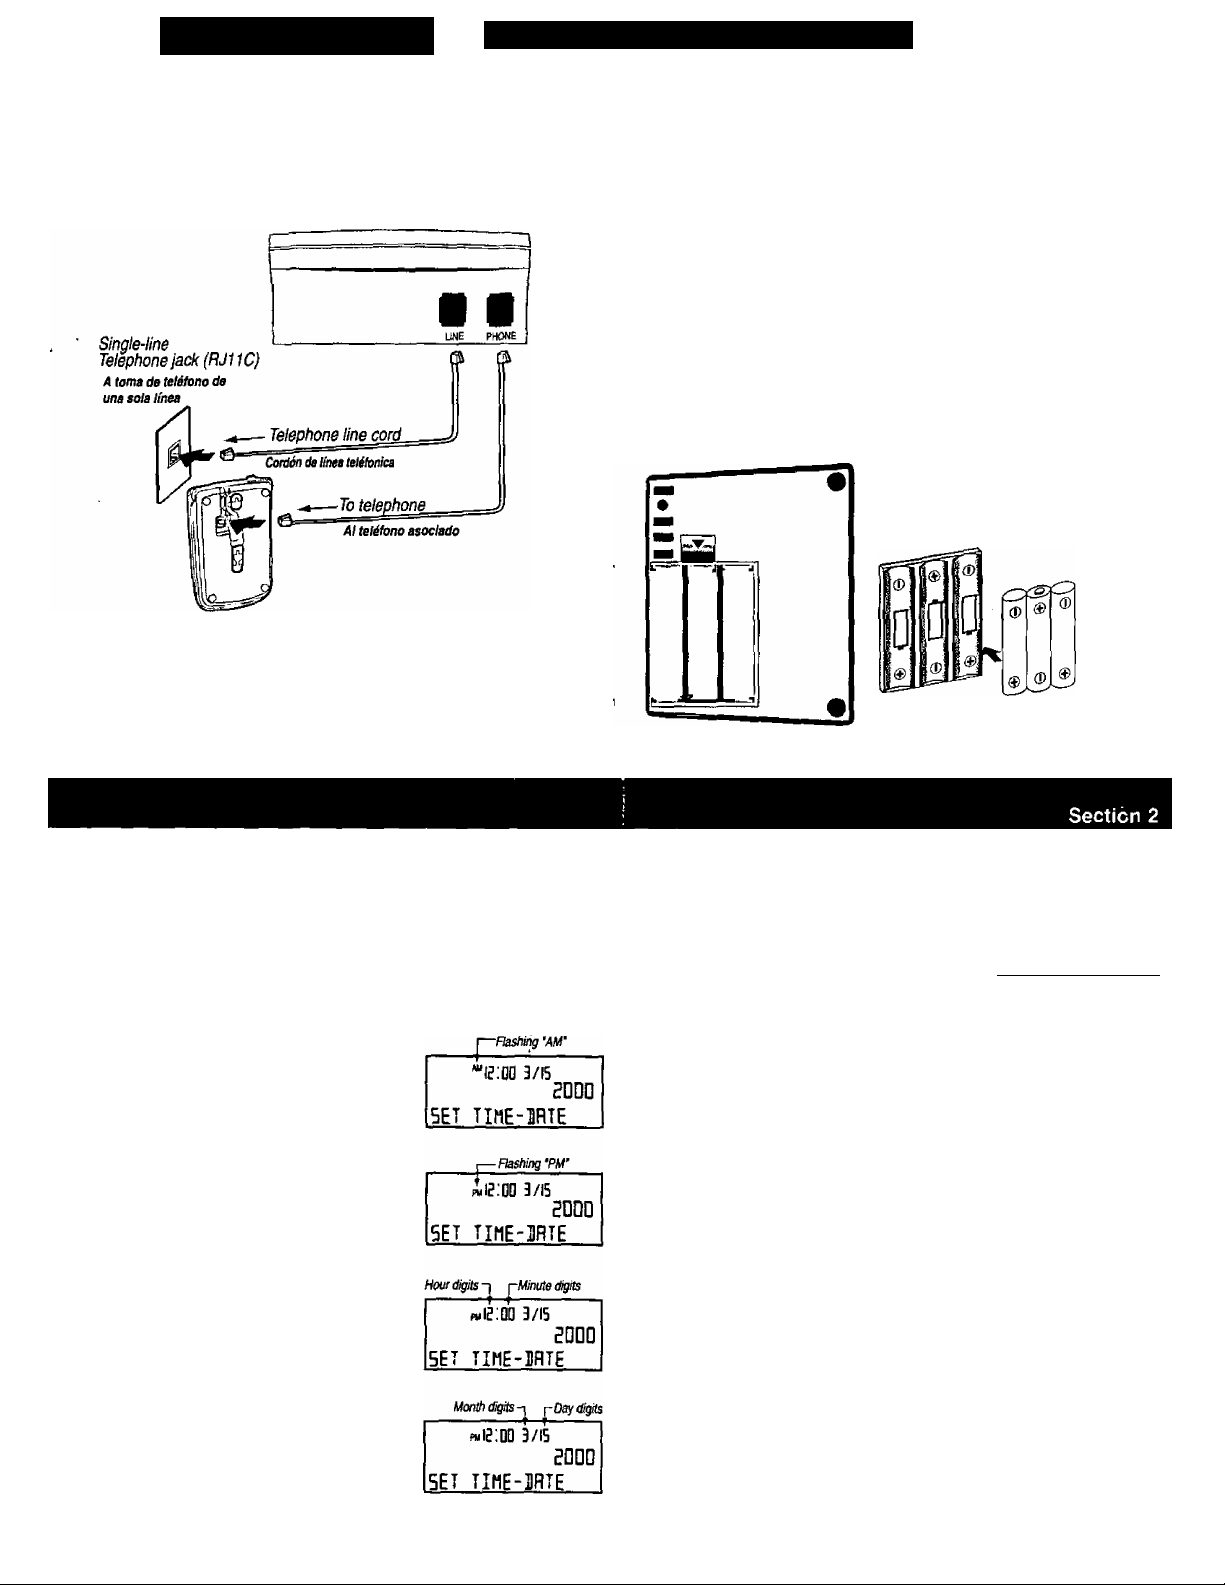
2’A Installation / Instalación
1 Connect the telephone line cord to the Caller ID Box LINE connector.
Conecte el cable de línea telefónica al conector LINE del Identificador de
Llamadas.
2 Connect the telephone to the Caller ID Box PHONE connector.
Conecte el cable del teléfono al conector PHONE del Identificador de
Llamadas.
Note: Be carefu/ to correctfy connect this unit, otherwise it will not work
properly.
Note: Asegúrese de conectar correctamente esta unidad, de otra manera, no
funcionará adecuadamente.
2-B Installing Batteries i Instalación de Baterías
1 Remove the cover
Quite completamente la tapa de baterías.
2 Install three “AA’ size alkaline batteries.
Make sure to match the V" and of the batteries with the diagram inside the
compartment.
Instate tres baterías alcalinas “AA”.
Asegúrese de que ia poiaridad de ias baterías coincida con el diagrama de
poiaridad dentro dei compartimento de baterías.
3 Put the cover back in its position and push softly.
Batteries last for about four months.
Coloque la tapa de baterías en su posición origtnai y presione suavemente.
Las baterías durarán cuatro meses aproximadamente.
• Batteries not included.
• Install three “AA" high quality alkaline batteries
prior to connect to the telephone line.
• Baterías no incluidas.
• Instale 3 baterías alcalinas “AA"
antes de conectar la unidad a la
línea telefónica.
2-C Setting theTime and Date
If you have subscribed to the Caller ID service, the time and late are automatically set
when you receive a call.
NOTE: The year will not be adjusted. To adjust the year follow jetting the
Time and Date Manuallf steps.
Setting theTime and Date Manually
If you want to set the time and date manually, do as described below.
1 Press CALL BACK/MENU,
2 Press DOWN C2) two times to scroll to
“SETTIME-DATE’ menu,
3 Press CLEAR / SET, the “AM” icon will start flashing.
To change the icon to “PM", press UP / SELECT, CS
Repeat this procedure to go from “PM" to “AM".
4 Press CLEAR / SET again to scroll to the right on the
hour digits (Both digits will be flashing).
5 Press UP / SELECTC5D to change the hour digits.
They can be changed from 1 to 12.
6 Press CLEAR / SET again to change to the desired
minutes (The selected digit will be flashing),
7 Press UP / SELECT (3D to change the minutes
digits, the first digit can be changed from 0 to 5, the
second digit can be changed from 0 to 9,
8 Press CLEAR / SET to scroll to the month digits, the
month digits will start flashing.
9 Press UP / SELECT 3D to change the month digits,
use the same procedure to change the hour digits.
To change the day digits use the same ornnedure you
used to change the minute digits.
Note: Default language m this unit Is English, if by any reason the setting is in Spanish or French
and you want to return to English, please follow procedure on step BA.
10 Press CLEAR / SET to scroll to the year digits, the
third digit will start flashing.
11 Press UP / SELECT 3D to change the year digit.
Use the CLEAR / SET Button to move between the
year digits. Use the UP / SELECT 3D Button to
change the flashing year digit.
Only the last two digits can be changed.
Both digits can be changed from 0 to 9.
12 When finished, press DOWN / SAVE 3D to save
the setting.
To exit from menu press CALL BACK / MENU again.
Notes:
* Do not take more than 30 seconds to replace the battenes; otherwise you will lose
all your data and settings.
, • The year will be shown when you are setting the time and date manually only.
___________
р«1г:ЕШ 3/15 \
SET ТХМЕ-ДЯТЕ
pvia'.oo 3/15
SHI'EII!
2-D Setting the Flash Time
Note: Only if the Flash Time is requited to be different than the default 700 ms.
1 Press CALL BACK/MENU.
2 Press DOWN 3D four times to scroll until the
“FLASH* option is found.
3 Press CLEAR / SET to select the “FLASH" option.
4 Press UP / SELECT 3D to choose the flash time
from 100ms, 200ms, 300ms,.., 900ms.
5 When finished, press DOWN / SAVE CSD to save
the setting.
To exit from menu press CALL BACK / MENU again.
PM 13 .‘QD 3/15
IGD
FLASH
pmI3:dd 3/15
5Hl'E3!
aooo
Page 3
BASIC
CALLER ID OPERATION/FUNCTIONS
Section 3
3-A Caller ID Service
Tiiis unit is compatible with the Caller ID service offered by your telephone company.
The calling party’s information wilt be displayed after the first ring, provided that you have
subscribed to a Caller ID service.
The unit can record information of up to 60 different caliers, inciuding the time and date
the call was received. The Caller ID List information is sorted from the most recent to the
oldest call.
Using the iist, you can automatically call back a caller.
If you subscribe to a Call Waiting service, when a second caii is received, the new cailer's
name and phone number will be displayed.
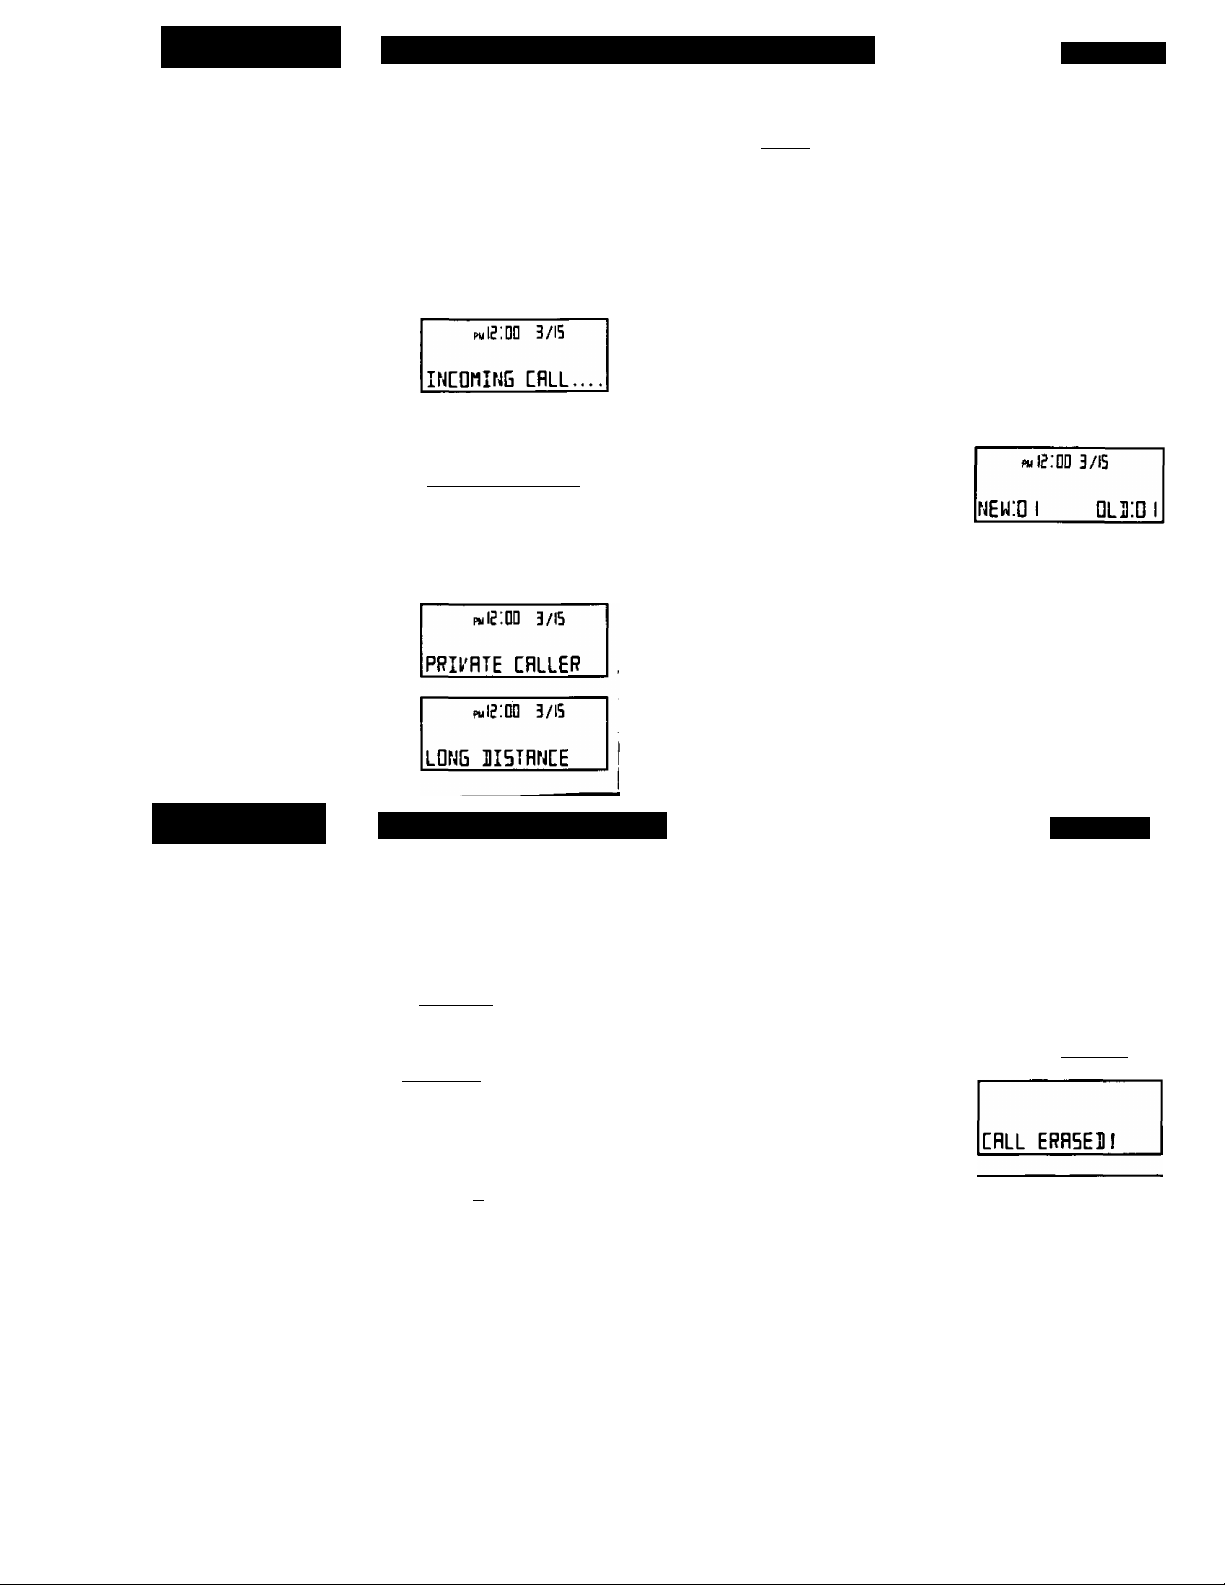
3-B How Caller Information is Displayed
When a Call is Received
When a call is received, the dispiay shows the caller's name
and number after the first ring.
• When the unit is connected to a PBX system, you can not
receive Caller ID information.
• In some calling areas, the Caller ID service may not be
availabie. For further information, please contact your
telephone company.
If the call is not answered and the caller hangs up, the
display will go to the default mode after 5 seconds. The new
calls counter is increased by 1 and the NEW CALL Button
vifill start flashing.*
In some cases, caller information can not be displayed.
The display will show as followrs;
• It the caller dialed from an area which does not provide a
Caller ID service, the display will show “OUT OF AREA*.
• If the caller has requested not to display his/her information,
the display will show “PRIVATE CALLER*.
• If the phone number is not available, the display will show:
“LONG DISTANCE*.
• Note; The NEW CALL Button will flash white you have
one or more new calls.
PwlgiGD 3/15
|-1ез-ч5Б-1Вза
KE^'IN dPHNSDN
Puie:D0
3/I5
OUT DF RREfl
3-C When you have Combined Call Waiting and Caller ID*
On Call Waiting, the IwfiTiNol icon will start flashing
and the second caller’s number and name will be
displayed.
Press the CALL WAITING Button if you hear a Call
Waiting tone while talking, or the icon
flashes.
The first call is put on hold and you can answer the
second call.
To return to the first caller, press CALL WAITING
again.
---------
l-E 8-495-20 Ш
JOHN 5И11Н
1-ЭЧ5-Б18-90 8
Call Waiting icon
Pul5:0D Ql-.lltssj
Timer for second call
PM 1^.00 0Q:D I
STEl'E WHITE
If the CALL WAITING Button is pressed within 30
seconds, the display will start taking the time for this
call, the previous call timer will continue running.
If the CALL WAITING Button is not pressed within 30
seconds, the second caller’s information will be
saved in the memory as a new call.
* Please corjtact your telephone company for
details and availability in your area.
USING
THE CALLER ID LIST
4-A Viewing the Caller ID List
To confirm who has called you, follow the steps below.
When the associated telephone is on hook, press SEARCH CH) or C5D.
1 To search from the most recent to the oldest
cal), press SEARCH CHD.
2 To search from the oldest to the most recent
call, press SEARCH O.
To move between callers, press
SEARCH or (Si.
• Once NEW calls have been reviewed, they
will be listed as OLD.
• The time and date each call will be recorded
in the Caller ID Ust.
• The OLD call entry will not be deleted until
you delete it manually.
‘ If the memory is full (60 calls stored) the oldest call is deleted automatically
when a new call is received, even if the oldest call has not been checked.
New call icon (the caS is Srst time
viewed)/
/ wasrecetyedy
^Di P«QB;to^3/ie
1-123-Ч5Б-1В9Б
miu jDHHsaN
ОШ call icon (the call was already
wewed) Dafa
I Time /
4
-----
¿оог шОпе з/п
/ / ■■
l-Б 19-495-24 IB
HRtiTIH tiPNES
Location in Ihe Caller ID Ust
______________
4-B Erasing the Caller ID List,
You can erase some or all of the entries in the Caller ID List.
To erase a specific caller from the Caller ID List
While the associated telephone is on hook:
1 Press SEARCH (3D or repeatedly to find the
caller you want to erase from the Caller ID List.
2 Press CLEAR, the information is erased and the
display shows “CALL ERASEDI". After 1 second the
display will show the next call.
MARTIN iJDNES
To erase all of the entries In the
Caller ID List
1 Press CALL BACK / MENU, the display will show
"ERASE ALL”.
2 Press CLEAR to erase all messages.
All of the entries are erased, “ALL ERASED!* will
be displayed.
Note: If you still have new calls In the Caller ID List,
the list will not be erased and the display will
show “ERROP!",
JOHN SMITH
ERH5E HLL
Section 4
рн01;1г з/и
49Б-24 IB
Ft«i2:DD 3/ID
555-n 89
Ftiie.DQ
3/I5
puI2;QD 3/I5
pmI?!DD 3/15
ERROR!
After 1 second the display will go to the default mode.
HLL ERRSEBi
puI2;QQ 3/15
new:di QLiiDa
Page 4

ADVANCED CALLER ID FUNCTIONS
5-A Calling Back from the Caller ID List (Dial Back Function)
When the associated telephone is on hook:
1 Search the phone nuinber you want to call
back by pressing CSor .
2 Press CALL BACK / MENU, the display will
show “PICK UP PHONE".
3 Lift the handset and the number in the display
will be dialed automatically; the display will
show “NOW DIALING”.
In some cases you can not dial back from the
Caller ID list:
• If the Caller ID information was received as “PRIVATE CALLER”, “OUT OF
AREA" or “LONG DISTANCE", the display will show "CAN’T BE DIALED" when
the CALL BACK / MENU Button is pressed.
In this case after 5 seconds, the display will go to the default mode. ,
Nofe: The dialing back function is done in
tone mode only; no pulse-dialing is
supported.
ou) QI pu . 00 3 /15
MgB'EQ ID
PICK UP PHONE
oiD 01 PU . QO 00 i 00
MBBED ID
NOW ilflLING
5-B To Edit a Calier Number from the Calier ID List
You can edit a caller number, only if you receive a call with 10 digits. In this case, digit 1
is added automatically.
I While the associated telephone is on hook, press
UP (23 or DOWN CH3 to review records.
2 Press CALL BACK / MENU to select the Caller ID
record for dial back function.
oil} DI pmI2!QQ 3/15
I- IE3-HBB-1B9D
PICK UP PHONE
3ess CALL BACK / MENU again to confirm the
rmat of the numbers to be dialed out (AREA
CODE -Phone No.}.
CIO D ] pul2!Q0 3/I5
ipa-HBB-iBBD
PICK UP PHONE
4 Press CALL BACK! MENU again to confirm the
format of the numbers to be dialed out (Phone
No.).
OLD01 pul2!DD 3/15
HBB-IBBO
PICK UP PHONE
5 Press CALL BACK / MENU again to confirm the
format of the numbers to be dialed out (i-Phone
No.}.
010 DI pmI2'.DQ 3/15
I-H5B-1B30
PICK UP PHONE
6 Press CALL BACK / MENU again to confirm the
format of the numbers to be dialed out. It will go
back to the original format.
oio D l pwl2!DD 3/lS
1- ipa-HEB-iBgo
PICK UP PHONE
7 Lift the handset and the numbers showed in the
display will be dialed automatically, the display will
show “NOW DIALING".
OLD 01 pul2.0D 3/lS
I laansBiBBo
NOW 3IRLING
5-C Voice Mail Service
Voice Mail service is an electronic on-line answering system offered by your telephone
company. After you subscribe, the Voice Mail system can answer calls automatically
when your line is busy or if the calls are not answered. Callers can leave messages by
following the pre-recorded instructions.
When you have Voice Mail messages, the Voice Mail
icon will flash at the right upper corner and the
“VOICE MAIL" indication will alternate with the default
mode.
' The Voice Mail icon will flash until all messages have been retrieved from your Mail
box by dialing the local access number provided by your phone company.
• While in the default mode, if the “VOICE MAIL” message or icon continue flashing after
you have listened to all your Voice Mail message(fe}, press CLEAR to erase the
flashing "VOICE MAIL" message and icon.
' The Voice Mail tone can be heard and messages can be retrieved from any extension
phone connected to the same telephone line, if you use other extension phone you
have to dial your access number as well.
Note; This unit is compatit^e with FSK and stutter tone for Voice Mail detection.
I'DICE nflIL
Voice Mall icon
i>mI2!QQ 3/15
O-
Page 5

USEFUL
INFORMATION
Section 6
6-A Battery Replacement
Replace the batteries when the Low Battery icon
flashes on the upper right corner of the display or the
display contrast looks dim after the contrast level has
been adjusted to maximum. We recommend you to
use high quality alkaline batteries.
Batteries last for about four months, depending
on use. *
Note: Do not take more than 30 seconds to replace the bafierfes; otherwise you will
lose all your data and settings.
Low Battery Mfcator
PM 12100 3/15 iX:
NEU.'OQ niiraQ
6-B Setting the Display Contrast Level
When the associated telephone is on hook:
1 Press CALL BACK/MENU.
2 Press DOWN (Si three times to scroll until
“CONTRAST option is found,
3 Press CLEAR / SET to select the "CONTRAST
option.
4 Press UP / SELECT(S to choose the display
contrast from level 1 to 5.
5 When finished, press DOWN / SAVE Cm) to
save the setting. The display will show “SAVED!".
To exit from menu press CALL BACK / MENU again.
Note: When you replace the battenes, the contrast level will RESET to 1 (default level).
PM 121 DO 3/15
i
C0NTRH5T
p«i21DD 3/15
SRl'EH!
6-C Before Requesting Help
rpbiem
The unit does not work.
The Gaffer’s name and phone
numbers do not appear on the
display.
When you receive a call the
display shows “OUT OF AREA”,
"PRIVATE CALLER" or "LONG
DISTANCE”.
You cannot dial numbers from the
Caller ID List
The Caller ID display is not clear.
Previously programmed
information Is erased.
If you cannot solve your problem
[H^dy
• Check the settings section.
• Remove the batteries and reinstall them to
reset the unit.
• You must be subscribed to the Caller ID
service.
• When the unit is connected to a PBX system,
you cannot receive Caller ID information.
• (n some calling areas, the name display
service may not be available. For further
information, please contact your telephone
company.
• When the unit is connected to a PBX system,
this option does not work, even if you have
edited the number correctly.
You must check the batteries’ condition.
Install new batteries.
Check the contrast level.
Do not take more than 30 seconds to
replace the batteries because programmed
information may be erased. Reprogram if
necessary.
Call our customer call center at
1 -800-211 -PANA (7262) or 1 -800-833 9626
for the location of an authorized service center.
Panasonic's e-mail address for customer
inquiries:
consumerproducts@panasonic.com
for customers in the USA or Puerto Rico ONLY
IMPORTANT
7-A Safety Instructions
When using this unit, basic safety
precautions should always be followed to
reduce the risk of fire, electric shock, or
personal injury.
1, - Read and understand all instructions.
2, - Follow all warnings and instructions
marked on this unit.
3, - Unplug this unit from the telephone line
before cleaning. Do not use liquid or
aerosol cleaners. Use a damp cloth for
deaning.
4, - Do not use this unit near water, for
example, near a bathtub, washbowl,
kitchen sink, or the like. •
5, - Place this unit securely on stable
suriace. Serious damage to the unit may
results it it tails.
6, - Do not cover slots and openings on the
unit. They are provided for ventilation
and protection against overheating.
Never place the unit near radiators, or
in a place where proper ventilation is
not provided.
7, - Do not place objects on the line cords.
Install the unit where no one can step
or trip on the cords,
8, - Never push any objects through slots in
this unit. This may results in the risk of
fire or electric shock.
Never spill any liquid on the unit.
9, - To reduce the risk of electric shock, do
not disassemble this unit. Take the unit
to an authorized service center when
service is required.
Opening or removing covers may
10.- Unplug this unit from the telephone
A. When the telephone line cord is
B. If liquid has been spilled into the unit.
C. If the unit has been exposed to rain
SAVE THESE INSTRUCTIONS.
WARNING;
TO PREVENT FIRE OR SHOCK
HAZARD, DO NOT EXPOSE THIS
PRODUCT TO RAIN OR ANY TYPE OF
MOISTURE.
SAFETY INSTRUCTIONS
expose you to dangerous voltages or
other risks. Incorrect re-assembly
can cause electric shock when the
unit is subsequently used.
line and refer servicing to an
authorized service center when the
following conditions occur:
damaged or frayed.
or water.
D. If the unit does not work normally by
following the operating instructions.
Adjust only controls covered by the
operating instructions.
Improper adjustment may require
extensive work by an authorized
service center.
E. If the unit has been dropped or
physically damaged.
F. If the unit exhibits a distinct change
in performance.
____
! may L..
_______
electric shock from lightning.
-
Section 7
7-B Caution:
To reduce the risk of fire or injury to persons, read and follow these instructions:
1. - Use only the batteries specified.
2. ' Do not dispose of the batteries in fire. They may explode. Check with local waste
management codes for special disposal instructions.
3. ' Do not open or mutilate the batteries. Released electrolyte is corrosive and may
cause burns or injury to eyes or skin. The electrolyte may be toxic if swallowed.
4. ' Exercise care in handling batteries in order not to short the battery to conductive
materials such as rings, bracelets, and keys. The battery and/or conductor may overheat
and cause burns.
Any changes or modifications not expressly approved by the party responsible for
compliance could void the user’s authority to operate this device.
Note; This equipment has been tested and found to comply with the limits for a Class B
digital device, pursuant to Part 15 of the FCC Rules. These limits are designed to
provide reasonable protection against harmful interference in a residential installation.
This equipment can radiate radio frequency energy and, if not installed and use in
accordance with the instructions, may cause harmful interference to radio
communications.
However, there is no guarantee that interference will not occur in a particular installation.
If this equipment does cause harmful interference to radio or television reception, which
can be determined by turning the equipment off and on, the users is encouraged to try
to correct the interference by one or more of the following measures:
Reorient or relocate the receiving antenna.
Increase the separation between the equipment and receiver.
Consult the dealer or an experienced radio/TV technician for help.
Page 6

8 AJUSTES
Language
Settings
8-A Cambio de Idioma de las Indicaciones (inglés, Francés o Español)
Change of Language Settings (English, French and Spanish
languages supported)
Usted puede cambiar el idioma de tas indicaciones siguiendo el procedimiento
mostrado abajo.
You can change the language setting, follow the next procedure.
Para elegir ESPAÑOL
Mientras el teléfono asociado se encuentre en la
posición de colgado:
1 Presione CALL BACK/MENU.
2 Presione DOWN CSiuna vez para modificar el
idioma, “LANGUAGE” aparecerá en la pantalla.
3 Presione CLEAR / SET para seleccionar esta
opción, “ENGLISH” aparecerá en la pantalla.
4 Presione UP/SELECT (3D para cambiar a
“ESPAÑOL”.
5 Cuando termine, presione DOWN / SAVE
para guardar el ajuste.
6 Para salir del menú presione la teda
CALL BACK/MENU.
Una vez seleccionado “ESPAÑOL", la información
mostrada en ta pantalla será en español.
To select another language
While the associated telephone is on hook:
1 Press CALL BACK/MENU.
2 Press DOWN once to modify the language.
3 Press CLEAR / SET to select this option.
4 Press UP / SELECT3Dto select the desired
language.
5 When you finish, press DOWN/SAVE C^to save
the setting.
6 To quit from menu, press CALL BACK / MENU.
Once sefected the desired language, the informa
tion will be showed in thatlanguage.
LflNGURGE
ENGLISH
ESPRnGL
flCEPTHIIDI
nue;oo
3/15
3/15
pu IS!DO 3/15
puIs:go 3/15
Fu(s:oo 3/15
8-B Ajuste de la Hora y la Fecha
Si usted ha contratado el servicio de “identificación de Llamadas”, la fecha y la hora &
mostrarán en pantalla automáticamente cuando usted reciba una llamada.
Nota: El año no es ajustado por su compañía telefónica local. Para ajustar el año en
su pantalla, siga los pasos que se muestran a continuación:
Ajuste de la Hora y la Fecha Manualmente
1 Presione CALL BACK / MENU.
2 Presione DOWN C3) dos veces y la pantalla
mostrará "AJ. HORA-FECHA”.
3 Presione CLEAR / SET, el indicador “AM” empezará
a parpadear. Para cambiar al indicador “PM”
presione UP / SELECT 3D. Repita este
procedimiento para cambiar entre “AM” y “PM”.
4 Presione CLEAR / SET otra vez para mostrar los
dígitos de hora (ambos dígitos empezarán a
parpadear).
5 Presione UP / SELECT
de hora. Los dígitos de hora pueden ser cambiados
de 1 a 12.
í Presione CLEAR / SET otra vez para cambiar los
dígitos de minutos (El dígito seleccionado empezará
a parpadear).
7 Presione UP / SELECT
dígitos de minutos, el primer dígito (decenas), puede
ser cambiado de 0 a 5, el segundo dígito (unidades)
puede a su vez, ser cambiado de 0 a 9.
8 Presione CLEAR / SET y la pantalla mostrará los
dígitos de mes, (ambos dígitos empezarán a
parpadear).
9 Presione UP / SELECT
dígitos de mes; utilice el mismo procedimiento que
utilizó para cambiar los dígitos de hora.
Para cambiar los dígitos del día utilice el mismo
procedimiento que utilizó.para cambiar los dígitos de
minutos.
(3D
para cambiar los dígitos
3D
para cambiar los
3D
para cambiar los
Rii HDRfl-FECHH
----------
Rlí HDRR-FECHR
RlJ. HDRR-FECHR
Rii HGRR-FECHR
Indicador ‘AM‘
*«12:00 3/15
Ifidicador ’PM’
P
pmIe:oo 3/15
Horas
pmI2!D0 3/15
Mes
pm15:0Q 3/15
EQDD
EDGQ
Minutos
EDGQ
Día
EDGD
Sección 8
10 Presione CLEAR / SET para moverse a los dígitos
del año. El tercer dígito empezará a parpadear.
11 Presione UP / SELECT 3 para cambiar el dígito
del año que está parpadeando. Utilice la tecla
CLEAR / SET para moverse al siguiente dígito del
año. Utilice la tecla UP / SELECT
cambiar el dígito que se encuentra parpadeando.
Sólo se pueden cambiar los dos últimos dígitos del
año. Ambos dígitos se pueden cambiar de 0 a 9.
12 Cuando haya terminado, presione
DOWN / SAVE 3D para guardar los ajustes.
Para salir del menú presione nuevamente CALL BACK / MENU.
Notas: j
• No tome más de 30 segundos para reemplazar las baterías', de otra manera perderá
todos los datos y ajustes almacenados.
• El año será mostrado sólo cuando se encuentre ajustando la fecha y hora
manualmente.
3D
para
RJ. HDRR-FECHR
RCEPTRSD!
Dígito de año-—
Dígito de década-,
p«ie:D0 3/15 f
pm!3!DD 3/15
8-C Ajustando el Tiempo de Flash
Nota: Sólo si se requiere que el tiempo de flash sea diferente al previamente ajustado
de 700 ms.
1 Presione CALL BACK / MENU.
2 Presione DOWN C3 cuatro veces para desplegar
la opción “FLASH".
3 Presione CLEAR / SET para seleccionar la opción
de “FLASH”.
4 Presione UP / SELECT para elegir el tiempo de flash
de lOOms, 200ms, 300ms,... 900ms.
-5 Cuando haya terminado, presione DOWN / SAVE
para guardar los ajustes.
pmI2:DQ 3/15
nCEPTRUG!
EODQ
Para salir del menú presione nuevamente CALL BACK / MENU.
Page 7

OPERACION
DEL IDENTIFICADOR DE LLAMADAS
Sección 9
9-A Servicio de Identificación de Llamadas
Esta unidad es compatible con el servicio de Identificación de Llamadas que ofrece su
compañía telefónica. La información de la persona que llama será desplegada después
del primer sonido de campana, proporcionada por el servicio de Identificación de
Llamadas al que se baya suscrito. La unidad puede grabar en la lista de llamadas
información de hasta 60 diferentes llamadas, incluyendo la hora y fecha en que fueron
recibidas. La información de la Lista de Llamadas es clasificada de la más reciente a la
más antigua. Usando la Lista de Llamadas, usted podrá regresar la llamada
automáticamente. Si se suscribe a un servicio de Llamada en Espera, cuando una
segunda llamada sea recibida, la pantalla desplegará la información de la nueva
llamada.
9-B Cómo es Desplegada la Información Cuando una
Llamada es Recibida
Cuando una llamada es recibida, después del primer sonido de campana, la pantalla
mostrará el nombre y el número telefónico de la persona que llama.
* Cuando la unidad es conectada a un sistema PBX,
usted no podrá recibir información del Identificador
de Llamadas.
* En algunas áreas, el servicio para desplegar
información puede no estar disponible. Para mayor
información, contacte a su compañía telefónica.
Si la llamada no es contestada y la persona que llama
cuelga, la unidad regresa la pantalla a su modo inicial
después de 5 segundos. El contador de nuevas
llamadas será incrementado en uno y la tecla NEW
empezará a parpadear.*
En algunos casos, la información de la persona que
llama no podrá ser desplegada. La pantalla mostrará
lo siguiente;
* Si la persona llama de un área, la cual no provee el
servicio de Identificación de Llamadas, la pantalla
mostrará "FUERA DE AREA".
* Si la persona que llama ha solicitado que no se
despliegue su información, la pantalla mostrará
“LLAMADA PRIVADA".
* Cuando el número no esté disponible, la pantalla
mostrará “URGA DISTANCIA".
*Nofa: La tecla NEW parpadeará siempre que haya una
o.másHamadas sinjevisar.
P«í2;0D 3/15
llMJRflran
puI¿;qo 3/15
1'1гЗ-Ч5Б-1В9й
KEl'IN JOHNSON
р«1г:оо 3/15
FUERñ ÎE RRER
il2:00 3/15
LLRHflíR PRU'flIR
p«ie:Do 3/15
LRRGfl HSÍHNEIfl
9-C Cuando se Tiene una Suscripción ai Servicio de
Identificación de Llamadas con Llamada en Espera*
En llamada en espera, el indicador |wAÍrfe| empezará
a parpaderar y se desplegará la información de la
segunda persona que llama.
Presione la tecla CALL WAITING si escucha el tono
de Llamada en Espera durante una conversación o si
ve que el indicador parpadea en la pantalla.
• La primer llamada es puesta en espera y usted
puede contestar la segunda llamada.
• Para regresar a la primer llamada presione
CALL WAITING Otra vez.
Si la tecla CALL WAITING es presionada durante los
primeros 30 segundos, el contador comenzará a
tomar el tiempo de esta llamada, el tiempo de la
llamada previa continuará siendo cronometrado.
Si la tecla CALL WAITING no es presionada durante
los primeros 30 segundos, la Información de la
segunda llamada se almacenará en la memoria del
identificador de llamadas como una llamada nueva.
* Para más detalles y disponihilidad del servicio,
consulte a su compañía telefónica local.
Indicador de Uamada en espera
_______________
PM I^.QQ 01:1Б Цтао]
1-г 13-495-ED ID
JOHN 5П1ТН
Contador de dempo de la llamada
^________________________
10 UTILIZANDO LA LISTA de llamadas recibidas Sección 10
10-A Revisando la Lista de Llamadas Recibidas
Para confirmar quién le ha llamado, siga los siguientes pasos:
Cuando el teléfono asociado esté en la posición de colgado, presione
SEARCHCH3óC^.
1 Para buscar de la llamada más reciente a la
más antigua, presione SEARCH .
2 Para buscar de la más antigua a la más
reciente, presione SEARCH C5D.
Para moverse entre llamadas, presione
SEARCH CH)óC^.
• Una vez que han sido revisadas las llamadas
nuevas (NEW), pasarán a ser listadas como
llamadas viejas (OLD).
• La hora y la lecha de cada llamada recibida
será almacenada en la Lista de Llamadas
Recibidas.
• Las llamadas antiguas (OLD) registradas en
la Lista de Llamadas Recibidas, no serán
borradas hasta que usted las borre
manualmente.
• Si la memoria se encuentra llena (60 llamadas
almacenadas), la llamada más antigua se
borra automáticamente cuando se recibe una
llamada nueva, aún si la llamada más antigua
no ha sido revisada.
Indicador de S^da nueva
(la ñamada no ha sido revisada)
HoraenquesetBdbió
la llamada f^aenguese
^
oiPM ob;io 3/15
l-lE3-H56-ia3B
KEl'IN JDHNSnN
Indicador da llamada vieja
Oa llamada ya
fue revisada) Hora /
l4
OLO 0?PM Oti I? 3/M
t-B I9-Hg5-EH IB
ȖflTIN JONES
Número que le corresponde
en la lista de //amadas reatadas.
j recibidla llamada
10-B Borrando la Información de la Lista del Identificador de Llamadas
Puede borrar algunas o todas las llamadas de la Lista de Llamadas Recibidas si to desea.
Para borrar una llamada específica de la Lista de Llamadas Recibidas
Mientras el teléfono asociado se encuentra en ia posición de colgado;
1 Presione SEARCH CS ó CHD repetidamente
hasta encontrar la llamada que desee borrar de la
Lista de Llamadas Recibidas.
2 Presione CLEAB, se borra la información y la
pantalla muestra “LLAMADA BORRADA!”. Después
de 1 segundo, la pantalla mostrará la siguiente
llamada.
Para borrar todas las llamadas de la Lista
de Llamadas Recibidas.
1 Presione CALL BACK/MENU, la pantalla mostrará
“BORRAR TODOS".
2 Presione CLEAR para borrar todos los mensajes.
Todas las llamadas son borradas, la pantalla
desplegará “BORRADOS!".
Nota: Si aún tiene liamadas nuevas en la Lista
de Llamadas Recibidas, la lista no será
borrada y la panfa//a mostrará “ERRORi”.
'02
PM
Di: 12 3/11
чзБ-еч IB
IMHRTIN JDNE5
LLRMflîH IGRRfllIHI
^ü\ PU
I2:0D 3/ID
555-n 09
ÜOHH SniTH
ni 12;00 3/15
ÍORRRR mus U
pu I2;0D 3/15
ÍDRRHDDSf
Después de 1 segundo, la pantalla regresará al modo normal.
Page 8

FUNCIONES DEL ídentieicador de llamadas
11>A Marcación de un Número de la Lista de Llamadas Recibidas
Cuando el lelétono asociado se encuentre en posición de coigado:
I Presione ó C3D hasta encontrar el
número al que desee regresar la llamada.
2 Presione CALL BACK / MENU y la pantalla
mostrará “DESCOLGAR”.*
3 Descuelgue el teléfono asociado y el número
deseado se marcará automáticamente; la pantalla
mostrará “MARCANDO."
En algunos casos usted no podrá marcar desde la
Lista de Llamadas Recibidas:
• Si la información de la llamada fue recibida como
“LLAMADA PRIVADA", "FUERA DE AREA" ó
“LARGA DISTANCIA", la pantalla mostrará
“IMPOSIBLE MARCAR" cuando presione
CALL BACK / MENU.
Después de 5 segundos, la pantalla regresará a su modo normal.
Note: El marcado de un número de la Lista de Llamadas Recibidas se realiza en
modo de marcación por tonos.
* Si recibe una llamada con 10 dígitos, usted puede editar el número de la
llamada presionando CALL BACK / MENU hasta que los números se
encuentren en el formato deseado.
OID OI put^.QO B/lS
HgB-20 IQ
SEBCQLGRR
ouiQI pul2^QQ OQ.QQ
436EG IQ
MRRLflyiD
qidQI
IHPPSIILE HRRCHB
_______________
pwIS'.ÜQ
3/I5
11-B Servicio de “Correo de Voz”
El servicio de Correo de Voz es un servicio electrónico en línea ofrecido por su
compañía telefónica loca!.
Después de suscribirse, el servicio Correo de Voz puede contestar tas llamadas
automáticamente cuando su línea está ocupada o si las llamadas no son contestadas.
Las personas que llaman pueden dejar mensajes siguiendo las instrucciones
pre-grabadas.
Cuando usted tenga mensajes en el Correo de Voz,
ei indicador de Coreo de Voz parpadeará en la
esquina superior derecha, también la leyenda
“MENSAJE EN BUZON" alternará con la pantalla en
modo normal.
• El indicador de Correo de Voz parpadeará hasta que todos los mensajes hayan sido
revisados en su Correo de Voz, activado por el número de acceso proporcionado po
su compañía telefónica local.
• Si durante el modo normal, el indicador de Coreo de Voz continúa parpadeando
después de que usted revisó todos sus mensajes, presione CLEAR para borrar el
mensaje parpadeante “MENSAJE EN BUZON", así como el icono respectivo.
• Usted puede escuchar el tono de Correo de Voz y obtener sus mensajes desde
cualquier extensión telefónica que se encuentre conectada a la misma línea tetefón
Si usted utiliza otra extensión telefónica deberá marcar el número de acceso para si
Correo de Voz.
Nofa; Esta unidad es compatible con ¡a modulación FSK y stuUer tone para la detect
de Correo de Voz.
hENBRiiE EH mm
Mensaje en Buzón
------------------
p«12:DD 3/I5 CT
12 INFORMACION
12-A Cambio de las Baterías
Reemplace las baterías cuando el indicador de
Batería Baja parpadee o cuando el nivel de contraste
en la pantalla del Identificador de Llamadas esté bajo
después de haberse ajustado al máximo.
Se recomienda utilizar baterías alcalinas de alta
'calidad.
Las baterías durarán cuatro meses aproximadamente.
Nota: No demore más de 30 segundos en cambiar las baier/as; de ofro modo se
perderá la información y los ajustes de el identificador de llamadas.
12-B Ajuste del Nivel de Contraste de la Pantalla del
Identificador de Llamadas
Cuando el tetéfono asociado se encuentre en la posición de colgado:
1 Presione CALI BACK / MENU.
2 Presione DOWN CS tres veces. La pantalla del
Identificador de Llamadas mostrará “CONTRASTE".
3 Presione CLEAR / SET para seleccionar la opción
“CONTRASTE".
4 Presione UP / SELECT C2) para seleccionar el
nivel de contraste entre 1 y 5.
5 Cuando termíne, presione DOWN / SAVE para
guardar el ajuste. La pantalla mostrará
"ACEPTADO!".
Para salir de este menú presione ¡a tecla CALL BACK / MENU,
Nota: Cuando reemplace las baterías, el nivel de contraste regresará al nivel 1,
nivel de fábrica.
Inc/icador (te Batería Baja
«iie:0Q 3/15
CQNTRRSrE
i pul^.QQ
3/15
rleptrddí
. I
DE UTILIDAD
12-C Antes de Solicitar Ayuda
1
Problema
La unidad no funciona.
La unidad no muestra en pantalla el
nombre y numero rfe la persona que
llama.
Cuando usted recibe una llamada
aparece "FUERA DE AREA",
"LLAMADA PRIVADA"ó "LARGA
DISTANCIA’’.
Usted no puede marcar un número
de la lista de llamadas recibidas.
La pantalla de identificación de
llamadas no tiene una buena
visibilidad.
Pérdida de los ajustes (información
previantente guardada).
SI su problema no es resuefto
Sección 12
fSoiución
• Verifique ia sección de ajustes.
• Retíre las baterías y vuélvalas a colocar
para reiniciar la unidad,
• Usted debe estar suscrito al servicio de
Identificación de Llamadas.
• Si la unidad está conectada a un sistema
de PBX usted no podrá ver la información
de la persona que llama.
• En algunas localidades el servicio de
información de nombre de la persona que
llama no está disponible, consulte a su
compañía telefónica local,
» Si la unidad está conectada a un sistema
PBX usted no podrá marcar un número
almacenado de la lista de llamadas
recibidas.
' Debe revisar la condición de las baterías.
Instale balerías nuevas,
‘ Verifique e) nivel de contraste.
• No se demore más de 30 segundos a)
cambiar las baterías a la untíad. Si pierde
la información, programe de nuevo.
' Consulte a su distribuidor autorizado.
______
íegunc
-ilílad.
Page 9

13 IMPORTANTE
INSTRUCCIONES DE SEGURIDAD
Sección 13
13-A Instrucciones de Seguridad
Cuando utilice esta unidad, se deberán de 9.'
seguir las precauciones básicas de
seguridad en todo momento, para reducir
el riesgo de fuego, choque eléctrico o
daños personales.
1. * Lea y comprenda todas las
instrucciones.
2. - Siga todas tas advertencias e
instrucciones marcadas en esta
unidad.
3. - Desconecte la unidad antes de
limpiarla. No utilice limpiadores
irquidos o en aerosol. Utilice un trapo
húmedo para limpiarla.
4. * No utilice esta unidad cerca de agua,
por ejemplo, cerca de una bañera,
palangana, lavabo, o similares.
5. - Coloque la unidad en una superficie
segura y estable. La unidad puede
dañarse seriamente si sufre alguna
calda,
6. - No cubra las ranuras ni aberturas en la
unidad; proveen ventilación y
protección contra sobrecalentamiento.
Nunca coloque la unidad cerca de ■
radiadores, o en lugares donde no se
provea la ventilación adecuada.
7. - No coloque objetos sobre los cables
de línea. Instale la unidad donde nadie
pueda pisar o tropezar con los cables,
8. - Nunca introduzca ningún objeto a
través de tas ranuras de esta unidad.
Esto puede producir riesgo de fuego o
choque eléctrico.
Para reducir el riesgo de choque
eléctrico, no desensamble esta
unidad.
Lleve la unidad a un centro de
servicio autorizado cuando requiera
mantenimiento. Abrir o quitar las
cubiertas puede exponerlo a voltajes
peligrosos u otro riesgo. El re-ensamble
incorecto puede causar choque
eléctrico cuando la unidad sea
subsecuentemente usada.
10.-
Desconecte esta unidad totalmente, y
para su servicio diríjase a un centro
de servicio autorizado cuando
ocurran las siguientes condiciones;
. Cuando el cable de la línea telefónica
esté dañado o raído.
Si se ha derramado líquido dentro de
la unidad.
. Si la unidad ha sido expuesta a lluvia
o agua.
. Si la unidad no trabaja normalmente
al seguir las instrucciones de
operación.
Ajuste sólo los controles cubiertos por
las instrucciones de operación. Un
ajuste inadecuado puede requerir
trabajo intensivo por parte de un
centro de servicio autorizado.
. Si la unidad ha sido golpeada o
dañada físicamente.
Si la unidad exhibe una reacción
distinta en su desenvolvimiento.
Durante tormentas eléctricas, evite el
11,-
uso de teléfonos, excepto los de tipo
inalámbrico. Puede haber un riesgo
remoto de choque eléctrico por
relámpagos.
GUARDE ESTAS INSTRUCCIONES
PRECAUCION:
PARA PREVENIR FUEGO O RIESGO DE CHOQUE ELECTRICO, NO EXPONG,
ESTE PRODUCTO A LA LLUVIA O A CUALQUIER OTRO TIPO DE HUMEDAD.
13-B Precaución:
Para reducir riesgo de fuego o daños personales, lea y siga las siguientes instruccione:
1. - Utilice sólo tas baterías especificadas.
2. - No exponga las baterías al fuego por que pueden explotar. Deposite las baterías
en un lugar apropiado o designado por el departamento de limpia de su localidad.
3, - No abra ni mutile las baterías. El contenido es corrosivo y puede causar daños o
quemaduras en la piel y ojos. No ingiera el electrolito, ya que es corrosivo.
4, - Maneje con cuidado las baterías y evite el contacto con los materiales conductivos
tales como anillos, brazaletes y llaves. Las baterías y los conductores pueden
producir sobrecalentamiento y causar quemaduras en la piel.
Cualquier cambio o modificación no aprobado expresamente por la parte responsable
para el cumplimiento podría anular la autoridad del usuario para operar esta unidad.
NOTA: Este equipo ha sido evaluado y se ha encontrado que cumple con los límites
de un dispositivo digital clase B, de acuerdo a tas reglas de la parte 15 de FCC. Esto;
límites están diseñados para proveer protección razonable contra interferencia, no
deseada, en una instalación residencial.
Este equipo puede radiar energía de radio frecuencia y, si no es instalada y operada
de acuerdo con las instrucciones, puede causar interferencia dañina para las
radiocomunicaciones.
Sin embargo, esto no garantiza que la interferencia no ocurrirá en una instalación
particular. Si este equipo causa interferencia dañina a la recepción de aparatos de
radio o televisión, lo cual puede ser determinado apagando y encendiendo el equipo,
el usuario está limitado a tratar de corregir la interferencia siguiendo una o más de la:
siguientes medidas:
Reoriente o reubique la antena receptora.
Incremente la separación entre el equipo y el receptor.
Consulte a su distribuidor o a un técnico de radicVT.V, especializado.
14 FCC
SAFETY INSTRUCTIONS
14-A FCC Information
This device complies with Part 15 of the FCC Rules, Operation is subject to the following
two conditions:
11 This device may not cause harmful interference, and
2) .this device must accept any interference received, including interference that may
cause undesired operation.
If requested by Telephone company, inform them as follows:
FCC RMistration No.............................................................(tound on the bottom of the unit)
Ringer Equivalence
The particular telephone line to which the equipment is connected.
This unit must not be connected a coin operated line.
If you are on party line. Check with your local telephone company.
Ringer Equivalence No. (REN):
The REN is useful in determining the quantity of devices you may connect to your
telephone line and still have all of those devices ring when your telephone number is
called. In most, but not all areas, the sum of the REN’s of all devices connected to one line
should not exceed five (5.0). To be certain of the number of devices you may connect to
your line, as determined by the REN, you should contact your local telephone company
10 determine the maximum REN for your calling area,
in the event terminal eq^uipment causes harm to the telephone network, the telephone
company should notify tne customer, if possible, that senrice may be stopped.
However, where prior notice is impractical, the company may temporarily cease service
providing that they:
a) Promptly notify the customer.
m Give the customer an opportunity to correct the problem with their equipment,
c) Inform the customer of the right to bring a complaint to the Federal Communication
ommission pursuant to procedures set out in FCC Rules and Regulations Subpart E of
Part 68.
The telephone Company may make changes in its Communications facilities, equipment,
operations or procedures, where such action is reasonably required in the operation of its
business and is not inconsistent with the rules and regulations in FCC Part. 68.
If such changes can be reasonably expected to render any customer terminal equipment
incompatible with telephone company communications facilities, or require modification or
alteration of such terminal equipment, or otherwise materially affect its use or
performance the customer shall be given adequate notice in writing, to allow the customer
an opportunity to maintain uninterrupted service.
.........................
.................................................................................0.1B
 Loading...