

Page 1
ffll-lfflE
Panasonic
Operating Instructions
AUTOMATIC TELEPHONE
ANSWERING SYSTEM
Thank you for purchasing
the Panasonic Telephone
La tarjeta de referenda rápida en español
puede encontrarse en las páginas 9~10.
Please read before use.
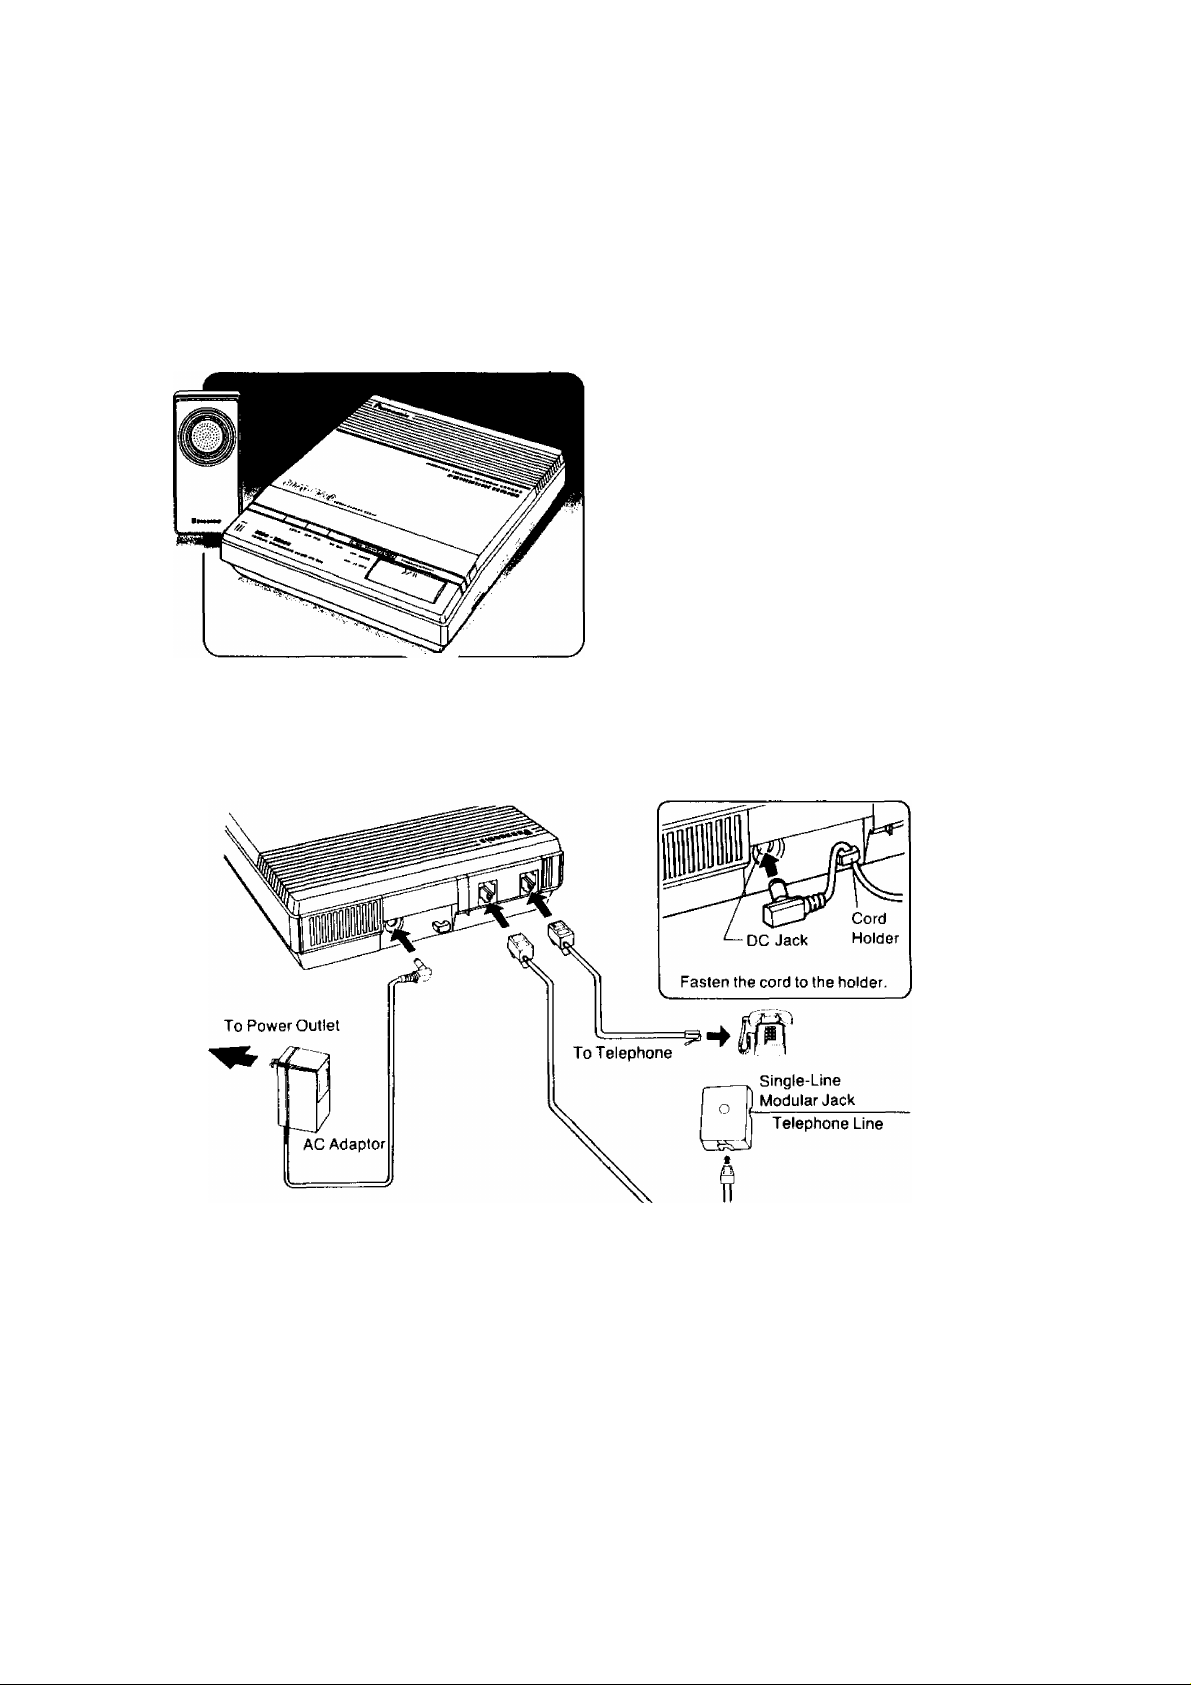
Connection
1 Connect as shown.
(Spanish quick reference card can be found
on pages9~10.)
KX-T1418
EASA-PHONE
Answering System.
Page 2

Location of Controls
Automatic Telephone Answering System
© ICMTape
RECORD
Button
OGM-Start/Stop
Button
@ Microphone
® Memo Button
© Rewind Button
® Fast Forward
Button
@ In Use Indicator
@ Power Indicator
@ Answer/Call Indicator
<Jj) OGMTape
CPC Switch
Ring Selector
■@ Recording
Time Selector
® Volume Control
-® Playback/Pause Button
Page 3
Preparation
1 Push the power switch on.
• Power Indicator will light.
2 Insert I and | ^ | , and then reset the OGM tape by pushing the OGM START/STOP
button.
•Wait until In Use Indicator goes out.
3 Select each selector.
^® CPC switch---------------------------------------
Set to “A”.
Usually set to “A”.
(No call waiting service line)
Set to “B” when your line has call
waiting service.
Or if some incoming messages are
incomplete.
(J4) Recording Time Selector —
1 MINUTE;
•The unit will record up to 1 minute.
VOX:
•The unit will record for as long as the
caller speaks.
r
2:
•The unit will answer the telephone
on the second ring,
4:
•The unit will answer the telephone
on the fourth ring.
AUTO:
•The unit will answer on the second
ring if any incoming messages
have been recorded,
•The unit will answer on the fourth
ring when no incoming messages
have been recorded.
@ Ring Selector
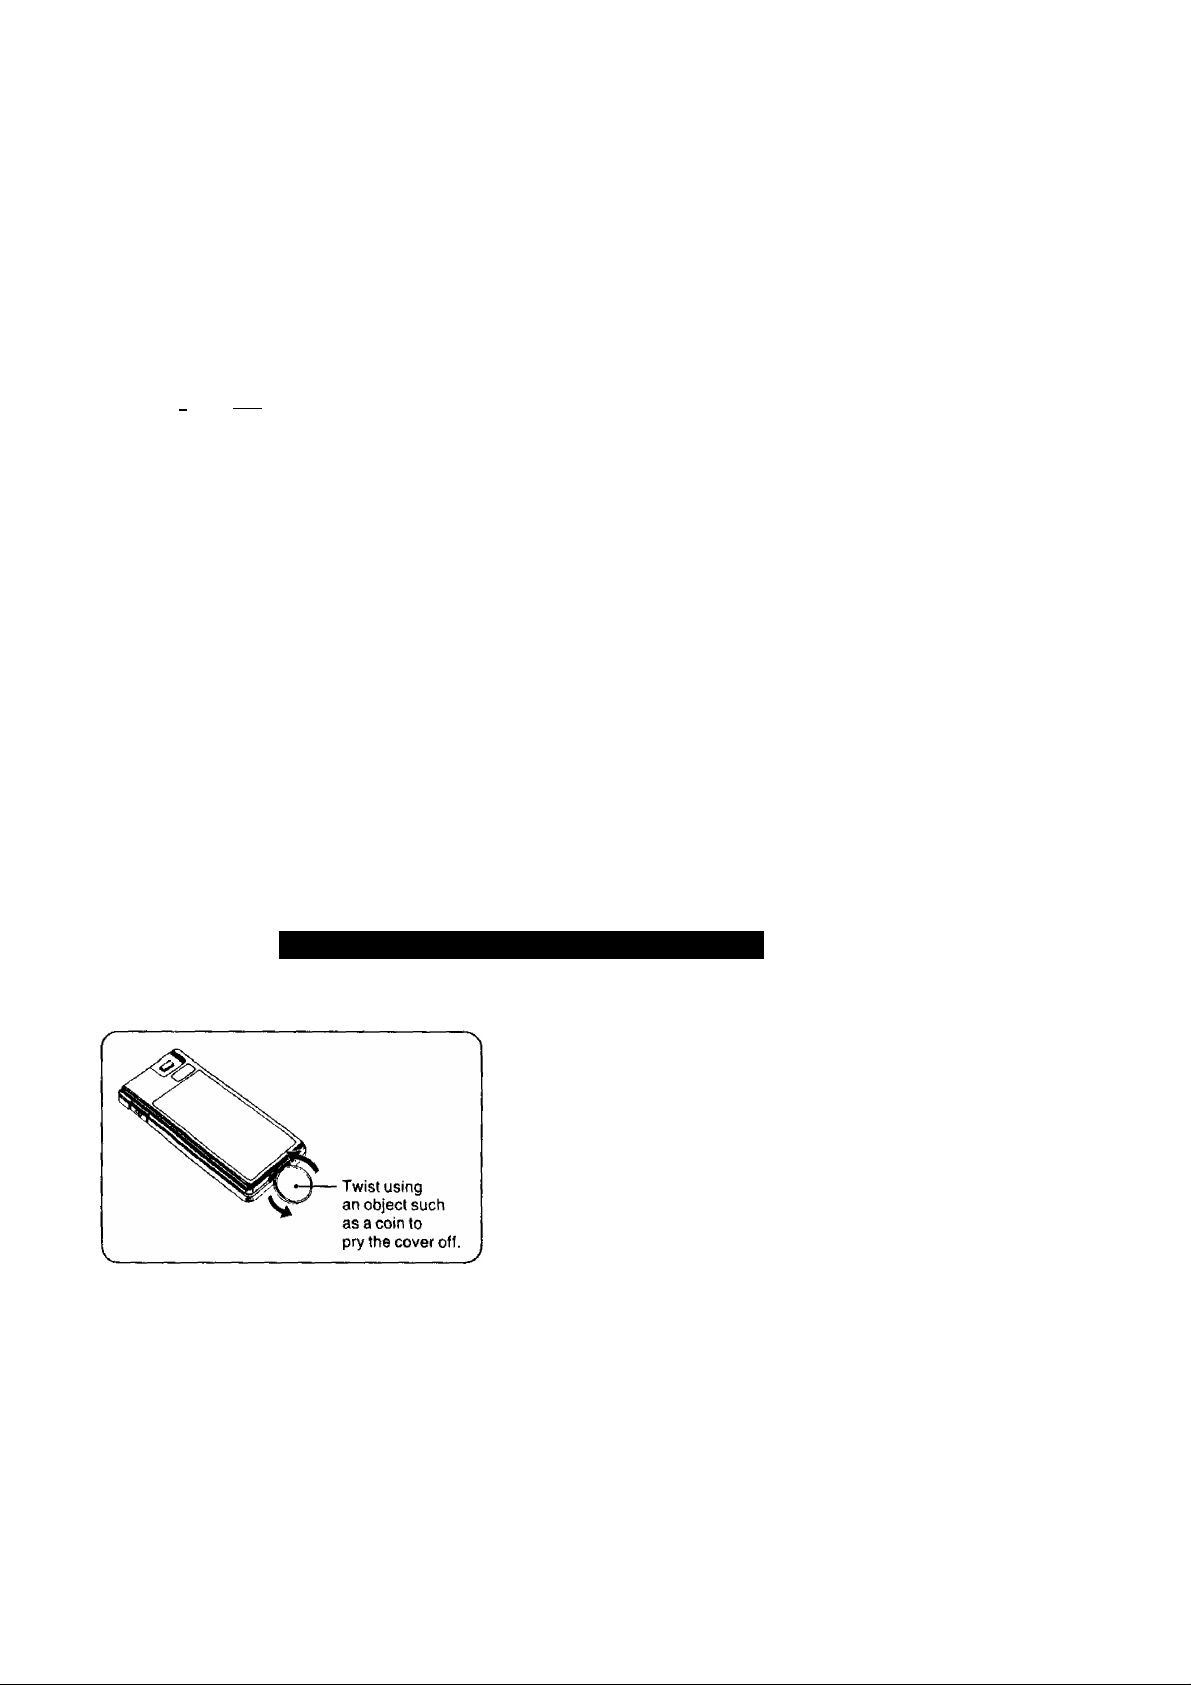
Battery Installation for Remote Controller
1 Open the Battery Compartment cover as
shown below.
2 Insert “AAA" size batteries (UM-4 or
equivalent) observing correct polarity {plus
and minus).
3 Replace the Battery Compartment cover.
Notes;
•If the Pickup Remote Controller is not to be
used for a long time, remove all the
batteries to prevent possible damage.
•The battery life is about one year for average
usage.
•When the sound from the Pickup Remote
Controller becomes weak, reolace all the
Page 4

How to Record Outgoing
Message (OGM)
The purpose of the Outgoing Message is to inform the calling party that you cannot answer, but want to
record the caller’s message.
Recording
While keeping it pushed.
Push
push the Q] until a beep sound is
heard.
•One beep tone will be heard.
• Please take care so as not to push the FF
button.
MIC
2
speak clearly and loudly to III .
•Speak up to 30 seconds from about
8 inches away from MIC.
•While recording, do not pause for over
2 seconds.
3 When you finished,
Push
•Wait until the In Use indicator goes out.
•A series of short beeps will be heard to
advance the tape followed by a long beep
signaling that the unit is at the beginning of
the tape.
•If you make a mistake, repeat from the
step 1,
□
Confirming
Sample of Outgoing Message
•Set Recording Time Selector to
“1 MINUTE”.
Hello, this is (the Panasonic Company).
We cannot answer your call at this time. If
you leave your name and phone number,
we will return your call as soon as possible.
Speak clearly after you hear the beep.
You have 1 minute to leave your message.
If the beep sounds 6 times, your
message wilt not be recorded. Should
this happen please call back tomorrow.
Note:
When the ICM tape is full, the unit cannot
record any more messages. This is
indicated to the caller by 6 beep tones.
If you wish to inform the caller of this
possibility, add the sentences (printed in
bold-face above) to your OGM recording.
•Set Recording Time Selector to “VOX”.
Hello, this is (the Panasonic Company).
We cannot answer your call at this time. If
you leave your name, phone number and
the purpose of your call, we will return your
call as soon as possible. Please speak
clearly after you hear the beep.
Push
•Adjust the volume control to confirm.
•Wait until the In Use indicator goes out.
□
Re-recording
If you want to record again, repeat from
step 1.
Note:
• If you pause for over 2 seconds while recording, a beep will sound 6 times.
So wait until the In Use indicator goes out and start with the step 1 over.
•The unit will automatically change to the answer set mode after 7 seconds from the In Use
indicator goes out.
- 3 -
Page 5

Setting Prior to
Listening to
Leaving
The unit will automatically set to the Answer
mode by simply pushing the Power Switch.
When the telephone rings, the unit will play
back the OGM, then it will record the Caller’s
messages on the ICM tape.
Preparation
After reviewing the Outgoing or Incoming
message the unit will automatically reset itself
to the Answer set position and will be ready to
answer the next call.
After reviewing, the Answer/Call indicator
lights.
To record future messages after
the last message.
Leave the unit as it is.
D
Messages
When an incoming message has been
recorded, the Answer/Call indicator will flash
in group. Each group indicates the number of
incoming messages up to 15 (i.e. Three flashes
followed by a pause means that 3 messages
were received).
In the case of a power interruption, the Answer/
Call indicator will flash slowly after the power is
restored.
To Listen to Messages
Pl_ AY BACK / PA USE
Push
Auto-Logic (One Touch Operation)
ICM tape will automatically rewind and begin
to play back. At the end of all the messages 3
beeps will be heard.
7 seconds after the 3 beeps are heard the unit
will reset back to the Answer mode.
•Future incoming messages will be
recorded after the last message. To
record from the beginning of the tape,
push the REW button.
To record future messages from
the beginning of the tape.
Push the REW button.
When you use a new ICM tape or record
future messages from the beginning of the
tape, push the REW button.
Confirm that the Answer/Call indicator light
is on.
If you do not want to set the unit to the
Answer mode, push the Power Switch to off.
1^
1 r|) □ (c=i]
4 -
To Stop the Tape
Temporarily
PI_AYBACK /PAUSE
Push
•The In Use Indicator will flash.
•To release, push it again.
•While in the pause mode, the unit will not
change to the Answer mode.
To Rewind (Fast Forward)
the Tape
■ M|Jjr «4 nEW I FF ^ j
Push
•To release, push the Playback/Pause
Button again.
Page 6

Other Features
'àmiÈà
ÜGiÉ«
Monitoring the
Incoming Calls
While an incoming message is being recorded,
1 Adjust the volume control.
•If the tape does not stop after the caller
hangs up, use the unit with setting the
recording time selector to “1 MINUTE”.
How to Speak to the
Caller Directly
1 Lower the Volume level using the
Volume Control to prevent a howling
noise and lift the
PLAYBACK /PALIBE
2^
Push
stops moving, and talk.
until the ICM tape
Save the Recorded
Messages
1 Play back the tape until the message
you want to save.
Rl_ A Y B A CK / P A US e
2[|
Push
►The unit will go into the Answer mode and
future incoming messages will be recorded
after the messages you have saved.
while keeping it
pushed, push the
rewind button.
•The unit will automatically be ready to
answer and record the next call.
3 When finished, hang up the
Message Memo
To record confidential message, any time at
home, on the ICM tape to be heard by someone
using the unit.
1^
Push
Mtc
2
Speak into the III.
until a beep sound is heard.
3 When finished, S? •
Push
•The unit will be ready to answer the next
call.
Erasing the Recorded
Message
To erase the incoming messages:
-
I I while keeping it pushed,
push the £ or until a beep is
heard.
•The messages are erased while rewinding or
fast forwarding.
•The cassette can be erased at high speed
even if the record-prevention (knock-out) tabs
have been removed.
tab
- 5 -
Page 7

Cassette Tapes
■ v.
•For optimum sound quality and performance,
we recommend that you replace the OGM
i
and the ICM cassette tapes every six
months and re-record the outgoing
message every three months assuming that
the unit answers about ten calls a day.
• Never place a cassette tape near a magnetic
source, such as a magnet or a TV set,
because this will affect tape quality.
Endless Cassette Tape
Cassette Tape (C-60) for
Incoming Messages
•Should the Incoming Message cassette tape
break or become worn, replace it with a high
quality “NORMAL” tape. Use Panasonic
(C-30, C-60, C-90), or other high quality tape.
Metal or chrome tape cannot be used.
•Slack in the tape can be tightened by rotating
the tape reel with a pencil.
•Do not use C-120 tape to prevent the tape
from sticking.
(KX-C030) for Outgoing
Message
•A sensing foil (silver) is attached to the
endless tape. If the sensing foil does not
contact the sensing switch, the endless tape
cannot stop automatically. Replace it with a
new Panasonic endless cassette tape.
(KX-C030).
•Observe carefully that the tape and capstan
are located as shown below, and insert the
endless tape into the machine.
Because the head and capstan assemblies are
in contact with the tape, dirt and residue from
the tape can easily adhere to these parts,
causing distortion. These parts should be
cleaned periodically in the manner described
below:
•Disconnect the telephone cord from the unit
•Clean the head surfaces, sensing switch,
Notes:
•Do not bring magnetic or metal objects, such
• Do not oil any part of the unit.
Maintenance
before cleaning.
pressure rollers and capstans with a
cotton swab.
If these surfaces are extremely dirty, dampen
the cotton swab with alcohol.
as a screwdriver, near the head assemblies,
as such objects could magnetize the heads.
The following endless cassette tapes can also
be used with this unit:
• KX-C010^KX-C020
V,
_______________.
Disconnect the telephone cord from the
unit before Maintenance.
- 6 -
Page 8

Pickup Remote Control
The Pickup Remote Controller produces a chirping sound in operation, and the answering machine
responds to the Controller with a beep.
Push the buttons on the Controller continuously, until the beep is heard through the telephone line from
the answering machine.
n
1
To Set the Answer mode
If you forgot to set the Answer mode:
To set
DIALTHEPHONENO. WAITFOR
TO WHICH THE UNIT 15 RINGS
IS CONNECTED
•The unit will play back the outgoing
message and then you may hang up the
Toll Saver
Set the Ring Selector to “Auto”;
If you call from a remote location and the unit
does not pick up on the third ring, hang up.
This means no calls have been recorded and
you will not be required to retrieve and pay toll
charges.
•Pick-up on At least one message
the second
ring:
•If does not
pick-up
on the
third ring:
After you have played back all the
messages from remote phone;
has been recorded.
No messages have been
recorded. So hang up.
Playback Messages
Dial the telephone number to which the
answering machine is connected.
While the Outgoing Message is playing,
place the Controller's speaker against the
telephone mouthpiece and push the Play
Back Button.
•One beep will sound then another beeps
will sound to tell you the number of
recorded messages, up to 8 times.
•The unit will rewind with voice and play
back all the recorded incoming messages
automatically, even at tape end.
•3 beeps will be heard after the last
message.
Hang up.
•Future incoming messages will be
recorded after the most recently recorded
message.
»Pick-up on
the second
ring in the
next call:
• If no pick-up occurs on the third ring, no
messages have been recorded.
At least one new message
has been recorded.
Remote Reset
To record the future incoming messages
from the beginning of the tape.
•After the recorded messages are played
back or while they are playing;
1 Push the Playback/Reset Button again.
2 Hang up.
7 -
Page 9

Memory Playback
When you have already heard the messages
from a remote phone, you can skip them and
listen only to the newly recorded messages.
1 Dial the telephone number to which the
answering machine is connected.
2 While the Outgoing Message is playing,
place the Controller’s speaker against the
telephone mouthpiece and push the
Memory Playback Button.
To record the future incoming messages
from the beginning of the tape after you
used Memory playback;
Push the Playback Button.
•The unit will rewind to the beginning of the
tape and then playback the incoming
messages.
Push the Playback Button again while
playing back.
• Future messages will be recorded from the
beginning of the tape.
> Hang up.
Recording a Marker
Message
After hearing all messages, you can leave your
index message on the tape.
3-beep
2-beep
•One beep will sound then another beeps
will sound to tell you the number of newly
recorded messages, up to 8 times.
•The unit will play back the new messages.
Remote Reset
To record the future incoming messages
from the first message that you heard by the
Memory playback;
1 Push the Memory Playback/Reset
Button again.
2 Hang up.
^----------H marker message
____________________________________'
3 beeps will be heard after all the recorded
messages have been played back.
10-second Record date, time, etc.
1 Start to talk right after the last 2 beeps.
2 When finished, hang up.
------------------------
If there is no response from the answering
machine to your remote controller’s
command, the telephone might be equipped
with a carbon microphone.
For the improvement of the performance,
please shake the handset to loosen carbon
particles.
NOTE--------------------------s
- 8 -
 Loading...