

Page 1

Operating Instructions
Home Photo Printer
Model No. KX-PX10M
Home Photo Printer KX-PX10M Operating Instructions
Warranty provided separately
Thank you for purchasing this Panasonic Home Photo Printer.
Please read this manual carefully to ensure proper operation. Especially, be sure
to read the “Important Safety Instructions” (pages 6 – 9) before using this product.
Store this manual and warranty in the safe place for future references.
Accessory Purchases
Purchase Parts, Accessories and Instruction Books online for all
Panasonic Products by visiting our Web Site at:
http://www.pasc.panasonic.com
or, send your request by E-mail to:
npcparts@us.panasonic.com
Page 2

Thank you for purchasing a Panasonic Home Photo Printer.
For your future reference
Date of purchase
Serial number (found on the rear of the unit)
Dealer’s name and address
Dealer’s telephone number
Attach your sales receipt here.
Caution:
Note that the images of printed documents will remain on the used ink sheet.
Use discretion when disposing of the used ink cassette.
2
Page 3

Table of Contents
Before Use
Important Safety Instructions .................................................. 6
Notes on Use ........................................................................... 10
• Usage locations .................................................................. 10
• Storage ............................................................................... 11
• Copy-prohibited items ......................................................... 11
• When disposing of, transferring ownership
or returning the printer ........................................................ 11
Package Contents ................................................................... 12
Names and Functions of Each Part ...................................... 13
Preparation
Connecting a Power Source .................................................. 15
Inserting Battery into the Remote Control ........................... 16
Paper and Ink Cassettes (Sold Separately) .......................... 18
• Handling of paper and ink cassettes ................................... 19
Inserting the Paper ................................................................. 20
Inserting the Ink Cassette ...................................................... 22
Connecting .............................................................................. 24
• Connecting the printer to a digital camera .......................... 24
• Connecting the printer to a TV ............................................ 25
• Connecting the printer to a computer .................................. 25
Before Use Preparation OthersPrinting Changing
Settings
Printing
PictBridge Printing with a Digital Camera ............................ 26
Printing with a TV ................................................................... 28
• Checking the connection to a TV ........................................ 28
• Inserting a memory card ..................................................... 29
• Turning the power on .......................................................... 29
• Changing the language ....................................................... 30
• Printing single image ........................................................... 32
• Printing multiple images ...................................................... 34
• Printing all images on a memory card ................................. 36
• Printing an index ................................................................. 38
• Printing using DPOF settings .............................................. 40
Advanced
Operations
With PC
3
Page 4

Changing Settings
Print Settings .......................................................................... 42
• Printing date ........................................................................ 42
• Borderless printing .............................................................. 44
• Rotating image 180° ........................................................... 46
Image Adjustment ................................................................... 48
Device Settings ....................................................................... 53
Saving Settings ....................................................................... 55
Restoring Default Settings ..................................................... 56
Advanced Operations
Searching for Images ............................................................. 57
• Searching for images by date ............................................. 57
• Exiting search mode ........................................................... 59
Selecting All Images ............................................................... 60
Slide Show ............................................................................... 62
• Starting a slide show ........................................................... 62
• Slide show of selected images ............................................ 64
• Slide show settings ............................................................. 65
Trimming/Rotating Images ..................................................... 67
Creating Calendars ................................................................. 69
Composite Printing ................................................................. 76
LUMIX Baby Mode .................................................................. 82
With PC
Printing with a Computer ....................................................... 84
• System requirements .......................................................... 84
• Installing the printer driver ................................................... 85
• Printing from the computer .................................................. 89
• Status monitor ..................................................................... 89
• License agreement ............................................................. 90
4
Page 5

Others
If a Paper Jam Occurs ............................................................ 91
LED Indicators ........................................................................ 93
Troubleshooting ...................................................................... 94
Message Display ................................................................... 100
Maintenance .......................................................................... 103
Specifications ....................................................................... 104
List of Factory Settings ........................................................ 105
Additional Information ......................................................... 106
Index ...................................................................................... 108
Customer Services .............................................................. 109
Before Use
5
Page 6

Important Safety Instructions
When using this unit, basic safety
precautions should always be followed
to reduce the risk of fire, electric shock,
or personal injury.
1. Read and understand all instructions.
2. Follow all warnings and instructions
marked on the unit.
3. Unplug this unit from wall outlets
before cleaning. Do not use liquid or
aerosol cleaners. Use a dry cloth for
cleaning.
4. Do not use this unit near water, for
example near a bathtub, wash bowl,
kitchen sink, etc.
5. Place the unit securely on a stable
surface. Serious damage and/or
injury may result if the unit falls.
6. Do not cover air vents on the unit.
They are provided for ventilation
and protection against overheating.
Never place the unit near radiators,
or in a place where proper ventilation
is not provided.
7. Use only the power source marked
on the unit. If you are not sure of the
type of power supplied to your home,
consult your dealer or local power
company.
8. Do not place objects on the power
cord. Install the unit where no one
can step or trip on the cord.
9. Do not overload wall outlets and
extension cords. This can result in
the risk of fire or electrical shock.
10.Do not damage the power cord, plug
or AC adaptor. Consult your dealer in
case where these items need to be
repaired.
11. Do not touch the plug with wet
hands.
12.Do not use a damaged plug or AC
adaptor or slack cord. Insert the
power plug fully and firmly.
13.Regularly clear away dust from the
power plug.
14.Never push any objects through slots
in this unit. This may result in the risk
of fire or electric shock. Never spill
any liquid on the unit.
15.To reduce the risk of electric shock,
do not disassemble this unit. Take
the unit to an authorized service
center when service is required.
Opening or removing covers may
expose you to dangerous voltages or
other risks. Incorrect reassembly can
cause electric shock when the unit is
subsequently used.
16.Unplug this unit from wall outlets
and refer servicing to an authorized
service center when the following
conditions occur:
A. When the power cord is damaged
or frayed.
B. If liquid has been spilled into the
unit.
C. If the unit has been exposed to
rain or water.
D. If the unit does not work normally
by following the operating
instructions. Adjust only controls
covered by the operating
instructions. Improper adjustment
may require extensive work by an
authorized service center.
E. If the unit has been dropped or
physically damaged.
F. If the unit exhibits a distinct
change in performance.
17.During thunderstorms, avoid using
the unit. There may be a remote risk
of an electric shock from lightning.
18.Do not place memory cards within
reach of infants. If you believe a
child has swallowed a memory card,
contact a physician immediately.
SAVE THESE
INSTRUCTIONS
6
Page 7

Before Use
WARNING:
• To prevent the risk of fire or electrical
shock, do not expose the product to
rain or any type of moisture.
• Unplug the product from power
outlets if it emits smoke, an abnormal
smell, or makes an unusual noise.
These conditions can cause fire or
electric shock. Confirm that smoke
has stopped emitting and contact the
Panasonic Call Center at 1-800-211PANA (1-800-211-7262).
Battery
To reduce the risk of fire or injury
to persons, read and follow these
instructions.
• Use only the battery specified.
• Keep coin battery out of the reach of
small children.
• Do not charge, disassemble or
remodel the coin battery, subject it to
pressure or heat, or place it in water or
fire.
• Be sure to check the + and – terminals
of the coin battery and insert it
correctly.
• Do not allow any metallic object (such
as necklace or hair pin) to contact the
+/– terminals of the coin battery. Place
the battery in a plastic bag or other
safe container to ensure that it does
not come in contact with any metallic
objects.
• If fluid leaks from the battery:
If fluid should for some reason leak
from the battery and it comes in
contact with your skin or clothes,
be sure to flush the affected area
thoroughly with water.
Avoid getting any battery leakage
in your eyes as this may cause eye
damage or loss of eyesight. If you
get any battery leakage in your eyes,
immediately wash the area with water
and consult a physician.
CAUTION:
• The wall outlet shall be installed near
the equipment and easily accessible or
the power plug or an appliance coupler
shall remain readily operable.
• Although the power button is in
the “OFF” position, the unit is not
completely disconnected from the
power supply. Remove the plug from
the wall outlet if you will not be using
the unit for an extended period of
time. Place the unit so the plug can be
easily removed.
• Be sure to remove the memory card
from the unit before disconnecting the
power cord.
• When moving the unit, disconnect the
power cord.
• Do not place heavy object on the unit,
or sit on it.
• Do not use the unit in a location
exposed to sooty or steamy emissions,
dampness or excessive dust.
• Avoid placing the unit in locations
subject to high temperatures. In
particular, avoid placing the unit in
locations subject to direct sunlight or
close to stoves.
• Take care not to catch your fingers in
the opening for the ink cassette and
paper cassette.
• Do not touch the paper during printing.
Paper moves back and forth 4 times
during printing. Do not touch the paper
until the printing process has finished.
• Do not touch the thermal head located
inside the unit as this may lead to burn
injury.
7
Continued on next page
Page 8

Important Safety Instructions
FCC NOTE: (U.S. only)
This equipment has been tested and
found to comply with the limits for a
Class B digital device, pursuant to
Part 15 of the FCC Rules. These limits
are designed to provide reasonable
protection against harmful interference
in a residential installation. This
equipment generates, uses, and can
radiate radio frequency energy and, if
not installed and used in accordance
with the instructions, may cause harmful
interference to radio communications.
However, there is no guarantee that
interference will not occur in a particular
installation. If this equipment does
cause harmful interference to radio
or television reception, which can be
determined by turning the equipment off
and on, the user is encouraged to try to
correct the interference by one or more
of the following measures:
• Reorient or relocate the receiving
antenna.
• Increase the separation between the
equipment and receiver.
• Connect the equipment into an outlet
on a circuit different from that to which
the receiver is connected.
• Consult the dealer or an experienced
radio/TV technician for help.
This equipment complies with Part 15 of
the FCC Rules. Operation is subject to
the following two conditions:
(1) This equipment may not cause
harmful interference, and (2) this
equipment must accept any interference
received, including interference that
may cause undesired operation.
Responsible party:
Panasonic Corporation of North America
One Panasonic Way,
Secaucus, New Jersey 07094
Phone number: 1-800-211-PANA
(1-800-211-7262)
FCC Caution: To assure continued
compliance, follow the attached
installation instructions and use only
shielded cables when connecting to
computer or other devices. Also, any
changes or modifications not expressly
approved by the party respossible
for compliance could void the user’s
authority to operate this equipment.
8
Page 9

Information on Disposal in other
Countries outside the European
Union
This symbol is only valid in the
European Union.
If you wish to discard this product,
please contact your local authorities or
dealer and ask for the correct method of
disposal.
Before Use
9
Page 10
Notes on Use
•
•
•
Usage locations
Printer usage location
Do not use in the following locations:
• Locations subject to a lot of dust or lint, as this may lead to inability to print cleanly.
• In direct sunlight, near an air conditioner, or in any other location where temperature
may rise above 95°F (35°C) or fall below 41°F (5°C). There is a risk of causing
malfunction, deformation, or damage to the printer.
• On a piano or a carpeted surface. There is a risk of causing damage or discoloration.
• Where it can be exposed to tobacco smoke. There is a risk of causing the printer to
malfunction.
Keep away from magnetic and/or electronic hardware.
In order to prevent adverse electromagnetic effects, be sure to operate as far away as
possible from the following type of appliances.
• Mobile phones, microwave ovens, electronic game units and stereo speakers.
Do not use the printer vertically.
This may cause the printer to malfunction.
If the printer’s inner components overheat
When the ambient temperature is high or when continuous printing has been performed,
printing operations may temporarily halt in order to keep the internal temperature of the
printer from rising. Printing will automatically resume when the internal temperature of the
printer goes down. Ensure that the printer is used in a well-ventilated location.
When ambient temperatures are low
To maintain high quality image output, the printer does not begin printing until the internal
temperature has warmed up, so it may take some time before printing starts. Printing starts
automatically once the temperature has risen sufficiently.
To prevent the printer deformation and keep the case finish
Do not spill or allow any volatile solvents, such as benzine, paint thinner, or other solvents
or insecticide to come in contact with the printer. Also, do not maintain contact with the
printer by rubber or vinyl-coated materials for an extended period of time. This may damage
the surface of the printer or cause the case finish to peel.
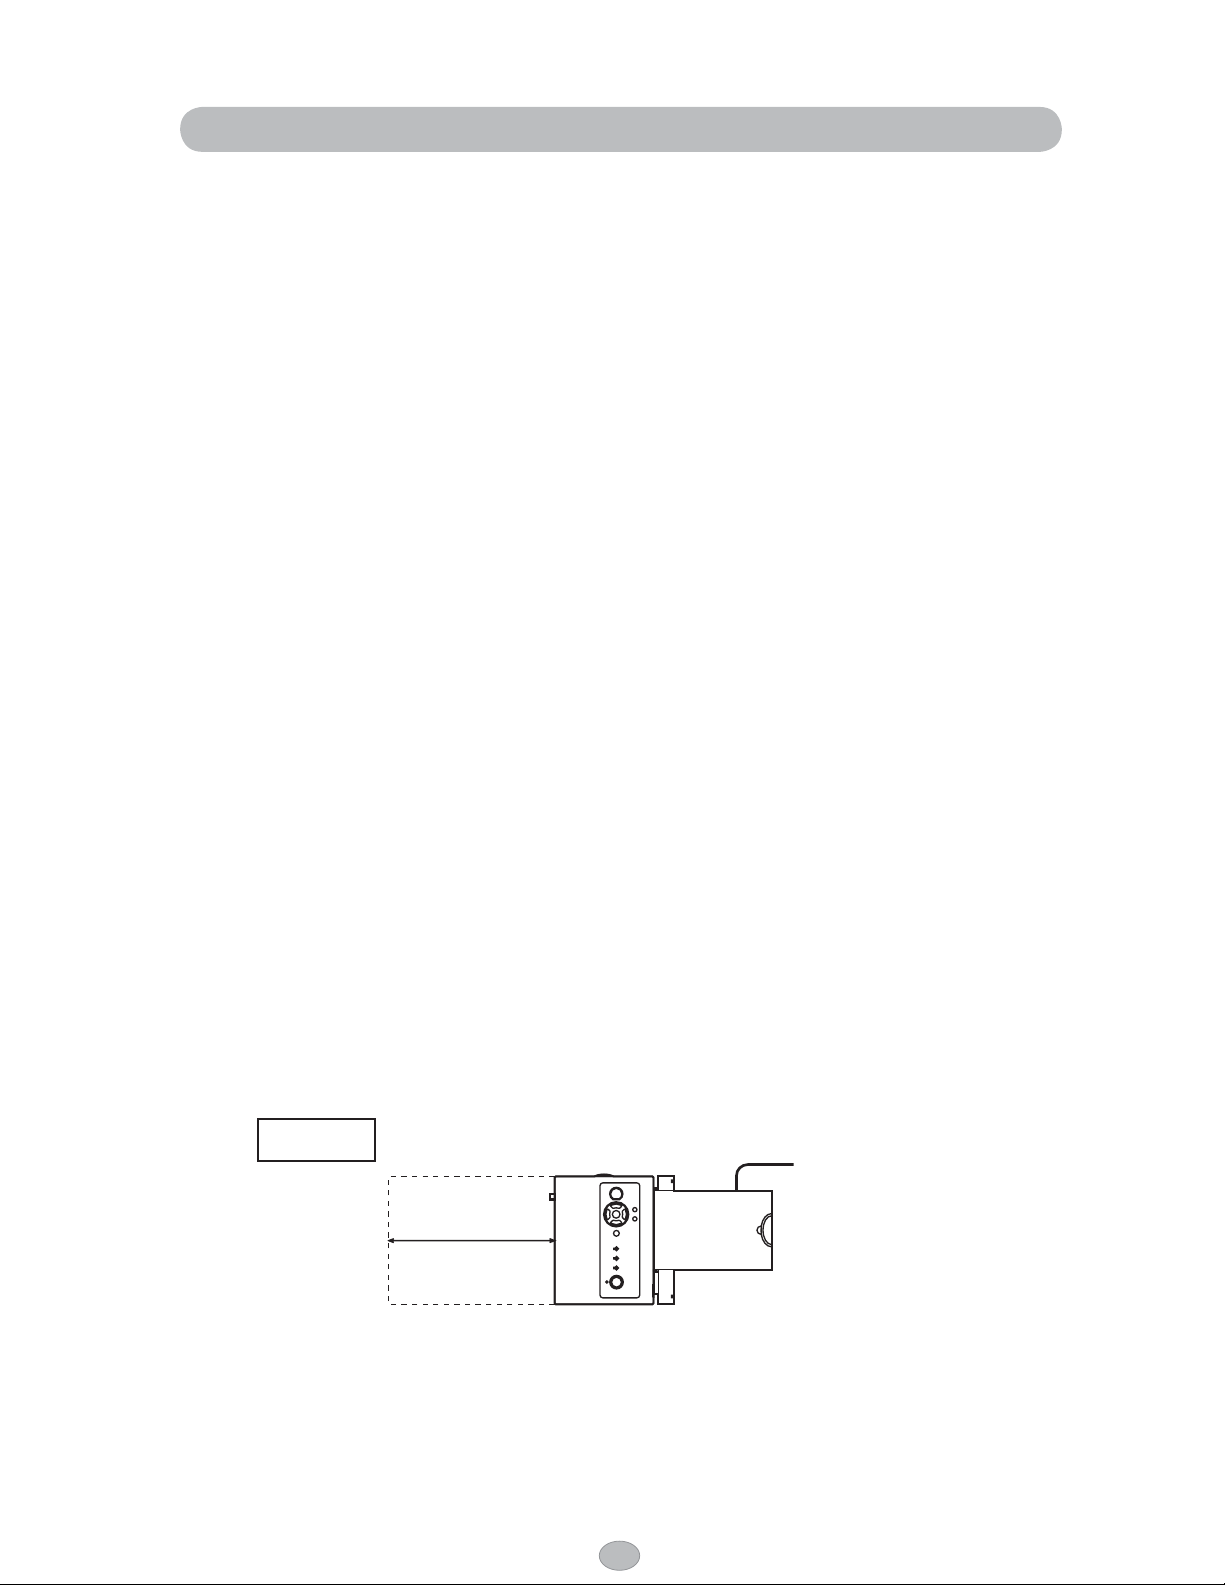
Required space during printing
Paper is ejected and inserted from the rear panel of this printer during printing.
Do not place any objects within 8.7Ǝ (220 mm) of the rear panel of the printer. This may lead
to paper jams.
Top view
Paper cassette
8.7Ǝ (220 mm)
10
Page 11

Storage
Before Use
Storing paper and ink cassettes
After use, remove the paper cassette from the printer, close the cassette lid, leaving any
remaining paper in the paper cassette. Then insert the paper cassette into a plastic bag and
store so that it lies flat.
Avoid placing the paper and ink cassette in locations subject to high temperature, high
humidity or direct sunlight. After opening the original packaging, use all the paper as soon
as possible.
When the printer is not to be used for an extended period of time
• To conserve electric power, turn off the printer’s power and disconnect the power cord.
(The printer will continue to consume approximately 1.5 W of power even after the unit
is turned off by pressing the POWER button if it is plugged in.) Leaving the printer idle
for long periods may impair functionality. Make sure you turn the printer’s power on and
operate the printer at least once every six months.
• Remove the paper cassette, ink cassette and memory card from the printer. Then close
the printer covers.
Copy-prohibited items
Copying of software is prohibited
Copying of software supplied with this printer for unauthorized commercial purposes or
copying on networks is prohibited.
Copying of prohibited material
Printing of monetary notes or marketable securities is illegal and a criminal offence
depending on the intention and means of application of the printed material.
When disposing of, transferring ownership or returning the printer
Note that information you have printed will remain in the ink cassette
after printing. Be sure to dispose of the ink cassette to avoid unexpected
damages due to distribution of this information (
p. 23).
11
Page 12

Package Contents
Check that you have all of the following before using the product. If any items are
found to be defective or missing during your check, please contact your dealer.
Note that a Paper and Ink set (sold separately) is required in order to print
(
p. 18).
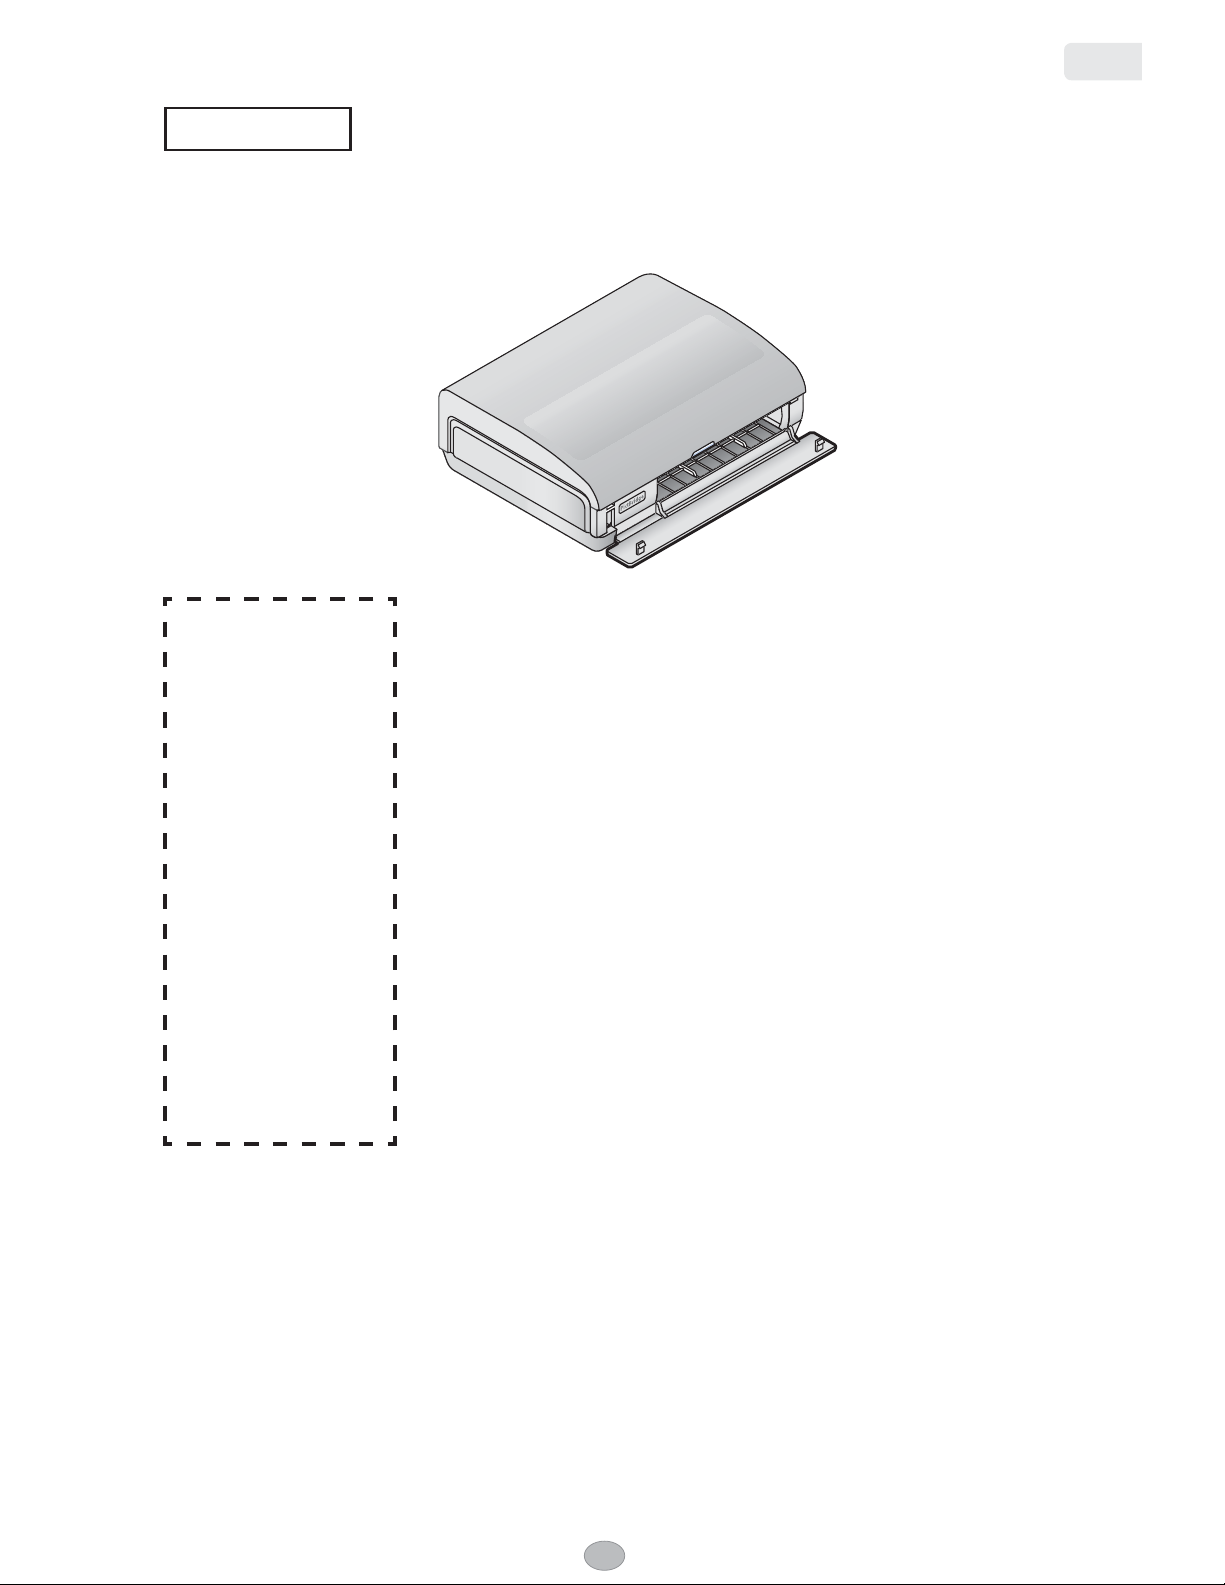
Photo printer and accessories
Photo Printer x 1
Postcard size paper cassette x 1
(Part number: PFZCPX1EX)
Power cord x 1
(Part number: PFJA02A007Z)
AC adaptor x 1
(Part number: PFAP1016)
Remote control x 1
(Part number: PFRM0002)
Coin battery (CR2025) x 1
Others
Operating Instructions
(this manual) x 1
Quick guide (in Spanish) x 1
Warranty x 1
CD-ROM (Printer Driver) x 1
Video cable x 1
(Part number: VJA0815-A)
Starter kit
• Ink cassette x 1
(for postcard size paper,
enough for 5 prints)
• Postcard size paper ... 5 sheets
(5 sheets x 1 bag)
12
Page 13
Names and Functions of Each Part
Front View
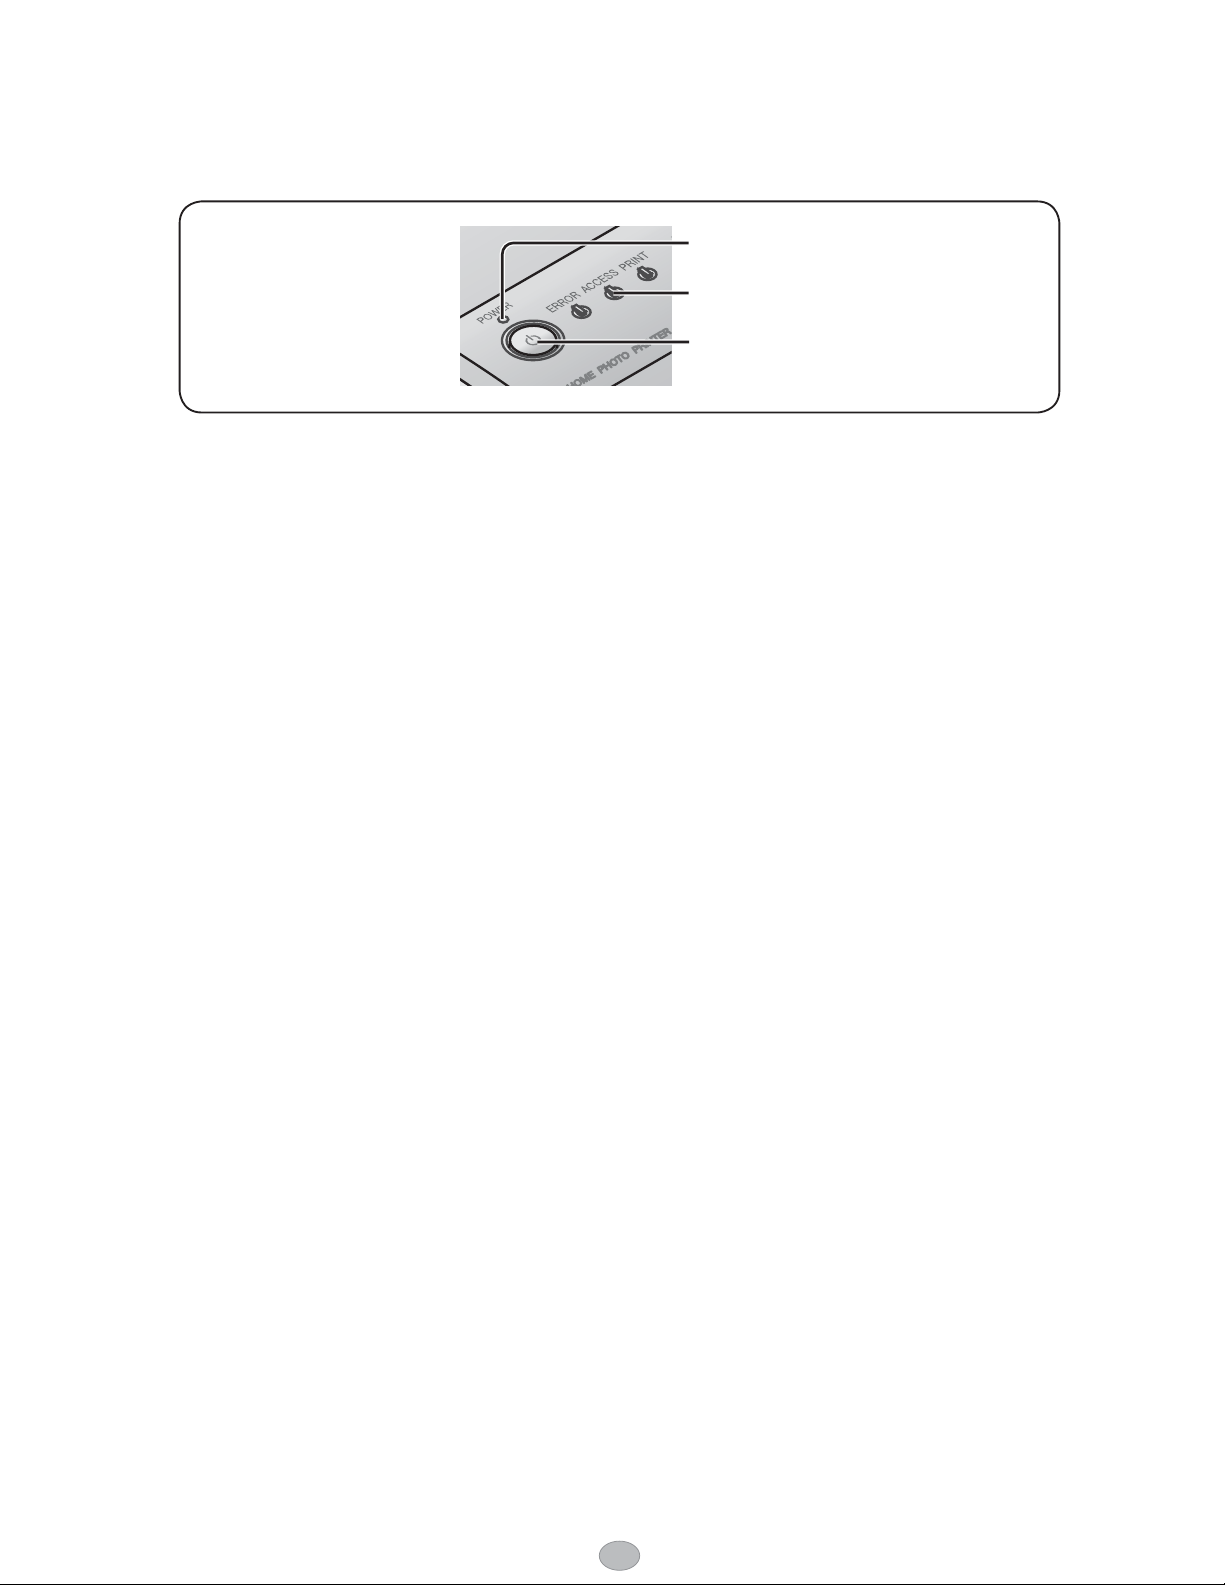
PRINT Lamp
(Green)
This lamp blinks while
printing is in progress
and lights up when
waiting for printing.
ACCESS Lamp
(Green)
This lamp lights
up or blinks when
image data is being
accessed.
ERROR Lamp
(Red)
This lamp lights up or
blinks when an error
occurs.
POWER Lamp
(Red/Green)
Before Use
13
Page 14

Names and Functions of Each Part (continued)
Rear View
Air Vent
Do not block.
Ink Cassette Eject
Lever
( p. 23)
Ink Cassette
Compartment Cover
Paper Jam Removal
Lever
( p. 92)
Remote Control
USB Port
( p. 25, 88)
Video Output
Terminal (VIDEO
OUT)
( p. 25, 28)
DC IN Port
Memory Card
Slot
( p. 29)
Remote Control
Transmitter
POWER Button
Direction Buttons
SLIDE SHOW
Button
Displays a slide show
of images on the
memory card.
MENU Button
ROTATE Button
Rotates images 90 degrees
in the clockwise direction
p. 67).
(
PRINT Button
OK Button
RETURN Button
DISPLAY Button
SEARCH Button
Searches for
images of the
selected time
period.
TRIMMING Button
Reduces or enlarges
the image size
p. 67).
(
14
Page 15

Connecting a Power Source
POWER lamp
DC IN port
1
Preparation
AC adaptor
Power cord
2
Wall outlet
Connect to household power
supply (100 V to 240 V AC)
3
When the power cord is connected to wall outlet, the POWER lamp lights up in red (standby
mode).
CAUTION:
• Never touch the power cord during a lightning storm.
• When you operate this product, the wall outlet should be near the product and easily
accessible.
• Use only the included AC adaptor and power cord.
15
Page 16

•
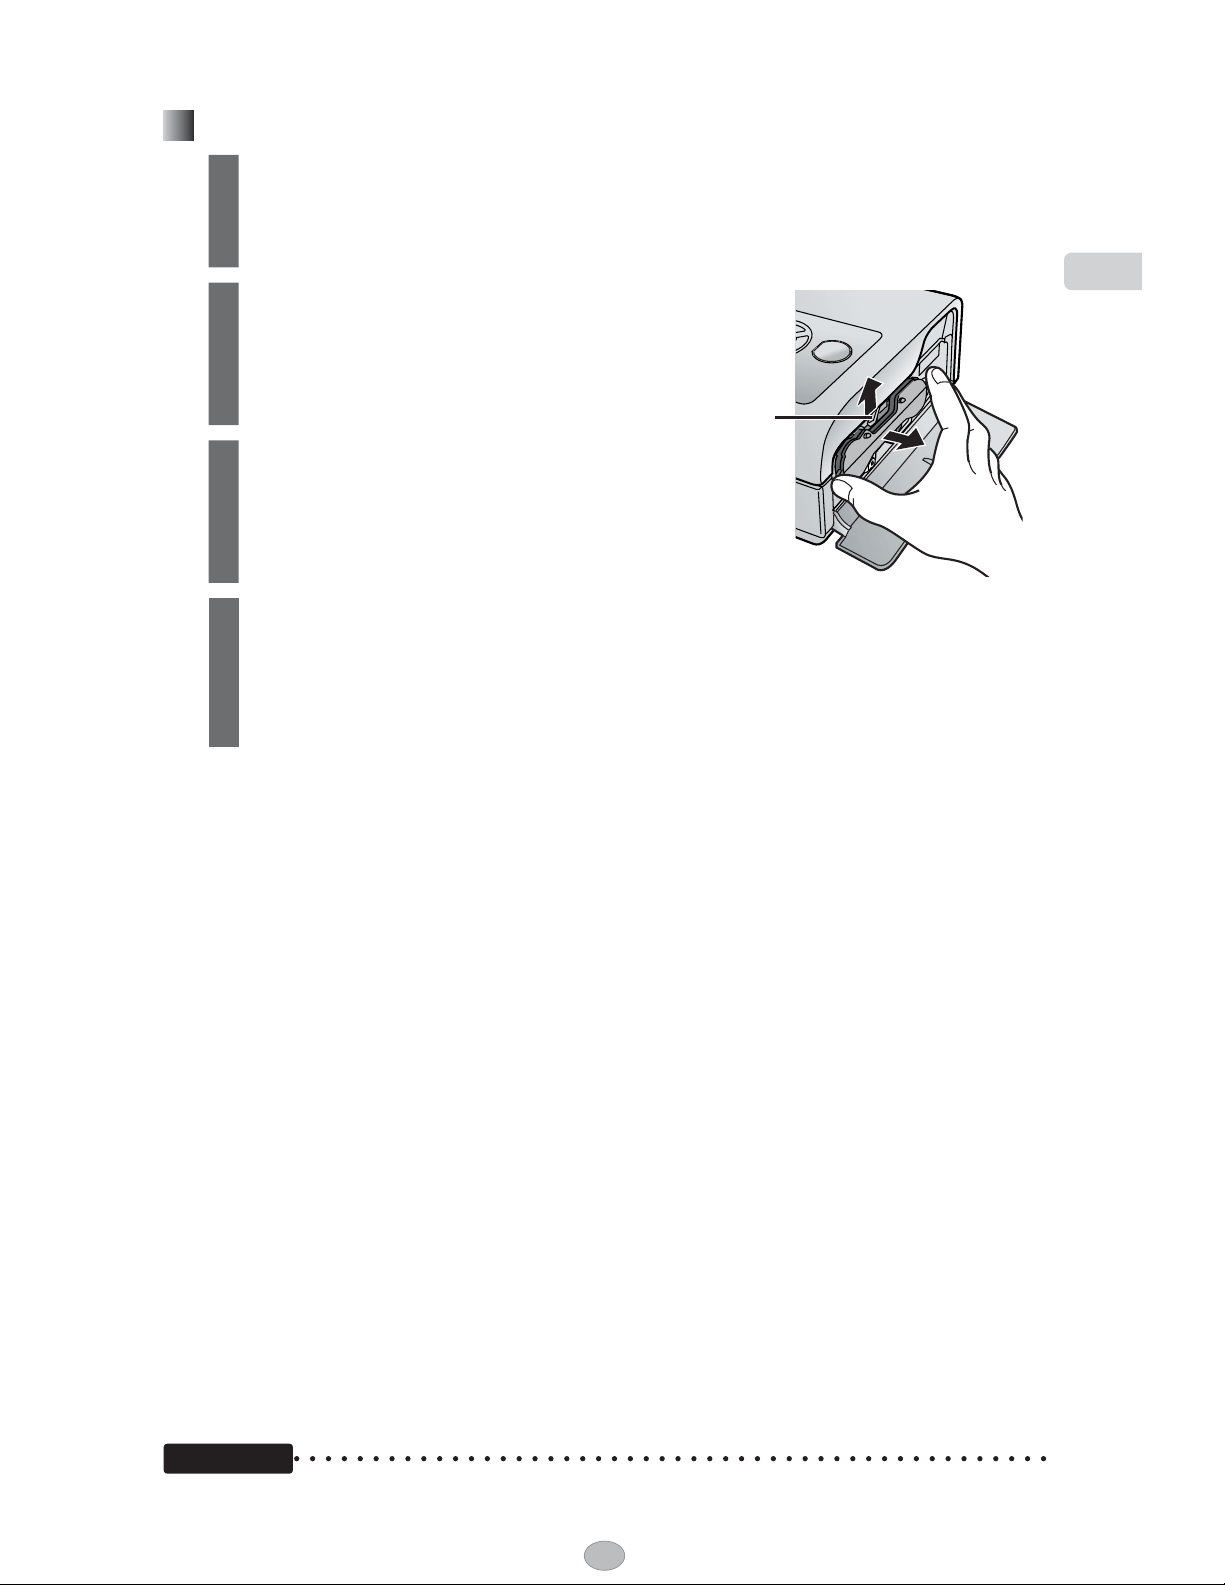
Inserting Battery into the Remote Control
Open the battery cover by
sliding in the direction of the
arrow.
1
Slide the coin battery into place
with + terminal facing up.
2
Close the battery cover.
3
To remove the coin battery
Tab
Pressing down on the tab, slide out the coin battery and remove.
Caution
• Risk of explosion if the battery is incorrectly replaced.
Replace only with type CR2025.
• Dispose of used batteries according to local regulations.
16
Page 17

Remote control operational range
Preparation
Important
• Make sure there are no objects blocking the path between the printer and the remote control.
The remote control may fail to operate the printer.
• Do not allow the printer’s remote control receiver to come in contact with direct sunlight or
strong fluorescent light. This may prevent the printer from working properly.
17
Page 18
Paper and Ink Cassettes (Sold Separately)
• Starter kit is included (5 sheets of postcard size paper).
Use only paper and ink cassettes in the Paper and Ink set described below.
Do not use postcard and ink jet type paper.
(This will cause paper jams and the printer to malfunction.)
• Protective coating is applied to the images that printed using paper and ink in the Paper and
Ink set, so that print quality can be maintained over an extended period of time.
• Ensure that only the ink cassette and papers, which come together as part of a set, are used
with the printer. The ink cassettes included in the Paper and Ink set provide enough ink to
print the number of sheets included in the Paper and Ink set. Always replace the ink cassette
when using a new Paper and Ink set. Paper and ink cassettes are not sold separately.
• The following paper cassette (sold separately) is required in order to print on wide
size paper.
Please purchase separately sold accessories from your dealer.
Item Model No. Paper size Remarks
Paper and Ink
set
Paper cassette KX-PVPW1M For wide size paper
1 This represents the paper size per sheet (after cutting).
KX-PVMS36KM
KX-PVMS108KM
KX-PVMS20WM
3.98Ǝ x 5.98Ǝ
(101 x 152 mm)
3.98Ǝ x 5.98Ǝ
(101 x 152 mm)
3.98Ǝ x 7.09Ǝ
(101 x 180 mm)
• Ink cassette x 1
(enough for 36 prints)
1
• Postcard size paper ... 36 sheets
(18 sheets x 2 bags)
• Ink cassette x 3
(a cassette provides enough ink to
print 36 sheets)
1
• Postcard size paper ... 108 sheets
(18 sheets x 6 bags)
• Ink cassette x 1
(enough for 20 prints)
1
• Wide size paper ... 20 sheets
(20 sheets x 1 bag)
Important
• Before using a Paper and Ink set, ensure that you acclimatize the Paper and Ink set to
the ambient temperature prior to opening. In particular, if the Paper and Ink set has been
stored at a low temperature, condensation may occur due to the difference in temperatures
p. 96, “Condensation”).
(
• Avoid storing paper and ink cassettes in places subject to high temperature, high humidity or
direct sunlight. This may lead to deterioration of print quality or prevent printing capability.
18
Page 19

Handling of paper and ink cassettes
During printing
• Do not open the ink cassette compartment cover, as print quality may be reduced.
• Do not remove the paper cassette or ink cassette.
• Do not pull the paper while it is moving.
• Be sure to remove printed paper before 10 or more sheets have piled up. Failure to do so
may result in a paper jam. Be particularly sure to remove paper with a high degree of curl
before it piles up.
• Do not touch the print surface with your fingers.
After printing
• Do not remove unused sheets of paper from the paper cassette. Close the cassette lid, then
insert the paper cassette into a plastic bag and store so that it lies flat.
• After removing the paper cassette, close the paper cassette compartment cover to prevent
dust from getting inside the printer.
• Remove the ink cassette and store it in a plastic bag or other safe container.
Handling printed paper
• Pay special attention to the following, otherwise discoloration, fading and color transfer may
occur.
• Do not allow objects such as vinyl desk mats, name card cases, or plastic erasers to come
in contact with the printed surfaces. When storing printed paper in an album, select holder
sleeves made of nylon, polypropylene or cellophane.
• Do not allow any volatile solvents such as alcohol to come in contact with the printed
surface.
• Do not touch the printed surface.
• Do not leave printed surfaces in contact with one another, or place any other papers on
printed surfaces for a certain period of time.
• Do not store printed paper in locations subject to high temperature, high humidity, or direct
sunlight.
• When writing on a printed surface, use permanent markers (oil-based) only. You may use
permanent markers (oil-based), water-based markers, pencils and oil-based ball point pens
to write on the back of printed papers.
• You can use printed images for your personal enjoyment. Copyright laws prevent their use in
any other way without the written permission of the copyright holders.
• Do not reuse paper that has already been printed on.
Preparation
Note
• When cutting paper after printing, fold the
paper along the perforated line. Then reverse
the fold in the opposite direction and cut the
paper along the folded line.
• If you are printing on the reverse side of a
sheet with a different printer, the ink may take
some time to dry.
19
Page 20
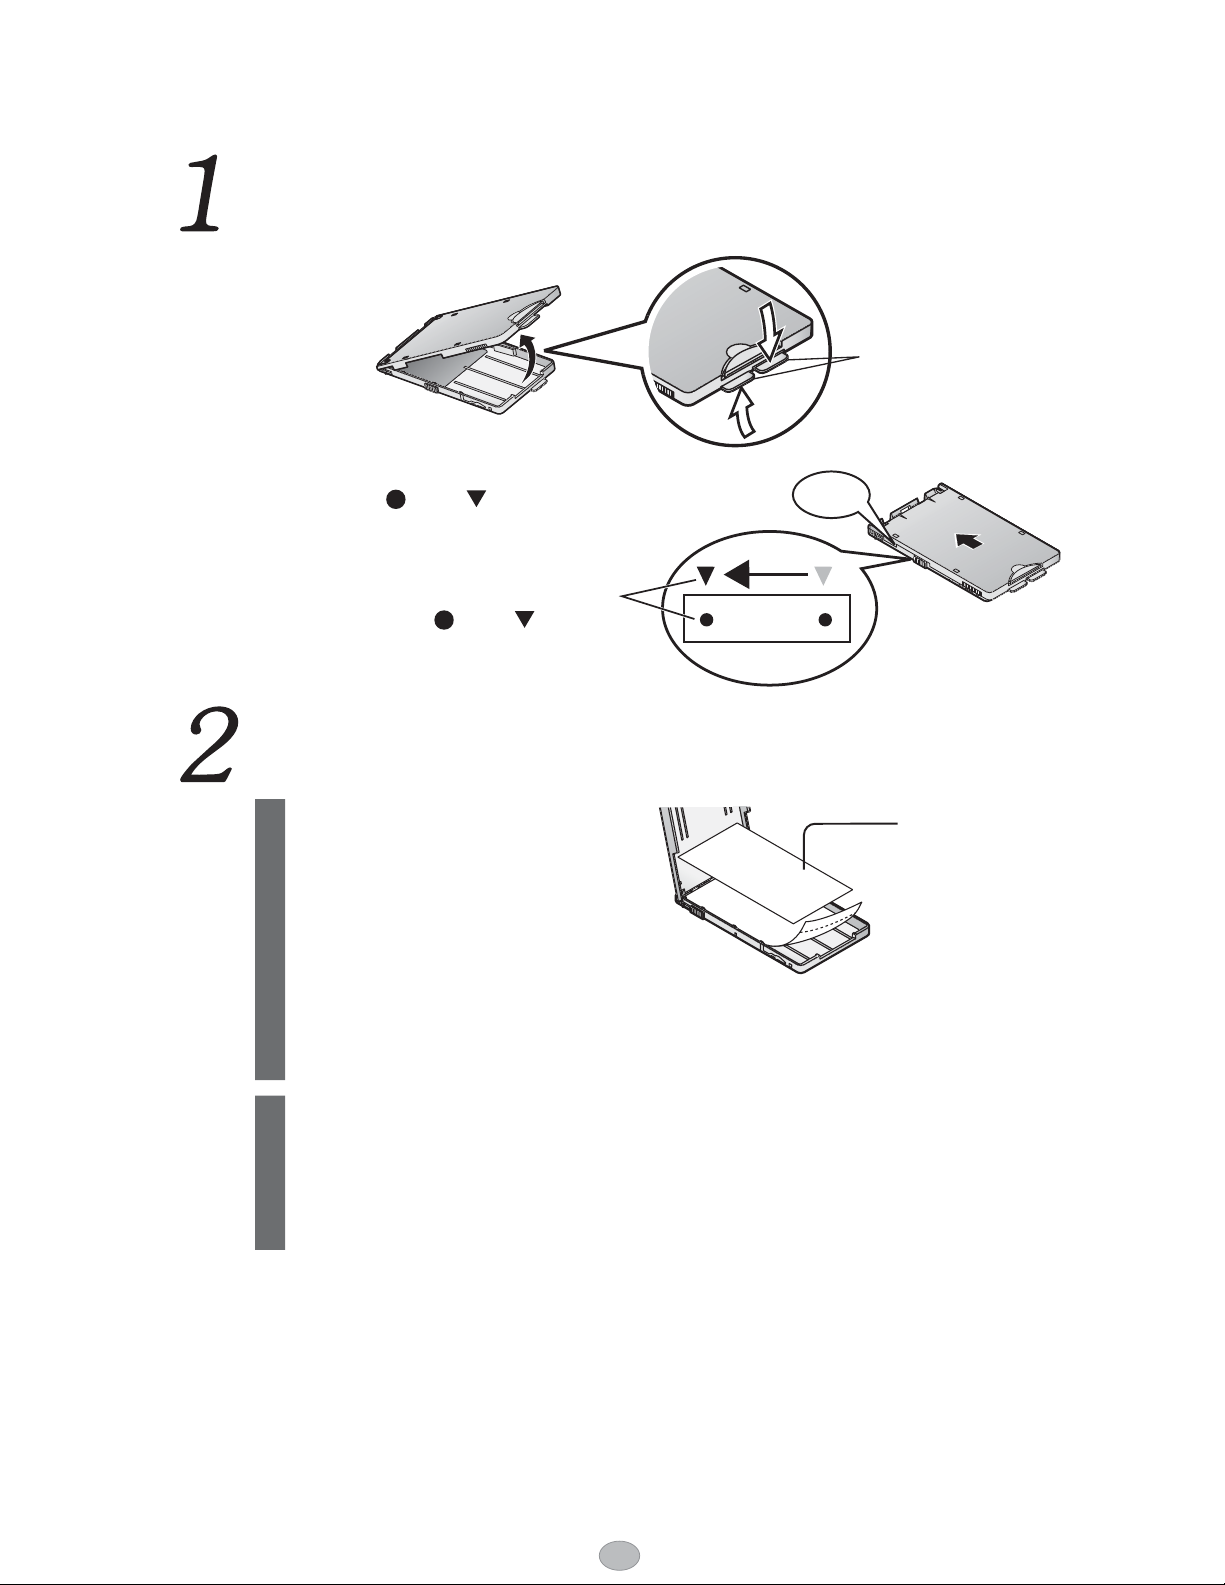
Inserting the Paper
For details on paper, refer to page 18.
Open the paper cassette lid.
• If the lid does not open, slide the
lid until “ ” and “ ” marks align
(until you hear the lid catch in
place).
Slide the lid to align
“ ” and “ ” marks.
Tab
• Push in the
direction of the
arrow.
Click
Insert paper in the paper cassette.
Fan the paper to avoid
multi-sheet feeds.
Place the paper in the
paper cassette without
removing protective sheet
1
so as not to touch the print
surface.
• The protective sheet will stick out
a little bit.
Remove the protective
sheet and close the paper
cassette lid.
2
• Take care not to leave fingerprints
on the paper.
• Make sure that the paper cassette and
ink cassette size match. If the size of the
cassettes does not match, printing will
become impossible.
Protective
sheet
20
Page 21

Insert the paper cassette to the printer.
Slide the paper cassette lid
forward until it catches in
place.
1
Pull the paper stop
2
upwards.
Open the paper cassette
compartment cover and
insert the paper cassette
firmly while holding the
unit.
3
• Make sure that the positions of
the “
attaching the paper cassette.
” and “ ” do not shift when
Click
Firmly insert
as far as
possible.
Pull the paper
stop upwards.
Slide the lid to align “
and “ ” marks.
• If you do not slide the
lid far enough, it will not
attach properly to the
printer.
Paper cassette
compartment cover
Preparation
”
Important
• Do not load more than 18 sheets of paper (or 20 sheets of wide size paper) in the paper
cassette.
• Be sure to remove printed paper before 10 or more sheets have piled up.
• Do not touch the print surface (the plain, glossy side) or allow it to get dirty. Clear prints may
become impossible if the print surface gets dirty, stained by fingerprints, or wet with water.
• Do not bend or fold the paper or load it in the cassette with the reverse side facing upward.
• Do not stretch the paper. This may lead to paper jam or prevent printing capability.
• Do not remove the perforated section before printing.
• Do not affix stamps or adhesive seals to the paper before printing.
• Do not print on the paper with a word processor before printing with this printer.
• Do not write on the paper before printing with this printer.
• Do not remove unused sheets of paper from the paper cassette. Close the cassette lid, then
insert the paper cassette into a plastic bag and store so that it lies flat.
21
Page 22

Inserting the Ink Cassette
For details on ink cassette, refer to page 18.
If the ink sheet is slack, tighten
it.
• Turn in the direction of the arrow displayed
on the ink cassette.
1
Open the ink cassette
compartment cover and insert
the cassette into the printer.
• Insert the ink cassette as far as it will go
with the arrow mark facing forward until it
catches in place.
2
Ink sheet
Turn the spool
in the direction
of the arrow.
Close the ink cassette
3
compartment cover.
Ink cassette
compartment
cover
When using the printer for the first
time, be sure to remove the padding
used during transportation.
22
Page 23
Removing the ink cassette
Open the ink cassette
compartment cover.
1
Pull the ink cassette eject
lever (green) upward.
2
Pull the ink cassette straight
out while grasping both ends
of it as shown in the figure to
3
the right.
Close the ink cassette
compartment cover.
• Do not open the ink cassette
4
compartment cover during printing, as
print quality may be reduced.
Preparation
Ink cassette
eject lever
(green)
Important
• Do not reuse a used ink cassette and be sure to dispose according to local regulations.
• Do not touch or pull on the ink sheet.
23
Page 24

Connecting
You can connect the printer to a digital camera, TV or computer.
Connecting the printer to a digital camera
You can connect the printer to a PictBridge compatible digital camera or digital video camera
to print recorded images.
For details on printing operation, refer to page 26.
Sample connection
24
Page 25

Connecting the printer to a TV
You can print images recorded on an SD Memory Card or MultiMediaCard while viewing them
on a TV screen.
For details on printing operation, refer to page 28.
Sample connection
Switch the TV to external
input mode (for example,
“VIDEO IN”).
Yellow
To printer’s video output
terminal “VIDEO OUT” on
the rear panel
Yellow
Video cable (included)
Preparation
To TV video input
terminal
Connecting the printer to a computer
You can connect the printer to a computer to print recorded images.
It is necessary to install a printer driver when connecting to a computer for the first time
p. 85).
(
Sample connection
25
Page 26
You can connect the printer to a PictBridge compatible digital camera or digital
video camera to print recorded images. An example of connecting to the Panasonic
digital camera LUMIX (DMC-FX9) is described here.
• Printer
ACCESS lamp
POWER button
26
Page 27

Follow the on-screen instructions
on the digital camera to proceed
the printing operation.
5
When printing has finished, turn
the printer off and disconnect the
USB cable.
6
Printing
Important
• Connect only PictBridge compatible devices to the PictBridge terminal.
• Do not disconnect the cable or turn off the power while the ACCESS lamp is lit. (This may
damage the data or could result in a malfunction of the printer.)
• Refer to the digital camera’s operating instructions for a description of PictBridge operations.
Note
• Certain PictBridge compatible devices may not operate correctly with this printer.
• If an error occurs, depending on the model, the digital camera may not display or operate
properly. Turn the camera and printer off and then turn them back on.
• TIFF format images cannot be printed directly from PictBridge compatible devices such as
digital cameras (
• When printing images with DPOF settings from PictBridge compatible devices, settings such
as the date are controlled by the DPOF setting.
• Settings on the printer driver (
compatible devices.
• When printing from a PictBridge compatible devices, image adjustments made on the printer
side are disabled.
p. 104).
p. 85) have no effect when printing directly from PictBridge
27
Page 28

Printing with a TV
Printer
You can print images stored on SD Memory Card or MultiMediaCard with this
printer.
The printing procedure is shown below.
Do not change the paper size during operations. Otherwise, printing will be
impossible.
Check the
connection to
the TV.
Select the
images you
want to print.
Commands can be issued during printing.
• About usable memory cards
This printer supports SD Memory Cards, MultiMediaCards, and miniSD Memory Cards
(adaptor required).
• Image formats that can be displayed/printed
This printer is able to display and print JPEG and TIFF format images. However, there are
cases when these format images cannot be displayed or printed. No image will be displayed
in this case. For details, refer to “Compatible Memory Card” on page 104.
• You can set number of copies.
Insert the
memory card.
Turn the printer
on.
Print.
Before operation
Perform the procedures in “Preparation” ( p. 15 – 25).
Checking the connection to a TV
Sample connection
Switch the TV to external
input mode (for example,
“VIDEO IN”).
Yellow
To TV video input
terminal
To printer’s video output
terminal “VIDEO OUT” on
the rear panel
Yellow
Video cable (included)
28
Page 29
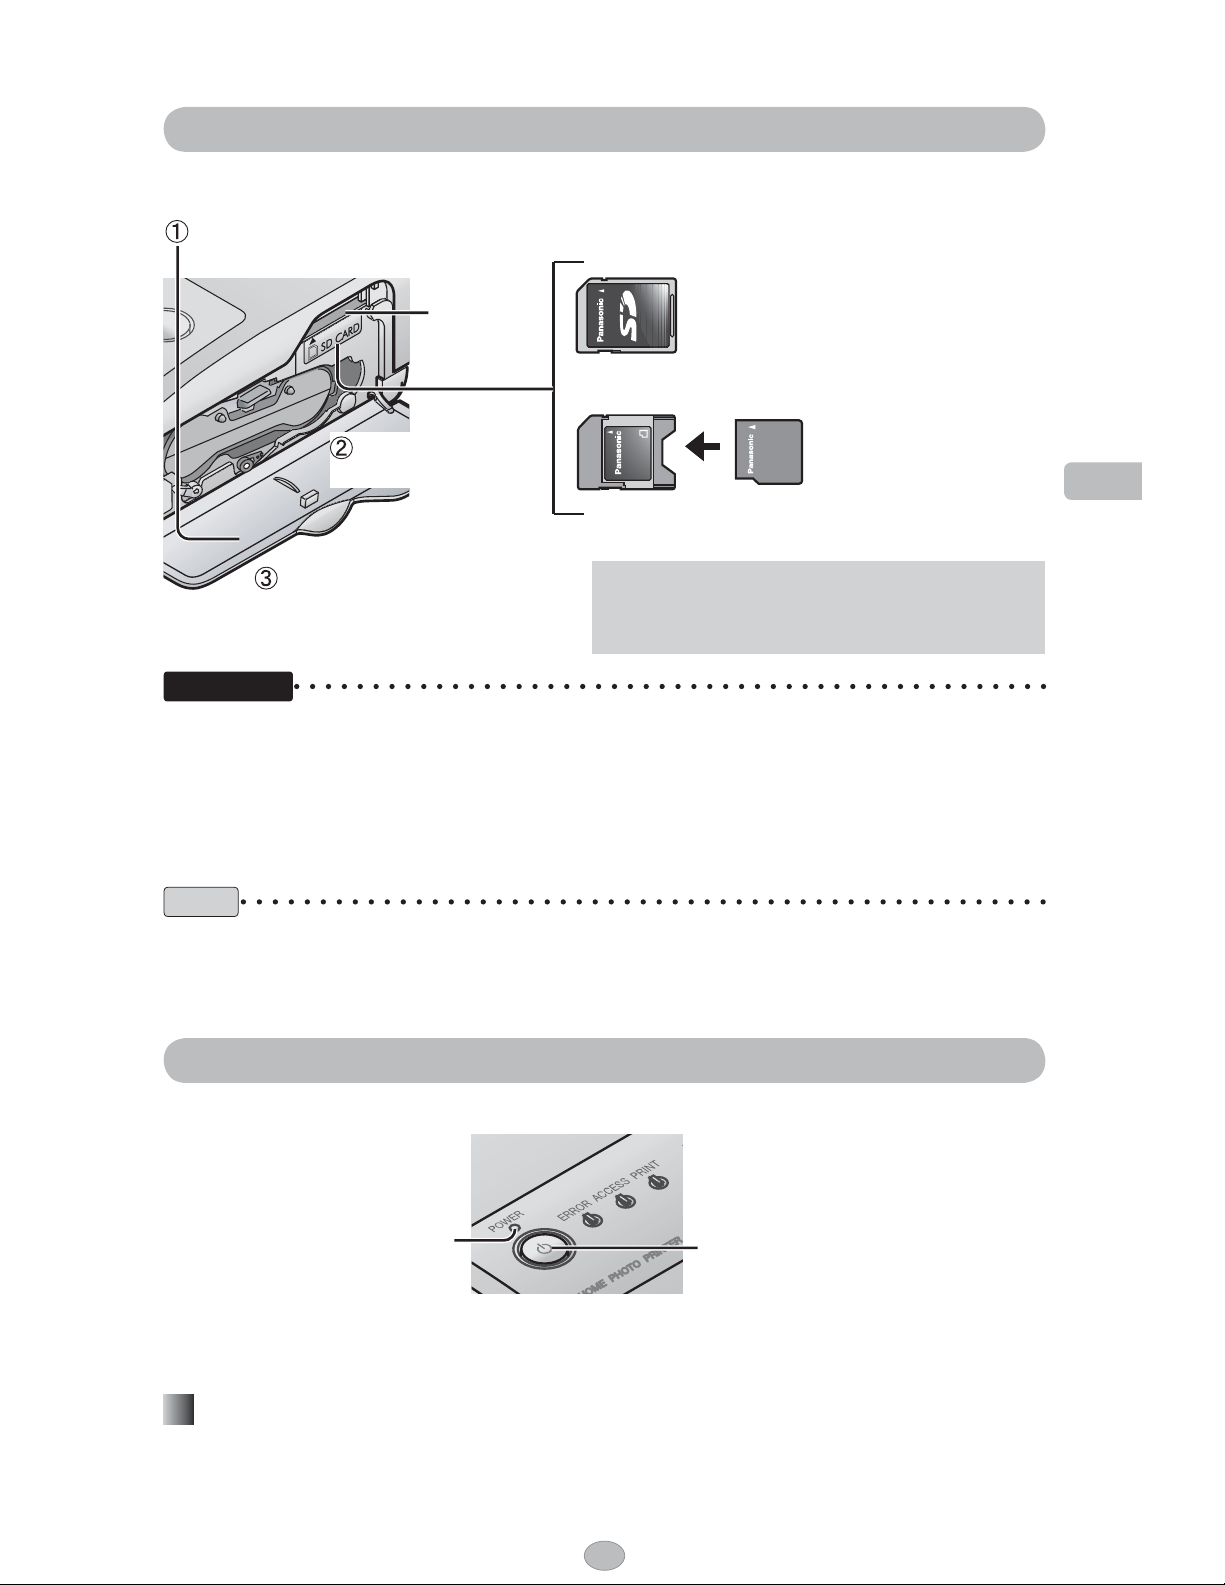
Inserting a memory card
• SD Memory Card and MultiMediaCard are not provided with the printer.
Open the ink cassette
compartment cover.
Memory
card slot
Insert the
memory card.
Close the ink cassette
compartment cover.
miniSD Memory Card
adaptor
First insert the miniSD Memory Card into the
card adaptor. Then insert the card adaptor into
the memory card slot.
SD Memory Card
MultiMediaCard
Insert the memory
card with the labelled
surface facing upward.
miniSD Memory Card
Important
• Push the memory card all the way in until it clicks into place.
• Do not remove the memory card when displaying images stored on the memory card on a
TV.
• To remove the card, push the card in and release.
• To print from a PictBridge compatible device, such as a digital camera, connected directly to
the printer, insert the memory card into the device.
Printing
Note
This printer does not support SD Memory Card having more than 2 GB in memory. However,
accidental insertion of an SD Memory Card having more than 2 GB in memory will not result in
damage to the memory card.
Turning the power on
Press the POWER button. POWER lamp on the printer will light up in green.
• Printer
POWER lamp
Same operations are also possible using the remote control. (For the button names on the
remote control, refer to page 14.)
POWER button
Turning off the power
Press the POWER button again. POWER lamp on the printer lights up in red (standby mode).
29
Page 30

Printing with a TV (continued)
Changing the language
You can change the language used for the setting screen.
• Printer
Direction buttons
OK
• The direction buttons are
represented in this manual as
follows.
Printer
RETURN
MENU
Same operations are also possible using the remote
control. (For the button names on the remote control,
refer to page 14.)
Press (MENU).
1
Press to select [Settings] and
press
(OK).
2
Press to select [Device Settings]
Press Up, Down,
Left or Right.
Press Up or Down.
Press Left or Right.
and press
(OK).
3
Press to select [Language] and
press
(OK).
4
30
Page 31

Press to select the language to
be used and press
(OK).
5
Press to select [OK] and press
(OK).
6
• If you select [Cancel] and press (OK) or
press
applied.
If a screen shown to the right is
displayed, press
and press
7
• Settings will be enabled after the printer is
restarted.
(RETURN), changes will not be
to select [Yes]
(OK).
Printing
31
Page 32

Printing with a TV (continued)
Printing single image
Printer
• Printer
Same operations are also possible using the remote control. (For the button names on
the remote control, refer to page 14.)
Press to move the cursor and
select the image you want to print.
Direction buttons
PRINT
RETURN
DISPLAY
OK
MENU
1
Press (PRINT).
2
Check the preview.
Then press
Or press
press
(OK).
(PRINT).
to select [Print] and
3
• Printing begins.
• For details on [Print Settings], refer to page 42,
82.
• For details on [Image Adjustment], refer to page
48.
• For details on [Zoom/Rotate], refer to page 67.
“Print” screen
32
Page 33

Ɣ
Ɣ
Ɣ
To stop print job midway
Press (MENU).
Press to select [Cancel Printing] and
press
Press to select [Yes] and press
• The printing for the paper currently being printed
will be completed and subsequent printing is
halted.
(OK).
(OK).
Image display
Image number/Total number of
images
Shooting date
1
Print status display
Paper size
To change pages
• When displaying a “Summary View” display
Press
2
press
• When displaying a “Single-Shot View” display
Press
Printing
to select [Previous] or [Next] and
(OK).
.
1 The date of the file will be displayed for
images that do not include shooting date
information.
Button operation guideCursor
Summary View
2 “P” is displayed for the postcard size paper.
“W” is displayed for the wide size paper.
To switch display
You can switch between “Single-Shot View”
display and “Summary View” display by
pressing
(DISPLAY).
Single-Shot View
Note
• It may take some time until the images are displayed depending on the type of memory card
and image format.
• Depending on the type of the memory card used, the image may appear flickered on the
TV screen or white bands may appear around the image. This has no effect on the printed
image.
33
Page 34

Press to move the cursor and
Ɣ
select the image you want to print.
1
Press (OK) for the number of
copies you want.
• The number of copies will increase one by one
each time you press this button.
• Up to 10 copies can be set for each image.
To reduce the number of copies
2
Press to select the image and press
34
Page 35

Check the preview.
Ɣ
Then press
Or press
press
• Printing begins.
• The first image is displayed in the preview.
• For details on [Print Settings], refer to page 42,
82.
• For details on [Image Adjustment], refer to
page 48.
5
To stop print job midway
Press (MENU).
Press to select [Cancel Printing] and
press
Press to select [Yes] and press
(OK).
(PRINT).
to select [Print] and
Printing
(OK).
(OK).
• The printing for the paper currently being printed
will be completed and subsequent printing is
halted.
35
Page 36

Printing with a TV (continued)
Printing all images on a memory card
You can print all images on a memory card, one image per sheet.
Press (MENU).
1
Press to select [Printing
Printer
Options] and press
(OK).
2
Press to select [All Images] and
press
(OK).
3
Check the preview.
Then press
Or press
press
(OK).
(PRINT).
to select [Print] and
4
• Printing begins.
• The first image is displayed in the preview.
• For details on [Print Settings], refer to page 42,
82.
• For details on [Image Adjustment], refer to
page 48.
36
Page 37

Ɣ
To stop print job midway
Press (MENU).
Press to select [Cancel Printing] and
press
Press to select [Yes] and press
• The printing for the paper currently being printed
will be completed and subsequent printing is
halted.
(OK).
(OK).
Printing
Note
• Up to 99 sheets can be printed by one operation.
• To increase or decrease the number of copies to be made of each image, refer to “Selecting
All Images” (
p. 60).
37
Page 38

Printing with a TV (continued)
Printer
Printing an index
You can print an index of images on the memory card, showing 25 thumbnail images per
sheet of paper (30 thumbnail images when using wide size paper).
Index print
Press (MENU).
1
Press to select [Printing
Options] and press
(OK).
2
Press to select [Index] and press
(OK).
3
38
Page 39

Check the preview.
Ɣ
Then press
Or press
press
• Printing begins.
• You can select [ON] or [OFF] in the [Date]
setting.
• You can select [Oldest to Newest] or [Newest to
Oldest] in the [Print Order] setting.
To stop print job midway
4
(OK).
(PRINT).
to select [Print] and
Printing
Press (MENU).
Press to select [Cancel Printing] and
press
Press to select [Yes] and press
• The printing for the paper currently being printed
will be completed and subsequent printing is
halted.
(OK).
(OK).
Note
• Each image is printed as one thumbnail on an index.
• You cannot set the number of copies for index.
39
Page 40

Printing with a TV (continued)
Printer
Printing using DPOF settings
You can select the images to be printed and the number of copies to be made using a DPOF
compatible digital video camera or digital camera. When you have inserted a memory card
containing DPOF settings into the printer, you can print images according to the setting.
Before operation
Insert the memory card containing images with DPOF settings into the printer ( p. 29).
Press (MENU).
1
Press to select [Printing
Options] and press
(OK).
2
Press to select [DPOF] and
press
(OK).
3
Press to select [Yes] and press
(OK).
4
• Printing begins.
• Images are printed using the settings (number
of copies, date etc.) specified in the camera or
DPOF compatible software.
40
Page 41

Ɣ
To stop print job midway
Press (MENU).
Press
Printing
41
Page 42

Print Settings
Printer
• Printer
Same operations are also possible using the remote control. (For the button names on
the remote control, refer to page 14.)
Direction buttons
PRINT
RETURN
OK
Printing date
You can print image date information (including the shooting date) on the lower right corner of
the image.
Press to select [Print Settings]
on the “Print” screen and press
1
(OK).
Press to select [Date] and press
(OK).
2
Press to select [ON] and press
(OK).
3
42
Page 43

Press to select [OK] and press
(OK).
4
• If you select [Cancel] and press (OK) or
press
applied.
(RETURN), changes will not be
Changing Settings
Note
• Factory setting for [Date] is [OFF].
• Date is not displayed on images displayed on screen.
• To print an image without date information, set [Date] to [OFF] in the [Print Settings].
• If you want to print all images using the same settings, select [Settings] ĺ [Print Settings] on
the “Menu” screen and change the desired items (
• You cannot print date for images with no date information stored on a memory card.
• The date information printed for images edited and saved on a computer will differ from the
actual image shooting date.
p. 55, “Saving Settings”).
43
Page 44

Print Settings (continued)
Borderless printing
You can select whether to print images with borders or not.
Press to select [Print Settings]
on the “Print” screen and press
Printer
1
(OK).
Press to select [Borders] and
press
(OK).
2
Press to select [ON] or [OFF]
and press
(OK).
3
Press to select [OK] and press
(OK).
4
• If you select [Cancel] and press (OK) or
press
applied.
(RETURN), changes will not be
44
Page 45

With borders Borderless
Whole part of the image is printed
on the paper with margins on the
paper edges.
Part of the image is cut off and
there is no margin spacing on the
paper edges.
Changing Settings
Note
• Factory setting for [Borders] is [OFF].
• If you want to print all images using the same settings, select [Settings] ĺ [Print Settings] on
the “Menu” screen and change the desired items (
p. 55, “Saving Settings”).
45
Page 46

Print Settings (continued)
Rotating image 180°
You can rotate the image 180 degrees.
Rotate image
180°
Printer
Upper side of the
image appears on the
right.
Press to select [Print Settings]
on the “Print” screen and press
1
(OK).
Press to select [Rotate Image]
and press
(OK).
2
Upper side of the
image appears on the
left.
46
Page 47

Press to select [ON] and press
(OK).
3
Press to select [OK] and press
(OK).
4
• If you select [Cancel] and press (OK) or
press
applied.
(RETURN), changes will not be
Changing Settings
Note
• Factory setting for [Rotate Image] is [OFF].
• To cancel the [Rotate Image] setting, set it to [OFF] in [Print Settings].
• If you want to print all images using the same settings, select [Settings] ĺ [Print Settings] on
the “Menu” screen and change the desired items (
47
p. 55, “Saving Settings”).
Page 48

Image Adjustment
Press to select [Image
Adjustment] on the “Print” screen
1
and press
Press
2
(OK).
48
Page 49

After you have made image
adjustment, press
(OK).
4
Press to select [OK] and press
(OK).
• If you select [Cancel] and press (OK) or
5
press
applied.
• Select [Reset] and press
saved settings.
Press to select [OK] and press
(OK).
(RETURN), changes will not be
(OK) to return to
Changing Settings
• If you select [Cancel] and press (OK) or
6
press
applied.
• Select [Reset] and press
saved settings.
(RETURN), changes will not be
(OK) to return to
49
Continued on next page
Page 50

Image Adjustment (continued)
Ɣ
Image Adjustment items
Printer
Effect
Gives special effects to an image when printed. You can select from the following items.
Item Result
OFF Prints images without special effects.
Warm Monochrome Prints images with a warm monochrome effect.
Cool Monochrome Prints images with a cool monochrome effect.
Sepia Prints images with a sepia effect.
Warm Prints images emphasizing warm colors.
Cool Prints images emphasizing cool colors.
Soft Portrait Prints images with a portrait effect.
Embossed Heart Prints images with background pattern of hearts.
Oil Painting Prints images so they resemble oil paintings on canvas.
Japanese Paper Prints images as if drawn on Japanese paper.
Convex Sphere Prints images so they appear convex.
Concave Sphere Prints images so they appear concave.
50
Page 51

Ɣ
Auto Mode
Automatically adjusts the brightness and contrast.
Item Result
OFF No brightness/contrast adjustment.
Auto Adjusts image brightness/contrast automatically.
Soft Skin Adjusts image brightness/contrast to make skin appear smoother.
Vividness Adjusts image brightness/contrast to print more vividly.
Night Scenery Adjusts image brightness/contrast to print night scenery with a more
natural balance between dark and light positions.
Changing Settings
51
Continued on next page
Page 52

Ɣ
Image Adjustment (continued)
Printer
Other Settings
Set brightness and contrast values to suit your taste. (Density/Balance, Color Levels, White
Balance, Noise Reduction)
Item Result
Density/Balance Adjusts image brightness, color saturation, contrast, edge
sharpness.
• Brightness: Adjusts image brightness.
• Saturation: Adjusts image color brilliance.
• Contrast: Adjusts image brightness contrast.
• Sharpness: Adjusts image contours.
Color Levels Adjusts image color tones.
Select a color from the color palette.
White Balance Adjusts colors more naturally according to light source.
Select [OFF] or [Auto].
Noise Reduction Reduces the noise in images shot in dark places.
Select [OFF] or [ON].
Note
• Factory settings for [Effect] is [OFF], [Auto Mode] is [Auto], [Noise Reduction] is [ON] and
other settings are [OFF].
•
If you want to print all images using the same settings, select [Settings] ĺ [Image Adjustment]
on the “Menu” screen and change the desired items (
• The image on the preview screen is not exact print image, just for your references.
• Adjustments made to the TV display do not affect the print quality.
p. 55, “Saving Settings”).
52
Page 53

Device Settings
You can change the print date format, language used for the setting screen and TV
aspect ratio.
Direction buttons
• Printer
OK
RETURN
MENU
Same operations are also possible using the remote control. (For the button names on
the remote control, refer to page 14.)
Press (MENU).
Printer
1
Press to select [Settings] and
press
(OK).
2
Press to select [Device Settings]
and press
(OK).
3
Press to select the item to be
changed and press
Press
4
option on the option select screen
to select the desired
(OK).
Changing Settings
and press
(OK).
53
Continued on next page
Page 54

Device Settings (continued)
•
Press to select [OK] and press
(OK).
• If you select [Cancel] and press (OK) or
Printer
press
applied.
5
When changing the [Language] and [TV
(RETURN), changes will not be
Aspect] settings
If a screen shown to the right is displayed, select
[Yes] and press
• Settings will be enabled after the printer is
restarted.
Item Description
Date Format Specifies print date format as
year (YYYY), month (MM) and
day (DD).
Language Changes the display language. Japanese
(OK).
Setting options
(Bold item indicates initial setting)
YYYY/MM/DD
DD/MM/YYYY
MM/DD/YYYY
English
Français (French)
Franç. (Canada) (Canadian French)
Deutsch (German)
Italiano (Italian)
Español (Spanish)
TV Aspect Changes the aspect ratio of the
TV screen. Select the aspect
ratio that matches your TV.
54
4:3
16:9
Page 55

Saving Settings
You can save the customized settings in [Print Settings] and [Image Adjustment].
These settings will be saved even if the printer’s power is turned off.
• Printer
Same operations are also possible using the remote control. (For the button names on
the remote control, refer to page 14.)
Changing Settings
55
Page 56

Restoring Default Settings
Performing this operation initializes all settings to the default values (factory
settings).
• Printer
Same operations are also possible using the remote control. (For the button names on
the remote control, refer to page 14.)
56
Page 57

Searching for Images
Direction buttons
• Printer
OK
RETURN
MENU
Same operations are also possible using the remote control. (For the button names on
the remote control, refer to page 14.)
Printer
Searching for images by date
You can search for images within a specified period and display these images in “Summary
View” display.
Press (MENU).
1
Press to select [Search] and
press
(OK).
2
Press to select [Search by Date]
and press
(OK).
3
Advanced Operations
57
Continued on next page
Page 58

Searching for Images (continued)
Specify the start date and end date.
Moves within the date items
(year, month, day).
4
58
Page 59

Exiting search mode
Ɣ
To return to a “Summary View” display of all images, perform the following procedures.
Press (MENU).
1
Press to select [Search] and
press
(OK).
2
Press to select [Cancel Search]
and press
(OK).
3
When using the remote control
Press the [SEARCH] button on the remote
control.
Select [Cancel Search] and press [OK]
button.
Advanced Operations
SEARCH
59
Page 60

Selecting All Images
You can set the number of copies for all images on the memory card to a single
print.
After you have selected all images, you can increase or decrease the number of
copies to be made for each separate image (
Press (MENU).
p. 34).
Printer
1
Press to select [Select All/Clear]
and press
(OK).
2
Press to select [Select All
Images] and press
(OK).
3
Press to select [Yes] and press
(OK).
4
60
Page 61

To clear the number of copies for all images
You can set the number of copies for all images to 0.
Press (MENU).
1
Press to select [Select All/Clear]
and press
(OK).
2
Press to select [Clear All] and
press
(OK).
3
Press to select [Yes] and press
(OK).
4
Advanced Operations
61
Page 62

Slide Show
The slide show features is used to display images on the memory card one-by-one
for a specified period of time each.
You can change the display time for each image in the [Slide Show Settings].
Slide Show display
Printer
• Printer
Same operations are also possible using the remote control. (For the button names on
the remote control, refer to page 14.)
Direction buttons
PRINT
RETURN
DISPLAY
OK
MENU
Starting a slide show
You can start a slide show from the first image on the memory card.
Press (MENU).
1
Press to select [Slide Show] and
press
(OK).
2
62
Page 63

Press to select [Start Slide
Ɣ
Show] and press
• To print the currently displayed image, press
(PRINT).
Button functions during a slide show
Button Function
3
Previous image/Next image
Pause/Resume
Operation guide On/Off
Stops slide show.
Prints currently displayed image.
(OK).
When using the remote control
Press [SLIDE SHOW] button on the remote
control to start the slide show.
Advanced Operations
SLIDE SHOW
63
Page 64

Slide Show (continued)
Printer
Slide show of selected images
To display only a selected images in a slide show, first select the images from the “Summary
View” display (
Press (MENU).
p. 33).
1
Press to select [Slide Show] and
press
(OK).
2
Press to select [Selected
Images] and press
3
• The slide show of the selected images start.
(OK).
Important
Do not remove the memory card while an image is being displayed. This may damage the
memory card or render the memory card inoperable.
Note
It may take some time until the image is displayed, depending on the size of the images. The
displayed time may also be longer than the setting time.
64
Page 65

Slide show settings
You can make changes to the various slide show settings in the [Slide Show Settings].
Press (MENU).
1
Press to select [Slide Show] and
press
(OK).
2
Press to select [Slide Show
Settings] and press
(OK).
3
Press to select the item you
want to change and press
4
(OK).
Advanced Operations
65
Continued on next page
Page 66

Slide Show (continued)
Press to select the desired
Printer
option and press
(OK).
5
Press to select [OK] and press
(OK).
6
• If you select [Cancel] and press (OK) or
press
applied.
Item Description
Interval Specifies the display time for
(RETURN), changes will not be
an image.
Setting options
(Bold item indicates initial setting)
3 seconds, 5 seconds, 7 seconds,
10 seconds
Pattern Specifies the transition
effect.
Operation Guide Toggles the display of the
operation guide shown on
the slide show screen.
Normal:
Switches images quickly.
Pattern 1:
Switches images from top to bottom.
Pattern 2:
Switches images from the center toward
the outside.
Pattern 3:
Switches images with a mosaic effect.
Random:
Randomly switches the Pattern 1
through 3 and Pattern 4 (where images
are switched from the outside toward the
center).
ON, OFF
66
Page 67

Trimming/Rotating Images
You can reduce/enlarge or rotate an image and print. These settings are available
on the “Print” screen (
• Printer
p. 32).
Direction
buttons
PRINT
RETURN
OK
MENU
Advanced Operations
67
Page 68

Press (OK) when finished editing
Ɣ
the image.
3
• A preview is displayed.
Press (PRINT).
Or press
press
To stop print job midway
Press (MENU).
4
Press to select [Cancel Printing] and
press
to select [Print] and
(OK).
(OK).
68
Page 69

Creating Calendars
You can create original calendars with your favorite images.
Do not change the paper size during operations. Otherwise, printing will
become impossible.
Printer
• Printer
Select layout.
Press (MENU).
1
Press to select [Printing
Options] and press
Direction
buttons
PRINT
RETURN
OK
MENU
(OK).
• Remote control
Direction
buttons
ROTATE TRIMMING
Advanced Operations
2
69
Continued on next page
Page 70

Creating Calendars (continued)
Press to select [Calendar]
Printer
and press
(OK).
3
Press to select the desired
layout and press
(OK).
4
Press to select [Start Year/
Month] and press
(OK).
5
Specify the start year and
month, and press
6
Moves between the year
and month setting items.
Sets the year or month.
(OK).
70
Page 71

Press to select [Start Day]
and press
(OK).
7
Press to select the
start day of week and press
8
(OK).
Press to select [OK] and
press
(OK).
9
Advanced Operations
71
Continued on next page
Page 72

Creating Calendars (continued)
Select image.
Press to select the image
insert position and press
Printer
1
(OK).
• The selected image position is outlined
with a yellow border.
Press to select an image
and press
(OK).
2
• To switch to “Single-Shot View” display,
press
Edit the image using
(Rotate), (Move) and
press
(DISPLAY).
(Reduce/Enlarge),
(OK).
3
• The image during editing is outlined
with a blue border.
• Use the remote control to reduce/
enlarge or rotate an image. These
features cannot be controlled on the
main unit.
72
Page 73

Add clip art.
Press to select [Add Clip
Art.] and press
1
• Up to 8 clip art can be applied.
Press to select clip art
and press
(OK).
(OK).
2
Edit the clip art using
(Reduce/Enlarge),
(Rotate), (Move) and
press
(OK).
• The clip art during editing is outlined
3
with a blue border.
• Use the remote control to reduce/
enlarge or rotate an image. These
features cannot be controlled on the
main unit.
• When you press
for the clip art will disappear.
(OK), the border
Advanced Operations
73
Continued on next page
Page 74

Ɣ
Creating Calendars (continued)
Print.
Press (PRINT).
Printer
Or press
1
and press
to select [Print]
(OK).
Press to select [Yes] and
press
• Printing begins.
• The display will return to the “4 Print”,
1 when printing starts. (The same
step
screen appears when you select [No].)
To stop print job midway
Press (RETURN).
Press to select [Yes] and press
2
(OK).
(OK).
Press (RETURN).
Press to select [Cancel
Printing] and press
Press to select [Yes] and press
(OK).
• The printing for the paper currently
being printed will be completed and
subsequent printing is halted.
(OK).
74
Page 75

To return to the “Menu” screen
Press (RETURN).
Press to select [Yes] and press (OK).
Note
• The preview is not exact print image. Actual printouts may differ from the preview.
• The yellow border surrounding images is not printed.
• You cannot change [Print Settings] items ( p. 42, 82) while creating a calendar.
• To adjust the image quality while creating a calendar, select [Settings] ĺ [Image Adjustment]
on the “Menu” screen (
• [Image Adjustment] settings can be made only for images while creating a calendar.
p. 55, “Saving Settings”).
Advanced Operations
75
Page 76

Composite Printing
You can create composite images, by adding a frame and clip art.
Do not change the paper size during operations. Otherwise, printing will
become impossible.
• Printer
• Remote control
Direction
buttons
PRINT
RETURN
OK
MENU
76
Page 77

Press to select
[Composite] and press
3
(OK).
Press to select the desired
layout and press
(OK).
4
Advanced Operations
77
Continued on next page
Page 78

Composite Printing (continued)
Select image.
Press to select the image
insert position and press
1
(OK).
• The selected image position is outlined
with a yellow border.
Press
2
78
Page 79

Add clip art.
Press to select [Add Clip
Art.] and press
1
• Up to 8 clip art can be applied.
Press to select clip art
and press
(OK).
(OK).
2
Edit the clip art using
(Reduce/Enlarge),
(Rotate), (Move) and
press
(OK).
• The clip art during editing is outlined
3
with a blue border.
• Use the remote control to reduce/
enlarge or rotate an image. These
features cannot be controlled on the
main unit.
• When you press
for the clip art will disappear.
(OK), the border
Advanced Operations
79
Continued on next page
Page 80

Composite Printing (continued)
Ɣ
Print.
Press (PRINT).
Printer
Or press
1
and press
to select [Print]
(OK).
Press to select [Yes] and
press
• Printing begins.
• The display will return to the “4 Print”,
1 when printing starts. (The same
step
screen appears when you select [No].)
To stop print job midway
Press (RETURN).
Press to select [Yes] and press
2
(OK).
(OK).
Press (RETURN).
Press to select [Cancel
Printing] and press
Press to select [Yes] and press
(OK).
• The printing for the paper currently
being printed will be completed and
subsequent printing is halted.
(OK).
80
Page 81

To return to the “Menu” screen
Press (RETURN).
Press to select [Yes] and press (OK).
Note
• The preview is not exact print image. Actual printouts may differ from the preview.
• The yellow border surrounding images is not printed.
• You cannot change [Print Settings] items ( p. 42, 82) while creating a composite image.
• To adjust the image quality while creating a composite image, select [Settings] ĺ [Image
Adjustment] on the “Menu” screen (
• [Image Adjustment] settings can be made only for images while creating a composite image.
p. 55, “Saving Settings”).
Advanced Operations
81
Page 82

LUMIX Baby Mode
If age information has been recorded for images using LUMIX Baby mode with a
Panasonic LUMIX digital camera, the age is printed in the lower left of the image.
• Printer
Same operations are also possible using the remote control. (For the button names on
the remote control, refer to page 14.)
Direction buttons
PRINT
RETURN
OK
MENU
82
Page 83

Press to select [OK] and press
Ɣ
(OK).
4
• If you select [Cancel] and press (OK) or
press
applied.
(RETURN), changes will not be
Press (PRINT).
Or press
press
To stop print job midway
Press (MENU).
5
Press to select [Cancel Printing] and
press
Press to select [Yes] and press
(OK).
• The printing for the paper currently being printed
will be completed and subsequent printing is
halted.
to select [Print] and
(OK).
(OK).
Advanced Operations
Note
• For details on settings available in LUMIX Baby mode, refer to the operating instructions
provided with the Panasonic LUMIX digital camera.
• Factory setting for [LUMIX Baby] is [OFF].
83
Page 84

Printing with a Computer
PC
Printer
You can perform printing operation on a computer.
After installing the printer driver (
p. 85), perform print operations using image
printing software.
Ensure that your computer’s configuration is compatible for use with this printer
(
table below).
System requirements
Computer IBM® PC/AT® compatible
CPU Intel® Pentium® II or Celeron® 500 MHz or higher
OS Microsoft® Windows® 98 Second Edition
Microsoft® Windows® Me
Microsoft® Windows® 2000 Professional
Microsoft® Windows® XP Home Edition/Professional
Memory Windows Me/Windows 98 SE:
64 MB or above (128 MB minimum recommended)
Windows XP/Windows 2000:
128 MB or above (256 MB minimum recommended)
Required Hard
Disk Space
Display High Color (16 bit) or higher
Interface USB port
Disc Drive CD-ROM drive (required for installation)
Other Mouse or equivalent device
• Operation is not necessarily guaranteed with the above environments.
• Operation is not guaranteed on Macintosh Computers.
• Operation is not guaranteed on Windows 3.1, Windows 95, Windows 98 or Windows NT®
environments.
• Operation is not guaranteed with operating system upgrades.
• Not compatible with multi-CPU configured environments.
• Compatible with Windows XP SP1 or SP2 environments.
120 MB minimum
Desktop area 800 x 600 pixels or higher
Important
Do not play the supplied CD-ROM on an audio CD player. Doing so may emit loud sound
resulting in damage to the speaker.
84
Page 85

Installing the printer driver
•
To print from the computer, you must first install the printer driver to your computer as follows.
For details on printer driver operations, see the printer driver’s help.
Important
• Do not connect the printer to a computer before installing the printer driver. Also, be
sure to turn off the printer’s power before making connections.
• When the “Found New Hardware Wizard” screen appears during the installation, click
[Cancel] on the screen.
• Quit all other active applications.
• Once you have installed the printer driver, do not shut down or log off your computer while
printing is in process. Doing so prevents the printer from printing properly.
• To insure against data loss or deletion of any data, ensure that you make a backup copy of
the software contained on the CD-ROM.
• For Windows XP and Windows 2000, log on as system administrator or have a similar level
of authorization to install the printer driver.
The following descriptions are intended for Windows XP.
The displayed messages and procedures may vary slightly depending on the OS.
Start the computer and insert the
supplied CD-ROM.
• The menu screen is displayed.
1
If the menu screen is not displayed…
1. Open [My Computer].
2. Open the CD-ROM drive and double-click
[Setup.exe] on the CD-ROM.
Click [KX-PX10 Printer Driver] on the
menu screen.
2
With PC
85
Continued on next page
Page 86

Printing with a Computer (continued)
•
Select the language for the
installation.
PC
3
Click [Next].
• When the screen displaying the message
“Before setup, make sure the printer is off.”
appears, click [OK].
4
Printer
Read the License Agreement
carefully.
Select [I accept the terms of the
license agreement] and click
[Next].
( p. 90)
5
If you do not agree to the conditions of
the license agreement, click [Cancel].
The installation process will be discontinued.
Click [Install].
6
86
Page 87

Connect the printer to the computer
•
with the USB cable when “Connect
the printer and switch it on.” screen
is displayed.
Then turn the printer on.
( p. 88)
7
If “Printer not found. Check the
connection.” screen is displayed
Make sure that the USB cable is connected
properly and the printer is turned on, and then
click [Retry].
Click [Finish].
8
The installation process has completed.
87
With PC
Continued on next page
Page 88

•
Connecting with a personal computer
88
Page 89

Printing from the computer
•
Use the application software installed on your computer to print images from the computer.
Refer to the application software’s operating instructions for details on the printing operation.
Open the image file to be printed
1
using the application software.
Print the image file.
• Make sure that printer paper size setting on
the application software matches the size of
the paper and ink cassette in the printer. If the
2
different size paper is selected on the application
software, printing will become impossible.
• A status monitor window (
displayed during printing.
see below) is
Status monitor
When attempting to print from application software,
a status monitor showing the progress of the
current print job will be displayed. The status
monitor will not be displayed under the following
conditions:
• When you have selected a different printer
Select this printer.
• When there are still previously initiated active
print jobs remaining in the print queue
Delete any unwanted print jobs.
Click this button when you want
to stop printing.
Deleting unwanted print jobs
• For Windows XP:
Select [Start] ĺ [Control Panel] ĺ [Printers and Other Hardware] ĺ [Printers and Faxes]
and then double-click the icon for this printer. Select the unwanted print jobs and press the
Delete key.
• For Windows 2000/Me/98 SE:
Select [Start] ĺ [Settings] ĺ [Printers] and then double-click the icon for this printer. Select
the unwanted print jobs and press the Delete key.
With PC
Important
Do not shut down or log off your computer while printing is in process. Doing so prevents the
printer from printing properly.
89
Page 90

Printing with a Computer (continued)
PC
Printer
License agreement
Please read the following license agreement carefully.
End-User License Agreement
THIS IS A LEGAL AGREEMENT BETWEEN YOU AND PANASONIC COMMUNICATIONS
CO., LTD. (“PANASONIC”) WITH RESPECT TO THE SOFTWARE PROGRAM
(“SOFTWARE”). CAREFULLY READ ALL THE TERMS AND CONDITIONS OF THIS
AGREEMENT PRIOR TO INSTALLING THE SOFTWARE. INSTALLING THE SOFTWARE
INDICATES YOUR ACCEPTANCE OF THESE TERMS AND CONDITIONS.
If you do not agree to these terms and conditions, do not install the SOFTWARE.
1. COPYRIGHT:
The SOFTWARE is protected by copyright laws and international treaty provisions, and all
other applicable laws. You acknowledge that you are receiving only a LIMITED LICENSE
TO USE the SOFTWARE and related documentation, and that you shall obtain no title,
ownership nor any other rights in or to the SOFTWARE and its related documentation, all of
which title and rights shall remain with PANASONIC or its licensor.
2. LICENSE:
(1) You may use the SOFTWARE solely for the purpose of operation of your Panasonic
Printer which is compatible with the SOFTWARE.
(2) You may make a copy of the SOFTWARE for the use defined in subparagraph (1)
above, or for internal back-up purpose only.
(3) You may transfer your rights under this License Agreement on a permanent basis,
provided that you transfer this Agreement, all copies of the SOFTWARE, all related
documentation and your Panasonic Printer, and the recipient thereof agrees to the terms
of this Agreement.
3. RESTRICTIONS:
You may not reverse engineer, decompile or disassemble the SOFTWARE, except as
expressly permitted by applicable laws. You may not use, copy, modify, alter, rent, lease or
transfer the SOFTWARE, its related documentation, or any copies thereof, in whole or in
part, except as expressly provided in this Agreement. You may not export the SOFTWARE
in contravention of any applicable U.S. or foreign export laws and regulations.
4. TERM:
This license is effective until terminated. You may terminate this Agreement at any time by
destroying the SOFTWARE and related documentation and all copies thereof. This license
will be terminated if you fail to comply with any term or condition of this Agreement. Upon
such termination, you agree to destroy the SOFTWARE, all copies thereof and related
documentation.
5. LIMITATION OF LIABILITY:
THE SOFTWARE IS PROVIDED “AS IS” WITHOUT ANY WARRANTY. PANASONIC
(INCLUDING MATSUSHITA ELECTRIC INDUSTRIAL CO., LTD. AND ITS AFFILIATE
COMPANIES, IN THIS ARTICLE) DOES NOT MAKE OR PASS ON TO YOU OR OTHER
THIRD PARTY, ANY WARRANTY OR REPRESENTATION INCLUDING, BUT NOT
LIMITED TO, THE IMPLIED WARRANTIES OF MERCHANTABILITY AND FITNESS
FOR A PARTICULAR PURPOSE. WITHOUT LIMITING THE GENERALITY OF THE
FOREGOING, PANASONIC DOES NOT WARRANT THAT THE SOFTWARE WILL BE
ERROR-FREE OR THAT IT WILL MEET YOUR REQUIREMENTS. PANASONIC SHALL
NOT BE LIABLE FOR ANY DAMAGE SUFFERED BY YOU INCLUDING, BUT NOT
LIMITED TO, CONSEQUENTIAL, INCIDENTAL, SPECIAL OR PUNITIVE DAMAGES,
EVEN IF PANASONIC HAS BEEN ADVISED OF THE POSSIBILITY OF SUCH DAMAGES.
NOTWITHSTANDING THE FOREGOING, IF THE TERMS AND CONDITIONS HEREOF
CONTRADICT THE LAWS OF THE JURISDICTION IN WHICH YOU LIVE, THIS LICENSE
AGREEMENT SHALL BE MODIFIED TO THE EXTENT SUCH LAWS REQUIRE.
90
Page 91

If a Paper Jam Occurs
The error message “Paper is jammed.” is displayed on the TV screen or status monitor of the
computer screen.
Turn off the printer’s power once
and turn it back on again with
both the paper cassette and ink
cassette still inserted.
1
• Jammed paper will be ejected from the
front panel
may be ejected from both the front panel
and the rear panel .)
Remove the paper from the front
panel
or the rear panel . (Paper
or rear panel .
2
Remove the ink cassette to
verify that there is no more
3
paper lodged inside the printer.
Replace the ink cassette.
Front panel
Rear panel
4
Opening for removing paper jams
Others
91
Continued on next page
Page 92

If a Paper Jam Occurs (continued)
If paper is not ejected
Turn off the power and
remove the paper cassette.
1
Important
If the paper has stopped moving and no error message appears, wait for a while, leaving the
paper as it is.
Note
When printing from a computer, printing sometimes continues after jammed paper is removed.
92
Page 93

LED Indicators
The operational and error status of the printer is displayed using a combination of lit and
blinking LED indicators. Messages can be displayed on TV screen and the status monitor of
the computer screen ( p. 100).
When operations are normal
Status POWER lamp ERROR lamp ACCESS lamp PRINT lamp
Power is off
(Standby mode)
Power is on
Loading image
Lit (Red)
Lit (Green)
Lit (Green)
Lit/Blink (Green)
Printing
Lit (Green)
Blink (Green)
Waiting to
1
print
temperature is too
high or too low)
1 When temperature is too high or too low, the printer will temporarily enter Waiting mode
(
(when
p. 10).
Lit (Green)
Lit (Green)
When an error occurs (For details, refer to page 100.)
Status POWER lamp ERROR lamp ACCESS lamp PRINT lamp
Paper/ink error
Lit (Green)
Paper jam
Lit (Green)
Lit (Red)
Blink (Red)
2
Internal printer
error
Blink (Red)
2 Sometimes the PRINT lamp blinks or lights up during printing.
Blink (Red)
93
Others
Page 94

Troubleshooting
Follow the procedures described below. If you are not able to solve the problem, contact your
dealer.
Power source
Problem Cause and Remedy Page
The power is not on. • Are the power cord and AC adaptor connected
correctly?
Connect the power cord and AC adaptor correctly. 15
Printing (with TV, digital camera or computer)
Problem Cause and Remedy Page
The ink cassette
cannot be inserted.
• Not able to print.
• Blank paper comes
out.
• When attaching the ink cassette, if it does not catch in
place when inserted, manually rotate the ink sheet reel
slightly as described below and try again.
Ink sheet
Rotate the reel on the other side in the direction
of the arrow to take up the slack of the ink sheet.
• Have you inserted the ink cassette as far as it will go?
Insert the ink cassette all the way in.
• Does the ink sheet have slack?
Flatten out the ink sheet.
• Have you inserted the paper cassette as far as it will go?
Insert the paper cassette all the way in.
• Does the size of paper cassette and ink cassette match?
Make sure that the paper cassette and ink cassette
sizes match.
• Have you been printing continuously or printing when
the room temperature is high?
Printing operations may temporarily halt in order
to keep the internal temperature of the printer from
rising. The PRINT lamp will change to lit status at this
time. This is not a malfunction. Please wait until the
internal temperature of the printer goes down.
• Has the ink in the ink cassette run out?
Replace the ink cassette.
Make sure that the side of
the ink cassette with an arrow
symbol is facing upward.
Rotate the reel on this side
about 90 degrees in the
direction of the arrow and
allow the ink sheet to slacken
slightly.
—
22
22
21
18
10
93
22
94
Page 95

Problem Cause and Remedy Page
Printing time is
unusually long.
There is a noise
during printing.
The printer printed
a different number
of copies than
selected.
• Unsatisfactory
print quality
• Horizontal lines
appear across the
printed image.
• Printing will require additional time when printing more
than 2 sheets in succession or when the printer’s
internal temperature is excessively high.
• The printer makes noise when the ink and paper are
being fed out during printing. This is normal.
• When printing using DPOF settings, only the number of
copies set by DPOF will be printed.
• Even if the number of copies has been set to each
image when selecting images, only one copy will be
printed if “All Images” or “ Index” is selected.
• Are you using different paper than that which is
indicated?
Insert the paper exclusive for this printer.
• Does the ink sheet have slack?
Flatten out the ink sheet.
• Have you inserted the paper with the wrong side facing
up?
Make sure that you insert the paper with the print side
(glossy surface) facing up.
1
• Print quality may be poor if there is condensation
to a difference in temperatures.
Wait for approximately 2 hours from the time the
printer’s power was turned on before attempting to
resume printing.
• Are the thermal heads dirty?
Clean the thermal heads
2
.
due
10
—
40
36
38
18
22
20
96
96
• Paper jams occur
frequently.
• Paper does not
feed.
• Have you loaded more than 18 sheets of paper (or
more than 20 sheets of wide size paper) in the paper
cassette?
Reduce the number of sheets.
• Have you inserted curled paper?
Do not use curled paper.
20
—
Others
95
Continued on next page
Page 96

Troubleshooting (continued)
Problem Cause and Remedy Page
Part of the printed
image is cut off.
There is an
unexpected margin
on the printed
images.
• Have you used application software to enlarge the
image beyond the printing range of this printer?
Reduce the image size so that it fits within the
printer’s printing range.
• Is [Borders] of the digital camera or printer driver
to [Off]?
Select [On] under [Borders].
• Is [Borders] of the digital camera or printer driver
to [On]?
Select [Off] under [Borders].
3
set
3
set
1 Condensation
Water droplets will form after a bottle has been removed from a refrigerator during the
summer season or in a warm environment. This formation of water droplets is called
condensation. Condensation that forms on printed paper and the printer roller and that has
not yet dried may cause smudging on the printed image.
2 Cleaning thermal heads
If photo images are marred by
horizontal lines and you are not able
to print high-quality photo images,
use a commercially available cotton
swab, approximately 6Ǝ (15 cm) in
length, to clean the full length of the
thermal heads in the ink cassette
slot.
• Do not clean the thermal heads
immediately after printing.
• Disconnect the power cord and
remove the ink cassette before
cleaning the thermal heads.
• Do not insert your fingers in the
ink cassette slot while cleaning
the thermal heads as this may
lead to injury.
Bottom of the printer
—
—
—
Thermal heads
3 Printer driver
For operation details, see the help on the supplied CD-ROM.
96
Page 97

Printing (with TV)
•
Problem Cause and Remedy Page
• Printer does not
operate when the
button is pressed.
• The menu is not
displayed even
when the MENU
button is pressed.
No image is
displayed.
• Has the printer unit become hot?
• Have you inserted the memory card correctly?
• Have you inserted a memory card that is not compatible
• Is the video format incorrect?
If the inside of the unit becomes hot, buttons may
stop functioning and the printer may stop midway
through printing. If this happens, the PRINT lamp will
light. This is not a malfunction. Please wait for the
temperature to go down.
Insert the memory card correctly.
with this printer?
Check that the format of the memory card is
compatible with the printer.
Change the video format as follows.
10
93
29
104
—
Changing the video format
The video format varies depending on the country or region. Follow the procedure below to
change the video format.
OK
DISPLAY
POWER
97
Others
Page 98

Troubleshooting (continued)
Problem Cause and Remedy Page
It takes considerable
time for the image to
be displayed.
It takes considerable
time for the initial
screen to be
displayed.
The image is
distorted.
The remote control
does not work.
• It may take some time until the image is displayed,
depending on the image format or size of the image.
This is not a malfunction.
• Do you have many images stored on the memory card?
It may take some time until the image is displayed.
This is not a malfunction.
• Is the printer located close to any devices that may be
emitting electric waves or magnetic waves?
Make sure the printer is not set close to any game
devices, stereo speakers or large format monitors,
etc.
• Are there any obstacles between the printer and the
remote control?
Remove any obstacles that may be in the way.
• Are you pointing the remote control at the remote control
receiver on the printer?
Make sure that you are aiming the remote control at
the printer’s remote control receiver.
• Is the battery used up?
Replace the battery with new one.
—
—
10
17
17
16
Printing (with a computer)
Problem Cause and Remedy Page
• Don’t know how to
stop the printing
process when
printing from a
computer.
• Printing has started
after starting the
computer.
• Cannot start
printing from the
computer.
• ERROR lamp on
the printer is lit
or blinking when
printing from the
computer.
• Click [Cancel Printing] on the status monitor.
• Select [Start] ĺ [Printers and Faxes] (or [Start] ĺ
[Settings] ĺ [Printers]) and then double-click the icon
for this printer. Then select [Printer] ĺ [Cancel All
Documents] (or [Purge Print Documents]).
• Check the information displayed on the status monitor. 89
89
—
100
101
98
Page 99

Problem Cause and Remedy Page
The printed image
has poor tone
balance.
• The printed image
is too bright.
• There is too much
image noise in the
dark areas of the
printed image.
A message
indicating “The
USB port cannot be
located” is displayed
on the computer.
• You can adjust the image quality on the [Image
Adjustment] tab of the printer driver
• Changing [Auto Mode] setting to [Off] on the [Image
Adjustment] tab of the printer driver
these problems.
• Have you connect the printer to USB port that supports
printers?
USB ports are displayed as [USB001] and [USB002].
Check the USB port configuration.
4
.
4
may improve
Checking method
• For Windows XP
Select [Start] ĺ [Control Panel] ĺ [Printers and
Other Hardware] ĺ [Printers and Faxes] and open
[Properties] window for this printer. Select USB ports
on [Ports] tab.
• For Windows 2000
Select [Start] ĺ [Settings] ĺ [Printers] and open
[Properties] window for this printer. Select USB ports
on [Ports] tab.
• For Windows 98 SE/Me
Select [Start] ĺ [Settings] ĺ [Printers] and open
[Properties] window for this printer. Select USB ports
on [Print to the following port] on [Details] tab.
—
—
—
4 Printer driver
For operation details, see the help on the supplied CD-ROM.
Others
99
Page 100

Message Display
•
•
Paper cassette and ink cassette related messages
LED indicators
POWER lamp ERROR lamp ACCESS lamp PRINT lamp
Lit (Green)
1 Sometimes the PRINT lamp blinks or lights up during printing.
Lit (Red)
Messages
Message Remedy Page
Load a new ink cassette.
(U02/U03/U04)
Load the ink cassette.
(U10/U12/U13/U14/U1A/
U1B/U1C)
Load paper.
(UA0/UA1/UA2)
Load the paper cassette.
(U27/UA3/UA4/UA5/UAD/
UAE/UAF)
• Replace with a new ink cassette as ink has run out. 22
• Insert the ink cassette. 22
• Load paper into the paper cassette. 20
• Insert the paper cassette with paper. 20
1
Incorrect ink cassette
size.
(U43/U44/U45)
Incorrect paper cassette
size.
(UAA/UAB/UAC)
Paper cassette and ink
cassette sizes do not
match.
(U19)
• Insert the ink cassette of correct size. 18
• Insert the paper cassette of correct size. 18
• Insert an ink cassette and paper cassette of the
same size.
18
100
 Loading...