

Utilities and Drivers
Model No. KX-PS8000
Reference Guide
Please carefully read the Operating Instructions and the Utilities and Drivers Reference Guide before using the
Digital Color Imaging System. Keep this CD-ROM in the protective case. Do not expose the CD-ROM to direct
sunlight or extreme heat and do not scratch or smudge the surface of the CD-ROM.

2
This manual explains how to use the Digital Duplicator Utility, Scanner and Printer features.
It consists of three parts:
■ Part 1 Digital Duplicator Utility (
☞
P. 3)
This part explains how to use the Digital Duplicator Utility, which lets you adjust the appearance of your
document before duplicating. For example, you can enlarge or reduce the size of the image, change the color,
or select an area. This utility also provides a variety of duplicating functions.
■ Part 2 Scanner Function (
☞
P. 74)
This part explains how to use the scanner driver, which lets you adjust the appearance of your document
before scanning. For example, you can enlarge or reduce the size of the image, change the contrast or
brightness, or perform other enhancement selections to improve the final image, making it better than the
original.
■ Part 3 Printer Function (
☞
P. 108)
This part explains how to use the print features through the printer drivers (Windows¨ 95
S
1
/ Windows 3.1
S
2
/
Windows NT¨ 4.0
S
3
).
■ Appendix (
☞
P. 150)
This section consists of Troubleshooting ( ☞ P. 151), Print Quality and Required Memory ( ☞ P. 166) and
Index ( ☞ P. 168).
Introduction
Microsoft, Windows and Windows NT are registered trademarks of Microsoft Corporation in the United States
and/or other countries.
Corel is a trademark of Corel Corporation.
Adaptec and EZ-SCSI are trademarks of Adaptec, Inc.
All other acknowledgements are trademarks or registered trademarks of their respective holders.
S
1
Microsoft¨ Windows¨ 95 operating system (hereafter Windows 95)
S
2
Microsoft¨ Windows¨ operating system Version 3.1 (hereafter Windows 3.1)
S
3
Microsoft¨ Windows NT¨ Workstation operating system, and Microsoft¨ Windows NT¨ Server network
operating system Version 4.0 (hereafter Windows NT 4.0)
It is granted from Microsoft Corporation to use Microsoft¨ Windows¨ Screen Shot(s).
Any details given in this manual are subject to change without notice.
© KYUSHU MATSUSHITA ELECTRIC CO.,LTD. 1997.

3
Basic Tasks
P
P
a
arrtt
1
1
Digital Duplicator
Utility
Displaying the Digital Duplicator Utility Window . . . . . . . . . . 5
Names and Functions . . . . . . . . . . . . . . . . . . . . . . . . . . . . . . . 6
Option Buttons . . . . . . . . . . . . . . . . . . . . . . . . . . . . . . . . . . . 10
Using the Print Preview Window . . . . . . . . . . . . . . . . . . . . . . . 12
Reducing or Enlarging the Output (Zoom) . . . . . . . . . . . . . . . 16
Displaying the Zoom Window . . . . . . . . . . . . . . . . . . . . . . . . 16
Changing the Zoom Value . . . . . . . . . . . . . . . . . . . . . . . . . . 18
Printing an Enlarged Image on Multiple Pages . . . . . . . . . . . 20
Shifting an Image . . . . . . . . . . . . . . . . . . . . . . . . . . . . . . . . . . . 24
Displaying the Shift Window . . . . . . . . . . . . . . . . . . . . . . . . . 24
Background Reduction . . . . . . . . . . . . . . . . . . . . . . . . . . . . . . 26
Selecting Print Quality . . . . . . . . . . . . . . . . . . . . . . . . . . . . . . . 28
Creating a Mirror/Negative Image . . . . . . . . . . . . . . . . . . . . . . 29
Creating a Mirror Image . . . . . . . . . . . . . . . . . . . . . . . . . . . . 29
Creating a Negative Image . . . . . . . . . . . . . . . . . . . . . . . . . . 29
Double Side Printing . . . . . . . . . . . . . . . . . . . . . . . . . . . . . . . . 30
Saving, Loading or Deleting a Setting . . . . . . . . . . . . . . . . . . 32
Saving the Current Settings . . . . . . . . . . . . . . . . . . . . . . . . . 33
Loading a Saved Setting . . . . . . . . . . . . . . . . . . . . . . . . . . . . 35
Deleting a Setting . . . . . . . . . . . . . . . . . . . . . . . . . . . . . . . . . 36
Changing the Unit of Measurement (mm or inch) . . . . . . . . . 37
Changing the Preview Resolution . . . . . . . . . . . . . . . . . . . . . 38
Enabling Jam Recovery ON . . . . . . . . . . . . . . . . . . . . . . . . . . . 39
Digital
Duplicator
Utility Window
Overview
Table of Contents

4
Adjusting the Overall Color of an Image . . . . . . . . . . . . . . . . 40
Displaying the Color Adjust Entire Image Window . . . . . . . . 40
Adjusting a Specific Color of an Image . . . . . . . . . . . . . . . . . 43
Modifying Color Data . . . . . . . . . . . . . . . . . . . . . . . . . . . . . . 46
Deleting the Stored Color Data . . . . . . . . . . . . . . . . . . . . . . . 47
Area Duplicate Function . . . . . . . . . . . . . . . . . . . . . . . . . . . . . 48
Displaying the Area Duplicate Window . . . . . . . . . . . . . . . . . 49
Pasting an Area of an Image in the Layout Box . . . . . . . . . . 52
Moving a Selection Area in the Original Box . . . . . . . . . . . . 55
Resizing a Selection Area . . . . . . . . . . . . . . . . . . . . . . . . . . . 56
Canceling a Selection Area . . . . . . . . . . . . . . . . . . . . . . . . . 56
Moving an Image in the Layout Box . . . . . . . . . . . . . . . . . . . 57
Resizing an Image in the Layout Box . . . . . . . . . . . . . . . . . . 57
Creating a Mirror or Negative Image in the Layout Box . . . . 60
Creating Multiple Images in the Layout Box . . . . . . . . . . . . . 61
Duplicating an Image in the Layout Box . . . . . . . . . . . . . . . . 63
Enlarging an Image to Fit on Paper . . . . . . . . . . . . . . . . . . . 64
Zooming an Image in the Layout or Original Box . . . . . . . . . 65
Moving the Selected Area to the Front in the Layout Box . . 66
Moving the Selected Area to the Back in the Layout Box . . . 66
Deleting an Image in the Layout Box . . . . . . . . . . . . . . . . . . 66
Using Template Function . . . . . . . . . . . . . . . . . . . . . . . . . . . 67
Area Duplicate
Adjusting
Colors
Table of Contents

5
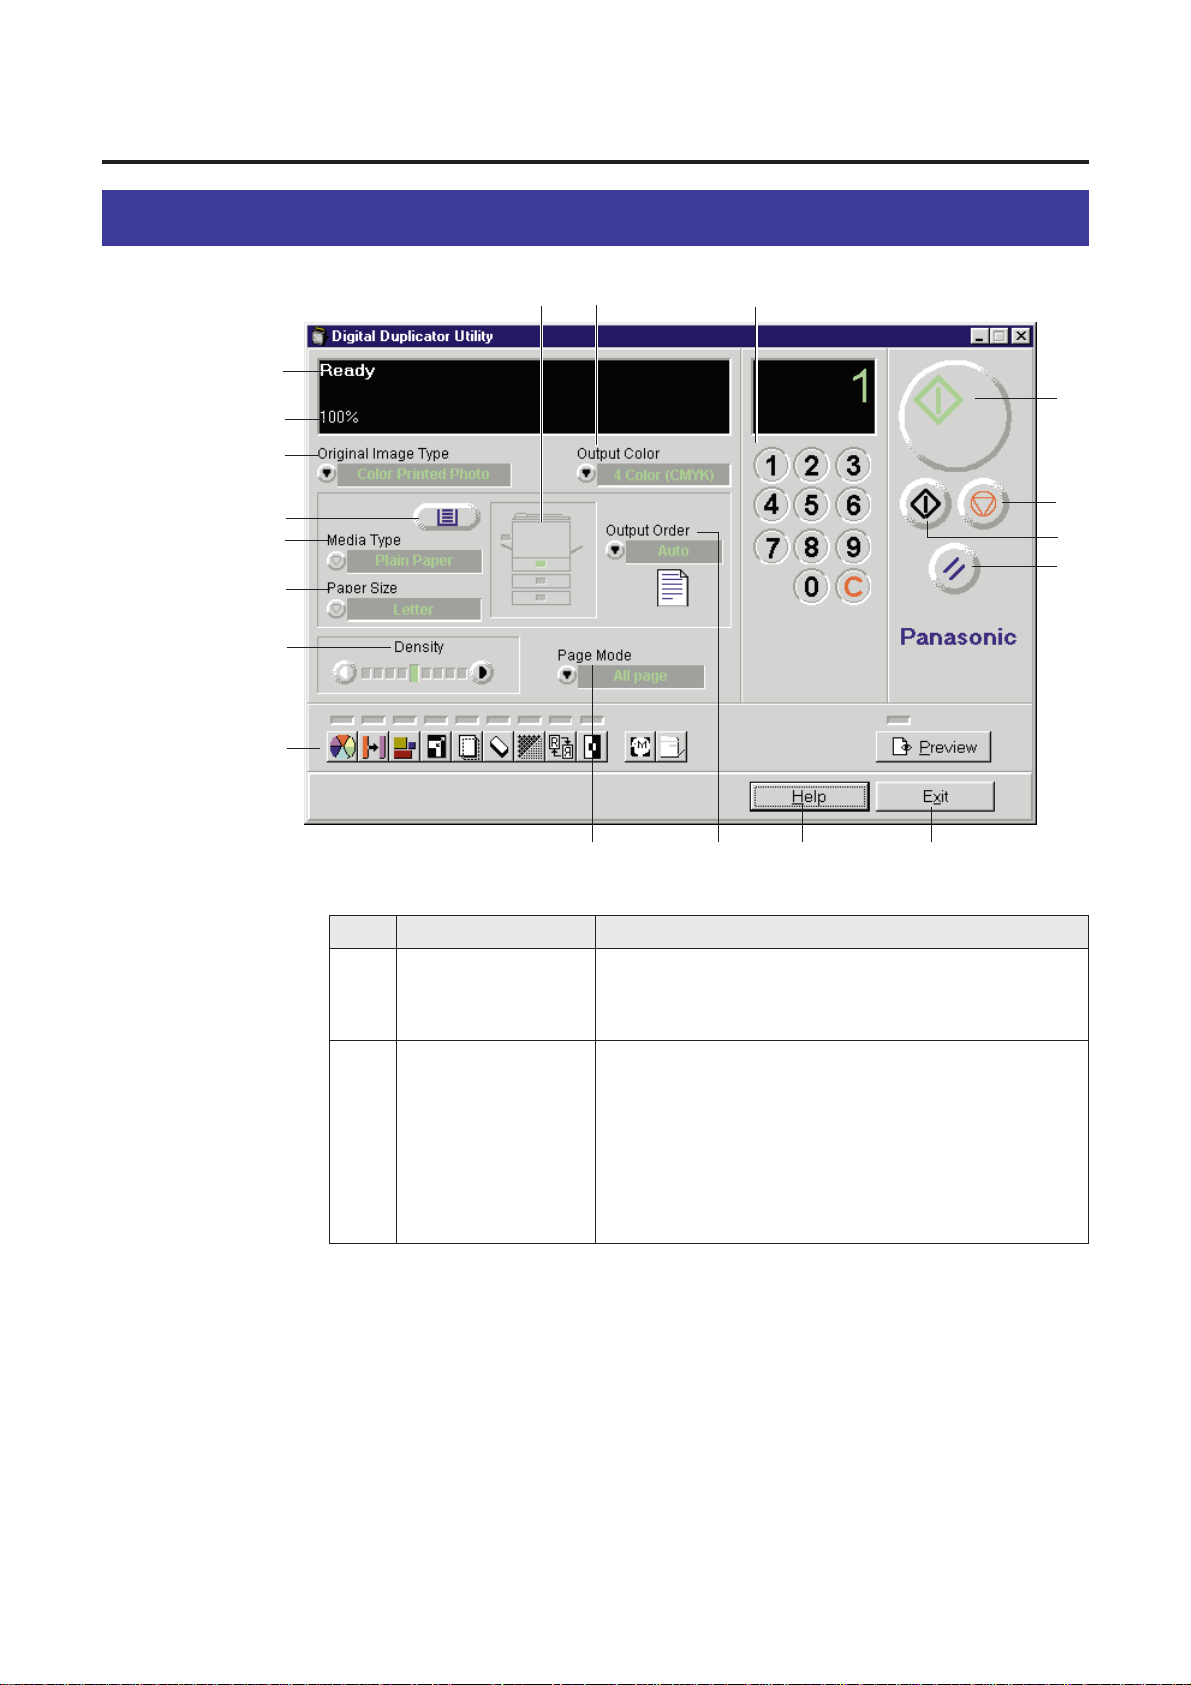
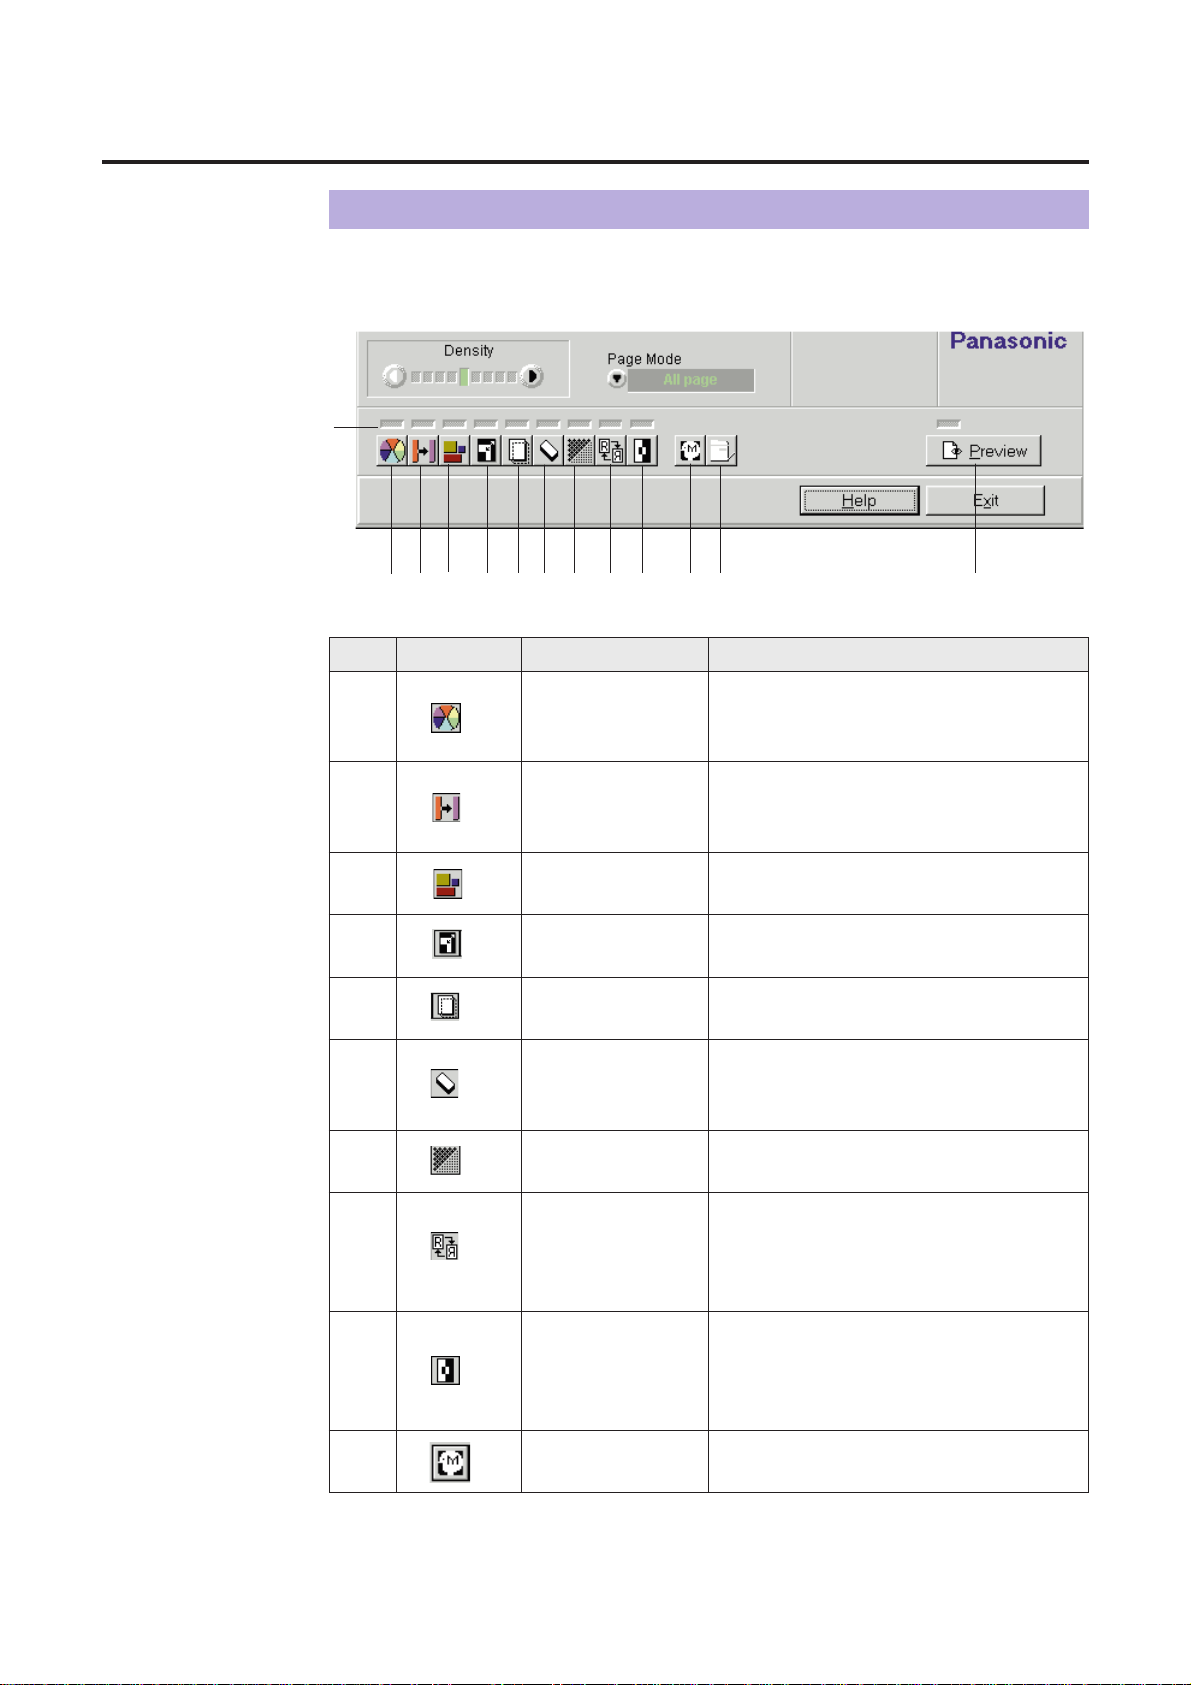
Digital Duplicator Utility Window
Overview
To display the Digital Duplicator Utility main window, perform either of the following
steps.
■ For Windows 95 / Windows NT 4.0
Click Start .
Select Programs, select KX-PS8000 Utilities then click Digital
Duplicator Utility.
The Digital Duplicator Utility main window appears.
■ For Windows 3.1
From the Program Manager, double-click the
KX-PS8000 Utilities
icon.
Double-click the
Digital Duplicator Utility
icon.
The Digital Duplicator Utility main window appears.
1
2
Displaying the Digital Duplicator Utility Window
1
2
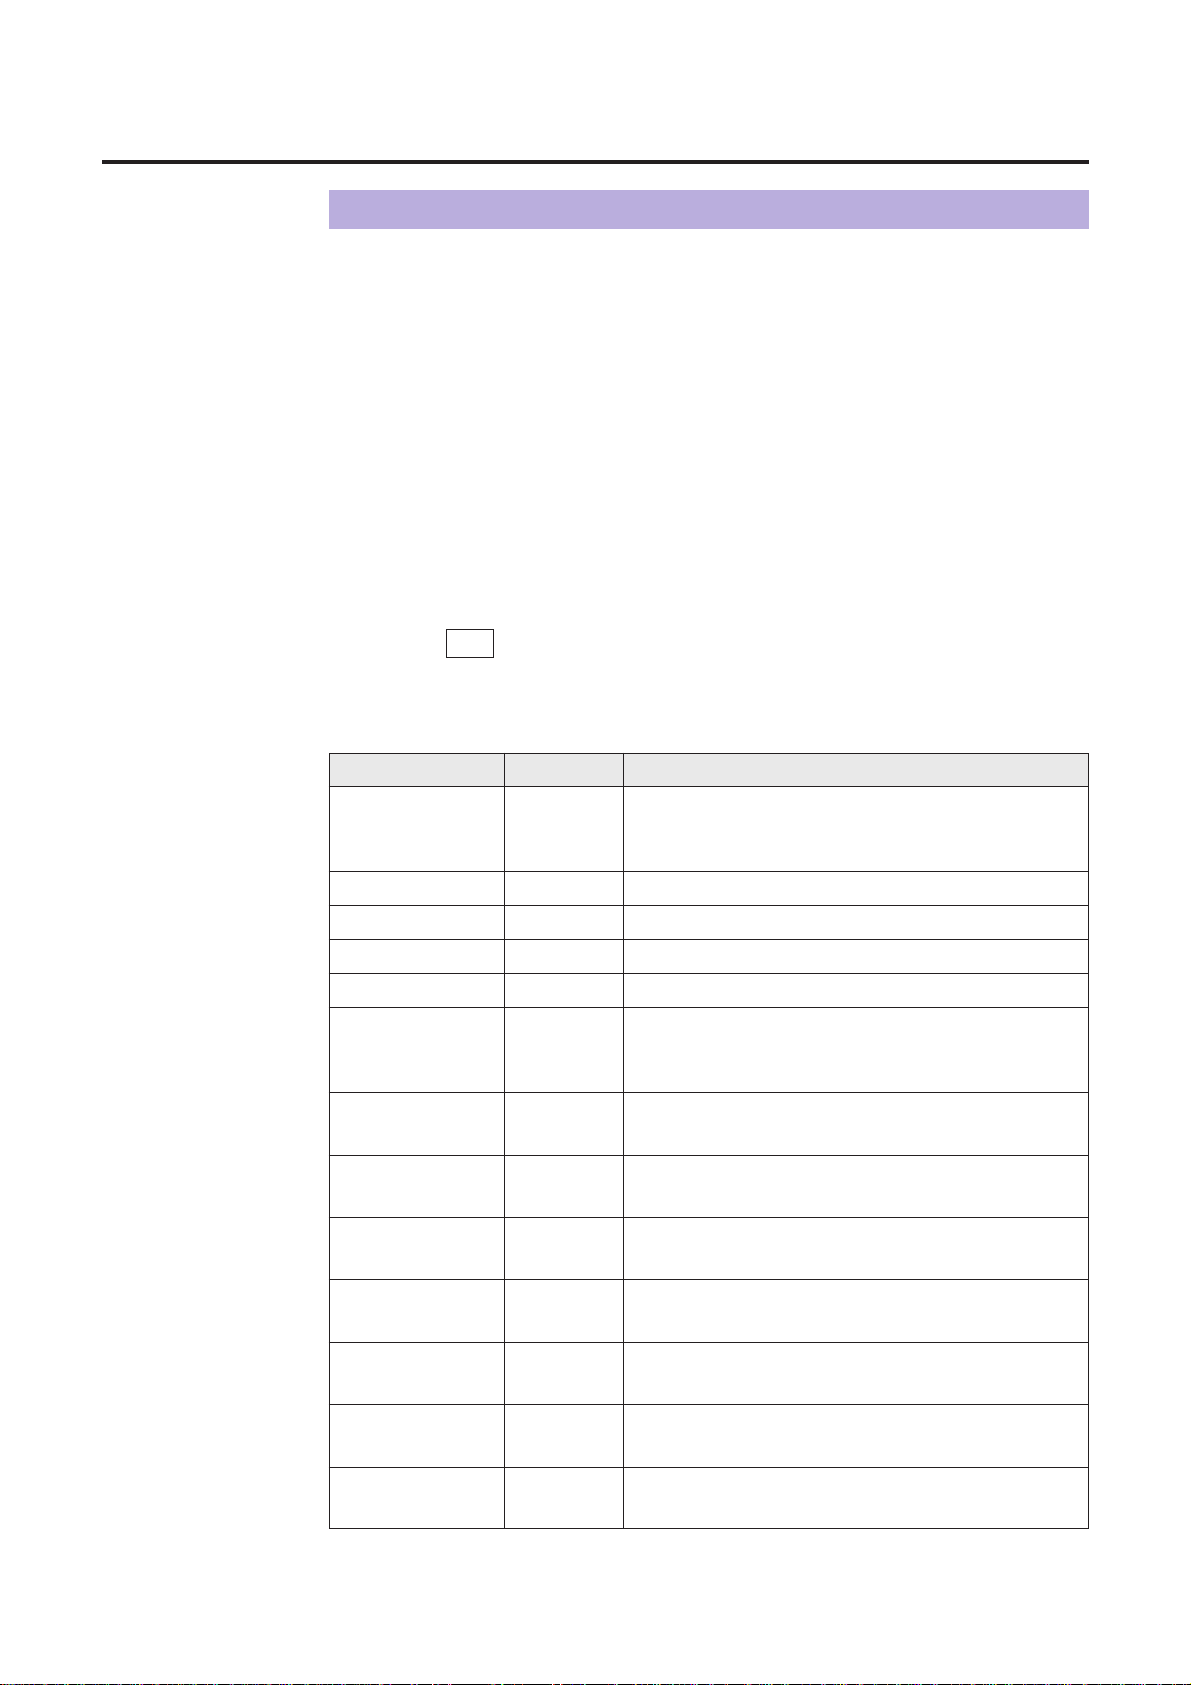
No. Name Function
6
1
Displays the status of the printer and the scanner.
Ready will be displayed when you open the main
window. If not, refer to Troubleshooting ( ☞P. 151).
Digital Duplicator Utility Window Overview
Names and Functions
Status display
Displays the zoom value currently set. When the
zoom values of the height and the width are the
same, one value is displayed. If they are different, two
values such as 100 x 50% are displayed.
Clicking on the displayed zoom value opens the
Zoom window ( ☞P. 16).
Zoom Value
display
2
13
16
15
14
9
11
10
8
3
6
7
5
4
2
1
18
12
19
17
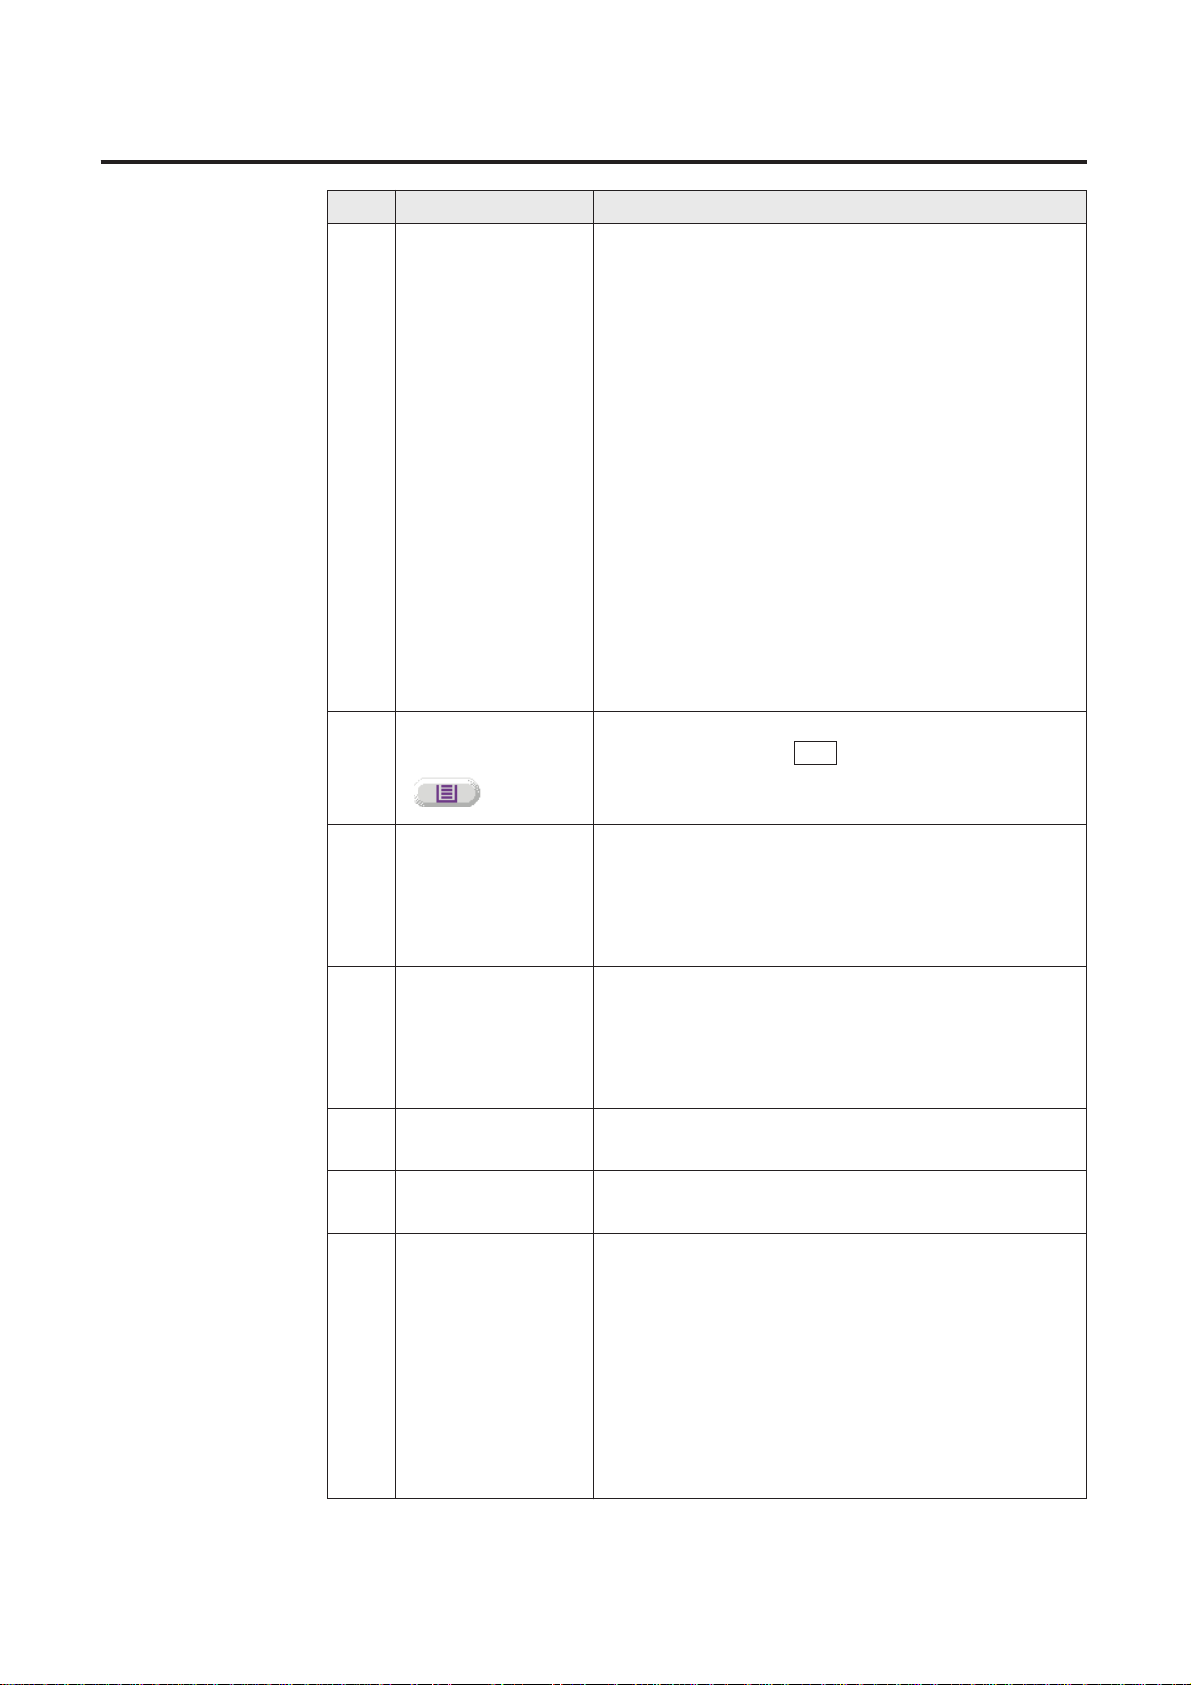
No. Name Function
3
7
Printing density can be adjusted by clicking Hor
M
or by pressing + or Ð keys on the keyboard.
Digital Duplicator Utility Window Overview
7 Density
8
Various options for editing an image can be selected
( ☞P. 10).
Option Buttons
4
6
Tray Selection
button
( )
Allows you to select an installed tray by clicking this
button or by pressing F12 on the keyboard. The
indicator of the selected tray will be illuminated in the
tray display ( ☞No. 19).
Paper Size
5
Allows you to select a media type loaded in the multipurpose tray by clicking G. This is effective only
when the multi-purpose tray is selected. Plain Paper,
Transparency, Label, Coated paper or Paper 2nd
Side can be selected.
Media Type
Allows you to select a paper size loaded in the multipurpose tray by clicking G, or displays the paper size
of the selected media tray. This is effective only when
the multi-purpose tray is selected. Letter, Legal or A4
can be selected.
Used to select an image type by clicking G.
B
Color Printed Photo:
Select for color printed materials such as a
catalog. The color mode is selected in the
Output Color
(☞No. 18).
B
Color Glossy Photo:
Select for color photos such as a glossy
photo. The color mode is selected in the
Output Color
(☞No. 18).
B
B/W Text:
Select for text.
The monochrome color is selected in the
Output Color (☞No. 18).
B
B/W Halftone, Photo:
Select for monochrome Photo or halftone
original. The monochrome color is selected
in the
Output Color (☞No. 18).
The image can be viewed in the Print Preview
window
(☞P. 12).
Original Image
Type
Page Mode9
Allows you to select a page mode by clicking G.
B
All page- All documents will be duplicated.
B
Even pageS- Only even pages will be duplicated.
B
Odd pageS- Only odd pages will be duplicated.
This function is used for double side printing
( ☞P. 30)
S
When Even page or Odd page is selected, the
Output Order selection ( ☞No. 10) is not effective
and the documents are automatically printed face
up.
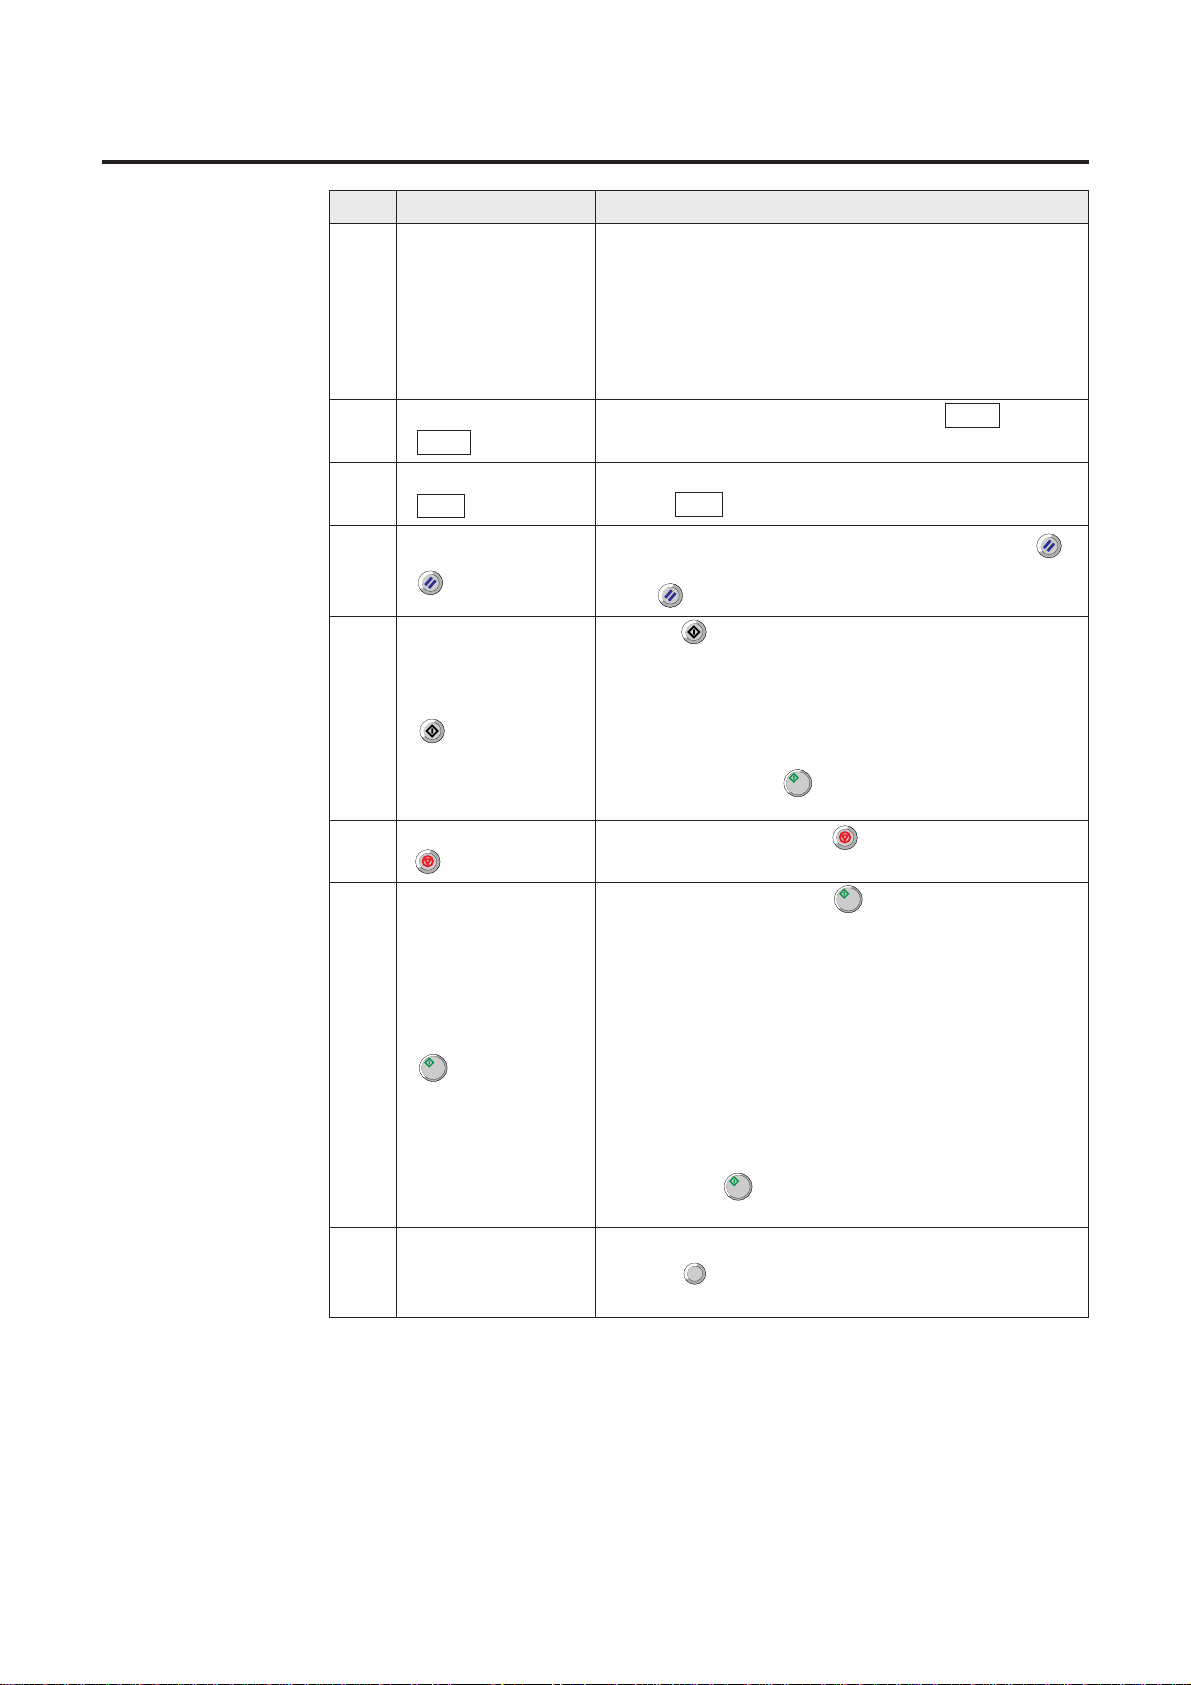
Stops printing by clicking .
Starts printing by clicking or by pressing the S
key on the keyboard. It is also used to resume
printing after loading media, or after clearing a media
jam when the Jam Recovery ON is selected
( ☞P. 39).
When the Energy Star is set to ON if the printer is idle
for 30 minutes, the printer will enter the Sleep Mode.
The status display in the Digital Duplicator Utility
window shows the message Ready (Sleep). While
the printer is in the Sleep Mode, a document cannot
be duplicated. To release the Sleep Mode, click the
Start button ( ). The message Ready will appear
in the status display.
No. Name Function
8
Specifies whether your document prints face up or
face down in the printerÕs output tray by clicking G.
Note: This selection is not effective when the MPT
(Multi-Purpose Tray) is selected. When the
MPT is selected, Face up is automatically
selected.
10
Digital Duplicator Utility Window Overview
Output Order
16
Start button
( )
13
Resets all settings to default settings by clicking
or by pressing the Home key on the keyboard. If you
press while printing, the printer stops printing.
Reset button
( )
B/W Text Start
button
( )
14
Clicking or pressing the Ctrl + S keys on the
keyboard forces a document to print in black and
white regardless of the color settings.
Note: When the B/W Text is selected in the Original
Image Type ( ☞No. 3) and Black is selected
in the Output Color ( ☞No. 18)), pressing the
Start button ( ) prints a document in black
and white.
15
Stop button
( )
11
Views the help information by clicking Help .Help button
( Help )
12
Exits the Digital Duplicator Utility window by
clicking Exit .
Exit button
( Exit )
Numeric keypad17
Used to enter the number of duplicates (1-999).
Clicking or pressing C key on the keyboard
resets the duplicate count to 1.
C
9
Digital Duplicator Utility Window Overview
No. Name Function
19
18
Displays the status of the selected tray. If the
selected tray has paper installed, the green indicator
will be illuminated. Otherwise, the red indicator will be
illuminated.
Tray display
Output Color
Sets an output color. The items of Output Color vary
depending on the item selected in the Original Image
Type ( ☞No. 3).
(1) When the Color Glossy Photo or Color Printed
Photo is selected, 4 Color (CMYK) or 3 Color (CMY)
can be selected. The 3 Color (CMY) selection
provides faster duplicating speed, and is used only
when printing on plain paper.
B
When Transparency, Label or Coated paper media
type is selected, 3 Color (CMY) cannot be selected.
(2) When the B/W Text or B/W Halftone, Photo is
selected, a monochrome color (Black, Yellow,
Magenta or Cyan) can be selected.
10
No. Button Name
Function
Various options for editing an image can be selected.
Option Buttons
1
3
2
4
Digital Duplicator Utility Window Overview
6
5 7
8
9
10
11
12
Creates a mirror image of the original
( ☞P. 29).
B
To return to the original, click this
button.
6
Reduces the visibility of a reverse side
print and can reduce background stains
( ☞P. 26).
Background
Reduction button
7
Changes the resolution setting
( ☞P. 28).
Quality button
8
Mirror button
9
Creates a negative image of the original
( ☞P. 29).
B
To return to the original, click this
button.
Negative/Positive
button
1
Adjusts the overall color of an image
( ☞P. 40).
Color Adjust
Entire Image
button
2
Adjusts a specific color of an image
( ☞P. 43).
Color Adjust
Specific Point
button
3
Allows you to select and edit an area of
an image ( ☞P. 48).
Area Duplicate
button
4
Enlarges or reduces an image
( ☞P. 16).
Zoom button
5
Shifts an image ( ☞P. 24).Shift button
10
Saves, loads, or deletes the settings
made in this utility ( ☞P. 32).
Memorize
Settings button
Indicators
11
No. Button Name
Function
Print Preview
button
Allows you to preview the print image by
clicking this button, or by pressing the
Page Down key on the keyboard. The
Print Preview window also shows
immediately how your changes affect the
image ( ☞P. 12).
11
Used to select a unit of measurement
(inch or mm) ( ☞P. 37), a resolution (30
dpi or 60 dpi) ( ☞P. 38), and enable or
disable the Jam Recovery function
( ☞P. 39).
Other Settings
button
12
Digital Duplicator Utility Window Overview
■ Indicators
When an option button indicator is illuminated, it indicates that the default setting
has been changed.
12
Make sure that your document has been inserted in the ADF tray or placed on the
scanner glass.
Click the Print Preview button ( ).
The scanner starts prescanning the document. During prescanning the
document the Scanning Progress window appears, then the prescanned
image appears in the Print Preview window.
Basic Tasks
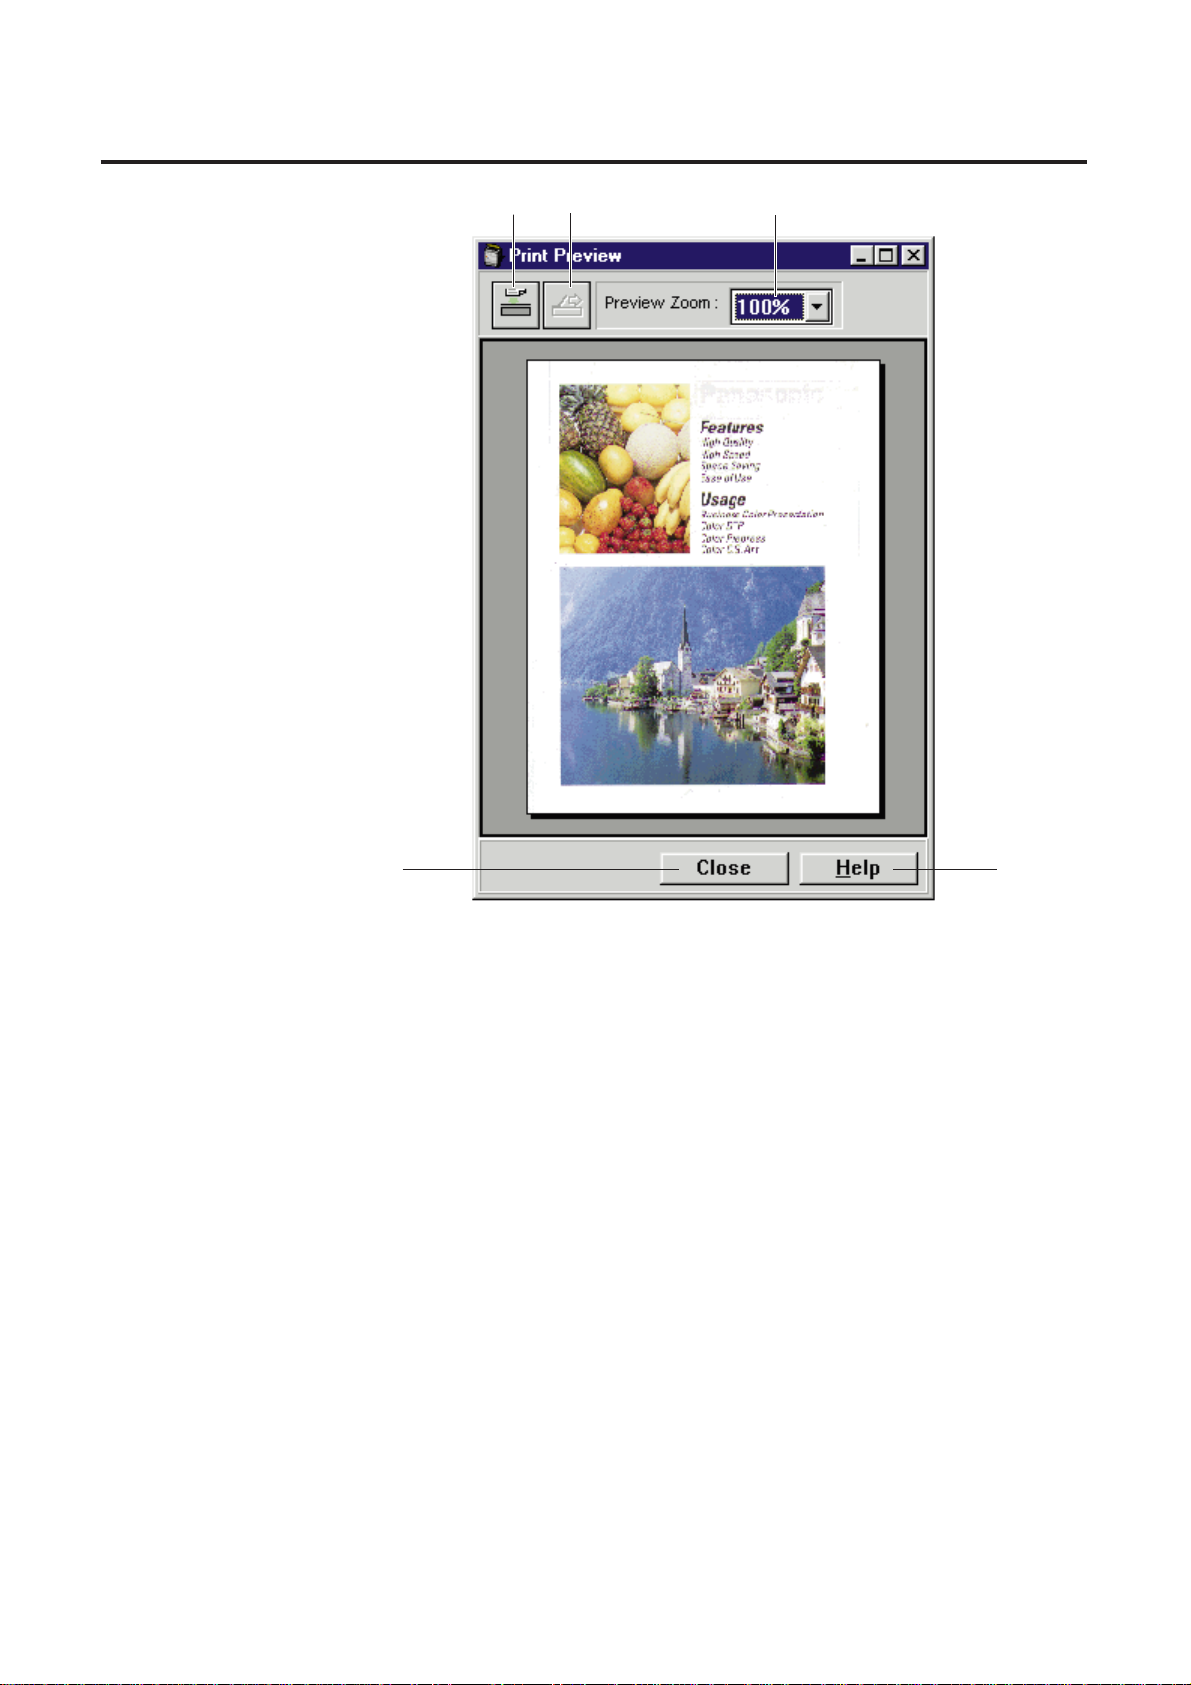
Using the Print Preview Window
The Print Preview window allows you to preview the print image of the document.
Before sending it to the printer, all adjustments are shown immediately.
It is helpful to open this window when you adjust an image using Zoom, Shift, Mirror
or Negative/Positive functions.
1
Note:
BThe Print Preview will not automatically prescan documents if a
document has already been prescanned. To represcan your
document, click the Prescan button ( ) in the Print Preview
window.
When the Prescan button is pressed, the Area Duplicate and Color
adjustment settings will be reset to the default settings.
13
Basic Tasks
#
Prescan button
Prescans a document and resets the Area Duplicate and the Color
Adjustment settings to the default settings.
If a document is duplicated from the ADF tray, the document is ejected
completely. However, if a document is prescanned from the ADF tray but
not duplicated, it will remain in the ADF tray. To eject the document, press
the Feed Out button (
☞
$
).
$
Feed Out button
Ejects the document that remains in the ADF tray.
%
Preview Zoom
Sets the zoom value (100, 125, 150, 175 or 200%) of the displayed image
in the Print Preview window.
&
Close button
Closes the Print Preview window.
'
Help button
Displays help information on the Print Preview window.
#
$
'
&
%
14
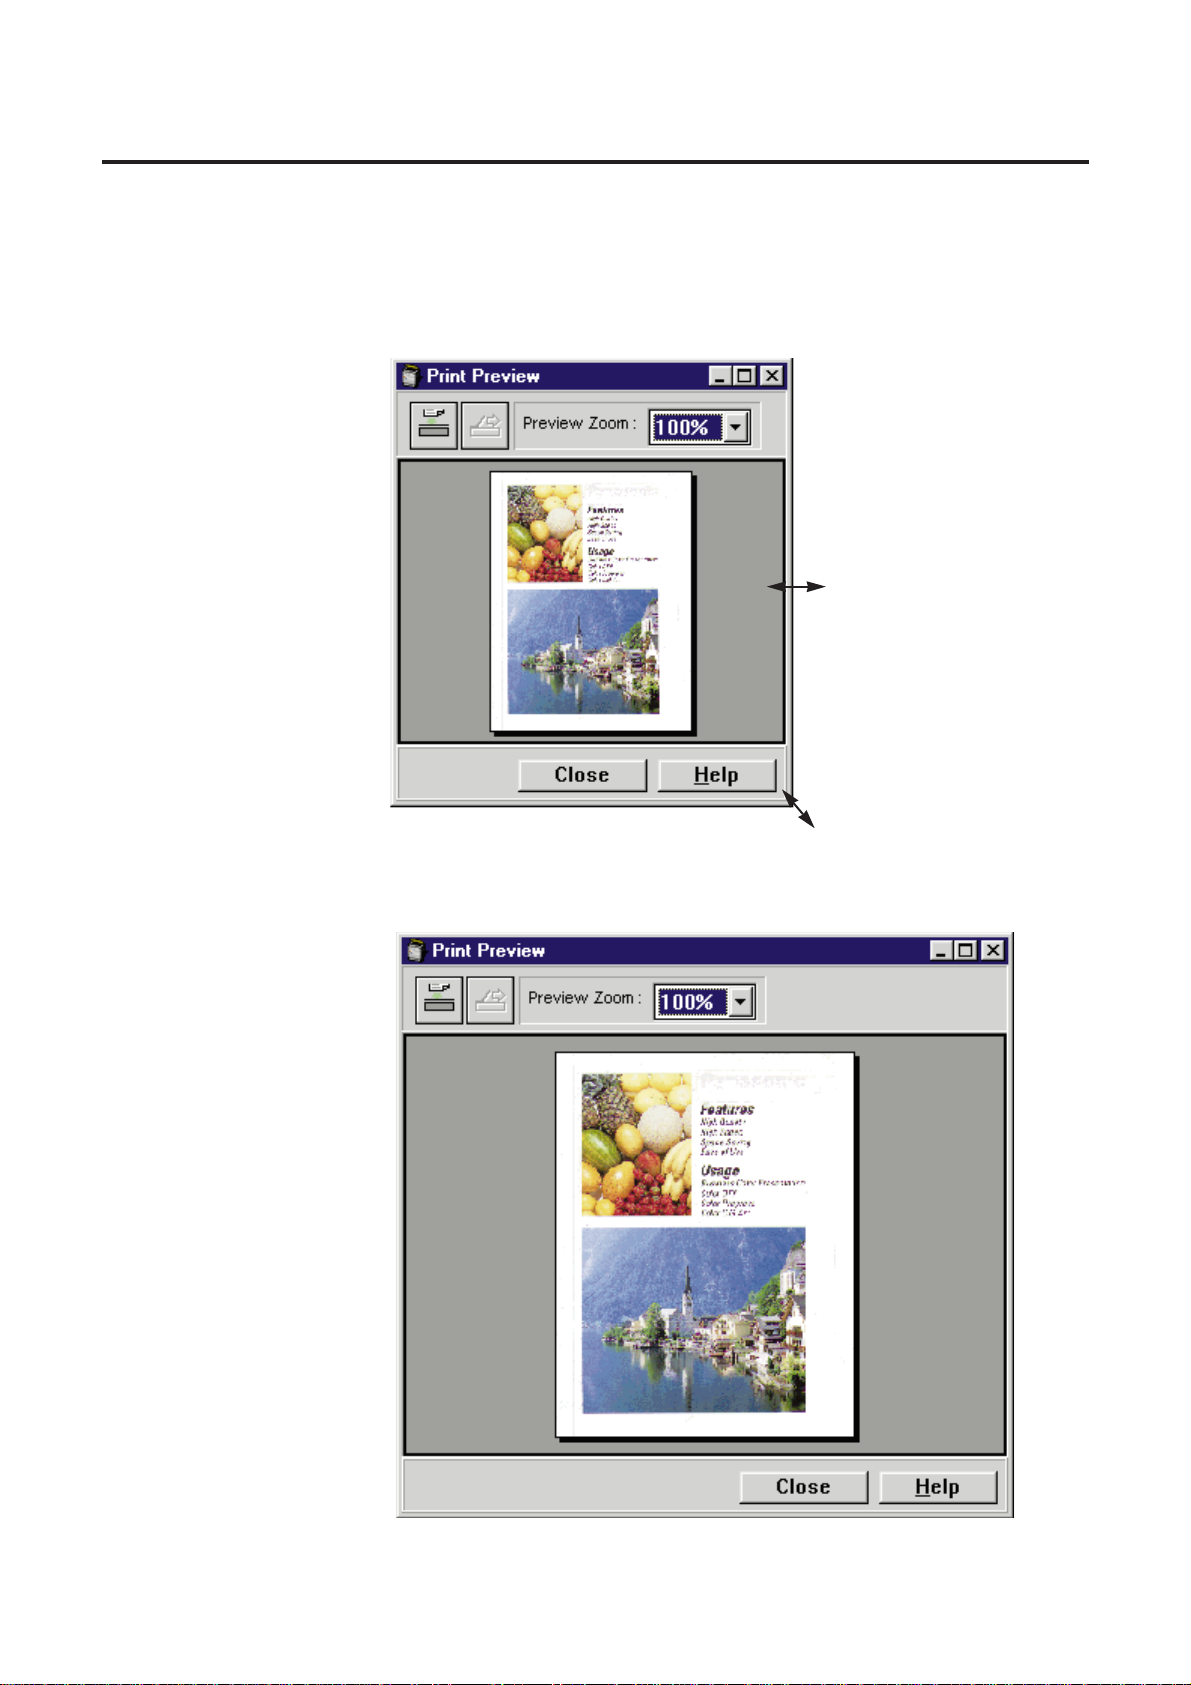
■ Changing the size of the Print Preview window
Position the cursor on the side/corner of the window. The mouse pointer changes
into a double-ended arrow. Press and hold the mouse button, and drag the
side/corner to obtain the desired size. Then release the mouse button.
Reduced window
Enlarged window
Basic Tasks

15
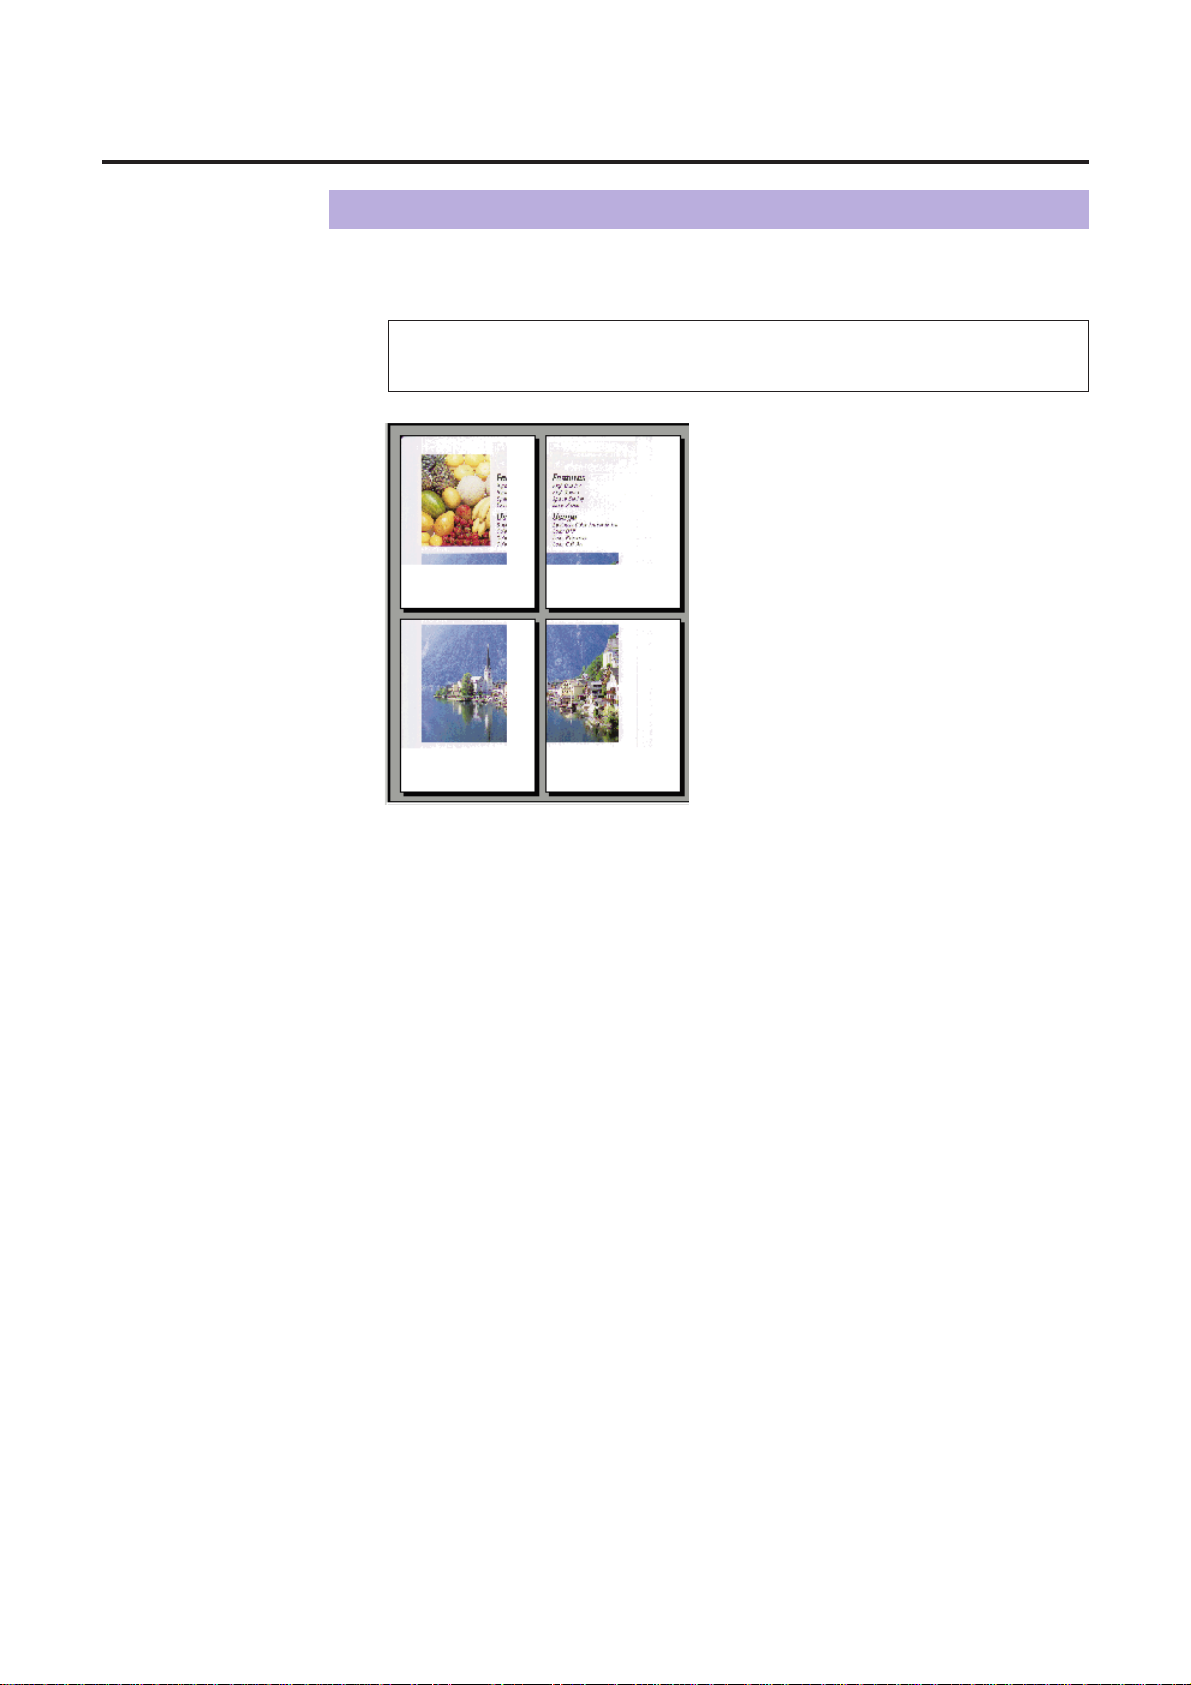
■ Simultaneously viewing the enlarged and divided
image
When Segment is selected for the enlarged image ( ☞P. 20), the divided multiple
images will be displayed in the Print Preview window.
Basic Tasks
16
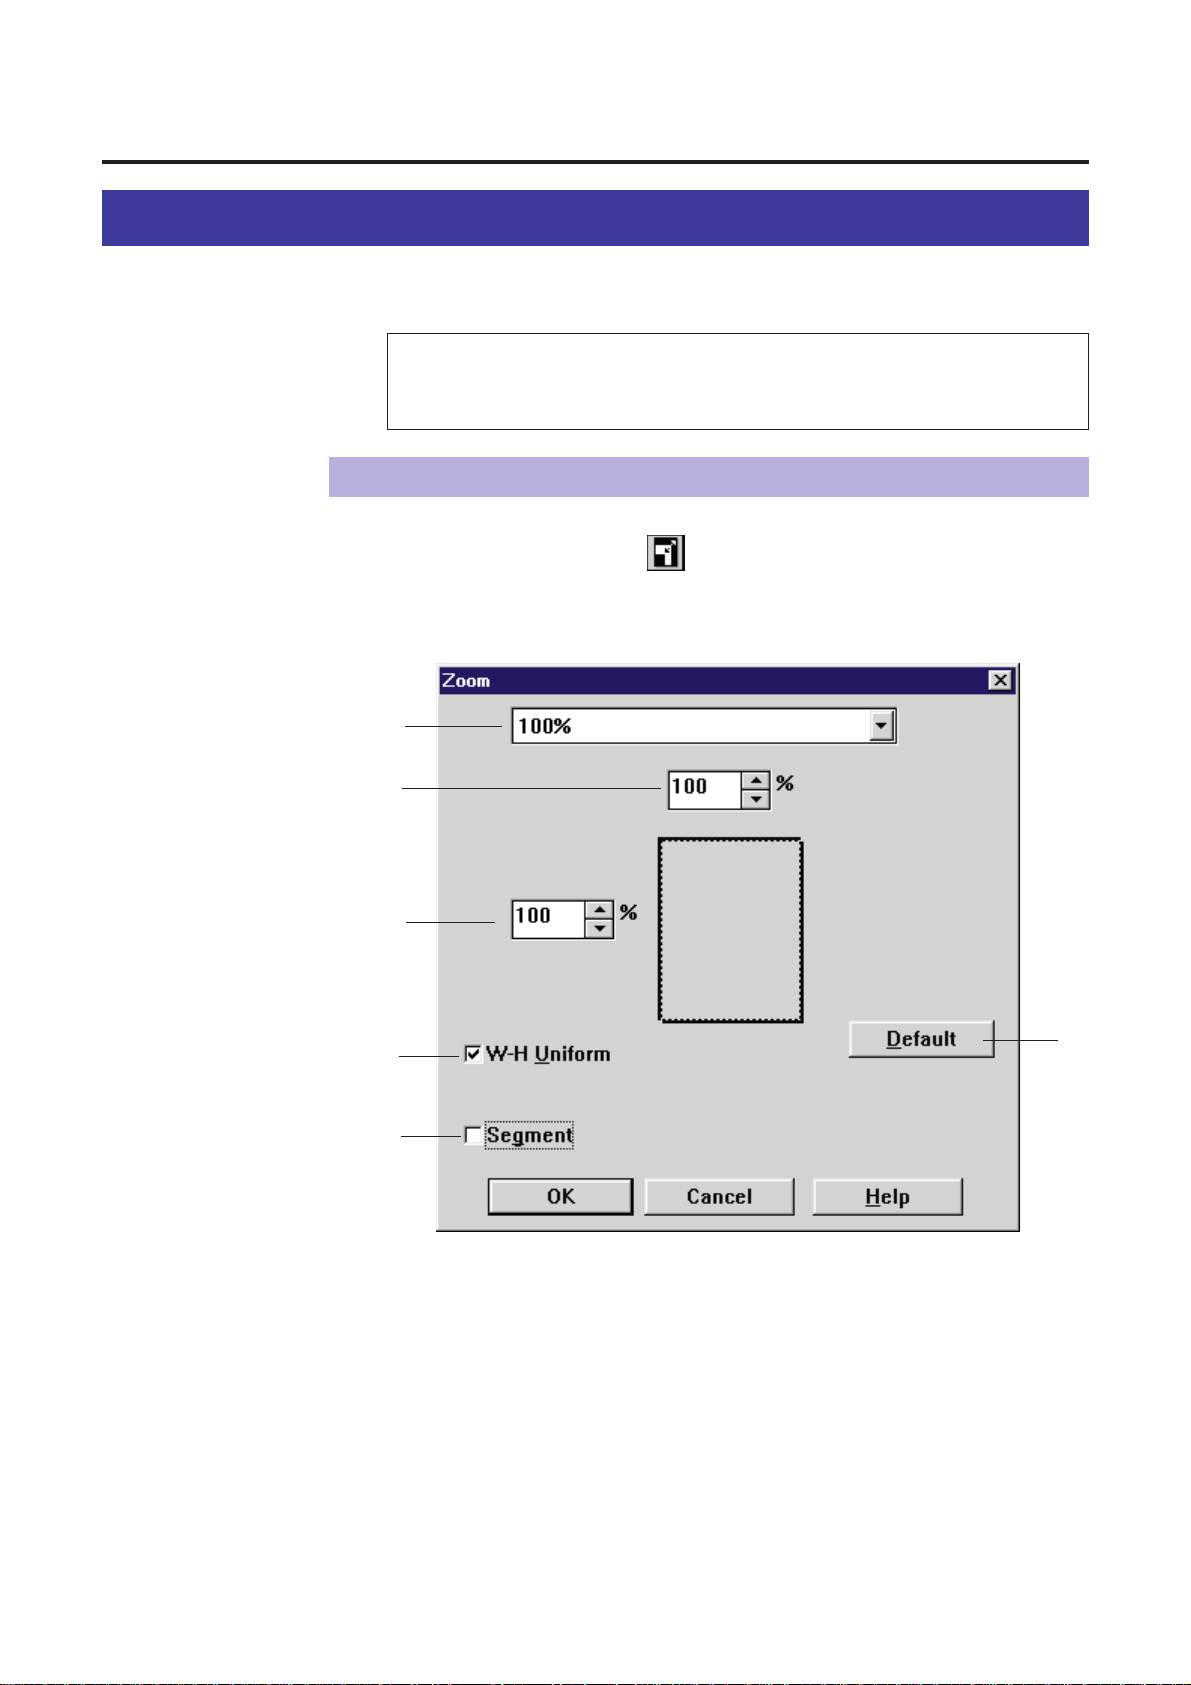
Click the Zoom button ( ).
The Zoom window appears.
The zoom function reduces or enlarges the output on the printed page. For your
convenience, open the Print Preview window to view changes to your image.
Basic Tasks
Reducing or Enlarging the Output (Zoom)
Displaying the Zoom Window
1
(
%
&
'
#
$
#
Zoom Value box
Displays the current zoom value. It also allows you to select a zoom value
by clicking G( ☞P. 18). Choosing a selection maintains the proportional
relationship of the height and width of an image.
$
Width Zoom Value box
Set the zoom value of the width by clicking F or G.
%
Height Zoom Value box
Set the zoom value of the height by clicking For G.
Note:
BWhen using the ADF tray, you cannot print an image enlarged
more than 100%.

17
Basic Tasks
&
W-H Uniform
Clicking on this check box allows you to set height and width
simultaneously by entering zoom value in either of their box. To set them
independently, click off this check box.
'
Segment
Divides the enlarged image ( ☞P. 20).
(
Default button
Resets the settings to the default settings.
18
Selections FunctionZoom value
100%
Duplicates an entire letter size document on A4
size paper.
Basic Tasks
Changing the Zoom Value
Change the zoom value by selecting an option from the Zoom Value box or by
entering it in the Width or Height Zoom Value box.
■ Using the Zoom Value box
Click Gof the Zoom Value box.
The zoom value selections appear ( ☞table below).
Click the desired selection.
The selected zoom value will be displayed in the Zoom Value, Width Zoom
Value and Height Zoom Value boxes. You can see the result of the selection in
the Print Preview window.
Click OK to make the selection effective.
The Zoom window will close.
1
2
400%
300%
200%
50%
Custom
A5->A4 (fit)
A4->A4 (fit)
A4->Letter (fit)
Letter->Letter (fit)
Letter->A4 (fit)
Letter ->Legal (fit)
Legal->Legal (fit)
100%
Duplicates the same size as the original.
If the document size is the same as paper size,
the edges of the document will not be printed.
Duplicates 4 times the original.
Duplicates 3 times the original.
Duplicates twice the original.
Duplicates at 50% of the original.
This option is automatically selected when the
zoom value of width and height are set using the
Width or Height Zoom Value box.
Enlarges to fit the A5 size document on A4 size
paper.
Duplicates an entire A4 size document on A4 size
paper.
Duplicates an entire A4 size document on Letter
size paper.
Duplicates an entire letter size document on Letter
size paper.
Duplicates an entire letter size document on Legal
size paper.
Duplicates an entire Legal size document on Legal
size paper.
400%
300%
200%
50%
Ñ
135%
95%
90%
96%
92%
96%
96%
3
19
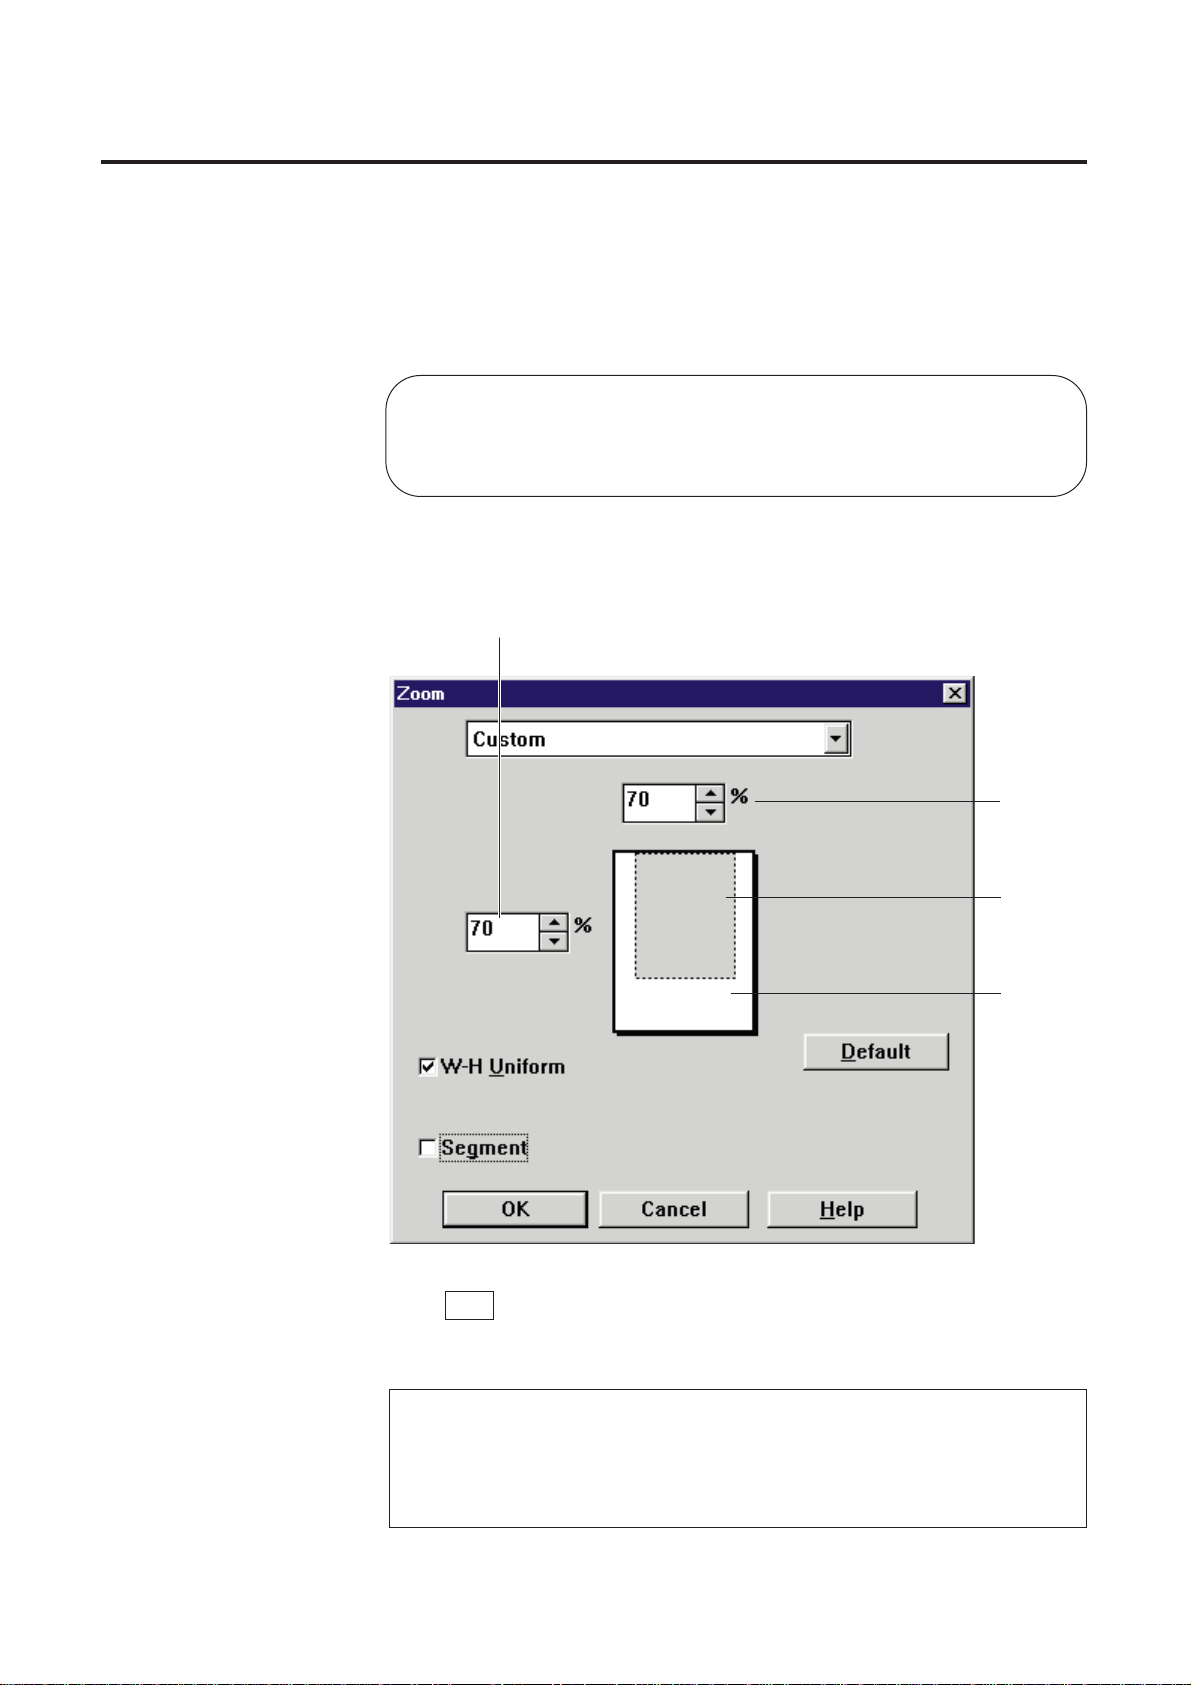
■ Using the Width / Height Zoom Value boxes
Enter the zoom value in either the Width or Height Zoom Value
box by clicking For G.
You can see the result of the selection in the Print Preview window.
B
To set each value independently, click off the W-H Uniform check box.
Click OK to make the selection effective.
The Zoom window will close.
Basic Tasks
F : increases the number of the zoom value (maximum 400%).
G : reduces the number of the zoom value (minimum 20%).
Holding down the mouse sequentially changes the zoom value.
Note:
BThe zoom value range available in the Digital Duplicator Utility is
from 20 to 400% . If you have used 200% for Area Duplicate
function ( ☞P.58), you can set the percentage up to 200%.
1
Height Zoom Value box
Width
Zoom
Value
box
Output
size
Paper
size
(Example: 70%)
2
20
Basic Tasks
Printing an Enlarged Image on Multiple Pages
You can enlarge the image and print it on multiple pages. Each divided image
overlaps 0.5 inch.
Note:
BThe ADF tray cannot be used when performing a multi-page print.
21
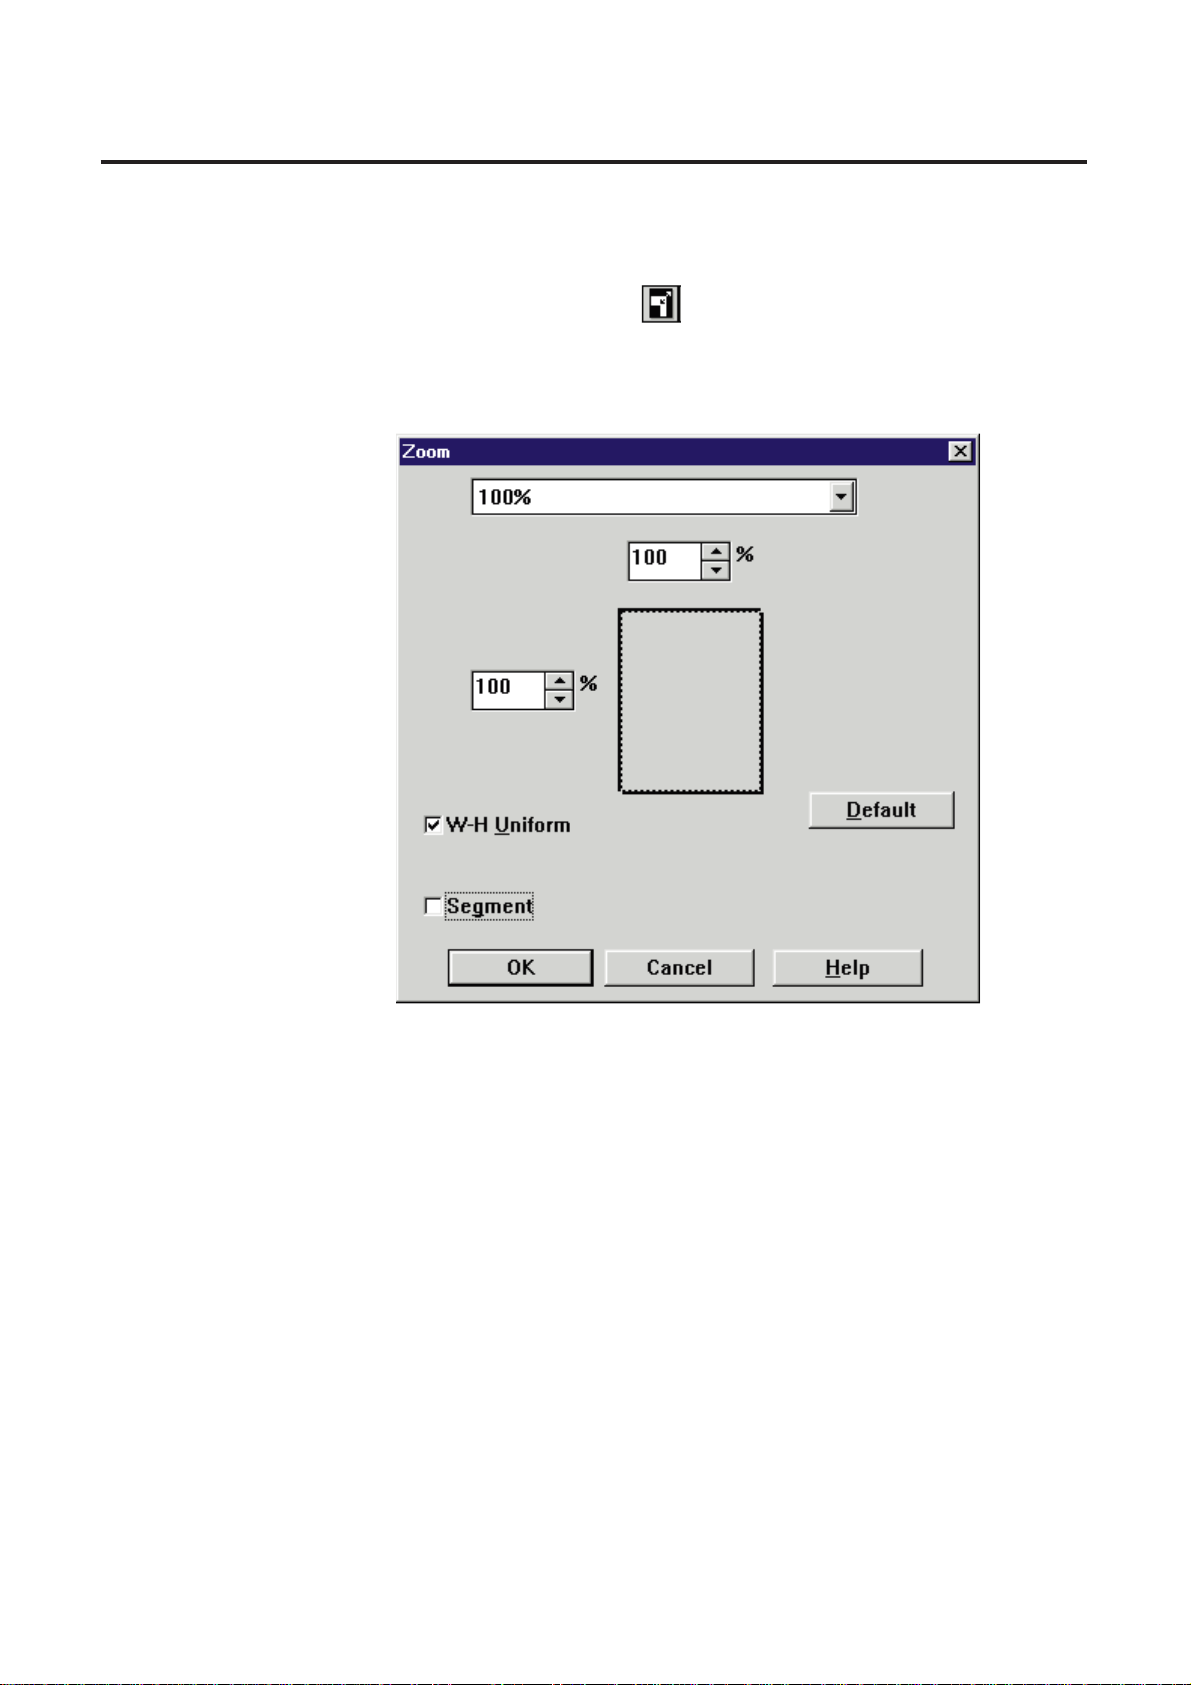
■ Example: Enlarging a Letter size document to 140% and printing it on
multiple pages
Click the Zoom button ( ).
The Zoom window appears.
1
Basic Tasks
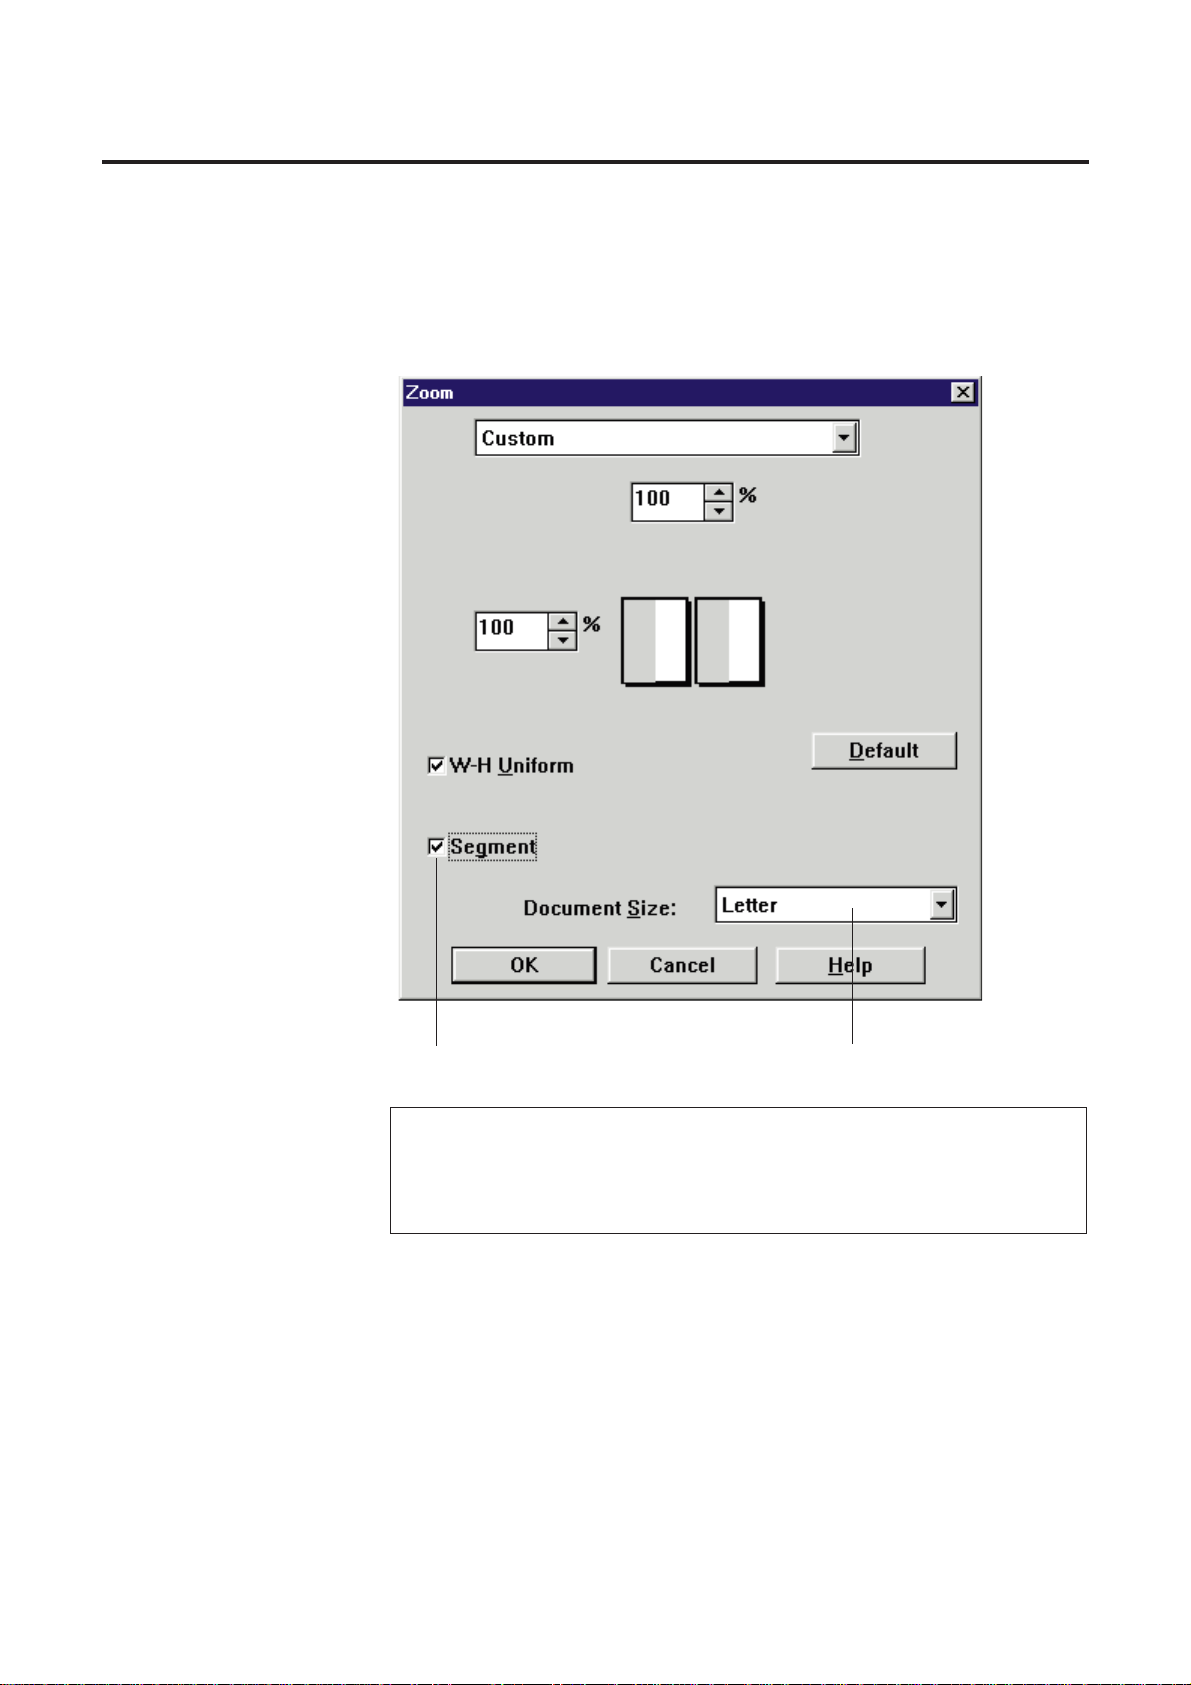
22
Click on the Segment check box.
The Document Size box appears at the bottom of the Zoom window.
Basic Tasks
Note:
BThe Document Size determines the size of the scanning area. The
closest size to the document must be selected from the Document
Size box.
2
Document Size box
Segment check box
23
Click the Document Size box, then click Letter.
Set the width and length zoom value to 140% by clicking For
G
of the Width or Height Zoom Value box.
The printing area (shade) is displayed on the divided pages.
Click OK to make the selection effective.
B
To cancel the selection, click Cancel .
The Zoom window will close and its
indicator is lit
.
BIf the Print Preview window is opened, the result of the selection is
displayed.
Click the Start button ( ).
The printer starts printing multiple pages.
5
6
Basic Tasks
3
4
Note:
BIf an image has been pasted in the Layout box of the Area
Duplicate window, the Document Size box becomes inactive.
In this case, the paper size selected in the Digital Duplicator
Utility window will be automatically assigned.

24
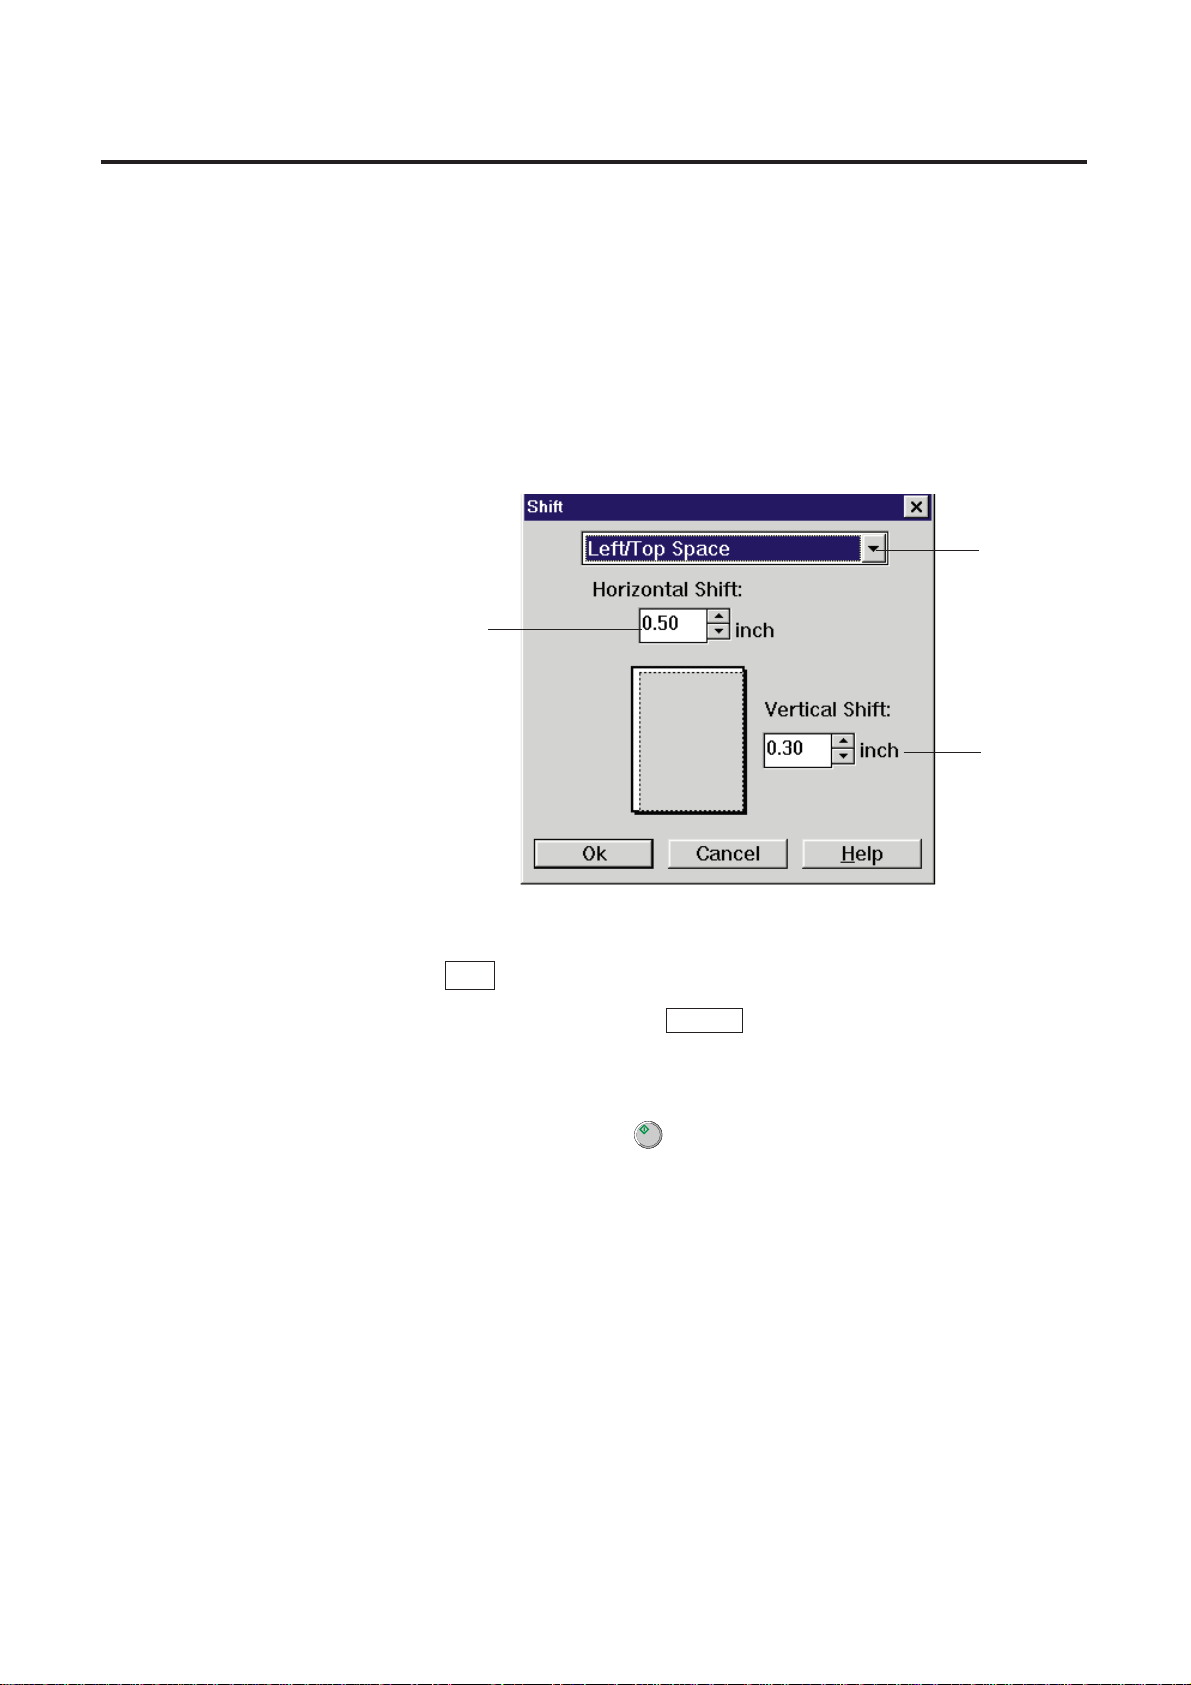
The Shift function shifts (scrolls) the image.
Click the Shift button ( ).
The Shift window appears.
#
Shift Direction box
Selects shift direction.
B
None: Returns the image to original position.
B
Left/Top Space: Allows you to make space on left and/or top.
B
Right/Top Space: Allows you to make space on right and/or top.
B
Left/Bottom Space: Allows you to make space on left and/or bottom.
B
Right/Bottom Space: Allows you to make space on right and/or bottom.
$
Horizontal Shift box
Shifts the image horizontally.
%
Vertical Shift box
Shifts the image vertically.
BIf you wish to use mm instead of inch, select mm in the Other
Settings window ( ☞P. 37).
Basic Tasks
Shifting an Image
1
Displaying the Shift Window
%
$
#
Note:
BThe Shift function is not effective when the Segment is selected in
the Zoom window ( ☞P. 21).
25
■ Example: Shifting the image 0.5ý on the left and 0.3ý on the top.
Click Gof the Shift Direction box, then select Left/Top Space.
Enter the desired space (0.5) in the Horizontal Shift box and
(0.3) in the Vertical Shift box by clicking F or G.
The image display reflects the changes.
Click OK to make the selection effective.
BTo cancel the selection, click Cancel .
The Shift window will close and its indicator is lit.
Click the Start button ( ).
The printer starts printing.
Basic Tasks
1
2
3
4
Horizontal
Shift box
Vertical
Shift box
Shift
Direction
box
26
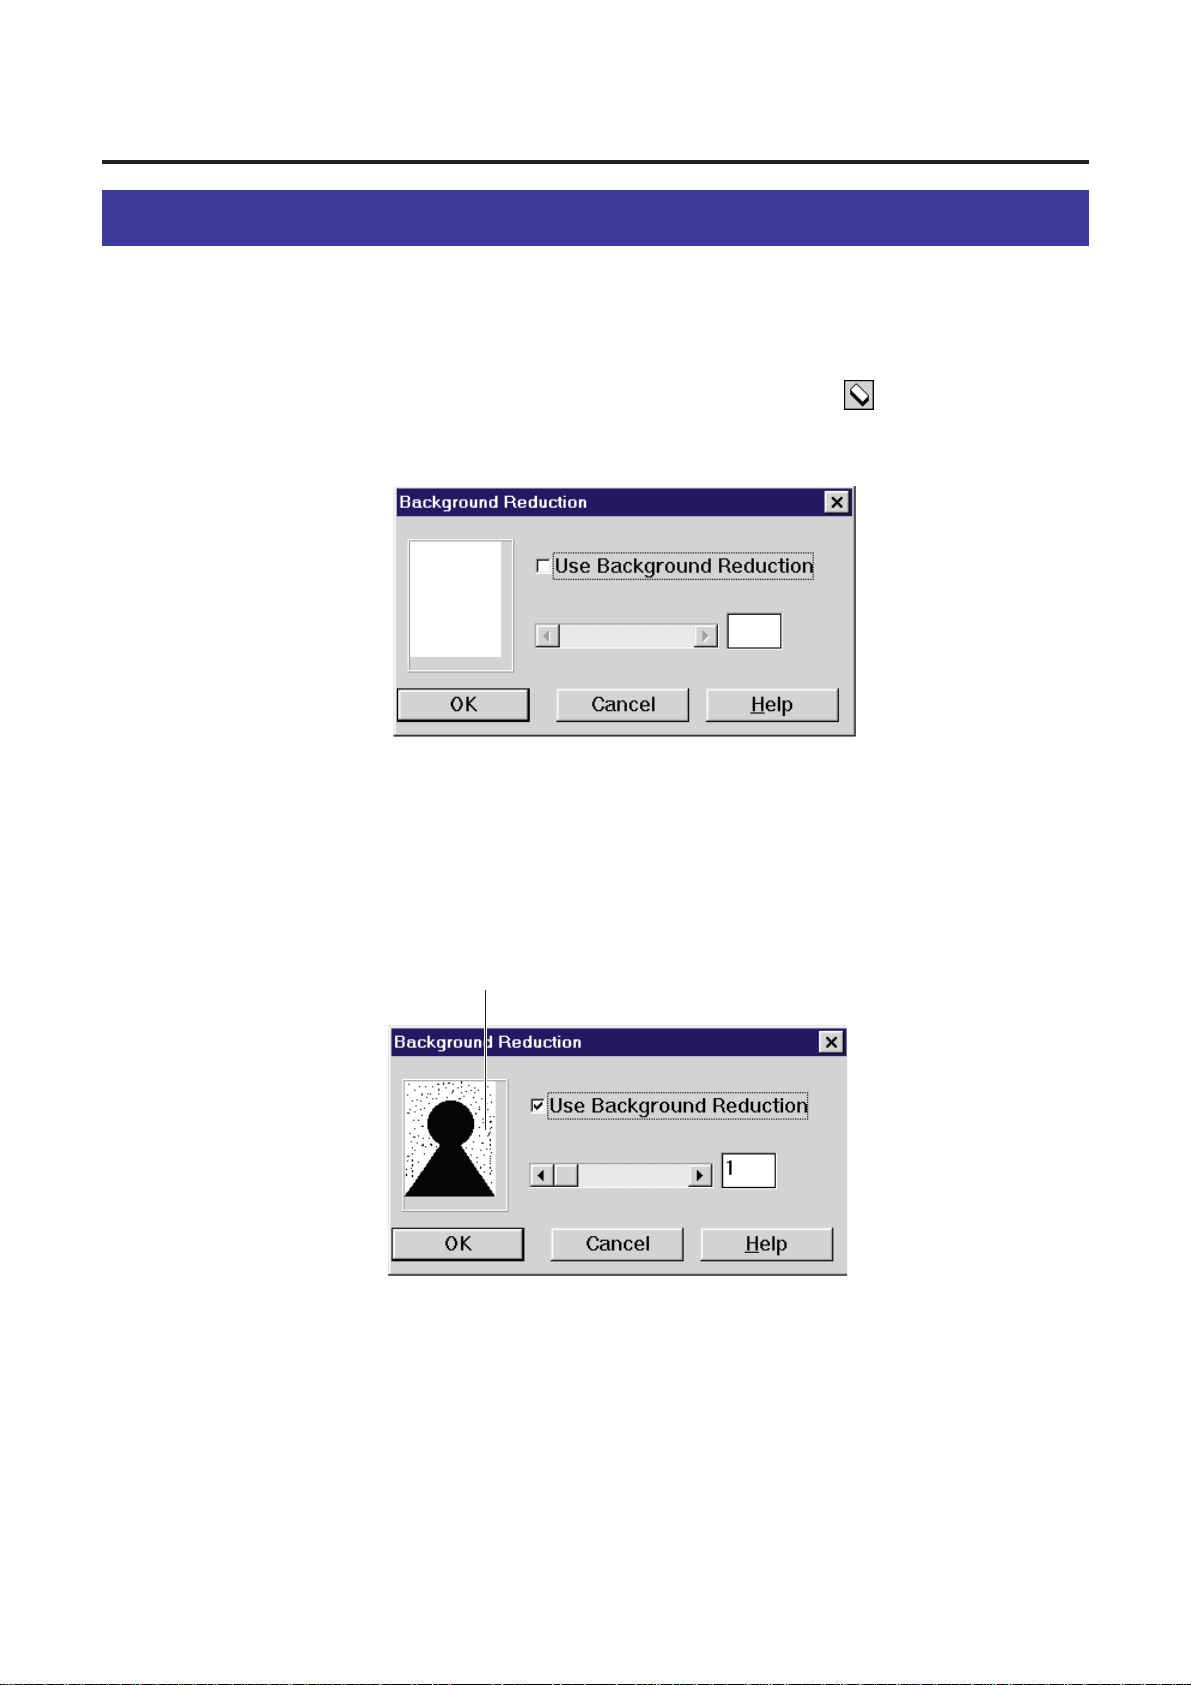
Basic Tasks
When a double side printed document is printed, the reverse side print may be visible
on the paper. To reduce this effect (visibility of a reverse side print), use the
Background Reduction function.
Click the Background Reduction button ( ).
The Background Reduction window appears.
Click on the Use Background Reduction check box.
The Background Level box becomes active.
Background Reduction
1
2
Background Level box

27
Basic Tasks
Drag the slider to right or click Hto reduce the background.
The setting range is 1-8. The effect level is displayed in the Level box, and the
result of the selection is displayed in the Background Level box.
Click OK .
B
To cancel, click Cancel .
The Background Reduction window will close.
Level box
3
4
Background Level box
28
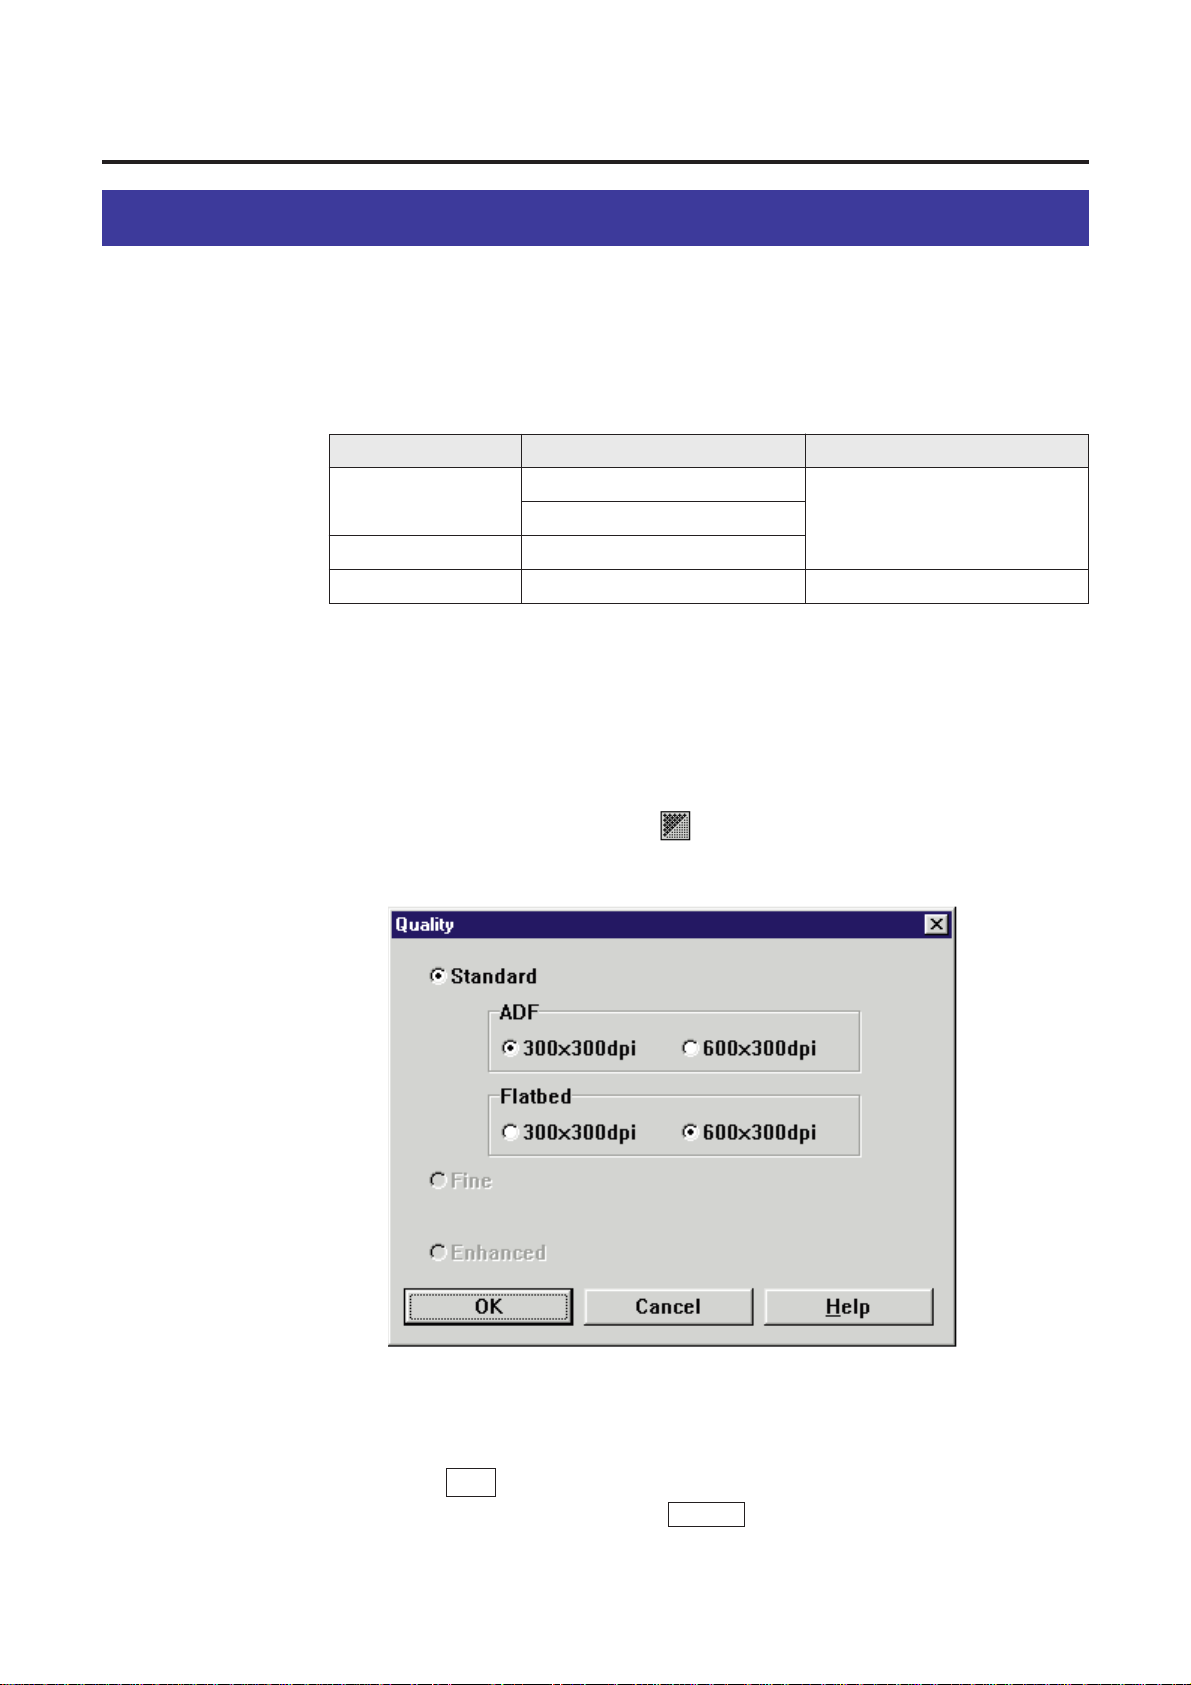
Three print quality modes (Standard, Fine and Enhanced) are available.
Fine or Enhanced mode provides better quality than Standard mode but takes longer
to process.
The standard mode for the ADF tray and for the Flatbed (Scanner glass) can be
selected individually.
S
1
Standard (300 ✕ 300 dpi for ADF tray, 600 ✕ 300 dpi for Flatbed) is the default
setting.
S
2
Additional memory (SIMM, option) is required to select these modes
( ☞ P. 166 Print Quality and Required Memory).
To select a mode, perform the following steps.
Click the Quality button ( ).
The Quality window appears.
Click the desired mode.
Click OK .
B
To cancel the selection, click Cancel .
The Quality window will close.
Selection Scanning resolution Printing resolution
300 ✕ 300 dpi
S
1
Basic Tasks
Selecting Print Quality
1
600 ✕ 600 dpi
600 ✕ 600 dpi 600 ✕ 1200 dpi
Standard
S
1
Enhanced
S
2
Fine
S
2
600 ✕ 300 dpi
S
1
600 ✕ 600 dpi
2
3
29
Basic Tasks
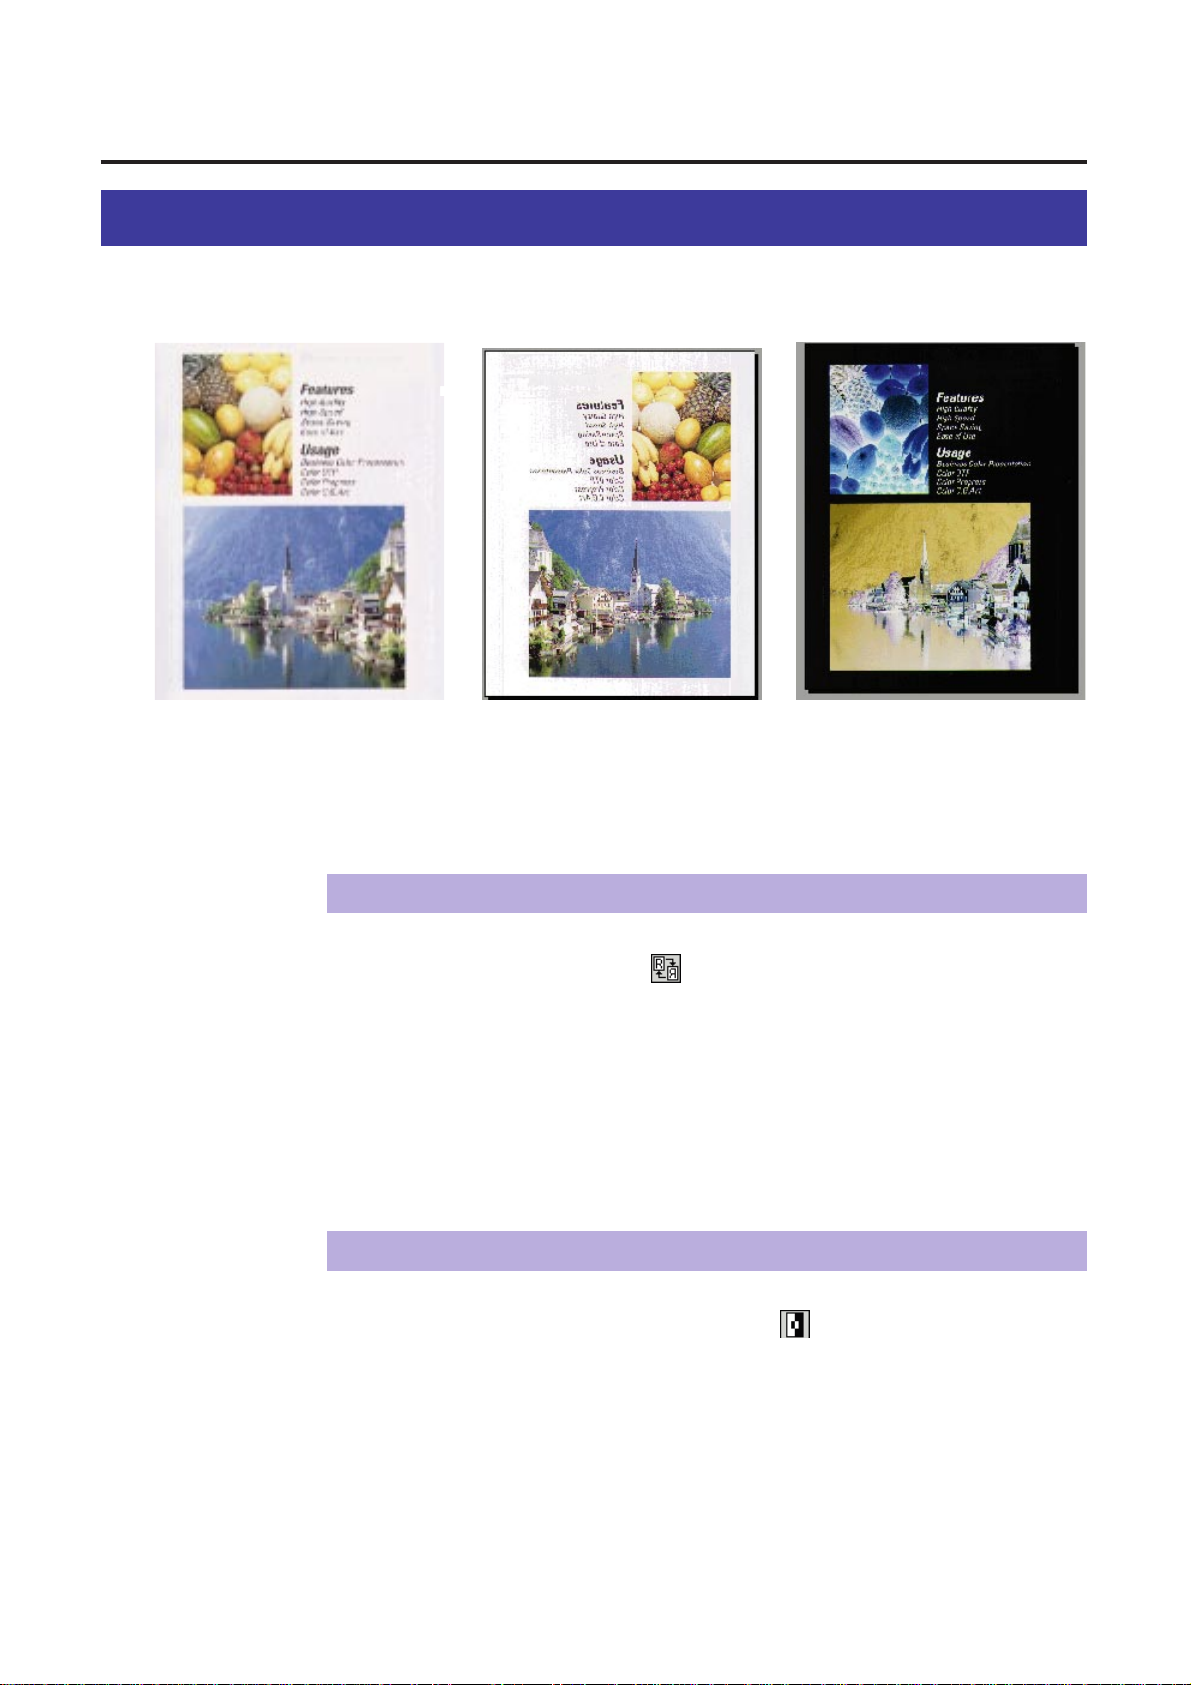
Creating a Mirror / Negative Image
You can create a mirror or negative image of the original.
Creating a Mirror Image
Click the Mirror button ( ).
The indicator is illuminated, and a mirror image of the document is displayed in
the Print Preview window.
BTo return to the original image, click the Mirror button again.
The indicator is turned off.
1
Mirror Image Negative ImageOriginal
Creating a Negative Image
Click the Negative/Positive button ( ).
The indicator is illuminated, and a negative image of the document is displayed
in the Print Preview window.
BTo return to the original image (positive image), click the
Negative/Positive button again. The indicator is turned off.
1
30
Basic Tasks
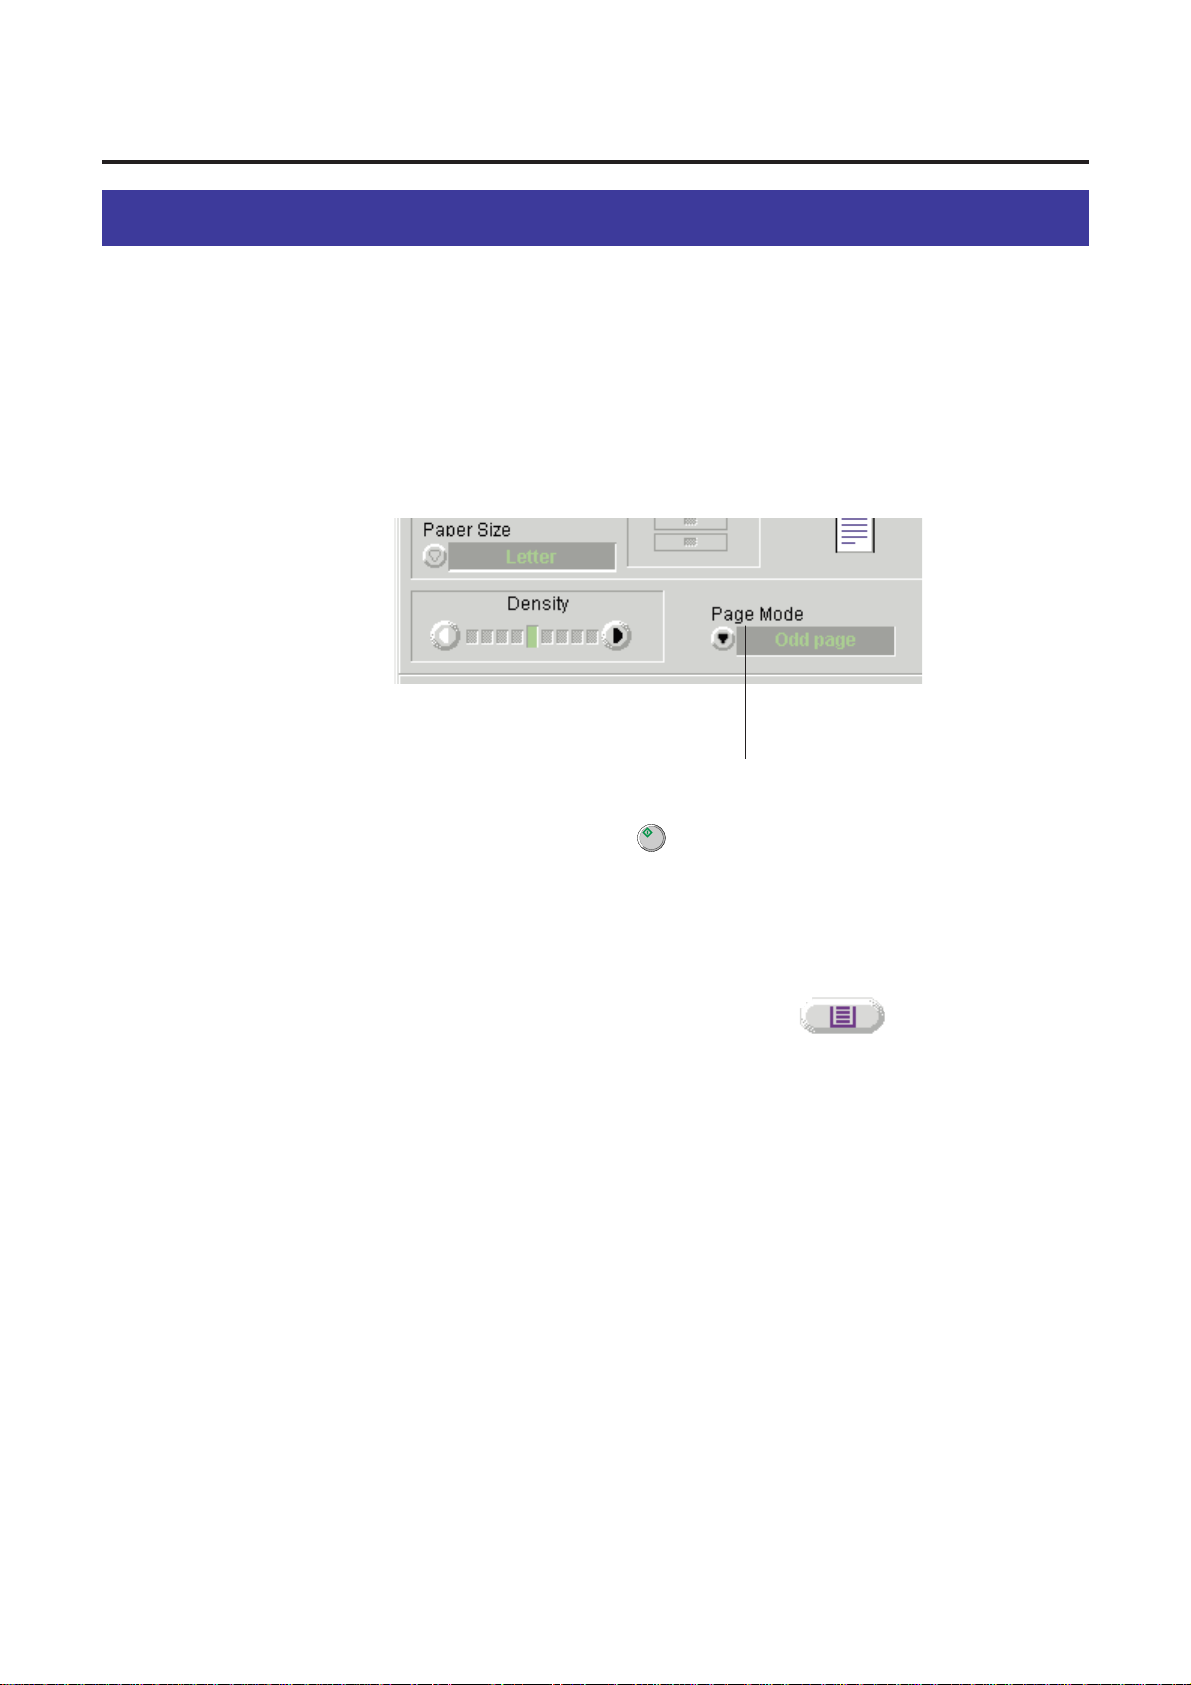
Double Side Printing
Single sided documents can be printed on both sides of the paper by using the Page
Mode function.
Insert the documents into the ADF with the printed sides facing
up and top of the documents first.
Click Gof the Page Mode and select Odd page.
Click the Start button ( ).
Odd pages of the documents will be printed face up.
Place the printed pages in the multi-purpose tray of the printer
with the page face down and top first. Select multi-purpose tray
by clicking the Tray Selection button ( ).
Place all the documents into the ADF tray again
( ☞Step 1 above)
.
Click Gof the Page Mode and select Even page.
1
3
2
5
4
6
Page Mode
 Loading...