

Page 1
Installation Manual
Additional Digital Cordless Handset
Model No. KX-PRXA10
Thank you for purchasing a Panasonic product.
This unit is an additional handset compatible with the following series of
Panasonic Digital Cordless Phone:
- KX-PRX120 (KX-PRXA10)
(The corresponding models are subject to change without notice.)
You must register this handset with your base unit before it can be used. This
document describes only the steps needed to register and begin using the
handset. Please read the base unit’s documentation for further details.
Please read this document before using the unit and save it for future reference.
For assistance, visit our Web site: http://www.panasonic.com/help
for customers in the U.S.A. or Puerto Rico.
Printed in China
PNQX6195ZA
CC1213YK1014 (E)
Page 2
A
B
Installation
Supplied accessories
Accessory item/Order number Quantity
Charger/PNLC1049ZW 1
AC adaptor/PNLV226-KZ 1
Rechargeable battery/KX-PRA10EX 1
Handset cover
*1 The handset cover comes attached to the handset.
ote:
N
R Please read the base unit’s documentation for additional/replacement
accessories.
1
*
/M81101016740
1
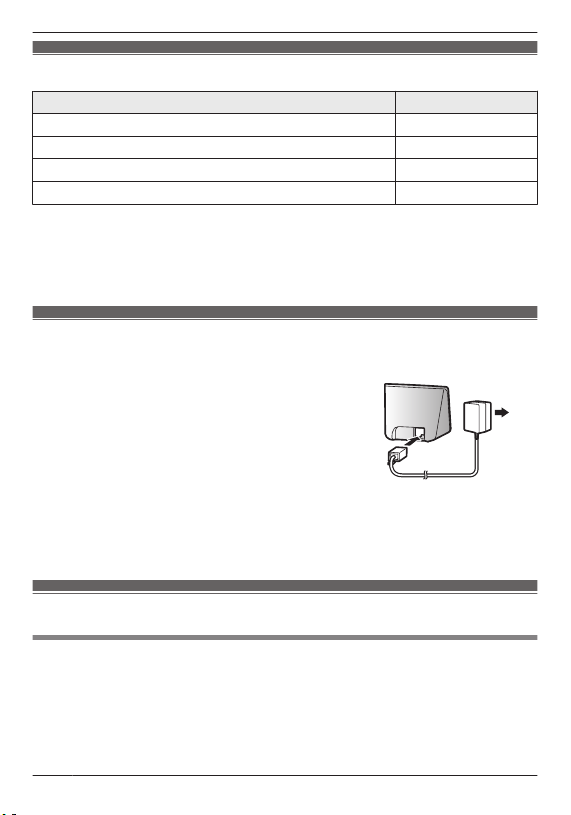
Preparing the charger
n KX-PRXA10
A Insert the AC adaptor plug to the unit until you
h
ear a click.
B Connect the AC adaptor to the power outlet.
Note:
se only the supplied Panasonic AC adaptor PNLV226K.
R U
R The AC adaptor must remain connected at all times. (It is normal for the adaptor
to feel warm during use.)
Preparing the handset
Inserting microSD card and the battery
microSD card (not supplied) allows you to expand the handset’s storage
A
capabilities.
Important:
R Use only the supplied battery. For replacement, use only the Panasonic
rechargeable battery noted on page 2.
2
For assistance, please visit http://www.panasonic.com/help
Page 3
1
2
A
B
3
B
A
4
A
B
5
Installation
R W
hen removing the battery, make sure you turn off the handset first.
R To avoid loss of data or malfunction, do not damage, carelessly handle, or
short-circuit the gold-colored contacts of the microSD card.
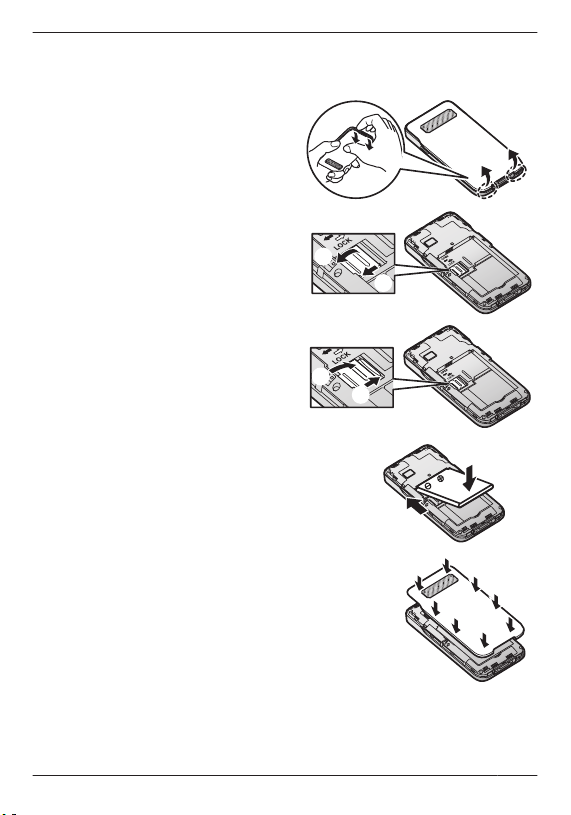
Remove the handset’s cover.
Open the microSD card cover by
liding it toward the nearest side
s
of the handset (A) and then lifting
up (B).
Insert the microSD card with the
g
old-colored contacts facing
down, close the microSD cover
(A), and then gently slide the
cover toward the opposite side of
the handset (B).
Insert the battery (A)
into the handset (B).
Attach the cover.
Note:
f the battery is fully charged, but the operating time seems to be shorter, clean
R I
the charge contacts of the handset and charger with a dry cloth and charge
again.
For assistance, please visit http://www.panasonic.com/help
and lower it
3
Page 4

A
A
Installation
Charging the handset
Charge the handset for about 5 hours before initial use. The charge indicator (A)
lights while the handset is charging and turns off when the handset is fully charged.
Important:
R If the handset is placed into the charger while talking on the phone, the call is
not disconnected.
or
Place the handset into the charger. Connect a USB cable (not
s
upplied) directly to the handset.
Turning on the handset
o turn the handset on, press and hold the power button on the top of the handset.
T
Setup wizard
The first time you turn on the handset, the setup wizard prompts you to configure
initial settings such as the display language. Follow the on-screen instructions to
configure the handset.
Registration dialog
While using the setup wizard, a dialog may be displayed prompting you to press
the M
on the base unit for 5 seconds. Follow the on-screen instructions to
N
register the handset to the base unit. When registration is complete, continue to
follow the setup wizard.
Registering the handset to the base unit
I
f the handset is not registered, the registration dialog (page 4) is displayed. Follow
the on-screen instructions to register the handset to the base unit.
If you cancel this dialog, you can display it again by tapping [Landline] in the home
screen or app list, and then tapping [Landline settings] a [Initial settings].
For assistance, please visit http://www.panasonic.com/help
4
Page 5
Installation
For your safety
To prevent severe injury and loss of life/property, read this section carefully before
using the product to ensure proper and safe operation of your product.
WARNING
Power connection
R C
ompletely insert the AC adaptor/power plug into the power outlet. Failure to do
so may cause electric shock and/or excessive heat resulting in a fire.
R Regularly remove any dust, etc. from the AC adaptor/power plug by pulling it
from the power outlet, then wiping with a dry cloth. Accumulated dust may cause
an insulation defect from moisture, etc. resulting in a fire.
R Unplug the product from power outlets if it emits smoke, an abnormal smell, or
makes an unusual noise. These conditions can cause fire or electric shock.
Confirm that smoke has stopped emitting and contact us at www.panasonic.com/
contactinfo
Installation
R T
his product is not water-resistant. To prevent the risk of fire or electrical shock,
do not expose the product to rain or any type of moisture.
R Do not place or use this product near automatically controlled devices such as
automatic doors and fire alarms. Radio waves emitted from this product may
cause such devices to malfunction resulting in an accident.
R Keep all accessories, including the microSD card, out of the reach of children to
prevent swallowing.
Operating safeguards
o prevent possible hearing damage, do not listen at high volume levels for long
R T
periods.
CAUTION
Installation and location
he AC adaptor is used as the main disconnect device. Ensure that the AC
R T
outlet is installed near the product and is easily accessible.
For assistance, please visit http://www.panasonic.com/help
5
Page 6

Installation
Battery
R Use only the specified battery or additional/replacement battery noted on page 2
for replacement battery information.
R Do not open or mutilate the battery. Released electrolyte from the battery is
corrosive and may cause burns or injury to the eyes or skin. The electrolyte is
toxic and may be harmful if swallowed.
R Exercise care when handling the battery. Do not allow conductive materials
such as rings, bracelets, or keys to touch the battery, otherwise a short circuit
may cause the battery and/or the conductive material to overheat and cause
burns.
R Charge the battery in accordance with the instructions and limitations specified
in this manual.
R Only use a compatible charger to charge the battery. Do not tamper with the
charger. Failure to follow these instructions may cause the battery to swell or
explode.
R Do not subject the battery to mechanical shock.
R Keep the battery out of the reach of children.
R Keep the battery clean and dry.
R Wipe the battery terminals with a clean dry cloth if they become dirty.
R Do not continuously charge the battery for a prolonged period of time.
R Remove the battery from the product if the product will not be used for a
prolonged period of time.
Attention:
The lithium ion/polymer battery you have
urchased is recyclable.
p
Please call 1-800-8-BATTERY
(1-800-822-8837) for information on how
to recycle this battery.
Important safety instructions
W
hen using your product, basic safety precautions should always be followed to
reduce the risk of fire, electric shock, and injury to persons, including the following:
1. Do not use this product near water for example, near a bathtub, washbowl,
kitchen sink, or laundry tub, in a wet basement or near a swimming pool.
2. Do not use the telephone to report a gas leak in the vicinity of the leak.
3. Use only the power cord and batteries indicated in this manual. Do not dispose
of batteries in a fire. They may explode. Check with local codes for possible
special disposal instructions.
SAVE THESE INSTRUCTIONS
For assistance, please visit http://www.panasonic.com/help
6
Page 7

Installation
Other information
R Operating the product near electrical appliances may cause interference. Move
away from the electrical appliances.
CAUTION: Risk of explosion if battery is replaced by an incorrect type. Dispose of
used batteries according to the instructions.
Routine care
ipe the outer surface of the product with a soft moist cloth.
R W
R Do not use benzine, thinner, or any abrasive powder.
Notice for downloading software or upgrading the operating system
roduct functions and operating procedures may change and certain
R P
applications may not function any longer if the product’s operating system is
upgraded.
R Confirm the safety and security of software before downloading or installing it on
this product. Installing malware or viruses can cause malfunction and the
disclosure of any private information stored in this product, or may cause
excessive sound volume.
Notice for product disposal, transfer, or return
his product can store your private/confidential information. To protect your
R T
privacy/confidentiality, we recommend that you erase information such as
phonebook or caller list entries from the memory before you dispose of, transfer,
or return the product.
Trademarks
R T
he Android robot is reproduced or modified from work created and shared by
Google and used according to terms described in the Creative Commons 3.0
Attribution License.
R microSDHC Logo is a trademark of SD-3C, LLC.
R All other trademarks identified herein are the property of their respective owners.
FCC and other information
his equipment is hearing aid compatible as defined by the FCC in 47 CFR Section
T
68.316.
When you hold the phone to your ear, noise might be heard in your Hearing Aid.
Some Hearing Aids are not adequately shielded from external RF (radio frequency)
energy. If noise occurs, use an optional headset accessory or the speakerphone
For assistance, please visit http://www.panasonic.com/help
7
Page 8

Installation
option (if applicable) when using this phone. Consult with your audiologist or
H
earing Aid manufacturer about the availability of Hearing Aids which provide
adequate shielding to RF energy commonly emitted by digital devices.
WHEN PROGRAMMING EMERGENCY NUMBERS AND(OR) MAKING TEST
CALLS TO EMERGENCY NUMBERS:
1) Remain on the line and briefly explain to the dispatcher the reason for the call.
2) Perform such activities in the off-peak hours, such as early morning or late
evenings.
This device complies with Part 15 of the FCC Rules. Operation is subject to the
following two conditions:
(1) This device may not cause harmful interference, and (2) this device must
accept any interference received, including interference that may cause undesired
operation.
Privacy of communications may not be ensured when using this phone.
CAUTION:
Any changes or modifications not expressly approved by the party responsible for
compliance could void the user’s authority to operate this device.
NOTE:
This equipment has been tested and found to comply with the limits for a Class B
digital device, pursuant to Part 15 of the FCC Rules. These limits are designed to
provide reasonable protection against harmful interference in a residential
installation. This equipment generates, uses, and can radiate radio frequency
energy and, if not installed and used in accordance with the instructions, may
cause harmful interference to radio communications. However, there is no
guarantee that interference will not occur in a particular installation. If this
equipment does cause harmful interference to radio or television reception, which
can be determined by turning the equipment off and on, the user is encouraged to
try to correct the interference by one or more of the following measures:
– Reorient or relocate the receiving antenna.
– Increase the separation between the equipment and receiver.
– Connect the equipment into an outlet on a circuit different from that to which the
receiver is connected.
– Consult the dealer or an experienced radio/TV technician for help.
FCC RF Exposure Warning:
R This product complies with FCC radiation exposure limits set forth for an
uncontrolled environment.
R This handset may not be collocated or operated in conjunction with any other
antenna or transmitter.
R For body-worn operation, the handset must be used only with a non-metallic
accessory. Use of other accessories may not ensure compliance with FCC RF
exposure requirements.
For assistance, please visit http://www.panasonic.com/help
8
Page 9

LThis product is designed for use in the United States of America. Sale or use
of this product in other countries may violate local laws.
LCet appareil est conçu pour être utilisé aux États-Unis d’Amérique. La vente
ou l’emploi de cet appareil dans certains autres pays peut constituer une
infraction à la législation locale.
LEste producto está diseñado para usarse en los Estados Unidos de América.
La venta o el empleo de este producto en ciertos países puede constituir
violación de la legislación local.
Lҏࠢட࣏ٺҢՄ೩Ȅӵڏтড়୵ܖٺҢȂџོႂІ࿋ӴݲٽȄ
Lߎߩຠߪޔᣣᧄ࿖ᄖߢߩ↪ࠍ⋡⊛ߣߒߡ⸳⸘ߐࠇߡ߅ࠅޔᣣᧄ࿖ౝߢߩ
↪ߪᴺᓞ㆑ߣߥࠅ߹ߔޕᓥߞߡޔᒰ␠ߢߪᣣᧄ࿖ౝߦ߅ߡߪේೣߣߒ
ߡୃℂߥߤߩࠨࡆࠬߪ⥌ߒ߆ߨ߹ߔޕ
Installation
Notice:
R F
CC ID can be found inside the battery compartment or on the bottom of the
unit.
Notice:
End-user license
his is an agreement between you and Panasonic System Networks Co., Ltd.
T
(“Panasonic”) with respect to the software installed in this product. Carefully read
the terms of this agreement prior to using this product and using indicates your
acceptance of these terms.
Copyright:
The software is protected by copyright laws and international treaty provisions, and
all other applicable laws. You are receiving only a limited license to use the
software and related documentation, and that you shall obtain no title, ownership
nor any other rights in or to the software and its related documentation, all of which
title and rights shall remain with Panasonic or its licensor.
License:
You may: A use the software solely for the purpose of recording images from this
product compatible with the software, B transfer your rights under this agreement
on a permanent basis, provided that you transfer this agreement, all copies of the
software, all related documentation and this product, and the recipient agrees to
the terms of this agreement.
Restrictions:
You may not: A reverse engineer, decompile or disassemble the software, except
as expressly permitted by applicable law, B use, copy, modify, alter, rent, lease or
transfer the software, its related documentation, or any copies thereof, in whole or
For assistance, please visit http://www.panasonic.com/help
9
Page 10

Installation
in part, except as expressly provided in this agreement, C
contravention of any applicable U.S. or foreign export laws and regulations.
export the software in
Open source software notice
P
arts of this product use open source software supplied based on the relevant
conditions of the Free Software Foundation’s GPL and/or LGPL and other
conditions. Please read all license information and copyright notices related to the
open source software used by this product. This information is available at the
following web page:
www.panasonic.net/pcc/support/tel/sdect
At least three (3) years from delivery of this product, Panasonic System Networks
Co., Ltd. will give to any third party who contacts us at the contact information
provided below, for a charge of no more than the cost of physically distributing
source code, a complete machine-readable copy of the corresponding source code
and the copyright notices covered under the GPL and the LGPL. Please note that
software licensed under the GPL and the LGPL is not under warranty.
www.panasonic.net/pcc/support/tel/sdect
Disclaimer
anasonic shall not be liable for loss of data or other incidental or consequential
P
damages resulting from the use of this product. The use of downloaded content
may be restricted or prohibited by the rights of third parties, including but not limited
to restriction under applicable copyright laws. You are entirely responsible for
additional content that you download to or forward from this product; Panasonic is
not responsible for such content or its use. Panasonic does not warrant or
guarantee the accuracy, integrity or quality of any additional content or any other
third-party content. Under no circumstances will Panasonic be liable in any way for
the improper use of additional content or other third-party content by this product or
its operator. This document and any related documentation may refer to services
and applications that are provided by third parties. The use of such services or
programs may require separate registration with the third-party provider and may
be subject to additional terms of use. For applications accessed on or through a
third-party web site, please review the web site’s terms of use and applicable
privacy policy in advance.
For assistance, please visit http://www.panasonic.com/help
10
Page 11

Customer Services Directory (United States and
Puerto Rico)
For hearing or speech impaired TTY users, TTY: 1-877-833-8855
For hearing or speech impaired TTY users, TTY: 1-866-605-1277
Accessory Purchases (United States and
Puerto Rico)
Obtain Product Information and Operating Assistance; locate your nearest
Dealer or Service Center; purchase Parts and Accessories; or make Customer
Service and Literature requests by visiting our Web Site at:
or, contact us via the web at:
http://www.panasonic.com/help
http://www.panasonic.com/contactinfo
Purchase Parts, Accessories and Owner’s Manual online for all Panasonic
Products by visiting our Web Site at:
or, send your request by E-mail to:
You may also contact us directly at: 1-800-237-9080 (Fax Only)
(Monday - Friday 9 am to 9 pm, EST.)
Panasonic National Parts Center
20421 84th Avenue S., Kent, WA 98032
(We accept Visa, MasterCard, Discover Card, American Express.)
http://www.pstc.panasonic.com
npcparts@us.panasonic.com
Appendix
Customer services
For assistance, please visit http://www.panasonic.com/help
11
Page 12

Panasonic Telephone Products
Limited Warranty
Limited Warranty Coverage
If your product does not work properly because of a defect in materials or workmanship,
Panasonic Corporation of North America (referred to as "the warrantor") will, for the length
of the period indicated on the chart below, which starts with the date of original purchase
(“Limited Warranty period"), at its option either (a) repair your product with new or refurbished
parts, or (b) replace it with a new or a refurbished equivalent value product, or (c) refund your
purchase price. The decision to repair, replace or refund will be made by the warrantor.
Parts Labor
One (1) Year One (1) Year
During the "Labor" Limited Warranty period there will be no charge for labor. During the
"Parts" Limited Warranty period, there will be no charge for parts. You must mail-in your
product prepaid during the Limited Warranty period. This Limited Warranty excludes both
parts and labor for batteries, antennas, and cosmetic parts (cabinet). This Limited Warranty
only applies to products purchased and serviced in the United States or Puerto Rico. This
Limited Warranty is extended only to the original purchaser and only covers products
purchased as new.
For Limited Warranty service for headsets if a headset is included with this product please
follow instructions above.
IF REPAIR IS NEEDED DURING THE LIMITED WARRANTY PERIOD THE PURCHASER
WILL BE REQUIRED TO FURNISH A SALES RECEIPT/PROOF OF PURCHASE
INDICATING DATE OF PURCHASE, AMOUNT PAID AND PLACE OF PURCHASE.
CUSTOMER WILL BE CHARGED FOR THE REPAIR OF ANY UNIT RECEIVED WITHOUT
SUCH PROOF OF PURCHASE.
Online Repair Request
To submit a new repair request and for quick repair status visit our Web Site at
http://www.panasonic.com/repair
When shipping the unit carefully pack in a padded shipping carton, include all accessories,
and send it prepaid. Include a letter detailing the complaint, a return address and provide a
day time phone number where you can be reached. P.O. Boxes are not acceptable. Keep
the tracking number for your records. A copy of valid registered receipt is required under
the 1 year parts and labor Limited Warranty.
Mail-In Service--Online
Appendix
Warranty (For United States and Puerto
ico)
R
For assistance, please visit http://www.panasonic.com/help
12
Page 13

Limited Warranty Limits And Exclusions
This Limited Warranty ONLY COVERS failures due to defects in materials or workmanship,
and DOES NOT COVER normal wear and tear or cosmetic damage. The Limited Warranty
ALSO DOES NOT COVER damages which occurred in shipment, or failures which are
caused by products not supplied by the warrantor, or failures which result from accidents,
misuse, abuse, neglect, bug infestation, mishandling, misapplication, alteration, faulty
installation, set-up adjustments, misadjustment of consumer controls, improper maintenance,
power line surge, lightning damage, modification, introduction of sand, humidity or liquids,
commercial use such as hotel, office, restaurant, or other business or rental use of the
product, or service by anyone other than a Factory Service Center or other Authorized
Servicer, or damage that is attributable to acts of God.
THERE ARE NO EXPRESS WARRANTIES EXCEPT AS LISTED UNDER "LIMITED
WARRANTY COVERAGE". THE WARRANTOR IS NOT LIABLE FOR INCIDENTAL OR
CONSEQUENTIAL DAMAGES RESULTING FROM THE USE OF THIS PRODUCT, OR
ARISING OUT OF ANY BREACH OF THIS LIMITED WARRANTY. (As examples, this
excludes damages for lost time, lost calls or messages, cost of having someone remove or
re-install an installed unit if applicable, travel to and from the servicer. The items listed are not
exclusive, but are for illustration only.) ALL EXPRESS AND IMPLIED WARRANTIES,
INCLUDING THE WARRANTY OF MERCHANTABILITY, ARE LIMITED TO THE PERIOD
OF THE LIMITED WARRANTY.
Some states do not allow the exclusion or limitation of incidental or consequential damages,
or limitations on how long an implied warranty lasts, so the exclusions may not apply to you.
This Limited Warranty gives you specific legal rights and you may also have other rights
which vary from state to state. If a problem with this product develops during or after the
Limited Warranty period, you may contact your dealer or Service Center. If the problem is not
handled to your satisfaction, then write to the warrantor's Consumer Affairs Department at the
addresses listed for the warrantor.
PARTS AND SERVICE, WHICH ARE NOT COVERED BY THIS LIMITED WARRANTY, ARE
YOUR RESPONSIBILITY.
When you ship the product
ȷCarefully pack your unit, preferably in the original carton.
ȷAttach a letter, detailing the symptom.
ȷSend the unit to Panasonic Exchange Center, prepaid and adequately insured.
ȷDo not send your unit to Panasonic Corporation of North America listed on the back
cover or to executive or regional sales offices. These locations do not repair consumer
products.
Appendix
For assistance, please visit http://www.panasonic.com/help
13
Page 14

1 Reconnect AC adaptor to the base unit.
2 Check if telephone line cord is connected.
3 Reinsert the battery and restart the handset.
4 Read troubleshooting page in the base unit’s
Operating Instructions.
IMPORTANT!
If your product is not working properly. . .
Visit our Web site: http://www.panasonic.com/help
LFAQ and troubleshooting hints are available.
Two Riverfront Plaza, Newark, NJ 07102-5490
Appendix
© Panasonic System Networks Co., Ltd. 2013
For assistance, please visit http://www.panasonic.com/help
14
 Loading...