

Page 1
Quick Guide
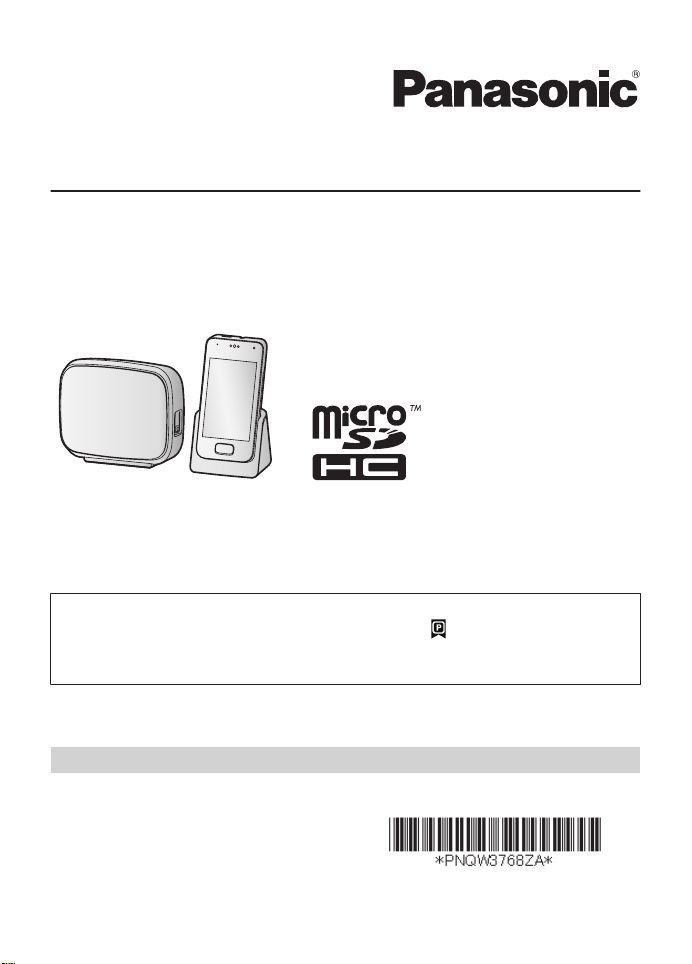
Premium Design Phone with Touchscreen
Model No. KX-PRX120
Thank you for purchasing a Panasonic product.
Please read this document before using the unit and save it for future reference.
For detailed information about the features of your phone system, refer to the
Operating Instructions, which is available by tapping in the home screen or by
visiting the support page for this product at the address below.
http://www.panasonic.net/pcc/support/tel/sdect
For assistance, visit our Web site: http://www.panasonic.com/help for customers
in the U.S.A. or Puerto Rico.
Please register your product: http://www.panasonic.com/prodreg
Printed in China
PNQW3768ZA
CC1213YK1014 (E)
Page 2
Introduction
Accessory information
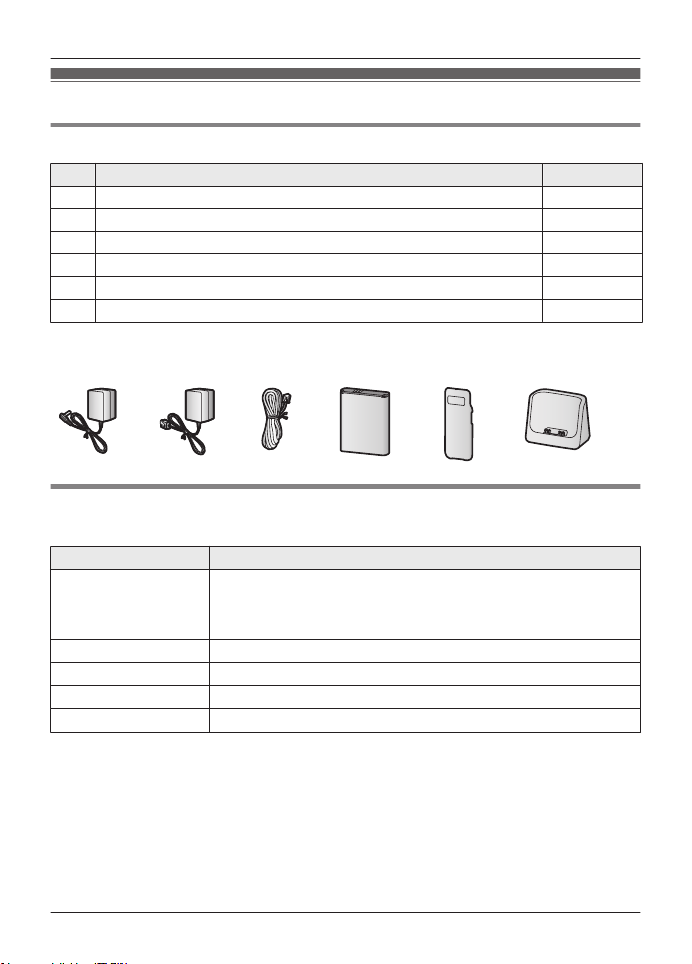
Supplied accessories
No. Accessory item/Order number Quantity
A AC adaptor for base unit/PNLV226Z 1
B AC adaptor for charger/PNLV226-KZ 1
C Telephone line cord/PQJA10075Z 1
D Rechargeable battery/KX-PRA10EX 1
1
E
Handset cover
F Charger/PNLC1049ZW 1
*1 The handset cover comes attached to the handset.
A B C D E F
*
/
M81101016740
Additional/replacement accessories
l
ease contact your nearest Panasonic dealer for sales information (page 26).
P
Accessory item Order number
Rechargeable battery KX-PRA10EX
Headset
T
-adaptor KX-J66
Range extender
K
ey detector
*1 Contact Panasonic or the authorized sales department listed on the back cover for the
he
adset available in your area.
*2 By installing this unit, you can extend the range of your phone system to include areas
where reception was previously not available. This product can be purchased online. Please
visit our Web site: http://www.panasonic.com/RangeExtender
*3 You can register up to 4 optional key detectors to your phone system. By registering a key
detector to the base unit and then attaching the key detector to an easily misplaced item,
such as your house or car keys, you can use your handset to find the item.
For more information, visit the following web site.
http://panasonic.net/pcc/products/telephone/p/tga20/
2
For assistance, please visit http://www.panasonic.com/help
thium Ion (Li-Ion) type battery
R Li
R To order, please visit
http://www.panasonic.com/batterystore
1
RP-TCM120
KX-TGA405
KX-TGA20
*
2
*
3
*
1
Page 3
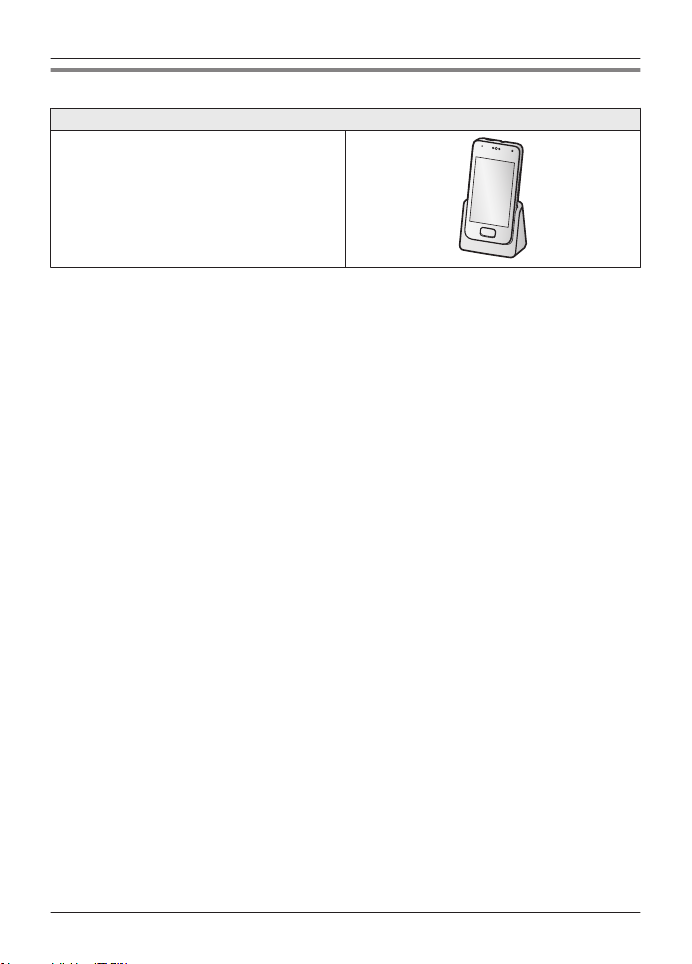
Expanding your phone system
Handset (optional): KX-PRXA10
You can expand your phone system by
gistering optional handsets (6 max.) to a
re
single base unit.
R Optional handsets may be a different color
from that of the supplied handsets.
Introduction
For assistance, please visit http://www.panasonic.com/help
3
Page 4

Introduction
For your future reference
We recommend keeping a record of the following information to assist with any repair under
warranty.
Serial No. Date of purchase
(found on the rear of the base unit)
Name and address of dealer
Attach your purchase receipt here.
Trademarks
o
ogle and Android are trademarks of Google Inc.
R G
R The Bluetooth® word mark and logos are owned by the Bluetooth SIG, Inc. and any use of
such marks by Panasonic Corporation is under license.
R Wi-Fi® is a registered mark of the Wi-Fi Alliance.
R microSDHC Logo is a trademark of SD-3C, LLC.
R All other trademarks identified herein are the property of their respective owners.
Notice
R Th
e term “apps” is used in this document to refer to programs that are installed on the handset.
R The handset supports microSD and microSDHC memory cards. In this document, the term
“microSD card” is used as a generic term for any of the supported cards.
R The illustrations and screenshots shown in this document are for reference only and may differ
from the appearance of the actual product.
R Information in this document is subject to change without notice.
4
For assistance, please visit http://www.panasonic.com/help
Page 5
For your safety
To
prevent severe injury and loss of life/
property, read this section carefully before
using the product to ensure proper and safe
operation of your product.
WARNING
Power connection
e only the power source marked on the
R Us
product.
R Do not overload power outlets and
extension cords. This can result in the risk
of fire or electric shock.
R Completely insert the AC adaptor/power
plug into the power outlet. Failure to do so
may cause electric shock and/or excessive
heat resulting in a fire.
R Regularly remove any dust, etc. from the
AC adaptor/power plug by pulling it from
the power outlet, then wiping with a dry
cloth. Accumulated dust may cause an
insulation defect from moisture, etc.
resulting in a fire.
R Unplug the product from power outlets if it
emits smoke, an abnormal smell, or makes
an unusual noise. These conditions can
cause fire or electric shock. Confirm that
smoke has stopped emitting and contact us
at www.panasonic.com/contactinfo
R Unplug from power outlets and never touch
the inside of the product if its casing has
been broken open.
R Never touch the plug with wet hands.
Danger of electric shock exists.
R The AC adaptor should only be used
indoors.
Installation
is product is not water-resistant. To
R Th
prevent the risk of fire or electrical shock,
do not expose the product to rain or any
type of moisture.
R Do not place or use this product near
automatically controlled devices such as
automatic doors and fire alarms. Radio
waves emitted from this product may cause
Important Information
such devices to malfunction resulting in an
ac
cident.
R Do not allow the AC adaptor or telephone
line cord to be excessively pulled, bent or
placed under heavy objects.
R Keep all accessories, including the
microSD card, out of the reach of children
to prevent swallowing.
Operating safeguards
n
plug the product from power outlets
R U
before cleaning. Do not use liquid or
aerosol cleaners.
R Do not disassemble the product.
R Do not spill liquids (detergents, cleansers,
etc.) onto the telephone line cord plug, or
allow it to become wet at all. This may
cause a fire. If the telephone line cord plug
becomes wet, immediately pull it from the
telephone wall jack, and do not use.
R Do not leave this product near heat sources
(such as heaters, kitchen stoves, etc.), in
direct sunlight, or in a car under blazing
sun. It should not be placed in rooms where
the temperature is less than 0 °C (32 °F) or
greater than 40 °C (104 °F).
R To prevent possible hearing damage, do
not listen at high volume levels for long
periods.
R Do not use this product at refueling points.
bserve restrictions on the use of radio
O
equipment in fuel depots, chemical plants
or where blasting operations are in
progress.
R To avoid damage or malfunction, do not
modify the microSD card or touch the
card’s gold-colored contacts.
R While driving, follow the traffic regulations in
your area regarding the use of this product.
R RF signals may affect electronic systems in
motor vehicles (such as fuel injection
systems, air bag systems, etc.) that have
been improperly installed or are
inadequately shielded. For more
information, consult the manufacturer of
your vehicle or its equipment.
For assistance, please visit http://www.panasonic.com/help
5
Page 6

Important Information
R Turn the product off when boarding an
a
irplane. Await instructions from flight staff
regarding the use of electronic devices
before turning the product on, and make
sure you turn on the product’s airplane
mode. Using this product in an aircraft may
be hazardous to the aircraft’s operation and
disrupt wireless communication, and may
also be illegal.
R This product is capable of producing bright
flashing lights, which may cause seizures
or blackouts.
R To prevent serious damage to this product,
avoid strong impacts and rough handling.
R The screen is made from glass. This glass
can break if the product is dropped on a
hard surface or receives a substantial
impact.
R Do not expose the skin to this product for a
long period of time. Using this product with
skin exposed to the heat generated by the
product or AC adaptor for a long period of
time can cause low-temperature burns.
R Although the product features GPS
functionality, it cannot be used as
navigation equipment for aircraft, vehicles
or people, or as a high-accuracy surveying
device. We do not take any responsibility
for any loss resulting from the use of the
GPS function for these purposes, or
resulting from inaccurate readings or
information caused by external factors such
as malfunction, operator error, or power
failure (including battery shortage).
Medical
nsult the manufacturer of any personal
R Co
medical devices, such as pacemakers or
hearing aids, to determine if they are
adequately shielded from external RF
(radio frequency) energy.
DECT features operate between 1.92 GHz
and 1.93 GHz with a peak transmission
power of 115 mW.
Wi-Fi features operate between 2.412 GHz
and 2.462 GHz with a peak transmission
power of 25 mW.
R Turn off this product when in health care
facilities in accordance with any regulations
posted in the area. Hospitals or health care
6
For assistance, please visit http://www.panasonic.com/help
facilities may be using equipment that could
be
sensitive to external RF energy.
CAUTION
Installation and location
R Ne
ver install telephone wiring during an
electrical storm.
R Never install telephone line jacks in wet
locations unless the jack is specifically
designed for wet locations.
R Never touch uninsulated telephone wires or
terminals unless the telephone line has
been disconnected at the network interface.
R Use caution when installing or modifying
telephone lines.
R The AC adaptor is used as the main
disconnect device. Ensure that the AC
outlet is installed near the product and is
easily accessible.
R This product is unable to make calls when:
– the handset battery needs recharging or
has failed.
– there is a power failure.
Battery
R Us
e only the specified battery.
R Do not open or mutilate the battery.
Released electrolyte from the battery is
corrosive and may cause burns or injury to
the eyes or skin. The electrolyte is toxic and
may be harmful if swallowed.
R Exercise care when handling the battery.
Do not allow conductive materials such as
rings, bracelets, or keys to touch the
battery, otherwise a short circuit may cause
the battery and/or the conductive material
to overheat and cause burns.
R Charge the battery in accordance with the
instructions and limitations specified in this
manual.
R Only use a compatible charger to charge
the battery. Do not tamper with the charger.
Failure to follow these instructions may
cause the battery to swell or explode.
R Do not subject the battery to mechanical
shock.
R Keep the battery out of the reach of
children.
R Keep the battery clean and dry.
Page 7

R Wipe the battery terminals with a clean dry
c
loth if they become dirty.
R Do not continuously charge the battery for a
prolonged period of time.
R Remove the battery from the product if the
product will not be used for a prolonged
period of time.
Attention:
The lithium ion/polymer battery you have
pu
rchased is recyclable.
Please call 1-800-8-BATTERY
(1-800-822-8837) for information on how to
recycle this battery.
Important safety instructions
When using your product, basic safety
precautions should always be followed to
reduce the risk of fire, electric shock, and
injury to persons, including the following:
1. Do not use this product near water for
example, near a bathtub, washbowl,
kitchen sink, or laundry tub, in a wet
basement or near a swimming pool.
2. Avoid using a telephone (other than a
cordless type) during an electrical storm.
There may be a remote risk of electric
shock from lightning.
3. Do not use the telephone to report a gas
leak in the vicinity of the leak.
4. Use only the power cord and batteries
indicated in this manual. Do not dispose of
batteries in a fire. They may explode.
Check with local codes for possible special
disposal instructions.
SAVE THESE INSTRUCTIONS
Important Information
For best performance
Base unit location/avoiding noise
Th
e base unit and other compatible Panasonic
units use radio waves to communicate with
each other.
R For maximum coverage and noise-free
communications, place your base unit:
– at a convenient, high, and central
location with no obstructions between
the handset and base unit in an indoor
environment.
– away from electronic appliances such as
TVs, radios, personal computers,
wireless devices, or other phones.
– facing away from radio frequency
transmitters, such as external antennas
of mobile phone cell stations. (Avoid
putting the base unit on a bay window or
near a window.)
R Coverage and voice quality depends on the
local environmental conditions.
R If the reception for a base unit location is
not satisfactory, move the base unit to
another location for better reception.
Environment
R K
ep the product away from electrical noise
e
generating devices, such as fluorescent
lamps and motors.
R The product should be kept free from
excessive smoke, dust, high temperature,
and vibration.
R Do not place heavy objects on top of the
product.
R When you leave the product unused for a
long period of time, unplug the product from
the power outlet.
R The maximum calling distance may be
shortened when the product is used in the
following places: Near obstacles such as
hills, tunnels, underground, near metal
objects such as wire fences, etc.
R Operating the product near electrical
appliances may cause interference. Move
away from the electrical appliances.
For assistance, please visit http://www.panasonic.com/help
7
Page 8
Important Information
Routine care
pe the outer surface of the product
R Wi
with a soft moist cloth.
R Do not use benzine, thinner, or any
abrasive powder.
Other information
CA
UTION: Risk of explosion if battery is
replaced by an incorrect type. Dispose of used
batteries according to the instructions.
Notice for downloading software or
up
grading the operating system
R Product functions and operating procedures
may change and certain applications may
not function any longer if the product’s
operating system is upgraded.
R Confirm the safety and security of software
before downloading or installing it on this
product. Installing malware or viruses can
cause malfunction and the disclosure of
any private information stored in this
product, or may cause excessive sound
volume.
Notice on disposal
Di
sposal may be regulated in your community
due to environmental considerations. For
disposal or recycling information, please visit
Panasonic website:
http://www.panasonic.com/environmental
or call 1-888-769-0149.
Notice for product disposal, transfer,
or
return
R This product can store your private/
confidential information. To protect your
privacy/confidentiality, we recommend that
you erase information such as phonebook
or caller list entries from the memory before
you dispose of, transfer, or return the
product.
8
For assistance, please visit http://www.panasonic.com/help
Notice
End-user license
is is a legal agreement between you and
Th
Panasonic System Networks Co., Ltd.
(“Panasonic”) with respect to the software
installed in and/or delivered by the Panasonic
Premium Design Phone with Touchscreen.
Carefully read all the terms of this agreement
prior to using this product. Using this product
indicates your acceptance of these terms.
Copyright:
The software is protected by copyright laws
and international treaty provisions, and all
other applicable laws. You acknowledge that
you are receiving only a limited license to use
the software and related documentation, and
that you shall obtain no title, ownership nor
any other rights in or to the software and its
related documentation, all of which title and
rights shall remain with Panasonic or its
licensor.
License:
1. You may use the software installed in and/
or delivered by this product.
2. You may transfer your rights under this
license agreement on a permanent basis,
Page 9

provided that you transfer this agreement,
al
l copies of the software, all related
documentation and your Panasonic
Premium Design Phone with Touchscreen,
and the recipient thereof agrees to the
terms of this agreement.
Restrictions:
You may not reverse engineer, decompile or
disassemble the software, except as expressly
permitted by applicable law. You may not use,
copy, modify, alter, rent, lease or transfer the
software, its related documentation, or any
copies thereof, in whole or in part, except as
expressly provided in this agreement. You
may not export the software in contravention
of any applicable U.S. or foreign export laws
and regulations.
Open source software
no
tice
Parts of this product use open source software
supplied based on the relevant conditions of
the Free Software Foundation’s GPL and/or
LGPL and other conditions. Please read all
license information and copyright notices
related to the open source software used by
this product. This information is available at
the following web page:
www.panasonic.net/pcc/support/tel/sdect
At least three (3) years from delivery of this
product, Panasonic System Networks Co.,
Ltd. will give to any third party who contacts us
at the contact information provided below, for
a charge of no more than the cost of
physically distributing source code, a complete
machine-readable copy of the corresponding
source code and the copyright notices
covered under the GPL and the LGPL. Please
note that software licensed under the GPL and
the LGPL is not under warranty.
www.panasonic.net/pcc/support/tel/sdect
Disclaimer
nasonic System Networks Co., Ltd.
Pa
(“Panasonic”) shall not be liable for loss of
data or other incidental or consequential
Important Information
damages resulting from the use of this
pr
oduct. This product can download, store,
forward, and receive additional content, such
as applications, ringtones, contact information,
and media files. The use of such content may
be restricted or prohibited by the rights of third
parties, including but not limited to restriction
under applicable copyright laws. You are
entirely responsible for additional content that
you download to or forward from this product;
Panasonic is not responsible for such content
or its use. Before using such content, it is your
responsibility to verify that your intended use
is properly licensed or is otherwise authorized.
Panasonic does not warrant or guarantee the
accuracy, integrity or quality of any additional
content or any other third-party content. Under
no circumstances will Panasonic be liable in
any way for the improper use of additional
content or other third-party content by this
product or its operator. This document and
any related product documentation may refer
to services and applications that are provided
by third parties. The use of such services or
programs may require separate registration
with the third-party provider and may be
subject to additional terms of use. For
applications accessed on or through a
third-party web site, please review the web
site’s terms of use and applicable privacy
policy in advance.
Specifications
Co
nnectivity
R DECT 6.0 (Digital Enhanced Cordless
Telecommunications 6.0)
R Wi-Fi: IEEE 802.11b/g/n
R Bluetooth: version 3.0, Class 2
R USB: version 2.0
Frequency range
R DECT: 1.92 GHz to 1.93 GHz
R Wi-Fi: 2.412 GHz to 2.462 GHz (channels 1
to 11)
RF transmission power
R DECT: 115 mW (peak transmission power)
R Wi-Fi: 25 mW (peak transmission power)
Handset operating system
R Android™ 4.0, Ice Cream Sandwich
Hardware
For assistance, please visit http://www.panasonic.com/help
9
Page 10

Important Information
R Display: TFT color 3.5-inch (HVGA:
3
20 ´ 480 pixels), capacitive touch screen
R Front camera: 0.3 M
R Memory card: microSD, microSDHC up to
32 GB (not supplied)
Battery
R Lithium Ion (Li-Ion) 3.7 V/1,450 mAh
Talk time
R Landline calls: up to 10 hours
Standby time
R Up to 220 hours
Power source
R 120 V AC, 60 Hz
Base unit power consumption
R Standby: approx. 0.4 W
R Maximum: approx. 0.8 W
Charger power consumption
R Standby: approx. 0.1 W
R Maximum: approx. 4.0 W
Operating conditions
R 0 °C–40 °C (32 °F–104 °F), 20 %–80 %
relative air humidity (dry)
Charging conditions
R 5 °C–40 °C (41 °F–104 °F)
10
For assistance, please visit http://www.panasonic.com/help
Page 11
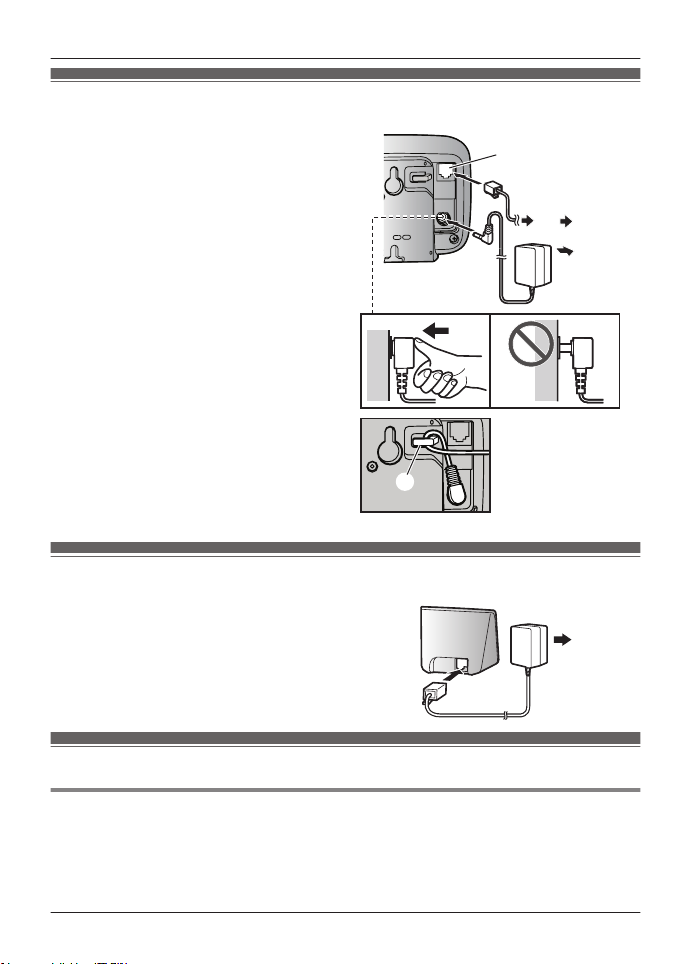
Preparing the base unit
D
E
C
D
A
B
BB
A
A Insert the AC adaptor plug firmly into the
base unit.
B Secure the cord by wrapping around the
ok.
ho
C Connect the AC adaptor to the power
tlet.
ou
D Insert the telephone line cord into the
se unit and the single-line telephone
ba
jack (RJ11C) until you hear a click.
E DSL/ADSL service users only: C
your DSL/ADSL filter (not supplied).
Note:
e only the supplied Panasonic AC
R Us
adaptor PNLV226.
R Use only the supplied telephone line cord.
onnect
Preparing the charger
A Insert the AC adaptor plug to the unit until
B Connect the AC adaptor to the power
Note:
R Us
adaptor PNLV226K.
yo
u hear a click.
tlet.
ou
e only the supplied Panasonic AC
Getting Started
Preparing the handset
Inserting a microSD card and the battery
microSD card (not supplied) allows you to expand the handset’s storage capabilities.
A
Important:
R When removing the battery, make sure you turn off the handset first.
For assistance, please visit http://www.panasonic.com/help
11
Page 12
1
2
A
B
3
B
A
4
A
B
5
Getting Started
R To avoid loss of data or malfunction, do not damage, carelessly handle, or short-circuit the
g
old-colored contacts of the microSD card.
Remove the handset’s cover.
Open the microSD card cover by sliding it
ward the nearest side of the handset
to
(A) and then lifting up (B).
Insert the microSD card with the
o
ld-colored contacts facing down, close
g
the microSD cover (A), and then gently
slide the cover toward the opposite side
of the handset (B).
Insert the battery (A)
handset (B).
Attach the cover.
12
and lower it into the
For assistance, please visit http://www.panasonic.com/help
Page 13
A
A
Getting Started
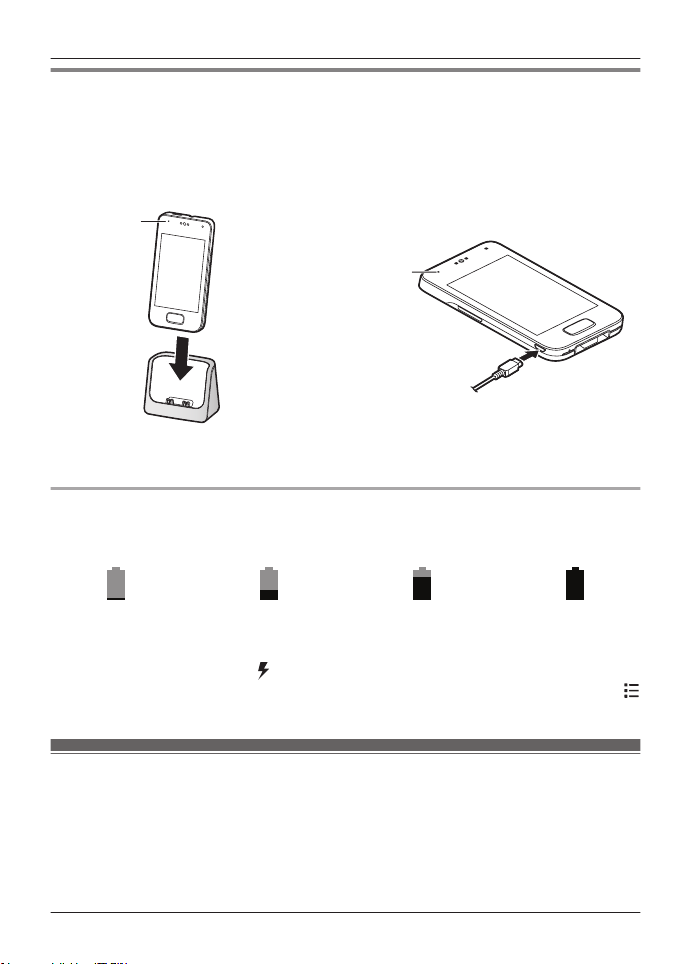
Charging the handset
Charge the handset for about 5 hours before initial use. The charge indicator (A) lights while the
handset is charging and turns off when the handset is fully charged.
Important:
R If the handset is placed into the charger while talking on the phone, the call is not
disconnected.
or
Place the handset into the charger. Connect a USB cable (not supplied)
rectly to the handset.
di
Battery power icon
Wh
en the screen is turned on, the battery icon in the upper-right corner of the screen indicates
the battery power as described below.
® ® ®
Very low Fully charged
Note:
en the handset is charging,
R Wh
R Yo
u can also check the percentage of battery power remaining. From the home screen, tap
® [System settings] ® [
is displayed inside the battery power icon.
Battery].
Information about power and charging
adaptor connection
AC
R The AC adaptor must remain connected at all times. (It is normal for the adaptor to feel warm
during use.)
R The AC adaptor should be connected to a vertically oriented or floor-mounted AC outlet. Do
not connect the AC adaptor to a ceiling-mounted AC outlet, as the weight of the adaptor may
cause it to become disconnected.
For assistance, please visit http://www.panasonic.com/help
13
Page 14

Getting Started
Power failure
R Th
e unit will not work during a power failure. We recommend connecting a corded-type
telephone (without AC adaptor) to the same telephone line or to the same telephone line jack
using a Panasonic T-adaptor (page 2).
Battery use and replacement
R Use only the supplied battery. For replacement, use only the Panasonic rechargeable battery
noted on page 2.
R The battery might swell when its life is close to an end. This is dependent on the usage
conditions and is not a problem.
Battery charging
R It is normal for the handset to feel warm during charging.
R Clean the charge contacts of the handset, base unit, and charger with a soft and dry cloth
once a month. Before cleaning the unit, disconnect from power outlets and any telephone line
cords. Clean more often if the unit is exposed to grease, dust, or high humidity.
Saving battery power
R The amount of time you can use the handset before the battery needs to be charged varies
depending on how you are using it. Each of the following can help you save battery power.
– Turn off the screen when you are not using the handset (page 16).
– Use the control panel to turn off the handset’s Wi-Fi, GPS, and Bluetooth features. See the
Operating Instructions for more information (download information is on page 1).
– When you are away from home, use the control panel to turn off the handset’s DECT
connection to the base unit. Note that if you do not turn the connection back on when you
return home, you will not be able to make or receive calls using the handset. See the
Operating Instructions for more information (download information is on page 1).
14
For assistance, please visit http://www.panasonic.com/help
Page 15
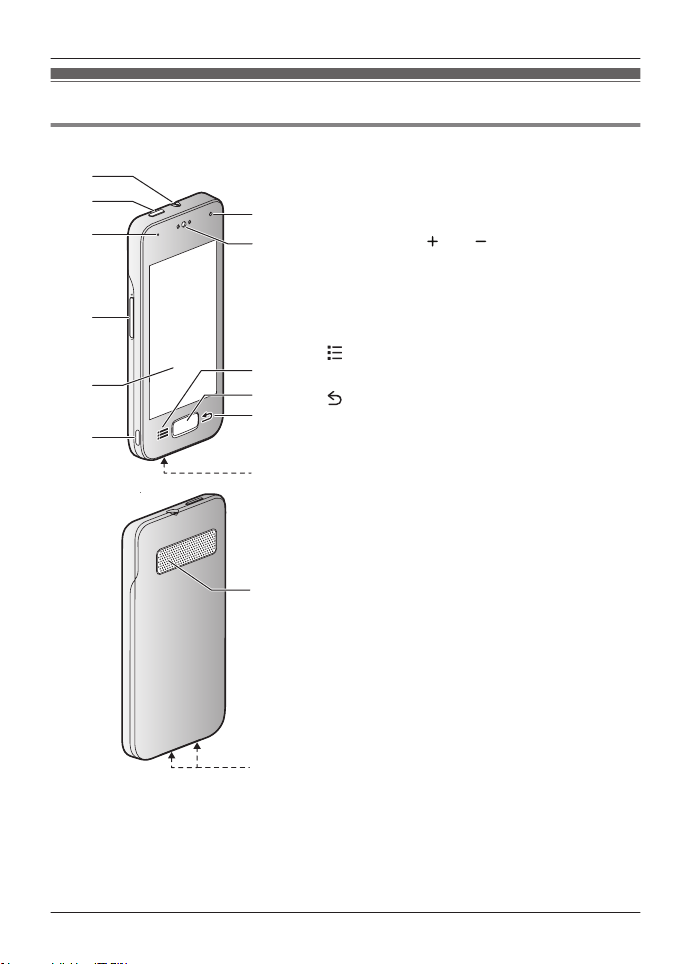
Getting to know your phone system
A
B
C
H
J
K
G
D
F
E
I
L
N
M
Handset overview
A Headset jack
B Power button
C Charge indicator
D
Volume button (
E Touchscreen
F Micro USB jack
G Front camera
H Receiver
I
(menu) button
J Home button
K
(back) button
L Microphone
M Speaker
N Charge contacts
Getting Started
and )
For assistance, please visit http://www.panasonic.com/help
15
Page 16

A
Getting Started
Base unit overview
A
M N
(locator) button
andsets registered to the base unit will
H
ring when you press this button. This can
be useful when you want to locate a
misplaced handset.
Turning the handset on and off
turn the handset on, press and hold the power button on the top of the handset. If the lock
To
screen appears, unlock the screen (page 16).
To turn the handset off, press and hold the power button on the top of the handset, and then tap
[Power off] ® [OK].
Note:
R The first time you turn on the handset, the setup wizard is displayed (page 16).
Turning the screen on and off
You can turn the screen off to save battery power and prevent accidental operation. While the
screen is turned off, you can still receive calls, messages, etc. Any apps that were in use when
the screen was turned off continue to run.
To turn the screen on and off, press the power button on the top of the handset. You can also
turn the screen on by pressing the home button.
Unlocking the screen
Wh
en you turn the screen on, the lock screen may be displayed. This screen prevents you from
accidentally tapping the handset and operating it unintentionally. When the default lock screen is
displayed, you can unlock the screen by dragging the lock icon toward the unlock icon or toward
the icon of the desired action.
Setup wizard
Th
e first time you turn on the handset, the setup wizard prompts you to configure the following
settings. Follow the on-screen instructions and configure each item as needed.
1 Select the language.
2 Configure date and time settings.
16
For assistance, please visit http://www.panasonic.com/help
Page 17

Getting Started
3 Select the desired automatic time adjustment setting.
f you select [Use network provided time], an Internet connection is needed for the
R I
handset to adjust its date and time setting automatically.
4 Add or create a Google™ account.
5 Configure Wi-Fi settings (displayed only if you choose to configure a Google account).
Note:
R Some items may be displayed in English regardless of the display language setting.
Setting up a Google account
Co
nfiguring your handset to synchronize with your Google account is an easy way to synchronize
contacts and other information between different devices, such as computers or smartphones,
and your phone system’s handset. For example, you can use your computer to add your contacts
to your Google account, and then configure the handset to synchronize with your Google
account. Your contacts will be automatically downloaded to your handset.
The setup wizard will prompt you to either add your existing Google account information to the
handset or create a new account. You can skip this step if desired. To configure Google account
settings later, see the Operating Instructions (download information is on page 1).
Note:
R An Internet connection is required to configure a Google account. If you choose to use or
create a Google account during the setup wizard, you will be prompted to enter Wi-Fi
information so that the handset can connect to the Internet.
Wi-Fi settings
you have a wireless router and an Internet connection, you can configure the handset to
If
connect to your Wi-Fi network and access the Internet for synchronizing your handset with your
Google account, using the [Browser] app to view web pages, etc. If the setup wizard prompts
you to enter Wi-Fi information, use the following procedure. To configure these settings later, see
the Operating Instructions (download information is on page 1).
1 Select a Wi-Fi network.
R If the desired Wi-Fi network is not displayed, you may need to enter the network name
(also called the “SSID”) manually. See the Operating Instructions for more information
(download information is on page 1).
2 Enter the password if you are connecting to a secure Wi-Fi network.
3 Tap [Connect].
Home button
Y
u can display the home screen at any time by pressing the home button.
o
Navigation buttons
(menu) button: D
isplays a list of options available in the current screen.
For assistance, please visit http://www.panasonic.com/help
17
Page 18

Getting Started
(back) button: R
on-screen keyboard, etc.
Note:
R The
and buttons are displayed in most screens. They appear at the bottom of the
h
ndset next to the home button, and turn off if you do not use them for a while. To display the
a
and buttons after they have turned off, simply touch the area of the handset where they
uld normally be displayed.
wo
eturns to the previous screen or closes the current dialog box, menu,
Landline app
Th
e [Landline] app is displayed by default on the handset’s home screen, and allows you to
access commonly used features of your phone system.
Allows you to make intercom calls
Allows you to change certain features of your phone system
Allows you to use the phone system’s answering system (KX-PRX120 only)
Allows you to access the base unit’s call log
Allows you to use the base unit’s key detector feature
Making calls
Im
portant:
R When the handset is connected to the base unit,
no
t displayed, the handset cannot make or receive calls.
R If the handset is placed into the charger while talking on the phone, the call is not
disconnected.
1 Tap [Phone] in the home screen or app list.
2 Select the
3 En
ter the phone number and then tap
R To
R To
en finished, tap
4 Wh
tab at the top of the screen.
erase a number, tap
enter a dialing pause, tap and hold
.
to end the call.
is displayed in the status bar. If this icon is
at the bottom of the screen.
.
Using other features during a call
Temporary tone dialing (for rotary/pulse phone service users)
Pr
to switch to tone dialing mode and then dial the numbers as desired.
ess
18
For assistance, please visit http://www.panasonic.com/help
Page 19

Getting Started
Answering calls
1 Wh
en a call is being received, tap
2 Ta
p
to end the call.
Receiver or speaker volume
ess the volume button up (
Pr
) and down ( ) repeatedly during a call.
and drag it to .
Using the call logs
Th
e handset and base unit each log your calls, allowing you to check a record of your calls. The
following symbols are used to indicate each type of call stored in the call logs.
Important:
R Caller ID is required to log missed and answered calls (page 23).
Call log Icon Meaning
Handset call
*1
lo
g
Base unit call
lo
g
*1 The handset call log can only log calls that are received while the handset is connected to
th
e base unit.
(blue)
(green) Outgoing call
(red) Missed call
(blue)
Missed call
Answered call
Answered call or missed
ll that has been confirmed
ca
Making a call from the handset call log
p [Phone] in the home screen or app list.
1 Ta
2 Select the
3 Se
lect the type of calls you want to view by tapping the desired tab.
4 Tap
en finished, tap
5 Wh
tab at the top of the screen.
next to the phone number or person you want to call.
to end the call.
Making a call from the base unit call log
p [Landline] in the home screen or app list.
1 Ta
2 Tap [Call log list].
R The handset connects to the base unit.
3 Tap
next to the phone number or person you want to call.
For assistance, please visit http://www.panasonic.com/help
19
Page 20

Getting Started
4 When finished, tap to end the call.
Ringtones and audio settings
Selecting an audio profile
1 Fr
om the home screen, tap
2 Tap
eset audio profiles
Pr
– [General]: You can select the desired ringtone, ringer volume, etc.
– [Silent]: The ringer is turned off.
– [Outdoor]: The settings of the [General] profile are used. The ringer volume is set to the
next to the desired audio profile.
maximum level.
® [System settings] ® [
Audio profiles].
Adding contacts
a
p [People] in the home screen or app list.
1 T
2 Tap
3 If
4 Enter the information as needed.
5 T
.
prompted, follow the on-screen instructions to determine where the contact will be saved.
R Contacts can be stored in the handset’s memory or synchronized with your Google
account.
R Tap [Add new account] (if displayed) if you want to register a Google account to the
handset.
R To add an image, tap the image icon.
R To undo the changes you have made, tap
, the changes will be saved.
R To add the new contact information to an existing contact, tap ® [Join].
ap [DONE].
® [Discard] ® [
OK]. Note that if you tap
Calling a contact
p [Phone] in the home screen or app list.
1 Ta
2 Select the
a
p the desired contact.
3 T
4 When finished, tap
20
tab at the top of the screen.
to end the call.
For assistance, please visit http://www.panasonic.com/help
Page 21

Getting Started
Answering system features (KX-PRX120 only)
Turning the answering system on and off
Th
e answering system is already turned on at the time of purchase.
1 Tap [Landline] in the home screen or app list.
2 Tap [Answering system].
R The handset connects to the base unit.
3 Turn the [Answer] switch on or off.
R
is displayed in the status bar while the answering system is turned on.
Playing messages
1 Tap [Landline] in the home screen or app list.
2 Tap [Answering system].
R The handset connects to the base unit.
R The number of messages is displayed at the top of the screen.
3 To play all new messages:
→ Tap [Play new message].
To play all messages:
→ Tap [Play all messages].
To play a specific message:
→ Tap [Message list] and then tap
o
te:
N
R Messages that have been played have a checkmark next to them in the message list.
Voice guidance language
u can change the language used for the answering system’s voice guidance.
Yo
1 Tap [Landline] in the home screen or app list.
2 Tap [Landline settings] ® [Initial settings].
R The handset connects to the base unit.
3 Tap [Voice prompt].
4 Select the desired language.
next to the desired message.
Tone/pulse setting
h
is setting must be set to match the dialing mode of your phone service, otherwise you will not
T
be able to make calls. (The default setting is [Tone].)
1 Tap [Landline] in the home screen or app list.
2 Tap [Landline settings] ® [Initial settings].
R The handset connects to the base unit.
3 Tap [Tone/pulse setting].
For assistance, please visit http://www.panasonic.com/help
21
Page 22

Getting Started
4 Select the desired setting.
Pulse]: Select if your phone service uses pulse (rotary) dialing mode.
– [
– [Tone]: Select if your phone service uses tone dialing mode.
Display language
r
om the home screen, tap
1 F
[Language].
® [System settings] ® [
Language & input] ®
2 Select the desired language.
Note:
R Some items may be displayed in English regardless of the display language setting.
Date and time
Selecting automatic or manual date and time setting
1 F
om the home screen, tap
r
& time].
® [System settings] ® [
2 To set the date and time automatically:
→ Select the desired method.
R If you select [Use network provided time], an Internet connection is needed for the
handset to adjust its date and time setting automatically.
To set the date and time manually:
→ Select [Off].
Setting the date and time manually
om the home screen, tap
1 Fr
® [System settings] ® [
2 Make sure that [Automatic date & time] is set to [Off].
3 To set the date:
→ Tap [Set date], select the desired date, and then tap [Set].
To set the time:
→ Tap [Set time], select the desired time, and then tap [Set].
Date & time] ® [Automatic date
Date & time].
22
For assistance, please visit http://www.panasonic.com/help
Page 23

Getting Started
Troubleshooting
Problem Cause and/or solution
is displayed.
I cannot make calls. R The tone/pulse setting may be set incorrectly. Change the
The handset does not turn
even after charging the
on
battery.
I fully charged the battery,
t the low battery
bu
message is still displayed
and/or the operating time
seems to be shorter.
Caller information is not
splayed.
di
Noise is heard, sound cuts
and out.
in
R The handset is too far from the base unit. Move closer.
R T
he base unit’s AC adaptor is not properly connected.
Reconnect AC adaptor to the base unit.
R The handset is not registered to the base unit. Register it. See
the Operating Instructions for more information (download
information is on page 1).
etting (page 21).
s
R The handset is turned off. Press and hold the power button on
the top of the handset.
R Clean the charge contacts of the handset and charger with a
dry cloth and charge again.
R It is time to replace the battery (page 2).
R You may need to subscribe to your phone service provider’s
Caller ID service. Contact your phone service provider for
details.
R If your unit is connected to any additional telephone
equipment, remove the additional equipment and plug the unit
directly into the wall jack.
R If you use a DSL/ADSL service, we recommend connecting a
DSL/ADSL filter between the base unit and the telephone line
jack. Contact your DSL/ADSL service provider for details.
R The name display service may not be available in some areas.
Contact your phone service provider for details.
R Other telephone equipment may be interfering with this unit.
Disconnect the other equipment and try again.
R You are using the handset or base unit in an area with high
electrical interference. Re-position the base unit and use the
handset away from sources of interference.
R Move closer to the base unit.
R If you use a DSL/ADSL service, we recommend connecting a
DSL/ADSL filter between the base unit and the telephone line
jack. Contact your DSL/ADSL service provider for details.
Caller ID support
Th
e base unit is Caller ID compatible. Caller ID is a service provided by your phone service
provider which may require a subscription. Contact your phone service provider for details and
availability.
For assistance, please visit http://www.panasonic.com/help
23
Page 24

This equipment complies with Part 68 of the
FCC rules and the requirements adopted by
the ACTA. On the bottom of this equipment
is a label that contains, among other
information, a product identifier in the
format US:ACJ----------.
If requested, this number must be provided
to the telephone company.
L Registration No.............(found on the rear
of the base unit)
L Ringer Equivalence No. (REN).......0.1B
A plug and jack used to connect this
equipment to the premises wiring and
telephone network must comply with the
applicable FCC Part 68 rules and
requirements adopted by the ACTA. A
compliant telephone cord and modular plug
is provided with the product. It is designed
to be connected to a compatible modular
jack that is also compliant.
The REN is used to determine the number
of devices that may be connected to a
telephone line. Excessive RENs on a
telephone line may result in the devices not
ringing in response to an incoming call. In
most but not all areas, the sum of RENs
should not exceed five (5.0). To be certain
of the number of devices that may be
connected to a line, as determined by the
total RENs, contact the local telephone
company. For products approved after July
23, 2001, the REN for the product is part of
the product identifier that has the format
US:AAAEQ##TXXXX. The digits
represented by ## are the REN without a
decimal point (e.g., 03 is a REN of 0.3).
If this equipment causes harm to the
telephone network, the telephone company
will notify you in advance that temporary
discontinuance of service may be required.
But if advance notice isn't practical, the
telephone company will notify the customer
as soon as possible. Also, you will be
advised of your right to file a complaint with
the FCC if you believe it is necessary.
The telephone company may make changes
in its facilities, equipment, operations or
procedures that could affect the operation of
the equipment. If this happens the
telephone company will provide advance
notice in order for you to make necessary
modifications to maintain uninterrupted
service.
If trouble is experienced with this
equipment, for repair or warranty
information, please contact a Factory
Service Center or other Authorized Servicer.
If the equipment is causing harm to the
telephone network, the telephone company
may request that you disconnect the
equipment until the problem is resolved.
Connection to party line service is subject to
state tariffs. Contact the state public utility
commission, public service commission or
corporation commission for information.
If your home has specially wired alarm
equipment connected to the telephone line,
ensure the installation of this equipment
does not disable your alarm equipment. If
you have questions about what will disable
alarm equipment, consult your telephone
company or a qualified installer.
This equipment is hearing aid compatible as
defined by the FCC in 47 CFR Section
68.316.
When you hold the phone to your ear, noise
might be heard in your Hearing Aid. Some
Hearing Aids are not adequately shielded
from external RF (radio frequency) energy. If
noise occurs, use an optional headset
accessory or the speakerphone option (if
applicable) when using this phone. Consult
with your audiologist or Hearing Aid
Other Information
FCC and other information
24
For assistance, please visit http://www.panasonic.com/help
Page 25

manufacturer about the availability of
Hearing Aids which provide adequate
shielding to RF energy commonly emitted
by digital devices.
WHEN PROGRAMMING EMERGENCY
NUMBERS AND(OR) MAKING TEST
CALLS TO EMERGENCY NUMBERS:
1) Remain on the line and briefly explain to
the dispatcher the reason for the call.
2) Perform such activities in the off-peak
hours, such as early morning or late
evenings.
This device complies with Part 15 of the
FCC Rules. Operation is subject to the
following two conditions:
(1) This device may not cause harmful
interference, and (2) this device must
accept any interference received, including
interference that may cause undesired
operation.
Privacy of communications may not be
ensured when using this phone.
CAUTION:
Any changes or modifications not expressly
approved by the party responsible for
compliance could void the user’s authority
to operate this device.
NOTE:
This equipment has been tested and found
to comply with the limits for a Class B digital
device, pursuant to Part 15 of the FCC
Rules. These limits are designed to provide
reasonable protection against harmful
interference in a residential installation. This
equipment generates, uses, and can radiate
radio frequency energy and, if not installed
and used in accordance with the
instructions, may cause harmful
interference to radio communications.
However, there is no guarantee that
interference will not occur in a particular
installation. If this equipment does cause
harmful interference to radio or television
reception, which can be determined by
turning the equipment off and on, the user is
encouraged to try to correct the interference
by one or more of the following measures:
– Reorient or relocate the receiving
antenna.
– Increase the separation between the
equipment and receiver.
– Connect the equipment into an outlet on a
circuit different from that to which the
receiver is connected.
– Consult the dealer or an experienced
radio/TV technician for help.
Some cordless telephones operate at
frequencies that may cause interference to
nearby TVs and VCRs. To minimize or
prevent such interference, the base of the
cordless telephone should not be placed
near or on top of a TV or VCR. If
i
nterference is experienced, move the
cordless telephone further away from the TV
or VCR. This will often reduce or eliminate
interference.
FCC RF Exposure Warning:
L
This product complies with FCC radiation
exposure limits set forth for an
uncontrolled environment.
L To comply with FCC RF exposure
requirements, the base unit must be
installed and operated 20 cm (8 inches)
or more between the product and all
person’s body.
L This product may not be collocated or
operated in conjunction with any other
antenna or transmitter.
L For body-worn operation, the handset
must be used only with a non-metallic
accessory. Use of other accessories may
not ensure compliance with FCC RF
exposure requirements.
Notice:
L FCC ID can be found inside the battery
compartment or on the bottom of the
units.
Other Information
For assistance, please visit http://www.panasonic.com/help
25
Page 26

Customer Services Directory (United States and Puerto Rico)
Obtain Product Information and Operating Assistance; locate your nearest
Dealer or Service Center; purchase Parts and Accessories; or make Customer
Service and Literature requests by visiting our Web Site at:
http://www.panasonic.com/help
or, contact us via the web at:
http://www.panasonic.com/contactinfo
For hearing or speech impaired TTY users, TTY: 1-877-833-8855
For hearing or speech impaired TTY users, TTY: 1-866-605-1277
Purchase Parts, Accessories and Owner’s Manual online for all
Panasonic Products by visiting our Web Site at:
http://www.pstc.panasonic.com
or, send your request by E-mail to:
npcparts@us.panasonic.com
You may also contact us directly at:
1-800-237-9080 (Fax Only)
(Monday - Friday 9 am to 9 pm, EST.)
Panasonic National Parts Center
20421 84th Avenue S., Kent, WA 98032
(We accept Visa, MasterCard, Discover Card, American Express.)
Accessory Purchases (United States and Puerto Rico)
Appendix
Customer services
26
For assistance, please visit http://www.panasonic.com/help
Page 27

Warranty (For United States and Puerto Rico)
Limited Warranty Coverage
If your product does not work properly because of a defect in materials or workmanship,
Panasonic Corporation of North America (referred to as “the warrantor”) will, for the length
of the period indicated on the chart below, which starts with the date of original purchase
(“Limited Warranty period”), at its option either (a) repair your product with new or
refurbished parts, or (b) replace it with a new or a refurbished equivalent value product, or
(c) refund your purchase price. The decision to repair, replace or refund will be made by
the warrantor.
Parts Labor
One (1) Year One (1) Year
During the “Labor” Limited Warranty period there will be no charge for labor. During the
“Parts” Limited Warranty period, there will be no charge for parts. You must mail-in your
product prepaid during the Limited Warranty period. This Limited Warranty excludes both
parts and labor for batteries, antennas, and cosmetic parts (cabinet). This Limited
Warranty only applies to products purchased and serviced in the United States or Puerto
Rico. This Limited Warranty is extended only to the original purchaser and only covers
products purchased as new.
Online Repair Request
To submit a new repair request and for quick repair status visit our Web Site at
http://www.panasonic.com/repair
When shipping the unit carefully pack in a padded shipping carton, include all
accessories, and send it prepaid. Include a letter detailing the complaint, a return
address and provide a day time phone number where you can be reached. P.O. Boxes
are not acceptable. Keep the tracking number for your records. A copy of valid
registered receipt is required under the 1 year parts and labor Limited Warranty.
For Limited Warranty service for headsets if a headset is included with this
product please follow instructions above.
IF REPAIR IS NEEDED DURING THE LIMITED WARRANTY PERIOD THE
PURCHASER WILL BE REQUIRED TO FURNISH A SALES
RECEIPT/PROOF OF PURCHASE INDICATING DATE OF PURCHASE,
AMOUNT PAIDAND PLACE OF PURCHASE. CUSTOMER WILL BE
CHARGED FOR THE REPAIR OF ANY UNIT RECEIVED WITHOUT SUCH
PROOF OF PURCHASE.
Panasonic Telephone Products
Limited Warranty
Mail-In Service--Online
Appendix
For assistance, please visit http://www.panasonic.com/help
27
Page 28

Limited Warranty Limits And Exclusions
This Limited Warranty ONLY COVERS failures due to defects in materials or workmanship,
and DOES NOT COVER normal wear and tear or cosmetic damage. The Limited Warranty
ALSO DOES NOT COVER damages which occurred in shipment, or failures which are
caused by products not supplied by the warrantor, or failures which result from accidents,
misuse, abuse, neglect, bug infestation, mishandling, misapplication, alteration, faulty
installation, set-up adjustments, misadjustment of consumer controls, improper
maintenance, power line surge, lightning damage, modification, introduction of sand,
humidity or liquids, commercial use such as hotel, office, restaurant, or other business or
rental use of the product, or service by anyone other than a Factory Service Center or
other Authorized Servicer, or damage that is attributable to acts of God.
THERE ARE NO EXPRESS WARRANTIES EXCEPT AS LISTED UNDER “LIMITED
WARRANTY COVERAGE”. THE WARRANTOR IS NOT LIABLE FOR INCIDENTAL OR
CONSEQUENTIAL DAMAGES RESULTING FROM THE USE OF THIS PRODUCT, OR
ARISING OUT OF ANY BREACH OF THIS LIMITED WARRANTY. (As examples, this
excludes damages for lost time, lost calls or messages, cost of having someone remove or
re-install an installed unit if applicable, travel to and from the servicer. The items listed are
not exclusive, but are for illustration only.) ALL EXPRESS AND IMPLIED WARRANTIES,
INCLUDING THE WARRANTY OF MERCHANTABILITY, ARE LIMITED TO THE
PERIOD OF THE LIMITED WARRANTY.
Some states do not allow the exclusion or limitation of incidental or consequential
damages, or limitations on how long an implied warranty lasts, so the exclusions may not
apply to you.
This Limited Warranty gives you specific legal rights and you may also have other rights
which vary from state to state. If a problem with this product develops during or after the
Limited Warranty period, you may contact your dealer or Service Center. If the problem is
not handled to your satisfaction, then write to the warrantor’s Consumer Affairs
Department at the addresses listed for the warrantor.
PARTS AND SERVICE, WHICH ARE NOT COVERED BY THIS LIMITED WARRANTY,
ARE YOUR RESPONSIBILITY.
L Carefully pack your unit, preferably in the original carton.
L Attach a letter, detailing the symptom.
L Send the unit to Panasonic Exchange Center, prepaid and adequately insured.
L Do not send your unit to Panasonic Corporation of North America listed on the back
cover or to executive or regional sales offices. These locations do not repair consumer
products.
When you ship the product
Appendix
28
For assistance, please visit http://www.panasonic.com/help
Page 29

1 Reconnect AC adaptor to the base unit.
2 Check if telephone line cord is connected.
3 Reinsert the battery and restart the handset.
4 Read troubleshooting page in the Operating Instructions.
If your product is not working properly. . .
IMPORTANT!
Visit our Web site: http://www.panasonic.com/help
L
FAQ and troubleshooting hints are available.
Two Riverfront Plaza, Newark, NJ 07102-5490
Appendix
© Panasonic System Networks Co., Ltd. 2013
For assistance, please visit http://www.panasonic.com/help
29
Page 30

Guía rápida
Teléfono con Diseño de Gran Calidad y Pantalla Táctil
Modelo n° KX-PRX120
Gracias por adquirir un producto Panasonic.
Lea este documento antes de usar la unidad, y guárdelo para consultarlo en el futuro.
Para obtener información detallada acerca de las funciones de su sistema telefónico, consulte las Manual de instrucciones, las cuales están disponibles al tocar
inicial, o visite la página de soporte técnico de este producto en la siguiente dirección.
http://www.panasonic.net/pcc/support/tel/sdect
en la pantalla
Page 31

Introducción
Información de los accesorios
Accesorios que se suministran
Nº Accesorio/Número de pedido Cantidad
A Adaptador de corriente alterna para la unidad base/PNLV226Z 1
B Adaptador de corriente alterna para el cargador/PNLV226-KZ 1
C Cable de línea telefónica/PQJA10075Z 1
D Batería recargable/KX-PRA10EX 1
E
Tapa del auricular*1/M81101016740
F Cargador/PNLC1049ZW 1
*1 La tapa del auricular viene unida a él.
A B C D E F
Accesorios adicionales y de reemplazo
Comuníquese con su distribuidor Panasonic más cercano para obtener información de ventas.
Accesorio Número de pedido
Batería recargable KX-PRA10EX
Audífono
Adaptador T KX-J66
Extensor de alcance KX-TGA405
Detector de llaves
*1 Comuníquese con Panasonic o con el departamento de ventas autorizado que aparece en la
contraportada para obtener información acerca del auricular disponible en su área.
*2 Puede registrar hasta 4 detectores de llaves opcionales en su sistema telefónico. Al registrar un
detector de llaves en la unidad base y después adjuntarlo a un artículo que pierde con facilidad, como
las llaves de su casa o de su auto, podrá usar su auricular para encontrar el artículo.
Para obtener más información, visite el siguiente sitio web.
http://panasonic.net/pcc/products/telephone/p/tga20/
R Batería tipo ion de litio (Li-Ion)
RP-TCM120
KX-TGA20
*1
*2
1
2
Page 32

Para expandir su sistema telefónico
Auricular (opcional): KX-PRXA10
Puede expandir su sistema telefónico si registra auriculares opcionales (máx. 6) a una sola unidad base.
R Los auriculares opcionales pueden ser de color
diferente al de los auriculares que se suministran.
Introducción
3
Page 33

Introducción
Para referencia en el futuro
Le recomendamos que mantenga un registro de la siguiente información que le servirá de ayuda para
cualquier reparación necesaria durante el período de garantía.
Nº de serie Fecha de compra
(se encuentra en la parte posterior de la unidad base)
Nombre y dirección del distribuidor
Adjunte aquí su recibo de compra.
Marcas registradas
R Google y Android son marcas comerciales de Google Inc.
R La marca denominativa y los logotipos de Bluetooth® son propiedad de Bluetooth SIG, Inc. y cualquier
uso de dichas marcas por parte de Panasonic Corporation se hace bajo licencia.
R Wi-Fi® es una marca registrada de Wi-Fi Alliance.
R El logotipo de microSDHC es una marca comercial de SD-3C, LLC.
R Todas las demás marcas comerciales que se identifican en el presente pertenecen a sus respectivos
propietarios.
Aviso
R El término “aplicaciones” se usa en este documento para referirse a programas que se instalan en el
auricular.
R El auricular es compatible con tarjetas de memoria microSD y microSDHC. En este documento, el
término “tarjeta microSD” se utiliza como un término genérico para cualquiera de las tarjetas compatibles.
R Las ilustraciones y las capturas de pantallas que se muestran en este documento son solo para
referencia y pueden diferir de la apariencia del producto real.
R La información de este documento está sujeta a cambios sin previo aviso.
4
Page 34

Especificaciones
Conectividad
R Telecomunicaciones inalámbricas digitales
mejoradas 6.0 (Digital Enhanced Cordless
Telecommunications, DECT 6.0)
R Wi-Fi: IEEE 802.11b/g/n
R Bluetooth: versión 3.0, Clase 2
R USB: versión 2.0
Rango de frecuencia
R DECT: 1.92 GHz a 1.93 GHz
R Wi-Fi: 2.412 GHz a 2.462 GHz (canales 1 al 11)
Potencia de transmisión de RF
R DECT: 115 mW (potencia de transmisión pico)
R Wi-Fi: 25 mW (potencia de transmisión pico)
Sistema operativo del auricular
R Android™ 4.0, Ice Cream Sandwich
Equipo
R Pantalla: color TFT de 3.5 pulgadas (HVGA:
320 ´ 480 píxeles), pantalla táctil capacitiva
R Cámara frontal: 0.3 m
R Tarjeta de memoria: microSD, microSDHC
hasta 32 GB (no incluida)
Batería
R Ion de litio (Li-Ion) 3.7 V/1,450 mAh
Tiempo de conversación
R Llamadas por línea terrestre: hasta 10 horas
Tiempo en espera
R Hasta 220 horas
Alimentación eléctrica
R 120 V CA, 60 Hz
Consumo de energía de la unidad base
R En espera: Aprox. 0.4 W
R Máximo: Aprox. 0.8 W
Consumo de energía del cargador
R En espera: Aprox. 0.1 W
R Máximo: Aprox. 4.0 W
Condiciones de funcionamiento
R 0 °C–40 °C (32 °F–104 °F), 20 %–80 % de
humedad relativa en el aire (seco)
Condiciones de carga
R 5 °C–40 °C (41 °F–104 °F)
Información importante
5
Page 35

D
E
C
D
A
B
BB
A
Pasos iniciales
Preparación de la unidad base
A Inserte el enchufe del adaptador de corriente
firmemente en la unidad base.
B Asegure el cable enrollándolo en el gancho.
C Conecte el adaptador para corriente a la toma
de corriente.
D Inserte el cable de la línea telefónica y la toma
para una sola línea telefónica (RJ11C) en la
unidad base hasta que escuche un clic.
E Solo para los usuarios de servicio DSL/
ADSL: conecte su filtro DSL/ADSL (no inclui-
do).
Nota:
R Use solo el adaptador de corriente alterna
Panasonic PNLV226 que se sumin
R Utilice solo el cable de la línea telefónica sumi-
nistrado.
istra.
Preparación del cargador
A Inserte el enchufe del adaptador de corriente
B Conecte el adaptador para corriente a la toma
Nota:
R Use solo el adaptador de corriente alterna
Panasonic PNLV226K que se suministra.
en la unidad hasta que escuche un clic.
de corriente.
Preparación del auricular
Cómo insertar una tarjeta micro SD y la batería
La tarjeta micro SD (no incluida) le permite expandir la capacidad de almacenamiento del auricular.
Importante:
R Al remover la batería, asegúrese de apagar primero el auricular.
6
Page 36

1
2
A
B
3
B
A
4
A
B
5
Pasos iniciales
R Para evitar la pérdida de datos o una falla de funcionamiento, no dañe, manipule descuidadamente ni
provoque un corto circuito en los contactos dorados de la tarjeta micro SD.
Retire la cubierta del auricular.
Abra la cubierta de la tarjeta micro SD deslizándola hacia el lado más cercano del auricular (A) y después levántela (B).
Inserte la tarjeta micro SD con los contactos
dorados hacia abajo. Cierre la cubierta de la
tarjeta micro SD (A), y después deslícela cui-
dadosamente hacia el lado opuesto del auricular (B).
Inserte la batería (A) y colóquela en el auricular (B).
Coloque la cubierta.
7
Page 37

A
A
Pasos iniciales
Cómo cargar el auricular
Cargue el auricular aproximadamente 5 horas antes de usarlo por primera vez. El indicador de carga (A)
se ilumina mientras el auricular se está cargando, y se apaga cuando está completamente cargado.
Importante:
R Si coloca el auricular en el cargador mientras habla por teléfono, la llamada no se desconectará.
o
Coloque el auricular en el cargador. Conecte un cable USB (no incluido) directa-
mente en el auricular.
Icono de energía de la batería
Cuando la pantalla está encendida, el icono de la batería que se encuentra en la esquina superior derecha
de la pantalla indica la energía de la batería como se describe a continuación.
® ® ®
Muy baja Completamente car-
Nota:
R Cuando el auricular se está cargando, se muestra
R También puede revisar el porcentaje restante de energía de la batería. En la pantalla inicial, toque
[Configuración del sistema] ® [Batería].
dentro del icono de energía de la batería.
Información acerca de energía y carga
Adaptador de corriente alterna
R El adaptador de corriente debe permanecer conectado en todo momento. (Es normal que el adaptador
se caliente durante su uso.)
R El adaptador de corriente debe estar conectado a un enchufe de corriente orientado verticalmente o en
una toma de corriente alterna colocada en el piso. No conecte el adaptador de corriente alterna a una
toma de corriente montada en el techo, ya que el peso del adaptador puede hacer que se desconecte.
8
gada
®
Page 38

Pasos iniciales
Falla en el suministro eléctrico
R La unidad no funciona durante las fallas del suministro eléctrico. Le recomendamos que conecte un
teléfono alámbrico (sin adaptador de corriente alterna) a la misma línea telefónica o a la misma toma de
la línea telefónica usando un adaptador en forma de T de Panasonic (página 2).
Uso y reemplazo de la batería
R Use solo la batería que se suministra. Para reemplazarla, use solo la batería recargable Panasonic que
se especifica en la página 2.
R La batería podría hincharse cuando se acerca el final de su vida. Esto depende de las condiciones de
uso y no representa un problema.
Carga de las baterías
R Es normal que el auricular se caliente durante la carga.
R Limpie los contactos de carga del auricular, la unidad base y el cargador con un paño suave y seco una
vez al mes. Antes de limpiar la unidad, desconéctela de las tomas de corriente y de cualquier cable de
líneas telefónicas. Límpielos con mayor frecuencia si la unidad está expuesta a grasa, polvo o un alto
nivel de humedad.
Ahorro de la energía de la batería
R La cantidad de tiempo que puede usar el auricular antes de tener que cargar de nuevo la batería varía
según la forma en que lo use. Cada una de las siguientes actividades pueden ayudarle a ahorrar energía
de la batería.
– Apague la pantalla cuando no esté usando el auricular (página 11).
– Utilice el panel de control para apagar las funciones de Wi-Fi, GPS y Bluetooth del auricular. Consulte
las Manual de instrucciones para obtener más información (la información de descarga se encuentra
en la página 1).
– Cuando esté fuera de su casa, utilice el panel de control para apagar la conexión DECT del auricular
a la unidad base. Recuerde que si no enciende de nuevo la conexión cuando regrese a su casa, no
podrá hacer o recibir llamadas usando el auricular. Consulte las Manual de instrucciones para
obtener más información (la información de descarga se encuentra en la página 1).
9
Page 39

A
B
C
H
J
K
G
D
F
E
I
L
N
M
Pasos iniciales
Conozca su sistema telefónico
Resumen del auricular
A Toma para audífono
B Botón de encendido
C Indicador de carga
D
E Pantalla táctil
F Toma micro USB
G Cámara frontal
H Receptor
I
J Botón de inicio
K
L Micrófono
M Altavoz
N Contactos de carga
Botón de volumen (
(menú)
Botón
(atrás)
Botón
y )
10
Page 40

A
Pasos iniciales
Resumen de la unidad base
A
Botón M
N (localizador)
Los auriculares registrados en la unidad base
timbrarán cuando oprima este botón. Esto puede ser útil cuando desee localizar un auricular
perdido.
Encendido y apagado del auricular
Para encender el auricular, oprima y mantenga oprimido el botón de encendido que se encuentra en la
parte superior del auricular. Si aparece la pantalla de bloqueo, desbloquéela (página 11).
Para apagar el auricular, oprima y mantenga oprimido el botón de encendido que se encuentra en la parte
superior del auricular y después toque [Apagar] ® [Aceptar].
Nota:
R La primera vez que encienda el auricular, se mostrará el asistente de instalación (página 11).
Encendido y apagado de la pantalla
Puede apagar la pantalla para ahorrar energía de la batería y evitar la operación accidental. Puede
continuar recibiendo llamadas, mensajes, etc. con la pantalla apagada. Cualquier aplicación que haya
estado en uso al apagar la pantalla continuará funcionando.
Para encender y apagar la pantalla, oprima el botón de encendido que se encuentra en la parte superior del
auricular. También puede encender la pantalla oprimiendo el botón de inicio.
Desbloqueo de la pantalla
Al encender la pantalla, quizás aparezca la pantalla de bloqueo. Esta pantalla le impide tocar
accidentalmente el auricular y operarlo sin intención. Cuando se muestre la pantalla de bloqueo
predeterminada, puede desbloquearla arrastrando el icono de bloqueo hacia el icono de desbloqueo o
hacia el icono de la acción deseada.
Asistente de configuración
La primera vez que encienda el auricular, el asistente de configuración le pedirá que configure los
siguientes parámetros. Siga las instrucciones en pantalla y configure cada elemento según lo requiera.
1 Seleccione el idioma.
2 Configure los parámetros de fecha y hora.
11
Page 41

Pasos iniciales
3 Seleccione el parámetro deseado de ajuste automático de la hora.
R Si selecciona [Usar tiempo proporcionado por la red], se requiere una conexión a Internet para
que el auricular ajuste automáticamente su configuración de fecha y hora.
4 Agregue o cree una cuenta de Google™.
5 Configure los parámetros de Wi-Fi (que se muestran solo si selecciona configurar una cuenta de
Google).
Nota:
R Es posible que algunos elementos se muestren en inglés sin importar la configuración del idioma en
pantalla.
Cómo configurar una cuenta de Google
Una forma fácil de sincronizar contactos y otra información entre diferentes dispositivos como
computadoras o teléfonos inteligentes y el auricular de su sistema telefónico es configurar su auricular para
que se sincronice con su cuenta de Google. Por ejemplo, puede usar su computadora para agregar sus
contactos a su cuenta de Google y después configurar el auricular para que se sincronice con su cuenta de
Google. Sus contactos se descargarán automáticamente a su auricular.
El asistente de configuración le pedirá que agregue la información de su cuenta de Google existente al
auricular, o que cree una cuenta nueva. Puede omitir este paso si lo desea. Para configurar los parámetros
de su cuenta de Google después, consulte las Manual de instrucciones (la información de descarga se
encuentra en la página 1).
Nota:
R Se requiere una conexión a Internet para configurar una cuenta de Google. Si selecciona usar o crear
una cuenta de Google con el asistente de configuración, se le pedirá que ingrese la información de Wi-Fi
para que el auricular pueda conectarse a Internet.
Parámetros de Wi-Fi
Si tiene un enrutador inalámbrico y una conexión a Internet, puede configurar el auricular para conectarlo a
su red de Wi-Fi y acceder a Internet para sincronizar su auricular con su cuenta de Google, usando la
aplicación [Navegador] para ver páginas web, etc. Si el asistente de configuración le pide que ingrese su
información de Wi-Fi, utilice el siguiente procedimiento. Para configurar estos parámetros después, consulte
las Manual de instrucciones (la información de descarga se encuentra en la página 1).
1 Seleccione una red de Wi-Fi.
R Si no se muestra la red de Wi-Fi deseada, quizás necesite ingresar el nombre de la red (también
llamado el “SSID”) manualmente. Consulte las Manual de instrucciones para obtener más
información (la información de descarga se encuentra en la página 1).
2 Ingrese la contraseña si se va a conectar a una red Wi-Fi segura.
3 Toque [Conectar].
Botón de inicio
Puede mostrar la pantalla de inicio en cualquier momento oprimiendo el botón de inicio.
12
Page 42

Pasos iniciales
Botones de navegación
(menú): Muestra una lista de opciones disponibles en la pantalla actual.
Botón
Botón
(atrás): Regresa a la pantalla anterior o cierra el cuadro de diálogo, menú, teclado en pantalla,
etc.
Nota:
R Los botones
auricular, enseguida del botón de inicio, y se apagan si no los usa durante un rato. Para mostrar los
botones
aparecerían normalmente.
y se muestran en la mayoría de las pantallas. Aparecen en la parte inferior del
y después de que se apaguen, simplemente toque el área del auricular donde
Aplicación Línea fija
La aplicación [Línea fija] se muestra en forma predeterminada en la pantalla de inicio del auricular, y le
permite acceder a funciones de uso común de su sistema telefónico.
Le permite realizar llamadas de intercomunicador
Le permite cambiar ciertas funciones de su sistema telefónico
Le permite usar el contestador de llamadas de su sistema telefónico (solo KX-PRX120)
Le permite acceder al registro de llamadas de la unidad base
Le permite usar la función del detector de llaves de la unidad base
Para hacer llamadas
Importante:
R Cuando el auricular está conectado a la unidad base, se muestra
no se muestra, el auricular no puede hacer ni recibir llamadas.
R Si coloca el auricular en el cargador mientras habla por teléfono, la llamada no se desconectará.
1 Toque [Teléfono] en la pantalla de inicio o en la lista de aplicaciones.
2 Seleccione la pestaña
3 Ingrese el número telefónico y después toque
R Para borrar un número, toque
R Para introducir una pausa en la marcación, toque y siga tocando
4 Cuando termine, toque
en la parte superior de la pantalla.
en la parte inferior de la pantalla.
.
para finalizar la llamada.
en la barra de estado. Si este icono
.
13
Page 43

Pasos iniciales
Cómo usar otras funciones durante una llamada
Marcación temporal por tonos (para usuarios del servicio de marcación de disco o por
pulsos)
Oprima
para cambiar al modo de marcación por tonos, y después marque los números según lo desee.
Para contestar llamadas
1 Cuando esté recibiendo una llamada, toque
2 Toque
Volumen del receptor o el altavoz
Oprima el botón de volumen hacia arriba (
para terminar la llamada.
y arrástrelo hasta .
) y hacia abajo ( ) repetidamente durante una llamada.
Cómo usar los registros de llamadas
El auricular y la unidad base registran cada uno sus llamadas, y le permiten revisar los registros de sus
llamadas. Los siguientes símbolos se utilizan para indicar cada tipo de llamada almacenada en los registros
de llamadas.
Importante:
R Es necesario tener identificador de llamadas para registrar las llamadas perdidas y contestadas
(página 19).
Registro de llamadas
Registro de llamadas en el auricu-
*1
lar
Registro de llamadas de la unidad
base
*1 El registro de llamadas del auricular solo puede registrar llamadas que se reciben mientras el auricular
está conectado a la unidad base.
Icono Significado
(azul)
(verde) Llamada saliente
(rojo) Llamada perdida
(azul)
Llamada perdida
Llamada contestada
Llamada contestada o llamada
perdida que ya fue confirmada
Cómo hacer llamadas desde el registro de llamadas del auricular
1 Toque [Teléfono] en la pantalla de inicio o en la lista de aplicaciones.
2 Seleccione la pestaña
en la parte superior de la pantalla.
14
Page 44

Pasos iniciales
3 Toque la pestaña deseada para seleccionar el tipo de llamadas que desea ver.
4 Toque enseguida del número telefónico o persona a quien desea llamar.
5 Cuando termine, toque para finalizar la llamada.
Cómo hacer llamadas desde el registro de llamadas de la unidad base
1 Toque [Línea fija] en la pantalla de inicio o en la lista de aplicaciones.
2 Toque [Lista del registro de llamadas].
R El auricular se conecta a la unidad base.
3 Toque
enseguida del número telefónico o persona a quien desea llamar.
4 Cuando termine, toque para finalizar la llamada.
Parámetros de tonos de timbre y audio
Cómo seleccionar un perfil de audio
1 En la pantalla inicial, toque
2 Toque
Perfiles de audio preestablecidos
– [General]: Puede seleccionar el tono de timbre, volumen de timbre, etc. deseado.
– [Silencio]: El timbre está apagado.
– [Exterior]: Se utilizan los parámetros del perfil [General]. El volumen del timbre se configura al nivel
máximo.
enseguida del perfil de audio deseado.
® [Configuración del sistema] ® [Perfiles de audio].
Cómo agregar contactos
1 Toque [Personas] en la pantalla de inicio o en la lista de aplicaciones.
2 Toque
3 Si se le indica, siga las instrucciones en pantalla para determinar si se guardará el contacto.
R Los contactos se pueden almacenar en la memoria del auricular, o sincronícelos con su cuenta de
R Toque [Agregar una cuenta nueva] (si se muestra) si desea registrar una cuenta de Google en el
4 Ingrese la información según sea necesario.
R Para agregar una imagen, toque el icono de imagen.
R Para deshacer los cambios que hizo, toque
R Para agregar la nueva información de contacto a un contacto existente, toque
5 Toque [FINALIZADO].
.
Google.
auricular.
® [Descartar] ® [Aceptar]. Observe que si toca
, los cambios se guardarán.
® [Agrupar].
15
Page 45

Pasos iniciales
Cómo llamar a un contacto
1 Toque [Teléfono] en la pantalla de inicio o en la lista de aplicaciones.
2 Seleccione la pestaña
en la parte superior de la pantalla.
3 Toque el contacto deseado.
4 Cuando termine, toque
para finalizar la llamada.
Funciones del contestador de llamadas (solo KX-PRX120)
Encendido y apagado del contestador de llamadas
El contestador de llamadas ya está encendido al momento de la compra.
1 Toque [Línea fija] en la pantalla de inicio o en la lista de aplicaciones.
2 Toque [Contestador].
R El auricular se conecta a la unidad base.
3 Mueva el interruptor de [Contestar] a la posición de encendido o apagado.
R Se muestra
Reproducción de mensajes
1 Toque [Línea fija] en la pantalla de inicio o en la lista de aplicaciones.
2 Toque [Contestador].
R El auricular se conecta a la unidad base.
R El número de mensajes se muestra en la parte superior de la pantalla.
3 Para reproducir todos los mensajes nuevos:
→ Toque [Reproducir mensaje nuevo].
Para reproducir todos los mensajes:
→ Toque [Reproducir todos los mensajes].
Para reproducir u
→ Toque [Lista de mensajes] y después toque
Nota:
R Los mensajes que se han reproducido tienen una marca de verificación enseguida de ellos en la lista de
mensajes.
en la barra de estado mientras el contestador de llamadas está encendido.
n mensaje específico:
enseguida del mensaje deseado.
Idioma de la guía de voz
Puede cambiar el idioma utilizado para la guía de voz del contestador de llamadas.
1 Toque [Línea fija] en la pantalla de inicio o en la lista de aplicaciones.
2 Toque [Parámetros del teléfono fijo] ® [Configuración inicial].
R El auricular se conecta a la unidad base.
3 Toque [Menú de Voz].
4 Seleccione el idioma deseado.
16
Page 46

Pasos iniciales
Configuración de tonos y pulsos
Este parámetro se debe configurar para que coincida con el modo de marcación de su servicio telefónico;
de lo contrario, no podrá hacer llamadas (la configuración predeterminada es [Tono]).
1 Toque [Línea fija] en la pantalla de inicio o en la lista de aplicaciones.
2 Toque [Parámetros del teléfono fijo] ® [Configuración inicial].
R El auricular se conecta a la unidad base.
3 Toque [Configuración de tono/pulso].
4 Seleccione la configuración deseada.
– [Pulso]: Selecciónelo si su servicio telefónico usa el modo de marcación por pulsos (rotatorio).
– [Tono]: Selecciónelo si su servicio telefónico usa el modo de marcación por tonos.
Idioma de la pantalla
1 Desde la pantalla de inicio, toque
[Idioma].
2 Seleccione el idioma deseado.
Nota:
R Es posible que algunos elementos se muestren en inglés sin importar la configuración del idioma en
pantalla.
® [Configuración del sistema] ® [Teclado e idioma] ®
Fecha y hora
Seleccione la configuración automática o manual de la fecha y la hora
1 Desde la pantalla de inicio, toque
hora automáticas].
2 Para configurar la fecha y la hora automáticamente:
→ Seleccione el método deseado.
R Si selecciona [Usar tiempo proporcionado por la red], se requiere una conexión a Internet
para que el auricular ajuste automáticamente su configuración de fecha y hora.
Para configurar la fecha y la hora manualmente:
→ Seleccione [Desactivar].
® [Configuración del sistema] ® [Fecha y hora] ® [Fecha y
Configuración de la fecha y la hora manualmente
1 En la pantalla inicial, toque
® [Configuración del sistema] ® [Fecha y hora].
2 Asegúrese de que [Fecha y hora automáticas] esté configurado en [Desactivar].
3 Para configurar la fecha:
→ Toque [Establecer fecha], seleccione la fecha deseada y después toque [Establecer].
Para configurar la hora:
→ Toque [Establecer la hora], seleccione la hora deseada y después toque [Establecer].
17
Page 47

Pasos iniciales
Solución de problemas
Problema Causa y/o solución
Aparece
No es posible hacer llamadas. R Es posible que el parámetro de tono/pulso esté configurado incorrec-
El auricular no se enciende incluso después de cargar la
batería.
La batería se cargó por completo, pero continúa mostrándose el mensaje de batería
baja y/o el tiempo de funcionamiento parece ser más corto.
No se muestra la información
de la persona que llama.
Se oye ruido y el sonido se
corta de forma intermitente.
.
R El auricular está demasiado lejos de la unidad base. Acérquelo.
R El adaptador para corriente de la unidad base no está conectado co-
rrectamente. Conecte de nuevo el adaptador para corriente a la unidad base.
R El auricular no está registrado en la unidad base. Regístrelo. Consul-
te las Manual de instrucciones para obtener más información (la información de descarga se encuentra en la página 1).
tamente. Cambie la configuración (página 17).
R El auricular está apagado. Oprima y mantenga oprimido el botón de
encendido en la parte superior del auricular.
R Limpie los contactos de carga del auricular y del cargador con un pa-
ño seco y cárguelo de nuevo.
R Es momento de reemplazar la batería (página 2).
R Quizás necesite suscribirse al servicio de identificación de llamadas
de su proveedor de servicio. Comuníquese con su proveedor de servicio telefónico para que le dé más detalles.
R Si su unidad está conectada a cualquier equipo telefónico adicional,
desconéctela de ahí y conéctela directamente a la toma de la pared.
R Si utiliza un servicio de DSL/ADSL, le recomendamos que conecte un
filtro de DSL/ADSL entre la unidad base y la toma de la línea telefónica. Comuníquese con su proveedor de servicio de DSL/ADSL para
que le dé más detalles.
R Es posible que el servicio que muestra el nombre no esté disponible
en algunas áreas. Comuníquese con su proveedor de servicio telefónico para que le dé más detalles.
R Es posible que otro equipo telefónico esté interfiriendo con esta uni-
dad. Desconecte el otro equipo e inténtelo de nuevo.
R Está usando el auricular o la unidad base en un área con mucha inter-
ferencia eléctrica. Cambie la posición de la unidad base y utilice el auricular alejado de fuentes de interferencia.
R Acérquese a la unidad base.
R Si utiliza un servicio de DSL/ADSL, le recomendamos que conecte un
filtro de DSL/ADSL entre la unidad base y la toma de la línea telefónica. Comuníquese con su proveedor de servicio de DSL/ADSL para
que le dé más detalles.
18
Page 48

Pasos iniciales
Soporte para el identificador de llamadas
La unidad base es compatible con el identificador de llamadas. El identificador de llamadas es un servicio
que proporciona su proveedor del servicio telefónico, y es posible que requiera una suscripción.
Comuníquese con su proveedor de servicio telefónico para obtener detalles acerca de la disponibilidad.
19
 Loading...