

Panasonic KX-F700 User Manual

Téléphoné Answering System
Model No. KX-F700C
O p e r a t i n g
Panasonic
with Facsimile
KX-F700
/ N S T R U C T I O N S
Please read these Operating
Instructions before using the unit.
❖ FAX PAPER ❖
98 tool roll of Panasonic super thermal paper
- or '
164 foot roll of Standard thermal paper
(See page 75 for order numbers.)

Please read IMPORTANT SAFETY INSTRUCTIONS on
page 74 before use. Read and understand all instructions.
For the United States Only
The Telephone Consumer Protection Act of 1991 makes it unlawful for any person to use a computer
or other electronic device to send any message via a telephone facsimile machine unless such a
message clearly contains in a margin on the top or bottom of at least the first sent page the following
information:
1) Date and time of transmission; and,
2) Identification of either business, business entity or individual sending the message; and,
3) Telephone number of either the sending machine, business, business entity or individual.
In order to program this information into your facsimile machine, you must complete the steps on
pages 36 to 37 in these Operating Instructions.
Important Phone Numbers
Authorized Service Center: 1-800-545-2672
Accessory Purchases: 1 -800-332-5368
Technical Support: 1-800-HELP-FAX
Accessories
Power cord
Handset
Any details given in these instructions are subject to change without notice.
The photo on the cover page shows KX-F700 and it may vary slightly from the actual product.
................
(page 11)
.... 1 pc.
1 pc.
For recording paper replacement, see page 75.
Telephone line
cord
..................
Handset cord
...............
1 pc.
(page 11)
Ipc.
(page 11 )
Paper stacker .... 1 pc.
AA (R6, UM-3) size
battery
....................
4 pcs.
(page 10)
Recording paper . .1 pc.
(page 9)

Thank you for purchasing the Panasonic Telephone Answering System with Facsimile.
This unit combines multiple functions of Facsimile, Answering Device and Telephone;
You can send and receive documents and voice messages on a single line.
Features
General
• Desktop type
• LCD (Liquid Crystal Display) readout
•Automatic paper cutter
• Silent ring fax recognition system (page 25)
• Help function (see below)
• Copier function (page 27)
Facsimile
•Automatic document feeder (up to 15 sheets)
• 64-level halftones
• Resolution: standard/fine/super fine/fialftone (page 19)
• Delayed transmission (page 42)
• Paper save function (page 49)
• Overseas transmission mode (page 47)
• Remote fax receiving using an extension phone (page 43)
• Junk mail prohibitor (page 45)
• Day/night mode (page 48)
Digital Answering System:
• Voice mailbox (page 54)
• Tone remote control system
integrated telephone system
• One-touch dialer (10 phone numbers) (page 38)
• 22-station speed dialer (page 39)
• Hands-free speakerphone (page 16)
• Electronic telephone directory (page 40)
HELP function
Use this function if the instructions are lost while using the unit. It will
provide the user with instructions.
When the HELP button is pressed, the unitwill print a quick reference.
Information:
• Transmit the leaflet on page 81 to several of your associates. In this way, you can confirm that your unit
will function correctly and inform them of the procedure for transmitting documents and/or recording voice
messages.
* •

Table of Contents
n ¡nstallation and Preparation
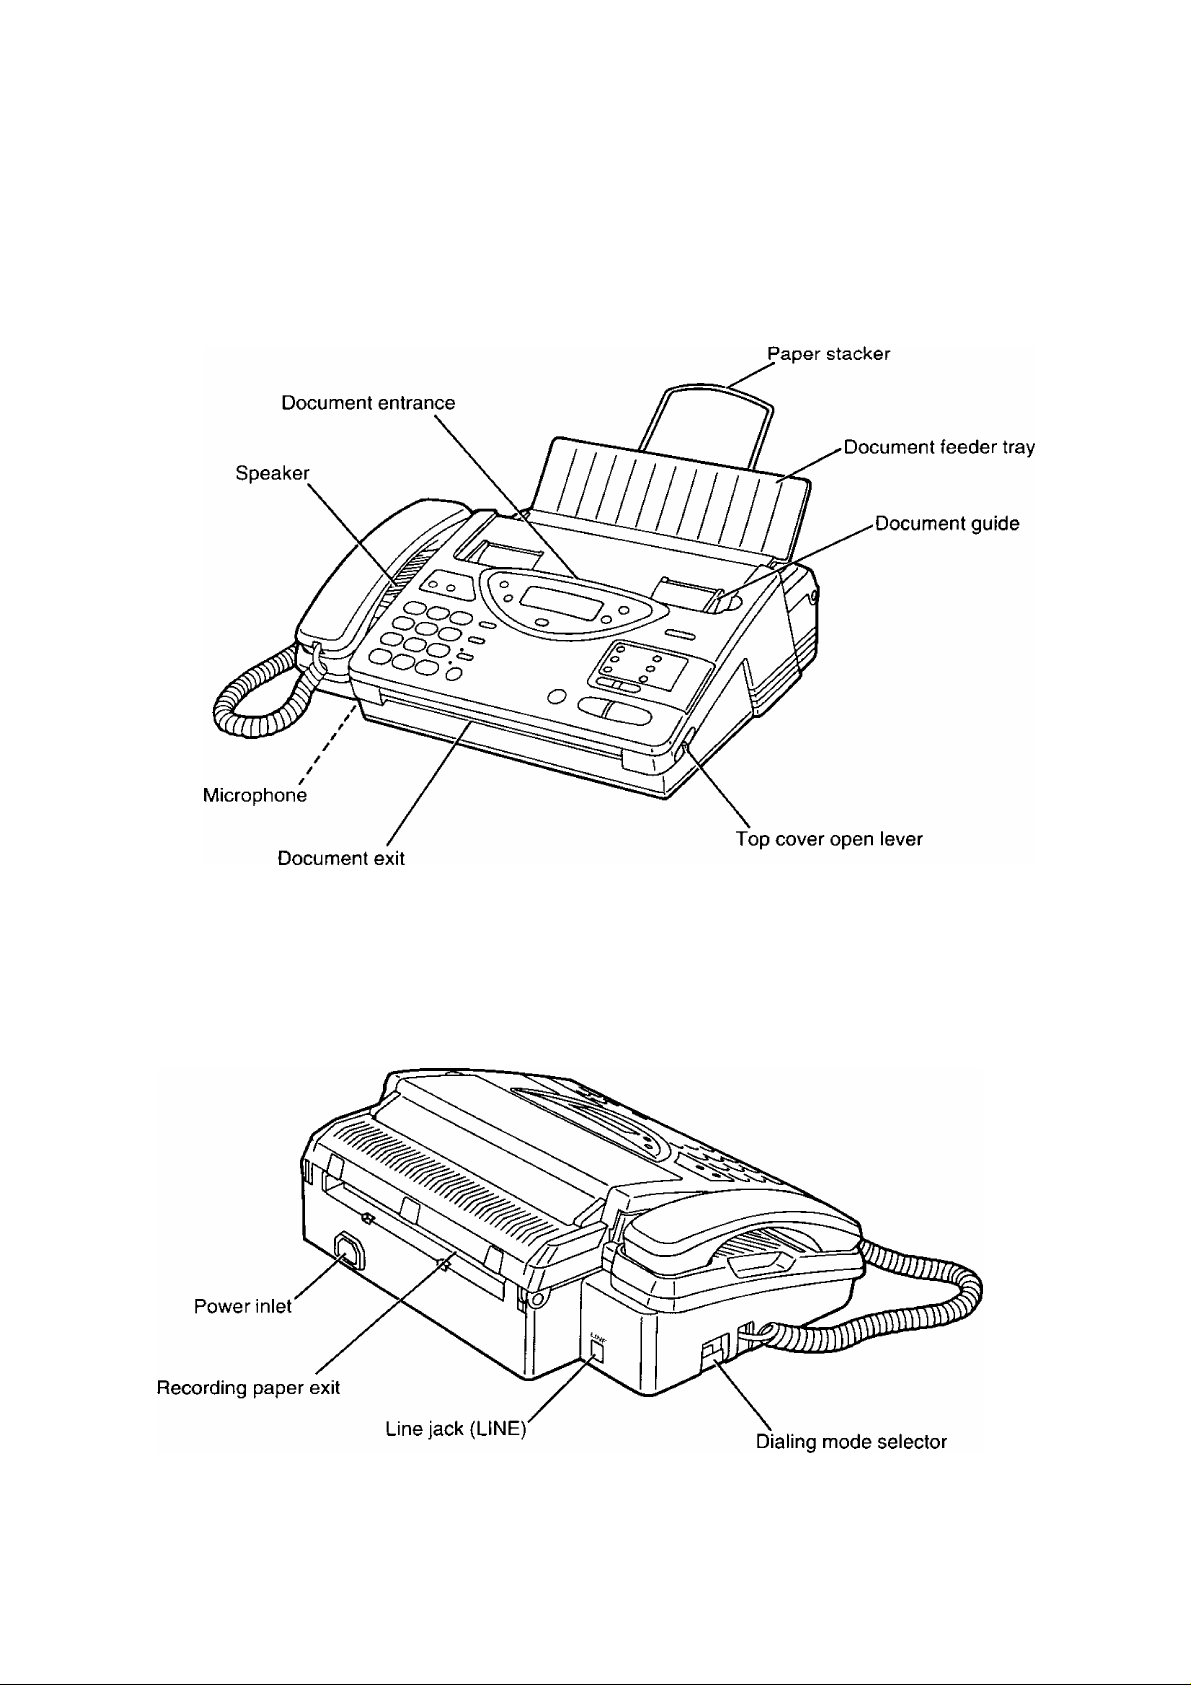
Location of Controls.................................................. 6
Front view................................................................. 6
Rear view................................................................. 6
Control panel ........................................................... 7
Answering control buttons........................................ 8
Installing Your Unit ................................................... 9
Installing the recording paper................................... 9
Installing the paper stacker
Installing the batteries
Connections and dialing mode setting
Adjusting Volumes ................................................... 12
Recording Greeting Messages................................. 13
How to record greeting messages........................... 13
Checking greeting messages
Setting the caller’s recording time
Selecting the Receive Mode
.....................................
...........................................
...................
..................................
..........................
.....................................
9
10
11
14
14
15
Basic instructions
Telephone
Making and Answering Voice Calls........................ 16
Making voice calls ................................................. 16
Making voice calls using automatic
dialing................................................................. 16
Redialing the last dialed number............................ 17
Voice muting
Answering voice calls............................................. 17
Helpful hints for the speakerphone
operation
Facsimile
Before Transmission
Acceptable documents........................................... 18
Loading documents................................................ 19
Setting resolution
Sending 16 or more sheets
Transmitting Documents ........................................ 20
Transmitting documents manually
Transmitting documents with fewer
procedures......................................................... 20
Transmitting documents using automatic
dialing
Receiving Documents and/or
Voice Calls ........................................................... 22
Manual reception
Automatic reception
.........................................................
...........................................................
...............................................
...................................................
....................................
.........................
................................................................
...................................................
...............................................
17
17
18
19
19
20
21
22
22
Receiving in the ANS/FAX mode
Setting the number of rings to answer
in the ANS/FAX mode
Receiving in the TEL/FAX mode
Setting the number of rings to answer
in the TEL/FAX mode
Silent ring fax recognition system
Receiving in the FAX mode
Setting the number of rings to answer
in the FAX mode............................................. 26
Copier
Making a Copy ......................................................... 27
Answering Device
Operating the Answering Device............................ 28
Setup of voice message and document
reception
Listening to recorded messages
Functions during playback
Erasing recorded messages
Recording a memo message
Recording a telephone conversation ..................... 30
Setting the message alert...................................... 31
Setting the recording time alert.............................. 31
............................................................
...........................
....................................
.........................
....................................
......................
..................................
............................
.....................................
..................................
.................................
22
23
24
25
25
26
28
28
29
29
30
Basic Settings
User Programmable Features................................. 32
Programming feature table
How to enter letters and symbols........................... 34
To enter characters
Special uses of the direct call
station keys
Setting the date and time
Setting your logo
Setting your facsimile telephone number ... 37
Setting the transmission report printing .... 37
Storing Phone Numbers for Automatic
Dialing .................................................................. 38
Storing phone numbers for one-touch
dialing ................................................................ 38
Storing phone numbers for speed dialing ... 39
To keep a phone number secret
....................................................
....................................................
....................................
............................................
.......................................
...........................
32
34
35
36
36
39
Wi Advanced Instructions
Electronic Telephone Directory
How to use the electronic telephone
directory ........................................................... 40
...........................
40

Polling ....................................................................... 41
Polling reception
Polling transmission (Polled)
Delayed Transmission ............................................... 42
Remote Fax Receiving Using an Extension
Phone ................................................................... 43
Using an extension phone...................................... 43
Changing the remote fax activation code ... 44
...................................................
.................................
41
41
Erasing a specific message from memory ... 61
Erasing all messages from memory
Room monitoring
Recording a marker message
Re-recording a greeting message
Turning on/off pager alert
To skip the greeting message
Pager Alert.................................................................. 63
..................................................
.......................................
.......................
...............................
..........................
................................
61
61
61
62
62
62
Junk Mail Prohibitor
Setting the junk mail prohibitor
Transmitting documents to your unit
with the prohibitor ID ......................................... 46
Special Settings ........................................................ 47
Logo print position
Overseas transmission mode
Setting the day/night mode .................................... 48
Paper save reception/copy
Extension copy
Original mode ........................................................ 51
Resetting the advanced features........................... 51
Voice Contact
Initiating voice contact
Receiving a request for voice contact.................... 52
TONE, FLASH and PAUSE Buttons.......................... 53
TONE button ......................................................... 53
FLASH button ....................................................... 53
PAUSE button
Voice Mailbox
To use maiibox ...................................................... 54
Recording a personal greeting message
for mailbox
Programming the mailbox password
How incoming messages are recorded
into each maiibox............................................... 55
Retrieving messages in the mailbox
Erasing recorded messages in the
mailbox
Retrieving messages in the mailbox
from a remote location
Setting the mailbox alert
Operating the Answering Device
from a Remote Phone............................................ 58
Summary of remote operations
Programming the remote ANS ID
Listening to the recorded messages
in the common memory
Retrieving the recorded messages
in the mailbox
Functions during playback..................................... 60
...................................................
.............................
.................................................
................................
...................................
.....................................................
...........................................................
...........................................
......................................................
...........................................................
.........................................................
.......................
.....................
..............................................................
.......................................
.......................................
.............................
.........................
.....................................
....................................................
45
45
47
47
49
50
52
52
53
54
54
56
56
57
57
58
59
59
60
55
Reports and Lists
Printing Reports and Lists
How to print each report/list.....................................64
Sample reports and lists..........................................65
Setting journal auto print
......................................
........................................
64
67
m Troubleshooting and
Maintenance
Troubleshooting
Error messages on the display..........................68
General corrective measures
Explanation of communication result
on the report
Clearing a recording paper jam
Clearing a document jam
Adjusting the feeder pressure
Maintenance
Cleaning the document feeder unit
Cleaning the thermal head
.................................................
............................
...............................................
.......................
................................
..........................
.......................................................
..................
...............................
68
69
70
71
72
72
73
73
73
B General Information
Important Safety Instructions
Accessory Order Information
Specifications .....................................................75
Users in the U.S.A...............................................76
Limited Warranty for the U.S.A
Users in Canada..................................................78
Limited Warranty for Canada
Index
.................................................................
FAX CORRESPONDENCE......................................81
Speed dialer list
.................................................
Servicenter directory
(For the U.S.A. only)
..............................
...............................
............................
......
.......................
.......................................
74
75
77
79
80
82
83
Installation and Preparation
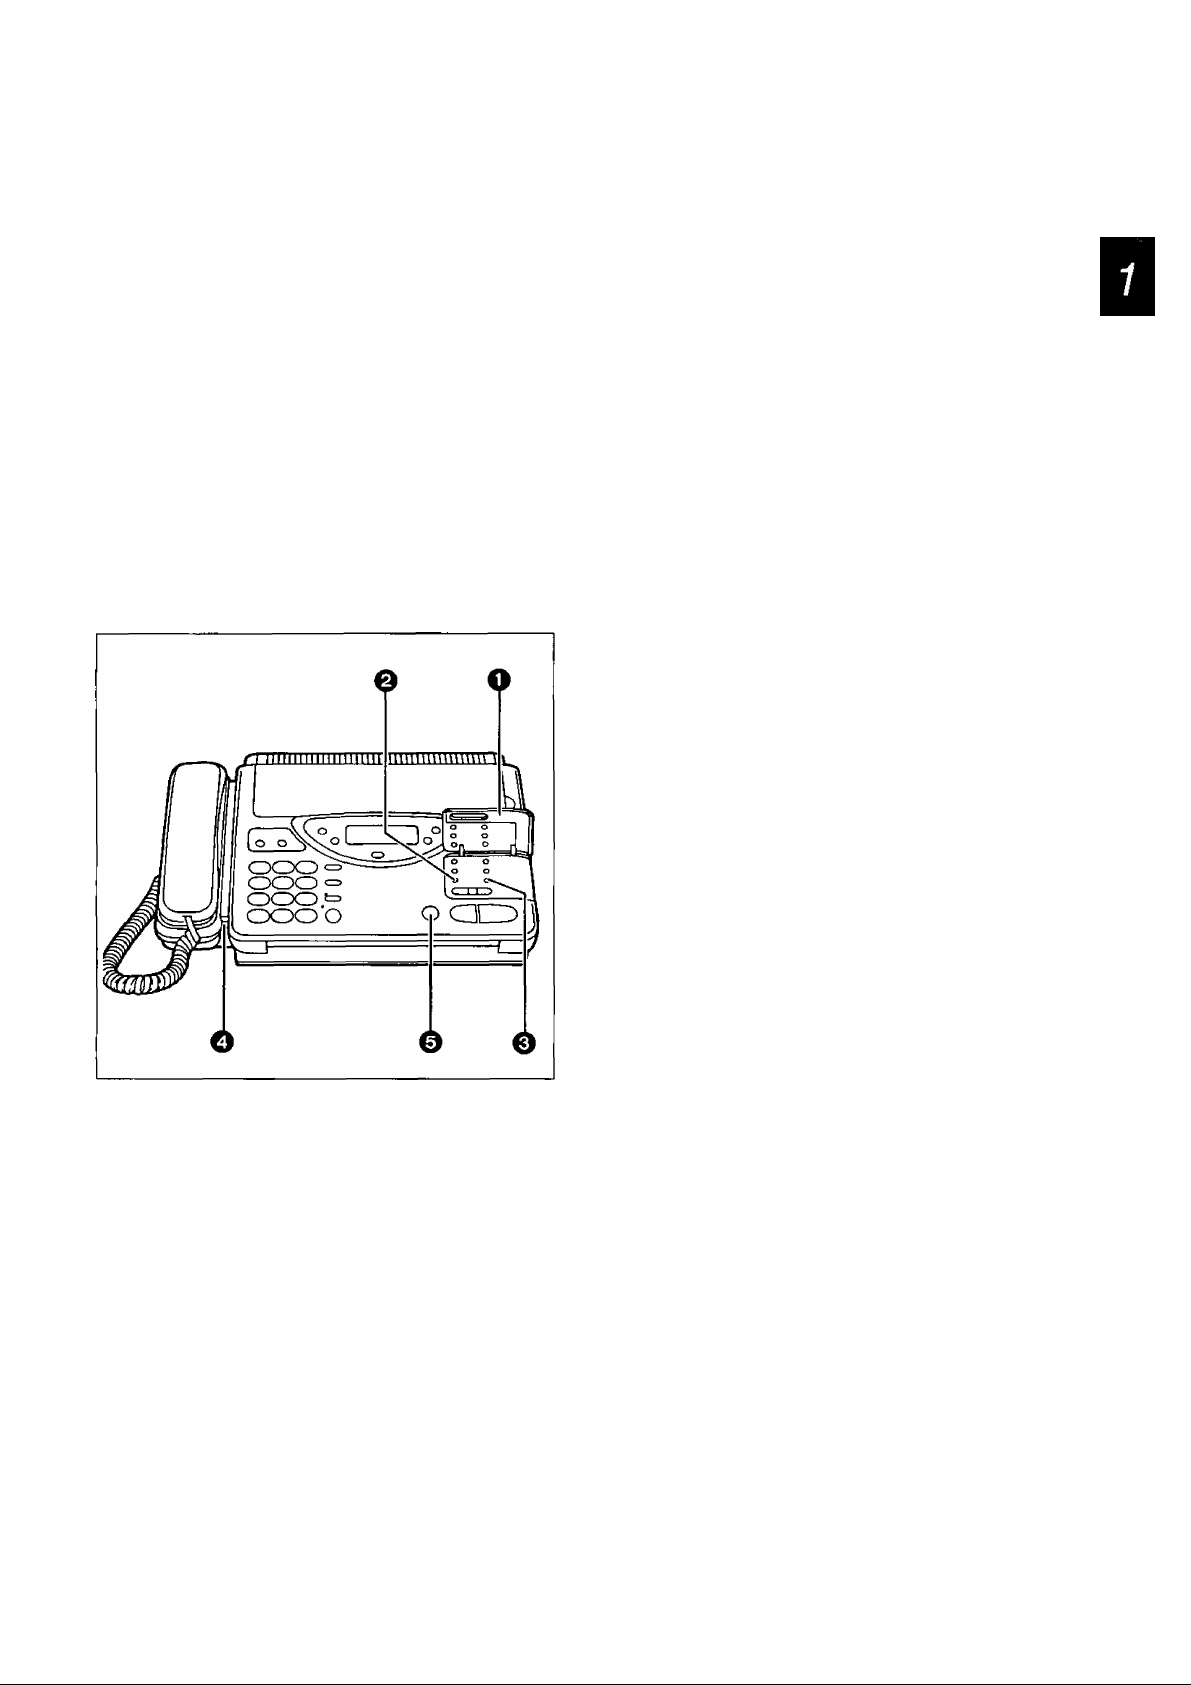
Location of Controls
Front view
_____________
Rear view

Installation and Preparation
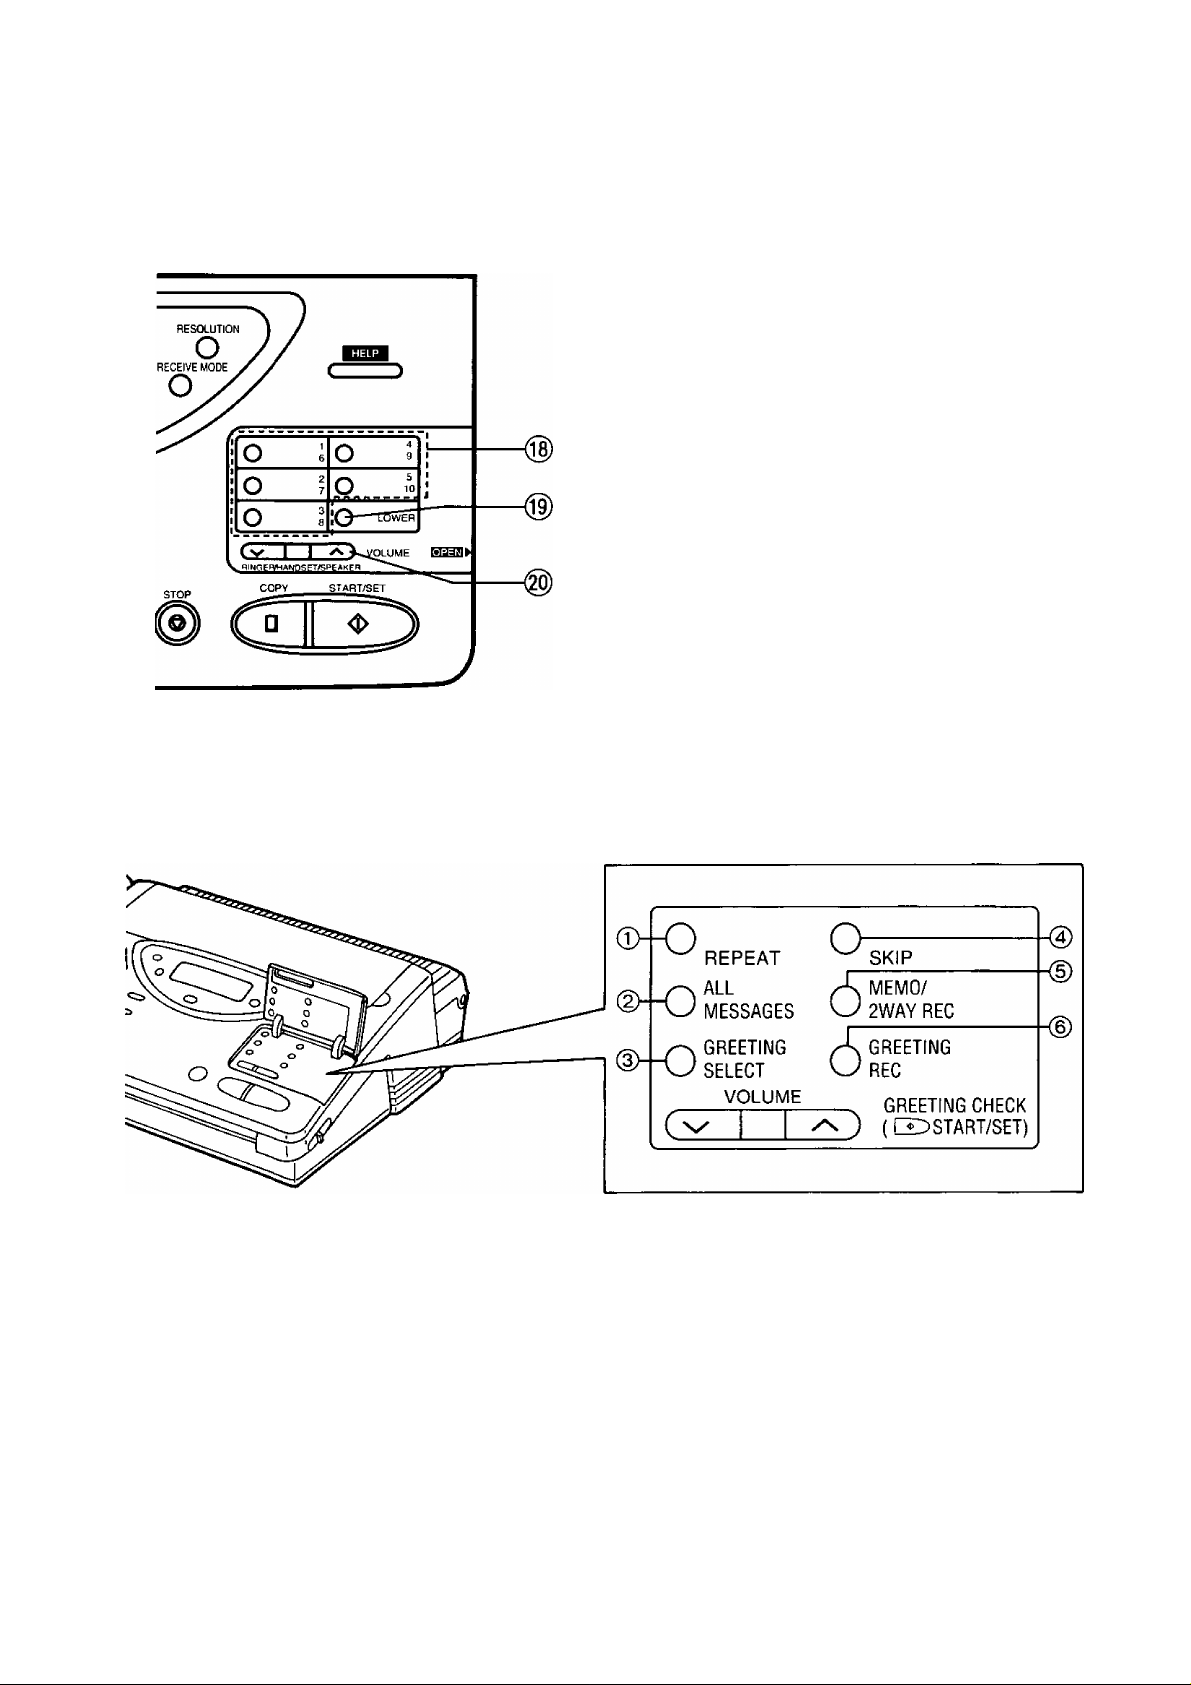
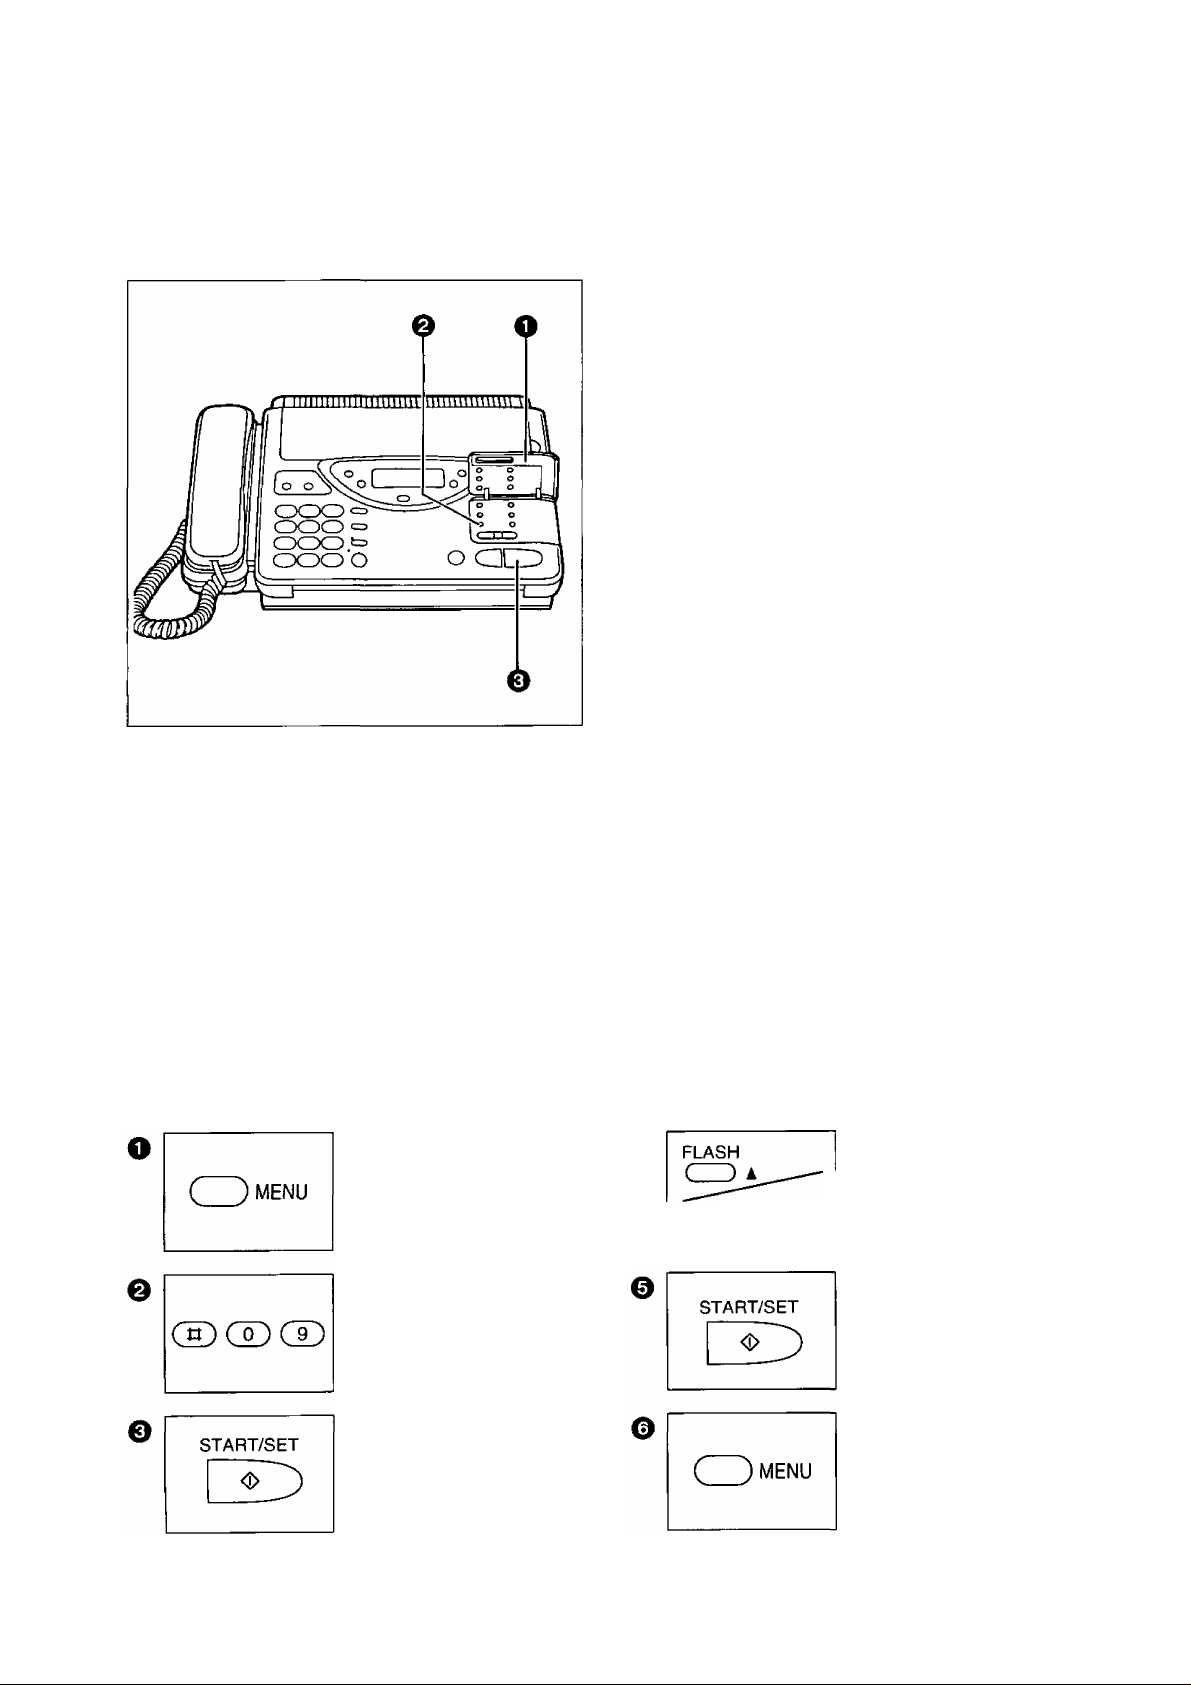
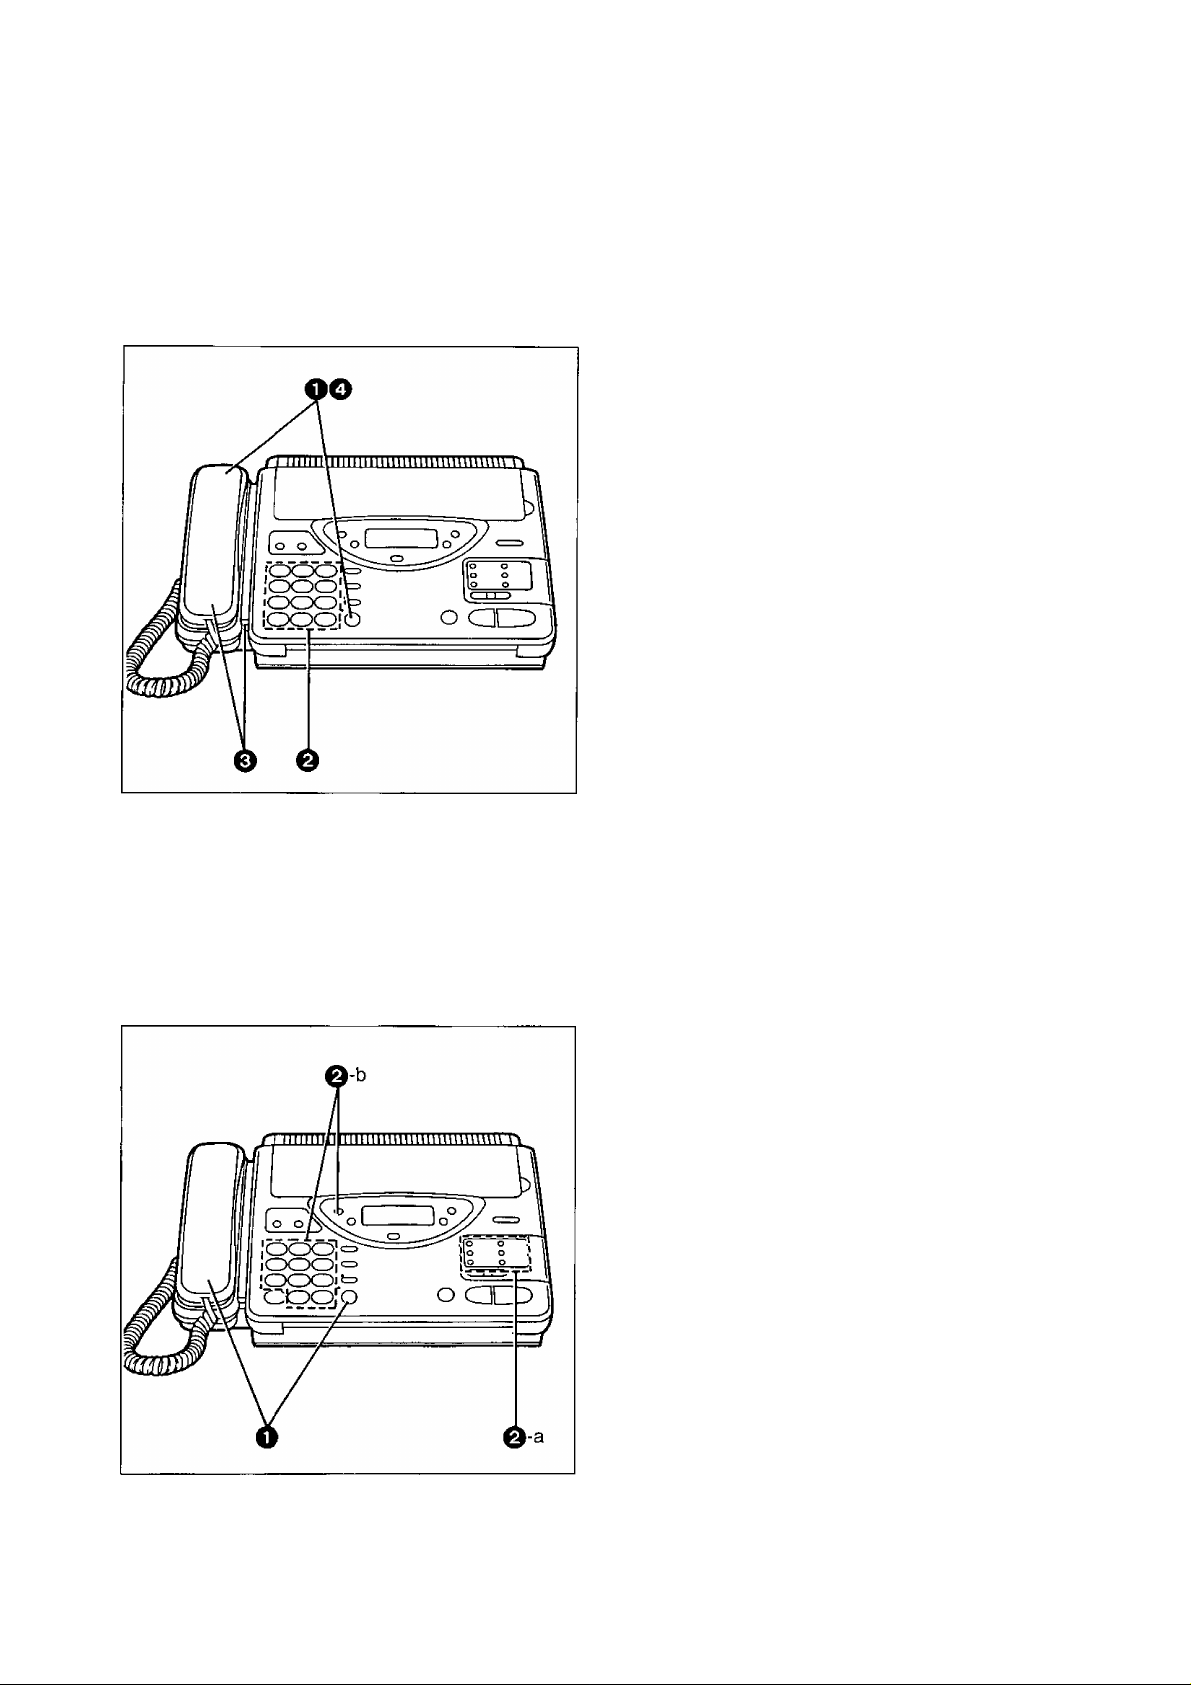
Control panel
0 NEW MESSAGES button (page 28)
Used to play back only new messages.
0 ERASE button (page 29)
Used to erase recorded incoming messages.
(3) DIRECTORY button (pages 16, 21 and 40)
Used for speed dialing. Also used for the
electronic telephone directory.
0 MAIL BOX button (page 56)
Used to select a voice mailbox number.
@ MENU button
Used to start and exit various programming.
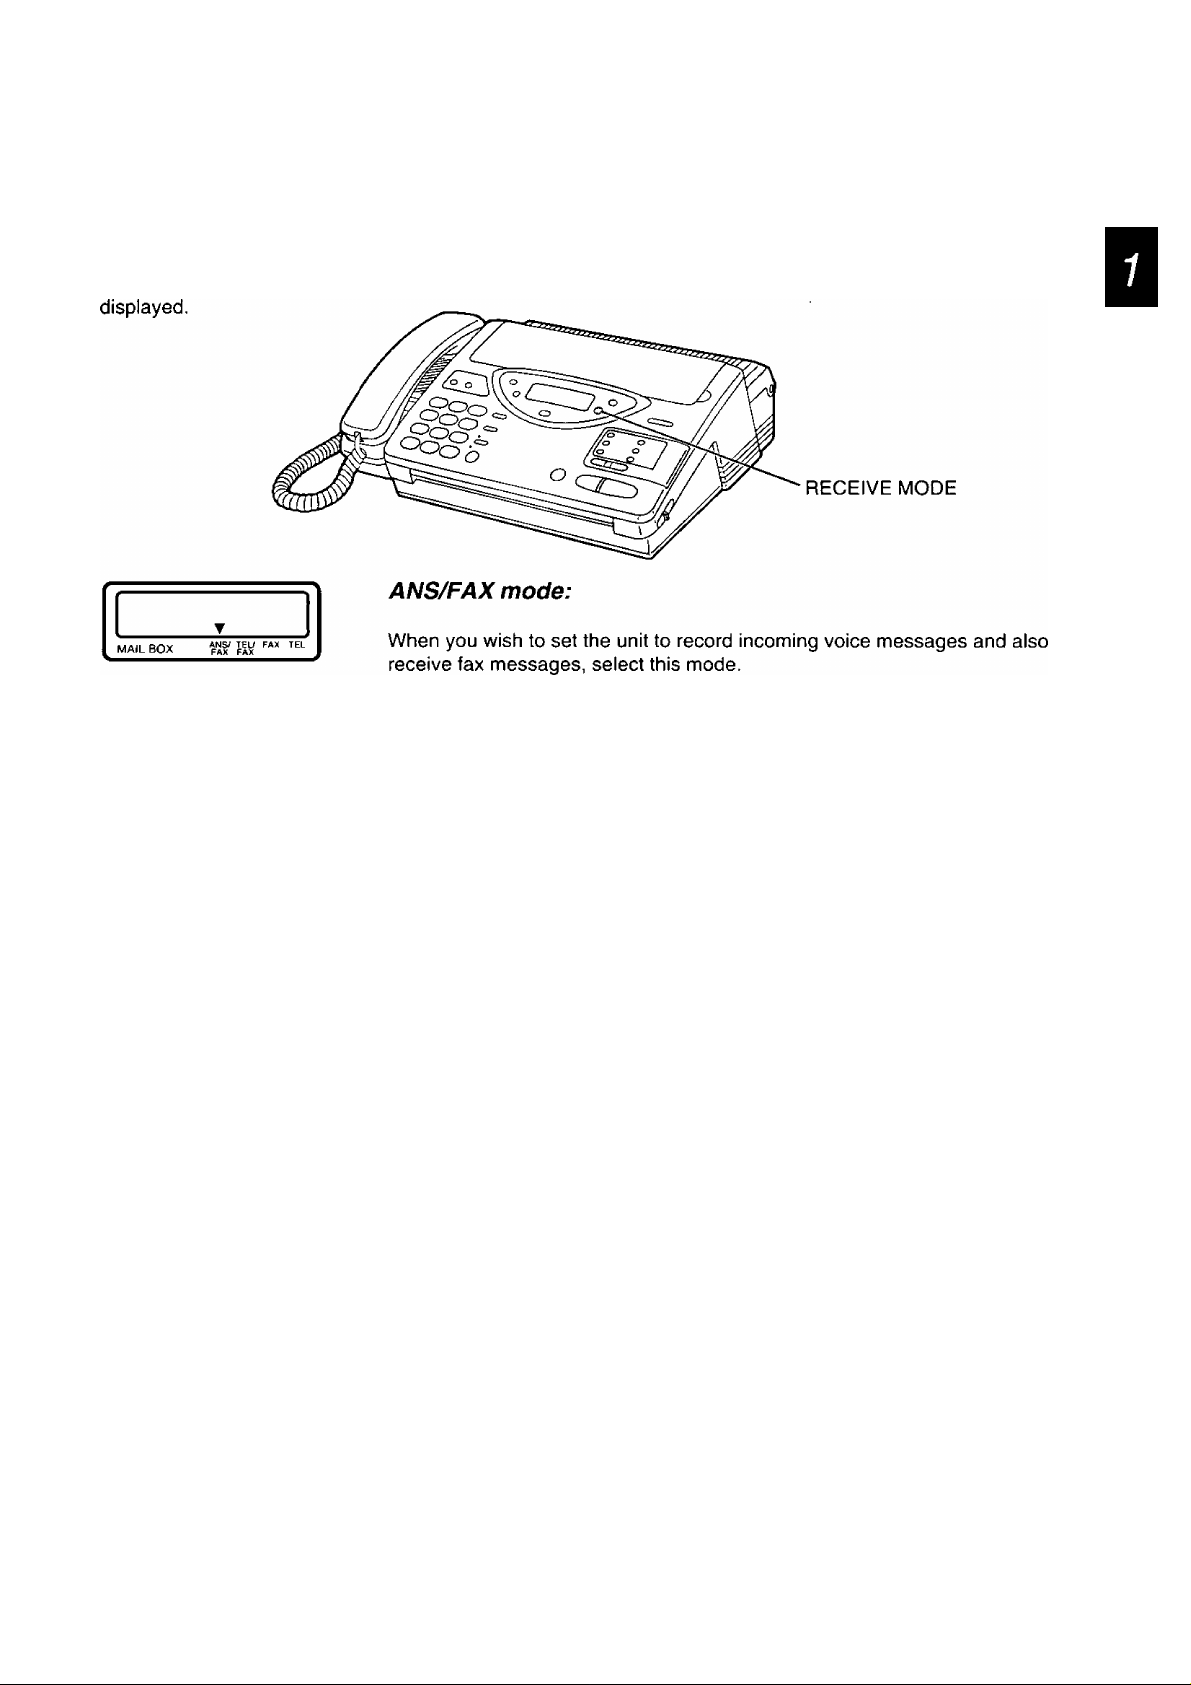
@ RECEIVE MODE button (page 15)
Used to select the desired receiving mode.
0 RESOLUTION button (page 19)
Used to adjust scanning line density.
@ HELP button (page 3)
Used to print an easy guide for operations.
(9) TONE button (page 53)
Used to temporarily change the dialing mode
from pulse to tone during a dialing operation.
Dial keypad
Used for dialing operation and parameter
setting. Also used as character keys.
SP-PHONE/VOICE STDBY button
(pages 16 and 52)
Used for on-hook dialing and voice contact
features.
MUTE button (page 17)
Used for voice muting.
REDIAL/PAUSE button (pages 17 and 53)
Used to redial the last dialed number. Also
used to insert a pause into a phone number.
FLASH button (page 53)
@
Used as a hook button. Also used to access
some features of your host exchange.
@ STOP button (page 20)
Used to stop fax communication.
@ COPY button (page 27)
Used to start copying.
0 START/SET button
Used to start fax communication. Also used to
store parameters during programming.
Installation and Preparation
Control panel (cont.)
@ Direct call station keys (pages 16, 21 and 38)
Used for one-touch dialing. Also used as
character keys when logo and station narhes
are programmed.
@ LOWER key (pages 16, 21 and 38)
Used to access lower stations (6 to 10) for
one-touch dialing.
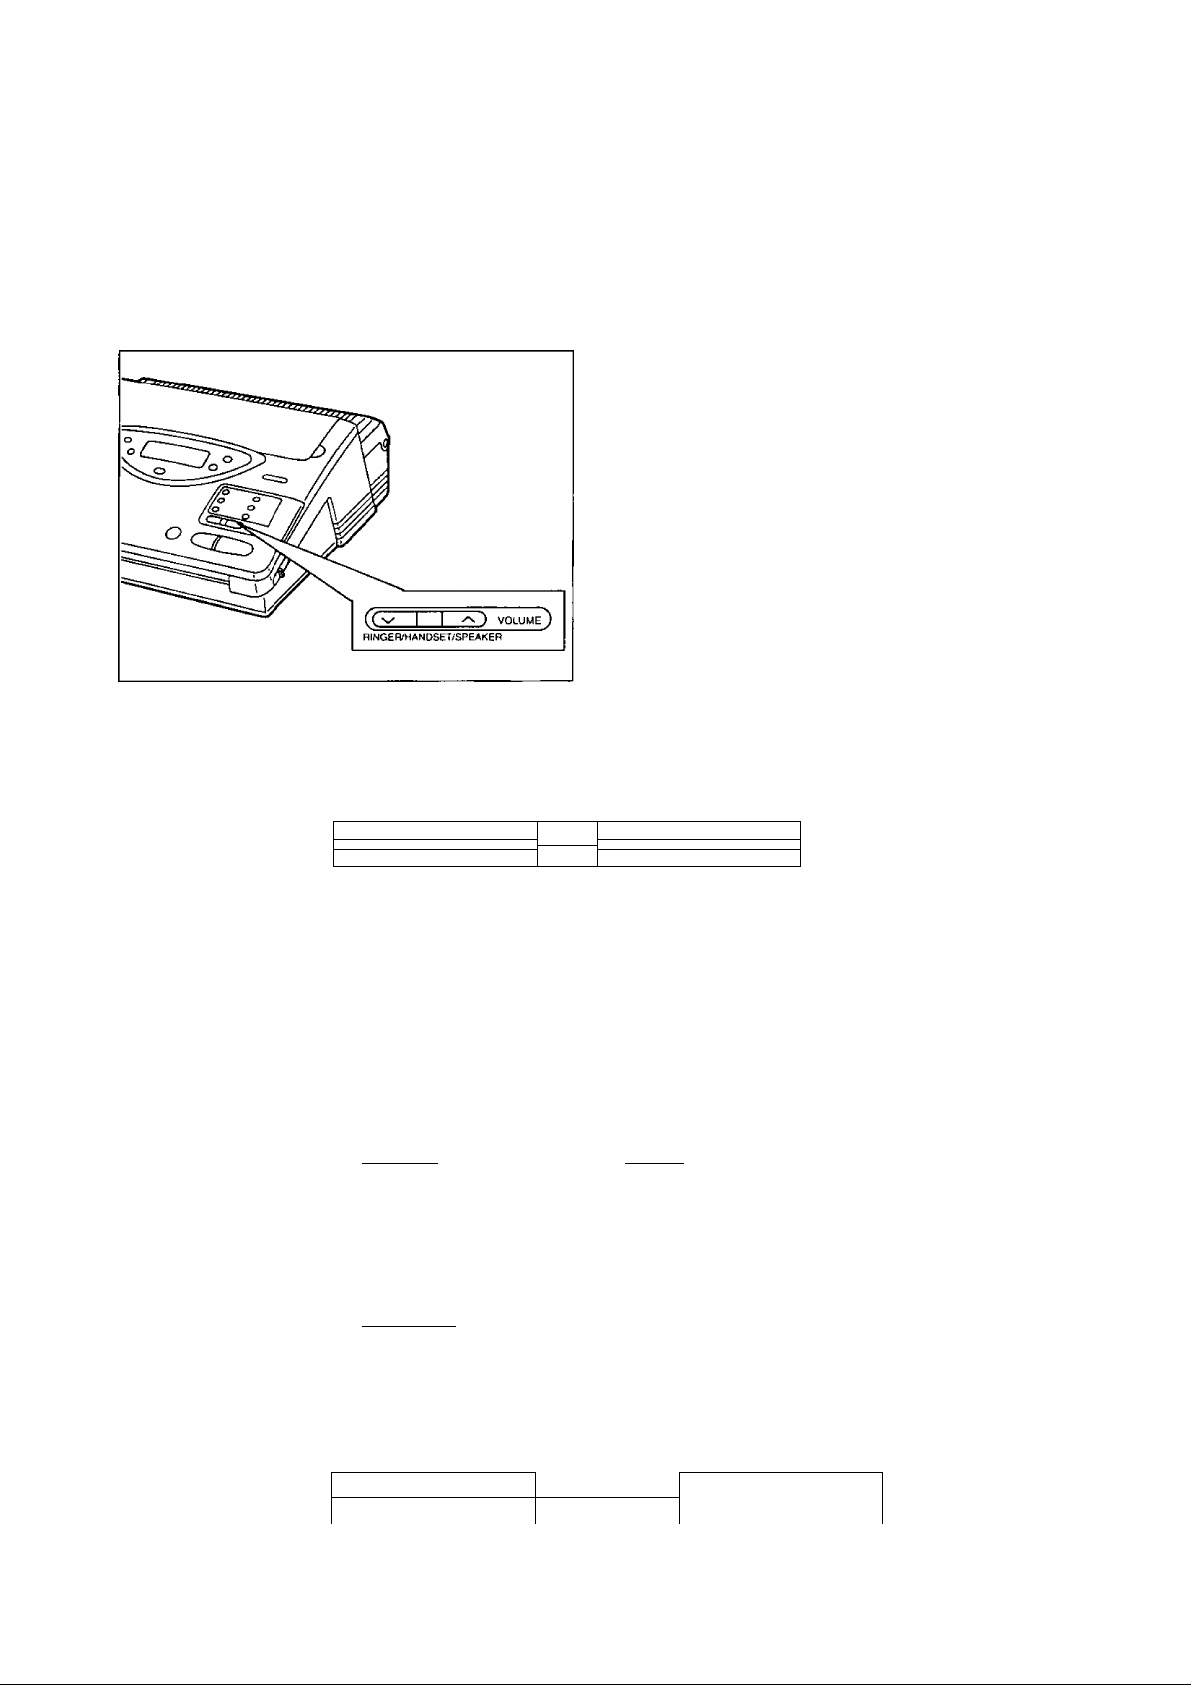
@ VOLUME buttons (page 12)
Used to adjust the volume level of the ringer,
handset and speaker.
Answering control buttons
0 REPEAT button (page 29)
Used to replay the previous message during
the message playback.
(0 ALL MESSAGES button (page 28)
Used to play back alt the recorded voice
messages.
GREETING SELECT button (pages 13 and
54)
Used to select a desired greeting message
when recording or checking the greeting
message.
@ SKIP button (page 29)
Used to skip to the next message during the
message playback.
© MEMO/2WAY REC button (page 30)
Used to start and stop recording a memo
message or a telephone conversation.
© GREETING REC button (pages 13 and 54)
Used to start and stop recording a greeting
message.
8

Installation and Preparation
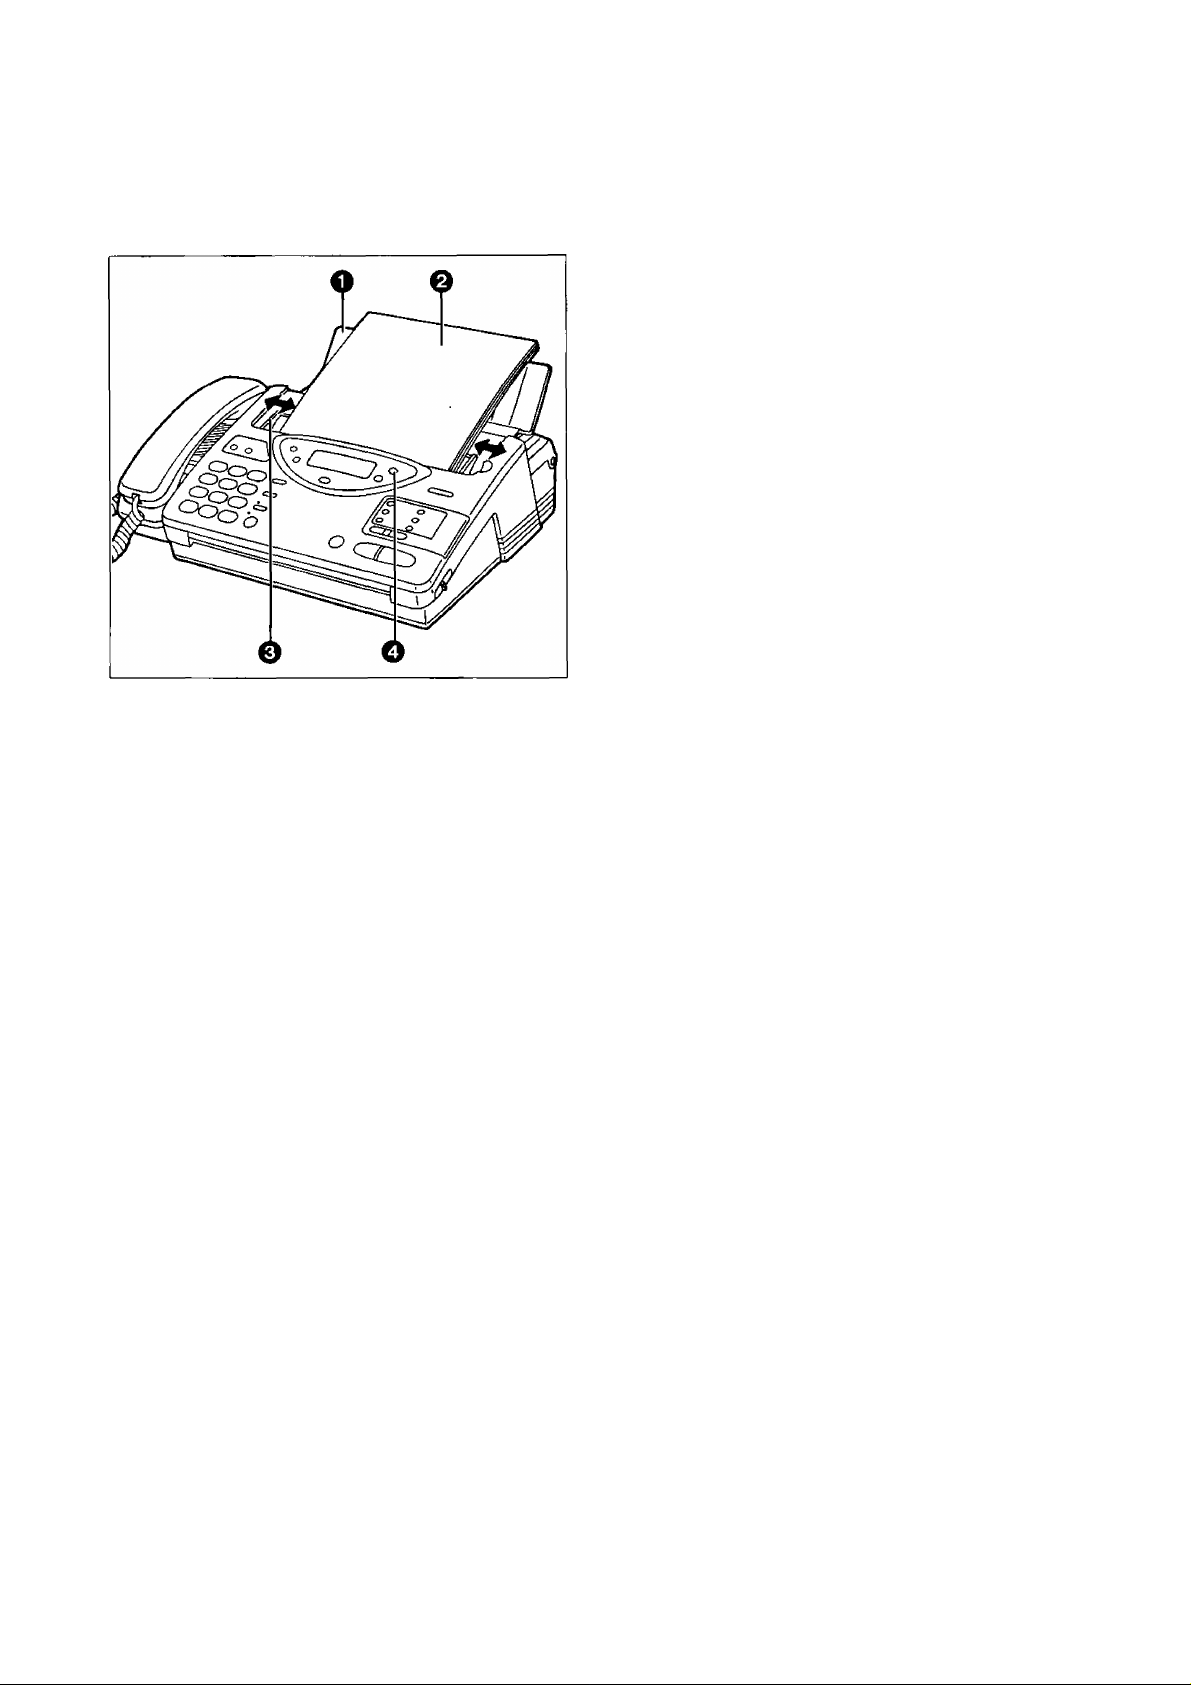
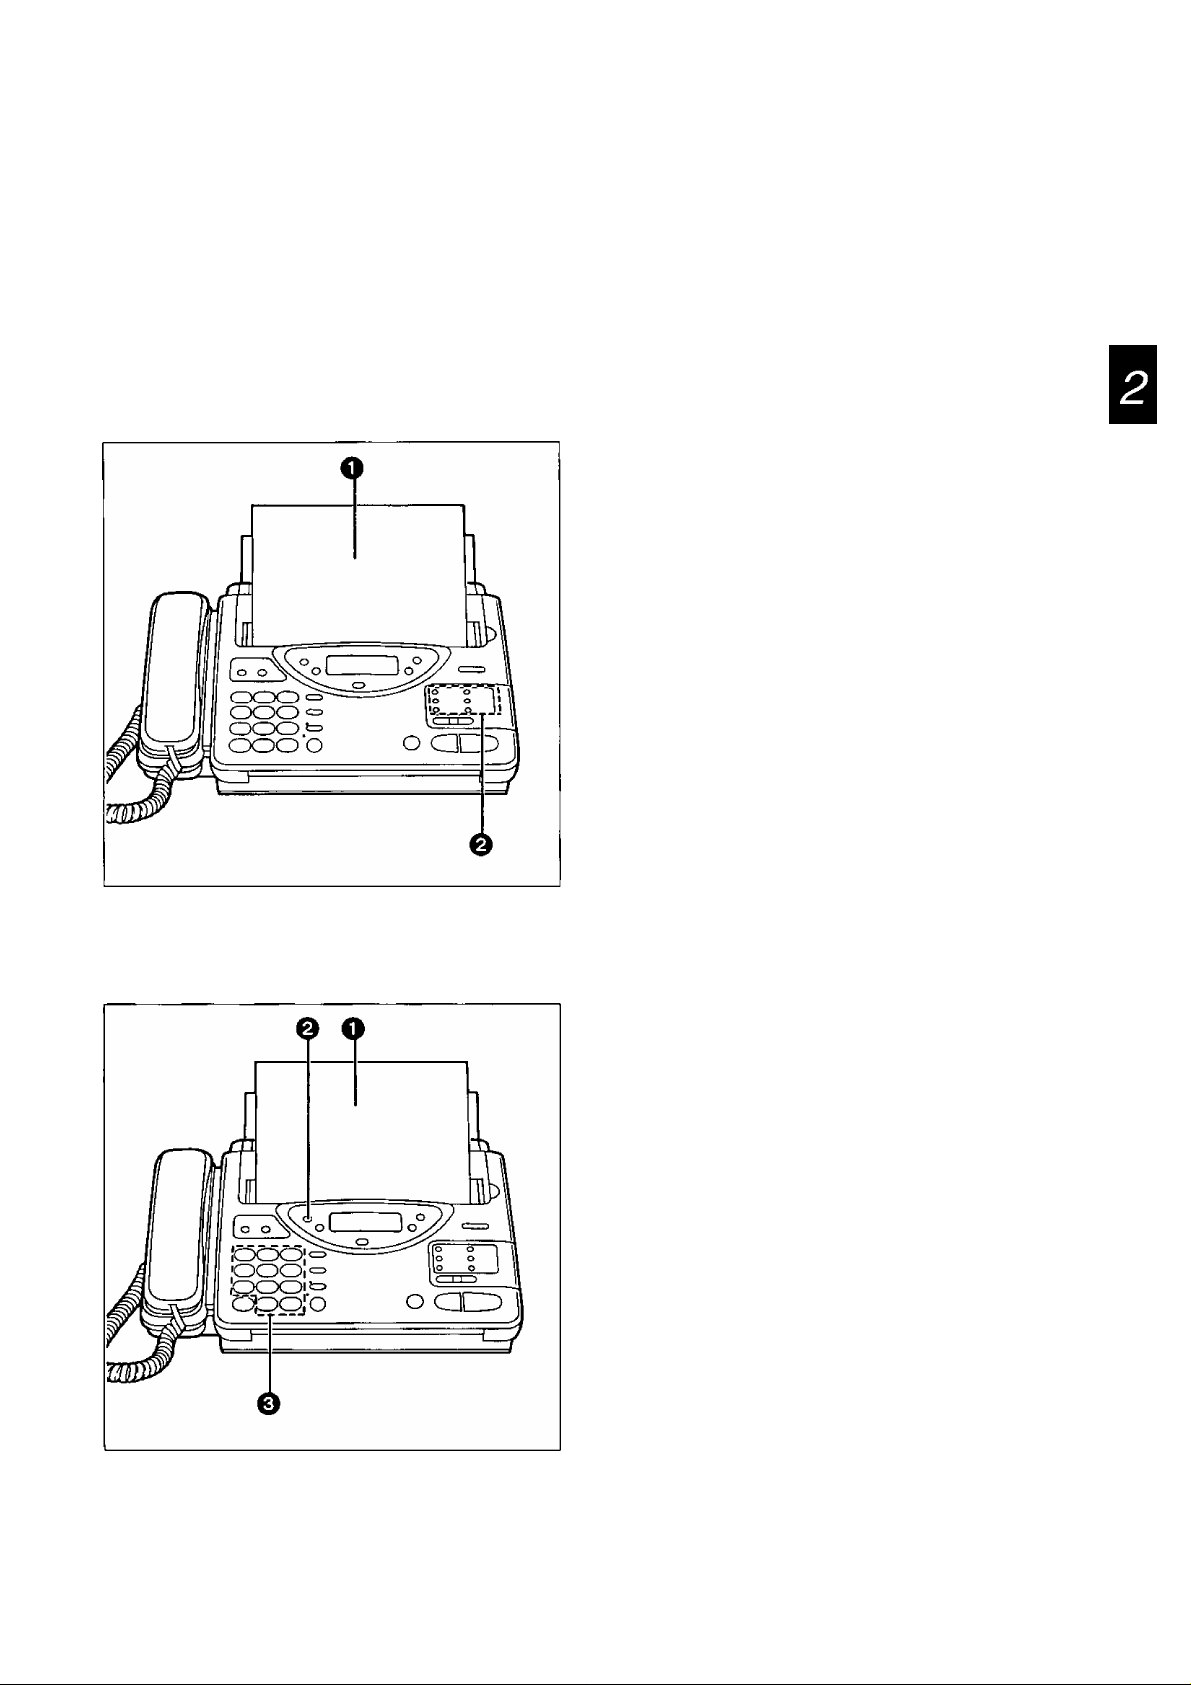
Installing Your Unit
Installing the recording paper
0 Slide the lever toward you to open
the top cover.
0 Place a recording paper roll in the unit.
—Make sure that the shiny side of
the paper is facing up and that
there is no slack, tape or
glue residue on the paper roll.
(See note below.)
o Insert the leading edge of recording
paper under the green bar.
Q
Close the top cover carefully by gently
pressing down on both ends.
Installing the paper stacker.
Notes:
• Use only the included roll or specified
recording paper, or else the print
quality may be affected and/or
excessive thermal head wear may
occur. See page 75 for order number.
• The start of some recording paper rolls
is secured using glue or tape. Residue
from this glue/tape may cause the
paper cutter to jam immediately
following installation of a new roll. To
prevent this, cut approximately 6 inches
from the new roll of paper prior to
installation.
Paper stacker
Installation and Preparation
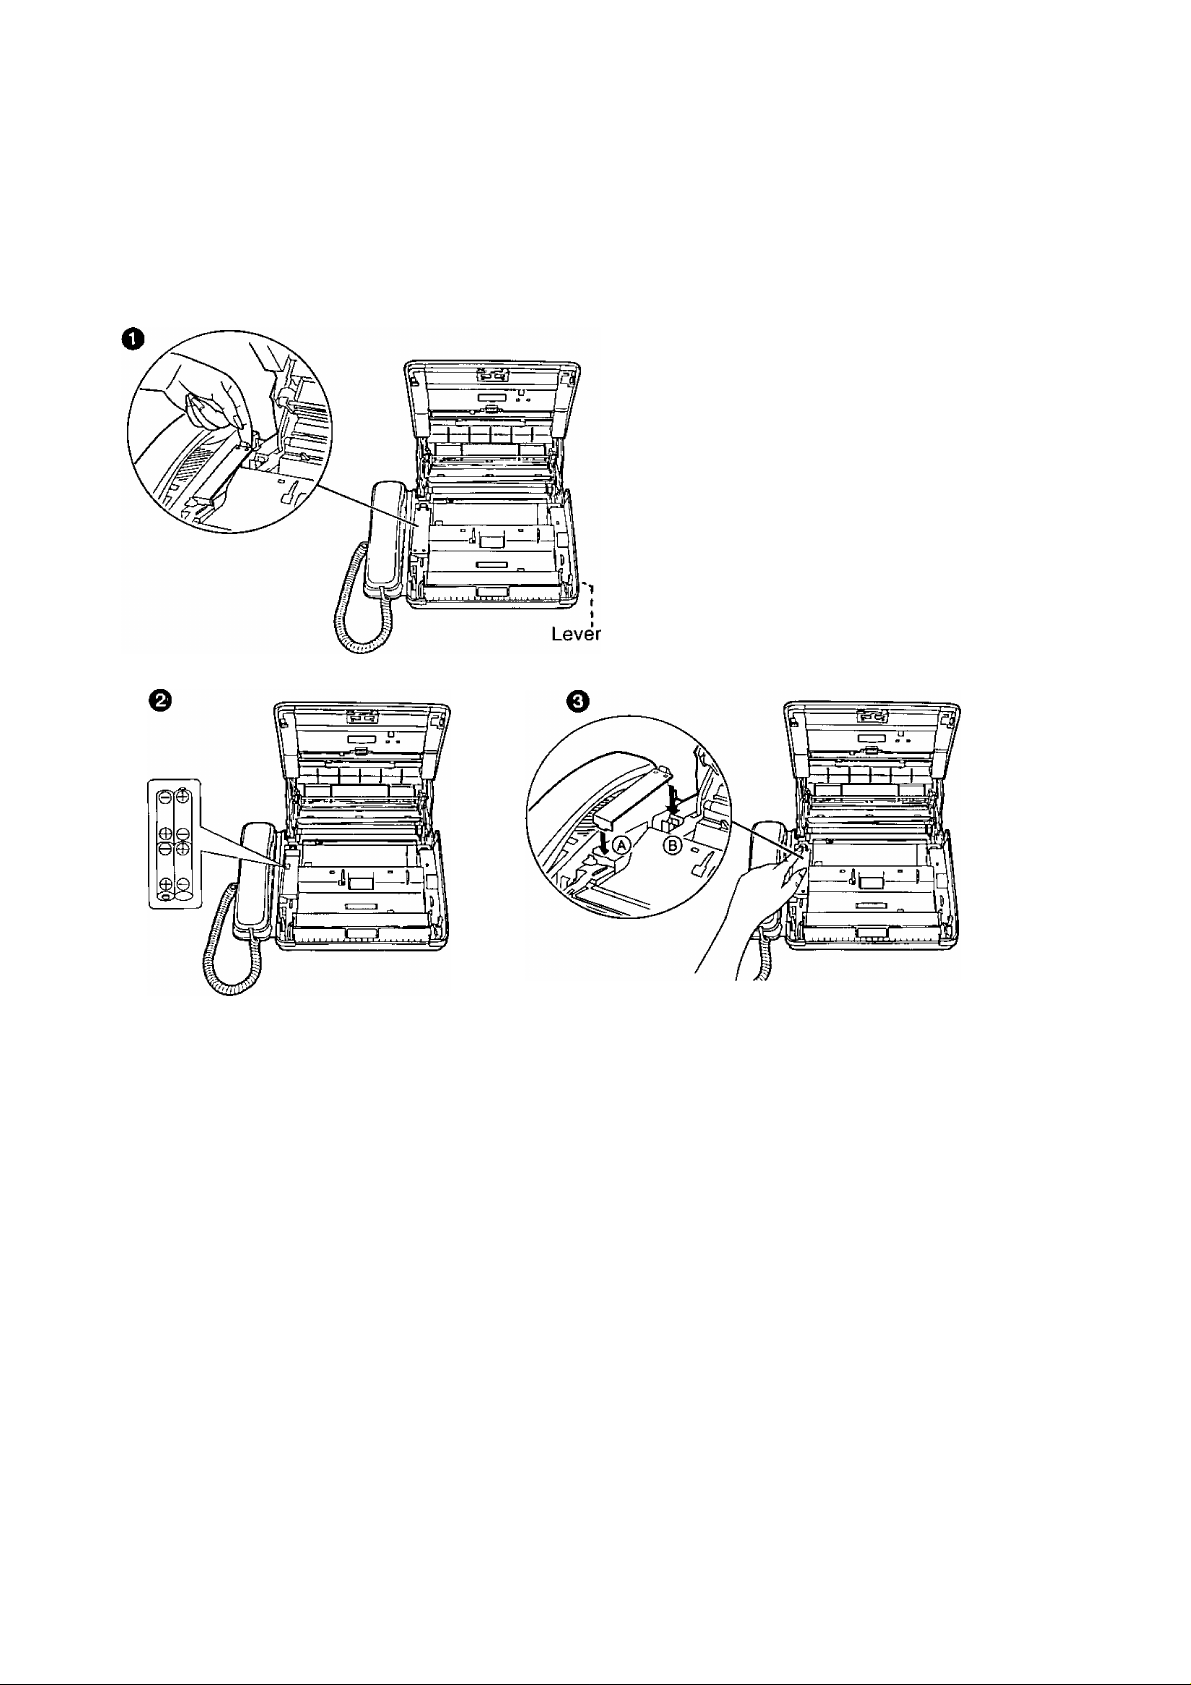
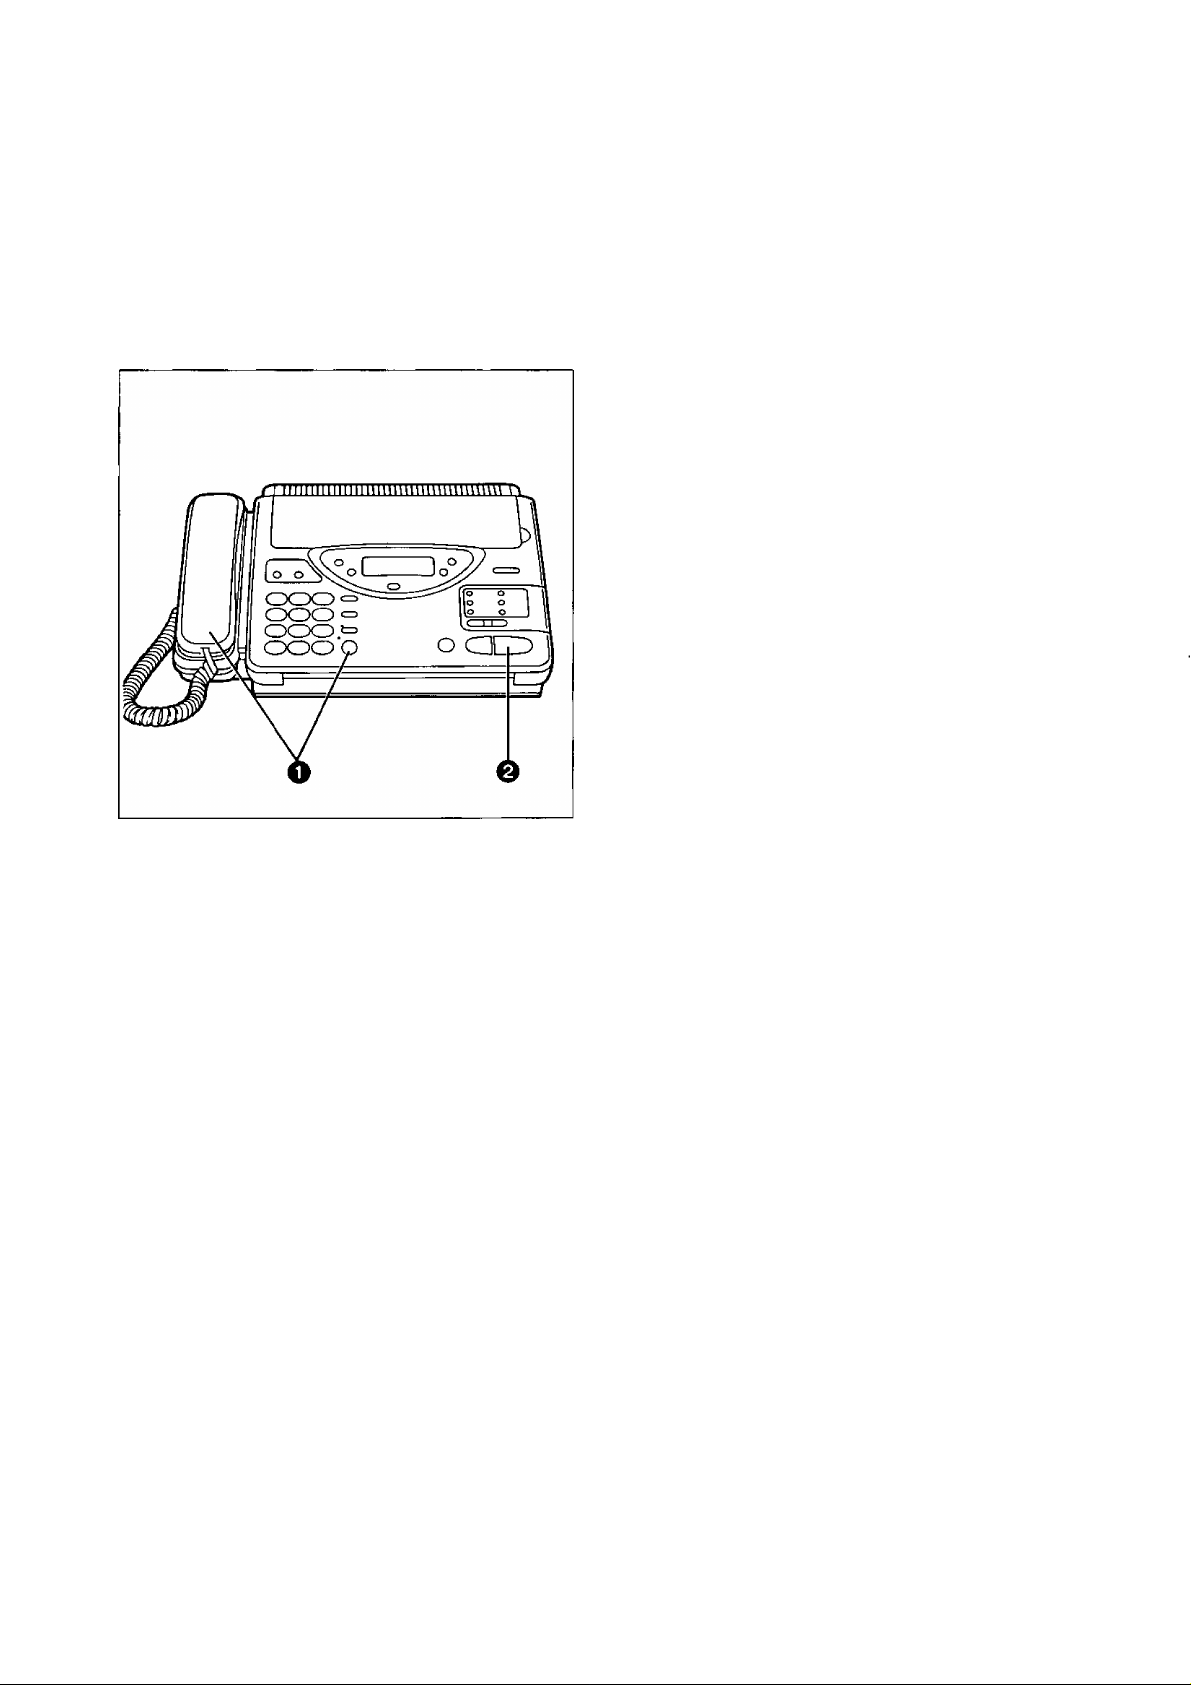
Installing the batteries
The batteries are required to retain voice messages in memory when the power cord is disconnected or
during a power failure. Install four AA batteries (supplied) before using the unit.
) Slide the lever toward you to open the top
cover and remove the battery compartment
cover by pulling the hook toward you and lifting
it up.
^ Install four AA batteries into the compartment
using correct polarity (+, -).
o
® Replace the battery compartment cover by
installing the tab of the cover into the hole
first.
CD Press down the part marked “PRESS” until
it ciicks.
O Close the top cover.
Battery precautions:
• The batteries should be used correctly, otherwise, the unit may be damaged due to battery leakage.
• Do not mix different types of batteries.
• Do not charge, short-circuit, disassemble, heat or dispose in fire.
• Remove all the batteries when replacing.
Notes:
• If you do not install the batteries, or if the battery power is low:
—The display will show the following message;
BATTERY LOW
Install new batteries.
—Greeting and all messages saved in memory will be erased when a power failure occurs.
•Batteries should be installed in order to provide message retention during a power failure. Message
retention time is approximately 1 day with new batteries.
• To avoid losing the greeting and alt messages saved in memory, the power cord must remain connected
when replacing batteries.
• Disconnect the telephone line cord before opening the battery compartment cover.
• Replace all the batteries once a year, or mis-operation may occur.
• Do not use Nickel-Cadmium batteries.
10
Installation and Preparation
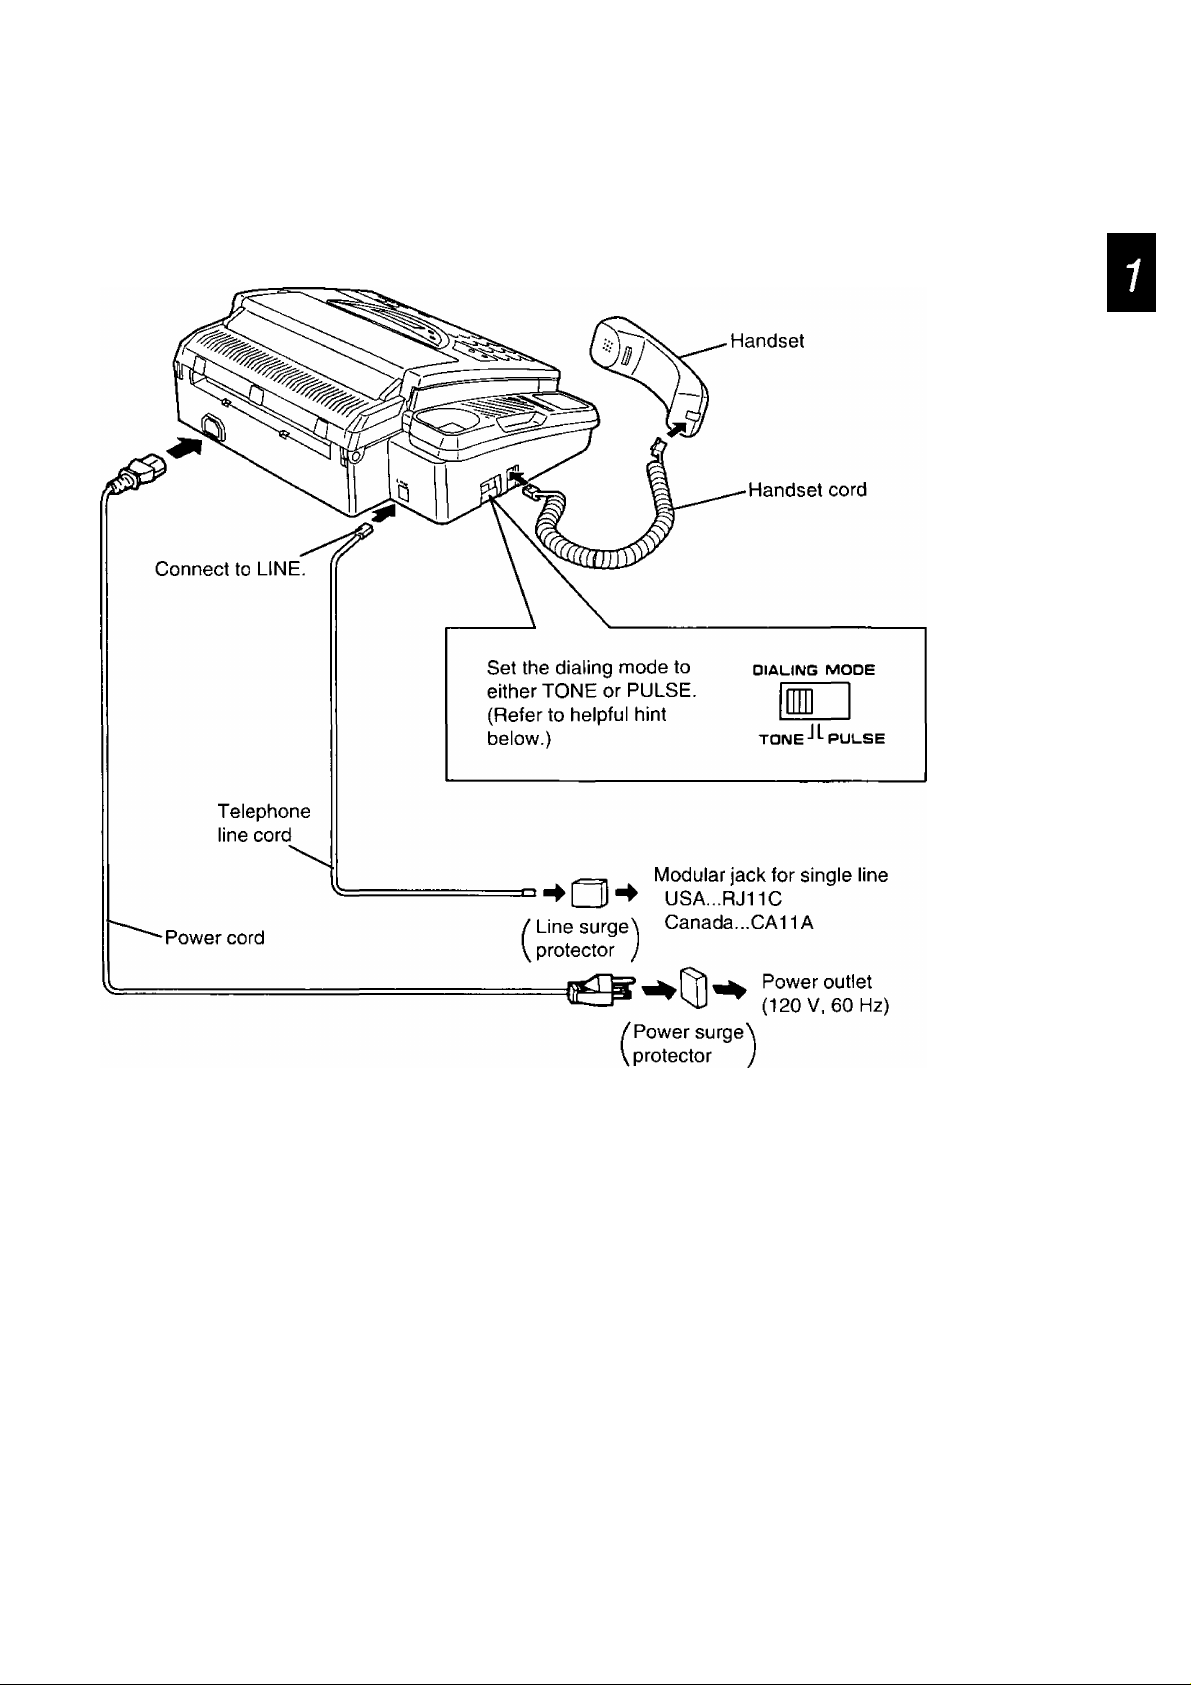
Connections and dialing mode setting
Helpful hint for setting the dialing mode:
1. Ensure that the dialing mode selector is set to TONE.
2. Lift the handset or press the SP~PHONE button, then listen for the dial tone.
3. Dial a familiar number.
4. if the call is successful, the unit is connected to a tone exchange. Leave the selector set to TONE.
5. If the call is n^ successful, the unit is connected to a pulse exchange. Switch the selector to PULSE.
Notes:
•
We recommend the use of an exclusive power outlet to avoid interference from other equipment.
•
When you operate this product, the socket outlet should be near the product and be easily accessible.
• The unit will not function during a power failure.
• For additional equipment protection, we recommend the use of a surge protector. In the U.S.A., the
following type is available; TELESPIKE BLOK MODEL TSB (TRIPPE MFG. CO.), SPIKE BLOK MODEL
SK6-0 (TRIPPE MFG. CO.), SUPER MAX (PANAMAX) or MP1 (ITW LINX).
In other areas, contact our service personnel.
11
Installation and Preparation
Adjusting Volumes
You can adjust the volume level of the ringer, the handset and the speaker.
These volume levels should be adjusted respectively.
To increase the volume level,
press A repeatedly.
To decrease the volume level,
press V repeatedly.
—The number of the black squares in the display
shows the volume level as below.
Ringer volume Press the buttons (a/v) repeatedly while the unit is in idle status.
3 levels are available.
High
Til I I I 1 I 1 IH T.t 1 II 1 H
Note:
Low
• If the ringer volume is set to off, the unit wilt not ring and the display will show
“RINGER OFF” in idle status.
Handset volume Press the buttons (a/v) repeatedly when the handset is in use.
3 levels are available.
High Middle Low
T.I I I'rn [TIH
TJ l"rrri H
speaker volume Press the buttons { a/v ) repeatedly when the speakerphone is used.
8 levels are available.
High Low
T,i I ] I I I I nn
8 levels
LD
Off
RINGER OFF= OK?
Press START/SET for
confirmation.
LQ
Answering
device volume
12
Press the buttons ( a /v) repeatedly while listening to messages recorded on the
answering device. 9 levels are available.
High Off
T.I 1 1 1 1 1 1 114
9 levels
L
H
Installation and Preparation
Recording Greeting Messages
Record two types of greeting messages before using the unit as an answering device and a facsimile. One is
the message for the
ANS/FAX
mode, and the other is for the
TEL/FAX
mode.
The greeting message for the
caller to leave a voice message or to send a fax message.
The greeting message for the
caller to wait until you answer the call or to send a fax message.
ANS/FAX
TEL/FAX
mode tells a caller that you are unable to answer, and allows the
mode tells a caller that the unit is calling you up, and allows the
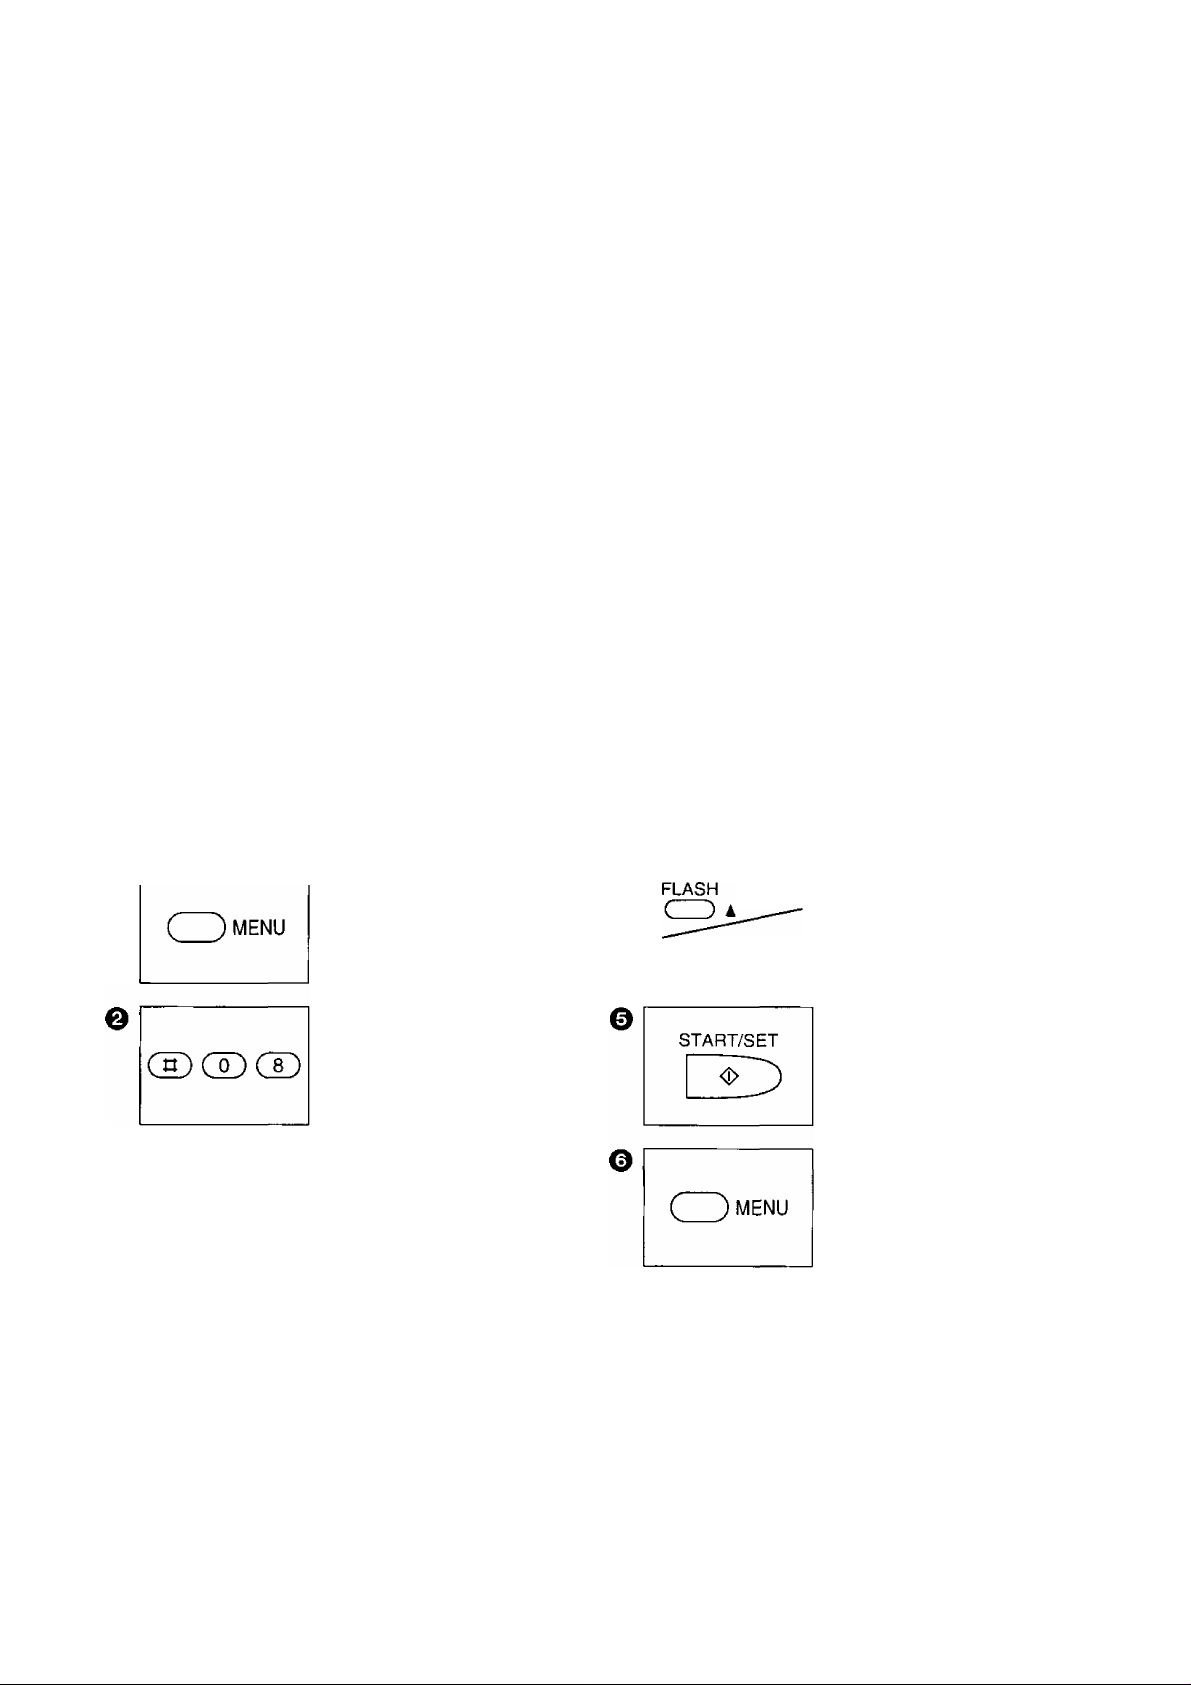
How to record greeting messages
Recording time is limited to 16 seconds for each message. Record a greeting message within 12 seconds
for optimum performance. Perform the following steps to record each of the messages.
Q Open the station key panel.
Q ■ For the ANS/FAX mode:
Press GREETING SELECT.
ANS-GREETING
For the TEL/FAX mode:
Press GREETING SELECT repeatedly until
the following is displayed.
TEL-GREETING
O Press GREETING REC.
Example:
Suggested messages
■ For the ANS/FAX mode:
“This is (your name, business and/or telephone
number). We are unable to answer right now. To
send a fax, start transmission. To leave a
message, speak (or ‘speak for up to 1 minute’)
Recording for the ANS/FAX mode
—A beep will be heard.
O Immediately after the beep, speak clearly and
loudly toward the microphone from a distance
of approximately 200 mm (8 inches).
0 When finished, press STOP.
—After a beep, the unit will play back the
message so that you can confirm it.
Adjust the speaker’s volume to a suitable
level by pressing the VOLUME buttons.
after the long beep. Thank you.
m For the TEUFAX mode:
“This is (your name, business and/or telephone
number). Please wait for someone to answer the
line. To send a fax, start transmission
Notes:
• If you make a mistake while recording, repeat
from step 2.
•
You can record the greeting message for the
ANS/FAX mode by directly pressing the
."
GREETING REC button without pressing the
GREETING SELECT button.
ANS REC 16s
13
Installation and Preparation
Checking greeting messages
0 Open the station key panel.
0 ■ Checking the greeting message for the
/iA/S/F4Xmode;
Press GREETING SELECT.
ANS-GREETING
Checking the greeting message for the
TEL/F^tX mode:
Press GREETING SELECT repeatedly until
the following is displayed.
TEL-GREETING
0
Press START/SET.
—After a beep, the unit will play back the
message.
Notes:
•Adjust the speaker volume using the VOLUME button (see page 12).
• You can check the greeting message for the ANS/FAX mode by directly pressing the START/SET button
without pressing the GREETING SELECT button.
Setting the caiier’s recording time
You can
VOX (unlimited): The unit will record an incoming message as long as a caller speaks (pre-selected
1 MIN (1 minute): The unit will record an incoming message up to 1 minute per message.
To change the recording time, proceed as follows:
choose from two lengths of recording times for incoming messages.
setting).
Press MENU.
1.SYSTEM SET UP
REDIAUPAUSE
Press A or T to select
the desired mode.
CZ) ▼
Press #09.
RECORDING TIME
Press START/SET to
store the setting.
14
Press START/SET.
MODE=VOX [AT]
Press MENU to end the
program.
Installation and Preparation
Selecting the Receive Mode
Select a desired receiving mode by pressing the RECEIVE MODE button repeatedly. The selected mode is
For further details, see page 22.
MAIL BOX
ANS/ lEU FAX TEL
TEUFAXmode:
When you wish to answer voice calls with ring and wish to receive fax
messages without hearing ring, select this mode.
You can answer voice calls only and will not be disturbed by incoming
faxes.
For further details, see page 24.
FAX mode:
When you wish to receive fax transmissions only, select this mode.
The unit will answer all calls and start to receive fax messages
automatically.
For further details, see page 26.
TEL mode:
When you wish to set the unit not to answer any incoming call
automatically, select this mode.
When you pick up the handset and fax reception is required, you can press
the START/SET button to receive documents.
If no one answers a call by 15 rings, the receiving mode will switch to the
ANS/FAX
mode automatically.
Note:
• Regardless of above setting, you can make voice and fax calls.
15
Basic Instructions
Making and Answering Voice Caiis
Making voice caiis
______________________
O Press SP-PHONE or lift the handset, then
listen for the dial tone.
0 Dial a phone number.
o When the other party answers, speak through
the microphone or handset.
0 When finished, press SP-PHONE again or
place the handset on the cradle.
Heipfui hints:
•Adjust the volume to a suitable level. See
page 12.
• If you wish to switch to the handset from the
speakerphone, lift the handset. To switch to the
speakerphone, press the SP-PHONE button.
• If you misdial, press the FLASH button firmly,
then dial the correct number.
• For helpful hints for the speakerphone operation,
see page 17.
Making voice caiis using automatic diaiing
You can dial a phone number automatically using one-touch dialing and speed dialing.
Before using automatic dialing, make sure that the desired telephone numbers have been stored in memory.
For storing phone numbers, see pages 38 and 39.
0 Press SP-PHONE or lift the handset.
0-a Using one-touch dialing:
■ When using the upper stations 1 to 5:
Press the desired direct call station key.
■ When using the lower stations 6 to 10:
Press LOWER, then press the desired
direct call station key.
0-b Using speed dialing:
Press DIRECTORY, then press # and the
desired 2-digit number (00-21).
Heipfui hint:
• You can also use the electronic telephone
directory to make a voice call (see page 40).
16

Basic Instructions
Redialing the last dialed number.
If the line is busy or you wish to redial the last dialed number, use the REDIAL7PAUSE button.
Press SP-PHONE or lift the handset, then press REDIAL/PAUSE.
Note:
• If the line is busy when using the speakerphone, the unit will automatically
redial the number (see item 8 on page 75).
Voice muting
The MUTE button will mute your voice during a telephone conversation. Using this feature, you can hear the
voice of the other party, but the other party cannot hear your voice.
Press MUTE and confirm the MUTE indicator light is on.
To resume the conversation, press MUTE again.
Answering voice calls
When the unit rings, lift the handset or press SP-PHONE to answer the call.
When you have finished, replace the handset on the cradle or press SP-PHONE.
Note:
• For helpful hints for the speakerphone operation, see below.
Helpful hints for the speakerphone operation
•
Use the speakerphone in a quiet room for best performance.
• If the other party has difficulty hearing you, decrease the volume using the VOLUME buttons (see
page 12).
• if you and the other party speak at the same time, parts of your conversation will be lost. To avoid this,
speak alternately.
______
17
Basic Instructions
Before Transmission
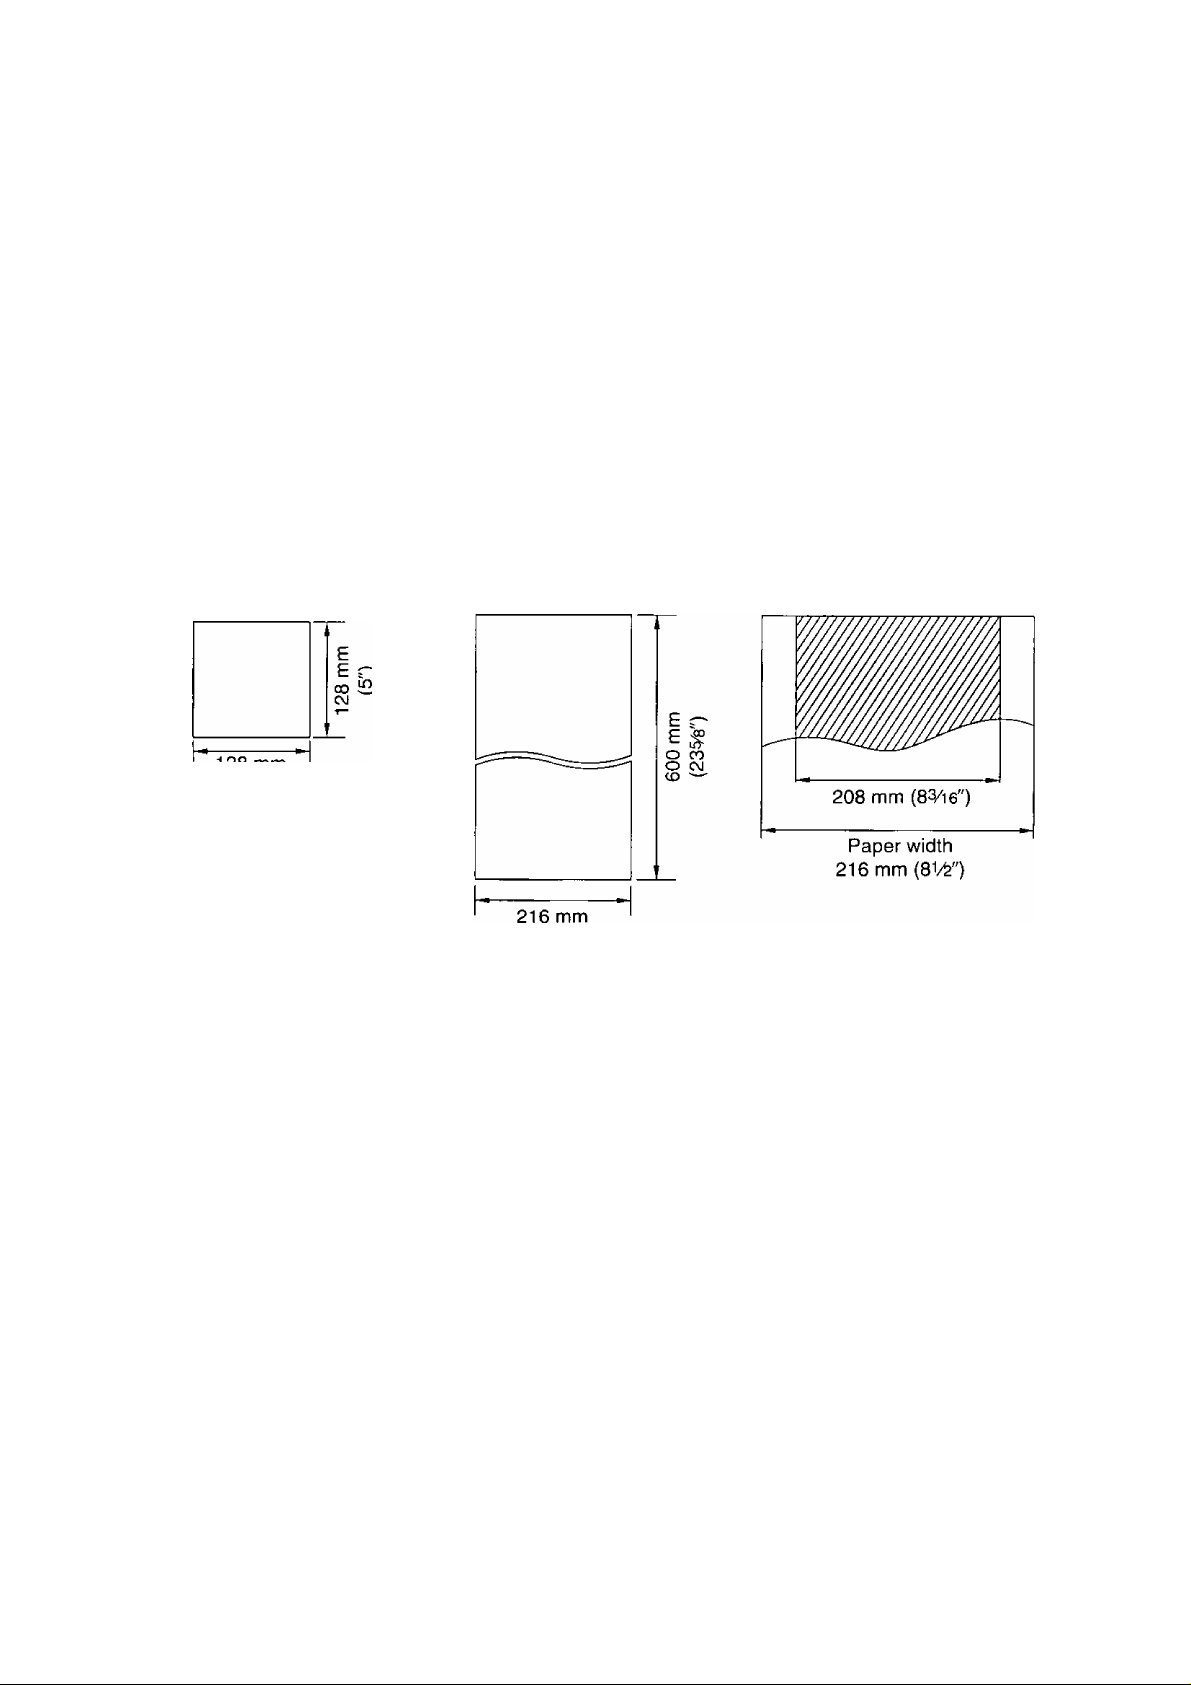
Acceptable documents
The unit can transmit documents that meet the following conditions.
—Document width should be from 128 to 216 mm {5 to
—Maximum document length should not exceed 600 mm (23^8").
—Effective scanning width can be up to 208 mm (8^16")—Number of pages that can be set in the document feeder tray must not exceed 15 sheets.
—Document weight:
Single sheet: 45 to 90 g/m^ (12 to 24 lb.)
Multiple sheets: 60 to 75 g/m^ (16 to 20 lb.)
Minimum document size
128 mm
(5")
Maximum document size
8W).
Effective scanning width
(81/^")
Note:
• Do not feed the following types of documents. Make a copy of these documents with a copier machine and
feed the copy into the unit.
—Paper with a chemically treated surface such as carbon paper or carbonless duplicating paper
—Electrostatically charged paper
—Heavily curled, creased or torn paper
—Paper with a coated surface
—
Small-sized paper such as a slip or voucher
—
Thin paper less than 45 g/nf (12 lb.)
—
Thick paper over 90 g/nf (24 lb.)
—Paper with faint contrast between the printing and the background
—Paper with printing on the reverse side that can be seen through the front (e.g. newspaper)
18
Basic Instructions
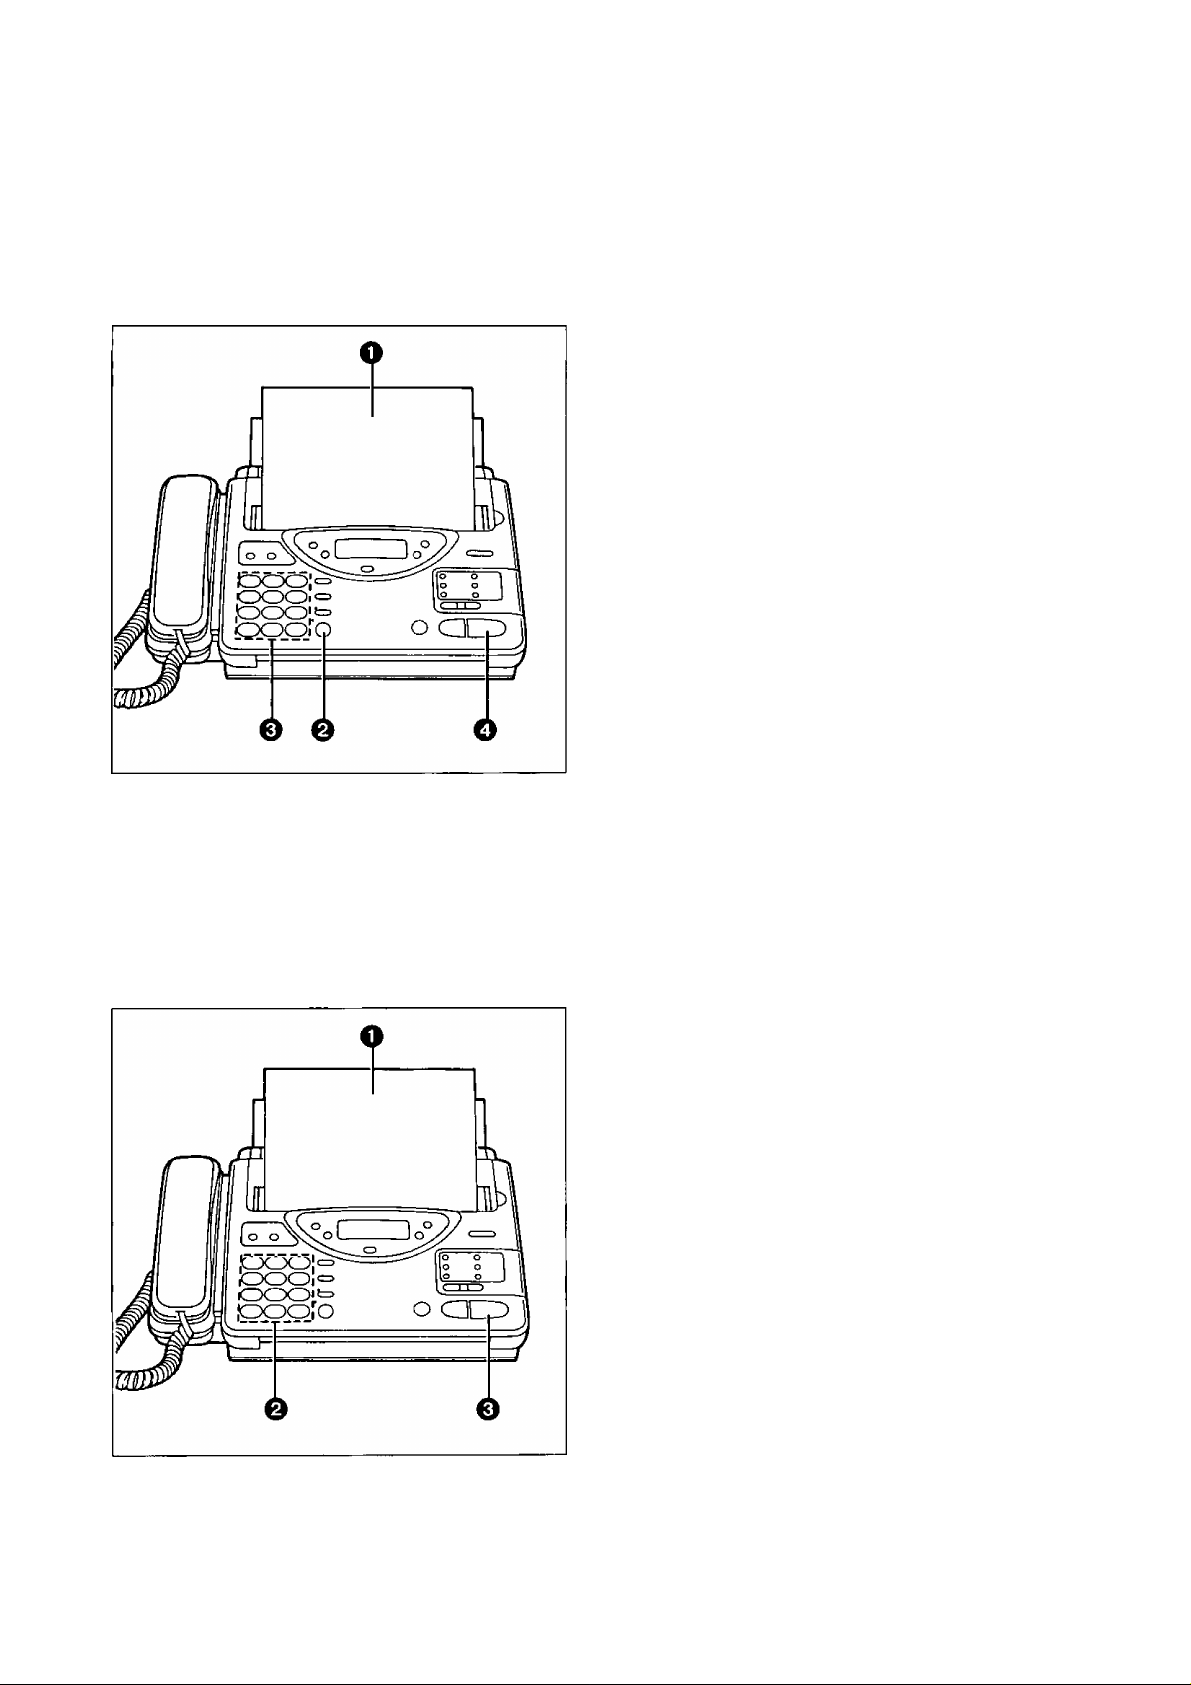
Loading documents
O Open the document feeder tray.
Q
Insert the documents FACE DOWN until a
beep tone is heard.
—The unit can accept up to 15 sheets of
paper at a time.
0
Adjust the document guides to the width of the
documents.
O Adjust the resolution by pressing
RESOLUTION if needed {see below).
Notes:
•
Remove clips, staples or other similar objects
from a document before feeding it into the unit.
Also check that all ink, paste or correction fluid
on the document has completely dried.
• If the top edge of the document Is curled, make it
flat and insert the document.
Setting resolution
Depending on the quality of the originals, you can select the desired resolution by pressing the
RESOLUTION button repeatedly. Use the button when the document has been fed into the unit.
STANDARD
FINE
SUPER FINE
HALF TONE
Notes:
•
Using these features except the standard resolution will increase the transmission time.
• The super fine resolution only works between other compatible machines.
• If the setting is changed during feeding, it will be effective from the next sheet.
•
To enhance the resolution settings, see page 51.
Suitable for printed or typewritten originals with normal-sized characters.
J Suitable for originals with small printing.
Suitable for originals with minute printing.
Useful for originals containing photographs, shaded drawings, etc.
Sending 16 or more sheets
If you wish to send 16 or more sheets at a time, insert the first 15 sheets of the document. Add the extra
sheets, up to 15 sheets at a time, before the last sheet is fed into the unit.
19
Basic Instructions
Transmitting Documents
Transmitting documents manuaiiy
0 Insert the documents FACE DOWN until a
beep tone is heard.
0 Press SP-PHONE or lift the handset, then
listen for the dial tone.
o Dial a phone number.
0 When a fax tone is heard, press START/SET.
0 Place the handset on the cradle if using it.
—The unit will start transmission.
Notes:
• if the other party answers your call, ask them to
press their start or transmit button to start the fax
reception, then press your START/SET button.
• If there is a misdial in step 3, press the FLASH
button firmly, then dial the correct number after
the dial tone is heard.
• To interrupt the transmission, press the STOP
button.
Transmitting documents with fewer procedures
You can transmit documents without using the handset or the SP-PHONE button.
0 Insert the documents FACE DOWN until a
beep tone is heard.
0 Enter the phone number.
—If incorrect, press the STOP button, then
enter the correct number.
0 Press START/SET.
—The unit will start to dial and transmit the
documents.
Note:
• If there is no answer or the line is busy, the unit
will automatically redial the number (see
Item 7 on page 75).
20
Basic Instructions
Transmitting documents using automatic diaiing
You can transmit documents automatically using one-touch dialing and speed dialing.
Before using automatic dialing, make sure that the desired telephone numbers have been stored in memory.
For storing phone numbers, see pages 38 and 39.
Using one-touch diaiing:
O Insert the documents FACE DOWN until a
beep tone is heard.
Q ■ When using the upper stations 1 to 5:
Press the desired direct call station key.
■ When using the lower stations 6 to 10:
Press LOWER, then press the desired
direct call station key.
—The unit will dial and transmit the documents
automatically.
Using speed diaiing:
Note:
•
If there is no answer or the line is busy, the unit
will automatically redial the number (see
item 7 on page 75).
0 Insert the documents FACE DOWN until a
beep tone is heard.
0 Press DIRECTORY.
0 Press #, then press the desired 2-digit number
(00-21).
—The unit will dial and transmit the documents
automatically.
Note:
• If there is no answer or the line is busy, the unit
will automatically redial the number (see
item 7 on page 75).
21
Basic instructions
Receiving Documents and/or Voice Caiis
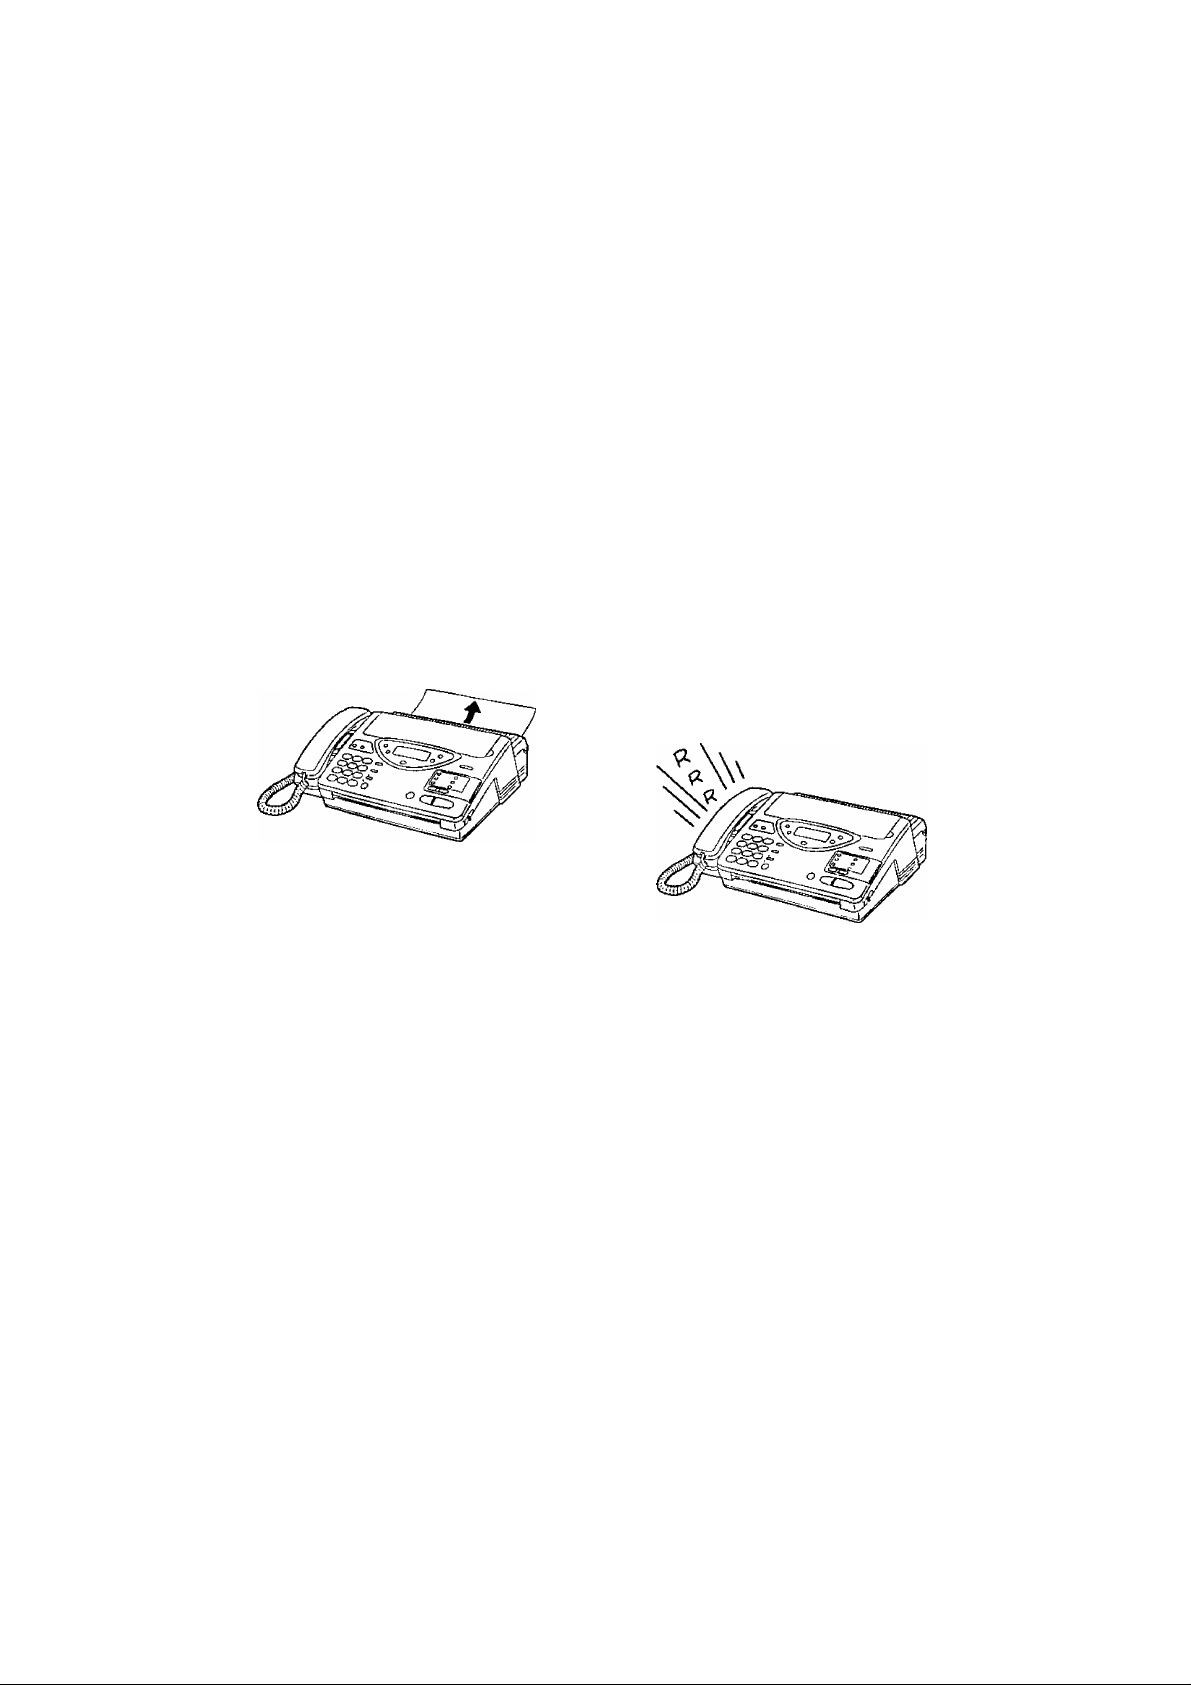
Manual reception
When in the
TEL
mode or during a telephone conversation, you can receive documents as follows.
Automatic reception
0 When the unit rings, press SP-PHONE or lift
the handset to answer the call.
0 When document reception is required, or a
slow beep or nothing is heard, press
START/SET.
o Place the handset on the cradle if using it.
—The unit will start reception.
Note:
• To interrupt reception, press the STOP button.
The unit will stop receiving.
Set the receive mode to
When a fax call comes in, the unit will automatically activate the fax function to receive documents.
ANS/FAX, TEL/FAX
or FAX by pressing RECEIVE MODE.
Receiving in the ANS/FAX mode
When a call comes in, the unit will automatically answer the call after 1 to 4 rings or no rings (user
programming) and distinguish between a fax and voice call.
When receiving a fax call, the unit will automatically activate the fax function to receive documents.
When receiving a voice call, the unit will play the greeting message and record an incoming voice message.
Helpful hint:
• Transmit the leaflet found on page 81 to several of your associates. This way, the user can confirm that
the unit is functioning correctly and inform them of the procedure of transmitting documents and/or
recording voice messages on the unit.
22
Basic Instructions
Setting the number of rings to answer in the ANS/FAX mode
This feature determines the number of rings after which the unit answers a call in the
The following choices are available:
1: The unit will answer after the first ring.
2: The unit will answer after the second ring.
3: The unit will answer after the third ring.
4: The unit will answer after the fourth ring.
Toll saver: (see below)
Ringer off: The unit will answer without ringing.
Toll saver:
•
When you call the unit from a remote location, the number of rings will tell you if there are any new
ANS/FAX
mode.
voice messages or not.
If the unit answers on the first ring, there is at least one newly recorded message.
If the unit answers on the third ring, there are no newly recorded messages.
Hang up immediately when you hear the second ring. The second ring indicates that there are no new
messages. This will save you the toll charge for the call.
Helpful hints:
• If you wish to have the opportunity to pick up the handset before the call is answered by the unit, increase
the number of rings.
• If you find there is difficulty in fax receiving from machines that have an automatic transmission feature,
decrease the number of rings.
To change the setting, proceed as follows:
O Press MENU.
1.SYSTEM SET UP
Press #08.
ANS/FAX RING
o
START/SET
Press START/SET.
RING=1
o
[AT]
]
Press A or ▼ to select
the desired number of
rings.
REDIAL/PAUSE
3 ▼
Press START/SET to
store the setting.
Press MENU to end the
program.
23
Basic Instructions
Receiving in the TEL/FAX mode
When a call comes in, the unit will work as follows.
A call comes in. iKl
The unit will automatically answer the call without ringing and
distinguish between a fax and voice call. ^2
Fax call
The unit will receive a document.
All extension phones (if connected) will ring once before the unit automatically answers the line.
^1
This number of rings can be changed to a maximum of 4. See “Setting the number of rings to
answer in the
Telephone fee will be charged to callers from this moment.
^2
If a voice call is detected, the unit will ring up to 3 times. This number of rings is adjustable to a
^3
maximum of 6. See “Silent ring fax recognition system” on page 25.
TEL/FAX
mode” on page 25.
The unit will start to ring.
While ringing, the other party will hear
the greeting message and then a
different ring back tone.
You can pick up the handset to answer
the call.
If you do not pick up the handset, the
unit will switch to the fax.
Voice call
^3
Notes:
•
The unit can distinguish between a voice and fax call by detecting the calling tone (CNG), sent by the
transmitting fax machines.
Some fax messages that are transmitted manually may not send with a calling tone. These calls must be
manually received after the unit rings and the call is answered.
• If you hear the facsimile unit ringing, you can pick up the handset on the facsimile unit or another
extension (if connected on the same fine) to answer the call.
24
Basic Instructions
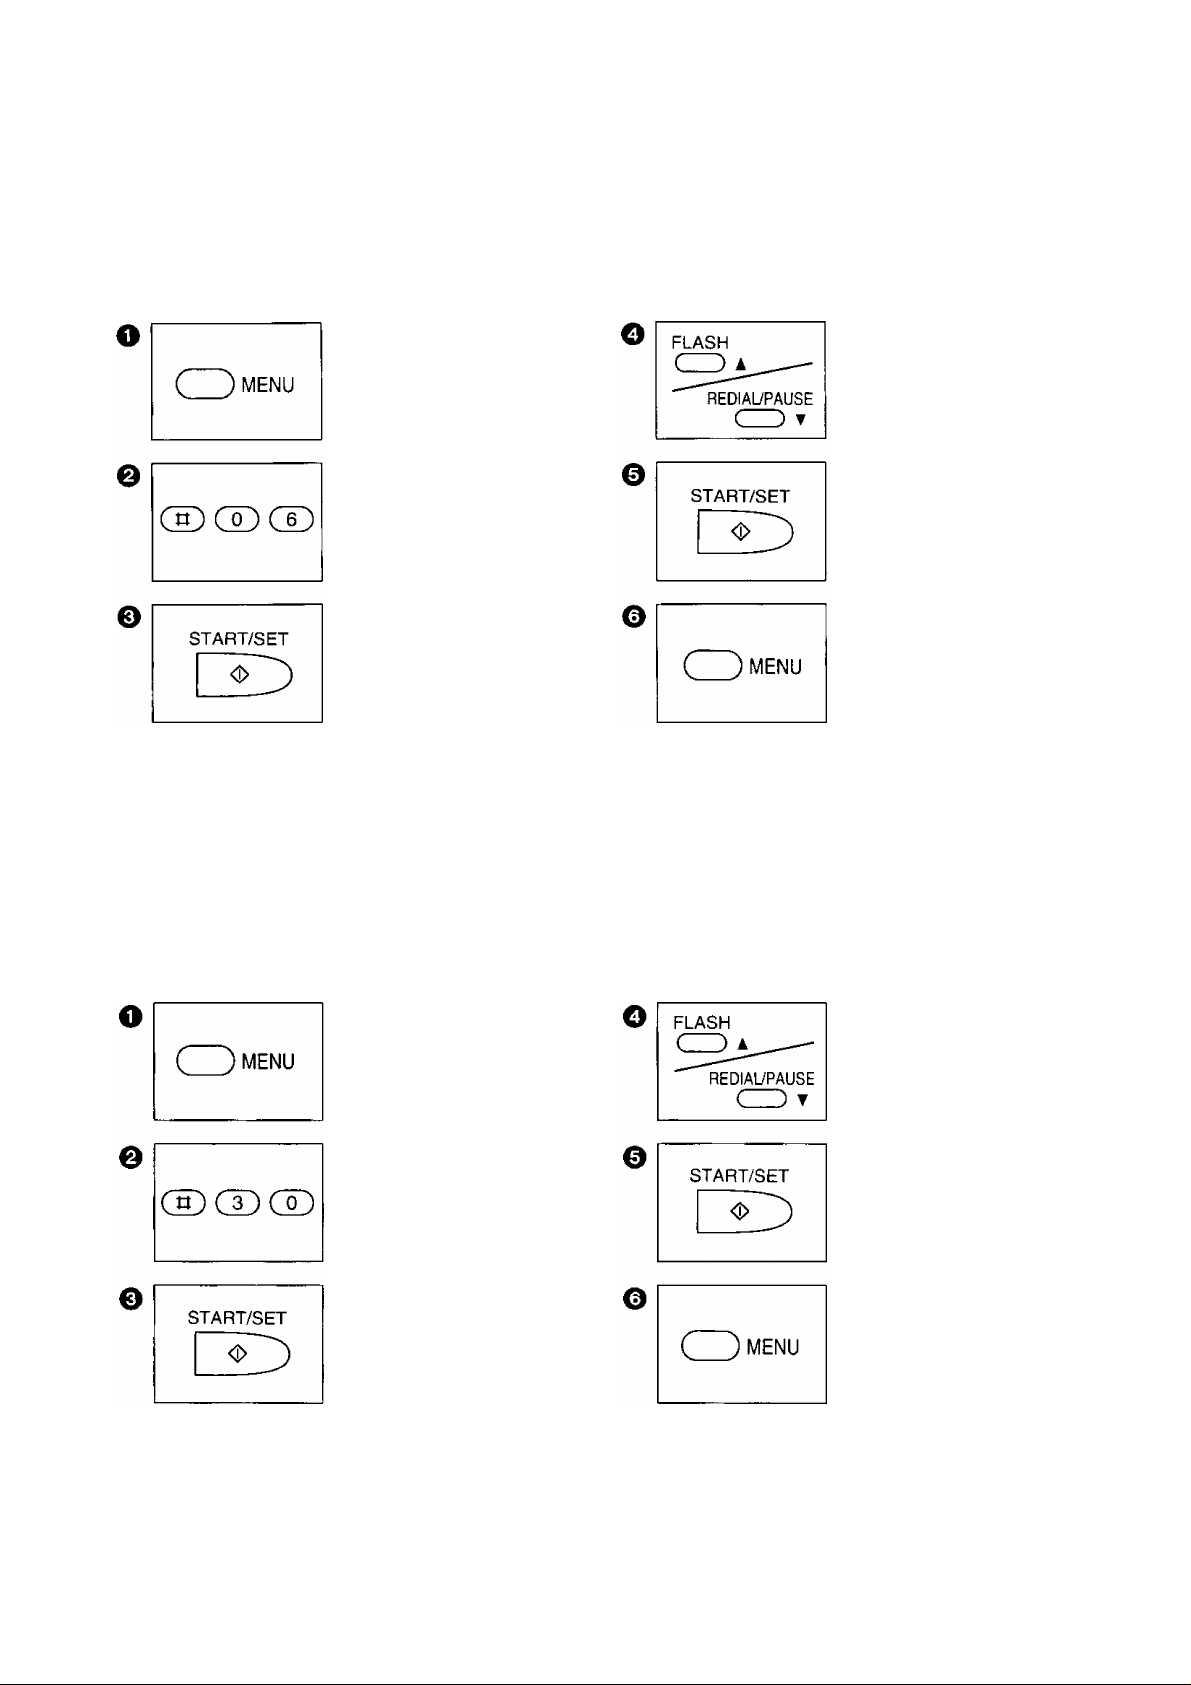
Setting the number of rings to answer in the TEL/FAX mode
This feature determines the number of rings after which the unit answers a call in the
You can change the number of rings from 1 to 4 rings.
Press MENU.
1.SYSTEM SET UP
Press #06.
TEL/FAX RING
Press START/SET.
RING=1 AT
Note:
•
If an extension telephone with a caller ID or call display feature is connected to the same line, set the
TEL/FAX
Press A or ▼ to select
the desired number of
rings (1 to 4).
Press START/SET to
store the setting.
Press MENU to end the
program.
mode.
number of rings to more than 2.
Siient ring fax recognition system
In the
TEL/FAX
ringing (we call this “silent ring fax recognition system”). If the unit detects a voice call, it will ring 3 times.
This number of rings can be changed to a maximum of 6 by following steps below.
mode, when a fax call is received, the unit will automatically activate the fax function without
Press MENU.
1.SYSTEM SET UP
Press #30.
SILENT FAX RING
Press START/SET.
RING=3
AT
Press A or T to select
the desired number of
rings (3 to 6).
Press START/SET to
store the setting.
Press MENU to end the
program.
25
Basic Instructions
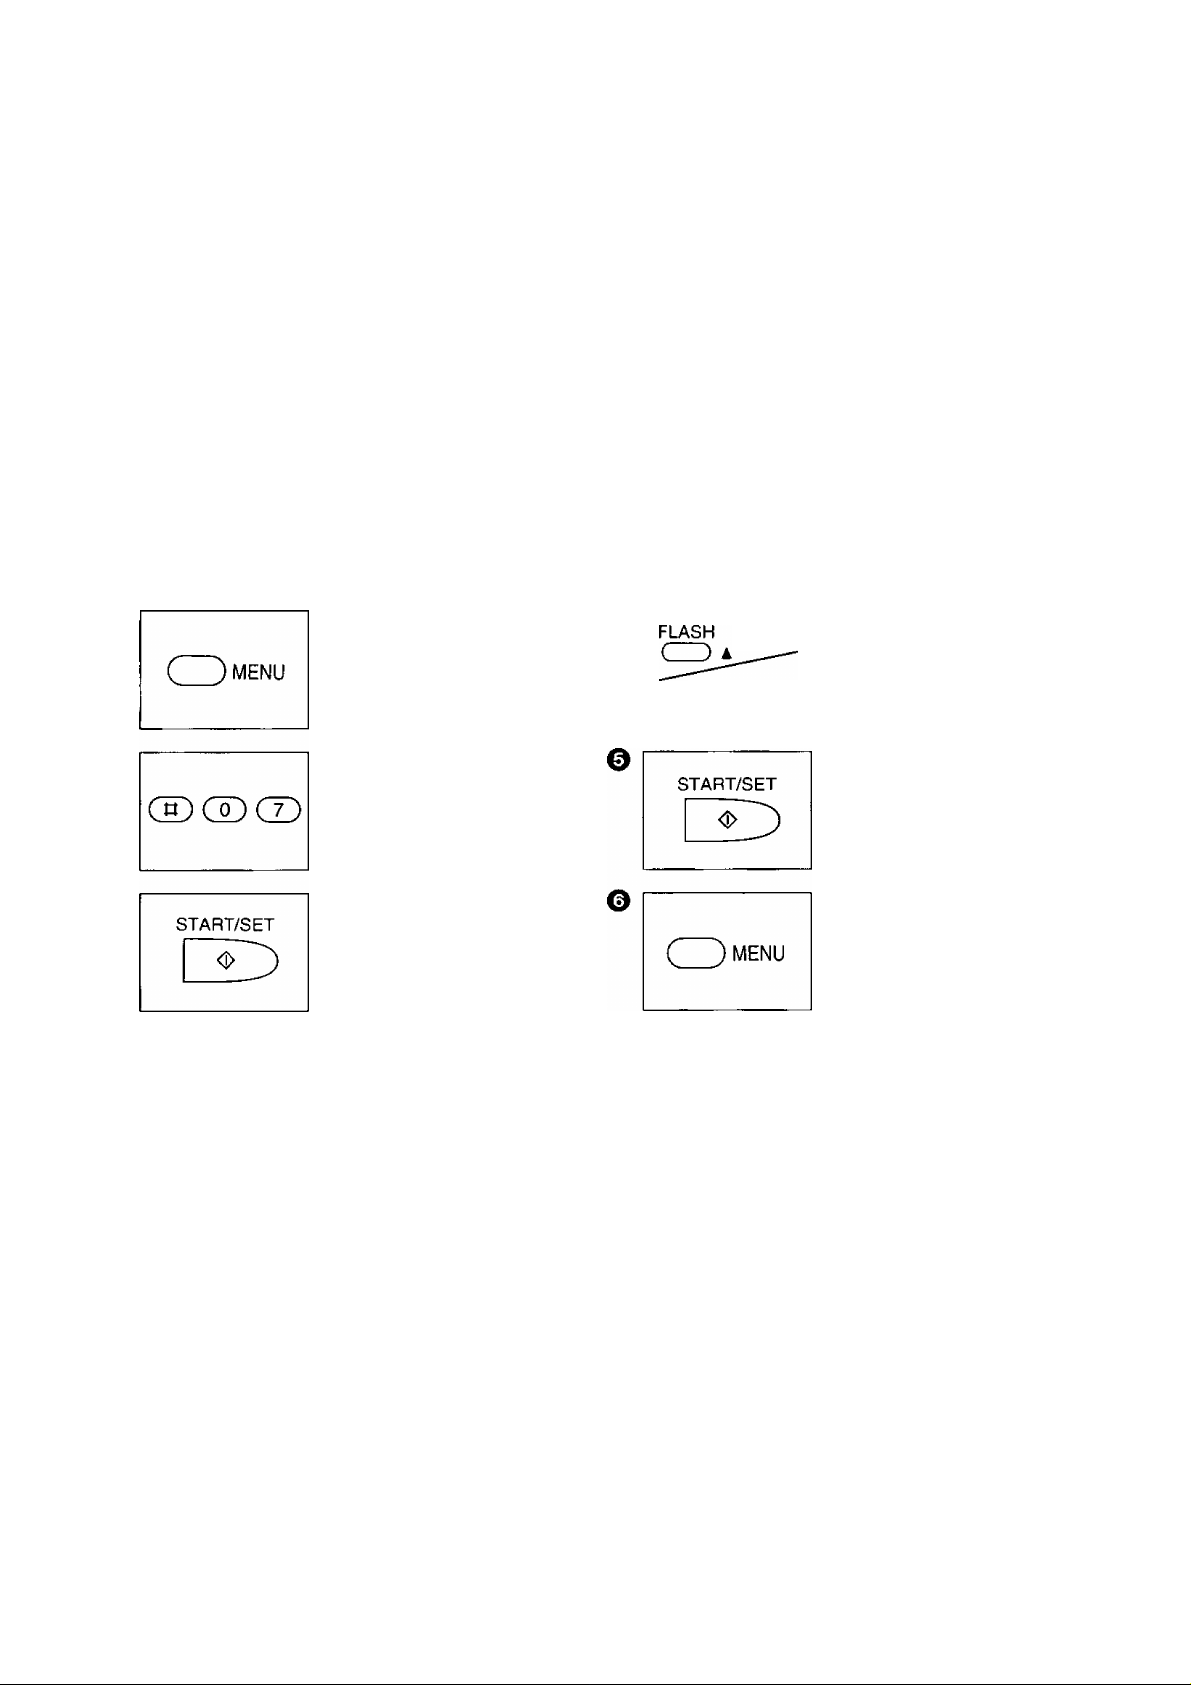
Receiving in the FAX mode
When a call comes in, the unit will automatically answer the line after 1 to 4 rings (user programming) and
activate the fax function.
Setting the number of rings to answer in the FAX mode
This feature determines the number of rings after which the unit answers a call in the
You can change the number of rings from 1 to 4 rings.
Helpful hints:
•
If you wish to have the opportunity to answer a call before the unit does, increase the number of rings.
FAX
mode.
• If you find there is difficulty in fax receiving from machines that have an automatic transmission feature,
decrease the number of rings.
Press A or T to select
the desired number of
rings (1 to 4).
Press START/SET to
store the setting.
Press MENU to end the
program.
0
Press MENU.
1.SYSTEM SET UP
Press #07.
FAX RING
Press START/SET.
RING=1
REDIAL7PAUSE
[AW
Note:
• If an extension telephone with a caller ID or call display feature is connected to the same line, set the
number of rings to more than 2.
26
 Loading...