

Page 1

Operating
Panasonic
Personal Facsimile
Model No. KX-F590
/NSTRUCTIONS
Please read these Operating
Instructions before using the unit.
* FAX PAPER ^
98 foot roll of Panasonic super thermal paper
- or -
164 foot roll of standard thermal paper
(See page 61 for order numbers )
Page 2

Please read IMPORTANT SAFETY INSTRUCTIONS on
page 60 before use. Read and understand all instructions.
Caution:
The Telephone Consumer Protection Act of 1991 makes it unlawful for any person to use a computer
or other electronic device to send any message via a telephone facsimile machine unless such a
message clearly contains in a margin on the top or bottom of at least the first sent page the following
information:
1) Date and time of transmission; and,
2) Identification of either business, business entity or individual sending the message; and,
3) Telephone number of either the sending machine, business, business entity or individual.
In order to program this information into your facsimile machine, you must complete the steps on
pages 30 to 31 in these Operating Instructions.
Important Phone Numbers
Authorized Service Center: 1-800-545-2672
Accessory Purchases: 1-800-332-5368
Technical Support: 1-800-HELP-FAX
Accessories
Power Telephone line
cord
...........
Ipc cord ............Ipc
(page 9)
Any details given in these instructions are subject to change without notice.
The picture on the cover page may vary from the actual product.
For recording paper replacement, see page 61.
Paper Recording
paper
...........
{page 9)
stacker ...Ipc
(page 8) (page 8) (page 9)
Ipc
Handset .. Ipc
Handset
cord . .. Ipc
{page 9)
Page 3

Thank you for purchasing the Panasonic Personal Facsimile.
Features
General
• Desktop type
• LCD (Liquid Crystal Display) readout
•Automatic paper cutter
• Silent ring fax recognition system (page 23)
• Help function (see below)
• TAM (telephone answering machine) interface (page 18)
• Copier function (page 25)
Facsimile
•Automatic document feeder (up to 15 sheets)
• 64-level halftones
• Resolution: standard/fine/super fine/hafftone (page 15)
• Delayed transmission (page 36)
• Ring pattern detection (page 41)
• Overseas transmission mode (page 44)
• Remote fax receiving using an extension phone (page 37)
•Junk mailprohibitor (page 39)
• Paper save function (page 45)
Integrated telephone system
• One-touch dialer (10 phone numbers) (page 32)
•22-station speed dialer (page 33)
• Hands-free speakerphone (page 12)
• Electronic telephone directory (page 34)
HELP function
Use this function if the instructions are lost while using the unit. It will
provide the user with instructions.
When the HELP button is pressed, the unit will print a quick reference.
Information:
• When you use the unit with a telephone answering machine, transmit the leaflet on page 65 to several of
your associates. In this way, you can confirm that your facsimile unit and telephone answering machine
will function correctly and inform them of the procedure for transmitting documents and/or recording voice
messages.
Page 4

Table of Contents
B installation and Preparation
Location of Controls
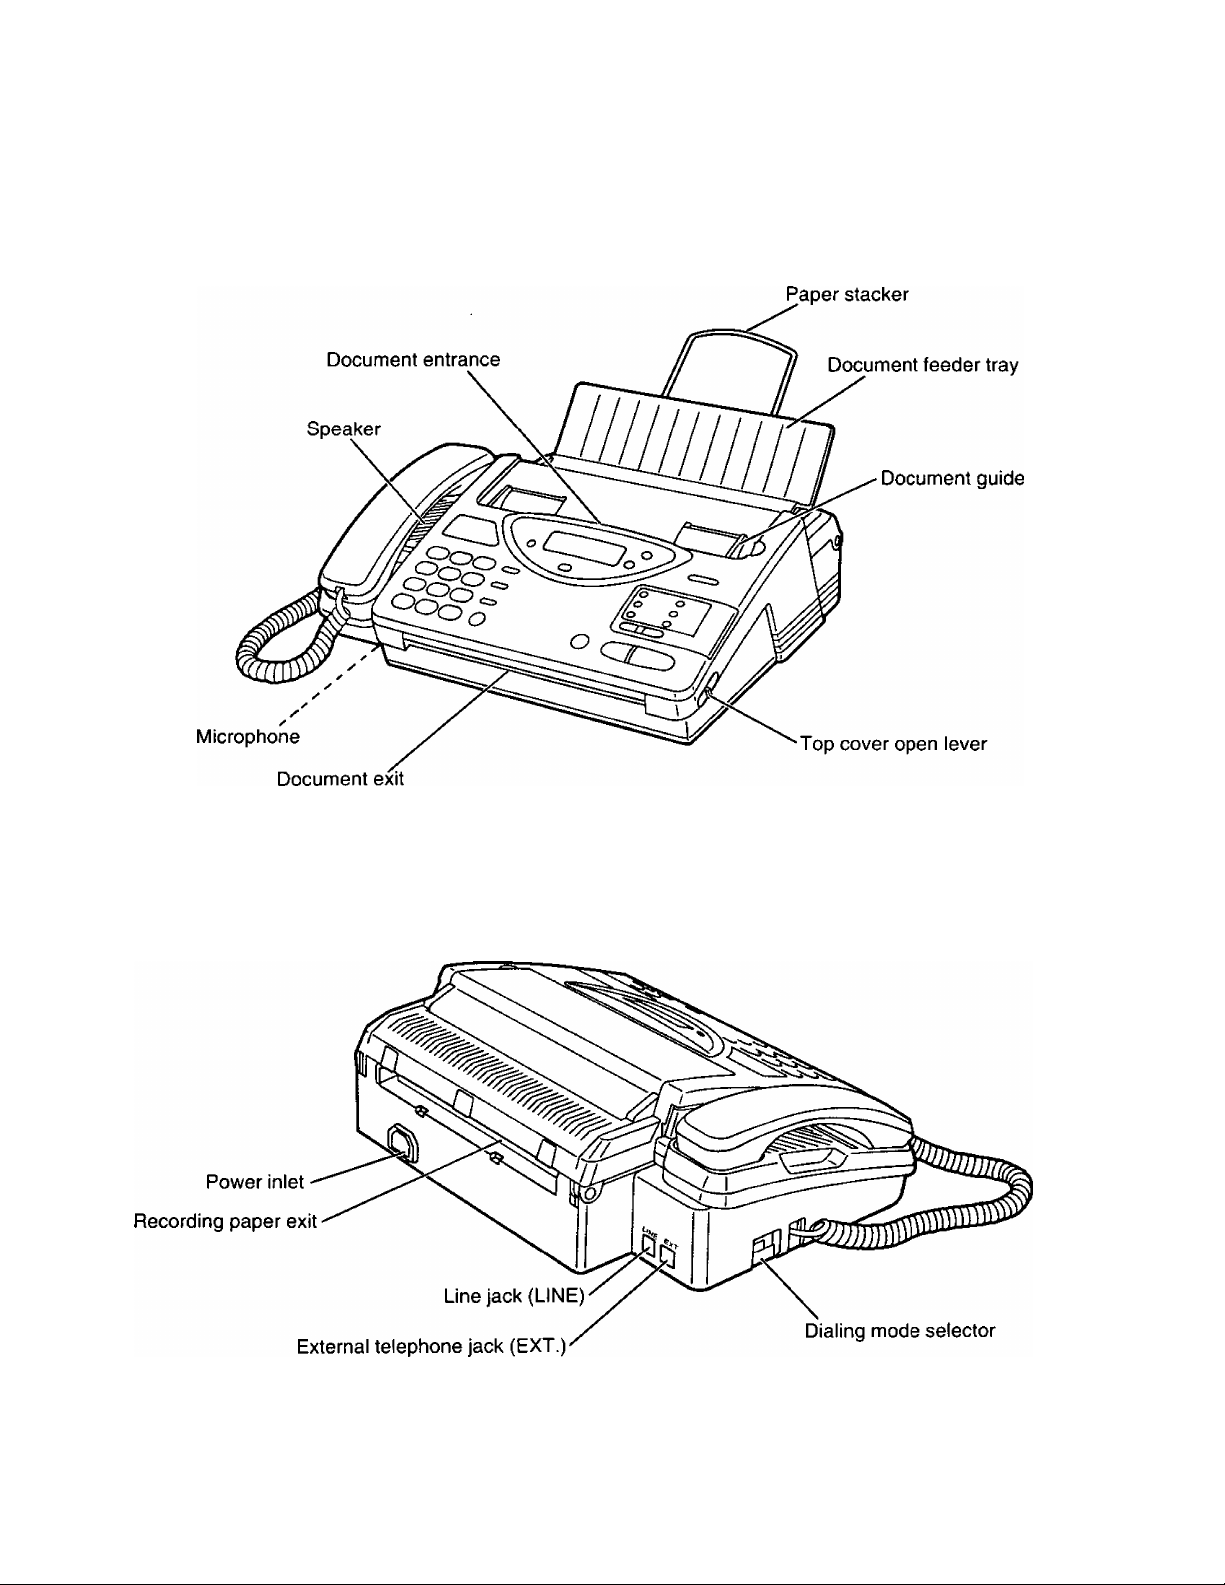
Front view................................................................. 6
Rearview
Control panel
..................................................................
...........................................................
...............................
Installing Your Unit................................. 8
Installing the recording paper
Installing the paper stacker
Connections and dialing mode setting...................... 9
Adjusting Volumes
....................................
.....................................
...............................
10
Selecting the Receive Mode ............... 11
Basic Instructions
Telephone
Making and Answering Voice
Calls.................................................. 12
Making voice calls ................................................... 12
Making voice calls using automatic
dialing................................................................... 12
Redialing the last dialed number
Voice muting
Answering voice calls............................................... 13
Helpful hints for the speakerphone
operation
...........................................................
.............................................................
.............................
Facsimile
Before Transmission
Acceptable documents............................................. 14
Loading documents.................................................. 15
Setting resolution
Sending 16 or more sheets ..................................... 15
.....................................................
Transmitting Documents
Transmitting documents manually
Transmitting documents with fewer
procedures........................................................... 16
Transmitting documents using automatic
dialing................................................................... 17
...........................
.....................
...........................
14
16
Receiving Documents and/or
Voice Calls........................................ 18
Manual reception
Automatic reception
Receiving in the EXT. TAM mode............................ 18
Connection........................................................... 18
.....................................................
.................................................
6
6
7
8
8
13
13
13
15
16
18
18
How to receive incoming calls in the
EXT. TAM mode ............................................ 19
Setting up the answering machine
Setting the remote TAM activation ID .... 20
Setting the silent detection
Notice when using with an
answering machine.......................................... 21
Receiving in the TEL/FAX mode
Setting the number of rings to answer
in the TEL/FAX mode
Silent ring fax recognition system....................... 23
Receiving in the FAX mode ................................... 24
Setting the number of rings in the
FAX mode
......................................................
....................................
...................
.................................
...........................
Copier
Making a Copy
.....................................
Basic Settings
User Programmable Features
Programming feature table..................................... 26
How to enter tetters and symbols
To enter characters
Special uses of the direct call
station keys..................................................... 29
Setting the date and time........................................ 30
Setting your logo..................................................... 30
Setting your facsimile telephone
number ............................................................. 31
Setting the transmission report printing .... 31
............................................
.............
...........................
Storing Phone Numbers for Automatic
Dialing
Storing phone numbers for one-touch
Storing phone numbers for speed
To keep a phone number secret ............................ 33
..............................................
dialing ................................................................ 32
dialing
................................................................
B Advanced Instructions
Electronic Telephone Directory
How to use the electronic telephone
directory ............................................................. 34
Polling
..................................................
Polling reception..................................................... 35
Polling transmission (Polled)
.................................
.............
20
21
22
23
24
25
26
28
28
32
33
34
35
35
Page 5

Delayed Transmission
.........................
36
Reports and Lists
Remote Fax Receiving Using an
Extension Phone
Using an extension phone
Changing the remote fax activation
code ................................................................... 38
.............................
.....................................
37
37
Junk Mail Prohibitor.............................. 39
Setting the junk mail prohibitor
Transmitting documents to your unit
with the prohibitor ID .......................................... 40
..............................
39
Receiving with Distinctive Ring
Service
Programming the unit with distinctive
ringing pattern
Special Settings
Logo print position
Overseas transmission mode
Paper save reception/copy
Extension copy
Original mode
Resetting the advanced features............................ 47
.............................................
...................................................
...................................
.................................................
................................
....................................
......................................................
........................................................
41
42
43
43
44
45
46
47
Voice Contact ...................................... 48
Initiating voice contact
Receiving a request for voice contact
............................................
....................
48
48
Printing Reports and Lists
How to print each report/list
Sample reports and lists
Setting journal auto print
.........................................
...................
....................................
........................................
LSI Troubleshooting and
Maintenance
Troubleshooting
Error messages on the display................................54
General corrective measures
Explanation of communication result
on the report........................................................56
Clearing a recording paper jam
Clearing a document jam
Adjusting the feeder pressure
Maintenance
Cleaning the document feeder unit
Cleaning the thermal head
..................................
..................................
..............................
........................................
................................
........................................
........................
......................................
B General Information
Important Safety Instructions
..............
50
50
51
53
54
55
57
58
58
59
59
59
60
TONE, FLASH and PAUSE
Buttons
TONE button........................................................... 49
FLASH button ........................................................ 49
PAUSE button
.............................................
.......................................................
49
49
Accessory Order Information
Specifications
FCC Information
......................................
..................................
.............
61
61
62
Limited Warranty.................................. 63
Index
....................................................
FAX CORRESPONDENCE
Speed dialer list
Servicenter directory
..................................
............................
................
64
65
66
67
Page 6
Installation and Preparation
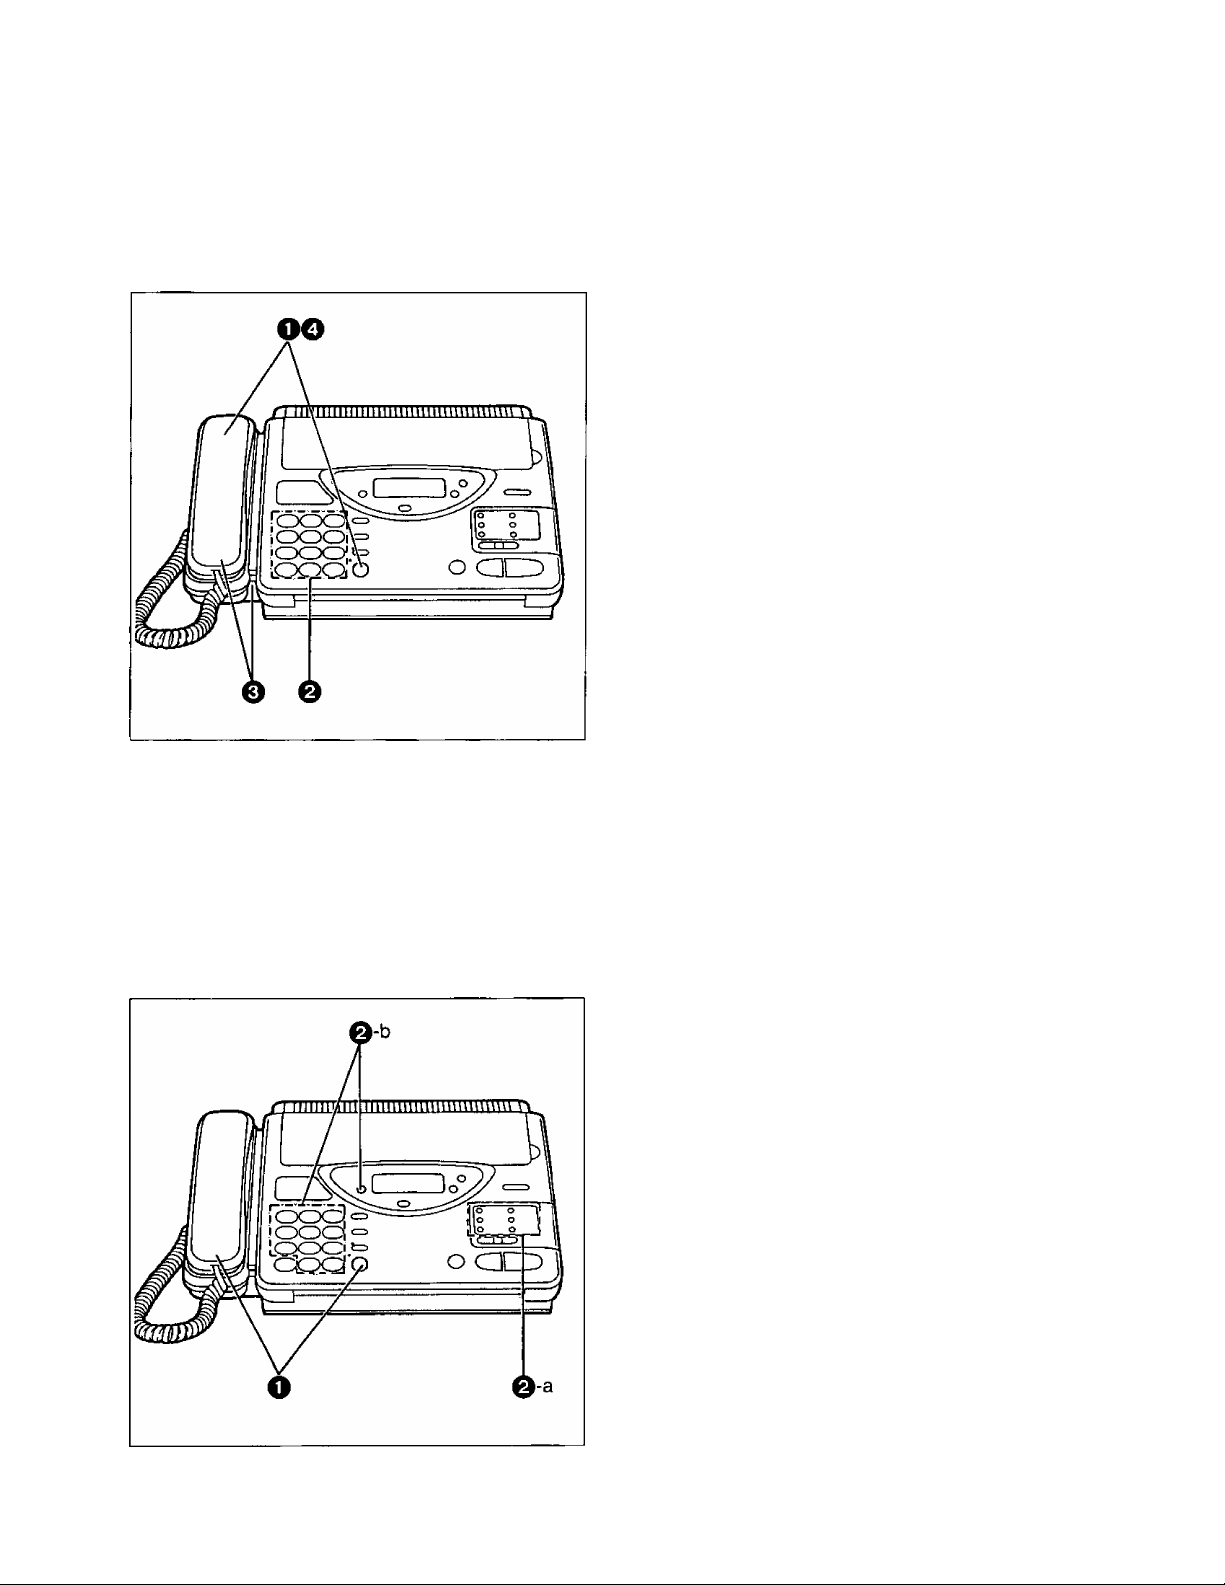
Location of Controls
Front view
_____________
Rear view
Page 7
Installation and Preparation
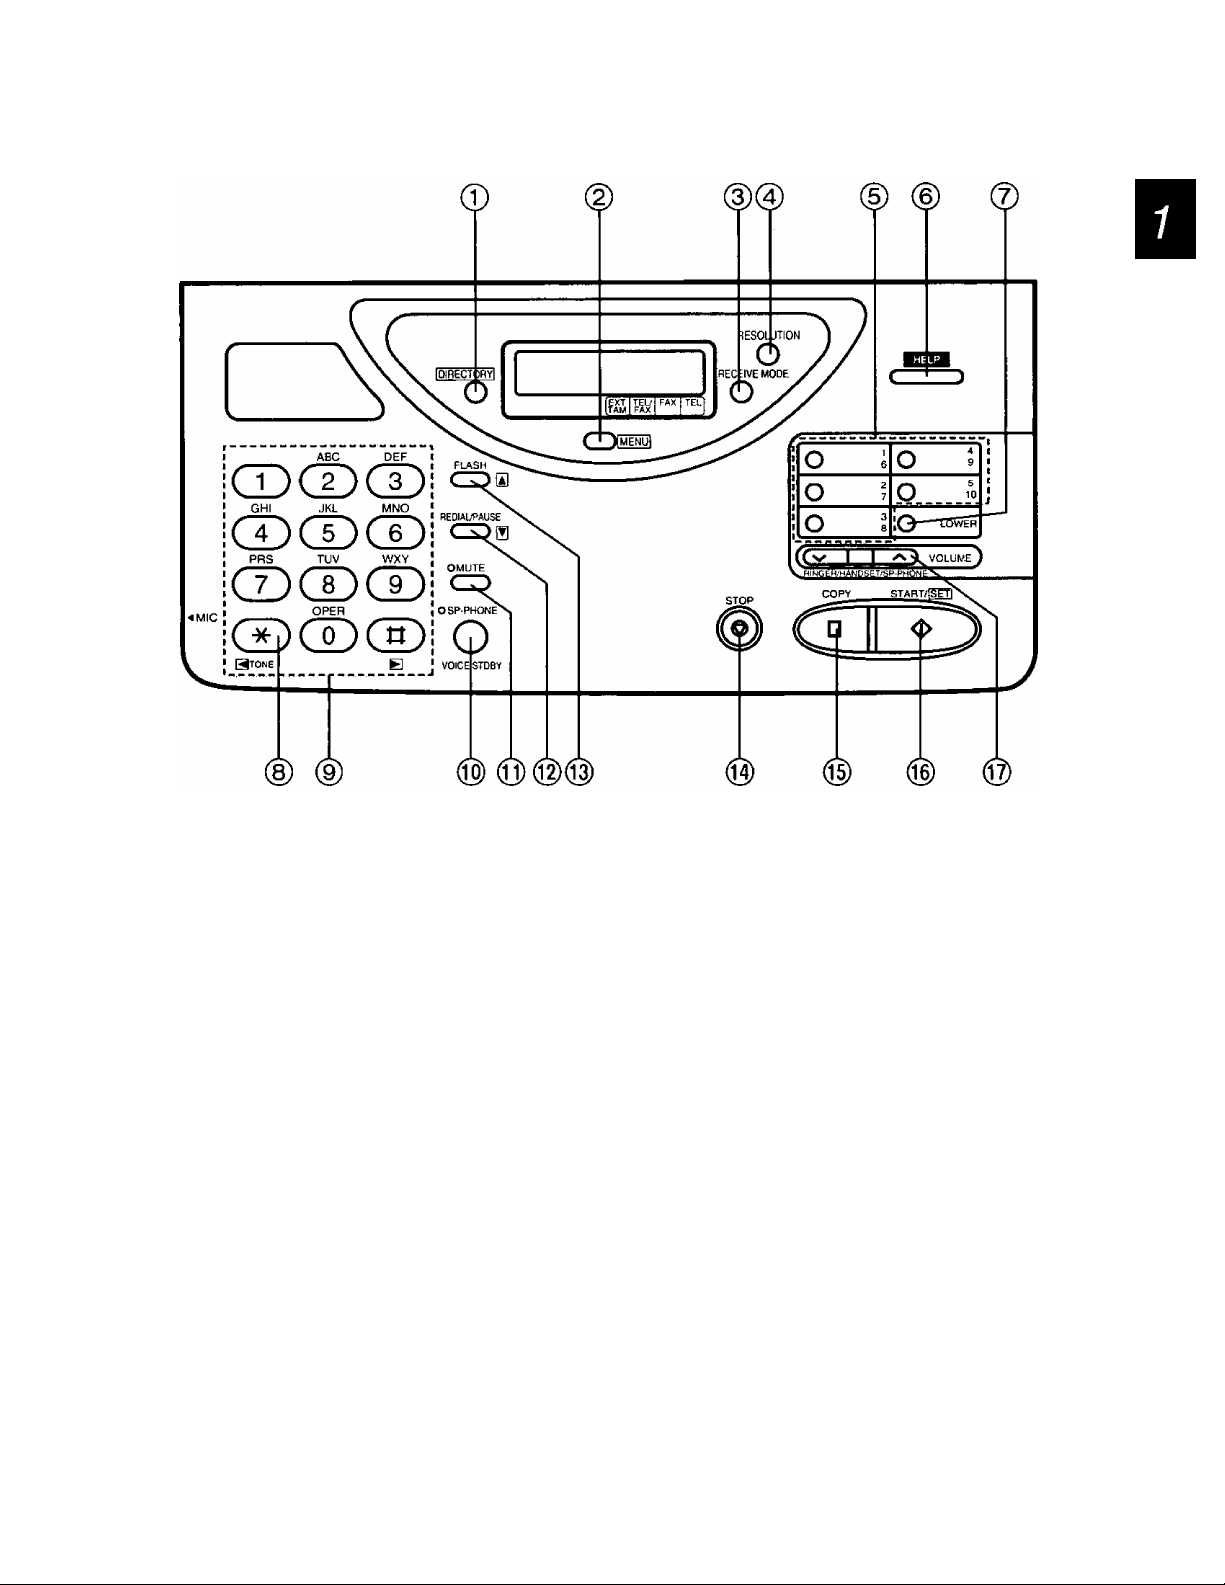
Control panel
© DIRECTORY button (pages 12, 17 and 34)
Used for speed dialing. Also used for the
electronic telephone directory.
@ MENU button
Used to start and exit various programming.
@ RECEIVE MODE button (page 11)
Used to select the desired receiving mode.
© RESOLUTION button (page 15)
Used to adjust scanning line density.
@ Direct call station keys (pages 12, 17 and 29)
Used for one-touch dialing. Also used as
character keys when logo and station names
are programmed.
(§) HELP button (page 3)
Used to print an easy guide of operations.
@ LOWER key (pages 12, 17 and 32)
Used to access lower stations (6 to 10) for
one-touch dialing.
@ TONE button (page 49)
Used to temporarily change the dialing mode
from pulse to tone during a dialing operation.
Dial keypad
Used for dialing operation and parameter
setting. Also used as character keys.
@ SP-PHONE/VOICE STDBY button
(pages 12 and 48)
Used for on-hook dialing and voice contact
features.
(Jl) MUTE button (page 13)
Used for voice muting.
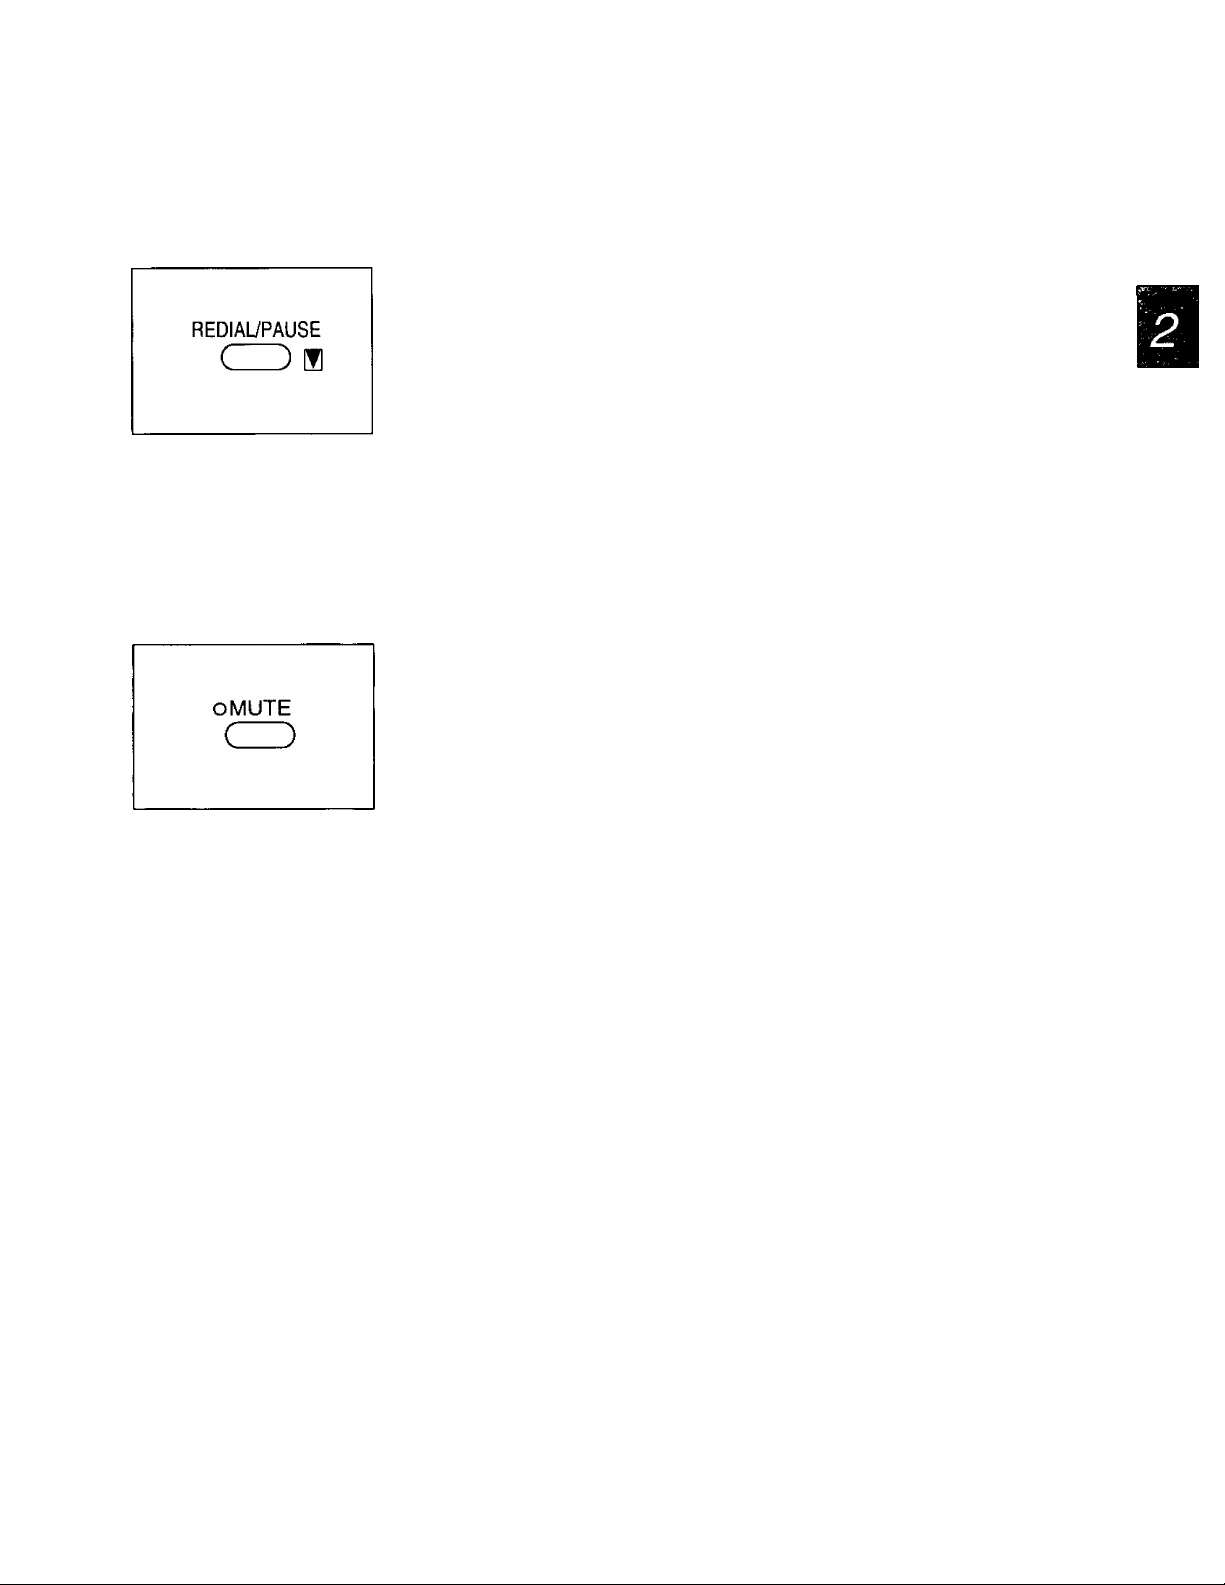
@ REDIAL/PAUSE button (pages 13 and 49)
Used to redial the last dialed number. Also
used to insert a pause into a phone number.
@ FLASH button (page 49)
Used as a hook button. Also used to access
some features of your host exchange.
@ STOP button (page 16)
Used to stop fax communication.
@ COPY button (page 25)
Used to start copying.
® START/SET button
Used to start fax communication. Also used to
store parameters during programming.
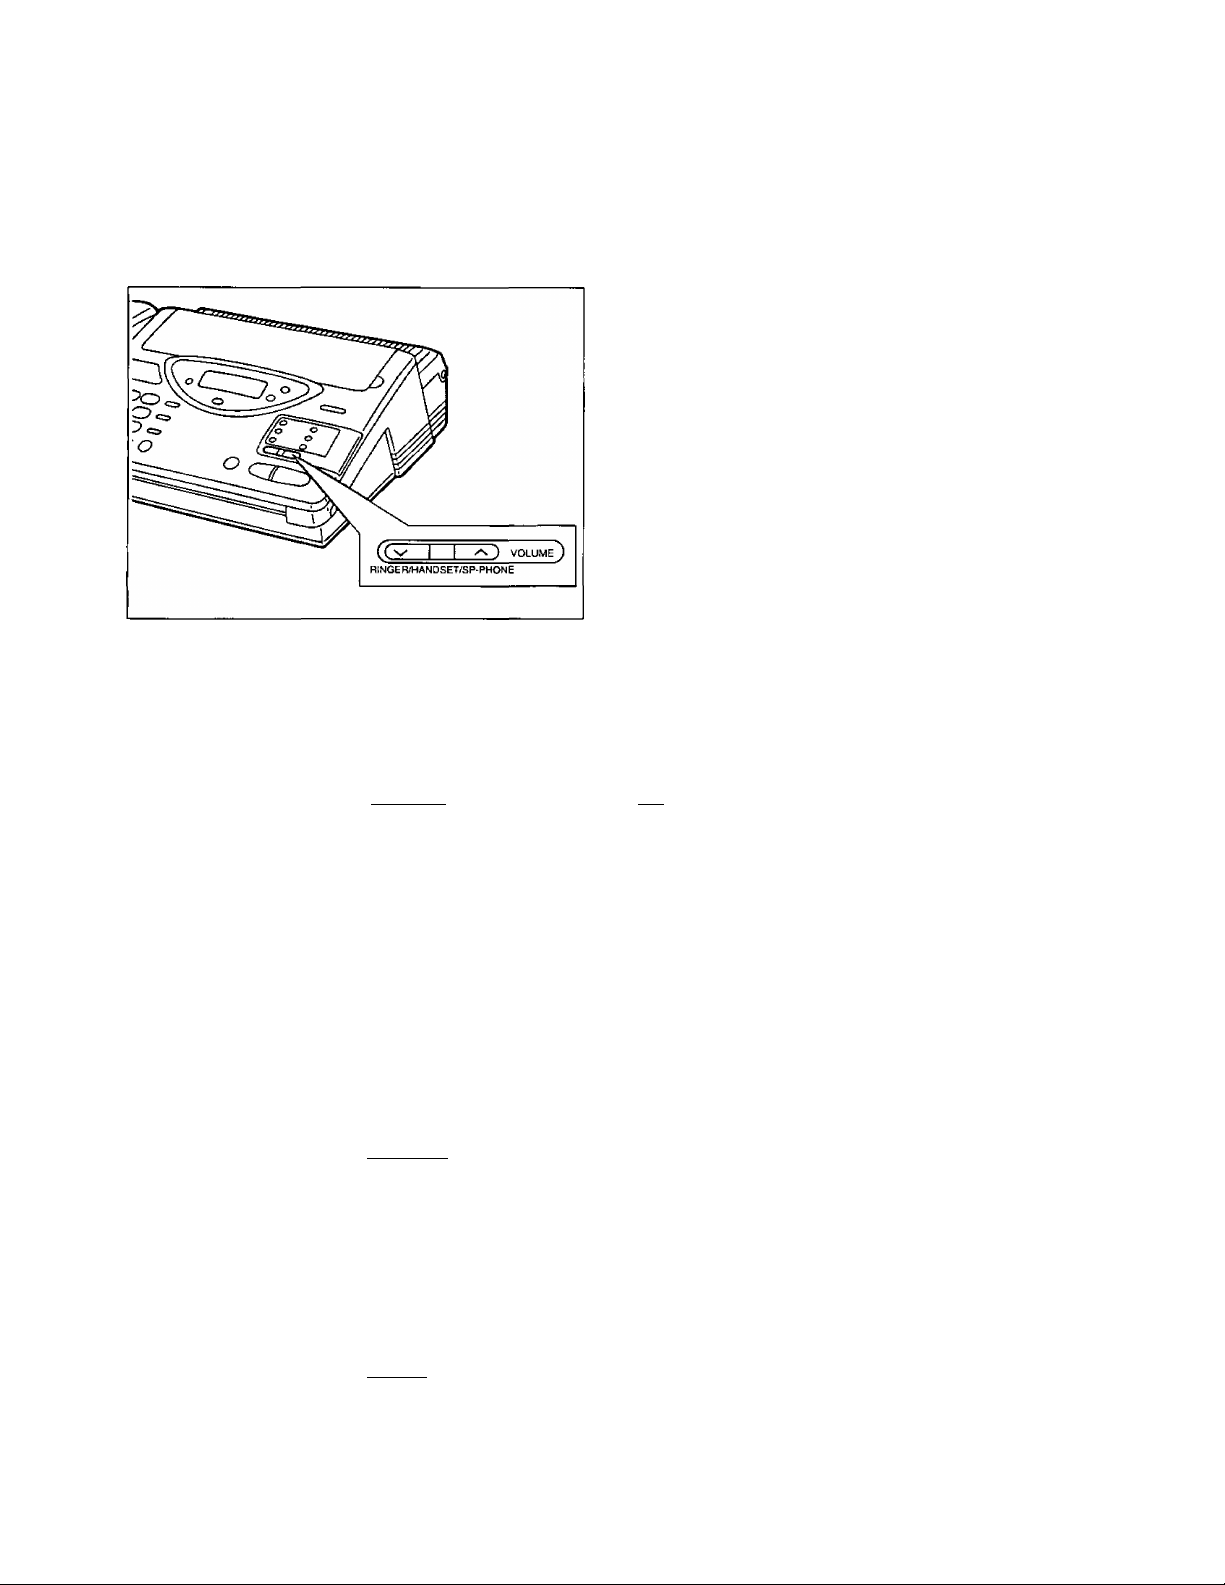
(© VOLUME buttons (page 10)
Used to adjust the volume level of the ringer,
speaker and handset.
Page 8
Installation and Preparation
Installing Your Unit
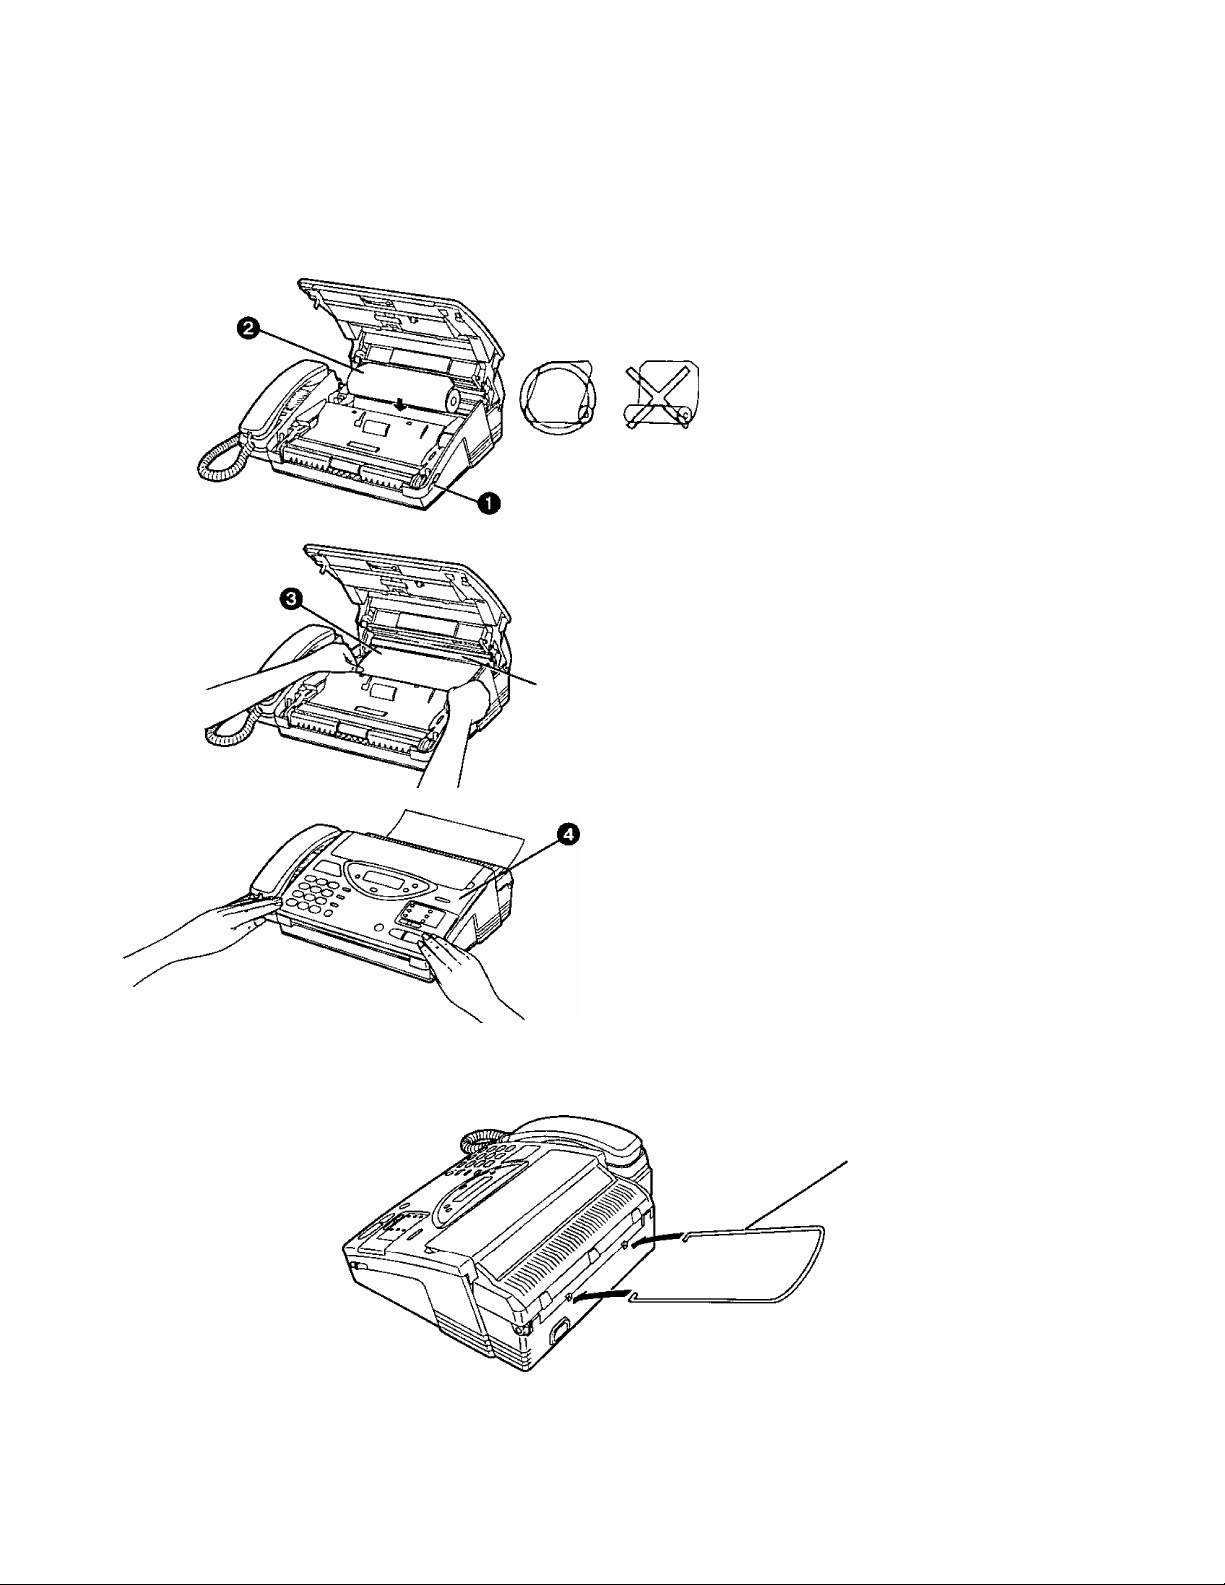
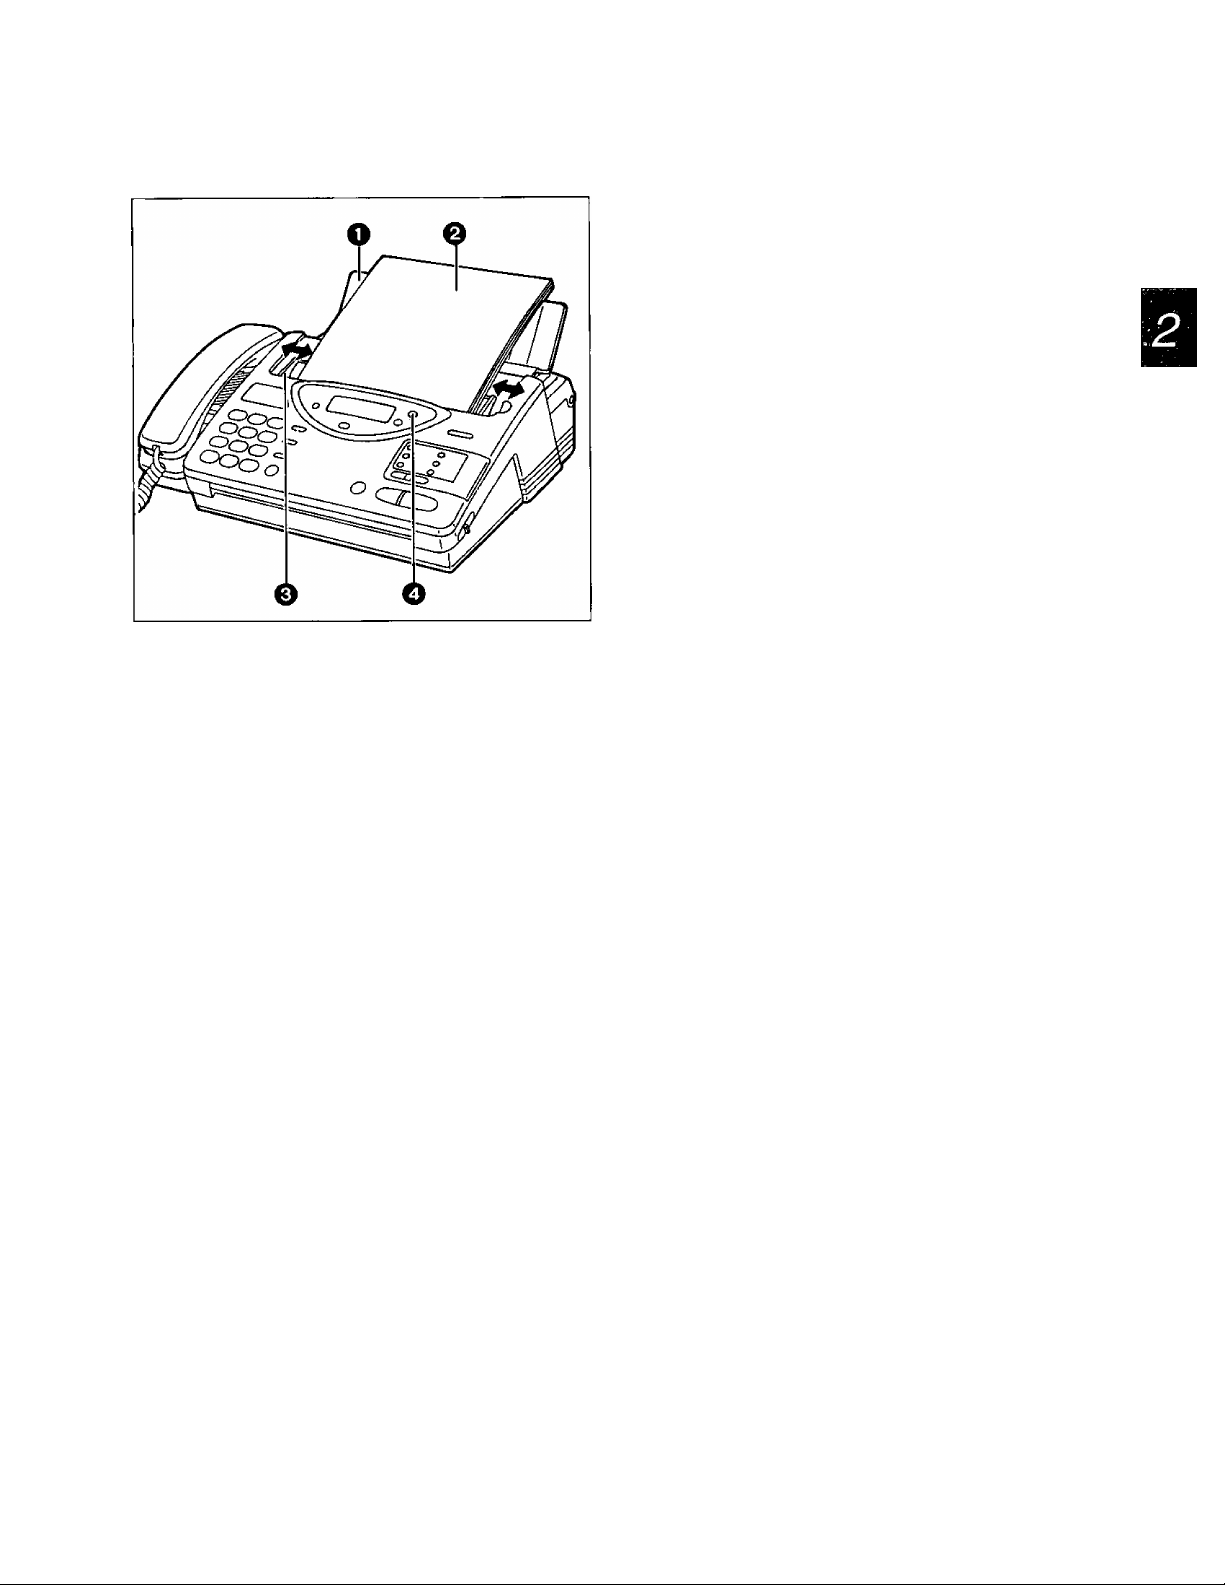
Installing the recording paper
0 Slide the lever toward you to open
the top cover.
^ Place a recording paper roll in the
unit.
—Make sure that the shiny side of
the paper is facing up and that
there is no slack, tape or glue
residue on the paper roll. (See
note below.)
o Insert the leading edge of recording
paper under the green bar.
Q Close the top cover carefully by
gently pressing down on both ends.
Green bar
Notes:
• Use only the included roll or specified
recording paper, or else the print
quality may be affected and/or
excessive thermal head wear may
occur. See page 61 for order number.
• The start of some recording paper rolls
is secured using glue or tape. Residue
from this glue/tape may cause the
paper cutter to jam immediately
following installation of a new roll. To
prevent this, cut approximately 150 mm
(6 inches) from the new roll of paper
prior to installation.
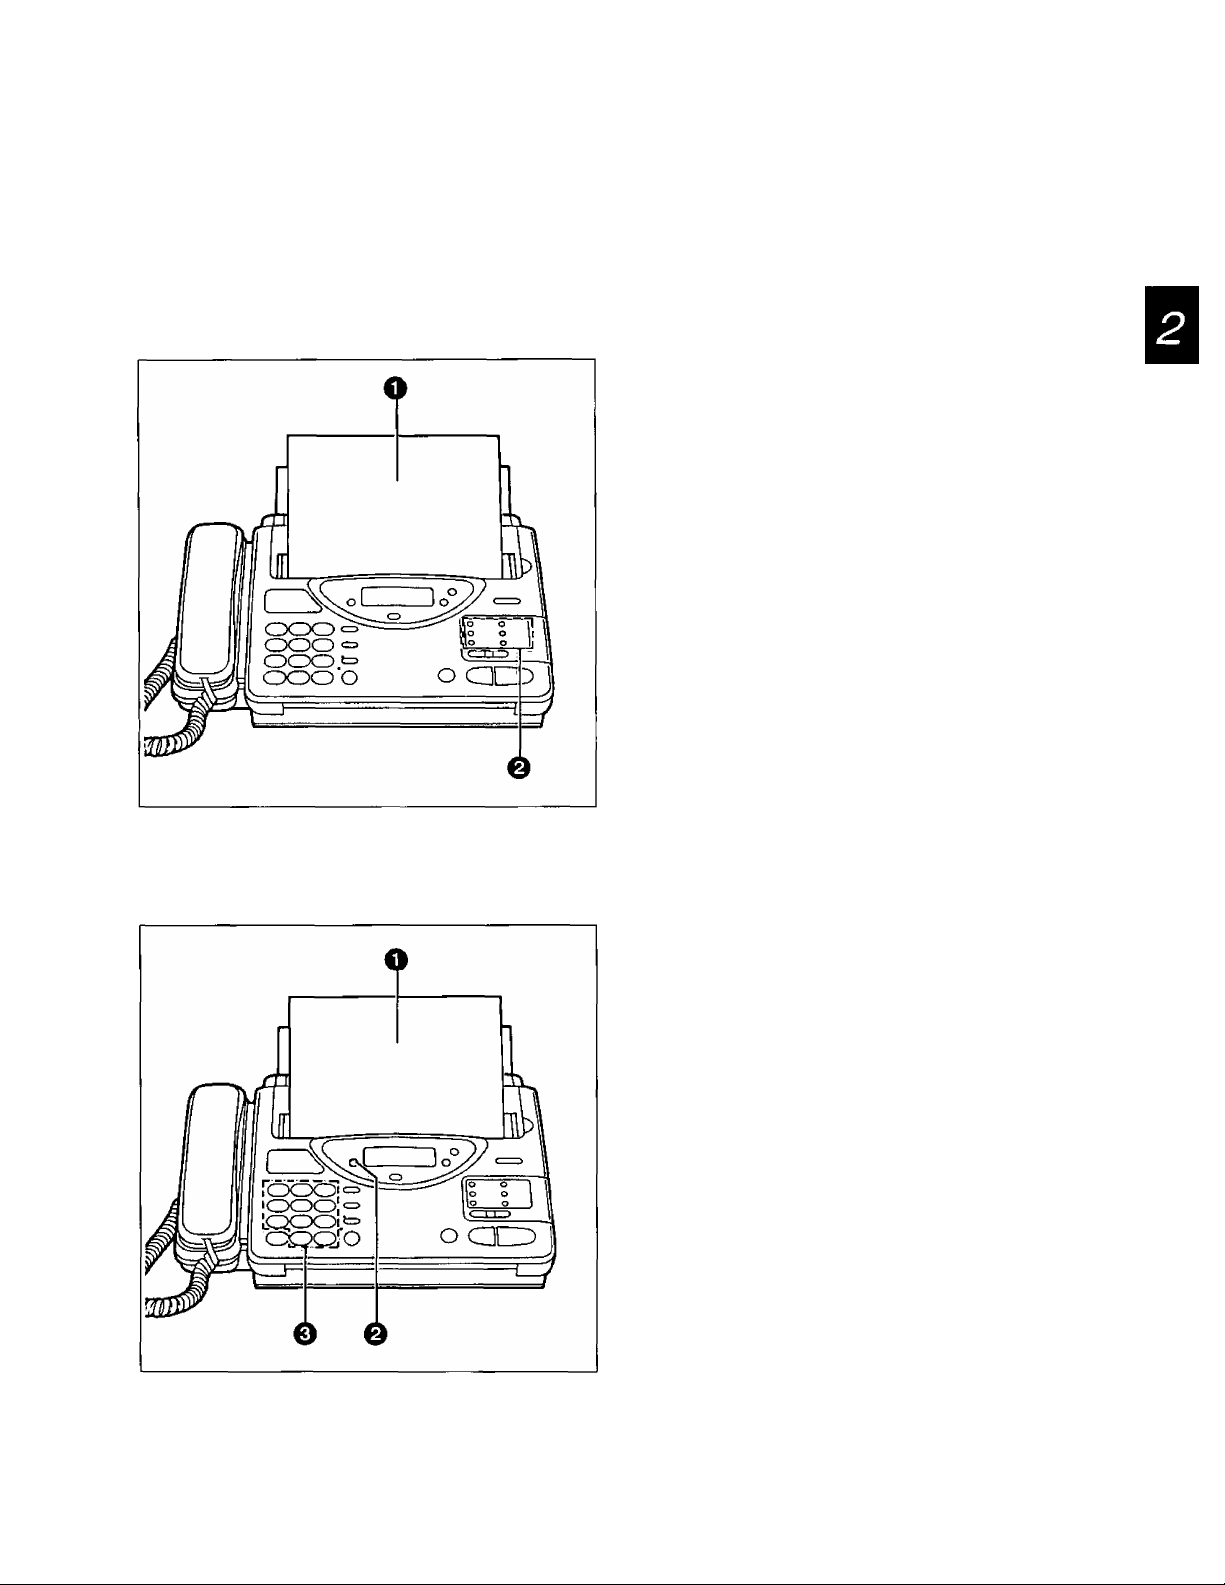
Installing the paper stacker
8
Paper stacker
Page 9
Installation and Preparation
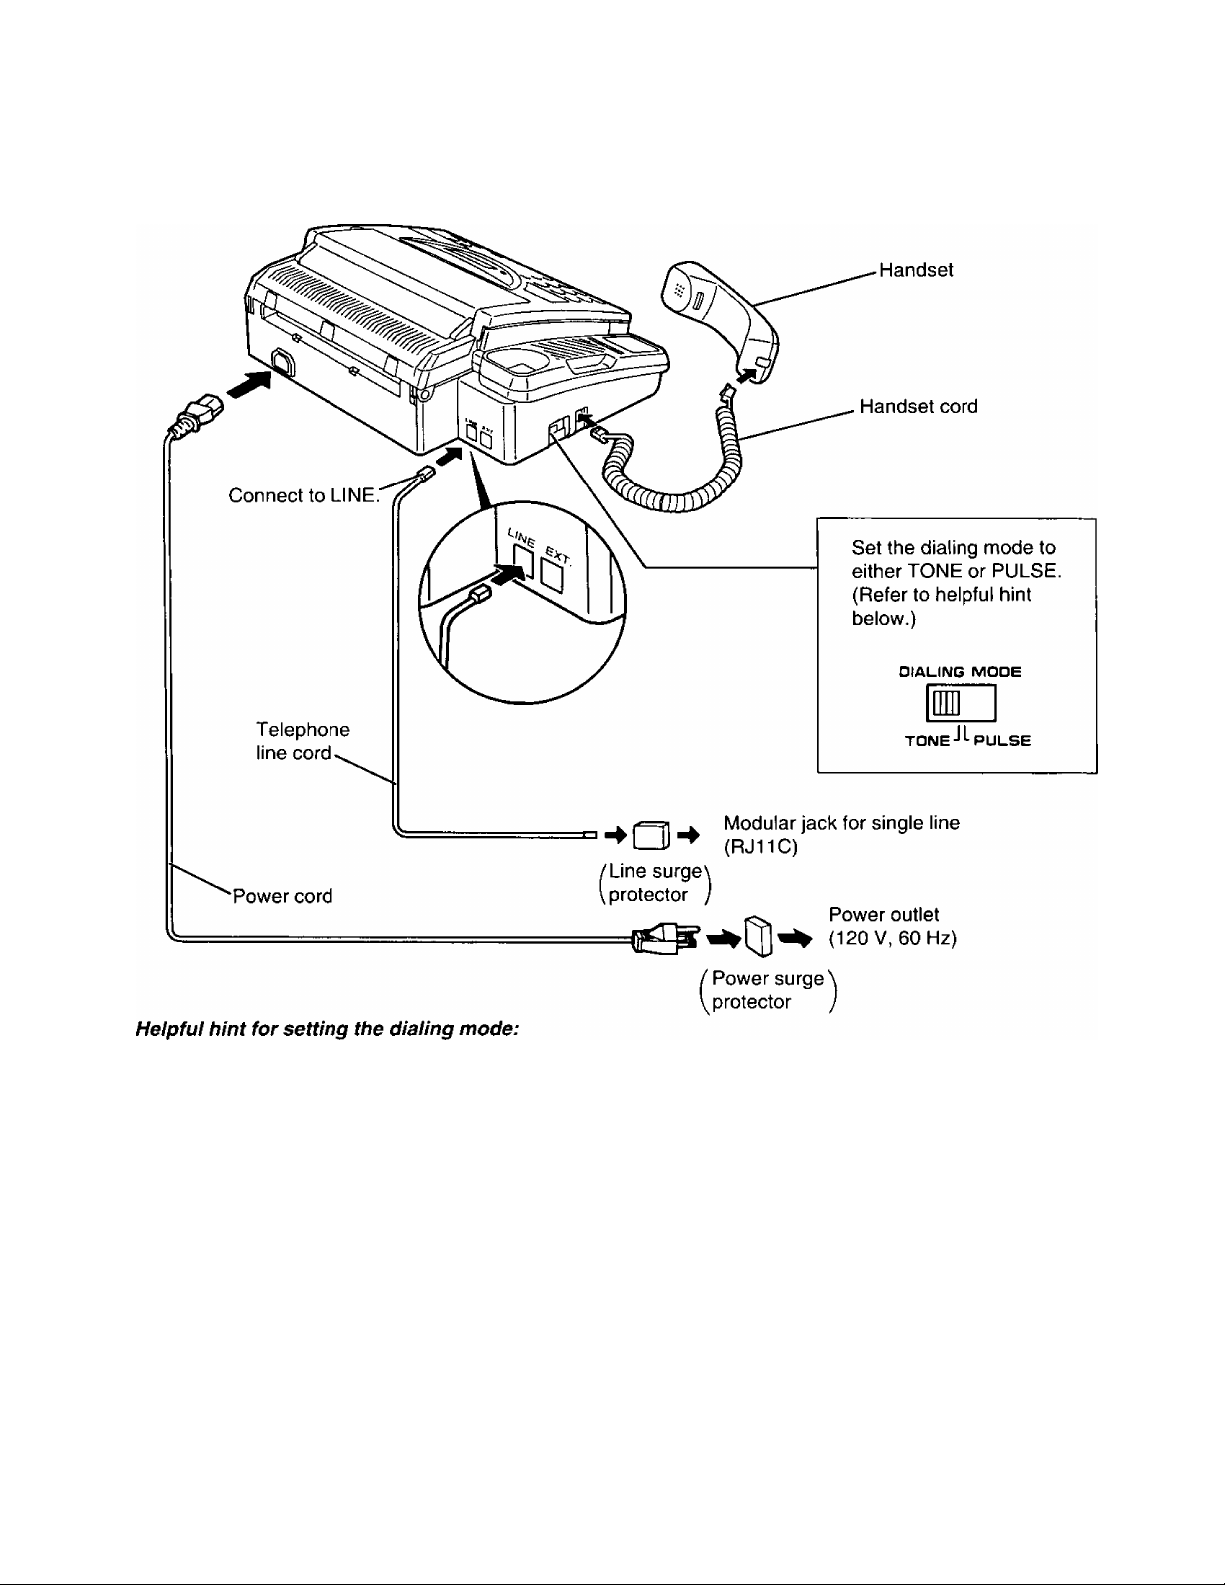
Connections and dialing mode setting
H
mm
1. Ensure that the dialing mode selector is set to TONE.
2. Lift the handset or press the SP-PHONE button, then listen for the dial tone.
3. Dial a familiar number.
4. If the call is successful, the unit is connected to a tone exchange. Leave the selector set to TONE.
5. If the call is not successful, the unit is connected to a pulse exchange. Switch the selector to PULSE.
Notes:
• We recommend the use of an exclusive power outlet to avoid interference from other equipment.
• When you operate this product, the socket outlet should be near the product and be easily accessible.
• The unit will not function during a power failure.
• You can connect an external telephone/answering machine to the unit after peeling off the tape on the
external telephone jack (EXT). When you use with an answering machine, see page 18.
• For additional equipment protection, we recommend the use of a surge protector. The following type is
available; TELESPIKE BLOK MODEL TSB (TRIPPE MFG. CO.), SPIKE BLOK MODEL SK6-0 (TRIPPE
MFG. CO.), SUPER MAX (PANAMAX) or MP1 (ITW LINX).
Page 10
Installation and Preparation
Adjusting Volumes
You can adjust the volume level of the ringer, the handset and the speaker.
These volume levels should be adjusted respectively.
To increase the volume level:
Press A repeatedly.
To decrease the volume level:
Press V repeatedly.
—The number of the black squares in the display
shows the volume level as below.
Ringer volume
Press the buttons (a/v) repeatedly while the unit is in idle status.
3 levels are available.
High
T.I I n I I M in
T.m-T
Low
Note:
• If the ringer volume is set to off, the unit will not ring and the display will show
“RINGER OFF" in idle status.
Handset volume Press the buttons (a/v) repeatedly when the handset is in use.
3 levels are available.
High Middle
T.1 [ i I I I l-TTH
Speaker volume Press the buttons (a/v) repeatedly when the speakerphone is in use.
8 levels are available.
Off
RINGER OFF=OK?
Press START/SET for
confirmation.
Low
LD
10
TJ rrrri [ I IR
High
Low
in
8 levels
Page 11

Installation and Preparation
Selecting the Receive Mode
Select a desired receiving mode by pressing the RECEIVE MODE button repeatedly. The selected mode is
displayed.
For further details, see page 18.
TEUFAXmode:
When you wish to answer voice calls with ring and wish to receive fax
messages without hearing ring, select this mode.
You can answer voice calls only and will not be disturbed by incoming
faxes.
For further details, see page 22.
FAX mode:
When you wish to receive fax transmissions only, select this mode.
The unit will answer all calls and start to receive fax messages
automatically.
For further details, see page 24.
TEL mode:
When you wish to set the unit not to answer any incoming calls
automatically, select this mode.
When you pick up the handset and fax reception is required, you can press
the START/SET button to receive documents.
If no one answers a call by 15 rings, the receiving mode will switch to the
TEL/FAX mode automatically.
Notes:
• Regardless of above setting, you can make voice and fax calls.
• If an external telephone is connected, use TEL/FAX, FAX or TEL mode.
11
Page 12
Basic Instructions
Making and Answering Voice Caiis
Making voice caiis
______________________
0 Press SP-PHONE or lift the handset, then
listen for the dial tone.
0 Dial a phone number.
0 When the other party answers, speak through
the microphone or handset.
0 When finished, press SP-PHONE again or
place the handset on the cradle.
Heipfui hints:
• If you wish to switch to the handset from the
speakerphone, lift the handset. To switch to the
speakerphone, press the SP-PHONE button.
• If you misdial, press the FLASH button firmly,
then dial the correct number.
•Adjust the volume to a suitable level. See
page 10.
• For helpful hints for the speakerphone operation,
see page 13.
Making voice caiis using automatic diaiing
You can dial a phone number automatically using one-touch dialing and speed dialing.
Before using automatic dialing, make sure that the desired telephone numbers have been stored in memory
(see pages 32 and 33).
0 Press SP-PHONE or lift the handset.
0-a Using one-touch dialing:
■ When using the upper stations 1 to 5:
Press the desired direct call station key.
■ When using the lower stations 6 to 10:
Press LOWER, then press the desired
direct call station key.
0-b Using speed dialing:
Press DIRECTORY, then press # and the
desired 2-digit number (00-21).
Helpful hint:
• You can also use the electronic telephone
directory to make a voice call (see page 34).
12
Page 13
Basic instructions
Redialing the last dialed number
If the line is busy or you wish to redial the last dialed number, use the REDIAL/PAUSE button.
Press SP-PHONE or lift the handset, then press REDIAUPAUSE.
Note:
• If the line is busy when using the speakerphone, the unit will automaticaily
redial the number (see item 8 on page 61).
Voice muting
The MUTE button will mute your voice during a telephone conversation. Using this feature, you can hear the
voice of the other party, but the other party cannot hear your voice.
Press MUTE and confirm the MUTE indicator light is on.
To resume the conversation, press MUTE again.
Answering voice calls
When the unit rings, lift the handset or press SP-PHONE to answer the call.
When you have finished, replace the handset on the cradle or press SP-PHONE.
Note:
• For helpful hints for the speakerphone operation, see below.
Helpful hints for the speakerphone operation
• Use the speakerphone in a quiet room for best performance.
• If the other party has difficulty hearing you, decrease the volume using the VOLUME buttons (see
page 10).
• If you and the other party speak at the same time, parts of your conversation will be lost. To avoid this,
speak alternately.
______
13
Page 14
Basic Instructions
Before Transmission
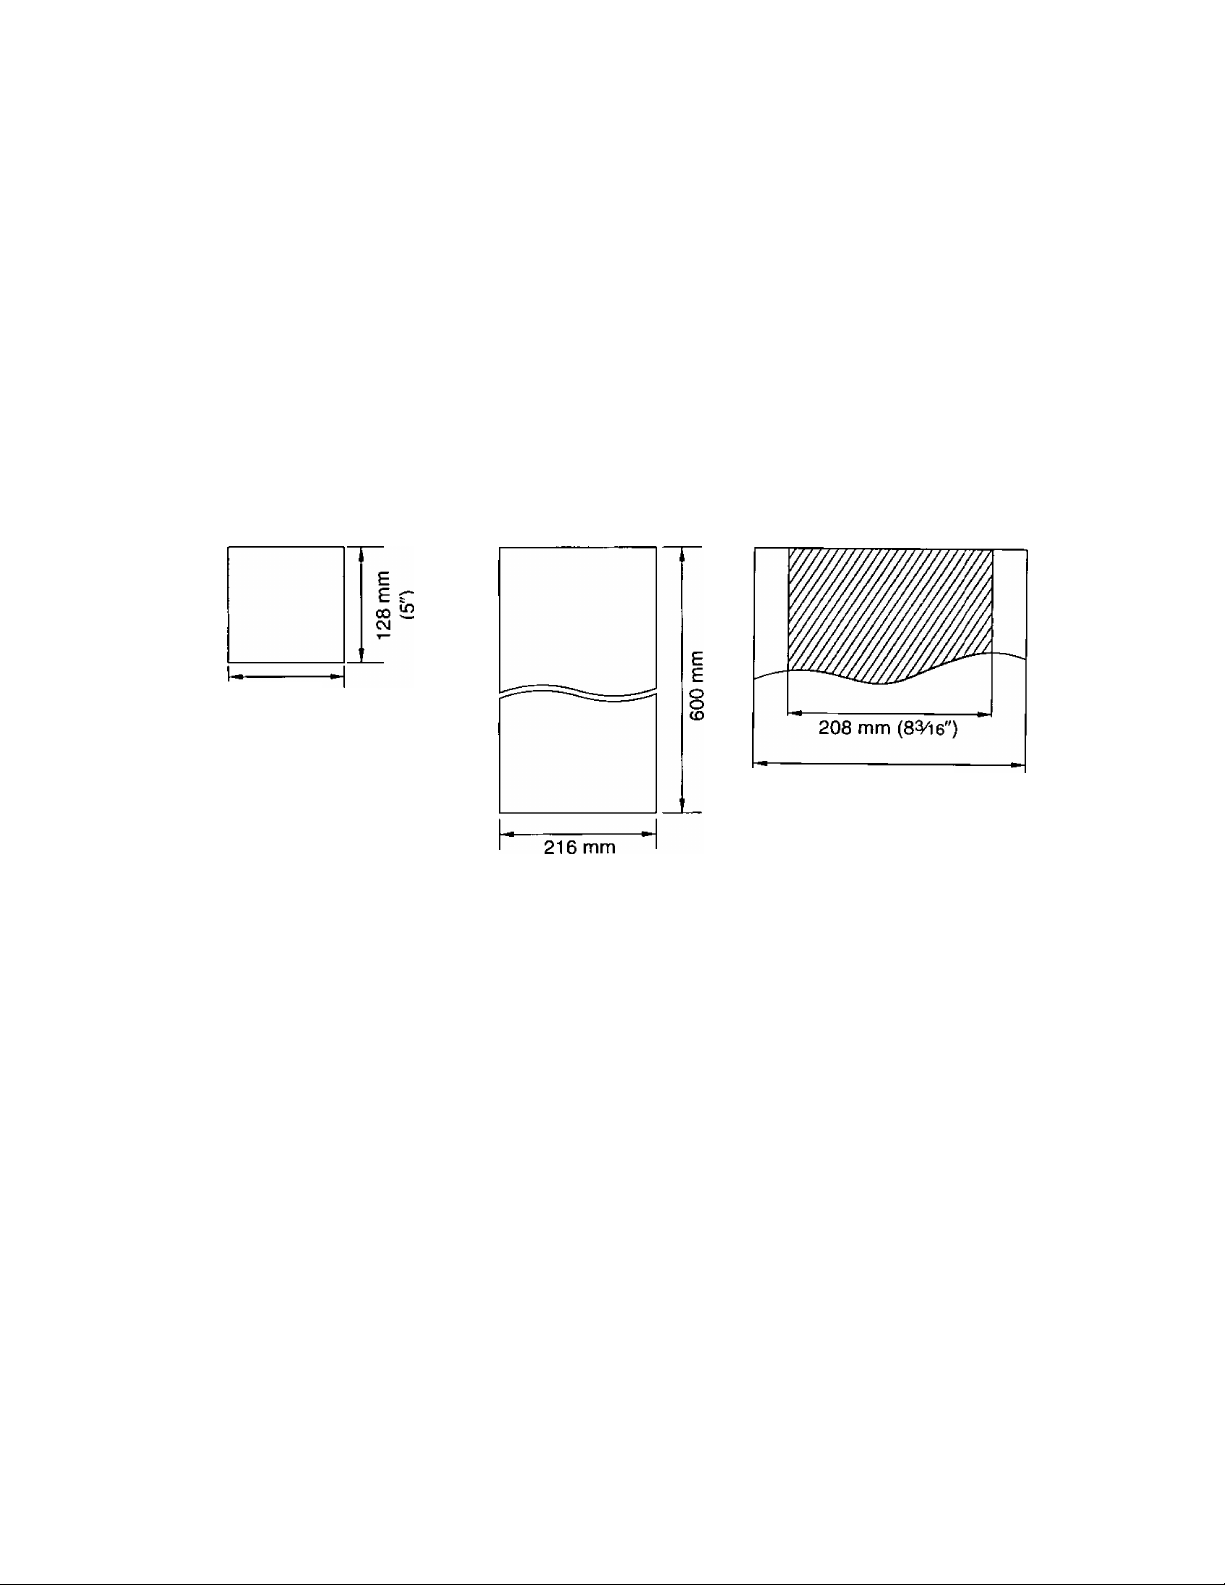
Acceptable documents
The unit can transmit documents that meet the following conditions.
—Document width should be from 128 to 216 mm (5 to&W).
—Maximum document length should not exceed 600 mm {23^').
—Effective scanning width can be up to 208 mm (8^i6")—Number of pages that can be set in the document feeder tray must not exceed 15 sheets.
—Document weight:
Single sheet: 45 to 90 g/m^ (12 to 24 lb.)
Multiple sheets: 60 to 75 g/m^ (16 to 20 lb.)
Minimum document size
128 mm
(5")
____
Maximum document size
CO
CJ
Effective scanning width
Paper width
216 mm {8W )
i&W)
Note:
• Do not feed the following types of documents. Make a copy of these documents with a copier machine and
feed the copy into the unit.
—Paper with a chemically treated surface such as carbon paper or carbonless duplicating paper
—Electrostatically charged paper
—Heavily curled, creased or torn paper
—Paper with a coated surface
—Small-sized paper such as a slip or voucher
— Thin paper less than 45 g/m^ (12 lb.)
— Thick paper over 90 g/m^ (24 lb.)
—Paper with faint contrast between the printing and the background
—Paper with printing on the reverse side that can be seen through the front (e.g. newspaper)
14
Page 15
Basic Instructions
Loading documents
0 Open the document feeder tray.
e Insert the documents FACE DOWN until a
beep tone is heard.
—The unit can accept up to 15 sheets of
paper at a time.
o Adjust the document guides to the width of the
documents.
0 Adjust the resolution by pressing
RESOLUTION if needed {see below).
Notes:
• Remove clips, staples or other similar objects
from a document before feeding it into the unit.
Also check that all ink, paste or correction fluid
on the document has completely dried.
• If the top edge of the document is curled, make it
flat and insert the document.
Setting resoiution
Depending on the quality of the originals, you can select the desired resolution by pressing the
RESOLUTION button repeatedly. Use the button when the document has been fed into the unit.
STANDARD
FINE
SUPER FINE
HALF TONE
Notes:
• Using these features except the standard resolution will increase the transmission time.
• The super fine resolution only works between other compatible machines.
• If the setting is changed during feeding, it will be effective from the next sheet.
• To enhance the resolution settings, see page 47.
Suitable for printed or typewritten originals with normal-sized characters.
Suitable for originals with small printing.
Suitable for originals with minute printing.
Useful for originals containing photographs, shaded drawings, etc.
Sending 16 or more sheets
If you wish to send 16 or more sheets at a time, insert the first 15 sheets of the document. Then add the
extra sheets, up to 15 sheets at a time, before the last sheet is fed into the unit.
15
Page 16

Basic Instructions
Transmitting Documents
Transmitting documents manuaiiy
0
Insert the documents FACE DOWN until a
beep tone is heard.
0 Press SP-PHONE or lift the handset, then
listen for the dial tone.
o Dial a phone number.
0 When a fax tone is heard, press START/SET.
0 Place the handset on the cradle if using it.
—The unit will start transmission.
Notes:
• If the other party answers your call, ask them to
press their start or transmit button to start the fax
reception, then press your START/SET button.
• If there is a misdial in step 3, press the FLASH
button firmly, then dial the correct number after
the dial tone is heard.
• To interrupt the transmission, press the STOP
button.
Transmitting documents with fewer procedures
You can transmit documents without using the handset or the SP-PHONE button.
0
Insert the documents FACE DOWN until a
beep tone is heard.
0 Enter the phone number.
—If incorrect, press the STOP button, then
enter the correct number.
O Press START/SET.
—The unit will start to dial and transmit the
documents.
Note:
• If there is no answer or the line is busy, the unit
will automatically redial the number (see
item 7 on page 61).
16
Page 17
Basic Instructions
Transmitting documents using automatic diaiing
You can transmit documents automatically using one-touch dialing and speed dialing.
Before using automatic dialing, make sure that the desired telephone numbers have been stored in memory
(see pages 32 to 33).
Using one-touch diaiing:
O Insert the documents FACE DOWN until a
beep tone is heard.
@ When using the upper stations 1 to 5:
Press the desired direct call station key.
When using the lower stations 6 to 10:
Press LOWER, then press the desired direct
call station key.
—The unit will dial and transmit the documents
automatically.
Using speed diaiing:
Note:
• If there is no answer or the line is busy, the unit
will automatically redial the number (see
item 7 on page 61).
O Insert the documents FACE DOWN until a
beep tone is heard.
0 Press DIRECTORY.
0 Press #, then press the desired 2-digit number
(00-21).
—The unit will dial and transmit the documents
automatically.
Note:
• If there is no answer or the line is busy, the unit
will automatically redial the number (see
item 7 on page 61).
17
Page 18
Basic Instructions
Receiving Documents and/or Voice Caiis
Manual reception
When in the TEL mode or during a telephone conversation, you can receive documents as follows.
O When the unit rings, press SP-PHONE or lift
the handset to answer the call.
Q When document reception is required, or a
slow beep or nothing is heard, press
START/SET.
e Place the handset on the cradle if using it.
—The unit will start reception.
Note:
• To interrupt reception, press the STOP button.
The unit will stop receiving.
Automatic reception
Set the receive mode to EXT. TAM, TEL/FAX or FAX by pressing RECEIVE MODE.
When a fax call comes in, the unit will automatically activate the fax function to receive documents.
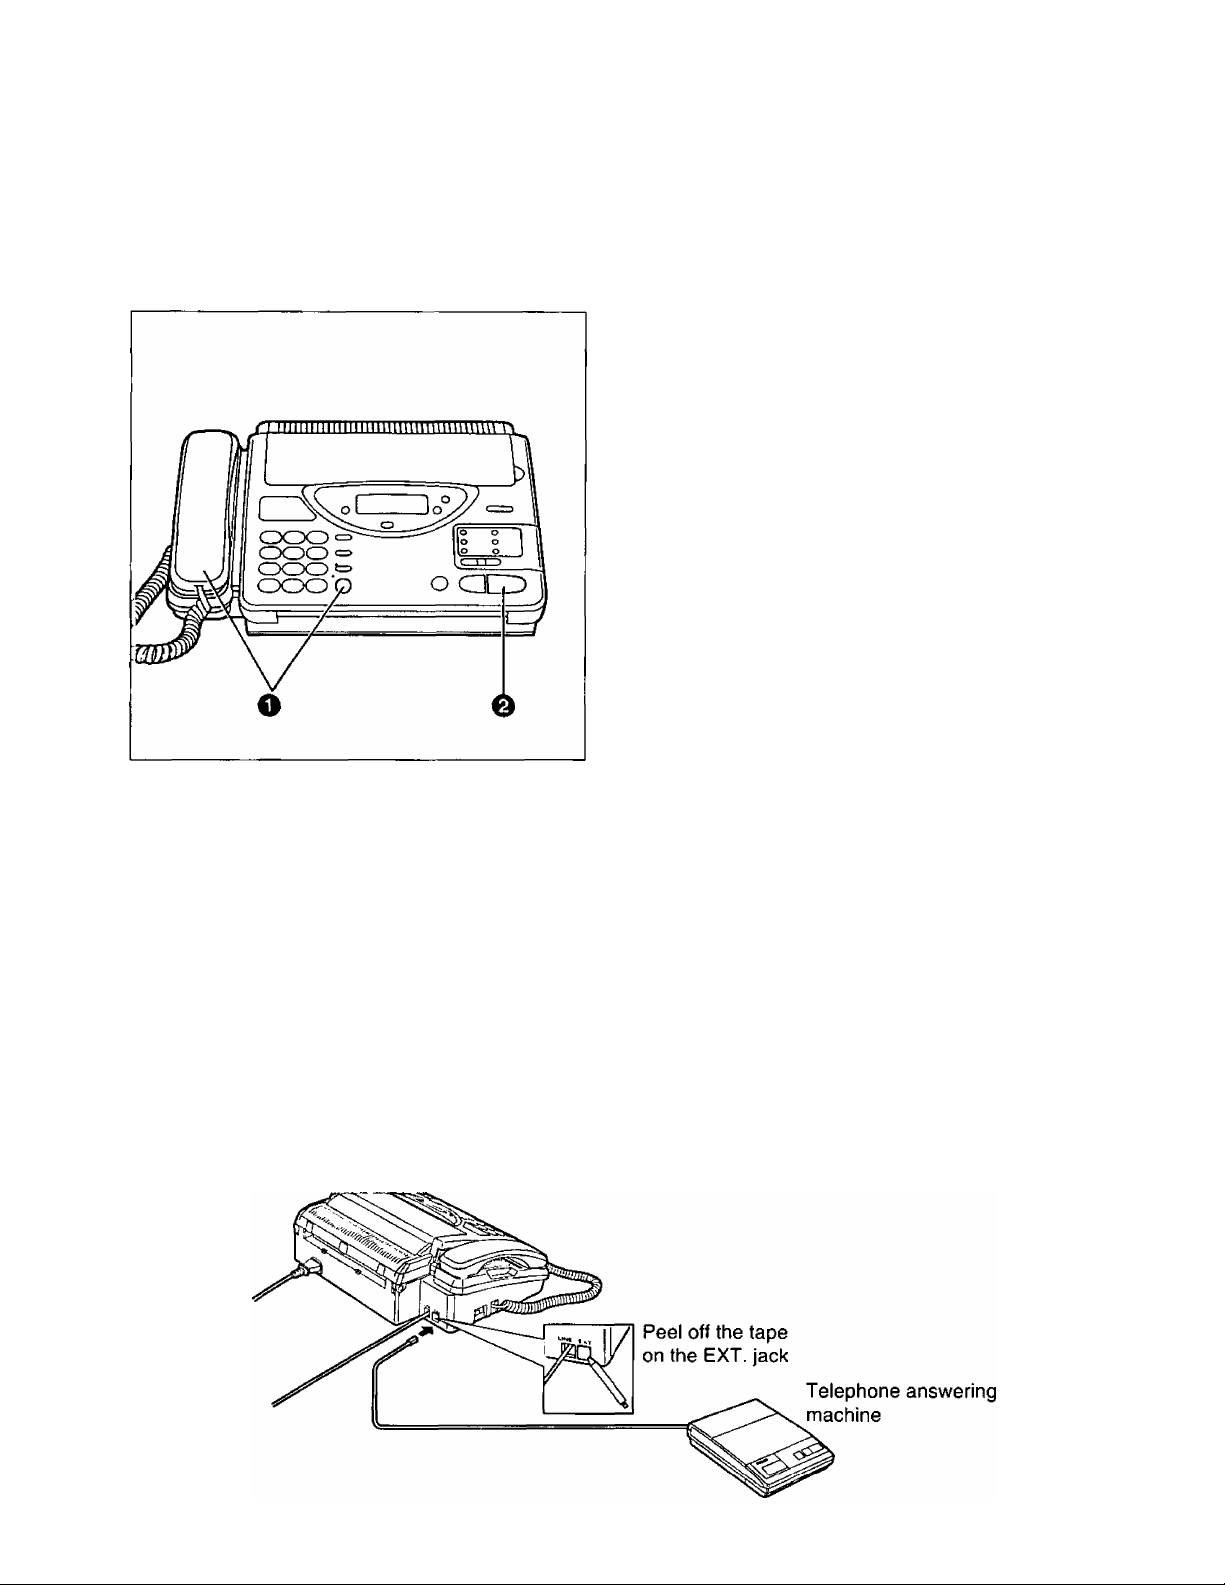
Receiving in the EXT. TAM mode
This mode is used only when an external telephone answering machine (TAM) has been connected to the
facsimile unit. Incoming voice messages will be recorded on the telephone answering machine and fax calls
will be received by the facsimile unit automatically.
Connection
Connect the telephone answering machine to the jack marked “EXT.”.
18
Page 19
Basic Instructions
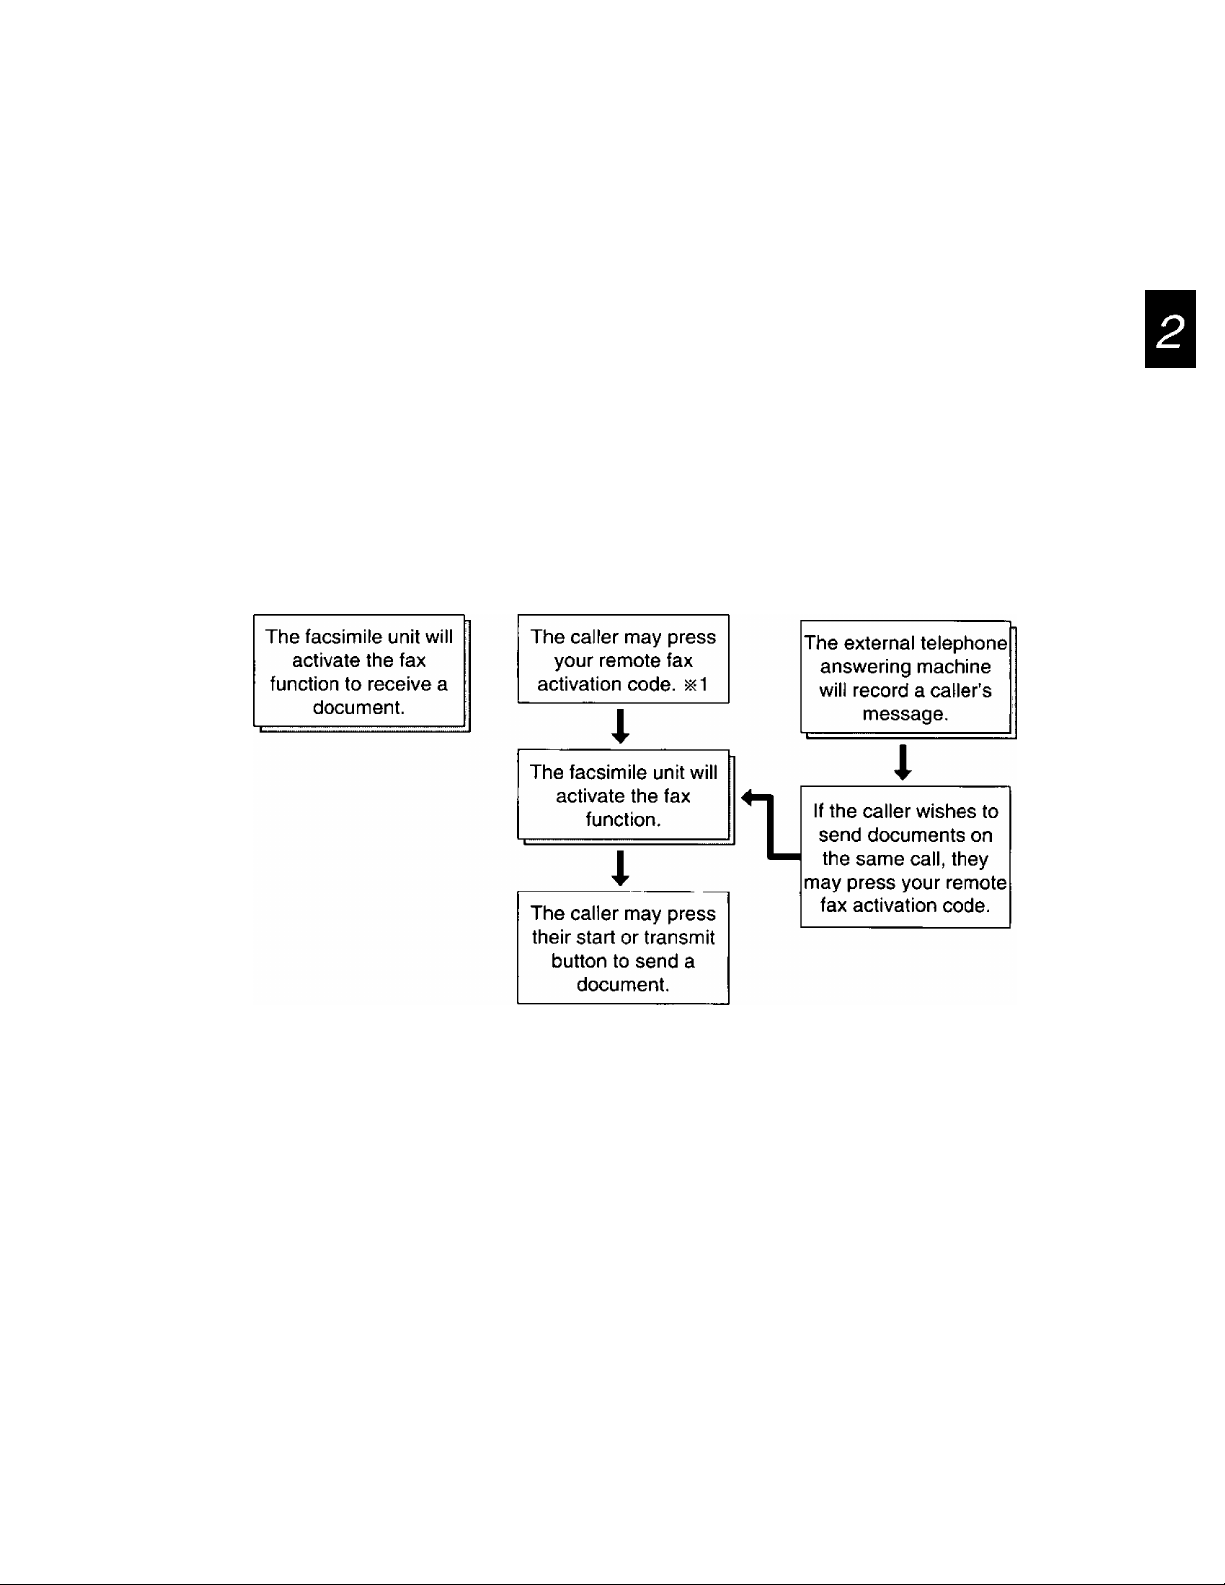
How to receive incoming cails in the EXT. TAM mode
When a call comes in, the facsimile unit and the external telephone answering machine will work as follows.
A call comes in.
i
The external telephone answering machine will answer the call.
Automatic
fax sending
iii1 If the caller calls your unit manually and wishes to send documents, they have to press your
remote fax activation code (see page 38) to activate your facsimile unit. You should inform
callers of this code beforehand.
Manual fax
sending
Voice call
Helpful hint:
• When you use the unit with a telephone answering machine, transmit the leaflet on page 65 to several of
your associates. In this way, you can confirm that your facsimile unit and telephone answering machine
will function correctly and inform them of the procedure for transmitting documents and/or recording voice
messages.
19
Page 20

Basic Instructions
Setting up the answering machine
1. Set the number of rings on the telephone answering machine to 1-4
2. Record your greeting message referring to the example below.
“This is (your name, business and/or telephone number). We are unable to answer right now. To leave a
message, speak after the long beep. To send a fax, press your asterisk button twice (remote fax
activation code) and start transmission. Thank you.”
—Do not pause more than 4 seconds in the message.
—Record your message for 8-16 seconds. We recommend you keep it around 10 seconds in length.
3. If your external telephone answering machine is equipped with a remote operation feature, you must set
the same remote access code (remote TAM activation ID) as stored on the telephone answering
machine in the unit’s memory. See below.
Setting the remote TAM activation ID
Your code can be from 1 to 5 digits long. The numbers 0 through 9 and characters # and ^ may be used.
Important:
• Note that the code should be different from the remote fax activation code (see page 38) and the junk mail
prohibitor ID (see page 39).
0
FLASH
CD ®
REDIAUPAUSE
CDe
Press MENU.
1. SYSTEM SET UP
Press #, then press 11.
REMOTE TAM ACT
Press START/SET.
MODE=OFF AT
Press A or T
repeatedly to select
“ON”.
MODE=ON
[AT]
©
(DCDCD
ФФФ
cSkScd
Press START/SET.
ID=11
Enter the new ID number.
Press START/SET to
store the number.
Press MENU to end the
program.
20
Page 21
Basic Instructions
Setting the silent detection
This feature allows the facsimile unit to activate the fax function automatically when a silent pause longer
than 4 seconds is detected in the EXT. TAM mode.
Helpful hints:
• If you wish to receive documents from stations that do not send calling tone (CNG) after dialing, set this
feature to “ON”.
• If you use a single cassette tape to give a greeting message and to record incoming messages, set this
feature to “OFF”.
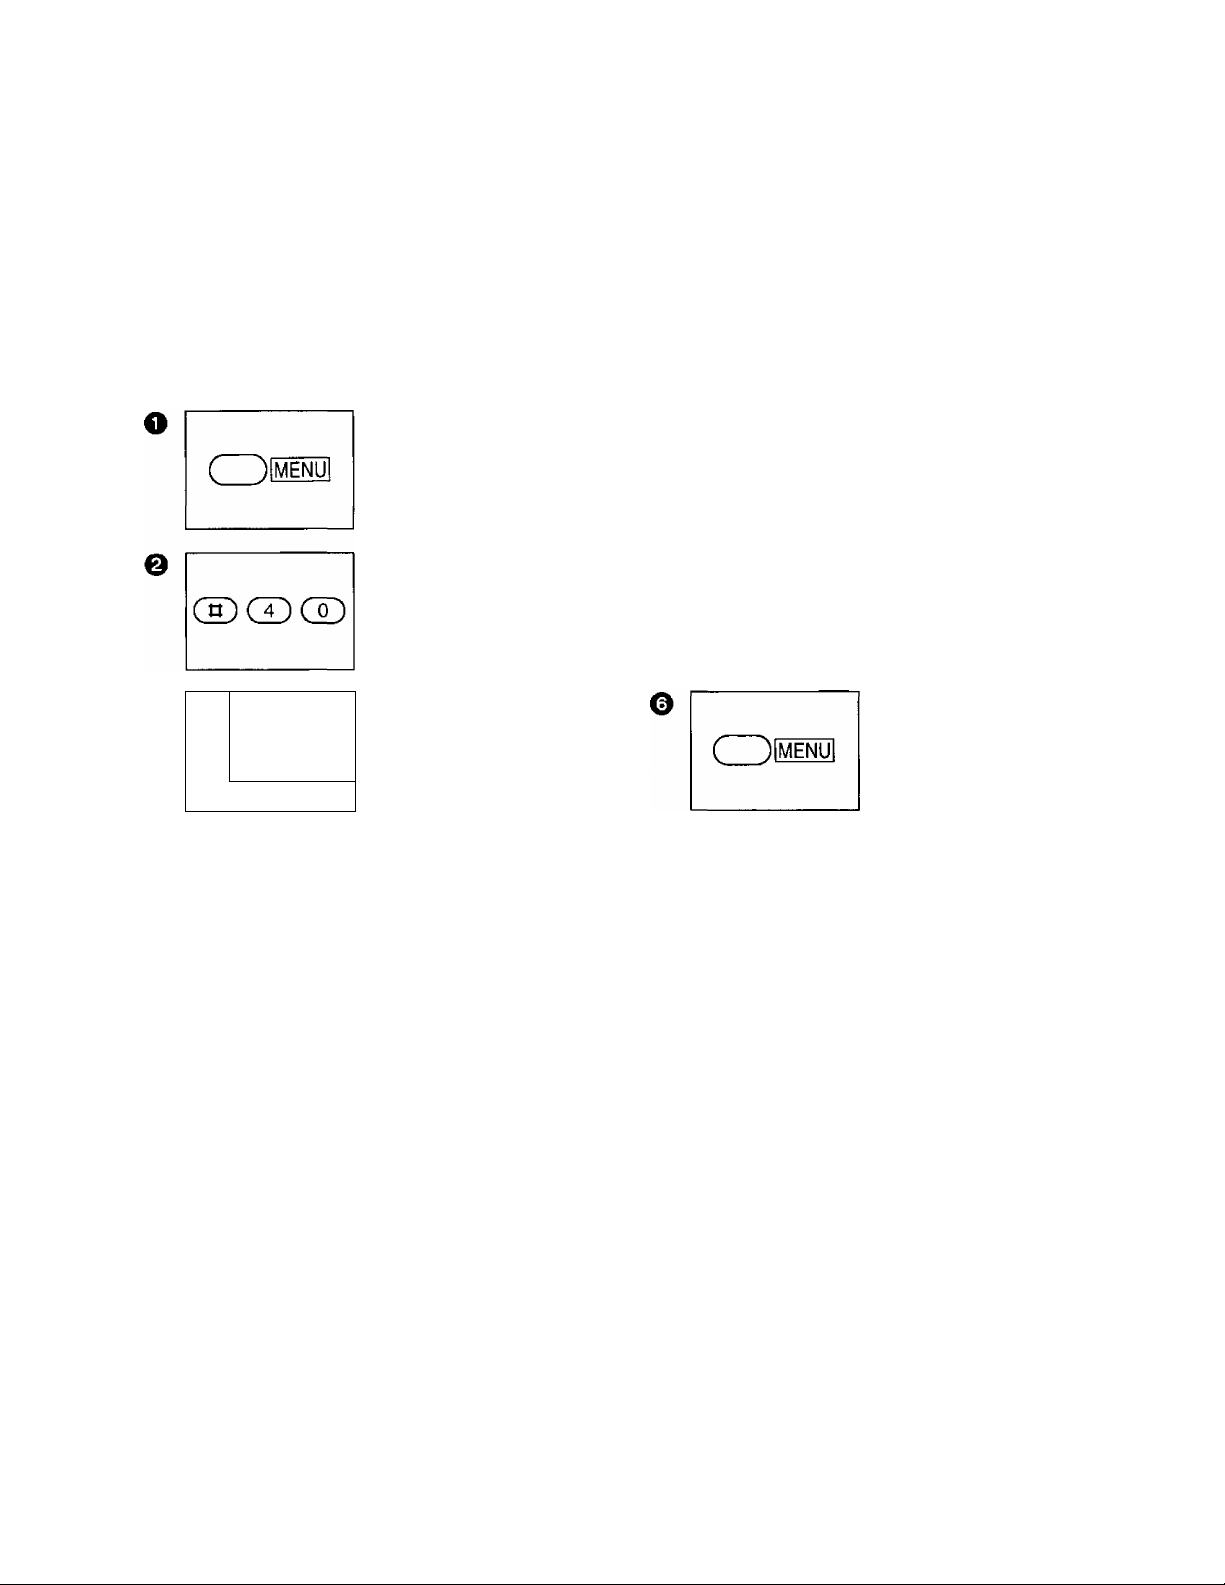
Press MENU.
1.SYSTEM SET UP
Press #40.
SILENT DETECT
FLASH
cz)a
REDIAUPAUSE
START/mil
Press A or T to select
the desired mode.
Press START/SET to
store the setting.
o
o
sTART/ fSETl
Press START/SET.
MODE=ON {AT)
Notice when using with an answering machine
• Every time the facsimile unit receives a document, a mute ora fax tone may be recorded on the tape.
• Advise callers that they should not pause for over 4 seconds while recording their messages. If they do,
the facsimile unit may activate the fax function.
• When your answering machine runs out of a recording tape, your facsimile unit may not be able to receive
a document. Rewind the tape and prepare for recording.
• When you set the answering machine to give only a greeting message, a fax reception may not be
available. We recommend to set your answering machine to record messages
• If you answer a call with the answering machine and pause for over 4 seconds, the facsimile unit may
activate the fax function and you may not be able to talk with the other party. To resume the conversation,
press the STOP button on the facsimile unit.
• When the answering machine does not answer a call after ringing 5 times, the facsimile unit will activate
the fax function.
• Set the receive mode of the facsimile unit to TEL in the following conditions:
—when you wish to set the number of rings on the answering machine to more than 5.
—when you wish to use auto transfer functions (transfer, pager call, etc.) on the answering machine.
Note that automatic fax sending (see page 19) can not be received automatically in the TEL mode.
Press MENU to end the
program.
21
Page 22

Basic Instructions
Receiving in the TEL/FAX mode
When a call comes in, the unit will work as follows.
A call comes in.
The unit will automatically answer the call without ringing and
distinguish between a voice and fax call. ^2
Fax call
The unit will receive a document.
^1 All extension phones (if connected) will ring once before the unit automatically answers the line.
This number of rings can be changed to a maximum of 4. See “Setting the number of rings to
answer in the TEL/FAX mode” on page 23.
^2 Telephone fee will be charged to callers from this moment.
iii3 If a voice call is detected, the unit will ring up to 3 times. This number of rings is adjustable to a
maximum of 6. See “Silent ring fax recognition system” on page 23.
The unit will start to ring. ^3
You can pick up the handset to answer
the call.
If you do not pick up the handset, the
unit will switch to the fax.
Voice call
Notes:
• The unit can distinguish between a voice and fax call by detecting the calling tone (CNG), sent by the
transmitting fax machines.
Some fax messagies that are transmitted manually may not send with a calling tone. These calls must be
manually received after the unit rings and the call is answered.
• If a voice call is received, the unit will start to ring. While ringing, the unit will emit a different ring back tone
to the calling party.
• If you hear the facsimile unit ringing, you can pick up the handset on the facsimile unit or another
extension (if connected on the same line) to answer the call.
22
Page 23

Basic Instructions
Setting the number of rings to answer in the TEL/FAX mode
This feature determines the number of rings after which the unit answers a call in the TEL/FAX mode.
You can change the number of rings among 1 to 4 rings.
Press MENU.
1.SYSTEM SET UP
FLASH
REDIAL7PAUSE
Press A or ▼ to select
the desired number of
rings (1 to 4).
(ZDm
Press #06.
TEL/FAX RING
Press START/SET.
RING=1 AT
Wofe;
• If an external telephone with a caller ID feature is connected, set the number of rings to more than 2.
©
Siient ring fax recognition system
In the TEL/FAX mode, when a fax call is received, the unit will automatically activate the fax function without
ringing (we call this “silent ring fax recognition system”). If the unit detects a voice call, it will ring 3 times.
This number of rings can be changed to a maximum of 6 by following steps below.
Press START/SET to
store the setting.
Press MENU to end the
program.
Press MENU.
1.SYSTEM SET UP
REDIAL/PAUSE
Press A or T to select
the desired number of
rings (3 to 6).
CD ffl
Press #30.
SILENT FAX RING
o
Press START/SET.
RING=3 AT
©
Press START/SET to
store the setting.
Press MENU to end the
program.
23
Page 24

Basic Instructions
Receiving in the FAX mode
When a call comes in, the unit will automatically answer the line after 1 to 4 rings (user programming) and
activate the fax function.
Setting the number of rings in the FAX mode
This feature determines the number of rings after which the unit answers a call in the FAX mode.
You can change the number of rings from 1 to 4 rings.
Helpful hints:
• If you wish to have the opportunity to answer a call before the unit does, increase the number of rings.
• If you find there is difficulty in fax receiving from machines that have an automatic transmission feature,
decrease the number of rings.
• ff an external telephone with a caller ID feature is connected, set the number of rings to more than 2.
e
Press MENU.
1.SYSTEM SET UP
Press #07.
FAX RING
Press START/SET.
RING=1
[AT
©
Press A or ▼ to select
the desired number of
rings (1 to 4).
Press START/SET to
store the setting.
Press MENU to end the
program.
24
Page 25

Basic Instructions
Making a Copy
Any transmissible document can be copied {see page 14). To make a copy, follow the steps below.
^ Insert the documents FACE DOWN.
0 Press COPY.
—The unit will start copying.
Notes:
• When copying, the unit will automatically select
the FINE resolution. Depending on the originals,
select the desired resolution (see page 15).
• You can make or receive voice calls while
making a copy.
• To interrupt a copy, press the STOP button. The
unit will stop copy operation and eject the
documents.
B
25
Page 26

Basic Settings
User Programmable Features
The unit has the following programming features.
Basic features are the settings that need to be programmed upon completing the installation. Most
probable choices have been pre-selected, but some features, such as codes #01, #02 and #03, must be
programmed by user.
Advanced features should be programmed as the need arises.
Programming feature table
Basic features
Code Feature
#01
#02
#03 YOUR TELEPHONE
#04
#06
#07 FAX RING COUNT
#11 REMOTE TAM
SET DATE & TIME Setting the current date and time. 30
YOUR LOGO
NUMBER
PRINT TRANSMISSION
REPORT
TEL/FAX DELAYED
RING
ACTIVATION
Setting your company name or
personal name.
Setting your facsimile telephone
number.
Setting individual transmission
report printing.
Setting the number of rings on the
extension phone (if connected)
before the facsimile unit answers
a call in the TEL/FAX mode.
Setting the number of rings to
answer in the FAX mode.
Setting the same remote control
code as stored on the telephone
answering machine.
Description Selection Page
Note: In the “Selection " column, the underlined print indicates the pre-selected settings.
up to 30 digits 30
up to 20 digits
ERROR/ON/OFF
1 to 4 rings 23
1 to 4 rings
ON/OFF
ID=up to 5 digits
(11)
31
31
24
20
26
Page 27

Basic Settings
Advanced features
Code
#21
#22
#23
#24 JUNK MAIL
#25
#30
#31
#33
LOGO POSITION
JOURNAL AUTO PRINT
OVERSEAS MODE
PROHIBITOR
DELAYED
TRANSMISSION
SILENT FAX
RECOGNITION RING
RING DETECTION Setting the distinctive ring pattern
PAPER SAVE
FUNCTION
Feature
Description
Setting the logo print position on
the transmitted document.
Printing journal report
automatically.
Setting the overseas transmission
mode.
Turning on the junk mail prohibitor
feature. Also setting the prohibitor
ID.
Setting the delayed transmission.
Setting the number of rings when
receiving a voice call in the
TEL7FAX mode.
that will be detected.
Setting the paper save
reception/copy.
Selection Page
OUT/IN/OFF 43
ON/OFF
ON/OFF 44
ON/OFF
Prohibitor ID=
2 digits (^)
ON/OFF
3 to 6 rings
A/B/C/D/OFF 42
ON/OFF
53
39
36
23
45
#34 EXTENSION COPY
#40 SILENT DETECTION
#41 REMOTE FAX
ACTIVATION CODE
#46
#80
ORIGINAL SETTING Setting the contrast mode.
SET DEFAULT
Copying a document twice in
length.
Selecting whether or not the unit
will activate fax function when a
silent pause longer than
4 seconds occurs in the EXT.
TAM mode after the call is
answered.
Setting the remote fax activation
code for remote receiving using an
extension phone.
Resetting the parameters of the
advanced features.
Note: In the “Selection” column, the underlined print indicates the pre-selected settings.
ON/OFF 21
up to 4 digits
(>k^)
NORMAL/
LIGHT/
DARKER
YES/NO 47
46
38
47
27
Page 28

Basic Settings
How to enter letters and symbols
The dial keypad and the direct call station 1 are used as alphabet and symbol character input keys when
you enter your logo and station names for automatic dialers.
To enter characters
Pressing each key will alternately select a character as shown below.
When the desired character is displayed, press # to move the cursor to the right and enter the next
character.
Keys
1 2 3
(D
œ
(D
CD
03
CD
CD
CD
CD
CD
|o ;| ;
CD
CD
1
A B
D E F d
G H I
J K L
M N O
P
T U
w X
0
◄ key (Used to move the cursor to the left)
► key (Used to move the cursor to the right)
4
[ ] { }
a b c 2
g
j
m n
< >
I
Q
( )
c
R S
V t u V 8
Y Z w x
?
Number of pressing times
5 6
+
e f 3
h i 4
k I 5
0 6
P q
* @
7 8 9 10 11 12 13
- /
r s
y
!
A
=
7
2
#
9
$
’
,
% & ¥
_
(
For example, when entering “Mike” as your logo:
0 Press 6 once, then press #.
LOGO=M3
0 Press 4 six times, then press #.
LOGO=MiD
Note:
• If you make a mistake while programming, use # or* to move the cursor to the incorrect character, then
make the correction.
O Press 5 five times, then press #.
LOGO^MikG
0 Press 3 five times.
LOGO^Mike
28
Page 29

Basic Settings
Special uses of the direct cail station keys
Direct call stations 2, 4 and 5 are used as command keys.
Character key-
vj
O
O
The layout of the direct call station keys is printed on the reverse side of the directory card.
1. Remove the directory card cover with a pencil or similar object as shown.
2. Turn over the directory card. You will find how each command is assigned to the direct call station keys.
11
O
J
2
INSERT 7 o
3
SECRET 8 o
.
DELETE 10
SPACE 9
LOWER
HYPHEN
4
Command keys
5
Direct call station 2 (INSERT):
This key is used to insert one character {or one
space) in the programmed logo.
Example: Compny-^Company
1. Press # or * repeatedly until the cursor is
positioned on “n”.
LOGO^Compny
2. Press INSERT.
LOGO^Comp ny
3. Press 2 repeatedly until “a” is shown.
LOGO=Company
Direct call station 4 (SPACE):
This key is used to replace one character with a
space.
Direct call station 5 (DELETE):
This key is used to delete one character from
the programmed logo.
Example: Comnpany-^Company
1. Press # or * repeatedly until the cursor is
positioned on “n”.
LOGO=Comnpany
2. Press DELETE.
LOGO=Company
29
Page 30

Basic Settings
Setting the date and time
The internal clock of the unit will print the date and time, on the top line of alt fax messages you transmit,
and on the fax communication reports such as the journal report and the transmission report.
Enter the current
month/day/year/hour/
minute by selecting each
2 digits. Then press *
for AM or press # for PM.
Example: Aug. 10
1995, 3:00 PM
Press 08 10 95 03 00,
then press # to select
PM.
Press START/SET to
store the setting.
Press MENU to end the
program.
( )|ШШ
CD® QD
0
START/Щт)
Press MENU.
1.SYSTEM SET UP
Press #01.
SET DATE & TIME
Press START/SET.
01/01/94 12:00A
ффф
(pep©
©Cp©
g:)©ce)
О
Notes:
• When you make a mistake while programming, press the STOP button, then make the correction.
• The accuracy of the clock will be approximately ± 45 seconds a month at room temperature.
Setting your logo
The logo is used to identify fax messages that are being transmitted by your unit. It may consist of
alpha-numeric letters and symbols. Usually the logo is a company, division or personal name in an
abbreviated form.
Enter your logo up to
30 characters by
following the instructions
on page 28.
Press START/SET to
store the setting.
Press MENU to end the
program.
® ® CD
О
( )|ШШ
START/ЩТ!
Press MENU.
1.SYSTEM SET UP
Press #02.
YOUR LOGO
Press START/SET.
LOGO =
0
0
СрфСр
©©©
©фер
START/[set!
о
( )[ШШ
о
Note:
• When the first character is entered, the preset logo will be cleared.
30
Page 31

Basic Settings
Setting your facsimile telephone number
Your programmed phone number will be printed on the top of each page transmitted from your unit.
CD CD CD
O
s
tart/[set|
Press MENU.
1.SYSTEM SET UP
Press #03.
YOUR TEL NO.
Press START/SET.
NO. =
CpCpCj)
Cj)CpCp
©
Enter your facsimile
telephone number up to
20 digits.
—The # button provides
a space and the -Xbutton provides
Press START/SET to
store the setting.
Press MENU to end the
program.
Setting the transmission report printing
Each time a document is transmitted, this feature will give you a printed record of the transmission.
The following choices are available:
ERROR: The report will print only when the transmission fails.
ON: The report will print, indicating whether the transmission is successful or not.
OFF: The report will not print.
Sample of transmission report:
1 XMT REPORT 1
NO.
OTHER FACSIMILE
01
COMPANY ABC
Press MENU.
CDKnü
Press #04.
®CDCD
O
START/[SEfl
Press START/SET.
<>:)
START TIME USAGE TIME MODE
Jan. 01 12:08AM
1.SYSTEM SET UP
TX-REPORT MODE
01’05 TX 01 OK
O
MODE = ERROR[AT]
Jan. 01 1994 12:09AM
PAGES
RED1AL7PAUSE
(ZZ)®
START/[set]
O
( )imm
RESULT
Press A or ▼ to select
the desired mode.
Press START/SET to
store the setting.
Press MENU to end the
program.
31
Page 32

Basic Settings
Storing Phone Numbers for Automatic Diaiing
The unit’s memory allows you to use both one-touch dialing (up to 10 phone numbers) and speed dialing
(up to 22 phone numbers) for rapid access to your most frequently dialed numbers.
One-touch dialing: The unit is equipped with 5 direct call station keys, each of which is divided into an
upper station and a lower station,
Speed dialing: The unit is equipped with additional 22 dialing stations. These stations are assigned to
2-digit numbers (00-21).
Storing phone numbers for one-touch dialing
Each station can store a phone number up to 30 digits in length and the associated station name up to
10 alpha-numeric characters.
or
1 w ?
|0 s|0 lowef.|
o ;
o ; o
o l
O i
O
LO«rtfi
Press MENU repeatedly
until the following is
displayed.
2.STORE TEL NO.
For upper stations 1 to
5:
Press one of the direct
call station keys.
Example: Station 4
<S04>=
or
For lower stations 6 to
10:
Press LOWER, then
press one of the direct
call station keys.
Example: Station 8
<LWR>=
o
©
OCDCD
&(p&
CD(J)Cl)
0(SCE)
START/[SETi
o
CpCpCj)
CpCpCj)
cdcJkS)
START/[set]
o
Enter a phone number.
Press START/SET to
store the number.
NAME =
Enter the station name
by following the
instructions on page 28.
Press START/SET to
store the station name.
—To program other
stations, repeat from
step 2.
Press STOP to end the
program.
<S08>=
Notes:
• To enter a hyphen in a phone number, press the LOWER key.
• If you make a mistake while programming, press the STOP button, then make the correction.
• To erase a programmed phone number in step 3, press the STOP button when the cursor is positioned on
the beginning of the number.
• Confirm that phone numbers and their station names have been correctly stored by printing the telephone
number list (see page 50).
32
Page 33

Basic Settings
Storing phone numbers for speed dialing
Each dialing station can store a phone number up to 30 digits in length and the associated station name up
to 10 alpha-numeric characters.
Press MENU repeatedly
until the following is
displayed.
©©CD
©©©
Enter the station name
by following the
instructions on page 28.
CD©CD
2.STORE TEL NO
Press START/SET to
0
CD CD©
©©©
CDCj)CD
Press #, then press a
2-digit number (00-21).
Example: Station #00
CD CD CD
<aoo>=
0
Notes:
• To enter a hyphen in a phone number, press the LOWER key.
• If you make a mistake while programming, press the STOP button, then make the correction.
• To erase a programmed phone number in step 3, press the STOP button when the cursor is positioned on
the beginning of the number.
• Confirm that phone numbers and their station names have been correctly stored by printing the telephone
number list (see page 50).
CD CD CD
CD CD CD
©CD CD
CDDCD
Enter a phone number.
Press START/SET to
store the number.
NAME =
store the station name.
—To program other
stations, repeat from
step 2.
Press STOP to end the
program.
To keep a phone number secret
Use this feature to keep a whole phone number or a portion of a phone number secret. When the telephone
number list is printed out (see pages 50 and 51), secret numbers will not be printed.
Using the SECRET (direct cali station 3) button:
SECRET 8
o
CDCD<t)
o
SECRET 8
3
Press the SECRET button before and behind the phone number you wish
to keep secret.
Example: The phone number you wish to keep secret is 12345.
Press SECRET, 12345 and SECRET again.
<A01>=[12345
Note:
• Pressing the SECRET button once counts as two digits.
33
Page 34

Advanced Instructions
Electronic Telephone Directory
The station names stored in memory for automatic dialing are automatically registered in the electronic
telephone directory in alphabetical order.
With the electronic telephone directory feature, you can make a fax or voice call by selecting the desired
station name on the display.
How to use the electronic telephone directory
To search a station name and make a voice or fax call, proceed as follows.
If you wish to send a fax, insert the documents into the document feeder first.
Q Press DIRECTORY.
0 ■ Press a dial key to which the initial of a
station name is assigned (see Index table).
Example: To search a name with the initial
Press 6 repeatedly until the first station
name with the initial “N” is displayed and
press ▼ until the desired name is displayed.
or
■ Press A or T repeatedly until the desired
name is displayed.
O Press START/SET.
__________________
SELECT INDEX
"N”
Index table
Dial
key
1 1
2 A, B, C, 2 8
3 D, E, F, 3 9
4 G, H, 1,4 0
J, K, L,5
5
6 M, N,0,6
Index
34
Dial
key
7
*
#
Index
P. Q, R.
T, U, V, 8
W, X, Y, Z, 9
0
Other symbols
(Used for speed dialing.
See pages 12 and 17)
S, 7
—The unit will start dialing.
—If a document has been fed into the unit, the
transmission will start.
Page 35

Advanced Instructions
Polling
Polling means that you call another facsimile machine to retrieve a document. On the other hand, the
documents loaded on your unit can be retrieved only at the request of the calling machines (we call this
“Polled” mode).
Polling reception
Make sure that no documents have been fed into your unit and that the other party’s machine is ready for
your call.
Press MENU repeatedly
until the following is
displayed.
4.POLLING
Press START/SET.
NO. =
Notes:
• The receiving unit incurs any telephone charges.
• If there is no answer or the iine is busy, the unit will automatically redial the number (see item 7 on
page 61).
О
ФФФ
CZ)C!È)Cp
CDcSc^
CD db СЮ
Enter the phone number
by using one-touch
dialing, speed dialing or
a full number.
Press START/SET.
—The unit will start
polling.
Polling transmission (Polled)
To let other machines retrieve documents loaded on your unit, proceed as follows.
Set the unit in the EXT.
TAM, TEUFAX or FAX
mode by pressing
RECEIVE MODE.
Press START/SET.
MODE=OFF [AT
Insert the documents
FACE DOWN.
FLASH
( ) Ш
REDIAL/PAUSE
CZD И
Press MENU repeatedly
until the following is
displayed.
5.POLLED
Note:
• When delayed transmission (see page 36) is set to ON, this feature is not available.
Press A or T to select
“ON”.
MODE=ON AT
—If this feature is not
required, select “OFF”.
Press START/SET.
POLLED ON
35
Page 36

Advanced Instructions
Delayed Transmission
Using a built-in clock, the unit can send documents automatically at a specific time. This allows you to take
advantage of low-cost calling hours given by some telephone companies.
The delayed transmission can be reserved to take place up to 24 hours.
Insert the documents
FACE DOWN.
Press MENU.
1.SYSTEM SET UP
Press #25.
DELAYED XMT
Press START/SET.
MODE=OFF [AT
Press A or T to select
"ON”.
O
CpCpCD
CD CD CD
®(i)CD
®cS)®
OCDd)
cpcp®
CD®®
Enter the phone number
using one-touch dialing,
speed dialing or a full
number.
—You can use the
electronic telephone
directory (see
page 34).
Press START/SET to
store the number.
TIME=12;00AM
Enter the transmission
start time.
Example: 11:00PM
Press 1100, then press #
to select PM.
—To select AM, press
Press START/SET to
store the setting.
MODE=ON
—If this feature is not
required, select “OFF’
Press START/SET.
NO. =
Notes:
• If there is no answer or the line is busy, the unit will automatically redial the number (see item 7 on
page 61).
• You can receive, transmit and copy documents while the delayed transmission is set. To copy or transmit
documents, remove documents from the tray and replace them when you have finished.
• If the programmed start time has passed during a power failure, delayed transmission wiil be attempted
soon after the power is restored.
• When polling transmission feature (see page 35) is set to ON, this feature is not available.
AT
Press MENU to end the
program.
—When the
programmed time has
come, the unit will
automatically start
transmission.
36
Page 37

Advanced Instructions
Remote Fax Receiving Using an Extension Phone
If you have an extension phone connected to the facsimile unit or connected on the same line, it is possible
to receive a fax message into your facsimile unit by using the touch tone extension phone.
This saves you the trouble of going to the facsimile unit and pressing the START button.
Important:
• This feature is available when you receive a call.
• To activate this feature, use a touch tone telephone as an extension phone and dial the remote fax
activation code. The remote fax activation code is set to “ >K ” as a preselected setting.
Using an extension phone
O When a call comes in, lift the handset of the
extension phone.
@ If a slow beep is heard, or the other party
wishes to send you a fax, press the remote fax
activation code.
o Replace the handset on the cradle.
—The facsimile unit will activate the fax
function to receive documents.
Note:
• The remote fax activation code can be changed.
See page 38.
37
Page 38

Advanced Instructions
Changing the remote fax activation code
Your code can be from 1 to 4 digits long. The numbers 0 through 9 and character may be used. (e.g.
234, 234*)
Important:
• The remote fax activation code should be different from the remote TAM activation ID (see page 20).
Press MENU.
1.SYSTEM SET UP
Press #41.
ффср
СрСЮф
REMOTE FAX ACT.
О
Press START/SET.
CODE=*>l<
Note:
• If the remote fax activation code is set to “0000”, the unit does not work properly.
Enter the new code
number.
Press START/SET to
store the number.
Press MENU to end the
program.
38
Page 39

Advanced Instructions
Junk Mail Prohibitor
The feature is effective to prevent fax receptions from unauthorized stations.
With this feature, the unit can receive documents only from the stations whose phone numbers are stored
for automatic dialing.
If you wish to receive documents from other stations, advise the caller to call your unit manually and enter
your prohibitor ID {see page 40) before initiating transmission.
Important:
• To activate this feature, set the unit in the EXT. TAM, TEL/FAX or FAX mode and let the unit receive
documents automatically.
• When in the EXT TAM or TEL/FAX mode, transmission using the prohibitor ID is available (see page 40).
• If manual reception is used, the documents from any transmitting stations will be received.
• If the transmitting machines have not been programmed with their facsimile telephone numbers, the unit
will not be able to receive documents automatically.
Setting the junk mail prohibitor
Press MENU.
1.SYSTEM SET UP
Press #24.
JUNK MAIL PROH
Press START/SET.
MODE=OFF AT
FLASH
CD®
REDIAUPAUSE
CD Я
Press A or ▼ to select
“ON”.
MODE=ON
AT
©
CD (ЮС)
CD СЮ СЮ
СЮ СЮ СЮ
®сюсю
В
Press START/SET to
store the setting.
10^22
If you wish to change the
junk mail prohibitor ID,
enter the desired 2-digit
number.
—0, # and * cannot be
used.
Press START/SET to
store the number.
Press MENU to end the
program.
—If this feature is not
required, select “OFF’
Note:
• The junk mail prohibitor ID must be different from the first 2 digits of the remote TAM activation ID (see
page 20). For example, if the remote TAM activation ID is set to “321", do not use “32” as a junk mail
prohibitor ID.
39
Page 40

Advanced Instructions
Transmitting documents to your unit with the prohibitor iD
If the junk mail prohibitor feature is activated, automatic fax reception from unauthorized stations will not be
available. However, in this instance, a caller can transmit documents to your unit manually by entering the
prohibitor ID.
Issue the prohibitor ID to callers with priority status.
Important:
• Transmission with the prohibitor ID is activated when your unit is in the EXT. TAM or TEUFAX mode.
Instructions for caller:
Q A caller may call your unit.
0 ■ When your unit is in the EXT. TAM mode:
They may enter the prohibitor ID while the
greeting message is being played or during
an incoming message recording mode.
or
■ When your unit is in the TEL/FAX mode:
They may enter the prohibitor ID while the
different ring back tone is heard.
e When a fax tone is heard, they may press their
start or transmit button to start the fax
transmission.
40
Page 41

Advanced Instructions
Receiving with Distinctive Ring Service
The unit has been equipped with a ring pattern detection feature, which allows you to have more effective
use of the distinctive ring service provided by some telephone companies.
The distinctive ring service gives you up to 3 phone numbers on your single telephone line, each with a
different ringing pattern. You may use one of the phone numbers as a facsimile telephone number. With the
ring pattern detection feature, the unit will detect its own distinctive ringing pattern and automatically activate
the fax function to receive documents.
If other calls come in, the unit will answer in the receiving mode selected by the RECEIVE MODE button.
When you set the distinctive ring feature, the FAX RING COUNT which determines the number of rings
before the unit answers a distinctive ring call is set to “1 ” automatically. To change the number of rings
before the unit answers a distinctive ring call, change the FAX RING COUNT {see page 24) after setting the
distinctive ring feature.
The table below shows how the unit will answer incoming calls.
Receiving call Receiving mode of the unit
EXT. TAM TEL/FAX FAX
A call matching
the selected
distinctive ring
pattern
Other call The telephone
Note:
• When receiving a normal ring call in EXT. TAM mode, the answering machine answers the incoming call to
record a message. If the facsimile detects fax tones, the unit activates the fax function. If the answering
machine does not answer a normal ring call for some reason, the facsimile unit will ring until you pick up.
The facsimile unit
will activate the
fax function.
answering
machine or the
facsimile unit will
activate
depending on an
incoming call.
The facsimile unit
will activate the
fax function.
The facsimile unit
will ring until you
pick up.
The facsimile unit
will activate the
fax function.
The facsimile unit
will activate the
fax function.
The facsimile unit
will ring until you
pick up.
If you do not
answer the call by
15 rings, the unit
will automatically
switch to the
TEL/FAX mode
and answer
depending on the
ring type.
TEL
41
Page 42

Advanced Instructions
Programming the unit with distinctive ringing pattern
To activate the feature, you need to program the ringing pattern of the phone number to be used as a
facsimile number.
Ringing patterns that can be programmed:
A: Standard ring
B: Double ring
C: Triple ring (Short-long-short)
D: Other triple ring
OFF: Turning off the ring pattern detection feature (initial setting)
e
e
Press MENU.
1.SYSTEM SET UP
Press #31.
RING DETECTION
Press START/SET.
MODE=OFF [AT]
0
FLASH
(ZIDE
REDIAUPAUSE
Press A or T to select
the desired mode.
m
Press START/SET to
store the setting.
Press MENU to end the
program.
42
Page 43

Advanced Instructions
Special Settings
Logo print position.
Your logo, telephone number, date, time and page number will be printed on the transmitted document from
your unit in.the following manner.
OUT; Outside of the transmitted document’s paper size.
IN: Inside of the transmitted document’s paper size.
OFF: Not printed.
CDCDQD
O
TART/fSEfi
s
Press MENU.
1.SYSTEM SET UP
Press #21.
LOGO POSITION
Press START/SET.
MODE=OUT
AT
e
FLASH
CZD®
REDIAL/PAUSE
CZ) m
START/[set!
O
Press A or ▼ to select
the desired setting.
Press START/SET to
store your selection.
Press MENU to end the
program.
43
Page 44

Advanced Instructions
Overseas transmission mode
You may experience difficulty in transmitting documents overseas. When this feature is set to on, it will
become easy to send documents as the transmission speed is slowed down.
Press MENU.
1.SYSTEM SET UP
Press #23.
OVERSEAS MODE
o
Press START/SET.
MODE=OFF AT
FLASH
REDIAL/PAUSE
Notes:
•After the transmission has completed, this feature is turned off automatically.
• When using this feature, transmission time will increase.
Press A or ▼ to select
“ON”.
MODE^ON AW
CZIDffl
—If this feature is not
required, select “OFF’
Press START/SET to
store your selection.
Press MENU to end the
program.
—Start transmission
procedure (see
pages 16 and 17).
44
Page 45

Advanced Instructions
Paper save reception/copy
Use this feature when you wish to save a recording paper during fax reception or copying. With this feature,
the unit will reduce the data and print it out in half in length.
Important:
• This feature will not work,
—when receiving documents sent in fine resolution or other nonstandard resolution.
—when making a copy in the fine, super fine or half tone resolution.
Sample of paper save print:
Original document
ABCDEFGHIJKLMNOPQRSTUVWXYZ
ABCDEFGHIJKLMNOPQRSTUVWXYZ
ABCDEFGHIJKLMNOPQRSTUVWXYZ
ABCDEFGHIJKLMNOPQRSTUVWXYZ
ABCDEFGHIJKLMNOPQRSTUVWXYZ
ABCDEFGHIJKLMNOPQRSTUVWXYZ
ABCDEFGHIJKLMNOPQRSTUVWXYZ
ABCDEFGHIJKLMNOPQRSTUVWXYZ
ABCDEFGHIJKLMNOPQRSTUVWXYZ
ABCDEFGHIJKLMNOPQRSTUVWXYZ
ABCDEFGHIJKLMNOPQRSTUVWXYZ
ABCDEFGHIJKI MNOPQRSTLJVWXVZ
To activate this feature, proceed as follows:
Press MENU.
1.SYSTEM SET UP
e
Press #33.
PAPER SAVE
e
Press START/SET.
Printed document
X\BCDEFOMI JKUIVi INORO RSXUVWXV2
ABODEFGMIJKLMIMOPQRSXU VWXY^
ABCDEFGMi JKUMNOFORSXUVWXY^
A F30 O E R G M lO K L_ M fNi O F=»0 R SX U VW X
A DC O e R G H IJ K LIVI rs| O R Q R 3TUJ V WX V ^
AF=lCOt£RGIH UrKL^rvIPgORQRSTU VWX VZ
Al lOOEFOm^JKi.rvirMOROi iSTLJ VWX vz
Ai.i0.otif-criMijK,i_pvirsic:sRORSTLJvwxvz
FLASH
REDÌAL7PAUSE
Press A or T to select
“ON”.
CZ) m
—If this feature is not
0
START/[SETI
Press START/SET to
store your selection.
O
MODE=ON
AT
required, select “OFF’
MODE=OFF
AT
Press MENU to end the
program.
45
Page 46

Advanced Instructions
Extension copy
With this feature, the unit will copy a document twice in length.
We recommend that you use this feature when you received fax messages in the paper save reception {see
page 45) and you wish to enlarge them.
Sample of extended copy:
Original document
ABCDEFGHIJKLMNOPQRSTUVWXY2
ABCDEFGHIJKLMNOPQRSTUVWXYZ
ABCDEFGHIJKLMNOPQRSTUVWXYZ
ABCDEFGHIJKLMNOPQRSTUVWXYZ
ABCDEFGHIJKLMNOPQRSTUVWXYZ
ABCDEFGHIJKLMNOPQRSTUVWXYZ
ABCDEFGHIJKLMNOPQRSTUVWXYZ
ABCDEFGHIJKLMNOPQRSTUVWXYZ
ABCDE FGHIJKLMNOPQRSTUVWX YZ
ABCDEFGHIJKLMNOPQRSTUVWXYZ
ABCDE FGHUKLMNOPQRS TUVWX VZ
ABCDE FGM UKLMNOAORST UWV XYZ
Extended copy
To make an extension copy, proceed as follows:
Insert the documents
FACE DOWN.
Press MENU.
1.SYSTEM SET UP
ABCDEFGHIJKLMNOPQRSTUVWXYZ
ABCDEFGHIJKLMNOPQRSTUVWXYZ
ABCDEFGHIJKLMNOPQRSTUVWXYZ
ABCDEFGHIJKLMNOPQRSTUVWXYZ
ABCDEFGHIJKLMNOPQRSTUVWXYZ
Press COPY.
COPYING
—The unit will start
printing.
Press MENU to end the
operation.
o
46
Press #34.
EXTENSION COPY
Page 47

Advanced Instructions
Original mode
Use this feature when you need to transmit and copy a document with very faint writing or very dark writing.
The following choices are available:
NORMAL: Used for a document with normal writing.
LIGHT: Used for a document with very faint writing.
DARKER: Used for a document with very dark writing.
These settings are available in the standard, fine and super fine resolutions.
Set this feature before starting transmission or copying by following steps below.
Press MENU.
1.SYSTEM SET UP
REDIAUPAUSE
Press A or T to select
the desired mode.
CUDm
Press START/SET to
store the setting.
® CD®
Press #46.
ORIGINAL
e
START/[set]
O
O
START/ISETl
o
Note:
• This feature will return to the normal mode after the transmission or copying has completed.
Press START/SET.
MODE=NORMAL[ AT’
©
(^3^[MENU
Resetting the advanced features
Use this feature to return the advanced features of #21 through #46 (see page 27) to their initial settings.
( )[menD
Press MENU.
1.SYSTEM SET UP
0
sTART/|SET|
Press MENU to end the
program.
Press START/SET.
RESET OK?
o
®®CD
START/[sin
O
REDIAUPAUSE
CZ)®
Press #80.
SET DEFAULT
Press START/SET.
RESET=NO
Press A or T to select
“YES”.
RESET=YES [ at;
[AT
0
—If this feature is not
required, press the
STOP button.
Press START/SET again.
RESET COMPLETED
Press MENU to end the
program.
47
Page 48

Advanced Instructions
Voice Contact
You can have a voice conversation on the same call after fax transmission or reception is completed.
This saves the extra expense and time of making a subsequent telephone call to discuss the information
sent over the fax.
Important:
• This feature works only when the other party’s unit is equipped with the voice contact/call reservation
feature.
Initiating voice contact
Press SP-PHONE/VOICE STDBY while
transmitting or receiving documents.
VOICE STANDBY
—Your unit wiil call the other party with a
distinctive ring.
^ When the other party answers, the unit will
emit a distinctive ring. While ringing, press
SP-PHONE/VOICE STDBY again or lift the
handset to start speaking.
Notes:
• If you initiate voice contact while transmitting
documents, you can speak after alt the
documents have been transmitted.
• If you initiate voice contact white receiving
documents, you can speak after the current page
of the documents is received.
• You can initiate the voice contact by iifting the
handset during transmission or reception.
• if the other party does not answer, the line will be
disconnected automatically.
Receiving a request for voice contact
If the other party initiates voice contact, your unit will emit a distinctive ring after the transmission or
reception is completed.
When a distinctive ring is heard, press SP-PHONE/VOICE STDBY or lift the handset, then start speaking.
Note:
• If you do not answer within 10 seconds of hearing the distinctive ring, the tine will be disconnected
automatically.
48
Page 49

Advanced Instructions
TONE, FLASH and PAUSE Buttons
TONE button___________________________
The TONE (*) button is used when your line has a rotary pulse dial
service. Pressing the button allows you to change temporarily from pulse to
tone mode during a dialing operation.
When you hang up, the unit will automatically return to pulse mode.
Note:
• TONE can be stored into a phone number for automatic dialing.
FLASH button
The FLASH button functions as the hookswitch on a regular phone. If you
misdial or dial another phone number, press the FLASH button firmly. The
FLASH
call will be terminated and you will hear dial tone. You can then dial the
next phone number.
PAUSE button
Also pressing the FLASH button allows you to use special features of the
host exchange {if connected) or local telephone company services.
For further details, contact the supplier or your local telephone companies.
Note:
• FLASH can be stored into a phone number for automatic dialing.
Exampie-2: If a transmission error occurs frequently when making an
overseas transmission, add two pauses at the end of the
phone number.
Note:
• PAUSE can be stored into a phone number for automatic dialing.
49
Page 50

Reports and Lists
Printing Reports and Lists
You can get the following reports and lists from your unit. See pages 51 and 52 for sample reports and lists.
Basic Feature List:
This provides you with the current settings of the basic programming features {#01 to #11).
Advanced Feature List:
This gives you a list of the current settings of the advanced programming features (#21 to #80).
Teiephone Number List:
This is a list of phone numbers and station names that are stored for one-touch dialing and speed dialing.
Journal Report:
This gives you a record of all transmissions and receptions (up to 35 fax communications). This report is
useful for keeping telephone records or for verifying telephone charges.
This report can be printed automatically after every 35 fax communications (see page 53).
Printer test list:
This allows you to check the print quality of your unit. If the test pattern has any blurred points or lines or
dirty patterns, please clean the thermal head by following the instructions on page 59.
How to print each report/Ust
Press MENU repeatedly
until the following is
displayed.
3.PRINT LIST
QDCZ)CD
OcS)©
CD®d)
For the basic feature list, press #1.
BASIC LIST
For the advanced
feature list, press #2.
ADVANCE LIST
For the telephone number list, press #3.
TEL NO. LIST
For the journal report,
press #4.
JOURNAL REPORT
For the printer test list,
press #5.
PRINTER TEST
Press START/SET to
start printing.
PRINTING
Press MENU to end the
operation.
50
Page 51

Reports and Lists
Sample reports and lists
Basic feature list
I
BASIC FEntURE LIST
NO. FEATURE
Й01 SET DATE 8. TIME
H02 YOUR LOGO
YOUR TELEPHONE NUMBER
Й03
Й04 PRINT TRANSMISSION REPORT
Й06
TEL/FAX DELAYED RING
Й07 FAX RING COUNT 1
Й11
Advanced feature list
REMOTE TAM ACT.
|
_______
CURR&rr SETTING_____________________
Jan. 01 1994 12:00AM
Panasonic FAX SYSTEM
ERROR
1
OFF CON,OFF]
ID = 11
[ERROR,ON.OFFI
[1...4]
[1...4]
Telephone number list
P: The pause has been entered.
F: The flash has been entered.
The secret phone number has been entered.
(The telephone number is not printed.)
51
Page 52

Reports and Lists
Journal report
(T) Communication mode:
TX...Transmission
RX...Reception
POL.TX...Polling transmission
POL.RX...Polling reception
@ Number of pages received or transmitted
successfully
Print test list
@ Communication result
{For the explanation of communication results,
see page 56.)
@ Error code (for the service personnel use only)
52
Page 53

Reports and Lists
Setting Journal auto print
This feature allows the unit to print a record of the last 35 fax communications (transmissions and
receptions) automatically.
After printing, memory will clear and the unit will begin to store new data of the journal report.
When this feature is deactivated, the journal report data is stored until the memory becomes full. When
memory is full and a new communication takes place, the oldest data will be erased and the newest data will
be stored.
To activate this feature, proceed as follows.
o
o
Press #, then press 22.
AUTO JOURNAL
Press START/SET.
MODE=ON AT]
©
Press A or T to select
the desired mode.
Press START/SET to
store the setting.
Press MENU to end the
program.
53
Page 54

Troubleshooting and Maintenance
Troubleshooting
Error messages on the display
If the unit detects a problem, one of the following messages will appear on the display.
ERROR MESSAGE
CHECK COVER
CHECK DOCUMENT
CHECK MEMORY
MECHA ERROR
NO RESPONSE
OUT OF PAPER
PAPER JAMMED
CAUSE AND REMEDY
•The top cover is open. Close it.
►The document is not fed into the unit properly. Re-insert the document.
If the misfeeding occurs frequently, clean the document feeder rollers
and the sub roller inside the unit (see page 59). Still it remains
unsolved, adjust the feeder pressure (see page 58).
»Memory (phone numbers, parameters, etc.) has been erased.
Re-program them.
»Mechanical error occurs. Open the cover and re-install the recording
paper. Then press the STOP button and close the cover.
•The receiving unit is busy or out of recording paper. Try again.
•The unit ran out of recording paper. Replace it (see page 8).
►The recording paper is jammed. Clear the jammed paper (see
page 57).
POLLING ERROR
REMOVE DOCUMENT
TRANSMIT ERROR
UNIT OVERHEATED
54
►The other unit does not provide the polling function. Check the other
party.
•The document is jammed. Open the cover, remove the jammed
document (see page 58) and try again.
•Attempted to transmit a document longer than 600 mm (235/6"). Press
the STOP button and remove it (see page 58).
•Transmission error occurs. Try again.
►The unit is too hot. Leave it as it is and allow it to cool down.
Page 55

Troubleshooting and Maintenance
General corrective measures
GENERAL
I cannot make and receive calls.
—The line cord is connected incorrectly or not
connected. Confirm the connection {see page 9).
I cannot make calls.
—The setting of the dialing mode is wrong. Check
the selector (see page 9).
The unit does not work.
—Disconnect the unit from the telephone line and
connect a known working phone. If the known
working phone operates properly, call your
service personnel to have the unit repaired. If
the known working phone does not operate
properly, consult your telephone company.
The unit does not ring.
—The ringer volume is set to OFF.
Raise it to a suitable level (see page 10).
The REDIAL/PAUSE button does not function
properly.
—The button has combination feature of redial
and pause. It will redial the last dialed number
when it is pressed after hanging up and getting
dial tone again (see page 13). If it is pressed
after you dial another phone number, the button
will function as pause button (see page 49).
The other party complains that dirty patterns or
black line appear on their received documents.
—The glass or rollers on your unit are dirty. Clean
them (see page 59).
I cannot make an international fax call.
—Use the overseas transmission mode (see
page 44).
—Add two pauses at the end of the phone number
(see page 49).
FAXRECEPTfON
____________________________
I cannot receive documents automatically.
—The receive mode is set to TEL. Set the receive
mode to EXT TAM, TEL/FAX or FAX.
—The time to answer the call may be too long.
Decrease the number of rings (see pages 23
and 24).
Recording image is faint.
—The sender transmitted a faint document.
Request them to transmit a clearer copy of the
document.
—The thermal head is dirty. Clean it (see page 59).
RECEPTiON IN EXT. TAM MODE
While programming, I cannot enter the code or
ID number.
—The whole or part of the number you try to enter
is same as the other code or ID. Change the
number into new one (see pages 20, 38 and 39).
FAX TRANSMiSSiON
_________________________
The other party complains that letters on their
received document are distorted.
—If your line has special telephone sen/ices such
as call waiting, the service may have been
activated during the fax reception. Connect the
unit to a line that does not have such services.
—Another telephone connected to the same line
as your unit is connected is hung off. Hang up
and try again.
I cannot receive documents automatically.
—Your greeting message on the answering
machine may be too long. Shorten the message
(up to 10 seconds) or ask the other party to
press your remote fax activation code and then
start transmission (see page 37).
—Set the number of rings to one or two on the
answering machine.
—The silent detection feature is set to OFF. Set it
to ON (se page 21).
I cannot receive voice messages.
—Confirm that the answering machine is turned on
or connected to the unit properly.
—Set the number of rings to one or two on the
answering machine.
55
Page 56

Troubleshooting and Maintenance
RECEPTION !N EXT. TAM MODE (cont)
When I tried to operate the answering machine
remotely, the line was disconnected after
I cannot retrieve messages remotely from the
answering machine.
—Your remote TAM activation code on the
answering machine may be same as your
remote fax activation code or junk mail prohibitor
ID. Set a different number in each code/ID.
Also set the same remote TAM activation code
as stored on the answering machine into the
unit’s memory (see page 20).
The greeting message on the answering
machine stop halfway and the caller cannot
leave a voice message.
—Make sure that the greeting message does not
have a silent pause longer than 4 seconds.
If so, re-record the greeting message.
pressing the remote access code.
—The code may include # which is used for some
features provided by telephone companies.
Change the code on the answering machine into
another number which does not include #, then
program the same code into the facsimile unit
(see page 20).
COPYING________________________________
Dirty patterns or black line appear on the
copied documents.
—The glass or rollers on your unit are dirty. Clean
them (see page 59).
Copied image is distorted.
—The thermal head is dirty. Clean it (see page 59).
Explanation of communication result on the report
When trouble occurs, the following messages may be printed on the transmission report and the journal
report.
PRINTED MESSAGE
COMMUNICATION ERROR:
DOCUMENT JAMMED:
JUNKMAIL PROH. REJECT:
NO DOCUMENT:
NO RESPONSE:
PAPER JAMMED:
PAPER OUT:
PRESSED THE STOP KEY:
PRINTER OVERHEATED:
THE COVER WAS OPENED:
MEANING
•Transmission or reception error occurred. Try again or check the
other party.
•A document was jammed. Remove the jammed document (see
page 58).
•The unit rejected fax reception when the junk mail prohibitor is
activated.
•The document was not fed into the unit properly.
•The receiving unit is busy or out of recording paper. Try again.
•The recording paper was jammed.
•The unit was out of recording paper.
•The fax communication was interrupted because the STOP
button was pressed.
• Printer was overheated.
•The top cover was open.
OK:
56
• Fax communication was successful.
Page 57

Troubleshooting and Maintenance
Clearing a recording paper jam
When the unit does not eject a recording paper during reception or copying, the recording paper has
jammed. Remove the jammed paper by following the steps below.
^ Slide the lever toward you to open the top
cover.
Q Remove the jammed paper carefully.
o Cut off the wrinkled portion.
Q Replace the recording paper roll in the proper
direction.
—Make sure that there is no slack in the paper
roll.
0 Insert the leading edge of the paper under the
green bar.
—If the recording paper cannot be inserted,
press the STOP button to reset the paper
cutter and insert the paper again.
Green bar
0 Close the cover carefully by gently pushing
down on both ends.
57
Page 58

Troubleshooting and Maintenance
Clearing a document jam
When an original document becomes jammed, remove the jammed document by following the steps below.
O Slide the lever toward you to open the top
cover.
0 Remove the jammed document carefully.
o Close the cover carefully by gently pushing
down on both ends.
Adjusting the feeder pressure
If misfeeding of documents, such a multiple feeding or no feeding, occurs frequently, try to adjust the feeder
pressure by following the steps below.
^ Open the top cover.
Q Shift the position of the lever by using an
instrument with a pointed end, like a clip or
bail-point pen.
Position A: The case of no feeding
Position B: Standard position
Position C: The case of multiple feeding
e Close the top cover carefully by gently
pressing down on both ends.
58
Page 59

Troubleshooting and Maintenance
Maintenance
Cleaning the document feeder unit
When the misfeeding occurs frequently or when dirty patterns or black bands appear on a copied or
transmitted document, clean the sub roller, the document feeder rollers and the glass by following the steps
below.
Q Disconnect the power cord and the telephone
line cord.
0 Slide the lever toward you to open the top
cover.
o Clean the rubber, the sub roller and the
document feeder rollers rotating them with a
cloth moistened with isopropyl rubbing alcohol,
then dry thoroughly.
0 Clean the glass and the white plate with a dry
soft cloth.
0 Close the top cover carefully by gently
pressing down on both ends.
0 Connect the power cord and telephone line
cord.
Cleaning the thermal head
If dirty patterns or black bands appear on a copied or received document, clean the thermal head by
following the steps below.
O Disconnect the power cord and the telephone
line cord.
0 Slide the lever toward you to open the top
cover.
0 Remove the recording paper roll from the unit.
0 Clean the thermal head with a cloth moistened
with isopropyl rubbing alcohol, then dry
thoroughly.
0 Re-install the recording paper roll, then close
the top cover carefully by gently pressing down
on both ends.
0 Connect the power cord and telephone line
cord.
Note:
• To prevent malfunction due to static electricity, do not use a dry cloth and do not touch the thermal head
directly with your finger.
59
Page 60

General Information
Important Safety Instructions
When using this unit, basic safety precautions as
below should always be followed to reduce the risk
of fire, electric shock, or personal injury.
1. Read and understand all instructions.
2. Follow all warnings and instructions marked
on this unit.
3. Unplug this unit from wall outlets before
cleaning. Do not use liquid or aerosol
cleaners. Use a damp cloth for cleaning.
4. Do not use this unit near water, for example,
near a bath tub, wash bowl, kitchen sink, or
the like.
5. Install this unit securely on a stable surface.
Serious damage may result if the unit falls.
6. Do not cover slots and openings of the unit,
for they are provided for ventilation and
protection against overheating. Never place
the unit near radiators, in/or a place where
proper ventilation is not provided.
7. Use only the power source as marked on the
unit. If you are not sure of the type of the
power supply to your home, consult your
dealer or local power company.
8. Do not place objects on the power cord.
Install the unit where no one can step on the
cord.
9. Do not overload wall outlets and extension
cords as this can result in the risk of fire or
electric shock.
10. Never push any objects into this unit through
slots as they may result in risk of fire or
electric shock. Never spill any liquid on the
unit.
11. To reduce the risk of electric shock, do not
disassemble this unit, but take it to a qualified
serviceman when some service or repair work
is required. Opening or removing covers may
expose you to dangerous voltages or other
risks. Incorrect reassembly can cause electric
shock when the appliance is subsequently
used.
12. Unplug this unit from the wall outlet and refer
servicing to qualified service personnel under
the following conditions:
A. When the power supply cord or plug is
damaged or frayed.
B. If liquid has been spilled into the unit.
C. If the unit has been exposed to rain or
water.
D. If the unit does not work normally by
following the operating instructions. Adjust
only controls covered by the operating
instructions, for improper adjustment may
require extensive work by a qualified
technician.
E.
If the unit has been dropped or damaged.
F.
If the unit exhibits a distinct change in
performance.
13.
During thunderstorms, avoid using telephones
except cordless types. There may be a remote
risk of electric shock from lightning.
14.
Do not use this unit to report a gas leak in the
vicinity of it.
SAVE THESE
INSTRUCTIONS
INSTALLATION:
1. Never install telephone wiring during a lightning
storm.
2. Never install telephone jacks in wet locations
unless the jack is specifically designed for wet
locations.
3. Never touch uninsulated telephone wires or
terminals unless the telephone line has been
disconnected at the network interface.
4. Use caution when installing or modifying
telephone lines.
WARNING:
To prevent fire or shock hazard, do not expose this
product to rain or any type of moisture.
Other Information
•Keep the unit away from electrical noise
generating devices, such as fluorescent lamps
and motors.
•The unit should be kept free from dust, moisture,
high temperature, and vibration.
•Thq unit should not be exposed to direct sunlight.
• Do not place heavy objects on top of this unit.
• Do not use benzine, thinner, or any abrasive
powder, to clean the cabinet. Wipe it with a soft
cloth.
• Do not damage the power cord.
Do not touch the plug with wet hands.
60
Page 61

General Information
Accessory Order Information
Use the following type of recording paper for replacement. For accessory order, call toll free 1 -800-332-5368.
Parts No.
KX-A116
KX-A106
KX-A125
Standard Thermal Recording Paper
Standard Thermal Recording Paper
Super Thermal Recording Paper
(Plain paper like)
Specifications
1. Applicable Lines:
2. Document Size;
3. Effective Scanning Width:
4. Printing Paper Size:
5. Effective Printing Width:
6. Transmission Time*:
7. Fax Auto Redial:
8. Telephone Auto Redial:
9. Scanning Density:
10. Scanner Type:
11. Printer Type:
12. Data Compression System:
13. Modem Speed:
14. Operating Environment:
15. Dimensions (HxWxD):
16. Mass (Weight):
17. Power Consumption:
18. Power Supply:
Description
216 mmxSOm {8i/^"xl64') roll
216 mmx30 m (8i/5"x98') roll
216 mmx30 m (8i/&"x98') roll
Public Switched Telephone Network
Max. 216 mm (QW ) in width
Max. 600 mm (23W) in length
208 mm {8Vie")
{See Accessory Order Information on this page)
208 mm (8Vie")
Approx. 15 sec/page (Original mode)
Approx. 30 sec/page (G3 Normal mode)
Up to 5 times
Up to 14 times
Horizontal 8 pels/mm (203 pels/inch)
Vertical 3.85 lines/mm (98 lines/inch)—Standard
7.7 lines/mm (196 lines/inch)—Fine/Halftone
15.4 lines/mm (392 lines/inch)—Superfine
CCD image sensor
Thermal printing
Modified Huffman (MH), Modified READ (MR)
9600/7200/4800/2400 bps; Automatic Fallback
5-35“C (41-95T), 45%-85% RH
122x362x287 mm (4iVi6"xl4V4"x11Vi6")
Approx. 3.9 kg (8.6 lb.)
Transmission: Approx. 15 W / Reception: Approx. 35 W
Copy: Approx. 40 W / Standby; Approx. 5 W
Maximum: Approx. 100W
120 VAC, 60 Hz
Comment
’Transmission Time: Transmission times apply to text data using the ITU-T No. 1 test chart, between the
same machine models at maximum modem speed. Transmission times vary in
actual usage.
61
Page 62

General Information
FCC Information
If required by the telephone company, inform them
of the following.
—FCC Registration No.: (found on the rear side of
the unit)
—Ringer Equivalence No.: (found on the rear side
of the unit)
—The particular telephone line to which the
equipment is connected.
This unit must not be connected to a coin operated
line. If you are on a party line, check with your
local telephone company.
Ringer Equivalence Number (REN):
This REN is useful in determining the quantity of
devices you may connect to your telephone line
and still have all of those devices ring when your
telephone number is called. In most but not all
areas, the sum of the REN’s of all devices
connected to one line should not exceed five (5.0).
To be certain of the number of devices you may
connect to your line, as determined by the REN,
you should contact your local telephone company
to determine the maximum REN for your calling
area.
In the event that terminal equipment causes harm
to the telephone network, the telephone company
should notify the customer, if possible, that service
may be stopped. However, where prior notice is
impractical, the company may temporarily cease
service providing that they:
a) Promptly notify the customer.
b) Give the customer an opportunity to correct the
problem with their equipment.
c) Inform the customer of the right to bring a
complaint to the Federal Communication
Commission pursuant to procedures set out in
FCC Rules and Regulations Subpart E of
Part 68.
The Telephone Company may make changes in its
communications facilities, equipment operations,
or procedures where such action is reasonably
required in the operation of its business and is not
inconsistent with the rules and regulations In FCC
Part 68. If such changes can be reasonably
expected to render any customer terminal
equipment incompatible with telephone company
communications facilities, or require modification
or alteration of such terminal equipment, or
otherwise materially affect its use or performance,
the customer shall be given adequate notice in
writing, to allow the customer an opportunity to
maintain uninterrupted service.
CAUTION:
Any changes or modifications not expressly
approved by the party responsible for compliance
could void the user’s authority to operate this
device.
When programming emergency numbers and/or
making test calls to emergency numbers:
1. Remain on the line and briefly explain to the
dispatcher the reason for the call before
hanging up.
2. Perform such activities in the off-peak hours;
such as early morning or late evenings.
This telephone provides magnetic coupling to
hearing aids.
Note:
This equipment has been tested and found to
comply with the limits for a Class B digital device,
pursuant to Part 15 of the FCC Rules. These limits
are designed to provide reasonable protection
against harmful interference in a residential
installation. This equipment generates, uses, and
can radiate radio frequency energy and, if not
installed and used in accordance with the
instructions, may cause harmful interference to
radio communications. However, there is no
guarantee that interference will not occur in a
particular installation. If this equipment does cause
harmful interference to radio or television
reception, which can be determined by turning the
equipment off and on, the user is encouraged to
try to correct the interference by one or more of the
following measures:
—Reorient or relocate the receiving antenna.
—Increase the separation between the equipment
and receiver.
—Connect the equipment into an outlet on a circuit
different from that to which the receiver is
connected.
—Consult the dealer or an experienced radio/TV
technician for help.
62
Page 63

General Information
Limited Warranty
PANASONIC PERSONAL FACSIMILE
Limited Warranty
Matsushita Consumer Electronics Company or Panasonic Sales Company (collectively referred to as
“The warrantor”), will repair this product with new or refurbished parts, free of charge, in the U.S.A. or
Puerto Rico for one (1 ) year from the date of original purchase in the event of a defect in materials or
workmanship.
Batteries (when applicable)—New rechargeable batteries in exchange for defective rechargeable
batteries for ten (10) days from the date of original purchase. Non-rechargeable batteries are not
warranted.
Carry-in or mail-in service in the U.S.A. can be obtained during the warranty period from a Matsushita
Services Company (MSC) Factory Servicenter listed in the Servicenter Directory. Carry-in or mail-in
service in Puerto Rico can be obtained during the warranty period by calling the telephone numbers
listed in the Servicenter Directory.
This warranty is extended only to the original purchaser. A purchase receipt or other proof of date of
original purchase will be required before warranty performance is rendered.
This warranty only covers failures due to defects in materials or workmanship which occur during
normal use. It does not cover damage which occurs in shipment or failures which are caused by
products not supplied by the warrantor or failures which result from accident, misuse, abuse, neglect,
mishandling, misapplication, alteration, faulty installation, modification, or service by anyone other than
an MSC Factory Servicenter or an authorized MSC Servicenter or damage that is attributable to Acts
of God, including, but not limited to, line surges.
LIMITS AND EXCLUSIONS
There are no express warranties except as listed above.
THE WARRANTOR SHALL NOT BE LIABLE FOR SPECIAL, INCIDENTAL, CONSEQUENTIAL OR
PUNITIVE DAMAGES, INCLUDING, WITHOUT LIMITATION. LOSS OF GOODWILL. PROFITS OR
REVENUE, LOSS OF USE OF THIS PRODUCT OR ANY ASSOCIATED EQUIPMENT, COST OF
SUBSTITUTE EQUIPMENT. DOWNTIME COSTS, OR CLAIMS OF ANY PARTY DEALING WITH
BUYER FOR SUCH DAMAGES, RESULTING FROM THE USE OF THIS PRODUCT OR ARISING
FROM BREACH OF WARRANTY OR CONTRACT, NEGLIGENCE, OR ANY OTHER LEGAL
THEORY.
ALL EXPRESS AND IMPLIED WARRANTIES, INCLUDING THE WARRANTIES OF
MERCHANTABILITY AND FITNESS FOR A PARTICULAR PURPOSE, ARE LIMITED TO THE
APPLICABLE WARRANTY PERIOD SET FORTH ABOVE.
Some states do not allow the exclusion or limitation of consequential damages, or limitations on how
long an implied warranty lasts, so the above exclusions or limitations may not apply to you.
This warranty gives you specific legal rights, and you may also have other rights which vary from state
to state.
If a problem with this product develops during the warranty period, you may contact your dealer or the
MSC Factory Servicenter or authorized MSC servicenter. If the problem is not handled to your
satisfaction, write to the Customer Satisfaction Center at the address indicated on the Servicenter
Directory.
63
Page 64

General Information
Index
A Advanced feature list
Automatic dialing................................. 12, 17, 32
В Basic feature list
C Cleaning ............................................................ 59
COPY ............................................................... 25
D Date and time
Delayed transmission
DELETE
Dial keypad....................................................... 28
Dialing mode....................................................... 9
Direct call station keys ................. 12, 17, 29, 32
DIRECTORY
E Electronic telephone directory
Error messages
Extension copy
EXT. TAM mode.......................................... 11,18
F FAX mode........................................................ 11, 24
FAX ring
Feeder pressure
FLASH ........................................................ 12,49
H Handset volume ................................................ 10
HELP.................................................................. 3
....................................................
..........................................................
..........................................
..........................................................
........................................
................................................
.......................................
12,17,34
...........................
................................................
.................................................
...............................................
50
50
30
36
29
34
54
46
24
58
One-touch dialing ................................... 12,17,32
Original mode ................................................... 47
Overseas transmission mode
Paper save
PAUSE
Polled................................................................ 35
Polling .............................................................. 35
Printer test list................................................... 50
RECEIVE MODE
REDIAL7PAUSE .............................................. 13
Remote fax activation code
Remote TAM activation ID................................ 20
RESOLUTION
Ringer volume................................................... 10
Ring pattern detection
SECRET
SET DEFAULT ................................................. 47
Silent detection ................................................ 21
Silent fax recognition ring ................................. 23
SPACE ............................................................. 29
Speaker volume................................................ 10
Speed dialing
SP-PHONE
START/SET
STOP................................................................ 16
......................................................
............................................................
.............................................
..................................................
......................................
..........................................................
.....................................
.................................................
.................................................
..........................
......................
12, 17, 33
44
45
49
11
37, 38
15
42
33
12,48
16,20
I INSERT.............................................................. 29
J Journal auto print .............................................. 53
Journal report ................................................... 50
Junk mail prohibitor........................................... 39
Junk mail prohibitor ID
L Logo position...................................................... 43
LOWER............................................... 12, 17, 32
M MENU
.................................................
MUTE
..............................................................
................................
20,30,35,50
39,40
13
TEL mode ........................................................ 11
TELVFAXmode
TEL/FAX ring
Telephone number list
TONE................................................................ 49
TONE/PULSE
Transmission report.......................................... 31
VOLUME........................................................... 10
Your logo........................................................... 30
Your telephone number.................................... 31
...........................................
....................................................
......................................
....................................................
11.22
23
50
9
64
Page 65

FAX CORRESPONDENCE
TO:
FROM:
OUR TEL. NO.:
DATE:
We have Panasonic personal facsimile and a telephone answering machine is
connected. So you can send both documents and voice messages on the same call.
Leaving a voice message and transmitting a document
1. Dial our phone number.
•Our telephone answering machine will play the greeting message.
2. Leave your message after the long beep.
3. Press your “-)f” (asterisk) button twice to activate the fax reception.
•A fax tone will sound.
4. Start transmission to send a fax.
Transmitting a document only
1. Dial our phone number.
•Our telephone answering machine will play the greeting message.
2. Press your button twice while the greeting message is being played.
•A fax tone will sound.
3. Start transmission to send a fax.
Transmitting a document from a rotary (pulse) phone
1. Dial our phone number.
•Our telephone answering machine will play the greeting message.
2. Start transmission to send a fax while the greeting message is being played.
Notes:
• If you wish to receive voice messages and documents automatically, the following preparations are
necessary.
—Connect a telephone answering machine to the unit and activate the answering function.
—Set the unit in EXT. TAM mode.
• “-X- button twice’’ is called remote fax activation code (see page 38). If you change it into another
one, inform callers of pressing the code.
65
Page 66

General Information
Speed dialer list
Station
No.
00 11
01 12
02
03 14
04
05 16
06 17
07
08 19
09 20
10 21
Name/Phone No.
Station
No.
13
15
18
Name/Phone No.
66
Page 67

Servicenter directory
PRODUCT INFORMATION* OPERATION ASSISTANCE* LITERATURE
REQUESTS* DEALER LOCATIONS
DIAL TOLL FREE: 1-800-HELP-FAX
Customer Satisfaction Center 2F-3, One Panasonic Way, Secaucus, NJ 07094 (Headquarters)
201-348-9090 (9:00am-8:00pm Monday-Friday, EST)
AUTHORIZED SERVICENTERS* PARTS DISTRIBUTOR LOCATIONS
To locate an independent authorized servicenter or parts distributor in your area, within the USA dial toil free 1-800-545-2672,
24 hours a day, 7 days a week.
PRODUCT REPAIRS
CALIFORNIA
6550 Katella Avenue
Cypress, CA 90630 Suite C
Phone (714) 373-7425 Norcross, GA 30093
Fax (714) 894-8534
800 Dubuque Avenue
So. San Francisco,
CA 94080
Phone(415)871-6373
Fax(415) 871-6840
20201 Sherman Way
Suite 102
Canoga Park. CA 91306
Phone (818)709-1775
Fax (818) 709-2165
3878 Ruffin Road
Suite A
San Diego, CA 92123
Phone (619) 560-9200
Fax (619) 560-1831
COLORADO
1640 South Abilene Suite D
Aurora, CO 80012
Phone (303) 752-2024
Fax (303) 752-0610
FLORIDA
3700 North 29th Avenue
Suite 102
Hollywood, FL 33020
Phone (305) 925-2880
Fax (305) 925-5224
4710 Eisenhower
Boulevard Suite A1
Tampa, FL 33634 Phone (809) 750-4300
Phone (813) 884-4746
Fax (813) 886-4564
■ Factory Servicenters
GEORGIA MICHIGAN TENNESSEE
4245 International Boulevard 37048 Van Dyke Avenue 919-8th Avenue South
Phone (404) 717-6880
Fax (404)717-6668
HAWAII
99-859 Iwaiwa Street
Aiea, Hawaii 96701
Phone (808) 488-1996
Fax (808) 486-4369 Fax (612) 854-2089
ILLINOIS
*1703 North Randall Road
Elgin, IL 60123
“12:30 to 4:30, Mon-Fri"
Phone (708) 468-5466
Fax (708) 468-5465
9060 Golf Road
Niles, IL 60714
Phone (708) 299-1700
Fax(708)299-1710
MARYLAND
Sulphur Springs
Business Center
1638 Sulphur Springs Road
Baltimore, MD 21227
Phone (410) 242-2607
Fax (410) 247-3047
MASSACHUSETTS
60 Glacier Drive, Suite G
Westwood, MA 02090
Phone (617) 329-4280
Fax (617) 329-0586
*pick-up/drop-off only
Sterling Heights, Ml 48312
Phone (810) 939-2060 Phone (615) 244-4434
Fax (810) 939-2638 Fax (615) 244-6713
MINNESOTA TEXAS
7S50-12th Avenue South 7482 Harwin Drive
Airport Business Center Houston, TX 77036
Bloomington, MN 55425
Phone (612) 854-8624
MISSOURI
11982 Dorsett Road
Maryland Heights, MO 63043
Phone (314) 739-5301
Fax (314) 739-3631
OHIO
2236 Waycross Road
Cincinnati, OH 45240
Phone (513) 851-4180
Fax(513)851-8443
PENNSYLVANIA
2221 Cabot Boulevard West
Suite B
Langhorne, PA 19047
Phone (215) 741-0661
Fax (215) 741-0521
Campbell’s Run
Business Center
500 Business Center Drive
Pittsburgh, PA 15205
Phone(412)788-2174
Fax (412) 788-2176
Nashville, TN 37203
Phone (713) 781-1528
Fax (713) 781-0643
13615 Welch Road Suite 101
Farmers Branch, TX 75244
Phone (214) 385-1975
Fax (214) 960-7626
WASHINGTON
20425-84th Avenue South
Kent, WA 98032
Phone (206) 872-7922
Fax (206) 872-0918
Service iri Puerto Rico
Matsushita Electric
of Puerto Rico, Inc.
Panasonic Sales Company/
Factory Servicenter
Ave. 65 de Infantería, Km. 9.5
San Gabriel Industrial Park
Carolina, Puerto Rico 00985
Fax (809) 768-2910
REPAIR INQUIRIES
EAST(PCE) EAST(PCE)
2221 Cabot Boulevard West 1854 Shackleford Court 1703 North Randall Road
Suite A
Langhorne, PA 19047
Phone (215) 741-0676 Phone (404)717-6860
Fax (215) 750-6492 Fax(404)717-6678
Covers:
CT, DE, ME. MO, MA, AL, FL, GA, MS. NC, SC. TN
NH, NJ, NY, PA, R1, VT,
VA, DC, WV
1 Regional Customer Care Department
CENTRAL (PCC) WEST (PCW)
Suite 4105 Elgin, IL 60123
Norcross, GA 30093
Covers: Covers:
Phone (708) 468-5530 Phone (714) 373-7440
Fax (708) 468-5528 Fax (714) 373-7447
AR, IL, IN, lA, KS. KY, LA,
Ml, MN, MO, NE, ND, OK,
SD,TX, WI,OH
ACCESSORY PURCHASES
1-800-332-5368 (Consumer Orders Only)
Matsushita Services Company Box 01,545 Tollgate Road Suite C, Elgin, IL 60123
(8:00am-7:30pm Monday-Thursday; 8:00am-5:00pm Friday; 9:00am-12:30pm Saturday; CST)
(Visa, Mastercard, Discover card. Check or Money Order)
6550 Katella Avenue
Cypress, CA 90630
Covers;
AK, AZ, CA, CO. ID, MT, NV,
NM, OR. UT, WA, WY, HI
(940905)
67
Page 68

FAX ADVANTAGE PROGRAM
e are proud to present the
W
Panasonic Fax Advantage
Program, Ws an incredible service
program thaPs full of exciting
advantages!
Customer Satisfaction
In support of our one-year limited warranty* (parts
and labor) on our current fax product line,
Panasonic is proud to offer you the following ser
vice options during the limited warranty period:
1 If you mail-in or carry-in your fax unit to one of
our Regional Servicenters, the product will be
repaired and returned to you, or...
2 If you call our 1-800-HELPFAX toll-free num
ber, you will receive a refurbished replacement
product overnight or on the second business day
(delivery depending on the time of your call.)
Support After The Sale
If you have a problem with your fax, just call our
1 -800-HELPFAX toll-free number for friendly sup
port and assistance. We have a highly-qualified
team of experts who can diagnose, and most
likely solve, your problem over the phone. Ap
proximately 90% of our customers’ problems are
resolved with just a simple phone call.
The Fax Advantage Program covers the first year of purchase
and works like this:
1 If you have a problem with your fax, call toll-free 1-800HELPFAX.
2 Talk to one of our experienced technical experts to diag
nose (and most likely solve) your problem over the phone.
3 Providing that you may be entitled to Panasonic’s service
under the terms and conditions of the limited warranty“, we
will arrange for a reconditioned replacement unit to be
Panasonic
shipped to you overnight or second
business day delivery, depending
on the time of your call.The re
placement unit will be completely
refurbished, quality-tested by
Panasonic technicians, and individ
ually hand-inspected before it is
shipped to you. You will keep the
replacement unit and send your
original unit to us, along with a
copy of your receipt.
Panasonic
4 TTiis receipt must be shipped
back with your original unit to
Panasonic Company (as per in
structions enclosed in your re
placement unit’s box).
Any unit that is replaced by
Panasonic and not backed up by
a proof of purchase by you will be
subject to a minimum $100.00 charge. Any unit that is re
placed, but does not meet the terms and conditions of the
limited warranty will be subject to additional charges, as per
the program guidelines.
5 Once you receive your replacement unit, pack up your
problem unit in the replacement unit’s box. UPS will make
3 attempts within 10 days to pick-up your defective unit at no
charge to you (should you be entitled to warranty service. If
warranty conditions do not apply, you will be charged for all
applicable shipping charges). The product must be property
packaged in the same manner as the replacement unit, utiliz
ing the packing materials provided. You must make your unit
available for UPS pick-up. If your unit is not available for UPS,
you will be responsible for shipping unit back at your ex
pense. Damage due to improper or inadequate packing will
be charged back to your charge card as an out-of-warranty
cost, as per the warranty stipulations (see back panel.)
Requirements:
6 You must give our technicians a valid credit card number.
They will keep this number on file to cover any charges that
are incurred by failure to send the problem product to
Panasonic Company, If your problem unit is not eligible for
warranty, you will be charged for the repair of the unit and for
any shipping charges associated with this program. If you do
not wish to pay out-of-warranty repair costs, you will be re
sponsible for returning the replacement unit to Panasonic and
for paying all shipping charges associated with this program
including the overnight delivery of replacement product to
you, shipment of problem unit to Panasonic, the replacement
unit back to Panasonic and the return of your original unit
back to you.
Acceptable credit cards:
Master Card American Express (Optima)
Product that is not returned to Panasonic by 10 business
days after shipment of the replacement product, will be
charged to your account at Panasonic’s Suggested Retail
Price (see dealer for details).
Credit status will be verified prior to sending the replacement
product.'
Proof of Purchase must be included with the returned unit to
verify warranty status.
Any parts and labor that are not covered by the limited war
ranty* will be charged as a non-warranty repair and billed at
Panasonic’s current rate for parts and labor.
"See back pane) for one-year limited warranty.
"Replacement program excludes Puerto Rico and is subject to termination at any
time without advance notice.
Discover VISA
Matsushita Consumer Electronics
Company, Division of Matsushita
Electric Corporation of America
One Panasonic Way. Secaucus,
New Jersey 07094
Printed in Japan
Panasonic Sales Company,
Division of Matsushita Electric of
Puerto Rico, Inc. (“PSC”)
Ave. 65 de Infanteria, Km. 9.5
San Gabriel Industrial Park, Carolina,
Puerto Rico 00985
PQQX11393ZA-CA F1294K0
 Loading...