

Page 1

Panasonic
OPERATING INSTRUCTIONS
Telephone Answering
System with Facsimile
KX-F50BA
MODEL NO. KX-F155BA
Please read before use.
Pictured Model KX-F50BA
Page 2

Thank you for purchasing the Panasonic Telephone Answering System with
Facsimile.
Before using the unit, please read these OPERATING INSTRUCTIONS.
You can then easily install, configure and operate the unit properly.
This unit combines multiple functions of Facsimile, Answering Device and
Telephone, so you can send and receive both voice-messages and documents on a
single telephone line.
WARNING
WHEN A FAILURE OCCURS WHICH RESULTS IN THE INTERNAL PARTS
BECOMING ACCESSIBLE, DISCONNECT THE POWER SUPPLY CORD
IMMEDIATELY AND RETURN THIS UNIT TO AN AUTHORIZED SERVICE
CENTER.
DISCONNECT THE TELECOM CONNECTION BEFORE
DISCONNECTING THE POWER CONNECTION PRIOR TO RELOCATING
THE EQUIPMENT, AND RECONNECT THE POWER FIRST.
THE POWER SOCKET WALL OUTLET SHOULD BE LOCATED NEAR
THIS EQUIPMENT AND BE EASILY ACCESSIBLE.
Printer
TO PREVENT FIRE OR SHOCK HAZARD, DO NOT EXPOSE THIS
PRODUCT TO RAIN OR ANY TYPE OF MOISTURE.
-1
Page 3

Introduction
Multi-function system using one telephone line
General:
•Desk-top type
•Combined facsimile, answering device and
integrated telephone
•Single telephone line operation
•Automatic answering device/facsimite
switching
•Clear copies
Facsimile (FAX):
•CCITT G3 compatibility
•Transmission time*: Approximately 17 seconds
per page
•Automatic document feeder for up to 10 pages
at a time
•One touch transmission with automatic dialer
•Superb image quality
•Polling function
•Automatic fall back (9600/7200/4800/2400 bps)
’Transmission times apply to text data using
CCITT No.1 test chart, between same machine
models at maximum modem speed.
Transmission times vary in actual usage.
Telephone Answering Device (TAD);
•One touch operation ;
The unit automatically plays back ail recorded
messages and stops at the last message, then
provides for answering the next call at the touch
of a button.
•Record 2-way telephone conversation
•Outgoing Message (OGM) stored on chip
• Remote control from touch tone telephone
Three types of receiving
mode
TAD/FAX mode:
When you wish to use the unit as a telephone
answering device and a facsimile, select this
mode.
When a call is received during your absence, the
unit records a voice-message and/or receives a
document automatically depending on the caller's
choice. In this mode, you also are able to speak
with the other party and transmit/receive a
document manually.
The unit automatically distinguishes between
voice and fax calls. If a fax tone is heard when
the call is answered, it will switch automatically to
the fax mode. If the caller's voice is heard within
5 seconds of the end of the OGM, the unit
functions as an answering device.
FAX mode:
When you wish to use the unit as a facsimile
machine only, select this mode.
If someone calls you when you are in the FAX
mode, a fax tone sounds and the person cannot
talk to you. Please inform your callers that this is
a fax only telephone number.
When in the FAX mode, you may still use the fax
telephone to place outgoing voice calls.
TEL (Telephone) mode:
When you wish to use the unit as a standard
telephone, select this mode. If you wish to
receive the incoming fax during telephone
conversation, press the START/COPY button.
integrated Telephone System:
•Call monitor for on-hook dialing
•One touch dialing and speed dialing
•Pulse-or-tone dialing capability
-2-
Page 4

Table of Contents
Introduction...................................................................................................2
Installation and Initial Preparation
Accessories...................................................................................................1-1
Installation Connections..............................................................................1-2
Location of Controls....................................................................................1-3
The Buttons and Indicators ........................................................................1-5
Precaution ....................................................................................................1-7
Page
Micro Cassette Tape Installation
...............................................................
1-8
Recording Paper Installation ......................................................................1-9
Document Tray Installation.........................................................................1-11
Selector Settings..........................................................................................1-12
Turning the Power Switch On
Recording an Outgoing Message (OGM)
Suggested message................................................................................1-13
Recording your OGM ..............................................................................1-14
Verifying or changing your OGM ............................................................ 1-14
Re-recording of OGM
.............................................................................
....................................................................
...................................................
1-14
1-12
1-13
Programming Functions..............................................................................1-15
List of programming functions
Programming...........................................................................................1-16
Programming your logo
Programming your facsimile telephone number......................................1-19
Programming Phone Numbers for Automatic Dialing
programming phone numbers for one touch dialing................................1-20
Programming phone numbers for speed dialing.....................................1-21
Programming secret phone numbers
Erasing a phone number.........................................................................1-23
Listing the directory card
.................................................................
...........................................................................
............................
.....................................................
.........................................................................
1-15
1-17
1-20
1-22
1-23
-3-
Page 5

Basic Instructions
Facsimile machine
Before Transmitting Documents ................................................................2-1
Acceptable documents
Document loading....................................................................................2-2
Resolution and contrast
Transmitting Documents .............................................................................2-3
Manual transmission................................................................................2-3
One touch transmission............................................................................2-4
Adding extra pages...................................................................................2-4
Transmitting documents using the REDIAL button
............................................................................
...........................................................................
..................................
Page
2-1
2-2
2-5
Receiving Documents and/or Voice-Messages
Receiving mode
Manual reception......................................................................................2-7
.......................................................................................
.........................................
2-6
2-6
Voice Contact.................................................................................................2-8
Initiating voice contact............................................................................. 2-8
Receiving a request for voice contact......................................................2-8
Making Copies.............................................................................................. 2-9
Answering device
Operating as an Answering Device
Recording after the messages you want to save
Recording a memo message ..................................................................2-12
Recording a 2-way conversation
Monitoring incoming calls ........................................................................2-13
...........................................................
...................................
.............................................................
2-10
2-11
2-13
Telephone
Making and Answering Voice Calls............................................................2-14
Making voice calls....................................................................................2-14
Redialing {Repeat call attempt)
Making voice calls using the automatic dialing .......................................2-15
Answering voice calls ..............................................................................2-15
...............................................................
2-14
Advanced Instructions
Facsimile machine
Polling .......................................................................................................... 3-1
Setting the polling password
Polling another facsimile..........................................................................3-2
Setting the Main Password
Answering device
Operating as an Answering Device from a Remote Phone ... 3-4
Toll saver...................................................................................................3-4
Summary of remote control functions.......................................................3-4
....................................................................
3-1
.........................................................................
_4_
3-3
Page 6

Page
Programming a REMOTE TAD ID number for remote operation
Message playback...................................................................................3-6
Newly recorded messages playback (Memory Playback)........................3-6
Back space and skip forward ..................................................................3-7
Recording a marker message..................................................................3-7
Resetting the tape for future messages
Re-recording an outgoing message ........................................................3-9
Skipping the OGM for ICM recording ......................................................3-9
Telephone
Other Features..............................................................................................3-10
TONE button (Temporary tone dialing).................................................. 3-10
RECALL button........................................................................................3-10
PAUSE button
Combination dialing.................................................................................3-11
.........................................................................................
General Information
Printing Reports and Lists
individual Transmission Report (TX REPORT) .......................................4-1
List of stored phone numbers (TELEPHONE NUMBER LIST)
System Programming Functions
FAX LOGO HEADING
FAX TX SPEED
FAX RX SPEED ......................................................................................4-4
TONE DETECT........................................................................................4-4
RECALL................................................................................................... 4-5
RECORDING TIME
CPC MODE..............................................................................................4-6
TAD RING COUNT..................................................................................4-6
FAX RING COUNT..................................................................................4-7
PRINTER TEST
PRINT CHARACTER CODE
RESET USER PROGRAMMABLE FUNCTIONS.....................................4-8
............
..................................................
.........................................................................
.................
................................................................
............................................................................
......................................................................................
..................................................................................
......................................................................................
....................................................................
3-5
3-8
3-11
4-1
4-2
4-3
4-3
4-3
4-5
4-7
4-7
Service Functions
Printing the SERVICE DATA LIST ..........................................................4-9
Programming the service functions..........................................................4-9
........................................................................................
4-9
Maintenance..................................................................................................4-10
Cassette deck...........................................................................................4-10
Facsimile machine....................................................................................4-11
Troubleshooting Guide................................................................................4-12
Specifications ..............................................................................................4-16
-5-
Page 7

■i .
- I
Installation and Initial Preparation
Page 8
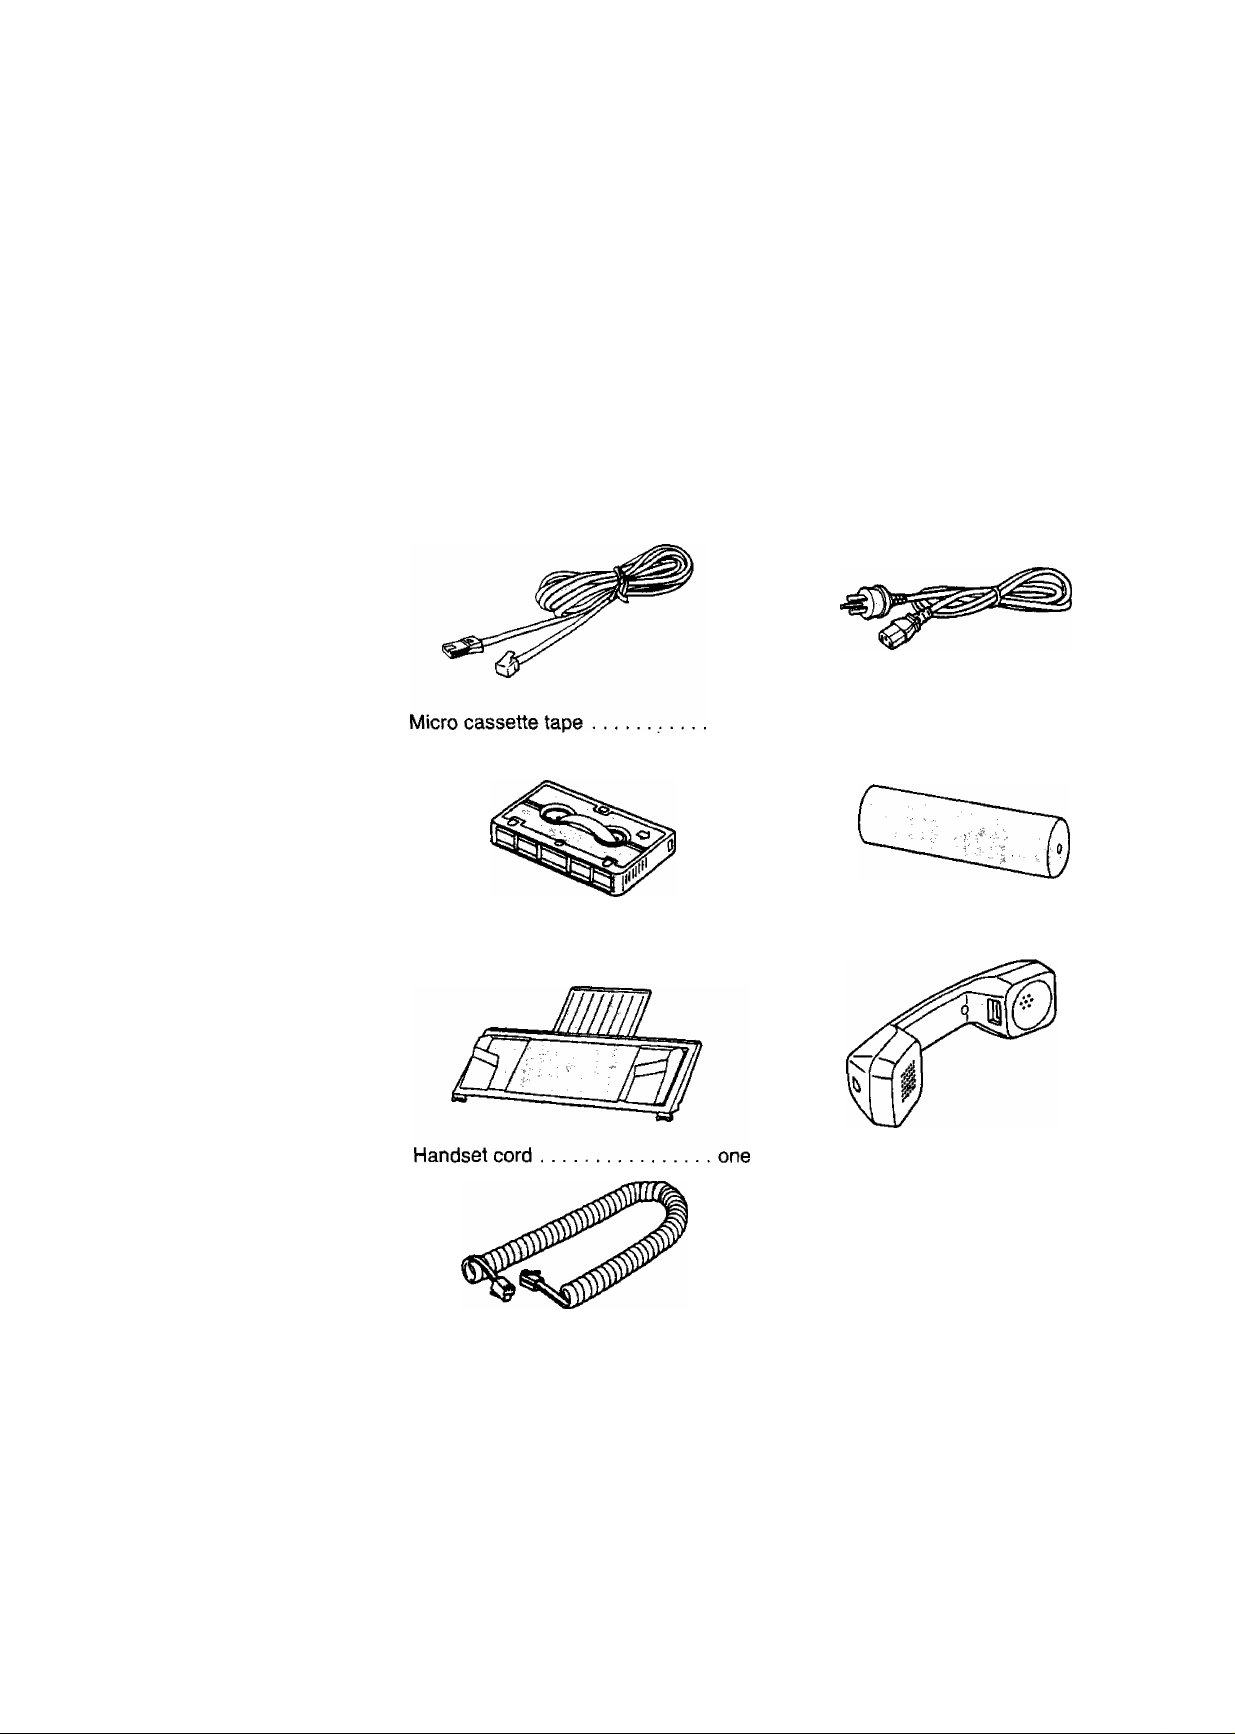
Accessories
1. Carefully remove the unit from the packing carton.
2. Examine the unit for signs of shipping damage.
3. All of the necessary accessories, hardware, cords, etc., are packed with the unit.
Make sure that you have removed all accessories before discarding the packing
material.
4. Check that all of the accessories are included. If you are missing any item,
consult your place of purchase.
Telephone line cord
Document tray
.............................
.....................
one AC power cord
one Handset
.......................................
one
one
one
1-1
Page 9
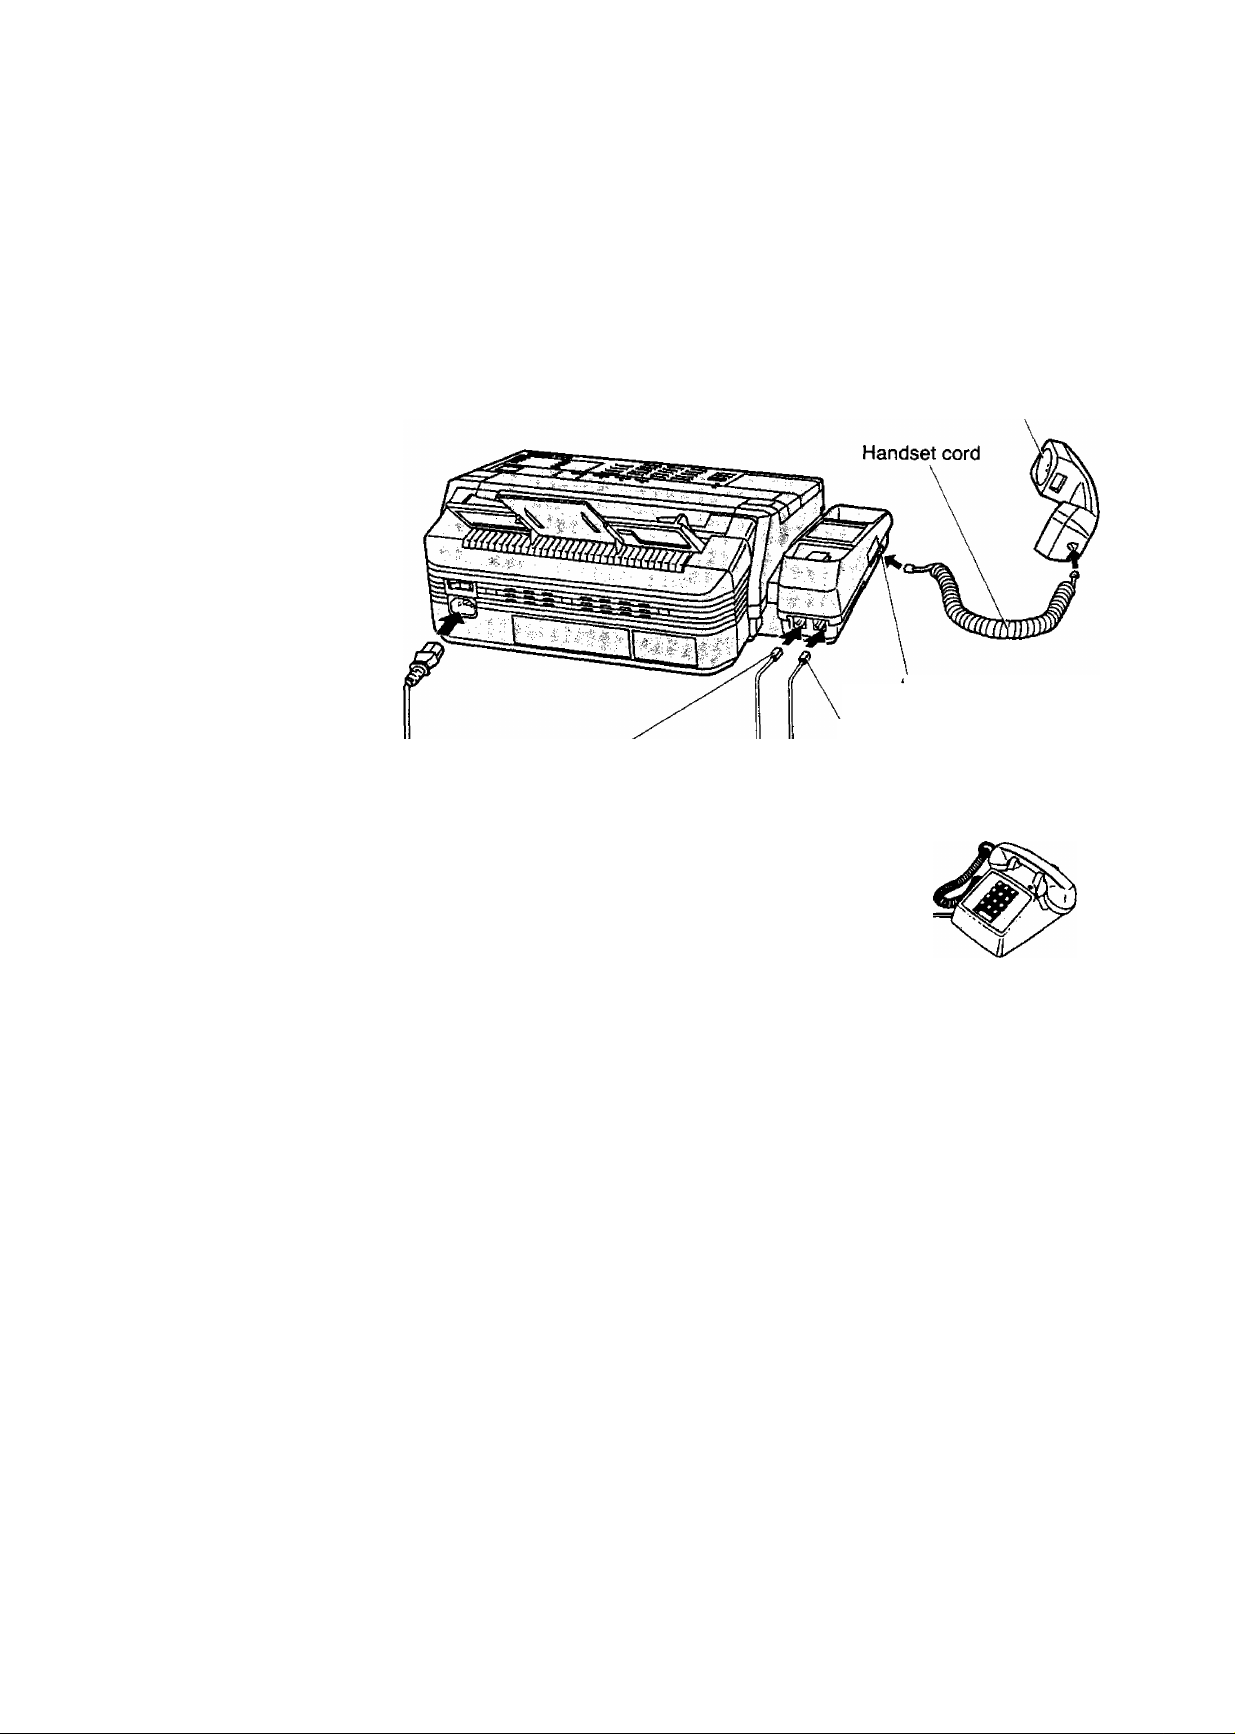
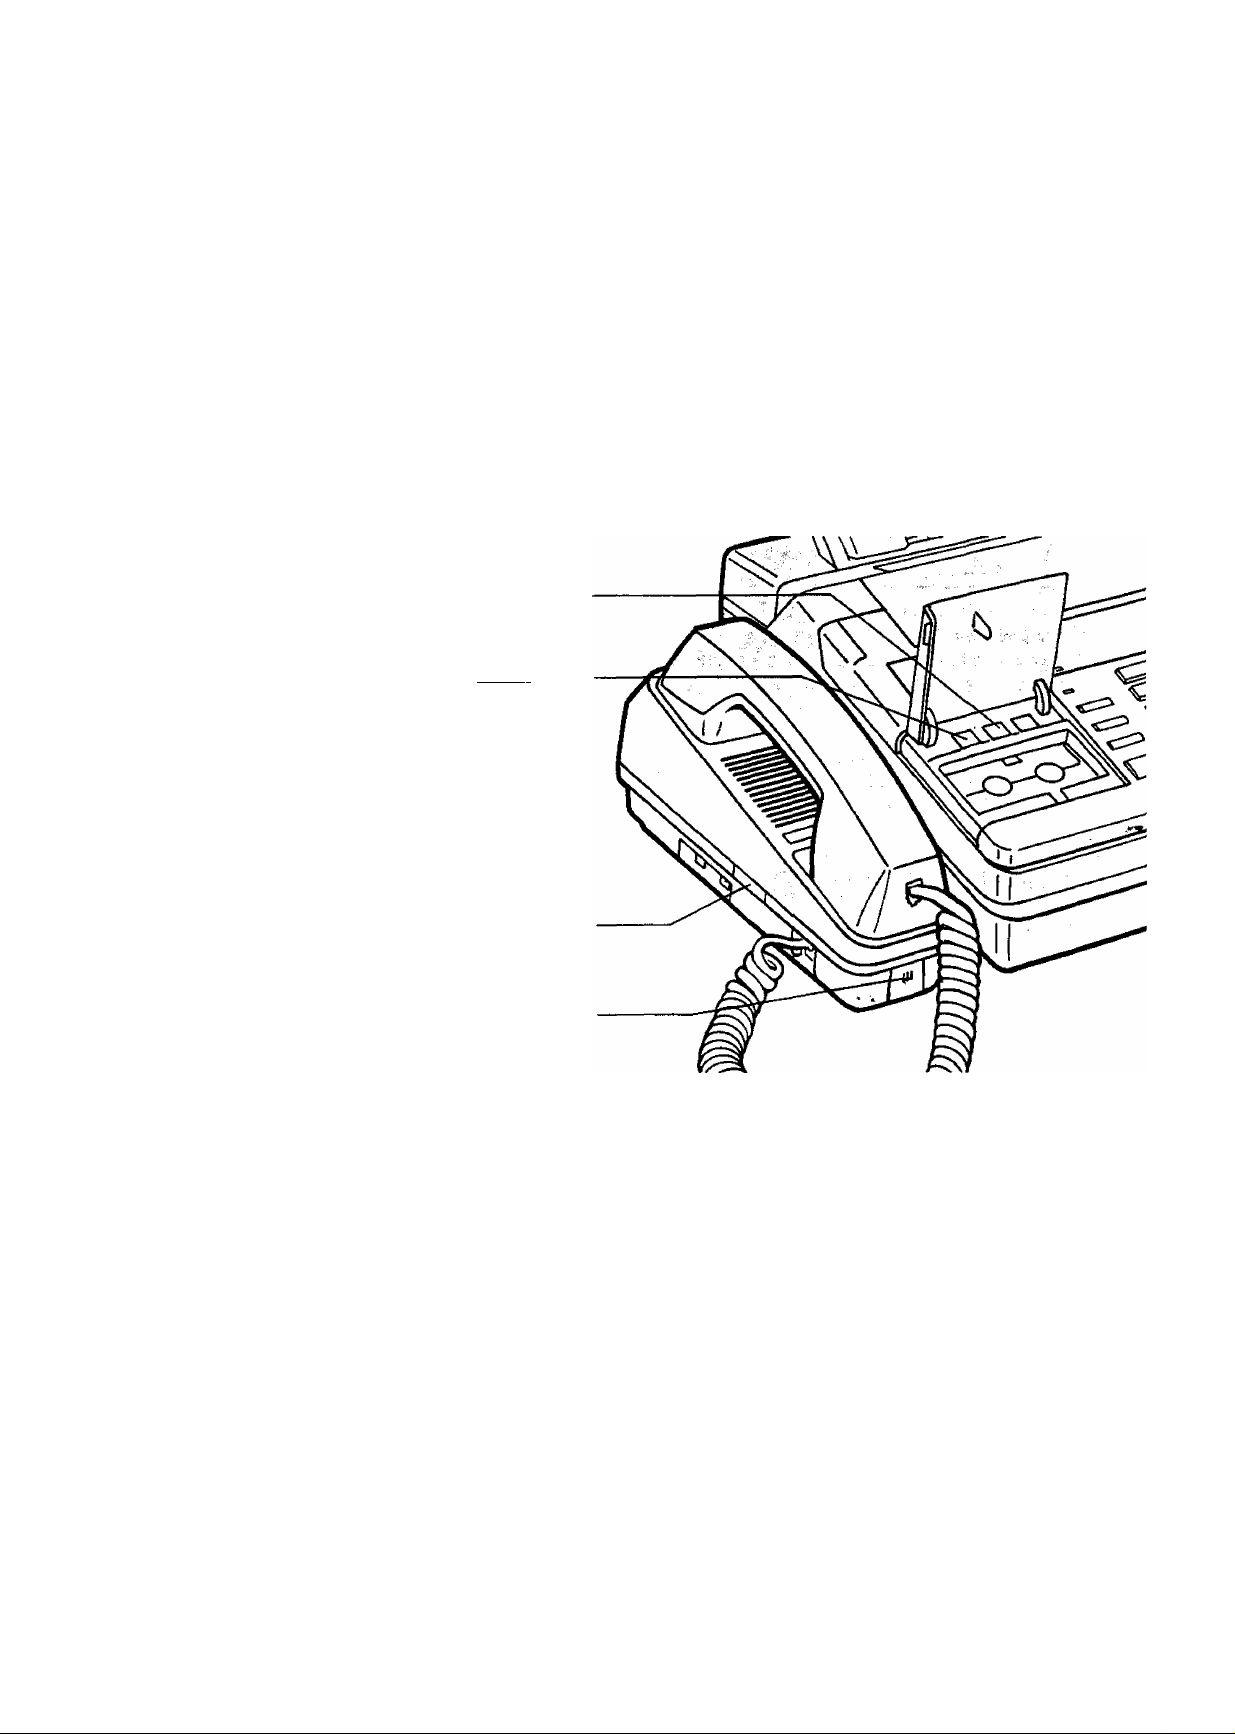
Installation Connections
Connect the AC power cord, the telephone line cord and the handset cord as shown
below. Then connect your unit to the AC outlet and the telephone line.
Handset
‘TO HANDSET"
To AC Outlet
AC 220 V~AC 240 V
The unit including the telephone handset will not function during a power failure or
power off. However, if you have a reserve telephone connected to the port of the
“TO EXTERNAL TEL’’, you will still be able to make calls during a power failure
or power off.
Avoid using the same AC outlet for the unit and other equipments.
We recommend you to use an exclusive AC outlet to avoid interference from
other equipment.
If you connect another extension to the same line that your unit is connected to,
do not use another telephone during fax transmission and reception. It will affect
image quality.
This unit is equipped with a 3-wire grounded type plug for safety. This plug will
only fit into a grounding-type power outlet. If you are unable to insert the plug into
your outlet, contact your electrician to replace your outlet.
Connect to
“TO TEL LINE"
To Single
Telephone Line^Ej|====^
Connect to ■
‘TO EXTERNAL TEL"
Reserve Telephone
1-2
Page 10
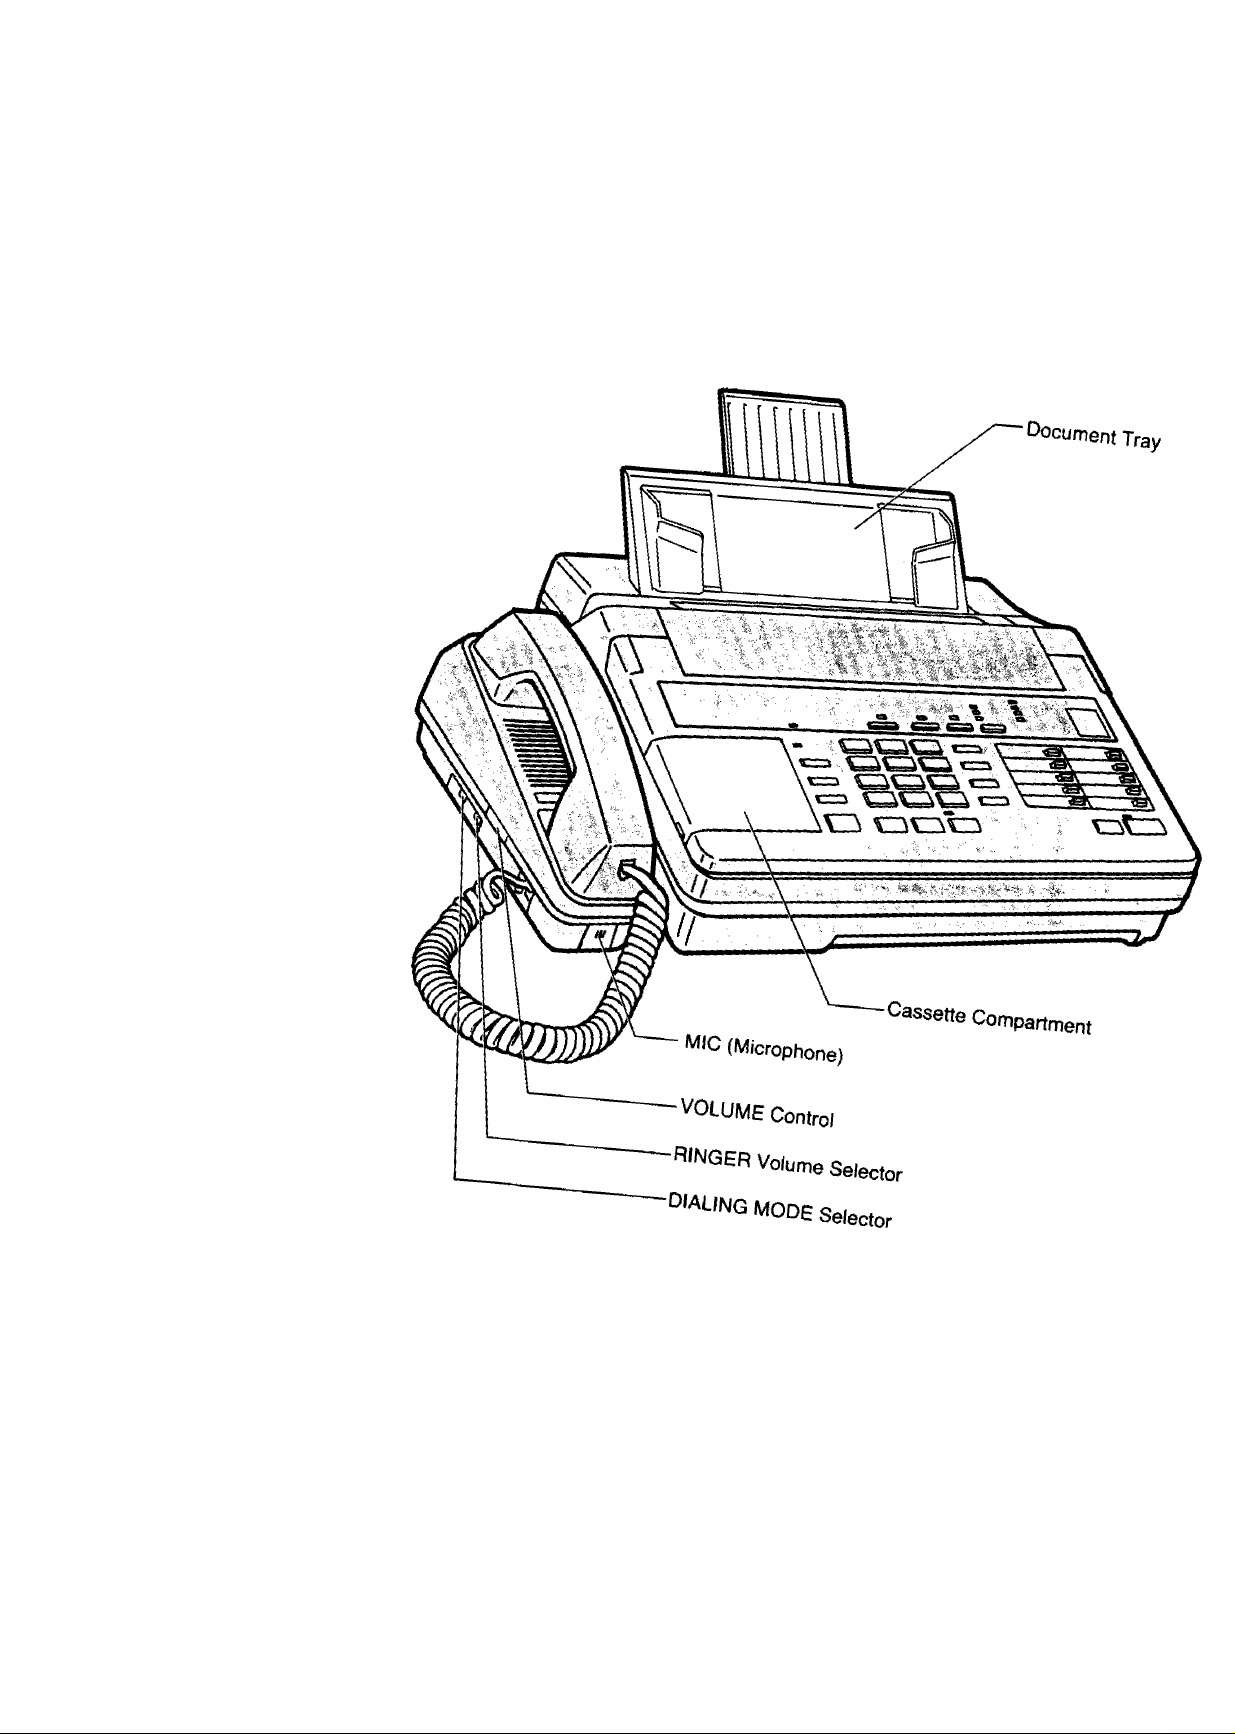
Location of Control:
Front view
1-3
Page 11
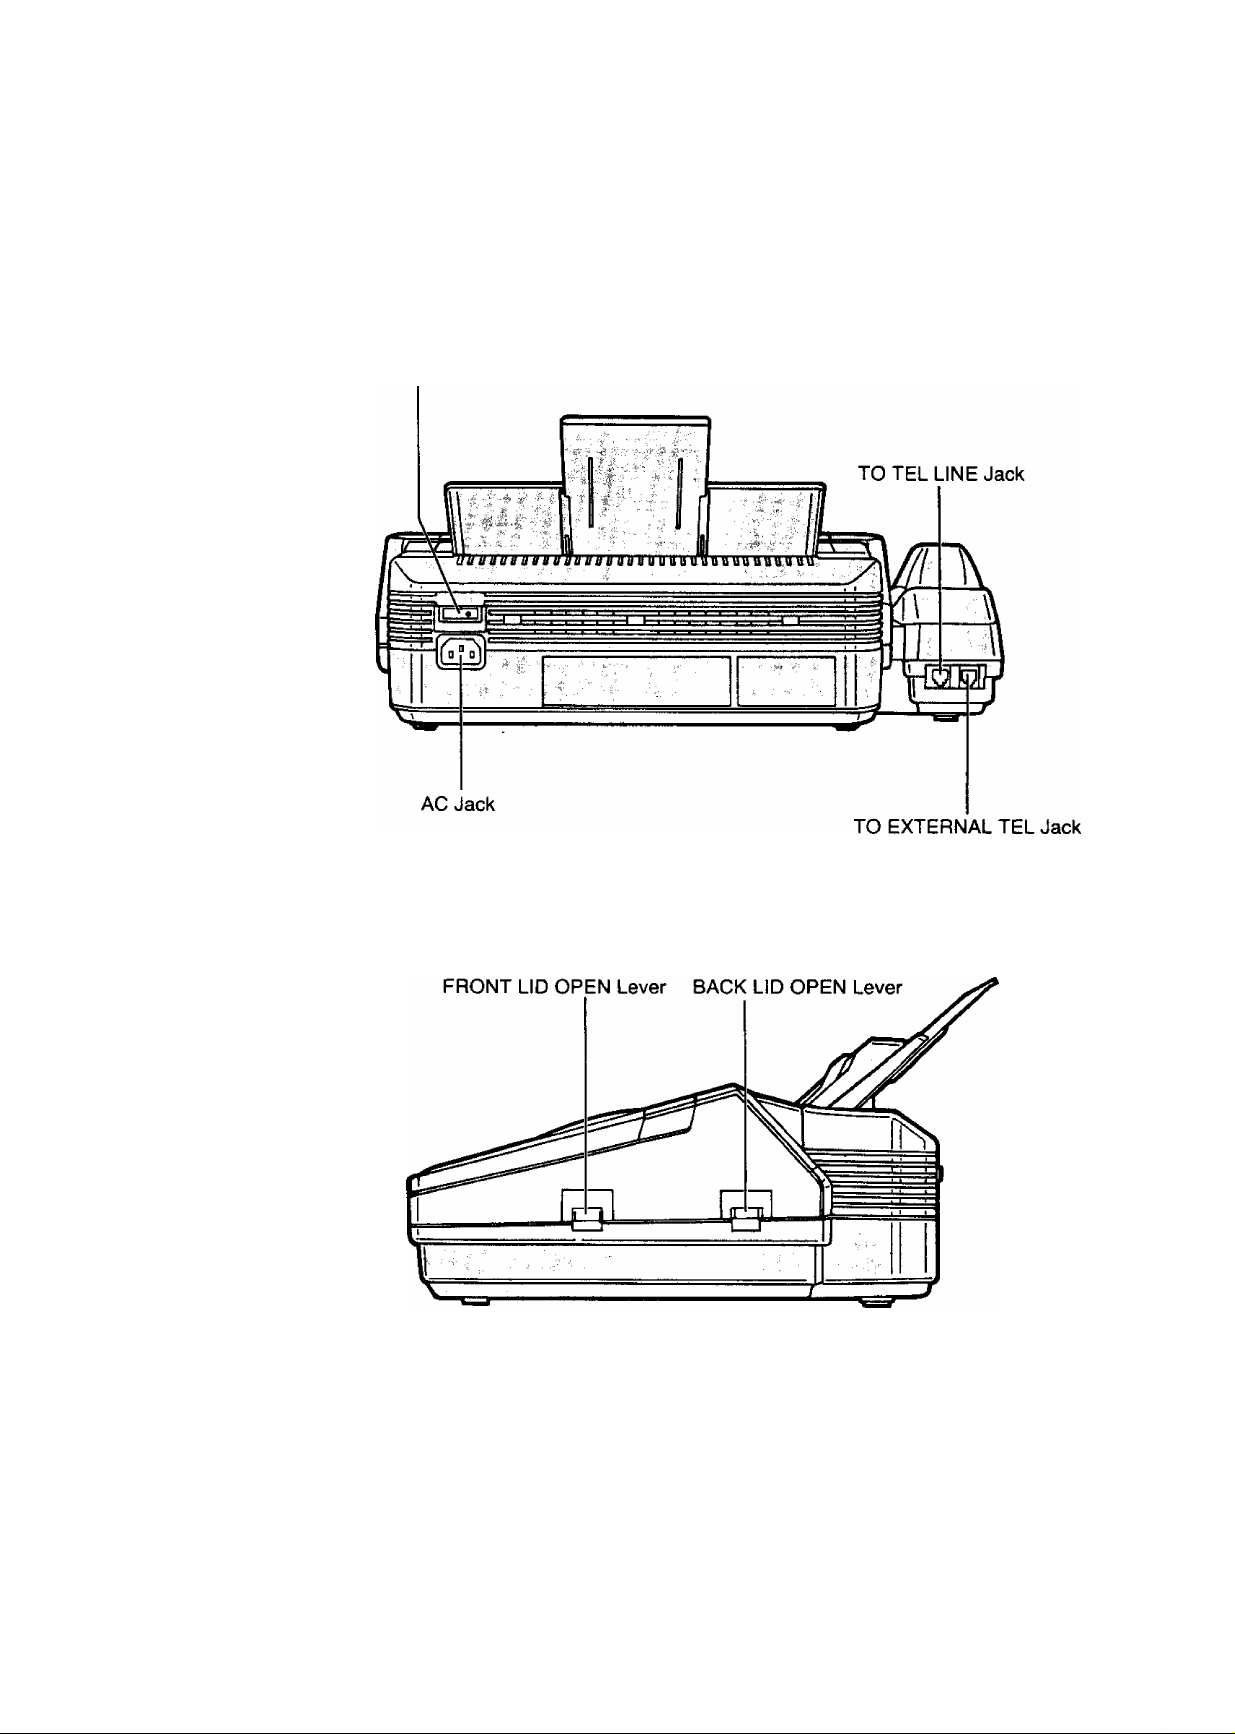
Rear view
Power Switch
Side view
1-4
Page 12
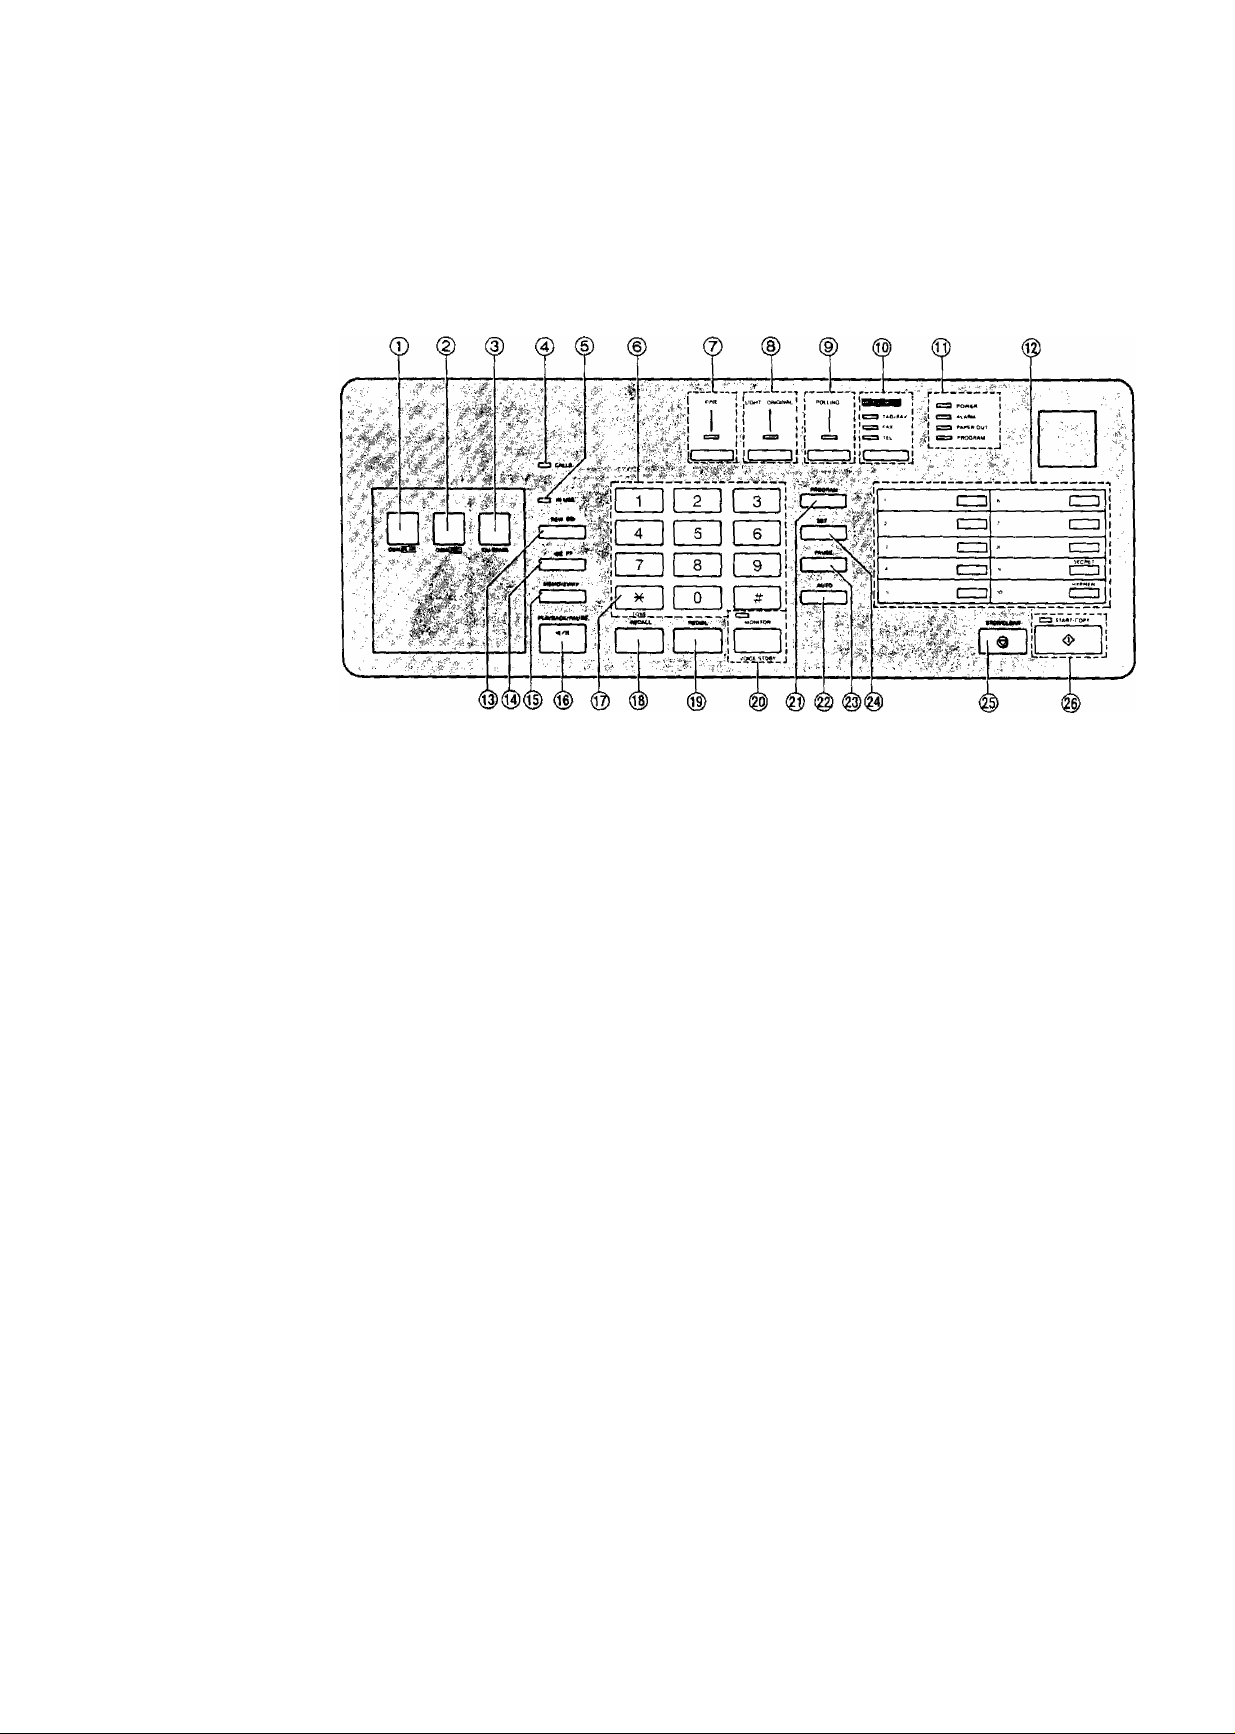
The Buttons and Indicators
© OGM PLAY Button {p. 1-14):
© OGM REC Button (p. 1-13):
© ICM ERASE Button (p. 2-10):
© CALLS Indicator (p. 2-10):
© IN USE Indicator:
© Dial Keypad:
0 FINE Button and Indicator
(P-2-2):
© LIGHT ORIGINAL Button
and Indicator (p. 2-2);
© POLLING Button and
Indicator (p. 3-2):
Used to replay your outgoing message.
Used to record your outgoing message.
Used to erase recorded incoming messages at
high speed.
The indicator flashes to show the number of
incoming messages recorded.
The indicator lights or flashes when the
answering device is in use.
Used to dial or program numbers.
Used to set the scanning line density. The
indicator lights when this feature is on.
Used to transmit or copy originals with faint
writing. The indicator lights when this feature is
on.
Used for polling function. The indicator lights
when polling function is being set.
© RECEIVE MODE Button
and Indicators (p. 2-6):
Used to select the desired receiving mode. The
indicators light to show the mode in which the
unit is set.
1-5
Page 13

® POWER Indicator (p. 1-12):
The indicator lights when the POWER switch is
turned on.
ALARM Indicator (p. 4-13):
yj
PAPER OUT Indicator:
The indicator lights when any trouble occurs.
The indicator lights when the recording paper
roll is empty.
PROGRAM Indicator:
The indicator lights or flashes when you are
programming the unit.
® Direct Cali Station Keys
Used for one touch dialing.
(P-1-20):
@ REW (REWIND) Button
(p. 2-10):
®FF (FAST FORWARD)
-r'
Button (p. 2-10):
(g) MEMO/2WAY Button
(p. 2-12,2-13):
® PLAYBACK/PAUSE Button
(p. 2-10):
® TONE Button (p. 3-10):
Used to run the tape quickly backward to a
desired point.
Used to run the tape quickly forward to a
desired point.
Used to start and stop recording of a memo
message or a telephone conversation.
Used to play back recorded messages, or
interrupt playback or FF/REW operation.
Used to change the dialing mode from pulse to
tone during a dialing operation.
® RECALL Button (p. 3-10):
® REDIAL Button (p. 2-14):
@ MONITOR (VOICE STDBY)
Button and Indicator
(p. 2-3,2-8);
@ PROGRAM Button (p. 1-15):
©AUTO Button (p.1-21):
© PAUSE Button (p. 3-11);
© SET Button (p. 1-16):
© STOP/CLEAR Button
(P-2-3):
START/COPY Button and
Indicator (p. 2-3):
Used to access some features of your host PBX.
Used to redial the last dialed number.
Used for on-hook dialing and voice contact
features. The indicator lights when these
functions are on.
Used to start or end programming functions.
Used for speed dialing.
Used to insert a pause into a facsimile
telephone number during programming.
Used to store parameters during programming.
Used to cancel transmission or copy operation.
Also used during programming to clear the
previously entered parameters.
Used to start transmission and copy functions.
The indicator lights when these functions are on.
1-6
Page 14
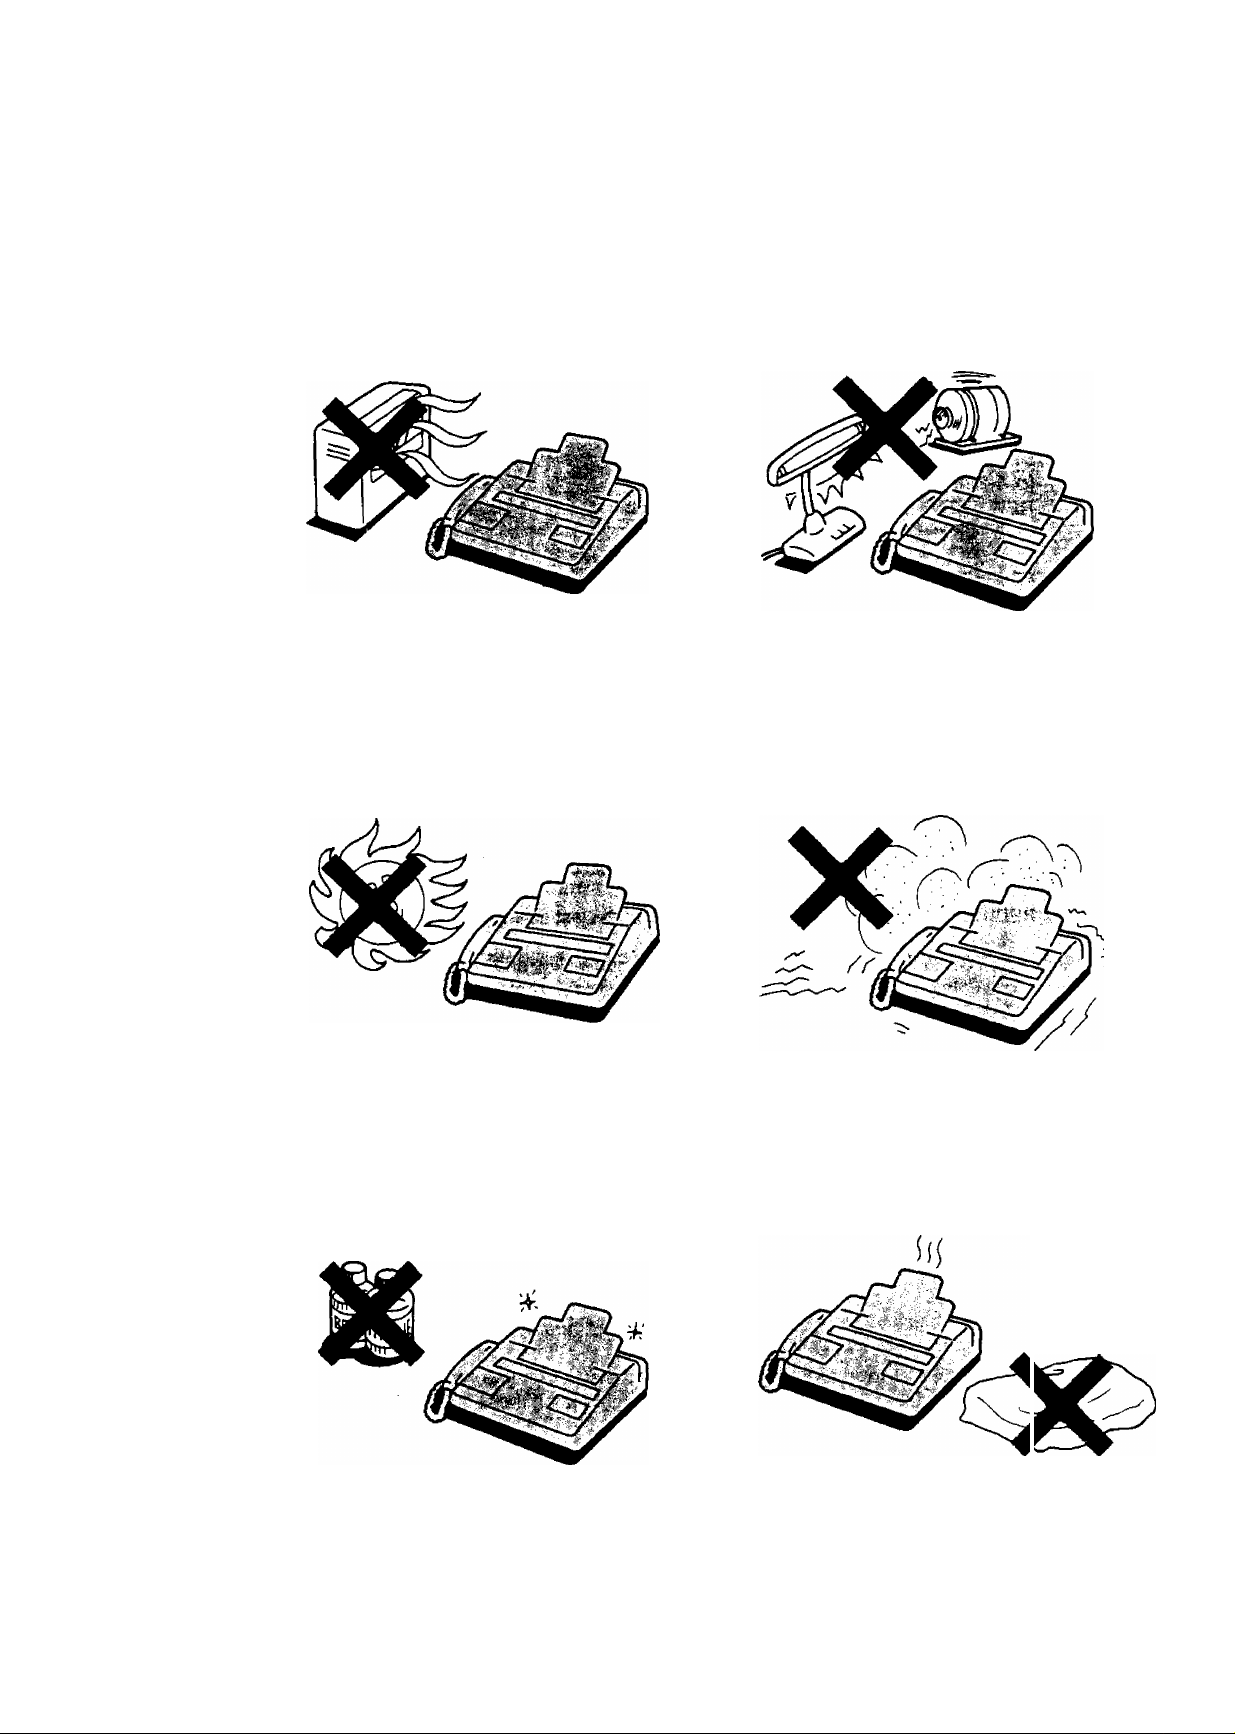
Precaution
Keep the unit away from heating appliances
such as radiators or air conditioning units.
The unit and the cassette tape should not
be exposed to direct sunlight.
Keep the unit away from electrical noise
generating devices such as fluorescent
lamps and motors.
The unit and the cassette tape should be
kept free from dust, moisture, high
temperature and vibration.
Do not use benzine, thinner, or the like, or
any abrasive powder to clean the cabinet.
Wipe it with a soft cloth.
Do not place any covering over the unit
while it is turned on.
1-7
Page 15
.■
'-'" +*’1
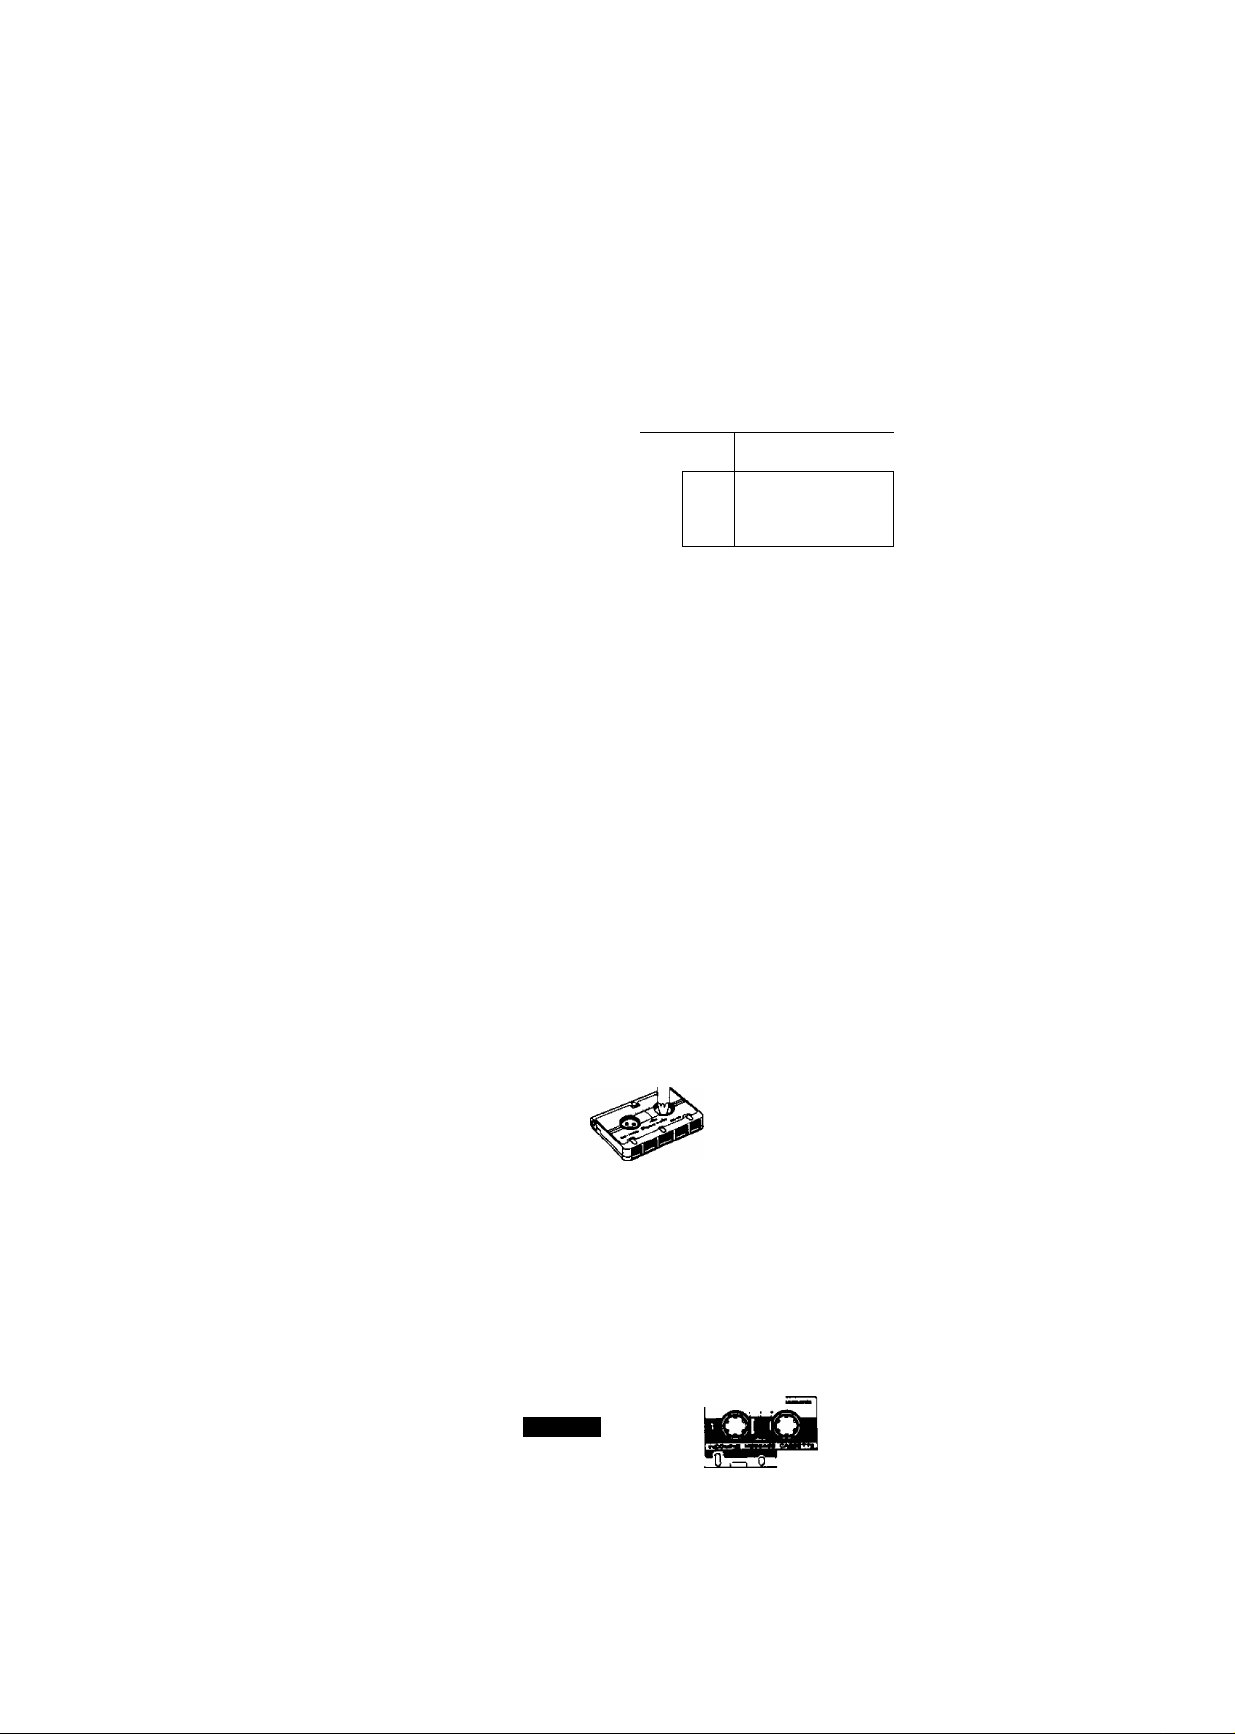
Micro Cassette Tape Installation
To record your outgoing message, install a micro cassette tape first.
1. Open the compartment cover.
2. Insert the micro cassette tape into the compartment as follows.
Slide in.
(§) Push down.
1 . A
3. Close the compartment cover.
Cassette Tape
•Make sure that there is no slack in the tape. If there is any slack, remove it by
rotating the tape reel with an instrument like a pencil, as shown.
•For optimum sound quality and performance, we recommend that you use the
opposite side (side-2) after six months and replace the tape with a new one every
year, assuming that the unit answers about ten calls a day.
•Never place a cassette tape near a magnetic source such as a magnet or a TV
set, because it may erase or break the recorded message on the tape.
•Should the cassette tape break or become worn, replace it with a new cassette
tape. We recommend using the Panasonic cassette tape RT-30MC or RT-60MC.
RT-30MC
islns
32:
RT-60MC
1-8
Page 16
^ /
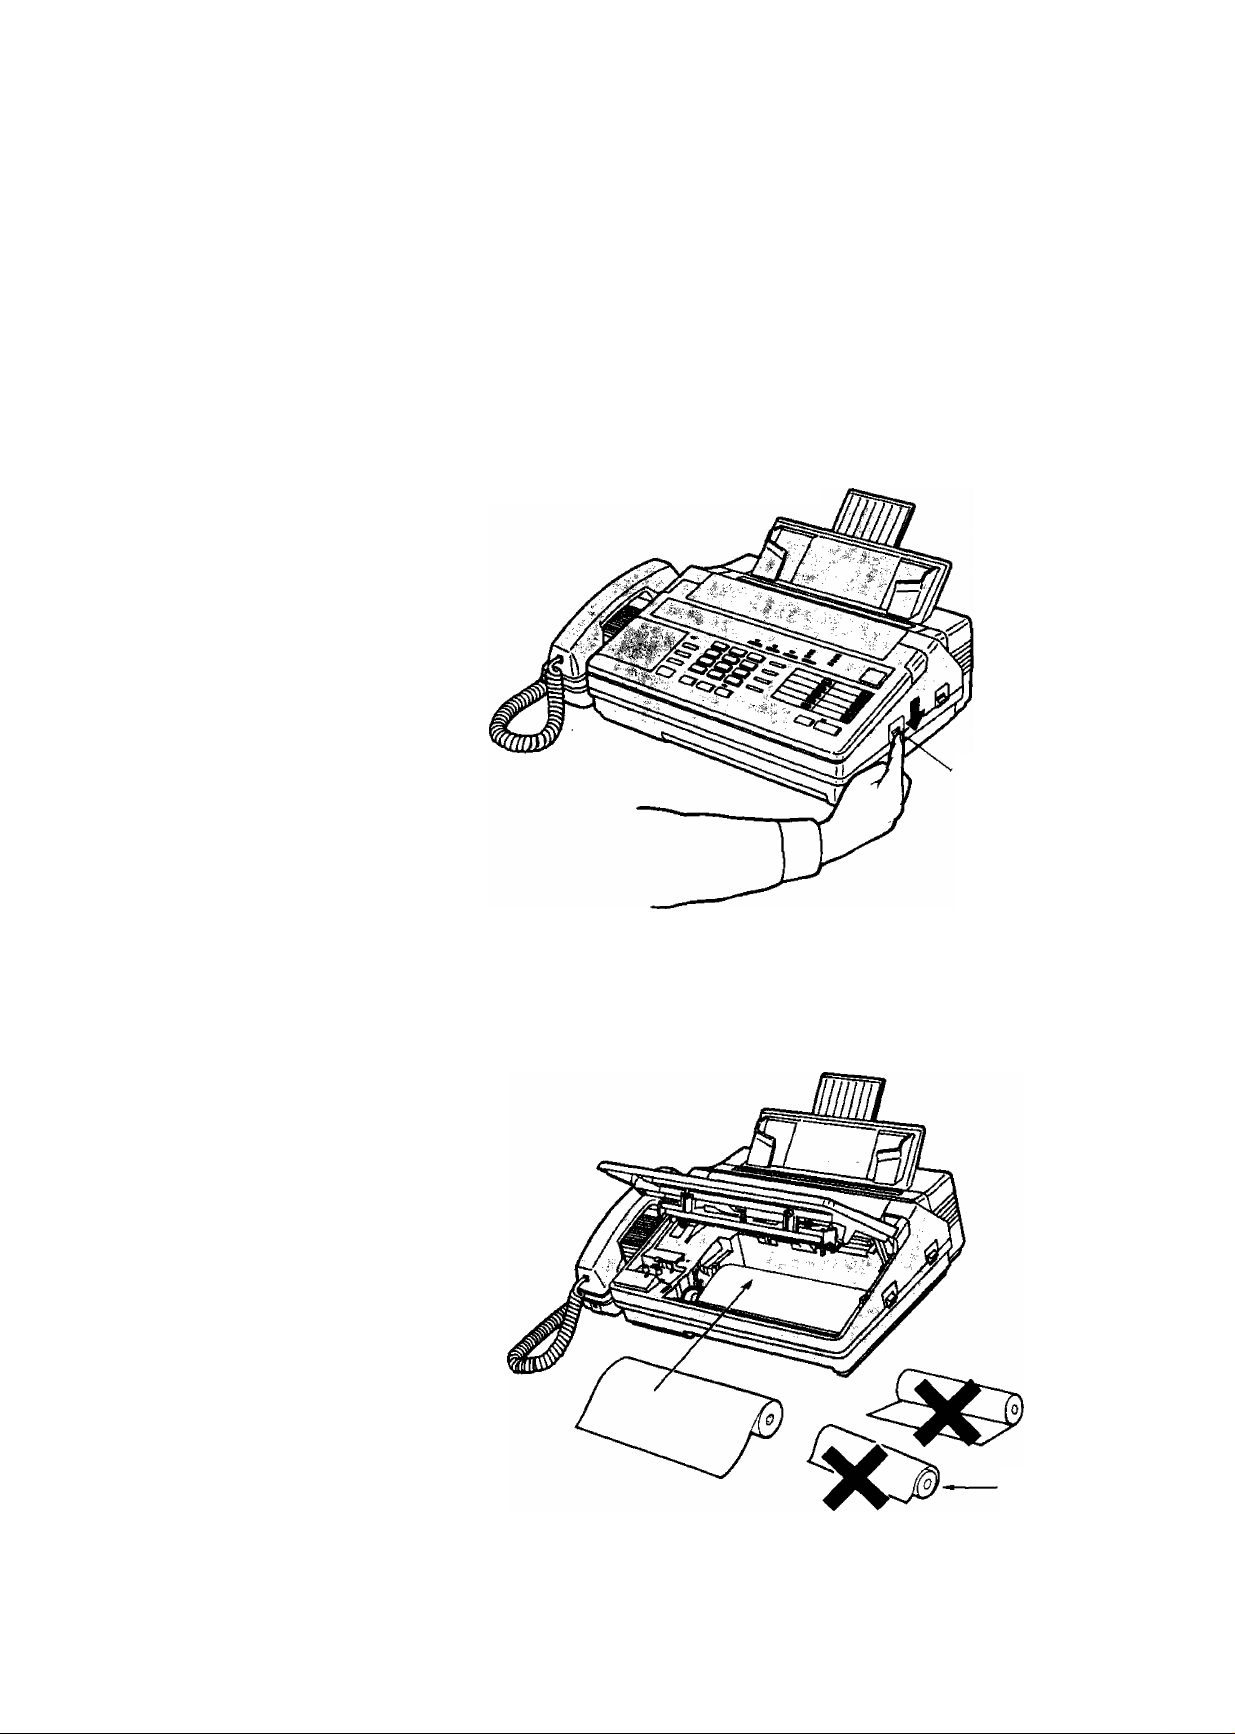
Recording Paper Installation
Follow the steps below to install a new roll of recording paper.
Caution:
Use only the included roll or specified recording paper (Part No. KX-A106) for
supplement or else the print quality may deteriorate or excessive thermal head wear
may occur.
Press the FRONT LID OPEN lever in the direction of the arrow to open the
1
cover.
*. A^'JuUa
FRONT LID OPEN
Lever
Place a recording paper roll into the paper compartment.
Make sure that the shiny side of the paper is facing up and that there is no
slack in the paper roll.
1-9
Slack
Page 17
>■
r-
' " i
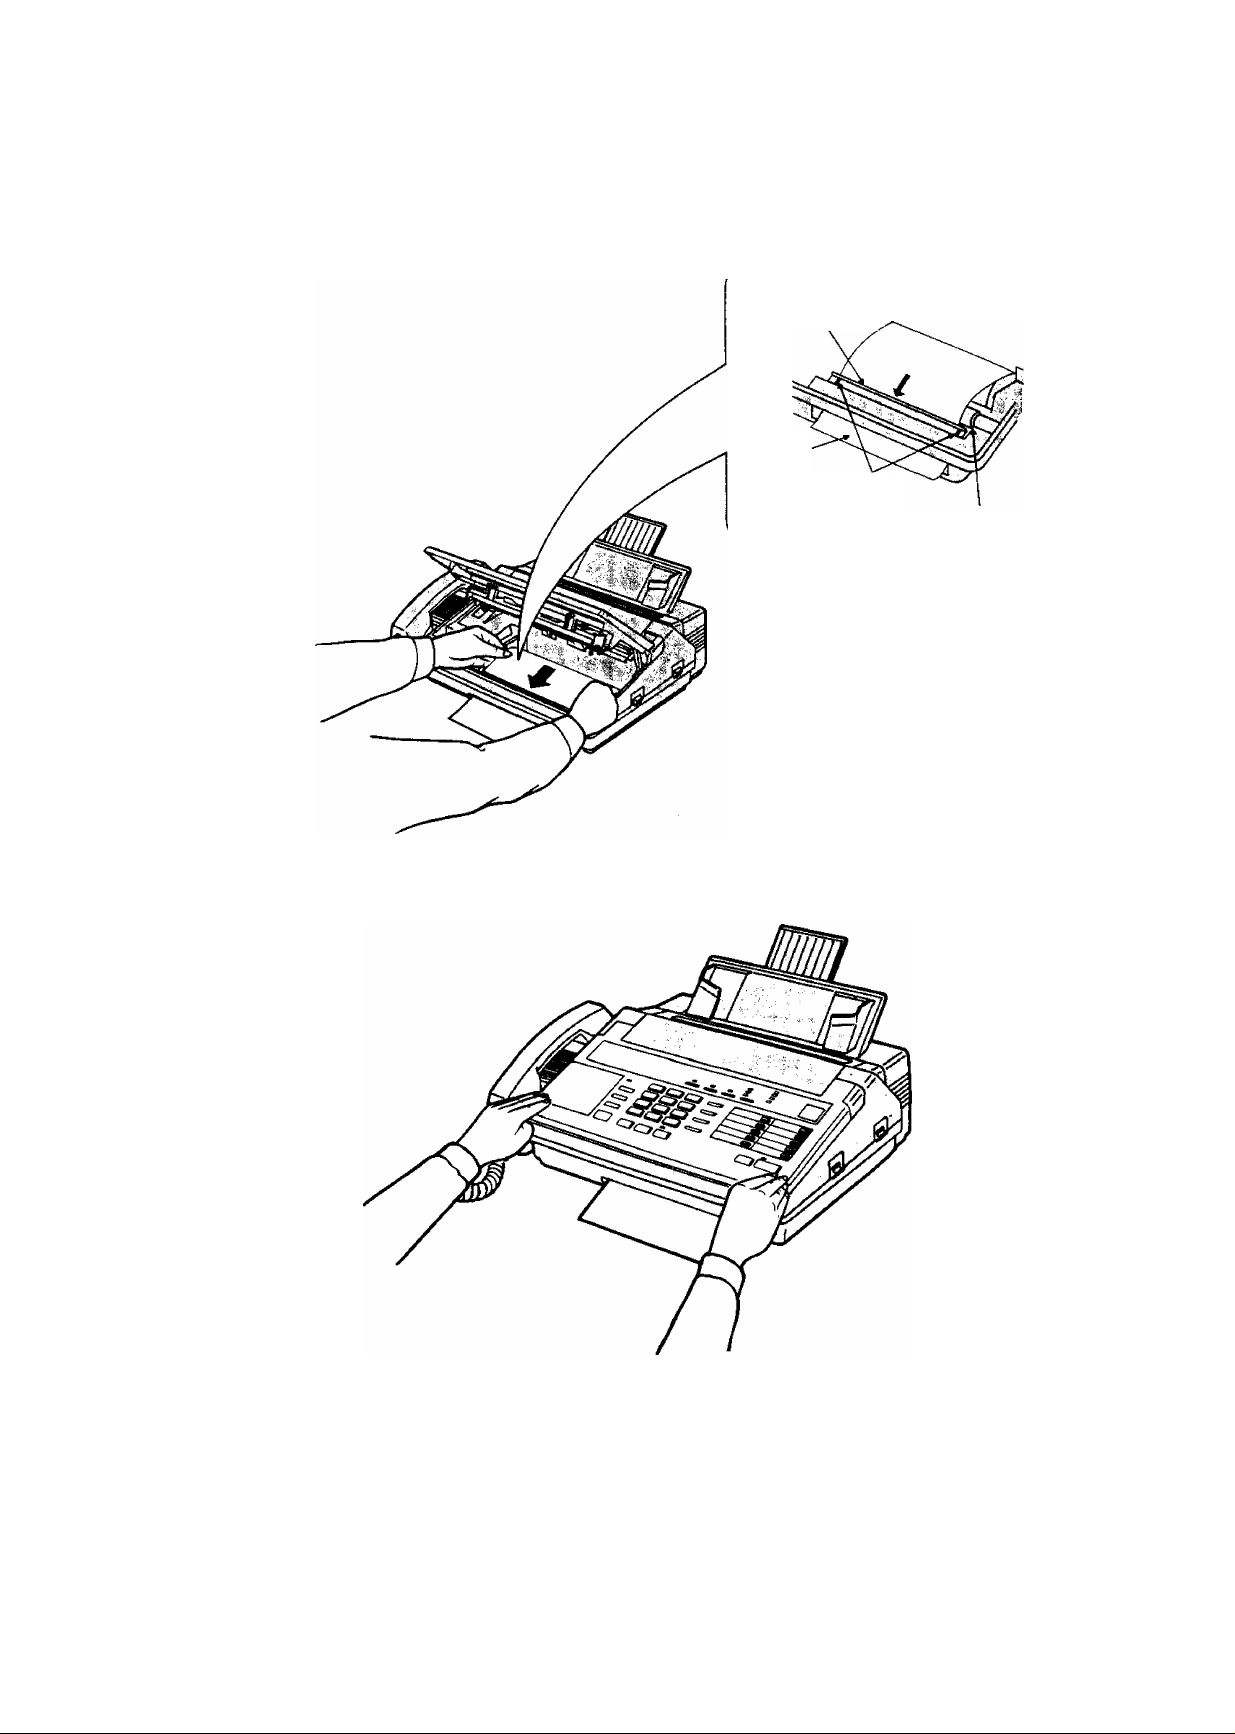
Insert the recording paper between the upper and the lower guide plates and
pull the paper a few centimeters {one or two inches) out of the unit.
Upper guide plate (green plate)
Paper-
Guide marks
Lower guide plate
^?lli
Close the cover carefully by pressing both ends gently.
1-10
Page 18
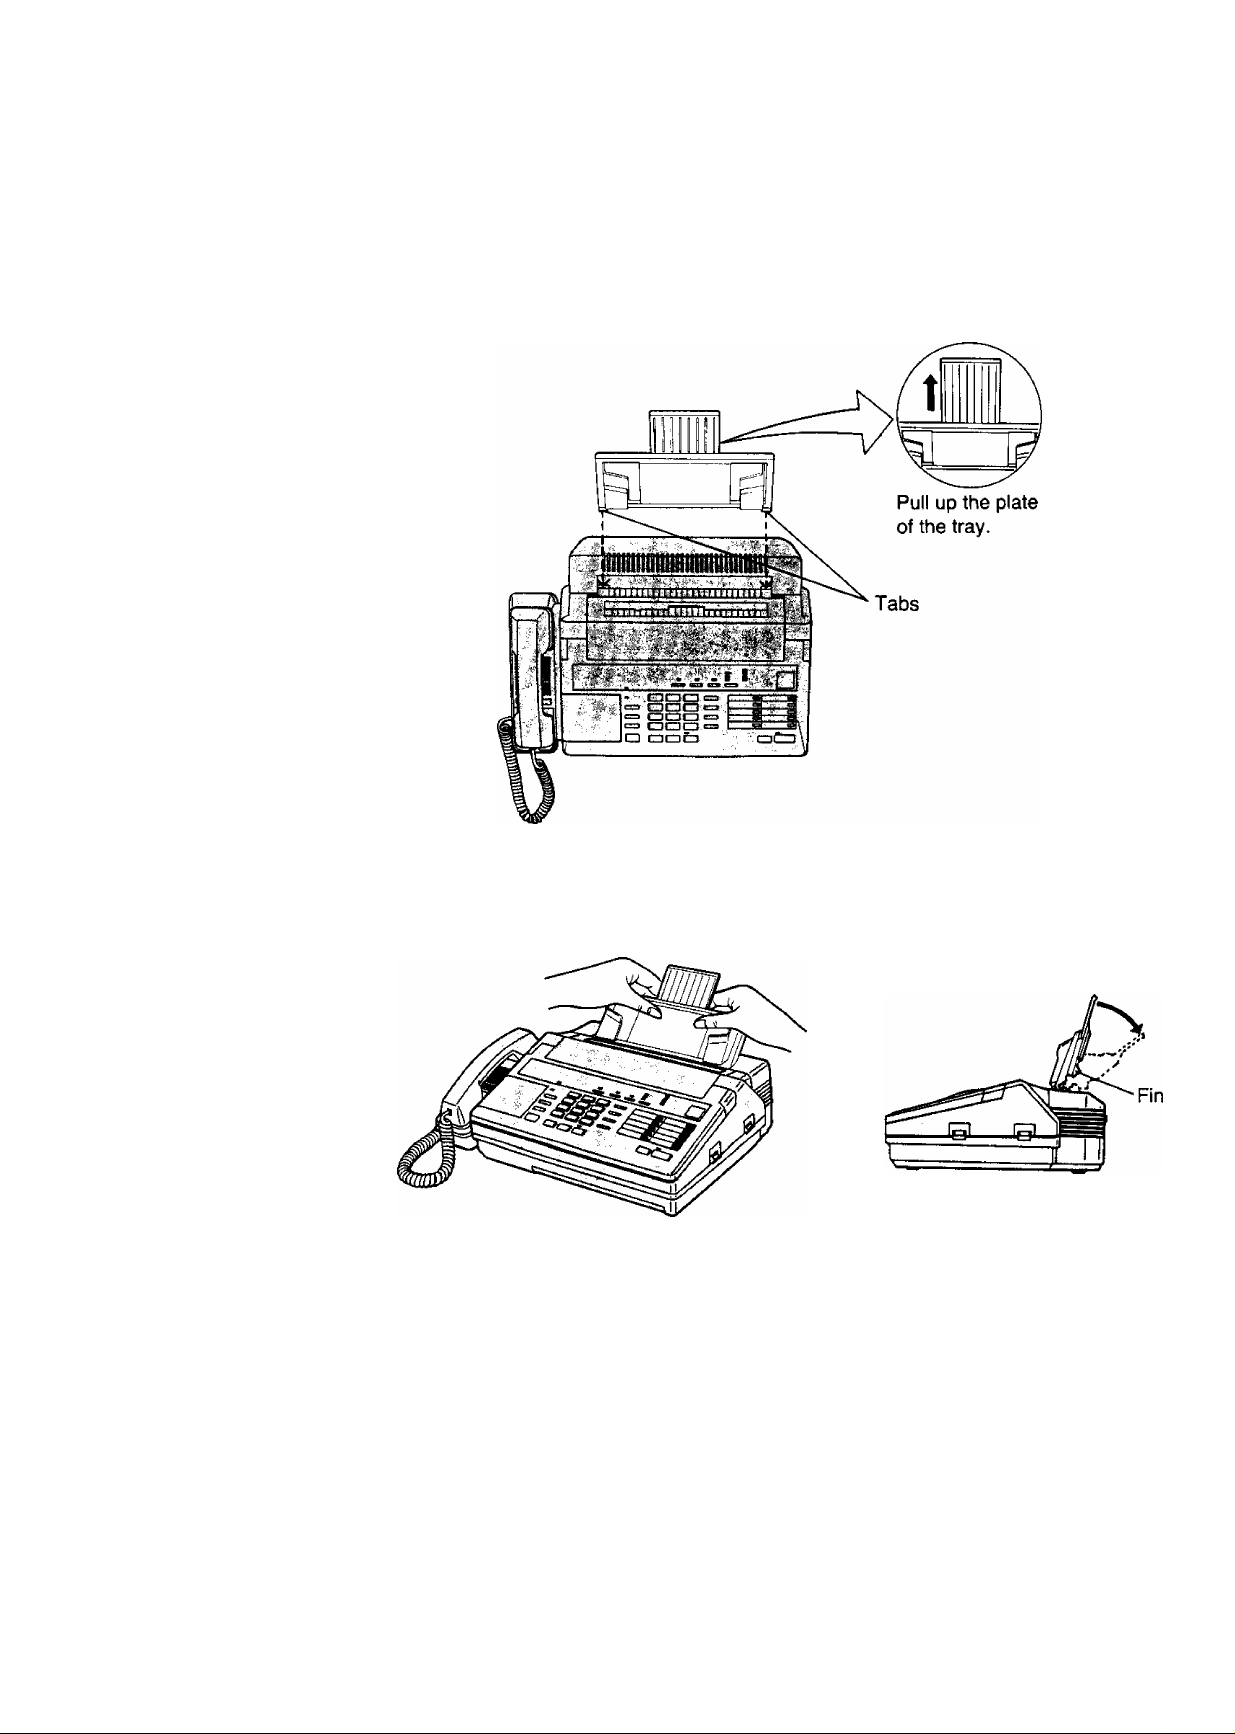
Document Tray Installation
^ Insert the two tabs of the tray into the two grooves on the unit.
Press the center of the tray with both hands until the two fins on the rear of the
tray click into place.
1-11
Page 19
■m
•>*«
¥S"
'»^ij
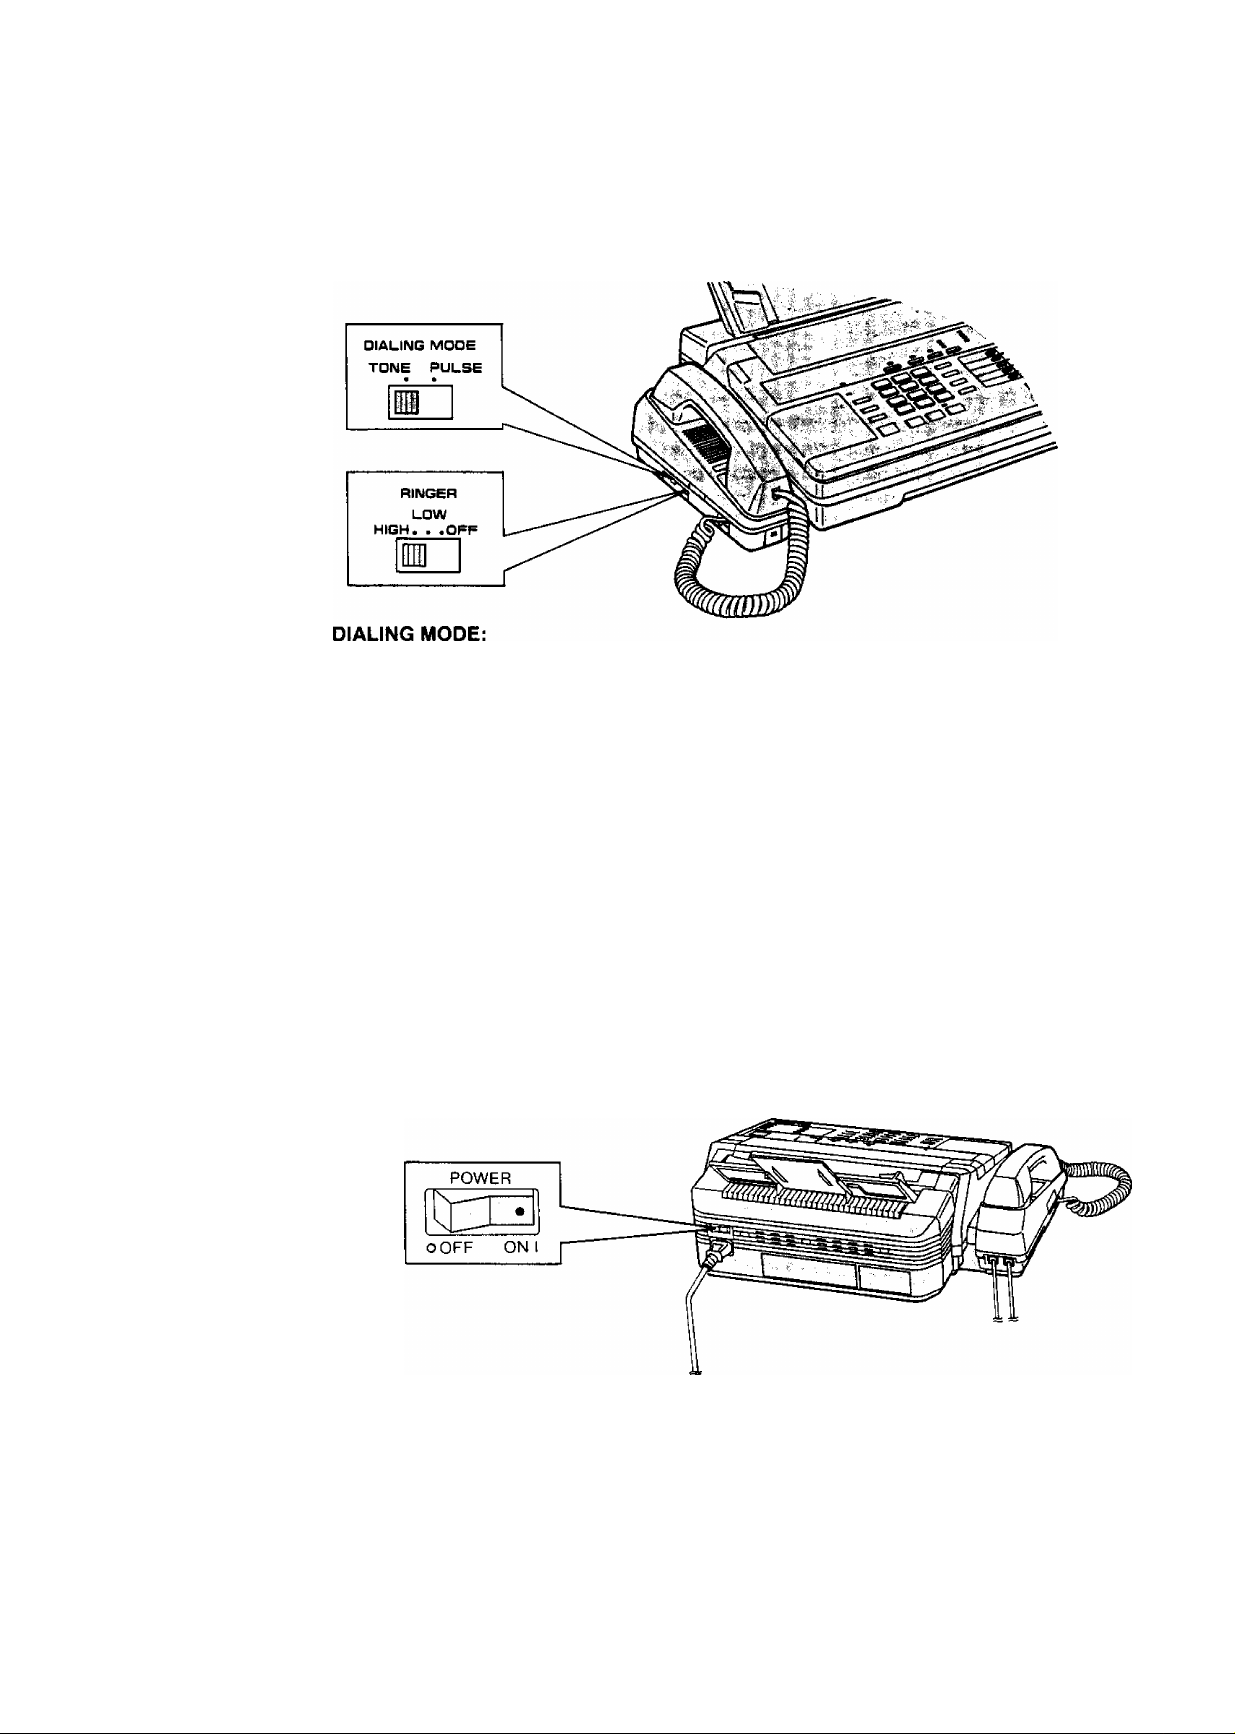
Selector Settings
If your line has touch tone service, set the selector to “TONE”. If your line has rotary
pulse dial service, set to “PULSE".
RINGER volume:
HIGH: The ringing sound will be loud.
LOW: The ringing sound will be soft.
OFF: The unit will not ring.
’Mf'
'^€M
Turning the Power Switch On
Before turning the POWER switch on, confirm the following:
1. The cassette tape and the recording paper are installed properly.
2. The handset is on the cradle.
Turn the POWER switch to the “I (ON)” position. The POWER indicator lights.
When you use the unit for the first time, the ALARM indicator will light. After
recording your outgoing message, the ALARM indicator will go out. See page 1*13.
M2
Page 20
\ - r:.. l^'r:
Recording an Outgoing Message (OGM)
•The outgoing message (OGM) tells the caller that you are out, and asks to leave a
voice-message or to send a fax message. Before using your unit as both an
answering device and a facsimile, you should first record your OGM.
•You can store a personal OGM up to 16 seconds on the voice-recordable
microchip. Once recorded, the OGM will be automatically recorded on the micro
cassette tape as a backup in case of power failure.
• If a power failure takes place or the POWER switch is turned off, the OGM
recorded on the microchip will be erased. However, after the power is restored,
the unit will automatically re-record the OGM onto the microchip using the OGM
recorded on the tape. You need not re-record your OGM.
OGM [Rlc] button
OGM [fTay] button
VOLUME Control
MIC (Microphone)
Suggested message
Record your OGM referring to the examples below.
"This is (your name, business andlor telephone number). We are out right now. To
send a fax, start transmission. To leave a message, speak after the long beep.
Thank you."
"This is (your name, business and/or telephone number). We are out right now. To
send a fax, start transmission. To leave a message, speak for up to 1 minute after
the long beep. Thank you."
You can choose from two lengths of recording times for incoming messages. When
the unit is in the “VOX” position, the recording time is unlimited, and when in the
“1 MIN” position, the recording time is limited to 1 minute. The two examples above
correspond to these two conditions.
The unit is preprogrammed to the “VOX” position. To change the recording time,
see page 4-5.
1-13
Page 21
-■
*/V'
Recording your OGM
Note:
•The recording time is limited to 16 seconds. For optimum performance, we
recommend that you record your OGM within 12 seconds.
• Do not pause for over 2 seconds while recording your OGM. If 16 seconds pass or
a pause continues for more than 2 seconds, the unit will finish recording. The rest
of your message will not be recorded.
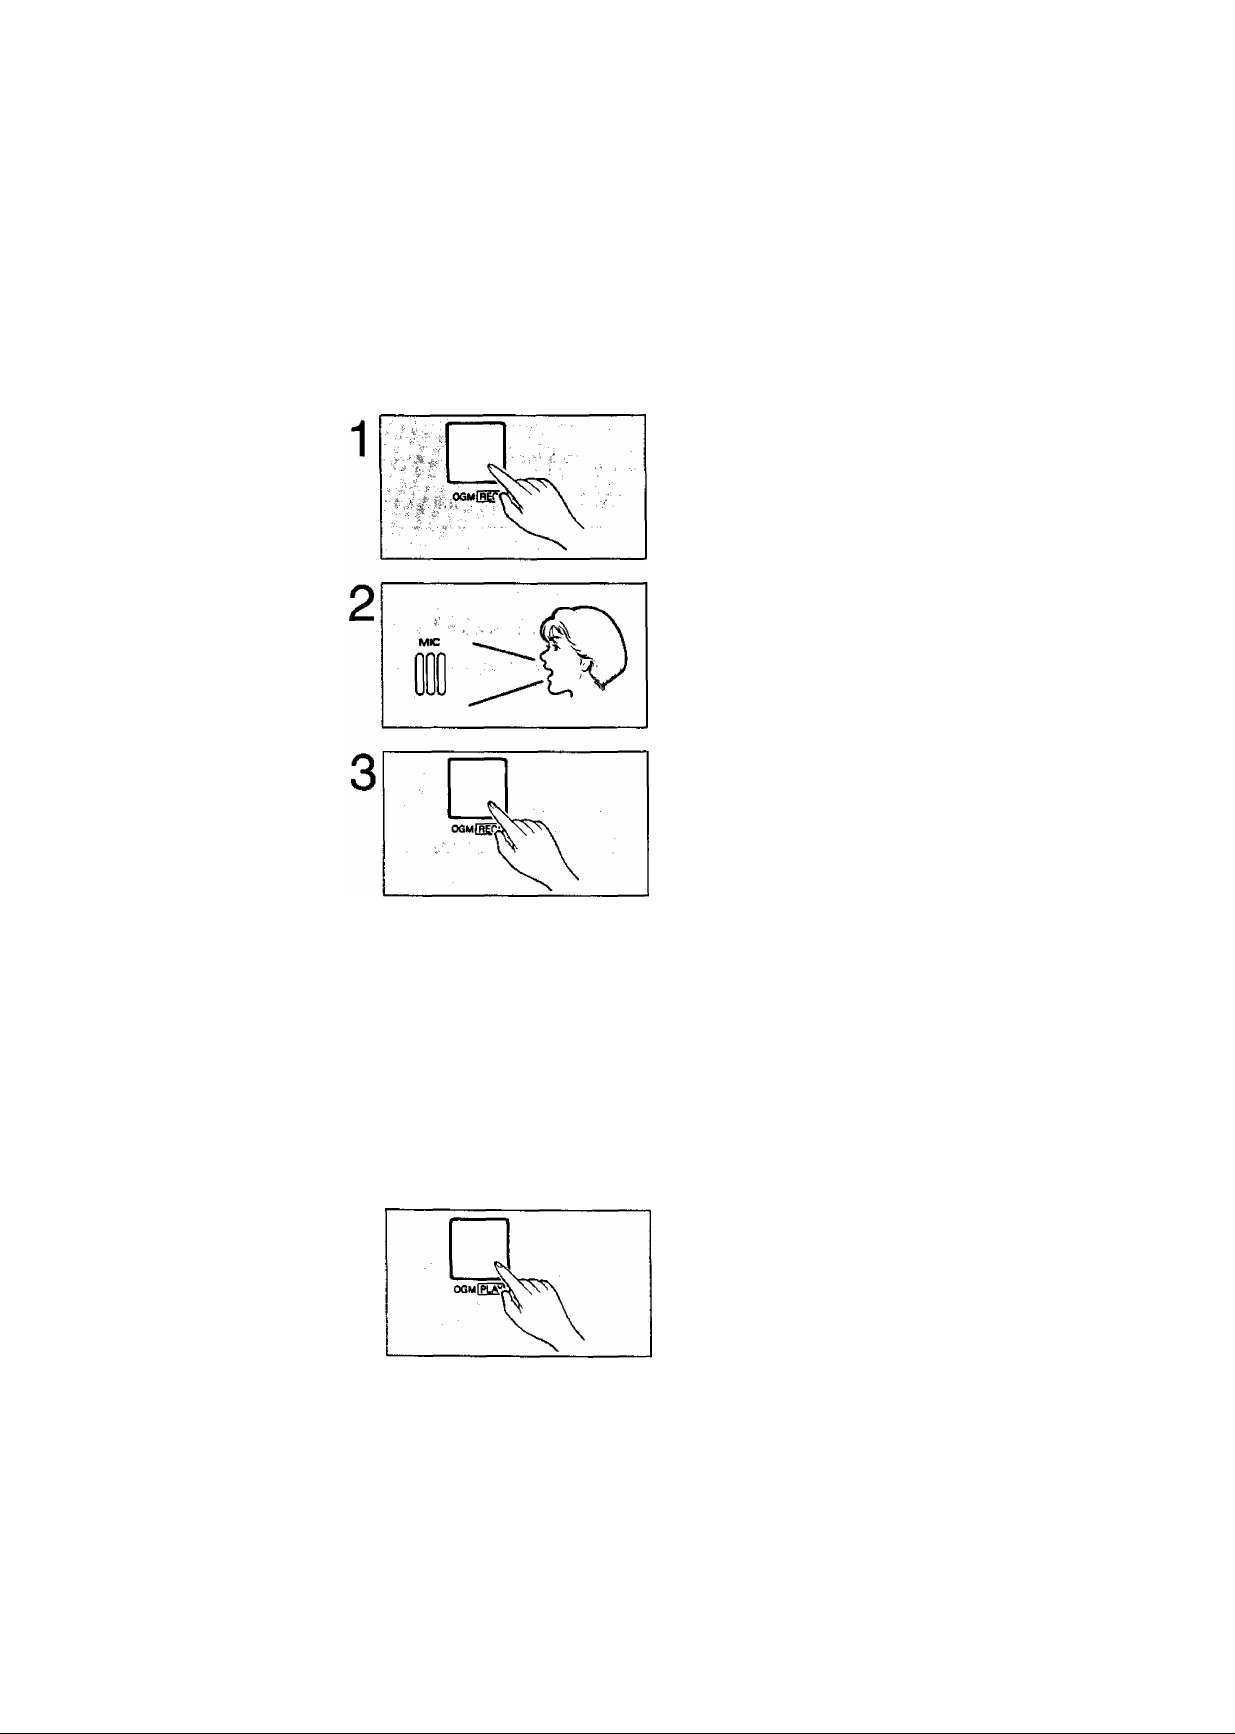
Lift the cassette compartment cover and
press the OGM REC button until a long
beep is heard, then release it.
After the beep, speak immediately,
clearly and loudly, toward the
microphone from a distance of
approximately 20 cm (8 inches).
V-;-ii--;'>r',^
,■ ■ f
‘f
■■''.n>A*^-''iS-^
'■A Vi'
Press the OGM REC button again upon
finishing your OGM.
A The unit plays the stored OGM so that you can confirm your
message.
C The unit plays the stored OGM again to record your OGM on
^ the micro cassette tape as a backup.
Note:
• If you make a mistake while recording, repeat from step 1.
Verifying or changing your OGM
Press the OGM PLAY button.
The unit replays your OGM. If you want to
change your OGM, perform the operation on
this page again. The previous message will be
automatically erased and a new message will be
recorded.
Re-recording of OGM
When you replace the cassette tape with a new one or you use the opposite side
(side-2), you have to record an OGM again.
1-14
Page 22
Programming Functions
List of programming functions
The following functions are user selectable. The most probable choices have been
pre-selected as default, but can be changed as needed.
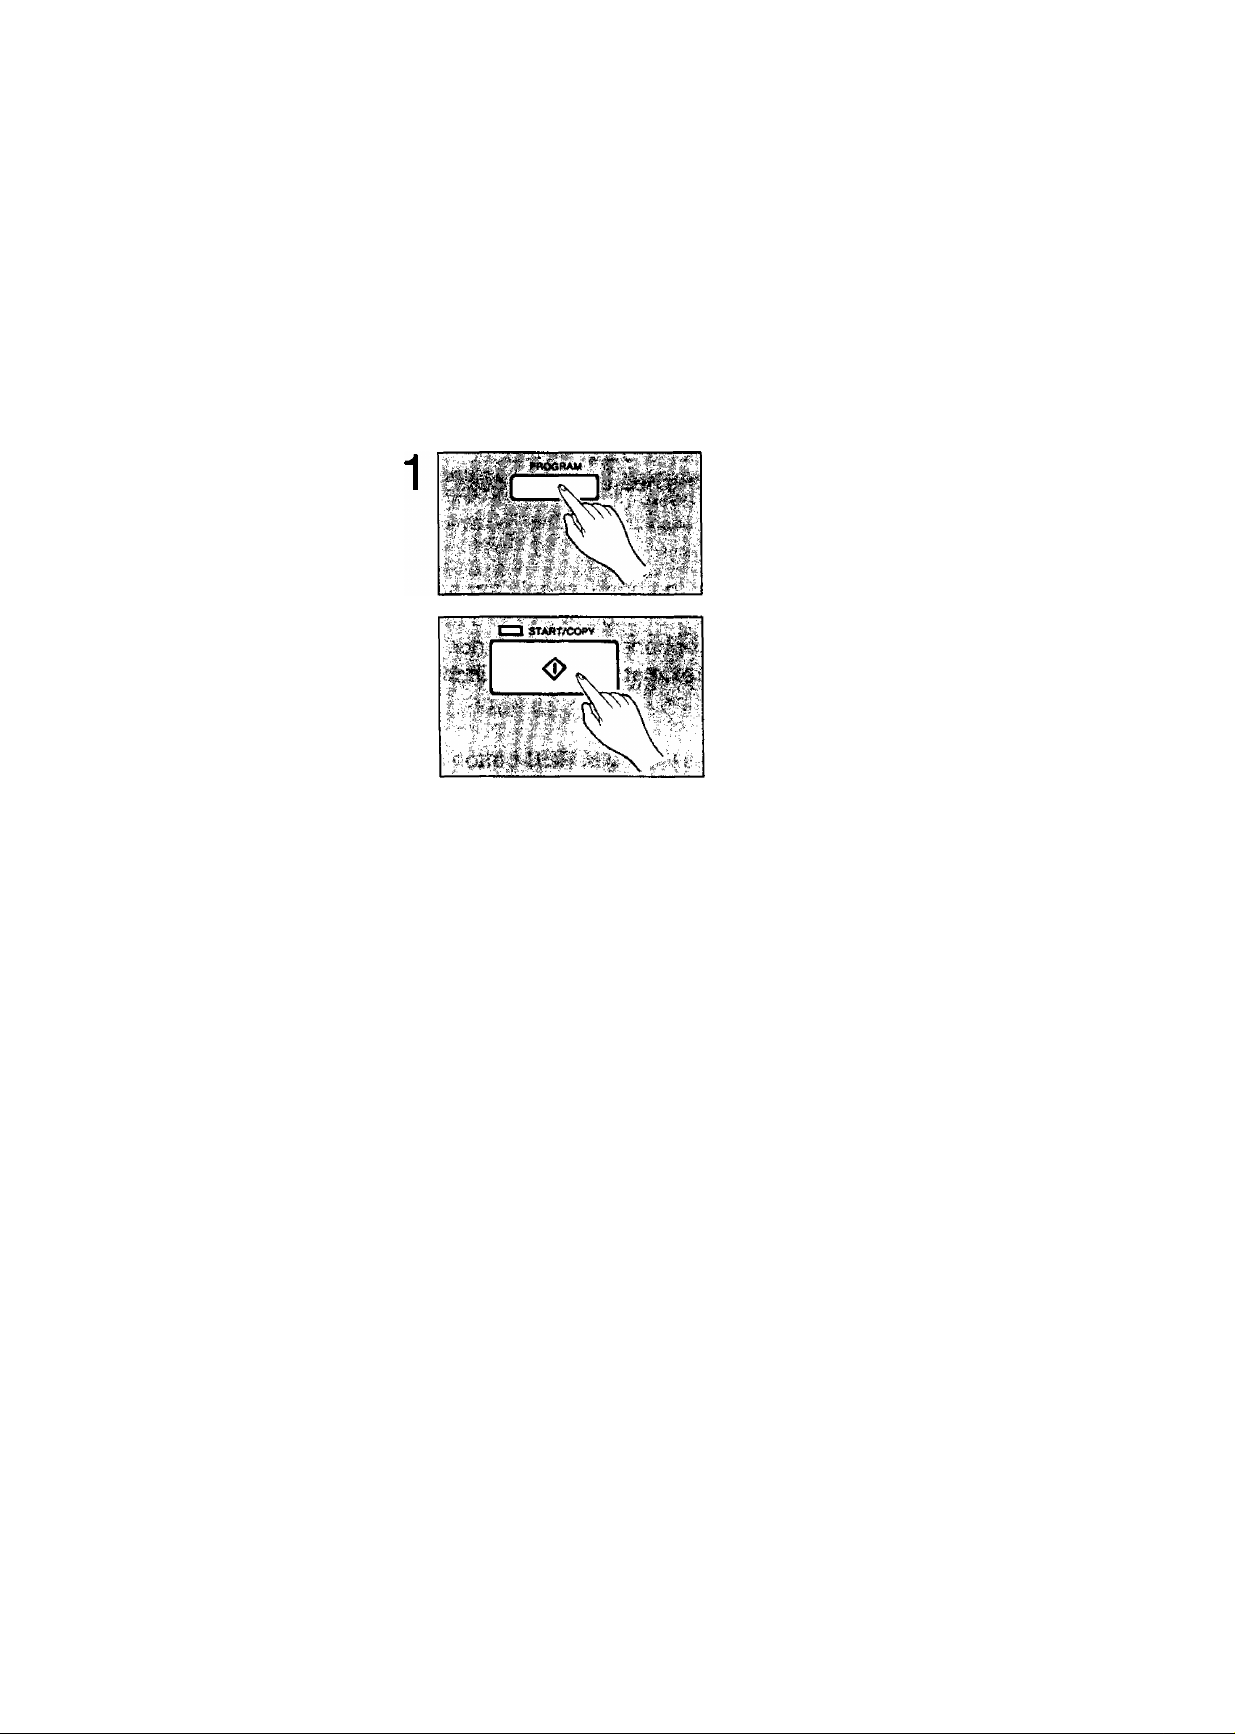
To print out the “SYSTEM SET UP LIST";
Press the PROGRAM button.
The PROGRAM indicator lights.
Press the START/COPY button.
'■ ■ ■: ^ ■- i‘ C'^ r#’* ...■i* ^'- ‘
■■ '■■ ■ ... ■./ ■■■■ 'Vi .-^
The unit starts printing.
>K ,
— << HOU TO SET UP >> —
1. PRESS "PROGRftM'‘ 1. CHECK "DIHLING HODE" SELECTOR
2.
PRESS THEN "CODE N0."
3. ENTER DESIRED UPLUE
4. PRESS "SET" TO STORE YOUR SELECTION
OR PRESS "SThRT/COPY" FOR 41 42 43 50
ET UP5. PRESS "PROGRPM" PGPIN TO END
<< SYSTEM SET UP LIST
H02 YOUR LOGO
H04
YOUR TELEPHONE NUMBER
«05
FPX LOGO HEPDING
«06
REMOTE THD ID
«11 PRINT TX REPORT
«12 MPIN PPSSUORD
«16
POLLING PHSSUORD
«17
FPX TX SPEED
«18
FPX RX SPEED
«20
TONE DETECT
«21
RECPLL
«30
RECORDING TIME
«31
CPC MODE
«32
TPD RING COUNT
«33
FPX RING COUNT
«41 PRINT TEL LIST
«42 PRINTER TEST
«43 PRINT CHPRACTER CODE
«50 RESET USER PROGRPMMPBLEFUNCTIONS C«05 TO «33)
ttS000>ti iISEROICE DPTP SET UP)
^ Hi **** ^ if: ^ >l< ^ ^ ’t'H; ^ >t< >(<>K * >K:+; )*t >loK* Jt: it:
=
=
ON a =
=
111
=
OFF a =
0000
0000
9600BPS a =
=
9600BPS Cl =
=
OFF Cl = ON
=
T_BR Cl =
=
UOX Cl = UOX
=
P Cl =
=
2 C2..,
=
2 C2..,
> 1-15
— <<H0U TO PROGRPM PHONE NO. >> —
1. CHECK "DIHLING MODE" SELECTOR
2.
PRESS "PROGRPM" +:
2. PRESS "PROGRPM"
3. PRESS "DIRECT CPLL" STHTION
OR PRESS "PlJTO" HMD "00-19"
4. ENTER PH0NE NO.
5. PRESS "SET" TO STORE PHONE N0.
TO STORE IN SUCCESSION.
REPEPT STEP 3 TO 5
6. PRESS "PROGRPM" TO E(;'ID SET UP
ON 2
ON 2
9600BPS
9600BRS 2=4800BPS)
T_BR
H
, 4
. 4)
=
OFF I'
=
ERROR 3 = OFF
2
=
4S00BPS)
2=OFF )
=
2
E_RE )
ii.
IMIN )
2
=
B )
TOLL SPUER )
0
■■Ic
.11
;i
i-
■f:
-ti
r
iti
4^
4;
M
>K
*
Page 23

*■'
"ifeTi
■ ■' '^■.->^'r^
Programming
To make a function change;
1. Press the PROGRAM button.
2. Press “#", then press code number described below.
3. If the code number pressed is 02 through 33, enter the desired value and then
press the SET button to store the programming in memory.
If the code number pressed is 41 through 50, press the START/COPY button to
print out reports.
4. Press the PROGRAM button again to end setup.
CODE FUNCTION
DEFAULT
REFERENCE
*" ?*+ A
'.v;'- -• C4
• ''f
■Vvi'.'iA^.y
#02
#04 YOUR TELEPHONE NUMBER
#05 FAX LOGO HEADING ON
#06
#11
#12
#16
‘j
#17
#18 FAX RX SPEED
#20
#21 RECALL
#30
#31
#32
#33
YOUR LOGO (not entered) See page 1-17.
(not entered) See page 1-19.
See page 4-3.
REMOTE TAD ID 111
PRINT TX REPORT
MAIN PASSWORD
POLLING PASSWORD
FAX TX SPEED
OFF
0000
0000 See page 3-1.
9600 BPS
See page 3-5.
See page 4-1.
See page 3-3.
See page 4-3.
9600 BPS See page 4-4.
TONE DETECT
RECORDING TIME VOX
CPC MODE
TAD RING COUNT
FAX RING COUNT 2 (twice)
OFF
T-BR
A
2 (twice)
See page 4-4.
See page 4-5.
See page 4-5.
See page 4-6.
See page 4-6.
See page 4-7.
#41
PRINT TEL LIST
#42 PRINTER TEST
#43
PRINT CHARACTER CODE
#50 RESET USER PROGRAMMABLE
FUNCTIONS (#05 TO #33)
#9000*
SERVICE DATA SET UP
M6
See page 4-2.
See page 4-7.
See page 4-7.
See page 4-8.
See page 4-9.
Page 24

Programming your logo
The logo is a means of identifying your unit. Your logo may consist of alphanumeric
letters and symbols. Your programmed logo will be printed on the top of all pages
transmitted from your unit.
Your Logo Your Telephone Number Number of Page
FROM: PANASONIC CO
TO: Mr, MATSUSHITA
FROM: PANASONIC COMPANY
PHONE NO.: 123 4567
FAX CORRESPONDENCE
DATE: June 5,1991
OURTEL.no.: 123-4567
P01
Usually the logo is a company, division or personal name in an abbreviated form.
Up to 30 characters can be entered as your logo.
To enter each character, select the correct code (2 digits) referring to the Character
Code Table on page 1-18, and program as shown below.
. I'
in
17
. t(MC
] CZ J L 3 I
] L. 5 ) I 6 I
DCZDm
Ifo II #I
. -- ■ SET . ■'
1
________
sv
.■'S g ■ PROGRAM
Enter your logo by using the dial keypad.
Example: If you want to program the logo as
“COMPANY ABC”, press “32 44 42
45 3Q 43 54 013Q 3132".
To print out your logo for confirmation during
programming, press the START/COPY button.
When you have finished, press the SET
, =. '
button to store the programming in
memory.
Press the PROGRAM button to end the
operation.
The PROGRAM indicator goes out.
1-17
Page 25

Page 26

■■ „.-.iH-wriBtilMiitfthtS-
Programming your facsimile telephone number
Your facsimile telephone number can be programmed into your unit.
When you transmit a document, your programmed telephone number will be printed
on the top of all pages transmitted from your unit.
The unit can hold your phone number up to 20 digits long.
Program as shown below.
Press the PROGRAM button.
The PROGRAM indicator lights.
Press then press “04” for your
telephone number setting.
Enter your telephone number by using
CII1CIÍ]
■feti:D::tDCD
'Czimm
the dial keypad.
Example: If the phone number is “123 4567",
press “123”, “#" and “4567”.
If you want to insert a space in a phone number,
press "#”.
To print out your phone number for confirmation
during programming, press the START/COPY
button.
When you have finished, press the SET
button to store the programming in
memory.
Press the PROGRAM button to end the
operation.
The PROGRAM indicator goes out.
Note; To correct an error while programming, press the STOP/CLEAR button then
repeat from step 2.
1-19
Page 27

Programming Phone Numbers for
Automatic Dialing
The unit’s memory allows you to use both one touch dialing (up to 10 phone
numbers) and speed dialing {up to 20 phone numbers) for rapid access to your
most frequently called numbers.
Programming phone numbers for one touch dialing
This unit is equipped with 10 direct call stations including SECRET and HYPHEN
keys, each of which can store a telephone number for one touch dialing. Each
phone number can be programmed up to 30 digits long.
Make sure first whether the DIALING MODE selector is set to TONE or PULSE
mode.
Press the PROGRAM button.
The PROGRAM indicator lights.
Press one of the direct call station keys
where you want to store the phone
number.
Enter the phone number by using the
CDC
me m16.1
mjL
mr
iDm
T1 I _9 I
dial keypad.
If you want to insert a hyphen in the number,
press the HYPHEN key during programming.
HYPHEN is counted as 2 digits.
Press the SET button to store the
programming in memory.
To program other phone numbers, repeat steps
2 to 4.
After programming all the numbers,
press the PROGRAM button to end the
operation.
The PROGRAM indicator goes out.
Note: To correct an error while programming, press the STOP/CLEAR button then
repeat from step 2.
You can print a list of the stored phone numbers. See page 4-2.
* 1-20
Page 28

- ' -i/-
ifcriiihd
Programming phone numbers for speed dialing
This unit is equipped with 20 stations (00 through 19), each of which can store a
telephone number for speed dialing. Each phone number can be programmed up to
30 digits long.
Make sure first whether the DIALING MODE selector is set to TONE or PULSE
mode.
Press the PROGRAM button.
The PROGRAM indicator lights.
Press the AUTO button, then enter the
station number at 2 digits (“00” through
“19”) by using the dial keypad.
uMLdiuIUUMMii^ttihy
Enter the phone number.
' "CZICID CZ
TZDmci
' i ^ ED ED EE
If you want to insert a hyphen in the number,
press the HYPHEN key during programming.
HYPHEN is counted as 2 digits.
■ 'm ED d
Press the SET button to store the
programming in memory.
To program other phone numbers, repeat steps
2 to 4.
After programming all the numbers,
press the PROGRAM button to end the
operation.
The PROGRAM indicator goes out.
Note: To correct an error while programming, press the STOP/CLEAR button then
repeat from step 2.
You can print a list of the stored phone numbers. See page 4-2.
1-21
Page 29

' i---' m :■
j- '‘f
Programming secret phone numbers
This function is useful for keeping the whole or a portion of a telephone number
secret. When you print out a list of the stored numbers, this number will not be
printed.
Press the PROGRAM button.
The PROGRAM indicator lights.
Press one of the direct call station keys.
OR
Press the AUTO button and enter the
station number (“00” through “19”)
LDCZ] □□
CZJODCI]
CDraCD
mmm
by using the dial keypad.
■ -• ■■
■v.n'>
nJZEim
Q H s
[ H L_o
. TON*
9
4.
SECRET I
II B I
II 9
JL^
SECRET
I
________
Press the SECRET key and enter the
phone number, then press the SECRET
key again.
Pressing the SECRET key once counts as
2 digits.
I
Press the SET button to store the
programming in memory.
To program other phone numbers into memory,
repeat steps 2 to 4.
After programming all the numbers,
press the PROGRAM button to end the
operation.
The PROGRAM indicator goes out.
Note: To correct an error while programming, press the STOP/CLEAR button then
repeat from step 2.
1-22
Page 30

Erasing a phone number
If you wish to erase a phone number programmed into memory, follow the steps
below.
Will* Iti
ì ‘ 11 * M < I >¿11 ¿à Ti inibir ¥ЙЙЙiT rtiiil ¿Мif • I il* tifr rtlWJМЙЙМЙМЙtrМftffr
Press the PROGRAM button.
The PROGRAM indicator lights.
Press the desired direct call station key. OR
Press the AUTO button, then enter the desired station number by using the dial keypad.
Listing the directory card
Remove the cover using an instrument with a pointed end like a pen.
Write the names of the other parties in the directory.
Press the SET button.
The number will now be erased.
If you wish to erase more than one number,
repeat from step 2.
Press the PROGRAM button to end the operation.
The PROGRAM indicator goes out.
Page 31

Basic Instructions
Page 32

V.' Vy'./'
Before Transmitting Documents
Acceptable documents
The unit can transmit documents that meet the following conditions.
•Paper width should be 128 mm (5") to 216 mm (8V2").
• Effective scanning width should be up to 208 mm (83/i6").
•Paper weight should be 45 g/m^ (12 pounds) to 90 g/m^ (24 pounds).
Maximum paper size
216 mm
(8V2")
Minimum paper size
128 mm
(5")
Effective scanning width
216 mm (8W')
Automatic document feeder:
• Up to 10 sheets of paper can be set in the document tray at a time.
•Paper weight should be 60 g/m^ (16 pounds) to 75 g/m^ (20 pounds).
•Paper with a coated surface must not be used.
2-1
Page 33

VT' ''
t^^i-^rti'- - ■
Do not use the following types of documents or they may jam. Make a copy of such
documents and feed the copy into the unit.
•Paper with chemically treated surfaces such as carbon paper or carbonless
duplicating paper
•Heavily curled, creased or torn paper
• Paper with a coated surface
• Small size paper such as a slip or voucher
•Thin paper less than 45 g/m^ (12 pounds)
•Thick paper over 90 g/m^ (24 pounds)
• Paper whose contrast between the print and the background is faint
• Paper whose printing on the reverse side can be seen through from the front
(e.g. newspaper)
Remove clips, staples or other similar objects from a document before feeding it into
the unit.
Make sure that any ink or paste on the document is completely dry before feeding it
into the unit.
•A document whose length exceeds 600 mm (235/e") cannot be transmitted. When
you feed such document, the unit stops transmitting and a long beep will be heard.
If this happens, press the STOP/CLEAR button and remove the document.
•If a document is electrostatically charged, the automatic document feeder may not
function properly.
Document loading
Place the documents on the tray FACE DOWN.
After aligning the documents, adjust the document guide according to their width.
Resolution and contrast
You can set the following functions depending on the quality of an original.
Set the functions before transmission or copying. If you set them during
transmission, they will be effective from the next sheet to be transmitted.
FINE is suitable for originals written with small
characters.
Press the FINE button. The FINE indicator lights.
LIGHT ORIGINAL is useful when transmitting or
copying originals with faint writing.
Press the LIGHT ORIGINAL button. The LIGHT
ORIGINAL indicator lights.
2-2
Page 34

■ - у.--: r riU |Д|р*||И1|»
. . :^..>w. rflirriiftilMi
Transmitting Documents
Manual transmission
ш
.л'' V-* Ч'
'Ч- ,
1
-■ -v; ГИЗ Ч*.
-v".*. MONITOR
—Л"
■■ : Ч , ’ . VOICE STOt^ V
,.Л-; ■ Ч -л.
Kvmmm ч
ШСПШШ:#
Insert the documents FACE DOWN.
The unit can accept up to 10 sheets of paper at
a time.
;ч
Press the MONITOR button or lift the handset.
\ у
Dial the phone number.
OR
Press the AUTO button, then press the
desired station number (“00” through
“19”) by using the dial keypad.
For programming of phone numbers, see
page 1 -21,
7 I I 3 I I 9
OilDCZ]
OR
OR
Press the direct call station.
For programming of phone numbers, see
page 1 -20.
Press the START/COPY button when a
fax tone is heard.
The unit feeds and transmits the documents.
After pressing the START/COPY button, replace
the handset if using it.
To stop transmission;
Press the STOP/CLEAR button until a beep
sounds. The transmission is interrupted.
To eject the documents, press the
STOP/CLEAR button again.
2-3
Page 35

You can dial and transmit documents automatically using direct call station keys.
Before using these features, make sure that the desired telephone numbers have
been stored in direct call stations.
For programming of phone numbers, see page 1 -20.
Insert the documents FACE DOWN.
The unit can accept up to 10 sheets of paper at
a time.
Press the desired direct call station key.
The unit dials and transmits the documents
automatically.
If there is no answer or the line is busy, the unit
will automatically redial the number up to 3 times
(Automatic redialing function).
To cancel automatic redialing, press the STOP/
CLEAR button.
If you want to send 11 or more sheets at a time, insert the documents up to 10 sheets
of paper first, and add the extra pages up to 10 sheets before the last page feeds into
the unit.
2-4
Page 36

Transmitting documents using the REDIAL button
You can transmit documents to the last dialed number using the REDIAL button.
1
Insert the documents FACE DOWN.
The unit can accept up to 10 sheets of paper at
a time.
Press the MONITOR button or lift the handset.
-V =
■ " REDiAt
Press the REDIAL button.
The unit dials the last dialed number.
..
:v.:Ol
Press the START/COPY button when a
fax tone is heard.
The unit feeds and transmits the documents.
Replace the handset if using it.
To stop transmission:
Press the STOP/CLEAR button until a beep
sounds. The transmission is interrupted.
To eject the documents, press the
STOP/CLEAR button again.
2-5
Page 37

Receiving Documents and/or
Voice-Messages
Receiving mode
The unit can receive documents and/or voice-messages either automatically or
manually.
The unit has three types of receiving mode. To select the desired receiving mode,
press the RECEIVE MODE button. Each time you press the RECEIVE MODE
button, one of the receiving modes will be selected.
■ TAD/FAX mode
Select this mode when you use the unit as a telephone answering device and/or
a facsimile machine. The TAD/FAX indicator lights.
When the unit is in the TAD/FAX mode, incoming calls are automatically routed
either to the fax or to the telephone answering device.
When a call is received, the unit answers the call and begins playing your OGM
to the calling party automatically. The unit automatically distinguishes between
voice and fax calls, and then functions as an answering device and/or a facsimile.
If a fax tone is heard when the call is answered, it will switch automatically to the
fax mode. If the caller’s voice is heard within 5 seconds of the end of the OGM,
the unit functions as an answering device.
FAX mode
Select this mode when you use the unit only as a facsimile machine. The FAX
indicator lights.
When a call is received, the unit answers the call and produces a fax tone for
documents reception. Then the unit receives documents automatically. Your
OGM is not played back.
If someone calls you when your unit is in the FAX mode, he/she will hear the fax
tone and cannot talk to you.
TEL (Telephone) mode
Select this mode when you use the unit as a telephone or for manual fax
reception. The TEL indicator lights.
In this mode, if you do not answer the call until the unit rings 15 times, the unit
will automatically switch to the TAD/FAX mode.
HELPFUL HINTS:
•If a caller wishes to transmit a document after recording a voice-message:
Advise the caller to .“Press the asterisk (*) button to send a document after
recording your voice-message”.
•If a caller wishes to record a voice-message after sending a document:
Advise the caller to “Make a call reservation following a voice contact procedure on
your facsimile during transmission". The unit will start playing the OGM again, then
be able to record a voice-message.
2-6
Page 38

■*%;'■ ' _»■■’•■>' '" " , "«ìW^PmPh
- V--V''^'
li. o...
</'
Manual reception
Press the RECEIVE MODE button to set to the TEL mode.
When the phone rings, lift the handset to answer the call.
Press the START/COPY button to receive documents, and then place the handset on the cradle.
If you do not place the handset on the cradle
after pressing the START/COPY button, the unit
automatically calls the other party. For further
details, see “Voice Contact” on page 2-8.
Note:
•When the red lines appear on both sides of the recording paper or the PAPER OUT
indicator tights, replace the paper roll with a new one.
The unit cannot receive a document without recording paper. To install recording
paper, see page 1-9.
If the ALARM indicator lights when you close the cover after installing the paper,
open the cover and dose it firmly again.
2-7
Page 39

:C>^!-'. ‘-.-li. v«*;í-.'»-.■’*i,:r;'-'-í:-^'^, x/'C^j''■ '.■■ V-' ■■ ■‘". ■ ■ .' ' ■ .
While you are transmitting or receiving a document, you may wish to speak to the
other party, if the other party’s unit is equipped with a voice contact feature, you can
initiate voice contact and notify the other party that you wish to speak after the
transmission/reception is completed. This saves the extra expense and time of
making a subsequent telephone call to discuss information sent over the fax.
Press the MONITOR button or lift the
handset while transmitting or receiving
the documents.
When the other party answers, start speaking using the handset.
If you initiate voice contact while transmitting
documents, you can speak after all the
documents have been transmitted.
If you initiate voice contact while receiving
documents, you can speak after receiving the
current page of the documents.
Receiving a request for voice contact
If the other party initiates voice contact during transmission or reception, your unit
will beep after the fax is completed.
When the beep sounds, lift the handset and start speaking.
If you do not answer within 10 seconds after hearing several beeps indicating the
request for voice contact, one of the following occurs;
•When you have set the unit to the TAD/FAX mode, the unit plays back your OGM
and records the voice-message on the tape.
•When you have set the unit to the FAX mode, the tine is disconnected.
•When you have set the unit to the TEL mode, the line is disconnected.
2-8
Page 40

Making Copies
This unit can make a copy. Any transmissible documents can be copied. The unit
automatically selects the FINE resolution when copying.
■ ■ ■ ■ ''-
Insert the documents FACE DOWN.
The unit can accept up to 10 sheets of paper at
a time.
Press the START/COPY button.
The unit feeds the documents and starts
copying.
To stop copying:
Press the STOP/CLEAR button until a beep
sounds.
To eject the document, press the STOP/CLEAR
button again.
2-9
I
Page 41

Operating as an Answering Device
The unit also works as an automatic telephone answering and recording system in
the TAD/FAX mode. The following functions are available as an answering device.
-(4) Calls Indicator
REW ►►
<§) ◄◄FF
MEMO/2 WAY
PLAYBACK/PAUSE
d) Rewinding (Resetting) the tape
quickly:
Press the REW (Rewind) button.
d) Recording a memo message:
See page 2-12.
Recording a 2»way conversation:
See page 2-13.
(|) Playing back recorded
vo ice-messages:
Press the PLAYBACK/PAUSE button.
One-touch operation:
The unit plays all the recorded messages
when the PWYBACK/PAUSE button is
pressed. At the end of the last message
the tape stops, and 3 beeps are heard.
After 7 seconds, the unit resets itself to
the TAD/FAX mode. All calls are saved
automatically.
Stopping the tape (pause niode):
Press the PLAYBACK/PAUSE button
during playback mode.
The tape pauses until you restart it by
pressing the PLAYBACK/PAUSE button.
The unit does not answer calls
automatically while in the pause mode.
(6) Forwarding the tape quickly:
Press the FF (Fast Forward) button.
Page 42

.f..^1i 111 1^,1,,’
Recording after the messages you want to save
New incoming messages will automatically be stored after the last message. If you
want a new incoming message to be stored after the messages you want to save,
perform the following steps.
1
PtAYBACKypAUSe
^/1* * WwWiMi
Press the PLAYBACK/PAUSE button
to play back the tape to the end of the
messages you want to save.
Press the PLAYBACK/PAUSE button again to stop the tape.
The IN USE indicator flashes.
Press the REW and PLAYBACK/
PAUSE buttons together.
New calls will be recorded after the messages
you have saved.
Note:
You can choose between two types of recording time of incoming messages. When th
unit is in the “VOX" position, the recording time is unlimited, and when in the "1 MIN"
position, the recording time is limited to 1 minute. The unit is preprogrammed to the
“VOX” position. To change the recording time, see page 4-5.
2-11
Page 43

ti L iki.; -.‘Vb . -f iia ^r-i-'r,-?--" ■■ •• ■■ ■ .
If you are going out and you want to leave a private message for someone, you can
record a voice memo in the unit. This can then be played back either directly or
remotely, exactly like any other incoming messages.
Press the MEMO/2WAY button until a beep is heard.
The IN USE indicator tights.
Speak toward the microphone from approximately 20 cm (8 inches) away.
When the recording is finished, press the MEMO/2WAY button again.
The IN USE indicator goes out.
Page 44

Recording a 2-way conversation
While speaking with someone on the telephone, you can record your conversation.
i.'t.éi.^.Ma,^ ■ .II' lìirt ' Tin ■^l¿lrtÉlil^^'ll1 im» t'liii' if^iirii
1
■ ..rV:
■ T):
■■■
• ji. ' jW V L
Wi Mr
Monitoring incoming calls
- > ■ ..V'
V, V-
During your conversation, press the
MEMO/2WAY button until a beep is
heard.
The IN USE indicator lights.
Continue your conversation.
A beep sounds every 15 seconds to notify the
caller that the conversation is being recorded.
To stop recording, press the MEMO/2WAY button again.
The IN USE indicator goes out.
While an incoming message is being recorded, you can monitor it through the
built-in speaker. Adjust the sound level using the VOLUME control.
You can talk to the caller directly by simply lifting the handset.
The unit stops recording automatically.
2-13
Page 45

Making and Answering Voice Calls
Making voice calls
Using the handset;
1 Lift the handset.
2 Dial the phone number.
Using on-hook diaiing:
1
■5S^_«S-
M
■'
........... --*t.t| 1 ifj i| ^ I .,r. J II nit SmI I
Redialing (Repeat call attempt)
If the line is busy or you wish to redial the last dialed number, you can redial by
simply pressing the REDIAL button.
Press the MONiTOR button, then dial
the phone number.
The MONITOR indicator tights, and you will hear
the number being dialed, the called tine ringing
and connection being made.
When the other party answers your call,
lift the handset and talk with it.
Press the MONITOR button or lift the
handset.
Press the REDIAL button.
The unit dials the last dialed number once.
2-14
Page 46

■ ■ ■; ■■’7-■: --t; ^
Making voice calls using the automatic dialing
The unit's memory allows you to use both one touch dialing (up to 10 phone
numbers) and speed dialing (up to 20 phone numbers) for rapid access to your
most frequently called numbers.
Before using these features, make sure that the desired telephone numbers have
been stored in memory. See pages 1-20 to 1-23.
Press the MONITOR button or lift the
handset.
Using one touch dialing:
Press the desired direct call station
key.
Answering voice calls
When the phone rings, lift the handset to answer the call.
OR
Using speed dialing:
Press the AUTO button, then press
the desired station number
(“00" through “19") by using the dial
keypad.
2-15
' V "I-
Page 47

Advanced Instructions
Page 48

Polling
Polling means that a facsimile machine “retrieves” a document loaded on the other
machine (we call it “polled machine") so that the telephone fee is charged to the
receiving unit, not the transmitting one.
This unit can only receive polled documents; it cannot be “polled”.
To activate the polling, the other machine must be prepared for your call.
Setting the polling password
If the document to be retrieved is of a confidential nature and the password is set on
the other machine to prevent unauthorized retrieving, you must set the same
password on your unit.
The polling using a password is effective only between Panasonic compatible
facsimile machines (e.g. KX-F95, KX-F110, etc.).
■>■'■'■ ’ ■ ■ '■'' ■"' •‘- 'vX
Press the PROGRAM button.
CD cm CD
CD CD CD
CD CD CD
CDCDCD
The PROGRAM indicator lights.
Press then press “16” for the
polling password setting.
Enter the same polling password of 4 digits using the dial keypad.
The polling password is set to “0000” as the
default. Set the same password as the polled
machine.
Press the SET button to store the programming in memory.
Press the PROGRAM button to end the operation.
The PROGRAM indicator goes out.
Note: To correct an error while programming, press the STOP/CLEAR button then
repeat frorrvstep 2. 3-1
Page 49

The following procedure lets you poll another station.
Make sure that documents are loaded on the polled machine.
Press the POLLING button.
The POLLING indicator lights.
2 Using one touch dialing:
Press the desired direct cal! station key.
The unit will dial and receive documents.
When reception ends, the POLLING indicator
goes out.
Using speed dialing or manual dialing:
Press the MONITOR button.
Press the AUTO button and the desired station number (“00” through “19”) for speed dialing,
OR
Dial the phone number for manual
dialing.
Press the START/COPY button.
The unit will dial and receive documents.
When reception ends, the POLLING indicator
goes out.
Note: The unit automatically redials up to 3 times if the polled station is busy or there
is no answer when you use one touch dialing.
3-2
Page 50

^: ^. :- [■■■ ~y^
i*i-iii iiifi 'iO tii f t;
Y'
Setting the Main Password
The password communication means that only the machines which have the same
password can transmit/receive confidential documents.
If the main password of 4 digits is set on your unit, you can participate in the
password communication among Panasonic compatible facsimile machines
(e.g. KX-F95, KX-F110, etc.).
Note: The password for the polling function is not related to this password
communication. They are independent functions.
Press the PROGRAM button.
The PROGRAM indicator lights.
mmm
QDOIIJID
CDIIII] CX]
CZD QI] CD
Press then press “12” for the main password setting.
Enter the same main password of
4 digits using the dial keypad.
The main password is set to “0000” as the
default. Set the same password as other stations.
Press the SET button to store the
programming in memory.
Press the PROGRAM button to end the
operation.
1 .
! ■
I
L
The PROGRAM indicator goes out.
Note: To correct an error while programming, press the STOP/CLEAR button then
repeat from step 2.
3-3
Page 51

Operating as an Answering Device from a
Remote Phone
You can retrieve the incoming messages and re-record your outgoing message
from a remote location with a touch tone telephone.
The following features are available on this unit.
• Message playback
•Newly recorded message playback (Memory Playback)
•Back space and skip forward
•Recording a marker message
• Resetting the tape for future messages
• Re-recording the OGM (outgoing message)
• Skipping the OGM for ICM (incoming message) recording
These operations are available only in TAD/FAX mode. If your unit is in the TEL
mode, call your unit and wait for 15 rings. The unit will switch to the TAD/FAX mode.
Toll saver
When you call the unit from a remote location, the number of rings tells you if there
are any new voice-messages.
If the unit answers on the 2nd ring, there is at least one new message recorded.
If the unit answers on the 4th ring, there are no new messages recorded.
Hang up immediately when you hear the 3rd ring. The 3rd ring indicates that there
are no new messages. This will save you the toll charge for the call.
The toll saver works only when TAD RING COUNT is set to the Toll Saver position.
See page 4-6.
Summary of remote control functions
Note: For your convenience, the quick reference card for remote operation is
attached in these operating instructions. See pages 4-14 and 4-15,
3-4
Page 52

•:^i
Programming a REMOTE TAD ID number for remote operation
The REMOTE TAD ID number prevents unauthorized persons from accessing your
unit and listening to your messages. The REMOTE TAD ID is preset to 111. If you
wish to change the number, you can choose any number from “1" to “999" except
numbers including “0" or “7”.
Press the PROGRAM button.
The PROGRAM indicator lights.
Press then press “06” for the REMOTE TAD ID setting.
Enter the desired REMOTE TAD ID using the dial keypad.
Press the SET button to store the programming in memory.
Press the PROGRAM button to end the
operation.
The PROGRAM indicator goes out.
hi 1
iahi'l 4
.;Li.
v-;| X
, Hsr
Note: You should not use codes which contain zero (0) since this causes the unit
to skip the OGM. (For example, 200, 502, 70 etc.)
We recommend that you do not use seven (7) as a code number, since this
number is used as the OGM rerecording command for remote operations.
Otherwise the answering features may not operate properly.
II
II
JL
II
2
im
5
8
0
II 6 I;-.
LjJ ■
m i
3-5
Page 53

Message playback
You can listen to the recorded messages from a remote location.
Call your unit.
Dial your REMOTE TAD ID while the
OGM is playing.
A long beep and a short beep(s) will sound.
Short beep{s) indicate(s) the number of
recorded message(s) up to 8 times. Even if 9 or
more calls are recorded, a short beep sounds
up to 8 times.
The unit rewinds the tape and plays
back the message(s) recorded.
3 beeps will be heard indicating the end of the
messages. After hanging up, all the recorded
messages are saved and the unit is ready to
record further messages.
Newly recorded messages playback (Memory Playback)
It is possible to skip over the recorded messages you have already heard and to
play back only new messages.
Press “4” immediately after hearing the
beeps that indicate the number of
recorded messages.
The unit plays back the new messages. Even
during the playback of previously heard
messages, you can skip to the new messages
by pressing “4".
3-6
Page 54

;'T
■'^". -v'./
Back space and skip forward
While listening to the recorded messages, you can rewind or advance the tape.
To rewind, press “1”.
Recording a marker message
After playing back the recorded messages, you can record your new message on
the same call.
When replay is finished, wait for 3 beeps indicating the end of the last message.
Then wait about 10 seconds for another 2 beeps indicating that the tape is ready for
recording.
3 beeps-..
H - ^
1 Lastm^e
1
The maximum length of message to be rewound
or advanced by one press is approximately
15 seconds. So you may have to press “1 ” or
“2” several times to rewind or advance the tape
to the desired position.
^ 2 beeps
Marker message (date, time, etc.)
10-sec. pause
it
Leave your message after the last
2 beeps.
Hang up when finished. The marker message is
recorded after the last message on the tape.
3-7
Page 55

Resetting the tape for future messages
After listening to the recorded messages, you can reset the tape and record future
messages from the beginning of the tape.
After all the messages have been played back or even white they are being played;
Press “3”, then hang up.
The unit rewinds the tape to the beginning.
Future messages will be recorded and the
previously recorded messages are lost.
If you have used Memory Playback;
Press “3”.
The unit rewinds the tape to the beginning of the
newly recorded messages, then beeps.
Press “3” again after hearing the beep.
If you have reset the tape by mistake;
The unit rewinds the tape to the beginning of the
previously recorded messages.
Press “2” after the tape has been reset.
One beep sounds.
The unit advances the tape to the end of the
recorded messages.
3-8
Page 56

' ^ .•^ V'4„;V ';'■;; V
f'
Re-recording an outgoing message
You can change the content of your OGM from a remote telephone.
1
hearing the beeps that indicate the
number of recorded messages.
Press “7” to start re-recording after
-•y> iifv/ .iV-Д -*4.- -
■■ -'-i ' ■"'
''''
■■' .-,' •' -T.'Is ^ I'
. ’ч" -J *♦ ’ "■ ■'*>"1^*', Y'-кЧ f
' W'' "i.' >■■ *'■'
. ,4W,. .* .•,■'■ 4S;, ::>.;V;- ^ ^ ‘ “
€ФШ
After hearing a long beep, speak clearly
and loudly for up to 16 seconds.
When you finish, press “9”.
The new OGM is played back to confirm the
change.
Note: If you pause for over 2 seconds while recording, the unit beeps and stops the
OGM recording. In such a case, repeat from step 1 within 10 seconds.
Skipping the OGM for ICM recording
You can leave a message on your unit without listening to your OGM.
You need not enter your REMOTE TAD ID.
Press “0” while the OGM is playing.
After hearing a long beep, speak clearly and
loudly to leave your message.
3-9
Page 57

V"- V''’i^ ■
Other Features
TONE button (Temporary tone dialing)
This function is useful only if your line has rotary pulse dial service. Pressing the
TONE (*) button will allow you to change from pulse to tone mode during a dialing
operation, and enter special tones and codes to operate your answering machine,
electronic banking services and other special services.
‘TONE’’ can be programmed into memory with the telephone numbers.
Press the TONE (*) button.
When you hang up, the unit automatically
returns to pulse mode.
•“TONE” can be stored in memory in the same
way as explained on pages 1-20 to 1-23.
•Pressing the TONE button counts as 1 digit
while programming.
The RECALL button is used to access some of the features of your host PBX (Private
Branch Exchange).
For further details, please contact your local telephone company for information
about the availability of these services in your area.
Using the RECALL button
Press the RECALL button briefly when required.
• “RECALL" can be stored into memory in the same way as explained on pages
1-20 to 1-23.
• Pressing the RECALL button counts as 1 digit while programming.
3-10
Page 58

I 'll ifiiTiiiVi iTiiltfr"-*‘‘^'**^-f?'*—T [w\i*^hi riiai
fi
PAUSE button
The PAUSE button is used in a dial sequence to access an outside line. Pressing
the PAUSE button makes a dialing delay.
Using the PAUSE button
Example; Line access number 9
PuriiKii;: Alo
A
FT nWN C NWw
Line access No.
• “PAUSE” can be stored in memory in the same way as explained on pages
1-20 to 1-23.
•Pressing the PAUSE button counts as 1 digit while programming.
Combination dialing
The following combination of dialing methods can be used.
•Manual dialing and automatic dialing
•Pulse and Tone dialing
•Plural memory stations
3-11
Page 59

4 >*
General information
Page 60

.■ .,■ ■ ■ i*, ■■'■'' ''■.*':':'X~'. ■■'’';i', :.'i'
--:■ /■ ■■■■■ ;:<■ u.,-rT>4^r^‘
Printing Reports and Lists
Individual Transmission Report (TX REPORT)
One of the following choices is available:
ON mode; The report is always printed to let you know if the transmission is successful or not.
ERROR mode: The report is printed only when a transmission error occurs.
OFF mode: The report is not printed whether the transmission is successful or not. (Default)
<< TX REPORT >>
OTHER FPCSIMILE = PPNPSONIC
PPGES = 00 RESULT = NGC 03 )
Transmission error codes
Code Description
OK Successful transmission
NG (02) The STOP/CLEAR button
was pressed to interrupt the
operation.
NG (03) Document jammed or not fed
into the unit properly.
Check the paper path and try
again.
NG (04)
Transmission error. Try again.
■ Setting PRINT TX REPORT mode
“I Press the PROGRAM button.
The PROGRAM indicator lights.
2 Press then press “11" for the
transmission report mode setting.
3 Press “1", "2” or “3", then press the
SET button to store your selection in
memory.
Selection is as follows;
Press “1" to set to ON mode.
Press “2” to set to ERROR mode.
Press “3” to set to OFF mode.
4 Press the PROGRAM button to end
the operation.
The PROGRAM indicator goes out.
4-1
Page 61

List of stored phone numbers (TELEPHONE NUMBER LIST)
You can print a list of the numbers programmed for one touch dialing and speed dialing.
Use this function to confirm that you have correctly stored phone numbers.
>K ^
TELEPHONE NUMBER LI ST
*
PHONE NUMBER PHONE NUMBER
<< STATION KEY LIST >>
*-
01 Tl23-d567
02 R345-6789
03 T[ ]
04 R[ 1
05 10
<<
HUTO KEY LIST >>
PHONE NUMBER
00 T233-5555 10 R111-222-3333
01 T456-P753-7568
02 TC
03
04
: 05 15
: 06
t 07 T4S6-C ]
: 09 18
! 09
]
06 T012-2345-6789
07 R123-[ ]
08
SECRET NUMBER
PHONE NUMBER
11 Rl23-F465-7890
12 R[ ]
13
14
16
17
19
•M
*
%
*
*
*
*
*
*
•*
*
*
*
*
*
♦
Codes in each phone number
■
T:
telephone number in the TONE dialing
mode.
R;
Shows that you have entered the
telephone number in the PULSE
(rotary) dialing mode.
P:
F;
■ Printing the TELEPHONE NUMBER
LIST
*] Press the PROGRAM button.
The PROGRAM indicator lights.
2 Press then press “41 ” for the
PRINT TEL LIST setting.
3 Press the START/COPY button.
The unit begins printing the list.
4 Press the PROGRAM button to end
the operation.
The PROGRAM indicator goes out.
4-2
Page 62

■'■ '■- X';■ '■,;*/ '■ ■ V."‘*•'■ •*
System Programming Functions
FAX LOGO HEADING
The FAX LOGO HEADING setting
ON: Your logo and telephone number are
printed on the transmitted document.
(Default)
OFF: Your logo and telephone number are
not printed.
Operation:
“I Press the PROGRAM button.
The PROGFIAM indicator lights.
2 Press “#", then press “05” for the
FAX LOGO HEADING setting.
3 Press “1" or “2".
(1=ON, 2=OFF)
4 Press the SET button to store your
selection in memory.
5 Press the PROGRAM button to end
the operation.
The PROGRAM indicator goes out.
FAX TX SPEED
The FAX TRANSMISSION SPEED setting
The unit can automatically select the
optimum transmitting speed depending on
the line condition and the type of the other
facsimile unit.
9600 BPS: Maximum speed of 9600 bits
per second. (Default)
4800 BPS: Maximum speed of 4800 bits
per second. If you frequently
experience problems such as
transmission errors caused by
poor line condition, set to
“4800 BPS”.
Operation:
“I Press the PROGRAM button.
The PROGRAM indicator lights.
2 Press then press “17" for the
FAX TX SPEED setting.
3 Press “1” or “2”.
(1=9600 BPS, 2=4800 BPS)
4 Press the SET button to store your
selection in memory.
5 Press the PROGRAM button to end
the operation.
The PROGRAM indicator goes out.
4-3
Page 63

l-- ^ - •
^^S.-;C?.-K^V:
aaSaisìifc^:
M
FAX RX SPEED
The FAX RECEPTION SPEED setting
The unit can automatically select the
optimum receiving speed depending on
the line condition and the type of the other
facsimile unit.
9600 BPS: Maximum speed of 9600 bits
per second. (Default).
4800 BPS: Maximum speed of 4800 bits
per second. If you frequently
experience problems such as
reception errors caused by
poor line condition, set to
“4800 BPS".
Operation;
■| Press the PROGRAM button.
The PROGRAM indicator lights.
2 Press then press “18" for the
FAX RX SPEED setting.
TONE DETECT
The TONE DETECT setting
The unit automatically disconnects the line
when it detects a busy tone after dialing in
on-hook dialing mode.
OFF; The unit does not detect a busy
tone. (Default)
ON: The unit detects a busy tone.
Operation:
“I Press the PROGRAM button.
The PROGRAM indicator lights.
2 Press then press “20” for the
TONE DETECT setting.
3 Press “1” or “2”.
(1=ON, 2=OFF)
4 Press the SET button to store your
selection in memory.
yw .'’I
r#"
3 Press “1” or “2".
(1=9600 BPS, 2=4800 BPS)
4 Press the SET button to store your
selection in memory.
5 Press the PROGRAM button to end
the operation.
The PROGRAM indicator goes out.
5 Press the PROGRAM button to end
the operation.
The PROGRAM indicator goes out.
’ ’ V i: - ■' ■*
4-4
Page 64

‘■\' . ■ ">'■’.-'’■ ■-'■: . 'y? ■ ■ -_ > ' ^
■'- :;'■' ’■■■' ■'■ ’■■■! ■"< v<'
RECALL
The RECALL (T-BR/E-RE) setting
Select T-BR or E-RE depending on your
host PBX.
T-BR; For PBX using timed break register
recall facility. (Default)
E-RE: For PBX using earth recall facility.
Operation:
■| Press the PROGRAM button.
The PROGRAM indicator lights.
2 Press then press “21” for the
RECALL setting.
3 Press “1” or “2”.
(1=T-BR,2=E-RE)
4 Press the SET button to store your
selection in memory.
5 Press the PROGRAM button to end the
operation.
The PROGRAM indicator goes out.
RECORDING TIME
The RECORDING TIME setting
The recording time for incoming messages
can be set to VOX (unlimited) or 1 MIN.
VOX: The unit records an I CM as long
as a caller speaks. (Default)
1 MIN; The unit records an ICM up to
1 minute per message.
Operation:
“I Press the PROGRAM button.
The PROGRAM indicator lights.
2 Press then press “30” for the
RECORDING TIME setting.
3 Press “1” or “2”.
(1=VOX, 2=1 MIN)
4 Press the SET button to store your
selection in memory.
5 Press the PROGRAM button to end
the operation.
The PROGRAM indicator goes out.
4-5
Page 65

■ -Ti '
TAD RING COUNT
The CPC (Calling Party Control) mode
setting
Select the CPC mode “A" or “B”
depending on your line condition.
A: Set to this mode if your line does not
have special telephone services.
(Default)
B: Set to this mode if your line has special
telephone services such as call waiting
and call forwarding. If some incoming
messages are cut off in mode “A”, set
the mode to “B”.
“I Press the PROGRAM button.
The PROGRAM indicator lights.
Press “#”, then press “31” for the
CPC MODE setting.
Press “1” or “2”.
(1=A, 2=B)
Press the SET button to store your
selection in memory.
Press the PROGRAM button to end
the operation.
The PROGRAM indicator goes out.
The TAD RING COUNT setting
This function is available only in the
TAD/FAX mode when receiving a call.
If you find there is difficulty in receiving
from machines that have an automatic
transmission feature, set the TAD RING
COUNT number to “2” (twice).
0; Toll Saver*
2\ The unit answers on the 2nd ring.
(Default)
3: The unit answers on the 3rd ring.
4: The unit answers on the 4th ring.
Operation;
"I Press the PROGRAM button.
The PROGRAM indicator lights.
2 Press then press “32" for the
TAD RING COUNT setting.
3 Press “0", “2". “3" or “4”.
(0=Toll Saver, 2=twice,
3=three times, 4=four times)
4 Press the SET button to store your
selection in memory.
5 Press the PROGRAM button to end
the operation.
The PROGRAM indicator goes out.
* Toll Saver function:
When you set the mode to “0", the number
of rings tells you if there are any new
voice-messages recorded.
If the unit answers on the 2nd ring, there is
at least one new message.
If the unit answers on the 4th ring, there
are no new messages.
Hang up immediately when you hear the
3rd ring. The 3rd ring indicates there are
no new messages. This will save you toll
charge for the call.
4-6
Page 66

"’ ■' . - '■. v''^-.>-.r ■■:“-■
FAX RING COUNT
The FAX RING COUNT setting
This function is available only in the FAX
mode when receiving a document.
If you find there is difficulty in receiving
from machines that have an automatic
transmission feature, set the FAX RING
COUNT number to “2” (twice).
2: The unit answers on the 2nd ring.
(Default)
3; The unit answers on the 3rd ring.
4: The unit answers on the 4th ring.
Operation:
■j Press the PROGRAM button.
The PROGRAM indicator lights.
2 Press then press “33” for the
FAX RING COUNT setting.
PRINTER TEST
If you have difficulty with the print
quality of your unit, check it using this
feature.
Operation:
'J Press the PROGRAM button.
The PROGRAM indicator lights.
2 Press then press “42”.
3 Press the START/COPY button.
The unit prints the pattern as shown in
Figure 1.
If the print pattern has any blurred
points or lines or dirty pattern, consult
with your service center.
4 Press the PROGRAM button to end
the operation.
The PROGRAM indicator goes out.
3 Press “2”. “3” or “4".
(2=twice, 3=three times,
4=four times)
4 Press the SET button to store your
selection in memory.
5 Press the PROGRAM button to end
the operation.
The PROGRAM indicator goes out.
Figure 1
PRINT CHARACTER CODE
You can print the character code list for fax
logo setting.
Operation:
“I Press the PROGRAM button.
The PROGRAM indicator lights.
2 Press “#”, then press “43".
3 Press the START/COPY button.
The unit starts printing.
4 Press the PROGRAM button to end
the operation.
The PROGRAM indicator goes out.
4-7
Page 67

j'-j-.'. t: - •:.: J- r.,-.. ■■•■ ■ :.
RESET USER
PROGRAMMABLE
FUNCTIONS
This operation enables you to return the
user programmable functions of
05 through 33 to their initial default
settings. The function number 02 (YOUR
LOGO setting) and 04 (YOUR TELEPHONE
NUMBER setting) will not be erased.
*1 Press the PROGRAM button.
The PROGRAM indicator lights.
2 Press “#”, then press “50".
3 Press the START/COPY button.
The following message is printed.
USER PROGRAMMABLE FUNCTIONS RESET OK? yes;
4 Press the START/COPY button to
return to initial settings.
The following message will be printed.
Press the STOP/CLEAR button to
cancel.
5 Press the PROGRAM button to end
the operation.
The PROGRAM indicator goes out.
PRESS
NO :
PRESS "STOP/CLEAR"
"START/COPY"
;:|lp'
V‘J.j!*^i. ,, ,
;„;ii trV ■s^'v-'r...
1^-J'''.yy.- r'
4-8
Page 68

^.....-^
__ __ ___ __ __
l~Jh l^^i?l i'll* iM’^r^i*w4^-4
Service Functions
The following service functions can be changed as the need arises. For further details, consult
with your service center.
Example of service functions list (SERVICE DATA LIST):
*)(!:(( SERUICE DATS LIST
>K
*
'M
*
>K
*
>K
'M
■M
>«
*
Hi
01
PAUSE TIME
03 DIAL SPEED = 10pp£ [1 = 10 2
10 UOX TIME
UOX SENSE
11
20 CED FREQ.
INTL. MDDE = ON [1 = ON
21
AUTO STANDBY
22
RX EQL.
23
24 TX EQL. = 1.SKm
<<
SPECIAL SERUICE SETTINGiS ' >
52 53 59 63 70 71 72
2 3 1
S3 34 8b
*
170 1 1
= 05Q-t<180
= bSec
X HI
= 21Hi0Hz
= ON
= 1.SKm
37 90
ms[000. . ,S00]'^100mS
15 2
1 02 065 2 00
Printing the SERVICE DATA
LIST
You can print a list of service functions
(SERVICE DATA LIST).
[1=6 2
U = HI
[1 = 2100 2
Cl = ON
[1 = 0.0 2
[1 = 0.0
00 030
91 92
= 20 ]pp3
73
15
93
175
= 4
2
= LOU ]
= 1100
2
= OFF ]
= OFF
2
= 1.8
= 1.8
2
74
94
I sec
IHz
]
3 = 3. 6
3 = 3. b
30 31
1 2
95 96
1 100 -15
H<
-4 = 7.2 ]Km
4 = 7.2 ] Km
82
1
97
2
Programming the service
functions
*1 Press the PROGRAM button.
The PROGRAM indicator lights.
Hi
;k
:K
Hi
H(
*
H<
:+;
Hi
Hi
Hi
:(i
Operation:
'I Press the PROGRAM button.
The PROGRAM indicator lights.
2 Press “#”, “9”, “0". “0", “0" and
3 Press the START/COPY button to
start printing.
4 Press the PROGRAM button to end
the operation.
The PROGRAM indicator goes out.
2 Press the “9”, “0", “0", “O’* and
3 Enter the desired code number.
4 Press the desired value.
5 Press the SET button to store your
selection in memory.
0 Press the PROGRAM button to end
the operation.
The PROGRAM indicator goes out.
4-9
Page 69

Maintenance
Be sure that the AC plug is disconnected from the outlet before performing any maintenance.
Cassette deck
Since the head and capstan assemblies are in contact with the tape, dirt and residue from the
tape may easily adhere to these parts, causing distortion. Clean these parts periodically in the
manner described below for the best sound quality.
Clean the head surfaces, pinch roller and capstan with a cotton swab.
If these surfaces are extremely dirty, wipe them with a cotton swab dampened with alcohol,
then wipe them with a dry soft cloth.
if \
Note:
•Do not bring magnetic or metal objects, such as a screwdriver, near the head assembly, as
such objects could magnetize the heads.
•Do not oil any part of the unit.
4-10
Page 70

' ■ ' '' ■ ;■ ‘ ■ V ' '■ >■. ?ir '* ,
Facsimile machine
If a streak or a dirty pattern appears on a copied, transmitted or received document;
1. Clean the glass with a dry soft cloth.
2. Clean the paper rollers with a damp cloth then dry thoroughly to prevent the paper from
jamming.
S'-i
If you cannot get a clear copy after performing the above steps 1 and 2, clean the thermal
head with a cloth moistened with denatured alcohol (alcohol without water), then dry
thoroughly. To prevent malfunction due to static electricity, do not use a dry cloth and do not
touch the thermal head with your finger directly.
4-11
Page 71

Troubleshooting Guide
Facsimile
>■ V;
•fc 1 tVk * "^ ■
■:.
PROBLEM
1 cannot receive documents
automatically.
Recording image is faint and 1 cannot
read it well.
The other party complains that the
letters on the document are distorted.
The START/COPY indicator flashes for
about 40 seconds after the unit
receives a call automatically, but
nothing is recorded.
CAUSE & REMEDY
•Make sure recording paper is installed
properly.
•Make sure the RECEIVE MODE of the
unit is set to TAD/FAX or FAX mode and
not to TEL mode.
•Shorten your OGM.
•Set the vox sensitivity (VOX SENSE) to
“LOW”. See page 4-9.
•The sender transmitted a faint document.
Request him to transmit a more clear
document (e.g. copied one) again.
•If your line has special telephone service
such as call waiting, it may have been
activated by another telephone call.
Connect the unit to a line that does not
have such service.
•Be sure another telephone is not
connected to the same line as your unit.
•The caller hangs up during or
immediately after playing back your
OGM. This may occur if the disconnect
signal is not transmitted from the central
office.
When 1 receive or copy a document that
has a dark background or contains
photographs, the unit produces a high
pitched noise.
The unit does not operate properly.
Problems when receiving international
facsimiles.
The recording paper does not move
during copying or receiving.
•This is quite normal.
•Turn the POWER switch off, then turn it
on again.
•Shorten your OGM to 10 seconds or less.
•FAX RX SPEED may need to be set to
4800 bps. See page 4-4.
• Make sure that the recording paper is
correctly inserted between the upper
guide plate and lower guide plate.
• If the recording paper is wrapped around the
roller, turn off the power and remove the
paper. Cut off any part of the paper that is
creased, and reinsert the paper between
the guides.
4-12
Page 72

Answering Device & Telephone
. ■ -. .,. . v . ■ ' -V.* ■ ‘■. S ‘ * ,■■
PROBLEM
The unit does not work when any
button is pressed.
The unit has been set to the
TAD/FAX mode, but no
voice-messages have been recorded.
When the tape is played, the sound
level is low or nothing can be heard.
1 have played back all the recorded
messages and 1 want to record the
next call after the last message.
1 cannot retrieve recorded messages
from a remote phone.
Some voice-messages have not been
fully recorded.
CAUSE & REMEDY
•Turn the POWER switch off, then turn it on
again.
•The tape is not installed properly or is
broken (cut, worn out or twisted). Install the
tape or replace it with a new one.
•Raise the sound level using the VOLUME
control.
•Clean the head of the cassette deck
compartment. See page 4-10.
•Leave the unit as it is after hearing the
messages.
•Make sure that you use your REMOTE TAD
ID number correctly.
•When you press your REMOTE TAD ID
number, press the buttons firmly.
•Set the calling party control (CPC) to “B".
See page 4-6.
When a caller hangs up after leaving
a message, the tape does not stop.
The unit does not ring.
The ALARM Indicator
PROBLEM
The indicator flashes after
transmission.
The indicator lights.
The indicator lights during
transmission.
•VOX TIME should be set to 4 seconds. See
page 4-9.
•Set the RINGER volume selector to the
HIGH or LOW position.
CAUSE & REMEDY
•A transmission error has occured. Try again.
•Confirm that the covers of the unit are
closed firmly.
•Your OGM is not recorded. See page 1-13.
•A document more than 600 mm (23%") is
being transmitted.
•A document is jamming. Remove it.
•Connect the unit to a line that does not have
special telephone service such as call
waiting.
4-13
Page 73

J '-^ K«i.,:-jf'r. •■» i-;,.
SPEED DIALER LIST
V*^'
■-'V'^VjC
--Ml
CODE
00
NAME
CODE
10
NAME
01 11
02 12
03 13
04
05
06
14
15
16
07 17
08
09
Transmitting a document using the speed diaier;
18
19
Insert the documents FACE DOWN, then press the AUTO button
and the code number (00 through 19).
4-14
QUICK REFERENCE CARD
FOR TONE REMOTE CONTROL
•To set the TAO/FAX mode, call your
unit and wait for 15 rings. The unit will
answer, then hang up.
•To send the document, press Q.
The “beep” (answering carrier tone) is
heard. Then start transmission.
Page 74

SPEED DIALER LIST
CODE
00
01
02
03
04
05
06
07
08
09
Transmitting a document using the speed dialer:
NAME CODE
10
11
12
13
14
15
16
17
18
19
NAME
Insert the documents FACE DOWN, then press the AUTO button
and the code number (00 through 19).
•When you press any button, press firmly.
4-15
Page 75

Specifications
Type:
Applicable Lines:
Compatibility:
Document Size:
Desktop
Public Switched Telephone Network
CCITT G3
Max. 216 mm (8W') in width,
Max. 600 mm (23^') in length
Effective Scanning Width;
Printing Paper Size:
Effective Printing Width:
Transmission Time'':
Max. 208 mm (8^i6")
216 mm (Ietter)x30 m roll {8Wx9Q' roll)
208 mm (8^ie")
Approx. 30 sec/page (G3 Normal mode)
Approx. 17 sec/page (Original mode)
Scanning Density:
Horizontal 8 pels/mm (203 pels/inch)
Vertical 3.85 lines/mm (98 lines/inch)—Standard
7.7 lines/mm (196 lines/inch)—Fine
Scanner Type:
Printer Type:
Data Compression System:
Modem Speed:
Automatic Document Feeder:
Temperature Range:
Humidity Range:
Dimensions (HxWxD):
Weight:
Power Consumption:
Power Supply:
CCD image sensor
Thermal printing
Modified Huffman (MH)
9600/7200/4800/2400 bps; Automatic Faiiback
Max. 10 sheets
5°-35°C (41°-95‘^F)
45%-85%
125 X 429 X 312 mm (429/32" x 16%" x 12%2")
5.2 kg (11 lb 7.4 oz.)
Approx. 65 W
AC 220 V-AC 240 V 50 H2/6O Hz
‘Transmission Time: Transmission times apply to text data using CCITT No. 1 test chart,
between same machine models at maximum modem speed.
Transmission times vary in actual usage.
4-16
 Loading...