

Page 1
Panasonic
TELEPHONE ANSWERING
SYSTEM WITH FACSIMILE
MODEL NO.
Operating Instructions
KX-F220
PiBiSisfi fsad before use.
Page 2

Thank you for purchasing the Panasonic Teiephone Answering System with Facsimile.
Before reading these instructions, please read the INSTALLATION MANUAL.
You can then easily install the unit and configure it property.
Since this unit functions as a Facsimile, an Answering Machine and a Telephone, you can
receive both voice-messages and documents utilizing one telephone line.
INTRODUCTION
Multi-function system utilizing a single
telephone line:
•Allows you to speak with a caller and/or receive a
document.
•Automatically receive a document during your
absence and/or records a caller's voice-message.
Facsimile;
•CCITTGIFG IK comm unication compatibility
•Transmission time*: Approx. 17sec./page
•Automatic document feeder up to 15 pages at a time
•Automatic paper cutter
•One-Touch transmission with automatic dialer
• Polling functions
• Delayed communications
• Password communications
• 16-step HALF-TONE feature for originals containing
photographs, shaded drawings, etc.
•Superb image quality
• Up to letter size {QVz" x 11") transmission
Answering Machine:
•AUTO-LOGIC
Automatically plays back all the recorded messages,
stopping at the last message: provides for answering
the next phone call at the touch of a button.
•Time/Day stamp
• Recording a 2-Way telephone conversation
• Recordable OGM chip
•Beeperless remote control with touch-tone telephone
Integrated Telephone System:
• Built-in speakerphone
•One-touch dialing and Speed dialing
•Automatic redialing
Copier Function:
•Clear copy of up to 15 pages
^Transmission time
Transmission times apply to next date using CCITT
No. 1 test chart, between same machine models at
maximum modem speed. Transmission times vary in
actual usage.
Setting Auto Receiving Mode:
1. Record your Outgoing Message.
2. Set the FUNCTION selector to the ANS/FAX
position.
3. Press the AUTO RECEIVE button.
•The AUTO RECEIVE indicator will light.
•When a call is received, the unit will record a
voice-message and/or receive a document.
•In this mode, you may speak with the other party
and transmit/receive a document manually.
Setting Manual Receiving Mode:
1. Press AUTO RECEIVE button.
•The AUTO RECEIVE indicator will go out.
FUNCTION Selector:
I ANS/FAX position
When you use the unit as an answering machine
and a facsimile in the Auto Receiving mode, set to
the ANS/FAX position.
The unit will automatically switch between an
answering machine and a facsimile.
If the caller’s voice is not heard within 5 seconds of
the end of your Outgoing Message (OGM), the unit
will switch itself to the facsimile mode to receive a
document.
If the caller's voice is heard, the unit will function as
an answering machine.
I
FAX position
When you use the unit as a facsimile machine only
in the Auto Receiving mode, set to the FAX position.
When a call is received, the unit will function as a
facsimile machine only.
Page 3

speaking with the Other Party^ and then Transmitting!Receiving a Document
With the automatic tetephone/facsimile switching
feature, you can switch between telephone and
facsimile functions without redialing.
So, if you are in the middle of a conversation and want
to transmit/receive a document, simply press the
START/COPY button. Then facsimile transmission/
reception wili take place automatically.
Recording a Voice-Message and Receiving a Document
______________________________________
The unit will automatically function as an answéring
machine or a facsimile depending on the caller's
choice.
When a call is received during your absence, the unit
will play your Outgoing Message (OGM), and then be
ready to record a voice-message and/or receive a
document (Auto Receiving Mode).
In this mode, you may speak with the other party and
transmit/receive a document manually.
Page 4

TABLE OF CONTENTS
Before Using the Unit
LOCATION OF CONTROLS ........................................................................................ 7
HOW TO READ THESE OPERATING INSTRUCTIONS
..........................................
11
SYSTEM SET UP ....................................................................................................... 12
•Printing “SYSTEM SET UP LIST’’........................................... 12
•Programming Date and Time ................................................. 15
______________
Manuat Communications
_________________
MANUAL DIALING ..................................................................................................... 16
•Making a Call ........................................................................ 16
•Receiving a Call .................................................................... 17
• Redialing for Manual Dialing.................................................. 17
MANUAL TRANSMISSION AND RECEPTION
•Manual Transmission............................................................. 78
•Manual Reception ................................................................. 19
________
How to Operate as a Facsimile Machine____________
........................................................
18
BEFORE TRANSMITTING A DOCUMENT.............................................................. 1-1
•Transmissible Document
•Using the Carrier Sheet
.....................................................
........................................................
1-1
7-2
TRANSMITTING A DOCUMENT .............................................................................. 1-4
•Manual Transmission............................................................ 1-4
• When Using One-Touch Dialing .......................................... 7-5
• When Using Speed Dialing ................................................. 7-6
• Transmitting Reservation .................................................... 7-7
•Redialing for One-Touch and Speed Dialing
•Setting Delayed Transmission .............................................. 1-9
..........................
1-8
RECEIVING A DOCUMENT AND/OR VOICE-MESSAGE.....................................1-11
•Manual Reception ..............................................................7-77
• Explanation of Auto Receiving Mode
•Receiving Voice-Messages and a Document
Automatically (Using as an Answering and a
Facsimile Machine)............................................................7-72
•Receiving a Document Automatically
(Using as a Facsimile Machine) .........................................7-73
•Cancelling Auto Receiving Mode..........................................1-13
•Setting Auto Receiving Mode Remotely
.................................
...............................
7-72
7-73
TRANSMITTING TO YOUR KX-F220 FROM A REMOTE
LOCATION...........................................................................................................1-14
•Recording Your Message and Transmitting a
Document ........................................................................ 1-14
• Transmitting a Document Only
.........................................
1-14
Page 5

VOICE CONTACT ......................................................................1-15
•Initiating Voice Contact During Transmission/
Reception...........................................................................1-15
•Receiving a Request for Voice Contact
................................
1-15
SETTING “PAGE COUNTER”....................................................1-16
REMOTE FAX ID.........................................................................1-17
• Setting Remote FAX ID ......................................................1-17
• Transmitting a Document with Remote Fax ID to your
KX-F220 from a Remote Location
.......................................
1-18
SETTING THE “MESSAGE OUT” .............................................1-19
TURNING ON/OFF THE AUTO RECEIVING MODE...................1-21
POLLING.......................................................................................1-23
•Programming the Polling Password
•Preparation for Being Polled.................................................1-24
•Single Station Polling...........................................................1-25
• Multi Station Polling
• Turnaround Polling.............................................................1-29
• Delayed Polling ..................................................................1-31
•Delayed Turnaround Polling
.........................................................
......................................
.................................................
1-23
1-27
1-33
PROGRAMMING AUTOMATIC DIALING NUMBERS
•Programming One-Touch Dialing Numbers
•Programming Speed Dialing Numbers
• Programming as Secref Phone Numbers
USING THE PRIORITY BUTTONS
•Programming Flowchart
• Programming Delayed XM T (Transmission) .......................1-43
• Programming POLL (Single Polling)
• Programming POLL (Multi Polling)
•Programming XMT & POLL (Turnaround Polling)
•Calling with Priority Buttons ................................................ 1-48
......................................................
.........................
.................................
..........................
............................................
...................................
.....................................
_________
7-35
1-37
7-39
1-42
1-44
1-45
1-47
.............
1-35
1-41
PASSWORD COMMUNICATIONS..............................................1-50
• Information of the Pass word Communications
•Programming the Password Communications
• Pass word Communications
•Programming Different Passwords into Priority
Buttons
..............................................................................
.............................................
PRINTING REPORTS AND LISTS
•Activity Report (JOURNAL Report)
•Setting JOURNAL Report....................................................7-58
• Printing a JOURNAL
• List of Multi Polling ............................................................7-59
•S/sfem Sef Up List
•Printing System Set Up List
•List of Stored Phone Numbers (TEL LIST)
•Printing a List of Stored Phone Numbers (TEL LIST). .1-62
• Individual Transmission Report (XMT Report)
•Setting XMT Report.............................................................7-63
.........................................................
.............................................................
.......................................
................................................
..............................................
..................
.....................
...........................
....................
7-57
7-53
7-55
1-56
1-57
1-57
7-59
7-60
7-60
7-67
7-63
MAKING COPIES ........................................................................1-65
•Making Copies....................................................................7-65
•Interrupting Copies..............................................................7-65
Page 6

TABLE OF CONTENTS
(CONT.)
How fo Operate as an Answering Machine
PREPARING THE ANSWERING MACHINE
•Recording an Outgoing Message (OGM) ..............................2-1
•Setting Up for Receiving Voice-Messages and a
Document (Using as an Answering Machine and a
Facsimile)...........................................................................2-2
• Voice TimelDay Stamp .......................................................2-2
•Programming an ATAS ID for Remote Operation
•Programming a Caller's Recording Time
...............................
OPERATING THE ANSWERING MACHINE
•Fast Forwarding Tape
•Resetting (Rewinding) Tape
• Call Counter
•Erasing Recorded Messages
•Playing Back Recorded Voice-Messages
• Stopping Tape (Pause mode)
•Recording a Message Memo
•Recording a 2-Way Conversation
(2-Way Recording)..............................................................2-8
•Saving Recorded Messages.................................................2-9
•Monitoring Incoming Calls
.......................................................................
.........................................................
.................................................
...............................................
..............................
.............................................
...............................................
....................................................
..............................
_________
..............................
HOW TO OPERATE FROM A REMOTE PHONE
•Summary of Remote Control Functions ................................2-70
• Playing Back Messages
•Playing Back Newly-Recorded Messages
(Memory Playback).............................................................2-11
•Back Space and Skip Forward..............................................2-11
•Resetting Tape for Future Messages
• Recording a Marker Message .............................................2-13
• Turning On the Speakerphone (Answer Back)
•Re-Recording the Outgoing Message
•Skipping the OGM for ICM Recording
• Turning On the Auto Receiving Mode
.....................................................
...................................
....................
...................................
...................................
..................................
2-3
2-4
2-5
2-5
2-5
2-6
2-6
2-6
2-7
2-9
.......................
2-11
2-12
2-13
2-14
2-14
2-15
2-1
2-5
2-10
Page 7

How to Operate as a Telephone
MAKING AND RECEIVING A CALL ........................ .. 3-1
•Making a Call ..................................................................
•Receiving a Call
•Redialing .........................................................................
..............................................................
.. 3-1
.. 3-2
.. 3-2
SWITCHING TO HANDS-FREE OR HANDSET OPERATION
DURING A CONVERSATION
•Handset to Hands-Free ...................................................
•Hands-Free to Handset ...................................................
..........................
.. 3-3
.. 3-3
OTHER FEATURES.............................................
•Mute Operation
•Flash Button (Accessing to PBX)
• Tone Button Dialing.........................................................
• Combination Dialing
•Outside Line or Computer Accessed Une
(Pause Button)................................................................
...............................................................
......................................
.......................................................
.. 3-4
.. 3-4
.. 3-4
.. 3-4
.. 3-5
General Informations
TROUBLESHOOTING GUIDE
.............
RECORDING PAPER INSTALLATION ..
DOCUMENT TRAY INSTALLATION ...
.. 3-3
.. 3-4
4-1
4-5
4-7
SYSTEM PROGRAMMING FUNCTIONS
•CPC MODE
•AUX. LEADS.......................................................................4-10
•DIAL PULSE.......................................................................4-11
• TONEDETECT
• TXSPEED..........................................................................4-13
•RX SPEED .........................................................................4-14
•STAMP DEFAULT ..............................................................4-15
•AUTO STANDBY.................................................................4-16
•SET DEFAULT....................................................................4-17
•TEST[PRINT OR MOTOR] ..................................................4-17
........................................................................
..................................................................
4-9
4-12
4-9
INDEX ............................................................................................4-18
Page 8
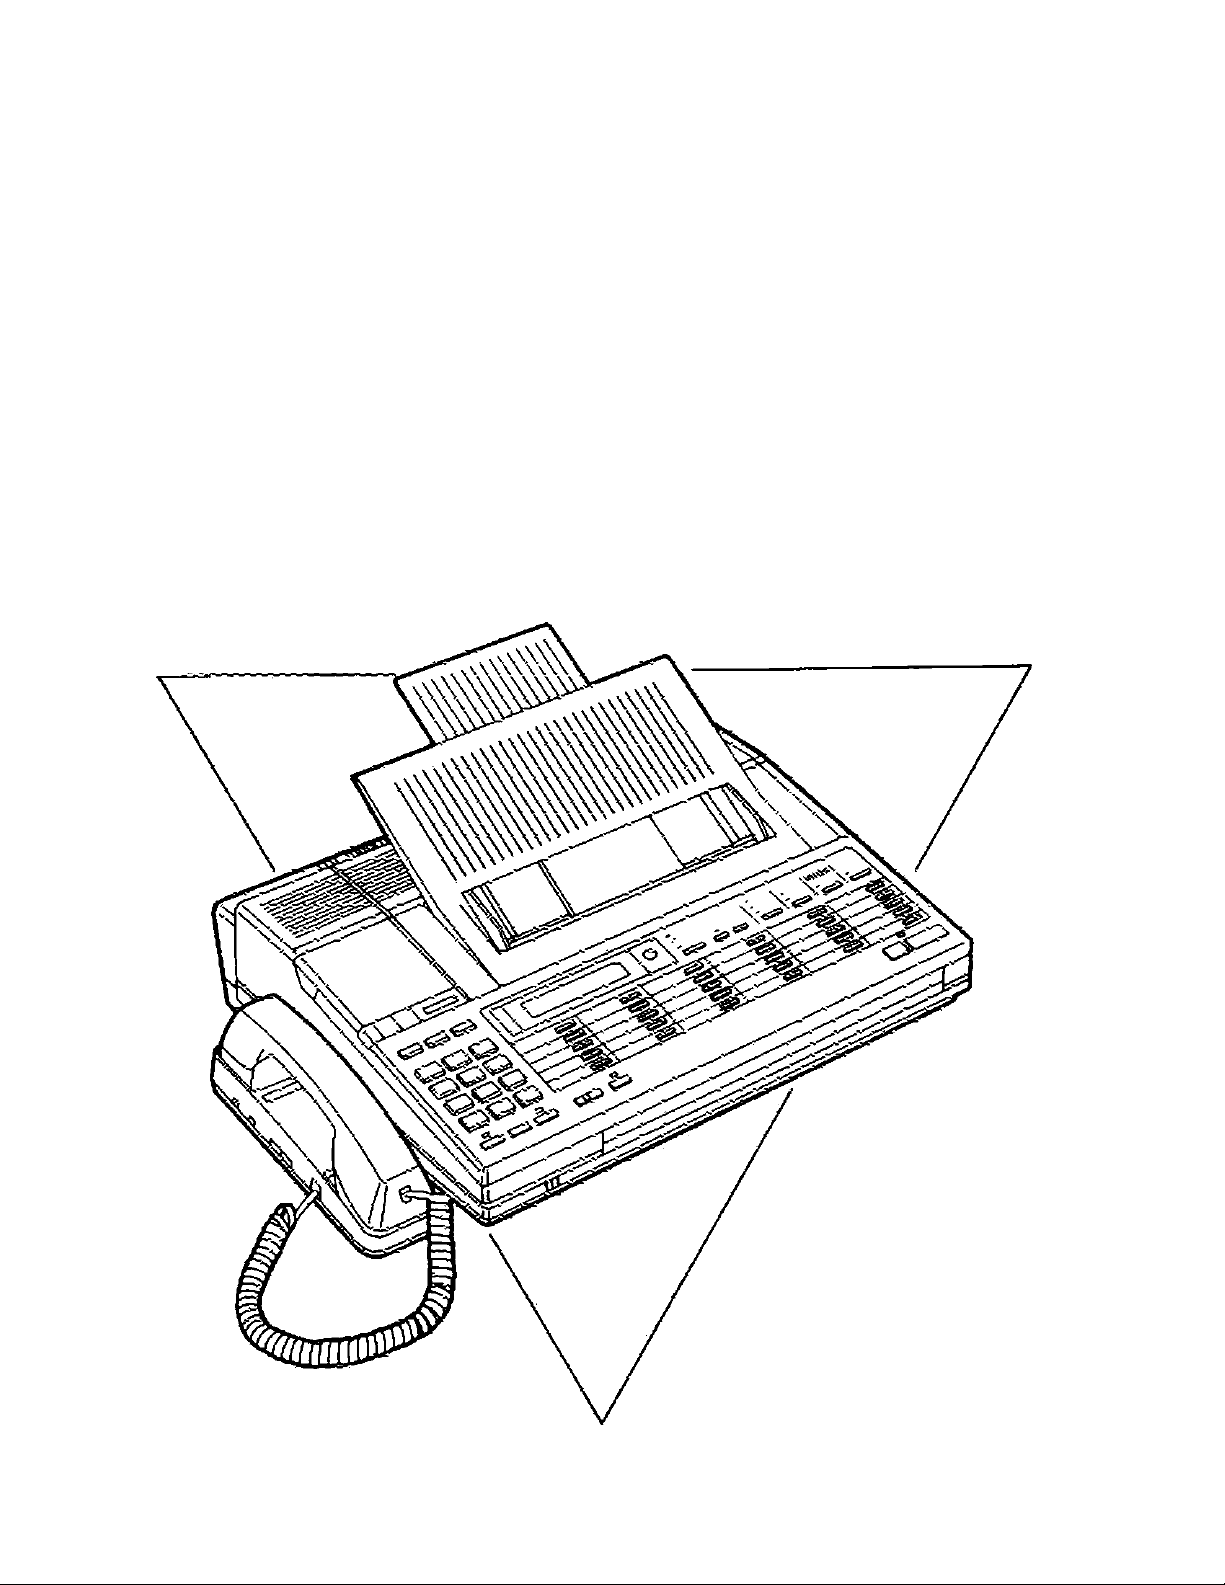
LOCATION OF CONTROLS
For Document tray installation, see pages 4-7 to 4-8.
Document tray
Write your own number
on the label.
RINGER VOLUME
Selector
DIALING MODE
Selector
VOLUME Control
'^MICROPHONE
MUTE Button and Indicator
Page 9

Control Panel
START/COPY Button
and Indicator
STOP Button
■ LC Display contrast adjustment
--------
-----------
BACK LID Lever
(To open the cover.)
FRONT LID Lever
(To open the cover.)
LC Display SERVICE MODE Switch
AUTO RECEIVE Button and Indicator
•FUNCTION Selector
-SP'PHONE Button and Indicator
■REDIAL Button
External Telephone
To telephone line
Page 10
© PAUSE Button:
Press to enter a pause in
facsimile/telephone numbers
when programming.
® FLASH Button:
Used to access some of the
features of your host PBX.
@ AUTO Button:
Used for speed dialing.
0 MENU Button:
Used to start XMT
RESERVATION, DELAYED
XMT. POLLING, SYSTEM SET
UP, etc.
® SET Button:
Press to set each parameter
you store or go to next step.
© CLEAR Button:
Used to clear the previously
entered function or go to
previous step.
© XMT RESERVATION
Indicator:
The indicator lights during XMT
RESERVATION setting.
® DELAYED XMT Indicator:
The indicator lights during
DELAYED XMT setting.
® POLLING Indicator:
The indicator lights when
POLLING setting.
® PROGRAM/REPORT
Indicator:
The indicator lights during
system set up.
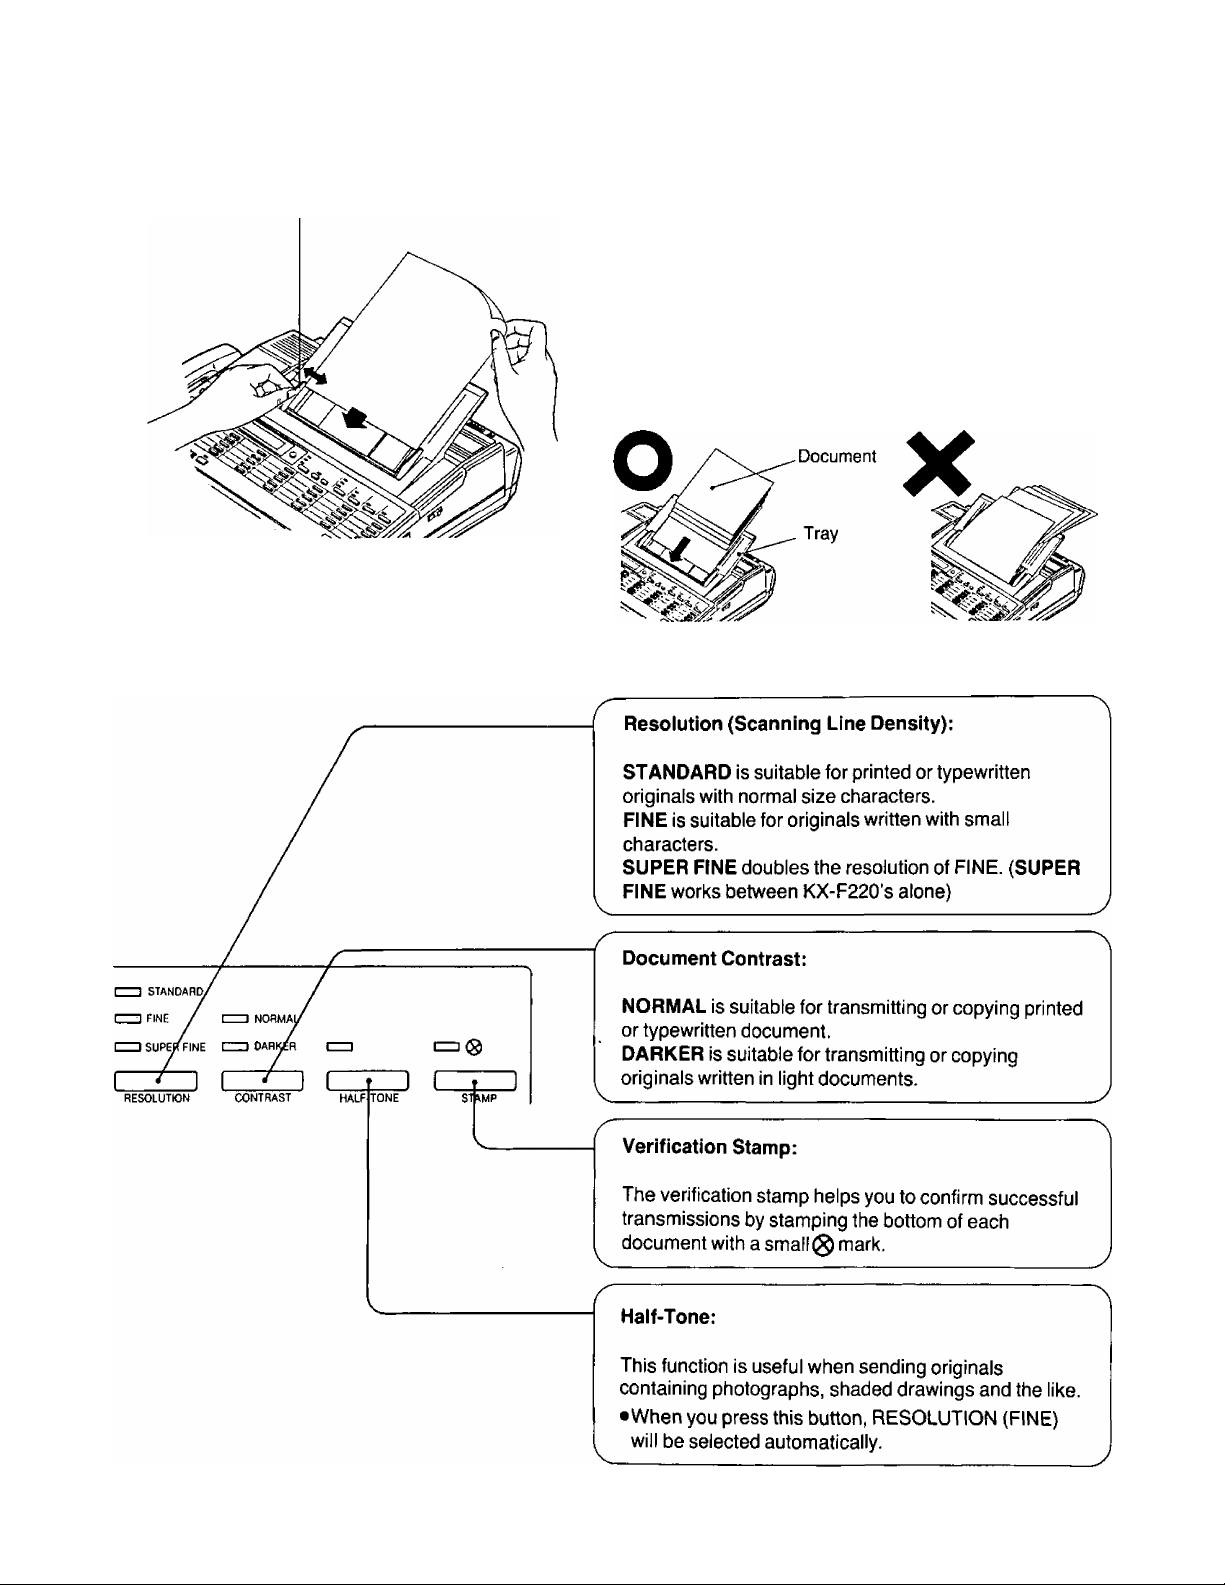
@ RESOLUTION Button and
Indicators:
Used to set the scanning line
density. The indicators light to
show which setting you are
using.
® CONTRAST Button and
Indicators:
Used to set the document
contrast. The indicators light to
show which setting you are
using.
® HALF-TONE Button and
Indicator:
Press to send a document
containing photographs,
shaded drawings and the like.
The indicator lights when the
halftone feature is on.
Page 11
@ STAMP Button and Indicator;
Press to mark originals which
have been sent. The indicator
lights when this feature is on.
® PRIORITY Buttons:
Used to program long dialing
procedure (e.g. delayed
communications) and extra
ONE TOUCH station.
® ONE TOUCH Stations:
Used for ONE TOUCH dialing.
@ DIAL KEYPAD:
Used to dial or program
numbers.
@ TONE Button:
Used to change from pulse
dialing mode to tone dialing
mode while dialing.
@ MUTE Button and Indicator:
Use this feature when you do
not want your voice to be heard
by the other party. The indicator
lights when this mode is on.
@ REDIAL Button:
Press to redial the last dialed
number.
@ SP-PHONE Button and
Indicator:
Used for on-hook dialing and
voice contact feature. The
indicator lights when this mode is
on.
10
FUNCTION Selector:
Used to switch the unit
between the telephone
answering machine/facsimile
function and the facsimile
function only.
AUTO RECEIVE Button and
Indicator:
Used to set to the Auto
Receiving mode. The indicator
lights when this mode is on.
STOP Button:
Used to cancel transmission or
copy.
START/COPY Button and
Indicator:
Used to start transmission or
copy. The indicator lights during
transmission or copy.
Page 12
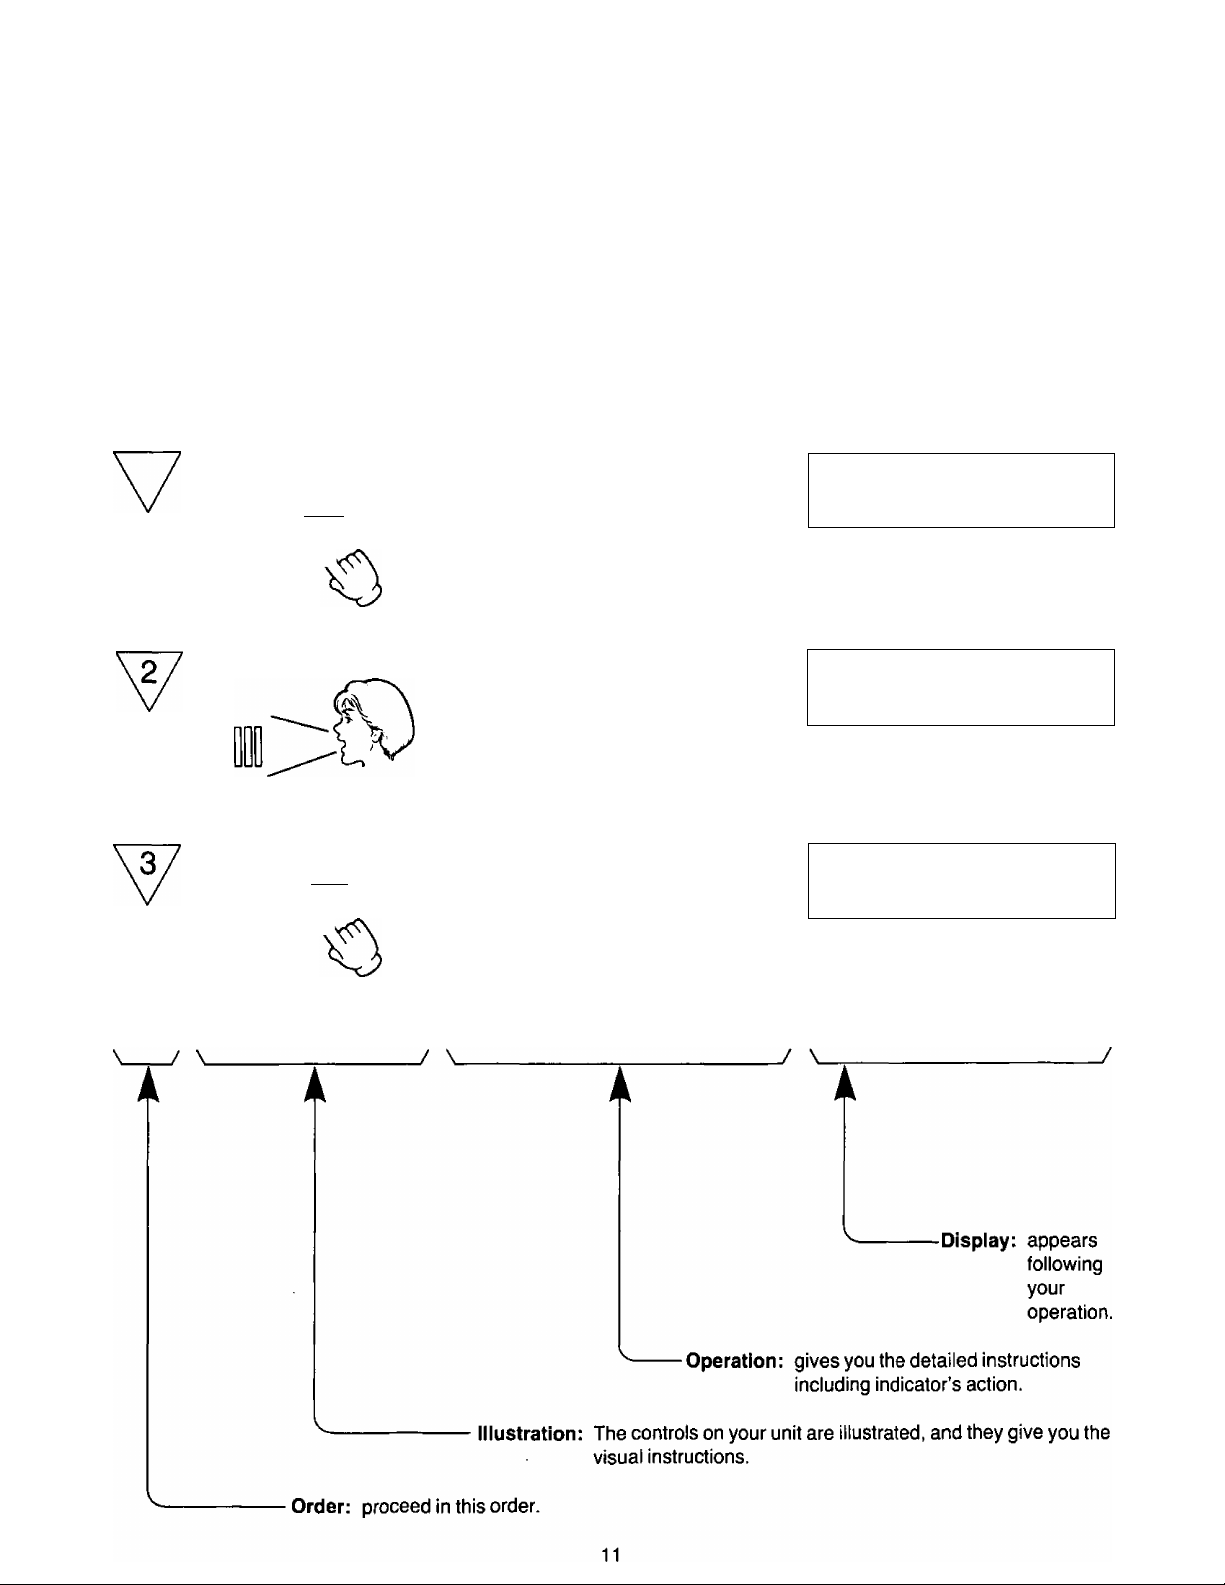
HOW TO READ THESE OPERATING INSTRUCTIONS
To use your unit easily and effectively, please understand these operating instructions completely.They are
constructed as follows.
'
-----------
t
Caption: Explaines the operation of the title in detail.
---------
Title: The operation that you are going to do.
Recording an Outgoing Message (OGM)
To use the unit as both an answering machine and a facsimile, you should first recorded your Outgoing
Message.
4
1
ogmIreci
□
Press OGM REC until a long beep is
heard, then release it.
•The IN USE indicator will light.
THU JUN29 3:00PM 00
OGM REC
»»»»
OGMiRE^
□
After the beep, speak immediately,
clearly and loudly into the microphone,
approximately 8 inches away.
•Recording time is 16 seconds.
•For optimum performance, record the
OGM within 12 seconds.
•Do not pause for over 2 seconds while
recording.
When recording is finished, press OGM
REC again.
•The unit will play back the OGM to confirm
your message. Adjust the VOLUME
control to an audible level.
•Verifying your OGM, press OGM PLAY.
The OGM will be played from the
microchip.
THU JUN29 3:00PM
OGM REC
THU JUN29
OGM PLAY »»»»
THU JUN29 3:00PM 00
TAPE BACK UP
■ ■■
3:00PM 00
00
»»>
Page 13

SYSTEM SET UP
Before using the unit:
■ Record an Outgoing Message.
When “RECORD OGM” appears on the LC Display, see page 2-1 in this manual.
■ Programming Date and Time.
If you want to change “Date and Time” on the LC Display, see page 15 in this manual.
Printing “SYSTEM SET UP LiST
Press MENU 4 times.
PROGRAM [1. DATE 2. TEL
3. SYSTEM 4. REPORT]
MENU
•The PROGRAM/REPORT indicator will light.
•This display will appear.
Press “4”, then press “1
•The “SYSTEM SET UP LIST" will be printed.
1
SELECT
2. TEL
PRINTING SYSTEM LIST
The following functions are user selectable, and may be changed as needed. Refer to next page.
S'rSTEM SETUP LIST **J(i*:4i^****)Mc+*+)f
9/ 7/89 03:42PM
n/30
«01
YOUR LOGO
«02 YOUR TELEPHONE NLMBER
LOGO POSITION
«03
«04 PRINT JOURNfiL
PRINT XMT REPtKT
«05
MESSHGE CUT OFF
«06
fi = )K*>K CONFIDENTIAL w*
B = IMMEDIATE REPLY REQUESTED
C =
«07
PAGE OXUTER
«03 REMOTE FAX ID
«09 REMOTE FAX ID NUMBER
«10 REMOTE ATAS ID
RECCFDING TirE
«11
CPC MODE
«12
AUX LEADS
«13
«14 DIAL PULSE
TONE DETECT
«15
AUTO RECEIUE TIMER
«16
ffiJTO RECEIUE ON TIME =
«17 TX SPEED
RX SPEED
«IB
STAi-P DEFAULT
«19
AUTO STANDBY
«20
MAIN PASSWORD
«21
SEND PASSWORD
«22
TX PASSWORD CHECK
«23
»24
RX PASSWORD CHECK
«25 POLLING PASSWORD
SET DEFAULT
«26
< DELftYED MODE >
«27 TEST [PRINT OR ^mOR]
DELAYED MODE
PHONE NUMBER
PASSWORD
START TIME =
=
=
OUT
FBJTO
=
OFF
=
OFF
=
OFF
=
2222
=
111
=
UOX
=
A
=
OUT
=
10PPS
=
OFF
=
OFF
12:00AM -AUTO
=
=
=
=
=
= ’
z;
■ftUTa RECEIUEOFF TiHE = 12:00Pn
9600BPS
9600BPS
OFF
ON
0000
OFF
OFF
OFF
0000
NO
OFF
0000
12:00AM
NO.
[1
NO. 3.
SYSTEM
JOURNAL]
12
Page 14

System Programming Functions:
CODE FUNCTION
#00
#01
#02
#03 LOGO POSITION
#04
#05
DATE AND TIME
YOUR LOGO
YOUR TELEPHONE NUMBER
PRINT JOURNAL
PRINT XMT REPORT
#06 MESSAGE OUT
#07 PAGE COUNTER
#08
#09
#10
#11 RECORDING TIME
#12
#13
#14
#15 TONE DETECT See page 4-12.
REMOTE FAX ID
REMOTE FAX ID NUMBER
REMOTE ATAS ID
CPC MODE
AUX. LEADS
DIAL PULSE
See page 15.
See page 18 in the INSTALLATION MANUAL
See page 18 in the INSTALLATION MANUAL.
See page 22 in the INSTALLATION MANUAL.
See page 1-57.
See page 1-63.
See page 1-19.
See page 1-16.
See page 1-17.
See page 1-17.
See page 2-3.
See page 2-4.
See page 4-9.
See page 4-10.
See page 4-11.
PAGE
#16
#17
#18
#19
#20
#21
#22
AUTO RECEIVE TIMER
TX SPEED
See page 1-21.
See page 4-13.
RX SPEED See page 4-14.
STAMP DEFAULT
AUTO STANDBY
See page 4-15.
See page 4-16.
MAIN PASSWORD See page 1-50.
SEND PASSWORD
See page 1-50.
#23 TX PASSWORD CHECK See page 1-50.
#24
#25
#26
#27
RX PASSWORD CHECK
POLLING PASSWORD
SET DEFAULT
TEST [PRINT OR MOTOR]
See page 1-50.
See page 1-23.
See page 4-17.
See page 4-17.
13
Page 15

In the SYSTEM PROGRAMMING mode, the message will be changed as follows each time you press the SET button.
The CLEAR button allows to go to the previous display.
1. ENTER YOUR LOGO
J 1 I 1
2. ENTER YOUR TEL NO.
I 1 I 1 X
3. LOGO POSITION=OUT
[1. OUT 2. IN 3. OFF]
I 1 I 1
4. JOURNAL=AUTO
[1. AUTO 2. MANUAL]
1 1 I 1
5. XMT REPORT=OFF
(1. OFF 2. ON 3. ERROR]
10. ENTER YOUR REMOTE
ATAS ID=111
11. RECORD TIME=VOX
[1. VOX 2. 1 MIN]
12. CPC MODE=A
[1. A 2. B]
■
13. AUX. LEADS=OUT
[1. OUT 2. IN]
14. DIAL PULSE=10 PPS
[1. 10 PPS 2. 20 PPS]
19. STAMP DEFAULT=OFF
[1. OFF 2. ON]
20. AUTO STANDBY=ON
[1. ON 2. OFF]
21. MAIN PASSWORD
=0000
I
22 . SEND PASSWORD=OFF
[1. OFF 2. ON]
1
23. TX PASSWORD CHECK
=OFF [1. OFF 2. ON]
I 1 I 1
6. MESSAGE OUT=OFF
[1. OFF 2. A3. B 4. C] [1. OFF 2. ON]
7, PAGE COUNTER=OFF
[1. OFF 2. ON]
8. REMOTE FAX ID=OFF
[1. OFF 2. ON] [1. 9600 2, 4800]
9. ENTER YOUR REMOTE 18.
FAX ID=2222
15. TONE DETECT=OFF
16. AUTO RCV TIMER
=OFF [1. OFF 2. ON]
17. TX SPEED=9600 BPS
RX SPEED=9600 BPS
9600 2. 4800]
[1.
1
24. RX PASSWORD CHECK
=OFF [1. OFF 2. ON]
I
25. POLLING PASSWORD
= 0000
I
26. SET DEFAULT=NO
[1. NO 2. YES]
I
27. TEST=OFF [1. OFF
2. PRINT 3. MOTOR]
X
1. ENTER YOUR LOGO
14
Page 16
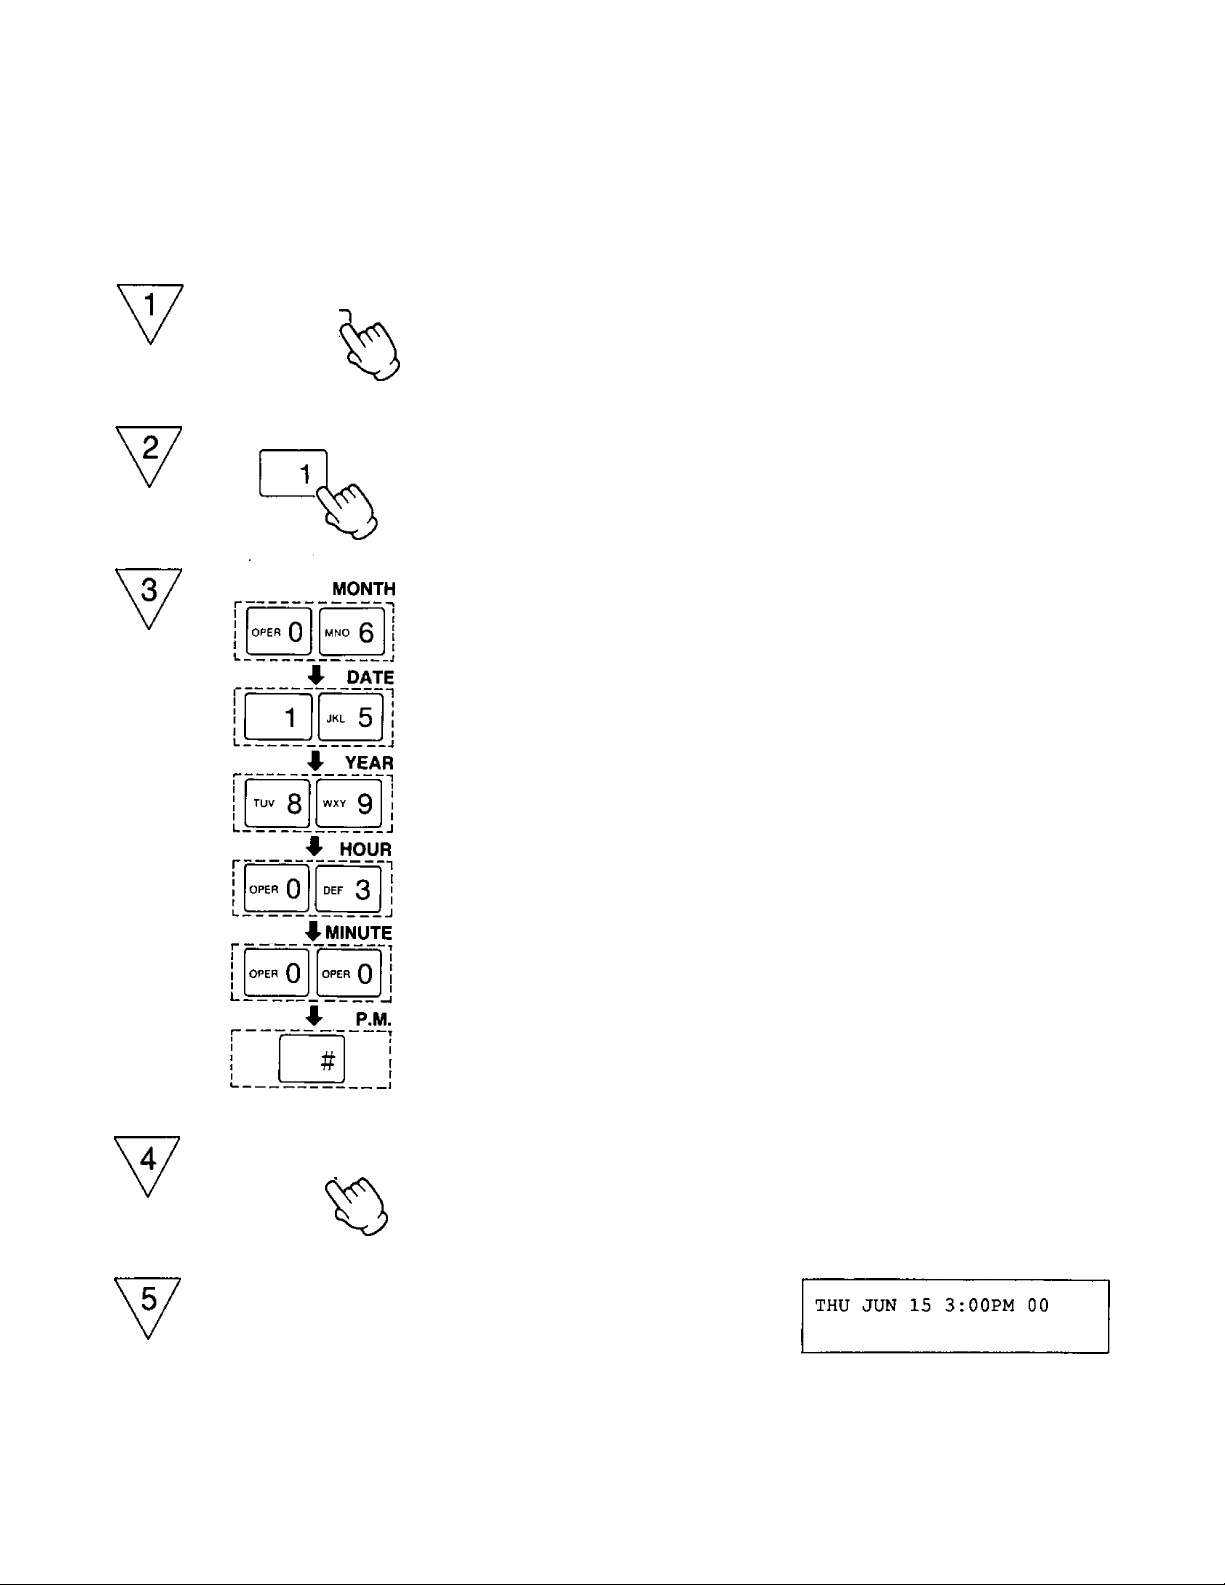
Programming Date and Time
Example: JUN. 15,19893:00P.M.
SYSTEM SET UP (CONT.)
MENU
Press MENU 4 times.
•The PROGRAM indicator will light.
•This display will appear.
Press “1”.
Enter the new clock setting in the format
MONTH/DATE^fEAR/HOUR/MINUTE
(2digits)/AMorPM.
•Press and “#” to select AM/PM
mode.
•Day of the week will be set automatically.
PROGRAM [1, DATE 2. TEL
3. SYSTEM 4. REPORT]
SET DATE t*=AM #=PM]
01 01 89 12:00am SUN]
SET DATE [=i^=AM #=PM]
06 15 89 03:00PM THU]
SET
MENU
When you have set the clock, press SET.
•The clock will start.
Press MENU to end the operation.
15
PROGRAM [1. DATE 2. TEL
3. SYSTEM 4. REPORT]
Page 17
MANUAL DIALING
Making a Calf
Using the Handset
1. Lift the handset and dial the phone number.
2. Speak with the other party.
3. Hang up the handset when finished.
On-hook Dialing (Hands-Free Operation)
-V I ^
-CZZJ-
^ I V
C3Ei]Ei]
]
0H~
4 11
QQQ
jKt
51I
Press SP-PHONE.
•The SP-PHONE indicator will light.
Dial the phone number, then speak.
•The display will show the dialed phone
number.
THU JUN 15 3:00PM 00
ENTER PHONE NUMBER
THU JUN 15 3:00PM 00
xxxxxxx
■dialed number
QQdl
When finished, press SP-PHONE again.
•The SP-PHONE indicator will go out.
HELPFUL HINTS FOR HANDS-FREE OPERATION:
•If it is difficult to hear the other party’s voice; raise the sound level using the SPEAKER VOLUME control.
•If the other party has difficulty hearing you; lower the sound level.
•Absorbing echoes; use this unit in a room which has curtains or carpeting.
•To avoid lost or broken conversations; If you and the other party speak at the same time, parts of your
conversation will be lost. To avoid this, speak alternately.
16
Page 18

MANUAL DIALING (CONT.)
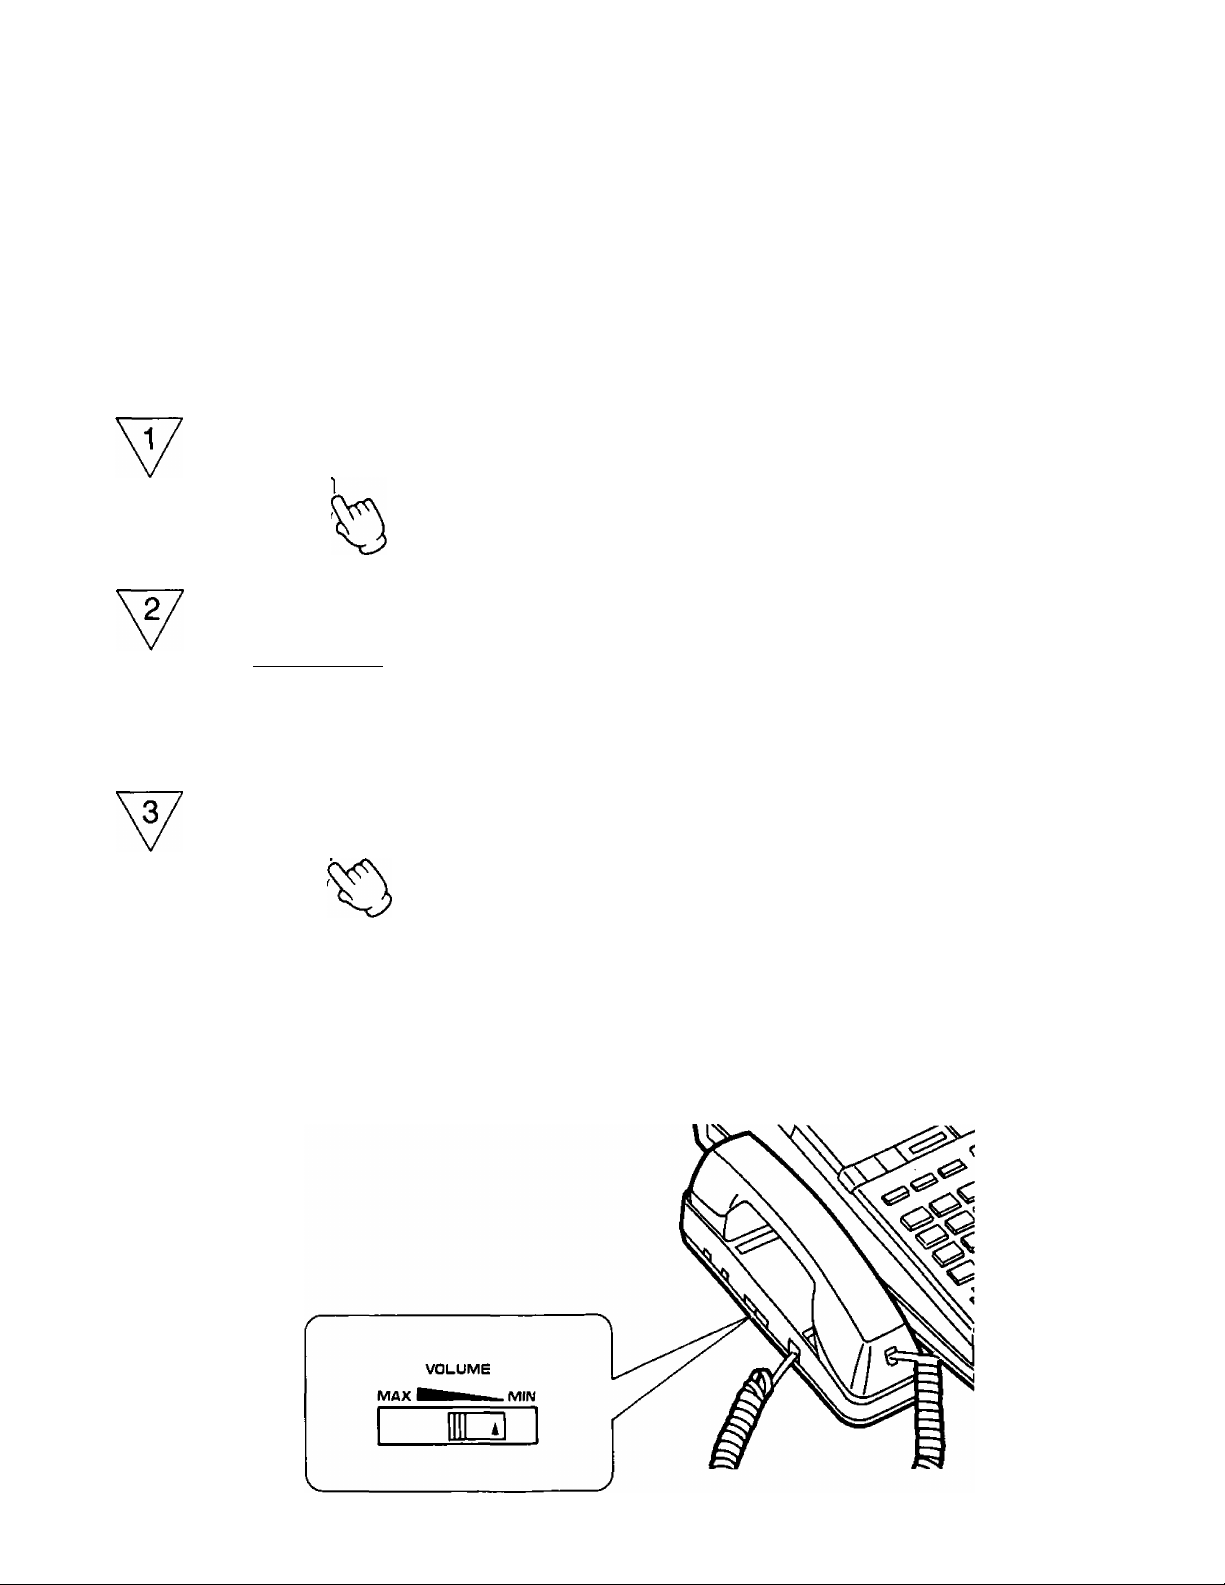
Receiving a Caii
When the phone rings, lift the handset or press the SP-PHONE button to answer a call.
Rediaiing for Manuat Diaiing
You can redial the last dialed number by simply pressing the REDIAL button.
Press REDIAL if busy tone is heard.
When using the handset:
Depressing the REDIAL button redials the last number once.
When using the Hands-Free Operation:
The unit will automatically redial up to 15 times within a 10-minute period.
(Automatic Redialing)
During the pause between each redialing, the display will show the following
messages, and the SP-PHONE indicator will flash slowly.
To cancel the automatic redialing, press the FLASH button.
<REDIALING>
xxxxxxx
last dialed number
THU JUN 15 3:00PM 00
WAITING TO REDIAL
17
Page 19
MANUAL TRANSMISSION AND RECEPTION
Manual Transmission
□DEH EH
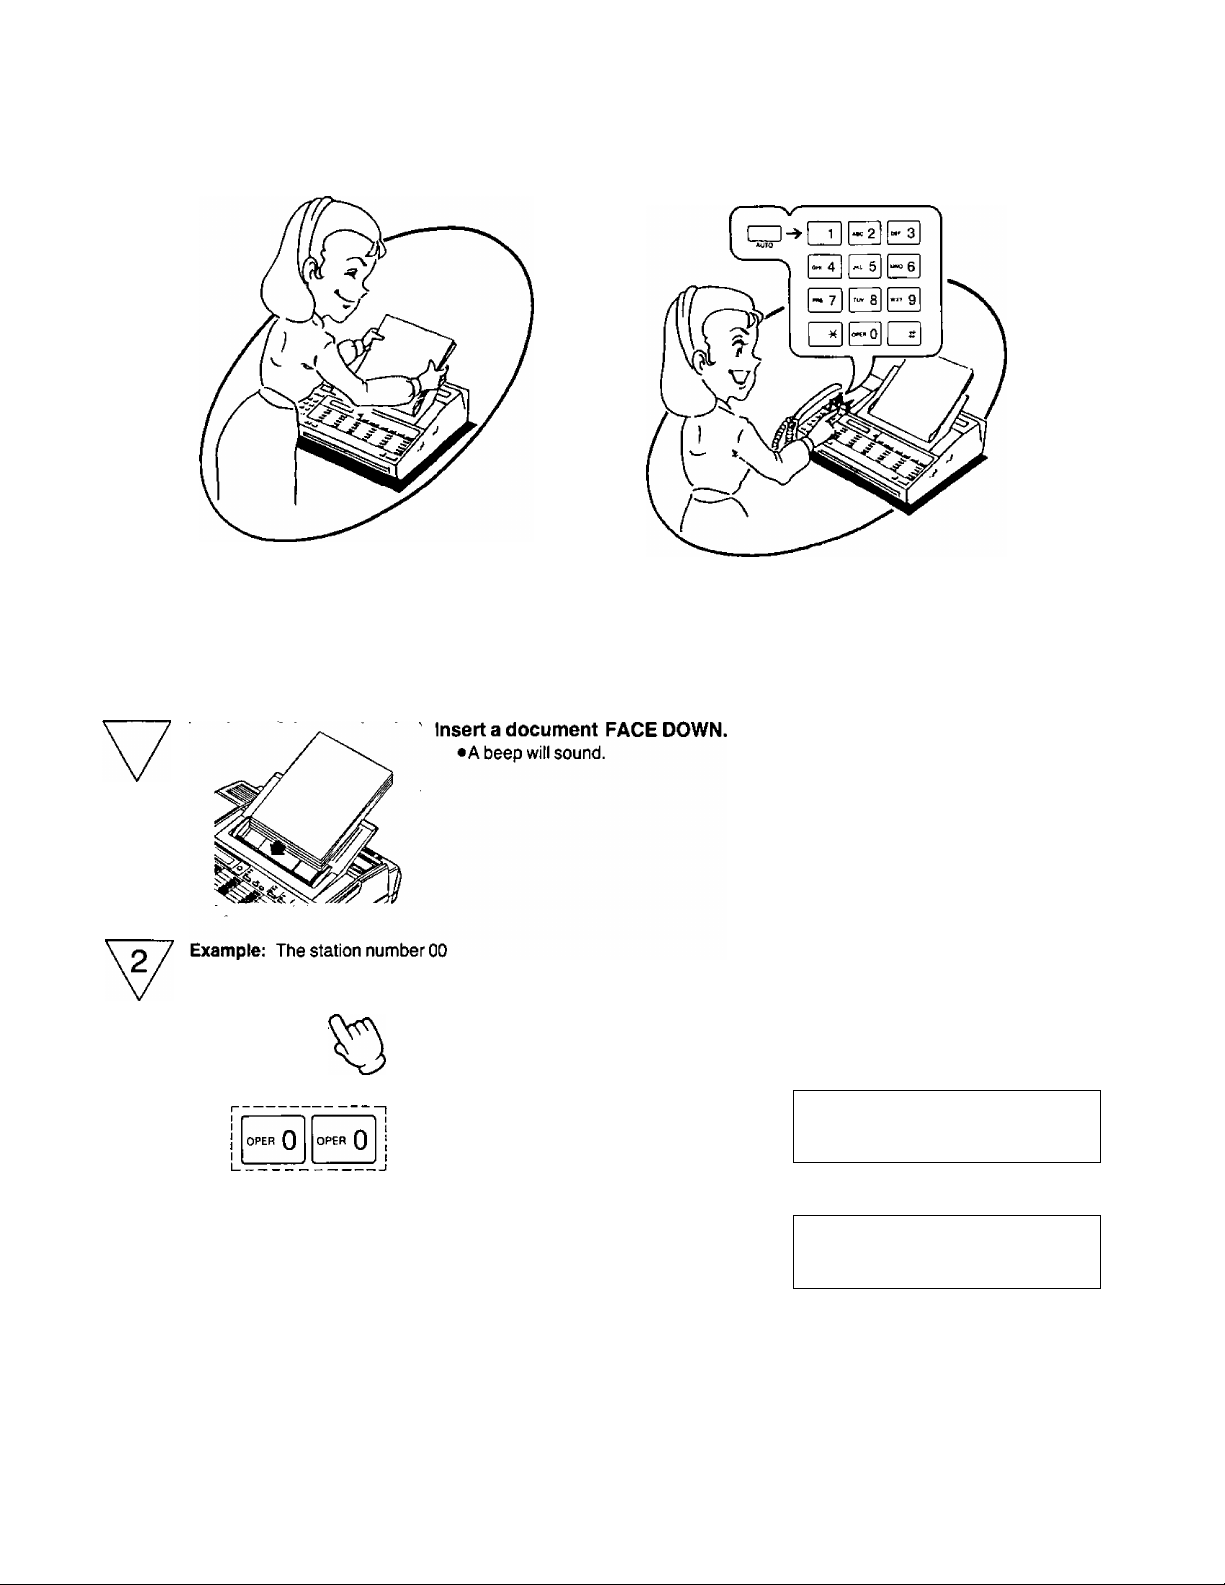
Insert a document FACE DOWN.
•The unit will accept up to 15 sheets of
paper at a time.
Lift the handset or press SP-PHONE,
then dial the fax number.
THU JUN15 3:00PM 00
ENTER PHONE NUMBER
THU JUN15 3 : 00PM 00
xxxxxxx
ED ED EH
dialed number
EH EH EH
I x| |«"0|j #1
v. I ✓
I V
START/COPY
When the beep (answering carrier tone)
is heard, press START/COPY.
SENDING P 1
TO: XXXXXXX
SO
After pressing START/COPY, replace
the handset if using the handset.
•During a fax transmission, the number of
each page (99 max.) is displayed.
Begin by transmitting the FAX CORRESPONDENCE leaflet (included) to several of your business associates to
confirm that your unit is functioning correctly, and to inform them of the procedure for transmitting documents and/or
recording voice-messages on your unit.
SENDING P 1
TO: XXXXXXX
THU JUN15 3:03PM 00
1 PAGE SENT OK
18
Page 20

MANUAL TRANSMISSION AND RECEPTION
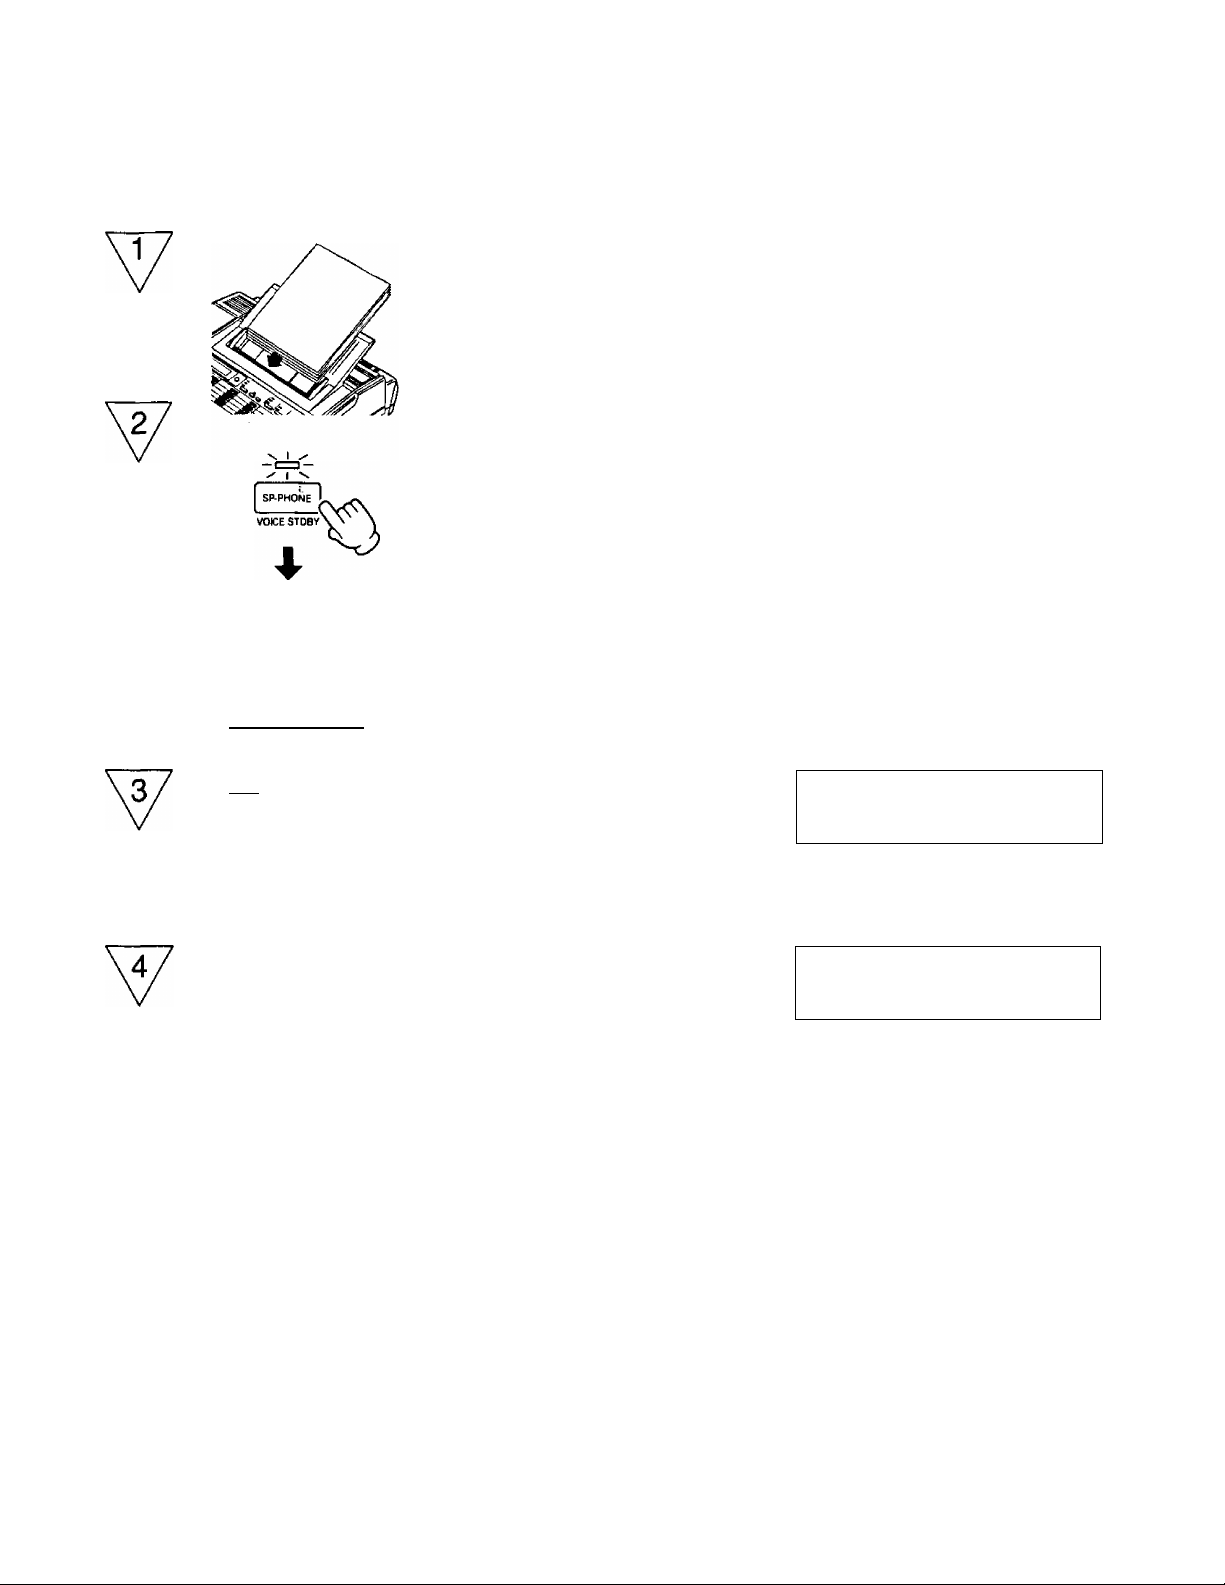
Manual Reception
When the phone rings, lift the handset or
press SP-PHONE to answer the call.
SP-PHONE
VOtCE STDBV
(CONT.)
Press START/COPY to receive a
document.
RECEIVING
FROM; XXXXXXX
START/COPY
After pressing START/COPY, replace
the handset if using the handset.
•During a fax reception, the number of
each page (99 max.) is displayed.
■ START/COPY indicator:
It will change from a flashing to a steady light, and the unit will begin transmitting or receiving documents.
NOTE:
•If you are using the speakerphone;
The line will be automatically disconnected after transaction is completed.
•If you do not hang up the handset after pressing the START/COPY button;
The unit will automatically call the other party. For further details, see “VOICE CONTACT” on page 1-15.
P 1
■Station name,
telephone number
or <G3>
19
Page 21

How to Operate
as a Facsimile Machine
Page 22
BEFORE TRANSMITTING A DOCUMENT
Transmissible Document
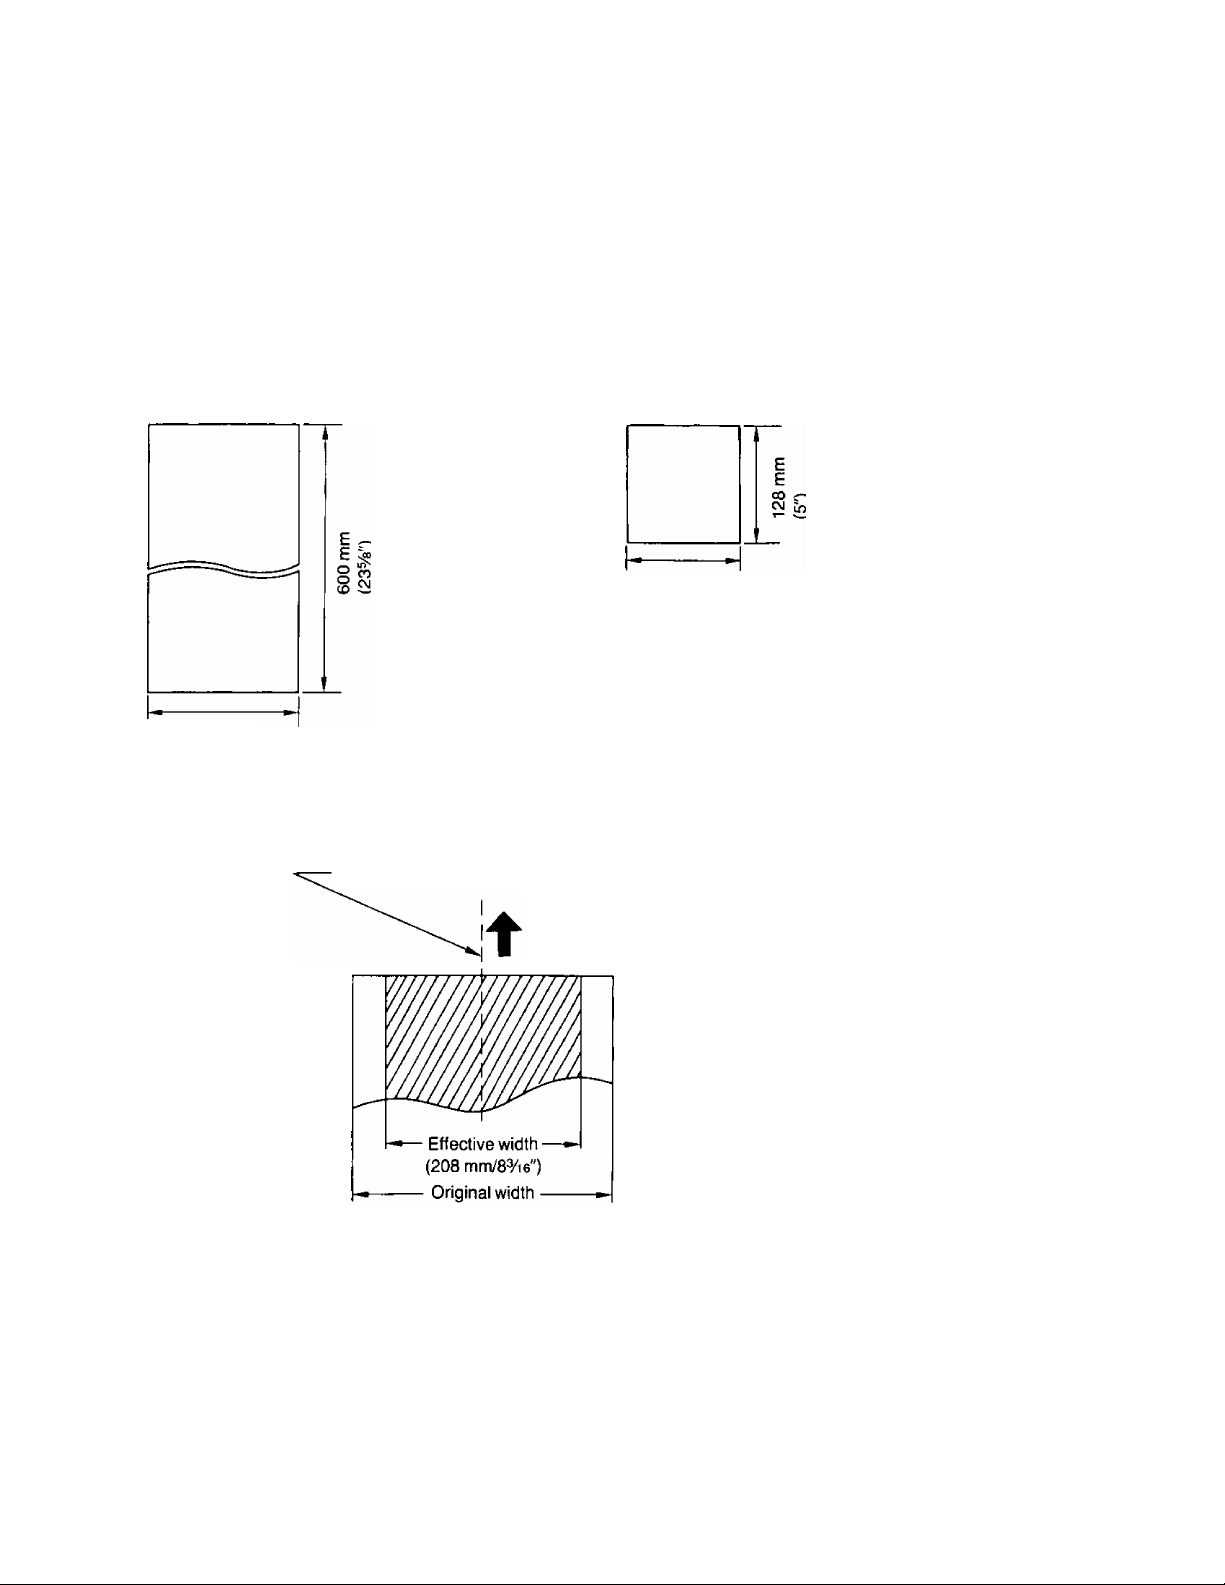
The unit can transmit a document of the following sizes, weight and textures.
•Original width is 128 mm (5") to 216 mm {8V2").
•Effective width is up to 208 mm (S^/ie").
•Weight of transmissible document is 12 to 24 pounds.
Maximum document size
216 mm
(8’/2")
Minimum document size
128 mm
(5")
Center of the original document
Direction of feed
(216mm/8V2")
■ Automatic Document Feeder:
• Up to 15 sheets of paper at the same time
•Bond paper (16 to 20 pounds)
• Paper with uncoated surface
NOTE:
•A document which is over 600 mm (23%'') cannot be transmitted. The unit will stop transmitting a document and the
display will show “REMOVE DOCUMENT”. If this happens, press the STOP button to remove the document,
• If the originals are electrostatically charged, the automatic document feeder may not function properly.
1-1
Page 23

Do not feed the following types of document into the unit or it may jam. Make copies of the document, and feed the
copies into the unit. Or use the exclusive carrier sheet inciuded with your unit.
We recommend you to use the carrier sheet or make the copies and feed the copies for the following originals:
• Paper with chemically treated surfaces such as
carbon-blacked paper or carbonless duplicating paper
• Heavily curled, creased or torn paper
• Paper with a coated surface
•Small size paper such as a slip or a voucher
•Thin paper (less than 12 pounds)
We recommend you to make copies and feed the copies for the following originals:
•Thick paper (over 24 pounds), since a carrier sheet cannot be used
•When the contrast between the printed letter and background is small
•When the letters printed on the back side can be seen from the front of the paper
(e.g. newspaper)
Remove clips, staple or other similar objects from a document before feeding it into the unit.
Let ink or paste on a document dry completely before feeding them into the unit.
Using the Carrier Sheet
1. Place an original into the carrier sheet with the print facing a transparent cover.
2. Place the transparent cover over the original.
3. Insert the carrier sheet. ^fc.---^Paper feed direction
Transparent
cover
1-2
Page 24
BEFORE TRANSMITTING A DOCUMENT
Document guide
The following functions must be set before starting a
transmission.
If you set these functions while a document is being
fed, the functions are effective from the next sheet of
paper.
(CONT.)
This unit will accept up to 15 sheets of paper at a time.
Place the document on the tray FACE DOWN, and
align them.
After aligning the document, adjust the document
guide according to the document width.
Make sure to insert the document properly and to
feed a bottom sheet first.
1-3
Page 25
TRANSMITTING A DOCUMENT
Manual Transmission
Insert a document FACE DOWN.
^ I
SP-PHONE
VOICE STDBV
4
miEiiEi]
|°" 4 I [ 5 I j"^ 6 I
SEDEl]
C3HQ
V. I
-1=3-
^ I
Lift the handset or press SP-PHONE,
then dial the fax number.
When the beep (answering carrier tone)
is heard, press START/COPY.
After pressing START/COPY, replace
the handset if using the handset.
•During a fax transmission, the number of
each page {99 max.) is displayed.
THU JUN 15 3:00PM 00
ENTER PHONE NUMBER
THU JUN 15 3:00PM 00
XXXXXXX
dialed number
SENDING
TO: XXXXXXX
SENDING
TO: XXXXXXX
p 1
P 1
1-4
THU JUN 15 3:03PM 00
1 PAGE SENT OK
Page 26
TRANSMITTING A DOCUMENT
(CONT.)
Inseting a document.
Pressing a One-Touch button.
When Using One-Touch Dialing
For convenience, you can program up to 24 facsimile or voice telephone numbers into 24 ONE-TOUCH stations.
6 PRIORITY buttons also can be used as One-Touch station. {Refer to page 1-41.)
The following method will let the unit dial and transmit documents automatically. As to programming for One-Touch
Dialing, refer to “PROGRAMMING AUTOMATIC DIALING NUMBERS" on page 1-35.
1
Insert a document FACE DOWN.
•A beep will sound.
Press the One-Touch station which
contains the facsimile number you wish
to transmit to.
•The START/COPY indicator will change
from a flashing to a steady light, and then
a document will begin to transmit.
Station name
or dialed number-
THU JUN 15 5:00PM 00
DIALING <XMT>
TO:XXXX
SENDING
TO;XXXX
THU JUN 15 5:01PM 00
1 PAGE SENT OK
PI
1-5
Page 27
Inserting a document. Pressing three buttons.
When Using Speed Dialing
For convenient transmission, you can program facsimile numbers into 100 memory stations.
As to programming for Speed Dialing, refer to “PROGRAMMING AUTOMATIC DIALING NUMBERS" on page 1 -37.
1
Press AUTO, then enter the speed dial number (00 to 99,2-digit).
AUTO
4-
THU JUN 15 5:30PM 00
THU JUN 15 5:30PM 00
<A00>
DIALING <XMT>
TO:XXXXX
Station No.
SENDING
P. 1
TO:XXXXX
Station name
or dialed number-
1-6
THU JUN 15 5;31PM 00
1 PAGE SENT OK
Page 28
TRANSMITTING A DOCUMENT (CONT.)
Starting reservation
Compieted reservation
Transmitting Reservation
While the unit is receiving a document from one station, you can reserve transmission to another. The unit will transmit a
document automatically after the receiving process is completed.
Receiving mode display.
RECEIVING
FROM: XXXXXXX
MENU
Example: One-Touch station 7
c
SET
Press MENU.
•The XMT RESERVATION indicator will
light.
•This display will appear.
Press the ONE TOUCH station, or press
AUTO and station number (2-digit), or
enter phone number with dial keypad.
Press SET.
Insert a document FACE DOWN.
•The unit will transmit a document
automatically after receiving is finished.
Telephone number,
station name or <G3>
XMT RESERVATION
ENTER PHONE NUMBER
ENTER PHONE NO.
=<S07>
INSERT DOCUMENT
FACE DOWN
NOTE:
This function cannot be used when this unit is transmitting, polling or being programmed for delayed transmission and
polling.
1-7
Page 29
Being busy on line
Redialing automatically
Redialing for One-Touch and Speed Dialing
If there is no answer or the line is busy, the unit will autonnatically redial the number up to 6 times within a 10-minute
period and the display will show;
THU JUN 15 5:30PM 00
WAITING TO REDIAL
If there is still no answer after six (6) tries, the display shown below will appear.
THU JUN 15 5:30PM 00
REDIAL TIME OUT
To stop the redialing, press the STOP button, original display will appear and the beep will be heard.
THU JUN15 5:30PM 00
1-8
Page 30
TRANSMITTING A DOCUMENT
(CONT.)
Programming a transmission time
Transmission at programmed time
Setting Delayed Transmission
The unit is equipped with a built-in timer. By programming the unit with a starting time and a facsimiie telephone
number, you can automaticaily transmit a document anywhere in the worid, and at any time of the day. This operation
can be reserved to take piace up to 24 hours after setting the timer.
1
C
MENU
□
SET
Example: One-Touch station 8
□
SET
Press MENU twice.
•The DELAYED XMT indicator will light.
•This display will appear.
Press “2”.
Press SET.
Enter the facsimile telephone number
using the one-touch diaiing, speed
diaiing or a fuli number.
Press SET.
DELAYED XMT=OFF
[1. OFF 2. ON]
DELAYED XMT=ON
[1. OFF 2 , ON]
ENTER PHONE NUMBER
ENTER PHONE NUMBER
=<S08>
SET START TIME
12:00 AM [5t==AM #=PM]
1-9
Page 31

Example: Starting time is 8:30 P.M,
Enter the time at which the fax is to be
Transmitted.
•Press or “#” to select AM/PM mode.
•To correct an error while programming,
press the CLEAR button, then enter the
correct input.
SET START TIME
08:30 PM [*=AM #=PM]
r'
P.M.
~l
INSERT DOCUMENT
FACE DOWN
Press SET.
SET
Insert a document FACE DOWN.
•The document will be transmitted at the
time selected.
THU JUN 29 05:00 PM 00
XMT AT 8:30PM
NOTE:
•Automatic and manual reception, transmission and copying function can be performed even when delayed
transmission is set. To copy another document, remove the document on the tray and replace it when you finish.
• If there is no answer or the line is busy when performing the delayed transmission, the unit will automatically redial
the number, up to 6 times within a 10-minute period.
•You cannot set a new Delayed Transmission before transmitting document reserved by the previous Delayed
Transmission setting or the previously entered setting will be overridden.
1-10
Page 32

DOCUMENT AND/OR VOICE-MESSAGE
Manual Reception
RECEIVING A
\ ^
^ I ^
When the phone rings, lift the handset or
press SP-PHONE to answer the call.
Press START/COPY to receive a
document.
RECEIVING
FROM: XXXXXX
After pressing START/COPY, replace
the handset if using the handset.
•During a fax reception, the number of
each page (99 max.) is displayed.
■ START/COPY indicator:
It will change from a flashing to a steady light, and the unit will begin transmitting or receiving a document.
RECEIVING
FROM: XXXXXX
P 1
P 1
■Telephone number,
station name
or <G3>
■ Begin by transmitting the FAX CORRESPONDENCE leaflet (included) to several of your business associates to
confirm that your unit is functioning correctly, and to inform them of the procedure for transmitting documents and/or
recording voice-messages on your unit.
NOTE:
•If you are using the speakerphone;
The line will be automatically disconnected after transaction is completed.
•If you do not hang up the handset after pressing the START/COPY button;
The unit will automatically call the other party. For further details, see “VOICE CONTACT" on page 1-15.
1-11
Page 33

Explanation of Auto Receiving Mode
The KX-F220 can receive a document either automatically or manually. When set to automatic, you can receive a
document and/or voice-messages without the need for manual operations.
The unit has two Auto Receiving modes;
A) You can use the unit as both an answering and a facsimile machine.
B) You can use the unit as a facsimile machine only.
Receiving Voice-Messages and a Document Automatically
(Using as an Answering and a Facsimile Machine)
You should first record an Outgoing Message (OGM).
Refer to “Recording an Outgoing Message” on page 2-1.
Set FUNCTION selector to the ANS/FAX
ANS/FAX-| pFAX
n
position.
• ANS/FAX position:
The unit switches between an answering
and a facsimile functions automatically.
Press AUTO RECEiVE.
■ »The AUTO RECEIVE indicator wiil iight.
AUTO RECEIVE
•When a call is received, the unit will begin playing back your OGM. Then the unit will automatically function as an
answering machine or a facsimile depending on the caller’s choice.
• If the caller’s voice is not detected, the unit will automatically enter facsimile mode.
1-12
Page 34

RECEIVING A
DOCUMENT AND/OR VOICE-MESSAGE (CONT.)
Receiving a Document Automaticatiy
(Using as a Facsimile Machine)
When a call is received, the unit will produce the answering carrier tone to receive a document. Then the unit will
receive a document automatically. At this time, your OGM will not be played.
1
ANS/FAX-| pFAX
AUTO RECEIVE
Set FUNCTION selector to the FAX position.
• FAX position:
The unit will function as a facsimile
machine only.
Press AUTO RECEIVE.
•The AUTO RECEIVE Indicator will light.
Cancelling Auto Receiving Mode
Press AUTO RECEIVE again.
•The AUTO RECEIVE indicator will go out.
AUTO RECEIVE
Setting Auto Receiving Mode Remotely
Call your unit, and let the telephone ring 15 times. The unit will go into the Auto Receiving Mode.
You can then hang up.
NOTE:
•This unit will answer on the first ring by default. You can change the ring count according to the instructions found on
pages 26 and 27 in the INSTALLATION MANUAL.
•If you encounter difficulty in receiving a document from facsimile machines which have an automatic transmission
feature, you will need to keep “RING COUNT” number at one (see pages 26 and 27 in the INSTALLATION MANUAL)
1-13
Page 35

TRANSMITTING TO
YOUR KX-F220 FROM A REMOTE LOCATION
Recording Your Message and Transmitting a Document
From tone phone;
Call your unit, then leave your message
after the long beep following your OGM.
When recording is finished, press to
change your unit to the facsimile mode.
•Start transmission after hearing the
answering carrier tone.
•If you have selected the REMOTE FAX ID to
ON, enter your REMOTE FAX ID after
From rotary (pulse) phone:
When the calling facsimile machine has a voice-contact function, you can leave a message with your facsimile.
•If Remote Fax ID (page 1 -17) is set to on your KX-F220, rotary phone cannot access your KX-F220.
1. Call your unit.
2. While the OGM is playing, press your mute button or cover the mouthpiece of your handset.
3. Start transmission after hearing the answering carrier tone.
4. Make a call reservation (e.g. ...lift the handset) during transmission.
5. Record your message after the long beep following your OGM.
Transmitting a Document Only
From tone phone: t
Call your unit.
When your OGM starts, press to
change your unit to the facsimile mode.
•Start transmission after hearing the
answering carrier tone.
From rotary (pulse) phone:
• If Remote Fax ID (page 1-17) is set to on your KX-F220, rotary phone cannot access your KX-F220.
1. Call your unit.
2. While the OGM is playing, press your mute button or cover the mouthpiece of your handset.
3. Start transmission after hearing the answering carrier tone.
1-14
Page 36

VOICE CONTACT
Initiating Voice Contact During Transmission!Reception
While you are transmitting or receiving a document, you may wish to speak with the other party. If the other party’s unit
is equipped with a voice contact feature, you can initiate voice contact as follows.
Lift the handset or push SP-PHONE
while transmitting or receiving documents.
RECEIVING P 1
VOICE STANDBY
SENDING
VOICE
When the other party answers, start
speaking.
If you initiate voice contact during transmission;
you will be able to speak after all of the document have been transmitted. The other party’s unit will ring or beep
depending on the type of unit they have.
If you initiate voice contact during receipt of a document;
you will be able to speak after receiving the current page of the document. The other party’s unit will ring or beep
depending on the type of unit they have, after the current page has been transmitted.
It may happen that the voice contact cannot be done according to some certain type of the voice contact provided
with the other party’s unit.
STANDBY
P 1
Receiving a Request for Voice Contact
If the other party tries to contact you during transmission or reception, the unit will beep.
Lift the handset or press SP-PHONE after hearing several beeps.
RECEIVING
PLEASE PICK
P 1
UP
SENDING P 1
PLEASE PICK UP
Start speaking.
NOTE;
If you do not answer within 10 seconds after hearing several beeps indicating the request for voice contact,
one of two conditions will occur;
•When the FUNCTION selector is set to the FAX position, the unit will be disconnected.
•When the FUNCTION selector is set to the ANS/FAX position and the unit is in the Auto Receiving mode, the unit will
play back your OGM and record the voice-message. If the unit is in the manual receiving mode, the unit will be
disconnected.
1-15
Page 37

SETTING “PAGE COUNTER”
When the PAGE COUNTER function is set to ON, the
page number will be printed at the top of each page you
transmitted.
The unit requests you to enter the total number of pages you transmit.
At this time, enter the number then press the SET button.
•Correcting an error while entering; press the CLEAR
button and enter correct input.
SET NUMBER OF PAGES
TOTAL=0
MENU
#
0
2 / Example: Page Counter is “ON”.
Press “2”, then press SET.
^
CZD
SET
Press MENU 4 times.
•The PROGRAM indicator will light.
•This display will appear.
Press“#”, then press “07”.
PROGRAM [1. DATE 2. TEL
3. SYSTEM 4, REPORT]
7 .
PAGE
COUNTER=OFF
2. ON]
OFF
[1.
7. PAGE
[1. OFF
PROGRAM
3. SYSTEM 4
COUNTER=ON
2. ON]
DATE 2. TEL
[1.
. REPORT]
MENU
Press MENU to end the operation.
1-16
THU JUN
15
5:00PM 00
Page 38

REMOTE FAX ID
A remote Fax ID is to prevent unauthorized persons accessing your unit from a remote location. A remote Fax ID can be
any of following ranges:
We recommend you to set different number from ATAS ID (page 2-3), to prevent accessing the answering machine.
1 digit: 1 to 9 2 digits: 10 to 99
3 digits: 100 to 999 4 digits: 1000 to 9999
Setting Remote Fax ID
MENU
#
0
CZD
SET
__
8
Press MENU 4 times.
•The PROGRAM indicator will light.
•This display will appear.
Press then press ”08”.
Press ”2”, then press SET to set to ON.
Press then press “09”.
PROGRAM [1. DATE 2. TEL
3. SYSTEM 4. REPORT]
8. REMOTE FAX ID=OFF
[1. OFF 2. ON]
8. REMOTE FAX ID=ON
[1. OFF 2. ON]
PROGRAM [1. DATE 2. TEL
3. SYSTEM 4. REPORT]
9. ENTER YOUR REMOTE
FAX ID=2222
Example: ID is 5678.
SET
MENU
Enter the desired remote Fax ID, then press SET.
9. ENTER YOUR REMOTE
FAX ID=5678
8
PROGRAM [1, DATE 2. TEL
3. SYSTEM 4. REPORT]
Press MENU to end the operation.
1-17
Page 39

Transmitting a Document with Remote Fax iO to Your KX-F220 from a Remote Location
1
Example: ID is 5678.
Call your unit.
When the OGM is heard, press then
enter the remote FAX ID.
•OGM is stopped, then the answering
carrier tone is heard.
Start transmission after hearing the
answering carrier tone.
1-18
Page 40

SETTING THE “MESSAGE OUT”
This function offers you to put your message on top of transmitted document. You may choose the message from the
following selections. The message has been preset to “OFF” at the factory.
A: CONFIDENTIAL***
B: *** IMMEDIATE REPLY REQUESTED***
C: You can program a message of your own.
OFF: No message.
Example: A
TROM : Panasonic
Example: B
FROM : Panasonic AUG.29.1989 i:23 PM PI
Example: C
Programmed message
MENU
*** CONFIDENTIAL ***
Xi** irtlEDIATE REPLY REQUESTED ***
Press MENU 4 times.
•The PROGRAM indicator will light.
•This display will appear.
flUG.29. 1989 i:i7 PM PI
PROGRAM [1. DATE 2. TEL
3* SYSTEM 4. REPORT]
Press“#”, then press“06”
1-19
6. MESSAGE OUT=OFF
[1
OFF 2.
A 3. B 4. C]
Page 41

Press the buttons as follows.
Selecting A mode ^ CONFIDENTIAL ^ ^ )
ABC 2
CZD
SET
Selecting B mode * IMMEDIATE REPLY REQUESTED ^)
SET
Selecting C mode (your own message)
czi:
SET
Example: U
Press “2”, then press SET.
Press “3”, then press SET.
Press 4, then press SET then enter a
sentence you wish to print using the
ONE TOUCH station button up to 64
characters.
{e.g. If the message is “URGENT!”)
•For the usage of the ONE TOUCH
station button, see the page 19 in the
INSTALUTION MANUAL,
MESSAGE
6.
OFF 2. A 3. B 4, C]
[1
OUT=A
PROGRAM [1. DATE 2. TEL
3. SYSTEM 4. REPORT]
6.
[1
MESSAGE
OFF 2 .
OUT=B
A3. B 4. C]
PROGRAM [1. DATE 2. TEL
3. SYSTEM 4. REPORT]
6.
[1
MESSAGE
OFF 2.
OUT=C
A3. B 4. C]
PLEASE SET MESSAGE
^URGENT!
13
SET
Selecting OFF
CZD
SET
UuVv
Press SET to store it into memory.
Press “1”, then press SET.
•No message will be printed.
1-20
PROGRAM [1. DATE 2, TEL
3. SYSTEM 4. REPORT]
6.
[1
MESSAGE
OFF 2 .
OUT=OFF
A 3. B 4. C]
PROGRAM [1. DATE 2. TEL
3. SYSTEM 4. REPORT]
Page 42

TURNING ON/OFF THE AUTO RECEIVING MODE
This function allows you to make the Auto Receiving mode ON or OFF for the desired time.
Use “AUTO RCV TIMER” for programming. The Auto Receiving mode automatically turn on or off at the programmed
time.
Example: Company XYZ
Company XYZ wants the unit to set to the Auto Receiving mode automatically from 5:00 PM. to 9:00 AM.
1
Press MENU 4 times.
MENU
•The PROGRAM indicator will light.
•This display will appear.
4
#
MNO 0
----------- Press “2”, then press SET.
Press then press “16”.
PROGRAM [1. DATE 2. TEL
3. SYSTEM 4. REPORT]
16. AUTO RCV TIMER
=OFF [1. OFF 2. ON]
AUTO RCV ON TIME
12:00AM [*=AM #=PM]
SET
Example: ON time is 5:00 PM.
1-21
Page 43

Example; OFF time is 9:00 AM.
' Press MENU to end the operation.
MENU
1-22
Page 44

POLLING
Polling is that you call the other station{s) to retrieve the document.
The other party must know in adovance that you will call, and must insert a document on the document tray.
You also need to program a polling password before transmission. This “POLLING" function may be performed
between the FAX’S which have the same protocol.
Programming the Polling Password
The first step in using the polling feature is to program your polling password. The password is a 4-digit number, which is
checked during the polling operation. If the password of the polling unit and that of the unit being polled do not match,
polling cannot take place.
MENU
ABC 2
Example: Password is 1234.
■►[
SET
JKL 5
-►
Press MENU 4 times.
•The PROGRAM indicator will light.
•This display will appear.
Press then press “25”.
Enter your polling password, then
press SET to store it into memory.
•To correct an error while
programming; press CLEAR, and then
enter correct input.
PROGRAM [1. DATE 2. TEL
3. SYSTEM 4. REPORT]
25. POLLING PASSWORD
=0000
25. POLLING
=1234
PROGRAM [1.
3. SYSTEM 4.
PASSWORD
DATE 2. TEL
REPORT]
Press MENU to end the operation.
THU JUN 29
MENU
NOTE:
If the polling password is set to "0000", the unit does not check password.
The polling is allowed only between KX-F220’s which have same polling password programed.
1-23
3:00 PM 00
Page 45

Preparation for Being Polied
In order to let other stations poll your unit, you must set a document on the tray of the unit.
After being polled, the unit will automatically return to the Auto Receiving mode.
1
MENU
Press MENUS times.
•The POLLING indicator will light.
•This display will appear.
Press “4”.
POLLING [1. OFF 2. ON
3. XMT & POLL 4. POLLED
READY TO BE POLLED
PRESS SET KEY
Press SET.
SET
Insert a document FACE DOWN, then
press AUTO RECEIVE to set to the Auto
Receiving mode.
INSERT DOCUMENT
FACE DOWN
THU JUN 29
POLLED ON
3:00PM 00
When another station polls your unit,
transmission is performed automatically.
NOTE:
Polled station should be set the REMOTE FAX ID to off. See page 1 -17.
1-24
Page 46

Single Station Polling
The following procedure lets you poll one station
POLLING (CONT.)
1
; dZ
Example: The polled station is the ONE-TOUCH station 8.
8 I .
MENU
SET
I by using the One-Touch dialing, Speed
-rL^ dialing or a full number.
Press MENU 3 times.
•The POLLING indicator will light,
•This display will appear.
Press “2”.
Press SET.
Enter the facsimile telephone number
POLLING [1. OFF 2. ON
3. XMT & POLL 4. POLLED]
POLLING ON
PRESS SET KEY
ENTER PHONE NUMBER
[01]
ENTER PHONE NUMBER
=<S08> [01]
-dialed number or
station name
I I ^ I
SET SET
Press SET twice.
•When you use a full number, press the
SET button once.
1-25
DELAYED POLL=OFF
[1. OFF 2. ON]
Page 47

Press SET.
•If you want to perform the delayed polling,
see page 1-31.
Press START/COPY.
• Polling will be performed.
DIALING <POLL>
TO: XXXXXXX
4-
POLLING
FROM: XXXXXXX
-dialed number or
station name
NOTE:
•For successful polling, the polled station must make preparations. Refer to page 1 -24.
• If the polled station is busy or there is no answer, the unit will automatically redial the number up to 6 times within a
10-minute period. If you receive or make another call during automatic redial period, the redial will be canceled.
1-26
PI
Page 48

POLLING (CONT.)
ss..»
Multi Station Polling
If you want to poll two or more stations, you can poll up to 40 stations in one operation. However, you must use ONE-
TOUCH and/or SPEED DIAL stations.
MENU
ABC
2
Press MENUS times.
•The POLLING indicator will light.
•This display will appear.
Press “2”.
POLLING [1. OFF 2, ON
3. XMT & POLL 4. POLLED]
POLLING ON
PRESS SET KEY
4
Press SET.
SET
Example: The polled stations are the One-Touch station 8 and the SPEED DIAL station 00.
Enter the phone number by using
One-Touch dialing and/or Speed dialing,
4-
IZZ)
SET
then press SET.
ENTER PHONE NUMBER
ENTER PHONE NUMBER
=<S08> [01]
[ 0 1 ]
AUTO
OPER
Q
SET
0
1-27
ENTER PHONE NUMBER
=<A00> [02]
Page 49

POLLING
• • •
—i
^ I
/1
C
SET
CZD
SET
START/COPY
Press SET.
•If you want to perform the delayed polling,
seepage 1-31.
Press SET.
Press START/COPY.
• Polling will be performed.
DELAYED POLL=OEF
[1. OFF 2. ON]
DIALING <POLL>
TO: XXXXXXX
POLLING
FROM: XXXXXXX
NOTE:
•For successful polling, the polled station must make preparations. Refer to page 1-24.
• If one of the polled stations is busy or there is no answer, the station is skipped. Then the unit will automatically dial
the next selected station. The skipped station(s) will be redialed 6 times after all selected stations have been called.
PI
1-28
Page 50

POLLING
(CONT.)
XMT
POLLING
Turnaround Polling
Turnaround polling is a combination function, and you do two operations automatically with making one call. First, the
unit will transmit a document to a station, and then it will poll the same station.
Press MENU 3 times.
1/ c
Example: The turnaround polled station is the ONE-TOUCH station 9.
MENU
SET
9 r ~ J
•The POLLING indicator will light.
•This display will appear.
Press “3”.
Press SET.
Enter the phone number by using OneTouch dialing. Speed dialing or a full
number.
POLLING [1. OFF 2. ON
3. XMT & POLL 4. POLLED]
XMT & POLL ON
PRESS SET KEY
ENTER PHONE NUMBER
=<S09>
-dialed number
or station name
SET
Press SET.
DELAYED XMT & POLL=OFF
[1. OFF 2. ON]
1-29
Page 51

Press SET.
• If you want to perform the delayed
SET
turnaround polling, see page 1-33.
Insert a document FACE DOWN.
INSERT DOCUMENT
FACE DOWN
Press START/COPY.
•The documents will be transmitted.
After the transmission, the unit will
automatically switch to polling mode and
poll the remote station.
NOTE:
•For successful polling, the polled station must make preparations. Refer to page 1 -24.
1-30
DIAL I
TO: XXX
NG <XMT & POLL>
XXX
---station name
POLLING
FROM: XXXXXXX
dialed number or
Page 52

POLLING
(CONI.)
Delayed Polling
By programming the unit with a starting time and a facsimile telephone number, you can automatically perform polling
function. This operation can be reserved to take place up to 24 hours after setting the timer.
If you enter a full number, you poll single station alone.
Press MENU 3 times.
•The POLLING indicator will light.
MENU
SET
Example: The polled station is the One-Touch station 8.
------
[ Enter the phone number by using
8 1
SET
“3 1 One-Touch dialing, speed dialing or a full
•This display will appear.
Press “2”.
Press SET.
number.
Press SET twice.
•If you want to add more stations, repeat
step 2.
POLLING [1* OFF 2. ON
3. XMT & POLL 4. POLLED]
POLLING ON
PRESS SET KEY
ENTER PHONE NUMBER
=<S08> [01]
■dialed number
DELAYED POLL=OFF
[1. OFF 2. ON]
1-31
Page 53

Example: The starting time is 8:00 PM.
Press “2”, then press SET.
SET POLLING TIME
12:00 AM [+=AM #=PM]
Enter the time at which the fax is to be
transmitted.
•Press or “#” to select AM/PM mode.
Press SET.
SET POLLING TIME
08:00 PM [*=AM #=PM]
THU JUN29 3:00PM 00
POLLING AT 8:00PM
NOTE:
•Automatic and manual reception, transmission and copying function can be performed when delayed polling is set.
• If there is no answer or the line is busy when performing the delayed polling, the unit will automatically redial the
number, up to 6 times within a 10-minute period.
•You cannot set a new Delayed Polling before receiving documents reserved by the previous Delayed Polling setting.
Otherwise the previous setting will be overridden.
1-32
Page 54

POLLING
XMT POLL
(CONTO
Delayed Turnaround Polling
By programming the unit with a starting time and a facsimile telephone number, you can automatically perform
turnaround polling function. This operation can be reserved to take place up to 24 hours after setting the timer.
Press MENUS times.
MENU
SET
Example: The polled station is ONE-TOUCH station 8.
•The POLLING indicator will light.
•This display will appear.
Press “3”.
Press SET.
Enter the phone number by using
One-Touch dialing, Speed dialing or a full
number.
POLLING [1. OFF 2. ON
3. XMT & POLL 4. POLLED]
XMT & POLL ON
PRESS SET KEY
ENTER PHONE NUMBER
=<5-Q8>
-dialed number
or station name
SET
Press SET.
•If you want to add more stations, repeat
step 2.
1-33
DELAYED XMT & POLL=OFF
[1. OFF 2. ON]
Page 55

Example; The starting time is 8:00 PM.
Press “2”, then press SET.
Enter the time at which the fax Is to be
transmitted.
•Press or “#” to select AM/PM mode.
Press SET.
SET START TIME
12:00 AM [*=AM #=PM]
SET START TIME
08:00 PM [+=AM #PM]
INSERT DOCUMENT
FACE DOWN
Insert a document FACE DOWN.
THU JUN
29 05 :00 PM 00
XMT&POLL AT800PM
NOTE:
•Automatic and manual reception, transmission and copying function can be performed when delayed turnaround
polling is set.
• If there is no answer or the line is busy when performing the delayed turnaround polling, the unitwill automatically
redial the number, up to 6 times within a 10-minute period.
•You cannot set a new Delayed Turnaround Polling before the previous Delayed Turnaround Polling is performed.
Otherwise the previous setting will be overridden.
1-34
Page 56

PROGRAMMING AUTOMATIC DIALING NUMBERS
Programming One-Touch Dialing Numbers
You can program up to 24 facsimile telephone numbers and station names. Telephone numbers may be programmed
up to 30 digits long. Station names may be programmed up to 16 alphanumeric characters (including symbols).
Example:
Program the facsimile number 123-4567 and station name into the station 7.
Press MENU 4 times.
•The PROGRAM indicator will light.
MENU
1 Press
Example: Program the facsimile number 123-4567 into the station 7.
PHS 7
•This display will appear.
Press a ONE TOUCH station.
Enter the facsimile telephone number.
•To correct an error while
programming; press the CLEAR button,
and then enter correct input.
• Pressing the HYPHEN button once counts
as 2 digits.
PROGRAM [1. DATE 2, TEL
3. SYSTEM 4. REPORT]
SELECT AUTO OR
ONE TOUCH KEY
ENTER PHONE NO. <S07>
ENTER PHONE NO. <S07>
=123-4567
SET
Press SET to store it into memory.
1-35
ENTER NAME
Page 57

Example: Program the station name into the station 7.
Enter the station name using the ONE-
TOUCH station (as character key) and the
dial keypad.
SET
•Refer to “How to Use the Character
Keys" on page 19 in INSTALLATION
MANUAL.
ENTER NAME
Press SET to store it into memory.
•To enter facsimile number and station
name in succession;
repeat steps 2 and 3.
After programming all the numbers, press
MENU
To enter the station name, use the character (station) keys on the Memory card and 0 through 9, * and # on the dial
keypad. But you cannot use the SECRET key.
MENU again.
•The PROGRAM indicator will go out.
SELECT AUTO OR
ONE TOUCH KEY
THU JUN 15 05:30PM 00
□ E3EU
EH ED EH
E3E3EI
aaa
Dial Keypad
Character keys
1-36
Command keys
Page 58

PROGRAMMING AUTOMATIC DIALING NUMBERS
(cont.)
Programming Speed Dialing Numbers
The unit allows keys “0” to “9” on the dial pad to be used for an additional 100 memory stations. These stations can
be accessed by dialing two digits {“00” through “99”). Telephone numbers may be programmed up to 30 digits long.
Station names may be programmed up to 16 alphanumeric characters (including symbols).
Example:
Program the facsimile number 987-6543 and station name into the station 00.
Press MENU 4 times.
1
MENU
Example: Program the facsimile number 987-6543 into the station 00.
•The PROGRAM indicator will light.
•This display will appear.
Press “2”.
Press AUTO, then enter the station
number (00 to 99).
Enter the telephone (or facsimile) number.
•Pressing the HYPHEN button once counts
as 2 digits.
PROGRAM [1. DATE 2, TEL
3. SYSTEM 4. REPORT]
SELECT AUTO OR
ONE TOUCH KEY
ENTER PHONE NO. <A00>
ENTER PHONE NO. <A00>
=987-6543
SET
Press SET to Store it into memory.
ENTER NAME
1-37
Page 59

Example: Program the station name into station 00.
Enter the station name using the ONE
TOUCH station (as character key) and the
dial keypad.
SET
•Refer to “How to Use the Character
Keys’’ on page 19 in INSTALLATION
MANUAL.
Press SET to store it into memory.
•To enter number and station name in
succession;
repeat steps 2 and 3.
ENTER NAME
SELECT AUTO OR
ONE TOUCH KEY
After programming all the numbers,
MENU
To enter the station name, use the character (station) keys on the Memory card and 0 through 9, * and # on the dial
keypad. But you cannot use the SECRET key.
press MENU again.
•The PROGRAM indicator will go out.
THU JUN 15 5:50PM 00
QEUEi]
SEE ED
EgHQ]
1
----
1 1 _ 1
(=□
Dial Keypad
Character keys
1-38
Command keys
Page 60

PROGRAMMING AUTOMATIC DIALING NUMBERS
(cont.)
Programming as Secret Phone Numbers
This function is useful for keeping a facsimile/phone number (or a portion of it) secret, when you print out the list of
facsimile/phone numbers.
Example:
Program the facsimile number 654-3210 and station name into the ONE TOUCH station 8 as a secret number.
1
MENU
Example: Program the facsimile number 654-3210 into the ONE TOUCH station 8 as a seacret number.
SECRET
]
-►
ABC
2
0
SECRET
Press MENU 4 times.
•The PROGRAM indicator will light.
•This display will appear.
Press “2”.
Press the ONE TOUCH station 8.
Press SECRET (PRIORITY 6), the
telephone number, then press
SECRET.
•To correct an error while
programming; press the CLEAR
button, and then enter the correct
input.
• Pressing the SECRET button once
counts as 2 digits.
PROGRAM [1. DATE 2. TEL
3. SYSTEM 4. REPORT]
SELECT AUTO OR
ONE TOUCH KEY
ENTER PHONE NO. <S08>
ENTER PHONE NO. <S08>
=[6543210]
(ZZ!
SET
Press SET to store it into memory.
1-39
ENTER NAME
Page 61

Example: Program the station name into the ONE TOUCH station 8.
Enter the station name using the ONE-
TOUCH station (as character key) and the
c
SET
dial keypad.
•Refer to "How to Use the Character
Keys" on page 19 in INSTALLATION
MANUAL.
Press SET to store it into memory.
•To enter number and station name in
succession; repeat steps 2 and 3.
ENTER NAME
SELECT AUTO OR
ONE TOUCH KEY
After programming all the numbers,
THU JUN 15 05:50PM 00
MENU
press MENU again.
•The PROGRAM indicator will go out.
To enter the station name, use the character (station) keys on the Memory card and 0 through 9, * and # on the dial
keypad. But you cannot use the SECRET key.
PHlOftlTtS p-
------------
QEllQ
HPi]
QSQ
mtùMii 1 ^ ^
e j
'
3
1-----,
1 )
n ^ ^
---------------------------------
1, 1 " """1
» 1
---------------------------------
-
« 1 ■ ■■■
1
1
?r j
----------------------------
I
------------
1
PniORlTV4 ^ ^
" 1
------------------------------
» f
" 1---------------------------------1
20 1 1
VftCi
J
1^ t
------------------------------
1 (fiiOUHyt,
^ 1 “ 1
-------------------------------
1 >
Dial Keypad
Character keys
1-40
Command keys
Page 62

USING THE PRIORITY BUTTONS
The unit has 6 PRIORITY buttons. These buttons can store communications parameters (XMT, POLL, XMT & POLL)
and starting time (Delayed communications) as well as a phone number in one station. This is very useful when you
have to transmit or poll documents frequently to specific phone numbers.
You may program a desired function described below into a PRIORITY button. Programming and Calling are
explained after this page.-
•One-Touch Dialing (page 1 -5) »Delayed Transmission (page 1 -9) «Single Station Polling (page 1 -25)
•Multi Station Polling (page 1-27) «Turnaround Polling (page 1-29)
Press MENU 4 times, then press “2’
•The PROGRAM indicator will light.
MENU
Example: Program into a PRIORITY 1.
Press a PRIORITY (#1 through #6).
PRIORITY1
Press “2”, then press SET.
•If you use this button as an One-Touch
station, press “1" instead of “2", then
enter the phone number and station
name. Refer to page 1 -35.
SET
PROGRAM [1. DATE 2. TEL
3. SYSTEM 4. REPORT]
SELECT AUTO OR
ONE TOUCH KEY
PRIO. 1 MODE=DIAL
[1, DIAL 2. PROG.]
PRIO. 1 MODE=PROG.
[1. DIAL 2. PROG.]
MODE=XMT [1. XMT
2. POLL 3. XMT&POLL]
OR
OR
Press “1 ”, ”2” or “3” as needed, then
press SET.
(E) Press “1” for XMT.
(Go to page 1 -43.)
Press “2” for POLL.
(D (Go to page 1-44 for single polling.)
(g) (Go to page 1 -45 for multi polling.)
(B) Press “3” for XMT&POLL
(Go to page 1-47.)
1-41
MODE=XMT [1. XMT
2. POLL 3. XMT&POLL]
MODE=POLL [1. XMT
2. POLL 3. XMT&POLL]
MODE=XMT&POLL [1. XMT
2. POLL 3. XMT&POLL]
Page 63

Programming Flowchart
iii When Delayed Communication is set to OFF, “SET START TIME" is not displayed.
1-42
Page 64

USING THE PRIORITY BUTTONS
A: Programming Delayed XMT (Transmission)
Enter phone number using one of the following ways.
(CONT.)
■ One-Touch dialing:
Speed dialing:
1
AUTO
4-
0
Station No.
Manual dialing:
Press a ONE-TOUCH station,
(e.g. If the station number is 7.
Press AUTO and station number
(2 digits).
(e.g. If the station number is 00.)
Dial the number with dial keypad.
(e.g. If the phone number is 1234567.)
Press SET.
ENTER PHONE NUMBER
=<S07>
ENTER PHONE NUMBER
=<A00>
ENTER PHONE NUMBER
=1234567
DELAYED XMT=OFF
(1. OFF 2. ON]-
Press “2”, then press SET.
SET
Example; The starting time is 11:00 PM.
\ ^ouR I Enter starting time, then press SET.
1
SET
I
I
n
I
I
I
I
Press MENU to end the operation.
I PM !
1
0
MENU
E
OPEFI Q
► cz?
DELAYED XMT=ON
[1. OFF 2. ON]
SET START TIME
12:00AM [*=AM #=PM]
SET START TIME
11:00PM [*=AM #=PM]
SELECT AUTO OR
ONE TOUCH KEY
1-43
Page 65

B; Programming POLL (Single Polling)
AS/ Enter phone number using one of the following ways.
■ One-Touch dialing:
Speed dialing:
Station No.
Manuaidiaiing:
SET
Press a ONE-TOUCH station,
(e.g. If the station number is 7.)
Press AUTO and station number
(2 digits).
{e.g. If the station number is 00.)
Dial the number with dial keypad.
{e.g. If the phone number is 1234567.)
Press SET.
ENTER PHONE NUMBER
=<S07> [01]
ENTER PHONE NUMBER
=<A00> [01]
ENTER PHONE NUMBER
=1234567
DELAYED POLL=OFF
[1. OFF 2. ON]
Select desired mode.
MENU
Press MENU to end the operation.
1-44
Page 66

USING THE PRIORITY BUTTONS (CONT.)
C; Programming POLL (Multi Polling)
Before programming multi polling, the desired phone numbers must be stored into ONE-TOUCH stations and/or
SPEED DIALING stations.
Enter phone numbers using one of the following ways.
■ One-Touch dialing:
-
--------------------------
Speed dialing:
station No.
-
1 oik
Press a ONE-TOUCH station.
(e.g. If the station number is 7.)
Press AUTO and station number
(2 digits).
(e.g. If the station number is 00.)
Press SET.
Repeat steps (4C) and (5C) for storing
phone numbers (up to 40 stations).
ENTER PHONE NUMBER
=<S07> [01]
ENTER PHONE NUMBER
=<A00>
ENTER PHONE NUMBER
[01]
[02]
After storing all the numbers, press SET
again.
1-45
DELAYED POLL=OFF
[1. OFF 2. ON]
Page 67

Select desired mode.
■ If you do not need to
set the timer;
1
I
If you want to perform
delayed multi polling; Press “2”, then press SET. And enter
[
-►IT“
SET
HOUR
MINUTE
Press “1”, then press SET.
the desired time, then press SET.
(If the starting time is 11:00 P.M.)
0
T
I
PM
¡-►L
SET
1
#
L.
_ _ _ _ _ _ _ _
j
SELECT AUTO OR
ONE TOUCH KEY
DELAYED POLL=ON
[1. OFF 2. ON]
SET POLLING TIME
11:00AM [1. *=AM 2.#=PM]
MENU
Press MENU to end the operation.
THU JUN 29 3:00PM 00
1-46
Page 68

USING THE PRIORITY BUTTONS
D; Programming XMT & POLL (Turnaround Polling)
Enter phone number using one of the following ways.
(CONT.)
■ One-Touch dialing:
Speed dialing:
Manual dialing:
SET
Press One-Touch station.
(e.g. If the station number is 7.)
Press AUTO and station number
(2 digits).
(e.g. If the station number is 00.)
Dial the number with dial keypad.
(e.g. If the phone number is 1234567.)
Press SET.
ENTER PHONE NUMBER
=<S07>
ENTER PHONE NUMBER
=<A00>
ENTER PHONE NUMBER
=1234567
DELAYED XMT&POLL=OFF
[1. OFF 2. ON]
Select desired mode.
■ If you do not need to
set the timer;
1
If you want to perform
delayed polling;
HOUR
1
—
■►a
MENU
SET
SET
1
hi
Press “1 ”, then press SET.
Press “2”, then press SET. And enter
the desired time, then press SET.
(If the starting time is 11:00 P.M.)
PM
;
1
i“i
1 '
#
□PER
Q
MINUTE
OPER 0
Press MENU to end the operation.
SELECT AUTO OR
ONE TOUCH KEY
DELAYED XMTiPOLL=ON
[1. OFF 2. ON]
SET START TIME
11:00PM [*=AM #=PM]
SET
1-47
Page 69

Calling with Priority Buttons
Delayed XMT
Example: Using PRIORITY button 1 to stores “XMT at 11:00 PM."
Insert a document FACE DOWN,
PRIORITY1
^ I then press the desired PRIORITY.
When the programmed time comes, the
unit starts transmission automatically.
THU JUN 29 3:00PM 00
XMT AT 11:00PM
■ To cancel;
Press STOP, then press “1 ”.
POLLING
Example: Using PRIORITY button 2.
Press the desired PRIORITY.
PRIOR1TY2 I
-----------
----------
>1
The unit starts polling.
■ To cancel;
Press STOP.
Delayed polling;
When the programmed time comes, the
unit starts polling automatically.
CANCEL DELAYED
XMT? [1. YES 2. NO]
DIALING <POLL>
TO: xxxxxxx
Station name
-----
or dialing number
THU JUN 29 3:00PM 00
USER STOPPED
THU JUN 29 3:00PM 00
POLLING AT 11:00PM
■ To cancel;
Press STOP, then press “1”.
1-48
CANCEL DELAYED
POLLING? [1. YES 2. NO]
Page 70

USING THE PRIORITY BUTTONS
Calling with Priority Buttons (com.)
XMT&POLL
Example: Using PRIORITY button 3.
Insert a document FACE DOWN,
PRIORITY3
then press the desired PRIORITY.
The unit starts turnaround polling.
(CONT.)
DIALING <XMT£P0LL>
TO:
■ To cancel;
Press STOP.
Delayed polling:
When the programmed time comes, the
unit starts polling automatically.
■ To cancel;
Press STOP, then press “1”.
THU JUN 29 3:00PM 00
USER STOPPED
THU JUN 29 3:00PM 00
XMT&POLL AT 11:00PM
CANCEL DELAYED XMT&
POLL? [1. YES 2 . NO]
NOTE:
•Automatic and manual reception, transmission and copying function can be performed when delayed transmission is
set. To copy another document, remove the document on the tray and replace it when you finish.
•If the line is busy when performing the delayed transmission, the unit will automatically redial the number, up to
6 times within a 10-minute period.
•When you use the PRIORITY button as a One-Touch station button, refer to page 1 -5.
1-49
Page 71

PASSWORD COMMUNICATIONS
This feature is effective only between Panasonic compatible machines.
Password communications helps you to transmit a document to the specific station. It will also be helpful in preventing
your unit receiving from unauthorized station.
When password communications is used, the identical main password {a 4-digit number) must be programmed on
both sides of the line. The unit checks the password either before transmitting or receiving a document.
The KX-F220 has two password communications functions. They are TX (transmission) password check mode and
RX (receiving) password check mode.
TX Password Check:
This function checks the password before transmitting a document. If the password sent from the other KX-F220 does
not match with the one programmed in your KX-F220, transmission will be prohlbitted.
23. TX PASSWORD CHECK
=OFF [1. OFF 2. ON]
RX Password Check:
This function checks the password before receiving a document. If the password sent from the other KX-F220 does not
match with the one programmed in your KX-F220, receiving will be prohibitted.
24. RX PASSWORD CHECK
=OFF [1. OFF 2. ON]
NOTE:
The Polling Function always performs independently, not related to the password communications feature.
1-50
Page 72

PASSWORD COMMUNICATIONS (CONT.)
Information of the Password Communications
Before using password communications, check that your password and the other station’s password are identical and
you set “SEND PASSWORD” to ON.
■ When you want to transmit a document only to specific people (TX password check mode):
Set “TX PASSWORD CHECK” to ON. (See the Table 1 below.)
FUNCTION
SEND PASSWORD ON
TX PASSWORD CHECK ON
RX PASSWORD CHECK OFF
YOUR
KX-F220
OTHER
KX-F220
ON
ON/OFF
ON/OFF
<Table 1>
THU JUN29 3:00PM 00
TX PASSWORD CHECK ON
•Your unit transmits a document only when the correct password is received.
When you want to receive a document only from specific people (RX password check mode):
Set “RX PASSWORD CHECK” to ON. (See the Table 2 below.)
FUNCTION
YOUR
KX-F220
OTHER
KX-F220
SEND PASSWORD ON
TX PASSWORD CHECK
RX PASSWORD CHECK ON
OFF
THU JUN29 3:00PM 00
RX PASSWORD CHECK ON
•Your unit receives a document only when the correct password is received.
1-51
ON
ON/OFF
ON/OFF
<Table 2>
Page 73

When you want to send a document to and receive a document from specific peopie. (TX password check and RX password check mode);
Set "TX PASSWORD CHECK" and “RX PASSWORD CHECK" to ON. (See the Table 3 below.)
FUNCTION
SEND PASSWORD
TX PASSWORD CHECK
RX PASSWORD CHECK
YOUR
KX-F220
ON
ON
ON ON/OFF
OTHER
KX-F220
ON
ON/OFF
<Table3>
THU JUN29 3:00PM 00
TX PASSWORD CHECK ON
THU JUN29 3:00PM 00
RX PASSWORD CHECK ON
•Your unit transmits and receives a document only when the correct password is received.
When you want to have facsimile communications only within a group of people:
All the people in the group must set both “TX PASSWORD CHECK” and “RX PASSWORD CHECK" to ON.
(See the Table 4 below.)
FUNCTION
YOUR
KX-F220
OTHER
KX-F220
SEND PASSWORD ON
TX PASSWORD CHECK
RX PASSWORD CHECK
ON
ON ON
ON
ON
<Table4>
THU JUN29 3:00PM 00
TX PASSWORD CHECK ON
THU JUN29 3:00PM 00
RX PASSWORD CHECK ON
•Only people who share the identical password can transmit and receive a document each other.
1-52
Page 74

PASSWORD COMMUNICATIONS
Programming the Password Communications
(CONTO
MENU
#
Example; Password is 1234.
GHI ^
Press MENU 4 times.
•The PROGRAM indicator will light.
•This display will appear.
Press then press “21 ”.
Enter your password (4 digits), then
press SET.
•0000 is not effective as a password.
PROGRAM [1. DATE 2. TEL
3. SYSTEM 4. REPORT]
21. MAIN PASSWORD
=0000
21. MAIN PASSWORD
=1234
PROGRAM [1. DATE 2. TEL
3. SYSTEM 4. REPORT]
#
□ZD
SET
Press then press “22”.
—t
I
Press “2”, then press SET.
22. SEND PASSWORD=OFF
[1. OFF 2. ON]
22. SEND PASSWORD=ON
[1. OFF 2. ON]
PROGRAM [1, DATE 2. TEL
3. SYSTEM 4. REPORT]
1-53
Page 75

Press then press “23”.
#
23. TX PASSWORD CHECK
=OFF [1. OFF 2. ON]
8
To set “TX PASSWORD CHECK” on;
2 ^
To set “TX PASSWORD CHECK” off;
T1
SET
----------
1 . Press then press “24”.
#1 ^
ABC 2
Press “2”.
Press “1”.
Press SET.
23. TX PASSWORD CHECK
=ON [1. OFF 2. ON]
23. TX PASSWORD CHECK
=OFF [1. OFF 2. ON]
PROGRAM [1. DATE 2. TEL
3. SYSTEM 4. REPORT]
24. RX PASSWORD CHECK
=OFF [1. OFF 2, ON]
To set “RX PASSWORD CHECK” on;
Press “2”.
To set “RX PASSWORD CHECK” off;
1
SET
4^
MENU
Press “1”.
Press SET.
Press MENU to end the operation.
24. RX PASSWORD CHECK
=0N [1. OFF 2. ON]
2'4. RX PASSWORD CHECK
=OFF [1. OFF 2. ON]
PROGRAM [1. DATE 2 . TEL
3. SYSTEM 4. REPORT]
1-54
Page 76

PASSWORD COMMUNICATIONS
(CONT.)
Password Communications
Password communications is activated with the MAIN PASSWORD {refer to page 1-53).
However, you may change or cancel the password temporarily by using MENU button (XMT RESERVATION,
DELAYED XMT, and XMT & POLL) when “SEND PASSWORD” or “TX PASSWORD CHECK" is set to ON.
This feature is useful when you need to transmit a document to a station which has a different password or no password
programmed.
Example: Using XMT RESERVATION
1
PHONE NO.
SET
To use the main
password.
To cancel the
password
temporarily.
Insert a document FACE DOWN.
Press MENU, then enter a phone
number.
Press SET.
Press to send the main password
(programmed password).
Press “#” to skip the password.
XMT RESERVATION
ENTER PHONE NUMBER
PASSWORD=MAIN [* =MAIN
#=NONE OR 4 DIGITS]
PASSWORD=NONE [* =MAIN
#=NONE OR 4 DIGITS]
To change the
password
temporarily.
JKL 5
PRS 7
MNO 0
TUV p
When you need to send a different
password, enter the numbers using
dial keypad.
(If the password is 5678.)
Press SET.
•The unit starts transmission.
1-55
PASSWORD=5678 [+ =MAIN
#=NONE OR 4 DIGITS]
DIALING <XMT>
TO:XXXXXXX
-Dialed number
Page 77

Programming Different Passwords into Priority Buttons
You may program different passwords into priority keys when “SEND PASSWORD" or “TX PASSWORD CHECK" is
set to ON. This feature is useful when you frequently transmit a document to people who have a different password
(including no password).
a / Program transmitting mode and the phone
* / number you need.
(Refer to pages 1-41 to 1-47).
Press SET.
PASSWORD=MAIN [+ =MAIN
#=NONE OR 4 DIGITS]
To use the mian
password.
TONtS^ hi
To program no password.
To programa different password.
JKL 5
MNO 0
8
SET
Press to send the main password
(programmed password).
Press to skip the password.
When you need to send a different
password, enter the numbers using
dial keypad.
(e.g. If the password is 5678.)
Press SET and go-to the next step.
(Refer to pages 1 -41 to 1 -47.)
PASSWORD=NONE [+ =MAIN
#=NONE OR 4 DIGITS]
PASSWORD=5678 [* =MAIN
#=NONE OR 4 DIGITS]
DELAYED XMT=OFF
[1. OFF 2. ON]
NOTE:
When a password is not programmed into a priority button, the main password is automatically sent if “SEND
PASSWORD” is set to ON.
1-56
Page 78

PRINTING REPORTS AND LISTS
Activity Report (JOURNAL Report)
The JOURNAL is a record of the last 30 transactions (transmission and receptions). When you set the JOURNAL to
AUTO, it is printed automatically after every 30 transactions. It may also be printed on request.
This function has been preset to AUTO (Default).
Selection is as follows:
•AUTO ...................... Prints a report every 30 transactions automatically.
• MANUAL................. Prints a report of last 30 transactions.
*
(3)
No.
01
1;
¥■
02 Panasonic C
03 Panasonic fl
04
05 Panasonic fl
06 1238756
07 Panasonic B
(4)
OTHER FPCSIMILE
Panasonic C
Panasonic B
Explanation of JOURNAL
(1) Print date: Month/Date/Year
(2) Print time: HourMinute
(3) Communication number (up to 30)
(4) Dial number
5263057: The other party’s number dialed
manually is 5263057.
INCOMING: Document or telephone call is
received.
Company XXXXX; Station name
(5)
START TIME
JLIL.29 3:04FH 00’31
JUL.29
JUL.29
JUL.29 3:08PH 00’58
JUL.29 3:10PM
JUL. 29
JUL. 29 3:15PN 00’34
3:-05PH
3:07PM
3:13PM 00’35
(6)
USAGE TIME
00’39
00’19
00’28
(5) Communication start time
(6) Usage time: Minute’Seconds
(7) Number of pages transmitted successfully
(8) Number of pages recieved successfully
(9) Communication result
OK: Successful communication
Numeral: Error code (See ERROR CODE below)
(1)
JUL.29.1989
TX PAGES
(2)
3:16 PH
(7)
01 00 OK
00 B1
00
01 01 OK
01 00 OK
00 00
00 01 OK
(8)
RX PAGES
00
RESULT
(9)
OK
IIGC02)
MGC02J
*
*:
CODE
01
When the power supply overheats.
DESCRIPTION
Allow unit to cool.
02
When transmission is interrupted by pushing
the STOP/CLEAR button.
03
When a document is jammed or does not
feed into the unit.
Check paper path.
04
When transmission/reception error occurs.
05 When the printhead overheats.
Allow unit to cool.
CODE
DESCRIPTION
06 When the unit is out of paper.
Check paper.
07 When the cover is opened.
Check Cover Latch.
08 When the paper is jammed.
Re-install the recording paper.
09
When Password Communication failed.
Confirm that your password correcponds to
the other facsimile unit.
1-57
Page 79

Setting JOURNAL Report
MENU
Press the buttons as follows.
To set the JOURNAL to AUTO
1
Press MENU 4 times.
•The PROGRAM indicator will light.
•This display will appear.
Press then press “04”.
Press “1”.
•The Journal report will be automatically
printed when the memory becomes full
(30 transactions). The journal memory will
then be cleared.
PROGRAM [1, DATE 2 , TEL
SYSTEM 4 . REPORT]
3.
JOURNAL=
4.
[1
AUTO 2.
AUTO
MANUAL]
4. JOURNAL=AUTO
[1. AUTO 2. MANUAL]
To set the JOURNAL to MANUAL
AflC
2
MENU
Press “2”.
•The Journal report will be stored until the
memory becomes full. The oldest will be
deleted.
Press SET to store your selection.
Press MENU to end the operation.
4, JOURNAL=MANUAL
[1. AUTO 2. MANUAL]
PROGRAM [1, DATE 2. TEL
3. SYSTEM 4. REPORT]
1-58
Page 80

PRINTING REPORTS AND LISTS
Printing a JOURNAL
(CONT.)
MENU
GHI ^
OEF 3
Press MENU 4 times.
•The PROGRAM indicator will light.
•This display will appear.
Press “4”.
Press “3”.
•The unit will start printing.
•If there was no activity, no JOURNAL
will be orinted.
PROGRAM [1. DATE 2. TEL
3. SYSTEM 4. REPORT]
SELECT
2. TEL
NO.
NO.
[1
3.
SYSTEM
JOURNAL
PRINTING JOURNAL
List of Multi Roiling
When polling other units, your unit will automatically print a “MULTI POLLING REPORT’
:t
*
:«
M
CODE
NO.
01
02 <S13>
03
KEY NCk
<S07>
<AO0>
123-4567
592-1387
312-6473
DESCRIPTION
10 When multi polling communication failed. 11
I1ULTI POLLlNCi REPORT
SEP.15. 1939
PHONE NO.
PànSon1C
MatusNi ta
Jorge LoucLiS
CODE
When multi polling is canceled by the STOP
button.
:+:;t:: r t:: t: :: r: r :■(:
5:17 PM
RX PPGES
00
00 NGQl)
00
DESCRIPTION
RESULT >1-
N600) x:
NGCm M
L t A:
Error code
;K
:t.
1-59
Page 81

System Set Up List
H0O
Ö01
Ö02
Ö03
Ö04
«05
«06
«07
«03
«09
«10
«11
«12
«13
«14
«15
«16
«17
«18
«19
«20
«21
«22
«23
«24
825
«26
«27
< DELAYED
SVSTEM SETUP LIST
9/ 7/89 03:42PM
YOUR LOGO
YOUR TELEPHONE NUMBER
LOGO POSITION
PRINT JOURNAL
PRINT XI-IT REPORT
MESSAGE OUT
p = CONFIDENTIAL
E - IMMEDIATE REPLY
C =
PAGE COUNTER
REMOTE FAX ID
REMOTE FAX ID .NUMBER
REMOTE ATAS ID
RECORDING TIME
CPC MODE
AUX LEADS
DIAL PULSE
TONE DETECT
AUTO RECEIUE TIMER
AUTO RECEIUE ON TIME = 12:0OAI1 Yi
TX SPEED
RX SPEED
STAUP DEFAULT
AUTO STANDBY
MAIN PASSUORD
SEND PASSUORD
TX PASSUORD CHECK
RX PASSUORD CHECK
POLLING PASSUORD
SET DEFAULT
TEST [PRINT OR MOTOR]
MODE >
DELAYED MODE
PHONE I^MBER
PASSUORD
START TIME
=
=
=
OUT
=
AUTO
=
OFF
=
OFF
REQUESTED
=
OFF
=
OFF
=
2222
=
111
=
UOX
=
A
=
OUT
=
10PPS
=
OFF
-
OFF
=
9600BPS
=
9600BPS
=
OFF
=
ON
=
0000
=
OFF
=
OFF
=
OFF
=
0000
NO
=
OFF
=
=
0000
12:00AM
Printing System Set Up List
MENU
Press MENU 4 times.
•The PROGRAM indicator will light.
•This display will appear.
Press “4”.
Press “1”.
•The unit will start printing.
1-60
PROGRAM [1. DATE 2. TEL
3. SYSTEM 4. REPORT]
SELECT
2 . TEL
NO.
u
NO. 3.
SYSTEM
JOURNAL]
Page 82

PRINTING REPORTS AND LISTS
List of Stored Phone Numbers (TEL LIST)
TELEPHONE MUIBER LIST +
< PRIORITY KEY LIST >
i- PRIORITY 1
01 liEV MODE
02 NODE
03 PHONE NtJMEER
04 PASSUGR^i F'ROTElT
05 PASSUORD
Ob DELAYED MODE
07 START TIME
PRIORITY 2
01 KEY NODE
02 NODE
03 PHONE NUMBER
04 PASSWORD PROTECT
05 PASSWORD
,06 DELAYED NODE
07 START TINE
= PROGRAM
= XNT
= T789
= NONE
= 8000
= ON
= 12:00AN
= PROGRAM
= POLL
= S07,S13,S19
= IJOhlE
= 0000
= ON
= 1 1:0 0 hN
(CONT.)
07 T123-4567
08 T789-2ti94
09
10
11
12
13 T592-1337
14
15
16
17
18
00 T312-6473
01
02
03
04
. NO.
01
02
03
04
05
< STATION KEY LIST >
PHONE NUMBER
< AUTO KEY LIST >
PHONE NUMBER
LIST >>
T222-2222
T123-4567
T800-447-4700
T[
T333-3333
TELEPHONE NUMBER LIST
NAME
Pansoni c
Jane
NauisKi ta
NAIE
Jorge LoucuS
Secret Phone No.
19 T531-6900
20
21
22
23
24
25
26
27
28
29
30
50 T430-03O5
51
52
53
54
PHONE NUMBER
PHONE NUMBER
NAME
Karl Louis
NA'IE
Na t i ona1
Explanation of TEL LIST
•T.. .When you enter the telephone number with
setting the DIALING MODE selector to the
TONE position.
•R... When you enter the telephone number with
setting the DIALING MODE selector to the
PULSE position.
03 R526-3057
1-61
Page 83

Printing a List of Stored Phone Numbers (TEL LiST)
i ...
GHI
_____
~'TI
MENU
Press MENU 4 times.
•The PROGRAM indicator will light.
•This display will appear.
Press “4”.
)
Press “2”.
•The unit will start printing.
PROGRAM [1. DATE 2. TEL
3. SYSTEM 4. REPORT]
SELECT
2 . TEL
PRINTING PHONE LIST
NO,
NO. 3. JOURNAL]
[1
SYSTEM
1-62
Page 84

PRINTING REPORTS AND LISTS
(CONT.)
Individual Transmission Report (KMT Report)
Each time a document is transmitted, this function will cause a record of the transmission to be printed. Once this
function is set to ON, it will remain ON until it is switched OFF.
This function has been preset to OFF (Default).
Selection is as follows:
•OFF
.................
•ON....................Prints a report regardless of transmission failure.
• ERROR
X; -K
X. X<
x; Mo. OTHER FRCSIMILE STfnRT TIME USHGE TIME TX PfiGES RX PAGES RESULT x:
NO XMT report.
_____
Print a report when transmission failed.
Gl 032 4SI 7503
XX'XX:X':);X;H ::f :LX:t;X:;t;x;:№LX ;X;X:XX:X:X"L(;>KXX:X:m^X;X:X:;t:XX::(:X:t;:t:XX:XX;X;x;XX^XX:LX;X-X;t;; ::(X X
JAM. 1 7:38PH
00’58
01
00 OK
Setting XMT Report
1
MENU
#
Press MENU 4 times.
•The PROGRAM indicator will light.
•This display will appear.
Press then press “05 .
PROGRAM [1. DATE 2. TEL
3. SYSTEM 4. REPORT]
5. XMT REPORT=OFF
OFF 2. ON 3. ERROR]
[1
1-63
Page 85

To turn onXMT report
Press the buttons as follows.
To turn on XMT (ERROR) report
To turn off XMT
report
•The report will not be printed.
Press “2”.
•The report will always be printed to let you
know if the transmission is successful or
5. XMT REPORT=ON
[1. OFF 2. ON 3. ERROR]
not.
Press “3”.
•The report will be printed only when the
transmission is not successful.
Press “1”.
5. XMT REPORT=ERROR
[1. OFF 2. ON 3. ERROR]
5. XMT REPORT=OFF
[1. OFF 2. ON 3. ERROR]
MENU
Press SET to store your selection.
Press MENU to end the operation.
1-64
PROGRAM [1. DATE 2. TEL
3. SYSTEM 4. REPORT]
Page 86

MAKING COPIES
Making Copies
The unit may also be used to make copies. Any documents which can be transmitted can be copied. The unit will
automatically select FINE resolution. If you have selected SUPER FINE resolution, the unit will make copies with
Insert the a document FACE DOWN.
Interrupting Copies
Press START/COPY.
Press STOP.
•A document will be ejected.
THU JUN 29 3:00PM 00
COPYING DOCUMENT
THU JUN 29 3:00PM 00
USER STOPPED
1-65
Page 87

How to Operate
as an Answering Machine
QUICK REFERENCE CARD
FOR TONE REMOTE CONTROL
□
|Back Spacel
CHI
4
Memory Playbach Answer Back
PRS
7
OGM Rec
ABC
——A
________
Skip Forward Reset
JKL
5
TUV
8
0
FAX OGM Skip
•To set Auto Receiving mode, call your
unit and wait for 15 rings. The unit will
answer, then hang up,
•To send the document, pressQ, and
FAX 10 {if REMOTE FAX ID is set to ON.).
Then start transmission.
OEf
_______
MNO
6
WXY
9
[ PGM Stop
Page 88

PREPARING THE ANSWERING MACHINE
In this section, we are going to describe the preparation of the answering machine.
■ Recording an Outgoing Message (OGM)
■ Setting Up for Receiving Voice-Messages and a Document
(Using as an Answering Machine and a Facsimile)
■ Programming an ATAS ID Number for Remote Operation
■ Programming a Callers’ Recording Time
Recording an Outgoing Message (OGM)
To use the unit as both an answering machine and a facsimile, you should first record your Outgoing
Message.
1
OGMÌRECl
Press OGM REC until a long beep is
heard, then release it.
•The IN USE indicator will light.
THU JUN29
OGM REC »»»»
3:00PM 00
%
OGMfMcl
□
After the beep, speak immediately,
clearly and loudly into the microphone,
approximately 8 inches away.
•Recording time is 16 seconds.
•For optimum performance, record the
OGM within 12 seconds.
•Do not pause for over 2 seconds while
recording.
When recording is finished, press OGM
REC again.
•The unit will play back the OGM to confirm
your message. Adjust the VOLUME
control to an audible level.
•Verifying your OGM, press OGM PLAY.
The OGM will be played from the
microchip.
THU JUN29 3:00PM
OGM REC
THU JUN29 3:00PM 00
OGM PLAY
THU JUN29 3:00PM 00
TAPE BACK UP
■ ■■
00
»»>
»»»»
During ICM playback;
•For Back Space, press D
•For Skip Forward, pressB.
•For ICM Tape Reset, pressQ.
•To save the ICM, hang up after
playback.
•To record a marker message, speak
after hearing 2 beeps.
►When you press a button, press firmly.
Samples of OGM
“This is Panasonic Company. To send a FAX, press the asterisk (*) button. To
leave a message, speak after the long beep,".
“This is Panasonic Company. To send a FAX, press the asterisk (*) button. To
leave a message, speak up to 1 minute after the long beep."
OGM Backup
After recording your OGM on the microchip, it will be recorded onto the
tape from the microchip as a backup.
If a power failure takes place or the POWER switch is set to OFF, the OGM
recorded on the microchip will be erased. 7 seconds after the power is restored,
the unit will automatically re-record the OGM onto the microchip using the OGM
recorded on the tape.
2-1
Page 89

Setting Up for Receiving Voice^Messages and a Document (Using as an Answering Machine and a Facsimiie)
1
AN$/FAX-| pFAX
AUTO RECEIVE
Set the FUNCTION selector to the ANS/FAX
position.
•ANS/FAX position:
The unit switches between an answering
and a facsimile functions automatically.
Press AUTO RECEIVE.
•The AUTO RECEIVE indicator will light.
Press REW to record future messages
from the beginning of the tape.
When a call is received, the unit will begin playing back your OGM. Then the unit will automatically function as an
answering machine or a facsimile depending on the caller’s choice.
If the caller’s voice is not heard or the caller press the -x- button, the unit will automatically enter facsimile mode.
Voice TimelDay Stamp
When the messages are received, a voice synthesized announcement of the time and day will be recorded on the tape
after the recorded message.
2-2
Page 90

PREPARING THE ANSWERING MACHINE (CONT.)
Programming an ATAS ID for Remote Operation
An ATAS ID helps to protect you from unauthorized persons accessing your unit and retrieving your messages. The
ATAS ID number has been preset to 111 at the factory. However, you may choose another ATAS ID from within the
following ranges;
Single digit 1 to9
Doubie digit 11 to 99
Triple digit 111 to 999
Be sure the SP-PHONE indicator is off while programming.
Example:
ATAS ID is 123.
1
MENU
■ Refer to NOTE below.
Press MENU 4 times.
•The PROGRAM indicator will light.
•This display will appear.
Press then press “10”.
0
•To ensure proper operation, we
recommend you use a different ATAS
ID number from a FAX remote ID
number.
PROGRAM [l.DATE 2 . TEL
3. SYSTEM 4. REPORT]
10. ENTER YOUR REMOTE
ATAS ID=111
Example:
ATAS ID is 123.
Enter the desired ATAS ID, then press
SET to store your selection.
10. ENTER YOUR REMOTE
ATAS ID=123
PROGRAM [1.DATE 2.TEL
3. SYSTEM 4. REPORT]
Press MENU to end the operation.
MENU
NOTE:
You cannot use codes which contain zero (0) as this will cause the unit to skip the OGM. We recommend that
you do not use seven (7) as a code number, since this number is used as the OGM re-recording command for remote
operations.
2-3
THU JUN 29 3:00PM 00
Page 91

Programming a Calleras Recording Time
The recording time for Incoming Messages can be set to “VOX” or “1 MIN'
The callers’ recording time is preset to “VOX”.
Be sure the SP>PHONE indicator is off while programming.
MENU
4
Enter your selection as follows.
■ Setting to “VOX”
1
Press MENU 4 times.
•The PROGRAM indicator will light.
•This display will appear.
Press“#”, then press“11”.
Press “1”.
•The unit will record for as long as
caller speaks.
PROGRAM [1. DATE 2. TEL
3. SYSTEM 4. REPORT]
11. RECORD
VOX 2. 1 MIN]
[1.
RECORD TIME=VOX
11.
VOX 2.
[1.
TIME=VOX
1 MIN]
Setting to “1 MIN”
ABC 2 1
SET
4r
MENU
Press “2”.
•The unit will record up to 1 minute.
Press SET to store your selection.
Press MENU to end the operation.
2-4
11, RECORD TIME=1 MIN
[1. VOX 2 . 1 MIN]
PROGRAM [1, DATE 2. TEL
3. SYSTEM 4. REPORT]
THU JUN 29 3:00PM 00
Page 92

OPERATING THE ANSWERING MACHINE
Fast Forwarding Tape
Press FF.
•The display will show;
THU
ICM
JUN 29
FORWARD
3:00PM 03
Recording a Message /Wemo (Page 2-7)
Recording a 2-Way Conversation (Page 2-8)
Resetting (Rewinding) Tape
Press REW.
•The display will show;
JUN 29 3:00PM 03
THU
ICM REWIND
«««
»»»
•The unit will rewind the tape, and future messages will be recorded over the
old messages.
Call Counter
The unit will show you the number of recorded voice-messages by
indicating them on the display and the AUTO RECEIVE indicator
flashes.
THU JUN 29 3:00PM 03
The number of recorded ■
voice-messages
•In case of power interruption, the Call Counter will show
2-5
Page 93

Erasing Recorded Messages
After reviewing your messages, you can erase them.
Press ICM ERASE.
•The display will show;
•The messages will be erased while the tape is rewinding.
•The tape can be erased at high speed even if the recorded-prevention
(knock-out) tabs have been removed.
JUN 29 3:00PM 00
THU
ICM
ERASE
>»>»
Playing Back Recorded Voice-Messages
Press PLAYBACK/PAUSE.
•The display will show;
AUTO-LOGIC (One Touch Operation):
At the touch of the PLAYBACK/PAUSE button, the unit will play all
the messages. At the end of the last message, the tape will stop, then
3 beeps will be heard. After 7 seconds, the unit will reset itself to the
Auto Receiving mode.
All calls will be saved automatically.
THU
ICM
JUN 29
PLAYBACK
3:00PM 03
«<«<
When the messages are received, a voice synthesized
announcement of the time and day will be recorded on the tape after
the recorded message.
Stopping Tape (Pause mode)
Press PLAYBACK/PAUSE.
•The display will show;
•The tape will pause until you restart it by pressing the PAUSE button again.
•The unit does not answer calls automatically while in pause mode.
2-6
THU JUN 29 3:00PM 03
PAUSE
Page 94

OPERATING THE ANSWERING MACHINE
(CONT.)
Recording a Message Memo
You may record a message memo on the tape. It will be recorded as if it were an incoming call and will be played
back if the unit is interrogated remotely or when the PLAYBACK/PAUSE button is pressed.
MEMO
2WAY
Press MEMO/2 WAY until a beep is heard.
•The IN USE indicator will light.
Speak into the microphone, approximately 8 inches away.
•Be sure that the volume control is
properly set.
When recording is finished, press
MEMO/2 WAY again.
•The IN USE indicator wiii go out.
THU JUN 29 3:00PM 00
MEMO «««
THU JUN 29
MEMO
THU JUN 29 3:00PM 01
3:00PM 00
«««
2-7
Page 95

Recording a 2-Way Conversation (2-Way Recording)
While speaking with someone on the telephone, you can record the conversation.
Many states have imposed regulations on the manner in which 2-Way telephone conversations may be recorded.
Consult your local public utility agency (your telephone company).
1
While having a conversation, press
MEMO/2 WAY until a beep is heard.
•The IN USE indicator will light.
Talk with the other party.
•The unit will generate a beep every
15 seconds to notify the caller that the
conversation is being recorded.
When recording is finished, press
MEMO/2 WAY again.
•The IN USE indicator will go out.
THU JUN 29 3:00PM 00
2 WAY RECORDING
THU JUN 29 3:00PM 00
2WAY RECORDING
2-8
Page 96

OPERATING THE ANSWERING MACHINE (CONT.)
Saving Recorded Messages
You can save the desired messages.
l/ll PLAYBACK/PAUSE
l/ll PLAYBACK/PAUSE
Play back the tape through the message
you want to save, and press PLAYBACK/
PAUSE to pause.
•The IN USE indicator will flash.
Press PLAYBACK/PAUSE and REW
simultaneously.
•The IN USE indicator will go out.
•Future messages will be recorded after
the messages you have saved.
THU JUN 29 3:00PM 00
PAUSE
THU JUN 29 3:00PM 00
Monitoring Incoming Calls
While an incoming message is being recorded, you can monitor it through the built-in speaker. Adjust the sound level
using the VOLUME control. Then you choose to lift the handset and speak to the caller directly.
I ^
-erra _
If you want to talk to the caller, lift the
handset or press SP-PHONE and talk.
•The unit will stop recording automatically.
THU JUN 29 3:00PM 00
ATAS ANSWERING
2-9
Page 97

HOW TO OPERATE FROM A REMOTE PHONE
On the following pages, we will explain the following features:
You can retrieve the recorded incoming messages from a
remote location with a tone telephone.
Playing Back Messages
Playing Back Newly-Recorded Messages
(Memory Playback)
Back Space and Skip Forward
Resetting Tape for Future Messages
Recording a Marker Message
Turning On the Speakerphone
(Answer Back)
Re-Recording the Outgoing Message
Skipping the OGM for ICM Recording
Turning On the Auto Receiving Mode
2-10
Page 98

HOW то OPERATE FROM A REMOTE PHONE (CONT.)
Playing Back Messages
You can listen to the recorded messages by simply pressing your ATAS ID. (Refer to page 2-3.)
1
5gm .
к
ATAS ID
Cal! your unit, then press your remote ATAS ID during
the OGM.
•A beep will sound, then other beeps will sound to tell you
the number of recorded messages up to 8 times.
•You will hear all the messages.
Listen to the messages.
•3 beeps will be heard after the last message is played
back.
Hang up.
•All calls will be saved automatically.
Playing Back Newly-Recorded Messages (Memory Playback)
When you have already heard the messages from a remote phone, you can skip them and only listen to the
newly-recorded ones.
Back Space and Skip Forward
Ч
1
Back Space
ABC^
2
Skip Forward
After entering your remote ATAS ID during the OGM,
press “4” right after hearing the beep tones indicating
the number of recorded messages.
•The unit will play back the new messages.
Even during the playback of previously heard
messages, you can skip them by pressing “4”.
Press “1 ” to rewind (back space) the tape.
Press “2” to fast forward (Skip Forward) the tape.
•The tape will be rewound or skipped for approximately
15 seconds corresponding to the playback time.
2-11
Page 99

Resetting Tape for Future Messages
After retrieving the messages, you can reset the tape and record future messages from the beginning of the tape.
After all the messages have been played back or while they are playing
DEF
3
If you have used the Memory Playback
DEF
3
Press “3”, then hang up.
•The unit will rewind the tape and reset itself.
Press “3”.
•The unit will rewind the tape to the beginning of the
newly-recorded messages and a beep will be heard.
Press “3” again after hearing a beep.
If you have reset the tape by mistake
ABC
2
Press “2” after the tape has been reset (one beep).
•The unit will advance the tape to the end of the recorded
messages.
2-12
Page 100

HOW TO OPERATE FROM A REMOTE PHONE
(CONT.)
Recording a Marker Message
After retrieving all of your messages from a remote phone, you can leave a message to anyone who knows your ATAS
ID without redialing.
^ 3-beeps ^ 2-beeps ^
1
u Last message
_____________
3 beeps will be heard after the last message, followed
by a 10-second pause, and then 2 beeps will be heard.
Marker message (date, time, etc.)
10-sec. pause "
J
Speak immediately after the last 2 beeps.
2 BEEPS
When recording is finished, hang up.
•The marker message will be recorded after the last
message on the tape.
Turning On the Speakerphone (Answer Back)
You may monitor sounds in the room where the unit is installed by turning on the speakerphone remotely. You can
also speak with anyone in the room, even if they cannot reach the unit.
Press “6”.
•The speakerphone of your unit wilt be turned on and you
can monitor the room sound for 30 seconds.
•To monitor further, press “6" again within 10 seconds of
hearing one beep.
If you want to talk to the other party in the room
Ask the other party to press the SP-PHONE button,
and then start the conversation.
•If no one answers, the line will terminate after
30 seconds.
•To use this function, position the SPEAKER VOLUME
control for normal use, otherwise it may be difficult for
anyone to hear you from the speaker.
2-13
 Loading...