

Page 1
Panasonic
Operation Manual
High Speed Scanner
Model No. KV-SS25D
Before using this unit, please read these instructions completely.
Page 2

Thank you for purchasing a Panasonic "High Speed Scanner".
------------------
Notice
Precautions
Component Identification
Minimum Space and Installing the Stand .:
• Minimum space ...........................................................................................................................................................8
• Installing the stand ......................................................................................................................................................8
Installing the Document Tray and the Exit Tray
Loading a Document
Clearing Paper Jams
Cleaning the Unit
Repacking Instructions
............................................
Table of Contents--------------------------
.......................................
..........................
...........
....
...............................
.............................
.................................
..........................
3
5
7
8
9
10
12
13
15
Specifications
Troubleshooting
Index
...........................................
..................................
.................................
16
17
18
The information given in this Operation Manual is subject to change without notice.
This Operation Manual is printed on recycled paper.
Page 3

Notice_____________________________
Federal Communications Commission Requirements
(For United States only)
Note: This equipment has been tested and found to comply with the limits for a Class A digital device, pursu
ant to Part 15 of the FCC Rules. These limits are designed to provide reasonable protection against harm
ful interference when the equipment is operated in a commercial environment. This equipment
generates, uses, and can radiate radio frequency energy and, if not installed and used in accordance
with the instruction manual, may cause harmful interference to radio communications. Operation of this
equipment in a residential area is likely to cause harmful interference in which case the user will be re
quired to correct the interference at his own expense.
FCC Warning: To assure continued FCC compliance, the user must use only the provided power supply
cord and shielded interface cable. Also, any unauthorized changes or modifications to this equipment
would void the user's authority to operate this device.
English
WARNING:
TO PREVENT FIRE OR SHOCK HAZARD, DO NOT EXPOSE THIS PRODUCT TO RAIN
OR ANY TYPE OF MOISTURE.
_____________________________
THE SOCKET-OUTLET MUST BE NEAR THIS EQUIPMENT AND MUST BE EASILY AC
CESSIBLE.
Français
Avertissement:
Pour éviter tout risque d'incendie ou de choc électrique, ne pas soumettre cet appareil
à la pluie ou à l'humidité.
__________________________
"La prise secteur devra se trouver à proximité de l'appareil et être facilement
accessible."
Page 4

Notice
For roller cleaning paper
Before using the roller cleaning paper, please read these instructions completely.
Keep these instructions for future reference.
English
WARNING
• Do not drink or inhale the roller cleaning paper fluid.
• The roller cleaning paper may be harmful to sensitive skin, so please use protective gloves.
• Do not use the roller cleaning paper near a heater or open flame.
• Do not store the roller cleaning paper in direct sunlight or in a place over 40 "C (104 T) •
• Only use the roller cleaning paper to clean the rollers and scanning area.
• If you need more information about the roller cleaning paper, please refer to the Material Safety Data
Sheet (MSDS).
KEEP AWAY FROM FIRE.
Français
Avertissement
• Ne pas boire ni respirer le liquide du papier de nettoyage de rouleaux fourni.
• Le papier de nettoyage de rouleaux pouvant être néfaste pour les peaux sensibles, utiliser des gants de
protection.
• Ne pas utiliser le papier de nettoyage de rouleaux à proximité d'un feu ou d'une flamme vive.
• Ne pas ranger le papier de nettoyage de rouleaux en plein soleil ni à une température dépassant
40 °C (104 T).
• Utiliser le papier de nettoyage de rouleaux exclusivement pour le nettoyage des rouleaux et de la surface
de balayage.
• Pour tout renseignement complémentaire sur le papier de nettoyage de rouleaux, voir la feuille de
données sur la sécurité du matériel.
NE PAS APPROCHER DU FEU.
Page 5
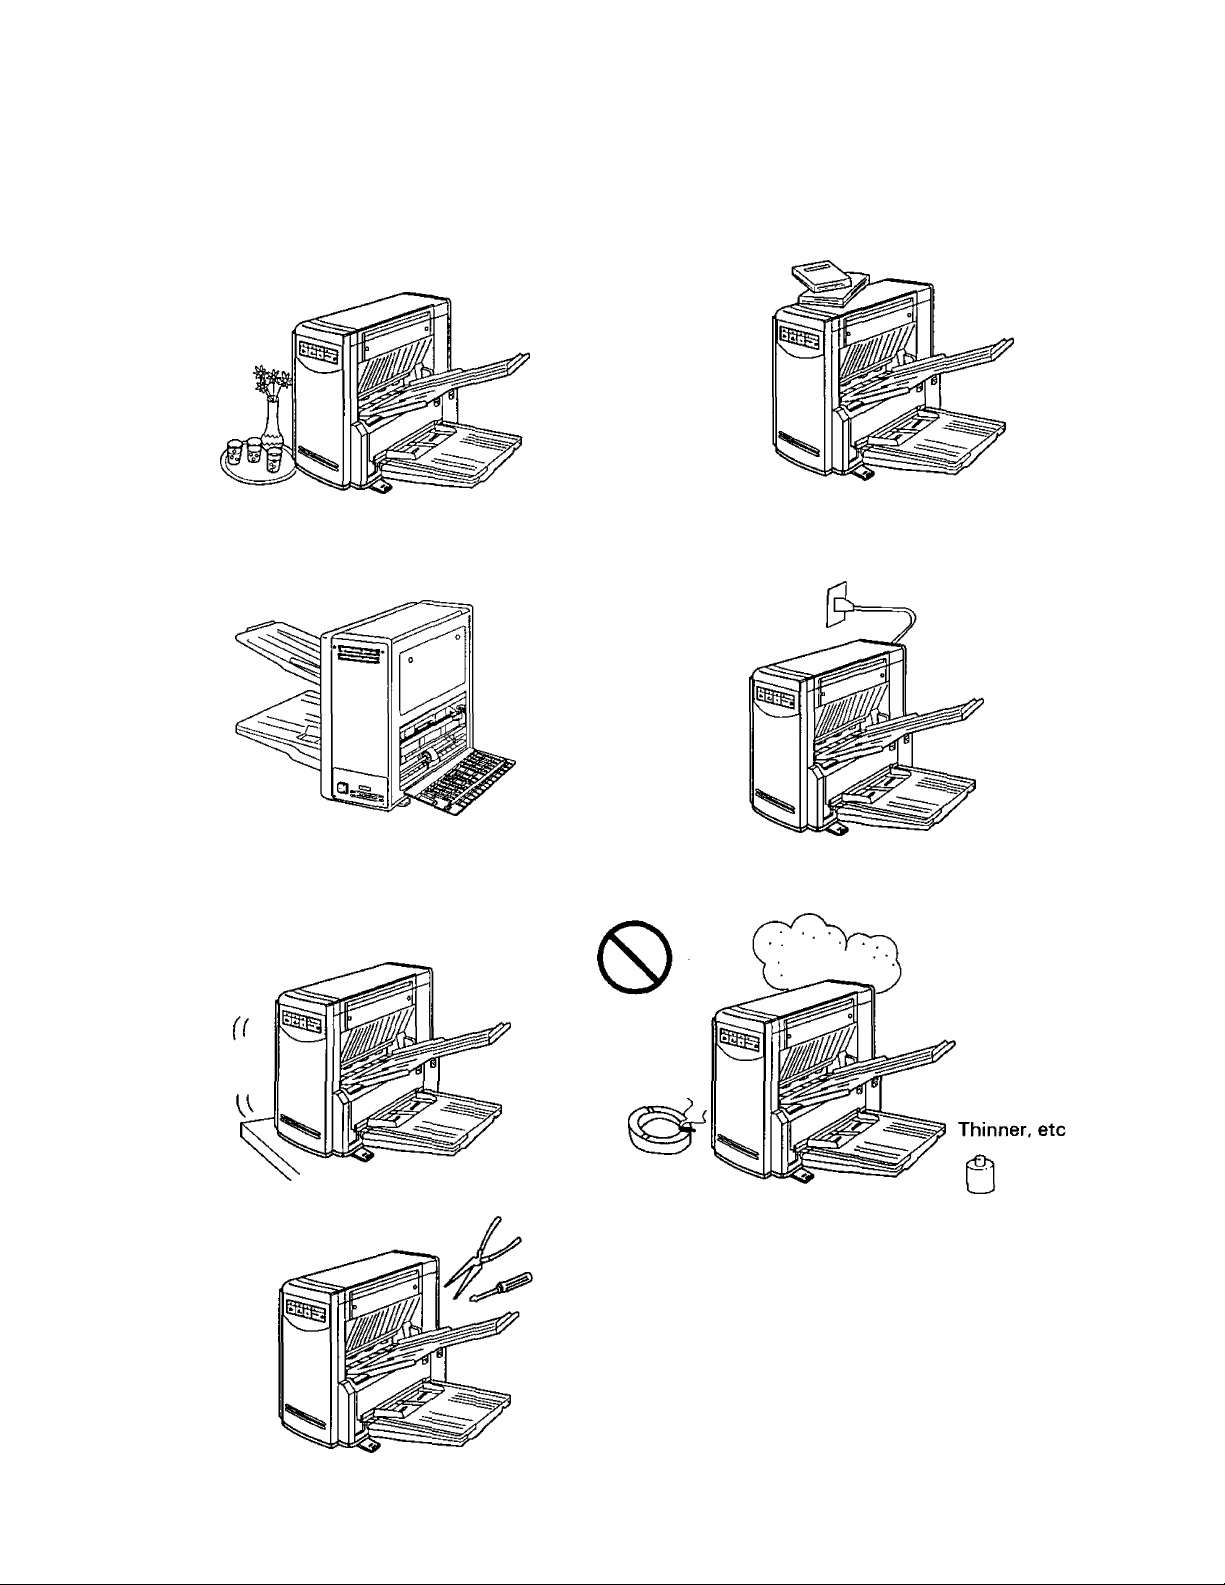
Precautions
The following precautions are recommended to extend the life of the unit
Do not place any liquids near the unit
— Accidental spillage of a liquid into the unit may
cause severe damage. If this occurs, unplug the
power cord and call service.
0
Do not operate the unit with covers open.
0
Do not place books, paper, or other items on the
unit.
0
Do not continue to plug the power cord if the unit
is not used for an extended period.
0
Do not place the unit on an uneven or unstable sur
face.
0
Do not disassemble the unit.
0
Do not place the unit in an area where there is a
lot of smoke, dust, chemical fumes or vibration.
• Special care should be taken to protect the unit if it is used in a less than optimum environment such as a ma
chine shop or a dusty or sandy area.
Page 6
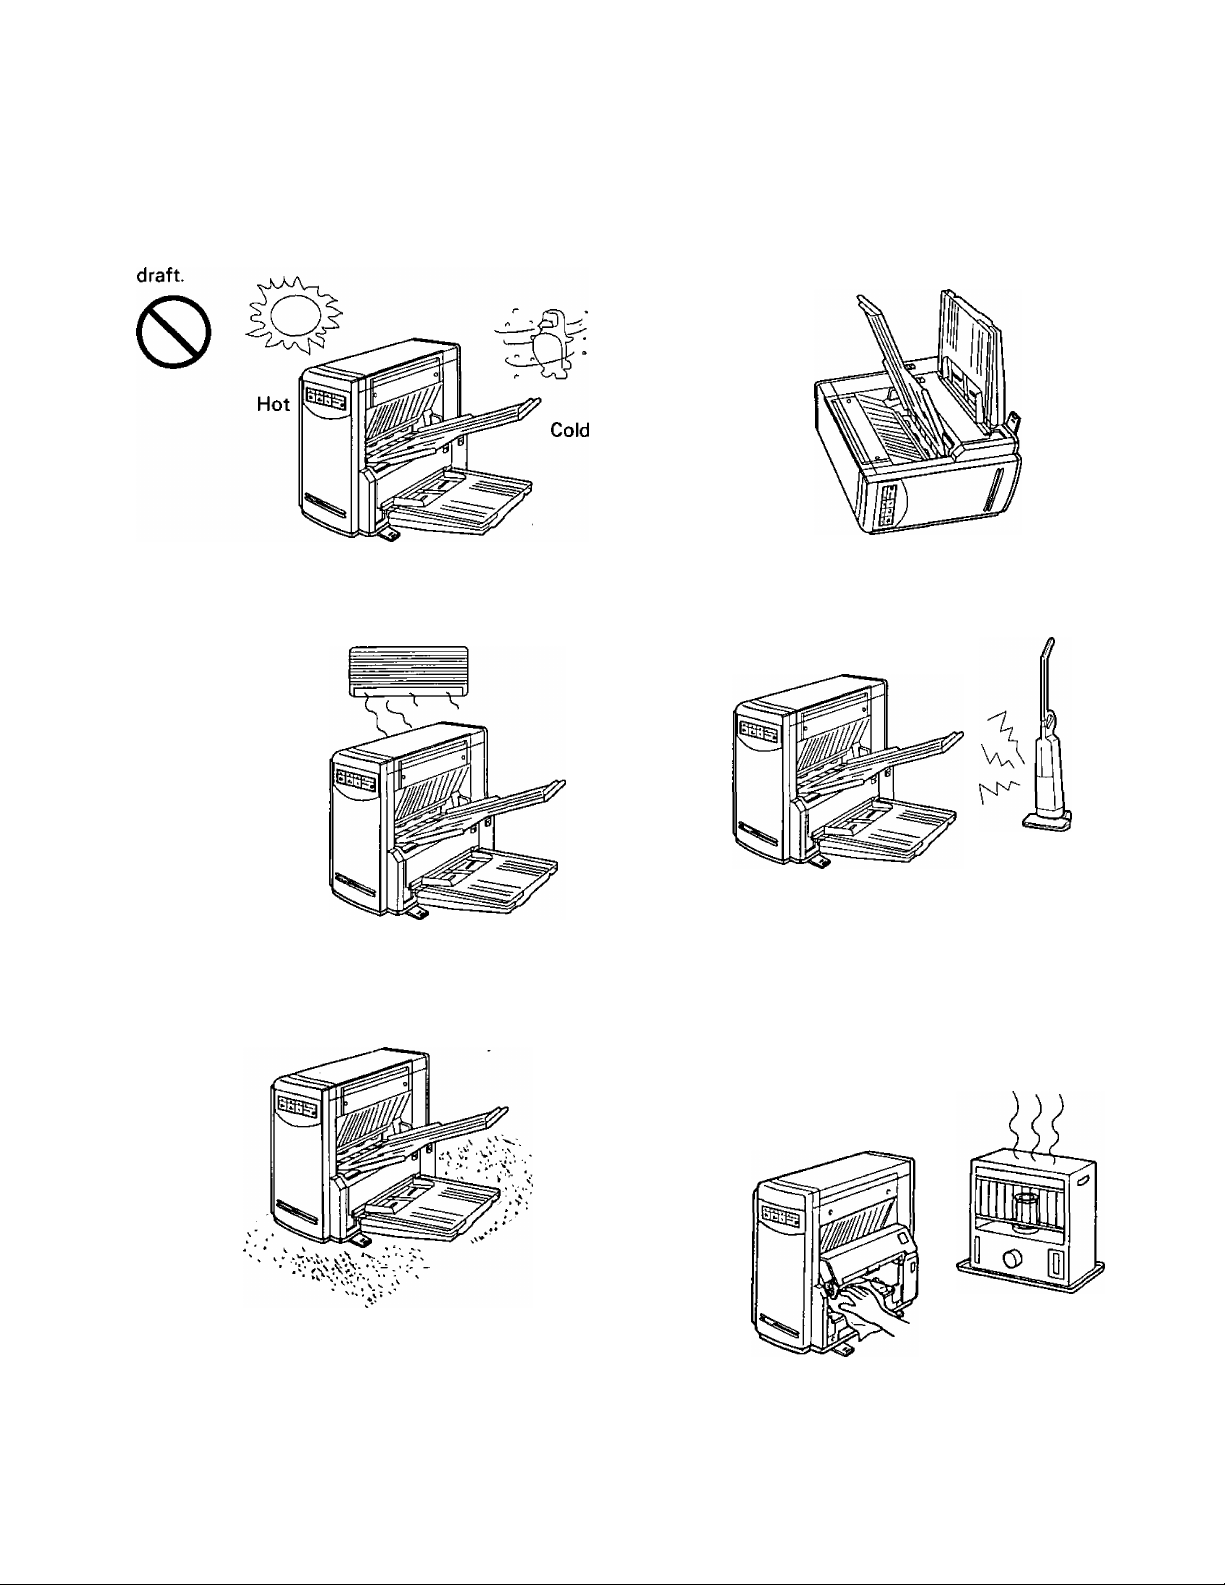
Precautions
Operating Environment
Do not subject the unit the following conditions.
Do not place the unit in direct sunlight or in a cold Do not use the unit in a vertical position.
0
Do not place the unit near a heating appliance or
an air conditioning vent. Do not place the unit in a
room with extremely high or low humidity.
0
Do not place the unit on a carpet. (Static electricity
can cause the unit to malfunction)
0
Do not place the unit near other appliances.
0
Do not drink or inhale the included roller cleaning pa
per fluid.
The roller cleaning paper may be harmful to sensi
tive skin, so please use protective gloves.
Do not use the roller cleaning paper near a heater
or open flame.
• This may cause a fire.
0
Power Source
• Use a voltage level which does not vary more than ±10% from the voltage level marked on the name
plate (located on the rear of the scanner).
• Do not use an extension cord.
• This scanner should be connected to a grounded outlet.
• Do not use a line conditioner, transient suppressor or surge protector.
Page 7

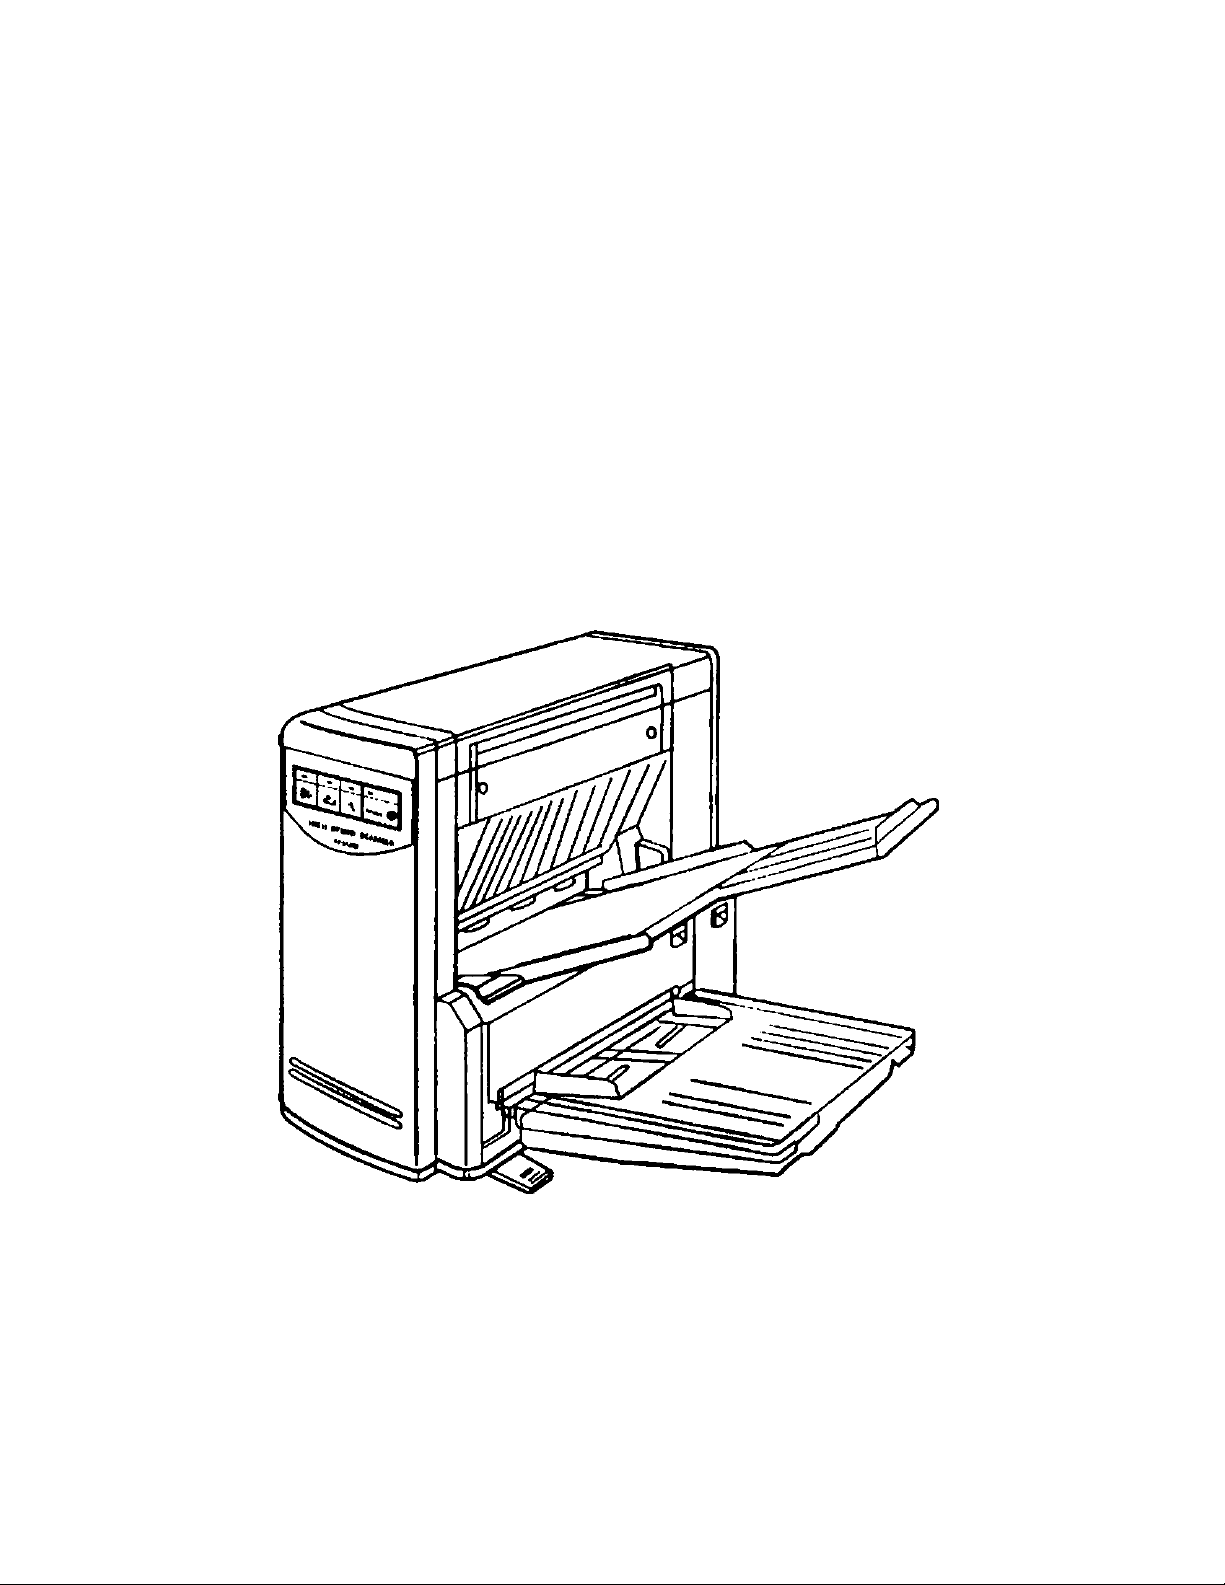
Component Identification
Power indicator
Display Panel
=
¿J
\
Document exit slot
Stand
Document feed slot
Exit tray sheet
POWER ©
Power switch
Scanning section cover release
Open the cover by this release if
a paper jam occurs.
Extension tray
Document guide
Page 8

Minimum Space and Installing the Stand
iMinimum space
Be sure to maintain the recommended space requirements for proper ventilation.
Ilnstalling the stand
Lift the unit.
1
• Do not hold the unit by the document feed slot.
Turn the four feet until they appear as in
the illustration.
2
8
Page 9

Installing the Document Tray and the Exit Tray
Align both sides of the tray with the docu
ment feed slot, then firmly insert the tray
1
into the slot using both hands until a "click"
is heard.
Caution:
Before installing the document tray, be sure
to perform the following procedure.
(D Connect the power cord,
d) Turn the power switch on and initialize
the unit for approximately 15 seconds.
Insert both ends of the exit tray into the
holes at the sides of the document exit slot.
2
Remove the protective cover from the adhe
sive strip on the exit tray sheet.
3
Place the exit tray sheet into the rear of the
document exit area and attach to the exit
tray.
Place the end of the exit tray sheet ("X"
marked area ) until touch the cabinet un
der the document exit slot and attach to
the exit tray sheet.
Removing the exit tray
Slightly bend the exit tray while pull
ing it toward you, as shown in the
figure.
Removing the document tray
Grasp the document tray as shown
in the figure, then lift slightly and
pull it toward you.
Document exit
slot
Exit tray sheet
■Adhesive tape
(Opposite side
of the exit tray
sheet)
"Exit tray
__________
Page 10

Loading a Document
Documents that have been stapled together
or have been sitting together (as in a file
1
folder) for some time will need to be sepa
rated.
Fan the stack of document to separate all
edges.
Hold both ends of the document and bend
the documents as shown in the illustration
to separate the centers.
Hold the documents firmly and pull them
apart as shown in the illustration to
straighten.
Repeat these steps as necessary.
Carefully align the documents.
2
Place the documents on the document tray
with the side to be scanned facing up, then
3
push them in the direction of the arrow un
til they stop.
• Be sure to place the documents on the docu
ment tray in the lengthwise direction (see figure
at right).
The amount of documents should not exceed
the limit mark on the document guide. This may
cause a paper jam or skew.
Portrait
Fill indicator
(Limit mark)
10
Page 11

Loading a Document
Adjust the document guides to the docu
ment size.
4
• Make sure to properly align the documents to
the document guides.
When using legal paper, pull out the exten
sion tray from the document tray as shown
5
in the illustration.
Caution :
• For thin or thick paper, scan the document using single paper feed. Also, remove the document from the
exit tray after it is scanned.
• The scanner will accept 13 to 27 lb paper for continuous scanning and 11 to 34 !b paper for a single
scan.
• You can load up to 80 sheets of 20 lb paper (limit mark of the document guide). Never allow the amount
of documents in the tray to exceed the fill indicator. Reduce the number of documents in the tray if they
are thick, creased, or curled.
• Be sure to remove the document from the exit tray after it is scanned.
• Especially when reading an important document, in case of a paper jam or damage to the document,
make a copy and use it to scan into the unit.
Types of Documents to Avoid :
• OHP sheets, other plastic film, cloth, or metallic sheets.
• Paper with irregularities such as tabs, staples, paste etc.
• Documents with wet ink.
• Thick or irregular documents such as envelopes, paste, ups, etc.
• Coated documents, photos.
• Copying paper such as carbons or carbonless paper. (Chemically treated carbonless forms)
Note: Scanning chemically treated paper will result in premature wear of paper feed roller.
• Damaged or wrinkled documents.
• Unusually shaped documents.
• Tracing paper.
11
Page 12

Clearing Paper Jams
Torn documents, thin documents or documents that are creased at the leading edge may cause paper jam
ming. If a paper jam occurs (the lamp "Sv" to indicate "Paper jam" will light on the Display Panel), remove
the jammed sheet according to the following procedure.
Removing paper jams from the scanner
Remove the exit tray, document tray and open
the scanning section cover by inserting your fin
ger into the cover release and gently pulling up
the tab while pushing down the cover slightly.
If the paper cannot be removed by pull
ing it forward
Open the cover and then open the scanning sec
tion cover inside by pulling the tab toward the
front.
12
Page 13

Cleaning the Unit
Outside of the Unit:
♦ at least once a month
Turn the power OFF.
1
Clean the cover with a soft cloth.
2
Remove dirt and dust from the fan exhaust
vent with a brush.
3
Inside of the Scanner:
• Please clean the unit once a month, when 50,000 sheets or
more are fed into the unit, or at the earliest opportunity.
• When you experience paper jamming or multiple sheet feed
ing problems, follow steps 1 through 4 for cleaning the roll
ers and paper sensors.
• When black vertical lines appear on the scanned image,
please follow steps 1 and 5 for cleaning the reading ele
ment.
Turn the power OFF.
1
When a jam or misfeed occurs, clean the
rollers (parts (D to @) with a clean cloth as
2
shown in the figure on the right.
13
Page 14

Cleaning the Unit
When the parts are especially dirty, use the
included "Roller Cleaning Paper", wipe clean
3
all of the dirty parts while rotating the roller
in the direction of the arrows shown in the
figure.
• When feeding of multiple sheets occurs often
clean the rollers (parts ®, (D and (3)) with the in
cluded roller cleaning paper.
Clean the paper sensors shown in fig. 1, us
ing a dry, clean cloth.
4
When the scanned image has vertical black
lines, wipe the glass and white reference
5
plate clean using a dry, clean cloth as
shown in the figure on the right.
• When especially dirty, use the included roller
cleaning paper to wipe clean.
White reference
Scanning section
glass
Note for the roller cleaning paper;
Open the bag by the dotted line and take the
roller cleaning paper out. (See fig. 5.)
• If the opened bag is left for a period of time, the alco
hol will vaporize. Please use the roller cleaning paper im
mediately after opening the bag.
^The roller cleaning paper (Model No. KV-SS03) is available at the dealer where you pur
chased your scanner.
plate
fig. 4
14
Page 15

Repacking Instructions
It is highly recommended that you keep the original carton and ALL packing materials. Should you need to trans
port or ship your scanner, please follow these instructions.
Please Note:
• Please use the original carton and all of the original packing materials. If you do not have the original pack
ing material, these are available from Panasonic. Please refer to your servicing dealer, or call
1-800-833-9626.
• Improper repacking of the scanner may result in a service charge to repair the unit.
• The scanner should be handled in the upright (vertical) position.
Material Required :
• Original Scanner Carton & Packing Materials
• Shipping Tape and Scissors
Disconnect your scanner from the electrical outlet and the SCSI interface cable.
1
Close the scanner stands into their shipping positions.
2
Packing the scanner.
3
15
Page 16

Specifications
Item
Scanner
Model No.
Scanning face
Scanning method
Readout speed
Resolution
Tonal gradation
Image control
Size
KV-SS25D
Duplex scanning
Front side: CCD image sensor
Reverse side : Contact-type image sensor
Simplex scanning : Approx. 20 sheets/min. (Letter, fed length
wise, 200 dpi)
Duplex scanning : Approx. 20 sheets/min. (Letter, fed length
wise, 200 dpi)
Main scanning direction : 150, 200, 240, 300dpi
Sub-scanning direction : 150, 200, 240, 300dpi
(As same as main scanning direction)
Binary mode, grayscale mode, 64-step gradation (dither)
mode, 64-step gradation (error diffusion) mode
Image emphasis. Automatic threshold. Automatic separation.
Monochrome reversing. Automatic back control
55x91 mm (2.2X3.6 in) to Legal [216X356mm (8.5X 14 in.)]
Unit
Operating
Environment
Storage
Environment
Accessories
Single paper feed : 0.05 to 0.2mm (2.0 to 7.9 mils)
Paper
External dimensions
(Width X Depth x Height)
Mass (Weight)
Power requirement AC120V, 60Hz
Power
consump
tion
Operating tempera
ture and humidity
Storage temperature
and humidity
Document tray, Exit tray. Exit tray sheet. Power cord. Operation manual and Installation
manual. Driver software (3.5" FD), Roller cleaning paper
Thickness
Weight
Maximum,
(scanning)
Minimum,
(standby)
Continuous paper feed : 0.06 to 0.15 mm (2.4 to 5.9 mils)
Note:1 mil = 1/1000 in.
Single paper feed : 40 to 127 g Xrrf (11 to 34 lbs.)
Continuous paper feed : 50 to 100 g / rrf (13 to 27 lbs.)
568x450x390mm (22.4x17.7x15.4 in.)
14kg [14kgf (31 lbs.)]
1.3 A
0.5A
15“C to 30°C (59T to 86T), 30% to 80%RH
0°C to 35°C (32T to 95T), 10% to 80%RH
“Weight in pounds" represents the weight of 500 [17X22 inches (432x559imn)] sheets.
16
Page 17

Troubleshooting
If a problem occurs while the unit is being used, first check the following items. If the unit still malfunctions,
switch it OFF, and call service.
Symptom
Power indicator does not light
when the power switch is turned
ON.
Scanning takes a long time to
start, or does not take place at all.
Documents are not fed
while scanning.
V
i::1j
8v
Multiple sheet feeding problem
occurs.
Document stops during a scan.
Document stops or is not fed
smoothly during a scan.
The scanned document is blank.
The scanned document is com
pletely blank.
Scanned document is skewed.
Vertical lines appear on the
scanned document.
The computer cannot connect to
the scanner.
Possible Cause Remedy
The power plug has come out. Insert the power plug firmly.
The fuse has blown.
Foreign matter is lodged in the
fan, preventing it from rotating.
The fluorescent lamp in the scan
ner has reached the end of its life.
The ambient temperature is less
than 15°C (59T).
Documents are not loaded cor
rectly.
Various covers are open. Close the covers firmly.
There is a paper jam.
The rollers are dirty.
The rollers are dirty.
The document is creased or torn,
or has a length of more than legal
or less than 91 X55nmi (3.6X2.2in).
The rollers are dirty. Wipe the rollers (see page 13).
The document to be scanned was
loaded face down (upside down).
The fluorescent lamp in the scan
ner has reached the end of its life.
The document guides were not
touching the edges of the docu
ment, or the documents was
skewed when loaded.
The white reference plate, scan
ning section glass or the rubber
rollers are dirty.
The unit of the same SCSI ID num
ber is connected to the computer.
When the scanner is connected to
the SCSI terminal, the terminator
is not connected.
When the scanner is not con
nected to the SCSI terminal, the
SCSI terminator switch is turned
ON.
The computer cannot recognize to
the scanner.
Pull out the power plug, then call
service.
Call service.
Use the unit in a room where the
ambient temperature is between
15“C and 30‘’C (59T and 86T).
Align the front edges of the docu
ment, place them firmly against
the document feed slot, then start
scanning.
Remove the jammed paper (see
page 12).
Wipe the rollers (see page 13).
Wipe the rollers (see pages 13
and 14).
Make a copy of the document on
paper of the specified size [be
tween 91 X 55 mm (3.6x2.2in.) and
Legal] and scan the copy.
Load the document correctly.
Call service.
Set the document guides or the
document correctly.
Wipe the dirty part with a clean
cloth (refer to page 13).
Change the SCSI ID number.
Turn the SCSI terminator switch
ON, or connect the registrator to
the SCSI connector.
Turn the SCSI terminator switch
OFF.
Turn the power of the computer
OFF. Turn the power of the scan
ner ON, then turn the power of
the computer ON again.
17
Page 18

Index
AC inlet
Cleaning the unit
Fan exhaust vent
Paper sensor
Scanning section glass . 14
White reference plate . 14
Component identification . 7
Cover
Cover release
Display panel
Document exit slot
Document feed slot . 7, 8
Document tray
Document guide
.............
.....
....
........
................
........
.........
..
.....
......
7, 9, 11
7
1 3
1 3
1 3
7
7
7
7, 9
7, 10
Installation
Document tray
Exit tray
Stand
Power indicator .......7
Power switch ..........7
Power cord ............7
Power source ..........6
Paper jam
Stand
Scanning section cover release .7
SCSI connector ........7
Scanning section cover . 12
Specifications
...............
................
..........
............
.......
......
9
9
8
12
7, 8
16
18
Exit tray
Extension tray
Fan exhaust vent
Fill indicator (Limit mark) . 10
..........
......
.....
7, 9
7, 11
7
Troubleshooting
.....
17
Page 19

Page 20

Panasonic Communications & Systems Company Division of Matsushita Electric Corporation of America
Two Panasonic Way, Secaucus, New Jersey 07094
Panasonic Canada Inc.
5770 Ambler Drive, Mississauga, Ontario, L4W2T3
Printed in Japan
PBQX50215ZA K1197E0
 Loading...