

Page 1
Operating Instructions
Wearable Camera
Model No.
Please read these instructions carefully before using this product, and save this manual for
future use.
HX-A100
VQT4X97
Page 2

Contents
Preparation
(Important) About the Waterproof/
Dustproof........................................................ 3
Read this first ................................................. 6
What you can do with this unit ..................... 7
Names and Functions of Main Parts ............8
Wearing this unit ............................................ 9
Power supply................................................ 11
Charging the battery .............................. 11
Charging and recording time ................. 12
Recording to a card ..................................... 13
Cards that you can use with this unit
Inserting/removing a microSD card ....... 14
Turning this unit on/off ................................ 15
®
Wi-Fi
function ............................................. 16
Connecting directly with a smartphone
Installing Image App .............................. 17
Connecting this unit with a smartphone
Starting Image App ................................ 18
Setting up with Setup wizard ...................... 19
Setting date and time................................... 20
Using the Setup Menu ................................. 21
Basic
Recording ..................................................... 22
Recording motion pictures ..................... 22
Recording still pictures .......................... 22
Using the Recording menu ......................... 24
Playback ....................................................... 27
Using the Playback menu ........................... 28
Playback settings................................... 28
Camera function .................................... 29
Required settings for sending data, etc
“LUMIX CLUB” settings ......................... 31
"Picture Share" settings ......................... 32
Data uploading ............................................. 33
Advanced
........ 13
........... 17
........ 17
. ..........30
Live broadcasting ........................................ 37
Setting for Live broadcasting ................. 37
Performing a live broadcast ................... 40
Connecting to devices on the network
(Connecting in Access Point mode)...........41
1 Connecting this unit to an access
point (such as a wireless LAN router) .... 41
2 Connecting this unit and a device
on the network ....................................... 42
Playing back on a DLNA-compatible TV ....43
Controlling from a DLNA-compatible
device..................................................... 43
Controlling from a smartphone............... 43
About network information of this unit
..........44
With a PC
What you can do with a PC .........................45
Card reader function (mass storage) .........45
Operating environment .......................... 45
Copying motion/still pictures on PC ....... 46
About the PC display ............................. 47
Using the HD Writer WE 1.0
(Windows only).............................................48
The feature of HD Writer WE 1.0 ........... 48
End User License Agreement ................ 49
Operating environment for HD Writer WE
1.0 .......................................................... 50
Installation.............................................. 51
Starting HD Writer WE 1.0 ..................... 52
Others
Initialising this unit ...................................... 53
Initialising the network settings .............. 53
Troubleshooting ...........................................54
Cautions for use ........................................... 58
Recordable time/Number of recordable
pictures .........................................................60
Requests when disposing of this unit
About copyright ........................................... 63
...........61
Setting the connection destination for Live
broadcasting
(Connecting in Live broadcast mode)........ 35
Connecting this unit with an access point
(such as a wireless router) .................... 35
- 2 -
Page 3

Preparation
(Important) About the Waterproof/ Dustproof
Waterproof/Dustproof Performance
This unit’s waterproof/dustproof rating complies with the “IP58” rating. Provided the care
and maintenance guidelines described in this document are strictly followed, this unit
can operate underwater, to a depth not exceeding 1.5 m for a time not exceeding
30 minutes. *
This does not guarantee no destruction, no malfunction, or waterproofing in all conditions.
* This means that this unit can be used underwater for specified time in specified pressure in
accordance with the handling method established by Panasonic.
∫ Handling of this unit
≥ Waterproofing is not guaranteed if the unit is subject to an impact as a result of being hit or
dropped etc. If an impact to this unit occurs, it should be inspected (subject to a fee) by a
Panasonic’s Service Centre to verify that the waterproofing is still effective.
≥ The waterproof performance may be degraded due to the strong water pressure when this unit is
used deeper than 1.5 m underwater.
≥ When this unit is splashed with detergent, soap, hot spring, bath additive, sun oil, sun screen,
chemical, etc., wipe it off immediately.
≥ Do not rinse with running water, such as tap water.
≥ Waterproof function of this unit is for sea water and fresh water only.
≥ Any malfunction caused by customer misuse, or mishandling will not be covered by the warranty.
≥ Cards are not waterproof. Do not handle with a wet hand. Also, do not insert wet card into this
unit.
≥ Do not open or close the side cover when your hands are wet or water droplets are present on
this unit. Failure to do so may lead to damage such as rusty terminals caused by water droplets.
≥ Foreign objects may adhere to the inner side of the side cover (around the rubber seal or
connecting terminals) when the side cover is opened or closed in places with sand or dust
etc. If you close the side cover with foreign objects adhering to it, water may enter the
inside. Be very careful because doing so may cause malfunctions.
≥ Do not leave this unit for a long period of time in places where temperature is very low (at high
altitude etc.) or very high (inside a car under strong sunlight, close to a heater, on the beach, etc.)
Waterproof performance may be degraded.
≥ The inside of this unit is not waterproof. Water leakage will cause malfunction.
≥ If any foreign object has adhered to the inner side of the side cover, remove it.
≥ If any liquid such as water droplets has adhered to this unit or inner side of the side cover,
wipe off with a soft dry cloth. Do not open or close the side cover near the water, when
underwater, using wet hands, or when this unit is wet. It may cause water leakage.
≥ The alert sound and shutter sound may be lowered when using this unit. This is for ensuring the
waterproof performance of this unit, and not a malfunction.
will restore the original volume.
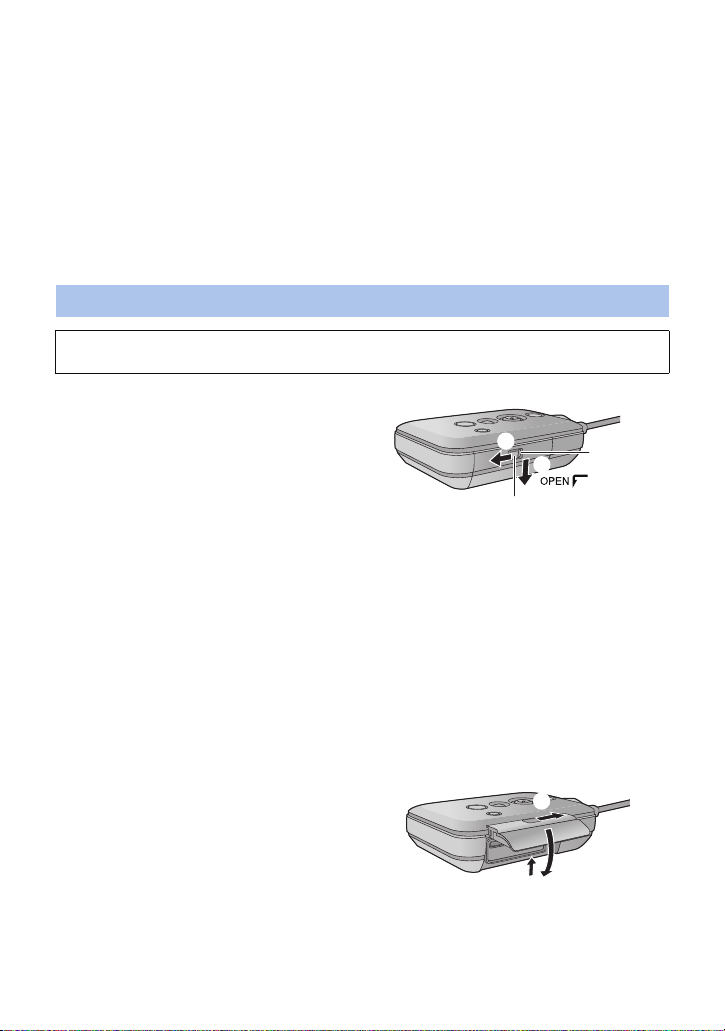
Opening and closing the side cover
- 3 -
Page 4
∫ When inner side of the lens is fogged (condensation)
A
B
Condensation may form and the inner side of the lens may steam up if this unit undergoes a
significant change in temperature or humidity, such as when this unit is moved from a cold place like
a high-altitude location to a warm place.
It is not a malfunction or failure of this unit. It may be caused by the environment in which
this unit is used.
≥ Be careful of condensation since it causes lens stains, fungus and unit malfunction.
What to do when inner side of the lens is fogged
≥ Turn off this unit and open the side cover in a place with constant ambient temperature, away
from high temperatures, humidity, sand and dust. The fog will disappear naturally in about 2 hours
with the side cover open when the temperature of this unit gets close to the ambient temperature.
≥ Contact Panasonic’s Service Centre if the fogging does not disappear.
Check before using underwater
Do not open or close the side cover in places with sand and dust, close to water, or with wet
hands. Sand or dust adhering may cause water leaks.
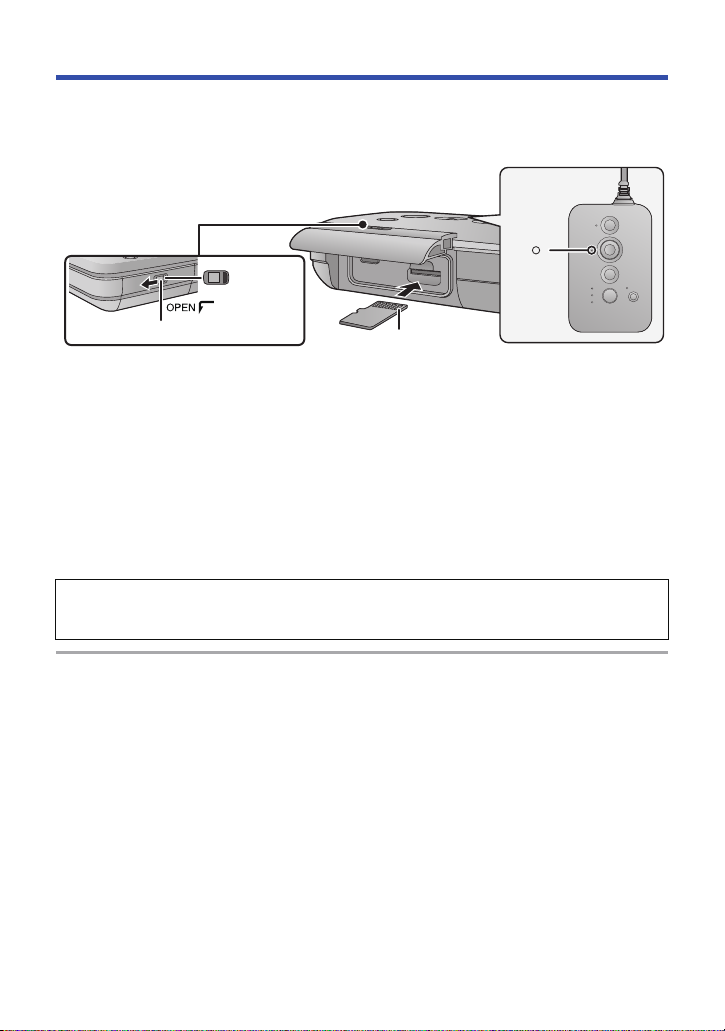
1 Open the side cover.
1 Slide the LOCK switch A to the left to
unlock the side cover.
B: Unlocked when the red indicator is visible
2 Slide the side cover downward to
open it.
2 Check that there are no foreign objects on the inner side of the side cover.
≥ If there are any foreign objects, such as lint, hair, sand, etc., on the surrounding area, water will
leak within a few seconds causing malfunction.
3 If there is foreign matter adhering to the unit, remove it.
≥ Be extremely careful to remove any sand etc. that may adhere to the sides and corners of the
rubber seal.
≥ Wipe it off with a dry soft cloth if there is any liquid. It may cause water leaks and malfunction if
you use this unit with liquid adhered.
4 Check for cracks and deformation of the rubber seal on the side cover.
≥ The integrity of the rubber seals may decrease after about 1 year, with use and age. To avoid
permanently damaging this unit the seals should be replaced once every two years. Please
contact Panasonic’s Service Centre for related costs and other information.
5 Close the side cover securely.
1 Close the side cover and slide it
upward.
2 Slide the LOCK switch to the right to
lock the side cover.
≥ Lock securely to the points where the red
portion of the LOCK switch is no longer
visible.
≥ Securely close it until it clicks.
≥ To prevent water seeping into this unit, be careful not to trap foreign objects such as liquids, sand,
hair or dust etc.
- 4 -
Page 5

Using this unit underwater
≥ Use this unit underwater at a depth of down to 1.5 m with the water temperature between 0 oC
and 35 oC.
≥ Do not use this unit at a depth of over 1.5 m.
≥ Do not use it in hot water over 35 oC (in a bath or hot spring).
≥ Do not use this unit underwater not longer than 30 minutes continuously.
≥ Do not open or close the side cover.
≥ Do not apply shock to this unit underwater. (Waterproof performance may not be maintained, and
there is a chance of water leak.)
≥ Do not dive into the water holding this unit. Do not use this unit in a location where the water will
splash strongly, such as rapid flow or waterfall. (Strong water pressure may be applied, and it may
cause malfunction.)
≥ This unit will sink in the water. Take care not to drop this unit.
Caring for this unit after using it underwater
Do not open or close the side cover until the sand and dust is removed by rinsing the
camera with water.
Make sure to clean the camera after using it.
≥ Thoroughly wipe off any water droplets, sand, and saline matter on your hands, body, hair, etc.
≥
It is recommended to clean the camera indoors, avoiding places where water spray or sand may fall.
Do not leave this unit uncared for longer than 60 minutes after using it underwater.
≥ Leaving this unit with foreign objects or saline matter on it may cause damage, discolouration,
corrosion, unusual odour, or deterioration of the waterproof performance.
1 Rinse with water with the side cover closed.
≥ After use at the seaside or underwater, soak the unit in fresh water pooled in a shallow container
for about 10 minutes.
2 Drain water by holding this unit and shaking it lightly a few times.
≥ After using this unit at the seaside or underwater, or after washing it, water will remain at the
speaker site or mic site of this unit for a while and it may cause lower sound or sound distortion.
≥ Pay careful attention to prevent this unit from dropping.
3 Wipe off water drops on this unit with a soft, dry cloth and dry this unit in a
shaded area that is well ventilated.
≥ Dry this unit approx. 1 hour or more.
≥ Dry this unit on a dry cloth.
≥ Do not dry this unit with hot air from dryer or similar. It will deteriorate the waterproof performance
or cause failure due to deformation.
≥ Do not use chemicals such as benzine, thinner, alcohol or cleanser, soap or detergents.
4 Confirm that there are no water droplets, open the side cover, and wipe off
any water droplets or sand left inside using a soft, dry cloth.
≥ Water droplets may adhere to the card, etc. when the side cover is opened without thoroughly
drying. Also, water may accumulate in the gap around the card slot or the terminal connector. Be
sure to wipe any water off with a soft, dry cloth.
≥ The water droplets may seep into this unit when the side cover is closed while it is still wet,
causing condensation or failure.
In case water enters this unit, stop the use and consult your dealer.
Malfunctions resulting from water leakage due to wrong handling by customers are not subject to
compensation.
- 5 -
Page 6

Read this first
∫ About recording formats and compatibility of this unit
≥ This unit is an MP4 format (MPEG-4 AVC file standard) Wearable Camera for recording high-
definition motion pictures.
≥ AVCHD and MPEG2 motion pictures are different formats, and are not therefore supported by
this unit.
∫ About the portrait rights
Be sure to pay special attention to the privacy, the portrait rights, etc. of the subject when you use
this unit. Use it at your own risk.
∫ Indemnity about recorded content
Panasonic does not accept any responsibility for damages directly or indirectly due to any type
of problems that result in loss of recording or edited content, and does not guarantee any
content if recording or editing does not work properly. Likewise, the above also applies in a case
where any type of repair is made to this unit.
∫ About the clock setting
Make sure to set date and time before recording. (l 20)
∫ For the purposes of these operating instructions
≥ Pictures may be slightly different from the original.
≥ Depending on the firmware version you are using, captured screens described in these operating
instructions may differ from the actual screens.
≥ Names, icons, contents and services of applications may be changed with no prior notice. Please
note that they may differ from the descriptions of these operating instructions.
≥ microSD Memory Card and microSDHC Memory Card are referred to as the “microSD card”.
≥ Smartphone and tablet computer are referred to as the “smartphone”.
≥ Pages for reference are indicated by an arrow, for example: l 00
∫ Cards that you can use with this unit
microSD Memory Card and microSDHC Memory Card
- 6 -
Page 7
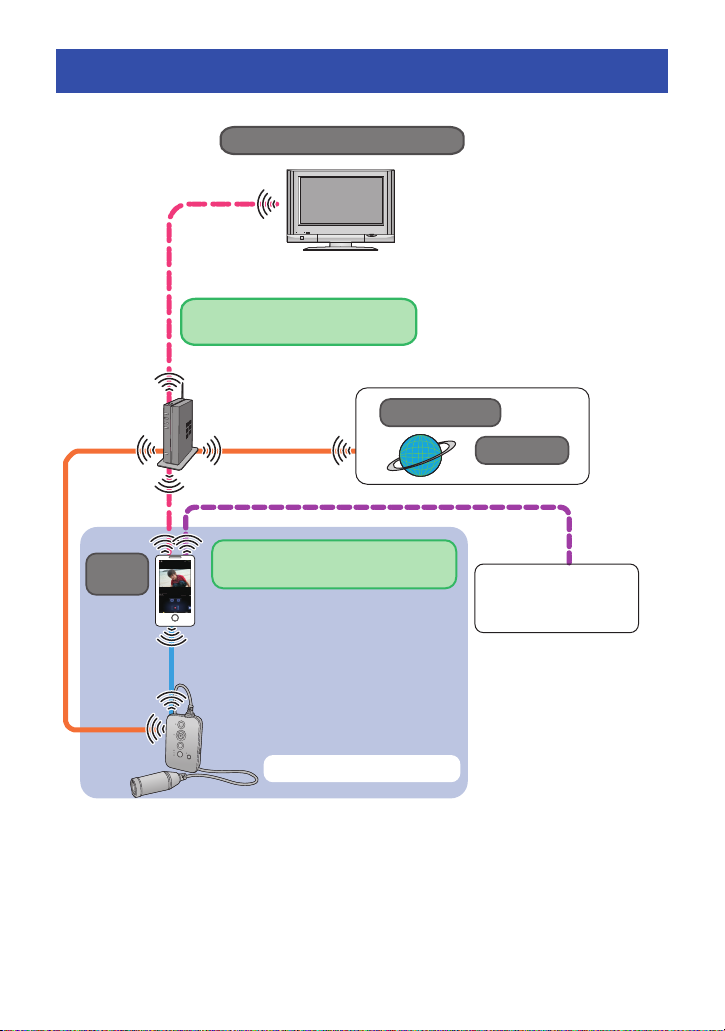
What you can do with this unit
Live broadcasting
*1
Using the “LUMIX CLUB” and
USTREAM services, you can
broadcast live motion pictures. (l 37)
Playback on DLNA-compatible
devices
You can play back the contents stored in
this unit on the DLNA-compatible
devices. (l 43)
≥ Live view (l 22)
≥ Remote control (l 22)
≥ Playback (l 27)
≥ Deletion/Copy (l 29, 32)
≥ Data uploading to web
services (l 33)
Recording
*3
(l 22)
≥ Facebook
≥ YouTube
™
, etc.
DLNA-compatible devices
Connecting to Access Point
Connecting direct to the
smartphone
*2
You can enjoy a variety of functions by connecting this unit to a smartphone or an access point.
LUMIX CLUB
USTREAM
Image
App
*1 Once you make the settings, you can perform a live broadcast with only the button operation on
this unit from the next time on.
*2 The functions available for the direct connection to the smartphone are also available for the
connection via an access point.
*3 You can record motion pictures or still pictures without connecting to the smartphone.
XXXXX
XXXXX XXXXX
- 7 -
Page 8
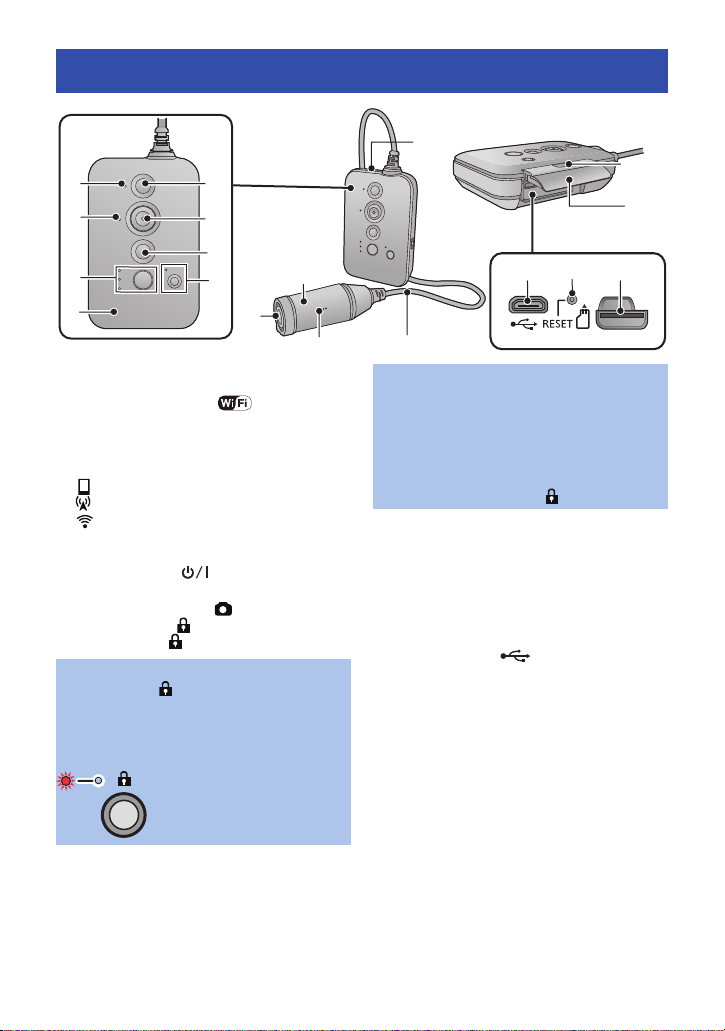
Names and Functions of Main Parts
9
10
11
12
13
15
14
5
6
7
8
3
4
2
1
16 17 18
Main unit
Camera
unit
Press and hold the
button for approx.
2 seconds.
1 Power lamp (l 12, 15)
2 Access lamp (l 14)
3 Wi-Fi
Switches to Wi-Fi mode. Each press of the
button switches the lamp.
≥ [ ]: Smartphone mode
≥ [ ]: Live broadcasting mode
≥ [ ]: Access point mode
≥ Off: Wi-Fi mode is turned off
4 Wi-Fi Transmitter
5 Power button [ ] (l 15, 53)
6 Recording start/stop button (l 22)
7 Photoshot button [ ] (l 22)
8 Hold button [ ]
®
/WPS button [ ] (l 17, 35, 40,
41, 53)
Wi-Fi mode lamp (l 17, 35, 40, 41, 53)
Hold lamp []
Hold function
The lock lamp [ ] lights up, and the
operation buttons on this unit are locked.
≥ Even when the operation buttons are
locked, you can perform operation from a
smartphone. (when connected to Wi-Fi)
To release the Hold function:
Press and hold the button for approx.
2 seconds when the Hold function is
activated.
≥ Even when the operation buttons are
locked, you can perform operation by
pressing any of them while pressing and
holding the hold button [ ].
9 Camera (l 10)
10 Lens (l 4)
11 Mic
12 Camera/main unit connection cable
≥ This cable is not removable.
13 Speaker
14 LOCK switch (l 4, 11 , 14)
15 Side cover (l 4, 11, 14)
16 USB terminal [ ] (l 11)
17 Reset button [RESET]
≥ If this unit fails to operate correctly, such as
when this unit cannot be turned on/off, press
the reset button by using a paper clip or a
similar object.
18 Card slot (l 14)
- 8 -
Page 9
Wearing this unit
Main unit
Camera unit
Wear the main unit and camera unit.
≥ If you have felt discomfort after a long period of use,
stop the use or loosen the tight fit by slightly
loosening the adjuster, etc.
≥ For the direction of the camera, check the actual
image on the Live view screen. (l 23)
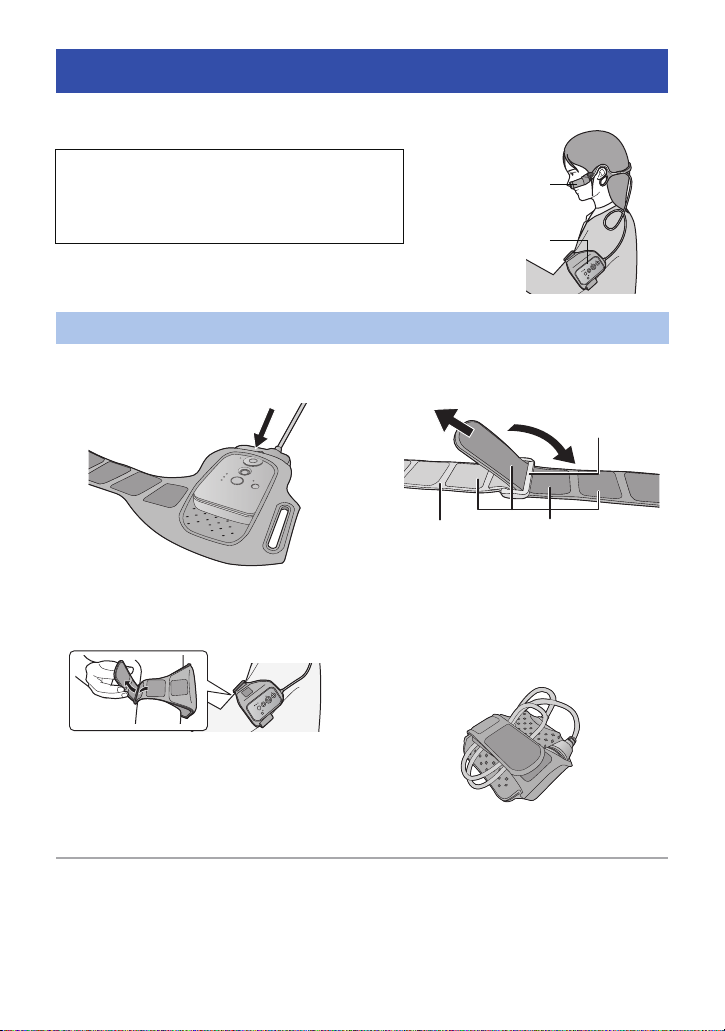
Fastening the main unit using the Armband Case
1 Insert so that you can see the
buttons on the main unit.
3 Fasten to your arm.
≥ When fastening the main unit, try not to drop
the camera unit to avoid a shock and try not
to scratch the lens.
≥ When removing the camera/main unit from the Armband Case, avoid pulling the camera/main
unit connection cable.
≥ You can use an optional Multi Mount (VW-MKA100) for a variety of scenes.
2 If the band is not long enough,
attach the extended band C.
A: Hook and loop fastener
≥ Attach by passing the tip of the armband
through the buckle portion B of the extended
band.
∫ About the Armband Case
The Armband Case can be used as a portable
holder.
≥ When fastening to your arm, remove the
camera unit from the armband case.
- 9 -
Page 10
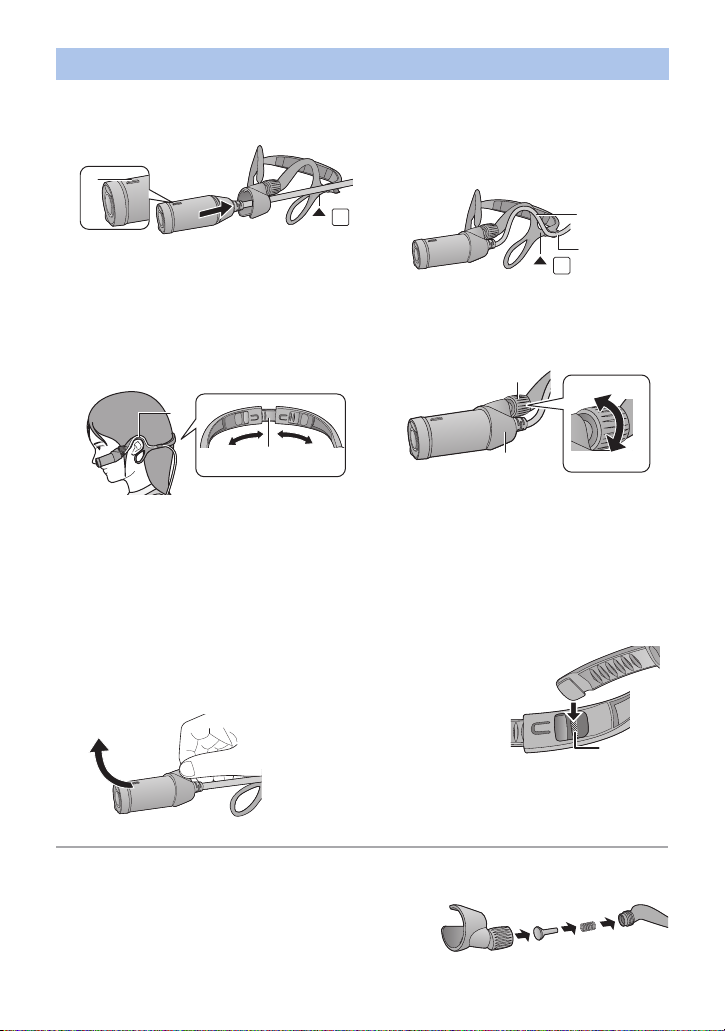
Attaching the camera unit to the earhook to wear
UP
L
UP
L
UNLOCK
LOCK
PUSH
1 Insert the camera unit until it
clicks into place.
≥ Insert so that the projecting part A of the
camera will face up.
3 Hook the earpieces D to ears
so that the camera unit will be
positioned on the left, and
adjust the size.
≥ Adjust by slowly pulling the adjuster E
sideways.
≥ If you adjust in such a way that the camera
unit comes into close contact with the cheek,
you can record less blurry images.
∫ How to remove the
camera
Hold the camera attachment
portion as shown in the figure, and
remove the camera unit in the
direction of the arrow.
∫ How to attach the adjuster (Large)
(supplied)
When the earhook is too tight,
remove the adjuster of the earhook,
and replace it with the supplied
adjuster (Large).
1 Press H in the direction
of the arrow using the
supplied adjuster (Large)
to pull out the attached adjuster.
≥ Pull out the one on the other side in the same way.
2 Insert the both side of supplied adjuster
(Large) until it clicks into place.
2 Loosen the camera/main unit
connection cable B to the
shape of an ear, and fit it in the
holder C.
4 Hold the camera attachment
portion F
direction of the lens.
≥ If the direction of the lens cannot be changed,
loosen the adjustment knob G slightly and
tighten it after adjusting the direction of the
lens.
≥ If the camera unit is shaky, tighten the
adjustment knob G.
, and adjust the
≥ Do not touch the lens or pull the cable while attaching or removing.
≥ When you adjust the adjuster, do so slowly without applying too much force.
≥ If the adjustment knob comes off, attach it as indicated in
the right figure.
- 10 -
Page 11
Power supply
B
A
C
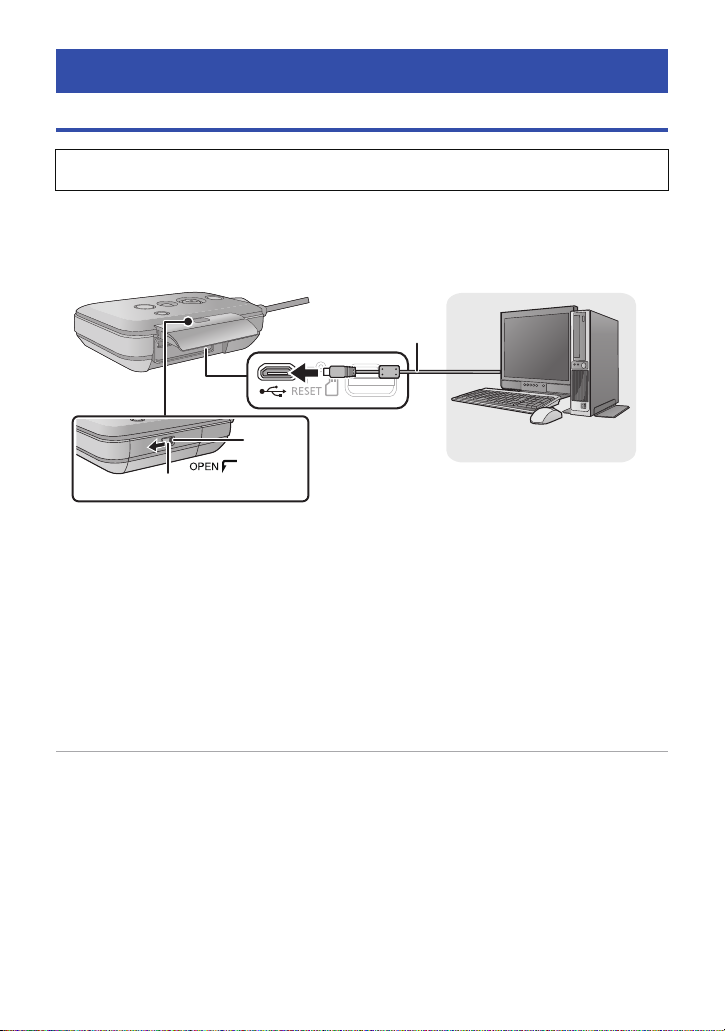
Charging the battery
When this unit is purchased, the battery is not charged. Charge the battery fully before
using this unit for the first time.
≥ This unit has a built-in rechargeable lithium-ion battery. Do not remove except when
disposing of this unit. (l 61)
≥ The battery will not be charged if this unit is turned on. Connect it with the PC to charge
the battery after turning it off.
≥ It is recommended to charge the battery in a temperature between 10 oC and 30 oC.
A: LOCK switch
B: USB cable (supplied)
C: Unlocked when the red indicator is visible
1 Slide A to the left to unlock the side cover and slide the side cover
downward to open it.
2 Connect the USB terminal of this unit to a PC with the USB cable B
(supplied).
≥ Insert the USB cable securely all the way.
≥ The Power lamp will flash red at an interval of 2 seconds (approximately 1 second on, 1 second
off), indicating that charging has begun.
It will turn off when the charging is completed.
≥ Do not use any other USB cables except the supplied one. (Operation is not guaranteed with any
other USB cables.)
≥ Do not heat or expose to flame.
≥ Do not leave the unit (including built-in battery) in a car exposed to direct sunlight for a long
period of time with doors and windows closed.
≥ If operating time is short even after fully charging the battery, the battery is worn out and needs to
be replaced. Please contact your dealer.
≥ When the PC is in a power saving mode such as a standby state, the battery may not be charged.
Cancel the power saving mode, and connect this unit again.
≥ Operation is not guaranteed when devices are connected through USB hubs or by using
extension cables.
≥ Operation cannot be guaranteed on all devices having a USB terminal.
- 11 -
Page 12
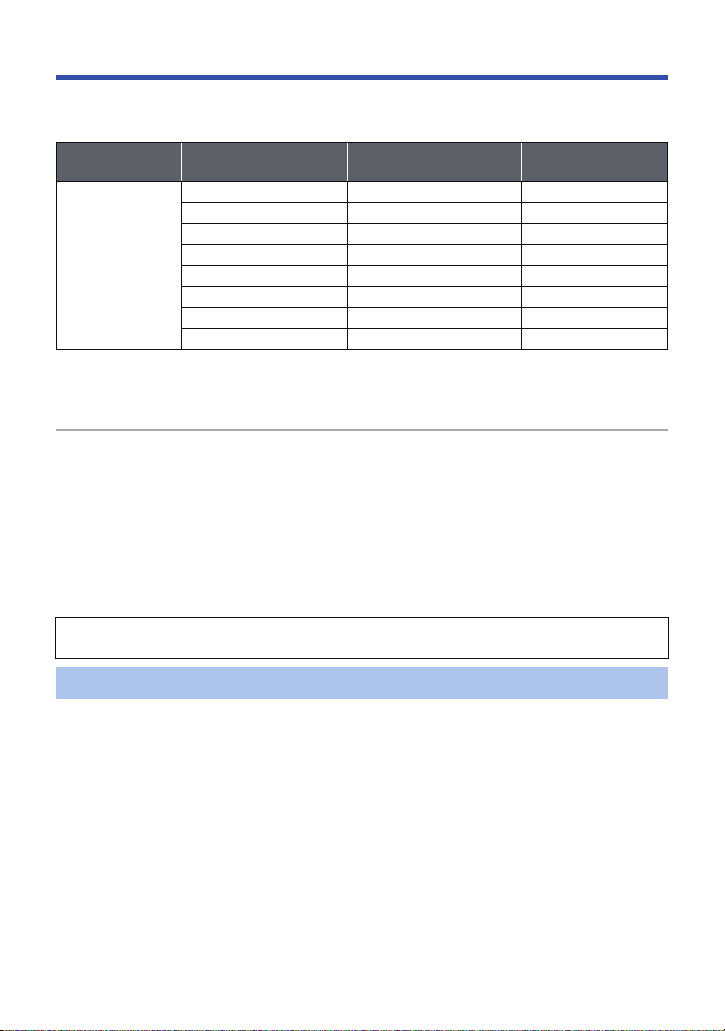
Charging and recording time
∫ Charging/Recording time
≥ Temperature: 25 oC/humidity: 60%RH
Charging time Recording mode
1920k1080/50p 2 h 1 h
1920k1080/25p 2 h 30 min 1 h 15 min
1280
k
720/50p 2 h 20 min 1 h 10 min
4h30min
≥ These times are approximations.
≥ The indicated charging time is for when the battery has been discharged completely.
Charging time and recordable time vary depending on the usage conditions such as high/
low temperature.
≥ The actual recordable time refers to the recordable time when repeatedly starting/stopping
recording, turning this unit on/off, etc.
≥ The main unit heats up after use or charging. This is not a malfunction.
≥ The power lamp flashes (Flashing with approx. 0.5 second period) when the remaining battery
time becomes low.
The remaining battery capacity is displayed on the screen when using Image App (l 17).
≥ For information about charging with a mobile USB charger or an AC adaptor, check the support
site.
http://panasonic.jp/support/global/cs/e_cam/index.html
(This site is English only.)
The mains plug is the disconnecting device. Install this unit so that the mains plug can be
unplugged from the socket outlet immediately.
1280k720/25p 2 h 45 min 1 h 25 min
848
k
480/25p 2 h 50 min 1 h 25 min
1920k1080/50fps 2 h 1 h
1280
k
720/100fps 2 h 15 min 1 h 10 min
848k480/200fps 2 h 25 min 1 h 15 min
Maximum continuous
recordable time
Actual recordable
time
When the Power lamp is flashing during charging
Flashing with approx. 0.5 second period (off for approx. 0.25 second, on for approx. 0.25 second):
≥ Check that the USB terminals of this unit or the connecting device, such as PC are not dirty or
covered with a foreign object, and reconnect correctly. If a foreign object or dirt is present, turn off
this unit before removing.
≥ The environment is at an extremely high or low temperature. Wait until the temperature has
returned to an appropriate level and try charging again. If you are still unable to charge, there may
be a fault in this unit or the connecting device.
Flashing with approx. 2 second period (off for approx. 1 second, on for approx. 1 second):
During charging normally (l 11)
Flashing with approx. 4 second period (off for approx. 2 seconds, on for approx. 2 seconds):
≥ When the battery is over discharged or the temperature of the battery is too high or low. It can be
charged, but it may take a few hours to complete the charging normally.
≥ It will flash in approx. 2 second intervals when normal charging resumes. Even in such cases, it
may start flashing in approx. 4 second intervals until charging is completed depending on the
conditions of use.
- 12 -
Page 13

Recording to a card
This unit can record motion pictures or still pictures to a microSD card.
Cards that you can use with this unit
Use microSD Memory Card (512 MB/1 GB/2 GB) or microSDHC Memory Card (4 GB/8 GB/
16 GB/32 GB) conforming to Class 4
picture recording.
≥ Operation of microSD cards other than described above is not guaranteed.
*1 SD Speed Class Rating is the speed standard regarding
continuous writing. Check via the label on the card, etc.
*2 Use microSD cards conforming to Class 6 or higher of the SD Speed Class Rating for
“Slow motion mode” (l 24). If you use microSD cards conforming to Class 4 or less of
that, the recording may stop suddenly.
≥ Please check the latest information on the support website below.
http://panasonic.jp/support/global/cs/e_cam/index.html
(This website is in English only.)
≥ Keep the Memory Card out of reach of children to prevent swallowing.
*2
or higher of the SD Speed Class Rating*1 for motion
e.g.:
- 13 -
Page 14
Inserting/removing a microSD card
A
B
D
C
Caution:
Check that the access lamp A has gone off.
≥ When this unit is accessing the microSD card (such as recognition, recording, playback and
deletion), the access lamp lights up.
C: Unlocked when the red indicator is visible
1 Slide the LOCK switch B to the left to unlock the side cover and
slide the side cover downward to open it and then insert (remove)
the microSD card into (from) the card slot.
≥ Face the terminal side D upward and press it straight in as far as it will go.
≥ Press the centre of the microSD card and then pull it straight out.
2 Close the side cover and slide the LOCK switch B to the right to
lock it.
≥ Close the side cover and slide it upward and then lock it.
≥ Securely close it until it clicks.
When using a microSD card not from Panasonic, or one previously used on other equipment, for
the first time on this unit, format the microSD card. (l 21) When the microSD card is formatted,
all of the recorded data is deleted. Once the data is deleted, it cannot be restored.
≥ When the microSD card is removed, a notification sound emits, and the access lamp flashes fast.
(a state in which a microSD card is not inserted)
≥ Do not touch the terminals on the back of the microSD card.
≥ For handling of microSD card, refer to page 59.
≥ If you insert or remove the microSD card while this unit is in playback mode, Wi-Fi mode
will turn off and this unit will lose the connection.
∫ About the access lamp
≥ When the access lamp is lit, do not:
j Remove the microSD card
j Turn this unit off
j Insert and remove the USB cable
j Expose this unit to vibrations or shock
Performing the above while the lamp is on may result in damage to data/microSD card or this
unit.
- 14 -
Page 15
Turning this unit on/off
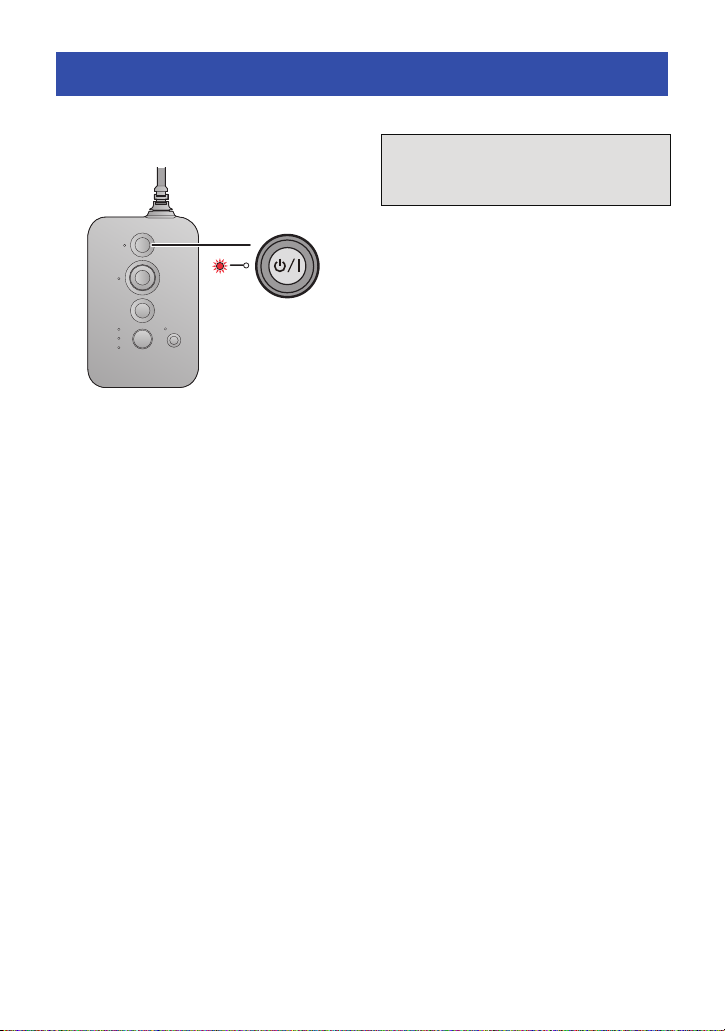
Press the power button to turn on this unit.
The power lamp is turned on.
To turn off this unit
Hold down the power button until the power
lamp goes off.
Proceed to “Connecting directly with a
smartphone” (l 17) and “Setting up
with Setup wizard” (l 19) to finish the
setup of this unit.
You can enjoy the functions of this unit
after finishing the setup.
- 15 -
Page 16

Wi-Fi® function
∫ Use this unit as a wireless LAN device
When using equipment or computer systems that require more reliable security than wireless LAN
devices, ensure that the appropriate measures are taken for safety designs and defects for the
systems used. Panasonic will not take any responsibility for any damage that arises when using the
camera for any purpose other than as a wireless LAN device.
∫ Use of the Wi-Fi function of this unit is presumed to be in countries
where this unit is sold
There is the risk that this unit violates the radiowave regulations if used in countries other than those
where this unit is sold, and Panasonic takes no responsibility for any violations.
∫ There is the risk that data sent and received via radio waves may be
intercepted
Please note that there is the risk that data sent and received via radio waves may be intercepted by
a third party.
∫ Do not use the camera in areas with magnetic fields, static electricity
or interference
≥ Do not use this unit in areas with magnetic fields, static electricity or interference, such as near
microwave ovens. Radio waves may not reach the camera.
≥ Using the camera near devices such as cordless telephones or any other wireless LAN device
that use the 2.4 GHz radio wave band may cause a decrease in performance in both devices.
∫
Do not connect to the wireless network you are not authorised to use
Do not attempt to connect to the wireless networks that you are not authorised to use (SSID*) as it
may be considered as unauthorised access.
* SSID refers to the name of device that is used to identify a network over a wireless LAN
connection. If the SSID matches for both devices, transmission is possible.
∫ Before use
To use a Wi-Fi function with this unit, you need an access point or destination device equipped with
a wireless LAN function.
≥ Do not connect to the wireless LAN connection via unknown wireless access point.
≥ Use a IEEE802.11b, IEEE802.11g or IEEE802.11n compatible device when using an access
point.
≥ When using an access point, we strongly recommend that you set a encryption to maintain
information security.
≥
Before sending motion pictures or still pictures, we recommend you charge the battery fully.
≥ When sending data on a mobile network or tethering, high packet communication fees may be
incurred depending on the details of your contract.
≥ This unit may not connect to an access point depending on the radio wave condition.
≥ When using the Wi-Fi function, do not cover the Wi-Fi transmitter with your hand.
≥ The Wi-Fi transmitter may become warm when using the Wi-Fi function; however this is not a sign
of a malfunction.
- 16 -
Page 17
Connecting directly with a smartphone
Installing Image App
The Image App is an application for the smartphone provided by Panasonic.
Required Operating Systems for Image App
The following Operating Systems of the smartphone are supported.
TM
Android
iOS device:
≥ The service may not be able to be used properly depending on the type of smartphone being
used. For compatible devices, see the following support site.
1 Connect your device (Android or iOS) to a network.
device:
http://panasonic.jp/support/global/cs/e_cam/index.html (This Site is English only.)
Android 2.2 to Android 4.2
iOS 4.3 to iOS 6.0
2 Android device: Select “Play Store”.
iOS device: Select “App Store
SM
”.
3 Enter “Panasonic Image App” into the search box.
4 Select “Image App” and install it.
≥ The icon will be added to the menu.
Connecting this unit with a smartphone
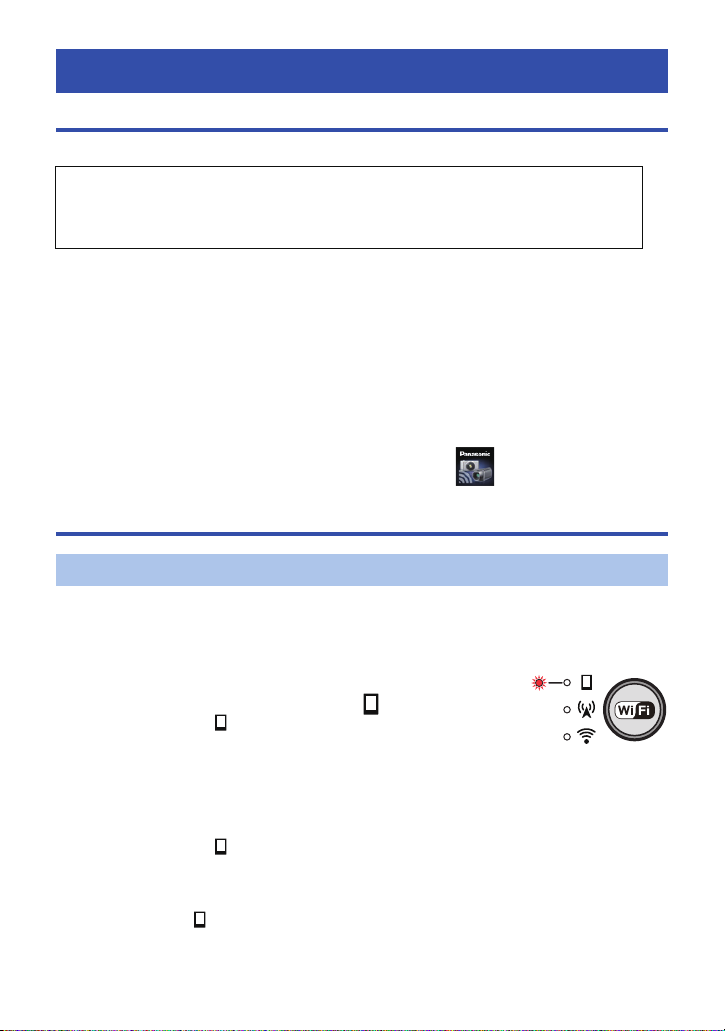
Connecting with a WPS-compatible smartphone
Please read the manual of your smartphone and check if the smartphone is compatible with WPS*.
≥ If your smartphone is not compatible with WPS, connect this unit with the smartphone according
to “Selecting SSID of this unit to connect with a smartphone”. (l 18)
* WPS stands for “Wi-Fi Protected Setup
TM
”.
1 Press the Wi-Fi/WPS button continuously to
change the Wi-Fi mode lamp to [ ].
≥ The Wi-Fi mode lamp [ ] flashes.
2 Set the Wi-Fi function to ON on the smartphone
setup menu.
≥ Refer to the manual of your smartphone.
3 Press and hold the Wi-Fi/WPS button for 3 seconds or more.
≥ The Wi-Fi mode lamp [ ] flashes faster.
4 Select the connection using the WPS button (or WPS function) in the
Wi-Fi settings of the smartphone within 3 minutes.
≥ Wi-Fi mode lamp [ ] will turn on when the connection is completed.
- 17 -
Page 18
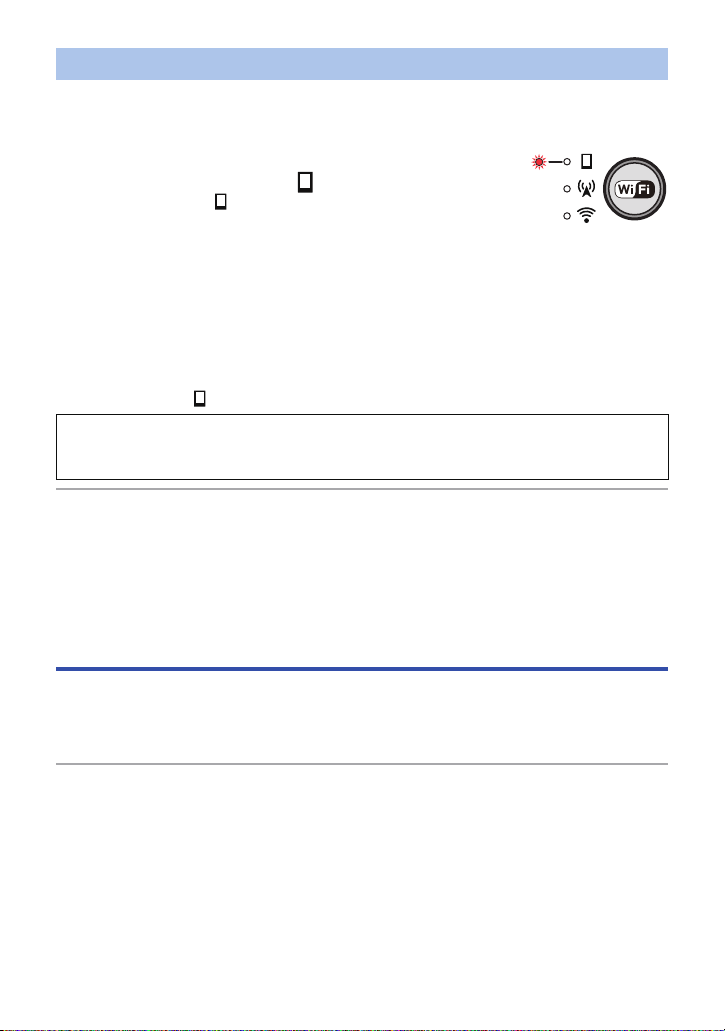
Selecting SSID of this unit to connect with a smartphone
Select this unit's SSID (Wireless network name) on a smartphone and enter password to connect
with the smartphone.
≥ Change the default SSID and password after completing the first setting. (l 19)
1 Press the Wi-Fi/WPS button continuously to change
the Wi-Fi mode lamp to [ ].
≥ The Wi-Fi mode lamp [ ] flashes.
2 Set the Wi-Fi function to ON on the smartphone
setup menu.
≥ Refer to the manual of your smartphone.
3 Tap the SSID of this unit (below) on the Wi-Fi network screen of the
smartphone.
≥ Password entry screen is displayed.
4 Enter password (below).
≥ Wi-Fi mode lamp [ ] will turn on when the connection is completed.
Default setting
SSID:
Password:
≥ Wi-Fi mode and Wi-Fi mode lamp will turn off if this unit cannot be connected with the
smartphone in approx. 30 minutes. Retry the connection setting from the Step1.
≥ If this unit and the smartphone are too far apart from each other when making the settings, the
connection may not be established. Move the devices closer to each other before making the
settings.
≥ Even if you have changed the SSID/password, the default SSID/password (above) are restored
when you initialise the network settings. (l 53) We recommend you keep this manual in a safe
place.
Starting Image App
A100-wearable
paR9We58n
Start Image App.
≥ If a screen asking you to select a connection destination is displayed, select the SSID for this unit.
≥ When the [Date & time] screen appears, perform the clock setting. (l 20)
≥ If a connection attempt with this unit fails, set the Wi-Fi function to OFF on the setup menu
of the smartphone, set it to ON again, and reconnect.
- 18 -
Page 19
Setting up with Setup wizard
After making the settings according to the setup wizard screens, you can use the main functions of this unit.
Proceed to complete the setup by following the on-screen instructions.
≥ The setup wizard is displayed at the time of purchase and after a long period of non-use during
which the battery ran down.
1 Synchronise the time of this unit with that of smartphone.
≥
Once the clock is set, recording, live broadcasting, and other functions of this unit can be used correctly.
≥
It may take approximately 60 seconds to synchronise the time of the smartphone with that of this unit.
2 Change the SSID and password for this unit.
≥ If the default SSID and password for this unit are used, a third party may obtain
compromised information or use the SSID and password for unlawful purposes. Make
sure to change the SSID and password.
≥ We recommend you periodically change the SSID and password for this unit.
≥ Set a password different from an SSID. Avoid setting a password that can be easily
guessed, and set the one consisting of both alphabetic and numeric characters.
≥ If a new SSID and password have been written down on a piece of paper, etc., manage
them so that they will not be compromised.
≥
When the SSID and password for this unit are set to the default ones, the setup wizard is displayed.
≥ Change the SSID and password for this unit.
j Enter an SSID consisting of alphanumeric characters and/or symbols. The length must be
between 1 to 32 characters.
j Enter a password consisting of both alphabetic and numeric characters. The length must be
between 8 to 64 characters.
j If the SSID and password have been changed, they will be set when this unit is turned on again
or the Wi-Fi of this unit is turned on again.
3 Make the connection settings for the access point mode to use
devices connected to a wireless router, etc.
≥ Enter the SSID and password (authentication key) of the access point.
∫ When connecting by (If the device is Android)
1 Ta p .
2 Tap the wireless access point to connect.
3 Enter password.
≥ This allows you to operate this unit via an access point using your smartphone.
4 Make the connection destination settings for a live broadcast.
≥ Enter the SSID and password (authentication key) of the access point.
Up to three access points can be registered. Register the access point you use, such as the
wireless router in your home or the mobile router you use outside.
≥ The settings can also be made from the Image App menu. (l 36)
≥ You can perform a live broadcast by setting the following.
j Make the live broadcast settings. (l 37)
For compatible access points, see the following support site.
http://panasonic.jp/support/global/cs/e_cam/index.html (This Site is English only.)
- 19 -
Page 20
∫ If the connection between this unit and the smartphone has been
interrupted
The connection between this unit and the smartphone may be interrupted temporarily depending on
radio wave conditions.
An attempt to reconnect is made automatically when radio wave interference, etc. is eliminated.
Please note the following.
≥ If you have been recording a motion picture or recording in the [Interval rec mode], the recording
will continue even after the connection interruption. To stop the recording, operate this unit.
≥ If Image App has been used in playback mode, if reconnecting takes 30 seconds or more, this
unit turns to recording mode and Image App will run in recording mode after the connection is
restored.
≥ If this unit has been deleting files, cutting unwanted scenes or formatting, the operation will
continue even after the connection interruption.
Do not remove the microSD card while the Access lamp of this unit lights.
Setting date and time
The clock of this unit is synchronised with that of the smartphone.
Synchronise to adjust the clock, etc.
When you start Image App connecting with this unit for the first time, a message asking you to
set the date and time will appear. (This message will also be displayed if this unit remains
unused for a long period of time.)
Perform Steps 2 below to set the date and time.
Preparation: Connect this unit with the smartphone and start Image App. (l 17)
1 Tap # [Camera setup].
2 Tap [Date & time].
≥ When you want to adjust the clock, change the time of the smartphone first, and then synchronise
the time with this unit.
≥ It may take approximately 60 seconds to synchronise the time of the smartphone with that of this
unit.
≥ When the built-in clock battery runs down, the clock setting returns to the default state. When the
battery of this unit is in a charged state, the built-in clock battery is also charged automatically. If
you leave the battery in this unit in a charged state for approximately 24 hours, the built-in clock
battery stores the clock setting for approximately 4 months.
≥ The setting range from 1 January 2013 through 31 December 2039 is available for time
synchronisation with the smartphone.
- 20 -
Page 21

Using the Setup Menu
For settings on the Setup menu, tap # [Camera setup] # respective items on the
Image App screen.
Alert Sound
Starting and stopping of recording, unit on/off and occurring errors can be confirmed with this sound.
(High/Low/OFF) (l 57)
Economy
When about 5 minutes have passed without any operation, this unit automatically turns off to save
the battery life.
≥ This unit will not automatically turn off during Wi-Fi mode or when using this unit as the card
reader.
Initial Set
Settings of this unit return to the default condition.
≥ Wi-Fi network settings will not be changed.
≥ When this unit is in playback mode, this item is not displayed.
Format
Please be aware that if a microSD card is formatted, then all the data recorded on the microSD card
will be erased and cannot be restored. Back up important data on a PC, etc. (l 45)
≥ Do not turn this unit off or remove the microSD card while formatting. Do not expose this unit to
vibrations or shock.
≥ Do not format a microSD card using any other equipment such as a PC. The card may not
be used on this unit.
Date & time
Please refer to page 20.
Number Reset
Set the file number of the motion picture and still picture recorded next to 0001.
≥ Folder number is updated and file number will start from 0001. (l 47)
≥ To reset the folder number, format the microSD card, and then perform [Number Reset].
Device info. display
The firmware version of this unit is displayed.
- 21 -
Page 22

Basic
Live view
Displays an image from the
camera of this unit.
≥ Also outputs sound from
the microphone of this
unit.
Still picture recording
icon
Motion picture recording
icon
Angle of view
Select Standard or Wide
mode.
Recording start/
stop button
Photoshot
button
Recording
Record motion pictures or still pictures using the smartphone as a remote control.
≥ For details, refer to the help of the Image App.
Preparation: Connect this unit with the smartphone and start Image App. (l 17)
1080/25p
XXXXX
Recording motion pictures
1 Tap .
≥ This unit is set to the recording mode.
2 Tap the motion picture recording icon to start.
≥ Starts recording.
3 Tap the motion picture recording icon again to stop recording.
≥ Stops recording.
Recording still pictures
1 Tap .
≥ This unit is set to the recording mode.
2 Tap the Still picture recording icon to record still picture.
≥ Updating Live view images may stop while recording still pictures.
∫ About recording with this unit
You can record images using this unit without any connection with
this unit, turning the Wi-Fi mode off.
≥ Motion pictures and still pictures cannot be recorded at the same
time.
- 22 -
Page 23

∫ Checks before recording
If you intend to record only with this unit by turning off the Wi-Fi mode, we recommend you make a
test recording to check the settings such as the field of view mode, [Image stabilization] and [White
balance] before recording. (l 22, 25, 26)
≥ Wear this unit, face the front, and then check them on the Live view screen (l 22).
≥ You can use
≥ This unit (camera unit) stabilises if you wear it while placing it on your cheek.
≥ The period between the start and end of recording is recorded as one file. However, if the
continuous recording time exceeds the following, the file is divided and the pieces are saved
separately. (Thumbnails are also created separately, so automatic continuous playback will not be
available)
The amount of data varies depending on the recording image, so use the following as
approximate indications.
j 1920k1080/50p: approx.10 min
j 1920k1080/25p: approx.19 min
j 1280k720/50p: approx.15 min
j 1280k720/25p and 848k480/25p: approx. 22 min
j 1920k1080/50fps: approx. 9 min
j 1280k720/100fps: approx. 5 min
j 848k480/200fps: approx. 2 min
≥ Each microSD card can save up to approximately 89100 files and approximately 900 folders.
When other motion pictures and still pictures have already been saved in the microSD card, the
capacity becomes lower.
≥ Motion pictures are saved in separate folders according to the [Normal shooting mode] or [Slow
motion mode]
[
Interval rec mode] (l 25) are saved in separate folders. For details about the folders, refer to 47
page.
≥ If you set the field of view mode to wide, [Level Shot Function] (l 25) and [Image stabilization]
(l 25) is set to OFF.
≥ If you set the field of view mode to standard and set [Image stabilization] to ON, the field of view
becomes narrower.
≥ If you set the field of view mode to wide or you set the recording mode to [Slow motion mode], the
picture size of a still picture will be approximately 5.3 M (3072k1728); if you set the mode to
standard, the picture size will be approximately 3 M (2304k1296).
≥ Refer to page 60 for the approximate recordable time and number of recordable pictures.
≥ Field of view mode cannot be used when [Slow motion mode] is set to ON.
≥ If you record motion pictures in a dark place in [Slow motion mode], recorded motion pictures
may be darker than those in [Normal shooting mode].
≥ If you record still pictures in a dark place, recorded still pictures may be darker than motion
pictures.
≥ It may take approximately 3 seconds to stop recording. Confirm if the motion picture recording
stops or not by the access lamp or Alert Sound.
≥ If you check an image or sound when recording motion pictures while this unit is connected
wirelessly to a smartphone, etc., howling* may occur. In that case, lower the volume of the
smartphone.
* Refers to a phenomenon in which a microphone outputs an abnormal sound when it picks up a
sound from a speaker.
[Shooting guidelines] (l 26) as a guide for balance in composition.
setting. (l 24) Still pictures that have been taken one at a time and those taken in
- 23 -
Page 24

Using the Recording menu
Tap # [Record Setup] # respective items on the Image App screen.
≥ For more information, refer to the help of the Image App.
Normal shooting mode
This sets the recording mode. The greater the number is, the higher the image quality is. However,
the file size also becomes greater. (l 60)
Set to ON to select Normal shooting mode in [Rec Mode]. (If [Normal shooting mode] is set to ON,
[Slow motion mode] is automatically switched to OFF.)
≥ 1920k1080/50p or 1280k720/50p is set, live broadcasting is not available. (l 37)
Slow motion mode
This records motion pictures in slow motion by setting a high frame rate (increasing the number of
frames).
Set to ON to select Slow motion mode in [Rec Mode]. (If [Slow motion mode] is set to ON, [Normal
shooting mode] is automatically switched to OFF.)
≥ Live view is not available during recording. (Video/audio cannot be output during recording.)
≥ Live broadcasting is not available.
≥ Sound cannot be recorded.
≥ [Color Night Rec], [Level Shot Function], [Image stabilization] and Angle switchover are not
available.
Rec Mode
The following recording modes are available.
≥ When [Normal shooting mode] is set to ON:
1920k1080/50p 1920k1080/25p 1280k720/50p
1280k720/25p 848k480/25p
≥ When [Slow motion mode] is set to ON:
1920k1080/50fps: Plays back at 1/2 times normal speed. (actual playback time is
1280k720/100fps: Plays back at 1/4 times normal speed. (actual playback time is four
848k480/200fps: Plays back at 1/8 times normal speed. (actual playback time is eight
twice as long as the recorded time)
times as long as the recorded time)
times as long as the recorded time)
Wind noise reduction
This reduces noise of the wind picked up by the built-in microphone.
≥ Default setting: OFF
≥ It may not reduce noise of the wind sufficiently, depending on the recording situation.
- 24 -
Page 25

Interval rec mode
This is for recording still pictures at a set interval. (60 Seconds/30 Seconds/10 Seconds/5 Seconds/
3 Seconds/OFF)
≥ If you tap the still picture recording icon, intermittent recording starts. (Tap it again to stop
recording.)
≥ You can also start/stop intermittent recording by pressing the photoshot button on this unit.
≥ The access lamp of this unit flashes.
≥ Normal recording of still pictures/motion pictures is impossible while in [Interval rec mode].
≥ Updating Live view images may stop while recording still pictures.
≥ The Self Timer is cancelled.
Self Timer
This is for recording still pictures using the timer.
If you record still pictures by setting this to [10 Seconds] or [2 Seconds], recording starts after the
set time elapses.
≥ After recording, the Self-timer is cancelled.
Level Shot Function
This is for automatically correcting the horizontal tilt of an image.
≥ [Level Shot Function] operates when starting to record a motion picture or still picture or when
starting to perform a live broadcast.
≥ [Level Shot Function] will not work in the following cases:
j When the tilt of the camera is large
j When the recording mode is set to [1920k1080/50p] or [1280k720/50p].
j When [Color Night Rec] is set to ON
j While [Slow motion mode] is set to ON
j When field of view is set to wide mode.
j When motion is continuous
Image stabilization
This is for reducing camera shakes.
≥ [Image stabilization] cannot be set in the following cases:
j When the recording mode is set to [1920k1080/50p] or [1280k720/50p].
j When [Color Night Rec] is set to ON
j While [Slow motion mode] is set to ON
j When field of view is set to Wide mode.
≥ The compensation may not be as effective in an extremely dark place or when shakes are too
strong.
≥ This may not work correctly when this unit is at rest.
- 25 -
Page 26

White balance
When the colour tone does not look natural due to a light source, etc., tap [Preset], and select the
mode.
≥ When recording under mercury vapor lamps, sodium lamps, spotlights in a theater, etc. or when
recording a sunset/sunrise, etc., fill the entire screen with the white subject, and tap [Custom] #
[Set] to set. (The set value is stored in [User].)
Preset mode Recording conditions
Auto White Balance Automatic White Balance adjustment
Daylight Outdoors under a clear sky
Cloudy Outdoors under cloudy sky
Indoor 1 Incandescent light, video lights like in the studio, etc.
Indoor 2 Colour fluorescent lamps, sodium lamps in gymnasiums etc.
User The colour tone set in [Custom]
Backlight Compens.
This makes the image brighter to prevent darkening of a backlit subject.
≥ It cannot be set while in [Color Night Rec].
Color Night Rec
This function allows you to record colour images in very low light situations.
≥ It cannot be set while in [Slow motion mode].
≥ Recorded scene is seen as if frames were missed.
≥ If set in a bright place, the screen may become washed out for a while.
≥ Bright dots that are usually invisible may be seen, but this is not a malfunction.
≥ [White balance] setting cannot be changed while this function is activated.
Shooting guidelines
You can check if the image is level. The function can also be used to estimate the balance of the
composition.
≥ The guidelines do not affect the actual images that will be recorded.
Shtr Sound
You can add a sound when recording still pictures. (High/Low/OFF)
- 26 -
Page 27

Playback
A
Motion pictures or still pictures stored in this unit are played back with the smartphone.
≥ For more information, refer to the help of the Image App.
Preparation: Connect this unit with the smartphone and start Image App. (l 17)
1 Tap .
≥ Thumbnails of motion picture or still picture stored in this unit are displayed.
2 Tap ( ).
∫ For playing back motion pictures
3 Tap M P 4 .
4 Tap the thumbnail of motion picture you want to play back.
≥ Motion picture playback screen is displayed.
5 Tap the playback icon on the screen to play back motion pictures.
≥ Tapping or dragging the slide bar will start playback
from the desired position of a motion picture file.
A: Slide bar
∫ For playing back still pictures
3 Tap JPEG.
4 Tap the thumbnail of still picture you want to play back.
≥ Still picture playback screen is displayed.
≥ Dragging (Flicking) to right or left will play back the next or previous still picture.
∫ To copy the data stored in this unit to the smartphone
Copy using "Picture Share" settings.
Set “Save to smartPH” to the picture share tab, and drag and drop the thumbnail of the file you want
to copy. (l 32)
≥ Copying motion picture files stored in this unit to a smartphone may not be possible depending on
the smartphone you are using.
≥
If motion picture files have been copied to a smartphone, the thumbnails for them will be displayed, but
playing them back may not be possible depending on the smartphone you are using.
≥ Refer to “"Picture Share" settings” (l 32), “SPLIT & DELETE” (l 29), and “Delete all” (l 29) for
information on deleting files.
- 27 -
Page 28

Using the Playback menu
Playback settings
Tap # [Playback settings] # respective items on the Image App screen.
≥ For more information, refer to the help of the Image App.
≥ Please refer to page 32 for "Picture Share" settings.
Size:Copy from camera
If “Medium” is set, the data will be resized to 2.1M when copying still picture data in this unit to the
smartphone. If “Large (original)” is set, the still picture data in this unit will be copied in its original
state.
Size:Upl. to WEB
If “Small” is set, still pictures that will be uploaded on a WEB service will be resized to 0.2M. If
“Medium” is set, they will be resized to 2.1M. If “Recommended” is set, they will be set to the optimal
size. If “Large (original)” is set, the still picture data in this unit will be uploaded in its original state.
LUMIX CLUB settings
≥ Please refer to page 31 for [Start LUMIX CLUB function use] and page 31 for [Regist. WEB
Service].
Manage login ID: A list of login information for registered WEB services is displayed. (l 31)
≥ This is displayed after selecting [Start LUMIX CLUB function use].
- 28 -
Page 29

Camera function
Tap # # items in [Camera function] on the Image App screen.
≥ For more information, refer to the help of the Image App.
≥ For “Play on TV”, refer to “Playing back on a DLNA-compatible TV” (l 43).
SCENE PROTECT
Motion/still pictures can be protected so that they are not deleted by mistake.
(Even if you protect some motion/still pictures, formatting the microSD card will delete
them.)
SPLIT & DELETE
This splits a motion picture into two and deletes the unnecessary part before or after the split point.
≥ It may not be possible to divide files with a short recording time.
Delete all
This deletes all files at once.
When MP4 thumbnails are displayed, only MP4 files are deleted all at once; when JPEG thumbnails
are displayed, only JPEG files are deleted all at once.
- 29 -
Page 30

Required settings for sending data, etc.
When you upload motion pictures and still pictures recorded with this unit on WEB services
(Facebook, YouTube, etc.) or perform a live broadcast using “USTREAM”, you are required to set
the following.
≥ For more information, refer to the help of the Image App.
∫ Required settings for uploading/live broadcasting
WEB services
≥ From the Play Store, etc.,
Uploading on WEB
services
≥ “"Picture Share" settings”
Live broadcasting
Refer to the “LUMIX CLUB” site for details.
http://lumixclub.panasonic.net/eng/c/
To use the Live broadcast, access following website.
http://lumixclub.panasonic.net/eng/c/
≥
≥
≥ “Live broadcast settings (synchronising with this unit)” (l 32
Android device iOS device
download the applications that
perform uploading on the WEB
services.
“Registering “LUMIX CLUB”” (
“Registering WEB services” (l 31
Required settings
≥
“Registering “LUMIX CLUB”” (
≥ “Registering WEB services”
(
l 31
(
≥ “"Picture Share" settings” (l 32
l 32
)
l 31
)
)
l 31
)
)
)
)
- 30 -
Page 31

“LUMIX CLUB” settings
If you intend to broadcast a live motion picture or use WEB services with an iOS device, you are
required to register “LUMIX CLUB” and WEB services you use because uploading or live
broadcasting is done via “LUMIX CLUB”.
Registering “LUMIX CLUB”
Perform service user registration (free of charge) for the “LUMIX CLUB”, acquire a login ID, and set
the registered content on this unit.
1 When this unit and a smartphone are connected directly (l 17), turn
off the Wi-Fi setting of the smartphone to make the internet
connection available.
≥ When using an access point connection (l 41), proceed to step 2.
2 Tap # [Playback settings] # [LUMIX CLUB settings] # [Start
LUMIX CLUB function use]
≥ If a login ID for the “LUMIX CLUB” has already been acquired on a PC, etc., the acquired login ID
can also be used.
on the Image App screen to set ON.
3 Tap [Sign up].
4 Read through the [LUMIX CLUB] terms of use, and tap [Agree].
5 Enter the password on the next screen. # Tap [Register].
≥ After the login, complete the registration according to the on-screen instructions. (When using an
access point connection (l 41), step 6 is not required.)
6 Close (or hide) the Image App, turn on the Wi-Fi setting, and connect
this unit and smartphone. (l 17)
Registering WEB services
Check the following site for supported WEB services.
http://lumixclub.panasonic.net/eng/c/
1 When this unit and a smartphone are connected directly (l 17), turn
off the Wi-Fi setting of the smartphone to make the internet
connection available.
≥ When using an access point connection (l 41), proceed to step 2.
2 Acquire login information (login ID, password, etc.) on the WEB
service you want to use.
3 Tap # [Playback settings] # [LUMIX CLUB settings] # [Regist.
WEB Service] # any WEB services you want to use on the Image
App screen, enter the login information acquired in Step2 and then
complete the registration.
≥ Follow on-screen instructions to register.
- 31 -
Page 32

4 Close (or hide) the Image App, turn on the Wi-Fi setting, and connect
this unit and smartphone (l 17)
Live broadcast settings (synchronising with this unit)
When you perform a live broadcast with USTREAM, you are required to synchronise the “LUMIX
CLUB” settings with this unit.
Tap # [Playback settings] # [LUMIX CLUB settings] # [Manage
login ID] and tap [Register the same LUMIX CLUB login ID as the
camera].
"Picture Share" settings
To upload on a WEB service from the Image App, you are required to make the "Picture Share"
settings.
"Picture Share" settings are also used for copying or deleting motion pictures or still pictures
recorded in this unit to a smartphone.
≥ For more information, refer to the help of the Image App.
1 When this unit and a smartphone are connected directly (l 17), turn
off the Wi-Fi setting of the smartphone to make the internet
connection available.
≥ When using an access point connection (l 41), proceed to step 2.
2 Tap # [Playback settings] # ["Picture Share" settings] on the
Image App screen.
3 Drag and drop the icons for uploading, copying and
deleting to one of the tabs on the four sides of the
screen to make the settings.
≥ Uploading, copying, deleting, etc. can be done by tapping and
holding a thumbnail, and dragging and dropping it to the tab.
XXXXXX XXXXXX XXXXXX
XXXXXX
XXXXXX XXXXXX
XXXXXX XXXXXXXXXXXX
XXXXXX
4 Close (or hide) the Image App, turn on the Wi-Fi setting, and connect
this unit and smartphone (l 17)
- 32 -
Page 33

Data uploading
Uploads motion/still pictures stored on this unit to WEB services.
“LUMIX CLUB” settings, etc. are required for uploading. (l 31) Refer to “Required settings
for sending data, etc.” (l 30).
≥ For more information, refer to the help of the Image App.
Preparation: Connect this unit with the smartphone and start Image App. (l 17)
When using the Android device
1 Tap .
≥ Thumbnails of motion picture or still picture stored in this unit are displayed. (l 27)
2 Tap and hold the thumbnail of the motion picture or still picture you
intend to upload.
≥ Tabs are displayed on four sides.
3 Drag and drop the thumbnail to the tab of the WEB service you
intend to use.
When using the iOS device
1 Tap .
≥ Thumbnails of motion picture or still picture stored in this unit are displayed. (l 27)
2 Tap and hold the thumbnail of the motion picture or still picture you
intend to upload.
≥ Tabs are displayed on four sides.
3 Drag and drop the thumbnail to the tab of the WEB service you
intend to use.
4 Enter a comment you intend to post on the WEB service.
5 Press the home button on the iOS device, and cancel the connection
between this unit and the iOS device (turn off the Wi-Fi setting).
≥ Set the internet environment, such as the 3G network connection, to the one for the iOS device.
6 Restart the Image App.
≥ When a message indicating that a connection attempt is being made with the camera is
displayed, close the message screen.
7 Tap on the top right of the screen, tap the motion picture or still
≥ After uploading, connect directly to the smartphone. (l 17)
≥ When using an access point connection (l 41), step 5 - 7 is not necessary if this unit and the
smartphone (iOS device) are connected to the same network. Uploading starts when comments
are entered.
1
picture you want to upload from the list, and send it.
- 33 -
Page 34

≥ If 3G or other mobile connections are used for uploading motion pictures or still pictures, high
data charges may be incurred depending on the content of your data plan.
Uploading on WEB services can also be done with an access point connection. (l 41)
- 34 -
Page 35

Advanced
*
USTREAM
LUMIX CLUB
Setting the connection destination for Live broadcasting (Connecting in Live broadcast mode)
This is the connection method for Live broadcasting using the “LUMIX CLUB” and “USTREAM”
services.
≥ Check if the wireless access point is compatible with IEEE802.11b, IEEE802.11g, or
IEEE802.11n.
≥ Access point settings are required specially for Live broadcasting.
* Only the smartphone compatible with tethering is available.
Connecting this unit with an access point (such as a wireless router)
Connecting to a WPS-compatible access point
Please read the manual of your access point and check if the access point is compatible with WPS.
≥ If your access point is not compatible with WPS, connect this unit with an access point according
to “Entering SSID to connect to an access point”. (l 36)
1 Press the Wi-Fi/WPS button continuously to
change the Wi-Fi mode lamp to [ ].
≥ The Wi-Fi mode lamp [ ] flashes. (“1 Beep” sounds 8 times.)
2 Press and hold the Wi-Fi/WPS button for
3 seconds or more.
≥ The Wi-Fi mode lamp [ ] flashes faster.
3 Press the WPS button of your access point within 3 minutes. (Set to
the WPS standby state.)
≥ When “2 Beeps” sound 8 times, the connection is completed.
- 35 -
Page 36

Entering SSID to connect to an access point
Enter SSID (Wireless network name) and password of your access point to connect this unit to the
access point.
Preparation: Connect this unit with the smartphone. (l 17)
1 Check the SSID and password of your access point.
≥ The SSID and password of the access point (e.g. a wireless router) you use are described on the
access point device or in its manual. For details, refer to the access point manual.
2 Tap # [Camera Wi-Fi settings] # [Live mode settings] # [Set
connect. dest.] on the Image App screen and enter the SSID and
password of your access point (Step1).
3 Press the Wi-Fi/WPS button continuously to change
the Wi-Fi mode lamp to [ ].
≥ The Wi-Fi mode lamp [ ] flashes. (“1 Beep” sounds 8 times.)
≥ When “2 Beeps” sound 8 times, the connection is completed.
∫ About the connection destination in Live broadcast mode
You can register up to three SSIDs for live broadcasting (step 2)
When perfoming a live broadcast, a connection attempt will be made with the first SSID, and if it
fails, an attempt will be made with the second one, and so on.
≥ From [Live mode settings] # [Set connect. dest.], the following can be set.
j Changing the priority order of the SSIDs for live broadcasting
j Deleting connection destinations
≥ To disconnect from the access point, press the Wi-Fi/WPS button and turn off the Wi-Fi mode
lamp.
≥ When the Wi-Fi mode lamp of this unit switches, the connection between this unit and the
smartphone is cancelled.
- 36 -
Page 37

Live broadcasting
USTREAM
*
Via “LUMIX CLUB”
Using the “LUMIX CLUB” and “USTREAM” services, you can broadcast live motion pictures. (Live
broadcasting)
≥ For the connection, refer to “Setting the connection destination for Live broadcasting (Connecting
in Live broadcast mode)” (l 35).
* Only the smartphone compatible with tethering is available.
Setting for Live broadcasting
Make the settings for performing a live broadcast on this unit.
For “LUMIX CLUB” settings, etc., refer to “Required settings for sending data, etc.” (l 30).
1 Using the browser of a PC or smartphone, register to “USTREAM”,
and acquire an ID/password/program.
About the USTREAM
With this video-sharing website, you can stream and watch motion pictures this unit is recording.
Refer to the USTREAM site for details.
http://www.ustream.tv/
2 Make the “LUMIX CLUB” settings (l 31)
3 From the Image App, tap # [Playback settings] # [LUMIX CLUB
settings] # [Regist. WEB Service] # [USTREAM].
4 Make the coordination settings between the “LUMIX CLUB” and
“USTREAM”.
≥ Enter the ID/password/program in step 1.
≥ Make the settings by following on-screen instructions.
- 37 -
Page 38

Settings on this unit
Set the Image Quality, etc. for when in Live broadcast mode. (Direct connection to the smartphone
is required for the settings. (l 17))
From the Image App, tap # [Camera Wi-Fi settings] # [Live mode settings], and make
the settings.
Items Contents
Set connect. dest. Up to three SSIDs can be registered for live broadcasting. Each of them
E-mail Setup This sends a notification e-mail for a live broadcast to e-mail addresses
E-mail date format This sets the date display format of an e-mail, which will be sent when
Save in USTREAM This sets whether to save motion pictures that have been broadcast live
Image Quality This sets the image quality of motion pictures that will be broadcast.
≥ Depending on the e-mail rejection or firewall setting at the destination address, e-mails may not
be delivered.
will make a connection attempt in turns when performing a live broadcast.
(l 36)
specified at the start of the “USTREAM” broadcast.
≥ If the e-mail setting is made, an e-mail will be sent for every broadcast.
If you do not want to send it, set this to OFF.
performing a live broadcast.
on the “USTREAM” side.
- 38 -
Page 39

∫ About Image Quality for Live broadcasting
Set the Image Quality from the following.
When [AUTO] is set, the Image Quality is checked and is automatically set to one of the options.
When broadcasting motion pictures or sound are interrupted or the line is disconnected, set
the Image Quality according to your communication environment.
Recommended
Image Quality
High pic. quality
Medium pic.
quality
Low pic. quality
*1 Recommended optimal speed (upstream) for the broadband line, mobile router (tethering), etc.
connected to this unit (For information on the optimal speed, contact your service provider, etc.)
*2 Frame rate in parentheses are when recorded simultaneously.
≥ Depending on the line state, images or sound may be interrupted or the line may be
disconnected. Set the Image Quality by referring to the values of the recommended optimal
speeds (upstream) above as an approximate guide.
≥ Operation cannot be guaranteed for all devices.
≥ Even with a broadband line, the recommended optimal speed may not be reached depending on
your environment.
≥ Narrowband lines such as analogue modems cannot be used.
≥ When using tethering function with a smartphone or a mobile router, an image or sound may be
interrupted or the communication may be disconnected.
≥ Check your contract details carefully, as broadband contract details may result in high
communication charges being incurred, or a limit placed on communication traffic.
optimal speed
(upstream)
3Mbps or more
1Mbps
500kbps or more
*1
or more
Resolution Frame rate
1280k720 5 to 25 fps (5 to 10 fps) 128kbps
640k360 5 to 25 fps (5 to 10 fps) 128kbps
320k176 5 to 25 fps (5 to 15 fps) 32kbps
Motion pictures
*2
Audio
- 39 -
Page 40

Performing a live broadcast
Press the Wi-Fi/WPS button continuously to change
the Wi-Fi mode lamp to [ ].
≥ The Wi-Fi mode lamp [ ] flashes and an alert sound is emitted while a
live broadcast connection is being processed.
≥ Wi-Fi mode lamp [ ] will turn on when the connection is completed.
≥ A live broadcast starts.
≥ If [E-mail Setup] is enabled, a broadcast notification e-mail is sent to the addresses that have
been set.
∫ To stop a live broadcast
Press the Wi-Fi/WPS button, and turn off the Wi-Fi mode lamp.
≥ If recording is taking place on this unit during a live broadcast, the live broadcast cannot be
stopped. Stop the motion picture recording in advance.
∫ About live broadcast images
You can record live broadcast images by pressing the recording start/stop button.
≥ The Image App cannot be used connecting with this unit in Live broadcast mode. Access the URL
of the live broadcast to check the image.
∫ When the Wi-Fi mode lamp [ ] is flashing fast (flashing at an
approximate interval of 0.5 second)
A live broadcast cannot be started.
≥ In the following cases, live broadcasting is not available.
j When the recording mode is set to [1920k1080/50p] or [1280k720/50p]
j When in [Slow motion mode]
j While recording a motion picture
j When in [Interval rec mode]
j When the date setting is out of sync by a day or more
j When two cameras simultaneously perform live broadcasts at the same account (The camera
that has started the broadcast first will be disconnected from the broadcast)
≥ When settings for live broadcasts are completed and [E-mail Setup] in [Live mode settings] is
set, a live broadcast starts and a notification e-mail is sent to all registered e-mail
addresses each time the Wi-Fi mode lamp [ ] lights up. When not sending, set to
≥ When you cannot view and listen to a broadcast using the USTREAM application of a television
or a smartphone, the password of a distribution programme is cancelled. Please rebroadcast.
≥ If a live broadcast motion picture is saved on the “USTREAM” side, the file name will be the same
as the channel name.
≥ The live broadcast stops as the elapsed broadcast time exceeds 8 hours 30 minutes, and then it
starts again. (A separate file will be saved on the “USTREAM” side.)
OFF.
- 40 -
Page 41

Connecting to devices on the network
Image App
XXXXX
XXXXX XXXXX
DLNA-compatible devices
(Connecting in Access Point mode)
The following connections are for controlling this unit from a smartphone via an access point
(wireless router, etc.) or for playing back motion pictures in this unit on a DLNA-compatible TV. (The
connections of both 1 and 2 are required)
≥ Check if the wireless access point is compatible with IEEE802.11b, IEEE802.11g, or
IEEE802.11n.
≥ Recording, playback and uploading using Image App, etc. are also available for the
connection via an access point.
1 Connecting this unit to an access point (such as a wireless LAN router)
Connecting to a WPS-compatible access point
Please read the manual of your access point and check if the access point is compatible with WPS.
≥ If your access point is not compatible with WPS, connect this unit with an access point according
to “Entering SSID to connect to an access point”. (l 42)
1 Press the Wi-Fi/WPS button continuously to
change the Wi-Fi mode lamp to [ ].
≥ The Wi-Fi mode lamp [ ] flashes.
2 Press and hold the Wi-Fi/WPS button for
3 seconds or more.
≥ The Wi-Fi mode lamp [ ] flashes faster.
3 Press the WPS button of your access point within 3 minutes. (Set to
the WPS standby state.)
≥ Wi-Fi mode lamp [ ] will turn on when the connection is completed.
- 41 -
Page 42

Entering SSID to connect to an access point
Enter SSID (Wireless network name) and password of your access point to connect this unit to the
access point.
Preparation: Connect this unit with the smartphone. (l 17)
1 Check the SSID and password of your access point.
≥ The SSID and password of the access point (e.g. a wireless broadband router) you use are
described on the access point device or in its manual. For details, refer to the access point
manual.
2 Tap # [Camera Wi-Fi settings] # [AP mode setup] # [Set
connect. dest.] on the Image App screen and enter the SSID and
password of your access point (Step1).
3 Press the Wi-Fi/WPS button continuously to change
the Wi-Fi mode lamp to [ ].
≥ The Wi-Fi mode lamp [ ] flashes.
≥ Wi-Fi mode lamp [ ] will turn on when the connection is completed.
2 Connecting this unit and a device on the network
1 Connect a smartphone or a DLNA-compatible device to the access
point.
≥ Connect with an SSID connection or a WPS connection. For information on the connection
method, refer to the operating instructions for your device or access point.
2 When connecting to the smartphone
From the Image App, tap # [Set connect. dest.], and tap this
unit from the connection destination list.
≥ When the connection is complete, control this unit from the Image App.
When connecting with a DLNA-compatible device
On the DLNA device, select this unit from the list of devices that are
connected to the access point.
≥ Refer to the operating instructions of your DLNA-compatible device.
≥ Refer to page 43 for how to play back on a DLNA-compatible TV.
≥ An access point connection cannot be started during motion picture recording.
≥ To disconnect from the access point, press the Wi-Fi/WPS button and turn off the Wi-Fi mode
lamp.
≥ When the Wi-Fi mode lamp of this unit switches, the connection between this unit and the
smartphone is cancelled.
- 42 -
Page 43

Playing back on a DLNA-compatible TV
(Examples of operati ons during
motion picture playback)
A Skip playback
B St op
C Playback/Pause
Play back the data in this unit on a DLNA-compatible device, such as a DLNA-compatible TV.
≥ Refer to “Connecting to devices on the network (Connecting in Access Point mode)” (l 41) for
information on the connection. (To control this unit from a smartphone, you need to connect both
the DLNA device and the smartphone to the same network.)
≥ For compatible devices, see the following support site. (This Site is English only.)
http://panasonic.jp/support/global/cs/e_cam/index.html
Controlling from a DLNA-compatible device
1 Select this unit (SSID) (l 18) by the TV side.
2 Perform playback operations with the TV
remote control.
≥ Playback operations may differ depending on the TV in use.
≥ The following operations can be performed if a colour button
is pushed.
Blue/Red: Skip playback
≥ Fast forward/Fast rewind playback cannot be performed.
Controlling from a smartphone
Play back the data in this unit by using the smartphone.
1 From the “Image App”, tap # # [Play on TV].
2 Tap the model name of DLNA-compatible TV you use for playback.
3 Perform playback operations with the smartphone.
≥ It may take time to start playing back.
≥ Motion picture files of [848k480/25p]/[848k480/200fps] can be played back on a DLNA-
compatible device.
≥ The data in this unit cannot be saved on a DLNA-compatible device.
≥ Images or sound may be interrupted or the line may be disconnected.
≥ When playing back on a TV, the image being played back is not displayed on the Image App
screen.
- 43 -
Page 44

About network information of this unit
For the network for this unit, tap # [Camera Wi-Fi settings] # [Camera SSID settings] from the
Image App to make changes, etc.
The following settings can be made.
j Changing the SSID/Changing the network password
j Displaying the MAC address information (MAC address refers to a unique ID number assigned
to devices that are capable of connecting to the network. MAC address is used for identifying
those devices.)
- 44 -
Page 45

With a PC
What you can do with a PC
If you connect this unit to a PC while this unit is turned off, charging of this unit starts. (l 11 )
If you connect this unit to a PC while this unit is turned on, this unit is recognised as a card reader,
so you can access the microSD card in this unit from the PC.
≥ If the battery has worn out with this unit, recharge sufficiently and turn on this unit.
≥ You can use HD Writer WE 1.0 when using with Windows. (l 48)
Use iMovie’11 when using with Mac. (For details about iMovie’11, please contact Apple Inc.)
∫ To connect this unit to a PC
Refer to “Charging the battery” (l 11) for how to connect this unit to a PC.
≥ Turn on this unit before connecting.
≥ When the power lamp and access lamp lights up, the connection is complete.
≥ When using HD Writer WE 1.0, connect after installing the software.
≥ If the supplied CD-ROM is in the PC, connect after removing it.
Card reader function (mass storage)
Operating environment
When using this unit as a card reader, the following PC environment is required.
≥ Even if the system requirements mentioned in these operating instructions are fulfilled, some PCs
cannot be used.
≥ The USB equipment operates with the driver installed as standard in the OS.
∫ For use with Windows
PC IBM PC/AT compatible PC
OS Windows 8 (32 bit/64 bit)
CPU Windows 8/Windows 7/Windows Vista: 1 GHz or higher
RAM Windows 8/Windows 7: 1 GB or more (32 bit)/2 GB or more (64 bit)
Interface USB port
Other
requirements
≥ This software is not compatible with Microsoft Windows 3.1, Windows 95, Windows 98,
Windows 98SE, Windows Me, Windows NT and Windows 2000.
≥ Operation on an upgraded OS is not guaranteed.
≥ Operation on an OS other than the one pre-installed is not guaranteed.
Windows 7 (32 bit/64 bit) or SP1
Windows Vista (32 bit) (SP2)
Windows XP (32 bit) (SP3)
32-bit (k86) or 64-bit (k64) processor (including compatible CPU)
Windows XP: Intel Pentium
400 MHz or higher
Windows Vista Home Basic: 512 MB or more
Windows Vista Home Premium/Business/Ultimate/Enterprise:
1 GB or more
Windows XP: 512 MB or more (1 GB or more recommended)
Mouse or equivalent pointing device
III 450 MHz or higher or Intel Celeron
- 45 -
Page 46

∫ For use with Mac
OS Mac OS X 10.8.2
CPU Intel Core 2 Duo or better
RAM 2GB or more
Interface USB port
Other
requirements
Mouse or equivalent pointing device
Copying motion/still pictures on PC
Using with Windows
When using this unit as a card reader, removable disk (Example: ) is displayed
in [Computer].
We recommend using HD Writer WE 1.0 (l 48) to copy motion picture files.
Using Windows Explorer or other programmes on the PC to copy, move or rename files and
folders recorded with this unit will result in them being unusable with HD Writer WE 1.0.
It is impossible to write files to microSD card on this unit from a PC.
1 Double-click the folder that contains the still pictures. ([DCIM] # [100CDPFQ]
etc.)
2 Drag and drop the still pictures onto the destination folder (on the PC’s HDD).
∫ To disconnect USB cable safely
Select the icon in task tray displayed on the PC, and then click [Eject Panasonic
Wearable Camera].
≥ Depending on your PC’s settings, this icon may not be displayed.
Using with Mac
When using this unit as a card reader, [CAM_SD] is displayed on the desktop.
1 Double-click [CAM_SD] displayed on the desktop.
2 Using a drag-and-drop operation, move the pictures you want to acquire or
the folder storing those pictures to any different folder on the PC.
∫ To disconnect USB cable safely
Drag [CAM_SD] disk icon to the [Trash], and then disconnect the USB cable.
≥ Do not delete the microSD card’s folders. Doing so may make the microSD card unusable in this
unit.
≥ When a file not supported by this unit has been recorded on a PC, it will not be recognised by this
unit.
≥ Always use this unit to format microSD cards.
≥ It is possible to play back still pictures on a PC using a image viewer standard to Windows or
commercially available image browsing software, and copy still pictures to a PC using Windows
Explorer.
- 46 -
Page 47

About the PC display
DCIM
CAM_SD
100CDPFQ
102YBPMW
103YDPMW
104XBPMW
106SDPMW
105XDPMW
107YZPMW
108XYPMW
109SXPMW
BACKUP.TMP
INDEX.DAT
BACKUP.HST
The folder structure of a microSD card on which this unit has performed recording is as follows.
Example folder structure of a microSD card:
≥ Folder numbers range from 100 to 999.
Four or five alphabetic characters after a three-digit
number indicate the file type.
≥ A new folder is created each time the date changes.
1 Still pictures in JPEG format (Each folder
stores a maximum of 999 still pictures)
Intermittent recording (A new folder is
created for each recording)
2 – 6 Motion picture files in MP4 format (Each
folder stores a maximum of 99 files)
2
1920k1080/50p
3
1920k1080/25p
4
1280k720/50p
5
1280k720/25p
6
848k480/25p
7 – 9 Slow-motion pictures (MP4 format)
7
1/2 times normal speed (1920k1080/50fps)
8
1/4 times normal speed (1280k720/100fps)
9
1/8 times normal speed (848k480/200fps)
: – ; Administrative files
- 47 -
Page 48

Using the HD Writer WE 1.0 (Windows only)
The feature of HD Writer WE 1.0
You can copy the motion/still picture files to the HDD of PCs or microSD cards using HD Writer WE
1.0, the software installed in the supplied CD-ROM.
What can be done with the HD Writer WE 1.0 Data type
Copying data to a PC Motion picture
Editing:
≥ Editing motion picture data copied on an HDD of a PC
≥ Dividing, Trimming, Title, Effect, Transition, BGM, Delete partially
≥ Converting part of motion picture into still picture
Online sharing:
You can upload motion pictures or still pictures on the Internet and share them
with your family and friends.
Playing back on a PC:
Play back the motion picture data in high-definition picture quality on a PC.
≥ Refer to the operating instructions of HD Writer WE 1.0 (PDF file) for details on how to use it.
≥ It is impossible to write files to this unit from a PC.
≥ Motion pictures that have been recorded on another device cannot be written to the
software supplied with this unit.
≥ When motion picture data is written to and read from the microSD card, correct operation
of this unit cannot be guaranteed if software other than supplied with this unit is used.
≥ Do not start the software supplied with this unit and other software at the same time. Close any
other software if you start the software supplied with this unit and close the software supplied with
this unit if you start any other software.
and still picture
Motion picture
Motion picture
and still picture
Motion picture
and still picture
- 48 -
Page 49

End User License Agreement
Before opening the CD-ROM package, please read the following.
You (“Licensee”) are granted a license for the
Software defined in this End User License
Agreement (“Agreement”) on condition that you
agree to the terms and conditions of this
Agreement.
Article 1 License
Licensee is granted the right to use the
software, including the information recorded or
described on the CD-ROM, instruction manuals,
and any other media provided to Licensee
(collectively “Software”), but all applicable rights
to patents, copyrights, trademarks and trade
secrets in the Software are not transferred to
Licensee.
Article 2 Use by a Third Party
Licensee may not use, copy, modify, transfer,
rent, lease, lend or allow any third party,
whether free of charge or not, to use, copy or
modify the Software, except as expressly
provided for in this Agreement.
Article 3 Restrictions on Copying the Software
Licensee may make a single copy of the
Software in whole or a part solely for back-up
purpose.
Article 4 Computer
Licensee may use the Software only on one
computer, and may not use it on more than one
computer. Further, Licensee may not use the
Software for commercial software hosting
services.
Article 5 Reverse Engineering, Decompiling or
Disassembly
Licensee may not reverse engineer, decompile,
or disassemble the Software, except to the
extent either of them is permitted under law or
regulation of the country where Licensee
resides. Panasonic, or its distributors will not be
responsible for any defects in the Software or
damage to Licensee caused by Licensee’s
reverse engineering, decompiling, or
disassembly of the Software.
Article 6 Indemnification
The Software is provided “AS-IS” without
warranty of any kind, either expressed or
implied, including, but not limited to, warranties
of non-infringement, merchantability and/or
fitness for a particular purpose. Further,
Panasonic does not warrant that the operation
of the Software will be uninterrupted or error
free. Panasonic or any of its distributors will not
be liable for any damage suffered by Licensee
arising from or in connection with Licensee’s
use of the Software.
Article 7 Export Control
Licensee agrees not to export or re-export to
any country the Software in any form without
the appropriate export licenses under
regulations of the country where Licensee
resides, if necessary.
Article 8 Termination of License
The right granted to Licensee hereunder will be
automatically terminated if Licensee
contravenes any of the terms and conditions of
this Agreement. In this event, Licensee must
destroy the Software and related
documentation together with all the copies
thereof at Licensee’s own expense.
Article 9 With regard to MICROSOFT SQL
SERVER COMPACT 3.5 produced by Microsoft
Corporation
(1) Licensee shall use the MICROSOFT SQL
SERVER COMPACT 3.5 only when included in
the Software, and shall not use the
MICROSOFT SQL SERVER COMPACT 3.5 in
any other configuration or method. Licensee
shall not publish the MICROSOFT SQL
SERVER COMPACT 3.5 or work around any
technical limitations in the MICROSOFT SQL
SERVER COMPACT 3.5.
(2) Licensee shall not use, copy, distribute,
regrant for use or otherwise handle the
Software in any way beyond the range of use
granted under Article 9 (1), and shall not
conduct operations such as reverse
engineering, decompilation, disassembling, etc.
of the MICROSOFT SQL SERVER COMPACT
3.5.
(3) All rights, including copyright, patent rights
etc. relating to the MICROSOFT SQL SERVER
COMPACT 3.5 shall belong to Microsoft
Corporation. Licensee shall not claim any rights
related to the MICROSOFT SQL SERVER
COMPACT 3.5 whatsoever.
- 49 -
Page 50

Operating environment for HD Writer WE 1.0
When using HD Writer WE 1.0, the following PC environment is required.
≥ Even if the system requirements mentioned in these operating instructions are fulfilled, some PCs
cannot be used.
≥ A CD-ROM drive is necessary to install the supplied software applications. (A compatible Blu-ray
disc/DVD writer drive and media are necessary for writing to a Blu-ray disc/DVD.)
PC IBM PC/AT compatible PC
OS Windows 8 (32 bit/64 bit)
CPU Intel Pentium 4 2.8 GHz or higher (including compatible CPU)
RAM Windows 8/Windows 7: 1 GB or more (32 bit)/2 GB or more (64 bit)
Display High Colour (16 bit) or more (32 bit or more recommended)
Free hard disk
drive space
Sound DirectSound Support
Interface USB port [Hi-Speed USB (USB 2.0)]
Other
requirements
Windows 7 (32 bit/64 bit) Starter/Home Basic/Home Premium/Professional/
Ultimate (SP1)
Windows Vista (32 bit) Home Basic/Home Premium/Business/Ultimate
(SP2)
Windows XP (32 bit) (SP3)
≥ Intel Core 2 Duo 2.16 GHz or higher or AMD Athlon 64 X2 Dual-Core
5200+ or higher is recommended when using playback function.
≥ Intel Core 2 Quad 2.6 GHz or higher is recommended when using editing
function.
Windows Vista: 1 GB or more
Windows XP: 512 MB or more (1 GB or more recommended)
Desktop resolution of 1024k768 pixels or more (1920k1080 pixels or more
recommended)
Windows 8/Windows 7/Windows Vista: DirectX 9.0c compatible video card
(DirectX 10 recommended)
Windows XP: DirectX 9.0c compatible video card
Compatible with DirectDraw overlay
PCI Express
Video memory of 256 MB or more recommended
Ultra DMA — 100 or more
450 MB or more (for installing the software)
Mouse or equivalent pointing device
Internet connection
™
k16 compatible recommended
- 50 -
Page 51

≥ Operation is not guaranteed in the following cases.
j When 2 or more USB devices are connected to a PC, or when devices are connected through
USB hubs or by using extension cables.
j Operation on an upgraded OS.
j Operation on an OS other than the one pre-installed.
≥ This software is not compatible with Microsoft Windows 3.1, Windows 95, Windows 98,
Windows 98SE, Windows Me, Windows NT and Windows 2000.
≥ Supplied CD-ROM is available for Windows only.
≥ Input is not supported in languages other than English, German, French and Russian.
≥ Operation is not guaranteed on Microsoft Windows Vista Enterprise, Windows XP
Media Center Edition, Tablet PC Edition, Windows 7 Enterprise and Windows 8 Enterprise.
≥ This software is not compatible with a multi-boot environment.
≥ This software is not compatible with a multi-monitor environment.
≥ If using Windows XP, an administrative account user only can use this software. If using Windows
Vista/Windows 7/Windows 8, administrative account and standard account users only can use
this software. (An administrative account user should install and uninstall this software.)
≥ For Windows 8, this software is available only as a desktop application.
≥ You will need a high performance PC depending on the functions to be used. It may not properly
play back or properly operate depending on the environment of the PC used. Refer to the
operating environment and notes.
≥ Operation during the playback may become slow if the CPU or memory is not fulfilling the
requirements of the operating environment.
≥ Always use the most current driver for the video card.
≥ Always make sure there is enough capacity on the HDD in the PC. It may become inoperable or
the operation may stop suddenly if the capacity gets low.
Installation
When installing the software, log on to your computer as the Administrator or with a user name with
equivalent authorization. (If you do not have authorization to do this, consult your manager.)
≥ Before starting the installation, close all applications that are running.
≥ Do not perform any other operations on your PC while the software is being installed.
≥ Explanation of operations is based on Windows 7.
1 Insert the CD-ROM into the PC.
≥ The [AutoPlay] screen is displayed automatically. Click [Run setup.exe] # [Yes].
≥ If the [AutoPlay] screen is not displayed automatically, select [Start] # [Computer] (or double-
click on [Computer] on the desktop), and then double-click [Panasonic].
2 Click [Yes].
3 Click [Next].
≥ Proceed with the installation by following the on-screen instructions.
≥ If the country or region cannot be selected, select [PAL Area].
≥ The PC must be rebooted for the application to work.
- 51 -
Page 52

∫ Uninstalling HD Writer WE 1.0
Follow the steps below to uninstall any software applications that you no longer require.
1 Select [Start] # [Control Panel] # [Uninstall a program].
2 Select [HD Writer WE 1.0], then click [Uninstall].
≥ Proceed with the uninstallation by following the on-screen instructions.
≥ After uninstalling the software, be sure to reboot the PC.
Starting HD Writer WE 1.0
≥ To use the software, log on as an Administrator or as user name for standard user account (only
for Windows 8/Windows 7/Windows Vista).
The software cannot be used with the user name for a guest account.
(On the PC)
Select [Start] # [All Programs] # [Panasonic] # [HD Writer WE 1.0] #
[HD Writer WE 1.0].
≥ For details on how to use the software applications, read the PDF operating instructions of the
software.
Reading the operating instructions of the software applications
≥ You will need Adobe Acrobat Reader 5.0 or later or Adobe Reader 7.0 or later to read the PDF
operating instructions.
Select [Start] # [All Programs] # [Panasonic] # [HD Writer WE 1.0] #
[Operating Instructions].
- 52 -
Page 53

Others
B
A
Initialising this unit
Initialising the network settings
This returns the following network-related settings to the default states.
≥ An SSID/password for this unit set after the purchase
([Camera Wi-Fi settings] # [Camera SSID settings] in the Image App)
≥ An SSID/password for the access point you use in Live broadcast mode
([Camera Wi-Fi settings] # [Live mode settings] # [Set connect. dest.] in the Image App)
≥ An SSID/password for the access point you use in Access Point mode
([Camera Wi-Fi settings] # [AP mode setup] # [Set connect. dest.] in the Image App)
≥ A login ID and password for the “LUMIX CLUB”
([Playback settings] # [LUMIX CLUB settings] # [Manage login ID] in the Image App)
Turn on this unit while pressing and holding
the Wi-Fi/WPS button, and press and hold the
Wi-Fi/WPS button A and the power button B
for approximately 5 seconds
≥ When the Wi-Fi mode lamps [ ] [ ] [ ] light up for
approximately 1 second and turn off, the initialisation of
the network settings is complete.
≥ When the operation buttons are locked (l 8), the network settings cannot be initialised.
≥ Initialising a login ID and password for the “LUMIX CLUB” will only delete them from this unit, and
will not cancel the membership. The site remains available.
.
- 53 -
Page 54

Troubleshooting
Problem Check points
The lens fogs up. ≥ This is due to condensation. It is not a malfunction. Please refer
This unit cannot be turned
on.
This unit does not stay on
long enough.
Battery runs down quickly.
If the microSD card is
inserted in this unit, it is
not recognised.
The power lamp flashes for
5 seconds and the power
turns OFF.
The alert sound and
shutter sound are low.
The access lamp flashes
for 5 seconds and the
power turns off (a warning
sounds).
This unit arbitrarily stops
recording.
Pictures cannot be taken. ≥ Pictures cannot be taken while recording motion pictures.
Colour balance of images
is strange when recording
in a place such as a
gymnasium.
Recorded motion pictures
flicker.
Horizontal lines appear in
recorded movies.
to page 4.
≥ Charge the battery again to ensure it is sufficiently charged.
(l 11 )
≥ In cold places, the battery using time becomes shorter.
≥ If the operating time is very short even after the battery has
been recharged sufficiently, the battery has worn out. Consult
with your dealer.
≥ If the microSD card is formatted on a PC, it may not be
recognised by this unit. Use this unit to format microSD cards.
(l 21)
≥ The temperature has become high. Please wait until the
temperature of this unit decreases.
≥ This is for ensuring the waterproof performance of this unit, and
not a malfunction. Opening and closing the side cover will
restore the original volume.
≥ A card which is not guaranteed to work may have been inserted,
or the number of folders or files on the inserted card may
exceed the limit.
Check the error details on the Image App screen.
≥ Use a microSD card that can be used for motion picture
recording. (l 13)
≥ The recordable time may have shortened due to the
deterioration of the data writing speed or repeated recording
and deletion. Using this unit, format the microSD card. (l 21)
≥ Using a microSD card with a speed class of 4 or less in [Slow
motion mode] (l 24) may cause to stop recording suddenly.
(l 13)
≥ Pictures cannot be taken in [Interval rec mode].
≥ Pictures cannot be taken during live broadcasting.
≥ In a place with multiple light sources, such as a gymnasium or a
hall, set the White Balance setting to [Indoor 2]. If you cannot
record clearly with the [Indoor 2], set it with [Custom]. (l 26)
≥ If motion pictures are recorded in [Slow motion mode] (l 24)
with the [1280k720/100fps]/[848k480/200fps] setting, flickering
or horizontal lines may appear when recorded under a
fluorescent light.
- 54 -
Page 55

Problem Check points
Mosaic-like noise
appears and movement
is jagged when viewing
the live view screen on
a smartphone.
A motion picture file is
created that is longer
than the recording time.
This unit does not
change to playback
mode.
Files cannot be played
back.
Power of this unit does
not turn OFF, even after
closing Image App.
The Image App screen
suddenly changes to
recording mode.
When the USB cable is
disconnected, an error
message will appear on
the PC.
When connected by the
USB cable, this unit is
not detected by the PC.
Cannot see the PDF
operating instructions
for HD Writer WE 1.0.
It cannot connect to the
access point or
smartphone.
Radio waves get
disconnected.
≥ If the Recording Mode is set to [1920k1080/50p] or a motion
picture recorded in [1920k1080/50p] is played back, mosaic-like
noise may appear on the screen, and movement may not seem
smooth. (The images to be recorded are not affected.)
≥
Recording in [Slow motion mode] (l24) will create a motion picture file
that is longer than the recording time. For example, the playback time
of a motion picture recorded in [848
be 8-times longer than the actual recording time.
≥ When this unit is recording a movie, Image App cannot change to
playback mode.
≥ If a high-quality motion picture is copied to a smartphone, it may
not be able to be played back on the smartphone. (l 24)
≥ The power of this unit can be turned OFF by tapping #
[Camera function] # [Camera power off] from the Image App
screen.
≥ Image App changes to changes to recording mode if pressing the
recording start/stop button or photoshot button on this unit while
Image App is in playback mode.
≥ To disconnect the USB cable safely, double-click the icon in the
task tray and follow the instructions on the screen. (Windows)
≥ If the power of this unit is OFF, this unit starts charging when it is
connected to a PC.
≥ After re-inserting the microSD card into this unit, reconnect the
supplied USB cable.
≥ Select another USB terminal on the PC.
≥ Check the operating environment. (l 45, 46, 50)
≥ Connect the supplied USB cable again after restarting the PC and
turning on this unit again.
≥ You will need Adobe Acrobat Reader 5.0 or later or Adobe
Reader 7.0 or later to read the PDF operating instructions for
HD Writer WE 1.0.
≥ Check how to connect to the access point and how to set the
security settings.
≥ If it takes time to complete the connection, the Wi-Fi connection will
be aborted. Reset the connection settings. (l 41)
≥ Make sure the SSID and password have been correctly input.
(l 44)
≥ When the radio waves are interrupted, the condition may improve
by moving the location or changing the angle of the access point.
≥ Is any device, such as microwave oven, cordless phone, etc., that
uses 2.4 GHz frequency operated nearby? Radio waves may get
interrupted when used simultaneously. Use them sufficiently away
from the device.
k
480/200fps] (1/8 slow-motion) will
- 55 -
Page 56

Problem Check points
Access point is not
displayed.
It takes long time every
time to connect to a
smartphone.
The Wi-Fi connection
disconnects
immediately.
This unit is not
displayed in the Wi-Fi
setting screen of the
smartphone.
I have forgotten the
Login ID or Password
for the “LUMIX CLUB”.
Live broadcasting does
not work even if live
broadcasting is set.
Motion pictures or
pictures cannot be sent
to the WEB service.
I have forgotten the
SSID and password of
this unit.
≥ Turn on the access point.
≥ Perform the connection closer to the access point.
≥ This unit may not display or connect to a access point depending
on the radio wave condition.
≥ It may not display even if the radio waves exist depending on the
setting of the access point. Check the settings of the access point.
≥ It may take longer time to connect depending on the Wi-Fi
connection setting of the smartphone, but it is not a malfunction.
≥ If the Android 4.0 or higher device is used and set to disable
connections if the connection is weak in the Wi-Fi Setting menu,
turn this setting OFF.
≥ Try switching the ON/OFF of the Wi-Fi function in the Wi-Fi settings
of the smartphone.
≥ Check the information in the login screen of “LUMIX CLUB”.
http://lumixclub.panasonic.net/eng/c/
≥ Live broadcasting cannot be performed if the date and time of the
smartphone that is synchronised with this unit is not set correctly.
First set the date and time of the smartphone correctly, then
synchronise it with this unit. (l 20)
≥ The WEB service site has some problem or connection may be
congested. Try again after waiting a short while.
≥ The password can be checked from the Image App screen. Tap
# [Camera Wi-Fi settings] # [Camera SSID settings]. (Image
App does not require a Wi-Fi connection.)
≥
If the password cannot be checked using the procedure above, reset
the network settings. (
to the default settings, including the “LUMIX CLUB” login ID settings
and registered SSID. (
l
53) Resetting this unit returns all Wi-Fi settings
l
18)
- 56 -
Page 57

Alert Sound
If this unit is not operating correctly, take note of the alert sound to resolve any problems.
“2 Beeps” sound 4 times
≥ If the power is ON, the time of this unit has not been set. Set the date and time. (l 20)
≥ If the power lamp flashes quickly and the power turns OFF, the following symptoms are
possible.
j The remaining battery level is low. (Charge the battery.) (l 11)
j This unit has become hot. (Turn ON the power after while a short while.)
≥ If the access lamp flashes quickly, the microSD card is defective. (Includes limit of card
capacity, data errors, etc.)
The status of this unit can be checked by directly connecting to a smartphone, or on the Image
App. (The status of this unit will be displayed as a message.)
“3 Beeps” sound and the Wi-Fi connection disconnects
≥ The connection environment has become worse. Move this unit closer to the connected device.
“4 Beeps” sound and Wi-Fi mode disconnects
≥ Wi-Fi mode disconnects automatically if Wi-Fi mode has not connected for approximately 30
minutes.
“1 Beep” sounds 8 times and live broadcasting does not start
≥ Cannot connect to the connection destination for live broadcasting. Check the settings (SSID or
password), and communication environment (signal conditions or whether the Wi-Fi mode is
correct).
(l 35)
“2 Beeps” sound 8 times and live broadcasting does not start
≥ This unit cannot log in to “LUMIX CLUB”. Check whether the settings (login ID/password,
synchronisation of setting details with this unit) are correct and the “LUMIX CLUB” site has
some problems. (l 31)
“3 Beeps” sound 8 times and live broadcasting does not start
≥ This unit cannot log in to “USTREAM”. Check whether the settings (login ID/password) are
correct and the “USTREAM” site has some problems. (l 31)
“4 Beeps” sound 8 times and live broadcasting does not start
≥ There is a problem with the “USTREAM” site. Check that multiple live broadcasts are not being
performed with the same ID, that there are no problems with the programme set for
broadcasting, that the data communication speed is sufficient, and that this unit clock is set
correctly.
“1 Beep” sounds 8 times and cannot connect to the access point
≥ Check the access point settings (SSID or password), and communication environment (whether
the signal or Wi-Fi mode are correct).(l 41)
- 57 -
Page 58

Cautions for use
About this unit
This unit and the microSD card become
warm during use. This is not a
malfunction.
Keep this unit as far away as possible from
electromagnetic equipment (such as
microwave ovens, TVs, video games etc.).
≥ If you use this unit on top of or near a TV, the
pictures and/or sound on this unit may be
disrupted by electromagnetic wave radiation.
≥ Recorded data may be damaged, or pictures
may be distorted, by strong magnetic fields
created by speakers or large motors.
≥ Electromagnetic wave radiation generated by
microprocessors may adversely affect this
unit, disturbing the pictures and/or sound.
Do not use this unit near radio transmitters
or high-voltage lines.
≥ If you record near radio transmitters or
high-voltage lines, the recorded pictures and/
or sound may be adversely affected.
Make sure to use the supplied cable.
Do not extend the cable.
Do not spray insecticides or volatile
chemicals onto this unit.
≥ If this unit is sprayed with such chemicals, its
body may be marred and the surface finish
may peel off.
≥ Do not leave rubber or plastic products in
contact with this unit for a long time.
When you use this unit in a sandy or dusty
place such as a beach, do not let sand or
fine dust get into the body and terminals of
this unit.
≥ Sand or dust may damage this unit. (Care
should be taken when inserting and removing
a card.)
Do not use this unit in strenuous sports
involving impacts and collisions.
When carrying this unit, do not drop or
bump it.
≥ A strong impact can break this unit’s casing,
causing it to malfunction.
Cleaning
≥ Before cleaning, pull the USB cable from the
PC, and then wipe this unit with a soft, dry
cloth.
≥ If this unit is very dirty, dip a cloth in water and
squeeze firmly, and then wipe this unit with
the damp cloth. Next, dry this unit with a dry
cloth.
≥ Use of benzine, paint thinner, alcohol, or
dishwashing liquid may alter the camera body
or peel the surface finish. Do not use these
solvents.
≥ When using a chemical dust cloth, follow the
instructions that came with the cloth.
Do not use this unit for surveillance
purposes or other business uses.
≥ This unit was designed for consumer
intermittent use. It was not intended for
continuous use, or for any industrial or
commercial application resulting in prolonged
use.
≥ In certain situations, continuous use could
cause this unit to overheat and cause a
malfunction. Such use is strongly
discouraged.
When you are not going to use this unit for
an extended time
≥ Store this unit in a cool place with minimal
humidity, and with a constant temperature
where possible (recommended temperature:
15 ºC to 25 ºC, recommended humidity:
40%RH to 60%RH).
≥ Always remove the card from this unit.
≥ When storing this unit for an extended time, it
is recommended that you charge it once
every year.
≥ The battery discharges slowly even if this unit
is not used. The remaining battery level will
decrease when this unit is not used for an
extended time.
≥ When storing this unit in a cupboard or
cabinet, it is recommended that you place a
desiccant (silica gel) in with it.
Terminate usage of armband/earhook if a
feeling of discomfort arises, including
any skin reactions.
- 58 -
Page 59

About personal information
Delete personal information from this unit when
requesting repairs or handing it to others/
disposing of this unit in order to protect personal
information. Wireless router and LUMIX CLUB
ID/passwords are stored in this unit, so make a
copy of this information and reset the network
settings to prevent unauthorised use of the
information. (l 53)
Also remember to remove the microSD card
from this unit. (l 14)
Indemnity
≥ Information, including personal information,
may be changed or lost as a result of
mistaken operation, static electricity effects,
accident, breakage, repair or other handling.
It should be noted before use that Panasonic
does not accept any responsibility for direct
or indirect problems which occur as the result
of the change to or loss of the information
including personal information.
About the microSD card
≥ The memory capacity listed on the microSD
card label is the total of the capacity that is
used for protection and management of
copyright, and capacity that can be used
normally with this unit and computer.
≥ Do not subject the microSD card to strong
shocks, bend it or drop it.
≥ Data on the microSD card may be damaged
or deleted due to electrical noise, static
electricity or malfunctions with this unit or the
microSD card.
When disposing of or giving away the
microSD card, note that:
≥ Formatting and deletion of data on this unit or
computer only changes the file management
information and does not completely delete
the data in the microSD card.
≥ It is recommended that the microSD card is
physically destroyed or the microSD card is
physically formatted using commercially
available data erasing software when
disposing of or giving away the microSD
card.
≥ The customer is responsible for the
management of the data in the microSD card.
Cautions for using a microSD card
≥ Do not expose the terminals of the microSD
card to water, dirt or dust.
≥ Do not place microSD cards in the following
areas:
j In direct sunlight
j In very dusty or humid areas
j Near a heater
j Locations susceptible to significant
difference in temperature (condensation
can occur.)
j Where static electricity or electromagnetic
waves occur
≥ To protect microSD cards, return them to their
cases when you are not using them.
About firmware updates
To update the firmware of this unit, copy the
firmware update file to the microSD card and
insert it into this unit, and turn the power of this
unit ON by pressing the power button while
holding the Wi-Fi/WPS button and photoshot
button. (l 8)
For the latest update information, check
the support website below. (As of
January 2013)
http://panasonic.jp/support/global/cs/e_cam/
index.html
(This site is English only.)
About the battery
The battery used in this unit is a
rechargeable lithium-ion battery. It is
susceptible to humidity and temperature
and the effect increases the more the
temperature rises or falls.
If the operating time is very short even after
the battery has been recharged, the battery
has worn out.
Consult with your dealer.
- 59 -
Page 60

Recordable time/Number of recordable
pictures
microSD cards are only mentioned with their main memory size.
Recording modes/approximate recordable time
≥ The stated times are the approximate recordable times for continuous recording.
≥ The default setting is [1920k1080/25p] Mode.
≥ The recordable time may be reduced if recording with a lot of action is recorded or recording of
short scene is repeated.
≥ Maximum continuously recordable time: 6 hours
≥ The recording is paused once when the continuous recording time exceeds 6 hours, and the
recording will automatically resume after a few seconds.
A: Favours image quality, B: Favours Recording time
Normal shooting
mode
Picture size/
Frame rate
Transfer rate (VBR)
microSD card
Slow motion mode
Picture size/
Frame rate
Transfer rate (VBR)
microSD card
1920k1080/
50p
Max.28Mbps
4GB
8GB
16 GB
32 GB
16 GB
32 GB
19min 35min 35min 1h 1h50min
40min 1h10min 1h10 min 2h 3h40min
1h20min 2h20min 2h20min 4h10min 7h30min
2h40min 4h40min 4h40min 8h20min 15h
1920k1080/50fps 1280k720/100fps 848k480/200fps
Average 15Mbps Average 9Mbps Average 4. 5Mb ps
4GB
8GB
1920k1080/
25p
Average 15Mbps Average 15Mbps
15 min 13 min 13 min
30 min 27 min 27 min
1h 55min 55min
2h 1h50min 1h50min
1280k720/
50p
Approximate number of recordable pictures
≥ The number of recordable pictures depends on the subject being recorded.
microSD card
Picture size
5.3M (3072k1728)
3M (2304k1296)
4GB 8GB 16 GB 32 GB
1100 2200 4500 8500
1600 3400 6500 13500
- 60 -
1280k720/
25p
Average 9Mbps Ave rage 4 .5Mbps
848k480/25p
Page 61

Requests when disposing of this unit
When disposing of your used products, remove the battery built into this unit after
initialising the network settings (l 53), and please cooperate in recycling of the battery.
Please refer to page 62 about how to remove the battery.
≥ Please make sure that the battery is disposed of at an officially assigned location, if there is one in
your country.
Do not disassemble this unit other than when disposing of this unit.
This is the rechargeable battery for this unit.
Do not use other than with this unit.
Do not charge the rechargeable battery
when it has been removed.
≥ Do not place in fire or heat it.
≥ Do not puncture with nails, subject it to
impact, disassemble or modify it.
≥ Do not touch metal to the r and s terminals.
≥ Do not store or carry together with necklaces
or hairpins, etc.
≥ Do not heat in microwaves or ovens, etc.
≥ Do not charge, use or leave in hot places
such as next to fires or in extremely hot
weather.
≥ Do not put into water.
This may cause leaking, overheating, fire or
rupture.
≥ If a leak should occur, by no means touch the
liquid with bare hands.
If the liquid gets on the body or clothes, wash
well with water. If the liquid gets into your
eyes, there is a danger of blindness. Do not
rub the eyes; after washing immediately with
clean water, consult your physician.
Keep removed screws etc. out of the reach
of small children.
If accidentally ingested there will be adverse
physical effects.
≥ Should you suspect that such an object has
been ingested, consult your physician
immediately.
Battery used for this unit
Name: Lithium ion (Li-ion)
Nominal voltage: DC 3.7 V
rechargeable battery
- 61 -
Page 62

How to remove the battery
When disposing of your used products, delete
personal information from this unit by initialising
the network settings.
This figure describes the disposal of this
unit, it is not instruction for repair. If
disassembled, repair is not possible.
≥ Disassemble after the battery runs out.
≥ If it cannot be removed smoothly, contact
Panasonic’s Service Centre.
≥ Keep disassembled parts out of reach of
children.
1 Open the side cover, and remove
all of the 6 screws indicated in the
figure below.
≥ Use a cross-slot screwdriver (commercially
available).
2 Remove the circuit board on the
front side (button side) of this unit,
and remove the flexible circuit
board A.
4 Remove the 4 screws indicated in
the figure below, and remove the
heatsink E.
5 Remove the connector F of the
camera unit, and lift up the circuit
board.
6 Remove the battery by using a
screwdriver.
Regarding the handling of used batteries
≥ Insulate the terminals with cellophane tape or
similar.
≥ Do not disassemble.
3 After pulling out the built-in battery
connector B, pull out the flexible
circuit board C, and pull out the
speaker connector D upwards.
- 62 -
Page 63

About copyright
∫ Carefully observe copyright
laws
Recording of pre-recorded tapes or discs or
other published or broadcast material for
purposes other than your own private use
may infringe copyright laws. Even for the
purpose of private use, recording of certain
material may be restricted.
∫ Licenses
≥ microSDHC Logo is a trademark of SD-3C,
LLC.
≥ Microsoft
≥ Microsoft product screen shot(s) reprinted
≥ IBM and PC/AT are registered trademarks of
≥ Intel
≥ AMD Athlon
≥
≥ App Store is a service mark of Apple Inc.
≥ Android and YouTube are trademarks or
≥ Facebook
≥ The Wi-Fi CERTIFIED Logo is a certification
≥ The Wi-Fi Protected Setup Mark is a mark of
≥ “Wi-Fi”, “Wi-Fi Protected Setup”, “WPA” and
≥ DLNA, the DLNA Logo and DLNA
≥ Other names of systems and products
®
are either registered trademarks or
trademarks of Microsoft Corporation in the
United States and/or other countries.
with permission from Microsoft Corporation.
International Business Machines Corporation
of the U.S.
are trademarks of Intel Corporation in the
U.S. and/or other countries.
Micro Devices, Inc.
iMovie, Mac and Mac OS are trademarks of
Apple Inc. registered in the U.S. and other countries.
registered trademarks of Google Inc.
mark of the Wi-Fi Alliance.
the Wi-Fi Alliance.
“WPA2” are marks or registered marks of the
Wi-Fi Alliance.
CERTIFIED are trademarks, service marks,
or certification marks of the Digital Living
Network Alliance.
mentioned in these instructions are usually
the registered trademarks or trademarks of
the manufacturers who developed the system
or product concerned.
, Windows® and Windows Vista
®
, Pentium®, Celeron® and Intel® Core™
™
is a trademark of Advanced
®
is a trademark of Facebook, Inc.
®
This product is licensed under the AVC patent
portfolio license for the personal and
non-commercial use of a consumer to (i)
encode video in compliance with the AVC
Standard (“AVC Video”) and/or (ii) decode AVC
Video that was encoded by a consumer
engaged in a personal and non-commercial
activity and/or was obtained from a video
provider licensed to provide AVC Video. No
license is granted or shall be implied for any
other use. Additional information may be
obtained from MPEG LA, LLC.
See http://www.mpegla.com
.
- 63 -
Page 64

This product incorporates the following
software:
(1) the software developed independently by
or for Panasonic Corporation,
(2) the software owned by third party and
licensed to Panasonic Corporation,
(3) the software licensed under the GNU
General Public License, Version 2.0 (GPL
V2.0),
(4) the software licensed under the GNU
LESSER General Public License, Version
2.1 (LGPL V2.1), and/or
(5) open source software other than the
software licensed under the GPL V2.0 and/
or LGPL V2.1.
The software categorized as (3) - (5) are
distributed in the hope that it will be useful, but
WITHOUT ANY WARRANTY, without even the
implied warranty of MERCHANTABILITY or
FITNESS FOR A PARTICULAR PURPOSE.
Please refer to the detailed terms and
conditions thereof shown in the attached
Application Software CD-ROM.
At least three (3) years from delivery of this
product, Panasonic will give to any third party
who contacts us at the contact information
provided below, for a charge no more than our
cost of physically performing source code
distribution, a complete machine-readable copy
of the corresponding source code covered
under GPL V2.0 or LGPL V2.1, as well as the
respective copyright notice thereof.
Contact Information:
oss-cd-request@gg.jp.panasonic.com
The source code and the copyright notice are
also available for free in our website below.
http://panasonic.net/avc/oss/index.html
- 64 -
Page 65

Panasonic Corporation
Web site: http://panasonic.net
 Loading...